

ZyXEL Prestige 100L Quick Start Manual

Prestige 100L
IDSL Router
Quick Start Manual
Version 2.40
June, 2000

Quick Start Manual for Prestige 100L
ii
Prestige 100L
IDSL Router
COPYRIGHT
Copyright © 2000 by ZyXEL Communications Corporation.
The contents of this publication may not be reproduced in any part or as a whole, transcribed, stored in a retrieval
system, translated into any language, or transmitted in any form or by any means, electronic, mechanical, magnetic,
optical, chemical, photocopying, manual, or otherwise, without the prior written permission of ZyXEL
Communications Corporation.
Published by ZyXEL Communications Corporation. All rights reserved.
DISCLAIMER
ZyXEL does not assume any liability arising out of the application or use of any products, or software described
herein. Neither does it convey any license under its patent rights nor the patent rights of others. ZyXEL further
reserves the right to make changes in any products described herein without notice. This publication is subject to
change without notice.
TRADEMARKS
Trademarks mentioned in this publication are used for identification purposes only and may be properties of their
respective owners.

Quick Start Manual for Prestige 100L
iii
Federal Communications Commission (FCC) Interference Statement
This device complies with Part 15 of FCC rules. Operation is subject to the following two conditions:
l This device may not cause harmful interference.
l This device must accept any interference received, including interference that may cause undesired
operations.
This equipment has been tested and found to comply with the limits for a Class B digital device pursuant to Part 15
of the FCC Rules. These limits are designed to provide reasonable protection against harmful interference in a
commercial environment. This equipment generates, uses, and can radiate radio frequency energy, and if not
installed and used in accordance with the instructions, may cause harmful interference to radio communications.
If this equipment does cause harmful interference to radio/television reception, which can be determined by turning
the equipment off and on, the user is encouraged to try to correct the interference by one or more of the following
measures:
1. Reorient or relocate the receiving antenna.
2. Increase the separation between the equipment and the receiver.
3. Connect the equipment into an outlet on a circuit different from that to which the receiver is connected.
4. Consult the dealer or an experienced radio/TV technician for help.
NOTICE 1
Changes or modifications not expressly approved by the party responsible for compliance could void the user's
authority to operate the equipment.
NOTICE 2
Shielded RS-232C cables are required to be used to ensure compliance with FCC Part 15, and it is the
responsibility of the user to provide and use shielded RS-232C cables.

Quick Start Manual for Prestige 100L
iv

Quick Start Manual for Prestige 100L
v
Information for Canadian Users
The Industry Canada label identifies certified equipment. This certification means that the equipment meets certain
telecommunications network protective, operation, and safety requirements. The Industry Canada does not
guarantee that the equipment will operate to a user's satisfaction.
Before installing this equipment, users should ensure that it is permissible to be connected to the facilities of the
local telecommunications company. The equipment must also be installed using an acceptable method of
connection. In some cases, the company's inside wiring associated with a single line individual service may be
extended by means of a certified connector assembly. The customer should be aware that the compliance with the
above conditions may not prevent degradation of service in some situations.
Repairs to certified equipment should be made by an authorized Canadian maintenance facility designated by the
supplier. Any repairs or alterations made by the user to this equipment, or equipment malfunctions, may give the
telecommunications company cause to request the user to disconnect the equipment.
For their own protection, users should ensure that the electrical ground connections of the power utility, telephone
lines, and internal metallic water pipe system, if present, are connected together. This precaution may be
particularly important in rural areas.
CAUTION
Users should not attempt to make such connections themselves, but should contact the appropriate electrical
inspection authority, or electrician, as appropriate.
NOTE
This digital apparatus does not exceed the Class A limits for radio noise emissions from digital apparatus set out in
the radio interference regulations of Industry Canada.
Quick Start Manual for Prestige 100L
vi

Quick Start Manual for Prestige 100L
vii
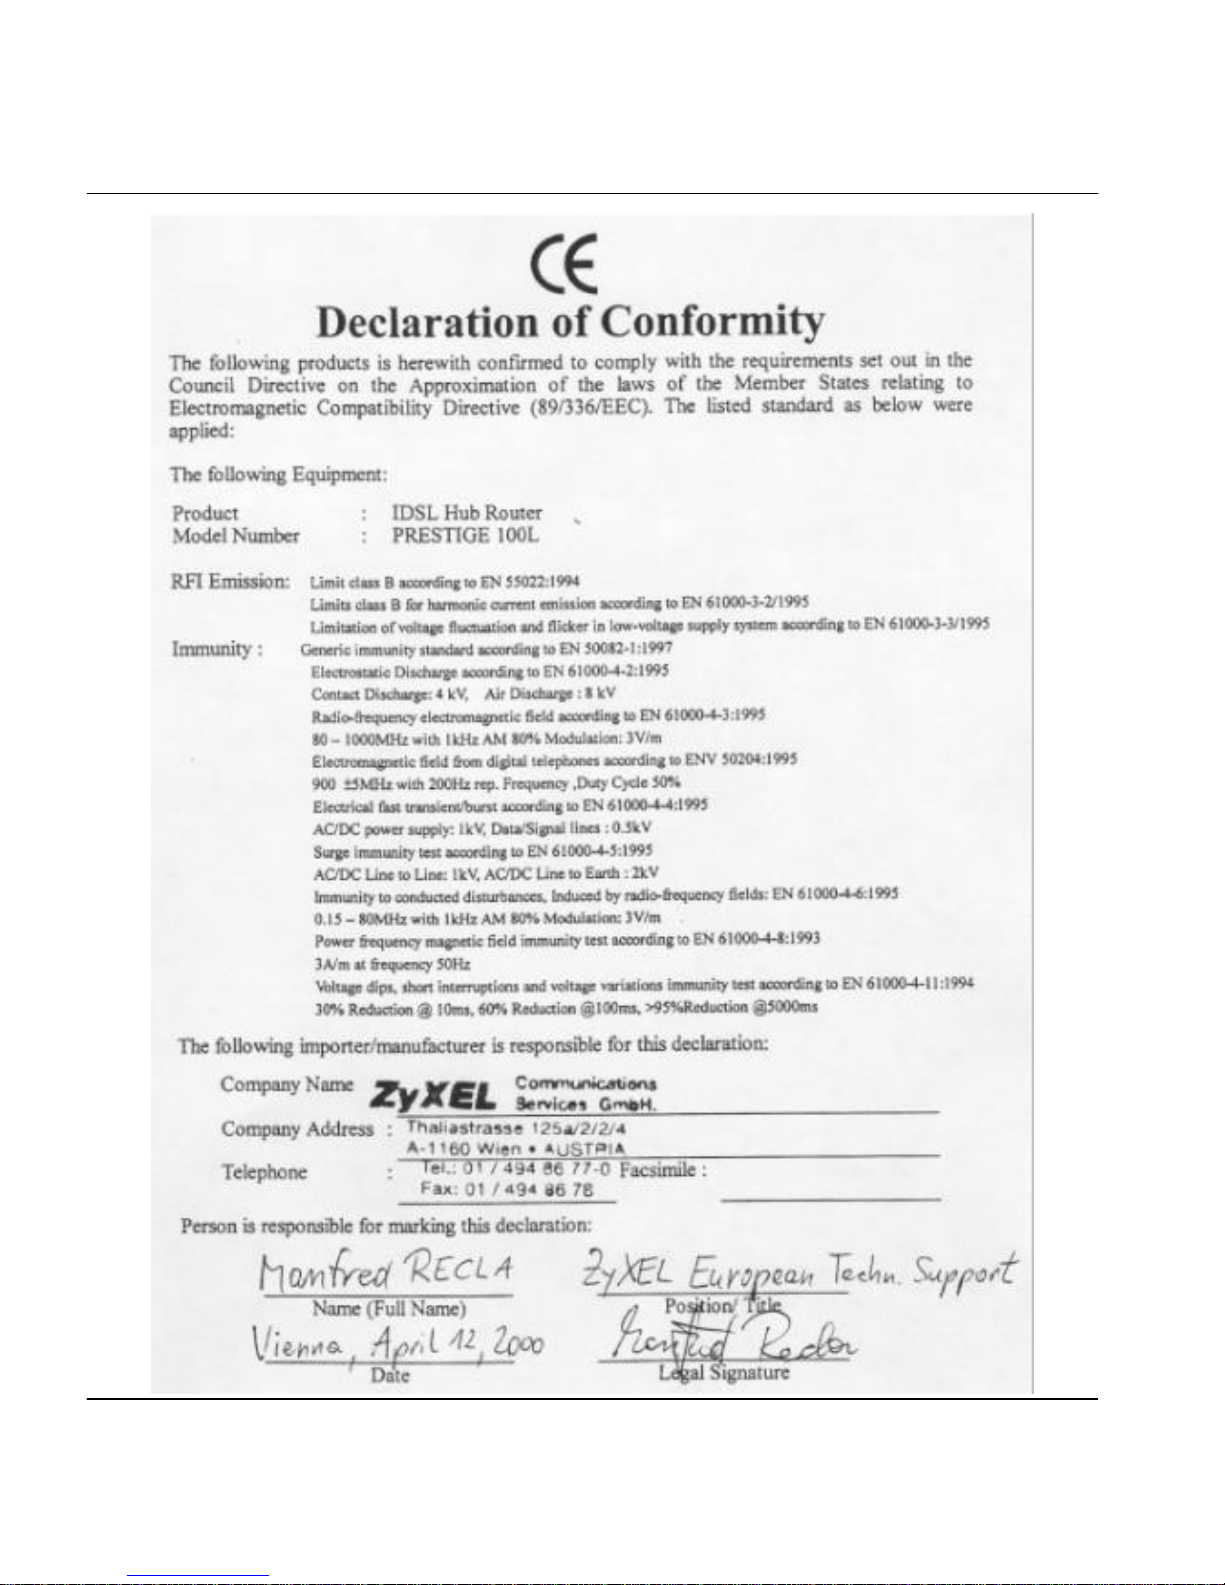
Declaration of Conformity
We, the Manufacturer/Importer,
ZyXEL Communications Corp.
No. 6, Innovation Road II,
Science-Based Industrial Park,
Hsinchu, Taiwan, 300 R.O.C
declare that the product
Prestige 100L
is in conformity with
(reference to the specification under which conformity is declared)
STANDARD
STANDARD ITEM
VERSION
• EN 50082-1
Generic immunity standard 1997
• EN 55022
Radio disturbance characteristics – Limits and method of
measurement.
1994
• EN 61000-3-2
Disturbance in supply system caused by household appliances
and similar electrical equipment “Harmonics”.
1995
• EN 61000-3-3
Disturbance in supply system caused by household appliances
and similar electrical equipment “Voltage fluctuations”.
1995
• EN 61000-4-2
Electrostatic discharge immunity test – Basic EMC Publication 1995
• EN 61000-4-3
Radiated, radio-frequency, electromagnetic field immunity test 1995
• EN 61000-4-4
Electrical fast transient / burst immunity test - Basic EMC
Publication
1995
• EN 61000-4-5
Surge immunity test 1995
• EN 61000-4-6
Immunity to conducted disturbances, induced by radio-frequency
fields
1995
• EN 61000-4-8
Power magnetic test 1993
• EN 61000-4-11
Voltage dips, short interruptions and voltage variations immunity
tests
1994
• ENV 50204
Electromagnetic field from digital telephones test 1995
NOTE: The TCF file can be obtained at: ZyXEL Communications Services, GmbH.
Thaliastrasse 125a/2/2/4
A-1160 Vienna, AUSTRIA.

Quick Start Manual for Prestige 100L
viii
ZyXEL Limited Warranty
ZyXEL warrants to the original end user (purchaser) that this product is free from any defects in materials or
workmanship for a period of up to two years from the date of purchase. During the warranty period, and upon proof
of purchase, should the product have indications of failure due to faulty workmanship and/or materials, ZyXEL
will, at its discretion, repair or replace the defective products or components without charge for either parts or labor,
and to whatever extent it shall deem necessary to restore the product or components to proper operating condition.
Any replacement will consist of a new or re-manufactured functionally equivalent product of equal value, and will
be solely at the discretion of ZyXEL. This warranty shall not apply if the product is modified, misused, tampered
with, damaged by an act of God, or subjected to abnormal working conditions.
NOTE
Repair or replacement, as provided under this warranty, is the exclusive remedy of the purchaser. This warranty is
in lieu of all other warranties, express or implied, including any implied warranty of merchantability or fitness for a
particular use or purpose. ZyXEL shall in no event be held liable for indirect or consequential damages of any kind
of character to the purchaser.
To obtain the services of this warranty, contact ZyXEL's Service Center; refer to the separate Warranty Card for
your Return Material Authorization number (RMA). Products must be returned Postage Prepaid. It is recommended
that the unit be insured when shipped. Any returned products without proof of purchase or those with an out-dated
warranty will be repaired or replaced (at the discretion of ZyXEL) and the customer will be billed for parts and
labor. All repaired or replaced products will be shipped by ZyXEL to the corresponding return address, Postage
Paid (USA and territories only). If the customer desires some other return destination beyond the U.S. borders, the
customer shall bear the cost of the return shipment. This warranty gives you specific legal rights, and you may also
have other rights that vary from state to state.
Online Registration
Do not forget to register your Prestige (fast, easy online registration at www.zyxel.com for free future product
updates and information.
Quick Start Manual for Prestige 100L
ix
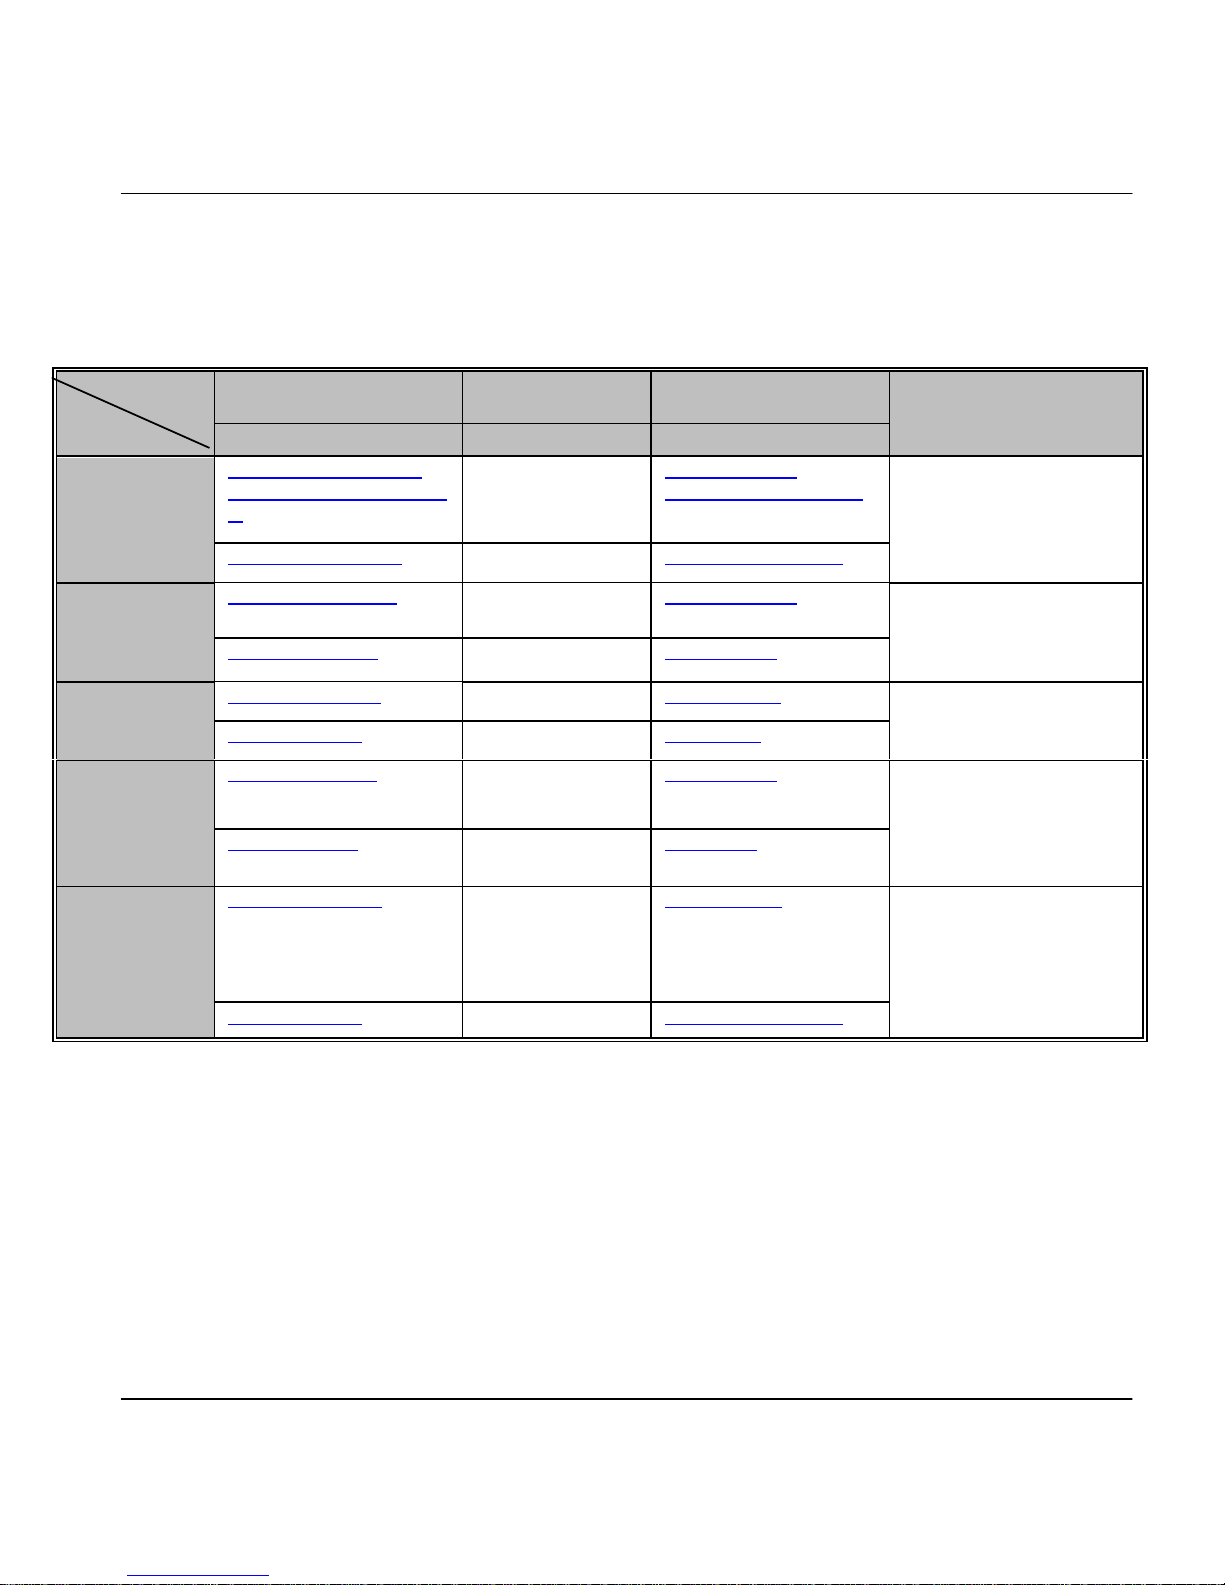
Customer Support
If you have questions about your ZyXEL product or desire assistance, contact ZyXEL Communications
Corporation offices worldwide, in one of the following ways:
EMAIL – SUPPORT TELEPHONE WEB SITE
METHOD
REGION
EMAIL – SALES FAX FTP SITE
REGULAR MAIL
support@zyxel.com.tw
support@europe.zyxel.co
m
+886-3-578-3942 www.zyxel.com
www.europe.zyxel.com
WORLDWIDE
sales@zyxel.com.tw +886-3-578-2439 ftp.europe.zyxel.com
ZyXEL Communications
Corp., 6 Innovation Road II,
Science-Based Industrial
Park, HsinChu, Taiwan.
support@zyxel.com +1-714-632-0882
800-255-4101
www.zyxel.com
NORTH
AMERICA
sales@zyxel.com +1-714-632-0858 ftp.zyxel.com
ZyXEL Communications Inc.,
1650 Miraloma Avenue,
Placentia, CA 92870, U.S.A.
support@zyxel.dk +45-3955-0700 www.zyxel.dk
SCANDINAVIA
sales@zyxel.dk +45-3955-0707 ftp.zyxel.dk
ZyXEL Communications A/S,
Columbusvej 5, 2860
Soeborg, Denmark.
support@zyxel.at +43-1-4948677-0
0810-1-ZyXEL
0810-1-99935
www.zyxel.at
AUSTRIA
sales@zyxel.at
+43-1-4948678
ftp.zyxel.at
Note: for Austrian users with *.at
domain only!
ZyXEL Communications
Services GmbH.,
Thaliastrasse 125a/2/2/4,
A-1160 Vienna, Austria
support@zyxel.de
+49-2405-6909-0
0180-5213247
Tech Support hotline
0180-5099935
RMA/Repair hotline
www.zyxel.de
GERMANY
sales@zyxel.de +49-2405-6909-99 ftp.europe.zyxel.com
ZyXEL Deutschland GmbH.,
Adenauerstr. 20/A4, D-52146
Wuerselen, Germany.

Quick Start Manual for Prestige 100L
x
Table of Contents
Declaration of Conformity ................................................................................................. vii
Cutomer Support ................................................................................................................ ix
Table of Contents................................................................................................................. x
Quick Start Manual (English)............................................................................................... 1
Manuel de mise en route rapide (French)..........................................................................17
Kurzanleitung (German) .....................................................................................................33
Guida rapida (Italian) ..........................................................................................................49
Manual de inicio rápido (Spanish)......................................................................................65
Quick Start-manual (Danish) ..............................................................................................81
Snabbstartshandbok (Swedish).........................................................................................97
Käyttöönoton pikaopas (Finnish).....................................................................................113
Aan de slag (Dutch) ..........................................................................................................129
Manual rápido (Portuguese).............................................................................................145
Quick Start Manual for Prestige 100L
1
Quick Start Manual
For Prestige 100L
The Prestige100L is the perfect IDSL Client for the Prestige 1600, offering inexpensive yet complete
telecommunications and internetworking solutions for your home or branch office. The Prestige is ideal for everything
from Internet access, LAN-to-LAN connections to Remote Access. ZyXEL’s Prestige 100L provides not only ease of
installation and Internet access, but also a complete security solution to protect your Intranet and efficiently manage
data traffic on your network.
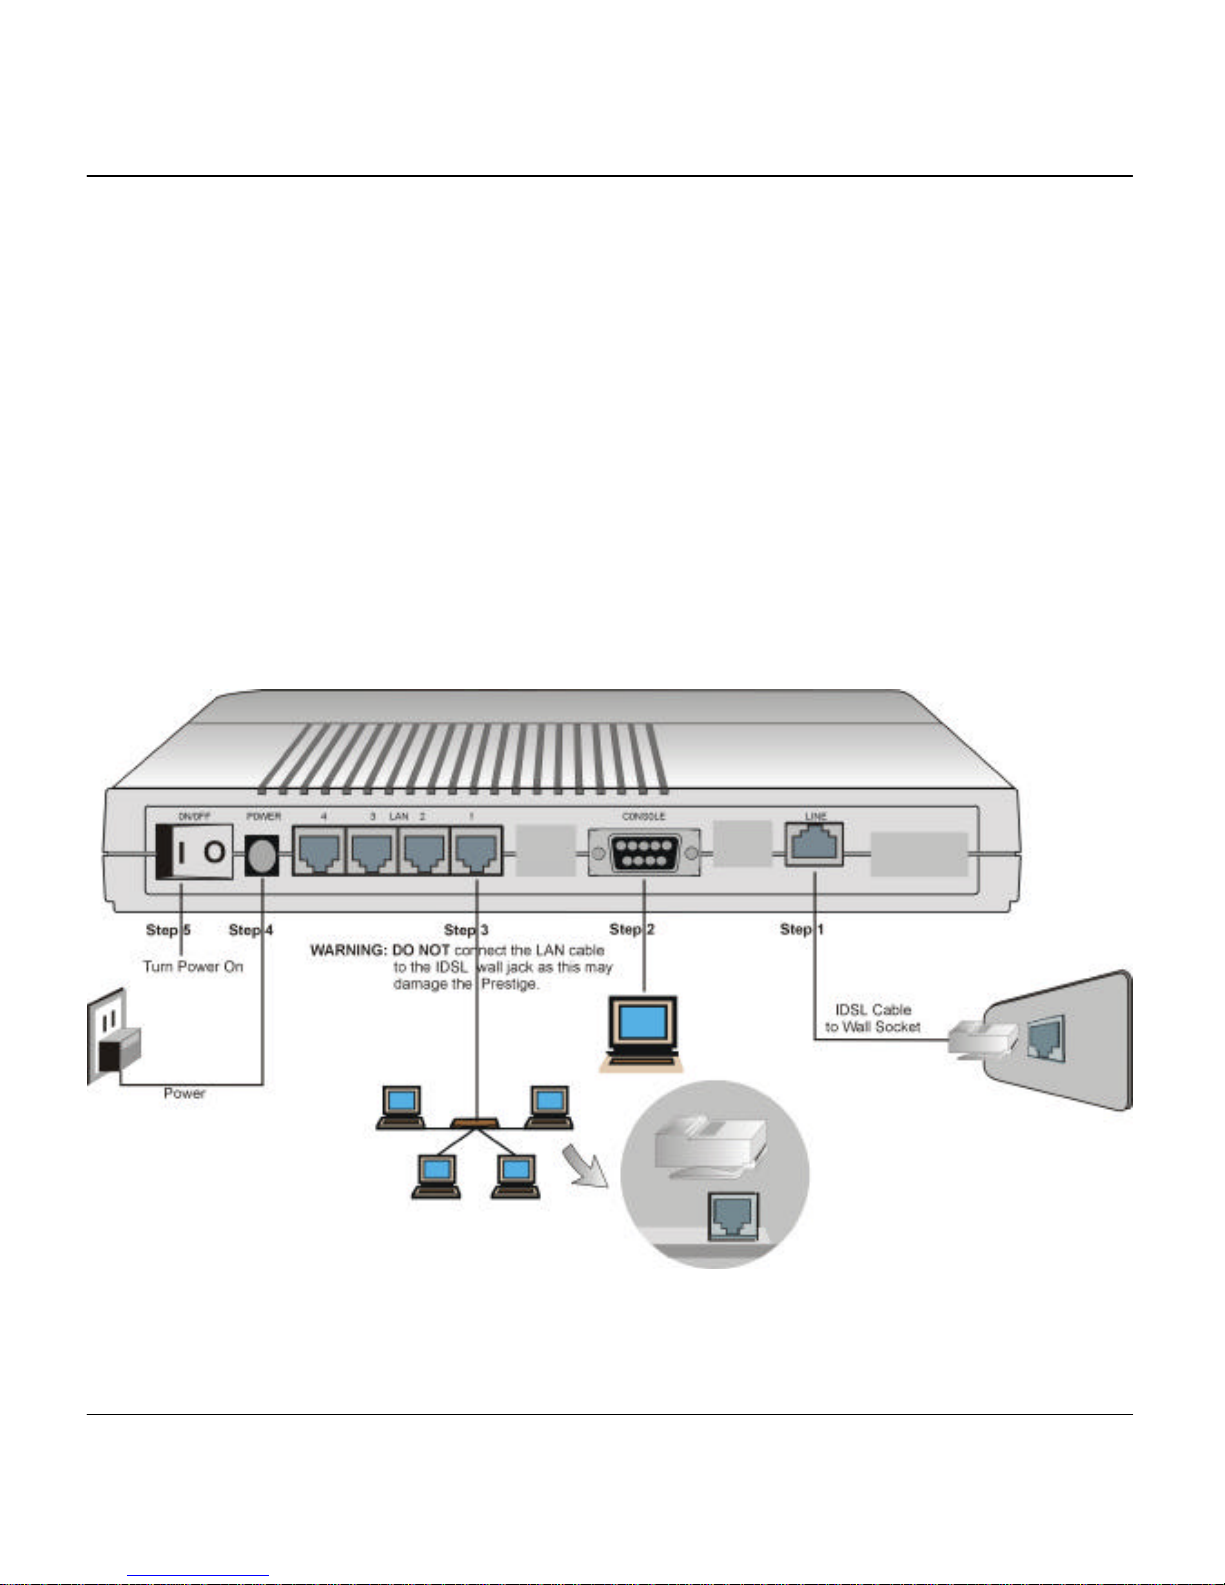
1 Rear Panel Connections
Figure 1 Rear Panel Connections

Quick Start Manual for Prestige 100L
2
1.1 Connecting Your Computer and Your Prestige
For the initial configuration of your Prestige, use the provided RS-232C cable and communication software to
configure your Prestige. After your Prestige has been successfully installed, you can modify the configuration through
a console port as well as a remote telnet connection.
Step 1. Connecting an IDSL Line to Your Prestige
Plug one end of the IDSL line included in your package into the socket on the rear panel of your Prestige labeled
LINE, and the other end into the IDSL wall jack or another Prestige.
NOTE: The IDSL jack is for IDSL line connections only. Connecting it to a regular phone
line may result in damage to your Prestige.
Step 2. Connecting the RS-232C Cable to Your Prestige
One 9-25 pin adapter is included with your Prestige. To connect an RS-232C cable, connect the 9-pin end of the cable
to the console port on the back panel of the Prestige. Connect the other end to the RS-232C cable connected to the
serial port (COM1, COM2, or any other COM port) of your computer.
Step 3. Connecting an Ethernet Cable to Your Prestige
The Prestige is equipped with a 4-port hub for you to build a 10Base-T Local Area Network (LAN). 10Base-T
networks use UTP (Unshielded Twisted Pair) cable and RJ-45 connectors that look like a bigger telephone plug with
8 pins. Two types of Ethernet cables come with the package:
A. Straight-through cable (white tag) – connect your computers to your Prestige.
B. Crossover cable (red tag) – connect your Prestige to another 10Base-T hub.
Step 4. Connecting the Power Adapter to Your Prestige
Plug the 16VAC 1000mA power adapter into the outlet on the rear panel of the Prestige labeled POWER. At this
point you should have connected the RS-232C cable, the ISDN phone line, the Ethernet cable, and the power supply.
Step 5. Powering On
You can now power on your Prestige.
Quick Start Manual for Prestige 100L
3
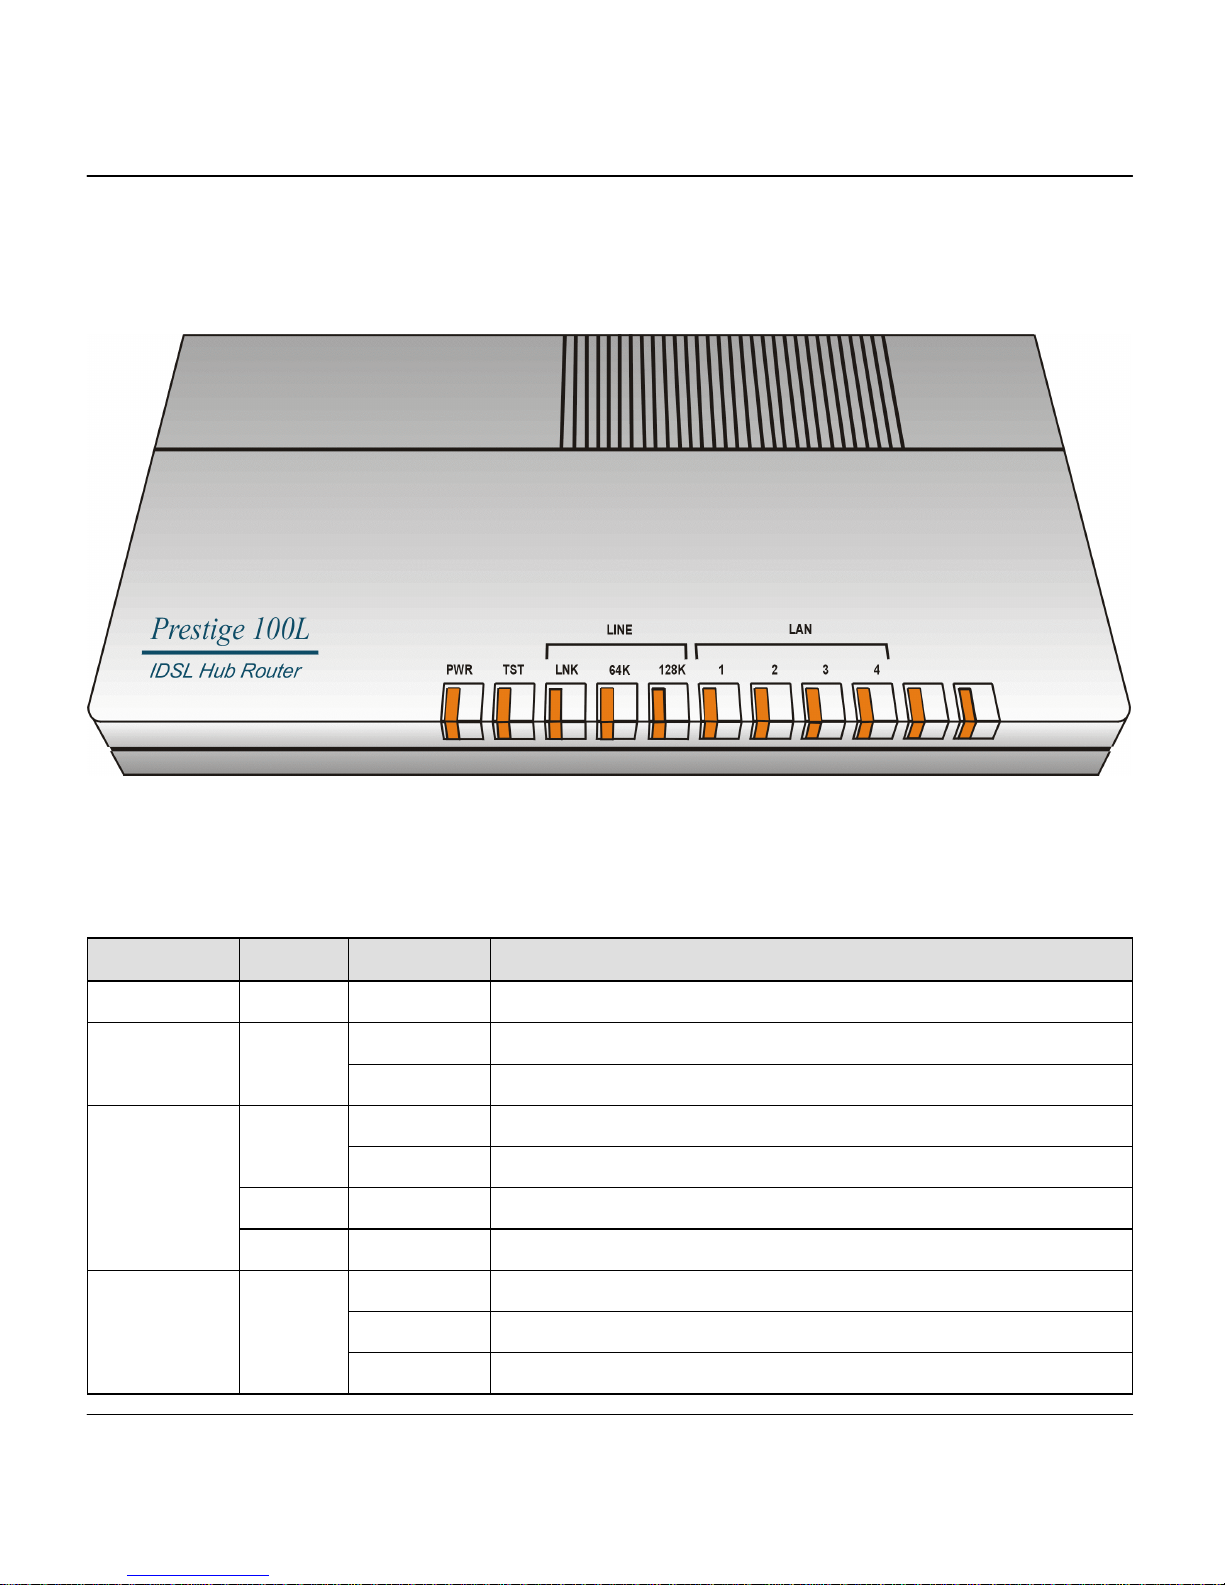
2 Front Panel LEDs
The LEDs on the front panel indicate the operational status of the Prestige.
Figure 2 Front Panel LEDs
The following table describes the LED functions:
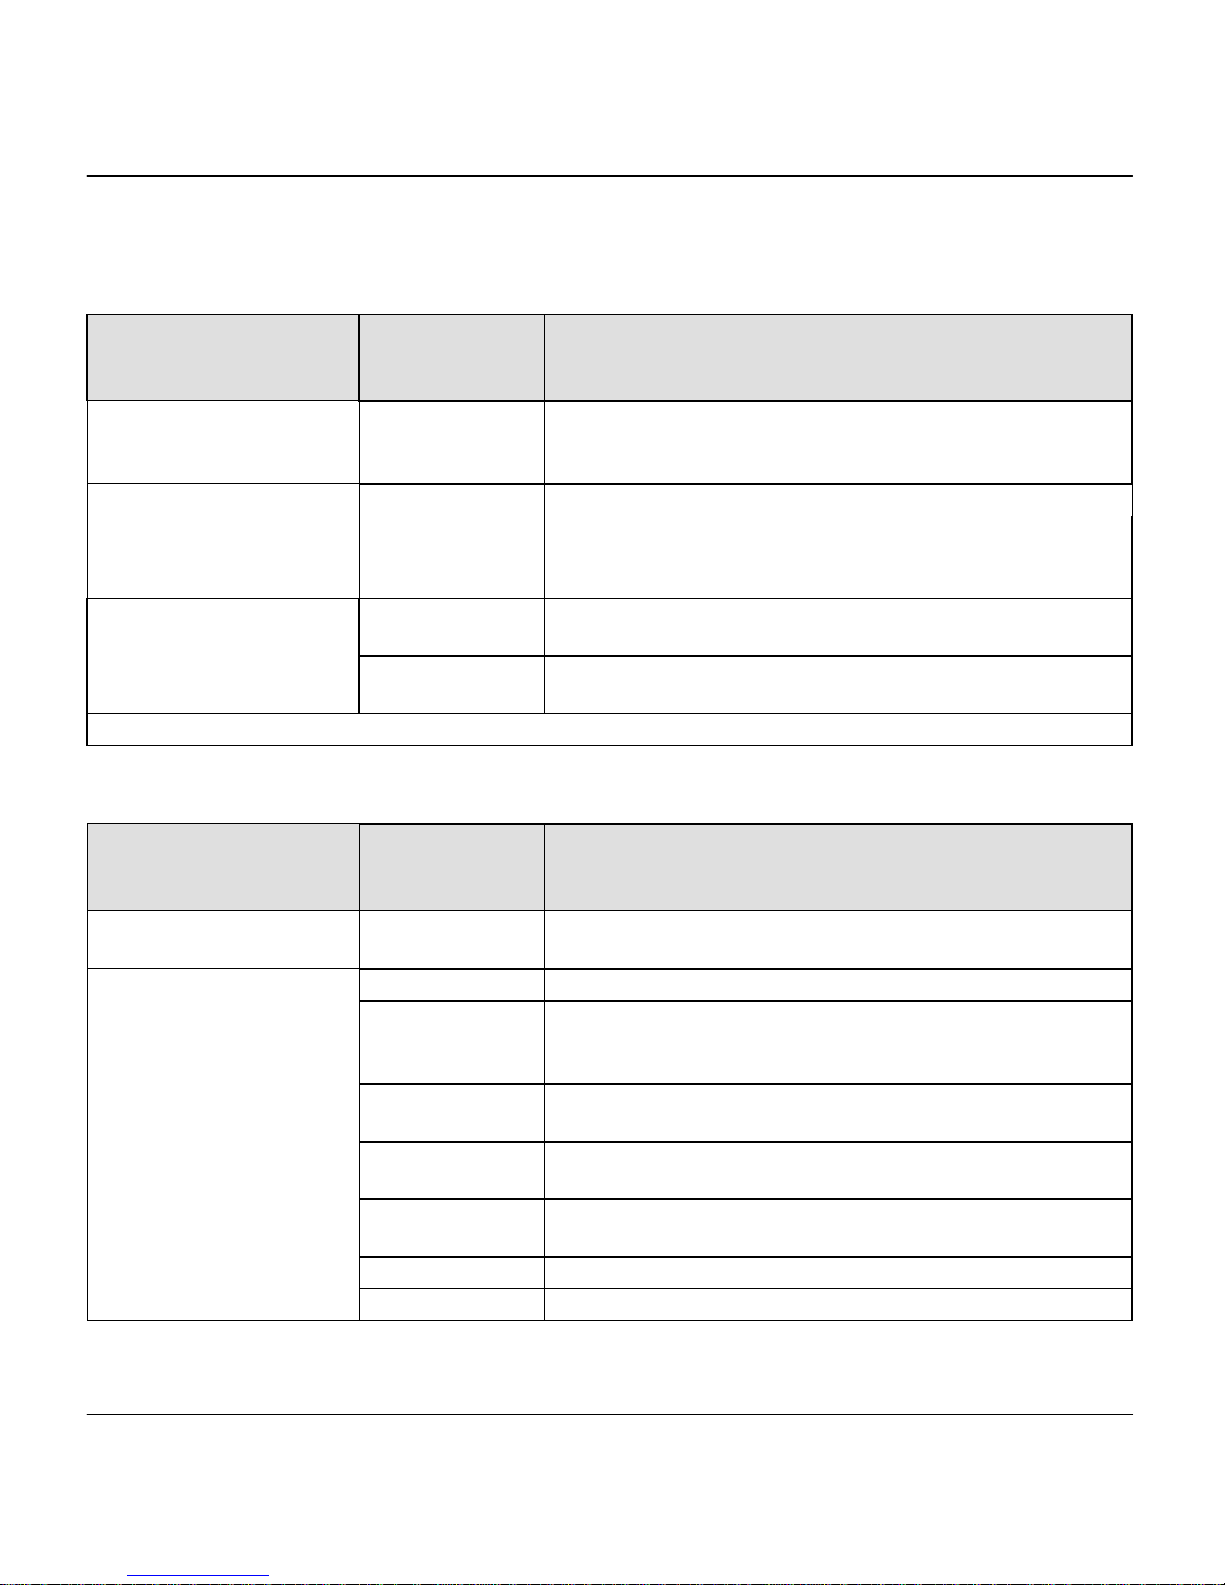
Table 1 Functions of Front Panel LEDs
FUNCTION LEDs ACTIVE DESCRIPTION
Power PWR On The power is on.
Off The system is not ready or malfunctioning.System Test TST
Flashing The system is ready and functioning properly.
Off IDSL link is not ready or failed.LNK
On IDSL link is functioning properly.
64K On The Prestige is connected at 64K bps line speed.
IDSL Line
128K On The Prestige is connected at 128K bps line speed.
Off The Ethernet port is not connected, not ready or has failed.
On The Ethernet port is connected and functioning properly.
LAN 1, 2, 3, 4
Flashing Sending or receiving.

Quick Start Manual for Prestige 100L
4
3 Setting Up Your Windows® 95/98 PC
All PCs must have an Ethernet adapter card installed and connected to an Ethernet port on the Prestige.
• Opening the Network Window
You need to open the Network window to add and to configure TCP/IP.
1. Click Start in the task bar (usually at the lower left-hand corner of the screen).
2. Move the mouse to Settings and then click Control Panel.
3. In the Control Panel window, double-click the Network icon to open it.
• TCP/IP Installation
You must first install TCP/IP software on each Windows® PC before you can use it for Internet access. If you
have already installed TCP/IP, go to the next section to configure it; otherwise, follow these steps to install:
1. In the Network window, click the Add button.
2. In the Select Network Component Type window, select Protocol and click Add.
3. In the Select Network Protocol window, select Microsoft™ from the manufacturers. Then
select TCP/IP from the Network Protocols and click OK.
• TCP/IP Configuration
Follow these steps to configure Windows® TCP/IP:
1. In the Network window, click the TCP/IP entry to select it and click the Properties button.
2. In the TCP/IP Properties window, select Obtain an IP address automatically.
NOTE: Do not assign arbitrary IP address and subnet mask to your PCs. Otherwise,
accessing the Internet is not possible.
3. Click the WINS Configuration tab and select Disable WINS Resolution.
4. Click the Gateway tab. Highlight any installed gateways and click the Remove button until there
are none listed.
5. Click the DNS Configuration tab and select Disable DNS.
6. Click OK to save and close the TCP/IP Properties window.
7. Click OK to close the Network window. It prompts you to insert your Windows® CD or disk.
When the configuration is updated, you are asked if you want to restart the PC. Make sure your Prestige is
powered on before answering Yes to the prompt. Repeat the above steps for each Windows® PC on your LAN.
Quick Start Manual for Prestige 100L
5
4 Basic Setup and Installation
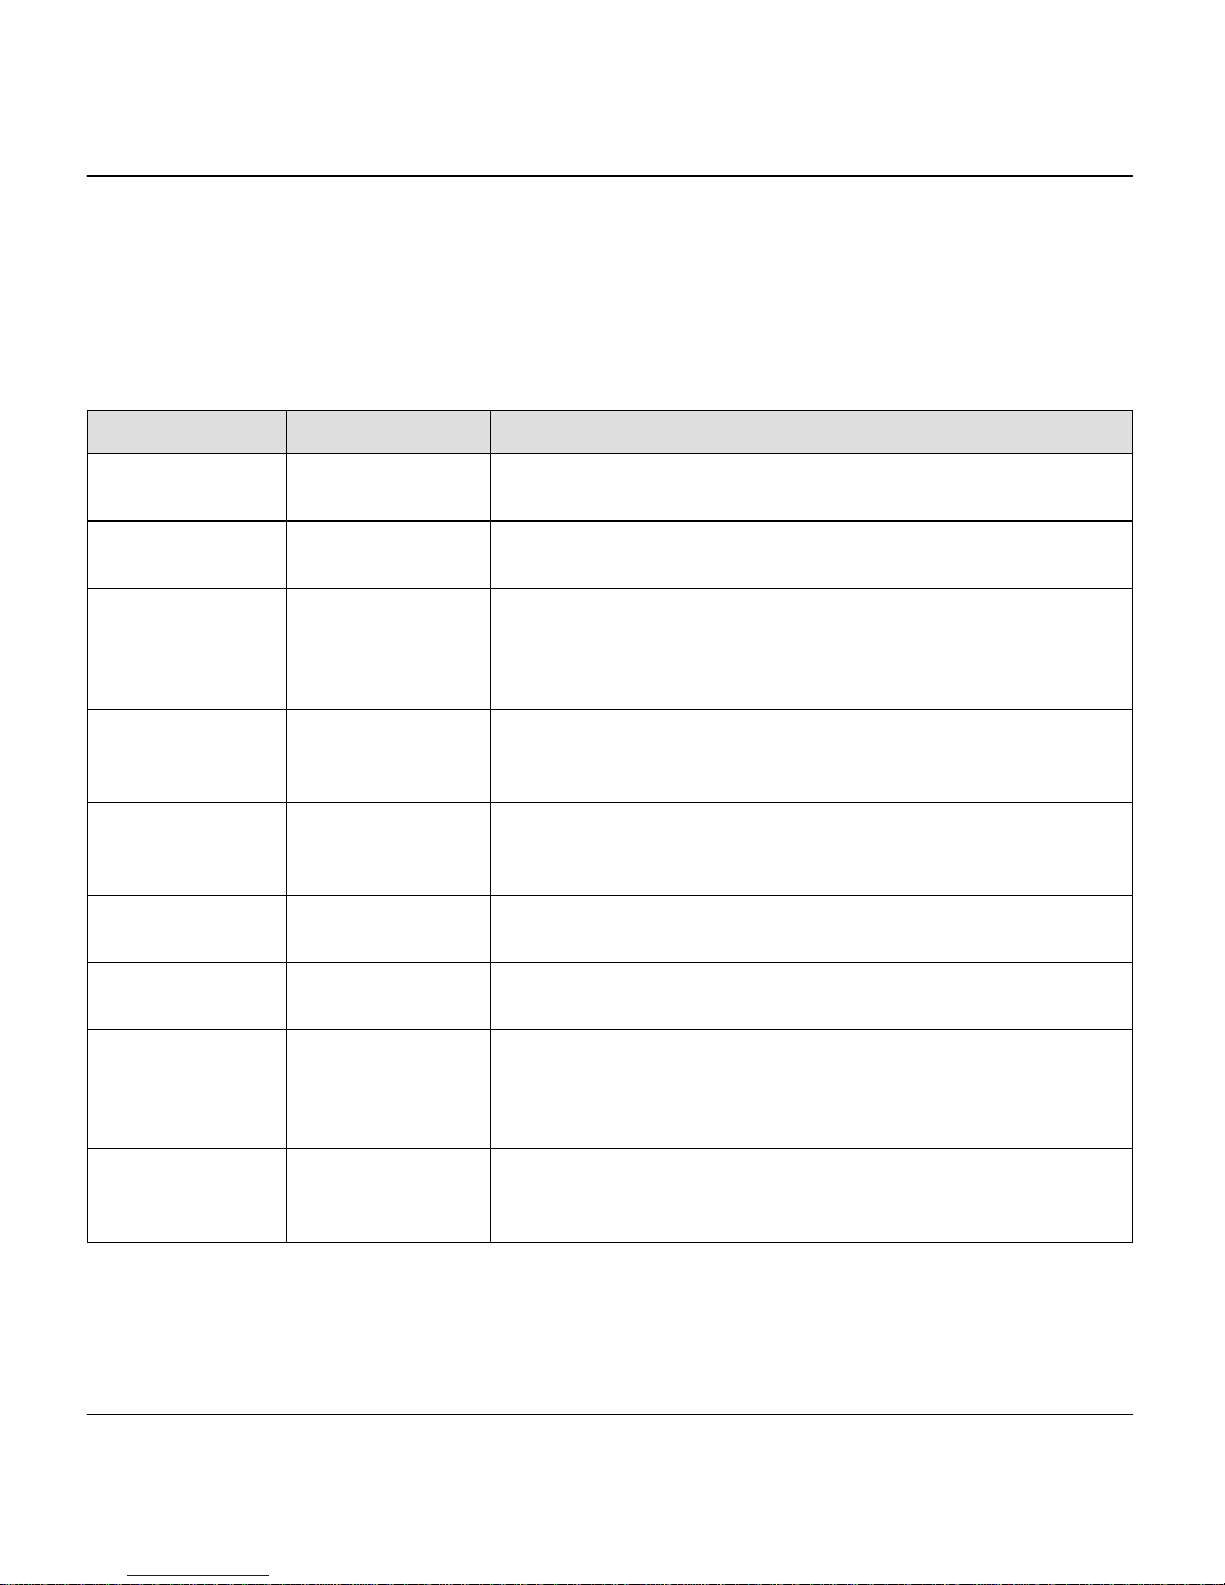
Table 2 Basic Setup and Installation
SMT (System
Management Terminal)
MENU No.
MENU ITEM DESCRIPTION
1
System Name Choose a descriptive name, up to 30 alphanumeric
characters long (no spaces, but dashes “–” and
underscores "_" are accepted) for identification purposes.
q Leased 128K q Leased 64K
2 Framing Rate
When the P100L is connected to the P1600 as the Client
router, this option cannot be set by the user as it is set on
the P1600.
My Login Enter the login name given to you by your ISP (Internet
Service Provider).4
My Password Enter the password associated with the login name
above.
Please refer to your system administrator for problems with the basic setup and installation.
Table 3 Prestige 100L Basic Default Values
SMT (System
Management Terminal)
MENU No.
MENU ITEM DEFAULT VALUE
23 System
Password
1234 (NOTE: It is recommended that you change the
System Password for security purposes.)
DHCP Server
Client IP Pool
Starting
Address
192.168.1.33
Size of Client IP
Pool
32
Primary DNS
Server
0.0.0.0
Secondary DNS
Server
0.0.0.0
IP Address 192.168.1.1
3.2
IP Subnet Mask 255.255.255.0
The following procedure is for the most typical usage of the Prestige where you have a single-user ISP account. If this
is not the case, please refer to the Prestige 100L User’s Guide for details on configuring your PCs and the Prestige.

Quick Start Manual for Prestige 100L
6
5 Power Up Your Prestige
When you power on your Prestige, it performs several internal tests and also does an IDSL line initialization. After
this initialization, your Prestige asks you to press the [Enter] key to continue as shown on the initial screen.
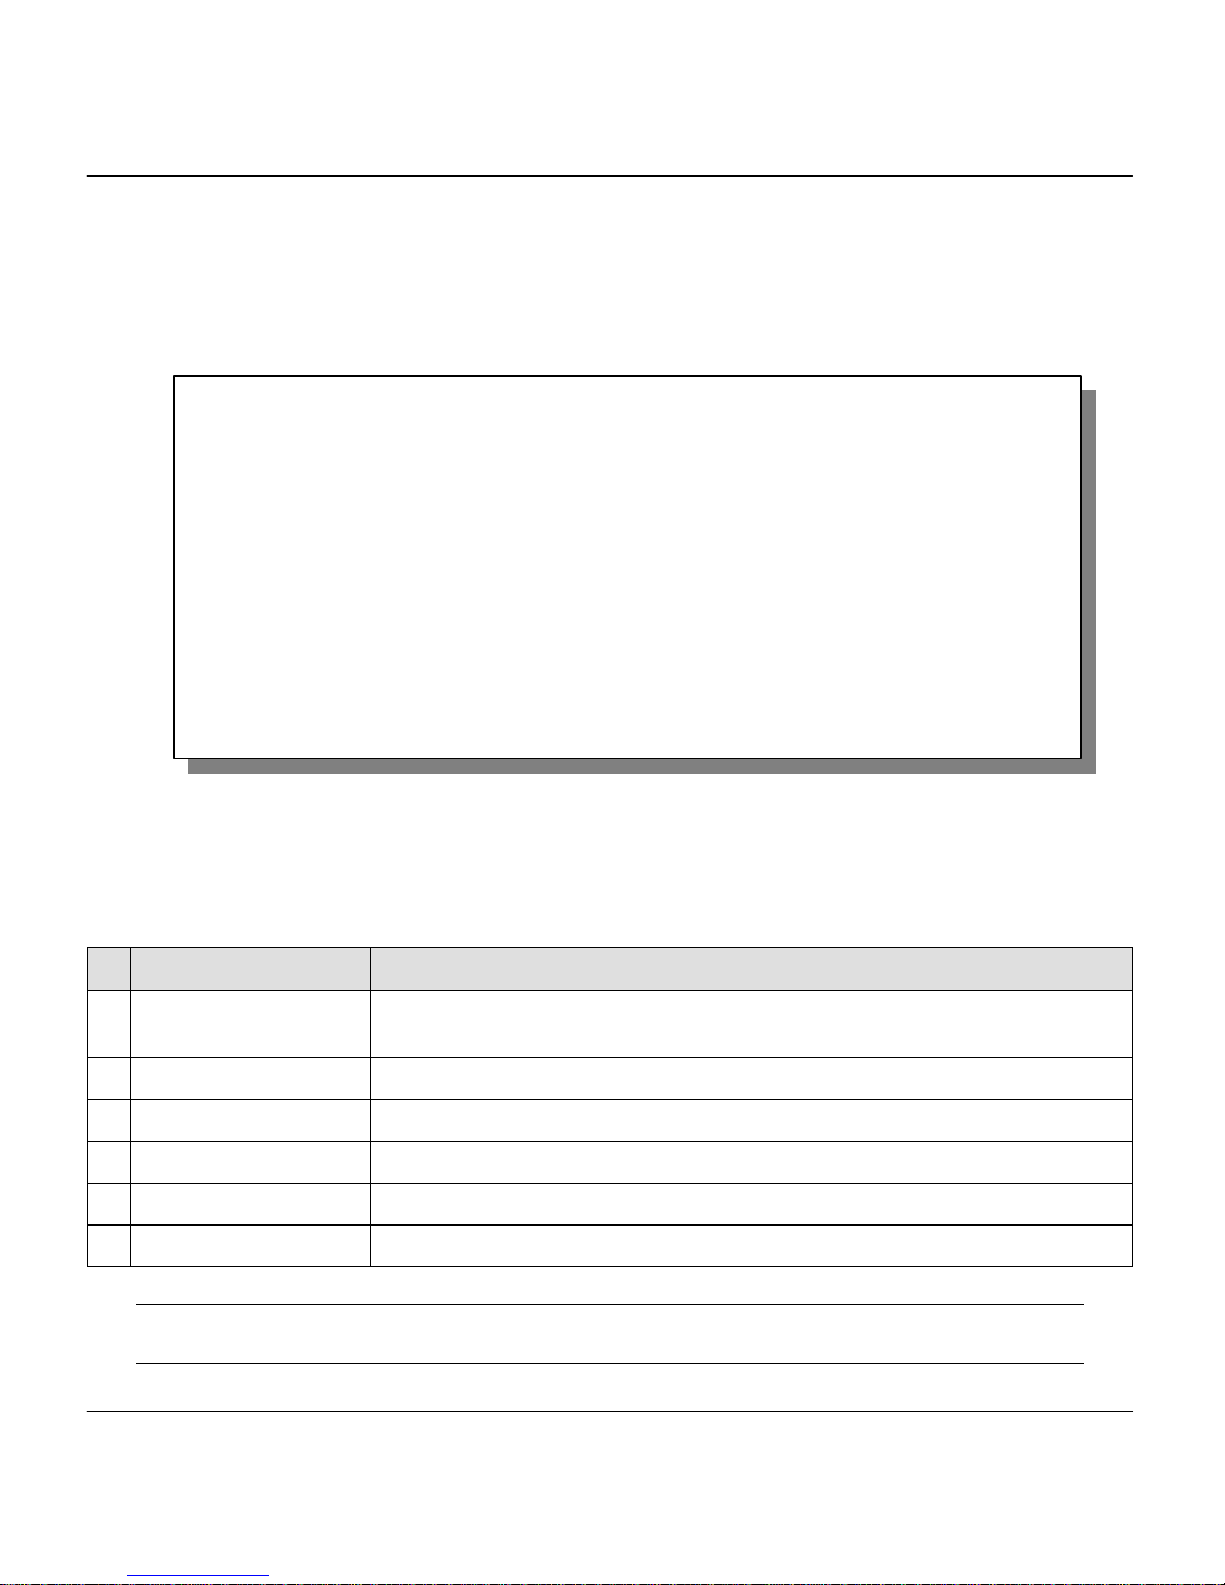
5.1 Initial Screen
Figure 3 Initial Screen
5.2 Entering Password
The login screen appears after you press the [Enter] key, prompting you to enter the password as shown on the next
screen. For your first login, enter the default password 1234. As you type the password, the screen displays an (X) for
each character you type. Please note that if there is no activity longer than 5 minutes after you log in, your Prestige
automatically logs you out and displays a blank screen. If you see a blank screen, press the [Enter] key to bring up the
login screen again.
Figure 4 Password Screen
Enter Password: XXXX
Copyright (c) 1994 - 2000 ZyXEL Communications Corp.
ethernet address: 00:a0:c5:01:23:45
Resetting IDSL Firmware.(2) IDSL Firmware Rev : V 09E
...............................
Press ENTER to continue...
Quick Start Manual for Prestige 100L
7
6 Navigating the SMT (System Management Terminal) Interface
The SMT is the interface that you use to configure your Prestige. Several operations that you should be familiar with
before you attempt to modify the configuration are listed in the following table.
Table 4 Main Menu Commands
OPERATION KEYSTROKES DESCRIPTION
Move down to
another menu
[Enter] key To move forward to a submenu, type in the number of the
desired submenu and press the [Enter] key.
Move up to a
previous menu
[Esc] key Press the [Esc] key to move back to the previous menu.
Move to a
“hidden” menu
Press [space bar]
to change No to
Yes then press
the [Enter] key
Fields beginning with “Edit” lead to hidden menus and have a
default setting of No. Press the [space bar] to change No to
Yes, then press the [Enter] key to go to a “hidden” menu.
Move the cursor [Enter] key or
[Up]/[Down] arrow
keys
Within a menu, press the [Enter] key to move to the next field.
You can also use the [Up]/[Down] arrow keys to move to the
previous and the next field, respectively.
Enter information Fill in, or
Press [space bar]
to toggle
You need to fill in two types of fields. The first requires you to
type in the appropriate information. The second allows you to
cycle through the available choices by pressing [space bar].
Required fields <?> All fields with the symbol <?> must be filled in order to be able
to save the new configuration.
N/A fields <N/A> Some of the fields in the SMT shows <N/A>. This symbol refers
to an option that is Not Applicable.
Save your
configuration
[Enter] key Save your configuration by pressing the [Enter] key at the
message [Press ENTER to confirm or ESC to cancel]. Saving
the data on the screen takes you, in most cases, to the
previous menu.
Exit the SMT
Type 99, then
press the [Enter]
key.
Type “99” at the Main Menu prompt and press the [Enter] key to
exit the SMT interface.
Quick Start Manual for Prestige 100L
8
6.1 Main Menu
After you enter the password, the SMT displays the Prestige 100L Main Menu, as shown in the following figure.
Figure 5 Prestige 100L Main Menu
6.2 System Management Terminal Interface Basic Summary
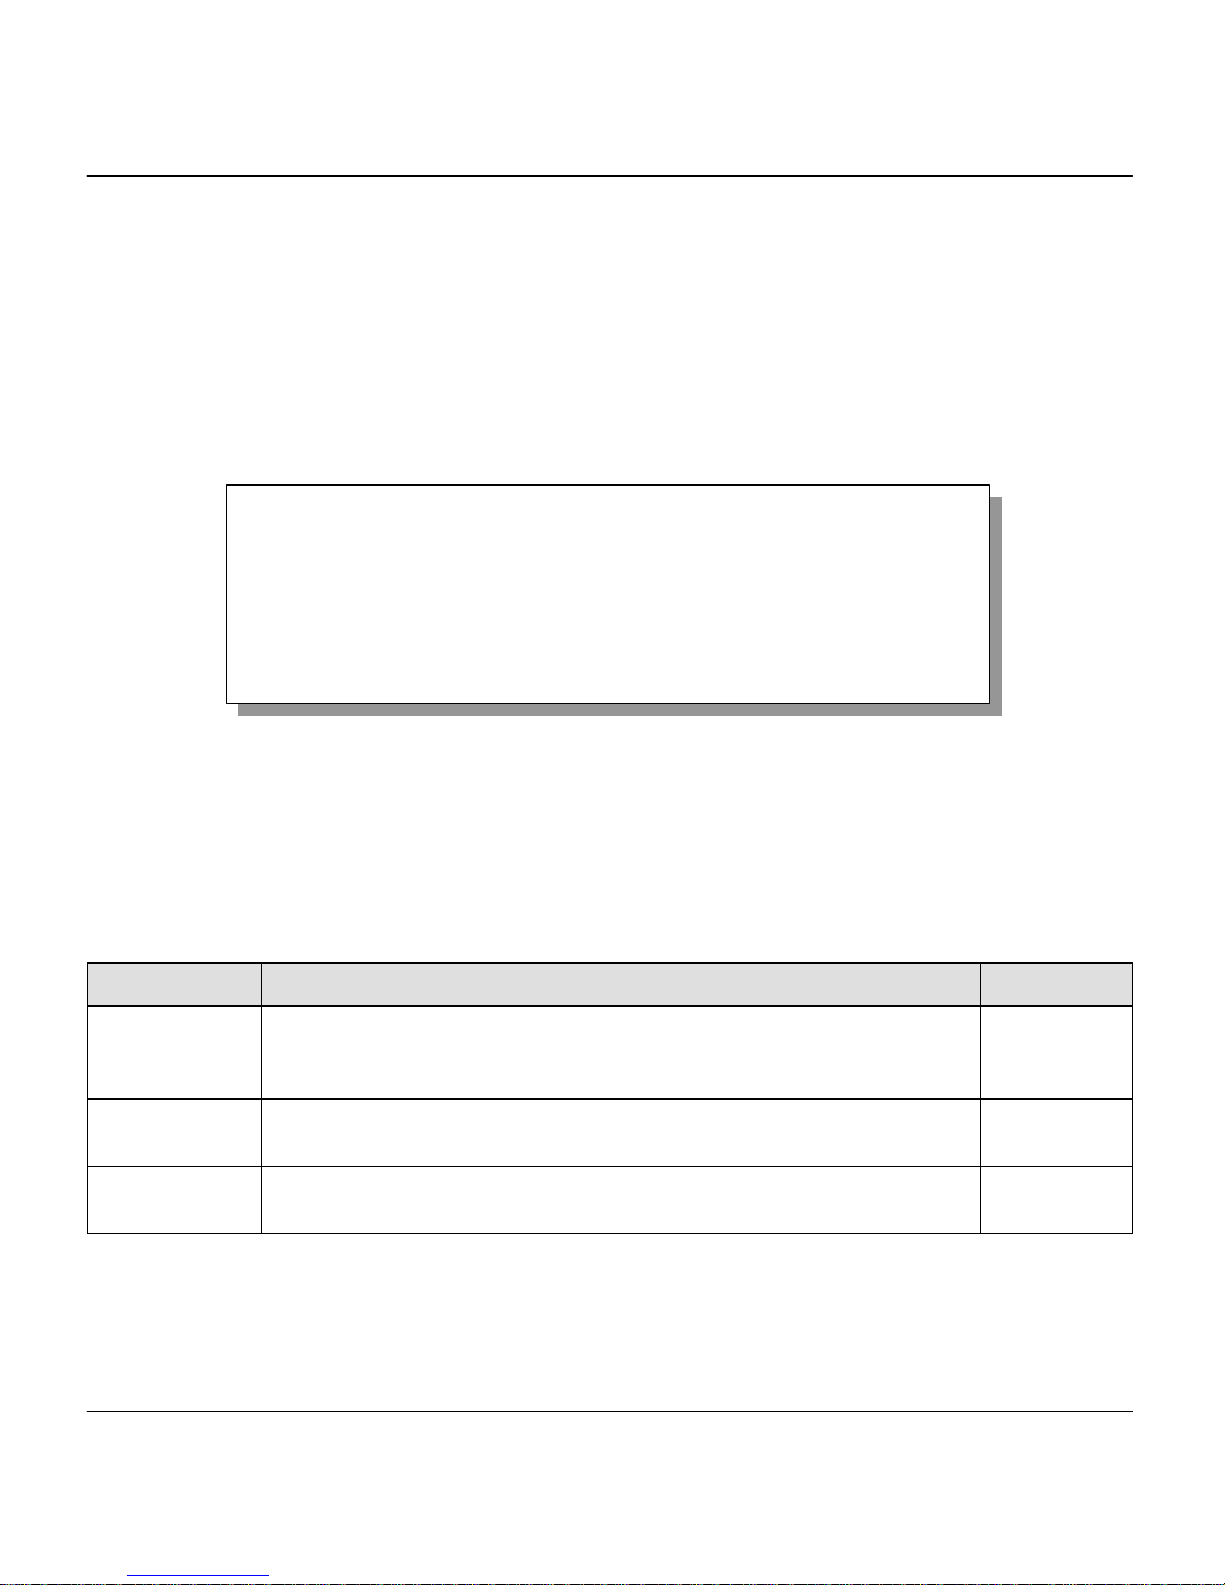
Table 5 Main Menu Getting Started Summary
No. MENU TITLE DESCRIPTION
1 General Setup Use this menu to setup general information and enable routing of specific
protocols.
2 WAN Port Setup Use this menu to setup the IDSL.
3 Ethernet Setup Use this menu to setup the Ethernet LAN.
4 Internet Access Setup A quick and easy way to setup Internet connection.
23 System Security Use this menu to setup security-related parameters.
99 Exit To exit from SMT and return to the blank (initial) screen.
NOTE: For the description of menus 11 to 24, please refer to the Prestige 100L User’s
Guide for more details.
Copyright (c) 1994 - 2000 ZyXEL Communications Corp.
Prestige 100L Main Menu
Getting Started Advanced Management
1. General Setup
2. WAN Port Setup
3. Ethernet Setup
4. Internet Access Setup
Advanced Applications
11. Remote Node Setup
12. Static Routing Setup
15. SUA Server Setup
21. Filter Set Configuration
22. SNMP Configuration
23. System Password
24. System Maintenance
99. Exit
Enter Menu Selection Number:

Quick Start Manual for Prestige 100L
9
7 Changing the System Password
The first thing your should do before anything else is to change the default system password by following the steps
below.
Step 1. Enter 23 in the Main Menu to open Menu 23 – System Password as shown below.
Figure 6 Menu 23 – System Password
Step 2. Enter your existing password and press the [Enter] key.
Step 3. Enter your new system password and press the [Enter] key.
Step 4. Re-type your new system password for confirmation and press the [Enter] key.
NOTE: As you type a password, the screen displays an (X) for each character you type.
7.1 Resetting the Prestige
You should already have downloaded the correct file from your nearest ZyXEL FTP server site. See the Prestige 100L
User’s Guide for more information on how to transfer the configuration file to your Prestige.
If you have forgotten your password or for some reason cannot access the SMT menu you need to reinstall the
configuration file. Uploading the configuration file replaces the current configuration file with the default
configuration file. You lost all configurations that you had before and the speed of the console port resets to the
default of 9600bps with 8 data bit, no parity, 1 stop bit (8n1), and no Flow Control. The password resets to the
default value of 1234, also.
Turn off the Prestige and begin a Terminal session with the current console port settings. Turn on the Prestige again.
When you see the message "Press Any key to enter Debug Mode within 3 seconds", press any key to enter debug
mode.
Menu 23 - System Password
Old Password= ?
New Password= ?
Retype to confirm= ?
Press ENTER to Confirm or ESC to Cancel:
Quick Start Manual for Prestige 100L
10
8 General Setup
Menu 1 – General Setup contains administrative and system-related information. To enter Menu 1 and fill in the
required information, follow these steps:
Step 1. Enter 1 in the Main Menu to open Menu 1 – General Setup.
Step 2. The Menu 1 – General Setup screen appears, as shown in the following figure. Fill in the
required fields.
Figure 7 Menu 1 – General Setup
The fields for General Setup are as shown below. System Name is for identification purposes. The Location is used
to enter the geographic location (up to 31 characters) of your Prestige, e.g., San Jose. The Contact Person’s Name is
used to enter the name (up to 30 characters) of the person in charge of your Prestige, e.g., John Doe. Both the
Location and Contact Person’s Name fields are optional.
Table 6 General Setup Menu Fields
FIELD DESCRIPTION EXAMPLE
System Name Choose a descriptive name, up to 30 alphanumeric characters long (no
spaces, but dashes “–” and underscores "_" are accepted) for
identification purposes.
P100L
Location Enter the geographic location (up to 31 characters) of your Prestige
(optional field).
San Jose
Contact
Person’s Name
Enter the name (up to 30 characters) of the person-in-charge of your
Prestige (optional field).
John Doe
Menu 1 - General Setup
System Name= xxx
Location=
Contact Person’s Name=
Press ENTER to Confirm or ESC to Cancel:
Quick Start Manual for Prestige 100L
11
9 IDSL Setup
This section describes how to configure the IDSL using Menu 2 – WAN Port Setup. From the Main Menu, enter 2
to open Menu 2.
Figure 8 Menu 2 – WAN Port Setup
The following table contains instructions on how to configure your IDSL setup.
Table 7 IDSL Setup Menu Fields
FIELD DESCRIPTION EXAMPLES
Service Type
Since the Prestige can only act as an IDSL Client, there is only one
option available: IDSL Client.
IDSL Client
B Channel
Usage
There are three options available: Leased 128K or Leased 64K,
which is used to decide the IDSL line’s speed; or Switch 64K for
Ascend MAX TNT IDSL-module. When the P100L is connected to
the P1600 as the Client router, then this option cannot be set by
the user as it is set on the P1600.
Leased 128K /
Leased 64K /
Switch 64K
10 Ethernet Setup
Figure 9 Menu 3 – Ethernet Setup Screen
Menu 3 – Ethernet Setup
1. General Setup
2. TCP/IP and DHCP Setup
Enter Menu Selection Number:
Menu 2 – WAN Port Setup
Service Type: IDSL Client
B Channel Usage = Leased 128K
Press ENTER to Confirm or ESC to Cancel:
Press Space Bar to Toggle

Quick Start Manual for Prestige 100L
12
This section describes how to configure the Ethernet-related information using Menu 3 – Ethernet Setup. From the
Main Menu, enter 3 to open Menu 3.
11 General Setup
This menu allows you to specify the filter sets you wish to implement on your Ethernet traffic. From Menu 3 –
Ethernet Setup, enter 1 to go to Menu 3.1 – General Ethernet Setup.
Figure 10 General Ethernet Setup Screen
NOTE: You may apply up to four filter sets separated by commas.
12 Input and Output Filter Sets
Filter sets are used to block certain packets to reduce traffic and to prevent a security breach. Filtering is a very
involved subject, so leave these fields blank for the time being. After you have studied filtering in the Prestige 100L
User’s Guide, come back and define the filter sets. Menu 3.2 is discussed in the next part of this Manual. Please read
on.
Menu 3.1 – General Ethernet Setup
Input Filter Sets:
protocol filters=
device filters=
Output Filter Sets:
protocol filters=
device filters=
Press ENTER to Confirm or ESC to Cancel:

Quick Start Manual for Prestige 100L
13
13 TCP/IP and DHCP Ethernet Setup
From the Main Menu, enter 3 to open Menu 3 – Ethernet Setup.
Figure 11 Menu 3 – Ethernet Setup Screen
To edit the TCP/IP and DHCP configuration, enter 2 to open Menu 3.2 – TCP/IP and DHCP Ethernet Setup as
shown below.
Figure 12 Menu 3.2 – TCP/IP and DHCP Ethernet Setup Screen
Follow the instructions in the following table on how to configure the DHCP fields.
Menu 3.2 - TCP/IP and DHCP Ethernet Setup
DHCP= Server
Configuration:
Client IP Pool Starting Address= 192.168.1.33
Size of Client IP Pool= 32
Primary DNS Server= 0.0.0.0
Secondary DNS Server= 0.0.0.0
Relay Server Address= N/A
TCP/IP Setup:
IP Address= 192.168.1.1
IP Subnet Mask= 255.255.255.0
RIP Direction= Both
Version= RIP-1
Press ENTER to Confirm or ESC to CANCEL:
Press Space Bar to Toggle.
Menu 3 – Ethernet Setup
1. General Setup
2. TCP/IP and DHCP Setup
Enter Menu Selection Number:

Quick Start Manual for Prestige 100L
14
Table 8 LAN DHCP Setup Menu Fields
FIELD DESCRIPTION EXAMPLE
DHCP This field enables/disables the DHCP server. If it is set to
Server, your Prestige acts as a DHCP server. If set to None,
DHCP service is disabled and you must have another DHCP
sever on your LAN, or else the workstation must be manually
configured. When DHCP is set to Server, the following four
items need to be set. If set to Relay, the Prestige acts as a
surrogate DHCP server and relays requests and responses
between the remote server and the clients.
None / Relay /
Server (default)
Client IP Pool
Starting Address
This field specifies the first of the contiguous addresses in the
IP address pool.
192.168.1.33
Size of Client IP Pool This field specifies the size, or count, of the IP address pool. 32
Primary DNS Server
Secondary DNS
Server
Enter the IP addresses of the DNS servers. The DNS servers
are passed to the DHCP clients along with the IP address and
the subnet mask.
Relay Server
Address
When the DHCP is set to Relay, the Prestige relays the DHCP
requests/responses between the PCs and the real DHCP server.
Follow the instructions in the following table to configure TCP/IP parameters for the LAN port.
Table 9 LAN TCP/IP Setup Menu Fields
FIELD DESCRIPTION EXAMPLE
IP Address Enter the IP address of your Prestige in dotted decimal notation. 192.168.1.1
(default)
IP Subnet Mask Your Prestige automatically calculates the subnet mask based on
the IP address that you assign. Unless you are implementing
subnetting, use the subnet mask computed by the Prestige.
255.255.255.0
RIP Direction
Press [space bar] to select the RIP direction from Both/In Only/Out
Only/None.
Both (default)
Version
Press [space bar] to select the RIP version from RIP-1 / RIP-2B /
RIP-2M.
RIP-1 (default)
Quick Start Manual for Prestige 100L
15
14 Internet Access Setup
The following steps describe the set-up procedure to configure your Prestige for Internet access.
Figure 13 Menu 4 – Internet Access Setup Screen
The following table describes this screen.
Table 10 Internet Access Setup Menu Fields
FIELD DESCRIPTION
ISP’s Name Enter the name of your Internet Service Provider, e.g., myISP. This
information is for identification purposes only.
My Login Enter the login name given to you by your ISP.
My Password Enter the password associated with the login name above.
Single User Account
Please refer to the Prestige 100L User’s Guide for a more detailed
discussion on the Single User Account feature. The default value is Yes.
IP Addr
Please refer to the Prestige 100L User’s Guide for a more detailed
discussion on setting the IP Address under a Single User Account.
Menu 4 - Internet Access Setup
ISP's Name =
My Login =
My Password =
Single User Account = Yes
IP Addr = 0.0.0.0
Press ENTER to Confirm or ESC to Cancel:

Quick Start Manual for Prestige 100L
16
15 Troubleshooting
Before performing troubleshooting, make sure the Prestige’s power (PWR) light is on and the test (TST) light is
blinking.
v The power (PWR) light is off.
Make sure the Prestige is connected to the power adapter and the power adapter is plugged into a wall outlet.
Make sure the power switch is in the ON position (“I” is on, “O” is off).
v The test (TST) light is not blinking.
Power cycle the Prestige by turning the power switch to off and then to on.
v How to verify my PC’s IP address assigned from Prestige?
Make sure you have the Prestige powered on and then power on your PC. After the PC starts, select RUN…
from the Windows® Start menu. Enter winipcfg and click OK to show the TCP/IP configuration of your PC.
Verify your cabling if the IP Address box shows “0.0.0.0”.
v What is the password for my Prestige?
The default password is 1234. You should change it to something more secure.
v I cannot connect to my ISP.
1. Check first if the link (LNK) light on the Prestige is on. If not, check the connection between the
Prestige’s LINE port and the wall jack.
2. Double-check the login name and password for your ISP before testing the Internet connection
again.
Manuel de mise en route rapide du Prestige 100L
17
Manuel de mise en route rapide
du Prestige 100L
Le Prestige 100L est le client RNIS parfait pour le Prestige 1600, puisqu'il offre des solutions à faible coût mais
complètes, dans le secteur des télécommunications et pour tous travaux professionnels d'importance variable sur
Internet. Le Prestige est idéal en tout, de l'accès à Internet aux connexions de réseau local à réseau local, en passant par
l'accès distant. Le Prestige 100L de ZyXEL offre non seulement un accès à Internet et une installation rapides, mais
également une solution de sécurité complète pour la protection de votre Intranet et une gestion efficace du trafic des
données sur votre réseau.
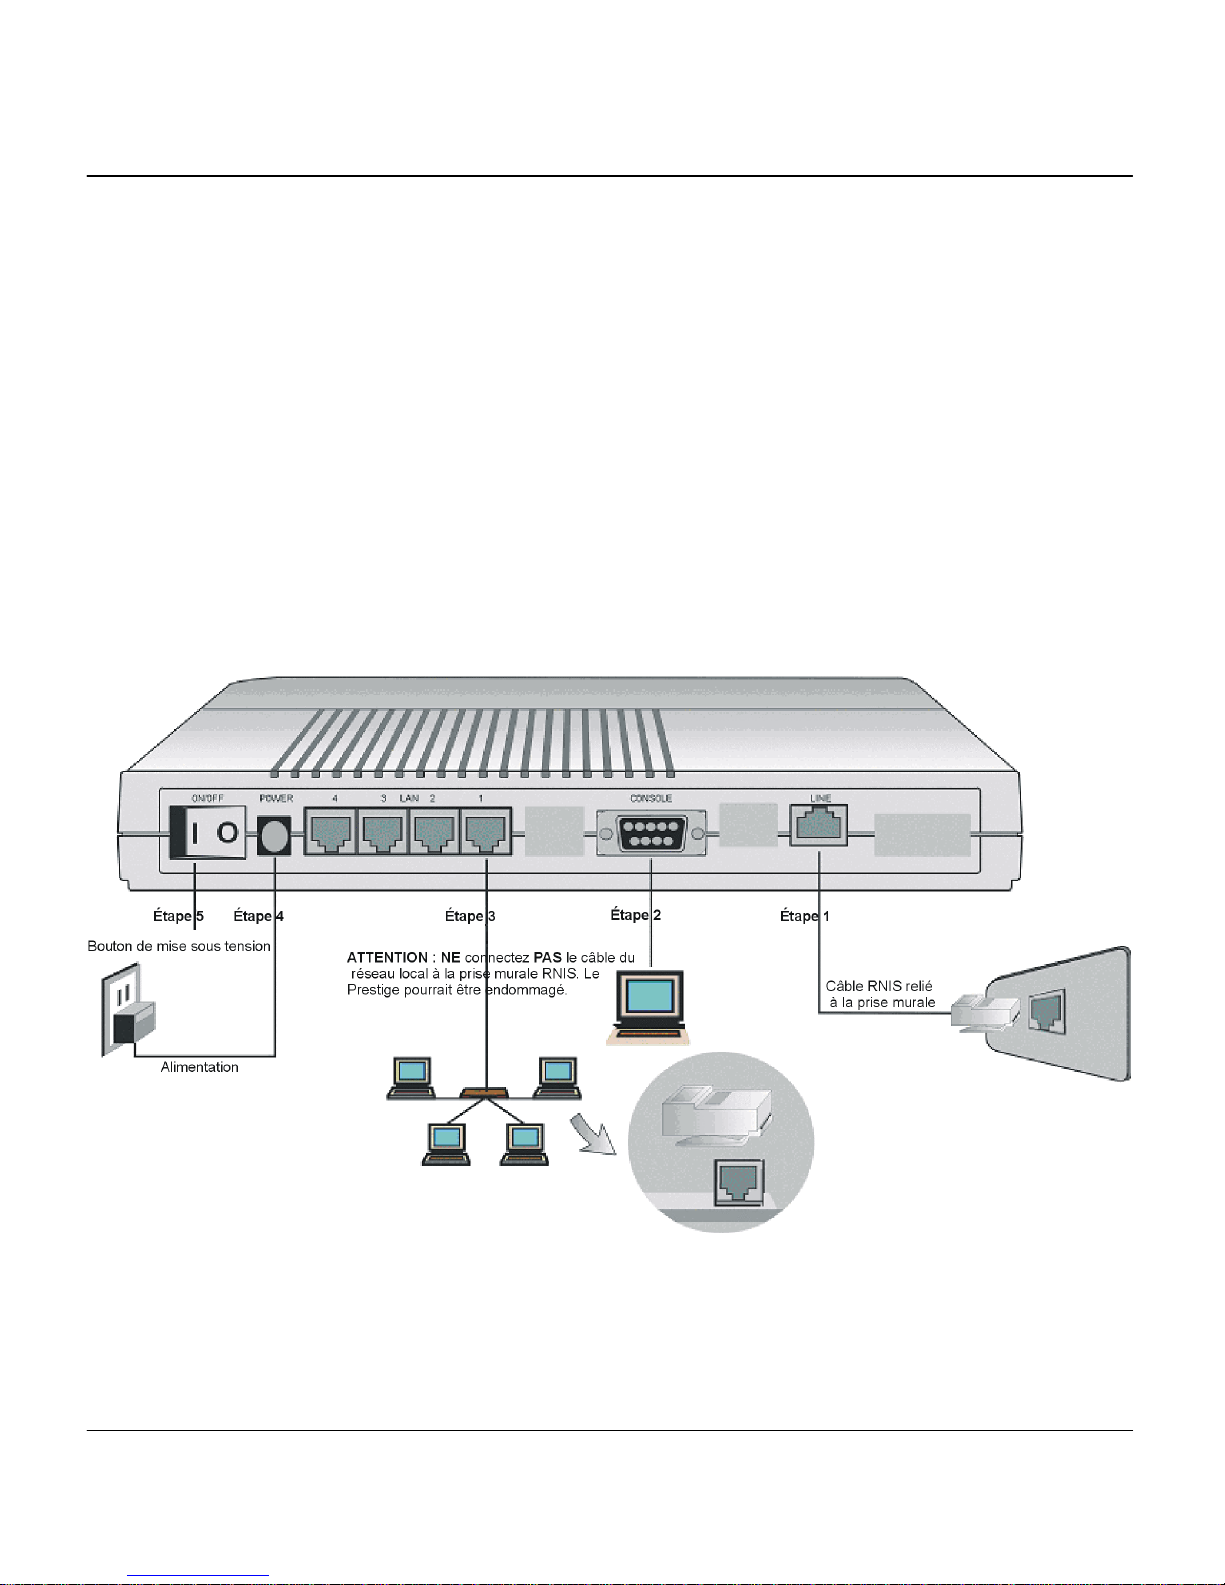
1 Connecteurs sur le panneau arrière
Figure 1 Connexions sue le panneau arrière

Manuel de mise en route rapide du Prestige 100L
18
1.1 Connexion de l'ordinateur et du Prestige
Pour la configuration initiale de votre Prestige, utilisez le câble RS-232C inclus dans l'emballage et un logiciel de
communication. Après avoir correctement installé votre Prestige, vous pouvez en modifier la configuration au moyen
d'un port console ou d'une connexion Telnet à distance.
Étape 1. Connexion de votre Prestige à une ligne RNIS
Branchez l'une des extrémités du câble RNIS inclus dans l'emballage dans la prise située sur le panneau arrière du
Prestige et portant l'indication LINE. Connectez l'autre extrémité à la prise murale RNIS ou à un autre Prestige.
NOTE : N'utilisez la prise RNIS que pour des connexions de ligne RNIS. Vous pourriez
endommager votre Prestige en le connectant à une ligne téléphonique normale.
Étape 2. Connexion du câble RS-232C au Prestige
Un adaptateur 9-25 broches est fourni avec votre Prestige. Pour connecter le câble RS-232C, reliez le côté à 9 broches
du câble au port console situé sur le panneau arrière du Prestige. Connectez l'autre extrémité du câble RS-232C au port
série (COM1, COM2, ou tout autre port COM) de votre ordinateur.
Étape 3. Connexion d'un câble Ethernet au Prestige
Le Prestige est équipé d'un concentrateur 4 ports vous permettant de construire un réseau local (LAN) 10Base-T. Les
réseaux 10Base-T utilisent un câble UTP (Unshielded Twisted Pair) et des connecteurs RJ-45 qui ressemblent à un
grosse prise de téléphone à 8 broches. Deux types de câbles Ethernet sont inclus dans l'emballage :
A. Câble direct (marque blanche) : connecte vos ordinateurs au Prestige.
B. Câble croisé (marque rouge) : connecte le Prestige à un autre concentrateur 10Base-T.
Étape 5. Connexion du câble d'alimentation au Prestige
Branchez le câble d'alimentation de 16 Vca (1000 mA) dans la prise située sur le panneau arrière du Prestige et portant
l'indication POWER. À ce stade de l'installation, vous devez avoir connecté le câble RS-232C, la ligne téléphonique
RNIS, le câble Ethernet et le câble d'alimentation.
Étape 6. Mise sous tension
Vous pouvez maintenant allumer votre Prestige.
Manuel de mise en route rapide du Prestige 100L
19
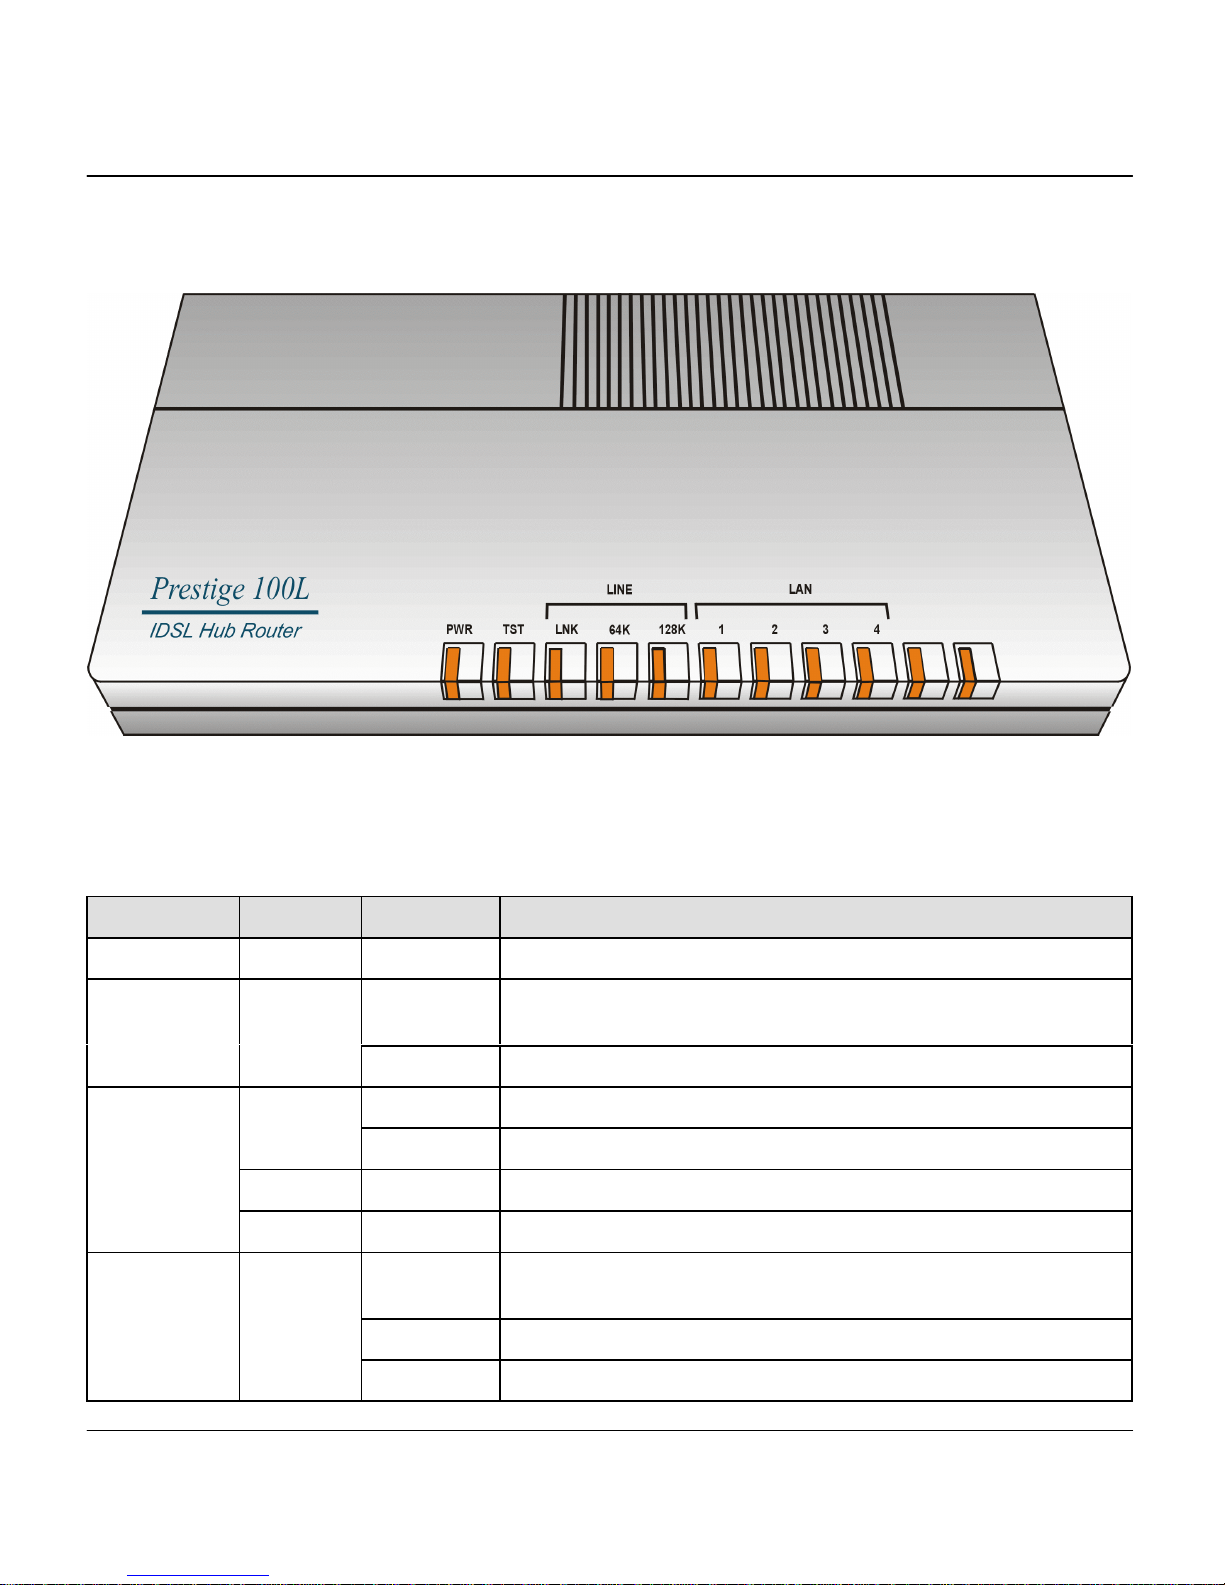
2 Voyants lumineux du panneau avant
Les voyants lumineux situés sur le panneau avant indiquent l'état de fonctionnement du Prestige.
Figure 2 Voyants lumineux du panneau avant
Le tableau suivant décrit les différentes fonctions des voyants lumineux :
Tableau 1 Fonctions des voyants lumineux du panneau avant
FONCTION VOYANTS ETAT DESCRIPTION
Alimentation PWR Allumé L'appareil est sous tension.
Test du
système
TST Éteint Le système n'est pas prêt ou ne fonctionne pas correctement.
Clignotant Le système est prêt et fonctionne correctement.
Ligne RNIS LNK Éteint La liaison RNIS n'est pas prête ou n'a pas été établie.
Allumé La liaison RNIS fonctionne correctement.
64K Allumé Le Prestige est connecté à une vitesse de ligne de 64 Ko/s.
128K Allumé Le Prestige est connecté à une vitesse de ligne de 128 Ko/s.
Réseau local 1, 2, 3, 4 Éteint Le port Ethernet n'est pas connecté, n'est pas prêt ou n'est pas
établi.
Allumé Le port Ethernet est connecté et fonctionne correctement.
Clignotant L'appareil est en train d'envoyer ou de recevoir des données.

Manuel de mise en route rapide du Prestige 100L
20
Configuration de votre PC sous Windows® 95/98
Tous les PC doivent avoir une carte réseau Ethernet installée et connectée au port Ethernet du Prestige.
• Ouverture de la boîte de dialogue Réseau
Pour ajouter et configurer le réseau TCP/IP, ouvrez la boîte de dialogue Réseau.
1. Cliquez sur Démarrer dans la barre des tâches (généralement située dans le coin inférieur gauche
de l'écran).
2. Cliquez sur Paramètres puis sur Panneau de configuration.
3. Dans la fenêtre du Panneau de configuration, double-cliquez sur l'icône Réseau pour ouvrir la
boîte de dialogue correspondante.
• Installation du protocole TCP/IP
Vous devez installer, dans un premier temps, le protocole TCP/IP sur tous les PC sous Windows® avant de
pouvoir l'utiliser pour accéder à Internet. Si vous l'avez déjà installé, passez à la section suivante pour le
configurer. Dans le cas contraire, installez-le en procédant comme suit :
1. Dans la boîte de dialogue Réseau, cliquez sur le bouton Ajouter.
2. Dans la fenêtre Sélection du type de composant réseau, sélectionnez Protocole, puis cliquez
sur Ajouter.
3. Dans la fenêtre Sélection de : Protocole réseau, sélectionnez Microsoft™ dans la liste des
Constructeurs. Puis sélectionnez TCP/IP dans la liste des Protocoles réseau et cliquez sur OK.
• Configuration du réseau TCP/IP
Pour configurer le réseau TCP/IP sous Windows®, procédez comme suit :
1. Dans la boîte de dialogue Réseau, cliquez sur l'élément TCP/IP pour le sélectionner, puis cliquez
sur le bouton Propriétés.
2. Dans la fenêtre Propriétés TCP/IP, sélectionnez Obtenir automatiquement une adresse IP.
NOTE : N'assignez pas au hasard d'adresses IP ni de masque de sous-réseau à vos PC.
Vous ne pourriez alors plus accéder à Internet.
3. Cliquez sur l'onglet Configuration WINS et sélectionnez Désactiver la résolution WINS.
4. Cliquez sur l'onglet Passerelle. Mettez en surbrillance toute passerelle déjà installée, puis cliquez
sur le bouton Supprimer jusqu'à ce que toutes les passerelles soient éliminées.
5. Cliquez sur l'onglet Configuration DNS et sélectionnez Désactiver DNS.
6. Cliquez sur OK pour confirmer et fermer la fenêtre Propriétés TCP/IP.
7. Cliquez sur OK pour fermer la boîte de dialogue Réseau. Vous serez alors invité à insérer votre
CD ou disquette Windows®.
Une fois mise à jour la configuration, il vous sera demandé si vous souhaitez redémarrer le PC. Vérifiez que le
Prestige est bien allumé avant de répondre Oui. Répétez les étapes décrites ci-dessus pour chacun des PC sous
Windows® de votre réseau local.
 Loading...