

Page 1

PLA-400
PowerLine Ethernet Adapter
Quick Start Guide
Version 1.00
Edition 1
9/2006
Table of Contents
ENGLISH 1
DEUTSCH 5
ESPAÑOL 9
FRANÇAIS 13
ITALIANO 17
РУССКИЙ 21
SVENSKA 25
繁體中文 29
Copyright © 2006. All rights reserved.
Page 2

ENGLISH
ENGLISH
Overview
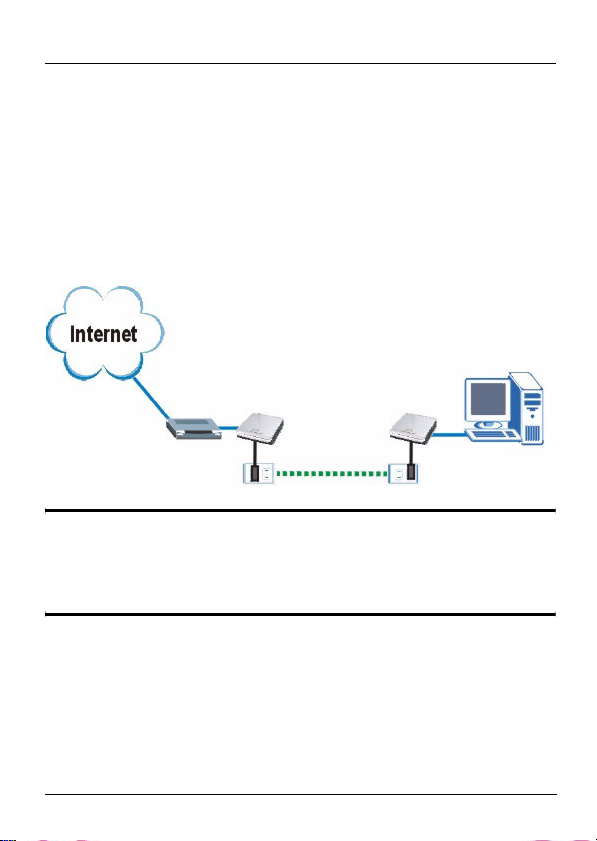
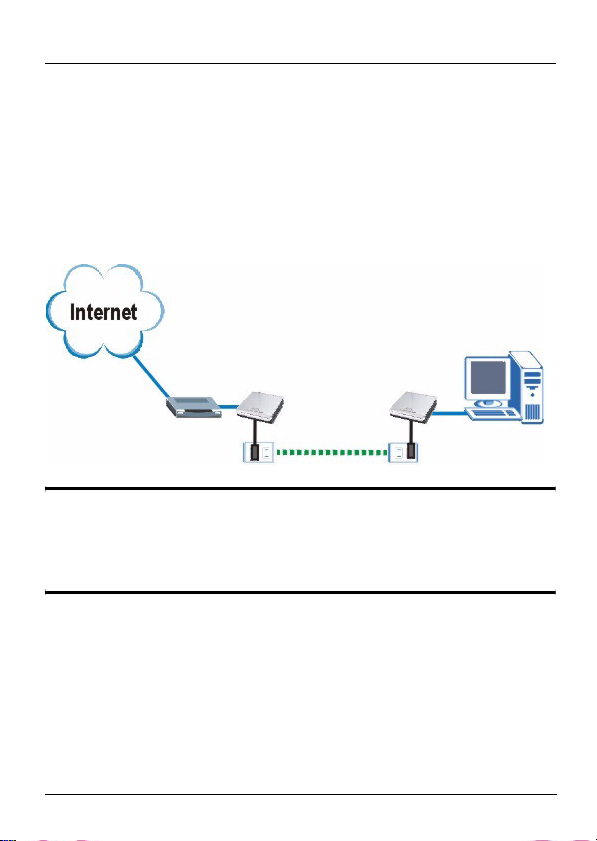
The PLA-400 allows you to extend your network (and Internet
connection) to any electrical outlet in your home. The figure
below shows your PLA-400 (B) connected to a DSL modem
(A). You can plug a second PLA-400 (C) into another outlet in
your home and connect a computer for Internet access.
A
B
C
" See the User’s Guide for information on how to
use the configuration utility to manage your
PLA-400.
Connections
This Quick Start Guide shows you how to make the following
connections:
1 PLA-400 to a Cable/DSL modem, router or switch.
2 PLA-400 to a computer in your home.
1
Page 3
ENGLISH
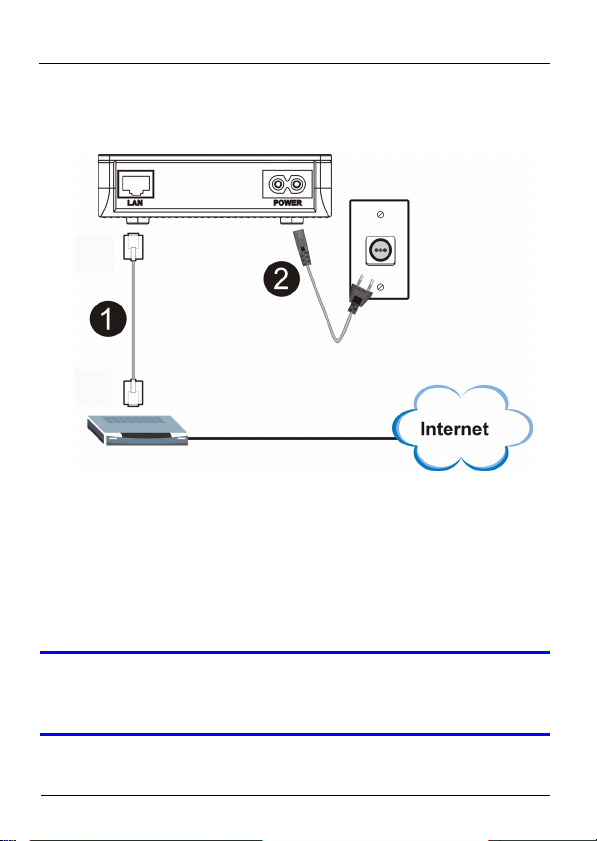
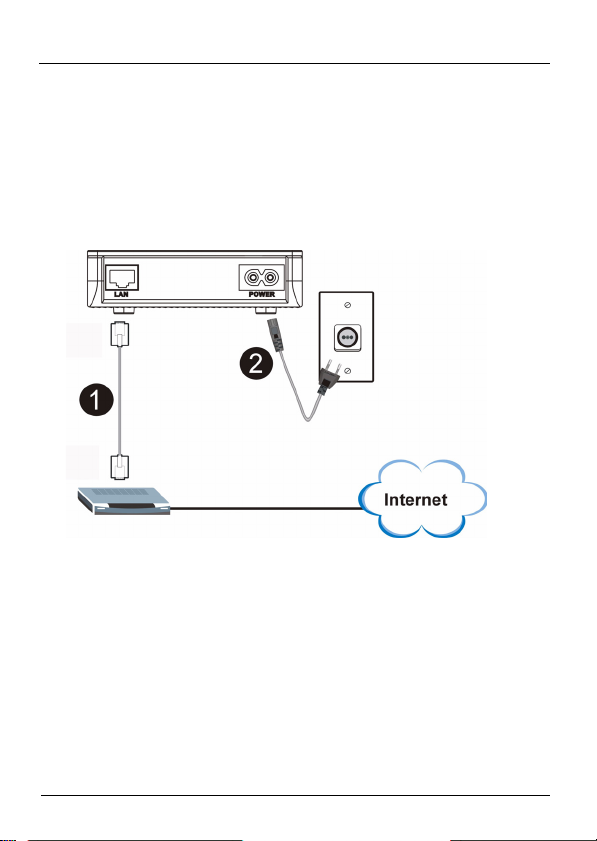
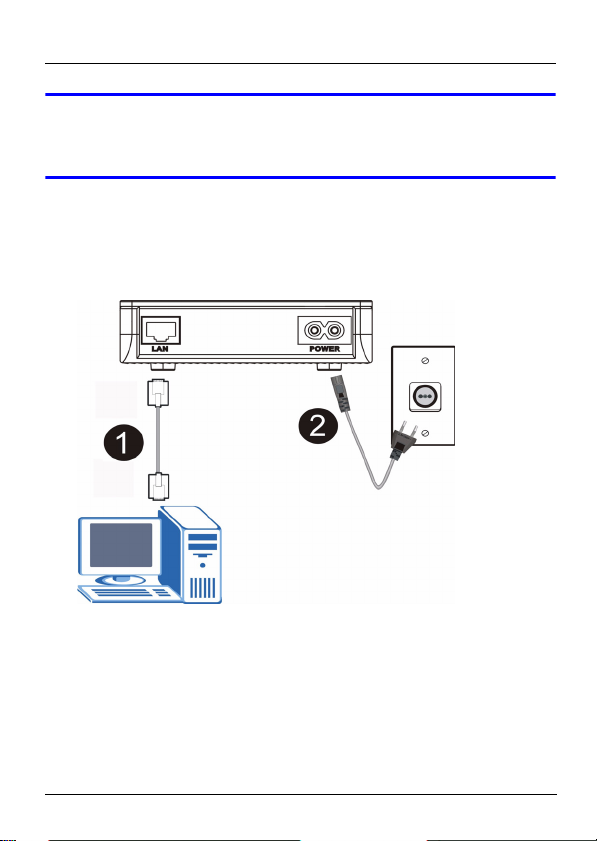
1 Connecting the PLA-400 to a Cable/
DSL Modem or Router
1 Use an Ethernet cable to connect the LAN port on the
PLA-400 an available Ethernet LAN port of your modem,
router or switch.
2 Connect the PLA-400 into a power outlet.
3 The PWR LED should be on and the ETHN LED should be
on or blinking.
V If none of the LEDs are on, unplug your device
and recheck your hardware connections.
2
Page 4
ENGLISH
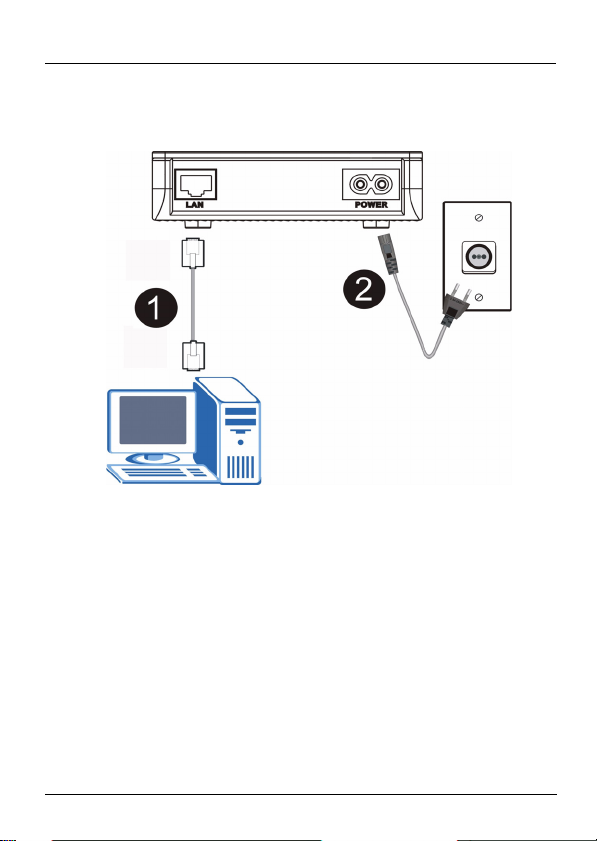
2 Connecting the PLA-400 to a
Computer
1 Use an Ethernet cable to connect the LAN port on the
PLA-400 to the Ethernet port on your computer.
2 Connect the PLA-400 into a power outlet.
3 The PWR LED should be on and the ETHN LED should be
on or blinking.
4 When the PLA-400 detects a connection to another PLA-
400 (or another Homeplug AV compatible power line
adapter), the LINK LEDs turn on and blink when there is
traffic.
3
Page 5

ENGLISH
V If the LINK LED is not on, try using another
power outlet.
Troubleshooting
If you are having trouble setting up your connections, make
sure:
• Your outlets are working properly. Unplug the PLA-400 and
plug in another electrical appliance that you know works.
• The Ethernet Cables you are using are Category 5 or higher.
Most cables are labeled with their specifications.
• All Ethernet and power cables are securely connected.
If the LINK LED is off.
• Use the management utility (see the User’s Guide for details)
to detect all other HomePlug AV devices on your power line
network. Try plugging a second HomePlug AV device into an
adjacent socket (to your PLA-400) and see if the LINK LED
lights up.
4
Page 6
DEUTSCH
DEUTSCH
Übersicht
Mit dem PLA-400 können Sie Ihr Netzwerk (und Ihre
Internetverbindung) zu Hause über eine beliebige
Netzsteckdose laufen lassen. In der Abbildung unten wird
dargestellt, wie der PLA-400 (B) an ein DSL-Modem
angeschlossen (A) ist. Sie können einen zweiten PLA-400 (C)
an eine andere Steckdose anschließen und dort einen
Computer für den Internetzugriff anschließen.
A
B
C
" Informationen zum Benutzen des
Konfigurationsprogramms für die Verwaltung
des PLA-400 finden Sie im Benutzerhandbuch.
Anschlüsse
In dieser Kurzanleitung erfahren Sie, wie Sie die folgenden
Verbindungen herstellen:
5
Page 7
DEUTSCH
1 Vom PLA-400 zu einem Kabel-/DSL-Modem, Router oder
Switch.
2 Vom PLA-400 zu einem Computer zu Hause.
1 Verbinden des PLA-400 mit einem
Kabel-/DSL-Modem oder Router
*
1 Schließen Sie ein Ethernetkabel an den LAN-Anschluss
des PLA-400 und an einen freien Ethernet-LAN-Anschluss
des Modems, Routers oder Switches an.
2 Schließen Sie den PLA-400 an eine Netzsteckdose an.
3 Die PWR LED sollte nun leuchten, und die ETHN LED
leuchten oder blinken.
6
Page 8
DEUTSCH
V Wenn keine der LEDs leuchtet, prüfen Sie noch
einmal alle Kabelverbindungen.
2 Anschließen des PLA-400 an einen
Computer
*
1 Schließen Sie ein Ethernetkabel an den LAN-Anschluss
des PLA-400 und an den Ethernetanschluss des
Computers an.
2 Schließen Sie den PLA-400 an eine Netzsteckdose an.
3 Die PWR LED sollte nun leuchten, und die ETHN-LED
leuchten oder blinken.
7
Page 9

DEUTSCH
4 Wenn der PLA-400 die Verbindung zu einem anderen
PLA-400 (oder einem anderen HomePlug AV-kompatiblen
Stromleitungsadapter) erkennt, beginnen die LINK-LEDs
zu leuchten und bei Datenverkehr zu blinken.
V Wenn die LINK-LED nicht leuchtet, verwenden
Sie eine andere Netzsteckdose.
Problembeseitigung
Wenn Sie Probleme haben, das Gerät anzuschließen, stellen
Sie sicher,
• dass die Netzsteckdose richtig funktioniert. Trennen Sie den
PLA-400 vom Stromnetz und schließen Sie an dieselbe
Netzsteckdose ein anderes Gerät an, von dem Sie wissen,
dass es funktioniert.
• dass Sie Ethernetkabel der Kategorie 5 oder höher verwenden. Bei den meisten Kabeln sind die Spezifikationen
aufgedruckt.
• dass alle Ethernet und Stromkabel fest angeschlossen sind.
Wenn die LINK-LED aus ist,
• versuchen Sie mit Hilfe des Verwaltungsprogramms
(ausführliche Informationen finden Sie im
Benutzerhandbuch) alle an das Stromleitungs- oder
Koaxialkabelnetzwerk angeschlossenen Geräte zu ermitteln.
Schließen Sie ein zweites HomePlug AV-Gerät an eine dem
PLA-400 benachbarte Steckdose an, und prüfen Sie, ob die
LINK-LED zu leuchten beginnt.
8
Page 10
ESPAÑOL
ESPAÑOL
Vista previa
El PLA-400 le permite extender su red (y la conexión a
Internet) a cualquier toma eléctrica en su casa. La siguiente
figura le muestra el PLA-400 (B) conectado a un módem DSL
(A). Puede enchufar un segundo PLA-400 (C) en otra toma
en su casa y conectar un ordenador para el acceso a
Internet.
A
B
C
" Vea la guía del usuario para información sobre
cómo usar la utilidad de configuración para
administrar su PLA-400.
Conexiones
Esta Guía de instalación rápida le muestra cómo realizar las
siguientes conexiones:
1 PLA-400 a un módem Cable/DSL, router o switch.
9
Page 11

ESPAÑOL
2 PLA-400 a un ordenador en su casa.
1 Conectar el PLA-400 a un módem
Cable/DSL o router
*
1 Utilice un cable Ethernet para conectar el puerto LAN del
PLA-400 a un puerto LAN Ethernet de su módem, router o
switch.
2 Conecte el PLA-400 en una toma de corriente.
3 El LED PWR debería estar encendido y el LED ETHN
debería estar encendido o parpadeando.
10
Page 12

ESPAÑOL
V Si ninguno de los LEDs está encendido,
desenchufe su dispositivo y vuelva a comprobar
sus conexiones de hardware.
2 Conectar el PLA-400 a un ordenador
*
1 Utilice un cable Ethernet para conectar el puerto LAN del
PLA-400 al puerto Ethernet del ordenador.
2 Conecte el PLA-400 en una toma de corriente.
3 El LED PWR debería estar encendido y el LED ETHN
debería estar encendido o parpadeando.
11
Page 13

ESPAÑOL
4 Cuando el PLA-400 detecta una conexión a otro PLA-400
(u otro adaptador de línea de corriente compatible con
HomePlug AV), los LEDs LINK se encienden y parpadean
cuando hay tráfico.
V Si el LED LINK no está encendido, inténtelo
utilizando otra toma de corriente.
Solución de problemas
Si tiene problemas configurando sus conexiones, compruebe
si:
• Sus tomas funcionan correctamente. Desenchufe el PLA400 y enchufe otro aparato eléctrico que sepa que funciona.
• Los cables Ethernet que utiliza son de Categoría 5 o mayor.
La mayoría de cables están etiquetados con sus especificaciones.
• Todos los cables Ethernet y de corriente están conectados
de forma segura.
El LED LINK está apagado.
• Utilice la utilidad de administración (ver la Guía del usuario
para más detalles) para detectar todos los otros dispositivos
HomePlug AV de su red de línea de corriente o de cable
coaxial. Intente enchufar un segundo dispositivo HomePlug
AV en un enchufe adyacente (a su PLA-400) y observe si el
LED LINK se enciende.
12
Page 14

FRANÇAIS
FRANÇAIS
Présentation
Le PLA-400 vous permet d'étendre votre réseau (et la
connexion Internet) à toute prise électrique de votre domicile.
La figure ci-dessous montre votre PLA-400(B) connecté à un
modem DSL (A). Vous pouvez brancher un second PLA-400
(C) à une autre prise dans votre domicile et connecter un
ordinateur pour l'accès à Internet.
A
B
C
" Consultez le guide de l'utilisateur pour les
informations sur la manière d'utiliser l'utilitaire
de configuration pour gérer vos PLA-400.
Connexions
Ce guide d’installation vous indique comment établir les
connexions suivantes :
13
Page 15

FRANÇAIS
1 PLA-400 à un modem Câble/DSL, routeur ou
commutateur .
2 PLA-400 à un ordinateur de votre domicile.
1 Connecter le PLA-400 à un modem
Câble/DSL ou à un routeur
*
1 Utilisez un câble Ethernet pour connecter le port LAN sur
le PLA-400 à un port LAN Ethernet disponible de votre
modem, routeur ou commutateur.
2 Connectez le PLA-400 à une prise d'alimentation.
3 La LED PWR doit être allumée et la LED ETHN doit être
allumée ou clignoter.
14
Page 16

FRANÇAIS
V Si aucune des LED n'est allumée, débranchez
votre appareil et vérifiez à nouveau les
connexions de votre matériel.
2 Connecter le PLA-400 à un
ordinateur
*
1 Utilisez un câble Ethernet pour connecter le port LAN sur
le PLA-400 au port Ethernet sur votre ordinateur.
2 Connectez le PLA-400 à une prise d'alimentation.
3 La LED PWR doit être allumée et la LED ETHN doit être
allumée ou clignoter.
15
Page 17

FRANÇAIS
4 Quand le PLA-400 détecte une connexion à un autre PLA-
400 (ou un autre équipement courant porteur en ligne
(CPL) compatible HomePlug AV), les LED LINK
s'allument et clignotent quand il y a du trafic.
V Si la LED LINK n'est pas allumée, essayez
d'utiliser une autre prise d'alimentation.
Dépannage
Si vous rencontrez des difficultés pour établir vos connexions,
vérifiez que :
• Vos prises fonctionnent correctement. Débranchez le PLA400 et branchez un autre appareil électrique dont vous êtes
sûr de l'état de marche.
• Les câbles Ethernet que vous utilisez sont de Catégorie 5 ou
supérieure. La plupart des câbles portent une étiquette avec
leurs spécifications.
• Tous les câbles Ethernet et les câbles d'alimentation sont
correctement connectés.
Si la LED LINK est éteinte.
• Utilisez l'utilitaire de gestion (consultez le guide de l'utilisateur pour les détails) pour détecter tous les autres appareils HomePlug AV sur votre ligne d'alimentation ou sur le
réseau de câble coaxial. Essayez de brancher un second
appareil HomePlug AV dans une prise adjacente (à votre
PLA-400) et voyez si la LED LINK s'allume.
16
Page 18

ITALIANO
ITALIANO
Cenni generali
PLA-400 consente di estendere la rete (e la connessione a
Internet) a qualsiasi presa elettrica presente in casa. La figura
sotto mostra PLA-400 (B) connesso a un modem DSL (A). È
possibile collegare un secondo PLA-400 (C) in un'altra presa
della casa e collegare un computer per l'accesso a Internet.
A
B
C
" Vedere la Guida dell'utente per informazioni su
come utilizzare l'utilità di configurazione per
gestire PLA-400.
Collegamenti
In questa Guida introduttiva viene spiegato come eseguire i
collegamenti seguenti:
1 PLA-400 a un modem via cavo/DSL, router o switch.
2 PLA-400 a un computer della casa.
17
Page 19

ITALIANO
1 Collegamento di PLA-400 a un
modem o router via cavo/DSL
*
1 Utilizzare un cavo Ethernet per collegare la porta LAN di
PLA-400 a una porta LAN Ethernet libera del modem,
router o switch.
2 Collegare PLA-400 a una presa elettrica.
3 Il LED PWR deve essere acceso e il LED ETHN deve
essere acceso o lampeggiante.
V Se nessuno dei LED è acceso, scollegare il
dispositivo e ricontrollare i collegamenti
hardware.
18
Page 20

ITALIANO
2 Collegamento di PLA-400 a un
computer
*
1 Utilizzare un cavo Ethernet per collegare la porta LAN di
PLA-400 alla porta Ethernet sul computer.
2 Collegare PLA-400 a una presa elettrica.
3 Il LED PWR deve essere acceso e il LED ETHN deve
essere acceso o lampeggiante.
4 Quando PLA-400 rileva un collegamento ad altro PLA-400
(o a un altro adattatore elettrico compatibile HomePlug
AV), i LED LINK si accendono e lampeggiano come
quando vi è del traffico.
19
Page 21

ITALIANO
V Se il LED LINK non è acceso, provare a
utilizzare un'altra presa elettrica.
Risoluzione dei problemi
Se si hanno problemi con la configurazione, verificare gli
aspetti seguenti.
• Le prese funzionano correttamente. Scollegare PLA-400 e
collegare un altro dispositivo elettrico sicuramente funzionante.
• I cavi Ethernet utilizzati siano di Categoria 5 o superiore. La
maggior parte dei cavi sono etichettati con le specifiche tecniche.
• Tutti i cavi Ethernet elettrici sono saldamente collegati.
Se il LED LINK è spento.
• Utilizzare l'utilità di gestione (vedere la Guida dell'utente per i
dettagli) per rilevare tutti gli altri dispositivi HomePlug AV
sulla rete su linea elettrica o coassiale. Provare a collegare
un secondo dispositivo HomePlug AV in una presa adiacente (al PLA-400) e vedere se il LED LINK si accende.
20
Page 22

РУССКИЙ
РУССКИЙ
Обзор
Адаптер PLA-400 позволяет вам расширить вашу сеть (и
подключение к сети Интернет) на все электрические
розетки вашего дома. На рисунке внизу показан PLA-400
(B), подключенный к DSL модему (A). Вы можете
подключить второй PLA-400 (C) в другую розетку в вашем
доме и, тем самым, получить доступ к Интернет.
A
B
C
" Там же описано использование
конфигурационной утилиты для PLA-400.
Схема подключения
В этом Руководстве по быстрому запуску будет показано,
как выполнить подключения:
1 PLA-400 к кабельному/DSL модему, маршрутизатору или
коммутатору.
21
Page 23

РУССКИЙ
2 PLA-400 к компьютеру в вашем доме.
1 Подключение PLA-400 к
кабельному/DSL модему или
коммутатору
*
1 При помощи кабеля Ethernet подключите порт LAN на
PLA-400 к доступному Ethernet ЛВС порту вашего
модема, маршрутизатора или коммутатора.
2 Подключите PLA-400 к сетевой розетке.
3 Индикатор PWR должен включиться, а индикатор
ETHN - включиться или замигать.
22
Page 24

РУССКИЙ
V Если ни один из индикаторов не загорается,
то отключите устройство и повторно
проверьте подключение оборудования.
2 Подключение PLA-400 к
компьютеру
*
1 При помощи кабеля Ethernet подключите порт LAN на
PLA-400 к Ethernet порту вашего компьютера.
2 Подключите PLA-400 к сетевой розетке.
3 Индикатор PWR должен включиться, а индикатор
ETHN - включиться или замигать.
23
Page 25

РУССКИЙ
4 Когда PLA-400 обнаружит подключение к другому PLA-
400 (или другому совместимому с HomePlug AV
сетевому адаптеру), индикатор LINK включится и
будет мигать при передаче данных.
V Если индикатор LINK не светиться, то
попытайтесь использовать другую сетевую
розетку разъем.
Устранение неисправностей
Если вам не удается настроить подключения, то
убедитесь, что:
• Ваши розетки нормально работают. Отключите PLA-400
и включите другой электроприбор, чтобы проверить
розетку.
• Вы используете кабели Ethernet категории 5 или выше.
На большинстве кабелей стоит их маркировка.
• Все Ethernet и сетевые кабели надежно подключены.
Если индикатор LINK выключен.
• Используйте утилиту по управлению (см. Руководство
пользователя для дополнительной информации) для
обнаружения других домашних HomePlug AV устройств,
подключенных к вашей силовой или коаксиальной сети.
Попытайтесь подключить второе HomePlug AV
устройство в смежную (с вашим PLA-400) розетку и
посмотрите, загорится ли индикатор LINK.
24
Page 26

SVENSKA
SVENSKA
Översikt
PLA-400 låter dig utöka ditt nätverk (och Internet-anslutning)
till valfritt uttag för ström i ditt hem. Figuren nedan visar PLA400 (B) ansluten till ett DSL-modem (A). Du kan ansluta en
andra PLA-400 (C) till ett annat uttag i ditt hem och ansluta en
dator för Internet-åtkomst.
A
B
C
" Se bruksanvisningen för information om hur du
använder konfigurationsverktyget för att hantera
dina PLA-400.
Anslutningar
Denna snabbstartguide visar hur du gör följande anslutningar:
1 PLA-400 till ett kabel/DSL-modem, router eller switch.
2 PLA-400 till en dator i ditt hem.
25
Page 27

SVENSKA
1 Ansluta PLA-400 till ett kabel/DSLmodem eller router
*
1 Använd en Ethernet-sladd för att ansluta LAN-porten på
PLA-400 till en ledig Ethernet LAN-port på ditt modem,
router eller switch.
2 Anslut PLA-400 till ett eluttag.
3 Indikatorlampan PWR ska lysa och indikatorlampan ETHN
ska lysa eller blinka.
V Om ingen indikatorlampa tänds, koppla bort
enheten och kontrollera dina
maskinvaruanslutningar på nytt.
26
Page 28

SVENSKA
2 Ansluta PLA-400 till dator
*
1 Använd en Ethernet-sladd för att ansluta LAN-porten på
PLA-400 till datorns Ethernet-port.
2 Anslut PLA-400 till ett eluttag.
3 Indikatorlampan PWR ska lysa och indikatorlampan ETHN
ska lysa eller blinka.
4 När PLA-400 detekterar en anslutning till en annan PLA-
400 (eller en annan HomePlug AV-kompatibel
strömlinjeadapter), tänds indikatorlampan LINK och
blinkar när det finns trafik.
27
Page 29

SVENSKA
V Om indikatorlampan LINK inte tänds, pröva
med ett annat eluttag.
Felsökning
Om du har problem med att ställa in dina anslutningar,
kontrollera att:
• Dina uttag fungerar som de ska. Koppla ur PLA-400 och
anslut en annan elapparat som du vet fungerar.
• Ethernet-sladdarna du använder håller kategori 5 eller
högre. De flesta sladdar är märkta med sina specifikationer.
• Alla Ethernet och strömsladdar är ordentligt anslutna.
Om indikatorlampan LINK är släckt.
• Använd hanteringsverktyget (se bruksanvisningen för
detaljer) för att detektera alla övriga HomePlug AV-enheter
på din strömlinje eller koaxiala sladdnätverk. Pröva att
ansluta en andra HomePlug AV-enhet till ett angränsande
uttag (till din PLA-400) och kontrollera om indikatorlampan
LINK tänds.
28
Page 30

繁體中文
繁體中文
概覽
PLA-400 可讓您將網路 ( 及網際網路連線 ) 擴充至家中任何電
氣插座 。下圖顯示連接至 DSL 數據機 (A) 的 PLA-400 (B)。
您可以將第二台 PLA-400 (C) 的插頭插入家中其他插座,然後
連接電腦,接取網際網路。
A
B
C
" 請參閱 《使用手冊》,了解如何使用設定公用程
式管理 PLA-400。
連接方法
本 《快速入門指引》說明如何建立下列連接:
1 PLA-400 與 Cable/DSL 數據機、路由器或交換器,以及。
2 PLA-400 與家中電腦的連接。
29
Page 31

繁體中文
1 PLA-400 與 Cable/DSL 數據機或路由
器的連接
*
1 使用乙太網路線將 PLA-400 上的 LAN 埠連接至數據機、路
由器或交換器的可用乙太網路埠。
2 將 PLA-400 接入電源插座。
3 PWR LED 指示燈應會亮起,ETHN LED 指示燈也應亮起或閃
爍。
V 如果 LED 指示燈都沒亮,請拔除裝置的電源插
頭,重新檢查硬體連接。
30
Page 32

繁體中文
2 PLA-400 與電腦的連接
*
1 使用乙太網路線將 PLA-400 的 LAN 埠連接至電腦的乙太網
路埠。
2 將 PLA-400 接入電源插座。
3 PWR LED 指示燈應會亮起,ETHN LED 指示燈也應亮起或閃
爍。
4 當 PLA-400 偵測到其他 PLA-400 (或其他符合 HomePlug
AV 標準的電線連網器 ) 時, LINK LED 指示燈會亮起,進
行傳輸時則會閃爍。
31
Page 33

繁體中文
V 如果 LINK LED 指示燈沒有亮起,請嘗試使用其
他電源插座。
疑難排解
如果無法建立連接,請確認下列項目:
• 插座功能正常。拔下 PLA-400 的電源插頭,將其他功能正常
的電氣裝置插頭插入。
• 您使用的乙太網路線為 Category 5 或更高等級。多數網路
線都會標明規格。
• 所有乙太網路線及電源線都確實連接。
如果 LINK LED 指示燈不亮。
• 使用管理公用程式 ( 請參閱 《使用手冊》取得詳細資訊 ) 偵
測電源線或同軸電纜網路上的所有其他 HomePlug AV 裝置。
試著將第二個 Homeplug 裝置的插頭插入相鄰插座 ( 與 PLA400 相連的插座 ) ,並觀察 LINK LED 燈是否亮起。
32
 Loading...