

Page 1

ZyWALL IDP 10
Intrusion Detection Prevention Appliance
User’s Guide
Version 1
July 2004
Page 2

ZyWALL IDP10 User’s Guide
Copyright
Copyright © 2004 by ZyXEL Communications Corporation.
The contents of this publication may not be reproduced in any part or as a whole, transcribed, stored in
a retrieval system, translated into any language, or transmitted in any form or by any means,
electronic, mechanical, magnetic, optical, chemical, photocopying, manual, or otherwise, without the
prior written permission of ZyXEL Communications Corporation.
Published by ZyXEL Communications Corporation. All rights reserved.
Disclaimer
ZyXEL does not assume any liability arising out of the application or use of any products, or software
described herein. Neither does it convey any license under its patent rights nor the patent rights of
others. ZyXEL further reserves the right to make changes in any products described herein without
notice.
This publication is subject to change without notice.
Trademarks
Trademarks mentioned in this publication are used for identification purposes only and may be
properties of their respective owners.
ii Copyright
Page 3

ZyWALL IDP10 User’s Guide
Federal Communications Commission (FCC)
Interference Statement
This device complies with Part 15 of FCC rules. Operation is subject to the following two conditions:
This device may not cause harmful interference.
This device must accept any interference received, including interference that may cause undesired
operations.
This equipment has been tested and found to comply with the limits for a CLASS B digital device
pursuant to Part 15 of the FCC Rules. These limits are designed to provide reasonable protection
against harmful interference in a commercial environment. This equipment generates, uses, and can
radiate radio frequency energy, and if not installed and used in accordance with the instructions, may
cause harmful interference to radio communications.
If this equipment does cause harmful interference to radio/television reception, which can be
determined by turning the equipment off and on, the user is encouraged to try to correct the
interference by one or more of the following measures:
Reorient or relocate the receiving antenna.
Increase the separation between the equipment and the receiver.
Connect the equipment into an outlet on a circuit different from that to which the receiver is
connected.
Consult the dealer or an experienced radio/TV technician for help.
Notice 1
Changes or modifications not expressly approved by the party responsible for compliance could void
the user's authority to operate the equipment.
Certifications
1. Go to www.zyxel.com.
2. Select your product from the drop-down list box on the ZyXEL home page to go to that product's
page.
3. Select the certification you wish to view from this page.
FCC Statement iii
Page 4

ZyWALL IDP10 User’s Guide
Information for Canadian Users
The Industry Canada label identifies certified equipment. This certification means that the equipment
meets certain telecommunications network protective, operation, and safety requirements. The
Industry Canada does not guarantee that the equipment will operate to a user's satisfaction.
Before installing this equipment, users should ensure that it is permissible to be connected to the
facilities of the local telecommunications company. The equipment must also be installed using an
acceptable method of connection. In some cases, the company's inside wiring associated with a single
line individual service may be extended by means of a certified connector assembly. The customer
should be aware that the compliance with the above conditions may not prevent degradation of service
in some situations.
Repairs to certified equipment should be made by an authorized Canadian maintenance facility
designated by the supplier. Any repairs or alterations made by the user to this equipment, or equipment
malfunctions, may give the telecommunications company cause to request the user to disconnect the
equipment.
For their own protection, users should ensure that the electrical ground connections of the power
utility, telephone lines, and internal metallic water pipe system, if present, are connected together. This
precaution may be particularly important in rural areas.
Caution
Users should not attempt to make such connections themselves, but should contact the appropriate
electrical inspection authority, or electrician, as appropriate.
Note
This digital apparatus does not exceed the class A limits for radio noise emissions from digital
apparatus set out in the radio interference regulations of Industry Canada.
iv Information for Canadian Users
Page 5

ZyWALL IDP10 User’s Guide
ZyXEL Limited Warranty
ZyXEL warrants to the original end user (purchaser) that this product is free from any defects in
materials or workmanship for a period of up to two years from the date of purchase. During the
warranty period, and upon proof of purchase, should the product have indications of failure due to
faulty workmanship and/or materials, ZyXEL will, at its discretion, repair or replace the defective
products or components without charge for either parts or labor, and to whatever extent it shall deem
necessary to restore the product or components to proper operating condition. Any replacement will
consist of a new or re-manufactured functionally equivalent product of equal value, and will be solely
at the discretion of ZyXEL. This warranty shall not apply if the product is modified, misused,
tampered with, damaged by an act of God, or subjected to abnormal working conditions.
NOTE
Repair or replacement, as provided under this warranty, is the exclusive remedy of the purchaser. This
warranty is in lieu of all other warranties, express or implied, including any implied warranty of
merchantability or fitness for a particular use or purpose. ZyXEL shall in no event be held liable for
indirect or consequential damages of any kind of character to the purchaser.
To obtain the services of this warranty, contact ZyXEL's Service Center for your Return Material
Authorization number (RMA). Products must be returned Postage Prepaid. It is recommended that the
unit be insured when shipped. Any returned products without proof of purchase or those with an outdated warranty will be repaired or replaced (at the discretion of ZyXEL) and the customer will be
billed for parts and labor. All repaired or replaced products will be shipped by ZyXEL to the
corresponding return address, Postage Paid. This warranty gives you specific legal rights, and you may
also have other rights that vary from country to country.
Online Registration
Register your product online to receive e-mail notices of firmware upgrades and information at
www.zyxel.com
for global products, or at www.us.zyxel.com for North American products.
ZyXEL Limited Warranty v
Page 6
ZyWALL IDP10 User’s Guide
Customer Support
When you contact your customer support representative please have the following information ready:
Please have the following information ready when you contact customer support.
• Product model and serial number.
• Warranty Information.
• Date that you received your device.
• Brief description of the problem and the steps you took to solve it.
REGULAR MAIL
ZyXEL Communications Corp.
6 Innovation Road II
Science Park
Hsinchu 300
Taiwan
ZyXEL Communications Inc.
1130 N. Miller St.
Anaheim
CA 92806-2001
U.S.A.
ZyXEL Deutschland GmbH.
Adenauerstr. 20/A2 D-52146
Wuerselen
Germany
1 rue des Vergers
Bat. 1 / C
69760 Limonest
France
Alejandro Villegas 33
1º, 28043 Madrid
Spain
ZyXEL Communications A/S
Columbusvej 5
2860 Soeborg
Denmark
ZyXEL Communications A/S
Nils Hansens vei 13
0667 Oslo
Norway
ZyXEL Communications A/S
Sjöporten 4, 41764 Göteborg
Sweden
ZyXEL Communications Oy
Malminkaari 10
00700 Helsinki
Finland
LOCATION
WORLDWIDE
AMERICA
SUPPORT E-MAIL TELEPHONE1 WEB SITE METHOD
SALES E-MAIL FAX1 FTP SITE
support@zyxel.com.tw +886-3-578-3942 www.zyxel.com
sales@zyxel.com.tw
support@zyxel.com +1-800-255-4101
sales@zyxel.com
support@zyxel.de +49-2405-6909-0 www.zyxel.de GERMANY
sales@zyxel.de
support@zyxel.es +34 902 195 420 SPAIN
sales@zyxel.es
support@zyxel.dk +45 39 55 07 00 www.zyxel.dk DENMARK
sales@zyxel.dk
support@zyxel.no +47 22 80 61 80 www.zyxel.no NORWAY
sales@zyxel.no
support@zyxel.se +46 31 744 7700 www.zyxel.se SWEDEN
sales@zyxel.se
support@zyxel.fi +358-9-4780-8411 www.zyxel.fi FINLAND
sales@zyxel.fi
+886-3-578-2439 ftp.zyxel.com
+1-714-632-0882
+1-714-632-0858 ftp.us.zyxel.com
+49-2405-6909-99
+33 (0)4 72 52 97 97 FRANCE info@zyxel.fr
+33 (0)4 72 52 19 20
+34 913 005 345
+45 39 55 07 07
+47 22 80 61 81
+46 31 744 7701
+358-9-4780 8448
www.europe.zyxel.com
ftp.europe.zyxel.com
www.us.zyxel.com NORTH
www.zyxel.fr ZyXEL France
www.zyxel.es
ZyXEL Communications
1
“+” is the (prefix) number you enter to make an international telephone call.
vi Customer Support
Page 7

ZyWALL IDP10 User’s Guide
Table of Contents
Copyright......................................................................................................................................... ii
Federal Communications Commission (FCC) Interference Statement.......................................... iii
Information for Canadian Users..................................................................................................... iv
ZyXEL Limited Warranty .................................................................................................................v
Customer Support.......................................................................................................................... vi
Preface.......................................................................................................................................... xii
Getting Started ...................................................................................................................................I
Chapter 1 Introducing the ZyWALL IDP 10..................................................................................1-1
1.1 Introduction ......................................................................................................................1-1
1.2 Features ...........................................................................................................................1-2
1.3 Application Examples.......................................................................................................1-3
Chapter 2 Introducing the Web Configurator..............................................................................2-1
2.1 Web Configurator Overview.............................................................................................2-1
2.2 Accessing the ZyWALL Web Configurator.......................................................................2-1
2.3 Navigating the ZyWALL Web Configurator ......................................................................2-3
2.4 Example Configuration Settings.......................................................................................2-6
General, Interface, and Remote Management................................................................................ II
Chapter 3 General Settings...........................................................................................................3-1
3.1 Device ..............................................................................................................................3-1
3.2 Introduction to VLANs ......................................................................................................3-2
3.3 Configuring VLAN on the ZyWALL ..................................................................................3-3
Chapter 4 Interface Screens .........................................................................................................4-1
4.1 10/100M Auto-Sensing Ethernet Ports.............................................................................4-1
4.2 Configuring Link ...............................................................................................................4-1
4.3 Stealth ..............................................................................................................................4-2
4.4 Policy Check ....................................................................................................................4-3
Chapter 5 Remote Management ...................................................................................................5-1
5.1 Remote Management Overview ......................................................................................5-1
5.2 Configuring WWW ...........................................................................................................5-1
5.3 SNMP...............................................................................................................................5-2
5.4 SSH Overview..................................................................................................................5-4
5.5 SSH (Secure Shell) Configuration ...................................................................................5-5
IDP .....................................................................................................................................................III
Chapter 6 IDP Policies...................................................................................................................6-1
6.1 IDP Overview ...................................................................................................................6-1
Table of Contents vii
Page 8

ZyWALL IDP10 User’s Guide
6.2 mySecurity Zone ............................................................................................................. 6-1
6.3 Signature Categories ...................................................................................................... 6-2
6.4 Configuring Pre-defined Policies................................................................................... 6-13
6.5 Update........................................................................................................................... 6-19
6.6 User-defined Policies .................................................................................................... 6-20
6.7 Registering your ZyWALL ............................................................................................. 6-28
Log and Report................................................................................................................................ IV
Chapter 7 Log and Report............................................................................................................ 7-1
7.1 Logs................................................................................................................................. 7-1
7.2 Report.............................................................................................................................. 7-2
7.3 Alarm Schedule ............................................................................................................... 7-4
Maintenance & CLI ........................................................................................................................... V
Chapter 8 Maintenance................................................................................................................. 8-1
8.1 Maintenance Overview.................................................................................................... 8-1
8.2 Password......................................................................................................................... 8-1
8.3 Time and Date................................................................................................................. 8-2
8.4 Firmware Upload............................................................................................................. 8-6
8.5 Configuration................................................................................................................. 8-10
8.6 Restart........................................................................................................................... 8-12
Chapter 9 Command Line Interface Overview ........................................................................... 9-1
9.1 Command Syntax Conventions....................................................................................... 9-1
9.2 Login................................................................................................................................ 9-2
9.3 Commands ...................................................................................................................... 9-2
Appendices & Index........................................................................................................................ VI
Appendix A Introduction to Intrusions .......................................................................................A-1
A.1 Introduction to Ports ........................................................................................................A-1
A.2 Introduction to Denial of Service .....................................................................................A-1
A.3 DoS Examples.................................................................................................................A-1
A.4 Scanning .........................................................................................................................A-3
A.5 Malicious Programs......................................................................................................... A-4
A.6 Example Intrusions.......................................................................................................... A-4
Appendix B Intrusion Protection.................................................................................................B-1
B.1 Firewalls and Intrusions ..................................................................................................B-1
B.2 Intrusion Detection and Prevention (IDP) .......................................................................B-1
B.3 Detection Methods .......................................................................................................... B-2
Appendix C Index..........................................................................................................................C-1
viii Table of Contents
Page 9

ZyWALL IDP10 User’s Guide
List of Figures
Figure 1-1 ZyWALL............................................................................................................................................ 1-1
Figure 1-2 Installation Example 1........................................................................................................................ 1-3
Figure 1-3 Installation Example 2........................................................................................................................ 1-4
Figure 1-4 Installation Example 3........................................................................................................................ 1-5
Figure 1-5 Installation Example 4........................................................................................................................ 1-6
Figure 2-1 Default Web Configurator IP Address................................................................................................ 2-1
Figure 2-2 Login Screen ...................................................................................................................................... 2-2
Figure 2-3 Change Password Screen ................................................................................................................... 2-2
Figure 2-4 Web Configurator HOME Screen....................................................................................................... 2-3
Figure 3-1 General: Device.................................................................................................................................. 3-1
Figure 3-2 General: VLAN.................................................................................................................................. 3-3
Figure 3-3 General: State..................................................................................................................................... 3-4
Figure 4-1 Interface: Link.................................................................................................................................... 4-1
Figure 4-2 Interface: Stealth ................................................................................................................................ 4-2
Figure 4-3 ZyWALL Policy Check...................................................................................................................... 4-3
Figure 4-4 Interface: Policy Check ...................................................................................................................... 4-4
Figure 5-1 Remote Management: WWW ............................................................................................................ 5-1
Figure 5-2 SNMP Management Model................................................................................................................ 5-2
Figure 5-3 Remote Management: SNMP............................................................................................................. 5-4
Figure 5-4 SSH Communication Example........................................................................................................... 5-5
Figure 5-5 How SSH Works ................................................................................................................................ 5-5
Figure 5-6 Remote Management: SSH ................................................................................................................ 5-6
Figure 5-7 PuTTY settings................................................................................................................................... 5-7
Figure 5-8 PuTTY Security Alert......................................................................................................................... 5-7
Figure 5-9 ZyWALL Command Interface Login Screen ..................................................................................... 5-8
Figure 6-1 P2P Signatures.................................................................................................................................... 6-2
Figure 6-2 IM (Chat) Signatures.......................................................................................................................... 6-3
Figure 6-3 Spam Signatures................................................................................................................................. 6-4
Figure 6-4 DoS/DDoS Signatures........................................................................................................................ 6-4
Figure 6-5 Scan Signatures .................................................................................................................................. 6-5
Figure 6-6 Buffer Overflow Signatures ............................................................................................................... 6-6
Figure 6-7 Worm/Virus Signatures ...................................................................................................................... 6-7
Figure 6-8 Backdoor/Trojan Signatures............................................................................................................... 6-8
Figure 6-9 Access Control Signatures.................................................................................................................. 6-9
Figure 6-10 Web Attack Signatures ................................................................................................................... 6-10
List of Figures ix
Page 10

ZyWALL IDP10 User’s Guide
Figure 6-11 Porn Signatures ...............................................................................................................................6-11
Figure 6-12 Others Signatures............................................................................................................................6-12
Figure 6-13 Pre-defined IDP Policies Summary.................................................................................................6-14
Figure 6-14 Search Example ..............................................................................................................................6-17
Figure 6-15 Query Example ...............................................................................................................................6-17
Figure 6-16 Pre-defined Policies: Modify ..........................................................................................................6-18
Figure 6-17 Update Policies ...............................................................................................................................6-19
Figure 6-18 User-defined Policies......................................................................................................................6-21
Figure 6-19 Configuring a User-defined IDP Policy..........................................................................................6-24
Figure 6-20 Registering ZyWALL......................................................................................................................6-29
Figure 7-1 View Log.............................................................................................................................................7-1
Figure 7-2 Report: E-Mail ....................................................................................................................................7-3
Figure 7-3 Report: syslog .....................................................................................................................................7-4
Figure 7-4 Alarm ..................................................................................................................................................7-5
Figure 8-1 Maintenance: Password.......................................................................................................................8-1
Figure 8-2 Debug Mode Reset Example...............................................................................................................8-2
Figure 8-3 Maintenance: Time Setting .................................................................................................................8-4
Figure 8-4 Synchronization in Process.................................................................................................................8-6
Figure 8-5 Synchronization is Successful.............................................................................................................8-6
Figure 8-6 Synchronization Fail ...........................................................................................................................8-6
Figure 8-7 Maintenance: F/W Upload ..................................................................................................................8-7
Figure 8-8 Firmware Upload in Progress .............................................................................................................8-9
Figure 8-9 Network Temporarily Disconnected ...................................................................................................8-9
Figure 8-10 Firmware Upload Error...................................................................................................................8-10
Figure 8-11 Maintenance: Configuration............................................................................................................8-11
Figure 8-12 Maintenance: Restart ......................................................................................................................8-12
Figure A-1 Three-Way Handshake ......................................................................................................................A-2
Figure A-2 SYN Flood ........................................................................................................................................A-2
Figure A-3 Smurf Attack .....................................................................................................................................A-3
x List of Figures
Page 11

ZyWALL IDP10 User’s Guide
List of Tables
Table 2-1 Web Configurator HOME Screen........................................................................................................ 2-4
Table 2-2 Screens Summary ................................................................................................................................ 2-5
Table 2-3 Example Configuration Settings.......................................................................................................... 2-6
Table 3-1 General: Device ................................................................................................................................... 3-2
Table 3-2 General: VLAN.................................................................................................................................... 3-3
Table 3-3 General: State....................................................................................................................................... 3-4
Table 4-1 Interface: Link...................................................................................................................................... 4-2
Table 4-2 Interface: Stealth.................................................................................................................................. 4-3
Table 4-3 Interface: Policy Check........................................................................................................................ 4-4
Table 5-1 Remote Management: WWW.............................................................................................................. 5-2
Table 5-2 SNMP Traps......................................................................................................................................... 5-3
Table 5-3 Remote Management: SNMP .............................................................................................................. 5-4
Table 5-4 Remote Management: SSH.................................................................................................................. 5-6
Table 6-1 Policy Severity................................................................................................................................... 6-12
Table 6-2 Policy Actions.................................................................................................................................... 6-13
Table 6-3 Selecting Pre-defined Policies ........................................................................................................... 6-15
Table 6-4 Pre-defined IDP Policies.................................................................................................................... 6-18
Table 6-5 Update Policies .................................................................................................................................. 6-20
Table 6-6 User-defined Policies......................................................................................................................... 6-21
Table 6-7 Configuring a User-defined IDP Policy............................................................................................. 6-25
Table 6-8 Registering ZyWALL ........................................................................................................................ 6-29
Table 7-1 View Log.............................................................................................................................................. 7-2
Table 7-2 Report: E-Mail ..................................................................................................................................... 7-3
Table 7-3 Report: syslog ...................................................................................................................................... 7-4
Table 7-4 Alarm ................................................................................................................................................... 7-5
Table 8-1 Maintenance: Password ....................................................................................................................... 8-1
Table 8-2 Default Time Servers ........................................................................................................................... 8-3
Table 8-3 Time and Date...................................................................................................................................... 8-4
Table 8-4 Maintenance: F/W Upload................................................................................................................... 8-7
Table 8-5 Restore Configuration........................................................................................................................ 8-11
Table 9-1 Commands Summary........................................................................................................................... 9-2
Table A-1 Common IP Ports ............................................................................................................................... A-1
Table A-2 Common Malicious Programs............................................................................................................ A-4
List of Tables xi
Page 12

ZyWALL IDP10 User’s Guide
Preface
About This User's Manual
Congratulations on your purchase of the ZyWALL IDP 10 Intrusion Detection Prevention Appliance .
This manual is designed to guide you through the configuration of your ZyWALL for its various
applications.
Related Documentation
Support Disk
Refer to the included CD for support documents.
Quick Start Guide
The Quick Start Guide is designed to help you get up and running right away. It contains
hardware (connection) information, basic troubleshooting and shows you how to configure the
device using the wizard.
Web Configurator Online Help
Embedded web help for descriptions of individual screens and supplementary information.
Packing List Card
The Packing List Card lists all items that should have come in the package.
Certifications
Refer to the product page at www.zyxel.com
ZyXEL Glossary and Web Site
Please refer to www.zyxel.com
support documentation.
for an online glossary of networking terms and additional
for information on product certifications.
Syntax Conventions
• This manual will refer to the ZyWALL IDP 10 Intrusion Detection Prevention Appliance simply
as the ZyWALL.
• The version number on the title page is the latest firmware version that is documented in this
User’s Guide. Earlier versions may also be included.
• “Enter” means for you to type one or more characters and press the carriage return. “Select” or
“Choose” means for you to use one of the predefined choices.
• The choices of a menu item are in Bold Arial font.
• Mouse action sequences are denoted using a comma. For example, “click the Apple icon, Control
Panels and then Modem” means first click the Apple icon, then point your mouse pointer to
Control Panels and then click Modem.
• For brevity’s sake, we will use “e.g.” as a shorthand for “for instance” and “i.e.” for “that is” or
“in other words” throughout this manual.
xii Preface
Page 13
ZyWALL IDP10 User’s Guide
User’s Guide Feedback
Help us help you. E-mail all User’s Guide-related comments, questions or suggestions for
improvement to techwriters@zyxel.com.tw or send regular mail to The Technical Writing Team,
ZyXEL Communications Corp., 6 Innovation Road II, Science-Based Industrial Park, Hsinchu, 300,
Taiwan. Thank you.
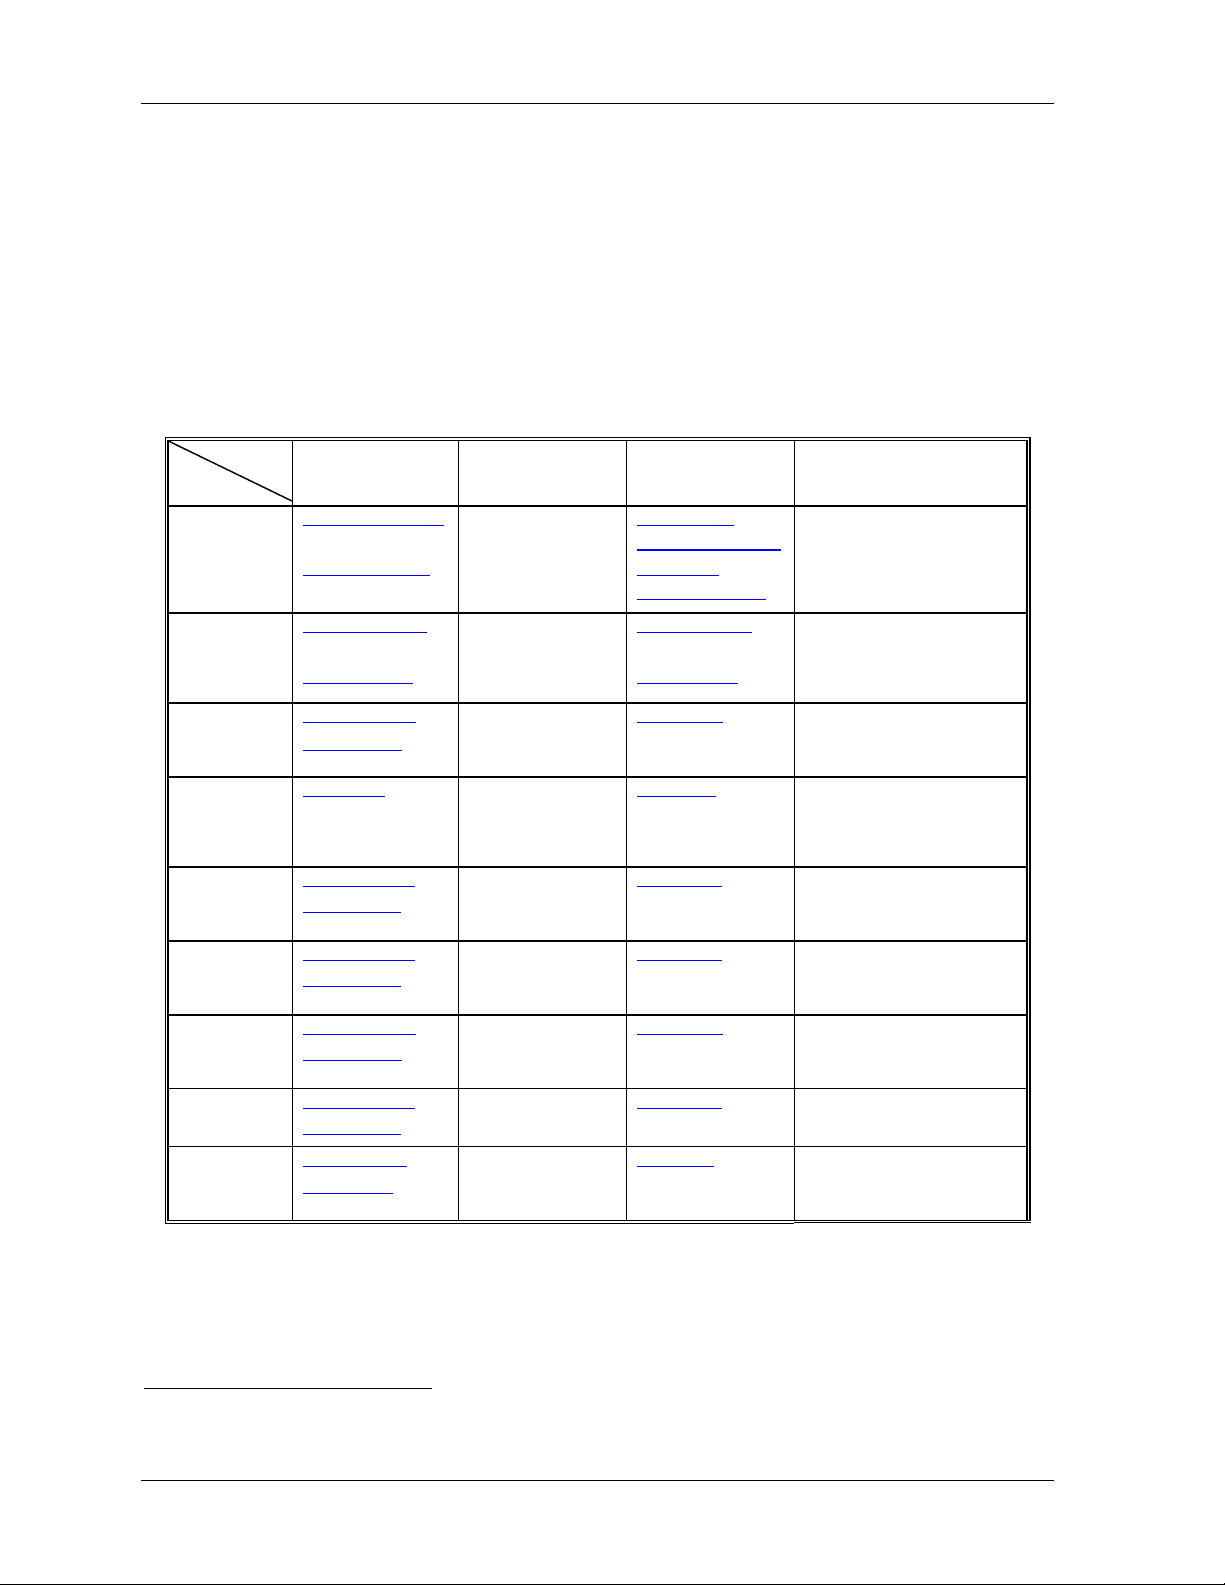
Graphics Icon Key
ZyWALL IDP
Computer
Firewall
Intrusion source
Blocked intrusion
Modem
Server
Router
Notebook Computer
Switch
Security hole
Preface xiii
Page 14

Getting Started
PPaarrtt II::
Getting Started
This part introduces intrusions, ZyWALL features, applications and the web configurator.
I
Page 15
ZyWALL IDP10 User’s Guide
Chapter 1
Introducing the ZyWALL IDP 10
This chapter introduces the main features and applications of the ZyWALL.
1.1 Introduction
An IDP system can detect malicious or suspicious packets and respond instantaneously. It can detect
anomaly detections based on violations of protocol standards (RFCs – Requests for Comments) or
traffic flows and abnormal flows such as port scans. The rules that define how to identify and respond
to intrusions are called “signatures”.
See the appendices for more detailed information on intrusions,
intrusion examples and detection types.
The ZyWALL is an Intrusion Detection and Prevention (IDP) Appliance designed to protect against
network-based intrusions. The ZyWALL functions as a transparent plug and play bridge designed to
protect networks from intrusions while allowing safe Internet access.
The ZyWALL comes with a built-in signature set that can be regularly updated. Regular updates are
vital as new intrusions evolve.
For people with knowledge of packet header types and OSI (Open System Interconnection), the IDP
allows you to create your own rules.
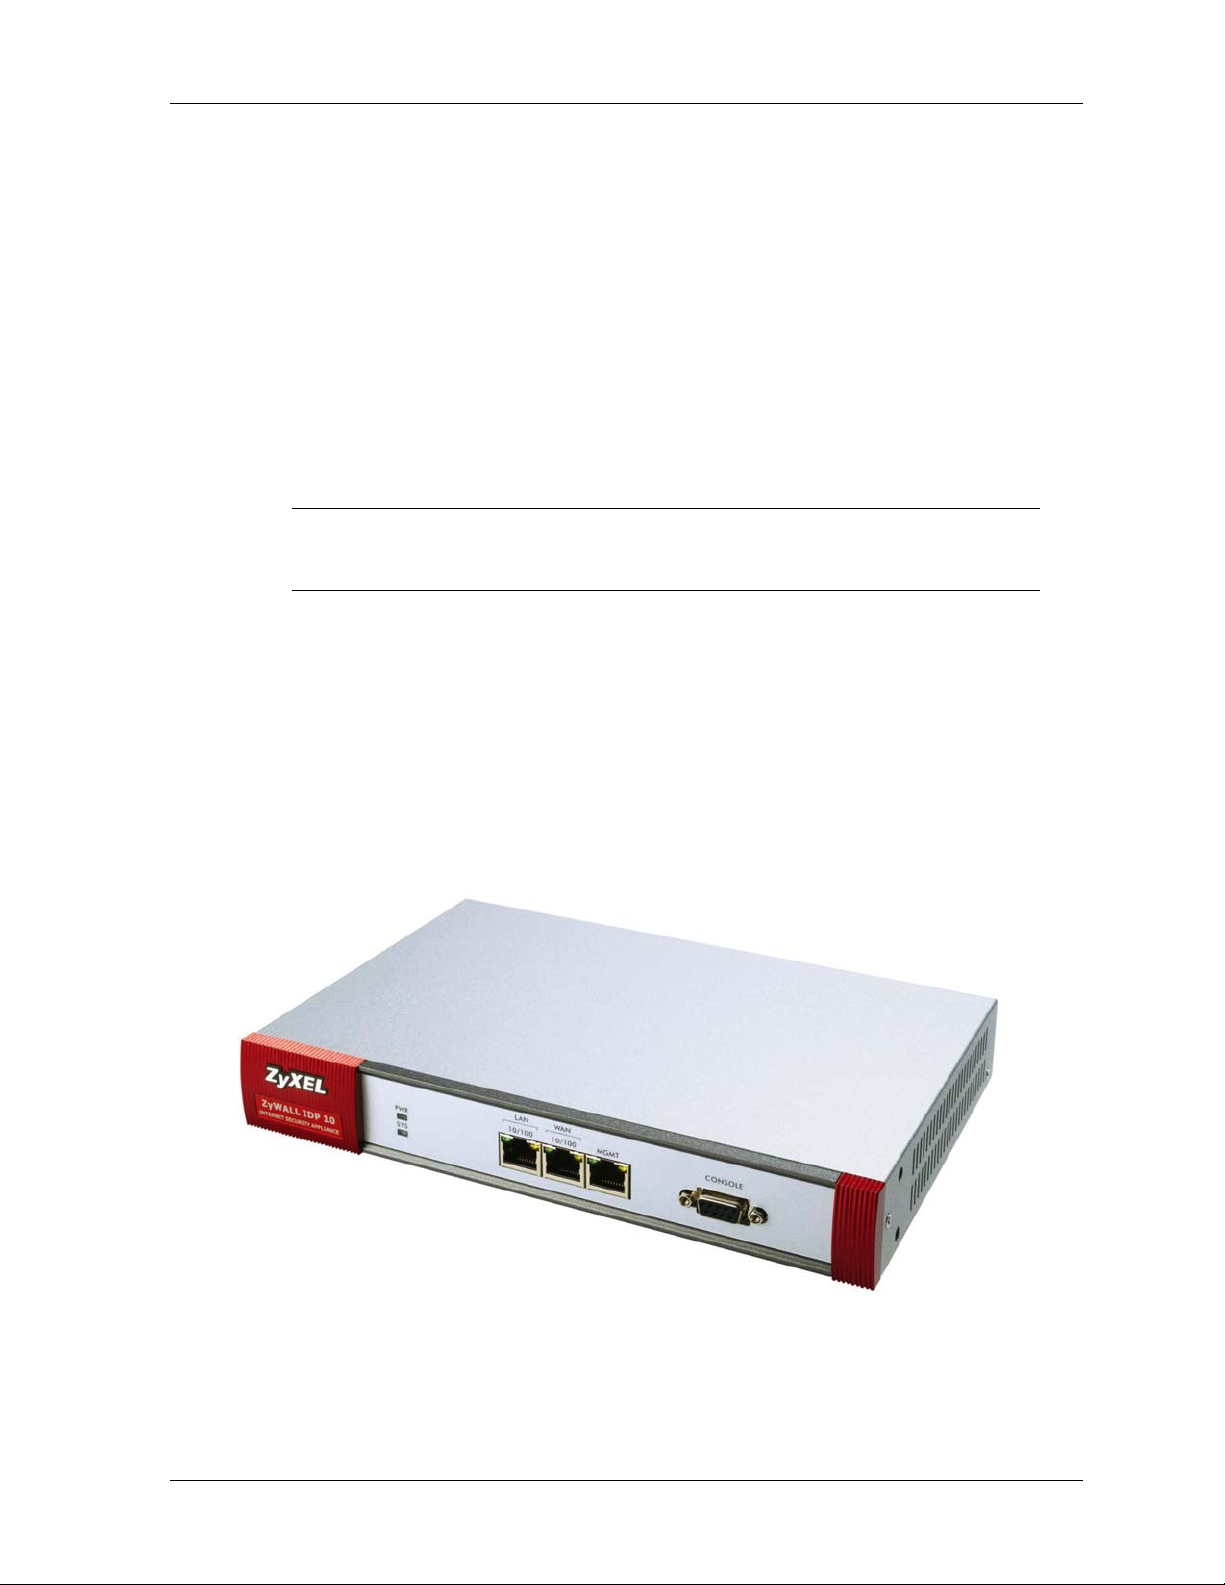
You can configure the ZyWALL using the friendly, embedded web configurator or the command-line
interface you access via the console port.
Figure 1-1 ZyWALL
Introducing the ZyWALL IDP 10 1-1
Page 16

ZyWALL IDP10 User’s Guide
1.2 Features
LAN, WAN and Management Ports
You can also manage the ZyWALL via the LAN or WAN port, but the MGMT port is dedicated for
management. If you manage the ZyWALL via the LAN or WAN port then the ZyWALL itself may be
susceptible to being compromised.
Intrusion Detection & Prevention (IDP)
Real-time detection & prevention system at structure
Inline, Monitor, Bypass modes
Automatic signature update
Protect against:
o DoS and DDoS attacks
o Buffer overflow
o Network and port scans
o Trojan Horse attacks
o Back Door attacks
o Worms
Detection Methods:
o Heuristic Analysis based on exceeding statistical thresholds such as abnormal port scan
probes.
o Pattern Matching where a signature database identifies malicious code strings in packets.
o Protocol Anomaly Detection based on RFC protocol violations.
o Traffic flow anomalies where certain applications such as peer-to-peer applications for
example are defined as “abnormal” and therefore an “intrusion”.
o Stateful pattern matching based on reassembling TCP screams to make the complete string
available to the detection engine.
User-defined rules allow:
o Multiple Attack Pattern Detection
o Multiple string match
o IP/TCP/UDP/ICMP and IGMP packets filters that block suspect attack sources.
Firmware Upgrade
Automatically schedule download and upgrade
Logs & Reports
Automatically schedule reports sent by E-mail.
Alarms are urgent notification of attacks.
1-2 Introducing the ZyWALL IDP 10
Page 17
ZyWALL IDP10 User’s Guide
System Management
Console (RS-232)
Web-based GUI (HTTP)
Command line interface
SNMP v2c
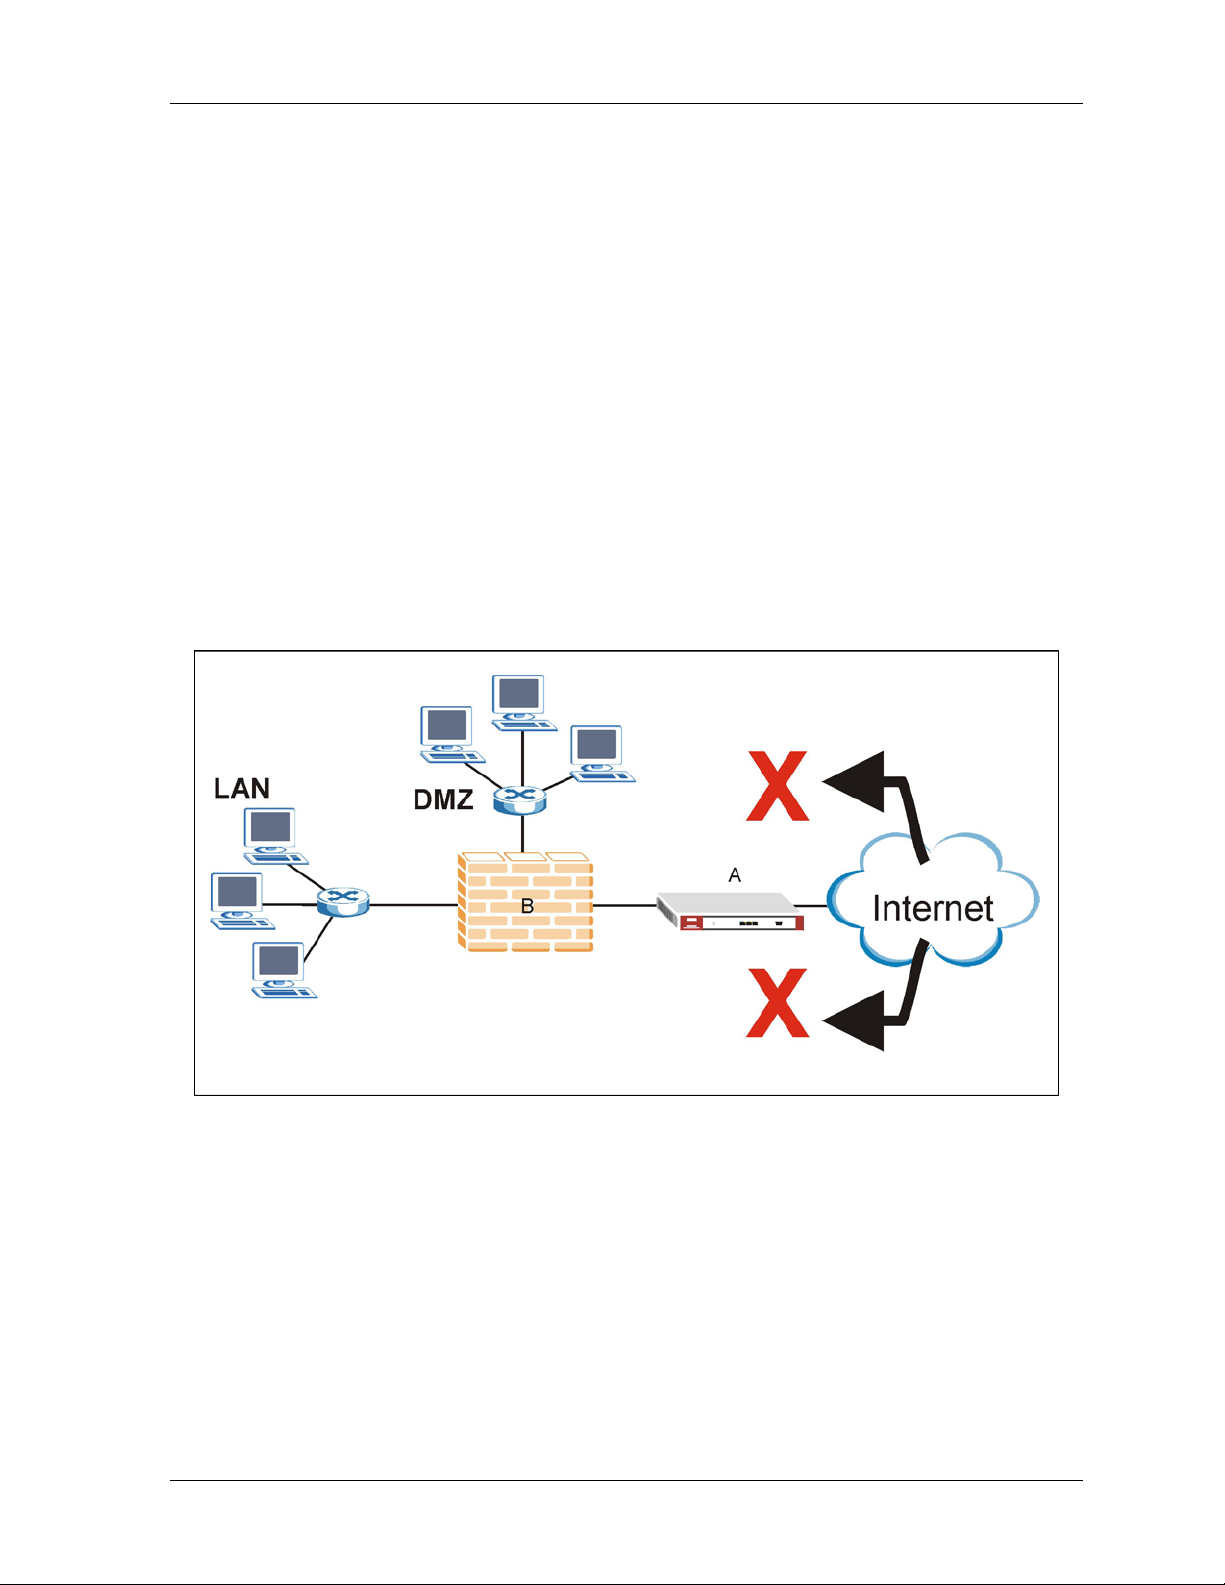
1.3 Application Examples
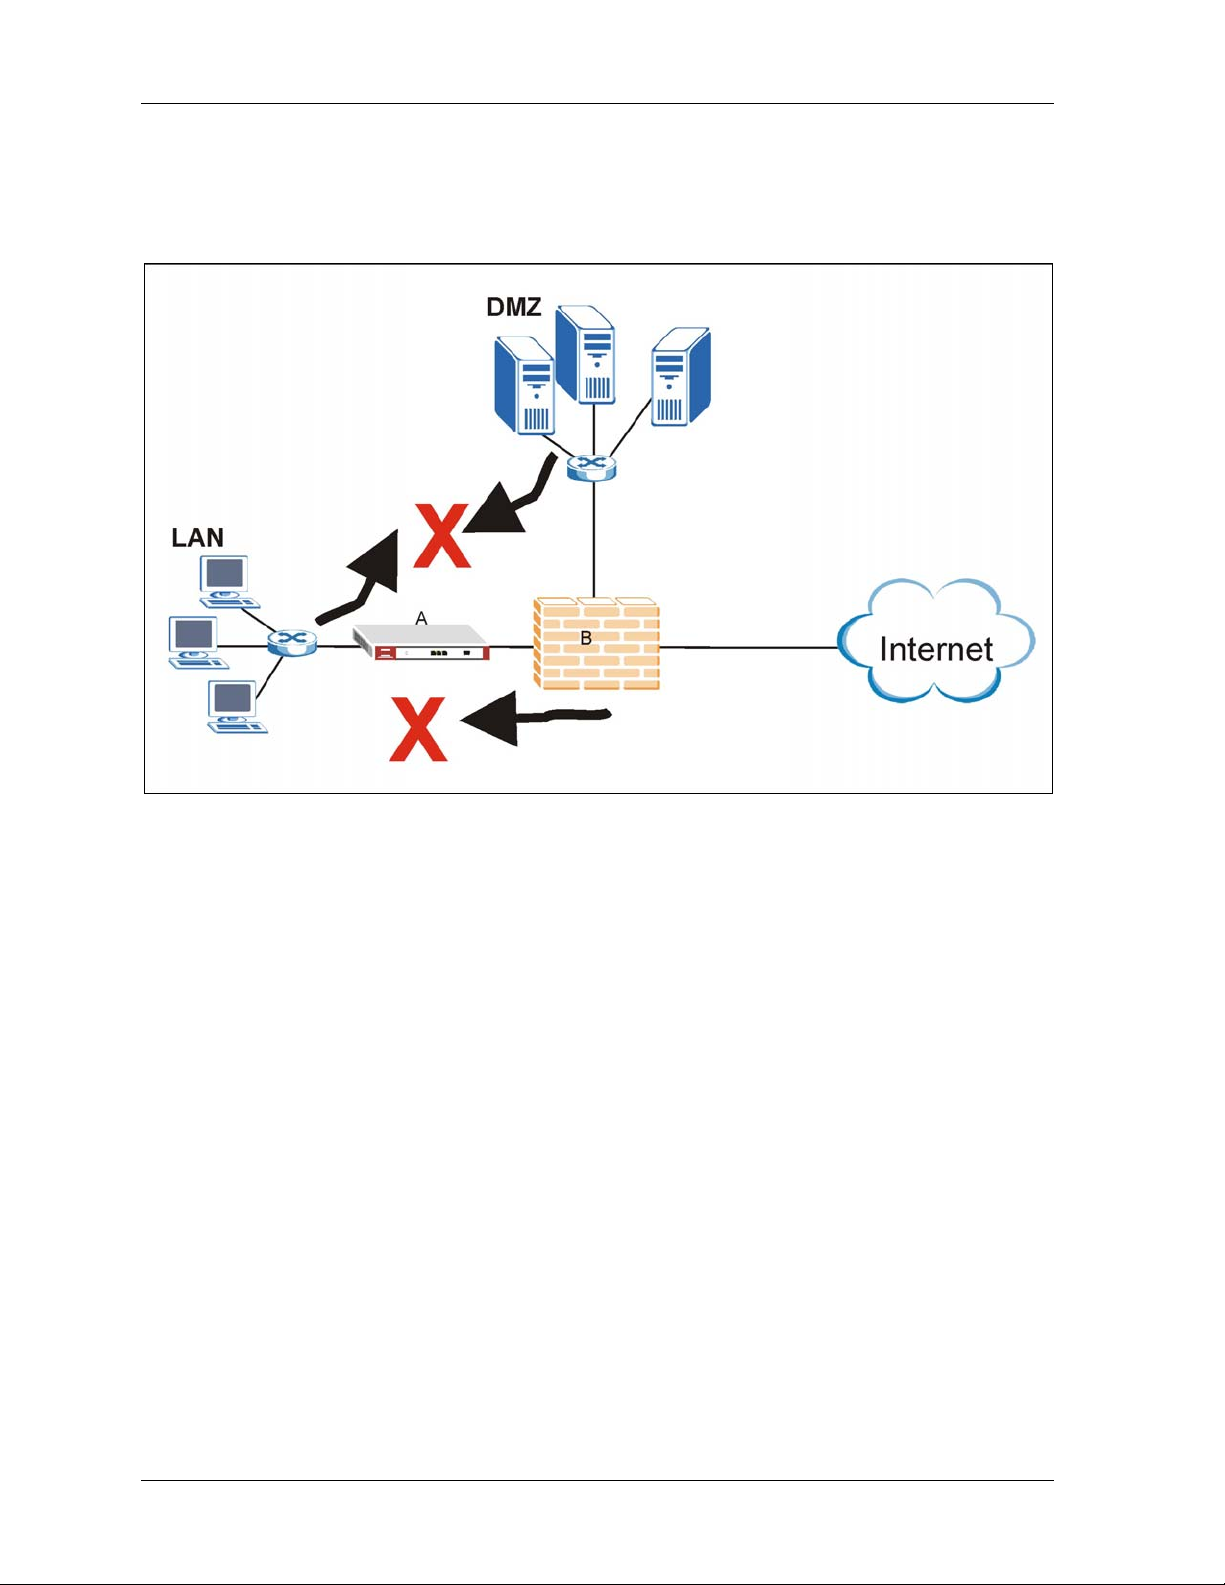
You can install a ZyWALL either between the firewall (or switch) and Internet (see Figure 1-2) to
protect your local networks and firewall (or switch) from intrusions from the Internet, behind the
firewall (or switch) to protect the DMZ servers from intrusions from the local network (due to an
infected LAN computer, for example), or ideally, install one in front of the firewall and two others
behind the firewall.
In installation example 1 (Figure 1-2) the ZyWALL (A) protects the firewall/router (B), DMZ servers
and LAN computers from network intrusions from the Internet. However, it does not protect the DMZ
servers from intrusions from the LAN (and vice versa), and the ZyWALL itself is vulnerable, as it
does not receive firewall protection.
Figure 1-2 Installation Example 1
Introducing the ZyWALL IDP 10 1-3
Page 18
ZyWALL IDP10 User’s Guide
In installation example 2 (see Figure 1-3) the ZyWALL (A) protects the LAN from intrusions from
the Internet and the DMZ servers from intrusions from the LAN (and vice versa). The ZyWALL itself
receives firewall protection too. However, it does not protect the firewall (B) nor the DMZ servers
from intrusions from the Internet.
Figure 1-3 Installation Example 2
1-4 Introducing the ZyWALL IDP 10
Page 19

ZyWALL IDP10 User’s Guide
In installation example 3 (see Figure 1-4) the ZyWALL (A) protects the DMZ servers from intrusions
from the Internet and also from intrusions from the LAN (and vice versa). The ZyWALL itself
receives firewall protection too. However, it does not protect the LAN computers nor the firewall (B)
from intrusions from the Internet.
Figure 1-4 Installation Example 3
Introducing the ZyWALL IDP 10 1-5
Page 20
ZyWALL IDP10 User’s Guide
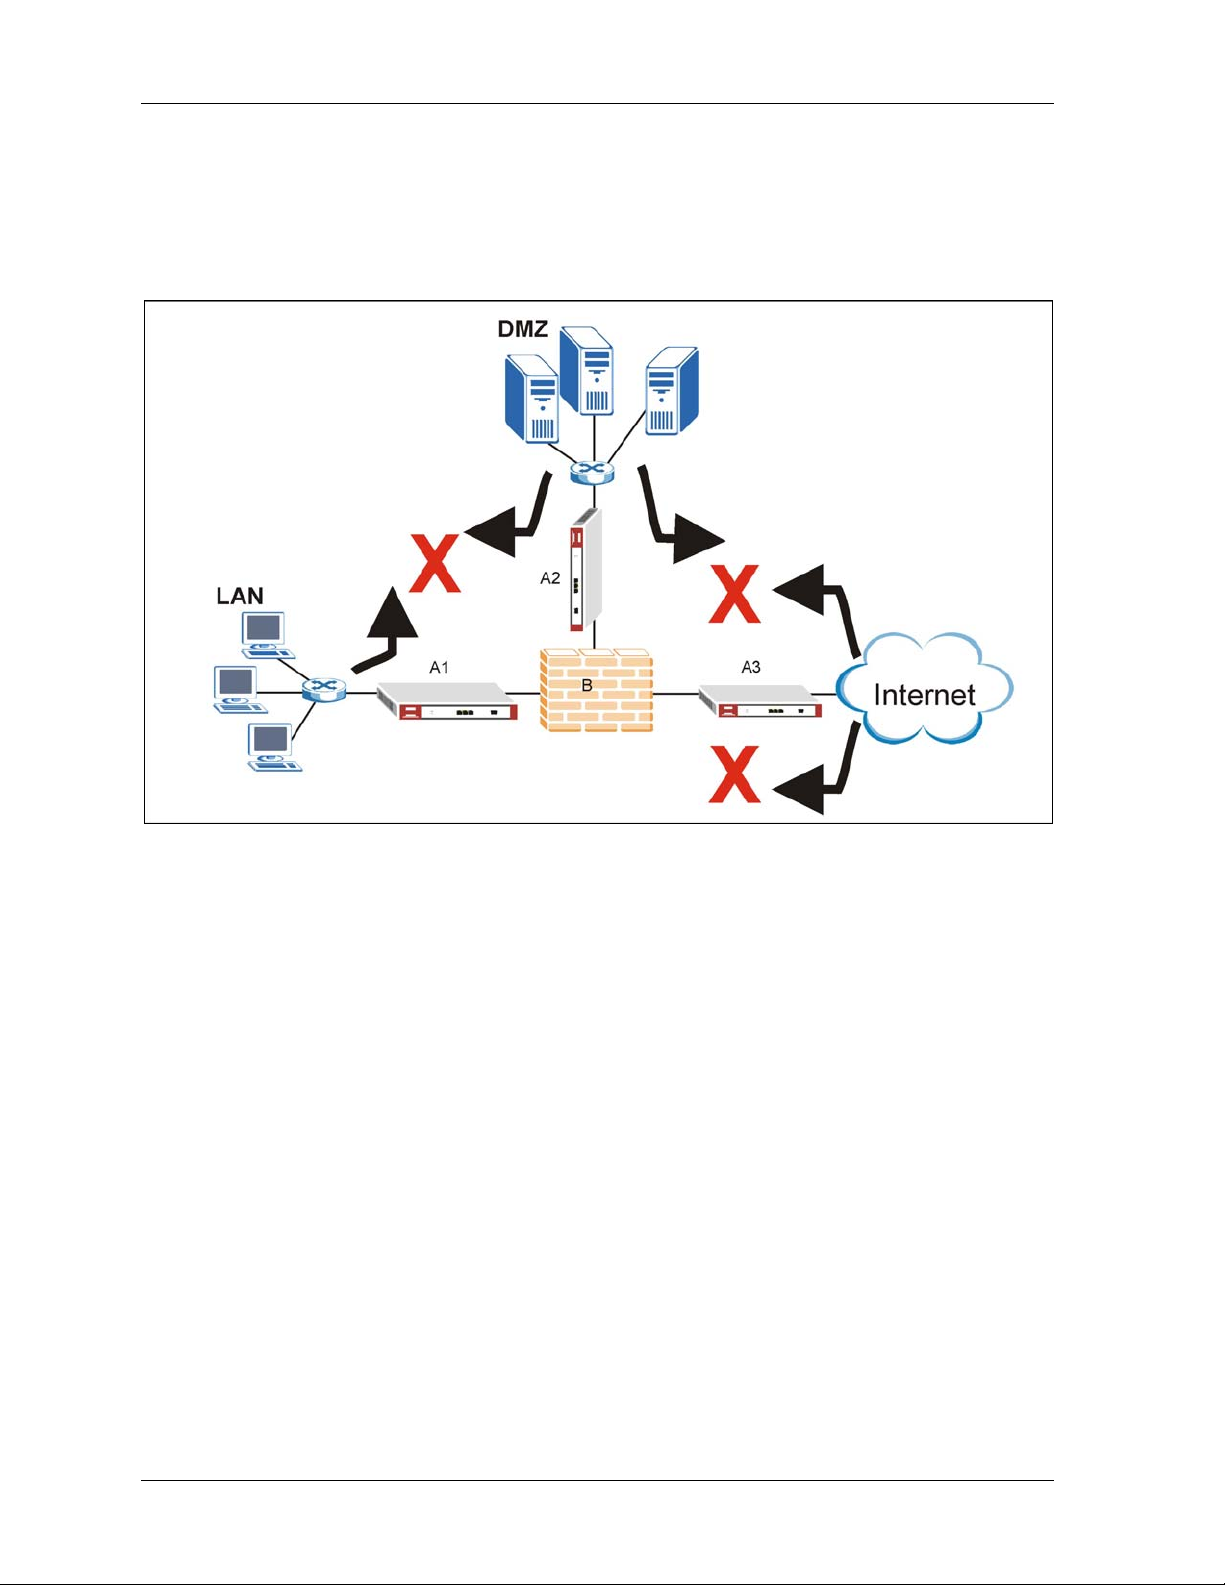
In installation example 4 (see Figure 1-5) ZyWALLs (A1 and A3) protect the LAN and DMZ from
intrusions from the Internet and from each other. ZyWALLs (A1 and A3) also receive firewall
protection.
ZyWALL (A2) protects the firewall (B), DMZ servers (and LAN). However, ZyWALL (A2) does not
receive firewall protection.
Figure 1-5 Installation Example 4
1-6 Introducing the ZyWALL IDP 10
Page 21

ZyWALL IDP10 User’s Guide
Chapter 2
Introducing the Web Configurator
This chapter describes how to access the ZyWALL web configurator and provides an
overview of its screens.
2.1 Web Configurator Overview
The embedded web configurator (eWC) allows you to manage the ZyWALL from anywhere through a
browser such as Microsoft Internet Explorer or Netscape Navigator. Use Internet Explorer 6.0 and
later or Netscape Navigator 7.0 and later versions with JavaScript enabled. It is recommended that you
set your screen resolution to 1024 by 768 pixels. The screens you see in the web configurator may
vary somewhat from the ones shown in this document due to differences between individual firmware
versions.
2.2 Accessing the ZyWALL Web Configurator
1. Make sure your ZyWALL hardware is properly connected and prepare your computer/computer
network to connect to the ZyWALL (refer to the Quick Start Guide).
2. Launch your web browser and type "192.168.1.3" as the URL.
Figure 2-1 Default Web Configurator IP Address
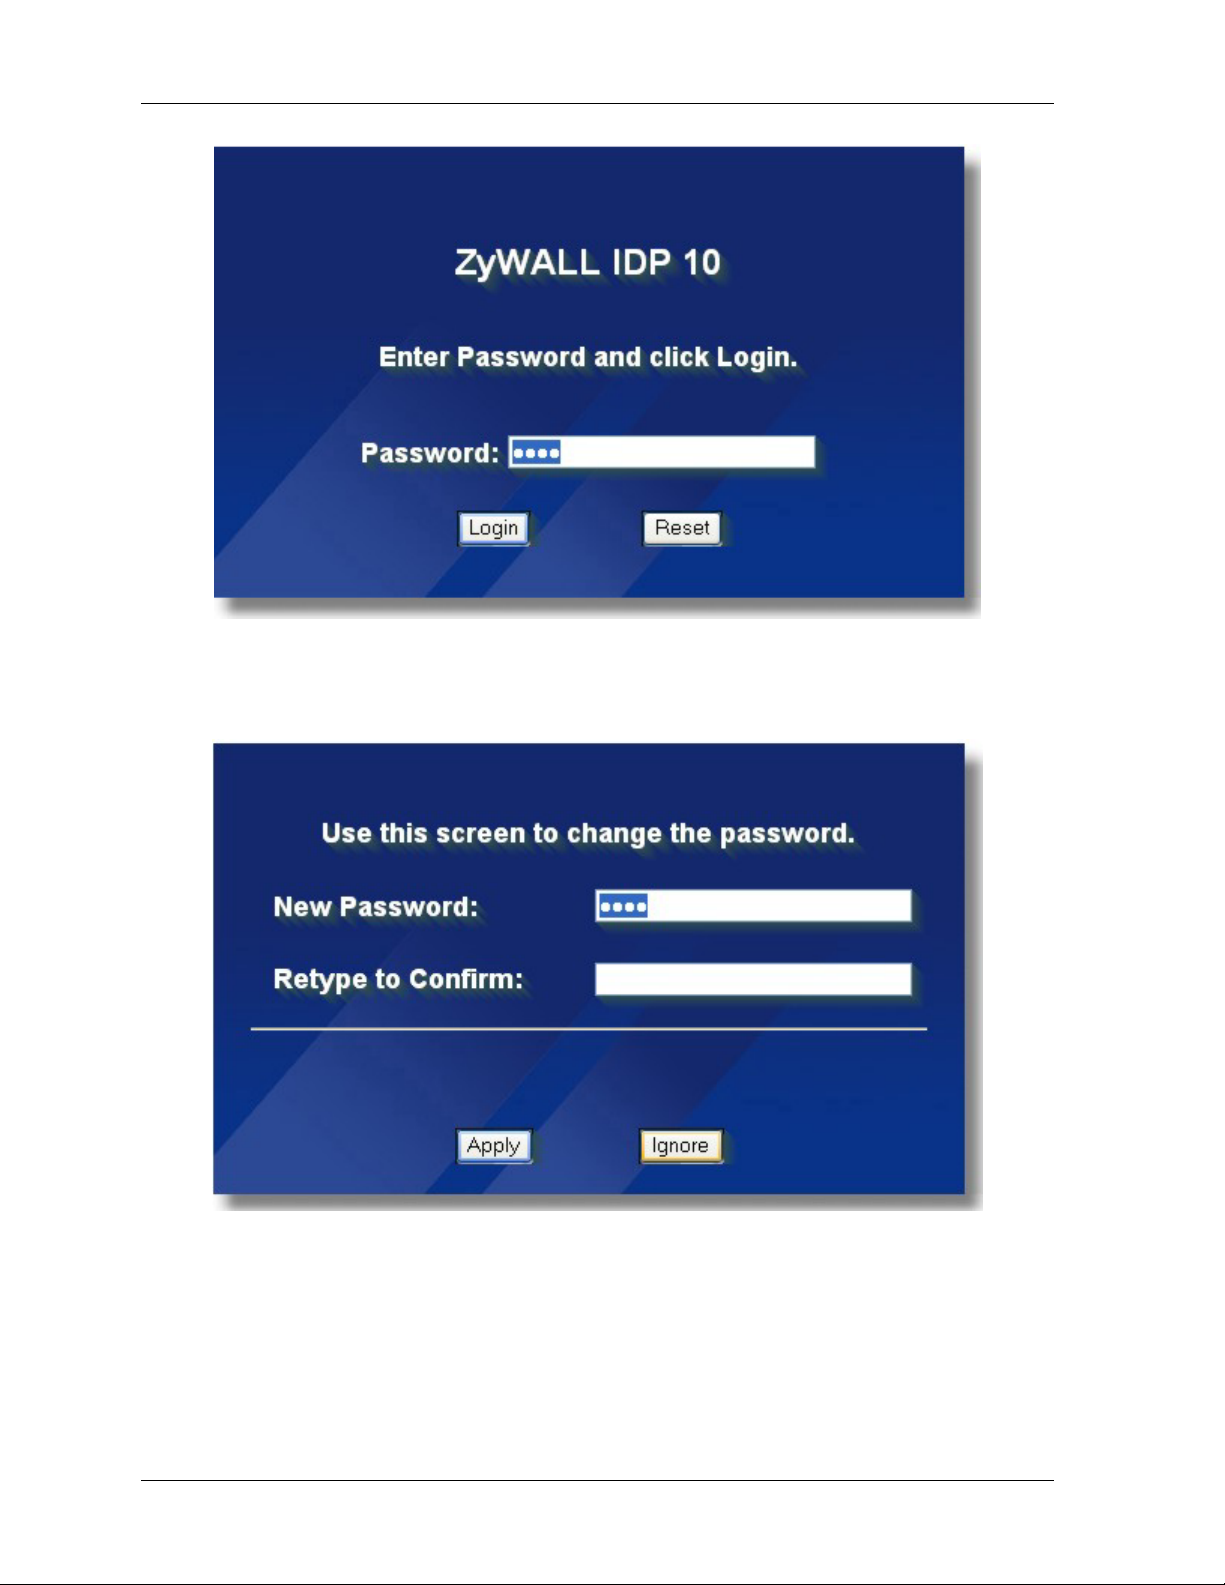
3.
Type "1234" (default) as the password and click Login. In some versions, the default password
appears automatically - if this is the case, click Login.
Introducing the Web Configurator 2-1
Page 22
ZyWALL IDP10 User’s Guide
Figure 2-2 Login Screen
4.
You should see a screen asking you to change your password (highly recommended) as shown
next. Type a new password (and retype it to confirm) and click Apply or click Ignore.
Figure 2-3 Change Password Screen
5.
You should now see the HOME screen (see Figure 2-4).
2-2 Introducing the Web Configurator
Page 23
ZyWALL IDP10 User’s Guide
The management session automatically times out when the
time period set in the Administrator Inactivity Timer field expires.
Simply log back into the ZyWALL if this happens to you.
2.3 Navigating the ZyWALL Web Configurator
The following summarizes how to navigate the web configurator from the HOME screen.
Click the help icon (located in the top right corner of most
screens) to view online help.
You can configure the ZyWALL’s IP address in order to access it for management. All LAN, WAN,
DNZ and WLAN ports act as a hub and share the same IP address.
Use submenus to configure
ZyWALL features.
Click LOGOUT at
any time to exit the
web configurator.
Click MAINTENANCE to view information about your ZyWALL or upgrade
configuration/firmware files. Maintenance includes Password, Time Setting, F/W (firmware)
Upload, Configuration (Backup, Restore, Default), and Restart.
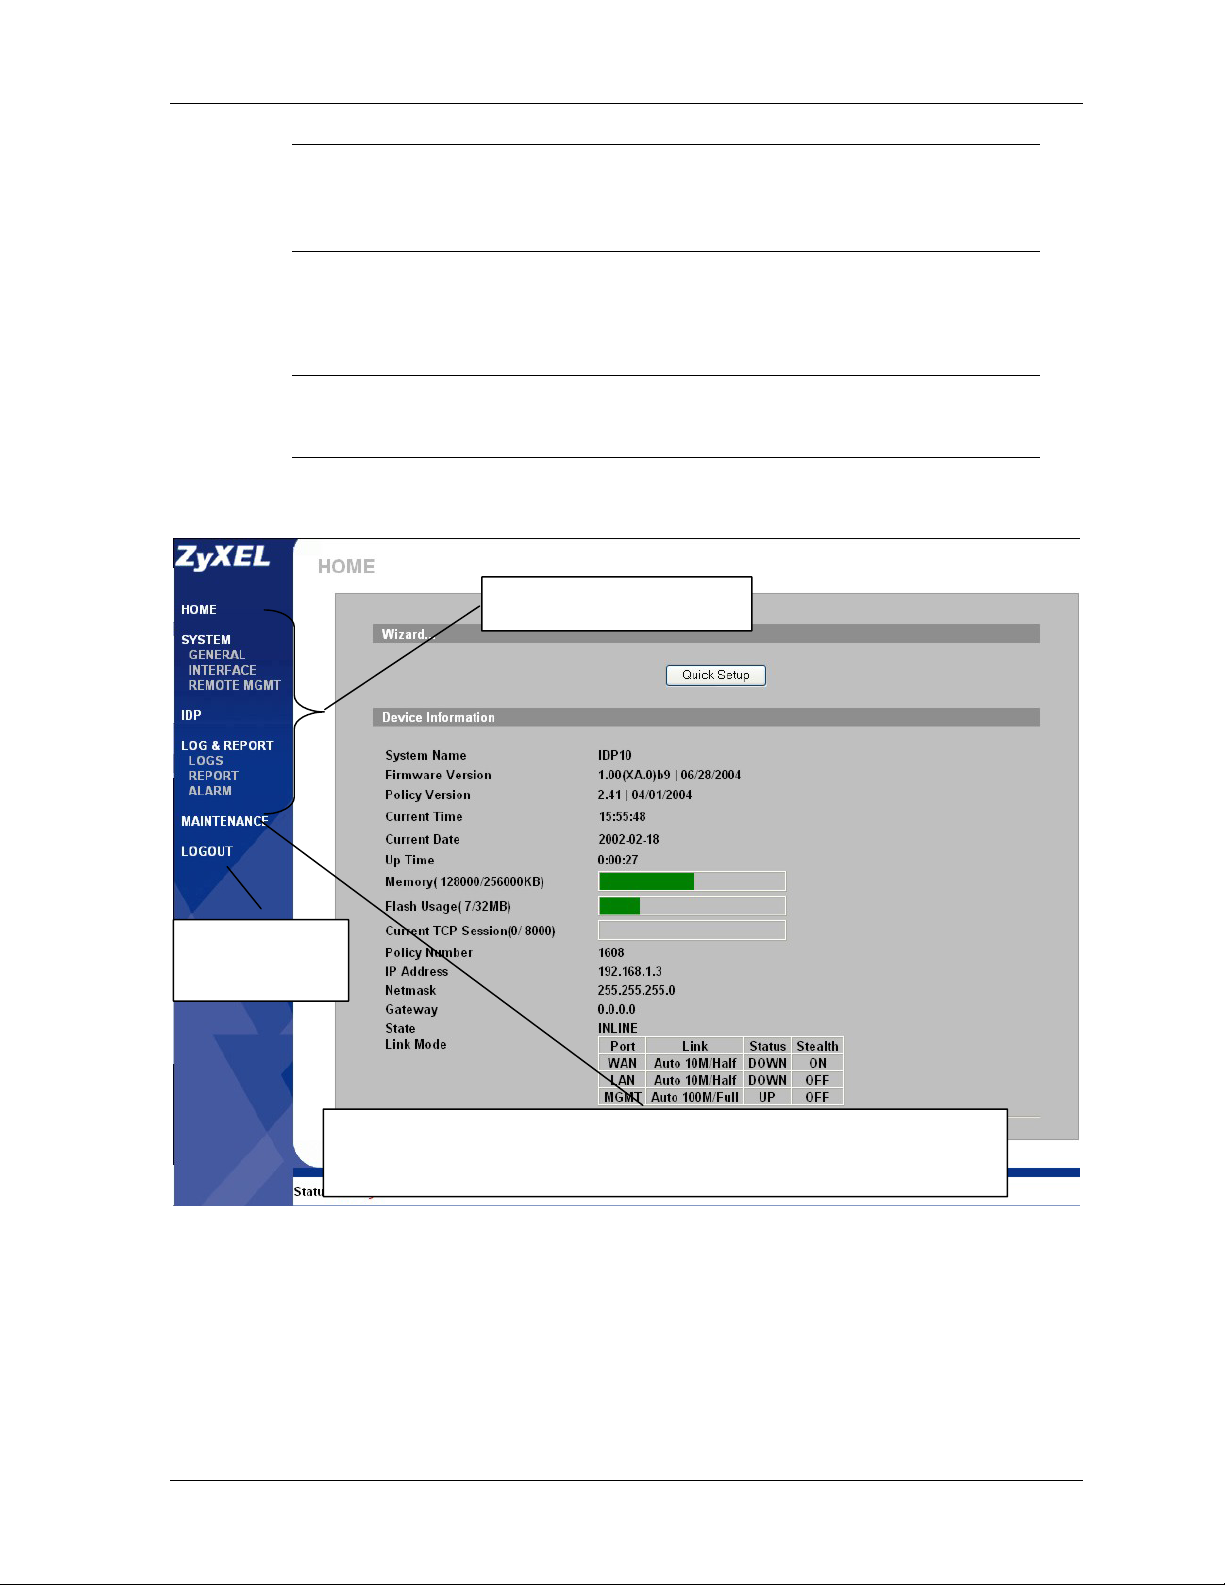
Figure 2-4 Web Configurator HOME Screen
The following table describes the labels in this screen.
Introducing the Web Configurator 2-3
Page 24

ZyWALL IDP10 User’s Guide
Table 2-1 Web Configurator HOME Screen
LABEL DESCRIPTION
Wizard…
Quick Setup
Device Information
System Name The system name identifies your device type. The system name should also be on a
Firmware Version This is the firmware version number and the date created.
Policy Version This field displays the intrusion signature set version number and the date updated
Current Time This field displays the present time as configured on the device.
Current Date This field displays the present date as configured on the device.
Up Time This field displays the total time in seconds since the ZyWALL was last turned on.
Memory The first number shows how many kilobytes of the heap memory the ZyWALL is using.
Flash Usage The first number shows the amount of flash (non-volatile) memory used by the ZyWALL.
Current TCP
Session
Policy Number This field displays the number of signature “rules” for the displayed policy version.
IP Address This shows the ZyWALL’s IP address. The LAN, WAN and MGMT ports all use the same
Netmask This shows the ZyWALL’s subnet mask.
Gateway This field displays the IP address of the gateway. The gateway is an immediate neighbor
State
Link Mode This field displays whether each port is up or down, the speed (10M or 100M), the
Click Quick Setup to start the ZyWALL setup wizard.
sticker on your device. If you are uploading firmware, be sure to upload firmware for this
exact system name.
Heap memory refers to the memory that is used by the ZYWALL operating system. The
second number shows the ZyWALL's total heap memory (in kilobytes). The bar displays
what percent of the ZyWALL's heap memory is in use. The bar is green when less than
70% is in use and red when more than 70% is in use.
The bar displays what percentage of disk space is in use. The bar is green when less
than 70% is in use and red when more than 70% is in use. The second number shows
the total available disk space (in megabytes).
This field displays number of TCP sessions currently established.
IP address.
of your ZyWALL that will forward the packet to the destination. The gateway must be on
the same segment as your ZyWALL. The gateway and DNS settings are only relevant to
the internal functions (SNMP, e-mail, syslog) of the ZyWALL.
This field displays whether the ZyWALL is Inline (configure an action for suspicious
packets), Monitor (send out alerts only for suspicious packets) or Bypass (all traffic can
pass through the ZyWALL without inspection).
duplex mode (full or half) and whether stealth is enabled.
2.3.1 Navigation Panel
After you enter the password, use the sub-menus on the navigation panel to configure ZyWALL
features.
The following table describes the sub-menus.
2-4 Introducing the Web Configurator
Page 25

ZyWALL IDP10 User’s Guide
Table 2-2 Screens Summary
LINK TAB FUNCTION
HOME This screen shows the ZyWALL’s general device information. Use this
screen to access the setup wizard.
SYSTEM
GENERAL Device Use this screen to configure device TCP/IP settings and TCP idle
VLAN Use this screen to configure the VLAN tag and VLAN ID.
State
INTERFACE Link Use this screen to set each port’s speed and duplex mode.
Stealth Use this screen to enable/disable stealth on the LAN or WAN ports.
Policy Check Policy check determines the interface on which traffic will be checked
REMOTE MGMT WWW Use this screen to configure through which interface(s) and from which
SNMP Use this screen to configure Simple Network Management Protocol
SSH Use this screen to configure through which interface(s) and from which
IDP Pre-defined All pre-defined IDP policies are already stored in the ZyWALL by
Update Use this screen to set the IP address of the update server and to
User-defined Use screen to create your own intrusion protection policies.
Registration Use this screen to register for IDP update server downloads.
LOG & REPORT
LOGS View Log Use this screen to view the logs for the categories that you selected.
REPORT E-Mail Use this screen to configure and schedule e-mailed log reports.
syslog A syslog server is an external logging server used to store and parse
ALARM ALARM Use this screen to configure and set the frequency of (e-mailed) alarms.
MAINTENANCE Password Use this screen to change your password.
Time Setting Use this screen to set your ZyWALL’s time and date.
F/W Upload Use this screen to configure and schedule firmware uploads to your
Configuration Use this screen to back up, restore ZyWALL configuration settings or
Access the GENERAL, INTERFACE and REMOTE MGMT links from
here.
timeout.
Use this screen to set the intrusion operating state (Inline, Monitor or
Bypass).
against the ZyWALL policy rules (both pre-defined and user-defined).
By selecting LAN port, then only traffic coming into the LAN and out
through the WAN will be checked. Similarly, by selecting WAN port,
then only traffic coming into the WAN and out through the LAN will be
checked.
IP address(es) users can use HTTP to manage the ZyWALL.
(SNMP) ZyWALL management.
IP address(es) users can use Secure Shell to manage the ZyWALL.
default. Use this screen to see all pre-defined policies or search fro
specific ones.
schedule automatic downloading.
Access the LOGS, REPORT and ALARM links from here.
logs.
ZyWALL.
reset them to the factory defaults.
Introducing the Web Configurator 2-5
Page 26

ZyWALL IDP10 User’s Guide
Table 2-2 Screens Summary
LINK TAB FUNCTION
Restart This screen allows you to reboot the ZyWALL without turning the power
off.
LOGOUT Click this link to log out of and exit the web configurator. For security
reasons, you should do this after each management session.
See the Quick Start Guide for information on using the wizard
to configure the ZyWALL for the first time.
2.4 Example Configuration Settings
The following table shows an example setup for your ZyWALL. In this setup, the ZyWALL is behind
a NAT router (or firewall) and is given a private IP address. The gateway is also in a private network.
The LAN and WAN ports are both in stealth mode and remote management is only allowed from the
MGMT port.
Table 2-3 Example Configuration Settings
ZyWALL Settings
IP Address 10. 10. 1.1 (private IP address)
Subnet Mask 255.255.255. 0
Gateway 10. 10. 1.254 (switch or router on LAN or DMZ)
State INLINE
Ports Settings
Port Link Status Stealth
WAN Auto 10M/Half UP ON
LAN Auto 100M/Full UP ON
MGMT Auto 100M/Full UP OFF
Remote Management:
WWW Server Access MGMT only
SNMP Server Access MGMT only
SSH Server Access MGMT only
2-6 Introducing the Web Configurator
Page 27

General, Interface, and Remote Management
PPaarrtt IIII::
General, Interface, and Remote Management
This part covers configuration of the General, Interface, and Remote Management screens.
II
Page 28

Page 29
ZyWALL IDP 10 User’s Guide
Chapter 3
General Settings
This chapter describes how to configure the ZyWALL’s TCP, VLAN and State settings.
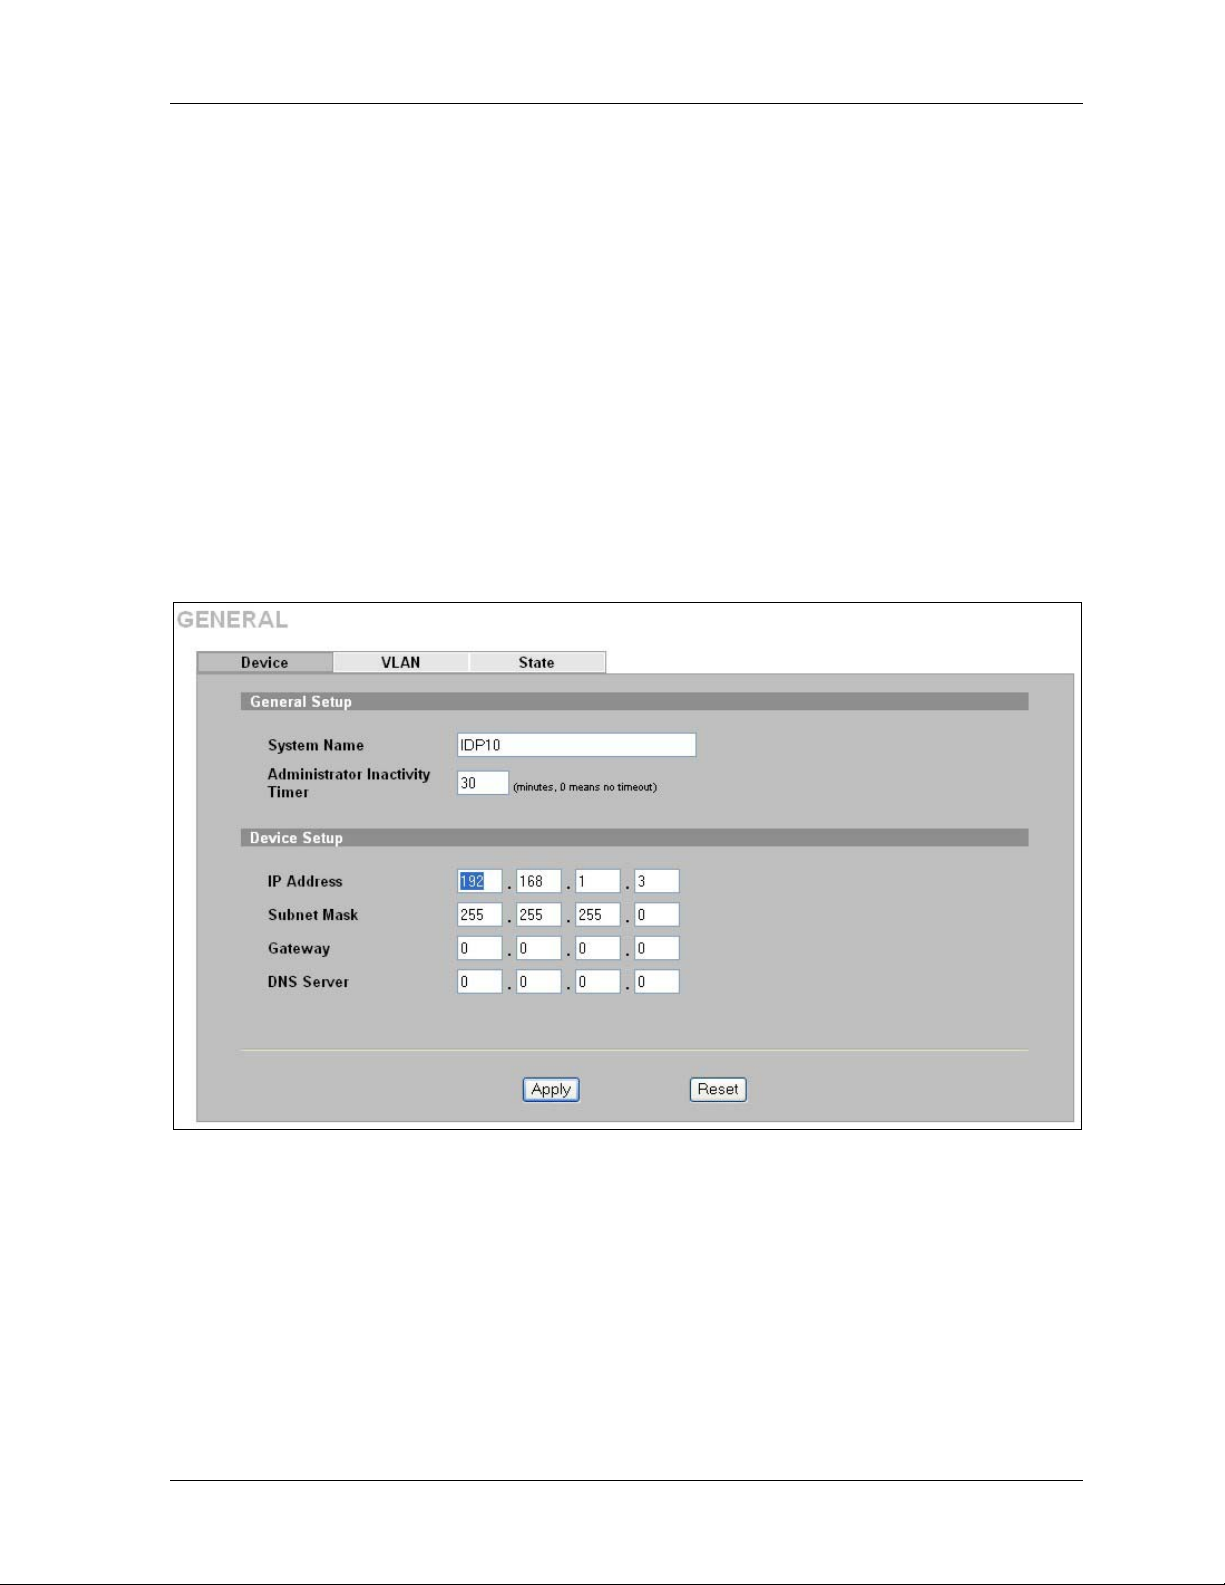
3.1 Device
Enter the ZyWALL IP address, subnet mask, gateway IP address and DNS server IP address in the
next screen. The gateway and DNS entries relate to the e-mail, syslog and SNMP functions of the
ZyWALL.
The DNS server maps a domain name to its corresponding IP address and vice versa. If you configure
a DNS server, you can enter an IP address or domain name for e-mail, syslog, etc. servers.
If you change the ZyWALL IP address, you will need to access it again using the new IP address. To
change your ZyWALL’s network settings click GENERAL, then the Device tab.
Figure 3-1 General: Device
The following table describes the fields in this screen.
General Settings 3-1
Page 30

ZyWALL IDP 10 User’s Guide
Table 3-1 General: Device
LABEL DESCRIPTION
System Name Enter a descriptive name of up to 128 single-Byte or double-Byte characters for
identification purposes.
Administrator
Inactivity Timer
Device Setup
IP Address Type the IP address of your ZyWALL. If you change the ZyWALL IP address, you will
Subnet Mask Type the IP subnet mask of your ZyWALL.
Gateway Type the IP address of the gateway. The gateway and DNS entries relate to the e-mail,
DNS Server The DNS server maps a domain name to its corresponding IP address and vice versa. If
Apply Click this button to save your changes back to the ZyWALL.
Reset Click this button to begin configuring this screen afresh.
Type how many minutes a management session (either via the web configurator or SSH)
can be left idle before the session times out. After it times out you have to log in with
your password again. Very long idle timeouts may have security risks. A value of "0"
means a management session never times out, no matter how long it has been left idle
(not recommended).
need to access it again using the new IP address.
syslog and SNMP functions of the ZyWALL.
you configure a DNS server, you can enter an IP address or domain name for e-mail,
syslog, etc. servers.
3.2 Introduction to VLANs
A VLAN (Virtual Local Area Network) allows a physical network to be partitioned into multiple
logical networks. Devices on a logical network belong to one group. A device can belong to more than
one group. With VLAN, a device cannot directly talk to or hear from devices that are not in the same
group(s); the traffic must first go through a router.
VLAN increases network performance by limiting broadcasts to a smaller and more manageable
logical broadcast domain.
3.2.1 Tagged VLANs (IEEE 802.1Q)
This section gives some technical background information on tagged VLANs. Skip to section 3.3 to
see how to configure VLAN tagging on the ZyWALL. When a device receives a frame from a
workstation, the VLAN from whence it came must be known so the device may respond, if necessary,
to the source of the frame. This is accomplished by tagging.
IEEE 802.1Q tagged VLAN uses an explicit tag (VLAN ID) in the MAC header to identify the VLAN
membership of a frame across devices - tagged VLANs are not confined to the device on which they
were created.
The VLAN ID associates a frame with a specific VLAN and provides the information that switches
need to process the frame across the network. A tagged frame is four bytes longer than an untagged
frame and contains two bytes of TPID (Tag Protocol Identifier, residing within the type/length field of
the Ethernet frame) and two bytes of TCI (Tag Control Information, a tagged header starts after the
source address field of the Ethernet frame).
3-2 General Settings
Page 31

ZyWALL IDP 10 User’s Guide
TPID
2 Bytes
User Priority
3 Bits
CFI
1 Bit
VLAN ID
12 bits
TPID has a defined value of 8100 (hex). The first three bits of the TCI define user priority (giving
eight priority levels). The CFI (Canonical Format Indicator) is a single-bit flag, always set to zero for
Ethernet switches. The remaining twelve bits define the VLAN ID, giving a possible maximum
number of 4,096 VLANs. Note that user priority and VLAN ID are independent of each other. A
frame with VID (VLAN Identifier) of null (0) is called a priority frame, meaning that only the priority
level is significant and the default VID of the ingress port is given as the VID of the frame. Of the
4096 possible VIDs, a VID of 0 is used to identify priority frames and value 4095 (FFF) is reserved,
so the maximum possible VLAN configurations are from 1 to 4,094.
3.3 Configuring VLAN on the ZyWALL
The ZyWALL is capable of receiving tagged or untagged frames. The ZyWALL does not alter the
VLAN ID of a frame if it is already tagged; however, when an untagged frame enters the ZyWALL, it
can.
If VLAN tagging is enabled, then the frame is transmitted as a tagged frame with the VLAN ID you
assign here; otherwise, it is transmitted as an untagged frame.
VLAN on the ZyWALL is for management functions of the ZyWALL. If your management computer,
mail or syslog server (from whatever port) are in a VLAN group then enter that group VLAN ID in
order for the ZyWALL to be able to communicate with them. There can only be one VLAN group.
You cannot have the management computer, mail or syslog server in a different VLAN groups.
To change your ZyWALL’s VLAN settings, click GENERAL, then the VLAN tab.
Figure 3-2 General: VLAN
The following table describes the fields in this screen.
Table 3-2 General: VLAN
LABEL DESCRIPTION
Management Traffic VLAN Setup
VLAN Tag
VLAN ID If you enabled VLAN tagging, enter the tag for outgoing frames here; the valid range is
Select ON to have the ZyWALL tag outgoing frames with the VLAN ID specified in the
next field.
General Settings 3-3
Page 32

ZyWALL IDP 10 User’s Guide
Table 3-2 General: VLAN
LABEL DESCRIPTION
between 1 and 4094.
Apply Click this button to save your changes back to the ZyWALL.
Reset Click this button to begin configuring this screen afresh.
3.3.1 State
To change your ZyWALL’s State settings, click GENERAL, then the State tab.
Figure 3-3 General: State
The following table describes the fields in this screen.
Table 3-3 General: State
LABEL DESCRIPTION
Device Operation State Setup
Inline: The ZyWALL will both identify suspicious or malicious packets and perform the
action dictated by the rule for that type of intrusion (block, log, drop, send an alarm).
Monitor: Monitor means the ZyWALL will function as a traditional IDS (Intrusion
Detection System) by identifying suspicious or malicious packets and then sending alerts
Device Operation
State:
Apply Click this button to save your changes back to the ZyWALL.
Reset Click this button to begin configuring this screen afresh.
(only). Monitor state may be advisable when you first deploy the ZyWALL in your
network so valid traffic is not blocked (“false positives”) nor invalid traffic wrongly allowed
(“”false negatives”). When “false positives” and “false negatives” have been identified
and corrected, you should then change to Inline.
Bypass: All LAN and WAN traffic is allowed to pass through the ZyWALL without
inspection.
3-4 General Settings
Page 33

ZyWALL IDP 10 User’s Guide
Chapter 4
Interface Screens
This chapter shows you how to configure the ZyWALL ports.
4.1 10/100M Auto-Sensing Ethernet Ports
The ZyWALL supports 10/100Mbps auto-negotiating Ethernet. There are two factors related to the
connection of two Ethernet ports: speed and duplex mode. In a 10/100Mbps fast Ethernet, the speed
can be 10Mbps or 100Mbps and the duplex mode can be half duplex or full duplex. The autonegotiation capability makes one Ethernet port able to negotiate with a peer automatically to obtain the
optimal connection speed and duplex mode.
When auto-negotiation is turned on, the Ethernet port of the ZyWALL negotiates with the peer
Ethernet port on the Ethernet cable automatically to determine the optimal connection speed and
duplex mode. If the peer Ethernet port does not support auto-negotiation or turns off this feature, the
ZyWALL determines the connection speed by detecting the signal on the cable and using half duplex
mode. When the ZyWALL’s auto-negotiation is turned off, the Ethernet port uses the pre-configured
speed and duplex mode settings when making a connection, thus requiring you to check the settings of
the peer Ethernet port in order to connect.
4.2 Configuring Link
To change your ZyWALL’s link settings, click INTERFACE, then the Link tab.
Figure 4-1 Interface: Link
The following table describes the fields in this screen.
Interface Screens 4-1
Page 34

ZyWALL IDP 10 User’s Guide
Table 4-1 Interface: Link
LABEL DESCRIPTION
WAN
LAN
Management
Apply Click this button to save your changes back to the ZyWALL.
Reset Click this button to begin configuring this screen afresh.
Select the speed (10 or 100 Mbps) and duplex mode (Full, Half, Auto) for this port.
Select the speed (10 or 100 Mbps) and duplex mode (Full, Half, Auto) for this port.
Select the speed (10 or 100 Mbps) and duplex mode (Full, Half, Auto) for this port.
4.3 Stealth
Stealth enabled on a port means that the ZyWALL drops all incoming packets destined for the
ZyWALL received on that port with no response to the sender. The ZyWALL doesn’t respond to
ICMP requests such as Ping, that is, it doesn’t send ICMP_ECHO_REPLY packets. It doesn’t send
TCP_RST packets if a TCP connection is blocked nor does it send ICMP_PORT UNREACHABLE
packets for UDP requests or forwarded traffic.
Replies to outgoing traffic from the ZyWALL are also not allowed.
When a port is in stealth mode, you cannot do remote
management or policy updates on that port.
You will have to disable stealth on the LAN port or WAN port (via the MGMT port or console port)
before being allowed to manage the ZyWALL from that port. The MGMT port has no stealth function.
To change your ZyWALL’s stealth settings, click INTERFACE, then the Stealth tab.
Figure 4-2 Interface: Stealth
The following table describes the fields in this screen.
4-2 Interface Screens
Page 35

ZyWALL IDP 10 User’s Guide
Table 4-2 Interface: Stealth
LABEL DESCRIPTION
Interface Stealth Setup
WAN Port
LAN Port
Apply Click this button to save your changes back to the ZyWALL.
Reset Click this button to begin configuring this screen afresh.
Select ON to enable stealth on the WAN port.
Select ON to enable stealth on the LAN port.
4.4 Policy Check
Policy check determines the interface on which traffic will be checked against the ZyWALL policy
rules (both pre-defined and user-defined). By selecting LAN only, then only traffic coming into the
LAN and out through the WAN will be checked. Similarly, by selecting WAN only, then only traffic
coming into the WAN and out through the LAN will be checked.
The interface you choose depends on the deployment of your ZyWALL (see the section on application
examples in Part 1). For example for ZyWALL A1 in installation example 4, you might apply policy
checking on the LAN only. By selecting one interface instead of both (the default) ZyWALL
throughput will increase.
ZyWALL
Policy Engine
LAN WAN
Figure 4-3 ZyWALL Policy Check
4.4.1 Policy Direction
Do not confuse policy check with a policy rule direction (see the IDP pre-defined and user-defined
policy screens) that refers to the intent of the policy rules (both pre-defined and user-defined).
Incoming means the policy applies to traffic coming from the WAN to the LAN.
Outgoing means the policy applies to traffic coming from the LAN to the WAN.
Bi-directional means the policy applies to traffic coming from the LAN or WAN.
Some rules such as blocking MSN Login would only apply to outgoing traffic as the intent is to block
outgoing attempts to log into MSN Messenger. Similarly other rules would only apply to incoming
traffic where the intent is to take an action on traffic initiated from somewhere on the WAN side.
Pre-defined policies have the direction pre-determined.
To configure Policy Check, click INTERFACE, then the Policy Check tab.
Interface Screens 4-3
Page 36

ZyWALL IDP 10 User’s Guide
Figure 4-4 Interface: Policy Check
The following table describes the fields in this screen.
Table 4-3 Interface: Policy Check
LABEL DESCRIPTION
Policy Check Setup
WAN Port
LAN Port
Apply Click this button to save your changes back to the ZyWALL.
Reset Click this button to begin configuring this screen afresh.
Select ON to have the ZyWALL check traffic coming into the WAN and out through the
LAN against the ZyWALL policy rules (both pre-defined and user-defined).
Select ON to have the ZyWALL check traffic coming into the LAN and out through the
WAN against the ZyWALL policy rules (both pre-defined and user-defined).
4-4 Interface Screens
Page 37

ZyWALL IDP 10 User’s Guide
Chapter 5
Remote Management
The remote management screens allow you to which ports are allowed web and SSH access
and configure SNMP
5.1 Remote Management Overview
Remote management allows you to determine which services can access which ZyWALL interface (if
any) from which computers.
You may access your ZyWALL using web or SSH via:
LAN +
MGMT
To disable remote management, select Disable in the Server Access field of the corresponding screen
(WWW or SSH).
WAN +
MGMT
MGMT ALL Disable
Remote management over LAN or WAN will not work when
there is already another remote management session of the same
type (web or SSH) running. You may only have one remote
management session of the same type running at one time.
5.1.1 Remote Management and Stealth
If you enable Stealth on a port, you cannot perform remote management via that port.
5.2 Configuring WWW
Click Remote Management to open the following screen (WWW is the first tab) to choose a port(s)
through which you can manage the ZyWALL using the web configurator. The default (at the time of
writing) is MGMT only. If you want to begin managing the ZyWALL from another port, you will
first have to start a local console port session to change this default using the commands.
Figure 5-1 Remote Management: WWW
Remote Management 5-1
Page 38

ZyWALL IDP 10 User’s Guide
The following table describes the fields in this screen.
Table 5-1 Remote Management: WWW
LABEL DESCRIPTION
HTTP
Server Access Select the interface(s) through which a computer may access the ZyWALL using this
service. Define the rule for server access by selecting from the drop-down menu.
Options are LAN + MGMT, WAN + MGMT, MGMT, ALL and Disable.
Select Disable to prevent remote management of a service.
Secure Client IP
Address
Apply Click this button to save your changes back to the ZyWALL.
Reset Click this button to begin configuring this screen afresh.
A secure client is a “trusted” computer that is allowed to communicate with the ZyWALL
using this service.
Select All to allow any computer to access the ZyWALL using this service.
Choose Selected to just allow the computer with the IP address that you specify to
access the ZyWALL using this service.
5.3 SNMP
Simple Network Management Protocol is a protocol used for exchanging management information
between network devices. SNMP is a member of the TCP/IP protocol suite. Your ZyWALL supports
SNMP agent functionality, which allows a manager station to manage and monitor the ZyWALL
through the network. The ZyWALL supports SNMP version 2c (SNMPv2c). The next figure
illustrates an SNMP management operation.
Figure 5-2 SNMP Management Model
An SNMP managed network consists of two main types of component: agents and a manager.
5-2 Remote Management
Page 39

ZyWALL IDP 10 User’s Guide
An agent is a management software module that resides in a managed device (the ZyWALL). An
agent translates the local management information from the managed device into a form compatible
with SNMP. The manager is the console through which network administrators perform network
management functions. It executes applications that control and monitor managed devices.
The managed devices contain object variables/managed objects that define each piece of information
to be collected about a device. Examples of variables include such as number of packets received,
node port status etc. A Management Information Base (MIB) is a collection of managed objects.
SNMP allows a manager and agents to communicate for the purpose of accessing these objects.
SNMP itself is a simple request/response protocol based on the manager/agent model. The manager
issues a request and the agent returns responses using the following protocol operations:
• Get - Allows the manager to retrieve an object variable from the agent.
• GetNext - Allows the manager to retrieve the next object variable from a table or list within an
agent. In SNMPv1, when a manager wants to retrieve all elements of a table from an agent, it
initiates a Get operation, followed by a series of GetNext operations.
• Set - Allows the manager to set values for object variables within an agent.
• Trap - Used by the agent to inform the manager of some events.
5.3.1 Supported MIBs
The ZyWALL supports MIB II that is defined in RFC-1213 and RFC-1215. The focus of the MIBs is
to let administrators collect statistical data and monitor status and performance.
5.3.2 SNMP Traps
The ZyWALL will send traps to the SNMP manager when any one of the following events occurs1:
Table 5-2 SNMP Traps
TRAP # TRAP NAME DESCRIPTION
0 coldStart (defined in RFC-1215) A trap is sent after booting (power on).
1 warmStart (defined in RFC-1215) A trap is sent after booting (software reboot).
5.3.3 SNMP Configuration
To change your ZyWALL’s SNMP settings, click REMOTE MGNT, then the SNMP tab. The screen
appears as shown.
1
These are the traps supported at the time of writing.
Remote Management 5-3
Page 40

ZyWALL IDP 10 User’s Guide
Figure 5-3 Remote Management: SNMP
The following table describes the fields in this screen.
Table 5-3 Remote Management: SNMP
LABEL DESCRIPTION
SNMP Configuration
Get Community This is the “password” for the incoming Get and GetNext requests from the management
station.
Set Community This is the “password” for incoming Set requests from the management station.
Trap Community Type the trap community, which is the password sent with each trap to the SNMP
manager.
Destination Type the IP address of the station to which SNMP traps are sent.
Server Access Select the interface(s) through which a computer may access the ZyWALL using this
service. Define the rule for server access by selecting from the drop-down menu.
Options are LAN + MGMT, WAN + MGMT, MGMT, ALL and Disable.
Secure Client IP
Address
Apply Click this button to save your changes back to the ZyWALL.
Reset Click this button to begin configuring this screen afresh.
A secure client is a “trusted” computer that is allowed to communicate with the ZyWALL
using this service. Select All to allow any computer to access the ZyWALL using this
service. Choose Selected to just allow the computer with the IP address that you specify
to access the ZyWALL using this service.
5.4 SSH Overview
Unlike Telnet or FTP, which transmit data in clear text, SSH (Secure Shell) is a secure communication
protocol that combines authentication and data encryption to provide secure encrypted communication
between two hosts over an unsecured network.
5-4 Remote Management
Page 41

ZyWALL IDP 10 User’s Guide
Figure 5-4 SSH Communication Example
5.4.1 How SSH works
The following table summarizes how a secure connection is established between two remote hosts.
1. Host Identification
The SSH client sends a connection request to
the SSH server. The server identifies itself with a
host key. The client encrypts a randomly
generated session key with the host key and
server key and sends the result back to the
server.
The client automatically saves any new server
public keys. In subsequent connections, the
server public key is checked against the saved
version on the client computer.
2. Encryption Method
Once the identification is verified, both the client
and server must agree on the type of encryption
method to use.
3. Authentication and Data Transmission
After the identification is verified and data
encryption activated, a secure tunnel is
established between the client and the server.
Figure 5-5 How SSH Works
The client then sends its authentication
information (user name and password) to the
server to log in to the server.
5.4.2 SSH Implementation on the ZyWALL
Your ZyWALL supports SSH version 1.5 using RSA authentication and three encryption methods
(DES, 3DES and Blowfish). The SSH server is implemented on the ZyWALL for remote management
and file transfer on port 22. Only one SSH connection is allowed at a time.
5.4.3 Requirements for Using SSH
You must install an SSH client program on a client computer (Windows or Linux operating system)
that is used to connect to the ZyWALL over SSH.
5.5 SSH (Secure Shell) Configuration
To change your ZyWALL’s Secure Shell settings, click REMOTE MGNT, then the SSH tab.
Remote Management 5-5
Page 42

ZyWALL IDP 10 User’s Guide
Figure 5-6 Remote Management: SSH
The following table describes the fields in this screen.
Table 5-4 Remote Management: SSH
LABEL DESCRIPTION
Server Access Select the interface(s) through which a computer may access the ZyWALL using this
service. The default is Disable. You need to select a port in order to access the ZyWALL
using SSH.
Options are LAN + MGMT, WAN + MGMT, MGMT (only), ALL (WAN + LAN + MGMT)
and Disable. Select Disable to totally prevent SSH access to the ZyWALL.
Secure Client IP
Address
Apply Click this button to save your changes back to the ZyWALL.
Reset Click this button to begin configuring this screen afresh.
A secure client is a "trusted" computer that is allowed to communicate with the ZyWALL
using SSH. Select Selected or All.
If you choose Selected you must enter an IP address in the field provided. The ZyWALL
will check if the client IP address matches the value here when an SSH session is up. If
it does not match, the ZyWALL will disconnect the session immediately.
Select All if you want to allow computers with any IP address to access the ZyWALL via
SSH.
5.5.1 Example Using SSH
1. Enable SSH access on a port as shown in section 5.5.
2. Run an SSH client program. PuTTY is used in this example. PuTTY is freeware that can be
downloaded from the Internet.
3. Configure PuTTY as shown in the following screen.
5-6 Remote Management
Page 43

Enter the IP address of the
ZyWALL.
Click Open.
Figure 5-7 PuTTY settings
4. You may see a PuTTY security alert next. Click Yes to continue.
ZyWALL IDP 10 User’s Guide
Figure 5-8 PuTTY Security Alert
5. You see the login screen of the ZyWALL next. Enter the username (default is “admin”) and
password (default is ‘1234”) to log in.
Remote Management 5-7
Page 44

ZyWALL IDP 10 User’s Guide
Figure 5-9 ZyWALL Command Interface Login Screen
5-8 Remote Management
Page 45

IDP
PPaarrtt IIIIII::
IDP
This part covers configuration of the IDP Policy screens.
III
Page 46

Page 47

ZyWALL IDP 10 User’s Guide
Chapter 6
IDP Policies
This chapter describes how to configure your ZyWALL’s IDP settings.
6.1 IDP Overview
An IDP system can detect malicious or suspicious packets and respond instantaneously. It can detect
“misuse” detections based on pre-defined attack patterns and “anomaly” detections based on violations
of protocol standards (RFCs – Requests for Comments) or abnormal flows such as port scans. The
rules that define “misuse” or “anomaly” detections and how to respond to them are called “IDP
policies”.
The ZyWALL ships with a built-in “pre-defined” policy set. This policy set can be regularly updated
(see Update). Regular updates are vital as new attack types evolve.
For people with knowledge of packet header types and OSI (Open System Interconnection), the IDP
allows you to create your own (“user-defined”) rules.
See the appendices for more information on IDP systems.
Rule ordering is important as rules are applied in turn. Pre-defined rules have already been ordered for
you and cannot be re-ordered.
User-defined rules are checked before pre-defined rules.
The total number of pre-defined and user-defined rules (maximum 128 rules permitted) allowed on the
ZyWALL is 3,000.
The ZyWALL cannot check encrypted traffic such as VPN tunnel
traffic. There is a log entry every hour that shows how many
encrypted packets have passed through the ZyWALL in one hour.
6.2 mySecurity Zone
mySecurity Zone is a web portal that provides all "security" related information for ZyXEL security
products.
You can find the policy description here that gives a detailed description about the intrusion for which
the policy was written. Copy the policy ID from the Note column in the Pre-defined screen or View
Log screen and paste it in a mySecurity zone search field to find detailed information about the
specific intrusion.
You can also find an advisory that tells you how to respond to new attacks.
If you have already registered your ZyWALL on myZyXEL.com, then you can use your
myzyXEL.com username and password to log into mySecurity Zone without having to register again
For more information on mySecurity zone, please visit http://www.mysecurity.zyxel.com.
IDP Policies 6-1
Page 48

ZyWALL IDP 10 User’s Guide
6.3 Signature Categories
This section defines some IDP terms used in the ZyWALL. See the appendices for more detailed
information on IDP term definitions. The following are both the pre-defined (not editable) and userdefined signature categories (you may refer to these policy categories when categorizing your own
user-defined rules.
6.3.1 P2P
Peer-to-peer (P2P) is where computing devices link directly to each other and can directly initiate
communication with each other; they do not need an intermediary. A device can be both the client and
the server. In the ZyWALL, P2P refers to peer-to-peer applications such as e-Mule, e-Donkey,
BitTorrent, iMesh etc. To find a list of all peer-to-peer signatures supported by the ZyWALL, do a
policy search by name (P2P) or policy query by type (P2P). The following screen shows some P2P
signatures supported by the ZyWALL at the time of writing.
Figure 6-1 P2P Signatures
6-2 IDP Policies
Page 49

ZyWALL IDP 10 User’s Guide
6.3.2 IM
IM (Instant Messaging) refers to chat applications. Chat is real-time, text-based communication
between two or more users via networked-connected computers. After you enter a chat (or chat room),
any room member can type a message that will appear on the monitors of all the other participants. To
find a list of all IM signatures supported by the ZyWALL, do a policy search by name (IM or chat) or
policy query by type (IM). The following screen shows some IM signatures supported by the
ZyWALL at the time of writing.
Figure 6-2 IM (Chat) Signatures
6.3.3 SPAM
Spam is unsolicited "junk" e-mail sent to large numbers of people to promote products or services. To
find a list of all spam signatures supported by the ZyWALL, do a policy search by name (spam) or
policy query by type (SPAM). The following screen shows some spam signatures supported by the
ZyWALL at the time of writing.
IDP Policies 6-3
Page 50

ZyWALL IDP 10 User’s Guide
Figure 6-3 Spam Signatures
6.3.4 DoS/DDoS
The goal of Denial of Service (DoS) attacks is not to steal information, but to disable a device or
network on the Internet. A distributed denial-of-service (DDoS) attack is one in which multiple
compromised systems attack a single target, thereby causing denial of service for users of the targeted
system. To find a list of all Denial of Service or Distributed Denial of Service signatures supported by
the ZyWALL, do a policy search by name (DoS) or policy query by type (DoS/DDoS). The following
screen shows some of the DoS/DDoS signatures supported by the ZyWALL at the time of writing.
Figure 6-4 DoS/DDoS Signatures
6-4 IDP Policies
Page 51

ZyWALL IDP 10 User’s Guide
6.3.5 Scan
Scan refers to all port, IP or vulnerability scans. Hackers scan ports to find targets. They may use a
TCP connect() call, SYN scanning (half-open scanning), Nmap etc. After a target has been found, a
layer-7 scanner can be used to exploit vulnerabilities. To find a list of all scan-related signatures
supported by the ZyWALL, do a policy search by name (scan) or policy query by type (Scan). The
following screen shows some of the scan-related signatures supported by the ZyWALL at the time of
writing.
Figure 6-5 Scan Signatures
6.3.6 Buffer Overflow
A buffer overflow occurs when a program or process tries to store more data in a buffer (temporary
data storage area) than it was intended to hold. The excess information can overflow into adjacent
buffers, corrupting or overwriting the valid data held in them.
Intruders could run codes in the overflow buffer region to obtain control of the system, install a
backdoor or use the victim to launch attacks on other devices.
To find a list of all buffer overflow related signatures supported by the ZyWALL, do a policy search
by name or policy query by type (Buffer Overflow). The following screen shows some of the buffer
overflow related signatures supported by the ZyWALL at the time of writing.
IDP Policies 6-5
Page 52

ZyWALL IDP 10 User’s Guide
Figure 6-6 Buffer Overflow Signatures
6.3.7 Virus/Worm
A computer virus is a small program designed to corrupt and/or alter the operation of other legitimate
programs. A worm is a program that is designed to copy itself from one computer to another on a
network. A worm’s uncontrolled replication consumes system resources thus slowing or stopping
other tasks.
To find a list of all virus/worm related signatures supported by the ZyWALL, do a policy search by
name or policy query by type (Virus/Worm). The following screen shows some of the virus/worm
related signatures supported by the ZyWALL at the time of writing.
6-6 IDP Policies
Page 53

ZyWALL IDP 10 User’s Guide
Figure 6-7 Worm/Virus Signatures
6.3.8 Backdoor/Trojan
A backdoor (also called a trapdoor) is hidden software or a hardware mechanism that can be triggered
gain access to a program, online service or an entire computer system. A Trojan horse is a harmful
to
program that s hidden inside apparently harmless programs or data.
To find a list of all backdoor/Trojan related signatures supported by the ZyWALL, do a policy search
by name or policy query by type (Backdoor/Trojan). The following screen shows some of the
backdoor/Trojan related signatures supported by the ZyWALL at the time of writing.
IDP Policies 6-7
Page 54

ZyWALL IDP 10 User’s Guide
Figure 6-8 Backdoor/Trojan Signatures
6.3.9 Access Control
Access control refers to procedures and controls that limit or detect access. Access control is used
typically to control user access to network resources such as servers, directories, and files.
To find a list of all access control related signatures supported by the ZyWALL, do a policy search by
name or policy query by type (Access Control). The following screen shows some of the access
control related signatures supported by the ZyWALL at the time of writing.
6-8 IDP Policies
Page 55

ZyWALL IDP 10 User’s Guide
Figure 6-9 Access Control Signatures
6.3.10 Web Attack
Web attack signatures refer to attacks on web servers such as IIS.
To find a list of all web attack related signatures supported by the ZyWALL, do a policy search by
name or policy query by type (Web Attack). The following screen shows some of the web attack
related signatures supported by the ZyWALL at the time of writing.
IDP Policies 6-9
Page 56

ZyWALL IDP 10 User’s Guide
Figure 6-10 Web Attack Signatures
6.3.11 Porn
The ZyWALL can block web sites if their URLs contain certain pornographic words. It cannot block
web pages containing those words if the associated URL does not.
To find a list of all porn related signatures supported by the ZyWALL, do a policy search by name or
policy query by type (Porn). The following screen shows some of the porn related signatures
supported by the ZyWALL at the time of writing.
6-10 IDP Policies
Page 57

ZyWALL IDP 10 User’s Guide
Figure 6-11 Porn Signatures
6.3.12 Others
This category refers to signatures for attacks that do not fall into the previously mentioned categories.
To find a list of all “others” related signatures supported by the ZyWALL, do a policy search by name
or policy query by type (Others). The following screen shows some of the “others” related signatures
supported by the ZyWALL at the time of writing.
IDP Policies 6-11
Page 58

ZyWALL IDP 10 User’s Guide
Figure 6-12 Others Signatures
6.3.13 Policy Severity
Intrusions are assigned a severity level based on the following table. The intrusion severity level then
determines the default signature action (see Table 6-2).
Table 6-1 Policy Severity
SEVERITY DESCRIPTION
Severe (5) These are intrusions that try to run arbitrary code or gain system privileges. The default action
for this level of intrusion is to block the traffic.
High (4) These are known serious vulnerabilities or intrusions that are probably not false alarms. The
default action for this level of intrusion is to block the traffic.
Medium (3) These are medium threats, access control intrusions or intrusions that could be false alarms.
The default action for this level of intrusion is to log the traffic.
Low (2) These are mild threats or intrusions that could be false alarms. The default action for this level
of intrusion is to log the traffic.
Very Low (1) These are possible intrusions caused by traffic such as Ping, trace route, ICMP queries etc.
The default action for this level of intrusion is to log the traffic.
6-12 IDP Policies
Page 59

ZyWALL IDP 10 User’s Guide
6.3.14 Policy Actions
Table 6-2 Policy Actions
ACTION DESCRIPTION
No Action
Log The packet is marked as an intrusion and a log is recorded (an alarm may also
Log + Drop Packet The packet is marked as an intrusion, a log is recorded and the packet is silently
Log + Block Connection The packet is marked as an intrusion, a log is recorded and the whole TCP
Log + Drop Packet + Block
Connection
The intrusion is detected and an alarm may be sent (if the Alarm check box is
selected) but no other action is taken. If the Alarm check box is also cleared, it is
recommended you simply disable the rule.
be sent if the Alarm check box is selected) but the packet is allowed to pass
through the ZyWALL.
discarded. (An alarm may also be sent if the Alarm check box is selected).
connection session is blocked (including subsequent TCP packets belonging to
the same connection) with both sender and receiver being sent TCP RST
packets. (An alarm may also be sent if the Alarm check box is selected).
The packet is marked as an intrusion, a log is recorded, the triggering packet is
silently discarded, and the whole TCP connection session is blocked (including
subsequent TCP packets belonging to the same connection) with both sender
and receiver being notified. (An alarm may also be sent if the Alarm check box is
selected).
6.4 Configuring Pre-defined Policies
Click IDP from the navigation panel. Pre-defined is the first screen as shown in the following figure.
IDP Policies 6-13
Page 60

ZyWALL IDP 10 User’s Guide
Figure 6-13 Pre-defined IDP Policies Summary
6-14 IDP Policies
Page 61

ZyWALL IDP 10 User’s Guide
Table 6-3 Selecting Pre-defined Policies
LABEL DESCRIPTION
Pre-defined Policy Group Setting
Modify Click this button to display a screen where you can batch enable or disable policy types
based on severity and/or target operating system. You can also batch enable or disable
peer-to-peer, instant messaging and spam signature categories.
Pre-defined Policy
Policy Search
Policy Query Alternatively, you can search for policies based on a combination of signature category
By Type Select one item or hold the <CTRL> key to select multiple items. See section 6.3 for
AND/OR
By Severity Select one item or hold the <CTRL> key to select multiple items. See Table 6-1 for more
By Operating
System
|<Prev Next >| Use these buttons to navigate between first, previous, next and last pages of the pre-
# This is the ore-defined policy index number. Pre-defined rules have already been
Enable Clear this checkbox to have the ZyWALL skip this rule when detecting intrusions. You
Alarm An alarm is an action (an e-mail is sent) to be taken on the policy when a packet
Type This field refers to the signature category as described in section 6.3.
Name The (read-only) policy name identifies a specific signature targeted at a specific
You can search for policies based on policy name or ID number. Select By Name or By
Policy ID form the drop-down list box, enter a (partial) name or a complete, exact ID
number in the text box and then click Search. The name entered in the text box is not
case sensitive.
After a search is performed, click IDP in the navigation panel to display all policies again.
(policy type), severity and/or attack target operating system. Hold the <CTRL> key to
select multiple items and then click Query. After a search is performed, click IDP in the
navigation panel to display all policies again.
more information on signature categories.
Logical AND means that all criteria must be fulfilled before a match is deemed found.
Logical OR means that at least one of the criteria must be fulfilled before a match is
deemed found.
information on policy severity.
This search category finds policies that were intended to defend specific operating
systems due to the intrusion being targeted at a weakness in that operating system.
Select one item or hold the <CTRL> key to select multiple items.
defined policies downloaded.
ordered for you and cannot be re-ordered.
can enable or disable individual policies here or enable/disable a batch of policies using
the screen that appears after you click Modify.
matches a rule. Alarm e-mails are not sent instantly but rather at periodic intervals
(minimum five minutes).
Select this checkbox to enable the alarm action. For other actions, select from the
Action drop-down list box.
intrusion.
IDP Policies 6-15
Page 62

ZyWALL IDP 10 User’s Guide
Table 6-3 Selecting Pre-defined Policies
LABEL DESCRIPTION
Direction A policy rule direction refers to the intent of the policy rule.
o Incoming means the policy applies to traffic coming from the WAN to the LAN.
o Outgoing means the policy applies to traffic coming from the LAN to the WAN.
o Bidirectional means the policy applies to traffic coming from and going to either
direction.
Some rules such as blocking MSN Login would only apply to outgoing traffic as the intent
is to block outgoing attempts to log into MSN Messenger. Similarly other rules would
only apply to incoming traffic where the intent is to take an action on traffic initiated from
somewhere on the WAN side. Pre-defined policies have the direction pre-determined.
Action This field defines the action to be taken for a rule match. See Table 6-2 for details on
actions.
You can change the specified default action for pre-defined rules. After you apply these
changes, your specified actions for pre-defined rules remain in effect even after you
update new rules or change modes (Inline to Monitor and back to Inline again).
An alarm is also an action to be taken on the policy, but you must select the Alarm
checkbox to have the ZyWALL send an alarm when a traffic flow matches a rule.
Note This field displays a policy ID number that gives details on the intrusion and the policy
fix. Log in and subscribe to the advisories at mysecurity.com for more information.
Apply Click this button to save your changes back to the ZyWALL.
Reset Click this button to begin configuring this screen afresh.
6.4.1 Search Example
The following screen displays when you perform a search for the “Sasser” virus. It shows that three
policies for the virus have been found. If the search finds more polices than one page can display, then
click Search again to display the next page.
6-16 IDP Policies
Page 63

ZyWALL IDP 10 User’s Guide
Figure 6-14 Search Example
6.4.2 Query Example
The following screen shows severe and high impact DoS/DDoS policies for intrusions that exploit
vulnerabilities on Windows 2000 and Windows XP computers. Use the <CTRL> key to select
multiple items. If the query finds more polices than one page can display, then click Query again to
display the next page.
Figure 6-15 Query Example
IDP Policies 6-17
Page 64

ZyWALL IDP 10 User’s Guide
6.4.3 Modify Screen
Click Modify in Figure 6-13 to display a screen where you can batch enable or disable policy types
based on severity and/or target operating system. You can also batch enable or disable peer-to-peer,
instant messaging and spam signature categories (see section 6.3).
As you can enable certain “attack group” items and at the same time disable certain “application
group” items (and vice versa), in some instances, conflict may occur. If conflict should occur, then the
action determined under “application group” takes precedence.
Figure 6-16 Pre-defined Policies: Modify
Table 6-4 Pre-defined IDP Policies
LABEL DESCRIPTION
ALL
Attack Group
Severity
Operation
Operating System
Select this checkbox and then select Enable or Disable to automatically enable or
disable all policies. When ALL is selected, Attack Group and Application Group
choices are not available. When ALL is cleared, you can enable or disable a group of
policies by severity (see Table 6-1), operating system or signature category (P2P, IM or
SPAM – see section 6.3.)
Select Enable to enable all policies that meet the following criteria.
If ALL is cleared (not selected), you may choose to enable or disabled policies based on
their seriousness (pre-determined by the IDP policy engineering team). See also Table
6-1.
Logical AND means that all criteria must be fulfilled before a match is deemed found.
Logical OR means that at least one of the criteria must be fulfilled before a match is
deemed found. Choose from the logical AND (rules that match both severity type and
selected operating systems are displayed) or logical OR ((rules that match either severity
type or selected operating systems are displayed) operators.
If ALL is not selected you may choose to display policies based on intrusions that attack
specific operating systems as shown in the screen. SGI refers to Silicon Graphics
Incorporated, who manufactures multi-user Unix workstations that run the IRIX operating
system (SGI's version of UNIX).
6-18 IDP Policies
Page 65

ZyWALL IDP 10 User’s Guide
Table 6-4 Pre-defined IDP Policies
LABEL DESCRIPTION
Application Group
Apply Click this button to save your changes back to the ZyWALL.
Cancel Click this button to close this screen without saving any changes.
If ALL is cleared (not selected), you may choose to enable or disabled policies based on
their signature category (P2P, IM or SPAM – see section 6.3.)
The action determined under “application group” takes precedence over any confliction
action determined under "attack group".
6.5 Update
The ZyWALL comes with a “pre-defined” set of policies that can be regularly updated. Regular
updates are vital as new intrusions evolve. Use the Update screen to immediately download or
schedule (pre-defined) new policy downloads. You should have already registered the ZyWALL (see
the Registration screen).
The ZyWALL does not have to restart when you update new
policies.
You cannot perform update on a port where stealth is enabled.
Click IDP from the navigation panel and then click the Update tab.
Figure 6-17 Update Policies
IDP Policies 6-19
Page 66

ZyWALL IDP 10 User’s Guide
Table 6-5 Update Policies
LABEL DESCRIPTION
Update Server Enter the IP address or URL of the IDP policy server (from which you download the
updated IDP policies).The default server at the time of writing is updateidp.zyxel.com. It
is also possible to use updateidp.zyxel.com.tw.
Check
Update Now
Auto Download &
Update
Update Schedule
Time Select the time you want the ZyWALL to begin automatically downloading policies from
Apply Click this button to save your changes back to the ZyWALL.
Reset Click this button to close this screen without saving any changes.
Click this button to have the ZyWALL verify that the connection to the specified Update
Server is valid.
Click this button to begin downloading policies from the Update Server immediately.
Select Enable to have the ZyWALL automatically download policies from the Update
Server regularly at the time and day specified below.
This is only relevant when you select Enable in Auto Download & Update.
Day Select the day(s) you want the ZyWALL to automatically download policies from the
Update Server.
the Update Server.
6.6 User-defined Policies
You need some knowledge of packet header types and OSI (Open System Interconnection) to create
your own User-defined rules.
Rule ordering is important as rules are applied in turn. You can order user-defined rules as you wish.
User-defined rules are checked before pre-defined rules.
The total number of pre-defined and user-defined rules allowed on the ZyWALL is 3,000. The total
number of user-defined rules allowed is 128. You can import up to a maximum of 128 rules as long as
the total (pre-defined and user-defined) number of rules does not exceed 3,000. Therefore if you have
2,900 pre-defined rules and 50 user-defined rules, you may only import up to an additional 50 userdefined rules. If you try to import more than this the import will fail.
User-defined policies of the same name are allowed as the ZyWALL uniquely identifies each userdefined rule by assigning a (hidden) ID number; however it is recommended you give unique names to
identify each rule more easily.
The ZyWALL cannot check encrypted traffic such as VPN tunnel
traffic. There is a log entry every hour that shows how many
encrypted packets have passed through the ZyWALL in one hour.
Click IDP from the navigation panel and then click the User-defined tab.
6-20 IDP Policies
Page 67

ZyWALL IDP 10 User’s Guide
Edit Delete
Figure 6-18 User-defined Policies
Table 6-6 User-defined Policies
LABEL DESCRIPTION
Enable Userdefined Policy
Import Userdefined Policy
File Path Save the file with the user-defined rules you want to import to your computer first. Then
Create Userdefined Policy
User-defined
Policy
# This is the policy index number. Rule ordering is important as rules are applied in turn.
This checkbox must be selected to have the ZyWALL check traffic using your custom
IDP rules. You may clear it to keep the rules but not have them applied to traffic.
Use these fields to import another person’s user-defined rules. The imported rules are in
binary format (not a text file), so they must be imported to the ZyWALL first and then
edited one by one if so desired. They cannot be edited before being imported.
type the file path and name in the text box or click Browse to find it on your computer
and finally click Import to import the file.
You can import up to a maximum of 128 rules as long as the total (pre-defined and userdefined) number of rules does not exceed 3,000.
User-defined rules of the same name are allowed so existing rules of the same name as
imported rules will not be overwritten.
This text box shows the number of user-defined rules already configured or imported in
the ZyWALL (maximum 128).
You can reorder user-defined rules using the Move button.
IDP Policies 6-21
Page 68

ZyWALL IDP 10 User’s Guide
Table 6-6 User-defined Policies
LABEL DESCRIPTION
Enable Use this checkbox to enable or disable an individual user-defined rule without deleting it.
Clear this checkbox to have the ZyWALL skip this (user-defined) rule when detecting
intrusions.
Alarm An alarm is an action (an e-mail is sent) to be taken on the policy when a packet
matches a rule. Alarm e-mails are not sent instantly but rather at periodic intervals
(minimum five minutes).
Select this checkbox to enable the alarm action. For other actions, select from the
Action drop-down list box.
Type Assign a signature category to your rule as described in section 6.3.
Name This is the rule name you configured for this intrusion type.
Direction A policy rule direction refers to the intent of the policy rule.
o Incoming means the policy applies to traffic coming from the WAN to the LAN.
o Outgoing means the policy applies to traffic coming from the LAN to the WAN.
o Bidirectional means the policy applies to traffic coming from and going to either
direction.
Action This field defines the action to be taken for a rule match. See Table 6-2 for details on
actions. An alarm is also an action to be taken on the policy, but you must select the
Alarm checkbox to have the ZyWALL send an alarm when a traffic flow matches a rule.
Note This field displays your added description of the rule you configured.
Modify
You may edit or delete an individual rule using these icons. Click to edit the rule or
click to delete the rule. Before the rule is deleted, you will first see a confirmation
dialog box.
6-22 IDP Policies
Page 69

ZyWALL IDP 10 User’s Guide
Table 6-6 User-defined Policies
LABEL DESCRIPTION
Export
Insert Click this button to configure a new user-defined policy. Type a number where the rule
Move Type the rule number that should be moved in the first textbox (that follows this label),
Apply Click this button to save your changes back to the ZyWALL.
Select the rule(s) you want to export and the click the Export button. You are then
prompted to save the file to your computer.
A name is generated for the file but you may change this name to something more
meaningful.
should be inserted in the textbox that follows this label. Rule ordering is important as
rules are applied in turn.
type the index number it should be moved to in the second textbox and then click Move
to rearrange this rule. Rule ordering is important as rules are applied in turn.
6.6.1 Configuring a User-defined IDP Policy
All “policy attributions” have a logical AND relationship, that is, all “policy attributions” criteria must
be met before a match is deemed found. Similarly, all “packet contents” have a logical AND
relationship, that is, all “packet contents” criteria must be met before a match is deemed found.
“Policy attributions” and “packet contents” also have a logical AND relationship, that is, both of the
criteria (“policy attributions” and “packet contents”) must be met before a match is deemed found.
From Figure 6-18, click Insert to create a new user-defined IDP policy.
IDP Policies 6-23
Page 70

ZyWALL IDP 10 User’s Guide
“Policy attributions”
“Packet contents”
Figure 6-19 Configuring a User-defined IDP Policy
6-24 IDP Policies
Page 71

ZyWALL IDP 10 User’s Guide
Table 6-7 Configuring a User-defined IDP Policy
LABEL DESCRIPTION
Attributions The “attributions” define the characteristics of the intrusion for which you’re configuring a
policy. A traffic flow must match your operating system selections, your protocol
definition and your repetition designation before your rule is invoked.
Name Type a meaningful rule name to identify this policy. You can enter up to 128 single-Byte
or double-Byte characters.
Type Select an appropriate signature category as described in section 6.3.
Note Type some added description for the rule you’re configuring.
Target Select the target operating systems that the intrusion for which you’re configuring a
policy apply (that is, the operating systems you want to protect from this intrusion). SGI
refers to Silicon Graphics Incorporated, who manufactures multi-user Unix workstations
that run the IRIX operating system (SGI's version of UNIX).
Protocol
Severity Assign a severity level based on the seriousness of the intrusion for which you’re
Frequency For the protocol defined, type how many packets of the type defined, received on the
Action Select what the ZyWALL should do in response to detecting packets with the above-
IP Header The next fields define the traffic flow direction, source IP address and destination IP
Direction A policy rule direction refers to the intent of the policy rule.
Select the protocol (IP, ICMP, IGMP, TCP or UDP) that characterizes this intrusion type.
You then fill in the corresponding protocol header information further below in this
screen. For example, if you choose IP, then fill in the corresponding IP Header fields
(the other header fields will not be editable).
configuring a policy. See Table 6-1 as a reference on policy severity.
ZyWALL per second constitute an “intrusion”.
defined attributes. You can choose to drop the packet, block the connection, e-mail an
alarm and/or create a log.
address to which the policy applies. These fields are only editable when you select IP
from the Protocol field above.
o Incoming means the policy applies to traffic coming from the WAN to the LAN.
o Outgoing means the policy applies to traffic coming from the LAN to the WAN.
o Bidirectional means the policy applies to traffic coming from and going to either
direction.
Some rules such as blocking MSN Login would only apply to outgoing traffic as the intent
is to block outgoing attempts to log into MSN Messenger. Similarly other rules would
only apply to incoming traffic where the intent is to take an action on traffic initiated from
somewhere on the WAN side. Select a direction for user-defined policies if you are clear
on which direction the initiating traffic (from somewhere on the WAN or somewhere on
the LAN) the policy action should apply to; if you’re unsure, select Bidirectional.
IDP Policies 6-25
Page 72

ZyWALL IDP 10 User’s Guide
Table 6-7 Configuring a User-defined IDP Policy
LABEL DESCRIPTION
Source IP
Destination IP
TCP Header
Source Port
Destination Port
UDP Header
Source Port
Destination Port
ICMP Header
Type
Code
IGMP Header
Select whether the policy applies to source packets that match (Equal), don’t match (Not
Equal), are within the range (In Set), are outside the range (Not In Set), have IP
addresses that come after the number specified in the range (Greater), have IP
addresses that come before the number specified in the range (Lesser) or all source IP
addresses (Don’t Care)
Then type an IP address and subnet mask in the corresponding textboxes to define a
network range of IP addresses (subnet).
Select whether the policy applies to destination packets that match (Equal), don’t match
(Not Equal), are within the range (In Set), are outside the range (Not In Set), have IP
addresses that come after the number specified in the range (Greater), have IP
addresses that come before the number specified in the range (Lesser) or all source IP
addresses (Don’t Care). Then type an IP address and subnet mask in the corresponding
textboxes to define a network range of IP addresses (subnet).
These fields are only editable when you select TCP from the Protocol field described
above.
Select whether the policy applies to source ports that match (Equal), don’t match (Not
Equal), are greater than (>), or lesser than (<) the port range you type in the From and
To text boxes that follows.
Select whether the policy applies to destination ports that match (Equal), don’t match
(Not Equal), are greater than (>), or lesser than (<) the port range you type in the From
and To text boxes that follows.
These fields are only editable when you select UDP from the Protocol field described
above.
Select whether the policy applies to source ports that match (Equal), don’t match (Not
Equal), are greater than (>), or lesser than (<) the port range you type in the From and
To text boxes that follows.
Select whether the policy applies to destination ports that match (Equal), don’t match
(Not Equal), are greater than (>), or lesser than (<) the port range you type in the From
and To text boxes that follows.
These fields are only editable when you select ICMP from the Protocol field described
above.
Select whether the policy applies to ICMP types that match (Equal), don’t match (Not
Equal), are greater than (>), or lesser than (<) the ICMP type you type in the text box
that follows.
Select whether the policy applies to ICMP codes that match (Equal), don’t match (Not
Equal), are greater than (>), or lesser than (<) the ICMP code you type in the text box
that follows.
These fields are only editable when you select IGMP from the Protocol field described
above.
6-26 IDP Policies
Page 73

ZyWALL IDP 10 User’s Guide
Table 6-7 Configuring a User-defined IDP Policy
LABEL DESCRIPTION
Type
Packet Content Packet Content parameters are for searching packet payloads. Do a traffic packet trace
Select whether the policy applies to IGMP types that match (Equal), don’t match (Not
Equal), are greater than (>), or lesser than (<) the IGMP type you type in the text box
that follows.
when an attack occurs and then isolate the part of the trace that identifies the attack, so
you can paste the identifying portion into the following field(s) to identify the attack.
Matching Offset and Matching Depth apply to all strings. The order in which they’re
found doesn’t matter (that is string 3 could be found before string 1 as long as it’s within
the depth defined). String overlaps are also allowed.
All strings must be found to constitute a
match.
Matching Offset
Matching Depth
Method
Content 1~6 Type or paste the content (string or hexadecimal characters) into the corresponding
Apply Click this button to save your changes back to the ZyWALL.
Cancel Click this button to close this screen without saving any changes.
Matching Offset defines the payload start point. If Protocol type is IP, then the
matching starting point is at the end of the layer-3 header; otherwise, it starts matching
from the end of the layer-4 header.
Matching Depth the length of the payload to search for a match.
Choose from Case sensitive (upper case and lower case letters are considered
different), Case insensitive (upper case and lower case letters are considered the
same), URL string (a complete web site address), Hexadecimal (0-9 and a –f
characters).
The URL string is case insensitive, can include the character ‘?’ and spaces and
ignores character order. Therefore “/cgi-bin/foo.exe?p1=abc&p2=def” and “/cgibin/foo.exe?p2=def&p1=abc” are considered a match. Extra parameters in the payload
don’t matter either. For example, a pattern “/cgi-bin/foo.exe?p1=abc&p2=def” would
match a packet with URL string “/cgi-bin/foo.exe?p0=xyz&p1=abc&p2=def”.
content field(s).
IDP Policies 6-27
Page 74

ZyWALL IDP 10 User’s Guide
6.6.2 Packet Content Example
In the following example, the rule is for the IP protocol, so the payload search begins at the end of
layer-3. Three strings (S1, S2 and S3) have been defined and have been found after the Matching
Offset (10) and within the Matching Depth (70). The order in which they are found doesn’t matter.
The same matching offset and depth applies to all strings and string overlaps are allowed.
Header
Depth = 70
Offset = 10
S3
Protocol = IP
S1
End of Layer-3
header
10 20 30 40 50 60 70 80 90
S2
6.7 Registering your ZyWALL
Use the Registration screen to enable IDP service on the ZyWALL. You need to do tis before you
update new policies. Follow this procedure to do this.
1. Go to http://www.myZyXEL.com
2. If you have not already done so for another ZyXEL product, create a myZyXEL.com account
containing a login name and password. You will need a valid e-mail address to which a
subscription code is sent that validates your e-mail address and login name/password.
3. Register your ZyXEL product, for example the ZyWALL IDP 10. You will need the product
serial number and authentication code (product MAC address), which should be found on a
label in the package that contained the product.
4. After you have registered the product, go to the product details and click the intrusion policy
service Activate
1
link.
, ZyXEL Communications online services center.
5. A screen then displays showing an Activation Key. This information is also sent to your
myZyXEL.com-registered e-mail address. Store this e-mail for future reference.
6. Log into the ZyWALL web configurator; click IDP and then the Registration tab to display
the screen as shown next.
1
Actual label names are liable to change, but the intent should remain the same. These are the label names used
at the time of writing.
6-28 IDP Policies
Page 75

ZyWALL IDP 10 User’s Guide
7. Paste the key generated in step 5 in to the Registration screen1 and click Apply.
Figure 6-20 Registering ZyWALL
Table 6-8 Registering ZyWALL
LABEL DESCRIPTION
Registration Status
Activation Key Paste the generated key as described in step 5, section 6.7. Be careful to avoid
Apply Click this button to save your changes back to the ZyWALL.
Reset Click this button to close this screen without saving any changes.
This read-only label displays Unregistered even after you paste the Activation
Key and click Apply in this screen. It will only display Registered after you paste
the Activation Key, click Apply in this screen and then update your pre-defined
policies at updateidp.zyxel.com or updateidp.zyxel.com.tw.
pasting trailing spaces.
IDP Policies 6-29
Page 76

Log and Report
PPaarrtt IIVV::
Log and Report
This part explains how to configure logs, setup reports and schedule alarms.
IV
Page 77

ZyWALL IDP 10 User’s Guide
Chapter 7
Log and Report
This chapter describes how to use the Log and Report screens.
7.1 Logs
To view logs and alert messages, click LOGS under the LOG & REPORT heading in the MAIN
MENU of the Web Configurator.
The log wraps around and deletes the old entries after it fills. You can re-order the logs according to
time generated by clicking the Time column title. A triangle indicates the direction of the sort order.
To configure your ZyWALL’s system logs, click LOGS in the MAIN MENU of the Web
Configurator.
Figure 7-1 View Log
The following table describes the fields in this screen.
Log and Report 7-1
Page 78

ZyWALL IDP 10 User’s Guide
Table 7-1 View Log
LABEL DESCRIPTION
Logs
Display Select a log category from the drop down list box to display logs within the selected
category:
o All Logs (view all logs)
o System Log (view logs related with the ZyWALL such as login to the ZyWALL or
startup)
o IDP Event Log (view logs related to detected intrusions)
Clear Click this button clear all the logs.
Refresh Click this button to refresh the log screen.
Page Use the dropdown list to select the log page you want.
|<Prev Next >| Use these buttons to navigate between first, previous, next and last pages of the logs.
# This displays the number of the log that was recorded.
Time This field displays the date and time the log was recorded.
Message This field states the reason for the log.
Source This field lists the source IP address and the port number of the packet that caused the
log.
Destination This field lists the destination IP address and the port number of the packet that caused
the log.
Action This field displays the action taken on the packet that caused the (IDP event) log.
Note This field displays additional information about the log entry.
7.2 Report
You can send logs by e-mail or send them to a syslog server.
7.2.1 E-Mail
Use the E-Mail Setup screen to configure to where and when the ZyWALL is to send logs by e-mail.
Logs may be e-mailed as soon as the log is full (see Report Schedule).
Click REPORT under the LOG & REPORT heading in the MAIN MENU of the web configurator,
and then click the E-MAIL tab.
7-2 Log and Report
Page 79

ZyWALL IDP 10 User’s Guide
Figure 7-2 Report: E-Mail
The following table describes the fields in this screen.
Table 7-2 Report: E-Mail
LABEL DESCRIPTION
E-Mail Setup
Active Click this button to enable e-mailed reports and allow editing of the fields below.
Report Schedule Select the frequency of e-mailed reports: weekly, daily, hourly, or only when the log is
full. If the Weekly or Daily option is selected, specify a time of day when the e-mail
should be sent. If the Hourly option is selected, specify the time (minutes and hour) that
the e-mail should be sent. If the Weekly option is selected, then also specify which day
of the week the e-mail should be sent. If the When Log is Full option is selected, a log
is sent as soon as the log fills up.
Day to report Select which day of the week to send the logs.
Time to report Type the time of the day in 24-hour format (for example 23:00 equals 11:00 PM) to send
the logs.
Mail Server Type the IP address or URL of the mail server. If this field is left blank, reports will not be
sent via e-mail. Your mail server must not request a username or password. If it does,
you must disable this first before using it to send ZyWALL reports. If this field is left
blank, reports will not be sent via e-mail.
Send From Type the sender e-mail address in this field.
Recipient(s) Type up to three e-mail address(es) separated by semi-colons of people who should
receive these reports.
Subject Type a title that you want to be in the subject line of the report that the ZyWALL sends.
Log and Report 7-3
Page 80

ZyWALL IDP 10 User’s Guide
Table 7-2 Report: E-Mail
LABEL DESCRIPTION
Apply Click this button to save your changes back to the ZyWALL.
Reset Click this button to begin configuring this screen afresh.
7.2.2 Syslog
Syslog logging sends a log to an external syslog server used to store logs.
Figure 7-3 Report: syslog
The following table describes the fields in this screen.
Table 7-3 Report: syslog
LABEL DESCRIPTION
Syslog Logging
Active
Syslog Server Enter the server name or IP address of the syslog server that will log the selected
Log Facility Select a location from the drop down list box. The log facility allows you to log the
Click Active to enable syslog logging.
categories of logs.
messages to different files in the syslog server. Refer to the documentation of your
syslog program for more details.
7.3 Alarm Schedule
An alarm is a “warning log” generated by an event that warrants more serious attention. They include
system errors and serious intrusions.
Click ALARM under the LOG & REPORT heading in the MAIN MENU of the Web Configurator.
7-4 Log and Report
Page 81

ZyWALL IDP 10 User’s Guide
Figure 7-4 Alarm
The following table describes the fields in this screen.
Table 7-4 Alarm
LABEL DESCRIPTION
Alarm Schedule
Active Select this field to activate your ZyWALL's alarm schedule as configured in the fields
below.
Period This field is used to configure the frequency of alarm messages. Alarm messages are
not sent instantaneously. There is a minimum wait period of five minutes between when
alarm messages are sent out.
Mail Server Type the IP address or URL of the mail server. If this field is left blank, alarms will not be
sent via e-mail. Your mail server must not request a username or password. If it does,
you must disable this first before using it to send ZyWALL alarms.
Send From Type the sender e-mail address in this field.
Recipient(s) Type up to three e-mail address(es) separated by semi-colons of people who should
receive these reports.
Subject Type a title that you want to be in the subject line of the alarm that the ZyWALL sends.
Apply Click this button to save your changes back to the ZyWALL.
Reset Click this button to begin configuring this screen afresh.
Log and Report 7-5
Page 82

Maintenance
PPaarrtt VV::
Maintenance & CLI
This part provides information on how to the ZyWALL maintenance screens and an introduction to the
Command Line Interface (CLI).
V
Page 83

ZyWALL IDP 10 User’s Guide
Chapter 8
Maintenance
8.1 Maintenance Overview
Use the maintenance screens to change the ZyWALL password, ZyWALL time, upload firmware,
manage configuration files and restart the ZyWALL.
8.2 Password
Use the Password screen to change the ZyWALL password. You should do this regularly for security
reasons.
Figure 8-1 Maintenance: Password
Table 8-1 Maintenance: Password
LABEL DESCRIPTION
Old Password Type the default password or the existing password you use to access the system in this
field.
New Password Type your new system password (minimum of 1 to 64 printable characters). Note that as
you type a password, the screen displays an asterisk (*) for each character you type.
Password Confirm Type the new password again in this field.
Apply Click this button to save your changes back to the ZyWALL.
Reset Click this button to begin configuring this screen afresh.
8.2.1 Forget Password
If you forgot your password, then you will have to reset it to the factory defaults (“1234”) from debug
mode via the console port.
1. Turn off and then turn on the ZyWALL or use the
Maintenance Screens 8-1
reboot command to restart the ZyWALL.
Page 84

ZyWALL IDP 10 User’s Guide
2. As the ZyWALL restarts you must enter debug mode before the login screen appears. Press
<ENTER> within 5 seconds of when the console screen displays “Press ENTER to enter Debug
Mode”.
3. Type
reset after the “debug”prompt. You will lose all your custom ZyWALL configurations
including your user-defined rules. (If you type
reset all, then all pre-defined rules will be
erased too). The IP address of the ZyWALL will be “192.168.1.3” and the password will be
“1234”.
4. Type
reboot to restart the ZyWALL and complete the reset. (This is also how you exit debug
mode.)
The following screen is an example of how you reset the ZyWALL to the factory defaults while in
debug mode.
IDS system kernel loader v1.0.0.0 2004/04/02 (ZyXEL)
Press ENTER to enter Debug Mode
Enter DEBUG Mode
…..
Loading Kernel Image <DBGBOOT>
…………………………………….
Checksum is valid.
Starting address is at 0x100000
Kernel image load completed.
Starting kernel…
DebugKernel Version 1.0.4 (2004/05/05)
DBG>
DBG>reset
Are you sure to reset all settings to manufacturing defaults? (y/n)y
Reset to defaults OK. Please reboot to apply new change.
DBG>reboot
Figure 8-2 Debug Mode Reset Example
8.3 Time and Date
To change your ZyWALL’s time and date, click MAINTENANCE, then the Time and Date tab. The
screen appears as shown. Use this screen to configure the ZyWALL’s time based on your local time
zone.
8.3.1 Pre-defined NTP Time Servers List
The ZyWALL uses the following pre-defined list of NTP timeservers if you do not specify a
timeserver or it cannot synchronize with the timeserver you specified.
8-2 Maintenance Screens
Page 85

ZyWALL IDP 10 User’s Guide
The ZyWALL can use this pre-defined list of timeservers
regardless of the Time Protocol you select.
When the ZyWALL uses the pre-defined list of NTP timeservers, it randomly selects one server and
tries to synchronize with it. If the synchronization fails, then the ZyWALL goes through the rest of the
list in order from the first one tried until either it is successful or all the pre-defined NTP timeservers
have been tried.
Table 8-2 Default Time Servers
ntp1.cs.wisc.edu
ntp1.gbg.netnod.se
ntp2.cs.wisc.edu
tock.usno.navy.mil
ntp3.cs.wisc.edu
ntp.cs.strath.ac.uk
ntp1.sp.se
time1.stupi.se
tick.stdtime.gov.tw
tock.stdtime.gov.tw
time.stdtime.gov.tw
Maintenance Screens 8-3
Page 86

ZyWALL IDP 10 User’s Guide
Figure 8-3 Maintenance: Time Setting
Table 8-3 Time and Date
LABEL DESCRIPTION
Current Time and Date
Current
Time
Current
Date
Time and Date Setup
Manual Select this radio button to enter the time and date manually. When you configure a new time and date manually,
This field displays the time of your ZyWALL.
Each time you reload this page, the ZyWALL synchronizes the time with the timeserver (if configured).
This field displays the date of your ZyWALL.
Each time you reload this page, the ZyWALL synchronizes the date with the timeserver (if configured).
the Time Zone settings are ignored.
8-4 Maintenance Screens
Page 87

ZyWALL IDP 10 User’s Guide
Table 8-3 Time and Date
LABEL DESCRIPTION
New Time
(hh:mm:ss)
New Date
(yyyy-mm-
Get from
Time Server
Time
Protocol
This field displays the last updated time from the timeserver or the last time configured manually.
When you set Time and Date Setup to Manual, enter the new time in this field and then click Apply.
This field displays the last updated date from the timeserver or the last date configured manually.
When you set Time and Date Setup to Manual, enter the new date in this field and then click Apply.
dd)
Select this radio button to have the ZyWALL get the time and date from the timeserver you specify below.
Select the time service protocol that your timeserver sends when you turn on the ZyWALL.
The NTP (RFC 1305) format displays a 4-byte integer giving the total number of seconds since 1970/1/1 at 0:0:0.
Time Server
Address
Synchronize
Time Zone Setup
Time Zone This field is only applicable when the ZyWALL gets the time from a timeserver. Choose the time zone of the
Enable
Daylight
Saving
Start Date
(mm-dd)
End Date
(mm-dd)
Apply
Reset
Enter the IP address or URL of a timeserver. Check with your ISP/network administrator if you are unsure of this
information. The ZyWALL uses a pre-defined list of NTP timeservers if you do not specify a timeserver or it cannot
synchronize with the timeserver you specified (see section 8.3.1).
Click this button and wait for one minute to have the ZyWALL get the time and date from a timeserver (see the
Time Server Address field). This also saves your changes (including the time server address).
Now
location of the ZyWALL from the drop-down list box. This will set the time difference between your time zone and
Greenwich Mean Time (GMT).
Daylight saving is a period from late spring to early fall when many countries set their clocks ahead of normal local
time by one hour to give more daytime light in the evening.
Select this option if you use daylight savings time.
Enter the month and day that your daylight-savings time starts on if you selected Enable Daylight Saving.
Enter the month and day that your daylight-savings time ends on if you selected Enable Daylight Saving.
Click Apply to save your changes back to the ZyWALL.
Click Reset to begin configuring this screen afresh.
8.3.2 Time Server Synchronization
Click the Synchronize Now button to get the time and date from the predefined timeserver or the
timeserver you specified in the Time Server Address field.
When the System Time and Date Synchronization in Process screen appears, wait up to one minute.
Maintenance Screens 8-5
Page 88

ZyWALL IDP 10 User’s Guide
Figure 8-4 Synchronization in Process
Click the Return button to go back to the Time and Date screen after the time and date is updated
successfully.
Figure 8-5 Synchronization is Successful
If the update was not successful, the following screen appears. Click Return to go back to the Time
and Date screen.
Figure 8-6 Synchronization Fail
8.4 Firmware Upload
Find firmware at www.zyxel.com in a file that (usually) uses the system model name with a "*.bin"
extension, e.g., "zywall.bin". The upload process uses HTTP (Hypertext Transfer Protocol) and may
take up to two minutes. After a successful upload, the system will reboot. Use the Firmware Upload
screen to schedule and upload firmware to the ZyWALL.
8-6 Maintenance Screens
Page 89

ZyWALL IDP 10 User’s Guide
The ZyWALL will restart automatically after a firmware upload is
performed.
Figure 8-7 Maintenance: F/W Upload
Table 8-4 Maintenance: F/W Upload
LABEL DESCRIPTION
Local Upgrade
File Path Type in the location of the file you want to upload in this field or click Browse ... to find it.
Maintenance Screens 8-7
Page 90

ZyWALL IDP 10 User’s Guide
LABEL DESCRIPTION
Table 8-4 Maintenance: F/W Upload
Browse...
Upload
Remote Upgrade
Update Server
Update Now
Auto Download &
Update
Apply
Schedule: You need to select Enable in the Auto Download & Update field before setting a schedule.
Check &
Download
Click Browse... to find the .BIN file you want to upload. Remember that you must
decompress compressed (.ZIP) files before you can upload them.
Click Upload to begin the upload process. This process may take up to two minutes.
Type in the IP address of the server from which to download the firmware to your
ZyWALL. Remember that you must first decompress compressed (.ZIP) files.
The default server at the time of writing is updateidp.zyxel.com. It is also possible to use
updateidp.zyxel.com.tw.
Click Check to check that the link to the remote server is valid.
Check
Click Update Now to immediately download the firmware file from the server and
upload it your ZyWALL.
Click Enable to allow your ZyWALL to automatically download and update firmware
(need restart) on the days and times specified below.
Click Disable to disallow your ZyWALL from automatically downloading and updating
firmware.
Click Apply to save your changes back to the ZyWALL.
Select the day(s) to check for new firmware downloads.
Select the time (hour and minutes) to check for new firmware downloads.
If there is new firmware found on the specified update server, it is downloaded to the
ZyWALL but not updated, so the ZyWALL does not have to restart. Choose a day and
time to download new firmware to the ZyWALL when the network path from the
ZyWALL to the update server will be least busy.
Select the day(s) to upload new firmware to the ZyWALL. The firmware should have
already been downloaded to the ZyWALL.
Upgrade & Reboot
Apply
Select the time (hour and minutes) to upload new firmware to the ZyWALL.
The ZyWALL will automatically restart after uploading, so it is recommended to choose
a day and time to upload new firmware when your network is not so busy, so as to
minimize interruption.
Click Apply to save your changes back to the ZyWALL.
Do not turn off the ZyWALL while firmware upload is in
progress!
After you see the Firmware Upload in Process screen, wait two minutes before logging into the
ZyWALL again.
8-8 Maintenance Screens
Page 91

ZyWALL IDP 10 User’s Guide
Figure 8-8 Firmware Upload in Progress
The ZyWALL automatically restarts in this time causing a temporary network disconnect. In some
operating systems, you may see the following icon on your desktop.
Figure 8-9 Network Temporarily Disconnected
After two minutes, log in again and check your new firmware version in the System Status screen.
If the upload was not successful, the following screen will appear. Click Return to go back to the
F/W Upload screen.
Maintenance Screens 8-9
Page 92

ZyWALL IDP 10 User’s Guide
Figure 8-10 Firmware Upload Error
8.5 Configuration
Use the Configuration screen to backup and restore ZyWALL configuration files or reset to the
factory default configuration file.
The ZyWALL configuration file includes all ZyWALL system settings and user-defined rules, but
NOT pre-defined rules.
8-10 Maintenance Screens
Page 93

ZyWALL IDP 10 User’s Guide
Figure 8-11 Maintenance: Configuration
8.5.1 Backup Configuration
Backup Configuration allows you to back up (save) the ZyWALL’s current configuration to a file on
your computer. Once your ZyWALL is configured and functioning properly, it is highly recommended
that you back up your configuration file before making configuration changes. The backup
configuration file will be useful in case you need to return to your previous settings.
Click Backup to save the ZyWALL’s current configuration to your computer.
8.5.2 Restore Configuration
Restore Configuration allows you to upload a new or previously saved configuration file from your
computer to your ZyWALL.
Table 8-5 Restore Configuration
LABEL DESCRIPTION
File Path
Browse...
Upload
Type in the location of the file you want to upload in this field or click Browse ... to find it.
Click Browse... to find the file you want to upload.
Click Upload to begin the upload process.
Maintenance Screens 8-11
Page 94

ZyWALL IDP 10 User’s Guide
The ZyWALL will restart automatically after a configuration
restore is performed. Do not turn off the device while configuration
file upload is in progress.
After you see a “configuration upload successful” screen, you must then wait one minute before
logging into the device again.
The device automatically restarts in this time causing a temporary network disconnect.
If you uploaded the default configuration file you may need to change the IP address of your computer
to be in the same subnet as that of the default device IP address. See your Quick Start Guide for details
on how to set up your computer’s IP address.
If the upload was not successful, you will see a Restore configuration error screen.
8.5.3 Back to Factory Defaults
Pressing the Reset button in this section clears all user-entered configuration information, including
user-defined rules (nut not pre-defined rules) and returns the ZyWALL to its factory defaults as shown
on the screen. A warning screen appears first.
If you want to revert to factory default configurations (with no user-defined rules) AND clear all predefined rules use the
reset all command from the console port.
8.6 Restart
Restart allows you to reboot the ZyWALL without turning the power off. Click MAINTENANCE,
and then Restart.. This does not affect the ZyWALL's configuration.
Figure 8-12 Maintenance: Restart
8-12 Maintenance Screens
Page 95

ZyWALL IDP 10 User’s Guide
Chapter 9
Command Line Interface Overview
This chapter briefly introduces the command line interface and lists the available commands.
See the Support CD for detailed information on using commands.
In addition to the web configurator, you can use commands to configure the ZyWALL.
It is recommended that you use the web configurator for
everyday management of the ZyWALL and that only qualified
engineers use commands for advanced switch diagnosis and
troubleshooting.
However, if you have problems with your ZyWALL, customer support may request that you issue
some of these commands to assist them in troubleshooting.
Telnet to you ZyWALL or connect a computer to the console port and use terminal emulation software
configured to the following parameters:
VT100 terminal emulation 9600 bps
No parity, 8 data bits, 1 stop bit No flow control
9.1 Command Syntax Conventions
The command keywords are in courier new font.
1. There is no command history. Previously typed commands are not remembered and must be
reentered.
2. The command keywords must be entered exactly as shown, or abbreviate each part of the
command to three letters (only).
3. The required fields in a command are enclosed in angle brackets (<>), for instance,
list port <port #>
means that you must specify the port number for this command.
4. The optional fields in a command are enclosed in square brackets ([]), for instance,
config [save]
means that the save field is optional.
5. A “|” means “or”
[on|off]
means that you can use either on or off.
6. “Command” refers to a command used in the command line interface (CLI command).
CLI Overview 9-1
Page 96

ZyWALL IDP 10 User’s Guide
9.1.1 Help Facility
You can issue the help or help all command at any time. The system will display a list of
available commands in response.
9.2 Login
When you log in you will be prompted for the username (“admin”) and password (default is “1234”).
If you changed the password in the web configurator, then use that new password here. If the
password prompt appears before the username prompt, press <ENTER> until you are prompted for
the username. Then enter
admin (this is not changeable) followed by the password at the password
prompt followed by <ENTER>.
You will have to disable stealth on the LAN port or WAN port
before being allowed to manage the ZyWALL from that port.
9.3 Commands
The following table lists all of the commands that you can use with the ZyWALL.
Refer to the Support CD for detailed information on using
commands in the command line interface.
Table 9-1 Commands Summary
COMMAND DESCRIPTION
Set Log logmax Set the maximum number of logs
the device generates every
second
System passwd
<value>
system
timeout
backup Back up configuration
restore Restore configuration
vlan id Set up vlan id
link <UnTAg|Tag> Enable/disable vlan tag
ip <ip
address>
mask Set up device subnet mask
gateway Set up device gateway ip address
detect vpnbypass <ON/OFF> Allow/disallow bypass of VPN
portscan <ON/OFF> Allow/disallow port scanning
fragment <ON/OFF> Enable/disable fragment function
Set up the login password. This is
same password used for console,
SSH and web login.
Set up the management idle
timeout
Set up device ip address
packets it doesn’t recognize.
9-2 CLI Overview
Page 97

ZyWALL IDP 10 User’s Guide
Table 9-1 Commands Summary
COMMAND DESCRIPTION
stateful <ON/OFF> Enable/disable TCP state check
integrity <ON/OFF> Enable /disable TCP packet state
integrity using this command
tcptimeout <value> Set the maximum TCP idle
timeout (this is how long a TCP
connection is allowed to remain
idle.
pinglen <value> Set up maximum ping length
pingmax <value> wan Set up maximum ping packet
accepted at wan port
lan Set up maximum ping packet
accepted at lan port
policy wan
<ON/OFF>
lan
<ON/OFF>
Interface link wan 10
<half/full>
100
<half/full>
auto
<half/full>
lan 10
<half/full>
100
<half/full>
auto
<half/full>
stealth wan <ON/OFF> Enable/disable stealth mode on
lan <ON/OFF> Enable/disable stealth mode on
Remote snmp on
<LAN+MGMT/WAN+MGMT/MGMT/ALL>
off Disable remote snmp access
acl <ip address> Set up access control list ip
commnuity ro <value> Set up community read only string
Enable remote snmp access from
Set up policy check on/off wan
port. Policy checks include both
user-defined and pre-defined
rules.
Set up policy check on/off loan
port
Set up wan port speed 10 at
full/half duplex
Set up wan port speed 100 at
full/half duplex
Enable auto negotiation
Set up lan port speed 10 at
full/half duplex
Set up lan port speed 100;
atfull/half duplex
Enable auto negotiation
the wan port. Replies to outgoing
traffic are not allowed. When a
port is in stealth mode, you
cannot do remote management
nor policy checks on that port.
thelan port
LAN+MGMT/WAN+MGMT/MGMT
ONLY/ALL port
address
CLI Overview 9-3
Page 98

ZyWALL IDP 10 User’s Guide
Table 9-1 Commands Summary
COMMAND DESCRIPTION
rw <value> Set up community read/write
string
trap
<value>
system name <value> Set up remote snmp system
trap <ON/OFF> Enable/disable remote snmp trap
trap ip <value> Set up remote snmp trap send to
ssh on
<LAN+MGMT/WAN+MGMT/MGMT/ALL>
off Disable remote SSH access
acl <ip address> Set up access control list ip
web on
<LAN+MGMT/WAN+MGMT/MGMT/ALL>
off Disable remote we access
acl <ip address> Set up access control list ip
Get State Get system state (Inline, Monitor
Log Get device log
System Get system information
Time Get device time
Interface Get interface information
All Get all information
Remote Get remote access information
Reboot Restart the device. Use this
Help Displays a “help” message
Reset Resets the ZyWALL to the factory
Reset
All
Netstat Display network state
Ping Perform Ping from the ZyWALL
As Reset and erases all pre-
Enable remote SSH access from
Enable remote web access from
Set up snmp trap
name
ip address
LAN+MGMT/WAN+MGMT/MGMT
ONLY/ALL port
address
LAN+MGMT/WAN+MGMT/MGMT
ONLY/ALL port
address
or Bypass).
command to also exit debug
mode.
defaults and erases all userdefined policies.
defined policies too.
9-4 CLI Overview
Page 99

ZyWALL IDP 10 User’s Guide
Table 9-1 Commands Summary
COMMAND DESCRIPTION
Arp Display address resolution
protocol information (device MAC
address and IP address table).
CLI Overview 9-5
Page 100

Appendices & Index
PPaarrtt VVII::
Appendices & Index
This part provides some adbanced background information on IDP.
VI
 Loading...