

Page 1
GS1200-5 / GS1200-8
5-Port / 8-Port Web Managed
Gigabit Switch
Back
Front
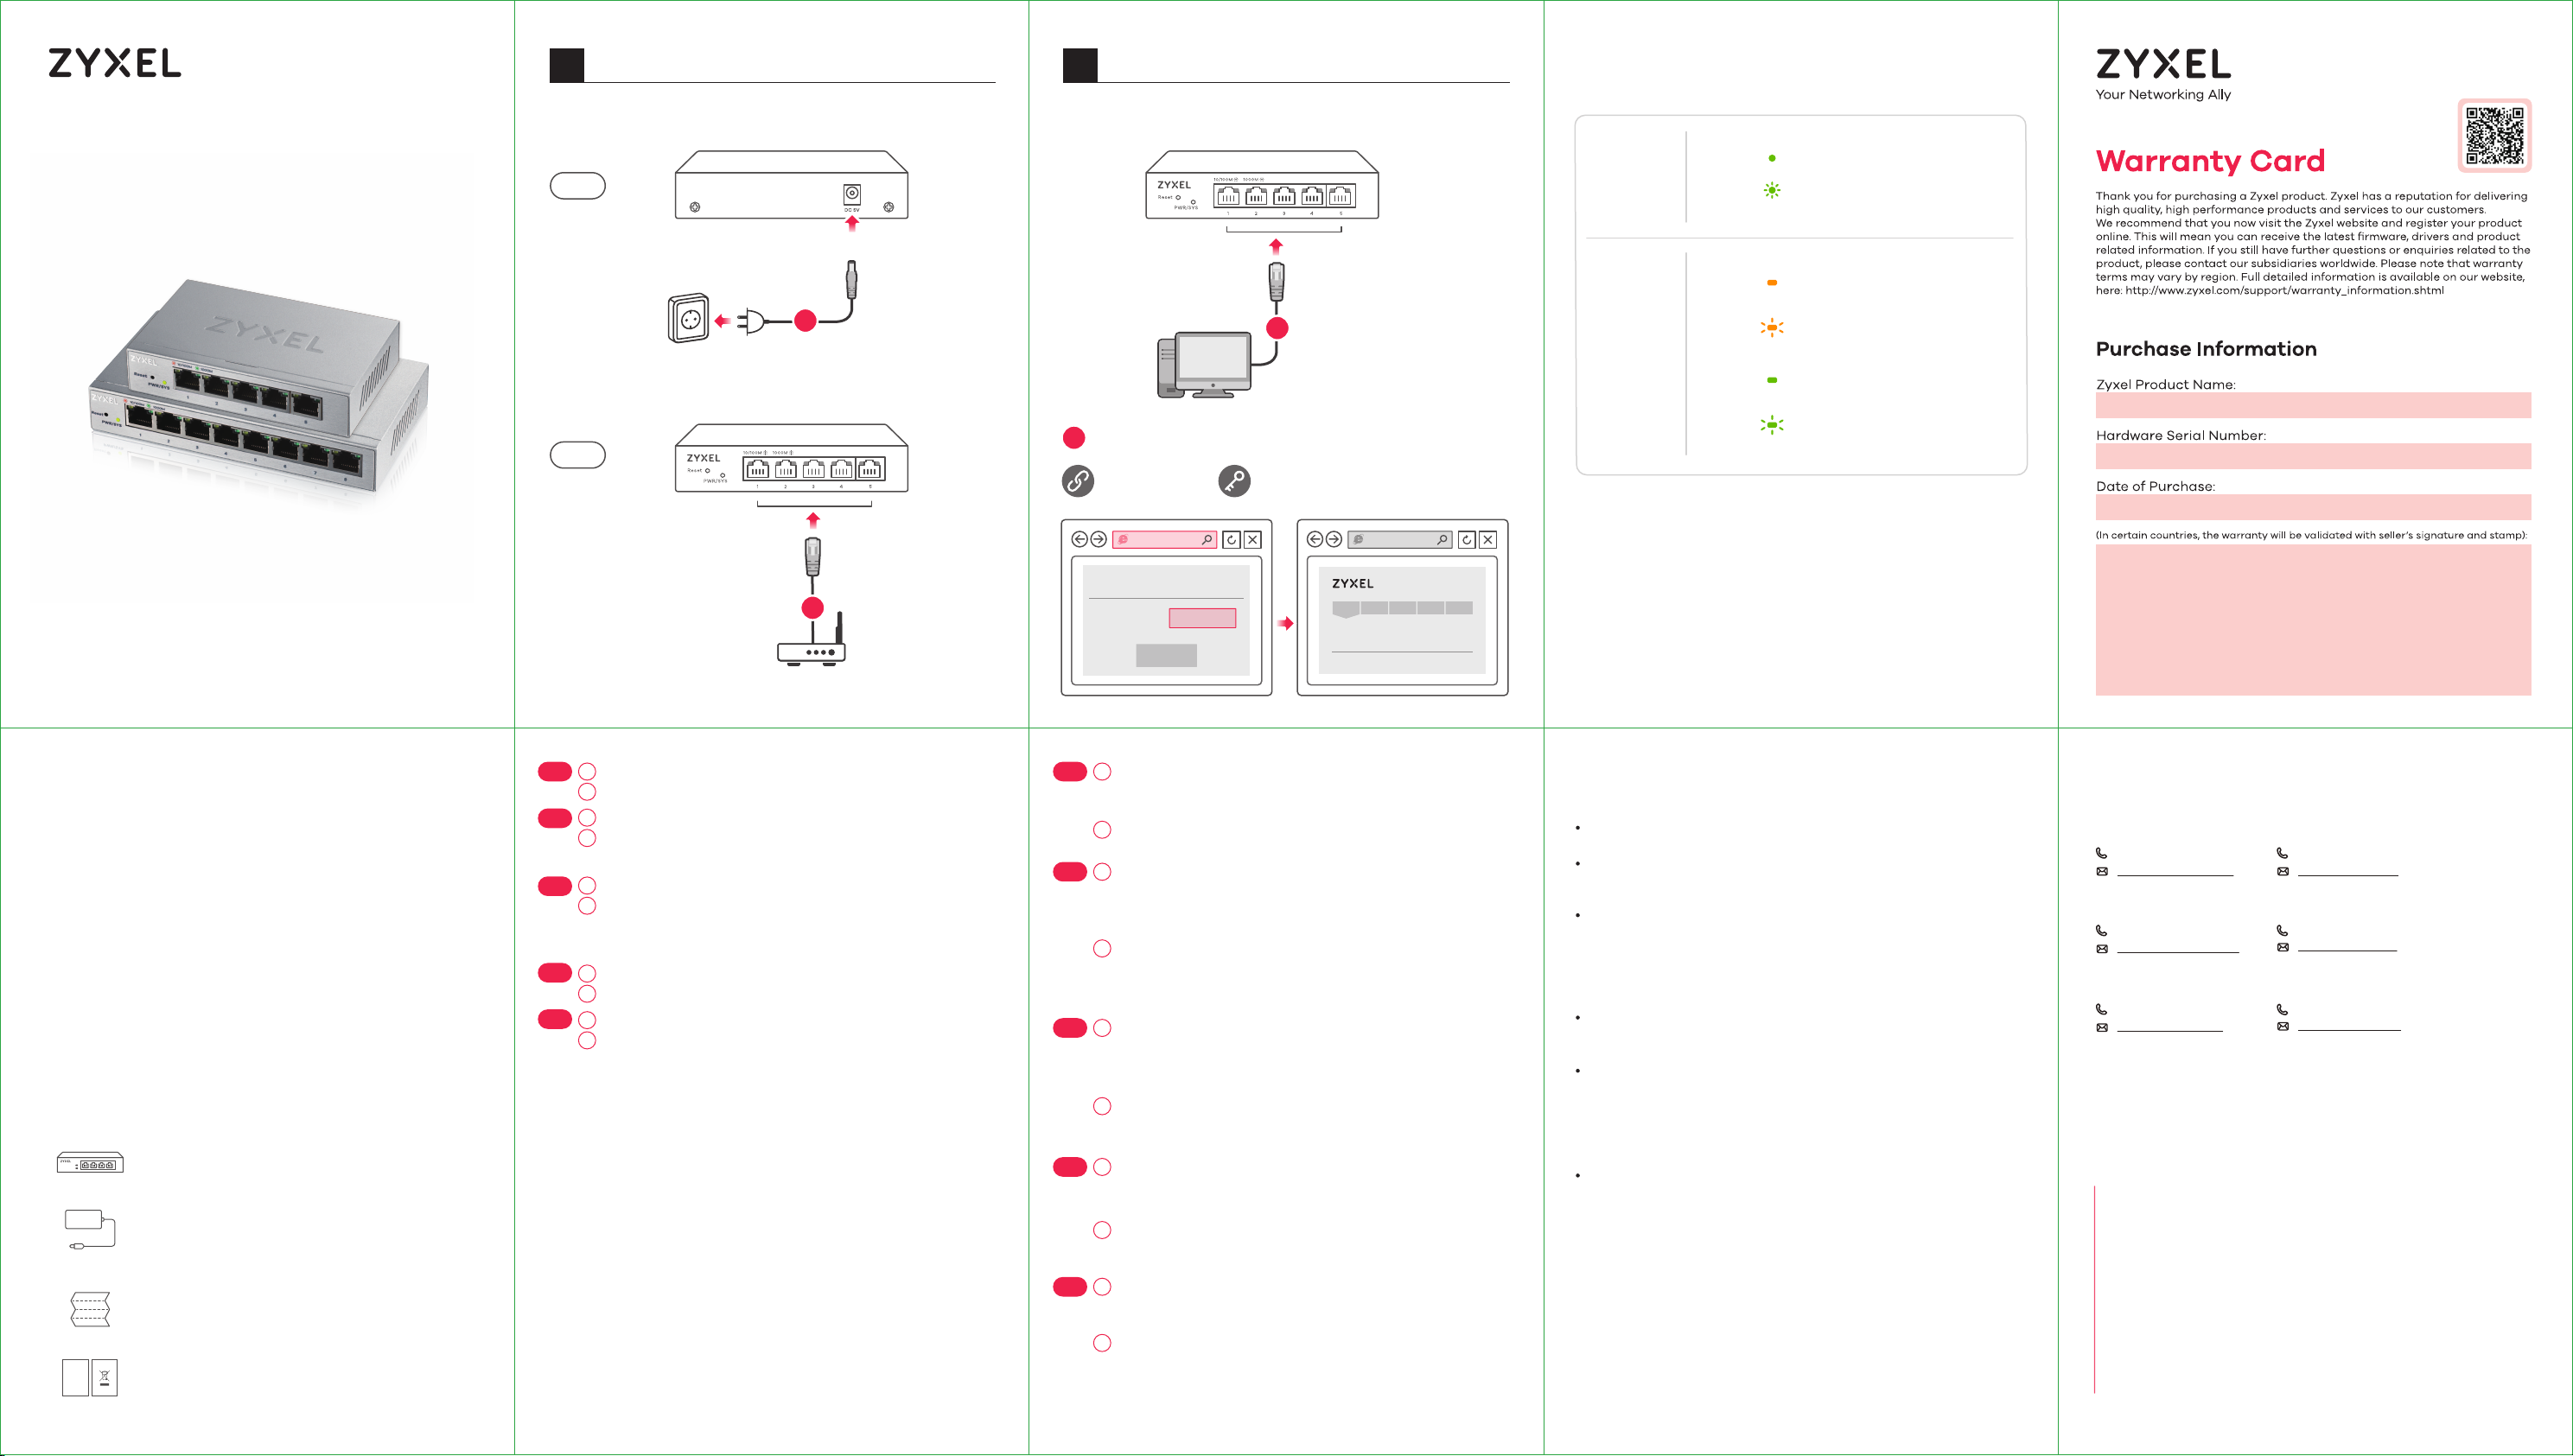
Hardware Installation1
Power Outlet
1
DC 5V
Manage Your Device2
4
http://192.168.1.3
3
PC IP:
192.168.1.4 ~ 192.168.1.254
Password : 1234
(default)
Switch IP:
192.168.1.3
LEDs
PWR/SYS Green
LINK/ACT
Amber
Green
On - Power on
Blinking - Starting up
- 10/100 Mbps
On
connection ready
Blinking - Data transmitting
- 1000 Mbps
On
connection ready
Blinking - Data transmitting
Quick Start Guide
ENGLISH | DEUTSCH | FRANÇAIS | ITALIANO
ESPAÑOL | NEDERLANDS | DANSK | NORSK
SVENSKA | SUOMI
Package Contents
DoC
Switch
Power Adapter
QSG
Declaration of Conformity
Safety Warning
EN
DE
FR
IT
ES
2
Modem / Router
Connect to an appropriate power source.
1
2
Connect to a modem or router that has internet access.
An eine geeignete Stromquelle anschließen.
1
2
An ein Modem oder einen Router mit Internetanschluss
anschließen.
Connectez-vous à une source d'alimentation appropriée.
1
2
Connectez-vous à un modem ou un routeur ayant accès
à Internet.Connectez-vous à un modem ou un routeur
ayant accès à Internet.
Collegare ad una fonte di alimentazione appropriata.
1
2
Connettersi a un modem o router con accesso Internet.
Conecte a una fuente de corriente apropiada.
1
2
Conectar a un módem o router con acceso a Internet.
Password 1234
3
EN
4
3
DE
4
3
FR
4
3
IT
4
3
ES
4
Log in
System Information
SIGN IN
Connect your computer to the Switch using an Ethernet
cable. Your computer must have an IP address in the
same subnet as the Switch.
Launch your web browser and go to http://192.168.1.3. Enter
1234 as the password. Click SIGN IN.
Verwenden Sie ein Ethernet-Kabel, um den Computer mit
dem Switch zu verbinden. Ihr Computer muss eine
IP-Adresse im gleichen Subnetz wie der Switch selbst
haben.
Starten Sie Ihre Web Browser und gehen Sie auf
http://192.168.1.3. Geben Sie admin als den Anwendernamen und 1234 als das Passwort ein.
Klicken Sie auf SIGN IN.
Connectez votre ordinateur au commutateur à l'aide d’un
câble Ethernet. Votre ordinateur doit disposer d'une
adresse IP dans le même sous-réseau que le
commutateur.
Lancez votre navigateur web et allez à http://192.168.1.3.
Entrez admin comme nom d’utilisateur et 1234 comme
mot de passe. Cliquez sur SIGN IN.
Collegare il computer allo Switch utilizzando un cavo
Ethernet. Il computer deve avere un indirizzo IP nella
stessa sottorete dello switch.
Avviare il browser e inserire l’indirizzo http://192.168.1.3.
Immettere admin come nome utente e 1234 come
password. Fare clic su SIGN IN.
Conecte su ordenador al conmutador usando un cable
Ethernet. Su ordenador debe tener una dirección IP en la
misma subred que el conmutador.
Abra el navegador web y vaya a http://192.168.1.3. Escriba
el nombre de usuario admin y la contraseña 1234. Haga
clic en SIGN IN.
Troubleshooting
I cannot see or access the Login screen in the Web Configurator.
Make sure you are using the correct IP address.
(The default IP address is 192.168.1.3.)
Make sure your computer is in the same subnet as the Switch. If you
haven’t changed the default IP address, your computer IP address should
be in the 192.168.1.4 ~ 168.1.254 range.
Make sure you have entered the Password correctly. If you have changed
the Password and have forgotten it, you’ll have to reset the Switch to its
factory default.
(The default Password is 1234.)
A loop is detected.
A loop may happen in the following example situations:
1. The Switch is connected to another device in a loop state.
2. The Switch is connected to another device with two cables.
Loop Prevention is enabled by default. If a loop happens, the Switch will
block the port in a loop state. If a loop happens on two ports, the Switch
will block the higher-numbered port. For example, if a loop happens on
ports 4 and 5, the Switch will block port 5, and its LED will be off. To restore
a port in a loop state, disconnect it, check the network connections, and
reconnect it.
You can log into the Web Configurator. Go to System in the Web
Configurator to check your port status.
Support Information
North America
USA
+ 1 800 255 4101
support@zyxel.com
UK
+ 44 (0) 118 9121 700
support@zyxel.co.uk
Germany
+ 49 (0) 2405 6909 0
support@zyxel.de
See the User's Guide at www.zyxel.com
for more information, including customer
support and safety warnings.
EU Importer
Zyxel Communications A/S
Generatorvej 8D, 2860 Søborg, Denmark.
http://www.zyxel.dk
US Importer
Zyxel Communications, Inc
1130 North Miller Street Anaheim, CA 92806-2001
http://www.us.zyxel.com
Copyright © 2017 Zyxel Communications Corp. All Rights Reserved.
France
+ 33 (0)4 72 52 97 97
support@zyxel.fr
Italy
+ 39 011 2308000
support@zyxel.it
Spain
+ 911 792 100
soporte@zyxel.es
Page 2
GS1200-5 / GS1200-8
5-Port / 8-Port Web Managed
Gigabit Switch
Back
Front
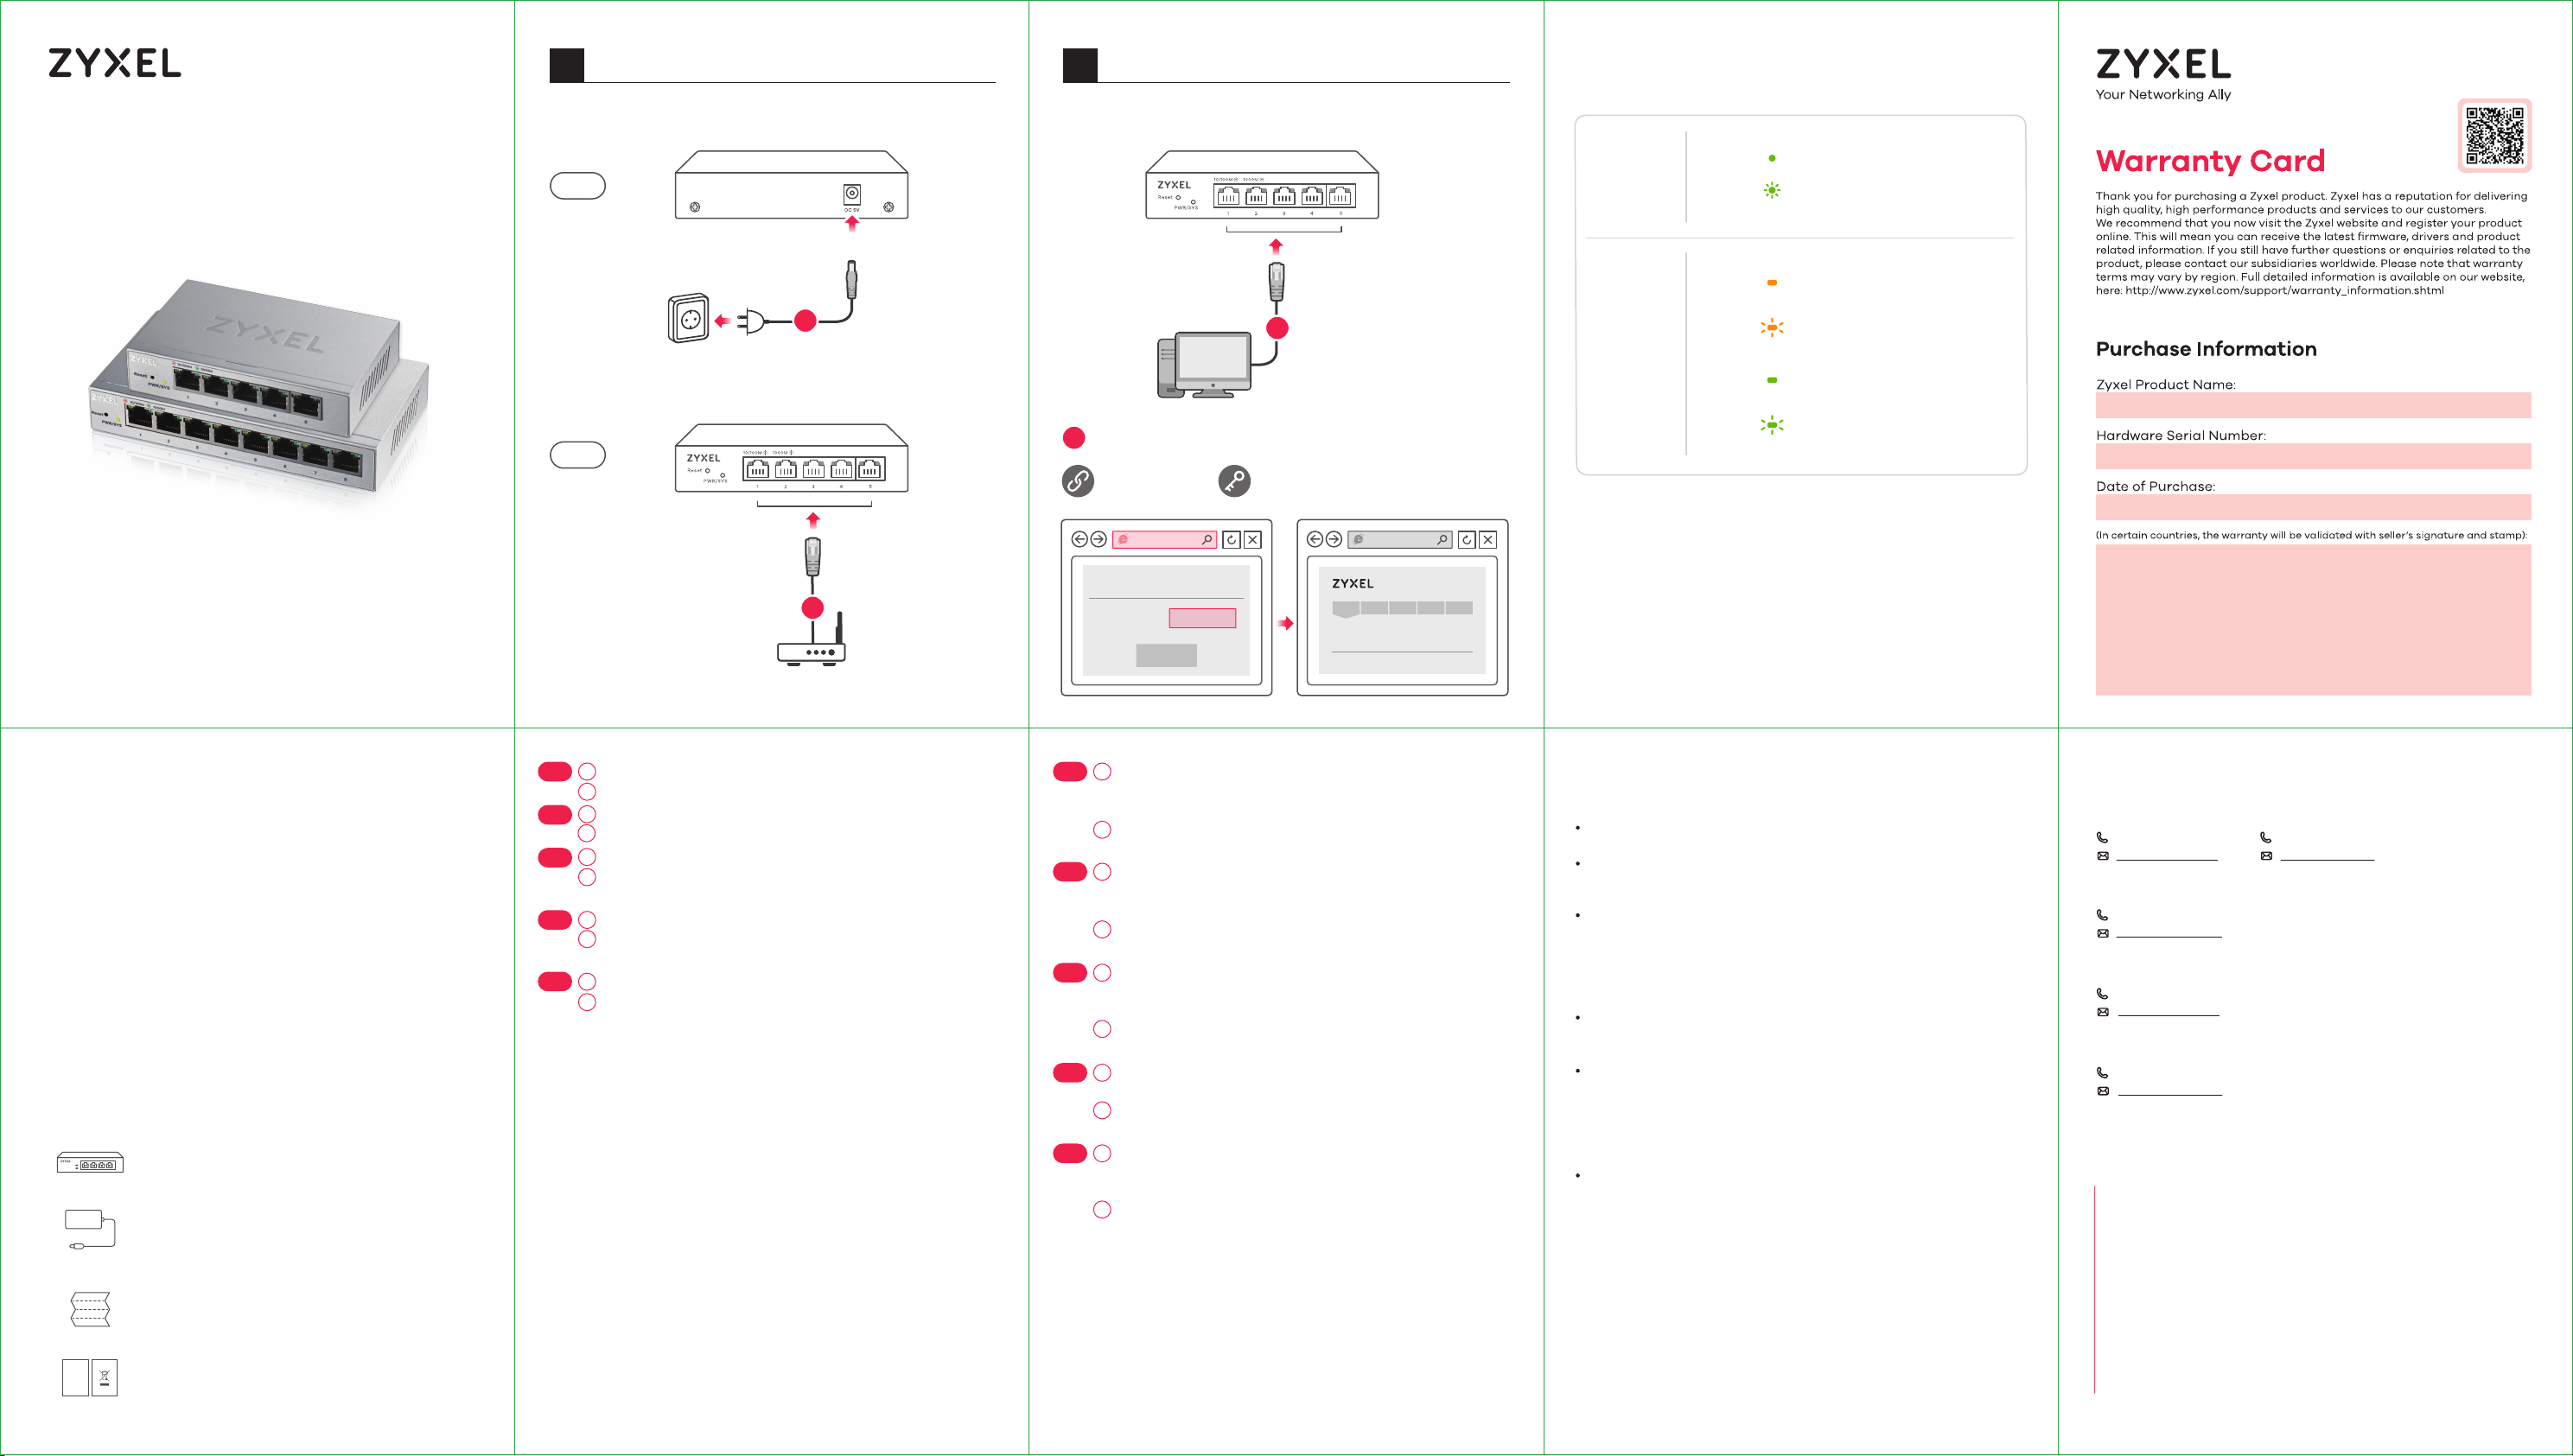
Hardware Installation1
Power Outlet
1
DC 5V
Manage Your Device2
4
http://192.168.1.3
3
PC IP:
192.168.1.4 ~ 192.168.1.254
Password : 1234
(default)
Switch IP:
192.168.1.3
LEDs
PWR/SYS Green
LINK/ACT
Amber
Green
On - Power on
Blinking - Starting up
- 10/100 Mbps
On
connection ready
Blinking - Data transmitting
- 1000 Mbps
On
connection ready
Blinking - Data transmitting
Quick Start Guide
ENGLISH | DEUTSCH | FRANÇAIS | ITALIANO
ESPAÑOL | NEDERLANDS | DANSK | NORSK
SVENSKA | SUOMI
Package Contents
DoC
Switch
Power Adapter
QSG
Declaration of Conformity
Safety Warning
NL
DK
NO
SE
FI
2
Modem / Router
Sluit aan op een geschikte stroombron.
1
Sluit aan op een modem of router met internetverbinding.
2
Tilslut til en relevant strømkilde.
1
2
Tilslut til et modem eller router der har internetadgang.
1
Koble til en hensiktsmessig strømkilde.
Koble til et modem eller en ruter som har
2
Internett-tilgang.
Anslut till en lämplig strömkälla.
1
Anslut till ett modem eller en router som har internetåt-
2
komst.
1
Liitä laite yhteensopivaan virtalähteeseen.
2
Liitä laite modeemiin tai reitittimeen, josta on
Internet-yhteys.
Password 1234
3
NL
4
3
DK
4
3
NO
4
3
SE
4
3
FI
4
Log in
System Information
SIGN IN
Sluit uw computer aan op de Schakelaar met een
Ethernet-kabel. Uw computer dient een IP-adres te
hebben in hetzelfde subnet als de Schakelaar.
Open uw webbrowser en ga naar http://192.168.1.3. Voer
1234 in als wachtwoord. Klik op AANMELDEN.
Tilslut din computer til switchen ved brug af et
Ethernet-kabel. Din computer skal have en IP-adresse i
det samme undernet som switchen.
Start din webbrowser og gå til http://192.168.1.3. Indtast
1234 som adgangskode. Klik på SIGN IN (Log på).
Koble datamaskinen til bryteren ved hjelp av en
Ethernet-kabel. Datamaskinen må ha en IP-adresse i
samme subnett som bryteren.
Åpne nettleseren og gå til http://192.168.1.3. Angi 1234 som
passord. Klikk på LOGG PÅ.
Anslut datorn till switchen med en Ethernet-kabel. Datorn
måste ha en IP-adress i samma subnät som switchen.
Starta din webbläsare och gå till sidan http://192.168.1.3.
Skriv in 1234 som lösenord. Klicka på LOGGA IN.
Liitä tietokone kytkimeen Ethernet-kaapelilla.
Tietokoneen IP-osoitteen on oltava samassa aliverkossa
kytkimen IP-osoitteen kanssa.
Avaa selain ja siirry osoitteeseen https://192.168.1.3. Kirjoita
salasanaksi 1234. Valitse SIGN IN (KIRJAUDU).
Troubleshooting
I cannot see or access the Login screen in the Web Configurator.
Make sure you are using the correct IP address.
(The default IP address is 192.168.1.3.)
Make sure your computer is in the same subnet as the Switch. If you
haven’t changed the default IP address, your computer IP address should
be in the 192.168.1.4 ~ 168.1.254 range.
Make sure you have entered the Password correctly. If you have changed
the Password and have forgotten it, you’ll have to reset the Switch to its
factory default.
(The default Password is 1234.)
A loop is detected.
A loop may happen in the following example situations:
1. The Switch is connected to another device in a loop state.
2. The Switch is connected to another device with two cables.
Loop Prevention is enabled by default. If a loop happens, the Switch will
block the port in a loop state. If a loop happens on two ports, the Switch
will block the higher-numbered port. For example, if a loop happens on
ports 4 and 5, the Switch will block port 5, and its LED will be off. To restore
a port in a loop state, disconnect it, check the network connections, and
reconnect it.
You can log into the Web Configurator. Go to System in the Web
Configurator to check your port status.
Support Information
Netherlands
+31 (0)88-00029112
support@zyxel.nl
Denmark
+ 45 30 55 07 00
support@zyxel.dk
Norway
+ 47 22 80 61 80
teknisk@zyxel.no
Sweden
+ 46 8 557 760 60
support@zyxel.se
See the User's Guide at www.zyxel.com
for more information, including customer
support and safety warnings.
EU Importer
Zyxel Communications A/S
Generatorvej 8D, 2860 Søborg, Denmark.
http://www.zyxel.dk
US Importer
Zyxel Communications, Inc
1130 North Miller Street Anaheim, CA 92806-2001
http://www.us.zyxel.com
Copyright © 2017 Zyxel Communications Corp. All Rights Reserved.
Finland
+ 358 9 4780 8400
teknisk@zyxel.fi
Page 3

GS1200-5 / GS1200-8
5-Port / 8-Port Web Managed
Gigabit Switch
Back
Front
Hardware Installation1
Power Outlet
1
DC 5V
Manage Your Device2
4
http://192.168.1.3
3
PC IP:
192.168.1.4 ~ 192.168.1.254
Password : 1234
(default)
Switch IP:
192.168.1.3
LEDs
PWR/SYS Green
LINK/ACT
Amber
Green
On - Power on
Blinking - Starting up
- 10/100 Mbps
On
connection ready
Blinking - Data transmitting
- 1000 Mbps
On
connection ready
Blinking - Data transmitting
Quick Start Guide
ČEŠTINA | SLOVENČINA | POLSKI | ROMÂNĂ
MAGYAR | SLOVENŠČINA | БЪЛГАРСКИ | TÜRK
ภาษาไทย | 繁體中文
Package Contents
DoC
Switch
Power Adapter
QSG
Declaration of Conformity
Safety Warning
CZ
SK
PL
RO
HU
2
Modem / Router
Připojte do odpovídajícího zdroje energie.
1
Zapojte do modemu nebo směrovače s přístupem k
2
internetu.
1
Pripojte k vhodnému zdroju napájania.
Pripojte k modemu alebo smerovaču s prístupom do
2
internetu.
1
Podłącz do odpowiedniego źródła zasilania.
Podłącz do modemu lub routera z dostępem do Internetu.
2
1
Conectați la o sursă de alimentare corespunzătoare.
Conectați la un modem sau router care este prevăzut cu
2
acces la internet.
Csatlakoztasson egy megfelelő áramforrást.
1
Csatlakoztasson egy internetkapcsolattal rendelkező
2
modemet vagy útválasztót.
Password 1234
3
CZ
4
3
SK
4
3
PL
4
3
RO
4
3
HU
4
Log in
System Information
SIGN IN
Kabelem sítě Ethernet připojte počítač nebo notebook k
přepínači. Počítač musí mít stejnou IP adresu ve stejné
podsíti jako přepínač.
Spusťte webový prohlížeč a přejděte na http://192.168.1.3.
Jako heslo zadejte 1234.
Klikněte na možnost SIGN IN (Přihlásit se).
Pomocou kábla siete Ethernet pripojte svoj počítač k
zariadeniu Switch. Adresa IP vášho počítača musí byť v
rámci rovnakej podsiete ako je zariadenie Switch.
Otwórz przeglądarkę internetową i wpisz adres
http://192.168.1.3. Podaj hasło 1234.
Kliknij SIGN IN (zaloguj się).
Podłącz komputer lub notebook do przełącznika,
korzystając z kabla sieciowego. Komputer musi mieć
adres IP w tej samej podsieci, co przełącznik.
Lansați navigatorul dvs. web și accesați http://192.168.1.3.
Introduceți 1234 ca parolă.
Dați clic pe SIGN IN (AUTENTIFICARE).
Conectați-vă computerul la Comutator cu ajutorul unui
cablu Ethernet. Computerul dvs. trebuie să aibă o adresă
IP în aceeași subrețea ca și Comutatorul.
Indítsa el a webböngészőt és írja be a http://192.168.1.3
címet. Adja meg az 1234 jelszót.
Kattintson a SIGN IN (bejelentkezés) gombra.
Csatlakoztassa számítógépét a switch-hez egy Ethernet
kábellel. Számítógépének a switch alhálózatához tartozó
IP címmel kell rendelkeznie.
Spusťte webový prohlížeč a přejděte na http://192.168.1.3.
Jako heslo zadejte 1234.
Klikněte na možnost SIGN IN (Přihlásit se).
Troubleshooting
I cannot see or access the Login screen in the Web Configurator.
Make sure you are using the correct IP address.
(The default IP address is 192.168.1.3.)
Make sure your computer is in the same subnet as the Switch. If you
haven’t changed the default IP address, your computer IP address should
be in the 192.168.1.4 ~ 168.1.254 range.
Make sure you have entered the Password correctly. If you have changed
the Password and have forgotten it, you’ll have to reset the Switch to its
factory default.
(The default Password is 1234.)
A loop is detected.
A loop may happen in the following example situations:
1. The Switch is connected to another device in a loop state.
2. The Switch is connected to another device with two cables.
Loop Prevention is enabled by default. If a loop happens, the Switch will
block the port in a loop state. If a loop happens on two ports, the Switch
will block the higher-numbered port. For example, if a loop happens on
ports 4 and 5, the Switch will block port 5, and its LED will be off. To restore
a port in a loop state, disconnect it, check the network connections, and
reconnect it.
You can log into the Web Configurator. Go to System in the Web
Configurator to check your port status.
Support Information
Czech
+ 420 241 774 665
support@cz.zyxel.com
Slovakia
+ 421 220 861 848
soporte@sk.zyxel.com
Poland
+ 48 22 652 16 26
support@pl.zyxel.com
Romania
info@ro.zyxel.com
See the User's Guide at www.zyxel.com
for more information, including customer
support and safety warnings.
EU Importer
Zyxel Communications A/S
Generatorvej 8D, 2860 Søborg, Denmark.
http://www.zyxel.dk
US Importer
Zyxel Communications, Inc
1130 North Miller Street Anaheim, CA 92806-2001
http://www.us.zyxel.com
Copyright © 2017 Zyxel Communications Corp. All Rights Reserved.
Hungary
+ 36 1 848 0690
support@zyxel.hu
Page 4

GS1200-5 / GS1200-8
5-Port / 8-Port Web Managed
Gigabit Switch
Back
Front
Hardware Installation1
Power Outlet
1
DC 5V
Manage Your Device2
4
http://192.168.1.3
3
PC IP:
192.168.1.4 ~ 192.168.1.254
Password : 1234
(default)
Switch IP:
192.168.1.3
LEDs
PWR/SYS Green
LINK/ACT
Amber
Green
On - Power on
Blinking - Starting up
- 10/100 Mbps
On
connection ready
Blinking - Data transmitting
- 1000 Mbps
On
connection ready
Blinking - Data transmitting
Quick Start Guide
ČEŠTINA | SLOVENČINA | POLSKI | ROMÂNĂ
MAGYAR | SLOVENŠČINA | БЪЛГАРСКИ | TÜRK
ภาษาไทย | 繁體中文
Package Contents
DoC
Switch
Power Adapter
QSG
Declaration of Conformity
Safety Warning
SL
BG
TR
TH
TW
2
Modem / Router
Priključite v ustrezno električno vtičnico.
1
Povežite na modem ali usmerjevalnik, ki ima internetni
2
dostop.
1
Свържете към подходящо захранване.
Свържете към модел или рутер, който има интернет
2
достъп.
Uygun bir güç kaynağına bağlayın.
1
Internet erişimi olan bir modeme veya yönlendiriciye
2
bağlayın.
1
เชื่อมต่อไปยังแหล่งจ่ายไฟที่เหมาะสม
2
เชื่อมต่อกับโมเด็มหรือเราเตอร์ที่มีการเข้าถึงอินเทอร์เนต็
1
連接至適當的電源插座。
2
連接至可存取網際網路的數據機或路由器。
Password 1234
3
SL
4
3
BG
4
3
TR
4
3
TH
4
3
TW
4
Log in
System Information
SIGN IN
Z eternetnim kablom povežite računalnik na Switch.
Računalnik mora imeti naslov IP v istem podmrežju, kot
ga ima Switch.
Zaženite spletni brskalnik in odprite http://192.168.1.3.
Vnesite geslo 1234. Kliknite PRIJAVI.
Свържете Вашия компютър към суича с помощта на
Ethernet кабел. Вашият компютър трябва да има IP адрес
в същата подмаска като суича.
Отворете браузъра и отидете на https://192.168.1.3.
Въведете 1234 като парола. Щракнете ВХОД.
Bilgisayarınızı bir Ethernet kablosu kullanarak Anahtara
bağlayın. Bilgisayarınız, Anahtarla aynı alt ağdaki bir IP
adresine sahip olmalıdır.
Web tarayıcınızı başlatıp http://192.168.1.3 adresine gidin.
Şifre olarak 1234 girin. SIGN IN (OTURUM AÇ) düğmesine
tıklayın.
เชื่อมต่อคอมพิวเตอร์กับสวิทช์โดยใช้สายเคเบิลอีเธอร์เน็ต
คอมพิวเตอร์ของคุณต้องมีที่อยู่ IP ในเครือข่ายย่อยเช่นเดียวกับสวิทช
เปิดเว็บเบราว์เซอร์ของคุณและไปที่ http://192.168.1.3 ป้อนรหัสผ่าน
1234 คลิก SIGN IN (ลงชื่อเข้าใช้งาน)์
用乙太網路線將電腦連接至交換器。您電腦的 IP 位址必須與交換
器位在同一個子網域。
啟動您的網頁瀏覽器,並前往 http://192.168.1.3。
輸入密碼 1234 並登入。
Troubleshooting
I cannot see or access the Login screen in the Web Configurator.
Make sure you are using the correct IP address.
(The default IP address is 192.168.1.3.)
Make sure your computer is in the same subnet as the Switch. If you
haven’t changed the default IP address, your computer IP address should
be in the 192.168.1.4 ~ 168.1.254 range.
Make sure you have entered the Password correctly. If you have changed
the Password and have forgotten it, you’ll have to reset the Switch to its
factory default.
(The default Password is 1234.)
A loop is detected.
A loop may happen in the following example situations:
1. The Switch is connected to another device in a loop state.
2. The Switch is connected to another device with two cables.
Loop Prevention is enabled by default. If a loop happens, the Switch will
block the port in a loop state. If a loop happens on two ports, the Switch
will block the higher-numbered port. For example, if a loop happens on
ports 4 and 5, the Switch will block port 5, and its LED will be off. To restore
a port in a loop state, disconnect it, check the network connections, and
reconnect it.
You can log into the Web Configurator. Go to System in the Web
Configurator to check your port status.
Support Information
Bulgaria
support@zyxel.bg
Turkey
+ 90 212 444 11 50
bilgi@Zyxel.com.tr
Thailand
+ 66 2831 5315
support@zyxel.co.th
Taiwan
+ 886 2 2739 9889
retail@zyxel.com.tw
See the User's Guide at www.zyxel.com
for more information, including customer
support and safety warnings.
EU Importer
Zyxel Communications A/S
Generatorvej 8D, 2860 Søborg, Denmark.
http://www.zyxel.dk
US Importer
Zyxel Communications, Inc
1130 North Miller Street Anaheim, CA 92806-2001
http://www.us.zyxel.com
Copyright © 2017 Zyxel Communications Corp. All Rights Reserved.
 Loading...