

Page 1

Vantage Access
Auto Configuration Server
Quick Start Guide
Version 3.0
12/2008
Edition 1
DEFAULT LOGIN
IP Address http://localhost
User Name root
Password root
Copyright © 2008. All rights reserved.
Page 2

ENGLISH
ENGLISH
Introduction
Vantage Access is a web-based management too l that allows you to remo tely management,
control and monitor multiple compatible devices. A compatible device is any device that supports
the TR-069, TR-098, TR-104 or TR-106 protocols. This Quick Start Guide shows you how to
install Vantage Access.
The following figure shows a network example. Once installed, you use a web browser from any
client computer (A) on the network to access the web configurator on the Vantage Access server
(B).
A
Overview
• Minimum System Requirements on page 3
• Before You Install on page 3
• Installation on page 4
• Installing Vantage Access DB on page 4
• Installing Vantage Access BED on page 5
• Installing Vantage Access HTTPD on page 7
• Starting Vantage Access on page 9
• Vantage Access Login on page 9
• Getting a Trial License Key on page 11
• Specifying a Download Server on page 12
• Registering a Device on page 12
• Editing an XML File for Multiple Devices on page 13
• Importing Devices on page 13
• ZyXEL Device Setting on page 14
B
2
Page 3

ENGLISH
1 Minimum System Requirements
For the Vantage Access server:
• CPU: Dual Intel Xeon 3.0 GHz
• Memory: 4 GB
• Hard Disk: 80 GB
• Operating System: Red Hat Enterprise Linux ES 3
• Others: License key - This is an authentication number that allows you to register ZyXEL devices
with the Vantage Access server. See the license key card.
For a Vantage Access client:
• CPU: Compatible Intel Pent iu m 45 0 MHz
• Memory: 256 MB
• Hard Disk: 2 GB
• Web Browser: Internet Explorer 6.0
• Flash Player: Flash 9.0
• Screen Resolution: 1024 x 768 pixels
2 Before You Install
" Since Vantage Access comes with its own Apache HTTP server and MySQL
database server, it is recommended that you install Vantage Access on a new
Linux computer. If you plan to install Vantage Access on an existing Linux
computer, you must uninstall existing Apache and MySQL from that server;
otherwise they will conflict with Vantage Access.
Vantage Access consists of three packages: DB, BED and HTTPD. You can install them
separately on different computers or on the same one.
• DB: This is the embedded MySQL database server of Vantage Access.
• BED: BED comprises the protocol suite that is used to manage compatible devices, an Apache
server and a watchdog service.
• HTTPD: This is the download server HTTP Daemon used for files store and transfer. These files
include device firmware, configuration, log and Vantage Access system files.
3
Page 4

ENGLISH
3 Installation
Follow the steps below to copy the installation files to the computer(s).
1 Log into the Linux computer as a root user
2 Insert the Vantage Access CD into the CD-ROM and copy the installation files (.bin) from the
Vantage Access CD to a directory in your co mputer (for example , ./Home/Access).
The following sections describe the installation steps for the three packages.
" You must install Vantage Access DB first.
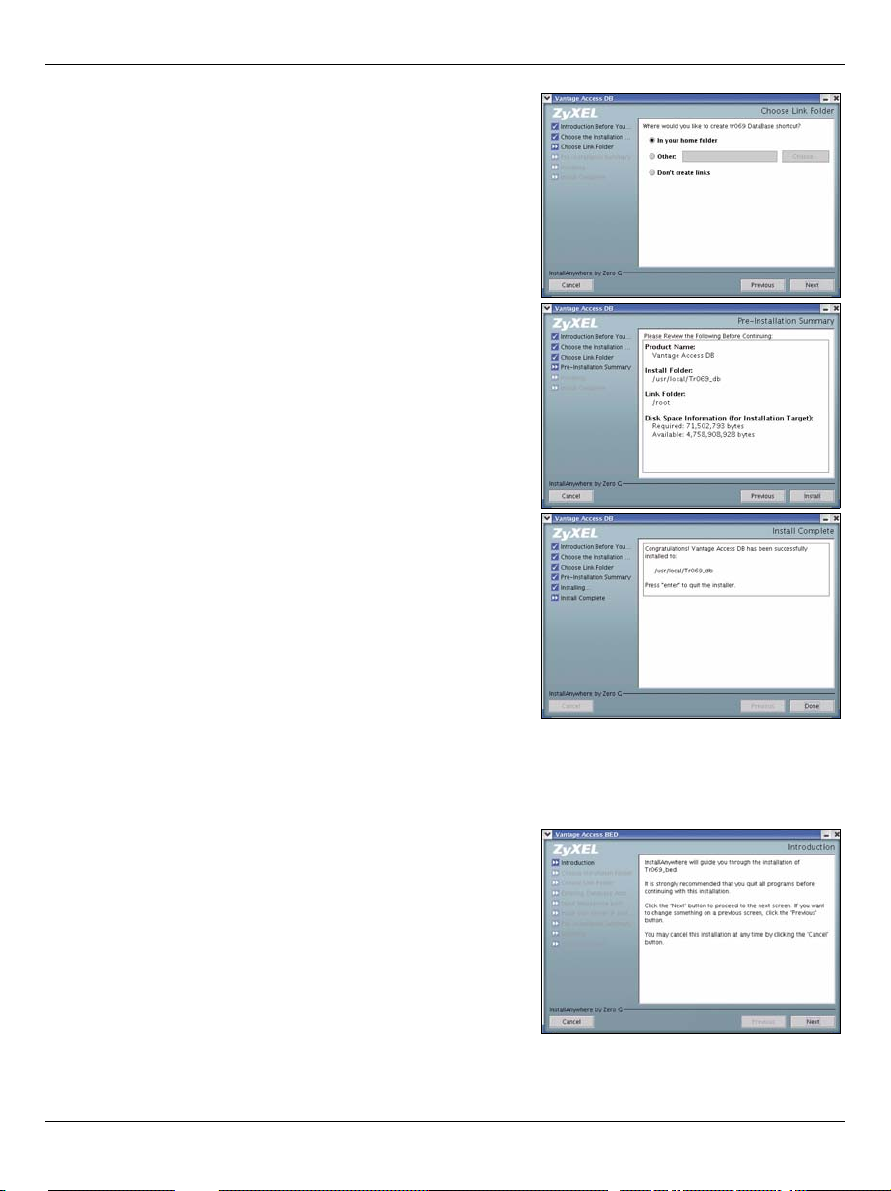
3.1 Installing Vantage Access DB
1 In the folder where you stored the installation file, en ter chmod +x
Vantage_Access_DB.bin to set it to be executable.
2 Enter ./Vantage_Access_DB.bin to start the installation process.
3 The wizard screen displays. Click Next in each screen
to continue.
4 Specify the location for the database. Accept the
default location (user/local) or enter the file path in th e
field provided.
4
Page 5
ENGLISH
5 Select the location for the shortcut or select Don’t
create links if you don’t want to create shortcuts.
6 Verify your installation options in this screen and click
Next to start the installation process.
7 After the software component is installed successfully,
the screen displays. Click Done.
3.2 Installing Vantage Access BED
1 In the folder where you stored the installation file, en ter chmod +x
Vantage_Access_BED.bin to set it to be executable.
2 Enter ./Vantage_Access_BED.bin to start the installation process.
3 The wizard screen displays. Click Next in each screen
to continue.
5
Page 6

ENGLISH
4 Specify the file location. Accept the default location or
enter the file path in the field provided.
5 Select the location for the shortcut or select Don’t
create links if you don’t want to create shortcuts.
6 Enter the IP address of the computer on which you
installed Vantage Access DB.
If you install both Vantage Access DB and Vantage
Access BED on the same computer, enter the computer
IP address or 127.0.0.1.
7 Enter the web service port number of Vantage Access
BED. Make sure the port is not used by any other
services on the computer.
6
Page 7

ENGLISH
8 Enter the IP address and port number of the Stun
server used in TR069 applications.
9 Verify your installation options in this screen and click
Next to start the installation process.
10After the software component is installed successfully, the screen displays. Click Done.
11Restart your computer.
3.3 Installing Vantage Access HTTPD
1 In the folder where you stored the installation file, en ter chmod +x
Vantage_Access_HTTPD.bin to set it to be executable.
2 Enter ./Vantage_Access_HTTPD.bin to start the installation process.
3 The wizard screen displays. Click Next in each screen
to continue.
7
Page 8

ENGLISH
4 Specify the file location. Accept the default location or
enter the file path in the field provided.
5 Select the location for the shortcut or select Don’t
create links if you don’t want to create shortcuts.
6 Specify the user name and password to log into the
HTTP server. You can use the default settings ("zyxel",
"1234" and port "80") or enter the information in the
fields provided. Remember this user name and
password as you will need this information later.
" If you install Vantage Access BED and
Vantage Access HTTPD on the same
computer, e nter a different port number other
than 80 in this screen. For example, enter 8080.
7 Verify your installation options in this screen and click
Next to start the installation process.
8
Page 9

ENGLISH
8 After the software component is installed successfully,
the screen displays. Click Done.
4 Starting Vantage Access
After the installation, you need to start the Vantage Access DB, BED and HTTPD services. Enter
./start.sh in the corresponding directories (Tr069_db, Tr069_bed and Tr069_httpd).
The success message indicates a successful service startup.
[root@localhost local]# cd /usr/local/Tr069_db
[root@localhost Tr069_db]# ./start.sh
Starting mysqld daemon with databases from /usr/local/Tr069_db/mysql/data
################################################################################
### Vantage_Access_DB started successfully! ###
################################################################################
[root@localhost Tr069_db]# cd /usr/local/Tr069_bed
[root@localhost Tr069_bed]# ./start.sh
Starting tr069...success
Starting httpd...success
Starting watchdog...success
###################################################################
Vantage Access started (tr069 pid 2364; httpd pid 2377)
Version: 2.0.47.83.00b31
Date: 2007-06-15
###################################################################
[root@localhost Tr069_bed]# cd /usr/local/Tr069_httpd
[root@localhost Tr069_httpd]# ./start.sh
#############################################################################
Vantage Access HTTPD started successfully from /usr/local/Tr069_httpd
Version: 2.0.47.83.00b3
Date: 2007-06-15
#############################################################################
[root@localhost Tr069_httpd]#
5 Vantage Access Login
This section shows you how to log into Vantage Access as root with access to all configuration
screens.
9
Page 10

ENGLISH
Vantage Access comes with a defa ult login account (username: root, password: root). You can
use it to create other accounts with either manager or call-center privellege level. See your
User’s Guide for more informatio n. The web confi gurator screens and privileges vary depending
on which account you use to log in.
1 On a client computer, open Internet Explorer (version 6) and enter the IP address of the
Vantage Access server in the address bar. For example, 192.168.252.10.
2 Select I have a license to activate Vantage
Access to start the product registration.
You can also select I want to try Vantage Access to
enter a 90-day trial period where you can manage up to
100 devices. See Getting a Trial License Key on page
11. Then click Continue.
3 A License screen displays. Some fields do not
appear in your screen if you already have a
myZyXEL.com account or if you are getting the trial
version. Enter the license key and the myZyXEL.com
account information in the fields provided. click
Apply to activate the product.
" The number of registered devices you can configure depends on your iCard. For
more information, see the product specifications chapter in the User’s Guide.
4 A login screen displays. Enter the root login user
name ("root") and password ("root"). Then click
Login.
5 The Vantage Access dashboard displays.
10
Page 11

ENGLISH
The following describes the parts of the Vantage Access screens.
A
B
E
C
• The control panel (A) displays in every web configurator screen. All the common web configurator
buttons are in the control panel.
• The title bar (B) displays the link path.
• The device window (C) displays the devices that are managed by the Vantage Access. You can
look for specific device(s) in the Search panel. You can also configure and view the logical group-
ings of the managed devices in the Topology panel.
• The navigation panel (D) displays the navigation links that you click to access configuration, log or
status screens.
• The configuration window (E) displays the configuration screens that you set for Vantage Access
or a selected device.
D
5.1 Getting a T rial License Key
If you select I want to try Vantage Access at the first time of login, continue with the following
steps.
11
Page 12

ENGLISH
1 you need the Authentication Code (AC) to get a license key .
Copy it from this screen and paste it to a text file on your
computer or write the AC down.
2 Click Continue.
3 The Active Vantage Access with license screen appears.
Contact your local customer support and tell them the AC.
Then you will get a license key. Enter it in this screen and click
Apply.
6 Specifying a Download Server
You must specify a server to store device firmware and configuration files and perform automatic
remote firmware upgrades or configuration restores on the man aged devices.
1 Click the System Manager icon in the control panel.
2 Click Download Server in the navigation panel to
display the configuration screen.
3 In the IP Address field, enter the IP address of the
HTTP server in dotted decimal notation.
" If the HTTP server and Vantage Access are installed on the same computer, you
must use a different port number for the HTTP serve r and spec ify th e po rt
number. For exa mple, if the HTTP server (192.168.100.1) is using port 8080,
then enter “192.168.100.1:8080” in the IP Address field.
4 Set the User Name and Password fields to access the HTTP server. If you have changed the
default settings (“zyxel” and “1234”) during the installation process, enter the ne w account
information. The account user name and password are case sensitive.
5 Click Apply to save the settings.
7 Registering a Device
You must register one or multiple compatible devices to Vantage Access to allow remote
management.
• To register one device, configure the device information in the Edit an XML file and upload to Vantage Access. See Section 7.1 on pag e 1 3 and Secti o n 7.2 on page 13.
12
Page 13

ENGLISH
• Configure the device to allow remote management from Vantage Access. See Section 7.3 on
page 14 .
7.1 Editing an XML File for Multiple Devices
You can import multiple devices to Vantage Access at one time.
To import multiple devices at one time, you need to create an XML file that contains the
information (such as the device name, OUI, serial number and device type) for the device. You
can download an example file in Provision Manager > Device Pre-Provision > Import Devices
window and modify it with your device’s information.
The following shows an example for two ZyXEL compatible devices.
<?xml version="1.0" encoding="UTF-8"?>
<Template xmlns:xsi="http://www.w3.org/2001/XMLSchema-instance">
<Device>
<deviceName>Device1</deviceName>
<OUI>001349</OUI>
<serialNumber>001349000000</serialNumber>
<deviceType>P-2602HW-D1A</deviceType>
</Device>
<Device>
<deviceName>Device2</deviceName>
<OUI>001349</OUI>
<serialNumber>00134900000a</serialNumber>
<deviceType>P-2802HWL-I1</deviceType>
</Device>
</Template>
7.2 Importing Devices
Follow the steps below to import your device(s).
1 Log into Vantage Access as root and click the Provision Manager icon.
2 Click Device Pre-Provision > Import Devices in the
navigation panel.
3 To import one device, select Import Single Device and
enter the device information in the fields provided.
T o import more than one device, select Import Multi-Devices
and specify the location and name of the XML file or click
Browse to locate it.
4 Click Import.
13
Page 14

ENGLISH
5 When the file import is successful, you should see the new
entry(ies) in the Device List panel. The device displaying without
a device icon in the first column means the device is unregistered.
To complete the device registration, see Section 7.3 on page 14.
If you cannot see the new entry(ies), check the system logs and
make sure the XML file format is correct.
7.3 ZyXEL Device Setting
You must configure the managed device to allow remote management from Vantage Access.
Refer to the user’s guide that comes with your compatible device for more information. The
following shows how to enable TR-069 communication protocol between a ZyXEL compatible
device and Vantage Access.
1 To activate TR-069 on the ZyXEL compatible device, access the CLI and enter the following
commands.
wan tr load Enables TR-069 configuration.
wan tr active 1 Activates TR-069 remote management.
wan tr acsUrl
172.25.21.174/TR069
wan tr periodicEnable 1 Enables periodic information update to the
wan tr informInterval 30 Sets the information update time. For example,
wan tr debug on Enables TR-069 debug mode to view logs.
wan tr save Saves the settings.
wan tr reset Sets the device to register to the Vantage
Sets the IP address of the Vantage Access
server. For example, 172.25.21.174.
server.
30 seconds.
Access server right away.
2 Once connected to the network, the ZyXEL device automatically locates and registers to the
Vantage Access server.
" For initial setup, the registration process may take several minutes (depend ing on
your network condition).
3 Check the device status in the Device List panel. There should
be a device icon shown before the device name. This indicates
that device registration is successful and that Vantage Access
has stored the ZyXEL compatible device information to its
database.
14
Page 15

ENGLISH
You can now use the Provision screens (when you log in as "admin") in Vantage Access to
remotely configure this ZyXEL compatible device. Refer to the User’s Guide for detailed
information.
Troubleshooting
1 I cannot start Vantage Access.
• You must reboot your computer after installing Vantage Access.
• Make sure Vantage Access DB has started. See Section 4 on page 9.
• If the "Error: Remote DB is not alive!" message displays, this means that you
have specified the wrong Vantage Access DB server IP address during the Vantage
Access BED installation. Uninstall and install Vantage Access BED with the correct IP
address. Refer to the uninstalling chapter in the User’s Guide and page 5 in this guide.
• Make sure you can connect to Vantage Access DB. If the MySQL server is on a different
computer, then maybe the computer is off or the connection to the computer is down.
2 I cannot display the Vantage Access login screen.
• This may happen if you have already installed Apache with your Linux distribution. Uninstall Apache.
• If you installed Vantage Access BED and Vantage Access HTTPD on the same computer,
uninstall and install Vantage Access HTTPD is using a different port number other than
80.
3 I cannot log into Vantage Access.
• Make sure the Vantage Access server is turned on.
• Make sure you have started Vantage Access on the server.
• Make sure you enter the correct IP address of the Vantage Access server.
• The default user name is "root" and the default password is "root". They are case-sensitive.
• If you enter the wrong password three times for a user name, you have to wait for 10 minutes before Vantage Access allows you to log in again with the same user name.
4 My web browser does not display the screen properly.
• Display the screens using only the supported web browsers. Refer to Section 1 on page 3.
• Make sure you have installed Macromedia Flash Player 9.0.
• It is recommended you use a monitor with a screen resolution set to 1024 by 768 pixels.
5 I cannot see my compatible device in Vantage Access.
• Make sure you have entered or imported an XML file containing the correct device information to Vantage Access. See Section 7 on page 12.
• Make sure you have properly set and activated management of compatible protocols on
the device. See Section 7.3 on page 14.
• The initial device discovery process may take up to three minutes depending on your network condition.
15
Page 16

ENGLISH
6 I see "[error]cannot add the device to Vantage Access, maybe database
cannot be connected or OUI-SN is duplicate" when I import device(s) using an XML
file.
• Make sure your OUI (the part of device’s MAC address that uniquely identifies a company)
and SN (device’s LAN MAC address) information in the XML file are not duplicated with
any existing device listed in the device list panel. Correct the information in the XML file
and upload it again.
• Make sure you can connect to Vantage Access DB. If not, reset the DB by entering "./
stop.sh" and "./start.sh" under Tr069_db directory.
7 My Vantage Access server is broken and I want to install Vantage Access on another
computer.
• Please refer to the reinstalling existing license chapter in the User’s Guide.
16
 Loading...