

Page 1

MF253M
Let’s go
Getting started with your device.
Page 2
Getti
a
O
e
fa
n
w
K
c
o
e
r
d
e
e
n
a
t
r
u
e
o
y
m
o
o
r
o
n
o
y
u
c
c
ng to
now Y
ur Dev
ice
Appe
rance
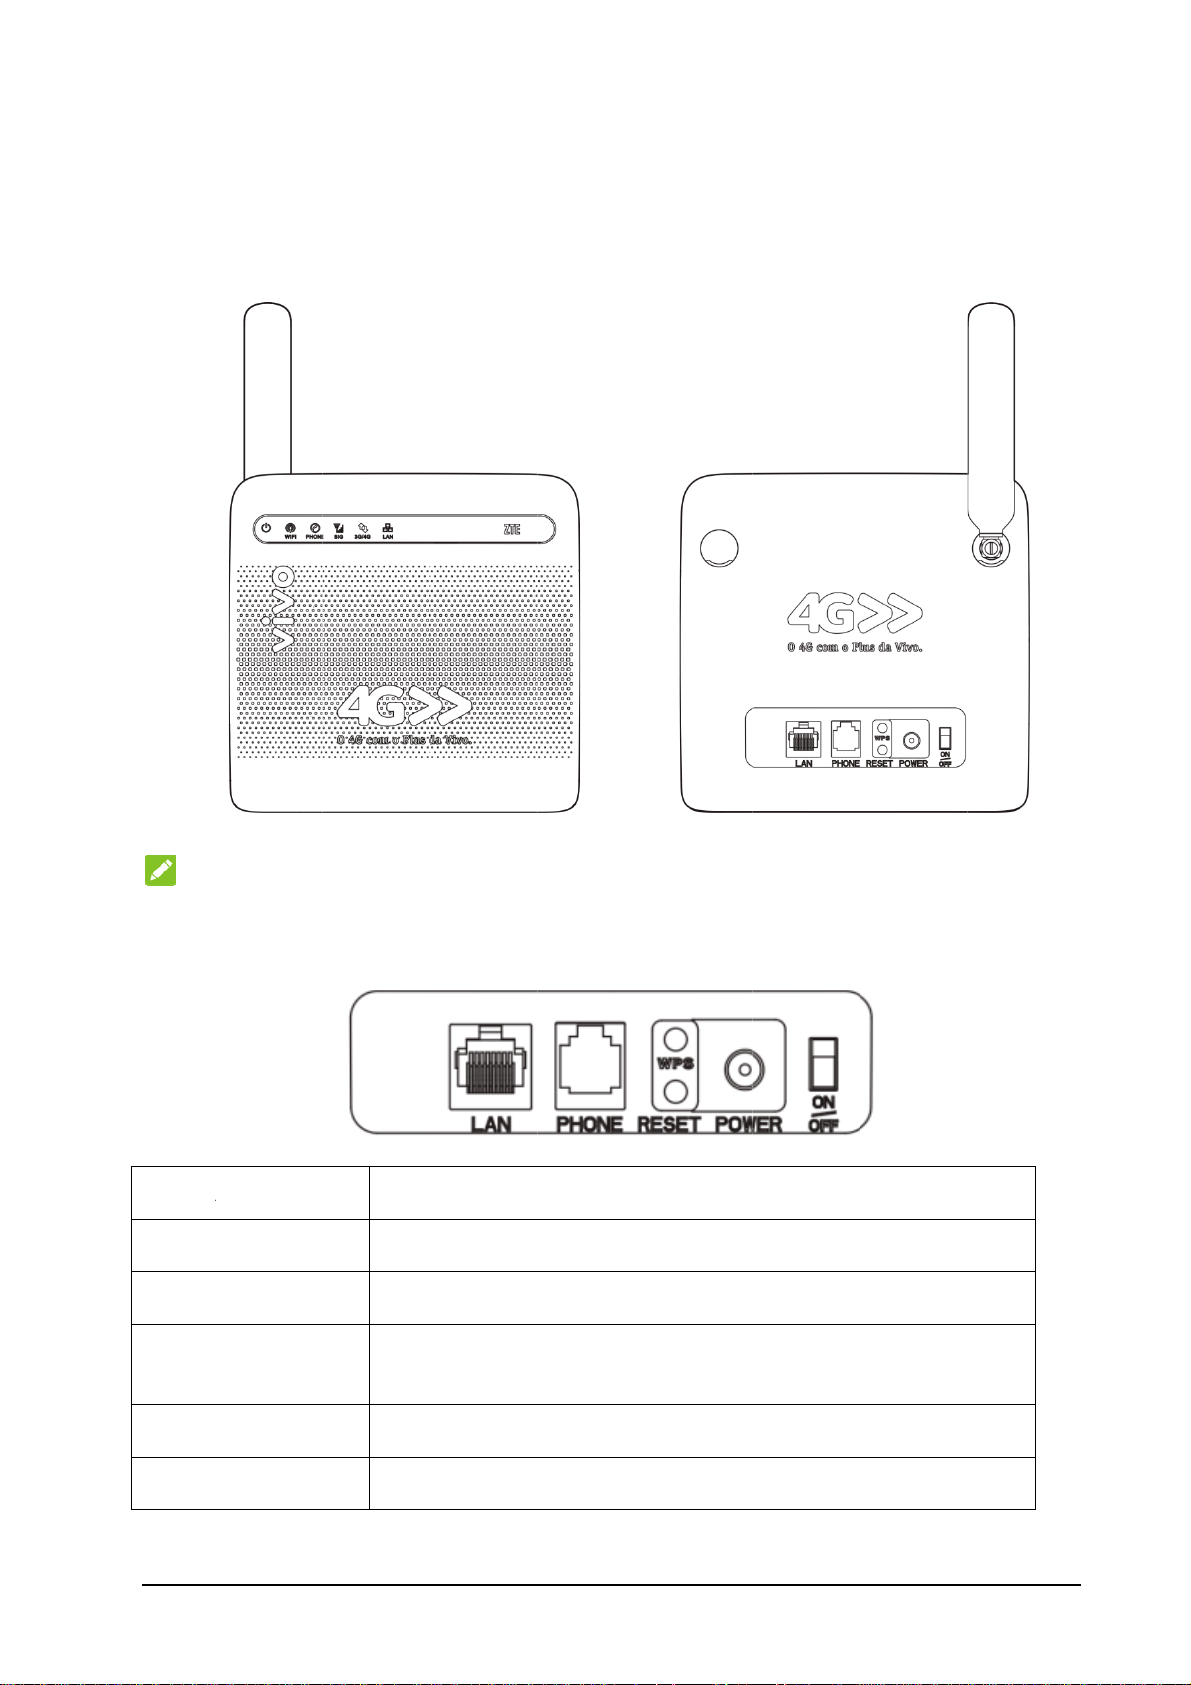
N
Pl
Inter
La
Pho
Res
WP
Po
TE:
ase use the
ce Des
ne
et
S button
er Socket
original ext
ription
Ethe
Stan
To r
WPS
proc
Con
rnal antenn
net connec
ard RJ11 c
store facto
button is
ss.
ector to th
if necessar
ions to co
onnector f
y default c
sed to sta
external p
.
puter.
r Telephon
nfiguratio
t Wi-Fi Pr
wer suppl
e.
s.
tected Set
.
p authenti
ation
On/
Off
Turn
the router
n or off.
2
Page 3
Insta
l
O
v
d
a
t
R
E
S
c
v
o
t
d
s
e
d
M
o
N
N
n
n
N
N
n
a
a
d
d
D
PwPwWtr
Wtr
WfuTTTS
S
e
d
l
rork
m
a
b
t
n
i
i
o
r
d
w
l
w
t
r
t
3
s
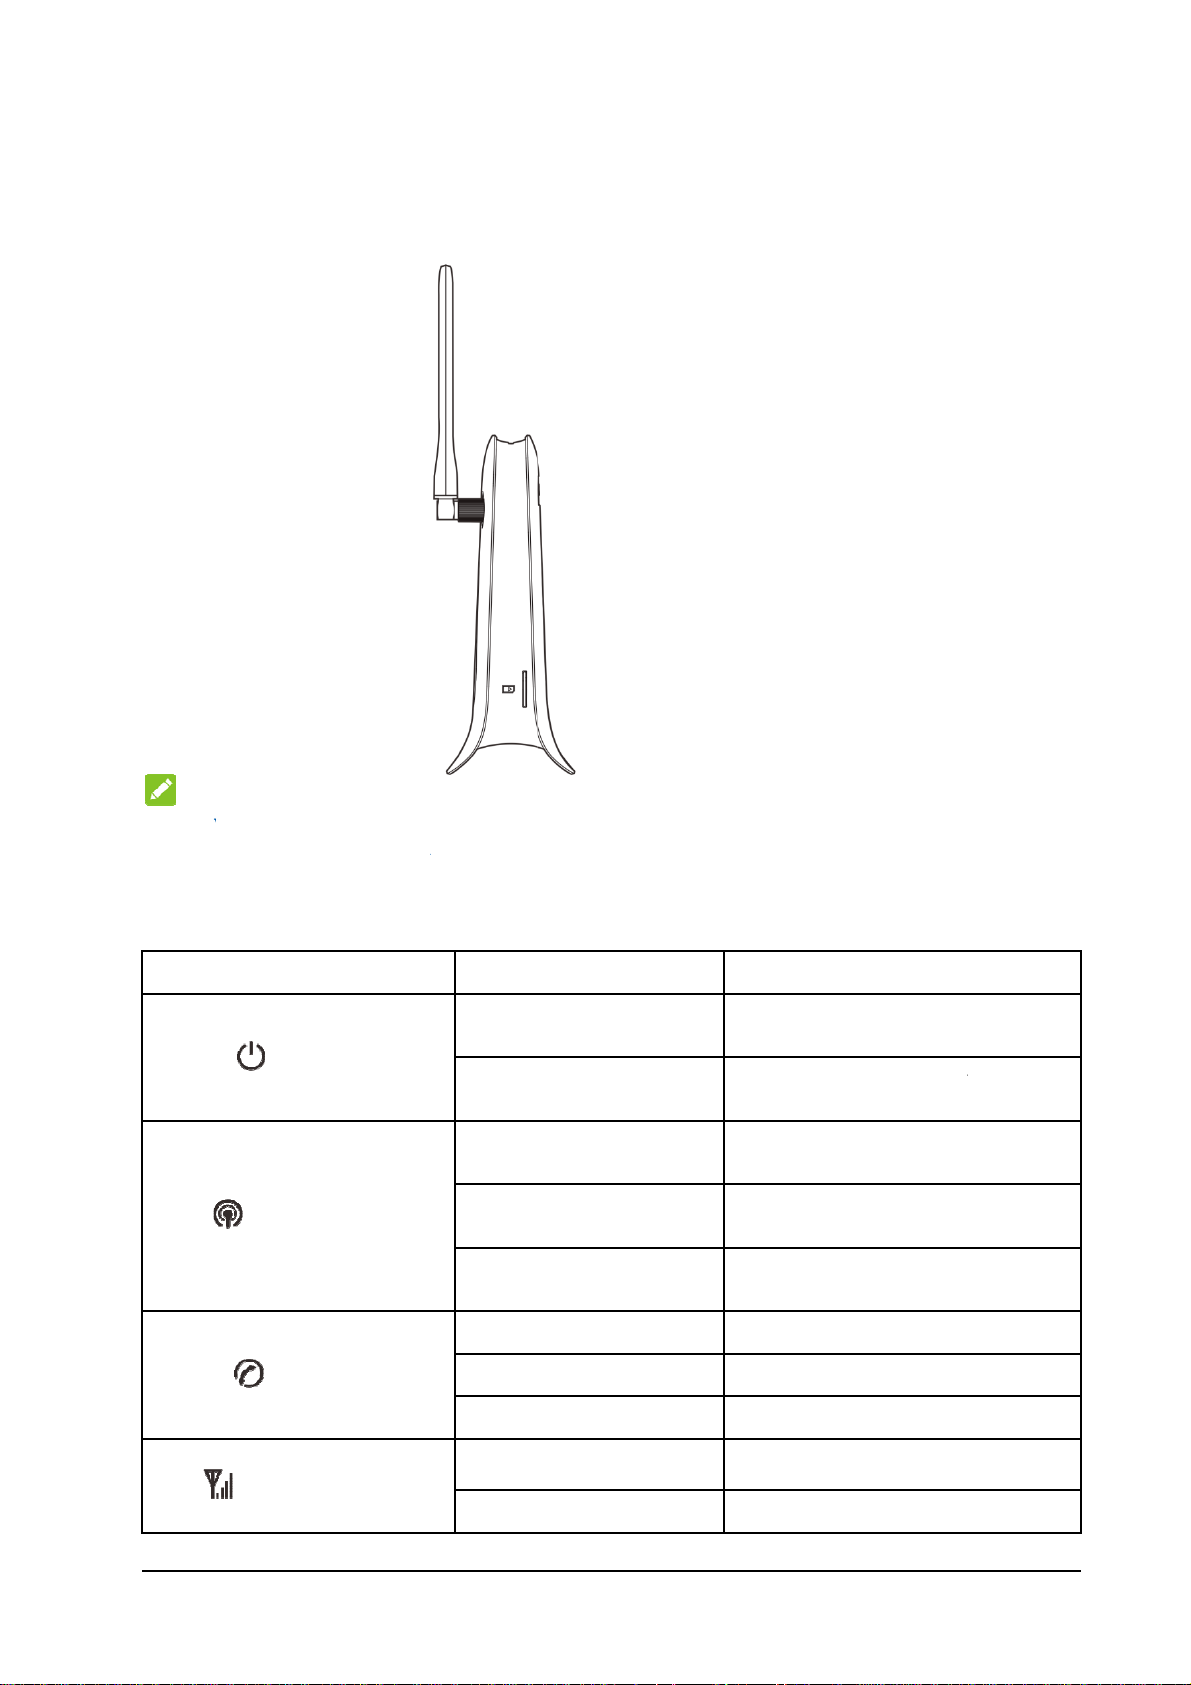
Hold th
l the (U)
e (U)SIM
IM Car
ard with it
cut corner
oriented as
shown an
slip it into
the card h
lder.
N
Your de
To avoi
Indic
Indica
POWE
WIFI
TE:
ice does n
damaging
tors
or
t support th
he device,
micro-SI
o not use th
State
Blue O
OFF
Blue O
Blue Bli
OFF
OFF
card and n
se cards or
king
no-SIM car
ny card hol
or any oth
ders.
escription
ower is on an
orking normal
ower is off o
ing abnor
i-Fi works
ansmission.
i-Fi works
ansmission.
i-Fi works
nction is disa
he phone is no
r nonstanda
external po
y.
external po
ally.
normally wi
normally
bnormally o
led.
in use.
d SIM card
er supply is
er supply is
h no data
with data
the Wi-Fi
.
PHON
SIG
Blue Bli
Blue O
Blue O
Blue Bli
king
king
he phone is ri
he phone is in
ignal strength
ignal strength
ging.
calling.
s very good or
s weak.
good.
Page 4
Indica
t
O
n
h
t
A
r
t
n
e
c
u
l
t
c
y
t
o
c
n
l
o
N
l
y
e
t
f
e
m
e
N
i
t
u
e
D
T
TtoTnTn
T
nTT
Ttr
T
i
L
m
c
a
u
s
o
n
g
g
s
t
b
w
c
a
a
n
s
e
3
d
e
P
n
h
o
or
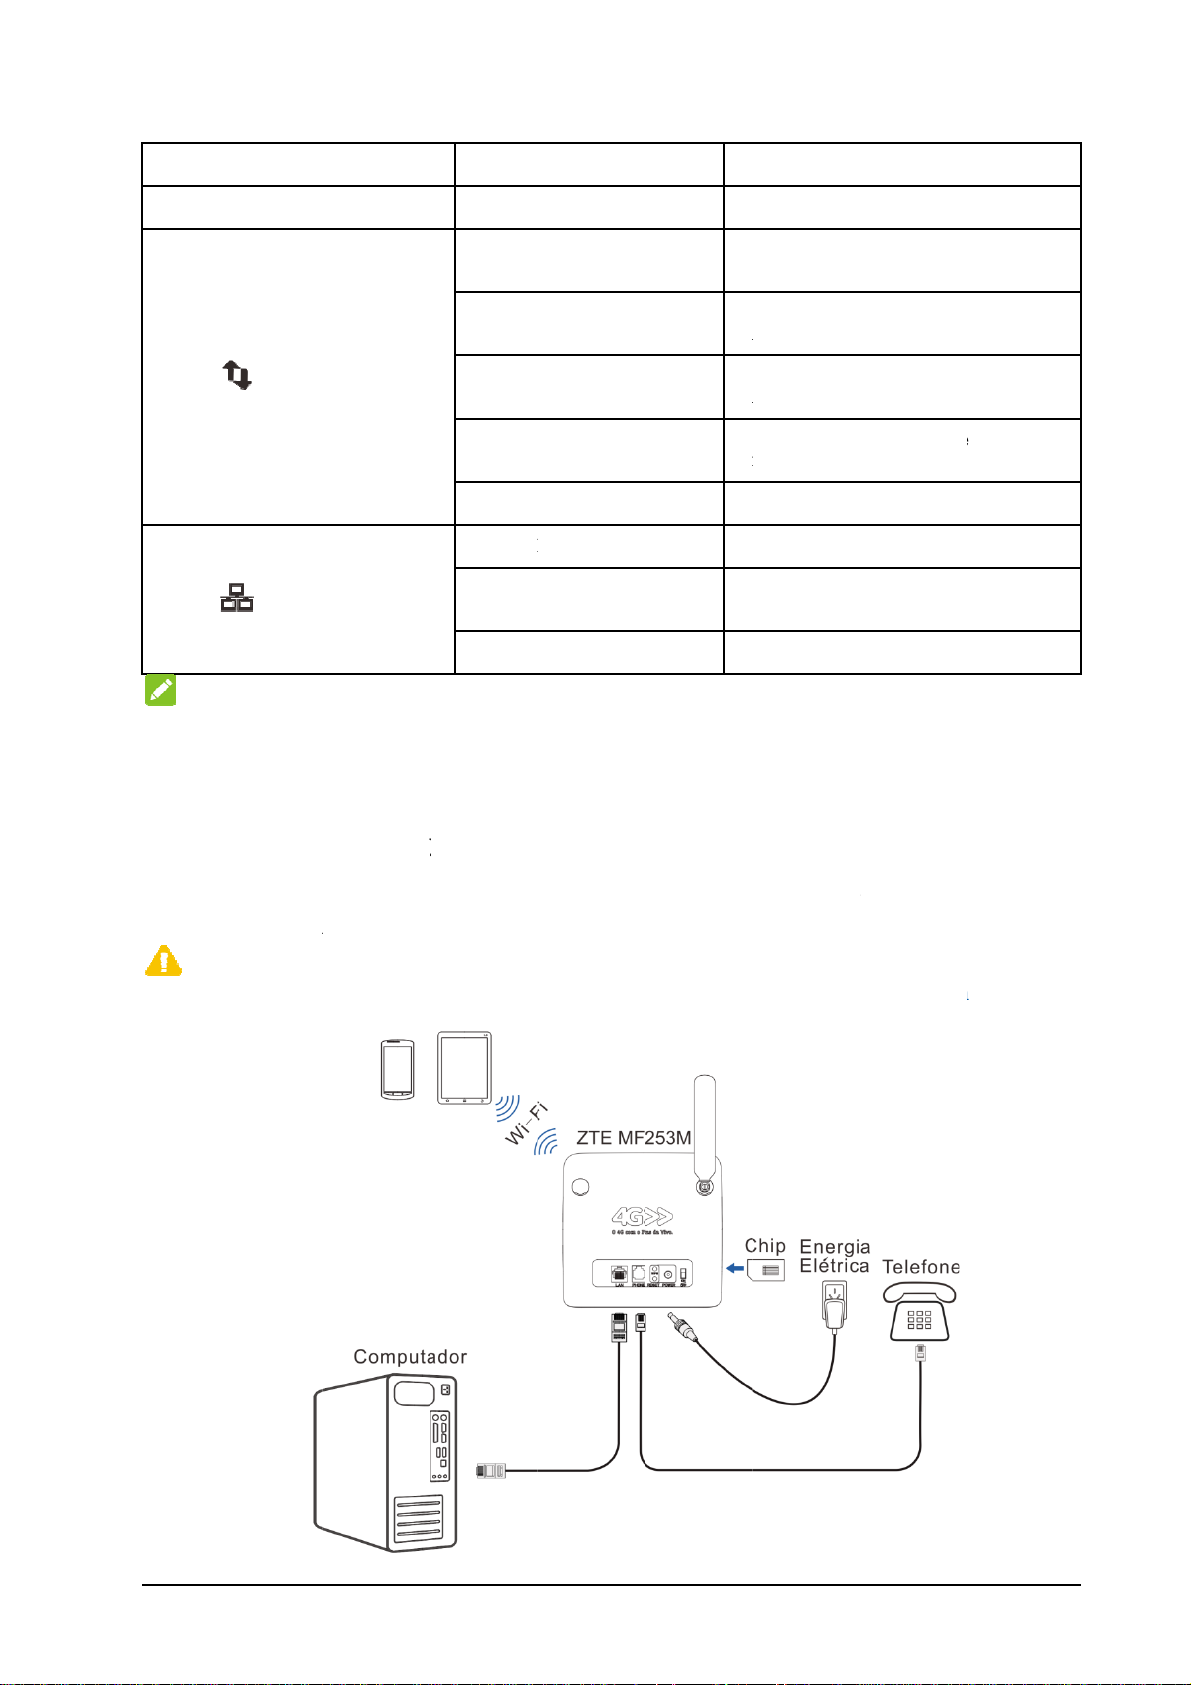
State
escription
3G/4G
LAN
N
The ph
TE:
one functio
needs the n
OFF
Red
Blue Bli
Blue Sol
Green B
Green S
Green O
Green B
OFF
etwork supp
king
id
inking
lid
inking
ort.
here is no sign
he device is t
the mobile ne
he device is
etwork and dat
he device i
etwork.
he device is c
a
d data is bein
he device is re
he LAN port i
he LAN por
ansmission.
he network ca
l.
rned on but
twork.
connected t
a is being tran
registered t
nnected to th
transferred.
istered to the
connected.
is connecte
le is not conn
ot registered
o the LTE
ferred.
the LTE
3G network
G network.
with data
cted.
Con
Follow
If you s
to the c
Interne
C
Put you
devices
ecting
the picture
elect a diff
apter “Ac
or use yo
UTION:
device at
o avoid ele
Your D
to connect
rent opera
essing the
r home ph
east 2 mete
tromagneti
evice
our devic
ion mode,
Internet”. I
ne, you ne
rs away fro
interferenc
.
he connect
you want
d insert yo
the conn
.
on of the
o use the
r (U)SIM
cted phone,
AN port is
obile net
ard first.
TV sets, r
different.
ork to con
dio and ot
lease refer
ect to the
er electronic
4
Page 5
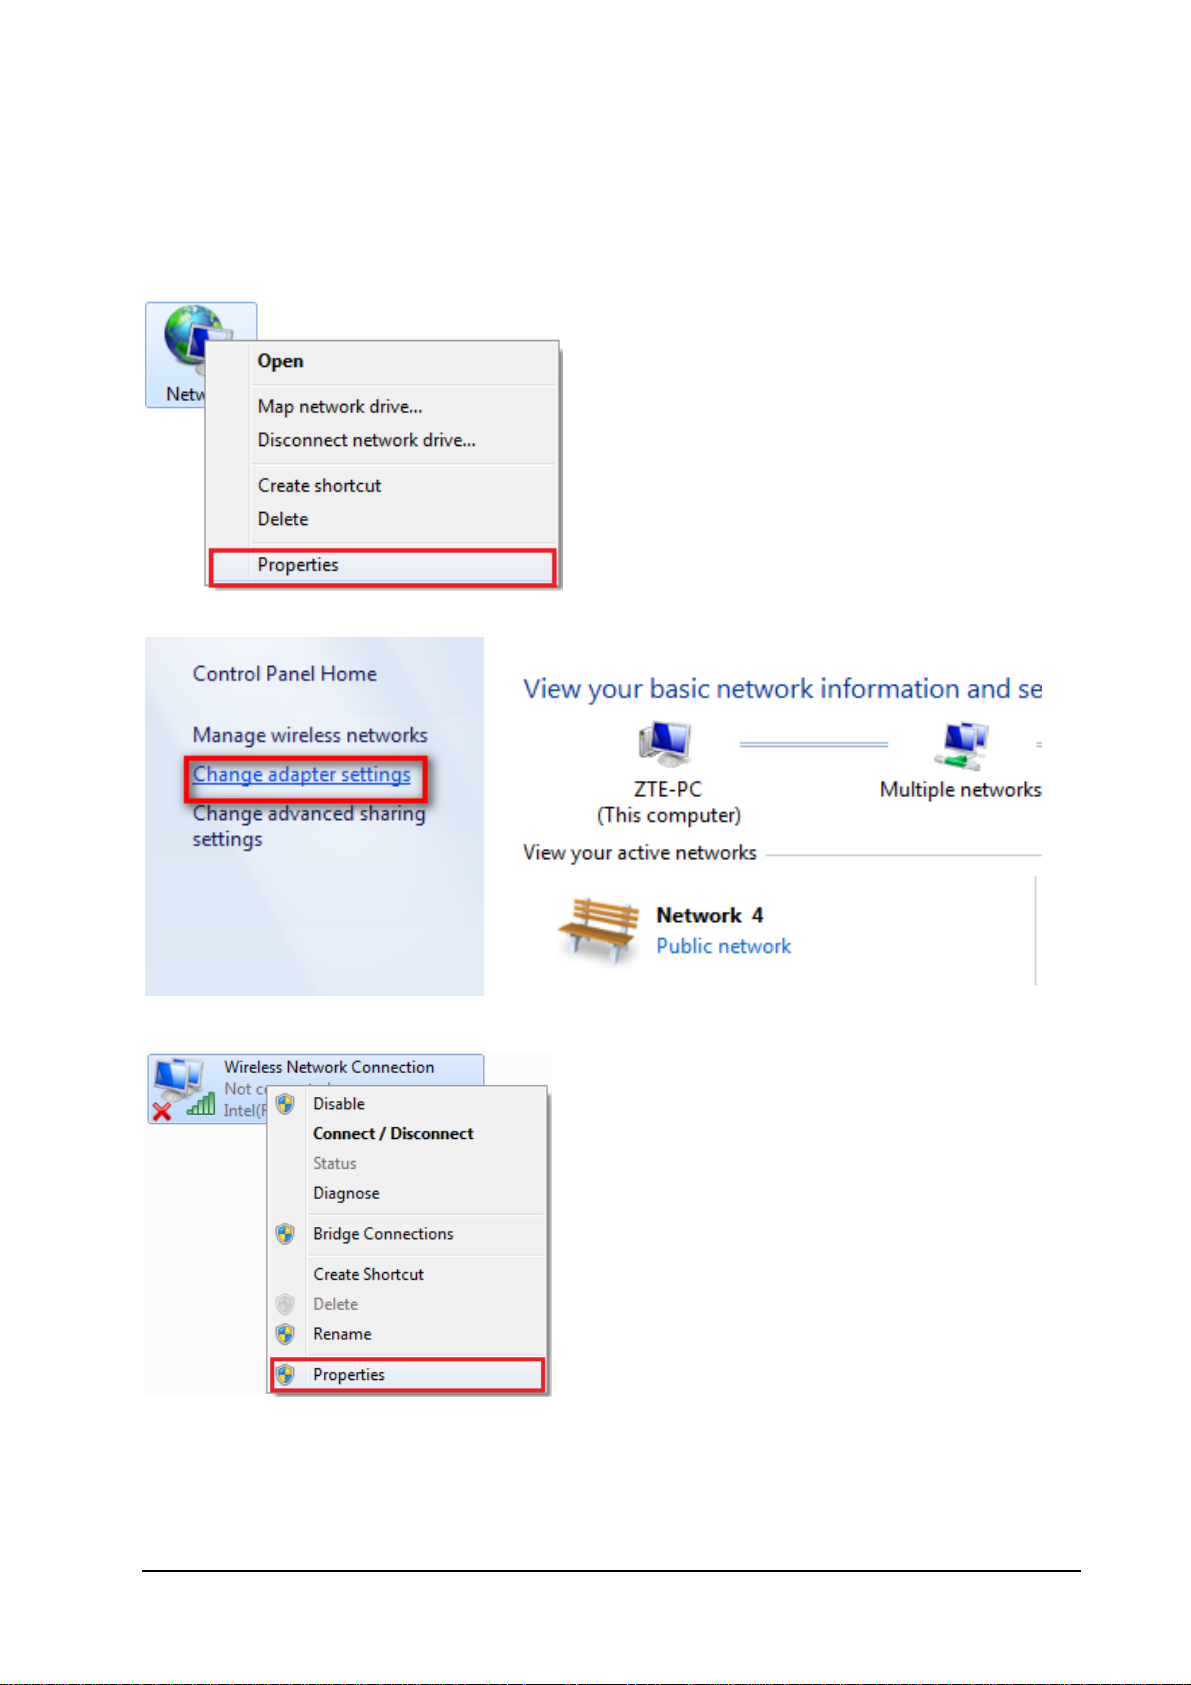
Configuring Your PC
The following procedure describes how to configure the Internet Protocol in the Windows 7 operating
system for your Wi-Fi connection.
1. Right-click Network and select Properties.
2. Select Chang adapter settings.
3. Right-click Wireless Network Connection and select Properties.
4. Select Internet Protocol Version 4 (TCP/IPv4) and click Properties.
5
Page 6
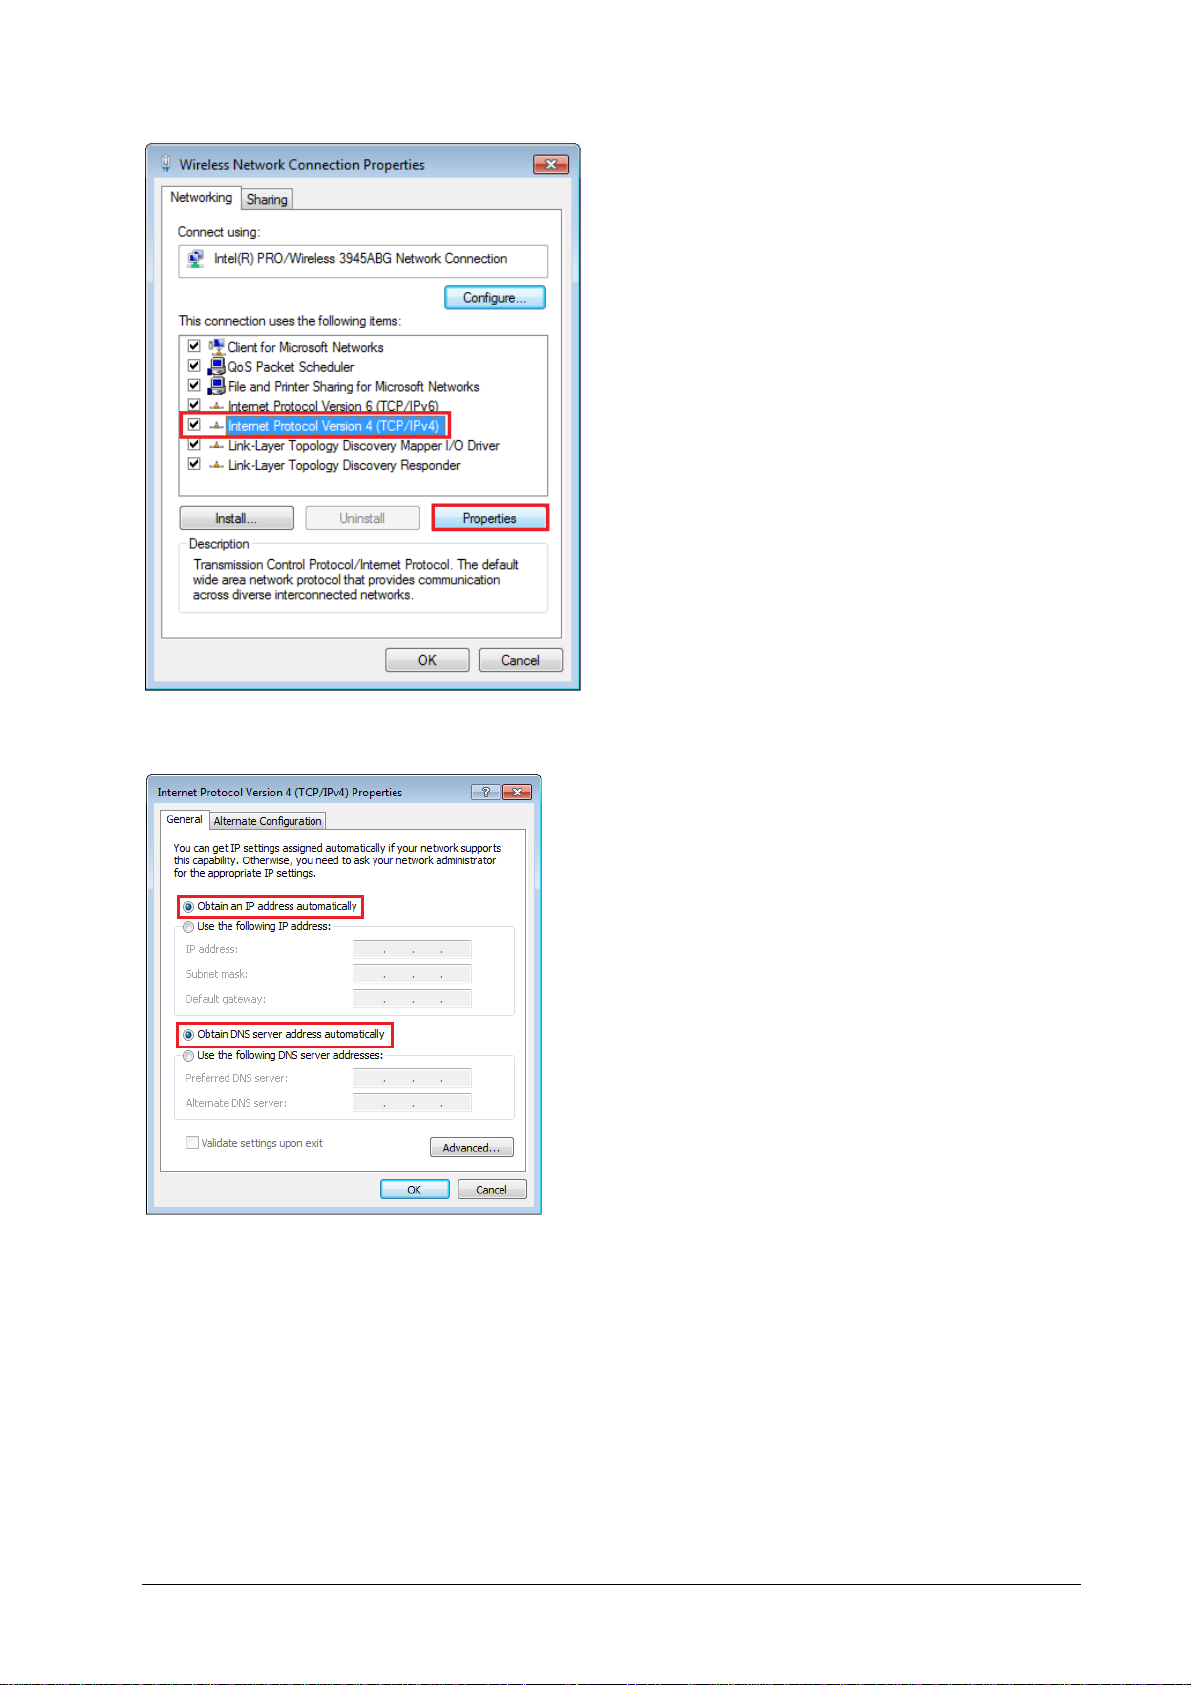
5. Select Obtain an IP address automatically and Obtain DNS server address automatically, and
click OK.
6
Page 7
Accessing the Internet
Before accessing the Internet, please make sure that the following operations are finished.
• Your device is connected via a network cable or Wi-Fi.
• Your PC is configured.
To access the Internet:
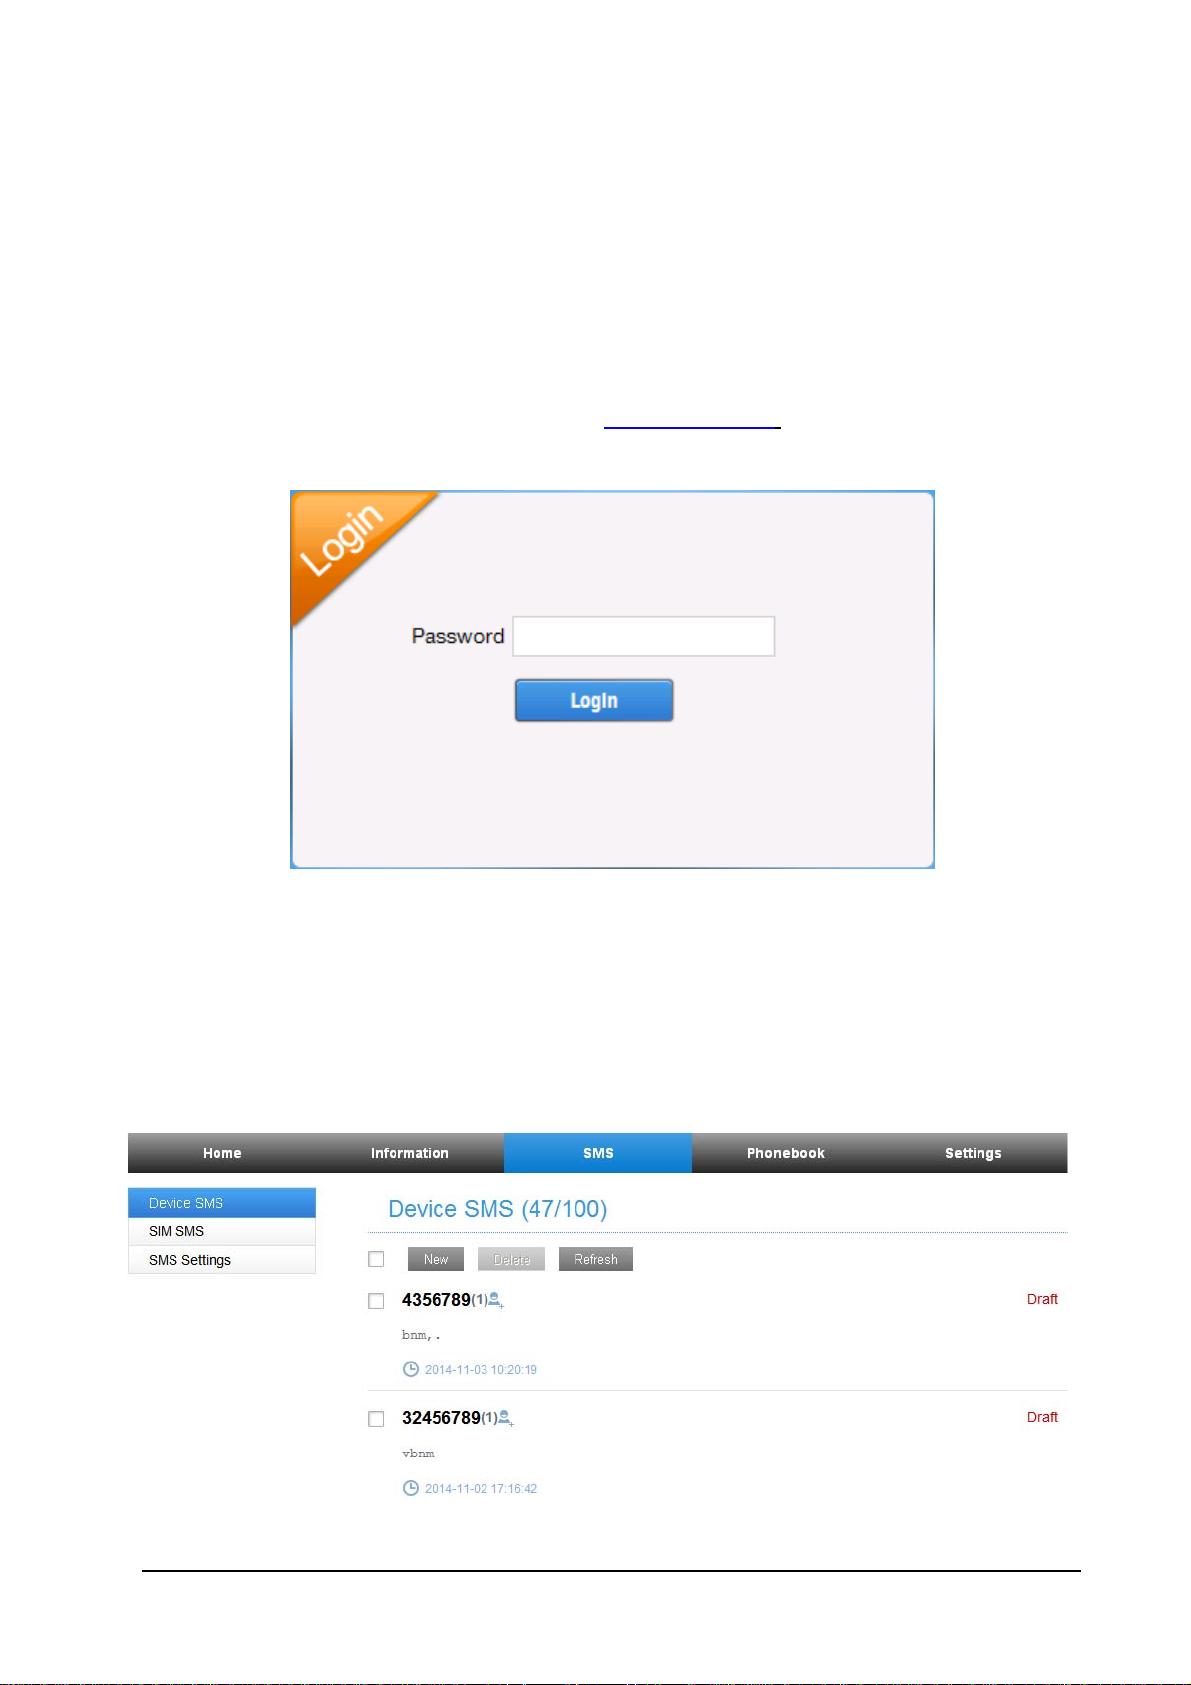
Log in the Configuration Page.
1) Launch the Internet browser and enter http://192.168.1.1 in the address bar. The login
page appears.
2) Input the password and then click Login. The default password is vivo.
SMS
Manage the SMS, send and receive text messages. You can also set the SMS limit settings.
This function allows you to send or receive short messages.
1. From the Web UI, click the SMS tab to manage messages in the device and SIM card.
7
Page 8

2. From the Web UI, click SMS > SMS Settings to set the SMS limit settings.
f Validity: Set valid period of outgoing messages.
f Center Number: Enter SMS center number. For more information, please contact your
service provider.
f Delivery Report: Receive or reject a prompt informing you that the message is delivered to
the recipient.
3. Click Apply to save your settings.
Phonebook
Manage the contacts information.
The phonebook information can be saved in the device or SIM card, and you can choose the
saved position.
• From the Web UI, click the Phonebook tab to view, add and delete new contacts.
8
Page 9

Setti
n
m
O
o
h
a
M
oMa
D
O
h
h
n
t
m
y
e
in
n
c
u
y
8
l
e
n
w
n
m
o
e
e
t
M
m
l
t
e
n
c
w
n
c
k
c
d
d
t
G
e
c
b
o
r
n
u
fa
r
r
i
A
c
b
i
C
e
o
n
t
a
s
i
u
f
h
b
R
r
a
e
i
i
>
n
h
g
n
s
n
o
n
g
t
M
9
g
r
r
Do not
N
Please d
gs
odify an
TE:
isconnect th
settings u
router fro
less instru
the networ
ted by you
before cha
service pr
ging the se
vider.
tings.
Netw
z
After t
Autom
Aut
On
N
rk Sett
D
ial-up Setti
e client is
tic, Man
ode
matic
nual
emand
TE:
onnected t
al or On D
Your devic
Internet dir
1. Log in
2. Select S
Click
The Max Id
gs
gs
Mode >
emand mo
is connecte
ctly.
o the web
ettings > N
e
Ho
e Time can
your devi
anual, and
and then
e successf
e. The de
to the Inte
UI configu
twork Sett
then click
lick
Conne
e defined b
lly, you c
ult mode i
Operation
net automat
ation page.
ngs > Dialpply to con
to access t
t
y the user.
n access th
s Automat
cally, and y
p Settings
irm your co
e Internet.
Internet i
c.
ou can surf
WAN Co
figuration.
the
n the
nection
•
•
z
N
From t
network
z
A
To modif
ttp://192.16
You can a
etwork Sel
e Web UI,
selection as
PN
the parame
.1.1.
so setting R
ction
click Setti
follows:
ers of your
connection
gs > Netw
device, log
Mode and
rk Setting
n to the we
onnection
s > Netwo
GUI confi
eset to conn
k Selectio
uration pa
ect to the In
,you can
e by visitin
ernet.
change you
To con
click Se
ect to the I
tings > Net
ternet you
ork Setti
an use the
gs > APN.
default Acc
ss Point N
mes (APN
) in Auto/
anual mode
,
Page 10

Create a new APN selecting the Manual mode, then click Add New.
Wi-Fi Settings
z Basic settings
From the Web UI, click Settings > Wi-Fi Settings > Basic Settings, the wireless network basic
parameters are shown in the following figure:
10
Page 11

f Wi-Fi Switch: Enable or disable Wi-Fi.
f Multi SSID Switch: Enable or disable multi SSID.
f Network Name (SSID): Service Set Identifier (SSID). Enter a string less than 32 characters as
the name for your wireless local area network (Wi-Fi).
f Broadcast Network Name (SSID): Disable or Enable (Default) this function. If Enable is
selected, the router broadcasts the SSID, and other devices can detect and connect to it. If
Disable is selected, the other devices cannot detect the router. You can only connect to the
router by manual setting.
f AP Isolation: When Enabled is selected, each of your wireless clients will not be able to
communicate with each other. When Disable is selected, each of your wireless clients will be
able to communicate with each other.
f Security Mode: The security modes are described below:
1. OPEN: You can authenticate successfully with a SSID, whether it is valid or empty.
2. WPA-PSK/WPA2-PSK: Apply both the WPA-PSK and WPA2-PSK scheme.
3. WPA2 (AES)-PSK: It is the securer version of WPA with implementation of the 802.11i standard.
If the Authentication type is WPA2 (AES)-PSK or WPA-PSK/WPA2-PSK , the bottom part of
the configuration page displays WPA parameters.
f Max Station Number: Set the maximum numbers of other devices connecting to your device.
z Advanced settings
From the Web UI, click Settings > Wi-Fi Settings > Advanced Settings, you can set Wi-Fi advanced
characters.
11
Page 12

z Black List
From the Web UI, click Settings > Wi-Fi Settings > Black List, to enable or disable black list.
z WPS
From the Web UI, click Settings > Wi-Fi Settings > WPS, select WPS mode, the two modes are
described below:
f PIN: Set the client's PIN code in Client PIN field.
f PBC: Press the WPS button of the router or select PBC, and then click Apply. Press the WPS
button on the client wireless adapter within two minutes, and the negotiation process will be
established.
12
Page 13

Devi
c
O
m
w
w
a
O
n
t
e
h
g
M
a
m
u
N
k
w
i
g
c
s
M
t
P
P
w
o
ts c
g
c
e
h
e
t
m
p
d
P
n
m
u
P
r
n
e
w
o
t
u
p
a
o
e
u
d
h
r
l
n
o
S
w
F
f
r
n
o
m
P
h
y
I
c
M
h
3
e
e
e
t
g
t
e settin
s
N
Three ti
PUK co
contact
Fire
Account
PIN Man
Reset
Restart
SNTP
Phone Li
Update M
TE:
es consec
de. The PI
ith networ
all
anagemen
gement
it
anagement
tive wrong
code and
operator.
Set the a
Configur
Set all t
the devic
To restar
Set the ti
Set limit
To upgra
IN code e
UK code
count pass
your PIN.
e settings t
will restar
the device.
e of the ro
hone numb
e the softw
tries will bl
ay be offer
ord.
their facto
automatica
ter.
er or phone
re version
ck the (U)
d together
y default v
ly.
umber.
f the router
IM card. T
ith the (U)
alues, and t
unlock it,
SIM Card.
en
ou need th
f not, pleas
You m
Internet.
N
You ca
your ne
Rout
From t
figure:
y setup fire
TE:
set Port F
work.
r Settin
e Web UI,
all rules t
ltering, Por
lick Settin
protect yo
Filtering,
s > Route
r network
ort Forwar
settings, t
from virus,
ing, URL
e router in
worm and
iltering, U
ormation is
alicious a
np, and D
shown in t
tivity on th
Z to protec
e followin
f
IP Addre
f
Subnet
s: IP addres
ask: Subnet
s for LAN i
mask for th
terface.
IP address.
1
Page 14

f
p
S
n
V
e
i
n
e
u
n
c
e
a
O
e
h
w
a
l
r
e
d
i
m
D
l
e
o
r
a
a
o
n
k
r
h
r
e
a
D
n
a
l
)
n
e
u
r
D
a
d
e
l
o
a
e
H
d
r)
a
r
b
e
e
l
s
e
e
n
l
-
t
i
e
e
e
u
d
f
DHCP Se
DHCP IP
ver: Enabl
Pool: Alloc
or disable
te begin an
HCP Serve
end IP ad
r function.
ress for IP p
ool.
f
Click A
DDN
You ca
oic
Mak
DHCP L
new IP ad
ply to conf
(Dyna
set your
Funct
ng a Ca
ase Time:
ress.
rm your co
ic Dom
DNS as fo
ion
efine how
figuration.
in Nam
lows:
long the lea
Serve
sed IP addr
ss will be
xpired, and
will relocat
You ca
To mak
1. Pick
2. Key i
3. You
conn
4. The c
N
If ther
sure not
Ans
When
also c
the ca
make a call
a call:
p the hands
the teleph
an either p
cted autom
ll will be c
TE:
is no 3G i
ing is bloc
ering a
the phone
n answer t
l.
through (U
t.
ne number.
ess # key o
tically.
nnected.
dication, th
ing it.
Call
ings, pick
e call by p
SIM card.
the teleph
radio sign
p the hands
essing the
ne to send
l is unavail
t to answe
ands-free
the call, or
ble. Chang
it. If the te
utton. Pres
wait 4~8 s
the locatio
ephone has
the Hands
econds for
of the dev
hands-free
free button
he call to b
ce and mak
function yo
again to en
14
Page 15

WPS Function
Your device supports WPS function. You can use this function to connect the client to your
device.
1. Power on your device, and enable the Wi-Fi function on your device.
2. Enable the WPS function. Please check the WPS Setting on the Configuration Page.
3. Press the WPS button on your device to start Wi-Fi Protected Setup authentication process.
4. Enable the WPS function on your client to respond to this authentication process.
5. Follow the system prompts on your client to finish the connection.
Wireless Connection (Optional)
If you want to use Wi-Fi to connect your router, please refer to the following steps.
1. Make sure that the Wi-Fi works normal. Please check the Wi-Fi Setting on the Configuration Page or
check the Wi-Fi indicator.
2. Power on your device. Use the Wi-Fi application on a client to search for available wireless networks.
15
Page 16

N
O
c
h
l
O
n
t
a
a
F
D
f
ter
w
d
s
v
n
e
a
l
p
n
f
t
1
h
n
n
e
p
a
p
e
cfer
fi
TE:
Set the
PC. The
C
3.
4.
Se
lient to obt
client gets
eck the Wi-
ect the SSI
in an IP ad
n IP addres
i SSID and
of your de
ress autom
, for examp
Wi-Fi Key
ice, and the
tically. For
e, 192.168.
rinted on t
click Con
he detailed
.101.
e label bene
ect.
rocedure, r
th the devi
e.
to Con
guring Your
N
TE:
You ca
5. En
16
find the de
the pass
ault SSID o
ord, and th
the label o
n click OK.
your devic
.
Page 17

N
O
y
d
a
b
R
o
s
p
e
a
o
i
t
o
o
w
n
w
c
o
b
s
o
p
h
e
o
i
d
r
a
w
n
u
ft
s
h
a
y
u
o
n
c
o
o
m
a
E
C
u
b
b
i
h
a
n
e
t
p
n
v
c
m
e
a
u
d
h
e
u
k
a
d
t
n
p
c
m
n
n
i
c
g
s
c
t
o
u
n
u
r
N
y
M
i
e
c
s
t
C
7
o
u
s
t
TE:
You ma
get the
6. W
Trou
Voice
Sympt
No Dia
There i
lift the
The lin
hook.
need to e
efault pass
it until the
lesho
elated Pro
ms
l Tone
a prompt/ ph
hone off the
is noisy/ dist
ter the pass
ord.
lient is con
ting
lems
ne alert/ anno
ook.
rted when I li
ord for the
ected to yo
ncement as so
the phone off
Wi-Fi conn
r device su
n as I
the
ection. You
cessfully.
P
ssible Proble
•
Please w
turned on.
•
If SIG L
reception.
Make sure yo
the PIN num
een entered
PUK code w
•
Remove
to the pho
•
The cabl
can view th
s/ Solutions
it for 1~2 min
D light is blin
hange the loc
r (U)SIM car
er has been en
ncorrectly the
en prompted.
ny electrical a
e or your devi
or phone set
label on y
tes after the ro
ing, you have
tion of the ro
is inserted co
ered. If the PI
you will need
pliance which
e.
ight be faulty.
ur device t
ter is
o good RF
ter.
rectly and
number has
to enter the
is too close
I hear
rapid engaged
the ho
k.
After d
aling the last
Interne
Sympt
I cann
The do
Related P
ms
t access the Int
nload or uplo
tone as soon a
igit I hear not
oblems
ernet at all.
d speed is ver
I lift the pho
ing /silence.
slow.
e off
Put the phone
connected to
lease discon
When you ha
or wait 4-8 se
P
ssible Proble
•
Please ch
Please w
•
•
Check yo
The speed is
signal strengt
on the hook a
he internet usi
ect this first.
e finished dial
onds to conne
s/ Solutions
ck your confi
it 1~ 2 minute
r service indi
ependent on si
and network
d try again. If
g the 2G (GS
ng you can pr
t the call.
uration setting
for the router
ators.
gnal strength.
ype.
ou are
) network,
ss the # key
.
o initialize.
heck your
1
Page 18

Symptoms Possible Problems/ Solutions
I cannot visit the Configuration Page
• Enter the correct address. The default address is
http://192.168.1.1
• Only use one network adapter in your PC.
• Do not use any proxy server.
I cannot establish the Wi-Fi connection between my device
and the client.
• Make sure the Wi-Fi function is active.
• Refresh network list and select the correct SSID.
• Check the IP address to make sure your client can
obtain an IP address automatically in the Internet
protocol (TCP/IP) properties.
• Type the correct network key (Wi-Fi password)
when you connect to the device.
Others
Symptoms Possible Problems/ Solutions
The 3G/4G signal indicator is always blinking or does not
light.
• This indicates poor reception. Try moving the router
to another location near the window.
.
About the password
• For the Wi-Fi connection password, please check
the label on the device.
• The default password of the Configuration Page is
vivo.
• If you changed the password and forgot the new
password, you need to restore the device to the
factory default settings.
18
Page 19

Warning and Notice
To the Owner
•If inadequately shielded, some electronic devices may be affected by the electromagnetic interference
caused by the device, such as the electronic system of vehicles. Consult the manufacturers of such
devices before using the device if necessary.
•Operating the device may interfere with medical instruments such as hearing aids and pacemakers.
Always keep the device more than 20 centimeters away from such medical instruments when your
device is turned on. Turn the device off if necessary. Consult a physician or the manufacturers of
medical instruments before using the device if necessary.
•Be aware of the usage limitation when using the device at places such as oil warehouses or chemical
factories, where there are explosive gases or explosive products being processed. Turn off the device if
necessary.
•Do not use electronic transmission devices in aircrafts, at petrol stations or in hospitals. Observe and
obey all warning signs, and turn off the device in these conditions.
•Do not touch the inner antenna area unless it is necessary. Otherwise the performance of the device may
be affected.
•Keep the device out of the reach of little children. The device may cause an injury if used as a toy.
•When the device is operating, do not touch the metallic parts. Failing to do so may cause burns.
Using Your Device
•Use original accessories or accessories that are authorized. Using any unauthorized accessories may
affect the performance of the device and violate the related national regulations about telecom terminals.
•Avoid using the device near or inside metallic structures or establishments that can emit electromagnetic
waves, because signal reception may be affected.
•The device is not waterproof. Keep the device dry and store it in a shady and cool place.
•Do not use the device immediately after a sudden temperature change. In such case, dew may be
generated inside and outside the device, so do not use it until it becomes dry.
•Handle the device carefully. Do not drop, bend or strike it. Otherwise the device may be damaged.
•Only qualified personnel can dismantle and repair the device.
•An operating temperature between -10
recommended.
°C and +45°C and humidity between 5% and 95% are
19
Page 20

Using the Battery
•Do not connect the battery in a short circuit, because a short circuit may cause excessive heat and fire.
•Do not store the battery in a hot area or put it in a fire. This avoids an explosion.
•Do not disassemble or modify the battery.
•If the battery is not used for a long period, remove it from your device and store it in a cool dry place.
•Never use a damaged charger and exhausted battery.
•Return the exhausted battery to the provider or put it in the appointed recycle place. Do not put it in
familial rubbish.
WARNING:
If the battery is broken, keep away from it. If it taints your skin, wash your skin with abundant fresh water
and ask doctor help if necessary.
Limited Warranty
•This warranty does not apply to defects or errors in the product caused by:
i. Reasonable abrasion.
ii. End users’ failure to follow ZTE’s installation, operation or maintenance instructions or
procedures.
iii. End users’ mishandling, misuse, negligence, or improper installation, disassembly, storage, servicing
or operation of the product.
iv. Modifications or repairs not provided by ZTE or a ZTE-certified individual.
v. Power failures, surges, fire, flood, accidents, and actions of third parties or other events outside ZTE’s
reasonable control.
vi. Usage of third-party products, or usage in conjunction with third-party products if such defects are
due to the combined usage.
vii. Any other cause beyond the range of normal usage intended for the product.
End users have no right to reject or return the product, or receive a refund for the product from ZTE
under the above-mentioned situations.
•This warranty is end users’ sole remedy and ZTE’s sole liability for defective or nonconforming items,
and is in lieu of all other warranties, expressed, implied or statutory, including but not limited to the
implied warranties of merchantability and fitness for a particular purpose, unless otherwise required
under the mandatory provisions of the law.
Limitation of Liability
ZTE shall not be liable for any loss of profits or indirect, special, incidental or consequential damages
resulting from or arising out of or in connection with using of this product, no matter whether or not ZTE
had been advised, knew or should have known of the possibility of such damages, including, but not
20
Page 21

limited to lost profits, interruption of business, cost of capital, cost of substitute facilities or product, or
any downtime cost.
You can get help by:
• Sending an E-mail to mobile@zte.com.cn
• Visiting www.ztedevice.com
• Calling the service hotline +86–755–26779999
21
Page 22

FCC Regulations:
This device complies with part 15 of the FCC Rules. Op
c
onditions: (1) This device may not cause harmful int
int
erference receive
This d
evice ha
ar
t 15 of the FCC Rules. These limits
P
int
erference
ener
gy and, if not installed and used in
ra
dio communications. However, th
to
alla
inst
e deter
b
erference
int
-Reorie
-Increase
-
Connect the equipment into an outlet on a circuit di
-
Consult the dealer or an experienced radio/TV technician for help.
in a residential installation. This equipment gen
tion If this equipment does cause harmful int
mined by turning the equipment off and on, the user is encouraged to try to co
by one or more of the following measures:
nt or relocate the
the sep
d, including int
s been tested and found to comply with the limits for a Class B digital device, pursuant to
rece
ara
tion between the equipment and
erference
accordance
ere
iving antenna.
that may cause undesired op
are de
signed to provide
is no gu
erference, a
with the instructions, may cause harmful int
arantee
erference
receiver
ffere
nt from that to which the
era
tion is subject to the following two
nd (2) This device must
era
rea
sonable protection against harmful
erate
s, uses and can radiated radio
that int
erference
to radio or television
.
acce
pt any
tion.
frequenc
erference
will not occur in a particular
rece
ption, which can
rrec
t the
receiver
is connected.
Caution:
Changes or modifications not expressly approved by the party responsible for compliance could void the
user‘s authority to o p e ra te the equipm ent.
y
RF Exposure Information
This device meets the government’s requirements for exposure to radio waves.
evice
This d
frequency (RF) ener
This d
o
rder
to avoid the possibility of ex
th
e antenna
is designed and manu
gy set by the Fed
evice c
omplies with FCC radiation exposure limits set forth for an uncontrolled environment. In
shall not be less than 20cm (8 inches) during normal op
facture
d not to ex
era
l Communications Commission of the U.S. Government.
cee
ding the FCC radio
cee
d the emission limits for exposure to radio
frequency e
xposure limits, human proximity to
era
tion.
22
 Loading...