

Page 1
Operation Manual
You must read the Usage and Safety Precautions before use.
©2024 ZOOM CORPORATION
Copying or reprinting this manual in part or in whole without permission is prohibited.
Product names, registered trademarks and company names in this document are the property of their respective companies. All trademarks and
registered trademarks in this document are for identification purposes only and are not intended to infringe on the copyrights of their respective owners.
Proper display is not possible on grayscale devices.
Page 2

Notes about this Operation Manual
You might need this manual in the future. Always keep it in a place where you can access it easily.
The contents of this document and the specifications of the product could be changed without notice.
• Microsoft and Windows are trademarks of the Microsoft group of companies.
• Mac, macOS, iPadOS and Lightning are trademarks of Apple Inc.
• iOS is a registered trademark or trademark of Cisco Systems, Inc. and affiliated companies in the USA
and other countries and is used under license.
• App Store is a service mark of Apple Inc.
• The Bluetooth® word mark and logo are registered trademarks of Bluetooth SIG, Inc., and these marks
are used under license by ZOOM CORPORATION.
• The microSDXC logo is a trademark of SD-3C LLC.
• USB Type-C is a trademark of the USB Implementers Forum.
• Recording from copyrighted sources, including CDs, records, tapes, live performances, video works
and broadcasts, without permission of the copyright holder for any purpose other than personal use is
prohibited by law. ZOOM CORPORATION will not assume any responsibility related to infringements of
copyrights.
2
Page 3

Contents
Notes about this Operation Manual........................................................................................................................ 2
H4essential overview.................................................................................................................................................. 6
Achieving high audio quality throughout recording and editing......................................................................... 6
Functions of parts..................................................................................................................................................... 10
Overview of screens that appear........................................................................................................................... 15
Recording process..................................................................................................................................................... 26
Making preparations.................................................................................................................................................27
Inserting microSD cards........................................................................................................................................... 27
Supplying power........................................................................................................................................................ 28
Connecting input devices.........................................................................................................................................30
Turning the power on/off........................................................................................................................................ 36
Setting the guide sound (first time starting up)...................................................................................................38
Setting the language shown (first time starting up)............................................................................................ 39
Setting the date format (first time starting up)....................................................................................................40
Setting the date and time (first time starting up)................................................................................................41
Setting the type of batteries used (first time starting up)..................................................................................43
Preventing misoperation (HOLD function)............................................................................................................ 44
Making input settings............................................................................................................................................... 45
Enabling tracks for recording.................................................................................................................................. 45
Converting built-in XY mic input to mono.............................................................................................................46
Setting plug-in power................................................................................................................................................47
Setting phantom power........................................................................................................................................... 48
Reducing noise (Lo Cut)............................................................................................................................................50
Enabling stereo linking............................................................................................................................................. 51
Setting the side level when recording mid-side stereo.......................................................................................53
Making output settings............................................................................................................................................ 55
Changing how the output level is adjusted.......................................................................................................... 55
Adjusting the fixed level...........................................................................................................................................57
Recording.................................................................................................................................................................... 59
Monitoring input sounds..........................................................................................................................................59
Adjusting the monitoring balance of input sounds............................................................................................. 61
Making recording settings........................................................................................................................................63
Recording.................................................................................................................................................................... 69
Adding marks during recording.............................................................................................................................. 71
Moving the file being recorded to the TRASH folder.......................................................................................... 72
Playing recordings..................................................................................................................................................... 73
Playing recordings..................................................................................................................................................... 73
Adjusting the volume balance of all tracks...........................................................................................................75
Making output settings.............................................................................................................................................76
Automatic volume adjustment during playback.................................................................................................. 77
3
Page 4

Changing the playback speed................................................................................................................................. 78
Repeat playback of a set interval (A-B repeat).....................................................................................................79
Changing the format and exporting files.............................................................................................................. 81
Moving the file being played to the TRASH folder...............................................................................................84
Managing files............................................................................................................................................................85
H4essential folder and file structure..................................................................................................................... 85
Checking files............................................................................................................................................................. 88
Using as an audio interface.................................................................................................................................... 89
For Windows...............................................................................................................................................................89
Connecting to computers, smartphones and tablets..........................................................................................89
Making input settings and monitoring adjustments........................................................................................... 93
Making output settings.............................................................................................................................................94
Recording on the H4essential while using it as an audio interface.................................................................. 96
Disconnecting from computers, smartphones and tablets................................................................................97
Transferring files to computers and other devices............................................................................................. 98
Connecting to computers, smartphones and tablets..........................................................................................98
Disconnecting from computers, smartphones and tablets..............................................................................100
Managing microSD cards....................................................................................................................................... 101
Formatting microSD cards..................................................................................................................................... 101
Testing microSD cards............................................................................................................................................102
Deleting files in the TRASH folder........................................................................................................................ 105
Using timecode........................................................................................................................................................106
Timecode overview................................................................................................................................................. 106
Connecting with an UltraSync BLUE.................................................................................................................... 108
Making various settings......................................................................................................................................... 111
Setting the language shown..................................................................................................................................111
Setting the date and time......................................................................................................................................112
Setting the date format..........................................................................................................................................114
Setting display power saving.................................................................................................................................116
Setting the display brightness...............................................................................................................................117
Setting the type of batteries used........................................................................................................................118
Setting the time until the power turns off automatically................................................................................. 120
Using the guide sound accessibility feature....................................................................................................... 122
Setting the guide sound (accessibility)................................................................................................................ 122
Setting the guide sound volume.......................................................................................................................... 124
Checking guide sound information......................................................................................................................125
Installing guide sounds.......................................................................................................................................... 126
Restoring the factory default state...................................................................................................................... 127
Managing the firmware..........................................................................................................................................128
Checking the firmware versions........................................................................................................................... 128
Updating the firmware........................................................................................................................................... 129
Operating the H4essential from a smartphone/tablet..................................................................................... 130
Disconnecting from smartphones and tablets...................................................................................................132
Checking the latest information for the H4essential........................................................................................ 133
4
Page 5

Appendix...................................................................................................................................................................134
Troubleshooting.......................................................................................................................................................134
H4essential metadata list...................................................................................................................................... 136
Specifications........................................................................................................................................................... 140
5
Page 6
H4essential overview
Achieving high audio quality throughout recording and editing
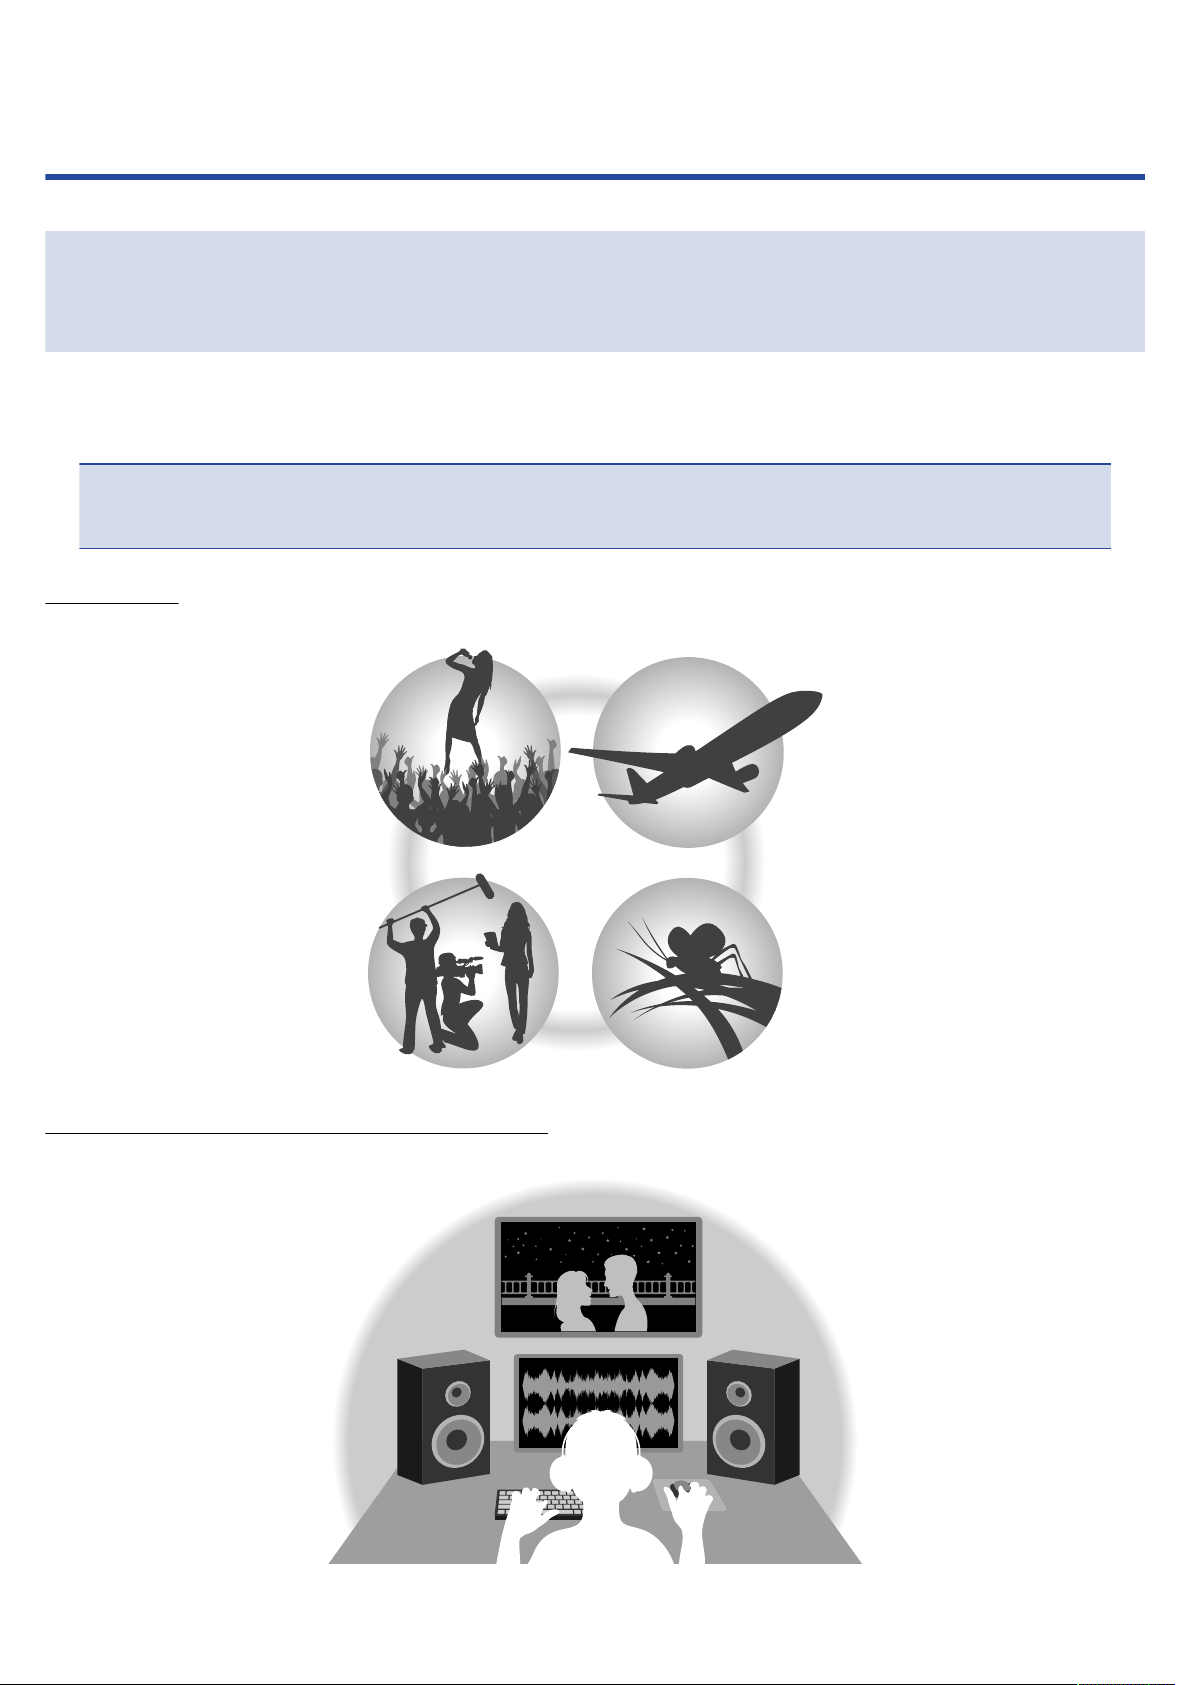
With dual A/D converter circuits and support for 32-bit float WAV files, the H4essential can maintain the
highest audio quality from recording through editing in a DAW or other software.
NOTE
On the H4essential, only the INPUT 1 and INPUT 2 jacks have dual A/D converter circuits.
Recording
Dual A/D converter circuits enable recording both loud and quiet sounds without making gain adjustments.
Editing with DAWs and other software
Since files are recorded using 32-bit float WAV format, audio quality can be retained when editing.
6
Page 7
Dual A/D converter circuit overview
High-gain
AD converter
Low-gain
AD converter
AD converter
switches in
response to
input level
・Airplane
・Nearby thunder
・Train passing on tracks overhead
・Inside train
・Shouting
・Grand piano
・Noisy street
・Chimes
・Ordinary conversation
・Whispering
・Quiet library
・Late night in suburb
Wide dynamic range covered
by two AD converters
Input gain adjusted to
desired recording volume
Dual AD converters
Conventional equipment
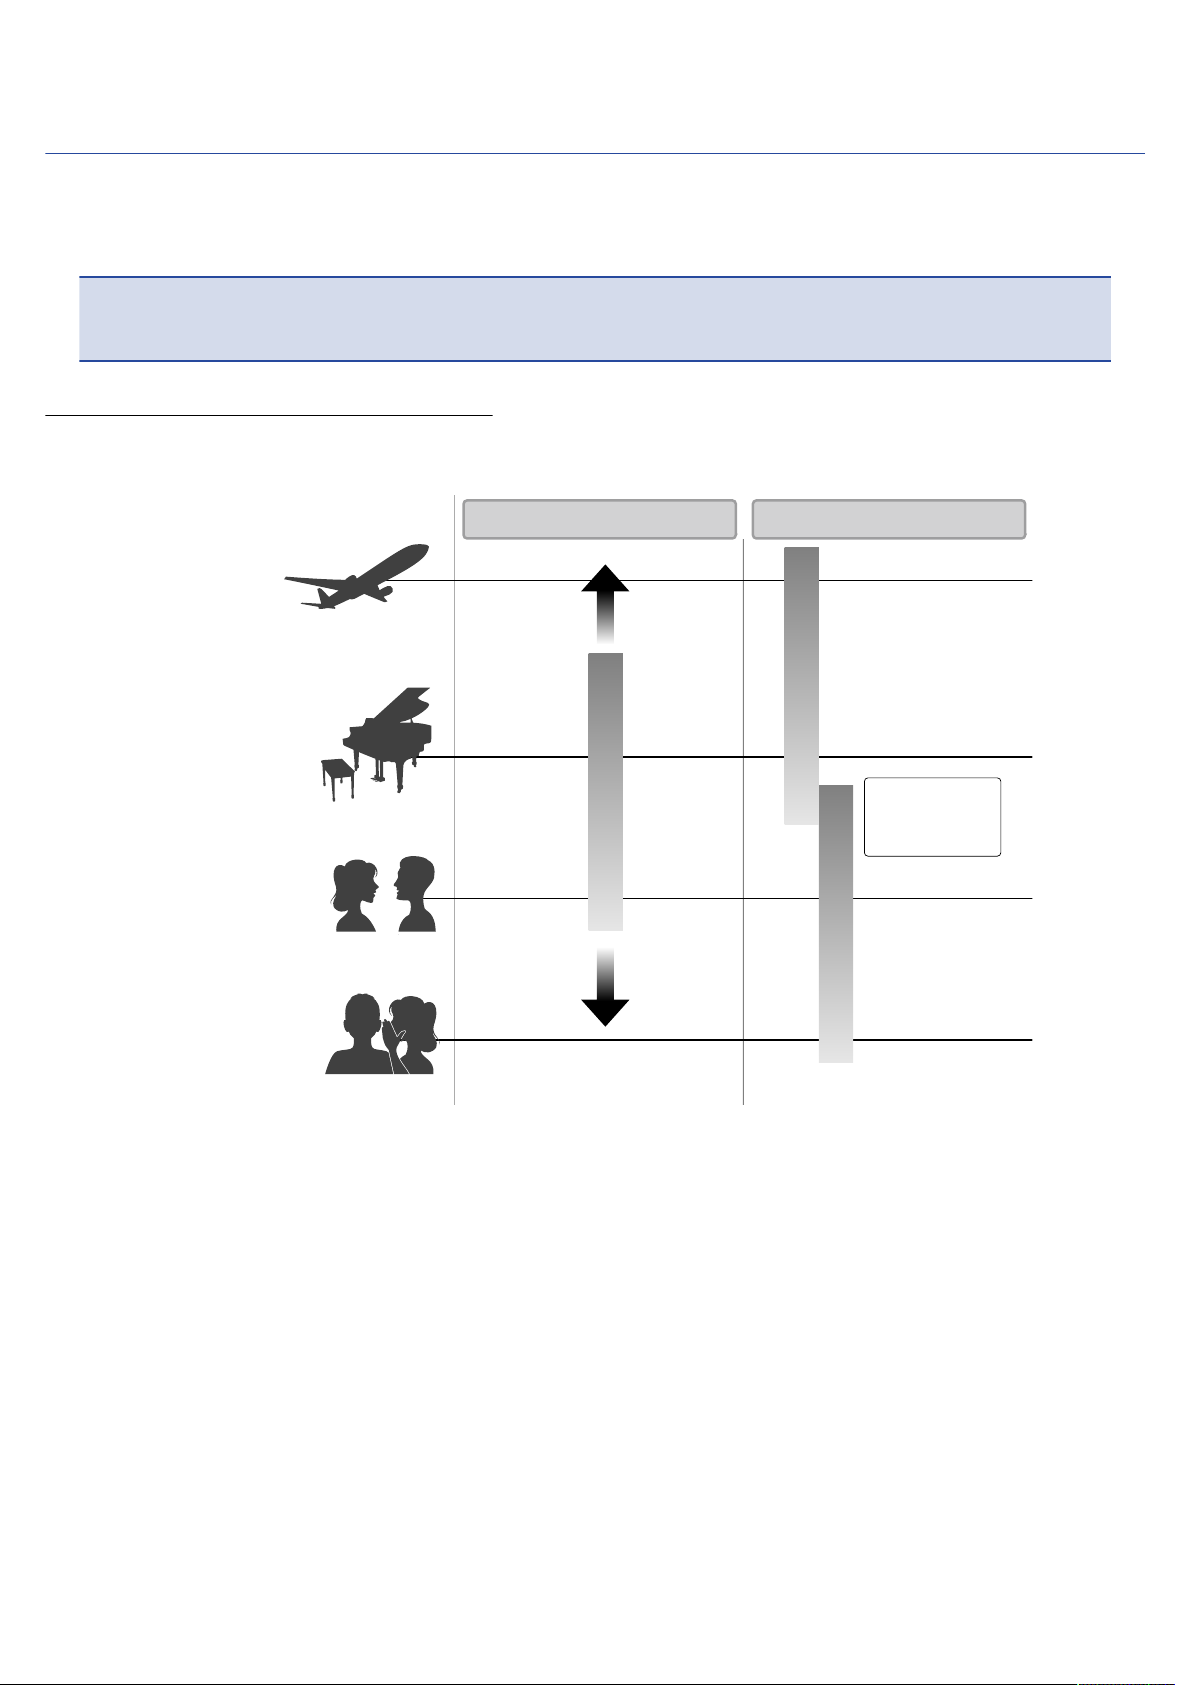
For each input circuit, the H4essential has two A/D converters with different input gains. This design
enables high-quality audio recording without the need to adjust gain settings, a step that is normally
indispensable.
NOTE
On the H4essential, only the INPUT 1 and INPUT 2 jacks have dual A/D converter circuits.
Providing amazing dynamic range
By combining two A/D converters, a wide dynamic range not possible with a single A/D converter has been
realized.
7
Page 8
Switching between two A/D converters
Low noise
because high-gain
AD converter selected
Low noise
because high-gain
AD converter selected
No clipping
because low-gain
AD converter selected
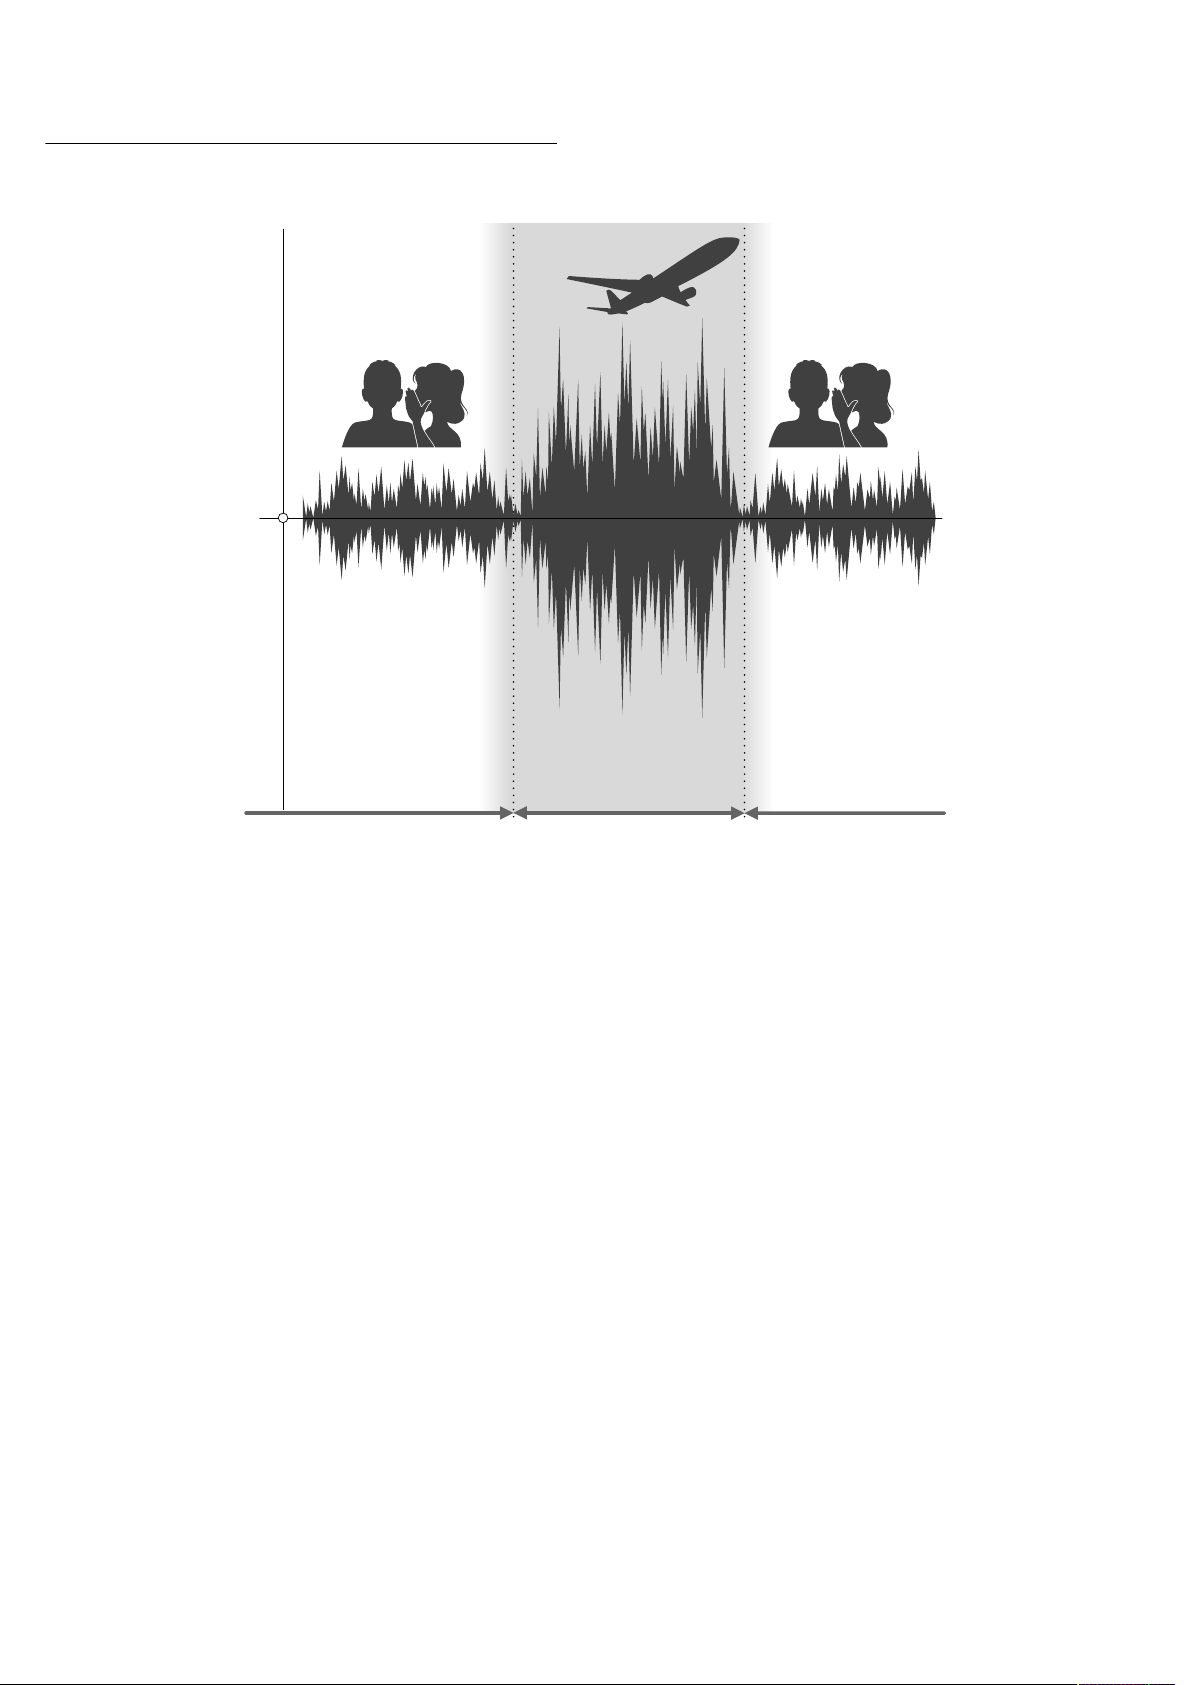
The H4essential constantly monitors data from the two A/D converters, and automatically selects the one
that provides the best recording results.
8
Page 9
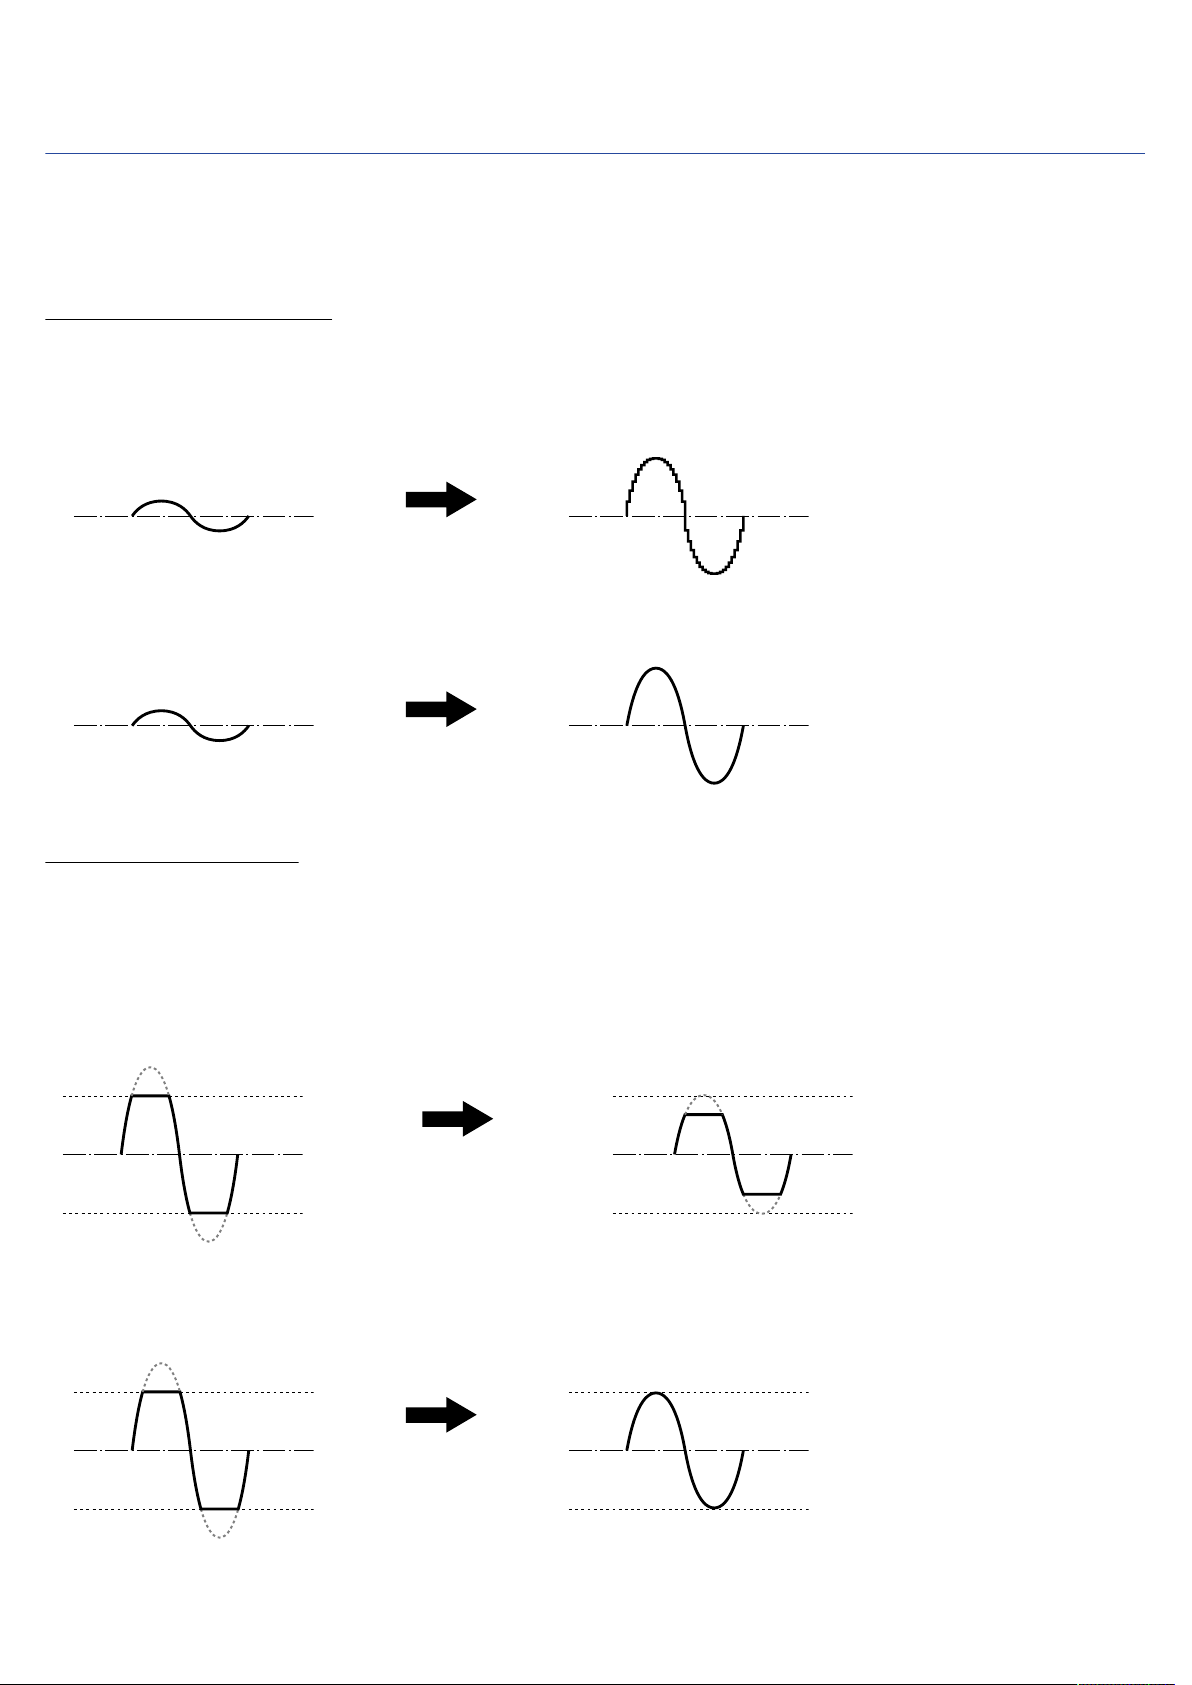
32-bit float WAV file overview
32-bit float WAV files have the following advantages over conventional 16/24-bit WAV files.
Due to these advantages, the audio quality of recording can be maintained afterward when editing in a
DAW or other software.
Resolution advantage
32-bit float WAV files have the advantage of being able to maintain high resolution even at low volumes. As
a result, quiet sounds can be made louder when editing after recording without degrading their quality.
■ 16/24-bit WAV
Resolution is low
Volume raised
■ 32-bit float WAV
Resolution is high
Volume raised
Clipping advantage
If a waveform sounds clipped when output from the H4essential or in a DAW, it can be edited after
recording to lower its volume and restore an unclipped waveform because the data in the 32-bit float WAV
file itself is not clipped.
■ 16/24-bit WAV
Clipped recording
Still clipped
Volume lowered
■ 32-bit float WAV
Clipped recording
Not clipped
Volume lowered
9
Page 10
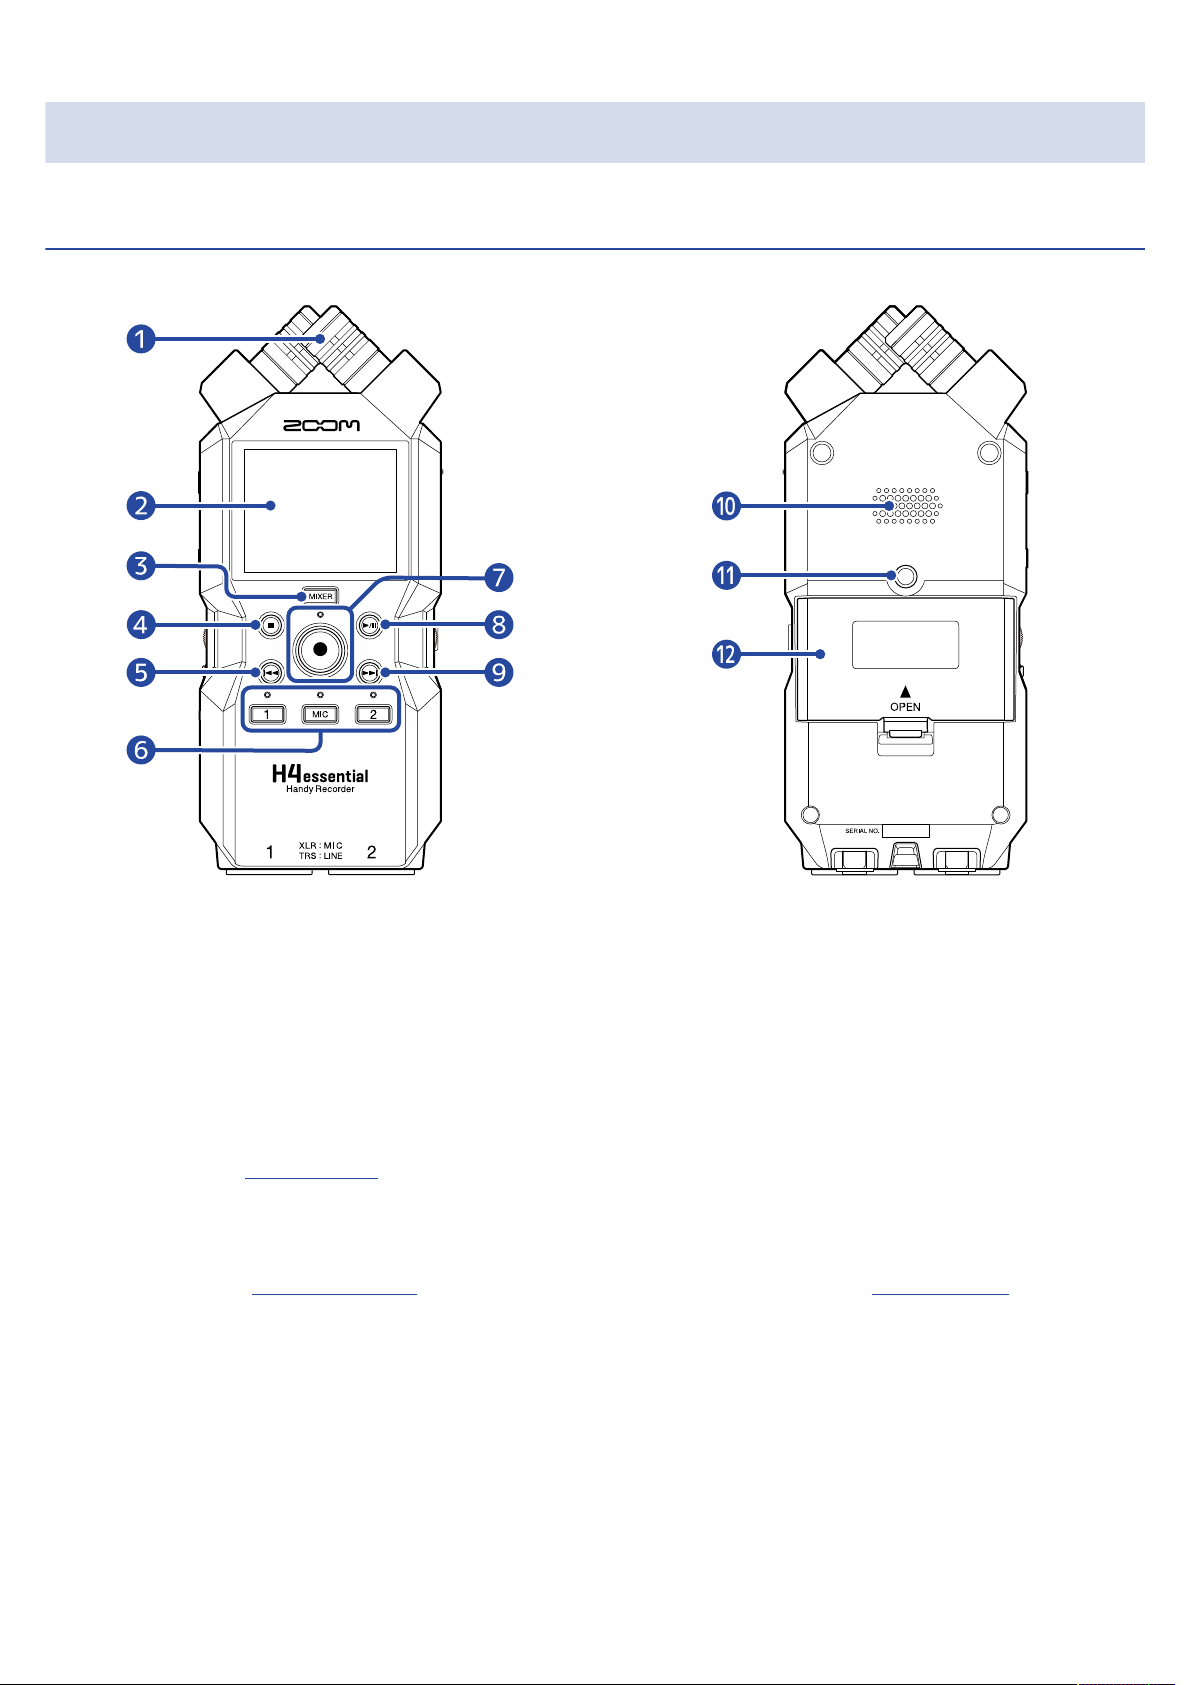
Functions of parts
Top and bottom
■ Top ■ Bottom
Built-in XY mic
❶
This stereo mic has two crossing directional mics. This mic can record three-dimensional sound with
natural depth and width.
Display
❷
This shows various types of information.
MIXER button
❸
This opens the Mixer Screen.
STOP button
❹
This stops recording/playback.
Press when the Playback Screen or a settings screen is open to return to the Home Screen (with some
exceptions).
REW button
❺
Press during playback or when paused to move to the previous file, the beginning of the file, or the
previous mark.
Press and hold to search backward.
Track buttons and status indicators
❻
These turn on/off the corresponding tracks. Status indicators will light red when tracks are on.
10
Page 11

REC button and indicator
❼
This starts recording. The indicator lights during recording.
Press when recording to stop recording.
PLAY/PAUSE button
❽
This starts and pauses playback.
FF button
❾
Press during playback or when paused to move to the next file or the next mark.
Press and hold to search forward.
Speaker
❿
Sound is output here during file playback.
If headphones are connected to the PHONE/LINE OUT jack, sound will not be output from the speaker.
Tripod mounting threads
⓫
This can be used to attach the H4essential to a tripod, for example.
Battery cover
⓬
Open this when installing or removing AA batteries. (→ Installing batteries)
11
Page 12
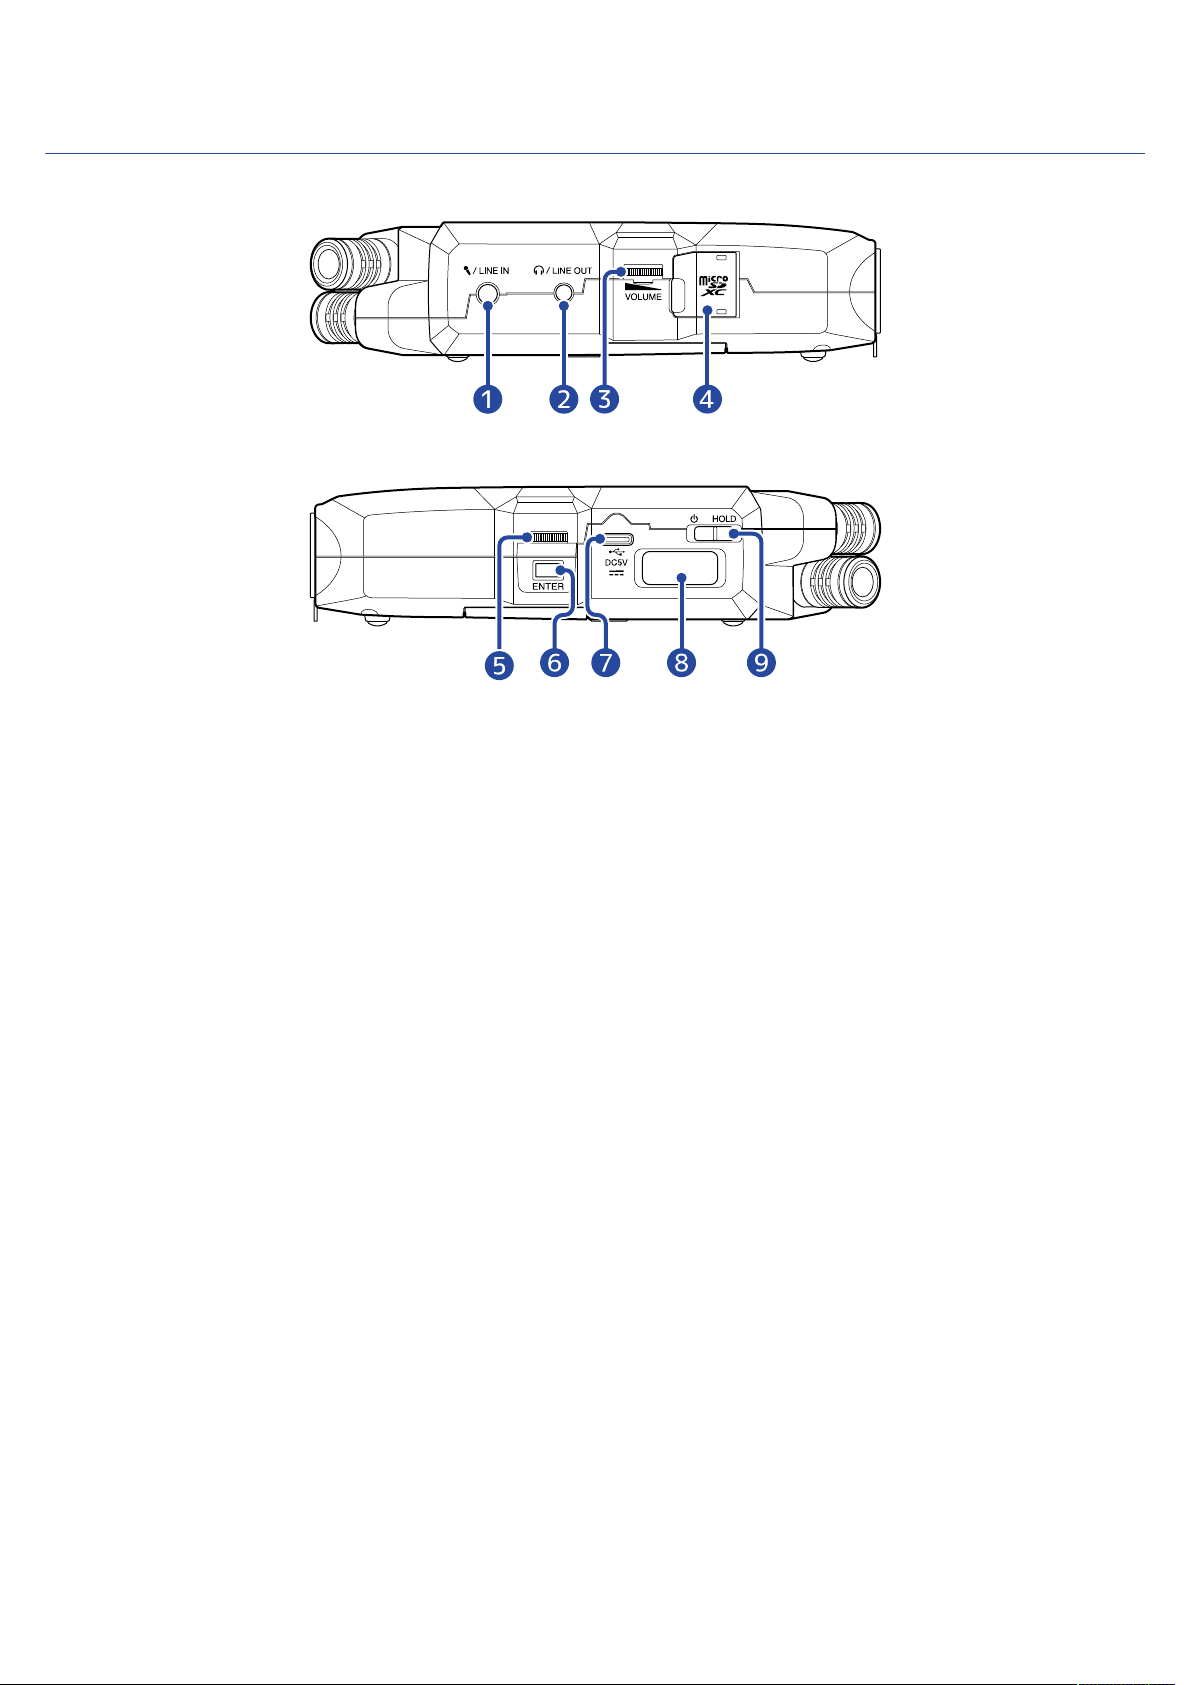
Left and right sides
■ Left side
■ Right side
MIC/LINE IN jack (supports plug-in power)
❶
A connected mic can be used to record.
Mics that require plug-in power can be used with this jack.
PHONE/LINE OUT jack
❷
Use this stereo mini jack to output sound to headphones or a connected device.
VOLUME
❸
This adjusts the output to the built-in speaker, headphones or connected device.
microSD card slot
❹
Insert a microSD card here.
Selection dial
❺
Use this to select items on the various screens.
ENTER button
❻
Use this to confirm items selected using the Selection dial.
USB port (Type-C)
❼
Connect this to a computer, smartphone or tablet to use file transfer functions and to use the
H4essential as an audio interface.
This supports operation on USB bus power.
REMOTE connector
❽
Connect a ZOOM BTA-1 or other dedicated wireless adapter here.
This enables use of the H4essential Control smartphone/tablet app to operate the H4essential
wirelessly.
12
Page 13

In addition, this enables SMPTE timecode to be input to the H4essential using an UltraSync BLUE made
by Timecode Systems.
POWER/HOLD switch
❾
Use this to turn the power on/off and to disable button operation.
13
Page 14
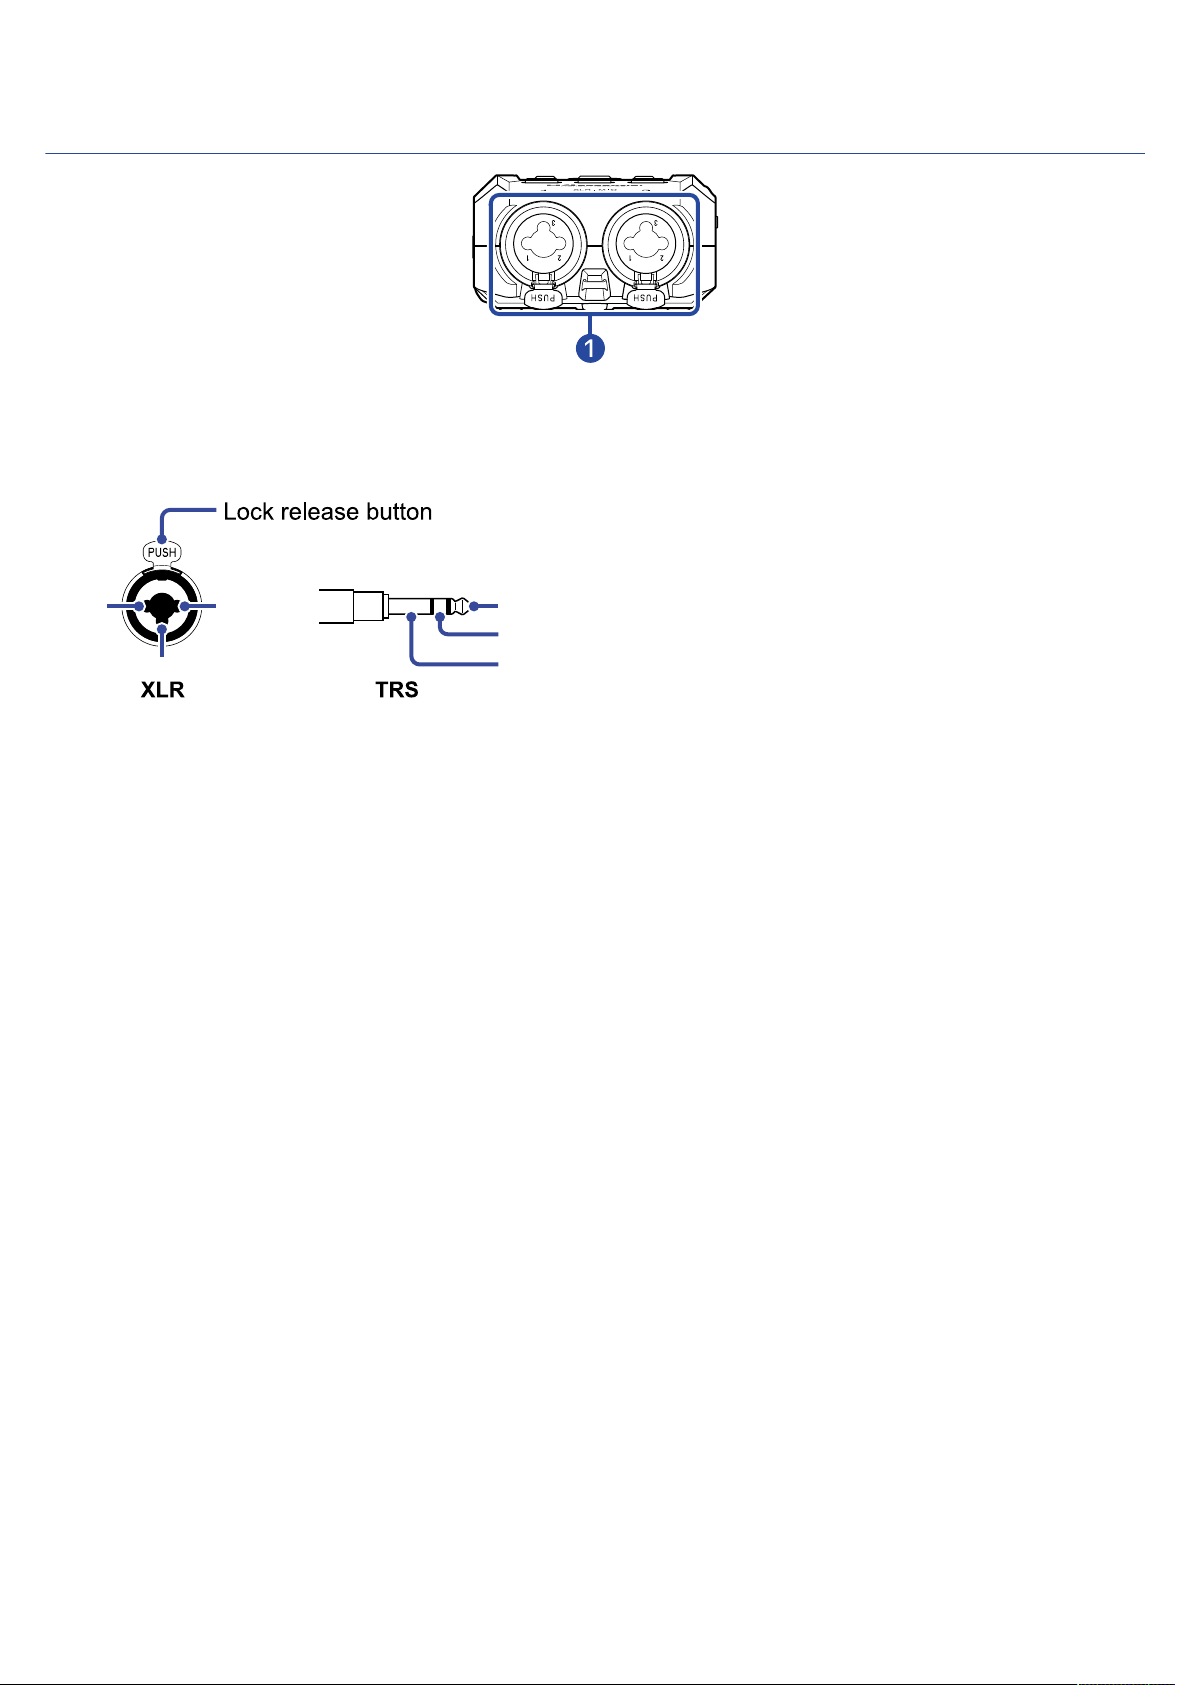
■ Front end
1: GND
2: HOT
3: COLD
1
2
3
TIP: HOT
RING: COLD
SLEEVE: GND
INPUT 1 and 2 jacks
❶
Connect mics and instruments to these. These can be used with XLR and TRS plugs.
When disconnecting an XLR plug, pull it while pushing the connector lock release button.
14
Page 15
Overview of screens that appear
Full Empty
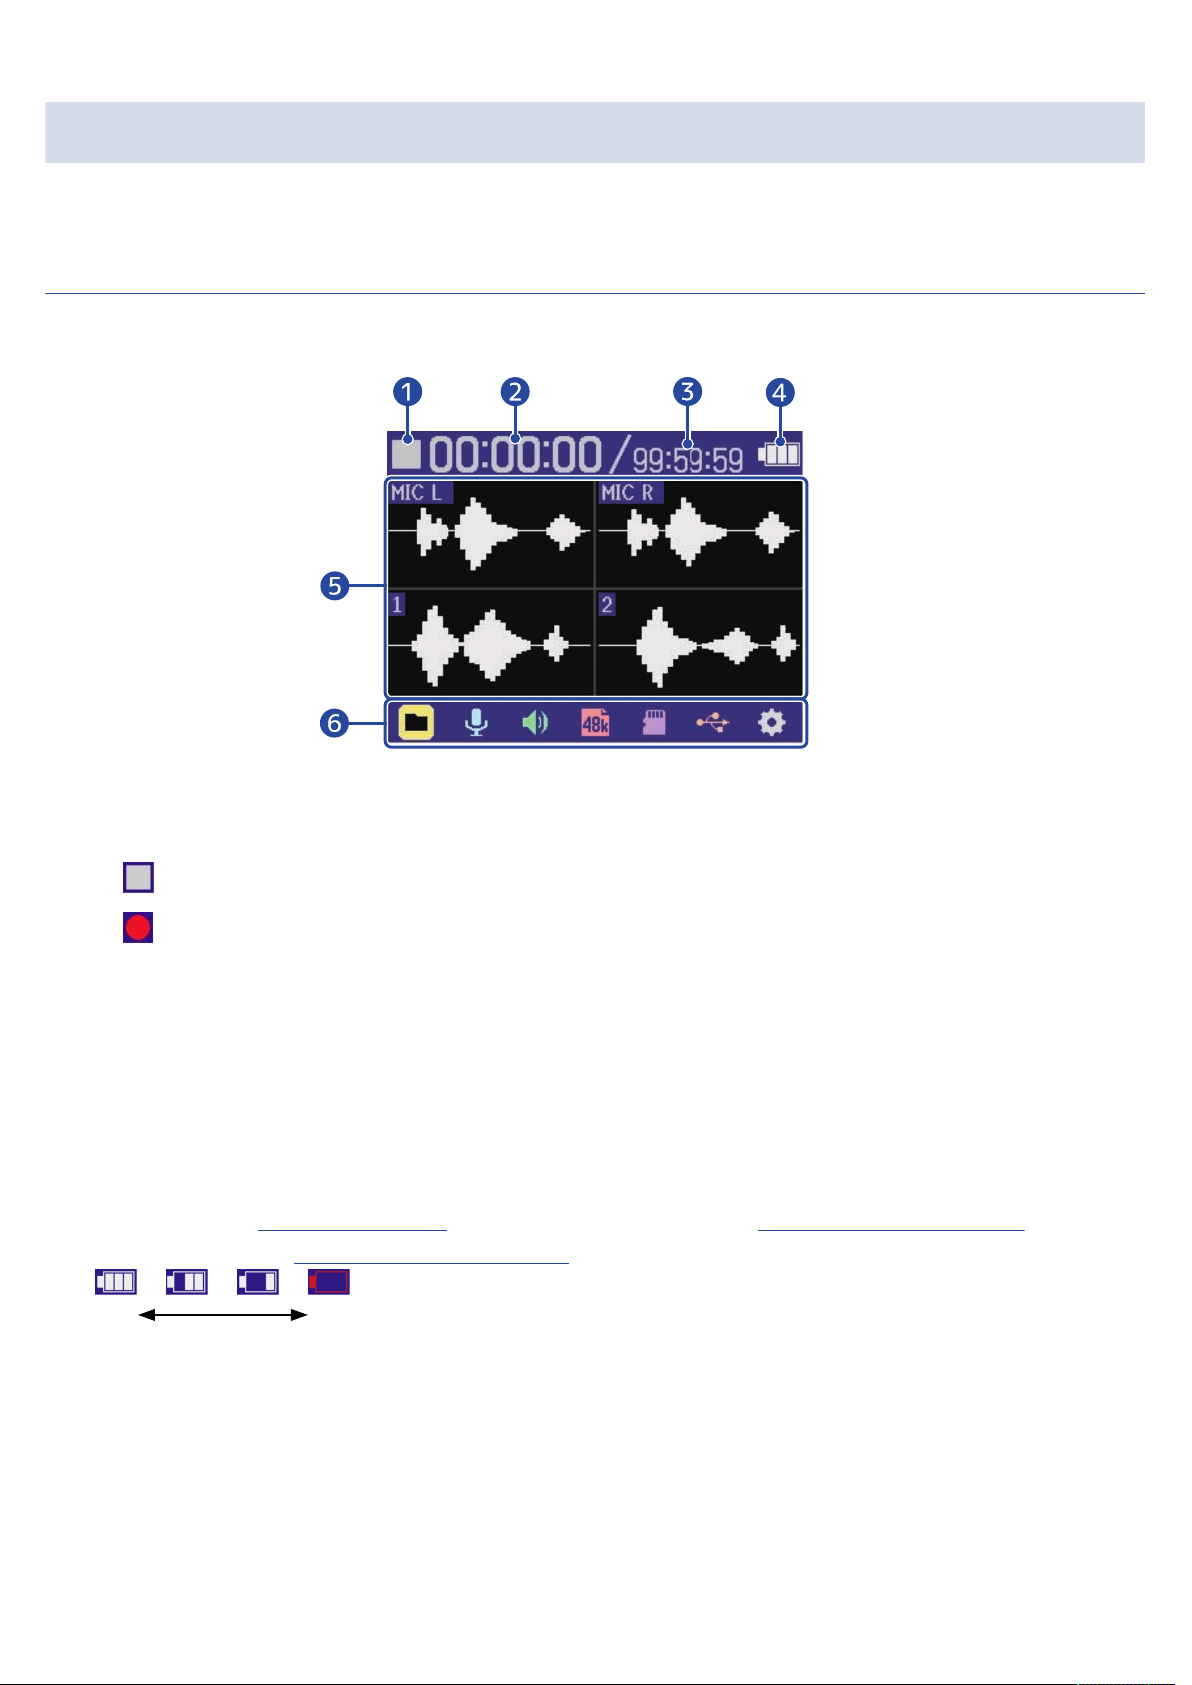
In this section, we explain the screens shown on the display of the H4essential.
Home Screen
This screen appears on the display when the H4essential power is turned on. This shows conditions of the
H4essential, including recording status and input signal waveforms.
Status icon
❶
The recording status is shown by an icon.
• Stopped
• Recording
Elapsed recording time
❷
This shows the current elapsed recording time.
Recordable time
❸
This is the current available recording time.
Remaining battery charge
❹
This is shown when operating on batteries. When the remaining battery charge becomes low, replace
the batteries (→ Installing batteries) or connect an AC adapter (→ Connecting an AC adapter) or
portable battery (→ Using other power sources).
Waveform display (built-in XY mic, inputs 1 and 2)
❺
This shows the waveforms of signals input into the H4essential. Waveforms that are currently being
recorded are shown in red.
The input types are shown at the left end of each waveform.
• MIC L: Built-in XY mic left channel
• MIC R: Built-in XY mic right channel
15
Page 16
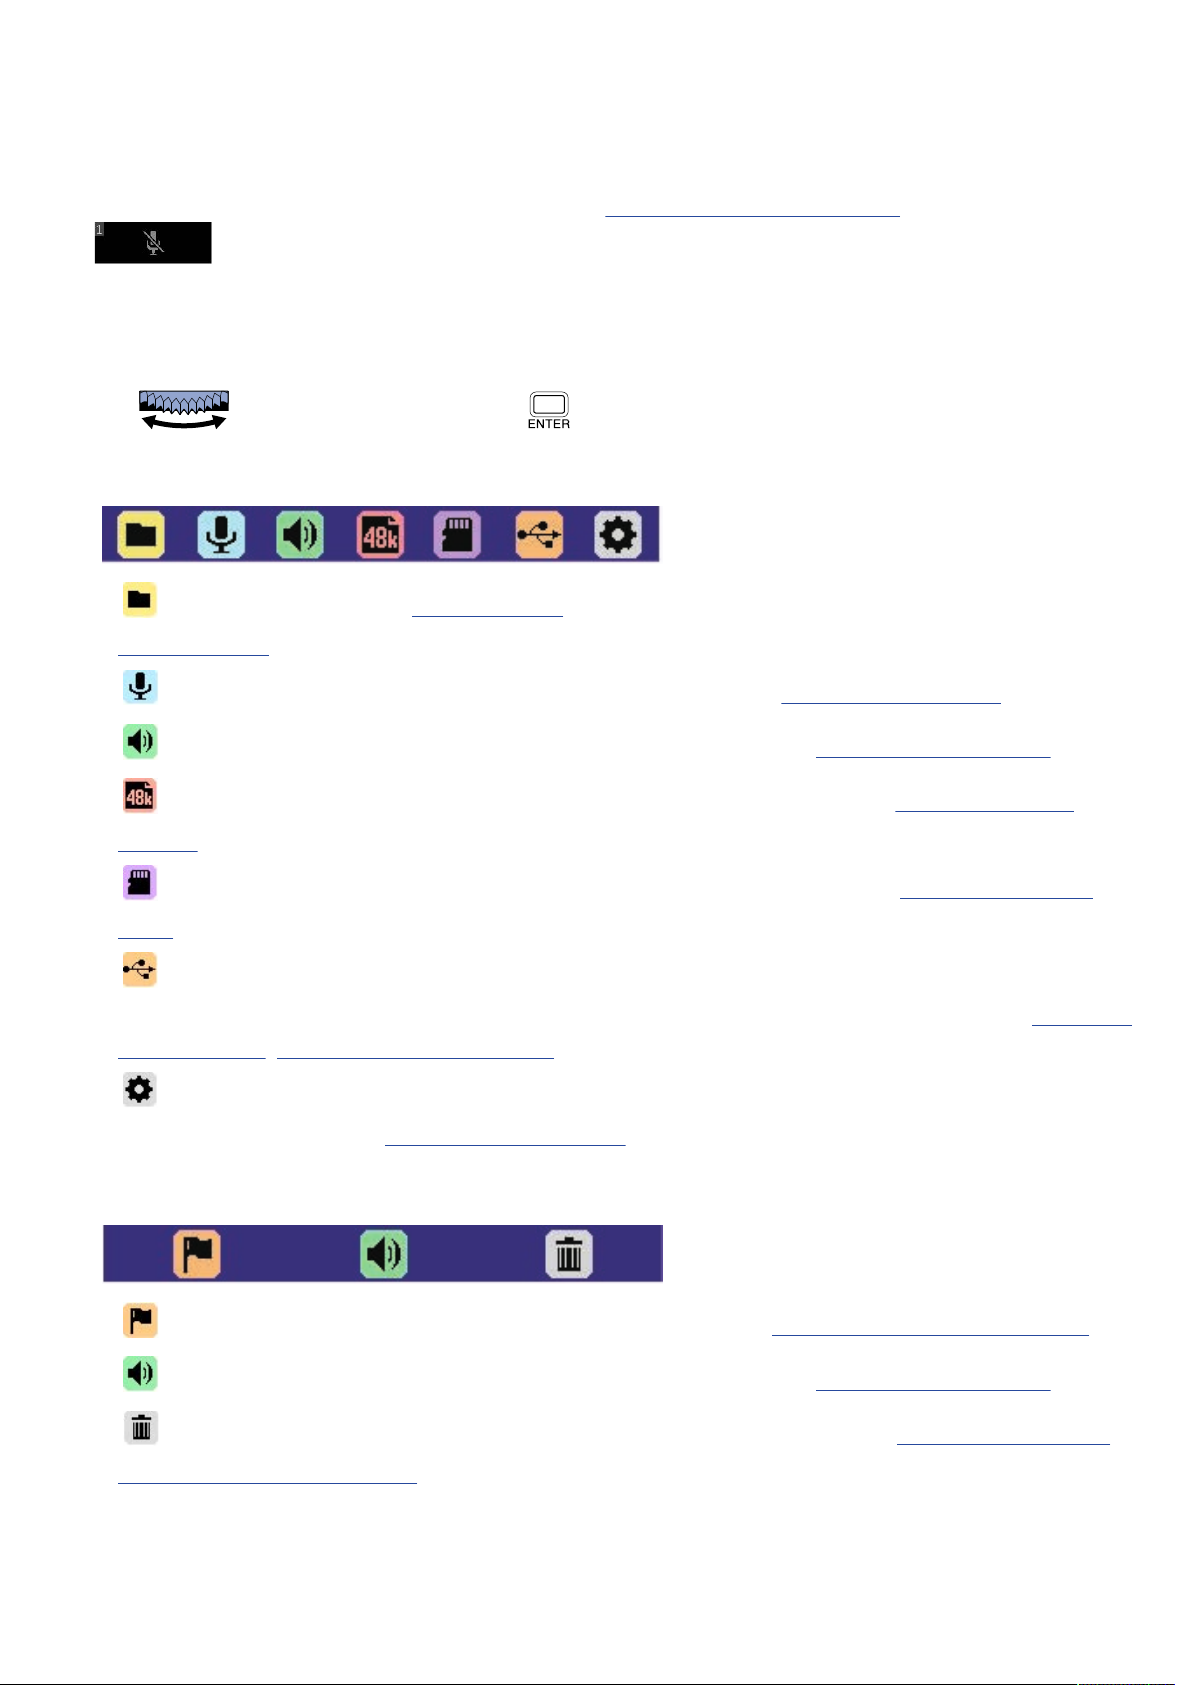
• 1: Input 1
• 2: Input 2
A muted icon will be shown when a track is off. (→ Enabling tracks for recording)
Menu bar
❻
This shows icons for various setting items so settings screens, including input, output, recording and
system, can be opened and settings can be made easily.
Use to select an icon, and press to conduct the following operations.
■ When recording paused
• File List: This opens the File List Screen where the files on the microSD card can be checked. (→
File List Screen)
• Input: This opens a screen with settings related to input. (→ Making input settings)
• Output: This opens a screen with settings related to output. (→ Making output settings)
• Rec Settings: This opens a screen with settings related to recording. (→ Making recording
settings)
• SD card: This opens a screen with settings related to microSD cards. (→ Managing microSD
cards)
• USB: This opens a screen to connect the H4essential to a computer, smartphone or tablet in
order to check and move files on the microSD card and make audio interface settings. (→ Managing
microSD cards, Using as an audio interface)
• System: This opens a screen where various unit settings, including date/time and display
settings, can be made. (→ Making various settings)
■ When recording
• Mark: Use this to add a mark to the file being recorded. (→ Adding marks during recording)
• Output: This opens a screen with settings related to output. (→ Making output settings)
• Trash: Use this to move the file being recorded to the TRASH folder. (→ Moving the file being
recorded to the TRASH folder)
16
Page 17

HINT
When the Playback Screen or a settings screen is open (with some exceptions), press to return to the
Home Screen.
17
Page 18
Playback Screen
Full Empty
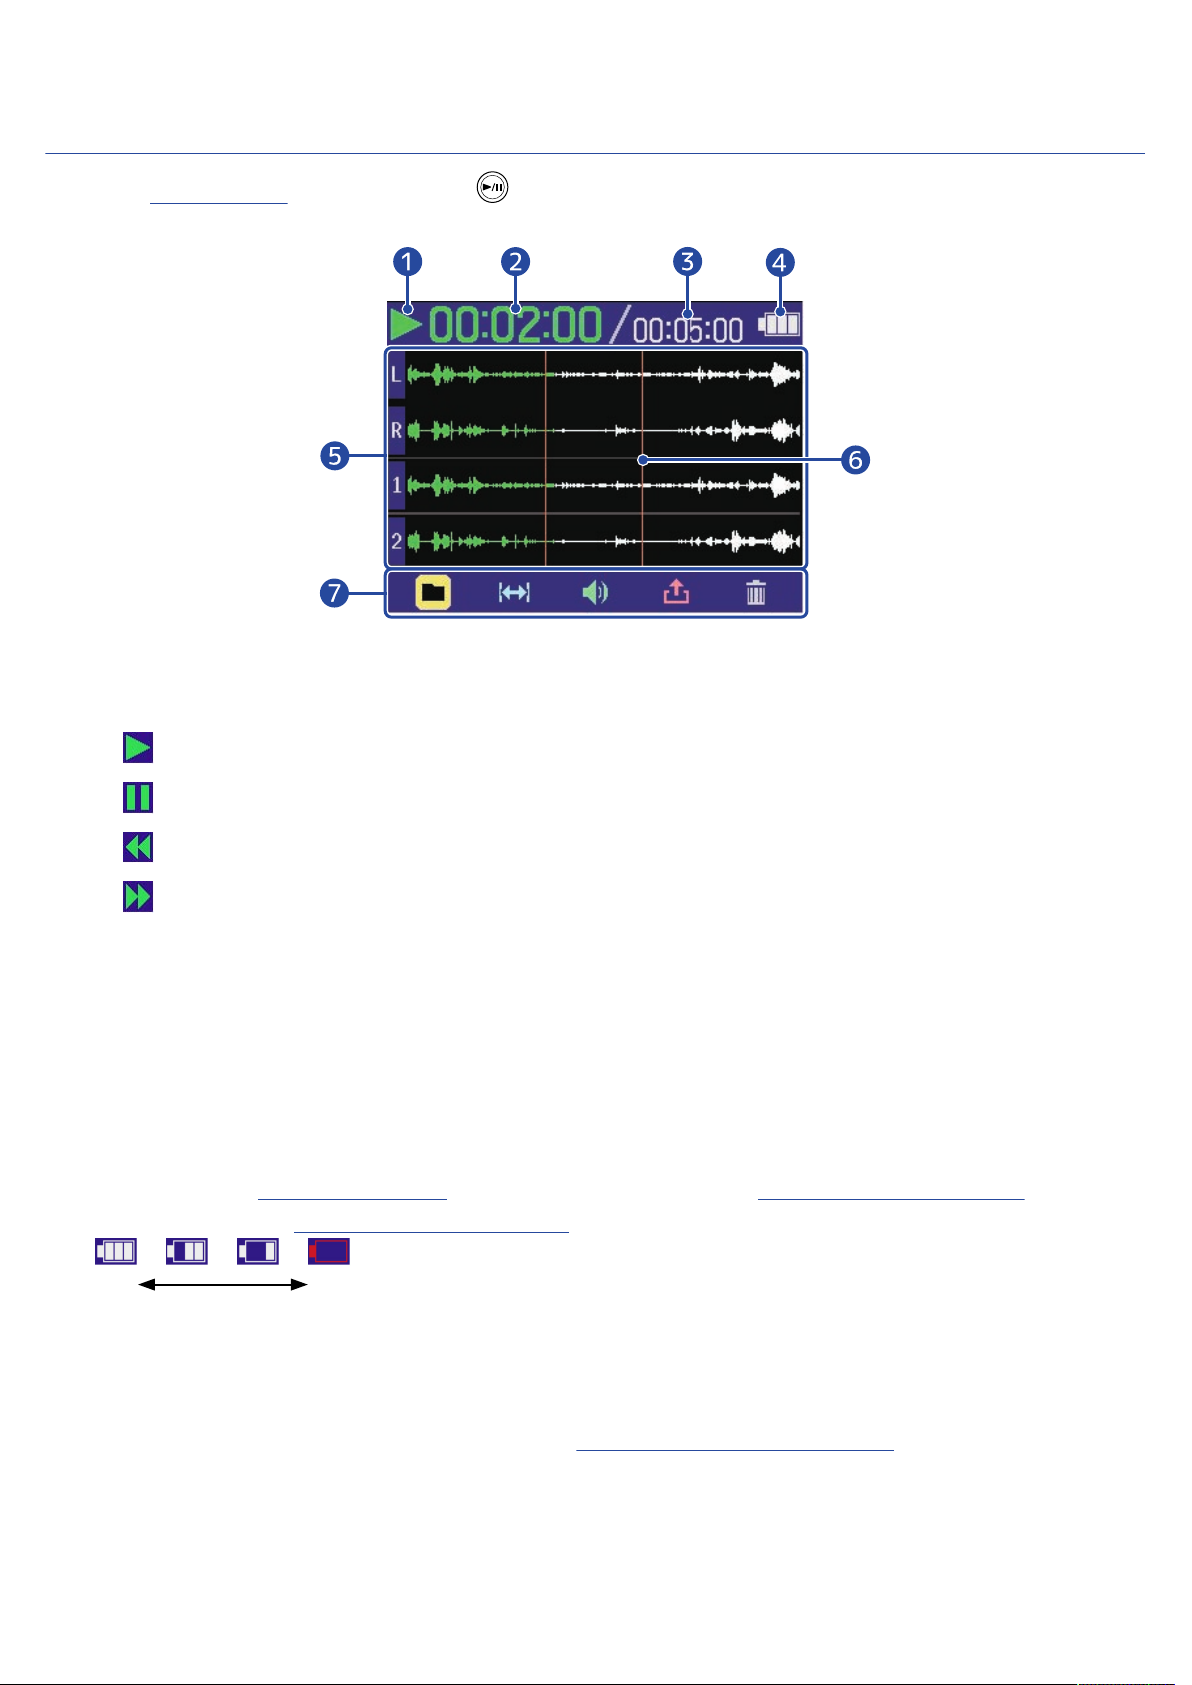
When the Home Screen is open, pressing to start playback will open this screen on the display.
This shows playback conditions of the H4essential, including playback time and recording file waveforms.
Status icon
❶
The playback status is shown by an icon.
• Playing back
• Paused
• Searching backward
• Searching forward
Playback time
❷
This shows the elapsed time since the start of playback.
File length
❸
This shows the length of the file currently playing.
Remaining battery charge
❹
This is shown when operating on batteries. When the remaining battery charge becomes low, replace
the batteries (→ Installing batteries) or connect an AC adapter (→ Connecting an AC adapter) or
portable battery (→ Using other power sources).
Waveform display (built-in XY mic, inputs 1 and 2)
❺
This shows the waveforms of the recorded files being played. The parts of the waveforms that have
already been played appear green.
The positions of marks can also be checked. (→ Adding marks during recording)
The input types are shown at the left end of each waveform.
• L: Built-in XY mic left channel
• R: Built-in XY mic right channel
18
Page 19
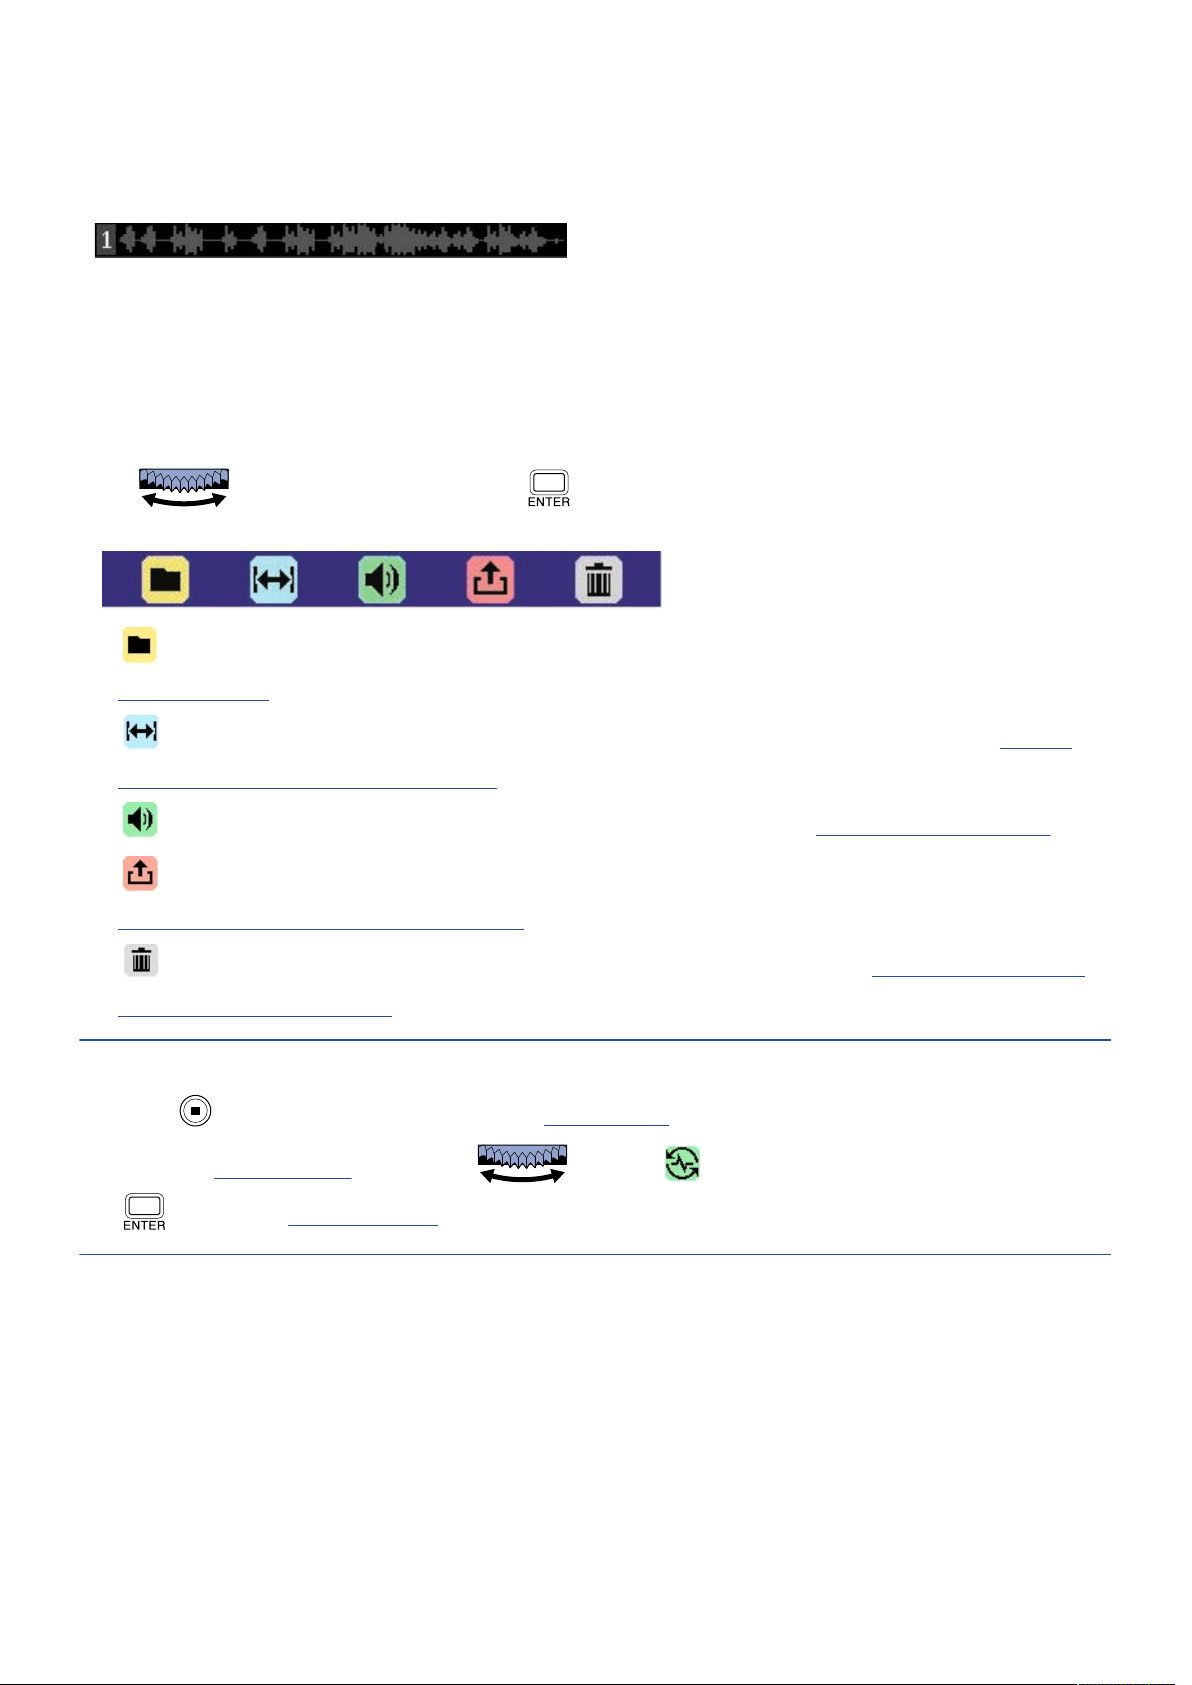
• 1: Input 1
• 2: Input 2
The waveform will be shown in gray when a track is off.
Mark bar
❻
This shows a mark added to the file being played back.
Menu bar
❼
This shows icons for various setting items so settings screens, including output and repeat, can be
opened and settings can be made easily.
Use to select an icon, and press to conduct the following operations.
• File List: This opens the File List Screen where the files on the microSD card can be checked. (→
File List Screen)
• A-B Repeat: Use this to set the starting and ending points for repeat playback. (→ Repeat
playback of a set interval (A-B repeat))
• Output: This opens a screen with settings related to output. (→ Making output settings)
• Export: Use this to change the format, for example, of the playing file and export it. (→
Changing the format and exporting files)
• Trash: Use this to move the file being played to the TRASH folder. (→ Moving the file being
played to the TRASH folder)
HINT
• Press to stop playback and return to the Home Screen.
• When the File List Screen is open, use to select (Play View) in the Menu bar and press
to open the Playback Screen.
19
Page 20
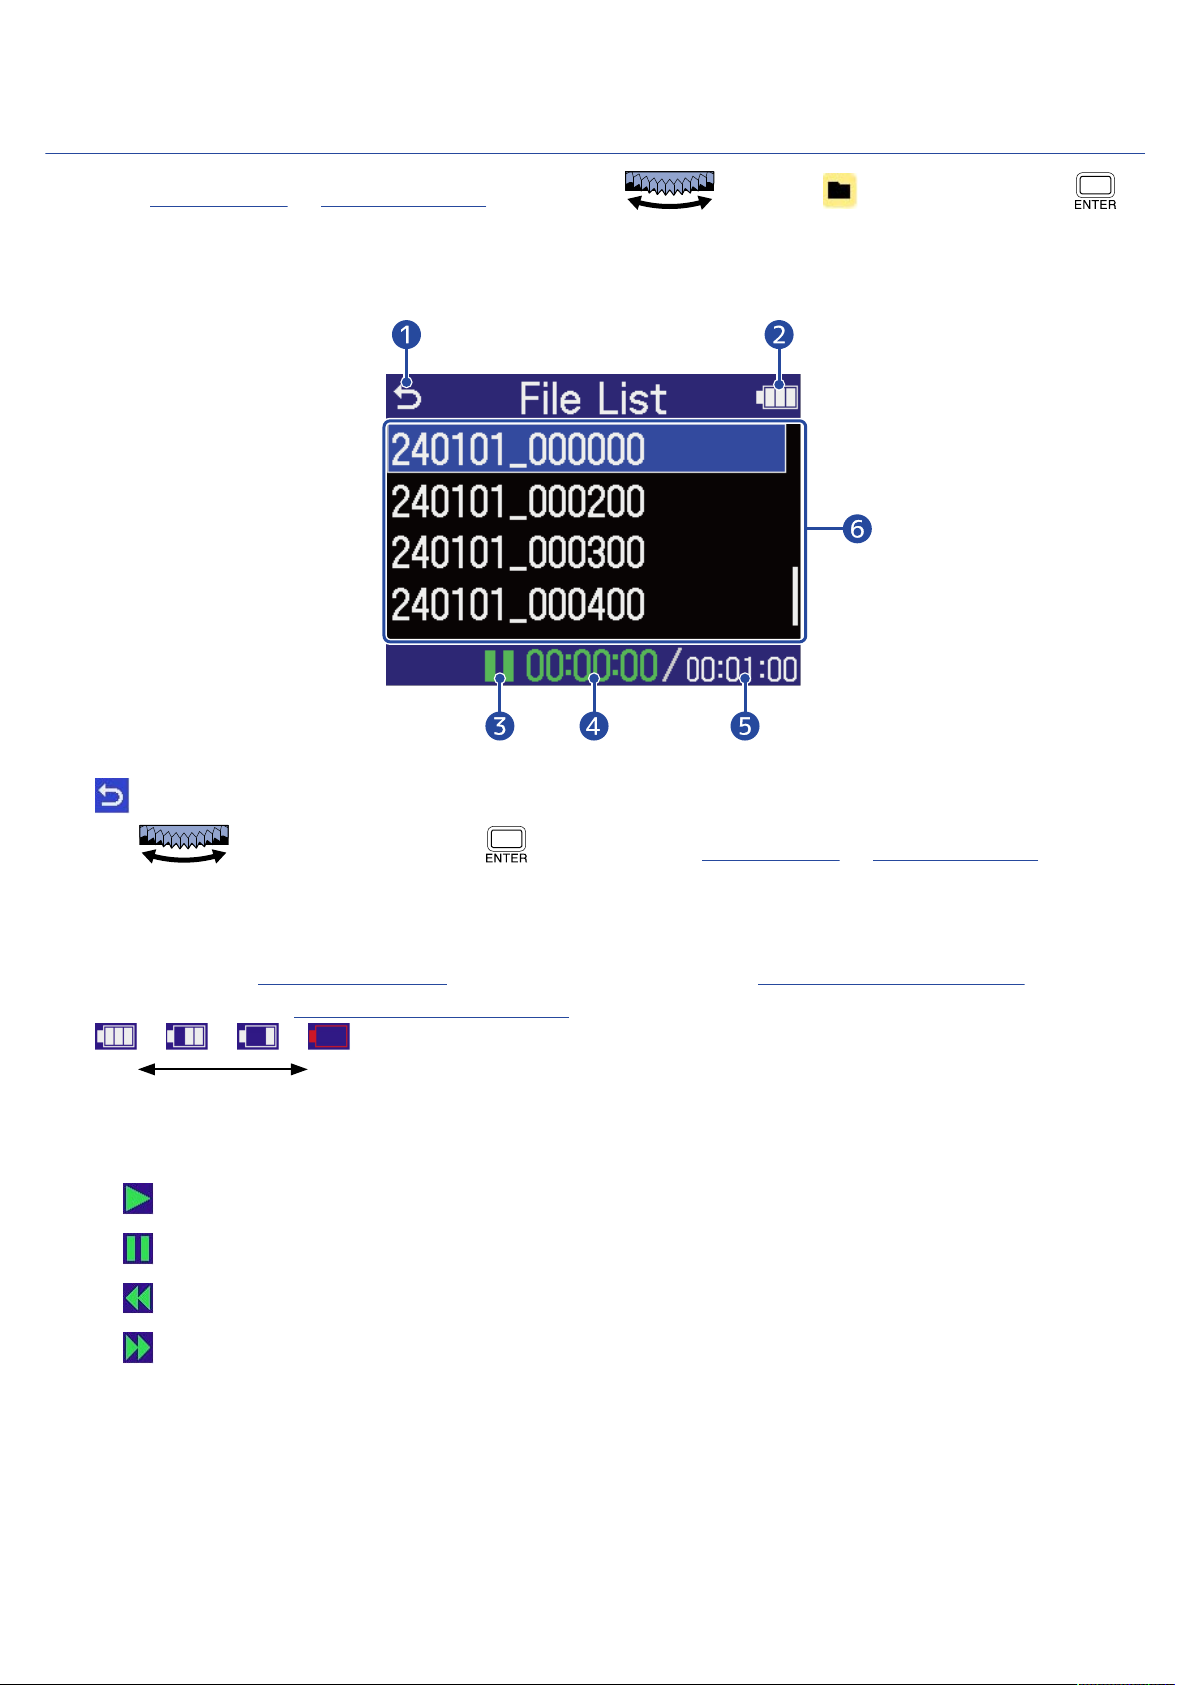
File List Screen
Full Empty
When the Home Screen or Playback Screen is open, use to select (File List) and press
to open it.
This lists the files on the microSD card on the display, allowing the content of the card to be checked and
files to be played and moved to the TRASH folder, for example.
❶
Use to select this and press to return to the Home Screen or Playback Screen.
Remaining battery charge
❷
This is shown when operating on batteries. When the remaining battery charge becomes low, replace
the batteries (→ Installing batteries) or connect an AC adapter (→ Connecting an AC adapter) or
portable battery (→ Using other power sources).
Status icon
❸
The playback status is shown by an icon.
• Playing back
• Paused
• Searching backward
• Searching forward
Playback time
❹
This shows the elapsed time since the start of playback.
File length
❺
This shows the length of the currently selected file.
20
Page 21
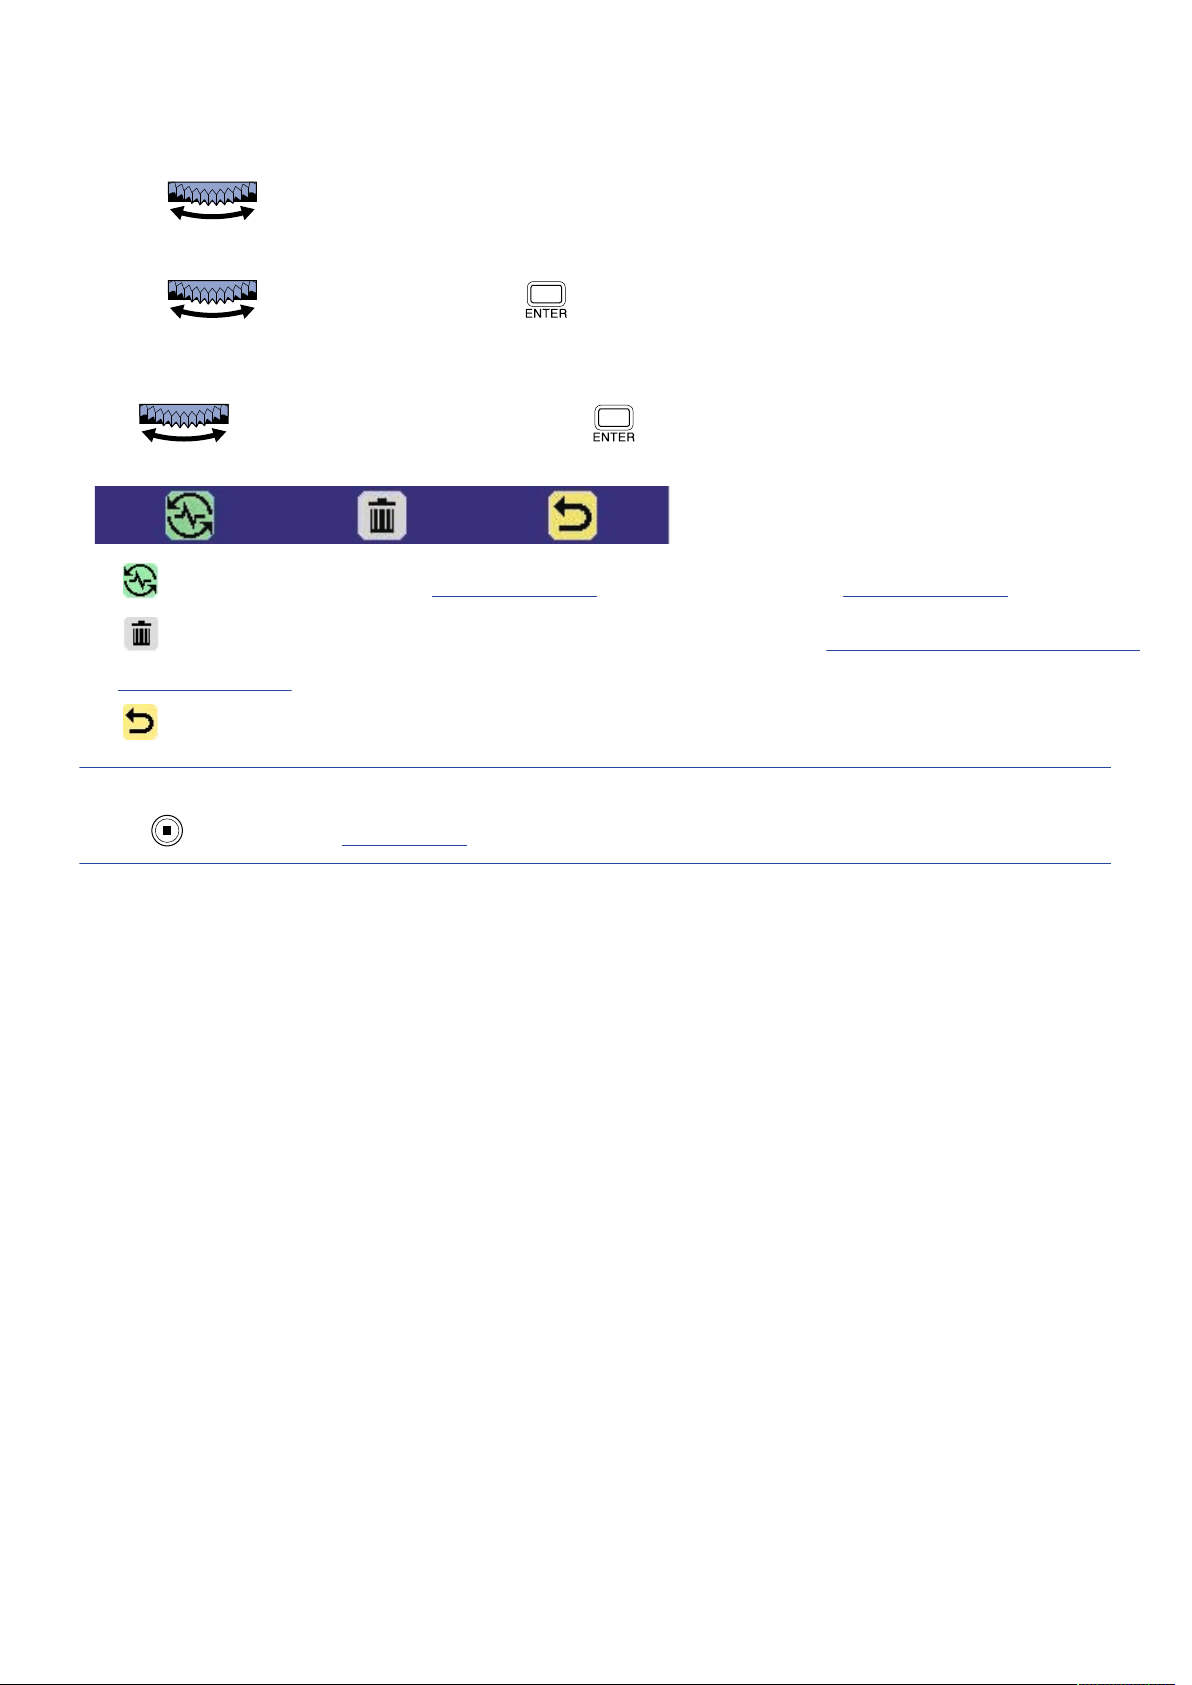
File list
❻
This shows the files on the microSD card in a list.
• Use to select files.
• When a list has more files than will fit on the display, a scrollbar will appear on the right edge.
• Use to select a file and press to show the Menu bar at the bottom of the screen.
Menu bar
Use to select a setting item, and press to conduct the following operations.
• Play View: This opens the Playback Screen for the selected file. (→ Playback Screen)
• Trash: Use this to move the selected file to the TRASH folder. (→ Moving the file being played to
the TRASH folder)
• Back: This closes the Menu bar and enables file selection again.
HINT
Press to return to the Home Screen.
21
Page 22
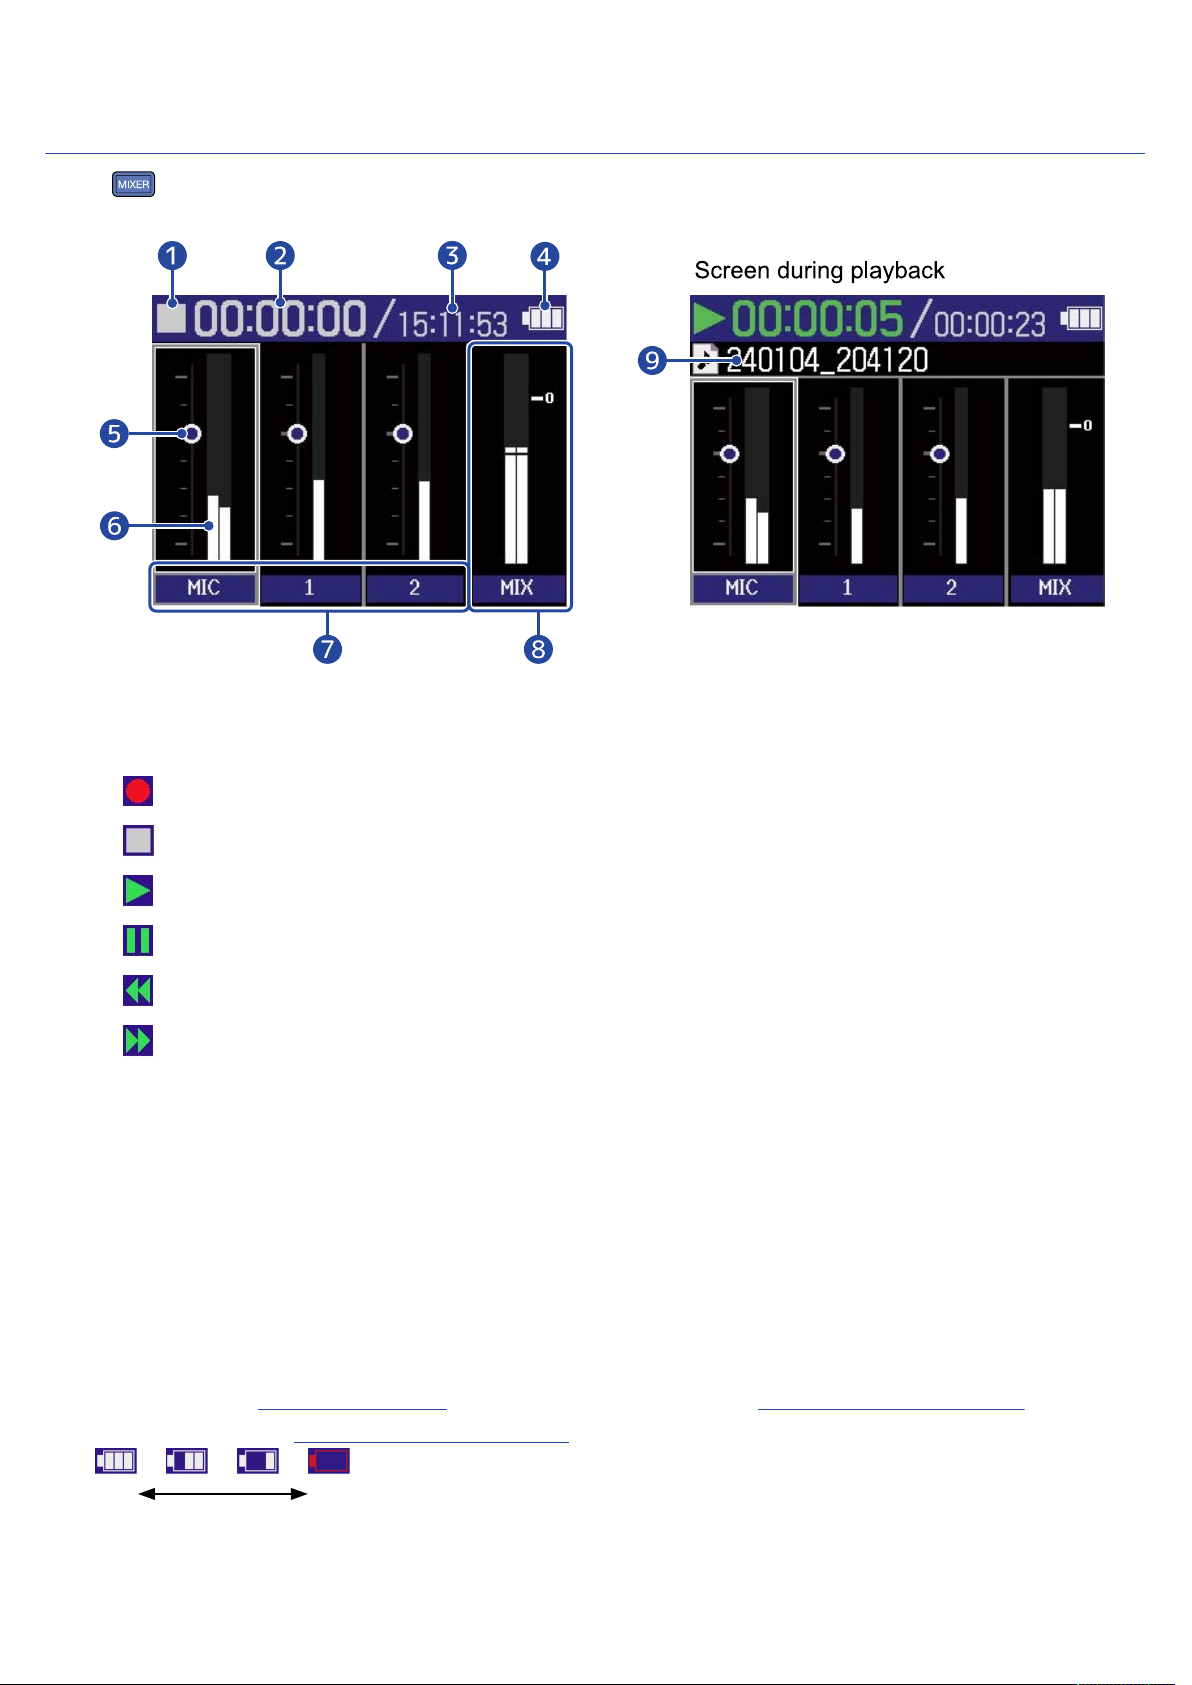
Mixer Screen
Full Empty
Press to open this.
The volume balance of sound from all inputs and playback tracks can be mixed.
Status icon
❶
The playback status is shown by an icon.
• Recording
• Recording paused
• Playing back
• Playback paused
• Searching backward
• Searching forward
Elapsed recording time / playback time
❷
During recording, this shows the current elapsed recording time.
During playback, this shows the elapsed time since the start of playback.
Available recording time / file length
❸
During recording, this shows the current available recording time.
During playback, this shows the length of the file currently playing.
Remaining battery charge
❹
This is shown when operating on batteries. When the remaining battery charge becomes low, replace
the batteries (→ Installing batteries) or connect an AC adapter (→ Connecting an AC adapter) or
portable battery (→ Using other power sources).
22
Page 23

Volume setting
❺
These show the volume settings for each track.
Level meters
❻
These level meters show the monitoring levels for each track.
Track status
❼
These show the names and statuses of tracks.
• Track 1 on
• Track 1 off
When the volume setting of a track is being adjusted, the setting value will be shown numerically
instead of the track name.
A muted icon will be shown in the level meter area when a track is off. (→ Enabling tracks for recording)
Stereo mix track
❽
These level meters show the monitoring levels of the stereo mix.
Playback file name
❾
During playback, the name of the file playing is shown.
HINT
Press to return to the Home Screen or Playback Screen.
23
Page 24
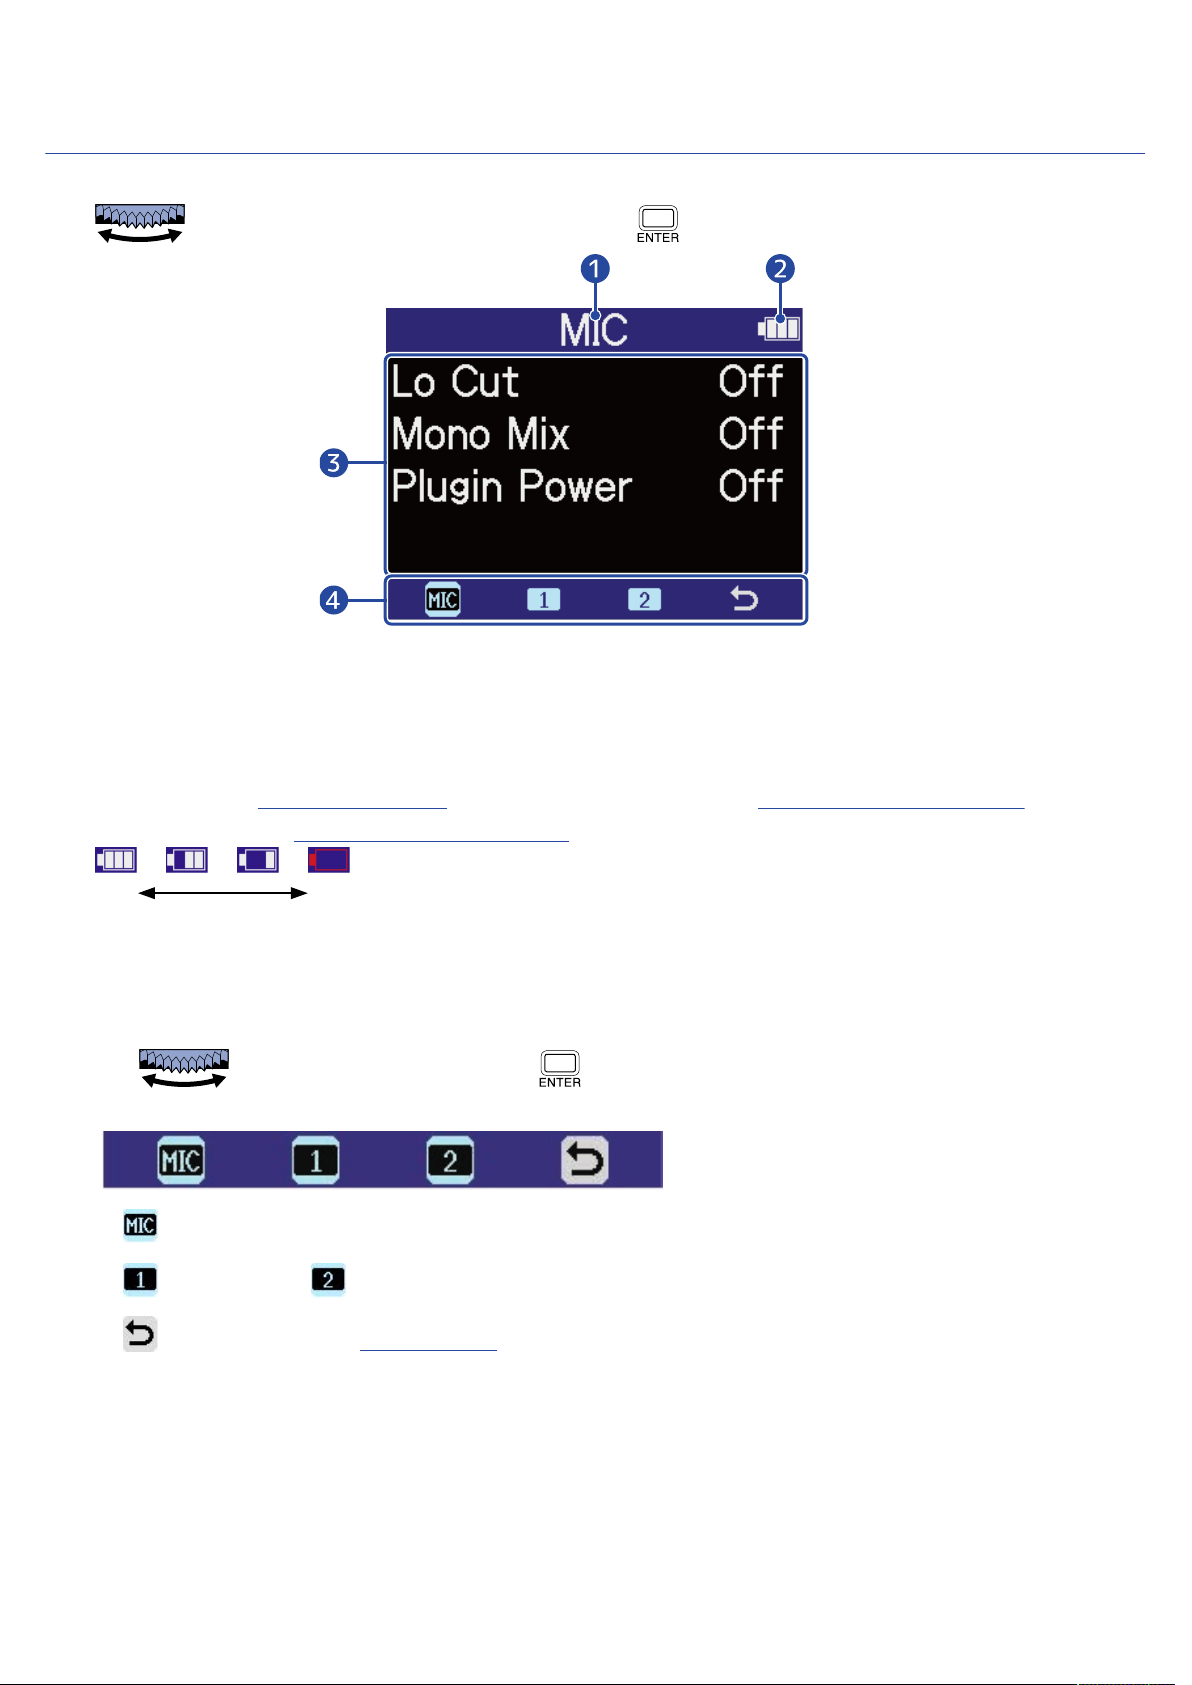
Input Settings Screen
Full Empty
Use this screen to make settings related to inputs.
Use to select a setting item or value, and press to confirm.
Name of input being set
❶
Remaining battery charge
❷
This is shown when operating on batteries. When the remaining battery charge becomes low, replace
the batteries (→ Installing batteries) or connect an AC adapter (→ Connecting an AC adapter) or
portable battery (→ Using other power sources).
Setting items and values
❸
Menu bar
❹
The inputs that can be set are shown by icons.
Use to select an input, and press to make settings for that input.
• MIC: Make settings for the built-in XY mic.
• (Input 1) and (Input 2): Make settings for inputs 1 and 2.
• Exit: Return to the Home Screen.
24
Page 25
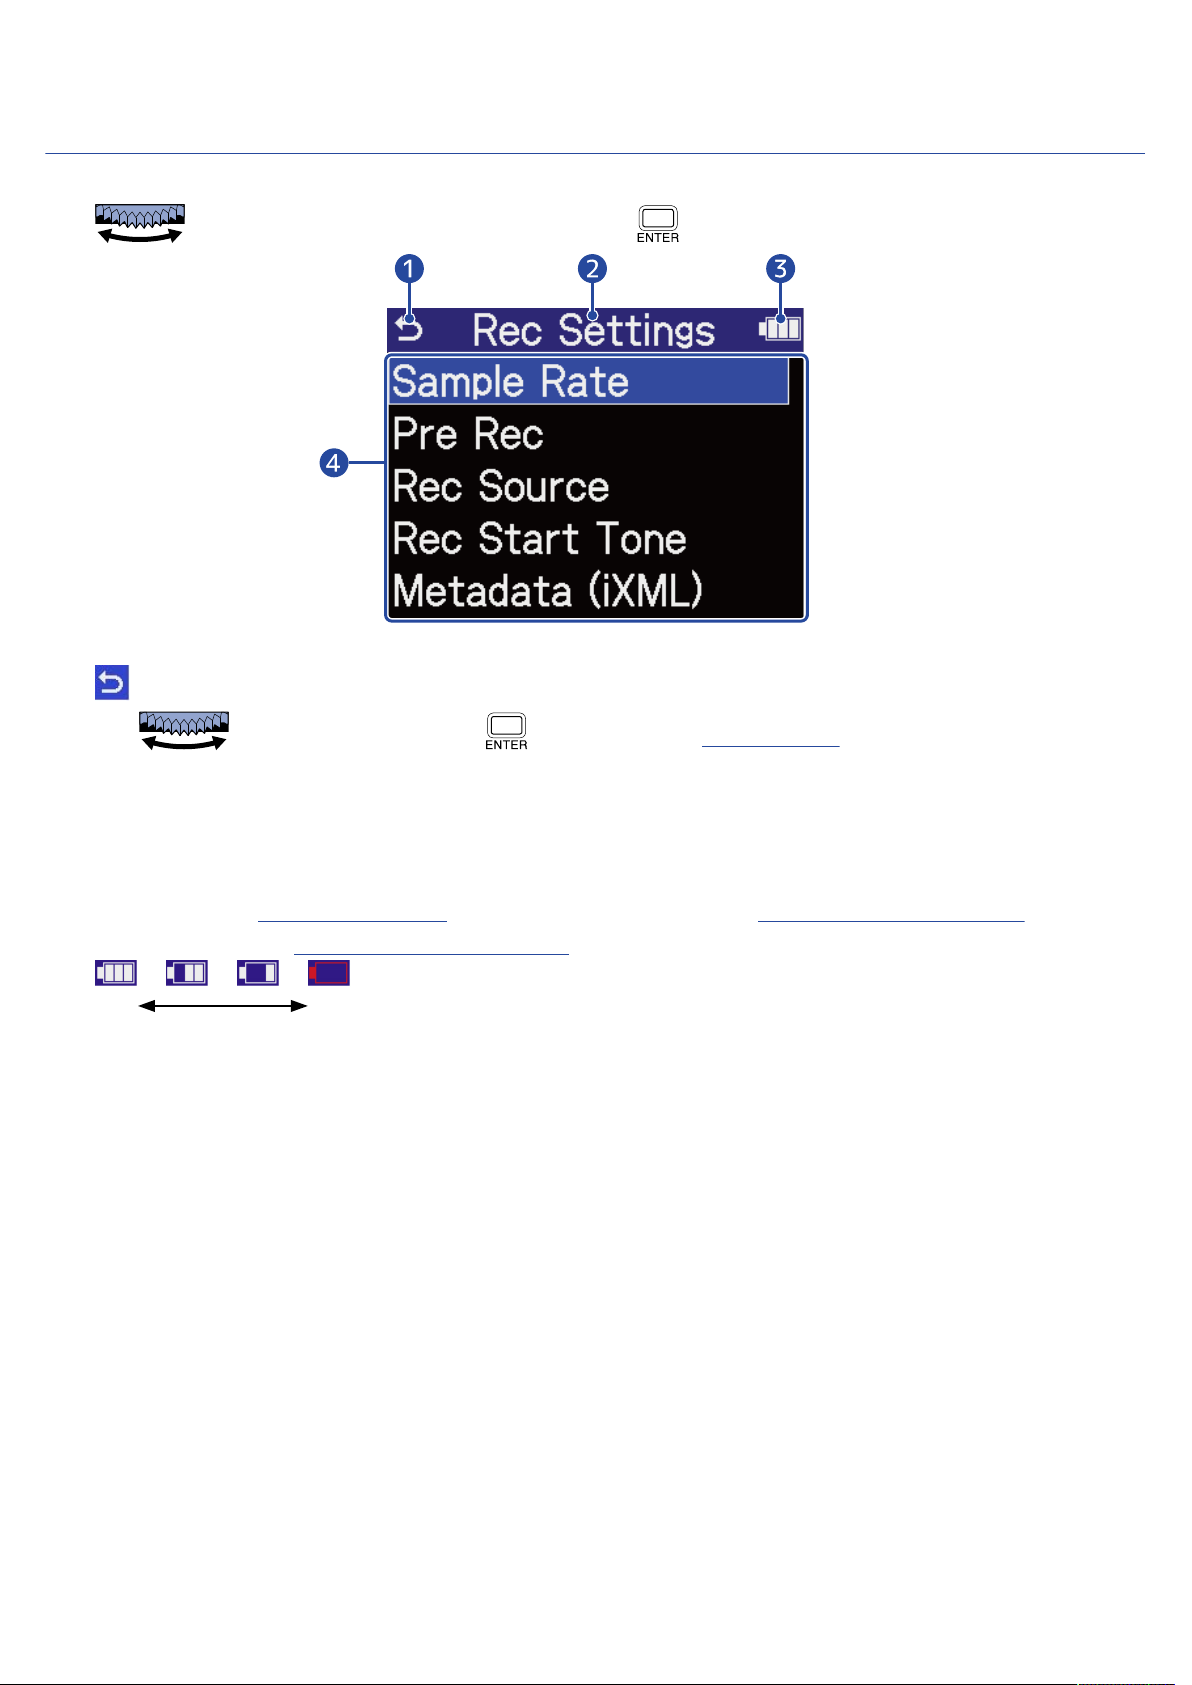
Other settings screens
Full Empty
Other screens can be used to make settings related to output, recording, SD cards, USB and the system.
Use to select a setting item or value, and press to confirm.
❶
Use to select this and press to return to the Home Screen.
Setting screen name
❷
Remaining battery charge
❸
This is shown when operating on batteries. When the remaining battery charge becomes low, replace
the batteries (→ Installing batteries) or connect an AC adapter (→ Connecting an AC adapter) or
portable battery (→ Using other power sources).
Setting items
❹
25
Page 26
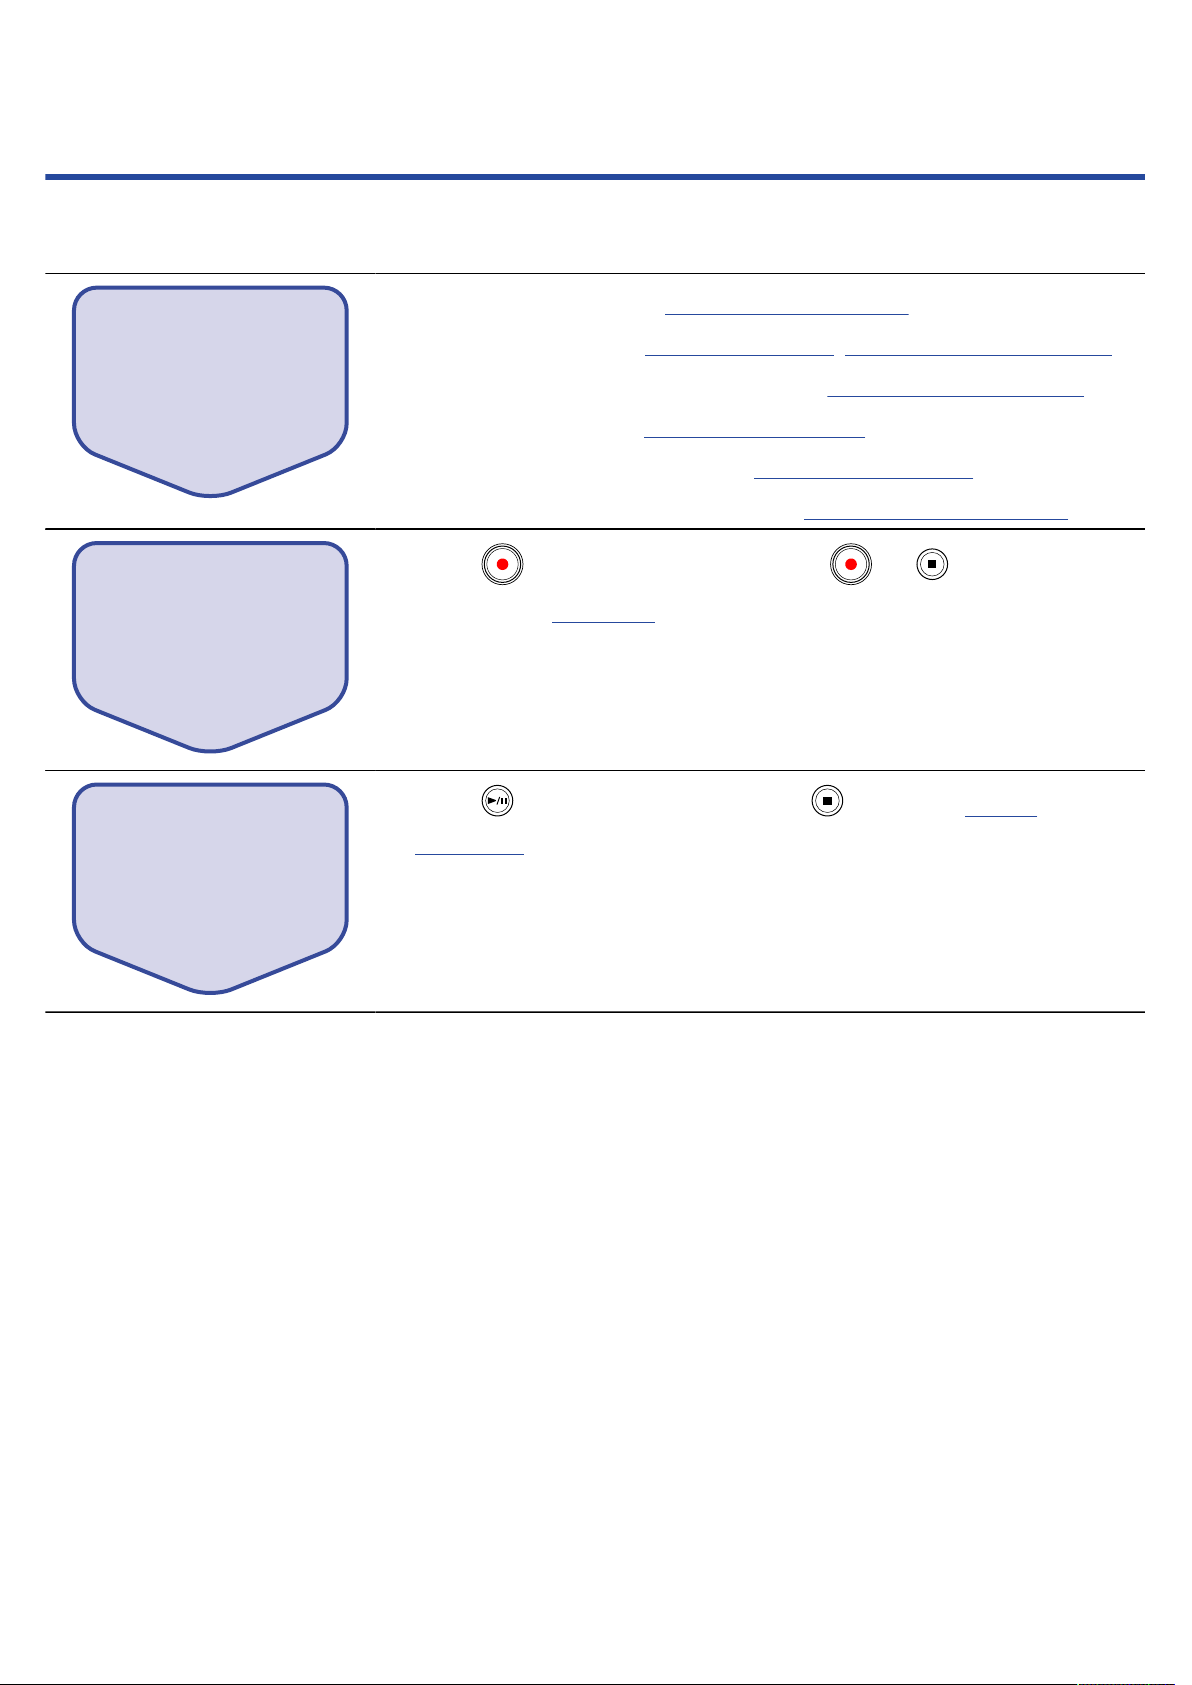
Recording process
Preparation before
recording
Recording
Playing back and
reviewing
Recording follows the process shown below.
• Load a microSD card (→ Inserting microSD cards)
• Prepare the power (→ Installing batteries, Connecting an AC adapter)
• Connect mics, for example, to inputs (→ Connecting input devices)
• Turn the power on (→ Turning the power on)
• Make settings related to input (→Making input settings)
• Make settings related to recording (→ Making recording settings)
• Press to start recording and press or to stop
recording (→ Recording)
• Press to start playback and press to stop (→ Playing
recordings)
26
Page 27
Making preparations
Inserting microSD cards
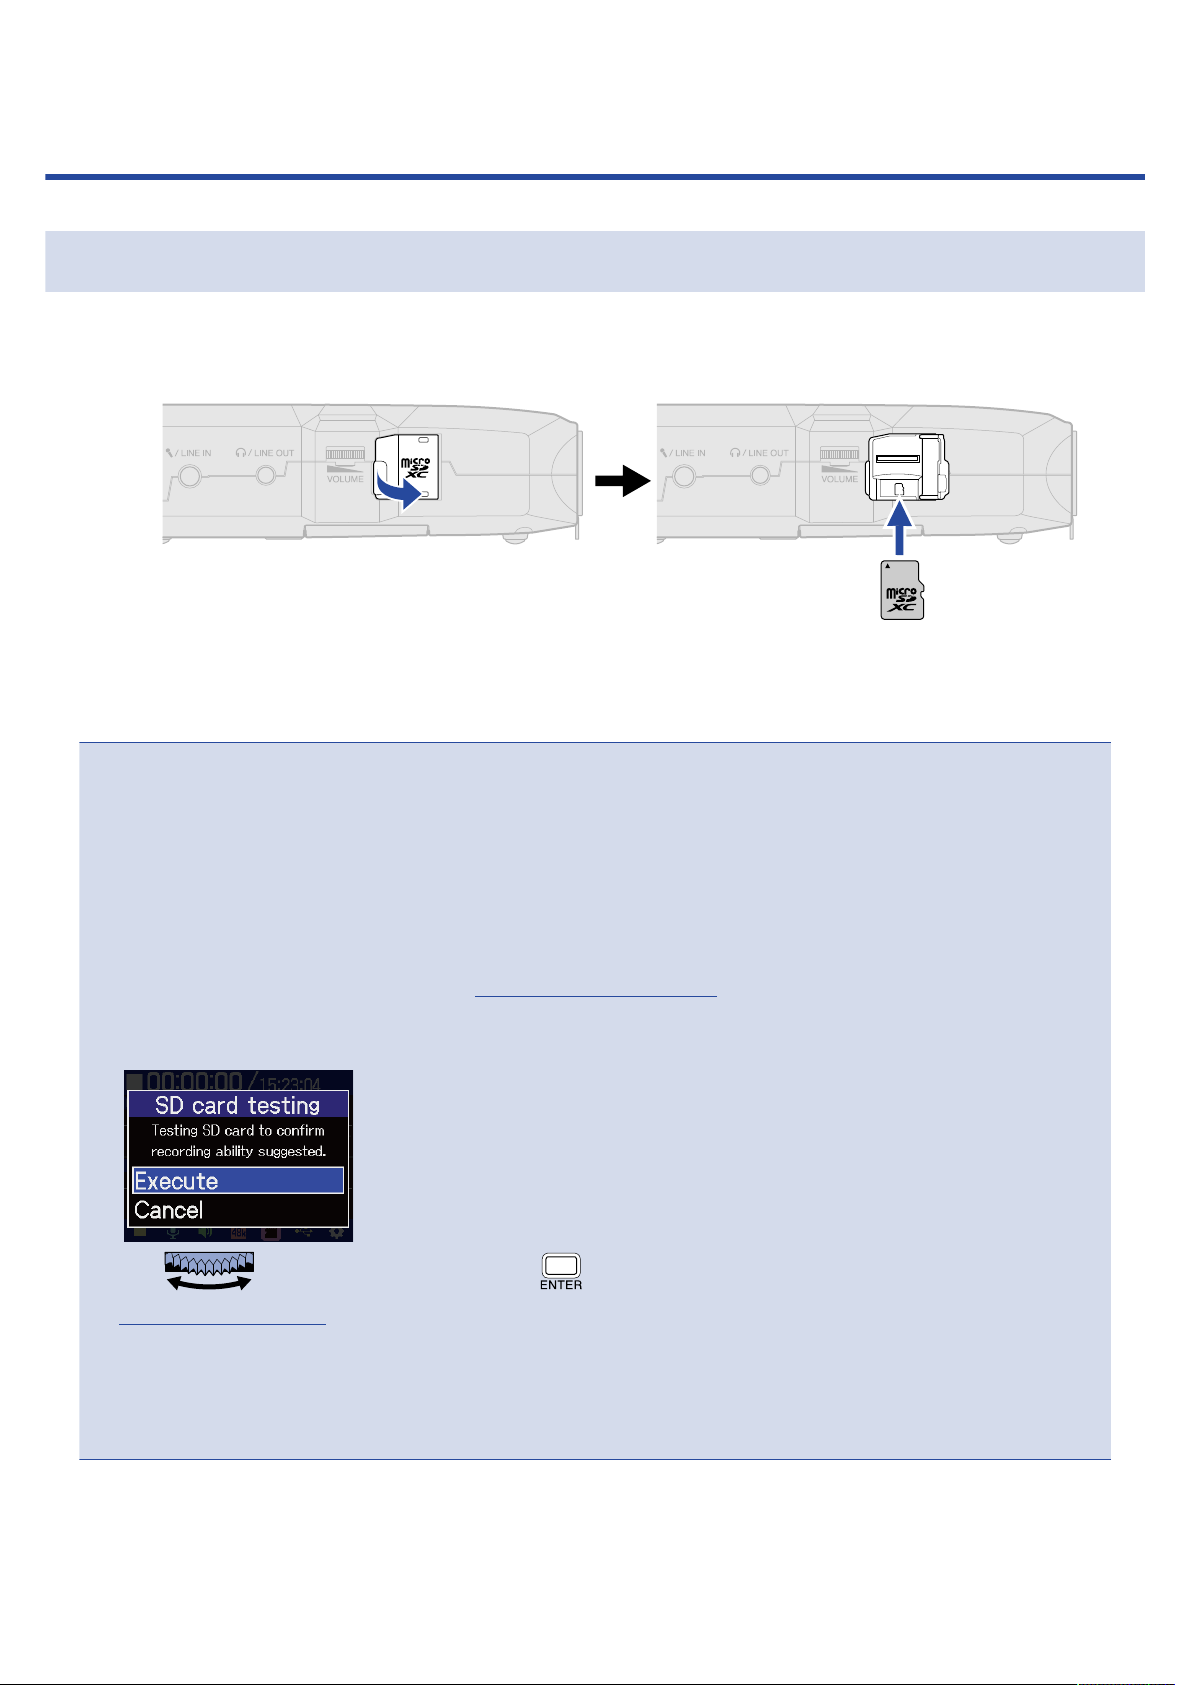
1. When the power is off, open the microSD card slot cover, and insert a microSD card with the logo
facing up all the way into the slot.
To remove a microSD card, push it further into the slot and then pull it out.
2. Close the microSD card slot cover.
NOTE
• Always make certain that the power is off when inserting or removing a microSD card. Inserting or
removing a card while the power is on could result in data loss.
• When inserting a microSD card, be sure to insert the correct end with the top side up.
• Recording and playback are not possible when a microSD card is not loaded in the H4essential.
• Always format microSD cards in order to maximize their performance after purchasing them new or
using them with a different device. (→ Formatting microSD cards)
• When an SD card that has not been used with the H4essential before is loaded in it, an SD card test
screen will open.
Use to select “Execute” and press to open the SD card screen and test the card. (→
Testing microSD cards)
• The following types of recording media are supported.
- microSDHC: 4 GB – 32 GB
- microSDXC: 64 GB – 1 TB
27
Page 28
Supplying power
The H4essential can operate using batteries or a power supply connected to the USB port (AC adapter, USB
bus power or portable battery).
Power from a power supply connected to the USB port will be used before batteries.
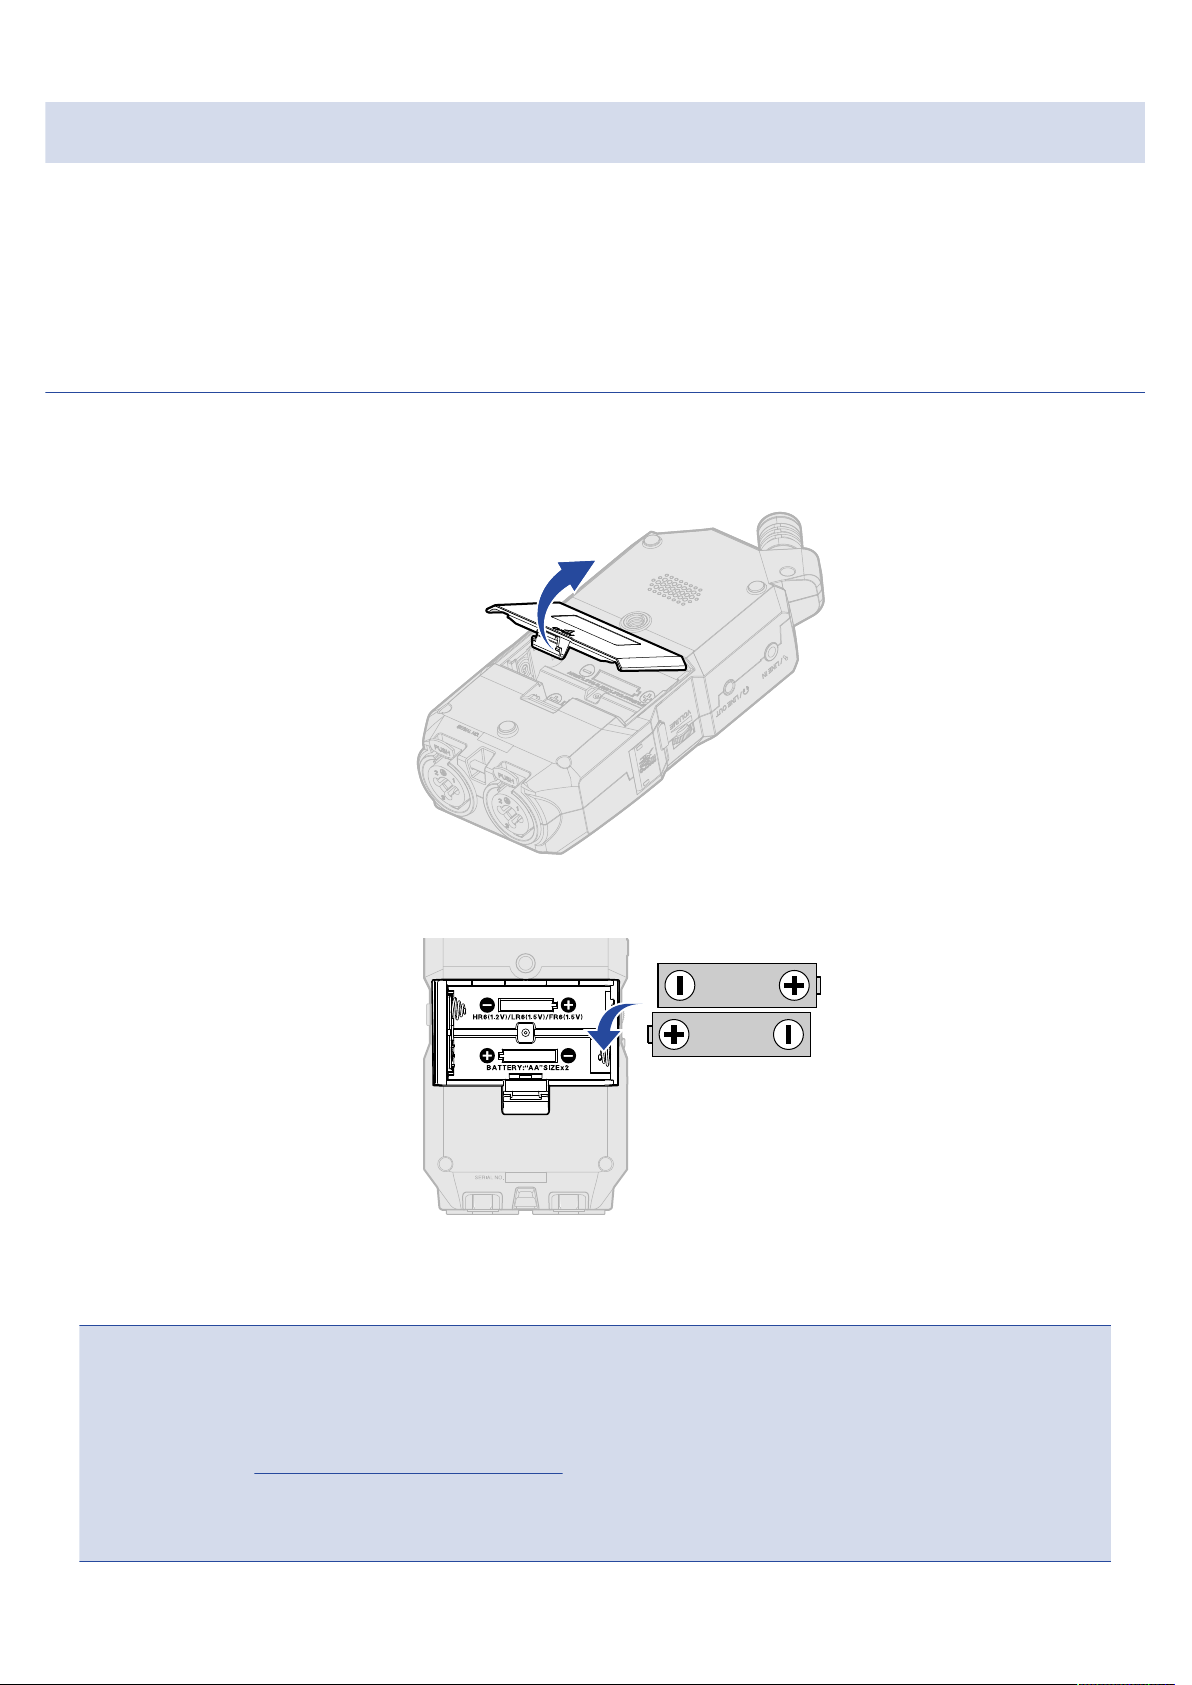
Installing batteries
Use 2 AA batteries when operating the H4essential on battery power.
1. When the power is off, push the latch up to open the battery cover.
2. Install 2 AA batteries.
3. Replace the battery cover.
NOTE
• Use only one type of battery (alkaline, NiMH or lithium) at a time.
• Set the type of battery used correctly so that the amount of remaining battery charge can be shown
accurately. (→ Setting the type of batteries used)
• If the batteries run out of charge, turn the power off immediately and install new batteries. The battery
charge will always be shown when operating on battery power.
28
Page 29
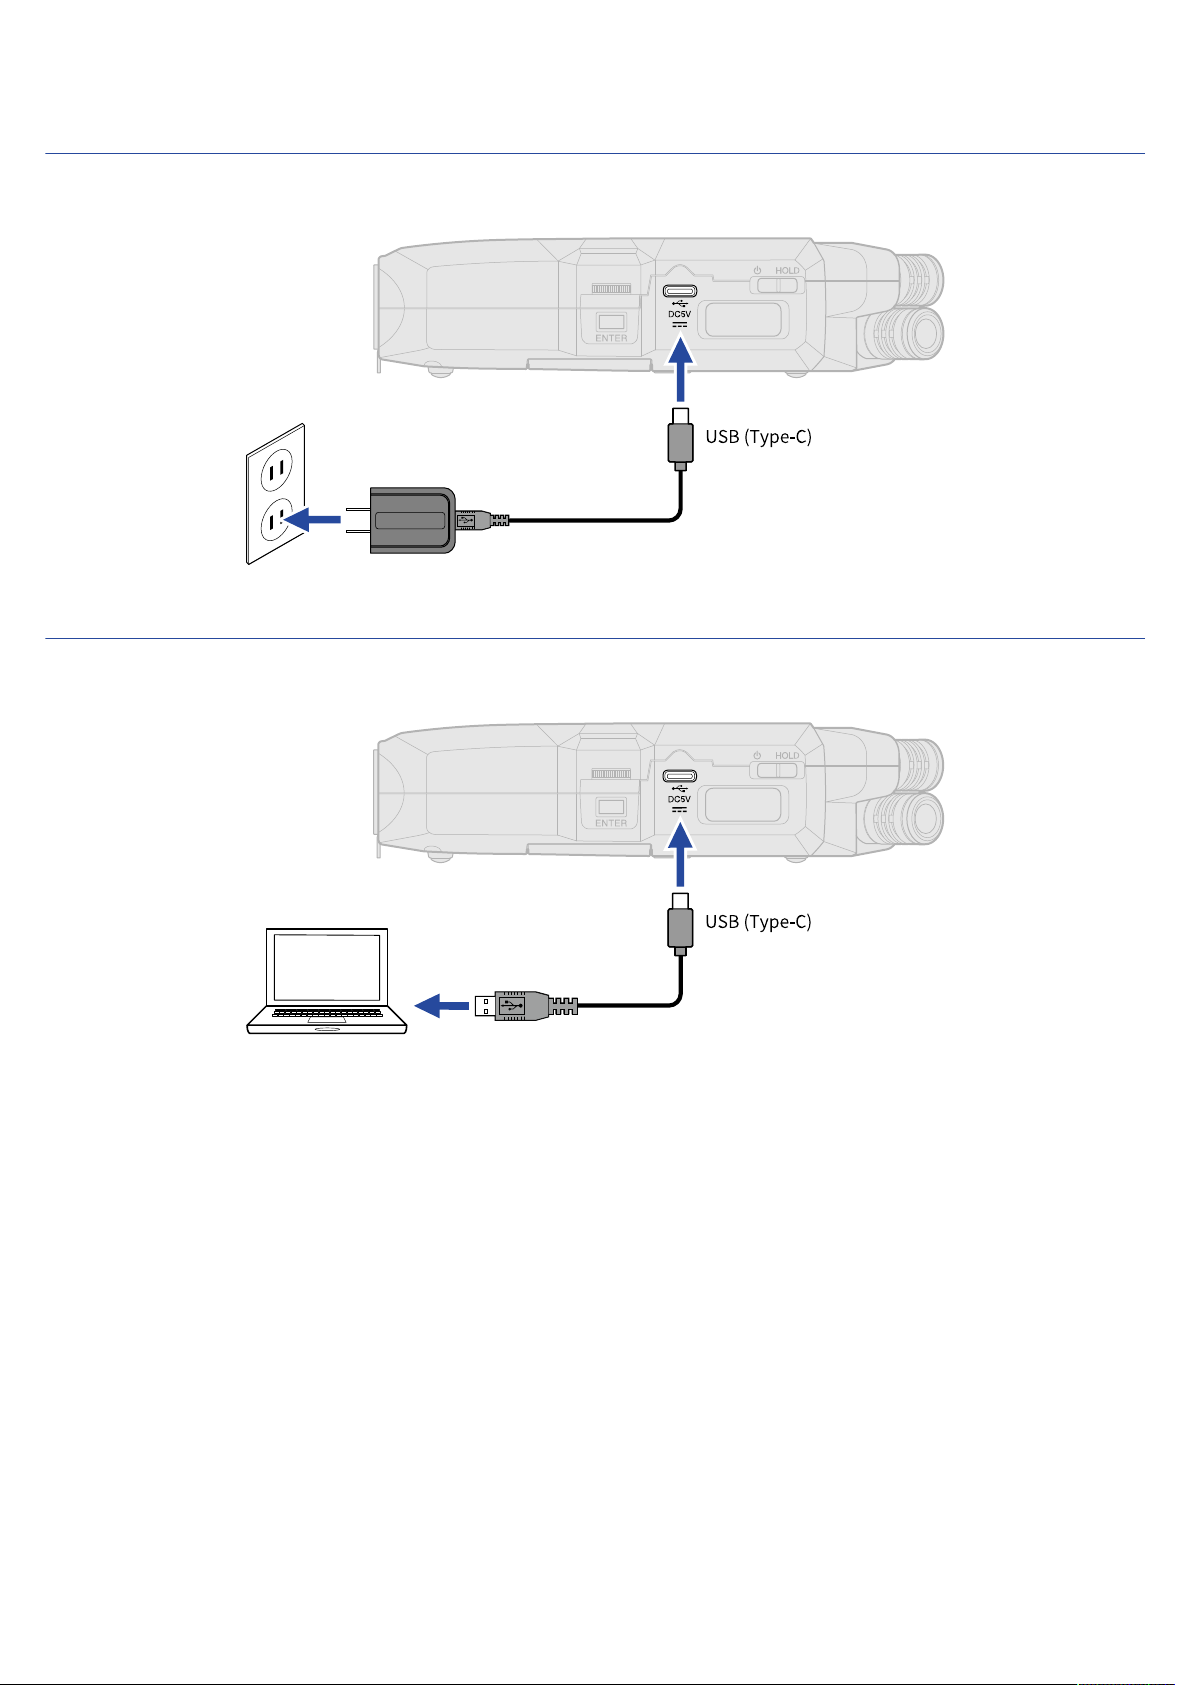
Connecting an AC adapter
Connect the cable of a dedicated AC adapter (AD-17) to the USB port (Type-C) and connect the adapter to
an outlet.
Using other power sources
By connecting the USB port (Type-C) to a computer, the H4essential can be operated using USB bus power.
Moreover, it can also be powered by a 5V portable battery (commercially-available).
29
Page 30
Connecting input devices
Using the built-in XY microphone
The H4essential uses an XY stereo format employing two mic units oriented perpendicularly to each other.
By having left and right diaphragms face inward perpendicularly to each other, a wide recording range can
be covered while fully capturing sound sources in the center.
Moreover, since the points of recording are almost the same, no phase differences occur between the left
and right channels.
Providing three-dimensional sound with natural depth and width, this recording technique is ideal for
capturing specific sound sources that are nearby or at medium distance.
Use examples: solo and chamber music performances, live rehearsals, field recordings, etc.
Connecting mics and other devices to inputs 1 and 2
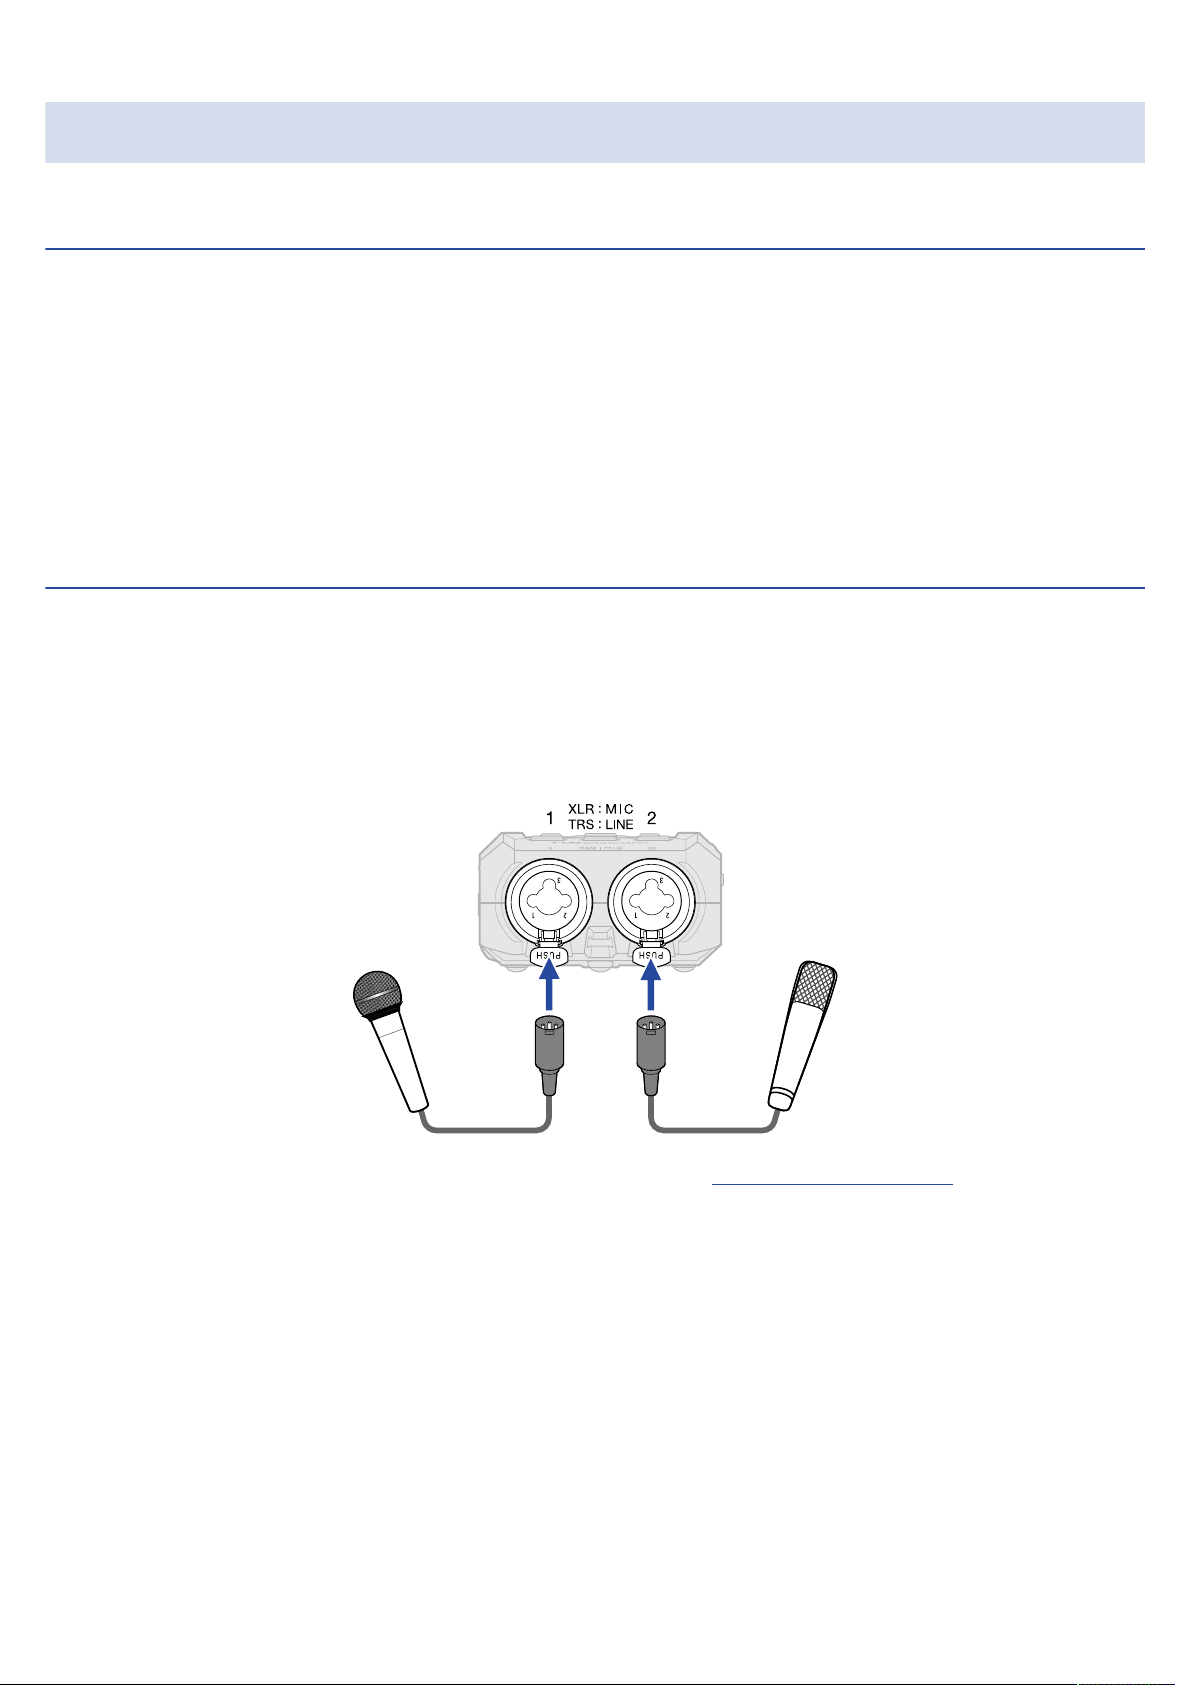
In addition to input from the built-in XY mic, the H4essential also has inputs 1 and 2 as well as a MIC/LINE
IN jack that supports plug-in power. These can be used together to input up to 4 channels.
Mics, mixers and other devices can be connected to inputs 1 and 2.
■ Connecting mics
Connect dynamic and condenser mics with XLR plugs to inputs 1 and 2.
• Phantom power (+48V) can be supplied to condenser mics. (→ Setting phantom power)
• When disconnecting a mic, pull the XLR plug while pushing the connector lock release button.
30
Page 31
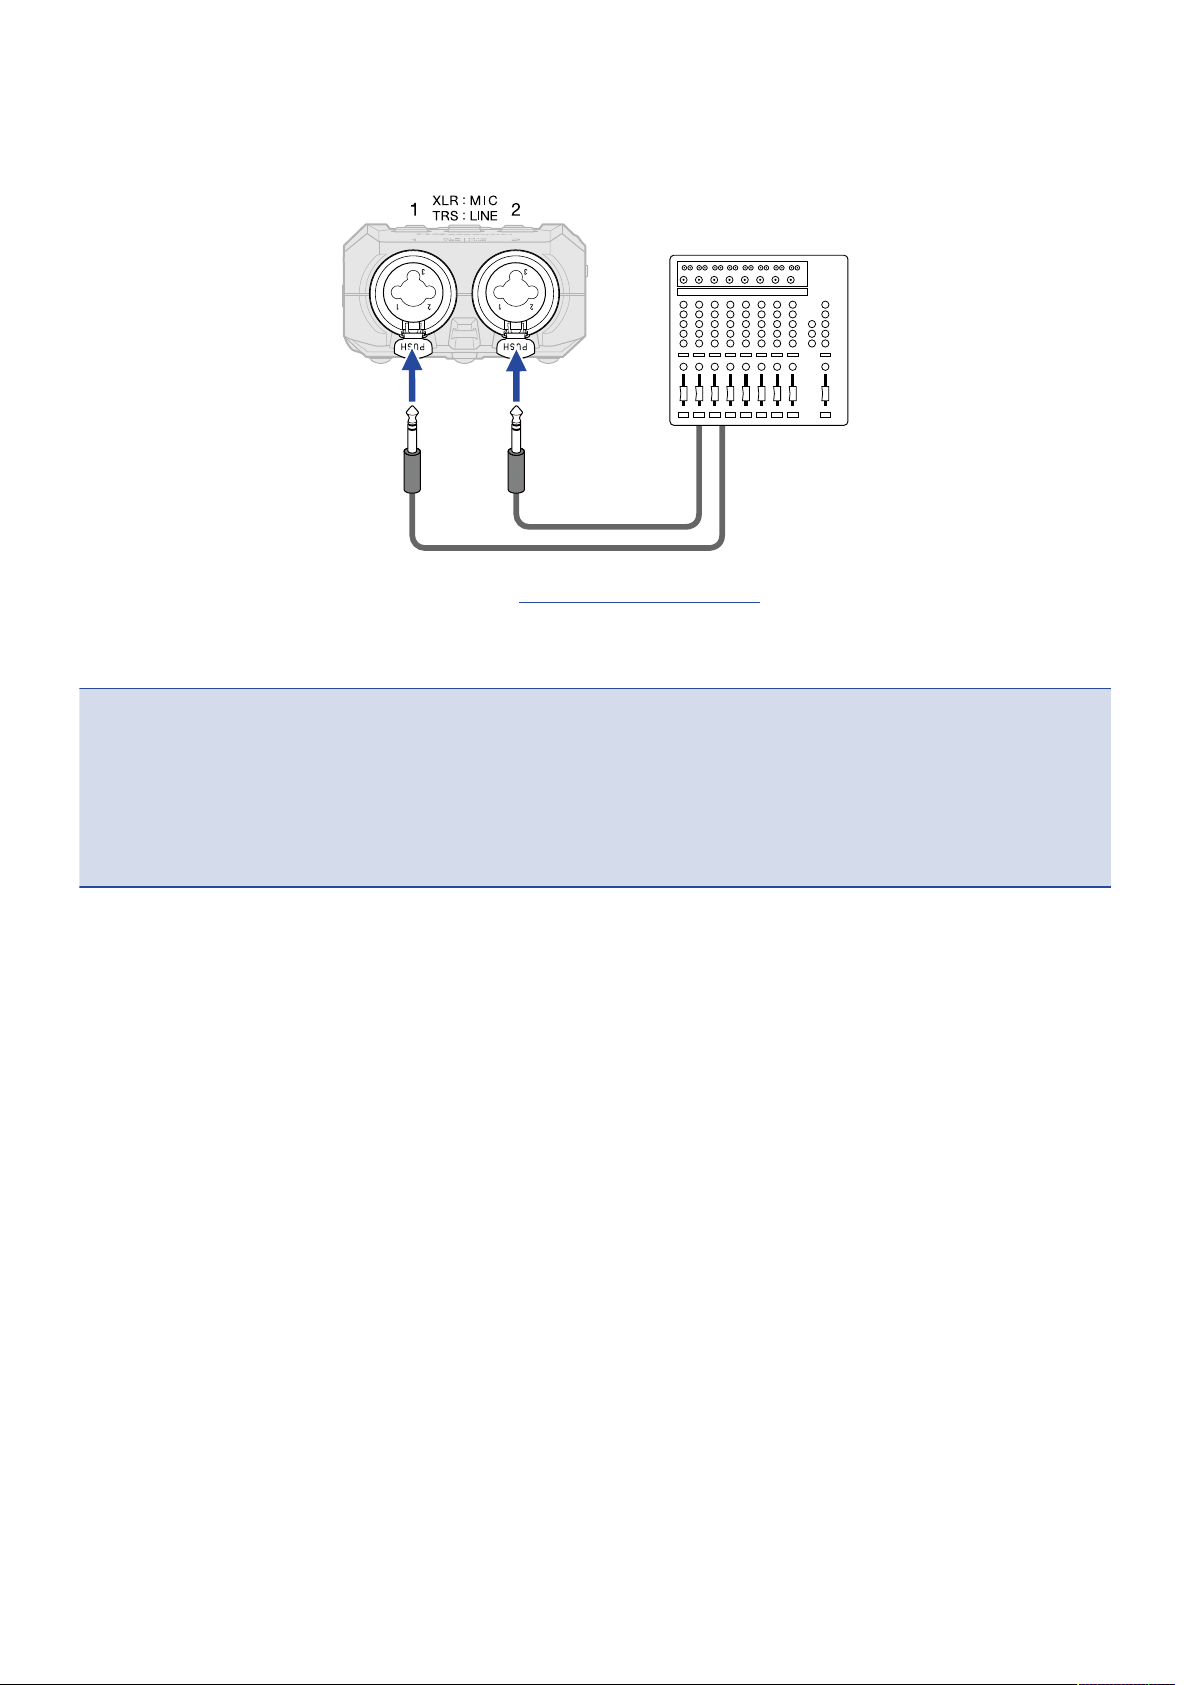
■ Connecting line level equipment
Connect the TRS plugs of mixers and other line-level equipment to inputs 1 and 2.
• Phantom power (+48V) can be supplied. (→ Setting phantom power)
• Direct input of passive guitars and basses is not supported. Connect these instruments through a mixer
or effects device.
NOTE
To make handling the levels of input signals easy, the H4essential sets input levels according to the types of
plugs connected to the input jacks.
• When connecting mic-level devices, use XLR plugs.
• When connecting line-level devices, use TRS plugs.
31
Page 32
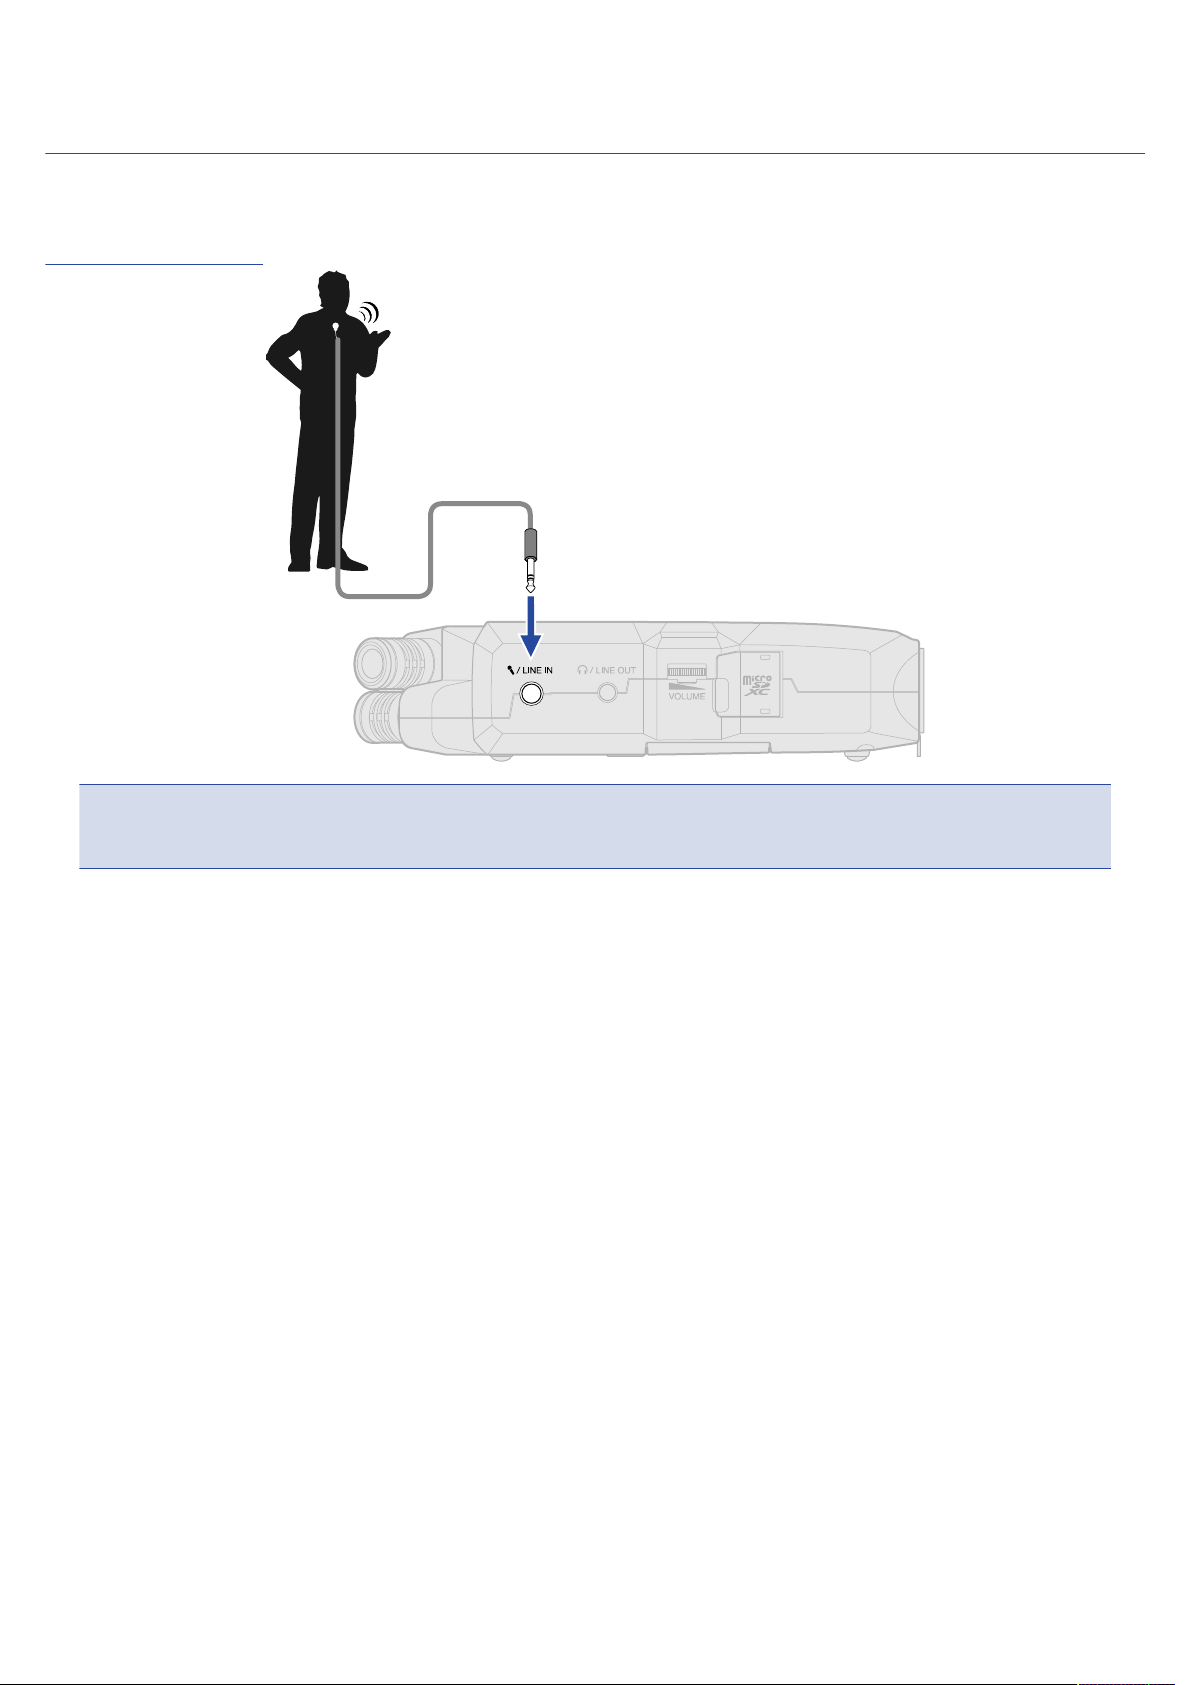
Connect a lavalier mic, for example, to the MIC/LINE IN jack.
The H4essential has a MIC/LINE IN jack that can be used to connect an external mic or line-level device.
By turning on the plug-in power setting, this jack can also provide plug-in power to mics that use it. (→
Setting plug-in power)
NOTE
When using the MIC/LINE IN jack, the built-in XY mic cannot also be used.
32
Page 33
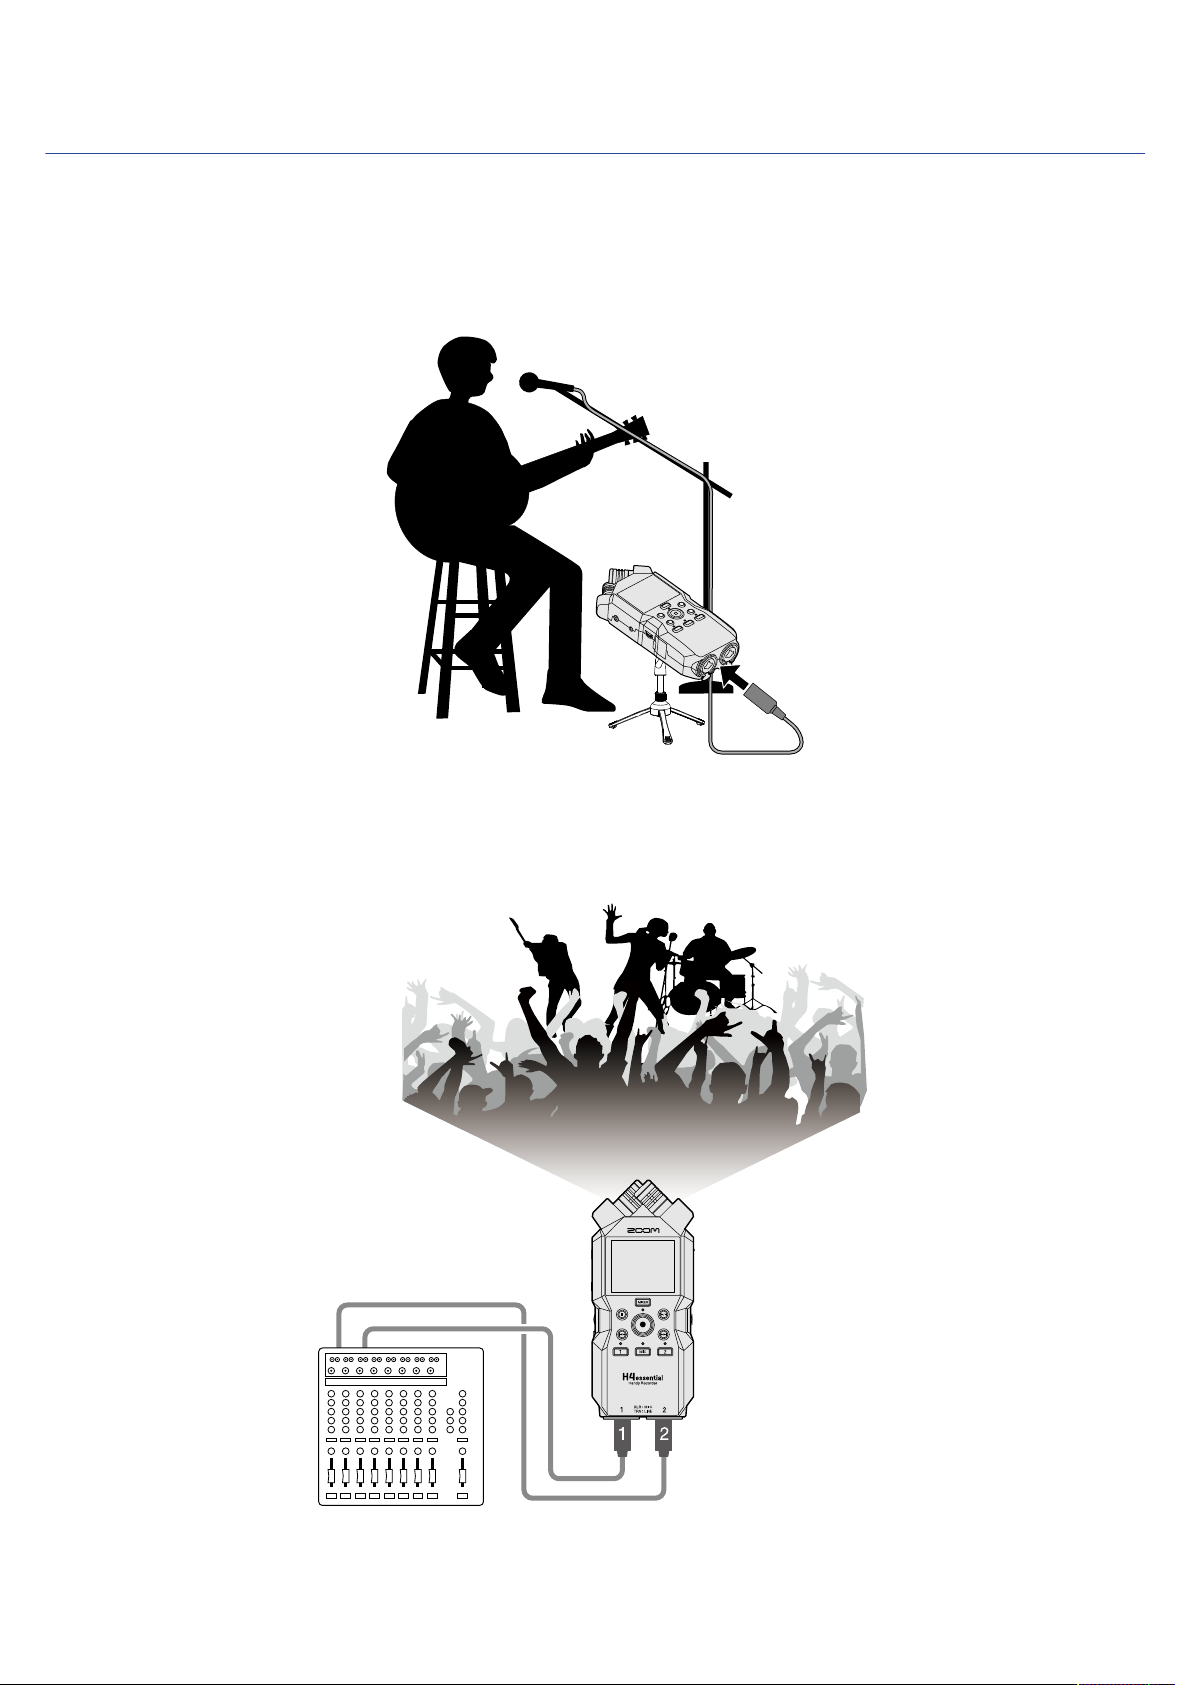
Connection examples
Recording audio is possible in the following kinds of situations.
■ Recording performances with a voice and instrument
The sound of an instrument being played can be recorded using the built-in XY mic of the H4essential while
vocals are recorded with a connected mic.
■ Concert recording
The sounds of the performance and the audience can be recorded using the built-in XY mic of the
H4essential while a stereo mix or individual channels are recorded separately from a mixer.
33
Page 34
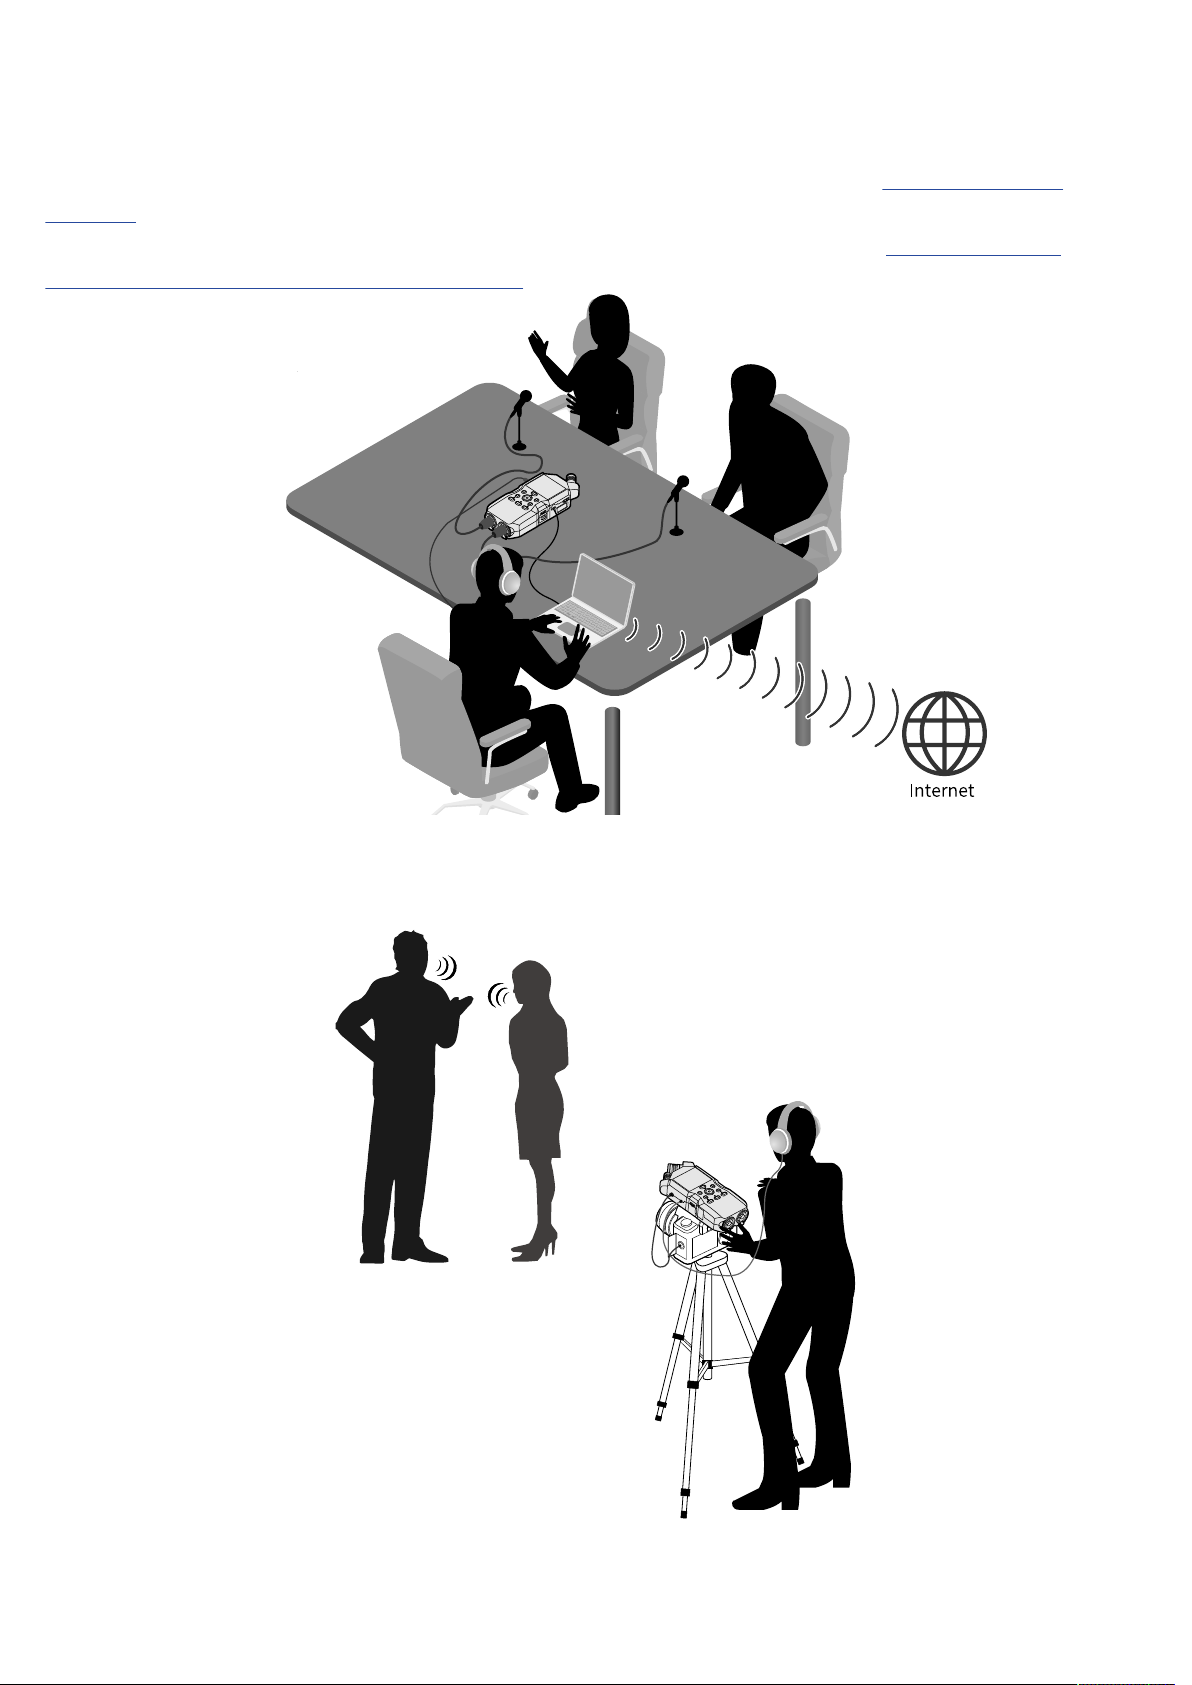
■ Live streaming a podcast
Audio can be streamed in real time using the H4essential and connected mics. (→ Using as an audio
interface)
While streaming audio in real time, the H4essential can simultaneously record. (→ Recording on the
H4essential while using it as an audio interface)
■ Capturing video
Audio and video can be captured simultaneously using the H4essential and a camera.
34
Page 35
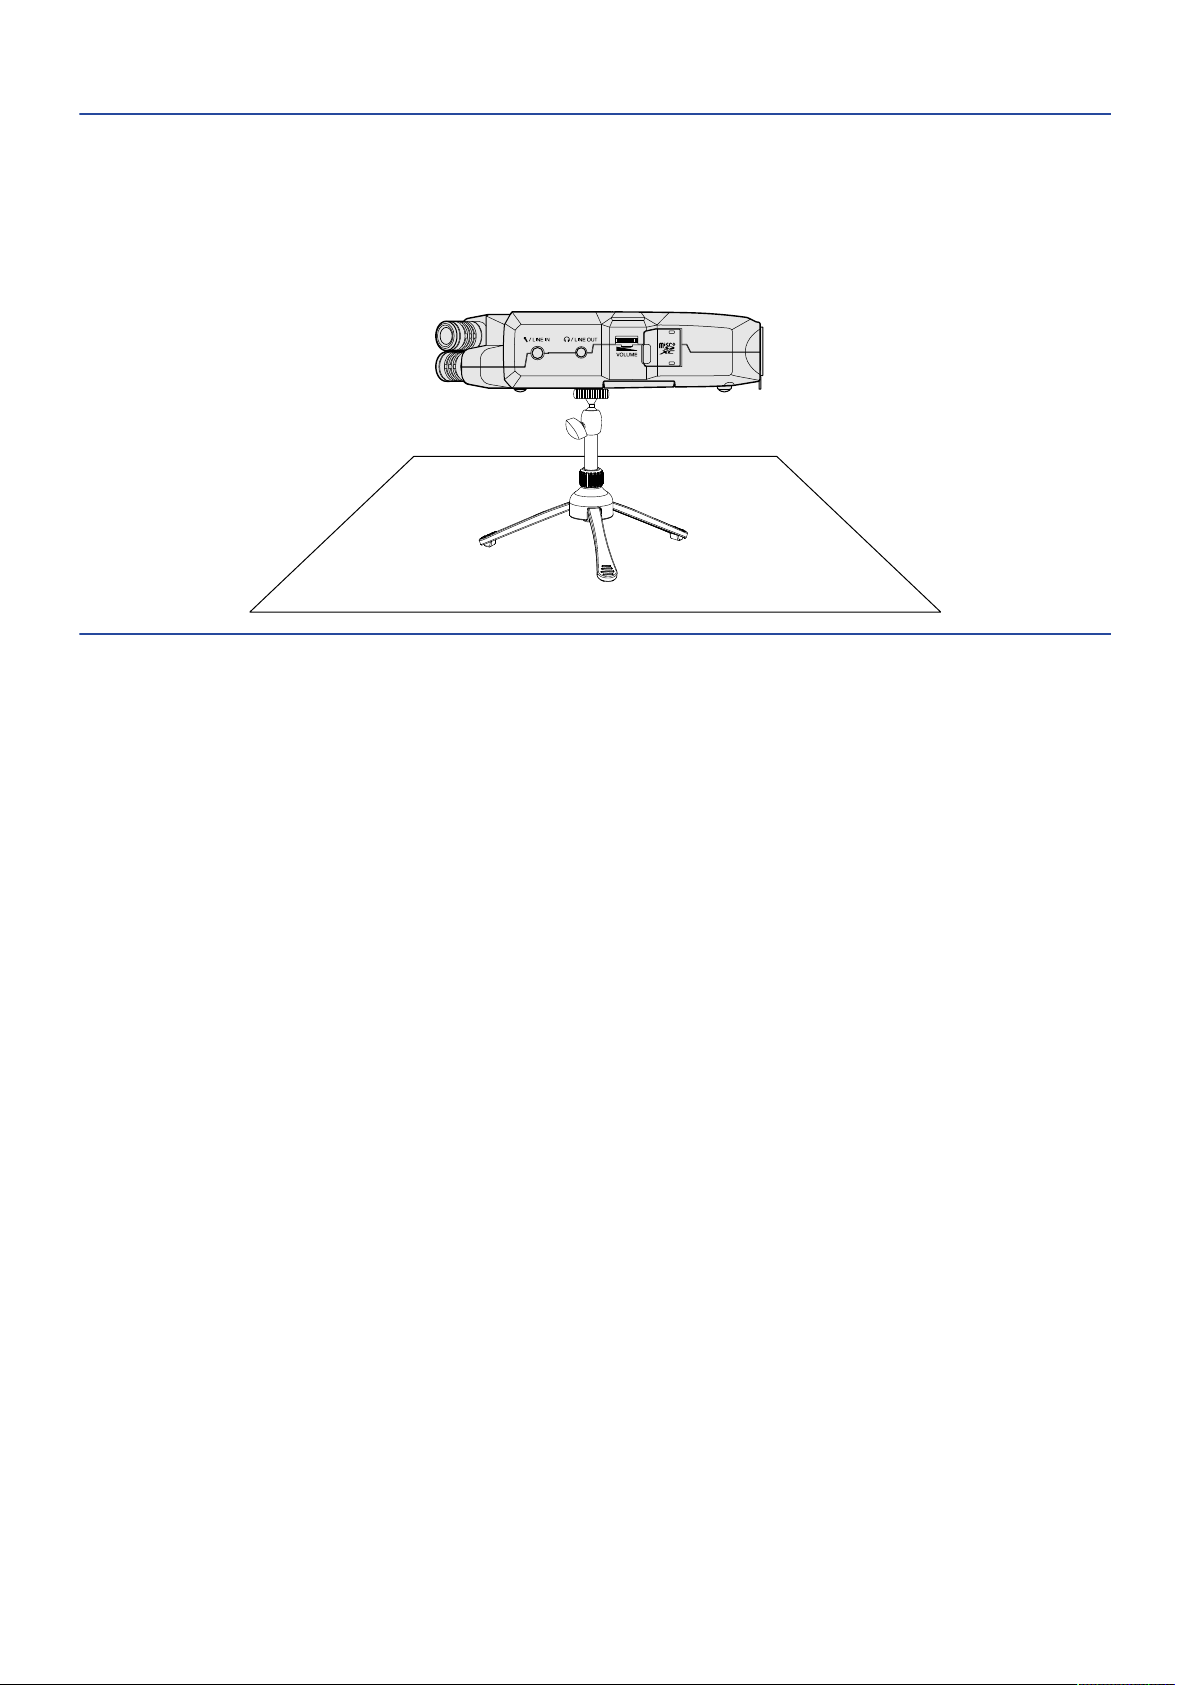
HINT
If the H4essential is placed directly on a table when recording using its built-in XY mic, reflected sound can
interfere with recording and reduce clarity. We recommend using a tripod, for example, to distance it from
the table. Placing something like a handkerchief can also be effective in reducing sound reflected from a
table.
35
Page 36
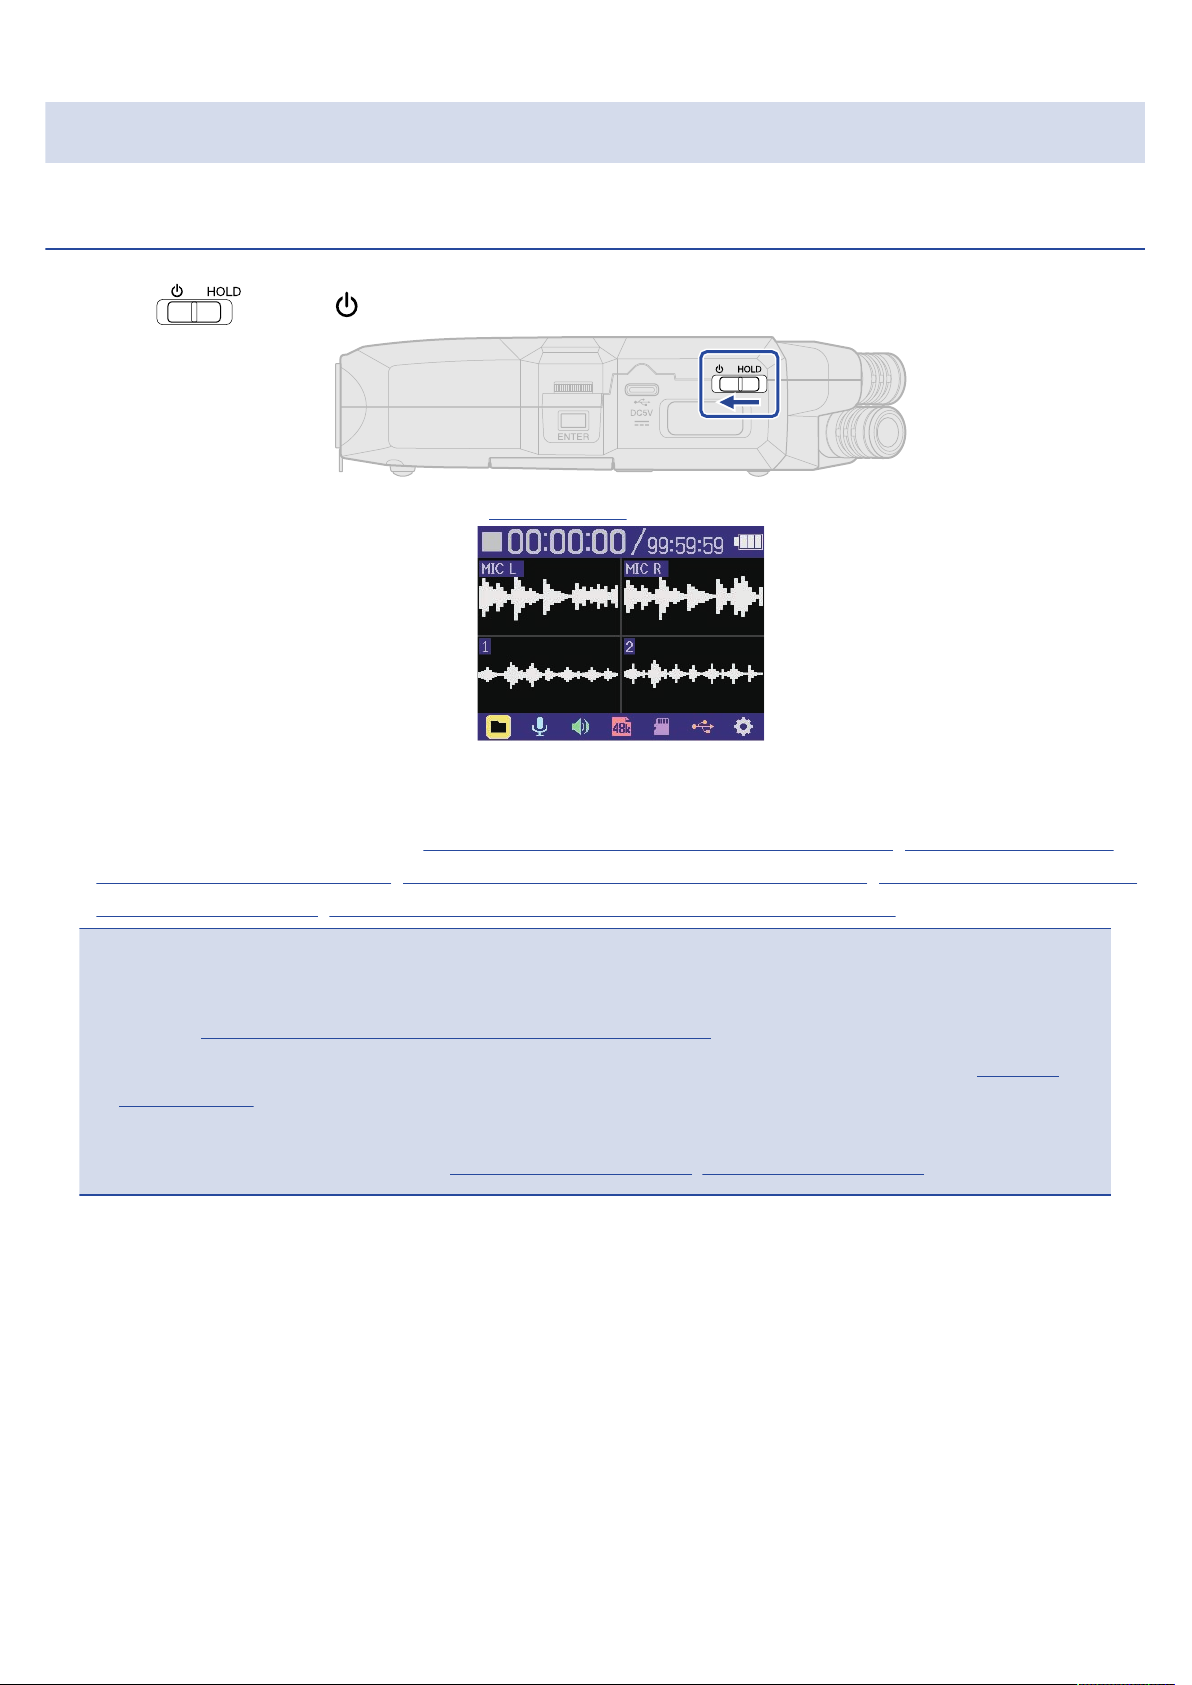
Turning the power on/off
Turning the power on
1. Slide toward until the display becomes active.
After the Startup Screen is shown, the Home Screen will open on the display.
The first time the power is turned on after purchase as well as when the H4essential has been reset
to factory defaults, setting screens for the guide sound, display language and date and time will be
shown. Make these settings. (→ Setting the guide sound (first time starting up), Setting the language
shown (first time starting up), Setting the date format (first time starting up), Setting the date and time
(first time starting up), Setting the type of batteries used (first time starting up))
NOTE
• The H4essential can be set so that its power will automatically turn off if it is not used for a set amount of
time. (→ Setting the time until the power turns off automatically)
• If “No SD Card!” appears on the display, confirm that a microSD card is inserted properly. (→ Inserting
microSD cards)
• If “Invalid SD Card!” appears on the display, the card is not formatted correctly. Format the microSD card
or use a different microSD card. (→ Formatting microSD cards, Inserting microSD cards)
36
Page 37

■ Turning the power off
1. Slide toward until “Please wait. Saving data…” appears on the display.
The display will darken and the power will turn off.
NOTE
• While “Please wait. Saving data…” is shown, the current settings of the H4essential are being saved. While
“Please wait. Saving data…” is shown, do not disconnect the AC adapter or remove the batteries.
• The power cannot be turned off while recording. Turn the power off after recording stops.
37
Page 38
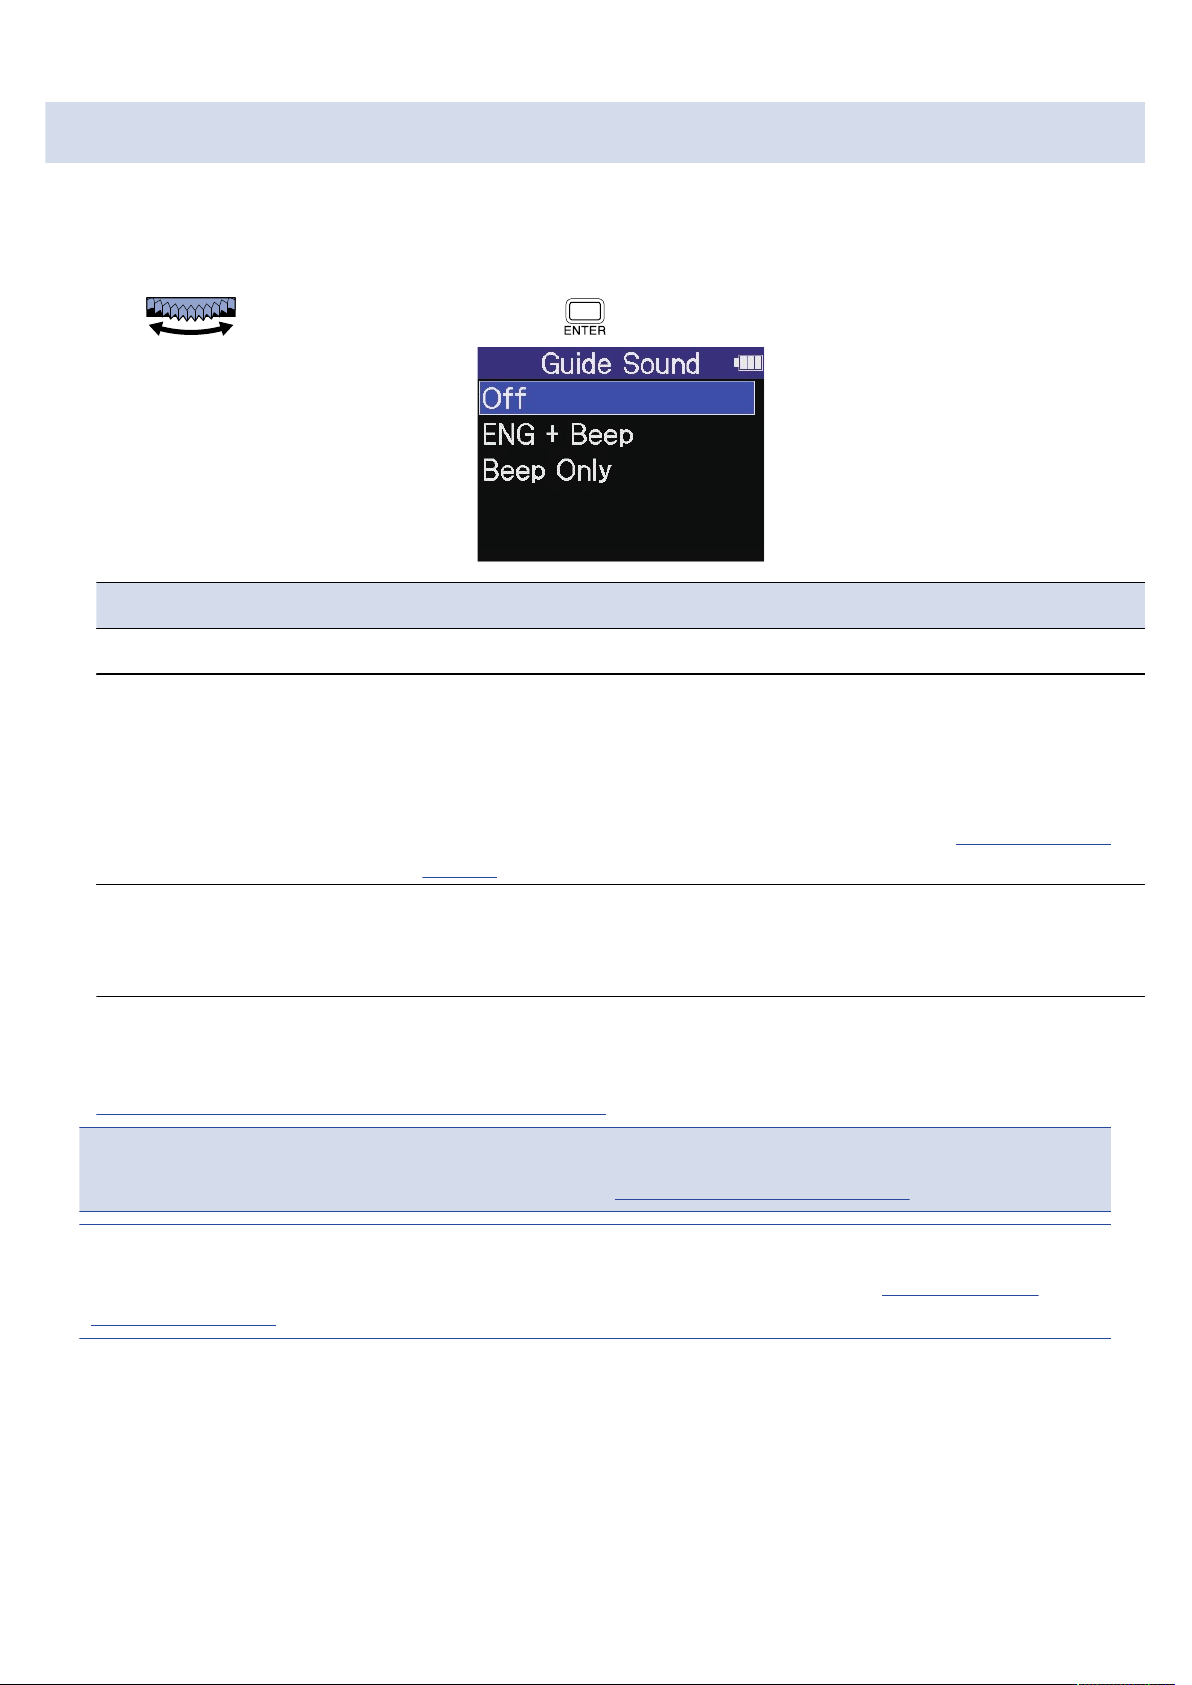
Setting the guide sound (first time starting up)
The first time the power is turned on after purchase as well as after the H4essential has been reset to
factory defaults, set the guide sound when a screen to set it is shown.
1. Use to select the setting and press .
Setting Explanation
Off This turns off the guide sound.
XXX + Beep
(“XXX” shows the installed
language.)
Beep Only A beeping sound will be used to notify when error messages occur,
After the guide sound setting is confirmed, set the language shown when a screen to set it opens. (→
Setting the language shown (first time starting up))
NOTE
The volume of the guide sound can also be adjusted. (→ Setting the guide sound volume)
HINT
The guide sound setting can also be changed later on the System Settings Screen. (→ Setting the guide
sound (accessibility))
Setting items will be read aloud in the installed language. A beeping
sound will be used to notify the occurrence of error messages,
recording starting/stopping and volume adjustment, for example.
English is installed at the time of purchase, but other languages
can be installed and used for reading as desired. (→ Installing guide
sounds)
recording starts/stops and the volume changes, for example. Nothing
will be read aloud.
38
Page 39
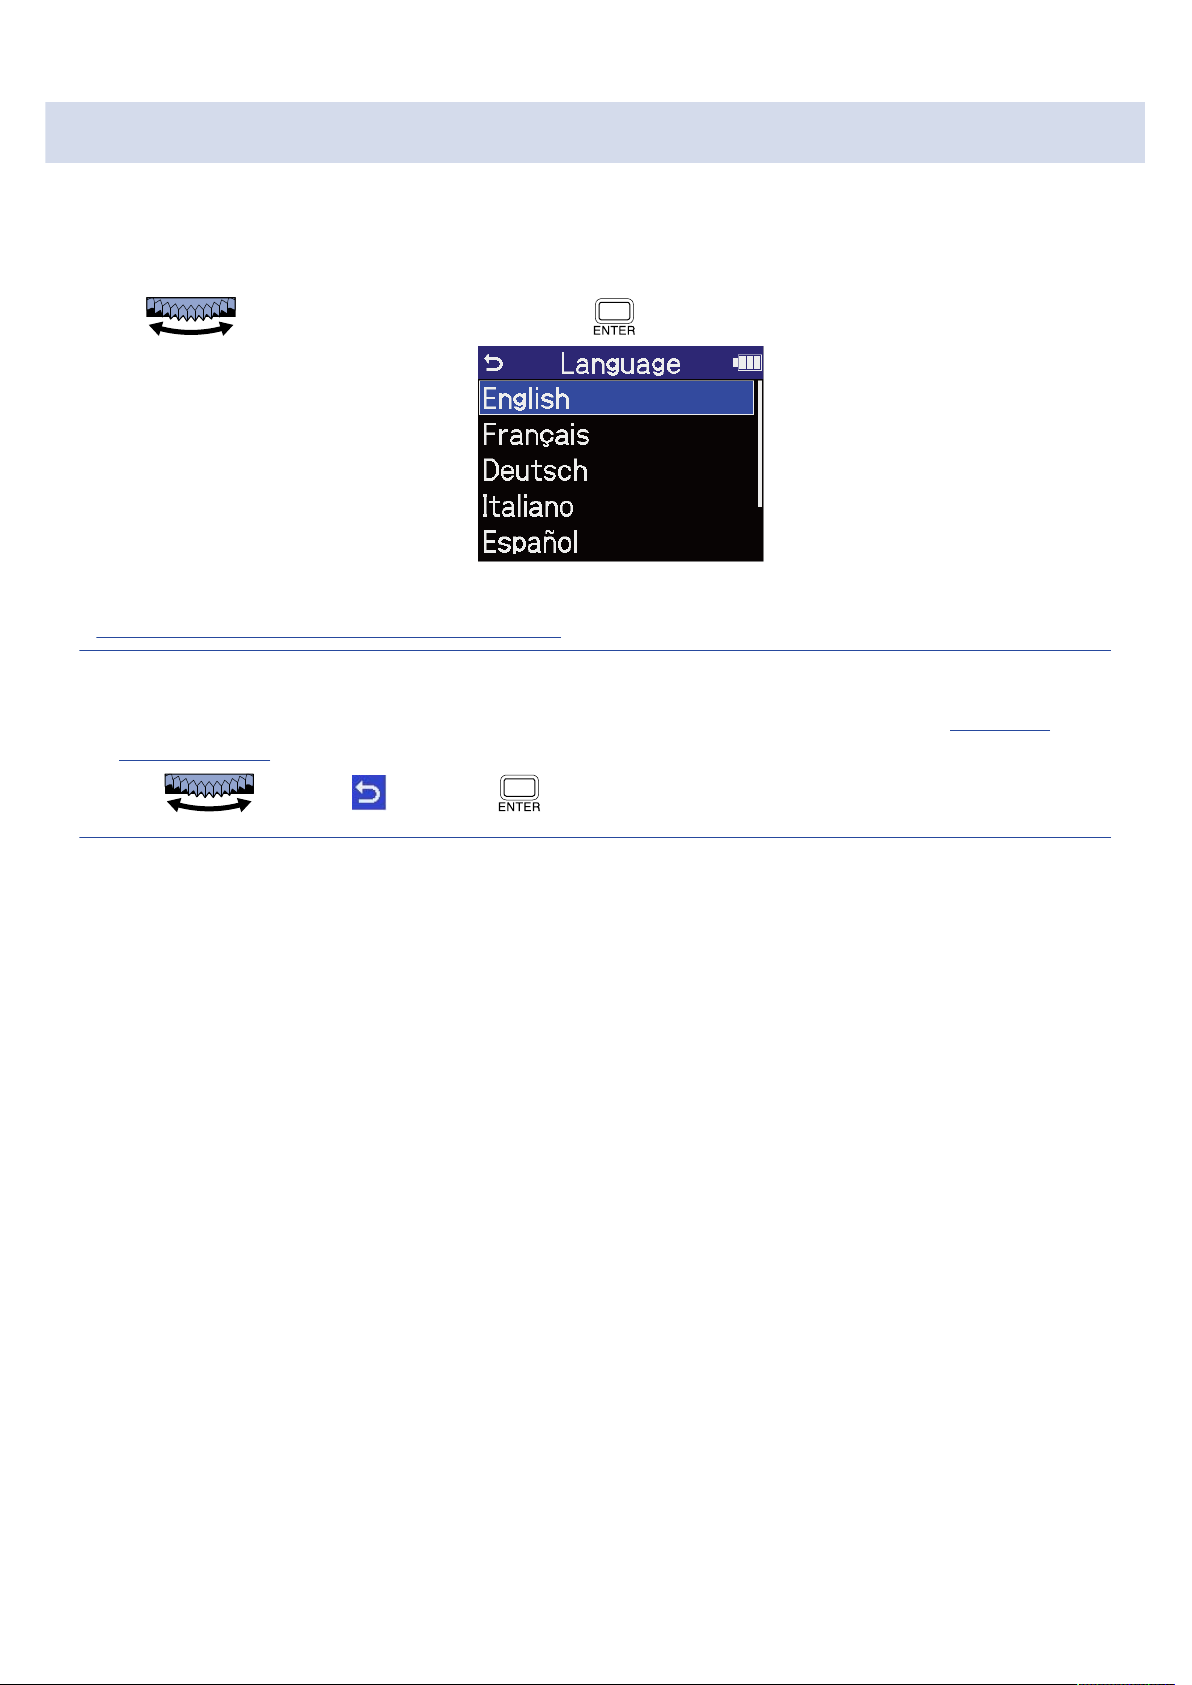
Setting the language shown (first time starting up)
The first time the power is turned on after purchase as well as when the H4essential has been reset to
factory defaults, set the display language when a screen to set it is shown after setting the guide sound.
1. Use to select the language, and press .
After the display language setting is confirmed, set the date format when a screen to set it opens. (→
Setting the date format (first time starting up))
HINT
• The display language setting can also be changed later on the System Settings Screen. (→ Setting the
language shown)
• Use to select and press to return to the previous setting screen.
39
Page 40
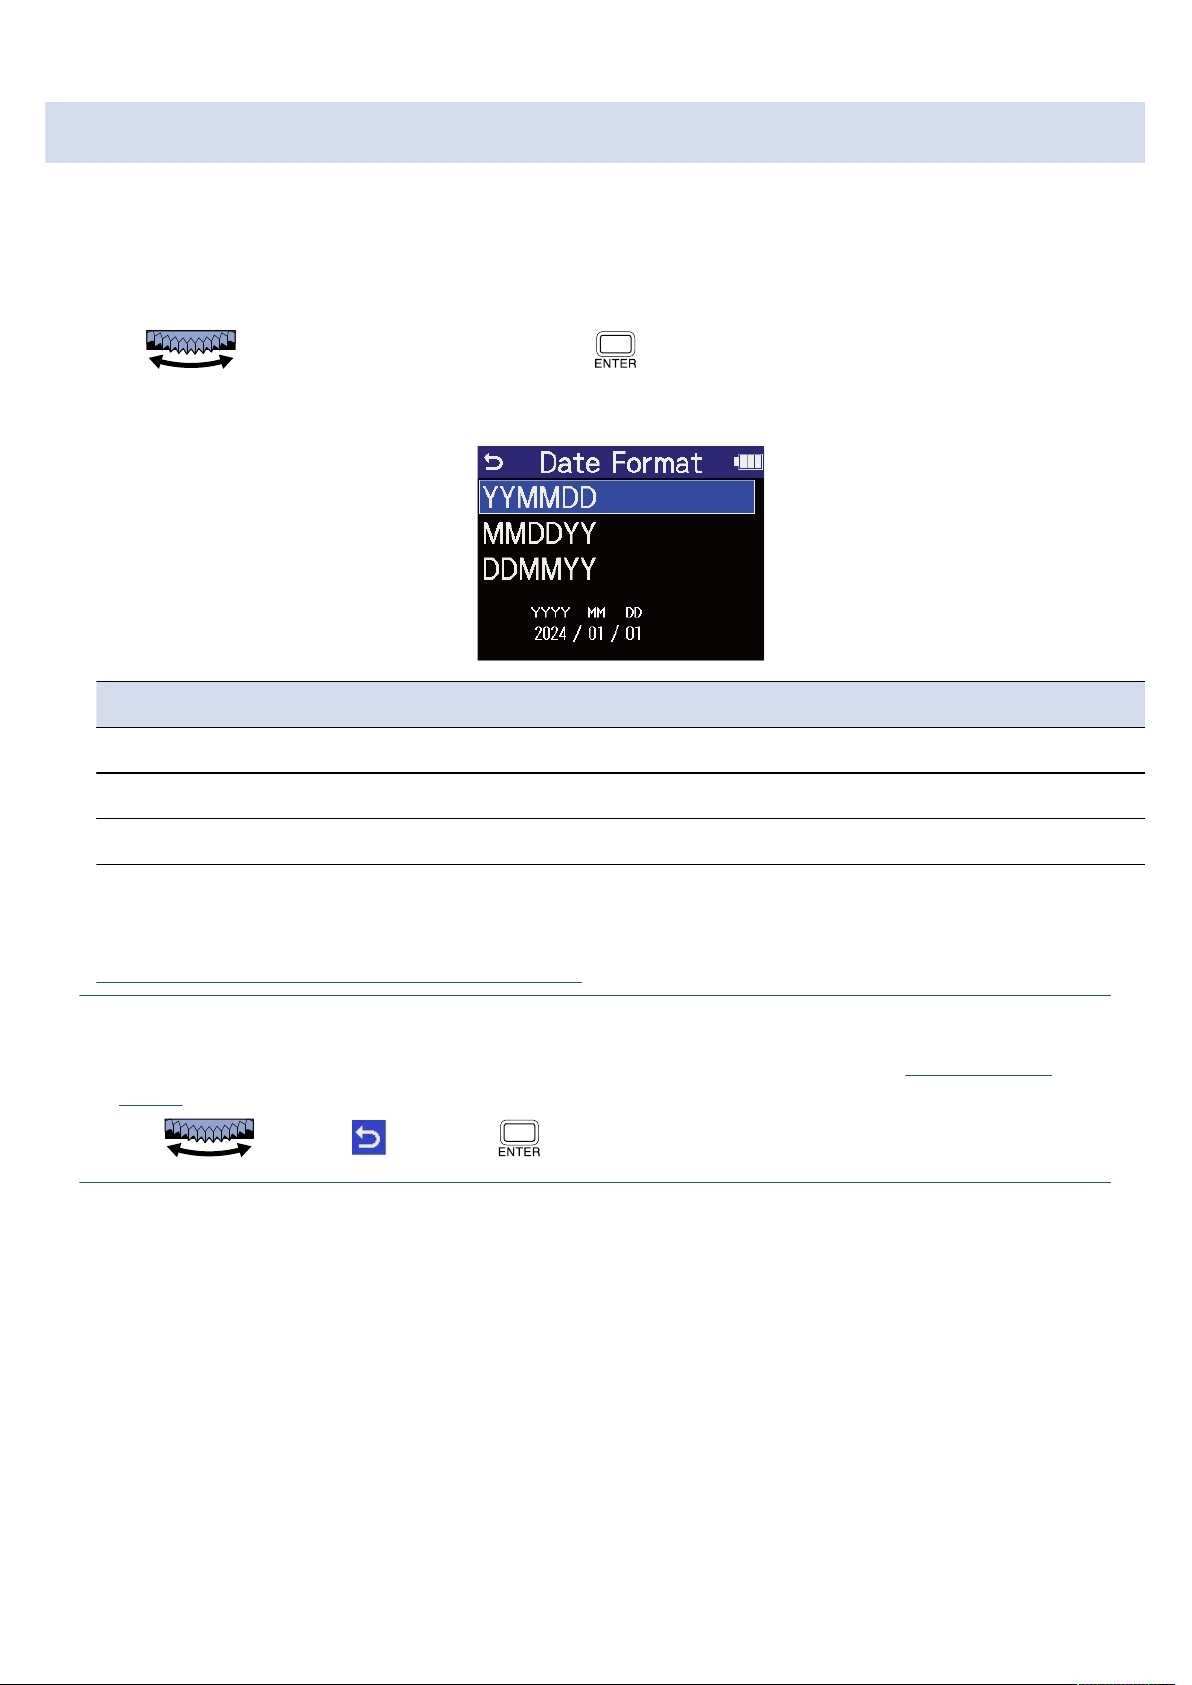
Setting the date format (first time starting up)
The first time the power is turned on after purchase as well as after the H4essential has been reset to
factory defaults, set the date format when a screen to set it is shown after setting the display language.
The date written to recorded files will use the date format selected here.
1. Use to select a date format and press .
A specific example of the set date format will be shown at the bottom of the screen using the current
date setting.
Setting Explanation
YYMMDD The date is shown in year, month, day order.
MMDDYY The date is shown in month, day, year order.
DDMMYY Day, month, year order
After the date format setting is confirmed, set the date and time when a screen to set them opens. (→
Setting the date and time (first time starting up))
HINT
• The date format setting can also be changed later on the System Settings Screen. (→ Setting the date
format)
• Use to select and press to return to the previous setting screen.
40
Page 41
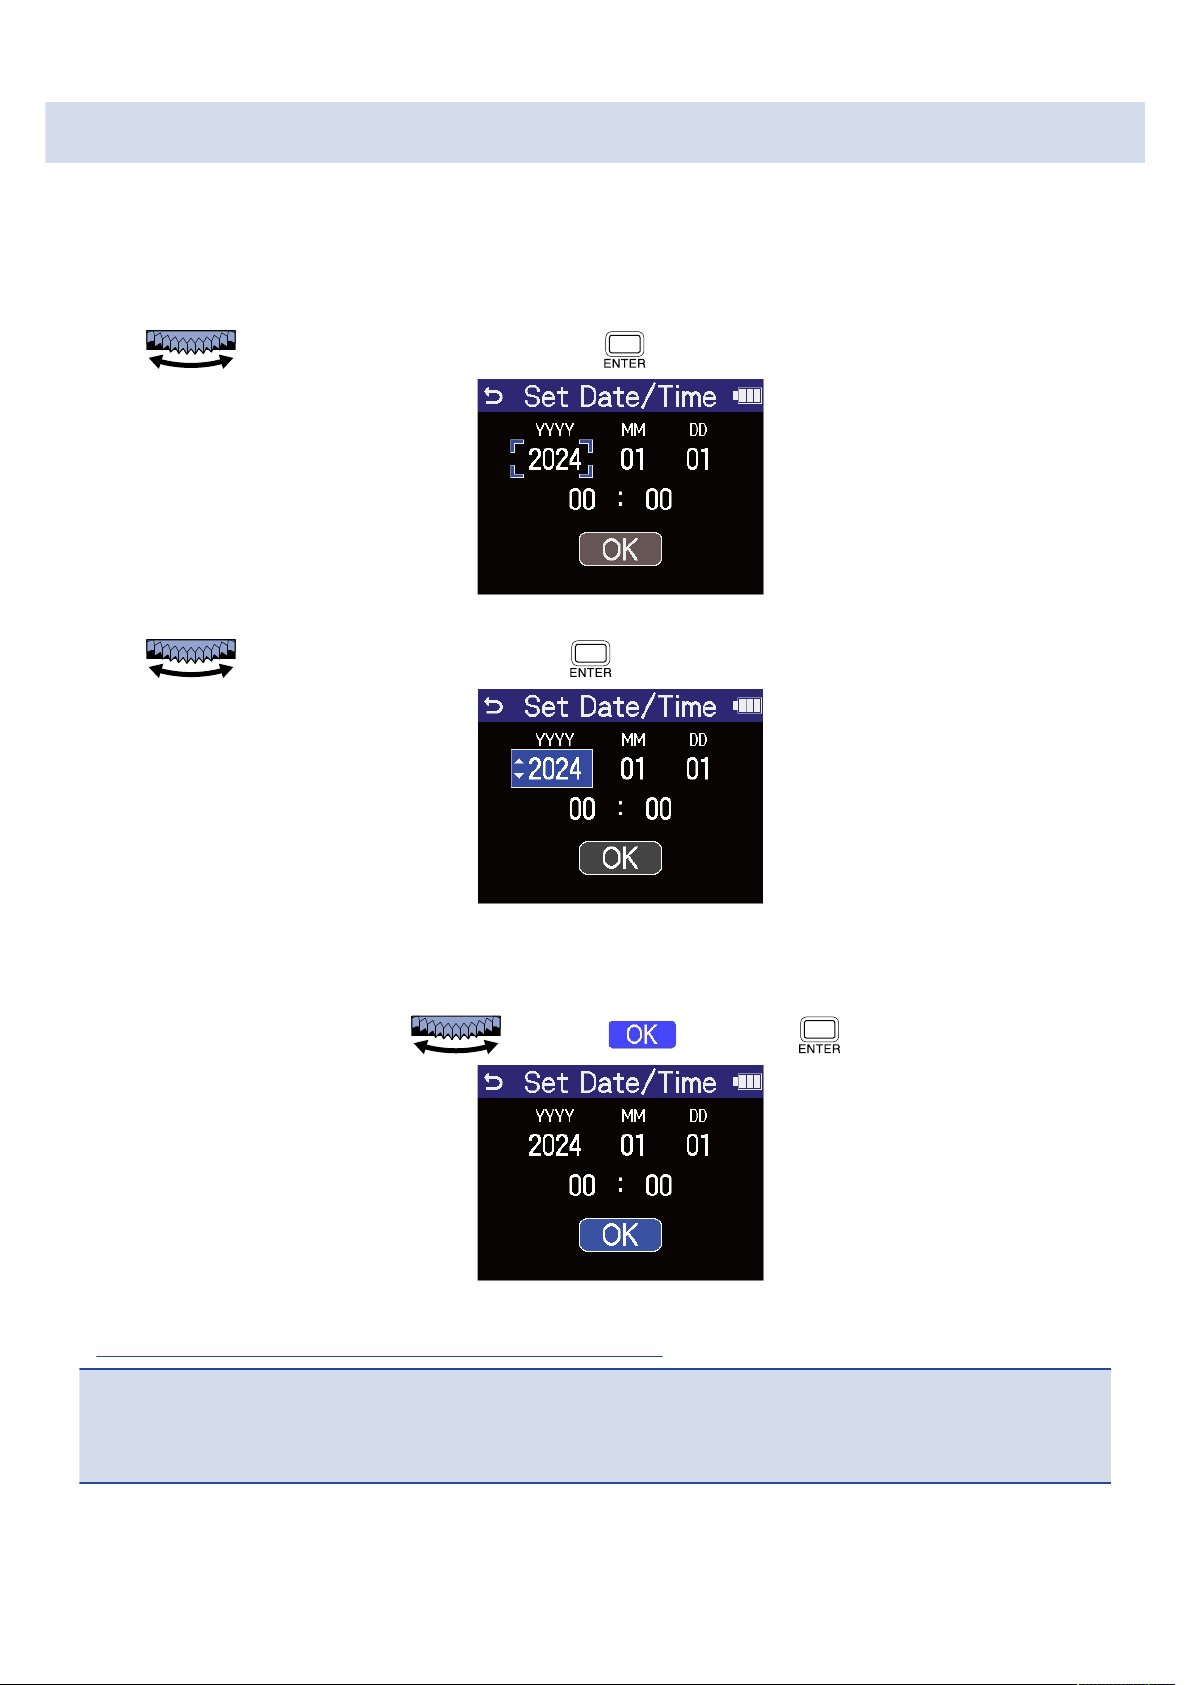
Setting the date and time (first time starting up)
The first time the power is turned on after purchase as well as after the H4essential has been reset to
factory defaults, set the date and time when a screen to set them is shown after setting the date format.
The date and time are stored in recording files.
1. Use to select the item to set and press .
2. Use to change the value, and press .
3. Repeat steps 1–2 to set the date and time.
4. After setting all the items, use to select and press .
After the date and time setting is confirmed, set the battery type when a screen to set it opens. (→
Setting the type of batteries used (first time starting up))
NOTE
If power is not supplied for a long time, the date and time settings stored in the unit will be reset. If the Set
Date/Time Screen appears during startup, set them again.
41
Page 42

HINT
• The date and time settings can also be changed later on the System Settings Screen. (→ Setting the date
and time)
• Use to select and press to return to the previous setting screen.
42
Page 43
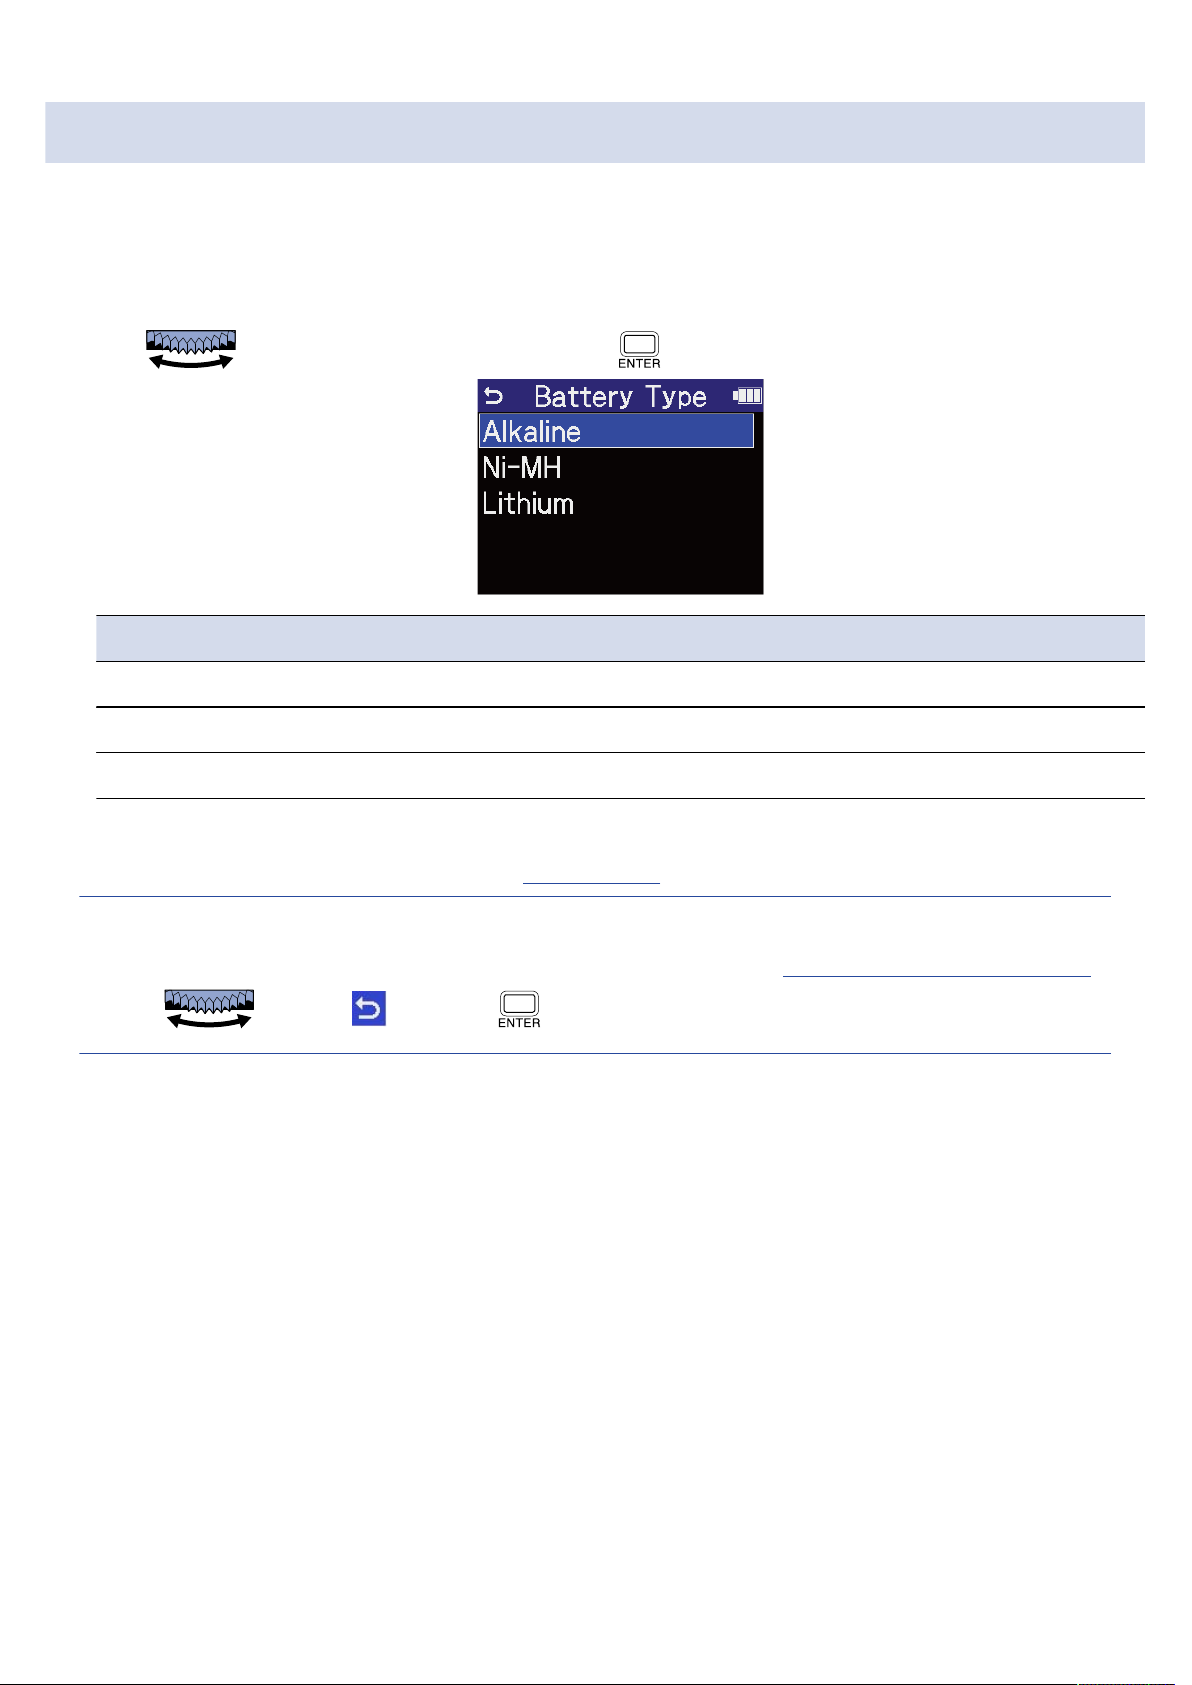
Setting the type of batteries used (first time starting up)
The first time the power is turned on after purchase as well as after the H4essential has been reset to
factory defaults, set the type of batteries used in the H4essential when a screen to set it is shown after
setting the date and time. This is necessary to accurately show the remaining battery charge on the display.
1. Use to select the battery type and press .
Setting Explanation
Alkaline Alkaline batteries
Ni-MH Nickel-metal hydride batteries
Lithium Lithium batteries
After first-time settings are complete, the Home Screen will open.
HINT
• The battery type setting can be changed later on the Setting Screen. (→ Setting the type of batteries used)
• Use to select and press to return to the previous setting screen.
43
Page 44
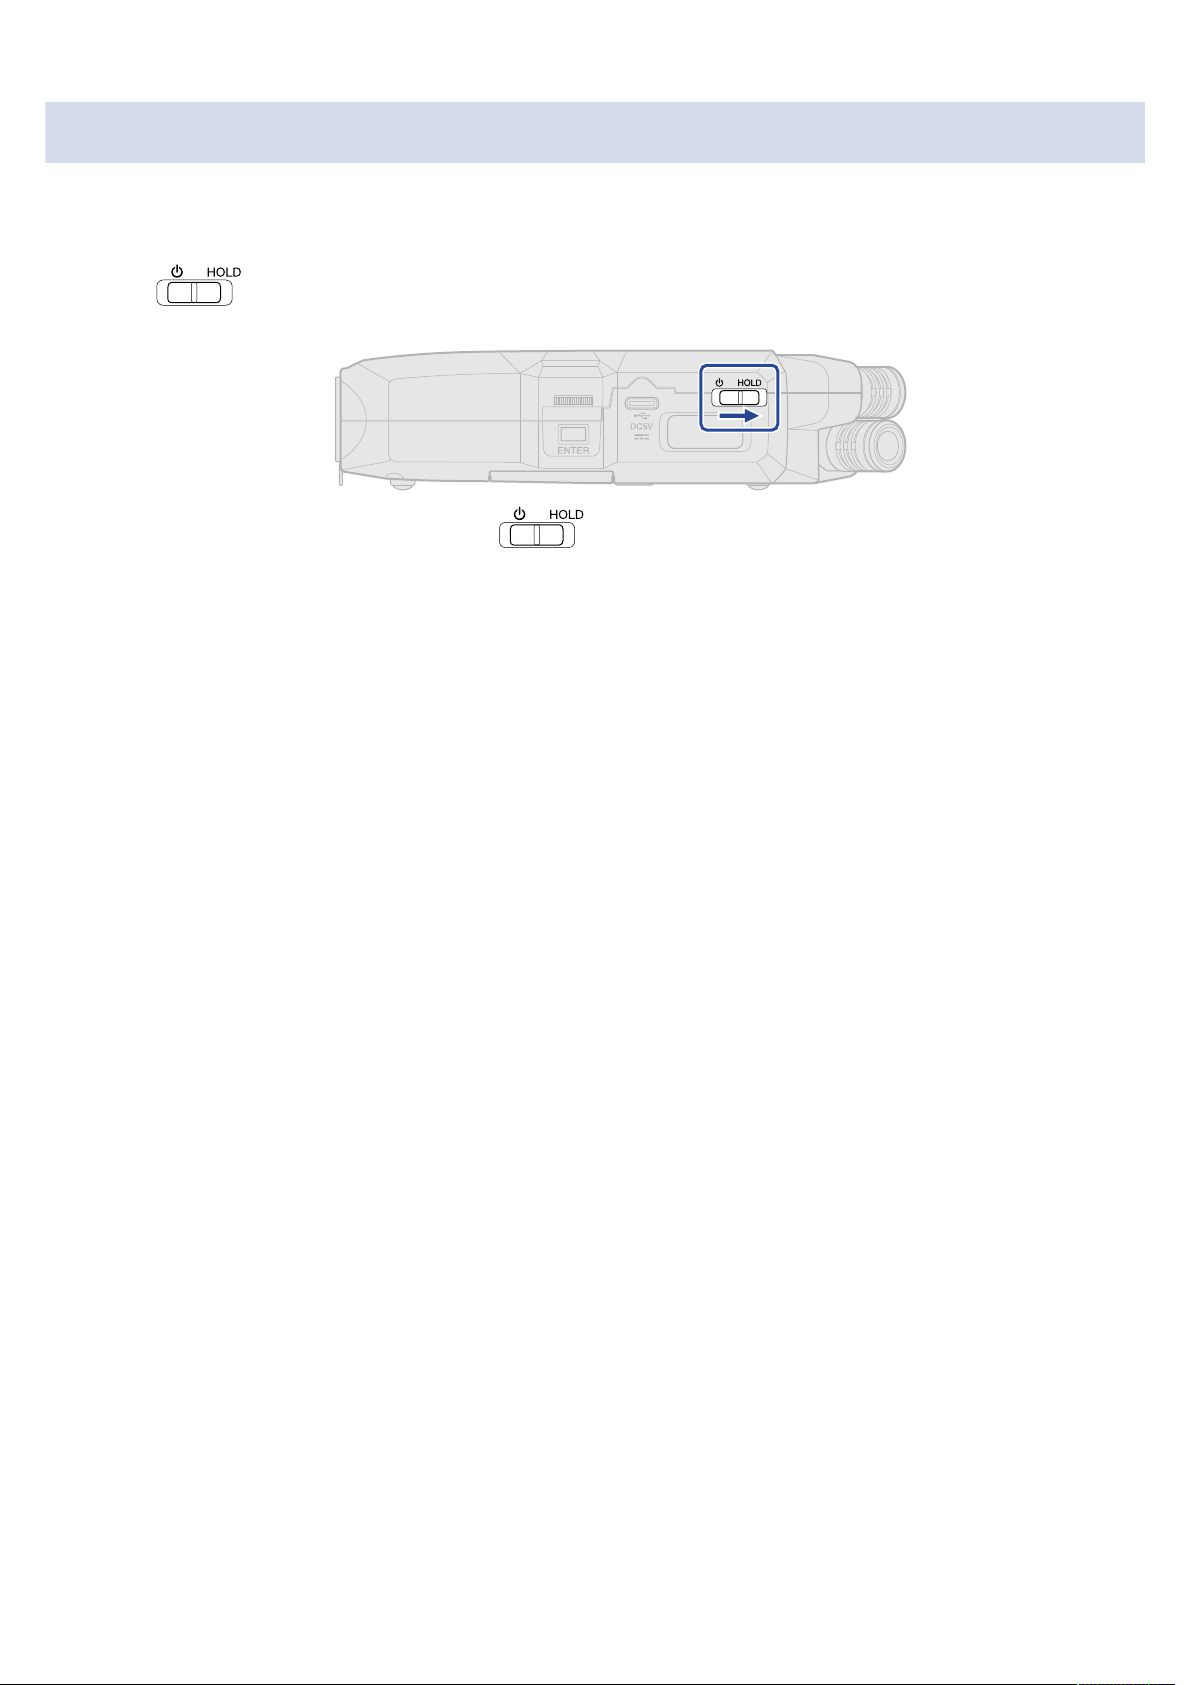
Preventing misoperation (HOLD function)
In order to prevent misoperation, the hold function can be used to disable the buttons on the H4essential.
1. Slide to HOLD.
This turns on the HOLD function, disabling operations using all buttons.
To deactivate the HOLD function, slide back to the center position.
44
Page 45
Making input settings
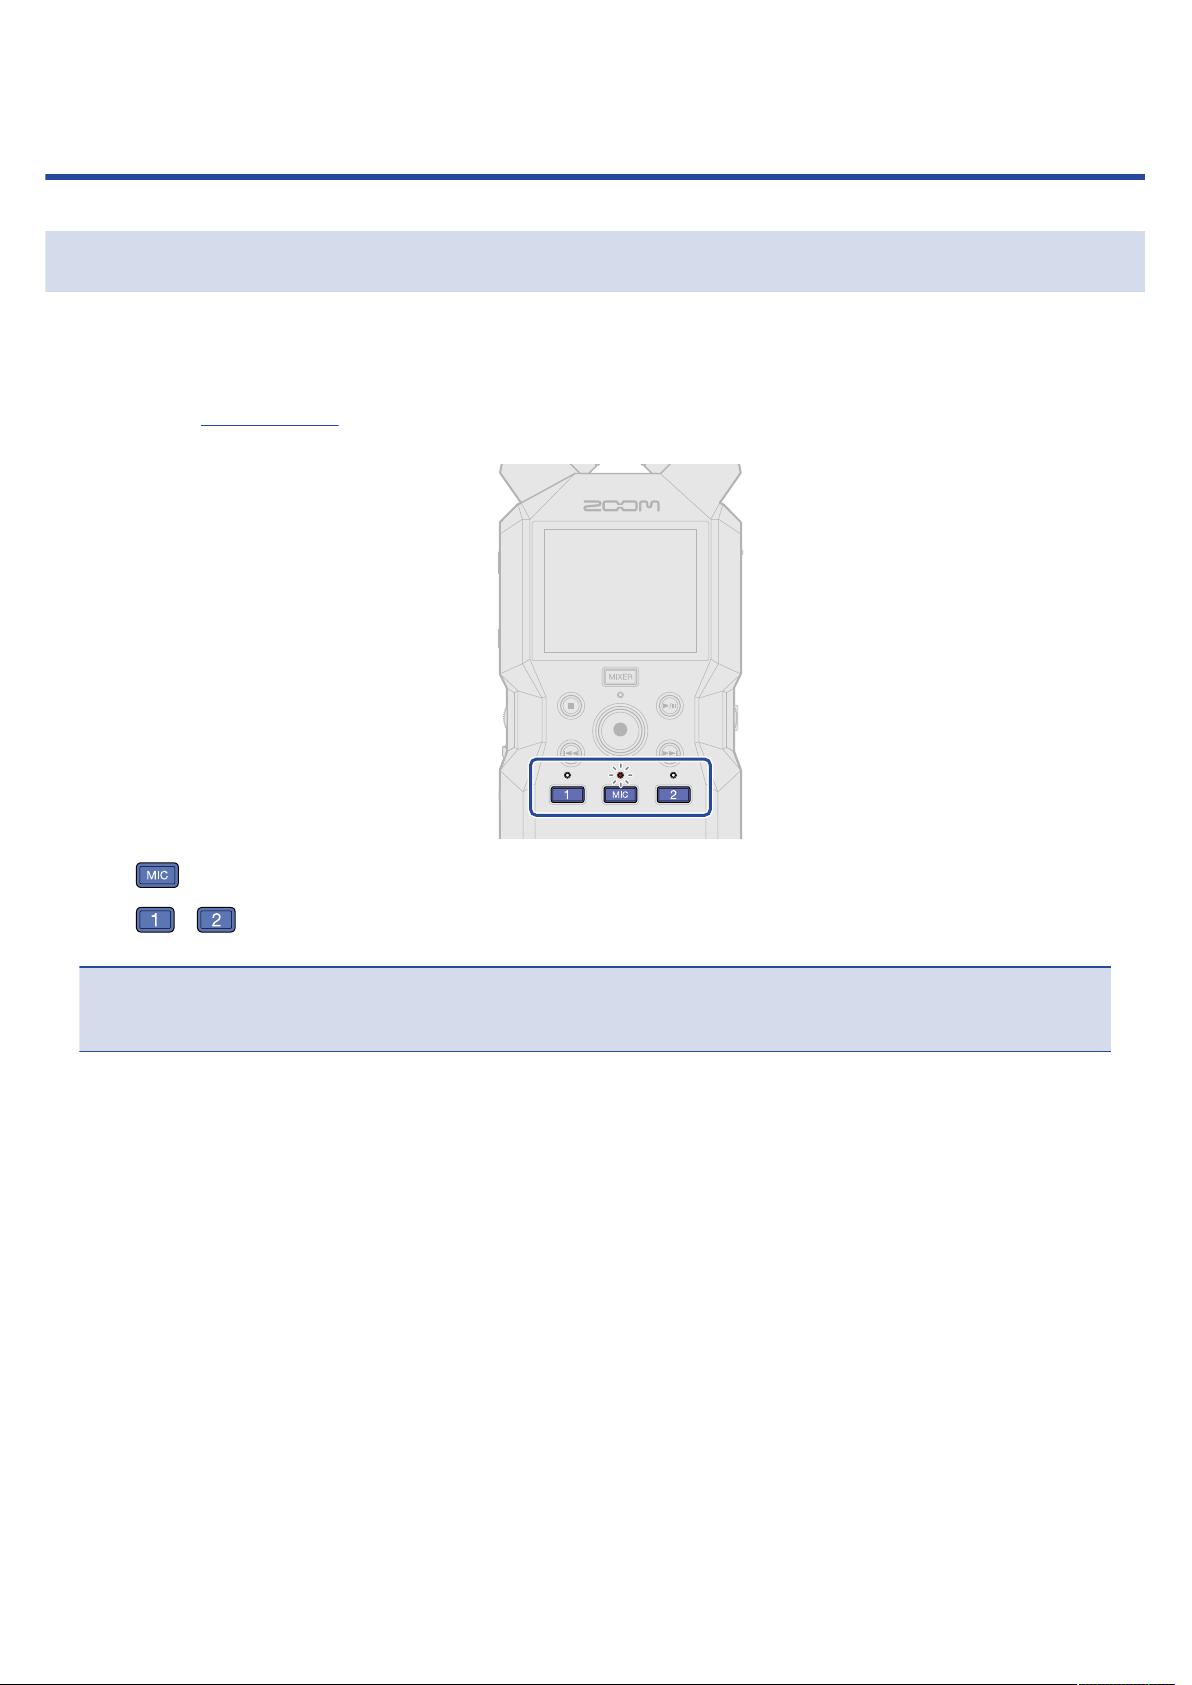
Enabling tracks for recording
Select which of the MIC (built-in XY mic) and input 1–2 tracks to record.
1. When the Home Screen is open, press the buttons of the tracks that you want to record.
The status indicators for selected tracks will light red.
• : Built-in XY mic
• , : Inputs 1 and 2
NOTE
When tracks are stereo-linked, either of their buttons can be pressed to select both.
45
Page 46
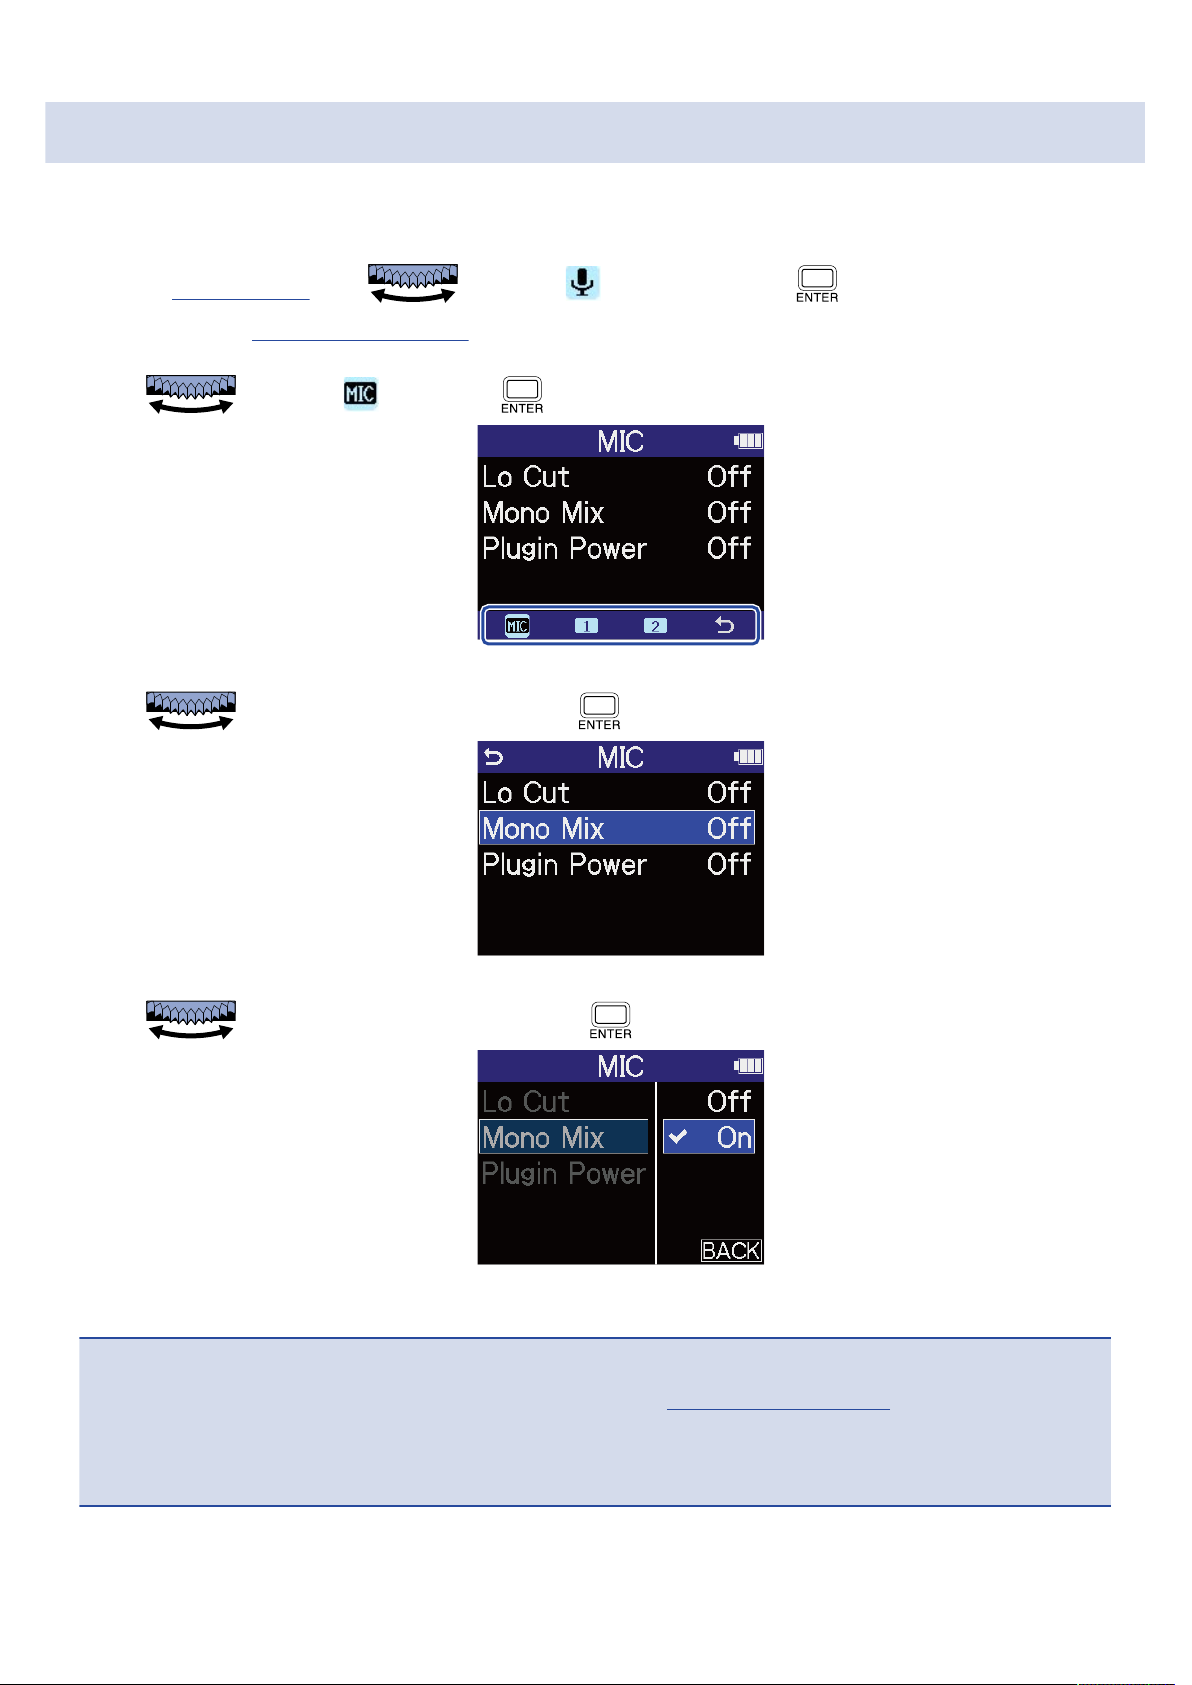
Converting built-in XY mic input to mono
Input from the built-in XY mic can be mixed to a single channel and handled as mono audio.
1. On the Home Screen, use to select (Input) and press .
This opens the Input Settings Screen.
2. Use to select and press .
3. Use to select “Mono Mix”, and press .
4. Use to select "On” or "Off”, and press .
When "On” is selected, built-in XY mic input will become mono.
NOTE
The recording file format will be changed in the same way. (→ Folder and file structure)
• Set to “On”: mono files
• Set to “Off”: stereo files
46
Page 47
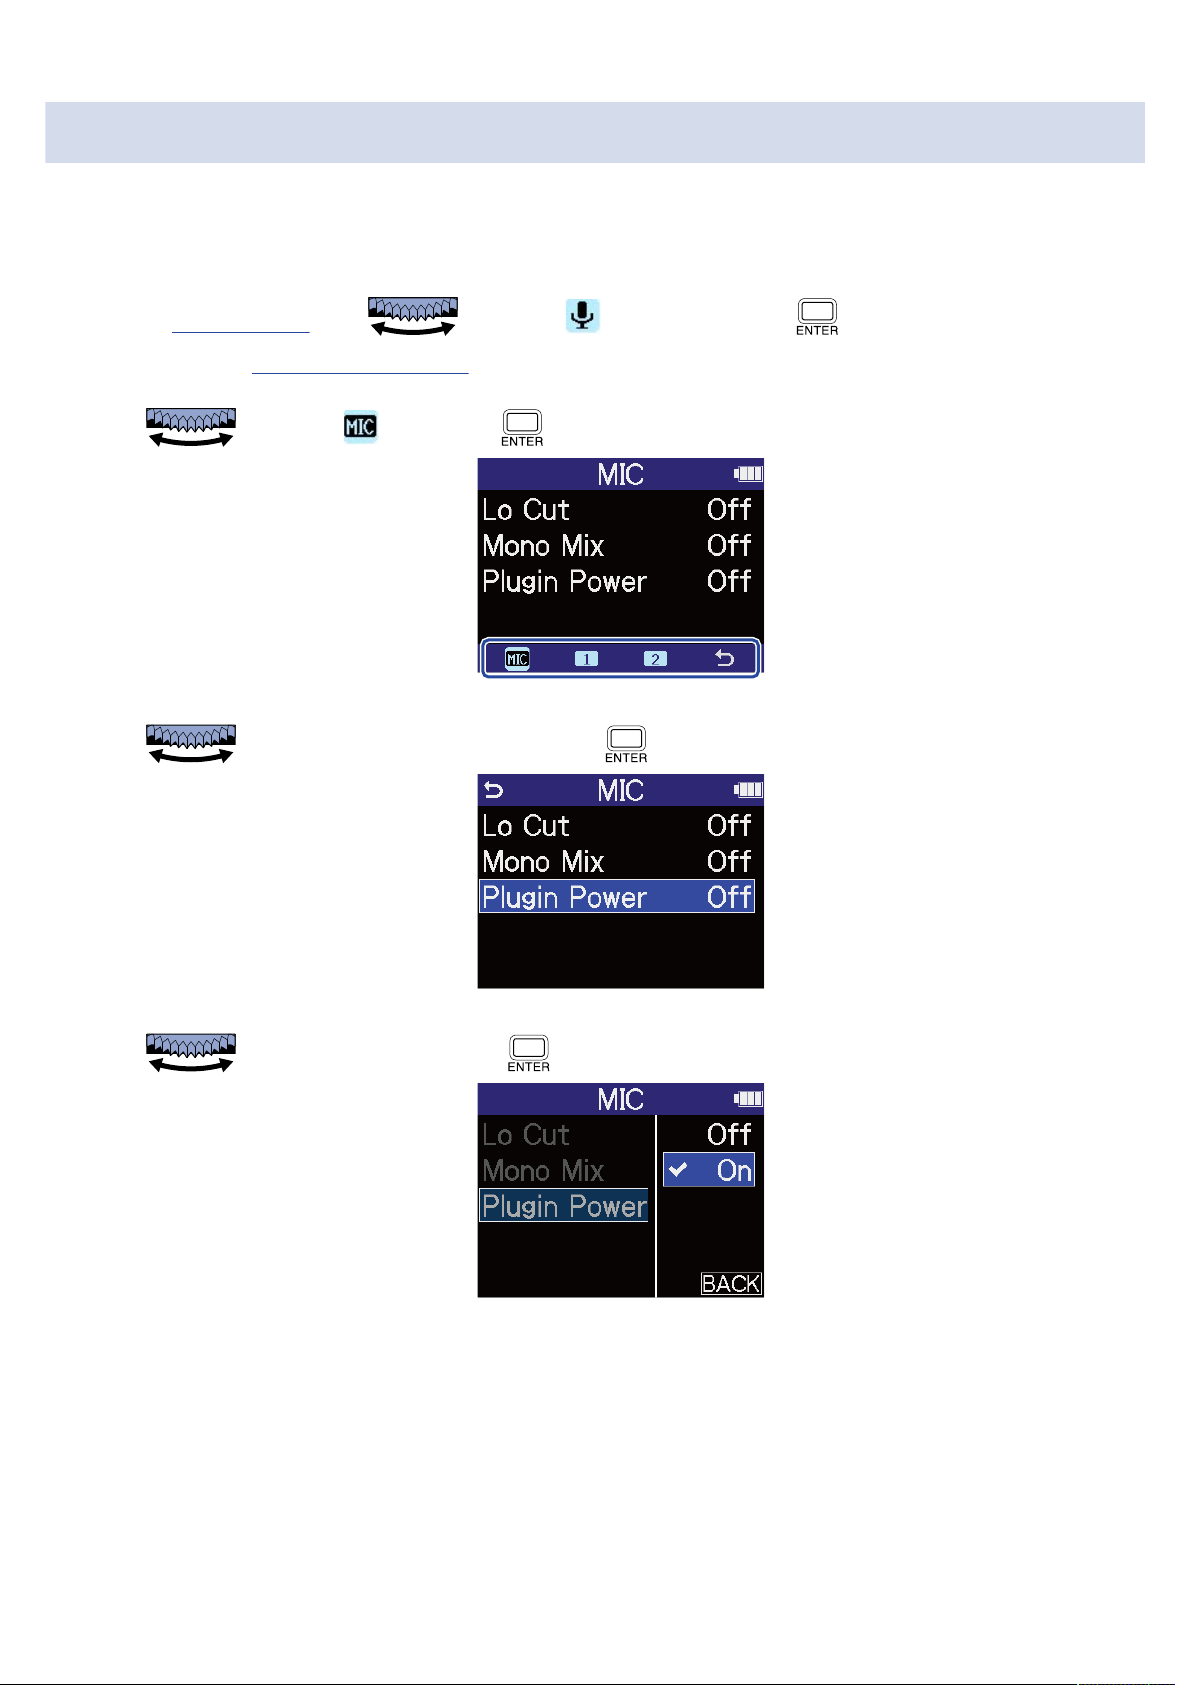
Setting plug-in power
Make the following setting when a mic that is compatible with plug-in power is connected to MIC/LINE IN
jack.
1. On the Home Screen, use to select (Input) and press .
This opens the Input Settings Screen.
2. Use to select and press .
3. Use to select "Plugin Power” and press .
4. Use to select "On”, and press .
47
Page 48
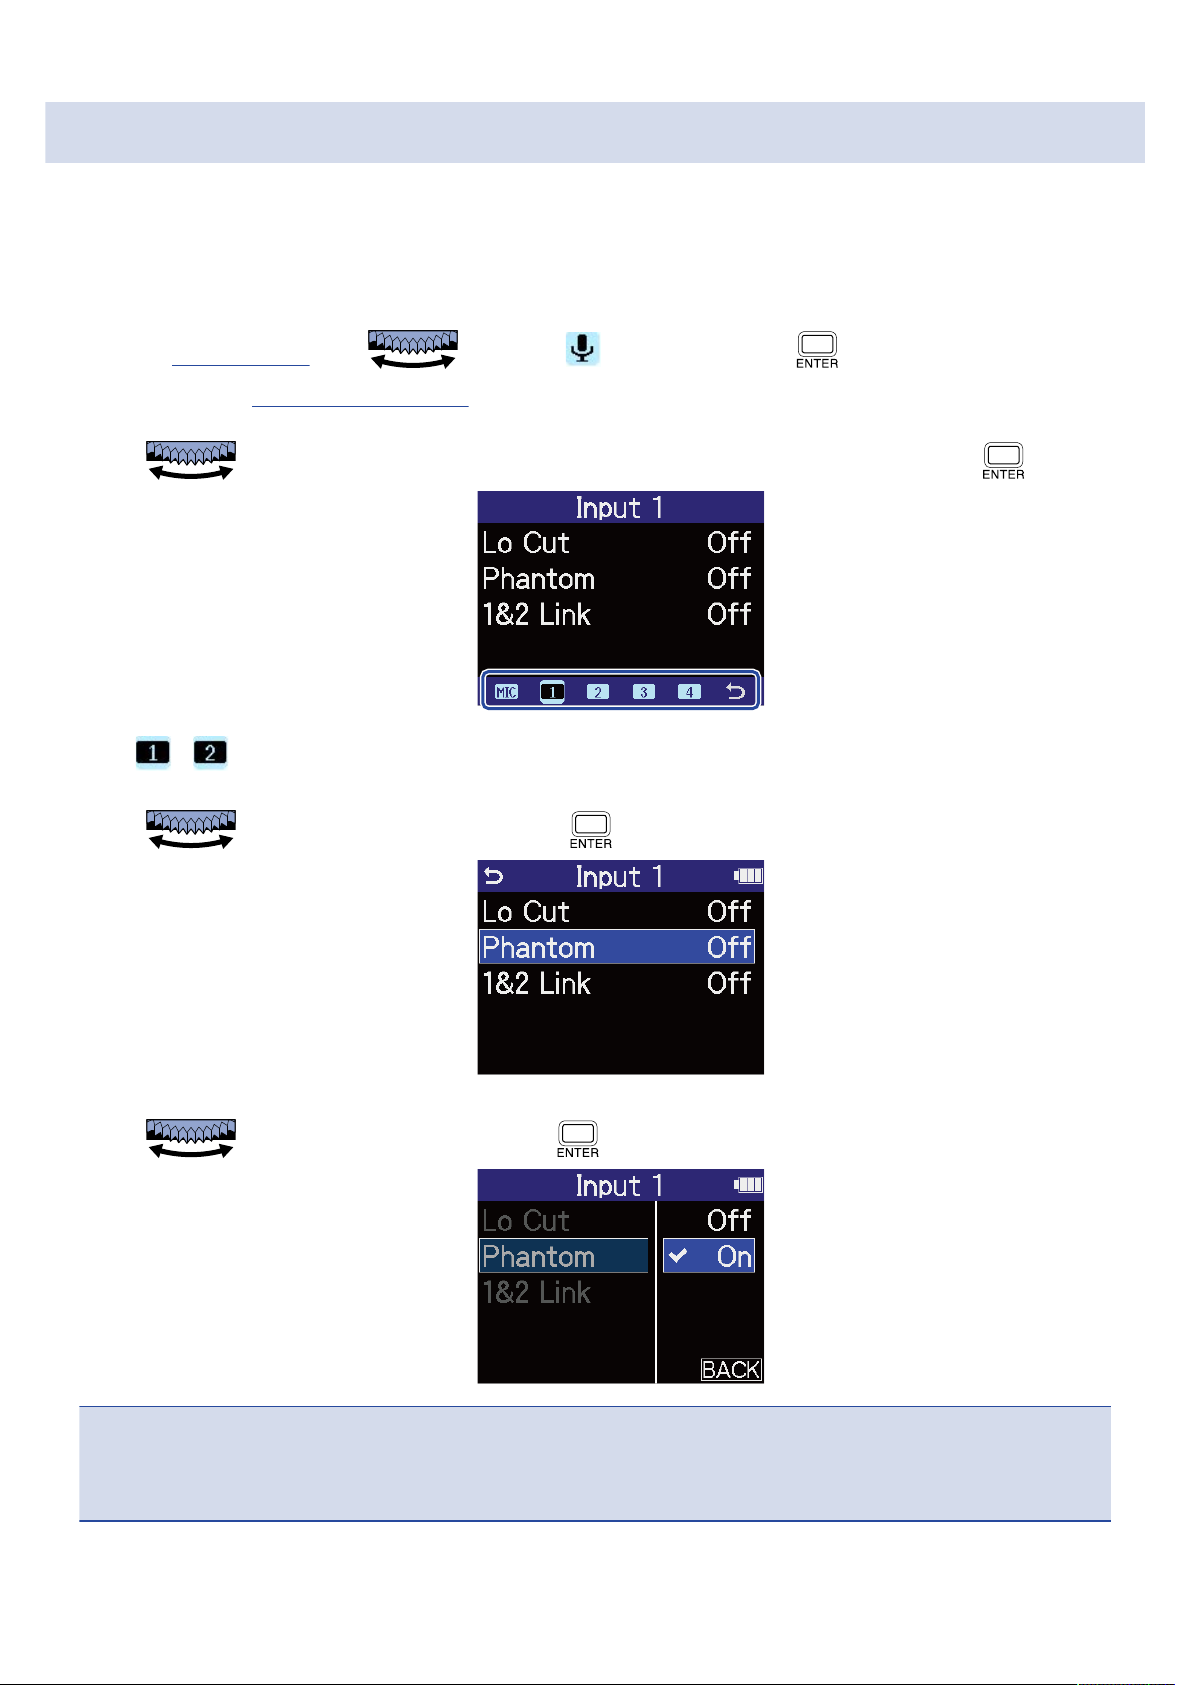
Setting phantom power
H4essential inputs 1 and 2 support phantom power and can provide +48 V. Turn on phantom power when
condenser mics that require it are connected.
This can be turned on/off separately for each input.
1. On the Home Screen, use to select (Input) and press .
This opens the Input Settings Screen.
2. Use to select the input for which you want to set phantom power and press .
• , : Inputs 1 and 2
3. Use to select “Phantom”, and press .
4. Use to select On or Off, and press .
NOTE
When connecting devices that are not compatible with phantom power, do not turn on the phantom setting.
Doing so could damage the device.
48
Page 49

HINT
Phantom power is a function that supplies power to devices that require an external power supply, including
some condenser mics.
+48 V is common.
49
Page 50
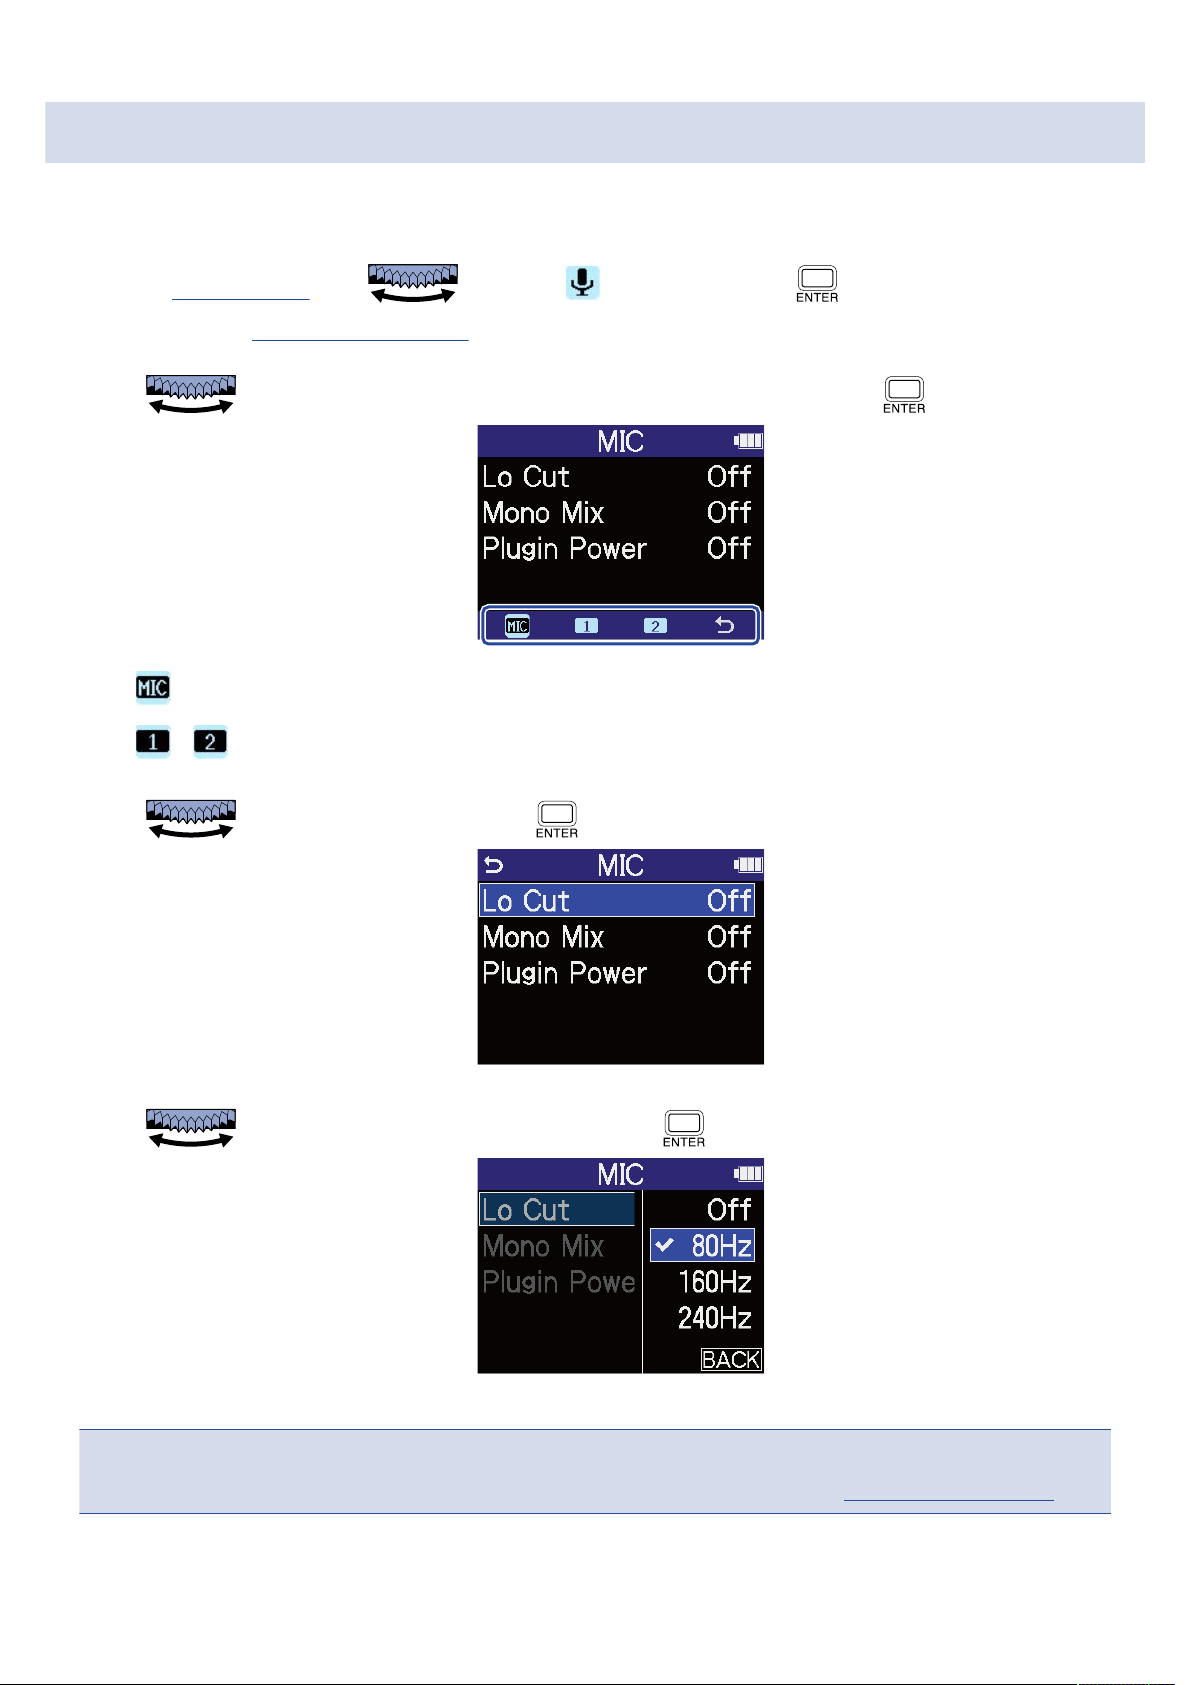
Reducing noise (Lo Cut)
Low frequencies can be cut to reduce the sound of wind and vocal pop noises, for example.
1. On the Home Screen, use to select (Input) and press .
This opens the Input Settings Screen.
2. Use to select the input for which you want to set Lo Cut and press .
• : Built-in XY mic
• , : Inputs 1 and 2
3. Use to select “Lo Cut” and press .
4. Use to select the cutoff frequency and press .
Lo Cut can be set to OFF, 80 Hz, 160 Hz or 240 Hz.
NOTE
When inputs 1 and 2 are stereo-linked, they share the same cutoff frequency. (→ Enabling stereo linking)
50
Page 51
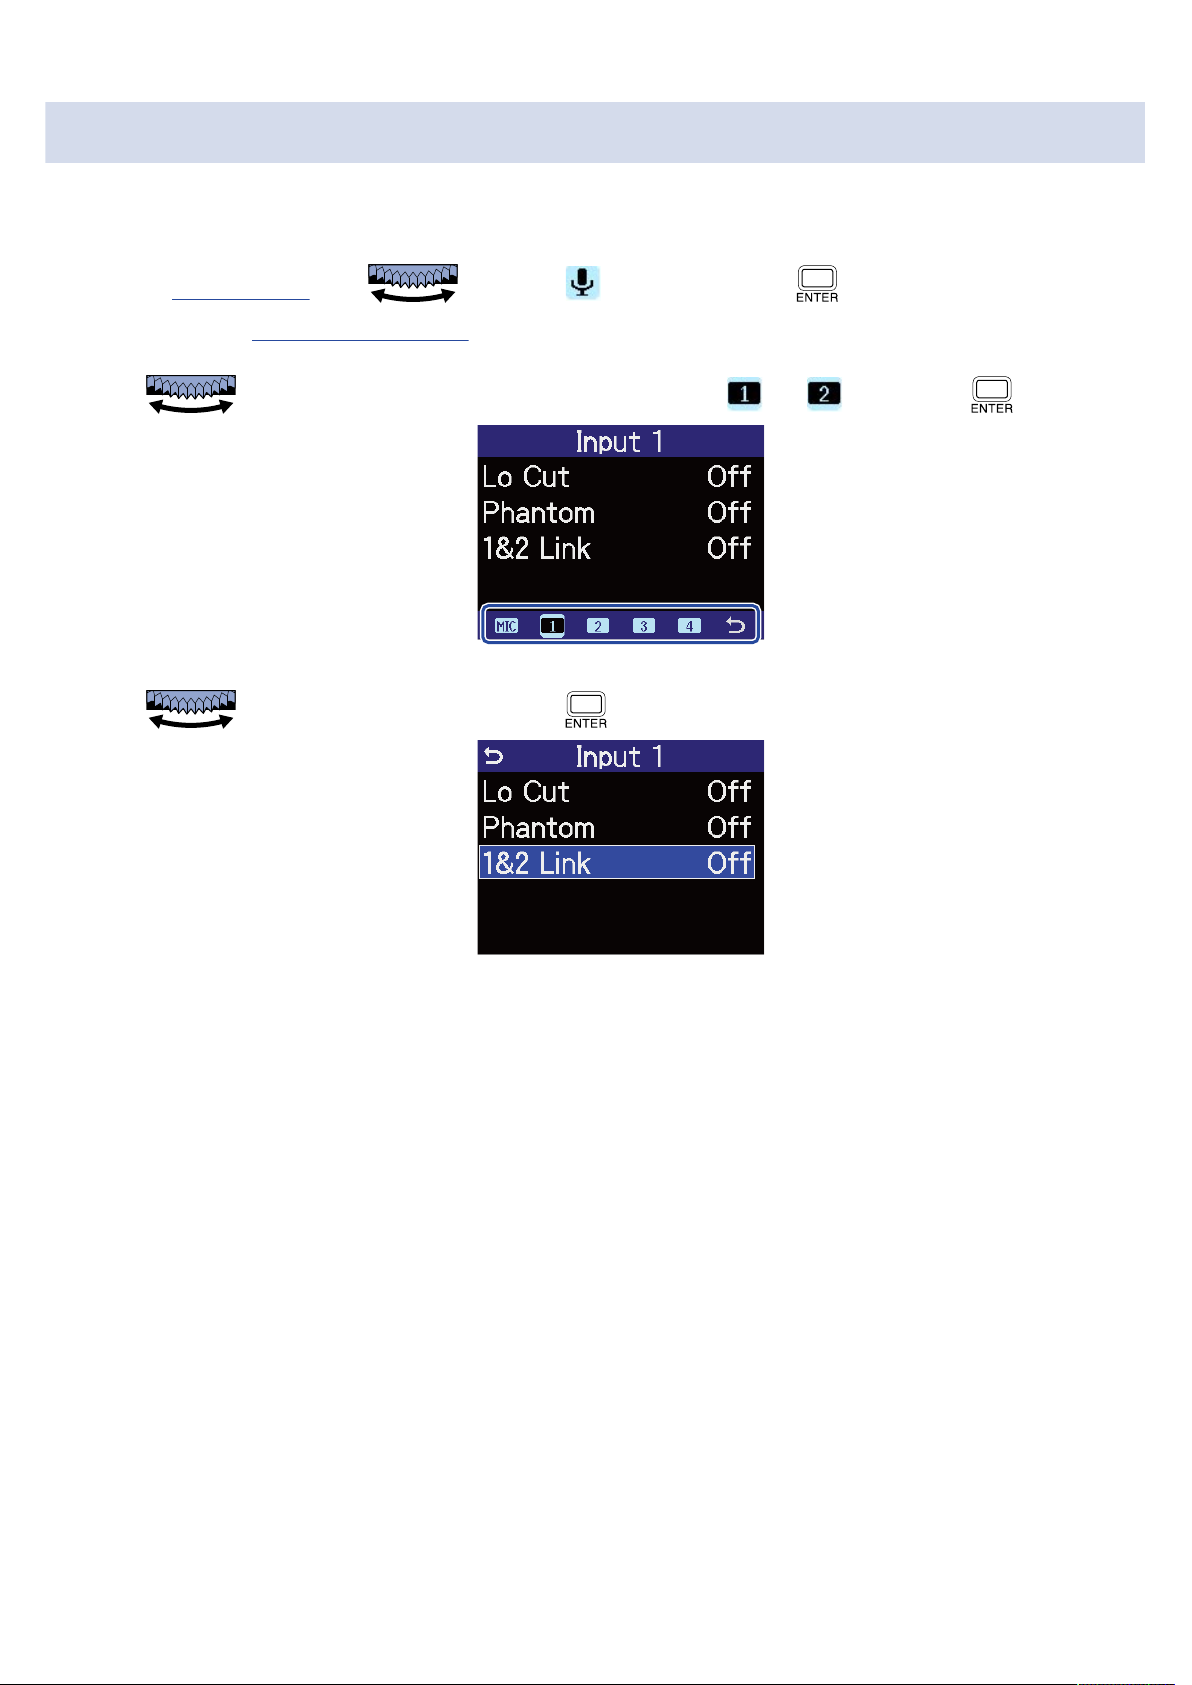
Enabling stereo linking
Using stereo-linking, input signals from inputs 1 and 2 can be handled as stereo audio.
1. On the Home Screen, use to select (Input) and press .
This opens the Input Settings Screen.
2. Use to select an input that you want to stereo link ( or ) and press .
3. Use to select “1&2 Link”, and press .
51
Page 52
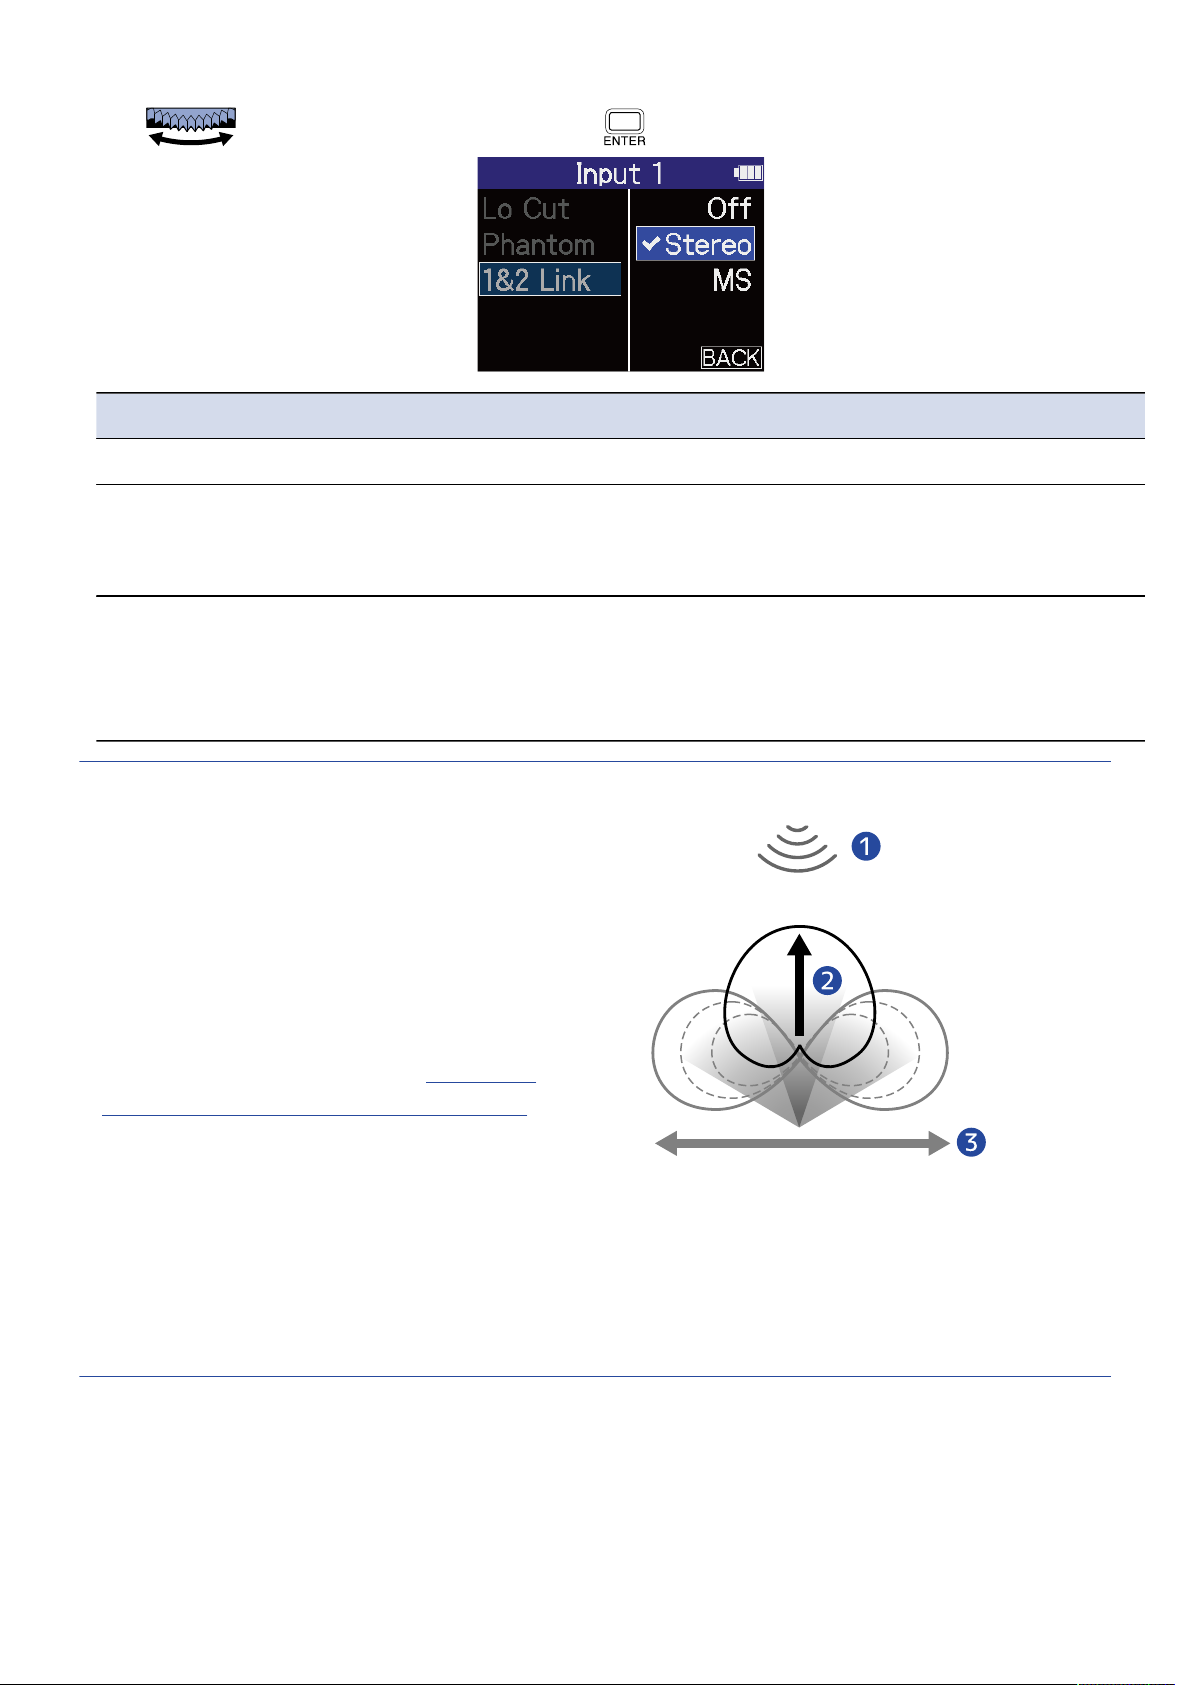
4. Use to select the item to set and press .
Setting Explanation
Off Input signals will be handled as mono audio.
Stereo The input signals from inputs 1 and 2 will be handled as stereo audio.
Input 1 will become the left channel and input 2 will become the right
channel.
MS The input signals from inputs 1 and 2 will be handled as audio
captured in mid-side format.
Input 1 will be used for the mid signal and input 2 will be used for the
side signal.
HINT
Mid-side format is a recording method
comprised of a mid mic and a side mic.
The mid mic captures sound front and
center while the side mic captures sound to
the left and right. These signals are recorded
and converted to stereo. At this time, the
stereo width can be changed by adjusting
the side mic recording level. (→ Setting the
side level when recording mid-side stereo)
Sound source
❶
Mid mic
❷
Side mic
❸
52
Page 53
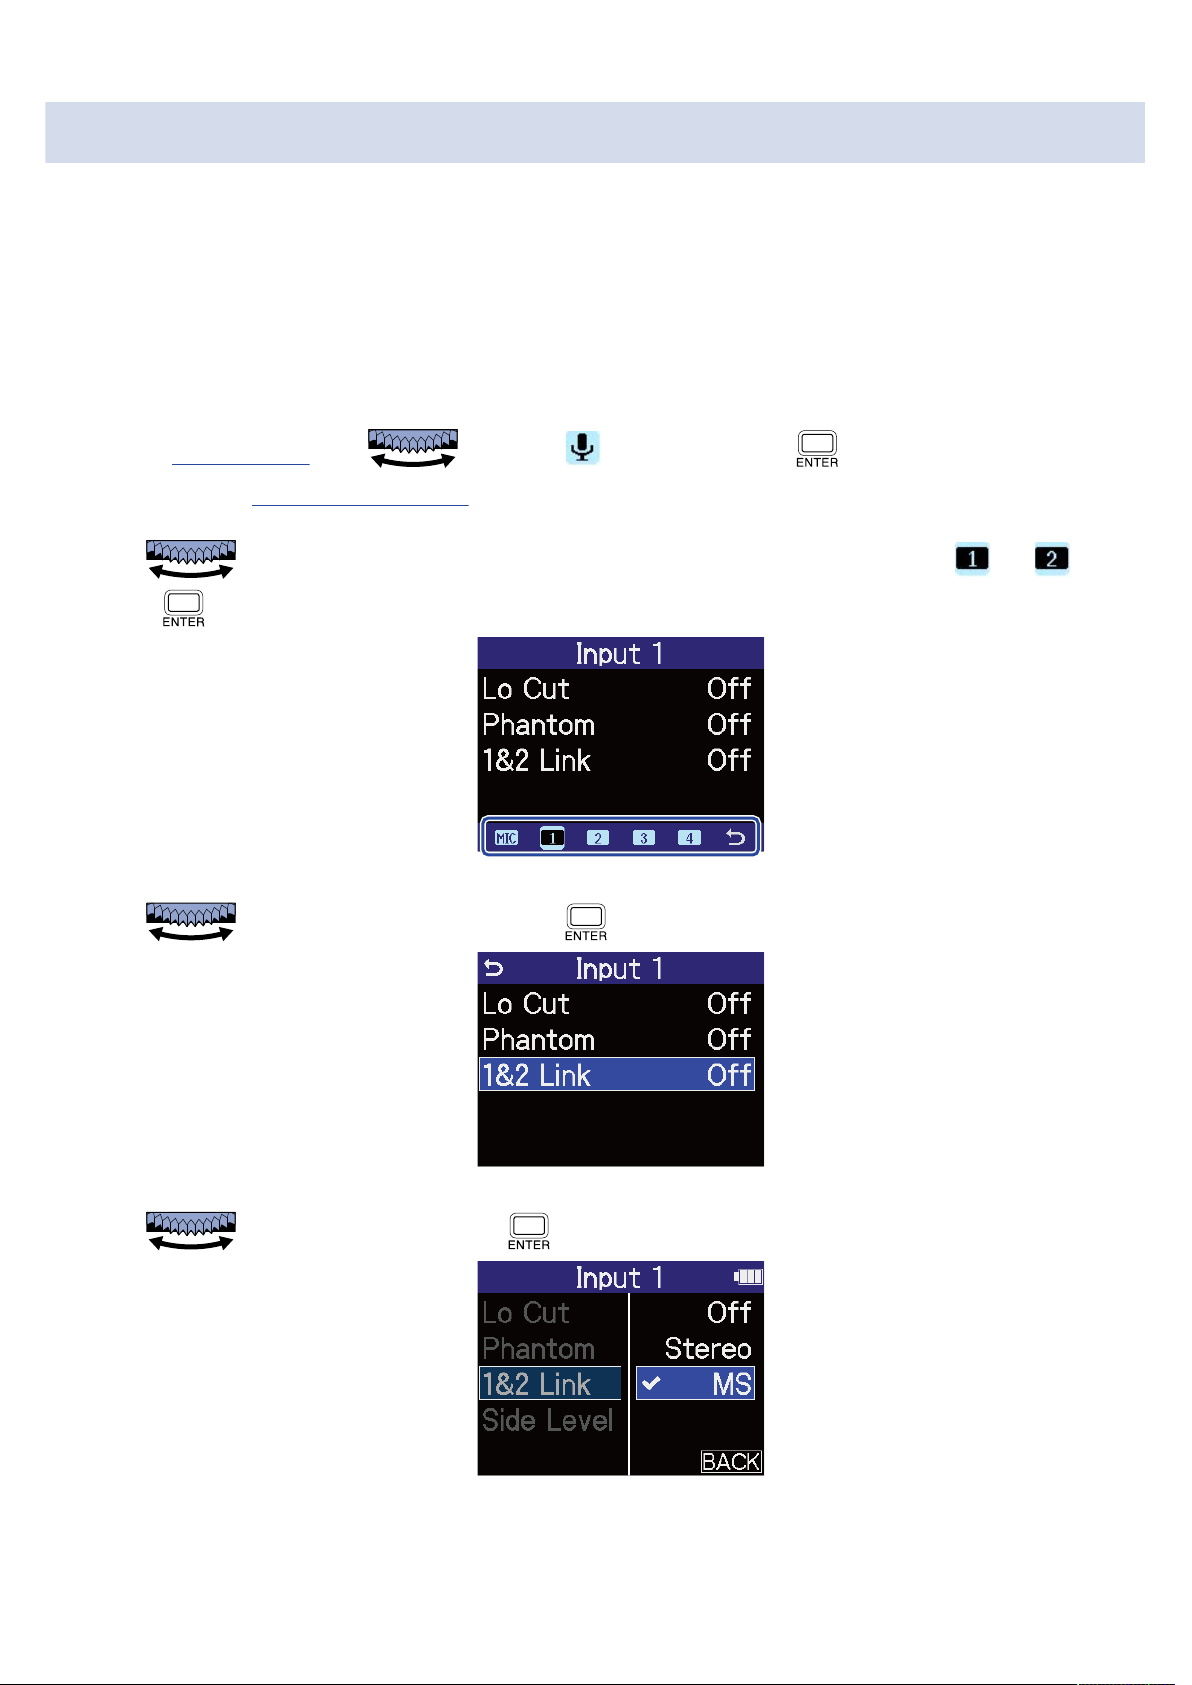
Setting the side level when recording mid-side stereo
The H4essential supports mid-side stereo recording.
The mid mic captures sound front and center while the side mic captures sound to the left and right. These
signals are recorded and converted to stereo. At this time, the stereo width can be adjusted by altering the
side mic recording level.
With the H4essential, the side level of the mid-side input signals can be set before recording, allowing the
stereo width of the input sound to be adjusted.
1. On the Home Screen, use to select (Input) and press .
This opens the Input Settings Screen.
2. Use to select an input that you want to set for mid-side stereo recording ( or ) and
press .
3. Use to select “1&2 Link”, and press .
4. Use to select “MS”, and press .
53
Page 54
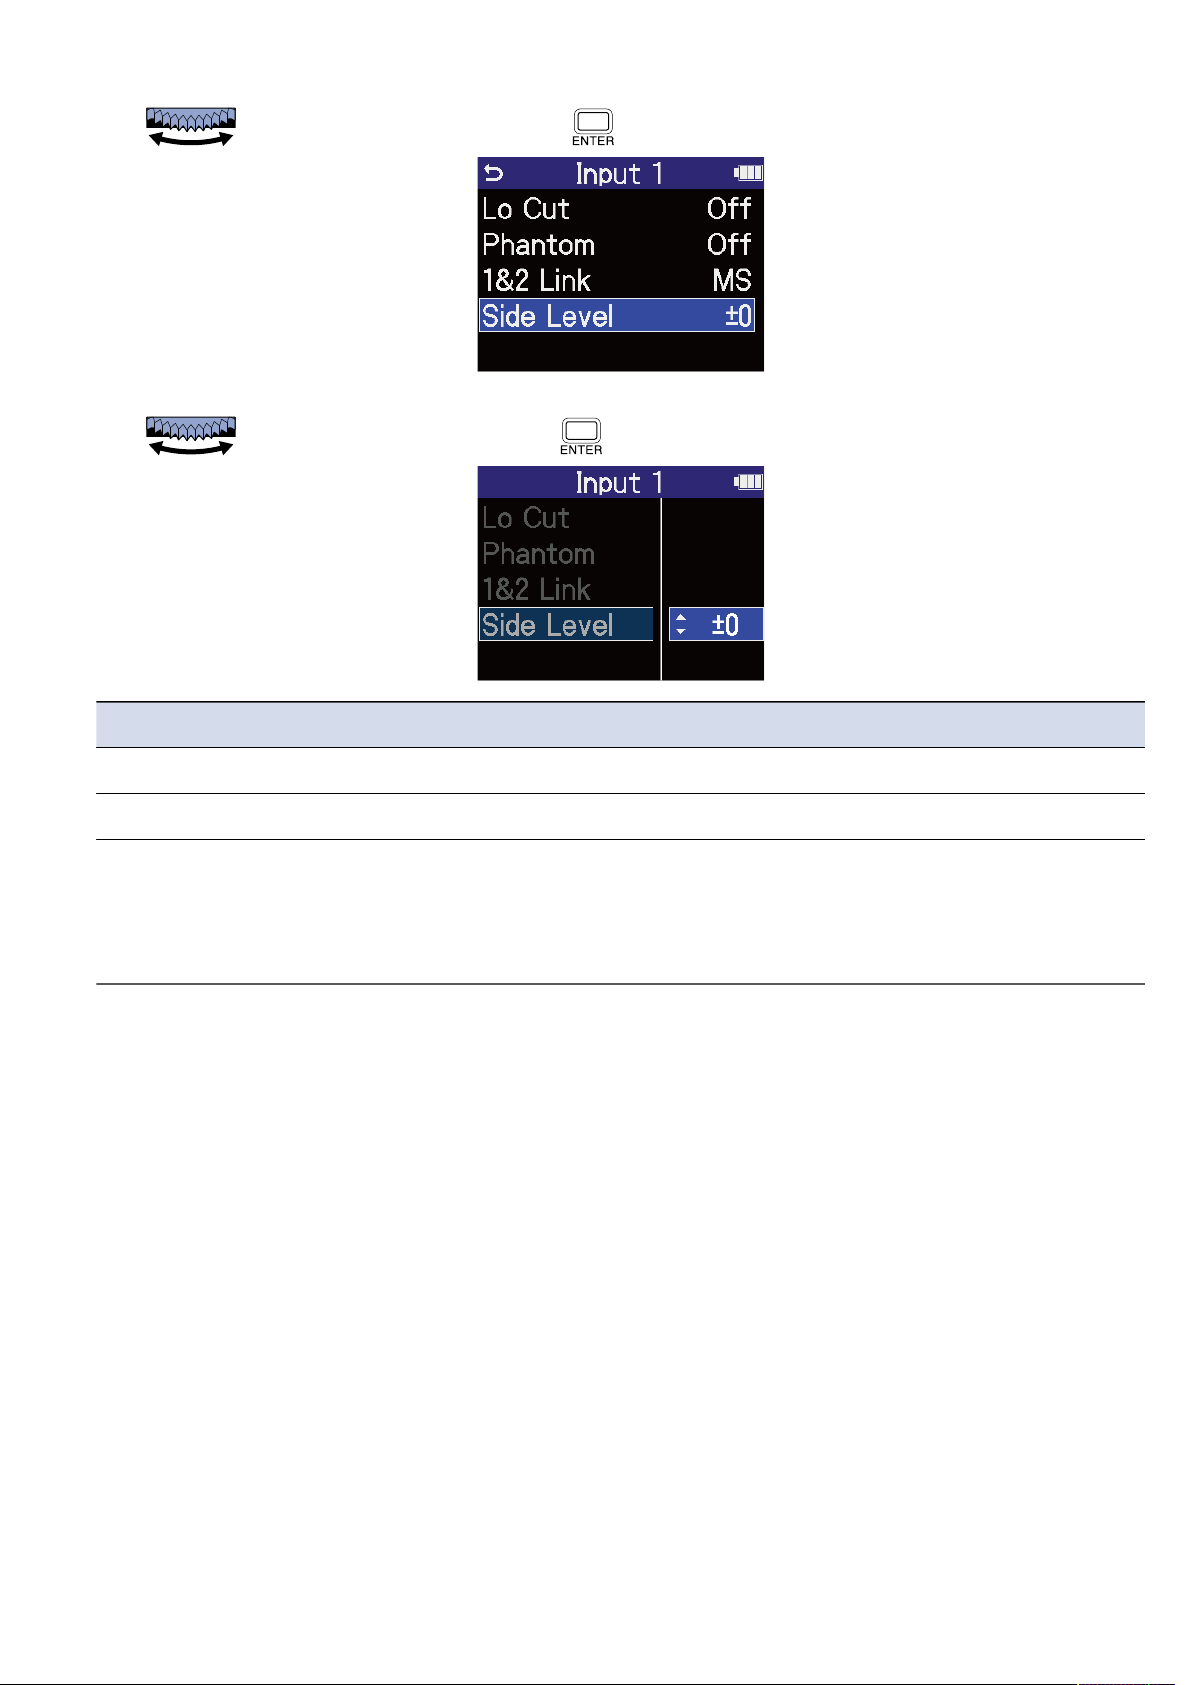
5. Use to select “Side Level” and press .
6. Use to set the side level and press .
Setting Explanation
–24 – +6 As the value increases, so does the stereo width.
Mute The side mic will be muted.
RAW The mid signal will be recorded to the left channel and the side signal
will be recorded to the right channel of the stereo file. This setting
is useful for changing the side level during post-production after
recording.
54
Page 55
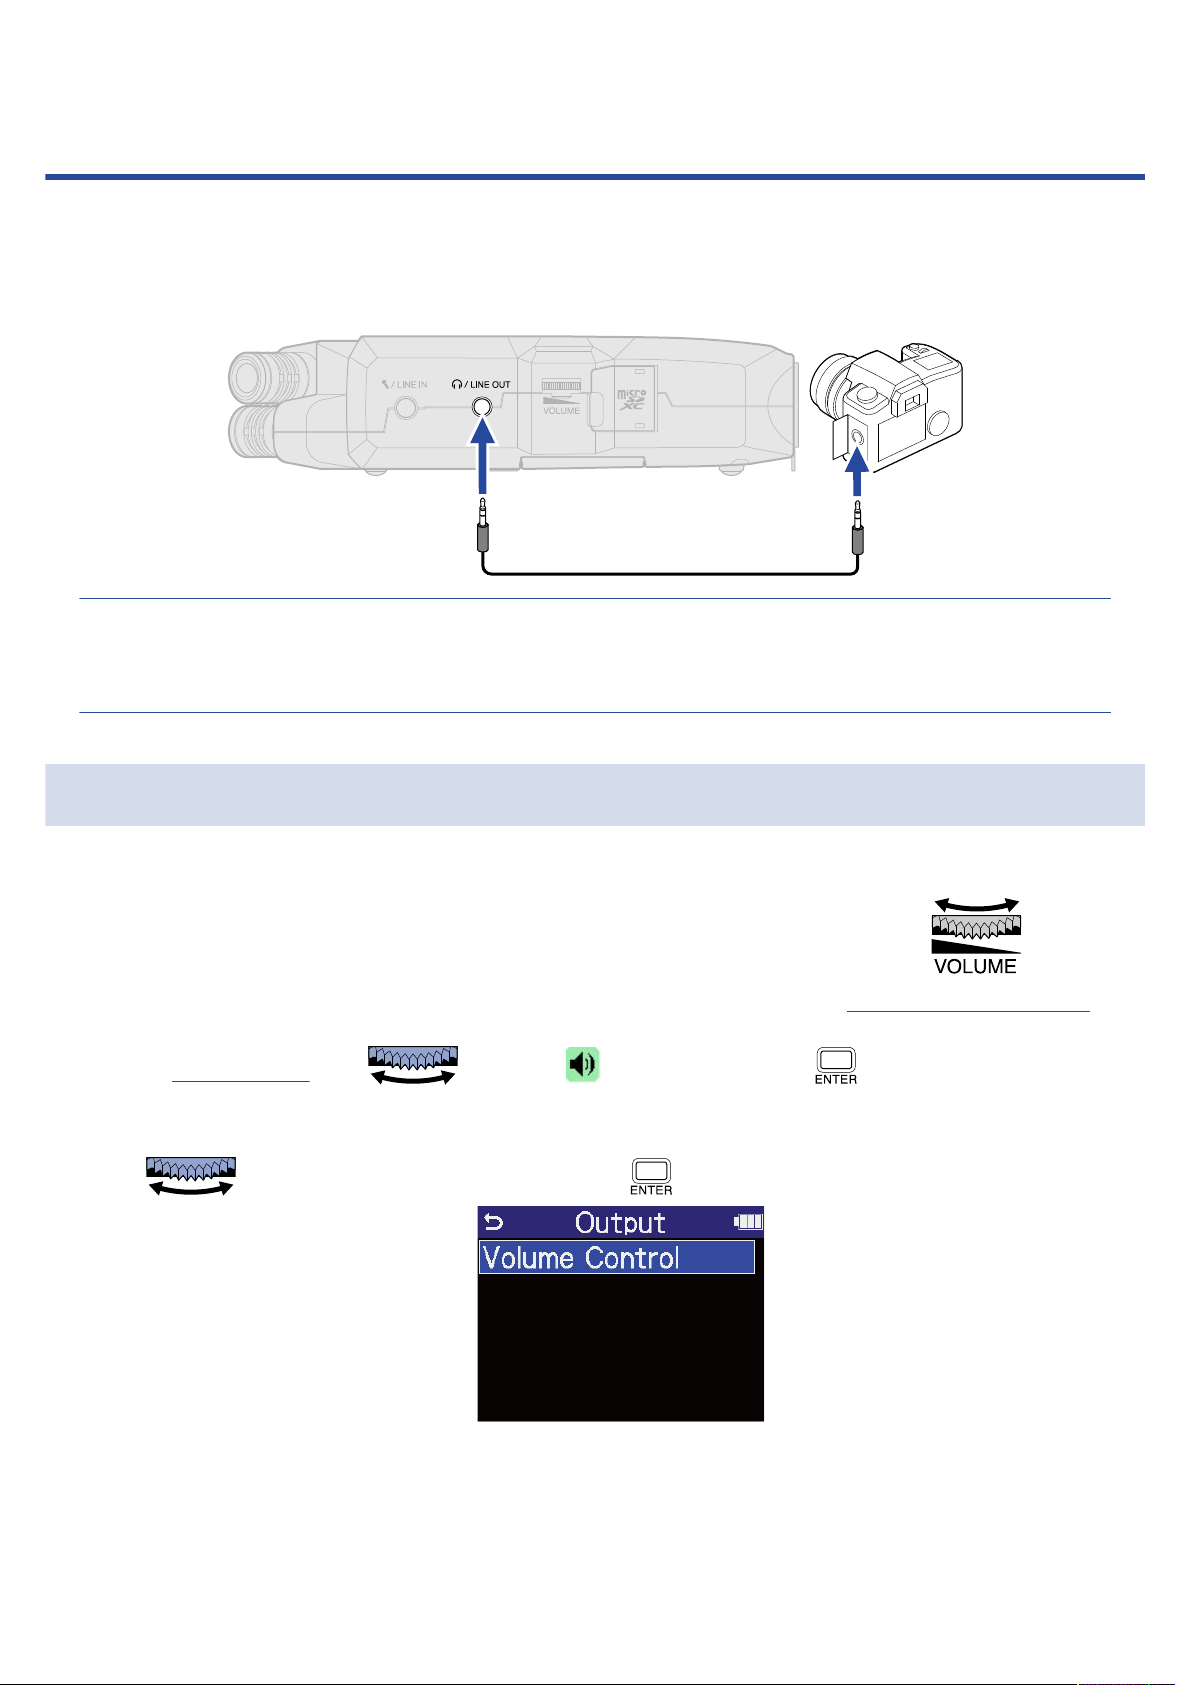
Making output settings
Settings can be made for output to the built-in speaker, headphones and connected devices.
When connecting another device, minimize its input gain and use an audio cable to connect its external mic
jack to the PHONE/LINE OUT jack on the H4essential.
HINT
When output to an external device is unnecessary, disconnecting the cable from the PHONE/LINE OUT jack
can increase the amount of operation time when using batteries.
Changing how the output level is adjusted
The way the output level is adjusted can be changed.
When connecting another device, for example, select “Fixed” if you do not want use of to change
the volume. This will cause sound to be output at the level set as explained in “Adjusting the fixed level”.
1. On the Home Screen, use to select (Output) and press .
This opens the Output Settings Screen.
2. Use to select “Volume Control” and press .
55
Page 56
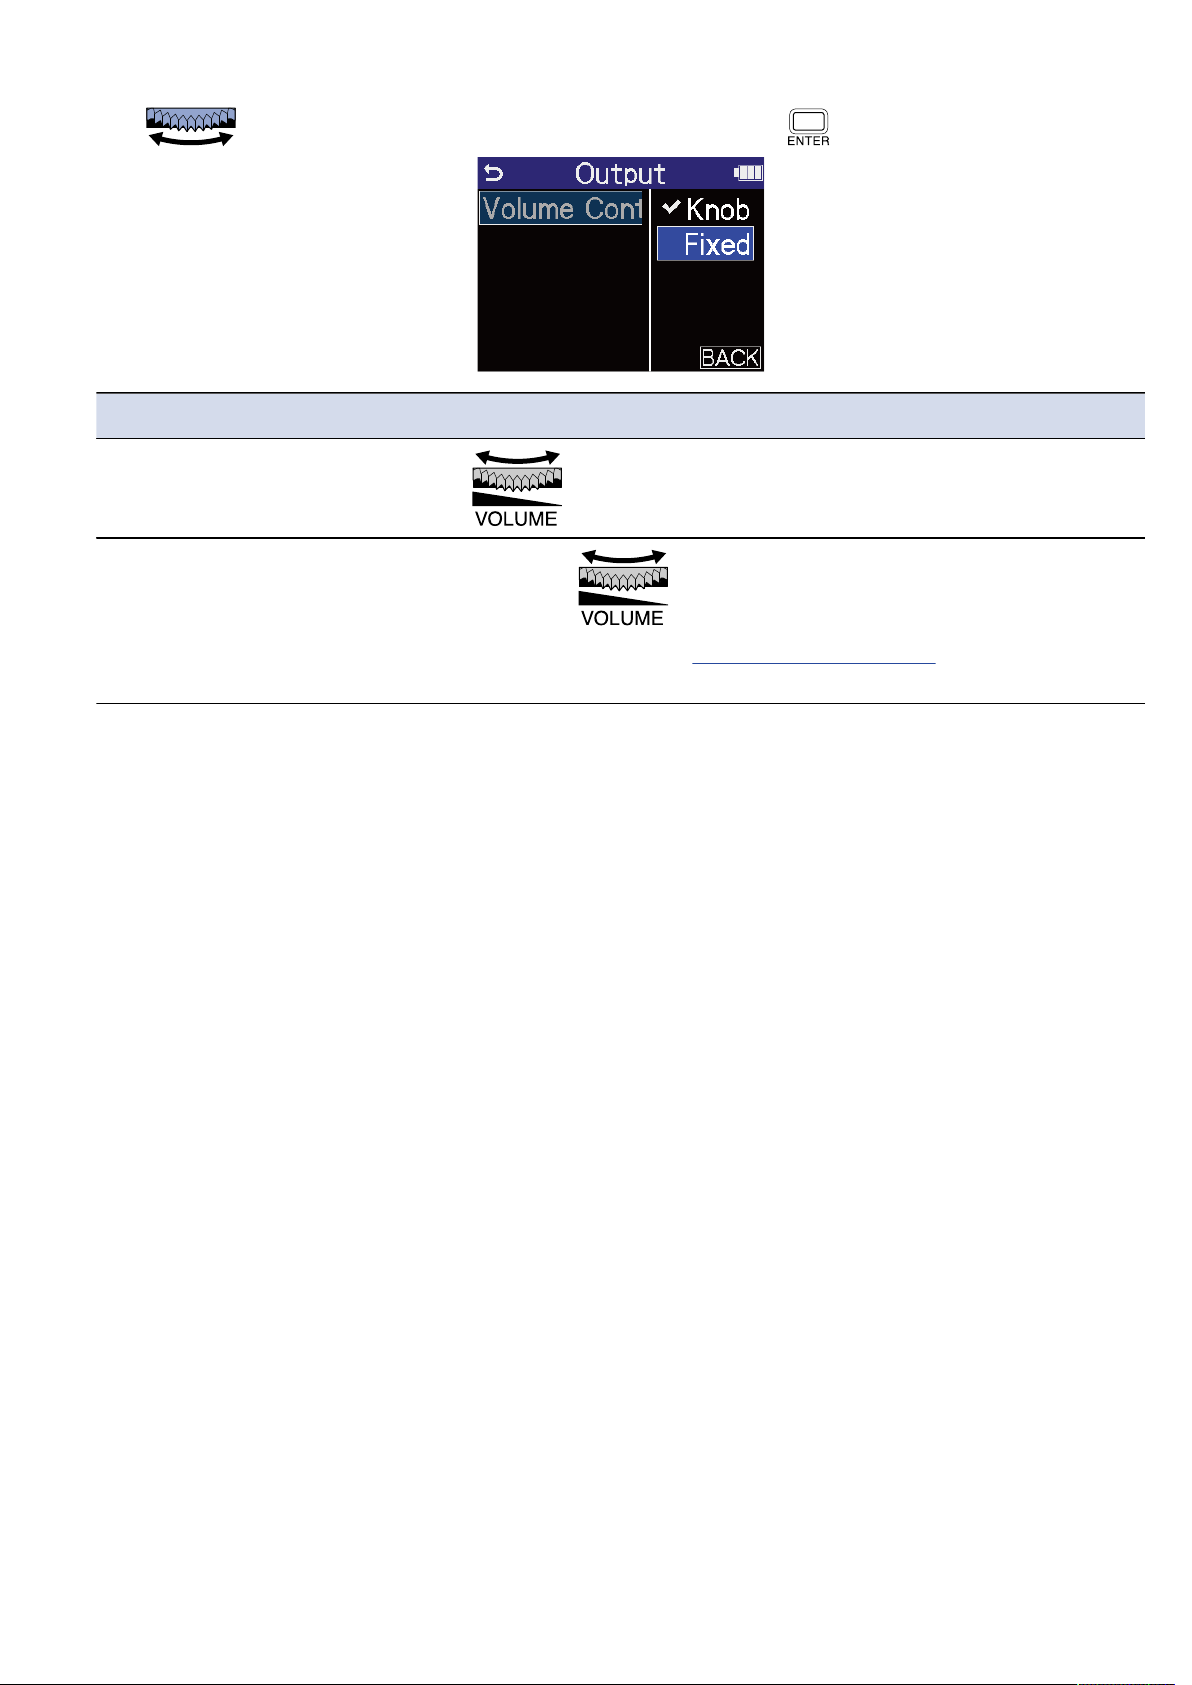
3. Use to select how the output level is adjusted, and press .
Setting Explanation
Knob
Use to adjust the output level.
Fixed
Adjustment of has no effect.
Follow the instructions in “Adjusting the fixed level” to adjust the
level.
56
Page 57
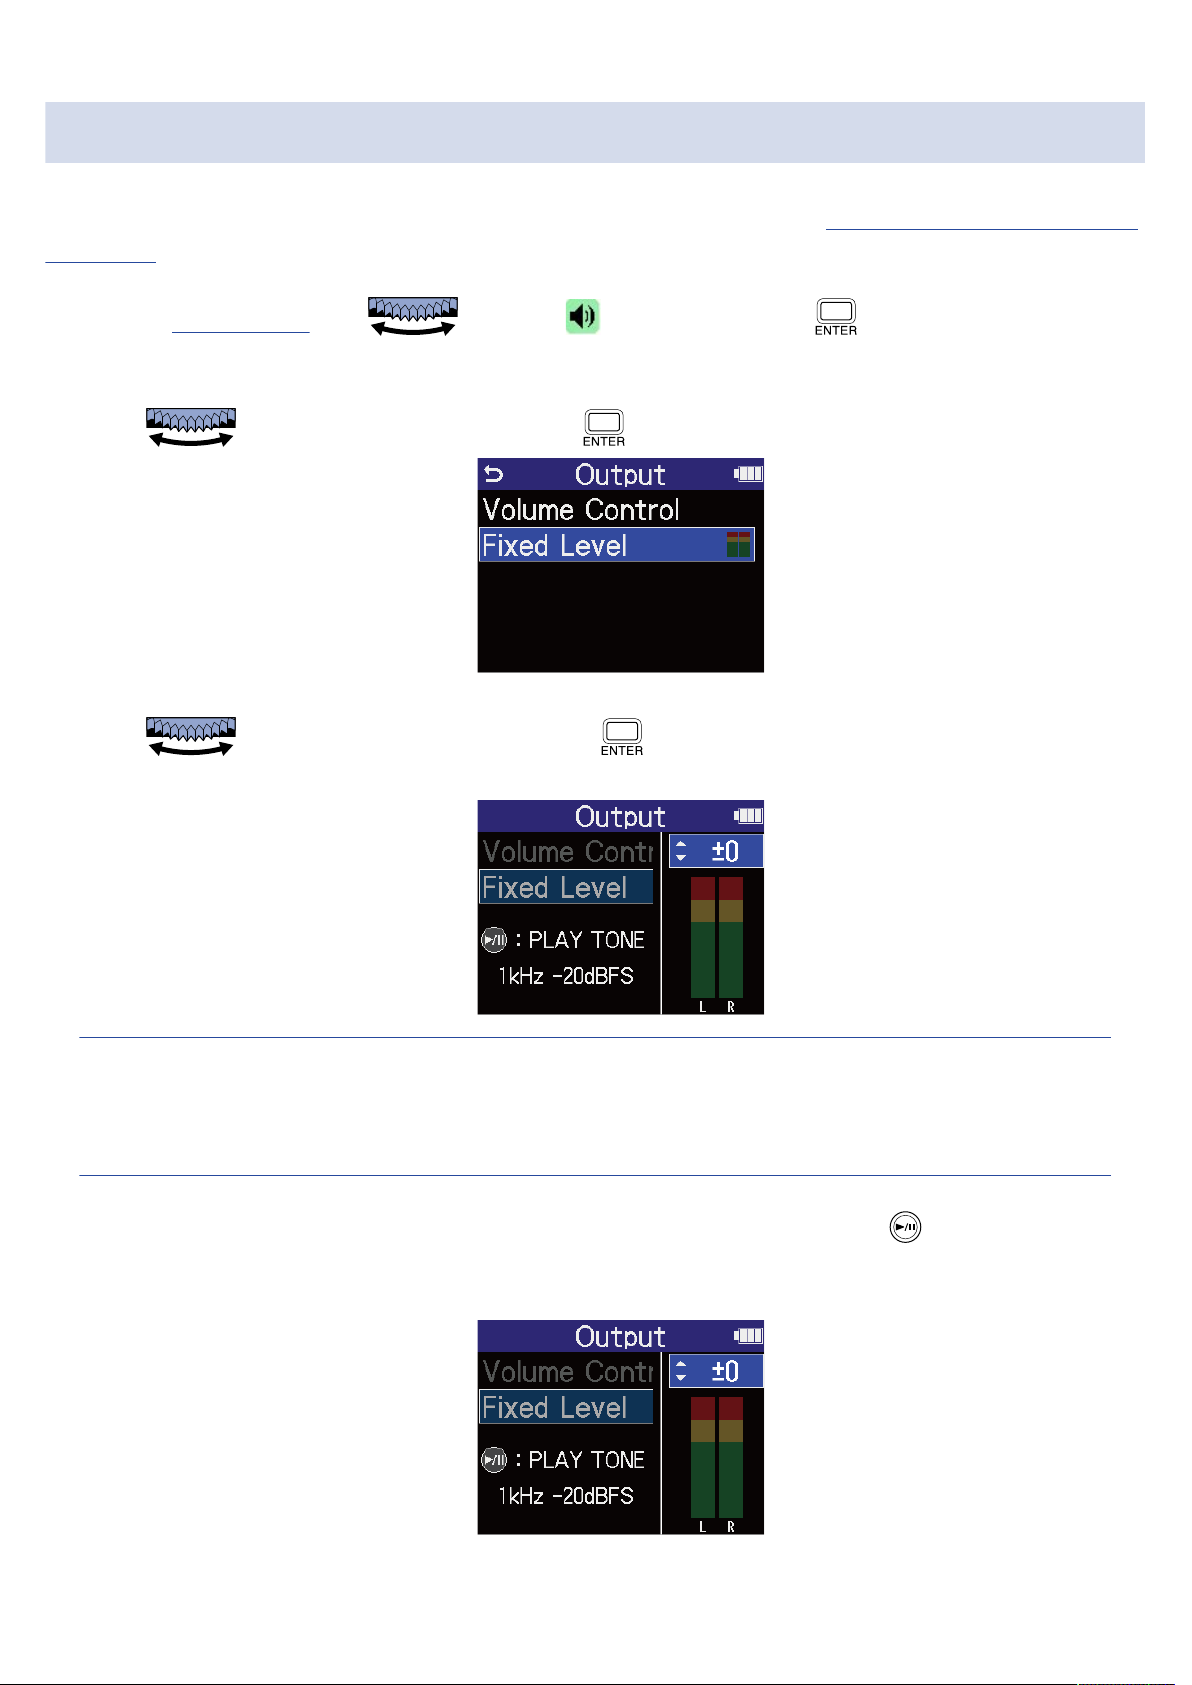
Adjusting the fixed level
The output level when “Volume Control” is set to “Fixed” can be adjusted. (→ Changing how the output level
is adjusted)
1. On the Home Screen, use to select (Output) and press .
This opens the Output Settings Screen.
2. Use to select “Fixed Level” and press .
3. Use to adjust the fixed level and press .
The output level meters can be checked while adjusting.
HINT
• This can be set to “Mute” or from –40 to +40.
• Selecting “Mute” silences the output from the built-in speaker and PHONE/LINE OUT jack.
4. To output a test tone from the H4essential and adjust the output level, press .
While checking the audio level meter of the connected device, adjust the input gain of that device until
the audio signal level is about −20 dB.
57
Page 58

HINT
The test tone is a 1kHz sine wave at –20 dBFS.
5. After adjusting the input gain of the connected device, press .
This stops test tone output.
NOTE
• See the manual of the connected device for information about its operation.
• If the automatic gain control function on the other device is on, turn it off.
• The level adjusted here does not affect the recorded audio or the audio level output from the USB port.
58
Page 59
Recording
When recording with the H4essential, every selected track is recorded separately. In addition, all signals are
mixed and simultaneously recorded as a stereo file.
The stereo file is recorded with the balance of signals set on the Mixer Screen. (→ Adjusting the monitoring
balance of input sounds)
NOTE
• Mixed stereo files will only be created when the sample rate is 44.1 kHz or 48 kHz. Mixed stereo files will
not be created when the sample rate is 96 kHz. To create a mixed 96kHz stereo file, use “2Mix” to export
it (Changing the format and exporting files).
• For details about recorded files, see “H4essential folder and file structure”.
Monitoring input sounds
Use headphones, for example, to monitor input sounds and adjust the volume.
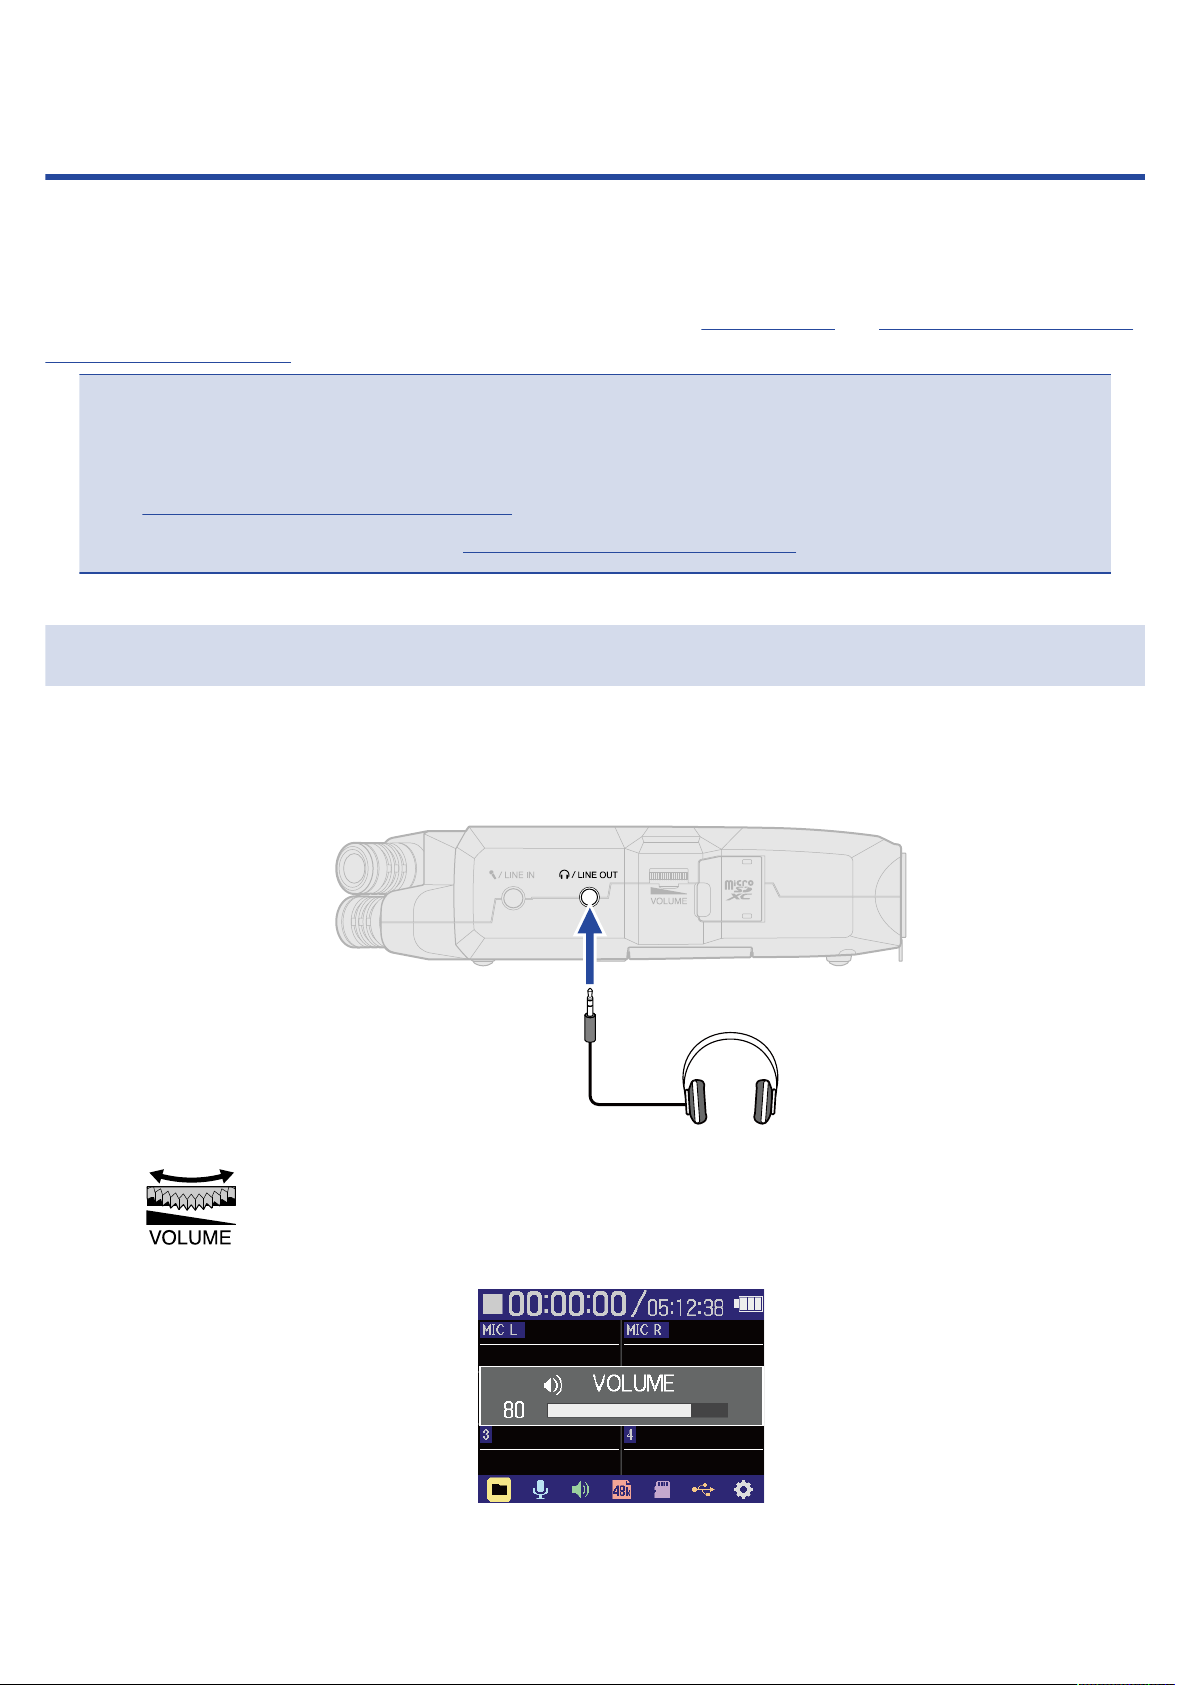
1. Connect headphones, for example, to the PHONE/LINE OUT jack.
2. Use to adjust the volume for the headphones or other connected device.
The volume is shown on the display while the volume is being adjusted.
59
Page 60

NOTE
• The volume output from the PHONE/LINE OUT jack is also affected by volume adjustments made on
the Mixer Screen. Adjust the headphone volume after adjusting the input mix levels. (→ Adjusting the
monitoring balance of input sounds)
• The built-in speaker cannot be used for monitoring while recording.
• When “Volume Control” is set to “Fixed”, cannot be used to adjust the volume. To use
for volume adjustment, set “Volume Control” to “Knob”. (→ Making output settings)
HINT
• When monitoring with headphones is unnecessary, disconnecting headphones from the PHONE/LINE
OUT jack can increase the amount of operation time when using batteries.
• The volume of each input can also be adjusted separately. (→ Adjusting the monitoring balance of input
sounds)
60
Page 61
Adjusting the monitoring balance of input sounds
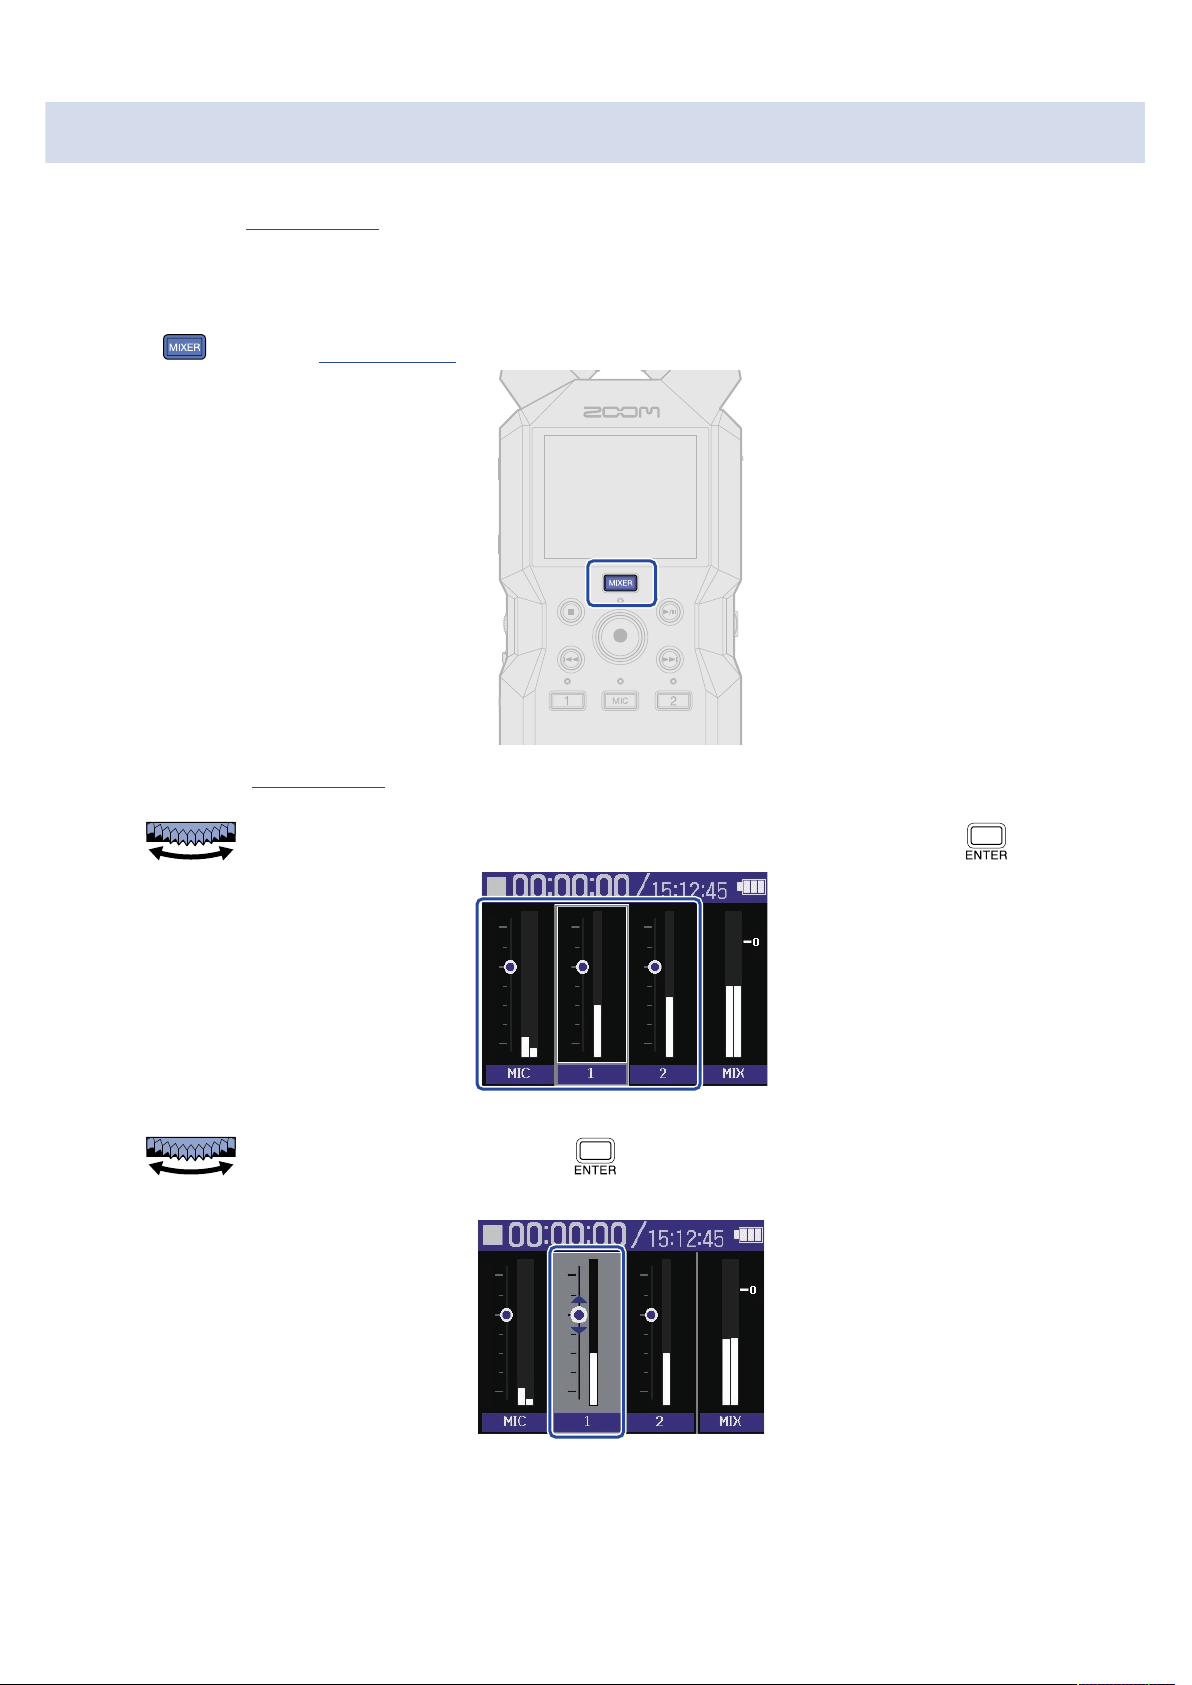
On the H4essential Mixer Screen, the monitoring balance of all inputs can be adjusted. Moreover, the
volumes of the input sounds and their stereo mix signal can be checked with the level meters.
This is a useful function for monitoring multiple input sounds with different volumes.
1. Press when the Home Screen is open.
This opens the Mixer Screen.
2. Use to select the input for which you want to adjust the volume and press .
3. Use to adjust the volume and press .
This confirms the adjusted volume.
61
Page 62
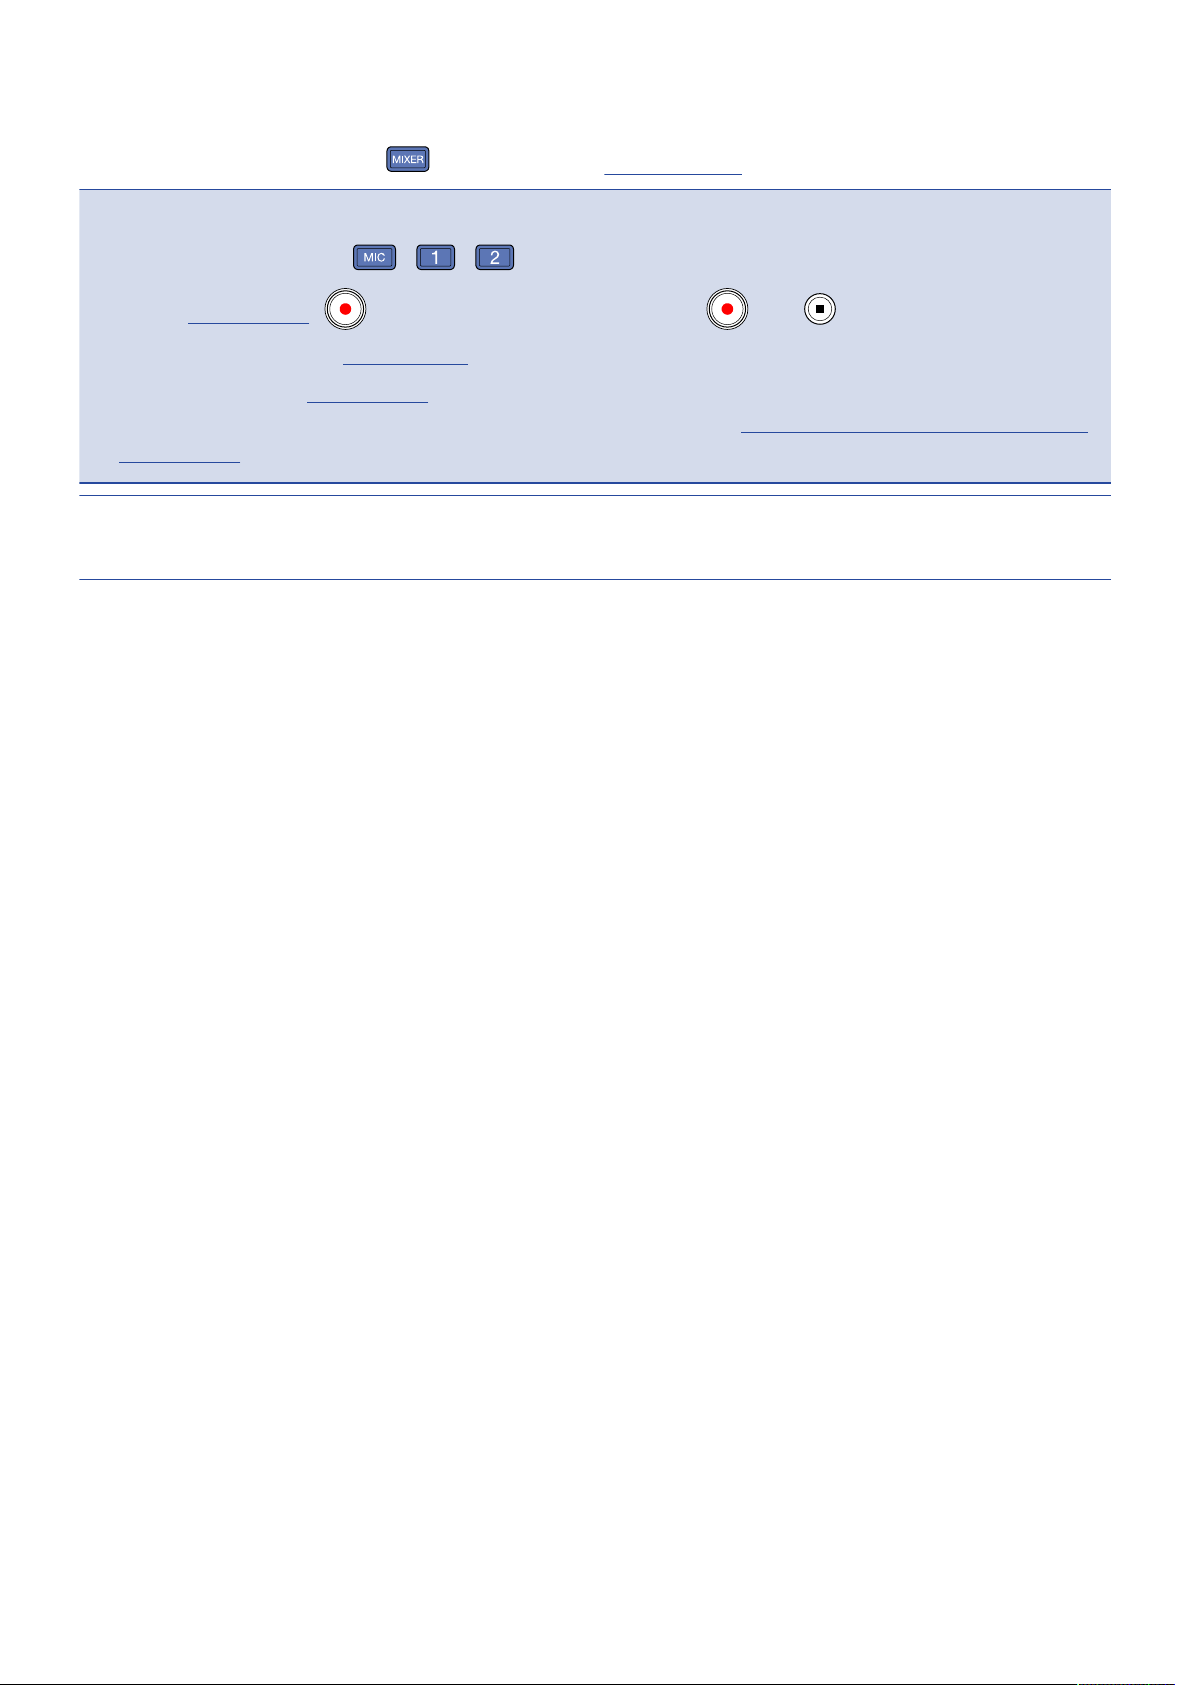
4. Repeat steps 2–3 to adjust the overall volume balance.
When done adjusting press to return to the Home Screen.
NOTE
• The input track buttons ( , , ) can be pressed to turn on/off their inputs.
• On the Mixer Screen, can be used to start recording and and can be used to stop it in
the same way as on the Home Screen.
• Adjustments on the Mixer Screen affect the stereo file created with recording. Moreover, these
adjustments can also be applied to the recording of each input. (→ Recording with levels adjusted on the
Mixer Screen)
HINT
Each input can be set to “Mute” or from –80 to +40.
62
Page 63
Making recording settings
Setting the sample rate
The sample rate used to record files can be set.
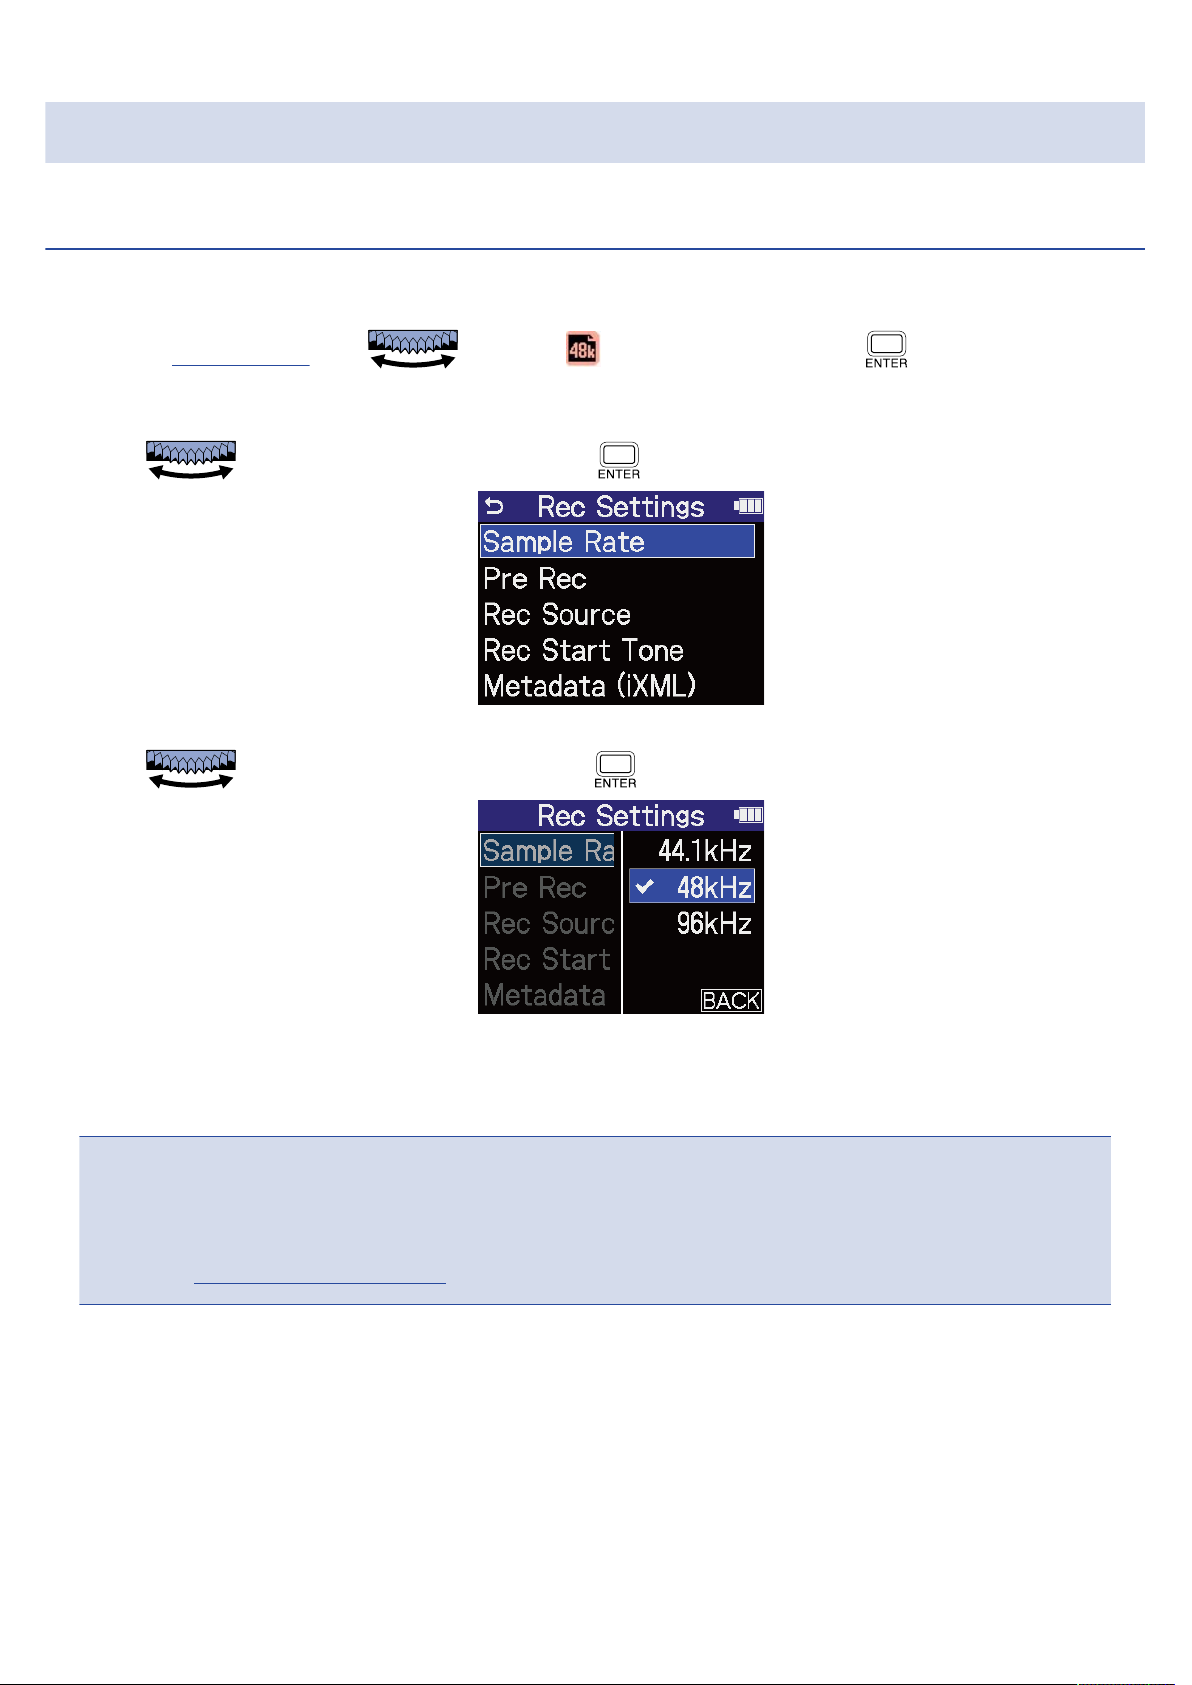
1. On the Home Screen, use to select (Rec Settings) and press .
This opens the Rec Settings Screen.
2. Use to select “Sample Rate” and press to confirm.
3. Use to select a sample rate and press to confirm.
You can select from the following sample rates.
44.1 kHz, 48 kHz, 96 kHz
NOTE
• The only bit depth that can be used for recording is 32-bit float.
• To use the H4essential to record while using it as an audio interface, set the sample rate to 44.1 kHz or 48
kHz. (→ Using as an audio interface)
63
Page 64
Capturing audio before recording starts (pre-recording)
The input signal is always buffered for a set amount of time, so it can be captured (pre-recorded) for up to 2
seconds before the time when is operated to start recording.
This is useful when is operated late, for example.
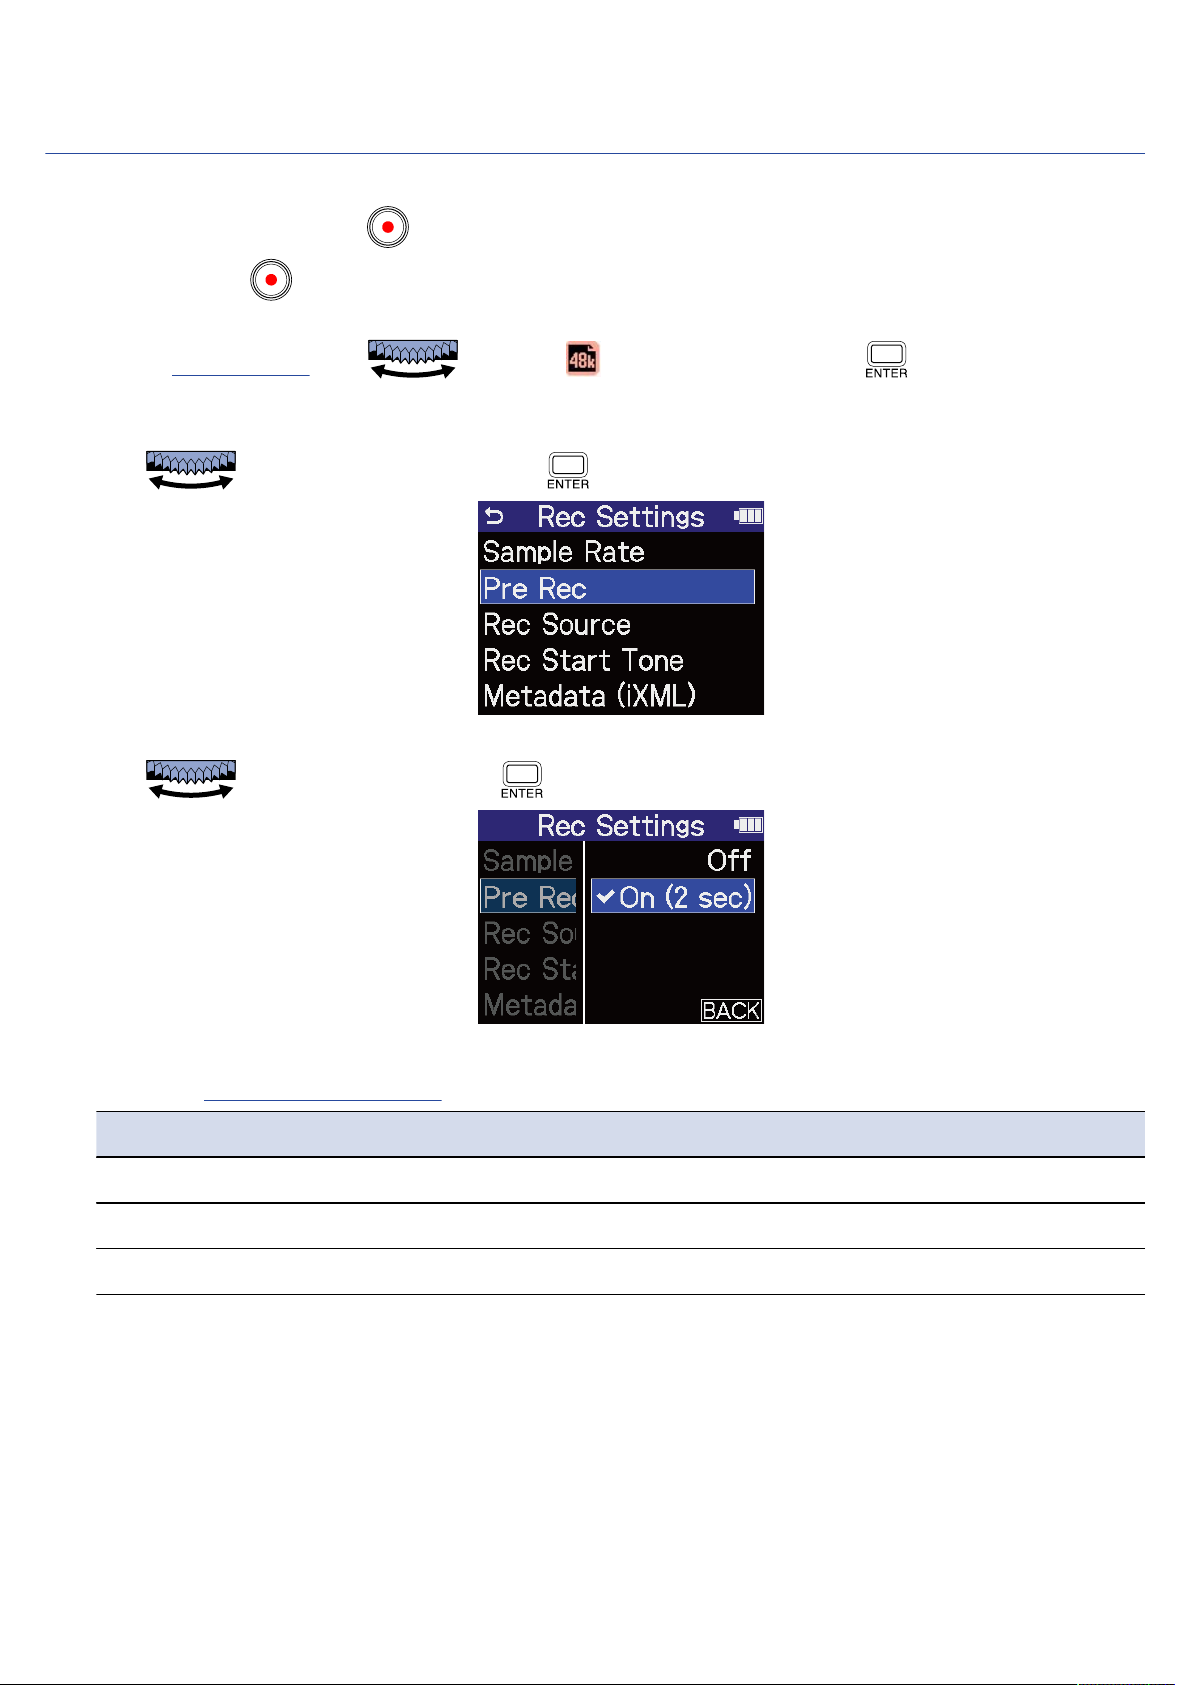
1. On the Home Screen, use to select (Rec Settings) and press .
This opens the Rec Settings Screen.
2. Use to select “Pre Rec” and press to confirm.
3. Use to select “On” and press to confirm.
The amount of time that can be pre-recorded when this is set to “On” depends on the sample rate
setting (→ Setting the sample rate).
Sample Rate Pre-recording time
44.1 kHz 2 seconds
48 kHz 2 seconds
96 kHz 1 second
64
Page 65
Recording with levels adjusted on the Mixer Screen
When recording, the levels of the sounds as input or the levels as adjusted on the Mixer Screen can be
used.
1. On the Home Screen, use to select (Rec Settings) and press .
This opens the Rec Settings Screen.
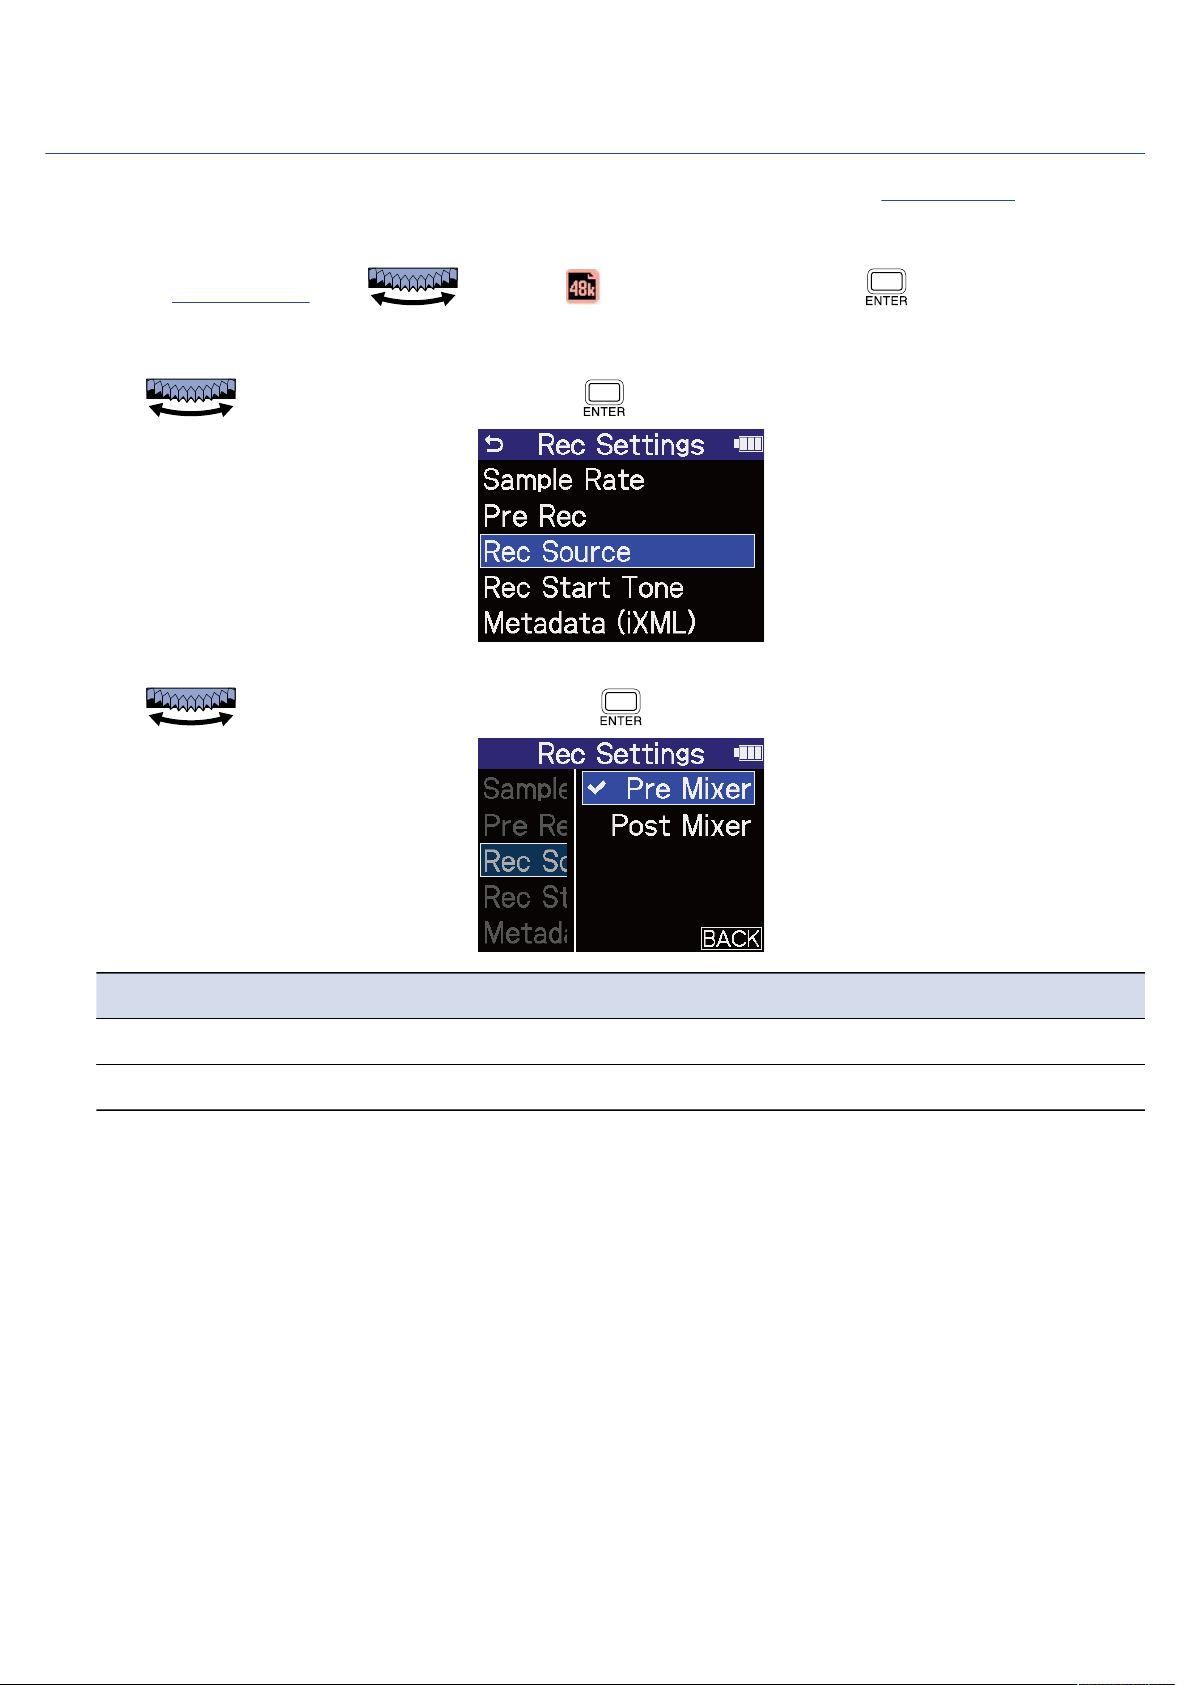
2. Use to select “Rec Source” and press to confirm.
3. Use to select a setting item, and press to confirm.
Setting Explanation
Pre Mixer Input sound is recorded as is.
Post Mixer Recording uses the levels adjusted on the Mixer Screen.
65
Page 66
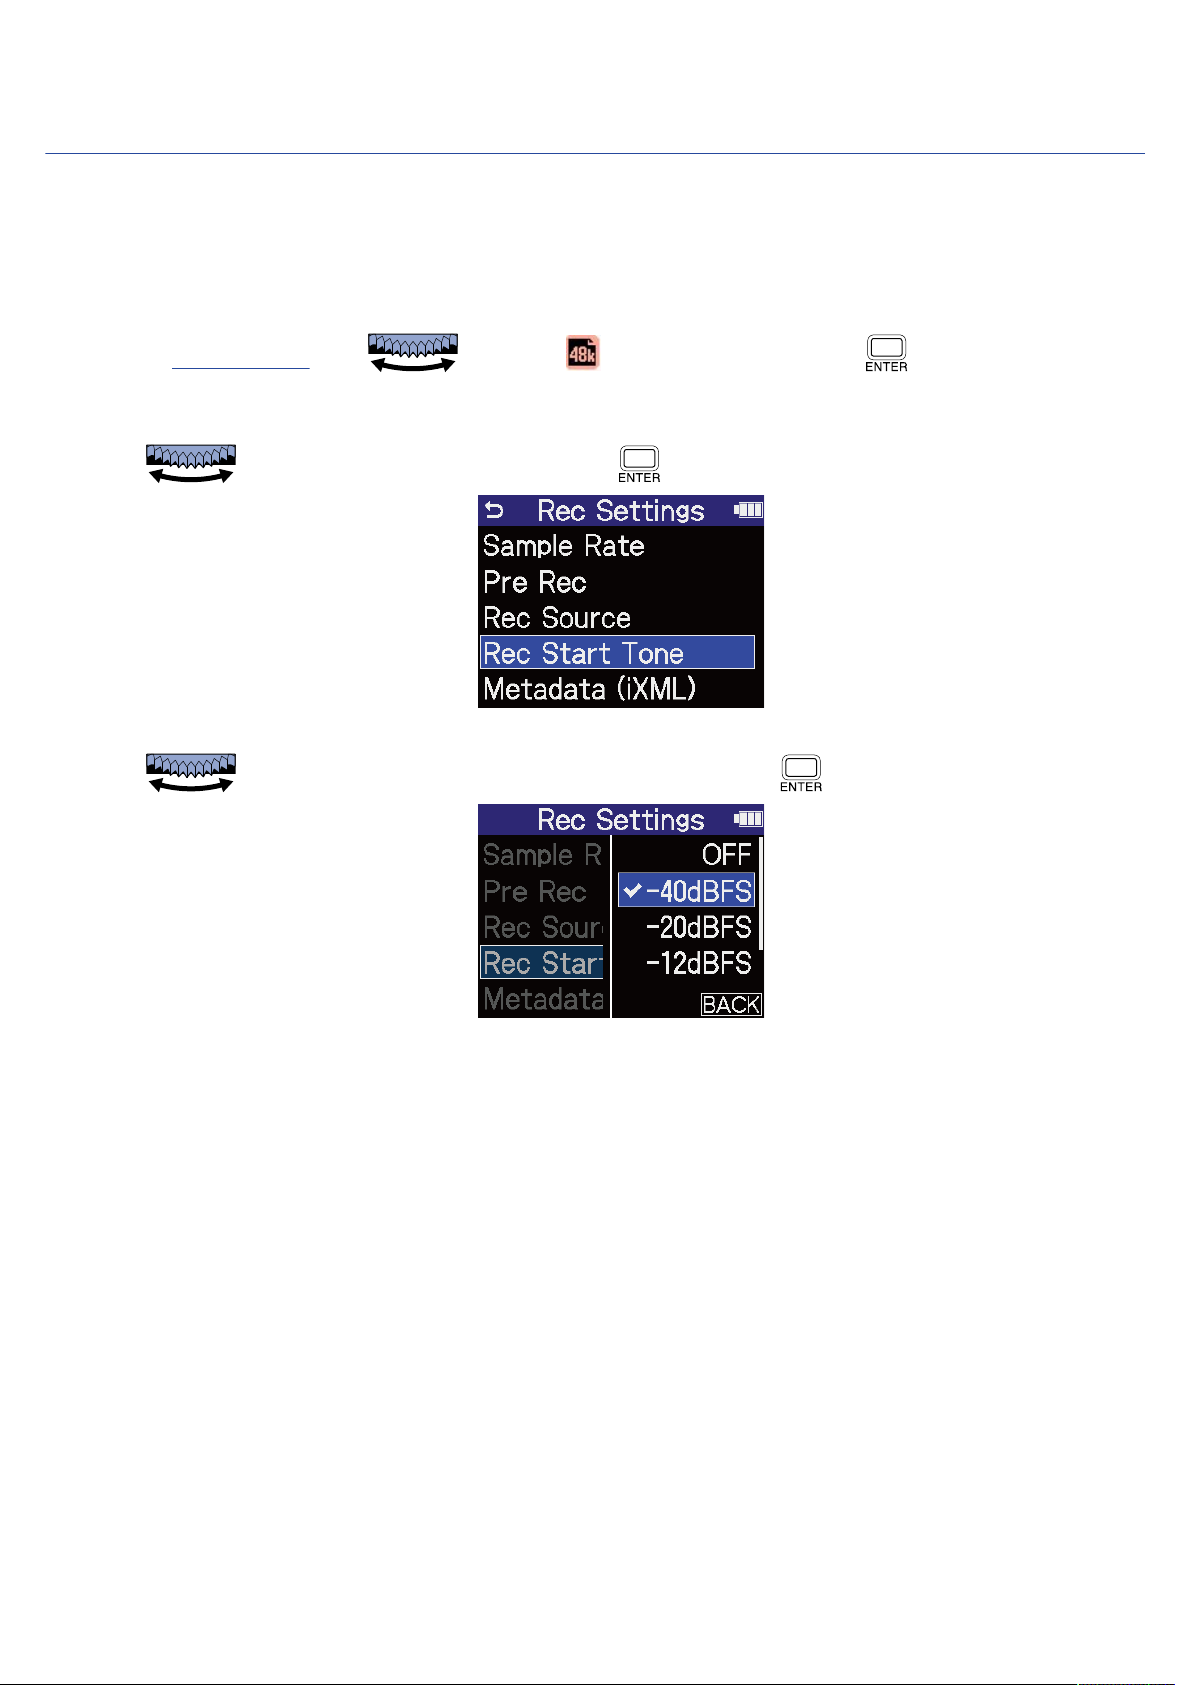
Enabling the recording start tone
Half-second tone signals (recording start tones) can be output from the PHONE/LINE OUT jack when
recording is started.
Since recording start tones are also written to recording files, when recording audio for video with the
H4essential, sending its output signal to the camera input can make synchronizing audio and video easier.
1. On the Home Screen, use to select (Rec Settings) and press .
This opens the Rec Settings Screen.
2. Use to select “Rec Start Tone” and press to confirm.
3. Use to select the recording start tone volume and press to confirm.
The following volumes can be selected.
OFF, –40 dBFS, –20 dBFS, –12 dBFS, –6 dBFS
No recording start tone will be played if “OFF” is selected.
66
Page 67
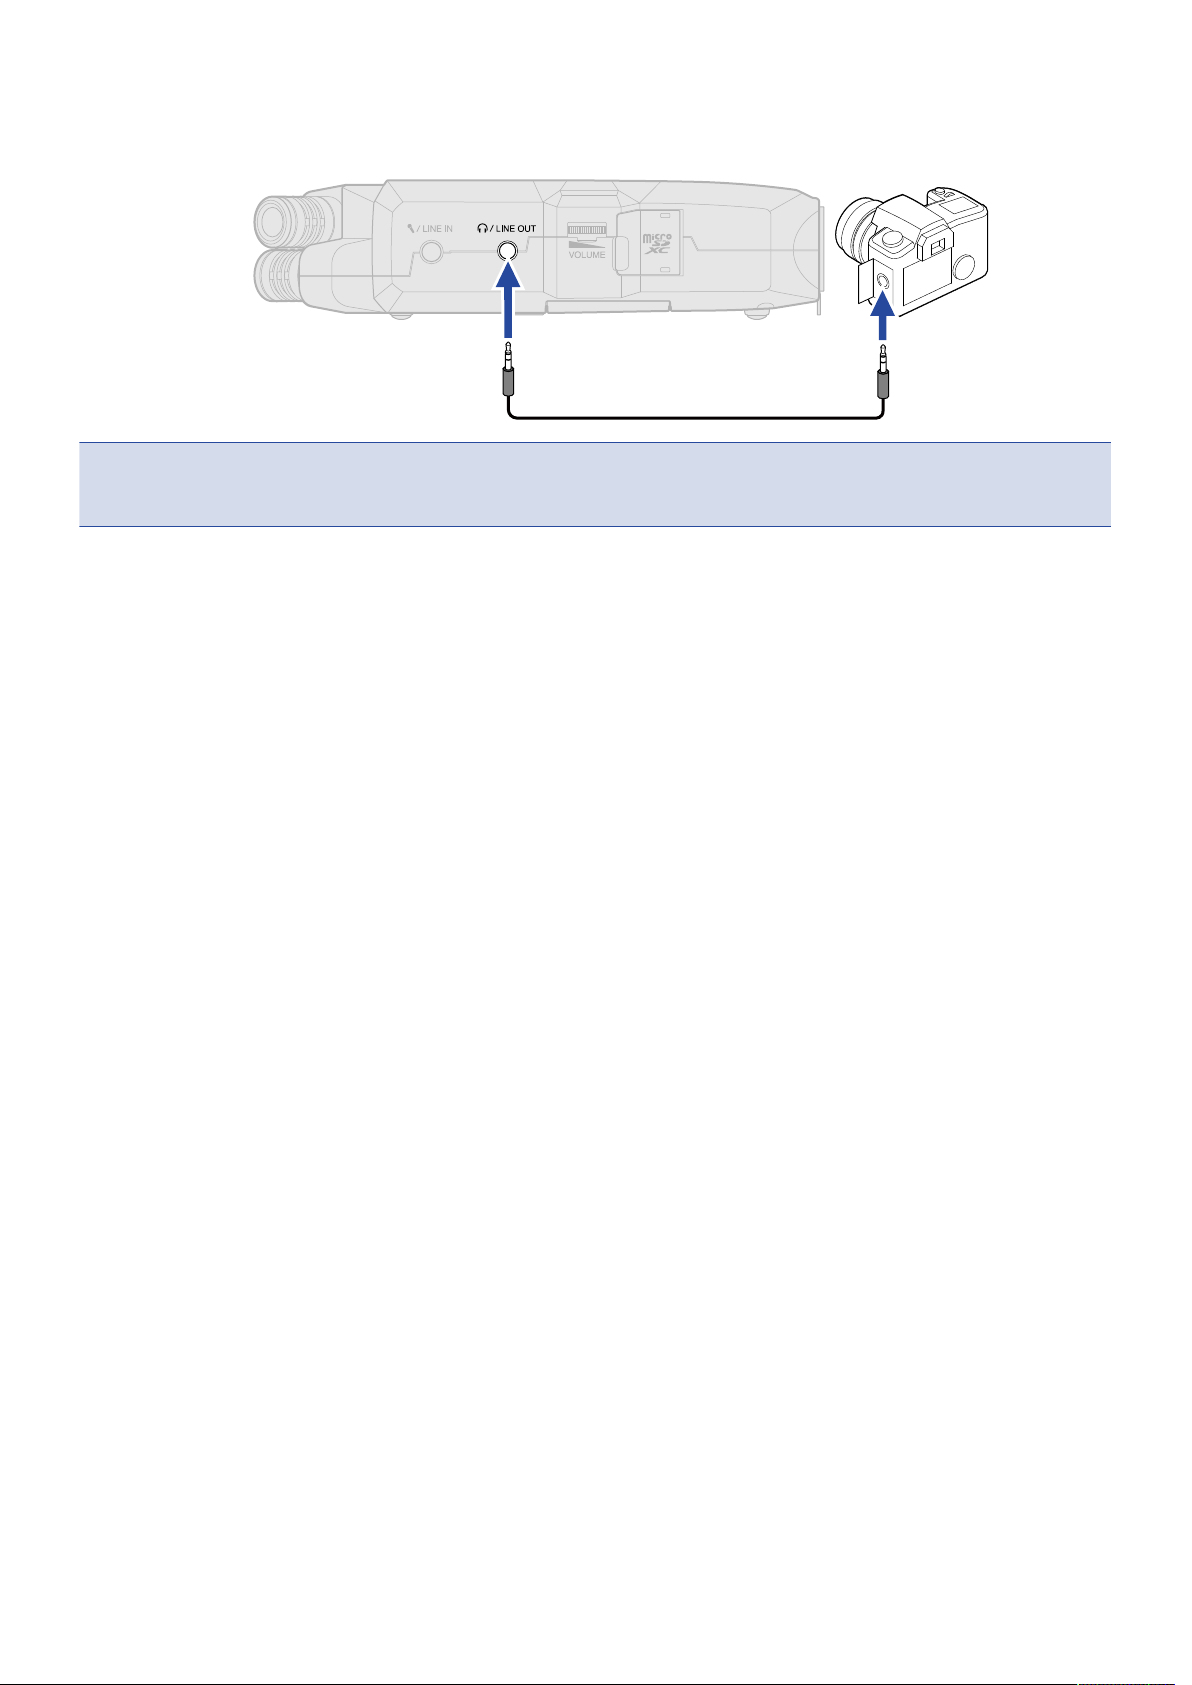
4. Use a stereo mini jack cable to connect the input jack of the camera to the H4essential PHONE/LINE
OUT jack.
NOTE
Be careful with the volume if you are monitoring the input sound with headphones, for example.
67
Page 68
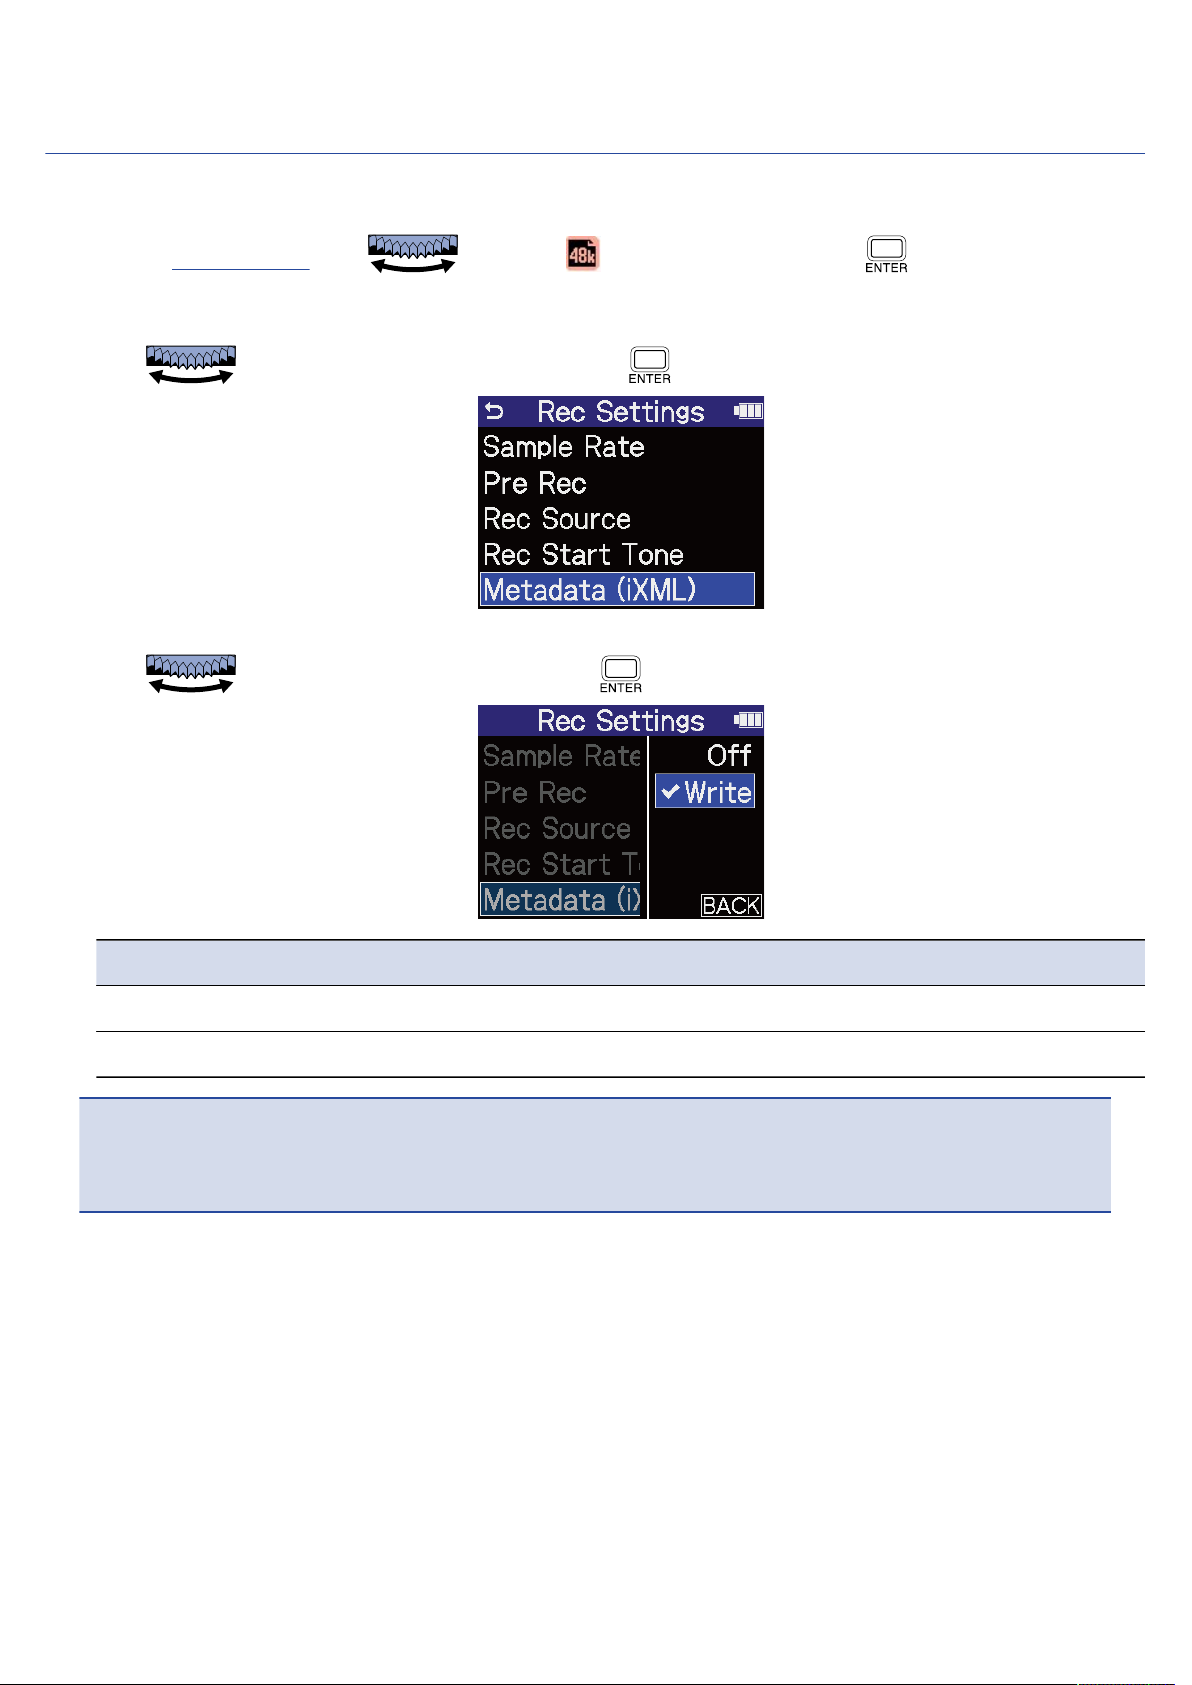
Writing metadata (iXML chunks) to recording files
Various related information (metadata) stored in iXML chunks can be written to recorded files.
1. On the Home Screen, use to select (Rec Settings) and press .
This opens the Rec Settings Screen.
2. Use to select “Metadata (iXML) and press to confirm.
3. Use to select a setting item, and press to confirm.
Setting Explanation
Off Metadata (iXML chunks) will not be added to recording files.
Write Metadata (iXML chunks) will be added to recording files.
NOTE
Some applications might not be compatible with files that have data embedded in them. If problems occur
with files when using an application, turning off metadata writing might resolve them.
68
Page 69
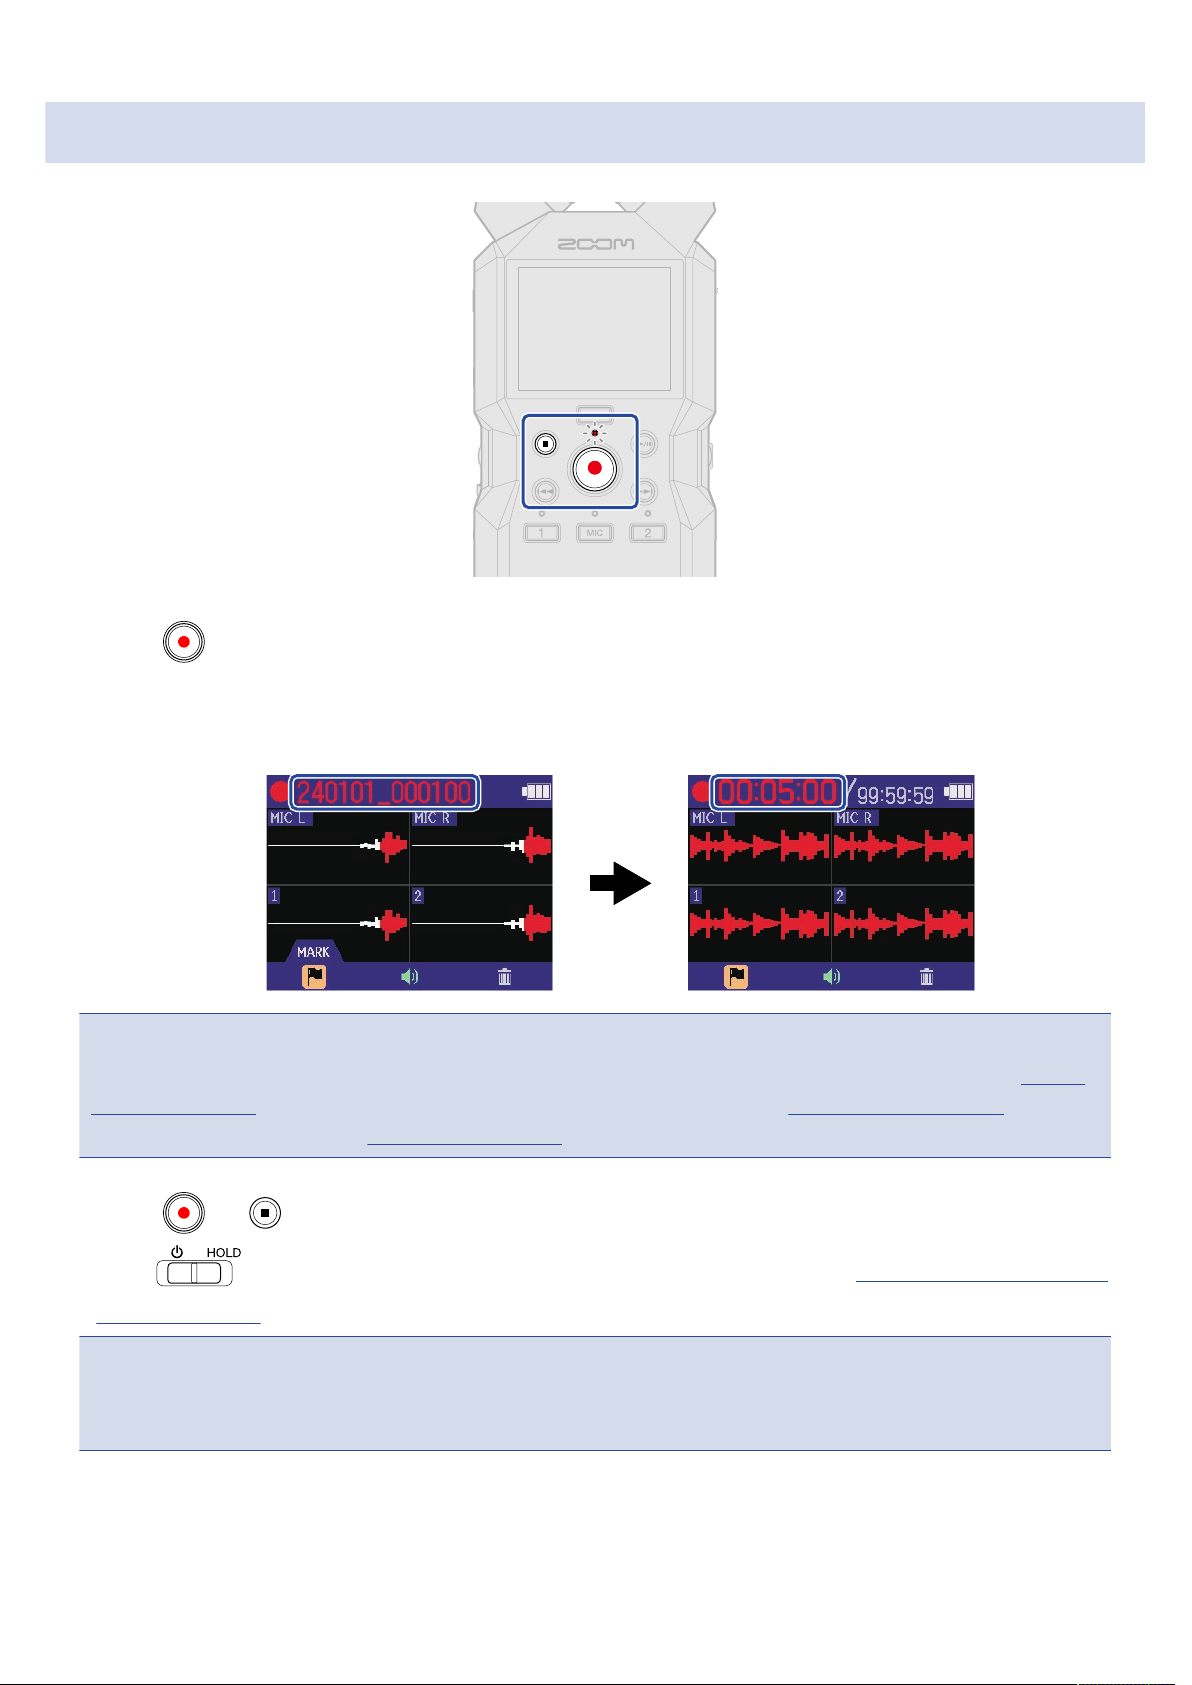
Recording
1. Press when the Home Screen is open.
The REC indicator will light red, the name of the recording file will appear on the display and recording
will start.
This shows the elapsed recording time when recording.
NOTE
The file name will be the date followed by the hour, minute and second using the set date and time (Setting
the date and time). The date will be shown using numbers in the set order (Setting the date format). For
details about file names, see “Recording file names”.
2. Press or to stop.
Slide toward HOLD to prevent misoperation when recording. (→ Preventing misoperation
(HOLD function))
NOTE
If the file size exceeds 2 GB during recording, a new file will be created automatically and recording will
continue without pause. No gap in sound will occur between the two files when this happens.
69
Page 70

HINT
• Marks can be added while recording by using to select (MARK) in the menu bar and
pressing . (→ Adding marks during recording)
A maximum of 99 marks can be added in a file.
• Files are automatically saved at regular intervals during recording. If the power is interrupted or another
problem occurs during recording, an affected file can be restored to normal by playing it with the
H4essential.
70
Page 71
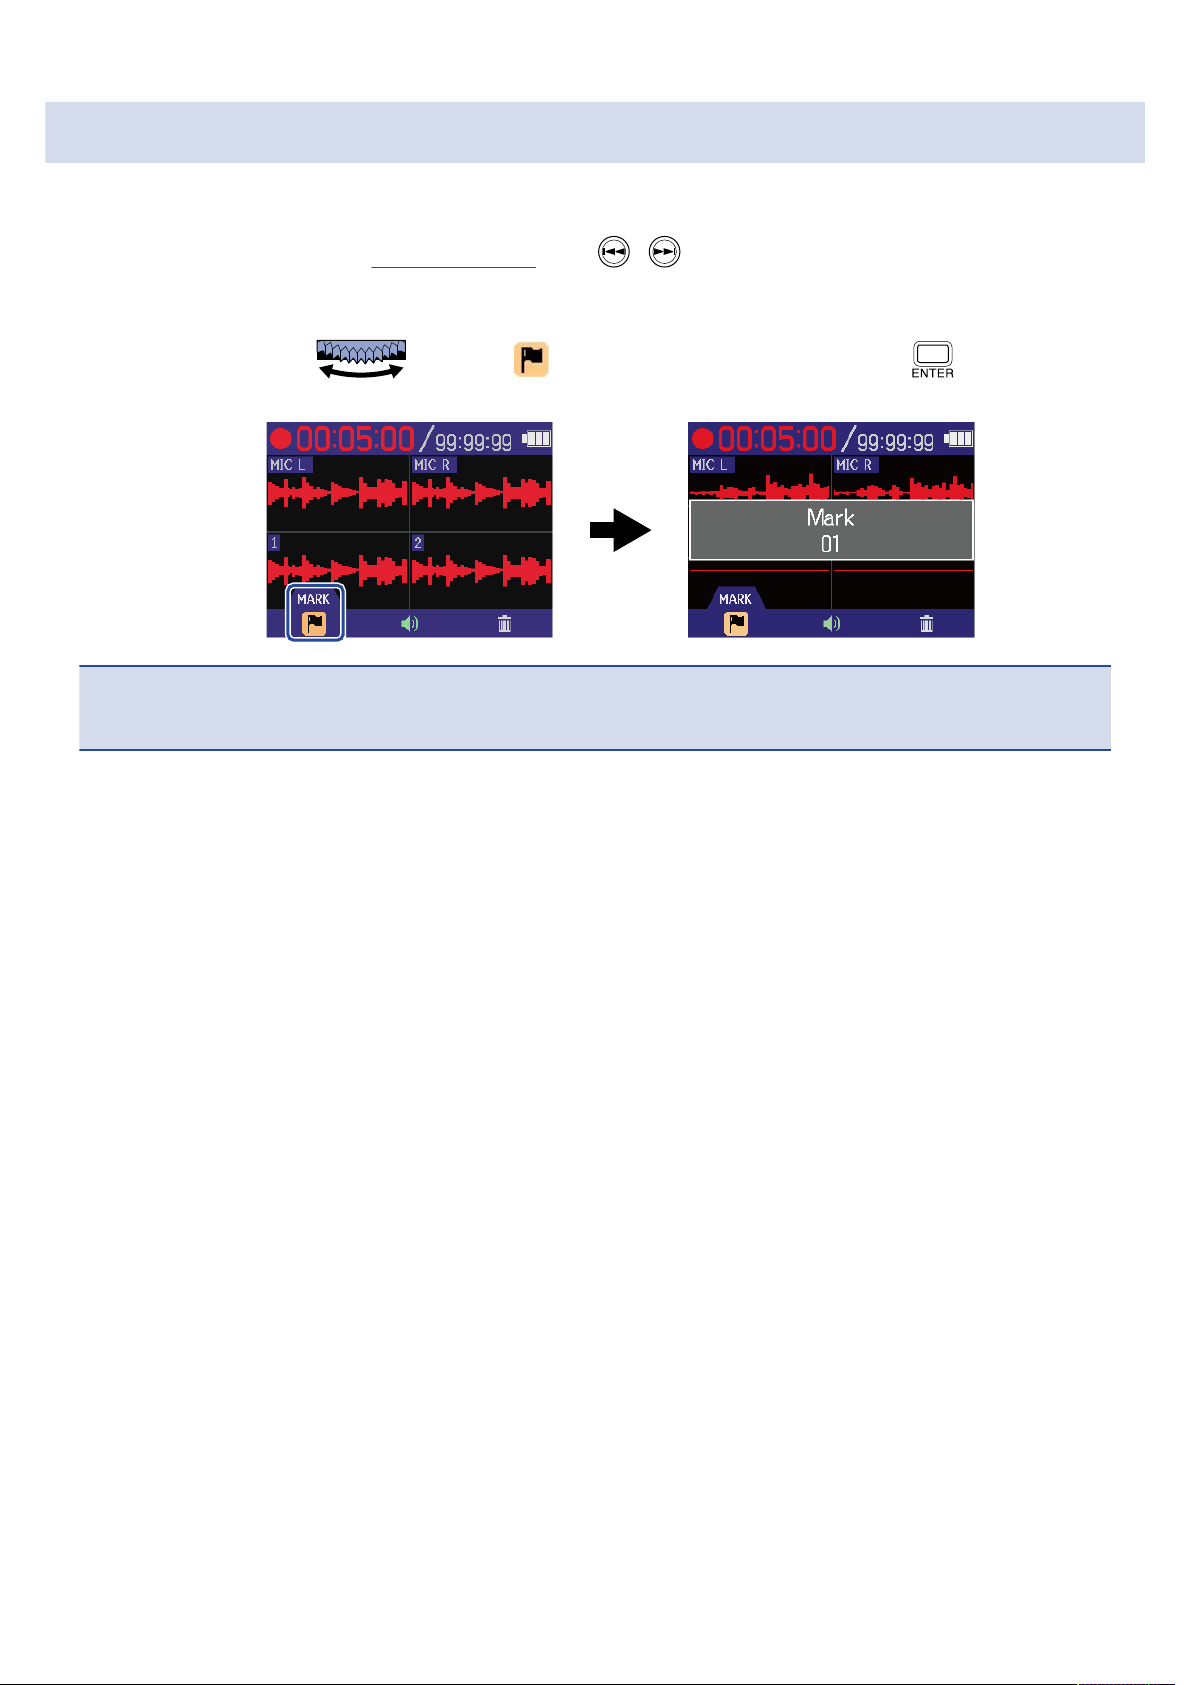
Adding marks during recording
Marks can be added to files while recording.
Added marks are shown on the Playback Screen, and / can be used to move the playback position
to a mark.
1. While recording, use to select (Mark) in the Menu bar and press .
This will add a mark at the position of the current elapsed recording time.
NOTE
A maximum of 99 marks can be added to a single file.
71
Page 72
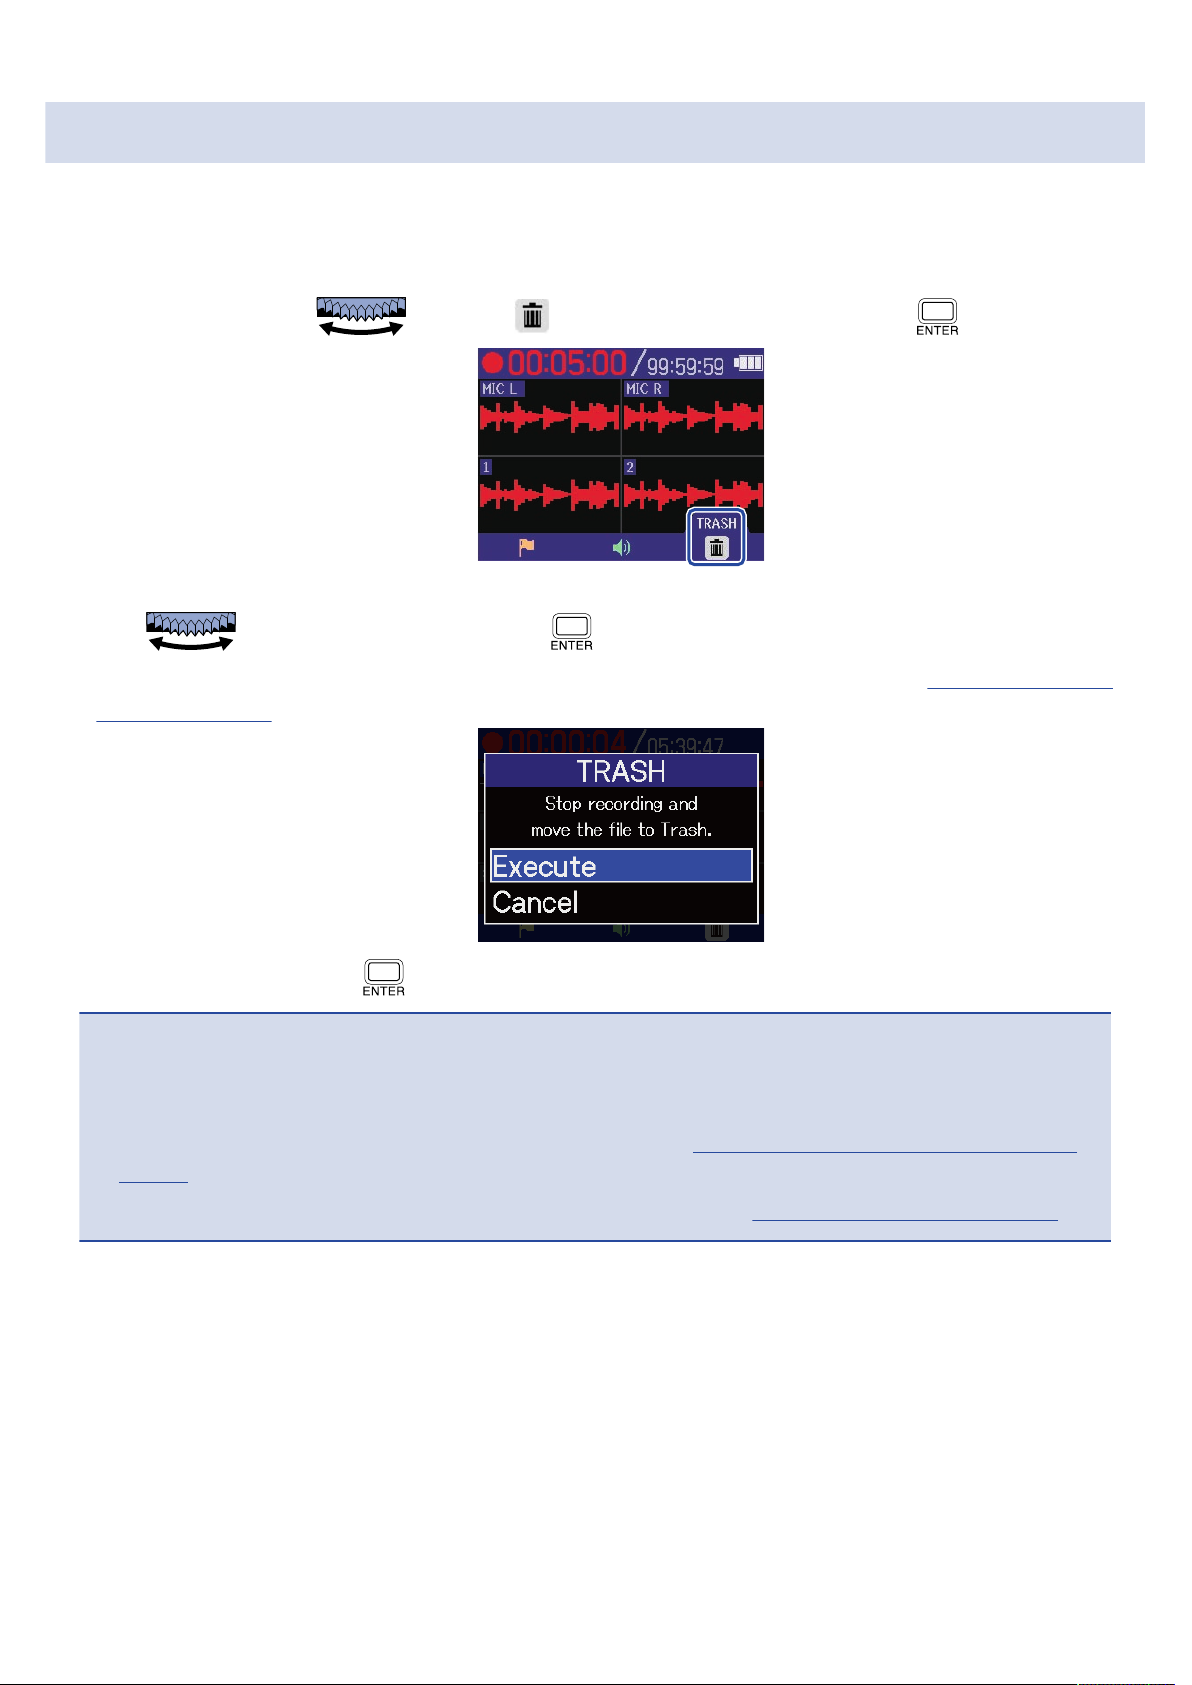
Moving the file being recorded to the TRASH folder
The file being recorded can be moved to the TRASH Folder. This function is convenient when, for example,
you feel a recording was not good enough.
1. While recording, use to select (Trash) in the Menu bar and press .
2. Use to select “Execute” and press .
This will stop recording and move the file being recorded to the TRASH folder. (→ H4essential folder
and file structure)
Select “Cancel” and press to cancel the operation and continue recording.
NOTE
• Files moved to the TRASH folder are saved in the TRASH folder created on the SD card, but their
information cannot be checked and they cannot be played back by the H4essential. To check or play
them, connect and use a computer, smartphone or tablet. (→ Transferring files to computers and other
devices)
• The files in the TRASH folder can all be deleted at the same time. (→ Deleting files in the TRASH folder)
72
Page 73
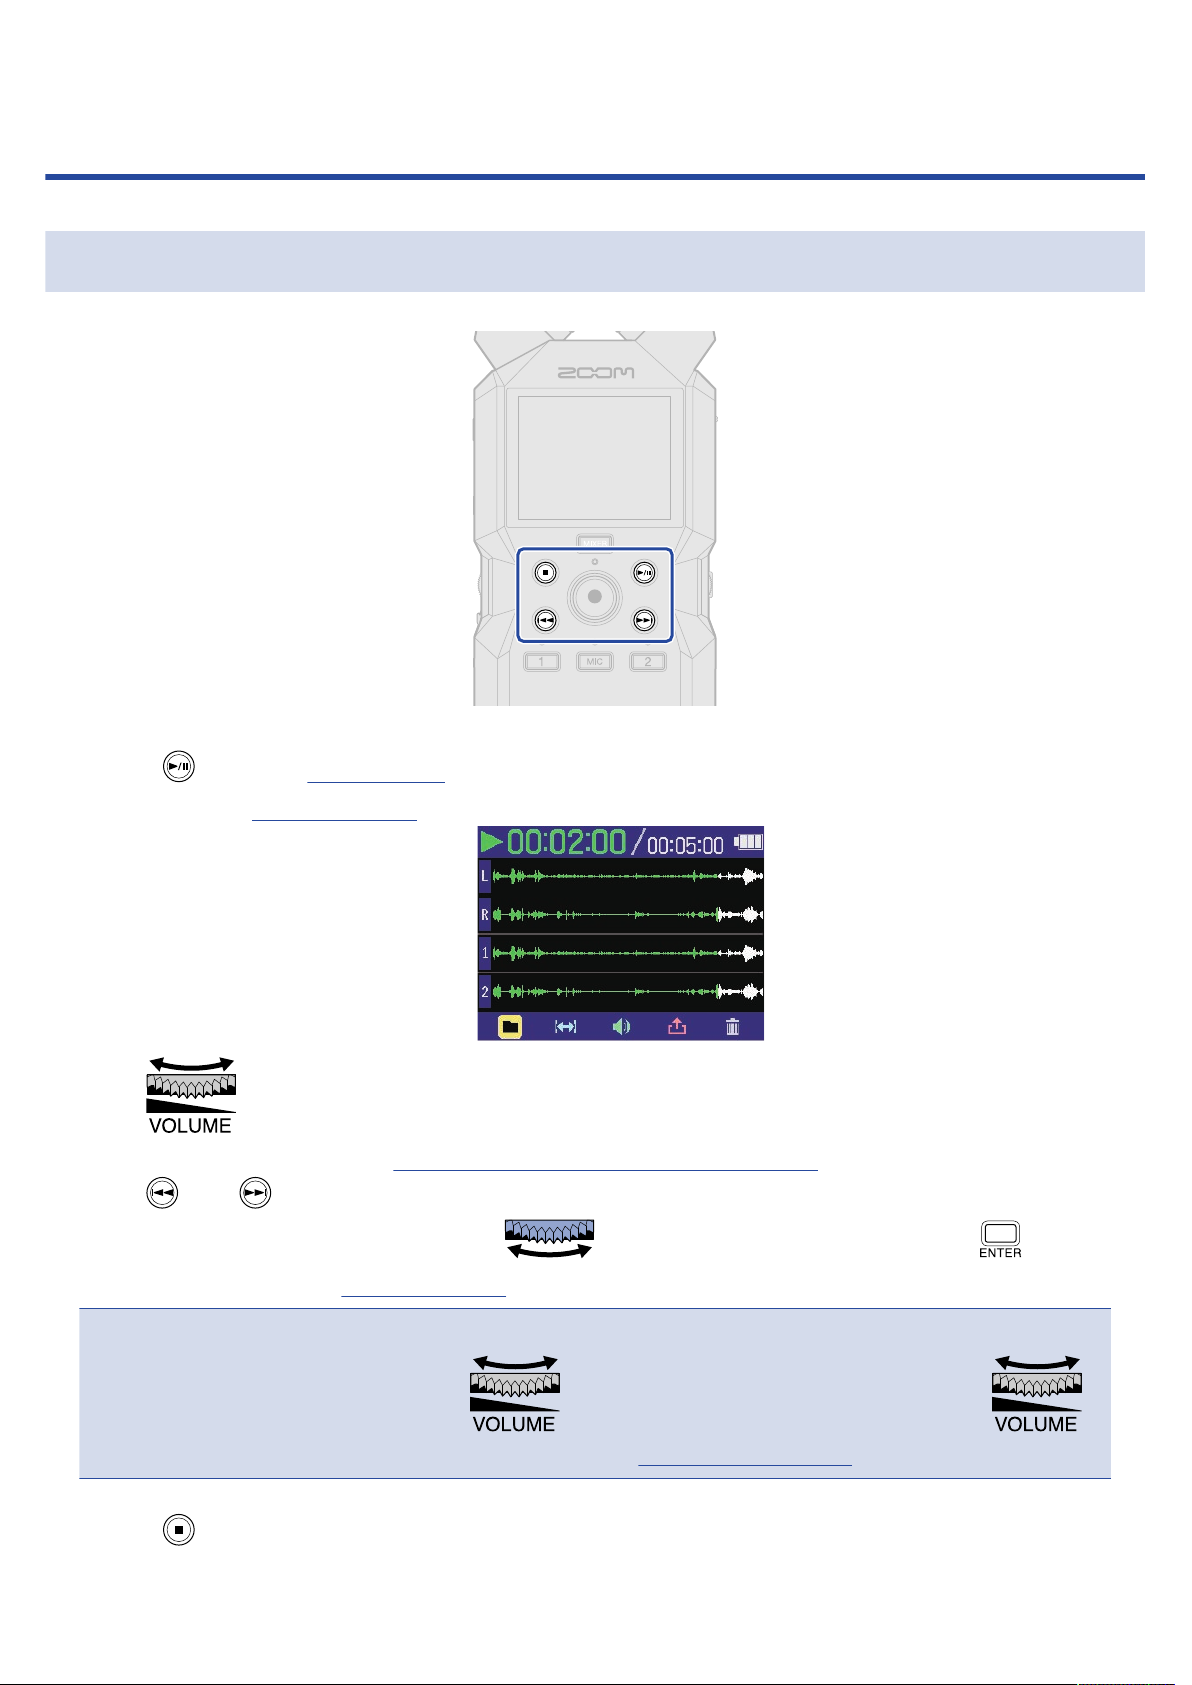
Playing recordings
Playing recordings
1. Press when the Home Screen is open.
This opens the Playback Screen on the display and starts playback of the most recently recorded file.
Use to adjust the headphone or speaker volume. The volume can also be adjusted
separately for each track. (→ Adjusting the volume balance of all tracks)
Use and to select the playback file.
When the Playback Screen is open, use to select a Menu bar icon and press to open
that settings screen. (→ Playback Screen)
NOTE
When “Volume Control” is set to “Fixed”, cannot be used to adjust the volume. To use
for volume adjustment, set “Volume Control” to “Knob”. (→ Making output settings)
2. Press .
73
Page 74

This stops playback and reopens the Home Screen.
NOTE
On the Playback Screen, all the files in a file folder are treated as one file. For example, if two files named
“240101_000000_Tr1.WAV” and “240101_000000_Tr2.WAV” have been created in a file folder, they will be
shown as a single file named “240101_000000” on the File List Screen. If this file is selected and deleted, this
operation will be applied to all files in the file folder. (→ H4essential folder and file structure)
HINT
Track keys ( , , ) can be pressed to turn on/off playback of those tracks. Tracks that have their
status indicators lit will be played back. This operation is only available for tracks that have been recorded.
74
Page 75
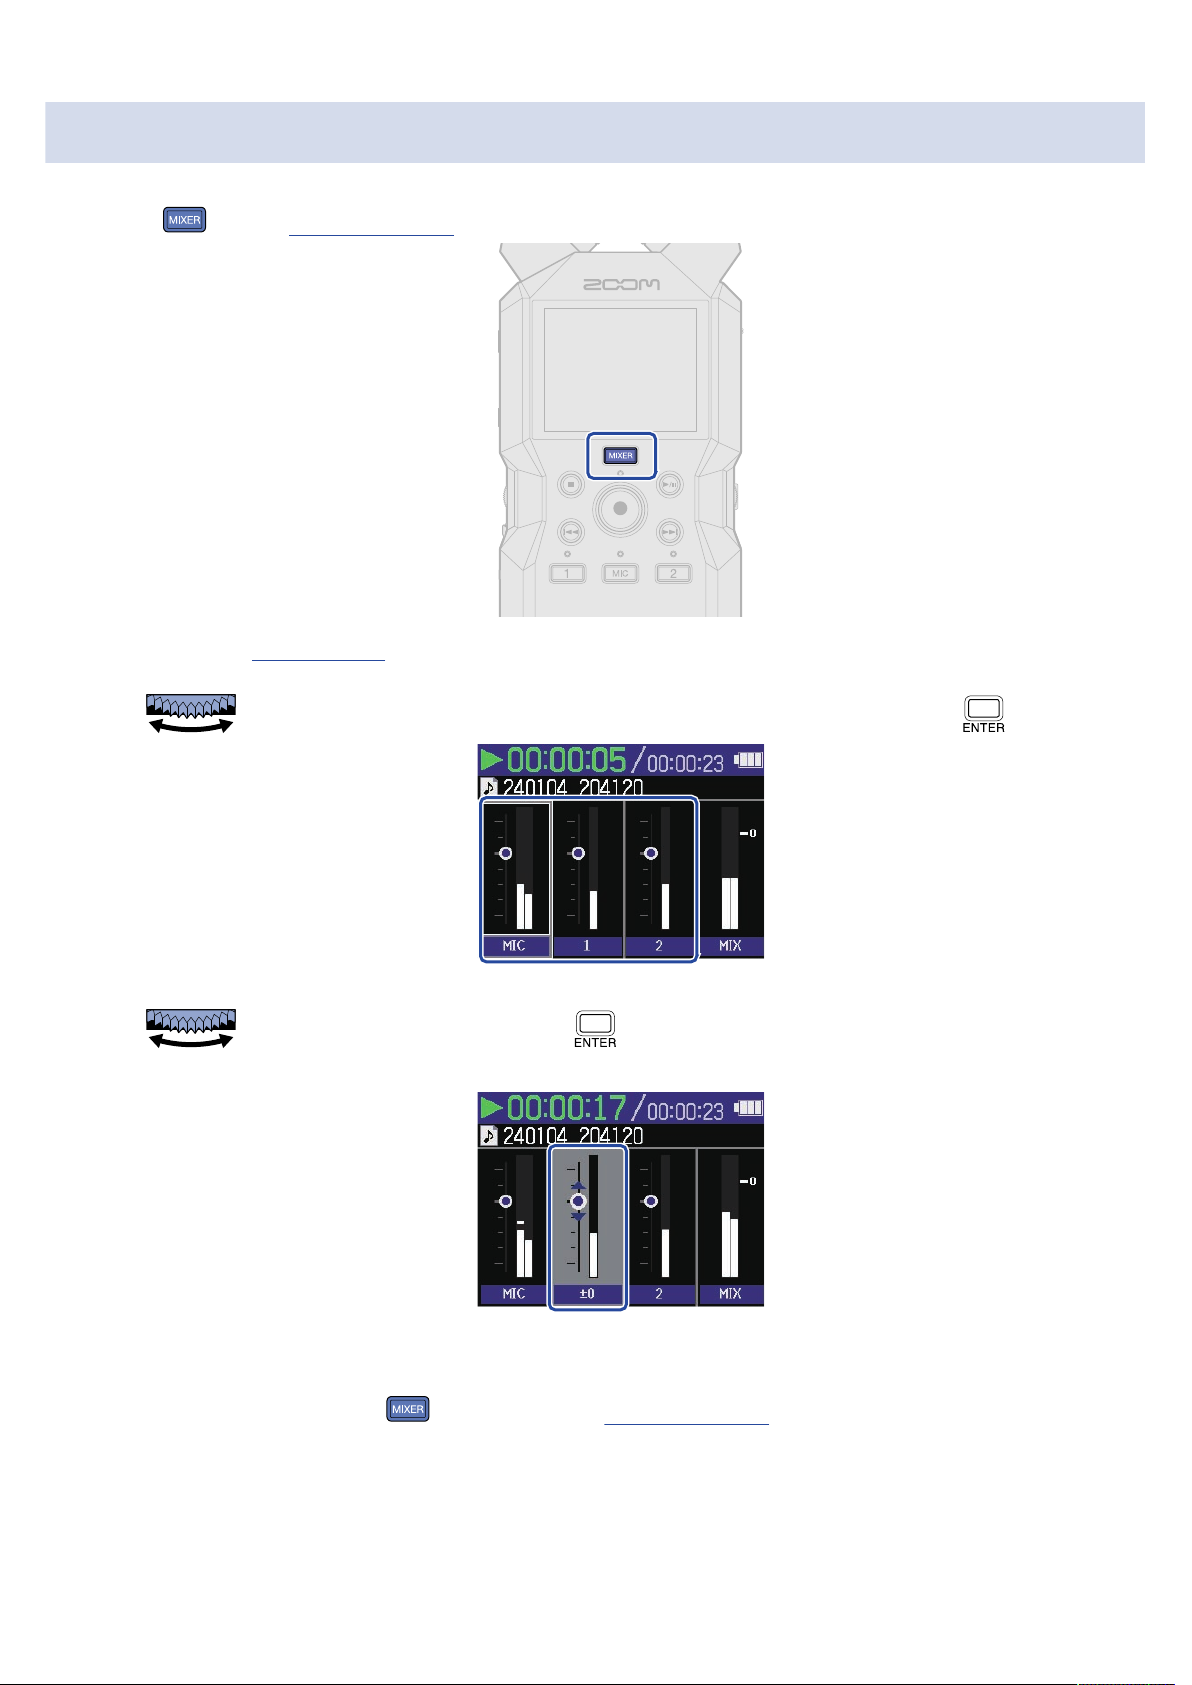
Adjusting the volume balance of all tracks
1. Press on the Playback Screen.
This opens the Mixer Screen.
2. Use to select the track for which you want to adjust the volume and press .
3. Use to adjust the volume and press .
This confirms the adjusted volume.
4. Repeat steps 2–3 to adjust the overall volume balance.
When done adjusting press to return to the Playback Screen.
75
Page 76
NOTE
• The track buttons ( , , ) can be pressed to turn on/off those tracks.
• On the Mixer Screen, operations can be conducted using , and as on the Playback Screen.
• Press to return to the Home Screen.
• Volume adjustments made on the Mixer Screen can be applied to files created when exporting. (→
Changing the format and exporting files)
Making output settings
When the Playback Screen is open, use to select (Output) and press to open the
Output Settings Screen.
Make settings for the output during playback to the built-in speaker, headphones and external devices.
For setting details, see “Making output settings”.
76
Page 77
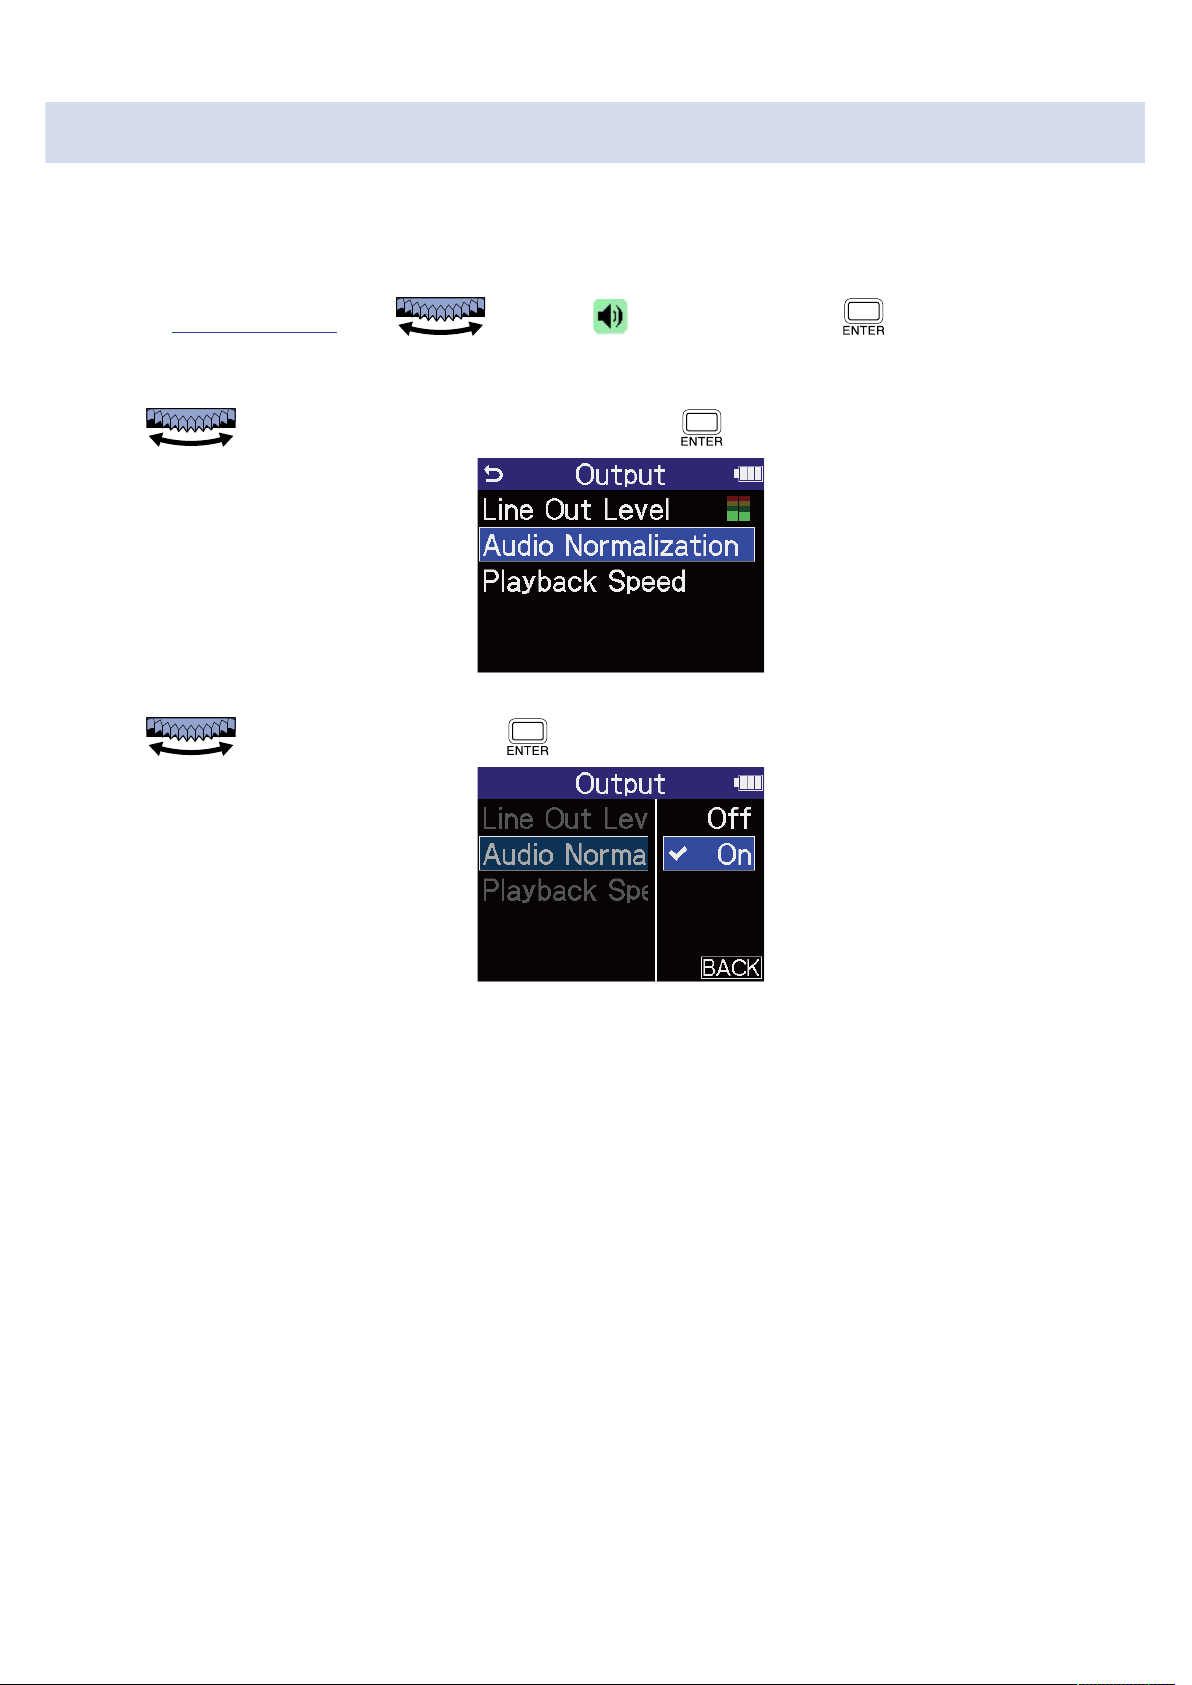
Automatic volume adjustment during playback
By setting “Audio Normalization” to “On”, the playback volume can be evened out regardless of recording
levels.
1. On the Playback Screen, use to select (Output) and press .
This opens the Output Settings Screen.
2. Use to select “Audio Normalization” and press .
3. Use to select “On”, and press .
77
Page 78
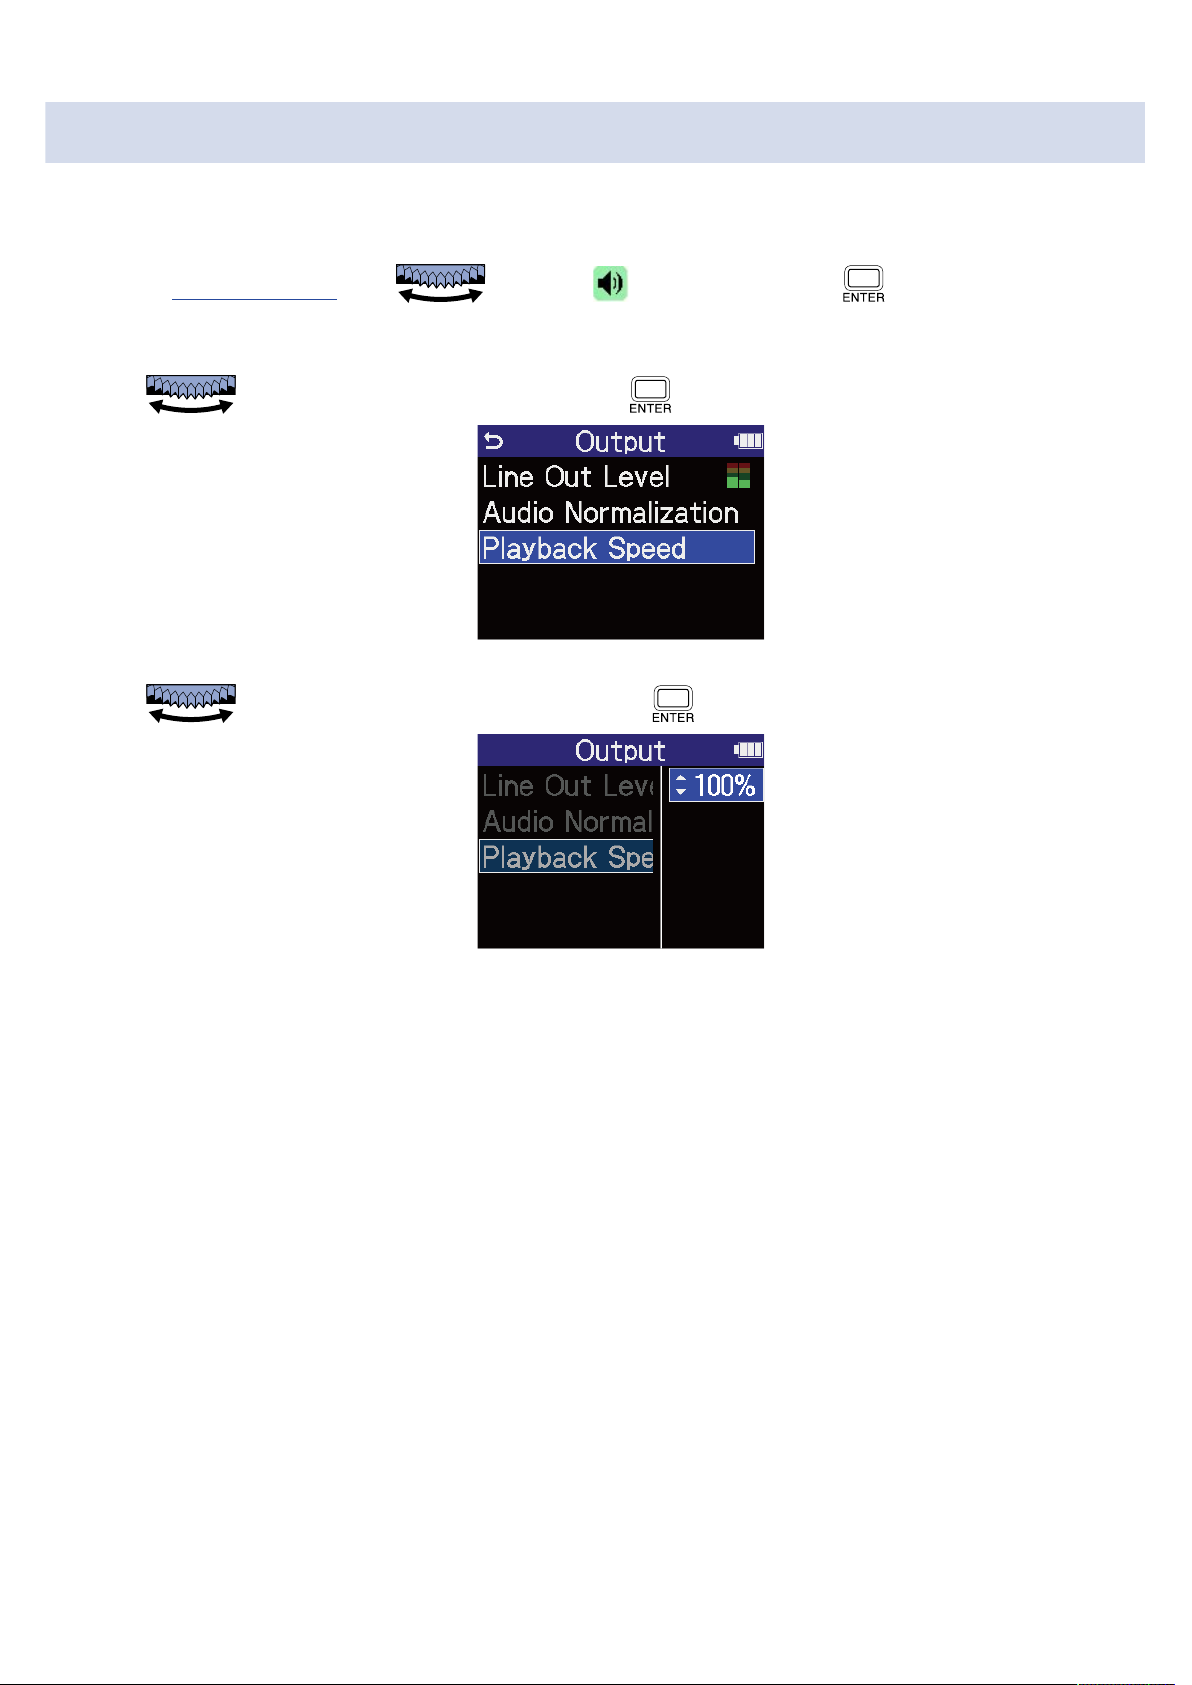
Changing the playback speed
The playback speed can be changed.
1. On the Playback Screen, use to select (Output) and press .
This opens the Output Settings Screen.
2. Use to select “Playback Speed” and press .
3. Use to select the playback speed and press .
The following speeds can be selected.
50% (half speed), 75%, 100% (normal), 125%, 150%, 200% (double speed)
78
Page 79
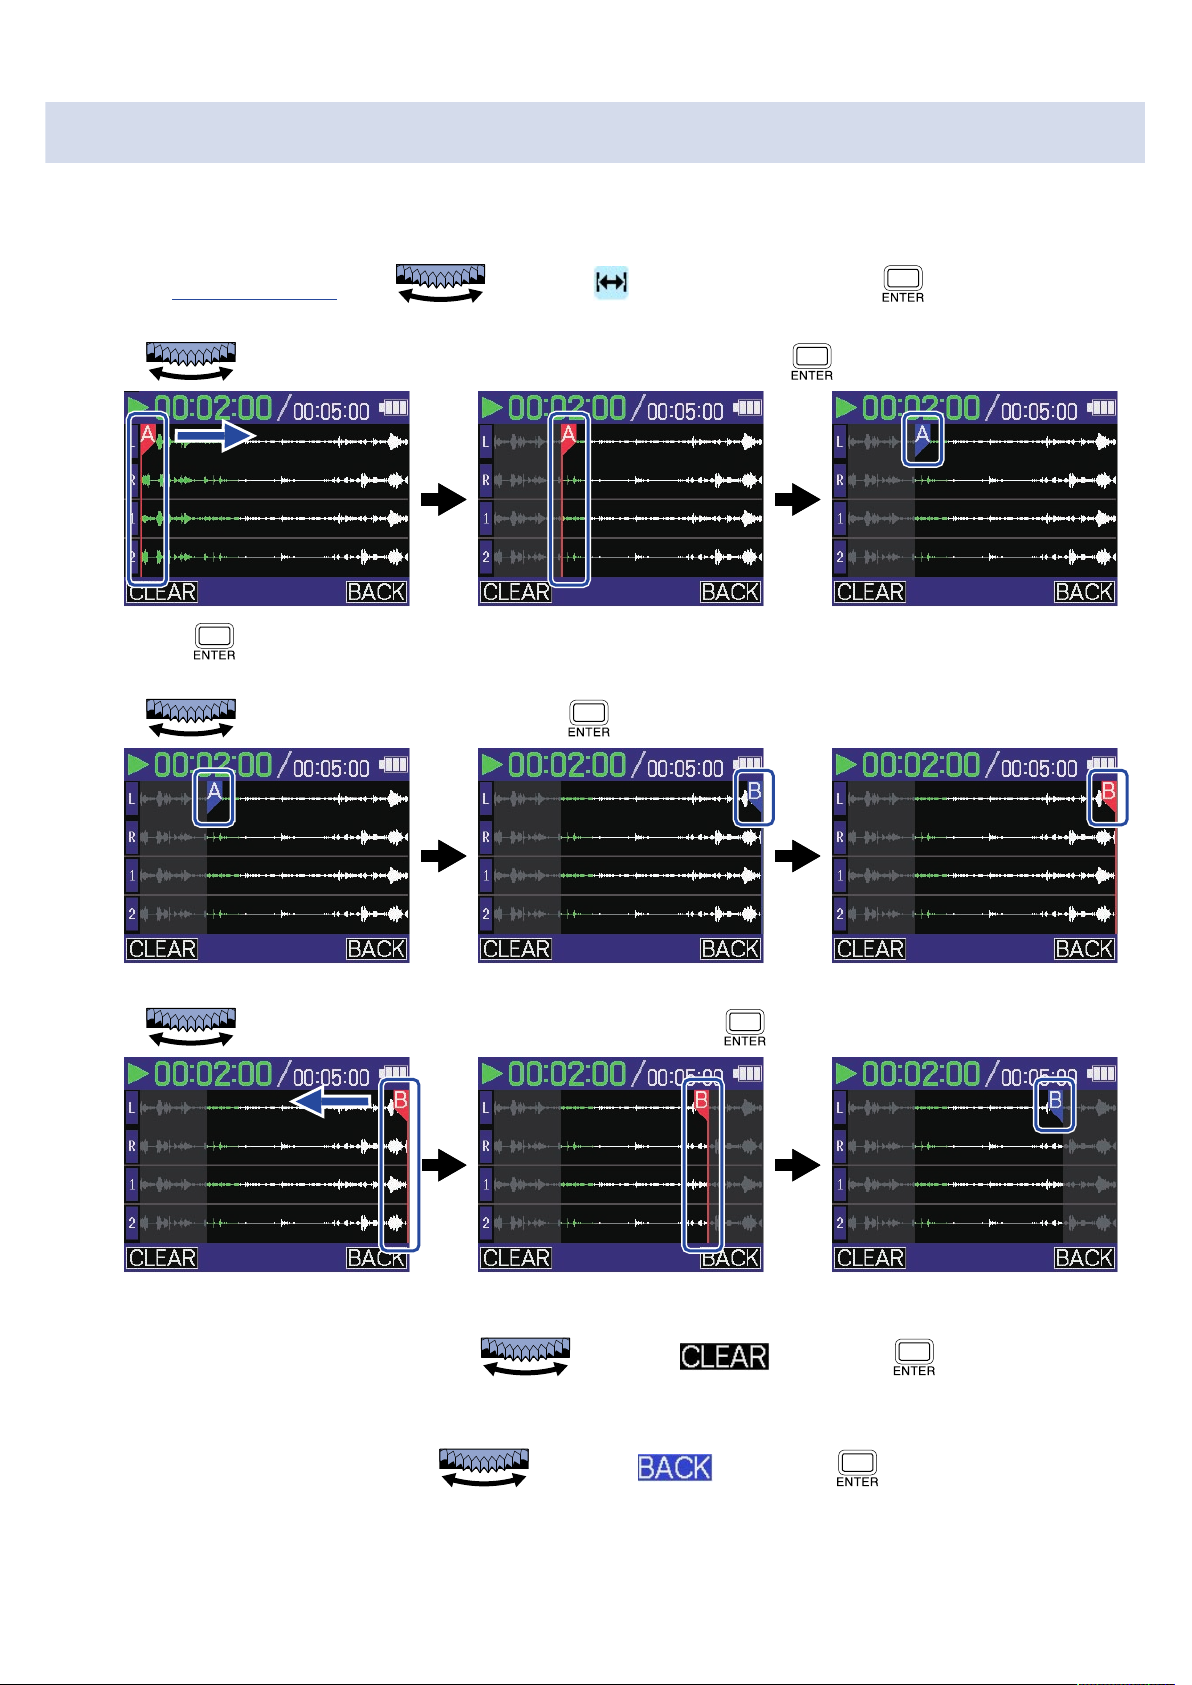
Repeat playback of a set interval (A-B repeat)
Playback can be repeated between two set points.
1. On the Playback Screen, use to select (A-B Repeat) and press .
2. Use to set the A point (playback starting point) and press .
Pressing confirms the A point and the A marker becomes blue.
3. Use to select the B point and press .
4. Use to set the B (playback ending point) and press .
• To change these settings, repeat steps 2 – 4.
• When A or B is shown in blue, use to select and press to clear the set
point.
5. When done making settings, use to select and press .
79
Page 80
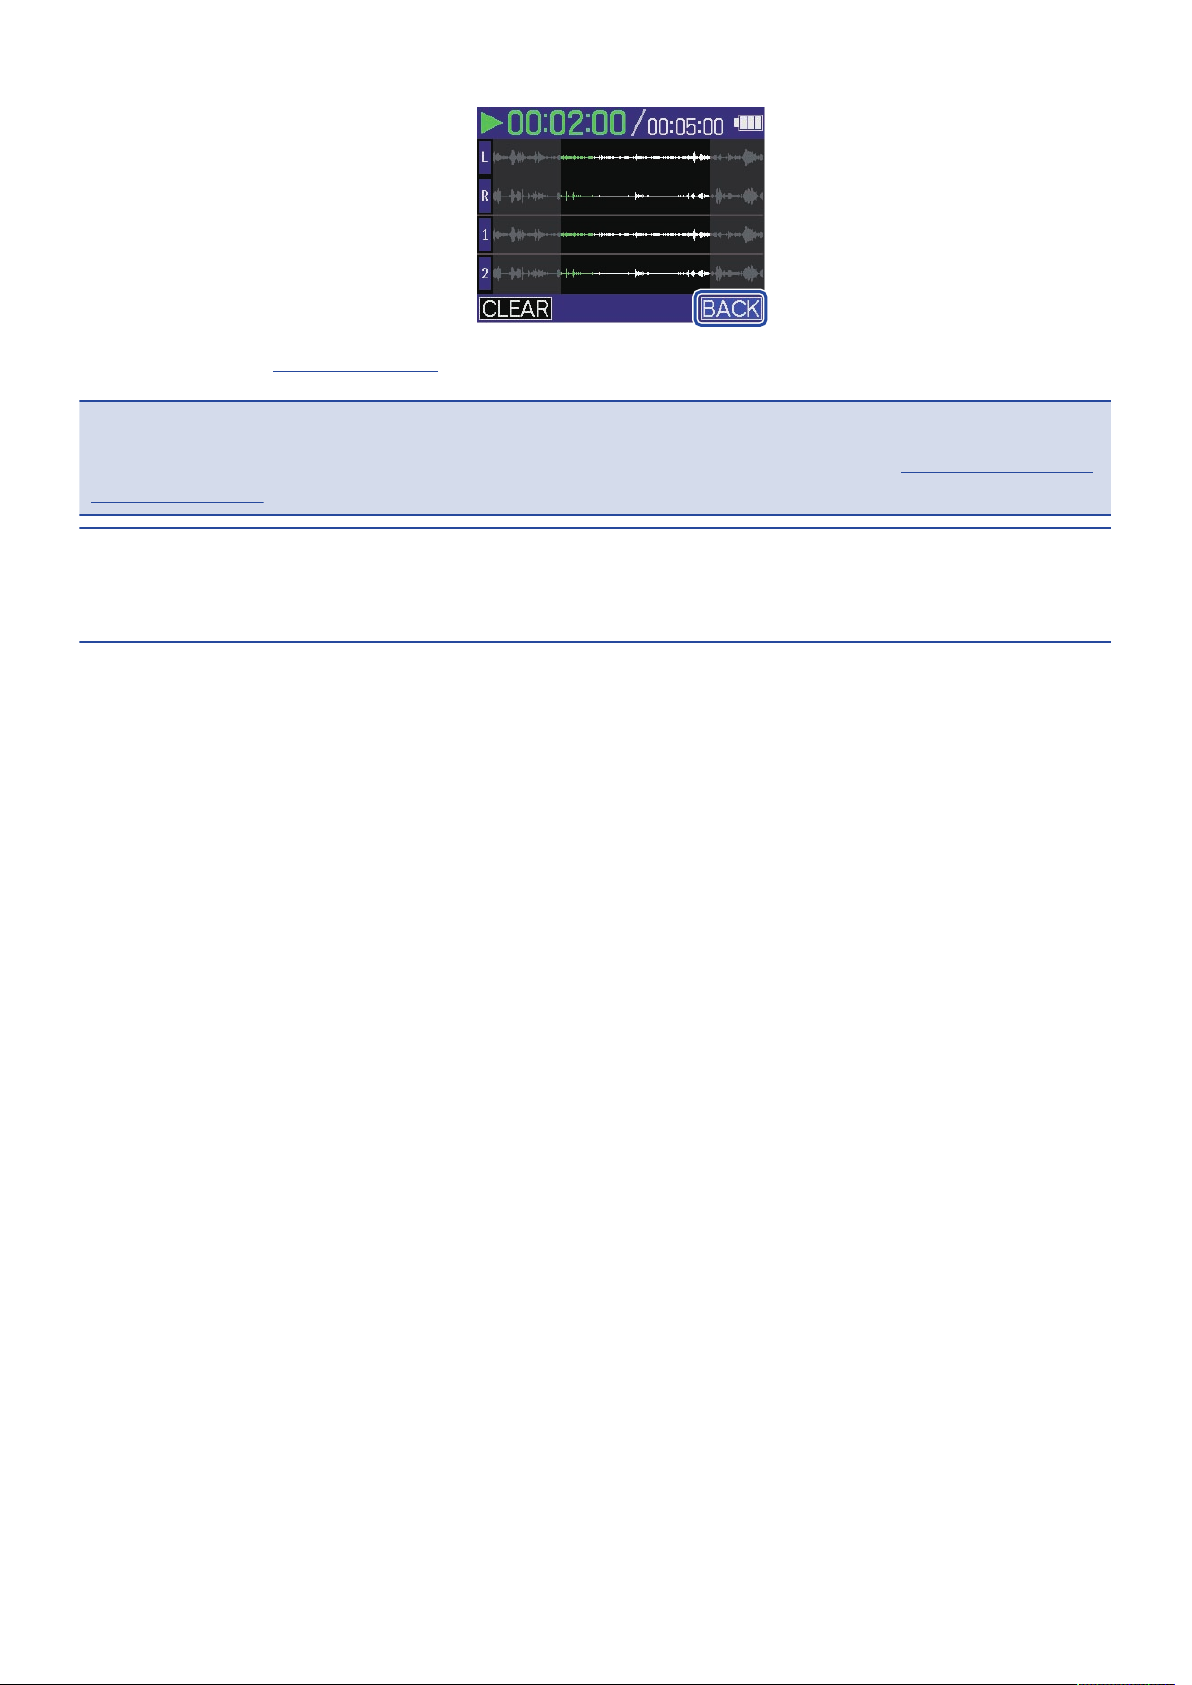
This reopens the Playback Screen.
NOTE
The interval specified using the A-B Repeat function can be applied when exporting. (→ Changing the format
and exporting files)
HINT
Since the A (playback start) and B (playback end) points can be moved during playback, changing the
playback start and end positions, they can be set while checking the playback sound.
80
Page 81
Changing the format and exporting files
The H4essential can only record using 32-bit float format, but recorded files can be converted to other
formats and exported.
This is convenient, for example, when loading files recorded on the H4essential to a computer, smartphone
or tablet if the application being used does not support 32-bit float format.
In addition, the exported tracks can be selected and trimmed to only the necessary parts as well as
normalized to optimize the volume of the recorded files.
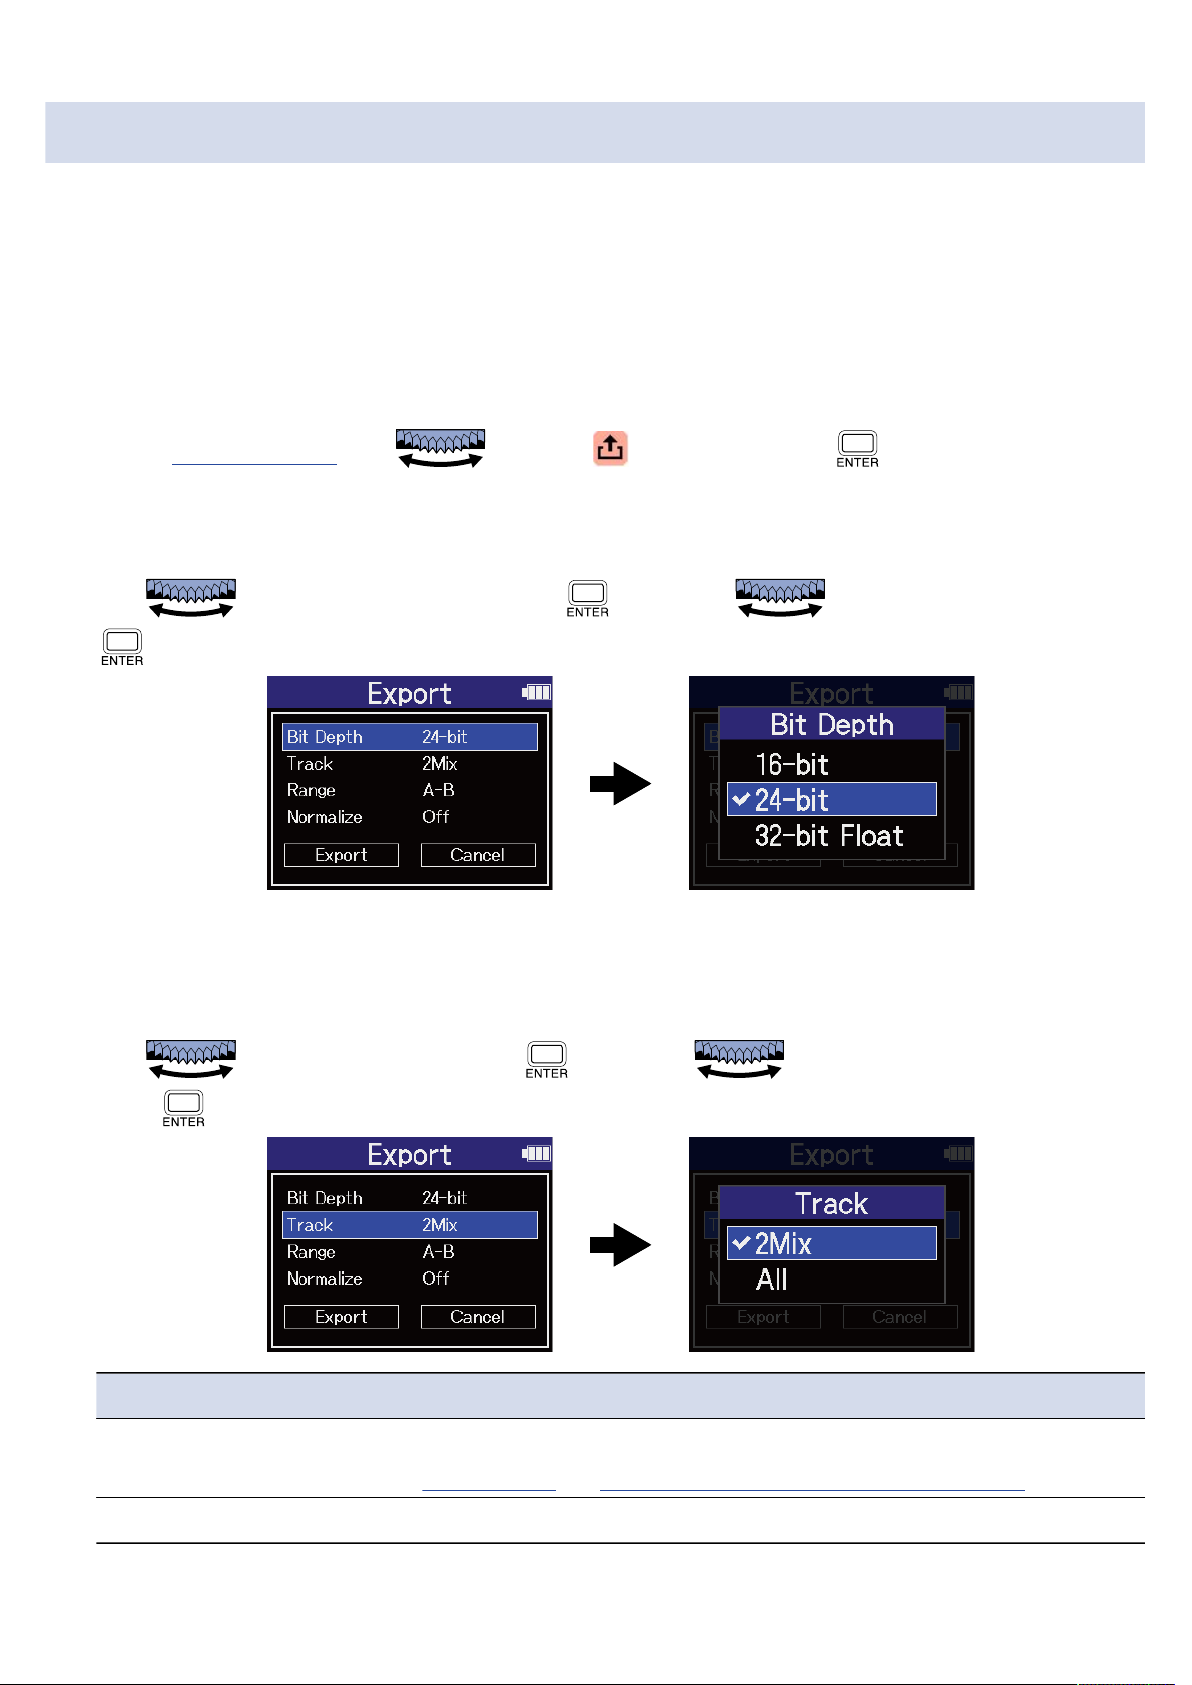
1. On the Playback Screen, use to select (Export) and press .
This opens the Export Screen.
2. Select the bit depth.
Use to select “Bit Depth” and press . Then, use to select the format and press
.
The following formats can be selected.
16-bit, 24-bit, 32-bit Float
3. Select the tracks to export.
Use to select “Track” and press . Then, use to select the tracks to export and
press .
Setting Explanation
2Mix This exports a stereo file that uses the mix balance adjusted on the
Mixer Screen. (→ Adjusting the volume balance of all tracks)
All This exports all the tracks separately.
81
Page 82
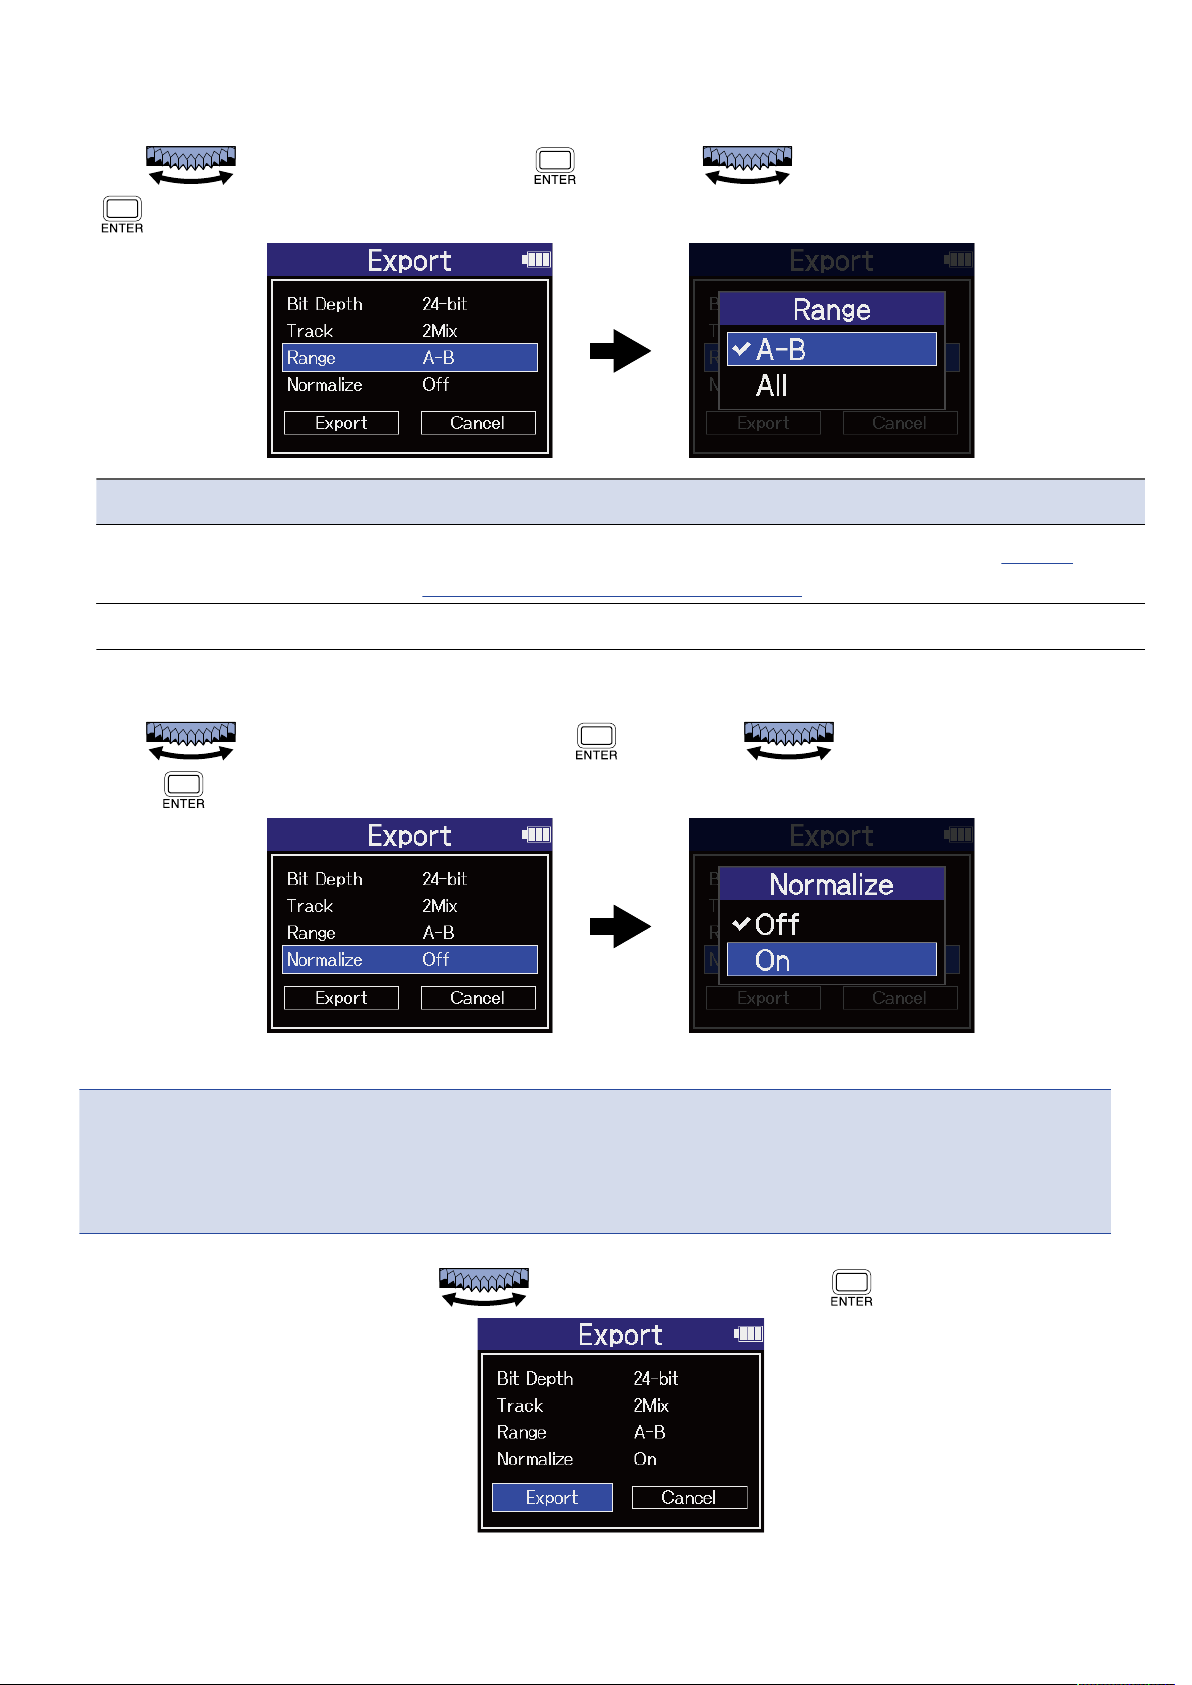
4. Select whether or not to export using a specified range.
Use to select “Range” and press . Then, use to select the setting and press
.
Setting Explanation
A-B This exports the range between the two points set using Repeat
playback of a set interval (A-B repeat).
All This exports the entire track.
5. Select whether or not to normalize.
Use to select “Normalize” and press . Then, use to select “On” or “Off” and
press .
If “On” is selected, the file will be normalized during export.
NOTE
Normalization is a function that reads the maximum volume of the audio data and levels the volume without
causing distortion. The volume is adjusted to the maximum possible without causing the loudest sound
(peak) in the data to distort.
6. When done making settings, use to select “Export” and press .
82
Page 83
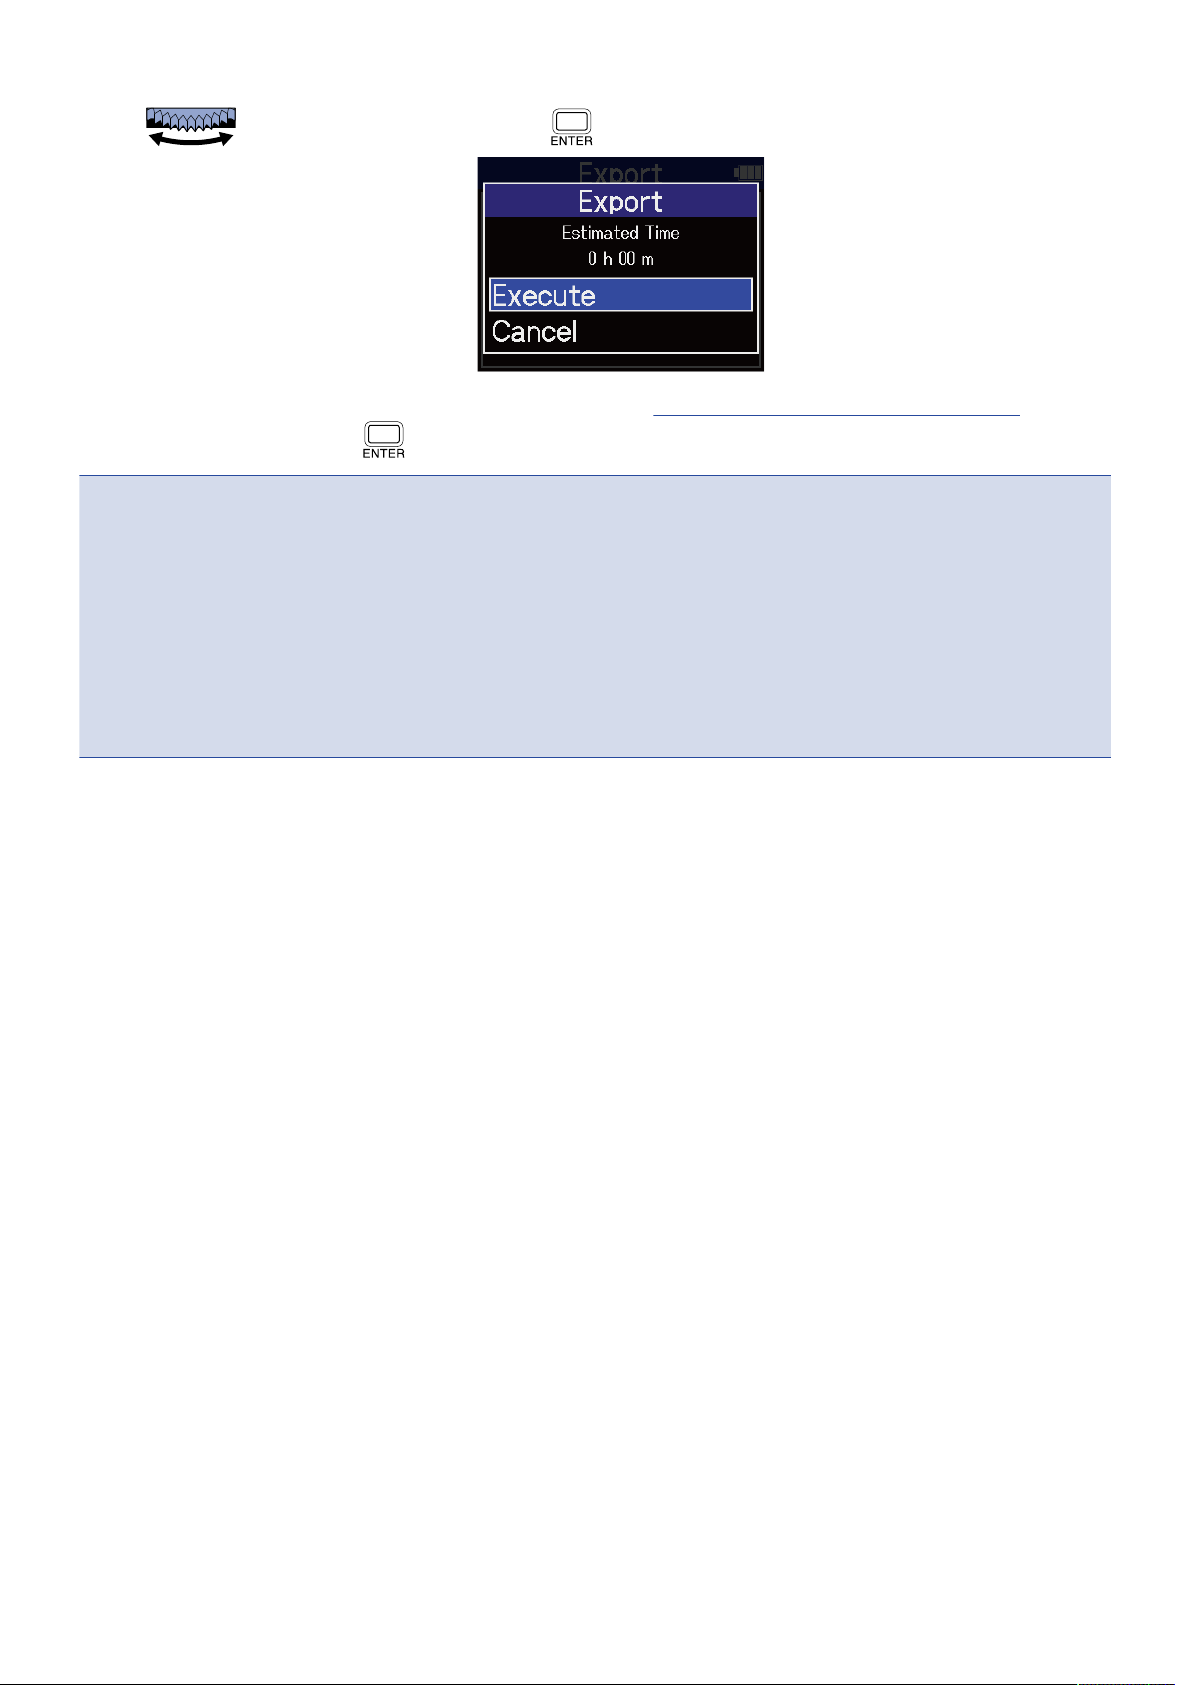
7. Use to select “Execute” and press .
The exported file will be saved in the Export folder. (→ H4essential folder and file structure)
Select “Cancel” and press to cancel the operation and return to the original screen.
NOTE
• Exported files saved in the Export folder are named in this format: FF_BB_NN_track name.WAV.
- FF: Name of the file folder that holds the exported file
- BB: Bit depth (“16” when 16-bit selected, “24” when 24-bit selected or nothing when 32-bit float
selected)
- NN: Normalization setting (“NORM” when on or nothing when off)
• The H4essential cannot play files in the Export folder.
83
Page 84
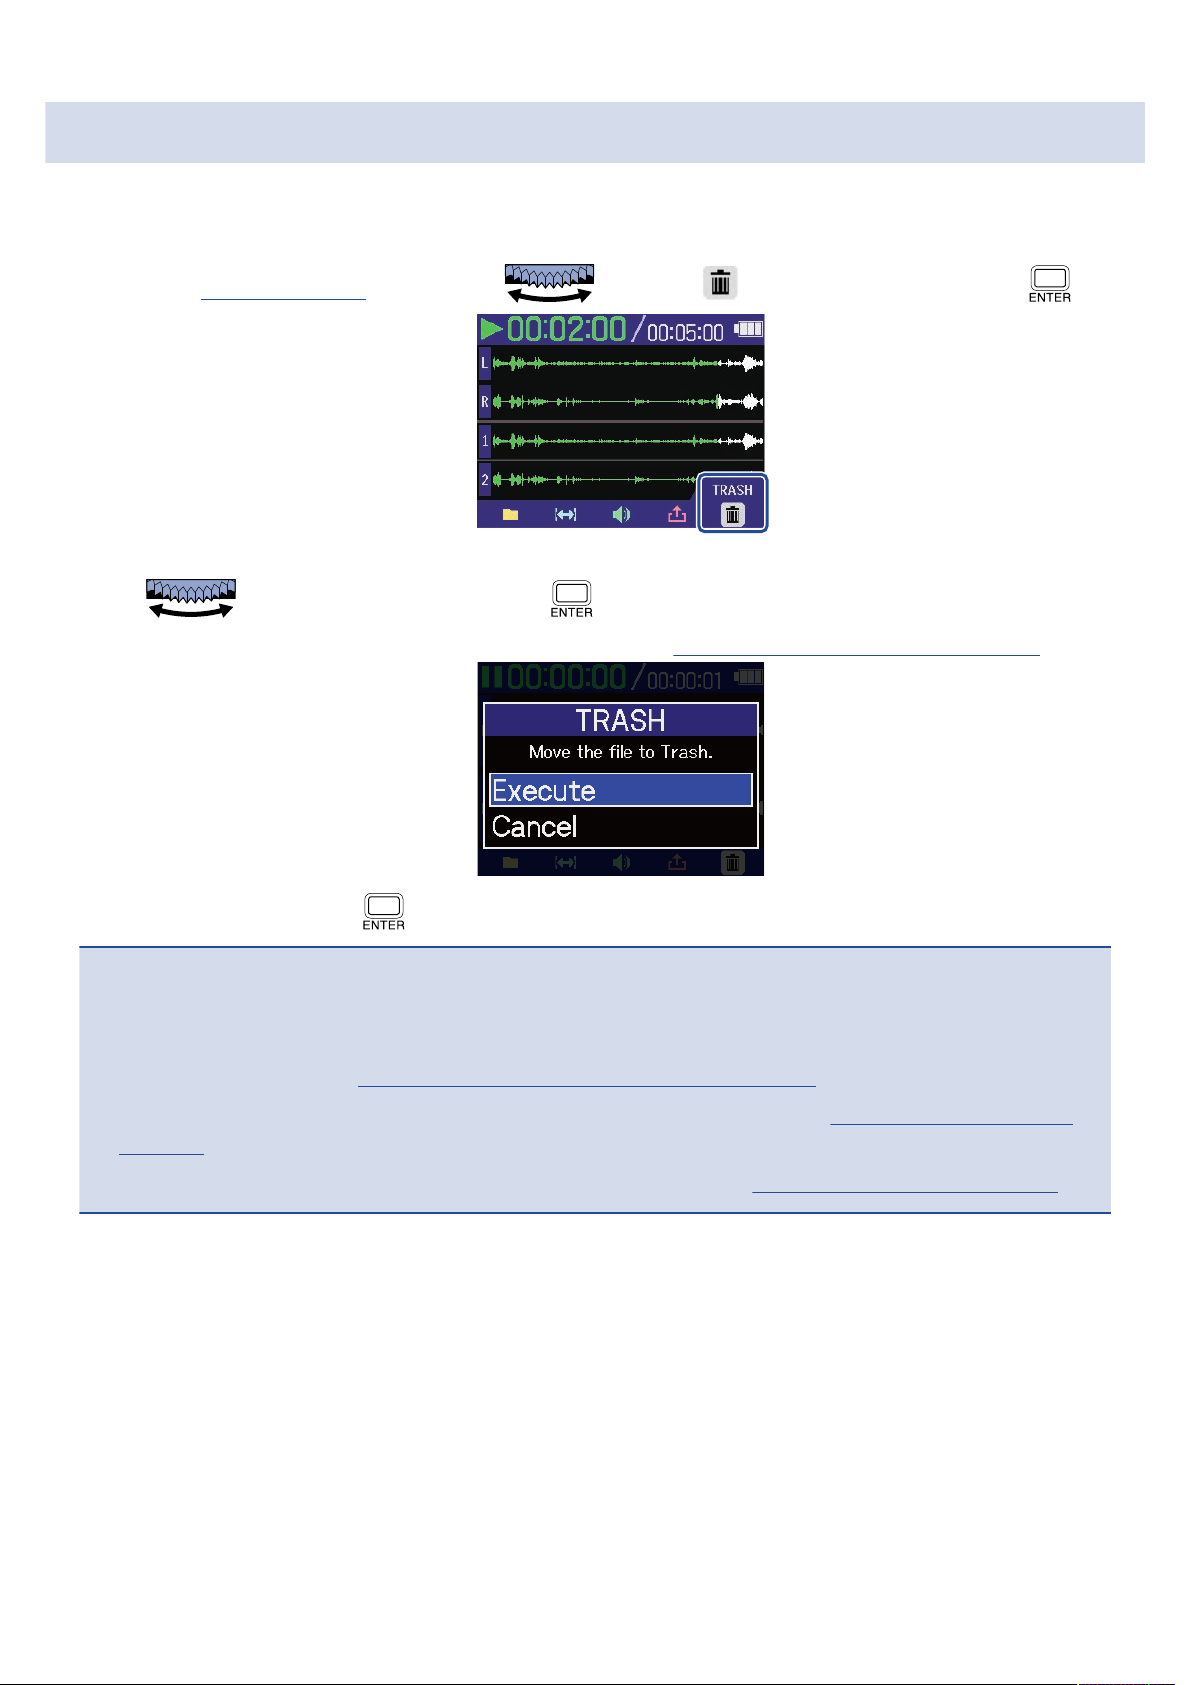
Moving the file being played to the TRASH folder
The file being played can be moved to the TRASH Folder.
1. When the Playback Screen is open, use to select in the Menu bar and press .
2. Use to select “Execute” and press .
This moves the file being played to the TRASH folder. (→ H4essential folder and file structure)
Select “Cancel” and press to cancel the operation.
NOTE
• Files moved to the TRASH folder are saved there, but their information cannot be checked and they
cannot be played back by the H4essential. To check or play them, connect and use a computer,
smartphone or tablet. (→ Transferring files to computers and other devices)
• Be aware that all files in the file folder will be moved to the TRASH folder. (→ H4essential folder and file
structure)
• The files in the TRASH folder can all be deleted at the same time. (→ Deleting files in the TRASH folder)
84
Page 85
Managing files
Root
Files created on the H4essential will be saved on the microSD card.
Recording files on the microSD card can be checked and deleted.
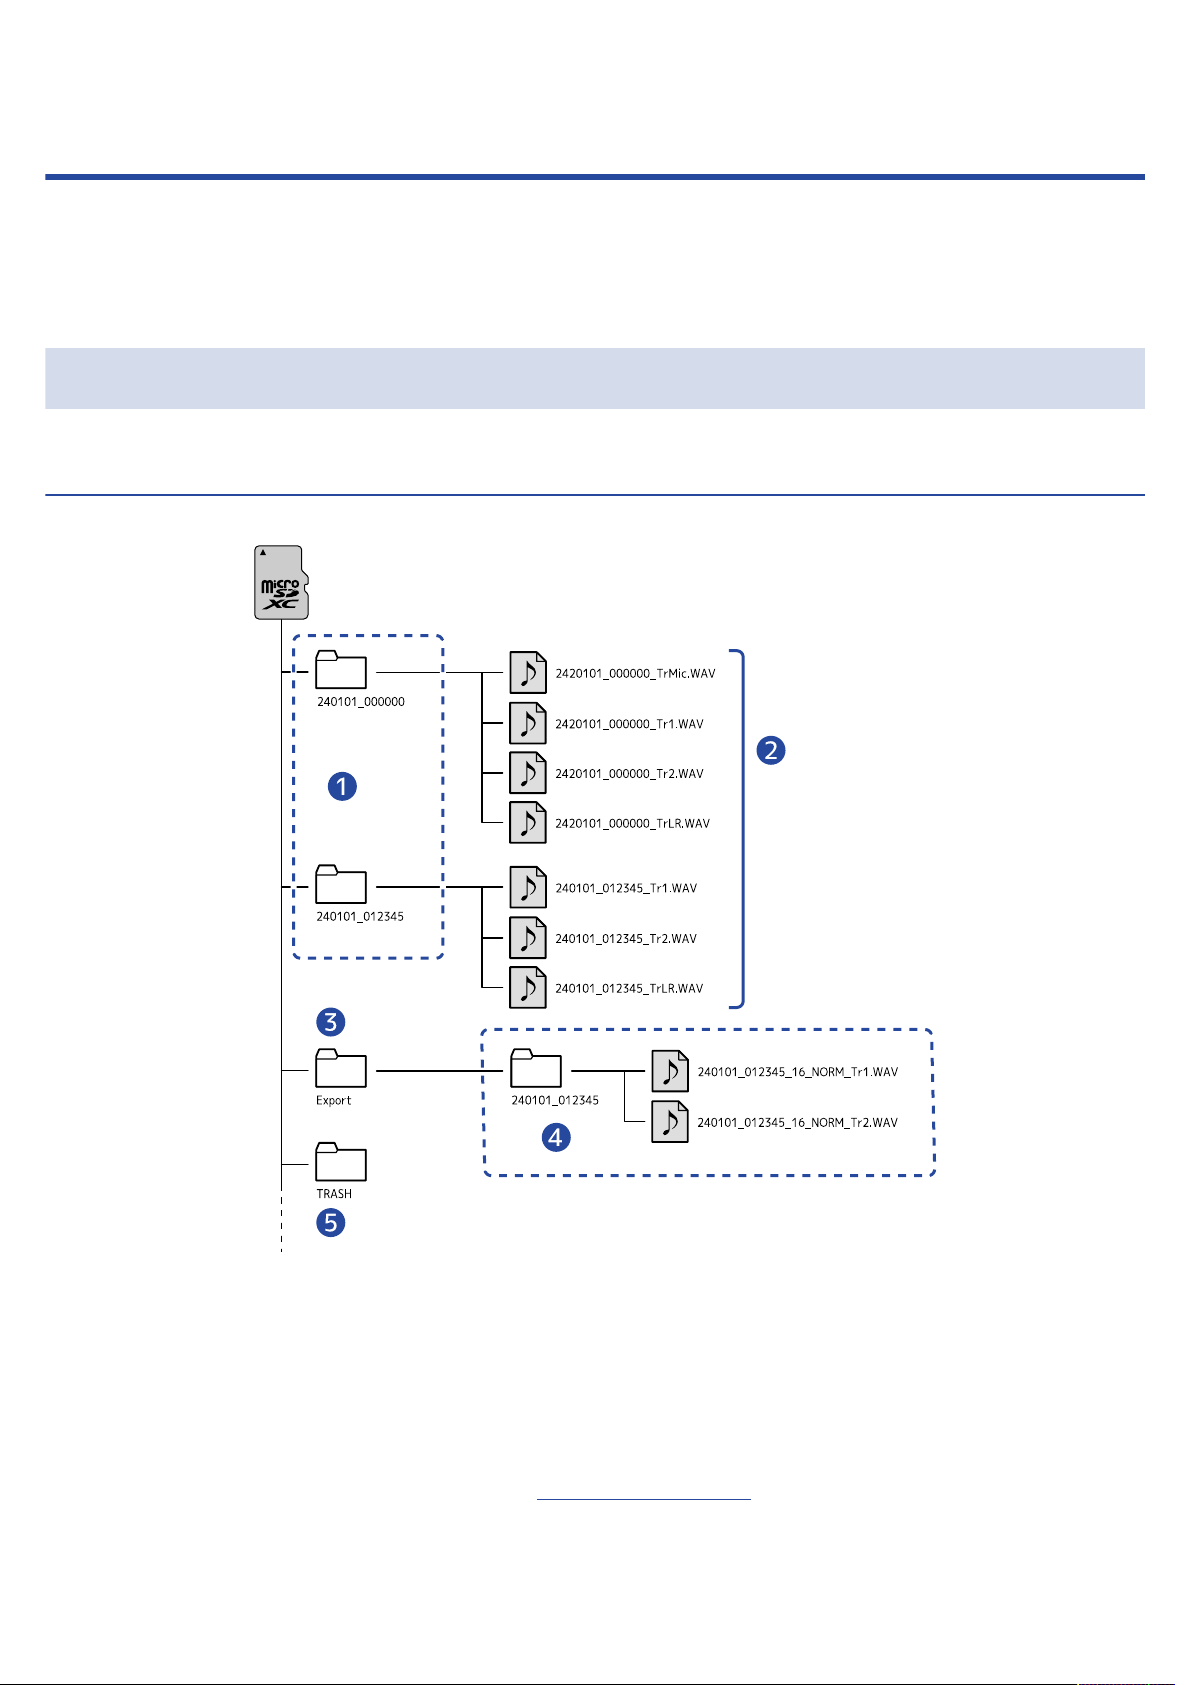
H4essential folder and file structure
Folder and file structure
When recording with the H4essential, files are created on microSD cards in the following manner.
File folders
❶
These are created each time recording is conducted. File folders are named in this format: Date_Time.
Mono and stereo files that are created are saved in them.
Recording files
❷
Files recorded by the H4essential are saved in file folders on the microSD card.
For details about recording file names, see “Recording file names”.
• The files for each track along with the stereo file that is a mix of all tracks are saved here.
85
Page 86

• Stereo files will be created if the MIC (built-in XY mic) “Mono Mix” input setting is “Off” or if inputs 1
and 2 are stereo linked. Mono files will be created in other cases. (→ Converting built-in XY mic input
to mono, Enabling stereo linking)
Export folder
❸
This is created when files are exported. Files created by exporting are saved in the Export folder. (→
Changing the format and exporting files)
Exported files
❹
Files created by exporting are saved in a subfolder with the same name inside the Export folder. (→
Changing the format and exporting files)
TRASH folder
❺
The TRASH folder is created automatically when an SD card is loaded in the H4essential. Files that have
been moved to the TRASH folder are saved inside it. (→ Moving the file being recorded to the TRASH
folder, Moving the file being played to the TRASH folder)
The files in the TRASH folder can all be deleted at the same time. (→ Deleting files in the TRASH folder)
86
Page 87
Recording file names
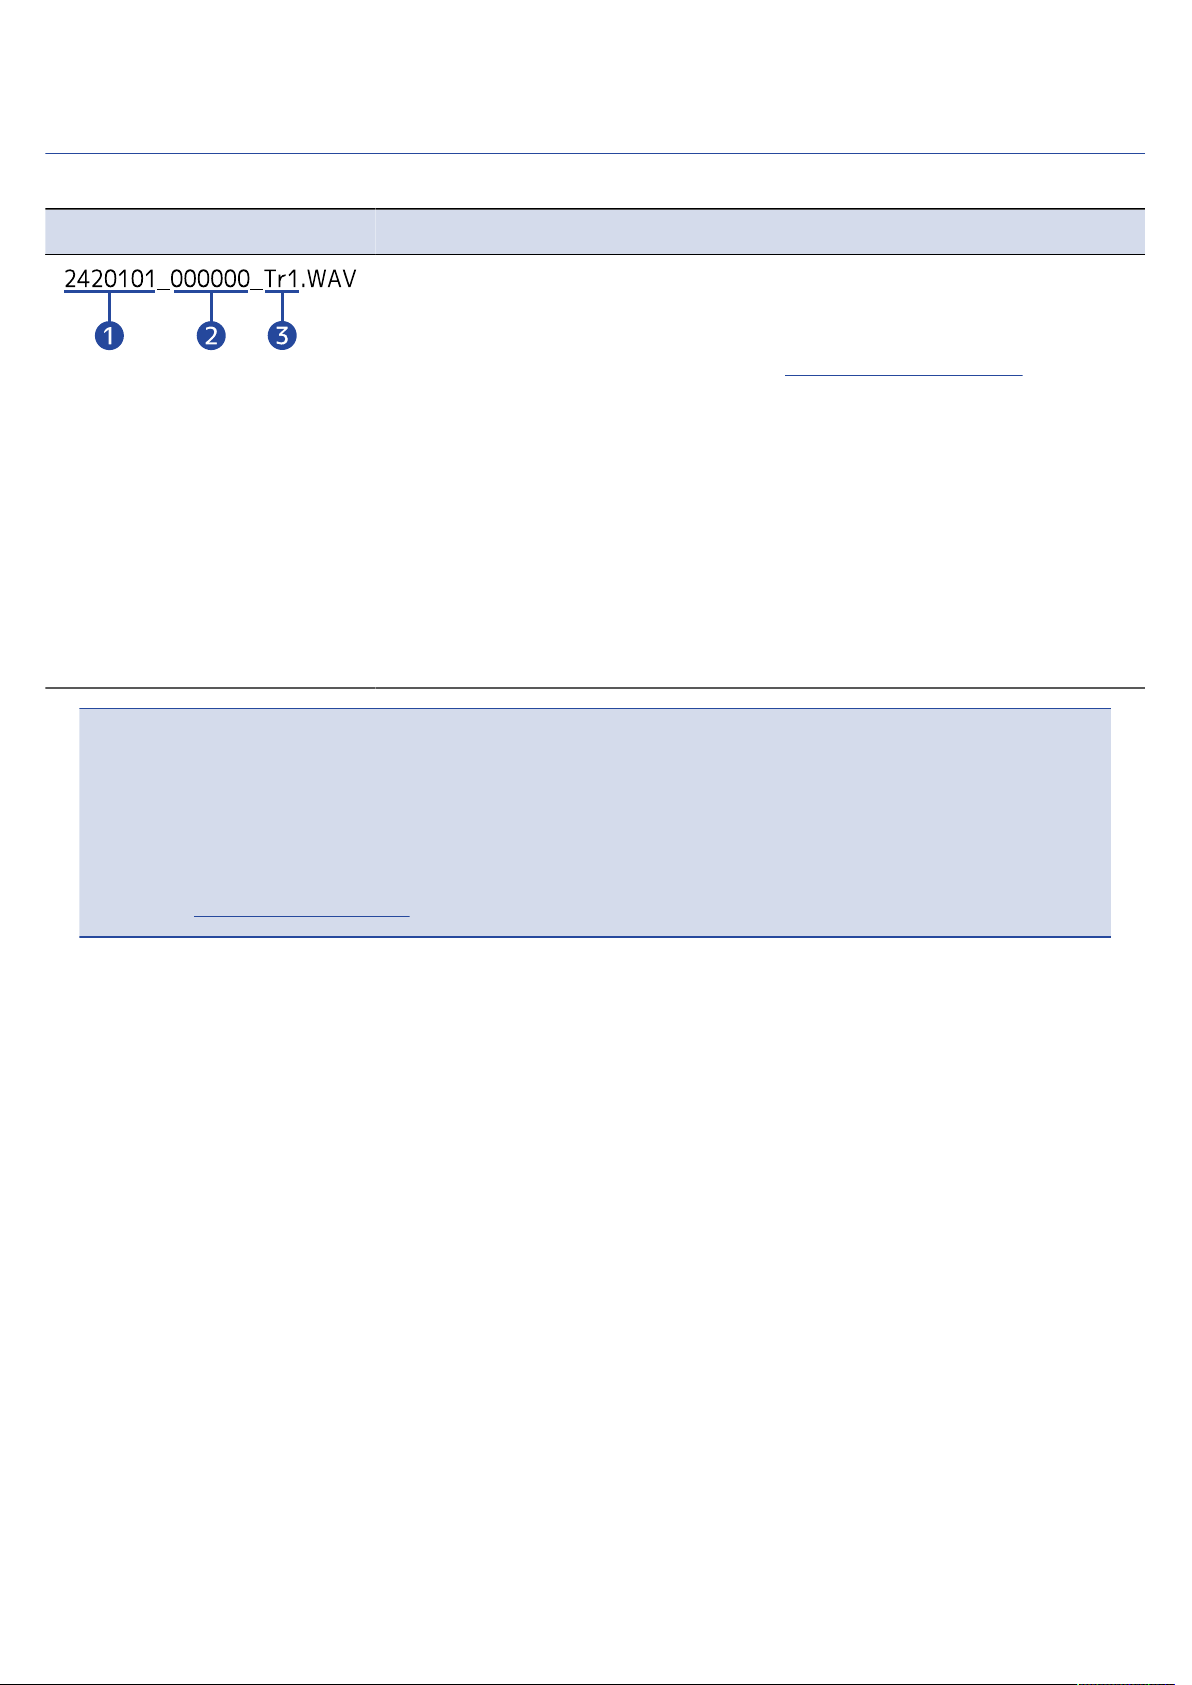
Files are named with the following format.
File name example Explanation
Date
❶
The date of recording is included numerically.
The numbers follow the set order (Setting the date format).
Time
❷
The hour, minute and second are included numerically.
Track name
❸
This shows the track used for recording.
• TrMic: File recorded using the built-in XY mic
• Tr1, Tr2: Files recorded using tracks 1 and 2
• TrLR: File that is a stereo mix of all tracks
NOTE
• If the file size exceeds 2 GB, new files and a new file folder will be created automatically and recording
will continue without pause. New files and file folders created this way will be named using the numerical
date and time of the moment of continuation.
• Files that are stereo mixes of all tracks will only be created when the sample rate is set to 44.1 kHz or 48
kHz. (→ Setting the sample rate)
87
Page 88
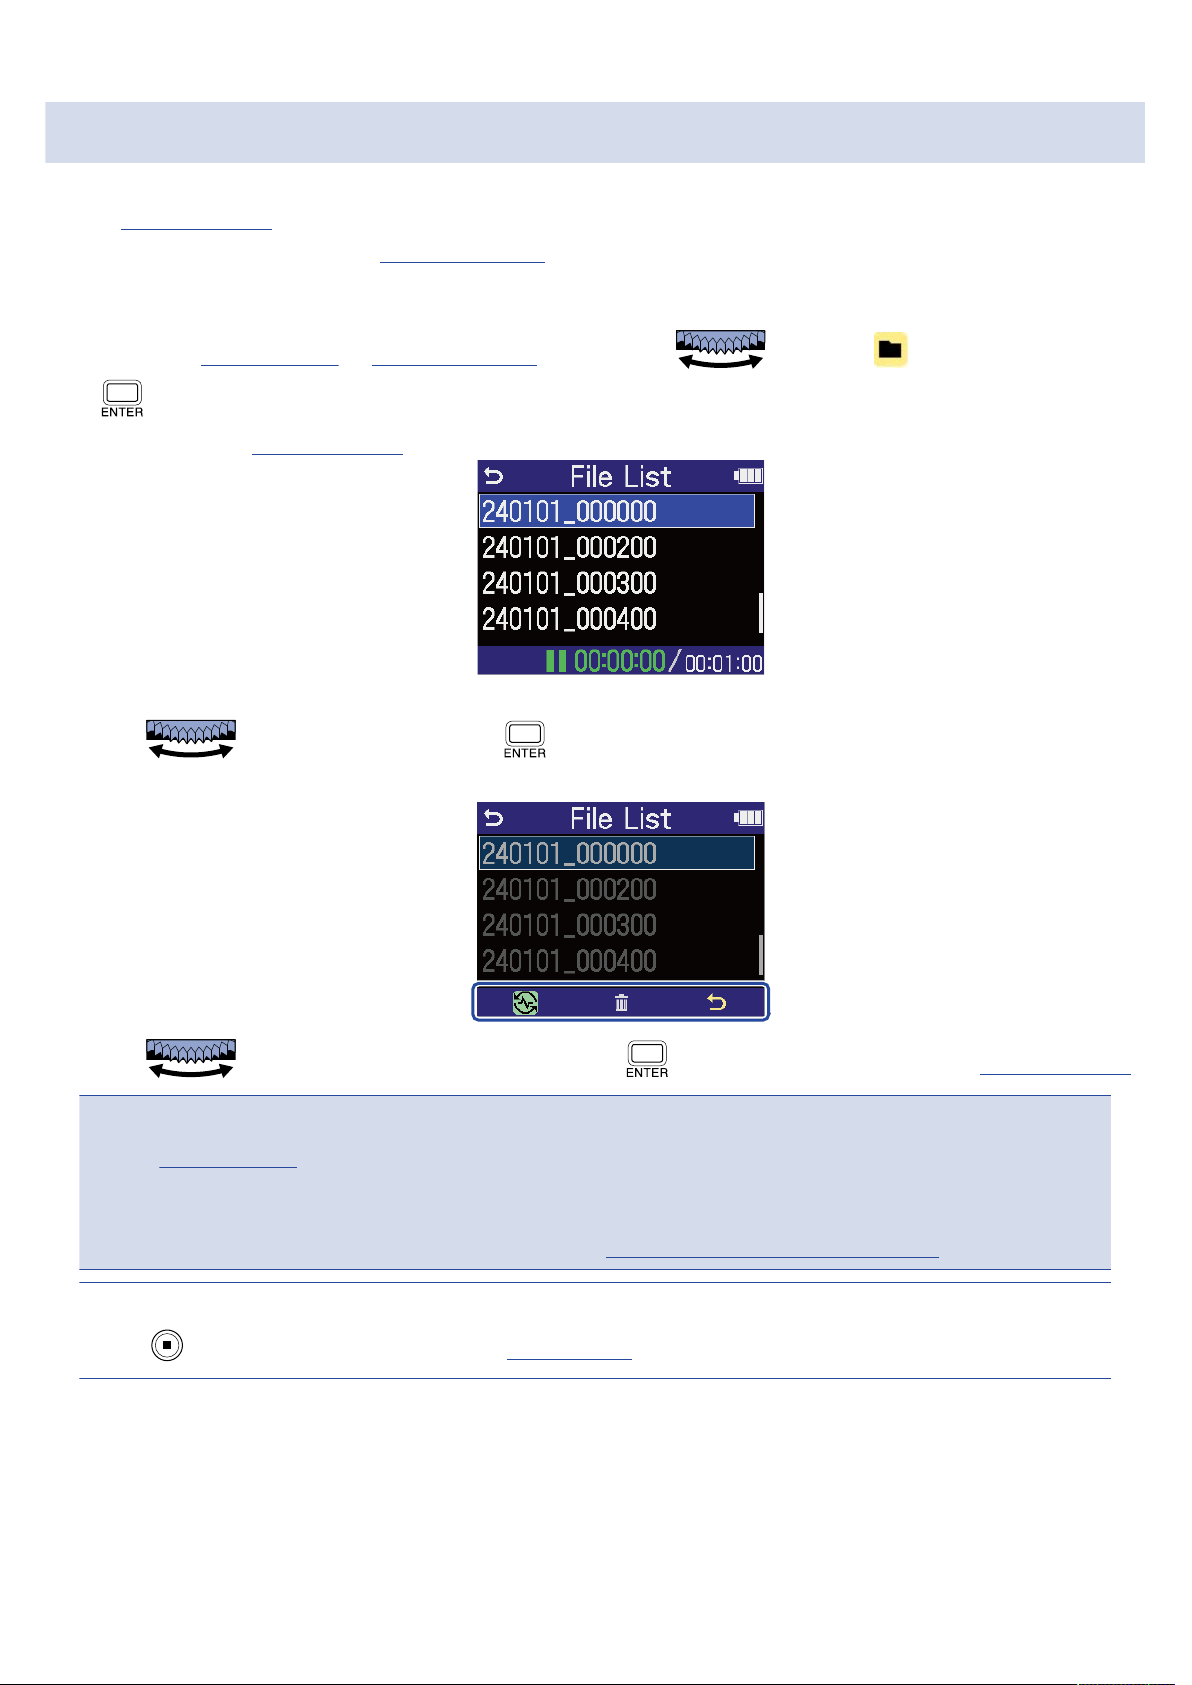
Checking files
On the File List Screen, files on the microSD card can be checked while playing them.
When the Menu bar is open, the Playback Screen can be opened for the selected file and that file can also
be moved to the TRASH folder.
1. When the Home Screen or Playback Screen is open, use to select (File List) and press
.
This opens the File List Screen, which lists the files on the microSD card.
2. Use to select a file and press .
A menu bar that enables operations on the selected file will appear.
Use to select the settings item and press to open a settings screen. (→ File List Screen)
NOTE
On the File List Screen, all the files in a file folder are treated as one file. For example, if two files named
“240101_000000_Tr1.WAV” and “240101_000000_Tr2.WAV” have been created in a file folder, they will be
shown as a single file named “240101_000000” on the File List Screen. If this file is selected and deleted, this
operation will be applied to all files in the file folder. (→ H4essential folder and file structure)
HINT
Press to return to the Home Screen. (→ Home Screen)
88
Page 89
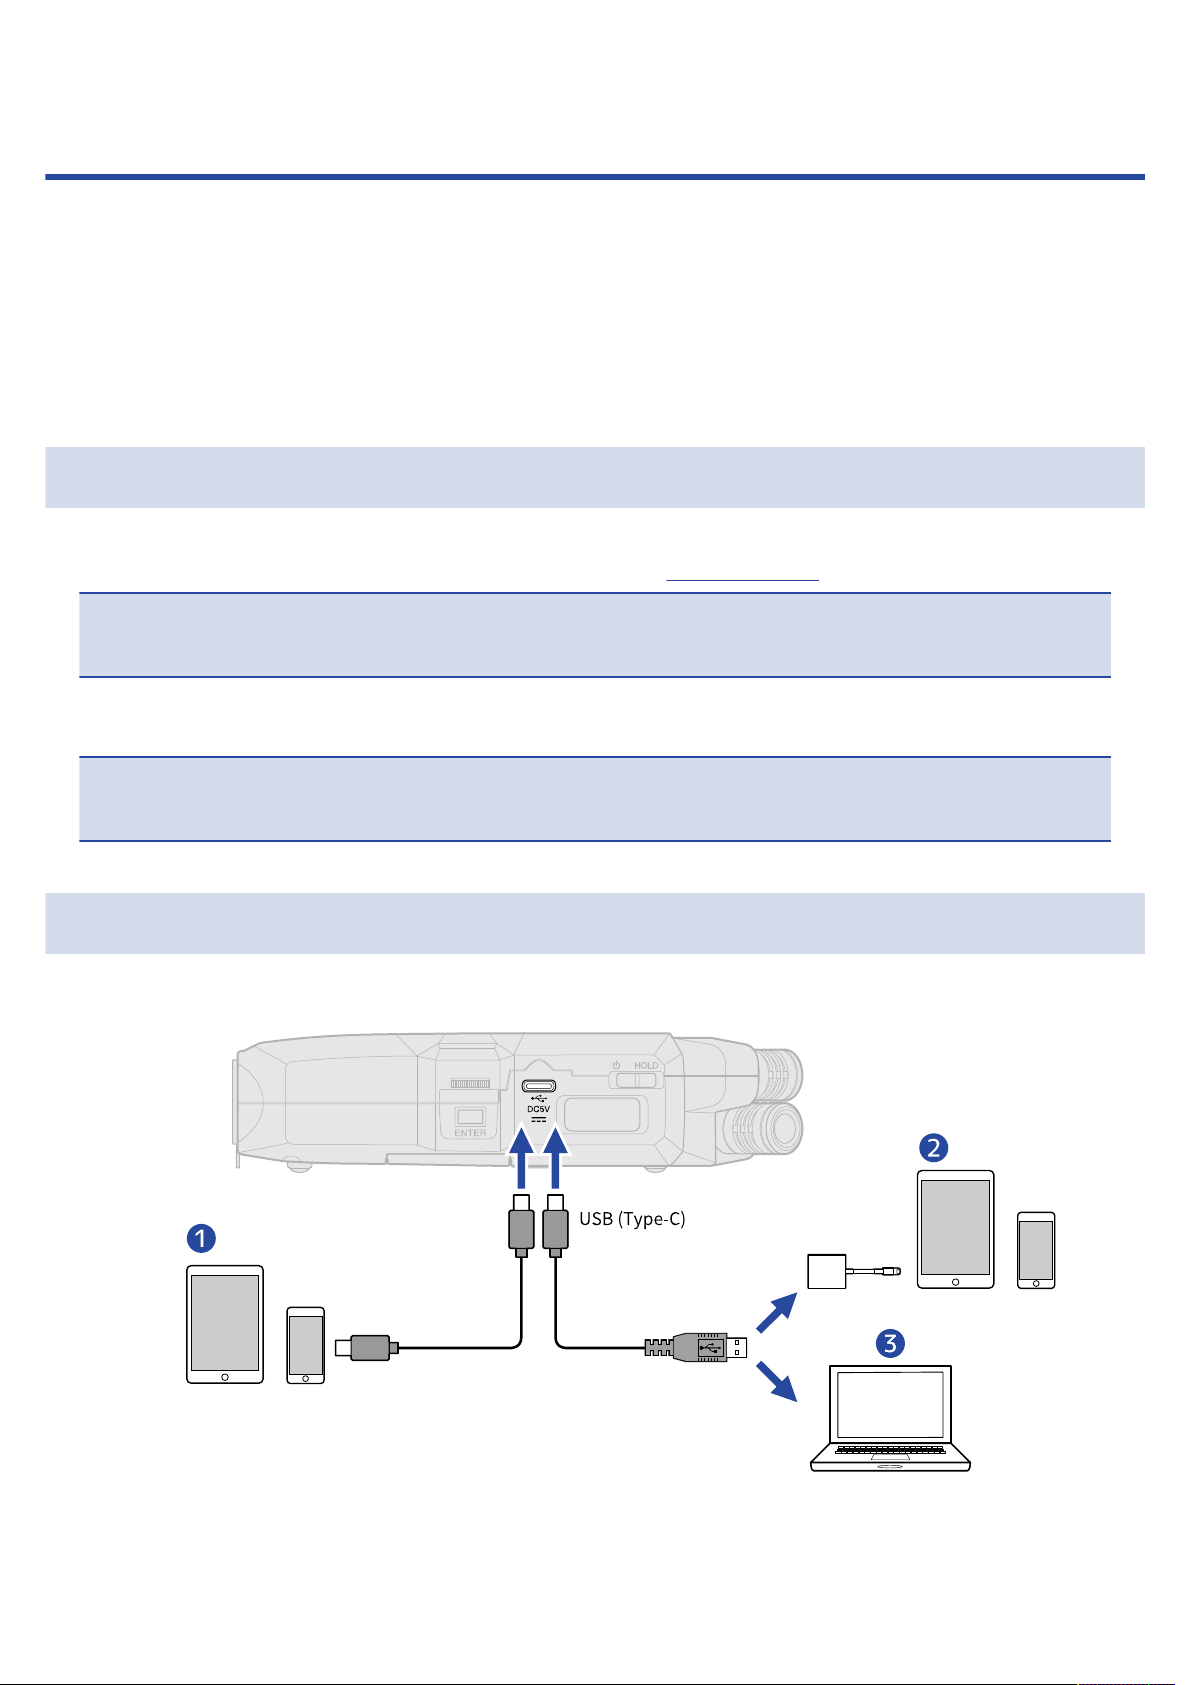
Using as an audio interface
Signals input to the H4essential can be sent to a computer, smartphone or tablet, and playback signals
from that device can be output from the H4essential.
Moreover, the H4essential can record even when it is being used as an audio interface.
No driver is necessary for use with smartphones, tablets or Mac computers.
A driver is necessary for use with Windows computers.
For Windows
1. Download the H4essential Driver to the computer from zoomcorp.com.
NOTE
The latest H4essential Driver can be downloaded from the above website.
2. Launch the installer and follow the instructions to install the H4essential Driver.
NOTE
See the Installation Guide included in the driver package for detailed installation procedures.
Connecting to computers, smartphones and tablets
1. Use a USB (Type-C) cable to connect the H4essential with a computer, smartphone or tablet.
Smartphone/tablet (USB Type-C)
❶
89
Page 90
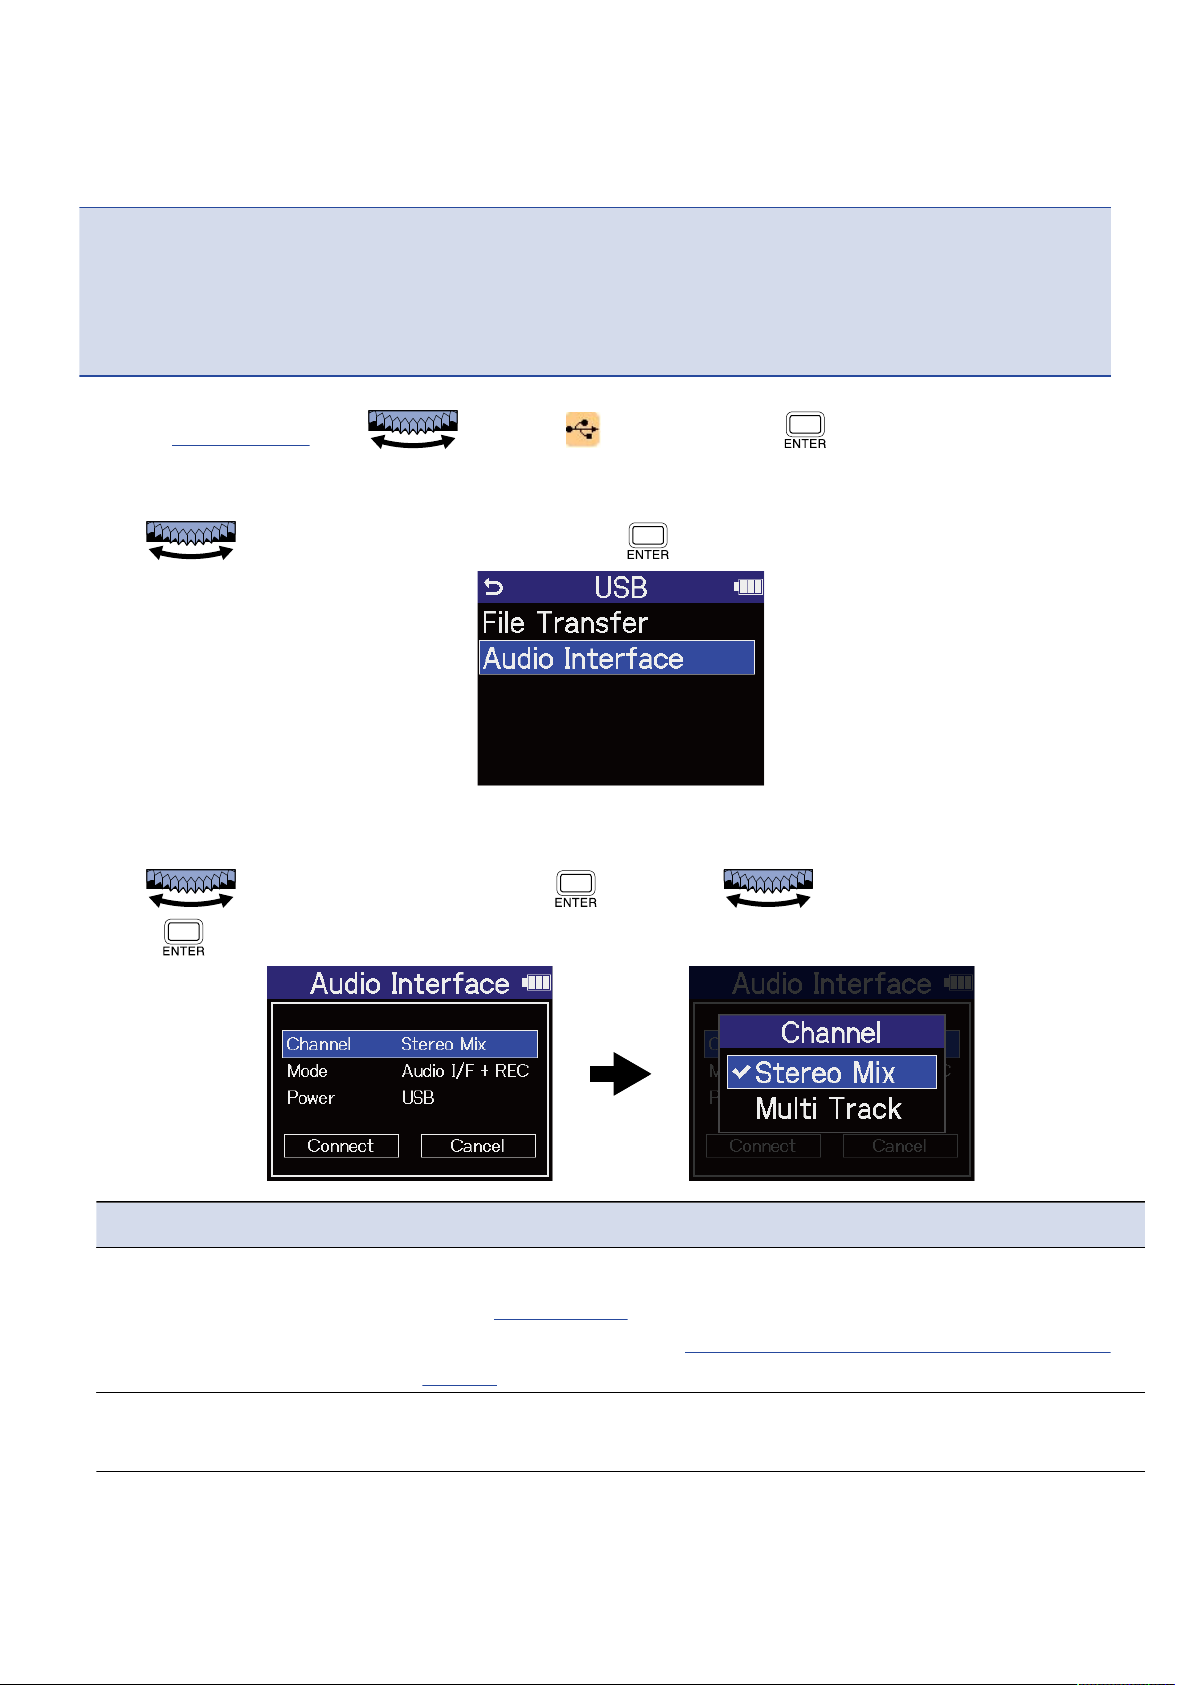
Smartphone/tablet (Lightning)
❷
Computer (Windows/Mac)
❸
NOTE
• Use a USB cable that supports data transfer.
• A Lightning to USB 3 Camera Adapter is necessary to connect to an iOS/iPadOS device with a Lighting
connector.
2. On the Home Screen, use to select (USB) and press .
The USB screen will open.
3. Use to select “Audio Interface” and press to confirm.
4. Set the channels to output to the computer, smartphone or tablet.
Use to select “Channel” and press . Then, use to select the channels and
press .
Setting Explanation
Stereo mix This will make a stereo mix of all inputs with the volume adjustments
on the Mixer Screen and output two channels to the computer,
smartphone or tablet. (→ Adjusting the monitoring balance of input
sounds)
Multi Track This will output 4 channels with each input separately to the
computer, smartphone or tablet.
90
Page 91
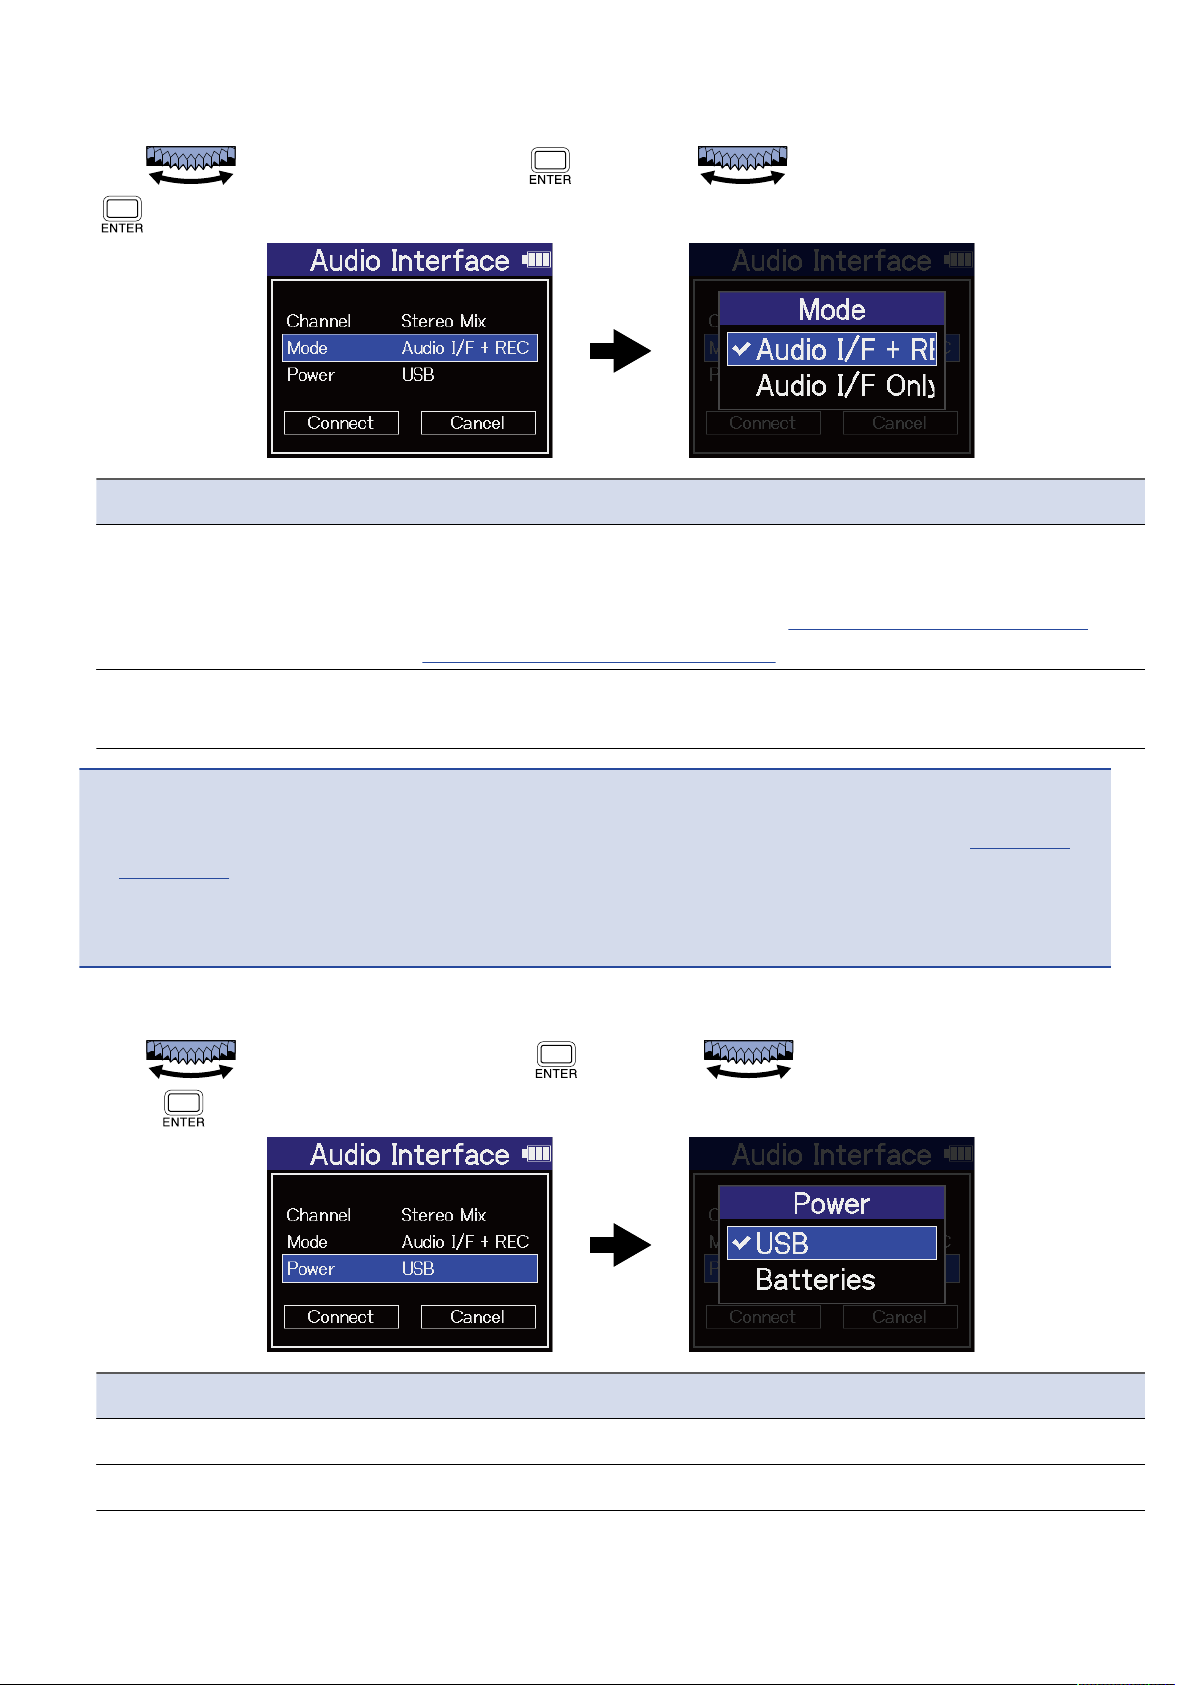
5. Set whether to record simultaneously with the H4essential.
Use to select “Mode” and press . Then, use to select the mode and press
.
Setting Explanation
Audio I/F + REC The H4essential can record and play back even when it is being used
as an audio interface.
For details about this function, see “Recording on the H4essential
while using it as an audio interface”.
Audio I/F Only The H4essential will not record or play back when it is being used as
an audio interface.
NOTE
• “Audio I/F + REC” can be selected only when the sample rate is set to 44.1 kHz or 48 kHz. (→ Setting the
sample rate)
• All sample rate options can be used when “Audio I/F Only” is selected. The sample rate, which can be set
from the computer, smartphone or tablet, has 44.1 kHz, 48 kHz and 96 kHz options.
6. Select the power supply.
Use to select “Power” and press . Then, use to select the power supply and
press .
Setting Explanation
USB Power will be supplied using USB bus power.
Batteries The batteries in the unit will be used.
91
Page 92
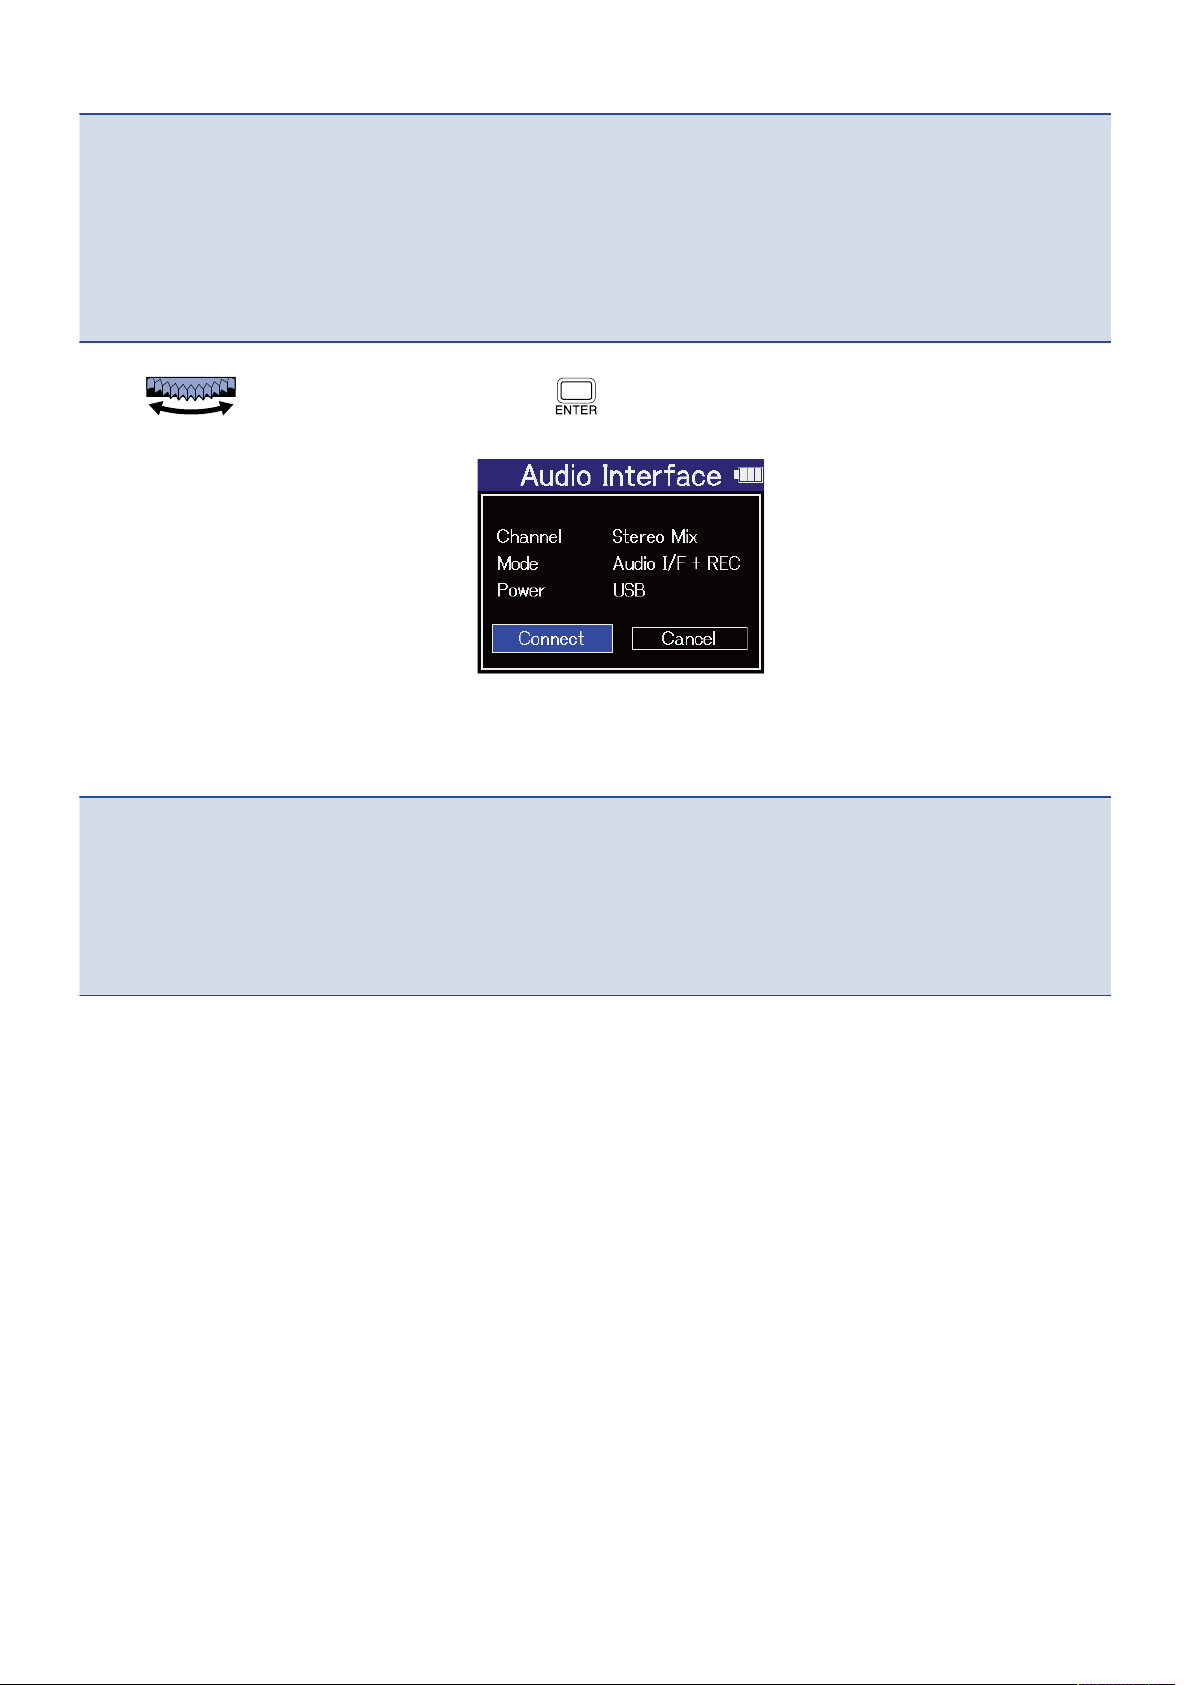
NOTE
• When “USB” is selected, power is supplied through the USB cable from the computer. Depending on the
USB bus power supply capacity of the computer, operation using bus power might not be possible. If this
is the case, select “Batteries” and operate using batteries when connected.
• When “Batteries” is selected, power will not be supplied from the other device. Instead, the H4essential
will operate using the batteries in it.
7. Use to select “Connect” and press to confirm.
Connect with the computer, smartphone or tablet.
8. Launch an application on the computer, smartphone or tablet, and select “H4essential” as the “Audio”
or “Input/Output” device.
NOTE
• If “H4essential” cannot be selected for the “Sound” setting on a computer, it can still be used as a 32-bit
float audio interface by selecting “H4essential” as the “Audio” or “Input/Output” device in an application
that supports 32-bit float format.
• See the application operation manuals for information about their operation.
92
Page 93

Making input settings and monitoring adjustments
When using the H4essential as an audio interface, input settings and monitoring adjustments can be made
in the same way as when using it as a recorder.
See the references below and make input settings and monitoring adjustments.
Reference Explanation
Enabling tracks for recording Select inputs from MIC (built-in XY mic) and inputs 1–2.
Converting built-in XY mic input to mono Input from the built-in XY mic can be mixed to a single
channel and handled as mono audio.
Setting plug-in power Make this setting when a mic that is compatible with plug-in
power is connected to the MIC/LINE IN jack.
Setting phantom power Inputs 1 and 2 support phantom power and can provide +48
V. Turn on phantom power when condenser mics that require
it are connected.
This can be turned on/off separately for each input.
Reducing noise (Lo Cut) Low frequencies can be cut to reduce the sound of wind and
vocal pop noises, for example.
This can be set separately for each input.
Enabling stereo linking Using stereo-linking, input signals can also be handled as
stereo audio.
When the stereo setting is used, input 1 will become the left
channel and input 2 will become the right channel.
When the mid-side stereo setting is used, input 1 will become
the Mid signal and input 2 will become the Side signal. Mid
captures sound front and center while Side captures sound
left and right. The stereo width can be changed by adjusting
the Side level.
Setting the side level when recording
mid-side stereo
Monitoring input sounds Use headphones, for example, to monitor input sounds and
The side level of inputs set to mid-side stereo can be set
before recording, allowing the stereo width of that input
sound to be adjusted.
adjust the volume.
Adjusting the monitoring balance of
input sounds
On the Mixer Screen, the monitoring balance of all input
sounds can be adjusted. Moreover, the volumes of the input
sounds and their stereo mix signal can be checked with the
level meters.
93
Page 94
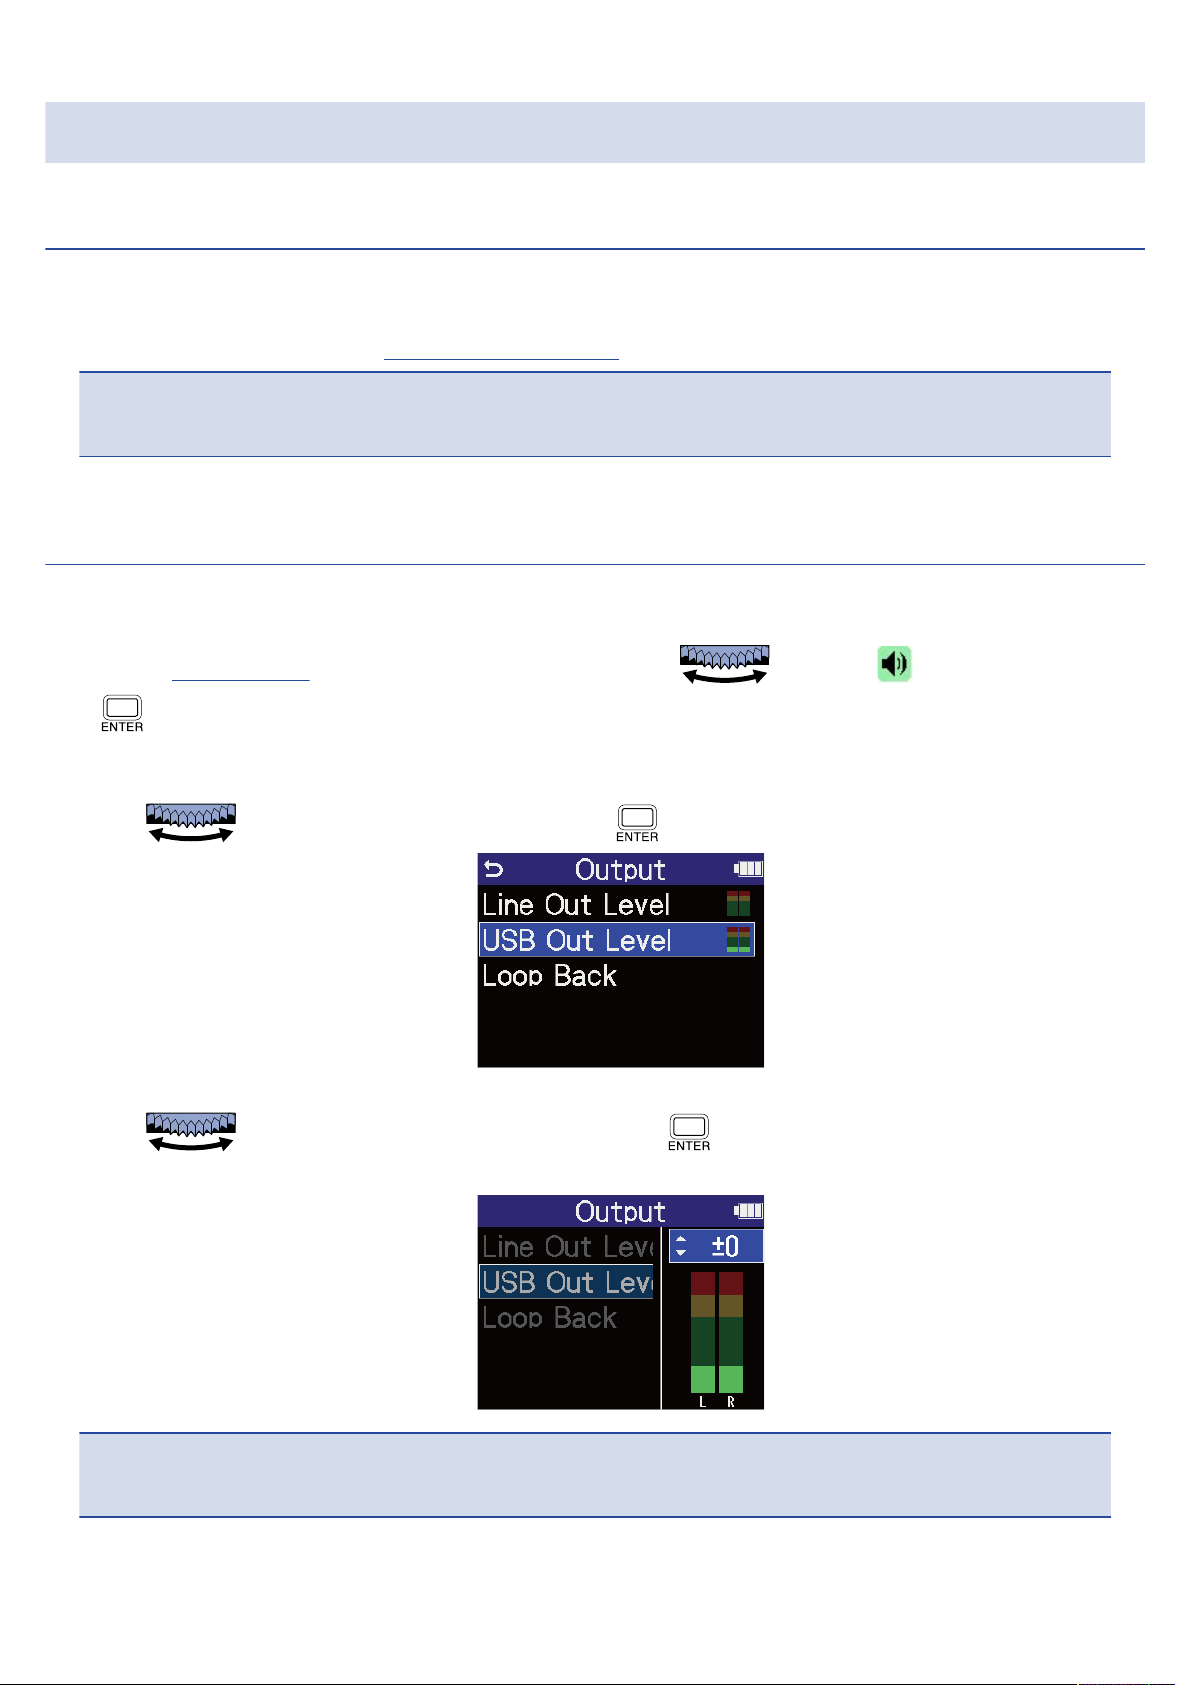
Making output settings
Adjusting the output level
The line output level used for output from the PHONE/LINE OUT jack to headphones or another device
during use as an audio interface can be adjusted.
For details about operation, see “Making output settings”.
NOTE
This does not affect the recorded audio or the audio levels output from the USB port.
Adjusting the USB output level
The level output by USB to the computer, smartphone or tablet can be adjusted.
1. On the Home Screen when in audio interface mode, use to select (Output) and press
.
This opens the Output Settings Screen.
2. Use to select "USB Out Level” and press .
3. Use to adjust the USB output level and press .
The output level meters can be checked while adjusting.
NOTE
This setting does not affect the recorded audio or the audio levels output from the PHONE/LINE OUT jack.
94
Page 95
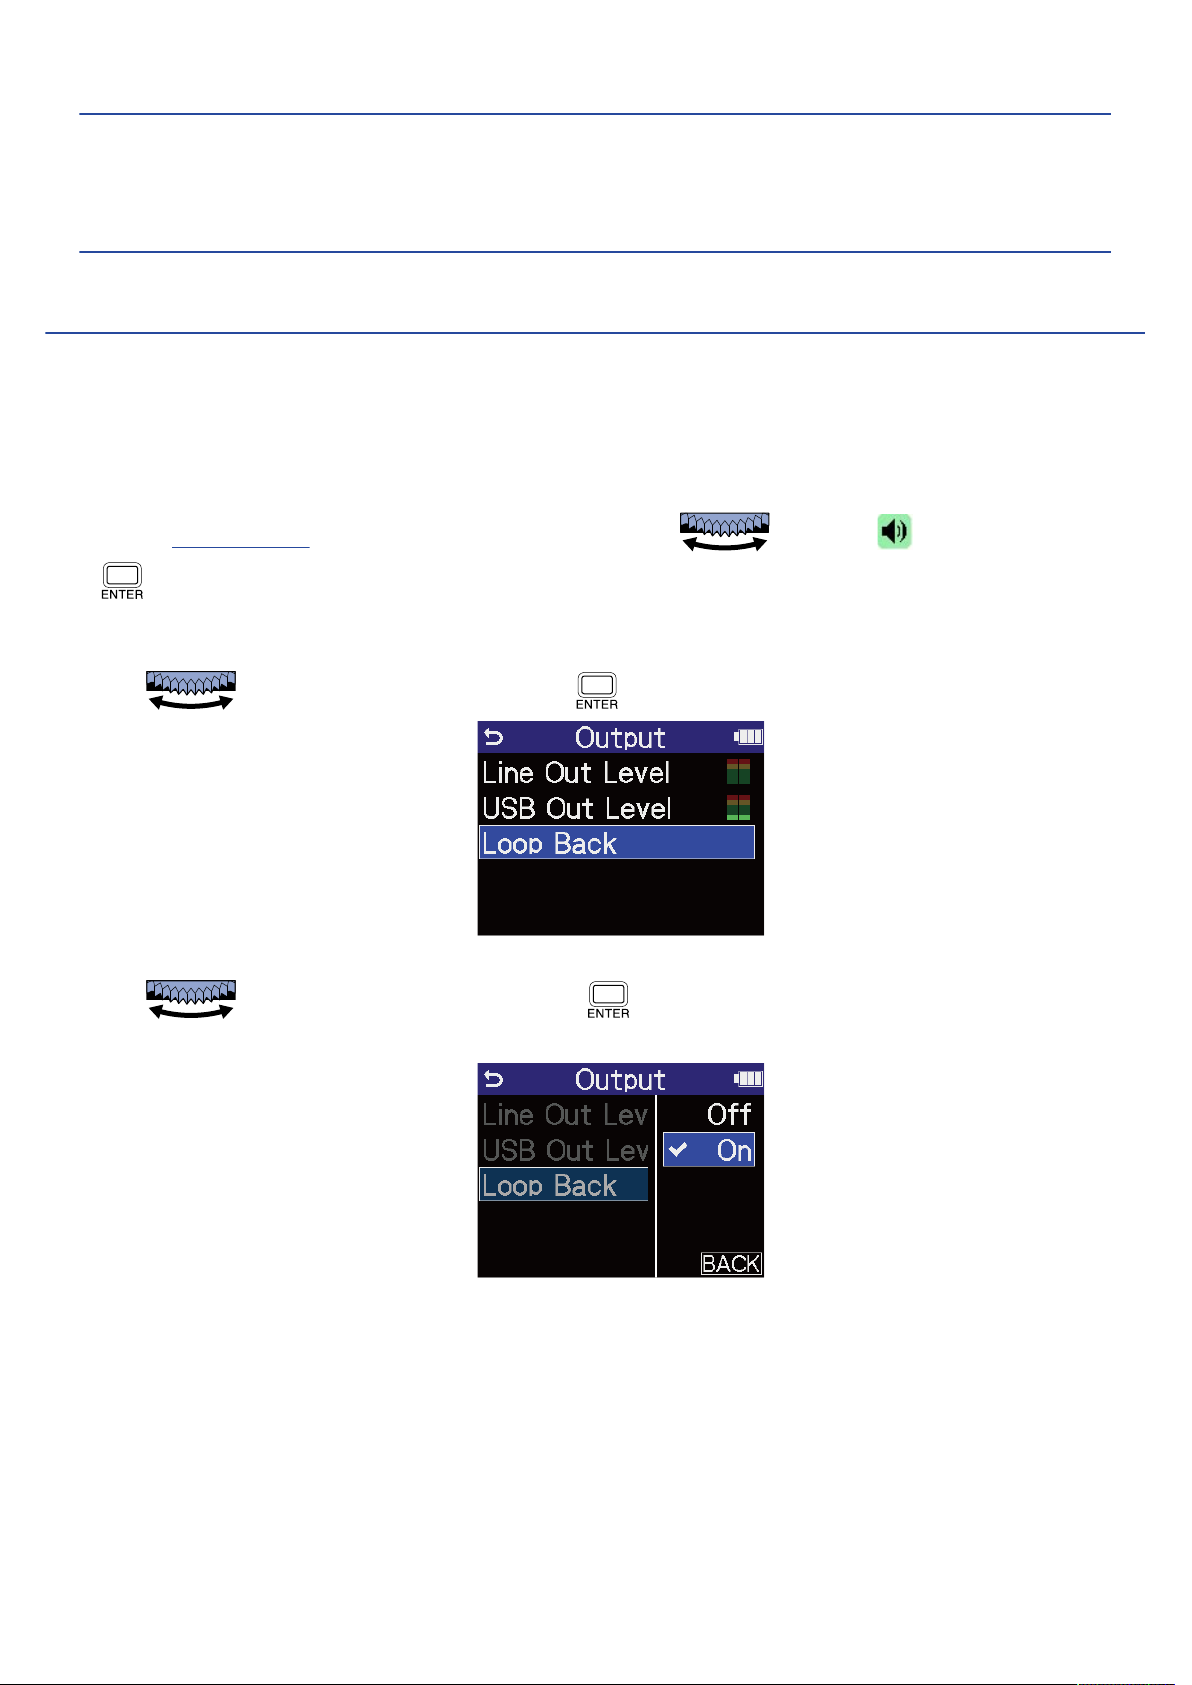
HINT
• This can be set to “Mute” or from –40 to +40.
• Selecting “Mute” silences the output from the USB port.
Enabling the loop back function
This function allows playback sound from a computer, smartphone or tablet and sounds input to the
H4essential to be mixed and sent again (looped back) to the computer, smartphone or tablet.
This function can be used to add narration to music played back from a computer and to record the mix or
stream it on that computer, for example.
1. On the Home Screen when in audio interface mode, use to select (Output) and press
.
This opens the Output Settings Screen.
2. Use to select “Loop Back” and press .
3. Use to select “On” or “Off”, and press .
Selecting "On” turns on the loop back function.
95
Page 96
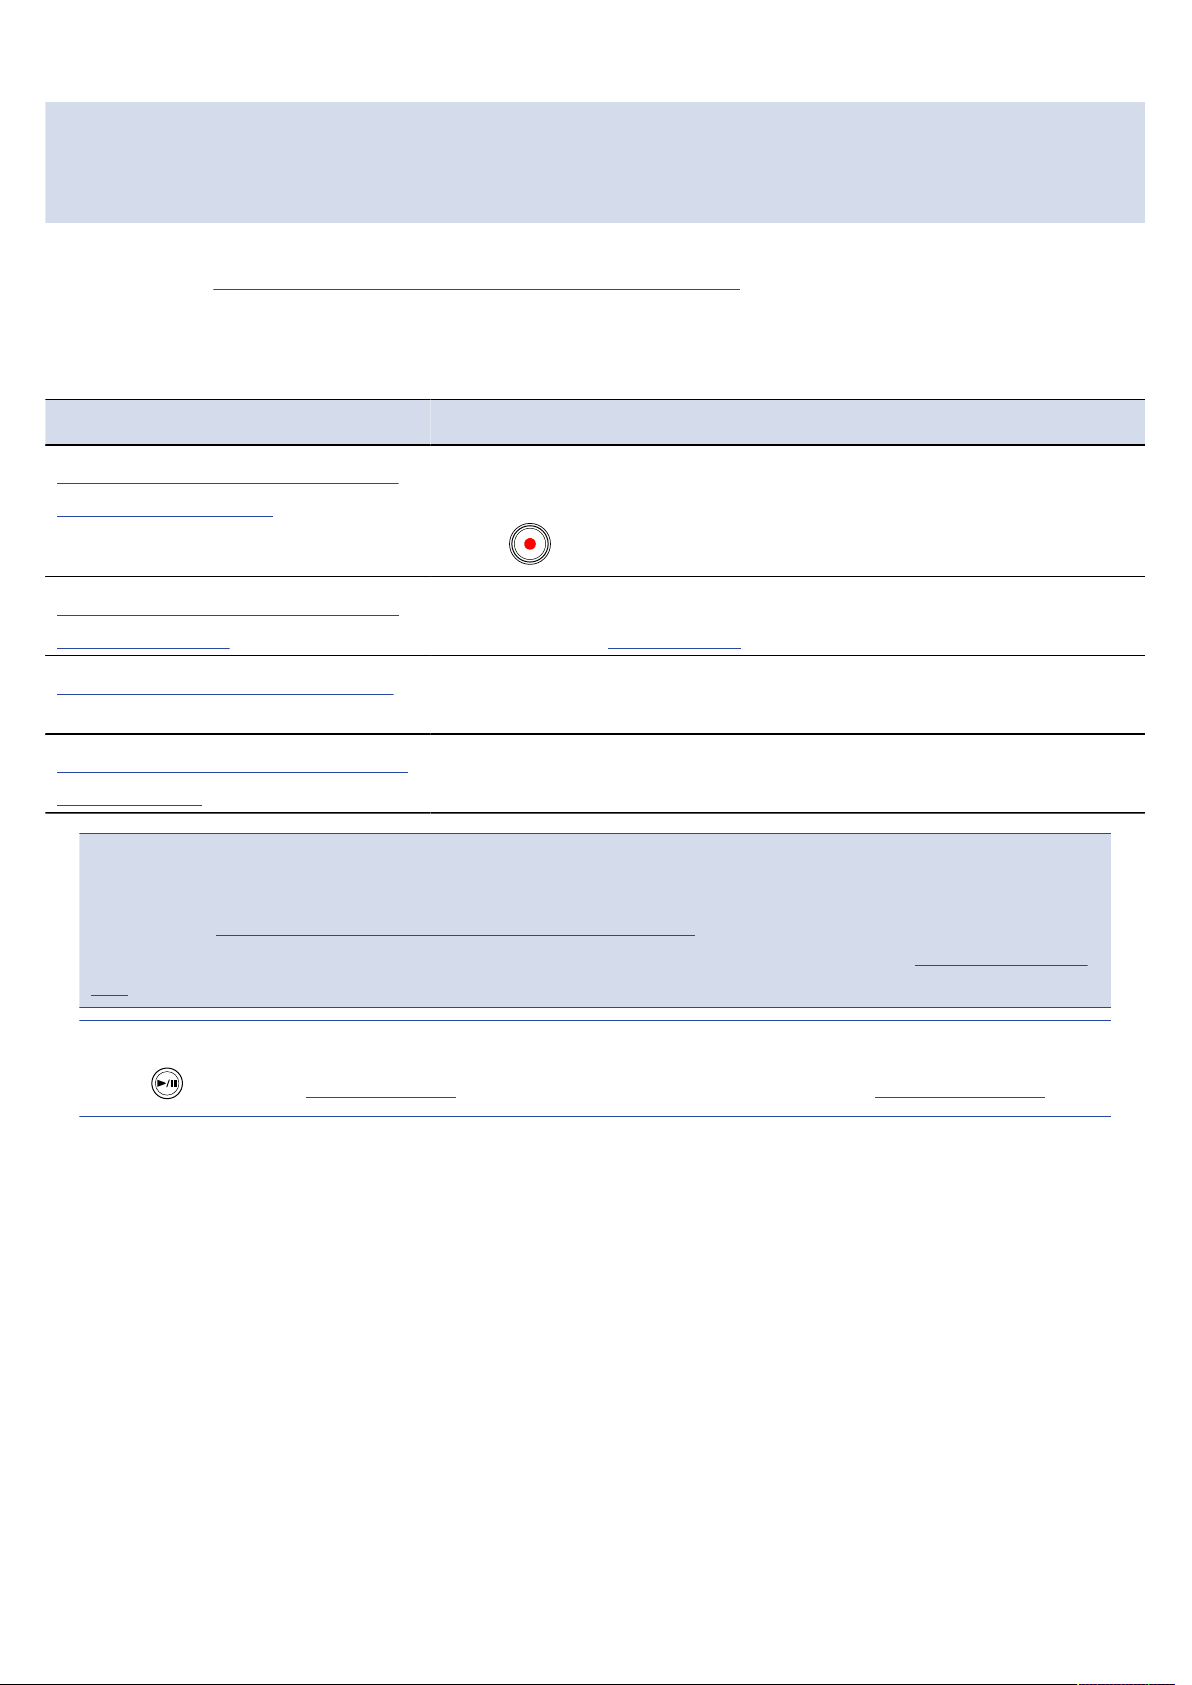
Recording on the H4essential while using it as an audio interface
As explained in “Connecting to computers, smartphones and tablets”, the H4essential can record while it is
being used as an audio interface if the Mode is set to “Audio I/F + REC”. In this case, recording settings can
be made in the same way as when using it as a recorder.
See the references below and make recording settings.
Reference Explanation
Capturing audio before recording
starts (pre-recording)
Recording with levels adjusted on
the Mixer Screen
Enabling the recording start tone Half-second tone signals (recording start tones) can be output from
Writing metadata (iXML chunks) to
recording files
NOTE
The sample rate of the H4essential itself cannot be changed when the Mode is set to “Audio I/F + REC” as
explained in “Connecting to computers, smartphones and tablets”. To change the sample rate, disconnect
from the computer, smartphone or tablet. Then change the sample rate as explained in “Setting the sample
rate”.
HINT
The input signal is always buffered for a set amount of time, so it
can be captured (pre-recorded) for up to 2 seconds before the time
when is operated to start recording.
When recording, the levels of the sounds as input or the levels as
adjusted on the Mixer Screen can be used.
the PHONE/LINE OUT jack when recording is started.
Various related information (metadata) stored in iXML chunks can
be written to recorded files.
Press to open the Playback Screen where recorded files can be played back. (→ Playing recordings)
96
Page 97
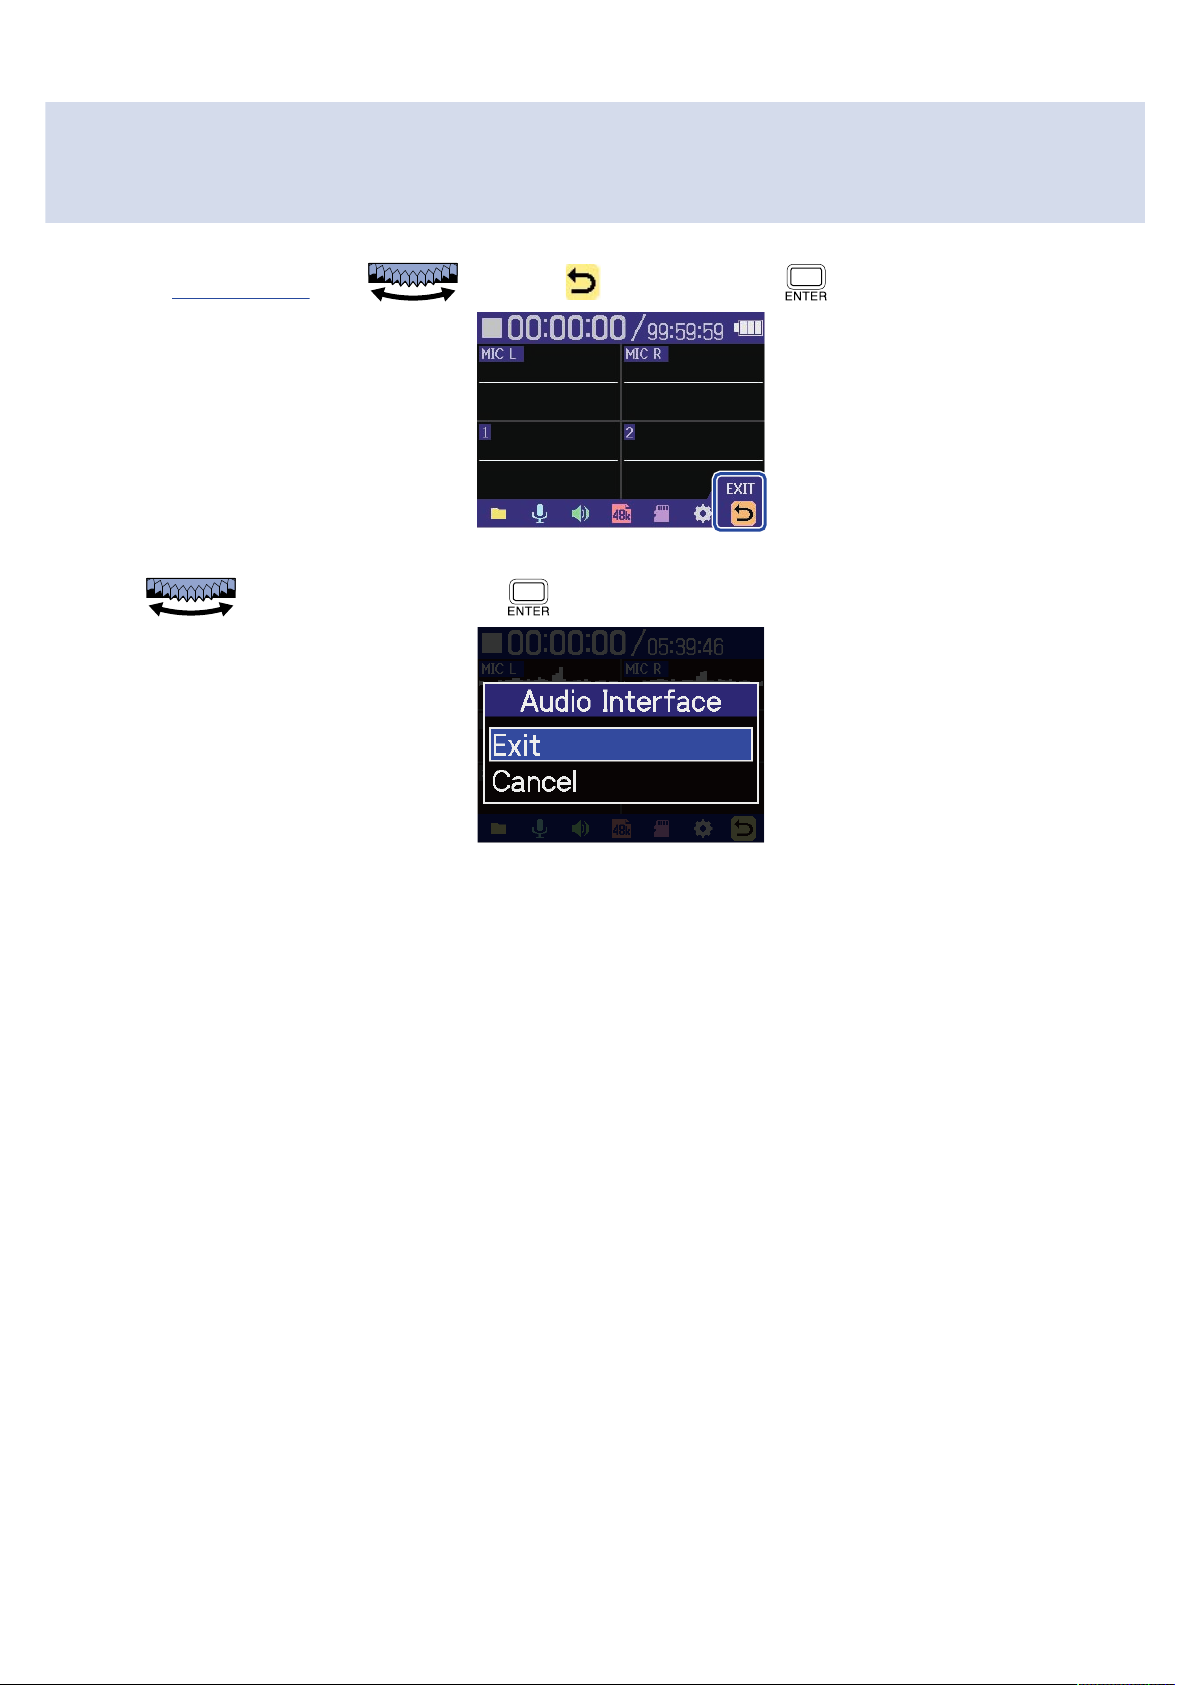
Disconnecting from computers, smartphones and tablets
1. On the Home Screen, use to select (EXIT) and press .
2. Use to select “Exit” and press .
97
Page 98
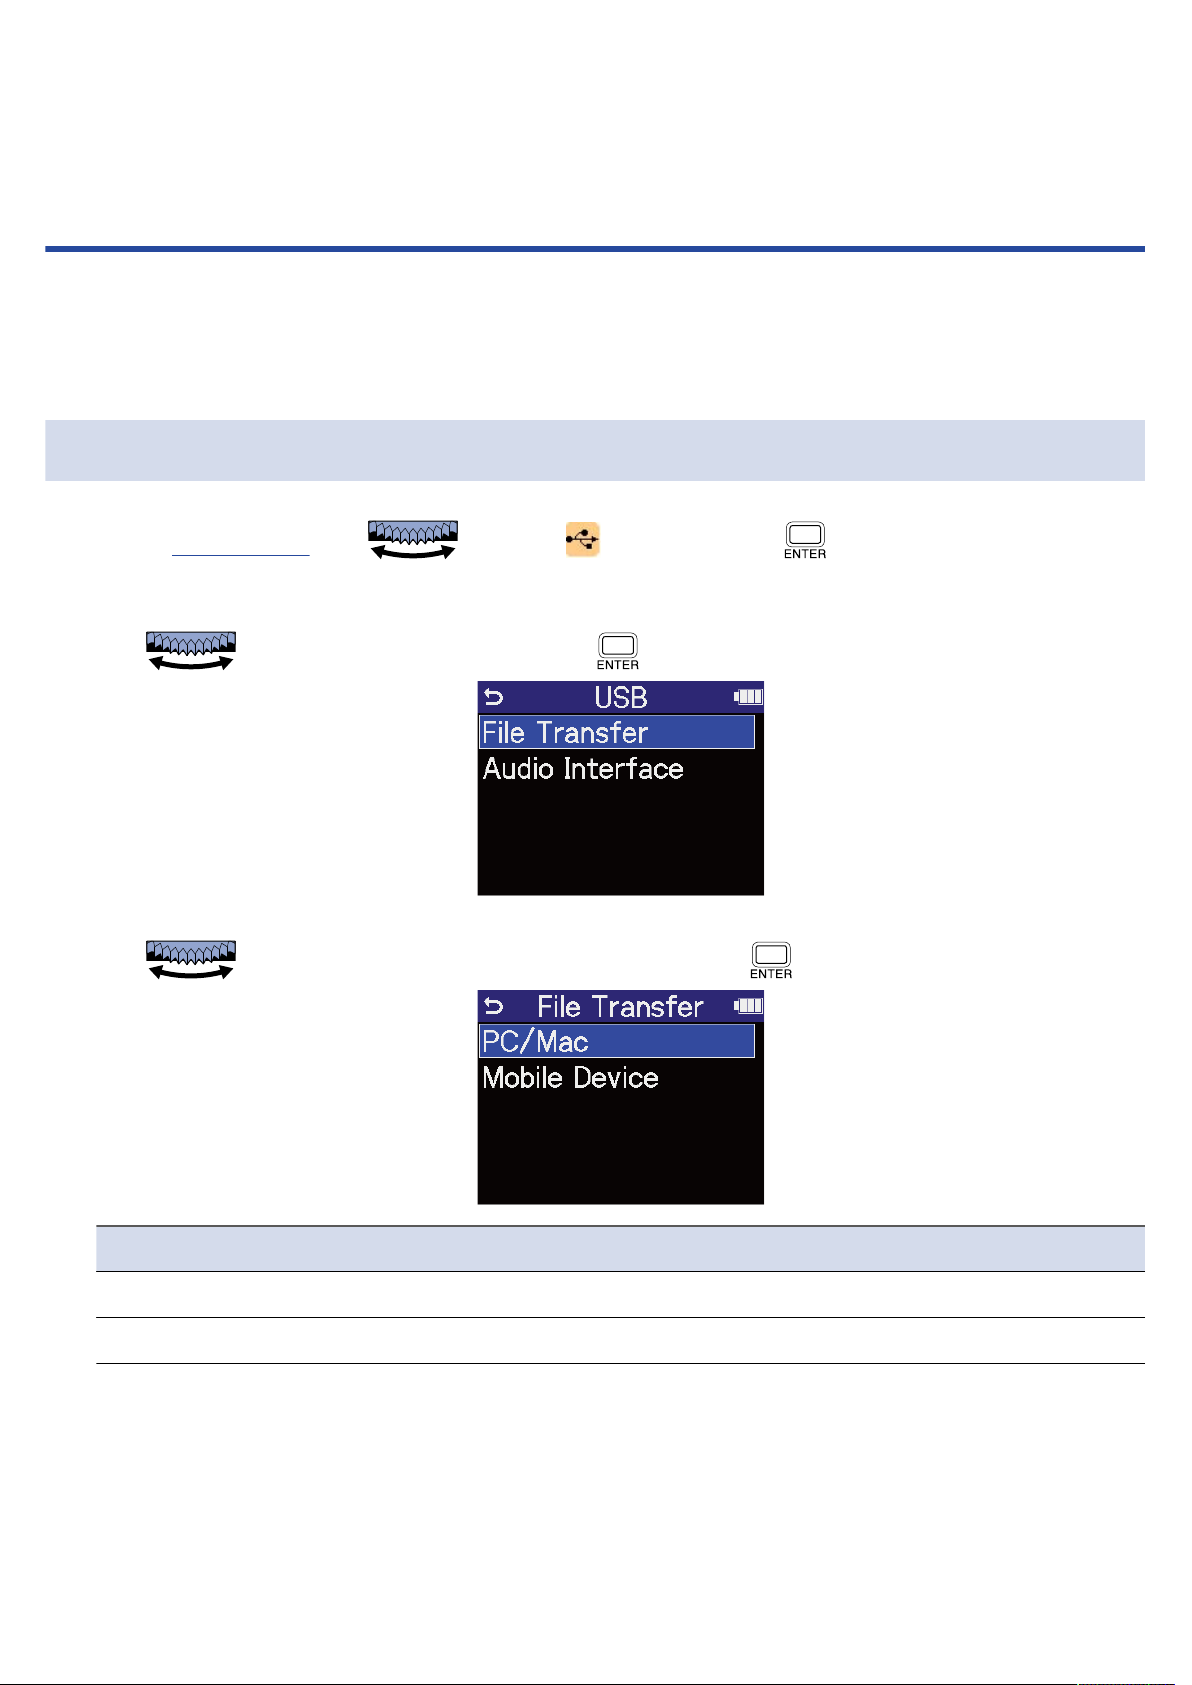
Transferring files to computers and other
devices
By connecting the H4essential with a computer, smartphone or tablet, files on the microSD card can be
checked and moved.
Connecting to computers, smartphones and tablets
1. On the Home Screen, use to select (USB) and press .
The USB screen will open.
2. Use to select “File Transfer” and press to confirm.
3. Use to select the type of device to connect and press to confirm.
Setting Explanation
PC/Mac Connect to a computer.
Mobile Device Connect to a smartphone or tablet.
98
Page 99
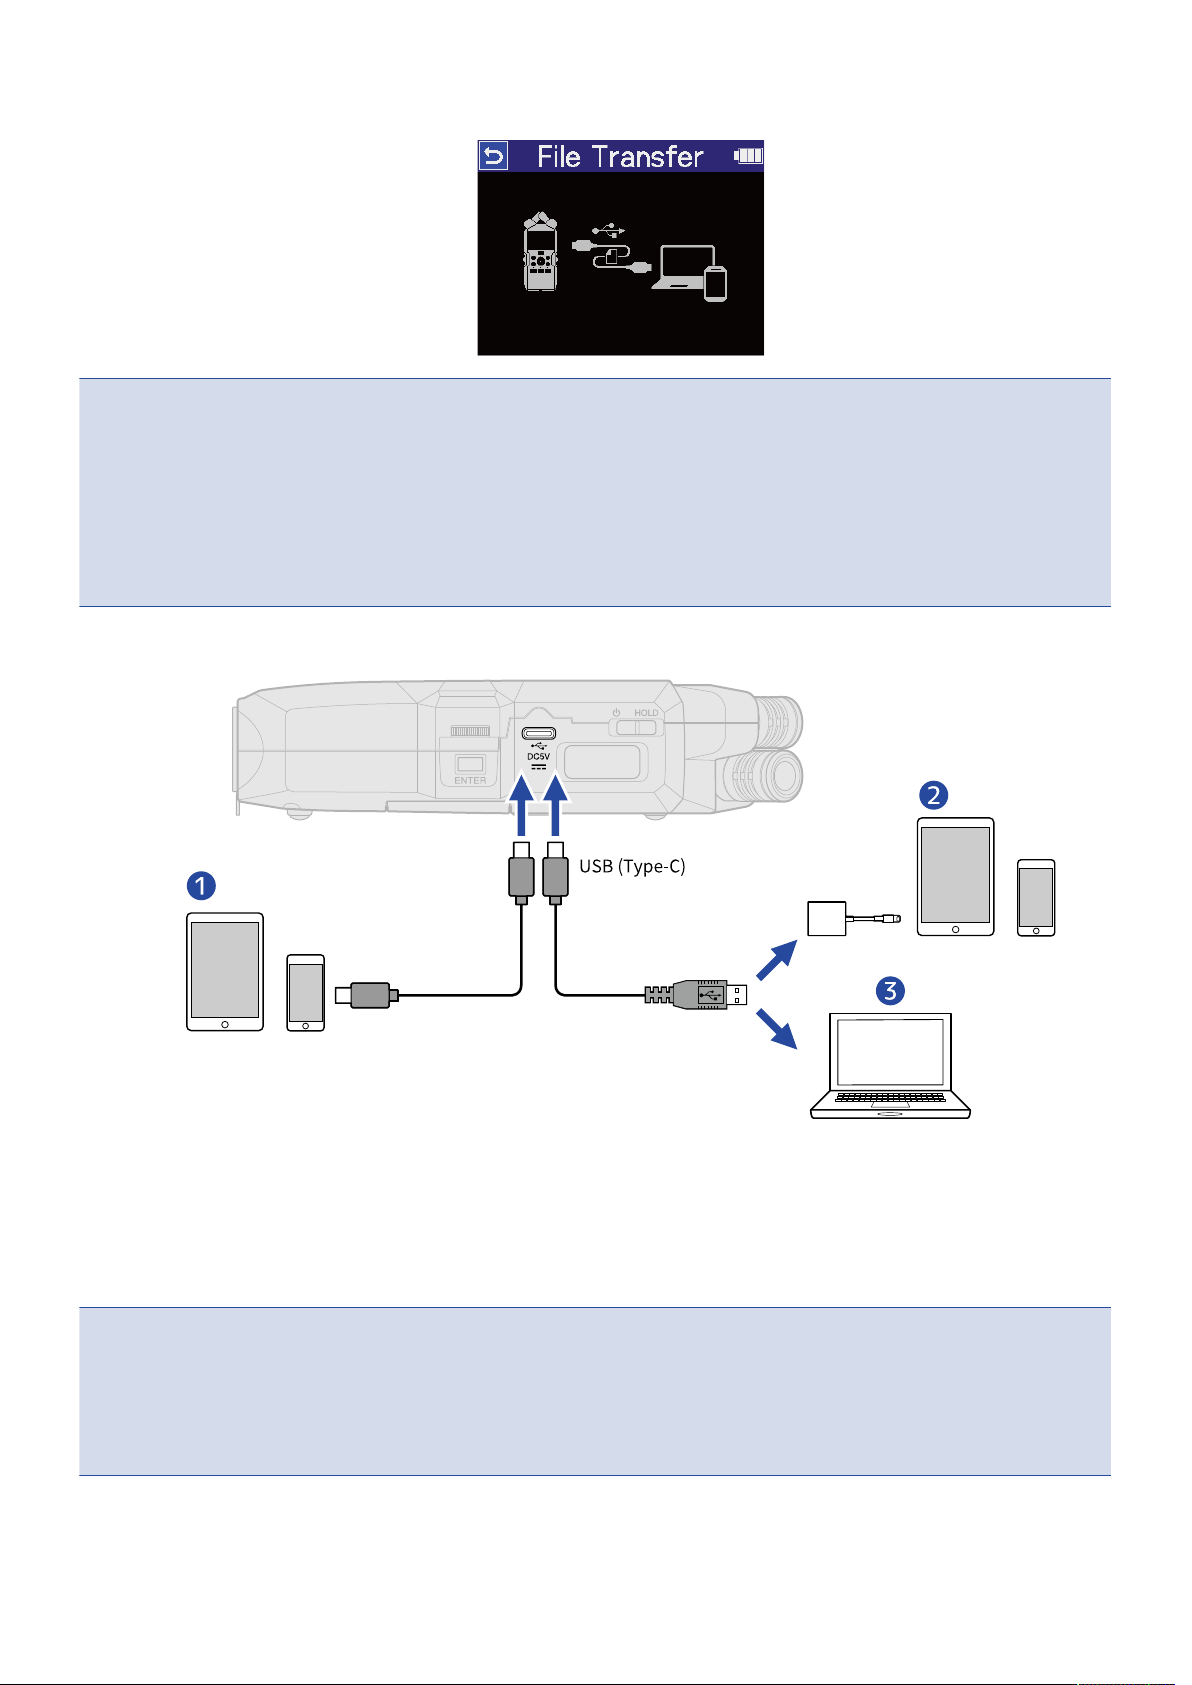
This opens the File Transfer Screen.
NOTE
• When “PC/Mac” is selected, power is supplied through the USB cable from the computer. Depending on
the USB bus power supply capacity of the computer, operation using bus power might not be possible. If
this is the case, select “Mobile Device” to operate using batteries.
• When “Mobile Device” is selected, power will not be supplied from the other device. Instead, the
H4essential will operate using the batteries in it.
4. Use a USB (Type-C) cable to connect the H4essential with a computer, smartphone or tablet.
Smartphone/tablet (USB Type-C)
❶
Smartphone/tablet (Lightning)
❷
Computer (Windows/Mac)
❸
NOTE
• Use a USB cable that supports data transfer.
• A Lightning to USB 3 Camera Adapter is necessary to connect to an iOS/iPadOS device with a Lighting
connector.
5. Use the computer, smartphone or tablet to work with the files saved on the microSD card.
99
Page 100
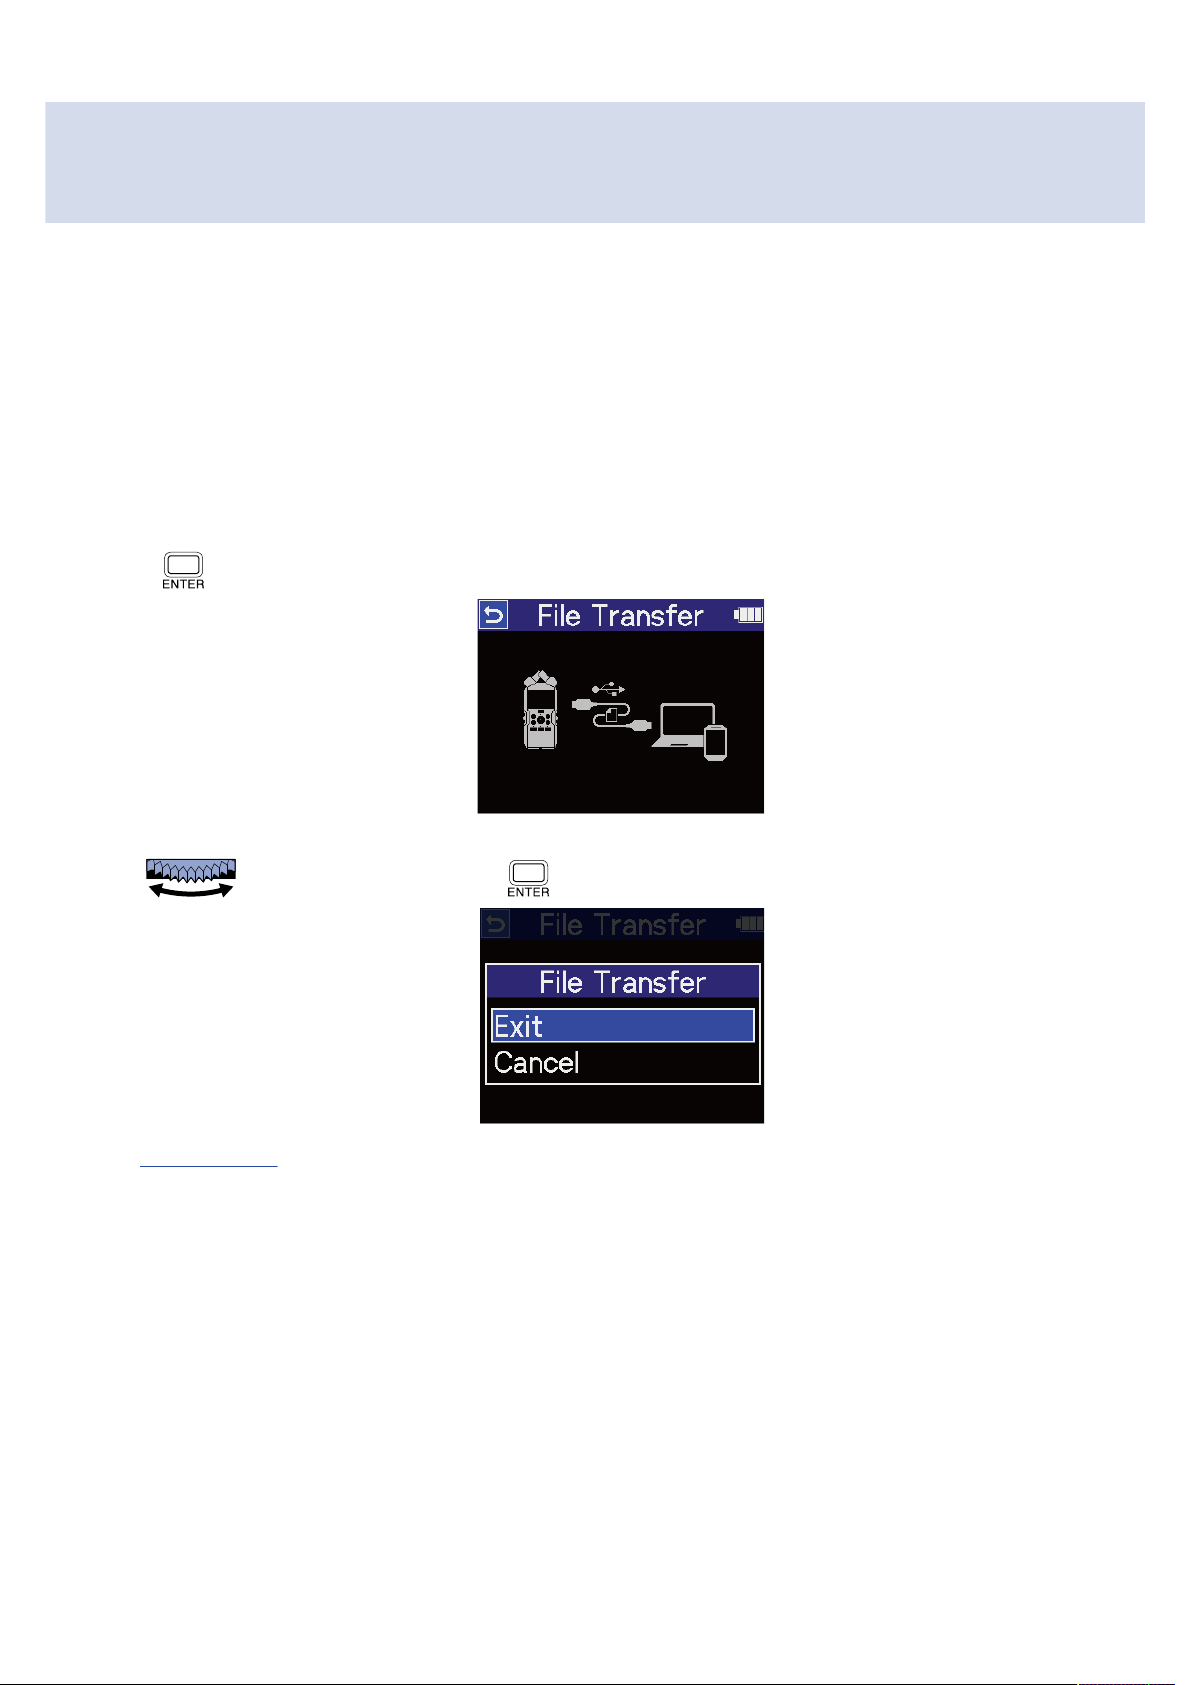
Disconnecting from computers, smartphones and tablets
1. Conduct disconnection procedures on the computer, smartphone or tablet.
• Windows:
Select the H4essential from "Safely Remove Hardware".
• macOS:
Drag the H4essential icon to the Trash and drop it.
• Smartphone/tablet:
See the operation manual for the device.
2. Press .
3. Use to select “Exit” and press to confirm.
The Home Screen will reopen.
100
 Loading...