

Page 1

WL 25
Electronic Water Level
The Zircon® WL 25 Electronic Water Level is an ideal tool for
determining level reference points up to 25 feet (8 m) away.
The WL 25 simplifies working alone or around corners with
accurate and reliable measurements and is ideal for a number
of applications, including erecting fences, building decks,
positioning drainage, plumbing, setting forms, completing
masonry work, or remodeling interiors. The WL 25 features a
25 foot (8 m) hose.
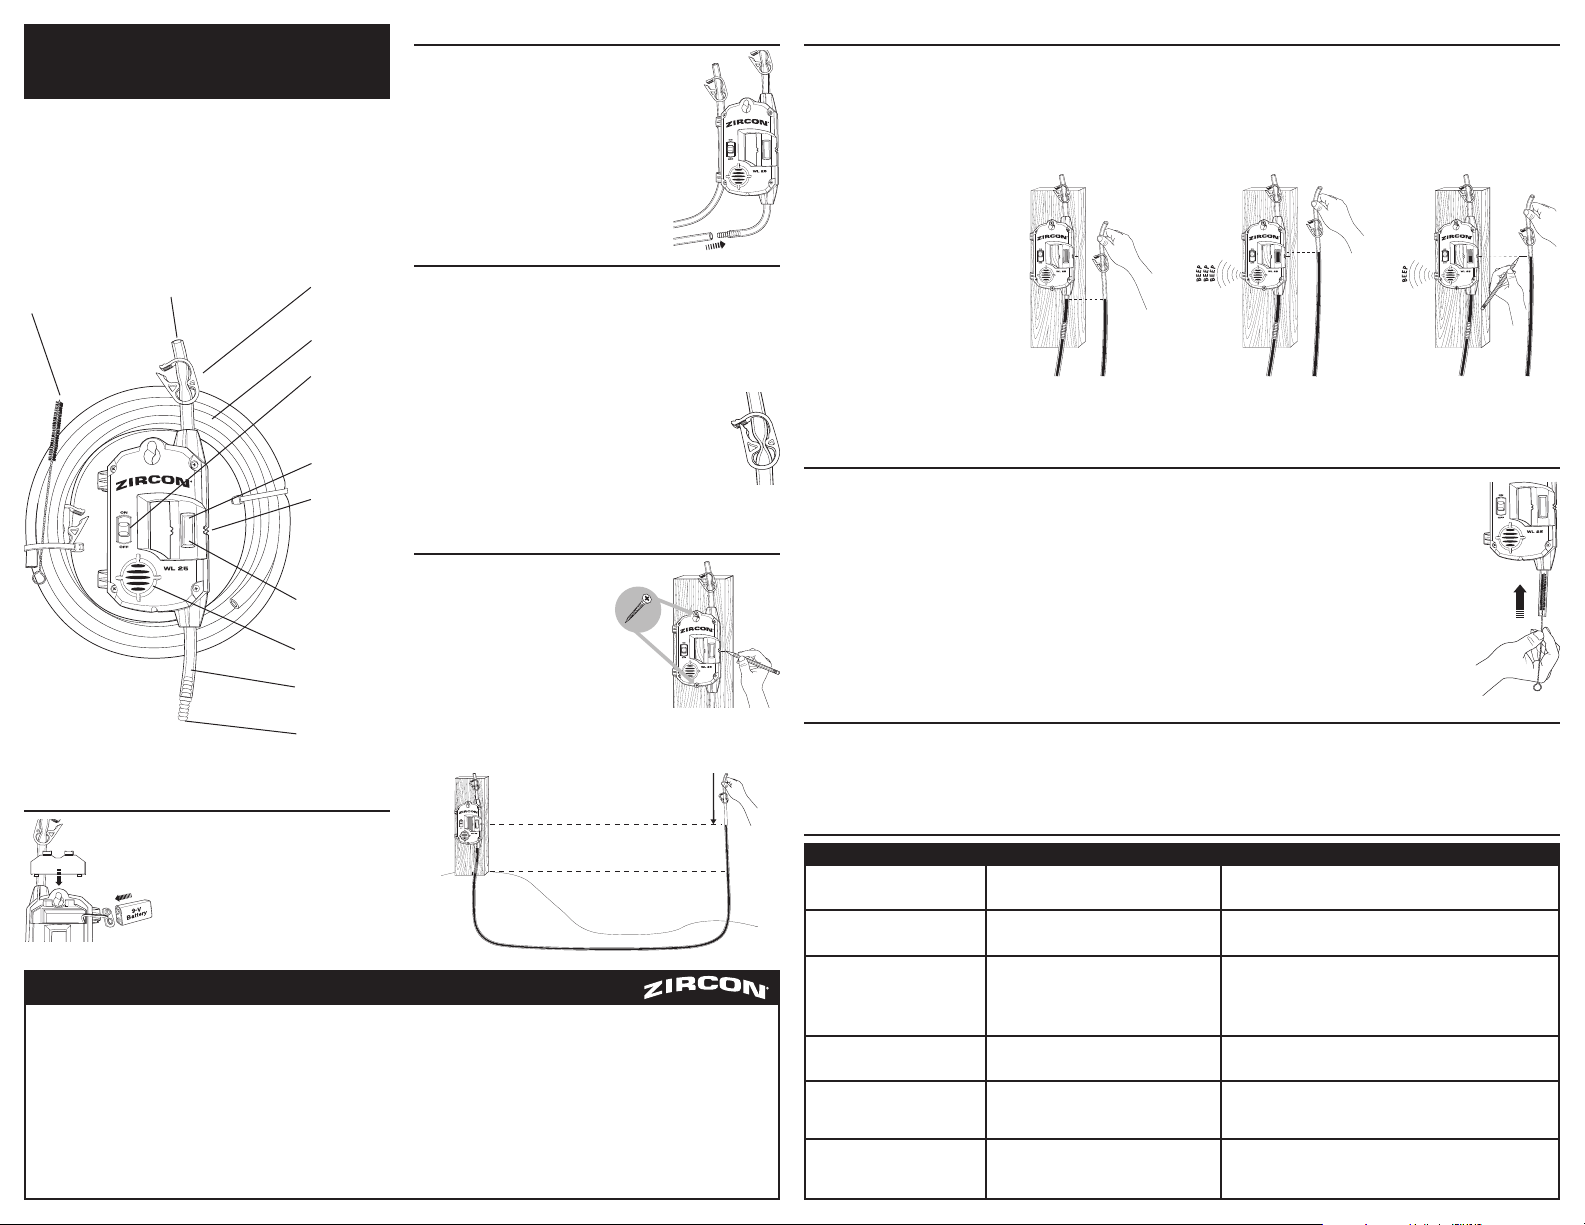
Tube-Cleaning Brush
Top Hose
1. INSTALLING BATTERY
Press battery door release and remove
door. Snap 9-V battery onto connector
and place inside battery compartment.
Replace door and snap shut.
ZIRCON® is a registered trademark of Zircon Corporation.
Visit www.zircon.com/support for the most current instructions.
LIMITED 1 YEAR WARRANTY
Zircon Corporation, (“Zircon”) warrants this product to be free from defects in materials and
workmanship for one years from the date of purchase. Any in-warranty defective product
returned to Zircon*, freight prepaid with proof of purchase date and $5.00 to cover postage and
handling, will be repaired or replaced at Zircon’s option. This warranty is limited to the electronic
circuitry and original case of the product and specifically excludes damage caused by abuse,
unreasonable use or neglect. This warranty is in lieu of all other warranties, express or implied,
and no other representations or claims of any nature shall bind or obligate Zircon. Any implied
warranties applicable to this product are limited to the one year period following its purchase.
IN NO EVENT WILL ZIRCON BE LIABLE FOR ANY SPECIAL, INCIDENTAL OR CONSEQUENTIAL
DAMAGES RESULTING FROM POSSESSION, USE OR MALFUNCTION OF THIS PRODUCT.
In accordance with government regulations, you are advised that: (i) some states do not allow
limitations on how long an implied warranty lasts and/or the exclusion or limitation of incidental
or consequential damages, so the above limitations and/or exclusions may not apply to you, and
further (ii) this warranty gives you specific legal rights and you may also have other rights which
vary from state to state.
Hose Clamp
Hose
ON/OFF
Switch
Sensing Tube
Level Line
Indicator
Power LED
Audio Output
Bottom Hose
Hose Connector
2. ASSEMBLING THE WL 25
Using the hose connector provided, attach
one end of the long hose to the lower end
of the short hose that passes through the
body of the unit. There will also be a short
length extending from the top. Move the
hose clamps, if necessary, so that one is on
the short hose extending from the top and
the other clamp is at the free end of the
long hose.
3. FILLING WITH WATER
Uncoil the hose and unlock the clamps at both ends. Fill a
container with about 2 qt. (2 L) of TAP WATER, not distilled.
Minerals, especially salt, are needed in the water for
conductivity. Place the open end of the long hose in the water
container, making sure the end of the hose stays under water.
Siphon to fill.
Lock the clamps at each end to keep the water from
running out as you set up your work area. To avoid
inaccurate readings, always remove large air bubbles
in the filled hose before using. Unlock both clamps and
shake the hose gently to force the bubbles to the top.
4. MOUNTING THE WL 25
Mount the WL 25 so that
the level reference points on
the sides are at the desired
finished level point.
You can also mount the WL 25
above or below that reference
point, measuring up or down
from your marks to the desired
position. Fasten the unit at both top and bottom to ensure
stability. If the unit swings from side to side, your level points
will change and give you inaccurate readings.
Return product freight prepaid with proof of purchase date (dated sales receipt) and
$5.00 to cover postage and handling, to:
Zircon Corporation
*Attn: Returns Department
1580 Dell Avenue
Campbell, CA 95008-6992 USA
Be sure to include your name and return address. Out of warranty service and repair,
where proof of purchase is not provided, shall be returned with repairs charged C.O.D.
Allow 4 to 6 weeks for delivery.
Customer Service, 1-800-245-9265 or 1-408-963-4550
Monday–Friday, 8:00 a.m. to 5:00 p.m. PDT
WWWZIRCONCOM s INFO ZIRCONCOM
U.S. Patent 6493954
Designed in U.S.A. Assembled in Mexico.
¥ :IRCON #ORPORATION s 0. s 2EV &
5. USING THE WL 25
Attach the electronic unit to the work area, then slide the ON/OFF button to ON. Lower the working end of the hose to keep water
below the level line indicator Open the clamp on the short top hose. Move the long length of the hose to the desired level position,
making sure that the hose is not knotted or kinked and will not be kicked, stepped on, or disturbed. Keep the long end of the hose
lower than the electronic unit until you are ready.
Elevate the end just enough that the water doesn’t run out. Open the clamp on the working end of the unit. SLOWLY raise the end
of the long hose until the continuous tone just starts. Mark a line on the work surface matching the level of the water.
Note: If you raise the
tube too fast and the
level point is passed
and the intermittent
tone sounds, lower the
working tube until the
tone stops and then
SLOWLY raise it again.
The longer the working
tube, the more time
it takes for the water
levels to stabilize.
No tone sounds;
level point too low.
Intermittent tone sounds;
level point too high.
Continuous tone sounds;
level point reached.
6. CLEANING AND STORING THE WL 25
In some areas, high mineral content in water may cause a coating to form on the inside of the sensing tube.
The WL 25’s sensing tube can be cleaned easily to ensure accuracy. To reduce mineral buildup do not leave
water in tube overnight.
Disconnect the longer length of working hose, connector, and clamps from the unit. Wet the tube-cleaning
brush (included in the package) with water. Insert fully into the short sensing tube. Rotate the bristles gently
to clean the contacts, remove brush, and then rinse. Reattach the working hose and the level is ready for use.
When quitting work for a short time, you can leave the water inside the hose. Lock the clamps at each
end of the hose, and carefully coil the hose.
Tube
Cleaning
Brush
To prevent corrosion when not in use, unclamp the hose at both ends and drain the water from the long end
of the hose. Store unit with clamps open in a dry place and out of sunlight.
7. ADDITIONAL HOSING IS AVAILABLE
Stores that sell this product usually sell or can order additional hosing in 25 ft. (8 m) lengths. You can also call Zircon Customer
Service at 1-800-245-9265 to order additional hoses if your local store does not carry them. The hose interior diameter is 5⁄16 in.
(8 mm) and comes with an additional connector to allow you to extend your working length.
8. HELPFUL HINTS
Probable Causes SolutionsSituation
Trouble seeing water level.
Water freezes.
Level points change.
Inaccurate readings.
Water runs out of tube as
you set up work area.
Unit does not beep at the
same spot.
Either steady beep or
intermittent beep does
not operate.
s7ATER AND TUBING ARE CLEAR
s4EMPERATURE DROPPED
s)TS TOO COLD TO WORK
s5NIT SWINGS FROM SIDE TO SIDE
s,ARGE AIR BUBBLES IN TUBING
s+INKS OR KNOTS IN TUBING
s#LAMPS OPEN
s7ATER LEVEL BEING MISREAD
s0INS ARE DIRTY
s!DD A FEW DROPS OF FOOD COLORING TO THE WATER BEFORE FILLING
s2EPLACE THE WATER IN HOSE WITH A MIXTURE OF VODKA AND WATER
s3ECURELY FASTEN ELECTRONIC UNIT AT BOTH TOP AND BOTTOM
s/PEN BOTH CLAMPS AND SHAKE TUBE GENTLY TO FORCE BUBBLES TO TOP
s3TRAIGHTEN OUT THE TUBING
s!LWAYS CLOSE BOTH CLAMPS AFTER FILLING TUBING
s"E SURE TO LOOK AT THE TUBE FROM THE SAME ANGLE AND MARK
the water level at the same spot in the tube.
s5SE TUBECLEANING BRUSH INCLUDED WITH TOOL TO CLEAN PINS
that detect water level.
Page 2
WL 25
Nivel Electronico de Agua
El nivel electrónico de agua, WL 25, de Zircon® es una herramienta
ideal para determinar puntos de referencia de nivel hasta una
distancia máxima de 25 pies (8 m). El WL 25 simplifica el trabajo
solo o alrededor de esquinas proporcionando medidas exactas y
confiables y resulta ideal para una serie de aplicaciones, como
por ejemplo, instalación de cercos, construcción de plataformas,
posicionamiento de drenajes, plomería, instalación de encofrados,
finalización de trabajos de albañilería o remodelación de interiores.
El WL 25 incluye una manguera de 25 pies (8 m).
Cepillo de
Limpieza de Tubos
1. COLOCACION DE LA BATERIA
ZIRCON® es una marca registrada de Zircon Corporation.
Visite www.zircon.com/support para actualización de las instrucciones.
GARANTÍA LIMITADA DE 1 AÑO
Zircon Corporation (“Zircon”) garantiza este producto como libre de defectos en materiales y mano de
obra por un año a partir de la fecha de compra. Cualquier producto defectuoso dentro de la garantía
enviado a Zircon* con el envio pagado, comprobante de fecha de compra y $5,00 para cubrir porte y
manejo, se reparará o reemplazará a opción de Zircon. Esta garantía se limita a los circuitos electrónicos
y a la caja original del producto y excluye específicamente los daños provocados por uso indebido, uso
no razonable o descuido. Esta garantía está en lugar de todas las demás garantías, expresas o implícitas,
y ninguna otra declaración o reclamación de cualquier naturaleza será obligatoria para Zircon. Cualquier
garantía implícita aplicable para este producto se limita al periodo de un año inmediato a su compra. EN
NINGÚN CASO, ZIRCON SERÁ RESPONSABLE DE NINGÚN DAÑO ESPECIAL, INCIDENTAL O RESULTANTE
DE LA POSESIÓN, USO O MAL FUNCIONAMIENTO DE ESTE PRODUCTO.
De conformidad con las reglamentaciones gubernamentales, se le notifica que: (i) en algunos estados no
se permiten limitaciones del tiempo de vigencia de una garantía implícita y/o de la exclusión o limitación
de daños incidentales o consecutivos; así que las limitaciones y/o exclusiones anteriores tal vez no se
apliquen para usted, y además, (ii) esta garantía le otorga derechos legales específicos y usted tal vez
tenga otros derechos que varían de estado en estado.
Manguera Superior
Abrazadera de
Manguera
Manguera
Interruptor de
Encendido/
Apagado
(ON/OFF)
Tubo Sensor
Indicador de
Línea de Nivel
Indicador de
Encendido
Salida de Audio
Manguera
Inferior
Conector de
Manguera
Presione el botón liberador de la
puerta de la batería y retire la puerta.
Inserte una batería de 9 voltios en
el conector y coloquela dentro del
compartimiento de baterías. Vuelva a
colocar la puerta en su posición.
2. MONTAJE DEL WL 25
Mediante el conector de manguera provisto,
conecte un extremo de la manguera larga al
extremo inferior de la manguera corta que
atraviesa la carcasa de la unidad. También hay
un tramo corto que se extiende desde la parte
superior. De ser necesario, mueva las
abrazaderas de la manguera a fin de que una
quede sobre la manguera corta que se extiende
desde la parte superior y la otra, en el extremo
libre de la manguera larga.
3. LLENADO CON AGUA
Desenrolle la manguera y abra las abrazaderas que se encuentran
en ambos extremos. Llene us contenedor con approximadamente
2 cuartos (2 L) de agua de grifo, no desilada. Es necesario que el
agua contenga minerales, especialmente sal, por propósitos de
conductividad. Coloque el extremo abierto de la manguera larga
en el contenedor de agua asegurándose de que el extremo de la
manguera quede sumergido. Forme un sifón para llenar.
Cierre las abrazaderas en cada extremo para evitar
que desborde el agua mientras usted prepara el área
de trabajo. Para evitar las lecturas inexactas, elimine
siempre las burbujas grandes de aire que pueda
tener la manguera llena antes de usarla. Abra ambas
abrazaderas y agite suavemente la manguera para
dirigir las burbujas hacia la parte superior.
4. COLOCACION DEL WL 25
Coloque el WL 25 de manera tal
que los puntos de referencia de
nivel que se encuentran a los lados
estén en el punto deseado en fin.
Usted también puede colocar el
WL 25 arriba o debajo de ese punto
de referencia, midiendo hacia arriba
o hacia abajo desde sus marcas hasta
la posición deseada. Ajuste la unidad
en la parte superior e inferior para
garantizar la estabilidad. Si la unidad se mueve de un lado al otro,
los puntos de nivel cambiarán y obtendrá lecturas inexactas.
Devuelva el producto con envio pagado y comprobante de la fecha de compra
(recibo de venta fechado) y $5,00 para cubrir el porte y el manejo, a:
Zircon Corporation
*Attn: Returns Department
1580 Dell Avenue
Campbell, CA 95008-6992 USA
Asegúrese de incluir su nombre y dirección. El servicio y reparación fuera de
garantía donde no se incluya el comprobante de compra se regresará con cargos
de reparación C.O.D. Permita de 4 a 6 semanas para la entrega.
Atención al Cliente, 1-800-245-9265 o 1-408-963-4550
Lunes a viernes, 8:00 a.m. a 5:00 p.m. Hora estándar del Pacífico
WWWZIRCONCOM s INFO ZIRCONCOM
Patente de EE.UU. 6493954
Diseñado en EE.UU. Ensamblado en Mexico.
¥ :IRCON #ORPORATION s 0. s 2EV &
5. USO DEL WL 25
Conecte la unidad electrónica al área de trabajo; después, lleve el botón ON/OFF (encendido/apagado) a la posición de encendido (ON).
Haga descender el extremo operativo de la manguera hasta que quede justo por debajo del indicador de línea de nivel. Abra la abrazadera
que se encuentra en la manguera corta superior. Mueva el tramo largo de la manguera hasta la posición de nivel deseada, asegurándose
de que la manguera no tenga nudos, no esté doblada, no pueda pisarse ni obstaculizarse. Mantenga el extremo largo de la manguera más
abajo que la unidad electrónica mientras la configura.
Eleve el extremo lo suficiente como para que no salga agua y abra la abrazadera que se encuentra en el extremo operativo de la unidad.
LENTAMENTE, eleve el extremo de la manguera larga hasta que se escuche el tono continuo. Marque sobre la superficie de trabajo en el
nivel de agua correspondiente.
NOTA: Si usted eleva el tubo
demasiado rápido, pasa el
punto de nivel y se escucha
el tono intermitente, haga
descender el tubo de trabajo
hasta que se detenga el
tono; a continuación, vuelva
a elevarlo LENTAMENTE.
Cuanto más largo sea el
tubo de trabajo, más tiempo
tardarán en estabilizarse los
niveles de agua.
No se escucha tono; el punto
de nivel está demasiado bajo.
Se escucha un tono
intermitente; el punto de
nivel está demasiado alto.
Se escucha un tono continuo;
se alcanzó el punto de nivel.
6. LIMPIEZA Y ALMACENAMIENTO DEL WL 25
En algunas áreas, el alto contenido de minerales en el agua puede hacer que se forme una capa en lado interior del
tubo sensor. El tubo sensor del WL 25 puede limpiarse fácilmente para garantizar la precisión. No deje el agua en el
tubo durante toda la noche para reducir la formación de la capa por la acumulación de minerales.
Desconecte el tramo más largo de la manguera de trabajo, el conector y las abrazaderas de la unidad. Humedezca con
agua el cepillo de limpieza de tubos (que se incluye en el paquete). Insértelo completamente en el tubo sensor corto.
Haga girar suavemente las cerdas para limpiar los contactos, retire el cepillo y luego enjuague. Vuelva a conectar la
manguera de trabajo y el nivel quedará listo para usarse.
Cuando haya un descanso corto durante el trabajo, se puede dejar el agua dentro de la manguera. Cierre las
Cepillo de
limpieza
de tubos
abrazaderas en cada extremo de la manguera y enróllela con cuidado.
Para prevenir la corrosión cuando no use el equipo, quite las abrazaderas de la manguera en ambos extremos y drene
el agua del extremo largo de la manguera. Guarde la unidad con las abrazaderas abiertas en un lugar seco,
y donde no haya la luz del sol.
7. HAY MANGUERAS ADICIONALES DISPONIBLES
Las tiendas que venden este producto, por lo general, venden o pueden efectuar el pedido de otras mangueras en tramos de 25 pies (8 m).
Usted también puede llamar a Servicio a Clientes de Zircon al 1-800-245-9265 para ordenar mangueras adicionales en caso de que su tienda
local no las mantenga en inventario. El diámetro interior de la manguera es 5⁄16 pulgadas (8 mm) y viene con un conector adicional para
permitirle extender su longitud de trabajo.
8. CONSEJOS UTILES
Causas Probables SolucionesSituación
Problemas para ver el nivel
de agua.
El agua se congela.
Los puntos de nivel cambian.
Lecturas inexactas.
Sale agua del tubo cuando
se configura el área de trabajo.
La unidad no emite un sonido
en el mismo nivel de agua en
el tubo.
El tono continuo o
intermitente no funcionan.
s%L AGUA Y LOS TUBOS SON TRANSPARENTES
s"AJØ LA TEMPERATURA
s%STÉ DEMASIADO FRÓO PARA TRABAJAR
s,A UNIDAD SE MUEVE DE UN LADO AL OTRO
s(AY BURBUJAS DE AIRE GRANDES EN
los tubos.
s(AY DOBLECES O NUDOS EN LOS TUBOS
s,AS ABRAZADERAS ESTÉN ABIERTAS
s,ECTURAS ERRØNEAS EN EL NIVEL DE AGUA
s,OS SENSORES ESTAN SUCIOS
s!GREGUE UNAS GOTAS DE COLORANTE DE ALIMENTOS AL AGUA
previa al llenado.
s2EEMPLACE EL AGUA DE LA MANGUERA CON UNA MEZCLA DE
vodka y agua.
s&IJE BIEN LA UNIDAD ELECTRØNICA EN LA PARTE SUPERIOR E INFERIOR
s!BRA AMBAS ABRAZADERAS Y AGITE SUAVEMENTE EL TUBO PARA
dirigir las burbujas hacia la parte superior.
s%NDERECE LOS TUBOS
s#IERRE SIEMPRE AMBAS ABRAZADERAS DESPUÏS DE LLENAR
los tubos.
s!SEGURESE DE MIRAR EL TUBO DESDE EL MISMO ANGULO Y EN
el mismo lugar marque el nivel de agua del tubo.
s5TILIZE EL CEPILLO DE LIMPIEZA DE TUBOS INCLUIDO CON LA
herramienta para limpiar los sensores que detectan el
nivel dela agua.
Page 3

WL 25
Niveau à Eau Électronique
Le niveau d’eau électronique WL 25 Zircon® est un outil idéal
pour déterminer les points de référence de niveau jusqu’à
25 pieds (8 m) de distance. Le WL 25 simplifie le travail que
l’on doit faire seul ou autour des coins avec des mesures
exactes et fiables. C’est l’appareil idéal pour un certain nombre
d’applications y compris monter des clôtures, construire
des terrasses, positionner les drains, la plomberie, couler
les formes, terminer le travail de maçonnerie ou refaire les
intérieurs. Le WL 25 comprend un tuyau de 25 pieds (8 m).
Brosse de Nettoyage - Tube
Tuyau Supérieur
1. INSTALLER LA PILE
Appuyez sur le déclencheur de
porte du compartiment de la pile, et
enlevez la porte. Branchez la pile de
9-V au connecteur, et insérez dans
le compartiment de la pile. Remettez
la porte, et enclenchez.
ZIRCON® est un marque de commerce déposée de la Zircon Corporation.
Visiter www.zircon.com/support pour les instructions plus courantes.
GARANTIE LIMITÉE D´UN AN
La société Zircon (« Zircon ») garantit ce produit libre de tous défauts de matériaux et de fabrication
pendant un an à partir de la date d´achat. Tout produit défectueux selon la garantie retourné à Zircon,
frais de transport prépayés avec une preuve d´achat datée et 5,00 $ pour couvrir les frais de poste et
de manutention sera réparé ou remplacé, à la discrétion de Zircon. Cette garantie est limitée au circuit
électronique et au boîtier originaldu produit et exclut spécifiquement les dommages causés par toute
mauvaise utilisation, utilisation déraisonnable ou négligence. Cette garantie remplace toutes autres
garanties expresses ou indirectes et aucune autre représentation ou réclamation de quelque sorte que
ce soit n´obligera ou ne liera Zircon. Toutes autres garanties indirectes applicables à ce produit sont
limitées à une période d´un an suivant l´achat.
DANS AUCUN CAS ZIRCON NE SERA TENUE RESPONSABLE DE TOUS DOMMAGES INDIRECTS OU
CONSÉCUTIFS SUITE À LA POSSESSION, L´UTILISATION OU LE MAUVAIS FONCTIONNEMENT DE CE
PRODUIT. Conformément aux règlements gouvernementaux, vous êtes avisé que : (i) certains états
n´acceptent pas de limites quant à la durée de la garantie implicite, donc il se peut que les limites et / ou
les exclusions précédentes ne s´appliquent pas dans votre cas et de plus, (ii) cette garantie vous donne
certains droits juridiques précis et vous pouvez aussi en avoir d´autres qui varient d´un état à l´autre.
Étrangleur
Tuyau
Interrupteur
MARCHE/
ARRÊT
Tube de
Détection
Indicateur
D’horizontale
DEL de Tension
Sortie Audio
Tuyau Inférieur
Raccord
de Tuyau
2. ASSEMBLAGE DU WL 25
À l’aide du connecteur de tuyau fourni,
attachez un bout du long tuyau à l’extrémité
inférieure du tuyau court qui traverse le
corps de l’unité. Un court segment sortira
aussi du dessus. Déplacez les étrangleurs, au
besoin, pour que le premier se trouve sur le
tuyau court sortant du dessus, et l’autre sur
le bout libre du long tuyau.
3. REMPLIR LE WL 25 D’EAU
Déroulez le tuyau, et desserrez les étrangleurs aux deux
bouts. Remplissez un contenant avec environ 2 litres d’EAU
DU ROBINET, non distillée. Les minéraux, surtout le sel, sont
essentiels à la conductivité de l’eau. Placez le bout ouvert du
long tuyau dans le contenant d’eau en vous assurant que le
bout du tuyau reste sous l’eau. Siphonnez pour remplir.
Verrouillez les étrangleurs à chaque bout pour
empêcher l’eau de s’écouler tandis que vous préparez
votre aire de travail. Pour éviter les lectures inexactes,
faites toujours sortir les grosses bulles d’air dans
le tuyau plein avant d’utiliser. Desserrez les deux
étrangleurs, et secouez doucement le tuyau pour forcer
les bulles à monter.
4. MONTER LE WL 25
Installez le WL 25 de façon à ce
que les points de référence de
niveau sur les côtés se trouvent
au point de niveau final désiré.
Vous pouvez également monter le
niveau au-dessus ou en dessous
de ce point en mesurant l’écart
entre vos marques et la position
voulue. Attachez l’unité en bas et
en haut pour en assurer la stabilité. Si l’unité oscille, vos points
de niveau changeront et causeront des lectures inexactes.
Retournez le produit frais de transport prépayés avec une preuve d´achat datée et
5,00 $ pour couvrir les frais de poste et de manutention à :
Zircon Corporation
*Attn: Returns Department
1580 Dell Avenue
Campbell, CA 95008-6992 USA
Assurez-vous d´inclure vos nom et adresse de retour. Les réparations et entretien hors
garantie, lorsque la preuve d´achat n´est pas fournie, seront retournés avec les frais de
réparation par envoi contre remboursement. Allouez 4 à 6 semaines pour la livraison.
Service à la clientèle : 1-800-245-9265 ou 1-408-963-4550
Du lundi au vendredi, 8 h à 17 h HNP
WWWZIRCONCOM s INFO ZIRCONCOM
Brevet des E.U. 6493954
Conçu aux É.U. Assemblé au Mexique.
¥ :IRCON #ORPORATION s 0. s 2EV $
5. UTILISER LE WL 25
Fixez l’unité électronique à l’aire de travail, puis glissez le bouton de MARCHE/ARRÊT en position de MARCHE. Abaissez le bout
de travail du tuyau juste en dessous de l’indicateur d’horizontale. Ouvrez l’étrangleur sur le tuyau supérieur court. Déplacez le long
segment du tuyau jusqu’à la position de niveau désirée en vous assurant que le tuyau n’est pas noué ou plié et qu’il ne sera ni
frappé, ni écrasé, ni déplacé. Gardez le long bout du tuyau plus bas que l’unité électronique jusqu’à ce que vous soyez prêt.
Élevez le bout suffisamment pour que l’eau ne s’écoule pas. Ouvrez l’étrangleur au bout de travail de l’unité. Montez LENTEMENT
le bout du long tuyau jusqu’à ce que la tonalité continue s’amorce. Marquez sur la surface de travail le point d’horizontalité de
l’eau correspondant.
Remarque : Si vous élevez
le tube trop vite, si le point
de niveau est dépassé et si
la tonalité intermittente se
fait entendre, abaissez le
tube de travail jusqu’à ce
que le signal s’arrête, puis
remontez-le LENTEMENT.
Plus le tube de travail est
long, plus il faudra de temps
pour que les niveaux d’eau
se stabilisent.
Aucune tonalité ;
point de niveau trop bas.
Tonalité intermittente ;
point de niveau trop haut.
Tonalité continue ;
point de niveau atteint.
6. NETTOYER ET RANGER LE WL 25
À certains endroits, la teneur minérale élevée de l’eau peut entraîner la formation d’un revêtement à l’intérieur
du tube de détection. Le tube de détection du WL 25 se lave facilement pour assurer l’exactitude. Pour réduire
l’accumulation de minéraux, ne laissez pas d’eau dans le tube pour la nuit.
Débranchez le long segment du tuyau de travail, le connecteur et les étrangleurs de l’unité. Mouillez la brosse
à nettoyer les tubes (incluse dans l’emballage) avec de l’eau. Insérez entièrement dans le tube détecteur court.
Faites tourner les soies doucement pour nettoyer les contacts, enlevez la brosse, et rincez. Rattachez le tuyau
de travail, et le niveau est prêt à utiliser.
Quand vous quittez le travail pour un temps réduit, vous pouvez laisser l’eau dans le tuyau. Verrouillez les
étrangleurs à chaque bout du tuyau, et enroulez-le avec soin.
Brosse de
nettoyage
- tube
Pour prévenir la corrosion quand l’appareil ne sert pas, desserrez le tuyau aux deux bouts, et videz l’eau du
long segment de tuyau. Rangez l’unité avec les étrangleurs ouverts dans un endroit sec.
7. TUYAU SUPPLÉMENTAIRE DISPONIBLE
Les magasins qui vendent ce produit offrent habituellement ou peuvent commander du tuyautage supplémentaire en segments de
25 pieds (8 m). Le diamètre intérieur du tuyau est de 5⁄16 po (8 mm), et il est fourni avec un connecteur supplémentaire pour vous
permettre d’allonger votre longueur de travail.
8. CONSEILS UTILES
Causes Probables SolutionsSituation
Difficulté à voir le point
d’horizontalité de l’eau.
L’eau gèle.
Les points de niveau
changent.
Lectures inexactes.
L’eau s’écoule du tube
lorsque vous préparez le site
de travail.
L’appareil ne fait pas
entendre la tonalité au
même endroit.
Soit la tonalité continue ou
la tonalité intermittente ne
fonctionne pas.
s,EAU ET LE TUBE SONT
transparents.
s,A TEMPÏRATURE A CHUTÏ
s)L FAIT TROP FROID POUR TRAVAILLER
s,UNITÏ OSCILLE
s'ROSSES BULLES DAIR DANS LES TUBES
s0LIS OU NUDS DANS LES TUBES
s³TRANGLEURS OUVERTS
s%RREUR DE LECTURE DU NIVEAU DEAU
s,ES BROCHES SONT SALES
s!JOUTEZ QUELQUES GOUTTES DE COLORANT ALIMENTAIRE DANS
l’eau avant de remplir.
s2EMPLACEZ LEAU DANS LE TUYAU AVEC UN MÏLANGE DE
vodka et d’eau.
s!TTACHEZ BIEN LUNITÏ ÏLECTRONIQUE EN BAS ET EN HAUT
s/UVREZ LES DEUX ÏTRANGLEURS ET SECOUEZ DOUCEMENT LE
tube pour forcer les bulles à monter.
s2EDRESSEZ LE TUYAUTAGE
s&ERMEZ TOUJOURS LES DEUX ÏTRANGLEURS APRÒS AVOIR REMPLI
les tubes.
s2ÏGLEZ Ì NOUVEAU Ì LIL ET MARQUEZ TOUJOURS LA MÐME
partie du niveau d’eau.
s5TILISEZ LA BROSSE DE NETTOYAGE DU TUBE INCLUSE AVEC LOUTIL
pour nettoyer les broches qui détectent le niveau d’eau.
 Loading...