

Page 1
4
12
20
28
36
44
52
60
GEBRAUCHSANWEISUNG
BRUGSANVISNING
INSTRUCCIONES DE USO
MANUEL D'UTILISATION
OPERATING MANUAL
ISTRUZIONI D’USO
GEBRUIKSAANWIJZING
INSTRUKCJA OBSŁUGI
2
6
5
3
4
>
1
:
Classic
P80 - P90 - P110
Page 2

2 ALGEMEINE SICHERHEIT
Zur Sicherheit, Gebrauchsanweisung vor Inbetriebnahme sorgfältig lesen! Personen,
die mit der Betriebsanleitung nicht vertraut sind dürfen das Gerät nicht bedienen. Wir
empfehlen Ihnen, diese Anleitung an einem sicheren Ort aufzubewahren.
6 SIKKERHED GENERELT
Læs denne brugsanvisning grundigt igennem af hensyn til sikkerheden! Personer, som
ikke er fortrolige med brugsanvisningens indhold, må ikke anvende dette klimaanlæg.
Vi anbefaler, at De gemmer denne brugsanvisning et sikkert sted med henblik på senere brug.
5 MEDIDAS DE SEGURIDAD
¡Consulte atentamente el modo de empleo y preste atención a las medidas de seguridad! Aquellos que no estén familiarizados con estas medidas de seguridad, no deben
utilizar este acondicionador de aire. Aconsejamos guardar en sitio seguro este manual
para poder consultar en caso necesario.
3 SÉCURITÉ GÉNÉRALE
Par mesure de sécurité, consulter attentivement ce manuel d’instructions ! Les personnes qui ne sont pas familiarisées avec le manuel d’instructions, ne doivent pas utiliser
ce climatiseur de l’air. Nous vous conseillons de ranger ce manuel d’instructions à un
endroit sûr pour pouvoir le consulter ultérieurement.
A. Ne pas utiliser de câble endommagé.
B. Ne pas serrer ou plier le câble.
C. Placer sur une surface égale.
D. Ne pas placer devant une fenêtre ouverte.
E. Ne pas mettre en contact avec des produits chimi-
ques.
F. Ne pas placer auprès d’une source de chaleur.
G. Ne pas immerger.
H. Ne pas renverser.
I. Ne rien introduire dans l’appareil.
J. Ne pas utiliser de câble de rallonge.
K. A tenir hors de portée des enfants.
L. Ne pas réparer soi-même.
A. No utilizar un cable deteriorado.
B. No averiar o doblar el cable.
C. Colocar en superficie llana
D. No colocar delante de ventana abierta.
E. No poner en contacto con productos químicos.
F. No poner en contacto con fuente de calor.
G. No sumergir en líquidos.
H. No verter líquidos.
I. No introducir objetos en el aparato.
J. No utilizar cable de extensión.
K. Poner fuera del alcance de los niños.
L. No hacer reparaciones.
A. Brug ikke beskadigede kabler.
B. Kabel må ikke sættes i klemme eller knækkes.
C. Anbringes på et plant gulv.
D. Må ikke anbringes ved et åbent vindue.
E. Må ikke komme i kontakt med kemikalier.
F. Må ikke anbringes ved en varmekilde.
G. Må ikke sænkes ned i vand.
H. Pas på med at spilde.
I. Der må ikke stikkes noget ind i apparatet.
J. Der må ikke bruges forlængerkabler.
K. Bruges uden for børns rækkevidde.
L. De må ikke selv reparere apparatet.
A. Kein beschädigtes Kabel verwenden.
B. Kabel nicht kneifen oder knicken.
C. Nicht uneben aufstellen.
D. Nicht vor geöffnete Fenster aufstellen.
E. Nicht mit Chemikalien in Kontakt bringen.
F. Nicht bei Wärmequellen aufstellen.
G. Nicht in Wasser untertauchen.
H. Kein Flüssigkeiten verschütten.
I. Nichts hineinstecken.
J. Kein Verlängerungskabel verwenden.
K. Außer Reichweite von Kindern halten.
L. Nicht selbst reparieren.
2
A
B
C
D
E
F
Page 3

3
4 GENERAL SAFETY
For safety reasons, please read this manual carefully before operating. Persons who are
not familiar with this manual must not use this air conditioner. We strongly recommend
keeping this manual in a safe place for future reference.
> SICUREZZA
Per motivi di sicurezza, si raccomanda di leggere attentamente il manuale prima di utilizzare l’apparecchio. Le persone che non conoscono il funzionamento del climatizzatore non devono usarlo. Si raccomanda di riporre il manuale in un luogo sicuro per
future referenze.
1 VEILIGHEID ALGEMEEN
Bestudeer voor de veiligheid deze gebruiksaanwijzing zorgvuldig! Personen, die met
de gebruiksaanwijzing niet vertrouwd zijn, mogen deze airconditioner niet gebruiken.
Wij raden u aan deze gebruiksaanwijzing op een veilige plaats te bewaren voor latere
raadpleging.
: OGóLNE ZASADY BEZPIECZEńTWA
Dla własnego bezpieczeństwa przeczytaj dokładnie treść instrukcji obsługi klimatyzatora!
Osobom, które nie zapoznały się z instrukcją obsługi niniejszego urządzenia, zabrania się z
niego korzystać. Radzimy przechowywać instrukcję obsługi w bezpiecznym miejscu, aby w
razie potrzeby móc skorzystać z niej w przyszłości.
A. Nie używać uszkodzonego przewodu zasilającego.
B. Nie uciskać ani nie zginać przewodu.
C. Urządzenie umieścić na płaskim podłożu.
D. Nie umieszczać urządzenia przed otwartym oknem.
E. Nie stosować żadnych środków chemicznych.
F. Nie umieszczać w bezpośrednim sąsiedztwie źródeł
ciepła.
G. Nie zanurzać w wodzie.
H. Nie rozlewać cieczy.
I. Nie wtykać obcych przedmiotów do aparatu.
J. Nie używać przedłużacza.
K. Trzymać z daleka od dzieci.
L. Nie próbować naprawiać klimatyzatora samodziel-
nie.
A. Gebruik geen beschadigde kabel.
B. Kabel niet afklemmen of knikken.
C. Plaats op een vlakke ondergrond.
D. Niet voor een open raam plaatsen.
E. Niet met chemicaliën in contact brengen.
F. Niet bij een warmtebron plaatsen.
G. Niet onderdompelen.
H. Niets morsen.
I. Niets in het apparaat steken.
J. Geen verlengkabel gebruiken.
K. Buiten bereik van kinderen houden.
L. Niet zelf repareren.
A. Non usare il cavo, se danneggiato.
B. Non bloccare o piegare il cavo.
C. Collocare l’apparecchio su una superficie piana.
D. Non collocare l’apparecchio davanti alla finestra
aperta.
E. Non porlo a contatto con prodotti chimici.
F. Non posizionarlo vicino ad una fonte di calore.
G. Non immergerlo nell’acqua.
H. Non versare liquidi sull’apparecchio.
I. Non inserire alcun oggetto nell’apparecchio.
J. Non usare prolunghe.
K. Tenere l’apparecchio lontano dalla portata dei
bambini.
L. Non cercare di riparare l’apparecchio.
A. Do not use a damaged cable.
B. Do not clamp or bend the cable.
C. Do not place unevenly.
D. Do not place in front of an open window.
E. Do not bring in contact with chemicals.
F. Do not place near a heat source.
G. Do not immerse in water.
H. Do not spill.
I. Do not insert anything.
J. Do not use an extension cord.
K. Keep out of the reach of children.
L. Do not repair.
G
H
I
J
K
L
Page 4

IMPORTANT
COMPONENTS
Control panel
Air outlet
Handle
Casters
Air filter
Air inlet
Exhaust air outlet
Cord hanger
Water stopper
(rubber plug inside)
Hose adapter
Exhaust hose
Foam
Window connector
Cap
Water tray
Drain-tube
1. READ THE DIRECTIONS FOR USE FIRST.
2. IN CASE OF ANY DOUBT, CONTACT YOUR DEALER.
4
36
Page 5

4
37
Dear Sir, Madam,
Congratulations on the purchase of your Zibro Clima air conditioner. In addition to air
cooling, this air conditioner has two other functions, namely air dehumidification and
circulation. The mobile Zibro Clima air conditioner is extremely easy to operate and move.
You have acquired a high quality product that will provide you with many years of
pleasure, on condition that you use it responsibly. Reading these instructions for use before
operating your Zibro Clima will optimise its life span. We wish you coolness and comfort
with your Zibro Clima.
Yours sincerely,
PVG International b.v.
Customer service department
Page 6

A SAFETY INSTRUCTIONS
If you are in any doubt about the electrical installation, have it checked and if
necessary modified by a qualified electrician.
• The air conditioner is safe. However, as with other electrical appliances, use it
with care.
• Keep out of the reach of children.
• Do not clean the air conditioner by spraying it or immersing it in water.
• Do not insert any object into the opening of the air conditioner.
• Disconnect from the mains before cleaning the unit or any of its components.
• Never connect to an electrical outlet using an extension cord. If an outlet is
not available, one should be installed by a licenced electrician.
• Any service other than regular cleaning or filter replacement should be
performed by an authorized service representative. Failure to do so could
result in a loss of warranty.
• A damaged supply cord should be replaced by the manufacturer, its service
agent or a qualified person in order to avoid a hazard.
WARNING
• Never operate this appliance if it has a damaged cord or plug.
Do not lead the cord over sharp edges.
• Never close the room completely. Avoid under pressure in the room;
this disturbs exhaust flow from geyser, (kitchen) exhausters and/or oven.
IMPORTANT
The unit is designed for indoor operation.
Rating: This unit must be connected to a 230 V / 50 Hz earthed outlet.
The installation must be in accordance with regulations of the country where the
unit is used.
4
38
Page 7
4
39
B POSITIONING YOUR AIR CONDITIONER
This unit is portable and can easily be moved from one room to another. In doing
so keep this in mind:
• The air conditioner must stand upright on an even surface.
• Position not (near) bath, shower or other wet or damp area.
• Keep for free air circulation at least 50 cm free from any obstacle or curtains.
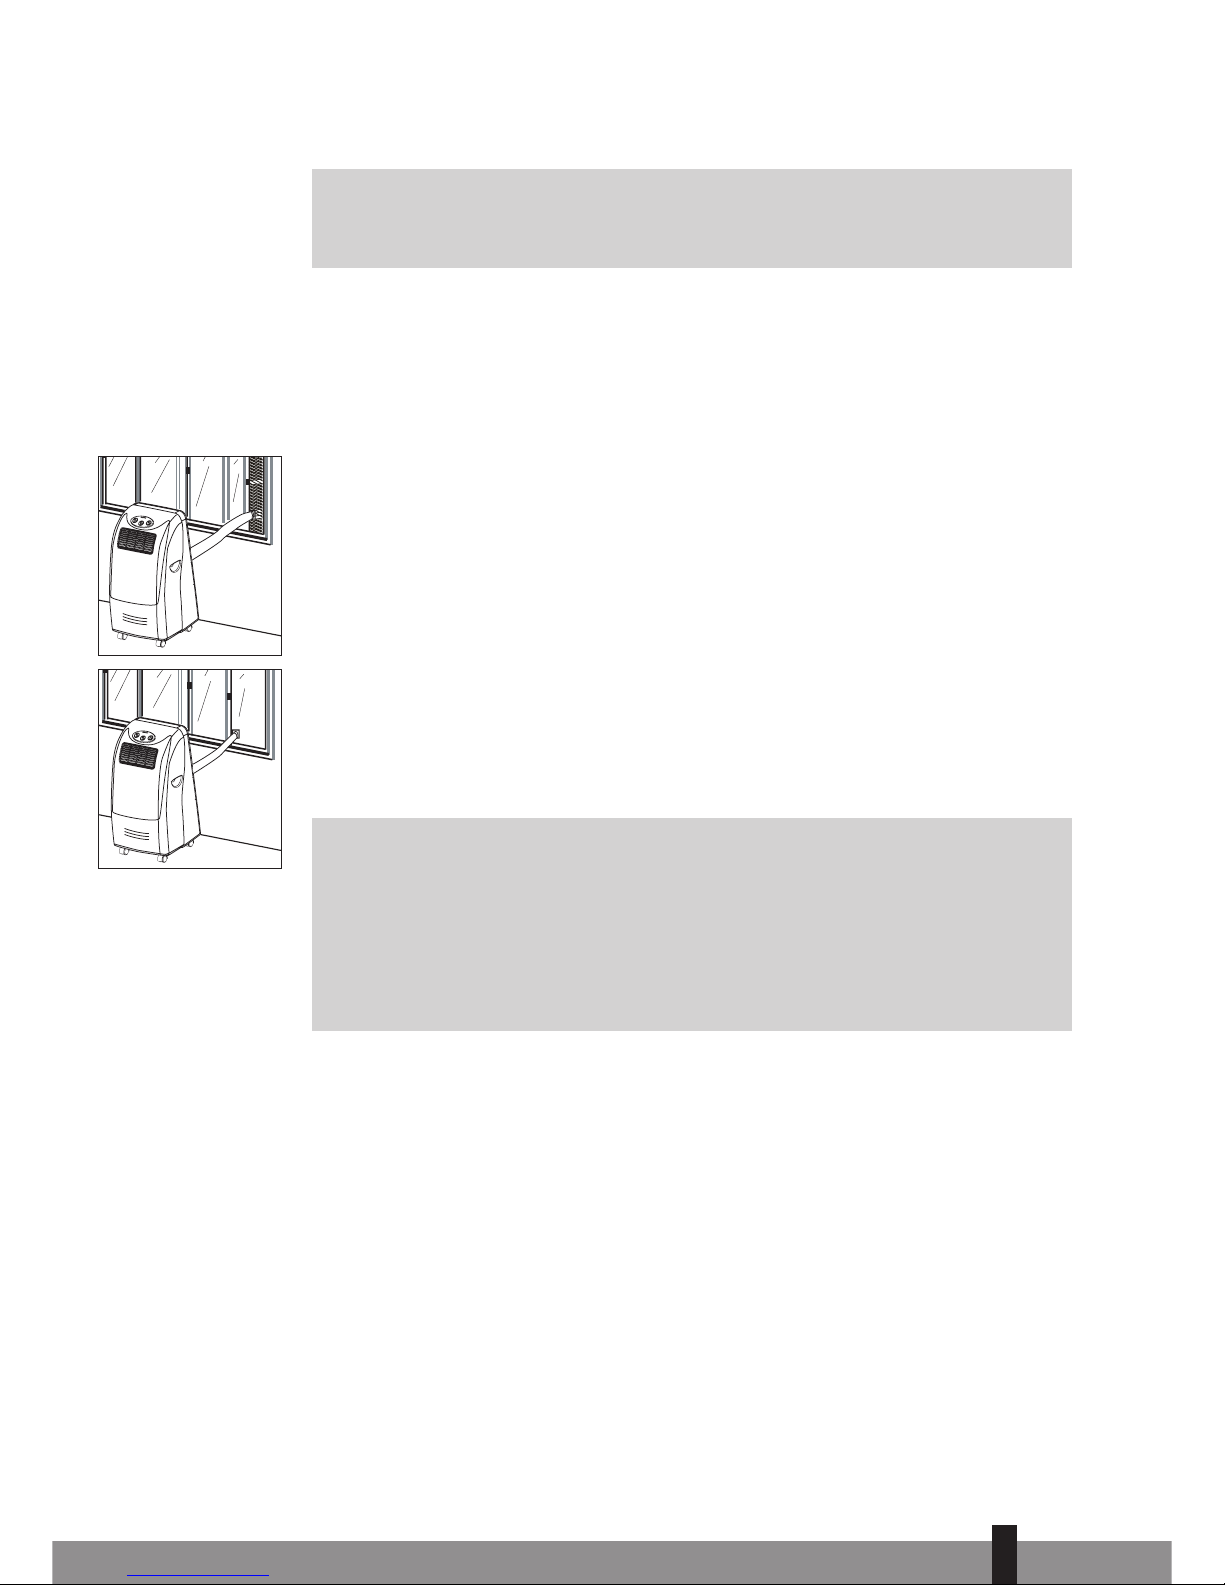
• Put the round adapter (10) on the exhaust hose. Connect the hose with the
rectangular end to the air conditioner.
Using the foam
The adapter (11) fits in the opening of the foam (12). Place the foam in the
window and close this as far as possible to refrain the warm air from re-entering
the room.
The window connector
Place the window connector (13) in the hole in the glass (diameter 112 millimetre)
and connect the exhaust hose. Use the cap (14) to close the opening when the air
conditioner is not used.
IMPORTANT
The flexible exhaust hose can be extended from 300 to 1500 mm for mounting.
This length has been designed especially according to the specifications of the air
conditioner. Do not use an extension or exchange for a different hose as that
may lead to malfunctioning. The exhaust air must flow freely, any blockage can
lead to overheating of the air conditioner. Take care to prevent any bow or bend
in the exhaust hose.
WARNING
Before using the air conditioner it should be left in an upright position for at
least 2 hours.
Page 8
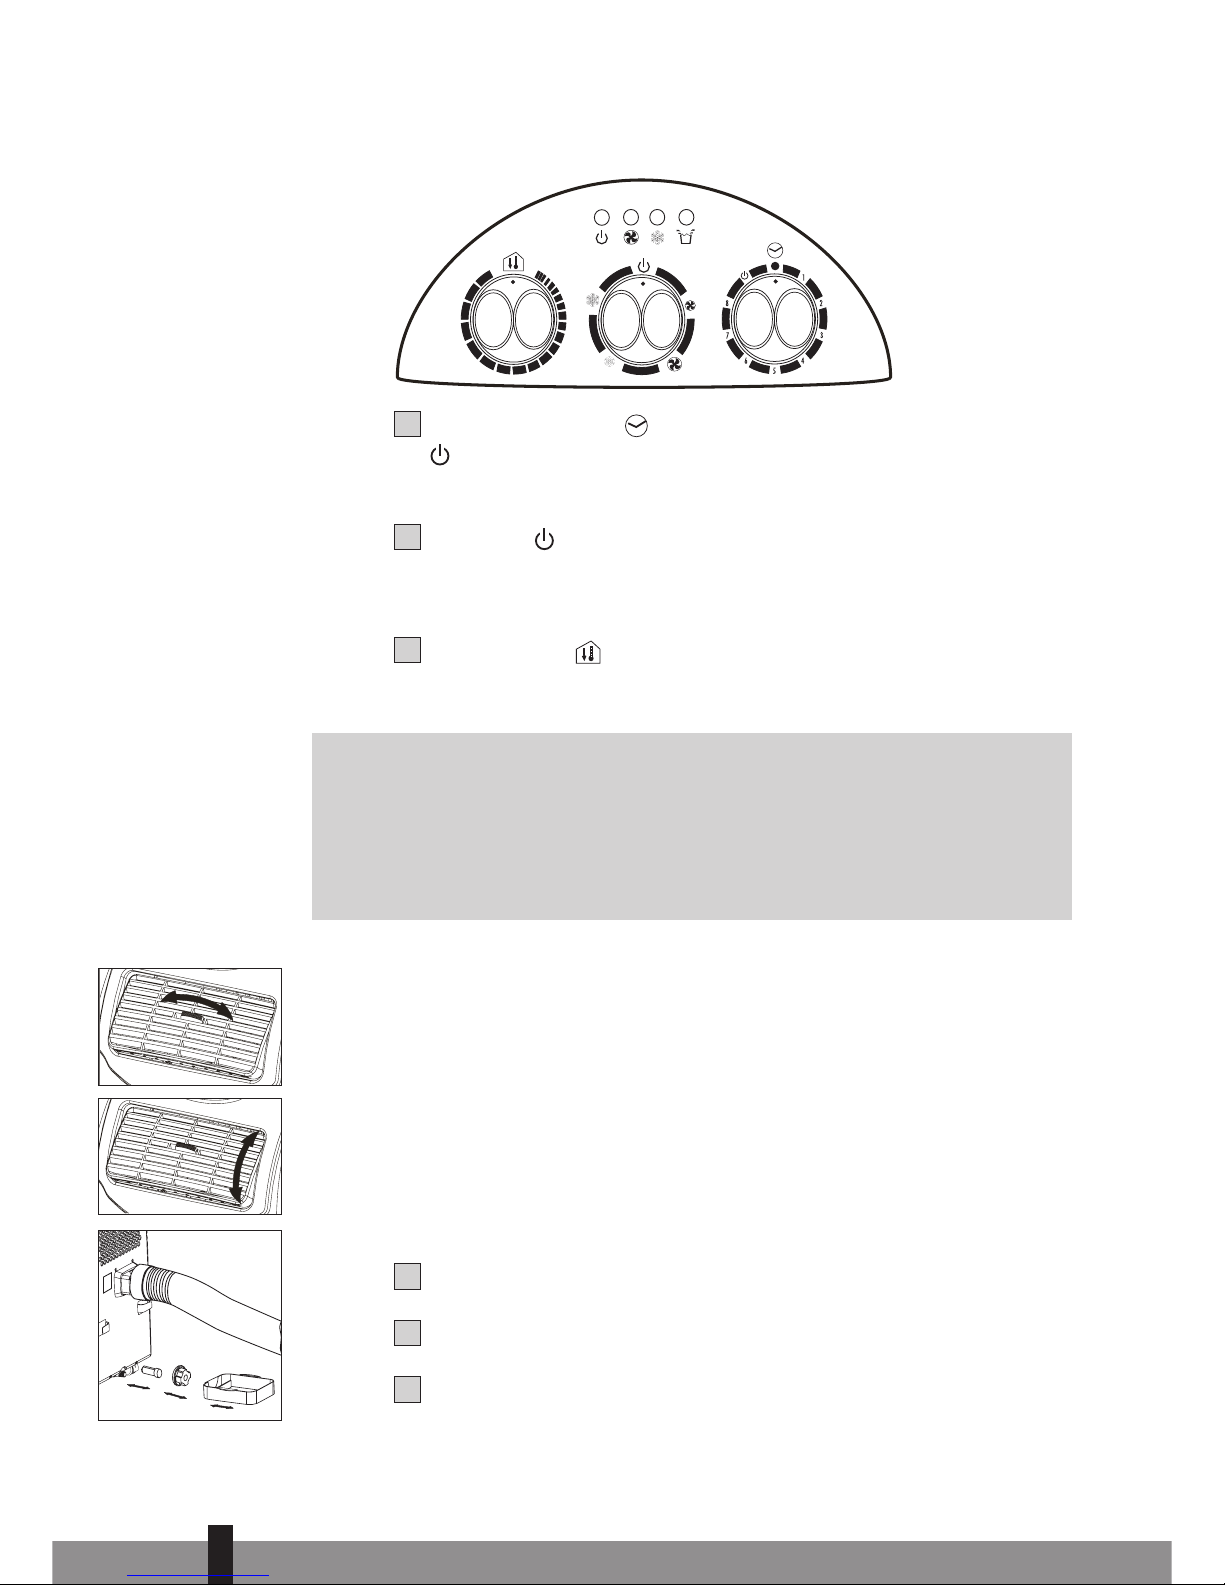
C OPERATING THE AIR CONDITIONER
ON/OFF and time knob
LED shows when the air conditioner is switched on (ON position). The unit
switches off automatically when the selected time has run down.
Mode knob
Select with this knob either low or high ventilation speed or low or strong
cooling.
Thermostat knob
Turn this knob to maintain the temperature level in combination with cooling.
D AIR FLOW
Turn the roller to control the air flow direction of the vertical louvres.
Move the air vent directly to adjust the air flow direction of the horizontal
louvres.
E EMPTYING THE WATER TANK
LED lights when the water tank is full, the compressor is stopped and the fan only
circulates the air.
Switch off the unit and remove the plug from the mains.
Place the water tray flat on the floor under the drain.
Remove the drain knob.
321
NOTICES!
The compressor has been set so that it starts functioning three minutes after the
(re)start of the air conditioner.
The cooling will switch off when the room temperature is lower than the set one.
Ventilation will however continue to work on the set level. When the room temperature rises above the selected value, the cooling will work again.
3
2
1
4
40
Page 9
4
41
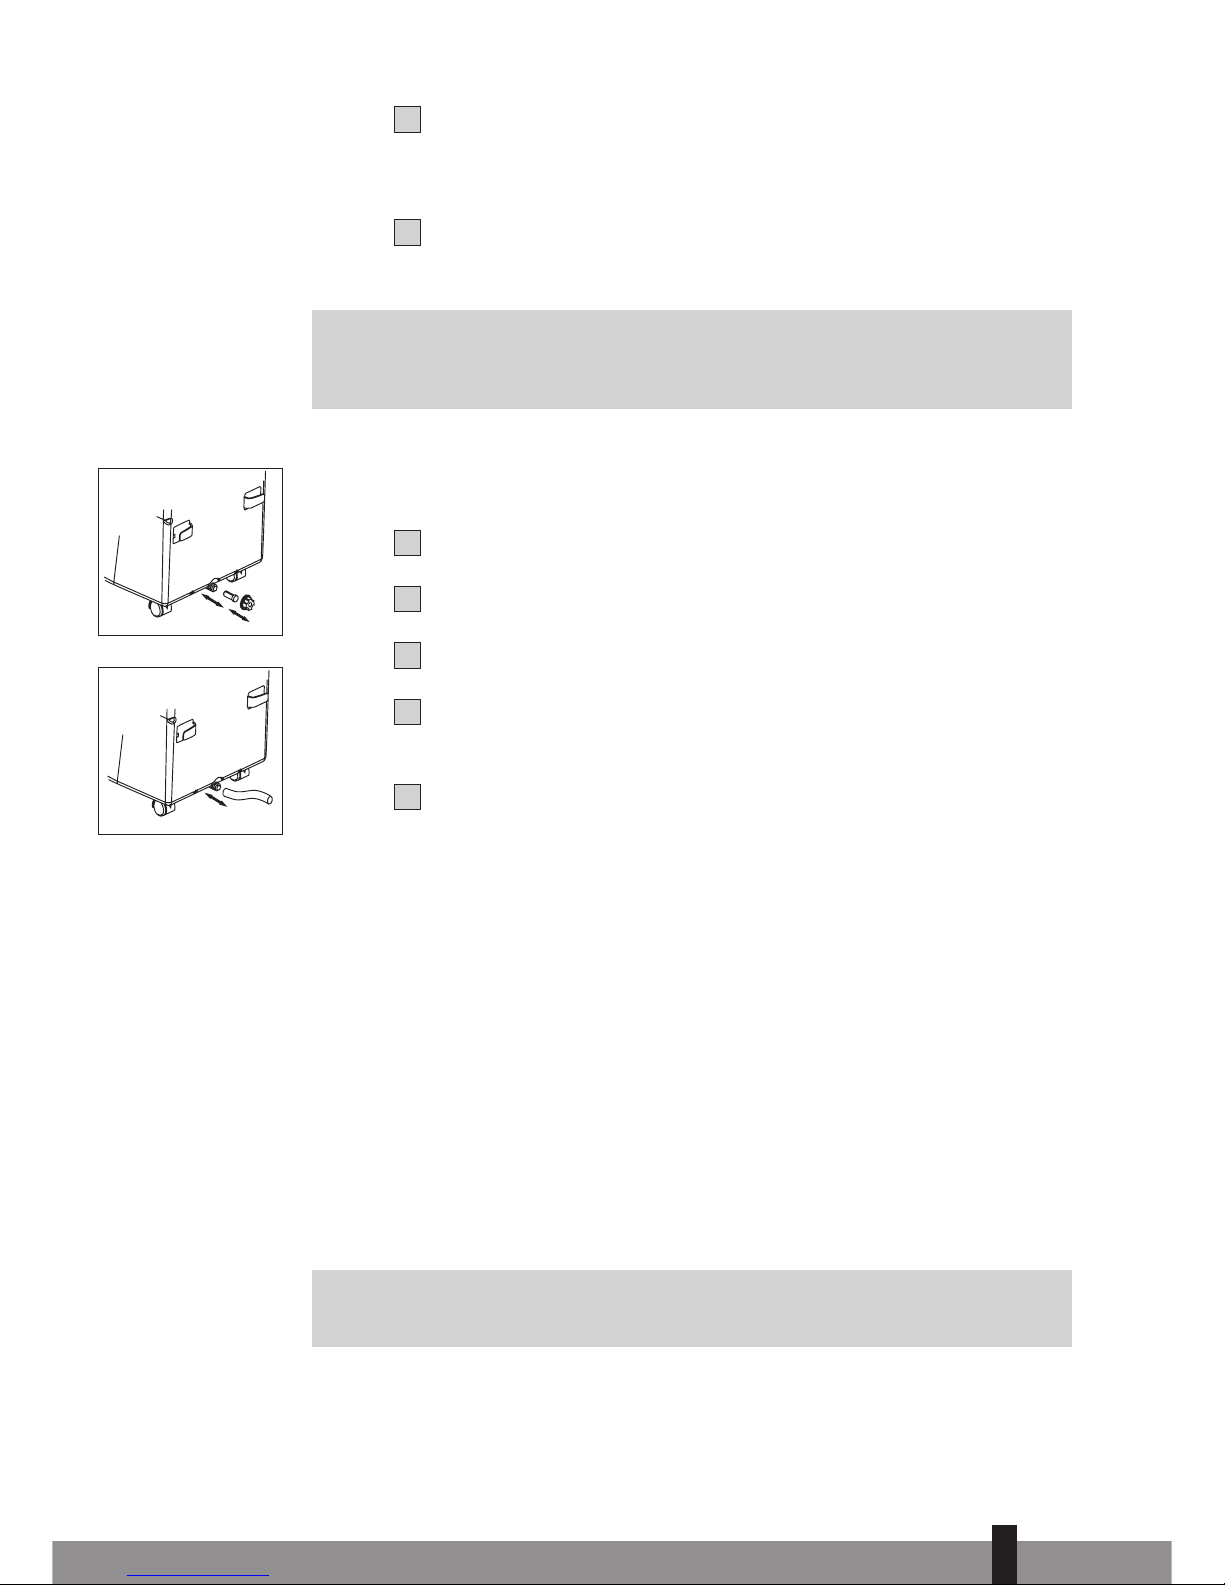
Remove the rubber plug and fill the water tray then replace the plug to stop
the water flow. Empty the tray and repeat this process until all water has
been removed.
Replace the rubber plug and the drain knob, plug the unit in and switch on.
LED should be off.
F CONTINUOUS DRAINAGE
Switch off the unit and remove the plug from the mains.
Remove the drain knob.
Remove the rubber plug.
Connect the drain tube into the water outlet and extend with extra water
tube as needed.
Place the other end in a normal drain. Make sure that the tube is free from
twists and bends. The tube must decline over its entire length.
Dehumidification
If the unit will be used mainly as dehumidifier, do not connect the exhaust hose
and let the warm air return in the room. Continuous drainage is then necessary
and more efficient.
G CLEANING
First of all switch off the unit and pull the plug.
Clean the housing with a soft, damp cloth. Never use aggressive chemicals, petrol,
detergents or other cleansing solutions. Clean the filter regularly with a vacuum
cleaner.
NOTICE!
Never use the air conditioner without airfilter.
54321
NOTICE!
When the air conditioner is in use, under normal circumstances the condensed
water will be drained through the air outlet-tube.
5
4
Page 10

H STORAGE
Empty the watertank (E).
Clean (or replace) the filter.
Put the unit in fan mode for a couple of hours to ensure that the inside
becomes completely dry.
Store cable as shown, protect the unit against dust and store in a dry place
not accessible to children.
I TROUBLE SHOOTING
Never try to repair or dismantle the air conditioner yourself. Incompetent repairs
result in loss of warranty and can endanger the user.
J GUARANTEE CONDITIONS
The air conditioner is supplied with a 24-month guarantee, commencing on the
date of purchase. All material and manufacturing defects will be repaired or
replaced free of charge within this period. The following rules apply:
1. We expressly refute all further damage claims, including claims for collateral
damage.
2. Repairs to or replacement of components within the guarantee period will
not result in an extension of the guarantee.
3. The guarantee is invalidated if any modifications have been made, non
genuine parts are fitted or repairs are carried out by third parties.
Problem Cause Solution
Connect to a functioning outlet
and switch on
Water tank indicator is on Empty water tank
Room temperature outside
operating temperature range
In direct sunlight Close curtains
Windows or doors open, many
people or heat source in room
Dirty filter Clean or replace filter
Room temperature lower than
selected value
Change temperature selection
The unit is noisy Unit stands uneven
Place on even surface (less
vibrations)
The compressor
does not work
Overheat protection probably
activated
Wait until room temperature
lowers
The unit does
not function
The unit does
not seem to
perform
Air inlet or air outlet blocked
Remove blockage
432
1
4
42
Page 11
4
43
4. Components subject to normal wear, such as the filter, are not covered by the
guarantee.
5. The guarantee is valid only when you present the original, dated purchase
invoice and if no modifications have been made.
6. The guarantee is invalid for damage caused by neglect or by actions that
deviate from those in this instruction booklet.
7. Transportation costs and the risks involved during the transportation of the
air conditioner or air conditioner components shall always be for the account
of the purchaser.
To prevent unnecessary expense, we recommend that you always first carefully
consult the instructions for use. Take the air conditioner to your dealer for repairs
if these instructions do not provide a solution.
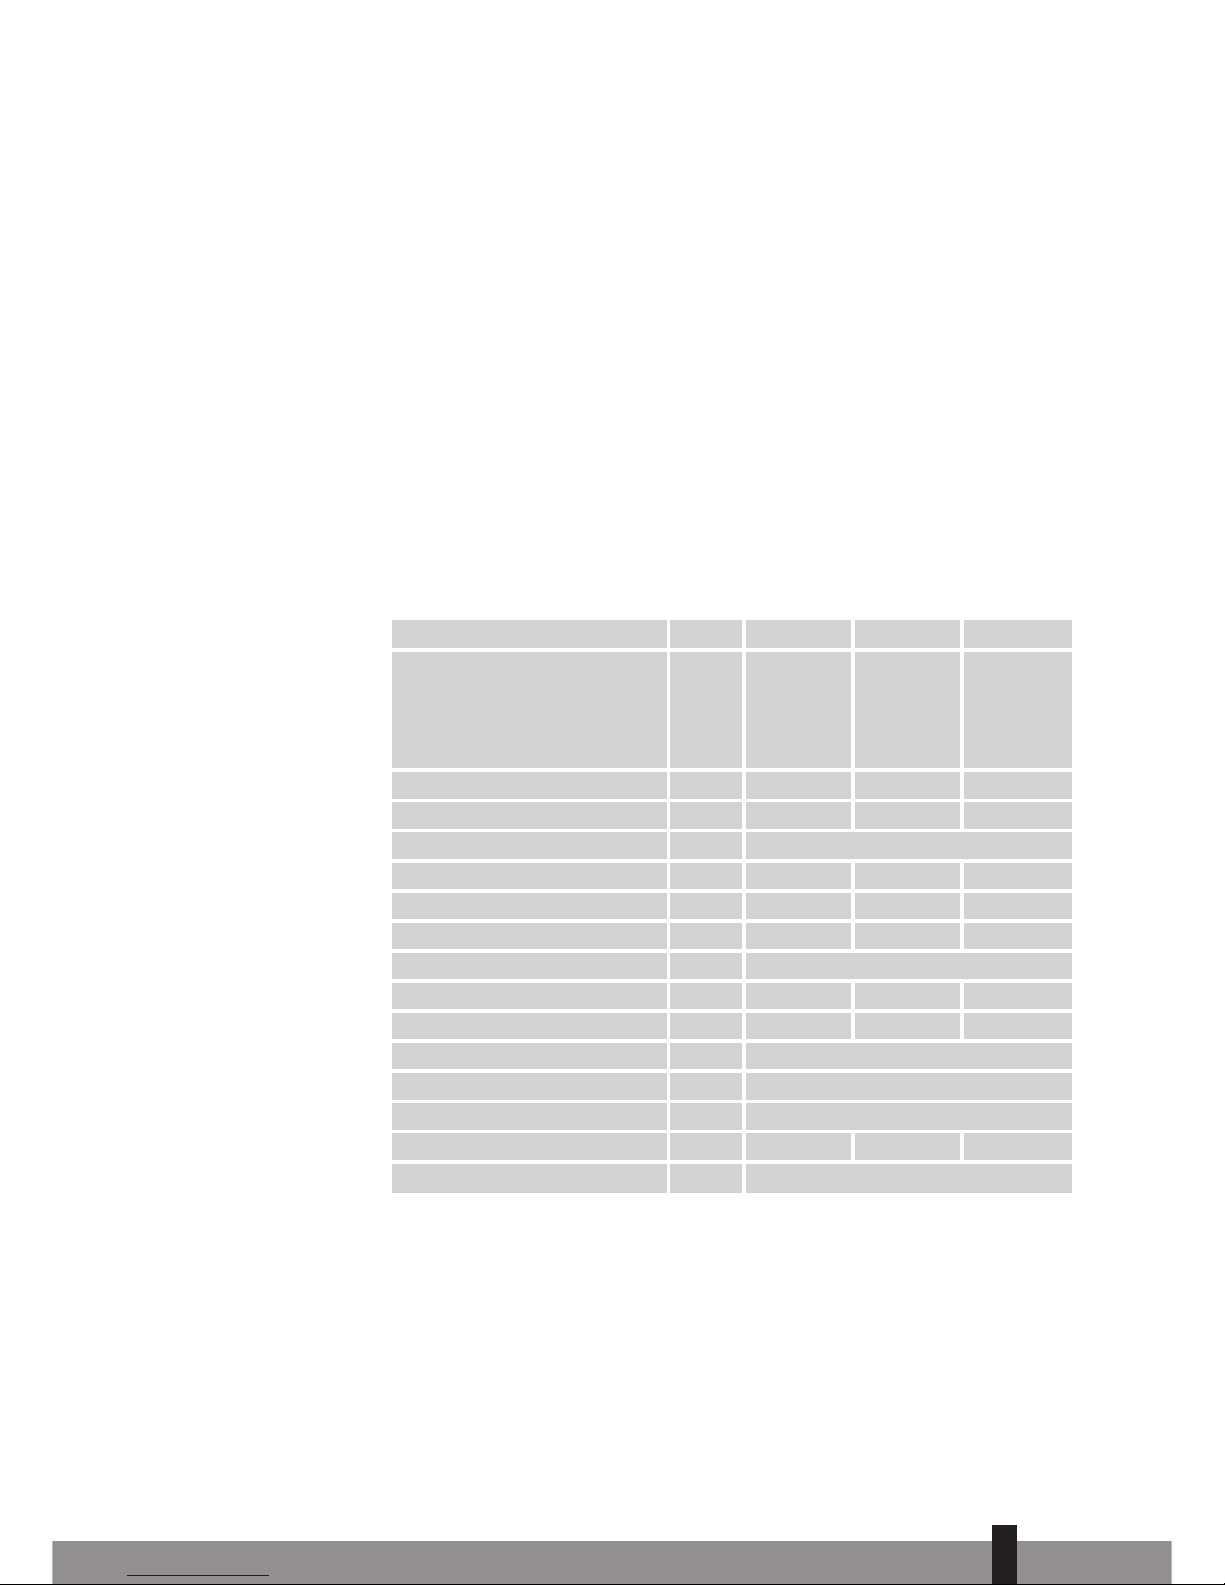
K TECHNICAL DATA
To be used as indication, subject to modifications
* Cooling capacities are measured at 27°C, 60% RH
** Moisture removal at 32°C, 80% RH
Model
P80 P90 P110
Cooling capacity *
- enthalpy difference (nom)
Btu/hr 9,000 10,000 12,000
- enthalpy difference
kW 2.7 2.9 3.5
- conform EC regulation
W 2,000 2,200 2,500
Power consumption
W 800 880 960
Current nom.
A 3.9 3.9 4.2
Mains (1PH)
V/Hz
Air delivery max.
m3/h 350 360 360
Dehumidification max. **
L/24h 15 18 24
Room size
m
3
60 75 85
Compressor model
Refrigerant
gr R407C / 470 R407C / 470 R407C / 480
Thermostat range
°C 18 - 32 18 - 32 18 - 32
Fan speeds
Noise level
dB
Dimensions (b x d x h)
mm
Weight
kg 29 29 31
Unit protection
52 - 58
380 x 400 x 750
IP 20
220 - 240 / 50
rotary
2
Page 12

ELENCO PARTI
Pannello di controlo
Uscita aria
Impugnatura
Rotelle girevoli
Filtro aria
Presa aria
Uscita aria di scarico
Avvolgicavo
Blocco scarico acqua
(con tappo in gomma
all'interno)
Adattori tubo
Tubo di scarico
Gommapiuma
Raccordo finestra
Coperchio
Vassoio portaacqua
Tubo di scarico
dell’acqua
1. LEGGERE DAPPRIMA LE ISTRUZIONI D'USO.
2. IN CASO DI DUBBIO, RIVOLGERSI AL RIVENDITORE.
>
44
Page 13

>
45
Gentile Signore, Signora,
Congratulazioni per l’acquisto del condizionatore d’aria, Zibro Clima. Oltre al
raffreddamento dell’aria, il condizionatore offre due funzioni supplementari, ovvero la
deumidificazione e la circolazione dell’aria. Il condizionatore mobile d’aria Zibro Clima è
estremamente facile da usare e da spostare. Lei ha acquistato un prodotto di qualità, che
Le offrirà molti anni di comfort, a condizione che venga usato in modo responsabile. Per
una durata ottimale dello Zibro Clima La invitiamo a leggere le istruzioni d’uso. Le
auguriamo molta freschezza e comfort con il Suo Zibro Clima.
Cordiali saluti,
PVG International b.v.
Reparto Assistenza Clienti
Page 14

A ISTRUZIONI PER LA SICUREZZA
Se vi sono dei dubbi in merito all’installazione, farla controllare ed eventualmente
modificare da un tecnico qualificato.
• Il climatizzatore è uno strumento sicuro. Tuttavia, trattandosi di un
apparecchio elettrico, usare la massima cautela.
• Tenerlo lontano dalla portata dei bambini.
• Non pulire il climatizzatore versandovi dei prodotti liquidi o immergendolo
nell’acqua.
• Non inserire alcun oggetto nelle aperture del climatizzatore.
• Estrarre la spina dalla presa prima di pulire l’apparecchio o uno dei suoi
componenti.
• Non collegare mai l’apparecchio alla presa elettrica utilizzando una prolunga.
Se non è disponibile una presa nelle vicinanze dell’apparecchio, farla
installare da un tecnico qualificato.
• Qualsiasi intervento, ad eccezione della regolare pulizia e della sostituzione
del filtro, deve essere effettuato da un tecnico dell’assistenza autorizzato. In
caso contrario si potrebbe invalidare la garanzia.
• Il cavo di alimentazione difettoso deve essere sostituito dalla casa
produttrice, dal proprio distributore o da persona qualificata, per evitare
qualsiasi pericolo.
AVVERTENZA
• Non far funzionare l’apparecchio in presenza di cavo o spina difettosi.
Non far passare il cavo sopra bordi taglienti.
• L'ambiente non deve essere chiuso ermeticamente. Evitare che si formi una
depressione nel vano di utilizzo dell'apparecchio, per non sregolare i flussi di
scarico dell'aria di scaldacqua a gas, cappe aspiranti e/o forni, pregiudicando
il funzionamento degli stessi.
IMPORTANTE
L’apparecchio è stato realizzato per funzionare in ambiente chiuso.
Classificazione: questo apparecchio deve essere collegato ad una presa con messa
a terra da 230 V/50 Hz. L’installazione deve essere conforme ai requisiti elettrici
locali.
>
46
Page 15

>
47
B INSTALLAZIONE DEL CLIMATIZZATORE
Questo climatizzatore è un apparecchio portatile che può essere spostato
facilmente da una stanza all’altra. A questo proposito seguire le istruzioni qui di
seguito illustrate:
• Il climatizzatore deve essere installato in posizione verticale su una superficie
piana.
• Non collocarlo vicino alla vasca da bagno, alla doccia o in una zona bagnata o
umida.
• Lasciare tra il climatizzatore e la finestra uno spazio minimo di 50 cm per la
libera circolazione dell’aria, lontano da ostacoli o tende.
• Inserire l’adattatore circolare (10) sul tubo di scarico. Collegare il tubo con
l’estremità rettangolare al climatizzatore.
Uso della gommapiuma
L’adattatore (11) si inserisce nell’apertura della gommapiuma (12). Posizionare la
gommapiuma nella finestra chiudendo quest’ultima il più possibile per impedire
all’aria calda di rientrare nella stanza.
Raccordo della finestra
Posizionarlo (13) nel foro sul vetro (diametro 112 mm) e collegare il tubo di
scarico. Usare il coperchio (14) per chiudere l’apertura del vetro quando il
climatizzatore non viene usato.
IMPORTANTE
Il tubo di scarico flessibile può essere allungato da 300 a 1500 mm durante il
montaggio. Questa lunghezza è stata ideata appositamente in base alle specifiche del climatizzatore. Non usare prolunghe o tubi di ricambio diversi per evitare un funzionamento scorretto. L’aria di scarico deve fuoriuscire liberamente, un
blocco qualsiasi può condurre ad un surriscaldamento del climatizzatore. Evitare
di piegare o inarcare il tubo di scarico.
AVVERTENZA
Prima di usare il climatizzatore, lasciarlo in posizione verticale per almeno due
ore.
Page 16

C FUNZIONAMENTO DEL CLIMATIZZATORE
ON/OFF e manopola timer
Il LED indica, se il climatizzatore è acceso (ON). L’apparecchio si spegne
automaticamente una volta trascorso il periodo di tempo selezionato.
Manopola modalità
Usarla per selezionare la velocità di ventilazione minima o massima o la funzione
di raffreddamento minima o massima.
Manopola termostato
Girarla per mantenere il livello della temperatura collegato al raffreddamento.
D FLUSSO DELL'ARIA
Girare la rotellina per controllare la direzione del flusso d’aria delle feritoie di
ventilazione verticali.
Orientare direttamente la presa di ventilazione per regolare la direzione del
flusso di aria delle feritoie di ventilazione orizzontali.
E SVUOTAMENTO DEL SERBATOIO DELL'ACQUA
Il LED si accende quando il serbatoio dell’acqua è pieno, il compressore si ferma e
la ventola smuove solo aria.
Spegnere l’apparecchio ed estrarre la spina dalla presa.
Collocare il vassoio in piano sul pavimento sotto lo scarico.
Estrarre il blocco dello scarico.
321
AVVERTENZA
Il compressore è stato impostato in modo tale da entrare in funzione tre minuti
dopo l’avvio del climatizzatore. La funzione di raffreddamento si disattiva quando la temperatura ambiente risulta minore di quella impostata. La ventilazione
tuttavia continua a funzionare al livello impostato. Quando la temperatura
ambiente è superiore rispetto al valore selezionato, la funzione di raffreddamento riparte. .
3
2
1
>
48
Page 17

>
49
Estrarre il tappo di gomma e riempire il vassoio d’acqua, quindi riposizionare
il tappo per bloccare il flusso d’acqua. Svuotare il vassoio e ripetere questa
procedura fino al completo svuotamento del serbatoio.
Riposizionare il tappo di gomma e il blocco dello scarico, inserire nuovamente
la spina nella presa ed accendere il climatizzatore. Il LED si deve spegnere.
F SCARICO CONTINUO
Spegnere l’apparecchio ed estrarre la spina dalla presa.
Rimuovere il blocco dello scarico.
Estrarre il tappo di gomma.
Connettere il tubo allo scarico dell’acqua e, se necessario, allungarlo.
Assicurarsi che il tubo non sia piegato o attorcigliato. Il tubo deve posto in
maniera tale da mantenere una leggera pendenza per tutta la sua lunghezza.
Deumidificare
Nel caso in cui adoperiate soltanto la funzione "deumidificatore", non dovrete
collegare il tubo di scarico dell’aria, in modo che l’aria calda rimanga
nell’ambiente da deumidificare. Il tubo per lo scarico dell’acqua deve essere
collegato ad uno scarico fisso.
G PULIZIA
Prima di tutto spegnere l’unità e poi togliere la spina della presa della corrente.
Pulire la superficie esterna del climatizzatore con un panno morbido ed umido.
Non usare agenti chimici aggressivi, benzina, detergenti o alter soluzioni per la
pulizia.
Pulire regolarmente il filtro con un aspirapolvere.
AVVERTENZA
Non usare mai il condizionatore senza filtro d’aria.
54321
AVVERTENZA
In condizioni normali il condizionatore scarica l’acqua condensata attraverso il
tubo di scarico dell’aria.
5
4
Page 18

H SISTEMAZIONE DELL'APPARECCHIO DOPO L'USO
Svuotare la vaschetta dell’acqua (E).
Pulire (o sostituire) il filtro.
Impostare l’apparecchio nella modalità ventola per un paio d’ore per
assicurarsi che l’interno del climatizzatore si asciughi completamente.
Sistemare il cavo come indicato nella figura, proteggere l’apparecchio dalla
polvere e sistemarlo in un luogo asciutto lontano dalla portata dei bambini.
I GUIDA ALLA RICERCA GUASTI
Non provare mai a riparare o smontare da soli il climatizzatore. Le riparazioni
eseguite da persone incompetenti possono invalidare la garanzia e possono
causare lesioni alla persona.
J GARANZIA
Il condizionatore d’aria ha una garanzia di 24 mesi dalla data d’acquisto. Entro
questo periodo vengono riparati gratuitamente tutti i difetti di materiale e di
fabbricazione. Qui di seguito sono riportate le condizioni della garanzia:
Guasto Causa Solutione
Collegarlo ad una presa
funzionante ed accenderlo
IL LED del serbatoio dell’acqua è
acceso
Svuotare il serbatoio dell’acqua
La temperatura ambiente non
rientra nell’intervallo specificato
Collocazione alla luce diretta del
sole
Chiudere le tende
Collocazione a finestre o porte
aperte, in presenza di molte
persone o di una fonte di calore
presente nella stanza
Filtro sporco Pulirlo o sostituirlo
Temperatura ambiente inferiore
rispetto al valore selezionato
Modificare il valore della
temperature selezionato
L’apparecchio fa
rumore
Non si trova su una superficie
piana
Collocarlo su una superficie piana
(minori vibrazioni)
Il compressore
non funziona
Probabilmente è attiva la
funzione di protezione
antisurriscaldamento
Aspettare che la temperatura
ambiente diminuisca
L’apparecchio
non funziona
L’apparecchio
non sembra in
grado di
eseguire le sue
funzioni
Presa o uscita d’aria bloccata
Rimuovere la causa del blocco
432
1
>
50
Page 19

>
51
1. Rifiutiamo esplicitamente tutte le altre richieste di risarcimento, compresi
danni conseguenti.
2. La riparazione o la sostituzione di parti entro il termine di garanzia non
comporta la proroga della garanzia stessa.
3. La garanzia non è valida qualora siano state apportate delle modifiche
qualora siano state montate parti non originali o qualora siano state
effettuate riparazioni da terzi.
4. Nella garanzia non sono comprese le parti sottoposte a normale usura, quali
il filtro.
5. La garanzia vale unicamente dietro presentazione della ricevuta d’acquisto
originale datata e qualora l’apparecchio non sia stato modificato.
6. La garanzia non è valida in caso di danno sorto in seguito ad operazioni che
non sono descritte in questo manuale o in seguito a negligenza.
7. Le spese di spedizione ed i rischi che la spedizione del apparecchio o delle
parti comporta sono sempre a carico dell'acquirente.
Per prevenire costi inutili, si consiglia di consultare dapprima le istruzioni d’uso
Qualora nelle istruzioni non sia presentata la soluzione corretta, rivolgersi al
rivenditore di fiducia per la riparazione del condizionatore d’aria.
K DATI TECNICI
I valori riportati sono indicativi, dati soggetti a modifiche
* Cap. di raffreddamento 60% humidità relativa, 27°C
** Tasso di humidità relativa pari al 80% ad una temperatura di 32°C
P80 P90 P110
Cap. di raffreddamento*
- differenza di entalpia nominale
Btu/hr 9.000 10.000 12.000
- differenza di entalpia
kW 2,7 2,9 3,5
- conforme alle norme EC
W 2.000 2.200 2.500
Consumo energia W 800 880 960
Corrente nom. A 3,9 3,9 4,2
Alimentazione (1PH) V/Hz
Flusso aria max.
m
3
/h
350 360 360
Deumidificazione max. ** L/24h 15 18 24
Ideale per ambienti fino a
m
3
60 75 85
Compressore modello
Refrigerante gr R407C / 470 R407C / 470 R407C / 480
Termostato °C 18 - 32 18 - 32 18 - 32
Velocità ventola
Livello di rumore dB
Dimensioni (b x d x h) mm
Peso netto kg 29 29 31
Unit protection
52 - 58
380 x 400 x 750
IP 20
Modello
220 - 240 / 50
rotazione
2
Page 20

BELANGRIJKE
ONDERDELEN
Bedieningspaneel
Uitblaasrooster
Handgreep
Wielen
Luchtfilter
Luchtinlaatrooster
Luchtafvoer
Snoerhouder
Afsluitdop
Verbindingsstukken
Luchtafvoerslang
Stuk schuimrubber
Raamverbinding
Afdichtkap
Waterbakje
Waterafvoerslang
1. LEES EERST DE GEBRUIKSAANWIJZING.
2. RAADPLEEG BIJ TWIJFEL UW DEALER.
1
52
Page 21

1
53
Geachte mevrouw, meneer,
Van harte gefeliciteerd met de aankoop van uw Zibro Clima airconditioner. Naast het
koelen van lucht heeft deze airconditioner nog een tweetal functies, namelijk
luchtontvochtiging en -circulatie. De verrijdbare Zibro Clima airconditioner is uiterst
gemakkelijk te bedienen en te verplaatsen. U heeft een kwaliteitsproduct aangeschaft
waar u nog vele jaren plezier van zult hebben, mits u de airconditioner verantwoord
gebruikt. Lees daarom eerst deze gebruiksaanwijzing, voor een optimale levensduur van
uw Zibro Clima.
Wij wensen u veel koelte en comfort met uw Zibro Clima.
Met vriendelijke groeten,
PVG International b.v.
Afdeling klantenservice
Page 22

A VEILIGHEIDSVOORSCHRIFTEN
De installatie moet volledig in overeenstemming zijn met de ter plaatse geldende
voorschriften, bepalingen en normen. Het apparaat is uitsluitend geschikt voor
gebruik binnenshuis. Controleer de netspanning. De airconditioner is uitsluitend
geschikt voor een geaard stopcontact, aansluitspanning 230 Volt / 50 Hz.
Controleer voor het aansluiten van het apparaat of:
• de aansluitspanning overeenkomt met die op het typeplaatje;
• stopcontact en stroomvoorziening geschikt zijn voor het apparaat;
• de stekker van het snoer in het stopcontact past.
Laat de elektrische installatie controleren door een erkend vakman als u er niet
zeker van bent dat alles in orde is.
• Haal altijd de stekker uit het stopcontact als het apparaat niet wordt
gebruikt.
• Wees uit veiligheidsoverwegingen altijd voorzichtig met kinderen in de buurt
van de airconditioner, zoals met ieder elektrisch apparaat.
• Laat eventuele reparaties – buiten het regelmatig onderhoud om – altijd
uitvoeren door een erkend servicemonteur of uw Zibro Clima leverancier,
anders kan dit leiden tot het vervallen van de garantie.
• De Zibro Clima airconditioner is een veilig apparaat. Het is volgens de
veiligheidsnormen gefabriceerd. Toch dient u, zoals bij ieder elektrisch
apparaat, voorzichtig te zijn.
• Haal altijd eerst de stekker uit het stopcontact voordat het apparaat of een
onderdeel ervan moet worden schoongemaakt.
• Reinig de airconditioner nooit door het apparaat met water te besproeien of
in water te dompelen.
• Sluit het apparaat NOOIT aan met behulp van een verlengsnoer. Is een
geschikt geaard stopcontact niet voorhanden, laat dit dan installeren door
een erkend elektricien.
• Breng het apparaat nooit in contact met water: kortsluitingsgevaar! Mocht
het ooit nodig zijn de stekker te vervangen, zorg er dan voor dat er altijd
weer een stekker met randaarde wordt gemonteerd.
LET OP!
• Gebruik het apparaat nooit met een beschadigd snoer of stekker.
Klem het snoer nooit af en laat het nooit over scherpe kanten lopen.
• De ruimte nooit volledig luchtdicht afsluiten. Voorkom onderdruk in de
ruimte, om afvoerstromen van geisers, afzuigkappen en / of ovens niet te
ontregelen.
BELANGRIJK
Het apparaat MOET altijd geaard worden aangesloten. Als de stroomvoorziening
niet geaard is, mag u het apparaat absoluut niet aansluiten. De stekker moet
altijd makkelijk toegankelijk zijn als het apparaat is aangesloten.
1
54
Page 23

1
55
B DE INSTALLATIE
De airconditioner is verplaatsbaar en kan gemakkelijk ergens anders worden
geplaatst. Let daarbij op het volgende:
• Zorg dat het apparaat rechtop en op een vlakke ondergrond staat.
• Het apparaat niet (in de buurt van) bad, douche of in een andere vochtige of
waterdamprijke omgeving gebruiken.
• Voor een goede luchtcirculatie tenminste 50 cm rondom het apparaat vrij
houden.
• Steek het ronde deel van het verbindingsstuk (10) in de slang. Steek het
rechthoekige deel aan de achterzijde (7) in het apparaat.
Schuimrubber in een geopend raam
Het verbindingsstuk (11) past in de uitsparing van het stuk schuimrubber (12).
Plaats het stuk schuimrubber in het geopende raam en sluit dat zo ver mogelijk,
zodat de afgevoerde lucht niet weer in de ruimte wordt teruggeblazen.
Door het vensterglas leiden
Steek de raamverbinding (13) in de in het glas gesneden opening (met een
doorsnede van ca. 112 mm) en sluit het verbindingsstuk (10) – op de slang – hier
op aan. Met afdekkapje (14) wordt het gat afgesloten als de airconditioner niet
wordt gebruikt.
OPMERKING
De flexibele luchtafvoerslang kan van 300 mm tot 1500 mm worden uitgerekt.
De lengte van deze slang is op de capaciteit van het apparaat berekend, het
gebruik van een andere slang of van een verlengstuk kan storingen van het
apparaat veroorzaken. De afgevoerde lucht moet ongehinderd kunnen verdwijnen, anders kan dit oververhitting van het apparaat tot gevolg hebben. Zorg er
daarom voor dat er geen knikken of kronkels in de afvoerslang zitten.
LET OP!
Vóór de ingebruikname van uw airconditioner moet deze minimaal 2 uur rechtop hebben gestaan.
Page 24

C BEDIENING
Aan/Uit en tijdklokschakelaar
Als het apparaat aanstaat (ON) brandt controlelampje . Als een ingestelde
werkingstijd om is schakelt het apparaat zich uit.
Functieschakelaar
Kies met deze schakelaar een lage of hoge ventilatorsnelheid (controlelampje
brandt) of geringe of krachtige koeling (controlelampje brandt).
Thermostaatschakelaar
Met deze schakelaar wordt de gewenste temperatuur ingesteld. Deze kan alleen
worden aangehouden als tegelijk koelen is ingesteld.
D RICHTING LUCHTUITBLAAS
Draaien om de stand van de verticale lamellen te veranderen.
Kantelen om de stand van de horizontale lamellen te veranderen.
E LEGEN WATERRESERVOIR
Bij een vol waterreservoir gaat het lampje branden, stopt de compressor en werkt
de ventilator alleen voor de luchtcirculatie.
Eerst het apparaat uitzetten en de stekker uit het stopcontact halen.
Leg het bakje vlak op de grond onder de afvoeropening.
Draai de afsluitdop los.
Haal de rubberen stop uit de afvoer en laat het bakje bijna vollopen, duw
432
1
OPMERKINGEN
Om de levensduur van de compressor te verlengen is deze zo ingesteld, dat deze
pas drie minuten na het (weer) aanzetten van het apparaat begint te werken.
Het koelsysteem wordt uitgezet zodra de omgevingstemperatuur lager is dan de
ingestelde waarde. Ventilatie blijft op de ingestelde snelheid werken. Als de
omgevingstemperatuur weer boven de ingestelde waarde stijgt, wordt het koelen hervat.
3
2
1
1
56
Page 25

1
57
dan de stop weer in de afvoer. Het bakje legen en deze stap herhalen tot al
het water is verwijderd.
Schuif de stop in de afvoer, draai de afsluitdop erop, stekker in het
stopcontact en het apparaat aanzetten. Controlelampje moet nu uit zijn.
F OP EEN VASTE AFVOER AANSLUITEN
Eerst het apparaat uitzetten en de stekker uit het stopcontact halen.
Draai de afsluitdop los.
Haal de rubberen stop uit de afvoer.
Schuif de waterafvoerslang over de waterafvoeropening en verleng deze
indien nodig.
Breng het andere einde van de afvoerslang aan op een vaste waterafvoer. Let
er daarbij speciaal op dat de afvoerslang niet gedraaid is of knikken heeft. De
slang moet aflopend geplaatst zijn over de gehele lengte.
Ontvochtigen
Als het apparaat (vrijwel) uitsluitend als ontvochtiger wordt gebruikt, breng dan
niet de luchtafvoerslang aan en laat de warme lucht terugstromen in de te
ontvochtigen ruimte. U dient wel de waterafvloerslang op een vaste afvoer aan te
brengen.
G ONDERHOUD
Schakel eerst de unit uit en trek de stekker uit het stopcontact voor u het
apparaat of filter gaat schoonmaken of het filter gaat vervangen.
Gebruik voor het regelmatig schoonmaken van de buitenkant van het apparaat
uitsluitend een zachte, vochtige doek.
Het filter moet regelmatig worden schoongemaakt. Gebruik daarvoor een
stofzuiger.
OPMERKING
Gebruik het apparaat nooit zonder luchtfilter.
54321
OPMERKING
Bij gebruik als airconditioner wordt onder normale condities het condenswater
via de luchtafvoerslang afgevoerd.
5
Page 26

H OPBERGEN
Leeg de watertank (E).
Maak het filter schoon.
Zet het apparaat enkele uren aan in ventilatorstand, waardoor het
binnenwerk volledig droog wordt.
Hang de kabel op, bescherm tegen stof en op een droge, niet voor kinderen
bereikbare, plaats opbergen
I STORINGEN
Probeer nooit zelf het apparaat uit elkaar te nemen of te repareren. Bij
onvakkundige reparatie vervalt de garantie. Niet vakkundige reparatie kan de
gebruiker van het apparaat in gevaar brengen.
J GARANTIEBEPALINGEN
U krijgt op de airconditioner 24 maanden garantie vanaf de aankoopdatum.
Binnen deze periode worden alle materiaal- en fabricagefouten kosteloos
verholpen. Hierbij gelden de volgende regels:
1. Alle verdere aanspreken op schadevergoeding, inclusief gevolgschade wijzen
wij uitdrukkelijk af.
Storing Oorzaak Oplossing
Geen stroomvoorziening
Het apparaat in een stopcontact
steken waarop spanning staat
Tank vol lampje brandt Watertank legen
Kamertemperatuur buiten
werkingstemperatuur
Staat in zonlicht
Apparaat uit het zonlicht
plaatsen
Ramen of deuren staan open, er
zijn veel mensen of
warmtebronnen in de ruimte
Filter vuil Schoonmaken of vervangen
Kamertemperatuur is lager dan
ingestelde waarde
Stel een andere temperatuur in
Het apparaat is
lawaaiig
Apparaat staat op een oneffen
ondergrond
Zet het apparaat op een effen
ondergrond (minder trilling)
De compressor
werkt niet
De oververhittingsbescherming is
in werking getreden
Wacht totdat de temperatuur is
gedaald
Het apparaat
werkt niet
Het apparaat
werkt
onvoldoende
Luchttoevoer of luchtuitblaas
verstopt of geblokkeerd
Verwijder de blokkage
432
1
1
58
Page 27

1
59
2. Reparatie of vervanging van onderdelen binnen de garantietermijn leidt niet
tot verlenging van de garantie.
3. De garantie geldt niet wanneer veranderingen zijn aangebracht, nietoriginele onderdelen zijn gemonteerd of reparaties zijn verricht door derden.
4. Onderdelen die aan normale slijtage onderhevig zijn, zoals de filter, vallen
buiten de garantie.
5. De garantie geldt uitsluitend als u de originele, gedateerde aankoopbon
overlegt en als daarop geen veranderingen zijn aangebracht.
6. De garantie geldt niet bij schade ontstaan door handelingen die afwijken van
die in de gebruiksaanwijzing of door verwaarlozing.
7. De verzendkosten en het risico van het opsturen van de airconditioner of
onderdelen daarvan, komen altijd voor rekening van de koper.
Om onnodige kosten te voorkomen, raden wij u aan eerst altijd zorgvuldig de
gebruiksaanwijzing te raadplegen. Wanneer deze geen uitkomst biedt, kunt u de
airconditoner ter reparatie aanbieden bij uw dealer.
K TECHNISCHE SPECIFICATIES
Indicatief gebruiken, wijzigingen voorbehouden
* koelcapaciteit gemeten bij 60% RH, 27°C
** ontvochtiging bij 32°C, 80% RH
P80 P90 P110
Koelcapaciteit *
- enthalpieverschil nominaal
Btu/hr 9.000 10.000 12.000
- enthalpieverschil
kW 2,7 2,9 3,5
- conform CE-normering
W 2.000 2.200 2.500
Opgenomen vermogen W 800 880 960
Stroomverbruik nom. A 3,9 3,9 4,2
Aansluitspanning (1PH) V/Hz
Luchtverplaatsing max. m3/h 350 360 360
Ontvochtiging max. ** L/24h 15 18 24
Ruimtecapaciteit m
3
60 75 85
Compressor type
Koelmiddel gr R407C / 470 R407C / 470 R407C / 480
Thermostaat range °C 18 - 32 18 - 32 18 - 32
Ventilatorsnelheden
Geluidsniveau dB
Afmetingen (b x d x h) mm
Gewicht kg 29 29 31
Beschermingsklasse
52 - 58
380 x 400 x 750
IP 20
Type
220 - 240 / 50
roterend
2
Page 28

ISTOTNE CZE˛ŚCI
Panel kontrolny
(przyciski i regulatory)
Wywietrznik
Uchwyt
Kółka
Filtr powietrza
Dopływ powietrza
Odpływ powietrza
Uchwyty do zawieszenia przewodu
Zatyczka
Złączki
Rura giętka do
odpływu powietrza
Uszczelka z
pianogumy
Złączka do
połączenia poprzez
szybę okienną
Zaślepka
Pojemnik na wodę
Wężyk odprowadzający wodę
1. PRZED PIERWSZYM UŻYCIEM PRZECZYTAĆ INSTRUKCJE˛ OBSłUGI.
2. W RAZIE WĄTPLIWOŚCI SKONTAKTOWAĆ SIE˛ Z DEALEREM.
:
60
Page 29

:
61
Szanowni Państwo,
Serdecznie gratulujemy Państwu zakupu klimatyzatora Zibro Clima. Oprócz chłodzenia
powietrza, klimatyzator ten ma jeszcze dwie inne funkcje, mianowicie odwilżanie i wentylacje.
Przenośny klimatyzator Zibro Clima jest wyjątkowo prosty w obsłudze i można go łatwo
przemieszczać.
Nabyli Państwo produkt wysokiej jakości, który - przy prawidłowej eksploatacji - będzie
Państwu wiernie służył przez wiele lat. W celu zapewnienia optymalnej trwałości klimatyzatora,
prosimy przed pierwszym użyciem aparatu uważnie zapoznać się z niniejszą instrukcją.
Życzymy naszym klientom przyjemnego chłodu i komfortu z Zibro Clima.
Łączymy serdeczne pozdrowienia,
PVG International b.v.
Dział Obsługi Klientów
Page 30

A PRZEPISY BEZPIECZEŃSTWA
Instalacja klimatyzatora musi odbyć się w całkowitej zgodzie z obowiązującymi
na miejscu przepisami, ustaleniami i normami. Klimatyzator nadaje się do użytku
jedynie w pomieszczeniach zamkniętych. Przed zainstalowaniem go sprawdzić
należy napięcie sieci zasilającej. Klimatyzator przystosowany jest do
przyłączenia do sieci wyłącznie za pośrednictwem uziemiającego gniazdka
sieciowego o napięciu sieci zasilającej 230 Volt (50 Hz).
Przed instalacją klimatyzatora należy sprawdzić czy:
• wysokość napięcia sieci zasilającej zgadza się z parametrami wskazanymi dla
danego typu;
• gniazdko sieciowe i rodzaj sieci zasilającej przystosowane są do przyłączenia
urządzenia;
• wtyczka przewodu zasilającego pasuje do gniazdka sieciowego.
W razie wątpliwości, czy powyższe wymogi są spełnione, radzimy kontrolę oraz
instalację powierzyć fachowcowi.
• Jeśli nie używasz klimatyzatora, wtyczkę przewodu należy wyjąć z gniazdka
sieciowego.
• Ze względu na bezpieczeństwo należy zwrócić uwagę na to, aby małe dzieci nie
miały bezpośredniego dostępu do klimatyzatora, tak jak ma to miejsce w
przypadku innych urządzeń elektrycznych.
• Ewentualne naprawy poza regularną konserwacją urządzenia należy zlecić
fachowcowi z autoryzowanego serwisu naprawczego lub serwisu firmy PVG,
gdyż w przeciwnym razie może spowodować to przepadek gwarancji.
• Klimatyzator marki Zibro Clima jest w pełni bezpiecznym urządzeniem,
wykonanym zgodnie z obowiązującymi normami bezpieczeństwa. Mimo to jak
w przypadku wszelkich innych urządzeń elektrycznych należy obchodzić się z
nim ostrożnie.
• Przed przystąpieniem do czyszczenia urządzenia lub którejś z jego części
składowych należy najpierw wyjąć wtyczkę przewodu zasilającego z gniazdka
sieciowego.
• Czyszcząc klimatyzator, nie należy go nigdy zwilżać, moczyć ani zanurzać w
wodzie.
• Klimatyzatora NIE WOLNO w żadnym wypadku przyłączać do sieci za pomocą
przedłużacza.
• W razie braku odpowiedniego uziemiającego gniazdka sieciowego należy zlecić
fachowcowi jego instalację.
• Nie wolno dopuścić do kontaktu urządzenia z wodą z uwagi na
niebezpieczeństwo zwarcia!
UWAGA!
Klimatyzator MUSI być przyłączony do sieci zasilającej przewodem uziemiającym.
Jeśli przyłączenie do sieci zasilającej nie jest uziemiające, klimatyzatora nie wolno w
żadnym wypadku do niej przyłączyć. Gdy urządzenie jest przyłączone do sieci zasilającej za pomocą gniazdka sieciowego, znajdująca się w nim wtyczka musi być
zawsze łatwo dostępna.
:
62
Page 31

:
63
• Jeśli zaistnieje potrzeba wymiany wtyczki przewodu zasilającego na nową,
należy pamiętać o tym, aby zainstalowana wtyczka była uziemiająca.
B INSTALACJA
Klimatyzator jest urządzeniem przenośnym i można go bez przeszkód umieścić w
innym dowolnie wybranym miejscu. W takim wypadku należy zwrócić uwagę na to, aby:
• ustawić klimatyzator w pozycji pionowej na płaskim podłożu.
• nie umieszczać ani używać urządzenia w łazience lub innych wilgotnych lub
zawierających parę wodną pomieszczeniach ani też w pobliskim ich sąsiedztwie.
• pozostawić wokół urządzenia wolną przestrzeń wynoszącą co najmniej 50 cm w
celu umożliwienia właściwej cyrkulacji powietrza.
• wetknąć złączkę (10) jej zaokrągloną stroną do rury odprowadzającej, natomiast
stroną czworokątną połączyć z klimatyzatorem od strony tylnej (7).
Uszczelka z pianogumy do zastosowania w otwartym oknie.
Czworokątna złączka (11) pasuje kształtem do otworu w uszczelce z pianogumy (12).
Pianogumę umieścić w otwartym oknie i domknąć je jak najszczelniej, aby
odprowadzone powietrze nie zostało ponownie wdmuchane do pomieszczenia.
Połączenie przez szybę okienną.
Złączkę do połączenia przez szybę okienną (13) umieścić w wyciętym w szybie
otworze ( o średnicy ok. 112 mm ), a następnie przyłączyć do niej złączkę (10)
przymocowaną z jednej strony do rury. Otwór ten należy zamknąć zaślepką (14), gdy
klimatyzator nie jest używany.
UWAGA!
Giętką rurę odprowadzającą powietrze można wydłużyć od 300 mm do 1500 mm.
Długość tej rury przystosowana jest do mocy i zdolności klimatyzatora, w związku z czym
użycie innej rury lub wydłużki rury może spowodować zakłócenia w pracy urządzenia.
Odprowadzane powietrze musi bez przeszkód wydostawać się na zewnątrz, w przeciwnym razie może dojść do przegrzania klimatyzatora. Dlatego należy też zwrócić uwagę
na to, aby rura odprowadzająca powietrze nie uległa zagięciom bądź skrzywieniom.
UWAGA!
Przed użyciem klimatyzatora zatroszczyć się o to, aby przed włączeniem znajdował
się on co najmniej 2 godziny w pozycji pionowej.
UWAGA!
• Nie wolno używać klimatyzatora, jeżeli przewód zasilający lub wtyczka przewodu
są uszkodzone. Nie wolno też uciskać przewodu ani przeciągać go wzdłuż
przedmiotów o ostrych krawędziach.
• Pomieszczenie nie może być nigdy hermetycznie odcięte od dopływu powietrza.
Aby nie zakłócić odprowadzania powietrza z podgrzewacza wody, okapu i pieca
kuchennego, zapobiegaj powstaniu podciśnienia w pomieszczeniu.
Page 32

C OBSŁUGA
Włącznik/wyłącznik oraz dawkownik czasu
Gdy klimatyzator jest włączony (ON) zapala się dioda kontrolna . Po upływie
ustalonego czasu chłodzenia urządzenie wyłącza się samoczynnie.
Przełącznik funkcji
Za pomocą tego przełącznika można ustawić niższą lub wyższą prędkość wentylatora
(zapala się dioda kontrolna) jak też niższe lub wyższe natężenia chłodzenia (zapala się
dioda kontrolna).
Przełącznik termostatu
Za pomocą przełącznika termostatu można ustawić wysokość pożądanej temperatury
pomieszczenia. Utrzymanie temperatury na ustalonym poziomie jest możliwe tylko
wtedy, gdy równocześnie włączone jest chłodzenie.
D REGULACJA KIERUNKU WYDMUCHU POWIETRZA
Przekręcić w celu zmiany położenia pionowych płytek.
Odwrócić w celu zmiany położenia poziomych płytek.
E OPRÓŻNIANIE POJEMNIKA NA WOD
Jeżeli pojemnik na wodę jest pełny, zapala się dioda sygnalizacyjna [4], kompresor
przestaje pracować, a wentylator reguluje jedynie przepływ powietrza.
Najpierw wyłączyć klimatyzator, a następnie wyjąć wtyczkę z gniazdka sieciowego.
Pojemnik na wodę umieścić na płasko bezpośrednio pod otworem spustowym.
Odkręcić zatyczkę.
321
UWAGA!
Aby przedłużyć czas użytkowania kompresora został on tak nastawiony, że rozpoczyna on swą pracę dopiero po upływie trzech minut od ( ponownego ) włączenia
urządzenia.
Układ chłodzenia wyłącza się automatycznie wtedy, gdy temperatura pomieszczenia
obniży się w stosunku do nastawionej wartości. Natomiast wentylacja przebiega na
ustalonym poziomie. Jeżeli temperatura pomieszczenia podniesie się ponad nastawioną wartość, włącza się ponownie chłodzenie.
3
2
1
:
64
Page 33

:
65
Wyjąć gumową zaślepkę z otworu spustowego umożliwiając spływ wody do
pojemnika. Po jego napełnieniu ponownie wetknąć zaślepkę w otwór spustowy.
Pojemnik opróżnić i powtórzyć kolejno opisane powyżej czynności aż do
całkowitego wyczerpania wody.
Zaślepkę wetknąć do otworu spustowego, nałożyć zatyczkę, włożyć wtyczkę
przewodu zasilającego do gniazdka sieciowego, następnie włączyć klimatyzator.
Dioda kontrolna [4] powinna zgasnąć.
F PRZYŁĄCZENIE STAŁEGO SPUSTU WODY
Najpierw wyłączyć klimatyzator, a następnie wyjąć wtyczkę przewodu z gniazdka
sieciowego
Odkręcić zatyczkę.
Wyjąć gumową zaślepkę z otworu spustowego.
Połączyć ujście wody z wężem odprowadzającym i rozwinąć wąż w miarę
potrzeby.
Drugi koniec gumowego węża odprowadzającego przyłączyć do stałego spustu
wody, zwracając przy tym specjalnie uwagę na to, aby wąż odprowadzający nie
był skręcony lub zgięty. Wąż musi odpadać przez całą jego długość.
Osuszanie powietrza
Jeżeli klimatyzator służy (prawie) wyłącznie do osuszania powietrza, nie należy przyłączać
giętkiej rury odpływowej, umożliwiając w ten sposób bezpośredni napływ ciepłego
powietrza do pomieszczenia. Jednak dla wygody oraz w celu lepszego funkcjonowania
zaleca się przyłączenie węża odprowadzającego do stałego spustu wody.
G CZYSZCZENIE I KONSERWACJA
Zanim przystąpisz do czyszczenia klimatyzatora lub filtra powietrza bądź też
jego wymiany, wyjmij najpierw wtyczkę przewodu z gniazdka sieciowego.
Do regularnego czyszczenia obudowy klimatyzatora należy używać wyłącznie
miękkiej, lekko wilgotnej ściereczki.
Filtr powietrza należy regularnie czyścić, posługując się przy tym odkurzaczem.
54321
UWAGA!
Używając urządzenie jako klimatyzator w normalnych warunkach kondensowana
woda będzie odprowadzana rurą wylotową.
5
4
Page 34

H PRZECHOWYWANIE
Opróżnij zbiornik wody (E).
Oczyść filtr powietrza.
Przy słonecznej pogodzie włącz klimatyzator na kilka godzin, nastawiając go na
funkcję wentylatora, w celu całkowitego osuszenia wnętrza urządzenia.
Zawieś przewód zasilający na przeznaczonych do tego uchwytach, chroń
klimatyzator przed kurzem i przechowuj go w suchym i niedostępnym dla dzieci
miejscu.
I USUWANIE ZAKŁÓCEŃ
Nie próbuj nigdy naprawiać lub rozmontowywać klimatyzatora samodzielnie. W
przypadku niefachowej naprawy gwarancja przepada. Niefachowo przeprowadzona
naprawa urządzenia może także zagrozić zdrowiu i życiu jego użytkownika.
Awaria Przyczyna Sposób usunięcia
Przyłączyć klimatyzator do
gniazdka posiadającego napięcie
sieciowe
Pojemnik na wodę pełny dioda
zapala się
Opróżnić pojemnik na wod
Temperatura pomieszczenia
wykracza poza zakres działania
Stoi w pełnym słońcu Zasunąć zasłony okienn
Okna lub drzwi są otwarte, w
pomieszczeniu jest dużo osób lub
wiele źródeł ciepła
Zanieczyszczony filtr powietrza Oczyścić lub wymienić fil
Temperatura pomieszczenia jest
niższa niż od nastawionej wartości
Nastawić inną temperatur
Urządzenie
pracuje za głośno
Klimatyzator stoi na nierównym
podłożu
Ustawić klimatyzator na równym
podłożu (mniejsze drgania)
Kompresor nie
działa
Włączyło się zabezpieczenie przed
przegrzaniem
Zaczekać, aż temperatura się
obniży
Urządzenie nie
działa
Urządzenie nie
pracuje
optymalnie
Zapchany lub zablokowany dopływ
lub odpływ powietrza
Usunąć przyczynę blokady
532
1
UWAGA!
Nigdy nie używać urządzenia bez filtra.
:
66
Page 35

:
67
J WARUNKI GWARANCJI
Wytwórca udziela na klimatyzator 24. miesięcznej gwarancji, licząc od daty zakupu. W
okresie gwarancyjnym naprawie podlegają wszelkie usterki materiałowe i błędy
fabryczne. Obowiązują przy tym następujące zasady:
1. Producent nie honoruje jakichkolwiek roszczeń o odszkodowanie, w tym roszczeń
związanych ze szkodą wtórną, powstała w wyniku usterki.
2. Naprawa lub wymiana części/podzespołów w okresie gwarancji nie ma wpływu na
obowiązujący okres gwarancji.
3. Gwarancja przepada jeżeli w urządzeniu dokonano zmian konstrukcyjnych,
wmontowano części nie oryginalne, lub też jeżeli urządzenie był naprawiany przez
osoby nieuprawnione.
4. Gwarancja nie obejmuje części, które w trakcie eksploatacji ulegają normalnemu
zużyciu (np. filtr).
5. Gwarancja jest ważna wyłącznie za okazaniem oryginalnego, opatrzonego datą
dowodu kupna (paragonu), na którym nie naniesiono jakichklolwiek poprawek.
6. Gwarancja nie obowiązuje w przypadku uszkodzenia powstałego wskutek
niezgodnego z instrukcją obchodzenia się z urządzeniem, lub będącego rezultatem
zaniedbania.
7. Koszty i ryzyko związane z przesyłką grzejnika lub części zamiennych ponosi klient.
Aby uniknąć niepotrzebnych kosztów, radzimy Państwu zawsze najpierw uważnie
przeczytać instrukcję obsługi. Jeżeli ujęte w niej wskazówki nie dadzą zadowalającego
rezultatu, klimatyzator należy oddać do naprawy w punkcie dealerskim.
K DANE TECHNICZNE
Podane wartości są orientacyjne, z zastrzeżeniem zmian
* Moc chłodzenia, 60% RH, 32˚C (różnica wartośći cieplnej).
** Osuszanie 32˚C, 80% RH.
P80 P90 P110
Moc chłodzenia *
- nominalna roznica entalpii
Btu/hr 9.000 10.000 12.000
- różnica entalpii
kW 2,7 2,9 3,5
- zgodne z przepisami Komisji EU
W 2.000 2.200 2.500
Moc pobierana
W 800 880 960
Zużycie energii
A 3,9 3,9 4,2
Napięcie sieci zasilającej
V/Hz
Objętość obiegu powietrza
m3/h
350 360 360
Osuszanie **
L/24h 15 18 24
Wielkość pomieszczenia
m
3
60 75 85
Kompresor typ
Chłodziwo
gr R407C / 470 R407C / 470 R407C / 480
Termostat
°C 18 - 32 18 - 32 18 - 32
Stopnie prędkości wentylatora
Noise level
dB
Wymiary (szer. x dł. x wys.)
mm
Ciężar
kg 29 29 31
Klasa zabezpieczenia
52 - 58
380 x 400 x 750
IP 20
Rodzaj / typ urządzenia
220 - 240 / 50
obrotowy
2
Page 36

i ÖSTERREICH
PVG Austria VertriebsgmbH
Salaberg 49
3350 HAAG
tel: +43 7434/44867
fax: +43 7434/44868
email: pvgaustria@zibro.com
e BELGIË
PVG Belgium NV/SA
Industrielaan 55
2900 SCHOTEN
tel: +32 3 326 39 39
fax: +32 3 326 26 39
email: pvgbelgium@zibro.com
q SCHWEIZ
PVG Schweiz AG
Genuastrasse 15
4142 MÜNCHENSTEIN
tel: +41 61 337 26 51
fax: +41 61 337 26 78
email: pvgint@zibro.com
2 DEUTSCHLAND
PVG Deutschland GmbH
Beiersdorfstraße 4
46446 EMMERICH
tel: +49 2821 76713
fax: +31 412 648385
email: pvgint@zibro.com
6 DANMARK
PVG Scandinavia A/S
Niels Bohrsvej 10
6100 HADERSLEV
tel: +45 73 53 02 02
fax: +45 73 53 02 04
email: pvgdenmark@zibro.com
5 ESPAÑA
PVG España S.A.
Pol. Ind. San José de Valderas II
Comunidad ”La Alameda”
C / Aurora Boreal, 19
28918 LEGANÉS (Madrid)
tel: +34 91 611 31 13
fax: +34 91 612 73 04
email: pvgspain@zibro.com
3 FRANCE
PVG France SARL
4, Rue Jean Sibélius
B.P. 185 - 76410
SOTTEVILLE SOUS LE VAL
tel: +33 2 32 96 07 47
fax: +33 2 32 96 07 77
email: pvgfrance@zibro.com
4 UNITED KINGDOM
Lister Gases
Bridge Street
Holloway Bank, Wednesbury
West Midlands WS10 OAW
Tel.: +44 121 506 1818
Fax: +44 121 505 1744
email: gases@lister.co.uk
> ITALIA
PVG Italy SRL
Via Niccolò Copernico 5
50051 CASTELFIORENTINO (FI)
tel: +39 571 628500
fax: +39 571 628504
email: pvgitaly@zibro.com
u NORGE
Sunwind - Gylling A/S
Rudsletta 71-75 / P.O. Box 64
N-1309 RUD
tel: +47 67 17 13 70
fax: +47 67 17 13 80
email: pvgint@zibro.com
1 NEDERLAND
PVG International b.v.
P.O.Box 96
5340 AB OSS
tel: +31 412 694694
fax: +31 412 622893
email: pvgnl@zibro.com
9 PORTUGAL
Gardena, Lda
Recta da Granja do Marquês
ALGUEIRÃO
2725-596 MEM MARTINS
tel: + 35 21 92 28 530
fax: + 35 21 92 28 536
email: pvgint@zibro.com
: POLSKA
PVG Polska Sp. z. o. o.
Kolonia Promna 58
26-803 PROMNA
tel: +48 48 615 16 33
fax: +48 48 615 16 33
email: pvgpoland@zibro.com
DISTRIBUTED IN EUROPE BY PVG INTERNATIONAL b.v.
PVG Traffic gsc©031210 man_P80|90|110
 Loading...