

LC – DX32
GB OPERATING MANUAL........ PAGE 2 (This product is not suitable for primary heating purpose)
DE GEBRAUCHSANWEISUNG..... PAGE 14 (Dieses Produkt eignet sich nicht als Hauptheizgerät)
FR MANUAL D’UTILISATION ..... PAGE 26 (Ce produit ne peut pas être utilisé comme chauffage principal)
NL GEBRUIKSAANWIJZING ...... PAGE 38 (Dit product is niet geschikt voor gebruik als primaire verwarming)
ES INSTRUCCIONES DE USO ..... PAGE 50 (Este producto no es adecuado para calefacción primaria)
IT ISTRUZIONI D’USO .......... PAGE 62 (Il presente prodotto non è adatto a funzioni di riscaldamento primario)
PT MANUAL DE INTRUÇÕES ..... PAGE 74 (Este produto não é adequado para fins de aquecimento principal)
DK BRUGERVEJLEDNING ........ PAGE 86 (Dette produkt er ikke egnet til brug som primær opvarmningskilde)
NO BRUKERINSTRUKSEN ........ PAGE 98 (Dette produkt er ikke egnet for primær oppvarmings)
SE BRUKSANVISNING........... PAGE 110 (Denna produkt lämpar sig inte för primär uppvärmning)
FI KÄYTTÖOHJEET ............ PAGE 122 (Tämä tuote ei sovellu ensisijaiseksi lämmittimeksi)

15 TIPS FOR SAFE USE
1 Children should be supervised to ensure that they do not play
with the appliance.
2 DO NOT move the heater when it is burning or still hot. DO
NOT refill nor service the heater when it is burning or still hot.
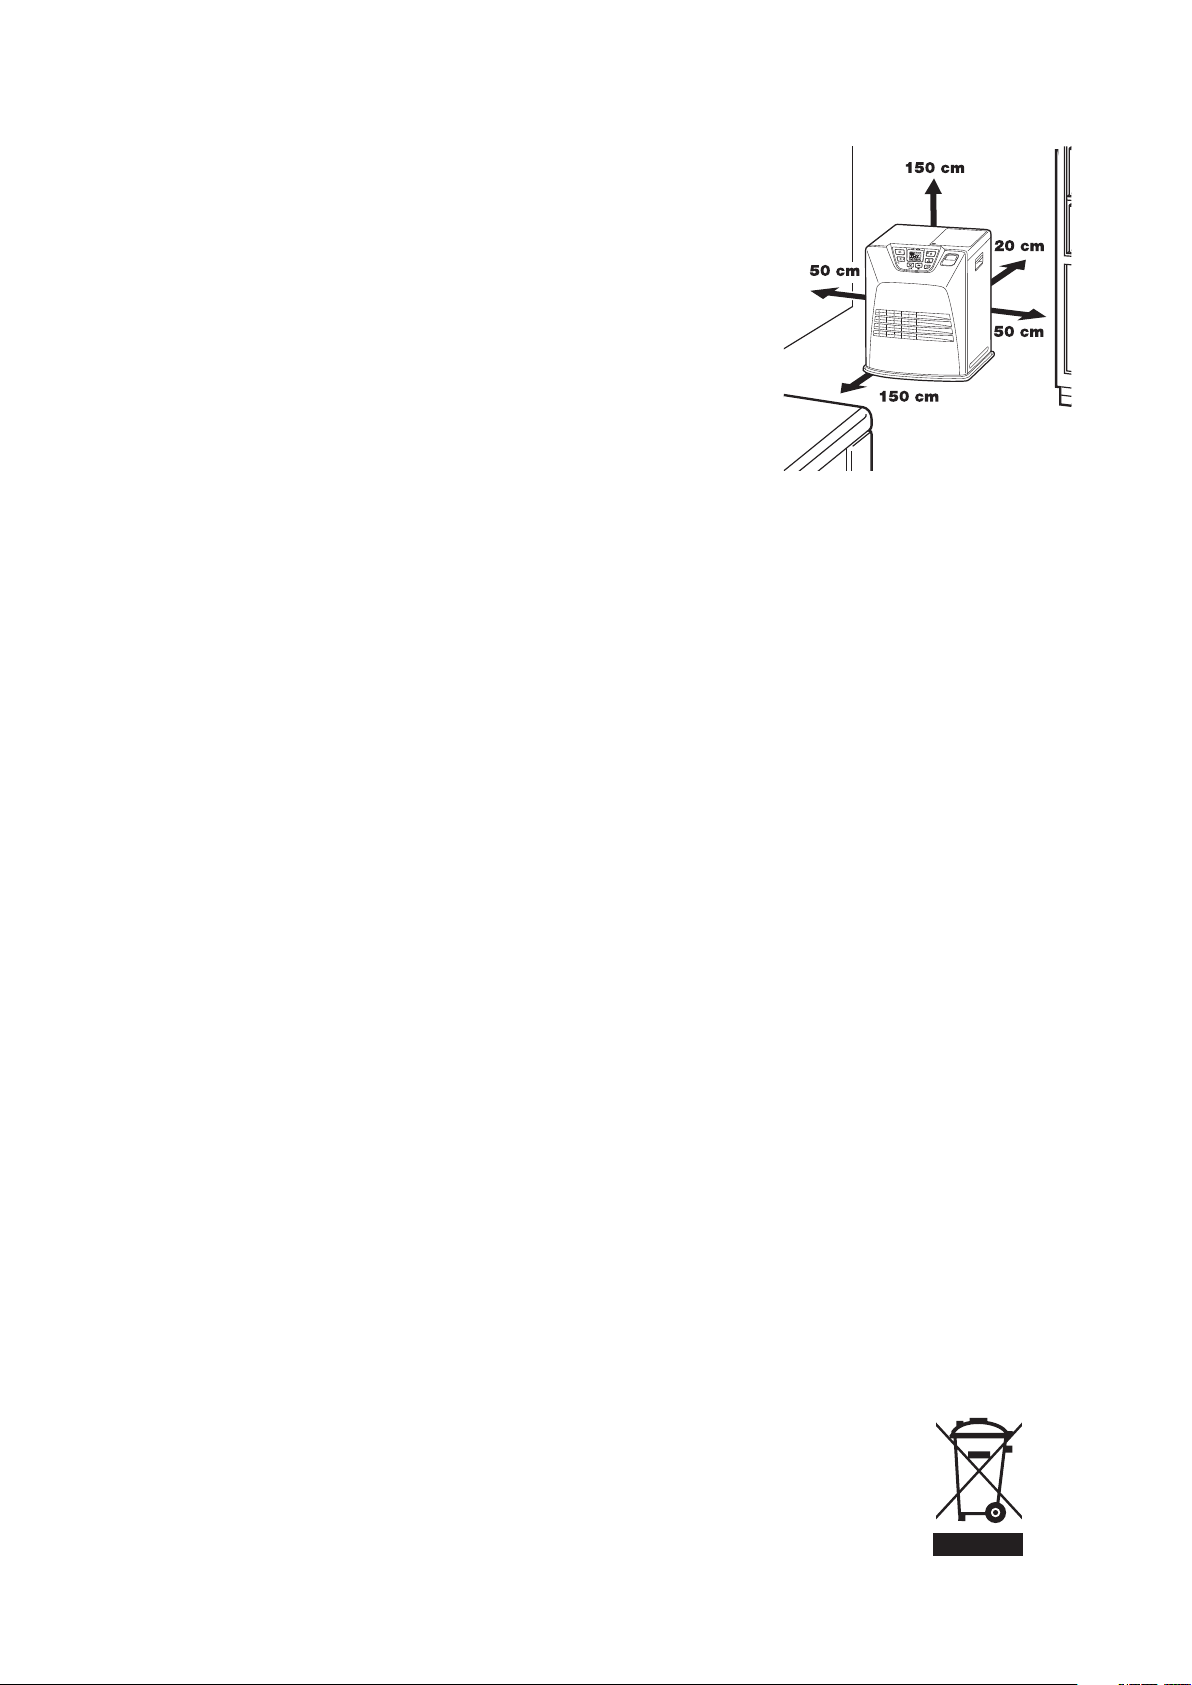
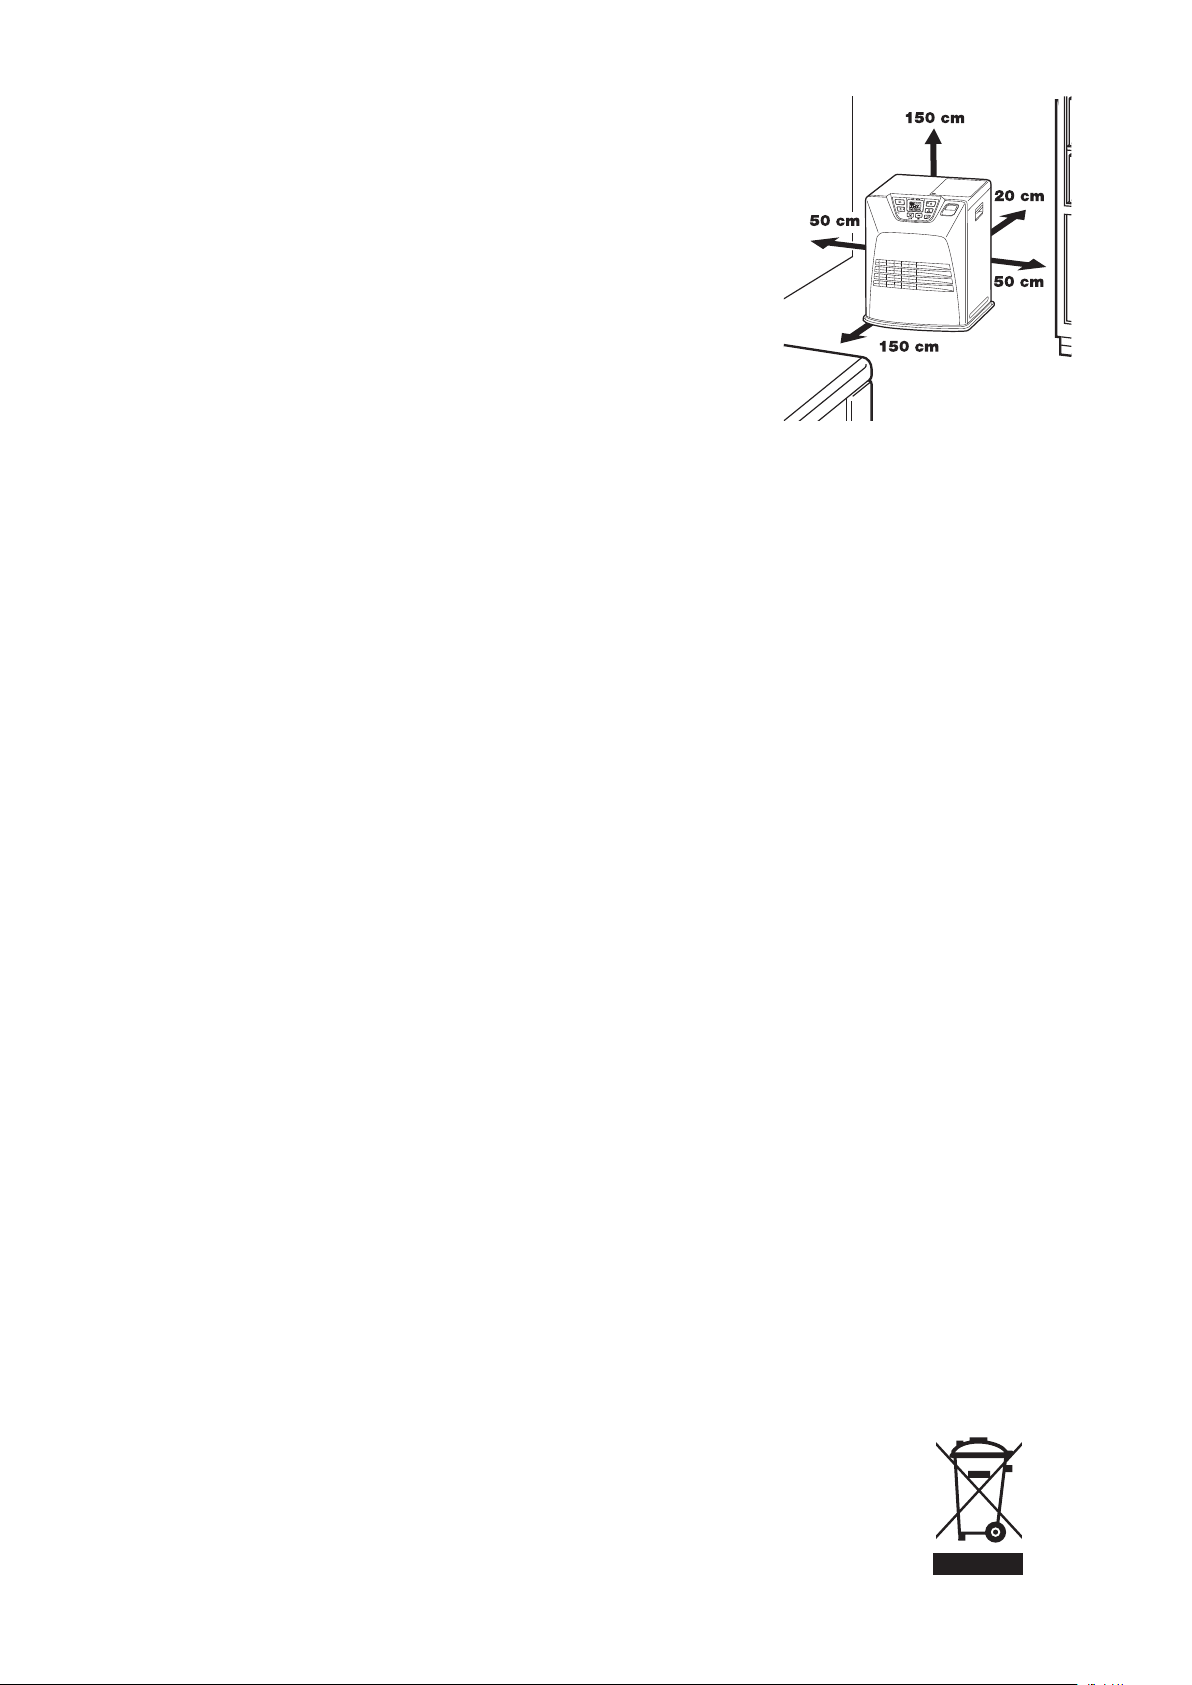
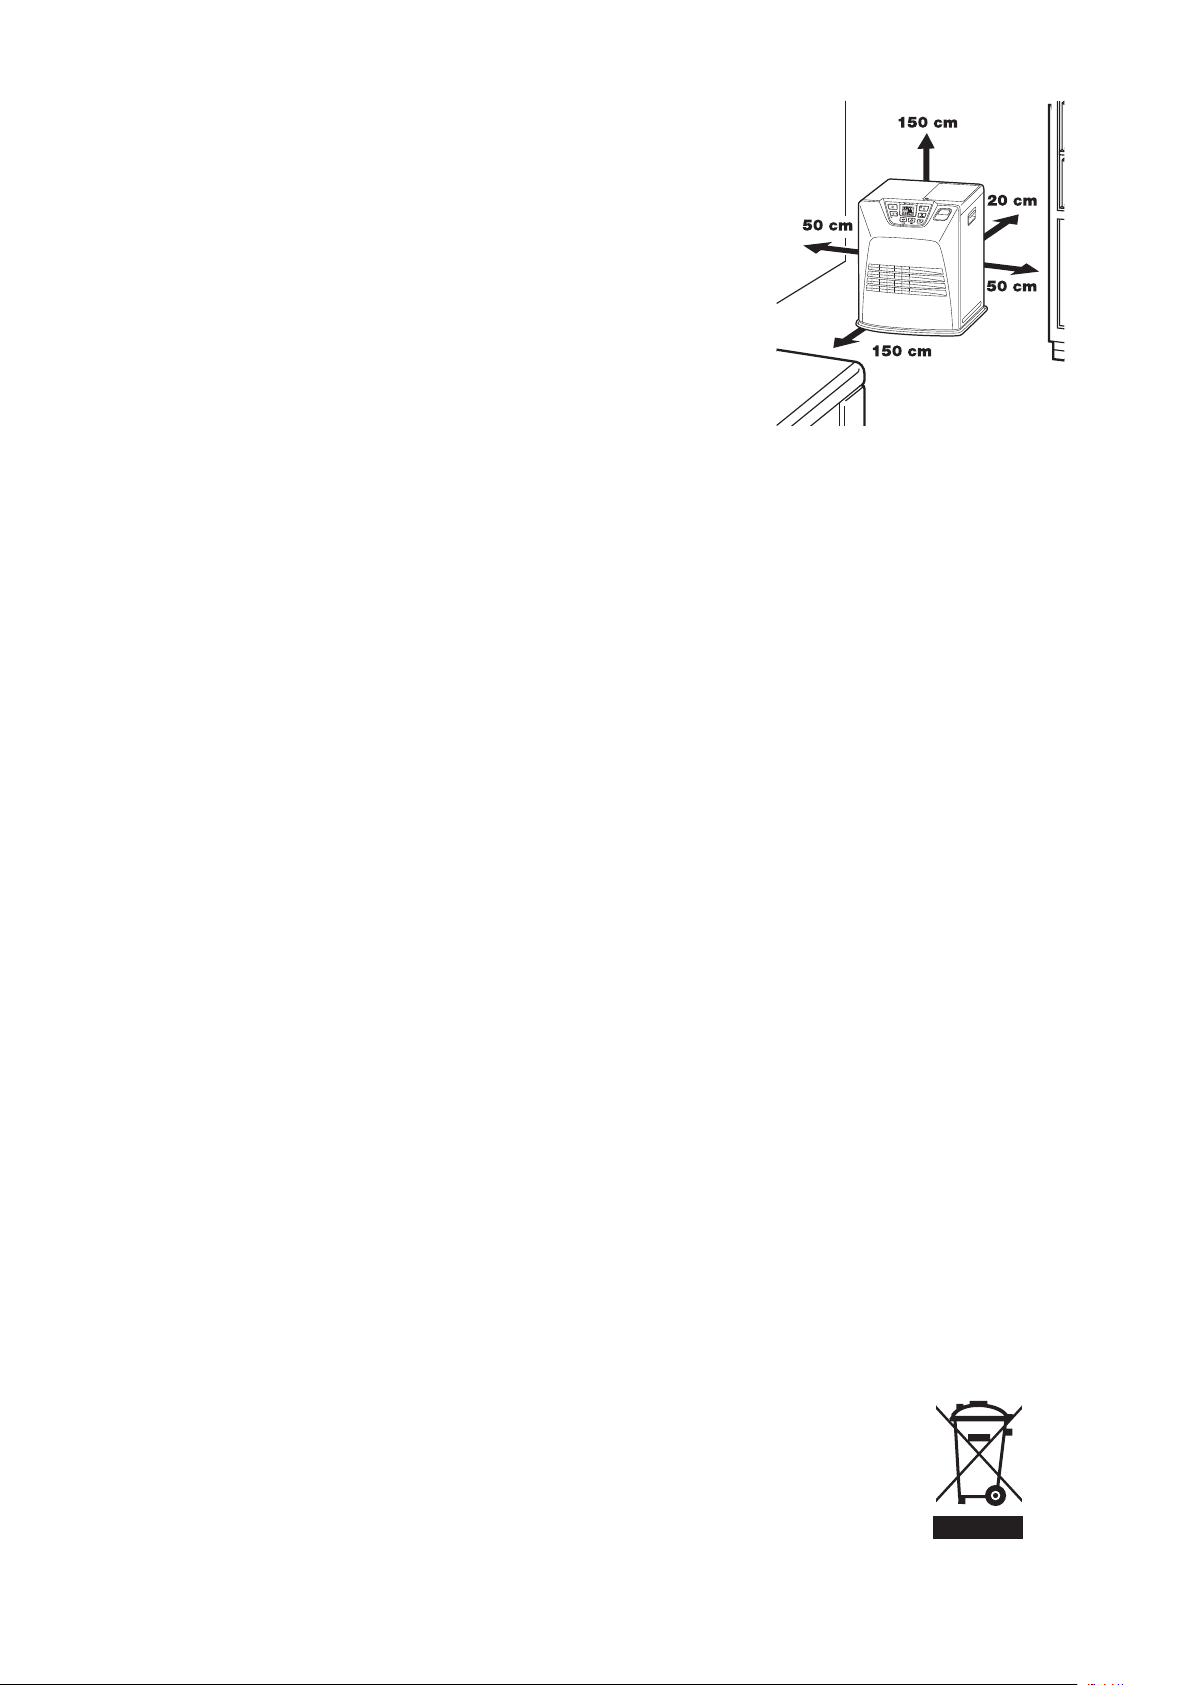
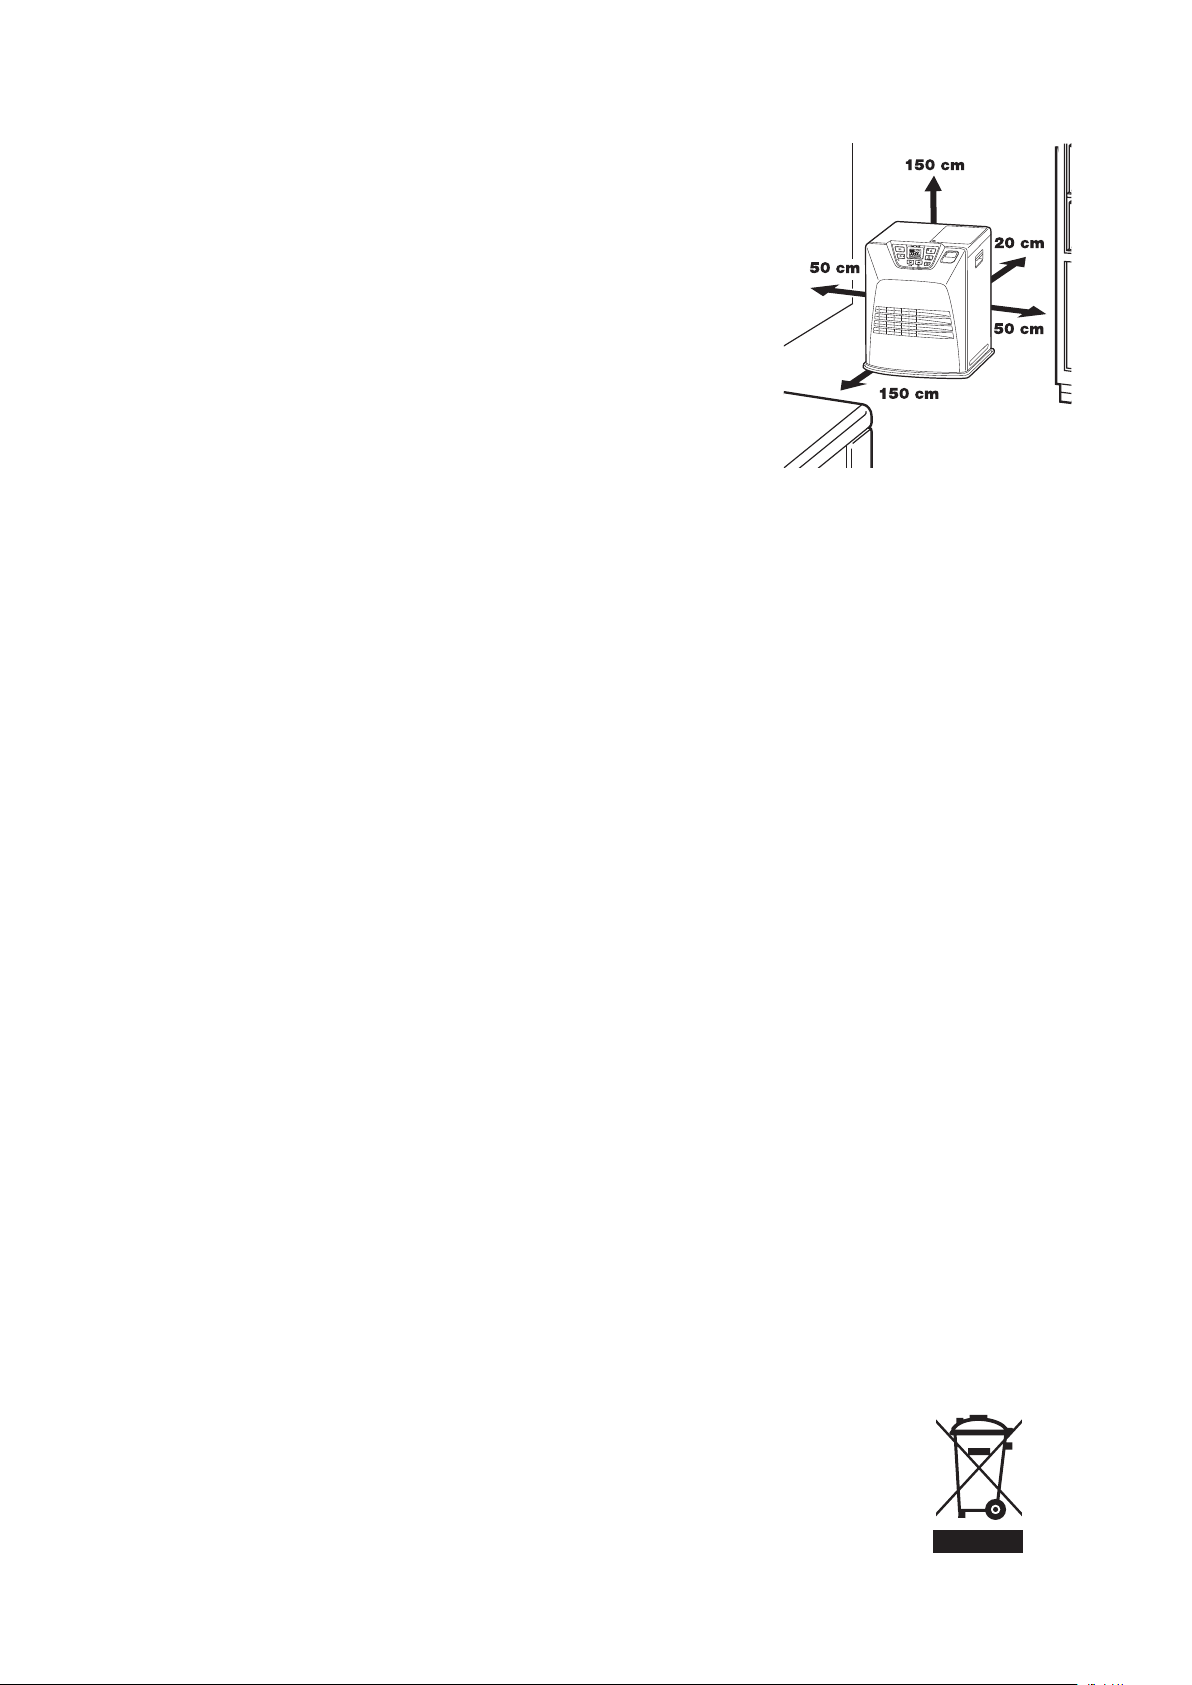
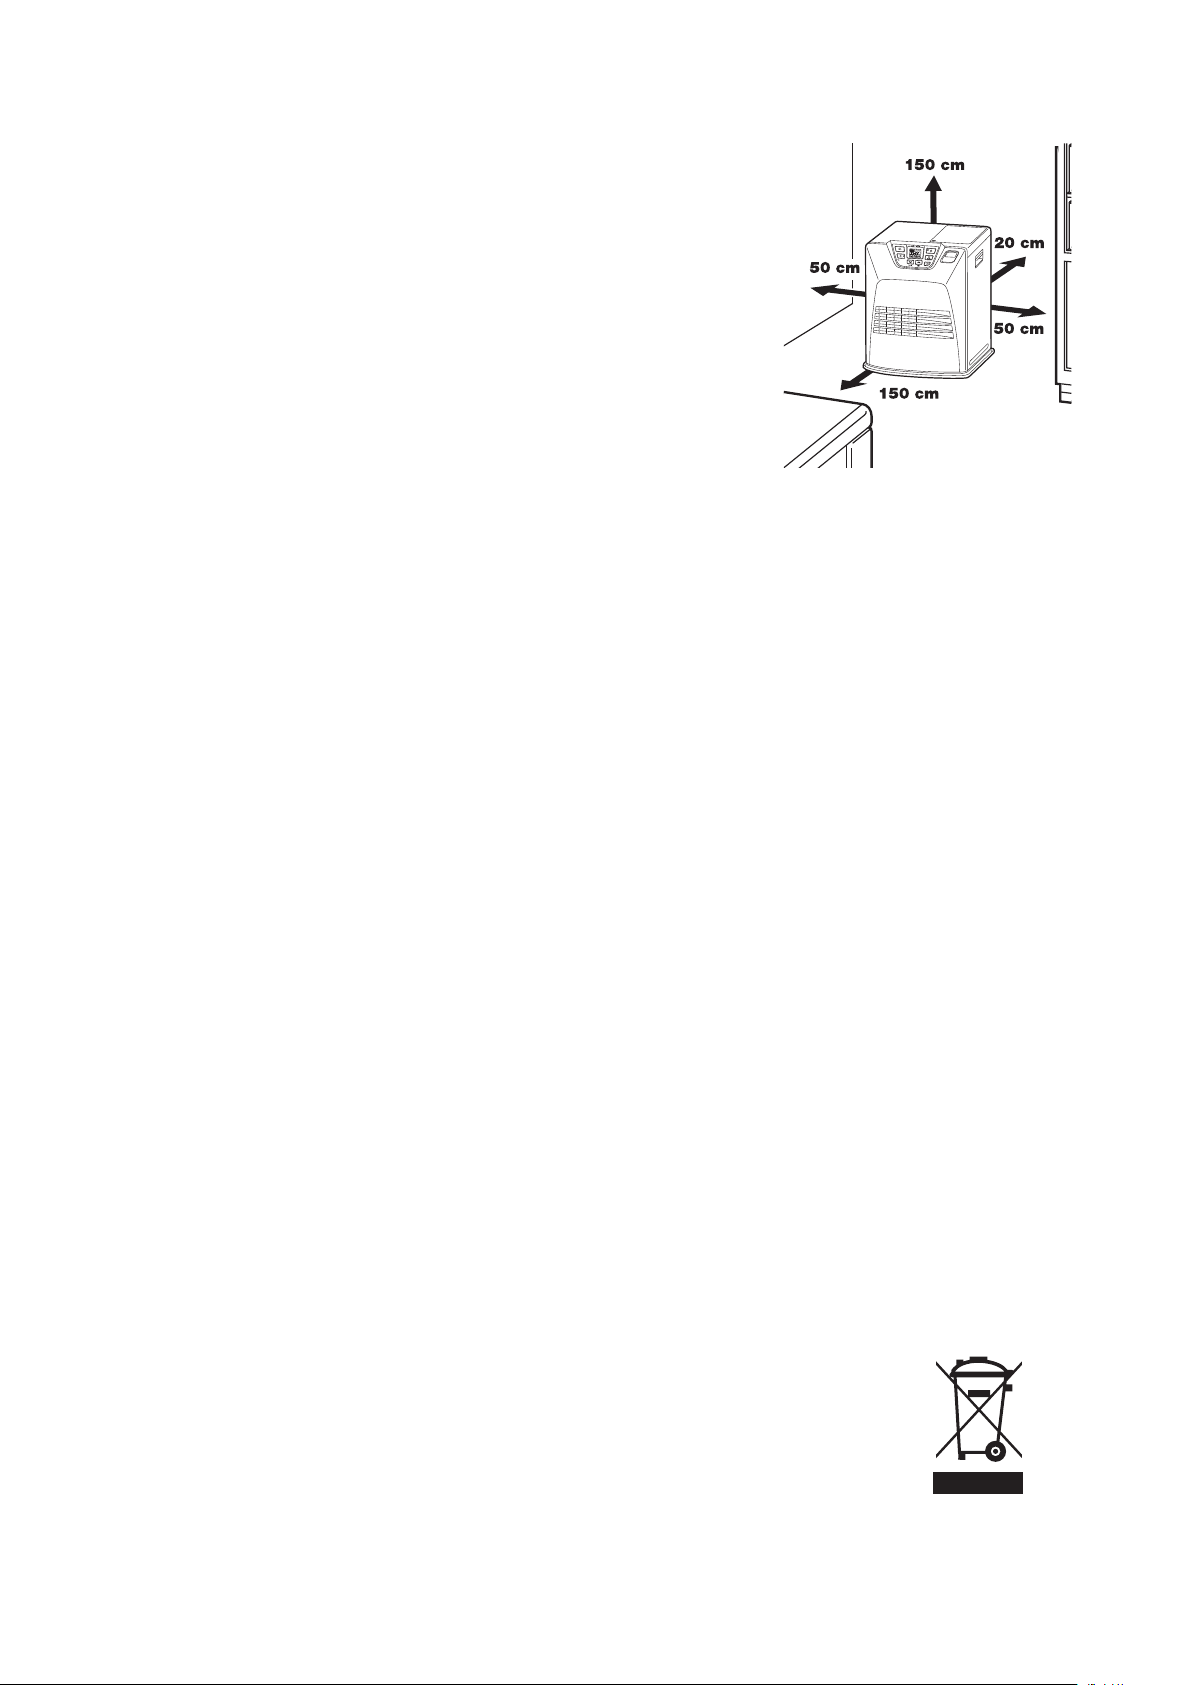
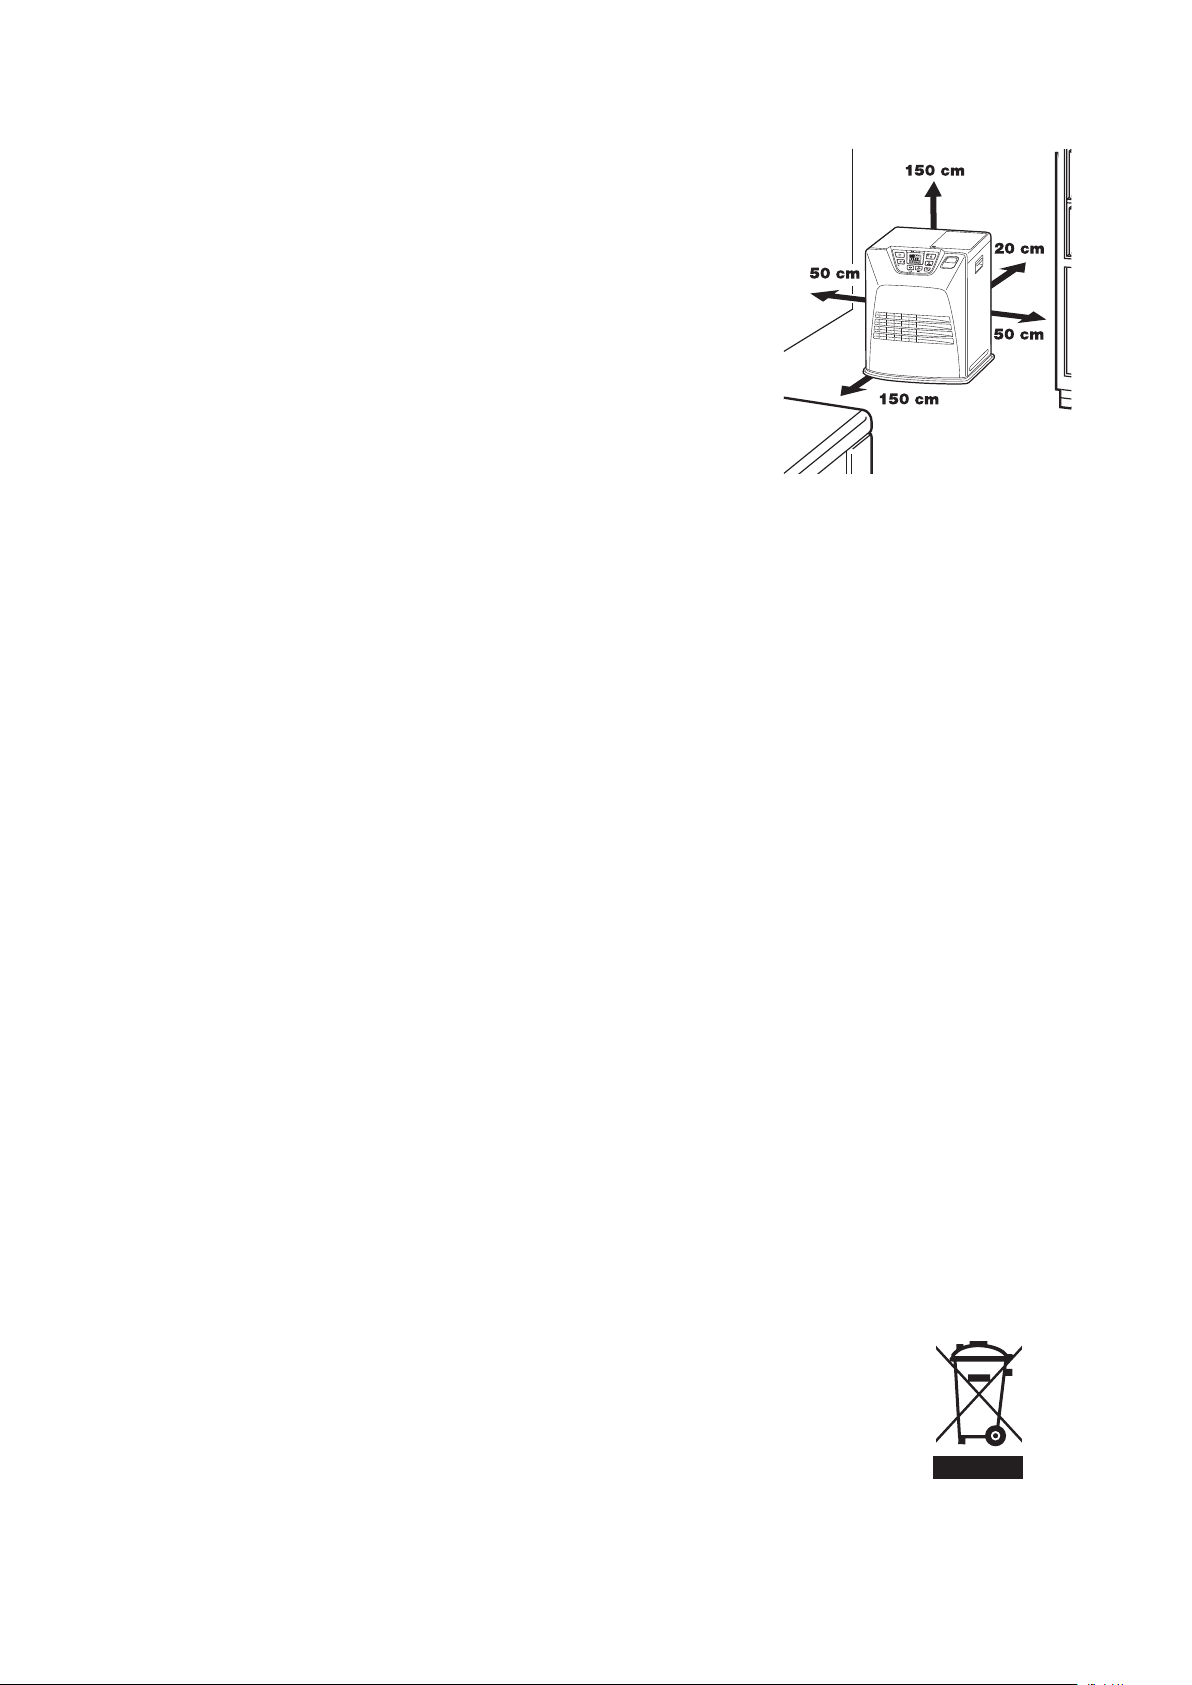
3 Position the front of the heater at a distance of minimum
1.5 metres from walls, curtains, furniture, spray can and gas
cylinder. DO NOT store the fuel tank near the heater.
4 DO NOT use the heater in dusty rooms. You will not have
optimum burning in such rooms. DO NOT use the heater in the
immediate surrounding of a bath, a shower or a swimmingpool.
5 Switch off the heater, before you leave or go sleeping. Unplug
the heater as well, when you go away for a longer period of time (e.g. holidays).
6 Store and move fuel only in suitable tanks and jerrycans.
7 Make sure that the fuel is not exposed to heat or extreme temperature changes. ALWAYS store
the fuel in a cool, dry and dark place (sunlight will affect the quality).
8 NEVER use the heater in places where harmful gasses or fumes may be present (e.g. exhaust
gasses or paint fumes).
9 Beware that the grid of the heater becomes hot. If the appliance is covered there is a risk of
fire.
10 ALWAYS make sure that there is sufficient ventilation.
11 The heater must not be located immediately below a socket-outlet.
12 Children of less than 3 years should be kept away unless continuously supervised. Children
aged from 3 years and less than 8 years shall only switch on/off the appliance provided that it
has been placed or installed in its intended normal operating position and they have been given
supervision or instruction concerning use of the appliance in a safe way and understand the
hazards involved. Children aged from 3 years and less than 8 years shall not plug in, regulate
and clean the appliance or perform user maintenance.
CAUTION - Some parts of this product can become very hot and cause burns. Particular
attention has to be given where children and vulnerable people are present.
13 Children shall not play with the appliance.
14 Cleaning and user maintenance shall not be made by children without supervision.
15 DO NOT stay near the heater for a long time.
Defective electrical devices and batteries must be kept separate from household
waste. Ensure that there is effective recycling where possible. Ask you local council
or dealer for expert advice on recycling.
4
15 TIPS ZUR SICHERHEIT
1 Kinder sind zu beaufsichtigen, um sicherzugehen, dass sie nicht
mit dem Gerät spielen.
2 Transportieren Sie den Ofen NICHT, wenn er brennt oder
noch heiß ist. In diesem Fall auch KEINE Wartungsarbeiten
durchführen.
3 Stellen Sie den Heizofen so auf, daß er sich mit der Vorderseite
minimal 1,5 Meter von Mauern, Gardinen, Möbeln, Sprühdoce
und Gas Zylinder befindet. Bewahren Sie den Brennstofftank
NICHT neben dem Ofen auf.
4 Benutzen Sie den Heizofen NICHT in staubigen Räumen und NICHT an Stellen, an denen es stark
zieht. In beiden Fällen erhalten Sie keine optimale Verbrennung. Benutzen Sie den Heizofen
nicht in unmittel- barer Umgebung einer Badewanne, Dusche oder eines Swimmingpools.
5 Schalten Sie den Heizofen aus, bevor Sie das Haus verlassen oder zu Bett gehen. Bei längerer
Abwesenheit (z.B. Urlaub) den Stecker aus der Steckdose ziehen.
6 Lagern und transportieren Sie den Brennstoff ausschließlich in den dazu bestimmten Tanks und
Kanistern.
7 Achten Sie darauf, daß der Brennstoff nicht Hitze oder extremen Temperaturunterschieden
ausgesetzt wird. Lagern Sie den Brennstoff IMMER an einem kühlen, trockenen und dunklen
Ort (Sonnenlicht schadet der Qualität).
8 Benutzen Sie den Heizofen NIEMALS an Stellen, an denen schädliche Gase oder Dämpfe
auftreten könnten (zum Beispiel Auspuffgase oder Farbdämpfe).
9 Das Gitter des Heizofens wird heiß. Der Heizofen darf nicht abgedeckt werden (Brandgefahr).
10 Achten Sie IMMER auf ausreichende Belüftung.
11 Das Heizgerät darf nicht direkt unter einer Steckdose stehen.
12 Kinder unter 3 Jahren dürfen nicht in die Nähe kommen oder sind ständig zu beaufsichtigen.
Kinder von 3-8 Jahren dürfen das Gerät nur dann ein- oder ausschalten, wenn es in seiner
vorgesehenen Betriebsstellung aufgestellt bzw. installiert ist und wenn die Kinder in die
sichere Bedienung des Geräts eingewiesen wurden und die damit einhergehenden Gefahren
verstanden haben. Kinder von 3-8 Jahren dürfen das Gerät nicht anschließen, steuern, reinigen
oder instand halten.
ACHTUNG - Einige Teile dieses Produkts können sehr heiß werden und Verbrennungen
verursachen. Achten Sie besonders auf Kinder und andere gefährdete Menschen.
13 Kinder nicht mit dem Gerät spielen lassen.
14 Reinigungs- und Wartungsarbeiten sollten nicht von Kindern ohne Aufsicht ausge-führt werden.
15 Bleiben Sie NICHT zu lange neben dem Ofen stehen.
Defekte elektrische Geräte und Batterien gehören nicht in den Hausmüll. Bitte
entsorgen Sie den örtlichen Vorschriften gemäß. Erkundigen Sie sich eventuell bei
der Behörde oder bei Ihrem Fachhändler.
'
15 CONSEILS POUR UN USAGE EN TOUTE SÉCURITÉ
1 Surveillez les enfants présents, ils ne doivent en aucun cas
jouer avec l’appareil.
2 NE déplacez PAS l’appareil lorsqu’il chauffe ou s’il est encore
brûlant. Dans ces conditions, il NE faut PAS ajouter du
combustible ni entreprendre l’entretien de l’appareil.
3 Placez l’avant de l’appareil a au moins 1,5 metre du mur, des
rideaux, des meubles, aerosol et bouteille de gaz. NE rangez
PAS le reservoir de combustible pres du poele.
4 N’UTILISEZ PAS l’appareil dans des pièces poussiéreuse ni dans des endroits à fort courant
d’air. Dans ces deux cas, la combustion ne sera pas optimale. NE PAS utiliser l’appareil pres
d’un point d’eau (bain, douche, piscine, etc.).
5 Eteignez l’appareil avant de sortir ou d’aller vous coucher. Si vous devez vous absenter
longtemps (vacances par exemple), retirez la fiche de la prise de courant.
6 Conservez le combustible exclusivement dans des réservoirs et bidons adaptés.
7 Veillez à ce que le combustible ne soit pas exposé à la chaleur ou à des écarts de température
extrêmes. Conservez le combustible TOUJOURS dans un endroit frais, sec et sombre (la lumière
solaire dégrade la qualité du combustible).
8 N’UTILISEZ JAMAIS l’appareil dans des endroits où des gaz, solvants ou vapeurs nocifs (par
exemple: gaz d’échappement ou vapeurs de peinture) peuvent être présents.
9 La grille de l’appareil devient brûlante. Ne pas couvrir l’appareil (risques d’incendie).
10 Aérez TOUJOURS suffisamment.
11
L’appareil de chauffage ne doit pas être situé immédiatement en dessous d’une prise de courant.
12 Les enfants de moins de 3 ans devraient être tenus à l’écart à moins d’être surveillés en
permanence. Les enfants âgés de 3 ans et de moins de 8 ans doivent uniquement allumer /
éteindre l’appareil à condition qu’il ait été placé ou installé dans sa position normale de
fonctionnement prévue et qu’ils soient sous surveillance ou qu’ils aient reçu des instructions
concernant l’utilisation de l’appareil de manière sûre et qu’ils comprennent les risques
encourus. Les enfants âgés de 3 ans et de moins de 8 ans ne doivent pas brancher, régler et
nettoyer l’appareil ni effectuer l’entretien d’utilisateur.
ATTENTION - Certaines parties de ce produit peuvent devenir très chaudes et provoquer
des brûlures. Une attention particulière doit être accordée aux endroits où les enfants et les
personnes vulnérables sont présents.
13 Ne pas laisser les enfants jouer avec l’appareil.
14 Les enfants ne doivent pas être chargés du nettoyage et de l’entretien de
l’appareil sauf s’ils sont encadrés.
15 NE demeurez PAS longtemps a proximite du poele.
Ne pas jeter vos appareils électriques avec vos ordures ménagères. Prière de
les déposer dans les lieux de dépôt prévus à cet effet. Pour toute information
concernant le recyclage, merci de vous informer auprès de votre distributeur ou des
autorités locales.
+
15 TIPS VOOR EEN VEILIG GEBRUIK
1 Er dient toezicht te worden gehouden op kinderen om er zeker
van te zijn dat zij niet met het apparaat spelen.
2 Verplaats de kachel NIET als deze brandt of nog heet is. In dat
geval ook NIET bijvullen en geen onderhoud verrichten.
3 Plaats de voorkant van de kachel op minimaal 1,5 meter van
muur, gordijnen, meubels, spuitbus en gascylinder. De jerry can
NIET naast de kachel opslaan.
4 Gebruik de kachel NIET in stoffige ruimtes, of op plaatsen
waar het sterk tocht. U krijgt dan geen optimale verbranding.
Gebruik de kachel NOOIT in natte ruimtes zoals in de nabijheid
van een bad, douche of zwembad.
5 Zet de kachel uit voordat u vertrekt of naar bed gaat. Bent u langere tijd weg (bv. vakantie),
trek dan ook de stekker uit het stopcontact.
6 Bewaar en vervoer de brandstof uitsluitend in de daarvoor bestemde tankjes en jerrycans.
7 Zorg ervoor dat de brandstof niet bloot staat aan hitte of extreme temperatuurverschillen.
Bewaar de brandstof ALTIJD op een koele, droge en donkere plaats (zonlicht tast de kwaliteit
aan).
8 Gebruik de kachel NOOIT op plaatsen waar schadelijke gassen of dampen aanwezig kunnen
zijn (bv. uitlaatgassen of verfdampen).
9 Het rooster van de kachel wordt heet. De kachel mag niet afgedekt worden (brandgevaar).
11 De kachel mag niet direct onder een stopcontact geplaatst worden.
12 Houd kinderen jonger dan 3 jaar uit de buurt van de kachel, tenzij zij continu onder toezicht
staan. Kinderen in de leeftijd van 3 tot 8 jaar mogen het apparaat uitsluitend in-/uitschakelen
mits het in de beoogde, normale bedrijfsstand is geplaatst of geïnstalleerd en mits zij begeleid
worden of instructies hebben gekregen over het veilige gebruik van de machine en de gevaren
ervan begrijpen. Kinderen in de leeftijd van 3 tot 8 jaar mogen het apparaat niet aansluiten,
reguleren, reinigen of er onderhoud op uitvoeren.
LET OP - Een aantal onderdelen van dit product kan zeer heet worden en brandwonden veroorzaken.
Toezicht is met name belangrijk op plaatsen waar kinderen en kwetsbare personen aanwezig zijn.
13 Zorg ervoor dat kinderen niet met het apparaat spelen.
14 Reiniging en onderhoud dient niet te worden uitgevoerd door kinderen waarop geen toezicht
wordt gehouden.
15 Blijf NIET voor de kachel staan voor een langere tijd.
Defecte elektrische apparaten en batterijen horen niet bij het huisafval. Zorg voor
een goede recycling waar mogelijk. Vraag eventueel uw gemeente of uw lokale
handelaar voor een deskundig recycling advies.
1

15 SUGERENCIAS PARA UN USO SEGURO
1 Se deberá vigilar a los niños para asegurar que no jueguen con
el aparato.
2 NO transportar la estufa cuando esté encendida o esté aún
caliente, NI tampoco llenarla de combustible, ni efectuar
trabajos de mantenimiento.
3 Ponga el frontal de la estufa a una distancia mínima de 1,5
metros de la pared, cortinas, muebles, aerosol y cilindro de gas.
NO guardar el depósito de combustible cerca de la estufa.
4 NO utilice la estufa en habitaciones polvorientas, ya que la
combustión no será óptima. NO utilice la estufa cerca de un baño, una ducha o una piscina.
5 Apague la estufa antes de salir de casa o al acostarse. En caso de abandonar el hogar por un
período largo de tiempo (p. ej., vacaciones), desenchufe la estufa.
6
Conserve y transporte el combustible únicamente en los depósitos y bidones destinados para ello.
7 No exponga el combustible al calor o a cambios extremos de temperatura. SIEMPRE guarde el
combustible en un lugar oscuro, seco y fresco (la luz solar afecta a la calidad).
8 NUNCA utilice la estufa en lugares donde gases o vapores nocivos puedan estar presentes (por
ej., gases de escape o vapores de pintura).
9 La rejilla de la estufa se calienta. Al cubrir la estufa con algún material, se crea un riesgo de
incendio.
10 Asegúrese SIEMPRE de una ventilación suficiente.
11 La estufa no deberá colocarse justo debajo de una toma de corriente.
12 Deberá mantenerse el aparato fuera del alcance de menores de 3 años, a menos que
se encuentren bajo supervisión constante. Los niños entre 3 y 8 años de edad solo podrán
encender o apagar el aparato siempre y cuando este haya sido colocado o instalado en su
posición operativa normal y el menor esté supervisado o haya sido instruido sobre su uso
seguro y comprenda los riesgos que entraña. Los menores de 3 a 8 años de edad no deben
enchufar, ajustar, limpiar ni realizar tareas de mantenimiento en el aparato.
PRECAUCIÓN - Algunas partes de este producto pueden alcanzar temperaturas elevadas
y causar quemaduras. Se debe prestar especial atención cuando haya menores y personas
vulnerables.
13 Los niños no deben utilizar el aparato como un juguete.
14 Las tareas de limpieza y mantenimiento reservadas al usuario no deben ser realizadas por niños
sin supervisión.
15 NO permanezca cerca de la estufa durante mucho tiempo.
No deseche aparatos eléctricos y las pilas junto con la basura doméstica, sino
elimínelos a través de un Punto Limpio si existe. Consulte a las autoridades locales o
a su distribuidor acerca del reciclado adecuado.
)
15 CONSIGLI PER UN USO SICURO
1 Occorre sorvegliare costantemente i bambini per essere sicuri
che non giochino con l’apparecchio.
2 NON spostare la stufa se questa è accesa o se è ancora calda.
In tal caso, NON riempirla di combustibile e non eseguire la
manutenzione.
3 Porre la parte anteriore della stufa ad una distanza minima di
1,5 metri da pareti, tende, mobili, spray can e cilindro a gas.
NON conservate il combustibile vicino alla stufa.
4 NON usare la stufa in locali polverosi. Non si avrà una combustione ottimale. NON usare queste
stufa nelle vicinanze, di un bagno, di una doccia o di una piscina.
5 Spegnere la stufa prima di uscire o prima di andare a letto. Se si rimane assenti per un lungo
periodo di tempo (ad es. per vacanze), staccare anche la spina dalla presa.
6 Conservare e trasportare il combustibile nei contenitori e nelle latte apposite.
7 Assicurarsi che il combustibile non sia esposto a fonti di calore o a forti escursioni termiche.
Conservare SEMPRE il combustibile in un luogo fresco, secco ed asciutto (la luce del sole ne
intacca la qualità).
8 NON usare mai la stufa in luoghi dove possono essere presenti gas o vapori pericolosi (ad
esempio, gas di scarico o vapori di vernici).
9 La griglia della stufa diventa calda. Non coprire l’apparecchio onde evitare rischi d’incendio.
10 Assicurarsi SEMPRE che la ventilazione sia sufficiente.
11 Non posizionare il dispositivo di riscaldamento immediatamente sotto ad una presa di corrente.
12 Tenere fuori dalla portata dei bambini di età inferiore ai 3 anni, se non continuamente sotto
la supervisione adulta. I bambini di età compresa tra i 3 e gli 8 anni possono solo accendere o
spegnere il dispositivo a condizione che questo sia stato posizionato o installato nella posizione
in cui dovrà rimanere una volta in funzione e a condizione che siano supervisionati o istruiti in
merito all’utilizzo sicuro del dispositivo e che comprendano i rischi connessi. I bambini di età
compresa tra i 3 e gli 8 anni non potranno collegare, regolare e pulire il dispositivo o eseguirne
la manutenzione.
ATTENZIONE - Alcuni componenti di questo prodotto possono diventare molto caldi e causare
scottature. È necessario prestare particolare attenzione in presenza di bambini e persone
vulnerabili.
13 I bambini non dovrebbero giocare col dispositivo.
14 Le operazioni di pulizia e manutenzione da parte dell’utente non vanno eseguite dai bambini
senza supervisione.
15 NON state vicino alla stufa per troppo tempo.
Gli apparecchi elettrici difettosi e le batterie usate non devono essere smaltiti come
rifiuti domestici. Se possibile utilizzarli per il riciclaggio. Eventualmente informarsi
presso il proprio comune o il rivenditore locale sulle possibilità di riciclaggio o di
smaltimento ecologico.
3
15 DICAS PARA UTILIZAÇÃO SEGURA
1 Deve ter sempre em atenção às crianças, estas não devem
brincar com o aparelho.
2 NÃO transportar o aquecedor quando está aceso ou ainda
quente, NEM encher de combustível ou fazer qualquer trabalho
de manutenção.
3 Posicione a frente do aquecedor a uma distância mínima de
1.5m de paredes, cortinados e mobílias.
4 NÃO utilize o aquecedor em recintos com poeira porque a
combustão não será a ideal. NÃO use o aquecedor perto da
banheira, chuveiro ou piscina.
5 Desligue o aquecedor antes de sair de casa ou na hora de dormir. Se sair de casa por um longo
período de tempo (por exemplo, férias), desligue o aquecedor.
6 Armazene e transporte o combustível somente em depósitos ou bidões destinados para o
efeito.
7 Certifique-se de que o combustível não está exposto ao calor nem mudanças extremas de
temperatura. Guarde SEMPRE o combustível em lugar fresco, seco e escuro (a luz solar irá
afetar a qualidade do mesmo).
8 NUNCA utilize o aquecedor em locais onde existam gases ou vapores nocivos (por exemplo
gases de escape ou vapores de tinta).
9 A grelha do aquecedor fica quente, ao cobrir com algum material pode causar um incêndio.
10 Certifique-se SEMPRE de que existe ventilação suficiente.
11 O aquecedor não deve estar colocado imediatamente abaixo de uma tomada.
12 As crianças com idade inferior a 3 anos devem ser mantidas à distância, a não ser que sejam
continuamente vigiadas. As crianças com uma idade a partir dos 3 e inferior a 8 anos apenas
podem ligar/desligar o aparelho se o mesmo tiver sido colocado ou instalado na sua posição
operativa normal, e caso tenham recebido indicações ou instruções quanto à utilização do
aparelho com segurança, com conhecimento dos perigos aqui envolvidos. Crianças com uma
idade a partir dos 3 e inferior a 8 anos não devem ligar, regular e limpar o aparelho ou efetuar
a manutenção do utilizador.
CUIDADO - Algumas partes deste produto podem ficar muito quentes e provocar queimaduras.
Deve ser prestada especial atenção na presença de crianças e pessoas vulneráveis.
13 As crianças não devem brincar com o aparelho.
14 A limpeza e manutenção pelo utilizador não será feita por crianças sem supervisão.
15 NÃO permaneça demasiado tempo junto ao aquecedor.
Os eletrodomésticos avariados devem ser mantidos separados do lixo doméstico.
Certifique-se de que há reciclagem eficaz sempre que possível. Pergunte ao seu
revendedor quais os conselhos dos especialistas sobre reciclagem.
=
15 TIPS FOR SIKKER BRUG
1 Børn bør være under opsyn, så det sikres, at de ikke leger med
apparatet.
2 Flyt ALDRIG kaminen, når den brænder eller stadig er varm. I
dette tilfælde må den heller IKKE påfyldes eller vedligeholdes.
3 Anbring kaminen så dens forkant er mindst 1,5 meter fra mure,
gardiner, møbler, spray dåse og gas cylinder. Opbevar IKKE
brændstoftanken i nærheden af ovnen.
4 Brug IKKE kaminen i støvede rum, da der så ikke opnås en
optimal forbrænding. Brug IKKE kaminen i umiddelbar nærhed
af badekar, brusekabiner eller svømmebassiner.
5 Sluk kaminen før De forlader huset eller går i seng. Hvis De er fraværende i længere tid (f.eks.
ferie), skal stikket også tages ud af stikkontakten.
6 Opbevar og transporter altid brændstoffet i de dertil beregnede tanke og dunke.
7 Sørg for, at brændstoffet ikke udsættes for varme eller ekstreme temperaturforskelle. Opbevar
ALTID brændstoffet et køligt, tørt og mørkt sted (sollys forringer kvaliteten af brændstoffet).
8 Brug ALDRIG kaminen på steder, hvor der kan være skadelige gasser eller dampe (f.eks.
udstødningsgasser eller malingsdampe).
9 Vær opmærksom på, at kaminens gitter bliver meget varmt. Hvis der anbringes ting oven på
kaminen, udgør det en brandfare.
10 Sørg ALTID for tilstrækkelig ventilation.
11 Varmeapparatet må ikke være placeret umiddelbart under en stikkontakt.
12 Børn under 3 år skal holdes væk, medmindre de løbende overvåges. Børn i alderen fra 3 år og
under 8 år må kun tænde/slukke for apparatet forudsat at den er anbragt eller installeret i den
tilsigtede normale driftsposition, og de har fået tilsyn eller instruktion om brugen af apparatet
på en sikker måde og forstår de involverede farer. Børn i alderen fra 3 år og under 8 år må ikke
tilslutte, regulere og rengøre apparatet eller udføre vedligeholdelse.
FORSIGTIG - Nogle dele af dette produkt kan blive meget varme og forårsage forbrændinger.
Særlig opmærksomhed skal udvises, hvor børn og udsatte personer er til stede.
13 Børn må ikke lege med apparatet.
14 Rengøring og brugervedligeholdelse må ikke foretages af børn uden vejledning.
15 Ophold dig IKKE tæt på ovnen i længere tid.
Elektrisk affald som defekte elektriske apparater og batterier bør ikke kasseres
sammen med husholdningsaffaldet. Indlever det venligst til et genbrugsanlæg.
Spørg de lokale myndigheder eller forhandleren til råds angående genbrug.
6

15 TIPS FOR SIKKER BRUK
1 Barn må overvåkes for å sikre at de ikke bruker apparatet som
leketøy.
2 IKKE flytt varmeovnen når den brenner eller fortsatt er varm.
IKKE fyll ovnen på nytt eller reparer den når den fortsatt er
varm.
3 Plasser forsiden av ovnen slik at det er minst 1,5 meter
til vegger, gardiner, møbler, sprayboks og gassflaske.
Drivstofftanken skal IKKE oppbevares i nærheten av
varmeapparatet.
4 IKKE bruk varmeovnen i støvete rom eller på svært trekkfulle steder. I begge tilfeller vil du ikke
oppnå optimal forbrenning. Ovnen må IKKE brukesi umiddelbar nærhet av badekar, dusj eller
svømmebasseng.
5 Slå av varmeovnen før du går ut av huset eller legger deg. Trekk også støpselet ut av
stikkontakten når du reiser bort i lengre tid (for eksempel på ferie).
6 Oppbevar og flytt drivstoff bare i egnede beholdere og jerrykanner.
7 Påse at drivstoffet ikke utsettes for varme eller ekstreme temperaturforandringer. Oppbevar
ALLTID drivstoffet på et kjølig, tørt og mørkt sted (sollys påvirker kvaliteten).
8 Bruk ALDRI ovnen på steder der det kan være farlige gasser eller damp (f.eks. eksosgass eller
damp fra maling).
9 Vær oppmerksom på at gitteret på varmeovnen blir varmt. Det er fare for brann hvis
varmeovnen dekkes til.
10 Påse ALLTID at det er tilstrekkelig ventilasjon.
11 Varmeapparatet må ikke plasseres rett under en stikkontakt.
12 Barn på under 3 år må holdes på avstand hvis de ikke er under tilsyn hele tiden. Barn fra 3 år og
mindre enn 8 år skal kun slå på/av apparatet gitt at det er plassert eller installert i dets tiltenkte
normalt driftsposisjon, og at de er under tilsyn eller har blitt gitt instruksjon i sikker bruk av
apparatet, og forstår de involverte farene. Barn fra 3 år og mindre enn 8 år skal ikke plugge inn,
regulere og rengjøre apparatet eller utføre brukervedlikehold.
FORSIKTIG - Noen deler av dette produktet kan bli svært varme og forårsake brannskader.
Spesiell oppmerksomhet må gis hvor barn og sårbare personer er tilstede.
13 Barn skal ikke leke med produktet.
14 Rengjøring og vedlikehold skal aldri utføres av barn uten tilsyn.
15 IKKE opphold deg i nærheten av varmeapparatet i lang tid.
Mangelfulle elektriske apparater og batterier må holdes atskilt fra
husholdningsavfall. Pass på at du gjenvinner der dette er mulig. Kontakt de lokale
myndighetene eller forhandleren for råd om gjenvinning.
9
15 TIPS FÖR SÄKER ANVÄNDNING
1 Barn bör övervakas för att garantera att de inte leker med
apparaten.
2 Flytta INTE på värmaren när den är på eller när den fortfarande
är varm. Fyll inte på värmaren och ägna dig INTE åt underhåll
när den är på eller när den fortfarande är varm.
3 Se till så att det minst är 1,5 meter mellan värmarens framsida
och väggar, gardiner, möbler, sprejflaska och gascylinder.
Förvara INTE bränsletanken nära brännaren.
4 Använd INTE värmaren på platser där det är mycket drag eller
damm. I båda fallen fungerar INTE värmaren optimalt.
5 Stäng av värmaren innan du går och lägger dig.
6 Bränsle ska endast förvaras och förflyttas i lämpliga bränslebehållare eller bränsledunkar.
7 Se till så att bränslet inte utsätts för värme eller extrema temperaturförändringar. Förvara
ALLTID bränslet på en sval, torr och mörk plats (kvaliteten påverkas av solljus).
8 Använd INTE värmaren på ställen där det kan finnas skadliga gaser eller ångor (t.ex. avgaser
eller färgångor).
9 Tänk på att värmarens galler blir mycket varmt. Om apparaten täcks över föreligger brandrisk.
10 Se ALLTID till så att ventilationen är tillräcklig.
11 Värmaren får inte placeras omedelbart nedanför ett eluttag.
12 Barn under 3 år ska hållas borta från objektet såvida de inte kontinuerligt övervakas. Barn
i åldern 3 till 8 år får endast stänga av/starta apparaten, förutsatt att den har placerats
eller installerats i sitt avsedda normala driftläge och att de övervakas eller instrueras om
användningen av apparaten på ett säkert sätt samt förstår de faror som är inblandade. Barn
i åldern 3 till 8 år ska inte koppla in, reglera, rengöra eller utföra användarunderhåll på
apparaten.
VARNING - Vissa delar av produkten kan bli mycket varma och orsaka brännskador. Särskild
uppmärksamhet måste ges när barn och utsatta personer är närvarande.
13 Barn får inte leka med enheten.
14 Rengöring och användarunderhåll får inte utföras av barn utan övervakning.
15 Vistas INTE nära brännaren någon längre tid.
Defekta elektriska enheter och batterier får inte slängas i hushållssoporna. Återvinn
alltid när så är möjligt. Du kan vända dig till din närmaste återvinningsstation för att
få råd.
@
15 OHJEITA TURVALLISTA KÄYTTÖÄ VARTEN
1 Lapsia on valvottava, etteivät he leiki laitteen kanssa.
2 ÄLÄ siirrä lämmitintä, kun se palaa tai on vielä kuuma. ÄLÄ
täytä tai huolla lämmitintä, kun se palaa tai on vielä kuuma.
3 Sijoita lämmitin siten, että sen etupuoli on vähintään 1,5 metrin
etäisyydellä seinistä, verhoista, huonekaluista, ruiskupurkki ja
kaasusylinteri. ÄLÄ säilö polttoainesäiliötä lämmittimen lähelle.
4 ÄLÄ käytä lämmitintä pölyisissä tai erityisen vetoisissa
paikoissa. Niissä palaminen ei tapahdu parhaalla mahdollisella
tavalla.
5 Sammuta lämmitin ennen kuin menet nukkumaan.
6 Säilytä ja siirrä polttoainetta vain sopivissa säiliöissä ja kanistereissa.
7 Varmista, että polttoaine ei altistu lämmölle tai suurille lämpötilanvaihteluille. Säilytä
polttoainetta AINA viileässä, kuivassa ja pimeässä paikassa (auringonvalo heikentää laatua).
8 ÄLÄ koskaan käytä lämmitintä paikoissa, joissa voi olla haitallisia kaasuja tai hajuja (esim.
pakokaasua tai maalinhajua).
9 Muista, että lämmittimen ritilä kuumenee. Laitteen peittämisestä aiheutuu tulipalovaara.
10 Varmista AINA, että ilmanvaihto on riittävä.
11 Lämmitintä ei saa sijoittaa välittömästi pistorasian alapuolelle.
12 Alle 3-vuotiaat lapset on pidettävä etäällä laitteesta, ellei heitä valvota jatkuvasti. Yli 3-vuotiaat
mutta alle 8-vuotiaat lapset saavat kytkeä laitteen päälle ja pois sillä edellytyksellä, että se on
asennettu tarkoitettuun, normaaliin käyttöpaikkaansa, ja heille on annettu neuvontaa tai ohjeet
laitteen käytöstä turvallisella tavalla, ja he ymmärtävät siihen liittyvät vaarat. Yli 3-vuotiaat
mutta alle 8-vuotiaat lapset eivät saa kytkeä laitetta verkkoon, säätää sitä, puhdistaa sitä tai
tehdä huoltotöitä.
HUOMIO - Jotkin tämän tuotteen osat voivat lämmetä hyvin kuumiksi ja aiheuttaa
palovammoja. Erityistä huomiota on kiinnitettävä silloin, kun lapsia ja vaaranalaisia ihmisiä on
läsnä.
13 Lapset eivät saa leikkiä laitteella.
14 Lapset eivät saa suorittaa huolto- tai puhdistustoimenpiteitä laitteelle ilman valvontaa.
15 ÄLÄ oleskele pitkiä aikoja lämmittimen lähellä.
Vialliset sähkölaitteet ja paristot on erotettava kotitalousjätteestä. Huolehdi
mahdollisuuksien mukaan tehokkaasta kierrätyksestä. Asiantuntevia neuvoja
kierrätyksestä saat kunnalliselta jäteneuvojalta ja jälleenmyyjältäsi.
*

Thank you for choosing a “TOYOTOMI” product!
Toyotomi products are used by satisfied customers worldwide. In order to
assure the comfortable and safe use of our products by customers in each
country, our products conform to the safety standards not only in Japan but
also in every country around the world we do business with.
Toyotomi tailors its products to satisfy its customer’s needs by always
pursuing our business philosophy, “sharing joys in daily living”. We will
continue to research, develop and manufacture products that match people’s
lifestyle for efficiency, safety and comfort.
We hope that you’ll enjoy your Toyotomi appliance for years to come!
We invite you to read this instruction manual first, to ensure the maximum
lifetime for this appliance.
Get to know us better… visit us at www.toyotomi.eu for our full line of
products.
1 READ THE DIRECTIONS FOR USE FIRST.
2 IN CASE OF ANY DOUBT, CONTACT YOUR DEALER.
3 POUR LIRE, DÉPLIEZ LA DERNIÈRE PAGE. 3 BEFORE YOU START READING, CONSULT THE MAIN COMPONENTS LIST ON THE LAST PAGE.
4
2
GENERAL DIRECTIONS FOR USE
Below you will find the main steps to be taken for using your
heater. For more details, please refer to the MANUAL.
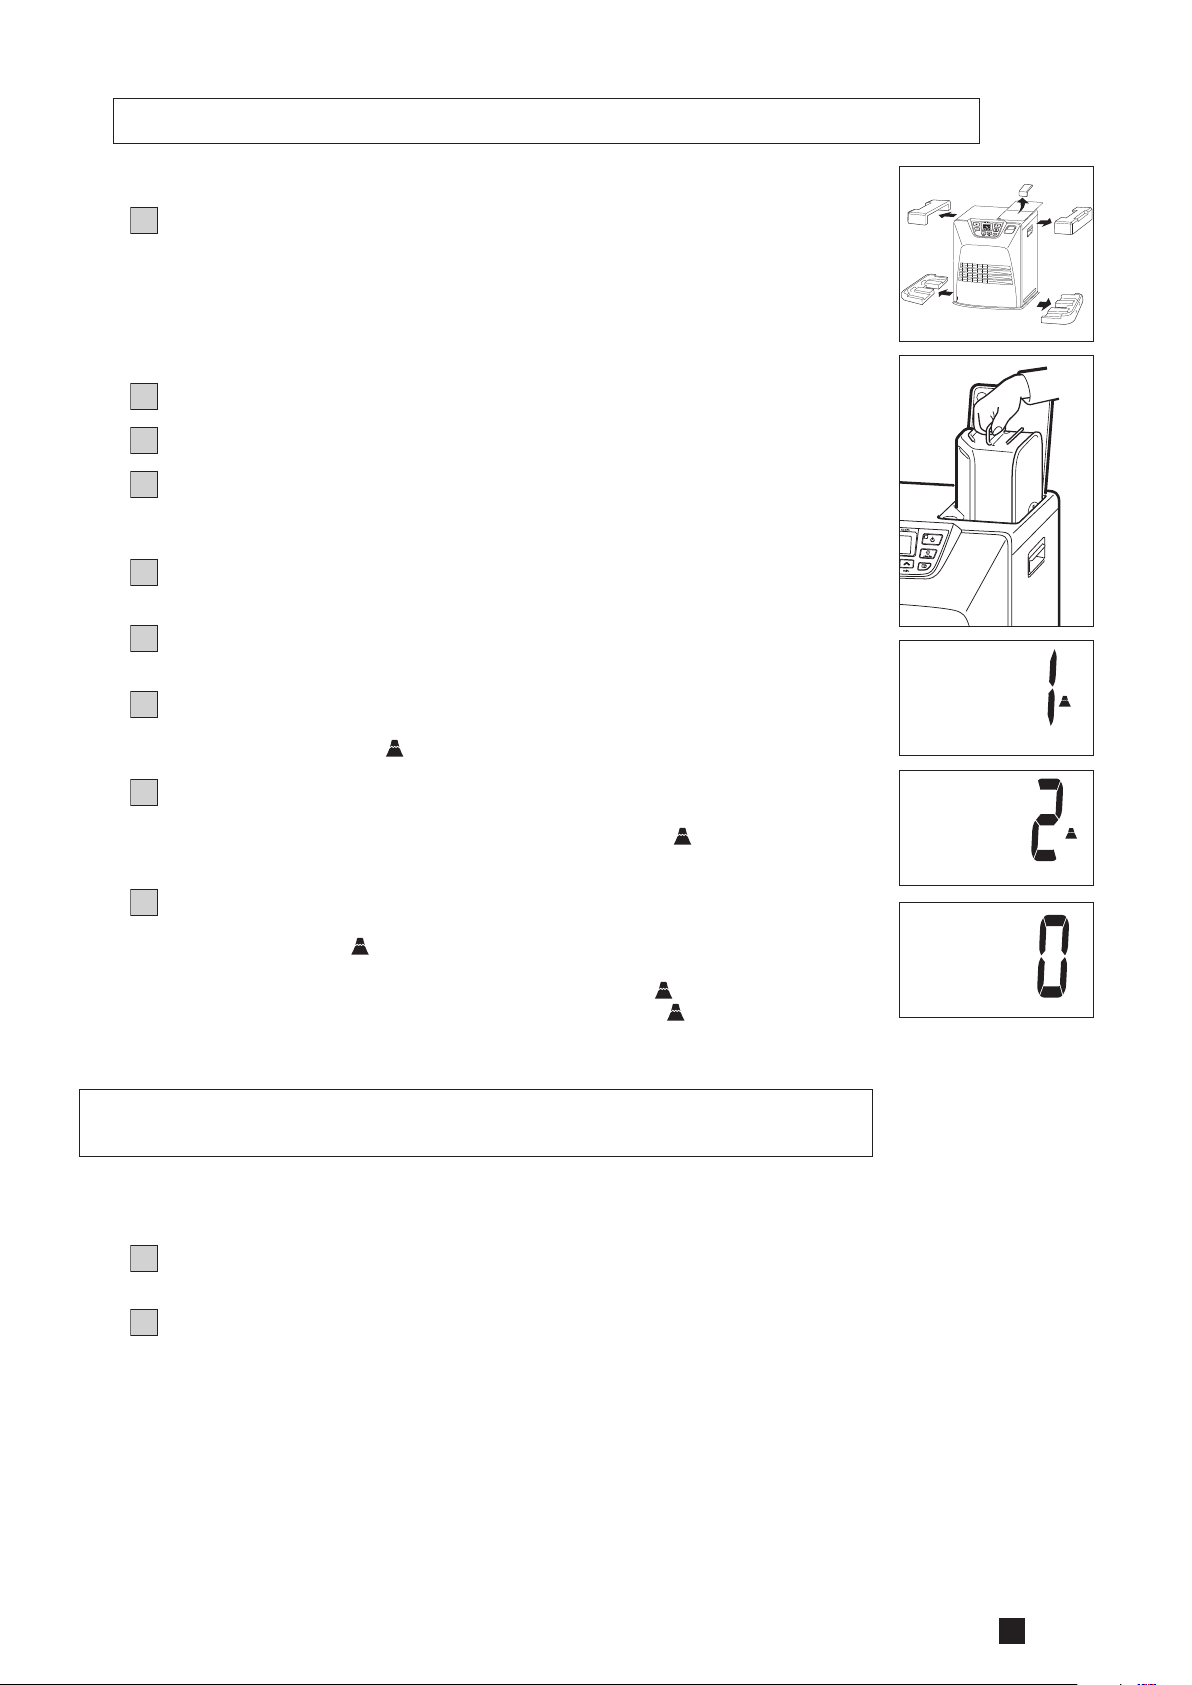
Remove all packaging materials (refer to Section A, Fig. A).
1
Fill the removable tank (refer to Section B, Fig. C).
2
Insert the plug into the wall-socket.
3
Ignite the heater using the
4
If required, change the temperature using the adjustment keys
5
(refer to Section E).
Switch off the heater by pressing the
6
• As a fire precaution, the tank must be filled either when the heater has
been switched off or in another room than the room where the heater is
installed.
• Always ensure that the tank is closed properly after filling it at a safe
distance from all sources of heat and open flames (see Section B).
• The first time the heater is ignited it will smell like “new” for a short time.
• Store all fuel containers with their original caps and seals in a cool and
dark place.
• Fuel ages. Use new fuel at the start of every heating season.
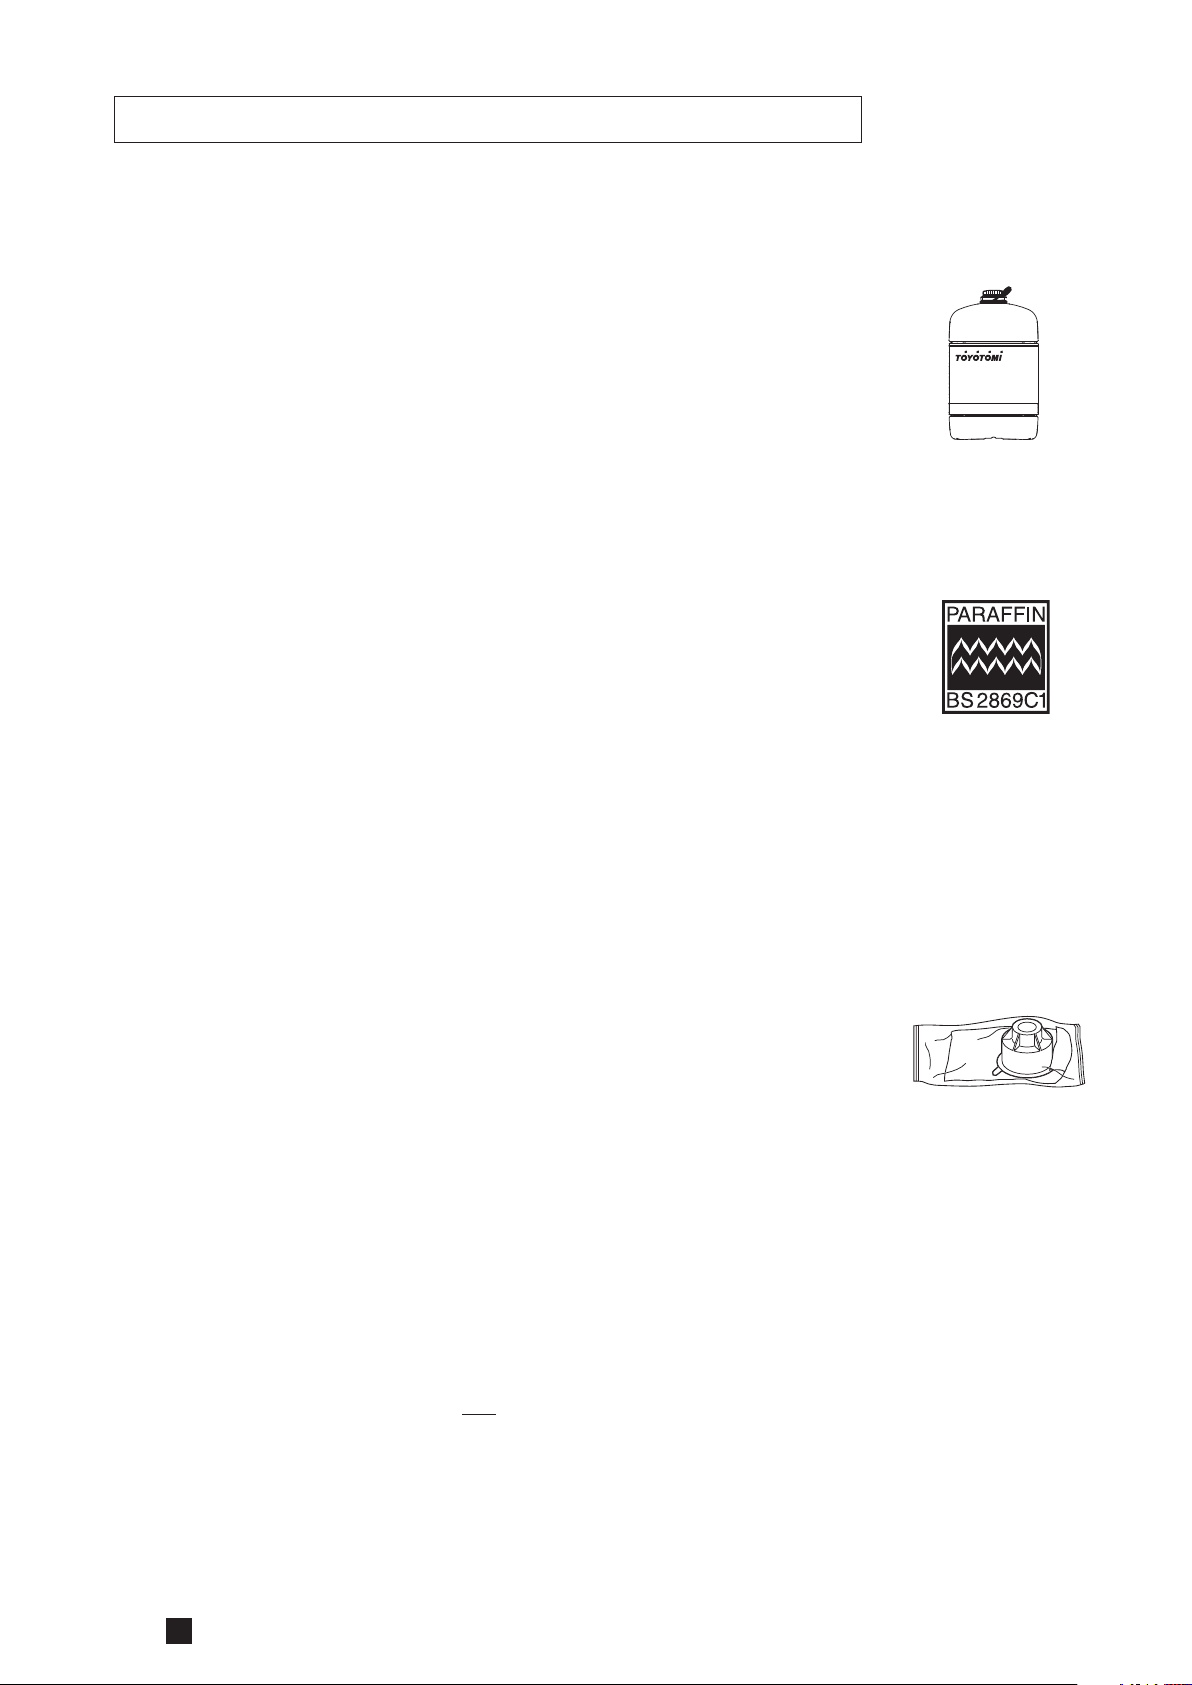
• Only use high quality and water-free pure paraffin in accordance with
local legislation (TOYOTOMI fuel).
• Before changing brands and/or types of fuel make sure that the mobile
heater first completely empties all of the remaining fuel inside the heater.
key (refer to Section D).
key .
4
3
WHAT YOU NEED TO KNOW IN ADVANCE
VENTILATE SUFFICIENTLY
Read this user manual carefully before using the appliance and keep it for future
reference. Install this device only when it complies with local/national legislation,
ordinances and standards. This product is intended to be used as a heater
in residential houses and is only suitable for use in dry locations, in normal
household conditions, indoors in living room, kitchen and garage.
For comfortable and safe heating ensure that there is sufficient ventilation.
NOTE: To avoid unexpected shut off, we recommend to put a door or window
ajar when the heater is operating.
Regardless of the model, you must always make sure that the heater is used
in a room large enough to enable the heater to be used safely without extra
ventilation (refer to Section P). If the room is smaller than required, you must
always open a door or window slightly (ensuring an opening of approx. 2.5 cm).
It is important that every room where the heater is used has sufficient air intake
and efficient air outflow (both openings must have a minimum cross section of 50
2
cm
).
We also recommend doing this in highly insulated or draught-free rooms and/or
at high altitude. Do not use your heater in cellars or other underground areas.
No modifications to the safety system are allowed, as that will invalidate the
guarantee that the air probe will work properly. Consult your dealer in case of
doubt.
ESPECIALLY FOR FRANCE: Your heater was designed to operate exclusively on
fuel for liquid fuel-operated mobile heaters in accordance with the Decrees of
18-07-2002 and 25-06-2010. The use of other fuels is forbidden.
Ask your dealer or check our website for the addresses of our retailers.
The liquid fuel-operated mobile heater is intended as an extra heater, and not as a
continuous source of heat.
Only the use of the
correct fuel will ensure
safe, efficient, and
comfortable use of
your heater.
ESPECIALLY FOR UNITED KINGDOM: Only use Class C1 paraffin fuel in
accordance with BS2869; Part 2, or equivalent.
The user must comply with the following instructions for proper use:
DO NOT
- use petrol.
- use the liquid fuel-operated mobile heater in caravans, boats, and vehicle
cabins.
- use the liquid fuel-operated mobile heater in insufficiently ventilated rooms
(consult the table of properties for the minimum dimensions of the room to be
heated), underground rooms and / or at a height of over 1900 metres.
- modify the heater safety features.
The use of this type of heating in public rooms is subject to prior regulatory
permission. Obtain proper information on this in advance.
THE RIGHT FUEL
Your heater has been designed for use with high-quality water-free pure paraffin
oil (TOYOTOMI fuel). Only fuels of this kind will ensure clean and proper burning.
Lower quality fuel may result in:
increased possibility of malfunctioning
incomplete combustion
reduced heater lifetime
smoke and/or fumes
deposits on the grid or mantle
Using the right fuel is therefore essential for safe, efficient, and comfortable use
of your heater.
Damage and/or malfunctions of the heater due to the use of other than high-
quality water-free pure paraffin oil is not covered by the warranty.
Always refer to (www.toyotomi.eu) for the right fuel for your heater.
This transportation cap
is packed separately in
the box. Only this cap
ensures trouble-free
transportation of the
heater after use.
Store it well!
4
4
MANUAL
A INSTALLING THE HEATER
1
Carefully remove your heater from the box and check the contents.
In addition to the heater you also need to have:
a manual fuel pump
a transportation cap
these directions for use
Keep the box and the packaging materials (Fig. A) for storage and/or
transportation.
2
Open the lid of the removable tank and remove the piece of cardboard.
3
Fill the removable tank as indicated in Section B.
4
The floor should be firm and completely level. Reposition the heater, when it
is not level. Do not try to correct the situation by placing books or other
goods under the heater.
5
Insert the plug into the wall-socket (230 Volts - AC / 50 Hz) and set the
correct time using the adjustment keys (refer to Section C).
6
Your heater is now ready for use.
SET ALTITUDE
1
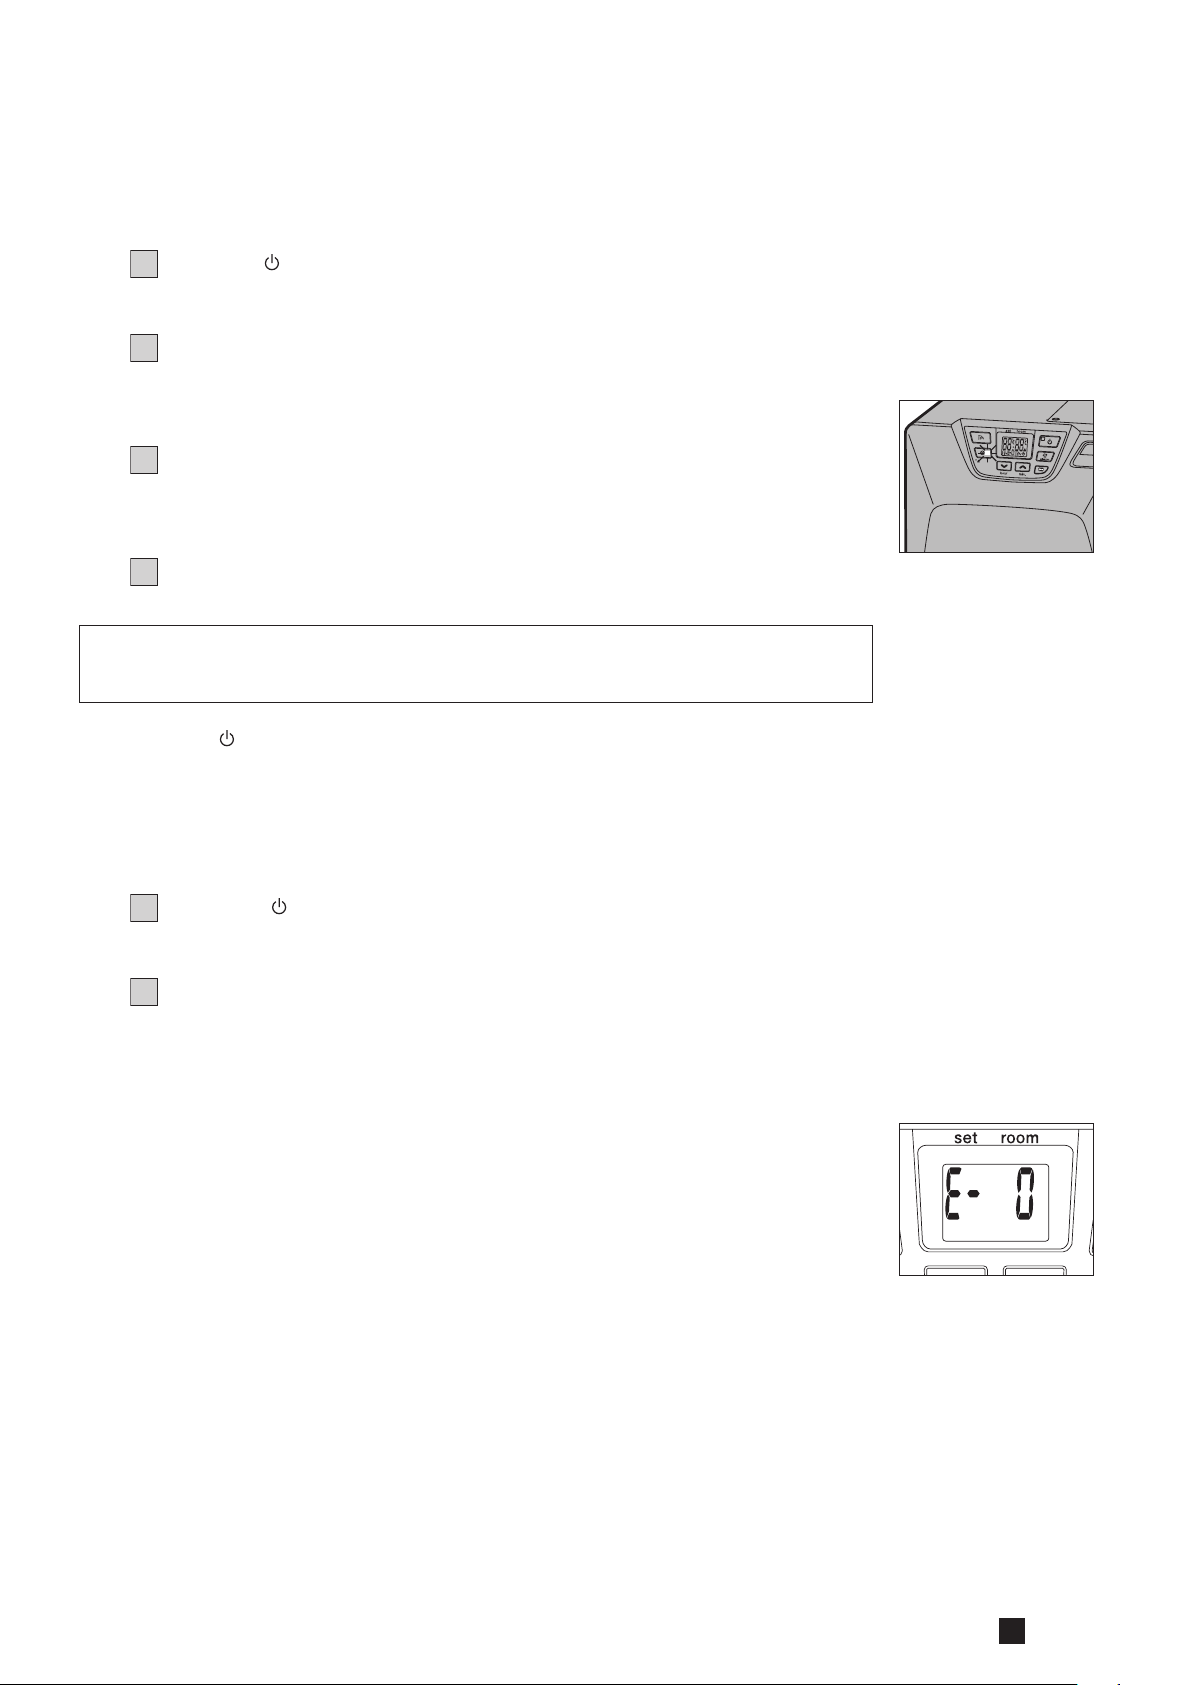
If the heater is used at a height of 800 m to 1300 m, use the altitude mode 1.
Push the altitude button with thin rod like a clip and plug into the outlet
simultaneously. Then “1
” will be shown on the display.
A
B
2
If the heater is used at a height of 1300 m to 1900 m, use the altitude mode
2. After setting the altitude mode 1, push the altitude button with thin rod
and plug into the outlet simultaneouosly again. Then “2
the display.
3
Switch off the altitude mode by pressing the altitude button and into the
outlet simultaneously after setting altitude mode 2. Then “0” will be shown
on the display and “
NOTE: When the altitude mode 1 is set, the altitude mark “
When the altitude mode 2 is set, the altitude mark “
operation.
NOTE: In the event of power failure or disconnection of heater, the altitude setting
will remain.
Do not use the heater at a height of over 1900 meters.
” will be disappeared.
” will be shown on
” is lit on the display.
” is blinking during
!
SWITCH THE VOLUME
This heater can be switched the buzzer sound volume. The initial setting is in
High level.
Push the SAVE key and holding it down for more than 3 seconds, then the
1
buzzer sound volume is switched from High to Low.
Push the SAVE key and holding it down for more than 3 seconds again,
2
then the buzzer sound volume is switched from Low to High.
NOTE: The volume level is Low and High only, but the alarm by safety device
sounds in High level.
NOTE: When the heater has been unplugged or after a power failure, the volume
will be the initial setting High.
4
5
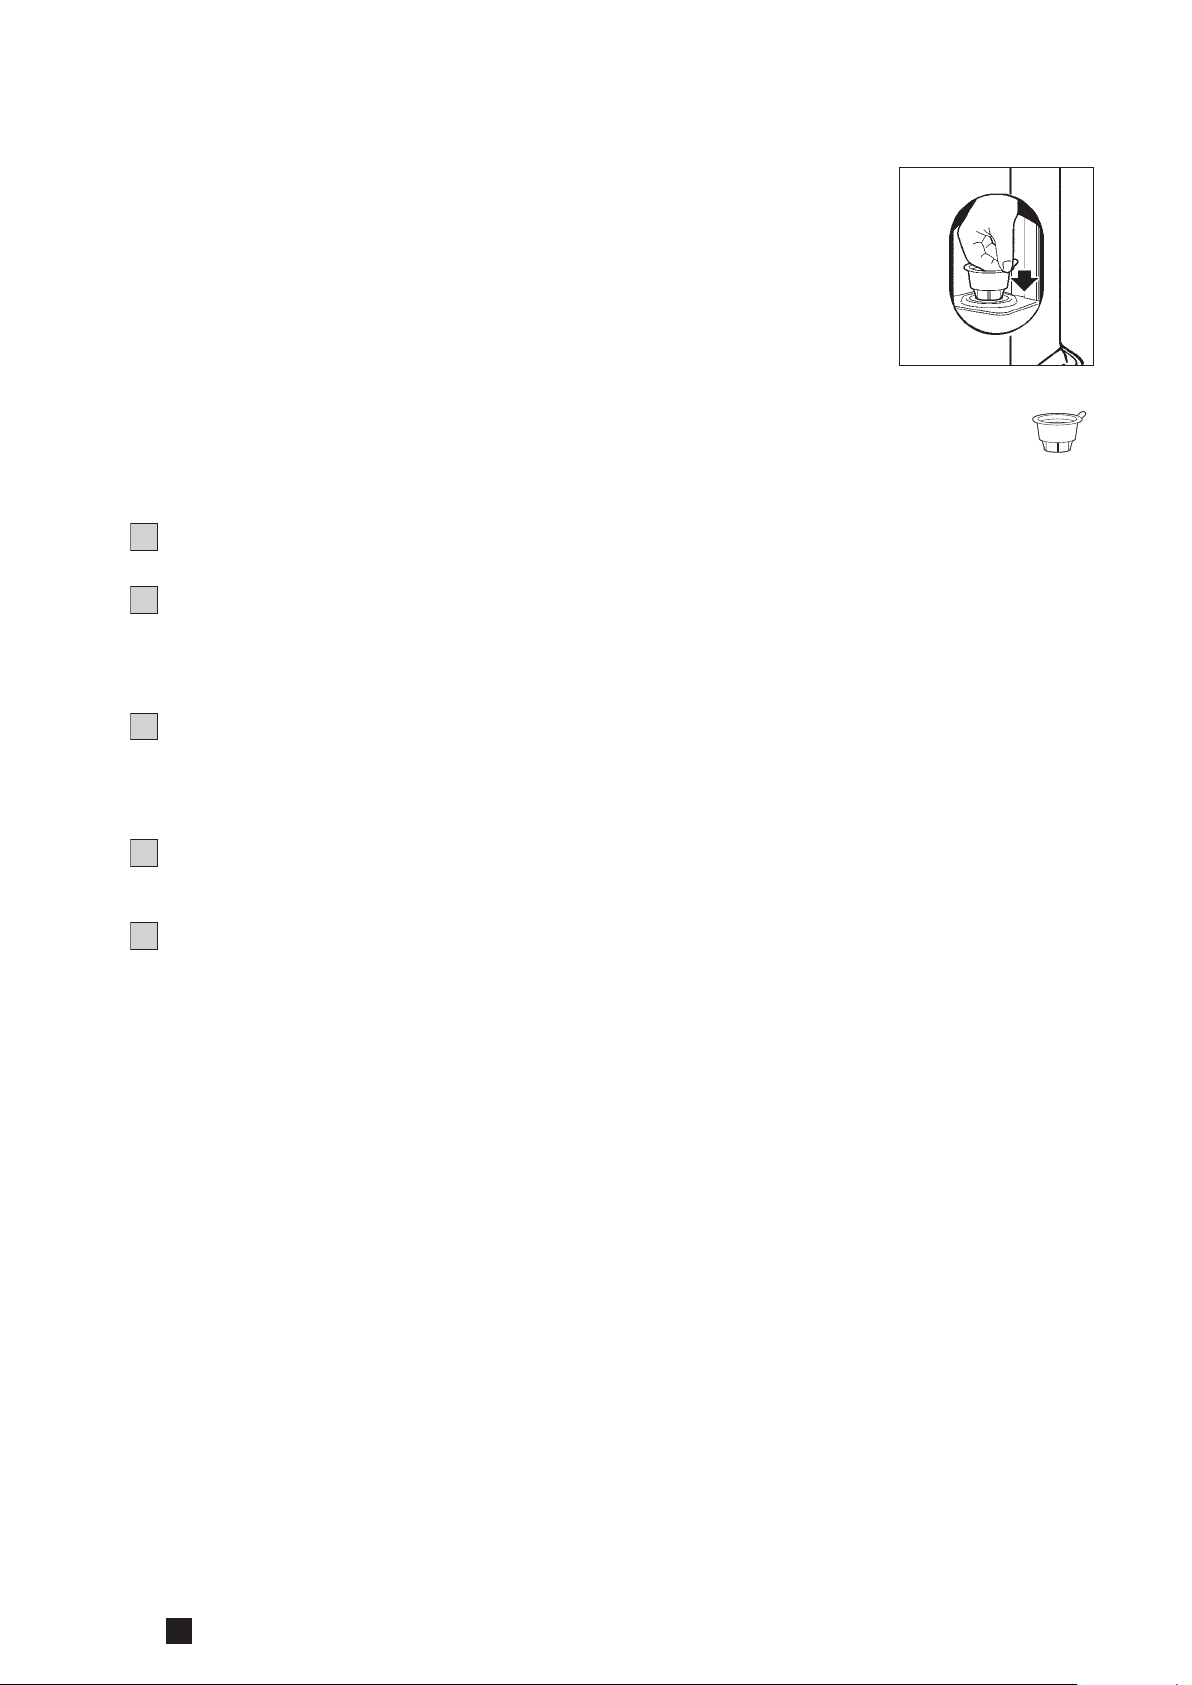
B FILLING FUEL
Fill the removable tank in a suitable place since there can always be some
spillage. Follow the procedure below:
1
Make sure that the heater is switched off.
2
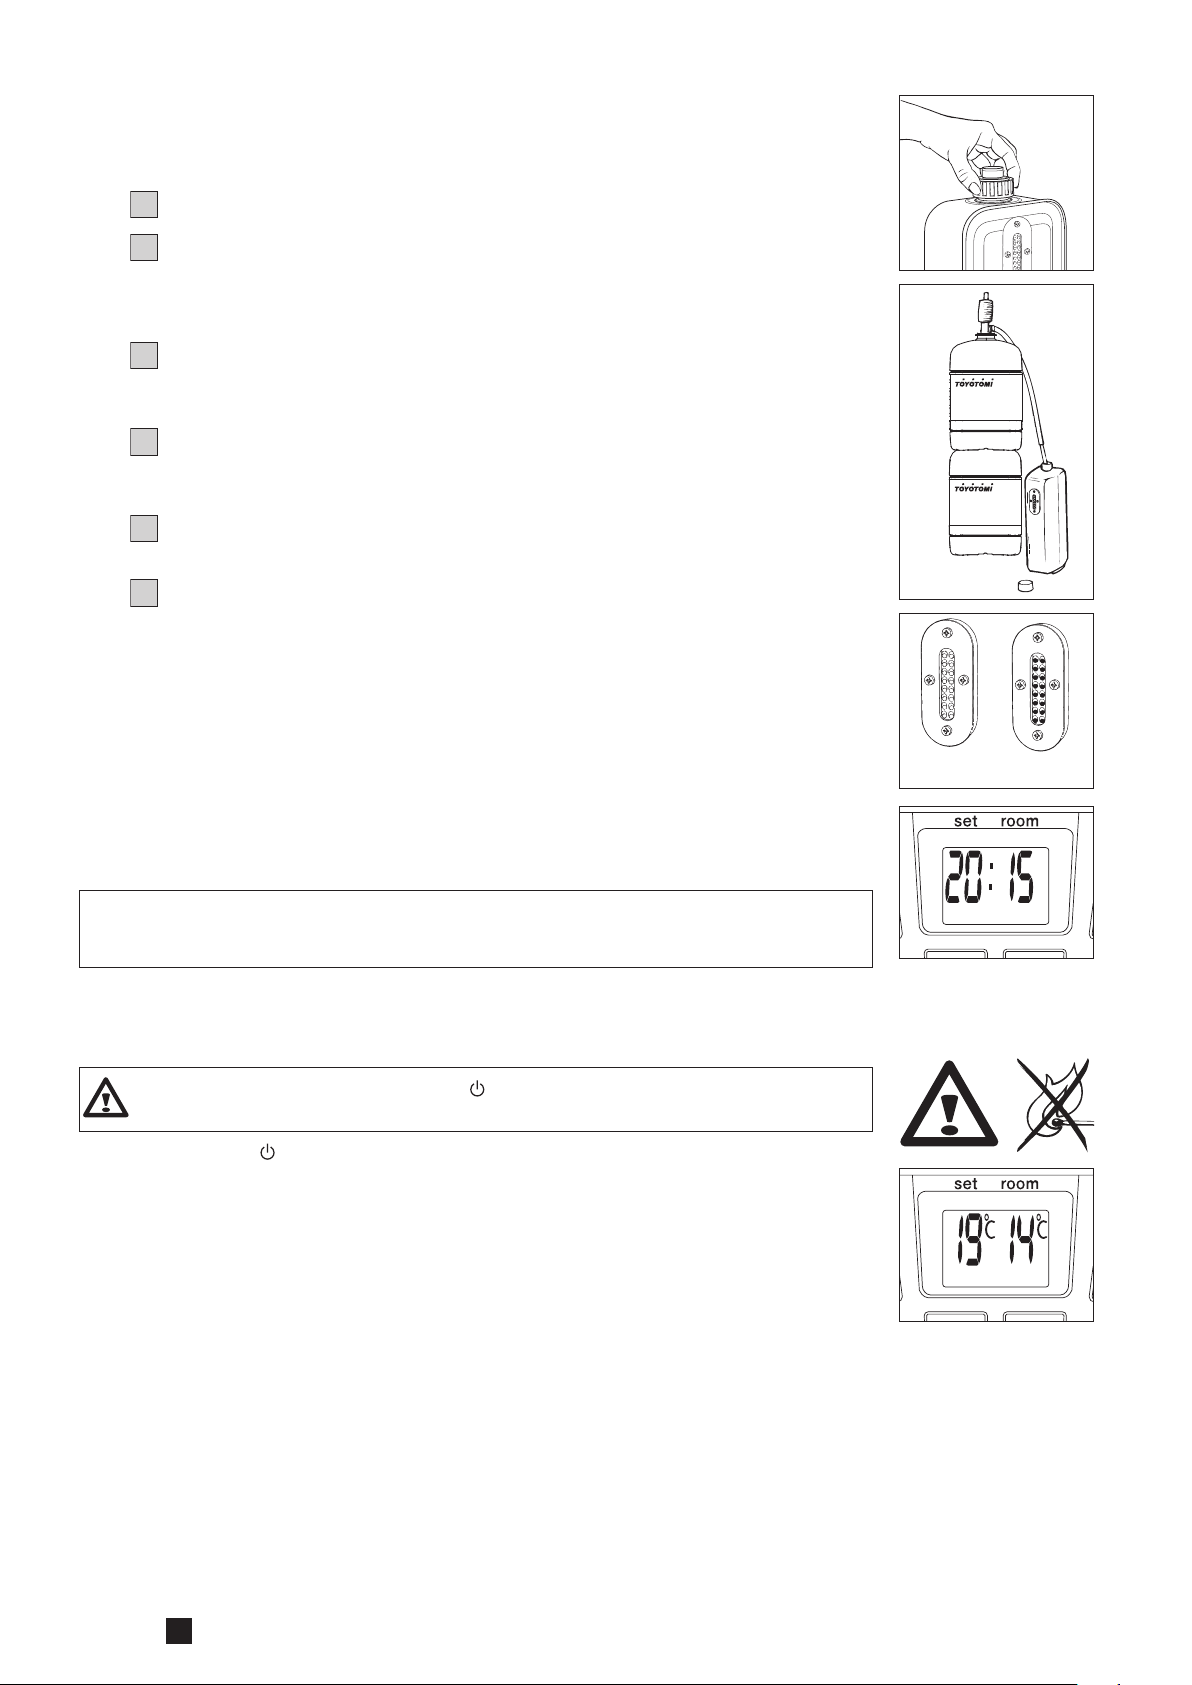
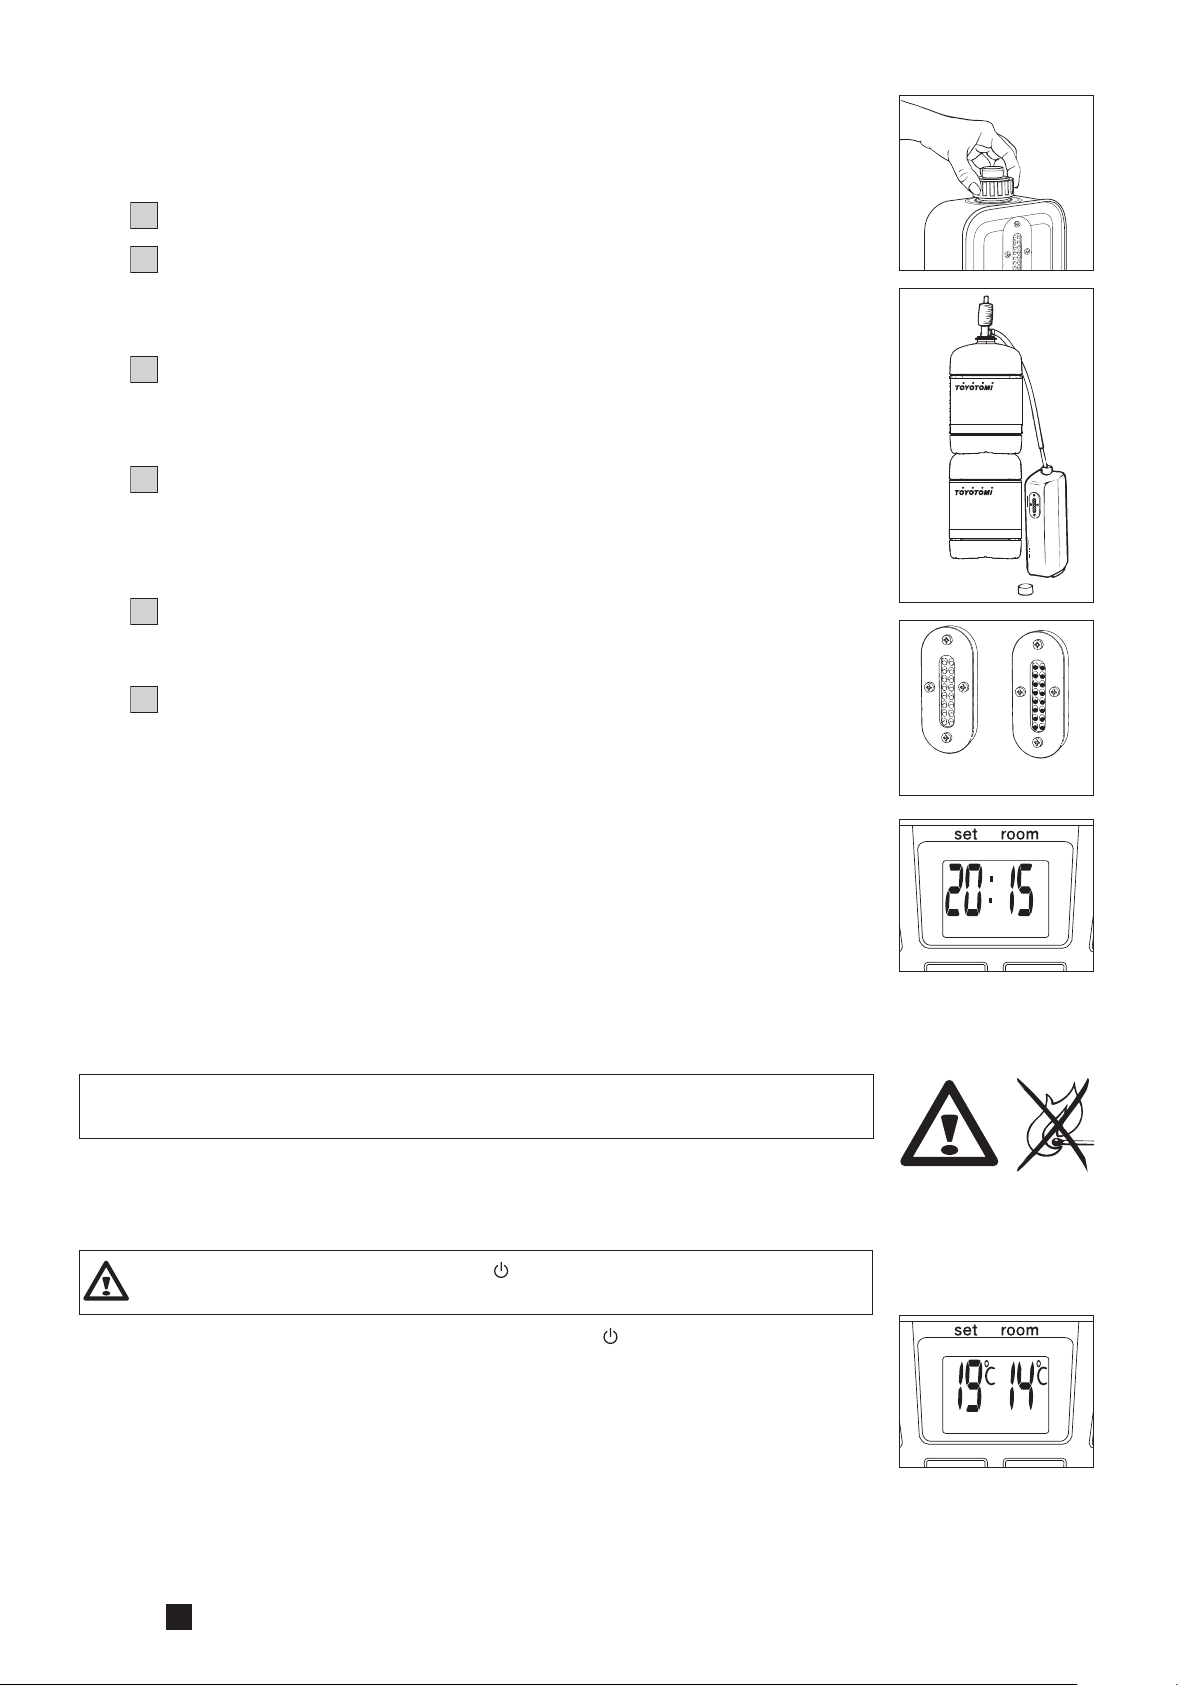
Open the upper lid and lift the removable tank out of the heater (Fig. B).
Put down the removable tank (cap pointing upwards, handle on floor) and
screw off the fuel cap (Fig. C).
NOTE: Some drops may leak from the tank.
3
Fill the removable tank using a fuel pump (refer to fuel pump operation
instructions.) Make sure that it is in a higher position than the removable tank
(Fig. D). Insert the ribbed hose into the opening of the removable tank.
4
Check the removable tank fuel gauge while filling the tank (Fig. E). Stop
filling once the gauge indicates that the tank is full. Never overfill the tank,
especially not when the fuel is very cold (fuel expands when it heats up).
5
Let the remaining fuel in the pump flow back into the jerrycan and carefully
remove the pump. Carefully screw the fuel cap back on the tank. Clean off
any spilled fuel.
6
Check whether the fuel cap is straight and tightened properly. Reinstall the
removable tank in the heater (cap down). Close the lid.
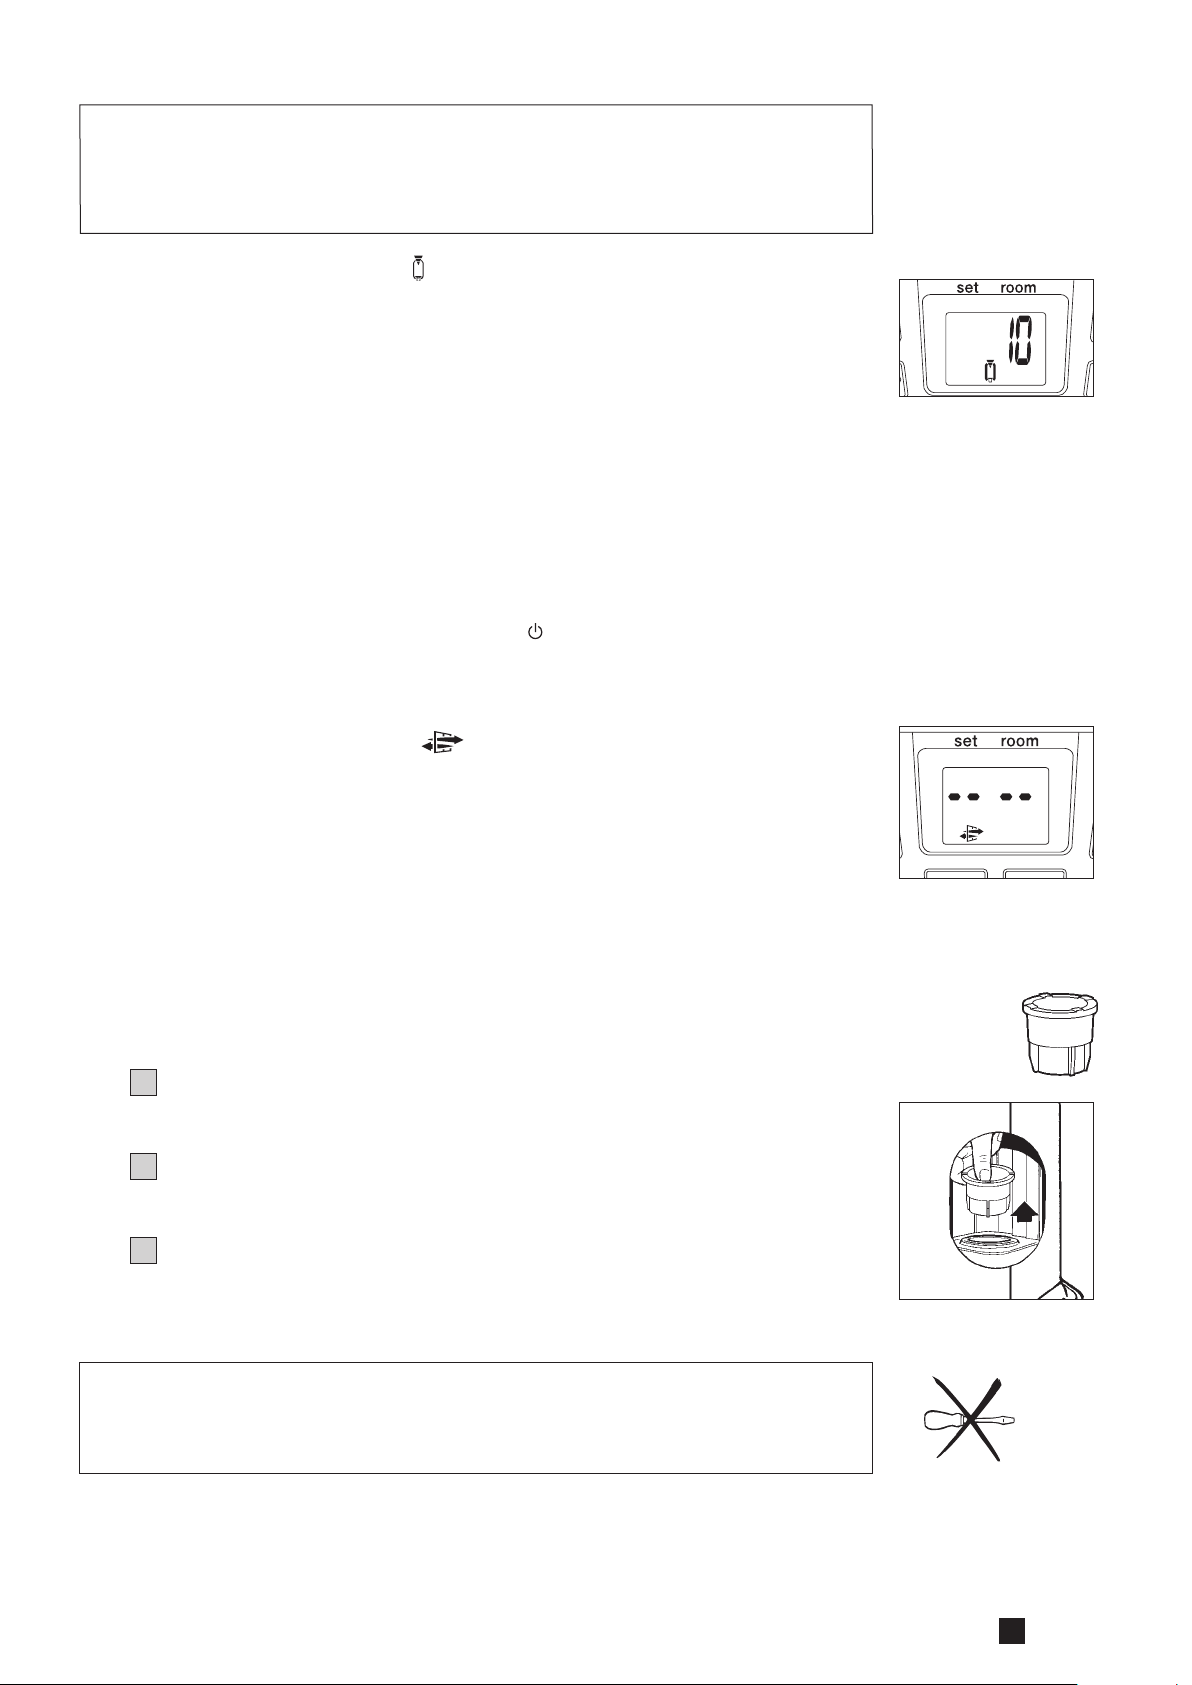
C SETTING THE CLOCK
It is only possible to set the correct time, when the heater is connected to the
mains and not burning. Use the adjustment keys to set the time. First press
either of the two keys to switch on the function (the 4-digit will start blinking).
Next, set the hours using the key on the left (hour) and the minutes using the
key on the right (min.). Press once to increase the value by one step. When you
hold down the key, the value will continue going up, until you release the key
again. After approximately 10 seconds the 4-digit will stop blinking and the setting will be locked (Fig. F). 5 minutes after switching off the heater, the information on the display will disappear and the heater will automatically switch into the
stand-by position.
empty
C
D
E
full
When the heater has been unplugged (or after a power failure), the time needs
to be set again.
!
D IGNITING THE HEATER
When used for the first time, a new heater may give out a smell for a short while.
You should therefore provide extra ventilation.
Always ignite the heater with the
cigarette lighter.
Just press the button to ignite the heater. The POWER lamp will start blinking,
indicating that the ignition procedure has started. This will take a short while.
Once the heater is burning, the POWER lamp will remain lit (red). The information
display will show two numbers. The light next to them indicates that these
numbers refer to the temperatures (Fig. G). The actual room temperature is
indicated below ROOM, while the temperature setting is indicated below SET. The
latter can be changed with the adjustment keys (refer to Section E).
Prior to igniting the heater, always check for sufficient fuel in the removable tank.
button
. Never use matches or a
E SETTING THE REQUIRED TEMPERATURE
The temperature setting can only be adjusted, when the heater is burning. Use
the adjustment keys to adjust the temperature. First press either of the two
keys to switch on the function (the °C mark will start blinking). Next, adjust the
temperature using the key on the right (min.) to set the temperature to a higher
setting and the key on the left (hour) to lower the temperature. Press once to
increase the value one step. After approximately 10 seconds the °C mark will stop
blinking and the setting will be locked (Fig. G).
The available temperature settings range from 6°C minimum to 28°C maximum.
When the heater has been unplugged (or after a power failure), the temperature
will reset to the factory setting of 20°C.
4
F: When the 4-digit
stops blinking, the set-
ting has been locked to
the indicated value.
G: The required tempe-
rature on the left, the
measured temperature
on the right.
6
F USING THE TIMER
The timer allows you to switch on the heater automatically at a preset time.
In order to switch on the timer, the correct time must have been set (refer to
Section C) and the heater should be off. Follow the procedure below:
1
Press the
The TIMER lamp and the 4-digit will start blinking.
2
Use the adjustment keys to set the time at which the heater must ignite.
Use the key on the left (hour) to set the hours and the key on the right
(min.) to set the minutes (interval of 5 minutes).
3
After approximately 10 seconds the 4-digit will show CLOCK again and the
TIMER lamp will light up, indicating that the timer function has been
activated (Fig. H).
4
The timer will ensure that the room will have been heated to approximately
the required temperature at the set time.
When you want to switch off the heater and ignite it again with the timer, all you
have to do is press the TIMER key (refer to Section G).
!
Press the
button and then the TIMER key immediately after that.
button once to clear the timer setting.
G SWITCHING OFF THE HEATER
There are two ways to switch off the heater:
H: The TIMER indicator
light indicates that the
timer function has been
switched on.
1
Press the
signal. Within approximately one minute the flame will have extinguished.
2
Press the TIMER key , when you want to switch off the heater and ignite it
again with the timer the next time. This not only switches off the heater, but
it also activates the timer function. You can change the required time with
the adjustment keys (refer to Section F).
button . The information display will show the CLOCK
H THE INFORMATION DISPLAY
The information display not only serves as an indicator of the (set) time and
temperature (Sections C, E, and F), it also indicates any malfunctioning of the
heater. The code on the information display tells you what is the matter:
CODE INFORMATION WHAT TO DO
e - 0 Temperature within the heater too high. Cool-down and re-ignite.
f - 0 Power interrupted. Re-ignite the heater.
e - 1 Faulty thermostat. Contact your dealer.
f - 1 Faulty burner thermistor. Contact your dealer.
e - 2 Starting problems. Contact your dealer.
e - 23
Re-ignite the heater immediately after
extinguishing.
e - 5 Tipping-over protection. Re-ignite the heater.
e - 6 Poor burning. Contact your dealer.
Wait for approx. 30 sec.
and re-ignite after inserting
the plug again.
In case of any
malfunctioning the
information display will
tell you what is the
matter.
4
7
e - 7 Room temperature If necessary,
above 32°C. re-ignite the heater.
e - 8 Defective booster. Contact your dealer.
e - 8 1 Abnormal frequency. Insert the plug into the wall-socket again.
Contact your dealer.
e - 9 Air filter dirty; or Clean filter.
Fuel pump dirty. Contact your dealer.
The heater has been in operation
continuously for a period of 65 hours
and has turned itself off automatically. Switch the heater back on.
+
-- : --
-- : --
Always contact your dealer for any malfunctioning not listed above and/or when
the error keeps occuring after taking the corrective measure as described above.
AUTOMATIC DEACTIVATION
This heater is fitted with a safety system that ensures that it switches off
automatically after 65 hours continuous operation. The following will then appear
in the display:
the
Out of fuel. Refill removable tank.
+
Too little ventilation. Ventilate better.
. If desired, you can switch the heater on again by pressing
button
L
(see Section D).
AUTOMATIC CLEANING MODE
When the heater has been burning continuously for two hours at its highest
setting, the burner will automatically start an autoclean procedure. The display
will show the autocleaningcode cl:05 running back to cl:01. The procedure takes 5
minutes, during which the heater will burn at its lowest setting, while the burner
autocleans. When the burner is clean again, the heater will automatically switch
back to the highest setting again.
I CHILDPROOF LOCK / PARENTAL CONTROL
The childproof lock can be used to prevent children accidentally changing the
heater settings. When the heater is burning and the childproof lock is on, the
heater can only be switched off. Other functions are blocked then. If the heater
has already been switched off, the childproof lock also prevents accidental ignition
of the heater.
holding it down for more than 3 seconds. The KEY-LOCK indicator
the information display (Fig. I), indicating that the childproof lock has been activated.
Switch off the childproof lock by pressing the key M and holding it down for more
than 3 seconds once again.
Activate the childproof lock by pressing the appropriate key M and
will appear on
J THE CORRECT USE OF ‘SAVE’
The ‘SAVE’ function allows you to limit the temperature. When this function is
activated, the heater will automatically switch off, when the room temperature exceeds
the set temperature by 3°C. Subsequently, when the room temperature has dropped
again to the set temperature, the heater will automatically switch on again.
the ‘SAVE’ setting by pressing the appropriate key. The SAVE indicator light will
light up (Fig. J). Switch off the function by pressing the SAVE key once again.
Activate
I: When the mark
appears, the childproof
lock has been activated.
J: When the SAVE light
lights up, the heater will
automatically switch on
or off in order to remain
within a specified tem-
perature range.
4
8
Without the ‘SAVE’ setting your heater will maintain the set temperature by
approximation as well, by adjusting its heating capacity. ‘SAVE’ is an economy
setting, which you can use when, for instance, you are not present in the room
!
or to keep it frost-free.
K THE ‘FUEL’ INDICATOR
When the FUEL indicator appears, it means that there is only fuel left for 10
more minutes. The count-down of the remaining heating time can be seen in the
information display (Fig. K). Now you have two options:
you remove the fuel tank and refill it outside the living room (Section B) or
you push the button extension J. By pushing this button, the remaining
heating time will extend to 60 minutes.
The heater will automatically switch back to its lowest position. In the display
the number 60 will appear, which will decline to 10. At the arrival of 10,
you will hear an alarm signal every two minutes, warning you to refill the
removable tank. If you do not react, the heater will extinguish by itself. The
heater will also sound a warning signal, when it switches off. The fuel
indicator will blink, while four lines (--:--) are blinking in the information
display. You can stop this by pressing the
Once the heater has used up all its fuel and extinguished, it will take some time,
after the refill, before the heater is completely ready for use again.
button once more.
K: When the FUEL
indicator has appeard,
the information display
will show the number of
minutes of fuel left in
the tank.
L THE ‘VENT’ INDICATOR
When the VENT indicator starts blinking, this is a sign that the room is not vented
sufficiently (Fig. L). The heater will switch off automatically. If the indicator
continues blinking after extra ventilation, please contact your dealer.
M MAINTENANCE
Switch off the heater and let it cool down, before you start any maintenance
work. Also disconnect the plug from the mains. Your heater needs hardly any
maintenance. It is, however, important that you clean the vent filter with a
vacuum cleaner and the grid with a damp cloth, both on a weekly basis.
Regularly inspect the fuel filter as well:
1
Remove the removable tank from the heater and remove the fuel filter
(Fig. M). Some drops may leak from the filter; keep a cloth at hand.
2
Remove the dirt by tapping the fuel filter upside-down against a hard surface.
(Never clean it with water!)
3
Reinstall the fuel filter into the heater.
We recommend that you remove dust and stains from time to time with a damp
cloth, because otherwise these may cause stains that are hard to remove.
L: A blinking VENT
indicator is a sign
that you need extra
ventilation.
Fuel filter
M
Do not remove any heater components yourself. Always contact your dealer
for repairs. When the power cord is damaged, it may only be replaced by an
!
authorised fitter. Use a new cord of the type H05 VV-F.
4
9
N STORAGE (END OF THE HEATING SEASON)
At the end of the heating season, you must store the heater in a dust-free place, if
possible in its original packaging. Unused fuel cannot be used in the next heating
season. We therefore recommend that you burn up all fuel. If there is still some
fuel left, do not throw it away, but dispose of it in accordance with the local
regulations for the disposal of domestic chemical waste.
Always start the new heating season with fresh fuel. When you start re-using the
heater follow the instructions again (starting from Section A and as specified).
N
O TRANSPORTATION
Take the following measures to avoid fuel leakage during the transportation of
the heater:
1
Let the heater cool down.
2
Remove the removable tank from the heater and remove the fuel filter
(refer to Section M, Fig. M). Some drops may leak from the filter; keep a cloth
at hand. Store the fuel filter and the removable tank outside the heater.
3
Place the transportation cap into the position of the fuel filter (Fig. N).
Press it tight. The transportation cap will, as much as possible, prevent oil
leakage from the heater during transport.
4
Always move the heater in an upright position.
5
Make the fixed tank empty with a fuel pump before transportation or in case
of wrong or dirty fuel. First remove the fuel filter and then insert the fuel
pump into the empty fixed tank. Follow the same procedure if the fuel tank
contains water.
Transportation
cap
4
10
P SPECIFICATIONS
Ignition electrical Dimensions (mm) width 376
Fuel paraffin including base plate: depth 296
Capacity (kW) max. 3.2 height 438
Capacity (kW) min. 0.80 Accessories: - manual fuel pump
Suitable space (m3)** 48-120 - transportation cap
Fuel consumption (l/hr)
*
0.333 Mains 230 V
-- AC / 50 Hz
Fuel consumption (g/hr)
Burning time per tank (hr)
*
267
*
16.2 - igniter 320 W
Electrical consumption
:
Capacity removable tank (litres) 5.4 - continuous 13 W
Weight (kg) 8.0 Fuse rating 250V, 5A
* At maximum setting ** Specified values are indicative
Q WARRANTY PROVISIONS
Your heater comes with a 48-month warranty starting on the date of purchase.
Within this period all defects in material or workmanship will be repaired without
any charge. The following provisions shall apply regarding this warranty:
1
We expressly dismiss all other claims for damages, including consequential
damages.
2
Any repairs or replacements of components within the term of warranty will
not result in an extension of the term of warranty.
3
The warranty shall no longer apply, when the heater has been modified,
non-original parts have been used, or when it is repaired by third parties.
4
The warranty shall not apply to parts that are subject to normal wear, such as
the burner mat, any kind of gasket and the manual fuel pump.
5
The warranty shall only apply, when you present the original, dated proof of
purchase, provided no changes have been made to it.
6
The warranty shall not apply to damages caused by actions not in compliance
with the Directions for Use, neglect, and the use of an incorrect type of fuel,
or fuel past its use-by date. The use of incorrect fuel can even be dangerous*.
7
Transportation costs and the risks involved during the transportation of the
heater or heater components shall always be at the expense of the purchaser.
In order to avoid unnecessary costs, we recommend that you always read the
’Directions for Use’ carefully first. In case they offer no solution, please take the
heater to your dealer for repair.
* Highly inflammable substances may induce uncontrollable burning, causing flames to break out. Should this
happen, never try to move the heater, but always switch off the heater immediately. In case of emergency you
may use a fire extinguisher, but only a type B extinguisher: a carbon dioxide or powder extinguisher.
4
11
R PRODUCT FICHE
(a) Supplier's name/Trademark TOYOTOMI Europe Sales B.V.
(b) Model LC-DX32
(c) EEC A
(d) Direct heat output 3.2kW
(e) Indirect heat output N/A
(f) EEI 95.0%
(g) Useful energy effi ciency 100%
For assembly, installation or main-
(h) Specifi c precaution
tenance instructions, please refer to
the operating manual.
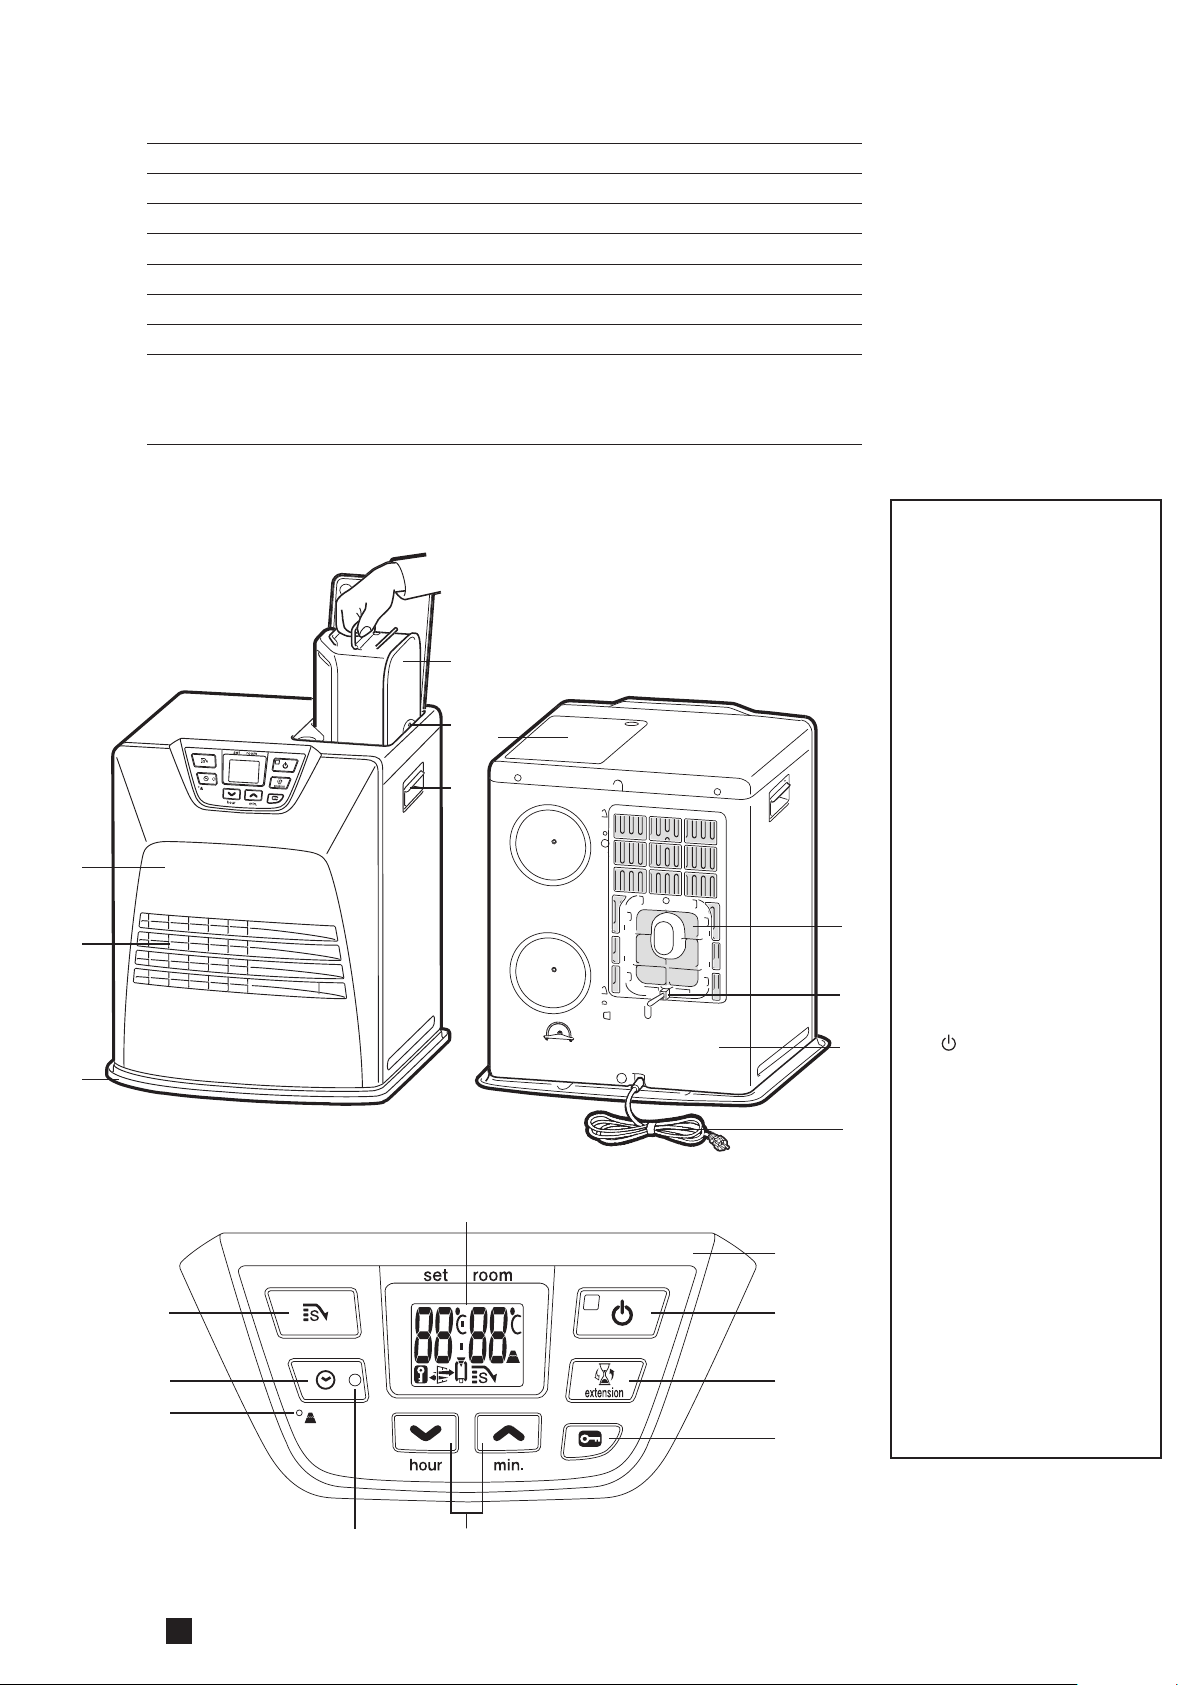
S MAIN COMPONENTS
Front plate
Grid
Base plate
Lid for removable
tank
Operation panel
Removable tank
Fuel gauge
removable tank
Vent filter
Thermostat
Plug + cord
Information display
key
Childproof lock
Adjustment keys
(time and
temperature)
Timer
4
12
J
SAVE key
Handle
Timer lamp
Altitude setting button
Extension

4
13

Vielen Dank für den Kauf des Marken-Heizofens von Toyotomi!
Der japanische Hersteller Toyotomi Co. Ltd. ist seit mehr als 65 Jahren
weltweiter Marktführer im Bereich mobiler Petroleumöfen. Toyotomi steht für
Service, Qualität und Garantie. Auf der ganzen Welt nutzen zufriedene Kunden
die komfortablen und sicheren Heizöfen. Toyotomi-Produkte erfüllen einen
sehr hohen Sicherheitsstandard, sie erfüllen die Sicherheitsnormen nicht nur
in Japan, sondern auch in allen Ländern auf der Welt, in denen die Produkte
verkauft werden.
Effizienz, Sicherheit und Komfort sind oberste Ziele bei Toyotomi.
Wir hoffen, dass Sie Ihr Toyotomi-Produkt viele Jahre geniessen können.
Bitte lesen Sie zunächst sorgfältig die Anleitung, um Ihr Gerät optimal
einzusetzen.
Informieren Sie sich auch über unsere anderen Produkten. Besuchen Sie uns
auf www.toyotomi.eu für unsere gesamte Produktlinie.
1 LESEN SIE ZUERST DIE BETRIEBSANLEITUNG.
2 WENDEN SIE SICH IM ZWEIFELSFALL AN IHREN HÄNDLER.
3 VOR DEM LESEN DER ANLEITUNG, KONSULTIEREN SIE DIE HAUPTKOMPONENTEN LISTE AUF DER LETZTEN
SEITE.
'
14
KURZANLEITUNG
Nachfolgend sind in groben Zügen die Schritte angegeben, die
zur Inbetriebnahme Ihres Heizofen ausgeführt werden müssen.
Detaillierte Beschreibung der Handlungen entnehmen Sie bitte der
GEBRAUCHSANWEISUNG.
Entfernen Sie das gesamte Verpackungsmaterial
1
(siehe Kapitel A, Abb. A).
Befüllen Sie den Brennstofftank (siehe Kapitel B, Abb. C).
2
Stecken Sie den Stecker in die Steckdose.
3
Starten Sie den Heizofen über die
4
(siehe Kapitel D).
Verändern Sie wenn nötig die gewünschte Temperatur
5
über die Einstelltasten (siehe Kapitel E).
Schalten Sie den Heizofen über die
6
-Taste
-Taste aus.
• Zur Vorbeugung von Feuer muss entweder der Heizofen vor dem Füllen
des Brennstoffbehälters ausgeschaltet werden oder der Behälter muss in
einem anderen Raum als dem, in dem sich der Heizofen befindet, gefüllt
werden.
• Sorgen Sie immer dafür, dass der Brennstoffbehälter nach dem Füllen gut
verschlossen ist. Achten Sie beim Füllen darauf, dass sich der Behälter
in einer sicheren Entfernung von Wärmequellen und offenen Flammen
befindet (siehe Kapitel B).
• Das erste Mal wird Ihr Heizofen während des Brennens noch kurz ‘neu’
riechen.
• Lagern Sie alle Brennstoffbehälter mit Originaldeckel und Versiegelung
kühl und dunkel.
• Brennstoff altert. Beginnen Sie jede Heiz saison mit neuem Brennstoff.
• Verwenden Sie nur sauberes Heizpetroleum in Übereinstimmung mit der
lokalen Gesetzgebung (TOYOTOMI Brennstoff).
• Wenn Sie zwischen den einzelnen Sorten / Marken wechseln, müssen Sie
den Heizofen erst voll ständig leer brennen lassen.
'
15
WICHTIG ZU WISSEN
JEDERZEIT AUSREICHEND LÜFTEN
Nur mit dem richtigen Brennstoff ist eine sichere, effiziente und komfortable
Benutzung Ihres Heizofens gewährleistet
Lesen Sie bitte vor der Anwendung des Geräts sorgfältig die Bedienungsanleitung
und bewahren Sie sie für eine zukünftige Einsichtnahme auf. Das Gerät nur
dann installieren, wenn die örtlich geltenden bzw. nationalen Vorschriften,
Verordnungen und Normen erfüllt sind. Dieses Produkt ist für den Gebrauch als
Heizofen in Wohngebäuden bestimmt, und darf nur in trockener Umgebung,
unter normalen Haushaltsverhältnissen, in Wohnräumen, Küchen und in Garagen
verwendet werden.
Um eine komfortable und sichere Beheizung zu erreichen, sorgen Sie bitte für
eine ausreichende Belüftung.
HINWEIS: Um ein unerwartetes Abschalten zu vermeiden, empfehlen wir, eine
Tür oder ein Fenster einen Spalt offen stehen zu lassen, wenn das Heizgerät in
Betrieb ist.
Jedes Modell benötigt eine bestimmte minimale Raumgröße, um den Heizofen
sicher, ohne zusätzliche Belüftung, betreiben zu können (siehe Kapitel P). Wenn
der betreffende Raum kleiner als der angegebene Minimumwert ist, dann muß
dafür gesorgt werden, daß immer ein Fenster oder eine Tür einen Spalt breit
offen bleibt (ca. 2,5 cm). Es ist wichtig, dass jeder Raum, in dem der Heizofen
benutzt wird, ausreichend belüftet und gut entlüftet wird (beide Öffnungen müssen einen Querschnitt von mindestens 50 cm
Wir empfehlen auch, dies in gut isolierten oder zugluftfreien Räumen und/oder
auf großer Höhe zu tun. Benutzen Sie den Heizofen nicht in Keller- oder anderen
unterirdisch gelegenen Räumen.
Änderungen am Sicherheitssystem sind unzulässig und würden die Garantie
einer einwandfreien Funktion des Luftfühlers nichtig machen. Wenden Sie sich
im Zweifelsfall an Ihren Händler.
2
haben).
Nur mit dem richtigen
Brennstoff ist eine
sichere, effiziente und
komfortable Benutzung
Ihres Heizofen
gewährleistet.
SPEZIELL FÜR FRANKREICH: Ihr Heizofen wurde ausschließlich für den Betrieb
mit Brennstoff für mit flüssigem Brennstoff betriebene mobile Heizöfen gemäß
den Richtlinien vom 18.07.2002 und 25.06.2010 ausgelegt. Die Verwendung anderer Brennstoffe ist verboten. Fragen Sie Ihren Händler. Die Adressen unserer
Händler finden Sie auf unserer Website.
Der mit flüssigem Brennstoff betriebene mobile Heizofen wurde als zusätzliches
Heizgerät ausgelegt und nicht als ständige Wärmequelle.
SPEZIELL FÜR GROSSBRITANNIEN: Verwenden Sie ausschließlich PetroleumBrennstoff der Klasse C1 gemäß BS2869 Teil 2 oder einen gleichwertigen
Brennstoff.
Im Hinblick auf die richtige Verwendung muss der Benutzer folgende
Anweisungen befolgen:
ES IST VERBOTEN
- verwenden Benzin.
- den mit flüssigem Brennstoff betriebenen mobilen Heizofen in Wohnwagen, auf
Booten und in Fahrerhäusern zu benutzen.
- den mit flüssigem Brennstoff betriebenen mobilen Heizofen in unzureichend
belüfteten Räumen (die Mindestmaße für zu beheizende Räume entnehmen Sie
bitte der Tabelle mit den technischen Daten), Kellerräumen bzw. in einer Höhe
von über 1900 m zu benutzen.
- Änderungen an den Sicherheitsvorrichtungen des Heizofens vorzunehmen.
Wenn diese Art von Heizung in öffentlich zugänglichen Räumen eingesetzt werden soll, muss eine entsprechende Genehmigung vorliegen. Erkundigen Sie sich
rechtzeitig nach den entsprechenden Vorschriften.
DER RICHTIGE BRENNSTOFF
Ihr Heizofen wurde für die Benutzung von, sauberem Heizpetroleum hoher
Qualität, entwickelt (TOYOTOMI Brennstoff). Nur dieser Brennstoff sorgt für eine
saubere und optimale
den Problemen führen:
erhöhte Störungsanfälligkeit
unvollständige Verbrennung
verkürzte Lebensdauer des Heizofens
Rauch und/oder Geruch
Ablagerung auf dem Gitter oder Gehäuse
Der richtige Brennstoff ist also wichtig für einen sicheren, effizienten und komfortablen Gebrauch Ihres Heizofens.
Verbrennung. Brennstoff geringerer Qualität kann zu folgen-
Den Transport-
verschluß finden Sie
im Verpackungs karton.
Nur hiermit kann
der Heizofen nach
Benutzung problemlos
transportiert werden.
Bewahren Sie den
Verschluß also gut auf!
Eine Beschädigung bzw. eine Störung des Heizofens aufgrund der Verwendung
von anderem als hochwertigem wasserfreiem Heizpetrolem fällt nicht unter die
Garantie.
Informieren Sie sich bei Ihrem Händler in Ihrer direkten Umgebung über den richtigen Brennstoff für Ihren Heizofen (www.toyotomi.eu).
'
16
GEBRAUCHSANWEISUNG
A DIE INSTALLATION DES HEIZOFENS
1
Nehmen Sie den Heizofen vorsichtig aus dem Karton und kontrollieren Sie
den Inhalt auf Vollständigkeit.
Außer dem Heizofen muß folgendes vorhanden sein:
eine Syphonpumpe
ein Transportverschluß
diese Gebrauchsanweisung
Bewahren Sie den Karton und das Verpackungsmaterial (Abb. A) zwecks
Lagerung und/oder Transport auf.
2
Öffnen Sie den Deckel des Brennstofftanks und entfernen Sie das Stück-
chen Karton.
3
Befüllen Sie den Brennstofftank wie in Kapitel B beschrieben.
4
Der Boden muß stabil und waagrecht sein. Stellen Sie den Kamin an eine an-
dere Stelle, falls er nicht waagrecht steht. Versuchen Sie nicht durch Unterlage von Büchern oder Ähnlichem den Stand zu korrigieren.
5
Stecken Sie den Stecker in die Steckdose (230 Volt - AC/50 Hz) und stellen
Sie die aktuelle Uhrzeit über die Einstelltasten ein (siehe Kapitel C).
6
Ihr Heizofen ist jetzt betriebsbereit.
A
B
EINSATZGEBIET/-HÖHE
1
Verwenden Sie das Heizgerät auf einer Höhe zwischen 800 und 1300 m, dann
nutzen Sie den Höhenmodus 1. Drücken Sie die Höhentaste mit einer
dünnen Stange (z. B. einer Büroklammer) und stecken Sie gleichzeitig den
Stecker in die Steckdose. Auf der Anzeige erscheint “1
2
Verwenden Sie das Heizgerät auf einer Höhe zwischen 1300 und 1900 m,
dann nutzen Sie den Höhenmodus 2. Nach Einstellung des Höhenmodus
1 drücken Sie die Höhentaste mit einer dünnen Stange und stecken Sie
gleichzeitig den Stecker erneut in die Steckdose. Dann erscheint “2
Anzeige.
3
Schalten Sie den Höhenmodus aus, indem Sie die Höhentaste drücken
und gleichzeitig den Stecker in die Steckdose stecken, nachdem Sie den
Höhenmodus 2 eingestellt haben. Auf der Anzeige erscheint “0” und “
verschwindet.
HINWEIS: Wenn der Höhenmodus 1 eingestellt ist, erscheint in der Anzeige das
Höhensymbol “
Höhensymbol “
HINWEIS: Bei einem Stromausfall oder nach dem Abtrennen des Heizgeräts
bleibt die Höheneinstellung erhalten.
Verwenden Sie den Heizer nicht in einer Höhe von über 1900 Metern.
”. Wenn der Höhenmodus 2 eingestellt ist, blinkt das
” während des Betriebs.
”.
” in der
!
LAUTSTÄRKE EINSTELLEN
Die Lautstärke des Summers an diesem Heizgerät kann geregelt werden. Die
Ausgangsstellung ist hohe Lautstärke.
Halten Sie die Taste SAVE 3 Sekunden gedrückt, dann wechselt die
1
Summerlautstärke von hoch zu niedrig.
”
Halten Sie die Taste SAVE erneut 3 Sekunden gedrückt, dann wechselt die
2
Summerlautstärke von niedrig zu hoch.
HINWEIS: Die Lautstärke kann hoch oder niedrig sein, doch der Alarm des
Sicherheitsgeräts ertönt immer laut.
HINWEIS: Bei einem Stromausfall oder nach dem Abtrennen des Heizgeräts ist
die Lautstärke wieder hoch.
'
17
B DAS BEFÜLLEN MIT BRENNSTOFF
Füllen Sie den Brennstofftank an einer dazu geeigneten Stelle (falls etwas verschüttet wird). Gehen Sie wie folgt vor:
1
Der Heizofen muss ausgeschaltet sein.
2
Öffnen Sie den Deckel und ziehen Sie den Brennstofftank aus dem Heizofen
(Abb. B). Stellen Sie den Brennstofftank ab (Tankverschluß nach oben, Griff
auf dem Boden) und drehen Sie den Tankverschluß auf (Abb. C).
HINWEIS: Der Tank kann kurz nachtropfen.
3
Füllen Sie den Brennstofftank mit einer Brennstoffpumpe (siehe Gebrauchsan-
weisung Brennstoffpumpe). Dabei ist darauf zu achten, dass der Kanister
höher steht als der Brennstofftank (Abb. D). Den geriffelten Schlauch stecken
Sie dann in die Öffnung des Brennstofftanks.
4
Achten Sie während des Füllvorgangs auf die Brennstoffanzeige des
Brennstofftanks (Abb. E). Wenn Sie sehen, daß der Tank fast voll ist, stellenSie den Füllvorgang ein. Den Tank niemals zu voll füllen. Vor allem nicht,
wenn der Brennstoff sehr kalt ist (Brennstoff dehnt sich aus, wenn er wärmer
wird).
5
Lassen Sie den Brennstoff, der sich noch in der Pumpe befindet, in den
Kanister zurückströmen und entfernen Sie die Pumpe vorsichtig. Schrauben
Sie den Tankverschluß wieder sorgfältig auf den Tank. Wischen Sie eventuell
verschütteten Brennstoff weg.
6
Kontrollieren Sie, ob der Tankverschluß gerade sitzt und fest angezogen ist.
Setzen Sie den Brennstofftank wieder in den Heizofen ein (Tankverschluß
nach unten). Schließen Sie den Deckel.
C
D
E
C DAS EINSTELLEN DER UHR
Die Zeiteinstellung können Sie nur vornehmen, wenn der Heizofen nicht in Betrieb
ist, der Stecker sich jedoch in der Steckdose befindet. Sie benutzen dazu die
Einstelltasten . Drücken Sie zuerst auf eine der beiden Tasten um die Funktion
zu aktivieren (die 4-Stellige Zahl im Informations-Display blinkt.). Danach können Sie die Stunden mit der linken Taste (hour) einstellen und die Minuten
mit der rechten Taste (min.). Durch einmaliges Drücken der Taste wird der Wert
stufenweise erhöht. Wenn Sie die Taste gedrückt halten, erhöht sich der Wert, bis
die Taste losgelassen wird. Nach ungefähr 10 Sekunden leuchtet die die 4-Stellige
Zahl und die Einstellung ist vorgenommen (Abb. F). 5 Minuten nachdem der Ofen
ausgeschaltet worden ist, wird die Information auf dem Display gelöscht und der
Ofen wird in den Standby-Modus umgeschaltet. Nachdem auf eine willkürliche
Taste gedrückt worden ist, erscheint wieder die Uhrzeit auf dem Display.
Wenn der Stecker aus der Steckdose gezogen wurde (oder bei Stromausfall)
muß die Zeit erneut eingestellt werden.
!
D DAS STARTEN DES HEIZOFENS
Ein neuer Ofen verursacht zu Beginn etwas Geruch. Sorgen Sie deswegen für
zusätzliche Belüftung.
Starten Sie den Heizofen immer mit die
ein Feuerzeug benutzen.
Um den Heizofen zu starten, brauchen Sie nur die
An/Aus-Lampe blinkt dann, um zu zeigen, daß der Zündvorgang läuft. Es
dauert einige Zeit bis der Vorgang abgeschlossen ist. Anschließend leuchtet die
An/Aus-Lampe ständig. Das Informations-Display zeigt zwei Zahlen an. An
den Kontroll-Lampen neben den Zahlen können Sie sehen, daß sich diese auf
die Temperatur beziehen (Abb. G). Unter ROOM steht die tatsächliche Raum-
temperatur, während unter SET die von Ihnen eingestellte Temperatur angezeigt
wird. Letztere können Sie über die Einstelltasten verändern (siehe Kapitel E).
Kontrollieren Sie vor dem Starten des Heizofens immer ob sich noch genügend
Brennstoff im Brennstofftank befindet.
-Taste . Niemals Streichhölzer oder
-Taste zu betätigen. Die
leer voll
F: Wenn die 4-Stellige
Zahl nicht mehr blinkt,
sind die Einstellungen
gespeichert.
G: Links die eingestellte
Temperatur, rechts die
tatsächliche Temperatur.
'
18

E TEMPERATUREINSTELLUNG
Sie können die eingestellte Temperatur nur verändern, wenn der Heizofen eingeschaltet ist. Hierzu benutzen Sie die Einstelltasten . Drücken Sie zuerst auf eine
der beiden Tasten um die Funktion zu aktivieren (die °C Blinkt). Danach können
Sie die Temperatur mit der rechten Taste (min.) höher und mit der linken Taste
(hour) niedriger einstellen. Nach ungefähr 10 Sekunen blinkt die 4-Stellige Zahl
nicht mehr, die Einstellung ist abgeschlossen (Abb. G).
Sie können die Temperatur auf minimal 6°C und maximal 28°C einstellen.
Wenn der Stecker aus der Steckdose gezogen wurde (oder bei Stromausfall) ist
die eingestellte Temperatur wieder auf dem Standardwert von 20°C.
F DIE BENUTZUNG DER ZEITSCHALTUHR (TIMER)
Mit Hilfe der Zeitschaltuhr kann der Heizofen zu einem vorprogrammierten
Zeitpunkt automatisch eingeschaltet werden.
Um die Zeitschaltuhr programmieren zu können, muß die aktuelle Uhrzeit eingestellt (siehe Kapitel C) und der Heizofen ausgeschaltet sein.
Sie gehen wie folgt vor:
1
2
3
4
Wenn Sie den Heizofen ausschalten möchten und ihn über die Zeitschaltuhr wieder einschalten lassen wollen, dann brauchen Sie nur die Taste TIMER zu betäti-
!
gen (siehe Kapitel G).
Um die Einstellung der Zeitschaltuhr rückgängig zu machen, betätigen Sie einmal
die
-Taste betätigen und direkt danach die TIMER Taste drücken.
Die
Die Zeitschaltuhrlampe und die 4-Stellige Zahl blinken.
Stellen Sie die Startzeit für den Heizofen über die Einstelltasten ein.
Die linke Taste (hour) ist für die Stunden, die rechte Taste (min.)
für die Einstellung der Minuten (Die Zeit lässt sich in 5 Minuten-Intervallen
einstellen).
Nach ungefähr 10 Sekunden zeigen die 4 Zahlen CLOCK an, und die Zeitschal-
tuhrlampe zeigt an, daß die Zeitschaltuhr aktiviert wurde (Abb. H).
Die Zeitschaltuhr sorgt dafür, daß der Raum zur programmierten Zeit die
gewünschte Temperatur annähernd erreicht hat.
-Taste .
G DAS AUSSCHALTEN DES HEIZOFENS
Der Heizofen kann auf zwei Arten ausgeschaltet werden:
H: Die Kontroll-Lampe
TIMER zeigt an, daß die
Zeitschaltuhr aktiviert
ist.
1
2
Wenn Sie den Heizofen ausschalten möchten und ihn das nächste Mal über
-Taste betätigen. Das Informations-Display springt auf CLOCK und
Die
innerhalb ca. einer Minute ist die Flamme gelöscht.
die Zeitschaltuhr wieder starten wollen, dann betätigen Sie die Taste TIMER
. Dadurch wird der Heizofen ausgeschaltet und gleichzeitig die Zeitschaltuhr aktiviert. Sie können die gewünschte Zeit über die Einstelltasten verändern (siehe Kapitel F).
'
19

H DIE FUNKTION DES INFORMATIONS-DISPLAyS
Das Informations-Display K zeigt nicht nur die (eingestellte) Zeit und Temperatur
an (Kapitel C, E und F), sondern meldet Ihnen auch eventuelle Störungen.
Über den jeweiligen Code auf dem Display erhalten Sie die notwendigen
Informationen:
CODE INFORMATION AUSZUFÜHRENDE HANDLUNG
e - 0 Temperatur innerhalb des Ofens Abkühlen und neu starten.
zu hoch.
Störungen werden im
Informations-Display
angezeigt.
f - 0 Netzspannung war unterbrochen. Heizofen neu starten.
e - 1 Thermostat defekt. Händler informieren.
f - 1 Brenner-Thermistor defekt. Händler informieren.
e - 2 Startprobleme. Händler informieren.
e - 23
Heizgerät sofort nach dem
Abschalten erneut einschalten.
Ca. 30 Sekunden warten, den Netzstecker wieder in
die Steckdose stecken und das Gerät einschalten.
e - 5 Kipp-Sicherung. Heizofen neu starten.
e - 6 Schlechte Verbrennung. Händler informieren.
e - 7 Zimmertemperatur Wenn nötig Heizofen
höher als 32°C. neu starten.
e - 8 Gebläsemotor defekt. Händler informieren.
e - 8 1 Abnormale Frequenz. Stecken Sie den Stecker in die Steckdose erneut.
Händler informieren.
e - 9 Luftfilter verschmutzt, oder Filter reinigen.
Brennstoffpumpe verschmutzt. Händler informieren.
Der Ofen war 65 Stunden ohne Un-
terbrechung in Betrieb und wurde
deshalb automatisch abgeschaltet. Den Ofen erneut starten.
+
-- : --
-- : --
Kein Brennstoff. Brennstofftank füllen.
+
Zu wenig Belüftung. Besser lüften.
Bei Störungen, die nicht in dieser Tabelle aufgelistet sind und/oder wenn sich das
Problem nicht löst mit den oben beschriebenen Maßnahmen, so wenden Sie sich
bitte an Ihren Händler.
AUTOMATISCHE ABSCHALTUNG
Der Ofen ist mit einem Sicherheitssystem ausgestattet, das für eine automatische
Abschaltung des Ofens sorgt, wenn dieser 65 Stunden ohne Unterbrechung in
Betrieb war. Im Display erscheint folgende Anzeige:
wieder in Betrieb nehmen möchten, drücken Sie die
Kapitel D).
AUTOMATIC CLEANING MODE (AUTOMATISCHES REINIGUNGSSySTEM)
Wenn der Ofen 2 Stunden ununterbrochen auf der höchsten Stufe gebrannt hat,
wird der Brenner sich automatisch reinigen. Auf der Anzeige wird dies mit dem
Code cl:05, zurückzählend bis cl:01 angegeben. 5 Minuten lang brennt der Ofen auf
niedrigster Stufe, während der Brenner sich in diese Zeit selbst reinigt. Nach der
Reinigung schaltet der Ofen wieder auf die höchste Stufe.
Wenn Sie den Ofen
.
Taste L. (siehe dazu
-
'
20

I KINDERSICHERUNG
Die Kindersicherung können Sie benutzen, um zu verhindern, daß ein Kind versehentlich die Einstellung des Heizofens verändert. Während des Brennens kann
der Heizofen dann nur noch ausgeschaltet werden. Wenn der Heizofen bereits
ausgeschaltet ist, verhindert die aktivierte Kindersicherung auch, daß der Ofen
versehentlich eingeschaltet wird.Sie aktivieren die Kindersicherung dadurch, daß
Sie die betreffende Taste länger als 3 Sekunden gedrückt halten. Die KontrollLampe KEY-LOCK
eingeschaltet ist. Um diese wieder auszuschalten, drücken Sie erneut länger als 3
Sekunden auf die Taste KEY-LOCK.
leuchtet auf (Abb.I) um anzuzeigen daß die Kindersicherung
J DIE RICHTIGE BENUTZUNG DER “SAVE” FUNKTION
Mit der “SAVE”-Funktion können Sie die Temperatur begrenzen. Wenn diese
Funktion eingeschaltet ist, wird sich der Heizofen automatisch ausschalten, wenn
die Zimmertemperatur 3°C über der eingestellten Temperatur liegt. Fällt die
Zimmertemperatur danach wieder auf die eingestellte Temperatur, schaltet sich
der Heizofen wieder automatisch ein.
Sie aktivieren die Einstellung “SAVE” durch Betätigung der betreffenden Taste
Die Kontroll-Lampe SAVE leuchtet auf (Abb. J). Durch nochmaliges Betätigen der
Taste SAVE schalten Sie die Funktion wieder aus.
Auch ohne die Einstellung “SAVE” sorgt Ihr Heizofen dafür, daß die eingestellte Temperatur annähernd beibehalten wird, und zwar durch Anpassung der
Heizkapazität.
!
“SAVE” ist eine Einstellung, die Sie zum Beispiel benutzen können, wenn Sie
nicht im Raum anwesend sind oder um den Raum frostfrei zu halten.
I: Wenn die Anzeige
auf dem
Informations-Display
erscheint ist die
Kindersicherung einge-
schaltet.
.
J: Wenn die Kontroll-
Lampe SAVE aufleuch-
tet, schaltet sich der
Heizofen automatisch
an und aus, um inner-
halb eines bestimmten
Temperatur bereiches zu
bleiben.
K DIE BRENNSTOFFANZEIGE
Wenn die Brennstoffanzeige auf dem Display erscheint, ist noch für 10 Minuten
Brennstoff vorhanden. Die restliche Brenndauer wird im Informations-Display
angezeigt (Abb. K). Es gibt nun 2 Möglichkeiten:
Sie holen den Brennstoffbehälter aus dem Ofen und füllen ihn mit neuem
Brennstoff nach (außerhalb des Wohnbereiches) (Siehe Kapitel B).
Sie drücken den Knopf ‘extension’ J. Hiermit verlängern Sie die Brenndauer
um 60 Minuten. Der Ofen schaltet dann automatisch auf die niedrigste Stufe.
Auf der Anzeige erscheint die Zahl 60, zurückzählend bis 10. Beim Erreichen
von 10 ertönt alle 2 Minuten ein akustisches Warnsignal, zum Zeichen, daß der
Wechseltank nachgefüllt werden muß. Reagieren Sie nicht, dann geht der Heizofen
von selbst aus. Auch dann ertönt ein Warnsignal. Die Brennstoffanzeige blinkt und
im Informationsdisplay erscheinen vier Striche (--:--).
indem Sie einmal auf die
Wenn der Heizofen vollständig leer gebrannt ist, müssen Sie nach dem Nachfüllen
einige Sekunden warten, bevor der Heizofen wieder betriebsbereit ist.
-Taste drücken.
Sie können dies ausschalten,
L DIE KONTROLL-LAMPE VENT
Wenn die Kontroll-Lampe VENT zu blinken beginnt, ist dies ein Zeichen dafür,
dass der Raum unzureichend ventiliert wird (Abb.L). Der Heizofen wird sich von
selbst ausschalten. Sollte die Kontroll-Lampe nach zusätzlicher Belüftung immer
noch blinken, wenden Sie sich bitte an Ihren Händler.
K: Wenn die FUEL-
Anzeige aufleuch-
tet sehen Sie im
Informations-Display
für wieviel Minuten Sie
noch Brennstoff haben.
L: Wenn die VENT –
Anzeige blinkt, ist dies
ein Zeichen daß der
Raum unzureichend
ventiliert wird.
'
21

M WARTUNG
Bevor Sie Wartungsarbeiten ausführen, muß der Heizofen ausgeschaltet und
abgekühlt sein. Ziehen Sie den Stecker aus der Steckdose.
Ihr Heizofen benötigt kaum Wartung. Wöchentlich sollten jedoch der
Ventilatorfilter mit einem Staubsauger und das Gitter mit einem feuchten
Tuch gereinigt werden.
Kontrollieren Sie regelmäßig den Brennstofffilter:
1
Nehmen Sie den Brennstofftank aus dem Heizofen und entfernen Sie den
Brennstofffilter (Abb. M). Dieser kann etwas nachtropfen- halten Sie ein Tuch bereit.
2
Klopfen Sie den umgedrehten Brennstofffilter auf einem harten Untergrund
aus, um so den Schmutz zu entfernen. (Niemals mit Wasser reinigen!)
3
Setzen Sie den Brennstofffilter wieder ein.
Wir empfehlen, dass Sie Staub und Flecken immer gleich mit einem feuchten
Tuch entfernen, da sonst Flecken entstehen können, die sich nur noch schwer entfernen lassen.
Entfernen Sie selbst keine Teile aus dem Heizofen. Wenden Sie sich bezüglich
einer eventuellen Reparatur immer an Ihren Händler.
Wenn das Stromkabel beschädigt ist, darf nur ein anerkannter Elektro-
!
Installateur das Kabel mit einem Typ H05 VV-F austauschen.
Brennstofffilter
M
N LAGERUNG (ENDE DER HEIZSAISON)
Wir empfehlen Ihnen, den Heizofen am Ende jeder Heizsaison vollständig leer brennen zu lassen und staubfrei zu lagern, vorzugsweise in der Original verpackung.
Übrig gebliebenen Brennstoff sollten Sie in der nächsten Heizsaison nicht mehr
benutzen. Verbrauchen Sie diesen also. Falls doch etwas übrig bleibt, schütten
Sie diesen nicht weg, sondern entsorgen Sie ihn laut den örtlichen Vorschriften
für chemischen Kleinabfall.
Beginnen Sie jede neue Heizsaison auf jeden Fall mit neuem Brennstoff. Beachten
Sie wieder diese Gebrauchsanweisung (wie beschrieben ab Kapitel A), wenn Sie
den Heizofen erneut in Betrieb nehmen.
O TRANSPORT
Um zu verhindern, daß der Heizofen während des Transportes Brennstoff verliert,
müssen folgende Maßnahmen getroffen werden:
1
Lassen Sie den Heizofen abkühlen.
2
Nehmen Sie den Brennstofftank aus dem Heizofen und entfernen Sie den
Brennstofffilter (siehe Kapitel M, Abb. M). Dieser kann eventuell etwas
nachtropfen; halten Sie ein Tuch bereit. Den Brennstofffilter und den
Brennstofftank außerhalb des Heizofens aufbewahren.
3
Setzen Sie den Transportverschluß anstelle des Brennstofffilters ein (Abb. N)
und drücken Sie ihn fest, so daß kein Brennstoff austritt.
N
Transportverschluß
4
Den Heizofen immer aufrecht transportieren.
5
Entleeren Sie den fest eingebauten Brennstoffbehälter vor dem Transport
oder falls ein falscher oder verunreinigter Brennstoff verwendet wurde, mit
einer Brennstoffpumpe. Entfernen Sie zunächst den Brennstofffilter und setzen Sie dann die Brennstoffpumpe in den leeren, fest eingebauten
Brennstoffbehälter. Gehen Sie genau so vor, wenn der Brennstoffbehälter
Wasser enthält.
'
22

P TECHNISCHE DATEN
Zündung Elektrisch Abmessungen
Brennstoff Heizpetroleum
lich Bodenplatte
Kapazität (kW) max. 3,2 Höhe 438
Kapazität (kW) min. 0,80 Zubehör: Brennstofpumpe
3)**
Geeigneter Raum (m
Brennstoffverbrauch (Ltr/Std)
48-120 Transportverschluß
*
0,333 Netzspannung 230 V
-- AC / 50 Hz
*
Brennstoffverbrauch (g/Std)
Brenndauer pro Tank (Std)
267 Stromverbrauch:
*
16,2 - Zündung 320 W
Inhalt Brennstofftank (Liter) 5,4 - Im Dauerbetrieb 13 W
Gewicht (kg) 8,0 Sicherungen 250V, 5A
* Bei Einstellung auf maximalem Stand ** Angegebene Werte sind Richtwerte
einschließ-
Breite 376
(mm) Tiefe 296
Q GARANTIEBEDINGUNGEN
Sie erhalten auf Ihren Heizofen 48 Monate Garantie ab Kaufdatum. Innerhalb dieser Zeit werden alle Material- und Herstellungsfehler kostenlos behoben. Hierbei
gelten folgende Regeln:
1
Alle weiteren Ansprüche auf Schadenersatz, inklusiv Folgeschäden, werden
nicht anerkannt.
2
Reparatur oder Austausch von Teilen innerhalb der Garantiezeit führt nicht zur
Verlängerung der Garantie.
3
Die Garantie verfällt, wenn Veränderungen angebracht wurden, Nicht- Origi-
nal Teile montiert oder Reparaturen durch Dritte am Heizofen ausgeführt wurden.
4
Die Garantie gilt nicht für Teile, die einem normalen Verschleiß unterliegen,
wie die Brennermatte, Dichtungen jeglicher Art und die manuelle Benzinpumpe.
5
Die Garantie gilt ausschließlich unter Vorlage der datierten Originalrechnung,
auf der keine Veränderungen vorgenommen wurden.
6
Die Garantie gilt nicht bei Schäden, die durch zweckwidrige Handlungen ent-
standen sind, beziehungsweise durch Verwahrlosung und durch die Benutzung von falschem oder veraltetem Brennstoff. Falscher Brennstoff kann sogar gefährlich sein.*
7
Die Versandkosten und das Versandrisiko des Heizofens, oder dessen Teile,
gehen zu allen Zeiten zu Lasten des Käufers.
Um unnötige Kosten zu vermeiden, empfehlen wir Ihnen, immer zuerst sorgfältig
die Gebrauchsanweisung zu lesen. Finden Sie darin keine Lösung, geben Sie den
Heizofen Ihrem Händler zur Reparatur.
* Leicht entzündliche Stoffe können zum Beispiel zu unkontrollierbarer Verbrennung führen, die ausschlagende Flammen zur Folge haben. Versuchen Sie in diesem Fall nie, den Heizofen zu transportieren, sondern
schalten Sie den Heizofen unverzüglich aus. In Notfällen können Sie einen Feuerlöscher benutzen, jedoch ausschließlich einen Kohlendioxid- oder Pulver-Feuerlöscher.
'
23

R PRODUKTDATENBLATT
(a)
Name / Warenzeichen des Lieferanten
(b) Model LC-DX32
(c) Energieeffi zienzklasse A
(d) Direkte Wärmeleistung 3.2kW
(e) Indirekte Wärmeleistung N/A
(f) Energieeffi zienzindex 95.0%
(g) Brennstoff-Energieeffi zienz 100%
(h) Besonderen vorkehrungen
TOYOTOMI Europe Sales B.V.
Für das Zusammenstellen, die Installation oder Wartung des Gerätes wir
verweisen wir nach die Gebrachsanleitung.
S WICHTIGE EINZELTEILE
Frontplatte
Gitter
Bodenplatte
Deckel Brennstofftank
Bedienungsfeld
Brennstofftank
Brennstoffanzeige
Brennstofftank
Ventilatorfilter
Thermostat
Stecker + Kabel
Informations-Display
-Taste
Kindersicherung
Einstelltasten
(Zeit und Temperatur)
Zeitschaltuhr
SAVE-Taste
'
24
J
Handgriff
Zeitschaltuhrlampe
Höhen-Modus-Knopf
EXTENSION-Taste

'
25

Merci d’avoir choisi un produit “TOYOTOMI”!
Les produits de “ Toyotomi “ sont utilisés par des clients satisfaits à travers
le monde entier. Afin d’assurer l’utilisation confortable et sûre de nos produits
par les clients dans chaque pays, nos produits sont conformes aux normes de
sécurité non seulement au Japon mais egalement dans tous les pays du monde,
dont nous distribuons nos produits.
Toyotomi adapte ses produits pour satisfaire aux besoins de ses clients en
poursuivant toujours notre philosophie d’entreprise, «partager les joies de la vie
quotidienne». Nous allons continuer à rechercher, développer et fabriquer des
produits qui répondent au mode de vie des gens comme l’efficacité, la sécurité et
le confort.
Nous espérons que vous apprécierez votre appareil “Toyotomi” pour les années
à venir!
Pour assurer une durée de vie maximale pour cet appareil, nous vous invitons
d’abord à lire ce manuel d’instruction.
Apprenez à mieux nous connaître ... rendez-vous sur notre site www.toyotomi.eu
pour une vue d’ ensemble de notre gamme de produits.
1 LISEZ D’ABORD LES INSTRUCTIONS CONCERNANT UNE PREMIÈRE UTILISATION.
2 EN CASE DE DOUTE, CONTACTEZ VOTRE REVENDEUR.
3 AVANT DE COMMENCER LA LECTURE, CONSULTEZ LA LISTE DES PRINCIPAUX COMPOSANTS À LA
DERNIÈRE PAGE
+
26

L’UTILISATION DANS LES GRANDES LIGNES
Voici, dans les grandes lignes, la marche à suivre pour utiliser votre appareil
mobile de chauffage à combus-tible liquide. Le MANUEL D’UTILISATION reprend
chaque étape en détail.
Retirez les différents emballages (voir le chapitre A, fig. A).
1
Remplissez le réservoir amovible (voir le chapitre B, fig. C).
2
Branchez la fiche dans la prise de courant.
3
Allumez l’appareil à l’aide de la touche
4
(voir le chapitre D).
Modifiez si nécessaire la température à votre convenance à
5
l’aide des touches de réglage (voir le chapitre E).
Pour éteindre l’appareil, appuyez sur la touche
6
.
• Le remplissage du réservoir doit se faire (sécurité contre l’incendie):
- soit appareil à l’arrêt,
- soit dans un autre local que celui où est installé le chauffage,
• Dans tous les cas, l’utilisateur doit vérifier la bonne fermeture de son
réservoir rechargé en dehors de toute source de chaleur ou de feux nus
(voir le chapitre B).
• Votre appareil dégagera une odeur de ‘neuf’ en chauffant pour la première
fois.
• Conservez votre combustible dans un endroit frais, à l’abri de la lumière
après avoir fermé le ou les bidons avec le bouchon d’origine.
• Le combustible vieillit. Utilisez à chaque début de saison de chauffage du
nouveau combustible.
• Utilisez uniquement paraffine de haute qualité, sans eau et pur
conformément à la législation locale (TOYOTOMI combustible).
• Si vous changez de marque et/ou de type de combustible, vous devez
d’abord vous assurer que l’appareil mobile de chauffage à combustible
liquide consomme entièrement le combustible présent.
+
27

CE QUE VOUS DEVEZ SAVOIR AU PRÉALABLE:
AÉREZ TOUJOURS SUFFISAMMENT
Lisez attentivement ce manuel d’utilisation avant d’utiliser l’appareil et conservezle pour toute référence ultérieure. Installez cet appareil uniquement s’il est
conforme à la législation, aux ordonnances et aux normes locales et nationales.
Ce produit a été conçu pour être utilisé comme chauffage dans des maisons
résidentielles, et il doit être utilisé uniquement dans des endroits secs, dans des
conditions domestiques normales et en intérieur, dans un séjour, une cuisine ou
un garage.
Pour votre confort et votre securite, assurez-vous que la piece ou se trouve
l’appareil, est suffisamment aeree.
REMARQUE: Afin d’eviter toute coupure intempestive, nous conseillons
d’entrouvrir une porte ou une fenetre lorsque l’appareil est en service.
Quel que soit le modèle, vous devez toujours prévoir une pièce de volume
minimal afin d’utiliser l’appareil en toute sécurité, sans aération supplémentaire
(voir le chapitre P). Si le volume de la pièce est plus petit que celui préconisé,
vous devez toujours entrebâiller une fenêtre ou une porte (2,5 cm). Il est
important que chaque pièce où l’appareil est utilisé soit munie d’une entrée d’air
suffisante et d’une sortie d’air efficace (section minimale de 50 cm2 pour chaque
orifice).
Nous recommandons également de le faire dans des pièces très isolées ou sans
courants d’air et / ou à haute altitude. N’utilisez pas votre poêle dans des caves
ou des pièces souterraines.
Toute modification du système de sécurité est interdite, car dans ce cas, nous
ne pourrons plus garantir le bon fonctionnement du contrôleur d’atmosphère. En
cas de doute, consultez votre distributeur.
PARTICULIÈREMENT POUR FRANCE: Votre appareil de chauffage a été conçu
pour fonctionner uniquement avec un combustible pour chauffage mobile
à combustible liquide (conforme aux arrêtés du 18/7/2002 et du 25/6/2010).
L’usage de tout autre combustible est interdit. Réclamez-les chez votre revendeur
ou consultez notre site internet pour l’adresse de nos points de ventes. Le
chauffage mobile à combustible liquide est un appareil de chauffage d’appoint à
functionnement intermittent.
Seul un combustible
approprié vous garantit
un usage sûr et durable
de votre appareil.
NOTE SPÉCIALE POUR LE ROYAUME-UNI : N’utilisez que du pétrole de classe C1
ou équivalent, en conformité avec la norme ‘BS2869- Part 2’.
Pour une utilisation convenable, l’utilisateur doit respecter les prescriptions
suivantes:
INTERDICTION
- d’utiliser de l’essence.
- d’utiliser le chauffage mobile à combustible liquide dans les caravans, les
bateaux et les cabines de véhicules.
- d’utiliser le chauffage mobile à combustible liquide dans les pieces
insuffisamment aérées (se reporter au volume minimal à chauffer dans le
tableau des caractéristiques) ou situées en dessous du niveau du sol et / ou
au-dessus de niveau plus haut que 1900 mètres.
- de toute intervention par l’utilisateur sur les dispositifs de sécurité du chauffage.
L’utilisation de ce type de chauffage dans les locaux recevant du public (ERP)
doit faire l’objet d’une démarche réglementée. Il est imperative de se renseigner
auparavant.
LE COMBUSTIBLE APPROPRIÉ
Votre appareil mobile de chauffage est conçu pour être utilisé avec un
combustible de haute qualité, pur et sans eau (TOYOTOMI combustible).
Seuls ces combustibles vous assurent une combustion propre et optimale. Un
combustible de moins bonne qualité peut se traduire par:
un risque accru de panes
une combustion imparfaite
une réduction de la durée de vie de l’appareil
un dégagement de fumée et/ou de mauvaise odeur
un dépôt sur la grille ou le manteau
Un combustible approprié est donc essentiel pour un usage sûr et durable de
votre appareil.
La garantie ne couvre pas les dommages et/ou pannes de l´appareil mobile
de chauffage causés par l’utilisation d’un combustible autre que celui qui est
recommandé.
Pour connaître le combustible le mieux adapté, consultez votre revendeur (www.
toyotomi.eu).
Vous trouverez ce
bouchon de transport
séparément dans le
carton. Pour transporter
l’appareil dans votre
véhicule, utilisez obliga-
toirement le bouchon
de transport. Il faut
donc bien le conserver!
+
28

MANUEL D’UTILISATION
A INSTALLATION DE L’APPAREIL
1
Retirez avec précaution votre appareil du carton et vérifiez-en le contenu.
En plus de l’appareil, vous devez disposer:
d’ une pompe à main
d’un bouchon de transport
du présent manuel d’utilisation
Conservez le carton et l’emballage (fig. A) à des fins d’entreposage et/ou de
transport.
2
Ouvrez le couvercle du réservoir amovible puis retirez la cale de carton.
3
Remplissez le réservoir amovible comme indiqué au chapitre B.
4
La surface du sol doit être plane. Déplacez l’appareil s’il n’est pas parfaitement
horizontal. N’essayez pas de corriger sa position en mettant en dessous des
livres ou un objet quelconque.
5
Branchez la fiche dans la prise de courant (230 volts CA - 50 Hz) et réglez
l’heure à l’aide des touches de réglage (voir le chapitre C).
6
Votre appareil est maintenant prêt à l’emploi.
REGLAGE D’ALTITUDE
1
Si l’appareil de chauffage est utilisé à une altitude de 800 m à 1300 m, utilisez
le mode d’altitude 1. Appuyez sur le bouton d’altitude avec une fine tige
comme un clip et branchez-le dans la prise simultanément. Ensuite, “1 ”
apparaît à l’écran.
A
B
2
Si le chauffage est utilisé à une hauteur de 1300 m à 1900 m, utilisez le mode
d’altitude 2. Après avoir réglé le mode d’altitude 1, appuyez sur le bouton
d’altitude avec une fine tige et branchez-le à nouveau simultanément.
Ensuite, “2
3
Désactivez le mode altitude en appuyant simultanément sur le bouton
d’altitude et sur la prise de courant après avoir réglé le mode d’altitude 2.
Ensuite, “0” apparaît à l’écran et “
REMARQUE: Lorsque le mode d’altitude 1 est défini, le repère d’altitude “
REMARQUE: En cas de panne de courant ou de déconnexion de l’appareil de
Ne pas utiliser l’appareil à une altitide supèrieure à 1900 mètres.
” sera affiché à l’écran.
” disparaît.
” est
allumé à l’écran. Lorsque le mode d’altitude 2 est réglé, le repère
d’altitude “
chauffage, le réglage de l’altitude restera.
” clignote pendant le fonctionnement.
!
CHANGER LE VOLUME
Cet appareil de chauffage peut changer le volume sonore de buzzer. Le réglage
initial est au niveau élevé.
Appuyez sur la touche SAVE et maintenez-la enfoncée pendant plus de 3
1
secondes, puis le volume sonore du buzzer passe de Elevé à Bas.
Appuyez à nouveau sur la touche SAVE et maintenez-la enfoncée pendant
2
plus de 3 secondes, puis le volume sonore du buzzer passe de Bas à Elevé.
REMARQUE : Le niveau de volume est uniquement Bas et Elevé, mais l’alarme
par le dispositif de sécurité retentit au niveau Elevé.
REMARQUE : Lorsque le chauffage a été débranché ou après une panne de
courant, le volume correspondra au réglage initial Elevé.
+
29

B REMPLISSAGE DU COMBUSTIBLE
Remplissez votre réservoir amovible dans un lieu approprié (au cas où vous
renverseriez du combustible). Procédez comme suit:
1
Assurez-vous que l’appareil est éteint.
2
Soulevez le couvercle, dégagez le réservoir amovible et retirez-le de l’appareil
(fig. B). Posez le réservoir amovible (côté bouchon vers le haut, côté poignée
par terre) puis dévissez le bouchon du réservoir (fig. C).
REMARQUE: Quelques gouttes de combustible peuvent encore s’écouler du
réservoir.
3
Prenez la pompe à main (voir manual d’utilisation de la pompe) et introduisez
le tuyau rigide dans le bidon. Veillez à ce que ce dernier soit plus haut que le
réservoir amovible (fig. D). Introduisez le tuyau flexible dans l’orifice du
réservoir amovible.
4
Lors du remplissage, observez attentivement la jauge du niveau de
combustible (fig. E). Si celle-ci est pleine, désamorcez la pompe. Ne
remplissez jamais trop le réservoir, surtout si le combustible est très froid
(en chauffant, le combustible se dilate).
5
Ne laissez pas le combustible encore présent dans la pompe, remettez-le
dans le bidon et retirez la pompe avec soin. Vissez le bouchon du réservoir
minutieusement sur le réservoir. Essuyez le combustible éventuellement
renversé.
6
Dans tous les cas, l’utilisateur doit verifier la bonne fermeture du reservoir
rechargé en dehors de toute source de chaleur ou de feux nus. Remettez le
réservoir amovible dans l’appareil (bouchon en bas). Refermez le couvercle.
Pensez à fermer votre bidon pour éviter des dépôts d’eau.
C REGLAGE DE L’HEURE
Introduisez la fiche dans la prise de courant (230 Volts CA/50Hz). La touche de
mise en route
d’abord sur la touche HOUR. Les 4 chiffres de l’écran commenceront à
clignoter. Appuyez ensuite sur le bouton (hour) jusqu’à obtenir l’heure actuelle.
Pour les minutes, appuyez sur la touche (min.). En appuyant une seule fois,
vous augmentez la valeur petit à petit. Si vous maintenez la touche enfoncée,
la valeur continue à augmenter jusqu’à ce que vous relâchiez la touche. Au
bout de 10 secondes environ, les 4 chiffres s’arrête de clignoter et le réglage
sera enregistré (fig. F). 5 Minutes après l’extinction de l’appareil, l’information
sur l’afficheur disparaîtra et l’appareil sera en position réserve (stand-by). Par
appuyer sur un bouton quelconque, l’heure sera visible.
doit être en position OFF. Pour effectuer le réglage, appuyez
C
D
E
vide plein
F: Quand les 4 chiffres
arrêtent à clignoter, les
valeurs insérées sont
mémorisées.
En cas de coupure de courant ou si la prise est débranchée, vous devez
procéder de nouveau au réglage.
!
D MISE EN ROUTE DE L’APPAREIL
Au début, un appareil à pétrole neuf dégage une certaine odeur. Prévoyez donc
une aération supplémentaire.
Allumez toujours l’appareil en vous servant de la touche
d’allumettes ou de briquet.
Une fois le réglage de l’heure effectuée, allumez l’appareil en appuyant tout
simplement sur la touche
indiquer que l’opération d’allumage est en cours. Cette opération dure
quelques instants. Lorsque l’appareil s’allume, le temoin reste rouge.
L’afficheur numérique affiche deux nombres. Le voyant température
s’allume (fig. G). La température actuelle s’affiche sous l’inscription ROOM. La
température désirée s’affiche sous l’inscription SET. Vous pouvez modifier cette
dernière en vous servant des touches de réglage (voir le chapitre E).
Avant d’allumer l’appareil, vérifiez qu’il reste suffisamment de combustible
dans le réservoir.
. Le temoin d’allumage se met à clignoter pour
. N’utilisez jamais
+
30

E REGLAGE DE LA TEMPERATURE DE VOTRE CHOIX
Vous pouvez modifier la température désirée lorsque l’appareil est allumé en
vous servant des touches de réglage .
sur la touche (min.). L’indication °C
température, appuyez sur la touche (hour). Après environ 10 secondes l’indication
°C arrêtera à clignoter et les valeurs insérées sont mémorisées (fig. G).
Vous pouvez régler la température sur 6°C minimum et 28°C maximum. En cas de
coupure de courant ou si la prise est débranchée :
- rebranchez l’appareil. Un message F-0 nous indique qu’il y a eu coupure de
courant; appuyez sur le bouton marche/arrêt
chapitre C), rallumez de nouveau l’appareil (voir chapitre D). La température
désirée passe à la valeur standard soit 20°C.
Pour augmenter la température, appuyez
commencera à clignoter. Pour diminuer la
, reprogrammez l’heure (voir
F PROGRAMMATION DE L’HEURE DESIREE (TIMER)
Le TIMER permet d’allumer automatiquement l’appareil à une heure désirée. Au
préalable, vous devez avoir programmé l’heure actuelle (voir chapitre C) ainsi
que votre température (voir chapitre E). L’appareil doit être éteint.
Procédez comme suit:
1
Appuyez sur la touche
TIMER et les 4 chiffres commenceront à clignoter.
2
Enregistrez l’heure à laquelle l’appareil doit s’allumer en vous servant des
touches de réglage . Appuyez ensuite sur la touche ( hour) pour
enregistrer l’heure et la touche (min.) pour les minutes (le réglage des
minutes s’effectue de 5 en 5 minutes).
3
Après environ 10 secondes les 4 chiffres afficheront de nouveau CLOCK et le
témoin TIMER s’allumera, indiquant que la fonction TIMER a été activée
(fig. H).
4
Le timer permet d’obtenir la température désirée à l’heure programmée.
L’appareil calcule lui-même à quel moment il doit se mettre en route pour
obtenir la température voulue (Fuzzy logics).
Si vous désirez éteindre l’appareil ou changer l’heure de démarrage, il vous
suffit simplement d’appuyer sur la touche TIMER (voir le chapitre G).
!
puis juste après sur la touche TIMER . Le témoin
G: A gauche la tempéra-
ture désirée, à droite la
température mesurée.
H: La lampe témoin
TIMER indique que
la fonction timer est
active.
Afin de désactiver la fonction du timer, appuyez une seule fois sur la touche
.
G EXTINCTION DE L’APPAREIL
Il y a deux manières d’éteindre l’appareil:
1
Appuyez sur la touche
la flamme s’éteint.
2
Si vous désirez éteindre l’appareil et faire en sorte qu’il s’allume la prochaine
fois automatiquement sous l’effet du timer, appuyez sur la touche TIMER .
Vous pouvez servant des touches de réglage (voir chapitre F).
. L’afficheur numérique se met en mode CLOCK et
H LE ROLE DE L’AFFICHEUR NUMERIQUE
L’afficheur numérique sert non seulement à afficher l’heure et la température
(consignées) (chapitres C, E et F) mais encore à signaler des pannes. Le code qui
apparaît sur l’afficheur vous indique ce qui se passe:
CODE INFORMATION ACTION
e - 0
f - 0 Panne de courant secteur. Rallumez l’appareil.
e - 1 Thermostat défectueux. Contactez votre revendeur.
f - 1 Thermistance du brûleur défectueuse. Contactez votre revendeur.
e - 2 Problèmes de mise en marche. Contactez votre revendeur.
e - 23
e - 5 Protection anti-renversement . Rallumez l’appareil.
e - 6 Mauvaise combustion. Contactez votre revendeur.
Surchauffe de l’appareil. Laissez refroidir, puis rallumez.
Attendez environ 30 secondes puis allumez de nouveau
Allumez de nouveau l’appareil juste
après qu’il se soit éteint.
l’appareil après avoir branché la prise de courant.
En cas de panne,
l’afficheur numérique
vous indique ce qui se
passe.
+
31

e - 7 Température ambiante Rallumez l’appareil
supérieure à 32˚C. si nécessaire.
e - 8 Moteur soufflant défectueux. Contactez votre revendeur.
e - 8 1 Fréquence anormale. Branchez la fiche dans la prise de courant de
nouveau.
Contactez votre revendeur.
e - 9 Filtre à air encrassé, ou Nettoyez le filtre.
Pompe à combustible encrassée. Contactez votre revendeur.
L’appareil de chauffage a fonctionné
sans interruption pendant 65 heures
et s’est éteint automatiquement. Rallumer l’appareil de chauffage.
+
-- : --
amovible.
+
-- : --
Contactez toujours votre revendeur en cas de panne non décrite ci-dessus et / ou
lorsque la panne se répète malgré les mesures décrites plus haut.
ARRÊT AUTOMATIQUE
Cet appareil est équipé d’un système de sécurité qui éteint l’appareil de chauffage
après 65 heures de fonctionnement sans interruption. L’écran affiche alors
l’information suivante:
l’appareil de chauffage en appuyant sur le bouton
chapitre D).
Combustible épuisé. Remplissez le réservoir
Manque d’aération. Aérer.
.
Si vous le souhaitez, vous pouvez rallumer
(MARCHE/ARR T) (voir
SYSTEME AUTONETTOYANT
Si l’appareil fonctionne en puissance maxi durant deux heures, le nettoyage de
la chambre de combustion s’effectue automatiquement. L’afficheur numérique
va passer progressivement de cl:05 à cl:01. Durant ces 5 minutes de nettoyage
automatique, l’appareil sera en position mini. L’opération de nettoyage effectuée,
l’appareil mobile de chauffage à combustible liquide reprendra sa position
initiale.
I VERROUILLAGE DE SECURITE ENFANTS
Vous pouvez utiliser le verrouillage de sécurite enfants pour éviter toute
modification accidentelle des réglages de l’appareil. La seule touche qui n’est pas
verrouillée par le bouton sécurité enfants est le bouton de mise en marche. Si
l’appareil est éteint et que le bouton verrouillage est activé, l’appareil ne peut pas
s’allumer. Activez le verrouillage de sécurité en appuyant la touche KEY LOCK
pendant plus de 3 secondes. L’indication KEY-LOCK
I), indiquant que la sécurité enfants a été activée. Pour désactiver le verrouillage
de sécurité enfants, appuyez encore une fois pendant plus de 3 secondes sur la
touche KEY-LOCK
.
apparaîtra sur l’écran (fig.
J L’UTILISATION DE LA TOUCHE ÉCONOMIQUE ’SAVE’
La fonction ’SAVE’ vous permet de limiter la température. Si cette fonction est
active, l’appareil s’éteindra automatiquement si la température ambiante (ROOM)
dépasse de 3˚C la température désirée (SET). Si la température ambiante est en
dessous ou égale à la température désirée, l’appareil se rallumera automatiquement.
Pour activer la fonction ’SAVE’, appuyez sur la touche correspondante
lampe témoin SAVE s’allume (fig. J). Pour désactiver cette fonction, appuyez de
nouveau sur la touche SAVE.
Même sans la fonction ’SAVE’, votre appareil veille à ce que la température
désirée soit approximativement maintenue en adaptant sa capacité de chauffage.
’SAVE’ est une position économique que vous employez lorsque, par exemple,
!
vous n’êtes pas présent dans la pièce ou pour maintenir la température de la
pièce en position “Hors gel”.
. La
I: Quand l’indication
apparaît sur l’écran,
la sécurité enfants a été
activée.
J: Si la lampe témoin
SAVE s’allume, l’appareil
s’allume et s’éteint
automatique ment afin
de rester dans les limites
d’une certaine plage de
températures.
+
32

K L’INDICATEUR ‘FUEL’
Après que l’indication FUEL est apparue, vous disposez encore de 10 minutes
de combustible. Un compte à rebours s’effectue sur l’afficheur numérique (fig.
K). Vous entendez un signal d’alarme toutes les 2 minutes, vous indiquant que
vous devez faire le plein de combustible. Vous avez le choix entre 2 posibilités:
Vous intervenez en remplissant le réservoir amovible, l’appareil reprend son
fonctionnement normal (chapitre B).
V
ous appuyer sur le bouton ’extension’ J, alors vous disposez de 60 minutes
de
combustible. L’appareil se met en mode réduit.
Un compte à rebours s’effectue
10 minutes de combustible, vous entendez le signal d’alarme toutes les 2 minutes.
Si vous n’intervenez pas, l’appareil s’éteint de lui-même. L’indicateur ’FUEL’ se
met alors à clignoter et l’afficheur numérique affiche quatre tirets (
pouvez faire cesser cela en appuyant une nouvelle fois sur le
Si l’appareil a entièrement épuisé son combustible, une fois le plein effectué,
vous devez attendre que le voyant ’FUEL’ s’éteigne avant de rallumer l’appareil.
sur l’afficheur numérique. Lorsqu’il ne reste que
--:--
). Vous
bouton .
L L’INDICATION VENT
Quand l’indication VENT commence à clignoter, la pièce n’est pas suffisamment
ventilée (fig. L). L’appareil s’éteindra automatiquement. Si cette indication continue
à clignoter après ventilation, veuillez contacter votre revendeur.
K: Après que l’indication
FUEL est apparue, l’écran
affichera les minutes qui
vous restent avant que le
réservoir soit vide.
M ENTRETIEN
Avant d’effectuer l’entretien de votre appareil, vous devez éteindre celui-ci et le
laisser refroidir. Votre appareil exige peu d’entretien. Mais vous devez nettoyer
chaque semaine le cache du ventilateur à l’aide d’un aspirateur, et la grille à
l’aide d’un chiffon.
Vérifiez aussi régulièrement le filtre à combustible:
1
Enlevez le réservoir amovible hors de l’appareil puis retirez le filtre à
combustible (fig. M). Ayez un chiffon à portée de main pour essuyer le
combustible restant.
2
Retirez le filtre à combustible et nettoyez-le avec du combustible ou à l’aide
d’une soufflette. (Ne nettoyez jamais à l’eau!)
3
Remettez le filtre à combustible en place dans l’appareil.
Nous vous conseillons de nettoyer de temps en temps la poussière et les taches
au moyen d’un chiffon sec. A défaut de quoi, des taches tenaces peuvent se
former.
Les réparations, le remplacement des pièces importantes et le travail sur les
éléments de sécurité ne doivent être exécutés que par des spécialistes agrées
(et reconnus par le fabricant ou l’importateur). Avant de procéder à son
entretien, laissez l’appareil refroidir.
!
Si le câble d’alimentation de cet appareil est endommagé, son remplacement
(type H05 VV-F) doit être realise par le fabricant, ou par un atelier de reparation
reconnu par l’importeur, afin d’éviter un danger.
L: Quand l’indication
VENT clignote, il est
nécessaire de ventiler la
pièce.
Filtre à
combustible
M
N ENTREPOSAGE (FIN DE LA SAISON)
En fin de saison, rangez l’appareil dans un lieu sans poussière, si possible en
utilisant l’emballage d’origine. Vous ne pourrez pas conserver le combustible
restant pour la saison suivante. Allumez l’appareil et laissez-le consommer
entièrement son combustible. Ne jetez pas le combustible n’importe où. Observez
les règles en vigueur dans votre commune concernant les déchets chimiques.
tout cas, commencez la nouvelle saison avec du combustible neuf. Lorsque vous
réfaisez usage de votre appareil suivez les instructions de nouveau (dès chapitre A).
En
+
33

O TRANSPORT
Afin d’éviter les fuites de combustible durant le transport de l’appareil, vous
devez prendre les précautions suivantes:
1
Laissez l’appareil refroidir.
2
Retirez le réservoir amovible de l’appareil et retirez le filtre à combustible
(voir le chapitre M, fig. M). Ce dernier peu goutter un peu; gardez un chiffon
portée de main. Conservez le filtre et le réservoir amovible indépendamment
de l’appareil.
3
Mettez le bouchon de transport à la place du filtre à combustible (fig. N) et
enfoncez-le bien. Le bouchon de transport permet d’éviter autant que possible
les fuites de combustible, pendant le transport du poêle.
4
Transportez l’appareil toujours en position verticale.
5
Avant de transporter le poêle, ou si vous y avez versé accidentellement le
mauvais combustible, videz le réservoir fixe à l’aide d’une pompe à
combustible. Retirez d’abord le filtre à combustible avant d’insérer la pompe.
Faites de même si le réservoir à combustible contient de l’eau.
à
P SPÉCIFICATIONS TECHNIQUES
Allumage électrique
Combustible Combustible liquide pour appareils mo-
biles de chauffage (Arrêté du 18/07/2002
et du 25/06/2010)
Puissance nominale moyenne 167 g/h 2000 Watt
Puissance calorifique max. 267 g/h 3200 Watt
Puissance calorifique min. 67 g/h 800 Watt
Conseiller pour des pièces normalement
airées
minimum m3 **
Ne convient pas pour des pieces
de volume inférieur à 48 m
Consommation de combustible* (l/heure) min. 0,083 max.
Consommation de combustible* (g/heure) min. 67 max.
Autonomie du réservoir (heures)
Contenance du réservoir amovible (litres) 5,4
Poids (kg) 8,0
Dimensions (mm) largeur 376
(plateau inférieur compris) profondeur 296
hauteur 438
Accessoires pompe à main
bouchon de transport
Tension secteur 230 V - CA 50 Hz
Consommation électrique allumage 320 W
continu 13 W
Niveau sonore min. 18 dB
Valeur nominale de fusible 250V, 5A
* En cas de réglage en position maximale
** Ces valeurs sont données à titre indictif
minimum 48 maximum 120
3
/ 20 m
min. 16,2 max. 65,0
2
0,333
258
max. 35 dB
N
Bouchon de
transport
Le marquage CE correspond a la conformite aux normes EN 60335-1 (2012)
et EN 60335-2-30 (2009)
+
34

Q CONDITIONS DE GARANTIE
Votre appareil est couvert par une garantie de 4 ans à compter de la date d’achat.
Durant cette période, tous les vices de fabrication ou de conception seront réparés
gratuitement. De plus, les règles suivantes s’appliquent :
1
Nous rejetons expressément toute autre demande d’indemnisation, y compris
en cas de préjudice indirect.
2
La réparation ou le changement de pièces effectués dans la période de garantie
n’entraîne pas la reconduction de la garantie.
3
La garantie ne s’applique pas dans les cas suivants: modifications apportées
au l’appareil, usage de pièces non d’origine, réparations de l’appareil
effectuées par des tiers.
4
Les pièces sujettes à l’usure normale, comme le tamis, tout type de joint ou la
pompe à main, ne sont pas couvertes par la garantie.
5
La garantie s’applique uniquement si vous présentez le bon d’achat d’origine,
daté et ne portant pas de modifications.
6
La garantie ne s’applique pas en cas de dommage occasionné par des
manipulations non conformes au manuel d’utilisation, par une négligence ou
par l’usage de combustible non approprié ou usagé. Un combustible non
approprié peut même être dangereux*.
7
Les frais d’expédition et les risques liés à l’envoi de l’appareil ou de ses pièces
sont toujours à la charge de l’acheteur.
En cas de problème, consultez le manuel d’utilisation. Si le problème persiste,
consultez votre revendeur.
* Les matières hautement inflammables, par exemple, peuvent produire une combustion incontrôlable avec,
pour conséquence, un jaillissement des flammes. Dans ce cas, ne déplacez pas l’appareil mais éteignez-le
immédiatement. En cas d’urgence, vous pouvez utiliser un extincteur mais uniquement du type B: extincteur à
acide carbonique ou à poudre.
+
35

R FICHE PRODUIT
(a)
Le nom du fournisseur / Marque commerciale
(b) Modèle LC-DX32
(c) La classe d'effi cacité énergétique A
(d) La puissance thermique directe 3.2kW
(e) La puissance thermique indirecte N/A
(f) L'indice d'effi cacité énergétique 95.0%
(g) Le rendement utile 100%
(h) Les éventuelles précautions parti-
culières
TOYOTOMI Europe Sales B.V.
Merci de vous référer au manuel
d’utilisation pour tout ce qui concerne les instructions d’assemblage,
d’installation ou d’entretien.
S ÉLÉMENTS IMPORTANTS
Façade
Grille
Plateau inférieur
Couvercle du réservoir
amovible
Panneau
de réglage
Réservoir amovible
Jauge de combustible
du réservoir amovible
Cache du ventilateur
Sonde de température
Cordon d’alimen tation
électrique
Afficheur numérique
Touche
Verrouillage sécurité
enfants
Touche de réglage
(heure et température)
Réglage de l’heure
d’allumage désirée
“Timer”
Touche ECONOMIQUE
+
36
J
Poignée
Témoin timer
Bouton de règlage
d’altitude
Touche EXTENSION

+
37

Wij danken u voor de koop van dit “TOYOTOMI” product!
Toyotomi producten worden gebruikt door tevreden klanten wereldwijd.
Om een aangenaam en veilig gebruik van onze producten door klanten in
elk land te waarborgen, voldoen onze producten niet alleen aan de Japanse
veiligheidsnormen, maar ook aan de veiligheidsnormen van elk land ter
wereld waarin wij actief zijn.
Toyotomi stemt haar producten af op de behoeften van haar klanten en
blijft haar klanten tevreden stellen door het nastreven van haar bedrijfs-
filosofie, “het delen van vreugde in het dagelijks leven”. We zullen blijven
doorgaan met het onderzoeken, ontwikkelen en produceren van producten die
overeenkomen met een levensstijl voor efficiëntie, veiligheid en comfort.
Wij hopen dat u vele jaren van uw Toyotomi product zult genieten!
Voordat u uw nieuwe kachel in gebruik neemt, vragen wij u deze
gebruiksaanwijzing zorgvuldig door te nemen, zodat u gegarandeerd bent van
een maximale levensduur van uw kachel.
Maak ook kennis met onze andere producten.
Bezoek ons op www.toyotomi.eu voor onze volledige productenlijn.
1 LEES EERST DE GEBRUIKSAANWIJZING.
2 BIJ TWIJFEL, NEEM CONTACT OP MET UW DEALER.
3 VOORDAT U BEGINT TE LEZEN, RAADPLEEG DE LIJST MET BELANGRIJKSTE ONDERDELEN OP DE LAATSTE
PAGINA.
1
38

HET GEBRUIK IN HOOFDLIJNEN
Dit zijn in grote lijnen de stappen die u moet nemen om uw kachel te gebruiken.
Voor de precieze handelingen verwijzen wij u naar de HANDLEIDING.
Verwijder alle verpakkingsmaterialen (zie hoofdstuk A, fig. A).
1
Vul de wisseltank (zie hoofdstuk B, fig. C).
2
Steek de stekker in het stopcontact.
3
Ontsteek de kachel met behulp van de
4
(zie hoofdstuk D).
Verander zonodig de gewenste temperatuur met behulp van
5
de insteltoetsen (zie hoofdstuk E).
Schakel de kachel uit door op de
6
-toets
-toets te drukken.
• Als brandbeveiliging moet de tank gevuld worden wanneer de kachel
uitstaat óf in een andere ruimte dan waar de kachel geïnstalleerd is.
• Zorg er voor dat de tank op de juiste wijze gesloten is na het vullen op
een veilige afstand van warmtebronnen en open vuur (zie hoofdstuk B).
• De eerste keer zal uw kachel tijdens het branden even naar ‘nieuw’
ruiken.
• Bewaar uw brandstof in de originele verpakking en met de originele
sluiting op een koele en donkere plaats.
• Brandstof veroudert. Begin elk stookseizoen met nieuwe brandstof.
• Gebruik alleen een hoge kwaliteits- en watervrije, zuivere paraffine over
eenkomstig de lokale wetgeving (TOYOTOMI brandstof).
• Indien u overgaat op een ander merk en/of soort brandstof, moet u de in
de kachel aanwezige brandstof eerst helemaal laten leegbranden.
1
39

WAT U VOORAF MOET WETEN
ALTIJD VOLDOENDE VENTILEREN
Lees deze gebruikershandleiding aandachtig alvorens het toestel te gebruiken
en bewaar het voor later. Installeer dit toestel enkel wanneer het voldoet aan de
lokale/nationale wetgeving, regelgeving en normen. Dit product is bedoeld om
gebruikt te worden als een kachel in woningen en is alleen geschikt voor gebruik
binnenshuis in woonkamers, keukens en garages op droge plaatsen, in normale
huishoudelijke omstandigheden.
Voor comfortabel en veilig gebruik dient u voor voldoende ventilatie te zorgen.
NB: Om onverwacht uitschakelen van de kachel te voorkomen raden we aan altijd
een deur of raam op een kier te zetten wanneer de kachel in gebruik is.
Jedes Modell benötigt eine bestimmte minimale Raumgröße, um den Heizofen
sicher, ohne zusätzliche Belüftung, betreiben zu können (siehe Kapitel P). Wenn
der betreffende Raum kleiner als der angegebene Minimumwert ist, dann muß
dafür gesorgt werden, daß immer ein Fenster oder eine Tür einen Spalt breit offen
bleibt (ca. 2,5 cm). Es ist wichtig, dass jeder Raum, in dem der Heizofen benutzt
wird, ausreichend belüftet und gut entlüftet wird (beide Öffnungen müssen einen
Querschnitt von mindestens 50 cm
We adviseren dit ook te doen in goed geïsoleerde of tochtvrije ruimtes en/of op
grote hoogte. Benutzen Sie den Heizofen nicht in Keller- oder anderen unterirdisch
gelegenen Räumen.
Änderungen am Sicherheitssystem sind unzulässig und würden die Garantie
einer einwandfreien Funktion des Luftfühlers nichtig machen. Wenden Sie sich im
Zweifelsfall an Ihren Händler.
SPECIAAL VOOR FRANKRIJK: uw kachel is voor het gebruik van watervrije en
zuivere petroleum van hoge kwaliteit ontworpen (conform de bepalingen van
18-07-2002 en 25-06-2010). Het gebruik van andere brandstoffen is verboden.
Vraag uw dealer of bekijk de website voor de adressen van onze retailers.
De petroleumkachel is bedoeld als een bijverwarming, en niet als een continue
verwarmingsbron.
2
haben).
Alleen met de juiste
brandstof bent u
verzekerd van een
veilig, efficiënt en
comfortabel gebruik
van uw kachel.
SPECIAAL VOOR GROOT-BRITTANNIË: Gebruik alleen Klasse C1 paraffine
brandstof in overeenstemming met BS2869, deel 2 of gelijkwaardig.
Voor een juist gebruik moet de gebruiker gevolg geven aan de volgende regels:
HET IS VERBODEN
- gebruik benzine.
- mobiele kachels werkend op brandstof in caravans, boten en woonwagens te
gebruiken.
- mobiele kachels werkend op brandstof te gebruiken in onvoldoende
geventileerde ruimtes (raadpleeg de tabel met technische specificaties voor
de minimale afmetingen van de te verwarmen ruimte), kelders en / of op een
hoogte van 1900 meter of meer.
- wijzigingen aan te brengen aan de veiligheidsonderdelen van de kachel.
Het gebruik van dit type kachel in publieke ruimtes is onderhevig aan wetgeving.
Zorg vantevoren voor de juiste informatie.
DE JUISTE BRANDSTOF
Uw kachel is ontworpen voor het gebruik van watervrije, zuivere kerosine van hoge
kwaliteit (TOYOTOMI brandstof). Alleen deze zorgt voor een schone en optimale
verbranding. Brandstof van mindere kwaliteit kan leiden tot:
verhoogde kans op storingen
onvolledige verbranding
beperkte levensduur van de kachel
rook en/of stank
aanslag op rooster of mantel
De juiste brandstof is dus essentieel voor een veilig, efficiënt en comfortabel
gebruik van uw kachel.
Schade en / of storingen aan de kachel als gevolg van het gebruik van anders dan
hoogwaardige watervrije paraffine olie valt niet onder de garantie.
Overleg altijd met de dichtstbijzijnde dealer over de juiste brandstof voor uw
kachel (www.toyotomi.eu).
Deze transportdop
vindt u los in de doos.
Alleen hiermee kunt u
de kachel na gebruik
probleemloos
vervoeren. Goed
bewaren dus!
1
40

HANDLEIDING
A HET INSTALLEREN VAN DE KACHEL
1
Haal uw kachel voorzichtig uit de doos en controleer de inhoud. Naast de
kachel moet u ook beschikken over:
een brandstofhevelpompje
een transportdop
deze gebruiksaanwijzing
Bewaar de doos en het verpakkingsmateriaal (fig. A) voor opslag en/of
transport.
2
Open het deksel van de wisseltank en verwijder het stukje karton.
3
Vul de wisseltank zoals aangegeven in hoofdstuk B.
4
De vloer moet stevig en waterpas zijn. Verplaats de kachel als deze niet
waterpas staat. Probeer dit niet te corrigeren door er boeken of iets anders
onder te leggen.
5
Steek de stekker in het stopcontact (230 Volt - AC/50 Hz) en stel de
juiste tijd in met behulp van de insteltoetsen (zie hoofdstuk C).
6
Uw kachel is nu gebruiksklaar.
A
B
INSTELLEN HOOGTE
1
Indien de kachel op een hoogte van 800 m tot 1300 m wordt gebruikt, stel
dan de hoogte in op modus 1. Druk op de hoogteknop met smal ijzerdraad
(bijv. een clipje) en stop tegelijkertijd de stekker in het stopcontact. Vervolgens
verschijnt “1
2
Indien de kachel op een hoogte van 1300 m tot 1900 m wordt gebruikt, stel
dan de hoogte in op modus 2. Nadat de hoogte is ingesteld op modus 1,
drukt u op de hoogteknop met smal ijzerdraad en tegelijkertijd in de outlet.
Vervolgens verschijnt “2
3
Schakel de hoogtemodus uit door op de hoogteknop te drukken en
tegelijkertijd de stekker in het stopcontact te steken nadat hoogtemodus 2 is
ingesteld. Vervolgens verschijnt “0” op het display en “
NB: Wanneer de hoogtemodus is ingesteld op 1, is de hoogtemarkering “
het display verlicht. Wanneer de hoogtemodus is ingesteld op 2, knippert de
hoogtemarkering “
NB: In geval van een stroomstoring of wanneer de kachel is uitgeschakeld, blijft
de hoogte-instelling behouden.
De kachel niet gebruiken boven een hoogte VAN 1900 meter.
” op het display.
” op het display.
“ verdwijnt.
” op
” op het display.
!
VOLUME AANPASSEN
Deze kachel is voorzien van een volumeschakelaar voor de zoemer. De
standaardinstelling is niveau High.
Druk op de SAVE-knop en houd deze 3 seconden ingedrukt. Nu is het
1
volume gewijzigd van High in Low.
Druk op de SAVE-knop en houd deze opnieuw 3 seconden ingedrukt. Nu is
2
het volume gewijzigd van Low in High.
NB: Het volumeniveau is Low of High, maar het alarm dat het veiligheidssysteem
geeft, staat op High.
NB: Het volume staat terug op de standaardinstelling wanneer de kachel
uitgeschakeld is geweest of na een stroomstoring.
1
41

B VULLEN MET BRANDSTOF
Vul de wisseltank op een geschikte plaats (er kan altijd een beetje gemorst
worden). U gaat daarbij als volgt te werk:
1
Zorg dat de kachel uit is.
2
Open het deksel en til de wisseltank uit de kachel (fig. B). Zet de wisseltank
neer (dop naar boven, handvat naar beneden) en schroef de tankdop eraf
(fig. C).
NB: De tank kan even nadruppelen.
3
Vul de uitneembare tank met behulp van een brandstofpomp (bekijk de
instructies van de brandstofpomp). Zorg dat deze hoger staat dan de wisseltank (fig. D). De geribbelde slang steekt u in de opening van de wisseltank.
4
Let tijdens het vullen op de brandstofmeter van de wisseltank (fig. E). Als u
ziet dat deze vol is, stop dan met vullen. Maak de tank nooit te vol. Vooral
niet als de brandstof erg koud is (brandstof zet uit als deze warmer wordt).
5
Laat de brandstof die nog aanwezig is in het pompje, terugstromen in de
jerrycan en verwijder het pompje voorzichtig. Schroef de tankdop nauwkeurig
op de tank. Veeg eventueel gemorste brandstof weg.
6
Controleer of de tankdop recht zit en goed is aangedraaid. Plaats de
wisseltank weer in de kachel (dop naar beneden). Sluit het deksel.
C
D
E
C HET GOED ZETTEN VAN DE KLOK
De juiste tijd kunt u alleen instellen als de kachel niet brandt, maar de stekker
wel in het stopcontact zit. U gebruikt hiervoor de insteltoetsen . Druk eerst op
één van beide toetsen om deze functie in te schakelen (de 4 cijfers gaan dan
knipperen). Vervolgens kunt u de uren instellen met de linkertoets (hour) en
de minuten met de rechtertoets (min.). Door éénmaal te drukken, verhoogt u
de waarde stap voor stap. Wanneer u de toets ingedrukt houdt, loopt de waarde
op tot u de toets loslaat. Na ongeveer 10 seconden stoppen de 4 cijfers met
knipperen en staat de instelling vast (fig. F). Vijf minuten na het uitschakelen van
de kachel, verdwijnt de informatie op het display en komt de kachel in de standby stand. Door op een willekeurige toets te drukken, wordt de tijd weer zichtbaar.
Als de stekker uit het stopcontact is geweest (of de stroom is uitgevallen), moet
u de tijd opnieuw instellen.
!
D HET AANMAKEN VAN DE KACHEL
Een nieuwe kachel veroorzaakt in het begin extra geur. Zorg dus voor extra
ventilatie.
Maak de kachel altijd aan met behulp van de
of een aansteker.
Om de kachel te ontsteken, hoeft u alleen de
POWER-lampje gaat dan knipperen, ten teken dat de ontstekingsprocedure in
werking is. Dit duurt even. Als de kachel eenmaal brandt, blijft het POWER-lampje
rood. Het informatiedisplay toont twee getallen. Aan het lampje ernaast kunt u
zien dat deze betrekking hebben op de temperatuur (fig. G). Onder ROOM staat
de huidige temperatuur, terwijl onder SET de ingestelde temperatuur wordt
vermeld. Deze laatste kunt u veranderen met behulp van de insteltoetsen (zie
hoofdstuk E).
Kijk vóór het aanmaken van de kachel altijd even of er nog voldoende brandstof
in de wisseltank zit.
1
-toets . Gebruik nooit lucifers
-toets in te drukken. Het
leeg vol
F: Als de 4 cijfers niet
meer knipperen, staat
de tijd vast ingesteld.
G: Links de gewenste
temperatuur, rechts de
gemeten temperatuur.
42

E HET INSTELLEN VAN DE GEWENSTE TEMPERATUUR
U kunt de ingestelde temperatuur alleen veranderen als de kachel aan is. U
gebruikt hiervoor de insteltoetsen . Druk eerst op één van beide toetsen om deze
functie in te schakelen (het °C teken gaat dan knipperen).
gewenste temperatuur verhogen door op de rechtertoets (min.) te drukken of
verlagen met de linkertoets (hour). Na ongeveer 10 seconden stopt het lampje
en met knipperen en staat de instelling vast (fig. G).
U kunt de temperatuur instellen op minimaal 6°C en maximaal 28°C. Als de
stekker uit het stopcontact is geweest (of de stroom is uitgevallen), springt de
ingestelde temperatuur weer op de standaardwaarde van 20°C.
Vervolgens kunt u de
F HET BENUTTEN VAN DE TIMER
Met behulp van de timer kunt u de kachel automatisch laten aanslaan, op een
vooraf ingestelde tijd. Om de timer te kunnen instellen moet de juiste tijd zijn
ingesteld (zie hoofdstuk C) en moet de kachel uit zijn. U gaat als volgt te werk:
1
Druk op de
Het TIMER-lampje en de 4 cijfers gaan nu knipperen.
2
Stel de tijd in waarop de kachel moet aanslaan, met behulp van de
insteltoetsen . De linkertoets (hour) is voor de uren, de rechtertoets
(min.) voor de minuten (verspringt per 5 minuten).
3
Na ongeveer 10 seconden springen de 4 cijfers weer op CLOCK en gaat
het TIMER-lampje branden, ten teken dat de timerfunctie is ingeschakeld
(fig. H).
4
De timer zorgt ervoor dat de ruimte op de ingestelde tijd bij benadering op
de gewenste temperatuur is.
Als u de kachel wilt uitzetten en met de timer wilt laten aanslaan, hoeft u alleen
maar de toets TIMER in te drukken (zie hoofdstuk G).
!
Om de timerinstelling ongedaan te maken, drukt u éénmaal op de
-toets en meteen daarna op de toets TIMER .
-toets .
G HET UITZETTEN VAN DE KACHEL
U hebt twee mogelijkheden om de kachel uit te zetten:
1
Druk de
ongeveer een minuut is de kachel uit.
-toets in. Het informatiedisplay springt dan op CLOCK en binnen
H: Het controlelampje
TIMER geeft aan dat de
timerfunctie is
ingeschakeld.
2
Wanneer u de kachel wilt uitzetten en de volgende keer met de timer wilt
laten aanslaan, drukt u op de toets TIMER . Dan slaat niet alleen de kachel
af, maar wordt tegelijk de timerfunctie ingeschakeld. U kunt de gewenste tijd
veranderen met de insteltoetsen (zie hoofdstuk F).
H WAT HET INFORMATIEDISPLAY U VERTELT
Het informatiedisplay is niet alleen bedoeld om u de (ingestelde) tijd en
temperatuur te tonen (hoofdstuk C, E en F), maar ook voor het melden van
storingen. De code in het informatiedisplay vertelt u dan wat er aan de hand is:
CODE INFORMATIE ACTIE
e - 0 Te hoge temperatuur in de kachel.
f - 0 Netspanning onderbroken. Kachel opnieuw aanmaken.
e - 1 Thermostaat defect. Dealer informeren.
f - 1 Brander-thermister defect. Dealer informeren.
e - 2 Startproblemen. Dealer informeren.
e - 23
Ontsteek de kachel direct
opnieuw nadat deze is gedoofd.
Afkoelen en opnieuw aanmaken.
Wacht ca. 30 seconden en ontsteek de kachel opnieuw
nadat u de stekker in het stopcontact hebt gedaan.
Bij storingen ziet u in
het informatiedisplay
wat er aan de hand is.
1
43

e - 5 Omvalbeveiliging. Kachel opnieuw aanmaken.
e - 6 Slechte verbranding. Dealer informeren.
e - 7 Kamertemperatuur Indien nodig kachel
hoger dan 32°C. opnieuw aanmaken.
e - 8 Aanjagermotor defect. Dealer informeren.
e - 8 1 Abnormale frequentie. Steek de opnieuw stekker in het stopcontact.
Dealer informeren.
e - 9 Luchtfilter vervuild óf Filter reinigen.
Brandstofpomp vervuild. Dealer informeren.
De kachel heeft 65 uur onaf gebroken gebrand en is
automatisch afgeslagen. Kachel opnieuw aanmaken.
+
-- : --
-- : --
Bij storingen waarin deze tabel niet voorziet, en / of wanneer het probleem zich
voor blijft doen na het opvolgen van bovenstaande adviezen, dient u altijd uw
dealer te raadplegen
Brandstof op. Wisseltank vullen.
+
Te weinig ventilatie. Beter ventileren.
.
AUTOMATISCHE UITSCHAKELING
Deze kachel is uitgerust met een veiligheidssysteem dat er voor zorgt dat
de kachel na 65 uur onafgebroken automatisch afslaat. Het display geeft dan het
volgende aan:
-toets L te drukken (zie hoofdstuk D).
de
Indien u dit wenst kunt u de kachel weer aanzetten door op
.
AUTOMATISCHE REINIGINGSFUNCTIE
Indien de kachel twee uur continu op zijn hoogste stand brandt, zal de brander
zichzelf automatisch reinigen. Dit wordt aangegeven in het display met de code
cl:05, teruglopend naar cl:01. Gedurende deze 5 minuten brandt de kachel op zijn
laagste stand, waardoor de brander zichzelf reinigt. Hierna schakelt hij automatisch weer naar de hoogste stand.
I HET KINDERSLOT
Het kinderslot kunt u gebruiken om te voorkomen dat een kind per ongeluk de instellingen van de kachel verandert. Tijdens het branden kan de kachel dan enkel nog
worden uitgeschakeld. Als de kachel al uit is, voorkomt het kinderslot ook dat de
kachel per ongeluk wordt aangemaakt. U activeert het kinderslot door de betreffen-
de toets M langer dan 3 seconden ingedrukt te houden. Het controlelampje KEYLOCK
ingeschakeld. Om het kinderslot uit te schakelen drukt u nogmaals langer dan 3
seconden op de toets KEY-LOCK M.
verschijnt op het informatiedisplay (fig I), ten teken dat het kinderslot is
I: Als het
verschijnt op het
display, is het kinderslot
ingeschakeld.
teken
J HET JUISTE GEBRUIK VAN ‘SAVE’
Met de functie ‘SAVE’ kunt u de temperatuur begrenzen. Als deze functie is
in geschakeld, zal de kachel automatisch afslaan indien de kamertemperatuur 3°C
boven de ingestelde temperatuur komt. Als de kamertemperatuur vervolgens weer
op de ingestelde temperatuur komt, zal de kachel automatisch weer aanslaan.
U activeert de instelling ‘SAVE’ door de betreffende toets in te drukken. Het
controlelampje SAVE licht dan op (fig. J). Door nog eens op de toets SAVE te
drukken, schakelt u deze functie weer uit.
1
44
J: Als het lampje SAVE
oplicht, slaat de kachel
automatisch aan en uit,
om binnen een bepaald
temperatuurbereik te
blijven.

Ook zonder de instelling ‘SAVE’ zorgt uw kachel ervoor dat de ingestelde temperatuur bij benadering wordt gehandhaafd, door zijn verwarmingscapaciteit aan
te passen. ’SAVE’ is een spaarstand die u bijvoorbeeld gebruikt wanneer u niet in
!
de ruimte aanwezig bent, of om deze vorstvrij te houden.
K DE ‘FUEL’ INDICATOR
Als de FUEL indicator verschijnt, heeft u nog voor 10 minuten brandstof. Deze
resterende tijd ziet u verstrijken in het informatiedisplay (fig. K). Er staan u nu
twee mogelijkheden ter beschikking:
u verwijdert de wisseltank uit de kachel en vult deze, buiten de woonruimte,
met nieuwe brandstof (zie hoofdstuk B)
Druk op de EXTENSION knop J. Door op deze knop te drukken, zal de brandduur
van de kachel worden verhoogd tot 60 minuten. De kachel gaat in de laagste stand
branden. In het display zal het getal 60 verschijnen en teruglopen tot 10. Bij het
bereiken van het getal 10, volgt om de twee minuten een waarschuwingssignaal,
ten teken dat u de wisseltank moet bijvullen. Reageert u niet, dan gaat de kachel
vanzelf uit. Ook dan klinkt een waarschuwingssignaal. De FUEL indicator knippert
nu en in het informatiedisplay knipperen vier streepjes (--:--) U kunt dit stoppen
door éénmaal op de
Als de kachel helemaal leeggebrand is geweest, moet u na het bijvullen even
geduld hebben voordat de kachel weer gebruiksklaar is.
-toets te drukken.
K: Als ‘FUEL’ indicatie
brandt, ziet u in het
informatiedisplay voor
hoeveel minuten u nog
brandstof hebt.
L DE ‘VENT’ INDICATIE
De ‘VENT’ indicatie begint te knipperen, is dat een teken dat de ruimte
onvoldoende wordt geventileerd (fig. L). De kachel zal vanzelf uitgaan. Blijft de
‘VENT’ indicatie nog knipperen nadat u extra hebt geventileerd, raadpleeg dan
uw dealer.
M ONDERHOUD
Voordat u onderhoud pleegt, dient u de kachel uit te zetten en te laten afkoelen.
Trek vervolgens de stekker uit het stopcontact.
Uw kachel vergt weinig onderhoud. Wel dient u elke week even de ventilatorfilter
te reinigen met een stofzuiger. Het rooster reinigt u met een vochtige doek.
Controleer ook met enige regelmaat het brandstofzeefje:
1
Haal de wisseltank uit de kachel en verwijder het brandstofzeefje (fig. M).
Dit kan wat nadruppelen; houd een doekje bij de hand.
2
Klop het brandstofzeefje omgekeerd leeg op een harde ondergrond, om het
vuil te verwijderen. (Nooit reinigen met water!)
L: Als de ‘VENT’ indica-
tie knippert, is dat een
teken dat u extra moet
ventileren.
Brandstofzeefje
M
3
Plaats het brandstofzeefje weer in de kachel.
We raden u verder aan om stof en vlekken bijtijds af te nemen met een vochtige
doek, omdat er anders hardnekkige vlekken kunnen ontstaan.
1
45

Verwijder zelf geen onderdelen van de kachel. Neem voor een eventuele
reparatie altijd contact op met uw dealer. Indien het elektriciteitssnoer
beschadigd is, mag alleen een erkend installateur dit vervangen door het type
!
H05 VV-F.
N OPSLAG (EINDE STOOKSEIZOEN)
Wij raden u aan de kachel aan het einde van het stookseizoen helemaal leeg te
branden. Berg de kachel aan het einde van het stookseizoen stofvrij op, zo mogelijk
met gebruik van de originele verpakkingsmaterialen.
Overgebleven brandstof kunt u een volgend stookseizoen niet meer gebruiken.
Maak deze dus op. Houdt u toch wat over, gooi deze brandstof dan niet weg, maar
volg de regels zoals die in uw gemeente gelden voor Klein Chemisch Afval.
Begin het nieuwe stookseizoen in elk geval met nieuwe brandstof en raadpleeg
deze gebruiksaanwijzing
(zie hoofdstuk A)
.
O VERVOER
Om te voorkomen dat uw kachel tijdens het transport brandstof lekt, moet u de
volgende maatregelen nemen:
1
Laat de kachel afkoelen.
2
Haal de wisseltank uit de kachel en verwijder het brandstofzeefje (zie
hoofdstuk M, fig. M). Dit kan wat nadruppelen; houd een doekje bij de hand.
Bewaar het brandstofzeefje en de wisseltank buiten de kachel.
N
Transportdop
3
Duw de transportdop op de plaats van het brandstofzeefje (fig. N) en druk
deze goed aan. De transportdop zal, zoveel mogelijk, voorkomen dat
brandstof uit de kachel lekt gedurende transport.
4
Vervoer de kachel altijd rechtop.
5
Leeg de vaste tank met een brandstofpomp voorafgaand aan transport of in
het geval van gebruik van verkeerde of verontreinigde brandstof. Verwijder
eerst de brandstoffilter en plaats de brandstofpomp in de vaste brandstoftank. Volg deze procedure ook indien er water in de brandstoftank zit.
1
46
P SPECIFICATIES
Ontsteking elektrisch Afmetingen (mm) breedte 376
Brandstof kerosine (inclusief bodemplaat) diepte 296
Capaciteit max. (kW) 3,2 hoogte 438
Capaciteit min. (kW) 0,80 Accessoires:
Geschikte ruimte (m3)** 48-120 transportdopje
*
Brandstofverbruik (l/uur)
0,333 Netspanning (Vac / Hz) 230 V
brandstofhevelpomp
-- AC 50 Hz
*
Brandstofverbruik (g/uur)
Brandduur per tank (uur)
267 Elektrisch verbruik:
*
16,2 - ontsteking 320 W
Inhoud wisseltank (liter) 5,4 - continu 13 W
Gewicht (kg) 8,0 Zekeringen 250V, 5A
* Bij instelling op maximale stand ** Opgegeven waarde is indicatief
Q DE GARANTIEVOORWAARDEN
U krijgt op uw kachel 48 maanden garantie vanaf de aankoopdatum. Binnen deze
periode worden alle materiaal- en fabricagefouten kosteloos ver holpen. Hierbij
gelden de volgende regels:
1
Alle verdere aanspraken op schadevergoeding, inclusief gevolgschade wijzen
wij uitdrukkelijk af.
2
Reparatie of vervanging van onderdelen binnen de garantietermijn leidt niet
tot verlenging van de garantie.
3
De garantie geldt niet wanneer veranderingen zijn aangebracht, niet-
originele onderdelen zijn gemonteerd of reparaties aan de kachel zijn
verricht door derden.
4
De garantie is niet van toepassing op onderdelen die onderhevig zijn aan
normale slijtage, zoals de brandermat, alle pakkingen en de handmatige
brandstoftoevoerpomp.
5
De garantie geldt uitsluitend als u de originele, gedateerde aankoopbon
overlegt en als daarop geen veranderingen zijn aangebracht.
6
De garantie geldt niet bij schade ontstaan door handelingen die afwijken van
de gebruiksaanwijzing, door verwaarlozing en door het gebruik van ver-
keerde of verouderde brandstof. Verkeerde brandstof kan zelfs gevaarlijk zijn*.
7
De verzendkosten en het risico van het opsturen van de kachel of onder delen
daarvan, komen altijd voor rekening van de koper.
Om onnodige kosten te voorkomen, raden wij u aan eerst altijd zorgvuldig de
gebruiksaanwijzing te raadplegen. Wanneer deze geen uitkomst biedt, geef de
kachel dan in reparatie bij uw dealer.
* Licht ontvlambare stoffen kunnen bijvoorbeeld leiden tot een oncontroleerbare verbranding, met uitslaande
vlammen als gevolg. Probeer in dat geval nooit de kachel te verplaatsen, maar zet de kachel onmiddellijk uit.
In noodgevallen kunt u een brandblusser gebruiken, maar dan uitsluitend van het type B: een koolzuur- of poederblusser.
1
47

R PRODUCTKAART
(a)
De naam van de leverancier / handelsmerk
(b) Model LC-DX32
(c) De energie-effi ciëntieklasse A
(d) De directe warmteafgifte 3.2kW
(e) De indirecte warmteafgifte N/A
(f) De energie-effi ciëntie-index 95.0%
(g) Het nuttig rendement 100%
(h)
De specifi eke voorzorgsmaatregelen
TOYOTOMI Europe Sales B.V.
Raadpleeg de gebruikshandleiding
voor instructies omtrent asssemblage,
installatie of onderhoud.
S BELANGRIJKE ONDERDELEN
Voorplaat
Rooster
Bodemplaat
Deksel wisseltank
Bedieningspaneel
Wisseltank
Brandstofmeter
wisseltank
Ventilatorfilter
Thermostaat
Stekker + snoer
Informatiedisplay
-toets
Kinderslot
Insteltoetsen
(tijd en temperatuur)
Timer
SAVE-toets
1
48
J
Handgreep
Timer-lampje
Hoogte instellingsknop
EXTENSION-toets

1
49

¡Gracias por escoger un producto “TOYOTOMI”!
Clientes satisfechos del mundo entero usan productos Toyotomi. A fin de
garantizar el uso cómodo y seguro de nuestros productos por clientes de todos
los países, nuestros productos satisfacen los estándares de seguridad no solo de
Japón,sino de todos aquellos países en los que prestamos servicio.
Toyotomi adapta sus productos a las necesidades del cliente siempre con-
forme a su filosofía comercial: “Compartir el disfrute de la vida diaria”.
Continuaremos investigando, desarrollando y fabricando productos que satis-
fagan las necesidades de eficiencia, seguridad y confort del estilo de vida de
nuestros clientes.
¡Esperamos que disfrute muchos años de su electrodoméstico Toyotomi!
Recomendamos leer antes este manual de instrucciones para garantizar la máxi-
ma vida útil de este electrodoméstico.
Conózcanos mejor… Visítenos en www.toyotomi.eu para consultar nuestra
gama completa de productos.
1 LEA PRIMERO LAS INSTRUCCIONES DE USO.
2 EN CASO DE DUDA, CONSULTE A SU DISTRIBUIDOR.
3 ANTES DE INICIAR LA LECTURA, CONSULTE LA LISTA DE COMPONENTES PRINCIPALES EN LA
3 POUR LIRE, DÉPLIEZ LA DERNIèRE PAGE. e e e e e e e e e e e e e
úLTIMA PáGINA.
)
50

EL USO A GRANDES RASGOS
Estos son a grandes rasgos los pasos a seguir para la utilización
de su estufa portátil. Para su correcta utilización, le remitimos al
MANUAL (pág. 35 y siguientes).
Retire todo el material de embalaje (vea capítulo A, fig. A).
1
Llene el depósito extraíble (vea capítulo B, fig. C).
2
Conecte en la toma de corriente.
3
Encienda la estufa, accionando el botón de
4
(vea capítulo D).
Si se desea, cambie la temperatura con los botones de ajuste
5
(vea capítulo E).
Apague la estufa, oprimiendo el botón de
6
• Para evitar incendios, se debe llenar el depósito cuando la estufa está
desconectada, o fuera de la habitación en la que se encuentre instalada
la estufa.
• Después de llenar el depósito, asegúrese siempre de que esté bien
cerrado y que se encuentre a una distancia apropiada de cualquier
fuente de calor y del fuego abierto (vea capítulo B).
• La primera vez que encienda su estufa, desprenderá un olor a “nuevo”.
• Guarde todos los contenedores de combustible con sus tapones y sellos
originales en un lugar fresco y oscuro.
• El combustible envejece. Comience cada otoño con nuevo combustible.
• Utilice exclusivamente parafina pura, sin agua y de alta calidad,
conforme a las normativas legales locales (COMBUSTIBLES TOYOTOMI).
• En caso de que cambie de tipo de combustible / de marca de
combustible, debe asegurarse primero de que la estufa ha consumido
todo el combustible presente.
.
)
51

LO QUE DEBE SABER PREVIAMENTE
VENTILAR SIEMPRE SUFICIENTEMENTE
La instalación deberá responder por completo a las disposiciones, reglamentos y
normas locales en vigor. El aparato está indicado para utilizarlo exclusivamente
en el hogar. Compruebe si la tensión de red es la correcta. El aparato se debe
utilizar exclusivamente en un enchufe con toma de tierra, voltaje 230 V / 50 Hz.
Este producto es apto sólamente como estufa en uso doméstico.
Para una temperatura agradable y segura, verifique que haya suficiente
ventilación en el lugar.
NOTA: Para evitar que la estufa se apague inesperadamente, le recomendamos
dejar entreabierta una puerta o una ventana.
Para todos los modelos y para poder utilizar la estufa con toda seguridad sin
necesidad de ventilación suplementaria, es necesario un espacio mínimo (vea
capítulo P). Si el espacio en cuestión es más pequeño que el indicado, deberá
siempre entreabrir una puerta o ventana (2,5 cm). Es importante que el lugar
donde se use la estufa disponga de una entrada de aire adecuada y una salida de
aire eficiente (la sección transversal de ambas aberturas debe ser como mínimo
2
50 cm
).
Recomendamos hacer esto en espacios altamente aislados o sin corriente
de aire y/o a gran altitud. No utilice su estufa en sotanos ni en otros espacios
subterraneos.
No se permite modificar el sistema de protección, porque en tal caso no se puede
garantizar el funcionamiento correcto de la sonda de aire. En caso de duda,
consulte con su proveedor.
INSTRUCCIONES ESPECÍFICAS PARA FRANCIA: Su estufa ha sido diseñada para
el uso exclusivo de combustible líquido para estufas portátiles, en conformidad
con los decretos de 25-06-2010 y 18-07-2002. Se prohibe el uso de otros tipos
de combustible. Consulte con su proveedor o visite nuestra página web para
obtener las direcciones de nuestros distribuidores.
Esta estufa portátil de combustible líquido está destinada para el uso como
calefacción complementaria, y no como fuente de calor continua.
Solamente el combusti-
ble apropiado le garan-
tiza un uso seguro,
eficaz y cómodo de su
estufa.
INSTRUCCIONES ESPECÍFICAS PARA EL REINO UNIDO: Debe usarse sólo
combustible de parafina de Clase C1, en conformidad con BS2869; Sección 2, o
equivalente.
El usuario debe observar las instrucciones siguientes para el uso correcto:
NO
- use gasolina.
- use la estufa portátil de combustible líquido en remolques, barcos y cabinas de
vehículos.
- use la estufa portátil de combustible líquido en lugares sin ventilación suficiente
(consulte el cuadro de propiedades para las dimensiones mínimas del lugar a
ser calentado), espacios subterráneos y / o a una altura de más de 1900 metros.
- modifique los dispositivos de protección de la estufa.
Para usar este tipo de calefacción en lugares públicos, se requiere el permiso
previo de las entidades reglamentarias. Infórmese al respecto antes de usar la
estufa.
EL COMBUSTIBLE APROPIADO
Su estufa está diseñada para quemar parafina líquida (combustible especial para
estufas), de alta calidad y sin agua (COMBUSTIBLES TOYOTOMI). Solamente
este combustible asegura una combustión limpia y completa: Un combustible de
calidad inferior puede conducir a:
mayor probabilidad de que se produzcan averías
una combustión incompleta
una reducción en la durabilidad de la estufa
la formación de humo y/o malos olores
residuos en la rejilla o en el revestimiento
El combustible apropiado es, por lo tanto, esencial para un uso seguro, eficaz y
cómodo de su estufa.
Este tapón de transporte
(amarillo) lo encontrará
dentro de la caja.
Solamente con este
tapón podrá transportar
su estufa sin problemas.
¡Por consiguiente, guár-
delo bien!
La garantía no cubre los daños y/o el malfuncionamiento de la estufa debido al
uso de un combustible otro que aceite de parafina de alta calidad sin agua.
Consulte siempre al distribuidor más cercano sobre el combustible apropiado
para su estufa (www.toyotomi.eu).
)
52

MANUAL
A INSTALACION DE LA ESTUFA
1
Extraiga de la caja con cuidado la estufa y controle el contenido.
Además de la estufa, la caja debe contener:
una pequeña bomba manual de combustible
un tapón de transporte (amarillo)
el presente manual de instrucciones
Guarde la caja y el material de embalaje (fig. A) para almacenar o transportar
la estufa.
2
Abra la tapa del depósito extraíble y retire el cartón y el plástico.
3
Llene el depósito extraíble, siguiendo las instrucciones del capítulo B.
4
El suelo debe ser sólido y nivelado. Desplace la estufa si no está bien nivelada.
No intente corregir esta posición, colocando libros u otros objetos debajo.
5
Introduzca el enchufe en la toma (230 Voltios - CA/50 Hz) y grabe la
hora correcta con los botones de ajuste (vea capítulo C).
6
Su estufa está ahora lista para su uso.
AJUSTE ALTITUD
1
Si la estufa está siendo usada a una altura de entre 800 m y 1300 m, use el
modo de altitud 1. Presione el botón con un objeto largo y fino como un
clip sujetapapeles y enchufe el aparato a la corriente simultáneamente. La
pantalla mostrará "1
".
A
B
2
Si la estufa está siendo usado a una altura de entre 1300 m y 1900 m, use
el modo de altitud 2. Después de seleccionar el modo de altitud 1, presione
el botón con un objeto largo y fino y enchufe el aparato a la corriente
simultáneamente de nuevo. La pantalla mostrará "2
3
Apague el modo de altitud presionando el botón de altitud y enchufando
el aparato a la corriente simultáneamente después de haber seleccionado el
modo de altitud 2. La pantalla mostrará "0" y "
NOTA: Cuando el modo de altitud 1 esté activado, el indicador de altitud "
estará encendido en la pantalla. Cuando el modo de altitud 2 esté activado,
el indicador de altitud "
NOTA: En caso de fallo de corriente o desconexión de la estufa, el ajuste de
altitud se mantendrá igual.
No utilice la estufa a una altitud superior a 1900 metros.
" parpadeará durante el funcionamiento.
".
" habrá desaparecido.
!
AJUSTE EL VOLUMEN
Esta estufa permite ajuste del volumen del zumbador. El ajuste inicial es Volumen
alto (High level).
Presione el botón 'SAVE’ durante más de 3 segundos para cambiar el
1
volumen de Alto (High) a Bajo (Low).
Presione el botón 'SAVE’ durante más de 3 segundos de nuevo para
2
cambiar el volumen de Bajo (Low) a Alto (High).
"
NOTA: El volumen puede ajustarse únicamente en Bajo (Low) o Alto (High), pero
la alarma del dispositivo de seguridad siempre sonará en Alto (High).
NOTA: Si la estufa se ha desenchufado o en caso de fallo de corriente, el volumen
estará ajustado en Alto (High).
)
53

B LLENAR DE COMBUSTIBLE
No llene nunca el depósito extraíble dentro del salón, hágalo en un lugar más
apropiado (existe siempre el riesgo de que caigan gotas de combustible). Proceda
como sigue:
1
Asegúrese de que la estufa está apagada.
2
Abra la tapa y extraiga el depósito extraíble de la estufa (fig. B). Ponga el
depósito extraíble en el suelo (tapón orientado hacia arriba, asa en el suelo) y
desenrosque el tapón (fig. C).
NOTA: El depósito puede gotear algo.
3
Llene el depósito extraíble usando una bomba de combustible (consulte las
instrucciones de operación de la bomba de combustible.) Asegúrase de que la
bomba de combustible esté colocada más alto que el depósito extraíble (fig.
D). Introduzca la goma flexible ranurada en el orificio del depósito extraíble.
4
Durante la operación de llenado, no deje de vigilar el indicador del
combustible del depósito extraíble (fig. E). Si está lleno, cese de llenar
aflojando el botón superior de la bomba. Nunca llene el depósito hasta el
tope, sobre todo cuando el combustible esté muy frío (el combustible se
dilata por el calor).
C
D
5
Deje que el combustible presente en la bomba se vacíe en el depósito y
retire la
cuidadosamente. Limpie eventuales gotas de combustible que hayan caído.
6
Controle si el tapón del depósito está en posición recta y debidamente
apretado. Coloque el depósito extraíble de nuevo en la estufa (tapón hacia
abajo). Cierre la tapa.
misma con cuidado. Cierre el depósito, enroscando el tapón
C AJUSTE DEL RELOJ
Para ajustar la hora, la estufa debe estar apagada y el enchufe conectado en la
toma. Para ello, se manipula los botones de ajuste . Primero, pulse uno de
estos botones para activar esta función (el dígito 4 empezará a parpadear). A
continuación, se pone la hora con el botón izquierdo ( hour) y los minutos con
el botón derecho (min.). Pulsando una sola vez, se incrementa paso a paso.
Manteniendo el botón oprimido, el valor subirá hasta que lo suelte. Después de
unos 10 segundos, el dígito 4 deja de parpadear y la hora introducida quedará
programada
no se presenta en el display; la estufa se pone en stand-by. Oprimiendo cualquier
botón, volverá a aparecer la hora en el display.
Si la estufa ha sido desenchufada (o la corriente ha sido cortada), se debe
ajustar de nuevo la hora.
!
(fig. F). Cinco minutos después de apagar la estufa, la información ya
D ENCENDER LA ESTUFA
Al principio, una estufa nueva despide siempre algún olor. Por consiguiente,
asegúrese de que haya ventilación suplementaria.
E
vacío
F; Cuando el dígito 4
deje de parpadear, la
programación quedará
ajustada al valor indi-
lleno
cado.
Encienda la estufa siempre con el botón de
un mechero.
Para encender la estufa, basta con oprimir un momento el botón de . El piloto
de encendido comenzará a parpadear, señal de que el proceso de encendido
está funcionando. Una vez que la estufa esté quemando, el proceso de ignición
durará un momento, el piloto de encendido deja de parpadear y se pondrá de color
rojo. El display de información muestra dos cifras. El piloto situado junto a éstas
hace referencia a la temperatura (fig. G). Las cifras debajo de ROOM indican la
. No utilice nunca cerillas o
)
54
G: A la izquierda la tem-
peratura deseada, a la
derecha la temperatura
existente

temperatura actual, mientras que debajo de SET figura la temperatura programada.
Esta última la puede cambiar con los botones de ajuste (vea capítulo E). Antes de
encender la estufa, controle siempre si queda suficiente combustible en el
depósito.
E PROGRAMACION DE LA TEMPERATURA
Para cambiar la temperatura programada, la estufa debe estar encendida.
Utilice para ello los botones de ajuste . Primero, pulse uno de estos botones
para activar esta función (el signo °C
para subir la temperatura deseada, oprima el botón derecho (min.) y
para bajarla, oprima el botón izquierdo (hour). Pulsando una sola vez, se
aumenta el valor paso a paso. Después de 10 segundos aproximadamente, el
signo °C dejará de parpadear y la programación quedará ajustada (fig. G). La
temperatura programable mínima es 6°C y la máxima es 28°C. Si la estufa ha
sido desenchufada (o la corriente ha sido cortada), la temperatura programada
volverá automáticamente al valor estándar de 20°C.
empezará a parpadear). A continuación,
F LA UTILIZACION DEL TEMPORIZADOR (TIMER)
El temporizador permite encender la estufa de forma automática, a una hora
previamente programada. Para programar el temporizador, es necesario que el
reloj indique la hora correcta (los minutos se programan de 5 en 5) y la estufa
debe estar apagada. Proceda como sigue:
1
Oprima el botón de
temporizador
2
Con los botones de ajuste, programe la hora a la que la estufa ha de
encenderse . El botón izquierdo (hour) sirve para programar las horas y
botón derecho (min.) para los minutos
y el dígito 4 empezarán a parpadear.
y a continuación el botón TIMER
(los minutos se programan de 5 en 5).
. El
piloto de
el
H: El piloto TIMER indica
que el temporizador está
activado.
3
Después de 10 segundos aproximadamente, el dígito 4 mostrará de nuevo
CLOCK y el
el temporizador activado (fig. H).
4
El temporizador se ocupa de que la temperatura ambiente sea
aproximadamente la deseada durante el tiempo programado.
Si desea apagar la estufa de forma manual y para que después vuelva a encenderse
con el temporizador, basta con oprimir el botón TIMER (vea capítulo G).
!
Para anular el ajuste del temporizador, pulse una vez .
piloto de temporizador se encenderá, quedando de esta manera
G APAGADO DE LA ESTUFA
Existen dos formas para apagar la estufa:
1
Oprima el botón de . El display de información saltará a CLOCK y después
de 1 minuto la llama quedará extinguida.
2
Para apagar la estufa de forma manual y de manera que la próxima vez se
encienda con el temporizador, oprima el botón TIMER . Así, no solamente
se apagará la estufa propiamente dicha, sino que se activa al mismo tiempo
la función del temporizador. Se puede cambiar la hora deseada con los
botones de ajuste (vea capítulo F).
H LA INFORMACION DEL DISPLAY
El display de información no solamente sirve para mostrarle la hora y
temperatura (programadas) (capítulo C, E y F), sino que a la vez nos indica
eventuales fallos. El código del display le informa del estado:
)
55

CODIGO INFORMACION SOLUCION
e - 0 Temperatura dentro de la estufa Deje enfriar la estufa y vuelva
demasiado alta. a encenderla después.
f - 0 Tensión de red interrumpida. Encienda la estufa de nuevo.
e - 1 Termostato averiado. Consultar al distribuidor.
f - 1 Resistencia del quemador averiado. Consultar al distribuidor.
e - 2 Problemas de ignición. Consultar al distribuidor.
e - 23
Reinicie la estufa inmediatamente
después de haber apagado.
Espere aproximadamente 30 segundos despues de
enchufar de nuevo.
e - 5 Seguro anti vuelco. Encender la estufa nuevamente.
e - 6 Mala combustión. Ventile suficientemente, limpiar filtro de aire.
Consulte a su distribuidor.
e - 7 Temperatura ambiente Si fuese necesario,
superior a los 32°C. encender la estufa de nuevo.
e - 8 Ventilador averiado. Consultar al distribuidor.
e - 8 1 Frecuencia anómala. Conecte en la toma de corriente de nuevo.
Consultar al distribuidor.
e - 9 Filtro de aire está sucio, o Limpiar el filtro.
bomba de combustible está sucia. Consultar al distribuidor.
La estufa ha estado encendida
65 horas sin interrupción y se ha
apagado automáticamente. Encienda la estufa de nuevo.
+
-- : --
-- : --
En caso de producirse fallos no mencionados en esta lista y/o cuando el fallo vuelva a
producirse después de medidas de corrección, siempre debe consultar con su proveedor.
Combustible agotado. Llenar el depósito extraíble.
+
Falta de ventilacíon. Mejorar la ventilación.
En caso de producirse
un fallo, aparecerá un
código en el display de
información.
APAGADO AUTOMÁTICO
Esta estufa está dotada de un sistema de seguridad que apaga la estufa
automáticamente después de 65 horas de funcionamiento sin interrupción. En el
display aparecerá la siguiente información:
estufa de nuevo, oprimiendo el botón
MODO DE LIMPIEZA AUTOMÁTICA
Si la estufa ha funcionado en su máximo de forma continua durante dos horas,
el quemador se limpiará automáticamente. Esto se señalará en el display con el
código cl:05, que irá bajando hasta cl:01. En estos 5 minutos la estufa funciona en
su mínimo, mientras que el quemador se limpia automáticamente. Después la
estufa empezará a funcionar en su máximo automáticamente.
(véase capítulo D).
Si lo desea, podrá encender la
.
I EL SEGURO DE NIÑOS
El seguro de niños se utiliza para evitar que éstos cambien los ajustes de la
estufa accidentalmente. Cuando la estufa está encendida con el seguro activado,
solamente es posible apagarla. Cuando la estufa está apagada, el seguro evita que
sea encendida accidentalmente. El seguro de niños se activa, oprimiendo el botón
de referencia y manteniéndolo oprimido más de 3 segundos. El indicador KEYLOCK
el sistema de bloqueo de teclado para niños, en señal de que el seguro de niños
está activado. Para desactivar el seguro de niños, mantener oprimido nuevamente
el botón KEY-LOCK durante más de 3 segundos.
aparecerá en la pantalla digital (fig. I), quedando de esta manera activado
I: Cuando el signo
aparezca en la pantalla,
el sistema de bloqueo de
teclado para niños se habrá
activado.
)
56

J USO CORRECTO DE LA FUNCION ‘SAVE’
La función ‘SAVE’ permite limitar la temperatura. Cuando esta función está
activada, la estufa se apagará automáticamente, cuando la temperatura ambiente
sea 3°C superior a la temperatura programada. Al alcanzar la temperatura
ambiente programada, la estufa volverá a encenderse automáticamente.
Para activar la función ‘SAVE’, oprima el botón de referencia . El piloto SAVE
parpadeará (fig.J). Para desactivar esta función, pulse una vez más el botón SAVE.
También sin el ajuste ‘SAVE’, la estufa cuida de mantener la temperatura
programada aproximadamente, adaptando su capacidad calorífica. ‘SAVE’ es
!
una posición de ahorro muy práctico.
K EL INDICADOR FUEL
Cuando aparece el indicador de COMBUSTIBLE, sólo queda combustible para los
próximos 10 minutos. En el display de información se indica el tiempo que va
quedando (fig. K). Usted tiene 2 opciones:
Ahora es el momento de llenar el depósito (vea capítulo B).
Si no lo quiere llenar enseguida, oprimiendo el botón ”extension” J , Ud.
puede prolongar este tiempo hasta 60 minutos.
De esta forma, la estufa empieza a funcionar automáticamente en su mínimo.
En el display aparece el número 60 que irá bajando hasta 10. A partir de este
momento, la estufa emitirá cada 2 minutos una señal sonora, indicando que hay
que rellenar el depósito extraíble. En caso de que Usted no reaccione, la estufa
se apagará automaticamente y sonará otra señal de advertencia. El símbolo de
combustible parpadeará, y en el display de información parpadearán 4 rayas
(--:--). Para anularlo, pulse una vez el botón de
Si la estufa ha agotado el combustible, hay que esperar un momento al llenarla la
próxima vez. hasta que la estufa esté de nuevo listo para ser usada.
.
J: Cuando el piloto SAVE
se ilumina, la estufa se
encenderá y se apagará
automáticamente, manteniendo la temperatura
dentro de un determi-
nado margen.
K: Cuando el indicador
FUEL aparezca, la pan-
talla digital indicará los
minutos restantes de
combustible antes de que
la estufa se apague.
L EL INDICADOR VENT
Cuando el indicador VENT comience a parpadear, significa que hay una
insuficiente ventilación en la habitación (fig. L). La estufa se apagará
automáticamente. Si el indicador continua parpadeando después de haber
ventilado la estancia, consulte a su distribuidor.
M MANTENIMIENTO
Antes de realizar trabajos de mantenimiento, apague la estufa y déjela enfriar.
A continuación, desconéctela de la red. Su estufa requiere poco mantenimiento.
Lo que sí es preceptivo, es limpiar semanalmente con el aspirador el filtro del
ventilador y limpiar la rejilla con un paño húmedo.
Así mismo, controle periódicamente el filtro del combustible:
1
Saque el depósito extraíble de la estufa y retire el filtro del combustible
(fig. M). Este puede gotear; tenga un trapo a mano.
2
Sacuda el filtro del combustible incidiendo en un fondo duro para quitar los
posos. (¡Nunca limpiar con agua!)
3
Coloque el filtro del combustible en la estufa.
Se recomienda quite el polvo y las manchas a tiempo con un paño húmedo, ya
que si no, podrían formarse manchas permanentes.
L: Si el indicador VENT
parpadea, necesita ventilar la estancia.
Filtro del
combustible
M
No manipule Usted mismo otras piezas de la estufa. Para eventuales reparaciones,
consulte siempre a su distribuidor. Si el cable eléctrico está dañado, tan solo un
!
instalador cualificado esta autorizado para cambiarlo por el tipo H05 VV-F.
)
57

N ALMACENAMIENTO (FIN DEL INVIERNO)
Llegado el fin de la temporada fría, le recomendamos que antes de guardarla, (si
es posible en su embalaje original) deje que la estufa queme todo el combustible
existente en el depósito. El combustible que ha sobrado no lo puede utilizar en
la temporada próxima. Por lo tanto, consúmalo. No obstante, si sobrara algo de
combustible, no lo tire, pero siga las reglas vigentes en su municipio con respecto
a Pequeños Residuos Químicos.
En cualquier caso, comience el próximo otoño con combustible nuevo. Cuando
vuelva utilizar la estufa, siga de nuevo las instrucciones (a partir del capítulo A).
O TRANSPORTE
Para evitar que la estufa pierda combustible durante el transporte, se deben
tomar las siguientes precauciones:
1
Deje enfriar la estufa.
2
Saque el depósito extraíble de la estufa y retire el filtro del combustible
(vea capítulo M, fig. M). Este puede gotear un poco; tenga un paño a mano.
Guarde el filtro y el depósito extraíble fuera de la estufa.
3
Coloque el tapón de transporte en el lugar del filtro del combustible (fig. N)
y oprímalo bien. El tapón de transporte evitará, en la medida de lo posible,
que la estufa pierda aceite durante el transporte.
4
Transporte la estufa siempre en posición vertical.
5
Vacíe el depósito fijo usando una bomba de combustible antes del
transporte, o cuando el combustible está sucio o del tipo incorrecto. Primero
saque el filtro de combustible, y luego inserte la bomba de combustible en el
depósito fijo y vacío. Siga el mismo procedimiento cuando el depósito de
combustible contiene agua.
N
Tapón de
transporte
P ESPECIFICACIONES
Encendido eléctrico Dimensiones (mm) ancho 376
Combustible
Potencia (kW) max. 3,2 alto 438
Potencia (kW) min. 0,80
Volumen idóneo del habitáculo (m
Consumo de combustible (l/hora)* 0,333 Tensión de red 230 V
-- CA / 50 Hz
Consumo de combustible (g/hora)
Duración de combustión por depósito (hora)
Contenido del depósito (litros) 5,4 - continuo 13 W
Peso (kg) 8,0 Potencia del fusible 250V, 5A
* En caso de estar en posición máxima ** Estos valores son a título indicativo
parafina líquida para estufas
3)**
48-120 tapón de transporte
*
267 Consumo eléctrico:
(placa de base incl.) profundo 296
Accesorios bomba manual de combustible
*
16,2 - del encendido 320 W
)
58

Q CONDICIONES DE GARANTIA
Su estufa está cubierta por una garantía de 48 meses, a partir de la fecha de compra.
Durante este período, todos los defectos de material o de fabricación serán arreglados
sin coste alguno. Además, se aplican las siguientes reglas:
1
No asumimos ninguna responsabilidad por otros daños, incluido daños
indirectos.
2
La reparación o el recambio de piezas efectuado dentro del período de
garantía no da lugar a una prórroga de la misma.
3
La garantía no se aplicará en los casos que: se hayan realizado modificaciones;
se hayan montado piezas no originales; reparaciones efectuadas por terceros.
4
Las piezas que están sujetas a desgaste normal, tales como la alfombrilla del
quemador, cualquier tipo de junta o empaquetadura y la bomba manual de
combustible, no están cubiertas por la garantía.
5
La garantía se aplica únicamente si Usted presenta la factura de compra,
fechada y sin modificación alguna.
6
La garantía no se aplica en caso de daños ocasionados por manipulaciones no
conformes con el manual de instrucciones, por negligencias y por el uso de
combustible envejecido o inapropiado. El uso de combustible inapropiado
incluso puede ser peligroso*.
7
Los gastos de envío y los riesgos del envío de la estufa o piezas de ésta,
correrán en todos los casos a cargo del comprador.
A fin de evitar gastos innecesarios, le recomendamos lea primero detenidamente el
manual del usuario. Si éste no da ningún resultado, lleve la estufa a su distribuidor
para su reparación.
* Las sustancias muy inflamables, pueden conducir, por ejemplo, a una combustión incontrolable, resultando
en un incendio. En tal caso, no intente transportar la estufa, pero apáguela inmediatamente. En casos de
emergencia puede utilizar un extintor de llamas, pero únicamente del tipo B: extintores de incendios con ácido
carbónico o con polvo.
)
59

R FICHA DE PRODUCTO
(a)
Nombre / Marca comercial del proveedor
(b) Modelo LC-DX32
(c) Clase de efi ciencia energética A
(d) Potencia calorífi ca directa 3.2kW
(e) Potencia calorífi ca indirecta N/A
(f) Índice de efi ciencia energética 95.0%
(g) Efi ciencia energética útil 100%
(h) Precauciones específi cas
TOYOTOMI Europe Sales B.V.
Para obtener instrucciones de montaje, instalación o mantenimiento,
consulte el manual de producto.
S PIEZAS IMPORTANTES
Placa frontal
Rejilla
Placa base
Tapa del depósito
extraíble
J
Panel de mando
Depósito extraíble
Indicador del
combustible en el
depósito extraíble
Filtro del ventilador
Termostato
Enchufe + cable
Display de
información
Botón de
Seguro de niños
Botones de ajuste
(hora y temperatura)
Temporizador
Botón SAVE
(AHORRO)
Asa
Piloto de
temporizador
Botón de ajuste de
altitud
Extensión
)
60

)
61

Grazie per aver scelto un prodotto “TOYOTOMI”!
I prodotti Toyotomi vengono usati da clienti soddisfatti in tutto il mondo.
Per garantire un uso agevole e sicuro dei nostri prodotti da clienti di ogni
paese, i nostri prodotti soddisfano le norme sulla sicurezza vigenti non solo in
Giappone, ma anche in tutti gli altri paesi del mondo in cui operiamo.
Toyotomi concepisce i propri prodotti perché soddisfino le esigenze dei
clienti basandosi sulla sua filosofia aziendale: “Sharing joys in daily living”.
Continueremo le nostre attività di ricerca, sviluppo e realizzazione di prodotti
che rientrino nello stile di vita di persone che cercano efficienza, sicurezza e
comfort.
Speriamo che godrà del suo apparecchio Toyotomi per anni!
La invitiamo a leggere innanzitutto il presente manuale di istruzioni, per
garantire la durata massima dell’apparecchio.
Venga a conoscerci meglio… visiti l’indirizzo www.toyotomi.eu per la nostra
gamma completa di prodotti.
1 LEGGERE LE ISTRUZIONI D’USO.
2 IN CASO DI DUBBIO, RIVOLGERSI AL RIVENDITORE.
3 POUR LIRE, DÉPLIEZ LA DERNIÈRE PAGE. 3 PRIMA DI INIZIARE A LEGGERE, CONSULTARE LA LISTA DEI COMPONENTI PRINCIPALI IN ULT I MA PAGINA.
3
62

OSSERVAZIONI SULL’USO GENERALE
Qui di seguito vengono descritte in generale le operazioni da
compiere per l’uso delle stufe portatili. Per maggiori dettagli si
prega di fare riferimento alle istruzioni d’uso (da pagina 65 in poi).
Togliere tutti i materiali dell’imballaggio
1
(cfr. capitolo A, fig. A).
Riempire il serbatoio estraibile (cfr. capitolo B, fig. C).
2
Inserire la spina nella presa.
3
Accendere la stufa con il pulsante
4
Se necessario, modificare la temperatura desiderata con gli
5
appositi pulsanti (cfr. capitolo E).
Spegnere la stufa premendo il tasto
6
• Per evitare il rischio di un incendio, il serbatoio deve essere riempito
dopo aver spento la stufa oppure in una stanza diversa da quella in cui la
stufa è in funzione.
• Assicurarsi sempre che il serbatoio venga accuratamente richiuso dopo
il rabbocco effettuato a distanza di sicurezza da ogni fonte di calore o
fiamme libere (cfr. capitolo B).
• La prima volta, durante la combustione, la stufa avrà quel particolare
odore di ‘nuovo’.
• Stoccare tutti i contenitori di combustibile provvisti dei loro tappi e sigilli
originali in luogo fresco e non esposto alla luce.
• Il combustibile invecchia. Cominciare ogni stagione fredda con nuovo
combustibile.
• Usare solo combustibile liquido per stufe portatili di alta qualità e senza
acqua, in conformità con le direttive locali (TOYOTOMI combustibile).
• Se si passa ad un’altra marca o tipo di combustibile, fare bruciare
dapprima la stufa fino a che non vi è più traccia del vecchio combustibile.
(cfr. capitolo D).
.
3
63

OSSERVAZIONI GENERALI
VENTILARE SEMPRE SUFFICIENTEMENTE
Prima di usare l’apparecchiatura, leggere attentamente il presente manuale
e conservarlo come riferimento futuro. Installare questo dispositivo soltanto
quando è conforme con la legislazione, le ordinanze e gli standard locali/nazionali.
Questo prodotto è destinato a essere usato come riscaldatore nelle case ad uso
residenziale ed è idoneo esclusivamente all’uso in luoghi asciutti, in normali
condizioni domestiche, all’interno di soggiorni, cucine e garage.
Per un riscaldamento confortevole e sicuro, assicurarsi che nell’ambiente ci sia
sufficiente ventilazione.
NOTA: Per evitare che la stufa si spenga improvvisamente durante il funzionamento,
si consiglia di tenere una finestra o una porta leggermente aperta.
Per ogni modello occorre uno spazio minimo in cui la stufa può essere usata in
modo sicuro, senza che sia necessaria una ventilazione supplementare (cfr. capitolo
P). Se lo spazio è più piccolo di quello indicato, occorre sempre aprire leggermente
una finestra o una porta (2,5 cm). E importante che in tutti gli ambienti in cui si
usa la stufa vi sia una presa d’aria sufficiente ed un’efficiente uscita per il ricambio
dell’aria (entrambe le aperture devono avere una sezione Diagonale minima di 50
2
cm
.)
Consigliamo di eseguire queste operazioni anche in una stanza altamente isolata
o priva di correnti d’aria e/o che si trova ad una certa altitudine. Non usare la stufa
portatile in cantine o altri spazi sotterranei.
Non sono ammesse modifiche al sistema di sicurezza, in quanto tali interventi
inficiano la garanzia. In caso di dubbi rivolgersi al concessionario di zona.
SOLO PER LA FRANCIA: la stufa è stata progettata per funzionare esclusivamente
con combustibile indicato per apparecchi di riscaldamento portatili funzionanti
a combustibile liquido, come previsto dai Decreti dell’25-06-2010 e 18-07-2002.
L’utilizzo di combustibili diversi è vietato. Rivolgersi al concessionario di zona per
gli indirizzi dei nostri rivenditori di combustibile. La stufa a combustibile liquido è
un apparecchio di riscaldamento supplementare, e non va considerata una fonte
di calore per impieghi continuativi/permanenti.
Solo con il combustibile
giusto si è certi di un
uso sicuro, efficiente
e confortevole della
stufa.
SOLO PER IL REGNO UNITO: Usare esclusivamente combustibile a base di
paraffina della Classe C1 in osservanza a BS2869; Parte 2, o prodotto equivalente.
L’utilizzatore deve attenersi alle seguenti prescrizioni per un uso appropriato
dell’apparecchio:
NON
- usate benzina.
- utilizzare la stufa portatile a combustibile liquido nella roulotte, in barca e nella
cabina di un veicolo.
- utilizzare la stufa portatile a combustibile liquido in ambienti non
sufficientemente ventilati (visionare la scheda delle caratteristiche per le
dimensioni minime dell’ambiente da riscaldare), in vani interrati e/o ad altitudini
superiori ai 1900 metri.
- modificare i dispositivi di sicurezza della stufa.
L’impiego di questo tipo di riscaldamento in luoghi pubblici è regolamentato e
richiede appositi permessi. Informarsi in precedenza sulle relative formalità.
IL COMBUSTIBILE GIUSTO
La stufa portatile è stata progettata per l’uso di un combustibile liquido per stufe
portatili di alta qualità, puro senza acqua, che assicura una combustione pulita
ed ottimale (TOYOTOMI combustibile). Un combustibile di qualità inferiore può
causare i seguenti problemi:
maggiore rischio di guasti
combustione insufficiente
durata limitata della stufa
fumo e/o odore cattivo
accumulo sulla griglia o sul rivestimento.
Il combustibile giusto è quindi essenziale per un uso sicuro, efficiente e confortevole
della stufa.
Non sono coperti dalla garanzia i danneggiamenti e/o difetti di funzionamento
dell’apparecchio causati dall’utilizzo di un combustibile non idoneo.
Consultare sempre il sitio www.toyotomi.eu per la scelta del combustibile adatto
alla stufa.
Questo tappo di
trasporto si trova nella
scatola. Serve per
trasportare la stufa
senza problemi dopo
l’uso. Conservare con
cura!
3
64

ISTRUZIONI D’USO
A INSTALLAZIONE DELLA STUFA
1
Estrarre con cautela la stufa dalla scatola e controllare il contenuto.
Oltre alla stufa, devono essere presenti i seguenti componenti:
una pompa a sifone per il combustibile
un tappo di trasporto
le istruzioni d’uso
Conservare la scatola ed il materiale d’imballaggio (fig. A) per
l’immagazzinaggio e/o il trasporto.
2
Aprire il coperchio del serbatoio estraibile e togliere il pezzo di cartone.
3
Riempire il serbatoio estraibile come indicato nel capitolo B.
4
Il pavimento deve essere robusto e perfettamente piano. Spostare la stufa,
qualora questa non sia in posizione perfettamente orizzontale. Non cercare
di correg gere la posizione mettendo sotto la stufa libri o altro materiale.
5
Inserire la spina nella presa (da 230 Volt - AC/50 Hz) e regolare il tempo
corretto con gli appositi pulsanti di regolazione (cfr. capitolo C).
6
Adesso la stufa è pronta per l’uso.
IMPOSTAZIONE ALTITUDINE
1
Se il dispositivo di riscaldamento è utilizzato ad un’altitudine compresa tra gli
800 e i 1300 m, usare la modalità altitudine 1. Premere il pulsante di altitudine
con l’astina sottile e collegare contemporaneamente la presa. Sul display
comparirà “1
”.
A
B
2
Se il dispositivo di riscaldamento è utilizzato ad un’altitudine compresa tra
gli 1300 e i 1900 m, usare la modalità altitudine 2. Dopo aver impostato la
modalità altitudine 1, premere il pulsante altitudine con l’asticella e
collegare di nuovo contemporaneamente la presa. Sul display comparirà “2
”.
3
Disattivare la modalità altitudine premendo il pulsante di altitudine e
collegando contemporaneamente la presa, dopo aver impostato la modalità
altitudine 2. Sul display comparirà “0” e “
NOTA: Quando è impostata la modalità altitudine 1, il segnale di altitudine “
” sarà acceso sul display. Quando la modalità è impostata la modalità
altitudine 2, il segnale di altitudine “
NOTA: In caso di interruzione dell’alimentazione o scollegamento del dispositivo
di riscaldamento, l’impostazione di altitudine rimarrà impostata.
Non usare la stufa ad un’altezza superiore a 1900 m sul livello del mare.
“ scomparirà.
” lampeggerà.
!
REGOLAZIONE INTENSITA’ SONORA
Su questo dispositivo è possibile impostare il volume dei suoni. L’impostazione
iniziale sarà su livello Alto.
Premere il pulsante SALVA e tenere premuto per più di 3 secondi. In questo
1
modo il volume passerà da Alto a Basso.
Premere il pulsante SALVA e tenere premuto di nuovo per più di 3 secondi.
2
In questo modo il volume passerà da Basso a Alto.
NOTA: Il livello di volume può solo essere Alto o Basso, ma i suoni di allarme del
dispositivo sono sempre impostati su Alto.
NOTA: Quando il dispositivo di riscaldamento è stato scollegato in caso di
interruzione dell’alimentazione, il volume tornerà sulla sua impostazione
iniziale, e cioè su Alto.
3
65
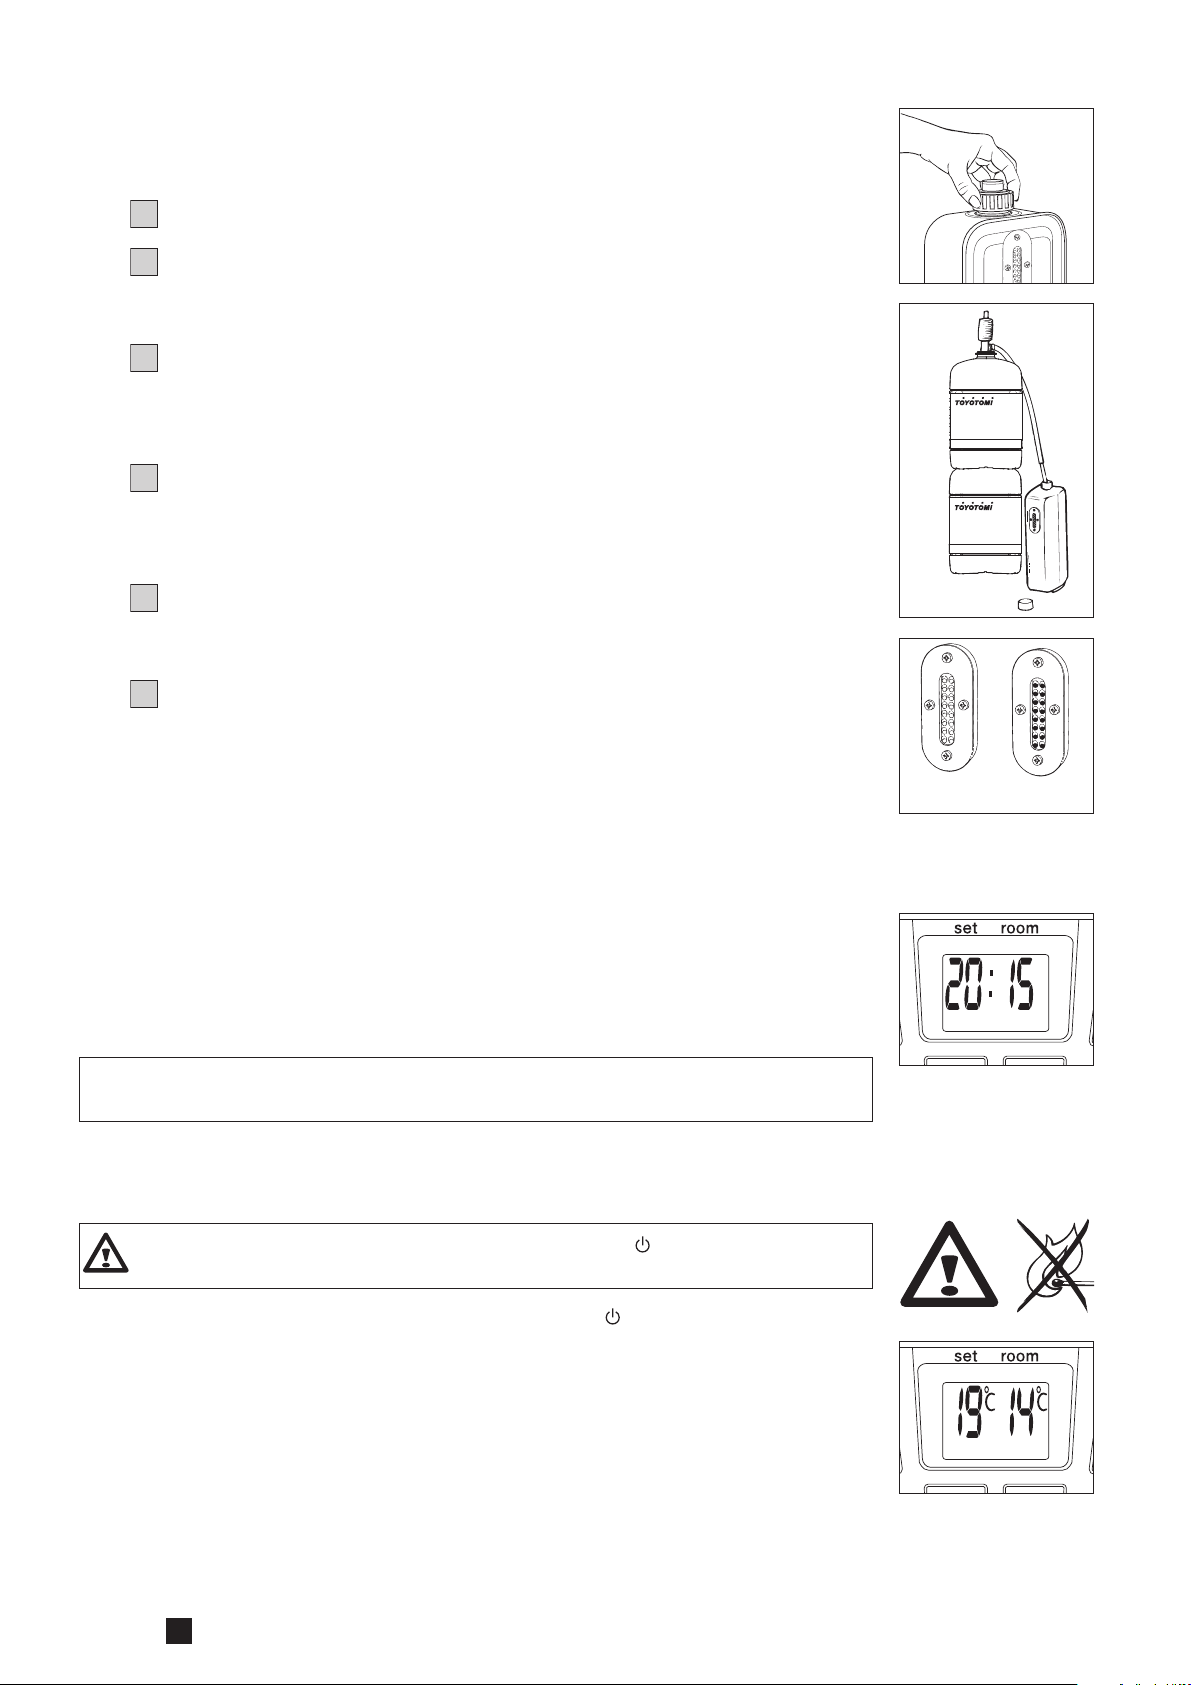
B RIFORNIMENTO DEL COMBUSTIBILE
Non riempire il serbatoio estraibile nello spazio abitativo, ma in un luogo più adatto
(una parte di combustibile può sempre fuoriuscire). Compiere le seguenti operazioni:
1
Assicurarsi che la stufa sia spenta.
2
Aprire il coperchio ed estrarre il serbatoio dalla stufa (fig. B). Appoggiare il
serbatoio (tappo in alto, maniglia sul pavimento) e svitare il tappo (fig. C).
NOTA: Il serbatoio può gocciolare leggermente.
3
Riempire il serbatoio amovibile usando una pompa per combustibile (fare
riferimento alle istruzioni uso della pompa). Assicurarsi che questa sia più in
alto rispetto al serbatoio estraibile (fig. D). Il tubo flessibile nervato deve
essere inserito nell’apertura del serbatoio estraibile.
4
Durante il rifornimento, fare attenzione all’indicatore del combustibile nel
serbatoio estraibile (fig. E). Se questo è pieno, interrompere il rifornimento.
Non riempire mai troppo il serbatoio, soprattutto se il combustibile è molto
freddo (il combustibile fuoriesce se diventa caldo).
5
Lasciare scorrere di nuovo il combustibile ancora presente nella pompa verso la
latta e rimuovere la pompa facendo molta attenzione. Avvitare con cura il
tappo sul serbatoio. Asciugare eventuali tracce di combustibile.
6
Controllare che il tappo del serbatoio sia diritto e ben avvitato. Porre nuovamente
il serbatoio estraibile nella stufa (con il tappo verso il basso). Chiudere il coperchio.
C
D
E
C REGOLAZIONE DELL’OROLOGIO
Si può regolare l’ora esatta solo se la spina è inserita nella presa e la stufa è
spenta. Per regolare l’ora si usano i pulsanti di regolazione . Dapprima
premere uno dei due pulsanti per attivare la funzione (I quattro numeri
iniziano a lampeggiare). In seguito regolare l’ora con il pulsante sinistro (hour)
ed i minuti con il pulsante destro (min.) Premendo una volta sola, si aumenta
gradualmente il valore. Se si tiene premuto il pulsante, il valore continua ad
aumentare, fino a che il pulsante non viene rilasciato. Dopo circa 10 secondi
la quattro numeri smette di lampeggiare e la regolazione è completa (fig. F). 5
Minuti dopo che la stufa è stata spenta, scompare l’informazione che era sul
display e la stufa rimane in ”stand-by”. Premendo un pulsante qualsiasi, appare
di nuovo l’informazione sul display.
Quando la stufa è stata disconnessa dall’alimentazione elettrica (o dopo
un’interruzione di corrente), bisogna impostare nuovamente l’orologio.
!
D ACCENSIONE DELLA STUFA
Una stufa nuova provoca sempre all’inizio un odore particolare. Per tale motivo,
assicurarsi che vi sia una ventilazione sufficiente.
Accendere sempre la stufa con l’ausilio del pulsante
fiammiferi o accendini.
Per accendere la stufa, basta premere il pulsante
comincia a lampeggiare, per indicare che l’accensione è in corso. Occorre
attendere qualche minuto. Una volta accesa la stufa, la spia di accensione rimane
rossa. Sul display
può vedere che i numeri si riferiscono alla temperatura (fig. G). Sotto ROOM viene
indicata la temperatura attuale, mentre sotto SET si legge la temperatura regolata.
Quest’ultimo valore può essere modificato con l’ausilio degli appositi pulsanti (cfr.
capitolo E). Prima di accendere la stufa controllare se nel serbatoio estraibile vi è
una quantità sufficiente di combustibile.
appaiono due cifre. Dalla spia luminosa che si trova a lato si
. Non usare mai
, la spia di accensione
vuoto
F: Nel momento in cui
I quattro numeri smet-
tono di lampeggiare, la
stufa è stata program-
mata secondo i dati
impostati.
G: A sinistra la temperatura desiderata, a destra
la temperatura misurata.
pieno
3
66

E REGOLAZIONE DELLA TEMPERATURA DESIDERATA
La temperatura regolata può essere modificata solamente se la stufa è accesa,
facendo uso degli appositi pulsanti . Premere dapprima uno dei pulsanti per
attivare la funzione (il simbolo °C iniziano a lampeggiare). In seguito, si può
aumentare la temperatura desiderata premendo il pulsante destro (min.),
oppure diminuirla premendo il pulsante sinistro (hour). Dopo circa 10 secondi
la spia luminosa smette di lampeggiare e la regolazione è completa (fig. G). La
temperatura può essere regolata su un valore minimo di 6°C ed un valore massimo
di 28°C. Dopo circa 10 secondi il simbolo °C smettono di lampeggiare indicando
che la stufa è stata programmata.
F USO DEL TIMER
Con il timer si può fare accendere la stufa ad una determinata ora, impostata in
precedenza. Per impostare il timer, occorre regolare dapprima l’ora esatta (cfr.
capitolo C); inoltre, la stufa deve essere spenta. Procedere come descritto qui di
seguito:
1
Premere il pulsante e subito dopo il pulsante
TIMER
2
Regolare l’ora in cui la stufa deve accendersi, con l’ausilio degli appositi
tasti N. Il tasto sinistro (hour) è per le ore, il tasto destro (min.) per i
minuti (intervalli di 5 minuti).
e I quattro numeri iniziano a lampeggiare .
del TIMER . La spia del
3
Dopo circa 10 secondi compare nuovamente l’ora nei quattro spazi digitali e
la spia del TIMER si accende, indicando che la funzione del timer è stata
attivata (fig. H).
4
Il timer fa sì che la temperatura del locale arrivi all’incirca alla temperatura
desiderata, all’ora indicata.
Per spegnere la stufa e farla accendere con il timer, basta premere il pulsante
TIMER (cfr. capitolo G).
Per cancellare la regolazione del timer, premere una volta sul pulsante
.
!
G PER SPEGNERE LA STUFA
Per spegnere la stufa si può procedere in due modi:
1
Premere il pulsante . Il display passa allora su CLOCK ed entro un
minuto la fiamma si spegne.
2
Quando si vuole spegnere la stufa e riaccenderla in seguito con il timer,
premere il pulsante TIMER . In questo modo, non solo la stufa si spegne, ma
viene attivata, nel contempo, la funzione del timer. Può si modificare l’ora
desiderata con gli appositi tasti (cfr. capitolo F).
H: La spia luminosa di
controllo TIMER indica
che la funzione del timer
è attiva.
3
67

H INFORMAZIONI PRESENTI SUL DISPLAy
Il display K non indica solamente l’ora e la temperatura (regolate) (cfr. capitolo C,
E ed F), ma comunica anche eventuali errori. Il codice sul display indica il guasto:
CODICE D’INFORMAZIONI AZIONE
e - 0 La temperatura interna alla stufa Far raffreddare e riaccenedere
è troppo alta. la stufa.
f - 0 Tensione di rete interrotta. Accendere nuovamente la stufa.
e - 1 Termostato guasto. Contattare il rivenditore.
f - 1 Bruciatore-termostato guasto. Contattare il rivenditore.
e - 2 Problemi di accensione. Contattare il rivenditore.
e - 23
Riaccendere immediatamente il
riscaldamento quando si spegne.
Attendere ca. 30 sec. e riaccenderlo dopo
aver reinserito la spina.
e - 5 Sicurezza antiribaltamento. Accendere nuovamente la stufa.
e - 6 Combustione cattiva. Contattare il rivenditore.
e - 7 Temperatura del locale Se necessario, accendere
superiore ai 32°C. nuovamente la stufa.
e - 8 Motore della ventola guasto. Contattare il rivenditore.
e - 8 1 Frequenza anomala. Inserire nuovamente la spina nella presa.
Contattare il rivenditore.
e - 9 Filtro dell’aria sporco, o Pulire i filtri.
Pompa del combustibile sporca. Contattare il rivenditore.
La stufa è rimasta accesa ininterrot tamente per un periodo di 65 ore
e si è spenta automaticamente. Riaccendere la stufa.
+
-- : --
-- : --
Combustibile esaurito. Riempire il serbatoio estraibile.
+
Insufficiente ventilazione. Migliorare la ventilazione.
In caso di guasto sul
display viene indicato il
problema.
Rivolgersi sempre al concessionario in caso di una qualsiasi anomalia segnalata
in precedenza, e /o se un errore continua a ripetersi anche dopo aver fatto ricorso
ai precedenti rimedi.
DISATTIVAZIONE AUTOMATICA
Questa stufa è dotata di un sistema di sicurezza che la fa spegnere automaticamente
dopo 65 ore di funzionamento ininterrotto. Ecco ciò che apparirà sul display:
Se lo si desidera è possibile riaccendere la stufa premendo il pulsante L (vedi
capitolo D).
SISTEMA DI PULIZIA AUTOMATICA
Nel caso in cui la stufa rimanga accesa ininterrottamente per due ore alla
massima intensità, si innescherà automaticamente la procedura di autoripulitura
del bruciatore che verrà contemporaneamente segnalata sul display a partire dal
codice cl:05 fino a cl:01. Questa procedura durerà 5 minuti, durante i quali la stufa
funzionerà alla sua minima intensità. Quando il bruciatore sarà ripulito, la stufa
ritornerà automaticamente alla posizione iniziale di massima intensità.
.
I DISPOSITIVO DI SICUREZZA
Il dispositivo di sicurezza serve a prevenire che un bambino modifichi involontariamente le regolazioni della stufa. Mentre è accesa, la stufa può solamente venire spenta.
Quando la stufa è già spenta, il dispositivo di sicurezza previene che venga accesa
involontariamente. Per attivare il dispositivo di sicurezza tenere premuto l’apposito
I: Quando la spia si
illumina sul display infor-
mativo, significa che è
attiva la funzione di sicu-
rezza per i bambini.
3
68

pulsante per più di 3 secondi. La spia KEY-LOCK appare sul display informativo
(fig. I) per indicare che è attiva la funzione sicurezza per i bamibini. Per disattivare il
dispositivo tenere premuto ancora una volta il pulsante KEY-LOCK per più di 3 secondi.
J USO CORRETTO DELLA FUNZIONE ‘SAVE’
Con la funzione ‘SAVE’ si può stabilire un valore massimo della temperatura. Se la
funzione è attivata, la stufa si spegne automaticamente quando la temperatura della
camera supera di 3°C la temperatura regolata. In seguito, quando la temperatura
della camera torna al valore impostato, la stufa si riaccende automaticamente. Per
attivare la regolazione ‘SAVE’ premere l’apposito pulsante
controllo SAVE si accende (fig. J). Premendo ancora una volta il pulsante ‘SAVE’,
si disattiva di nuovo la funzione.
Per mantenere più o meno costante la temperatura regolata, anche senza la
funzione ‘SAVE’, la stufa modifica la propria capacità di riscaldamento. ‘SAVE’ è
una modalità che permette di risparmiare combustibile e che può essere usata
!
quando il locale è vuoto o per impedire che una stanza geli.
. La spia luminosa di
J: Se la spia luminosa
SAVE si accende, la
stufa si accende e si
spegne automatica-
mente, per rimanere
entro una determinata
temperatura.
K LA SPIA ‘FUEL’
Quando appare la segnalazione “FUEL’, significa che il carburante è quasi esaurito e che
la stufa ha un’autonomia di soli 10 minuti. Dal display informativo
trascorrere de tempo che ancora rimane (vedi fig. K). Esistono due opzioni;
Rimuovere il serbatoio del combustibile e riempirlo fuori dalla stanza (cfr. capitolo B).
Premendo in questo momento il pulsante ”extension” J , andrete a prolungare il tempo
di combustione della stufa fino ad un massimo di 60 minuti.
La stufa inserisce automaticamente il processo di combustione minima, segnalandone
visivamente lo scorrere sul display con una numerazione regressiva che va da 60 a 10.
Successivamente, ogni due minuti avvertirete un segnale acustico che indicherà la
necessità di riempire il serbatoio estraibile. Se il serbatoio non viene riempito, la stufa
si spegne automaticamente. Anche in questo caso si ode un segnale di avvertimento.
L’indicatore del carburante si illumina ad intermittenza, mentre sul display appare il
simbolo a quattro tratti (--:--). Per fermarle, basta premere una volta il pulsante
Se il combustibile nella stufa è completamente esaurito, dopo aver riempito il serbatoio
estraibile, occorre attendere qualche minuto, prima che la stufa sia nuovamente pronta
per l’uso.
potete osservare il
.
L LA SPIA ‘VENT’
Quando la spia VENT inizia a lampeggiare, significa che la stanza non è sufficientemente
areata (fig. L). La stufa si spegnerà automaticamente. Se dopo avere areato l’ambiente,
la stufa continua ad lampeggiare VENT, è necessario contattare il rivenditore.
M MANUTENZIONE
Prima di procedere alla manutenzione, occorre spegnere la stufa e farla raffreddare.
In seguito staccare la spina dalla presa. La stufa richiede una manutenzione
minima. Tuttavia, ogni settimana occorre pulire il filtro del ventilatore
aspirapolvere; inoltre occorre pulire la griglia
Controllare periodicamente anche il filtro del combustibile:
con un panno.
con un
K: Quando appare la spia
FUEL, verrano mostrati
sul display informativo i
minuti di funzionamento
che ancora rimangono
alla stufa in base alla
quantità di combustibile
rimasta nel serbatoio.
L: La spia VENT
lampeggiante significa
che è necessario
aerare maggiormente
l’ambiente.
Filtro del
combustibile
1
Togliere il serbatoio estraibile dalla stufa ed estrarre il filtro del com-
bustibile (fig. M). Il filtro può gocciolare; tenere un panno a portata di mano.
2
Capovolgere il filtro e picchiettarlo su una superficie rigida per togliere
completamente lo sporco. (Non pulirlo mai con acqua!)
3
Installare nuovamente il filtro del carburante nella stufa.
M
3
69

Si consiglia di rimuovere per tempo polvere e macchie con un panno umido,
altrimenti possono formarsi macchie difficili da rimuovere.
Non smontare i componenti della stufa. In caso di riparazione, contattare sempre
il rivenditore. Se il cavo dell’elettricità è danneggiato, deve essere sostituito con
!
un cavo di tipo H05 VV-F solamente da un elettricista autorizzato.
N IMMAGAZZINAGGIO (FINE DELLA STAGIONE FREDDA)
Il combustibile rimasto non può più essere usato. Bruciarlo completamente. Se
ne rimane, non gettarlo via, ma smaltirlo conformemente alle direttive locali
vigenti per i rifiuti chimici. In ogni caso cominciare la nuova stagione fredda con
combustibile nuovo. Quando si riaccende la stufa seguire nuovamente le istruzioni
(come riportate a partire dal capitolo A).
O TRASPORTO
Per evitare che la stufa perda combustibile durante il trasporto, occorre prendere
le seguenti precauzioni:
1
Lasciare raffreddare la stufa.
2
Togliere il serbatoio estraibile dalla stufa e rimuovere il filtro del
combustibile (cfr. capitolo M, fig. M). Questo può perdere qualche goccia di
combustibile; tenere un panno a portata di mano. Conservare il filtro ed il
serbatoio estraibile al di fuori della stufa.
N
Tappo per il
trasporto
3
Mettere il tappo per il trasporto al posto del filtro (fig. N) e premerlo bene. Il
tappo di spostamento serve a prevenire nei limiti del possibile perdite di olio
dalla stufa durante il trasporto.
4
Trasportare la stufa sempre in posizione eretta.
5
Svuotare il serbatoio fisso, utilizzando una pompa per combustibile, prima di
uno spostamento o in caso di utilizzo di combustibile non idoneo o
contaminato. Staccare innanzitutto il filtro del combustibile ed inserire
successivamente la pompa nel serbatoio fisso vuoto. Seguire la stessa
procedura qualora nel serbatoio del combustibile vi sia acqua.
P SPECIFICHE
Accensione elettrica Dimensioni con (mm) larghezza 376
Combustibile petrolio (con piastra inferiore) profondità 296
Capacità (kW) mas. 3,2 altezza 438
Capacità (kW) min. 0,80 Accessori
Spazio adatto (m3)** 48-120 Tappo per il trasporto
Consumo di combustibile (l/ora)* 0,333 Tensione di rete 230 V
-- AC / 50 HZ
Consumo di combustibile (g/ora)* 267 Consumo:
Durata del combustibile per serbatoio (ora)
Volume serbatoio estraibile (litri)
Peso (kg) 8,0 Amperaggio fusibile 250V, 5A
* Con regolazione al massimo ** I valori riportati sono indicativi
*
16,2 - accensione elettrica 320 W
5,4 - continuo 13 W
Pompa a sifone per il carburante
3
70

Q CONDIZIONI DELLA GARANZIA
La stufa ha una garanzia di 48 mesi a partire dalla data d’acquisto. Entro questo
periodo tutti i guasti imputabili ai materiali ed alla produzione vengono riparati
gratuitamente. Le condizioni sono le seguenti:
1
La Toyotomi Europe Sales B.V. rifiuta esplicitamente tutti gli accordi relativi
a rimborso dei danni, compreso il rimborso di danni sorti in seguito a guasti.
2
La riparazione o la sostituzione delle parti entro il termine di garanzia non
implica un prolungamento della garanzia stessa.
3
La garanzia viene considerata nulla qualora siano state apportate delle
modifiche, qualora siano state montate delle parti non originali o qualora
siano state effettuate delle riparazioni alla stufa da parte di terzi.
4
Le parti normalmente sottoposte ad usura, come lo stuoino di combustione,
qualsiasi tipo di guarnizione e la pompa a sifone per il combustibile, non sono
comprese nella garanzia.
5
La garanzia vale esclusivamente se l’utente è in possesso della ricevuta
d’acquisto originale, datata, alla quale non siano state apportate modifiche o
correzioni.
6
La garanzia viene considerata nulla in caso di danni sorti in seguito ad azioni
non conformi alle istruzioni d’uso, in seguito a negligenza ed in seguito
all’uso di combustibile del tipo sbagliato o vecchio. L’uso di combustibile
sbagliato può anche costituire un pericolo*.
7
Le spese di spedizione ed i rischi che la spedizione della stufa o delle parti
comporta sono sempre a carico dell’acquirente.
Per prevenire spese inutili, si consiglia dapprima di consultare con attenzione le
istruzioni d’uso. Qualora queste non offrano alcuna soluzione al problema, portare
la stufa dal rivenditore per la riparazione.
* Le sostanze leggermente infiammabili possono portare ad una combustione non controllabile, e
consequentemente alla formazione di fiamme pericolose. In tal caso, non cercare mai di spostare la stufa, ma
spegnerla immediatamente. In caso d’emergenza si può fare uso di un estintore, esclusivamente del tipo B:
estintore a polvere o ad acido carbonico.
3
71

R SCHEDA PRODOTTO
(a) Nome / Marchio del fornitore TOYOTOMI Europe Sales B.V.
(b) Modello LC-DX32
(c) Classe di effi cienza energetica A
(d) Potenza termica diretta 3.2kW
(e) La potenza termica indiretta N/A
(f) Indice di effi cienza energetica 95.0%
(g) Effi cienza utile 100%
Per istruzioni di installazione e manu-
(h) Eventuali precauzioni
tenzione vi preghiamo di fare riferimento al manuale prodotto.
S COMPONENTI PRINCIPALI
Piastra anteriore
Griglia
Piastra inferiore
Coperchio serbatoio
estraibile
Pannello di controllo
Serbatoio estraibile
Indicatore del
combustibile nel
serbatoio estraibile
Filtro del ventilatore
Termostato
Spina + cavo
Display delle
informazioni
Tasto
Dispositivo di sicurezza
Tasti di regolazione
(ora e temperatura)
Timer
Tasto SAVE
Manico
Spia del timer
3
72
Pulsante impostazione
J
altitudine
Prolunga

3
73

Obrigado por escolher um produto “TOYOTOMI”!
Os produtos Toyotomi são usados por clientes satisfeitos em todo o mundo.
De forma a garantir o uso seguro e confortável dos nossos produtos por parte
dos clientes, estes estão em conformidade com as normas de segurança,
não só do Japão, mas também de todos os países do mundo onde estamos
representados.
A Toyotomi adapta os seus produtos para satisfazer as necessidades dos
clientes seguindo sempre a nossa filosofia de “partilha de alegrias na vida
diária”. Continuaremos a pesquisar, desenvolver e fabricar produtos que
combinem o estilo de vida das pessoas com a eficiência, segurança e conforto.
Esperamos que vá desfrutar do nosso aparelho Toyotomi nos próximos anos!
Convidamo-lo a ler, em primeiro lugar, este manual de instruções para garantir
o máximo de tempo de vida do aparelho.
Conheça-nos melhor…visite-nos em www.toyotomi.eu para ver a nossa linha
completa de produtos.
1 EM PRIMEIRO LUGAR, LEIA AS INSTRUÇÕES DE USO.
2 EM CASO DE DÚVIDA, CONTACTE O SEU REVENDEDOR.
3 POUR LIRE, DÉPLIEZ LA DERNIÈRE PAGE. 3 CONSULTE A LISTA DE COMPONENTES PRINCIPAIS NA ÚLTIMA PÁGINA.
=
74

INSTRUÇÕES GERAIS DE USO
Abaixo encontrará os principais passos a tomar para usar o seu
aquecedor. Para mais detalhes, consulte o MANUAL.
Retire todos os materiais da embalagem (veja o capítulo A, Fig. A).
1
Encha o tanque removível (veja capítulo B, Fig. C).
2
Insira a ficha na tomada de parede.
3
Ligue o aquecedor usando o
4
Se for necessário mude a temperatura usando o botão de ajustamento
5
(veja capítulo E).
Desligue o aquecedor usando o
6
• Para evitar incêndios, deve encher o depósito removível quando o
aquecedor está desligado e fora do local onde o aquecedor está instalado.
• Depois de encher o depósito certifique-se de que a tampa está bem
fechada e que está a uma distância adequada de qualquer fonte de calor
e fogo (veja o Secção B).
• A primeira vez que acender o aquecedor este emitirá um cheiro
caraterístico a ser “novo”.
• Guarde todos os recipientes do combustível com as tampas e selos
originais em local fresco e seguro.
• Use um combustível novo no início de cada estação.
• Utilize apenas parafina pura de alta qualidade e de acordo com a
legislação em vigor (TOYOTOMI combustível).
• Antes de mudar de marca e/ou tipo de combustível certifique-se de que
esvazia todo o combustível existente no interior do aquecedor.
botão (veja capítulo D).
botão .
=
75

O QUE PRECISA SABER ANTES DE COMEÇAR A USAR
CERTIFIQUE-SE SEMPRE QUE EXISTE BOA VENTILAÇÃO
Leia este manual, cuidadosamente, antes de usar o aparelho e guarde-o para futuras consultas. Instale o dispositivo apenas quando este está em conformidade com
a legislação, portarias e normas locais e nacionais aplicáveis. Este produto destinase a ser usado como aquecedor doméstico e só é adequado para uso em locais
secos e em ambientes fechados tais como a sala de estar, cozinha e garagem.
Para obter uma temperatura agradável e segura, verifique se existe ventilação
suficiente no local.
NOTA: Para evitar que o aquecedor se apague inesperadamente, recomendamos
que deixe uma porta ou uma janela entreaberta.
Para poder utilizar o aquecedor com segurança e sem necessidade de ventilação
suplementar, é necessário uma área mínima (ver Secção P). Se o espaço em questão
é mais pequeno que o indicado, deve entreabrir uma porta ou janela (2,5 cm). É
importante que em cada local onde o aquecedor é utilizado, exista circulação de
ar suficiente (ambas aberturas devem ter uma secção mínima de 50 cm
Recomendamos também que tal seja feito em locais altamente isolados ou sem
correntes de ar e/ou a altitudes elevadas. Não utilize o aquecedor em caves e recintos subterrâneos.
Não são permitidas modificações ao sistema de segurança pois comprometem a
garantia do funcionamento correto da sonda de ar. Em caso de dúvida, consulte o
seu revendedor.
INSTRUÇÕES ESPECIFICAS PARA FRANÇA: O seu aquecedor foi projetado para o
uso exclusivo de combustíveis líquidos para aquecedores portáteis, de acordo com
os decretos de 18-07-2002 e 25-06-2010. É proibida a utilização de outros tipos
de combustível. Verifique com o seu revendedor ou visite nosso site identificar os
nossos distribuidores. Este equipamento trata-se dum aquecedor de combustível
líquido portátil e destina-se a uso como aquecimento suplementar, e não como
uma fonte de calor contínua.
2
).
Apenas o uso do
combustível correto
assegura o uso seguro,
eficiente e confortável
do seu aquecedor.
INSTRUÇÕES ESPECIFICAS PARA REINO UNIDO: Deve usar combustível parafina
classe C1, em conformidade com BS2869, Secção 2 ou equivalente.
O utilizador deve observar as seguintes instruções para uso adequado:
NÃO
- Usar gasolina.
- Usar o aquecedor portátil a funcionar com combustível líquido em caravanas,
barcos e no interior de veículos.
- Usar o aquecedor portátil a funcionar com combustível líquido em espaços insu-
ficientemente ventilados (consulte a tabela de propriedades com as dimensões
mínimas do espaço a ser aquecido), salas subterrâneas e/ou a uma altura superior
a 1900 metros.
- Modificar as características de segurança do aquecedor.
O uso deste tipo de aquecimento em espaços públicos está sujeito a autorização
regulamentar prévia. Obter informação adequada sobre este assunto com antecedência.
COMBUSTÍVEL CORRETO
O seu aquecedor foi projetado para a queima de parafina líquida (combustível
especial para aquecedores), de alta qualidade e livre de água (TOYOTOMI combustível). Apenas este tipo de combustível garante uma combustão limpa e completa.
Um combustível de qualidade inferior pode conduzir a:
Maior probabilidade de avarias
Uma combustão incompleta
Uma redução da durabilidade do aquecedor
Formação de fumos e maus odores
Depósito de impurezas na grelha ou no revestimento
Usar um combustível correto é, pois, essencial para uma utilização segura, eficiente e confortável do seu aquecedor.
A garantia não cobre danos e/ou mau funcionamento do aquecedor, devido à utilização de outro combustível que não a parafina pura, livre de água e de alta qualidade.
Consulte sempre o seu distribuidor sobre qual o combustível a usar para o seu
aquecedor (www.toyotomi.eu).
Este saco de transporte é
embalado separadamente
na caixa. Este saco
é necessário para
transportar sem problemas
o aquecedor após o uso.
Guarde-o bem!!
=
76

MANUAL
A INSTALAÇÃO DO AQUECEDOR
1
Retire com cuidado o seu aquecedor da caixa e verifique o conteúdo. Além
do aquecedor deve ter:
uma bomba manual de combustível.
uma tampa de transporte (Amarelo)
manual de instruções de utilização
Conserve a caixa e os materiais da embalagem (Fig. A) para armazenagem e /
ou transporte.
2
Levante a tampa do depósito e remova o cartão.
3
Encha o depósito removível conforme indicado no Secção B.
4
O chão deve estar firme e nivelado. Reposicionar o aquecedor, quando não
está nivelado. Não corrigir a situação, colocando livros ou outros materiais sob
o aquecedor.
5
Insira a ficha na tomada (230 Volts - CA/50 Hz) e defina o tempo correto
através do botão de regulação (veja capítulo C).
6
O seu aquecedor está agora pronto para usar.
MODO “ALTITUDE”
1
Se o aquecedor for utilizado a uma altura entre 800 m e 1300 m, use o modo
de altitude 1. Prima o botão de altitude com uma haste fina como a de um
clipe e ligue o aparelho à tomada simultaneamente. Irá então aparecer “1
” no visor.
A
B
2
Se o aquecedor for utilizado a uma altura entre 1300 m e 1900 m, use o
modo de altitude 2. Depois de ter definido o modo de altitude 1, prima o
botão de altitude com uma haste fina e ligue de novo o aparelho à tomada
simultaneamente. Irá então aparecer “2
3
Desligue o modo de altitude premindo o botão de altitude desligando a
tomada simultaneamente depois de definir o modo de altitude 2. Irá então
aparecer “0” no visor e o símbolo “
NOTA: Quando o modo de altitude 1 está definido, o símbolo de altitude “
acende no visor. Quando o modo de altitude 2 está definido, a símbolo de
altitude “
NOTA: Caso ocorra uma falha de energia ou desligamento do aquecedor, a
definição de altitude permanecerá.
Não usar o aquecedor a altitudes superiores a 1900 metros.
” fica a piscar durante a operação.
” no visor.
” desaparecerá.
!
LIGAR O VOLUME
Este aquecedor pode ser ligado ao volume de som da campainha. A configuração
inicial está no nível Alto.
Prima a tecla SAVE e mantenha-a premida por um tempo superior a 3
1
segundos, o volume do som da campainha será então alterado de Alto para
Baixo.
Prima a tecla SAVE e mantenha-a de novo premida por um tempo superior
2
a 3 segundos, o volume do som da campainha será então alterado de Baixo
para Alto.
”
NOTA: O nível de volume poderá ser apenas Baixo ou Alto, mas o alarme do
dispositivo de segurança soa em nível Alto.
NOTA: Quando o aquecedor for desligado ou após uma falha de energia, o
volume ficará com a configuração inicial Alta.
=
77

B ABASTECIMENTO DE COMBUSTÍVEL
Nunca encha o depósito removível na sala de estar, faça-o num espaço mais
apropriado (existe sempre o risco de derrame de combustível).
Siga o procedimento abaixo descrito:
1
Certifique-se de que o aquecedor está desligado.
2
Abra a tampa e retire o depósito do aquecedor (Fig. B).
Coloque o tanque removível (tampa para cima) e desenrosque a tampa do
combustível (Fig. C).
NOTA: Algumas gotas podem escorrer do tanque.
3
Encha o tanque removível usando uma bomba de combustível (consulte as
instruções de funcionamento da bomba de combustível). Certifique-se de
que aquecedor está numa posição mais alta do que o tanque removível (Fig.
D). Inserir o tubo com nervuras na abertura do reservatório amovível.
4
Durante o enchimento verifique o medidor de combustível do tanque (Fig. E).
Pare de encher quando o medidor indicar que o tanque está cheio. Nunca
encha demasiado o tanque, principalmente, quando o combustível estiver
demasiado frio (o combustível dilata ao aquecer).
5
Deixe que o combustível que resta na bomba flua de volta ao bidão e retire
cuidadosamente a bomba. Volte a colocar a tampa no tanque. Limpe o
combustível, eventualmente, derramado.
6
Verifique se a tampa do tanque está bem ajustada e apertada. Coloque de
novo o depósito removível no aquecedor com a tampa para baixo. Feche a
tampa.
C
D
E
C AJUSTE DO RELÓGIO
Só é possível definir a hora correta, quando o aquecedor estiver ligado à
corrente elétrica e não esteja a queimar. Use as teclas de ajuste para definir
o tempo. Primeiro, pressione qualquer uma das duas teclas para ativar esta
função (os 4 dígitos começarão a piscar). Em seguida, ajuste as horas com
a tecla da esquerda ( hour) e os minutos com a tecla da direita ( min.).
Pressione uma vez para aumentar o valor em uma única unidade. Se mantiver a
tecla pressionada, o valor vai continuar a subir, até que solte a tecla novamente.
Depois de, aproximadamente, 10 segundos os 4 dígitos deixarão de piscar e o
acertar será bloqueado (Fig. F). 5 minutos depois de ser desligado o aquecedor,
as informações no visor desaparecerão e o aquecedor passa automaticamente
para a posição stand by.
Se o aquecedor for desligado (oua corrente foi cortada), terá de ajustar,
novamente, a hora.
!
DACENDER O AQUECEDOR
Quando usado pela 1ª vez, um novo aquecedor origina algum cheiro por um
curto período de tempo. É necessário providenciar ventilação extra.
Ligar sempre o aquecedor com tecla
. Nunca usar fósforos ou isqueiro.
vazio
F: Quando os 4-digitos
deixarem de piscar, o
acertar será bloqueado
no valor indicado.
cheio
Pressione o botão para ligar o aquecedor. O lâmpada do POWER começa a
piscar, sinal de que o aparelho está em processo de ignição de trabalho. Quando
o lâmpada do POWER para de piscar e passa a vermelho o aquecedor começa
a funcionar, ou seja, está em processo de queima. No display aparecem dois
números (Fig. G): o da esquerda (set) indica a temperatura desejada e pode
ser ajustado com as teclas de ajuste (veja o capítulo E); o da direita indica a
temperatura do espaço.
=
78
G: A la izquierda la tem-
peratura deseada, a la
derecha la temperatura
existente.

E PROGRAMAÇÃO DA TEMPERATURA
O ajuste da temperatura só pode ser efetuado quando o aquecedor está
a queimar. Use as teclas de ajuste para ajustar a temperatura. Primeiro
pressione qualquer uma das duas teclas para ativar esta função (a marca ° C
começa a piscar), de seguida, ajuste a temperatura com a tecla da direita ( min.
- para subir a temperatura) ou com a tecla da esquerda ( hour - para baixar a
temperatura). Pressione uma vez para aumentar o valor uma unidade. Após 10
segundos a marca ° C pára de piscar e o ajuste estará concluído (Fig. G).
Os ajustes de temperatura disponíveis variam entre 6°C e 28°C. Quando o
aquecedor for desligado (ou após uma falha de energia), a temperatura será
reajustada para o valor padrão de 20°C.
F USAR O TEMPORIZADOR
O temporizador permite ligar o aquecedor automaticamente a uma hora
predefinida.Para ligar o temporizador a hora tem de estar correta (ver Secção C) e
o aquecedor tem de estar desligado.Siga o procedimento abaixo:
1
Depois disso pressione o botão
4-dígitos começam a piscar.
2
Use as teclas de ajuste para alterar a hora a que o aquecedor deve ligar.
Use a tecla esquerda (hora) para definir a hora e tecla direita (min.) para
definir os minutos (intervalos de 5 minutos).
3
Depois de aproximadamente 10 segundos os 4-dígitos mostram novamente
a informação CLOCK e a luz TIMER ( acenderá, indicando que a função
temporizador foi ativada (Fig. H).
4
O temporizador garante que o local será aquecido aproximadamente para a
temperatura programada.
Quando pretender desligar o aquecedor e acendê-lo novamente utilizando a
função temporizador, apenas tem de pressionar a tecla TIMER (ver Secção G).
!
Pressione o botão
uma vez para desativar a função temporizador.
e a tecla timer . A luz TIMER e os
G DESLIGAR O AQUECEDOR
Há duas maneiras de desligar o aquecedor:
1
Pressione o botão
aproximadamente, um minuto a chama estará apagada.
. O display mostra o sinal de CLOCK. Dentro de,
H: A luz TIMER indica
que a função foi ativada.
2
Para desligar o aquecedor de forma manual e de maneira a que a próxima
vez ligue com o temporizador, pressione o botão TIMER . Assim, não
só o próprio aquecedor desliga, mas ao mesmo tempo ativa a função de
temporizador. Pode alterar o tempo definido utilizando as teclas de ajuste
(ver Secção F).
H INFORMAÇÃO DO DISPLAY
A visualização das informações no display não serve apenas como indicador
do tempo e da temperatura (secções C, E, e F), este também indica qualquer mau
funcionamento do aquecedor. O código na tela de informações diz-lhe qual é o
problema:
CÓDIGO INFORMAÇÃO SOLUÇÃO
e - 0 Temperatura muito elevada. Arrefecer e reiniciar.
f - 0 Energia interrompida. Reiniciar o aquecedor.
e - 1 Termóstato deficiente. Consultar o revendedor.
f - 1 Resistência do queimador defeituosa. Consultar o revendedor.
En caso de producirse
un fallo, aparecerá un
código en el display de
información.
=
79

e - 2 Problemas de ignição. Consultar o revendedor.
e - 23
Volte a acender o aquecedor
imediatamente após a extinção.
Aguarde aprox. 30 seg. e volte a acender depois
de ter ligado aficha de novo.
e - 5 Segurança anti-queda. Reacender o aquecedor.
e - 6 Falha de combustão. Consultar o revendedor.
e - 7 Temperatura ambiente Se necessário, reacender
superior a 32°C. o aquecedor.
e - 8 Ventilador avariado. Consultar o revendedor.
e - 8 1 Frequência anormal. Insira a ficha na tomada de parede de novo.
Consultar o revendedor.
e - 9 Filtro de ar sujo Limpar o filtro.
Ûomba de combustível suja. Consultar revendedor.
Aquecedor esteve a funcionar
65 horas sem interrupção e
Desligou-se automaticamente. Reacender o aquecedor.
+
-- : --
-- : --
Contate sempre o seu revendedor para qualquer mau funcionamento que não
conste da lista acima, ou quando o erro se mantém depois da acção corretiva
descrita.
DESATIVAÇÃO AUTOMáTICA
Este aquecedor está equipado com um sistema segurança que o fará desligar
automaticamente após 65 horas de operação contínua. A seguir aparecerá no
visor:
botão
Sem combustível. Reabastecer o depósito.
+
Muito pouca ventilação. Melhorar a ventilação.
. Se desejar, pode ligar, novamente, o aquecedor pressionando o
L
(ver capítulo D).
MODO DE LIMPEZA AUTOMáTICO
Se o aquecedor for queimando continuamente durante duas horas na sua
configuração mais alta, este fará automaticamente a operação de autolimpeza. O
display mostrará o código cl:05 e depois volta para cl:01. O procedimento demora
5 minutos, durante os quais o aquecedor vai queimar na sua configuração mais
baixa, enquanto o queimador se limpa automaticamente. Quando o queimador
está limpo, o aquecedor muda, automaticamente, para a configuração mais alta.
I TECLA DE BLOQUEIO / CONTROLO PARENTAL
O bloqueio de segurança pode ser usado para evitar que as crianças,
acidentalmente, mudem as configurações do aquecedor. Quando o aquecedor
está a queimar e o bloqueio está ligado, o aquecedor apenas pode ser desligado.
As outras funções estão bloqueadas. Se o aquecedor está desligado, o bloqueio
de segurança também impede a ligação acidental do aquecedor. Ative o bloqueio
M
de segurança, pressionando a tecla
3 segundos. O indicador KEY-LOCK
I), indicando que o bloqueio de segurança foi ativado. Desligue o bloqueio de
segurança, pressionando a tecla
segundos.
e mantendo-a pressionado por mais de
aparece no visor de informações (Fig.
M
e mantendo-o pressionada por mais de 3
J USO CORRETO DE SAVE
A função SAVE permite limitar a temperatura. Quando esta função está ativada, o
aquecedor desliga-se, automaticamente, quando a temperatura ambiente for superior
à temperatura definida em 3°C. Posteriormente, quando a temperatura ambiente
descer para a temperatura ajustada, o aquecedor liga automaticamente. Ative a opção
SAVE, pressionando a tecla
função pressionando a tecla SAVE mais uma vez.
apropriada. A luz SAVE acende-se (Fig. J). Desligue a
I: Quando o sinal
aparece, o bloqueio de
segurança para crianças
foi ativado.
J: Quando a luz SAVE
acende-se o aquecedor
liga/desliga automatica-
mente de forma a man-
ter o intervalo de tem-
peraturas selecionado.
=
80

Sem o ajuste SAVE o aquecedor irá manter a temperatura definida por
aproximação, bem como, adaptar a sua capacidade de aquecimento. SAVE é
um ajuste de poupança que pode usar quando, por exemplo, não está presente
!
no espaço ou para impedir que este arrefeça.
K INDICADOR DE COMBUSTÍVEL
Quando o indicador de combustível aparece, significa que há apenas combustível
disponível para mais 10 minutos. A contagem decrescente do tempo de
aquecimento restante pode ser visto no ecrã de informação (Fig. K). Agora tem
2 opções:
Remova o tanque de combustível e encha-o fora do local (Secção B).
Carregue no botão extension J . Ao carregar neste botão, o aquecedor
permanecerá ligado por mais 60 minutos nas mesma definições.
Depois desse período o aquecedor regressará, automaticamente, à sua
posição mais baixa. No display surgirá o número 60, que descerá para 10. No
visor, aparece o número 10, ouve-se um sinal de alarme a cada dois minutos,
avisando que tem de encher o tanque removível. Se esta operação não for
efetuada, o aquecedor desliga. Quando se desliga, o aquecedor emite um sinal
de alerta. O indicador de combustível pisca, o display mostra quatro linhas (--:-
-) a piscar no visor de informações. Para interromper esta informação prima o
botão
Quando o aquecedor tiver consumido todo o combustível e desligado, vai
demorar algum tempo, após a recarga, antes que o aquecedor esteja pronto para
uso.
, mais uma vez.
K: Quando o indicador
FUEL surge, o display
indicará o número de
minutos restantes para
consumir o combustível
no reservatório.
L INDICADOR DE “RESPIRO”
Quando aparece a informação VENT a piscar, significa que a ventilação no local
é insuficiente (Fig. L). O aquecedor desliga automaticamente. Se após melhorar a
ventilação a indicação VENT permanecer, por favor contacte a loja.
M MANUTENÇÃO
Desligue o aquecedor e deixe arrefecer antes de iniciar qualquer trabalho de
manutenção. Desligue também a ficha da tomada. O seu aquecedor requer pouca
manutenção. É, no entanto, importante que limpe o filtro de ventilação com
um aspirador de pó e a grelha com um pano húmido, uma vez por semana.
Regularmente verifique também o filtro do combustível:
1
Remova o tanque removível do aquecedor e retire o filtro do combustível
(Fig. M). Algumas gotas podem ser derramadas do filtro.
2
Remova a sujidade batendo, suavemente, com o filtro de combustível,
voltado para baixo, numa superfície dura. (Nunca limpar com água!)
3
Coloque o filtro de combustível no aquecedor.
Pontualmente, é recomendável remover a poeira e as manchas com um pano
húmido, caso contrário, poderão surgir manchas de difícil remoção.
L: Uma luz a piscar
indica que necessita de
ventilação adicional.
Filtro de
combustível
M
Não remova componentes do aquecedor. Contate sempre o seu revendedor
para reparações. Quando o cabo de alimentação estiver danificado, só pode ser
!
substituído por instalador autorizado. Use um cabo novo do tipo H05 VV-F
=
81

N ARMAZENAGEM (FIM DA TEMPORADA DE AQUECIMENTO)
No fim da temporada de aquecimento, guarde o aquecedor num lugar sem pó, se
possível, na embalagem original. O combustível que sobra não pode ser usado
na próxima estação de aquecimento. Por isso recomendamos a queima total do
combustível. Se restar algum combustível não o deite fora, mas descarte-o de
acordo com a legislação de eliminação de resíduos químicos domésticos.
Inicie sempre a nova temporada de aquecimento com combustível novo. Quando
recomeçar a utilizar o aquecedor siga, novamente, as instruções (a partir do
capítulo A).
O TRANSPORTE
Tome as seguintes medidas para evitar o derramamento de combustível durante
o transporte do aquecedor:
1
Deixe arrefecer o aquecedor.
2
Retire o tanque removível do aquecedor e remova o filtro do combustível
(veja a Secção M, Fig. M). Podem verter algumas gotas do filtro; mantenha
um pano à mão. Guarde o filtro do combustível e o tanque removível fora do
aquecedor.
N
Tapón de
transporte
3
Coloque a tampa de transporte na posição do filtro do combustível (Fig. N).
Pressione firmemente. A tampa de transporte irá, tanto quanto possível,
prevenir vazamento de combustível do aquecedor durante o transporte.
4
Desloque sempre o aquecedor na posição vertical.
5
Antes do transporte ou no caso de ter usado combustível errado ou sujo,
esvazie o tanque fixo usando uma bomba de combustível. Primeiro remova
o filtro do combustível e, em seguida, insira a bomba de combustível no
tanque fixo vazio. Siga o mesmo procedimento se o tanque de combustível
contém água.
=
82

P ESPECIFICAÇÕES
Ignição eléctrico dimensões (mm) largura 376
Combustível parafina líquida
Potência (kW) máx. 3.2 alto 438
Potência (kW) min. 0.80 Acessórios:
Volume idóneo do habitáculo (m3)**
Consumo de combustível (l/hora)* 0.333 Tensão da rede 230 V
-- AC / 50 Hz
Consumo de combustível (g/hora)* 267
Duração da combustão por depósito (hora)
Capacidade do depósito (litros) 5.4 - contínuo 13 W
Peso (kg) 8.0 Potência do fusível 250V, 5A
* Em caso de estar em posição máxima ** Estes valores são a título indicativo
para aquecedor
48-120 - tampa de transporte
*
16.2
(placa de base incl.): profundo 296
- bomba manual de combustível
Consumo eléctrico da
- ignição
320 W
:
Q CONDIÇÕES DE GARANTIA
O seu aquecedor vem com uma garantia de 48 meses a partir da data da
compra. Durante este período todos os defeitos de material ou fabricação serão
solucionados gratuitamente. As seguintes disposições aplicam-se, relativamente,
a esta garantia:
1
Rejeitamos, explicitamente, qualquer outra reclamação de indemnização,
inclusive danos indiretos.
2
Quaisquer reparações ou substituição de componentes dentro do prazo de
garantia não resultarão numa extensão do prazo de garantia.
3
A garantia deixa de ser aplicável, quando o aquecedor tiver sido modificado,
terem sido utilizadas peças não originais ou quando é reparado por terceiros.
4
A garantia não se aplica às partes que estão sujeitas a desgaste normal,
tais como a esteira do queimador, qualquer tipo de vedação e a bomba de
combustível manual.
5
A garantia só é aplicável, com a apresentação da fatura de compra datada e
se não foram feitas alterações à mesma.
6
A garantia não se aplica a danos causados por ações que não estão em
conformidade com as instruções de uso, negligência, e o uso de um tipo
incorreto de combustível ou combustível fora do prazo de validade. A
utilização de combustível incorreto pode mesmo ser perigosa*.
7
Os custos de transporte e os riscos envolvidos durante o transporte do
aquecedor ou componentes serão sempre suportados pelo comprador.
A fim de evitar custos desnecessários, recomendamos que, primeiramente, leia
sempre as “instruções de uso” cuidadosamente. No caso de estas não levarem a
nenhuma solução, leve o aquecedor ao seu revendedor para reparação.
* Os produtos inflamáveis podem induzir numa combustão incontrolável provocando chamas consideráveis.
Caso isto aconteça, nunca tente mover o aquecedor, mas sempre desligá-lo imediatamente. Em caso de
emergência, utilize um extintor de incêndios apenas do tipo B: de gás carbónico ou de pó.
=
83

R FICHA DE PRODUTO
(a)
Nome do fornecedor/ marca comercial
(b) Modelo LC-DX32
(c) Classe de efi ciência energética A
(d) Saída direta de calor 3.2kW
(e) Saída indireta de calor N/A
(f) Índice de efi ciência energética 95.0%
(g) Efi ciência energética útil 100%
(h) Precauções específi cas
TOYOTOMI Europe Sales B.V.
Para montagem, instalação ou manutenção, consulte o manual de
instruções.
S PIEZAS IMPORTANTES
Placa frontal
Grelha
Placa base
Tampa do depósito
removível
Painel operacional
Depósito removível
Fuel gauge removable
tank
Filtro do ventilador
Termóstato
Ficha + cabo
Visor de informação
Tecla de
Bloqueador parental
Teclas de ajuste
(hora e temperatura)
Temporizador
Tecla SAVE
(POUPANÇA)
=
84
J
Comandos
lâmpada do TIMER
Botão modo “
altitude”
Extension

=
85

Vi takker dig for dit køb af dette “TOYOTOMI” produkt!
Toyotomi produkter bliver brugt af tilfredse kunder over hele verden. For
at vi kan være sikre på, at vores kunder rundt om i verden kan bruge vores
produkter sikkert, imødekommer vores produkter ikke kun den japanske
standard, men også standarderne i landene, hvor vi sælger vores produkter.
Hos Toyotomi afstemmer vi vores produkter til vores kunders behov og
imødekommer vores kunders tilfredshed igennem vores virksomhedsfilosofi:
“at dele glæde i dagligdagen” Vi vil fortsætte med at undersøge, udvikle og
producere produkter, som er lig med en livsstil, som omhandler effektivitet,
sikkerhed og komfort. Vi håber, at du i mange år vil nyde godt af dit
Toyotomi produkt. Inden du tager din nye Transportable ovn i brug, beder vi
dig læse brugsanvisningen omhyggeligt, således du kan være sikker på en
maksimal livstid på din Transportable ovn.
Lær vores andre produkter at kende.
Besøg os på www.toyotomi.eu for vores alle vores produkter.
1 LÆS FØRST BRUGERVEJLEDNINGEN.
2 DU BEDES KONTAKTE DIN FORHANDLER, HVIS DU ER I TVIVL.
3 POUR LIRE, DÉPLIEZ LA DERNIÈRE PAGE. 3 SE VENLIGST LISTEN MED VIGTIGE RESERVEDELE PÅ DEN SIDSTE SIDE, INDEN DU BEGYNDER AT LÆSE.
6
86

GENERELT OM BRUGEN
Dette er i store træk, hvordan Deres kaminen skal anvendes. For
yderligere information henvises der til VEJLEDNINGEN.
Fjern alt emballagemateriale (se kap. A, fig. A).
1
Fyld brændstoftanken (se kap. B, fig. C).
2
Sæt stikket i stikkontakten.
3
Tænd for kaminen på
4
Hvis De ønsker at ændre temperaturen, brug da
5
indstillingsknapperne (se kap. E).
Sluk for kaminen på
6
• På grund af brandrisikoen skal tanken fyldes, når kaminen er slukket,
eller i et andet lokale end kaminen.
• Sørg altid for at lukke tanken ordentligt efter påfyldning på sikker
afstand af alle varmekilder og åben ild (se kap. B).
• Første gang kaminen tændes, lugter den “ny” i en kort periode.
• Opbevar alle brændstofbeholdere med deres originale dæksler og
forseglinger et koldt og mørkt sted.
• Brændstof kan blive forældet: Start hver fyringssæson med nyt
brændstof.
• Brug kun vandfri paraffin af høj kvalitet, som imødekommer lokale love
(TOYOTOMI brændstof).
• Før du skifter brændstofmærke og/eller brændstoftype, skal du sørge for
at tømme den flytbare kamin helt for brændstof.
knappen (se kap. D).
knappen .
6
87

INDEN DE TÆNDER FOR KAMINEN
SØRG ALTID FOR TILSTRÆKKELIG VENTILATION
Læs denne brugervejledning grundigt, før du tager apparatet i brug, og gem den
til senere brug. Ovnen skal installeres på en sådan måde, at den overholder lokale
og nationale bestemmelser, vedtægter og standarder. Dette produkt er beregnet
til brug som en varmer i private hjem og er kun egnet til brug i tørre omgivelser,
under almindelige forhold i private hjem, indendørs i stuer, køkkener eller i
garager.
Sørg for at der er tilstrækkelig ventilation, så opvarmningen er behagelig og
sikker.
BEMÆRK: For at undgå at varmeapparatet slås fra, anbefaler vi at en dør eller
vindue sættes på klem når varmeapparatet er tændt.
Uanset model skal du altid sørge for, at kaminen bruges i et lokale, der er
tilstrækkelig stort til, at den kan bruges sikkert uden behov for ekstra ventilation
(se kap. P). Hvis lokalet er mindre end påkrævet, skal du altid åbne en dør eller
et vindue på klem (sørg for, at åbningen er cirka 2,5 cm). Det er vigtigt, at der er
tilstrækkeligt luftindtag og effektivt luftudtag i alle lokaler, hvor kaminen bruges
(begge åbninger skal have et tværsnit på mindst 50 cm
Vi anbefaler også at gøre dette i velisolerede rum eller rum uden gennemtræk og/
eller i høj højde. Brug ikke Deres kamin i kældre eller andre underjordiske rum.
Du må ikke foretage ændringer af sikkerhedssystemet, da garantien for, at
luftmåleren fungerer korrekt, dervedÛortfalder. Kontakt forhandleren, hvis du
har spørgsmål.
SÆRLIGE OPLYSNINGER FOR BRUGERE I FRANKRIG: Kaminen er fremstillet til kun
at blive brugt med brændstof, der er beregnet til flytbare kaminer, som fyrer med
flydende brændstof, i henhold til de franske dekreter af 25-06-2010 og 18-07-
2002. Det er forbudt at bruge andre former for brændstof.
Kontakt din forhandler, eller find adresser på forhandlere på vores websted.
Denne flytbare kamin, der fyrer med flydende brændstof, er beregnet til brug
som en ekstra varmekilde og ikke som en konstant varmekilde.
2
).
Kun med det rigtige
brændstof er De
garanteret en ufarlig,
effektiv og optimal brug
af Deres Kaminen.
SÆRLIGE OPLYSNINGER FOR BRUGERE I STORBRITANNIEN: Brug kun Klasse C1
petroleum i henhold til BS2869 Del 2 eller lignende.
Brugeren skal overholde følgende anvisninger om korrekt brug:
UNDLAD AT
- bruge benzin.
- bruge den flytbare kamin, der fyrer med flydende brændstof, i campingvogne,
både og førerhuse.
- bruge den flytbare kamin, der fyrer med flydende brændstof, i lokaler med
utilstrækkelig ventilation (se minimummålene for det lokale, der skal opvarmes
i skemaet med specifikationer) samt lokaler, der ligger under jordhøjde og/eller i
en højde på over 1900 meter.
- ændre kaminens sikkerhedsfunktioner.
Anvendelse af denne type opvarmning på offentlige steder kræver forudgående
tilladelse fra myndighederne. Indhent korrekte oplysninger, før kaminen tages i
brug.
DET RIGTIGE BRÆNDSTOF
Kaminen er konstrueret til at anvende vandfrit, rent petroleum af god kvalitet
(TOYOTOMI brændstof). Kun denne slags brændstoffer sikrer en ren og optimal
forbrænding. Brændstof af ringere kvalitet kan medføre:
øget risiko for funktionsfejl
ufuldstændig forbrænding
reduceret levetid for kaminen
røg og/eller os
aflejringer på gitteret eller glødenettet
Det rigtige brændstof er derfor af stor betydning for sikker, effektiv og behagelig
brug af kaminen.
Skader på kaminen og/eller funktionsfejl som følge brug af andet end anvendelse
af vandfrit, rent petroleum af god kvalitet dækkes ikke af garantien.
Spørg altid den lokale forhandler om den rigtige type brændstof til kaminen
(www.toyotomi.eu).
Denne transportprop
findes løst i kassen.
Kun med denne kan
kaminen transporteres
uden problemer. Gem
den derfor omhyggeligt!
6
6
88
88
 Loading...