

Page 1
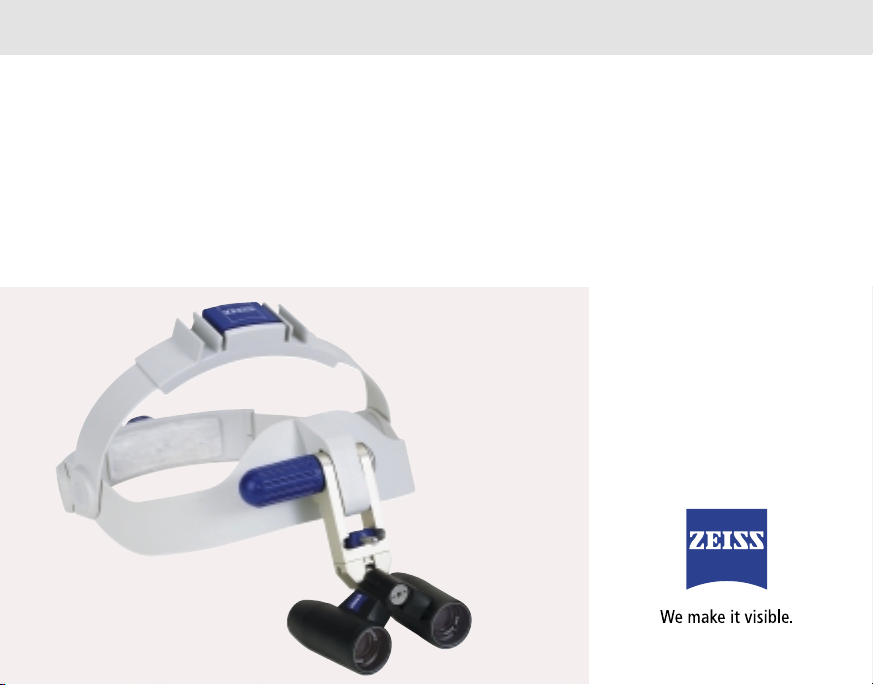
Kopflupe KS
Head-worn Loupe KS
Loupe à support frontal KS
Sistema frontal de aumento KS
Sistema frontale ingrandente KS
Gebrauchsanweisung
Instructions for Use
Mode d‘emploi
Instrucciones de manejo
Istruzioni per l‘uso
Page 2

Inhalt
Übersicht und
Bezeichnung der Teile
Lieferumfang und
Ergänzungsteile
Wichtige Hinweise
Sicherheitshinweise
Einstellen auf
individuelle Kopfgröße
und Kopfform
Positionieren und
Einstellen des Fernrohrlupen-Systems K
Auswechseln des
FernrohrlupenSystems K
Aufbewahrung
und Pflege
Desinfektion und
Sterilisation
Kaltlicht-Beleuchtung
für Kopflupe KS
Technische Daten
CE-Konformität
Testkarte
Contents
Overview and
description
of components
Delivery package
and supplementary
parts
Important notes
Safety notes
Setting support to
individual head size
and shape
Positioning and
setting teleloupe
system K
Changing teleloupe
system K
Storage and care
Disinfection and
sterilization
Cold-light illumination system for KS
head-worn loupe
Technical data
CE conformity
Test card
Sommaire
Vue d’ensemble
et désignation des
composants
Eléments constitutifs
de l’équipement et
accessoires
Remarques importantes
Consignes de sécurité
Adaptation du support
à la taille et à la forme
de la tête
Positionnement et
réglage du système de
téléloupe K
Remplacement
du système
de téléloupe K
Rangement
et entretien
Désinfection et
stérilisation
Eclairage à lumière
froide pour loupe à
support frontal KS
Caractéristiques
techniques
Conformité CE
Carte de test
3-5
6-7
8-9
10-11
12-15
16-21
22-23
24-25
26-27
28-29
30
31
32
Indice
Vista general
y denominación
de las piezas
Sistema frontal de
aumento KS y elementos
adicionales
Notas importantes
Notas de seguridad
Ajuste del soporte respecto
al perímetro y a la forma
individual de la cabeza
Posicionado y
regulación
Sustitución del
sistema de
telemicroscopio K
Conservación y cuidado
Desinfección y
esterilización
Iluminación de luz fría
para el sistema frontal
de aumento KS
Datos
técnicos
Conformidad CE
Tarjeta de test
Indice
Panoramica e
descrizione dei
componenti
Fornitura e
componenti
complementari
Avvertenze importanti
Norme di sicurezza
Regolazioni
individuali
Posizionamento e
installazione del
binocolo sistema K
Sostituzione del
binocolo sistema K
Cura e manutenzione
Disinfezione e
sterilizzazione
Illuminazione a luce
fredda per sistema
prismatico ingrandente KS
Dati tecnici
Conformità CE
Scheda test
2
Page 3
3
1212 11 8 9
10
17
17
18
17
16
14
5
15
3120 21 13
17
26194
Page 4

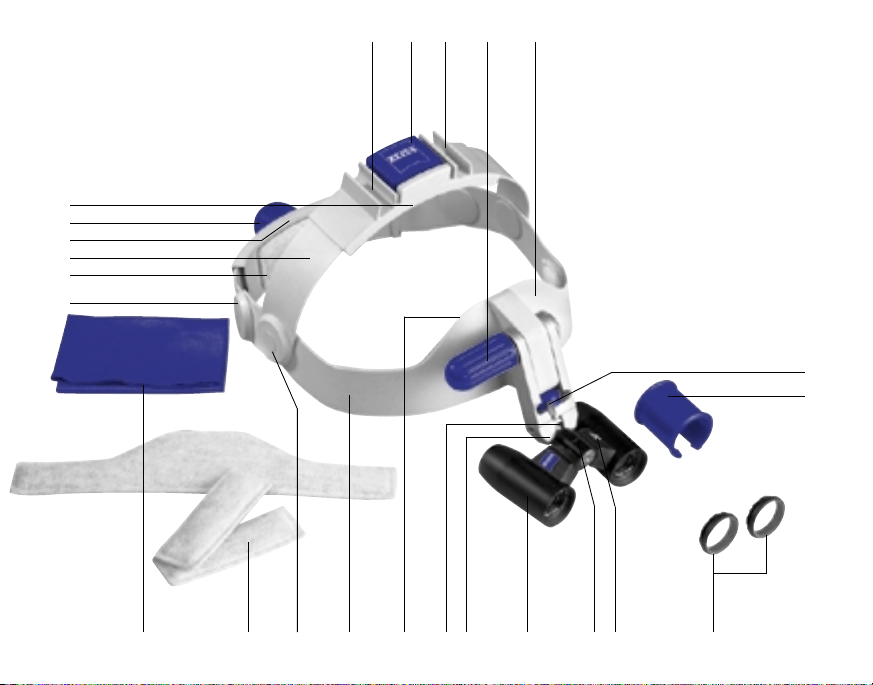
Übersicht und
Bezeichnung
der Teile (Abb.1)
Overview and
description of
components (Fig.1)
Vue d’ensemble et
désignation des
éléments
constitutifs (Fig.1)
Vista general y
denominación de
las piezas (fig.1)
Panoramica e
descrizione dei
componenti
Kopflupe KS
1 Fernrohrlupen-System K
2 Kennzeichnung:
Vergrößerung,
Arbeitsabstand
3 Knickbrücke
4 Kugeladapter
5 Support
6 Optik-Aufnahme
7 Klemmhebel für die
Optik-Aufnahme
8 Feststellknopf für die
Höhenanpassung
9 Vorderkopfband
10 Überkopfband
11 Einstelltaste für das
Überkopfband
12 Lichtleiterhalterung
13 Drehgelenk für das
Überkopfband
14 Hinterkopfband
15 Drehgelenk für das
Hinterkopfband
16 Einstellknopf für den
Kopfumfang
17 Austauschbare Pads
18 Sterilisierbarer
Berührungsschutz
19 Objektivschutz
20 Optik-Reinigungstuch
21 Pads
4
Enhorabuena por la compra de
su sistema frontal de aumento
KS de Carl Zeiss. Para poder
disfrutar de un funcionamiento
impecable y duradero de este
sistema, haga el favor de atenerse a los siguientes consejos.
Complimenti per avere acquistato il sistema prismatico
ingrandente KS di Carl Zeiss.
Per assicurare un funzionamento corretto, rispettare le
avvertenze seguenti.
Wir beglückwünschen Sie zum
Kauf der Kopflupe KS von
Carl Zeiss. Um eine dauerhafte,
störungsfreie Benutzung zu
gewährleisten, beachten Sie
bitte die folgenden Hinweise.
We congratulate you on
the purchase of the KS headworn loupe from Carl Zeiss.
To ensure safe use at all times,
please observe the following
notes.
Nous vous félicitons pour
l’acquisition de cette loupe à
support frontal KS de Carl
Zeiss. Afin que celle-ci puisse
être utilisée constamment
sans défaillance, il convient
d’observer les consignes
suivantes.
Page 5

KS Head-worn
Loupe
1 Teleloupe System K
2 Indication of
magnification/working
distance
3 Folding bridge
4 Ball adapter
5 Support
6 Optics mount
7 Clamping lever for
optics mount
8 Locking knob for vertical
adjustment
9 Front headband
10 Upper headband
11 Adjusting knob for
overhead band
12 Light guide mount
13 Hinge for
overhead band
14 Rear headband
15 Hinge for rear headband
16 Adjusting knob for head
circumference
17 Exchangeable pads
18 Sterilizable contact guard
19 Protectors for
objective lenses
20 Optical cleaning cloth
21 Pads
Sistema frontal
de aumento KS
1 Sistema de telemicros-
copio K
2 Grabado Aumento/
Distancia de trabajo
3 Puente articulado
4 Rótula
5 Soporte
6 Montura de la óptica
7 Palanca para bloquear
la montura
8 Botón para bloquear
el ajuste vertical
9 Cinta anterior
10 Cinta superior
11 Pulsador regulador de la
cinta superior
12 Ranura del conductor de luz
13 Articulación de la cinta
superior
14 Cinta posterior
15 Articulación de la cinta
posterior
16 Botón regulador del
perímetro
17
Guarniciones intercambiables
18 Protección de contacto
esterilizable
19 Protección del objetivo
20 Paño de limpieza para
superficies ópticas
21 Guarniciones
Sistema frontale
ingrandente KS
1
Sistema K ingrandente
2 Indicazione ingrandimento/
Distanza di lavoro
3 Ponte snodato
4 Adattatore a sfera
5 Supporto
6 Montatura delle ottiche
7 Seva di blocco per la
montatura 6
8 Bottone di blocco per la
regolazione in altezza
9 Cingitesta frontale
10 Cingitesta superiore
11 Tasto di regolazione per
il cingitesta superiore
12 Sostegno per le fibre ottiche
13 Snodo girevole per il
cingitesta superiore
14 Cingitesta posteriore
15 Snodo girevole per il
cingitesta posteriore
16 Bottone per la regola-
zione intorno alla testa
17 Pads intercambiabili
18 Protezione anticontatto
sterilizzabile
19 Lente per la protezione
meccanica dell’obiettivo
20 Panno per la pulizia
delle ottiche
21 Pads
Loupe à support
frontal KS
1 Système de téléloupe K
2 Valeurs imprimées du
grossissement/de la
distance de travail
3 Articulation
4 Adaptateur à rotule
5 Support
6 Monture de l’optique
7 Levier de blocage de la
monture de l’optique
8 Bouton d’immobilisation
en hauteur
9 Bandeau frontal
10 Bandeau supérieur de serre-tête
11 Touche de réglage de
serre-tête
12 Evidement pour encastrer
la fibre optique
13 Articulation du bandeau
de serre-tête
14 Bandeau postérieur
15 Articulation du bandeau
postérieur
16 Bouton de réglage du
pourtour de serre-tête
17 Garnitures interchangeables
18 Gaine stérilisable
19 Couvre-objectif
20 Chiffon pour nettoyer l’optique
21 Garnitures
5
Page 6

Lieferumfang
Kopflupe KS:
Behälter mit Kopflupe KS
3 Textilpads vorn
6 Textilpads hinten und oben
1 Optik-Reinigungstuch
1 Sechskant-Schraubendreher
Ergänzungsteile:
x Kaltlicht-Beleuchtung,
bestehend aus:
1 Beleuchtungssystem
mit Adapter für Fernrohrlupen-System K
1 Fluid-Lichtleiter
2 Lichtleiter-Befestigungen
1 Kaltlichtquelle
Schott KL 1500 LCD
x Sterilisierbarer
Berührungsschutz
x Adapter für Kaltlicht-
Beleuchtung
6
Page 7

Delivery package
for Head-worn
Loupe KS:
Container with
Head-worn Loupe KS
3 textile pads, front
6 textile pads, rear and top
1 optics cleaning cloth
1 screwdriver for hexagon
head cap screws
Supplementary
parts:
x Cold-light illumination,
consisting of:
1 illumination system with
adapter for
Teleloupe System K
1 liquid light guide
2 light guide attachments
1 Schott KL 1500 LCD
cold-light source
x Sterilizable contact guard
x Adapter for cold-light
illumination
Eléments constitutifs de la loupe à
support frontal KS
livrée:
Mallette de rangement garnie
de la loupe à support frontal
KS livrée
3 garnitures textiles du
bandeau avant
6 garnitures textiles des
bandeaux arrière et supérieur
1 chiffon de nettoyage
d’optique
1 clé hexagonale pour
vis à six pans
Accessoires:
x Eclairage à lumière froide
comprenant:
1 système d’éclairage muni
de l’adaptateur du système
de téléloupe K
1 Conducteur de lumière
à fluide
2 raccords de fixation
de fibre
1 Source de lumière froide
Schott KL 1500 LCD
x Gaine stérilisable
x Adaptateur d’éclairage à
lumière froide
Sistema frontal de
aumento KS,
compuesto de:
Estuche con el sistema frontal
de aumento KS
3 Guarniciones anteriores
6 Guarniciones posteriores
y superiores
1 Paño de limpieza para
superficies ópticas
1 Llave hexagonal
Elementos
adicionales
x Iluminación de luz fría,
formada por:
1 sistema de iluminación con
adaptador para el sistema de
telemicroscopio K
1 conductor de luz de fluido
2 anillos de bloqueo
1 fuente de luz fría Schott
KL 1500 LCD
x Protección anticontacto
esterilizable
x Adaptador para la fuente
de luz fría
Sistema frontale
ingrandente KS,
composto da:
Valigietta con il sistema
frontale ingrandente KS
3 pads di materiale tessile,
anteriori
6 pads di materiale tessile,
posterior e superiori
1 Panno per la pulizie delle
ottiche
1 Chiave esagonale
Elementi
addizionali
x Illuminazione a luce fredda
1 Sistema d’illuminazione
con adattatore per il sistema
ingrandente K
1 Fibra ottica
2 Rotelle zigrinate di blocco
1 Generatore di luce fredda
Schott KL 1500 LCD
x Protezione anticontatto
sterilizzabile
x Adattatore per
illuminazione a luce fredda
7
Page 8

8
Wichtige Hinweise
Bestimmungsgemäßer
Gebrauch
Die Kopflupe KS wird zum
binokularen, stereoskopischen
Nahsehen benutzt. Sie ist für
den Einsatz in Medizin, Labor
und Industrie vorgesehen.
Im medizinischen Bereich ist
die Kopflupe gemäß Richtlinie
93/42/EWG ein Produkt der
Klasse 1.
Hinweis auf
verwendete Symbole
Achtung, es ist eine Gefährdung oder Fehlbedienung
möglich. Beachten Sie die
Hinweise in der Gebrauchsanweisung.
!
Page 9

9
Notas importantes
Uso pertinente
El sistema frontal de aumento
KS se utiliza para la visión
binocular próxima estereoscópica en medicina, industria
y laboratorios.
De acuerdo con la definición
de la directiva 93/42/CEE, el
sistema frontal de aumento KS
es un producto de la clase I.
Nota acerca de los
símbolos utilizados
Atención: es posible un daño
o un error de manejo. Favor de
seguir las notas en las instrucciones de manejo.
Important notes
Proper use
The KS head-worn loupe is
used for binocular stereoscopic
near vision. It is intended for
use in medicine, laboratories
and industry.
In the field of medicine, the
head-worn loupe is a Class 1
device as per directive
93/42/EEC.
Key for symbols used
Caution: There may be some
risk or incorrect operation.
Please observe the notes in
the user manual.
Instructions
importantes
Emploi conformément
aux prescriptions
Destinée à des applications
médicales, expérimentales et
industrielles, la loupe à support
frontal KS se prête à la vision
stéréoscopique binoculaire de
près.
Elle constitue un appareil de la
classe 1 en vertu de la directive
93/42/CEE en vigueur dans le
domaine médical.
Remarque relative
aux symboles employés
Attention, il peut y avoir un
danger potentiel ou un risque
de manipulation erronée.
Respecter les instructions énoncées dans le mode d’emploi.
!
!
!
!
Avvertenze
importanti
Utilizzo corretto
Il sistema prismatico ingrandente KS viene utilizzato per
la visione ravvicinata binoculare
e stereoscopica. Viene utilizzato in medicina, in laboratorio
e in ambito industriale.
In ambito medico, ai sensi della
direttiva 93/42/CEE il dispositivo è un prodotto di classe 1.
Spiegazione dei
simboli utilizzati
Attenzione; potenziale pericolo
o possibilità di un comando
errato. Rispettare le istruzioni
fornite nel manuale.
Page 10

10
Sicherheitshinweise
Achten Sie auf den sicheren Sitz
Ihrer Kopflupe KS.
Schauen Sie mit der Kopflupe KS
nie direkt in die Sonne oder in
hochintensive technische Lichtquellen (z. B. Laser), da die Augen
geschädigt werden können.
Achten Sie beim Einstellen des
optischen Systems auf ausreichenden Abstand zwischen Auge
und optischem System und vermeiden Sie den direkten Kontakt
zwischen Optik-Aufnahme und
dem Nasenrücken.
Bei unsachgemäßer Behandlung
oder starker mechanischer Beanspruchung, z. B. durch Fall oder
Stoß, können Systemträger S und
Fernrohrlupen-System K beschädigt werden. Dies führt zu einer
Beeinträchtigung der Funktion,
was unbedingt eine fach- und
sachgerechte Überprüfung durch
den Hersteller erfordert.
Wird die Kopflupe KS in Kombination mit der Kaltlicht-Beleuchtung verwendet, entnehmen Sie
bitte zusätzliche Sicherheitshinweise zur Kaltlichtquelle KL 1500
LCD der zugehörigen Gebrauchsanweisung.
!
!
!
!
Page 11

11
Notas de seguridad
Fíjese en el asiento seguro de
su sistema frontal de aumento KS.
No mire nunca directamente al
sol o a fuentes luminosas altamente intensas (p. ej. láser) con
el sistema, ya que podrá dañar
sus ojos.
Al ajustar el sistema óptico, fíjese en dejar suficiente espacio
entre el ojo y el sistema óptico,
evitando el contacto directo
entre el apoyo de la óptica y el
puente de la nariz.
En caso de un tratamiento indebido o una carga mecánica elevada, por ejemplo por un golpe
o una caída, el portasistema S y
el sistema de telemicroscopio K
pueden quedar dañados. Esto
podría perturbar el funcionamiento correcto, por lo que su
sistema debe ser revisado imperativamente por el fabricante.
Al emplear el sistema frontal
de aumento KS junto con la
iluminación de luz fría, haga el
favor de familiarizarse con las
normas de seguridad adicionales de las instrucciones de
manejo de la fuente de luz
fría KL 1500 LCD.
!
!
!
!
!
!
!
!
!
!
!
!
!
!
!
!
!
!
!
Notes on safety
Ensure that your KS headworn loupe is sitting properly
and safely in position.
Never use your KS head-worn
loupe to look directly at the
sun or at high-intensity light
sources (e. g. lasers), as this
could lead to eye injury.
When you are setting the
system, ensure that there is
a sufficient distance between
your eye and the system,
and avoid direct contact
between the optics mount and
the bridge of your nose.
System carrier S and teleloupe
system K may be damaged
if subjected to improper treatment or severe mechanical
stress, e.g. if you drop them
or knock them against other
objects. This leads to an impairment of the system’s function.
If this occurs, the system must
be examined and re-checked
by the manufacturer.
If the KS head-worn loupe
is used together with the
cold-light illumination, please
see the KL 1500 LCD user manual for further notes on safety.
Consignes
de sécurité
Veiller à ce que la loupe à
support frontal KS présente une
bonne assise.
Ne jamais regarder directement
le soleil ou une source lumineuse très intense à usage technique (tel qu’un laser) à travers
la loupe à support frontal KS
sous peine d’atteintes oculaires.
S’assurer lors du réglage du système optique qu’il est suffisamment distant de l’œil et éviter le
contact direct du support de
l’optique avec l’arête du nez.
Le maniement incorrect ou de
fortes contraintes mécaniques,
imputables à un choc ou à une
chute par exemple, risquent
d’altérer le support de système
S et le système de téléloupe K
et d’induire des dysfonctionnements. Il est absolument nécessaire alors de les faire inspecter
méticuleusement par le fabricant.
Si la loupe à support frontal KS
est utilisée en combinaison avec
l’éclairage à lumière froide,
il faut respecter également les
consignes de sécurité addtionnelles qui sont énoncées dans le
mode d’emploi dédié à la source
de lumière froide KL 1500 LCD.
Norme di sicurezza
Non guardare verso il sole né
verso altre potenti fonti di illuminazione (ad esempio, laser) con
il sistema prismatico ingrandente: pericolo di danni alla vista!
Per la regolazione assicurarsi che
sia presente una distanza sufficiente tra l’occhio e il sistema
ottico ed evitare il contatto diretto tra l’alloggiamento ottico e il
dorso del naso.
In caso di manipolazione errata
o di forte sollecitazione meccanica, ad esempio in seguito a urti
o cadute, possono verificarsi
danni al supporto S e al sistema
con binocolo, con conseguente
compromissione del funzionamento; in tal caso, rivolgersi
immediatamente al produttore
che provvederà a un adeguato
controllo a regola d’arte.
Se il sistema prismatico ingrandente KS viene utilizzato insieme
all'illuminazione a luce fredda,
consultare le norme di sicurezza
aggiuntive del generatore di luce
fredda KL 1500 LCD fornite nel
relativo manuale di istruzioni.
Page 12

Einstellen des
Supports auf die
individuelle
Kopfgröße und
Kopfform
x Das Fernrohrlupen-System K
sollte zunächst nach oben
geschwenkt und mit dem
Feststellknopf (8) fixiert werden.
x Den Einstellknopf für den
Kopfumfang (16) nach links
drehen, bis der Support
bequem auf den Kopf zu
setzen ist (Abb. 2). Das Hinterkopfband (14) lässt sich
gegebenenfalls nach oben
bzw. nach unten schwenken.
x Der Support ist so auszurich-
ten, dass die Optik-Aufnahme
(6) symmetrisch über der
Nasenwurzel sitzt und die
Unterkante des Vorderkopfbandes (9) sich etwa 35
bis 45 mm oberhalb der
Augenmitten befindet
(Abb. 3).
12
2
3
Page 13

Setting support to
individual head size
and shape
x The Teleloupe System K
should first be swung upward
and locked with knob (8).
x Turn knob (16) for setting
head circumference to the left
until the support can be placed
comfortably on your head
(Fig. 2). Rear headband (14)
can be swivelled upwards and
downwards, if required.
x The support should be
adjusted in such a way that
optics mount (6) is positioned
symmetrically above the bridge
of the nose, and that the lower
edge of front headband (9) is
located approx. 35 to 45 mm
above the centre of the eyes
(Fig. 3).
Adaptation du
support à la taille et
la forme de la tête
de l’utilisateur
x Relever d’abord le système
de téléloupe K, puis le fixer à
l’aide du bouton (8).
x Tourner à gauche le bouton
de réglage du pourtour de
serre-tête (16), jusqu’à ce que
le support repose parfaitement
bien sur la tête (figure 2). Le
bandeau postérieur (14) peut
pivoter vers le haut ou le bas,
si besoin est.
x Placer le support de façon à
ce que la monture de l’optique
(6) repose symétriquement
au-dessus de la base du nez
et que le bord inférieur du
bandeau frontal (9) se situe de
35 à 45 millimètres environ
au-dessus du milieu des yeux
(figure 3).
Ajuste del soporte
respecto al
perímetro y a la
forma individual
de la cabeza
x El sistema de telemicros-
copio K tendrá que estar subido
y fijado con el botón (8).
x Girar el botón regulador
del perímetro (16) hacia la
izquierda, hasta que el soporte
pueda colocarse cómodamente
en la cabeza (Fig. 2). La cinta
posterior (14) puede subirse o
bajarse.
x El soporte se orientará de
manera que la montura de la
óptica (6) se encuentre simétricamente encima de la raíz de la
nariz y el borde inferior de la
cinta anterior (9) unos 35 hasta
45 mm encima del centro de
los ojos (Fig. 3).
Regolazione del
supporto sulla
forma e grandezza
individuale della
testa
x Il sistema ingrandente K
dovrebbe essere tenuto
sollevato e bloccato con il
bottone (8).
x Girare a sinistra il bottone
(16) per la regolazione del supporto intorno alla testa, finchè
esso si adatta comodamente
alla circonferenza della testa
(Fig. 2). Il cingitesta posteriore
(14) può essere orientato
secondo necessità verso l’alto o
verso il basso.
x Allineare il supporto in modo
che la montatura delle ottiche
(6) si trovi simmetricamente
sopra la radice del naso ed il
bordo inferiore del cingitesta
frontale (9) da 35 a 45 mm
circa sopra il centro degli occhi
(Fig. 3).
13
Page 14

x Das Überkopfband (10) ist
vom Werk mit einer Grundeinstellung versehen, die im
Bedarfsfall individuell verändert
werden kann. Mit dem Drehgelenk für das Überkopfband
(13) kann die Einstellung in
frei gewählten Rastpositionen
fixiert werden. Durch Zusammenschieben des zweiteiligen
Überkopfbandes (10) ist die
optimale Anpassung an die
Kopfhöhe möglich (Abb. 4).
Durch Drücken auf die Einstelltaste für die Kopfhöhe (11) lässt
sich das zweiteilige Überkopfband wieder auseinanderziehen (Abb. 5).
Die Einstellung des Supports
ist prinzipiell nur einmal
erforderlich. Zur Sicherheit
sollte sie vor einem Spiegel
vorgenommen werden.
x Zum Abnehmen des
Supports (5) wird der Einstellknopf für den Kopfumfang (16) nach links gedreht
und der Support nach oben
abgenommen. Wird das
Hinterkopfband (14) nach oben
geschwenkt, kann der Support
auch nach vorne abgenommen
werden (Abb. 6).
14
45
6
!
Page 15

x Upper headband (10) has
been factory-adjusted to a
basic setting which can be
changed to meet individual
requirements, if necessary.
The overhead band can be
locked in selected stop positions via hinge (13). The two
parts of overhead band (10)
can be pushed together for
optimum adaptation to the
height of the user’s head
(Fig. 4). To pull apart the two
parts of the overhead band
again, press knob (11) for
setting the head height
(Fig. 5).
The support normally needs
to be set once only. It is
recommended that the
adjustment procedure be
performed in front of a mirror.
x To remove support (5),
turn knob (16) for adjusting
the head circumference to the
left and remove the support
in an upward direction. The
support can also be removed
in a forward direction by
swivelling rear headband (14)
upwards (Fig. 6).
x Le bandeau supérieur (10)
est préréglé à l’usine sur un
certain écartement qui peut
être modifié individuellement,
si nécessaire. L’articulation du
bandeau serre-tête (13) permet
de bloquer la position requise
sur l’un des crans ainsi offerts.
Le coulissement simultané des
deux parties du bandeau
supérieur (10) permet à l’utilisateur de l’adapter parfaitement à la hauteur de sa tête
(figure 4). Il lui suffit d’appuyer
sur la touche de réglage du
serre-tête (11) pour pouvoir
actionner de nouveau les deux
éléments du bandeau (Fig. 5).
En principle, le réglage du
support ne s’impose qu’une
seule fois. Il est recommandé
d’y procéder devant un miroir
pour plus d’assurance.
x Le support (5) est ôté, en
tournant à gauche le bouton
de réglage du pourtour de
serre-tête (16). Il peut être
alors soulevé. Si le bandeau
postérieur (14) est relevé,
il est possible de retirer le
support par l’avant (Fig. 6).
x En la fábrica, la cinta superior
(10) ha sido ajustada a una
posición básica, modificable de
manera individual. La articulación de la cinta superior (13)
permite fijarla en posiciones de
enclavamiento discrecionales.
Acercando las dos partes de la
cinta superior (10), se la adapta
óptimamente a la altura de la
cabeza (Fig. 4). Las dos partes
de la cinta superior se separan
oprimiendo el pulsador regulador (11) (Fig. 5).
En general es suficiente ajustar
el soporte una sola vez; para
más seguridad convendría
hacerlo delante de un espejo.
x El soporte (5) se quita
hacia arriba después de girar
el botón (16) hacia la izquierda.
Cuando se sube la cinta
posterior (14), es posible
retirarlo hacia adelante
(Fig. 6).
x Il cingitesta superiore (10) ha
un’impostazione di base eseguita in stabilimento, che in
ogni caso può essere adattata
alle necessità individuali.
A mezzo dello snodo girevole
(13), il cingitesta superiore
può essere bloccato in ogni
posizione voluta. Le due parti
che compongono il cingitesta
(10) superiore vengono spinte
l’una contra l’altra per trovare
la posizione più comoda sulla
sommità del capo (Fig. 4).
Premendo sul tasto (11), le due
parti si separano nuovamente
(Fig. 5).
La regolazione del supporto si
esegue normalmente una volta
sola. La cosa migliore è di farla
davanti ad uno specchio.
x Per togliere il supporto (5)
girar verso sinistra il bottone
per la regolazione intorno alla
circonferenza della testa (16) e
sollevare in alto il supporto.
Esso può essere tolto anche in
avanti, alzando il cingitesta
posteriore (14) (Fig. 6).
15
!
!
!
!
Page 16

Positionieren und
Einstellen des
FernrohrlupenSystems K auf den
Augenabstand und
die Durchblickhöhe
x Durch Carl Zeiss wird bereits
eine Grundeinstellung in Bezug
auf den Augenabstand und die
Durchblickhöhe vorgenommen.
x Bei der Anpassung des
Supports (5) befindet sich das
Fernrohrlupen-System K (1) zunächst in der oberen Position.
Man ergreift es ein- oder
beidhändig (ggf. mit dem
Berührungsschutz (18)) und
führt es nach oben. Eine
interne Rastscheibe ermöglicht
jede Position. Hierzu ist der
Feststellknopf für die
Höhenanpassung (8) vorher
festzuziehen.
x Aus der Grundstellung
wird nach der Anpassung des
Supports (5) das FernrohrlupenSystem K in die Gebrauchsstellung vorgeschwenkt. Dazu
wird es ein- oder beidhändig
(ggf. mit dem Berührungsschutz (18)) nach unten geführt
(Abb. 7).
16
7
Page 17

Positioning and
setting of
Teleloupe System K
to PD and viewing
height of user
x An initial setting for the PD
and viewing height has already
been made by Carl Zeiss before
delivery of the system.
x To set support (5), Teleloupe
System K (1) should first be
located in its upper position,
with knob (8) for locking
vertical adjustment tightened.
Hold Teleloupe System K (1)
with one or two hands (using
contact guard (18), if necessary) and guide it upwards.
An internal locking disk allows
any desired position to be set.
x After support (5) has been
adjusted, the Teleloupe System
is swung forward out of the
initial setting into the position
of use. To do this, it is held
with one or two hands
(with contact guard (18),
if necessary) and moved
downwards (Fig. 7).
Positionnement et
réglage du système
de téléloupe K sur
la distance interpupillaire et à la
hauteur d’observation souhaitée
x L’écart interoculaire et la
hauteur d’observation sont
réglés par l’établissement
Carl Zeiss sur des valeurs
prédéterminées.
x Le système de téléloupe K (1)
se trouve d’abord dans une
position relevée au moment
d’adapter le support (5). Il y est
bloqué, en serrant à fond le
bouton d’immobilisation en
hauteur (8). Saisi d’une main
ou bien des deux (enveloppé)
de la gaine (18), lecas échéant),
il est dirigé vers le haut, suite à
quoi il est librement orientable
dans la position requise au
moyen d’un disque à crans
d’arrêt interne.
x Un fois le support (5) adapté,
le système de téléloupe K (1)
est abaissé dans la position
requise d’une main ou bien des
deux (enveloppé de la gaine
(18), le cas échéant), comme
décrit sur la figure 7.
Posicionado y regulación del sistema de
telemicroscopio binocular K en función
de la distancia interpupilar y de la altura
deobservación
x La casa Carl Zeiss ya ha
procedido a la regulación
básica de la distancia interpupilar y de la altura de
observación.
x Al adaptar el soporte (5),
el sistema K (1) se encuentra
en la posición superior. El sistema K (1), en caso necesario
recubierto de la protección de
contacto (18) se toma con una
o bien ambas manos y se sube.
Un disco de enclavamiento
permite disponerlo en posciones discrecionales. Para ello,
se cierra con anterioridad el
botón (8).
x Una vez adaptado el soporte
(5), se toma con una o bien
ambas manos el sistema K (1),
en caso necesario recubierto
de la protección de contacto
(18) y se baja a la posición de
uso (Fig.7).
Posizionamento e
messa a punto del
sistema ingrandente
K sulla distanza
interpupillare e
sull’altezza dell’asse
di sguardo
x Una prima impostazione sulla
distanza interpupillare e sull’altezza dell’asse di sguardo
viene eseguita in fabbrica
presso la Carl Zeiss.
x Per l’adattamento del
supporto (5), il sistema ingrandente K (1) viene portato nella
sua posizione superiore, spingendolo in alto con una o due
mani, usando, se necessario, la
protezione anticontatto (18).
Un disco interno di fermo
permette di metterlo nella
posizione voluta. Per questo,
si stringe prima il bottone (8).
x Dopo aver adattato il
supporto (5), il sistema K (1)
viene messo in posizione d’uso.
A questo scopo esso viene
abbassato con una o entrambe
le mani usando, se necessario,
la portezione anticontatto (18)
(Fig. 7).
17
Page 18

x Durch Linksdrehung lassen
sich der Feststellknopf für die
Höhenanpassung (8) und der
Klemmhebel für die Optik-Aufnahme (7) lösen. Dabei sollte
das Fernrohrlupen-System K
mit der linken Hand festgehalten werden. Das Fernrohrlupen-System K (1) lässt sich in
dieser Situation frei führen und
bzgl. Durchblickhöhe, Neigung
und Abstand zu den und
zwischen den Augen einstellen
(Abb. 8). Dabei ist es wichtig,
den Arbeitsabstand so zu
wählen, dass zunächst
die Testscheibe (Seite 32)
scharf gesehen wird. Das
Fernrohrlupen-System K (1)
wird dann in die gewünschte
Position gebracht und der
Augenabstand so eingestellt,
dass sich ein einheitliches, kreisrundes und scharf begrenztes
Sehfeld ergibt (Abb. 9).
Diese Einstellung wird durch
Rechtsdrehung des Feststellknopfes für die Höhenanpassung (8) und des Klemmhebels für die Optik-Aufnahme
(7) fixiert (Abb. 10 und 11).
18
89
10
11
Page 19

x Knob (8) for locking vertical
adjustment and lever (7) for
locking the optics mount can
be loosened by turning them
to the left. The Teleloupe
System K should be held with
the left hand when this is
being done. Teleloupe System
K (1) can then be moved freely
and the viewing height, tilt,
and the distance to and
between the eyes can be set
(Fig. 8). It is important to
set the working distance in
such a way that the test disk
(page 32) is seen in sharp
focus. Teleloupe system K (1) is
then brought into the required
position of use and the PD is
set so that a uniform, circular
and sharply defined field of
view is obtained. This position
is locked by turning knob (8)
for locking vertical adjustment
and lever (7) for locking the
optics mount to the right
(Figs. 10 and 11).
x Le bouton d’immobilisation
en hauteur (8) et le levier de
blocage (7) de la monture de
l’optique sont desserrés par
rotation à gauche, tout en
maintenant le système de
téléloupe K de la main gauche.
Il est possible à ce stade de
manœuvrer sans entrave le
système de téléloupe K (1) et
d’en régler la hauteur d’observation, l’inclinaison, ainsi que la
distance par rapport aux yeux
et l’écart interoculaire (figure
8). Ce faisant, il importe de
choisir la distance de travail de
façon à voir d’abord le disque
de test avec netteté (page 32).
Le système de téléloupe K (1)
est ensuite incliné comme
voulu et l’écart interoculaire
est ajusté de façon à percevoir
un seul champ de vision
circulaire bien défini. Il est fixé
dans la position appropriée,
en tournant à droite le bouton
d’immobilisation en hauteur (8)
et le levier de blocage (7) de
la monture de l’optique
(figures 10 et 11).
x El botón de bloqueo de la
regulación vertical (8) y la
palanca de bloqueo de la montura (7) se sueltan girándolos
hacia la izquierda. Durante esta
operación, el sistema K (1) se
sujeta con la mano izquierda.
En esta disposición, el sistema
(1) se mueve libremente y se
ajustan su altura de observación, inclinación, distancia a los
ojos así como interpupilar.
(Fig. 8). Es importante elegir
la distancia de trabajo de
modo que primeramente se
vea nítido el test (pág 32).
A continuación se gira el
sistema K (1) a la posición
deseada y se regula la distancia
interpupilar de modo que se
obtenga un campo visual
iluminado de manera homogénea, circular y nítidamente
delimitado (Fig. 9).
Esta posición se fija girando a
la derecha el botón de bloqueo
(8) y la palanca de bloqueo de
la montura (7) (Fig. 10 e 11).
x Il bottone di blocco per la
regolazione in altezza (8) e la
leva per il fermo della montatura (7) vengono allentati,
tenendo fermo con la mano
sinistra il sistema K. Ora esso
può essere mosso liberamente
e venir impostato sulla distanza
interpupillare, sull’inclinazione
voluta e sull’altezza dell’asse di
sguardo (Fig. 8). E’ importante
mettere il sistema a punto su
una distanza di lavoro che
permetta di vedere nitidamente
la scheda (pag 32). Il sistema K
(1) viene allora disposto nella
posizione voluta e la distanza
interpupillare regolata in modo
che produca un campo visivo
circolare, uniformemente
illuminato e ben definito.
Questa posizione viene poi
fissata girando verso destra
bottone di blocco (8) per la
regolazione in altezza e la
leva (7) per il fermo della
montatura (Fig. 10 e 11).
19
Page 20

Der hier beschriebene Einstellvorgang ist im Prinzip nur einmal
durchzuführen. Die Anpasselemente des Supports
gewährleisten eine weitgehend
rekonstruierbare Einstellung.
Allenfalls sind kleinere
Korrekturen notwendig.
x Die Innenseite des Supports ist
aus Gründen des Tragekomforts
an verschiedenenen Stellen mit
Pads (17) ausgestattet
(Abb. 12). Die austauschbaren
Pads (17) werden durch Klettverschlüsse fixiert. Sie sind
waschbar (+ 40 °C Feinwäsche).
Zu jedem Support gehören
zwei Garnituren Pads zum
Austauschen.
20
12
The setting procedure described above normally needs to
be performed only once. The
adjusting components of the
support guarantee that the
setting is largely reproducible.
If corrections are necessary,
they will be very minor.
Page 21

x The inside of the support is
fitted with pads (17) in different areas to ensure optimum
wearing comfort (Fig. 12).
The exchangeable pads (17)
are held in position by velcro
fasteners. They are washable
(mild detergent at + 40 °C).
Every support is supplied with
two spare sets of pads.
Une seule opération de réglage,
comme décrite précédemment,
s’avère nécessaire, en principe.
Les éléments d’adaptation du
support garantissent en effet
sa réutilisation en l’état, mises
à part les infimes rectifications
qui s’imposent pour parfaire
l’ajustage.
x Pour rendre son port plus
agréable, le support est revêtu
de garnitures (17) à divers
endroits (figure 12) de sa
face interne. Les garnitures
interchangeables (17) sont
fixées par une fermeture
velcro. Elles sont lavables à
+ 40 °C sur un programme de
linge délicat. Chaque support
est assorti de deux jeux de
garnitures interchangeables.
En general, se procede sólo
una vez al ajuste descrito más
arriba. Los elementos reguladores garantizan un ajuste
ampliamente repetible
que no precisa sino ligeras
correcciones.
x Por razones de comodidad,
se han previsto en el interior
del soporte varias guarniciones
(17) (Fig. 12). Estas guarniciones (17) sustituibles y lavables
(detergente suave, + 40 °C) se
fijan con cintas Velcro. Con
cada soporte, se suministran
dos juegos de guarniciones de
repuesto.
Il procedimento di messa a
punto deve essere normalmente eseguito una sola volta.
Gli elementi per l’adattamento
del supporto garantiscono una
messa a punto ampiamente
riproducibile. Possono essere
necessarie solo piccole correzioni.
x La parte interna del supporto
è dotata di pads (17) in diversi
punti per aumentare il comfort
nell’uso (Fig. 12).
I pads (17) sono intercambiabili
e tenuti in posizione da speciali
fermagli. Possono essere lavati
(a + 40 °C con un detersivo
per biancheria delicata). Ogni
supporto viene fornito con due
corredi di pads di ricambio.
21
Page 22

Auswechseln des
FernrohrlupenSystems K
Durch Linksdrehung den
Klemmhebel (7) sowie die
seitliche Schraube an der
Optik-Aufnahme (6) lösen
und das Fernrohrlupen-System
K bis zum Anschlag nach vorne
schwenken. Die Optik-Aufnahme (6) lässt sich dann über
eine Führung mit dem
Fernrohrlupen-System K (1)
nach vorne abnehmen
(Abb. 13).
Fernrohrlupen-System K Ihrer
Wahl in die Optik-Aufnahme
(6) einführen und diese wieder
am Support befestigen.
22
13
Page 23

Changing
Teleloupe
System K
Loosen clamping lever (7) by
turning it to the left and loosen
the lateral screw on optics
mount (6). Swing Teleloupe
System K forward as far as it
will go. Optics mount (6) can
then be removed with
Teleloupe System K (1) by
moving it forward along
a guideway (Fig. 13).
Insert the teleloupe system of
your choice in optics mount (6)
and re-attach the mount to the
support.
Remplacement
du système de
téléloupe K
Desserrer le levier de blocage
(7), ainsi que la vis qui se
trouve sur le côté de la monture d’optique (6), en les tournant vers la gauche. Basculer
ensuite le système de téléloupe
K vers l’avant jusqu’en butée.
Une glissière permet alors de
retirer par l’avant la monture
d’optique (6) et le système de
téléloupe K (1) (figure 13).
Insérer le système de téléloupe
choisi dans la monture de
l’optique (6) et la fixer de
nouveau au support.
Sustitución del
sistema de
telemicroscopio
binocular K
Girar la palanca (7) hacia la
izquierda y soltar el tornillo
lateral de la montura de la
óptica (6) y desplazar el sistema
de telemicroscopio K hacia
adelante, hasta llegar al tope.
La montura (6) con el sistema
de telemicroscopio K (1) se
retira hacia adelante moviéndola a lo largo de una guía
(Fig. 13).
Introducir en la montura (6)
el sistema de telemicroscopio
binocular deseado y volver a
fijar ésta en el soporte.
Sostituzione
del sistema
ingrandente K
Girar la leva (7) verso la sinistra
e allentare la vite laterale sulla
montatura delle ottiche (6).
Spostare il sistema ingrandente
K in avanti fino ad arrivare
all’arresto. La montatura (6)
insieme al sistema ingrandente
K (1) si rimuovono in avanti
spostandola nella sua guida.
(Fig. 13).
Inserire il sistema ingrandente,
a seconda delle necessità,
nella montatura (6), che verrà
nuovamente fissata alsupporto.
23
Page 24

Aufbewahrung
und Pflege
Wird die Kopflupe KS nicht
benutzt, sollte sie in dem
Behälter aufbewahrt werden
(Abb. 14). Abb. 15 zeigt die
zusätzliche Unterbringung
von Beleuchtungssystem und
Lichtleiter.
Die Kopflupe KS bedarf keiner
besonderen Pflege. Allgemeine
Verschmutzungen sind auf die
übliche Weise zu entfernen.
Lösungsmittel und scharfe
Reinigungsmittel dürfen jedoch
nicht eingesetzt werden.
Zur Reinigung verschmutzter
Glasoberflächen verwenden
Sie das mitgelieferte Reinigungstuch (20). Schutz vor
Verschmutzung oder mechanischer Beschädigung bietet
der Objektivschutz (19)
(Abb. 16), der in das Gehäuse
eingeschraubt wird und zum
Lieferumfang des Fernrohrlupen-Systems K gehört.
Wichtiger Hinweis:
Die Kopflupe KS ist nicht
wasserdicht. Eine Reinigung
im Ultraschallbad darf deshalb
keinesfalls vorgenommen
werden.
24
14
16
15
!
Page 25

Storage and care
x When the Head-worn Loupe
KS is not in use, it should
always be kept in its special
storage container (Fig. 14).
Fig. 15 shows the additional
accommodation for the
illumination system and light
guide.
x The Head-worn Loupe KS
does not require any special
care. Dirt on the support and
housing should be removed
in the usual way. However,
solvents must not be used.
The special cleaning cloth (20)
enclosed should be used to
clean soiled glass surfaces.
To prevent soiling or mechanical damage to the objectives,
we recommend that lens
protectors (19) be used to protect them (Fig. 16); the lens
protectors, which are included
in the delivery package of the
teleloupe system K, are
screwed into the housing.
Important note:
The Head-worn Loupe KS is
not water-proof. No attempt
must therefore be made to
clean it in an ultrasonic bath.
Rangement et
entretien
x Veiller à ranger la loupe à
support frontal KS dans la mallette spéciale prévue à cet effet
en cas d’inutilisation (figure 14).
La figure 15 montre comment
y ranger aussi le dispositif
d’éclairage et la fibre optique.
x La loupe à support frontal
KS n’exige aucun entretien particulier. Pour en supprimer la
saleté, recourir à une méthode
usuelle, mais proscrire les solvants et les détergents agressifs. Nettoyer les surfaces en
verre à l’aide du chiffon spécial
optique fourni (20). Les couvreobjectifs (19) (Fig. 16) qui sont
compris dans l’équipement
du système de téléloupe K
sont vissés dans le boîtier pour
prémunir les objectifs des
saletés et des altérations
mécaniques (Fig. 4).
Remarque importante:
La loupe à support frontal KS
n’étant pas étanche, elle ne
doit donc être nettoyée en
aucun cas dans un bain à
ultrasons.
Conservación y
cuidado
x El sistema frontal de aumen-
to KS no empleado se guardará
siempre en su estuche especial
(Fig. 14). En la fig. 15 se ve
cómo guardar también el
sistema de iluminación y el
conductor de luz.
x El sistema frontal de aumen-
to KS no necesita cuidado
especial. Las particulas de
suciedad que se hayan depositado en el soporte y en el
sistema se quitarán de manera
habitual, no estando permitido
el uso de disolventes.
Las superficies ópticas del
objetivo y del ocular se
limpiarán únicamente con el
paño especial, incluido en el
suministro (20). Las protecciones (19), incluidas en el
suministro del telemicroscopio
K, se enroscan en la caja,
evitando así la suciedad y
daños mecánicos (Fig. 16).
Nota importante:
El sistema frontal de aumento
KF no es hermético, por lo que
nunca deberá intentar de lavarlo en un baño de ultrasonido.
Custodia e
manutenzione
x Riporre il sistema frontale
ingrandente KS in caso di
mancato utilizzo, nell’apposita
valigetta (Fig. 14). La figura 15
mostra come sistemare anche
il sistema di illuminazione e il
fotoconduttore.
x Il sistema frontale ingran-
dente KS non necessita
di particolare manutenzione.
La pulizia del supporto e delle
parti esterne avviene normalmente. Non utilizzare perciò
solventi.Per la pulizia delle
ottiche utilizzare l’apposito
panno (20). Le lenti (19), in
dotazione nella fornitura,
offrono un’ottima protezione
contro la polvere ed evitano
danni meccanici (16). Vengono
avvitate direttamente nella
struttura.
Indicazione importante:
il sistema frontale ingrandente
KF non è impermeabile. Non
usate perciò mai il bagno ad
ultrasuoni.
25
!
!
!
!
Page 26

Desinfektion
Die Desinfektion ist durch
Abreiben mit einem feuchten
Desinfektionstuch möglich.
Sterilisation des
Berührungsschutzes
Die Sterilisation des Berührungsschutzes ist im Autoklaven bei 2,05 bar, 121 ºC
und einer Sterilierzeit von
15 Minuten möglich.
Disinfection
Disinfection of the Head-worn
Loupe KS is possible by rubbing
with a moist disinfectant cloth.
Sterilization of the
contact guard
The contact guard can be
autoclaved at 2.05 bar, 121 ºC
for a duration of 15 minutes.
Désinfection
Frotter la loupe à support frontal KS au moyen d’un chiffon
désinfectant humide.
Stérilisation de la
garniture de
protection
La garniture de protection est
stérilisable en autoclave à
une pression de 2,05 bars et
à une température de 121 ºC
pendant 15 minutes.
Desinfección
La desinfección del sistema
frontal de aumento KS se
realiza frotando el sistema
con un paño desinfectante
húmedo.
Esterilización de
la protección de
contacto
La esterilización de las protecciones de contacto podrá
realizarse en el autoclave
con 2,05 bar, 121 ºC y un
tiempo de esterilización de
15 minutos.
26
Page 27

Disinfezione
La disinfezione è possibile
strofinando con un fazzoletto
umido da disinfezione.
Sterilizzazione
della protezione di
contatto
La protezioni a contatto
sono sterilizzabili in autoclave
a 2,05 bar, 121 ºC per
15 minuti.
27
Page 28
28
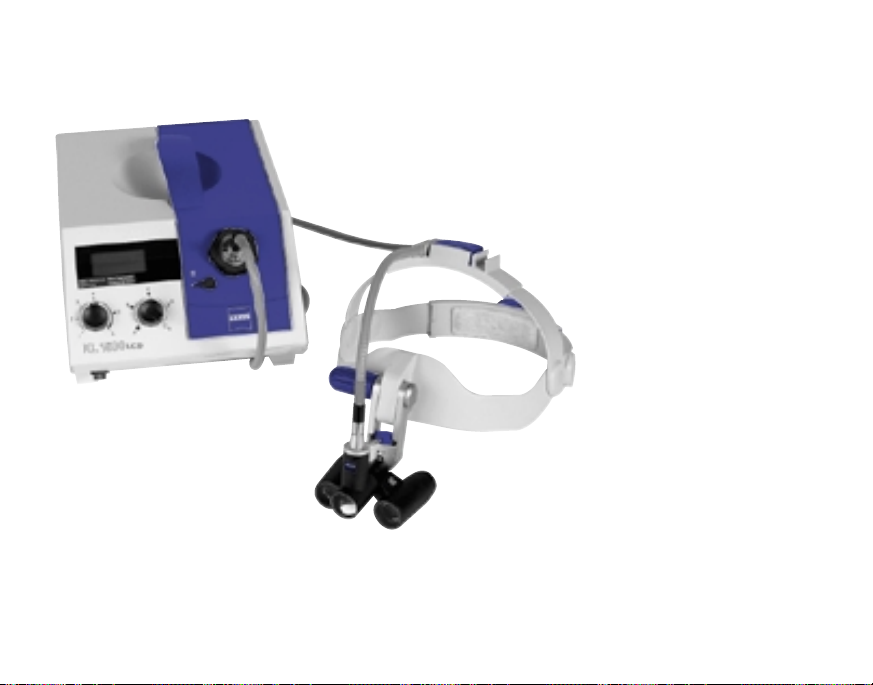
KaltlichtBeleuchtung für
Kopflupe KS
Die Kopflupe KS kann in
Kombination mit der KaltlichtBeleuchtung von Carl Zeiss
benutzt werden (Abb. 17).
Diese ist für den Einsatz in
Medizin, Labor und Industrie
vorgesehen.
Im Bereich der Medizin ist die
Beleuchtung gemäß Richtlinie
93/42/EWG ein Gerät der
Klasse 1 und zur intensiven
Ausleuchtung von Beobachtungsfeldern ohne Patientenkontakt bestimmt. Bitte
beachten Sie hierzu die
Hinweise in der zugehörigen
Gebrauchsanweisung.
Die Kaltlicht-Beleuchtung ist
nicht im Lieferumfang der
Kopflupe KS enthalten.
Page 29

29
Iluminación de
luz fría para
el sistema frontal
de aumento KS
El sistema frontal de aumento
KS es empleable en combinación con la iluminación de luz
fría de Carl Zeiss (Fig. 17), prevista para el uso en medicina,
laboratorios e industria.
En el ámbito de la medicina,
la iluminación es un equipo de
la clase I de acuerdo con la
definición de la directiva
93/42/CEE, destinada a al
iluminación intensa de campos
de observación sin contacto
con el paciente. Favor de seguir
las notas respectivas de las
instrucciones de manejo correspondientes.
La iluminación de luz fría no
está contenida en el volumen
de suministro del sistema
frontal de aumento KS.
Cold-light
illumination for KS
head-worn loupe
The KS head-worn loupe can
be used together with the
cold-light illumination from
Carl Zeiss (Fig. 17), which is
intended for use in medicine,
laboratories and industry.
In the field of medicine, the
illumination is a Class 1 device
as per directive 93/42/EEC, and
is intended for high-intensity
illumination of observation
fields without patient contact.
Please observe the notes in the
respective user manual.
The cold-light illumination is
not included in the delivery
package of the KS head-worn
loupe.
Eclairage à lumière
froide pour loupe à
support frontal KS
La loupe à support frontal KS
est utilisable en combinaison
avec l’éclairage à lumière froide
de Carl Zeiss (Fig. 17) qui est
destiné à un emploi en médecine, au laboratoire ou dans
l’industrie.
L’éclairage à lumière froide
constitue un appareil de la
classe 1 en vertu de la directive
93/42/CEE en vigueur dans le
domaine médical, où il sert à
illuminer les champs d’observation avec une haute intensité
sans contact avec le patient.
Veuillez tenir compte des
informations fournies à ce
sujet dans le mode d'emploi
qui lui est dédié.
L’éclairage à lumière froide
n’est pas compris dans l’équipement de la loupe à support
frontal KS.
Illuminazione a
luce fredda per
sistema prismatico
ingrandente KS
Il sistema prismatico ingrandente KS può essere utilizzato
congiuntamente all’illuminazione a luce fredda di Carl Zeiss
(Fig. 17), idonea per l’impiego
in medicina, in laboratorio
e in ambito industriale.
In ambito medico, ai sensi della
direttiva 93/42/CEE il dispositivo è un prodotto di classe 1,
destinato all’illuminazione
intensiva del campo di osservazione, senza contatto con il
paziente. Si prega di rispettare
le avvertenze indicate nel
rispettivo manuale di istruzioni.
L’illuminazione a luce fredda
non è compresa nella dotazione standard del sistema
prismatico ingrandente KS.
Page 30

Fernrohrlupen-System K
Teleloupe system K
Système de téléloupe K
Sistema de telemicroscopio K
Sistema telescopico ingrandente K
Vergrößerung 4x 4x 4,3x 4,5x 5x 4,5x 5x 6x 8x
Magnification 3,2x 3,3x 3,5x 3,6x 4x
Grossissement
Aumentos
Ingrandimenti
Arbeitsabstand, vom Auge gemessen mm 500 450 400 350 300 250 235 215 190
Working distance measured from eye in mm
Distance de travail mesurée à partir de l’œil en mm
Distancia del vértice corneal al objeto en mm
Distanza di lavoro (misurata dall’ochio) in mm
Freier Objektabstand mm 425 375 325 275 220 180 155 135 110
Free distance to object in mm 430 380 330 280 230
Libre distance du verre à l’objet en mm
Distancia de trabajo en mm
Distanza libera dall’oggetto in mm
Sehfeld mm 93 81 68 56 44 40 36 30 23
Field of view in mm 115 100 86 71 56
Champ visuel en mm
Diámetro del campo visual en mm
Diametro del campo visivo in mm
Baulänge der optischen Systeme mm 51,5–62
Length of optical systems in mm
Longueur des systèmes optiques en mm
Longitud mecánica de los sistemas ópticos en mm
Lunghezza dei sistemi ottici in mm
Gewicht Kopflupe KS ca. 330 g
Weight (Head-worn Loupe KS) approx.
Poids de la loupe à support frontal KS approx.
Peso aprox. del sistema frontal de aumento KS
Peso dello sistema frontale di ingrandimento KS circa
Technische Daten
Specifications
Caractéristiques
techniques
Datos técnicos
Dati tecnici
Änderungen in Ausführung und
Lieferumfang sowie technische
Weiterentwicklung vorbehalten.
Subject to change.
Sous réserve de modifications
techniques.
Nos reservamos el derecho a
modificaciones técnicas.
Con riserva di modifiche nel quadro
del progresso tecnologico.
30
Page 31

31
CE-Konformität
Die Kopflupe KS erfüllt
die grundlegenden
Anforderungen nach
Anhang 1 der Richtlinie
93/42/EWG über
Medizinprodukte und
trägt entsprechend das
CE-Zeichen.
CE Conformity
The KS head-worn
loupe meets the essential requirements stipulated in Annex 1 to
the 93/42/EEC Directive
governing medical
devices, and bears the
CE label accordingly.
Conformité CE
La loupe à support
frontal KS remplit les
prescriptions fondamentales énoncées
dans l’annexe 1 de la
directive 93/42/CEE
relative aux produits
à usage médical et il
porte à ce titre le sigle
d’homologation
européenne CE.
Conformidad CE
El sistema frontal de
aumento KS cumple
los requisitos fundamentales de acuerdo
al anexo I de la directiva
93/42/CEE acerca de
productos médicos y
está dotado de la sigla
CE correspondiente.
Conformità CE
Il sistema prismatico
ingrandente KS soddisfa i requisiti dell’allegato 1 della Direttiva
93/42/CEE sui dispositivi
medici ed è provvisto
del relativo marchio CE.
Page 32

32
Testkarte (Abb. 18)
Test card (fig. 18)
Carton de cible d’ajustage
Tarjeta de test (Fig. 18)
Scheda di prova (fig. 18)
Page 33

Carl Zeiss Vision
D-73428 Aalen
Germany
www.zeiss.de/opto
optics@zeiss.de
G 20-660-d/e/f/s/i Printed in Germany DBD-H-VI/2005 Poo
 Loading...