


P1028247-001 Rev. C
Zebra® KR203
Kiosk Receipt Printer
Hardware Integrator
Guide

© 2014 ZIH Corp. The copyrights in this manual and the software and/or firmware in the printer
described therein are owned by ZIH Corp. Unauthorized reproduction of this manual or the software and/or
firmware in the printer may result in imprisonment of up to one year and fines of up to $10,000
(17 U.S.C.506). Copyright violators may be subject to civil liability.
This product may contain ZPL®, ZPL II®, and ZebraLink™ programs; Element Energy Equalizer®Circuit;
E3®; and Monotype Imaging fonts. Software © ZIH Corp. All rights reserved worldwide.
ZebraLink and all product names and numbers are trademarks, and Zebra, the Zebra logo, ZPL, ZPL II,
Element Energy Equalizer Circuit, and E3Circuit are registered trademarks of ZIH Corp. All rights reserved
worldwide.
All other brand names, product names, or trademarks belong to their respective holders. For additional
trademark information, please see “Trademarks” on the product CD.
Proprietary Statement This manual contains proprietary information of Zebra Technologies Corporation
and its subsidiaries (“Zebra Technologies”). It is intended solely for the information and use of parties
operating and maintaining the equipment described herein. Such proprietary information may not be used,
reproduced, or disclosed to any other parties for any other purpose without the express, written permission
of Zebra Technologies.
Product Improvements Continuous improvement of products is a policy of Zebra Technologies. All
specifications and designs are subject to change without notice.
Liability Disclaimer Zebra Technologies takes steps to ensure that its published Engineering
specifications and manuals are correct; however, errors do occur. Zebra Technologies reserves the right to
correct any such errors and disclaims liability resulting therefrom.
Limitation of Liability In no event shall Zebra Technologies or anyone else involved in the creation,
production, or delivery of the accompanying product (including hardware and software) be liable for any
damages whatsoever (including, without limitation, consequential damages including loss of business
profits, business interruption, or loss of business information) arising out of the use of, the results of use of,
or inability to use such product, even if Zebra Technologies has been advised of the possibility of such
damages. Some jurisdictions do not allow the exclusion or limitation of incidental or consequential
damages, so the above limitation or exclusion may not apply to you.

Contents
1 • Introduction .................................................... 1
Who Should Use This Document ............................................ 1
How This Document Is Organized ........................................... 1
Contacts ............................................................... 2
Technical Support .................................................... 2
2 • Design Overview ................................................ 3
KR203 Kiosk Receipt Printer ............................................... 3
Package Contents ....................................................... 4
Unpack and Inspect the Printer .......................................... 4
Design Considerations Overview ............................................ 5
3 • Printer Overview ................................................ 7
Printer Dimensions ....................................................... 7
Printer Orientation ....................................................... 8
Printer Features ......................................................... 9
Opening the Printhead ................................................ 11
Opening the Presenter ................................................ 11
Printer Information ...................................................... 12
Media Types ........................................................ 13
Printer Mounting ........................................................ 13
Mounting Orientations ................................................ 15
Design Your Own Mounting ............................................... 16
Printing ............................................................... 17
Looping Presenter ................................................... 17
Page Modes ........................................................ 18
Printer Configuration Methods and Tools .................................. 18
06/22/2014 KR203 Hardware Integrator Guide P1028247-001 Rev. C

ii
Buttons, Indicators and Sensors ........................................... 19
Feed Button ........................................................ 19
Power Indicator ..................................................... 19
Sensing and Error Reporting ........................................... 20
Manual Printer Reset .................................................... 20
4 • Connections .................................................... 7
Cabling and Cable Routing ................................................ 7
Large Media Roll Adapter Accessory ..................................... 7
Attaching Power ......................................................... 8
Electrostatic Discharges and Earth Currents ................................ 9
Connecting the Printer to the Host .......................................... 11
Interface Cable Requirements .......................................... 11
USB Interface Requirements ........................................... 11
Communicating with the Printer ......................................... 12
5 • Media ........................................................ 13
Designing Your Own Media Dispensing System ............................... 13
Designing a Roll Support .............................................. 14
Designing Media Guides .............................................. 14
Designing for Fan-Fold Media .......................................... 14
Media Mounting Considerations ........................................... 15
Media Supply Method ................................................ 16
Media Input Aperture ................................................. 16
Media Guide ........................................................... 18
Installing the Media Guide ............................................. 18
Media Guide Calibration .............................................. 19
Determining Thermal Media Types ......................................... 19
Black Mark Media Requirements ........................................... 20
Preparing a Media Roll for Use ............................................ 22
Loading Media ......................................................... 24
Automated Media Loading ............................................. 24
Manual Media Loading ............................................... 25
Clearing Paper Jams .................................................... 25
Printing a Test Receipt ................................................... 26
6 • Accessories ................................................... 27
Accessories Overview ................................................... 27
Nozzle Bezel Kit – P1011185 ............................................. 29
Quick-Fit Hubs – 103939 ................................................. 30
Quick Fit Leaf Spring Retainer – 01473-000 .................................. 30
Wall Mount Roll Holder – P1014123 ........................................ 31
Roll Support ........................................................... 33
P1028247-001 Rev. C KR203 Hardware Integrator Guide 06/22/2014

Media Roll Low Sensor .................................................. 34
Small Core Media Roll Adapter – P1027727 .................................. 35
Printer Mounting Plate – 104208 ........................................... 36
Universal Roll Holder – P1014125 .......................................... 37
Printer Power Supply – 808099-004 ........................................ 41
Attaching the Power Supply ............................................ 41
Universal Serial Bus (USB) Cable – P1027715 ................................ 43
Large Media Roll Adapter – P1026858 ...................................... 44
Attaching to the Printer ............................................... 45
Loading Media ...................................................... 46
Mounting Plate for Large Media Roll Adapter – P1027728 ....................... 47
Attaching to the Printer ............................................... 47
Using other Accessories with the Large Media Roll Adapter ...................... 48
Universal Roll Holder ................................................. 48
Routing Cables with the Large Media Roll Adapter ............................. 49
Media Roll Low Sensor ............................................... 49
PowerCable........................................................ 50
Data Cables ........................................................ 50
iii
7 • Troubleshooting ................................................ 51
Status Light Descriptions ................................................. 51
Application LED States ............................................... 51
Application User Interface ............................................. 53
Print Quality Problems ................................................... 54
Media Sensing Problems ................................................. 55
Other Problems ........................................................ 57
Resetting the Factory Default Values ........................................ 58
Contact Technical Support ................................................ 58
06/22/2014 KR203 Hardware Integrator Guide P1028247-001 Rev. C

iv
P1028247-001 Rev. C KR203 Hardware Integrator Guide 06/22/2014

Who Should Use This Document
This guide is intended for use by any person who needs to develop a kiosk using the KR203
printer, operate, or to troubleshoot problems with the printer.
1
Introduction
How This Document Is Organized
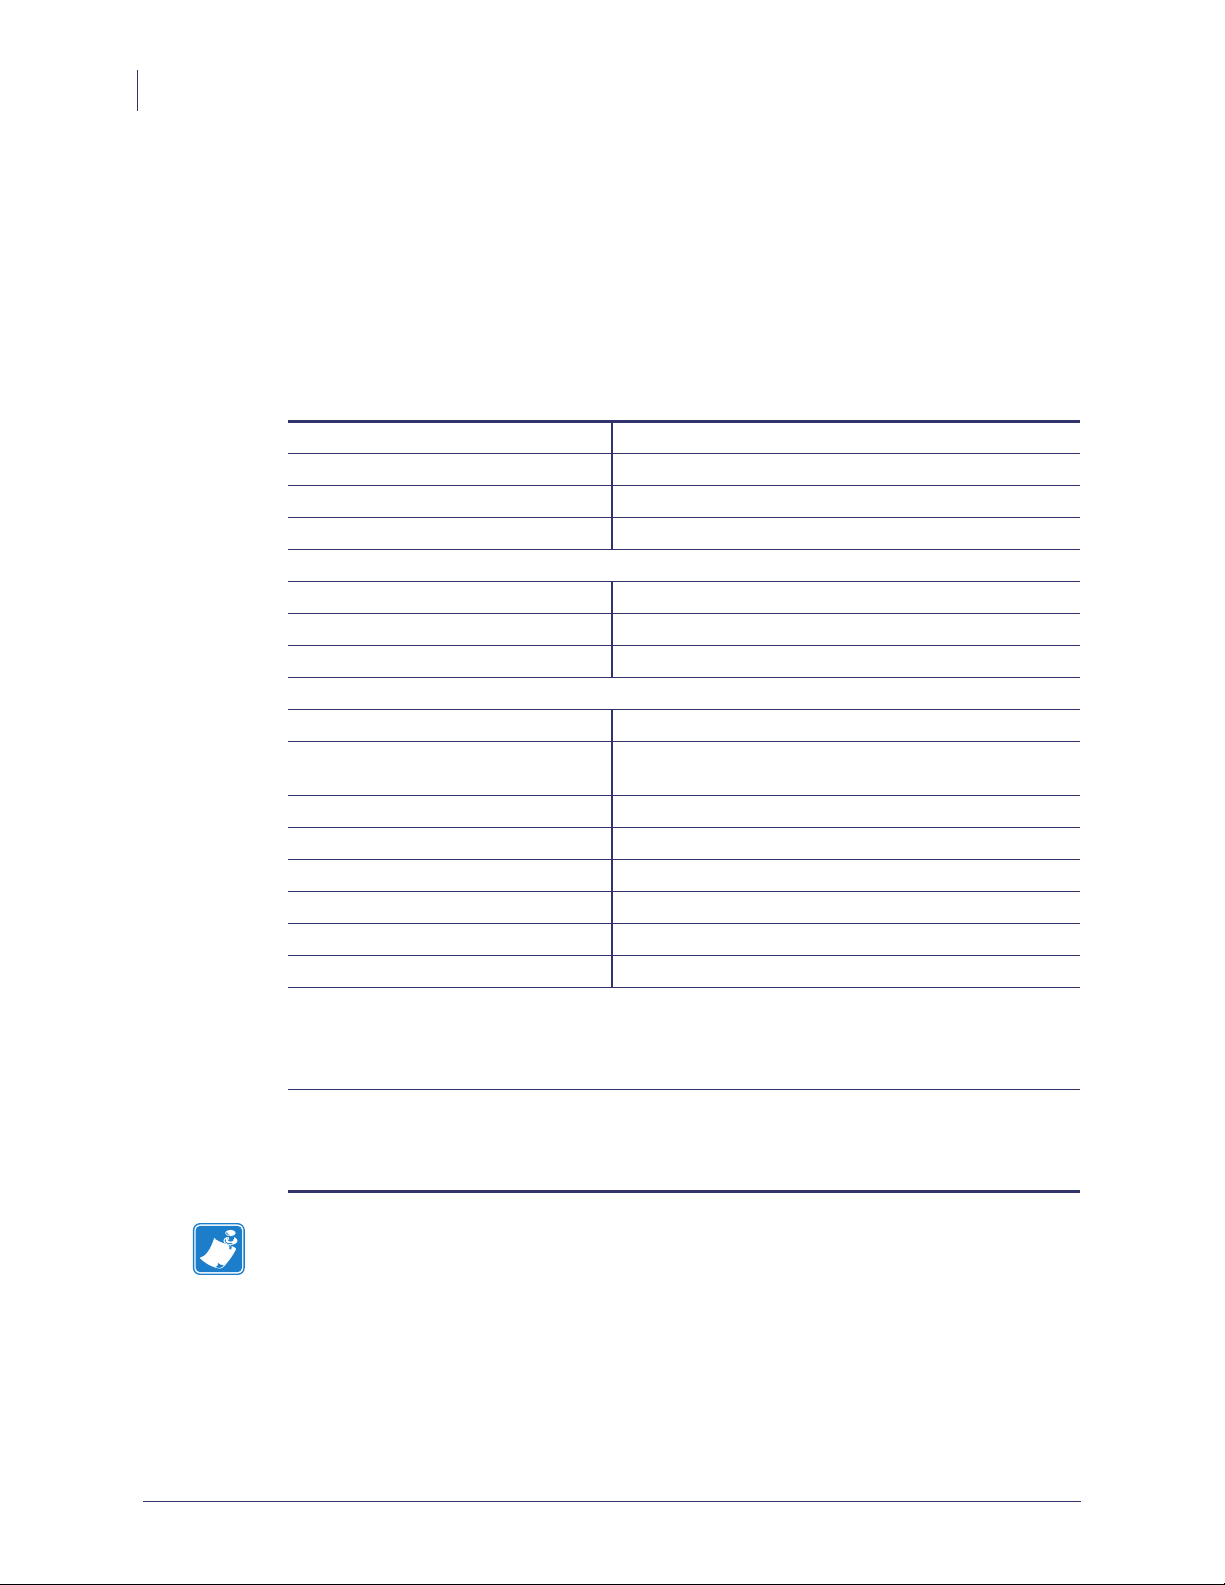
The manual is set up as follows:
Chapter Description
Introduction What is covered in this document, contact information.
Design Overview Introduction to the KR203 Printer and package contents,
design considerations overview.
Printer Overview Dimensions, orientation, and other features.
Connections Power and communication connections
Media Loading, mounting, and feed angles.
Accessories Available options to enhance the kiosk design.
Troubleshooting Covers operational issues and resolutions for status
indicator codes and poor print quality.
6/22/2014 KR203 Hardware Integrator Guide P1028247-001 Rev. C

Introduction
2
Contacts
Contacts
Technical Support
Technical Support is available via Internet 24 hours per day, 365 days per year at
www.zebra.com. You can also email or call us using the following contact information.
The Americas Europe, Middle East, and Africa (EMEA) China Asian Pacific (except China) and India -
Zebra Technologies Corporation
Zebra Technologies Corporation
475 Half Day Road, Suite 500
Lincolnshire, IL 60069 USA
T: +1 847 634 6700
Toll-free +1 866 230 9494
F: +1 847 913 8766
Zebra Technologies Europe Limited
Dukes Meadow
Millboard Road
Bourne End
Buckinghamshire, SL8 5XF, UK
T: +44 (0)1628 556000
F: +44 (0)1628 556001
Zebra Technologies Asia Pacific, LLC
120 Robinson Road
#06-01 Parakou Building
Singapore 068913
T: +65 6858 0722
F: +65 6885 0838
tschina@zebra.com
kiosksupport@zebra.com
tsasiapacific@zebra.com
tseurope@zebra.com
P1028247-001 Rev. C KR203 Hardware Integrator Guide 6/22/2014

Design Overview
KR203 Kiosk Receipt Printer
The Zebra KR203 Hardware Integrator model is the best-in-class thermal kiosk printer
with a good range of features. The KR203 Hardware Integrator printer provides direct
thermal printing at speeds up to 150mm/s (5.9 ips) at a 203 dpi print density. The KR203
supports a driver based printing protocol.
2
The KR203 Hardware Integrator printer features:
• Patented Looping Presenter - To reduce jamming and print image distortion
caused by the user attempting to withdraw the receipt before imaging is finished,
the KR203 employs an innovative "looping station". The receipt is retained inside
the print mechanism until imaging is complete, then it is presented to the user for
removal.
• Media Pull Detection - When the user grasps the receipt and applies force to
remove it, the KR203 Hardware Integrator senses the force and dispenses the
receipt in a controlled fashion to prevent tearing or jamming.
• Easy Media Loading - Automatic media loading and preparation for printing.
Optional media low sensing.
• Flexible Media Support - Supports continuous, fanfold and black line receipt
media with automatic media sensing and calibration.
• Flexible Mounting - Horizontal and vertical printer mounting covering 90° of printer
orientation.
• Bar Code Support - Will image any font, barcode and graphic supplied by the
application through the printer driver.
• Interface Support - USB v1.1 (2.0 compatible)
6/22/2014 KR203 Hardware Integrator Guide P1028247-001 Rev. C

Design Over view
4
Package Contents
The KR203 printers offer a wide range of printer options and accessories:
• 58, 60, 80, and 82.5mm media guide widths
• 70 watt external printer power module
• Multiple printer media roll mounting accessory configurations and options
• Media Roll Low sensor for use with Zebra and custom media roll mounting.
This integrators guide provides information you will need to develop a kiosk using the
KR203 printer and accessories.
Package Contents
The KR203 Hardware Integrator package comes with the following items:
• The KR203 Hardware Integrator printer.
• Warranty information.
Note • To minimize cost and reduce waste, the KR203 Hardware Integrator does not
include unneeded components or accessories. Additional items are required to make the
printer operational.
Unpack and Inspect the Printer
When you receive the printer, open the package immediately and inspect the contents for
shipping damage.
• Save all packing materials.
• Check all exterior surfaces for damage.
• Open and close the printer and remove any media or test prints in the printer.
If you discover shipping damage upon inspection:
• Immediately notify the shipping company and file a damage report. Zebra
Technologies Corporation is not responsible for any damage incurred during
shipment of the printer and will not cover the repair of this damage under its
warranty policy.
• Keep all packaging material for shipping company inspection.
• Notify your authorized Zebra reseller.
P1028247-001 Rev. C KR203 Hardware Integrator Guide 6/22/2014

Design Considerations Overview
The kiosk designer needs to consider how the printer will be used, operated (media supply
and maintenance), serviced, integrated with other kiosk components, and integrated into
the enclosure itself. The KR203 Hardware Integrator printer requires some basic design
elements to function properly, safely, and easily for the operator. The general issues are:
• Locking Enclosure – The KR203 Hardware Integrator printer should always be
installed in a secure enclosure. The user or untrained personnel should not have
access to, operate, or service the printer.
• Mounting orientation.
• Mounting of the printer to the kiosk.
• Printer Power Requirements and DC power connector.
• Connection of the printer to the host computer.
• Media Handing – The design of the kiosk should consider the type of media to be
used: roll or fan-fold media; the appropriate media dispensing system; the location
of the media in the kiosk relative to the printer; and the overall size of the media
package (roll diameter or stack height).
Design Overview
Design Considerations Overview
5
• Operator Access – The operator needs access to:
• The printer's control panel for status lights and also access to view and
press the feed button while observing the status lights for media loading,
setup, and servicing the printer. (See Buttons, Indicators and Sensors
on page 21)
• Open and clean the pr inthead or remove jams. (see Clearing Paper Jams
on page 42)
• The media path between the printer and media (roll or fan-fold). A
minimum clearance of 250 mm on one or the other side of the printer,
printer controls, and media is needed.
• Service and printer replacement: Access to mounting hardware.
• Designing for the operator - ideas for a more intuitive media loading,
media preparation and use of media loading labels and documents.
• Ambient Lighting and external light sources which can affect printer sensors.
• Cooling - The printer needs space on both sides of the printer to allow for
convection cooling of the printer. This becomes more important with kiosk
installations that are in extreme environments or have high printer usage.
6/22/2014 KR203 Hardware Integrator Guide P1028247-001 Rev. C

Design Over view
6
Design Considerations Overview
P1028247-001 Rev. C KR203 Hardware Integrator Guide 6/22/2014

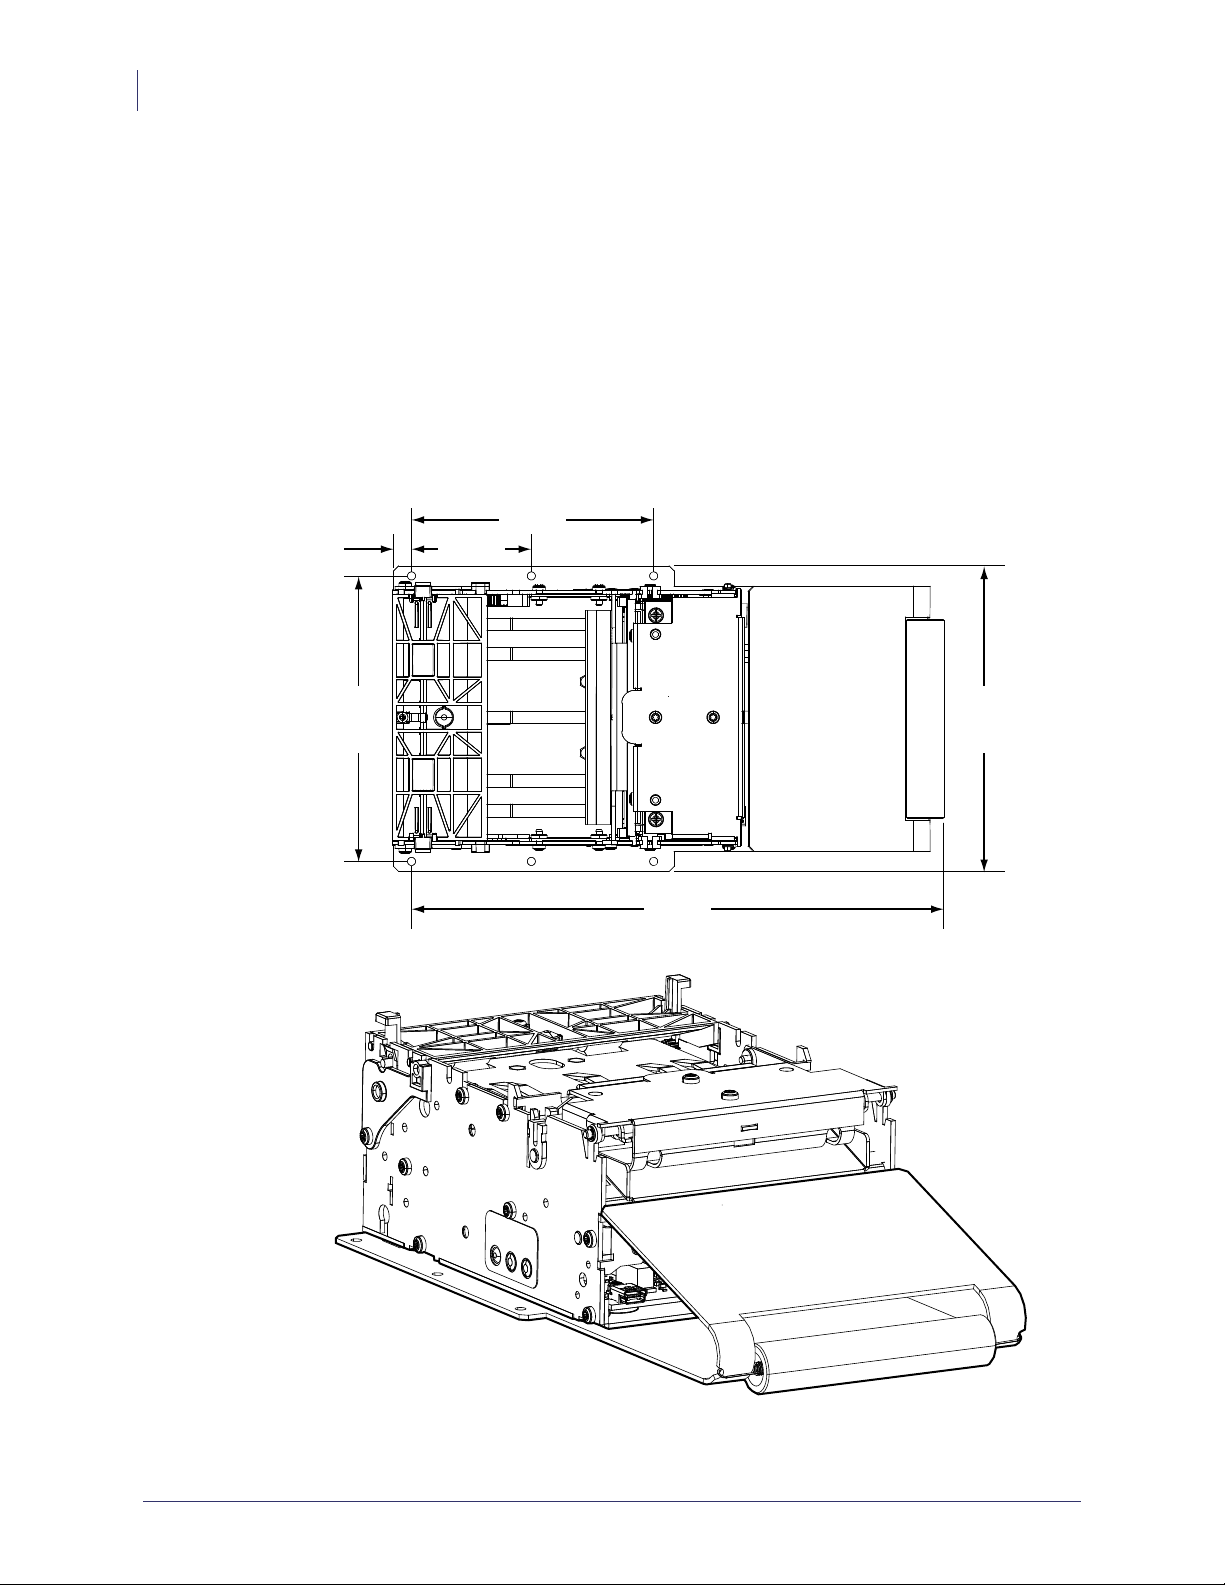
Printer Dimensions
The illustration below outlines the basic printer mounting dimensions to install the printer in a
kiosk. These basic printer dimensions do not illustrate the unique integration requirements
needed to use the printer with specific printer accessories, operator servicing access, media
mounting, power and cabling access, and printer media handling.
3
Printer Overview
Figure 3-1 • Printer Dimensions
6/22/2014 KR203 Hardware Integrator Guide P1028247-001 Rev. C
Printer Over view
8
Printer Orientation
Printer Orientation
REAR
Media IN
RIGHT
FRONT
Media Out
LEFT
Figure 3-2 • Printer Orientation
P1028247-001 Rev. C KR203 Hardware Integrator Guide 6/22/2014

Printer Features
Printer Overview
Printer Features
9
Figure 3-3 • Printer Features
Table 1 • Printer Features
Printhead Release Bar Cutter Bar
Printhead Platen (drive) Roller
Media Present Sensor Cutter
Control Panel Media Sensors
6/22/2014 KR203 Hardware Integrator Guide P1028247-001 Rev. C

Printer Over view
10
Printer Features
Printer Features (continued)
Figure 3-4 • Printer Features
Table 2 • Printer Features
USB Port Power Input
Media Roll Low Sensor Input
P1028247-001 Rev. C KR203 Hardware Integrator Guide 6/22/2014

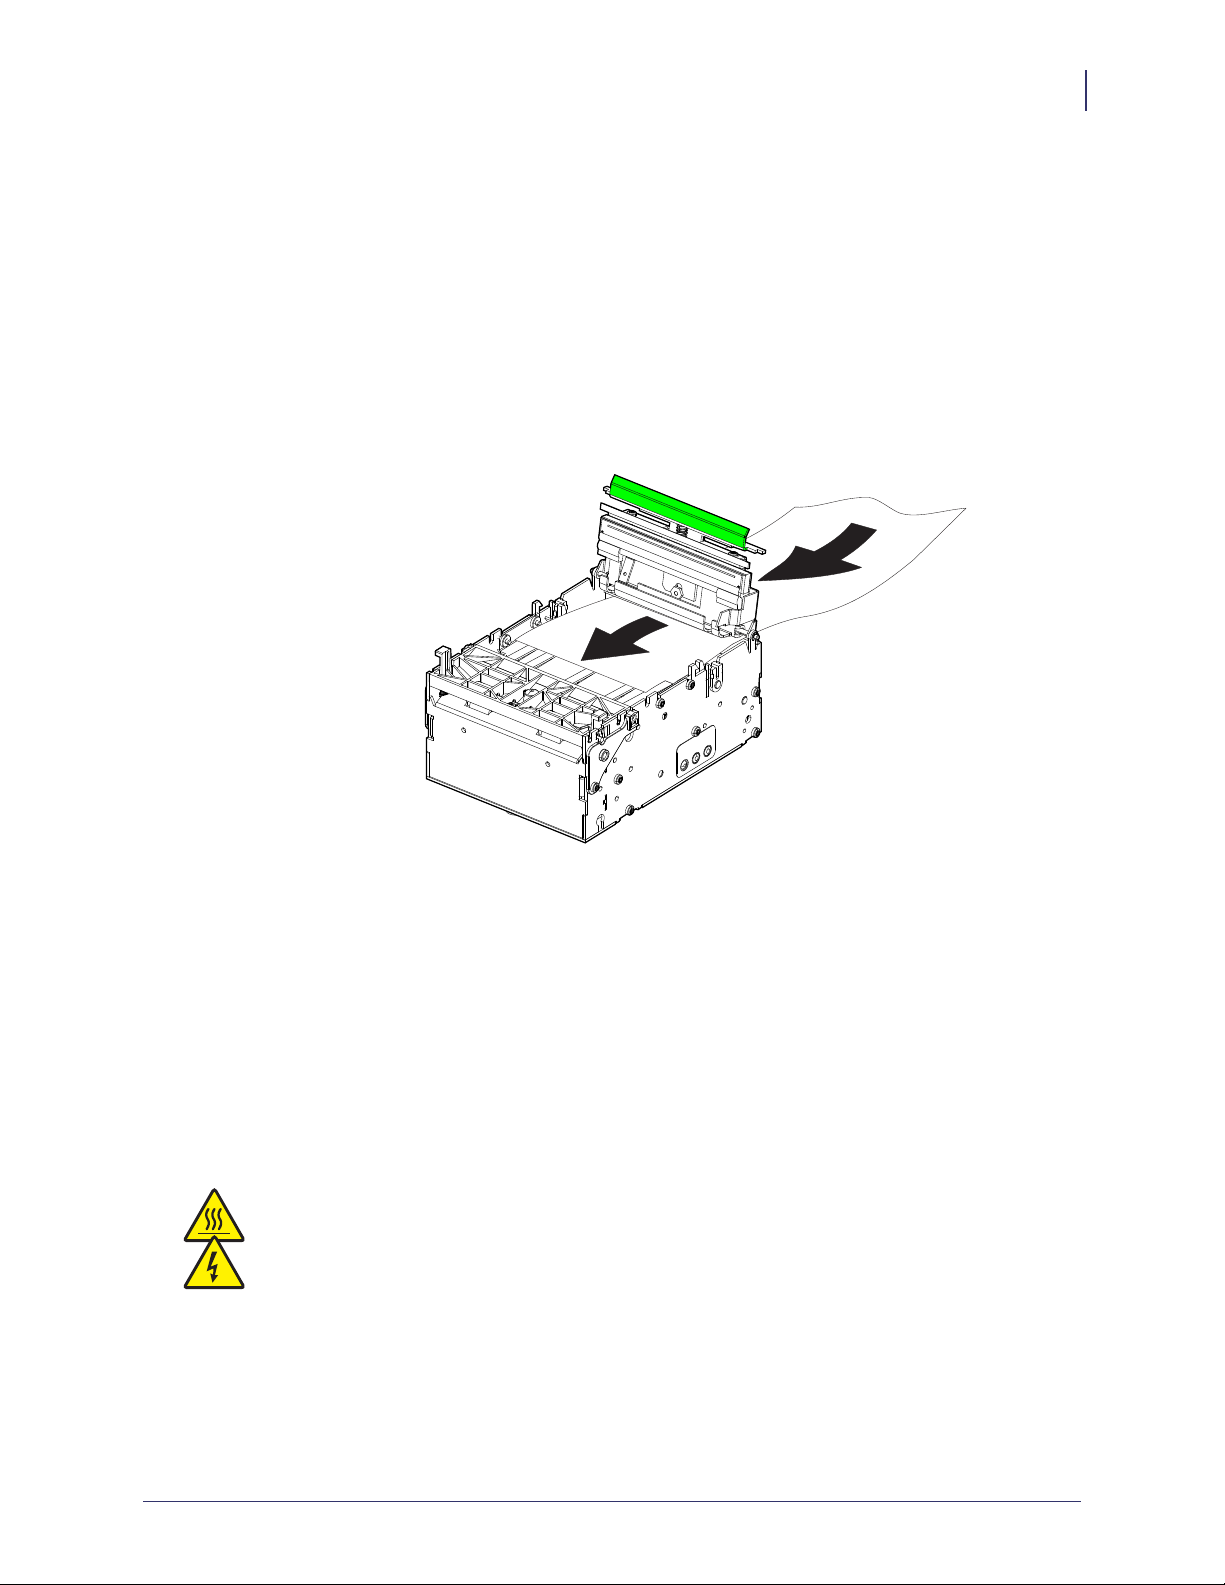
Opening the Printhead
When cleaning or servicing the printer, it is sometimes necessary to access the printhead.
1. Press the green printhead release bar to unlock the printhead.
2. Rotate the printhead assembly upward.
Printer Overview
Printer Features
11
Opening the Presenter
When cleaning or servicing the printer, it is sometimes necessary to access the presenter.
1. Squeeze the two presenter locking tabs together to unlock the presenter assembly.
2. Rotate the presenter assembly upward.
Figure 3-5 • Opening the Printhead
Figure 3-6 • Opening the Presenter
Note • When closing the presenter, make sure to close securely with an audible click on both
locking tabs.
6/22/2014 KR203 Hardware Integrator Guide P1028247-001 Rev. C

Printer Over view
12
Printer Information
Printer Information
Printer control Printer Control Panel - Allows very basic printer
configuration setup that includes a test page.
Print method Direct thermal page printing using thermal sensitive media.
Resolution 8 dots/mm (203 dpi)
Print speed 152 mm/s (6.0 inches/sec.) — Default
127 mm/sec.(5 inches/sec.)
101.6 mm/sec. (4 inches/sec.)
76.2 mm/sec. (3 inches/sec.)
Note: Printer media is rated for specific speed ranges and
some media types and materials will print better at slower
speeds.
Present speed 300 mm/s (11.81 inches/sec)
The KR203 Hardware Integrator uses the Looping Presenter
modes.
In pass-through presenter mode (loop size set to zero)
presenter speed matches the print speed.
Print duty cycle Up to 33%
Media Sensors Out of paper, paper in presenter, black mark, and an optional
external paper-low sensor.
Maximum print width 80 mm = 640 pixels
Auto Selected Print Widths
58 and 60 mm guide 60 mm = 480 pixels maximum
80 and 82.5 mm guide 80 mm = 640 pixels maximum
P1028247-001 Rev. C KR203 Hardware Integrator Guide 6/22/2014

Media Types
Printer Overview
Printer Mounting
13
Receipt Media Supply
Type
Outer Roll diameter 250 mm (9.84 inches) maximum
Spindle (core) diameter 25 mm minimum (typical core size)
Paper width 58, 60, 80, and 82.5 mm (common receipt roll widths)
Paper Thickness or Caliper 0.054 – 0.11 mm
Paper Density or
Grammage
Outside Wound Continuous Roll: Plain receipt, receipt with
black marks, and pre-printed receipt media with black marks.
Fanfold: Stacked receipt media with black marks and preprinted receipt media with black marks.
Note: The maximum roll diameter is dependent upon roll
holder in use and the kiosk design.
40 mm maximum
12 mm minimum with Small Core Media Roll Adapter
For information on ordering media, refer to Contacts
on page 2.
2
55 –110 g/m
Note - This is an approximate area density measurement that
varies by country, paper type and measurement method
applied.
(or gsm)
Printer Mounting
The printer can only be mounted to the kiosk using the four printer mounting screw holes
shown in the illustration below. The printer is most secure when using all four of the mounting
positions connecting the printer’s base to a rigid metal base plate in the kiosk. The kiosk’s
metal printer mounting plate should be connected to the kiosks electrical (earth) ground for
6/22/2014 KR203 Hardware Integrator Guide P1028247-001 Rev. C

Printer Over view
14
Printer Mounting
purposes of controlling static discharge and electrical noise.
1b
2
1a
Figure 3-7 • Printer Mounting
Table 3 • Mounting Configuration
Mounting Positions Kiosk’s Print Base Mounting Variation Details
1a and 1b Full coverage of printer’s
base plate
• Minimum mount positions.
• Supports the Quick-Fit Hubs
• Supported by most Zebra
accessory mounting solutions.
1a and 2 Partial (and Full) coverage
1 (a and b) and 2
of the printer’s base plate
• Minimum three point mounting
to fight torsional forces.
For information on ordering accessories, refer to Contacts on page 2.
P1028247-001 Rev. C KR203 Hardware Integrator Guide 6/22/2014

Printer Overview
Printer Mounting
15
X
Table4•M3Metric Mounting Screw Length
X 1.5mm minimum Printer mounting surface
Y 1.5mm Printer base plate thickness
Z 2mm maximum Penetration into circuit board area
X + Y = minimum length
X + Y + Z = maximum length
Mounting Orientations
The printer can be mounted horizontally or vertically depending on the design of the kiosk.
The maximum angle that the printer can operate from the nominal vertical or horizontal
orientations is dependent upon environmental conditions and the media in use.
M3 Screw
Figure 3-8 • Printer Mounting
Y
Z
Environmental conditions that may affect operation: Humidity, temperature, air circulation air
in the kiosk, and static buildup on adjacent kiosk components and surfaces, etc.
Media considerations:Receipt length, partial cut of receipt in receipt design, curl at the end of
the media roll, thickness and weight, perforations on fan-fold or receipt media, etc.
Other considerations: Media mounting, media path, media access, printer maintenance,
cabling, etc.
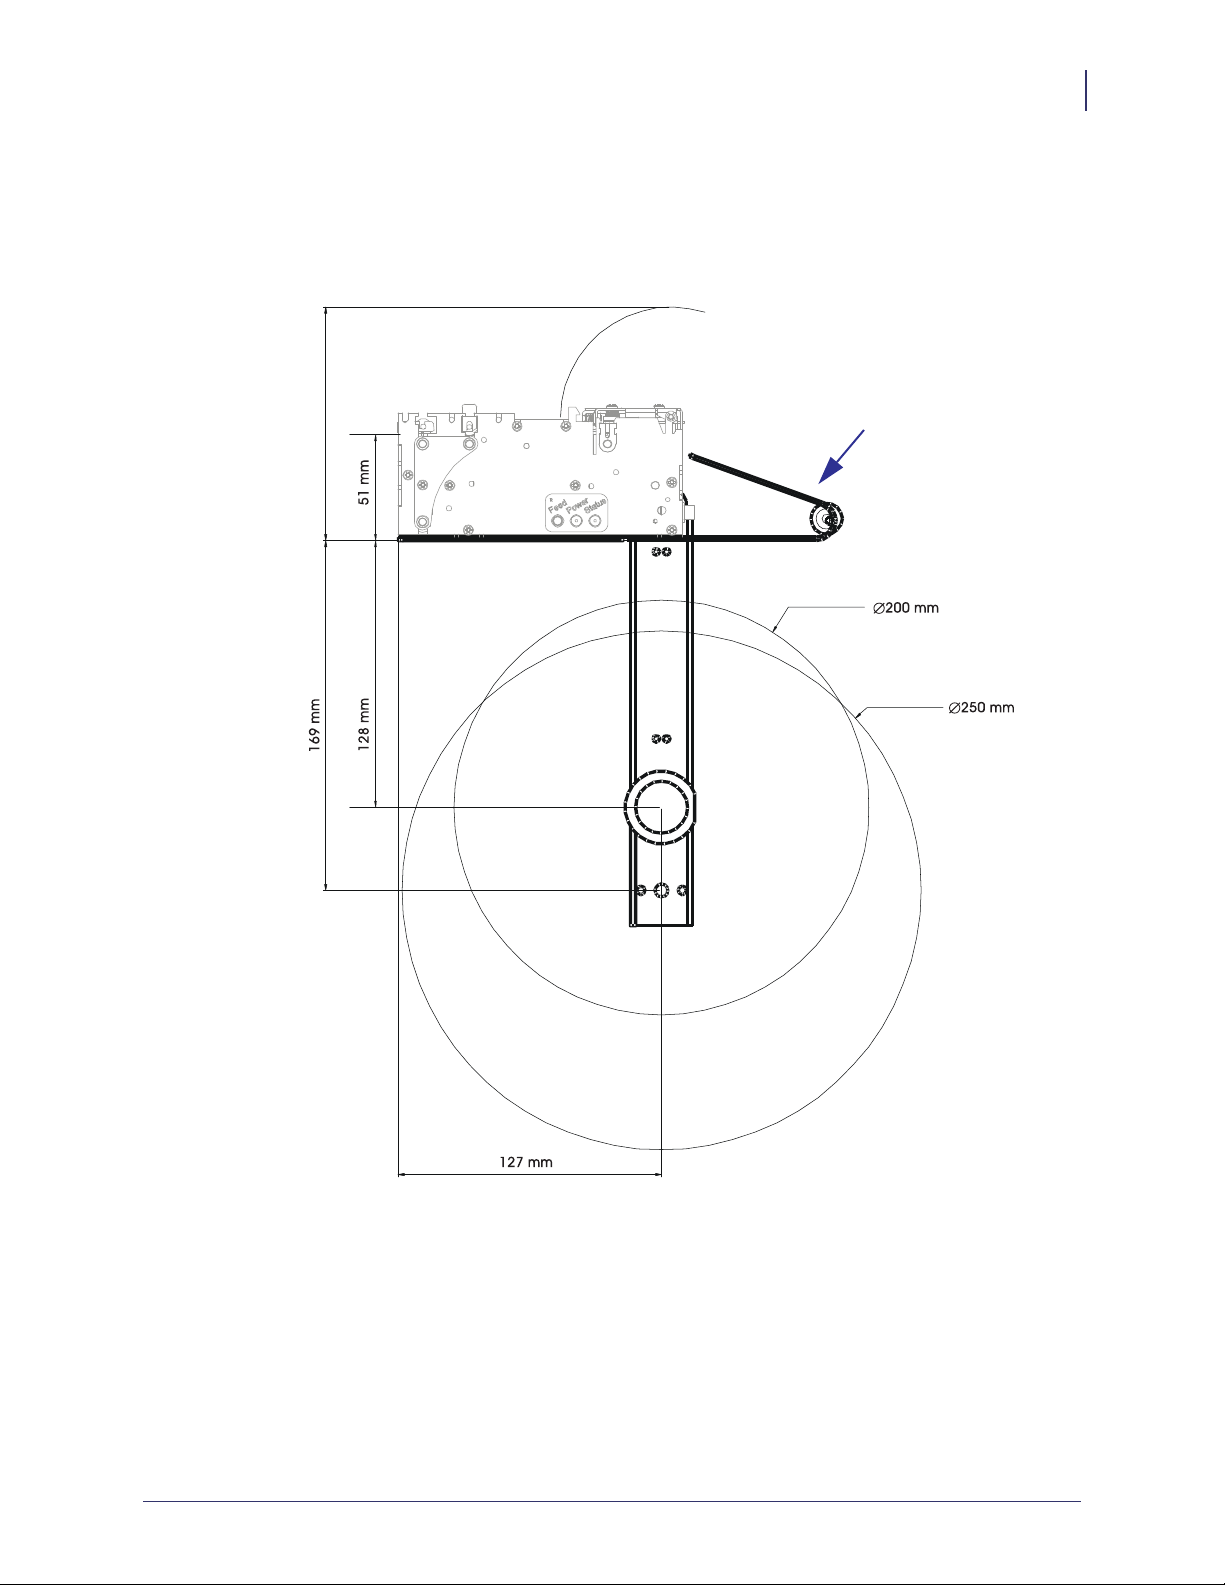
Note • In vertical mounting orientation the small core media adapter may be used to ensure
that media enters the present path.
The area of primary concern is the ‘loop area’ – this area requires special attention when
designing the kiosk. The printer requires space to store the printed receipt before presenting it
to the customer. The longer the receipt, the greater the area needed. When mounting the printer
at angles other than the nominal vertical or horizontal orientations, simulated receipt printing
operations should be observed with the chosen media for use in the kiosk and in the
environmental conditions that it will operate on-site.
6/22/2014 KR203 Hardware Integrator Guide P1028247-001 Rev. C

Printer Over view
16
Design Your Own Mounting
Design Your Own Mounting
The illustration below gives an example of a printer-mounting shelf:
Figure 3-9 • Printer Mounting
Additional space is required for paper loading and service access. Consider mounting the
printer on a movable platform so that the printer can be maintained outside the printer
enclosure.
Note • We recommend making the output slot 97 mm wide. This width should accommodate
all paper widths that the KR203 Hardware Integrator printers can handle.
Caution • NEVER use screws that go into the printer more than 4 mm! This will damage or
destroy the electronics inside. See Printer Mounting on page 13.
P1028247-001 Rev. C KR203 Hardware Integrator Guide 6/22/2014

Printing
Printer Overview
Printing
The printing sequence starts with the leading edge of the media resting at the cut position after
loading media or printing a previous receipt. The printer begins printing the page upon
completion of the transfer of the image to the printer. When the page has finished printing, the
printer cuts the receipt to finish.
The printer then presents the receipt to the kiosk client. When the client pulls the receipt, the
printer immediately detects the roller movement and causes the printer to accelerate the receipt
out of the printer. This helps prevent damage to the receipt.
17
Media Input - Use Auto or Manual
media loading procedure.
Loop area- stores receipt until printing
completed.
Media Cutter - Full or partial media
cuts.
Looping Presenter
The looping presenter mechanism has many benefits:
• It handles documents of various lengths by storing the printed paper in a loop.
• It holds the printout until fully printed and cut before presenting the completed printout to
the customer. This eliminates issues many other printers have when the kiosk client tries
to remove media before printing has finished.
• A portion of the printout is presented. When the customer takes the receipt, the printer
detects a movement and issues the rest of the receipt at 300 mm/s to help ensure receipt is
removed undamaged. The amount of media presented can be customized to account for
differences in the thickness of the kiosk wall.
Figure 3-10 • Printing Sequence
Table 5 • Printing Sequence
Printhead and Platen (Drive) Roller.
Media Drive Roller and Loop Stop
(forward only.)
Media Present - Detects a media pull
with motor.
6/22/2014 KR203 Hardware Integrator Guide P1028247-001 Rev. C

Printer Over view
18
Printing
Page Modes
The printer sets the following modes using the Windows driver.
Variable Page Mode The length of the page (receipt) varies with the contents. Pages
shorter than the minimum page (receipt) length will be extended
to the minimum length. Pages (receipts) longer than the
maximum page (receipt) length will print the maximum page
(receipt) length, then place the extra data on additional pages
(receipts).
Fixed Page Mode The length of the page (receipt) is fixed. The printer will always
create a page (receipt) of the defined length. If the page (receipt)
image is shorter than the defined length, blank media will be fed
until the defined length is reached. Any data beyond the defined
length will be placed on subsequent pages (receipts). Between
pages (receipts), the cut behavior (full or partial) specified for
the print job will occur.
Black Mark Mode Marks on the paper set the form length. Black mark mode can
work with either fixed or variable length pages (receipts). In
fixed page mode, the printer will force a cut at every black mark
and multiple pages can be imaged for one document. In variable
page mode, the printer will cut ar the next black mark after the
end of the data.
Printer Configuration Methods and Tools
The KR203 Hardware Integrator printer has a variety of printer configuration methods for the
software and hardware integrator. Each is designed to assist you with various kiosk design and
integration tasks. These integration tasks include printer startup, proof of concept, receipt
design, status reporting, multi-printer configuration, and kiosk application design. The
configuration methods from hardware to programming application include:
• Media Guides — Sets the printer’s maximum print width. See Media Guide
on page 18 and Installing the Media Guide on page 18.
• Control Panel — The printer’s control panel (Feed Button) provides access self test,
media guide detection, test prints, and resetting the printer to factory defaults. See the
Feed Button on page 19.
• Windows Drivers — Quickly allows the developer to use the printer, test
configuration options, send programming commands or files, and print directly from
Windows applications. Refer to the Software Integrator Guide (P1028248) for
additional information.
P1028247-001 Rev. C KR203 Hardware Integrator Guide 6/22/2014

Buttons, Indicators and Sensors
The KR203 Hardware Integrator printer uses controls, indicators, and sensors to enhance the
usability of the printer for the client’s kiosk experience, the kiosk operator’s service and
maintenance duties, and expand the developer’s ability to provide printing and service
information to the host kiosk system. The controls, indicators and sensors include:
• Printer control and indicators on each side of the printer to provide the integrator
greater flexibility for designing printer mounting and servicing the printer.
• Media ‘Feed’ button with configuration functionality.
• Media detection and control sensors.
• Cutter home position sensing and jam detection.
• Media output pull detection sensing.
• Support for an external low media (roll) detection sensor accessory option. See Media
Roll Low Sensor on page 34.
Feed Button
Printer Overview
Buttons, Indicators and Sensors
19
The feed button has thee functions:
Power On - Press and Release
After power has been applied to the printer it will perform a brief self-test. Pressing and
releasing the feed button will feed media, cut, and present a blank receipt. In black mark mode,
the cut will be synchronized with the next black mark.
Power On - User Interface Mode
After power has been applied to the printer, it will perform a brief self-test. Pressing and
holding the feed button will access the user interface features. See Table 2, Feed Button User
Interface on page 53 for user interface features.
Power Indicator
The Power Indicator is green when the printer has the 24 VDC power applied to the printer.
6/22/2014 KR203 Hardware Integrator Guide P1028247-001 Rev. C

Printer Over view
20
Manual Printer Reset
Sensing and Error Reporting
The KR203 Hardware Integrator has sensing and error reporting capability available to the
printer for internal process control, status reporting to the host and custom printer software
development by the software integrator. Many of these features and functions are supported
directly by the Windows Driver. See Table 1, Application LED States on page 51 for error
codes.
• The printer monitors the printhead, cutter, and a variety of internal main board
• The printer also monitors the media position via IR sensors that can be used to detect
Manual Printer Reset
The KR203 Hardware Integrator printer does not have a power switch or reset button. To
manually reset the printer, disconnect the 24 VDC power from the printer. Wait a few seconds
for the Power LED to turn off and reconnect the power plug. The printer will reboot and
initialize.
functions.
some issues with motors.
Ideally, the printer power should be connected to a dedicated switch to prevent removing other
cables when disconnecting power. Additionally, when certain accessories are installed, and
because of the proximity of other receptacles, having a dedicated power switch to the printer
will prevent reattaching the power to the incorrect receptacle on the printer.
P1028247-001 Rev. C KR203 Hardware Integrator Guide 6/22/2014

Cabling and Cable Routing
Always use cable tie downs, use locking connectors where possible, allow for kiosk
component servicing, and avoid electrical noise sources.
• All cables that are near the printer, media path, or media should be tied to the kiosk
chassis or printer mounting hardware. The operator can accidentally disconnect the
printer or other kiosk components when maintaining the kiosk. Cabling must not
interfere with the proper operation of the printer and media. The operator can become
caught on cabling and drop heavy media damaging the kiosk or hurting themselves.
4
Connections
• Service Loops - There should be enough slack in the cabling to not put pressure on the
cable connectors or the circuit boards. Also, enough slack is needed to disconnect the
printer (or their kiosk components) for servicing. Allow for movement needed to
access the cable locks or slide the printer out when using the Quick-fit hubs.
• Avoid electrical noise sources: fluorescent lighting and ballast, power supplies, fans,
AC power lines, CRT monitors, etc.
• Avoid twisting power and communication cables together. This can cause spurious
noise on the communication port or raise emissions levels.
Large Media Roll Adapter Accessory
The large media roll adapter accessory adds an additional 10cm to the front of the printer. It is
therefore necessary to route cables differently when using this accessory. See Routing Cables
with the Large Media Roll Adapter on page 49for additional information.
6/22/2014 KR203 Hardware Integrator Guide P1028247-001 Rev. C
Connections
8
Attaching Power
Attaching Power
The KR203 Hardware Integrator printer has unique power requirements to operate efficiently,
safely and within safety and compliance regulation guidelines. To achieve optimum
performance, an approved power supply should be used to operate the KR203 Hardware
Integrator printer. Refer to Printer Power Supply – 808099-004 on page 41.
If a non-Zebra supplied power supply is used with the KR203 Hardware Integrator, it must
comply with the following requirements.
Output Rating 24.0 Volts. 2.92 Amps, +5° to +40° C
Voltage 24.0 Vdc +5/-2% Initial Tolerance, No Load)
Current 2.92A Maximum
Output Requirement When Printing (worst case conditions)
Max Output Power 24.0 Vdc x 2.92A = 70 Watts typical
Peak Power (90VA Cin, 47Hz) 243W
Table6•PowerSupply Output Characteristics
Output Regulation
Line Regulation ±0.5% over AC input operation range.
Ripple & Noise 240mVpp at lout = 2.92 Amps, Resistive Load
(4.7µF/50V ceramic Cap. On output, 20MHz BW)
Transient Load Response < 5mS Recovery, 40% to 80% Load Change
Overshoot, Power-Ip 10% Max at power-on or power-off
Holdup Time 20ms Minimum, Rated DC Load, 120VAC/60Hz
Over-Voltage Output Limited to +28V max.
Fuse Yes
Thermal Allowed, Not Required
Remark:
When Short Circuit Protection or Over Current Protection is activated, the power supply will
shutdown automatically. Once the abnormal condition resulting in the failure being removed, the
power supply will restart accordingly.
Automatic Recovery:
Over Voltage Protection is activated, the power supply will shutdown. The power supply is fully
protected against short circuits and automatically recovers upon removal of the short without the
need for re-cycling the AC input voltage.
Note • The printer does not have an integrated power switch.
P1028247-001 Rev. C KR203 Hardware Integrator Guide 6/22/2014

DC Power Plug Requirement
The KR203 Hardware Integrator printer uses a locking two pin connector. The mating
connector is Tyco part number 1445022-2. The wiring for this connector and to meet the
power requirements should be 20 AWG insulated wiring (UL type 1007).
+24 VDC
Figure 4-11 • Power Plug
Tyco -
1445022-2
Ground
Connections
Attaching Power
9
Caution • Never operate the printer and power supply in an area where they can get wet.
Serious personal injury could result!
Electrostatic Discharges and Earth Currents
The printer should have a dedicated earth ground connection. Preventing ESD and earth
currents from affecting the printer operation requires proper connection to the printer chassis
via a 12 AWG wire to protective earth.
The ground wire should be connected to the printer as follows:
1. Using a #8 Torx driver, remove the screw shown.
2. Attach the 12 AWG ground wire with cable lug to the printer chassis.
3. Connect the other end of the ground wire to a protective earth ground.
6/22/2014 KR203 Hardware Integrator Guide P1028247-001 Rev. C

Connections
10
Attaching Power
Figure 4-12 • Grounding
P1028247-001 Rev. C KR203 Hardware Integrator Guide 6/22/2014

Connecting the Printer to the Host
Interface Cable Requirements
Data cables must be of fully shielded construction and fitted with metal or metallized
connector shells. Shielded cables and connectors are required to prevent radiation and
reception of electrical noise.
Additionally, the USB cable should include a ferrite located at the end of the cable closest to
the host computer. This is to prevent any electrical noise generated by the printer from
affecting the host computer.
USB Interface Requirements
Universal Serial Bus (version 2.0 compliant) provides a fast interface that is compatible with
your existing PC hardware. USBs “plug and play” design makes installation easy. Multiple
printers can share a single USB port/hub.
Connections
Connecting the Printer to the Host
11
When using a USB cable (not supplied with your printer), verify that the cable or cable
packaging bears the “Certified USB™” mark (see below) to guarantee USB 2.0 compliance.
The figure below displays the cable wiring required to use the printer’s USB interface.
Pin Signal
1 Vbus - N/C
2D-
3D+
4 Not connected
5 Ground
Shell Shield / Drain Wire
For printer supported operating systems and to download the latest driver, visit the Zebra
printer web site at:
http://www.zebra.com
Caution • Keep the kiosk OFF when attaching the interface cable. The power cord must be
inserted into the power supply and the power receptacle on the back of the printer before
connecting or disconnecting the communications cables.
Important • This printer complies with FCC “Rules and Regulations,” Part 15, for Class B
Equipment, using fully shielded data cables. Use of un-shielded cables may increase radiated
emissions above the Class B limits.
Pin 1
To minimize electrical noise pickup in the cable:
• Keep data cables as short as possible (6 foot [1.83 m] recommended).
• Do not tightly bundle the data cables with power cords.
6/22/2014 KR203 Hardware Integrator Guide P1028247-001 Rev. C

Connections
12
Connecting the Printer to the Host
Communicating with the Printer
The only way to begin using your complete kiosk printing solution is to utilize the Windows
Driver. With the driver loaded, you can test the kiosk printing system, configure your printer,
and view printer error codes. Refer to the Software Integrator Guide (P1028248) for
installation instructions.
• Do not tie the data cables to power wire conduits.
• Avoid fluorescent lighting and power supply components.
The latest driver can be found at
www.zebra.com.
P1028247-001 Rev. C KR203 Hardware Integrator Guide 6/22/2014

Media
Designing Your Own Media Dispensing System
Properly dispensing the media to the printer is critical to the operation of the printer and
quality print. The media, roll or fan-fold, needs to flow smooth and free with minimal drag or
binding. Ideally it should have a clean and cool location for dispensing and storing media.
Loading or dispensing media to the printer should not have interference or access restrictions
with the kiosk enclosure or internal components.
5
• The media entering the printer should be aligned to the center of the printer. Use a
media guide appropriate to the width of the desired media (see Media Guide
on page 18).
• The printer and roll media should be level to prevent drag on the side of the roll and
damage to the receipt edges. This can cause jams and printer stalls in the worst case
conditions.
• The media should never touch or rest on cabling, kiosk walls and components,
exhaust fans (dust and heat), heat sinks, etc.
• The media should be easy to reach and see inside the kiosk. Do not force the operator
to bend or extend their arms too far into the kiosk to load media or service the printer.
• Optional Media Storage — Media stored in the kiosk should have a dark cool area
separate from the rest of the kiosk enclosure that can be closed off from the heat of the
kiosk components, moisture, and cleaning chemical vapors used near the kiosk.
6/22/2014 KR203 Hardware Integrator Guide P1028247-001 Rev. C

Media
14
Designing Your Own Media Dispensing System
Designing a Roll Support
The design elements needed for a good media roll support are:
• Simple design with no loose parts that can get misplaced, installed incorrectly, or
require special techniques that can, when done incorrectly or carelessly, have the
operator drop the media in the kiosk.
• Minimal drag. Do not use wires, cables or bars as a roll holder - all of these cause the
roll to stop and start and rock back and forth. Narrow radius roll supports case these
behaviors to a lesser extent. Some media vendors use roll cores made of fiberboard
that can have seams. The KR203 Hardware Integrator Roll Support accessory
(page 33) minimizes the media contact area (only makes contact with the outside
edges) and a large enough radius to smooth over seams. The larger the roll (more
mass), the greater the effect it has on drag (see Large Media Roll Adapter – P1026858
on page 44).
• Leave plenty of access room to load media when designing the area for your roll
support. Leave additional clearance for the roll swinging on the support and hands
that hold the media to load it.
Designing Media Guides
The media guides need to have a minimum radius of 10 mm. The surface should be smooth
and not touch the edges of the media (causes drag or edge damage). The media should only
touch radius surface and not the edge of the radius for all roll sizes that may be used (full or
nearly empty). See the Wall Mount Roll Holder – P1014123 on page 31 and the Universal
Roll Holder – P1014125 on page 37 side views to illustrate roll size and contact with a media
guide.
Designing for Fan-Fold Media
Fan-fold media creates unique challenges. It has square edges that can get caught and the stack
can fall into other components and cabling.
Make a tray to hold the fan-fold media unless it is being pulled straight up. Always test and
observe with the actual media. Fan-fold media can un-fold erratically and act differently at the
beginning and end of the stack.
Design a tray a little higher than the height of a full stack of media. Fan-fold media tray should
keep the media stacked and never allow the media to be pulled into the kiosk.
When using a media guide, the guide should ideally be twice the distance of the length of the
media stack away from the media guide and aligned to the center of the stack. This allows the
media to completely unfold and minimizes the chances of having it bind in other components
or printing multiple receipt or tickets.
P1028247-001 Rev. C KR203 Hardware Integrator Guide 6/22/2014

Media Mounting Considerations
The KR203 Hardware Integrator printer uses direct thermal media which is chemically treated
to react to heat. The printer has several basic requirements for dispensing the media to the
printer from a roll or fan-fold media which include:
• Align Printer with Media - The center line of the media roll or fan-fold stack should
align with the center of the printer to provide the best image quality and keep the
media un-damaged. A media guide is a required accessory for printing (see Media
Guide on page 18).
• Media Only Contacts Media Mounting and Printer in Kiosk - The media should
not touch cables, other kiosk components, or surfaces other than media guides or the
fan-fold media tray. Refer to Media Input Aperture on page 16 for clearance
requirements.
• Do Not Blow Air on Media - Air should be pulled out of the media area of the kiosk
to keep dust (shortens printhead life and affects print quality), aerosol born chemicals
(such as cleaning solutions like ammonia) and exhaust heat from other kiosk
components and power supplies.
• Direct Sunlight, Incandescent or Infrared Lighting or Heat Sources - These light
sources can come from kiosk vents and other kiosk components. Incandescent light
bulbs and heat sinks are examples of heat sources that shouldn’t be near the printer,
media or media storage areas.
Media
Media Mounting Considerations
15
• Media Dispensing Must Be Smooth and Easy - Roll media must be able to turn with
little or no drag, and allow the printer to smoothly pull media without jerking and
stopping. Larger, heavier media rolls are more susceptible to these issues (see Large
Media Roll Adapter – P1026858 on page 44). Minimize roll to roll holder contact and
avoid sharp contact surfaces. Fan-fold media must have sufficient room to unfold and
not bind on media guide surfaces or at the perforations or sides. The printer can
produce a distorted print (e.g. compressed print, short receipts, etc.), motor stalls, and
jamming if media dispensing to the printer if the media transition is not smooth and
easy for the printer.
6/22/2014 KR203 Hardware Integrator Guide P1028247-001 Rev. C

Media
16
Media Mounting Considerations
Media Supply Method
The KR203 Hardware Integrator printer supports two media supply types: outside wound roll
mount; and stacked fan-fold media. The media printing surface faces up towards the ‘top’ of
the printer and away from the body of the printer.
Printing
Surface
Printing
Surface
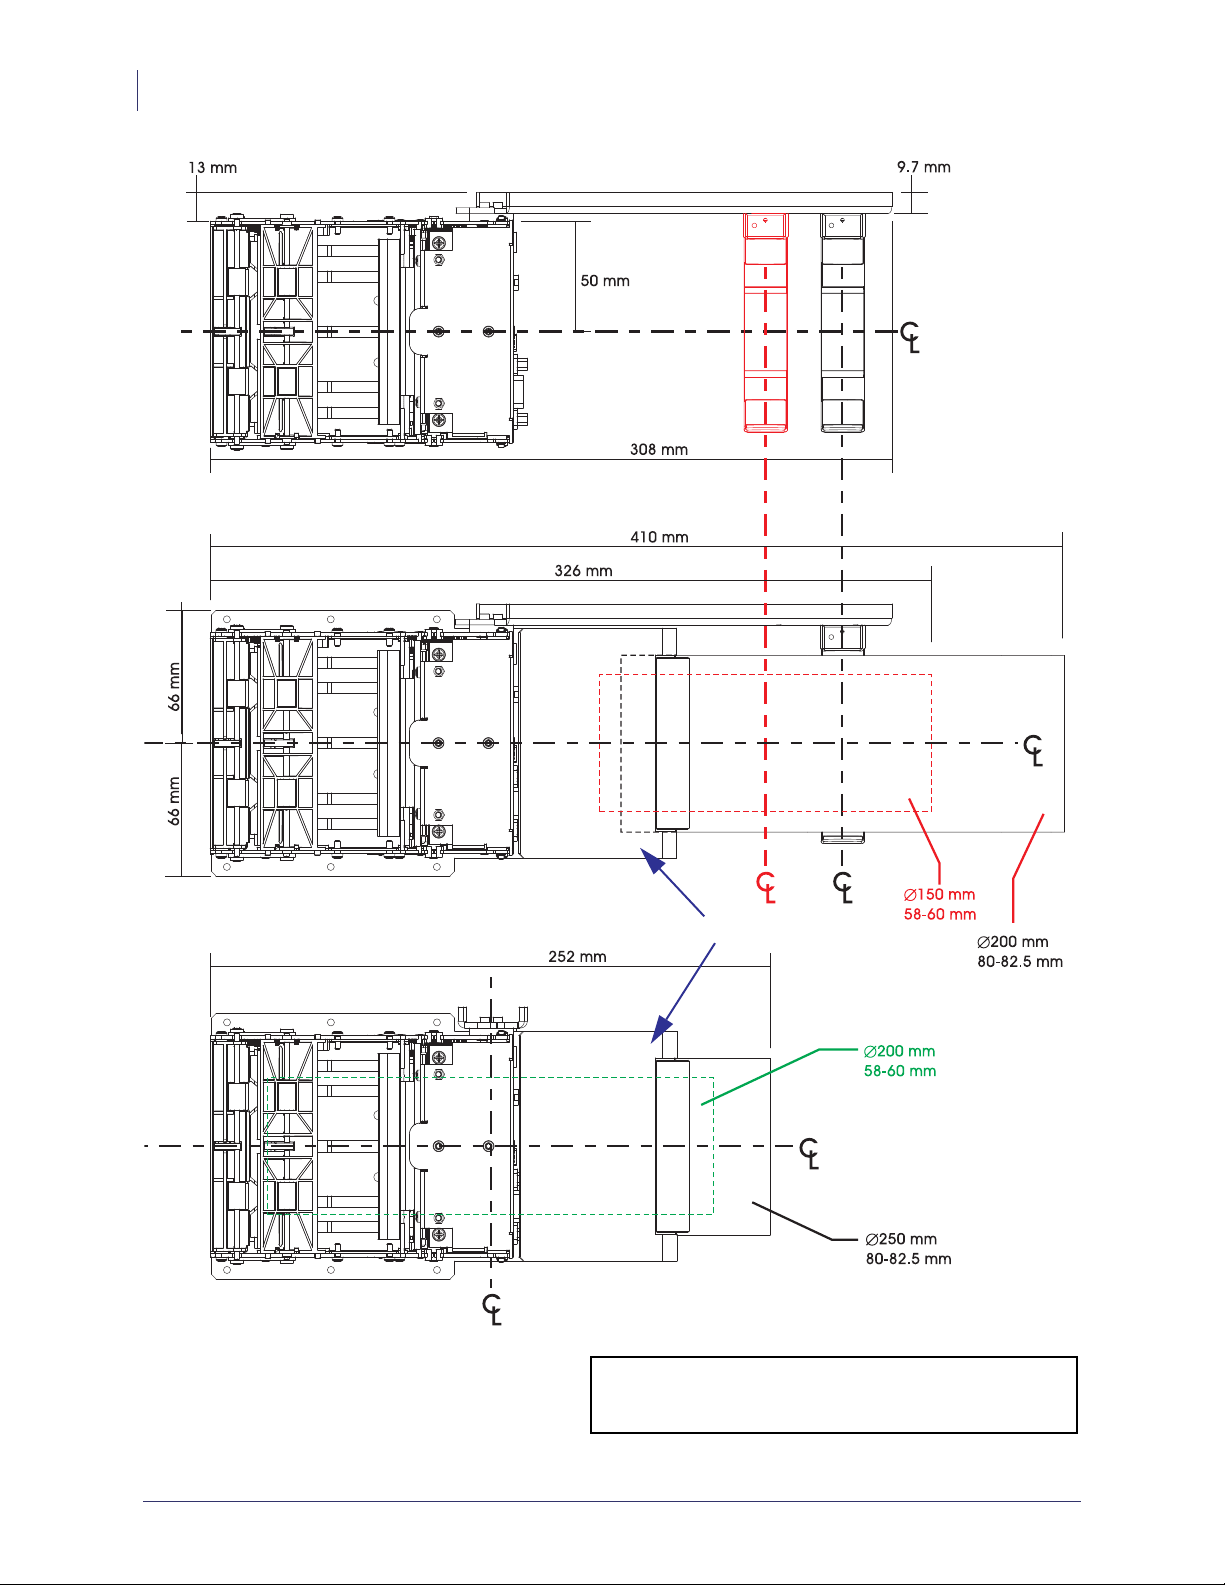
Media Input Aperture
The KR203 Hardware Integrator printer has a wide aperture to support a range of media
mounting locations. The media can enter the printer directly or indirectly with the addition of
custom media guides or printer roll mounting accessory kits.
Figure 5-1 • Media Supply
59°
Media In
25°
Minimum Clearance Area for
Printer Power and Cabling
Figure 5-2 • Media Input Aperture
P1028247-001 Rev. C KR203 Hardware Integrator Guide 6/22/2014

Media
Media Mounting Considerations
The direct media input (or angle of contact with media guides - not shown here) will change as
the media is being consumed.
Minimum Clearance Area for
Printer Power and Cabling
17
This area should have a continuous physical barrier separating the media and
folds from binding in the cabling, printer body, kiosk chassis seams, etc.
Figure 5-3 • Media Aperture
6/22/2014 KR203 Hardware Integrator Guide P1028247-001 Rev. C

Media
18
Media Guide
Media Guide
The media guide is a required accessory and must be installed for the printer to work properly.
The media guide is available in four widths as shown below:
Figure 5-4 • Media Guide
Width (mm) Part Number Width (mm) Part Number
58 09170-058-3 80 09170-080-3
60 09170-060-3 82.5 09170-082-3
A printer demo kit (Part No. P1021954) is available for the KR203 Hardware Integrator
printer that includes all four media guides plus other accessories to complete your installation
and operate the printer.
Installing the Media Guide
A calibration routine is required after installing the appropriate media guide. See Media Guide
Calibration on page 19 for details.
Caution • The printhead becomes hot while printing. To protect from damaging the
printhead and risk of personal injury, avoid touching the printhead. Use only the cleaning pen
to perform maintenance.
Caution • Always disable printer power by un-plugging the printer from the kiosk power
supply or turning off the printer and/or kiosk power.
1. Remove the screw securing the media guide.
2. Open the printhead.
P1028247-001 Rev. C KR203 Hardware Integrator Guide 6/22/2014

Media
Determining Thermal Media Types
3. Insert the media guide under the printhead. Insert the T-shaped tab of the media guide into
the “T”-slot, slide it forward, and fasten the screw.
19
Figure 5-5 • Media Guide Installation
4. Close the printhead.
Media Guide Calibration
When the media guide is changed, the printer will signal media present even when none is.
You must instruct the printer to detect the sensor it should use again. This is accomplished
with the two flash function (see Table 2, Feed Button User Interface on page 53).
This process must be done without media in the printer. If the process is attempted with media
in the printer an error will occur. Upon successful detection of the guide, guide settings are
stored.
Determining Thermal Media Types
The KR203 Hardware Integrator printer uses direct thermal media. Direct thermal media has a
chemically treated print surface that uses heat to expose or darken the area where heat is
applied. Thermal transfer media or ordinary un-treated paper requires ribbon or ink for
printing while direct thermal media does not. To determine what type of media is being used
and print surface of the media, perform a media scratch test.
1. Scratch the print surface of the media with a finger nail or pen cap. Press firmly and
quickly while dragging it across the media surface. Direct thermal media is chemically
treated to print (expose) when heat is applied. This test method uses friction heat to expose
the media.
6/22/2014 KR203 Hardware Integrator Guide P1028247-001 Rev. C

Media
20
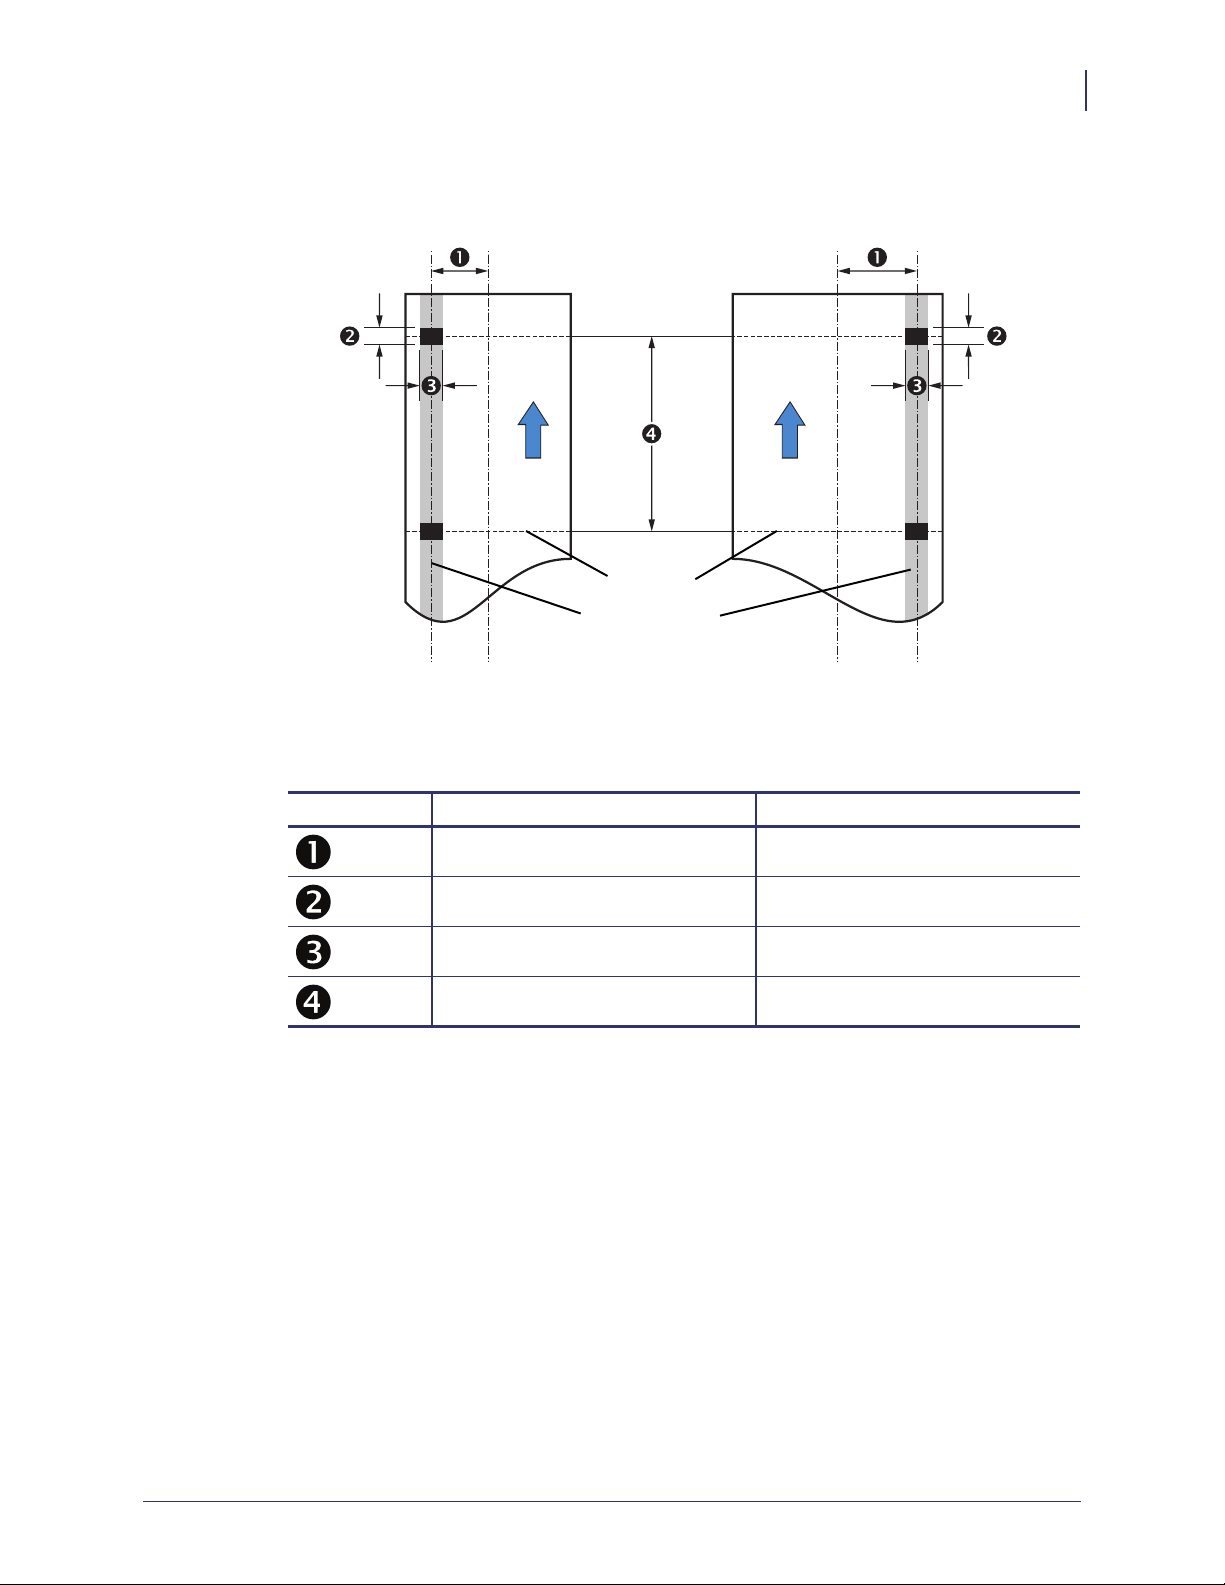
Black Mark Media Requirements
Did a black mark appear on the media?
If a black mark... Then the media is...
Does not appear on the media Thermal transfer. A ribbon or ink is
Appears on the outside of the media. Direct thermal. No ribbon or ink are
Black Mark Media Requirements
The printer is optimized to detect black marks printed with IR sensitive ink and ignore preprint in IR blind ink.
For 80 and 82.5mm media, the black marks will be centered 30mm to the right of the paper
center when viewing the imaged side of the receipt and print direction is downward; for 58 and
60mm media, the black marks will be centered 22mm to the left of the paper when viewing the
imaged side of the receipt and the print direction is downward.
required and is not support for use by the
KR203 Hardware Integrator.
required.
The printer will support media with black mark thickness in printing direction of 2.5 – 9.0mm,
and a width of 5.0 – 10.0mm when the black mark is centered on the sensor.
In the figure below, the “No Print Zone” is the area on the backside of the media where no
marks (other than the black marks for sensing) should be printed.
P1028247-001 Rev. C KR203 Hardware Integrator Guide 6/22/2014
Media
Black Mark Media Requirements
For media that has both perforations and black marks, perforations should be positioned in the
middle of the black mark. By default, the printer will cut the media in the middle of the black
mark.
21
Feed
Direction
Feed
Direction
Cut Line
No Print Zone
58 and 60mm
Media Width
80 and 82.5mm
Media Width
Example shown from printed side. Black marks shown are
on opposite side.
Dimension 58 and 60mm Width 80 and 82.5 Width
22 mm 30mm
2.5mm – 9.0mm 2.5mm – 9.0mm
5.0mm – 10.0mm 5.0mm – 10.0mm
92mm – 600mm 92mm – 600mm
6/22/2014 KR203 Hardware Integrator Guide P1028247-001 Rev. C

Media
22
Preparing a Media Roll for Use
Preparing a Media Roll for Use
1. Turn the new media roll as shown below.
2. Tear off a full turn of the media from the roll.
Caution • This is important since the outer end of the paper is usually fixed to the roll with
some type of glue or self-adhesive substance that might otherwise cause paper jam or even
print head damage.
Figure 5-6 • Paper Roll Orientation
Figure 5-7 • Full Turn Paper Removal
P1028247-001 Rev. C KR203 Hardware Integrator Guide 6/22/2014
Media
Preparing a Media Roll for Use
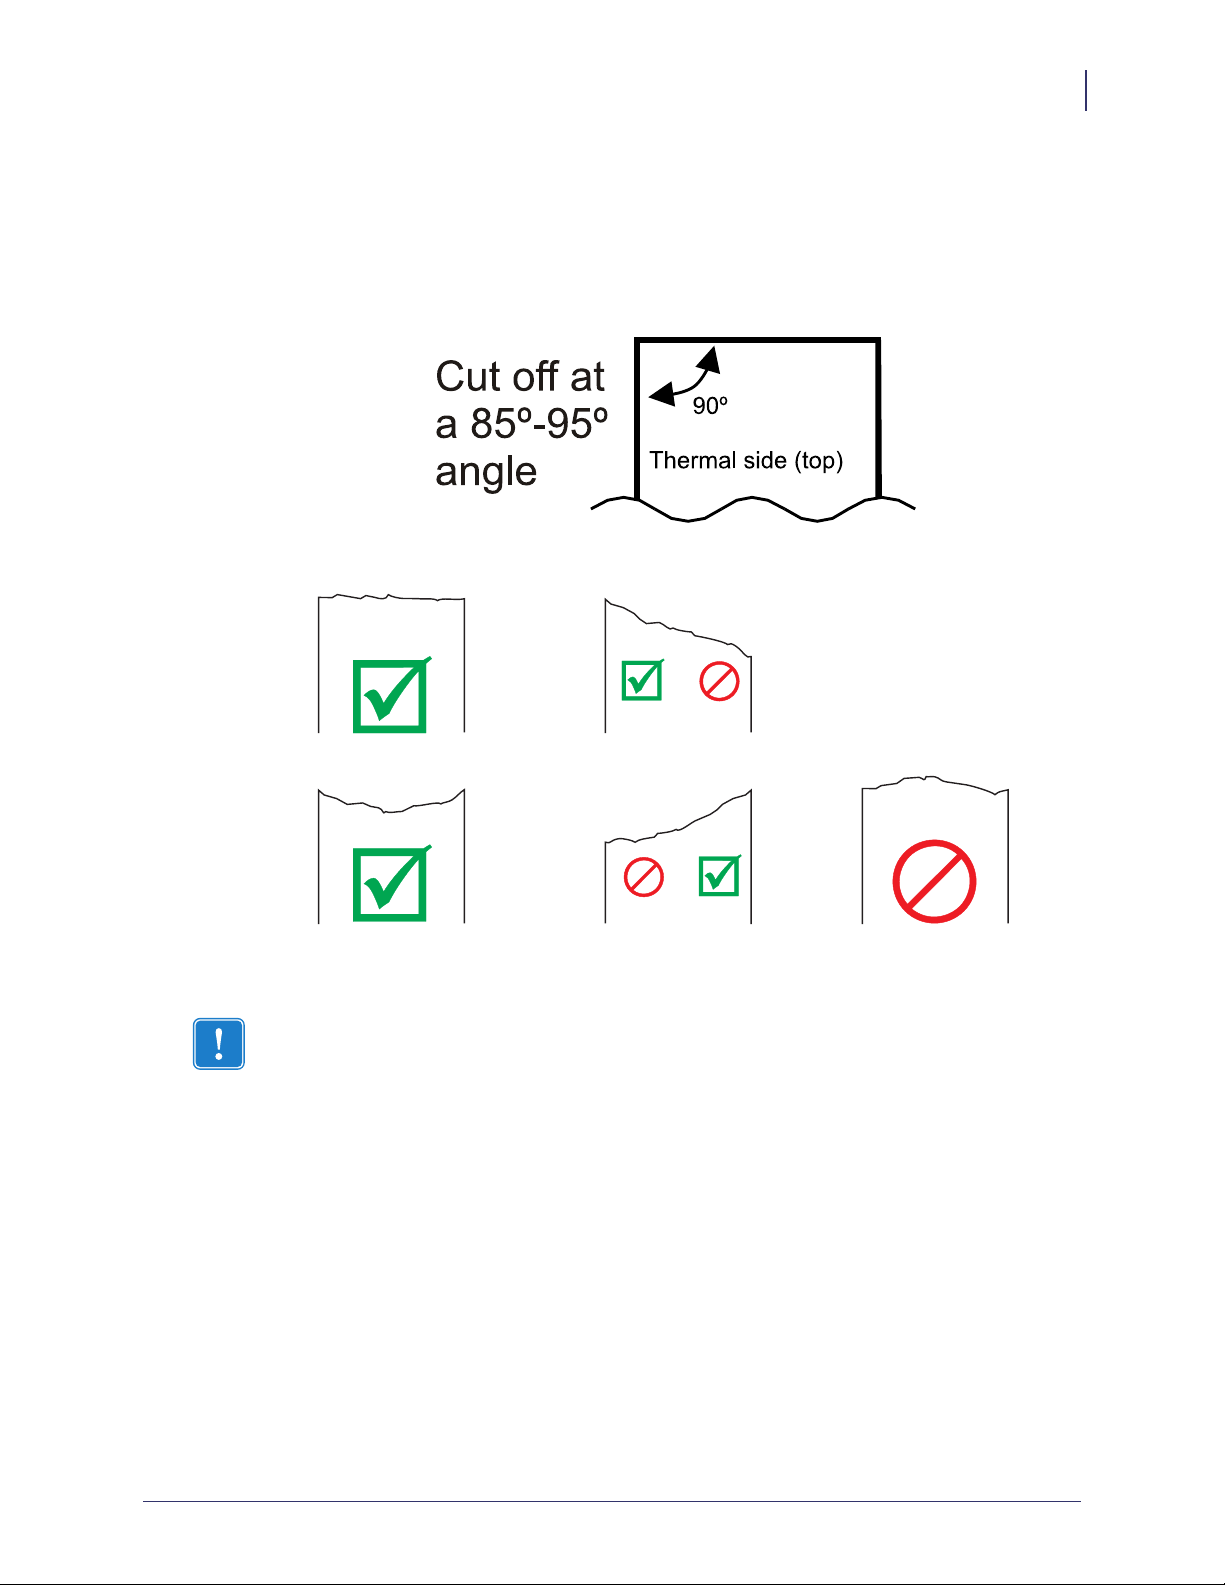
3. The loading process works best with the cut as a square, straight edge. Cut the paper in a
suitable angle.
If the media is not cut square and the operator does not have the ability to cut or tear a
straight edge, then the printer can fail to load the media or even cause a media jam. The
media should not make contact with the platen roller before the sensor detects the media.
23
Auto Loads
Auto Loads
Figure 5-8 • Suitable Paper Edge for Loading Media
Important • The wide media sensor (80 and 82.5 mm) and printer's power connector are both
Narrow Media
Auto Loads
Fails Auto Load
Media Contact
Leads
Media Sensing
Wide Media
Auto Loads
located on the right side of the printer when looking into the printer from the rear. The media
sensor for narrow media (58 and 60 mm) is located on the left side when looking into the
media input slot from the rear of the printer.
6/22/2014 KR203 Hardware Integrator Guide P1028247-001 Rev. C

Media
24
Loading Media
Loading Media
Automated Media Loading
The printer is designed to detect media when it is inserted into the empty media input slot at
the rear of the printer. The printer begins turning the platen (drive) roller when the leading
edge of the media passes over the media sensor.
The printer will then feed, cut, and eject a blank receipt and then go to a ready state (solid
green status indicator).
Figure 5-9 • Automated Media Loading Sequence
Table 1 • Media Loading Sequence
Sequence Number Action
Paper is inserted into printer.
Feed rollers move media to presenter
Media is cut.
Cut media is moved through presenter and ejected.
Press and release the feed button several times to feed, cut, and present in order to verify media
is loaded properly.
P1028247-001 Rev. C KR203 Hardware Integrator Guide 6/22/2014
Manual Media Loading
Manual media loading is intended for maintenance operations, such as printhead cleaning and
removing media jams. Please use the automated media loading procedure (page 24) to load
media for normal operations.
1. Open the printhead.
2. Insert the media through the rear of the printer and under the open printhead. Pull the
media just past the cutter and platen (drive) roller. Do not insert the media past the
presenter or rest the media on top of the presenter as it will not feed properly and an error
will occur.
Media
Clearing Paper Jams
25
3. Close the printhead. Push down on the push-bar to securely latch the printhead closed.
4. The printer will then feed, cut, and eject a blank receipt and then go to a ready state (solid
green status indicator).
Clearing Paper Jams
Should a paper jam occur, follow the procedure below:
Clearing the printhead:
Caution • The printhead becomes hot while printing. To protect from damaging the
printhead and risk of personal injury, avoid touching the printhead.
Caution • Always disable printer power by un-plugging the printer from the kiosk power
supply or turning off the printer and/or kiosk power.
1. Carefully cut the media at the rear of the printer.
2. Open the printhead (see Opening the Printhead on page 11).
3. Remove and discard the damaged media.
Figure 5-10 • Manual Media Loading
6/22/2014 KR203 Hardware Integrator Guide P1028247-001 Rev. C

Media
26
Printing a Test Receipt
4. Close the printhead and reload the media using the Automated Media Loading method
(page 24).
Clearing the Presenter:
1. Open the presenter (see Opening the Presenter on page 11).
2. Remove and discard the damaged media.
3. Close the presenter securely.
Printing a Test Receipt
Before you connect the printer to your computer, make sure that the printer is in proper
working order.
You can do this by printing a test receipt.
1. Make sure the media is properly loaded and ready with the printhead closed. Then, turn
the printer power on if you have not already done so.
2. Press the feed button to feed, cut, and present media. Repeat two to three times to allow
the printer to properly calibrate the printer for the installed media. The printer may feed
several extra receipts during this process if media calibration needs to be adjusted (this is
an automatic printer feature).
3. When the status light is solid green, press and hold the feed button until the status light
flashes once.
4. Release the feed button. A printer self test will print.
P1028247-001 Rev. C KR203 Hardware Integrator Guide 6/22/2014

Accessories Overview
The KR203 Hardware Integrator printer has a wide range of accessories designed and tested to
work with your printer. The accessories can be used by themselves, combined with other
printer accessories, or as part of your own unique printer integration design. Some of the
accessories are available for your printer include:
6
Accessories
• Nozzle Bezel — A translucent media exit bezel styled after common credit card input
bezels used in ATM machines and other kiosks.
• Quick-Fit Printer Mounting — A quick printer release mounting system that can be
used with KR203 Hardware Integrator mounting accessories or with your own design.
The service tech can pull the leaf spring (latch) to unlock the printer and quickly slide
it out for easy replacement or service. the parts can be ordered separately as:
• Quick-Fit Hubs — Flanged hubs and printer mounting screws
• Leaf Spring Retainer — Spring and two M3x3mmscrews
• Wall Mount Roll Holder — The wall mount supports a maximum media roll diameter
of 150 mm. The wall mounting bracket attaches at the front of the printer flush to the
kiosk wall.
• Roll Support — A rugged media roll support bracket designed to provide minimal
friction and self centering of the media roll.
• Media Roll Low Sensor — Optical sensor designed to mount into the Roll Support
accessory or other KR203 Hardware Integrator printer mounting accessory and plug
directly into the rear of the printer.
• Small Core Media Roll Adapter — Designed to guide the leading edge of receipt into
the input of the media present rollers. Allows the use of media roll inside diameters
less than 25 mm (typically POS media) and increases the operational range of printer
in a given mounting orientation (see Printer Mounting on page 13).
6/22/2014 KR203 Hardware Integrator Guide P1028247-001 Rev. C

Accessories
28
Accessories Overview
• Printer Mounting Plate (for roll holder mounted below printer) — This mounting
plate assembly is designed to work with the Universal Roll Holder accessory when
the roll is in the Low and Under holder positions. It includes a inertia dampening
spring roller to optimize printer performance when using the large 250 mm diameter
rolls.
• Universal Roll Holder — This versatile mounting accessory supports three roll
positions with the ability to mount it on either side of the printer.
• Printer Power Supply (70 watts) — This printer accessory has been optimized for use
with thermal printers and in particular your KR203 Hardware Integrator printer. It has
been designed and tested to meet or exceed most international safety and compliance
standards. Please check for more detailed safety and compliance information for the
printer and this power supply at the Zebra Web site: www.zebra.com
• Large Media Roll Adapter and Mounting Plate – Designed for use with the printer
when using large (200 – 250mm) media rolls to prevent excessive pulling force by the
feed motor.
P1028247-001 Rev. C KR203 Hardware Integrator Guide 6/22/2014

Nozzle Bezel Kit – P1011185
The nozzle bezel is used not only as a decorative accessory, but also serves to prevent
customers from unknowingly inserting payment cards into the printer; which could cause
damage to the printer and the customer’s payment card.
The nozzle bezel is installed on the front of the printer (at the media exit) using two 2.5mm
hex screws.
The nozzle bezel kit comes with screws and 10 bezels per kit.
Accessories
Nozzle Bezel Kit – P1011185
29
9.5mm
Media Exit
91mm
35mm
100mm
6/22/2014 KR203 Hardware Integrator Guide P1028247-001 Rev. C

Accessories
30
Quick-Fit Hubs – 103939
Quick-Fit Hubs – 103939
The Quick-Fit hubs are designed to use the printer’s mounting holes when mounting the
printer to a custom sheet metal surface 1.5 mm thick. When installed, the quick-fit hubs allow
quick installation to, and removal from the surface. See Design Your Own Mounting
on page 16 for more details.
Quick Fit Leaf Spring Retainer – 01473-000
The leaf spring retainer is designed to be used as a locking mechanism when using the quickfit hubs on a custom mounting surface.
P1028247-001 Rev. C KR203 Hardware Integrator Guide 6/22/2014

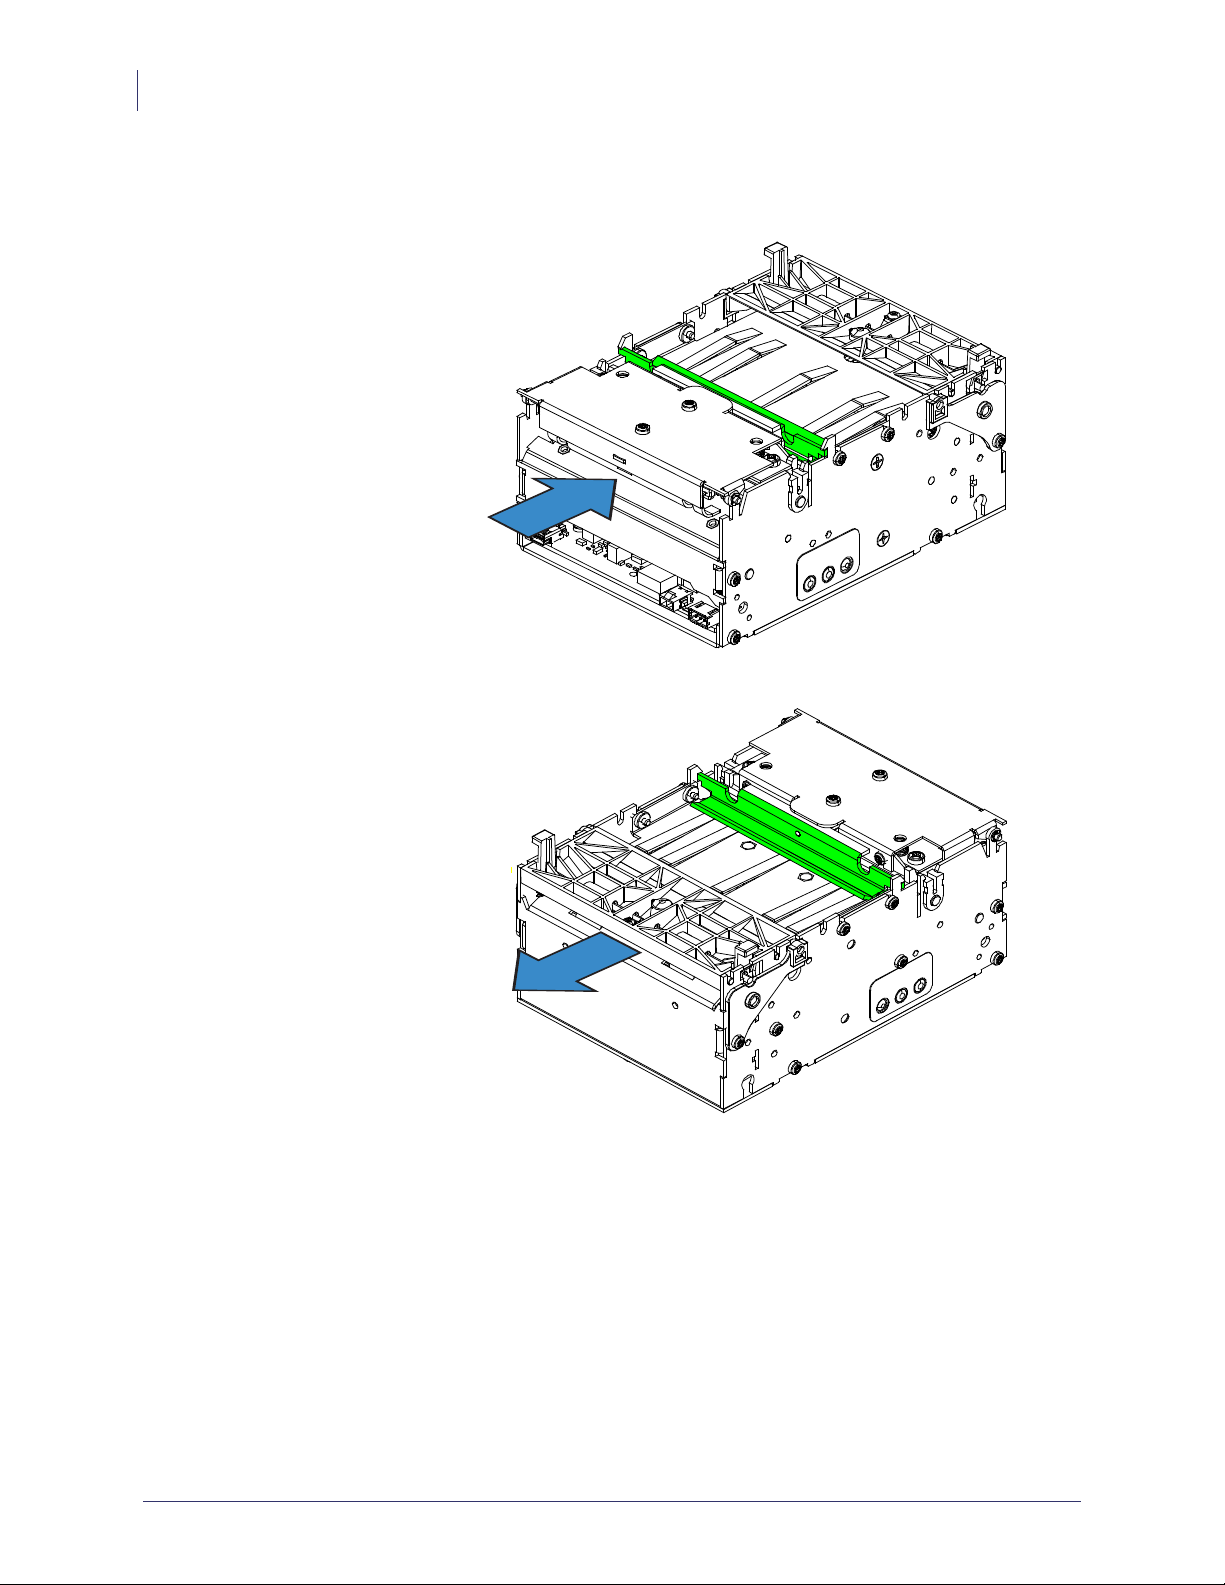
Wall Mount Roll Holder – P1014123
The wall mount roll holder enables mounting of the printer to the wall of a kiosk. Included is
the quick-fit hubs and leaf spring retainer.
The holder can accommodate media rolls up to 150mm in diameter, and 58, 60, 80, and
82.5mm media widths without adjustments.
Roll center
Accessories
Wall Mount Roll Holder – P1014123
31
6/22/2014 KR203 Hardware Integrator Guide P1028247-001 Rev. C

Accessories
32
Wall Mount Roll Holder – P1014123
1. Install the quick-fit hubs to the bottom of the printer.
2. Install the leaf spring retainer to the underside of the wall mount .
3. Attach the wall mount to the desired position in the kiosk.
4. Slide the printer onto the wall mount and engage the retainer.
P1028247-001 Rev. C KR203 Hardware Integrator Guide 6/22/2014

Roll Support
The roll support is designed (and tested) to mount to a sheet metal wall 1.5 mm thick for media
rolls up to 250 mm O.D. (Outer Diameter) with media roll cores of 25.4 mm I.D. (Inner
Diameter). The wider media roll widths (80 and 82.5mm) fit to the larger offsets, while the
narrow media widths (58 and 60mm) fit to the narrow offset.
The roll support can also accommodate the media roll low sensor.
Accessories
Roll Support
33
Media Widths
80 & 82.5
Roll Core ID
(used for Media Low Sensor mounting)
C
C
3
Media Widths
58 & 60
Roll Core ID
20
6/22/2014 KR203 Hardware Integrator Guide P1028247-001 Rev. C

Accessories
34
Media Roll Low Sensor
Media Roll Low Sensor
The media roll low sensor is available in two lengths:
• 01890-300 – KIT PAPER-LOW SENSOR 300MM CBL
• 01890-500 – KIT PAPER-LOW SENSOR 500MM CBL
The sensor alerts the system when a fixed level of media is remaining on the roll.
The media roll low sensor operates by reflecting a light against the white side of a media
roll to detect it. When the media is low, no light is reflected. After three successive media low
conditions are noted by the printer, a media low flag is set. Installing a new roll of media will
reset the flag.
Note • Black marks or dirt on the side of the media roll may signal false media low
conditions.
P1028247-001 Rev. C KR203 Hardware Integrator Guide 6/22/2014

Small Core Media Roll Adapter – P1027727
Small Core Media Roll Adapter – P1027727
The KR203 Hardware Integrator mounting becomes even more versatile if the Small Roll
Media Roll Adapter accessory is used to guide the leading edge of receipt into the input of the
media drive rollers. This allows the printer to be mounted in a wider range of mounting
orientations shown below.
The small core media roll adapter accessory is used to prevent the page curl that occurs at the
end of a tightly wound media roll. It is used to keep the media in position to feed into the
presenter.
Accessories
35
6/22/2014 KR203 Hardware Integrator Guide P1028247-001 Rev. C
Accessories
36
Printer Mounting Plate – 104208
Printer Mounting Plate – 104208
The Printer Mounting Plate preforms several functions:
• Provides a solid printer mounting base.
• Designed to work with the Universal Roll Holder accessory (page 37) for the ‘Low’
and ‘Under’ the printer mounting positions
• This plate or an equivalent custom design is required to protect the cables and media
from interfering with each other and the operator when the media roll is mounted
under the printer
• Includes a inertia dampening spring roller to optimize printer performance when
using the large 250mm (10 inch) diameter media rolls.
95mm
8mm
47mm
112mm
120mm
217mm
P1028247-001 Rev. C KR203 Hardware Integrator Guide 6/22/2014

Universal Roll Holder – P1014125
This roll holder can be fitted on the right or left side of the printer. The arm can be set at three
different angles. This makes make integration in the kiosk easy.
• 58mm, 60mm, 80mm, and 82.5mm media widths can be used without adjustments.
• The universal roll holder supports up to 200mm rolls in the ‘high’ and ‘low’ arm
positions, and 250mm rolls in the ‘under’ position with clearance for cabling.
• No other accessories are required for the ‘high’ arm position, while the Printer
Mounting Plate (page 36) with the inertia dampening spring guide and cable shield is
needed in the two other positions.
• The optional media roll low sensor (page 34) can be added to the roll support.
Accessories
Universal Roll Holder – P1014125
37
Mounts on
either side
6/22/2014 KR203 Hardware Integrator Guide P1028247-001 Rev. C

Accessories
38
Universal Roll Holder – P1014125
‘High‛ Position (No Mounting Plate)
Minimum Printhead Access Clearance
Low‛ Position with Mounting Plate
Minimum Printhead Access Clearance
Mounting Plate
P1028247-001 Rev. C KR203 Hardware Integrator Guide 6/22/2014
‘Under‛ Position with Mounting Plate
Minimum Printhead Access Clearance
Accessories
Universal Roll Holder – P1014125
Mounting Plate
39
6/22/2014 KR203 Hardware Integrator Guide P1028247-001 Rev. C
Accessories
40
Universal Roll Holder – P1014125
‘High‛ Position (No Mounting Plate)
‘Low‛ Position with Mounting Plate
‘Under‛ Position with Mounting Plate
For illustration purposes:
— ‘High’ position - media is not shown
— ‘High’ position - both roll supports are shown
Mounting Plate
P1028247-001 Rev. C KR203 Hardware Integrator Guide 6/22/2014

Printer Power Supply – 808099-004
The KR203 Hardware Integrator power Supply accessory can easily be incorporated into a
kiosk design. The power supply is easily attached to the kiosk with tie wraps.
The power supply has been tested to work with the KR203 Hardware Integrator printer and
complies with all of the same safety and compliance regulations and has the following
specifications:
• Output voltage: 24 VDC
• 70 Watts, 90-264 VAC at 47-63 Hz
• Peak Power 243 Watts
• Input Current: 2.92 Amp max.
• Inrush Current: 40 Amp max.115 VAC or 80 Amp max.230 VAC
Accessories
Printer Power Supply – 808099-004
41
The DC power filter and cable
length is a minimum of 174 mm
Power ON LED
EMI Power Filter
Attaching the Power Supply
1. Insert the 24 VDC power supply’s power connector into the printer’s power receptacle.
Verify the power plug’s latch has locked to the connector by giving it a slow gentle pull.
2. Insert the AC power cord into the power supply. Plug the other end of the cord into an
appropriate AC electrical outlet. The active power light will go on if power is on at the AC
outlet.
6/22/2014 KR203 Hardware Integrator Guide P1028247-001 Rev. C
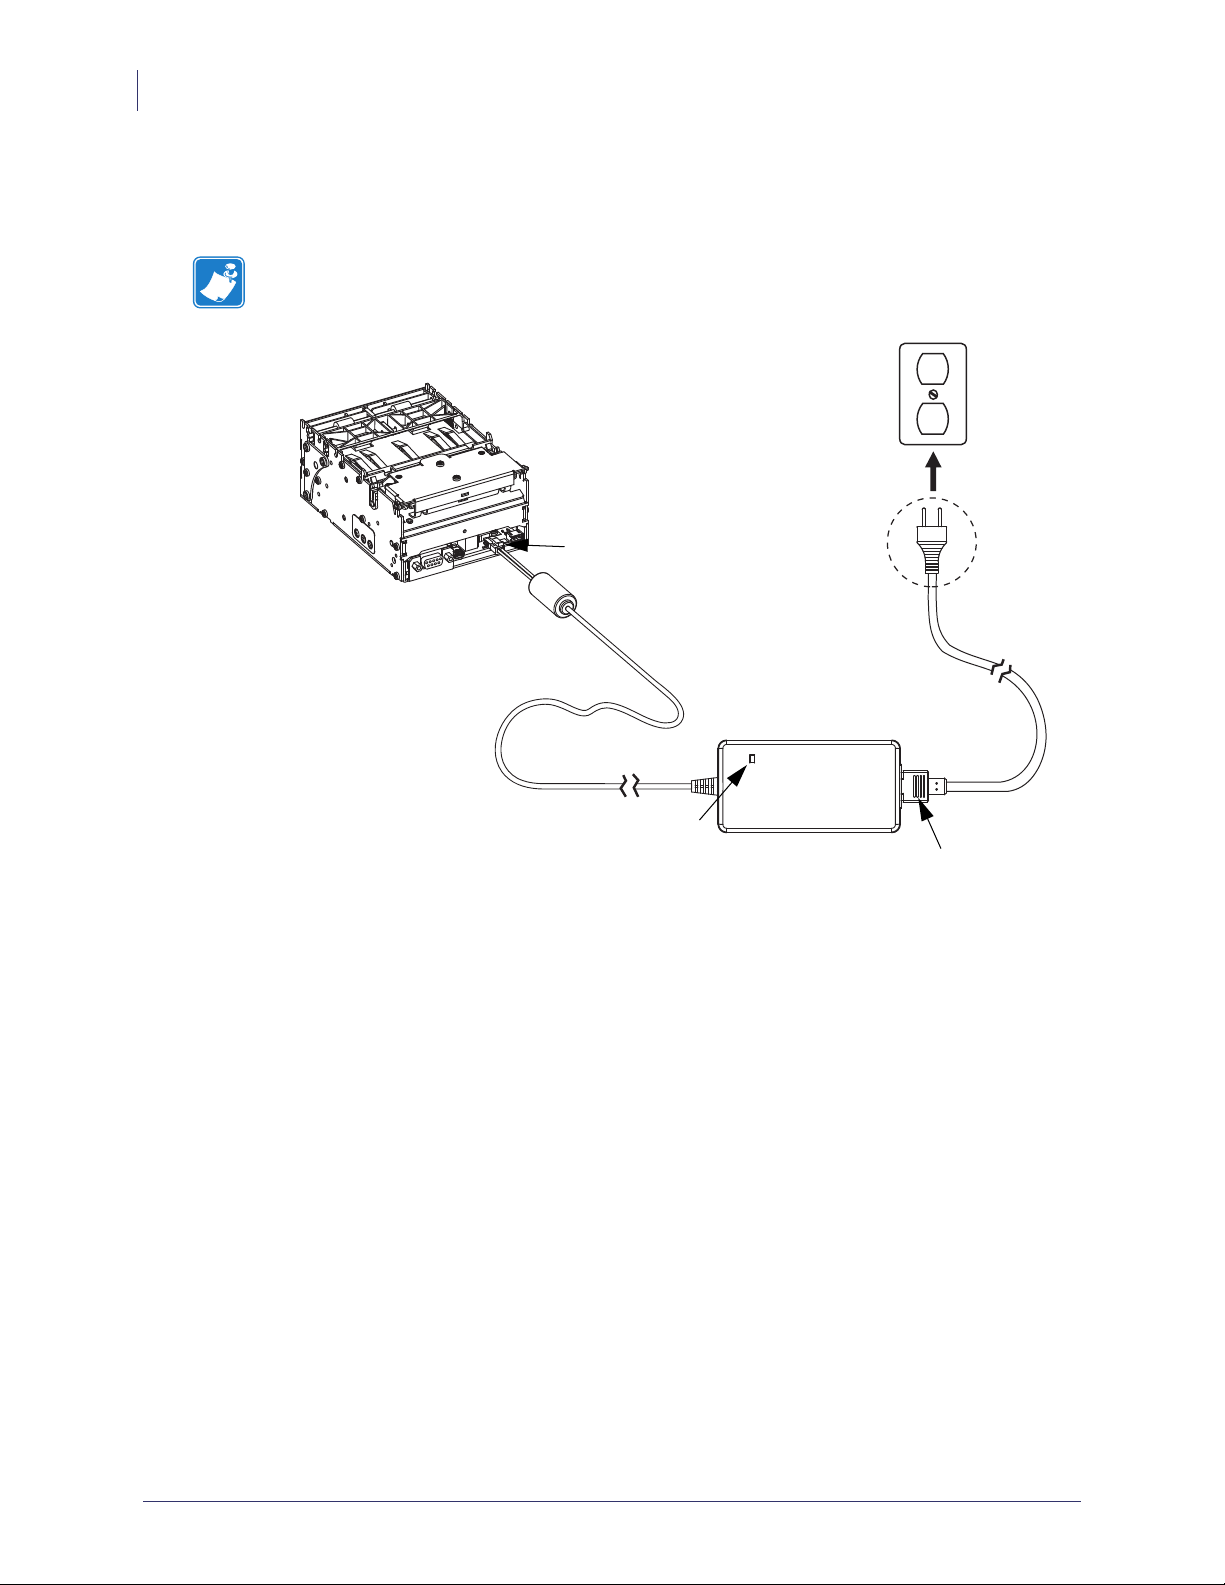
Accessories
42
Printer Power Supply – 808099-004
3. With the power supply on and connected to the printer, the printer’s power status indicator
Note • Ensure the appropriate power cord with a three (3) prong plug and an IEC 60320-C13
connector are used at all times. These power cords must bear the relevant certification mark of
the country in which the product is being used.
will light up green. The printer will begin the printer initialization process. The printer will
test the cutter and check for the presence media. The status indicator will be green if
media is loaded and flashing red (single blink) if media is not loaded.
Printer
Plug Varies
Printer Power
Connector
by Country
AC
Power
Cord
Active Power Light
Optional Power Supply
Accessory
IEC 60320 C-13 Plug
P1028247-001 Rev. C KR203 Hardware Integrator Guide 6/22/2014

Universal Serial Bus (USB) Cable – P1027715
Universal Serial Bus (USB) Cable – P1027715
The KR203 Hardware Integrator power USB Cable accessory can easily be incorporated into a
kiosk design. The cable easily be attached to the kiosk with tie wraps.
The USB cable has been tested to work with the KR203 Hardware Integrator printer and
complies with all safety and compliance regulations.
Accessories
43
6/22/2014 KR203 Hardware Integrator Guide P1028247-001 Rev. C

Accessories
44
Large Media Roll Adapter – P1026858
Large Media Roll Adapter – P1026858
The large media roll adapter is used to prevent excessive pulling force on the printer feed
motor when large roll (250mm (10 inch)) media is used. In some cases, when a large media
roll is used, the feed motor may stall when slack has built up between the roll and the printer.
Note • Make sure you have installed the correct media guide for the width of media selected
before installing the adapter.
P1028247-001 Rev. C KR203 Hardware Integrator Guide 6/22/2014

Attaching to the Printer
1. Place the adapter on the printer at an angle as shown.
Accessories
Large Media Roll Adapter – P1026858
45
2. Rotate the adapter upwards as shown and install the screws.
Install
screws on
both sides
6/22/2014 KR203 Hardware Integrator Guide P1028247-001 Rev. C

Accessories
46
Large Media Roll Adapter – P1026858
Loading Media
1. Open the adapter tensioner assembly by pushing the locking tab .
2. Insert the media through the adapter and into the printer. For narrow media, the printer
will load automatically. For wide media, manual media loading may be required (see
Loading Media on page 24).
3. Close and lock the adapter tensioner assembly.
P1028247-001 Rev. C KR203 Hardware Integrator Guide 6/22/2014

Mounting Plate for Large Media Roll Adapter – P1027728
Mounting Plate for Large Media Roll Adapter –
P1027728
When the large media roll adapter is used with the printer, the standard mounting plate cannot
be used.
Attaching to the Printer
Attach the plate to the printer and the adapter using the screws as shown.
Accessories
47
6/22/2014 KR203 Hardware Integrator Guide P1028247-001 Rev. C

Accessories
48
Using other Accessories with the Large Media Roll Adapter
Using other Accessories with the Large Media Roll Adapter
Universal Roll Holder
The universal roll holder (page 37) can be attached to either side of the large media roll
adapter. Additionally, the media roll low sensor (page 34) can still be used in this configuration
(see Routing Cables with the Large Media Roll Adapter on page 49).
1. Attach the mounting block to the large media roll adapter as shown using the two
screws .
2. Attach the universal roll holder to the mounting block with the screw .
Note • Printer not shown attached for clarity.
P1028247-001 Rev. C KR203 Hardware Integrator Guide 6/22/2014

Routing Cables with the Large Media Roll Adapter
Routing Cables with the Large Media Roll Adapter
Media Roll Low Sensor
When the universal roll holder is attached to the large medial roll adapter, the 500mm media
roll low sensor should be used (see Media Roll Low Sensor on page 34).
Left Side Routing
1. Plug the media roll low sensor into the printer.
2. Secure the wiring to the tie-down point on the large media roll adapter using a plastic
cable tie .
Accessories
49
3. Route the wiring under and to the outside of the universal roll holder and secure it using
plastic cable ties .
4. Attach the sensor to the roll support using the screw.
6/22/2014 KR203 Hardware Integrator Guide P1028247-001 Rev. C

Accessories
50
Routing Cables with the Large Media Roll Adapter
Right Side Routing
1. Plug the media roll low sensor into the printer.
2. Secure the wiring to the tie-down points on the large media roll adapter using plastic cable
ties as shown.
3. Route the wiring under and to the outside of the universal roll holder and secure it using
plastic cable ties.
4. Attach the sensor to the roll support using the screw.
Power Cable
Because of the ferrite attached to the power cable accessory, it is necessary to route it so that it
does not interfere with the function of the large media roll adapter.
When using a power source other than the power supply accessory, routing the wiring is done
along the left side of the large media roll adapter using a plastic cable tie at the tie-down point.
Data Cables
Data cables are routed along the right side of the large media roll adapter. Secure the cables to
the tie-down point on the large media roll adapter using plastic cable ties.
P1028247-001 Rev. C KR203 Hardware Integrator Guide 6/22/2014

Troubleshooting
Status Light Descriptions
Application LED States
7
Immediately after power is applied to the printer, a brief self test is performed and the status
light will report the following conditions:
Table 1 • Application LED States
Solid Green 0 - OK This code is reported when no other
codes are active. It indicates the
printer is functioning normally.
One Red Flash 1 - Paper Jam in
Presenter
Two Red Flashes 2 - Cutter Jam This code indicates that the printer
This code indicates that media is stuck
in the presenter. This error is set when
the printer attempts to eject the media
but cannot complete the operation.
This error is cleared by removing the
media from the presenter sensor.
could not find the cutter blade or could
not properly manage its position. The
error is set when the printer attempts
to cut but fails after three retries. This
error is cleared by cycling the power
off and on.
6/22/2014 KR203 Hardware Integrator Guide P1028247-001 Rev. C

Troubleshooting
52
Status Light Descriptions
Table 1 • Application LED States
Three Red Flashes 3 - Out of Paper This code indicates that the selected
EOP sensor has detected no media
present. This value is signaled wither
when the mark engine has detected a
mark larger than "TOF marker length”
plus 5mm, or when the A/D reading of
the EOP sensor drops below the “End
of paper threshold”. This error is
cleared after successful media load
(either via calibration of via regular
media load).
Four Red Flashes 4 - Print Head Lifted This code indicates that the print head
has been lifted. This error is cleared
by returning the print head to its
locked position.
Five Red Flashes 5 - Paper Feed Error This code indicates that the paper
failed to reach the presenter sensor
within the expected amount of time.
The error is signaled if the media does
not reach the presenter sensor after
feeding the length from the cuter to the
sensor plus 15mm. This error is
cleared by opening and closing the
print head, or by cycling power off and
on.
Yellow Flashing 6 - Head Temperature
Error
This code indicates that the print head
has exceeded the maximum permitted
temperature. This status code is set
when the print head temperature
exceeds 65° C (149° F). When this
condition occurs, the printer feeds
100mm (4 inches) of blank media,
cuts, and presents. This error is
cleared automatically when the print
head temperature falls below 55° C
(131° F).
Rapid Amber
Flashing
Firmware missing or
corrupt
This code indicates that the bootware
has detected an incorrect or missing
checksum in the firmware. This error is
cleared when the firmware is reloaded
or updated. Refer to the Software
Integrator Guide for firmware upload
procedure.
P1028247-001 Rev. C KR203 Hardware Integrator Guide 6/22/2014

Application User Interface
With the printer power on, press and hold the feed button. Continue holding the feed button
until the status indicator flash sequence occurs. The next flash sequence occurs after
completion of the previous flash sequence. The flash sequences perform the following
functions:
Table 2 • Feed Button User Interface
Troubleshooting
Status Light Descriptions
53
Status Flash
Sequence
One Flash, then Solid
Green
Two Flash, then Solid
Green
Three Flash, then
Solid Green
Four Flash, then Solid
Green
Five Flash, then Solid
Green
If the feed button remains pressed after the five flash sequence, the status light goes
off.
Appears for one second. This will print an internal self-test
page.
Appears for one second. Performs system calibration – must
be started with paper out of presenter and from under
printhead, and with no error signaled.
Appears for one second. Performs a simulated USB cable
connect and reconnect causing a USB plug-and-play event to
occur.
Appears for one second. Sets all printer settings to the default
with the exception of media guide calibration, then it will
perform the media guide calibration.
Appears for one second. Pr ints a 50% gray pattern, ejects it
and then prints a diagonal line pattern and ejects it.
Action
Printer status is also reported during normal operation when an error occurs, or a status request
can be sent to the printer via the Windows driver. Refer to the Software integrator Guide for
error codes reported by the Windows driver.
6/22/2014 KR203 Hardware Integrator Guide P1028247-001 Rev. C

Troubleshooting
54
Print Quality Problems
Print Quality Problems
No print on the label.
• The media may not be direct thermal media, or the thermal media coating is not facing
upward. See Determining Thermal Media Types on page 19.
• Is the media loaded correctly? Is the thermal media coating facing upward? Loading
Media on page 24.
• The printhead may be dirty or damaged.
• The printhead is dirty. Clean the printhead. Refer to the Service Manual (P1028249)
for instructions.
• The printhead is damaged. Replace the printhead. Refer to the Service Manual
(P1028249) for instructions.
• The printhead wiring may be damaged or not connected properly.
• Check the wiring connections at the printhead and the main logic board. Refer to the
Service Manual (P1028249) for instructions.
• Check for damage to the wiring. Replace the wiring if damaged. Refer to the Service
Manual (P1028249) for instructions.
The printed image does not look right.
• The printhead is dirty. Clean the printhead. Refer to the Service Manual (P1028249) for
instructions.
• The printhead has worn out. The printhead is a consumable item and will wear out due to
friction between the media and printhead. Using unapproved media may shorten life or
damage your printhead. Replace the printhead. Refer to the Service Manual (P1028249)
for instructions.
• Adjust the print darkness and/or print speed.Refer to the Software Integrator Guide
(P1028248) for instructions.
• The Windows printer driver or application software may change these settings and
may require a change to optimize print quality.
• The media being used is incompatible with the printer. Be sure to use the recommended
media for your application, and always use Zebra-approved media.
• The platen (driver) roller maybe losing traction due to:
• Foreign objects attached to its surface.
• The rubbery smooth surface has become polished and slippery.
• The platen may need cleaning or replacement. Refer to the Service Manual (P1028249)
for instructions.
There are long tracks of missing print (blank vertical lines) on
several labels.
• The printhead may be dirty or damaged.
P1028247-001 Rev. C KR203 Hardware Integrator Guide 6/22/2014

Troubleshooting
Media Sensing Problems
• The printhead is dirty. Clean the printhead. Refer to the Service Manual (P1028249)
for instructions.
• The printhead is damaged. Replace the printhead. Refer to the Service Manual
(P1028249) for instructions.
• The printhead has worn out. The printhead is a consumable item and will wear out due to
friction between the media and printhead. Using unapproved media may shorten life or
damage your printhead. Replace the printhead. Refer to the Service Manual (P1028249)
for instructions.
The printing does not start at the top of the receipt or misprinting of
one to three receipts.
• The printer needs to be calibrated (refer to the two-flash sequence of Application User
Interface on page 53).
• Reload the media. See Loading Media on page 24.
55
Media Sensing Problems
The KR203 Hardware Integrator printer default media mode is continuous. The printer will
remain in this mode until it is changed by the Windows Driver.
The KR203 Hardware Integrator printer has automatic media calibration capability for black
mark media. Once the printer is printing or feeding media, the printer continually checks and
adjusts the media sensing to accommodate for minor changes in media parameters from page
to page on a roll, and from roll to roll of media. The printer will automatically initiate a media
length calibration if the expected media length or the page to page gap distance has exceeded
the acceptable variation range when starting a print job or feeding media.
If the printer does not detect blacklines (or notches with black mark sensing) after feeding the
media the default maximum label length distance of 24 inches (610mm), then the printer will
report a media error.
Optionally, the printer can be set to do a short media calibration after loading media or when
closing the printhead with power on. The printer will then feed up to three labels while
calibrating.
6/22/2014 KR203 Hardware Integrator Guide P1028247-001 Rev. C

Troubleshooting
56
Media Sensing Problems
The printer will not load the media.
• The media has changed, or a different media guide has been installed.
• Make sure the appropriate media guide is installed for the media being used. See
Media Guide on page 18.
• Perform a two-flash procedure to recalibrate the printer, then perform a four-flash to
reset the printer defaults (refer to Application User Interface on page 53).
• Load the media manually (refer Manual Media Loading on page 25).
• The platen (driver) roller maybe losing traction due to:
• Foreign objects attached to its surface.
• The rubbery smooth surface has become polished and slippery.
• The platen may need cleaning or replacement. Refer to the Service Manual (P1028249)
for instructions.
• The media sensor may be dirty or damaged. Refer to the Service Manual (P1028249) for
instructions.
• The printhead assembly is not closed.
• Check the status light on either side of the printer. If the status light is showing four
red flashes then the printhead is not closed. Push down on the printhead assembly
until it locks into place.
• There is a jam under the printhead. Refer to the Service Manual (P1028249) for
instructions.
• The large media roll may be over torquing the feed motor. Install the large media roll
adapter. See Large Media Roll Adapter – P1026858 on page 44.
The printer will not eject the media.
• The presenter rollers are dirty or damaged.
• The presenter rollers are dirty. Refer to the Service Manual (P1028249) for
instructions.
• The presenter rollers are damaged. Refer to the Service Manual (P1028249) for
instructions.
• There is a jam under the presenter. Refer to the Service Manual (P1028249) for
instructions.
• The presenter sensor may be dirty or damaged.
• The presenter sensor is dirty. Refer to the Service Manual (P1028249) for
instructions.
• The presenter sensor is damaged. Refer to the Service Manual (P1028249) for
instructions.
• The presenter has not cleared the previous receipt.
• Check the status light on either side of the printer. If the status light is showing one
red flash then the printer is reporting media in the presenter. Remove any media that
may be in the presenter.
P1028247-001 Rev. C KR203 Hardware Integrator Guide 6/22/2014

• The presenter motor may need to be replaced. Refer to the Service Manual (P1028249) for
instructions.
• The presenter drive gears may be damaged or worn. Refer to the Service Manual
(P1028249) for instructions.
Other Problems
The receipts are not cutting properly.
• The cutter blade may be worn. Replace the cutter blades. Refer to the Service Manual
(P1028249) for instructions.
• The cutter tensioner may be worn or damaged. Replace the cover plate assembly. Refer to
the Service Manual (P1028249) for instructions.
• Check the Cutter Mode setting, and the Partial Cut Width setting in the Windows driver.
Refer to the Software Integrator Guide (P1026208).
• The cutter motor may need to be replaced. Refer to the Service Manual (P1028249) for
instructions.
Troubleshooting
Other Problems
57
• The cutter drive gear, drive pin, or cutter actuator may be damaged or worn. Refer to the
Service Manual (P1028249) for instructions.
• Check for the latest firmware and driver version. Refer to the Software Integrator Guide
(P1028248) or see Contacts on page 2.
There are no lights on the printer.
• Make sure there is power applied to the printer. Refer to Attaching Power on page 8.
• The control panel may be dirty or damaged. Refer to the Service Manual (P1028249) for
instructions.
• The main logic board may be damaged. Refer to the Service Manual (P1028249) for
instructions.
• Check for the latest firmware and driver version. Refer to the Software Integrator Guide
(P1028248) or see Contacts on page 2.
A receipt format was sent to, but not recognized by, the printer.
• If the status LED is on or flashing, refer to Application User Interface on page 53.
• Make sure the USB cable is correctly installed. Refer to Connecting the Printer to the
Host on page 11.
• A communications problem has occurred. Perform a USB detect (refer to the three-flash
sequence of Application User Interface on page 53).
6/22/2014 KR203 Hardware Integrator Guide P1028247-001 Rev. C

Troubleshooting
58
Resetting the Factory Default Values
The receipts are not cutting at the black mark.
• Make sure you are using the appropriate media guide for the desired media width. See
Media Guide on page 18.
• Perform a media guide calibration. Refer to the four-flash sequence of Application User
Interface on page 53.
• Make sure you are using the appropriate media. See Determining Thermal Media Types
on page 19.
• Use the Windows driver to set the printer to black mark mode. Refer to the Software
Integrator Guide (P1026208) for instructions on setting black mark mode.
• Reload the media. See Loading Media on page 24.
Resetting the Factory Default Values
• Sometimes, resetting the printer to the factory defaults may solve some problems. Refer to
the two-flash sequence of Application User Interface on page 53.
• Use the Windows driver to perform a printer reset. Refer to the Software Integrator Guide
(P1026208) for instructions.
Contact Technical Support
Technical Support via the Internet is available 24 hours per day, 365 days per year.
www.zebra.com
For questions on the operation of Zebra equipment and software, please call your distributor.
For additional assistance, contact us (see Contacts on page 2).
Please have your model and serial numbers available.
P1028247-001 Rev. C KR203 Hardware Integrator Guide 6/22/2014
 Loading...