

Page 1
Page 2

Page 3

Contents
Welcome 13
1 Getting Started 19
Disclaimer . . . . . . . . . . . . . . . . . . . . . . . . . . . . . . . . . . . . . . . . . . . . . . . . . . . . 9
Trademarks. . . . . . . . . . . . . . . . . . . . . . . . . . . . . . . . . . . . . . . . . . . . . . . . . . . . 9
Copyright . . . . . . . . . . . . . . . . . . . . . . . . . . . . . . . . . . . . . . . . . . . . . . . . . . . . . 9
Publication information . . . . . . . . . . . . . . . . . . . . . . . . . . . . . . . . . . . . . . . . . . 9
Declaration of conformity . . . . . . . . . . . . . . . . . . . . . . . . . . . . . . . . . . . . . . . 10
Warranty information. . . . . . . . . . . . . . . . . . . . . . . . . . . . . . . . . . . . . . . . . . . 10
Important safety information . . . . . . . . . . . . . . . . . . . . . . . . . . . . . . . . . . . . . 10
About your computer . . . . . . . . . . . . . . . . . . . . . . . . . . . . . . . . . . . . . . . . . . . . . . 14
Package contents . . . . . . . . . . . . . . . . . . . . . . . . . . . . . . . . . . . . . . . . . . . . . . . . . . 15
Optional accessories. . . . . . . . . . . . . . . . . . . . . . . . . . . . . . . . . . . . . . . . . . . . 16
Contacting Xplore – service and questions. . . . . . . . . . . . . . . . . . . . . . . . . . . . . . 17
Front view . . . . . . . . . . . . . . . . . . . . . . . . . . . . . . . . . . . . . . . . . . . . . . . . . . . . . . . 19
Back view. . . . . . . . . . . . . . . . . . . . . . . . . . . . . . . . . . . . . . . . . . . . . . . . . . . . 21
Top view . . . . . . . . . . . . . . . . . . . . . . . . . . . . . . . . . . . . . . . . . . . . . . . . . . . . 22
Bottom view. . . . . . . . . . . . . . . . . . . . . . . . . . . . . . . . . . . . . . . . . . . . . . . . . . 23
Left side view. . . . . . . . . . . . . . . . . . . . . . . . . . . . . . . . . . . . . . . . . . . . . . . . . 24
Right side view. . . . . . . . . . . . . . . . . . . . . . . . . . . . . . . . . . . . . . . . . . . . . . . . 25
LED indicators . . . . . . . . . . . . . . . . . . . . . . . . . . . . . . . . . . . . . . . . . . . . . . . . 26
Quick-start guide . . . . . . . . . . . . . . . . . . . . . . . . . . . . . . . . . . . . . . . . . . . . . . . . . . 28
Application, Windows, and hot keys . . . . . . . . . . . . . . . . . . . . . . . . . . . . . . . 28
iX104C4 User’s Handbook 3
Page 4

Contents
2 Using the Tablet 31
Turning on the computer. . . . . . . . . . . . . . . . . . . . . . . . . . . . . . . . . . . . . . . . . . . . 31
Turning off the computer . . . . . . . . . . . . . . . . . . . . . . . . . . . . . . . . . . . . . . . . . . . 32
Using the Reset switch. . . . . . . . . . . . . . . . . . . . . . . . . . . . . . . . . . . . . . . . . . 32
Suspending and resuming operation . . . . . . . . . . . . . . . . . . . . . . . . . . . . . . . . . . . 33
Suspending operation. . . . . . . . . . . . . . . . . . . . . . . . . . . . . . . . . . . . . . . . . . . 34
Resuming operation . . . . . . . . . . . . . . . . . . . . . . . . . . . . . . . . . . . . . . . . . . . . 36
Using the pen. . . . . . . . . . . . . . . . . . . . . . . . . . . . . . . . . . . . . . . . . . . . . . . . . . . . . 37
Selecting Auto-Sense, Active, or Touch mode . . . . . . . . . . . . . . . . . . . . . . . 38
Using the digitizer to perform mouse functions. . . . . . . . . . . . . . . . . . . . . . . 39
Changing the pen double-click speed . . . . . . . . . . . . . . . . . . . . . . . . . . . 40
Positioning the pen and pen tether . . . . . . . . . . . . . . . . . . . . . . . . . . . . . . . . . 41
Using the fingerprint scanner . . . . . . . . . . . . . . . . . . . . . . . . . . . . . . . . . . . . . . . . 43
Changing the screen orientation . . . . . . . . . . . . . . . . . . . . . . . . . . . . . . . . . . . . . . 44
Adjusting the screen brightness. . . . . . . . . . . . . . . . . . . . . . . . . . . . . . . . . . . . . . . 45
Windows XP . . . . . . . . . . . . . . . . . . . . . . . . . . . . . . . . . . . . . . . . . . . . . . . . . 45
Windows Vista. . . . . . . . . . . . . . . . . . . . . . . . . . . . . . . . . . . . . . . . . . . . . . . . 45
Enabling automatic backlight control . . . . . . . . . . . . . . . . . . . . . . . . . . . . . . 46
Optimizing screen settings for outdoor use . . . . . . . . . . . . . . . . . . . . . . . . . . 47
Windows XP . . . . . . . . . . . . . . . . . . . . . . . . . . . . . . . . . . . . . . . . . . . . . . 47
Windows Vista . . . . . . . . . . . . . . . . . . . . . . . . . . . . . . . . . . . . . . . . . . . . 47
Docking the tablet . . . . . . . . . . . . . . . . . . . . . . . . . . . . . . . . . . . . . . . . . . . . . . . . . 48
Connecting devices . . . . . . . . . . . . . . . . . . . . . . . . . . . . . . . . . . . . . . . . . . . . . . . . 49
Connecting to a local area network . . . . . . . . . . . . . . . . . . . . . . . . . . . . . . . . 49
Connecting USB-compatible devices . . . . . . . . . . . . . . . . . . . . . . . . . . . . . . 49
Connecting an external microphone . . . . . . . . . . . . . . . . . . . . . . . . . . . . . . . 50
Adjusting microphone volume – Windows XP . . . . . . . . . . . . . . . . . . . 50
Adjusting microphone volume – Windows Vista . . . . . . . . . . . . . . . . . . 50
4 iX104C4 User’s Handbook
Page 5

Contents
Connecting a headphone or speakers . . . . . . . . . . . . . . . . . . . . . . . . . . . . . . . 51
Adjusting headphone or speaker volume – Windows XP . . . . . . . . . . . 51
Adjusting headphone or speaker volume – Windows Vista . . . . . . . . . . 51
Connecting a monitor or projection panel . . . . . . . . . . . . . . . . . . . . . . . . . . . 52
Activating the monitor or projection panel. . . . . . . . . . . . . . . . . . . . . . . 52
Connecting a device to the optional serial port . . . . . . . . . . . . . . . . . . . . . . . 53
Connecting an XPL snap-on expansion module . . . . . . . . . . . . . . . . . . . . . . 53
Using the battery . . . . . . . . . . . . . . . . . . . . . . . . . . . . . . . . . . . . . . . . . . . . . . . . . . 54
Charging the battery pack . . . . . . . . . . . . . . . . . . . . . . . . . . . . . . . . . . . . . . . 54
If you do not have an external battery charger . . . . . . . . . . . . . . . . . . . . 54
If you have an external battery charger . . . . . . . . . . . . . . . . . . . . . . . . . 55
Removing and installing the battery . . . . . . . . . . . . . . . . . . . . . . . . . . . . . . . 55
Removing the battery . . . . . . . . . . . . . . . . . . . . . . . . . . . . . . . . . . . . . . . 55
Installing the battery . . . . . . . . . . . . . . . . . . . . . . . . . . . . . . . . . . . . . . . . 57
Discarding batteries . . . . . . . . . . . . . . . . . . . . . . . . . . . . . . . . . . . . . . . . . . . . 57
Using power options – Windows XP . . . . . . . . . . . . . . . . . . . . . . . . . . . . . . . . . . 58
Displaying power options . . . . . . . . . . . . . . . . . . . . . . . . . . . . . . . . . . . . . . . 58
Changing the computer’s power schemes . . . . . . . . . . . . . . . . . . . . . . . . . . . 59
Changing battery alarm settings. . . . . . . . . . . . . . . . . . . . . . . . . . . . . . . . . . . 59
Checking battery power status . . . . . . . . . . . . . . . . . . . . . . . . . . . . . . . . . . . . 60
Selecting power settings. . . . . . . . . . . . . . . . . . . . . . . . . . . . . . . . . . . . . . . . . 60
Enabling Hibernation mode . . . . . . . . . . . . . . . . . . . . . . . . . . . . . . . . . . . . . . 61
Using power options – Windows Vista. . . . . . . . . . . . . . . . . . . . . . . . . . . . . . . . . 62
Checking battery power status . . . . . . . . . . . . . . . . . . . . . . . . . . . . . . . . . . . . 62
Selecting a power plan . . . . . . . . . . . . . . . . . . . . . . . . . . . . . . . . . . . . . . . . . . 62
Selecting power options . . . . . . . . . . . . . . . . . . . . . . . . . . . . . . . . . . . . . . . . . 63
Selecting Power (On/Off)/Backlight(On/Off)/Resume button options . . . . . 64
Tips for conserving battery power . . . . . . . . . . . . . . . . . . . . . . . . . . . . . . . . . 65
iX104C
4
User’s Handbook 5
Page 6

Contents
Accessing the hard disk drive compartment . . . . . . . . . . . . . . . . . . . . . . . . . . . . . 66
Re-installing the hard disk drive compartment cover . . . . . . . . . . . . . . . . . . 67
Accessing the PCMCIA compartment . . . . . . . . . . . . . . . . . . . . . . . . . . . . . . . . . 68
Re-installing the PCMCIA compartment cover. . . . . . . . . . . . . . . . . . . . . . . 69
Programming hot keys . . . . . . . . . . . . . . . . . . . . . . . . . . . . . . . . . . . . . . . . . . . . . 70
Programming hot keys to start applications, open documents,
or go to a Web site . . . . . . . . . . . . . . . . . . . . . . . . . . . . . . . . . . . . . . . . . . . . . 71
Programming hot keys to perform pre-defined functions . . . . . . . . . . . . . . . 75
Programming hot keys to perform other key functions . . . . . . . . . . . . . . . . . 77
3 Maintaining the Tablet 81
Caring for the tablet. . . . . . . . . . . . . . . . . . . . . . . . . . . . . . . . . . . . . . . . . . . . . . . . 81
Checking power cords and connectors. . . . . . . . . . . . . . . . . . . . . . . . . . . . . . 81
Protecting the computer from damage. . . . . . . . . . . . . . . . . . . . . . . . . . . . . . 81
Preventing the computer from overheating . . . . . . . . . . . . . . . . . . . . . . . . . . 82
Storing the computer . . . . . . . . . . . . . . . . . . . . . . . . . . . . . . . . . . . . . . . . . . . 83
Caring for the display screen . . . . . . . . . . . . . . . . . . . . . . . . . . . . . . . . . . . . . 83
Protecting the display screen . . . . . . . . . . . . . . . . . . . . . . . . . . . . . . . . . 83
When to replace the pen . . . . . . . . . . . . . . . . . . . . . . . . . . . . . . . . . . . . . . . . . . . . 84
Calibrating the digitizer. . . . . . . . . . . . . . . . . . . . . . . . . . . . . . . . . . . . . . . . . . . . . 85
Calibrating the digitizer: iX104C4 – Windows XP . . . . . . . . . . . . . . . . . . . . 86
Calibrating the digitizer: iX104C4 – Windows Vista . . . . . . . . . . . . . . . . . . 88
Calibrating the digitizer: iX104C4 Dual Mode – Windows XP . . . . . . . . . . 90
Calibrating the digitizer: iX104C4 Dual Mode – Windows Vista . . . . . . . . . 93
6 iX104C4 User’s Handbook
Page 7

Contents
A Troubleshooting 97
B Using BIOS and AOS Functions 99
Disabling the Auto Power feature . . . . . . . . . . . . . . . . . . . . . . . . . . . . . . . . . . . . 100
Enabling automatic LCD backlight control . . . . . . . . . . . . . . . . . . . . . . . . . . . . 100
C Glossary 101
D Hardware Specifications 105
E Agency Notices 111
F Configuring Dual Mode Tablet Digitizer Input Methods 115
Using the BIOS Setup Utility to set input method defaults . . . . . . . . . . . . . . . . 116
Starting the BIOS Setup Utility . . . . . . . . . . . . . . . . . . . . . . . . . . . . . . . . . . 116
Selecting the digitizer input method . . . . . . . . . . . . . . . . . . . . . . . . . . . . . . 117
Setting digitizer input method security . . . . . . . . . . . . . . . . . . . . . . . . . . . . 118
Using the Panel Control Center to configure temporary changes
to the input method . . . . . . . . . . . . . . . . . . . . . . . . . . . . . . . . . . . . . . . . . . . . . . . 119
iX104C
Summary: Dual Mode digitizer input method settings . . . . . . . . . . . . . . . . . . . . 121
Sample implementations . . . . . . . . . . . . . . . . . . . . . . . . . . . . . . . . . . . . . . . . . . . 126
Sample 1. . . . . . . . . . . . . . . . . . . . . . . . . . . . . . . . . . . . . . . . . . . . . . . . . . . . 126
Sample 2. . . . . . . . . . . . . . . . . . . . . . . . . . . . . . . . . . . . . . . . . . . . . . . . . . . . 126
Index 129
4
User’s Handbook 7
Page 8

8 iX104C4 User’s Handbook
Page 9

Disclaimer
Xplore Technologies® has made every effort to ensure the accuracy and
completeness of this document; however, because ongoing development
efforts are made to continually improve the capabilities of our products,
we cannot guarantee the accuracy of the contents of this document. We
disclaim liability for errors, omissions, or future changes herein.
Trademarks
Xplore and the Xplore logo are registered trademarks of Xplore
Technologies Corp.; iX104, iX104C
Dual Mode are trademarks of Xplore Technologies Corp.
Kensington and MicroSaver are registered trademarks of the Kensington
Technology Group. Microsoft is a registered trademark of Microsoft
Corporation. Windows 2000 Professional, Windows XP Professional, and
Windows XP Tablet PC Edition are trademarks of Microsoft Corporation.
PCMCIA and CardBus are registered trademarks of the Personal
Computer Memory Card International Association. Intel, Pentium, and
SpeedStep are registered trademarks of Intel Corporation. Wi-Fi is a
trademark of the Wireless Ethernet Compatibility Alliance (WECA).
FireWire is a registered trademark of Apple Computer, Inc. ISODAMP is
a registered trademark of Aearo Company.
All other brands, product names, company names, trademarks and service
marks used herein are property of their respective companies.
4
, iX104C4 AllVue, and iX104C4
Copyright
Copyright © 2003-2008 Xplore Technologies Corp. All rights reserved.
No part of this publication may be copied, reproduced, or translated,
without the prior written consent of Xplore Technologies. No part of this
publication may be stored or transmitted in any electronic form without
the prior consent of Xplore Technologies. Any unauthorized use is a
violation of copyright laws.
Publication information
PN: 95-01085, Rev. A
July 2008
iX104C4 User’s Handbook 9
Page 10

Declaration of conformity
a
DECLARATION OF CONFORMITY according to FCC Part 15
Responsible Party Name: Xplore Technologies Corp.
Address: 14000 Summit Drive, Suite 900, Austin, Texas 78728
Telephone: 512.336.7797
Declares that product: Model Series: iX104C
This device complies with Part 15 of the FCC rules. Operation is subject to the
following two conditions: (1) This device may not cause harmful interference, and, (2)
This device must accept any interference received, including interference that may
cause undesired operation.
WARNING
Changes or modifications to this unit not expressly approved by the party responsible for
compliance may void the user’s authority to operate this equipment.
For more information about FCC rules and their applicability to the iX104, see
Appendix E, “Agency Notices.”
4
complies with Part 15 of the FCC Rules.
Warranty information
The iX104C4 is backed by a standard 36-month International Limited Warranty. An
extended International Limited Warranty is available. Check the service kit included
with your computer for warranty terms and conditions.
Important safety information
Before you use the iX104C
instructions and the operation instructions in this handbook.
Failure to observe all these instructions voids the Limited Warranty and may lead
to suspension or denial of services to the offender, or legal action, or both.
Follow any special regulations governing the use of the tablet and, if radio-enabled,
always switch it off in areas where radio devices are forbidden or when the radio device
can cause interference or danger.
Always follow any safety laws and regulations pertaining to the use of cell phones and
two-way radios, because these laws and regulations typically apply to the use of the
wireless-enabled tablet.
Observe all restrictions on the use of radio equipment in fuel depots (fuel storage and
distribution areas), chemical plants, and wherever blasting operations are in progress or
in any area in which restrictions on radio transmissions are imposed.
Switch off the tablet when in an aircraft. The tablet is not FAA-approved for use on
aircraft. The effect of the use of the tablet in aircraft is unknown. Using the tablet in an
aircraft may affect aircraft instrumentation, communication, and performance; may
disrupt the network; and may be illegal.
Operating the wireless-enabled tablet may interfere with the functioning of
inadequately protected medical devices such as pacemakers. Consult a physician or the
manufacturer of the medical device if you have any questions.
4
(referred to as the tablet), read these safety
10 iX104C4 User’s Handbook
Page 11

Radio signals from your tablet will not affect the operation of most modern equipment,
a
a
but certain electronic equipment, including automotive systems, may not be shielded
against radio signals from your tablet. Check with the manufacturer of your motor
vehicle or the manufacturer’s representative to determine whether using the tablet will
present any safety issues.
Avoid using the tablet in any environment that requires your full attention, such as
when driving a vehicle. If you need to use your tablet while driving, have a passenger
use it for you or find a safe location to halt your vehicle.
WARNING
Use only battery types specified in this handbook. Using any other type of battery can be
dangerous and can disable the tablet.
WARNING
Do not use any dock or any other accessory or attachment that is not manufactured or
supplied by Xplore or an authorized Xplore accessories supplier. Use of any accessory or
attachment that is not supplied or approved for use with the tablet by Xplore is not
permitted because it may cause hazards.
Operate the tablet only from the type of power source indicated on the marking label.
(See page 54 for more information about the battery and power supply.) Route power
supply cords so that they are not likely to be walked on or pinched by items placed
upon or against them. Pay particular attention to cords at plugs and convenience
receptacles, and at the point where cords exit from the tablet or its dock. Do not
overload wall outlets, extension cords, or integral convenience receptacles because this
can cause fire or electric shock.
Unplug the tablet and refer the tablet and dock for service to qualified service personnel
if any of the following conditions occur:
■ The power supply cord or plug is damaged.
■ The tablet or dock does not operate normally when you follow the instructions in
this book.
■ The tablet or dock exhibits a distinct change in performance.
Adjust only controls for which there are instructions in this book. An improper
adjustment of other controls can result in damage and may require extensive work by a
qualified technician to restore the tablet or dock to normal operation.
CAUTION
Avoid prolonged physical contact with the exposed metal surfaces on the front and
back of the tablet. While the tablet may not feel hot to the touch, if you maintain
physical contact with the tablet for a long time (for example, if you rest the tablet on
your lap for a long time), your skin may suffer low-heat injury. In addition, be careful
when you remove a PC card that has been used for a long time, because the card
may be hot.
iX104C4 User’s Handbook 11
Page 12

12 iX104C4 User’s Handbook
Page 13

Welcome
™
Welcome to the Xplore Technologies® iX104C
4
tablet PC, the
rugged tablet designed, tested, and manufactured to meet the
environmental and physical real-world challenges faced by today’s
mobile workers. Based on years of experience in rugged mobile
applications, the
iX104C
4
is designed to withstand the abuses of
everyday wear and tear.
Advanced technology, innovative design, and a rugged case are just a
few highlights of your
Note: This handbook assumes that you have basic experience
using computers and Microsoft® Windows®.
iX104C
4
system.
iX104C4 User’s Handbook 13
Page 14

Welcome
About your computer
The iX104C4 is a high-performance tablet PC that runs on Microsoft
Windows XP® Professional Tablet PC Edition and Vista Business
operating systems.
The method you use to control the tablet depends on the tablet model,
as follows:
Tablet Model Digitizer/Touchscreen Control Method
4
iX104C
Dual Mode Inductive and resistive
touch digitizer
4
iX104C
Dual Mode
AllVue Xtreme
4
iX104C
AllVue
Xtreme
Sunlight-viewable display
with inductive and
resistive digitizer
Sunlight-viewable display
with inductive digitizer
• Special, enhanced pen
(included with the tablet)
• Your finger
• Any suitable pointing
device
• Special, enhanced pen
(included with the tablet)
• Your finger
• Any suitable pointing
device
• Special, enhanced pen
(included with the tablet)
• Any suitable pointing
device
Note: In this handbook, all information applies to all models
unless otherwise noted.
14 iX104C4 User’s Handbook
Page 15

Welcome
Package contents
iX104C
4
tablets have been engineered and tested to meet Military
All
Standards for Environmental Extremes (MIL STD 810F). Your tablet
includes the following features that make it exceptionally rugged and
durable:
■ Durable, long-lasting, dense magnesium enclosure
■ Interior and exterior multi-layer magnesium frames and cavities
■ ISODAMP
®
shock absorbing materials in patented bumpering
system and gasket protection mechanisms
■ Shock-isolated hard disk
■ Integrated, protected wireless LAN and WAN antennas for dual
mode operation
■ Locked in place memory, cables, and connectors
■ Proprietary thermal management system
Check to make sure your package includes the following items:
■ Quick Start Guide
■ Battery pack
■ Power cord
■ AC adapter
■ Pen
■ Pen tether
■ iX104C
■ Warranty information kit
4
tablet PC
iX104C4 User’s Handbook 15
Page 16

Welcome
Optional accessories
Your package also includes any optional accessories you ordered.
Docking options
■ xStand Desktop Docking Station
■ xDock Vehicle Docking Station
Carrying cases
■ Shoulder cases
■ Portfolio case
■ Dockable case
Storage options
■ External USB floppy disk drive
■ External USB CD-ROM drive
Memory
■ 2 GB RAM
■ 32 GB 2.5-inch solid state hard drive
Power options
■ AC adapter with U.S. cord
■ Main battery pack (41 watt hours)
■ Extended life battery pack (55 watt hours)
■ Auto adapter (cigarette lighter adapter)
Additional accessories
■ USB non-rugged mini keyboard (83-key)
■ USB rugged, backlit keyboard (83-key)
■ Screen protectors (2-pack)
■ Active stylus
■ Pen tether
16 iX104C4 User’s Handbook
Page 17

Contacting Xplore – service and questions
The serial number is on the
back of the tablet. See
page 21.
Note: To troubleshoot problems (including wireless and GPS
problems), before you call, read the FAQ page of the Xplore
Technologies Web site. Go to http://www.xploretech.com; then
select Customer Support; then FAQ.
If you purchased your tablet from an authorized Xplore dealer,
contact the dealer for service and support.
If you purchased your tablet directly from Xplore, use any of the
following methods to contact Xplore for service and support:
Web site http://www.xploretech.com
E-mail customersupport@xploretech.com
Toll free 1-866-296-8541, extension 222
Welcome
iX104C4 User’s Handbook 17
Fax 1-512-336-7791
Before you contact Xplore, have the following information ready so
that the customer support representative can quickly provide a
solution:
Product name: iX104C
Product serial number
Purchase date
Conditions under which the problem occurred
Any error messages that were displayed
Type of device connected, if any
4
Page 18

18 iX104C4 User’s Handbook
Page 19
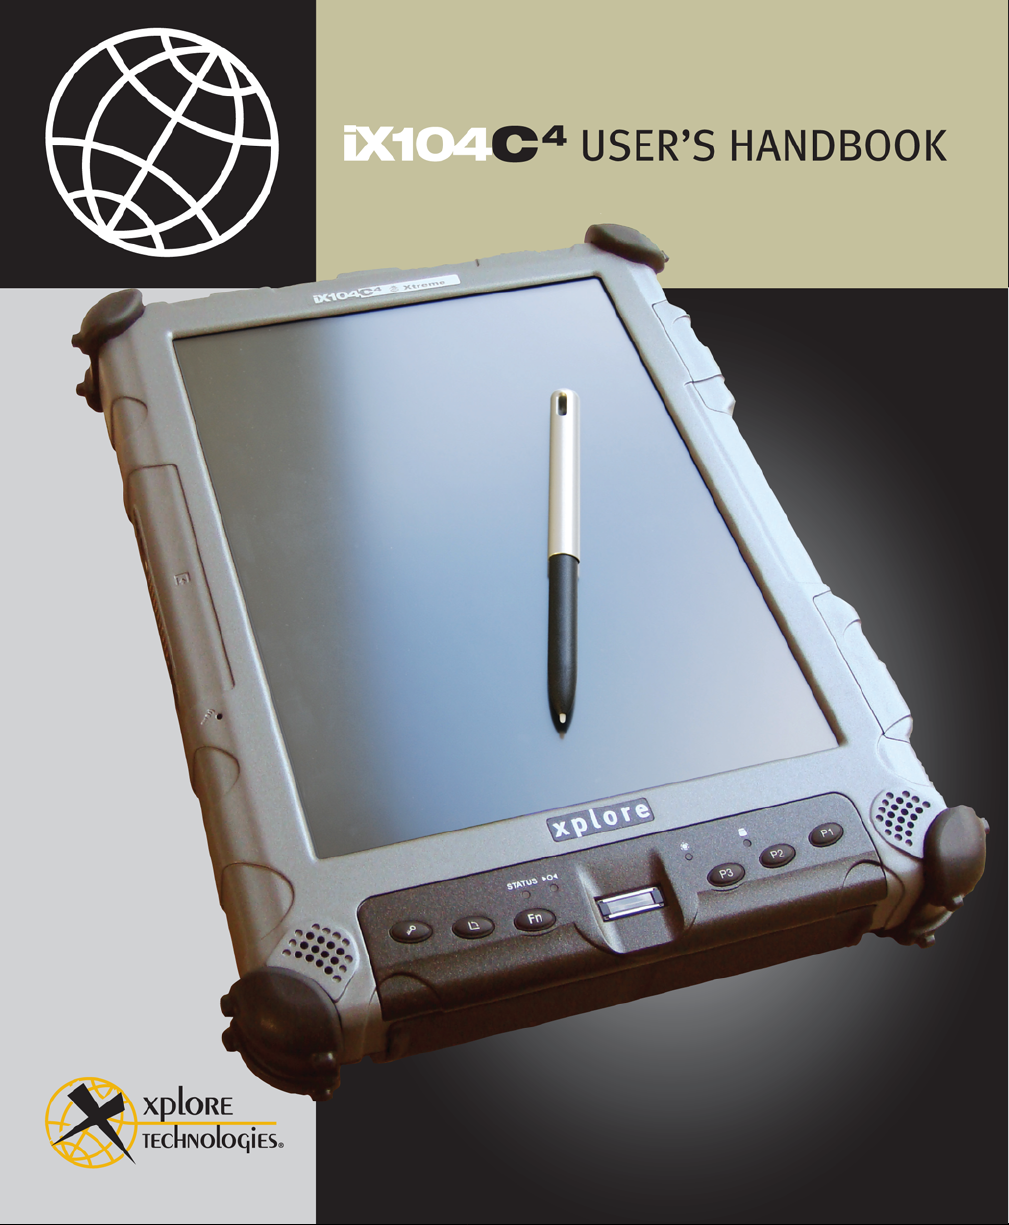
1 Getting Started
Built-in
microphone
Speaker
Speaker
Auto Light sensor
Reset switch
Status indicator
HDD indicator
Fingerprint scanner
This chapter gives you an overview of your tablet and includes a
quick-start guide to tablet keys.
Front view
Built-in microphone Enables you to input mono audio with noise cancellation. (See page 50.)
Reset switch Enables you to turn off the computer when using the Power (On/Off)/Backlight
Status indicator Indicates the computer status (on, off, etc.). (See page 26.)
Speakers Enable you to listen to stereo audio files. Sealed to provide protection from the
iX104C4 User’s Handbook 19
(On/Off)/Resume key is not effective. (See page 32.)
environment.
Page 20

Chapter 1. Getting Started
Front view
Auto Light sensor Detects ambient light conditions.
HDD indicator Indicates hard disk drive activity. (See page 26.)
Fingerprint scanner Enables you to use fingerprint verification features. (See page 43.)
20 iX104C4 User’s Handbook
Page 21

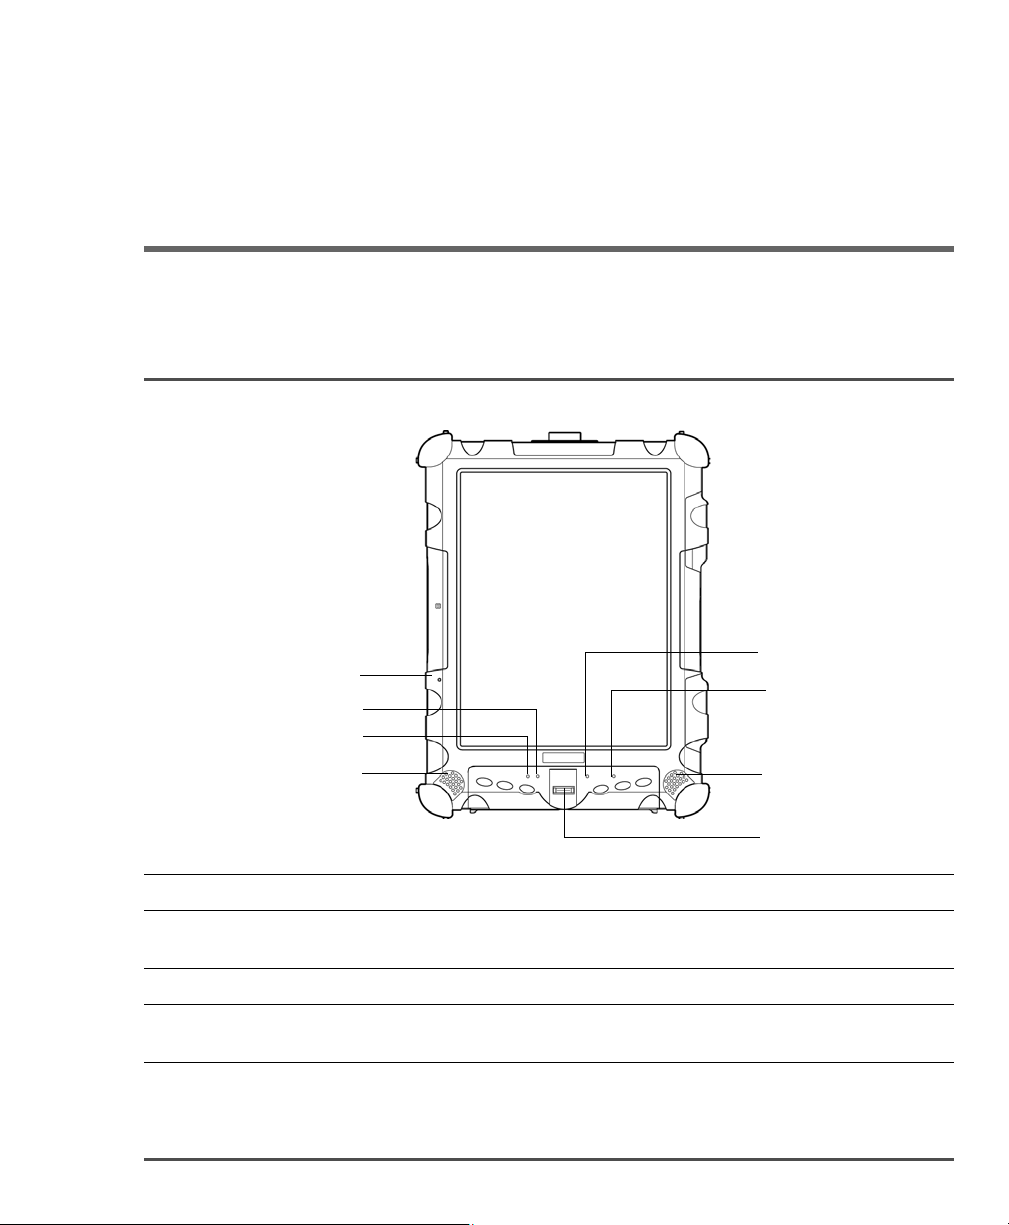
Back view
Convection
air flow
cover
Pen
Removable
battery pack
Battery
release
latch
Pen holder
Antenna
covers
Certificate of
Authentication label
Battery
lock
button
Serial number
Chapter 1. Getting Started
Front view
Convection air flow cover Magnesium cover over the thermal transfer bay that manages heat movement out
of the computer.
Antenna covers For optional wireless LAN and WAN models, protect and secure the radio antennas
(accessible by authorized service personnel only).
Pen The main device you use to enter data and control applications (instead of a mouse
or a keyboard). Also called the stylus. See “Using the pen” on page 37.
Pen holder Provides a place to secure the pen when you are not using it.
Battery release latch Provides access to the battery.
Battery lock button Secures the battery inside the tablet.
Removable battery pack Powers the computer when AC power is unavailable.
Certificate of Authentication
label and serial number
Label that identifies the tablet’s operation system as being genuine Microsoft
software, and your tablet’s serial number.
iX104C4 User’s Handbook 21
Page 22
Chapter 1. Getting Started
Power (On/Off)/
Backlight (On/Off)/
Resume button
Air flow vents
Bluetooth antenna
Kensington
lock slot
Front view
Top view
Power (On/Off)/
Backlight (On/Off)/
Resume button
Air flow vents Help prevent the computer from overheating by forcing heat away from the
Bluetooth antenna Bluetooth antenna.
Kensington™ lock slot Connector for the optional Kensington MicroSaver™ or equivalent compatible
Press the button to turn the computer on or off, to turn the backlight on or off, or to
resume operation.
computer. (Do not block the vents.)
security cable.
Note: Contact your reseller for information about the Kensington security cable.
22 iX104C4 User’s Handbook
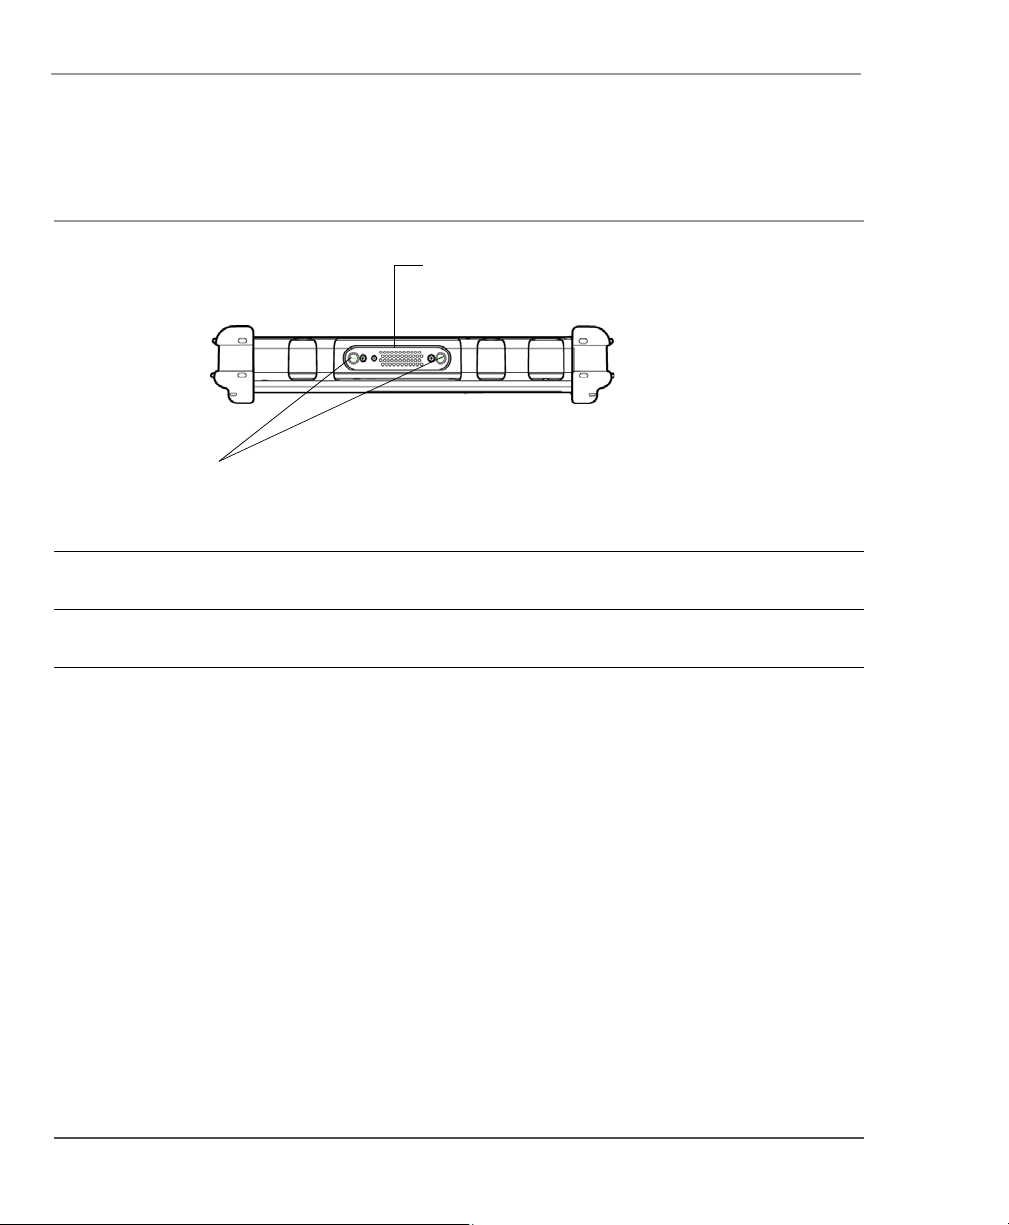
Page 23
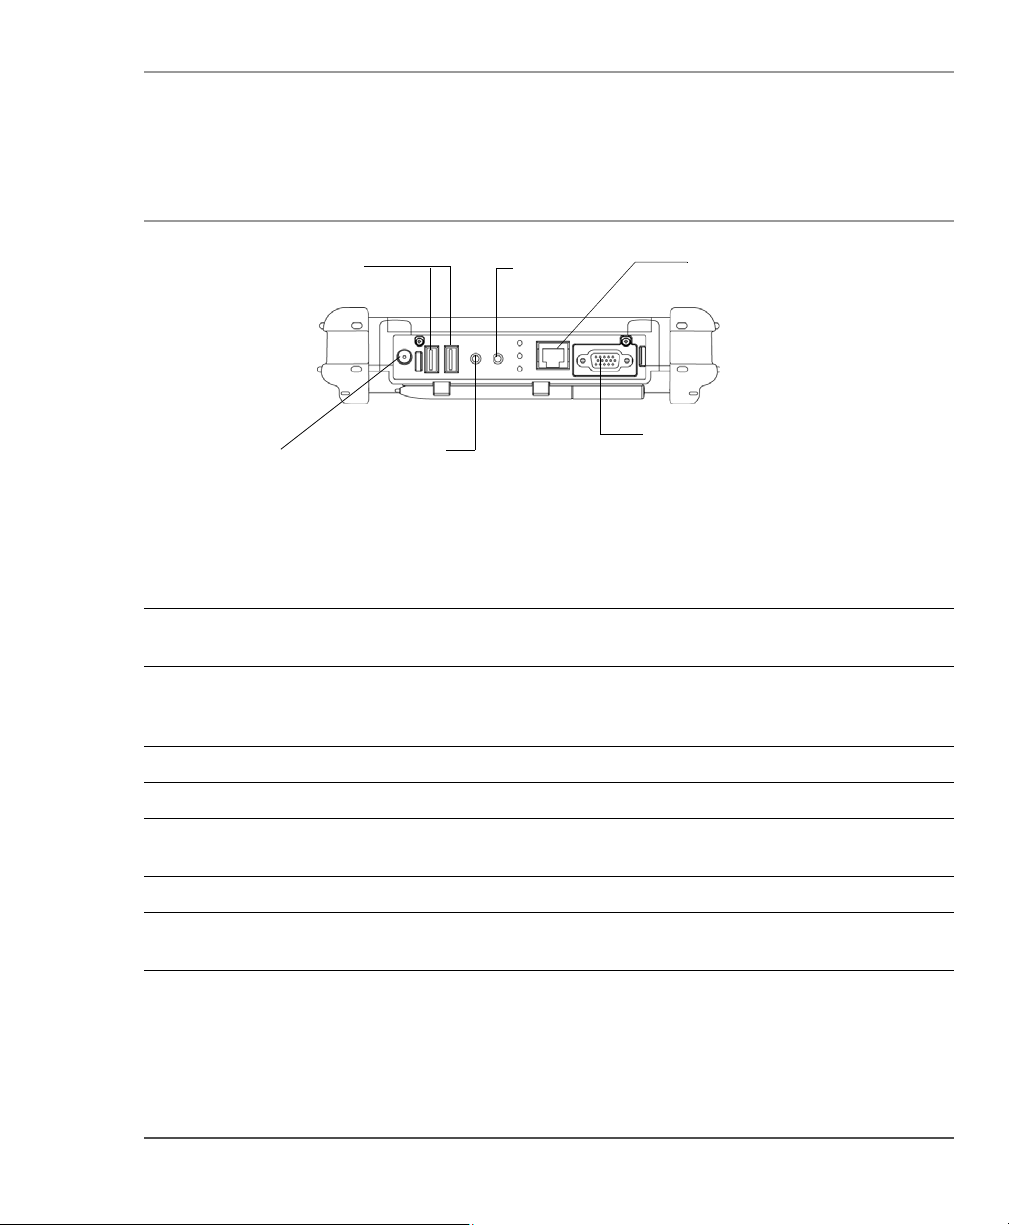
Chapter 1. Getting Started
Microphone
connector
Power
connector
External monitor
connector
(or optional 9-pin
serial port)
LAN connector
USB ports
Headphone
connector
Front view
Bottom view
The connectors on the bottom of the computer are located behind the outer doors.
Power connector For the optional AC adapter or auto adapter. (See “Optional accessories” on
page 16.)
USB 2.0 ports For Universal Serial Bus devices (compliant with USB Standard Revision 2.0).
Note: The optional Office and Vehicle Docks include additional USB ports. See
“Optional accessories” on page 16.
Headphone connector For stereo headphones or speakers.
Microphone connector For an external microphone.
LAN connector For connecting a standard RJ-45 connector to the tablet’s internal local area
network (LAN) card
External monitor connector For an external monitor or projection panel.
(Optional) 9-pin serial port For connecting terminals or other devices that use the RS-232, RS-422, or RS-485
data transfer standard.
iX104C4 User’s Handbook 23
Page 24
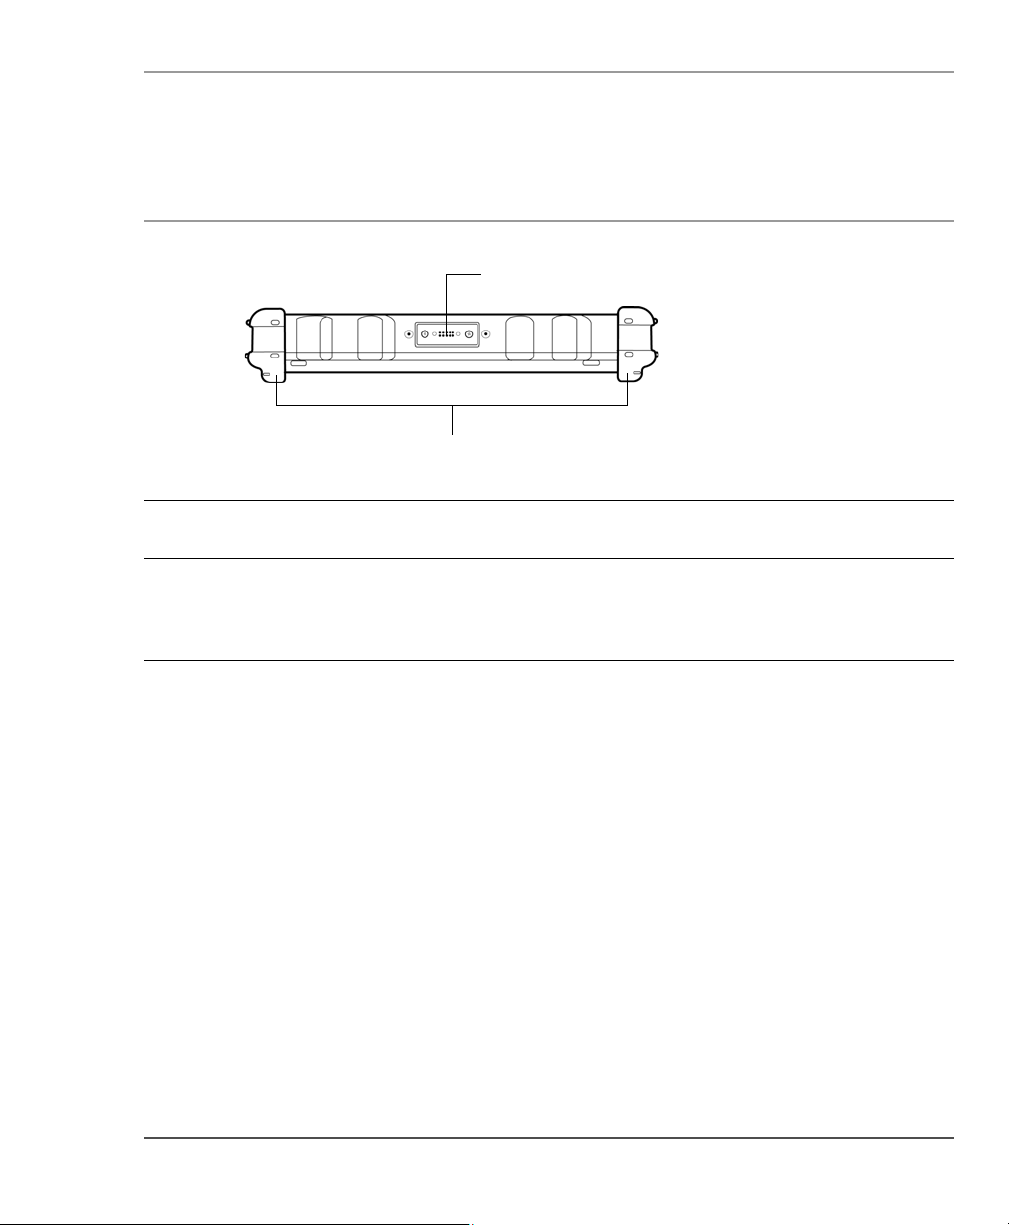
Chapter 1. Getting Started
Guide pin
receptacles
Docking connector for the
optional Xplore Tablet Dock
Front view
Left side view
Docking connector Enables you to connect the optional xStand Desktop Docking Station or xDock
Vehicle Docking Station.
Guide pin receptacles Help assure a secure connection of the optional xStand or xDock.
Note: See “Optional accessories” on page 16.
24 iX104C4 User’s Handbook
Page 25
Chapter 1. Getting Started
XPL expansion port
Bumpers
Front view
Right side view
Bumpers Fabricated from rugged material. Raised to help protect the computer from
damage.
XPL expansion port A USB port (compliant with USB Standard Revision 2.0) that enables you to
connect XPL snap-on expansion modules with additional functionality such as
GPS, barcode scanning, and magnetic stripe reading.
Note: Contact your reseller for information about the XPL expansion module.
iX104C4 User’s Handbook 25
Page 26
Chapter 1. Getting Started
Status LED
HDD LED
Front view
LED indicators
The LED indicator lights show the status of system functions.
The following table defines the various LED states.
Table 1 Status LED indicator
Mode/State LED State Meaning
On state green, continuous The computer is on, ready for use, and functioning
normally. The battery is fully charged.
Charging green, blinking The AC adapter is plugged in and the battery is
charging.
Off state off (no light) The computer is off.
Suspend mode yellow, continuous The computer is on and is in Suspend or
Hibernation mode.
Thermal control yellow, blinking The computer is on and is in Warm-up mode, with
the LCD and backlight off. After the system has
warmed to a safe level, the LCD and backlight turn
on.
26 iX104C4 User’s Handbook
Page 27

Chapter 1. Getting Started
Table 1 Status LED indicator (continued)
Mode/State LED State Meaning
On red, blinking The computer is powered on, running on battery
power, and the charge level in the battery has
reached a minimum warning state. Plug the
computer into an AC/DC power source or install a
charged battery.
On red, continuous The computer is on, running on battery power, and
the charge level in the battery has reached a critical
state. Plug the computer into an AC/DC power
source or install a charged battery.
Or:
The computer has encountered a fault and is not
operating normally. Contact your computer support
personnel, such as your help desk.
Front view
iX104C4 User’s Handbook 27
Page 28
Chapter 1. Getting Started
Ctrl-Alt-Delete
(Secure Attention
Sequence) key
Screen Rotation
key
Function
key
Hot key 1
Hot key 2
Hot key 3
Fingerprint scanner
Quick-start guide
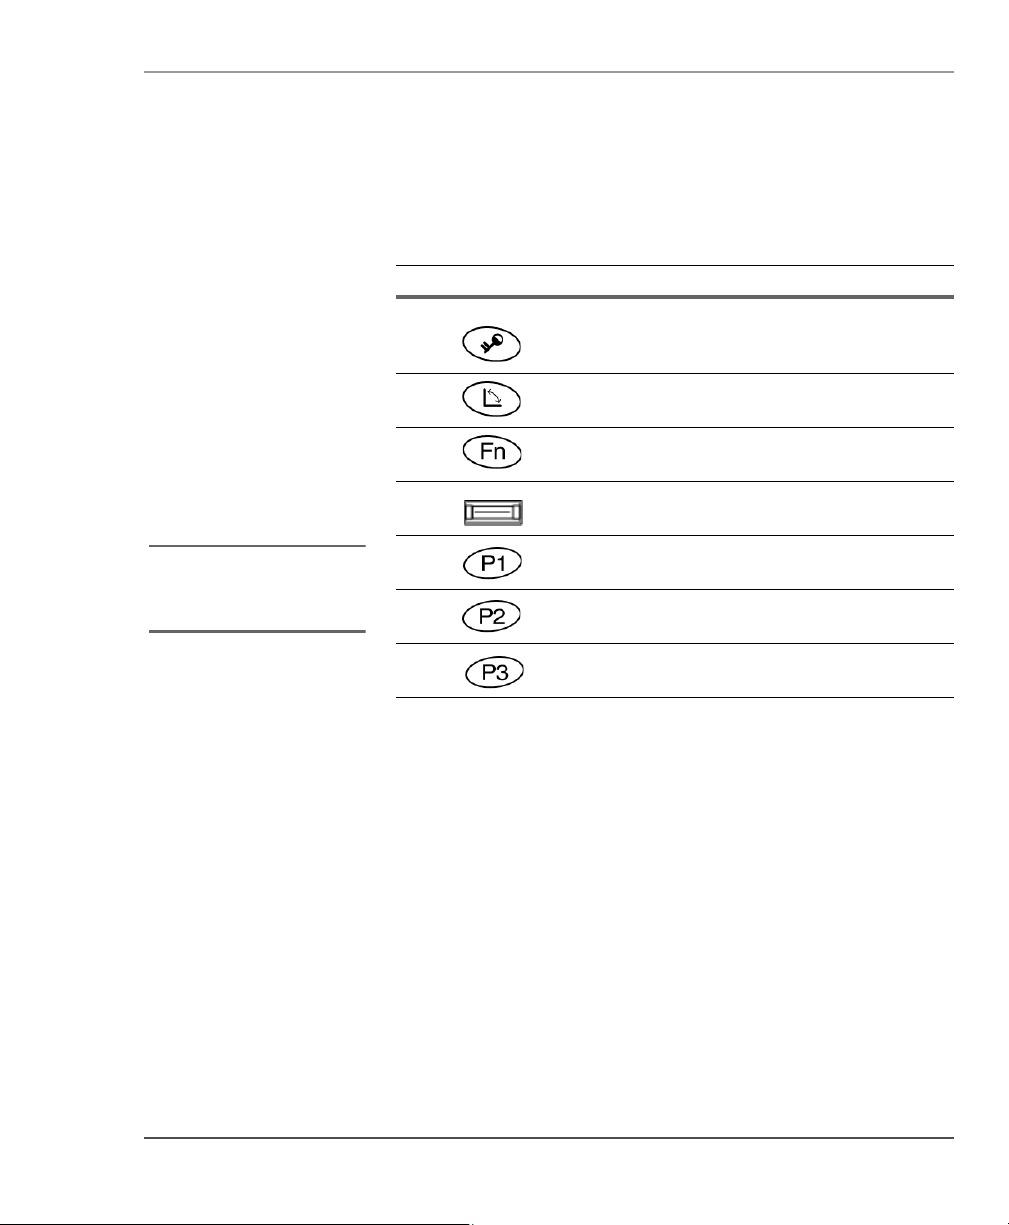
Quick-start guide
This section is a quick guide to using the main features of your tablet.
(See Chapter 2 for detailed information.)
Application, Windows, and hot keys
28 iX104C4 User’s Handbook
Page 29
Chapter 1. Getting Started
To define a function, see
“Programming hot keys” on
page 70.
Table 2 Main keys
Press this key... To perform this function
Log on after resuming operation from power
management, powering on, or locking.
After logging on, launch Windows Task Manager.
Rotate screen orientation between portrait
(vertical) and landscape (horizontal).
Use in combination with another key to perform
various functions. (See page 30.)
Fingerprint scanner.
Open Help, or perform a user-definable function.
Open Internet Explorer, or perform a
user-definable function.
Open your email application, or perform a
user-definable function.
Quick-start guide
iX104C4 User’s Handbook 29
Page 30
Chapter 1. Getting Started
Quick-start guide
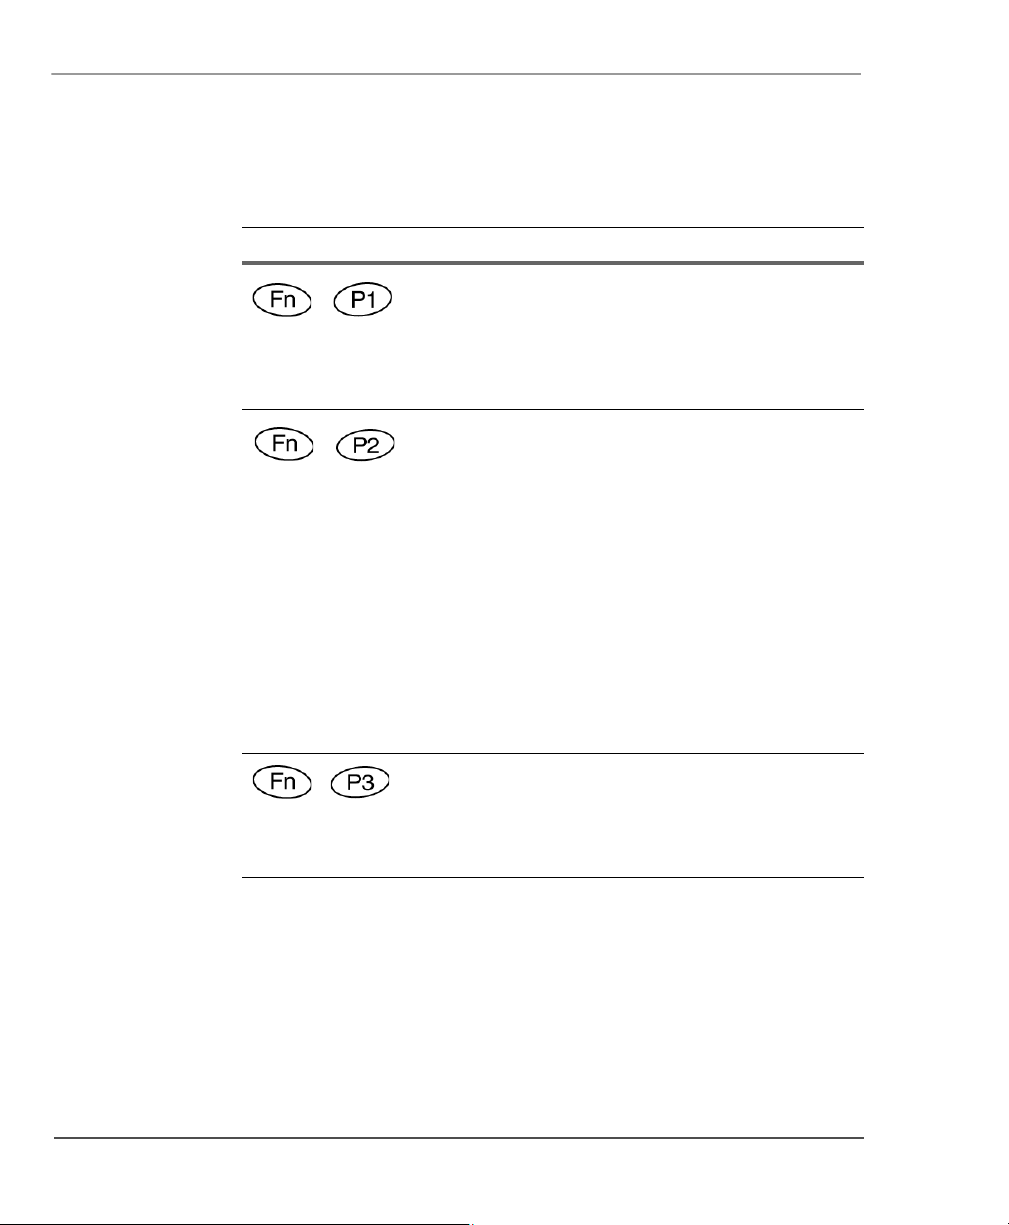
Table 3 Function mode keys
Press these keys... To perform this function
Default function: Send video display to a monitor or
projection panel connected to the computer (and back to
the computer again). You can program this key
combination to perform a different function. (See
“Programming hot keys to start applications, open
documents, or go to a Web site” on page 71.)
Default function:
Default function: Open the pen calibration program. You
4
iX104C
“Programming hot keys to start applications, open
documents, or go to a Web site” on page 71).
iX104C
mode, or Touch mode. This determines the input
devices you can use. In Auto-Sense mode, you can use
the pen, your finger, or another similar device
interchangeably. In Active mode, you can use only the
pen. In Touch mode, you can use your finger or another
similar pointing device. You can program this key
combination to perform a different function. (See
“Programming hot keys to start applications, open
documents, or go to a Web site” on page 71.)
can program this key combination to perform a different
function. (See “Programming hot keys to start
applications, open documents, or go to a Web site” on
page 71.)
: Open a pre-defined program (see
4
Dual Mode: Select Auto-Sense mode, Active
30 iX104C4 User’s Handbook
Page 31

2 Using the Tablet
When the computer is off,
the Status LED is off.
Power On/Off/
Suspend/Resume
button
This chapter contains detailed instructions for using the tablet.
Turning on the computer
1. Make sure the computer is off.
2. Make sure the battery is charged or that the computer is plugged
in to an external power source.
3. Press the Power On/Off/Suspend/Resume button.
iX104C4 User’s Handbook 31
Page 32

Chapter 2. Using the Tablet
When the computer is in
Suspend mode, the Status
LED is continuously yellow.
Power On/Off/
Resume button
Use the Reset switch only if
you cannot turn off the
computer by any other
means, because you may
lose unsaved data.
Reset switch
Turning off the computer
Turning off the computer
1. If the computer is in Suspend mode, press the Power On/Off/
Suspend/Resume
button to resume operation. (See page 34 for
information about Suspend mode.)
2. Make sure the battery is charged or that the computer is plugged
in to an external power source.
3. Save your work and close all programs.
4. From the Windows Start menu, click Turn Off Computer.
5. The Turn off computer dialog box opens.
6. Click Turn Off.
Using the Reset switch
If the computer does not seem to be accepting input and you cannot
turn it off by using the method described in “Turning off the
computer,” press the
instrument to press the switch).
32 iX104C4 User’s Handbook
Reset switch. (Use the stylus or a similar
Page 33

Suspending and resuming operation
To conserve battery power when you do not want to turn off the
computer or when you need to install a charged battery pack, put the
computer into Suspend mode. (You can suspend operation without
closing any programs or Windows.)
When you suspend operation:
■ Programs that are running stop (but do not close).
■ Active data is saved.
■ The system enters one of the following low-power modes:
• Suspend-to-RAM mode – The Status LED light is
continuously yellow. Active data is saved in RAM and most
other components are turned off.
Although the computer uses very little power when in
Suspend-to-RAM mode, eventually the battery’s power does
run out. If you do not plan to use the computer for an extended
period of time, turn the computer off or put it in Hibernation
mode instead of using Suspend-to-RAM.
• Hibernation mode – Active data is saved on the hard disk and
power usage is reduced to the same level as when the
computer is turned off. In Hibernation mode, there is no
danger of losing data if battery power is lost.
Chapter 2. Using the Tablet
Suspending and resuming operation
Note: For more information, see “Using power options – Windows
XP” on page 58 or “Using power options – Windows Vista” on page 62.
If you have set your computer to turn power off (in the Power Options
utility in Windows Control Panel), you cannot suspend operation. To
change power settings, see “Using power options – Windows XP” on
page 58 or “Using power options – Windows Vista” on page 62.
iX104C4 User’s Handbook 33
Page 34

Chapter 2. Using the Tablet
Power (On/Off)/
Backlight (On/Off)/
Resume button
Suspending and resuming operation
If the Suspend action of the Power On/Off/Suspend/Resume button
has been disabled to prevent accidental interruption, pressing the
button does not suspend the computer. You must use a software
application to suspend the computer. For more information, contact
your help desk or your iX104C
If your computer is connected to a network, the network may
automatically log you off after a period of inactivity while system
operation is suspended. Contact your help desk or system
administrator to learn your log-off time limit.
Suspending operation
Use one of the following methods to suspend operation:
Method 1
Press and hold the Power (On/Off)/Backlight (On/Off)/Resume button
for 4 seconds.
4
dealer.
Note: In order to suspend operation, the Suspend option must be
enabled in Windows Power Options. See “Using power options –
Windows XP” on page 58 or “Using power options – Windows
Vista” on page 62.
34 iX104C4 User’s Handbook
Page 35

Chapter 2. Using the Tablet
Status LED
Status LED
Suspending and resuming operation
Method 2 – Windows XP
From the Windows Start menu, press Turn Off Computer.
1.
The
Turn off computer dialog box opens.
2. Press Stand By.
When operation is suspended, the Status LED displays a continuous
yellow light.
Method 2 – Windows Vista
From the Windows Start menu, press the right arrow in the lower
1.
right corner.
2. Press Sleep.
When operation is suspended, the Status LED displays a continuous
yellow light.
iX104C4 User’s Handbook 35
Page 36

Chapter 2. Using the Tablet
Power (On/Off)/
Backlight (On/Off)/
Resume button
Suspending and resuming operation
Resuming operation
To resume operation when the computer is in Suspend mode, press
the
Note: Press the button only once.
After a minute or two, the computer resumes normal operation. When
the Status LED displays a continuous green light, you can begin using
the computer.
Power (On/Off)/Backlight (On/Off)/Resume button.
Note: Resuming operation from Hibernation mode takes a little
longer than from Suspend-to-RAM mode.
36 iX104C4 User’s Handbook
Page 37

Using the pen
For more information about
Dual Mode tablet input
methods, see Appendix F,
"Configuring Dual Mode
Tablet Digitizer Input
Methods.”
Chapter 2. Using the Tablet
Using the pen
You can use the pen to select items and to navigate through programs.
If your computer is an iX104C4:
Use the special multi-function pen provided with the
computer.
If your computer is an iX104C4 Dual Mode:
You can use any of the following input methods:
Auto-Sense mode: Use either the multi-function pen or your
finger interchangeably. The computer distinguishes between
the two input modes and automatically adjusts accordingly.
This is the tablet’s default state.
Active mode: Use only the special multi-function pen
provided with the computer.
Touch mode: Use your finger or another similar pointing
device.
For more information, see “Selecting Auto-Sense, Active, or
Touch mode” on page 38.
iX104C4 User’s Handbook 37
WARNING
Do not use items such as a ball point pen or a screwdriver that can
damage the tablet. Damage caused by using an item not provided with
the tablet is not covered by the tablet warranty.
Note: During the first use of the tablet, or if the action you are
trying to perform does not occur when you use the pen or your
finger to touch the screen, calibrate the digitizer as described in
“Calibrating the digitizer” on page 85.
Page 38

Chapter 2. Using the Tablet
Using the pen
Selecting Auto-Sense, Active, or Touch mode
If your computer is the iX104C4 Dual Mode or iX104C4 Dual Mode
AllVue Xtreme, use the Fn-P2 key combination to select Auto-Sense
mode (the default mode), Active-only mode, or Touch-only mode.
In Auto-Sense mode, you can use the multi-function pen provided
with the tablet, your finger, or any other similar pointing device
interchangeably, on the fly.
In Active mode, you can use only the special multi-function pen
provided with the tablet.
In Touch mode, you can use your finger or another similar pointing
device.
Note: The input methods available to you depend on the way
your tablet has been configured. See Appendix F, "Configuring
Dual Mode Tablet Digitizer Input Methods.”
38 iX104C4 User’s Handbook
Page 39

Chapter 2. Using the Tablet
right-click
icon
right-click
button
Using the pen
Using the digitizer to perform mouse functions
To perform this function... Do this
Select an object
(left button click).
Perform a double-click. Quickly tap the pen tip twice on the object.
Perform a right-click. If your computer is an
Move or drag an object. Place the pen tip on the object; then
Tap the pen tip once on the object.
4
iX104C
If your computer is an
iX104C
continue to hold the pen tip against the
screen as you move the pen.
:
Hold the pen directly on the object for
1 second. The right-click icon appears.
or
Press the right-click button on the pen
while you click the object.
4
Dual Mode:
Touch mode:
In the Windows taskbar, press the
right-click icon; then click the object.
Active mode:
Hold the pen directly on the object for 1
second. The right-click icon appears.
or
Press the right-click button on the pen
while you click the object.
iX104C4 User’s Handbook 39
Page 40

Chapter 2. Using the Tablet
Using the pen
Changing the pen double-click speed
The pen double-click speed is in sync with the mouse double-click
speed. To change the speed, follow the instructions below.
Changing the pen double-click speed – Windows XP
1. Click the Windows Start button.
2. Click the Settings option.
3. Click the Control Panel option.
4. In the Control Panel window:
If your computer is an iX104C3 Tablet PC:
Click the Tablet and Pen Settings icon.
If your computer is an iX104C3 Dual Mode:
In Active mode: Click the Tablet and Pen Settings icon.
In Touch mode: Click the
5. Click the Windows tab.
Pointer Devices icon.
6. Follow the instructions that appear in the Windows tab.
Changing the pen double-click speed – Windows Vista
1. Click the Windows Start button.
2. Click the Control Panel option.
3. In the Control Panel window:
If your computer is an iX104C4:
Click the Pen and Input Devices icon.
If your computer is an iX104C4 Dual Mode:
a.
Press the Pen and Input Devices icon.
b. In the Pen Options tab, select Double-tap.
c. Press Settings.
4. Drag the slider to a faster or slower speed; then press OK.
40 iX104C4 User’s Handbook
Page 41

Chapter 2. Using the Tablet
pen tether
pen
Using the pen
Positioning the pen and pen tether
The pen tether helps prevent the loss of your pen. The following
illustrations show how to position the pen and pen tether.
Tether anchored at the top
iX104C4 User’s Handbook 41
Page 42

Chapter 2. Using the Tablet
pen
tether
pen
Using the pen
Tether anchored on the side
42 iX104C4 User’s Handbook
Page 43

Using the fingerprint scanner
Fingerprint scanner
The fingerprint scanner and the associated Protector Suite QL
software enable you to use fingerprint verification to protect the
security of your data.
The first step for using fingerprint verification is to enroll your
fingerprint to create an association between your username, password,
and fingerprint.
After fingerprint enrollment you will be able to:
■ Use your fingerprint as part of computer login security.
■ Register Web pages and Windows applications to use your
fingerprint instead of passwords.
■ Launch applications by swiping your finger the sensor.
■ Store confidential information in an encrypted form in a
protected folder.
Chapter 2. Using the Tablet
Using the fingerprint scanner
To launch the Enrollment Wizard, select:
Start > All Programs > Protector Suite QL > User Enrollment
and follow the wizard’s instructions.
For more information about using the fingerprint scanner, see the
Protector Suite QL User’s Guide PDF included on your hard disk in
the Protector Suite QL folder.
iX104C4 User’s Handbook 43
Page 44

Chapter 2. Using the Tablet
portrait mode
landscape mode
Changing the screen orientation
Changing the screen orientation
To rotate the screen orientation from portrait (vertical) to landscape
(horizontal) mode or from landscape to portrait mode, press the
screen rotation key.
44 iX104C4 User’s Handbook
Page 45

Adjusting the screen brightness
Brightness control icon
Display brightness slider
Windows XP
To adjust the screen brightness, click the brightness control icon on
the Windows taskbar; then use the slider bar to make the adjustment.
Windows Vista
To adjust the screen brightness:
Chapter 2. Using the Tablet
Adjusting the screen brightness
1. Click Start.
2. Open the Control Panel.
3. Double-click the Windows Mobility Center icon.
4. Use the Display brightness slider to adjust the brightness.
iX104C4 User’s Handbook 45
Page 46

Chapter 2. Using the Tablet
Auto Light sensor
Adjusting the screen brightness
Enabling automatic backlight control
When the Auto Light sensor is enabled, the computer automatically
controls the amount of backlight sent to the screen to provide
optimum brightness for the lighting conditions in which you are
working.
To enable automatic backlight control, see page 100.
46 iX104C4 User’s Handbook
Page 47

Chapter 2. Using the Tablet
Adjusting the screen brightness
Optimizing screen settings for outdoor use
Windows XP
1. Click Start; then select Control Panel.
2. Click the Desktop tab and set the background to None.
3. In the Control Panel, click Display.
4. Click the Appearance tab.
5. From the drop-down menu, select Windows Classic.
6. From the Windows and buttons drop-down menu, select High
Contrast White
7. Click the Effects button. Make sure that Use the following method
to smooth edges of screen fonts
selected from the drop-down list. Click
8. Click the Settings tab. Make sure the Screen resolution setting is
1024 by 768 pixels and that the Color quality setting is Highest (32
bit)
. Click OK.
.
is checked and that ClearType is
OK.
Windows Vista
1. Click Start; then select Control Panel.
2. In the Control Panel, click Control Panel Home.
3. Click Appearance and Personalization.
4. Click Change desktop background. In the Location area, select
Solid Colors. For the background color, select white; then click
OK.
5. In the Appearance and Personalization window, click Customize
Colors.
Select Frost. Move the Color intensity slider bar to the far right;
6.
then click
OK.
iX104C4 User’s Handbook 47
Page 48

Chapter 2. Using the Tablet
Docking port
Guide pin receptacles
Docking the tablet
Docking the tablet
If you have the optional xStand office dock or xDock vehicle dock,
connect it to the tablet at the docking port. (See the iX104 Docking
Stations Handbook.)
48 iX104C4 User’s Handbook
Page 49

Connecting devices
LAN connector
Devices must be in
compliance with USB
Standard Revision 2.0.
USB ports
Chapter 2. Using the Tablet
Connecting devices
Refer to the following subsections for information about connecting
external devices to your computer.
Note: If the device you want to use does not appear to be
working with your computer, the device may need to be enabled
in the computer’s configuration program. Contact your local help
desk or Xplore reseller.
Connecting to a local area network
Connect a local area network (LAN) cable’s RJ-45 connector to the
internal LAN interface card. (See your network system administrator
for more information.)
iX104C4 User’s Handbook 49
Connecting USB-compatible devices
Connect any USB-compatible devices to the computer’s USB ports.
Page 50

Chapter 2. Using the Tablet
microphone
connector
Connecting devices
Connecting an external microphone
Adjusting microphone volume – Windows XP
If necessary, adjust the volume of the microphone as follows:
1. Press the Windows Start key; then open the Control Panel.
2. In the Control Panel window, double-click the Sounds and Audio
Properties
3. In the Sounds and Audio Properties window, click the Audio tab.
icon.
4. In the Sound recording area, click the Volume button.
5. Adjust the volume.
6. Click OK.
Adjusting microphone volume – Windows Vista
If necessary, adjust the volume of the microphone as follows:
1. Press the Windows Start key; then open the Control Panel.
2. In the Control Panel window, double-click the Sound icon.
3. In the Sound Properties window, click the Recording tab.
4. Select Microphone; then press Properties.
5. Select the Levels tab.
6. Adjust the microphone volume or boost.
7. Click OK.
50 iX104C4 User’s Handbook
Page 51

Chapter 2. Using the Tablet
headphone/speakers
connector
Connecting devices
Connecting a headphone or speakers
Adjusting headphone or speaker volume – Windows XP
1. Click the audio icon in the Status area of the Windows taskbar.
The volume control area opens.
2. If the Mute check box is checked, uncheck it.
3. Move the slider bar up or down to increase or decrease the
volume.
Adjusting headphone or speaker volume – Windows Vista
1. Click the audio icon in the Status area of the Windows taskbar.
The volume control area opens.
2. If the Mute button indicates that sound is muted, click the button
to turn on the sound.
3. Move the slider bar up or down to increase or decrease the
volume.
iX104C4 User’s Handbook 51
Page 52

Chapter 2. Using the Tablet
Monitor/projection
panel connector
Connecting devices
Connecting a monitor or projection panel
Activating the monitor or projection panel
To change the video output to the monitor or projection
panel:
Press the Fn-P1 key combination.
To change the video output back to the computer:
Press the Fn-P1 key combination again.
52 iX104C4 User’s Handbook
Page 53

Chapter 2. Using the Tablet
Optional 9-pin
serial port
XPL expansion port
Connecting devices
Connecting a device to the optional serial port
If your tablet includes the optional serial port, you can connect a
terminal or other device that uses the RS-232, RS-422, or RS-485
data transfer standard.
Connecting an XPL snap-on expansion module
iX104C4 User’s Handbook 53
Page 54

Chapter 2. Using the Tablet
Power
connector
Using the battery
Using the battery
You can recharge, remove, and replace the battery pack.
Charging the battery pack
If you do not have an external battery charger
Follow these steps to charge the battery while it is installed in the
computer:
1. Connect a power source, such as an AC adapter or cigarette
lighter adapter, to the power connector on the computer.
If the battery charge is below 90%, the battery begins charging
and the Status LED flashes green. (If the battery charge is higher
than 90%, the battery will not charge, preventing battery
overcharge.)
2. Check the level of charge. (See “Checking battery power status”
on page 60.)
The charging process continues until the battery charge reaches
100%.
54 iX104C4 User’s Handbook
Page 55

Chapter 2. Using the Tablet
Using the battery
Table 4 shows the approximate time required to charge the battery
level to 100%.
Table 4 Approximate battery charge time
Battery pack capacity Charge time
41 watt hours (5700 mAh) 2.5 hours
55 watt hours (7600 mAh) 3.5 hours
If you have an external battery charger
Remove the battery pack (see page 55).
1.
2. Use the external battery charger to charge the battery.
3. Install the battery (see page 57).
Removing and installing the battery
You can remove the battery and use an (optional) external charger to
charge it.
Removing the battery
1. To swap with a charged battery:
Use one of the methods described in “Suspending operation”
on page 34 to suspend operation.
If a charged battery is not available:
Save your work and close all running programs; then shut
down the computer or put the computer in Hibernation mode
(see “Suspending operation” on page 34).
Note: To avoid losing unsaved data, wait until the computer
has completed switching to Suspended mode before
removing the battery.
iX104C4 User’s Handbook 55
Page 56

Chapter 2. Using the Tablet
Removable
battery
Battery
release
latch
Battery
lock
button
Using the battery
2. Use the stylus or a pen to depress the battery lock button.
3. On the computer, slide the battery release latch toward the lock
button.
The battery unlocks and slightly rises from the computer.
4. Pull the battery away from the computer and remove it.
Note: After removing the battery, you must replace the battery
or connect the computer to an external power supply within
3 to 5 minutes or the computer completely loses power.
56 iX104C4 User’s Handbook
Page 57

Chapter 2. Using the Tablet
Using the battery
Installing the battery
1. Orient the battery with the slides in the empty battery tray.
2. Slide the battery into the tray and press it firmly until it is seated.
3. Slide the battery release latch to its original position.
The lock button pops back into the locked position, securing the
battery in place.
Discarding batteries
Dispose of batteries in accordance with your local government
regulations. Under federal, state, or local law, it may be illegal to put
batteries in the trash. Contact your system administrator, municipal
waste disposal department/provider for information.
iX104C4 User’s Handbook 57
Page 58

Chapter 2. Using the Tablet
Using power options – Windows XP
Using power options – Windows XP
Displaying power options
On the Windows taskbar, click the battery icon.
The Power Options Properties window opens.
58 iX104C4 User’s Handbook
Page 59

Chapter 2. Using the Tablet
Using power options – Windows XP
Changing the computer’s power schemes
In the Power Options Properties window, select the Power Schemes
tab; then select options from the drop-down lists.
Changing battery alarm settings
In the Power Options Properties window (page 58), select the Alarms
tab; then use the slider bars to change the alarm settings.
iX104C4 User’s Handbook 59
Page 60

Chapter 2. Using the Tablet
Using power options – Windows XP
Checking battery power status
In the Power Options Properties window (page 58), select the Power
Meter
tab. The window shows the amount of power left in the battery.
Selecting power settings
In the Power Options Properties window (page 58), select the
Advanced tab; then select the power settings options you want to use.
60 iX104C4 User’s Handbook
Page 61

Chapter 2. Using the Tablet
Using power options – Windows XP
Enabling Hibernation mode
In the Power Options Properties window (page 58), select the
Hibernate tab; then check the Enable Hibernation check box.
iX104C4 User’s Handbook 61
Page 62

Chapter 2. Using the Tablet
Using power options – Windows Vista
Using power options – Windows Vista
Checking battery power status
On the Windows taskbar, click the battery icon.
The following window opens, displaying the percentage of power
remaining in the battery:
Selecting a power plan
1. On the Windows taskbar, click the battery icon.
The following window opens:
2. Select one of the following power plans:
Balanced – A balance between computer performance and
battery life.
Power Saver – Longer battery life and lower performance.
High performance – Higher performance and shorter battery life.
62 iX104C4 User’s Handbook
Page 63

Chapter 2. Using the Tablet
Using power options – Windows Vista
Selecting power options
1. On the Windows taskbar, right-click the battery icon.
2. Select Power Options.
The following window opens.
3. Under the selected power plan, press Change plan settings.
4. Select the power options you want to use.
iX104C4 User’s Handbook 63
Page 64

Chapter 2. Using the Tablet
Power (On/Off)/
Backlight (On/Off)/
Resume button
Using power options – Windows Vista
Selecting Power (On/Off)/Backlight(On/Off)/Resume button options
To change what happens when you press the button:
1. On the Windows taskbar, right-click the battery icon.
2. Select Power Options.
The following window opens.
3. Press Choose what the power buttons do.
4. Select the options you want to use.
64 iX104C4 User’s Handbook
Page 65

Chapter 2. Using the Tablet
Using power options – Windows Vista
Tips for conserving battery power
The following tips help you extend the life of your battery by
conserving battery power:
■ Use an external power source such as the AC or auto adapter
whenever available.
■ Suspend operation if you know that you will not be using the
system for a while. (See “Suspending operation” on page 34.)
■ If you do not plan to use the computer for an extended period of
time, turn it off.
Note: If your computer is running Windows XP, you also have
the option of placing it in Hibernation mode. (See
“Enabling Hibernation mode” on page 61.)
■ Adjust power options to automatically conserve power. (See
“Using power options – Windows XP” on page 58 or “Using
power options – Windows Vista” on page 62.)
iX104C4 User’s Handbook 65
Page 66

Chapter 2. Using the Tablet
5 screws
5 screws
Accessing the hard disk drive compartment
Accessing the hard disk drive compartment
When you install a new hard disk drive, follow the instructions in this
section to access the hard disk drive compartment.
WARNING Failure to follow this procedure can result in
damage to the case and the cover, which is not
covered under the Xplore Technologies warranty.
Xplore recommends that you use an
approved Xplore Technologies service center
for this procedure.
Turn off the computer.
1.
2. Remove all power from the unit, including batteries and other
power sources such as power supplies, cigarette lighter adapters,
and mobile power sources.
3. Use an M1 Phillips screwdriver to remove the 10 screws from the
compartment cover. (Do not use a power screwdriver.)
66 iX104C4 User’s Handbook
Page 67

Chapter 2. Using the Tablet
Accessing the hard disk drive compartment
Re-installing the hard disk drive compartment cover
1. Make sure the sealing gasket is properly placed.
2. Reposition the cover on the compartment.
3. Use the M1 Phillips screwdriver and a torque wrench to replace
the 10 screws.
Notes: Use a maximum torque of 3 kg-cm (2.6 lb-in) for each
screw.
Do not use power tools.
iX104C4 User’s Handbook 67
Page 68

Chapter 2. Using the Tablet
Note: This compartment can
handle most PCMCIA cards,
but additional equipment may
be required for some items to
function with the computer.
6 screws
Accessing the PCMCIA compartment
Accessing the PCMCIA compartment
When you install a PCMCIA card, follow the instructions in this
section to access the PCMCIA compartment.
WARNING Failure to follow this procedure can result in damage
to the case and the cover, which is not covered under
the Xplore Technologies warranty. Xplore
recommends that you use an approved Xplore
Technologies service center for this procedure.
1.
Turn off the computer.
2. Remove all power from the unit, including batteries and other
power sources such as power supplies, cigarette lighter adapters,
and mobile power sources.
3. Remove the battery. (See “Removing and installing the battery”
on page 55.)
4. Use an M1 Phillips screwdriver to remove the 6 screws from the
compartment cover. (Do not use a power screwdriver.)
68 iX104C4 User’s Handbook
Page 69

Chapter 2. Using the Tablet
Accessing the PCMCIA compartment
Re-installing the PCMCIA compartment cover
1. Make sure the sealing gasket is properly placed.
2. Reposition the cover on the compartment.
3. Use the M1 Phillips screwdriver and a torque wrench to replace
the 6 screws.
Notes: Use a maximum torque of 3 kg-cm (2.6 lb-in) for each
screw.
Do not use power tools.
iX104C4 User’s Handbook 69
Page 70

Chapter 2. Using the Tablet
Programming hot keys
Programming hot keys
Xplore pre-programs the P1, P2, and P3 hot keys and Function mode
hot key combinations to perform certain functions by default.
However, you can program them to perform different functions, as
described in this section.
Table 5 Programmable hot keys
Key Default function
Starts Help.
Starts Internet Explorer.
Starts your email application.
Table 6 Programmable Function mode hot key combinations
Key combination Default function
Sends video display to a monitor or projection
panel.
iX104C
Starts the pen calibration program.
4
: Opens a pre-defined program.
4
Dual Mode: Selects the input device
iX104C
(see page 38).
70 iX104C4 User’s Handbook
Page 71

Chapter 2. Using the Tablet
Programming hot keys
Programming hot keys to start applications, open documents, or go to a Web site
1. In the Status area of the Windows taskbar, click the iX104C4
Configuration
The Launch Button QuickShow dialog box opens.
2. Click the Configure button.
icon.
The Panel Control Center window opens.
iX104C4 User’s Handbook 71
Page 72

Chapter 2. Using the Tablet
Programming hot keys
3. Click the Change button next to the key or key combination you
want to program.
The following options appear:
4. Click Launch an Application, Document or Web site.
The following options appear:
72 iX104C4 User’s Handbook
Page 73

Chapter 2. Using the Tablet
Programming hot keys
5. To start an application:
a.
Click Launch an Application.
b. Press Browse to find the application you want the hot key or
Function mode hot key combination to start (for example:
word.exe, notepad.exe, excel.exe).
c. Click Change.
6. To open a document:
a.
In the Click Open a Document.
b. Press Browse to find the document you want the hot key or
Function mode hot key combination to open. (For example:
spreadsheet.xls, airports.doc, wiringdiagram.jpg)
c. Click Change.
iX104C4 User’s Handbook 73
Page 74

Chapter 2. Using the Tablet
Programming hot keys
7. To open a multimedia file:
a.
Click Open a Multimedia file.
b. Press Browse to find the name of the multimedia file you
want the hot key or Function mode hot key combination to
open. (For example:
c. Click Change.
8. To open a Web page:
a.
Click Open a Web page.
b. Press Browse to find the URL of the Web page you want the
911training.dir, demo.ppt)
hot key or Function mode hot key combination to open. (For
example:
c. Click Change.
9. Program more hot keys, or click Close to close the Panel Control
http://www.xploretech.com)
Center window.
74 iX104C4 User’s Handbook
Page 75

Chapter 2. Using the Tablet
Programming hot keys
Programming hot keys to perform pre-defined functions
1. In the Status area of the Windows taskbar, click the iX104C4
Configuration
The Launch Button QuickShow dialog box opens.
2. Click the Configure button.
icon.
The Panel Control Center window opens.
3. Next to the key or key combination you want to program, click
the
Change button.
iX104C4 User’s Handbook 75
Page 76

Chapter 2. Using the Tablet
Programming hot keys
The following options appear:
4. Click Start a pre-defined function.
5. In the Function selection drop-down list, select an option.
6. Program more hot keys, or click Close to close the Panel Control
Center window.
76 iX104C4 User’s Handbook
Page 77

Chapter 2. Using the Tablet
Programming hot keys
Programming hot keys to perform other key functions
1. In the Status area of the Windows taskbar, click the iX104C4
Configuration
The Launch Button QuickShow dialog box opens.
2. Click the Configure button.
icon.
The Panel Control Center window opens.
3. Next to the key or key combination you want to program, click
the
Change button.
iX104C4 User’s Handbook 77
Page 78

Chapter 2. Using the Tablet
Programming hot keys
The following options appear:
4. Click Press a key or key combination.
The following options appear:
78 iX104C4 User’s Handbook
Page 79

Chapter 2. Using the Tablet
Programming hot keys
5. If you want the hot key or hot key combination to perform the
function of a single key:
a.
If the Ctrl, Alt, or Shift boxes are checked, uncheck them.
b. Click the key you want the hot key or hot key combination to
perform. (For example:
If you want the hot key or hot key combination to perform the
function of a key combination:
a.
Check the Ctrl, Alt, or Shift box.
b. From the drop-down list, select the additional key, or click
F6, G, or Caps Lock)
the key on the keyboard.
Examples
To cause the hot key to perform the print screen function
(
Alt-Print Scrn): Check the Alt check box; then select PrtScr
from the drop-down list.
To cause the hot key to perform the paste
Check the
6. Program more hot keys, or click Close to close the Panel Control
Ctrl check box; then click the V key.
function (Ctrl-V):
Center window.
iX104C4 User’s Handbook 79
Page 80

80 iX104C4 User’s Handbook
Page 81

3 Maintaining the Tablet
This chapter provides instructions for maintaining your tablet.
Caring for the tablet
This section provides information about how to keep your tablet in
top working condition.
Checking power cords and connectors
Check AC and DC power cords and power connectors periodically for
damage. Replace the power cord immediately if you find any damage.
Protecting the computer from damage
■ Your computer is designed to sustain a multiple-axis drop to a
non-yielding surface. Do not intentionally drop the computer,
because the cumulative effects of multiple drops may damage the
computer.
■ Do not place heavy objects on the computer.
■ Do not disassemble the computer.
■ Keep the computer at least 5 inches (13 centimeters) away from
any electrical appliance that generates a strong magnetic field,
such as a motor, magnet, TV, refrigerator, or large audio
speakers.
iX104C4 User’s Handbook 81
Page 82

Chapter 3. Maintaining the Tablet
air vent
area
air vents
Caring for the tablet
Preventing the computer from overheating
The computer monitors its internal temperature. As the internal
temperature approaches the tolerable limits of heat-sensitive
components, system functions are automatically limited or turned off
to prevent damage.
To prevent the computer from overheating, do not obstruct the
computer’s air vents.
82 iX104C4 User’s Handbook
Page 83

Chapter 3. Maintaining the Tablet
Caring for the tablet
Storing the computer
You can store the computer in the Off state for about 30 days with a
fully charged battery installed. After this period, recharge the battery
or replace it with a charged battery.
If you intend to store the computer for more than 30 days, remove the
battery pack and keep it in a cool place.
Caring for the display screen
To clean the display screen, dampen a soft cotton cloth with water
and gently wipe the screen surface.
Note: Do not use isopropyl alcohol to clean the screen. Alcohol
may damage the surface of the screen.
Protecting the display screen
The screen protector is a durable, replaceable writing surface that
protects the display screen from abrasion.
To obtain additional screen protectors, check with your reseller, or go
to the Xplore Web site at www.xploretech.com for ordering
information. Additional information about installation is included
with the screen protectors.
iX104C4 User’s Handbook 83
Page 84

Chapter 3. Maintaining the Tablet
edge
When to replace the pen
Removing the screen protector
Slide your fingernail under the edge of the screen protector and pull
the protector away from the screen.
Installing a new screen protector
Follow the instructions included with your screen protector
replacement kit.
Note: If a screen protector is already installed on the display
screen, remove it before installing the new screen protector.
When to replace the pen
With use, the pen tip may become worn and can scratch the screen.
If your pen exhibits one of the following problems, replace the pen:
■ The pen does not move freely across the screen.
■ The pen does not perform as expected.
84 iX104C4 User’s Handbook
Page 85

Calibrating the digitizer
Chapter 3. Maintaining the Tablet
Calibrating the digitizer
Calibrating the digitizer adjusts the cursor position on the screen
relative to the position of the pen tip or finger. Calibrate the digitizer
to adjust the distance error between where the pen or finger is actually
touching the screen and where the computer is registering the pen or
finger touch.
You may need to calibrate the digitizer in the following situations:
■ You are using the computer for the first time.
■ The previous user of the computer writes with the opposite hand
or at a different pen angle.
■ The computer has not been used for some time.
■ The computer has been serviced.
iX104C4 User’s Handbook 85
Page 86

Chapter 3. Maintaining the Tablet
Tablet and
Pen Settings
icon
Calibrating the digitizer
Calibrating the digitizer: iX104C4 – Windows XP
Follow these instructions if your computer is running Windows XP.
1. From the Start menu, select Control Panel.
The Control Panel opens.
2. Click the Tablet and Pen Settings icon.
The Tablet and Pen Settings window opens.
86 iX104C4 User’s Handbook
Page 87

Chapter 3. Maintaining the Tablet
Calibrating the digitizer
3. In the Calibration area drop-down list, select the mode for which
you want to calibrate the pen:
Calibrate.
Landscape or Portrait; then click
The Calibration program starts.
4. Follow the instructions that appear on the screen.
5. When you finish, click OK.
iX104C4 User’s Handbook 87
Page 88

Chapter 3. Maintaining the Tablet
Tablet PC Settings
icon
Calibrating the digitizer
Calibrating the digitizer: iX104C4 – Windows Vista
Follow these instructions if your computer is running Windows Vista.
1. From the Start menu, select Control Panel.
The Control Panel opens.
2. Double-click the Tablet PC Settings icon.
The Tablet PC Settings window opens.
88 iX104C4 User’s Handbook
Page 89

Chapter 3. Maintaining the Tablet
Calibrating the digitizer
3. In the General tab, press the Calibrate button.
4. Follow the instructions that appear on the screen.
5. When you finish, click OK.
6.
iX104C4 User’s Handbook 89
Page 90

Chapter 3. Maintaining the Tablet
See “Selecting Auto-Sense,
Active, or Touch mode” on
page 38.
Tablet and
Pen Settings
icon
Calibrating the digitizer
Calibrating the digitizer: iX104C4 Dual Mode –
Windows XP
Follow these instructions if your computer is running Windows XP.
In Active mode, you can use only the stylus included with the
computer as the pointing device.
In Touch mode, you can use the stylus, a similar pointing device, or
your finger.
Follow the instructions in the sections below to calibrate the digitizer
for each mode.
Calibrating the digitizer: Active mode
1.
From the Start menu, select Control Panel.
The Control Panel opens.
2. Click the Tablet and Pen Settings icon.
The Tablet and Pen Settings window opens.
90 iX104C4 User’s Handbook
Page 91

Chapter 3. Maintaining the Tablet
Calibrating the digitizer
3. In the Calibration area drop-down list, select the mode for which
you want to calibrate the pen:
Calibrate.
Landscape or Portrait; then click
The Calibration program starts.
4. Follow the instructions that appear on the screen.
5. When you finish, click OK.
iX104C4 User’s Handbook 91
Page 92

Chapter 3. Maintaining the Tablet
Calibrating the digitizer
Calibrating the digitizer: Touch mode
1.
From the Start menu, select All Programs > Touch Utility.
The Touch Utility window opens.
2. Click the appropriate Calibration button.
Note: Xplore Technologies recommends 5 Pt or 9 Pt calibration, for
greater accuracy.
The Calibration program starts.
3. Follow the instructions that appear on the screen.
4. When you finish, click OK.
92 iX104C4 User’s Handbook
Page 93

Chapter 3. Maintaining the Tablet
See “Selecting Auto-Sense,
Active, or Touch mode” on
page 38.
Tablet PC Settings
icon
Calibrating the digitizer
Calibrating the digitizer: iX104C4 Dual Mode –
Windows Vista
Follow these instructions if your computer is running Windows Vista.
In Active mode, you can use only the stylus included with the
computer as the pointing device.
In Touch mode, you can use the stylus, a similar pointing device, or
your finger.
Follow the instructions in the sections below to calibrate the digitizer
for each mode.
Calibrating the digitizer: Active mode
From the Start menu, select Control Panel.
1.
The Control Panel opens.
iX104C4 User’s Handbook 93
2. Double-click the Tablet PC Settings icon.
Page 94

Chapter 3. Maintaining the Tablet
Calibrating the digitizer
3. In the General tab, press the Calibrate button.
4. Follow the instructions that appear on the screen.
The Tablet PC Settings window opens.
The Calibration program starts.
5. When you finish, click OK.
94 iX104C4 User’s Handbook
Page 95

Chapter 3. Maintaining the Tablet
Calibration buttons
Calibrating the digitizer
Calibrating the digitizer: Touch mode
From the Start menu, select All Programs > Touch Utility.
1.
The iTouch window opens.
2. Select the Device tab.
3. Select the appropriate calibration button.
Note: Xplore Technologies recommends 5 Pt or 9 Pt calibration, for
greater accuracy.
Press Exit.
4.
iX104C4 User’s Handbook 95
Page 96

96 iX104C4 User’s Handbook
Page 97

A Troubleshooting
Table 7 contains solutions to some problems. If you cannot solve the
problem by taking the actions described, contact your local help desk
or your reseller for further assistance.
Table 7 Troubleshooting
Problem Possible cause and solution
Computer will not start. • The battery may be defective or discharged to a critically low level.
Connect an external power supply (such as the AC adapter) or install
a charged battery. See “Using the battery” on page 54.
• Internal components may be above or below the acceptable
operating range (below -20° C or above 60° C). After the
temperature returns to safe operating range the computer will start.
The computer will not resume operation
after being suspended.
The Status LED is red, continuous. • The computer is on, running under battery power, and the charge
The Status LED is red, blinking. The computer is powered on, running under battery power, and the
• The battery may be defective or discharged to a critically low level.
When the battery reaches a critically low level, the computer is
forced into Suspend- to-RAM mode to avoid a total system power
failure. Connect an external power supply (such as the AC adapter)
or install a charged battery. See “Using the battery” on page 54.
• The computer may be at the critical thermal limit. To avoid damage
to heat-sensitive components, the computer enters Suspend-toRAM mode when the computer operates above 60° C. Operation
automatically resumes when the computer cools to below 60° C.
Move the computer to a cooler location.
level in the battery has reached a critical level. Plug the computer
into an AC/DC power source or install a charged battery.
• The system has encountered a fault and is preventing normal
operation. Contact your local help desk.
charge level in the battery is at a minimum warning level. Plug the
computer into an AC/DC power source or install a charged battery.
iX104C4 User’s Handbook 97
Page 98

Appendix A. Troubleshooting
Table 7 Troubleshooting (continued)
Problem Possible cause and solution
Display screen is blank or difficult to
read.
Cursor is not tracking the pen. Calibrate the pen. See “Calibrating the digitizer” on page 85.
Computer is not responding to the pen. Connect an external USB keyboard to the computer. If the computer
Headphone or speaker volume is too
low.
• Confirm that the computer is on (the Power icon is displayed
continuously in the Status area).
• The brightness may be set too low, causing the screen to appear too
dark. To change system brightness, press the Fn and Start keys to
open the Xplore menu and adjust the brightness. (See page 30.)
• An external monitor may be selected. Press the Fn and P1 keys to
select the computer display screen. (See page 30.)
• The video time-out may have expired. Tap the display screen to
reactivate the display.
Note: This is a normal, power-saving feature.
• If the Status light is blinking red, the computer is in Suspend-to-RAM
mode because the temperature is below -20° C or above 60° C.
When the temperature returns to a safe operating range, the display
screen automatically comes back on. If possible, move the computer
to a warmer or cooler location.
• If the Status light is continually yellow, the computer is in Suspend or
Hibernate mode. Press the Power On/Off key to resume.
does not respond to the external keyboard, the application or
operating system may have been corrupted. Press the Reset key.
(See page 32.) If the system responds to a keyboard but not to the
pen, contact your local help desk or reseller for further assistance.
• The volume may be in Mute mode or set too low. Follow the
instructions in “Adjusting headphone or speaker volume – Windows
XP” on page 51.
• Make sure the volume control in your audio software is set to an
audible level.
An external device is not working with
the computer.
The device may need to be enabled in the computer’s configuration
program (BIOS Setup). Contact your local help desk or reseller.
98 iX104C4 User’s Handbook
Page 99

B Using BIOS and AOS Functions
Note: Each button has its
own blue-light LED. No
matter which button you
press, every blue-light LED is
on for about 3 seconds, then
off. When in Shifted mode, all
blue-light LEDs flicker.
This appendix explains how to use the application and navigation
buttons with the Basic Input-Output System (BIOS) program and the
Advanced Operating System (AOS) Options menu.
Note: These functions are typically for use only by your system
administrator or by authorized service technicians.
Table 8 Using BIOS and AOS functions
In Shifted Mode
Button BIOS Key Function BIOS Key Function
F1 F1 continues message. Up Arrow Navigate up through Multi Boot
options and BIOS menus.
F2 Start the BIOS program: When the
computer is booting, press the P2
button and follow the instructions
that appear on the screen.
F8 Prompt Windows to select Safe
mode.
F11
(Lock Fn)
F12 Enter Multi Boot mode. F4 Change a BIOS setup value.
• Press for less than one second for
F11 function.
• Press longer to enable Shifted
mode.
Down Arrow Navigate down through Multi
Boot options and BIOS menus.
Right Arrow Navigate to the right.
Release
Function
Press once to exit Shifted mode.
iX104C4 User’s Handbook 99
Ctrl+Alt+Del Reboot. Enter Enter.
Page 100

Appendix B. Using BIOS and AOS Functions
Note: When the tablet is in
the docking station, it will shut
down or go into Hibernation
or Standby mode the same as
it does when not in the
docking station.
Disabling the Auto Power feature
Disabling the Auto Power feature
When Auto Power is enabled, the tablet automatically turns on if you
dock it and the following conditions exist:
■ The tablet is off or in Hibernation or Standby mode.
■ The dock or the tablet is connected to an external power source
(including power applied when a vehicle’s ignition is started).
If you dock the tablet and the tablet is off and no power is present, the
tablet turns on as soon as power is applied.
To disable the Auto Power feature:
1. When the computer is booting, press the P2 button to access the
BIOS Setup Utility.
2. Select the Advanced tab.
3. Disable the Dock with Auto Power On option.
Enabling automatic LCD backlight control
When the LCD backlight control is in manual mode, the ambient light
sensor is disabled and the computer does not automatically control the
screen brightness.
Follow these steps to enable automatic LCD backlight control:
1. When the computer is booting, press the P2 button to start the
BIOS Setup Utility.
2. Select the Main tab.
3. In the LCD Backlight Control drop-down list, select Automatic.
4. Click OK.
100 iX104C4 User’s Handbook
 Loading...