

Zebra ET50PT, ET50TE, ET50BE, ET50TT, ET50PE Integrator Manual
...
ET5X
Enterprise Tablet
Integrator Guide
for Android ™ Version
6.0.1
MN-003016-02 Rev. A

Copyright
© 2017 ZIH Corp. and/or its affiliates. All rights reserved. ZEBRA and the stylized Zebra head are trademarks of
ZIH Corp., registered in many jurisdictions worldwide. All other trademarks are the property of their respective
owners.
COPYRIGHTS & TRADEMARKS: For complete copyright and trademark information, go to www.zebra.com/
copyright.
WARRANTY: For complete warranty information, go to www.zebra.com/warranty.
END USER LICENSE AGREEMENT: For complete EULA information, go to www.zebra.com/eula.
Terms of Use
• Proprietary Statement
This manual contains proprietary information of Zebra Technologies Corporation and its subsidiaries
(“Zebra Technologies”). It is intended solely for the information and use of parties operating and
maintaining the equipment described herein. Such proprietary information may not be used, reproduced,
or disclosed to any other parties for any other purpose without the express, written permission of Zebra
Technologies.
• Product Improvements
Continuous improvement of products is a policy of Zebra Technologies. All specifications and designs are
subject to change without notice.
• Liability Disclaimer
Zebra Technologies takes steps to ensure that its published Engineering specifications and manuals are
correct; however, errors do occur. Zebra Technologies reserves the right to correct any such errors and
disclaims liability resulting therefrom.
• Limitation of Liability
In no event shall Zebra Technologies or anyone else involved in the creation, production, or delivery of the
accompanying product (including hardware and software) be liable for any damages whatsoever
(including, without limitation, consequential damages including loss of business profits, business
interruption, or loss of business information) arising out of the use of, the results of use of, or inability to
use such product, even if Zebra Technologies has been advised of the possibility of such damages. Some
jurisdictions do not allow the exclusion or limitation of incidental or consequential damages, so the above
limitation or exclusion may not apply to you.
Revision History
Changes to the original guide are listed below:
Change Date Description
Rev A 7/2017 Initial release.
-02 Rev. A 12/2017 Remove ZBack conversion procedures.
1

Table of Contents
Copyright ........................................................................................................................................... 1
Terms of Use .................................................................................................................................... 1
Revision History ................................................................................................................................ 1
About This Guide
Introduction ....................................................................................................................................... 8
Configurations ................................................................................................................................... 8
Chapter Descriptions ........................................................................................................................ 9
Notational Conventions ..................................................................................................................... 9
Related Documents and Software .................................................................................................. 10
Service Information ......................................................................................................................... 10
Provide Documentation Feedback .................................................................................................. 10
Getting Started
Introduction ..................................................................................................................................... 11
Unpacking ....................................................................................................................................... 11
Getting Started ................................................................................................................................ 11
Installing a micro SIM Card (ET55 Only) ................................................................................... 11
Installing a microSD Card ......................................................................................................... 15
Charging the ET5X .................................................................................................................... 16
Resetting the ET5X ......................................................................................................................... 16
Accessories
Introduction ..................................................................................................................................... 18
Charge Only Cradle ........................................................................................................................ 21
Installing the Insert .................................................................................................................... 21
Charging the ET5X .................................................................................................................... 22
Communication and Charging Cradle ............................................................................................. 24
Installing the Insert .................................................................................................................... 25
Charging the ET5X .................................................................................................................... 25
Rugged Communication and Charging Cradle ............................................................................... 28
Charging the ET5X .................................................................................................................... 29
4-Slot Charge Only Cradle .............................................................................................................. 32
Insert Installation ....................................................................................................................... 32
Guide Installation ............................................................................................................................ 34
3

Table of Contents
Battery Charger Installation ....................................................................................................... 35
Power Setup .............................................................................................................................. 36
Charging the Battery ................................................................................................................. 37
4-Slot Battery Charger .................................................................................................................... 38
Rugged Frame ................................................................................................................................ 41
Expansion Back .............................................................................................................................. 44
Installation ................................................................................................................................. 44
Replacement Hand Strap .......................................................................................................... 46
Attaching the Stylus to the Expansion Back .............................................................................. 49
Removal .................................................................................................................................... 50
USB Communication
Connecting to a Host Computer via USB ........................................................................................ 53
Transferring F ile s usin g M e d ia Tr a n s fe r P rotocol ..... .. ................ ............... ................ ............... 53
Transferring F ile s usin g P h o to Tr a n sf e r P rotocol ................... ............................. ................ ...... 54
Disconnect from the Host Computer ............................................................................................... 54
DataWedge Configuration
DataWedge Configuration ............................................................................................................... 55
Basic Scanning ............................................................................................................................... 55
Profiles ............................................................................................................................................ 55
Profile0 ...................................................................................................................................... 56
Plug-ins ..................................................................................................................................... 56
Input Plug-ins ............................................................................................................................ 56
Process Plug-ins ....................................................................................................................... 56
Output Plug-ins ......................................................................................................................... 56
Profiles Screen .......................................................................................................................... 57
Profile Context Menu ................................................................................................................. 57
Options Menu ............................................................................................................................ 58
Disabling DataWedge ............................................................................................................... 58
Creating a New Profile .............................................................................................................. 59
Profile Configuration ....................................................................................................................... 59
Associating Applications ........................................................................................................... 60
Data Capture Plus ..................................................................................................................... 62
BarCode Input ........................................................................................................................... 65
Enabled ............................................................................................................................... 65
Scanner Selection ............................................................................................................... 65
Decoders ............................................................................................................................. 65
Decoder Params ...............................................................................................................
HAN XIN .............................................................................................................................. 70
Decode Lengths .................................................................................................................. 72
UPC EAN Params ............................................................................................................... 73
Reader Params ................................................................................................................... 75
Scan Params ....................................................................................................................... 76
Keep Enabled on Suspend ....................................................................................................... 77
Keystroke Output ...................................................................................................................... 77
Intent Output ............................................................................................................................. 78
Intent Overview ................................................................................................................... 79
IP Output ................................................................................................................................... 80
.. 67
4

Table of Contents
Usage .................................................................................................................................. 81
Using IP Output with IPWedge ............................................................................................ 82
Using IP Output without IPWedge ....................................................................................... 83
Generating Advanced Data Formatting Rules ................................................................................ 84
Configuring ADF Plug-in ................................................................................................................. 84
Creating a Rule ................................................................................................................... 85
Deleting a Rule .................................................................................................................... 85
Defining Criteria .................................................................................................................. 85
Defining an Action ..................................................................................................................... 87
Deleting a Rule .......................................................................................................................... 87
Order Rules List ........................................................................................................................ 88
Deleting an Action ..................................................................................................................... 89
ADF Example ............................................................................................................................ 90
DataWedge Settings ................................................................................................................. 92
Exporting a Configuration File ................................................................................................... 93
Importing a Configuration File ................................................................................................... 94
Exporting a Profile ..................................................................................................................... 94
Importing a Profile File .............................................................................................................. 94
Restoring DataWedge ............................................................................................................... 94
Configuration and Profile File Management .................................................................................... 95
Enterprise Folder ....................................................................................................................... 95
Auto Import ................................................................................................................................ 95
Programming Notes ........................................................................................................................ 95
Overriding Trigger Key in an Application ................................................................................... 96
Capture Data and Taking a Photo in the Same Application ...................................................... 96
Soft Scan Feature ..................................................................................................................... 96
Sample ................................................................................................................................ 96
Scanner Input Plugin ................................................................................................................. 96
Function Prototype .............................................................................................................. 97
Parameters .......................................................................................................................... 97
Return Values ..................................................................................................................... 97
Example .............................................................................................................................. 97
Comments ........................................................................................................................... 98
Enumerate Scanners ................................................................................................................ 98
Function Prototype .............................................................................................................. 98
Parameters .......................................................................................................................... 98
Return Values ..................................................................................................................... 98
Example .............................................................................................................................. 99
Comments ........................................................................................................................... 99
Set Default Profile ..................................................................................................................... 99
Default Profile Recap .......................................................................................................... 99
Usage Scenario ................................................................................................................. 100
Function Prototype ............................................................................................................ 100
Parameters ........................................................................................................................ 100
Return Values ................................................................................................................... 100
Example ............................................................................................................................ 101
Comments ......................................................................................................................... 101
Reset Default Profile ............................................................................................................... 102
Function Prototype ............................................................................................................ 102
Parameters ........................................................................................................................ 102
Return Values ................................................................................................................... 102
5

Table of Contents
Example ............................................................................................................................ 102
Comments ......................................................................................................................... 102
Switch To Profile ..................................................................................................................... 103
Profiles Recap ................................................................................................................... 103
Usage Scenario ................................................................................................................. 103
Function Prototype ............................................................................................................ 103
Parameters ........................................................................................................................ 103
Return Values ................................................................................................................... 104
Example ............................................................................................................................ 104
Comments ......................................................................................................................... 104
Settings
Screen Unlock Settings ................................................................................................................. 106
Set Screen Unlock Using PIN ................................................................................................. 106
Set Screen Unlock Using Password ....................................................................................... 107
Set Screen Unlock Using Pattern ............................................................................................ 108
Passwords .................................................................................................................................... 110
Accounts ....................................................................................................................................... 110
Language Usage ........................................................................................................................... 110
Changing the Language Setting .............................................................................................. 110
Adding Words to the Dictionary ............................................................................................... 111
Keyboard Settings ......................................................................................................................... 111
About Tablet .................................................................................................................................. 111
Application Deployment
Security ......................................................................................................................................... 113
Secure Certificates ........................................................................................................................ 113
Installing a Secure Certificate ....................................................................................................... 113
Development Tools ....................................................................................................................... 114
Android .................................................................................................................................... 114
EMDK for Android ................................................................................................................... 115
StageNow ................................................................................................................................ 115
ADB USB Setup ............................................................................................................................ 115
Application Installation .................................................................................................................. 115
Installing Applications Using the USB Connection .................................................................. 115
Installing Applications Using the Android Debug Bridge ......................................................... 116
Uninstalling an Application ............................................................................................................ 116
System Update ............................................................................................................................. 118
Random Access Memory .............................................................................................................. 121
Device Storage ............................................................................................................................. 122
Enterprise Storage .................................................................................................................. 124
Portable Storage ..................................................................................................................... 124
Formatting a microSD Card or USB Drive ........................................................................ 125
Format as Internal Memory ............................................................................................... 126
Application Management .............................................................................................................. 127
Viewing Application Details ..................................................................................................... 128
Managing Downloads ................................................................................................................... 129
6

Table of Contents
Maintenance and Troubleshooting
Introduction ................................................................................................................................... 130
Maintaining the ET5X .................................................................................................................... 130
Battery Safety Guidelines ............................................................................................................. 130
Cleaning ........................................................................................................................................ 131
Materials Required .................................................................................................................. 131
Cleaning the ET5X .................................................................................................................. 131
Housing ............................................................................................................................. 131
Display .............................................................................................................................. 131
Power Connector .............................................................................................................. 131
Cleaning Cradle Connectors ................................................................................................... 132
Cleaning Expansion Back Connectors .................................................................................... 132
Cleaning Frequency ................................................................................................................ 133
Troubleshooting ............................................................................................................................ 134
Device Diagnostic Tool ........................................................................................................... 135
Settings ............................................................................................................................. 138
Battery Test Information .................................................................................................... 138
GPS Test Information ........................................................................................................ 139
System Test Information ................................................................................................... 139
WLAN Test Information ..................................................................................................... 139
WWAN Test Information ................................................................................................... 139
Bluetooth Test Information ................................................................................................ 139
ET5X ....................................................................................................................................... 141
Charge Only Cradle ................................................................................................................ 142
Communication and Charging Cradles ................................................................................... 142
Expansion Back ...................................................................................................................... 143
Specifications
Technical Specifications ............................................................................................................... 144
ET5X ....................................................................................................................................... 144
SE4750 Expansion Back Decode Range ..................................................................................... 147
SE4750 SR Decode Ranges ................................................................................................... 147
SE4750 MR Decode Ranges .................................................................................................. 148
Accessory Specifications .............................................................................................................. 149
Charge Only Cradle ................................................................................................................ 149
Communication and Charging Cradle ..................................................................................... 149
Rugged Communication and Charging Cradle ....................................................................... 150
Expansion Backs ..................................................................................................................... 150
7

About This Guide
Introduction
This guide provides information about configuring and setting up the ET5X and accessories.
NOTE Screens and windows pictured in this guide are samples and can differ from actual screens.
Configurations
This guide covers the following configurations:
Table 1 Configurations
Configuration
ET50PE Version
ET50PT Version
ET55BE Version
ET55BT Version
Operating
System
6.0.1
6.0.1
6.0.1
6.0.1
Radios Display Memory Data Capture
WLAN:
802.11a/b/g/n/ac/d/h/i
WPAN: Bluetooth
WLAN:
802.11a/b/g/n/ac/d/h/i
WPAN: Bluetooth
WLAN:
802.11a/b/g/n/ac/d/h/i
WPAN: Bluetooth
WWAN: NA - LTE
WLAN:
802.11a/b/g/n/ac/d/h/i
WPAN: Bluetooth
WWAN: NA - LTE
8” color 2 GB RAM/
32 GB Flash
10” color 2 GB RAM/
32 GB Flash
8” color 2 GB RAM/
32 GB Flash
10” color 2 GB RAM/
32 GB Flash
SE4750
Expansion Backs,
RS507
Hands-free
Imager
SE4750
Expansion Backs,
RS507
Hands-free
Imager
SE4750
Expansion Backs,
RS507
Hands-free
Imager
SE4750
Expansion Backs,
RS507
Hands-free
Imager
8

Table 1 Configuration s (Co ntinued)
About This Guide
Configuration
ET55TE Version
ET55TT Version
Operating
System
6.0.1
6.0.1
Chapter Descriptions
Topics covered in this guide are as follows:
• Getting Started, provides information on getting the tablet up and running for the first time.
• Accessories, describes the accessories available for the tablet and how to use the accessories with the
tablet.
• USB Communication, describes how to connect the ET5X to a host computer using USB.
Radios Display Memory Data Capture
WLAN:
802.11a/b/g/n/ac/d/h/i
WPAN: Bluetooth
WWAN: ROW - LTE
WLAN:
802.11a/b/g/n/ac/d/h/i
WPAN: Bluetooth
WWAN: ROW - LTE
8” color 2 GB RAM/
32 GB Flash
10” color 2 GB RAM/
32 GB Flash
SE4750
Expansion Backs,
RS507
Hands-free
Imager
SE4750
Expansion Backs,
RS507
Hands-free
Imager
• DataWedge Configuration, describes how to use and configure the DataWedge application.
• Settings, provides the settings for configuring the ET5X.
• Application Deployment, provides information for developing and managing applications.
• Maintenance and Troubleshooting, includes instructions on cleaning and storing the tablet, and provides
troubleshooting solutions for potential problems during tablet operation.
• Specifications, includes a table listing the technical specifications for the tablet.
Notational Conventions
The following conventions are used in this document:
• “tablet” refers to the Zebra ET5X tablet.
• Bold text is used to highlight the following:
• Dialog box, window and screen names
• Drop-down list and list box names
• Check box and radio button names
• Icons on a screen
• Key names on a keypad
• Button names on a screen.
9

About This Guide
• Bullets (•) indicate:
• Action items
• Lists of alternatives
• Lists of required steps that are not necessarily sequential.
• Sequential lists (e.g., those that describe step-by-step procedures) appear as numbered lists.
Related Documents and Software
The following documents provide more information about the ET5X tablets.
• ET5X Quick Reference Guide, p/n MN001844Axx
• ET5X User Guide for Android Version 6.0.1, p/n MN-003015-xx
For the latest version of this guide and all guides, go to: www.zebra.com/support
Service Information
If you have a problem with your equipment, contact Zebra Global Customer Support for your region. Contact
information is available at: www.zebra.com/support
When contacting support, please have the following information available:
• Serial number of the unit
• Model number or product name
• Software type and version number.
Zebra responds to calls by email, telephone or fax within the time limits set forth in support agreements.
If your problem cannot be solved by Zebra Customer Support, you may need to return your equipment for servicing
and will be given specific directions. Zebra is not responsible for any damages incurred during shipment if the
approved shipping container is not used. Shipping the units improperly can possibly void the warranty.
If you purchased your Zebra business product from a Zebra business partner, contact that business partner for
support.
.
.
Provide Documentation Feedback
If you have comments, questions, or suggestions about this guide, send an email to EVM-Techdocs@zebra.com.
10

Getting Started
Introduction
This chapter explains how to set the device up for the first time.
Unpacking
Carefully remove all protective material from around the ET5X and save the shipping container for later storage
and shipping.
Verify that you received all equipment listed below:
• Table with lithium-ion battery
• Quick Reference Guide.
Inspect the equipment for damage. If you are missing any equipment or if you find any damaged equipment,
contact the Zebra Support Center immediately. See Service Information on page 10 for contact information.
Getting Started
In order to start using the ET5X for the first time:
• install the micro SIM Card (ET55 only)
• install microSD card (optional)
• start the ET5X
• configure the ET5X.
Installing a micro SIM Card (ET55 Only)
CAUTION Do not use nano to micro SIM card adapters.
To install a micro SIM card:
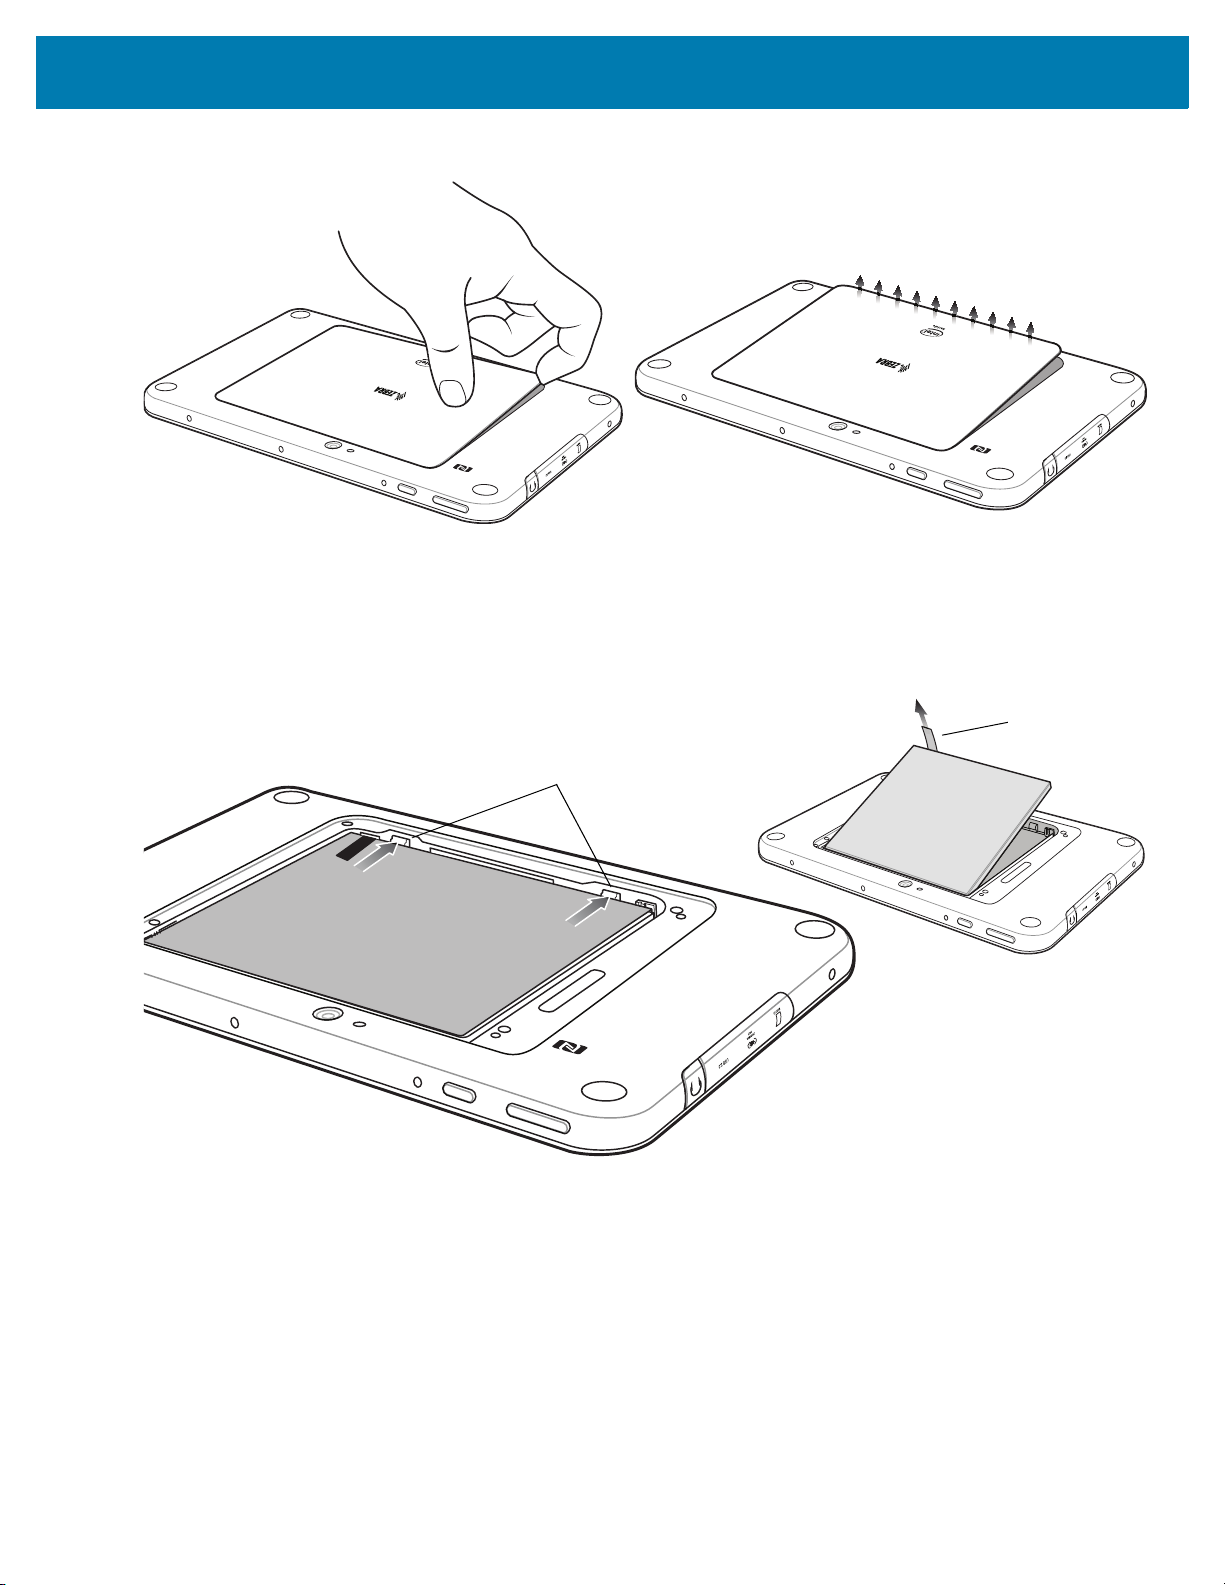
1. Press the Power button to turn off the ET55.
2. Lift the notched corner of the battery cover.
11
Getting Started
Pull Tab
8” Version
Locking Tabs
Figure 1 Removing the Battery Cover
3. Carefully lift the battery cover off the ET55.
4. On the 8” version, push the two locking tabs up, then pull up on the tab to remove battery.
On the 10” version, push the two locking tabs up (1), then, using index fingers, lift the battery up (2).
Figure 2 Removing the Battery - 8”
12
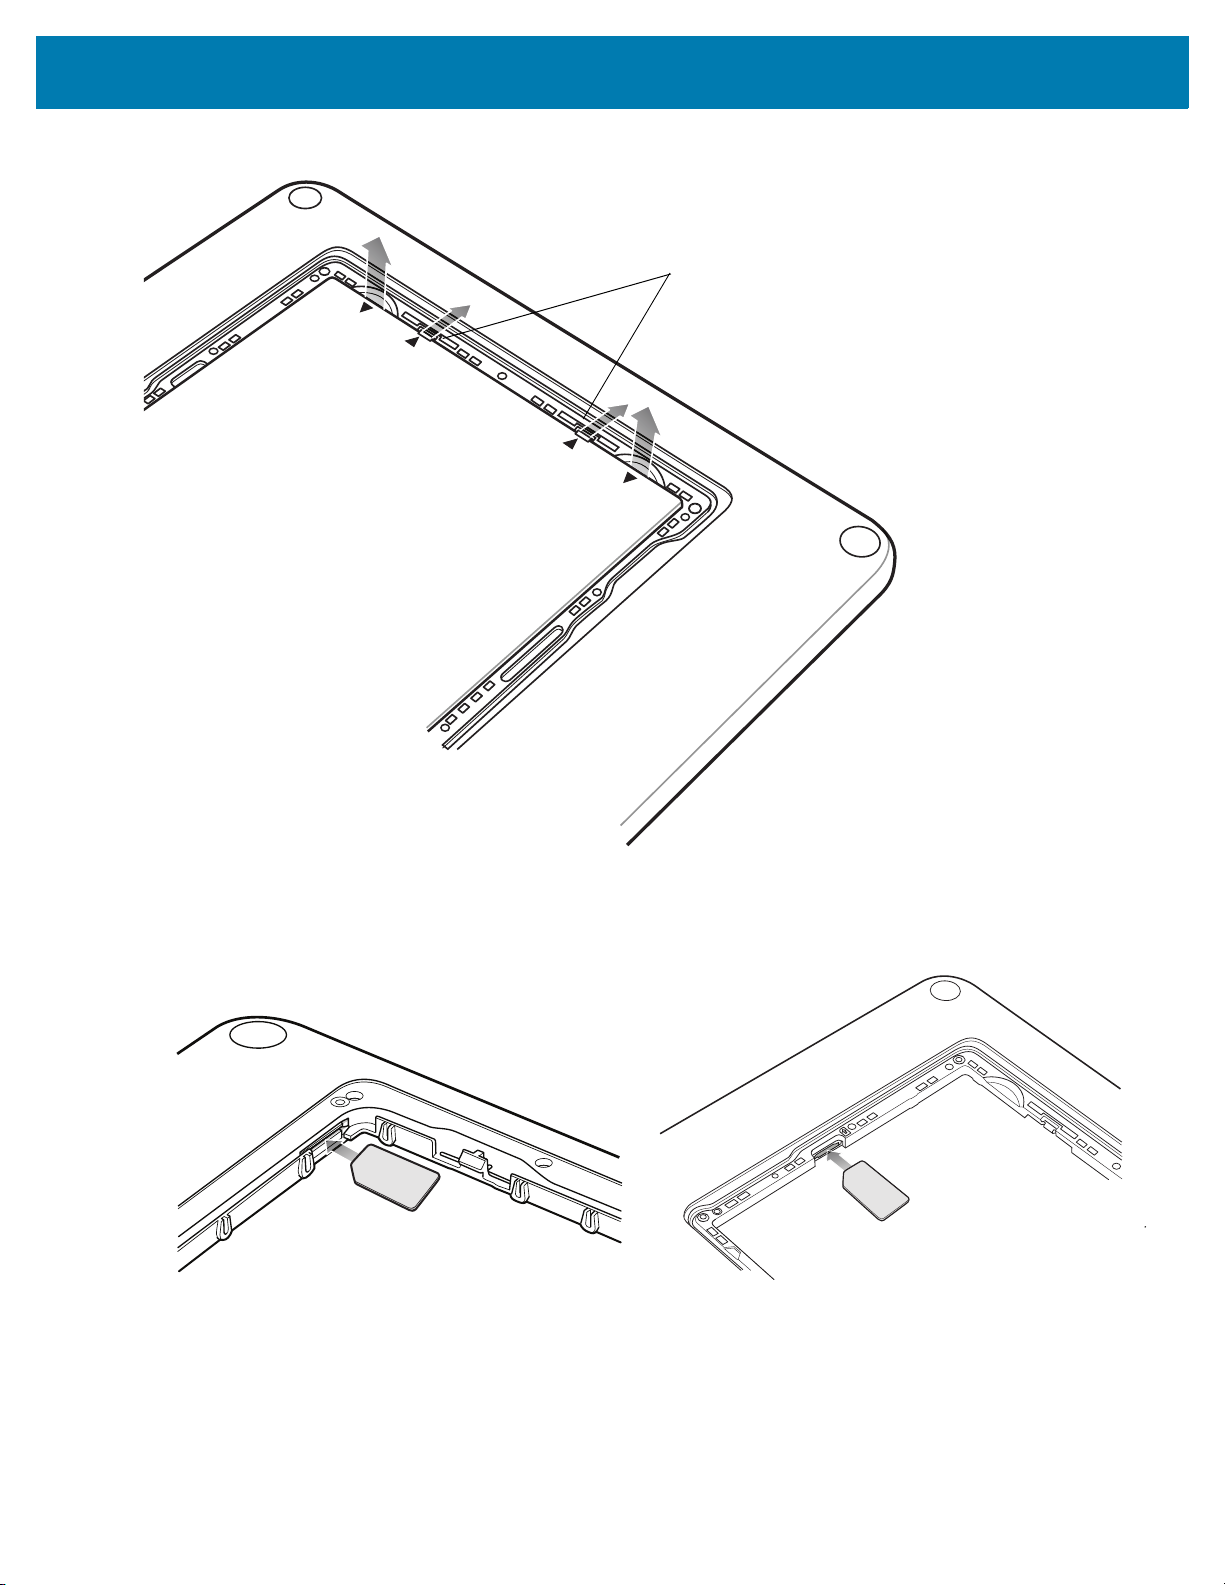
Figure 3 Removing the Battery - 10”
2.LIFT UP
2
.LIFT
U
P
1.RELEAS
E LO
C
KING
1
.
R
E
LEA
S
E
L
OC
K
ING
10” Version
Locking Tabs
8” Version 10” Version
Getting Started
5. Insert the micro SIM card with contacts facing down.
Figure 4 Insert SIM Card
6. Push the SIM card in and ensure that it locks into place.
7. Replace the battery.
On the 10” version, ensure that the two battery latches engage.
13
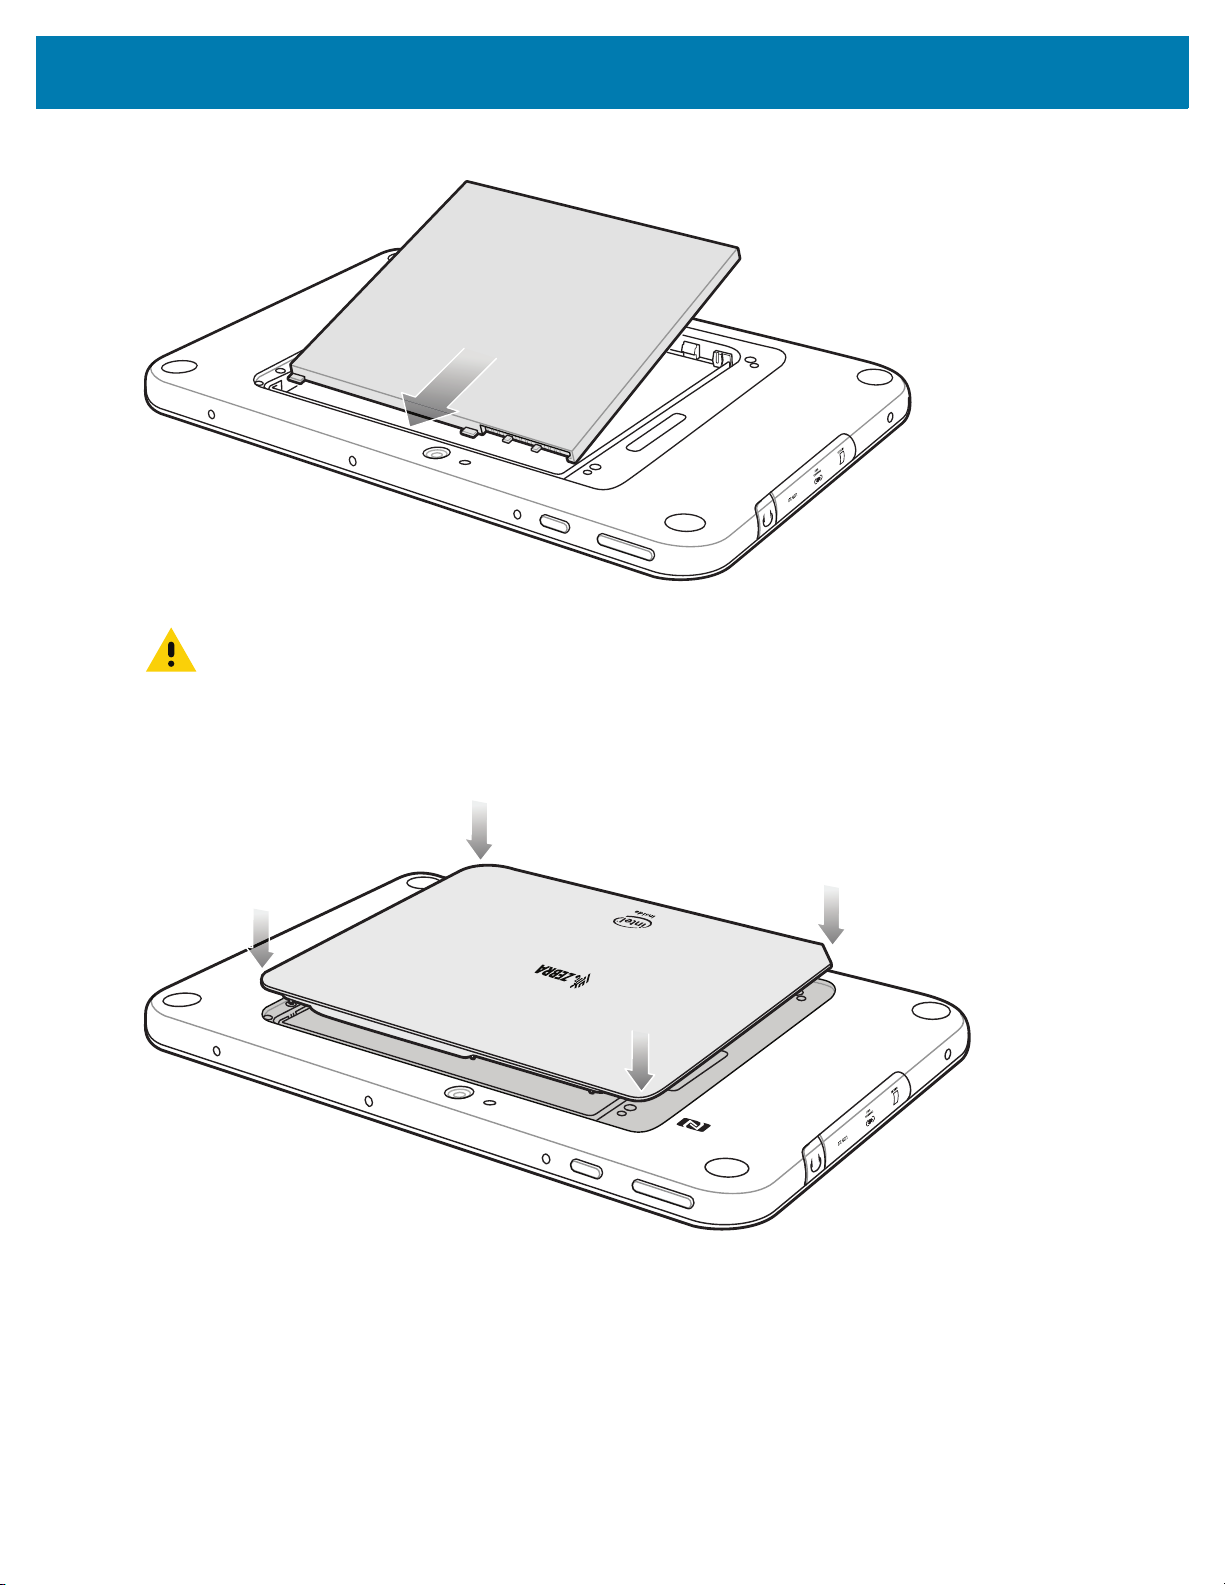
Figure 5 Insert Battery
CAUTION Be aware of the orientation of the battery cover. Failure to replace the battery cover properly may damage
the battery cover.
Getting Started
8. Align the tabs on the underside of the cover with the slot around the battery well. Make sure that the notch on
the battery cover is at the bottom left cover of the ET5X.
Figure 6 Align Battery Cover
9. Carefully press down around the edge of the cover. Make sure that the cover is seated properly.
14
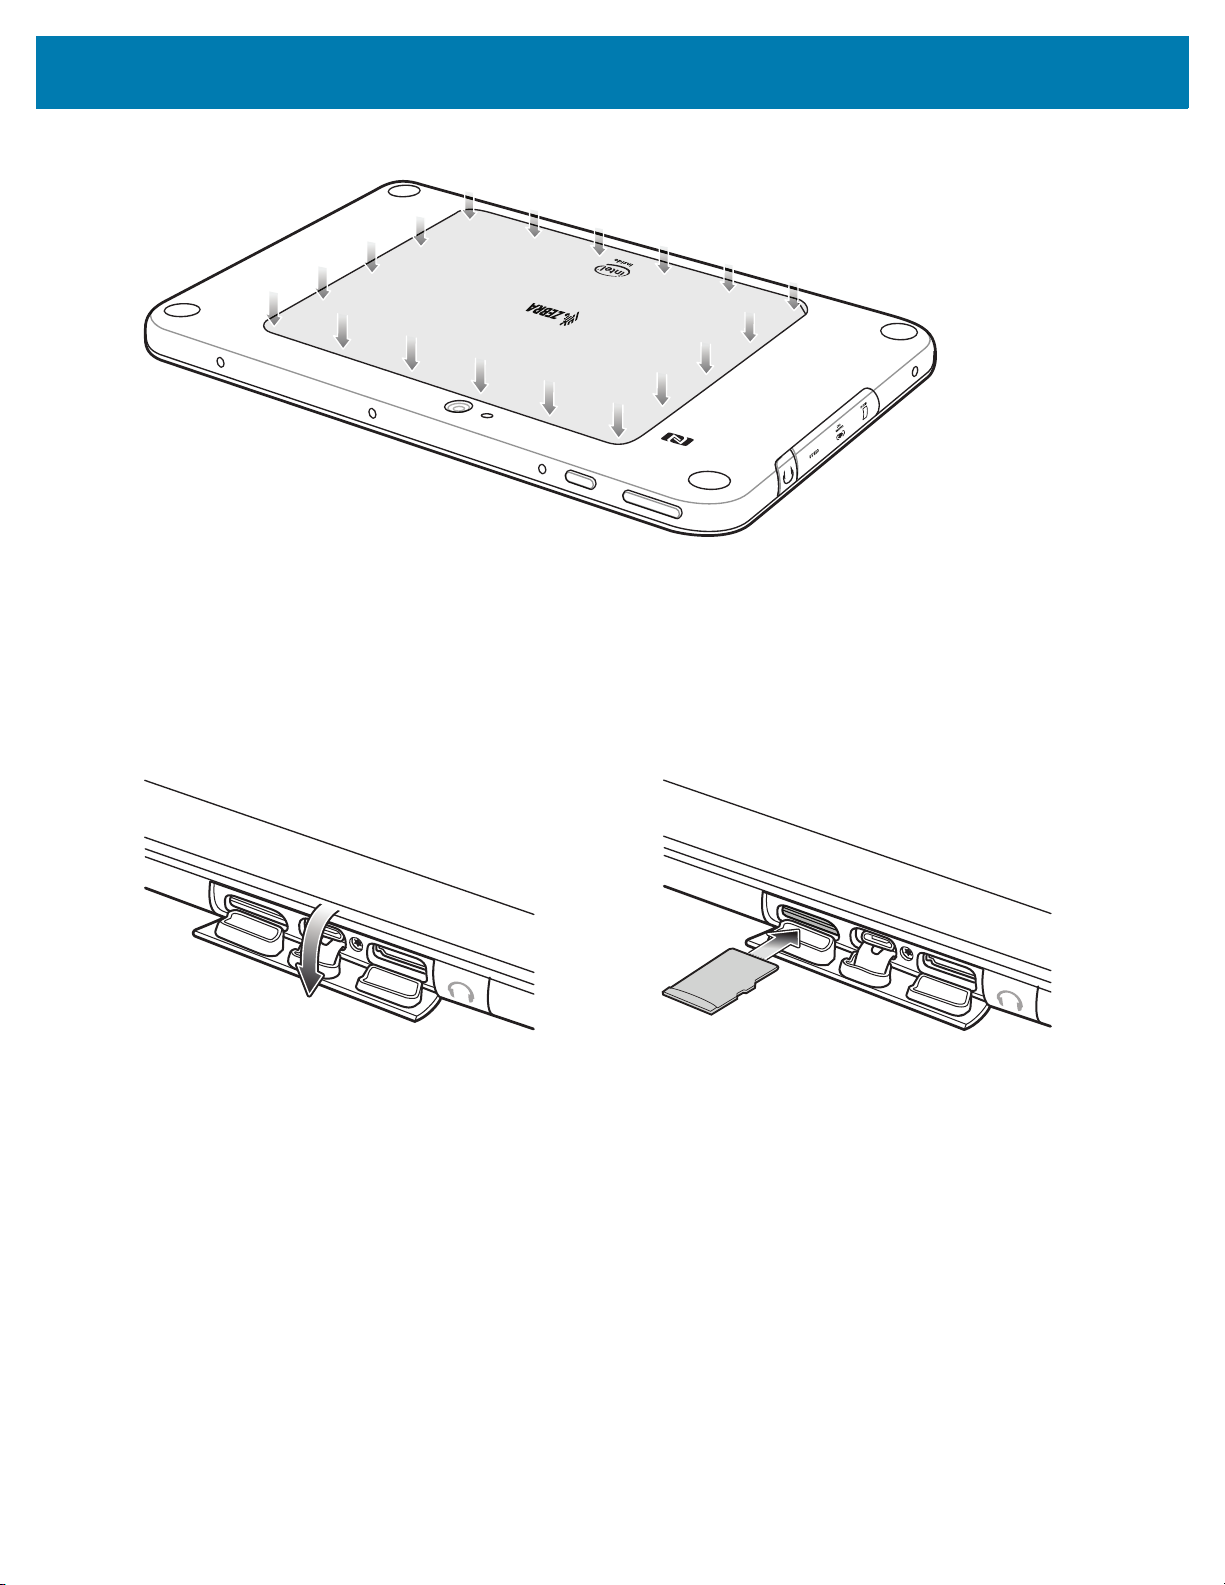
Figure 7 Press Down on Battery Cover
10. Press Power button to turn on the ET55.
Installing a microSD Card
Getting Started
To install a microSD card:
1. Open access door.
Figure 8 Open Access Door
2. Insert microSD card into slot with contacts facing down.
3. Press the card in to ensure that it is seated properly.
4. Close access door.
15
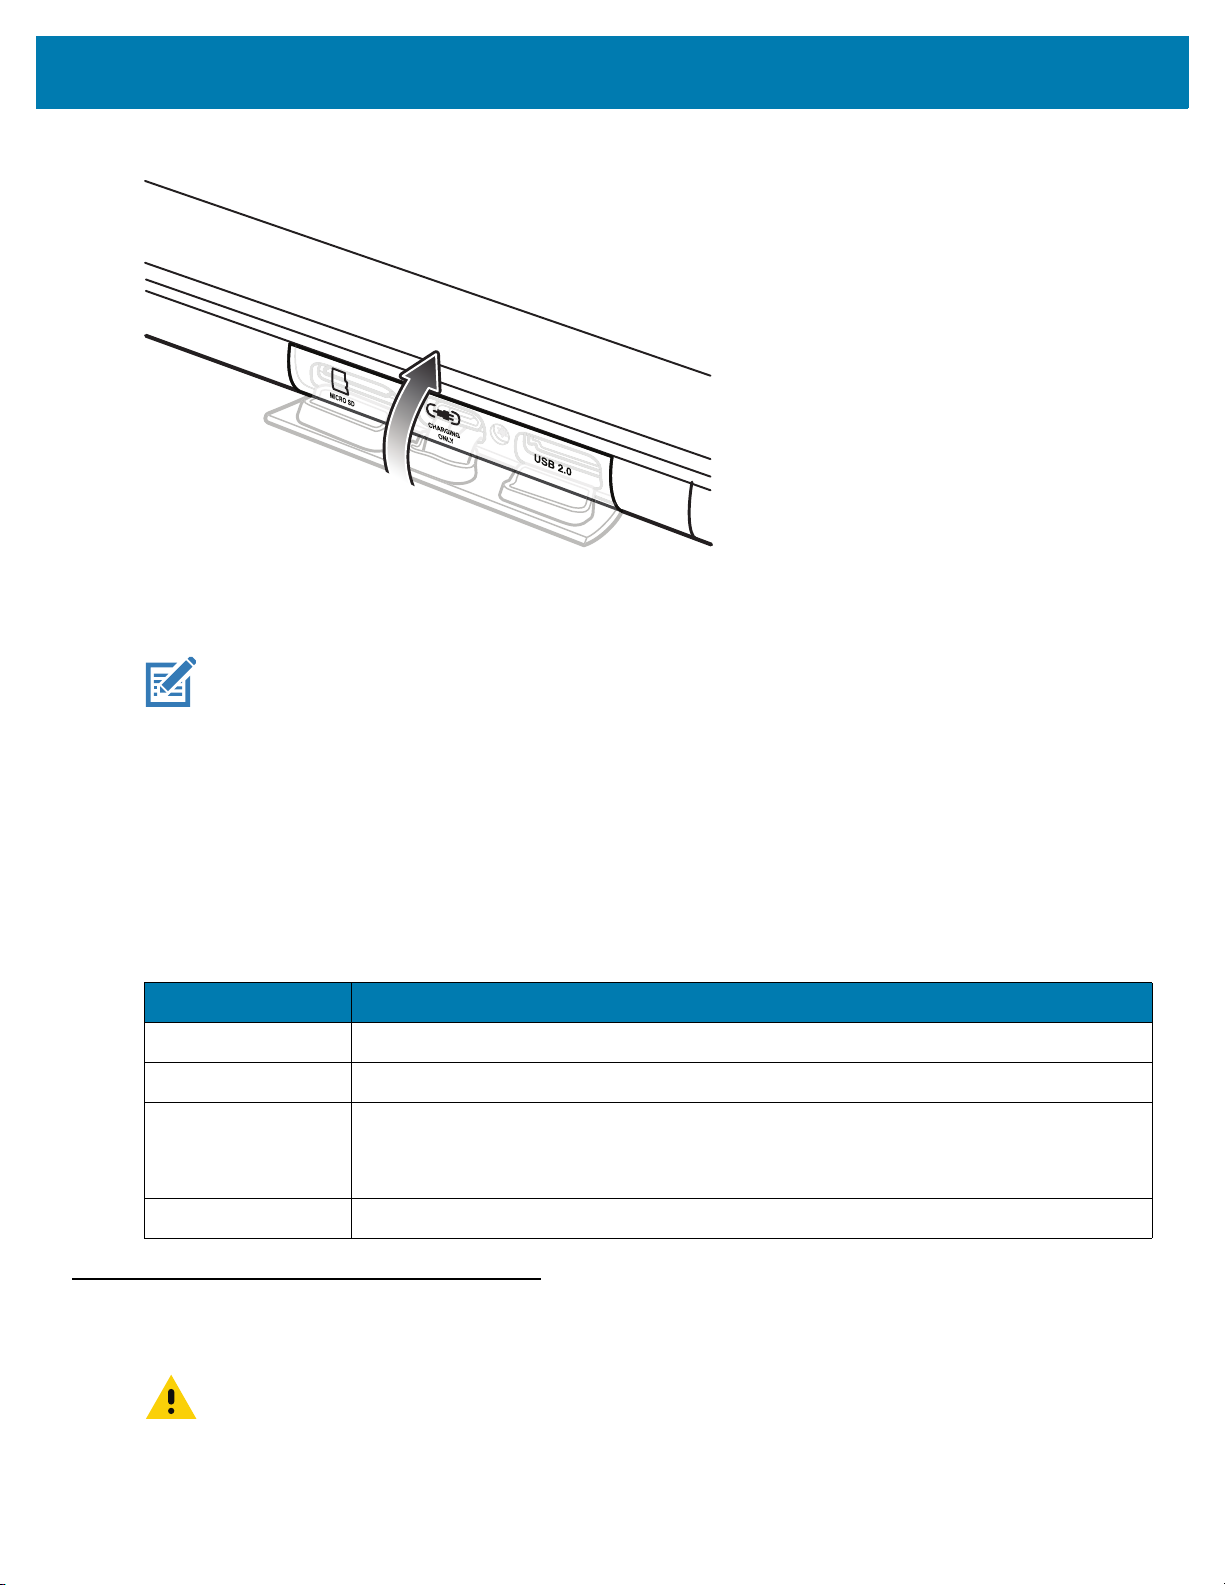
Figure 9 Close Access Door
Charging the ET5X
Getting Started
NOTE Use only Zebra approved accessories listed in this guide when charging the ET5X.
Use one of the available accessories to charge the ET5X. Refer to Chapter 6, Accessories for charging
accessories.
The 8” tablet main battery charges from fully depleted to 90% in approximately 2.5 hours and from fully depleted to
100% in approximately 3.5 hours.
The 10” tablet main battery charges from fully depleted to 90% in approximately three hours and from fully depleted
to 100% in approximately four hours.
Table 2 Charging Indicator
LED Indication
Off ET5X is not in cradle. ET5X is not seated properly. Cradle is not powered.
Orange ET5X is charging.
Green Charging complete.
Note: When the battery is initially inserted in the ET5X, the amber LED flashes once if
the battery power is low or the battery is not fully inserted.
Red Error in charging; check placement of the ET5X.
Resetting the ET5X
CAUTION Resetting the ET5X erases all data from the ET5X, including your account configuration, applications,
music, pictures and files. Make sure that you back up all the required data before you proceed.
Resetting the ET5X returns the device to original factory settings.
16

Getting Started
To reset the ET5X:
1. Swipe down with two fingers from the status bar to open the quick access panel and then touch .
2. Touch Backup & reset.
3. Touch Enterprise data reset.
CAUTION Resetting the ET5X erases all data from the ET5X, including your account configuration, applications,
music, pictures and files.
4. Touch RESET TABLET.
5. If required, enter PIN, or password and touch Continue.
6. Touch ERASE EVERYTHING. The ET5X erases all data then reboots.
17

Accessories
Introduction
The ET5X accessories provide a variety of product support capabilities. Table 3 lists the accessories available.
Table 3 ET5X Accessories
Accessory Part Number Description
Cradles
Charge Only Cradle CRD-ET5X-1SCG1 Charges the ET5X main battery and optional
Power Pack installed in the Expansion Back.
Requires power supply PWR-BGA12V50W0WW,
DC Line Cord CBL-DC-388A1-01 and
country-specific AC line cord.
Communication and
Charging Cradle
Rugged Communication
and Charging Cradle
4-Slot Charge Only Cradle CRD-ET5X-SE4CO1-01 Charges up to four ET5X main battery and optional
Chargers
Power Supply PWR-BGA12V108W0WW Provides power to the 4-Slot Charge Only Cradle.
CRD-ET5X-1SCOM1 Charges the ET5X main battery and optional
Power Pack installed in the Expansion Back.
Requires power supply PWR-BGA12V50W0WW,
DC Line Cord CBL-DC-388A1-01 and
country-specific AC line cord.
CRD-ET5X-1SCOM1R Charges the ET5X main battery and optional
Power Pack installed in the Expansion Back.
Supports ET5X with rugged frame and rugged IO
Adapter. Requires power supply
PWR-BGA12V50W0WW, DC Line Cord
CBL-DC-388A1-01 and country-specific AC line
cord.
Power Pack installed in the Expansion Back and
up to four Power Pack in the optional 4-Slot
Battery Charger. Requires power supply
PWR-BGA12V108W0WW, DC line cord
CBL-DC-378A1-01, DC line cord and
country-specific AC line cord.
18

Accessories
Table 3 ET5X Accessories (Continued)
Accessory Part Number Description
Power Supply PWR-BGA12V50W0WW Provides power to the Charge Only Cradle, the
Communication and Charging Cradles, the 4-Slot
Battery Charger, and Rugged Charge Connector.
4-Slot Battery Charger SAC-ET5X-4PPK1-01 Chargers up to four Power Packs. Requires power
supply PWR-BGA12V50W0WWl, DC Line cord
CBL-DC-388A1-01, and country-specific AC line
cord.
Rugged Charge Connector CHG-ET5X-CBL1-01 Charges the ET5X main battery and optional
Power Pack installed in the Expansion Back.
Requires power supply PWR-BGA12V50W0WW,
DC Line Cord CBL-DC-388A1-01 and
country-specific AC line cord.
Miscellaneous
Replacement 8” Internal
Battery
Replacement 10” Internal
Battery
Replacement 8” Battery
Cover
Replacement 10” Battery
Cover
8” Rugged Frame with IO
Adapter
10” Rugged Frame with IO
Adapter
Replacement Rugged IO
Connector
8” SE4750 Expansion Back ZBK-ET5X-8SCN5-02 Provides data capture using the SE4750 scan
BTRY-ET5X-8IN1-01 Replacement battery for 8” tablet.
BTRY-ET5X-10IN1-01 Replacement battery for 10” tablet.
KT-ET5X-8BTDR1-01 Replacement battery cover for 8” tablet.
KT-ET5X-10BTDR1-01 Replacement battery cover for 10” tablet.
SG-ET5X-8RCSE1-02 Add extra protection for the 8” tablet and IO
Adapter for connection to the Rugged
Communication and Charging Cradle.
SG-ET5X-10RCSE1-01 Add extra protection for the 10” tablet and IO
Adapter for connection to the Rugged
Communication and Charging Cradle.
SG-ET5X-RGIO1-01 Replacement rugged IO connector for the Rugged
Frames.
engine, rotating hand strap and slot for optional
Power Pack.
8” Expansion Back ZBK-ET5X-8RH1-01 Provides rotating hand strap and slot for optional
Power Pack.
10” SE4750 Expansion
Back
10” Expansion Back ZBK-ET5X-10RH1-01 Provides rotating hand strap and slot for optional
Power Pack BTRY-ET5X-PRPK1-01 Provides additional power for charging the ET5X
ZBK-ET5X-10SCN5-02 Provides data capture using the SE4750 scan
engine, rotating hand strap and slot for optional
Power Pack.
Power Pack.
battery using an Expansion Back.
19

Accessories
Table 3 ET5X Accessories (Continued)
Accessory Part Number Description
Active Stylus KT-ET5X-ASTY2-01 Provides easy writing, drawing, and navigation and
accuracy with the thin tip.
Replacement Expansion
Back Hand Strap
Coiled Stylus Tether SG-ET5X-SLTETR-01 Secures a stylus to the hand strap on the
10” Screen Protector KT-ET5X-10SCRN1-01 Provides additional screen protection for 10” tablet
8” Screen Protector KT-ET5X-8SCRN1-01 Provides additional screen protection for 8” tablet
10” Screen Protector
(Rugged Frame)
8” Screen Protector
(Rugged Frame)
8” Operations Case SG-ET5X-8HLST-01 Provides carrying solution for 8” tablet.
10” Operations Case SG-ET5X-10HLST-01 Provides carrying solution for 10” tablet.
Universal Shoulder Strap 58-40000-007R Use with the 8” Operations Case and D-clips to
SG-ET5X-RHTP1-01 Replacement hands strap for Expansion Backs.
Expansion Backs.
(5-pack).
(5-pack).
KT-ET5X-8SCRN1-01 Provides additional screen protection for 10” tablet
with Rugged Frame (5-pack).
KT-ET5X-10SCRN1-02 Provides additional screen protection for 8” tablet
with Rugged Frame (5-pack).
carry tablet on shoulder.
20
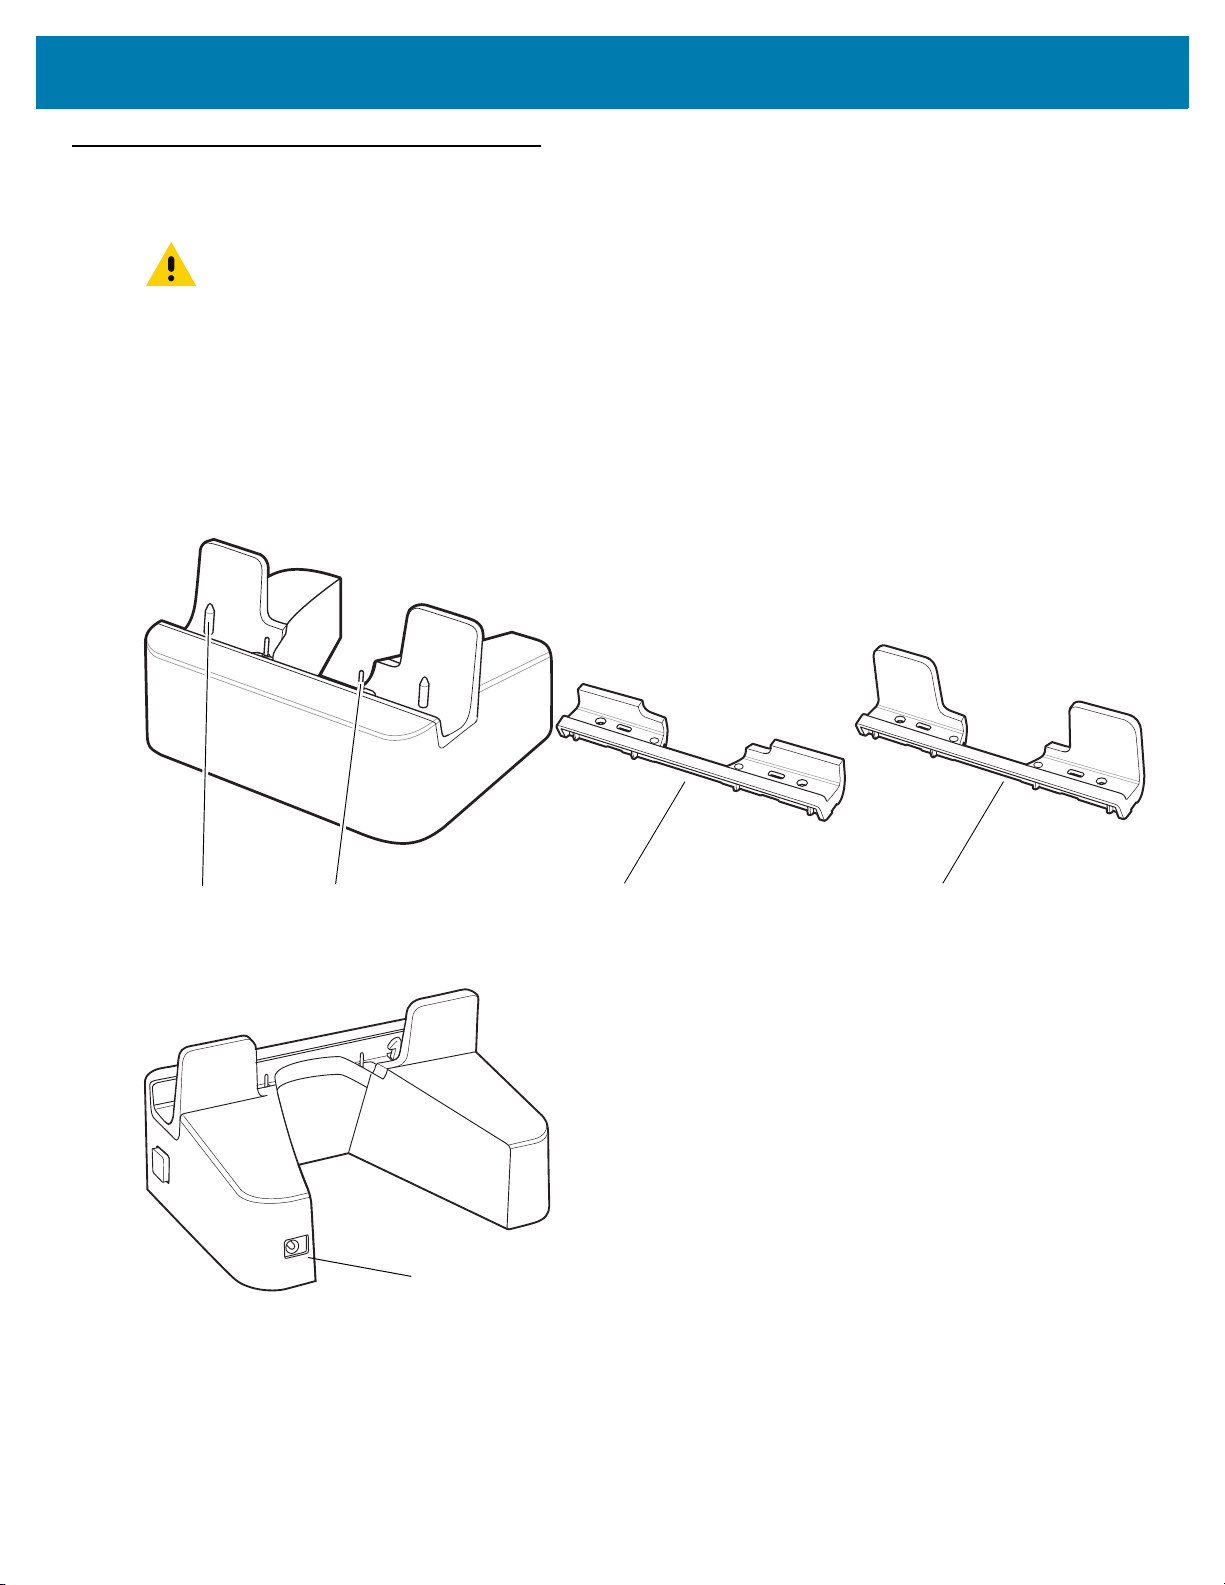
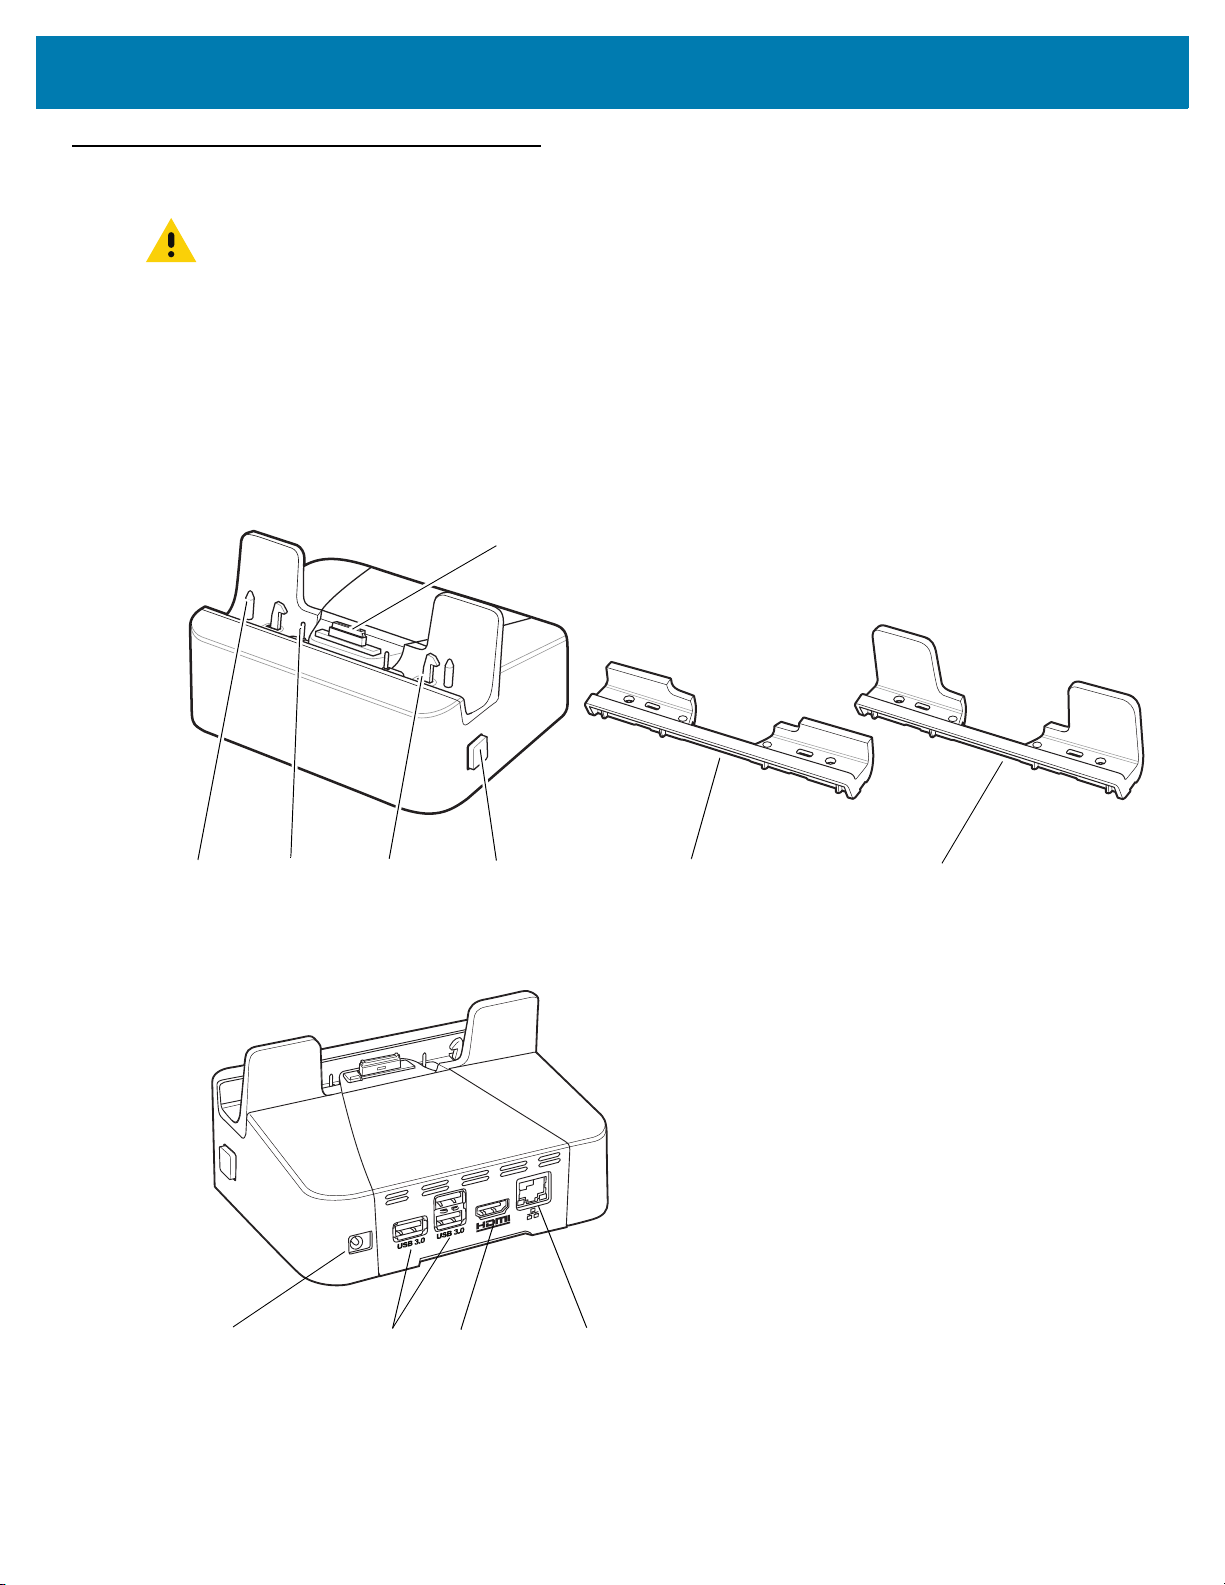
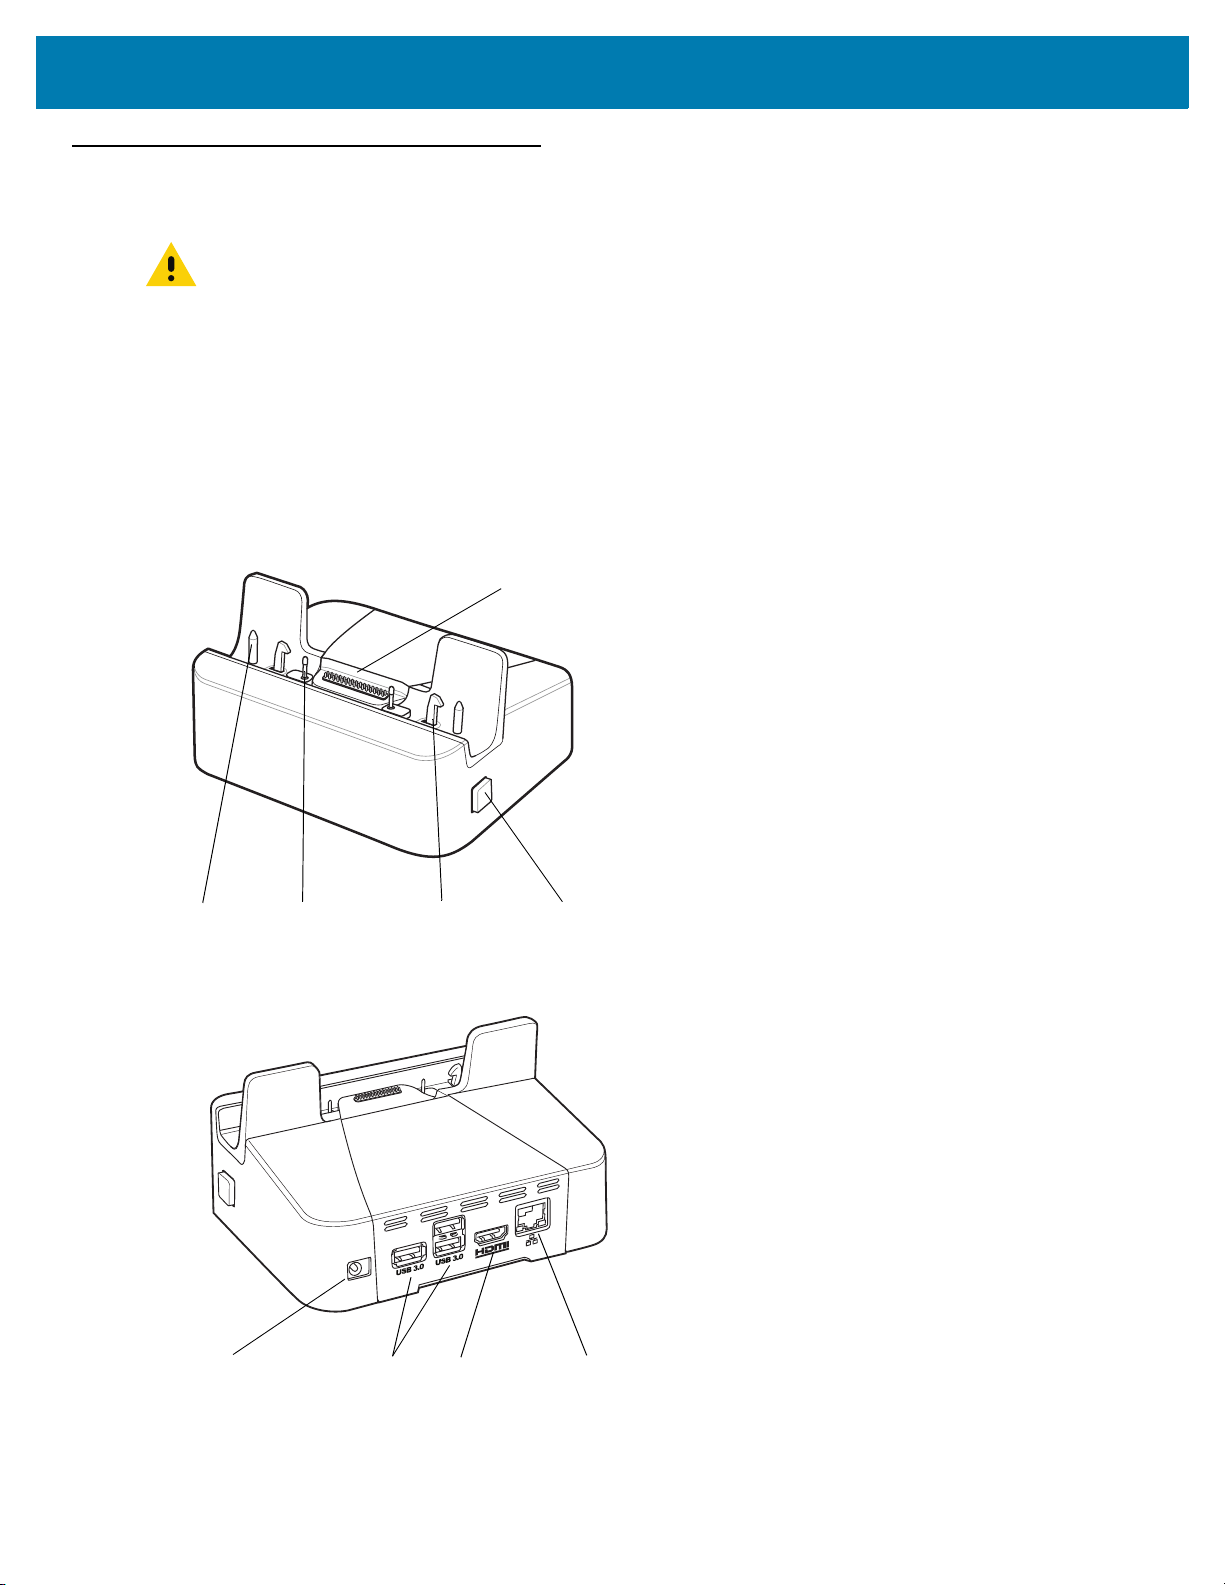
Charge Only Cradle
Charging PinsGuide Pins Small Insert Tall Insert
Power Input
CAUTION Ensure that you follow the guidelines for battery safety described in Battery Safety Guidelines on page
130.
This section describes how to use a Charge Only Cradle with the ET5X. The Charge Only Cradle ships with an
insert that must be installed when inserting an ET5X without the protective boot installed.
The Charge Only Cradle:
• Provides power for operating the ET5X.
• Charges the ET5X’s battery.
Figure 10 Charge Only Cradle - Front View
Accessories
Figure 11 Charge Only Cradle - Rear View
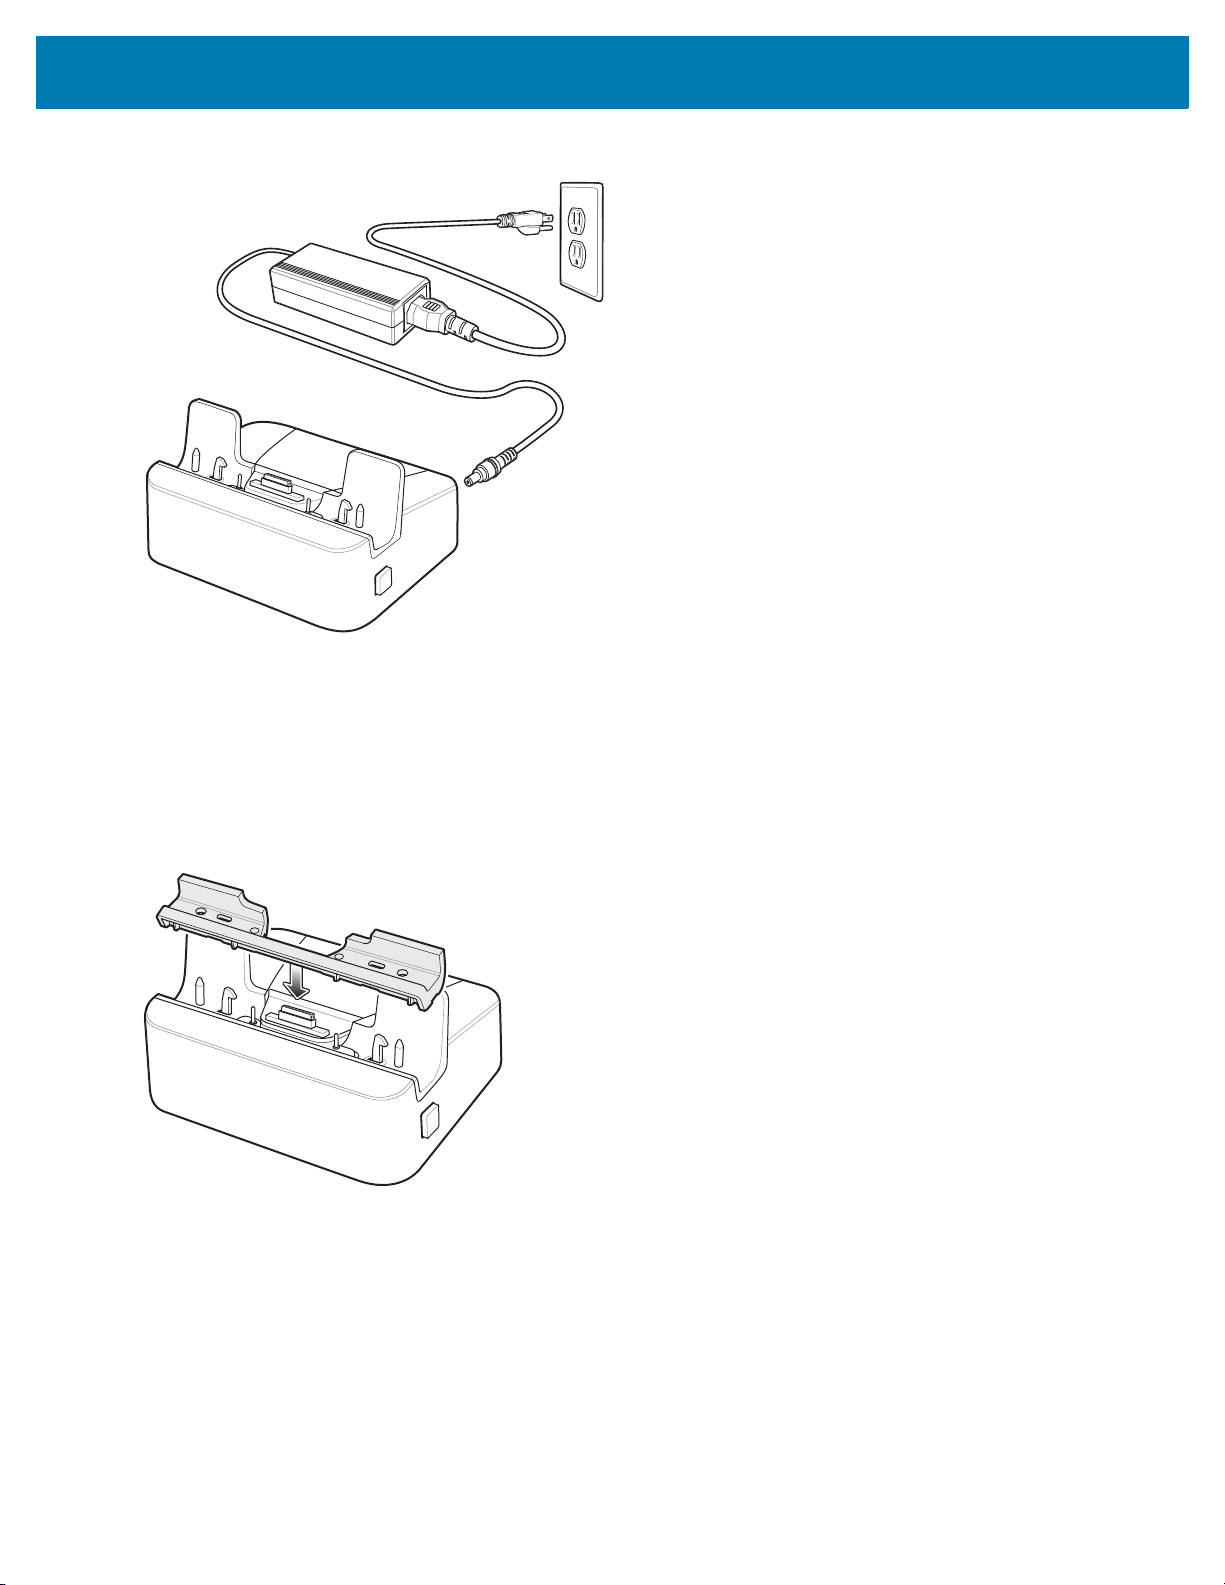
Installing the Insert
The insert must be installed onto the cradle when docking an ET5X without a protective boot.
1. Align the insert over the pins.
21
Accessories
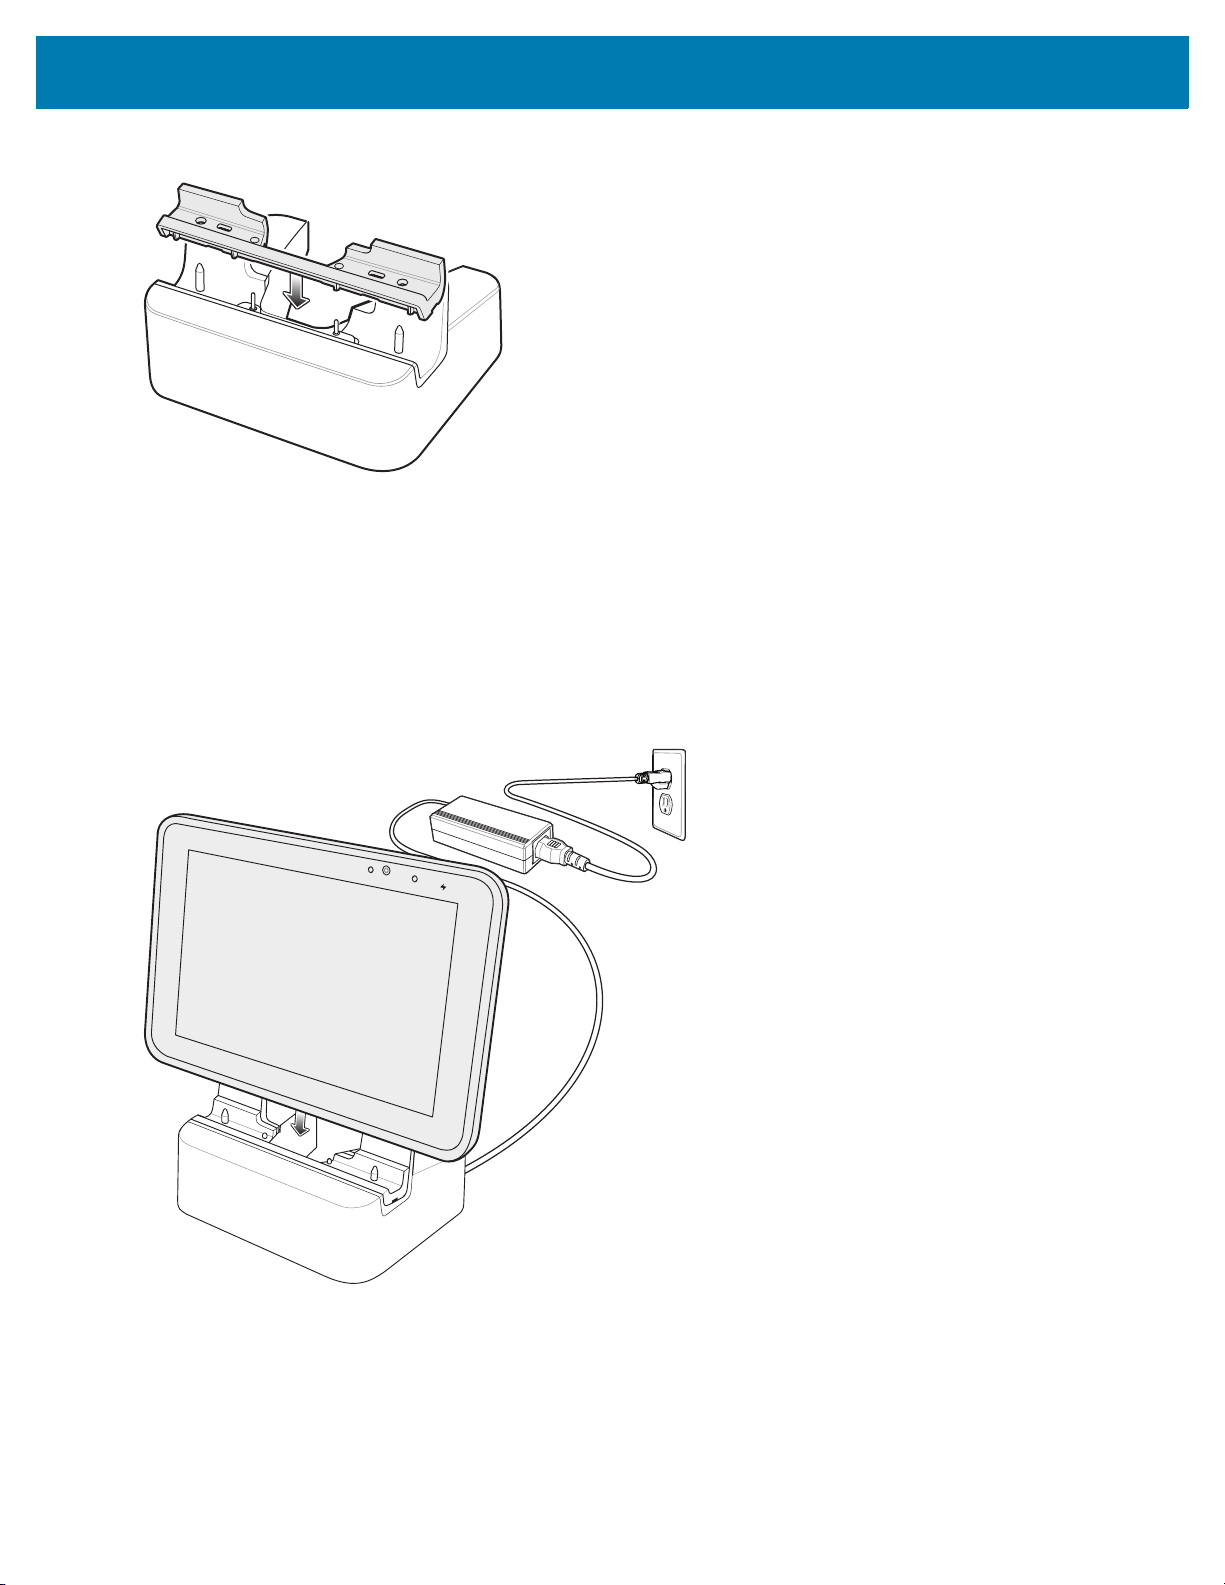
Figure 12 Align Insert with Cradle
2. Press the insert down until it seats flush in the cradle.
Charging the ET5X
To charge the ET5X in the Charge Only Cradle:
1. Align the ET5X with the alignment pins on the cradle.
2. Insert the ET5X into the cradle.
Figure 13 Insert ET5X into Charge Only Cradle
3. The ET5X Charging LED indicates charging.
4. To remove the ET5X from the Charge Only Cradle, hold the cradle down with one hand and lift the ET5X.
22
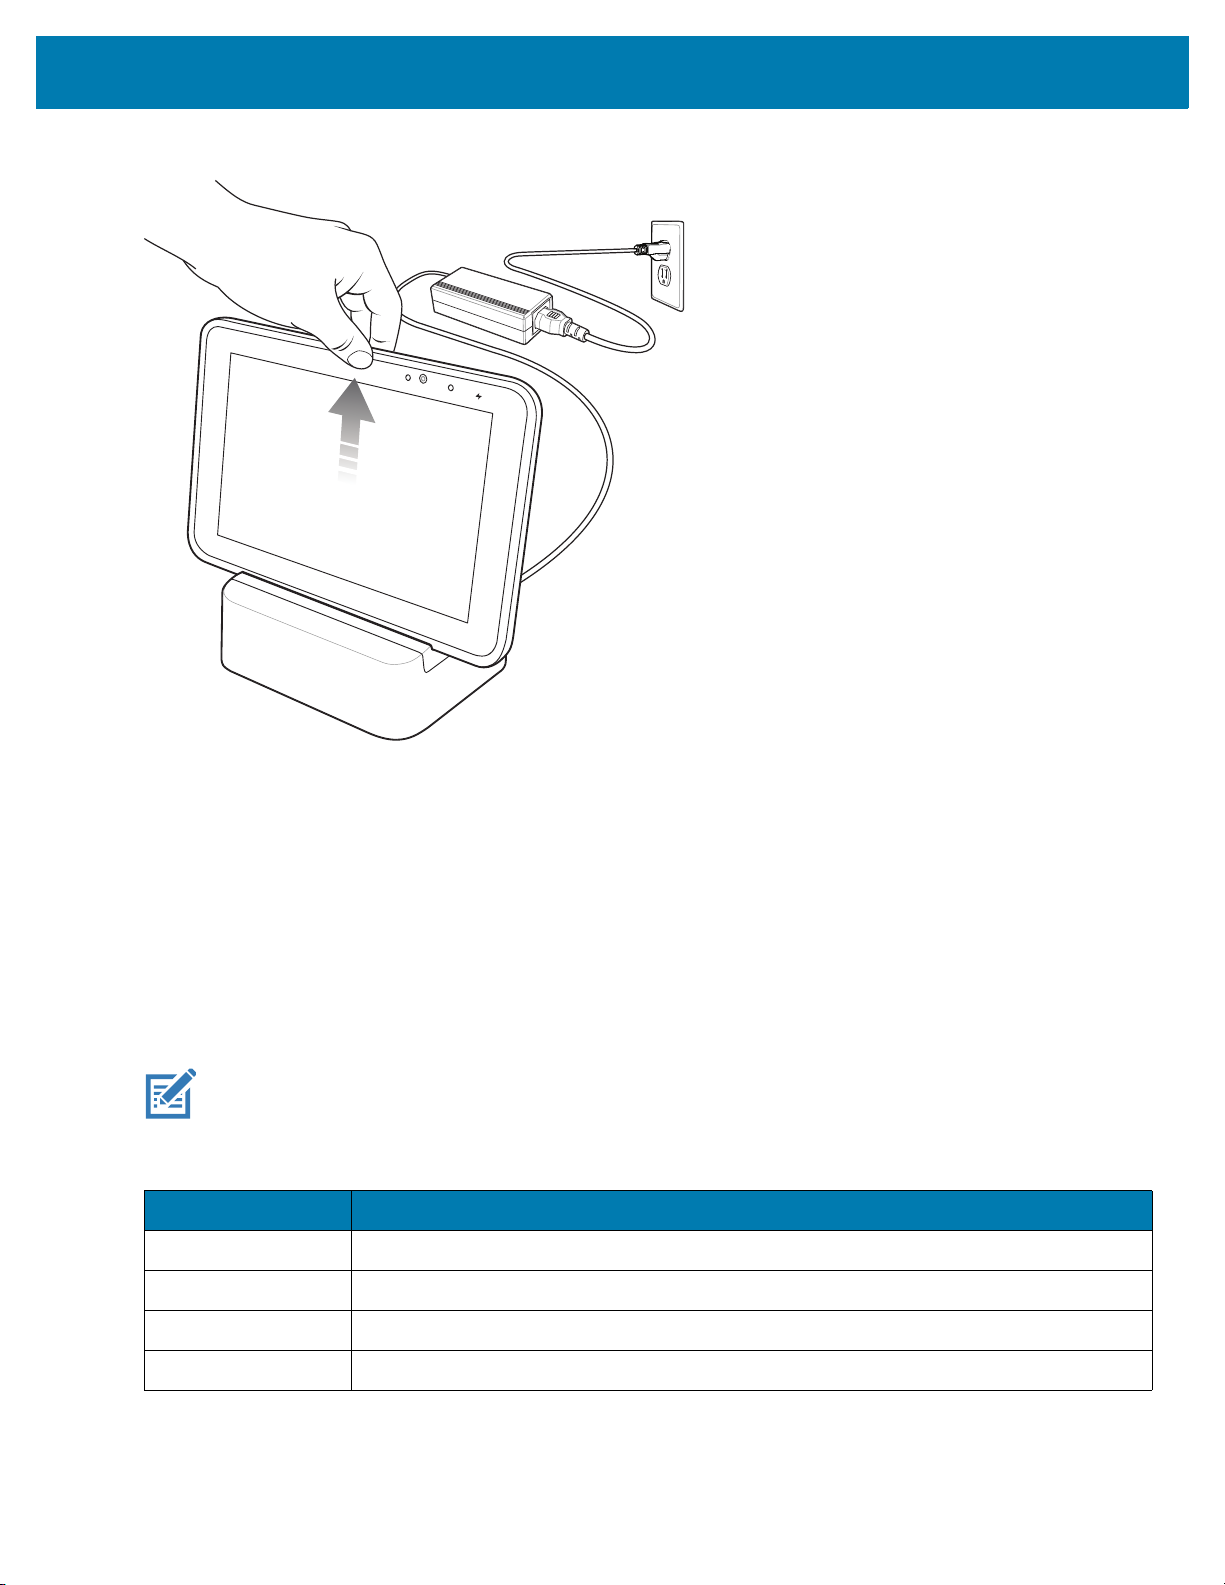
Accessories
Figure 14 Remove ET5X from Charge Only Cradle
Charge batteries in ambient temperatures from 0°C to 40°C (32°F to 104°F) as reported by the battery. Charging is
intelligently controlled by the charger. To accomplish this, for small periods of time, the charger alternately enables
and disables battery charging to keep the battery at acceptable temperatures.
The ET5X’s amber charge LED shows the status of the battery charging in the ET5X. See Table 2 on page 16 for
charging status indications.
The 8” tablet main battery charges from fully depleted to 90% in approximately 2.5 hours and from fully depleted to
100% in approximately 3.5 hours.
The 10” tablet main battery charges from fully depleted to 90% in approximately three hours and from fully depleted
to 100% in approximately four hours.
NOTE The Charging indicator only illuminates when the ET5X is connected to AC power.
Table 4 Charging Indicator
LED Indication
Off ET5X is not in cradle. ET5X is not seated properly. Cradle is not powered.
Orange ET5X is charging.
Green Charging complete.
Red Error in charging; check placement of the ET5X.
23
Accessories
Release
Button
Locking
Latches
Docking
Connector
Charging
Pins
Guide Pins Short Insert
Tall Insert
USB 3.0 Ports LAN (RJ45) PortPower Input
HDMI Port
Communication and Charging Cradle
CAUTION Ensure that you follow the guidelines for battery safety described in Battery Safety Guidelines on page
130.
This section describes how to use a Communication and Charing Cradle with the ET5X.
The Communication and Charging cradle:
• Provides power for operating the ET5X.
• Provides ports for connecting USB devices to the tablet, video output and connection to a LAN.
Figure 15 Communication and Charging Cradle - Front View
Figure 16 Communication and Charging Cradle - Rear View
24
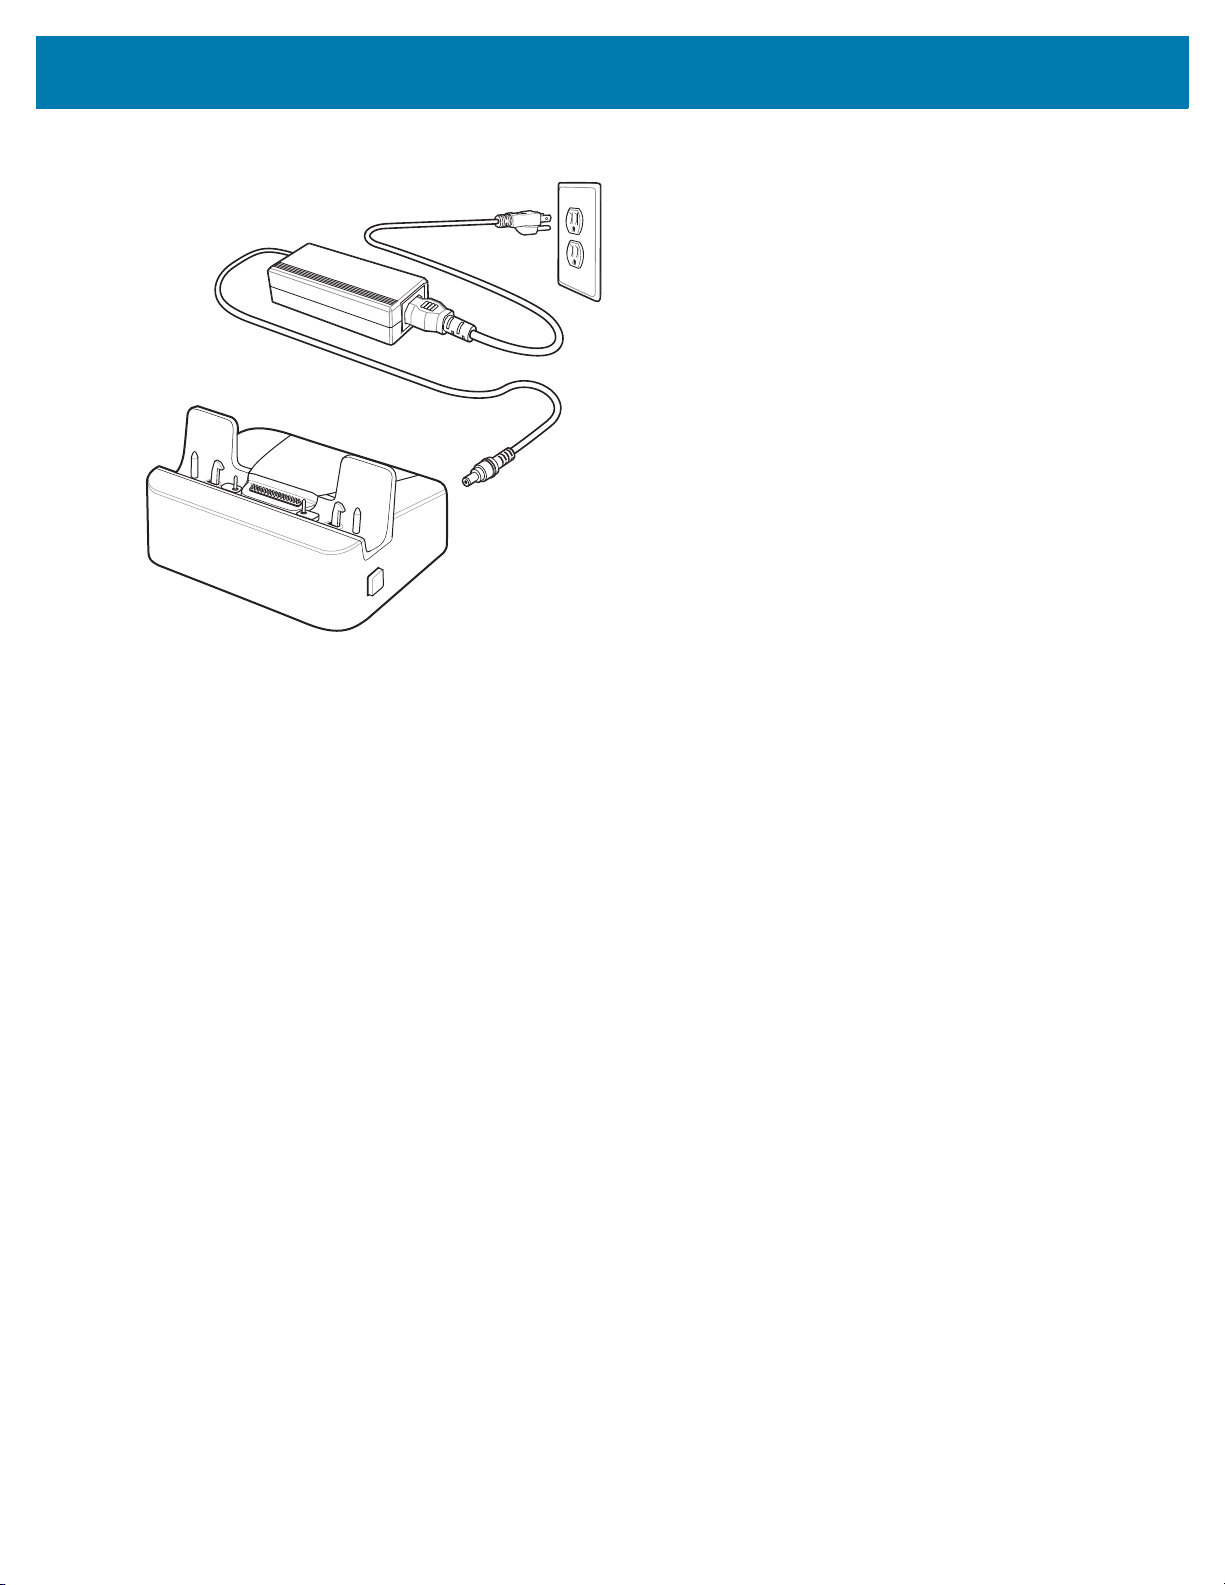
Accessories
Figure 17 Communication and Charging Cradle - Setup
Installing the Insert
Install the tall insert when using an ET5X without an Expansion Back. Install the small insert when using an ET5X
with an Expansion Back.
1. Align the insert over the pins.
Figure 18 Align Insert with Cradle
2. Press the insert down until it seats flush in the cradle.
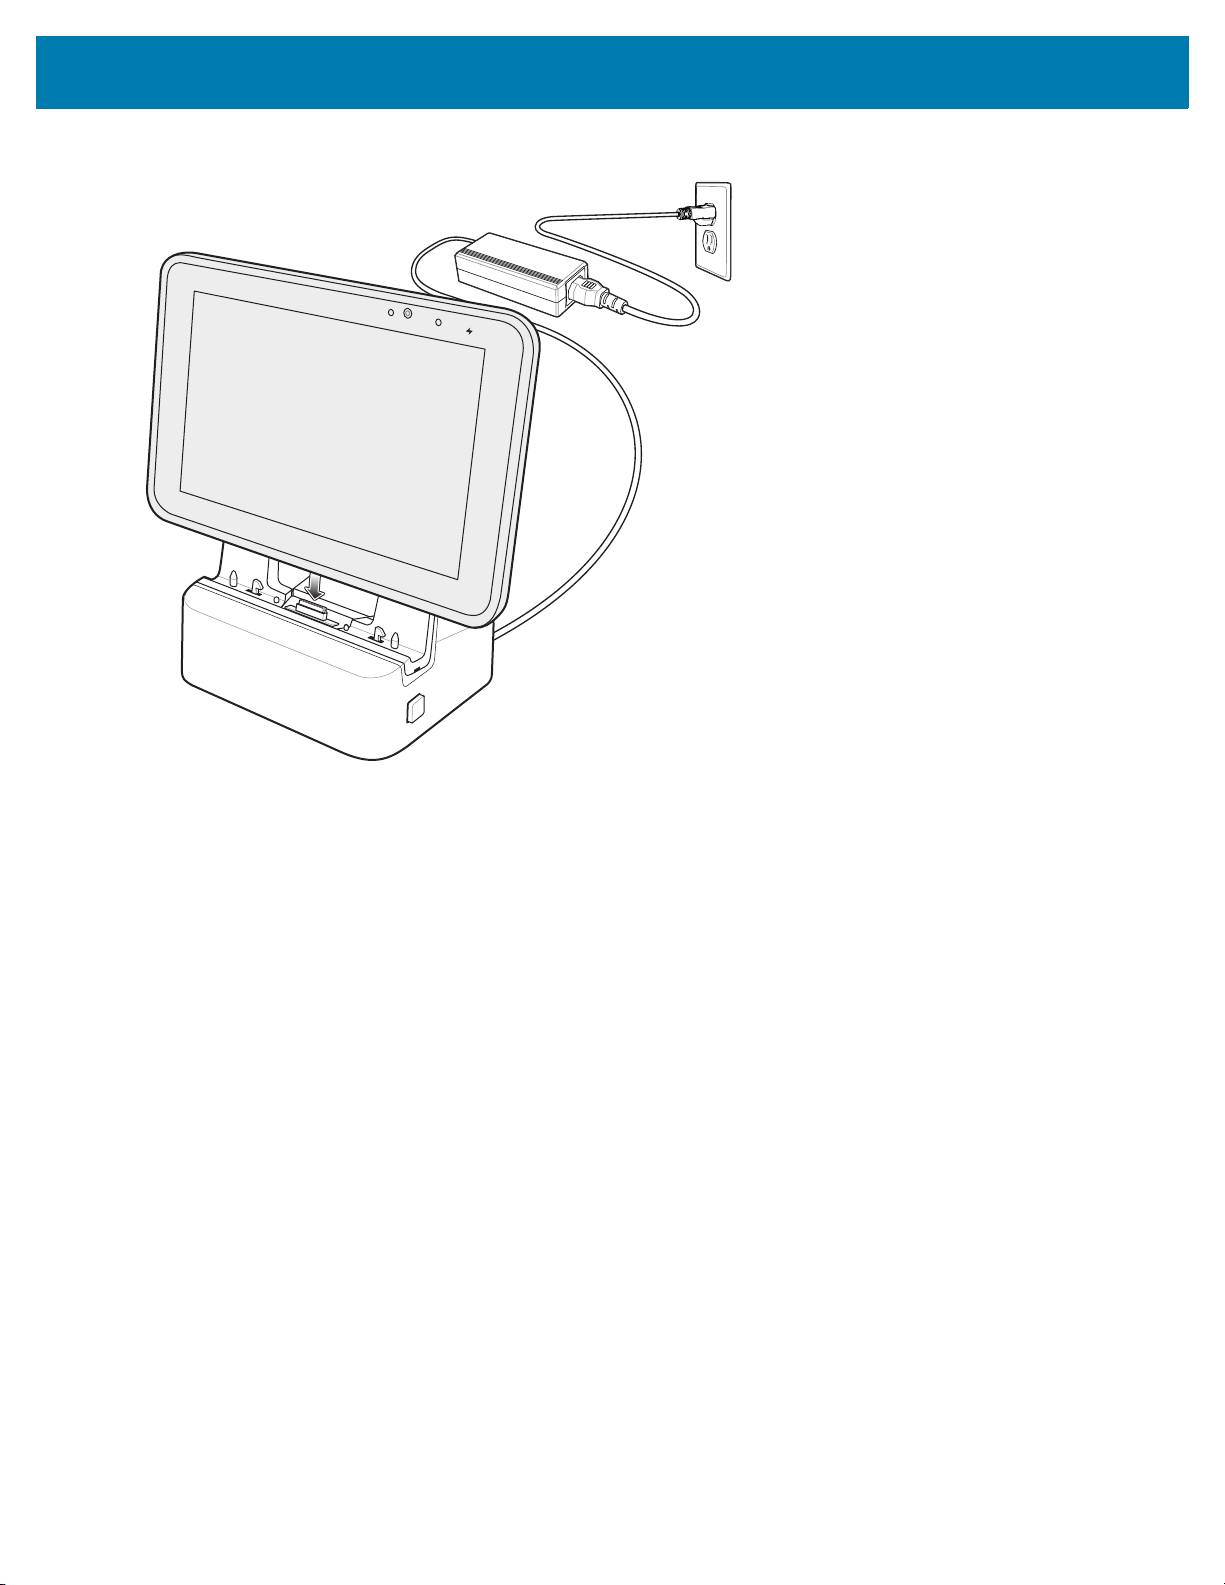
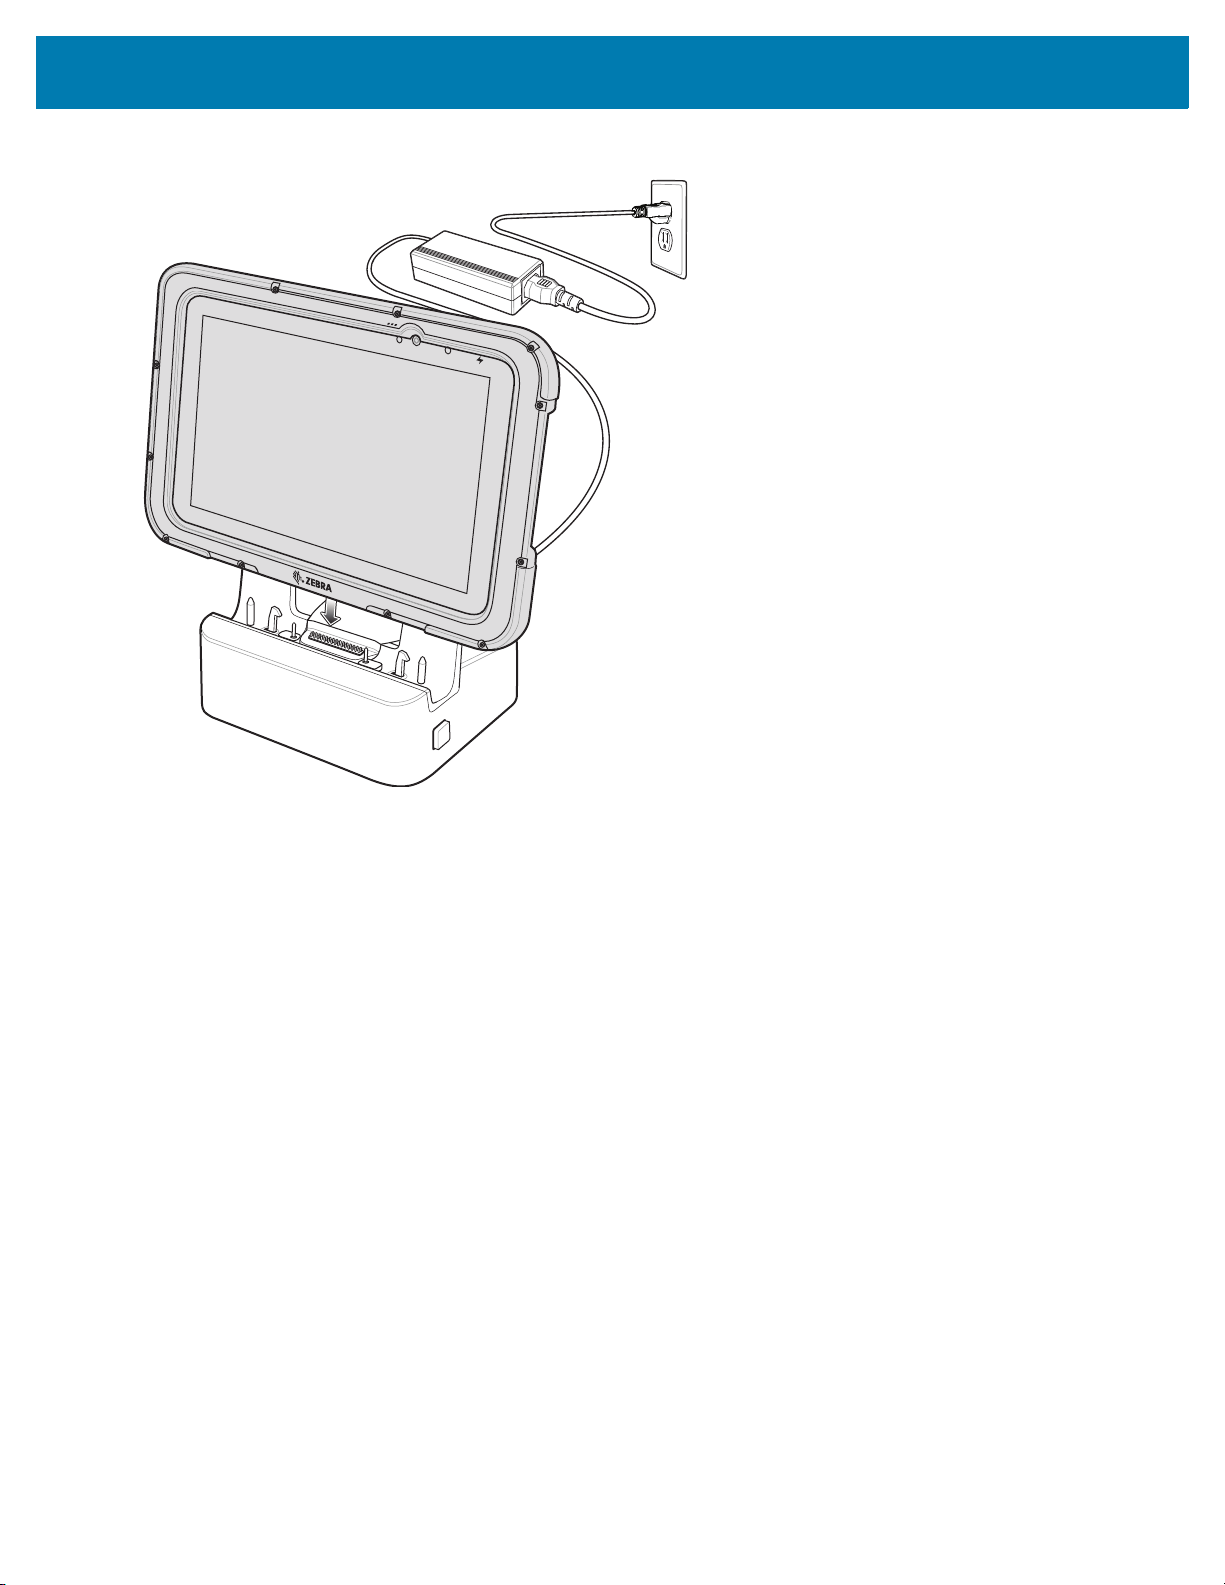
Charging the ET5X
To charge the ET5X in the Communication and Charging Cradle:
1. Open the bottom access door and hold it to the back of the tablet.
2. Align the ET5X with the alignment pins on the cradle.
3. Insert the ET5X into the cradle. Note that the Communication and Charging Cradles contains a locking
mechanism that locks the ET5X to the cradle.
25
Accessories
Figure 19 Insert ET5X into Communication and Charging Cradle
4. The ET5X Charging LED indicates charging.
5. To remove the ET5X from the Communication and Charging Cradle, press the release button on the right side
of the cradle and lift the ET5X. Use thumb to hold down the cradle.
26

Accessories
Figure 20 Remove ET5X from Communication and Charging Cradles
Charge batteries in ambient temperatures from 0°C to 40°C (32°F to 104°F) as reported by the battery. Charging is
intelligently controlled by the charger. To accomplish this, for small periods of time, the charger alternately enables
and disables battery charging to keep the battery at acceptable temperatures.
The ET5X’s amber charge LED shows the status of the battery charging in the ET5X. See Table 2 on page 16 for
charging status indications.
The 8” tablet main battery charges from fully depleted to 90% in approximately 2.5 hours and from fully depleted to
100% in approximately 3.5 hours.
The 10” tablet main battery charges from fully depleted to 90% in approximately three hours and from fully depleted
to 100% in approximately four hours.
27
Accessories
Release
Button
Locking
Latches
Rugged Docking
Connector
Charging
Pins
Guide Pins
USB 3.0 Ports LAN (RJ45) PortPower Input
HDMI Port
Rugged Communication and Charging Cradle
CAUTION Ensure that you follow the guidelines for battery safety described in Battery Safety Guidelines on page
130.
This section describes how to use a Rugged Communication and Charing Cradle with the ET5X.
The Rugged Communication and Charging cradle:
• Provides power for operating the ET5X.
• Provides ports for connecting USB devices to the tablet, video output and connection to a LAN.
• Charges the ET5X’s battery
Figure 21 Rugged Communication and Charging Cradle - Front View
and optional Power Pack installed in an Expansion Back
.
Figure 22 Rugged Communication and Charging Cradle - Rear View
28
Accessories
Figure 23 Rugged Communication and Charging Cradle - Setup
Charging the ET5X
To charge the ET5X using the Rugged Communication and Charging Cradle:
1. Align the ET5X with the alignment pins on the cradle.
2. Insert the ET5X into the cradle. Note that the Rugged Communication and Charging Cradles contains a locking
mechanism that locks the ET5X to the cradle.
29
Accessories
Figure 24 Insert ET5X with Rugged Frame and IO Adapter into Rugged Communication and Charging Cradle
3. The ET5X Charging LED indicates charging.
4. To remove the ET5X from the Rugged Communication and Charging Cradle, press the release button on the
right side of the cradle and lift the ET5X. Use thumb to hold down the cradle.
30
 Loading...