

Page 1

YSI INCORPORATED
DATA SCOUT
Software for the Level Scout
OPERATIONS MANUAL
Page 2

CONTENTS
1.0 Product Introduction ......................................................................................................................................................4
1.1 Data Scout and Data Scout Mobile Features..................................................................................................................4
1.2 Data Scout and Data Scout Mobile Hardware ...............................................................................................................4
2.0 Installation and Setup......................................................................................................................................................5
2.1 Installing the Applications...............................................................................................................................................5
2.1.1 Installing Data Scout onto A PC...........................................................................................................................5
2.1.2 Installing Data Scout Mobile onto a Handheld PC.............................................................................................5
2.2 Connecting the Level Scout To a Computer ..................................................................................................................6
3.0 Operating Data Scout and Data Scout Mobile...............................................................................................................9
3.1 Launching, Starting, Selecting, Stopping and Exiting....................................................................................................9
3.1.1 Launch the Applications .......................................................................................................................................9
3.1.2 Starting (Discovering Transducers) ...................................................................................................................10
3.1.3 Selecting from Multiple Transducers.................................................................................................................11
3.1.4 Stopping (Forget) Transducers...........................................................................................................................11
3.1.5 Exit the Applications ...........................................................................................................................................11
3.2 Live Tab ..........................................................................................................................................................................12
3.2.1 View Live Data.....................................................................................................................................................12
3.2.2 Change Level Units..............................................................................................................................................12
3.2.3 Change Temperature Units ................................................................................................................................13
3.2.4 Zero Level or Set Fixed Offset.............................................................................................................................13
3.2.5 View or Set Scan Average Time ..........................................................................................................................14
3.3 Table Tab........................................................................................................................................................................15
3.3.1 Save Data table.....................................................................................................................................................15
3.3.2 View Data Table ..................................................................................................................................................16
3.3.3 Clear Data Table..................................................................................................................................................17
3.4 Parameters Tab ..............................................................................................................................................................17
3.4.1 Change Transducer Date and Time ...................................................................................................................17
3.4.2 Configure Alarms and Broadcasts......................................................................................................................18
YSI Incorporated Data Scout 2
Page 3

3.4.3 Change battery.....................................................................................................................................................19
3.4.4 Memory Options (erase Tests) ...........................................................................................................................20
3.4.5 Change Transducer Address...............................................................................................................................20
3.4.6 Update Firmware.................................................................................................................................................21
3.4.6.1 normal Firmware Update Method..........................................................................................................21
3.4.6.2 Alternate Firmware Update Method.......................................................................................................22
3.5 Tests Tab.........................................................................................................................................................................23
3.5.1 Time Test Tab......................................................................................................................................................23
3.5.2 Method Test Tab .................................................................................................................................................25
3.5.3 Data Test Tab.......................................................................................................................................................26
3.5.4 Control Test Tab .................................................................................................................................................26
3.5.5 Extract Tab...........................................................................................................................................................27
Section 3.5.5.1 - Extract Above Test ....................................................................................................................28
Section 3.5.5.2 - Extract Active Test ....................................................................................................................28
Section 3.5.5.3 - Pick Done Test ..........................................................................................................................28
Section 3.5.5.4 - Change Units, Scans, and Files.................................................................................................29
4.0 Support Information .....................................................................................................................................................30
4.1 Warranty.........................................................................................................................................................................30
4.2 Contact Information......................................................................................................................................................30
Ordering and Technical Support.................................................................................................................................30
Service Information......................................................................................................................................................31
4.3 Recycling.........................................................................................................................................................................31
Battery Disposal............................................................................................................................................................31
4.3 Accessories......................................................................................................................................................................32
YSI Incorporated Data Scout 3
Page 4

1.0 PRODUCT INTRODUCTION
This User Manual applies Level Scout software Data Scout and Data Scout Mobile version 2.0 and greater. These applications can be
found on the Information and Support CD which accompanied your YSI Level Scout or on the YSI website (www.ysi.com).
Data Scout and Data Scout Mobile maintain a consistent menu structure and feature set. There is, however, one difference in
appearance between the two application programs: tabs on Data Scout appear at the top of the application window and the tabs for
Data Scout Mobile appear at the bottom of the screen.
The remainder of the User Manual will use the term “applications” when referring collectively to Data Scout and Data Scout Mobile.
In addition to these two software applications, the Level Scout can also be used with a Data Scout Advanced (DSAdv). DSAdv can
operate multiple transducers concurrently on a selected serial port. DSAdv also has a useful conversion function that allows you to
correct logged data for changes in barometric pressure that are logged by a separate barometer unit (BaroScout). See the DSAdv
manual for more information.
1.1 DATA SCOUT AND DATA SCOUT MOBILE FEATURES
Data Scout 2.0 is designed for computers running versions of the Windows
(Common Language Runtime). Data Scout Mobile is designed for handheld computers running Microsoft Windows Mobile® 2003
and Windows Mobile 5 operating systems. Data Scout and Data Scout Mobile are fully functional, yet simple application programs for
the YSI Level Scout.
®
operating system supporting the Microsoft® .NET™ CLR
Key features include:
Freely available, user friendly software,
Common “look and feel” on desktop, laptop, or handheld PC,
Ability to view and log real-time data and configure tests in Level Scout transducers,
Extract logged data and save to a file, as well as
Intuitive graphical user interface.
1.2 DATA SCOUT AND DATA SCOUT MOBILE HARDWARE
For Data Scout, YSI recommends a computer with the following minimum requirements:
Windows
installed on the computer, it will be installed during the Data Scout installation process) and
An RS-232 serial port, provided either via USB adapter or DB-9 serial port.
For Data Scout Mobile, YSI recommends a handheld PC with the following minimum requirements:
Microsoft Windows Mobile® 2003 or Windows Mobile 5 Operating System,
®
98SE, 2000, XP, Vista, or 7 with version 2.0 of the .NET™ CLR installed (if .NET™ CLR is not already
3 Mb of available program memory,
2 Mb of available storage memory, and
A fully implemented RS-232 serial port capable of supporting ActiveSync and interfacing with peripheral devices.
Both the Data Scout software and Level Scout upgrades are available at no charge via the YSI website at www.ysi.com.
YSI Incorporated Data Scout 4
Page 5

2.0 INSTALLATION AND SETUP
This chapter will provide a detailed description of how to set up and install Data Scout and Data Scout Mobile.
2.1 INSTALLING THE APPLICATIONS
2.1.1 INSTALLING DATA SCOUT ONTO A PC
The Data Scout installation application is located on the CD shipped with the Level Scout. For the latest version of Data Scout, visit
the YSI website (www.ysi.com).
To install Data Scout:
1) Remove any old version of the program before installing a new version. Use the Windows’ Add and Remove
Programs Utility to properly remove the older application.
2) Unzip the setup files to a directory on the computer.
3) Double click on the Setup.exe file to start the installation process.
4) The Setup program will verify that the user wants to install Data Scout onto the computer. Confirm by clicking the
Install button on the setup page.
5) Data Scout Setup Wizard will guide the user through the installation procedure. Click the Next button at each stage
to continue.
6) Click Close when the installation completes.
A shortcut to Data Scout will be placed in the Start Menu in a YSI folder and on the desktop. A Level Scout is now able to connect to
the computer’s serial port and be configured via Data Scout.
2.1.2 INSTALLING DATA SCOUT MOBILE ONTO A HANDHELD PC
The Data Scout Mobile installation application is located on the CD that was shipped with the Level Scout. For the latest version of
Data Scout Mobile, visit the YSI website (www.ysi.com).
1) Connect the handheld device to a computer that is running the ActiveSync® application.
2) Make sure that ActiveSync® recognizes that the handheld device is properly connected and available.
3) Remove any older version of Data Scout Mobile from your desktop or laptop PC before installing the new version.
4) Unzip the setup files to a location on your PC.
5) Click on the Setup.exe icon to begin the installation.
6) The setup program verifies the user wants to install Data Scout Mobile onto computer and start the Setup Wizard.
7) The Setup Wizard guides the user through the installation procedure. Follow the direction given, and click on the Next
button at each stage to continue.
8) If the required .NET support package for the Windows Mobile operating system is not already installed on the mobile device,
you are asked to install it before the application is installed on the remote device. Click Yes.
9) If you have previously installed Data Scout Mobile, you will be asked to confirm that is should be re-installed. Click Yes.
10) You will be asked to check the screen of your handheld to ensure that no additional operations are required. After
performing any necessary steps on the handheld screen, click OK.
11) Click Close after the wizard has completed all the steps of the installation.
YSI Incorporated Data Scout 5
Page 6

The Data Scout Mobile program icon is placed in the Program folder of your handheld PC. This may be selected from the handheld’s
Start Menu. The next time you use the Start Menu, you will find a quick link to Data Scout Mobile in the bottom section of the Start
menu.
To add a permanent link to Data Scout Mobile in the top section of the Start menu, follow these steps:
1) Click on the Start Menu in the upper left hand corner of the Handheld PC desktop.
2) Click on the Settings menu item.
3) Select the Personal tab.
4) Click the Menus icon.
Windows Mobile® allows a limited number of programs to be displayed on the Start Menu. You may need to remove an existing item
from the Start menu by clearing the check box beside its name. Once this has occurred, you may place a check in the box beside Data
Scout Mobile and click OK.
Connect the Level Scout to the handheld device and configure it via Data Scout Mobile.
2.2 CONNECTING THE LEVEL SCOUT TO A COMPUTER
Connect the Level Scout to the computer using the field cable and 778 all-in-one adapter or using the 770 communications cable and
RS-485/RS-232 converter as illustrated in figure 2.1.
YSI Incorporated Data Scout 6
Page 7
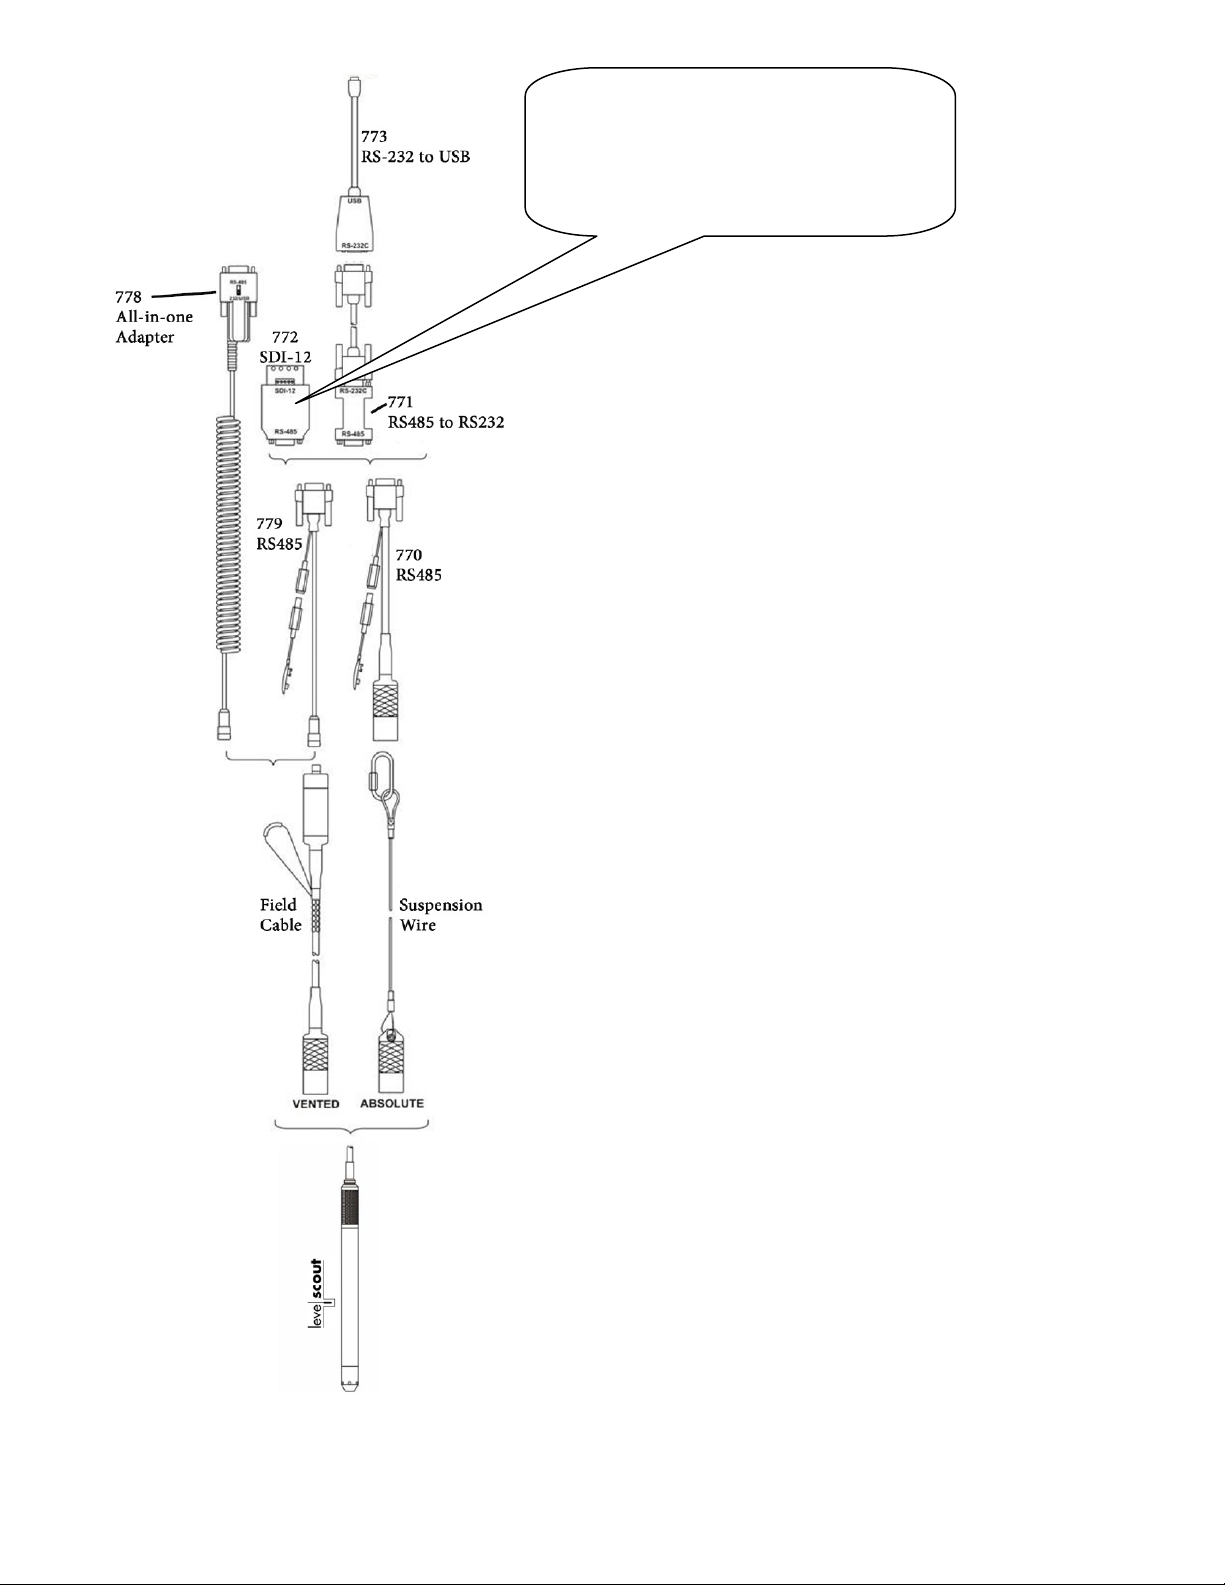
Note: For SDI-12 communication, the Level
Scout’s baud rate must be set to 1200 via Data
Scout Advanced software. Be sure to use the
Transducer > Exit command when exiting
Data Scout to retain the Level Scout
communication setup.
Figure 2.1
YSI Incorporated Data Scout 7
Page 8
g
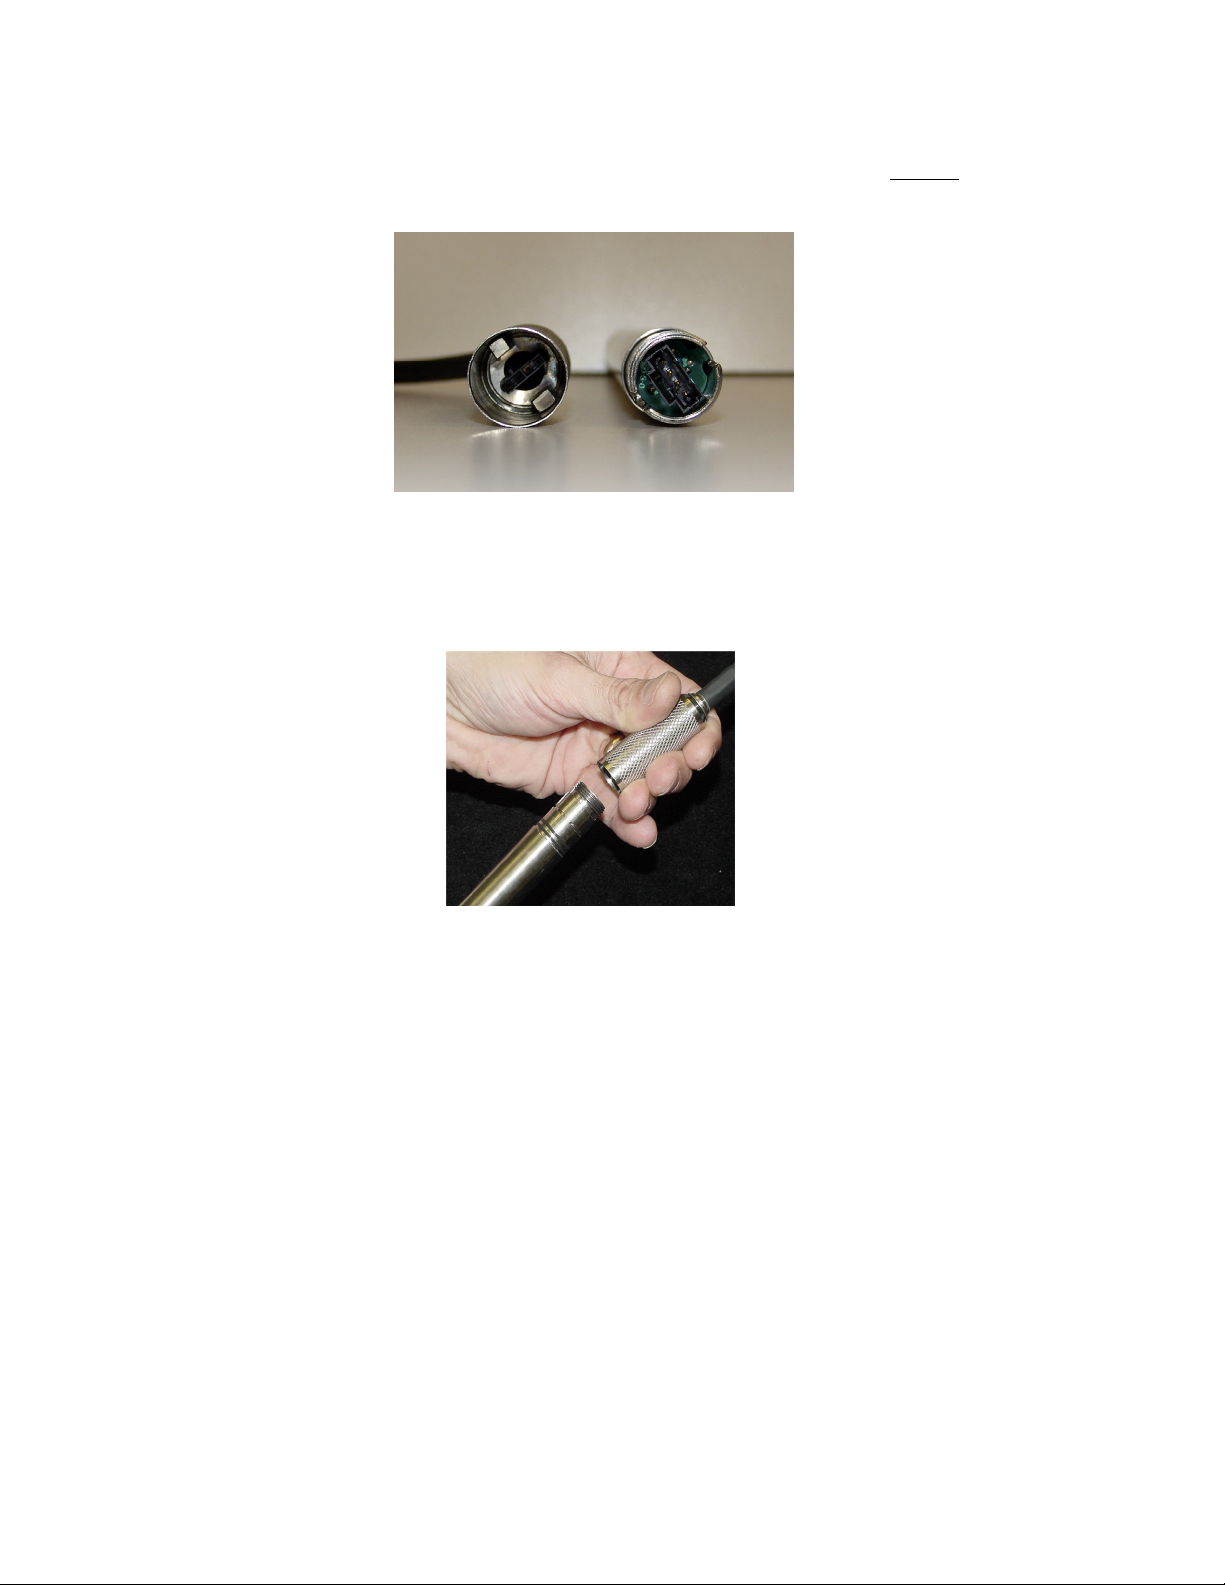
The following procedure explains how to connect the filed cable to a Level Scout:
Inspect the two o-rings on the open, battery end of the transducer to ensure they are clean and not damaged.
Remove the battery insulator strip from the Level Scout.
Look inside the cable end of the connectors to view how the two sections mate together. The two keys in the
transducer and cable are two different sizes. This is important to note to ensure proper alignment (figure 2.2).
ure 2.2
Insert the transducer housing into the cable retaining nut. Hold the transducer assembly in one hand and the cable
in the other near the retaining nut (figure 2.3).
Fi
While applying slight pressure, push the two parts together and slowly rotate the transducer assembly until the keys
Figure 2.3
align. When the keys align, the housing will slip into the retaining nut assembly an additional one inch and the
transducer will no longer rotate while the user is holding the cable.
Now that the keys are aligned and seated, grasp the transducer in one hand and the retaining nut in the other. While
applying slight pressure, push the two parts together and screw the retaining nut onto the transducer housing. Continue
threading the parts together until they are fully mated, leaving no visible gap where the retaining nut meets the transducer
housing.
The field cable incorporates an innovative vent filter that provides lifetime moisture protection for vented Level Scouts. A GORETEX®-like plug prevents water droplets from entering the filter while allowing air to pass freely to the internal silica gel desiccant. The
316 SS housed filter also provides surge protection and utilizes a compact electrical connector.
The 778 adapter provides connection from the field cable to a modem, PDA, or computer, and includes built-in conversion to RS-232
and USB as well as a DC input connector. When using the 778, you will be prompted to install drivers from the Information and
Support CD that was included with your Level Scout.
If using an older style, universal cable assembly (figure 2.4), the RS-485 communications interface to the Level Scout is terminated in a
9-pin male D-shell connector. This connector is intended to work directly with the Level Scout communication adapters 771 (RS-
232), 772 (SDI-12), and 773 (USB).
If using a 771 RS-485 to RS-232 adapter, ensure the RS-485 end of the adapter is pointed toward the transducer and the RS-232 labeled
end is connected to your PC or USB adapter.
YSI Incorporated Data Scout 8
Page 9
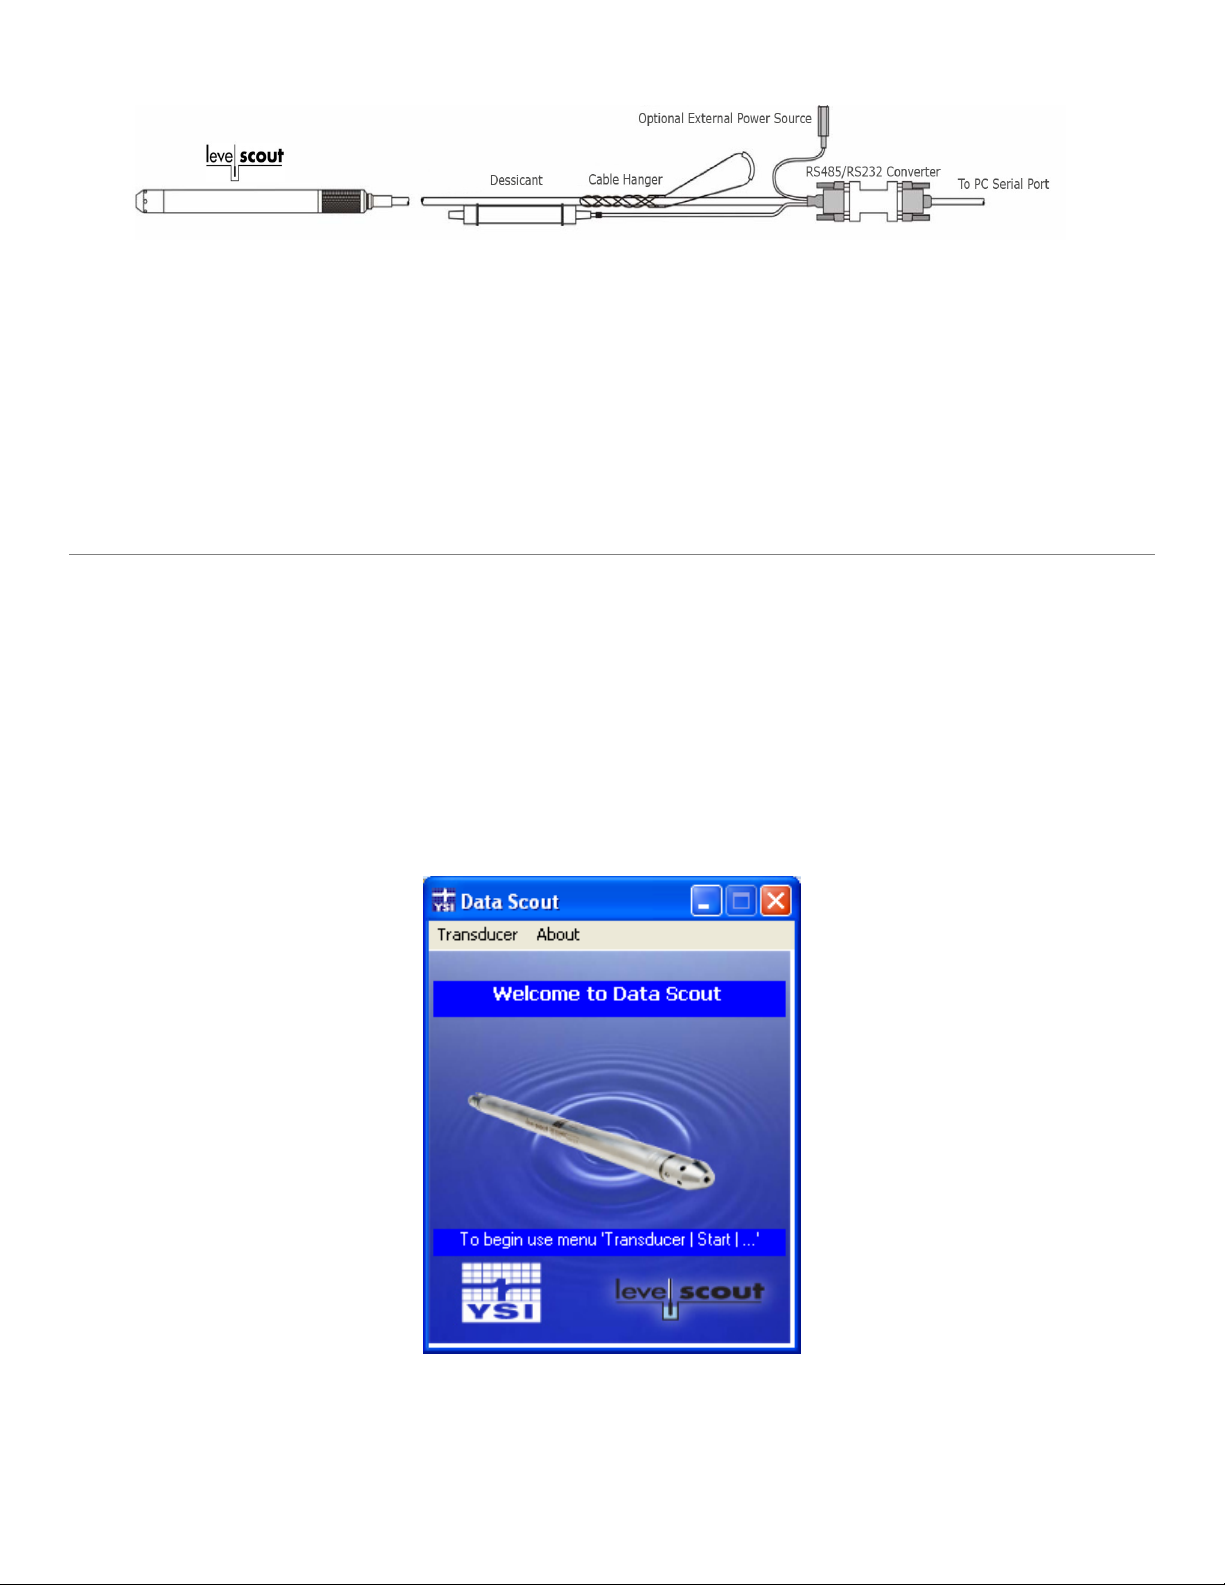
Figure 2.4
3.0 OPERATING DATA SCOUT AND DATA SCOUT MOBILE
This chapter describes how to operate the applications in order to fully utilize and configure the Level Scout. Before proceeding in this
chapter, install the applications as described in Section 2.
All screen shots in this chapter are of Data Scout (desktop) and so have tabs on the top of the application window. The tabs for the
Mobile application are located at the bottom of the window.
3.1 LAUNCHING, STARTING, SELECTING, STOPPING AND EXITING
3.1.1 LAUNCH THE APPLICATIONS
To start Data Scout Mobile click on the Start Menu > Programs > Data Scout Mobile.
To start Data Scout click on the Start Menu > Programs > YSI > Data Scout, or double-click on the YSI Data Scout desktop icon.
The main screen will open (Figure 3.1). Notice that the “main” form has a menu bar with two labeled menu items across the top of the
form of the application. This menu appears at the bottom of the screen for the Mobile application. Also, notice the instructions in
white type along the bottom. It prompts the user to use the Transducer menu to start looking for the transducer. If you hover your
mouse cursor over this the Welcome message or the transducer picture, a large Tooltip appears summarizing the various Start
methods. Double-clicking on the transducer picture is a short-cut to the frequently-used Previous Start method. All three Start
methods are described in the next section.
Figure 3.1
YSI Incorporated Data Scout 9
Page 10

3.1.2 STARTING (DISCOVERING TRANSDUCERS)
There are three methods for discovering transducers that are connected to the PC. To begin the discovery process, select Transducer >
Start > Complete, Selective, or Previous (Figures 3.2 and 3.3).
Complete
you connect a device. If the first attempt fails, check the connection and try again.
Selective
specify the exact ports.
Previous
time. This method is fastest for repeat connections.
–Checks all Comm Ports at all baud rates. This takes longer but should always find a device. Use this the first time
– Allows you to specify which Comm Port(s) to check. Once you start the check, a pop-up window will allow you to
– Checks the last used Comm Port and baud rate. Use this when connecting your Level Scout to the same port each
Verifying transducer connectivity and configuration may take up to 90 seconds, when using a Complete check. During this time, the
application checks all possible combinations of communication parameters so that all connected transducers will be available for
configuration. Figure 3.4 shows a transducer’s status on the information page after successful discovery. After detecting a transducer,
Data Scout changes the Level Scout’s communication rate so that data may be transferred more efficiently.
Important: The user must use the Transducer > Exit or Transducer > Stop menu to terminate the connection between the Level Scout
and Data Scout. If this is not done, the transducer will be left at Data Scout's default communication configuration instead of its initial
configuration.
Figure 3.2
Figure 3.3
Figure 3.4
YSI Incorporated Data Scout 10
Page 11

3.1.3 SELECTING FROM MULTIPLE TRANSDUCERS
If Data Scout discovers multiple transducers via the Selective or Complete detection routines, you need to choose which Level Scout to
view and configure. Do this by clicking Transducer > Select. Check the transducer you wish to view live data from and configure
(Figure 3.5).
Figure 3.5
3.1.4 STOPPING (FORGET) TRANSDUCERS
Once you have opened Data Scout, you may occasionally wish to stop live data collection for that transducer: to preserve batteries, to
save memory space on a pocket PC, etc. By clicking Transducer > Stop (Figure 3.6), you can stop live collection and “un-discover”
the transducer. When you perform this operation, you will immediately return to the welcome screen (Figure 3.1). To rediscover the
same transducer, simply click Transducer > Start > Previous.
Figure 3.6
3.1.5 EXIT THE APPLICATIONS
When using the desktop version of Data Scout, you may exit using one of two methods. Either method executes the “Stop” function
described in Section 3.1.4, i.e. cancelling live data collection.
By clicking Transducer > Exit (Figure 3.7).
By clicking the red [X} at the top right corner of the application.
When using the mobile application, you must always exit by clicking Transducer>Exit. If you just click the [X] at the top right corner,
the application will only be ‘hidden’ from view and will still be running in the background.
YSI Incorporated Data Scout 11
Page 12

Important: Exit also restores the original communication rate and the original (or possibly modified) state of any Broadcast options.
Therefore, you must select Transducer > Exit to restore these original settings to the transducer. For this reason, it is also important to
select Transducer > Exit or Transducer > Stop when disconnecting one transducer and connecting a different one to the PC.
Figure 3.7
3.2 LIVE TAB
The ‘Live Data’ tab provides live readings as well basic information about the Level Scout. The top of the window identifies the model
and serial number of your instrument in addition to the firmware version installed and the operating pressure range. The green status
bar indicates the transducer’s remaining battery life.
3.2.1 VIEW LIVE DATA
The applications display live level and temperature readings in the center of the window next to their respective labels. In Data Scout,
you can change the size of the numerical readouts by clicking directly on the numbers (Figure 3.8). In Data Scout Mobile, a small
rectangle appears left ofthe live level and temperature readings. Click the rectangle to change the font sizes in Data Scout Mobile.
Figure 3.8
3.2.2 CHANGE LEVEL UNITS
Clicking the Level Units Label button next to the live level reading open the ‘Select Level Units’ window (Figure 3.9). Here, the user
may select one of the included measurement units or insert a scale factor that will convert PSI to the desired units. Note: the ‘A’ or ‘V’
displayed after the unit labels on the Level Units Label button indicate an Absolute or Vented level, respectively.
Users may configure transducers to output data in any unit required for the intended application. Some of the more common units of
measurement are incorporated in this program and in the transducer as configuration options. Occasionally, an installation will
require units of measurement other than those included by default, so provisions are included to allow entry of custom conversion
YSI Incorporated Data Scout 12
Page 13

factors (Figure 3.10). After selecting the desired units of measure, click OK to confirm. You can select Cancel to return to the Live tab
without saving any changes.
Some groundwater installations record the distance from ground surface or some other reference point to the surface of the water. This
is commonly called a TOC or “Top of Casing” measurement because the reference point for the measurement is typically at the top of
the well casing. The transducer may be easily configured for a TOC measurement by checking the “Configure TOC” check box (Figure
3.11). The “Span Value” will be automatically configured based on the units selected via the radio buttons on the left of the window.
After accepting this adjustment, a new offset value can be entered using the Zero Level or “Set Fixed Offset” menu (see Section 3.2.4).
Click on the Zero Level or Set Fixed Offset button, then select the “is submerged” option. Deploy the Level Scout. Next, measure the
distance from the top of casing or reference point to the surface of the water, enter that value in the entry box, and select OK. The
transducer will automatically calculate the correct offset value for its installed location. Anytime the level (pressure) measurement of
the transducer is referenced to TOC, its units name is displayed with an asterisk suffix. For example, mH2O*
Note: Anytime Data Scout displays an overlay screen such as the one in Figure 3.10, live data collection is temporarily paused.
Figure 3.9 Figure 3.10 Figure 3.11
3.2.3 CHANGE TEMPERATURE UNITS
The units of measurement for temperature can be changed between Fahrenheit and Celsius through the Temperature Units Label
button that is next to the live temperature reading on the Live tab. Selecting this button will open a new screen allowing the user to
change temperature units (figure 3.12). Select OK to confirm the change.
Figure 3.12
3.2.4 ZERO LEVEL OR SET FIXED OFFSET
Transducers may require periodic adjustment to correct for drift associated with aging and the environment. In addition, users may
wish to adjust a transducer’s output to a common reference point in order to more easily correlate data from multiple sites. The Zero
YSI Incorporated Data Scout 13
Page 14

Level or Set Fixed Offset button (Figure 3.13) located on the Live tab performs these adjustments on the Level Scout transducers. Once
the Re-Zero Transducer window is open, one of two options must be selected prior to proceeding (Figure 3.14).
If a vented transducer simply needs to be adjusted for zero drift and the transducer is not yet installed under water, select the “Not
Submerged” option and acknowledge the choice with the OK button. Do not perform this function if using an Absolute Level Scout.
Absolute Level Scouts should read atmospheric pressure in air, not zero.
If the transducer needs to be adjusted to a known value, select the “is Submerged” option. When the selected option is changed, a data
field will appear allowing direct entry of a corrected value in the currently selected unit of measure. Acknowledge the change by
clicking the OK button; the transducer will adjust its offset to indicate the new value (Figure 3.15). Note: if entering a TOC offset, be
sure the Level Scout is deployed prior to entering the offset.
After performing either of these operations the ‘Information’ window will re-appear with the adjusted pressure data. At this time, the
user can verify the pressure value to ensure it has been corrected.
Figure 3.13
Figure 3.14 Figure 3.15
3.2.5 VIEW OR SET SCAN AVERAGE TIME
Click the View or Set Scan Average Time button (Figure 3.16) to open the ‘Change Average Time/Samples’ window (Figure 3.17). This
window displays two text boxes; however, you can only edit the box labeled “Select Scan Average Time of Transducer”. The lower
window reflects how many measurements the Level Scout will make and average per live reading or logged data point. To set this
control, simple enter the desired ‘Scan Average Time’ in the top box and click OK. You may enter in fraction of seconds up to 24.0
seconds.
Setting the top box to ‘0’ will yield the most precise data; this is because the instrument will not average any scans, it simply conducts
and logs a single scan. Notice the box warning about setting a time greater than two seconds, this reflects the tendency for each logged
datum to become slightly less precise as increasingly more data points are averaged. However, setting the average time higher will take
up less internal memory as the instrument only logs one averaged point during that time span.
Figure 3.16
YSI Incorporated Data Scout 14
Page 15

Figure 3.17
3.3 TABLE TAB
The Table tab continually records data that are being viewed in the live screen (Figure 3.18). This tab allows the user to monitor level,
temperature, and battery voltage in real-time on a data table in time-stamped data lines. The newest data is displayed at the top of the
screen and constantly pushes older data off the bottom of the screen. Use the scroll bar on the right side of the screen to view older data
that is no longer visable.
Time-stamped ‘Event Lines’ may occasionally appear in the table for two reasons:
When a transducer is changed via the Transducer > Select function. The table displays a line that begins with “XdcrChange”.
When any overlay page or tab is displayed that obscures the ‘Live’ or ‘Table’ tabs, live recording ends. The table will mark this
break in data collection display another event line when live data acquisition resumes (Figure 3.19).
In Data Scout Mobile, which has very limited data main memory resource, this logging function could consume all memory if you
leave it running unattended for long periods of time. Select the Test or Parameter tab to suspend such memory usage – or use Stop or
Exit to conserve battery power as well.
Figure 3.18 Figure 3.19
3.3.1 SAVE DATA TABLE
Clicking the Save button along the bottom of the Table tab opens a standard Windows ‘Save As…” window. Data Scout automatically
generates a file name beginning with the Level Scout’s model number and serial number followed by _LIVE_ followed by the date and
time. This allows for quick live saves without overwriting existing files. After clicking OK, the file is automatically saved as a .csv text
file that can be processed by most standard spreadsheet programs like Microsoft® Excel™. The ‘Save’ function saves all data collected
YSI Incorporated Data Scout 15
Page 16

“live” since the last time you started Data Scout or since the last time you pressed the Clear button. Saving this file does not clear the
Table in main memory.
If you plan to process (plot or convert) these files later with DSAdv’s Playback application, the leading parts of these file names (i.e.
Model #, Serial #, and _Live_) should not be changed. DSAdv uses these file name descriptors to distringuish between various types of
.csv files.
3.3.2 VIEW DATA TABLE
The View button along the bottom of the table allows the user to view previously saved .csv files. Clicking View opens the default Data
Scout Dat directory in a standard Windows® ‘Open’ window. Data Scout users can select the file they wish to open and click ‘Open’ to
view the files in NotePad. (To change the default viewing program, read this section’s Note*.) Mobile users must use File Explorer™
outside the application to select and view a file, or move the files to a PC for easier processing.
*Note: Data Scout users can change the default data viewing program by performing the following steps:
1. Position the cursor directly to the right of the ‘About’ menu item and click the hidden menu that highlights blue (Figure 3.20).
Figure 3.20
2. Click No in the first menu (Figure 3.21).
Figure 3.21
3. Click No in the ‘Make Files Compatible with Playback?’ menu (Figure 3.22).
Figure 3.22
YSI Incorporated Data Scout 16
Page 17

4. Enter the directory of the .exe file for the spreadsheet application you wish to use. For example, if you wish to use Microsoft®
Excel™, you would not enter: excel.exe. Instead, you would enter something similar to: C:\Program Files\Microsoft
Office\Office12\EXCEL.EXE (Figure 3.23). Check your computer’s directory to find the exact file path.
Figure 3.23
3.3.3 CLEAR DATA TABLE
Click the Clear button to wipe all live data that has been collected since you entered Data Scout. After you click Clear, click OK to
confirm the memory wipe.
3.4 PARAMETERS TAB
Clicking the Parameters tab displays the Level Scout’s model number, serial number, firmware version and the current date and time.
Next to the date and time, a value under ‘deviation’ is listed. This is the Level Scout’s time deviation away from the PC’s current data
and time. For example, -00:00:01 would indicate that the Level Scout’s time is 1 second behind the PC’s clock. Perfect
synchronization is not easy to obtain and a synchronization within plus or minus 1 second is adequate.
All live level and temperature data acquisition is ceased when the Parameters tab is selected.
3.4.1 CHANGE TRANSDUCER DATE AND TIME
The Level Scout has an internal calendar/clock. That clock must be synchronized to the desired time standard so that recorded data can
be accurately time stamped. The transducer internal clock may be adjusted to an absolute date and time or may be synced with the
device running Data Scout. The display below the Change Date/Time button shows the current transducer date and time on the left
and the differential between the device clock and the transducer in Hours: Minutes: Seconds to the right. Clicking on the Change
Date/Time button opens the ‘Change Date/Time’ window which allows the user to adjust the Level Scout’s internal clock (Figure 3.24).
Click the “Set Date/Time to Specific Value” radio button to input the desired date and time. Click the radio button next to “Sync
Date/Time with Host PC” to adjust the date and time to match the computer. Click OK to confirm the update.
Figure 3.24
YSI Incorporated Data Scout 17
Page 18

3.4.2 CONFIGURE ALARMS AND BROADCASTS
Click the Alarms and Broadcast button (Figure 3.25) to access the ‘Alarms and Broadcasts’ window (Figure 3.26). Alarm and broadcast
features are available for configuration. An alarm is simply an indication that some pre-determined measurement boundary has been
exceeded. An Alarm Limit is configured as a high and low level band within which all readings are expected to fall. If a measurement
value falls outside of the defined band, then the alarm condition is met and the alarm action is initiated.
Figure 3.25
Figure 3.26
To enable the Alarm and Broadcast function, check the Enable Alarm Checking box at the top of the form. When enabled, Alarm
Checking only occurs during an active test (Tests tab). Set the Alarm and Warning High and Low levels to the desired value. To disable
a specific high limit, set it higher than the transducer can read (example, 9999). To disable a particular low limit, set it lower than the
transducer can read (example -9999).
The transducer’s scan interval may be changed to a different interval during an alarm condition. To change the scan interval during an
alarm condition, set the Alarm Scan Interval to the desired scan interval. To maintain the active test’s scan interval as set in the Test
tab, set the Alarm Scan Interval to all zeros.
The two boxes near the bottom of the Alarm form enable/disable broadcasting. Alarm Checking can be specified with or without
broadcasting. Broadcasting can be used to communicate Level Scout scans to a third party device that is connected to the cable. When
Broadcast Normal Logs is enabled, all scans are broadcasted to the third party device. Special three letter normal codes begin these
messages (see first four entries in Table 1 below). Note that the Enable Alarm Checking does not need to be enabled for these messages
to be broadcasted. When Broadcast Alarm Logs and Enable Alarm Checking are enabled, only scans that meet alarm conditions are
broadcasted to the third party device. These messages begin with a three letter alarm code (see last four entries in Table 1).
If only Enable Alarm Checking is enabled and neither of the two broadcast are checked, then the only way to determine if an alarm
condition is happening is to manually poll an Active test’s status with the refresh button on the software.
Important: Broadcasts should be used with caution as they interfere with the normal communications between a transducer and its
controlling PC using SDI-12 protocol. For this reason, Data Scout and Data Scout Mobile always operate each transducer with
broadcasts disabled. Factors that should be considered when selecting a scan interval for broadcast data include the possible duration
of an alarm event and whether the expected rate of change warrants the data rate specified. Both normal scan interval and alarm scan
interval must be kept long enough to allow for transducer communication between broadcasts. Thus, setting either interval shorter
than 10 seconds is impractical when broadcasting is uses.
Alarm Code Code definition
YSI Incorporated Data Scout 18
Page 19

g
NLN Normal, linear logged scan
NLA Normal, linear average logged scan
NLG Normal, logarithmic logged scan
NEB Normal, event based logged scan
AHI Alarm, logged scan above high alarm limit
ALO Alarm, logged scan below low alarm limit
WHI Warn, logged scan above high warn limit
WLO Warn, logged scan below low warn limi
Table 1, Broadcast ID code description
3.4.3 CHANGE BATTERY
The Level Scout uses two AA alkaline batteries for power. When these batteries are changed, the transducer’s internal battery
condition must be reset so that the percentage of battery charge remaining is accurately reported. This parameter should only be
modified if the transducer’s batteries are replaced. Two types of batteries may be selected as having been installed. YSI recommends
only using AA alkaline batteries in the Level Scout. If the incorrect battery type is selected, the available power indicator will be
inaccurate. Normally, you cannot input a value in the ‘Capacity in mAhr’ box. However, if you select ‘Other’ you may input the
correct milliamp-hours listed for the battery to receive accurate battery capacity readings.
Click the Change Battery button (Figure 3.27) to access the ‘Change Batteries’ window (Figure 3.28). Select the battery type and click
OK to save the change to the battery, then confirm by clicking OK again in the warning window.
Warnin
Due to the inherent explosion risks of lithium batteries when exposed to
water, YSI does not recommend using lithium batteries in the Level Scout.
Figure 3.27
Figure 3.28
YSI Incorporated Data Scout 19
Page 20

3.4.4 MEMORY OPTIONS (ERASE TESTS)
Click the Memory Options (Erase Tests) button (Figure 3.29) to open the ‘Change Memory Options’ window (Figure 3.30). This
window displays how much free memory is available. This window also allows you to select between ‘Wrap’ or ‘No Wrap’ memory
options:
No Wrap –When memory is used up, the Level Scout stops measuring and logging data. Any active test will turn off.
Wrap – When memory is used up, the Level Scout begins to write the newest data over the oldest data.
The Level Scout can store up to 288,288 pressure scans if using the low memory Level Scout or up to 393,120 pressure scans if using
the high memory Level Scout. Checking Clear Memory (Erase All Tests) and pressing OK will delete all stored data and clear all 16 test
configurations.
The Level Scout can store up to16 discrete test configurations. You may ‘vacate’ a test configuration from the Test tab to clear the
configuration in order to set up a new test configuration. Vacating a test configuration does not delete that test’s data from the
transducer’s memory.
Important: If there is any relevant data stored within the transducer, it should be extracted prior to performing a Clear Memory
operation. Erasure is permanent once it has been initiated.
Figure 3.29
Figure 3.30
3.4.5 CHANGE TRANSDUCER ADDRESS
Click the Change Address button (Figure 3.31) to enter the ‘Change Address’ window (Figure 3.32). This function changes the Level’s
Scouts SDI-12 address. Addresses can be single characters within the range of 0-9, a-z, and A- Z. After selecting a new address, click OK
to save. Data Scout will automatically change its configuration to maintain connectivity.
The Level Scout transducers are addressable, and if there are more than one transducer attached to a single serial port, then unique
addresses are required in order to communicate to all of the transducers. This requirement is especially important when multiple
transducers are to be attached to an SDI-12 data logger.
Figure 3.31
YSI Incorporated Data Scout 20
Page 21

Figure 3.32
3.4.6 UPDATE FIRMWARE
Occasionally, new features may be added to the Level Scout. The latest version of Level Scout firmware can be retrieved from YSI’s
website, www.ysi.com. The currently installed version of firmware is displayed at the top of each main tab. There are two methods to
update firmware: the normal method and the alternate method. Both methods are described separately below. Both methods perform
the same task, but the alternate method is sometimes required should the normal method not finish for some reason (i.e. in case the
transducer is accidentally disconnected from the PC during a normal firmware update).
3.4.6.1 NORMAL FIRMWARE UPDATE METHOD
Click the Update Firmware button (Figure 3.33) at the bottom of the Parameters tab. After clicking this button, a prompt will ask to
confirm the firmware update in the attached transducer (Figure 3.34).
Figure 3.33
Figure 3.34
After confirming the firmware update, a file selection window will open. Locate the firmware update (.hex) file that was retrieved from
YSI’s website. Select that file and confirm the selection by clicking the Open button.
The file will be read and verified before being written to the transducer. A progress bar window will open to indicate the status of the
update.
Note: During the firmware update, you cannot exit from the software application or disconnect the Level Scout from the PC. Doing so
may corrupt the firmware and make the Level Scout inoperable.
YSI Incorporated Data Scout 21
Page 22

A successful firmware update is indicated by the pop-up window. After clicking OK in this window, the Change Date/Time window
will open automatically. It is important to reset the Level Scout’s transducer date and time to correct for any time loss that occurred
during the firmware update.
If you get an error message during the firmware update, notate the com port listed in the error message. This will be used in the
alternative firmware update function. Before attempting the Alternate Firmware Update, change the Level Scout batteries and try the
Normal Update again. The firmware update is power intensive; therefore, new batteries may be required.
3.4.6.2 ALTERNATE FIRMWARE UPDATE METHOD
Before attempting the Alternate Firmware Update, replace the Level Scout batteries and try the Normal Update again. The firmware
update is power intensive; therefore, new batteries may be required.
The Alternate Firmware Update method can be started from the Transducer menu of Data Scout’s initial screen (Figure 3.35). A
prompt will open asking if you want to continue, select Yes if you wish to continue with the update.
Figure 3.35
Once the attached transducer is discovered, a file window opens. Navigate to and open the .hex firmware file you wish to upload to the
Level Scout. A firmware verification progress bar will open verifying the process. Once complete, a message will pop-up indicating that
you should reset the Level Scout. After clicking OK, you must perform the reset within 2 minutes. Reset the transducer by briefly
short-circuiting the center pin of the external power connector (located on the communication adapter) to the surrounding metallic
frame.
After a successful firmware update, be sure to reset the transducer’s data and time.
YSI Incorporated Data Scout 22
Page 23

3.5 TESTS TAB
Up to 16 unique, sequentially scheduled test configurations can be programmed within a Level Scout. Test configurations are
numbered from 1 to 16 and may be named for convenience. Each configuration defines a test start date and time, a test end date and
time, a scan interval, a scan method, and a selection of measurements to record at each scan interval.
When the ‘Tests’ tab is selected, the current state of every configured test is read from the transducer. This operation may take up to 1
minute and status will be indicated by the progress bar. Each test configuration may be reviewed by changing the test “Number”
control in the upper left side of the window. This number and the optional Test Name will identify the test being modified or
reviewed. From this page, it is possible to modify and create test configurations for the attached transducer. Between the test ‘State’ and
‘Scans’ (number of scans completed thus far in a test) is a small Refresh button (the pointer is hovering over the Refresh button in
Figure 3.36). Click this button to refresh information about the test’s State and number of Scans. This button turns red while the test
information is updating.
Tests can exist in one of five possible conditions in Data Scout: Vacant (not configured or empty), Idle (partially configure in
transducer, but no Begin Time entered), Pending (waiting for the initial start time to elapse), Active (in the process of logging data), or
Done (test is complete). A test is Done when it reaches the set End Time, it is manually stopped by the user, the Level Scout’s memory
is full and No Wrap is selected, or a Pending test’s Begin Time is reached.
You can configure any Vacant test. You can extract logged data from any Done or Active test. You can vacate a Done test after
extracting the data in order to reconfigure it for a new study.
Figure 3.36
3.5.1 TIME TEST TAB
The controls on this tab (Figure 3.37) display the current test’s ‘Begin Date and Time,’ ‘End Date and Time,’ and ‘Scan Interval.’ Once
a test has become Active its configuration may not be modified although it may be stopped early in the ‘Control’ tab.
Figure 3.37
YSI Incorporated Data Scout 23
Page 24

The Begin and End date and times may be easily modified by clicking on the down arrow to the right of each Date/Time field. This
action will open a calendar, as illustrated in Figure 3.38, for a point-and-click selection of the date. Clicking in the time fields allows
for direct entry of the desired value for hours:minutes:seconds.tenths of seconds (Figure 3.39). This is a 24-hour time entry box, no
AM or PM indication is necessary.
Figure 3.38 Figure 3.39
Generally, the Scan Interval is the period of time between measurements during a test. The function of the Scan Interval may be
modified by selecting one of various Scan Methods, see section 3.5.2. Measurements may be taken at regular intervals provided that the
Scan Method is set to Linear and the interval is less than the time between the start and end times of the test. For example, if a test
were configured to start on January 1st at 0:0:0 and end on January 15
th
at 0:0:0 then the longest permitted interval between
measurements would be 14 days:23 hours:59 minutes: and 59.9 seconds. This interval would produce a test data file containing two
measurements, one at the start date and time and one just 0.1 seconds prior to the end date and time. The values for this parameter
may be changed using the keyboard or via the Δ∇ control to the right of each entry field. Figure 3.40 shows a 15 minute interval being
defined for test nine.
Figure 3.40
YSI Incorporated Data Scout 24
Page 25

3.5.2 METHOD TEST TAB
There are four possible Scan Methods available. The selected method utilizes the Scan Interval that set in the Time tab. Each Scan
Method interprets this interval in a unique way.
Figure 3.41
Linear - This results in logging data at a constant interval (scan interval) for the entire test (Figure 3.41).
Linear Averaged - This method averages x data points into one logged measurement. For example, a test which had a scan
interval of 10 minutes would acquire 6 measurements per hour. If the Scan Method was Linear Averaged and the Averages
were set to 6 then only one measurement would be logged in the test record every hour. Each of those logged measurements
would be the average of the 6 discrete measurements spaced at 10 minute intervals.
Logarithmic - This method begins recording data at the shortest interval possible, increasing the interval after each
measurement on a logarithmic curve until the interval equals the scan interval defined on the Time tab. The Time tab’s scan
interval is maintained until the test ends.
Event Based - This method takes a measurement at the scan interval defined on the Time tab but does not log the
measurement unless one of two conditions is met. A measurement is logged every x scans as defined by the Default # Scans in
the Method tab (Figure 3.42). A measurement will also be logged if the difference between the previous measurement and the
current measurement is equal to or greater than the Delta value for either the pressure (level) or temperature measurement
(depending on what is selected). For example, a test is configured to log data for 3 months with a scan interval of 5 minutes
(12 times an hour). The goal is to log a measurement once an hour if there is no change in water level and to log every
measurement if the water level changes 0.5 feet between the 5 minute intervals. Therefore, Delta is set to 0.2 (PSI), pressure is
selected and the Default # Scans is set to 12. Note, the units for Delta Pressure are always in PSI and the units for Delta
Temperature are always in degrees centigrade. Any pressure or temperature change value between 0.0 and 999.9 may be
specified in the Delta text box.
Figure 3.42
YSI Incorporated Data Scout 25
Page 26

3.5.3 DATA TEST TAB
The Data tab allows selection of the parameters to be logged (Figure 3.43). The available parameters are: Level (the current level
measurement in the configured units), Sensor Temperature (the temperature of the level sensor itself), and Voltage (the current
battery voltage). Level Scouts with 4 MB of memory incorporate one additional measurement, a high precision temperature sensor
located on the circuit board. If the attached transducer is identified as a 4 MB version by the model number (models AS4. AT4, VS4,
and VT4), an additional check box will become available to enable logging of this parameter.
Figure 3.43
3.5.4 CONTROL TEST TAB
The ‘Control’ tab allows the user to start, end, or modify a test. To start a test, select the desired test in the upper left of the window
and check “Enable Test Selected Above” (Figure 3.44).
Figure 3.44
To end a test, click the End Currently Active Test button (Figure 3.45). The “Currently Active Test #” is listed directly above this
button.
Figure 3.45
Click the Alarms and Broadcasts button (Figure 3.46) for quick access to the Alarms and Broadcasts screen detailed in Section 3.4.2.
Figure 3.46
YSI Incorporated Data Scout 26
Page 27

To clear a specific test setup, select the desired “Done” Test # at the top of the screen and check the “Vacate Test Selected Above” box
(Figure 3.47). This action will immediately produce a confirmation box, allowing you to either clear test information or retain it for
further use (Figure 3.48). Click Yes to clear the information. Be sure to extract the test data before performing this function.
Figure 3.47
Figure 3.48
3.5.5 EXTRACT TAB
The ‘Extract’ tab displays several options for extracting data from the Level Scout (Figure 3.49). Extracted files will be stored in a
format readable by Microsoft® Word and Excel. Choose which test you wish to extract then press Extract Test. This will initiate the
extraction and will display the screen shown in Figure 3.50. Once the file is completely extracted, Data Scout will display Figure 3.51 to
show you which folder the file was saved in.
Note: If you click Change Units/Scans/File, you will be asked to specify how you wish to extract your data in three additional screens.
See section 3.5.5.4 for more details.
Figure 3.49 Figure 3.50
YSI Incorporated Data Scout 27
Page 28

Figure 3.51
SECTION 3.5.5.1 - EXTRACT ABOVE TEST
Extract Test Selected Above allows you to simply download the test currently listed under ‘Test #.’ To extract this test, select the
appropriate checkbox and then click on Extract Test (Figure 3.52).
Figure 3.52
SECTION 3.5.5.2 - EXTRACT ACTIVE TEST
Extract Active Test # allows you to download the active test listed. To extract this test, select the appropriate checkbox and then click on
Extract Test (Figure 3.53)
Figure 3.53
SECTION 3.5.5.3 - PICK DONE TEST
Checking the Pick from List of Done Tests box displays all tests currently completed and stored on the Level Scout. Click on a test you
wish to download and then press Extract Test Figure 3.54)
YSI Incorporated Data Scout 28
Page 29

Figure 3.54
SECTION 3.5.5.4 - CHANGE UNITS, SCANS, AND FILES
Checking the Change Units/Scans/File box along the bottom of the window provides the user with a little more control over the
download process. After checking this box and then click Extract Test, you will have the option to change the exported measurement
units (Figure 3.55). For example, if you logged data in PSI, you can export in FtH20 using this feature.
Figure 3.55
You will then have the option to choose a range of scans if you do not want to export all data from that test. To do this, you will define
a first and last scan and download all scans in between them. The first screen (Figure 3.56) will ask for the first scan (chronologically)
you would like to download. The second screen will ask for the last scan in the series you wish to download (Figure 3.57). Enter the
scan # then click OK.
Figure 3.56 Figure 3.57
Next, you can choose a particular file name to be assigned to the file created during the extraction process.
YSI Incorporated Data Scout 29
Page 30

4.0 SUPPORT INFORMATION
4.1 WARRANTY
The YSI Level Scout Instrument is warranted for two (2) years from date of purchase by the end user against defects in materials and workmanship,
exclusive of batteries and any damaged caused by defective batteries. YSI Level Scout cables and suspension wires are warranted for two (2) years from
date of purchase by the end user against defects in material and workmanship. YSI Level Scout systems (instrument & cable/wire) are warranted for 1
year from date of purchase by the end user against defects in material and workmanship when purchased by rental agencies for rental purposes.
Within the warranty period, YSI will repair or replace, at its sole discretion, free of charge, any product that YSI determines to be covered by this
warranty.
To exercise this warranty, write or call your local YSI representative, or contact YSI Customer Service in Yellow Springs, Ohio at +1 937-7677241(800-897-4151 US). Send the product and proof of purchase, transportation prepaid, to the Authorized Service Center selected by YSI. Repair
or replacement will be made and the product returned, transportation prepaid. Repaired or replaced products are warranted for the balance of the
original warranty period, or at least 90 days from date of repair or replacement.
LIMITATION OF WARRANTY
This Warranty does not apply to any YSI product damage or failure caused by:
1) failure to install, operate or use the product in accordance with YSI's written instructions;
2) abuse or misuse of the product;
3) failure to maintain the product in accordance with YSI's written instructions or standard industry procedure;
4) any improper repairs to the product;
5) use by you of defective or improper components or parts in servicing or repairing the product;
6) modification of the product in any way not expressly authorized by YSI.
THIS WARRANTY IS IN LIEU OF ALL OTHER WARRANTIES, EXPRESSED OR IMPLIED, INCLUDING ANY WARRANTY OF
MERCHANTABILITY OR FITNESS FOR A PARTICULAR PURPOSE. YSI'S LIABILITY UNDER THIS WARRANTY IS LIMITED
TO REPAIR OR REPLACEMENT OF THE PRODUCT, AND THIS SHALL BE YOUR SOLE AND EXCLUSIVE REMEDY FOR ANY
DEFECTIVE PRODUCT COVERED BY THIS WARRANTY. IN NO EVENT SHALL YSI BE LIABLE FOR ANY SPECIAL,
INDIRECT, INCIDENTAL OR CONSEQUENTIAL DAMAGES RESULTING FROM ANY DEFECTIVE PRODUCT COVERED BY
THIS WARRANTY.
4.2 CONTACT INFORMATION
ORDERING AND TECHNICAL SUPPORT
Telephone: 800 897 4151 (USA)
+1 937 767 7241 (Globally)
Monday through Friday, 8:00 AM to 5:00 ET
Fax: +1 937 767 9353 (orders)
+1 937 767 1058 (technical support)
Email: environmental@ysi.com
Mail: YSI Incorporated
1725 Brannum Lane
Yellow Springs, OH 45387 USA
Website: www.ysi.com
YSI Incorporated Data Scout 30
Page 31

When placing an order please have the following available:
1.) YSI account number (if available)
2.) Name and phone number
3.) Purchase Order or Credit Card number
4.) Model Number or brief description
5.) Billing and shipping addresses
6.) Quantity
SERVICE INFORMATION
YSI has authorized service centers throughout the United States and Internationally. For the nearest service center information, please
visit www.ysi.com and click ‘Support’ or contact YSI Technical Support directly at 800-897-4151 (+1 937-767-7241).
When returning a product for service, include the Product Return form with cleaning certification. The form must be completely filled
out for a YSI Service Center to accept the instrument for service. The form may be downloaded from www.ysi.com by clicking on the
‘Support”.
4.3 RECYCLING
YSI is committed to reducing the environmental footprint in the course of doing business. Even though materials reduction is the
ultimate goal, we know there must be a concerted effort to responsibly deal with materials after they’ve served a long, productive lifecycle. YSI’s recycling program ensures that old equipment is processed in an environmentally friendly way, reducing the amount of
materials going to landfills.
• Printed Circuit Boards are sent to facilities that process and reclaim as much material for recycling as possible.
• Plastics enter a material recycling process and are not incinerated or sent to landfills.
• Batteries are removed and sent to battery recyclers for dedicated metals.
When the time comes for you to recycle, follow the easy steps outlined at www.ysi.com.
BATTERY DISPOSAL
The Level Scout is powered by alkaline batteries which the user must remove and dispose of when the batteries no longer power the
instrument. Disposal requirements vary by country and region, and users are expected to understand and follow the battery disposal
requirements for their specific locale.
YSI Incorporated Data Scout 31
Page 32

4.3 ACCESSORIES
Model 770* Communication Cable, non submersible. Provides RS-485.
Model 771* RS-485 to RS-232 converter. Connects to 779 and 710, 720, 730 and 740 cables.
Model 772* RS-485 to SDI-12 converter. Connects to 779 with gender changer. Connects to
710, 720, 730 and 740 cables. For SDI-12 communication, the baud rate of the
Level Scout must be set to 1200.
Model 773* RS-232 to USB converter. Connects to 771.
778-0-0* All-in-one communications adapter. Connects to 711, 721, 731 and 741 cables.
Provides RS232, RS485 and USB output.
779-0-0 Communication adapter. Connects to 711, 721, 731, and 741 cables. Provides
RS485 output.
Model 781 Cable Hanger
Model 782 2” vented locking well cap with dock
Model 783 2” vented locking well cap ONLY
Model 784 2” dock ONLY
Model 785 4” vented locking well cap with dock
Model 786 4” vented locking well cap ONLY
Model 787 4” dock ONLY
BS2 BaroScout, stainless steel, 2 MB memory
BS4 BaroScout, stainless steel, 4 MB memory
711-X Field cable with in-line vent filter, Polyurethane jacketed, Stainless Steel, X ft in
length
721-X Field cable with in-line vent filter, ETFE jacketed, Stainless Steel, X ft in length
731-X Field cable with in-line vent filter, Polyurethane jacketed, Titanium, X ft in length
741-X Field cable with in-line vent filter, ETFE jacketed, Titanium, X ft in length
750-X Suspension wire, Stainless Steel, X ft in length
760-X Suspension wire, Titanium, X ft in length
750-0
760-0 Titanium Backshell, deployment cap
Stainless Steel Backshell deployment cap
*See communication diagram, figure 2.1 page 6.
YSI Incorporated Data Scout 32
Page 33

A605816
Rev C
May 2010
Data Scout Manual
YSI Incorporated
YSI Incorporated Data Scout 33
 Loading...