

Page 1
FIELD OPERATION GUIDE
YSI 610 DISPLAY/LOGGER
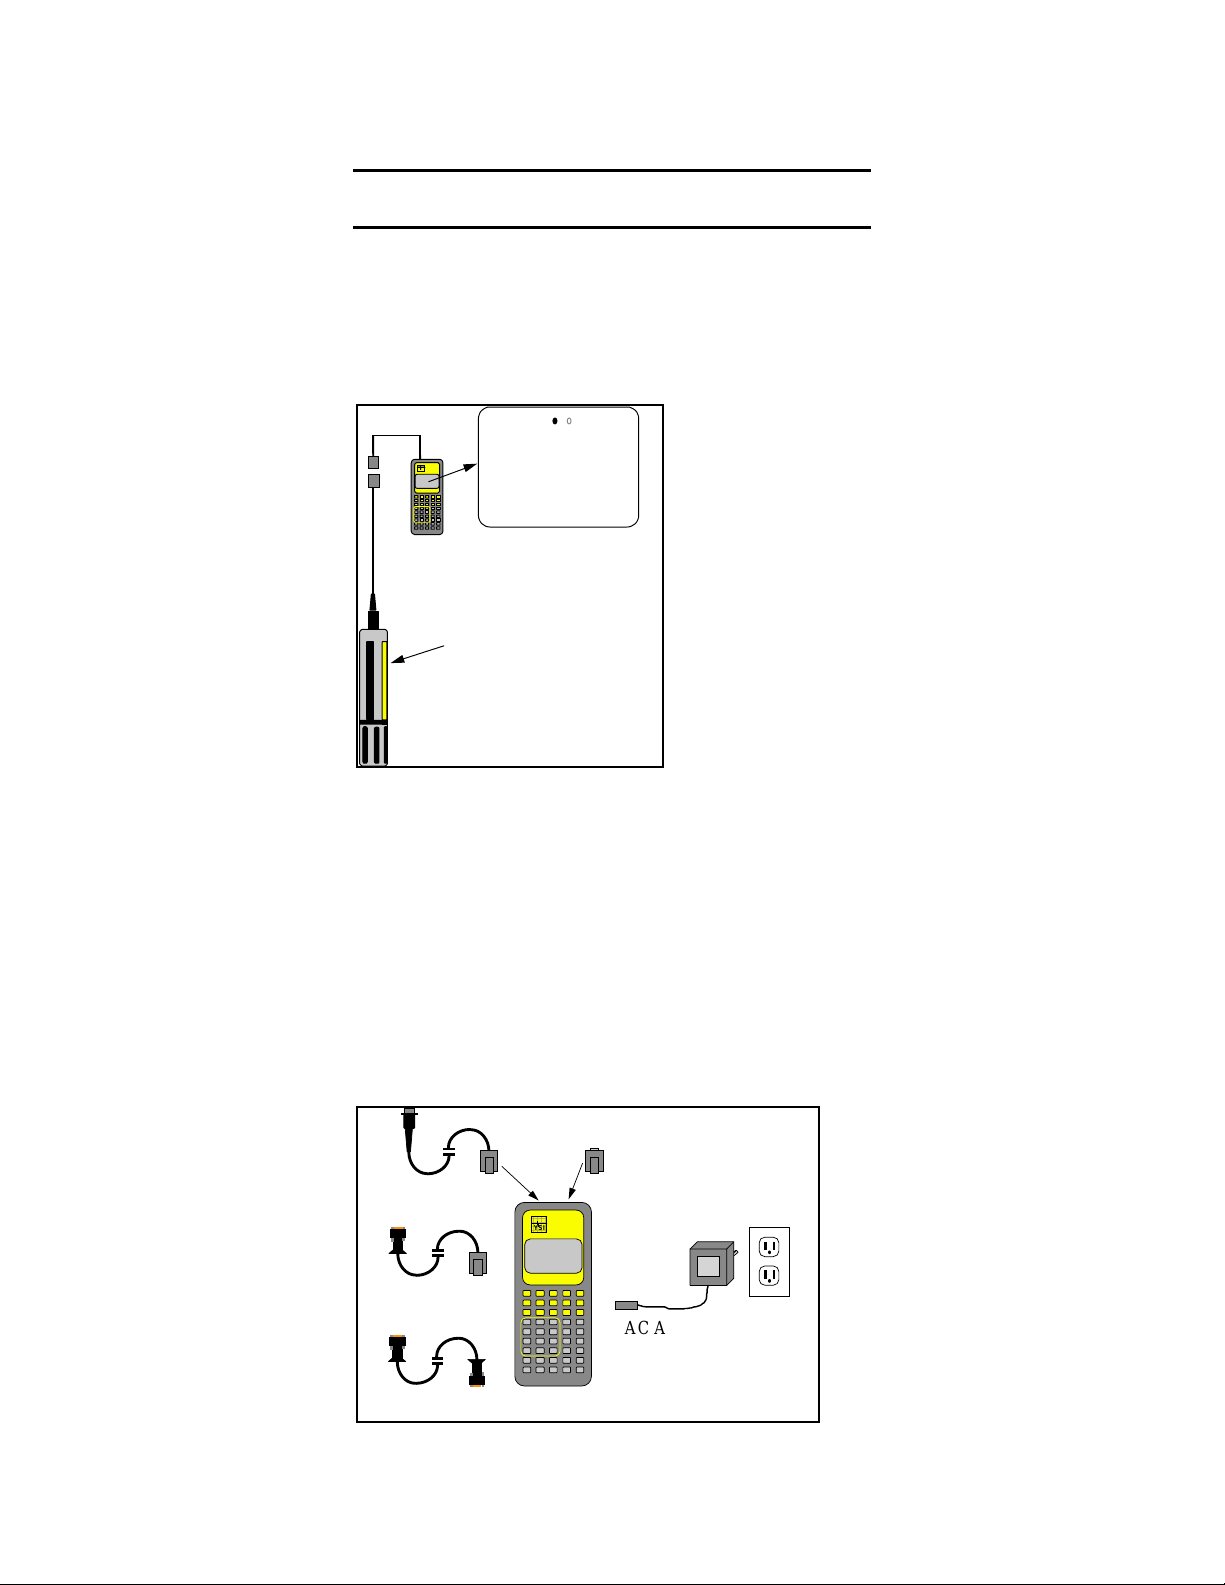
CONNECTING TO A SONDE
Since YSI 6-Series sondes do not have displays or controls, users must communicate to them with a PC or terminal and emulation device. The figure below is a diagram of the YSI 610 connected to any 6-series sonde.
RUN
TMP 20.54
Environm ental
Monitoring
YSI
Systems
610-DM
CND 0.687
DO% 97.5
DOc 38.0
pH 8.32
NO3 2.35
610 Handheld Display
SpC 0.750
SAL 1.42
DO 8.56
DEP 10.12
ORP 90.2
TRB 2.3
68
20
The 6-Series Sonde.
Two slide plug cable adapters are available for the communications plug. One is for communication with a PC
and terminates in a 9-pin miniature sub-D connector.
When communicating with a PC, be sure to use a null
modem cable. The other adapter is for use with a sonde
and terminates in an 8 pin, military style connector. Plug
the MS-8 end of the cable into the sonde and the other
end into the YSI 610.
Power Jack Module
MS-8 Pigtail
Environmental
Monitoring
YSI
Systems
DB-9 Pig t a i l
Null Modem Cable
610-DM
AC Adaptor for 120 VAC
1
Page 2

SAMPLING APPLICATIONS
Sampling applications refer to readings that are taken
while the user is present and controlling the collection of
data. In sampling applications the total data collection
time is relatively brief, from a few minutes to perhaps a
few hours.
The YSI 610 has several storage options for sampling
applications. Because the interpretation and use of the
Site List depends on which feature you use, we recommend that you choose one method that best suits your
needs, learn that method and ignore the others. Storage
options are:
STASH - Data are not intended to be uploaded to a PC.
Data are stored in 26 slots, each referred to by letter (AZ). Weather data scan be stored in the same way. From
Run mode, press S then choose a letter (slot). To store
Weather, Press W. To recall, press R.
ADD - For storing single sets of readings to an uploadable file. Only available on the 610-DM. From the Run
mode, press “A”. You may store as many readings as you
like by pressing the A key repeatedly.
CAPTURE
For storing several consecutive readings to
-
an uploadable file. Only available on the 610-DM. Capture stores readings to a file as quickly as they come from
the sonde. From Run Mode press the C key to start Capture. Stop it by pressing C, Esc or Power.
MARK - For storing readings from many sites in a single, uploadable file. Only available on the 610-DM.
• The 610 stores all Marked data in a special file
named “marked”. The 610 stores a site number with
each set of readings, not a site name.
• Only one weather entry is possible for the entire
marked file. You cannot enter different Weather data
for each site or for different days.
• Before using the Mark feature, you must define pairs
of site names and site numbers in the Site List.
• All sets of readings in the marked file must have the
same parameters.
• To store marked data in a different file, rename the
current Marked file using 610 File System. The renamed file still contains a Mark Number for each set
of readings. Additional marked data will be stored
in a new file named “marked”.
2
Page 3
USING THE SITE LIST WITH THE MARKED FILE
The Site List is accessed through the Setup 610 menu.
When using the Mark feature, there is only one filename,
“marked”. All readings that are stored using the “m”
prompt during Run mode are stored to filename
“marked”.
You can not type in the word “marked” to create this file.
You may rename “marked” file to a filename of your
choice using submenu FILES.
In the Site List use the File item to hold the Mark Name,
and the Site item to hold the Mark Number.
From Main menu choose Setup 610, then Setup Site List.
When in the field taking readings, from Run mode, you
would press the “m” key, and a list would appear.
Choose the site name to begin the process of collecting
the readings.
Remember that when you review data from the “marked”
file, lines of data from the site “spillway” will be labeled
as “sample 6”. Each of the sites will have corresponding
numbers. When you set up the sites, write down the
numbers for later reference.
SITELIST
headwtrs
bridge1
bridge2
uplake
midlake
SITE
Make NEW Entry
File:spillway
Site:
Move
Move
Insert
Insert
Revise
Delete
SETUP
Enter a mark name.
SITE
Make NEW E ntry
File:spillway
Site:
Date: 5/20/96
Time: 10:24:36
Dump 610 Setup
Delete All Files
Setup Site List
Enter a mark number that
corresponds to the name.
SITE
Make NEW Entry
File:spillway
Site:6
shft
SITELIST
Create a list of sites
you go to the field.
before
headwtrs
bridge1
bridge2
uplake
midlake
spillway
3
Page 4

USING THE SITE LIST FOR CAPTURE, ADD AND
LOG FILES
From Main menu scroll to Setup 610, press Enter, then
scroll to Setup Site List. To modify an existing site, press
Enter, then choose from the pop-up menu. To enter a
new site, choose Insert.
You may further describe your site by highlighting
“Site:”. This is not recommended if you don’t intend to
use the Mark feature.
There are different kinds of files for each of the three
types of storage: Add, Capture and Log. The file type is
fixed after the first set of readings is stored to the file.
SETUP
Date: 5/20/96
Time: 10:24:36
Dump 610 Setup
Delete All Files
Setup Site List
SITELIST
headwtrs
bridge1
bridge2
uplake
midlake
shft
Move
Move
Insert
Insert
Revise
Delete
Create a list of filenames
before you go to the field.
SITELIST
headwtrs
bridge1
bridge2
uplake
midlake
spillway
Enter a file name.
SITE
Make NEW Entry
File:spillway
Site:
LOGGING WITH THE 610-DM
The 610-DM can log sample data to its internal memory
from any 6-Series sonde. Logging produces a file in the
standard YSI file format capable of being uploaded to a
PC and processed by PC6000 or EcoWatch for Windows.
When logging with the 610-DM, the 6000, 6920 and
600XLM sondes go to low power mode between logged
samples. Other sondes do not. This has important consequences related to DO warm-up time. For logging sondes like the 6000, 6920 and 600XLM the DO warm-up
should be set between 40 and 60 seconds (and a multiple
4
Page 5

of 4 sec). On all other sondes, the DO warm-up should
be set to 120 seconds. Be sure to recalibrate DO anytime
you change the DO warm-up.
To begin logging select the Logging menu from the Main
menu of the 610-DM. Choose Setup Header and set a
file name and interval. Then choose 610 Logging. Stop
logging by pressing Esc or Power.
SETTING UP THE 6000 FOR UNATTENDED
LOGGING
From the 610 Main Menu choose Deploy, then unattended mode. Be sure that warm-up is set to 40-60 seconds, Specify a site and an interval. Unlike files and sites
in the 610, in the 6000, the Site name and the File name
are one in the same. Choose Stop Logging from the Deploy Menu to stop logging.
SETTING UP THE 6920 AND 600XLM FOR
UNATTENDED LOGGING
Like the 6000, the 6920 and 600XLM are capable of logging readings to a file independent of any other device.
To set up either of these sondes for logging, select Deploy Sonde from the Main menu.
The 610 communicates with the sonde’s main menu.
Choose Run and then choose Unattended Sample. You
need only enter a filename, a logging interval and then
choose the last item on the menu, Start logging. Unlike
files and sites in the 610, in the 6000, the Site name and
the File name are one in the same. Finally, the sonde asks
for confirmation before actually starting the logging run.
Logging will begin at the next even multiple of your logging interval.
UPLOADING LOGGED FILES FROM A 6000 TO
A 610-DM
Uploading a file from a sonde does not change the file in
the sonde in any way. Only formatting flashdisk will
delete files. To upload the data in a file, you need not
stop logging. If you get a “Busy” message, try again in a
minute.
If you get a “No Sonde” message that persists for more
than a 15 seconds, check the cabling, batteries or power,
and baud rate.
5
Page 6

From the Main menu go to the Communications menu
and select Kermit 610 < Sonde. When you see the directory displayed, select the desired file and press Enter. If
only one file exists inside the 6000, the upload will begin
immediately.
During the upload, you will see several status counters on
the 610 screen. But if the counters do not advance, press
Esc to abort the upload, and try again. When the upload
is done, you will see "Successful" on the 610 screen.
UPLOADING LOGGED FILES FROM A 6920 OR
600XLM TO A 610-DM
As mentioned in the previous section, you need not stop
logging to upload file data. However, if the sonde is busy
taking a reading, you may need to wait a minute before
beginning the transfer of data.
From the Main menu go to the Communications menu
and select Kermit 610 < Sonde. You will see the sonde’s
File menu. From that menu choose Upload. Select the
file you want and then select Proceed. You will be asked
what file format you want - PC6000 format is best for
most applications. You will see several status counters on
the 610 screen. But if the counters do not advance, press
Esc to abort the upload, and try again.
When the upload is done, you will see "Successful" on
the 610 screen.
TRANSFERRING FILES FROM THE
610-DM TO A PC
Run the EcoWatch or PC6000 program on the PC. Select
the Sonde icon from EcoWatch’s toolbar, or select Sonde
from the PC6000 top menu bar, and press Enter. A message will indicate “No Sonde” is connected. Press Enter
on the PC again to obtain a blank screen.
Connect the null modem cable to the appropriate PC
comm port. Connect the other end of the null modem
cable to the 610 DB-9 pigtail PC adapter.
From the 610 Main menu select Communications, then
select Kermit 610 > PC. Select the file you wish to send,
or select Send All Files (at the bottom of the list).
During the upload, you will see several status counters on
the 610 and PC screens. But if the counters do not advance, press Esc at both the PC and the 610 to abort the
upload, and try again
.
6
Page 7

Upload 610 Data Files to Lab Computer
Null Modem Cable
6099 DB-9 Adapter
MAIN
Run Mode
Setup 610
Calibration Mode
Setup Parameters
Setup Sensors
Deploy Sonde
Smart Terminal
Terminal
Environmental
Monitoring
YSI
Systems
610-DM
610-DM
RUN
TMP 20.54
CND0.687
DO% 97.5
DOc 38.0
pH 8.32
NO3 2.35
DB-9
DB-9
You will need...
!
610-DM
!
6099 DB-9 Adapter
!
Null Modem Cable
!
DB-9 to DB-25 Adapter may
be needed at Com Port
610-D Menu
SpC 0.750
SAL 1.42
DO 8.56
DEP 10.12
ORP 90.2
TRB 2.3
SETUP
TERM
# menu
- - - - - - - - - - - - - - - - Ma
1-Run
2-Calibrate
3-System
Select option (0 for
Baud Rate: 9600
Contrast: 7
Sonde Power : on
Shutoff Time: 10
Key Click: on
Date Format: mdy
shft
CALIBRATE
Conductivity
Dissolved Oxy
Pressure Abs
ISE1 pH
ISE2 Orp
ISE3 NO3-
MAIN
Run
Calibrate
System
Report
Sensor
Advanced
REPORT SETUP
Temp C
"
- Temp F
- Temp K
SpCond mS/cm
"
- SpCond uS/cm
SENSORS ENABLED
Cond mS/cm
"
Temperature
"
Conductivity
"
Dissolved Oxy
"
- Pressure-Abs
ISE1 pH
"
- ISE2 Orp
DEPLOY
Disk Free Space
Format Flashdisk
Unattended Mode
Conditional Mode
Discrete Mode
Stop Logging
MAIN
Run Mode
Setup 610
Communications
Calibration Mode
Setup Parameters
Setup Sensors
Deploy Sonde
Logging Mode
File System
610-DM Menu
RUN
TMP20.54
CND0.687
DO% 97.5
DOc 38.0
pH 8.32
NO3 2.35
FILES
buckcrk2 9872
buckcrk3 10650
downstr7 22356
effluent 589
< 43K free >
SpC 0.750
SAL 1.42
DO 8.56
DEP10.12
ORP 90.2
TRB 2.3
SETUP
Baud Rate: 9600
Contrast: 7
Sonde Power: on
Shutoff Time: 10
Key Click: on
Date Format: mdy
LOG
Setup Head er
Setup Filter
Start 610 Logging
Information
7
shft
COMM
Terminal
Smart Terminal
Kermit 610 PC
Kermit 610 SONDE
Kermit 610 LOGGER
Xmodem 610 PC
Xmodem 610 LOGGER
DEPLOY
Disk Free Space
Format Flashdisk
Unattended Mode
Conditional Mode
Discret e M ode
Stop Logging
CALIBRATE
Conductivity
Dissolved Oxy
Pressure Abs
ISE1 pH
REPORT SETUP
ISE2 Orp
Temp C
"
ISE3 NO3-
- Temp F
- Temp K
SpCond mS/cm
"
- SpCond uS/cm
Cond mS/cm
"
SENSORS ENABLED
Temperature
"
Conductivity
"
Dissolved Oxy
"
- Pressure-Abs
ISE1 pH
"
- ISE2 Orp
Page 8

YSI Incorporated
1725 Brannum Lane
Yellow Springs, Ohio 45387 USA
(800) 897 4151 (937) 767 7241
Fax: (937) 767 9353
http://www.ysi.com
e-mail: info@ysi.com
Item #061008
DRW #A61008A
August 1998
8
 Loading...