

Page 1
6-Series Sonde
Quick Start Guide
is document will assist an
experienced user with the steps
required to make your YSI 6-Series
product operational.
For full instructions, please refer to
the 6-Series User Manual.
Unpacking and Inspection
Inspect the outside of the shipping
container(s) for damage. If you see any
damage, contact your shipping carrier
immediately.
Remove the equipment from the shipping
box. Some parts are loose in the box, so check
the packing material carefully. Check o all
items on the packing list and inspect them for
damage.
Items Needed
• Sonde
• Probes
• Calibration cup
• Probe guard
• Batteries
• DI water
• Flathead screwdriver
• Calibration standards
• Communication or eld cable
If using 6562 DO probe:
• 6570 maintenance kit
• 5775 membrane kit
• Razor blade
(if sonde has battery compartment)
Preparing Sonde for Use
To prepare the sonde for operation, you
will need to:
• Install a new membrane on the YSI 6562
DO Probe, if you are using this item.
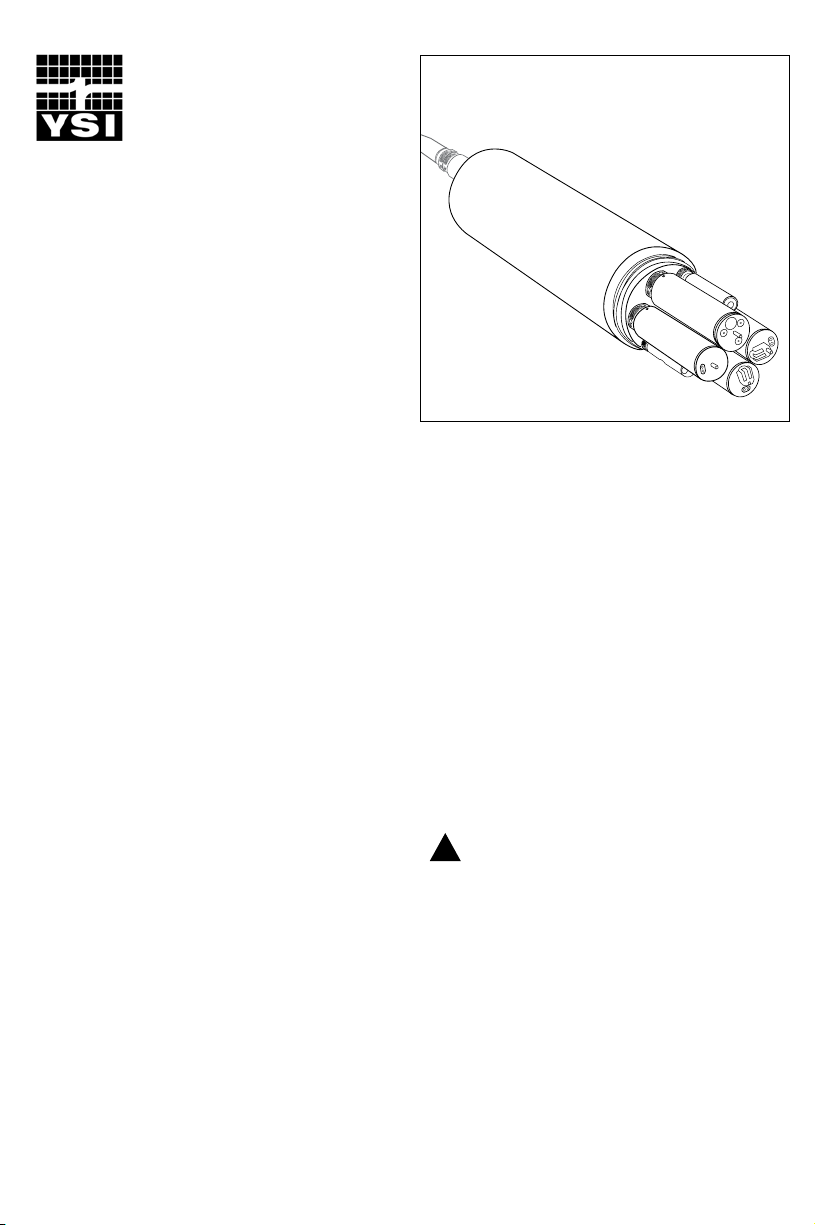
• Install probes (sensors) into the connectors
on the sonde bulkhead.
• Provide power for the sonde through
batteries or line power.
• Connect a eld cable or PC communication
cable.
It is important to calibrate all
!
sensors prior to using the sonde for eld
measurements. Refer to Section 2.6.2 of the
6-Series User Manual.
Page 2
Installing Membrane on
6562 DO Probe
(Skip to next section if you are not using
this probe)
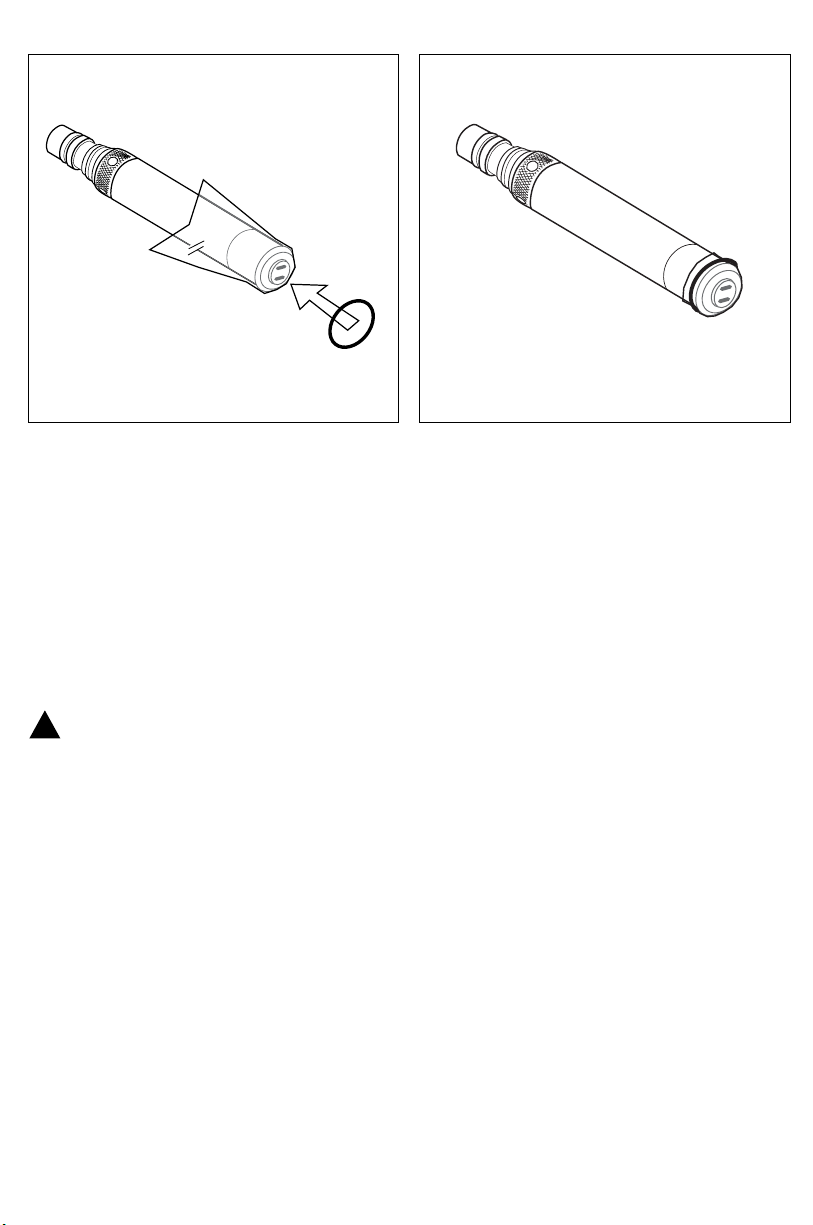
e 6562 Rapid Pulse™ Dissolved Oxygen
probe is shipped with a protective dry
membrane on the sensor tip. Remove the
O-ring and membrane. Handle the probe
with care. It is important not to scratch or
contaminate the sensor tip.
!
e DO sensor on the 600R/QS cannot
be removed.
necessary, shake o electrolyte and start over.
4. Secure a membrane between your le
thumb and the probe body. Touch membrane
only at the ends.
5. With the thumb and forenger of
your right hand, grasp the free end of the
membrane and gently stretch it up, over,
and down the other side of the sensor. e
membrane should be stretched below the
ridge where the O-ring seats so a good seal is
achieved.
Open the 6562 DO Probe Kit and follow these
steps:
1. Prepare the electrolyte solution as specied
on the bottle.
2. Put/keep the protective cap on the
connector end of the probe to protect it from
contamination.
3. Hold the probe in a vertical position and
apply a few drops of KCl solution to tip. e
uid should completely ll the small moat
around the electrodes—and create a large
meniscus on the probe face. Be sure no air
bubbles are stuck to the face of the sensor. If
6. Secure the end of the membrane under the
forenger of your le hand.
7. Roll the O-ring over the end of the probe,
being careful not to touch the membrane
surface with your ngers.
8. If bubbles or wrinkles are present, remove
the membrane and repeat steps 3-7.
9. Trim excess membrane with a razor blade.
Rinse o any excess KCl solution, but be
careful not to get any water in the connector.
Refer to Section 2.3 of the 6-Series User
Manual for complete instructions and photos.
Page 3

!
When installing probes, be
careful not to cross-thread the
probe nuts. If you meet resistance
while nger-tightening, STOP,
back out, and begin again.
Installing Probes
Before installing any probe into the
!
sonde bulkhead, be sure that the probe port
is free of moisture. Use a Kimwipe™ or lintfree cloth to dry.
1. Remove the calibration cup from your
sonde, if necessary.
2. Using the long end of the probe
installation tool supplied in the 6570
Maintenance Kit, remove the port plug from
the port.
3. Some probes can only be installed into
specic ports. Refer to Section 2.3 of the 6Series User Manual for port designations.
4. Apply a thin coat of lubricant (Krytox™)
to the O-rings on the connector side of the
probe.
!
Make sure there are NO contaminants
between the O-ring and the probe.
Contaminants will cause leaks when the
sonde is deployed.
5. Optical probes (6025 chlorophyll, 6130
Rhodamine, 6131 phycocyanin blue-green
algae, 6132 phycoerythrin blue-green algae,
6136 turbidity, and 6150 ROX DO): Insert
the probe in the appropriate optical port,
seating the pins of the two connectors. Handtighten the probe nut to the bulkhead. Finish
tightening the probe using the short end of the
installation tool. Do not over-tighten.
6. 6562 Rapid Pulse DO, 6560 conductivity/
temperature, 6561/6579 pH, or 6565/6569
pH/ORP probes: Insert the probe into the
appropriate port, seating the pins of the two
connectors. Push the probe inward so that it
seats into the port. Screw down the probe nut
by hand until it is nger tight. Use the long
end of the installation tool to tighten the probe
a quarter turn or until snug. Do not overtighten.
7. Ammonium, nitrate, and chloride ISE
probes do not have slip nuts and should be
installed without tools. Seat the probe body
directly on the sonde bulkhead. Use your
ngers to tighten.
Page 4

Installing Probe Guard
e probe guard protects probes during
deployment and some calibration procedures.
Once the probes are installed, screw on the
guard by aligning it with the threads on the
bulkhead and turn the guard clockwise until
secure. Be careful not to bump the 6562 probe
membrane when installing the probe guard.
Installing Calibration Cup
Installing the calibration cup is performed
in the same manner as installing the probe
guard. e calibration/storage cup is used
for calibration procedures as well as sonde
storage when not in use.
Power
• External power is required for the YSI
600R, 600QS, 600XL, 600XL V2, 6820 V2,
and non-battery versions of 600OMS V2 and
600LS sondes.
• Internal batteries power the YSI 6920 V2,
6920DW, 6600 V2, 6600EDS V2, 600XLM,
600XLM V2, 600DW, and battery versions
of 600OMS V2 and 600LS sondes. ese can
also run on external power.
• If you have a YSI 650 MDS display or other
datalogger, attaching your sonde to it will
power the sonde when “power sonde” is
enabled.
It is important to calibrate all
!
sensors prior to using the sonde for eld
measurements. Refer to Section 2.6.2 of the 6Series User Manual.
• For lab calibration, a YSI 6067 or 6095
calibration cable and YSI 6038 (110 VAC) or
6037 (220 VAC) power supply is required for
sondes without internal batteries. (6095 cable
must be used with a eld cable.)
• Connect the 6038 or 6037 power supply to
the 6067 or 6095 cable. Aer attaching the
four-pin connector from the power supply
to the pigtail, plug the power supply into the
appropriate AC outlet.
Page 5

• When using the sonde’s internal batteries,
install batteries prior to test and calibration.
• When using the 650 as the interface for
sondes with internal power, disable the
“sonde power” feature. Conversely, when
using the 650 for sondes without batteries,
enable the “sonde power” feature.
• Expected power supply outputs are:
6VDC = 4AA
12VDC = 8AA
12VDC = 8C
If you see signicantly diering values from
these outputs, the batteries may not have a
full charge or may be installed incorrectly.
(You can nd outputs in “Status” in the sonde
menu; see next page.)
Refer to Section 2.2 of the 6-Series User
Manual for complete details.
Communication
Communication to the sonde is started with
EcoWatch® for Windows®, the 650 display/
logger, or any terminal emulator.
1. Place the EcoWatch compact disk in
your computer’s CD drive. An Installshield
Wizard will automatically start on most
computers. Follow the prompts to complete
the installation.
2. Select the EcoWatch icon on your
desktop or from the Windows Program
Menu and open the application.
3. Select the sonde icon in the toolbar,
and then select the proper Comm port to
which your sonde is connected. Refer to the
diagram above for Communication Settings.
Click “OK” to open a terminal window.
4. e terminal window is white. Type
“Menu” aer the # sign, press Enter, and the
sonde Main menu will be displayed.
5. is soware is menu-driven. Select
functions by typing their corresponding
numbers. You do not need to press Enter
aer choosing a selection. Type the 0 or Esc
key to return to the previous menu.
Page 6

6. Aer establishing connection with
EcoWatch, you can congure sonde settings
including date/time, sensors, logging, setup,
and access stored les.
Refer to Section 4 of the 6-Series User Manual
or the Help section of the soware.
Menu
Run = set up sonde for discrete or unattended
logging applications
Calibrate = access sensors for calibration
Advanced = view calibration constants,
choose Auto Sleep conguration, adjust TDS
constant and other sonde settings. Refer to
Sections 2.5 and 2.9.8 of the 6-Series User
Manual before making any changes to the
settings in the Advanced Menu.
Technical Support
YSI Technical Support is available Monday
through Friday 8 to 5 .. Eastern Time.
Tel: 800-897-4151 option 1
or +1 937-767-7241 option 1
File = view logged les including the
calibration record (.glp le)
Status = access rmware version, date and
time, battery voltage and estimated life,
amount of free memory, and logging status
System = access sonde communication
settings and instrument identication
Report = choose parameters to log and units
of measurement
Sensor = enable sensors and assign probes to
ports
E-mail: environmental@ysi.com
Web: www.ysi.com
item # 069307
dwg # A69307
rev 01
October 2008
 Loading...