

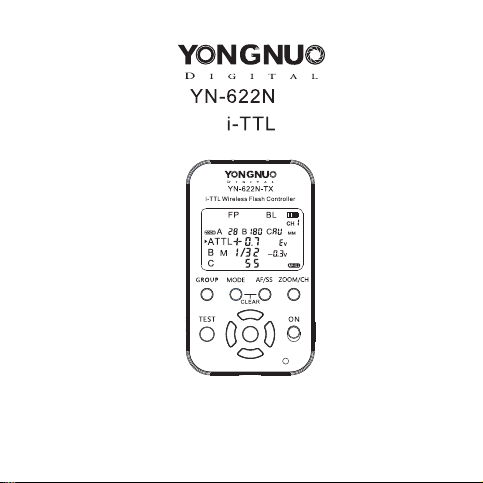
-TX
Wi rel ess Fla sh Co ntrol ler
User Manual
用户手册


Conten ts
General De scr ipt ion . . . . . . . . . . . . . . . . . 1
Conventi ons u sed i n the m anu al. . . . . . . . . . . 2
Supporte d Fun cti ons L ist . . . . . . . . . . . . . . . 3
Name of Part s/L CD . . . . . . . . . . . . . . . . . 4
Name of Part s/Q uic k Sta rt Gu ide . . . . . . . . . . . . 5
Preparat ion B efo re Us e . . . . . . . . . . . . . 6-7
Setting . . . . . . . . . . . . . . . . . . . . . 8-1 0
Flash awak ing a nd tr igg eri ng . . . . . . . . . . . 11
The other Tri gge r Mod es . . . . . . . . . . . . . 12
Shutter Re lea se Fu nct ion . . . . . . . . . . . . 1 3
Referenc e . . . . . . . . . . . . . . . . . . . 14-1 5
Tro ubl esh oot ing . . . . . . . . . . . . . . . . . . 16
Specific ati ons . . . . . . . . . . . . . . . . . . . 17
Cautio ns
Pl eas e tu rn of f power s uppli es of all e quipm ent whe n
connecti ng or i nst all ing t he pr odu ct.
Please keep i t dry. Be sur e not to us e wet hand to touc h the
product. It is als o no t al low ed t o im mer se t he prod uct into waster
or ma ke it be expo sed i n the ra in; othe rwi se it may not w ork
normally o r eve n be da mag ed.
Do not use it in exp los ive situ ati ons ; vio lat ion of t his warning
may cause an e xpl osi on or f ire .
This produ ct invo lve s bat ter y, ple ase be in strict accord anc e
with th e relevant p rov isi ons on th e use of th e ba tte ry, ot her wis e it
would caus e pro per ty da mag e or pe rso nal i nju ry.

Genera l Description
Thank y ou fo r pur chase t he pr odu cts of Yongn uo fi rst ly.
YN -62 2N-TX i-TT L wi rel ess fla sh contro lle r is for suppor tin g
th e use o f YN-62 2N i-TT L wi rel ess fla sh tr igger t ran sceiv er.
Th is pro duct ado pts fl exibl e LCD men u contro l, sup porti ng
mi xed use of th e A/B /C th ree groups of flashe s usi ng i-TT L,
ma nua , or super syn c fl ash mo de, can be a djust ed t he e xposu re
co mpe nsati on or fla sh o utput o f ea ch grou p. In ad dit ion, it
su ppo rts set ting di ffe rent fo cal len gth(z oom )of the thr ee grou ps
of flas h, th e r emote -cont rol led d ist ance ca n r each 100M,
su ppo rting s eve n wi rel ess cha nne ls a nd A/ B/C thr ee grou ps, a nd
eq uip ped wi th th e AF-a ssi st beam e mitte r. Supp ort USB
fi rmw are u pgrad e.
Compa tible camera list :
Nikon
D7 0/D 70S/D 80/ D9 0/D 200/D 300 /D 300 S/D60 0/D 700/D 800/
D3 000 serie s/D 50 00s eries /D7 00 0se ries
Inclu de item s:
1×YN-622N- TX Co ntr oll er
1×Usermanu al
1×LS-2.5/N 1 shu tte r con nec tin g cab le
1×LS-2.5/N 3 shu tte r con nec tin g cab le
Conven tions used in the manual
Th is man ual to ass um e that using th e co mp at ible
camer a/f lash, an d us ing th e YN -622N tr ans ceive r wi th
same channel . Funct ion s su ppo rted by the pro duc t depe nd
on th e c amera an d f lash use d. Conce rni ng th e o per ation of
YN-62 2N transcei ver, came ra and flas h , pl eas e read the
user ma nua l respe cti vel y.
The la test v ersio n of th e comp ati bilit y list an d user
manua l, fi rmwar e, pl eas e visit w ww.h kyongnuo .co m.
Up gra de to th e l ate st fi rmw ar e v er sio n b ef ore
using (P1 5).
YN-622N-TX
YN-622N
The below ic on us ed in t his m anu al:
Refer s to sh ort pre ss th e butto n.
Refer s to lo ng pres s(h old dow n) th e butto n.

Suppor ted Functions List
LCD screen display, mult i-b utt ons q uic k ope rat ion
The firmware can be upgraded th rou gh th e USB i nte rfa ce
Support wireless shutt er re lea se fu nct ion
The focal length(zoom)of the A/B/C three groups of flas h
can be adjusted separate ly
Eq uip ped w ith t he AF f ocu s assis t lig ht (c an be d isa ble d)
Group ing f las h mod e: i-TTL/ Man ual f las h/S uper sy nc
Su ppo rti ng mix ed use of the A/B/ C t hre e g rou ps of fla she s w ith i-
, Ma nua l fla sh, o r Sup er sync
TTL fl ash m ode
Th e ex pos ure co mpe nsa tio n or fl ash out put of A/B /C three g rou ps
of f las hes c an be a dju sted se parate ly
Sh utt er Sync : f irs t c urt ain sync , s eco nd cur tai n s ync an d FP high -
sp eed s ync , the h igh est syn c spe ed is 1 /80 00s
Su ppo rt ex pos ure c omp ensat ion , fla sh va lue l ock f unc tio n(FVL )
Su ppo rt si mul ate ( model ing ) fla sh, r ed- eye r edu ction f las h
Su ppo rt th e fla sh zo omi ng (aut o)
Su per Syn c (SS ) tim e delay adjust men t, for hi ghe r x-s ync spe ed
th an th e cam era a llo ws
Se tti ngs s ave d aut oma tic ally
Th e fla sh sy nc si gna l can be input t hro ugh t he PC p ort
Su ppo rt th e bas ic fl ash tri gge r (ma x syn c spe ed is 1/2 50s ) of
st and ard h ot sh oe (n on Ni kon b ody)
*The abo ve fun cti ons need to be used wi th the YN-62 2N
transceiver.
of t he c am er a an d f las h. (FVL,Mo del in g Fl ash, Re d- ey e
Red uct ion F las h etc . ).
Parts of fun cti ons may refe r to th e m anu fac tur er

Name of Pa rts/LCD
※The protec tiv e fil m can b e tor n out .
LCD
High speed s ync
Rear curta in Sy nc
ZOOM
Flash para met er
area
i-TTL ba lan ced
fill-flash
Battery el ect ric ity
Channel
AF as sis t bea m
emitte r

Name of Pa rts/Quick Start Guide
A-LCD: D isp lay all the sett ing s o f controller, c onv eni ent for you r
view and setup.
B-2.5MM Sh utt er r ele ase int erf ace : Wi rel ess shu tte r rel ease
function(P.13) .
C-AF assist beam emitte r: (P.10 )
D-PC interface: Input t he fl ash s ync s ign al( P.12).
E-USB i nte rfa ce: F irm ware up gra de th rou gh c onn ect ing t he
computer(P.15) .
F-Mode button: E ach tim e yo u pr ess the swi tch in the fla sh
mode(P.8) .
G-Group button: The a rro w sho wn th e swi tch s etting group(P.8) .
H-TEST butt on: Lo ng pre ss for flas h awak en, loosen for fl ash
testing(P.11) .
I-Select/Set bu tto n g rou p: M ult ifu nct ion butt on group, inc lud ing
the [UP ] [D OWN ] [LEFT] [RI GHT ] an d [OK] bu tto ns, whi ch ca n se t
the channel, ZOOM, flas h out put a nd ot her p ara met ers .
J- AF/ SS b utt on : S ho rt pr es s f or AF
switch(P.10 ), lo ng pr ess f or [S upe r Sync] parameter setting (P.9) .
K-ZOOM/CH button: Each shor t pre ss fo r A/B/ C thr ee gr oup s
switch(P.10 ), lo ng pr ess f or ch ann el setting(P.7) .
L-Power switch: Slide to ON fo r pow er on .
M- Sta tus i ndi ca tor : The gr een l igh t wi ll br igh t when in
communication, w hil e the r ed li ght w ill b rig ht wh en in t rig ger ing ( or
shutter releasing).
N-Locking ring and locking pin: (P.6)
O-Hot shoe Mounting foot and contact s: (P.6)
P-Battery compartme nt an d bat ter y cov er: ( P.6)
as sis t be am em it ter

Prepar ation Before Use
1. Inst all ing the Batt eri es
Open the co ver and instal l two AA
ba tte ri es ( exclu ded)a cc ord in g to the
marks , re cha rge able batt eries of 1.2V
can be us ed.
Remov e the batt eri es wh en th e produc t is
not u sed for long tim e. Pl eas e rep lac e the
both tw o bat teries at th e sam e time.
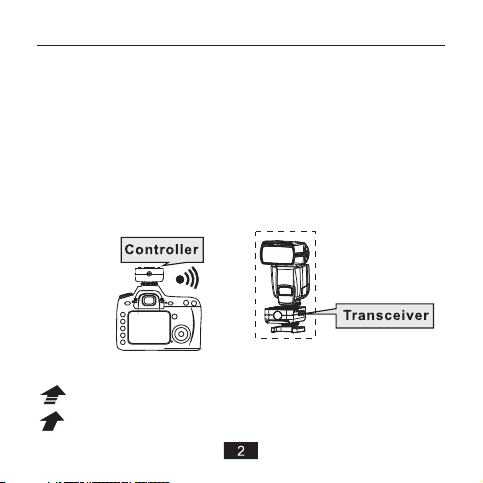
2.Install ing the Con tr oller on th e Camera
1). Uns cre w the loc kin g rin g of the co ntr oller.
2). Sli p the m ounti ng fo ot in to the ho t sho e of the camer a.
3). Tur n t he locki ng rin g a ccord ing to t he dir ection o f a rro w,
the loc kin g pin wil l pro tru de from t he mo unting foo t.
3. Power ON.
Power on w hen t he power swi tch s lid es to [ ON].
Prepar ation Before Use
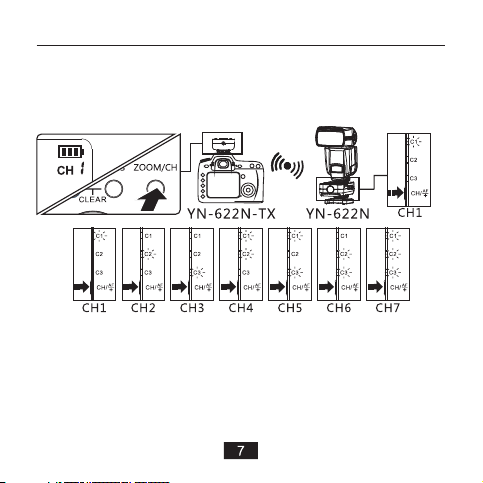
4.Chann el Sett ing:
Long pres s th e [Z OOM /CH ] bu tton, the n press the [UP] or
[RIGH T] f or i ncr easin g, p res s th e [D OWN] or [LEFT ] fo r
decre asi ng, p res s [OK ] for conf irm. Set the sa me ch ann el
as the YN-62 2N tr ansceive r.
5. :
Transcei ver and F lash Sett ings
1).
Set the tra nscei ver ’s receiv ing gro up, and set the sam e
chann el as t he YN -622N-TX c ont rolle r.
Set the fla sh t o i- TTL fl ash mo de* , the flas h wi ll f ire
2).
accor din g to the fl ash mod e and par ame ters set by th e
co ntr oller , sup por t i -TTL/man ual fla sh. (
flash m ode o r other trig ger ing mod e, re fer to P.12).
*For no n-i -TLL
Settin g
1. Groups a nd Mode s Setting (Remote C ontro l)
Shoot ing w ith a Differ ent F lash Mo de fo r Each Group
1). P re ss t h e [GR O UP ] b ut to n to
choose th e se tup gro up, pr ess wit h
the arrow to s ele ct A/B /C gr oup .
2).Press the [M ODE ] b utton to set the
flash mode of s ele cted gr oup, e ach
press for th e set tin gs as b elo w:
TTL: i-T TL Fla sh, th e FEC ad jus tment ra nge is wi thin -3+3EV, press [ LEF T] or [RI GHT] bu tto n to i ncr ease an d
reduc e 1EV, p res s [UP] or [RI GHT] bu tto n to increa se and
reduc e 0.3E V.
di rec tl y, the co mpe ns ati on value shal l be sup erpos ed
accor din g to flas h set tin g plus th e con troller se tti ng.
M: Man ual Fl ash , The a dju stmen t range is wi thi n 1/12 8-1 /1,
press [LEFT] or [R IGH T] but ton to adj ust, p res s t he [U P] or
[RIGH T] bu tton for fin e adj ustme nt.
SS: (Su per S ync, refer t o Pag e 9)
(None ):T he group is no t par ticip ate i n flash.
When sett ing the flash mod e an d pa ram eters on the
contr oll er, t he scr een of t he f lash on th e tr ans ceive r wi ll
not cha nge .
It is sup porte d to se t the FEC on th e flas h

Settin g
2.
Abo ut the Supe r Sync( SS)
Us e th e no n- hi gh s pe ed s yn c
flash to realize hi ghe r sync spee d,
this func tio n is more app lic abl e to
strobe fl ash es who se flash d ura tio n
is l ong er, and it i s fo r the c ame ra
w h ich s up po rt A ut o F P o n l y.
S upp or t
paramete r of Su per S ync .
1.Set the ti me de lay p ara met er of c ont rol ler S S:
Long pr ess the [AF /SS ] bu tto n to pro cee d se tti ng, pre ss the
[UP][DOW N][ LEF T][ RIG HT] button to adj ust, p ress [OK ] t o
confirm an d exi t setup , sup por ts Automatic Set up (A U) or Man ual
Setup 0.1- 3.0 .
2.
1).Set t he flas h in man ual m ode , Sup por t tra nsc eiv er using hot
2).Set the f las h sy nc sp eed of th e camera as AUTO FP, the
3).Take pho tos and ch eck whe the r the p hot os a re synchr ono us ,
s etu p t he t i me d e la y
Using Supe r Syn c:
shoe f las h o r c onn ect ing to the PC port . and it may needs
setting at m anu al fu ll- pow er fl ash o utp ut (1 /1) .
ma xi mu m sh ut te r sy nc s pe eds c an re ac h to 1 /8 00 0s .
Accordin g to the fla sh m odel, output pow er a nd s hut ter speed
to adjust co ntr oll er “S S” to a s uit abl e tim e del ay pa rameters.
it may se e gr ada tio ns or v ari ations in the ph oto s, r esults
depend on th e cam era a nd fl ash .

Settin g
3.ZOOM
It s uppor t th e co ntr oll er s ettin g th e th e focal len gth of
the fla sh la mp holder on t he tr ansce ive r.
Each sho rt press th e [ZO OM/ CH]
butto n, c hoo se o ne of t he A/ B/C
gr oup , pres s th e [U P] [ DOWN]
[LEFT ] [RIGHT] butt ons to setu p,
suppo rts the ran ge o f setup: 2420 0,AU (auto ma ti c) , p re ss th e
[OK] bu tto n to confirm .
AF As sist Beam E mitte r
4.
When u sin g AF under low -light, the bu ilt -in AF- assist
bea m e mi tt e r o f th e co n tor ll er w i ll b e e mi tte d
autom ati cally to mak e it ea sier to a uto focus.
Short press t he [ AF/SS] butto n to ena ble/d isa ble the A F
Assis t Bea m Emi tter funct ion , the LCD will disp lay ed th e
icon.
※ I t nee d to usin g sin gle AF of th e cam era.

Flash aw aking and triggering
1.Flash a wakin g&Test ing flash
When ha lf pres s the shu tte r butto n of the came ra or pre ss
the [TEST ] bu tto n of the con troll er , the awaki ng indica tor
light of g ree n li ght will bright, the hot-shoe flash o n th e
trans cei ver will be awak ene d.
butto n, t he g rou ps h ave bee n se lected of f lash will b e te sted
for onc e.
2.Flash t rigge ring
Compl ete ly pres s the s hut ter b utton o f the cam era w ill
trigg er t he fla sh synchr ono usly, the t rig gerin g in dicat or l ight
of red li ght w ill bri ght .
Example s:
When loosing the [TEST]

The othe r Trigger Modes
1.Non -Re mot e Control Mo de:
Set the com pat ible flas h on the tra nsc eiver to Manual or RPT
flash mo de, th e f las h will wo rk acc ord ing to th e m ode an d
paramete rs dis pla yed , t he con tro lle r w ill not sup por t t he rem ote
controll ing t he f las h mod e or f lash ex pos ure com pen sat ion ( flash
output).
2.PC interface & Basi c fla sh Tr igg er( Sup por t non N iko n bod y)
PC inte rfa ce (i nput) trig ger : Use L S- PC/ PC cabl e (op tion) to
co nne ct the co ntr oller a nd th e PC inte rfa ce of cam era .
Bas ic flas h (Si ngl e Conta ct) t rig ger: In sta ll the co ntrol ler
on t he ca mera hot sho e.
1).Tr ans mit ting group setup: Gro up se tup acc ord ing to th e
co ntr oller.
2).Fl ash mode setu p: Set t he man ual f las h(M) mod e thr oug h
th e fla sh cont rol p anel, c han ge t he fl ash out put m anual ly, us e
th e c ontro lle r PC int erfac e o r m ain f las h con tact tri gger, not
su ppo rt high spe ed sy nc or other TTL fu nct ion (th e highe st
sy nch ronou s spe ed is 1/2 50s o r lo wer ).

Shutte r Release Function
Use the Y N-6 22N transc eiv er fo r wi rel ess t ransmitting , the
YN-622N- TX co ntr oll er as t he sh utt er si gna l out put .
1).In sta ll t he YN-6 22N -TX con tro ller on the camera’s hot shoe,
an d us e LS -2 .5 s eries s hu tt er c onnec ti ng c ab le(ma y
addit ion al pu rch ases) to con nec t the c ont rol ler and came ra.
2).Lo ng pr ess t he [TEST] bu tto n of YN -62 2N tr ansceive r to
focus , loosen the [TE ST] but ton to shot . If t he f las h in sta lle d
o n t he Y N - 6 2 2N t ra ns ce iv er , t h e f la sh w il l f i r e
synch ron ous ly.
Sup por t sin gle s hot only.
If th e con tro ller does no t ins tal led on the com pat ibl e
camer a’s hot shoe , t he shu tte r will r ele ase when pres sin g
the [TE ST] b utt on of t ran sceiver.
The compatible shut ter r ele ase c abl e lis t:
LS-2.5/N1:
LS-2.5/N3:
LS-2.5/N2(O ptional):
D200/D300/D300S/D700/ D80 0
D90/D600/D3100/D3200/ D50 00S eri es/ D70 00S eri es
D70/D70S/D80

Refere nce
1.Fla sh Sh utter Sync :
Refer to th e ca mera’s se tti ng. Su ppo rts fr ont -curt ain
sync, re ar- curtain syn c and hig h speed syn chr onous(Au to
FP*). The r eleva nt ic ons w ill be di spl ayed on the LC D(P.4 ).
Using hi gh- speed synch ron izati on nee d to set the
flash sy nc sp eed of th e c ame ra to “A UTO FP”. Th e
maxim um syn c s peed is 1 /8000s o r 1/4000 s (depen ds
on the ca mer a).
Some mo del s of c ame ra does n ot su pport t he HS S
(with out Auto F P opt ion ), the sh utt er speed wil l be
limit ed to 1 /250s or les s whe n using t his k ind of camer a.
2.Abo ut th e LCD backli ght :
Press a ny bu tton, the LC D bac kligh t wil l light for 5 se con ds.
3.Abo ut th e battery el ect ricit y dis play :
The ba ttery ic on in the up per ri ght co rner of the LCD will
displ ay th e curre nt el ectri cit y. W hen i n low bat tery, the
batte ry ic on will b lin k, pl ease re pla ce the batte ry.
4. Ab out t he Au tom atic Save Fu nct ion:
Then co ntr oll er will auto mat ically s ave t he se tti ngs o f
chann el, gr oupin g, fla sh mod e, AF assist beam emitter
etc.

Refere nce
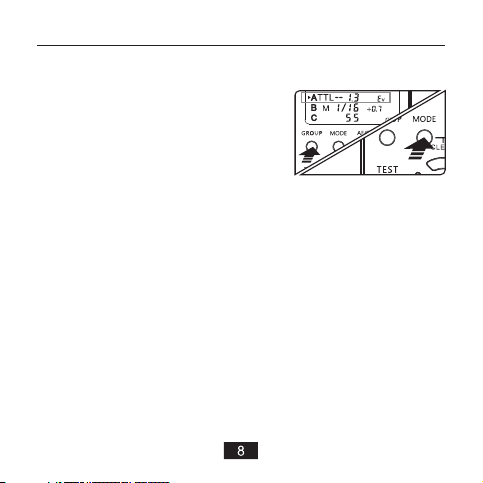
5.Fac tor y Reset
Hold dow n the [MO DE] an d [AF/SS ]
butto ns at the s ame t ime unt il the
sc ree n as sho wn, the n lo osen to
resto re fa ctory sett ing s.
6.USB F irm ware Upgra de
1).Vis it YO NGN UO of fic ial w ebs ite :
http://w ww.h kyo ngn uo. com /e- detail.php?ID= 339
to downloa d the f irm war e upg rad e sof twa re an d the l ate st
firmware .
2).Tur n of f . K eep pre ssi ng [ mod e] button and tur n on aga in. The
screen wil l sho w
current ve rsi on ).
3).Conne ct t he c ont rol ler to PC v ia U SB- MIN IB c abl e
include)
4).Compl ete t he fi rmw are u pgr ade o per ation accordi ng to t he
.
prompt of so ftw are .
firmware upgrad e int erf ace (wi ll disp lay the
(not

Trouble shooting
1. Fai l to po wer on or auto mat ic shut dow n:
The bat ter y is load ed in ver sely or e xha usted.
ØInsta ll the batter y ac cor ding to the cor rect dire ction the
batte ry compar tme nt ind ica tes an d ensure t he bat ter y is fu ll
and res tar t the pow er .
2. The flash do esn 't fire
ØEnsur e t he power of all equ ipmen ts are full , the fl ash is
in read y sta te(the flash-re ady ind icator on)
ØTh e c o nn ec tio n a mo ng the co nt ro l le r(t ra ns c ei ve r),
camer a and t he flas h is re lia ble;
ØWheth er th e contr oll er and trans cei vers ar e set i n the
same ch ann els and c ont rol lable g rou ps.
3. i-TTL underex pos ure or overe xpo sure:
Ch eck wh ether the ca mera b od y or th e f las h s et
compe nsa tion se tti ng. It may be u nderexpo se if exc eeds th e
flash ing effect distan ce . I t ma y overe xpo sure when T TL an d
manua l flas h are use d at the same time, now th e manu al
flash s uit s to be use d as a ba ckl ight.
vIt i s sugge ste d using t he f oll owing p roc edure s to
deal wi th wh en other tro ubl e occur d uri ng th e using :
1).R est art all t he eq uip ments .
2).R epl ace the b att eri es of the c ont roller and t ran sceiv ers .
3).R ese t the fac tor y set o f the con tro ller and tra nsc eiver s.
4).Re set t he factory s et of t he came ra/ flash.

Specif ications
Syste m typ e: Digi tal F SK 2. 4GHz wi rel ess contro lle r
Dista nce : 100M
Chann el: 7
Flash m ode : i-TTL, Man ual f lash, S upe r Sync
Sync mode: f ront- cur tain s ync, r ear-curt ain sy nc, Hi -sp eed
sync( Aut o FP)
Group s: 3G roups (A/B /C)
MAX Syn c spe ed: 1/8000 s
Trigge r Int erface: Ho t-shoe,P C
Shutt er re lease inte rfa ce: 2.5 MM sh utter rele ase i nterf ace
USB Fir mwa re Upgrade : sup port
AF As sis t Beam Em itt er: suppor t
Batte ry: AA X2(su ppo rt 1. 2 V recha rge able batte ry) 3V
Stand -by t ime: 120h
Dimen sio ns: 89.5×5 3×3 9mm
Wei ght:8 2g
The f unc tions of t his u ser m anual are based o n t est
conditio ns of o ur company. Further n oti ce wi ll not be g ive n if
the design a nd sp eci fic ati ons c han ge.
The YON GNU O log o in thi s man ual in clu des the registered
trademar k o r t rad ema rk of Sh enz hen Yong nuo Phot ogr aph y
Equipmen t Co.,L td in China or/and other countries(reg ion s).
All other tra dem ark s ar e th e pr operty of the ir r esp ect ive
owners.

目录
产品功能简 介 . . . . . . . . . . . . . . . . . . . . 1
说明书约定 . . . . . . . . . . . . . . . . . . . . . 2
支持的功能 列表 . . . . . . . . . . . . . . . . . . . 3
各部位名称/显 示屏 . . . . . . . . . . . . . . . . . . 4
各部位名称 、快速 使用指南. . . . . . . . . . . . . . . 5
使用前准备 . . . . . . . . . . . . . . . . . . . . 6- 7
设置 . . . . . . . . . . . . . . . . . . . . . . 8-10
闪光灯唤醒 、引闪 . . . . . . . . . . . . . . . . . . 11
其他引闪模 式 . . . . . . . . . . . . . . . . . . . 12
快门线功能 . . . . . . . . . . . . . . . . . . . . 13
参考 . . . . . . . . . . . . . . . . . . . . . 14 -15
故障排除 . . . . . . . . . . . . . . . . . . . . . 16
规格 . . . . . . . . . . . . . . . . . . . . . . . 1 7
注意事项
连接或安装 本产品 时,请关闭所有设 备电源 。
请保 持干 燥, 勿用 湿手 接触 产品 ,亦不可将产品浸入水中或暴 露
雨中,否则 可能引 起无法正常使用, 甚至损 坏。
请勿在易燃 易爆场 合中使用,违反此 警告可 能引起 爆炸或火灾 。
本产 品涉 及电 池, 关于 电池 的使 用请严格按照相关规定,否则 会
引起财产损 失或人 身伤害。

产品功能简介
首先感谢您 选购永诺产 品。
YN-62 2N-TX i-TTL 无 线 引 闪 控 制 器 是 为YN-622N i-
TT L无线引闪收 发器配套使用的产 品。
本产 品 使用 人性的LCD菜单控 制, 支 持A/ B/C三组 闪光 灯混
合使 用i-TTL, 手动 闪光或超级同步 模式 ,可调整各分组 曝光补
偿或 闪光输出,支持 设定 三组 闪光灯不同的焦 距, 遥控 距离可
达100M , 支 持7个 无线频 道 及A/B/C三个 分 组,并 带 有辅 助对
焦灯功能, 支持USB固件 程序升级。
兼容的相机 列表:尼康
D70/D 70S/D 80/D90/D 200/D 300/D 300S/D60 0/D70 0/
D800/ D3000系 列/D5000系列/D 7000系列
随附物品:
1×YN-622N- TX 控制 器
1×用户手册
1×LS-2.5/N 1 快门连 接线
1×LS-2.5/N 3 快门连 接线

说明书约定
本说 明书为假定 使用兼容的相机/闪 光灯 ,并且使用 相同 频道
的YN-6 22N收发 器,本 产 品所支 持的功 能 取决 于 使用的 相机
及闪 光灯,有关YN- 622 N收发 器、相机及闪光 灯的 操作,请阅
读其使用手 册。
最 新 版 本 的 兼 容 性 列 表 、 用 户 手 册 及 升 级 固 件 请 访 问
www.h kyongnuo.com获取 。
使用前请将 固件升级到 最新版本( 第15页)。
YN-622N-TX
YN-622N
此用户手册 中使用以下 图标:
表示短按按 钮。
表示长按按 钮。

支持的功能列表
LCD屏 幕显示 ,多按 键快捷操作
可通过USB接口升级 固件
支持无线快 门线功 能
可单独调整A/B/ C三组闪 光灯焦 距
内置辅助对焦灯(可禁 用)
分组闪光模式:i-TTL /手动闪 光/超级同步
A/B/C三组闪光 灯可混 合使用i -TTL、手动闪光及
可单独调整A/B/C三组闪 光灯曝 光补偿 或闪光 输出
快门 同步 :前 帘同 步, 后帘同 步,F P高速 同步 ,支 持最 高同 步速 度
为1/8000s
支持曝光补偿,闪 光值锁 定功能
支持模拟(造型)闪光、防 红眼闪 光
支持闪光灯头变焦(自 动)
Super Sy nc( SS)时延调整,更 好支持(伪)高 速同步 功能
设置自动保存
可通过PC接口输入闪 光同步 信号
支持标准热靴(非尼康 机身)的基 本闪光 引闪(最高 同步速 度为1/ 250s)
超级同步
*以上功能需 配合YN-622N收 发器使用,
机及 闪光灯制 造商 说明书:闪 光值锁定( FV L OCK ),造 型闪光 ,防红
眼闪光等。
以下 功能的 使用请参阅 相

各部位名称/显示屏
※此处保护薄膜可以撕去。
显示屏
高速同步
后帘同步
灯头变焦
闪光参数
显示区
i-TTL 均 衡补充闪光
电池电量
频道
辅助对焦灯

各部位名称/快速使用指南
A-显示屏: 显示控制器 的所有设定 ,方便您查看、设 置。
B-2.5 MM快门线接 口:无线快 门线功能(第 页)。
C-辅助对焦 灯:(第10页)。
D-PC接口 :输入闪光 同步信号(第12页)。
E-USB接 口:通过与 电脑连接升 级控制器固件(第15页)。
F-Mod e按钮:每按 一次在各闪 光模式中切换(第8页)。
G-Gro up按钮:箭 头所示切换 设置的分组(第8页)。
H-TES T按钮:长按 唤醒闪光灯 ,松开时测试闪光(第1 1页)。
I-选 择/设置 按钮 组: 多功 能按 钮组 ,包 括【 上】 【下 】【 左】
【右】及【O K】按钮,可 设置频道、 焦距、闪光输出等 参数。
J-AF/ SS按 钮:短 按为辅 助 对焦 灯 开关(第10页),长按 为SS参
数设置(第9页)。
K-ZOO M/CH按钮 :每 短按 一次 ,将 在A/B/C三 组焦 距中切换
(第10页),长按设 置频道(第7页)。
L-电源开关 :滑动至ON为 电源开。
M-状态指示 灯:通信时 亮绿灯,引 闪(快门释放)时亮红灯。
N-固定环及 锁定销:(第6页)
O-热靴固定 脚及触点:(第6页)
P-电池仓及 电池仓盖:(第6页)
13

使用前准备
1.安装电池
打开 电池仓,根 据电 池仓正负极 方向
安装两 节AA电池 ( 不含 ),可以 使用
两节1.2V充 电电池。
长 期不使用 产品 请 将 电 池 取出,
更换电池时 ,请两节一 起更换。
2.安装控制器于相机 机顶热靴
1). 按箭头方向 旋松固定环 。
2). 将热 靴固定脚完 全卡入相机 热靴插座。
3). 按箭 头方 向旋紧固定环, 锁定销将伸出将 控制 器锁定在相机
热靴插座上 。
3.开启电源
将电源 开关滑 动至【 】开启 电源。ON

使用前准备
4.设置频道:
长 按 【Z OOM/C H】 按 钮 , 再 按【 上 】或
【下 】或【 左】 减少,按【O K】确 定。设 置与Y N-622 N收发
器相同的频 道。
5.收发器及闪光灯设 置:
1).设置好 收发器接收 分组并设置 好与控制器在相同 的频道。
2).将闪 光灯 设置在i-TTL模式*,
的闪 光模 式及参数闪光,支持 i-T TL /手动 闪光
设置在非i- TLL模式或 使用其他引 闪模式,请参考第1 2页)。
该闪 光灯将 根据 发控制器设 置
【 右 】 增 加 , 按
。(*将 闪光 灯

设置
1.分组及模式设置(远程 控制模式):
为各组设定 不同的闪光 模式拍摄。
1).按【GRO UP】 按钮 ,
每 按 一 次依 箭头 所 指 选 择 A/B/C
组。
2).按【MODE】 按钮
TT L:i-TTL,支持调整范围-3-+3EV,按【左】或1【右 】增 加
或减 小 EV,按 【上】或【下】 增加 或减小0.3 EV。支持直接在
闪光灯上 设置 曝 光补偿 ,补 偿 值将与控 制 器 设置的补 偿值 叠
加。
M:调节 范围1/1 28-1/ 1,按 【左】 或【右 】调 整 ,按 【上】
或【下】微 调。
SS:超级同 步(Supe rSy nc,见第9页)
(无):该组不参 与闪光。
在控 制器 远程 设置 闪光 模式 及参 数时 ,收 发器 上的 闪光 灯屏
幕将不会变 化。
,每按一次 设置如下:
闪光模式
选择设 置组
设 置 所 选 分 组

设置
2.关于超级同步(SS )
使用 非 高速 同步闪 光灯 实现更 高的
同步速 度,本 功能更 适合闪 光持续 时
间较 长的影楼灯,只 限于使用支 持自 动
FP(高速 同 步)的 相机 , 支持 设 置SS时
延参数。
1.设置控制 器SS时延参数 :
长按 【AF/SS】按钮 进行 参数设 置,按 【左 】或【 右】调 整,
按【 上】或【下】微 调, 按【O K】按钮确认并退 出设 置, 支持
自动设置(AU)或手动设置0.1 -3.0。
2.使用超级 同步:
1.)将闪光灯设 置在 手动模式, 支持 使用热靴闪光灯 或PC接 口连
接闪光灯。 可能需要设 置全功率闪 光输出(1/1)。
2.)设置 相机 为“自 动FP闪 光”, 快 门 同步速 度 最高可 设置 在
1/800 0s, 根据 使用 的闪 光灯 、输 出功率、快门速 度不 同调
整至一个合 适的时延参 数。
3.)拍摄并检查照片是否同步,可能会看到光线的层次变化,效
果将根据相 机及闪光灯 不同会有所 不同。

设置
3.ZOOM:闪光灯 头焦距
支持在控制 器设置收发 器上的闪光 灯头焦距。
每 短 按 一 次 【 ZOOM/ CH】 按钮 ,
选择A /B/C组其 中一 组焦距设置 ,按
【 上】【 下】 【 左 】 【右】 按钮 设
置, 支持 设置 的范 围:2 4-200 ,AU (自
动),按【OK】按 钮确定。
4.辅助对焦 灯
当光 线不 足以 自动 对焦时会启动辅助对焦灯功能 ,控 制器 的
辅助对焦灯 会点亮以辅 助镜头更容 易对焦。
短按 【AF /SS】按钮启用/禁用 辅助 对焦 灯功 能, 显示 屏将 有图
标显示。
※ 需 相机 单次AF模式。使用

闪光灯唤醒、引闪
1.闪光灯唤醒、测试 引闪
半按 相机 快门 按钮 或
灯亮 ,收 发器 的 松开 【TEST】按钮时,
所选分组闪 光灯将被测 试闪光一次 。
2.引闪闪光灯
完全 按下相机快门按 钮时 将同 步引闪闪光 灯, 红色 引闪 指示灯
亮。
按住 控制 器【T EST】按钮,绿色唤 醒指 示
热靴 闪光 灯将 被唤 醒。
示例:

其他引闪模式
1.非远程控 制模式
将收 发器上的兼容的 闪光 灯设 置在手动闪 光或 重复 闪光 模式,
控 制 器 将不 支 持 远 程 设置 其 闪 光 模 式或 曝 光 补 偿 ( 输出功
率),该闪 光灯将根据 其显示的模 式及参数闪光。
2.PC接口 、基本闪光 引闪(支持非尼 康机身)
PC接口(仅限输入使 用):使 用LS-PC/PC连 接线(另 购)连接控制
器及相机的P C接口。
基本闪光(单触 点)引闪:安装控制 器于标准热 靴的相机。
.发射分组设 置:
1) 依据控制器 分组设置。
2).闪光 模式 设置: 通过 闪光灯控制 面板 设置在 手动 闪光( )模
式,手动更改闪 光输出,使 用控 制器PC接口或 主闪光触点 引
闪 , 不 支 持 高 速 同 步 或 其 他 TTL功 能(最 高 同 步 速 度 为
1/250 s或更低)。
M

快门线功能
使用Y N-622N收发 器无 线发 射,Y N-622N-T X控制 器作 快门 信
号输出。
1).将YN- 622N-TX控制 器安装于相 机机顶,并 使用LS -2.5系列 快
门连接线(可能 需要额外购买)将控制 器与相机快 门接口 连接。
.长按
2) YN-62 2N收发器【TES T】按 钮对焦,松开【TES T】按 钮
时将 触 发快 门,若Y N-622N收发 器上 安装了 闪光灯 ,该 闪光
灯将同步闪 光。
只支持单张 拍摄。
若控 制器 没有 安装于兼容的相机热靴, 快门 将会 在按 下收 发
器【TEST】 按钮时释放 。
兼容的快门 线型号:
LS-2. 5/N 1:
LS-2. 5/N 3:
LS-2. 5/N 2(需另购):
D200/D30 0/D 300S/D70 0/D 800
D90/D600 /D3 100/D320 0/D 5000系列/D70 00系列
D70/D70S /D8 0

参考
1.关于闪光快门同步:
请在 相机 上进 行设 置, 支持 前帘 同步 、后 帘同 步、 高速 同步
(自动FP),将有相 关图标在控制器屏 幕上显示(第四 页)。
使用F P高速 同步 需相 机及 闪光 灯支 持, 需设 置相 机闪 光同 步速
度为"自动FP”, 最 高同步 速度 为1/8000 s或1/ 4000s( 取决于 相
机)。
部分 相机 机型不支持高速 同步(无 自动FP选项 ),使 用这 些类 型的
相 机时 ,快门 速度会被限 制在1/ 250s或更低。
2.关于LCD背 光:
按任何按钮 ,屏幕 背光将点亮5秒。
3.关于电池电量显示:
屏幕 右上 角电 池图标将显示当前电 量, 当电 量不 足时 ,电池图标
闪烁,请更 换电池 。
4.关于自动保存功能:
控制器将自 动保存 频道,分组, 辅助对焦灯 等设置 。闪光模式,

参考
5.恢复出厂设置
同时 按【MODE】与【AF/S S】按 钮,
直至 屏幕如图所示后 松开 ,恢复出厂设
置。
6.USB固件升级
1).访问永 诺官方网站:
http: //www. hkyon gnuo.com/s-de tail. php?I D=339
下载固件升 级程序及最 新固件。
2).关闭 电源,
显示进入固 件升级界面(将 显示当前版 本号)。
3).使用US B-MIN IB连接线(不含)将 控制器 与PC进行连接 。
4).按照软 件上的提示 完成固件升 级操作。
按住<MODE >按钮 的 同时重 新打开 电源, 屏幕

故障排除
1.无法开机 或自动关机 :
电池装反或 电池耗尽。
Ø
按照 电池 仓指 示标志的正确方向安 装( 更换 )电 池, 并确 保
电池有电, 重新开启电 源。
2.闪光灯不 闪光:
Ø确保 所有 设备 电池 电量 充足 ,
闪光 灯在 就绪 的状 态( 闪光 灯
回电指示灯 已点亮)。
确保
Ø控 制器(收发器),闪 光灯及相机 安装连 接可靠。
Ø确保控制器 及收发器已 设置在相同 的频道及可控制的 分组。
3. i-TTL闪光 曝光过度或 曝光不足
检查 是否 在相 机机 身或闪光灯上设置了曝光补偿;超 出闪 光
有效 距离可 能会 曝光不足;T TL与 手动 闪光 模式混 合使 用时可 能
会过曝,此 时手动灯适 合作为背景 灯使用。
v 在使用过程 中遇到其他 故障,建议 进行以下步 骤解决:
1).重启所 有设备。
2).给控制 器/收发器更换 电池。
3).恢复控 制器及收发 器出厂设置 。
4).恢复相 机/闪光灯出厂 设置。

规格
系统模式: 数字FS K 2.4 GHz无线控制
距离: 100 M
无线通道: 7个
闪光模式: i -TTL、手动闪光 、超级 同步
同步模式: 前 帘、后 帘、高速同步
分组控制: A /B/ C 3个组别
最高同步速 度:1/ 8000s
引闪接口: 热靴、P C接口
快门接口:2 .5M M快门接口
USB固件升 级:支 持
辅助对焦灯 功能: 支持
闪光灯变焦 功能: 支持
电池:AAX 2节 (支持1 .2V充 电电池)
待机时间:1 20小时
体积:89. 5×5 3.5×3 9mm
重量:82克
本手 册中 的功能是依据本 公司 的测 试条 件获 得。 设计 和规格如有变
更,恕不另 行通知 。
本手 册中 的永 诺(YO NGNUO)徽标是深圳市永 诺摄 影器 材股 份有 限
公司 在中 国或/和其 他国 家(地区 )的注 册商 标。 其他 所有 商标 均为其
各自所有者 拥有。
3V


 Loading...