

Page 1

FLXA21-P1 Analyzers
Programming Custom Buffer Tables
FLXA21, comes with NIST Buffer tables pre-programed intot the analyzer. When using the
autocalibration mode, the system uses these preprogramed tables for reference.
However there is an option for customers to change buffer table data information.
There are three sets of NIST buffer tables, pH 4.01, pH 6.98, and pH9.18, by using the free
program options, you can choose to change whichever table and however many
tables you need to change. This document is intended to assist customers with the
steps that need to be taken inorder to to change the Buffer Tables.
1.) Click on the settings icon (wrench)
2.) Using either the the scroll key or by
clicking directly on the diamond next to
Commissioning, select it.
Tech Note: TNA1403 Date: February 5, 2014
Page 2
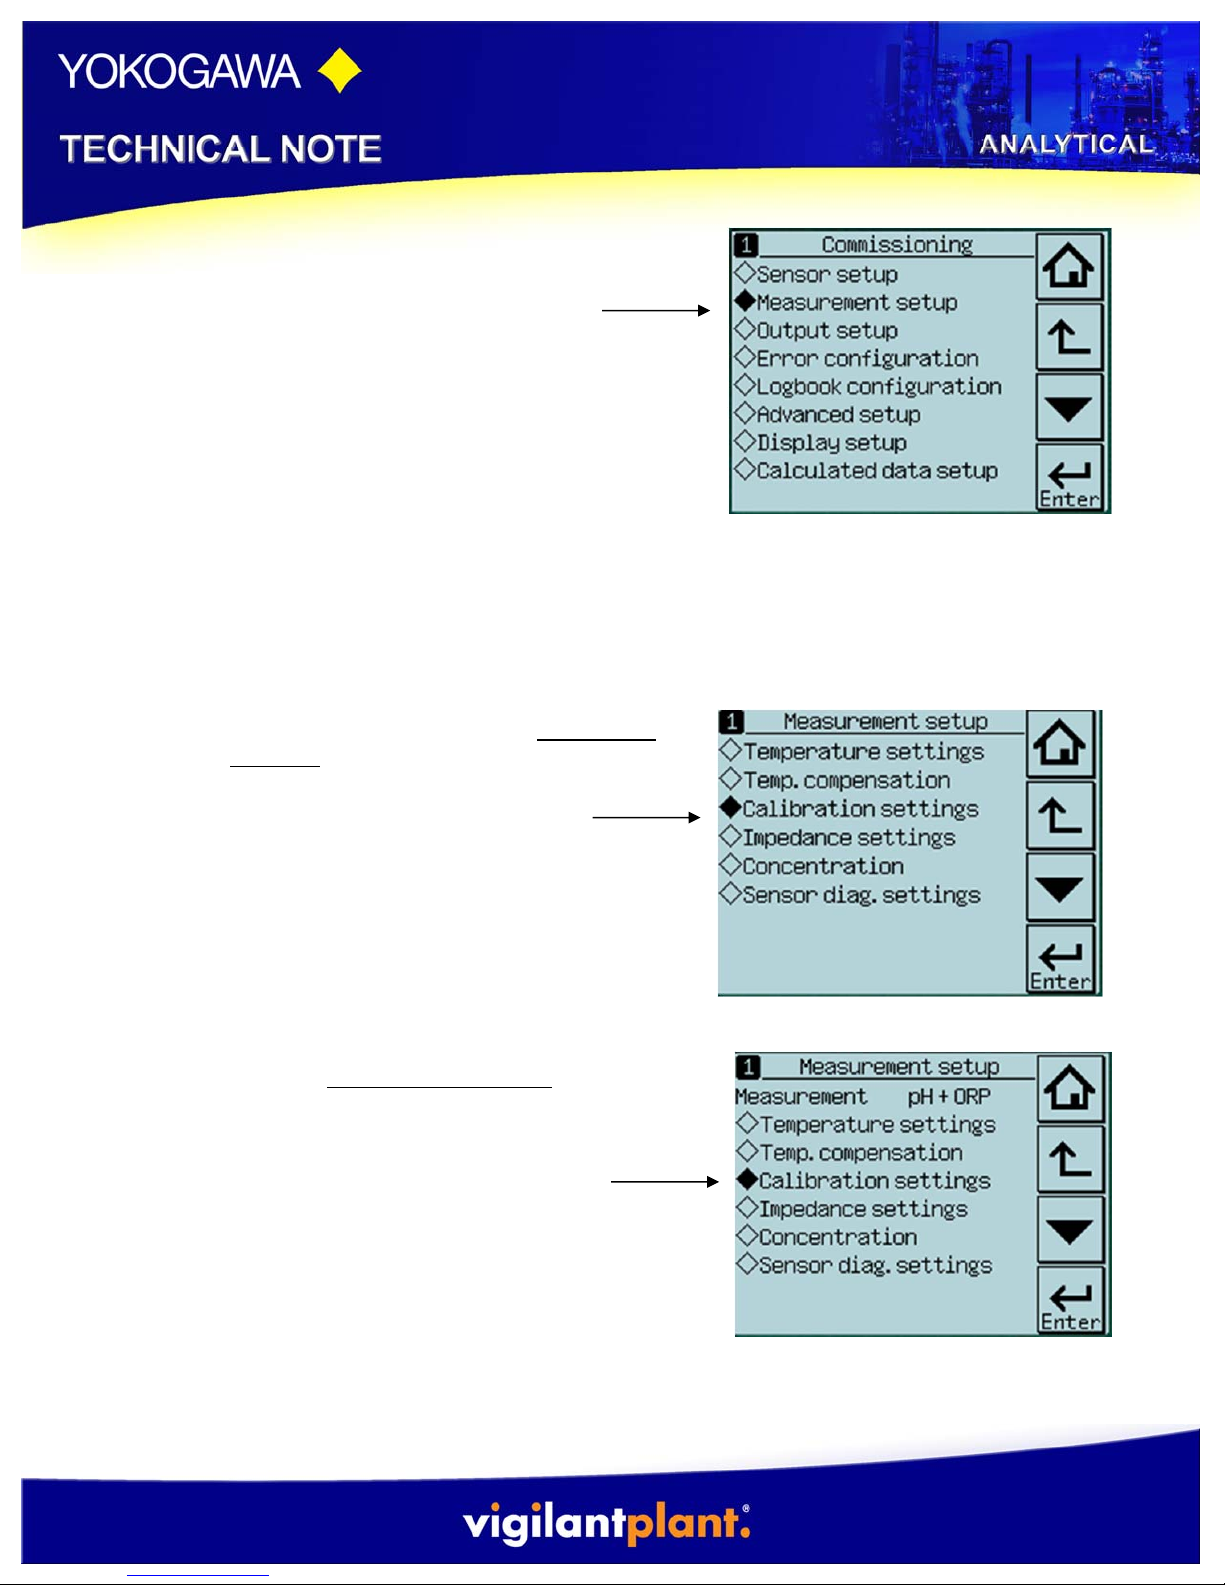
3.) Next, selected the diamond next to
Measurement Setup
4.) Depending on what your analyzer is set up to measure, the Measurement
screen will look differently. If your anlyzer is set up to measure pH only,
continue to Setp #5. If your analyzer is set up to measure pH + ORP,
Proceed to Step #5a.
5.) Select the diamond next to Calibration
Settings, and Proceed to Step #7.
a. pH + ORP, Select the diamond next
to Calibration Settings, Proceed to
Step #6
Tech Note: TNA1403 Date: February 5, 2014
Page 3
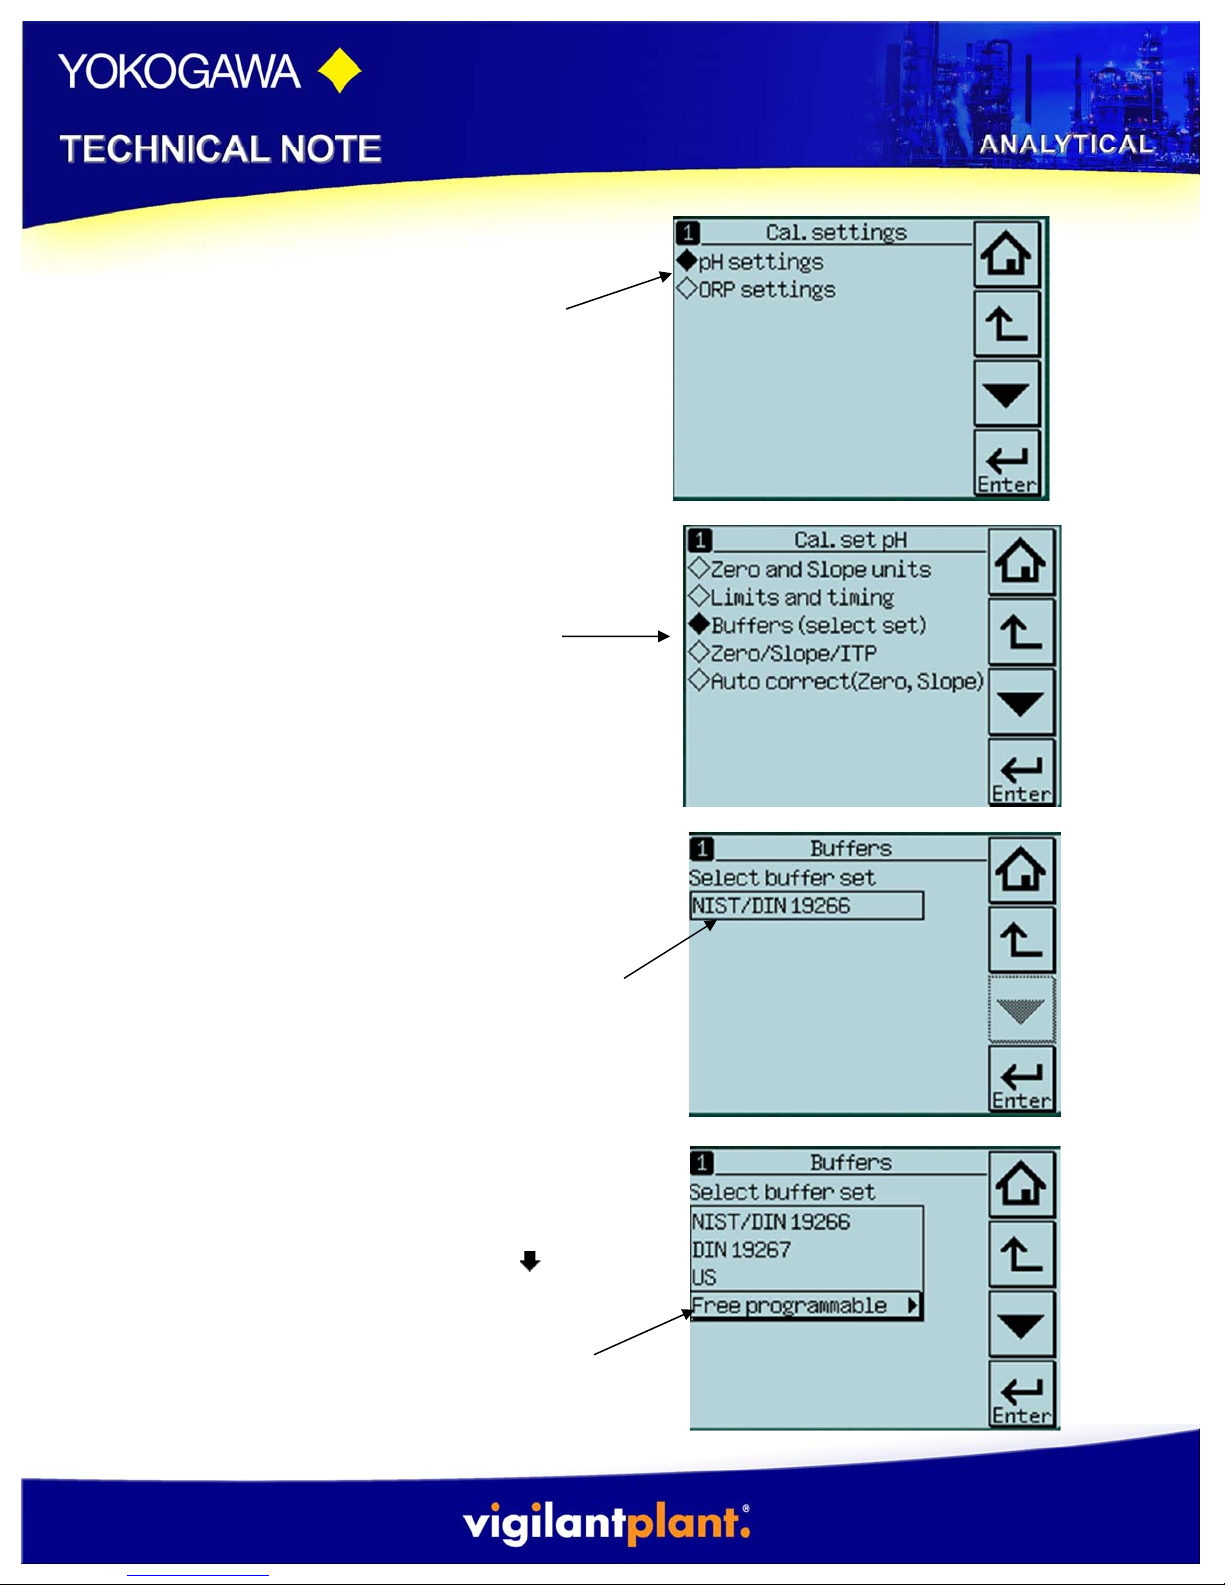
6.) Select the diamond next to pH
settings, proceed to Step #7
7.) Select the diamond next to Buffers
8.) Next, choose the text NIST/DIN19266
and a drop down menu should appear.
9.) Next, ssing either the the scroll key
and enter, or by clicking directly on the
choose the Free Programable.
Tech Note: TNA1403 Date: February 5, 2014
Page 4

10.) Depending on which buffers you wil
be using in your application, click on the
diamond next to the User defined buffer
that needs to be changed.
a. User defined Buffer 1, is the buffer
table for pH 4.01;
b. user defined Buffer 2, is the the
buffer table for pH 6.87;
c. and user defined Buffer3, is the
buffer table for pH 9.18.
For this example we will choose to change the values within the User
Deinfed Buffer 2, pH 6.87, because this is the most commonly choosen
table to change values to reflect pH 7.0.
11.) Select the diamond next to Enter
Values
Tech Note: TNA1403 Date: February 5, 2014
Page 5

12.) Click on each pH value next to the
temperature, in order to enter customer
pH value for the particular given
temperature value. In order to use this
feature the customer must have a pH
for each given temperature value in 5
degree increments from 0ºC-80ºC. Click
enter when finished, to return to original
Buffer Table screen.
Tech Note: TNA1403 Date: February 5, 2014
Page 6

13.) Once the pH values for the
temperatures 0ºC-30ºC have been
changed, click on the diamon next the
the Next to precede to the next page
of the table. Note: You do not have to
change all of the values, only the ones
that are stated mandatory.
14.) If you choose to fill out the pH
values for 35ºC-65ºC do so in the
same manner as described above in
step #11. Once the pH values for the
temperatures 35ºC-65ºC that you wish
to change have been changed, click on
the diamond next the the Next to
precede to the next page of the table.
15.) If you choose to fill out the pH
values for 70ºC-80ºC do so in the same
manner as described above in step #11.
Once the pH values for the temperatures
70ºC-80ºC that you wish to change have
been changed, click on the diamond next
the the Finish to return to the original
User definded 2 Buffer screen.
Tech Note: TNA1403 Date: February 5, 2014
Page 7
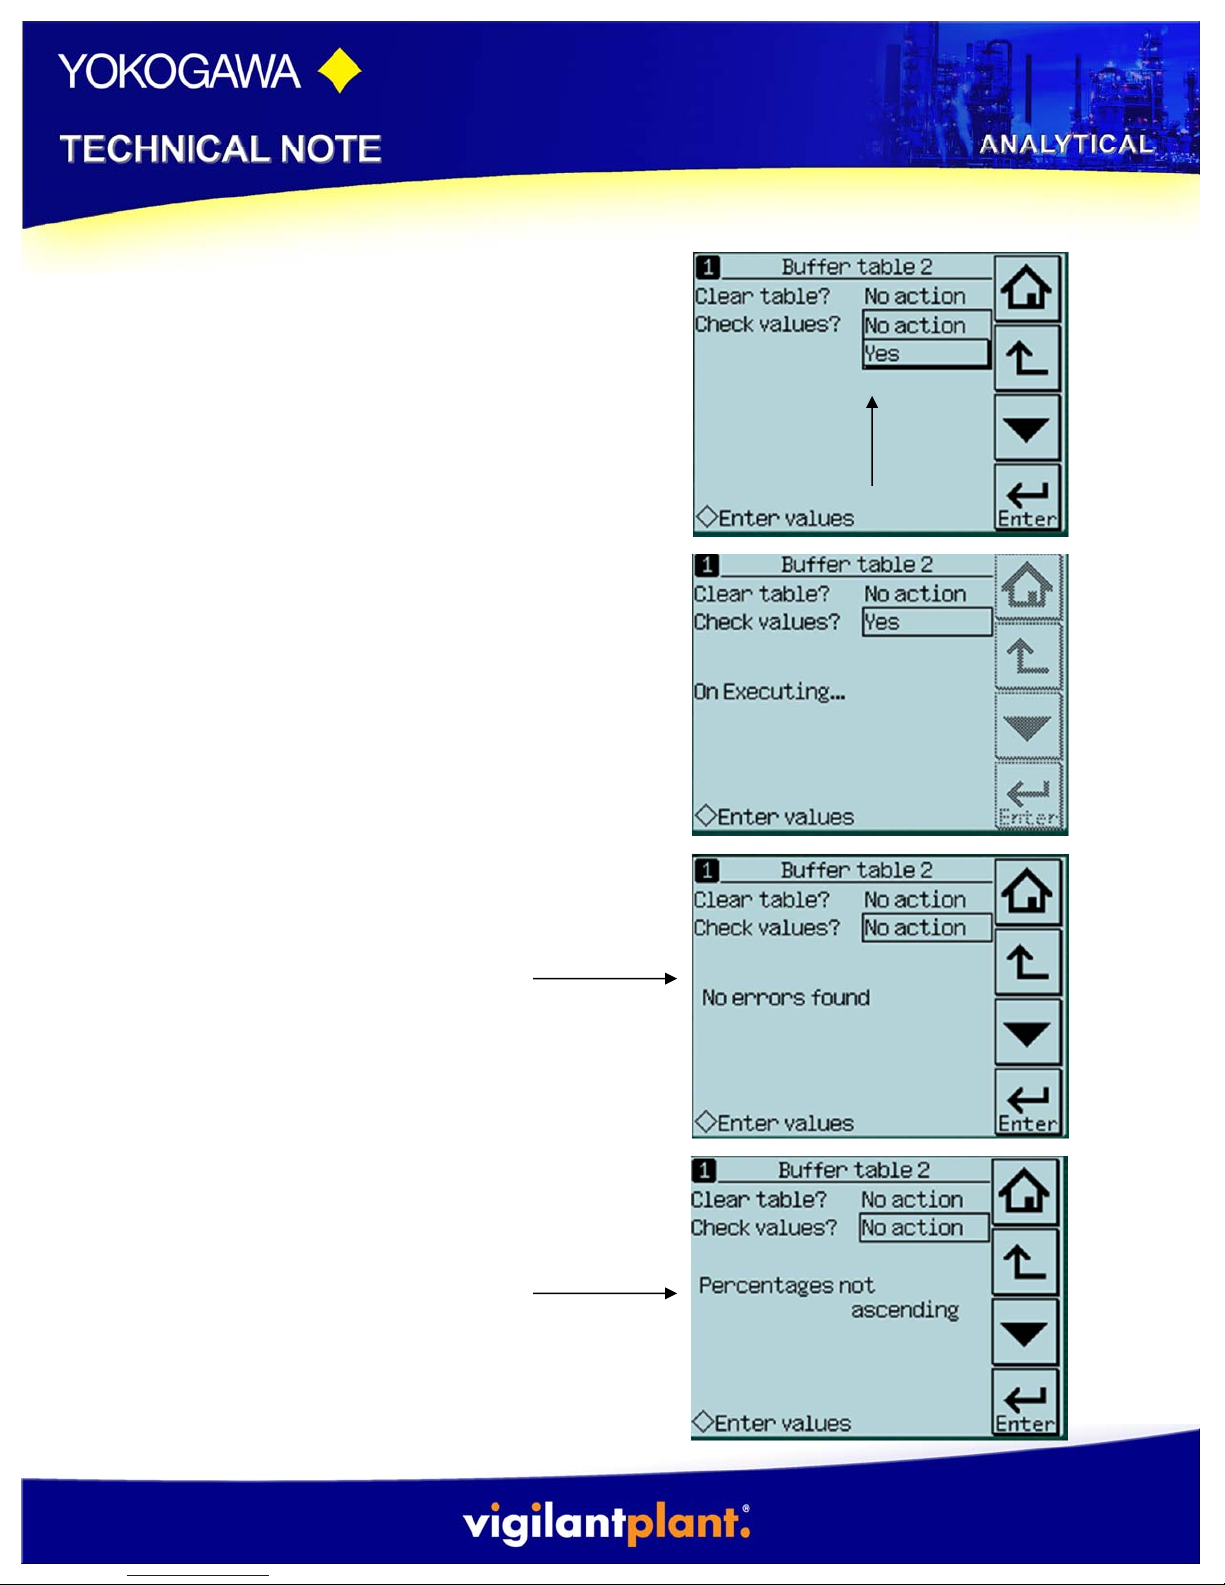
16.) Next select YES under Check
Values on the original User Definded 2
Buffer screen. This check is only looking
to make sure that the mandatory values
are completed. If NO Errors are found
the screen should reveal results.
However, if a mandatory field was
missed the screen would show the
error.
With that being siad, pay extra
attention to make sure that all values
entered are entered in correctly. Since
this is a free programable option, the
system will take any data that is
entered.
Tech Note: TNA1403 Date: February 5, 2014
Page 8

17.) If you want to change another
buffer table, click the Back Arrow to
return to the User Defined Screen and
follow steps 10-16.
Otherwise click on the home icon (the house),
to remain to the main page.
18.) Now when you choose to automatic
calibrate the unit will be using user
defined pH Buffer.
Tech Note: TNA1403 Date: February 5, 2014
Page 9

Appendix: If at any point you would like to reset your analyzer back to factory
default buffer tables, you can do so by following the steps below.
1.) Click on the settings icon (wrench)
2.) Using either the the scroll key or by
clicking directly on the diamond next to
Commissioning, select it.
3.) Select Advanced Set up
4.) Select the diamond next to Settings
Tech Note: TNA1403 Date: February 5, 2014
Page 10

5.) Choose to Load Factory Factory Settings.
6.) A warning screen will appear. Select Yes.
On loading will appear and the unit will restart
7.) Once the system has been restored the
unit will automatticaly go back to the
main home page.
Tech Note: TNA1403 Date: February 5, 2014
 Loading...