

Page 1
®
1
68010 68011 68016 68024
68104 68108
68132 68136 68143 68147
68064 68068 68164 68168
Instruction Manual
Leak Monitors
Refrigerant Models: 68002 68004 68006 68008
Ammonia Models: 68032 68036 68043 68047
Hydrocarbon Models:
YELLOW JACKET
The instructions contained in this manual must be adhered to or the
correct operation of this product may be impaired resulting in danger
from unobserved gas leaks.
Ritchie Engineering Co., Inc.
YELLOW JACKET Products Division
10950 Hampshire Avenue South
Bloomington, MN 55438-2623
Telephone: 800-769-8370
Fax: 800-322-8684
E-mail: custerv@yellowjacket.com
Web: www.yellowjacket.com
CERTIFIED REFRIGERANT TEST GAS MIXTURES
Some municipalities require the use of a certified test gas to validate the installation
prior to approving the Building Inspection. YELLOW JACKET does not offer certified
test gases but has identified the following source which can ship the gas via UPS. They are small high pressure cylinders which require a special regulator. The test
gases are mixed with dry nitrogen or air depending on the gas under test and are
shipped via UPS ground. MSA Mine Safety Appliances
121 Gamma Drive
Pittsburgh, PA 15238-2919, US
1-800-672-2222
http://www.msanet.com
Part No. Description Cyl. Size
459948 0.25 L/min Regulator
803500 R134a, 100 PPM Test Gas 100 L
710874 R134a, 990 PPM Test Gas 100 L
494450 Hydrocarbon, 100 PPM Test Gas 100 L
711078 Ammonia, 25 PPM NH3 Test Gas 34 L To ensure the certified gas remains at the correct PPM (parts per million) concentra-
tion, tape a small box with a hole in it, over the senor to retain the gas. Insert the flexi-
ble hose into the hole and fill the box with the test gas for 60 seconds. Close the cylin-
der and hold the hose in the hole. The system under test should respond to the test gas within three to four minutes time.
This product is fully warranted against defective materials and/or workmanship for
a period of one year after purchase, provided it was not improperly used. For your
protection, please use this product as soon as possible. If returned, it must be securely
WARRANTY
wrapped, sent prepaid and insured to Ritchie Engineering Co., Inc.
12
Printed in U.S.A. P/N 395098_B
Page 2

11
TIP: A YELLOW JACKET quick coupler gasket (#19020) inserted in the end
of the syringe will help make a seal at the cylinder port. Open the cylinder
valve until a light hiss can be heard. This will purge air from the cylinder port.
Press the syringe against the cylinder port and watch the plunger move as the
syringe fills. Close the cylinder valve when the syringe is full.
1 gallon plastic jug (clean) and screw cap (with seal)
10 to 15cc syringe
Cylinder of virgin refrigerant
MAKING AND USING A REFRIGERANT TEST GAS MIXTURE
Materials:
Procedure: NOTE: Perform these steps in an area away from the refrigerant monitor. 1. Clean the plastic jug by blowing it out with compressed air. Start with the syringe
plunger fully engaged (0cc). Carefully fill the syringe with vapor refrigerant from
the virgin cylinder. This should be done in an area away from the plastic jug.
to obtain the desired volume (4cc for a ~1000ppm mixture, 2cc for a ~500ppm
2. Immediately turn the syringe so the opening is upward. Slowly move the plunger
mixture). If the plunger moves below the desired volume, go back to step 2.
opening of the syringe to contain the measured gas. Place the opening of the
3. Once the proper volume is achieved in the syringe, place your finger over the
syringe into the opening of the plastic jug, remove your finger, and slowly release
the refrigerant sample down into the jug by pressing on the plunger.
4. When the syringe plunger is fully engaged, remove the syringe from the jug, place
the screw cap on the jug, and tighten the screw cap so it seals. Allow the jug to sit
in an upright position for a few minutes. Then turn the jug upside down and allow it
to sit for a few more minutes in this position. This will allow the refrigerant to blend
with the air in the jug.
A NOTE ON TESTING
To test refrigerant monitors, open the jug screw cap and place the opening of the jug
over the sensor, holding it so it seals against the sensor housing. This will minimize the
dissipation of the sample. Once the test is completed, immediately replace the screw
cap. Avoid rapid movement of the jug when it is open, as this will create air currents
that will dissipate the sample. Mix a fresh sample as required.
SYSTEM TECHNICAL DATA
Controller: Steel Mounting: Wall or Bulkheads Audio Alarm: 1/2 Sensors internal 80 dB/12 V DC Horn
4/6 Sensors external 110 dB/12 V DC Horn Outputs: Dry Contacts rated for 10 A @ 120/230 VAC
Uncommitted 12 v DC @ 100mA (4/6 Sensor Models)
Mechanical obstructions to inhibit air flow
Plenums for return air
Heat domes created by large boilers or equipment.
Product which limits gas movement
Where is the system vulnerable to breakage
Dangerous to Life if Leak Occurs
INSTALLATION INSTRUCTIONS
The controller and its sensors should be positioned carefully to avoid mechanical
damage, i.e. moving product, machinery, doors, etc.. They should also be kept away
from heat sources and should not be placed in strong drafts or in high moisture areas. DO NOT route sensor cables on building exteriors or between buildings via overhead
cables. Also, sensor wiring should be kept a minimum of 1.5 feet (500mm) from
electrical and telephone cables. (See section on sensor location). The controller and sensor must be installed in accordance with these instructions to
protect this equipment and ensure its correct performance.
QUANTITY AND LOCATION OF SENSORS
Sensor cable length must not exceed recommendations for the type of monitor if the
unit is to operate correctly. For one and two sensor models the wires to the sensors
cannot exceed 200 feet (60 meters). For four and six sensor models the sensor wires
cannot exceed 500 feet (160 meters). It is sometimes difficult to determine the number of sensors needed and the best
location of the sensors, as there is no hard and fast rule. However, there are a number
of simple guidelines which help to make the decision easier. Most standards normally
recommend some degree of ‘overkill’ to ensure adequate coverage. The two methods of locating sensors are “Point”, where sensors are located near the
most likely sources of leakage, and “Perimeter”, where sensors completely surround
the hazardous area. The size and nature of the site will help to decide which of these
methods is the most appropriate to use, consider the following:
YELLOW JACKET sensors can be calibrated for a maximum sensitivity to either group
“A” or group “C” refrigerant gases. If not specified ,the default is to Group A gases. Important: Do not try to economize by using the minimum number of sensors
possible. A few extra sensors could make all the difference when a gas leak occurs!
POSITIONING SENSORS
When detecting a refrigerant gas with vapor density greater than 1 (i.e. heavier than
air) the sensors should be located near ground level, approximately 16 –20” (40-50cm)
from the floor. Examples of such gases would be butane, LP Gas, xylene and very cold
ammonia in a deeply refrigerated cold storage. For any lighter than air gases, such as ammonia, methane or hydrogen, the sensor
2
needs to be located higher, 8-12” (20-30cm) from top of wall.
Page 3

Maximum Sensor Wire Length, Per Sensor
3
It is not recommended to locate sensors on the ceiling in mechanical rooms as this is
where the hot gases collect and you may get a thermal inversion which prohibits the
sensor from detecting the escaped refrigerant gas. In certain circumstances, false alarms may be caused by
the occasional presence of sufficiently high concentration of
other trace gases. If the installer encounters such a situa-
tion check with our Customer Service Department for in-
structions on how to tune this issue out. Examples of situations where such abnormalities may arise
include:
Facilities maintenance activities involving solvents, paint
fumes, waxes or other volatile organic compounds
(VOC’s).
Cold Storage facilities used in fruit ripening/storage from
gas given off by the ripening food (bananas – ethylene,
apples – carbon dioxide).
Heavy localized exhaust fumes (carbon monoxide, diox-
ide) from engine driven forklifts in confined spaces or
close to sensors.
Combinations of above listed fumes from neighboring factories.
A response delay is built in to the system to minimize the possibilities of false alarms. Mount the controller in a convenient position.
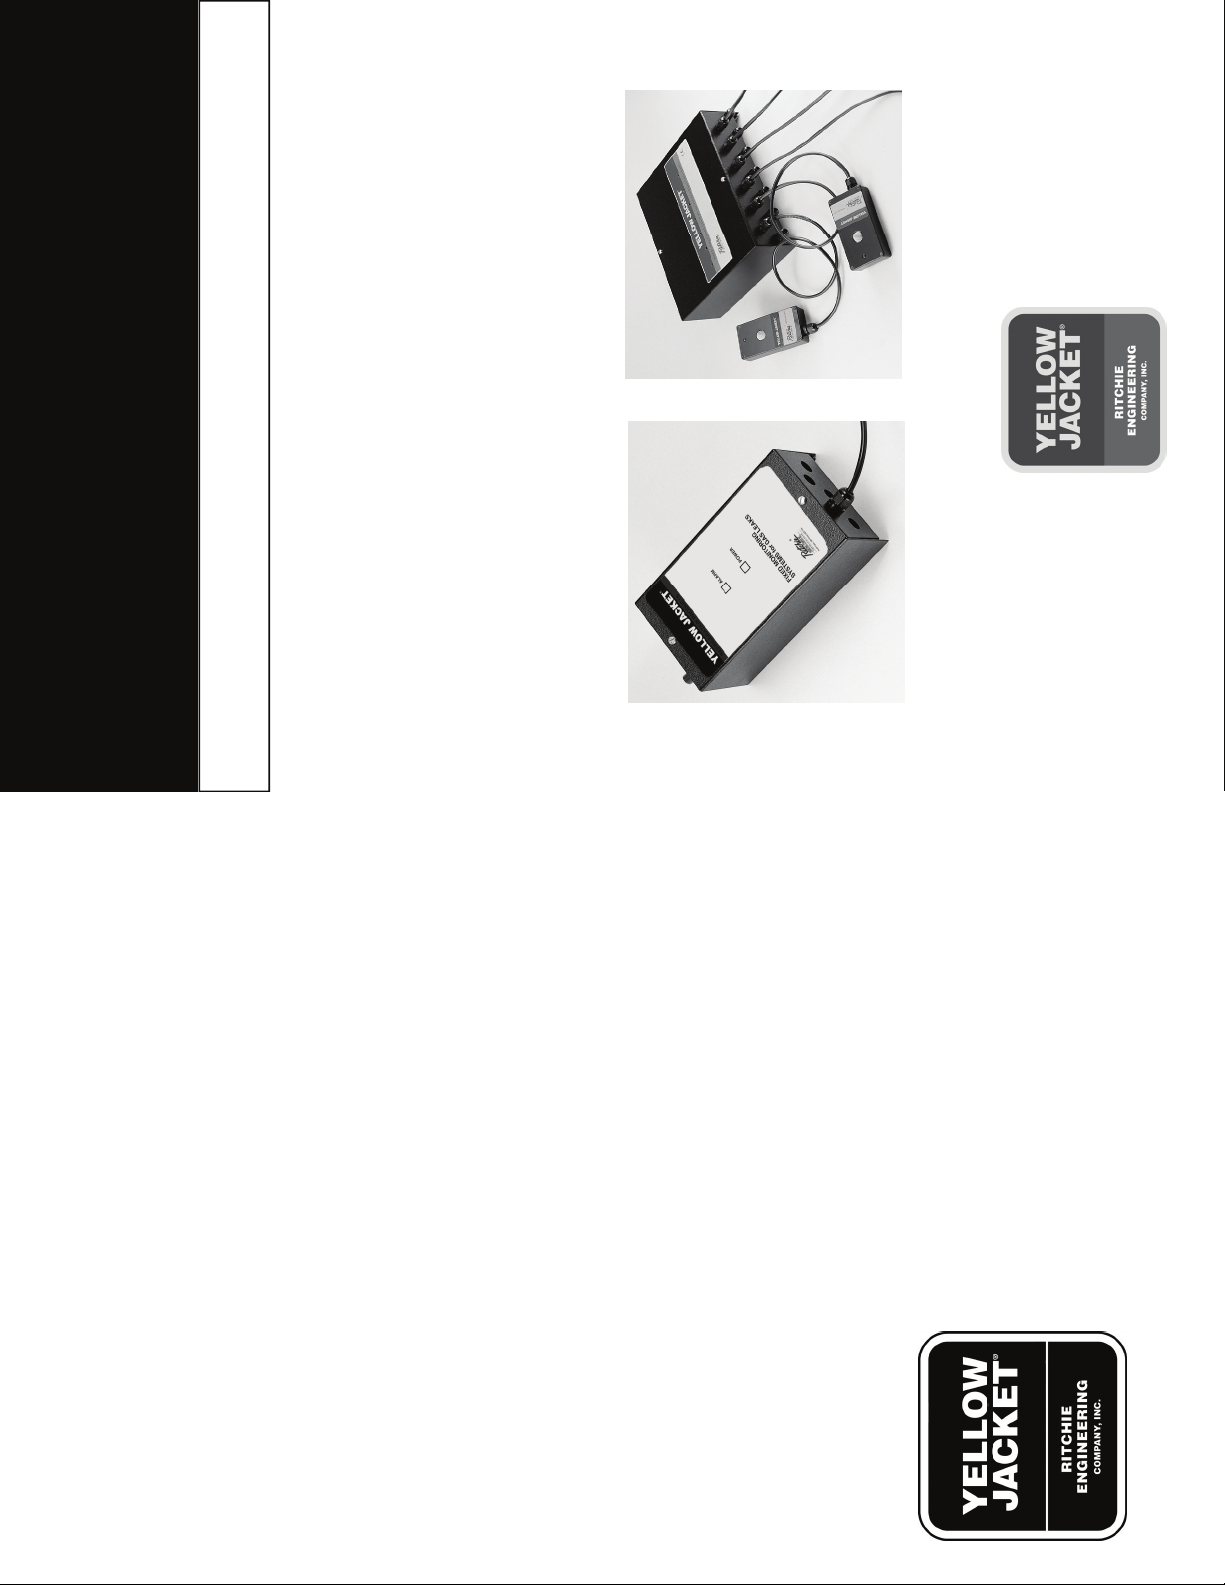
WIRING REMOTE SENSORS
Remove the covers off the controller and sensor housings and attach strain reliefs
through the openings in both. Fasten the controller and sensors to the walls per the
instructions on pages 2 and 3. Route cable wires through the strain reliefs between
sensors and controller per table below. Connect the wires to sensor terminal block CN1 on Controller circuit board positions 1,
2, 3 & 4. Connect the other end of the sensor cable to terminal block CN1 positions 1,
2, 3 & 4. Caution: Make certain that the colors connect 1 to 1, 2 to 2, 3 to 3 and 4 to 4.
Replace Sensor cover. Repeat above sequence for each other sensor assuming
monitor has multiple sensors. If you do not need to use all the sensors you can eliminate them by connect terminals
Controller board for a 4- or 6- sensor leak monitor
Sensor Qty Voltage Length Min. Wire Gauge & Ohms
two and three of the sensor terminal block using a 2200 ohm resistor.
On/Off positions for key
to turn off sounder
when in alarm.
1 & 2 12 VDC 200 ft (60m) 22ga (0.2 mm) (3.52 Ohms/1000 ft)
1 & 2 120 AC 200 ft (60m) 22ga (0.2 mm) (3.52 Ohms/1000 ft)
4 & 6 120 AC 500 ft (160m) 22ga (0.2 mm) (3.52 Ohms/1000 ft)
1 & 2 230 AC 130 ft (40m) 22ga (0.2 mm) (3.52 Ohms/1000 ft)
4 & 6 230 AC 320 ft (100m) 22ga (0.2 mm) (3.52 Ohms/1000 ft)
Typical installation for a 4- or 6- sensor leak monitor
10
Page 4

leak monitor
a one- or two-sensor
Typical installation for
120 90 mA
230 45 mA
Models VAC Power Draw
1 & 2 Sensor
Leak Monitor
120 180 mA
230 90 mA
120 300 mA
3 & 4 Sensor
Leak Monitor
5 & 6 Sensor
Leak Monitor
9
230 150 mA
Controller board for a
two-sensor leak monitor
P/N Description
68091 Replacement Refrigerant Sensor, 2 Level
68093 Replacement Ammonia Sensor, 2 Level
68194 Replacement Hydrocarbon Sensor, 2 Level
68084 Plenum Duct Mount Enclosure
68089 Environmental Enclosure
SCHEMATICS & DIAGRAMS:
ACCESSORIES
68099 Replacement Key Switch
Models Connection Points
1 & 2 Sensor Leak Monitor CN5: Low Level Alarm
CN4: High Level Alarm
4 & 6 Sensor Leak Monitor CN10: Low Level Alarm
CN9: High Level Alarm
CN12: Fault Reporting Relay
plug and socket is used installation should include a readily accessible switch
and a 2 or 5 Amp fuse should be within 10 feet (3 meters) of the controller.
WIRING DRY CONTACTS to Operate Alarms, Fans or Systems
The dry contacts on your Leak Monitor are rated for 10A at 120/230 VAC and the high
level alarm condition will override a low level alarm condition.
The low and high level alarms each have a pair of contacts and are normally open
(N/O) and normally closed (N/C) in standby. They are a switches you can use to turn
your system off or a fan on. If your application requires more than 10 amps then you
will need to use the dry contact to activate a secondary relay to handle the load of your
warning lights and alarms, building monitoring systems and auto dialers.
application. See below for connection points.
Applications for dry contacts include: turning system off, isolation solenoids, fans,
CONNECTING POWER TO LEAK MONITOR
Connect electrical supply to terminal block CN3. Use rated wire for your installation.
Connections are L (line), N (neutral) and E (ground). Ensure that the ground
connections to the lid and base of the enclosure are maintained.
Note: Connection to power supply must be per local wiring codes and regulations. If a
IMPORTANT: The monitor must be installed in accordance with the instructions to en-
sure that the unit functions correctly. Each of the sensors has a green light to indicate
that power is present.
To minimize false alarms, the system has a built in delay between the time a sensor
detects gas and an alarm occurs. For two level controllers, this delay is 10-15 seconds
before a low level alarm, and 25-30 seconds on a high level alarm.
When the YELLOW JACKET Gas Monitor has been installed in accordance with the
installation instructions it is ready to monitor the area/equipment and detect gas leaks
at the pre-set levels.
Control Unit Type: Fuse Rating:
1 & 2 Sensor 12 VDC 20mm T500mA 12 V
4 & 6 Sensor 12 VDC 20mm T2mA 12 V
1 & 2 Sensor 120 VAC 20mm T100mA 120 V
4 & 6 Sensor 120 VAC 20mm T315mA 120 V
1 & 2 Sensor 230 VAC 20mm T50mA 230 V
4 & 6 Sensor 230 VAC 20mm T160mA 230 V
FUSE REPLACEMENT
4
Page 5

.
5
UNIT OPERATIONS 1-2 SENSOR, SINGLE LEVEL MONITORS
One level systems have a single level of protection. The monitor will go into alarm
when the sensor detects a gas concentration of 1000 parts per million (PPM) or higher.
(DEFAULT SETTING) After initial start-up the unit goes into standby: Only the green light on the panel is on
and no gas is present. If the green light is off, power to the unit has been interrupted.
3 Minute Delay and Servicing
Single Level Monitors have a 3 minute delay and a way to take the system off-line dur-
ing repairs or service. In the middle of the Controller Board is a JP1 jumper. Moving
the jumper link to the “ON” position will provide a 3 minute delay from when the sensor
detects a refrigerant to when the unit goes into alarm. To take the monitor off-line dur-
ing service move the jumper so it is only on one contact. Placing the jumper on one
contact will prevent the loss of the jumper.
1-2 SENSOR, TWO LEVEL MONITORS
Two level monitors provide two levels of protection. The monitor will go into a low level
alarm when the sensor detects a gas concentration of 100 PPM. This provides a warn-
ing to have time for a maintenance check on your system. Then if the sensor detects a
concentration of 1000 PPM or higher, the monitor will go into a high level alarm. After initial start-up the unit goes into standby: Only the green panel light is on when no
gas is present. If the green light is off, then power to the unit has been interrupted.
Delays and Servicing
The Two Level Monitor has built in delays of 10-15 seconds on low level alarms and 25
-30 seconds on high level alarms. To take the unit off-line during service turn the key
switch 90 degrees to shut the alarm off.
ALARM CONDITIONS
Single Level Monitors
Alarm (1000 ppm): One or more red lights on the panel turn on. The audio alarm oper-
ates continuously, and the alarm dry contact relay operates: this indicates presence of
Description Voltage At Sensor
a high level of gas at one or more of the sensors.
Two Level Monitors
Low Alarm (100ppm): One or more yellow lights on the panel turn on. The audio alarm
operates intermittently, and the low alarm dry contact relay operates: this indicates
presence of a low level of gas at one or more of the sensors. High Alarm (1000ppm): One or more red lights on the panel turn on. The audio alarm
operates continuously, and the high alarm dry contact relay operates: this indicates
presence of a high level of gas at one or more of the sensors. The High Alarm will
override the Low Alarm actions. For the purpose of system maintenance, the audio alarm may be disabled temporarily
10-15V
Sensor in standby 0.4V
Reference Values
Low Alarm Condition
by turning off the key switch parallel with the wall on the controller
1.6V
2.8V
High Alarm Condition
Approximate-Internal
after power is switched on).
FAULT FINDING GUIDE
Alarm Panel
(Technician Use Only)
Symptom: No lights displayed on panel.
Cause: 1. Power failure (check supply).
2. Tripped circuit breaker or blown fuse on electrical supply.
3. Blown fuse at the electrical supply on the controller PCB board
4. Two level controller only: Has unit warmed up? (This takes 3-4 minutes
operation after 3 minutes.
controllers, link on jumper JP1 on 1 level controllers removed).
in order the calibration pot may have been adjusted and may need to be
reset. Check with us for instructions.
Symptom: Red light is on, but no alarm condition is active: i.e. no alarm and no relay
Cause: 1. Make sure the alarm has not been deactivated (key switch on 2 level
2. This indicates a wiring or sensor fault (Call service provider). If these are
Sensor
sensor fault. Check power supply to the controller. Check connections
between the controller and the sensor to ensure that the wires from
Symptom: Green light on sensor is off.
Cause: 1. This may indicate a wiring fault between the controller and sensor or a
positions 1 to 4 on the sensor connect to the corresponding 1 to 4 on
the controller. (See “Wiring Remote Sensors”).
Sensor connection position in the controller is not blown.
3. If the fault is not cleared then the sensor has been damaged.
2. On a 4 & 6 sensor unit check that the sensor fuse on the particular
Negative Ground
Power Supply 7.2V minimum reading,
unless you have power drop reduction.
4
1
Number
DIAGNOSTIC GUIDE
Terminal
3 Approximately 4-5V 4.8-5V
2 Two level system -
8
Page 6

7
FOUR AND SIX SENSOR MODELS
These units operate much the same as the one and two sensor models. They have
more sensors and the sensors can be located farther away from the controller. The
sensors are part of one single system. They are not individual zones with independent
reactions. If the installation requires independent responses then an Expander Box should be
added. This allows each senor to act as an independent zone with it’s own response. A
Four Sensor Expander Box is p/n 68028 and a Six Sensor model is p/n 68029. The four and six sensor controller has a sensor fault circuit to warn if the system is
registering a fault. If the fault circuit activates it will switch CN12 a dry contact to
provide a means to activate an alarm, indicator light or another warning device. Four and six sensor models also have a way to reverse the N/O and N/C dry contacts
by moving a jumper setting. This can be handy when troubleshooting. This is done by
moving the jumper setting at JP1.
INSTALLATION OF EXPANDER BOX
Alarm control unit and relay box should be mounted close together. The ribbon cable
should be fed out through the gap between the top cover and base on each unit. Both units must be fed from the same power source. If a switch is fitted, it should
control the power to the control panel and the expander unit. Connect the relays in the expander box as you require to remote systems or sirens etc,
Position 1 in the expander is the same as sensor position 1 on the alarm control PCB.
EXPANDER BOX OPERATION
The relays in the expander box makes each of the four or six channels into
individual zones. The relays in the expander box follow the LED status on the controller, i.e. yellow LED
– low level will have the low level relay in the expander box live. Red LED – high level
will have the high level relay in the expander box live. A sensor fault only activates the red LED’s on the control panel. When the sensor fault
is active the unit (no siren or the relay operation). The fault relay will operate. No relay
in the expander box will operate. As long as a high level alarm condition is present at one or more of the sensors (i.e. a
high level of gas is still present) both relays for the sensor(s) will be on. If the alarm
condition has cleared, and the alarm unit is a manual reset type, only the high level
relay will be on until the reset button is pushed. While the panel is warming up, (the first 5 minutes or so), the relays on the expansion
unit may change state briefly, before settling down. This is normal.
RESETTING AN ALARM CONDITION
Single Level Monitors
The monitor will reset automatically after the gas dissipates.
Two Level Monitors
High level alarm conditions require a manual reset (by pressing the reset button).
Please note that a high alarm condition can only be reset 30-60 seconds after the gas
clears from around the sensors. On two level controllers, low level alarm conditions will reset automatically when the
gas has fully dissipated. Forced air movement will decrease the time required.
SYSTEM CHECKING
It is advisable to check operation of the monitor regularly by exposing the sensor to
a test concentration of the appropriate refrigerant gas. DO NOT RELEASE RAW
REFRIGERANT AT THE SENSOR as this will shock and ruin the sensor. See
“Making and Using a Refrigerant Test Gas Mixture” on page 11 of this manual.
RECALIBRATION
The system is very stable and routine re-calibration is not necessary unless required
by local regulations. (For procedure contact the factory). If periodic tests are required
see Making and Using a Refrigerant Test Gas Mixture at back of this manual.
AMMONIA and HYDROCARBON LEAK MONITORS
The monitors for ammonia (NH3) and hydrocarbon refrigerants operate the same as
the monitors for refrigerants using the same controller. The sensors and calibration
settings are different.
AMMONIA SENSOR INSTALLATION
Ammonia is one material where the temperature determines if it will rise or sink.
For this reason you need to look at the temperatures involved and determine if the
ammonia will sink or rise. Then position your sensors per instructions on page 2-3.
12 VOLT BATTERY MODELS
Battery back-up models need a 7.5 amp hour, sealed lead-acid battery and a
maintenance free “trickle” charger rated for the battery. They do not come with the
Leak Monitor due to shipping issues. They can be sourced at a fire alarm supply or a
Batteries Plus type store. Installation is very similar to the standard models with the only changes being the
power supply. You will need to mount your 7.5 amp hour battery near an outlet to plug
the maintenance free trickle charger into. Instead of supplying 120/230 volts AC to the
controller, you connect the 12 volt power from the battery to the controller. For a 1-2 sensor units, connect the negative wire to the L terminal and the positive wire
to the N terminal. For 4-6 sensor units, connect the negative to the N terminal and the
6
12 volt positive to the L terminal. NOTE: the 1-2 and the 4-6 are not the same.
Replacement fuses are listed on page 7.
 Loading...