

Page 1
7/20
52030F manual/manuel
Operating Instructions
Yellow JacketTM 52030F
Thermal Imager
Contents Made in China
Fabriqué en Chine
Product distributed by
Produit distribué par
Southwire Company, LLC.
One Southwire Drive
Carrollton, GA 30119
©2020 Southwire Company, LLC
All rights reserved.
Tous droits réservés.
Page 2
INTRODUCTION
The Yellow JacketTM 52030F Thermal Imager is an accurate, high-quality
handheld thermal imaging camera. The 52030F has been designed
exclusively for the purpose of performing elevated skin temperature
screening. The 52030F thermal imager meets the recommendations
established by the U.S Food & Drug Administration (FDA) for elevated skin
temperature screening. The 52030F has a measurement accuracy of ±0.9F
(±0.5C) over a temperature screening range of 93.2-102.2°F (34-39°C).
The thermal imaging camera has been calibrated in the factory using
a blackbody temperature reference source. No on-site calibration is
required.
Meets international performance standards for thermographic devices.
Not FDA-cleared or approved.
KEY FEATURES
• Designed exclusively for elevated skin temperature screening
• 80x60 thermal resolution or 4800 temperature measurement points
• 9Hz frame rate. The camera creates images at the rate of 9 per second
• Hot, Cold, Center temperature tracking
• Large, easy-to-read graphical TFT display
• Buzzer alarm
• 6 hours operating time with rechargeable battery
• Compact, rugged design
PRODUCT USE RECOMMENDATIONS
• Please read this Operating Manual carefully before using the
thermal imager
• The optimal measuring distance for this product is 3 feet.
• To ensure measurement accuracy, please use the product in an
operating environment of 59°F to 86°F (15°C to 30°C), <85% relative
humidity (non-condensing).
• Please use the thermal imager indoors and in a room with minimal air
movement. When changing to a new environment, please turn on the
thermal imager 10 to 15 minutes before you begin taking measurements.
• The ambient temperature for measuring must be stable. Do not measure
in places where there is a lot of airflow from fans or air outlets.
• If the person being measured has been in a place where the temperature
was significantly warmer or cooler than the measurement environment,
have that person remain in the measurement room for 10 to 30 minutes
before taking their temperature.
• The 52030F measures the surface temperature of an object. If
temperature compensation is needed, please adjust in the Settings menu.
• The thermal imager is self-calibrating. If the reading jumps quickly, allow
the measurement to steady before taking a reading.
• After measuring extremely high or low temperature objects, leave the
product alone for about 10 minutes before next use.
• Do not use the product in places with strong sunlight or electromagnetic
interference.
• Please do not use this product in flammable, explosive, steamy, wet or
corrosive environments.
• Please stop using the product if it has been damaged or modified to avoid
inaccurate measurement results.
• Highly Recommended: For high measurement accuracy, ensure that the
emissivity setting in the thermal imager matches the surface material (ex.
human skin) you are measuring.
• For better results, , please warm-up the thermal imager for 10 minutes
before performing measurements.
• When the battery is being charged, the internal temperature of the
product will increase. This can impact the accuracy of temperature
measurements. Therefore, it is not recommended to take measurements
while the product is being charged or right after it has been charged.
IMPORTANT INFORMATION CONCERNING
ELEVATED SKIN TEMPERATURE SCREENING
• Temperature measurement should not be solely or primarily relied upon
to diagnose or exclude a diagnosis of COVID-19, or any other disease
Page 3
• Elevated body temperature in the context of use should be confirmed with
secondary evaluation methods (e.g., an FDA approved non-contact
infrared thermometer (NCIT) or a clinical grade contact thermometer)
• Public health officials, through their experience with the device in the
particular environment of use, should determine the significance of any
fever or elevated temperature based on the skin telethermographic
temperature measurement
• The thermal imaging camera should be used to measure only one
subject’s temperature at a time
• Visible thermal patterns are only intended for locating the points from
which to extract the thermal measurement.
RECOMMENDATIONS FOR USING THE THERMAL IMAGER
FOR ELEVATED SKIN TEMPERATURE SCREENING
(Consistent with ISO/TR 13154: 2017 guidelines on thermograph usage)
Preparing the Area where you will use the thermal imaging system
• Recommended room temperature should be 64-86 °F (18-30 °C) with
a relative humidity of 60 percent.
• Try to control other conditions that could impact the temperature
measurement:
• Avoid reflective backgrounds (for example, glass, mirrors, metallic
surfaces) to minimize reflected infrared radiation.
• Set up the thermal imaging camera in a room with minimal movement
of air, out of direct sunlight, and away from radiant heat (for example,
portable heaters, electrical sources).
• Avoid strong lighting (for example, incandescent, halogen and quartz
tungsten halogen light bulbs).
PREPARING THE PERSON BEING EVALUATED
The person operating the thermal imaging system should make sure
the person being evaluated:
• Does not have any face obstructions during measurement (such as a
mask, glasses, hat, headband, or scarf), the person's hair is pulled away
from the face, and the person’s face is clean and dry.
• Does not have a higher or lower face temperature from wearing excessive
clothing or head covers (for example, headbands, bandanas) or from using
facial cleansing products (for example, cosmetic wipes).
• Has waited at least 15 minutes in the measurement room or 30 minutes
after exercising, strenuous physical activity, bathing, or using hot or cold
compresses on the face.
PREPARING THE THERMAL IMAGING SYSTEM
• The 52030F thermal imager does not require the use of a black body
for calibration during evaluation
• Turn on the camera 30 minutes before use.
USING THE THERMAL IMAGING SYSTEM
• Measure only one person’s surface skin temperature at a time.
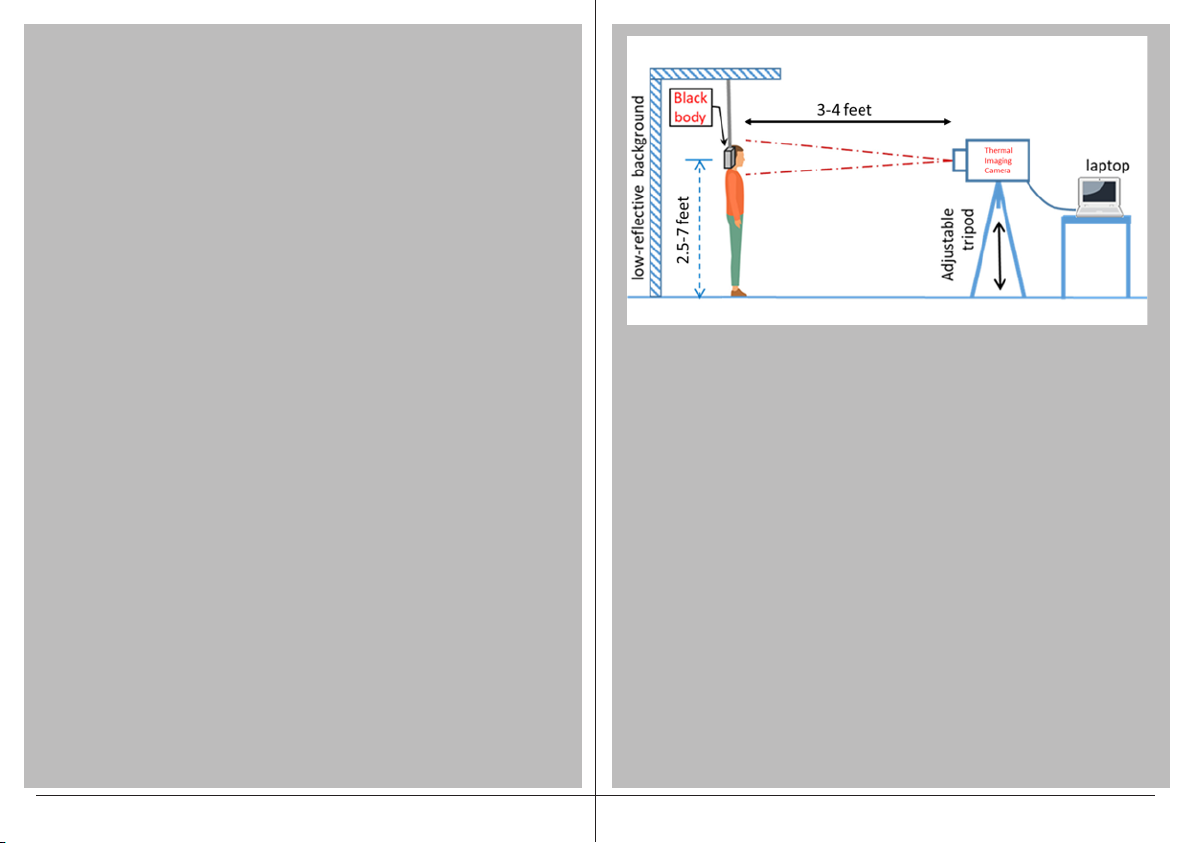
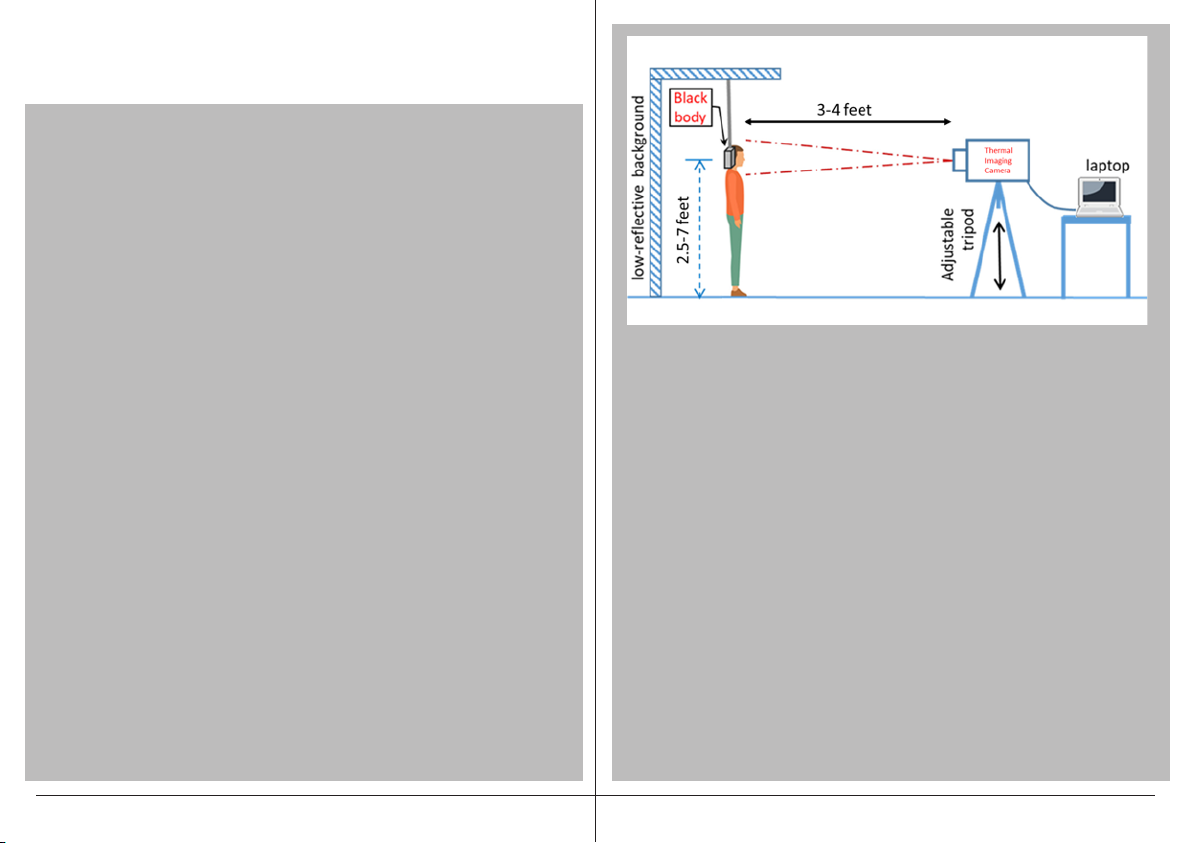
• Position the person at a fixed distance of 3 feet (1 meter) from the
thermal imaging system, directly facing the camera.
• Recommended viewing angle is approximately 21° vertical x 21°
Page 4
horizontal
• The image area should include the person’s whole face
• If an increased temperature is seen using the thermal imaging system,
you should use a different method to confirm a fever. Public health
officials can help you determine if the fever is a sign of infection.
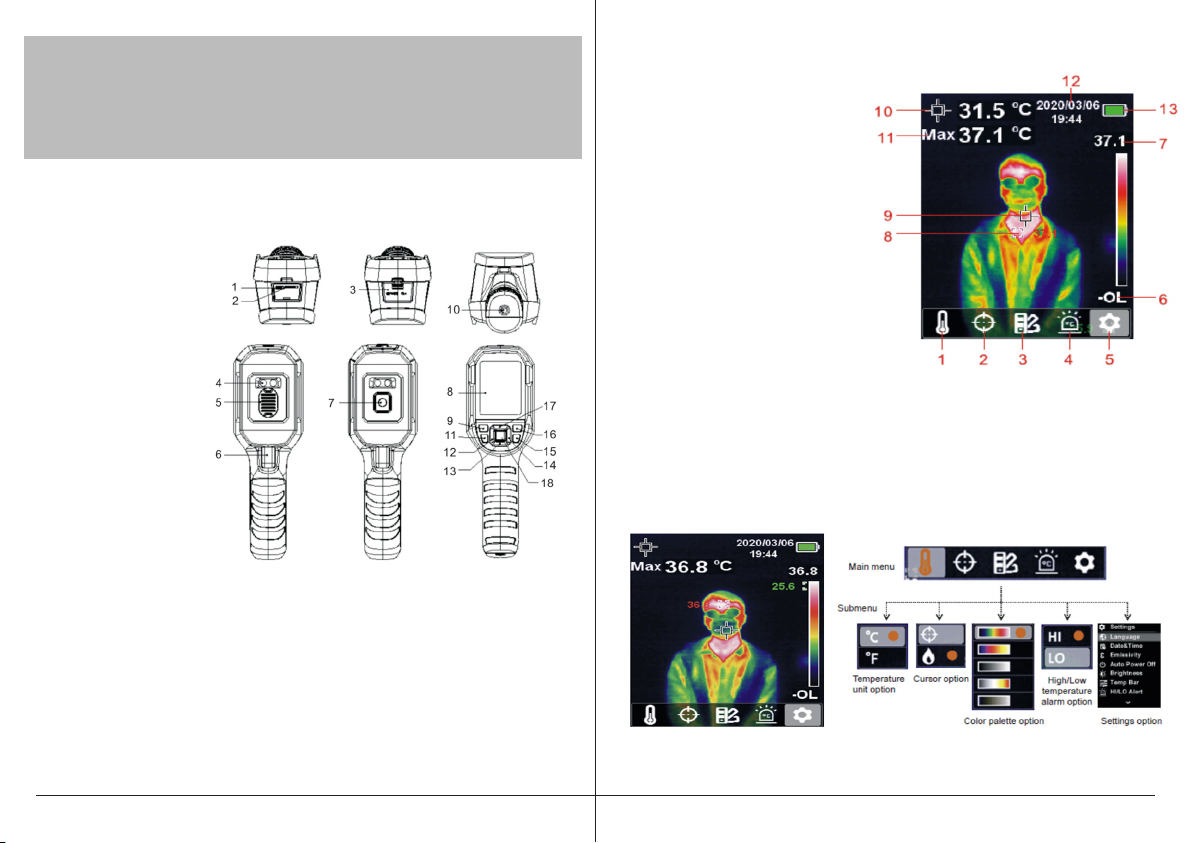
PARTS OF THE THERMAL IMAGER
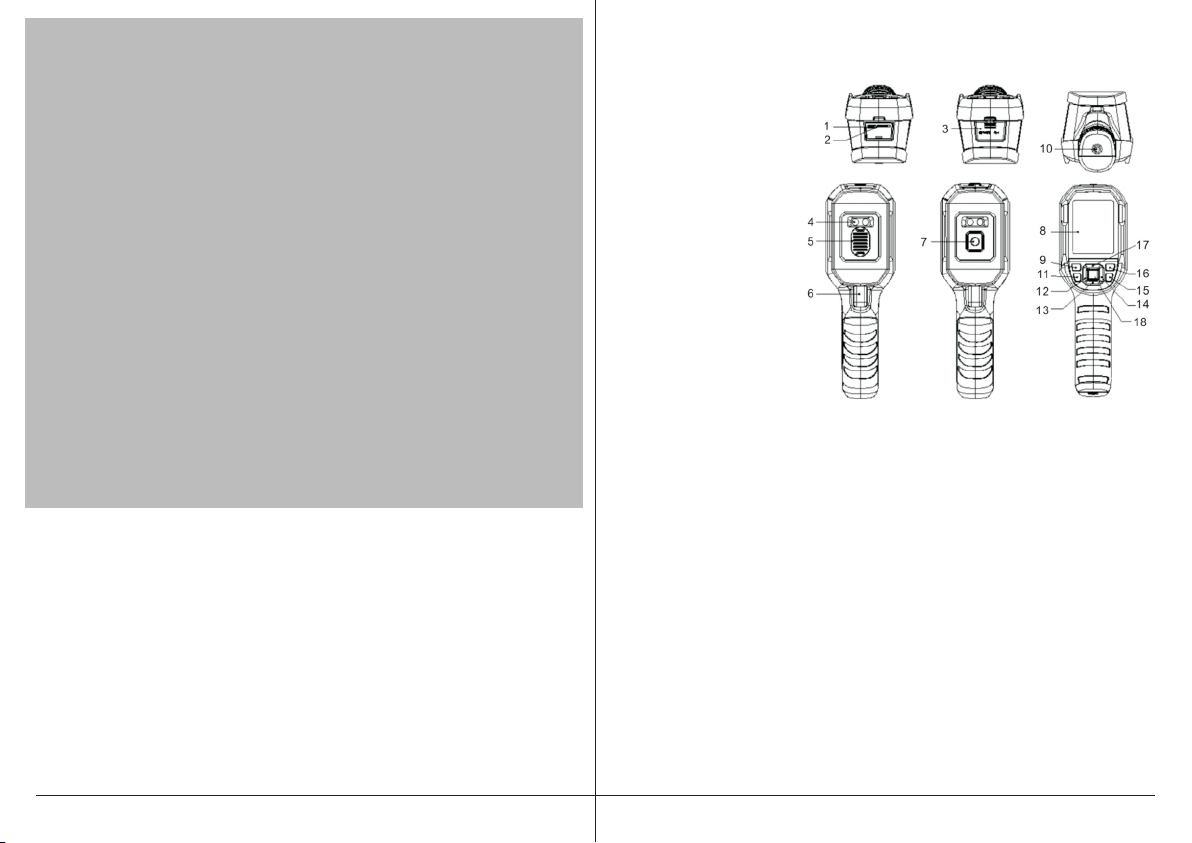
1: Micro SD card slot
2: Type-C USB interface
3: Interface cover
4: LED light
5: Infrared camera
lens cover
6: Trigger
7: Infrared camera lens
8: LCD
9: Power button
10: Tripod mounting hole
11: Flashlight button
12: Left button
13: Down button
14: Right button
15: Back button
16: Replay button
17: Up button
18: SET button
THE THERMAL IMAGER DISPLAY
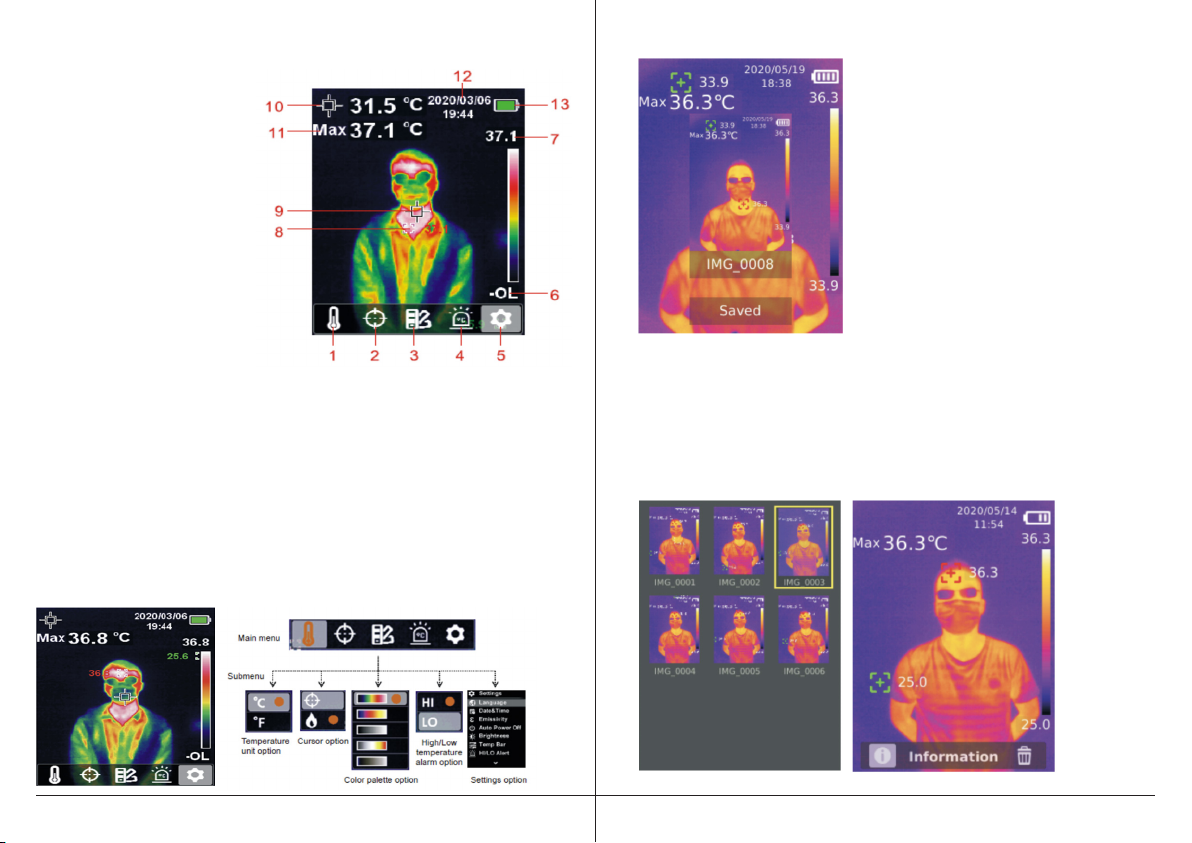
1: Temperature unit option
2: Cursor option
3: Color palette option
4: High/Low temperature
alarm option
5: Settings option
6: Temperature bar lower value
7: Temperature bar upper value
8: Maximum temperature point
9: Center point
10: Center point temperature
11: Maximum temperature
12: Date & time
13: Battery status
POWER ON/OFF
Press the yellow power button for 3 seconds to turn the thermal imager ON.
Press the yellow power button for 1 second to turn the thermal imager OFF.
MENU INTRODUCTION
Page 5
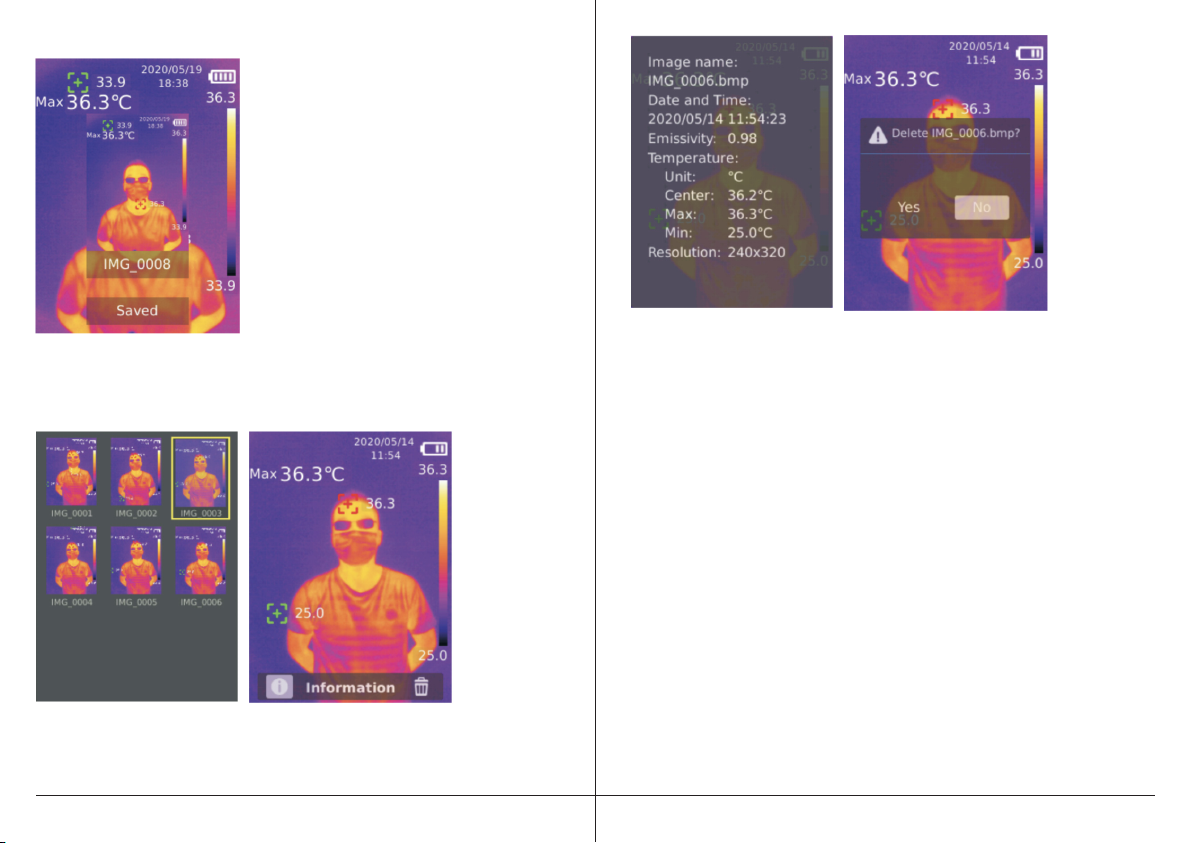
OPERATING INSTRUCTIONS
1. Pull and release the trigger to capture a
thermal image. See the section near the
end of this manual titled AUTO SAVE.
2. If AUTO SAVE is turned ON, the image will
be automatically saved to the SD card
memory.
3. If AUTO SAVE is turned OFF, you must save
the image manually. You can save the
image to the SD card memory by pressing
the left arrow button. To discard the
image, press the right arrow button.
Press the SET button to confirm or the
back button to return.
Note: Images can only be saved if an SD card is installed.
IMAGE VIEWING
1. Press the blue replay button to enter the picture gallery.
2. Use the up/down/left/right buttons to select the desired image.
3. Press the SET button to view the image in full screen mode.
4. Press the SET button in full screen mode to delete the image or view its
information.
Note: Do not remove or insert the SD card while viewing images
LED LIGHT OPERATION
Press and hold the flashlight button for 3 seconds to turn ON or OFF the
LED light. When the temperature alert is on and the measured temperature
exceeds the set temperature range, the LED light will flash.
Note: When the LED light is on, please do not aim it into the eyes of people
or animals.
BATTERY CHARGING
The thermal imager battery is charged using the supplied USB cable. You
can also connect the USB cable to a 120V AC outlet using the USB cable
and a safety-certified 5V/1A or 5V/2A power adapter (not
included).
Page 6
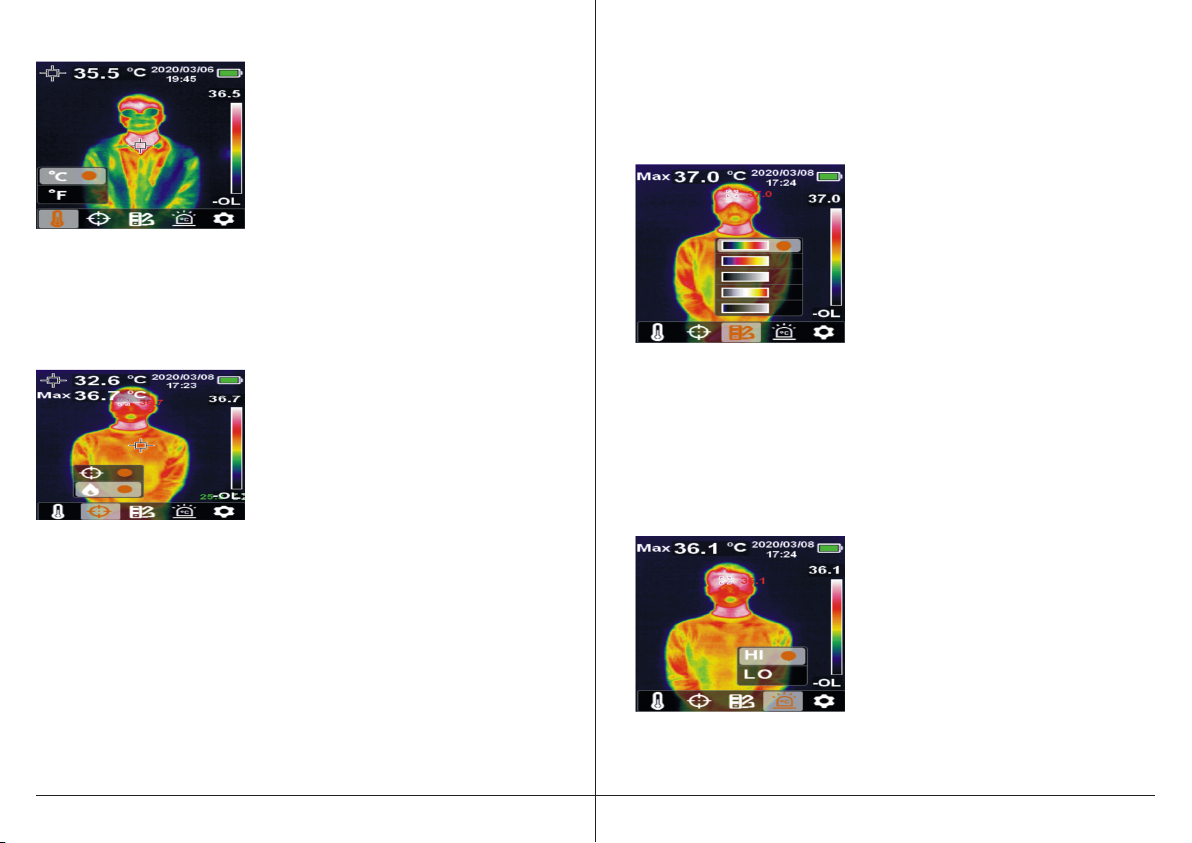
TEMPERATURE UNIT SELECTION
1. Press the SET button to open the main
menu.
2. Press the left/right button to select the
temperature unit symbol.
3. Press the SET button to enter the
temperature unit submenu.
4. Press the up/down button to select
°C or °F.
5. Press the back button to exit the
current menu.
CENTER POINT AND HIGH TEMPERATURE TRACKING
TO TRACK CENTER POINT TEMPERATURE:
1. Press the SET button to open the main
menu.
2. Press the left/right button to select the
cursor symbol.
3. Press the SET button to enter the
cursor submenu.
4. Press the up/down button to select the
cursor symbol.
5. Press the SET button to confirm.
6. The center point marker is turned on and the center point temperature
is displayed in the upper left corner of the LCD display.
7. Press the back button to exit the current menu
TO TRACK HIGH TEMPERATURE:
1. Press the SET button to open the main menu.
2. Press the left/right button to select the cursor symbol.
3. Press the SET button to enter the cursor submenu.
4. Press the up/down button to select the temperature unit symbol.
5. Press the SET button to confirm.
6. The high temperature indicator is turned on and the corresponding
temperature is displayed in the upper left corner.
7. Press the back button to exit the current menu.
COLOR PALETTE SELECTION
1. Press the SET button to open the main
menu.
2. Press the left/right button to select the
color palette symbol.
3. Press the SET button to enter the color
palette submenu.
4. Press the up/down button to select the
desired color. Choose from Iron Red,
Rainbow, White Hot, Red Hot, or Ice
Blue.
5. Press the back button to exit the
current menu.
HIGH/LOW TEMPERATURE ALARM
TO ENABLE HIGH/LOW TEMPERATURE ALARM:
1. Press the SET button to open the main
menu.
2. Press the left/right button to select the
temperature alarm symbol.
3. Press the SET button to enter the high/
low temperature alarm submenu.
4. Press the up/down button to select HI
(High) or LO (Low). Choosing HI turns
on the high temperature alarm. Choosing LO turns on the low
temperature alarm
Page 7
5. Press the SET button to confirm.
6. Press the back button to exit the current menu.
Note: High temperature alarm and low temperature alarm can be enabled
simultaneously or separately.
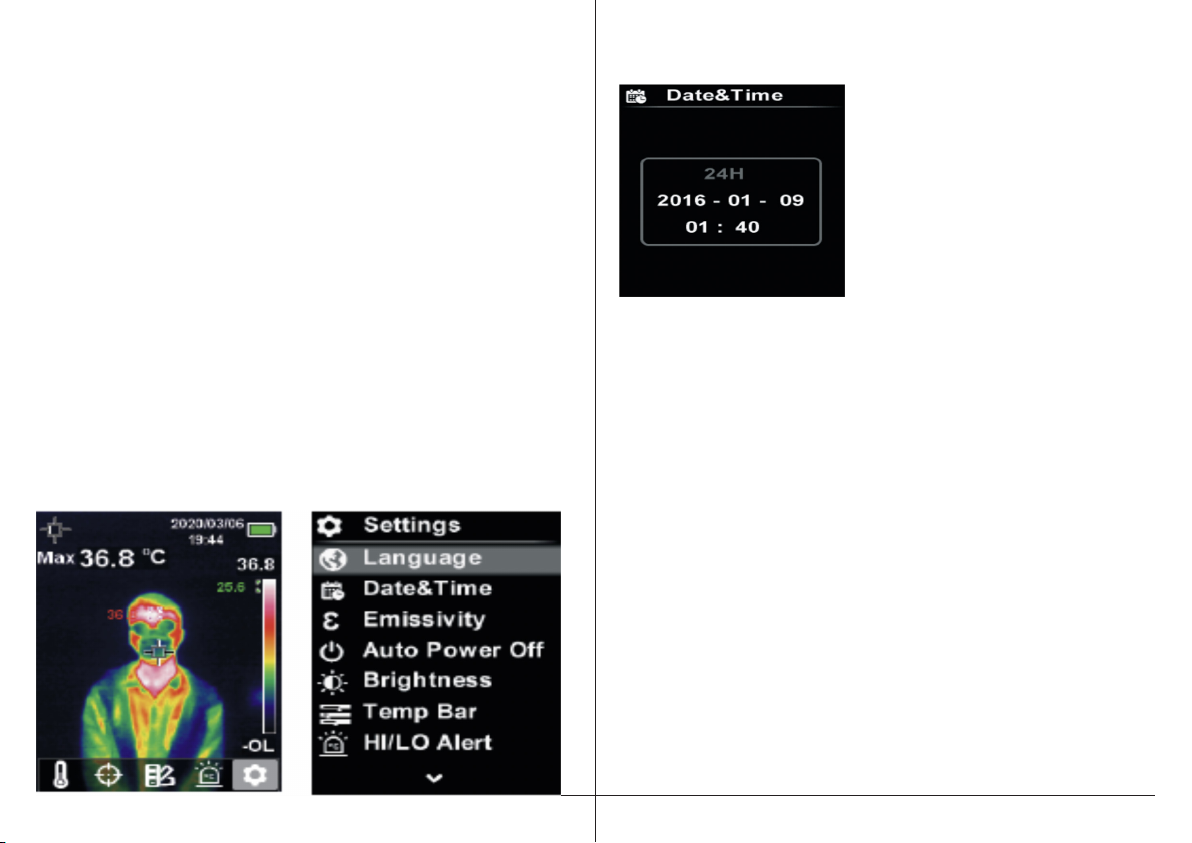
SETTINGS
To enter the Settings menu:
1. Press the SET button to open the main menu.
2. Press the left/right button to select the Setting symbol option.
3. Press the SET button to confirm.
TO SET THE LANGUAGE FOR THE THERMAL IMAGER
1. Press the up/down button to select the Language option in the Settings
menu.
2. Press the SET button to enter the Language submenu.
3. Press the up/down button to select the desired language. Choose from
English or Chinese.
4. Press the SET button to confirm.
5. Press the back button to exit the current menu.
DATE AND TIME
TO SET THE DATE & TIME
1. Press the up/down button to select the
Date & Time option in the Settings
menu.
2. Press the SET button to enter the Date &
Time submenu.
3. Press the left/right button to select the
parameter to be adjusted.
4. Press the SET button.
5. Press the up/down button to increase
or decrease the value.
6. Press the SET button to save the
settings and return to set other
parameters.
7. Press the back button to exit the current
menu.
EMISSIVITY/TEMPERATURE COMPENSATION
Emissivity is a number which describes a materials ability to emit thermal
radiation. It is a number between 0.1 and 1. A number like 0.1 represents
a perfect reflector (like aluminum foil) whereas the number 1 represents a
perfect emitter (like black cloth). You can adjust the emissivity setting of
the thermal imager to match the material being measured. Using an emissivity setting that matches the material you are measuring will ensure that
your temperature measurements are as accurate as possible. For example,
if you are monitoring the temperature of concrete as it cures, you would set
emissivity to 0.94 (see chart below) so your measurement is as accurate as
possible.
TO SET EMISSIVITY
1. Press the up/down button to select the
Emissivity option in the Settings menu.
2. Press the SET button to enter the
Page 8
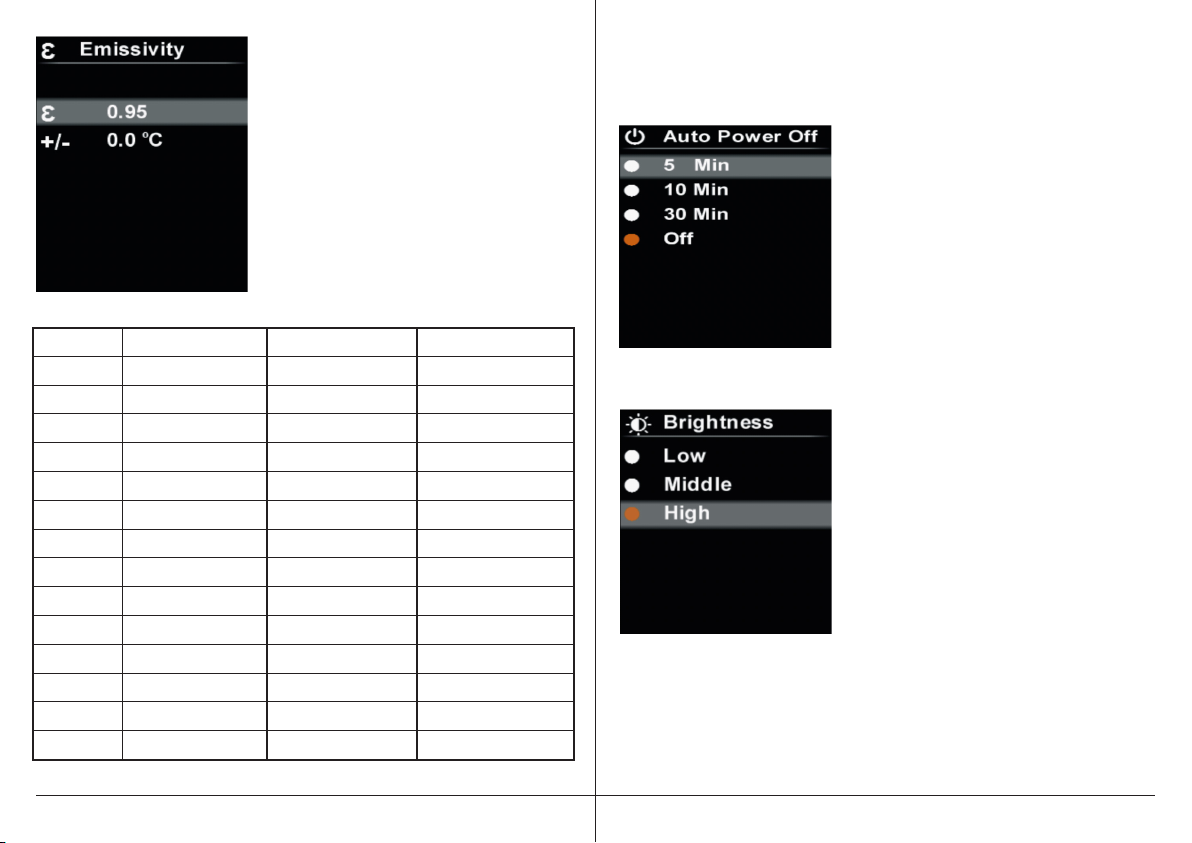
Emissivity submenu.
3. Press the up/down button to select
emissivity or temperature compensation.
4. Press the SET button to enter the
parameter adjustment state.
5. Press the up/down button to increase
or decrease the value.
6. Press the SET button to save the settings.
7. Press the back button to exit the
current menu.
Substance Thermal Emissivity Substance Thermal Emissivity
Asphalt 0.90 to 0.98 Cloth (black) 0.98
Concrete 0.94 Human skin 0.98
Cement 0.96 Lather 0.75 to 0.80
Sand 0.90 Charcoal (powder) 0.96
Earth 0.92 to 0.96 Lacquer 0.80 to 0.95
Water 0.92 to 0.96 Lacquer (matt) 0.97
Ice 0.96 to 0.98 Rubber (black) 0.94
Snow 0.83 Plastic 0.85 to 0.95
Glass 0.90 to 0.95 Timber 0.90
Ceramic 0.90 to 0.94 Paper 0.70 to 0.94
Marble 0.94 Chromium oxides 0.81
Plaster 0.80 to 0.90 Copper oxides 0.78
Mortar 0.89 to 0.91 Iron oxides 0.78 to 0.82
Brick 0.93 to 0.96 Textiles 0.90
AUTO POWER OFF
The 52030F thermal imager will turn off automatically after a preset time.
To set the auto power off time period:
1. Press the up/down button to select the
Auto Power Off option in the settings menu.
2. Press the SET button to enter the Auto
Power Off submenu.
3. Press the up/down button to select the
desired option from 5 Min, 10 Min, 30 Min,
and Off.
4. Press the SET button to confirm.
5. Press the back button to exit the
current menu.
LCD DISPLAY BRIGHTNESS
TO SET DISPLAY BRIGHTNESS
1. Press the up/down button to select the
Brightness option in the Settings menu.
2. Press the SET button to enter the
Brightness submenu.
3. Press the up/down button to select the
desired option. There are three choices:
Low, Middle, and High.
4. Press the SET button to confirm.
5. Press the back button to exit the
current menu.
Page 9
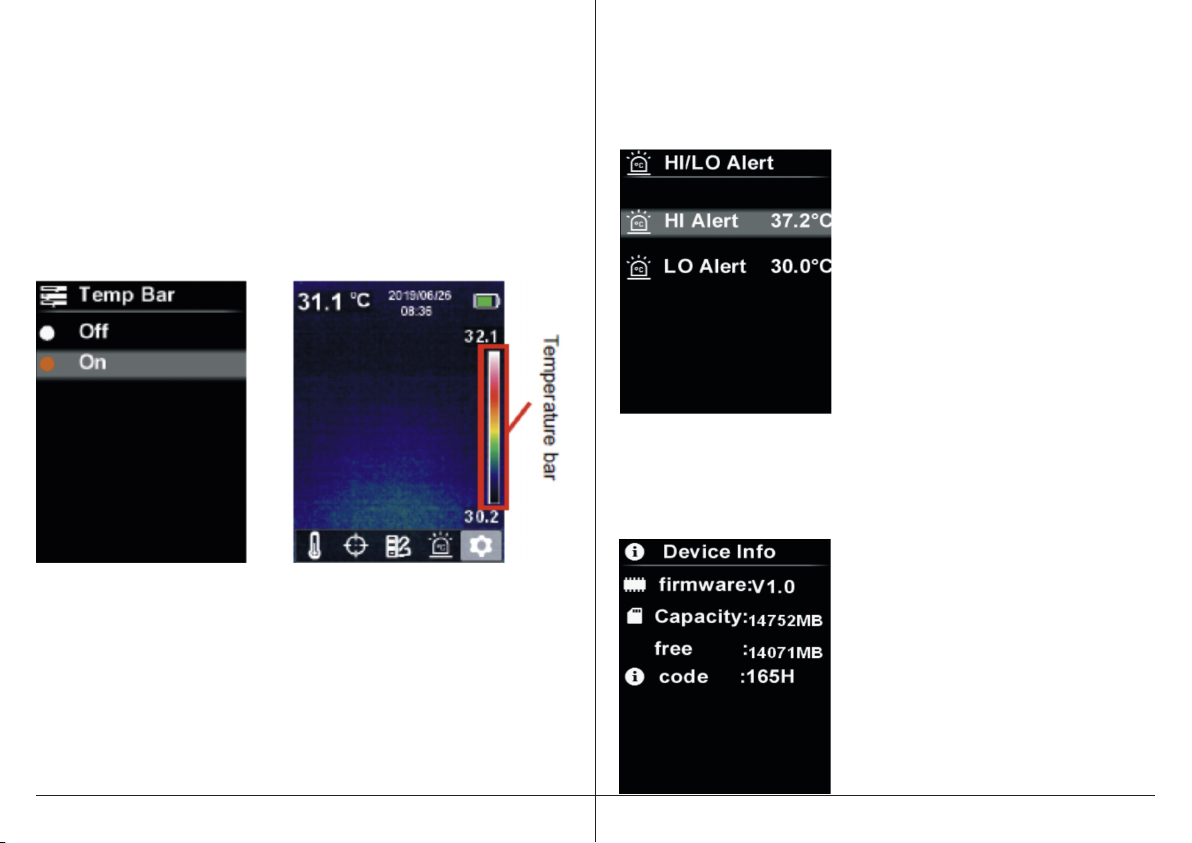
TEMPERATURE BAR
A temperature bar can be displayed on the LCD screen. This bar shows you
how the colors in the thermal image correspond with temperatures
To turn the temperature bar ON or OFF:
1. Press the up/down button to select the Temp Bar option in the Settings
menu.
2. Press the SET button to enter the Temp Bar submenu.
3. Press the up/down button to select ON or OFF.
4. Press the SET button to confirm.
5. Press the back button to exit the current menu.
ALARM TEMPERATURES
The 52030F thermal imager has an audible alarm that will inform you if a
preset temperature is reached.
TO SET THE TEMPERATURE ALARM
1. Press the up/down button to select the
HI/LO Alert option in the settings menu.
2. Press the SET button to enter the HI/LO
Alert submenu.
3. Press the up/down button to select the
desired option. Choose from HI Alert or
LO Alert.
4. Press the SET button to enter the
temperature adjustment state.
5. Press the up/down button to adjust
the temperature.
6. Press the SET button to save the settings
and return to set another temperature.
7. Press the back button to exit the current
menu.
DEVICE INFORMATION
TO VIEW INFORMATION ABOUT THE THERMAL IMAGER
1. Press the up/down button to select the
Device Info option in the settings menu.
2. Press the SET button to view the detail
information of the device.
3. Press the back button to exit the current
menu.
Page 10
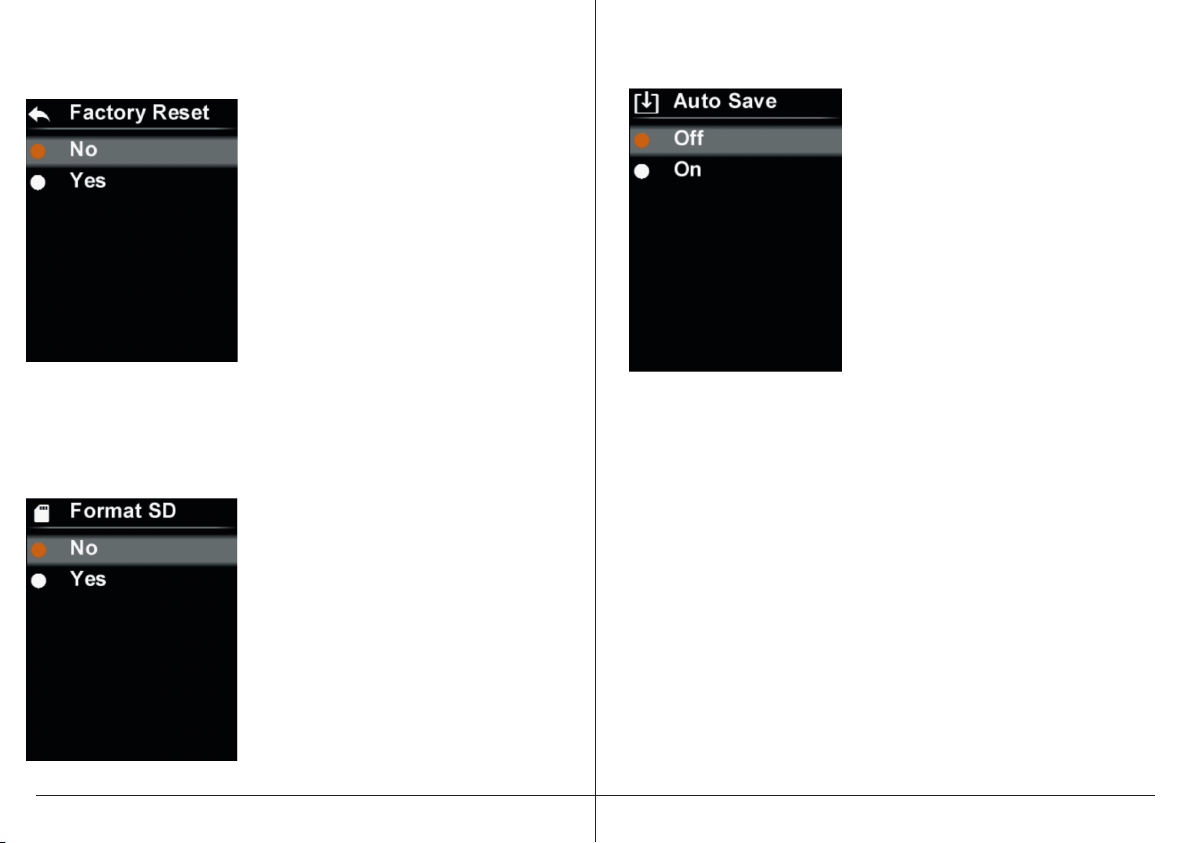
FACTORY RESET
To restore the settings in the thermal imager back to the original factory
values, do the following:
1. Press the up/down button to select the
Factory Reset option in the settings
menu.
2. Press the SET button to enter the Factory
Reset submenu.
3. Press the up/down button to select Yes.
4. Press the SET button to confirm.
5. Press the back button to exit the current
menu.
FORMAT SD CARD
Formatting the SD card will delete all information from the SD card
To format the SD card:
1. Press the up/down button to select the
Format SD option in the settings menu.
2. Press the SET button to enter the Format
SD submenu.
3. Press the up/down button to select Yes.
4. Press the SET button to confirm.
5. Press the back button to exit the
current menu.
AUTO SAVE
TO TURN ON OR OFF AUTO SAVE
1. Press the up/down button to select the
Auto Save option in the settings menu.
2. Press the SET button to enter the Auto
Save submenu.
3. Press the up/down button to select
On or Off.
4. Press the SET button to confirm.
5. Press the back button to exit the
current menu.
Note: Do not remove or insert the SD card while saving or viewing images.
If the SD card is replaced while the thermal imager is in use, restart the
thermal image
Page 11
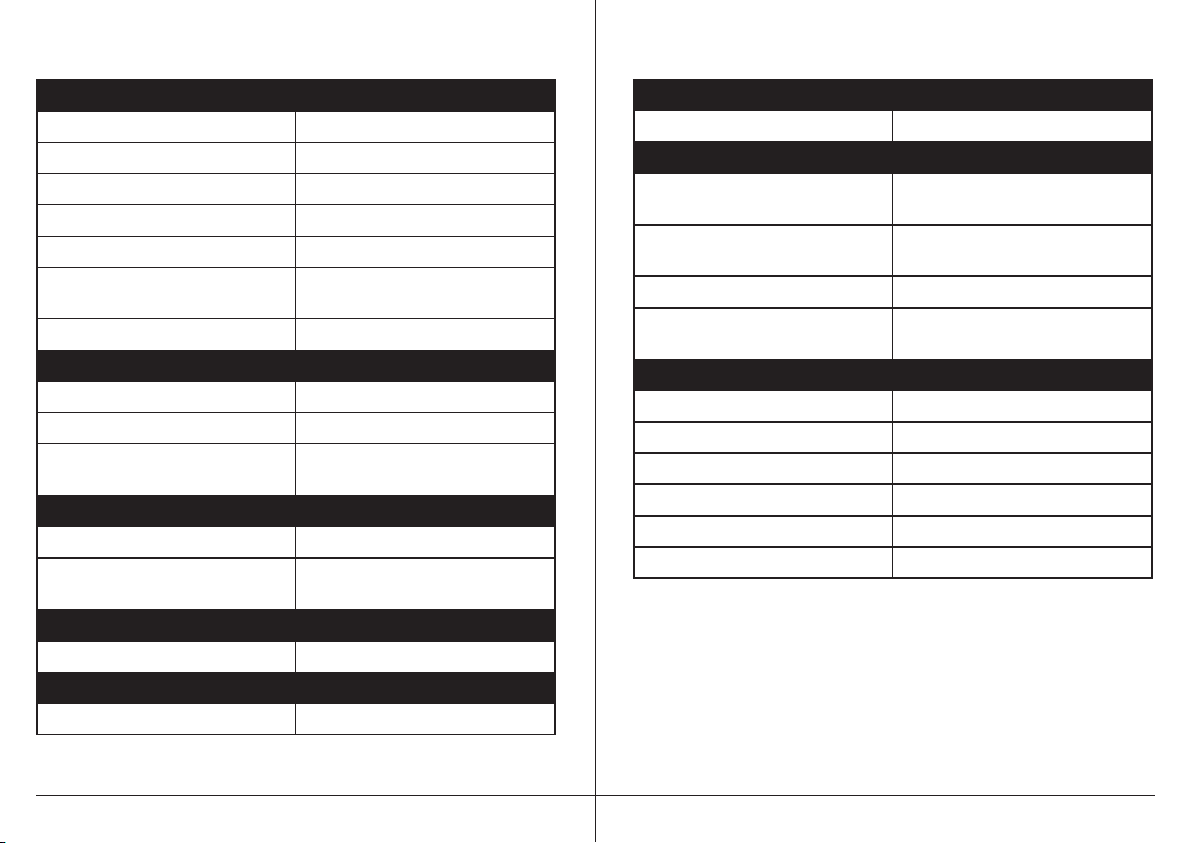
8. TECHNICAL SPECIFICATIONS
IMAGING AND OPTICAL DATA
Field of View (FOV) 51°H x 38°V
Spatial resolution 11 mrad
NETD ≤ 150 mK
Image frequency ≤ 9 Hz
Focus mode Focus free
Focal Plane Array (FPA) / Spectral
range
IR Resolution 80 x 60 (4800 pixels)
IMAGE PRESENTATION
Display 2.8" TFT LCD
Display resolution 320 × 240 pixels
Color palettes Iron Red, Rainbow, White Hot, Red
MEASUREMENT
Object Temperature Range 86°F (30°C) to 113°F (45°C)
Accuracy in Normal Mode ±0.9°F (±0.5C) (at 25°C ambient
MEASUREMENT ANALYSIS
Emissivity Correction Variable from 0.01 to 1.0
STORAGE OF IMAGES
Image Storage format BMP, Micro SD card
Uncooled microbolometer / 8–14
µm
Hot, Ice Blue
temperature)
DATA COMMUNICATION INTERFACES
Bluetooth N/A
POWER SYSTEM
Battery 3.6V/5000mAh rechargeable Li-ion
battery
Battery Charger Internal, USB cable, 4 hours
charging time
Charging System In camera (AC adapter)
Power Management 5 minutes, 10 minutes, 30 minutes,
off (default: 30 minutes)
ENVIRONMENTAL DATA
Operating Temperature 59°F to 86°F (15°C to 30°C)
Storage Temperature -4°F to 140°F (-20°C to 60°C)
Humidity(operating and storage) <85% RH
Drop test None
Operating Altitude ≤ 2000m
Dimensions 236mm x 75.5mm x 86mm
Page 12
MAINTENANCE
Use a wet cloth or mild soap solution to clean the outer shell of the device.
Do not use abrasives, isopropyl alcohol or solvents to clean the outer shell,
lens, or window
COMPLIANCE
• CE
• Lithium battery is compliant with UN 38.3, UL 1642, and UL 2054
• Product is compliant with FCC 47 CFR Part 15B
Manual de instrucciones
de uso Termógrafo
PACKAGE CONTENTS
1. Yellow Jacket 52030F thermal imaging camera
2. USB data transfer and charging cable
3. 16GB Micro SD card
4. User manual
Yellow JacketTM 52030F
Page 13
INTRODUCCIÓN
El termógrafo Yellow JacketTM 52030F es una cámara portátil de imágenes
térmicas de gran precisión y calidad. El modelo 52030F está diseñado
exclusivamente para detectar temperatura elevada en la piel. El termógrafo
52030F cumple con las recomendaciones que establece la Administración de
alimentos y medicamentos (FDA) de los Estados Unidos para la detección de
temperatura elevada en la piel. La precisión en las mediciones del 52030F
es de ±0.9 °F (±0.5 °C) en un intervalo de detección de temperatura de 93.2
a 102.2 °F (de 34 a 39 °C). La cámara de imágenes térmicas viene calibrada
de fábrica con una fuente de referencia de temperatura de cuerpo negro.
No es necesario realizar una calibración in situ.
Cumple con los estándares internacionales de rendimiento para dispositivos
termográficos. No aprobado o aprobado por la FDA.
CARACTERÍSTICAS PRINCIPALES
• Diseño exclusivo para detectar temperatura elevada en la piel;
• Resolución térmica de 80 × 60 o 4,800 puntos de medición
de temperatura;
• 9 Hz de velocidad de fotogramas: la cámara genera imágenes a una
velocidad de 9 fotogramas por segundo;
• Seguimiento de la temperatura caliente, fría y media;
• Pantalla gráfica de TFT grande y fácil de leer;
• Capacidad de descargar imágenes térmicas a la PC por cable USB para
el monitoreo en tiempo real;
• Alarma de vibración;
• Seis horas de funcionamiento con batería recargable;
• Diseño compacto y resistente.
RECOMENDACIONES DE USO DEL PRODUCTO
• Lea este manual de instrucciones de uso con atención antes de usar el
termógrafo.
• La distancia de medición óptima para este producto es de 3 pies.
• Para garantizar la precisión de las mediciones, use el producto en un
entorno operativo de 59 °F a 86 °F (de 15 °C a 30 °C) con menos del 85 %
de humedad relativa (sin condensación).
• Use el termógrafo en interiores y en una sala con la menor circulación de
aire posible. Cuando cambie de entorno, encienda el termógrafo de 10 a
15 minutos antes de empezar a hacer las mediciones.
• Es necesaria una temperatura ambiente estable para realizar las
mediciones. No realice mediciones en lugares con mucho flujo de aire de
los ventiladores o de las salidas de aire.
• Si la persona a la que se realizará la medición viene de un lugar donde la
temperatura era mucho más alta o baja que la del entorno de las
mediciones, esta persona debe permanecer en la sala de mediciones por
un período de 10 a 30 minutos antes de que se mida su temperatura.
• El modelo 52030F mide la temperatura de la superficie de un objeto. Si es
necesario compensar la temperatura, ajústela en el menú Settings
(Ajustes).
• El termógrafo se calibra automáticamente. Si el resultado cambia con
rapidez, permita que la medición se estabilice antes de hacer la lectura.
• Después de medir objetos con temperaturas muy altas o bajas, deje
reposar el producto durante unos 10 minutos antes de usarlo de nuevo.
• No use el producto en lugares con luz solar intensa o con interferencias
electromagnéticas.
• No use este producto en entornos inflamables, explosivos, con vapor,
húmedos o corrosivos.
• Interrumpa el uso del producto si sufre daños o modificaciones, a fin de
evitar resultados imprecisos en las mediciones.
• Muy recomendable: para lograr una precisión alta en las mediciones,
asegúrese de que los ajustes de la emisividad en el termógrafo coincidan
con el material de la superficie (p. ej., la piel del ser humano) que está
midiendo.
• Para obtener mejores resultados, encienda el termógrafo 10 minutos antes
de comenzar con las mediciones.
• Durante la carga de la batería, la temperatura interna del producto se
elevará. Esto puede afectar a la precisión de las mediciones de
Page 14
temperatura. Por lo tanto, no se recomienda realizar mediciones mientras
el producto se está cargando ni inmediatamente después de que se
termine de cargar.
INFORMACIÓN IMPORTANTE SOBRE LA DETECCIÓN DE
TEMPERATURA ELEVADA EN LA PIEL
• La medición de temperatura no debe ser el único factor, ni el principal,
para diagnosticar o descartar el diagnóstico de la COVID-19 ni de
ninguna otra enfermedad.
• En la práctica, la temperatura corporal elevada se debe corroborar con
métodos de evaluación secundarios (p. ej., un termómetro infrarrojo sin
contacto [NCIT] aprobado por la FDA o un termómetro de contacto de uso
clínico).
• Las autoridades de la salud pública, a partir de su experiencia con el
dispositivo en el entorno específico de uso, deben determinar la
importancia de cualquier caso de fiebre o temperatura elevada según
la medición de la temperatura en la piel por termografía.
• La cámara de imágenes térmicas se debe usar para medir la temperatura
de una persona a la vez.
• Los patrones térmicos visibles tienen como único objetivo localizar los
puntos de los que se obtendrán las mediciones térmicas.
RECOMENDACIONES PARA EL USO DEL TERMÓGRAFO PARA
LA DETECCIÓN DE TEMPERATURA ELEVADA EN LA PIEL
(De acuerdo con las directrices ISO / TR 13154: 2017 sobre
el uso de termógrafos)
• Se recomienda una temperatura ambiente de 64 a 86 °F (de 18 a 30 °C) c
on una humedad relativa del 60 por ciento.
• Procure regular los demás factores que podrían afectar las mediciones
de la temperatura.
• Evite los fondos reflectantes (p. ej., vidrios, espejos, superficies metálicas)
para reducir al mínimo la radiación infrarroja reflejada.
• Instale la cámara de imágenes térmicas en una sala con el menor flujo de
aire posible, alejada de la luz solar y del calor radiante (p. ej.,
calefactores portátiles o fuentes de energía eléctrica).
• Evite la iluminación intensa (p. ej., bombillas incandescentes, halógenas
y halógenas de cuarzo y tungsteno).
PREPARACIÓN DEL SISTEMA DE DIAGNÓSTICO
POR IMÁGENES TÉRMICAS
• El termógrafo 52030F no requiere el uso de un cuerpo negro para
la calibración durante la evaluación.
• Encienda la cámara 30 minutos antes de usarla.
PREPARACIÓN DE LA PERSONA A EXAMINAR
La persona que opera el sistema de diagnóstico por imágenes térmicas
debe asegurarse de que la persona a examinar cumpla con los siguientes
requisitos:
• No presenta ninguna obstrucción en la cara durante las mediciones
(como una máscara, gafas, sombrero, banda para la cabeza o bufanda) y
que el cabello no le cubra ninguna parte de la cara, que debe estar
limpia y seca.
Page 15
• No presenta una temperatura más alta o baja en la cara por llevar
demasiada ropa o tener accesorios que le cubran la cabeza (p. ej., bandas
para la cabeza o pañuelos) o por el uso de productos de limpieza facial
(p. ej., toallitas cosméticas).
• Esperó por lo menos 15 minutos en la sala de medición o 30 minutos si
realizó ejercicio, alguna actividad física intensa, se bañó o usó compresas
calientes o frías en la cara.
USO DEL SISTEMA DE DIAGNÓSTICO
POR IMÁGENES TÉRMICAS
• Mida la temperatura de la superficie de la piel de una persona a la vez.
• Ubique a la persona a una distancia fija de 3 pies (1 metro) del sistema de
diagnóstico por imágenes térmicas, bien frente a la cámara.
• Se recomienda un ángulo de visión de alrededor de 21° en vertical por 21°
en horizontal.
• El área de la imagen debe abarcar toda la cara de la persona.
• Si se observa un aumento de la temperatura por medio del sistema de
diagnóstico por imágenes térmicas, se debe utilizar un método adicional
para confirmar si hay fiebre. Las autoridades de la salud pública pueden
ayudar a determinar si la fiebre es un signo de infección.
PIEZAS DEL TERMÓGRAFO
1. Ranura para tarjeta micro SD
2. Interfaz USB-C
3. Tapa de la interfaz
4. Luz led
5. Tapa de lente de la
cámara infrarroja
6. Disparador
7. Lente de la cámara
infrarroja
8. Pantalla LCD
9. Botón de encendido
10.Orificio de montaje
del trípode
11.Botón de la linterna
12.Botón de desplazamiento
hacia la izquierda
13.Botón de desplazamiento
hacia abajo
14.Botón de desplazamiento
hacia la derecha
15.Botón para volver
16.Botón de repetición
17.Botón de desplazamiento
hacia arriba
18.Botón de ajustes
Page 16
PANTALLA DEL TERMÓGRAFO
1. Selector de unidad de temperatura
2. Selección de cursor
3. Selector de paleta de colores
4. Selector de alarma
de temperatura alta o baja
5. Selector de ajustes
6. Valor inferior de la
barra de temperatura
7. Valor superior de
la barra de temperatura
8. Punto máximo de temperatura
9. Punto medio
10.Temperatura del punto medio
11.Temperatura máxima
12.Fecha y hora
13.Estado de la batería
ENCENDIDO Y APAGADO
Presione el botón amarillo de encendido durante 3 segundos para
activar el termógrafo. Presione el botón amarillo de encendido
durante 1 segundo para desactivar el termógrafo.
INTRODUCCIÓN AL MENÚ
INSTRUCCIONES DE USO CAPTURA DE IMÁGENES
1. Tire del disparador y suéltelo para cap
turar una imagen térmica. Consulte la
sección que se encuentra casi al final
de este manual llamada GUARDADO
AUTOMÁTICO.
2. Si la opción AUTO SAVE (GUARDADO
AUTOMÁTICO) está activada, la imagen
se guardará de forma automática en la
memoria de la tarjeta SD.
3. Si la opción AUTO SAVE (GUARDADO
AUTOMÁTICO) está desactivada, debe
guardar la imagen de forma manual.
Con el botón de la flecha hacia la
izquierda, puede guardar la imagen en la memoria de la tarjeta SD. Para
descartar la imagen, presione el botón de la flecha hacia la derecha.
Presione el botón de ajustes para confirmar o el botón para volver para
poder regresar. Nota: Las imágenes solo se pueden guardar si se insertó
una tarjeta SD.
VISTA DE LAS IMÁGENES
Page 17
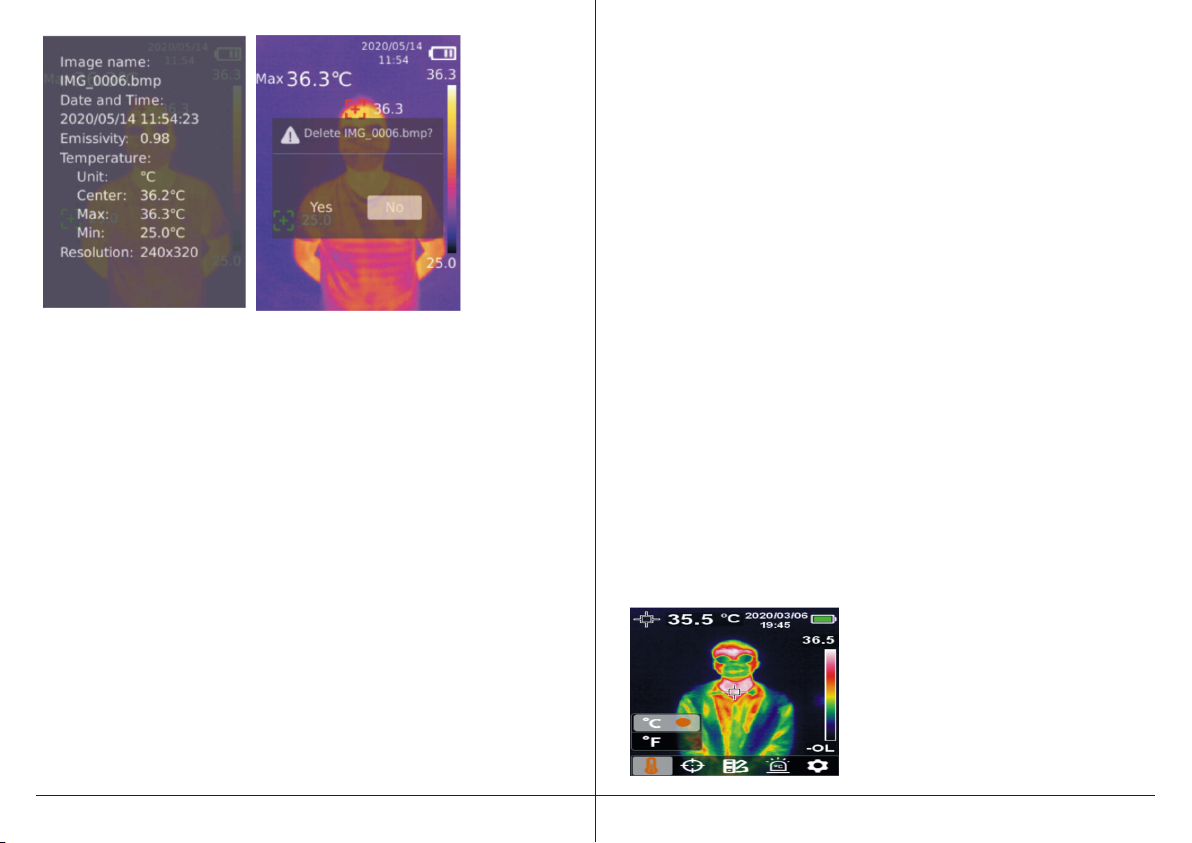
1. Presione el botón azul de repetición para ingresar a la galería
de imágenes.
2. Utilice los botones de desplazamiento hacia arriba, abajo, la izquierda
o la derecha para seleccionar la imagen que desee.
3. Presione el botón de ajustes para ver la imagen en el modo de pantalla
completa.
4. Presione el botón de ajustes en el modo de pantalla completa para
eliminar la imagen o ver su información.
Nota: No retire ni inserte la tarjeta SD mientras esté mirando imágenes.
FUNCIONAMIENTO DE LA LUZ LED
Presione el botón de la linterna durante 3 segundos para encender o apagar
la luz led.
Cuando la alerta de temperatura esté activada y la medición de la temperatura supere el intervalo de temperatura establecido, la luz led parpadeará.
Nota: Cuando la luz led esté encendida, no la dirija hacia los ojos de personas ni animales.
COMUNICACIÓN USB Y PRESENTACIÓN DE LAS IMÁGENES
1. Descargue e instale el software para PC. El software se puede obtener
en www.southwire.com.
2. Conecte el cable USB a la PC y al termógrafo.
3. Para obtener ayuda sobre el uso del software para PC, consulte el
manual del usuario del software. Se puede obtener en la pestaña Help
(Ayuda) del software para PC.
3. Los usuarios pueden explorar las imágenes y analizar los datos con el
software para PC.
Nota: No desconecte el cable USB mientras el software está cargando
imágenes.
INFORMACIÓN DE LA TARJETA SD
El termógrafo 52030F utiliza una tarjeta Micro SD (tarjeta TF) para almacenar las imágenes. Si guarda una gran cantidad de imágenes en la tarjeta
SD, es posible que la velocidad del termógrafo disminuya. Para que esto
no suceda, es conveniente descargar con frecuencia el contenido de la
tarjeta SD en una PC. Copie los datos de seguridad de forma regular y vacíe
la tarjeta SD a tiempo. Para que no se produzcan alteraciones en los datos
de la tarjeta SD, no la inserte ni la extraiga con frecuencia. Procure retirar e
insertar la tarjeta SD cuando el equipo esté apagado.
CARGA DE LA BATERÍA
La batería del termógrafo se carga con el cable USB que viene con el equipo. También puede conectar el cable USB a una toma de corriente de 120 V
de CA con el cable USB y un adaptador de corriente de 5 V/1 A o 5 V/2 A con
certificación de seguridad (no está incluido).
SELECCIÓN DE LA UNIDAD DE TEMPERATURA
1. Presione el botón de ajustes para abrir el
menú principal.
2. Presione el botón de desplazamiento
hacia la izquierda o derecha para
seleccionar el símbolo de la unidad de
temperatura.
3. Presione el botón de ajustes para ingresar
al submenú de la unidad de temperatura.
Page 18
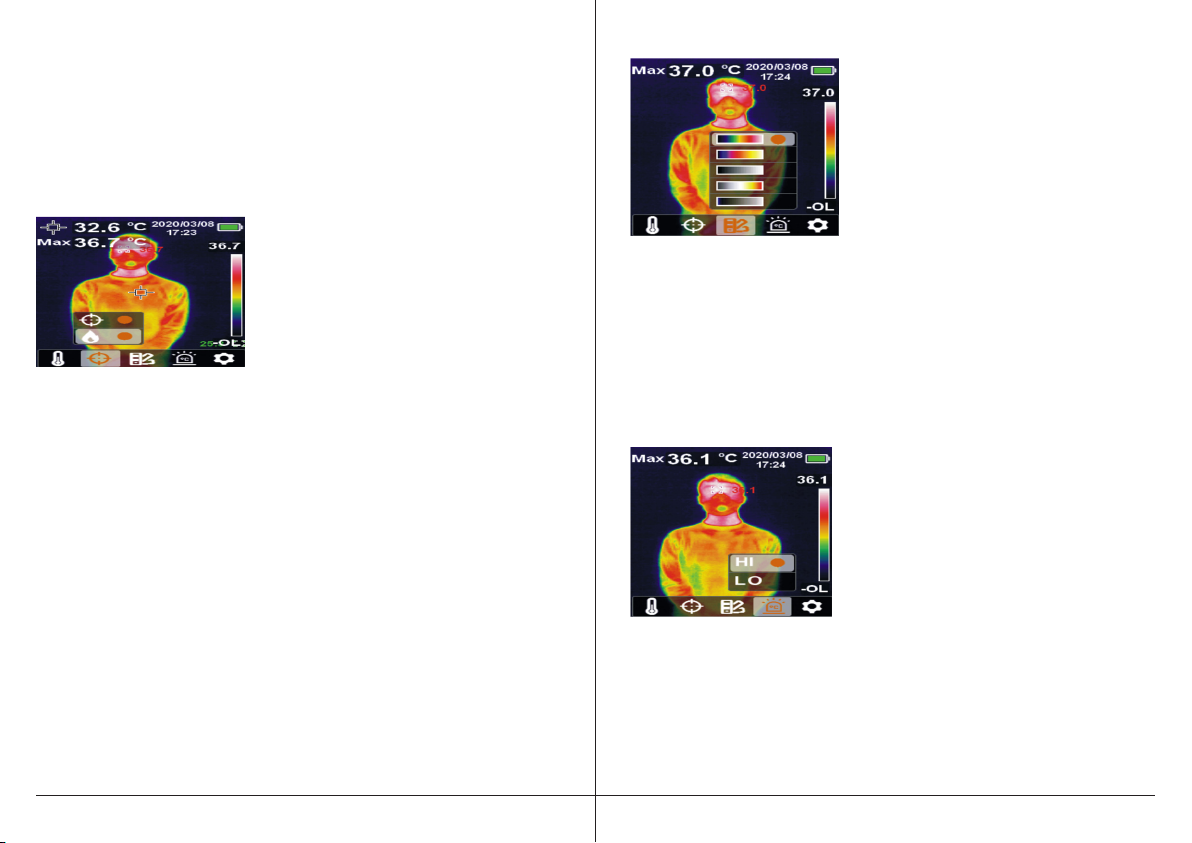
4. Presione el botón de desplazamiento hacia arriba o abajo para
seleccionar °C o °F.
5. Presione el botón para volver para salir del menú actual.
SEGUIMIENTO DE LA TEMPERATURA DEL PUNTO
MEDIO Y ALTA
PARA HACER UN SEGUIMIENTO DE LA TEMPERATURA
DEL PUNTO MEDIO, SIGA ESTOS PASOS:
1. Presione el botón de ajustes para abrir el
menú principal.
2. Presione el botón de desplazamiento
hacia la izquierda o derecha para
eleccionar el símbolo del cursor.
3. Presione el botón de ajustes para ingresar
al submenú del cursor.
4. Presione el botón de desplazamiento
hacia arriba o abajo para seleccionar el símbolo del cursor.
5. Presione el botón de ajustes para confirmar.
6. El marcador del punto medio se enciende y aparece la temperatura del
punto medio en la esquina superior izquierda de la pantalla LCD.
7. Presione el botón para volver para salir del menú actual.
PARA HACER UN SEGUIMIENTO DE LA TEMPERATURA ALTA,
SIGA ESTOS PASOS:
1. Presione el botón de ajustes para abrir el menú principal.
2. Presione el botón de desplazamiento hacia la izquierda o derecha para
seleccionar el símbolo del cursor.
3. Presione el botón de ajustes para ingresar al submenú del cursor.
4. Presione el botón de desplazamiento hacia arriba o abajo para
seleccionar el símbolo de la unidad de temperatura.
5. Presione el botón de ajustes para confirmar.
6. El indicador de temperatura alta se enciende y aparece la temperatura
correspondiente en la esquina superior izquierda.
7. Presione el botón para volver para salir del menú actual.
SELECCIÓN DE LA PALETA DE COLORES
1. Presione el botón de ajustes para abrir el
menú principal.
2. Presione el botón de desplazamiento
hacia la izquierda o derecha para
seleccionar el símbolo de la paleta de
colores.
3. Presione el botón de ajustes para ingresar
al submenú de la paleta de colores.
4. Presione el botón de desplazamiento
hacia arriba o abajo para seleccionar el
color que desea. Puede elegir entre Iron
Red (Rojo hierro), Rainbow (Arco iris),
White Hot (Blanco candente), Red Hot
(Rojo candente) o Ice Blue (Azul hielo).
5. Presione el botón para volver para salir
del menú actual.
ALARMA DE TEMPERATURA ALTA O BAJA
Para habilitar la alarma de temperatura alta
o baja, siga estos pasos:
1. Presione el botón de ajustes para abrir el
menú principal.
2. Presione el botón de desplazamiento
hacia la izquierda o derecha para
seleccionar el símbolo de la unidad de
temperatura.
3. Presione el botón de ajustes para ingresar al submenú de la alarma de
emperatura alta o baja.
4. Presione el botón de desplazamiento hacia arriba o abajo para
seleccionar HI (Alta) o LO (Baja). Si selecciona HI (Alta), se activa la
alarma de temperatura alta. Si selecciona LO (Baja), se activa la alarma
de temperatura baja.
5. Presione el botón de ajustes para confirmar.
Page 19
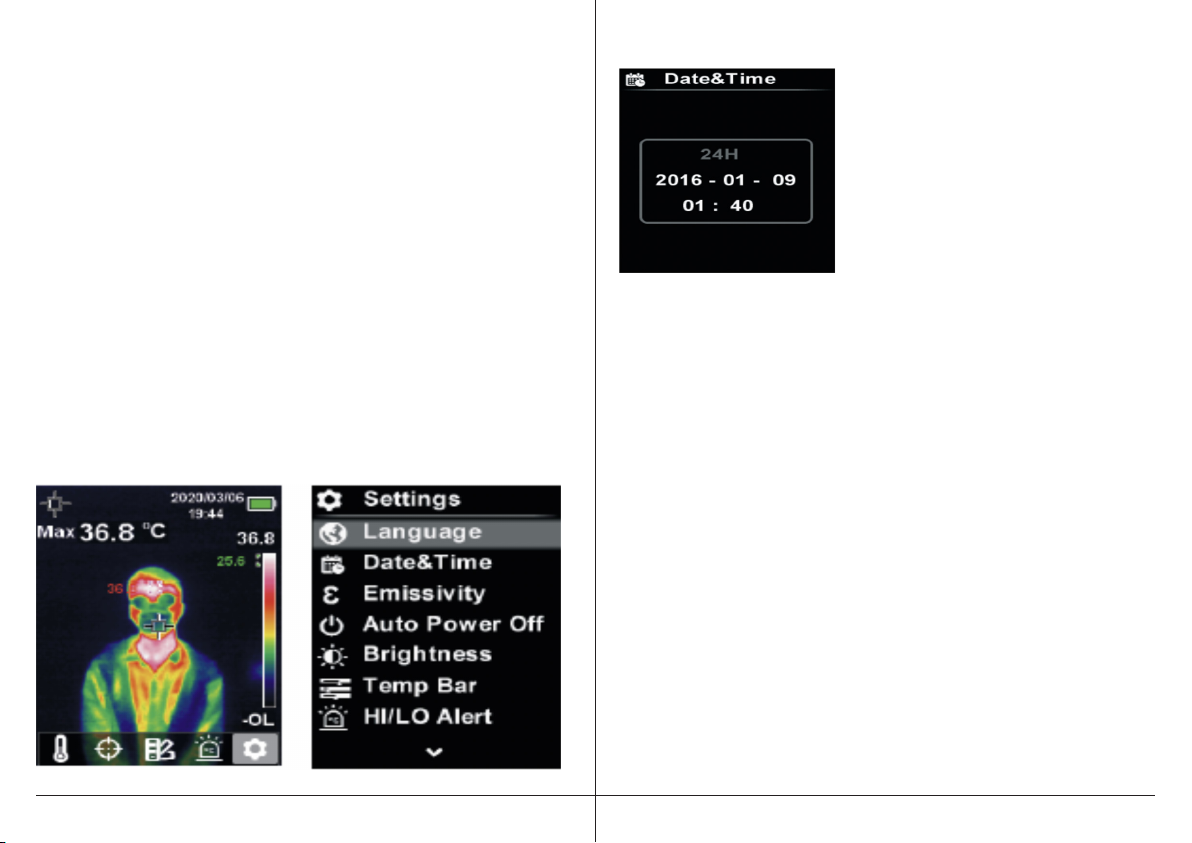
6. Presione el botón para volver para salir del menú actual.
Nota: La alarma de temperatura alta y la de temperatura baja se pueden
activar en simultáneo o por separado.
AJUSTES
Para ingresar al menú Settings (Ajustes), siga estos pasos:
1. Presione el botón de ajustes para abrir el menú principal.
2. Presione el botón de desplazamiento hacia la izquierda o derecha para
seleccionar la opción del símbolo de ajustes.
3. Presione el botón de ajustes para confirmar.
IDIOMA
Para configurar el idioma del termógrafo, siga estos pasos:
1. Presione el botón de desplazamiento hacia arriba o abajo para seleccionar
la opción Language (Idioma) en el menú Settings (Ajustes).
2. Presione el botón de ajustes para ingresar al submenú Language (Idioma).
3. Presione el botón de desplazamiento hacia arriba o abajo para seleccionar
el idioma que desea. Seleccione English (Inglés) o Chinese (Chino).
4. Presione el botón de ajustes para confirmar.
5. Presione el botón para volver para salir del menú actual.
FECHA Y HORA
Para configurar la fecha y la hora, siga estos pasos:
1. Presione el botón de desplazamiento hacia
arriba o abajo para seleccionar la opción
Date & Time (Fecha y hora) en el menú
Settings (Ajustes).
2. Presione el botón de ajustes para ingresar
al submenú Date & Time (Fecha y hora).
3. Presione el botón de desplazamiento hacia
la izquierda o derecha para seleccionar el
parámetro que desea ajustar.
4. Presione el botón de ajustes.
5. Presione el botón de desplazamiento hacia arriba o abajo para
aumentar o disminuir el valor.
6. Presione el botón de ajustes para guardar los ajustes y pasar a
configurar otros parámetros.
7. Presione el botón para volver para salir del menú actual.
COMPENSACIÓN DE TEMPERATURA Y EMISIVIDAD
La emisividad es un número que indica la capacidad de un material para
emitir radiación térmica. Es un número entre 0.1 y 1. Un número como 0.1
representa un reflector perfecto (como el papel de aluminio), mientras que
el número 1 representa un emisor perfecto (como un paño negro). Puede
ajustar la emisividad del termógrafo para que se adecue al material que está
midiendo. Si ajusta la emisividad en función del material que está midiendo,
podrá garantizar la mayor precisión posible en las mediciones de la temperatura. Por ejemplo, si estuviera monitoreando la temperatura del hormigón
mientras se endurece, configuraría la emisividad a 0.94 (consulte el gráfico
que figura a continuación) para que la medición sea lo más precisa posible.
Para configurar la emisividad, sigas estos pasos:
1. Presione el botón de desplazamiento hacia arriba o abajo para seleccionar
la opción Emissivity (Emisividad) en el menú Settings (Ajustes).
2. Presione el botón de ajustes para ingresar al submenú Emissivity
(Emisividad).
3. Presione el botón de desplazamiento hacia arriba o abajo para seleccionar
Page 20
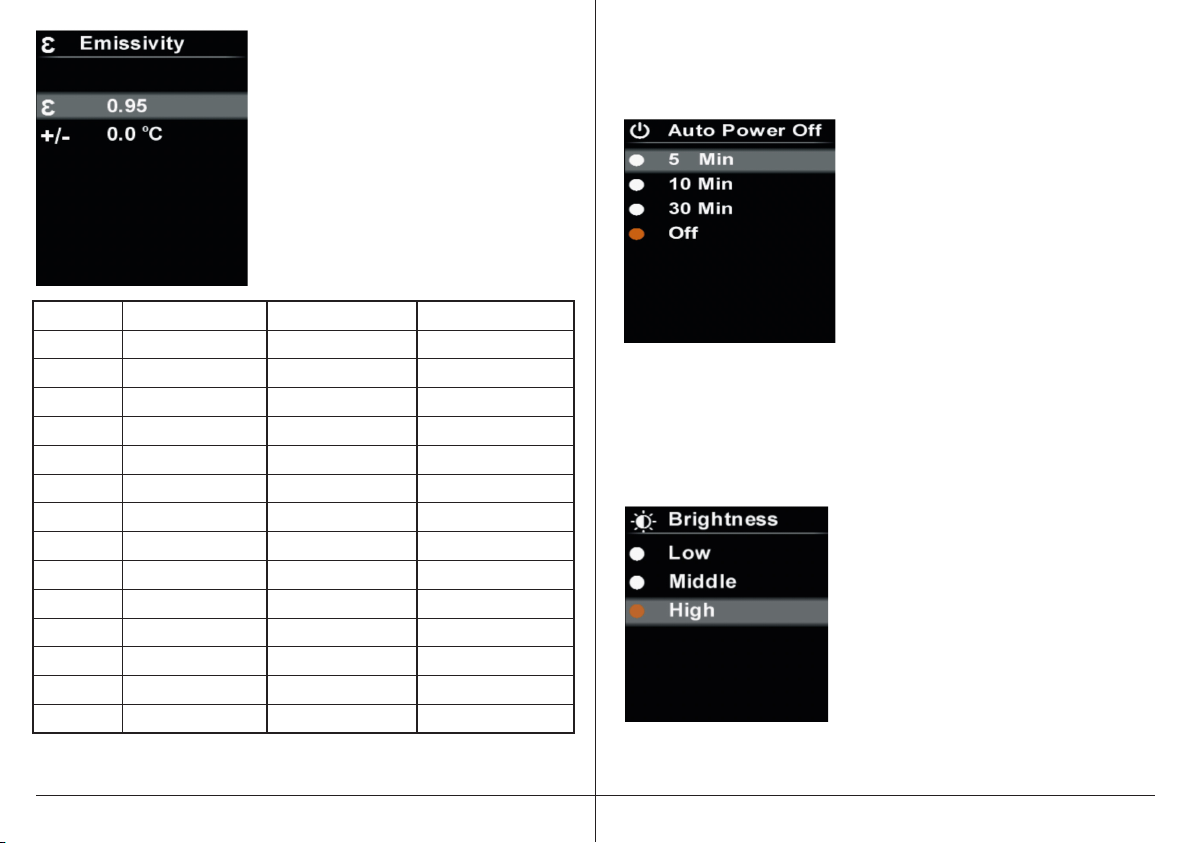
la compensación de la emisividad o de la
temperatura.
4. Presione el botón de ajustes para ingresar
el estado del ajuste de los parámetros.
5. Presione el botón de desplazamiento hacia
arriba o abajo para aumentar o disminuir el
valor.
6. Presione el botón de ajustes para guardar
los ajustes.
7. Presione el botón para volver para salir del
menú actual.
Sustancia Emisividad térmica Sustancia Emisividad térmica
Asfalto 0.90 a 0.98 Paño (negro) 0.98
Hormigón 0.94 Piel del ser humano 0.98
Cemento 0.96 Espuma 0.75 a 0.80
Arena 0.90 Carbón (polvo) 0.96
Tierra 0.92 a 0.96 Barniz 0.80 a 0.95
Agua 0.92 a 0.96 Barniz (mate) 0.97
Hielo 0.96 a 0.98 Goma (negra) 0.94
Nieve 0.83 Plástico 0.85 a 0.95
Vidrio 0.90 a 0.95 Madera 0.90
Cerámica 0.90 a 0.94 Papel 0.70 a 0.94
Mármol 0.94 Óxido de cromo 0.81
Yeso 0.80 a 0.90 Óxido de cobre 0.78
Cal 0.89 a 0.91 Óxido de hierro 0.78 a 0.82
Ladrillo 0.93 a 0.96 Materiales textiles 0.90
APAGADO AUTOMÁTICO
El termógrafo 52030F se apagará de forma automática una vez transcurrido
el tiempo preestablecido.
Para configurar el período de apagado automático, siga estos pasos:
1. Presione el botón de desplazamiento
hacia arriba o abajo para seleccionar la
opción Auto Power Off (Apagado
automático) en el menú de ajustes.
2. Presione el botón de ajustes para ingresar
al submenú de Auto Power Off (Apagado
automático).
3. Presione el botón de desplazamiento
hacia arriba o abajo para seleccionar la
opción que desea: 5 min, 10 min, 30 min
y Off (Apagado).
4. Presione el botón de ajustes para
confirmar.
5. Presione el botón para volver para salir
del menú actual.
BRILLO DE LA PANTALLA LCD
Para configurar el brillo de la pantalla, siga estos pasos:
1. Presione el botón de desplazamiento
hacia arriba o abajo para seleccionar la
opción Brightness (Brillo) en el menú
Settings (Ajustes).
2. Presione el botón de ajustes para ingresar
al submenú Brightness (Brillo).
3. Presione el botón de desplazamiento
hacia arriba o abajo para seleccionar la
opción que desea. Hay tres opciones:
bajo, medio y alto.
4. Presione el botón de ajustes para confirmar.
5. Presione el botón para volver para salir del menú actual.
Page 21
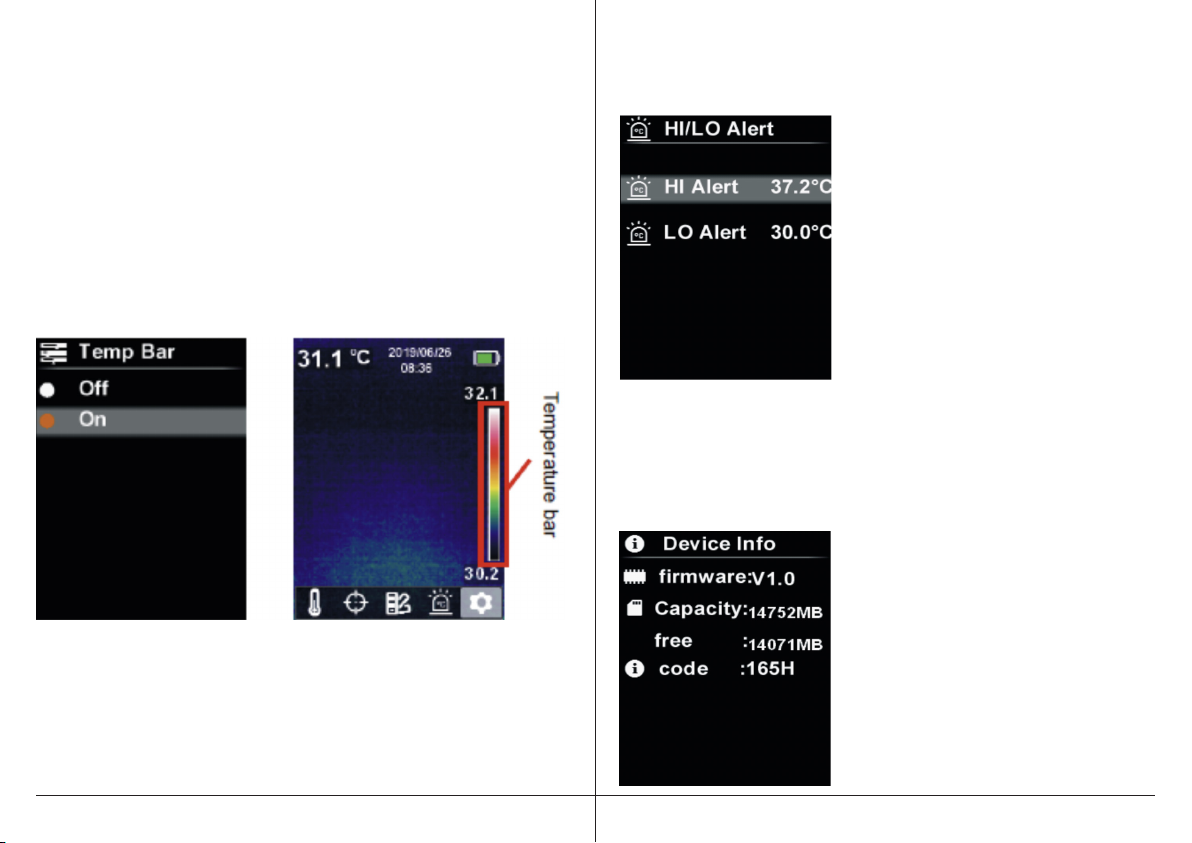
BARRA DE TEMPERATURA
Es posible ver una barra para la temperatura en la pantalla LCD. Esta barra
indica la correspondencia entre los colores de la imagen térmica y las
temperaturas.
Para encender o apagar la barra de temperatura, siga estos pasos:
1. Presione el botón de desplazamiento hacia arriba o abajo para selec
cionar la opción Temp Bar (Barra de temperatura) en el menú Settings
(Ajustes).
2. Presione el botón de ajustes para ingresar al submenú Temp Bar (Barra de
temperatura).
3. Presione el botón de desplazamiento hacia arriba o abajo para
seleccionar ON (Encendida) u OFF (Apagada).
4. Presione el botón de ajustes para confirmar.
5. Presione el botón para volver para salir del menú actual.
TEMPERATURAS DE ALARMA
El termógrafo 52030F tiene una alarma sonora que le avisará si se alcanza
una temperatura preestablecida.
Para configurar la alarma de la temperatura, siga estos pasos:
1. Presione el botón de desplazamiento
hacia arriba o abajo para seleccionar la
opción HI/LO Alert (Alerta alta/baja) en el
menú de ajustes.
2. Presione el botón de ajustes para ingresar
al submenú HI/LO Alert (Alerta alta/baja).
3. Presione el botón de desplazamiento
hacia arriba o abajo para seleccionar la
opción que desea. Seleccione HI Alert
(Alerta alta) o LO Alert (Alerta baja).
4. Presione el botón de ajustes para ingresar
el estado del ajuste de la temperatura.
5. Presione el botón de desplazamiento
hacia arriba o abajo para ajustar la temperatura.
6. Presione el botón de ajustes para guardar los ajustes y pasar a
configurar otra temperatura.
7. Presione el botón para volver para salir del menú actual.
INFORMACIÓN DEL DISPOSITIVO
Para ver información sobre el termógrafo,
siga estos pasos:
1. Presione el botón de desplazamiento
hacia arriba o abajo para seleccionar la
opción Device Info (Información del
dispositivo) en el menú de ajustes.
2. Presione el botón de ajustes para ver la
información detallada del dispositivo.
3. Presione el botón para volver para salir
del menú actual.
Page 22
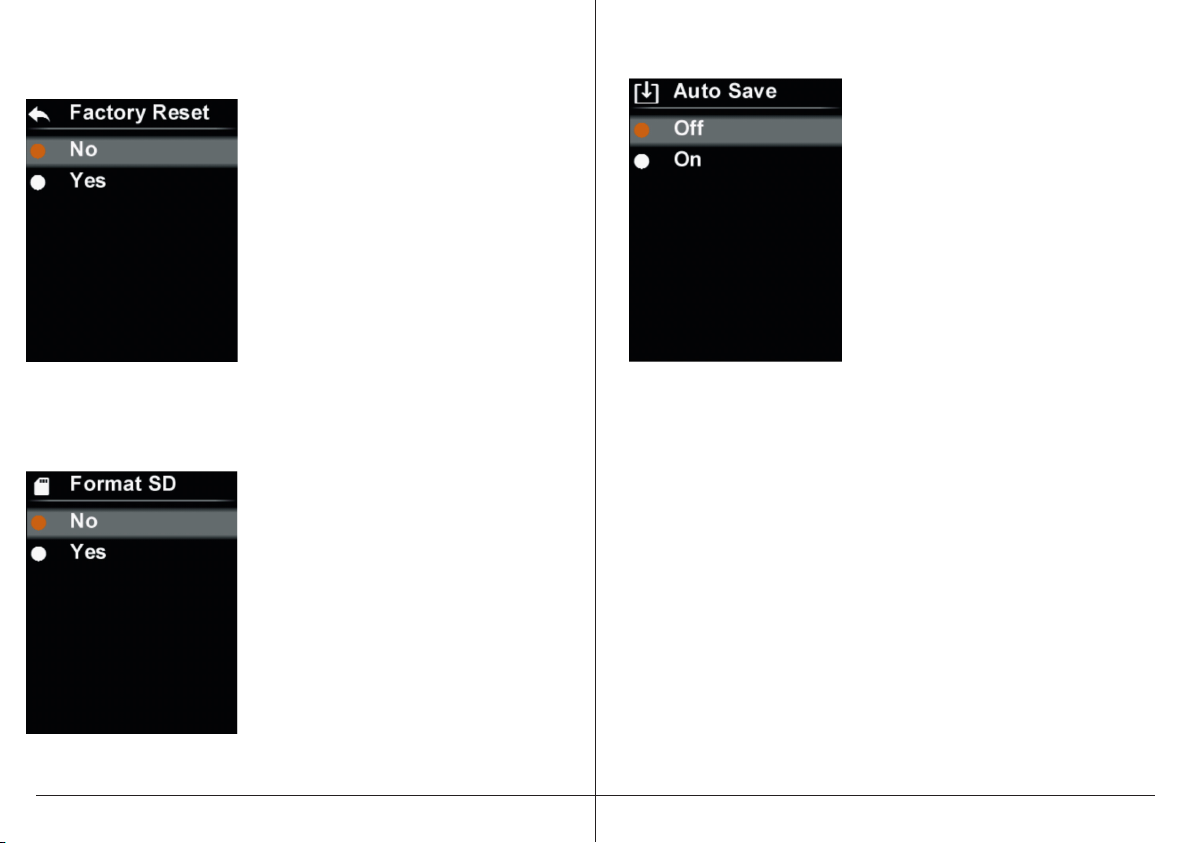
RESTABLECIMIENTO DE LOS AJUSTES DE FÁBRICA
Para restaurar los ajustes del termógrafo a los valores originales de fábrica,
siga estos pasos:
1. Presione el botón de desplazamiento hacia
arriba o abajo para seleccionar la opción
Factory Reset (Restablecer los valores de
fábrica) en el menú de ajustes.
2. Presione el botón de ajustes para ingresar
al submenú Factory Reset (Restablecer los
ajustes de fábrica).
3. Presione el botón de desplazamiento hacia
arriba o abajo para seleccionar Yes (Sí).
4. Presione el botón de ajustes para
confirmar.
5. Presione el botón para volver para salir del
menú actual.
FORMATEO DE LA TARJETA SD
Si formatea la tarjeta SD, se eliminará toda la información que contenga.
Para formatear la tarjeta SD, siga estos pasos:
1. Presione el botón de desplazamiento hacia
arriba o abajo para seleccionar la opción
Format SD (Formatear SD) en el menú de
ajustes.
2. Presione el botón de ajustes para ingresar
al submenú Format SD (Formatear SD).
3. Presione el botón de desplazamiento hacia
arriba o abajo para seleccionar Yes (Sí).
4. Presione el botón de ajustes para
confirmar.
5. Presione el botón para volver para salir
del menú actual.
GUARDADO AUTOMÁTICO
Para activar o desactivar el guardado automático, siga estos pasos:
1. Presione el botón de desplazamiento
hacia arriba o abajo para seleccionar la
opción Auto Save (Guardado automático)
en el menú de ajustes.
2. Presione el botón de ajustes para ingresar
al submenú Auto Save (Guardado
automático).
3. Presione el botón de desplazamiento
hacia arriba o abajo para seleccionar On
(Activado) u Off (Desactivado).
4. Presione el botón de ajustes para
confirmar.
5. Presione el botón para volver para salir
del menú actual.
Nota: No retire ni inserte la tarjeta SD mientras esté guardando o mirando
imágenes. Si reemplaza la tarjeta SD mientras el termógrafo está en uso,
reinicie el equipo.
Page 23
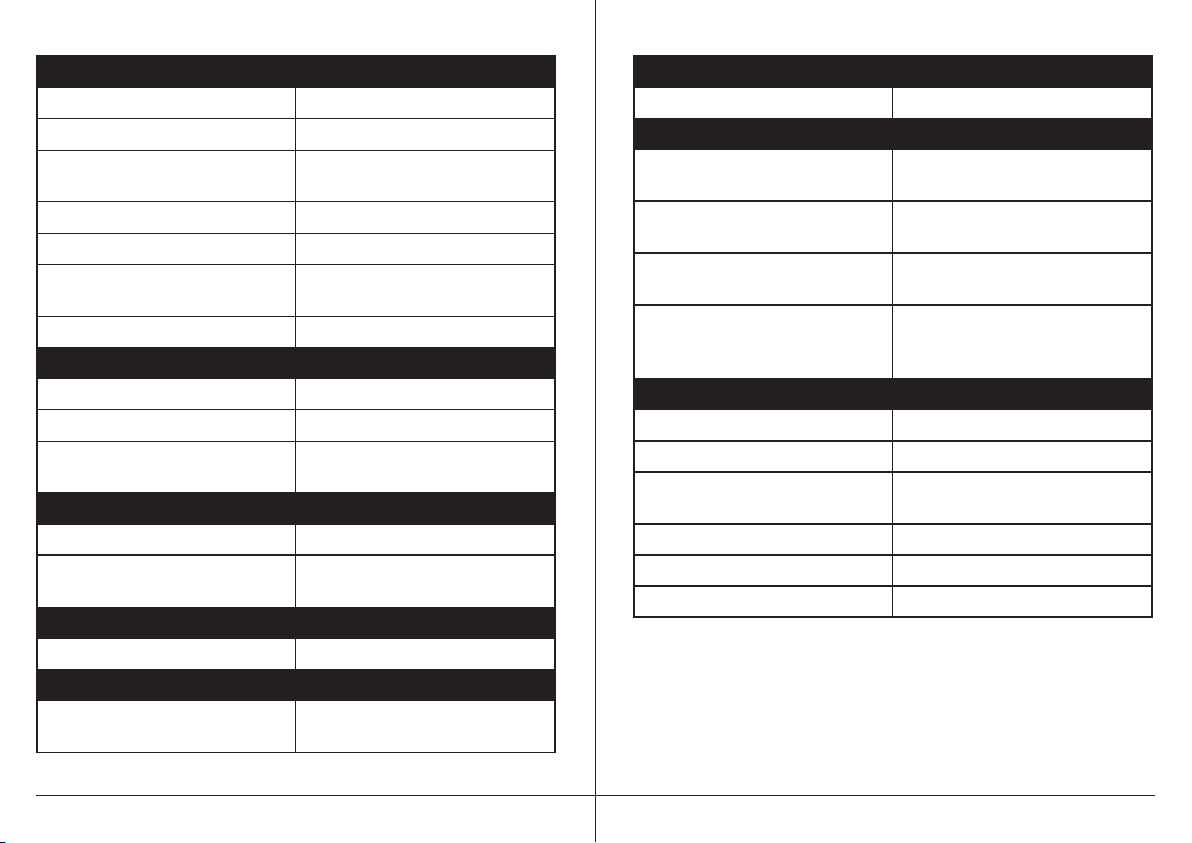
ESPECIFICACIONES
DATOS ÓPTICOS Y DE IMAGEN
Campo de visión (CDV) 51° horizontales × 38° verticales
Resolución espacial 11 mrad
NETD (diferencia de temperatura
equivalente a ruido)
Frecuencia de imagen ≤9 Hz
Modo de enfoque Enfoque automático
Matriz de plano focal (MPF)/Inter-
valo espectral
Resolución de IR 80 × 60 (4,800 píxeles)
PRESENTACIÓN DE LA IMAGEN
Pantalla LCD TFT de 2.8"
Resolución de la pantalla 320 × 240 píxeles
Paletas de colores rojo hierro, arco iris, blanco can-
MEDICIONES
Intervalo de temperatura del objeto 86 °F (30 °C) a 113 °F (45 °C)
Precisión en modo normal ±0.9 °F (±0.5 °C) (a temperatura
ANÁLISIS DE LAS MEDICIONES
Corrección de emisividad Varía de 0.01 a 1.0
ALMACENAMIENTO DE IMÁGENES
Formato de almacenamiento de
imágenes
≤150 mK
Microbolómetro no refrigerado/de
8 a 14 µm
dente, rojo candente y azul hielo
ambiente de 25 °C)
BMP, tarjeta Micro SD
INTERFACES DE COMUNICACIÓN DE DATOS
Bluetooth N/A
SISTEMA DE ALIMENTACIÓN
Batería Batería de iones de litio recargable
de 3.6 V/5,000 mAh
Cargador de la batería Interno, cable USB, 4 horas de
carga
Sistema de carga Dentro de la cámara (adaptador
de CA)
Administración de la alimentación 5 minutos, 10 minutos, 30 minutos,
apagado (predeterminado: 30
minutos)
DATOS DEL ENTORNO
Temperatura de funcionamiento 59 °F a 86 °F (15 °C a 30 °C)
Temperatura de almacenamiento -4 °F a 140 °F (-20 °C a 60 °C)
Humedad (funcionamiento y
almacenamiento)
Prueba de caídas Ninguna
Altura de funcionamiento ≤2,000 m
Dimensiones 236 mm × 75.5 mm × 86 mm
HR <85 %
MANTENIMIENTO
Use un paño húmedo o una solución con poco jabón para limpiar la
cubierta exterior del dispositivo. No utilice abrasivos, alcohol isopropílico
o disolventes para limpiar la cubierta exterior, la lente ni la ventana.
Page 24

CUMPLIMIENTO DE LAS REGULACIONES
• La batería de litio cumple con las normas UN 38.3, UL 1642 y UL 2054.
• El producto cumple con la parte 15B de la norma FCC 47 CFR.
CONTENIDO DEL PAQUETE
1. Cámara de imágenes térmicas Yellow Jacket 52030F,
2. Cable USB de transferencia de datos y de carga,
3. Tarjeta Micro SD de16 GB,
4. Manual del usuario.
 Loading...