

Page 1
Prime Business Phone
T57W
Quick Start Guide
App lies to firmware version 97 .84.0.10 or later.
Page 2
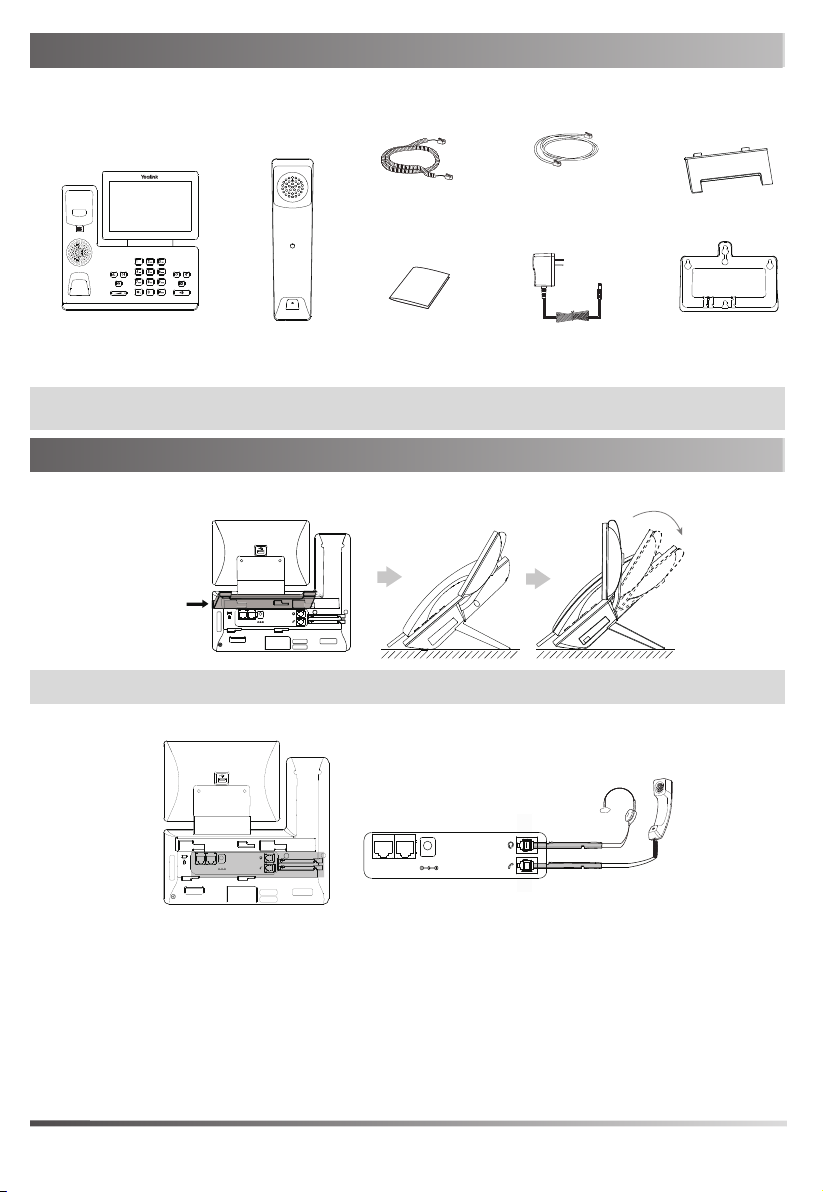
Package Contents
PUSH
;
΄ΩίΠέΩΠί
Ϳ;ͰΑ
;
΄ΩίΠέΩΠί
Ϳ;ͰΑ
;
΄ΩίΠέΩΠί
Ϳ;ͰΑ
The following items are included in your package. If you find anything missing, contact your system
administrator.
EthernetCable
(2m CAT5EFTP
Cable)
Power Adapter
(Optional)
Stand
WallMount
Bracket
(Optional)
Phone
Handset
Handset
Cord
Quick Start
Guide
Note: We recommend thatyou u se the accessories provided or approved by Yealink. The use of unapproved
third-party accessories may result in poor performance.
Assembling Your Phone
1. Attach the stand and adjust the angle of the screen
Note: You can also mount the ph one to a wall.
2. Connect the handset and optional headset
1
Page 3
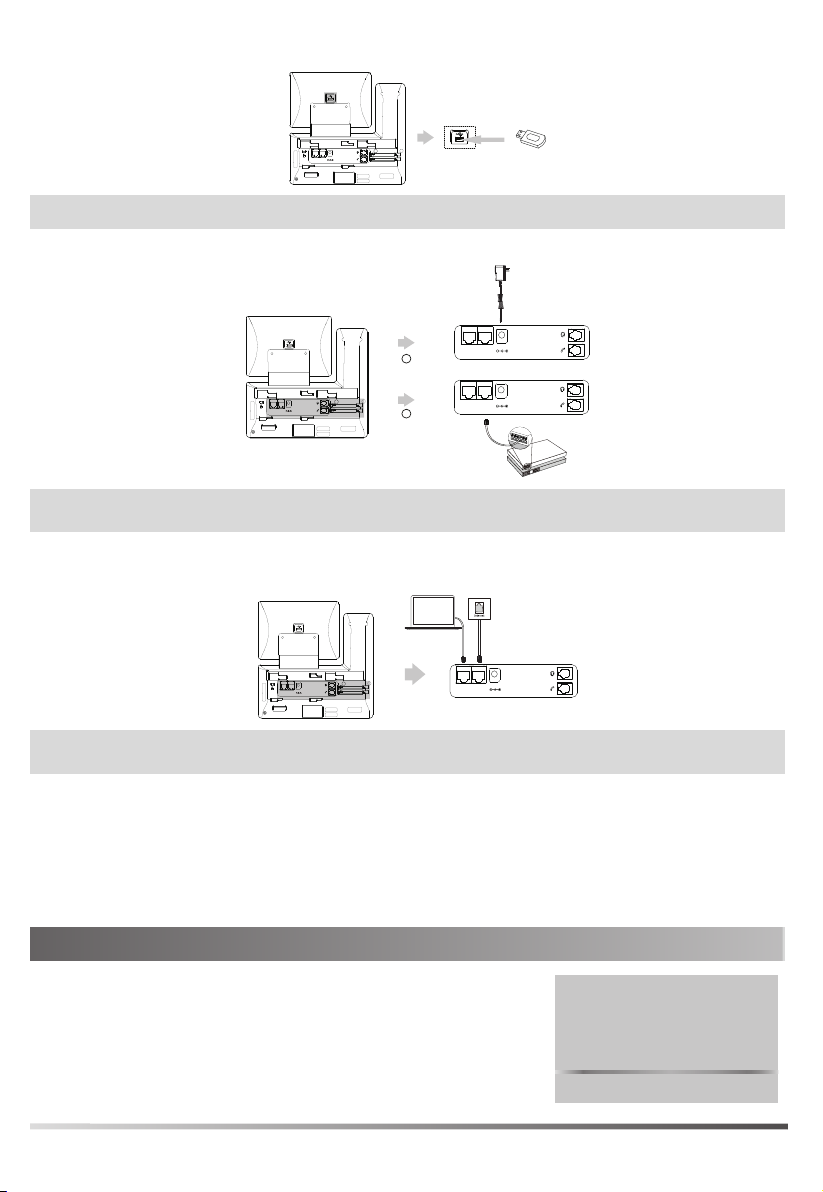
3. Optional: Connect the USB devices
;
΄ΩίΠέΩΠί
Ϳ;ͰΑ
A
B
AC Power Option
PoE ( Power over
Ethernet ) Option
Power Adapter
(DC 5V)
IEEE 802.3af compliant
PoE Hub/Switch
;
΄ΩίΠέΩΠί
Ϳ;ͰΑ
;
΄ΩίΠέΩΠί
Ϳ;ͰΑ
;
΄ΩίΠέΩΠί
Ϳ;ͰΑ
PC Connection
(Optional)
PC
;
΄ΩίΠέΩΠί
Ϳ;ͰΑ
;
΄ΩίΠέΩΠί
Ϳ;ͰΑ
Welcome
Initializing... Please wait
Note: The USB port can also be used to connect other USB devices, such as EXP50,USB headsetand so on.
4. Connect the AC power or PoE
Note: The ph one should beused with Yealink original poweradapter (5V/2A) on ly. The use of the third-party
power adapter may cause the damage to the phone.
5. Connect to the network
• Connect to the wired network
Note: If you are connecting a PC to your phone, we recommend that you usethe Ethernet cableprovided by
Yealink.
• Connect to the wireless network
1. Navigate to Menu->Basic->Wi-Fi.
2. Turn on Wi-Fi.
3. Select an available wireless network from the list of networks.
4. If the networkissecure, enterits password in the Password field.
5. Tap OK to connect to the wirelessnetwork.
Starting the Phone
After the phone isconnected to the networkand supplied with
power,itautomatically begins the initialization process. After startup,
the phone isready for use. You can configure the phonevia phone
user interface or web user interface.
2
Page 4

Configuring Your Phone
Configuring via web user interface
Accessing the web user interface:
1. Tap Menu->Status->General to obtain the IP address of the phone.
2. Open a web browseron your computer,enterthe IP address into the addressbar(fox example,
"http://192.168.0.10" or "192.168.0.10") .
3. In the Login page,type the user name (default: admin) and password (default: admin) and click Login.
Configuring Network Settings: Click Network->Basic->IPv4 Config
DHCP: By default, the phone attempts to contact a DHCP serverin your network to obtain its valid network set-
tings,forexample, IP address, subnet mask, gateway address and DNS address.
Static IP: If your phone cannotcontact a DHCP server for any reason, you need to configure them manually.
Note: The ph one also supports IPv6, but IPv6 is disabled by default. Wrong network settings may result in the
inaccessibility of yourphone and may havean impact on the network performance. Con tact yoursystemadministrator for more information.
Configuring Account Settings: Click Account->Register->Account X (X=1, 2, 3...15, 16)
Parameters of the account:
Register Status:
Line Active:
Label:
Display Name:
User Name:
Register Name:
Password:
Server Host:
Register status icons on the LCD screen:
It shows the register status of the current account.
It enables or disables the account.
It is shown on the LCD screen to identify the account.
It is shown as caller ID when placing a call.
It is provided by ITSP (required).
It is provided by ITSP (required).
It is provided by ITSP (required).
It is provided by ITSP (required).
(Green) Registered (Green and Flashing) Registering (Gray) Register Failed
Note: Check with your systemadministrator if any errorappears during the registration proc ess or a specific con-
figuration is required for your registration.
Configuring via phone user interface
Configuring Network Settings:
Navigate to Menu->Advanced (default password: admin)->Network->WAN Port->IPv4.
Configuring Account Settings:
Navigate to Menu->Advanced (default password: admin)->Accounts.
Note: For more information on account parameters,refer to Configuring via web user interface above.
3
Page 5

Using Basic Call Functions
Placing a Call
Using the handset:
1. Pick up the handset.
2. Enterthe number, and then tap Send.
Using the speakerphone:
1. With the handseton-hook, press .
2. Enterthe number, and then tap Send.
Using the headset:
1. With the headset connected, press to activatethe headsetmode.
2. Enterthe number, and then tap Send.
Note: During a call, you can alternate between the headset, hands-free speakerphone and handsetmodes by
pressing the HEADSET key, the Speakerphone key or by picking up the h andset. Headset mode requiresa
con nected h eadset.
Answering a Call
Using the handset:
Pick up the handset.
Using the speakerphone:
Press .
Using the headset:
Press .
Note: You can reject an incoming callby tapping Reject.
Ending a Call
Using the handset:
Hang up the handset or tap End Call.
Using the speakerphone:
Press or End Call.
Using the headset:
Tap End Call.
Redialing a Call
• Press to enter the Placed Calls list, and then tap the desired entry.
• Press twice when the phone is idleto dial out the last dialed number.
Muting and Un-muting a Call
• Press to mutethe microphoneduring a call.
• Press again to un-mute the call.
Holding and Resuming a Call
To Hold a call:
4
Page 6

Press or Hold during an active call.
To Resume the call, do one of the following:
• If there is only one callon hold, press or Resume.
• If there is more than one call on hold, select the desired call,and then press or Resume.
Transferring a Call
You can transfer a call in the following ways:
Performing a Blind Transfer
1. Press or Transfer during an active call.The callisplaced on hold.
2. Enterthe number you want to transfer to.
3. Press or B Transfer.
Performing a Semi-Attended Transfer
1. Press or Transfer during an active call.The callisplaced on hold.
2. Enterthe number you want to transfer to, and then press .
3. Press or Transfer when you hear the ring-back tone.
Performing a Attended Transfer
1. Press or Transfer during an active call.The callisplaced on hold.
2. Enterthe number you want to transfer to, and then press .
3. Press or Transfer when the second party answers.
Forwarding a Call
To enable call forward:
1. Navigate to Menu->Features->Call Forward.
2. Select the desired forward type:
Always Forward----Incoming callsare forwarded unconditionally.
Busy Forward----Incoming callsare forwarded when the phoneis busy.
No Answer Forward----Incoming calls areforwarded ifnot answered aftera period of time.
3. Enterthe number you want to forward to. For No Answer Forward, select the desired ring time to waitbefore
forwarding from the After Ring Time field.
4. Tap Save to accept the change.
Initiating a Conference Call
1. Tap Conference during an active call.The call isplaced on hold.
2. Enterthe number of the second party, and then tap Conference.
3. Tap Conference again when the second party answers. Threeparties arenow joined in the conference.
Note: You can split the conference c allinto two individualcallsby tapping Split.
Configuring and Using Speed Dial
To configure a speed dial key:
1. Navigate to Menu->Features->Dsskey.
2. Select the desired DSS key.
3. Select SpeedDial from the Type field, select the desired line from the Account ID field, enter a labelin the
Label field and then enter the numberin the Value field.
4. Tap Save to accept the change.
To use the speed dial key:
Pressthe speed dialkey to dial out the presetnumber.
5
Page 7

Listening to Voice Mails
Messagewaiting indicatoron the idle screen indicates that one ormorevoicemailmessages are waiting at the message center.The power indicatorLED slowly flashes red.
To listen to voice mails:
1. Press or Connect.
2. Followthe voice prompts to listen to yourvoicemailmessages.
Customizing Your Phone
Managing Call History
1. Tap History.
2. Select an entry from the list.
3. Tap afterthe desired entry, and then you can do the following:
• Tap Send to call the entry.
• Tap Delete to delete the entry from the list.
• Tap Edit to editthe entry before calling.
• Tap Add to add the entry to the local directory.
• Tap Blacklistto add the entry to the blacklist.
Managing Contact Directory
Adding a contact:
1. Tap Directory.
2. Tap Add to add a contact.
3. Entera unique contact name in the Name field and contact numbers in the corresponding fields.
4. Tap Save to accept the change.
Editing a contact:
1. Tap Directory.
2. Tap afterthe desired entry.
3. Editthe contact information.
4.TapSave to accept the change.
Deleting a contact:
1. Tap Directory.
2. Tap afterthe desired entry and then tap Delete.
3. Tap OK when the LCD screen prompts “Delete selected item?”.
Adjusting the Volume
Press to adjustthevolume.
Setting Ring Tones
1. Navigate to Menu->Basic->Sound->Ring Tones.
2. Select Common or the desired account.
3. Select the desired ring tone.
4. Tap Save to accept the change.
6
Page 8

T 5 7 W- E N
Regulatory Notices
Operati ng Ambi ent Te mperature s
•Operatingtemperature:+ 32t o104°F (0to 40°C)
•Relativehumidity: 5%to90%, noncondensing
• Storagetemperature: -22to +160°F(-30 to+ 70°C)
Warranty
Our prod uct warranty i s lim ited only to th e uni t itsel f, whe n used norma lly
in accordance with the ope rating instructi ons and the system envi ronm ent. We are n ot li able for d amage or l oss resultin g from the use o f
thi s product, o r for any cla im f rom a third party. We are n ot li able for p roblem s with Yeali nk device arising from the use o f thi s product; w e are n ot
li able for fi nancia l dam ages, l ost profi ts, claim s from th ird parti es, etc.,
arisin g from the use of thi s product.
Explanationof thesymbols
DC symbo l
ist heDC voltagesymbol.
WEEE Warning symbol
To avoidthepotentialeffects ontheenvironmentandhumanhealth as aresult oft he
presenceof hazardoussubstancesinelectricalandelectronicequipment, endusersof elec-
tricalandelectronicequipmentshouldunderstandthemeaningof thecrossed-out wheeledbin
symbol. Donotdisposeof WEEEas unsortedmunicipalwasteandhaveto collectsuch
WEEE separately.
Restrictio n of Hazardou s Substan ces Di rective (RoHS)
Thisdevicecomplieswitht herequirementsof the EURoHS Directive. Statements ofcom-
pliancecanbeobtainedby contactingsupport@yealink.com.
Safety In struction s
Savetheseinstructions.Readthesesafety instructionsbeforeuse!
General Re quirem ents
*Before youinstallanduset hedevice,readt hesafety instructionscarefullyandobservethe
situationduringoperation.
*Duringtheprocessof storage, transportation, andoperation, pleasealwayskeepthe device
dryandclean,avoidcollisionandcrash.
*Pleaseattempt not todismantlethedeviceby yourself. In caseof anydiscrepancy,please
contactt heappointedmaintenancecenterfor repair.
*Pleaserefer tothe relevant lawsandstatutes whileusingt hedevice.Legalrights ofothers
shouldberespectedas well.
Environme ntal Requ iremen ts
*Placet hedeviceat awell-ventilatedplace. Donotexposethe deviceunderdirect sunlight.
*Keept hedevicedry andfree ofdusts.
*Do not placethedeviceonor nearany inflammableorf ire-vulnerableobject, suchasrubber-
madematerials.
*Keept hedeviceawayfrom any heatsourceor barefire,such asacandleoran electric
heater.
Operati ng Re quirem ents
*Do not let achildoperatethe devicewithout guidance.
*Do not let achildplaywith thedeviceor any accessoryincase ofaccidentalswallowing.
*Pleaseuset heaccessories providedor authorizedby themanufactureronly.
*T hepowersupply of thedeviceshallmeet therequirements oft heinputvoltageof thedevice.
Pleaseuse theprovidedsurgeprotectionpowersocket only.
*Before pluggingor unplugginganycable,make suret hat yourhandsarecompletely dry.
*Do not spillliquidof anykindon theproduct or uset heequipmentnearwater, forexample,
near abathtub, washbowl,kitchensink, wet basementor neara swimmingpool.
*Duringat hunderstorm, stopusingt hedeviceanddisconnectit from thepowersupply.
UnplugthepowerplugandtheAsymmetric DigitalSubscriberLine(ADSL)twistedpair(the
radiof requencycable)to avoidlightningstrike.
*I ft hedeviceis left unusedfor aratherlongtime, disconnectit from thepowersupplyand
unplugthepowerplug.
Technical Support
VisitYealinkW IKI (http://support.yealink.com/)f or thelatestf irmware, guides,FAQ ,
Product documents, andmore.F orbetterservice, wesincerelyrecommendyout ouse
YealinkTicketingsystem (https://t icket.yealink.com)t osubmit allyour technicalissues.
*W henthereis smokeemittedfrom thedevice, orsomeabnormalnoiseor smell,dis-
connect thedevicef rom thepowersupply,andunplugt hepowerplugimmediately.
*Contact thespecifiedmaintenancecenterfor repair.
*Do not insertany object intoequipment slots thatis not part oft heproductor auxiliary
product.
*Before connectinga cable, connectt hegroundingcableof thedevicefirst. Donot dis-
connect thegroundingcableuntilyoudisconnectallothercables.
Cle aning Req uireme nts
*Before cleaningthedevice,disconnect it fromt hepowersupply.
*Use apieceof soft, dryandanti-static clotht ocleant hedevice.
*Keept hepowerplugcleananddry.
Troubl eshooti ng
Theunit cannot supplypower toYealinkdevice.
Thereis abadconnectionwiththe plug.
1. Cleant heplugwitha drycloth.
2. Connect it toanotherwalloutlet.
Theusageenvironment isout of operatingt emperaturerange.
1. Usein theoperatingtemperaturerange.
Thecablebetweent heunit andthe Yealinkdeviceis connectedincorrectly.
1. Connect thecablecorrectly.
Youcannot connectt hecableproperly.
1. Youmay haveconnectedawrongYealinkdevice.
2. Uset hecorrect powersupply.
Somedust, etc., maybein theport.
1. Cleant heport.
Contact your dealeror authorizedservicef acility forany furtherquestions.
FCC State ment
Thisdevicecomplieswithpart 15of theFCC Rules. Operationis subject tot hef ol-
lowing
twoconditions: (1) this devicemaynot causeharmfulinterference, and(2) thisdevice
must acceptany interferencereceived, includinginterferencethat maycause
undesiredoperation.
AnyChangesor modificationsnot expresslyapprovedby thepartyresponsiblefor
compliancecouldvoidtheuser's authority tooperatethe equipment.
IC State ment
ThisdevicecomplieswithI ndustry Canada’s licence-exempt RSSs. Operationis sub-
jectt othef ollowingt woconditions:
(1)t hisdevicemay not causeinterference; and
(2)t hisdevicemust accept anyinterference, includinginterferencethat maycause
undesiredoperationof thedevice.CAN ICES-3(B)
Leprésent appareilest conformeaux CNRd’IndustrieCanadaapplicablesaux appar-
eils radioexempts delicence.L’exploitationest autoriséeauxdeuxconditions
suivantes:
(1)l’appareilne doitpas produiredebrouillage;
(2)l’utilisateurdel’appareildoitacceptert out brouillageradioélectriquesubi, mêmesile
brouillageest susceptibled’encompromettre lef onctionnement.NMB-3(B)
Radi ation Exposure State ment
Thisequipmentcomplieswith FCCandIC radiationexposurelimits setforth for an
uncontrolledenvironment. Thisequipmentshouldbeinstalledandoperatedwithmin-
imumdistance20cmbetweent heradiatorandyourbody.
Cetémetteur nedoit pasêtre Co-placéou nefonctionnant enmêmetempsqu'aucune
autreantenneou émetteur. Cet équipement devraitêtre installéetactionnéavecune
distanceminimumde20 centimètresentreleradiateuret votrecorps.
Cont act Inform ation
YEALINKNETW ORKTECHNOLOGY CO.,LTD.
309, 3rdFloor,No.16, YunDingNorthRoad,HuliDistrict, XiamenCity, Fujian,P. R.
China
YEALINK(EUROPE) NETWORK TECHNOLOGY B.V.
Strawinskylaan3127,At riumBuilding,8th floor, 1077ZXAmst erdam,T heNeth-
erlands
YEALINK(USA) NETWORK TECHNOLOGY CO., LTD.
999PeachtreeSt reet Suite2300,F ulton,At lanta,G A, 30309, USA
MadeinChina
Web: www.yealink.com Copyright©2019YEALINK(XIAMEN)NETW ORK
TECHNOLOGY CO., LTD.Allrights reserved
 Loading...