

Page 1
Ultra-elegant Gigabit IP Phone
SIP-T42S
www.yealink.com
Quick Start Guide
(V81.1)
Page 2
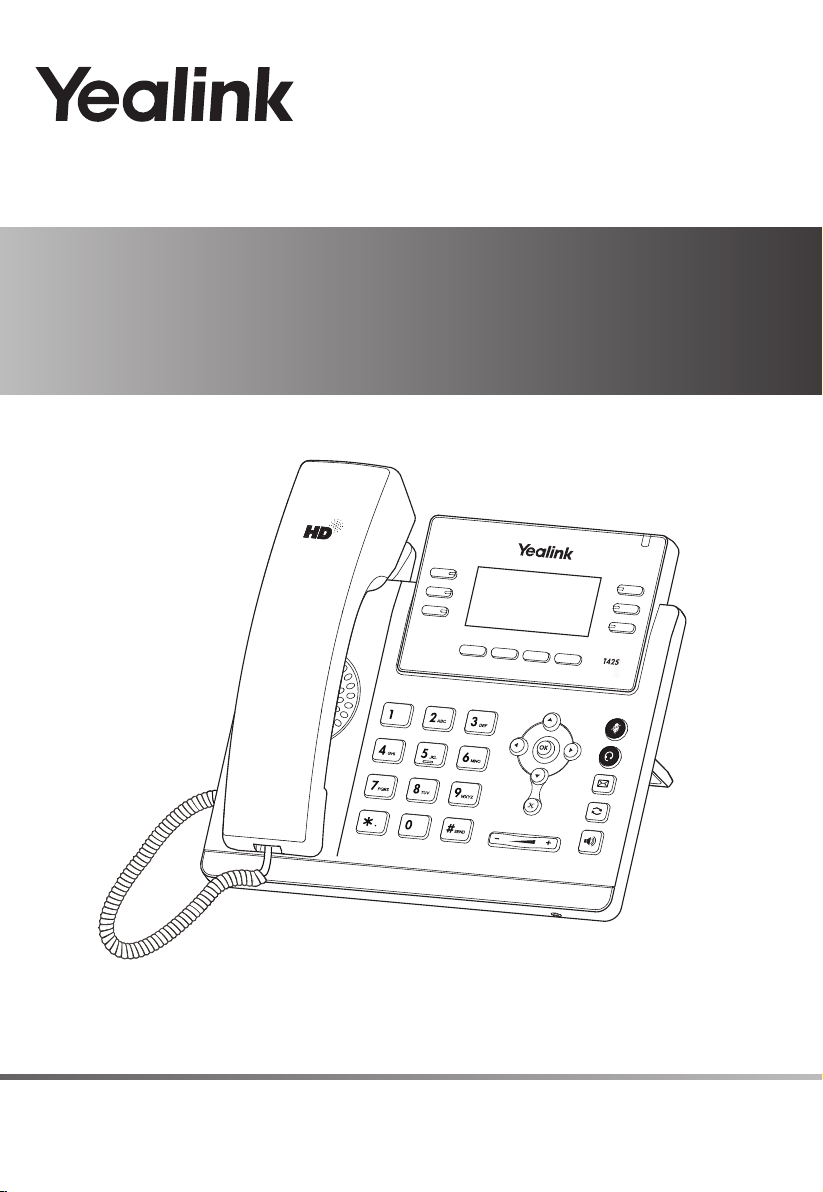
Packaging Contents
The following items are included in your package. If you find anything missing, contact your system administrator.
IP Phone
T42S
Handset
Handset Cord
Quick Start Guide
Ethernet Cable
Power Adapter
(Optional)
Stand
Wall Mount Bracket
(Optional)
Note: We recommend that you use the accessories provided or approved by Yealink. The use of unapproved
third-party accessories may result in reduced performance.
Assembling the Phone
Assembling the Phone
1. Attach the stand, as shown below:
AAA
404040
BBB
454545
Desk Mount Method
Note: You can also mount the phone to a wall. For more information on how to attach the wall mount bracket, refer
to Yealink Wall Mount Quick Installation Guide for
Yealink IP Phones
.
2. Connect the handset and optional headset, as shown below:
EHS36
Wireless Headset Adapter EHS36
Note: The headset or wireless headset adapter EHS36 should be purchased separately. EHS36 is used for
connecting the phone and a compatible wireless headset. For more information on how to use the EHS36,
refer to Yealink EHS36 User Guide.
1
Page 3
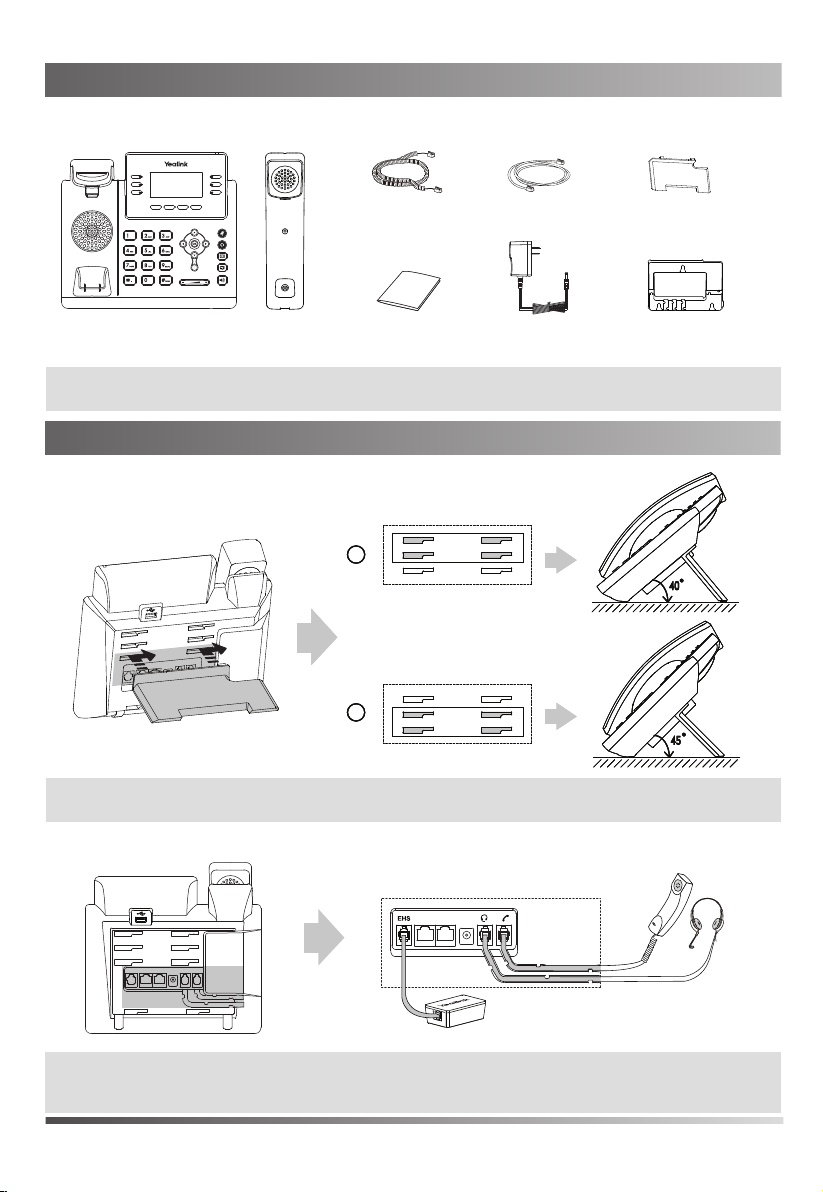
3. Connect the USB flash driver, as shown below:
Note: The USB port can also be used to connect the Bluetooth USB dongle BT40 or USB headset. The USB flash
driver, BT40 and USB headset should be purchased separately. For more information on how to use the
BT40, refer to Yealink Bluetooth USB Dongle BT40 User Guide.
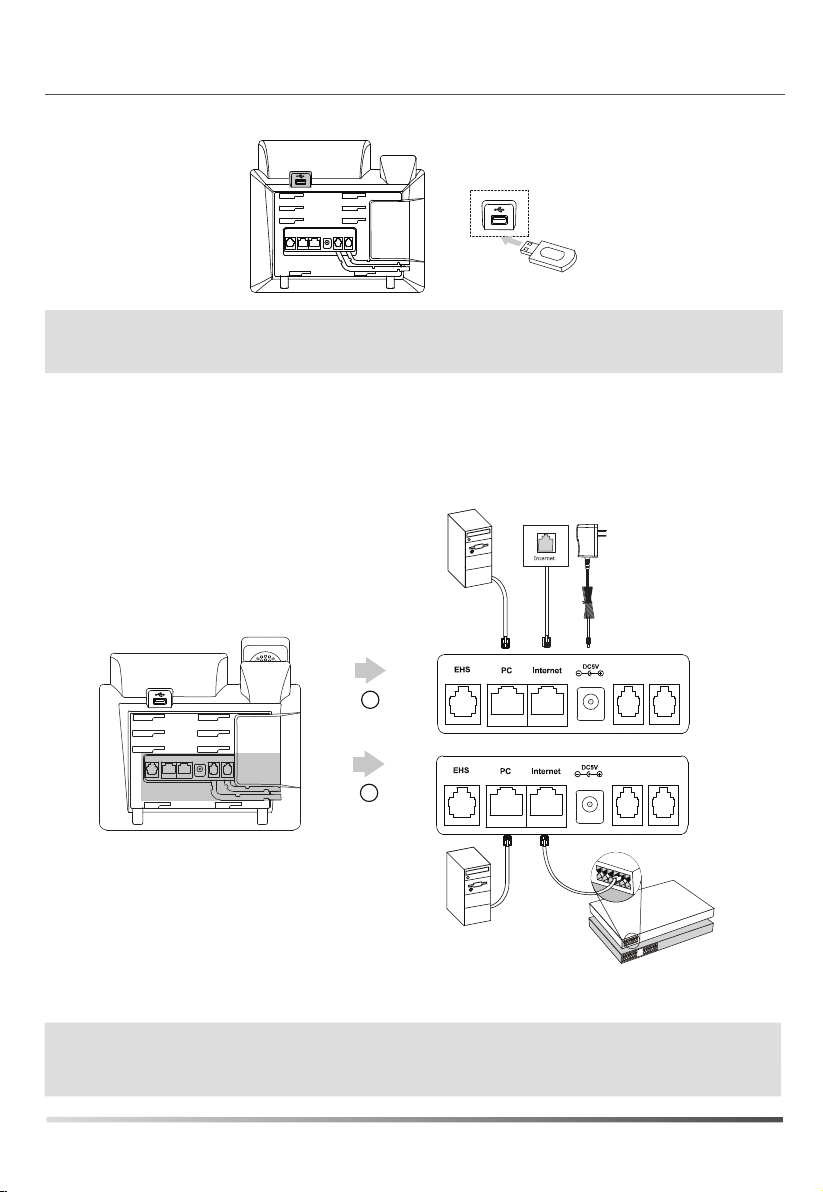
4. Connect the network and power, as shown below:
You have two options for network and power connections. Your system administrator will advise you which one to use.
PC Connection
(Optional)
A
AC Power Option
B
PoE ( Power over
Ethernet ) Option
PC Connection
(Optional)
Note:
The IP phone should be used with Yealink original power adapter (5V/1.2A) only. The use of the third-party
power adapter may cause the damage to the phone.
If inline power (PoE) is provided, you don’t need to connect the power adapter. Make sure the hub/switch is
PoE-compliant.
Power Adapter
(DC 5V)
IEEE 802.3af compliant
PoE Hub/Switch
2
Page 4

Startup
After the IP phone is connected to network and supplied with
power, it automatically begins the initialization process. After
startup, the phone is ready for use. You can configure the phone
via web user interface or phone user interface
.
Welcome
Initializing...please wait
Configuring Your Phone
Configuring via web user interface
Accessing the web user interface:
1. Press the OK key when the phone is idle to obtain the IP address of the phone.
2. Open a web browser on your computer, enter the IP address into the address bar (e.g., "http://192.168.0.10" or
"192.168.0.10"), and then press the Enter.
3. Enter the user name (default: admin) and password (default: admin) in the login page and click Confirm.
Network Settings: Click on Network->Basic->IPv4 Config
You can configure the network settings in the following ways:
DHCP:
By default, the phone attempts to contact a DHCP server in your network to obtain its valid network settings,
e.g., IP address, subnet mask, gateway address and DNS address.
Static IP Address:
subnet mask, gateway address, primary DNS address and secondary DNS address for the phone
manually.
Note: The IP phone also supports IPv6, but IPv6 is disabled by default.
The wrong network settings may result in the inaccessibility of your phone and may have an impact on the
network performance. Contact your system administrator for more information.
Account Settings: Click on Account->Register->Account X (X=1,2,3...11,12)
Parameters of the account:
Register Status:
Line Active:
Label:
Display Name:
Register Name:
User Name:
Password:
Server Host:
If your phone can not contact a DHCP server for any reason, you need to configure the IP address,
It shows the register status of the current account.
You can select Enabled/Disabled to enable/disable the account.
It is shown on the LCD screen to identify the account.
It is shown as Caller ID when placing a call.
It is an authenticated ID for authentication provided by ITSP (required).
It is provided by ITSP for registration (required).
It is provided by ITSP for registration (required).
It is provided by ITSP for registration (required).
Register status icons on the LCD screen:
Registered Registering
Note: Check with your system administrator if any error appears during the registration process or a specific
configuration is required for your registration.
3
Register Failed
Page 5

Configuring via phone user interface
Network Settings:
Press the Menu soft key when the phone is idle, select
WAN Port/VLAN/Webserver Type/802.1x Settings/VPN/LLDP/CDP/NAT
Account Settings:
Press the Menu soft key when the phone is idle, select Settings->Advanced Settings (default password: admin)->Accounts to
configure the account.
Note: For more information on account parameters, refer to Configuring via web user interface above.
Settings->Advanced Settings (default password: admin)->Network->
to configure the network.
Basic Call Features
Placing a Call
Using the handset:
1. Pick up the handset.
2. Enter the number, and then press the Send soft key.
Using the speakerphone:
1. With the handset on-hook, press
2. Enter the number, and then press the Send soft key.
Using the headset:
1. With the headset connected, press to activate the headset mode.
2. Enter the number, and then press the Send soft key.
Note: During a call, you can alternate between the headset, hands-free speakerphone and handset modes by
pressing the Headset key, the Speakerphone key or by picking up the handset. Headset mode requires a connected
headset.
Answering a Call
Using the handset:
Pick up the handset.
Using the speakerphone:
Press .
Using the headset:
Press .
.
Note: You can reject an incoming call by pressing the Reject soft key.
Ending a Call
Using the handset:
Hang up the handset or press the EndCall soft key.
Using the speakerphone:
Press or the EndCall soft key.
Using the headset:
Press the EndCall soft key.
4
Page 6

Redial
Press to enter the placed call list, press or to select the desired entry, and then press or the
Send soft key.
Press twice when the phone is idle to dial out the last dialed number.
Call Mute and Un-mute
Press to mute the microphone during a call.
Press again to un-mute the call.
Call Hold and Resume
To place a call on hold:
Press the Hold soft key during an active call.
To resume the call, do one of the following:
If there is only one call on hold, press the Resume soft key.
If there is more than one call on hold, press or to select the desired call, and then press the Resume
soft key.
Call Transfer
You can transfer a call in the following ways:
Blind Transfer
1. Press the Tran soft key during an active call. The call is placed on hold.
2. Enter the number you want to transfer to.
3. Press the Tran soft key.
Semi-Attended Transfer
1. Press the Tran soft key during an active call. The call is placed on hold.
2. Enter the number you want to transfer to, and then press .
3. Press the Tran soft key when you hear the ring-back tone.
Attended Transfer
1. Press the Tran soft key during an active call. The call is placed on hold.
2. Enter the number you want to transfer to, and then press .
3. Press the Tran soft key when the second party answers.
Call Forward
To enable call forward:
1. Press the Menu soft key when the phone is idle, and then select Features->Call Forward.
2. Select the desired forward type:
Always Forward----Incoming calls are forwarded unconditionally.
Busy Forward----Incoming calls are forwarded when the phone is busy.
No Answer Forward----Incoming calls are forwarded if not answered after a period of time.
3. Enter the number you want to forward to. For No Answer Forward, press or to select the desired ring time
to wait before forwarding
4. Press the Save soft key to accept the change.
Call Conference
1. Press the Conference soft key during an active call. The call is placed on hold.
2. Enter the number of the second party, and then press the Send soft key.
3. Press the Conference soft key again when the second party answers. All parties are now joined in the conference.
4. Press the
Note: You can split the conference call into two individual calls by pressing the Split soft key.
EndCall
soft key to disconnect all parties.
from the After Ring Time field.
5
Page 7

Speed Dial
To configure a speed dial key:
1. Press the Menu soft key when the phone is idle, and then select Features->DSS Keys.
2. Select the desired DSS key, and then press the Enter soft key.
3. Select Speed Dial from the Type field, select the desired line from the Account ID field, enter a label in the Label field
and then enter the number in the Value field.
4. Press the Save soft key to accept the change.
To use the speed dial key:
Press the speed dial key to dial out the preset number.
Voice Message
Message waiting indicator on the idle screen indicates that one or more voice messages are waiting at the message
center. The power indicator LED slowly flashes red.
To listen to voice messages:
1. Press or the Connect soft key.
2. Follow the voice prompts to listen to your voice messages.
Customizing Your Phone
Call History
1. Press the History soft key when the phone is idle, press or to scroll through the list.
2. Select an entry from the list, you can do the following:
Press the Send soft key to call the entry.
Press the Delete soft key to delete the entry from the list.
If you press the Option soft key, you can also do the following:
Select Detail to view detailed information about the entry.
Select Add to Contacts to add the entry to the local directory.
Select Add to Blacklist to add the entry to the blacklist.
Select Delete All to delete all entries from the list.
Contact Directory
To add a contact:
1. Press the Directory soft key when the phone is idle, and then select All Contacts.
2. Press the Add soft key to add a contact.
3. Enter a unique contact name in the Name field and contact numbers in the corresponding fields.
4. Press the Add soft key to accept the change.
To edit a contact:
1. Press the Directory soft key when the phone is idle, and then select All Contacts.
2. Press or to select the desired contact, press the Option soft key and then select Detail from the prompt list.
3. Edit the contact information.
4. Press the Save soft key to accept the change.
To delete a contact:
1. Press the Directory soft key when the phone is idle, and then select All Contacts.
2. Press or to select the desired contact, press the Option soft key and then select Delete from the prompt list.
3. Press the OK soft key when the LCD screen prompts “Delete selected item?”.
Note: You can add contacts from call history easily. For more information, refer to Call History above.
Volume Adjustment
Press during a call to adjust the receiver volume of the handset/speakerphone/headset.
Press when the phone is idle
Press to adjust the media volume in the corresponding screen.
Ring Tones
1. Press the Menu soft key when the phone is idle, and then select Settings->Basic Settings->Sound->Ring Tones.
2. Press or to select Common or the desired account and then press the Enter soft key.
3. Press or to select the desired ring tone.
4. Press the Save soft key to accept the change.
or ringing
to adjust the ringer volume.
6
Page 8

About us
Founded in 2001, Yealink, a leading provider of VoIP Phone and IP communication solutions, has been focusing on VoIP
products characterized by reliable quality, easy deployment and affordable price for more than a decade. Today, customers
from over 140 countries rely on Yealink as the backbone of global collaboration to extend the value of network communications.
More about Yealink
Since 2001, Yealink has continued to develop state-of-the art, hi-tech VoIP communication terminals that include IP video
phones, IP phones and USB phones. With a worldwide market in more than 140 countries, the company has also established
a first-class international service network.
Our priorities are quality, functionality, ease-of-use, customer support and competitive pricing. To provide new solutions for the
future in this fast-evolving sector, Yealink’s large, talented and highly-experienced VoIP R&D team is totally committed to the
pursuit of excellence.
To date, we have passed more than 80 interoperability tests and meet certification requirements set by leading VoIP system and
platforms. Yealink works in close partnership with T-Mobile, Telefonica, Portugal Telecom and other leading telecommunication
service providers.
YEALINK(XIAMEN) NETWORK TECHNOLOGY CO.,LTD.
Web: www.yealink.com
Addr: 309, 3th Floor, No.16, Yun Ding North Road, Huli
District, Xiamen City, Fujian, P.R. China
Copyright
©2016Yealink Inc.All right reserved.
Page 9

Federal Communication Commission Interference Statement
This device complies with Part 15 of the FCC Rules. Operation is subject to the
following two conditions:
(1)This device may not cause harmful interference, and
(2)This device must accept any interference received, including interference that
may cause undesired operation.
This equipment has been tested and found to comply with the limits for a Class B
digital device, pursuant to Part 15 of the FCC Rules. These limits are designed to
provide reasonable protection against harmful interference in a residential
installation. This equipment generates, uses and can radiate radio frequency energy
and, if not installed and used in accordance with the instructions, may cause harmful
interference to radio communications. However, there is no guarantee that
interference will not occur in a particular installation. If this equipment does cause
harmful interference to radio or television reception, which can be determined by
turning the equipment off and on, the user is encouraged to try to correct the
interference by one of the following measures:
- Reorient or relocate the receiving antenna.
- Increase the separation between the equipment and receiver.
- Connect the equipment into an outlet on a circuit different from that to which
- Consult the dealer or an experienced radio/TV technician for help.
the receiver is connected.
FCC Caution: Any changes or modifications not expressly approved by the party
responsible for compliance could void the user's authority to operate this
equipment.
 Loading...