

Page 1
DECT Repeater
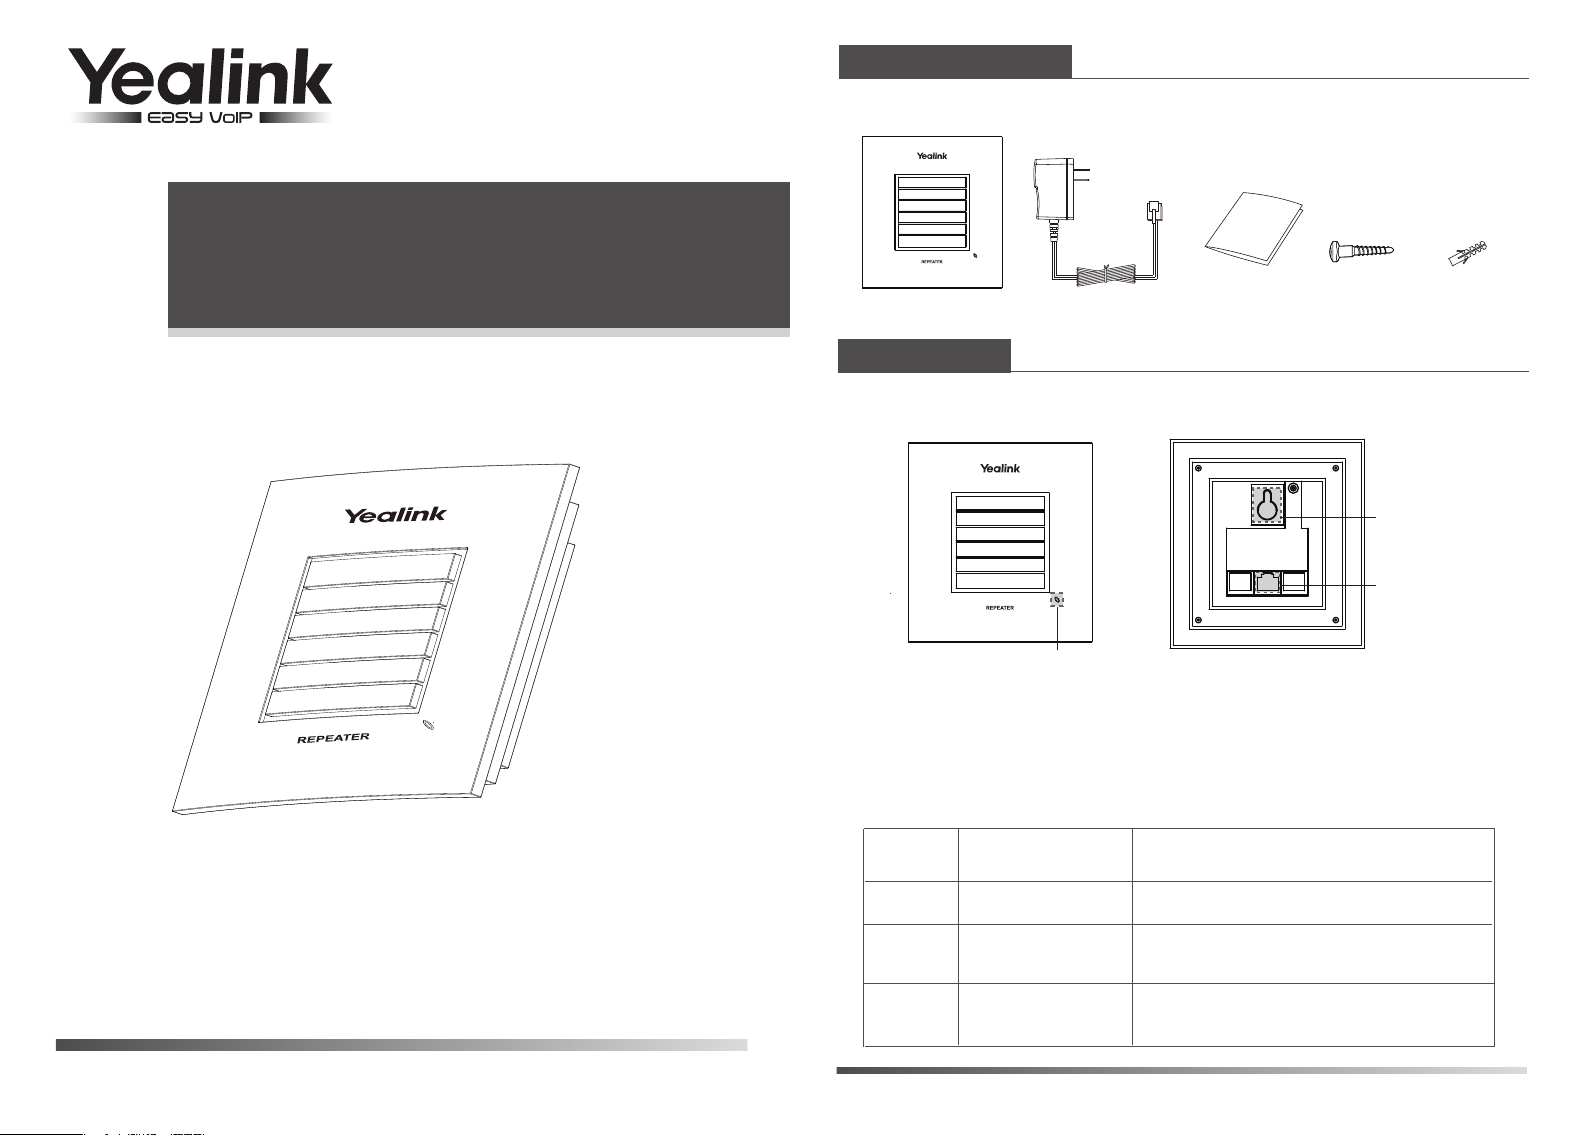
Packaging Contents
The following items are included in your package:
RT10
Repeater
Power Adapter
User Guide
Screw
Screw Anchor
Overview
Appearance Instructions
Wall Mount
Hole
DC Jack
LED Indicator
LED Status
The DECT repeater has one LED indicator describing the repeater operations. The
following table provides instructions on repeater operations and LED indications.
LED Indication
Operation
www.yealink.com
User Guide
Red
Red
Slowly flashes
Double flashes
Power offOff
Unregistered, ready for manual registration.
Unregistered, ready for auto registration.
DECT Repeater RT10 User Guide
Page 2
LED
Indication
Operation
Introduction
Red
Red
Steady on
Shortly flashes
Registered to base station, ready for use.
Attempting handset connection.
Installation
To connect the power for the repeater:
1. Connect the DC plug on the power adapter to the DC jack on the repeater.
2. Connect the other end of the power adapter to the AC outlet.
Hook
Yealink DECT repeater RT10 is designed in accordance with Digital Enhanced Cordless
Telecommunication (DECT) standard. It can be deployed to extend the range of the
W52P IP DECT phone to cover areas where reception was previously not available. All
the usual handset functions are supported by the base station in the extended radio
range. The repeater, base station and cordless handset employ wireless connection.
Signals are exchanged without acoustical and visual differences.
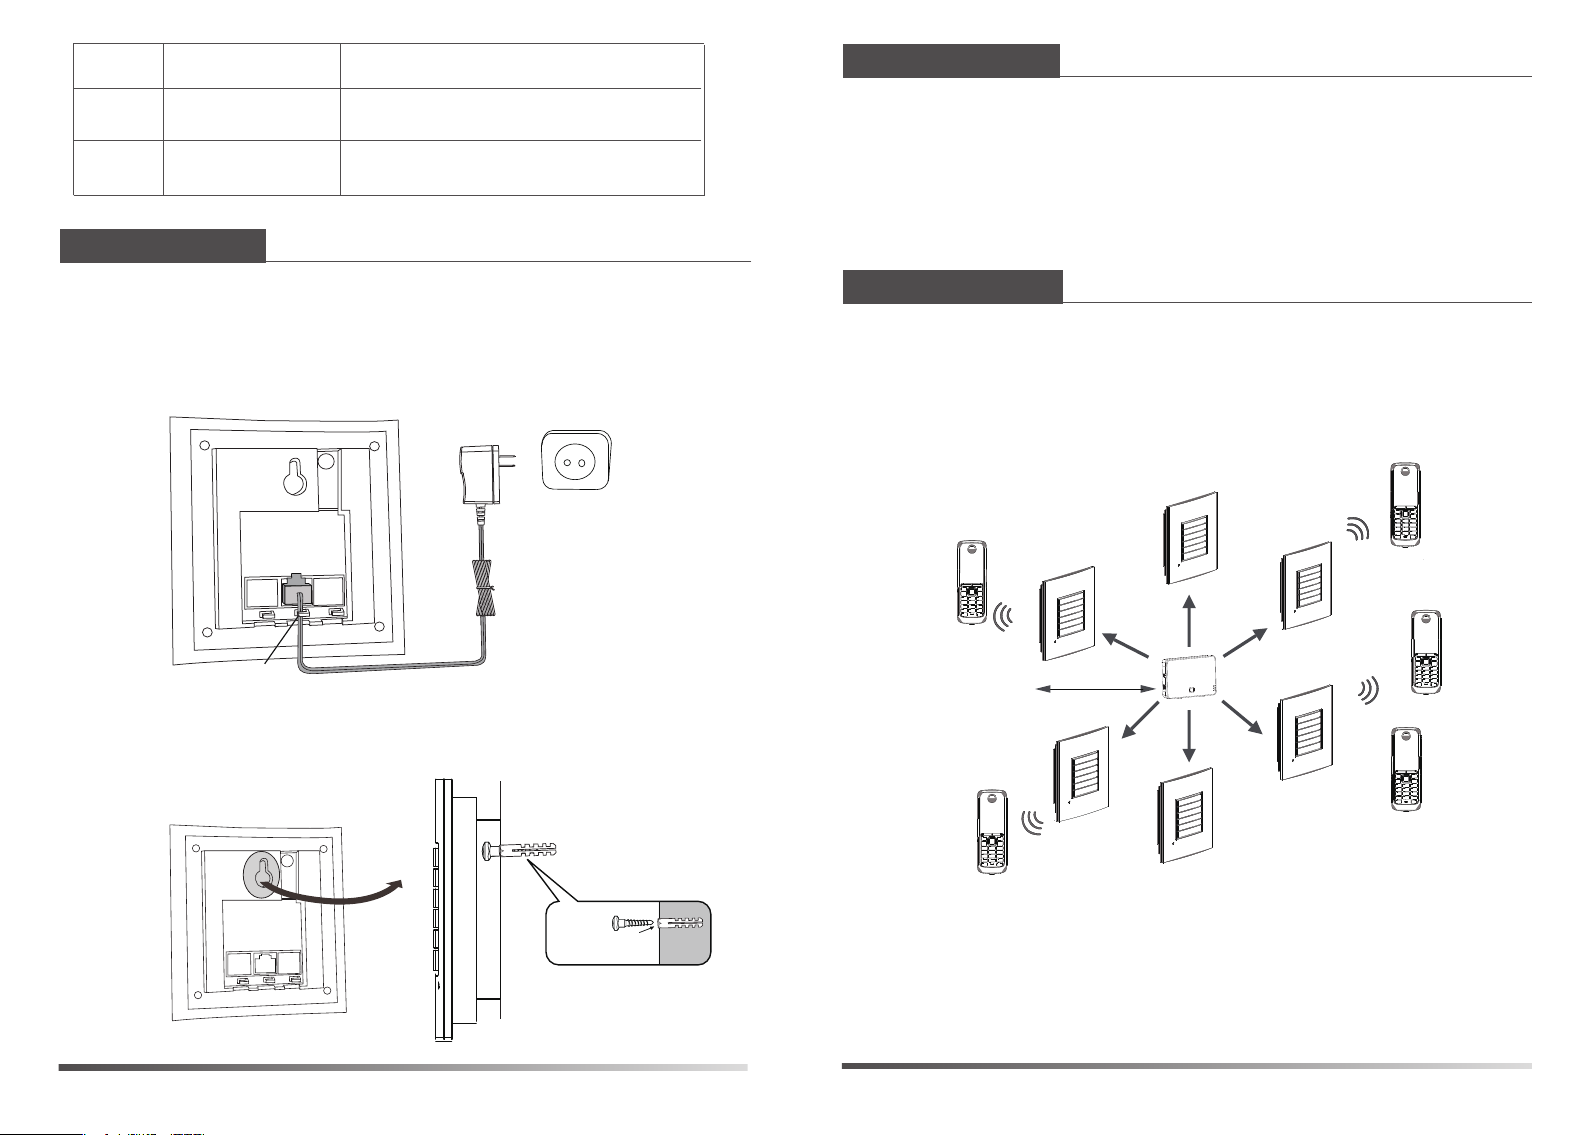
Multiple Repeaters
Up to 6 repeaters can be registered to one base station to extend available reception
range for all registered handsets. All repeaters must be installed within the base station
coverage area (up to 300m in unobstructed outdoor areas and up to 50m inside
buildings), as shown in the figure below. It is not possible to install the repeaters in series
or “daisy-chain”.
50m/300m
To install the repeater using the supplied screw:
Wall Mount
DECT Repeater RT10 User Guide
Wall
Insert the screw into
the screw anchor.
Screw anchor is used to fix
the screw on concrete wall.
The maximum number of handsets that can be registered to your base station is not
affected by the repeater. The repeater can be used to extend the coverage range in all
directions, allowing several floors to be covered. The automatic handover process is
seamless.
If the repeater is placed correctly (overlapping the coverage area of the base station),
the handsets can move freely within the total coverage area while on a call.
www.yealink.com
Page 3

Registering the Repeater
The repeater can be registered to a base station in two ways: Auto Registration and
Manual Registration. Before registering the repeater, you need to enable the repeater
mode on the handset. For more information on how to enable the repeater mode, refer
Yealink W52P User Guide
to
Note: Auto Registration cannot be performed if the repeater is already registered to one base
station. In this case, de-register the repeater before attempting auto registration. For more
information, refer to ”De-registration”.
Auto Registration
Using the auto registration method, the repeater can be registered to a base station.
To register a repeater automatically:
1. Switch on the repeater and check if the LED indicator on the repeater double flashes.
If the LED indicator does not double flash, you need to de-register the repeater first.
Please refer to “De-registration”. If the LED indicator double flashes, go to step 2.
2. Switch off the repeater (disconnect the power adapter).
3. Set the base station in registration mode.
Long press the paging key on the base station till the first LED flashes.
4. Switch on the repeater (connect the power adapter).
The LED indicator on the repeater flashes. After a short while, the LED indicator stays on
permanently indicating that registration is completed, and the repeater is ready for use.
The first LED on the base station flashes after the registration is completed. You can
press the paging key to cancel the flash.
Note: If the registration is not successful, the LED indicator will flash continuously. In this case,
repeat steps 2-4.
Manual Registration
The repeater, base station and handset must be accessible before performing the
registration. If you want to register more than one repeater, the registration must be
performed separately for each repeater.
To register a repeater manually:
1. Set the repeater in registration mode.
Switch on the repeater for 1-5 seconds and then switch it off. Switch it on once more
and leave it there.
The LED indicator on the repeater flashes slowly.
You now have five minutes to complete the registration. If the registration is not
completed within this period, you must start over again.
2. Set the base station in registration mode.
Long press the paging key on the base station till the first LED flashes.
3. The LED indicator on the repeater flashes.
.
If the LED flashes fast without interruptions, go to step 5. If the LED flashes fast with
interruptions, go to step 4.
4. Registration of handset.
If the password of the base station has been changed, reset it to “0000”. You must
re-register the handset even if the handset used was already registered to the base
station. Now the LED indicator flashes fast without interruptions.
5. Assign a repeater number.
You must now assign a repeater number to the repeater (choose from 2 to 7, for up to
6 repeaters):
a) Press #*9 and the off-hook key on the handset. The LED indicator illuminates.
b) Press a number between 2 and 7. When the repeater has accepted the chosen
number, the LED indicator will flash a corresponding number of times.
If you miss the confirmation flash, press the number again.
c) Accept the registration by pressing the * key, and then press the on-hook key.
The repeater is now automatically restarted: the LED indicator goes off for 2 seconds,
flashes for a brief moment and then stays illuminated.
The registration of the repeater is completed. You can now disconnect the power
adapter and move the repeater to the selected location (disconnecting the power will
not clear the registration).
Note: Each number can be only assigned once when using more than one repeater on a base
station. Repeater number and handset number are independent of each other.
De-registration
If you want to register the repeater to another base station using the auto registration
method, de-register the repeater beforehand as described below:
1. Switch off the repeater (disconnect the power adapter).
2. Switch it on for 1 to 5 seconds and switch it off again.
3. Switch it on for 25 to 35 seconds and switch it off again.
After a while, the LED indicator on the repeater double flashes, and the repeater is ready
for a new auto registration.
Placement
To achieve optimum performance for the repeater, it is important to find a good location.
Here are a few tips for placing repeaters:
Choose a rasied position for both the base station and repeater wherever possible.
When positioning the repeater, avoid obstacles that can interfere with radio
transmission such as thick wall and metal structures that may be in the coverage area
between the base station and repeater.
Avoid interference from other electrical appliances such as micro-wave ovens, Hi-Fi
equipment, computers etc.
DECT Repeater RT10 User Guide
www.yealink.com
Page 4

Keep a minimum of 10 meters between multiple repeaters to avoid coverage areas
overlapping.
Note: The LED indicator remains on constantly after the repeater has been switched on. If the LED
flashes, the repeater is too far away from the base station or reception is hindered by obstacles.
The flow diagrams of these two registration methods are shown below:
Auto Registration
Base Station
Switch on
Manual Registration
Base Station
Switch on
Repeater
Switch off
Handset
Enable repeater mode
Handset
Enable repeater mode
Repeater
Switch on (1-5s) and
off
Base Station
Long press paging
key
Repeater
Switch on
Repeater
Switch on again
Base Station
Long press paging
key
Verification Tone
To find the best possible location for the repeater, you may need to try various locations.
Place a call and walk around with the handset to determine the base station’s coverage
area. The verification tone allows you to easily check the extent of the repeater’s
coverage area. The tone is audible on the handset during a call.
To activate the verification tone on the repeater:
1. Switch off the repeater (disconnect the power adapter).
2. Switch it on for 1 to 5 seconds and switch it off again.
3. Switch it on again. The LED indicator on the repeater flashes slowly.
4. Switch it off again.
5. Switch it on again.
The verification tone is then activated.
Place a call using the handset to check whether the handset is working in the extended
area of the repeater. If the call is successfully handled by the repeater, you can hear the
verification tone from the handset every few seconds.
To deactivate the verification tone, repeat the above steps.
Repeater
LED flashes
Repeater
LED stays on
Ready for use
DECT Repeater RT10 User Guide
Repeater
LED flashes without
interruptions
Handset
Dial out #*9
Repeater
LED stays on
Handset
Press number (2-7)
and * key
Hang up
Ready for use
No
Set password to 0000
LED flashes without
Repeater
LED flashes with
interruptions
Base Station
Handset
Re-register to base
station
Repeater
interruptions
www.yealink.com
 Loading...