

Page 1

Yealink Redirection and Provisioning Service (RPS)
I | Yealink
Page 2

Yealink Redirection and Provisioning Service (RPS)
Contents
Contents __________________________________________________________________ II
Welcome _________________________________________________________________ IV
Guide for User ______________________________________________________________ 1
1 Logging into the RPS _____________________________________________________ 1
To login the RPS Web UI ............................................................................................................ 1
2 Adding Devices __________________________________________________________ 2
To add devices to a server ......................................................................................................... 2
3 Mass adding devices by uploading a Comma-Separated Value (CSV) File ___________ 4
To add multiple devices using a *.csv or .xls file ......................................................................... 4
4 Adding Servers __________________________________________________________ 6
To add a configuration server to the RPS .................................................................................... 6
5 Managing Your Account ___________________________________________________ 7
To change your profile .............................................................................................................. 7
To change your password .......................................................................................................... 7
To logout from the RPS .............................................................................................................. 7
To view your summary information ........................................................................................... 8
To manage your Devices ............................................................................................................ 8
To manage your Servers ............................................................................................................ 9
To view system Log ................................................................................................................. 10
Guide for End-user _________________________________________________________ 12
About Yealink _____________________________________________________________ 14
II | Yealink
Page 3

Yealink Redirection and Provisioning Service (RPS)
Document Revision History
Release Version Reason for Change Date Author
1.0.2 1.0 December 1, 2011 Mike Hou
III | Yealink
Page 4

Yealink Redirection and Provisioning Service (RPS)
Welcome
About this manual
This Yealink Redirection and Provisioning Service Manual provides information on how to operate on
Yealink Redirection Service. This manual is for deployers, Users and VAR Users of Yealink products who
configure and manage devices, servers and accounts.
Document Overview
This manual is divided into two main parts by user type:
For User, please go to “PAGE 1-11”
For End-user, please go to “PAGE 12”
Introduction
RPS is a free service developed for all Yealink customers worldwide. Through RPS, service providers can
greatly simplify mass deployments of Yealink phones, save time and money in configuring and shipping
phones, reduce errors caused by complicated manual configuration.
IV | Yealink
Page 5

Guide for User
Guide for User
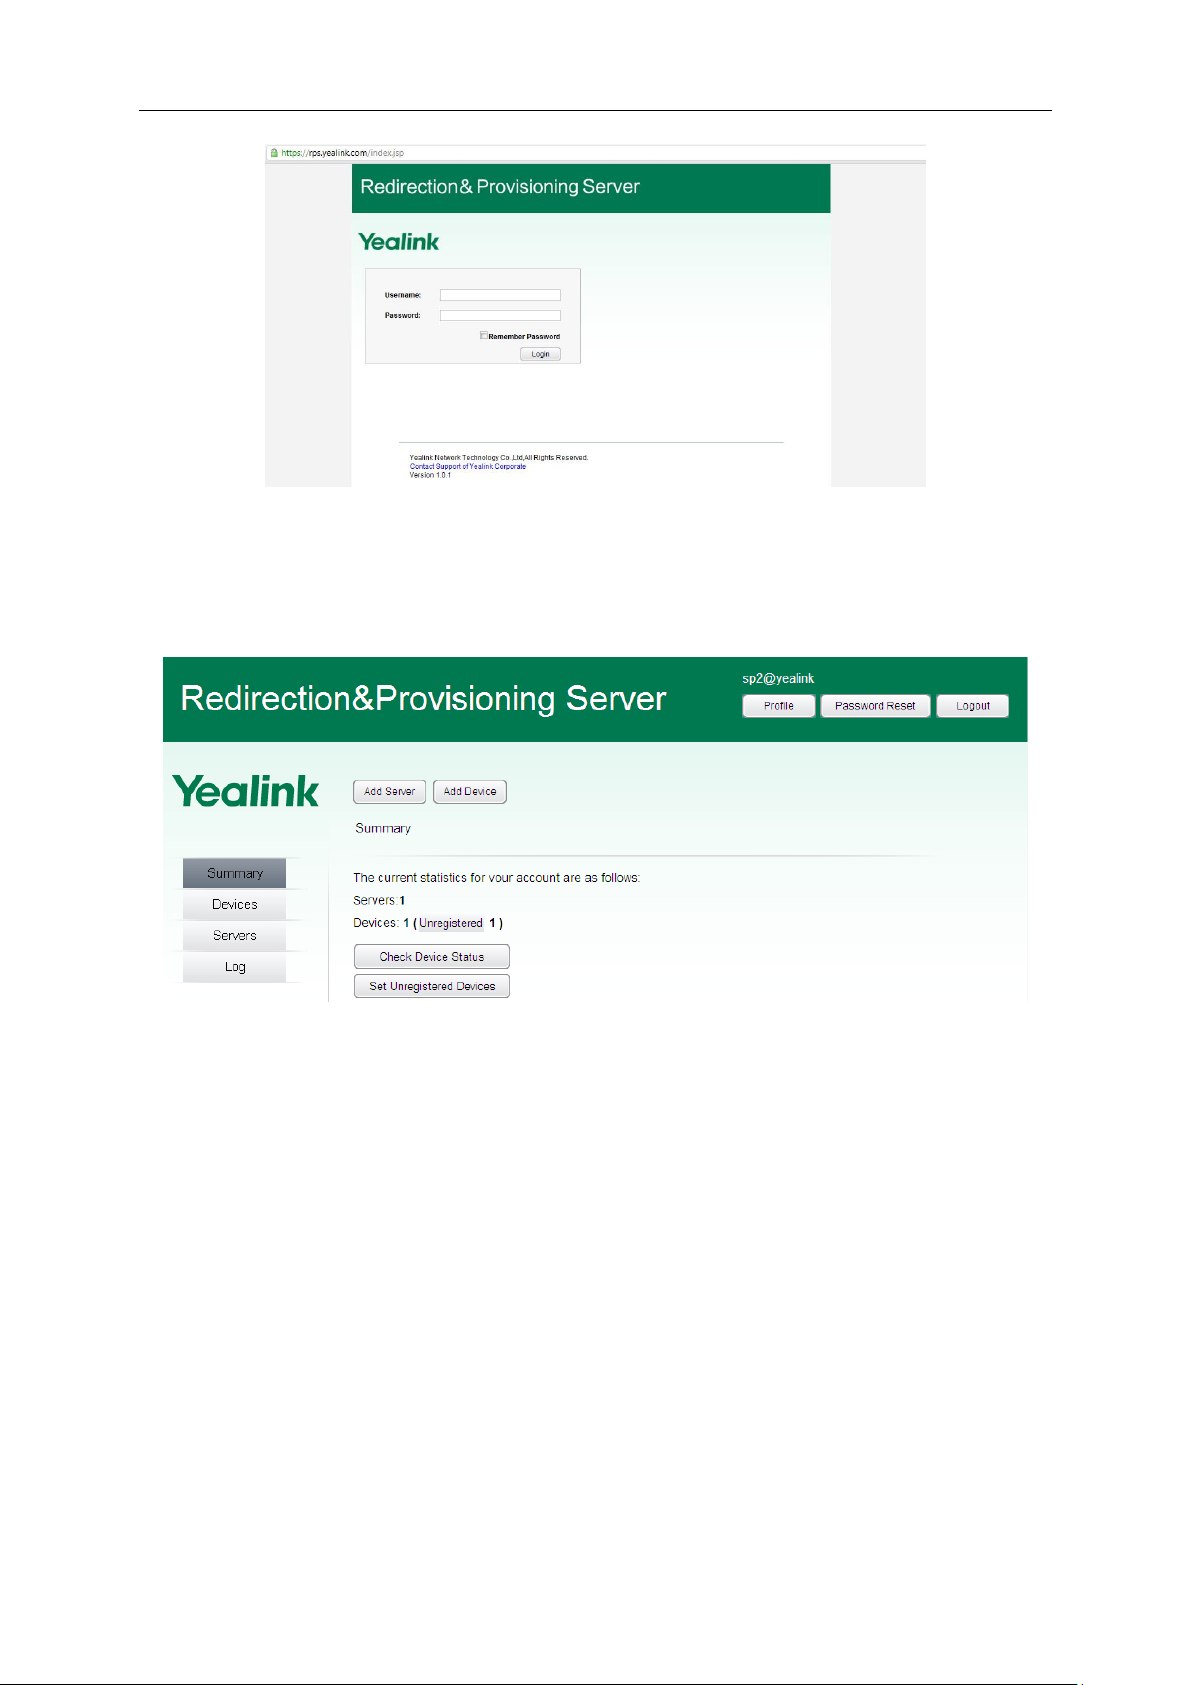
1 Logging into the RPS
The Web UI URL is https://rps.yealink.com. First of all, a User must be assigned a Username and Password
by the Yealink distributor, and then use these credentials to login the RPS.
To login the RPS Web UI
1. Type the URL in the address bar of your web browser and press <Enter>. The login page displays as
Figure 1.1:
Figure 1.1
2. Enter the Username and Password provided by Yealink distributor and then press <Enter> or click
Login button, the main page displays as Figure 1.2:
Figure 1.2
Notes:
1
○
If you forget your username and password, please contact Yealink distributor in your region for
assistance.
2
○
For security, you will logout automatically after you stay inactive for 10 minutes.
1 | Yealink
Page 6

Guide for User
2 Adding Devices
Through adding devices, a User can assign the Yealink devices to a specific configuration server
To add devices to a server
1. On the summary page, click Add Device on the top shortcut-buttons, then Add Device dialog displays
as Figure 2.1:
Figure 2.1
2. In the Enter MAC field, enter a valid MAC address and press <Enter>, the MAC address you entered
appears in the MAC List, in this way, you can add multiple MAC addresses one by one.
Notes:
1
○
Four types of valid MAC address formats are 001565000001, 00-15-65-00-00-01, 00 15 65 00 00 01,
00:15:65:00:00:00:01
2
○
”Invalid MAC” notification means that the MAC address format is invalid.
3
○
Each MAC address can only be added one time by the same user. If you want to re-add the MAC
address, you should delete it and then add it.
④If you enter a MAC that another RPS user has added, “Override current registration,continue?”
notification will pop up, you should check the MAC carefully before pressing “Yes” to override.
3. In the MAC List field, you can delete or clear the incorrect MAC addresses
4. In the Server field, you can select the server belonging to you.
Note:
The Server field can be None.
5. Click Save button to add these MAC addresses.
6. After adding devices successfully, Devices page displays as Figure 2.2, and the MAC addresses you just
added will display in the top of the list.
2 | Yealink
Page 7

Guide for User
Figure 2.2
3 | Yealink
Page 8

Guide for User
3 Mass adding devices by uploading a Comma-Separated Value
(CSV) File
Through this feature, you can add a large number of MAC addresses at one time. You can save these
devices’ MAC addresses in a *.csv or *.xls file on your PC, and then upload it to the RPS.
To add multiple devices using a *.csv or .xls file
1. Open a new document using a spreadsheet application(i.e., Microsoft Excel™)
2. In the first column, enter the MAC addresses of the devices you want to add to the RPS. One example
is shown as Figure 3.1
Notes:
1
○
You must type the MAC addresses in the first column. Other columns will be ignored.
2
○
00-15-65-00-00-01 format is recommended. In addition, 001565000001, 00 15 65 00 00 01,
00:15:65:00:00:00:01 are also supported.(001565000001 format is not available in *.csv file,
because the “00” in the beginning will cause incompatibility problem.)
Figure 3.1
3. Save your file on your PC using “Save as” in the format “.csv” or “.xls”. And the name can be
user-defined.
Notes:
1
○
The file must be less than 1MB in size.
2
○
To check the validity of your .csv file, open it from plain-text program (i.e., Notepad, TextEdit).Make
sure there are no extra commas, other than between fields.
3
○
*.xlsx file is not supported at the moment.
4. On the summary page, click Devices on the left menu, then Devices page displays as Figure 3.2:
5. Click Upload button, the Upload File dialog displays as Figure 3.2:
Figure 3.2
6. In the File to Upload field, click <Browser…> to find the file you saved on your PC.
7. In the Server filed, generally select None or specially select the server added by you.
4 | Yealink
Page 9

Guide for User
8. Click Save button to add these MAC addresses.
9. After adding devices successfully, Devices page displays, and the MAC addresses you just added will
display in the top of the list.
5 | Yealink
Page 10

Guide for User
4 Adding Servers
Before a device can be redirected to a specific configuration server, the server must be added to the RPS
by entering a name and a URL.
To add a configuration server to the RPS
1. On the summary page, click Add Server on the top shortcut-buttons, then Add Server dialog displays
as Figure 4.1:
(Additionally, you can click Add button on Servers list page to display Add Server dialog)
Figure 4.1
2. In the Name field, enter the name that must be less than 20 characters.
3. In the URL field, enter the exact server address that must be less than 255 characters
Note:
Four types of URL are supported: https/http/ftp/tftp
4. Click Save button to add the server to the RPS.
5. After adding server successfully, Servers page displays as Figure 4.2. The server you just added will
display in the top of the list.
6 | Yealink
Figure 4.2
Page 11

Guide for User
5 Managing Your Account
To change your profile
1. Click Profile button on the top-right menu, Edit Profile dialog displays as Figure5.1
Figure 5.1
2. You can change your address, work phone and mobile phone.
3. Click Save button to save your changes.
To change your password
1. Click Password Reset button on the top-right menu, Reset User Password dialog displays as Figure5.2
Figure 5.2
2. Enter your current password, new password and confirm new password.
3. Click Save button to save your new password.
To logout from the RPS
1. Click Logout button on the top-right menu, login interface displays as Figure 5.3:
7 | Yealink
Page 12
Guide for User
Figure 5.3
To view your summary information
1. Click Summary on the left menu, Summary page displays as Figure 5.4.
Figure 5.4
2. You can know the count of Servers added by you, the count of Devices you own.
Note:
“Devices:1( 1 Unregistered)” means: you have 1 piece of Yealink products added to RPS in total,
thereinto, 1 of them has been added to the RPS.
You can check one device’s registration status by the MAC address. Click Check Device Status button
and fill the MAC address you want to check, then click Save or Press <Enter>, the status will appear.
To manage your Devices
1. Click Devices on the left menu, Devices page displays as Figure 5.5
8 | Yealink
Page 13
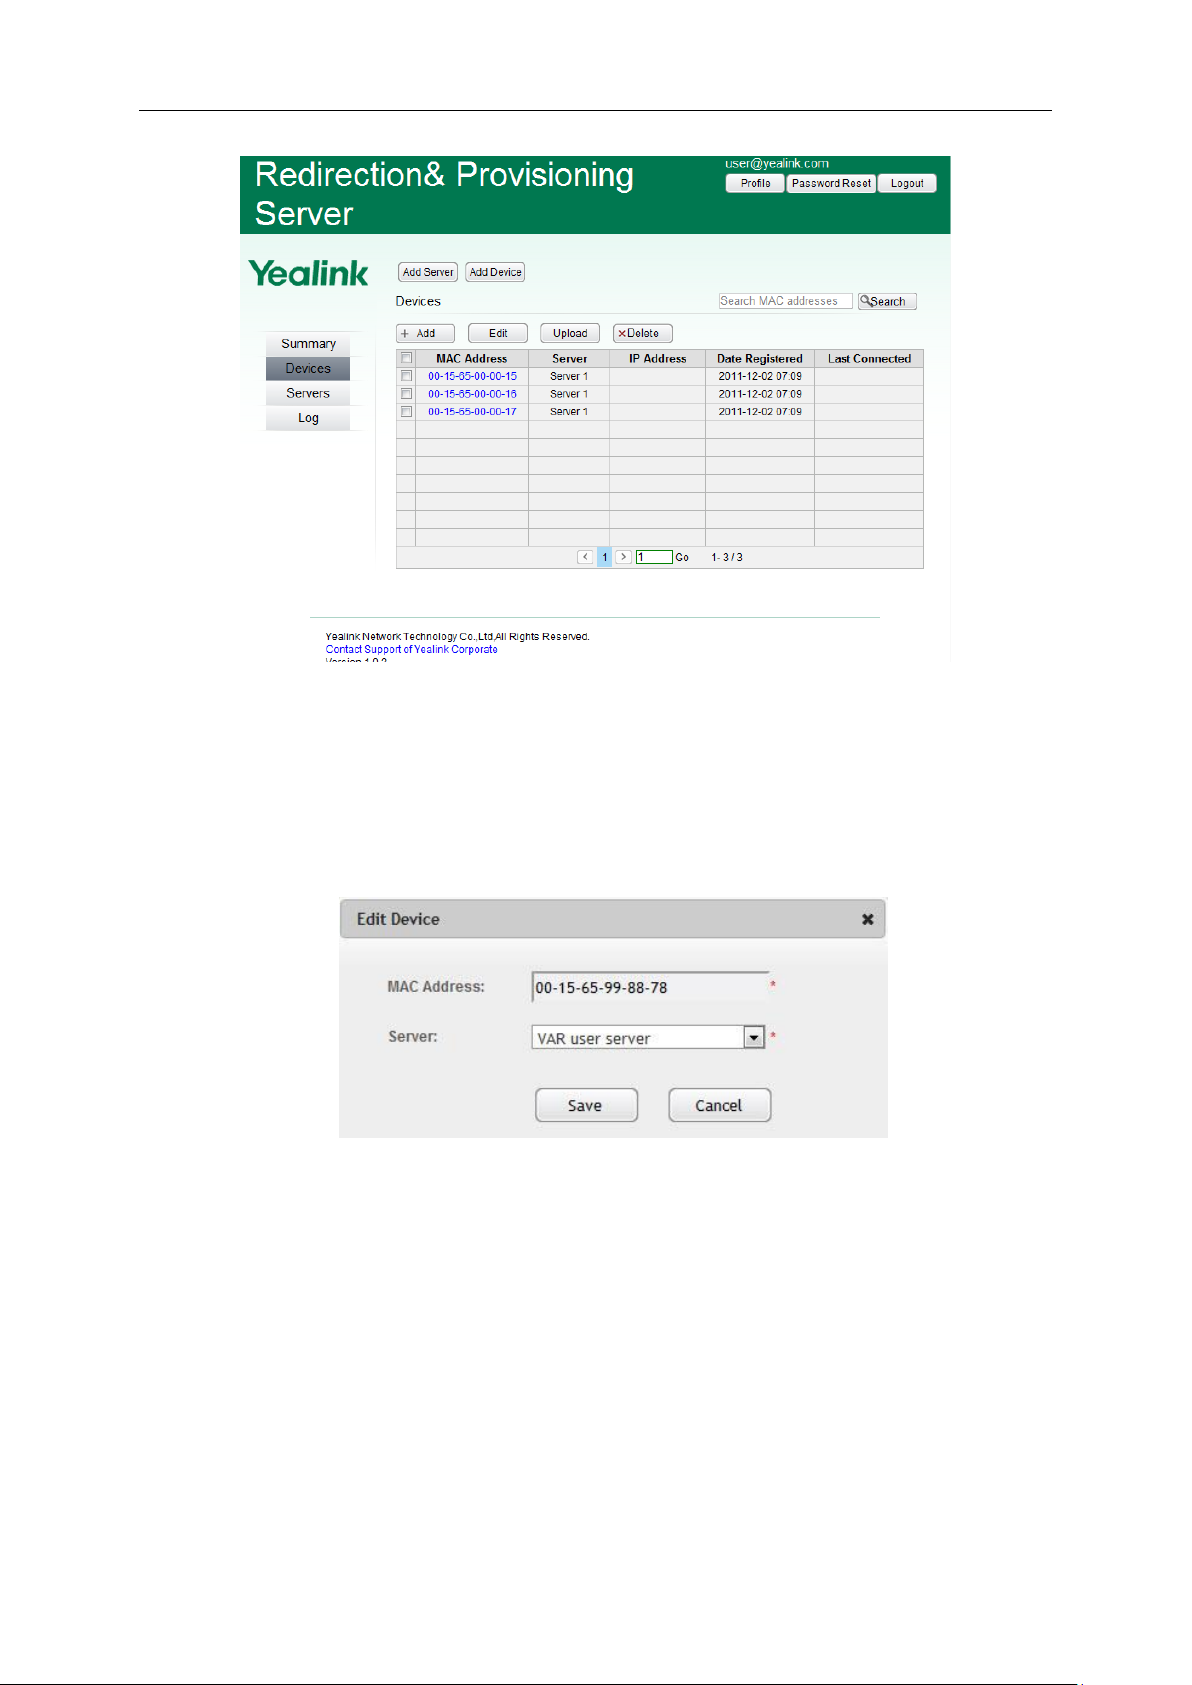
Guide for User
Figure 5.5
Note:
The devices you can see are the devices that you have added to the RPS.
2. On the Devices page, you can manage your devices through the following operation:
Add Device: Please see “Adding device” part
Upload Devices: Please see “Mass adding devices” part
Edit Device: Just click the MAC address that is blue font. The Edit Device page displays as Figure 5.6
Figure 5.6
Delete Devices: Click the checkbox beside the MAC address and then Click Delete button on the top.
Caution:
Deleting a device cannot be undone. After the device is deleted, the association with the server
will be removed, but you can re-add it to the RPS anytime.
View Devices: You can sort all the devices by clicking any of the column headings in ascending or
descending order. By default, devices are sorted in descending order by modification date.
To manage your Servers
1. Click Servers on the left menu. Servers’ page displays as Figure 5.7.
9 | Yealink
Page 14

Guide for User
Figure 5.7
2. On the Servers page, you can manage your devices through the following operation:
Add a Server: Please see “Adding server” part
Edit a Server: Just click the server Name that is blue font. The Edit Server page displays as Figure 5.8
Figure 5.8
Delete Servers: Click the checkbox beside the server name and then click Delete button on the top.
Caution:
Deleting a server cannot be undone. After the server is deleted, those devices associated with the
server will be removed from the RPS.
View Servers: You can sort all the servers by clicking any of the column headings in ascending or
descending order. By default, servers are sorted in descending order by modification date.
To view system Log
1. Click Log on the left menu. Log page displays as Figure 5.9.
10 | Yealink
Page 15

Guide for User
Figure 5.9
2. On the Log page, you can manage your devices through the following operation:
(1) Export operation log by clicking Export button.
(2) Search log by user name and date.
(3) View the log by sorting them in the column headings.
Note:
If you want to use API for reprogramming to your system, i.e. IP PBX, ERP or Website, you can contact
your local distributor to get” XML-API for Yealink RPS” document.
11 | Yealink
Page 16

Guide for End-user
Guide for End-user
When the end-user gets the IP phone, power up the phone, the bootup processes on Yealink T28 IP phone
are as followings:
Figure 1 Figure 2
Figure 3 Figure 4
Figure 5
1. On Figure 2 , if your phone cannot connect to the network, then “Network Unavailable !” will display
on the screen. 3 seconds later, Figure 5 will come out to allow you to reconfigure the network, at this
point you should check your network cable connection or set your network parameters, then press
Next softkey to try again. (Press Back softkey will skip the process of contacting the RPS.)
2. On Figure 3, the phone is contacting the RPS and getting the specific URL of the configuration server.
3. If the network is available, the phone will go to Configuration Updating interface.
4. After successfully updating, your phone will reboot automatically. If failed, “Update Failed! ”will
display on the LCD first ,and go to idle interface 3 seconds later.
Notes:
1
○
After the screen of configuration updating, the authentication screen will display if the configuration
server is authority required. On the authentication screen, you should enter the username and
password provided by your service provider.
12 | Yealink
Page 17

Guide for End-user
2
○
After the configuration update is done, the phone won’t contact the RPS until you reset the phone to
factory default.
3
○
If you really want the phone to contact the RPS again without resetting to factory default(e.g.,you
don’t want to lose your personal configuration in the phone), you can contact your service provider for
assistance.
13 | Yealink
Page 18

About Yealink
About Yealink
Founded in 2001, Yealink is the professional designer and manufacturer of IP Phone and IP Video Phone
for the world-wide broadband telephony market. For more than ten years, Yealink has focused on VoIP
products characterized by high cost-performance, easy deployment and affordable price. Yealink benefits
customers from flexibility and broad interoperability with the major IP-PBX, softswitch and IMS in the
market. Chosen by famous carriers, enterprises and clients from over 80 countries, Yealink provides SMB
and diversified customers from all over the world a best choice to extend the value of network
communication.
Contact us
Yealink Network Technology Co., Ltd.
Addr: 4th-5th Floor, South Building, No.63 Wanghai Road,
2nd Software Park, Xiamen, China (361008).
Tel: 86-592-570-2000
www.yealink.com
14 | Yealink
 Loading...