

Page 1

DESKTOP AUDIO SYSTEM
SYSTEME AUDIO DESKTOP
TSX-W80
G
OWNER’S MANUAL
MODE D’EMPLOI
BEDIENUNGSANLEITUNG
BRUKSANVISNING
MANUALE DI ISTRUZIONI
MANUAL DE INSTRUCCIONES
GEBRUIKSAANWIJZING
ИНСТРУКЦИЯ ПО ЭКСПЛУАТАЦИИ
Page 2

CAUTION: READ THIS BEFORE OPERATING YOUR UNIT.
1 To assure the finest performance, please read this
manual carefully. Keep it in a safe place for future
reference.
2 Install this unit in a well ventilated, cool, dry, clean
place - away from direct sunlight, heat sources,
vibration, dust, moisture and cold. For proper
ventilation, allow the following minimum clearances.
Top: 15 cm (6 in)
Rear: 10 cm (4 in)
Sides: 10 cm (4 in)
3 Locate this unit away from other electrical
appliances, motors, or transformers to avoid
humming sounds.
4 Do not expose this unit to sudden temperature
changes from cold to hot, and do not locate this unit
in an environment with high humidity (i.e. a room
with a humidifier) to prevent condensation inside this
unit, which may cause an electrical shock, fire,
damage to this unit, and/or personal injury.
5 Avoid installing this unit where foreign object may
fall onto this unit and/or this unit may be exposed to
liquid dripping or splashing. On the top of this unit,
do not place:
– Other components, as they may cause damage
and/or discoloration on the surface of this unit.
– Burning objects (i.e. candles), as they may cause
fire, damage to this unit, and/or personal injury.
– Containers with liquid in them, as they may fall
and liquid may cause electrical shock to the user
and/or damage to this unit.
6 Do not cover this unit with a newspaper, tablecloth,
curtain, etc. in order not to obstruct heat radiation. If
the temperature inside this unit rises, it may cause
fire, damage to this unit, and/or personal injury.
7 Do not plug in this unit to a wall outlet until all
connections are complete.
8 Do not operate this unit upside-down. It may
overheat, possibly causing damage.
9 Do not use force on switches, knobs and/or cords.
10 When disconnecting the power cable from the wall
outlet, grasp the plug; do not pull the cable.
11 Do not clean this unit with chemical solvents; this
might damage the finish. Use a clean, dry cloth.
12 Only voltage specified on this unit must be used.
Using this unit with a higher voltage than specified is
dangerous and may cause fire, damage to this unit,
and/or personal injury. Yamaha will not be held
responsible for any damage resulting from use of this
unit with a voltage other than specified.
13 To prevent damage by lightning, keep the power
cable disconnected from a wall outlet or this unit
during a lightning storm.
14 Do not attempt to modify or fix this unit. Contact
qualified Yamaha service personnel when any
service is needed. The cabinet should never be
opened for any reasons.
15 When not planning to use this unit for long periods of
time (i.e. vacation), disconnect the AC power plug
from the wall outlet.
16 Be sure to read the “TROUBLESHOOTING” section
on common operating errors before concluding that
this unit is faulty.
17 Before moving this unit, press to set the system to
off, and disconnect the AC power plug from the wall
outlet.
18 Condensation will form when the surrounding
temperature changes suddenly. Disconnect the power
cable from the outlet, then leave this unit alone.
19 When using this unit for a long time, this unit may
become warm. Turn the system off, then leave this
unit alone for cooling.
20 Install this unit near the wall outlet and where the AC
power plug can be reached easily.
21 The batteries shall not be exposed to excessive heat
such as sunshine, fire or the like. When you dispose
of batteries, follow your regional regulations.
22 Be sure to use the AC adaptor supplied with this unit.
Using an AC adaptor other than the one provided
may cause fire or damage to this unit.
This unit is not disconnected from the AC power source
as long as it is connected to the wall outlet, even if this
unit itself is turned off by . In this state, this unit is
designed to consume a very small quantity of power.
WARNING
TO REDUCE THE RISK OF FIRE OR ELECTRIC
SHOCK, DO NOT EXPOSE THIS UNIT TO RAIN OR
MOISTURE.
CAUTION
Danger of explosion if battery is incorrectly replaced.
Replace only with the same or equivalent type.
Do not use this unit within 22 cm (9 in) of persons with a
heart pacemaker implant or defibrillator implant.
We, the manufacturer Yamaha hereby declare that the
TSX-W80 is in compliance with the essential
requirements and other relevant provisions of Directive
1999/5/EC.
There is a chance that placing this unit too close to a
CRT-based (Braun tube) TV set might impair picture
color. Should this happen, move this unit away from the
TV set.
i En
Page 3
PREPARATION
CONTENTS
NAMES OF PARTS AND THEIR FUNCTIONS
..................................................................................2
BASIC FUNCTIONS..............................................4
LISTENING TO RADIO STATIONS ................. 8
TROUBLESHOOTING.........................................9
SPECIFICATIONS..............................................12
LISTENING TO iPod™ AND EXTERNAL
SOURCES ...............................................................6
■ Features
– Hi-quality iPod/iPhone, radio and external device playability.
– Firm bass sound and spacious stereo sound from 2.1 ch powered speaker (tweeter × 2, woofer × 1), SR-
Bass™ (Yamaha Swing Radiator Bass technology) and DSP in a compact unit.
– Easy user-intuitive interface by buttons with Guide LED and knob dials.
■ Yamaha AirWired
Real-time uncompressed music transfer without sound degradation is realized by Yamaha original digital
wireless transfer technology, AirWired. You can also control system on/off and volume with the iPod by
AirWired.
y
You can use a subwoofer wirelessly with the Wireless subwoofer kit (SWK-W10, etc., sold separately). Refer to the owner’s
manual of the SWK-W10 for details.
■ About this manual
• This unit is iPod and also iPhone-compatible. “iPod” described in this manual may also refer to “iPhone”.
• This manual describes how to operate this unit using buttons on the unit. Some of these operations are also
available using the remote control.
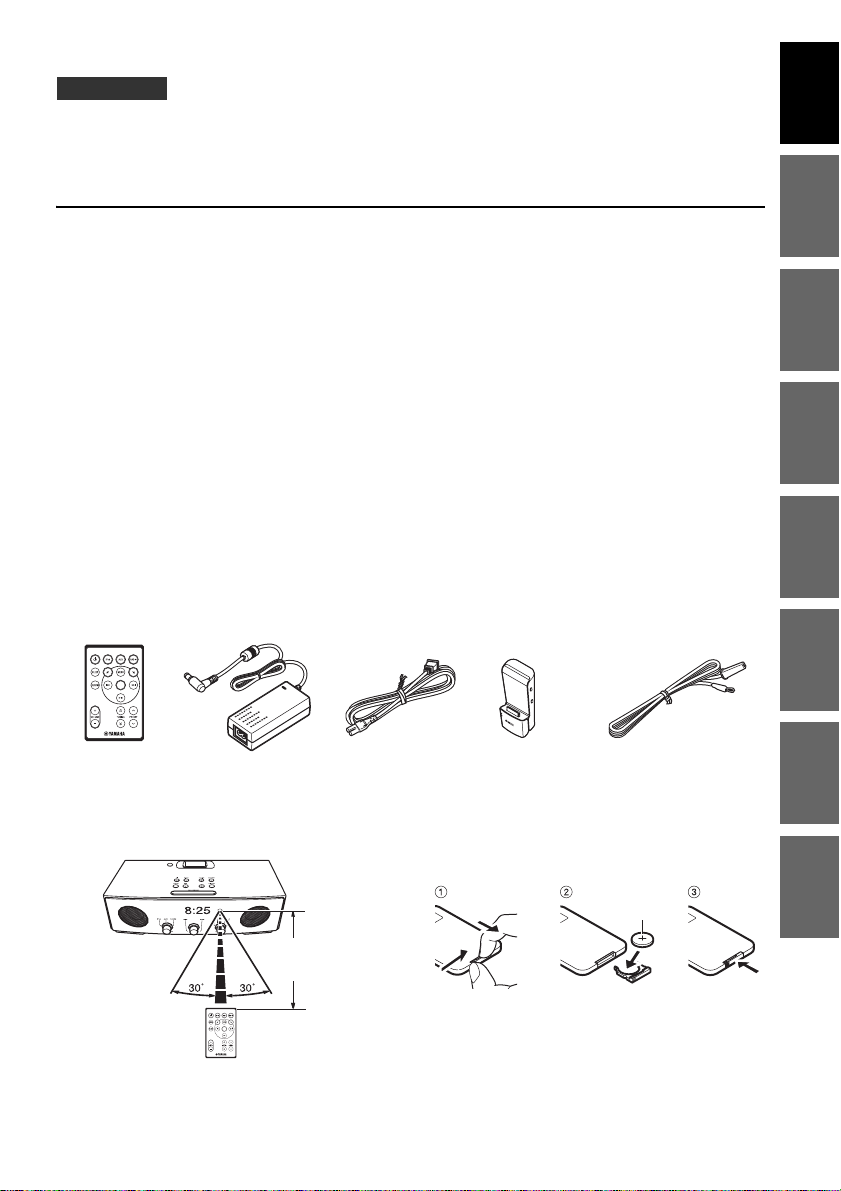
■ Supplied accessories
Remote control AC adaptor Power cable Transmitter Indoor FM antenna
English Français Deutsch Svenska Italiano Español Nederlands Русский
(DC 15 V, 2.66 A,
model number:
NU40-2150266-I3)
YIT-W11TX
■ Using the remote control ■ Replacing the battery in the remote
control
CR2025
battery
Within 6 m
(20’)
1 En
Page 4
NAMES OF PARTS AND THEIR FUNCTIONS
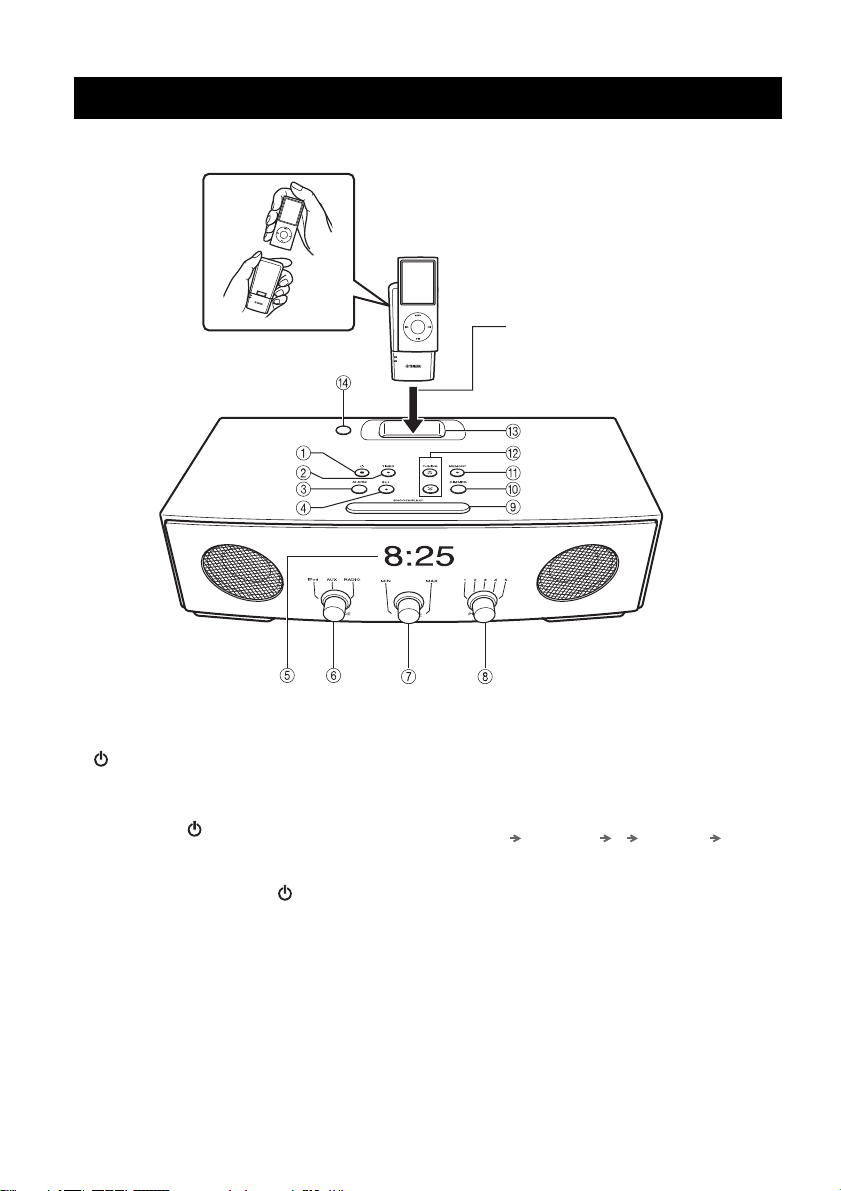
■ Front and top panel
When charging an iPod,
1 Connect the iPod to the transmitter.
2 Set the iPod connected to the transmitter to the
charging cradle.
1 : Press to turn the system on/off.
Time is displayed even when the system is off.
y
• Press and hold on the top of the unit for more than 3
seconds to set the system to standby mode. All the
information on the front panel display is not displayed
in standby mode. This can reduce power consumption.
To cancel standby mode, press .
• Even in system off/standby mode, the alarm function is
available.
2 TIMER: Timer setting (☞ P. 5)
3 ALARM: Alarm on/off (☞ P. 4)
4 SET: Alarm setting (☞ P. 4)
5 Front panel display
6 SOURCE: iPod, AUX, RADIO
7 VOLUME: Volume control
2 En
8 PRESET: Storing your favorite 5 radio stations
(☞ P. 8)
9 SNOOZE/SLEEP (☞ P. 5)
0 DIMMER:
A (auto) 3 (brightest) 2 1 (darkest) back to A
Setting brightness of the front panel
y
When A (auto) is set, the brightness of the front panel is
adjusted automatically depending on the brightness of the
room.
A MEMORY (☞ P. 7, ☞ P. 8)
B TUNING (☞ P. 8)
C Charging cradle: For charging an iPod
D Illumination sensor: Measuring surrounding
illuminance. Do not cover this sensor.
Page 5
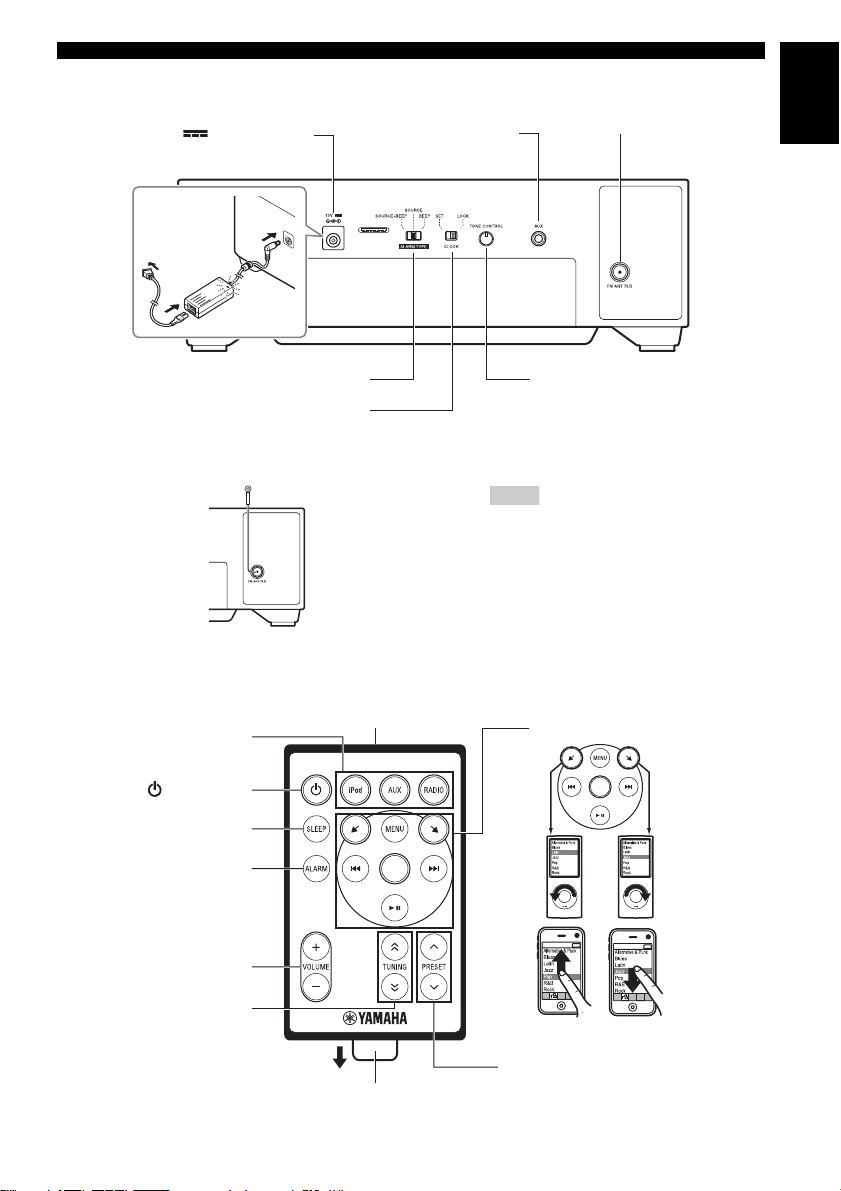
■ Rear panel
15V : Connect supplied
AC adaptor and power cable.
AUX: Connect an external
device. (☞ P. 7)
NAMES OF PARTS AND THEIR FUNCTIONS
FM antenna terminal
(See below.)
English
ALARM TYPE switch (☞ P. 4)
CLOCK switch (☞ P. 4)
■ Connecting antenna
■ Remote control
Source buttons: iPod,
AUX, RADIO
: System on/off
SLEEP: Sleep setting
(☞ P. 5)
ALARM: Alarm on/off
(☞ P. 4)
Indoor FM antenna (supplied)
Infrared signal transmitter
TONE CONTROL: Control Bass
and Treble.
Notes
• The antenna should be stretched out.
• If radio reception is poor, change the height,
direction, or placement of the antenna.
• If you use an outdoor antenna instead of the
supplied FM antenna, reception will be better.
iPod control buttons
VOLUME: Volume control
TUNING: Tuning radio
(☞ P. 8)
Battery insulation sheet:
Remove before using.
PRESET: Select the preset radio
station. (☞ P. 8)
3 En
Page 6
OPERATION
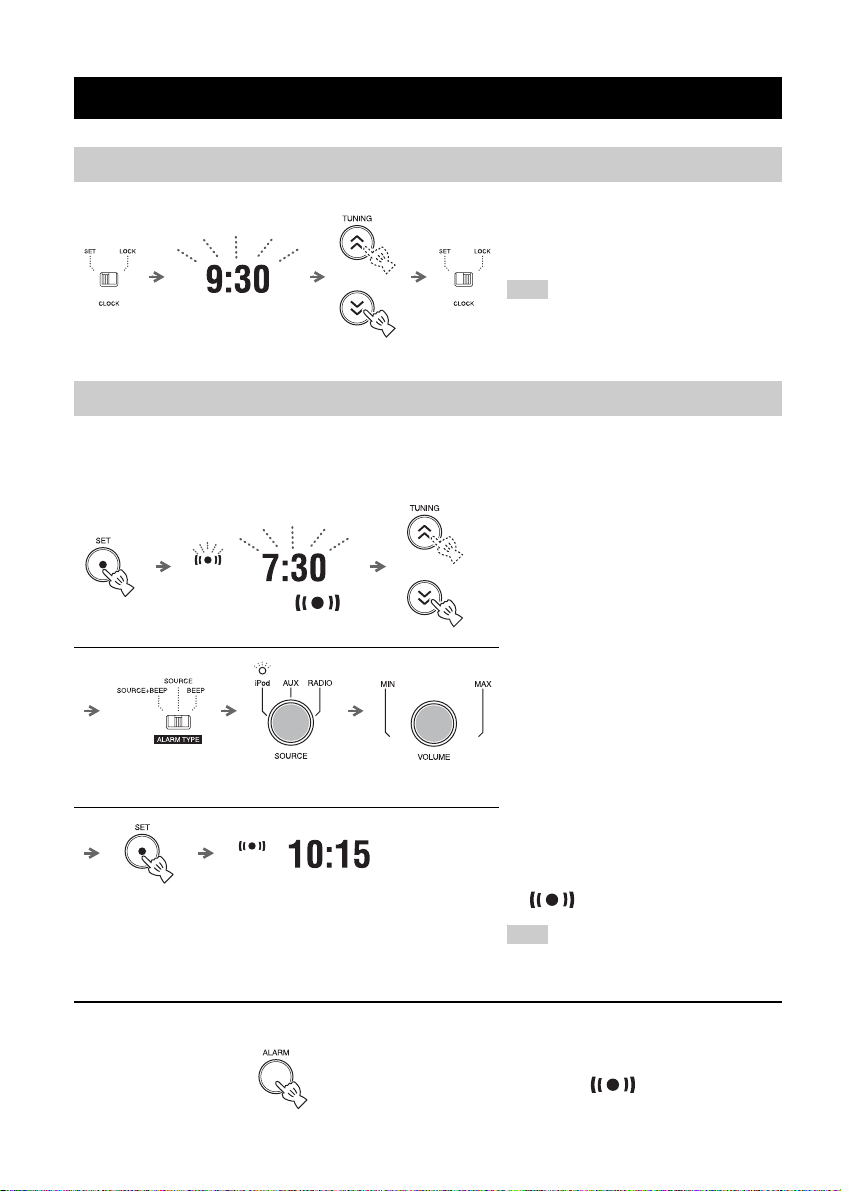
BASIC FUNCTIONS
Adjusting the clock
Rear panel Front panel display
Alarm setting
This unit can play back iPod/radio and/or beep sound at the set time.
■ Setting the alarm time and sound
flashes.
Alarm indicator ( )
and front panel display
flashes.
Rear panel (As required)
1Set CLOCK to SET.
2 Set the time with TUNING.
3Set CLOCK to LOCK.
Note
The time settings are lost approximately one
week after unplugging the unit.
1Press SET.
2 Set the alarm time with
TUNING.
3Set ALARM TYPE.
• SOURCE+BEEP: selected source
(played back from 3 minutes before
the alarm time) and beep sound
(played back at the alarm time)
• SOURCE: selected source
• BEEP: beep sound only
When you select SOURCE+BEEP or
SOURCE, select:
• iPod: this unit resumes the song you
listened to last time.
• RADIO: this unit plays back the
radio station you listened to last time.
4 Set the alarm volume.
5Press SET.
Alarm is set and the alarm indicator
( ) lights up.
■ Switching the alarm on/off
4 En
Note
When iPod is selected as a source, set the iPod
to the charging cradle (☞ P. 2). If iPod is not
set at the alarm time, beep sound is played back.
Switch on/off the alarm function.
When the alarm is on, the alarm
indicator ( ) lights up and alarm
time is displayed for a while.
Page 7
Operations during playing back alarm sound
At the set time, alarm sound plays back. During playback, operations below are available.
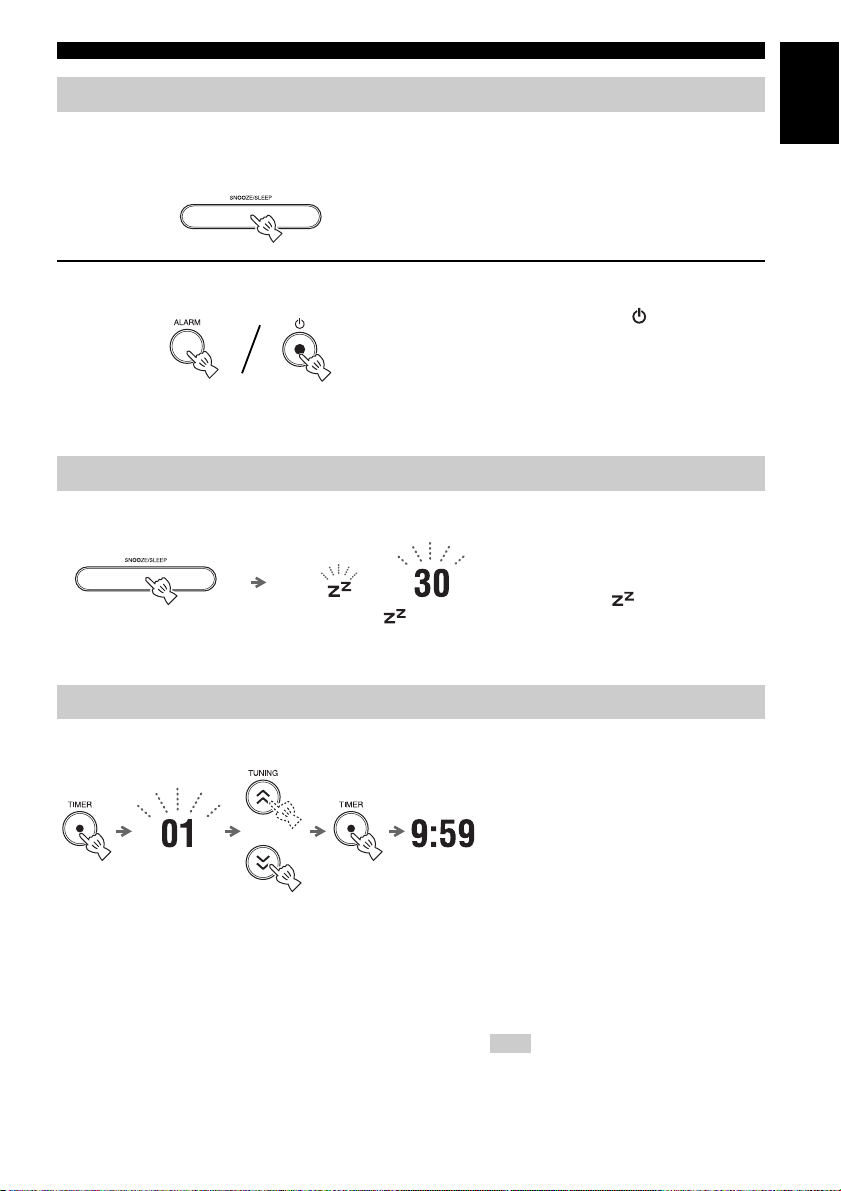
■ Using the snooze function
Press SNOOZE/SLEEP.
The alarm sound stops and resumes
after 5 minutes.
■ Stopping the alarm
Press ALARM or .
y
• Unless you stop the alarm, the alarm stops
after 60 minutes automatically.
• When you stop the alarm, the alarm time
setting, etc., is saved for convenient use next
time.
Sleep setting
You can set the time to turn off the system automatically when sleep is set to on.
Select the sleep time.
You can set 30, 60, 90 or 120 minutes.
When the sleep function is on, the
sleep indicator ( ) lights up.
y
To cancel the sleep, press SNOOZE/SLEEP.
Press repeatedly.
Sleep indicator ( ) and front
panel display flash.
BASIC FUNCTIONS
English
Timer setting
You can set the countdown timer.
Front panel
display flashes.
Countdown
starts.
1Press TIMER.
2 Set the countdown time with
TUNING.
You can set the time,
• 1 to 15 minutes: minute steps.
• 20 to 120 minutes: 10-minute steps.
3Press TIMER.
Countdown starts. When the timer
reaches 0, the timer sound plays back.
y
• To stop the timer sound, press TIMER.
• To cancel the timer, press TIMER during
countdown.
Note
Sleep and timer cannot be used together.
• Sleep cannot be set during countdown.
• Sleep is set to off when timer is set while
sleep is on.
5 En
Page 8
LISTENING TO iPod™ AND EXTERNAL SOURCES
Listening to your iPod™
For details on compatible iPod models, refer to “SPECIFICATIONS” (☞ P. 12).
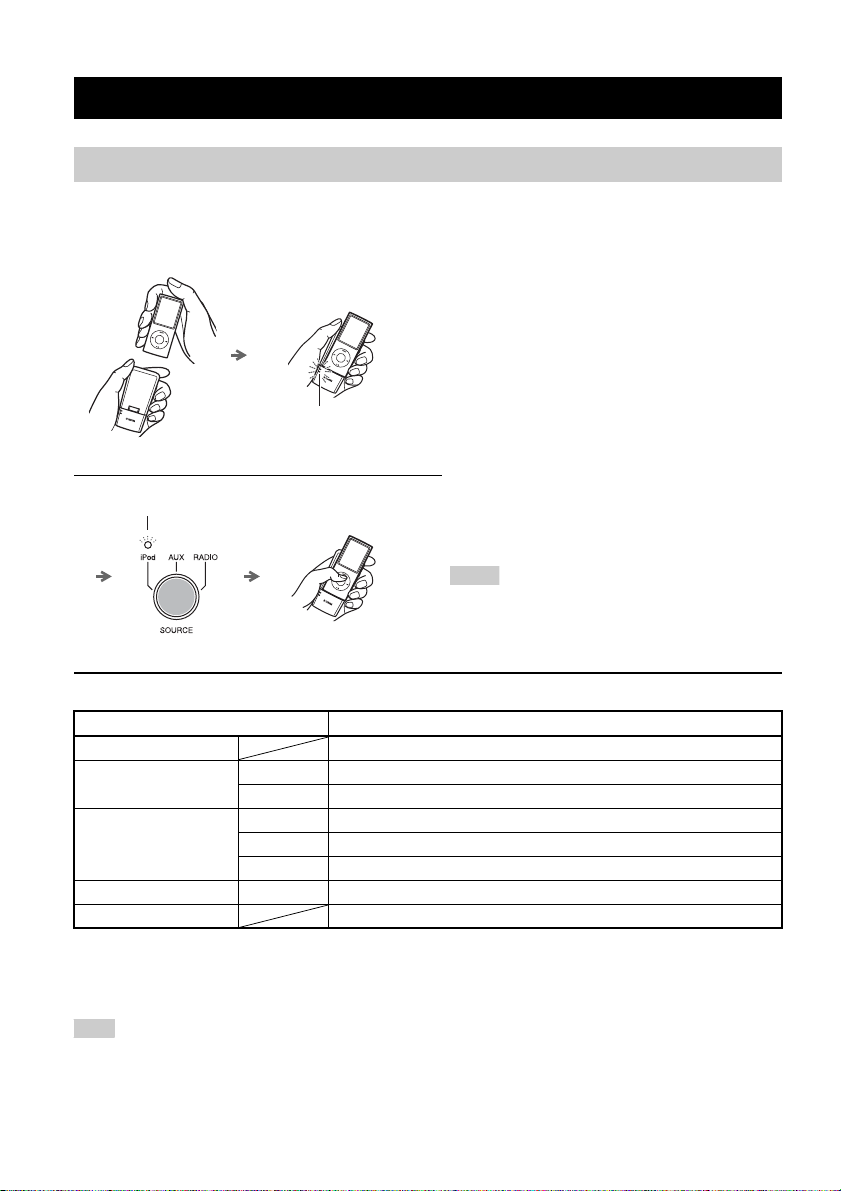
■ Playing back
1 Connect your iPod to the transmitter.
2 The status indicator blinks, and
wireless communication starts.
3Set SOURCE to iPod.
4 Play the iPod.
y
• You can remove the iPod whenever you want.
Status indicator
iPod indicator
■ Status indicator of transmitter
LED status The current status of the unit
Lights up green Wireless communication between the unit and transmitter is established.
Flashes green once Adjusting the volume level.
continuously Connection in progress, please wait.
Flashes red once The volume of this unit is set to maximum or minimum.
2 seconds An unsupported iPod is connected.
continuously Error occurs. Remove the iPod from the transmitter, and connect again.
Flashes red 2 times continuously The battery of the iPod is low.
Off An iPod is not connected or wireless communication has not been established.
y
The iPod indicator of SOURCE on the unit:
• lights up when wireless communication has been established.
• flashes if the status is other than above.
Note
If cutting/no sound occurs, refer to “TROUBLESHOOTING” (☞ P. 10).
• When music/video in the iPod is played back, this unit
turns the system on automatically and plays back the
iPod even if the unit is system off.
• To charge the iPod, set the iPod to the charging cradle
on the unit (☞ P. 2).
• You can control the volume by the iPod.
• This unit turns the system off automatically after a
while if the iPod is turned off or removed from the
transmitter when SOURCE is set to iPod.
Notes
• If an iPod to be connected to the transmitter is playing
back, playback of iPod stops.
• When using a microwave oven, wireless LAN or
cordless telephone, etc., sound may be cut. Place the
unit away from these devices.
6 En
Page 9
LISTENING TO iPod™ AND EXTERNAL SOURCES
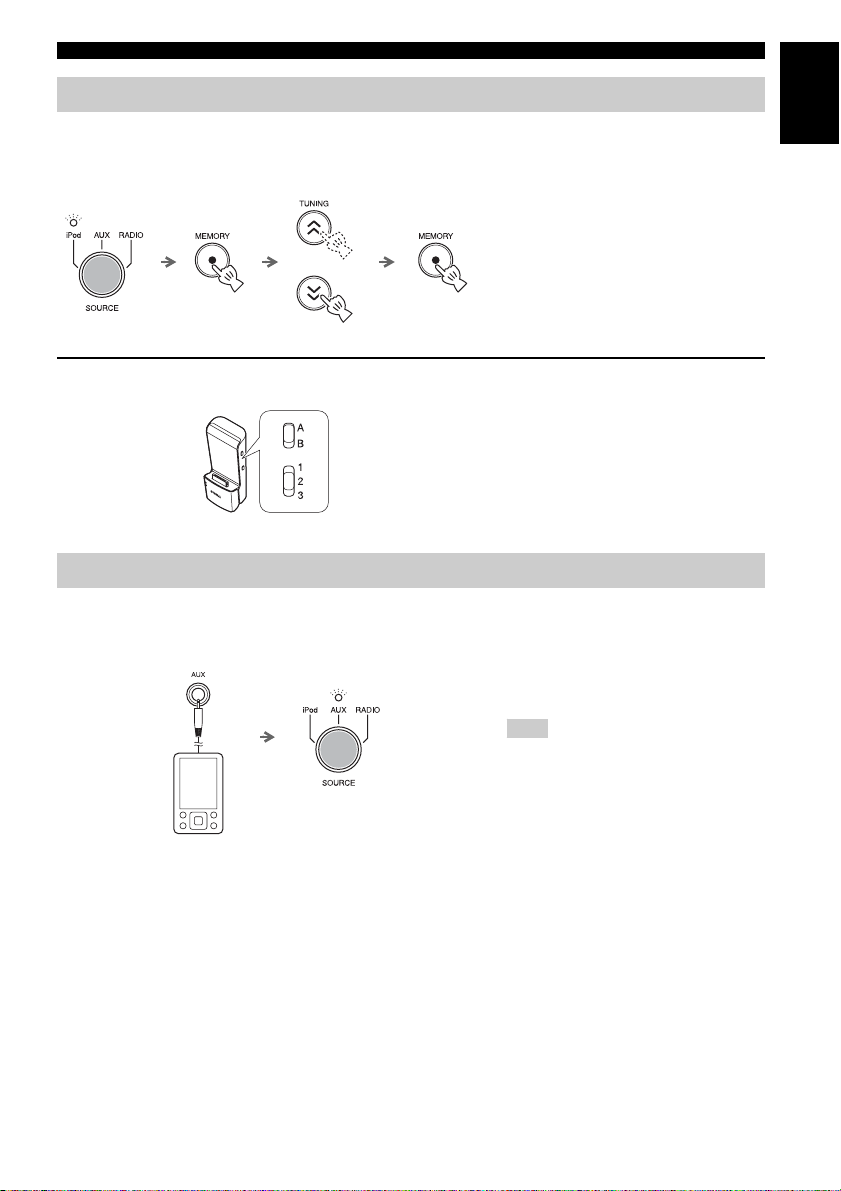
Group setting
Connection between transmitter and unit is made by setting their group settings the same.
■ Group setting for the unit
1Set SOURCE to iPod.
2 Press and hold MEMORY.
3 Set the group with TUNING.
Select A1, A2, A3, B1, B2 or B3.
B1/B2/B3 are displayed as b1/b2/b3 on
Press and hold.
the front panel display.
4Press MEMORY.
■ Group setting for the transmitter
Set the group selection switch.
Playing back external sources
■ Playing back
Rear panel
1 Connect your portable audio
device to AUX using a
commercially available 3.5 mm
(1/8 in) mini plug cable.
Note
Turn down the volume of this unit and your
portable audio device before connection.
2Set SOURCE to AUX.
3 Start playback on the
connected portable audio
device.
English
7 En
Page 10

LISTENING TO RADIO STATIONS
Tuning radio stations
Presetting radio stations
You can store your favorite radio stations with the preset function.
1Set SOURCE to RADIO.
2 For automatic tuning, press
and hold TUNING.
For manual tuning, press
TUNING repeatedly.
Note
If you tune to a station manually, the sound
is monaural.
1 Tune into a favorite radio
station.
2Press MEMORY.
3 Select the PRESET number
you want to store to.
y
To cancel the preset, press TUNING again.
4Press MEMORY to complete.
Selecting preset radio stations
8 En
1Set SOURCE to RADIO.
2 Select the preset radio station
with PRESET.
Page 11

ADDITIONAL INFORMATION
TROUBLESHOOTING
In case of a problem with the unit, check the following list first. If you cannot solve your problem with the
suggested solutions or if your problem is not listed below, turn off and unplug the unit, and consult the nearest
authorized Yamaha dealer or service center.
General
Problem Cause Solution
The system turns on but
immediately shuts off.
The speakers make no
sound.
Sound suddenly turns off.
The unit does not operate
properly.
A digital or high-frequency
equipment produces noises.
The clock setting has been
cleared.
iPod does not play back at
the alarm time even if
SOURCE is set to iPod.
Clock flashes and the unit
cannot be operated.
Sound is cracked/distorted
or there is abnormal noise.
The power cable may be connected
improperly.
The unit may have received a strong
electrical shock such as lightning or
excessive static electricity.
The volume may be set to the minimum
level.
The source may be incorrect. Select the correct source.
The sleep (☞ P. 5) may be set. Turn on the system and play the source
The unit may have received a strong
electrical shock such as lightning or
excessive static electricity, or power
supply may have dropped.
The unit may be placed too close to the
digital or high-frequency equipment.
The unit is left more than one week after
you disconnect the power cable from the
wall outlet.
The iPod is not set to the charging cradle. Set the iPod to the charging cradle
ALARM TYPE is set to BEEP. Set ALARM TYPE to SOURCE+BEEP or
CLOCK on the rear panel is set to SET,
and this unit is in clock setting mode.
Input source volume is excessive, or
volume of this unit is excessive
(especially Bass).
Make sure the power cable is plugged into
the wall outlet firmly.
Set the system to off, and disconnect the
power cable. Wait about 30 seconds,
reconnect the power cable, and turn on the
system.
Adjust the volume level.
again.
Set the system to off, and disconnect the
power cable. Wait about 30 seconds,
reconnect the power cable, and turn on the
system.
Place the unit farther away from the
equipment.
Plug the power cable into the wall outlet
firmly, and set the clock again
(☞ P. 4).
(☞ P. 2).
SOURCE (☞ P. 4).
Set CLOCK to LOCK.
Adjust volume with VOLUME, or adjust
Bass with TONE CONTROL.
English
9 En
Page 12

TROUBLESHOOTING
iPod™
Problem Cause Solution
The iPod does not charge up.
No sound
Cannot change the volume
by changing the volume of
the iPod.
The iPod display does not
change by pressing the
remote control volume keys.
Suddenly the speaker
produces sound even though
an iPod is not connected.
Transmitted sound is cut.
(Status indicator of
transmitter flashes green and
iPod indicator of SOURCE
on unit flashes.)
The iPod connecting to the transmitter is
set in the charging cradle improperly.
The iPod is not connected to the
transmitter firmly.
Earphones are connected. Remove the earphones.
Distance between the unit and the iPod is
too far.
The battery of the iPod is low. Charge the iPod.
The iPod software version has not been
updated.
The iPod is in the process of connecting
with the unit.
The unit and transmitter are not
connected since they are set to different
groups.
The unit is connected to another unit. Select a different group by changing the
– The iPod is not supported by this unit.
– The iPod is not connected correctly.
– The iPod software version is out of
date.
– The transmitter is connected to several
units.
The unit is connected to another
transmitter.
The signal from the transmitter is
blocked by your body or metall ic objects,
etc.
There is a device (microwave oven,
wireless LAN, cordless telephone, etc.)
outputting signals in the 2.4 GHz
frequency band nearby.
If noise occurs at the same frequency the
transmitter is using, the unit will search
and move to another (unused) frequency,
which may cause sound to be cut.
Remove the iPod connecting to the
transmitter from the unit, then set it in the
charging cradle again (☞ P. 2).
Connect the iPod firmly.
Move the transmitter closer to the unit.
Download the latest iTunes software to
update the iPod software version to the
latest.
Please wait for a while.
Set both the unit and transmitter to the same
group (☞ P. 7).
group setting of the unit and transmitter
(☞ P. 7).
– Use the supported iPod.
– Connect the iPod firmly.
– Update the iPod software version to the
latest.
If the problem cannot be solved, even the
latest software, reset the iPod.
– Change the group setting (☞ P. 7).
Change the group setting (☞ P. 7).
Change the way of holding, the orientation,
or the position of the transmitter to avoid
your body or metallic objects blocking the
signal.
Place the unit away from these devices, or
turn them off. If the device is IEEE802.11ncompliant, change the channel s etting of the
device so as not to affect the unit.
This is not malfunction. If cut occurs
frequently, relocate the unit.
10 En
Page 13

Radio reception
Problem Cause Solution
Too much noise during
stereo broadcast.
Even with an outdoor
antenna, radio wave
reception is weak. (Sound is
distorted.)
Remote control
Problem Cause Solution
The remote control does not
work properly.
TROUBLESHOOTING
The FM antenna may be connected
improperly.
The radio station you selected may be far
from your area, or the radio wave
reception is weak in your area.
Multipath reflection or other radio
interferences may have occurred.
The remote control may be operated
outside its operation range.
The remote control sensor on the unit
may be exposed to direct sunlight or
lighting (inverted fluorescent lamps).
The battery may be worn out. Replace the battery with a new one
There are obstacles between the sensor of
the unit and the remote control.
Wireless communication is not
established when SOURCE is set to
iPod.
Make sure the FM antenna is connected
properly (☞ P. 3).
Try manual tuning to improve the signal
quality (☞ P. 8) or use a multi-channel
outdoor antenna.
Change the height, direction, or placement
of the antenna.
For information on the remote control
operation range, refer to “Using the remote
control” (☞ P. 1).
Change the lighting or orientation of the
unit.
(☞ P. 1).
Remove the obstacles.
Play the iPod to establish wireless
communication (☞ P. 6).
English
11 En
Page 14

SPECIFICATIONS
■ PLAYER SECTION
iPod
• Supported iPod .... iPod (5th generation), iPod classic, iPod
nano, iPod touch, iPhone, iPhone 3G, iPhone 3GS
AUX IN
• Input connector
............STEREO L/R: 3.5 mm (1/8 in) STEREO mini Jack
■ AMPLIFIER SECTION
• Maximum output power ..........................4 W + 4 W + 8 W
• Driver unit .................. 4 cm (1 5/8 in) full-range driver × 2
5.5 cm (2 1/8 in) woofer + SR-BASS × 1
(6 Ω 1 kHz, 10% THD)
■ TUNER SECTION
• Tuning range
FM .................................................. 87.50 to 108.00 MHz
■ TRANSMITTER SECTION
• Frequency ............................................................... 2.4 GHz
• Transmission range.......................... Approx. 20 m (65.6 ft)
• Number of units which can be simultaneously transmitted
to......................................................................Up to 7 units
(depending on the circumstances)
(without interference)
■ For U.K. customers
If the socket outlets in the home are not suitable for the plug
supplied with this appliance, it should be cut off and an
appropriate 3 pin plug fitted. For details, refer to the
instructions described below.
Note
The plug severed from the mains lead must be destroyed, as a
plug with bared flexible cord is hazardous if engaged in a live
socket outlet.
■ GENERAL
• Power Supply ...........................AC 100 to 240 V, 50/60 Hz
• Power consumption......................................................10 W
• System off consumption .............................................3.5 W
• Standby consumption......................................1.0 W or less
• Dimensions (W × H × D)...................260 × 90.3 × 141 mm
• Weight.........................................................1.2 kg (2.6 lbs.)
Specifications are subject to change without notice.
(10 1/4 × 3 1/2 × 5 1/2 in)
iPod™, iPhone™
iPod is a trademark of Apple Inc., registered in the U.S. and
other countries.
iPhone is a trademark of Apple Inc.
“Made for iPod” means that an electronic accessory has been
designed to connect specifically to iPod and has been
certified by the developer to meet Apple performance
standards.
“Works with iPhone” means that an electronic accessory has
been designed to connect specifically to iPhone and has been
certified by the developer to meet Apple performance
standards.
Apple is not responsible for the operation of this device or its
compliance with safety and regulatory standards.
■ Special Instructions for U.K.
Model
IMPORTANT
THE WIRES IN MAINS LEAD ARE COLOURED
IN ACCORDANCE WITH THE FOLLOWING
CODE:
Blue: NEUTRAL
Brown: LIVE
As the colours of the wires in the mains lead of this
apparatus may not correspond with the coloured
markings identifying the terminals in your plug,
proceed as follows:
The wire which is coloured BLUE must be connected
to the terminal which is marked with the letter N or
coloured BLACK. The wire which is coloured
BROWN must be connected to the terminal which is
marked with the letter L or coloured RED.
Make sure that neither core is connected to the earth
terminal of the three pin plug.
12 En
Page 15

Limited Guarantee for European Economic Area (EEA) and Switzerland
Thank you for having chosen a Yamaha product. In the unlikely event that your Yamaha product needs guarantee service,
please contact the dealer from whom it was purchased. If you experience any difficulty, please contact Yamaha representative
office in your country. You can find full details on our website (http://www.yamaha-hifi.com/ or http://www.yamaha-
uk.com/ for U.K. resident).
The product is guaranteed to be free from defects in workmanship or materials for a period of two years from the date of the
original purchase. Yamaha undertakes, subject to the conditions listed below, to have the faulty product or any part(s) repaired,
or replaced at Yamaha’s discretion, without any charge for parts or labour. Yamaha reserves the right to replace a product with
that of a similar kind and/or value and condition, where a model has been discontinued or is considered uneconomic to repair.
Conditions
1. The original invoice or sales receipt (showing date of purchase, product code and dealer’s name) MUST accompany the
defective product, along with a statement detailing the fault. In the absence of this clear proof of purchase, Yamaha
reserves the right to refuse to provide free of charge service and the product may be returned at the customer’s expense.
2. The product MUST have been purchased from an AUTHORISED Yamaha dealer within the European Economic Area
(EEA) or Switzerland.
3. The product must not have been the subject of any modifications or alterations, unless authorised in writing by Yamaha.
4. The following are excluded from this guarantee:
a. Periodic maintenance and repair or replacement of parts due to normal wear and tear.
b. Damage resulting from:
(1) Repairs performed by the customer himself or by an unauthorised third party.
(2) Inadequate packaging or mishandling, when the product is in transit from the customer. Please note that it is the
customer’s responsibility to ensure the product is adequately packaged when returning the product for repair.
(3) Misuse, including but not limited to (a) failure to use the product for its normal purpose or in accordance with
Yamaha’s instructions on the proper use, maintenance and storage, and (b) installation or use of the product in a
manner inconsistent with the technical or safety standards in force in the country where it is used.
(4) Accidents, lightning, water, fire, improper ventilation, battery leakage or any cause beyond Yamaha’s control.
(5) Defects of the system into which this product is incorporated and/or incompatibility with third party products.
(6) Use of a product imported into the EEA and/or Switzerland, not by Yamaha, where that product does not conform to
the technical or safety standards of the country of use and/or to the standard specification of a product sold by
Yamaha in the EEA and/or Switzerland.
5. Where the guarantee differs between the country of purchase and the country of use of the product, the guarantee of the
country of use shall apply.
6. Yamaha may not be held responsible for any losses or damages, whether direct, consequential or otherwise, save for the
repair or replacement of the product.
7. Please backup any custom settings or data, as Yamaha may not be held responsible for any alteration or loss to such
settings or data.
8. This guarantee does not affect the consumer’s statutory rights under applicable national laws in force or the consumer’s
rights against the dealer arising from their sales/purchase contract.
English
Information for Users on Collection and Disposal of Old Equipment
and Used Batteries
These symbols on the products, packaging, and/or accompanying documents mean that used electrical and
electronic products and batteries should not be mixed with general household waste.
For proper treatment, recovery and recycling of old products and used batteries, please take them to
applicable collection points, in accordance with your national legislation and the Directives 2002/96/EC
and 2006/66/EC.
By disposing of these products and batteries correctly, you will help to save valuable resources and prevent
any potential negative effects on human health and the environment which could otherwise arise from
inappropriate waste handling.
For more information about collection and recycling of old products and batteries, please contact your local
municipality, your waste disposal service or the point of sale where you purchased the items.
[Information on Disposal in other Countries outside the European Union]
These symbols are only valid in the European Union. If you wish to discard these items, please contact your
local authorities or dealer and ask for the correct method of disposal.
Note for the battery symbol (bottom two symbol examples):
This symbol might be used in combination with a chemical symbol. In this case it complies with the
requirement set by the Directive for the chemical involved.
13 En
Page 16

ATTENTION : VEUILLEZ LIRE CE QUI SUIT AVANT D’UTILISER
L’APPAREIL.
1 Pour utiliser l’appareil au mieux de ses possibilités,
lisez attentivement ce mode d’emploi. Conservez-le
soigneusement pour référence.
2 Installez cet appareil dans un endroit frais, bien aéré,
sec et propre - à l’abri de la lumière du soleil, des
sources de chaleur, des vibrations, des poussières, de
l’humidité et du froid. Pour une aération correcte,
tenez compte des distances minimales suivantes.
Au-dessus : 15 cm
À l’arrière : 10 cm
Sur les côtés : 10 cm
3 Placez l’appareil loin des équipements, moteurs et
transformateurs électriques, pour éviter les
ronflements parasites.
4 N’exposez pas l’appareil à des variations brutales de
température, ne le placez pas dans un environnement
très humide (par exemple dans une pièce contenant
un humidificateur) car cela peut entraîner la
condensation d’humidité à l’intérieur de l’appareil
qui elle-même peut être responsable de décharge
électrique, d’incendie, de dommage à l’appareil ou de
blessure corporelle.
Evitez d’installer l’appareil dans un endroit où des
5
objets peuvent tomber, ainsi que là où l’appareil pourrait
être exposé à des éclaboussures ou des gouttes d’eau.
Sur le dessus de l’appareil, ne placez pas :
– d’autres appareils qui peuvent endommager la
surface de l’appareil ou provoquer sa décoloration.
– des objets se consumant (par exemple, une bougie)
qui peuvent être responsables d’incendie, de
dommage à l’appareil ou de blessure corporelle.
– des récipients contenant des liquides qui peuvent
être à l’origine de décharge électrique ou de
dommage à l’appareil.
6
Ne couvrez pas l’appareil d’un journal, d’une nappe,
d’un rideau, etc. car cela empêcherait l’évacuation de la
chaleur. Toute augmentation de la température
intérieure de l’appareil peut être responsable d’incendie,
de dommage à l’appareil ou de blessure corporelle.
7 Ne branchez pas la fiche du câble d’alimentation de
l’appareil sur une prise secteur aussi longtemps que
tous les raccordements n’ont pas été effectués.
8 Ne pas faire fonctionner l’appareil à l’envers. Il
risquerait de chauffer et d’être endommagé.
9 N’exercez aucune force excessive sur les
commutateurs, les boutons et les cordons.
10 Pour débrancher la fiche du câble d’alimentation au
niveau de la prise secteur, saisissez la fiche et ne tirez
pas sur le cordon.
11 Ne nettoyez pas l’appareil au moyen d’un solvant
chimique, ce qui pourrait endommager la finition.
Utilisez un chiffon sec et propre.
12 N’alimentez l’appareil qu’à partir de la tension
prescrite. Alimenter l’appareil sous une tension plus
élevée est dangereux et peut être responsable
d’incendie, de dommage à l’appareil ou de blessure
corporelle. Yamaha ne saurait être tenue responsable
des dommages résultant de l’alimentation de
l’appareil sous une tension autre que celle prescrite.
13 Pour empêcher tout dommage causé par les éclairs,
déconnectez la câble d’alimentation et toute antenne
extérieure de la prise murale pendant un orage.
14 Ne tentez pas de modifier ni de réparer l’appareil.
Consultez le service Yamaha compétent pour toute
réparation qui serait requise. Le coffret de l’appareil
ne doit jamais être ouvert, quelle que soit la raison.
15 Si vous envisagez de ne pas vous servir de l’appareil
pendant une longue période (par exemple, pendant
les vacances), débranchez la fiche du câble
d’alimentation au niveau de la prise secteur.
16 Lisez la section intitulée « GUIDE DE
DÉPANNAGE » où figurent une liste d’erreurs de
manipulation communes avant de conclure que
l’appareil présente une anomalie de fonctionnement.
17 Avant de déplacer l’appareil, appuyez sur pour
éteindre le système puis débranchez la fiche du câble
d’alimentation au niveau de la prise secteur.
18
La condensation se forme lorsque la température ambiante
change brusquement. En ce cas, débranchez la fiche du
câble d’alimentation et laissez l’appareil reposer.
19
La température de l’appareil peut augmenter en raison d’une
utilisation prolongée. En ce cas, coupez l’alimentation de
l’appareil et laissez-le au repos pour qu’il refroidisse.
20 Installez cet appareil à proximité de la prise secteur et
à un emplacement où la fiche du câble d’alimentation
est facilement accessible.
21
Les piles ne doivent pas être exposées à une chaleur extrême,
par exemple au soleil, à une flamme, etc. Lors de la mise au
rebut des piles, suivez vos réglementations locales.
22 Utilisez l’adaptateur secteur fourni avec cet appareil.
L’emploi de tout autre adaptateur secteur peut causer
un incendie ou endommager l’appareil.
Cet appareil n’est pas déconnecté du secteur tant qu’il reste
branché à la prise de courant, même si l’appareil en soi est
éteint par la touche . Dans cet état, l’appareil consomme
une très faible quantité de courant.
AVERTISSEMENT
POUR RÉDUIRE LES RISQUES D’INCENDIE OU DE
DÉCHARGE ÉLECTRIQUE, N’EXPOSEZ PAS CET
APPAREIL À LA PLUIE OU À L’HUMIDITÉ.
ATTENTION
Danger d’explosion si la pile n’est pas remplacée correctement.
La remplacer par une pile de type identique ou équivalent.
Ne pas utiliser cet appareil à moins de 22 cm de personnes
ayant un stimulateur cardiaque ou un défibrillateur.
Nous, le fabricant Yamaha, déclarons que le TSX-W80 est
conforme aux exigences essentielles et aux autres
dispositions pertinentes de la Directive 1999/5/EC.
Il y a un risque possible de création d’interférences,
visibles sur les images en couleurs si cet appareil est placé
à côté d’un téléviseur à tube cathodique (tube de Braun).
Dans ce cas, éloigner l’unité du téléviseur.
i Fr
Page 17

PREPARATION
TABLE DES MATIÈRES
NOM DES PARTIES ET LEURS FONCTIONS
..................................................................................2
FONCTIONS DE BASE.........................................4
ÉCOUTE DES STATIONS RADIO.....................8
GUIDE DE DÉPANNAGE.................................... 9
CARACTÉRISTIQUES TECHNIQUES........... 12
ÉCOUTE DE L’iPod™ ET DE SOURCES
EXTERNES.............................................................6
■ Caractéristiques
– Lecture de haute qualité d’un iPod/d'un iPhone, de la radio et de dispositifs audio externes.
– Son grave ferme et son stéréo spacieux depuis haut-parleur à 2.1 canaux (tweeter × 2, haut-parleur de
graves × 1), SR-Bass™ (technologie Yamaha Swing Radiator Bass) et DSP dans un appareil compact.
– Interface à boutons facile et intuitive pour l’utilisateur avec DEL guides et molettes.
■ Yamaha AirWired
Transfert de musique non compressée en temps réel sans perte de qualité sonore grâce à AirWired, la
technologie originale de transfert digital sans fil de Yamaha. Vous pouvez également allumer/éteindre le
système et le volume avec votre iPod via AirWired.
y
Vous pouvez utiliser un caisson de graves sans fil grâce à l’Ensemble de caissons de sous-graves sans fil (SWK-W10, etc.,
vendu séparément). Pour plus de détails, voir le mode d’emploi du SWK-W10.
■ Quelques mots sur ce mode d’emploi
• Cet appareil est compatible avec l’iPod ainsi que l’iPhone. « iPod » indiqué dans ce manuel peut
également faire référence à « iPhone ».
• Ce mode d’emploi indique comment faire fonctionner cet appareil en utilisant les boutons sur l’appareil.
Certaines de ces fonctions sont également disponibles en utilisant la télécommande.
■ Accessoires fournis
Télécommande Adaptateur
secteur
Cordon
d’alimentation
Émetteur Antenne intérieure FM
Français
(CC 15 V, 2,66 A,
numéro de modèle :
NU40-2150266-I3)
YIT-W11TX
■ Utilisation de la télécommande ■ Remplacement de la pile de la
télécommande
Pile
CR2025
À moins de 6 m
1 Fr
Page 18

NOM DES PARTIES ET LEURS FONCTIONS
■ Panneau avant et supérieur
Lors du chargement d’un iPod,
1 Connectez l’iPod à l’émetteur.
2 Placez l’iPod connecté à l’émetteur dans le
support de chargement.
1 : Appuyez pour allumer/éteindre le système.
L’heure est affichée même lorsque le système est
éteint.
y
• Appuyez et maintenez sur la partie supérieure de
l’appareil pendant plus de 3 secondes pour mettre le
système en mode veille. Toutes les informations de
l’afficheur ne s’affichent pas en mode veille. Cela peut
réduire la consommation d’électricité. Pour annuler le
mode veille, appuyez sur .
• Si le système est éteint/en mode veille, la fonction
d’alarme est disponible.
2 TIMER : Réglage de la minuterie (☞ P. 5)
3 ALARM : Alarme activée/désactivée (☞ P. 4)
4 SET : Paramètres de l’alarme (☞ P. 4)
5 Afficheur
6 SOURCE : iPod, AUX, RADIO
7 VOLUME : Réglage du volume
2 Fr
8 PRESET : Mémorisation de vos 5 stations radio
favorites (☞ P. 8)
9 SNOOZE/SLEEP (☞ P. 5)
0 DIMMER : Réglage de la luminosité de l’afficheur
A (auto) 3 (le plus lumineux) 2 1 (le plus
sombre) retour à A
y
Lorsque réglé sur A (auto), la luminosité de l’afficheur
s’ajuste automatiquement en fonction de la luminosité de
la chambre.
A MEMORY (☞ P. 7, ☞ P. 8)
B TUNING (☞ P. 8)
C Support de chargement : Pour charger un iPod
D Capteur d’illumination : Mesure le niveau
d’illumination ambiante. Ne pas couvrir ce capteur.
Page 19

■ Panneau arrière
15V : Branchez l’adaptateur
secteur fourni et le cordon
d’alimentation
AUX : Branchez un
dispositif audio externe.
(☞ P. 7)
NOM DES PARTIES ET LEURS FONCTIONS
Borne d’antenne FM
(voir ci-dessous.)
Français
Commutateur ALARM TYPE (☞ P. 4)
Commutateur CLOCK (☞ P. 4)
■ Branchement antenne
■ Télécommande
Touches de sélection de
source : iPod, AUX, RADIO
: Allumer/éteindre système
SLEEP : Réglage de la mise
en veille (☞ P. 5)
ALARM : Alarme activée/
désactivée (☞ P. 4)
Antenne intérieure FM (fournie)
Transmetteur de signaux
infrarouges
TONE CONTROL : Contrôle
des graves et des aigus.
Remarques
• L’antenne doit être déployée.
• Si la réception de la radio est mauvaise,
changez la hauteur, le sens ou la disposition
de l’antenne.
• Si vous utilisez une antenne extérieure au lieu
de l’antenne FM fournie, la réception sera
meilleure.
Touches de réglage iPod
VOLUME : Réglage du volume
TUNING : Syntonisation
de la radio (☞ P. 8)
Feuille isolante de la pile :
retirer avant usage.
PRESET : Sélectionnez la station
radio présélectionnée. (☞ P. 8)
3 Fr
Page 20

OPERATION
FONCTIONS DE BASE
Réglage de l’horloge
1Réglez CLOCK sur SET.
2 Réglez l’heure avec TUNING.
3Réglez CLOCK sur LOCK.
Remarque
Panneau
arrière
L’afficheur clignote.
Réglage de l’alarme
Cet appareil peut lire l’iPod/la radio et/ou faire retentir le bip à l’heure que vous avez définie.
■ Réglage de l’alarme et du son
L’indicateur d’alarme
( ) et l’afficheur
clignotent.
Panneau arrière (comme souhaité)
Les paramètres de l’heure se perdent après plus ou
moins une semaine après avoir débranché l’appareil.
1 Appuyez sur SET.
2 Réglez l’heure d’alarme avec
TUNING.
3Réglez ALARM TYPE.
• SOURCE+BEEP : source
sélectionnée (lue jusqu’à 3 minutes
avant l’heure d’alarme) et bip sonore
(lu à l’heure d’alarme)
• SOURCE : source sélectionnée
• BEEP : uniquement bip sonore
Lorsque vous sélectionnez SOURCE+BEEP
ou SOURCE, sélectionnez :
• iPod : cet appareil continue la lecture
de la chanson que vous écoutiez la
dernière fois.
• RADIO : cet appareil lit la station radio
que vous écoutiez la dernière fois.
4 Réglez le volume de l’alarme.
5 Appuyez sur SET.
L’alarme est réglée et l’indicateur
d’alarme ( ) s’illumine.
Remarque
Lorsqu’iPod est sélectionné en tant que source,
placez l’iPod dans le support de chargement
(☞ P. 2). Si l’iPod n’est pas placé au moment
de l’alarme, vous entendrez le bip sonore.
■ Activer/désactiver l’alarme
4 Fr
Activer/désactiver la fonction
d’alarme.
Lorsque l’alarme est activée, l’indicateur
d’alarme ( ) s’allume et l’heure
d’alarme s’affiche pendant un moment.
Page 21

FONCTIONS DE BASE
Opérations durant la lecture du son d’alarme
À l’heure sélectionnée, le son d’alarme est lu. Pendant la lecture, les opérations suivantes sont disponibles.
■ Utilisation de la fonction snooze
Appuyez sur SNOOZE/SLEEP.
Le son de l’alarme s’arrête puis
reprend au bout de 5 minutes.
■ Arrêter l’alarme
Appuyez sur ALARM ou .
y
• Si vous n’arrêtez pas l’alarme, celle-ci s’arrête
automatiquement au bout de 60 minutes.
• Lorsque vous arrêtez l’alarme, le réglage de
l’heure d’alarme, etc., est enregistré afin de
simplifier les prochaines utilisations.
Réglage de la mise en veille
Vous pouvez régler l’heure à laquelle le système sera automatiquement mis hors tension lorsque la mise en veille est activée.
Sélectionnez l’heure de mise en veille.
Vous pouvez sélectionner 30, 60, 90
ou 120 minutes. Lorsque la fonction de
mise en veille est activée, l’indicateur
Appuyez plusieurs fois
de suite.
L’indicateur de mise en veille
( ) et l’afficheur clignotent.
de mise en veille ( ) s’allume.
y
Pour annuler la mise en veille, appuyez sur
SNOOZE/SLEEP.
Français
Réglage de la minuterie
Vous pouvez régler la minuterie du compte à rebours.
L’afficheur
clignote.
Le compte
à rebours
commence.
1 Appuyez sur TIMER.
2 Réglez le compte à rebours
avec TUNING.
Vous pouvez régler l’heure,
• 1 à 15 minutes : tranches d’une minute.
• 20 à 120 minutes : tranches de 10 minutes.
3 Appuyez sur TIMER.
Le compte à rebours commence. Lorsque la
minuterie atteint 0, le son de la minuterie sera lu.
y
• Pour arrêter le son de la minuterie, appuyez
sur TIMER.
• Pour annuler la minuterie, appuyez sur
TIMER durant le compte à rebours.
Remarque
Le mode veille et la minuterie ne peuvent pas
être utilisés ensemble.
• Le mode veille ne peut pas être réglé
pendant le compte à rebours.
• Le mode veille est désactivé lorsque la
minuterie est activée pendant que le mode
veille est activé.
5 Fr
Page 22

ÉCOUTE DE L’iPod™ ET DE SOURCES EXTERNES
Écoute de votre iPod™
Pour plus de détails à propos des modèles d’iPod compatibles, veuillez consulter « CARACTÉRISTIQUES
TECHNIQUES » (☞ P. 12).
■ Lecture
1 Connectez votre iPod à l’émetteur.
2 Le témoin d’alimentation clignote et la
communication sans fil commence.
3Réglez SOURCE sur iPod.
4 Lecture de l’iPod.
y
• Vous pouvez retirer l’iPod quand vous le souhaitez.
Témoin d’alimentation
Indicateur iPod
■ Témoin d’alimentation de l’émetteur
État de la DEL L’état actuel de l’appareil
Lumière verte La communication sans fil entre l’appareil et l’émetteur est établie.
Clignotement vert une fois Réglage du volume.
continuellement
Clignotement rouge une fois Le volume de l’appareil est réglé au maximum ou au minimum.
2 secondes Un iPod non pris en charge est connecté.
continuellement
Clignote rouge 2 fois
Éteint L’iPod n’est pas connecté ou la communication sans fil n’a pas été établie.
continuellement
Connexion en cours, veuillez patienter.
Une erreur est survenue. Débranchez l’iPod de l’émetteur, puis recommencez
la connexion.
Le niveau de batterie de l’iPod est bas.
y
L’indicateur de SOURCE iPod sur l’appareil :
• s’allume lorsque la communication sans fil est établie.
• clignote si le statut est autre que ci-dessus.
Remarque
Si le son est haché ou coupé, veuillez consulter le « GUIDE DE DÉPANNAGE » (☞ P. 10).
• Lorsque de la musique/de la vidéo qui se trouve dans
l’iPod est lue, cet appareil allume automatiquement le
système et lit l’iPod même si le système est éteint.
• Pour charger l’iPod, placez l’iPod dans le support de
chargement sur l’appareil (☞ P. 2).
• Vous pouvez régler le volume au travers de l’iPod.
• Cet appareil éteint automatiquement le système au bout
d’un moment même si l’iPod est éteint ou retiré de
l’émetteur lorsque SOURCE est réglé sur iPod.
Remarques
• Si un iPod qui doit être connecté à l’émetteur est en
cours de lecture, la lecture de l’iPod s’arrête.
• Lors de l’utilisation d’un four à micro-ondes, d’un
réseau sans fil ou d’un téléphone sans fil, etc., le son
peut être coupé. Éloignez l’appareil de ces dispositifs.
6 Fr
Page 23

ÉCOUTE DE L’iPod™ ET DE SOURCES EXTERNES
Réglage de groupe
La connexion entre l’émetteur et l’appareil est établie en réglant leurs réglages de groupe de la même manière.
■ Réglage de groupe de l’appareil
1Réglez SOURCE sur iPod.
2 Appuyez et maintenez
MEMORY enfoncé.
3 Réglez le groupe avec
TUNING.
Appuyez et maintenez.
Sélectionnez A1, A2, A3, B1, B2 ou
B3.
B1/B2/B3 s’affichent en tant que b1/
b2/b3 sur l’afficheur.
4 Appuyez sur MEMORY.
■ Réglage de groupe pour l’émetteur
Réglez le commutateur de
sélection de groupe.
Lecture de sources externes
■ Lecture
Panneau arrière
1 Raccordez votre dispositif
audio portable à AUX à l’aide
d’un câble à mini fiche de
3,5 mm disponible dans le
commerce.
Remarque
Baissez le volume de cet appareil et de votre
dispositif audio portable avant le
raccordement.
2Réglez SOURCE sur AUX.
3 Commencez la lecture sur le
dispositif audio portable
raccordé.
Français
7 Fr
Page 24

ÉCOUTE DES STATIONS RADIO
Syntonisation sur les stations radio
1Réglez SOURCE sur RADIO.
2 Pour une syntonisation
automatique, appuyez et
maintenez TUNING enfoncé.
Pour une syntonisation
manuelle, appuyez sur
TUNING plusieurs fois de suite.
Remarque
Si vous syntonisez manuellement sur une
station, le son est en mono.
Présélection des stations radio
Vous pouvez mémoriser vos stations radio favorites à l’aide de la fonction de présélection.
1 Choisissez l’une de vos
stations radio préférées.
2 Appuyez sur MEMORY.
3 Sélectionnez le numéro
PRESET sur lequel vous
souhaitez mémoriser.
y
Pour annuler la présélection, appuyez à
nouveau sur TUNING.
4 Appuyez sur MEMORY pour
terminer.
Sélection d’une station radio présélectionnée
8 Fr
1Réglez SOURCE sur RADIO.
2 Sélectionnez la station radio
présélectionnée avec
PRESET.
Page 25

ADDITIONAL INFORMATION
GUIDE DE DÉPANNAGE
Si cet appareil ne semble pas fonctionner normalement, vérifiez les points de la liste suivante. Si l’anomalie
constatée n’est pas mentionnée, ou bien si les mesures suggérées sont sans effet, mettez l’appareil hors tension,
débranchez la fiche du cordon d’alimentation et adressez-vous au revendeur ou le service après-vente Yamaha
le plus proche.
Généralités
Anomalies Causes possibles Solution
Le système s’éteint
immédiatement après s’être
allumé.
Les haut-parleurs n’émettent
aucun son.
Le son est subitement
coupé.
Cet appareil ne fonctionne
pas correctement.
Un appareil numérique ou
haute fréquence produit des
bruits.
Le réglage de l’horloge a été
effacé.
L’iPod n’est pas lu au
moment de l’alarme même si
SOURCE est réglée sur
iPod.
L’horloge clignote et
l’appareil ne peut pas être
manipulé.
Le son grésille/est
distortionné ou il y a un bruit
anormal.
Le cordon d’alimentation n’est pas
convenablement branché.
Cet appareil a peut-être été soumis à un
choc électrique puissant, comme la
foudre ou une forte charge
électrostatique.
Le volume est réglé au niveau minimum. Réglez le niveau du volume.
La source est peut-être incorrecte. Sélectionnez la source correcte.
La mise en veille (☞ P. 5) peut être
réglée.
Cet appareil a peut-être été soumis à un
choc électrique puissant, comme la
foudre ou une forte charge
électrostatique, ou bien la tension
d’alimentation a chuté.
Cet appareil est trop près de l’appareil
numérique ou haute fréquence.
L’alimentation de cet appareil a été
coupée pendant plus d’une semaine.
L’iPod n’est pas placé dans le support de
chargement.
L’ALARM TYPE est réglé sur BEEP. Réglez ALARM TYPE sur
CLOCK sur le panneau arrière est réglé
sur SET et cet appareil est en mode de
réglage de l’horloge.
Le volume de la source d’entrée est
excessif ou le volume de l’appareil est
excessif (en particulier les graves).
Assurez-vous que la fiche du cordon
d’alimentation est complètement introduite
dans la prise secteur.
Éteignez l’appareil et débranchez le cordon
d’alimentation. Attendez environ
30 secondes, rebranchez le cordon
d’alimentation et allumez l’appareil.
Allumez l’appareil et poursuivez la lecture.
Éteignez l’appareil et débranchez le cordon
d’alimentation. Attendez environ
30 secondes, rebranchez le cordon
d’alimentation et allumez l’appareil.
Éloignez les deux appareils l’un de l’autre.
Branchez à fond la prise du cordon
d’alimentation sur la prise murale et réglez
de nouveau l’horloge (☞ P. 4).
Placez l’iPod dans le support de
chargement (☞ P. 2).
SOURCE+BEEP ou SOURCE (☞ P. 4).
Réglez CLOCK sur LOCK.
Ajustez le volume à l’aide de VOLUME ou
ajustez les basses à l’aide de TONE
CONTROL.
Français
9 Fr
Page 26

GUIDE DE DÉPANNAGE
iPod™
Anomalies Causes possibles Solution
L’iPod ne se charge pas.
Aucun son.
Impossible de modifier le
niveau du volume à partir de
l’iPod.
L’affichage de l’iPod ne
change pas lorsque vous
appuyez sur les touches de
volume de la télécommande.
L’enceinte reproduit soudain
du son alors qu’aucun iPod
n’est raccordé.
Le son transmis est coupé.
(Le témoin d’alimentation de
l’émetteur clignote en vert et
l’indicateur de SOURCE
iPod clignote sur l’appareil.)
L’iPod connecté à l’émetteur n’est pas
placé correctement dans le support de
chargement.
L’iPod n’est pas fermement connecté à
l’émetteur.
Des écouteurs sont branchés. Débranchez les écouteurs.
La distance entre l’émetteur et l’appareil
est trop grande.
Le niveau de batterie de l’iPod est bas. Chargez l’iPod.
La version du logiciel de l’iPod n’a pas
été mise à jour.
L’iPod est occupé à établir la connexion
avec l’appareil.
L’appareil ou l’émetteur ne sont pas
raccordés, car ils n’appartiennent pas au
même groupe.
L’appareil est raccordé à un autre
appareil.
– L’iPod n’est pas pris en charge par cet
appareil.
– L’iPod n’est pas connecté
correctement.
– La version du logiciel de l’iPod est
dépassée.
– L’émetteur est connecté à plusieurs
appareils.
L’appareil est raccordé à un autre
émetteur.
Le signal provenant de l’émetteur est
bloqué par votre corps, par des objets
métalliques, etc.
À proximité, un appareil (four à microondes, réseau ou téléphone sans fil, etc.)
émet des signaux dans la gamme de
fréquences de 2,4 GHz.
Si du bruit se produit à la même
fréquence utilisée par l’émetteur,
l’appareil recherche et sélectionne un
autre fréquence (inutilisée), ce qui peut
provoquer une coupure du son.
Retirez l’iPod connecté à l’émetteur de
l’appareil, ensuite placez celui-ci à nouveau
dans le support de chargement (☞ P. 2).
Connectez fermement l’iPod.
Rapprochez l’émetteur de l’appareil.
Téléchargez le logiciel iTunes le plus récent
pour mettre à jour la version du logiciel de
l’iPod.
Patientez quelques instants.
Affectez l’appareil et l’émetteur au même
groupe (☞ P. 7).
Sélectionnez un autre groupe à l’aide du
réglage de groupe de l’appareil et de
l’émetteur (☞ P. 7).
– Utilisez un iPod compatible.
– Connectez fermement l’iPod.
– Téléchargez le logiciel de l’iPod le plus
récent pour le mettre à jour.
Si l’anomalie ne peut pas être résolue
même avec le logiciel le plus récent,
réinitialisez l’iPod.
– Changez le réglage de groupe (☞ P. 7).
Changez le réglage de groupe (☞ P. 7).
Modifiez votre façon de tenir l’émetteur,
son orientation ou sa position afin d’éviter
que le signal soit bloqué par votre corps ou
des objets métalliques.
Éteignez-les ou déplacez cet appareil. Si
l’appareil est conforme IEEE802.11n,
modifiez le réglage canal de l’appareil afin
de ne pas nuire à l’appareil.
Il ne s’agit pas d’un dysfonctionnement. Si
les coupures sont fréquentes, déplacez
l’appareil.
10 Fr
Page 27

Réception de la radio
Anomalies Causes possibles Solution
Trop de parasites pendant
l’écoute d’une station
stéréophonique.
Même avec une antenne
extérieure, la réception est
médiocre. (Le son présente
de la distorsion.)
Télécommande
Anomalies Causes possibles Solution
La télécommande ne
fonctionne pas
convenablement.
GUIDE DE DÉPANNAGE
L’antenne FM n’est pas convenablement
raccordée.
La station sélectionnée est trop éloignée,
ou bien la réception des ondes est
médiocre dans la région où vous habitez.
Distorsion due à la propagation par
trajets multiples ou aux interférences
radio.
Vous utilisez la télécommande hors de sa
portée de fonctionnement.
Le capteur de télécommande de cet
appareil est exposé à la lumière du soleil
ou d’un éclairage (lampe fluorescente à
convertisseur).
La pile est épuisée. Remplacez la pile par une neuve (☞ P. 1).
Il y a des obstacles entre le capteur de cet
appareil et la télécommande.
La communication sans fil n’est pas
établie lorsque SOURCE est réglé sur
iPod.
Assurez-vous que l’antenne FM est
convenablement raccordée (☞ P. 3).
Essayez d’effectuer la syntonisation
manuellement pour obtenir un signal de
meilleure qualité (☞ P. 8) ou bien utilisez
une antenne extérieure multivoies.
Modifiez la hauteur, l’orientation ou la
disposition de l’antenne.
Pour de plus amples informations à ce sujet,
reportez-vous à « Utilisation de la
télécommande » (☞ P. 1).
Changez d’éclairage ou réorientez
l’appareil.
Retirez les obstacles.
Démarrez la lecture sur l’iPod pour établir
la communication sans fil (☞ P. 6).
Français
11 Fr
Page 28

CARACTÉRISTIQUES TECHNIQUES
■ SECTION LECTEUR
iPod
• iPod pris en charge ... iPod (5ème génération), iPod classic,
iPod nano, iPod touch, iPhone, iPhone 3G, iPhone 3GS
AUX IN
• Connecteur d’entrée
...... STÉRÉO L/R : prise STÉRÉO à mini fiche de 3,5 mm
■ SECTION AMPLIFICATEUR
• Puissance de sortie maximale..................4 W + 4 W + 8 W
• Amplificateur............Haut-parleur large bande de 4 cm × 2
Haut-parleur de graves de 5,5 cm + SR-BASS × 1
(6 Ω 1 kHz, 10% THD)
■ SECTION SYNTONISEUR
• Plage d’accord
FM ....................................................87,50 à 108,00 MHz
■ SECTION ÉMETTEUR
• Fréquence................................................................2,4 GHz
• Portée d’émission ....................... Approximativement 20 m
• Nombre unités vers lesquelles on peut transmettre
simultanément.............................................Jusqu’à 7 unités
(sans interférence)
(dépend de la situation)
■ GÉNÉRALITÉS
• Alimentation ............................. CA 100 à 240 V, 50/60 Hz
• Consommation.............................................................10 W
• Consommation lorsque le système est désactivé ........3,5 W
• Consommation en veille .............................1,0 W ou moins
• Dimensions (L × H × P).....................260 × 90,3 × 141 mm
• Poids........................................................................... 1,2 kg
Les caractéristiques peuvent être modifiées sans préavis.
iPod™, iPhone™
iPod est une marque d’Apple Inc., déposée aux Etats-Unis et
dans d’autres pays.
iPhone est une marque commerciale d’Apple Inc.
« Made for iPod » signifie qu’un accessoire électronique a
été spécialement conçu pour être raccordé à un iPod et qu’il a
été certifié par le développeur comme répondant aux normes
de performances d’Apple.
« Works with iPhone » signifie qu’un accessoire électronique
a été spécialement conçu pour être raccordé à un iPhone et
qu’il a été certifié par le développeur comme répondant aux
normes de performances d’Apple.
Apple n’est pas responsable du bon fonctionnement de cet
appareil ou de sa conformité aux normes de sécurité et à la
réglementation en vigueur.
12 Fr
Page 29

Garantie Limitée pour l’Espace Économique Européen et la Suisse
Merci d’avoir porté votre choix sur un produit Yamaha. Dans l’hypothèse où vous devriez recourir au service de notre garantie
après-vente, veuillez contacter votre revendeur Yamaha. Si vous rencontrez la moindre difficulté, n’hésitez pas à contacter
directement Yamaha dans votre pays de résidence. Vous pouvez trouver toutes informations complémentaires sur notre site
Web (http://www.yamaha-hifi.com/ ou http://www.yamaha-uk.com/ pour les résidents au Royaume-Uni).
Yamaha garantit votre produit contre tout défaut de fabrication, pièces et main d’oeuvre, pour une durée de 2 ans à compter de
la première date de vente au détail. Yamaha s’engage, dans les conditions décrites ci-après, à procéder à la réparation du
produit défectueux (ou d’un quelconque de ses composants) ou à son remplacement à l’appréciation de Yamaha en prenant à sa
charge les coûts relatifs aux pièces détachées et à la main d’oeuvre. Yamaha se réserve le droit de remplacer le produit par un
modèle semblable, de par sa valeur et ses caractéristiques, dès lors que la commercialisation dudit produit a cessé ou bien
lorsque sa réparation s’avère économiquement injustifiée.
Conditions
1. La facture d’achat originelle ou un justificatif d’achat correspondant (indiquant la date d’achat, la référence du produit et le
nom du revendeur) DOIT accompagner le produit défectueux, ainsi qu’une description précise du dysfonctionnement
constaté. En l’absence de cette preuve d’achat, Yamaha se réserve le droit de refuser le service de la garantie et le produit
peut être restitué aux frais du consommateur.
2.
Le produit DOIT avoir été acheté chez un distributeur agréé Yamaha au sein de l’Espace Economique Européen ou en Suisse.
3. Le produit doit n’avoir fait l’objet d’aucune modification ou altération, sauf accord écrit de Yamaha.
4. Les cas suivants font obstacle à l’application de la garantie :
a. Entretien périodique et réparation ou remplacement de pièces ayant subi une usure ou défaillance normale.
b. Dommages résulótant de :
(1) réparation effectuée par le consommateur lui-même ou par un tiers non autorisé.
(2) emballage ou manutention inadéquats lors du transport du produit pour réparation. Veuillez noter qu’il est de la
responsabilité de l’expéditeur de s’assurer que le produit est correctement emballé.
(3) utilisation non-conforme du produit, correspondant aux cas non limitatifs (a) d’utilisation non conforme à l’objet
normal du produit ou non-conforme aux instructions d’utilisation, de maintenance ou d’installation publiées par
Yamaha, (b) ou d’utilisation du produit incompatible avec les normes techniques ou de sécurité en vigueur au sein du
pays d’utilisation.
(4) accidents, foudre, dégât des eaux, incendie, ventilation incorrecte, fuite de pile ou toute autre cause échappant au
contrôle de Yamaha.
(5) les défauts de la configuration dans laquelle ce produit est incorporé et/ou l’incompatibilité avec des produits tiers.
(6) produit importé au sein de l’EEE, et/ou en Suisse, par une autre entité que Yamaha, dès lors que ce produit n’est pas
conforme aux normes techniques ou de sécurité du pays d’utilisation et/ou aux normes des produits commercialisés
par Yamaha au sein de l’EEE et/ou en Suisse.
5.
Lorsque la garantie diffère entre le pays d’achat et le pays d’utilisation du produit, la garantie du pays d’utilisation est applicable.
6. Yamaha ne saurait être tenu pour responsable de quelconques pertes ou dommages, directs, consécutifs ou autres, sa
responsabilité au titre de la garantie étant strictement limitée à la réparation ou au remplacement du produit.
7. Nous vous invitons à sauvegarder toutes les données ou réglages personnalisés de votre produit, Yamaha ne pouvant être
tenu responsable de leur modification ou perte.
8. La présente garantie laisse intégralement subsister les droits que le consommateur peut détenir au titre de la garantie légale
en vigueur ou au titre du contrat de vente conclu avec son revendeur.
Français
Information concernant la collecte et le traitement des piles usagées et
des déchets d’équipements électriques et électroniques
Les symboles sur les produits, l’emballage et/ou les documents joints signifient que les produits électriques
ou électroniques usagés ainsi que les piles ne doivent pas être mélangés avec les déchets domestiques
habituels. Pour un traitement, une récupération et un recyclage appropriés des déchets d’équipements
électriques et électroniques et des piles usagées, veuillez les déposer aux points de collecte prévus à cet
effet, conformément à la réglementation nationale et aux Directives 2002/96/EC et 2006/66/EC.
En vous débarrassant correctement des déchets d’équipements électriques et électroniques et des piles
usagées, vous contribuerez à la sauvegarde de précieuses ressources et à la prévention de potentiels effets
négatifs sur la santé humaine qui pourraient advenir lors d’un traitement inapproprié des déchets.
Pour plus d’informations à propos de la collecte et du recyclage des déchets d’équipements électriques et
électroniques et des piles usagées, veuillez contacter votre municipalité, votre service de traitement des
déchets ou le point de vente où vous avez acheté les produits.
[Information sur le traitement dans d’autres pays en dehors de l’Union Européenne]
Ces symboles sont seulement valables dans l’Union Européenne. Si vous souhaitez vous débarrasser de
déchets d’équipements électriques et électroniques ou de piles usagées, veuillez contacter les autorités
locales ou votre fournisseur et demander la méthode de traitement appropriée.
Note pour le symbole « pile » (les deux symboles du bas) :
Ce symbole peut être utilisé en combinaison avec un symbole chimique. Dans ce cas il respecte les
exigences établies par la Directive pour le produit chimique en question.
13 Fr
 Loading...