

EN
ES
FR
Network Receiver
Réseau Ampli-Tuner
Owner’s Manual
Mode d’emploi
Manual de instrucciones
URL
• The R-N803 and R-N803D network receivers allow you to play back sound in
high-quality stereo at your own home.
• This manual explains preparations and operations for everyday users of the unit.
• Les récepteurs réseau R-N803 et R-N803D vous permettent de lire des sources audio en
bénéficiant d’un son stéréo de qualité supérieure dans le confort de votre salon.
• Ce manuel décrit les préparatifs et les procédures pour l’usage quotidien de cette unité.
• Los receptores de red R-N803 y R-N803D permiten reproducir sonido estéreo de alta
calidad en casa.
• En este manual se explican los preparativos y el funcionamiento de la unidad en el día a
día.
English
CAUTION: TO REDUCE THE RISK OF
ELECTRIC SHOCK, DO NOT REMOVE
COVER (OR BACK). NO USER-SERVICEABLE
PARTS INSIDE. REFER SERVICING TO
QUALIFIED SERVICE PERSONNEL.
CAUTION
RISK OF ELECTRIC SHOCK
DO NOT OPEN
IMPORTANT SAFETY INSTRUCTIONS
The above warning is located on the rear of the unit.
Explanation of Graphical Symbols
The lightning flash with arrowhead symbol
within an equilateral triangle is intended to alert
the user to the presence of uninsulated
“dangerous voltage” within the product’s
enclosure that may be of sufficient magnitude
to constitute a risk of electric shock to persons.
The exclamation point within an equilateral
triangle is intended to alert the user to the
presence of important operating and
maintenance (servicing) instructions in the
literature accompanying the product.
1 Read these instructions.
2 Keep these instructions.
3 Heed all warnings.
4 Follow all instructions.
5 Do not use this apparatus near water.
6 Clean only with dry cloth.
7 Do not block any ventilation openings. Install in accordance
with the manufacturer’s instructions.
8 Do not install near any heat sources such as radiators, heat
registers, stoves, or other apparatus (including amplifiers) that
produce heat.
9 Do not defeat the safety purpose of the polarized or
grounding-type plug. A polarized plug has two blades with
one wider than the other. A grounding type plug has two
blades and a third grounding prong. The wide blade or the
third prong are provided for your safety. If the provided plug
does not fit into your outlet, consult an electrician for
replacement of the obsolete outlet.
10 Protect the power cord from being walked on or pinched
particularly at plugs, convenience receptacles, and the point
where they exit from the apparatus.
11 Only use attachments/accessories specified by the
manufacturer.
12 Use only with the cart, stand, tripod,
bracket, or table specified by the
manufacturer, or sold with the apparatus.
When a cart is used, use caution when
moving the cart/apparatus combination to
avoid injury from tip-over.
13 Unplug this apparatus during lightning storms or when unused
for long periods of time.
14 Refer all servicing to qualified service personnel. Servicing is
required when the apparatus has been damaged in any way,
such as power-supply cord or plug is damaged, liquid has
been spilled or objects have fallen into the apparatus, the
apparatus has been exposed to rain or moisture, does not
operate normally, or has been dropped.
i En
WARNING
TO REDUCE THE RISK OF FIRE OR ELECTRIC SHOCK,
DO NOT EXPOSE THIS APPARATUS TO RAIN OR
MOISTURE.
FCC INFORMATION (U.S.A.)
1 IMPORTANT NOTICE: DO NOT MODIFY THIS
UNIT!
This product, when installed as indicated in the
instructions contained in this manual, meets FCC
requirements. Modifications not expressly approved by
Yamaha may void your authority, granted by the FCC,
to use the product.
2 IMPORTANT:
accessories and/or another product use only high quality
shielded cables. Cable/s supplied with this product MUST
be used. Follow all installation instructions. Failure to
follow instructions could void your FCC authorization to
use this product in the USA.
When connecting this product to
3 NOTE: This product has been tested and found to
comply with the requirements listed in FCC
Regulations, Part 15 for Class “B” digital devices.
Compliance with these requirements provides a
reasonable level of assurance that your use of this
product in a residential environment will not result in
harmful interference with other electronic devices.
This equipment generates/uses radio frequencies and,
if not installed and used according to the instructions
found in the users manual, may cause interference
harmful to the operation of other electronic devices.
* This applies only to products distributed by YAMAHA CORPORATION OF AMERICA. (class B)
Compliance with FCC regulations does not guarantee
that interference will not occur in all installations. If
this product is found to be the source of interference,
which can be determined by turning the unit “OFF”
and “ON”, please try to eliminate the problem by using
one of the following measures:
Relocate either this product or the device that is being
affected by the interference.
Utilize power outlets that are on different branch (circuit
breaker or fuse) circuits or install AC line filter/s.
In the case of radio or TV interference, relocate/
reorient the antenna. If the antenna lead-in is 300 ohm
ribbon lead, change the lead-in to co-axial type cable.
If these corrective measures do not produce
satisfactory results, please contact the local retailer
authorized to distribute this type of product. If you can
not locate the appropriate retailer, please contact
Yamaha Corporation of America, A/V Division, 6600
Orangethorpe Ave, Buena Park, CA90620
The above statements apply ONLY to those products
distributed by Yamaha Corporation of America or its
subsidiaries.
FCC CAUTION
Change or modifications not expressly approved by the party
responsible for compliance could void the user’s authority to
operate the equipment.
IMPORTANT
Please record the serial number of this unit in the space below.
Model
Serial No.
The serial number is located on the bottom or rear of the unit.
Retain this Owner’s Manual in a safe place for future
reference.
* This applies only to products distributed
by YAMAHA CORPORATION OF AMERICA.
CAN ICES-3 (B)/NMB-3(B)
NOTICE
This equipment compiles with FCC/IC radiation exposure limits set forth for uncontrolled equipment and meets the FCC radio
frequency (RF) Exposure Guidelines and RSS-102 of the IC radio frequency (RF) Exposure rules. This equipment has very low
levels of RF energy that it deemed to comply without maximum permissive exposure evaluation (MPE). But it is desirable that it
should be installed and operated with at least 20 cm and more between the radiator and person’s body.
(Ser.No)
(can_b_02)
COMPLIANCE INFORMATION STATE ME NT
(DECLARATION OF CONFORMITY PROCEDURE)
Responsible Party: Yamaha Corporation of America
Address: 6600 Orangethorpe Ave., Buena Park, Calif.
Telephone: 714-522-9011
Type of Equipment: Network Receiver
Model Name: R-N803
This device complies with Part 15 of the FCC Rules and Industry
Canada licence-exempt RSS standard(s).
Operation is subject to the following two conditions:
1) this device may not cause harmful interference, and
2) this device must accept any interference received including
interference that may cause undesired operation.
See user manual instructions if interference to radio reception is
suspected.
* This applies only to products distributed by YAMAHA
CORPORATION OF AMERICA.
90620
This transmitter must not be co-located or operated in conjunction with any other antenna or transmitter.
(FCC DoC)
English
ii En

WARNING
PRECAUTIONS
PLEASE READ CAREFULLY BEFORE USE. BE SURE TO FOLLOW THESE INSTRUCTIONS.
The precautions listed below are to prevent risk of harm to the user and others, as well as to prevent property
damage, and to help the user use this unit properly and safely. Be sure to follow these instructions.
After reading this manual, be sure to keep it in a safe place where
it can be referenced at any time.
• Be sure to request inspections or repairs from the dealer
where you purchased the unit or from qualified Yamaha
service personnel.
• Yamaha cannot be held responsible for damage caused by
improper use or modifications to the unit.
• This product is for ordinary homes. Do not use for
applications requiring high reliability, such as managing
lives, health care or high-value assets.
This content indicates “risk of serious injury or death.”
■ Power supply/power cord
• Do not do anything that could damage the power cord.
- Do not place it near a heater.
- Do not bend it excessively or alter it.
- Do not scratch it.
- Do not place it under a heavy object.
Using the power cord with the core of the cord exposed could
cause electric shocks or a fire.
• Do not touch the power plug or cord if there is a chance of
lightning. Failure to observe this may cause electric shocks.
• Use this unit with the power supply voltage printed on it.
Failure to connect to an appropriate AC outlet may cause a fire,
electric shocks, or malfunctions.
• Be sure to use the supplied power cord. Also, do not use the
supplied power cord for other units. Failure to observe the
above may cause a fire, burns, or malfunctions.
• Check the electric plug periodically and remove any dirt or dust
which may have accumulated on it. Failure to observe this may
cause a fire or electric shocks.
• When setting up the unit, make sure that the AC outlet you are
using is easily accessible. If some trouble or malfunction
occurs, immediately turn off the power switch and disconnect
the plug from the AC outlet. Even when the power switch is
turned off, as long as the power cord is not unplugged from the
wall AC outlet, the unit will not be disconnected from the
power source.
• If you hear thunder or suspect approaching lightning, quickly
turn off the power switch and pull the power plug from the AC
outlet. Failure to observe this may cause a fire or malfunctions.
• If not using the unit for long periods of time, be sure to pull the
power plug from the AC outlet. Failure to observe this may
cause a fire or malfunctions.
■ Do not disassemble
• Do not disassemble or modify this unit. Failure to observe this
may cause a fire, electric shocks, injury, or malfunctions. If you
notice any irregularities, be sure to request an inspection or
repair from the dealer where you purchased the unit or from
qualified Yamaha service personnel.
■ Water warning
• Do not expose the unit to rain, use it near water or in damp or
wet conditions, or place on it any containers (such as vases,
bottles or glasses) containing liquids which might spill into any
openings. A liquid such as water getting into the unit may cause
a fire, electric shocks, or malfunctions. If any liquid such as
water seeps into the device, turn off the power immediately and
unplug the power cord from the AC outlet. Then, request an
inspection from the dealer where you purchased the unit or from
qualified Yamaha service personnel.
• Never insert or remove an electric plug with wet hands. Do not
handle this unit with wet hands. Failure to observe this may
cause electric shocks or malfunctions.
■ Fire warning
• Do not place any burning items or open flames near the unit,
since they may cause a fire.
■ Maintenance and care
• Do not use aerosols or spray-type chemicals that contain
combustible gas for cleaning or lubrication. The combustible
gas will remain inside the unit, which may cause explosion or
fire.
■ Battery use
• Do not disassemble a battery. If the contents of the battery get
on your hands or in your eyes, it can cause blindness or
chemical burns.
• Do not dispose of batteries in fire. Doing so may result in the
battery bursting, causing a fire or injury.
• Do not expose a battery to high temperatures, such as direct
sunlight or a fire. The battery may burst, causing a fire or injury.
• Do not attempt to recharge batteries that are not intended to be
charged. Charging could cause the battery to burst or leak,
which can cause blindness, chemical burns, or injury.
• If the batteries do leak, avoid contact with the leaked fluid.
If the battery fluid should come in contact with your eyes,
mouth, or skin, wash immediately with water and consult a
doctor. Battery fluid is corrosive and may possibly cause loss of
sight or chemical burns.
■ Wireless unit
• Do not use this unit near medical devices or inside medical
facilities. Radio waves from this unit may affect electromedical devices.
• Do not use this unit within 15 cm (6 in) of persons with a heart
pacemaker implant or a defibrillator implant. Radio waves from
this unit may affect electro-medical devices, such as a heart
pacemaker implant or defibrillator implant.
■ If you notice any abnormality
• If any of the following abnormalities occur, immediately turn
off the power and disconnect the power plug. If you are using
batteries, remove the batteries from this unit.
- The power cord/plug is damaged.
- An unusual smell or smoke is emitted from the unit.
- Foreign material gets into the interior of the unit.
iii En

PRECAUTIONS
CAUTION
- There is a loss of sound during use.
- There is a crack or damage in the unit.
Continued use could cause electric shocks, a fire, or
malfunctions. Immediately request an inspection or repair from
the dealer where you purchased the unit or from qualified
Yamaha service personnel.
• Be careful not to drop or apply strong impact to this unit. If you
suspect the unit may have been damaged due to dropping or
impact, immediately turn off the power and pull the power plug
from the AC outlet. Failure to observe this may cause electric
shocks, a fire, or malfunctions. Immediately request an
inspection from the dealer where you purchased the unit or from
qualified Yamaha service personnel.
This content indicates “risk of injury.”
■ Power supply/power cord
• Do not use an AC outlet where the power plug fits loosely when
inserted. Failure to observe this may cause a fire, electric
shocks, or burns.
• When removing the electric plug from the unit or an AC outlet,
always hold the plug itself and not the cord. Pulling by the cord
can damage it and cause electric shocks or a fire.
• Insert the power plug firmly all the way into the AC outlet.
Using the unit when it is not plugged in sufficiently can cause
dust to accumulate on the plug, causing a fire or burns.
■ Installation
• Do not place the unit in an unstable position where it might
accidentally drop or fall over and cause injuries.
• Do not block this unit's ventilation holes (cooling slits). This
unit has ventilation holes on the top/bottom to prevent the
internal temperature from becoming too high. Failure to
observe this may trap heat inside the unit, causing a fire or
malfunctions.
• When installing this unit: - Do not cover it with any cloth.
- Do not install it on a carpet or rug.
- Make sure the top surface faces up; do not install on its sides
or upside down.
- Do not use the device in a confined, poorly-ventilated
location.
Failure to observe the above may trap heat inside the unit,
causing a fire or malfunctions. Ensure that there is adequate
space around the unit: at least 30 cm (11-3/4 in) on top, 20 cm
(7-7/8 in) on the sides, and 20 cm (7-7/8 in) on the rear.
• Ensure that the top is facing upwards. Failure to observe this
may cause malfunctions or for the unit to fall and cause injury.
• Do not place the unit in a location where it may come into
contact with corrosive gases or salt air. Doing so may result in
malfunction.
• Avoid being near the unit during a disaster, such as an
earthquake. Since the unit may turn over or fall and cause
injury, quickly move away from the unit and go to a safe place.
• Before moving this unit, be sure to turn off the power switch
and disconnect all connection cables. Failure to observe this
may damage the cables or cause you or someone else to trip and
fall.
• When transporting or moving the unit always use two or more
people. Attempting to lift the unit by yourself may damage your
back, result in other injury, or cause damage to the unit itself.
■ Hearing loss
• Do not use the unit/speakers or headphones for a long period of
time at a high or uncomfortable volume level, since this can
cause permanent hearing loss. If you experience any hearing
loss or ringing in the ears, consult a physician.
• Before connecting the unit to other devices, turn off the power
for all devices. Also, before turning the power of all devices on
or off, make sure that all volume levels are set to the minimum.
Failing to do so may result in hearing loss, electric shock, or
device damage.
• When turning on the AC power in your audio system, always
turn on the unit LAST, to avoid hearing loss and speaker
damage. When turning the power off the unit should be turned
off FIRST for the same reason. Failure to observe the above
may cause hearing impairment or speaker damage.
■ Maintenance
• Remove the power plug from the AC outlet when cleaning the
unit. Failure to observe this may cause electric shocks.
■ Handling caution
• Do not insert foreign materials such as metal or paper into the
ventilation holes of this unit. Failure to observe this may cause a
fire, electric shocks, or malfunctions. If foreign material gets
into the unit, immediately shut off the power and pull the power
plug from the AC outlet / then turn off any amplifiers and
receivers and request an inspection from the dealer where you
purchased the unit or from qualified Yamaha service personnel.
• Do not rest your weight on the unit or place heavy objects on it.
Avoid applying excessive force to the buttons, switches or
connectors. Failure to observe the above may cause injury or
unit damage.
• Avoid pulling the connected cables to prevent injuries or
damage to the unit by causing it to fall.
■ Battery use
• Always replace all batteries at the same time. Do not use new
batteries together with old ones. Using new ones with old ones
could cause a fire, burns, or inflammation due to fluid leaks.
• Do not mix battery types, such as alkaline batteries with
manganese batteries, or batteries from different makers, or
different types of batteries from the same maker, since this can
cause a fire, burns, or inflammation due to fluid leaks.
• Keep batteries away from children. A child could accidentally
swallow a battery. Failure to observe this may also cause
inflammation due to battery fluid leaks.
• Do not put in a pocket or bag, carry, or store batteries together
with pieces of metal. The battery could short, burst, or leak,
causing a fire or injury.
• Always make sure all batteries are inserted in conformity with
the +/- polarity markings. Failure to do so might result in a fire,
burns, or inflammation due to fluid leaks.
• When the batteries run out, or if the unit is not to be used for a
long time remove the batteries from the remote control to
prevent possible leakage of the battery fluid.
• When storing or discarding batteries, insulate the terminal area
by applying tape, or some other protection. Mixing them with
other batteries or metal objects can cause a fire, burns, or
inflammation due to fluid.
Caution
Do not touch the surface marked with
this label.
The surface may become hot during
operation.
English
iv En

Notice and Information
Notice
Indicates points that you must observe in order to
prevent product failure, damage or malfunction and
data loss, as well as to protect the environment.
■ Power
• If not using the unit for a long period of time, be sure to pull the
power plug from the outlet. Even if the A (Standby/On) switch
has been turned off, a minute current is still flowing.
■ Installation
• Do not use this unit in the vicinity of other electronic
equipment, such as a TV, radio, AV unit, or mobile phone.
Failure to observe this may cause this unit or the TV or radio to
produce noise.
• Do not use this unit in a location that is exposed to direct
sunlight (such as a vehicle interior), that becomes extremely
hot, such as near a heater, or extremely cold, or that is subject to
excessive dust or vibration. Failure to observe this may cause
the unit's panel to become deformed, the internal components to
malfunction, or for operation to become unstable.
• Install this unit as far away from other electronic equipment as
possible. Digital signals from this unit may interfere with other
electronic equipment.
• If using a wireless function, avoid installing this unit near metal
walls or desks, microwave ovens, or other wireless devices.
■ Connections
• If connecting external units, be sure to thoroughly read the
manual for each unit and connect them in accordance with the
instructions. Failure to properly handle a unit in accordance
with the instructions could cause malfunctions.
• Do not connect this unit to industrial units. Digital audio
interface standards for consumer use and industrial use are
different. This unit has been designed to connect to a consumeruse digital audio interface. Connections to an industrial-use
digital audio interface could not only cause this unit to
malfunction, but could also damage the speakers.
Information
Indicates information of note regarding this product.
■ About content in this manual
• The illustrations and screens in this manual are for instructional
purposes only.
• The company names and product names in this manual are the
trademarks or registered trademarks of their respective
companies.
• Software may be revised and updated without prior notice.
• Information marked by the “ WARNING” icon indicates
points that may lead to death or serious injury if not observed.
• Information marked with the “ CAUTION” icon indicates
points that may lead to injury if not observed.
• Information in the “Notice” sections indicates points that you
must observe to prevent product failure, damage or malfunction
and data loss.
• Information listed in the “Note” sections indicates
supplementary information.
• This manual describes the “iPhone”, “iPad” and “iPod touch”
collectively as the “iPhone”. (“iPhone” refers to the “iPhone”,
“iPad” and “iPod touch”, unless otherwise specified.)
• In this manual, illustrations of English menu screens are used as
examples.
■ Handling
• Do not place vinyl, plastic, or rubber products on this unit.
Failure to observe this may cause discoloration or deformation
in the panel of this unit.
• If the ambient temperature changes drastically (such as during
unit transportation or under rapid heating or cooling) and there
is a chance condensation may have formed in the unit, leave the
unit for several hours without turning on the power until it is
completely dry before use. Using the unit while there is
condensation can cause malfunctions.
■ Maintenance
• When cleaning the unit, use a dry, soft cloth. Using chemicals
such as benzine or thinner, cleaning agents, or chemical
scrubbing cloths can cause discoloration or deformation.
■ Batteries
• Be sure to discard used batteries in accordance with local
regulations.
v En

Contents
Contents
INTRODUCTION
What you can do with this unit ................................. 2
Sources that can be played back on this unit ................. 2
Supplied accessories ................................................... 3
Controls and functions ............................................... 4
Front panel ..................................................................... 4
Front display .................................................................. 6
Rear panel ...................................................................... 7
Remote control............................................................... 8
PREPARATION
Connections ............................................................... 10
Connecting audio devices ............................................ 10
Connecting the speakers .............................................. 11
Connecting the FM/AM antennas (R-N803) ............... 13
Connecting the DAB/FM antenna (R-N803D) ............ 13
Connecting the network cable ..................................... 14
Preparing a wireless antenna ....................................... 14
Connecting the power cord .......................................... 14
Turning on the unit ...................................................... 14
Connecting to network ............................................. 15
Sharing the iOS device setting..................................... 16
Configuring with the router's WPS push button .......... 17
Set the wireless network connection manually............ 18
Connecting a mobile device to the unit directly
(Wireless Direct) ..................................................... 19
Verify the network connection status .......................... 20
Configuring MusicCast................................................ 20
BASIC OPERATION
Playback .................................................................... 22
Playing a source........................................................... 22
Switching information on the front display ................. 22
Front panel operations ................................................. 23
Using the sleep timer ................................................... 24
Listening to FM/AM radio....................................... 25
FM/AM tuning............................................................. 25
Registering favorite radio stations (presets) ................ 25
Radio Data System tuning
(U.K. and Europe models only)............................... 28
Listening to DAB radio (R-N803D)......................... 29
Preparing the DAB tuning ........................................... 29
Selecting a DAB radio station for reception................ 29
Using preset function................................................... 30
Displaying the DAB information................................. 31
Checking reception strength of each DAB channel
label ......................................................................... 31
Playing back music via Bluetooth............................ 32
Connecting a Bluetooth device (pairing) ..................... 32
Playing back Bluetooth device contents ...................... 32
Disconnecting a Bluetooth connection ........................ 33
Playing back music stored on media servers
(PCs/NAS) ............................................................. 34
Setting the media sharing of music files ...................... 34
Playback of PC music contents.................................... 35
Listening to Internet radio....................................... 37
Playing back iPhone/iTunes music via a network
(AirPlay) ................................................................ 38
Playback of iPhone/iTunes music contents ................. 38
Playing back music stored on a USB storage
device ......................................................................39
Connecting a USB storage device ............................... 39
Playback of USB storage device contents ................... 39
Registering the current playback song/station
(Preset function) ....................................................41
Registering to a preset ................................................. 41
Recalling a preset......................................................... 41
Clearing a preset .......................................................... 41
ADVANCED OPERATION
Optimizing the speaker settings automatically
(YPAO)...................................................................42
Error messages............................................................. 44
Warning messages ....................................................... 45
Configuring playback settings for different
playback sources (Option menu) .........................46
Option menu items....................................................... 46
Configuring various functions (Setup menu) .........47
Setup menu items......................................................... 48
Network ....................................................................... 48
Bluetooth ..................................................................... 50
YPAO .......................................................................... 50
Volume ........................................................................ 50
AutoPowerStdby (Auto Power Standby)..................... 51
ECO Mode................................................................... 51
Configuring the system settings
(ADVANCED SETUP menu)...............................52
ADVANCED SETUP menu items .............................. 52
Checking the firmware version (VERSION)............... 52
Changing the speaker impedance setting (SP IMP.) ... 52
Selecting the remote control ID (REMOTE ID).......... 52
Setting tuner frequency step (TU) ............................... 53
Restoring the default settings (INIT) ........................... 53
Updating the firmware (UPDATE) ............................. 53
Updating the unit’s firmware via the network.......54
ADDITIONAL INFORMATION
Troubleshooting.........................................................55
Error indications on the front display.....................61
Supported devices and file formats .........................62
Supported devices........................................................ 62
Supported file formats ................................................. 62
Trademarks ...............................................................63
Specifications .............................................................64
Index...........................................................................66
PREPARATION INTRODUCTION
BASIC
OPERATION
ADVANCED
OPERATION
ADDITIONAL
INFORMATION
English
1 En
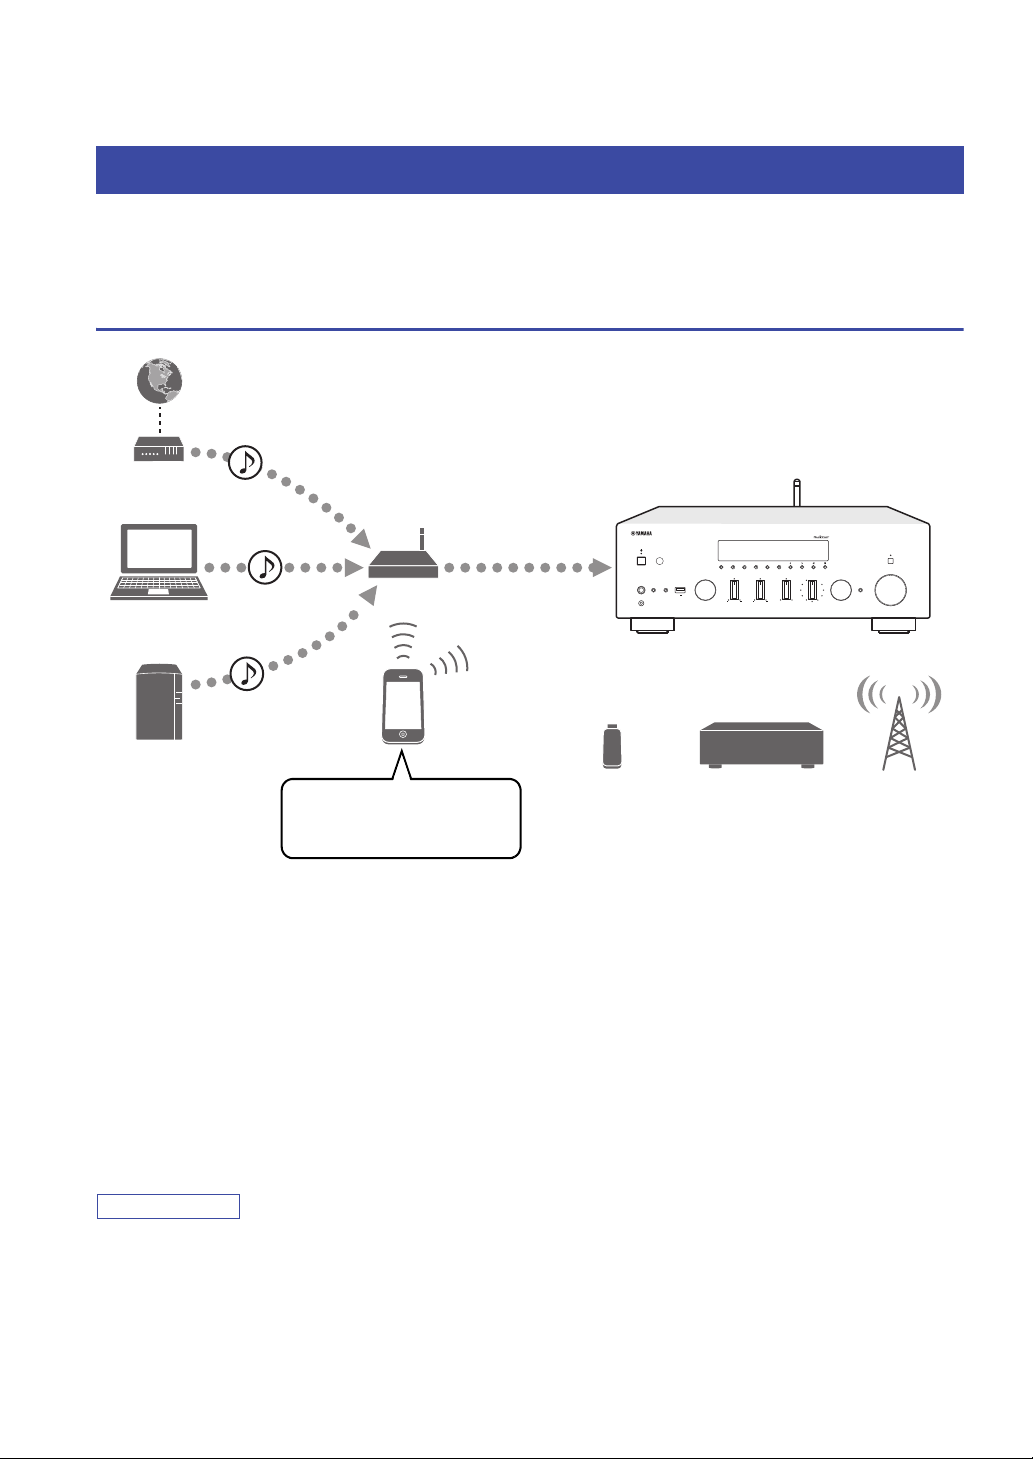
INTRODUCTION
Note
This unit
1 Internet
2 Streaming service
Modem
Router*
3 PC
5 AirPlay (iTunes)
4 NAS
5 AirPlay
(iPhone/iPad/iPod touch)
6 Bluetooth
7 USB device 8 CD player, etc.
Mobile
device
9 Radio
What you can do with this unit
This unit is a network receiver compatible with a network source such as a media server and mobile device.
It supports playback from not only audio sources such as a CD player or radio, but also from Bluetooth devices and
network streaming services.
Sources that can be played back on this unit
*
You need a commercially available wireless router (access point) when you use a mobile device.
1 Play back the Internet radio (p. 37)
2 Play back the streaming service
3 Play back music files stored on your PC (p. 34)
4 Play back music files stored on your NAS
(see the supplement for each service.)
(p. 34)
TUNINGPRESET
BAND
MEMORY CLEAR
DIMMER MODE
DISPLAY
BASSINPUT
BALANCE
LOUDNESS
TREBLE
PHONES
SPEAKERS USB
AB
5V
1A
YPAO MIC
LR
FLAT
-30dB
PURE DIRECT
VOLUME
SELECT
PUSH - ENTER
RETURN
CONNECT
6 Play back audio content from Bluetooth
devices (p. 32)
7 Play back music files stored on your USB
device (p. 39)
8 Play back your external component (p. 10)
9 Listening to radio (p. 25, 29)
5 Play back music files stored on your iPod/
iTunes with AirPlay (p. 38)
For details on connecting the external devices, see “Connections” (p. 10).
2 En
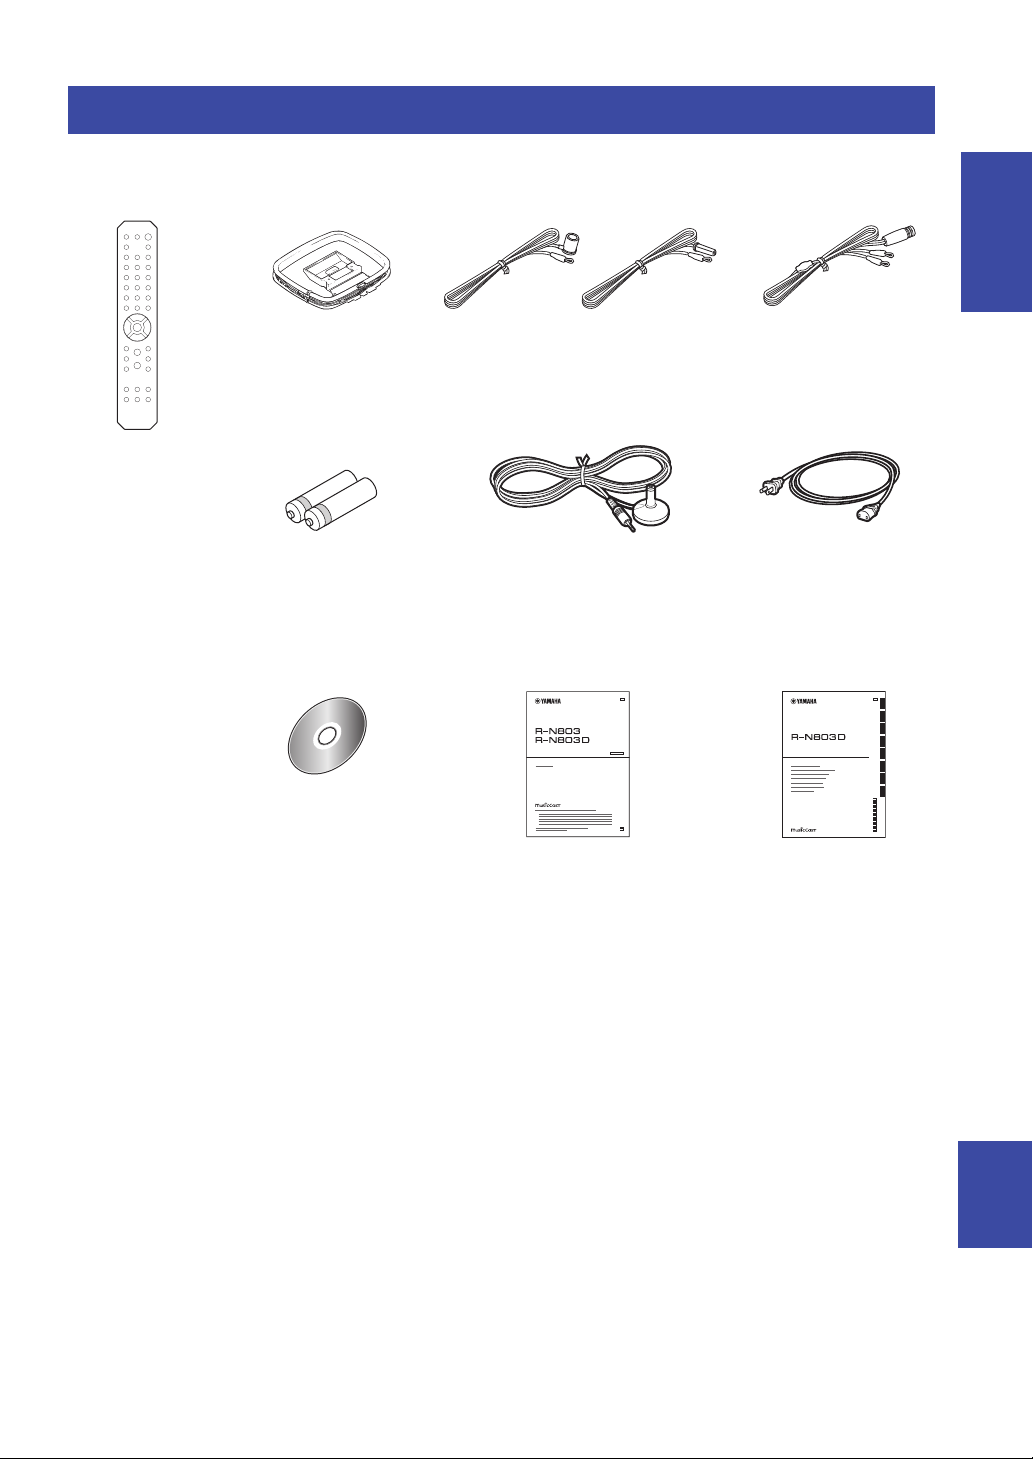
Supplied accessories
Remote control FM antenna (R-N803)AM antenna (R-N803) DAB/FM antenna (R-N803D)
YPAO microphone
Power cord
* The supplied power cord
varies depending on the
region of purchase.
Batteries (x2)
(AA, R6, UM-3)
*
One of the above is supplied depending
on the region of purchase.
R-N803/R-N803D
Owner’s Manual
CD-ROM (Europe model)
R-N803D
Quick Start Guide
(Europe model)
G
■
■
■
■
Network Receiver
R-N803/R-N803D
Owner’s Manual
(except Europe model)
Check that the following accessories are supplied with the product.
Supplied accessories
INTRODUCTION
Network Receiver
Réseau Ampli-Tuner
Сетевой ресивер
G
English
3 En
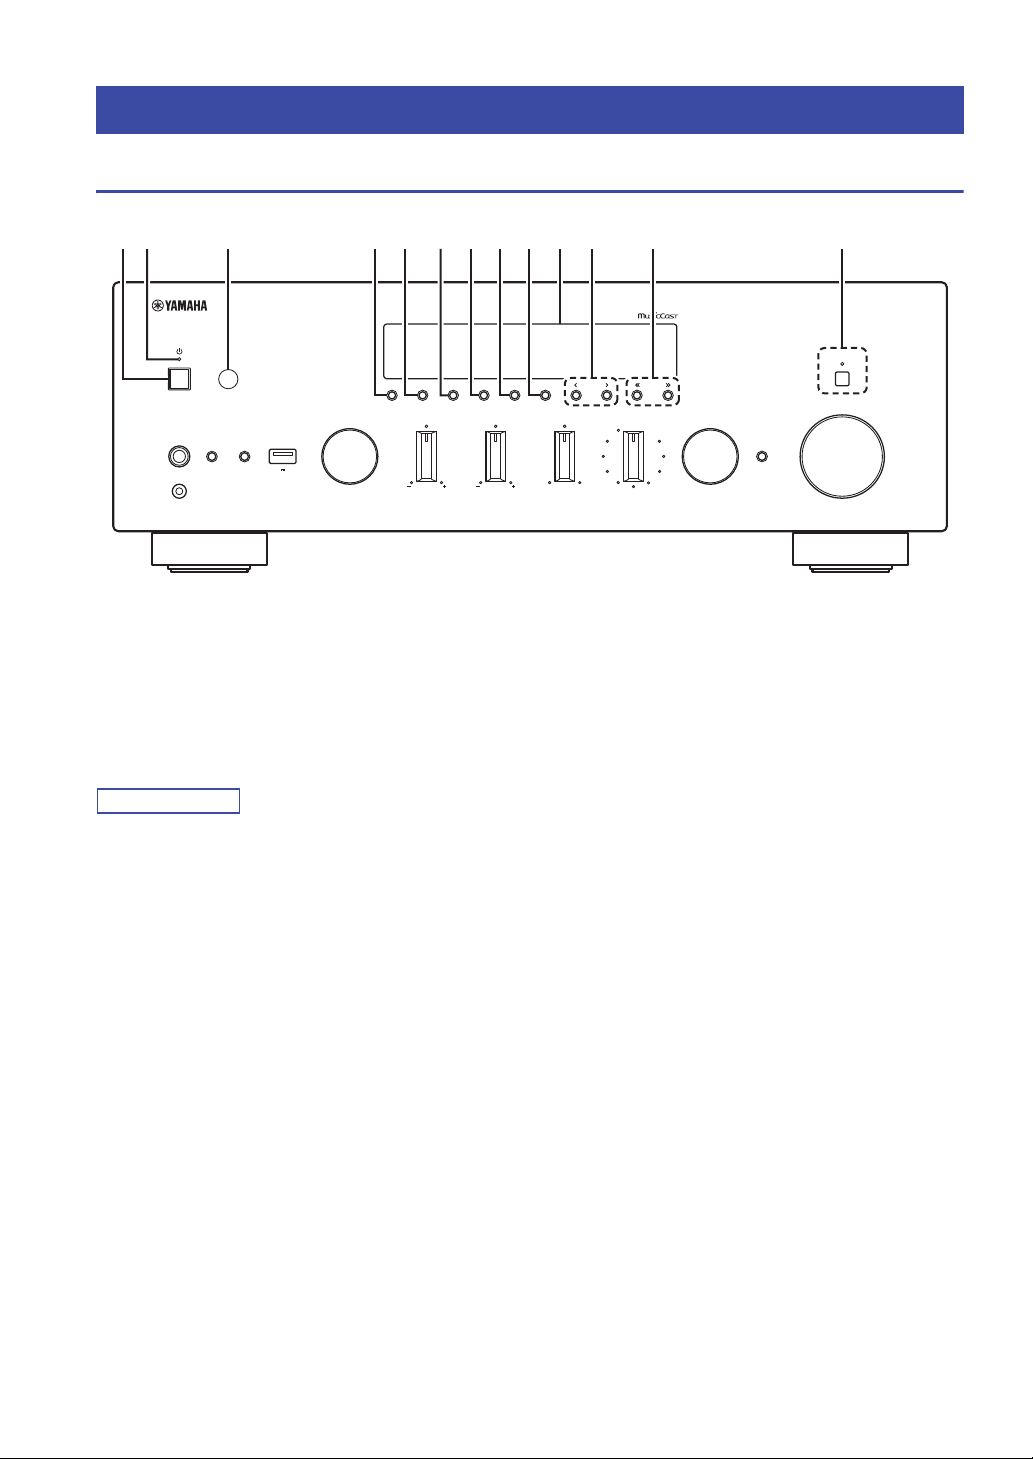
Front panel
Note
VOLUME
PURE DIRECT
RETURN
CONNECT
PUSH - ENTER
TUNINGPRESET
BAND
MEMORY CLEAR
BASSINPUT
5V
1A
BALANCE
LR
TREBLE
LOUDNESS
FLAT
-30dB
DIMMER MODE
DISPLAY
SELECT
PHONES
YPAO MIC
SPEAKERS USB
AB
12 3 4 5 6 7 8 9: B CA
Controls and functions
1 A (power)
Turns on/off the unit.
2 Power indicator
Brightly lit: Power is on
Dimly lit: Standby mode
Tuned off: Power is off
When not using this unit for an extended period of time, be sure
to unplug it from the power outlet. This unit uses a minimal
amount of power even in standby mode.
3 Remote control sensor
Receives infrared signals from the remote control.
4 DIMMER
Changes the brightness level of the front display. Choose
brightness from 5 levels by pressing this button
repeatedly.
5 DISPLAY
Selects the information displayed on the front display
(p. 22).
6 MODE
Sets the FM band reception mode to automatic stereo or
monaural (p. 25).
7 MEMORY
Registers the current radio station as a preset when
TUNER is selected as the input source (p. 25, 30).
Registers the current playback song or streaming station
as a preset when NET or USB is selected as the input
source (p. 41).
8 CLEAR
Clears a preset radio station when TUNER is selected as
the input source (p. 27, 30).
Clears a preset song or a preset streaming station when
NET or USB is selected as the input source (p. 41).
9 BAND
Sets the radio tuner band when TUNER is selected as the
input source. (p. 25, 29)
0 Front display
Shows information about the operational status of this unit
(p. 6).
A PRESET j / i
Recalls a preset radio station (p. 27, 30) or song/streaming
station (p. 41).
B TUNING jj / ii
Selects the tuning frequency (p. 25) or a DAB radio
station (p. 29) when TUNER is selected as the input
source.
C PURE DIRECT and indicator
Allows you to listen to a source in the purest possible
sound (p. 23). The indicator above it lights up and the
front display turns off when this function is turned on.
4 En
Controls and functions
Note
VOLUME
PURE DIRECT
RETURN
CONNECT
PUSH - ENTER
TUNINGPRESET
BAND
MEMORY CLEAR
BASSINPUT
5V
1A
BALANCE
LR
TREBLE
LOUDNESS
FLAT
-30dB
DIMMER MODE
DISPLAY
SELECT
PHONES
YPAO MIC
SPEAKERS USB
AB
OJIHFED K LMNG
INTRODUCTION
D PHONES jack
Outputs audio to your headphones for private listening.
E YPAO MIC jack
For connecting the supplied YPAO microphone (p. 42).
F SPEAKERS A/B
Turns on or off the speaker set connected to the
SPEAKERS A and/or SPEAKERS B terminals on the rear
panel each time the corresponding button is pressed.
G USB jack
For connecting a USB storage device (p. 39).
H INPUT selector
Selects the input source you want to listen to.
I BASS control
Increases or decreases the low frequency response. The
center position produces a flat response (p. 23).
J TREBLE control
Increases or decreases the high frequency response. The
center position produces a flat response (p. 23).
K BALANCE control
Adjusts the sound output balance of the left and right
speakers to compensate for sound imbalances caused by
speaker locations or listening room conditions (p. 23).
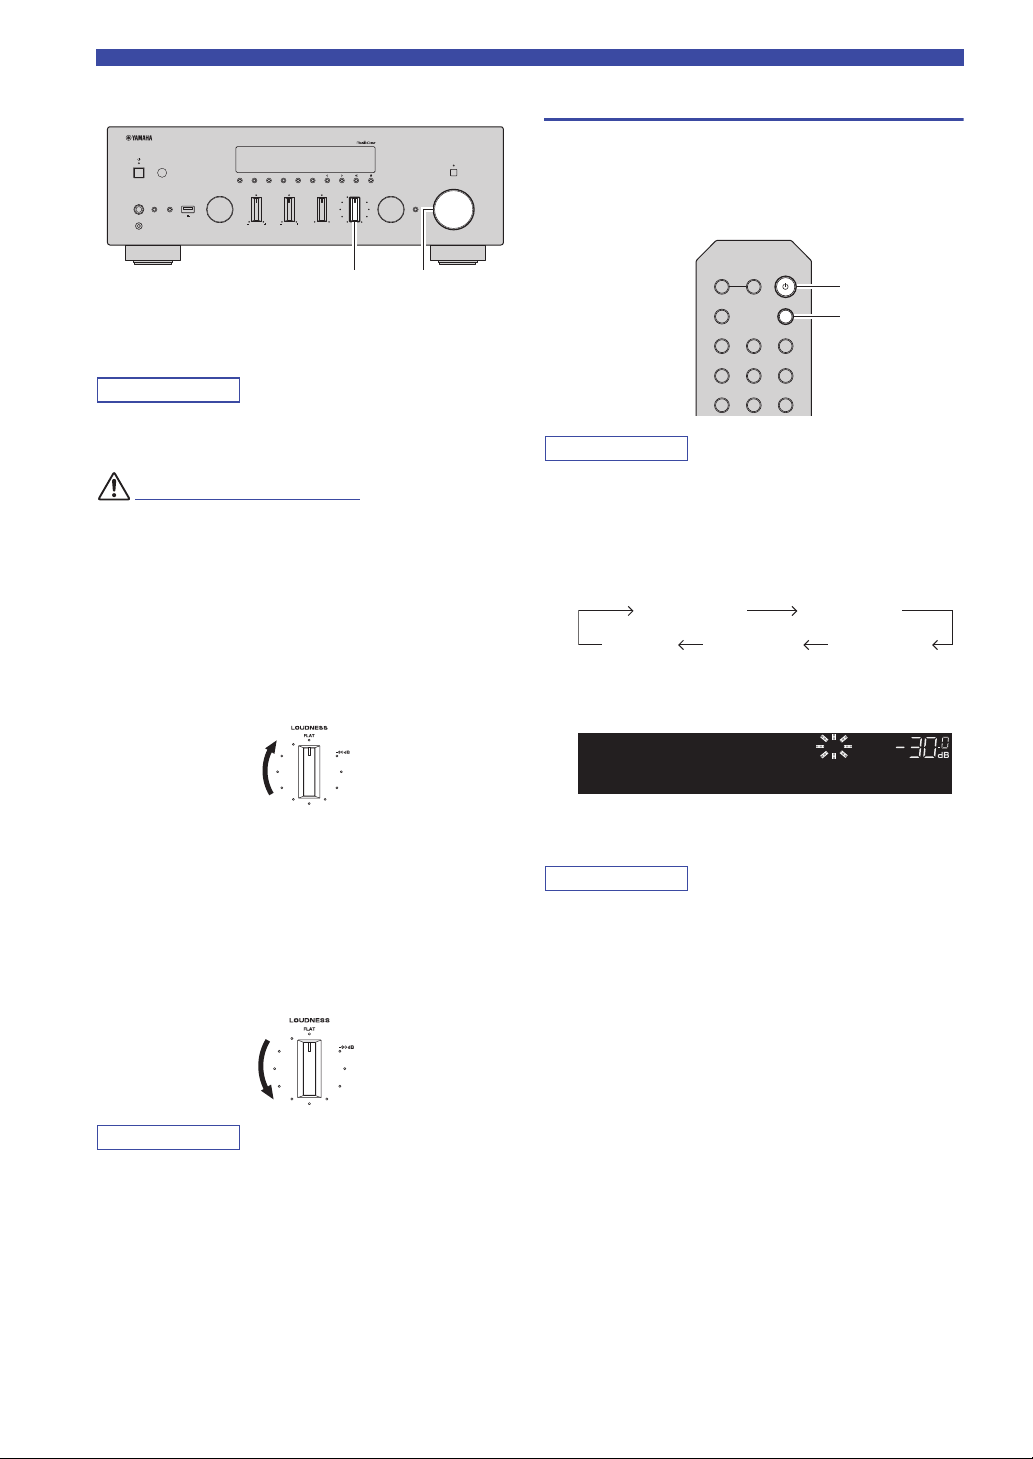
L LOUDNESS control
Retains a full tonal range at any volume level (p. 24).
The LOUDNESS control does not function when the YPAO
Volume function (p. 50) is enabled.
M SELECT/ENTER
Turn the dial to select a numeric value or setting, and press
the dial to confirm.
N RETURN
Returns to the previous indication of the front display.
CONNECT
Use to register this unit to the MusicCast network (p. 20).
O VOLUME control
Increases or decreases the sound output level.
English
5 En

Controls and functions
Note
VOL. MUTE
TUNED
SLEEP
YPAO VOL.
STEREO
SW
L R
AB
1 9
: A: B
2
3 6 7854
Front display
• If you turn on the power to the unit right after you purchase or
initialize it, the unit will display “WAC” (Wireless Accessory
Configuration) on the front display and trigger an automatic
iOS device search. See “Sharing the iOS device setting” (p. 16)
for details on the iOS device and network connection.
• You can change the brightness level of the front display by
pressing DIMMER on the front panel (p. 4).
1 Information display
Displays the current status (such as input name).
You can switch the information that is displayed when you
press DISPLAY on the front panel (p. 22).
2 Bluetooth indicator
Lights up when the unit is connecting to a Bluetooth
device.
3 Signal strength indicator
Lights up when the unit connects to a wireless network or
operates as an access point. The strength of the wireless
network signal can be verified by the indicator status.
4 SLEEP indicator
Lights up when the sleep timer is on (p. 24).
5 STEREO indicator
Lights up when the unit is receiving a stereo FM radio
signal.
6 TUNED indicator
Lights up when the unit is receiving an FM/AM radio
station signal.
7 YPAO VOL. indicator
Lights up when the YPAO volume (p. 50) function is
enabled.
The YPAO volume function is automatically enabled after
YPAO is performed.
8 A/B indicators
“A” lights up when the SPEAKERS A output is enabled
and “B” lights up when the SPEAKERS B output is
enabled.
9 Volume indicator
Indicates the current volume.
0 Cursor indicators
Indicate the remote control cursor keys currently
operational.
A Speaker indicators
Indicate the speakers from which signals are output during
YPAO.
A Front speaker (L)
S Front speaker (R)
L Subwoofer
B MUTE indicator
Blinks when audio is muted.
6 En
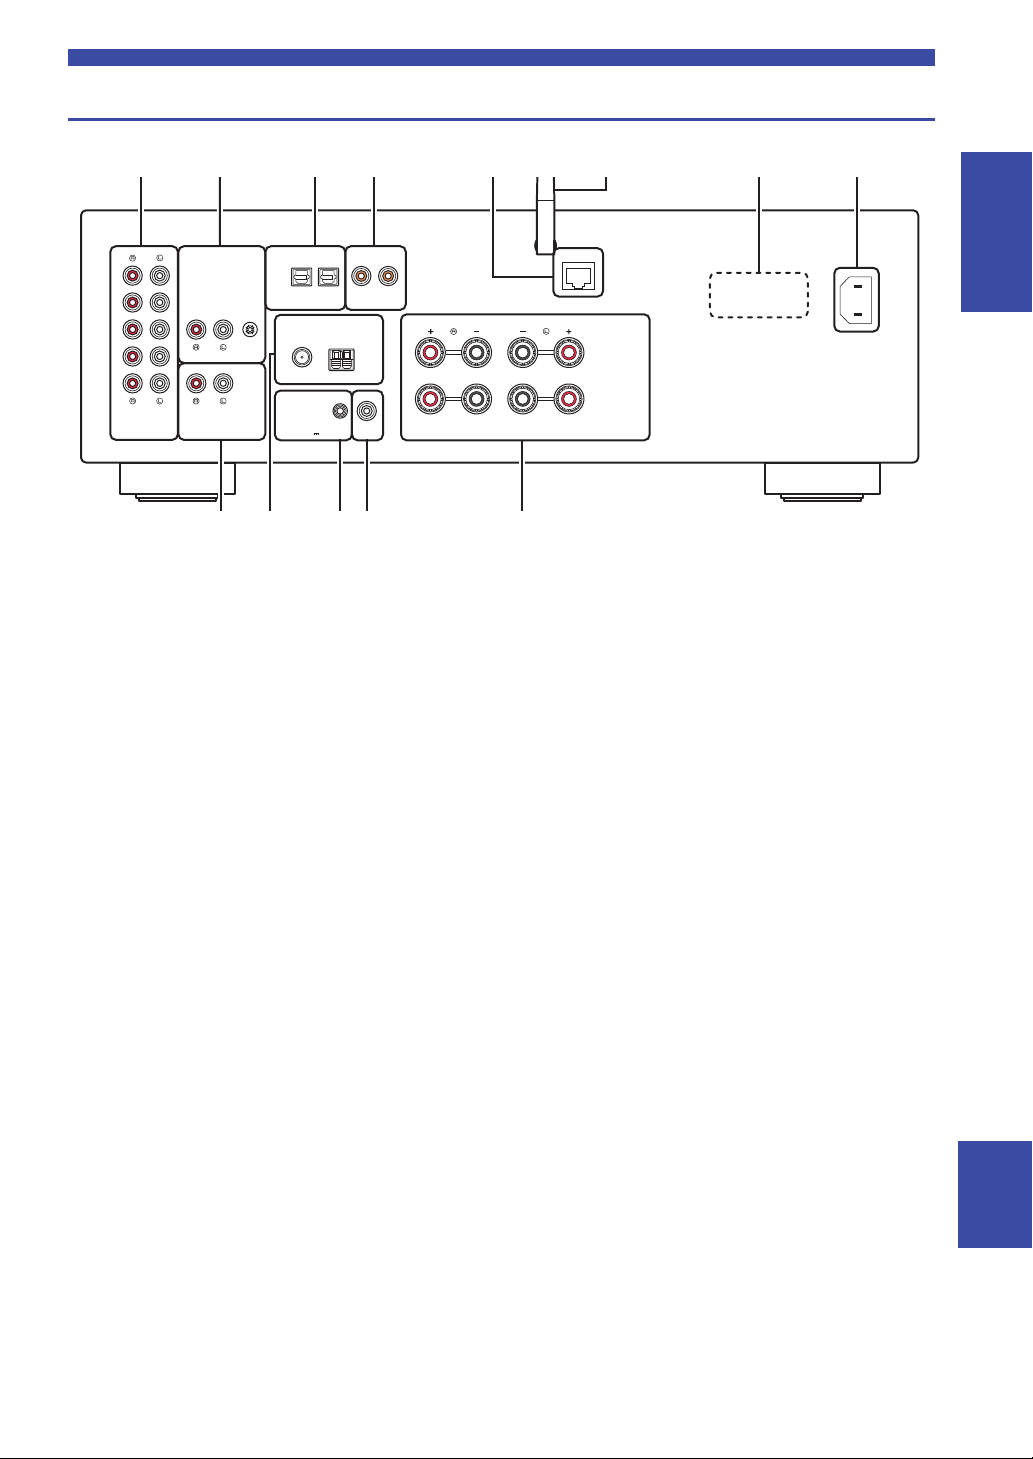
Rear panel
A
B
SPEAKERS
NETWORK
COAXIALOPTICAL
FM AM
75Ω
ANTENNA
SUBWOOFER
OUT
TRIGGER
OUT
IN
2
IN
1
IN
OUT
OUT
3
12 12
CD
PHONO
LINE
GND
12V 0.1A
AC IN
381 2 4 5 6
9
7
A B C:
(R-N803)
Controls and functions
INTRODUCTION
1 LINE 1-3 jacks
For connecting to analog audio components (
p. 10
).
2 PHONO jacks
For connecting to a turntable (p. 10).
3 OPTICAL 1/2 jacks
For connecting to audio components equipped with
optical digital output (p. 10).
4 COAXIAL 1/2 jacks
For connecting to audio components equipped with a
coaxial digital output (p. 10).
5 NETWORK jack
For connecting to a network with a network cable (p. 14).
6 Wireless antenna
For connecting to a network device wirelessly (p. 14).
7 VO LTAGE SELECTOR (General models only)
Selects the switch position according to your local voltage
(p. 14).
8 AC IN jack
For connecting the supplied power cord (p. 14).
9 CD jacks
For connecting to a CD player, etc. (p. 10).
0 ANTENNA terminals
For connecting to the radio antennas (p. 13).
A TRIGGER OUT jacks
For connecting to a subwoofer that supports the trigger
function (p. 10).
B SUBWOOFER OUT jack
For connecting to a subwoofer with built-in amplifier
(p. 10).
C SPEAKERS terminals
For connecting to speakers (p. 10).
English
7 En
LINE 1
OPT 1 OPT 2 CD
COAX 1 COAX 2
BLUETOOTH
NET USB
LINE 2 LINE 3
TUNER
PRESET
TUNING
BAND
MEMORY
SETUP
HOME
MUTENOW PLAYING
VOLUME
RETURN
ENTER
REPEAT
SHUFFLE
SLEEP
PHONO
B
A
SPEAKERS
OPTION
A
B
C
D
E
1
3
6
7
0
8
9
2
4
5
Controls and functions
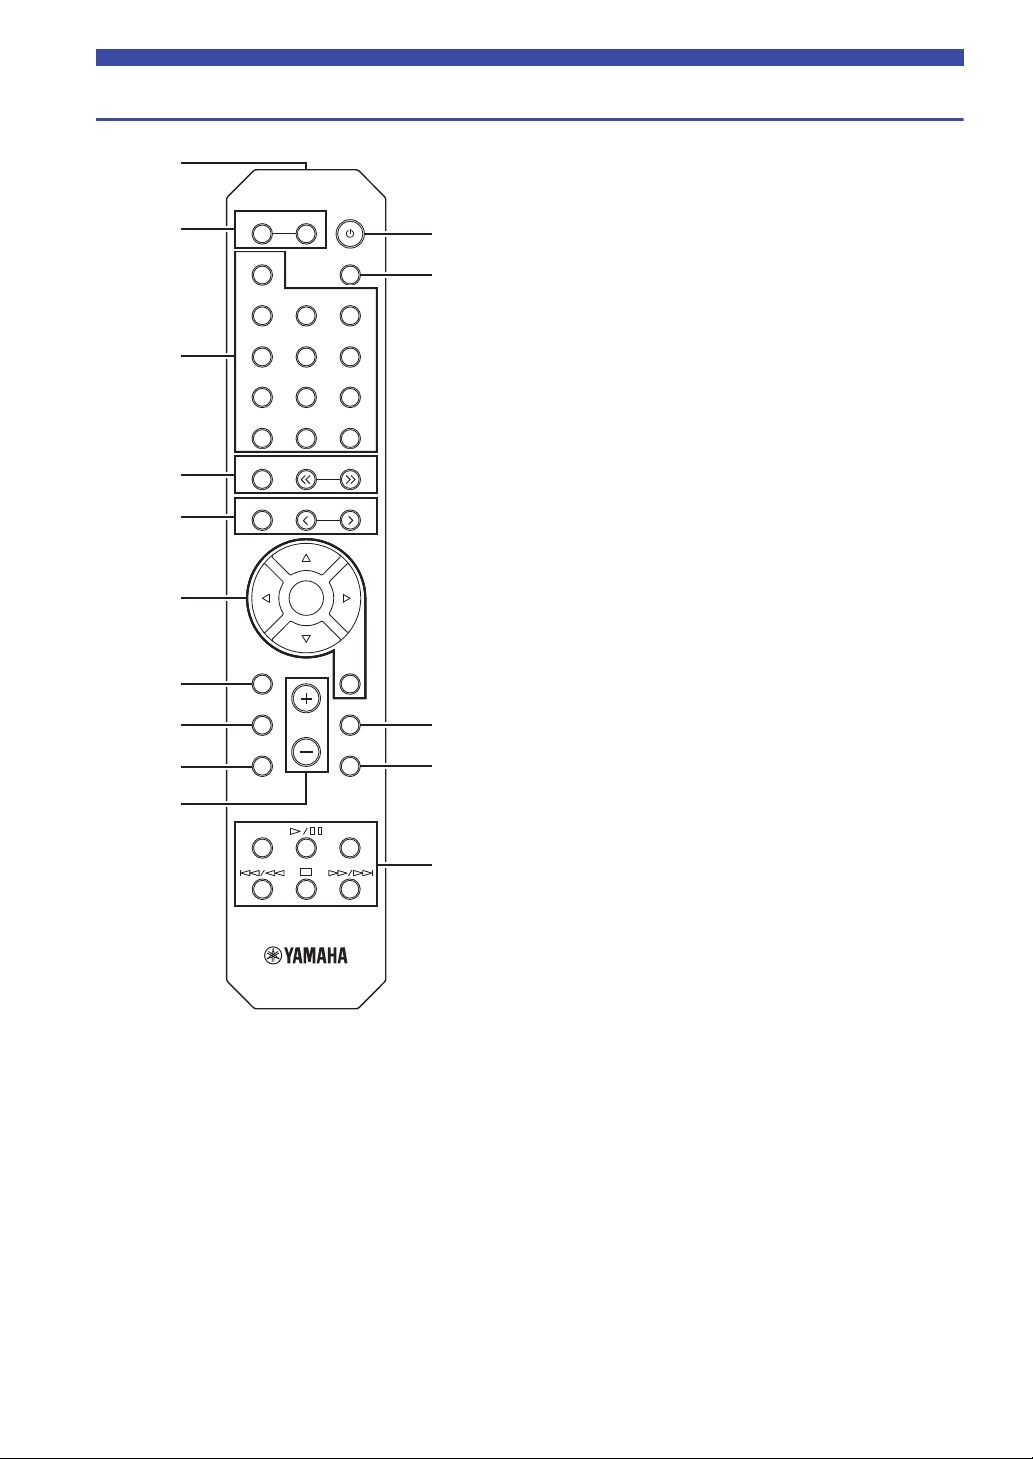
Remote control
1 Infrared signal transmitter
Sends infrared signals.
2 SPEAKERS A/B
Turns on and off the set of speakers connected to the SPEAKERS
A and/or SPEAKERS B terminals on the rear panel of this unit
when the corresponding key is pressed.
3 Input selection keys
Select an input source for playback.
PHONO PHONO jacks
COAX 1/2 COAXIAL1/2 jacks
BLUETOOTH Bluetooth connection
OPT 1/2 OPTICAL 1/2 jacks
CD CD jacks
LINE 1-3 LINE 1-3 jacks
TUNER (R-N803) FM/AM tuner
(R-N803D) FM/DAB tuner
NET Network source (press repeatedly to select a
desired network source)
USB USB jack (on the front panel)
4 Radio keys
Operate the radio.
BAND Sets the radio tuner band when TUNER is
selected as the input source. (p. 25, 29)
TUNING jj/ii Selects the tuning frequency (p. 25) or a DAB
radio station (p. 29) when TUNER is selected
as the input source.
5 Preset keys
MEMORY Registers the current radio station as a preset
when TUNER is selected as the input source
(p. 25, 30).
Registers the current playback song or
streaming station as a preset when NET or
USB is selected as the input source (p. 41).
PRESET j/i Recalls a preset radio station (p. 27, 30) or
song/streaming station (p. 41).
6 Menu operation keys
Cursor keys Select menus and parameters, etc.
(B/C/D/E)
ENTER Confirms a selected item.
RETURN Returns to the previous state.
7 HOME
Moves up top level when selecting music files, folders, etc.
8 SETUP
Displays the “Setup” menu (p. 47).
9 NOW PLAYING
Displays music information when selecting music files, folders,
etc.
0 VOLUME +/-
Adjust the volume.
8 En
Controls and functions
Note
Note
Note
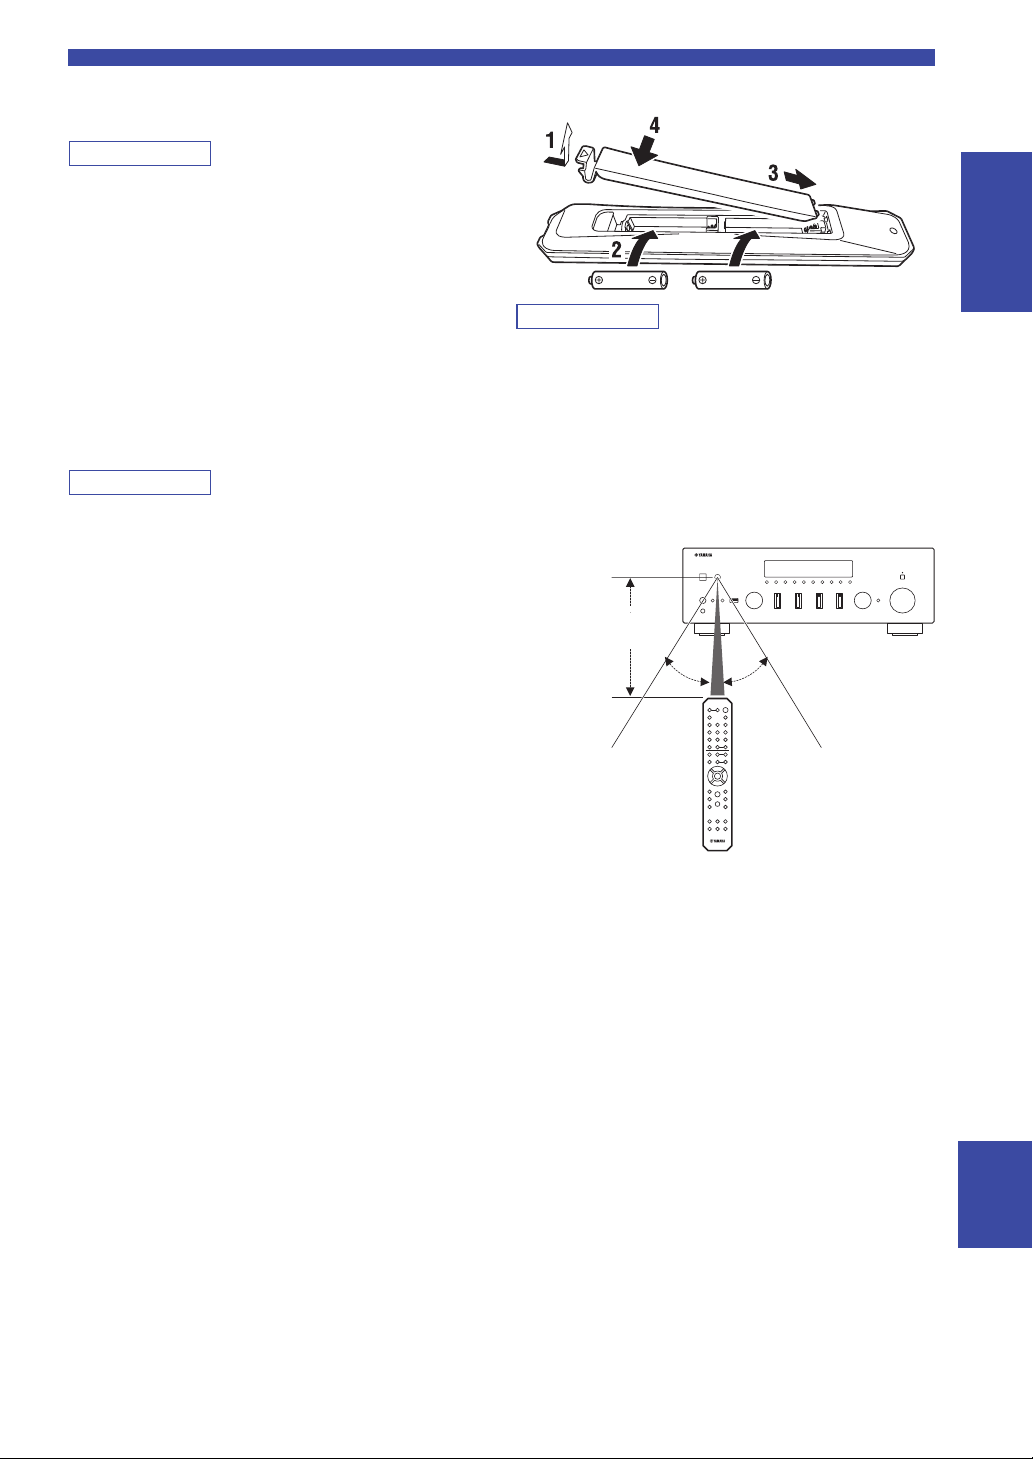
30° 30°
Remote control
Approximately
6 m (20 ft)
A A (power)
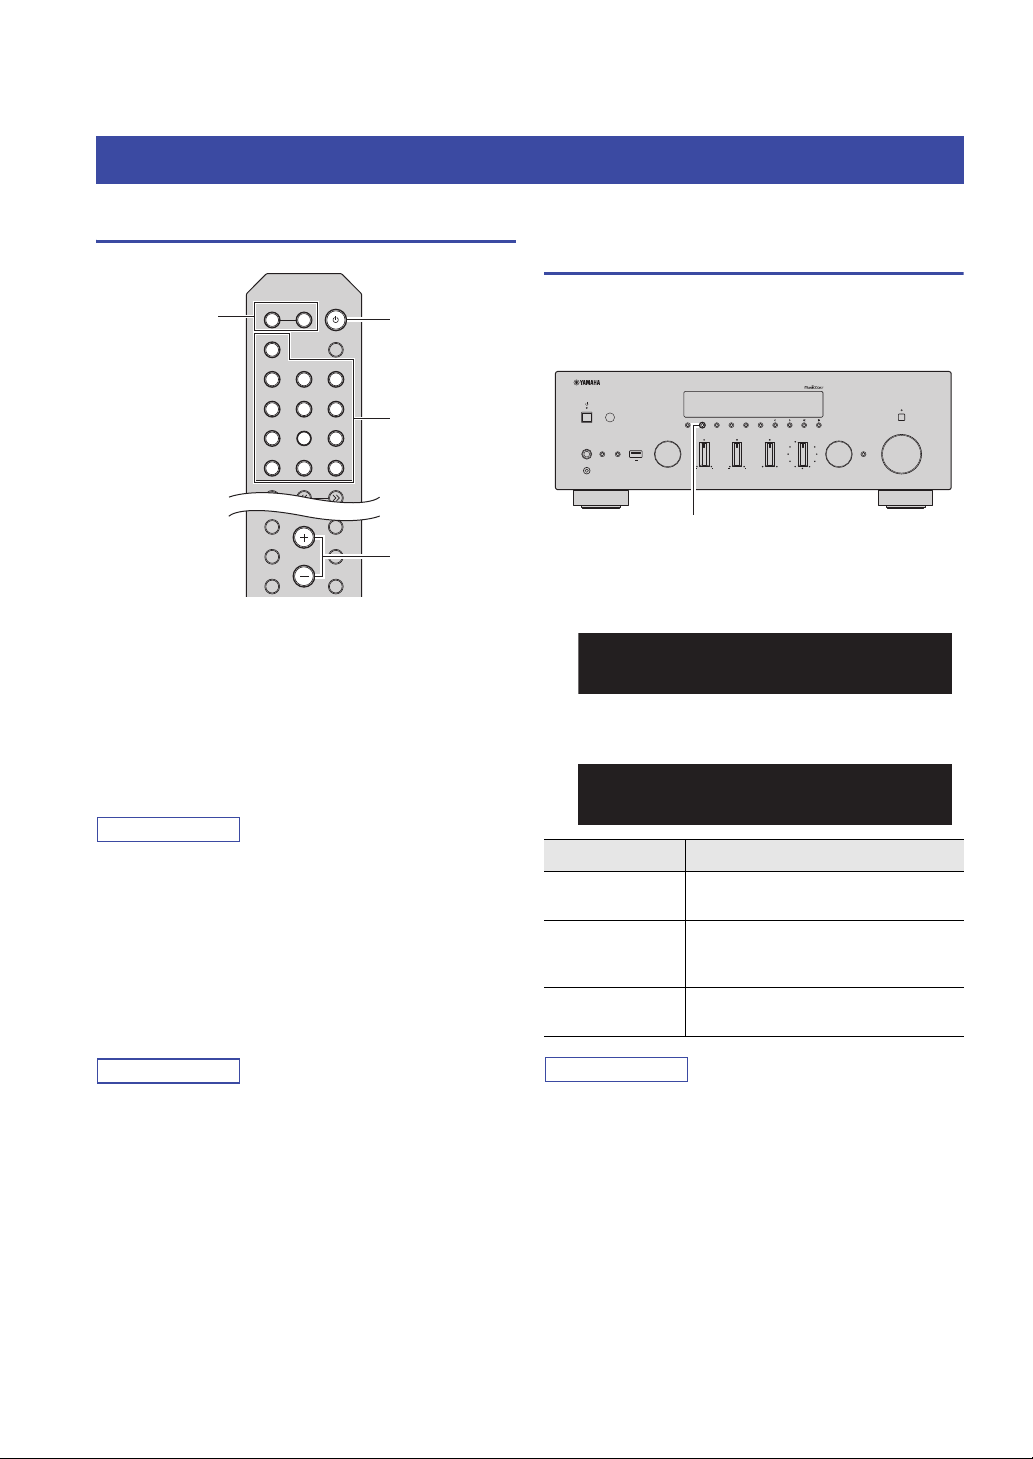
Turns on/off (standby) the unit.
The A (power) key on the remote control works only when the A
(power) on the front panel is on.
B SLEEP
Sets the sleep timer (p. 24).
C OPTION
Displays the “Option” menu (p. 46).
D MUTE
Mutes the audio output.
E Playback keys
Let you play back and perform other operations for network
sources, Bluetooth devices and USB devices.
The playback keys may not work depending on the Bluetooth
device.
■ Installing batteries
INTRODUCTION
• Change all batteries if the operation range of the remote control
narrows.
• Before inserting new batteries, wipe the compartment clean.
■ Operation range
The remote controls transmit a directional infrared beam.
Be sure to aim the remote controls directly at the remote
control sensor on the front panel of this unit.
English
9 En
PREPARATION
CAUTION
A
B
SPEAKERS
NETWORK
COAXIALOPTICAL
FM AM
75Ω
ANTENNA
SUBWOOFER
OUT
TRIGGER
OUT
IN
2
IN
1
IN
OUT
OUT
3
12 12
CD
PHONO
LINE
GND
12V 0.1A
O C
Audio
input
Audio
output
Speakers B
Turntable
Audio
output
DVD player, etc.
GND
Audio output
(digital coaxial)
Audio output
(digital optical)
CD player, etc.
Audio
output
CD player, etc.
Subwoofer
CD recorder, etc.
Speakers A
System
connection
Connections
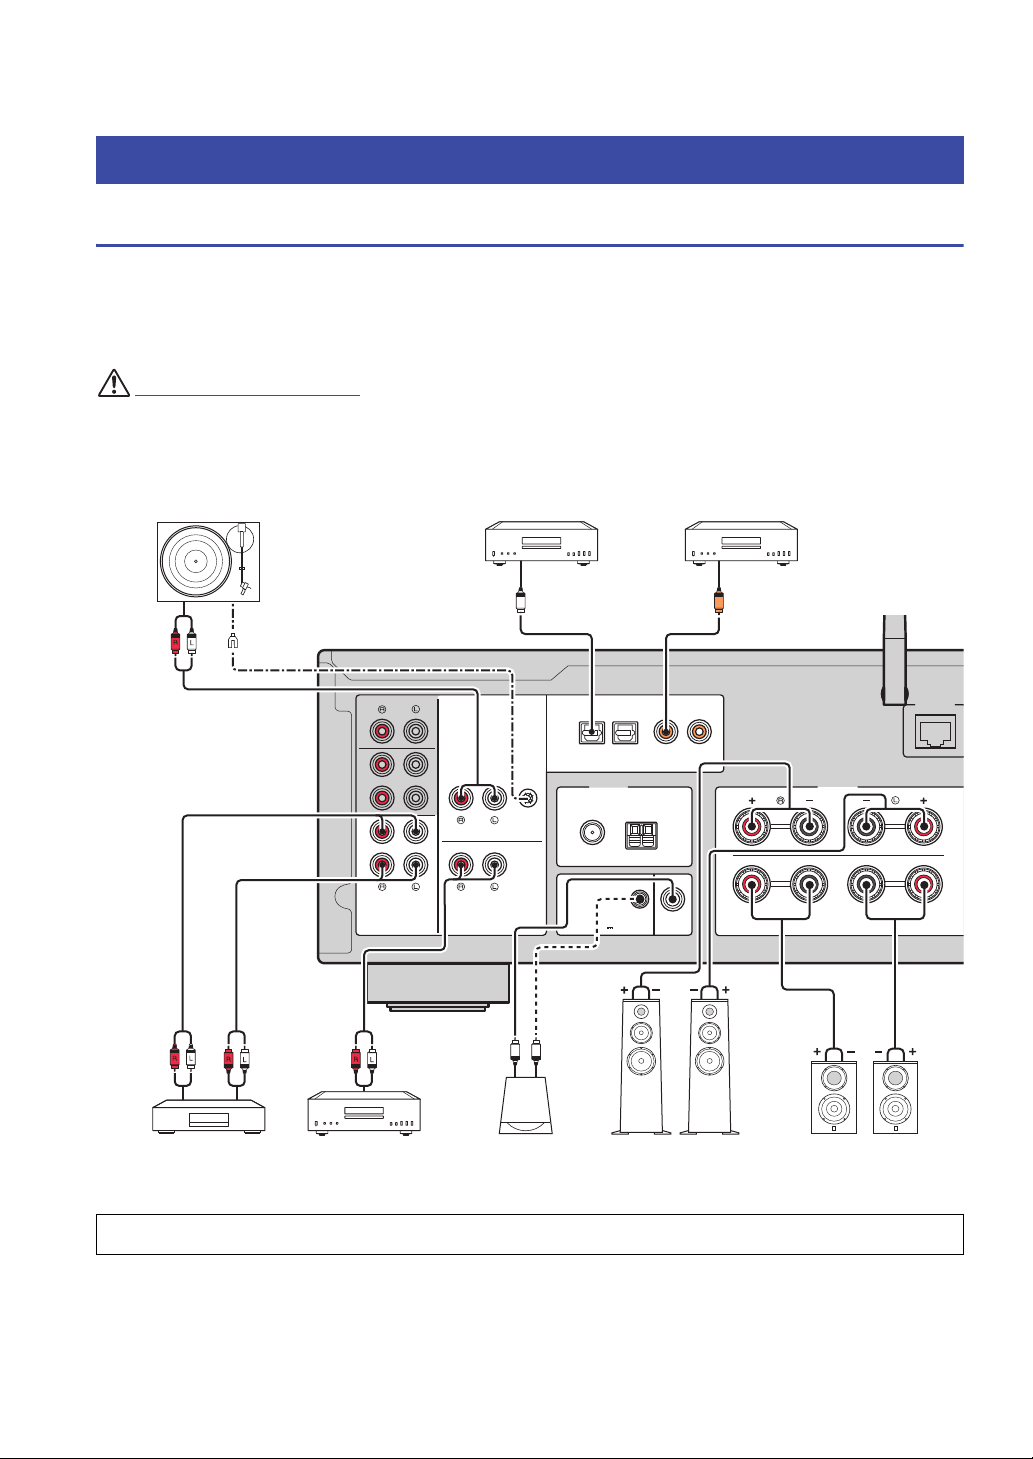
Connecting audio devices
Make sure to connect L (left) to L, R (right) to R, “+” to “+” and “–” to “–”. If the connections are faulty, no sound will
be heard from the speakers, and if the polarity of the speaker connections is incorrect, the sound will be unnatural and
lack bass. Refer to the owner’s manual for each of your components.
Make sure to use RCA cables, optical cables, or coaxial cables to connect audio components.
• Do not connect this unit or other components to the main power until all connections between components are complete.
• Do not let bare speaker wires touch each other or any metal part of this unit. This could damage this unit and/or the speakers.
Only PCM signals can be input to the digital (OPTICAL/COAXIAL) jacks of this unit.
10 En
Note
• Do not bundle audio cables and speaker cables together with the
CAUTION
Note
10 mm
(3/8")
Banana plug
power cable. Doing so may generate noise.
• The PHONO jacks are designed for connecting a turntable with
an MM cartridge.
• Connect your turntable to the GND terminal to reduce noise in
the signal. However, for some turntables, you may hear less
noise without the GND connection.
• If you have a Yamaha subwoofer that supports a system
connection, you can switch the power of the subwoofer in
conjunction with tuning on/off this unit by connecting the
subwoofer to the TRIGGER OUT jack with a monaural miniplug cable.
• In order to prevent the audio signal from looping when an audio
recording device is connected, the audio signal is not output
from the LINE 2 (OUT) jacks when LINE 2 is selected.
Similarly, the audio signal is not output from the LINE 3 (OUT)
jacks when LINE 3 is selected.
Connections
Connecting the speakers
Connect the speakers with impedance as shown below. If you
connect speakers with an excessively low impedance, this unit
may overheat. You can change the speaker impedance setting of
this unit in “SP. IMP” (p. 52) in the ADVANCED SETUP menu.
Speaker impedance (SP IMP.)
Speaker connection
SPEAKERS A or
SPEAKERS B
SPEAKERS A and
SPEAKERS B
Bi-wire connection 4 Ω or higher 8 Ω or higher
4 MIN
4 Ω or higher 8 Ω or higher
8 Ω or higher 16 Ω or higher
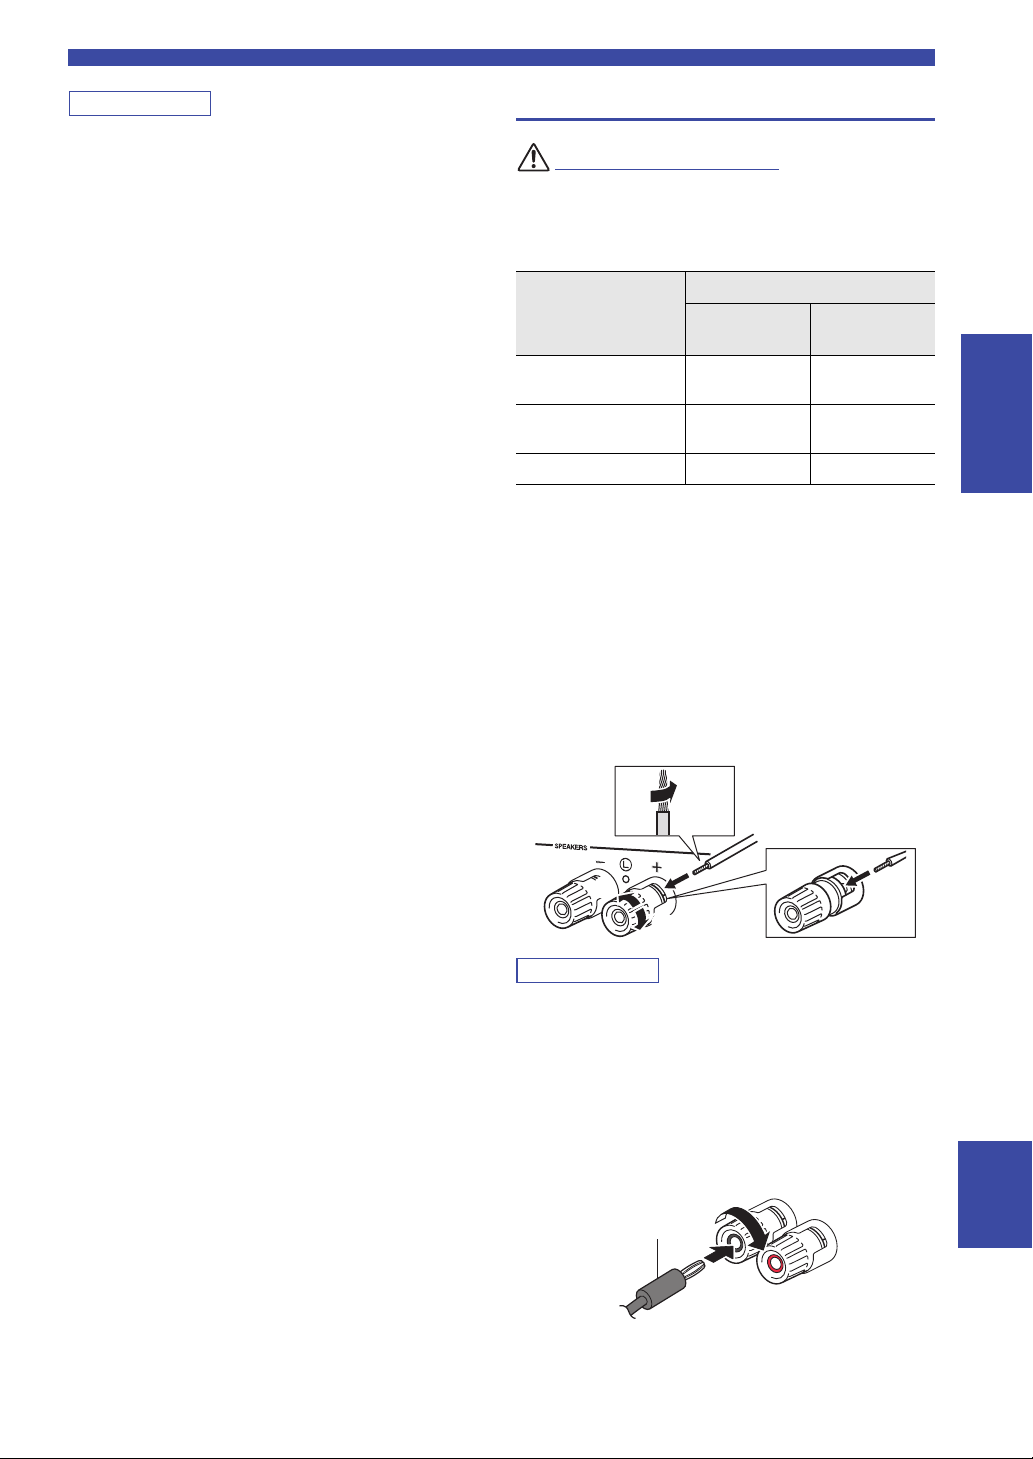
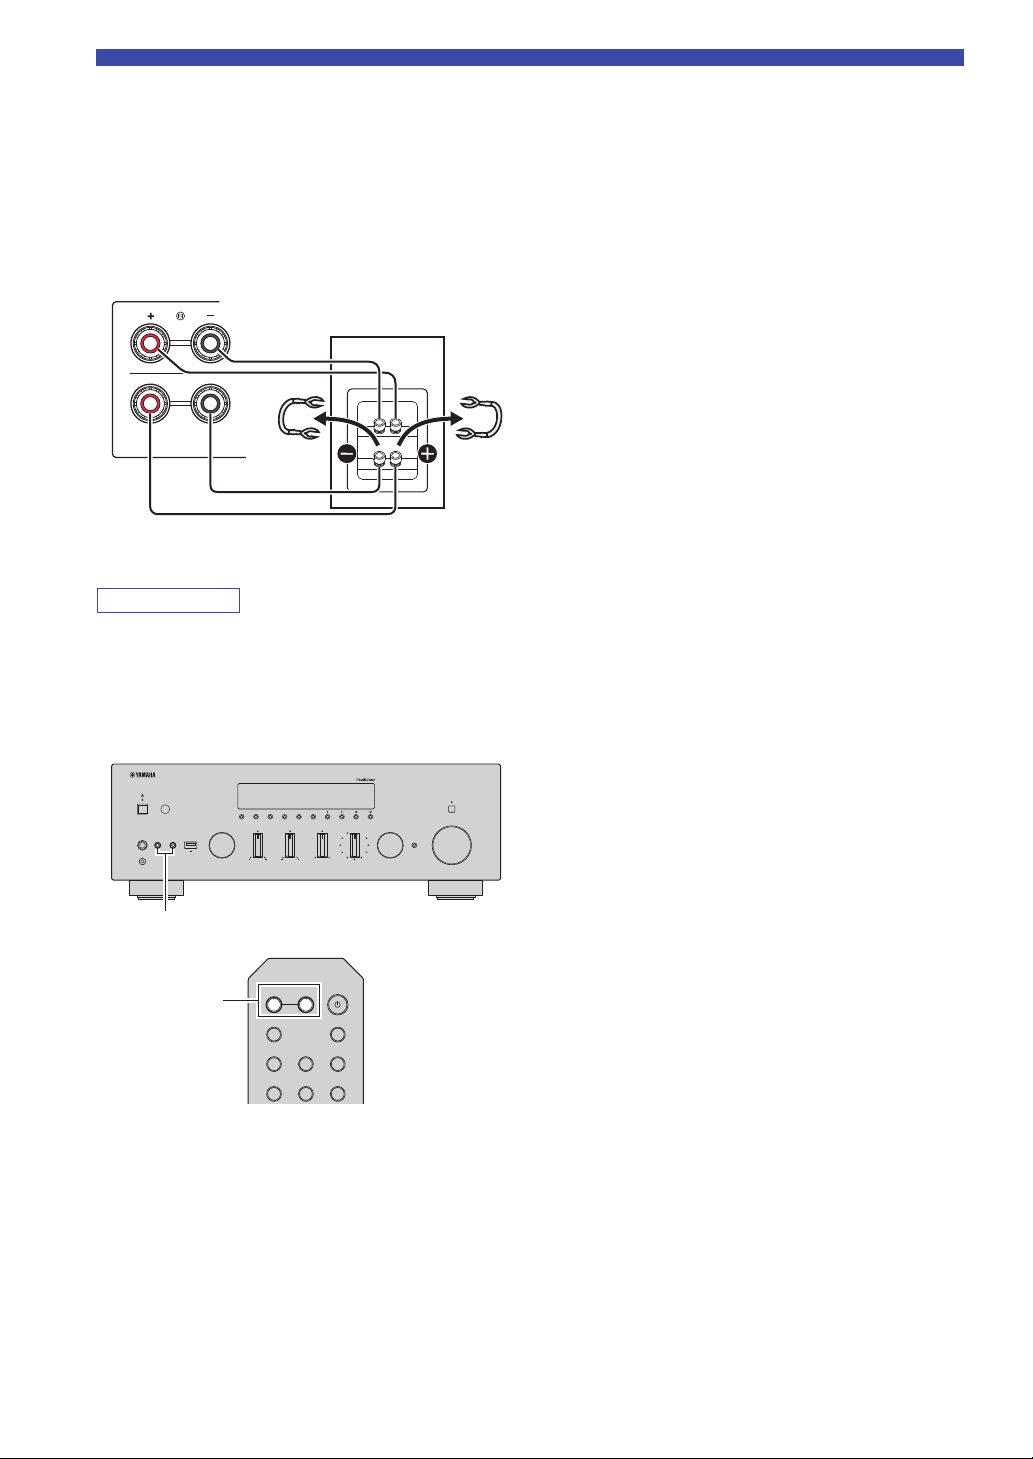
■ Connecting speaker cables
Speaker cables have two wires. One is for connecting the
negative (–) terminal of the unit and the speaker, and the
other is for the positive (+) terminal. If the wires are
colored to prevent confusion, connect the black wire to the
negative and the other wire to the positive terminal.
a
Remove approximately 10 mm (3/8”) of insulation from the ends of
the speaker cable and twist the bare wires of the cable firmly together.
b Loosen the speaker terminal.
c Insert the bare wires of the cable into the gap on the side (upper
right or bottom left) of the terminal.
d Tighten the terminal.
8 MIN
(Default)
PREPARATION
aa
c
c
b
b
d
d
When inserting speaker cables into the speaker terminals, insert
only the bare speaker wire. If insulated cable is inserted, the
connection may be poor and sound may not be heard.
■ Connecting via banana plug
(North America, Australia,
General models only)
Tighten the knob and then insert the banana plug into the
end of the corresponding terminal.
English
11 En
Connections
Note
A
B
SPEAK
This unit
Speaker
VOLUME
PURE DIRECT
RETURN
CONNECT
PUSH - ENTER
TUNINGPRESET
BAND
MEMORY CLEAR
BASSINPUT
5V
1A
BALANCE
LR
TREBLE
LOUDNESS
FLAT
-30dB
DIMMER MODE
DISPLAY
SELECT
PHONES
YPAO MIC
SPEAKERS USB
AB
SPEAKERS A/B
SPEAKERS A/B
■ Bi-wire connection
Bi-wire connection separates the woofer from the
combined midrange and tweeter section. A bi-wire
compatible speaker has four binding post terminals. These
two sets of terminals allow the speaker to be split into two
independent sections. With these connections, the mid and
high frequency drivers are connected to one set of terminals
and the low frequency driver to another set of terminals.
Connect the other speaker to the other set of terminals in
the same way.
• When making bi-wire connections, remove the shorting bridges
or cables on the speaker. Refer to the speakers’ instruction
manuals for more information.
• To use the bi-wire connections, press SPEAKERS A and
SPEAKERS B on the front panel or on the remote control so
that both “A” and “B” indicators light up on the front display.
12 En
A
PHONO
COAX 1 COAX 2
OPT 1 OPT 2 CD
SPEAKERS
B
SLEEP
BLUETOOTH
Connections
Note
Note
COAXIALOPTICAL
FM AM
75Ω
ANTENNA
12 12
PHONO GND
FM antenna AM antenna
Insert
2
Hold down
1
COAXIALOPTICAL
FM AM
75Ω
ANTENNA
12 12
PHONO GND
FMDAB
DAB/FM antenna
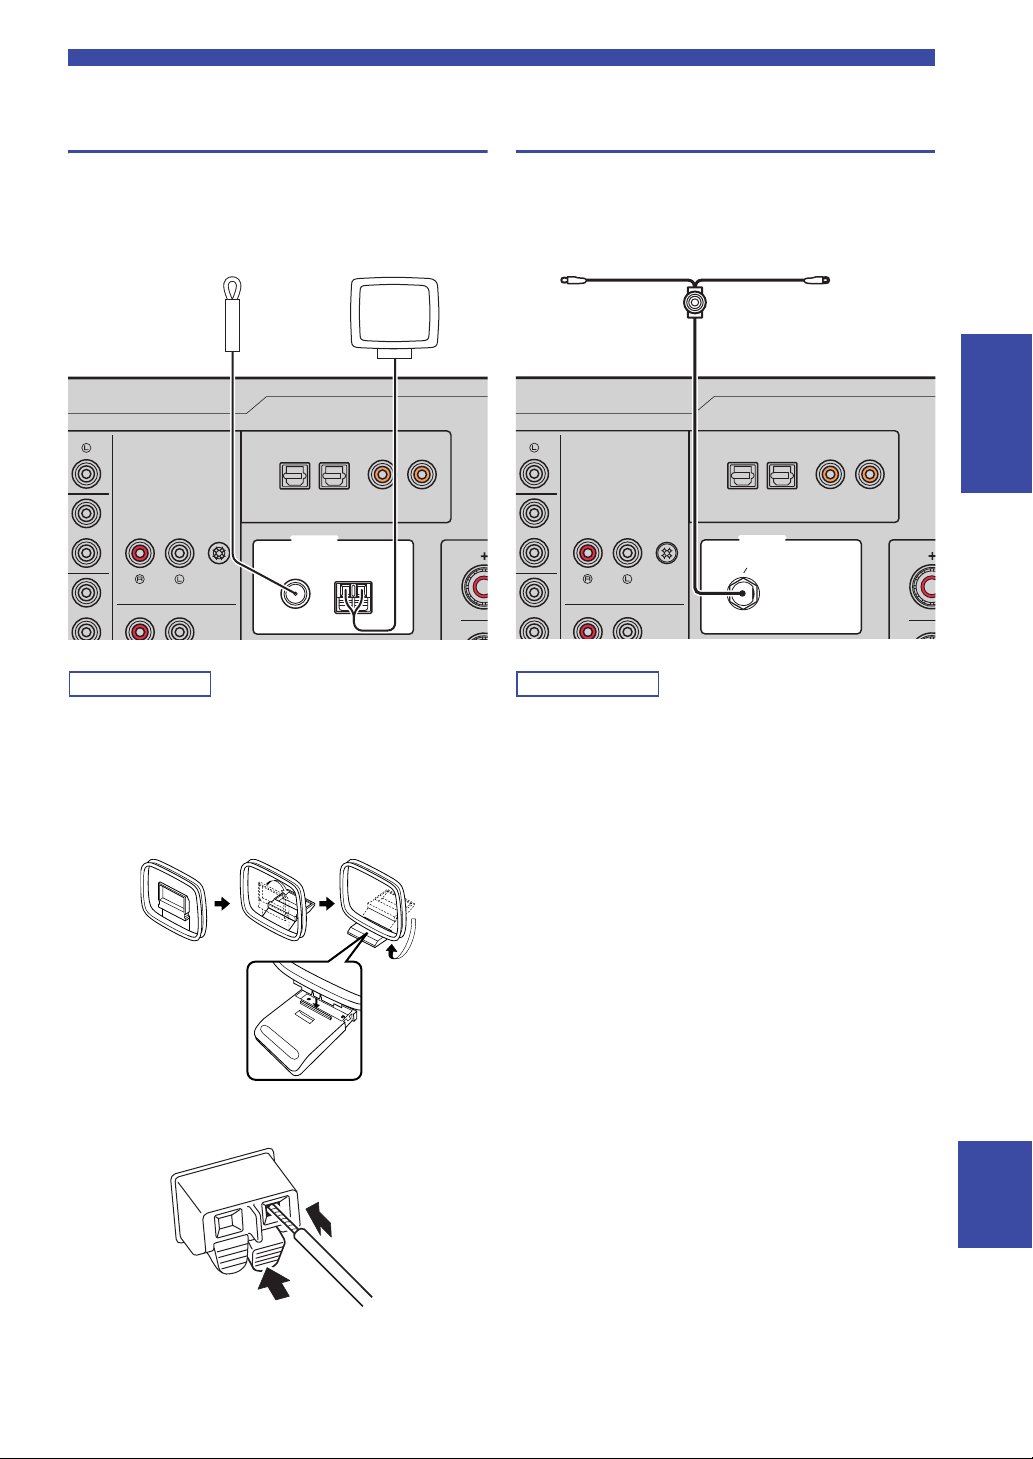
Connecting the FM/AM antennas (R-N803)
Connect the supplied FM/AM antenna to this unit.
Fix the end of the FM antenna to a wall, and place the AM
antenna.
Connecting the DAB/FM antenna (R-N803D)
Connect the supplied DAB/FM antenna to this unit and fix
the antenna ends to a wall.
PREPARATION
• If you experience poor reception quality, install an outdoor
antenna.
• Unwind only the length of cable needed from the AM antenna
unit.
• The wires of the AM antenna have no polarity.
■ Assembling the supplied AM antenna
■ Connecting the wires of the AM antenna
• If you experience poor reception quality, install an outdoor
antenna.
• The antenna should be stretched out horizontally.
English
13 En

Connections
Note
Notice
WARNING
Network Attached
Storage
(NAS)
Internet
Modem
Router
Network cable
PC
This unit (rear)
Mobile device
(such as iPhone)
(R-N803)
NETWORK
AC IN
VOLTAGE SELECTOR
110–120 V 220–240 V
To the AC wall outlet
with the power cord
A (power)
Connecting the network cable
Connect the unit to your router with a commerciallyavailable STP network cable (CAT-5 or higher straight
cable).
Use an STP (Shielded Twisted Pair) cable to prevent
electromagnetic interference.
WAN
LAN
NETWORK
SPEAKERS
A
AC IN
Connecting the power cord
After all the connections are complete, connect the
supplied power cord to this unit and then to an AC wall
outlet.
(General model only)
Before connecting the power cord, make sure you set
VOLTAGE SELECTOR of this unit according to your
local voltage. Improper setting of VOLTAGE SELECTOR
may cause fire and damage to this unit.
Turning on the unit
Press A (power) on the front panel to turn on the unit.
•
Preparing a wireless antenna
If you use a wireless network connection or a Bluetooth
connection, erect the wireless antenna. For information on
how to connect the unit to a wireless network, see
“Connecting to network” (p. 15). For information on using
this unit with a Bluetooth device, see “Playing back music
via Bluetooth” (p. 32).
Do not apply excessive force on the wireless antenna. Doing so
may damage the antenna.
14 En
Connecting to network
Note
R-N803 XXXXXX
WAC
Connecting using the Wi-Fi setting of the iOS
device (iPhone/iPad/iPod touch)
Share the Wi-Fi setting of the iOS
device (p. 16)
Connecting using WPS push button configuration
on the wireless router (or access point)
Use the WPS push button
configuration (p. 17)
Connecting with a wireless router (access point)
without WPS push button configuration
Set the network connection
manually (p. 18)
Connecting using “MusicCast CONTROLLER”
Register this unit to the MusicCast
network and make the wireless
network connection at once (p. 20)
Connecting to network
There are several methods to connect the unit to a network. Select a connection method according to your environment.
• Some security software installed on your PC or the firewall settings of network devices (such as a router) may block the access of the
unit to the network devices or the Internet. In these cases, configure the security software or firewall settings appropriately.
• Each server must be connected to the same subnet as the unit.
• To use the service via the Internet, broadband connection is strongly recommended.
• When playing a high-resolution audio source via the network, we recommend connecting with a wired router for stable playback.
WAC (Wireless Accessory Configuration)
If you turn on the power to the unit right after you purchase or
initialize it, the unit will automatically use the network settings of the
iOS device (iPhone/iPad/iPod touch) and try to connect to a wireless
LAN (unless the unit is already connected to a wired LAN).
If you have an iOS device, follow the procedure from Step 6 in “Sharing the iOS device setting” (p. 16).
If you plan to connect the unit wirelessly by another method, press RETURN to exit the current screen, and then proceed to one of
the sections below.
■ Connecting with a wireless router (access point)
Connect to the network with the method listed below that corresponds to your environment.
PREPARATION
English
15 En
Connecting to network
Note
Note
Note
Note
Note
Connecting using the DHCP server function of the
router
You can connect to the network by
simply making a wired LAN
connection (p. 14)
Connecting wirelessly to a mobile device
(Wireless Direct)
Connect wirelessly with Wireless
Direct (p. 19)
RETURN
SETUP
ENTER
Cursor keys B /
C
■ Connecting with the wired router
• You can configure the network parameters (such as IP address) in “IP Address” (p. 49) in the “Setup” menu.
• If you want to use a wired LAN connection when a wireless connection has been made, set “Connection” (p. 48) in the “Setup” menu
to “Wired”.
■ Connecting without a wired router or wireless router (access point)
When the unit is connected to the network with Wireless Direct, it cannot connect to any other wireless router (access point). To p lay
back contents from the Internet or update the unit's firmware via the network, connect this unit to a network with a wired router or
wireless router (access point).
Sharing the iOS device setting
You can easily setup a wireless connection by applying the
connection settings on iOS devices (iPhone/iPad/iPod
touch).
Before proceeding, confirm that your iOS device is
connected to a wireless router (access point).
MEMORY
PRESET
ENTER
HOME
RETURN
SETUP
• If you set up a wireless connection with this method, all the
network settings will be initialized.
• This configuration does not work if the security method of your
wireless router (access point) is WEP. In this case, use other
connection method.
VOLUME
OPTION
MUTENOW PLAYING
1 Press SETUP.
2 Use the cursor keys (B / C) to select
“Network” and press ENTER.
To return to the previous state, press RETURN.
3 Use the cursor keys (B / C) to select
“Connection” and press ENTER.
4 Use the cursor keys (B / C) to select
“Wireless” and press ENTER.
5 Use the cursor keys (B / C) to select “Share
Setting” and press ENTER twice.
WIRELESS
Share Setting
SHARE
Wireless(WAC)
When connected to a wired network, “LAN CABLE” and “Pls
disconnect” appears on the front display. In this case, disconnect
the network cable from the unit, and press ENTER.
16 En

Connecting to network
Note
Note
The name of this unit
Example (iOS 10)
Tap here to start setup
The network currently
selected
Cursor keys B /
C
6 On the iOS device, select the unit as the
AirPlay speaker in the Wi-Fi screen.
7 Check the network currently selected and tap
“Next”.
When the sharing process finishes, the unit is
automatically connected to the selected network
(access point).
When the setting finishes, verify whether the unit is
connected to a wireless network (p. 20).
Configuring with the router's WPS push button
You can easily set up a wireless connection with one push
of the WPS button.
This configuration does not work if the security method of your
wireless router (access point) is WEP or WPA2-TKIP. In this
case, use other connection method.
MEMORY
PRESET
HOME
SETUP
ENTER
VOLUME
RETURN
OPTION
MUTENOW PLAYING
RETURN
ENTER
SETUP
1 Press SETUP.
2 Use the cursor keys (B / C) to select
“Network” and press ENTER.
To return to the previous state, press RETURN.
3 Use the cursor keys (B / C) to select
“Connection” and press ENTER.
PREPARATION
4 Use the cursor keys (B / C) to select
“Wireless” and press ENTER.
WIRELESS
WPS
5 Press ENTER twice.
“Connecting” appears on the front display.
6 Push the WPS button on the wireless router
(access point).
When the connection process finishes, “Completed”
appears on the front display. When the setting
finishes, verify whether the unit is connected to a
wireless network (p. 20).
If “Not connected” appears, repeat from Step 1 or try
another connection method.
7 To exit from the menu, press SETUP.
About WPS
WPS (Wi-Fi Protected Setup) is a standard established by the
Wi-Fi Alliance, which allows easy establishment of a
wireless home network.
English
17 En

Connecting to network
Note
Note
RETURN
PRESET j / i
SETUP
ENTER
Cursor keys
B / C / D /
E
SSID
WPA2-PSK(AES)
SECURITY
Set the wireless network connection manually
Before performing the following procedure, check the
security method and security key on the wireless router
(access point).
MEMORY
PRESET
ENTER
HOME
RETURN
SETUP
VOLUME
OPTION
MUTENOW PLAYING
1 Press SETUP.
2 Use the cursor keys (B / C) to select
“Network ” and press ENTER.
To return to the previous state, press RETURN.
3 Use the cursor keys (B / C) to select
“Connection” and press ENTER.
4 Use the cursor keys (B / C) to select
“Wireless” and press ENTER.
5 Use the cursor keys (B / C) to select “Manual
Setting” and press ENTER.
MANUAL
SSID
6 Use the cursor keys (B / C) to select “SSID”
and press ENTER.
9 Use the cursor keys (D / E) to select desired
security method and press RETURN.
Settings
None, WEP, WPA2-PSK (AES), Mixed Mode
If you select “None”, the connection may be insecure since the
communication is not encrypted.
10 Use the cursor keys (B / C) to select
“Security Key” and press ENTER.
KEY
11 Use the cursor keys to enter the security key
on the wireless router (access point), and
press RETURN to previous state.
If you select “WEP” in step 9, enter either 5 or 13
character string, or 10 or 26 hexadecimal digits.
If you select “WPA2-PSK (AES)” or “Mixed Mode”
in step 9, enter 8 to 63 character string or 64
hexadecimal digits.
Use the cursor keys (D/E) to move the edit position
and the cursor keys (B/C) to select a character.
Press PRESET i to insert a character and PRESET j
to delete.
12 Use the cursor keys (B / C) to select
“Connect[ENTER]” and press ENTER to save
the setting.
If the wireless network connection cannot be made,
the SSID or security key may be incorrect. Repeat
from Step 6.
You can verify whether the unit is connected to a
wireless network (p. 20).
13 To exit from the menu, press SETUP.
7 Use the cursor keys to enter the SSID on the
wireless router (access point), and press
RETURN to previous state.
Use the cursor keys (D/E) to move the edit position
and the cursor keys (B/C) to select a character.
Press PRESET i to insert a character and PRESET j
to delete.
8 Use the cursor keys (B / C) to select
“Security” and press ENTER.
18 En
Connecting to network
Note
Note
Note
RETURN
PRESET j / i
SETUP
ENTER
Cursor keys
B / C / D /
E
SSID
W DIRECT
WPA2-PSK(AES)
SECURITY
Connecting a mobile device to the unit directly (Wireless Direct)
Using Wireless Direct, this unit can operate as a wireless
network access point that mobile devices can directly
connect to.
MEMORY
PRESET
ENTER
HOME
SETUP
When making a Wireless Direct connection, you cannot connect
this unit or the mobile device to the Internet, so Internet services
such as Internet radio are not available.
1 Press SETUP.
2 Use the cursor keys (B / C) to select
“Network” and press ENTER.
To return to the previous state, press RETURN.
3 Use the cursor keys (B / C) to select
“Connection” and press ENTER.
4 Use the cursor keys (B / C) to select
“WirelesDirect” and press ENTER.
5 Press ENTER to check the SSID on this unit,
and press RETURN to previous state.
6 Use the cursor keys (B / C) to select
“Security” and press ENTER.
VOLUME
RETURN
OPTION
MUTENOW PLAYING
7 Use the cursor keys (D / E) to select desired
security method and press RETURN.
Settings
None, WPA2-PSK (AES)
• If you select “None”, proceed to Step 10.
• If you select “None”, the connection may be insecure since the
communication is not encrypted.
8 Use the cursor keys (B / C) to select
“Security Key” and press ENTER.
KEY
9 Use the cursor keys to enter the security key
on this unit, and press RETURN to previous
state.
Enter 8 to 63 character string or 64 hexadecimal
digits.
Use the cursor keys (D / E) to move the edit position
and the cursor keys (B / C) to select a character.
Press PRESET i to insert a character and PRESET j
to delete.
10 Use the cursor keys (B / C) to select
“Connect[Enter]” and press ENTER to save
the setting.
11 Configure the Wi-Fi settings of a mobile
device.
For details on settings of your mobile device, refer to
the instruction manual of the mobile device.
(1) Enable the Wi-Fi function on the mobile device.
(2) Select the SSID of this unit from the list of
available access points.
(3) When you are prompted for a password, enter the
security key displayed in Step 9.
If the Wireless Direct connection cannot be made, the
security key may be incorrect. Configure the Wi-Fi
settings of a mobile device again.
12 To exit from the menu, press SETUP.
PREPARATION
English
19 En
Connecting to network
Note
Note
Note
Note
RETURN
SETUP
ENTER
Cursor keys B /
C
Verify the network connection status
Perform the following procedure to verify the unit’s
connection to a network.
MEMORY
PRESET
ENTER
HOME
RETURN
SETUP
1 Press SETUP.
2 Use the cursor keys (B / C) to select
“Network” and press ENTER.
To return to the previous state, press RETURN.
3 Use the cursor keys (B / C) to select
“Information” and press ENTER.
4 Use the cursor keys (B / C) to select
“STATUS”.
VOLUME
OPTION
MUTENOW PLAYING
Configuring MusicCast
■ About MusicCast
Use MusicCast to share music between MusicCastcompatible devices in multiple rooms.
With the dedicated “MusicCast CONTROLLER” app, you
can easily enjoy music from your smartphone, a media
server (a personal computer or NAS) or Internet radio
(streaming services) wherever you are in your home.
• All MusicCast-compatible devices can be operated
from the dedicated “MusicCast CONTROLLER” app
• Multiple devices that support MusicCast in separate
rooms can be linked to play music simultaneously
• Supports music playback through Internet radio
(streaming services)
• Network settings for devices that support MusicCast
Visit the following website for more information on
MusicCast and on which devices are compatible.
http://www.yamaha.com/musiccast/
For details on MusicCast, download the MusicCast Setup Guide
from the Yamaha Download website.
http://download.yamaha.com/
■ MusicCast CONTROLLER
STATUS
Connect
When “Connect” appears, the unit is connected to a
network. If “Disconnect” appears, reset connection.
5 To exit from the menu, press SETUP.
To use network functionality with a device that supports
MusicCast, you need to use the “MusicCast
CONTROLLER” dedicated app for mobile devices.
Search for and install “MusicCast CONTROLLER” (free)
in the App Store or on Google Play.
■ Registering to the MusicCast network
Register this unit to the MusicCast network.
At the same time, configure the wireless network
connection settings for this unit.
The SSID and security key for your wireless network will
be needed.
1 On your mobile device, start “MusicCast
CONTROLLER” and tap “Setup”.
If you have already connected other MusicCast
compatible devices to the network, tap “” (Settings)
and then “Add New Device”.
20 En

2 Operate “MusicCast CONTROLLER”
Note
CONNECT
following the on screen instructions, then
hold down CONNECT on the front panel of
this unit for 5 seconds.
3 Operate “MusicCast CONTROLLER”
following the onscreen instructions to set up
the network.
This completes the MusicCast network registration and
wireless network connection settings.
Use “MusicCast CONTROLLER” to play back music.
• AirPlay and DSD sound cannot be transmitted. Music can be
played back only from this unit.
• When Pure Direct (p. 23) is turned on, only the network sources
(such as Internet radio), Bluetooth device sources and USB
storage device sources can be played via the MusicCast
network.
Connecting to network
PREPARATION
English
21 En
BASIC OPERATION
Note
Note
Note
Input selection
keys
A (power)
VOLUME
SPEAKERS A/B
VOLUME
PURE DIRECT
RETURN
CONNECT
PUSH - ENTER
TUNINGPRESET
BAND
MEMORY CLEAR
BASSINPUT
5V
1A
BALANCE
LR
TREBLE
LOUDNESS
FLAT
-30dB
DIMMER MODE
DISPLAY
SELECT
PHONES
YPAO MIC
SPEAKERS USB
AB
DISPLAY
Track
INFO
A
Playback
Playing a source
SPEAKERS
B
A
LINE 2 LINE 3
NET USB
TUNING
VOLUME
SLEEP
BLUETOOTH
RETURN
OPTION
MUTENOW PLAYING
PHONO
COAX 1 COAX 2
OPT 1 OPT 2 CD
LINE 1
TUNER
BAND
HOME
SETUP
1 Press one of the input selection keys to
select the input source you want to listen to.
2 Press SPEAKERS A and/or SPEAKERS B to
select speakers A and/or speakers B.
When speaker set A is turned on, “SPEAKERS
A:On” appears on the front display.
When speaker set B is turned on, “SPEAKERS
B:On” appears on the front display.
Switching information on the front display
When you select a network source or USB as the input
source, you can switch playback information on the front
display.
1 Press DISPLAY.
Each time you press the key, the displayed item
changes.
About 3 seconds later, the corresponding information
for the displayed item appears.
SERVER
A
Track #1
• When one set of speakers is connected using bi-wire connections,
• When listening with headphones, turn off the speakers.
3 Play the source.
4 Press VOLUME +/– to adjust the sound
You can adjust the tonal quality by using the BASS, TREBLE,
BALANCE and LOUDNESS controls or the PURE DIRECT
switch on the front panel.
5 When you finish using, press A (power) on
22 En
or when using two sets of speakers simultaneously (A and B),
press SPEAKERS A and SPEAKERS B on the front panel or on
the remote control so that both “A” and “B” indicators light up
on the front display.
output level.
the front panel to turn off the power.
When you press A (power) on the remote control, this
unit set to standby mode.
Input source Item
Bluetooth
Server
AirPlay
USB
Net Radio
Track (song title), Artist (artist name),
Album (album name)
Track (song title), Artist (artist name),
Album (album name), Time
Track (song title), Album (album name),
Time, Station (station name)
“_” (underscore) will be displayed for characters not supported
by the unit.
Playback
Note
Note
PURE DIRECT switch
VOLUME
PURE DIRECT
RETURN
CONNECT
PUSH - ENTER
TUNINGPRESET
BAND
MEMORY CLEAR
BASSINPUT
5V
1A
BALANCE
LR
TREBLE
LOUDNESS
FLAT
-30dB
DIMMER MODE
DISPLAY
SELECT
PHONES
YPAO MIC
SPEAKERS USB
AB
BASS TREBLE
VOLUME
PURE DIRECT
RETURN
CONNECT
PUSH - ENTER
TUNINGPRESET
BAND
MEMORY CLEAR
BASSINPUT
5V
1A
BALANCE
LR
TREBLE
LOUDNESS
FLAT
-30dB
DIMMER MODE
DISPLAY
SELECT
PHONES
YPAO MIC
SPEAKERS USB
AB
BALANCE
Front panel operations
■ Enjoying pure high fidelity sound
(Pure Direct)
When the PURE DIRECT switch is turned on, routes
input signals from your audio sources so that the input
signals bypass the BASS, TREBLE, BALANCE and
LOUDNESS controls, thus eliminating any alterations to
the audio signals and creating the purest possible sound.
The PURE DIRECT indicator lights up and the front
display turns off after a few seconds.
PHONES
SPEAKERS USB
AB
5V
1A
YPAO MIC
• When the PURE DIRECT switch is turned on, the front display
turns off.
• The BASS, TREBLE, BALANCE, and LOUDNESS controls do
not function while PURE DIRECT is turned on.
BASSINPUT
BALANCE
LR
LOUDNESS
FLAT
-30dB
TREBLE
TUNINGPRESET
BAND
MEMORY CLEAR
DIMMER MODE
DISPLAY
PURE DIRECT
SELECT
PUSH - ENTER
VOLUME
RETURN
CONNECT
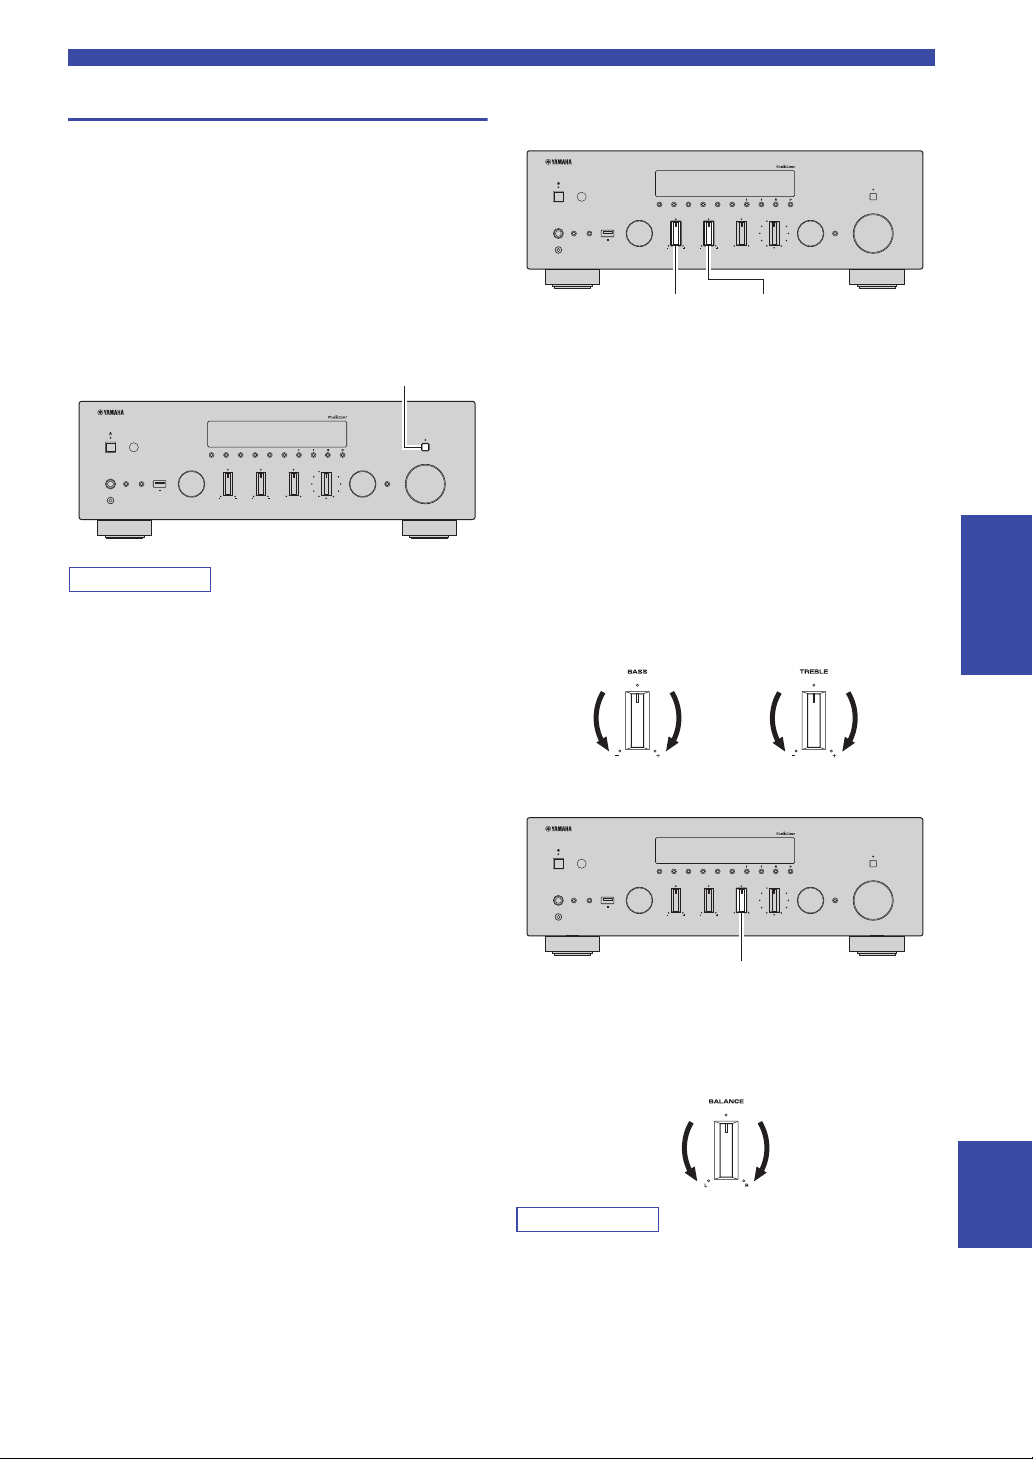
■ Adjusting the BASS and TREBLE
controls
The BASS and TREBLE controls adjust high and low
frequency response.
The center position produces a flat response.
BASS control
When you feel there is not enough bass (low frequency
sound), rotate clockwise to boost. When you feel there is
too much bass, rotate counterclockwise to suppress.
Control range: –10 dB to +10 dB (20 Hz)
TREBLE control
When you feel there is not enough treble (high frequency
sound), rotate clockwise to boost. When you feel there is
too much treble, rotate counterclockwise to suppress.
Control range: –10 dB to +10 dB (20 kHz)
BASIC
OPERATION
■ Adjusting the BALANCE control
The BALANCE control adjusts the sound output balance
of the left and right speakers to compensate for sound
imbalance caused by speaker locations or listening room
conditions.
English
If you rotate the BALANCE control to the end of L (left) or R
(right), the opposite side of channel is muted.
23 En
Playback
Note
CAUTION
Note
Note
Note
VOLUME
PURE DIRECT
RETURN
CONNECT
PUSH - ENTER
TUNINGPRESET
BAND
MEMORY CLEAR
BASSINPUT
5V
1A
BALANCE
LR
TREBLE
LOUDNESS
FLAT
-30dB
DIMMER MODE
DISPLAY
SELECT
PHONES
YPAO MIC
SPEAKERS USB
AB
VOLUMELOUDNESS
(power)
Sleep 120 min.
Sleep Off Sleep 30 min. Sleep 60 min.
Sleep 90 min.
■ Adjusting the LOUDNESS control
Retain a full tonal range at any volume level, thus
compensating for the human ears’ loss of sensitivity to
high and low-frequency ranges at low volume.
The LOUDNESS control does not function when the YPAO
Volume function (p. 50) is enabled.
If the PURE DIRECT switch is turned on with the LOUDNESS
control set at a certain level, the input signals bypass the
LOUDNESS control, resulting in a sudden increase in the sound
output level. To prevent your ears or the speakers from being
damaged, be sure to press the PURE DIRECT switch after
lowering the sound output level or after checking that the
LOUDNESS control is properly set.
1 Set the LOUDNESS control to the FLAT
position.
Using the sleep timer
Use this feature to automatically set this unit to standby
mode after a certain amount of time. The sleep timer is
useful when you are going to sleep while this unit is
playing or recording a source.
SPEAKERS
B
A
PHONO
COAX 1 COAX 2
OPT 1 OPT 2 CD
LINE 1
SLEEP
BLUETOOTH
LINE 2 LINE 3
The sleep timer can only be set with the remote control.
1 Press SLEEP repeatedly to set the amount of
time before this unit is set to standby mode.
Each time you press SLEEP, the front display
changes as shown below.
The SLEEP indicator blinks while setting the amount
of time for the sleep timer.
A
SLEEP
2 Rotate the VOLUME control on the front
panel (or press VOLUME +/– on the remote
control) to set the sound output level to the
loudest listening level that you would listen
to.
3 Rotate the LOUDNESS control until the
desired volume is obtained.
After setting the LOUDNESS control, enjoy listening to music at
your preferred volume level. If the effect of the LOUDNESS
control setting is too strong or weak, readjust the LOUDNESS
control.
A
SLEEP
VOL.
Sleep 120min.
If the sleep timer is set, the SLEEP indicator on the
front display lights up.
• To disable the sleep timer, select “Sleep Off”.
• The sleep timer setting can also be canceled by pressing
A (power) to set this unit to standby mode.
24 En

Note
Note
Note
Note
Listening to FM/AM radio
TUNING jj / ii
TUNER
BAND
FM 98.50MHz
VOL.
TUNEDSTEREO
A
Frequency
VOLUME
PURE DIRECT
RETURN
CONNECT
PUSH - ENTER
TUNINGPRESET
BAND
MEMORY CLEAR
BASSINPUT
5V
1A
BALANCE
LR
TREBLE
LOUDNESS
FLAT
-30dB
DIMMER MODE
DISPLAY
SELECT
PHONES
YPAO MIC
SPEAKERS USB
AB
MODE
R-N803D does not include an AM tuner.
FM/AM tuning
SPEAKERS
B
A
PHONO
COAX 1 COAX 2
OPT 1 OPT 2 CD
LINE 1
TUNER
BAND
MEMORY
1 Press TUNER to select “TUNER” as the input
source.
2 Press BAND repeatedly to select the
reception band (FM or AM).
3 Press TUNING jj / ii to set a frequency.
To search stations automatically, press and hold
TUNING jj / ii for a second.
If a broadcast is being received, “TUNED” indicator
on the front display will be lit. If a stereo broadcast is
being received, the “STEREO” indicator will also lit.
SLEEP
BLUETOOTH
LINE 2 LINE 3
NET USB
TUNING
PRESET
Listening to FM/AM radio
■ Improving FM reception (FM mode)
If the signal from the station is weak and the sound quality
is not good, set the FM band reception mode to monaural
mode to improve reception.
1 Press MODE repeatedly to select “Stereo”
(automatic stereo mode) or “Mono”
(monaural mode) when this unit is tuned in to
an FM radio station.
When “Mono” is selected, FM broadcasts will be
heard in monaural sound.
The STEREO indicator on the front panel lights up while
listening to a station in stereo mode.
Registering favorite radio stations (presets)
You can register up to 40 radio stations as presets. Once
you have registered stations, you can easily tune into them
by selecting their preset numbers.
You can automatically register FM radio stations that have
strong signals (auto preset). For AM radio stations or FM
radio stations with weak signals, register them manually
(p. 26).
BASIC
OPERATION
• If the station signals are weak, tuning search does not stop at the
desired station.
• When FM radio reception is unstable, switching the FM mode
to "Mono" may improve it.
■ Registering FM radio stations
automatically (auto preset)
• When you register radio stations automatically, radio stations
currently registered to preset numbers may be overwritten.
• If the station you want to register is weak in signal strength, try
using the manual preset tuning method.
• FM stations registered as presets using the automatic preset
registration feature will be heard in stereo.
• (U.K. and Europe models only)
Only Radio Data System broadcasting stations can be preset
automatically.
English
25 En

Listening to FM/AM radio
Note
Note
Note
PRESET j / i
RETURN
OPTION
TUNER
BAND
ENTER
Cursor keys B /
C
Preset number Frequency
02:Empty
VOL.
9850
TUNEDSTEREO
A
“Empty” (not in use) or the frequency currently registered
LINE 1
LINE 2 LINE 3
TUNER
NET USB
BAND
TUNING
MEMORY
PRESET
ENTER
HOME
RETURN
SETUP
VOLUME
OPTION
MUTENOW PLAYING
1 Press TUNER to select “TUNER” as the input
source.
2 Press OPTION on the remote control.
The “Option” menu is displayed (p. 46).
3 Use the cursor keys (B / C) to select “Auto
Preset”, and then press ENTER.
OPTION
A
VOL.
Auto Preset
READY
A
VOL.
01:FM 87.5 MHz
■ Registering a radio station manually
BAND
TUNING
MEMORY
MEMORY
HOME
SETUP
ENTER
VOLUME
PRESET
RETURN
OPTION
PRESET j / i
RETURN
1 Follow “FM/AM tuning” (p.25) to tune into the
desired radio station.
2
Press MEMORY.
By holding down MEMORY for more than 3 seconds, you can
skip the following steps and automatically register the selected
station to an empty preset number (i.e., the preset number
following the last preset number used).
3 PRESET j / i
which the station will be registered.
If you select a preset number to which no station is
registered, the message “Empty” is displayed.
to select the preset number to
This unit starts scanning the FM band about 5
seconds later from the lowest frequency upwards.
To begin scanning immediately, hold down ENTER.
• Before scanning begins, you can specify the first preset number
to be used by pressing PRESET j / i or cursor key (B/C) on the
remote control.
• To cancel scanning, press BAND or RETURN.
When scanning is complete, “FINISH” is displayed and
then the display returns to original state.
4
Press MEMORY.
When registration is complete, the display returns to
the original state.
To cancel registration, press RETURN.
26 En

Listening to FM/AM radio
Note
TUNER
PRESET j / i
OPTION
ENTER
TUNER
Cursor keys B /
C
Clear Preset
VOL.
OPTION
A
Preset station to be cleared
INPUT CLEAR PRESET j / i SELECT/
ENTER
Preset station to be cleared
01:Cleard
VOL.
CLEAR
AA
■ Recalling a preset station
You can recall preset stations that were registered using
automatic station preset or manual station preset.
SPEAKERS
B
A
PHONO
COAX 1 COAX 2
OPT 1 OPT 2 CD
LINE 1
TUNER
BAND
MEMORY
SLEEP
BLUETOOTH
LINE 2 LINE 3
NET USB
TUNING
PRESET
1 Press TUNER to select “TUNER” as the input
source.
2 Press PRESET j / i to select a preset
number.
• Preset numbers to which no stations are registered are skipped.
• “No Presets” is displayed if no stations are registered.
4 Use the cursor keys (B / C) to select a preset
station to be cleared and press ENTER.
TUNEDSTEREO
CLEAR
AA
VOL.
01:FM 98.50MHz
If the preset station is cleared, “Cleared” appears and
then the next in-use preset number is displayed.
CLEAR
AA
VOL.
01:Cleard
5 Repeat step 4 until all desired preset stations
are cleared.
6 To exit from the “Option” menu, press
OPTION.
On the front panel
BASIC
OPERATION
■ Clearing a preset station
Clear radio stations registered to the preset numbers.
On the remote control
LINE 1
LINE 2 LINE 3
TUNER
NET USB
BAND
TUNING
MEMORY
PRESET
ENTER
HOME
SETUP
VOLUME
RETURN
OPTION
MUTENOW PLAYING
1 Press TUNER to select “TUNER” as the input
source.
2 Press OPTION.
3 Use the cursor keys to select “Clear Preset”
and press ENTER.
1 Rotate the INPUT selector to select “TUNER”
as the input source.
2 Press CLEAR.
3 Press PRESET j / i to select a preset station
to be cleared and press CLEAR.
TUNEDSTEREO
CLEAR
AA
VOL.
01:FM 98.50MHz
If the preset station is cleared, “Cleared” appears.
English
27 En
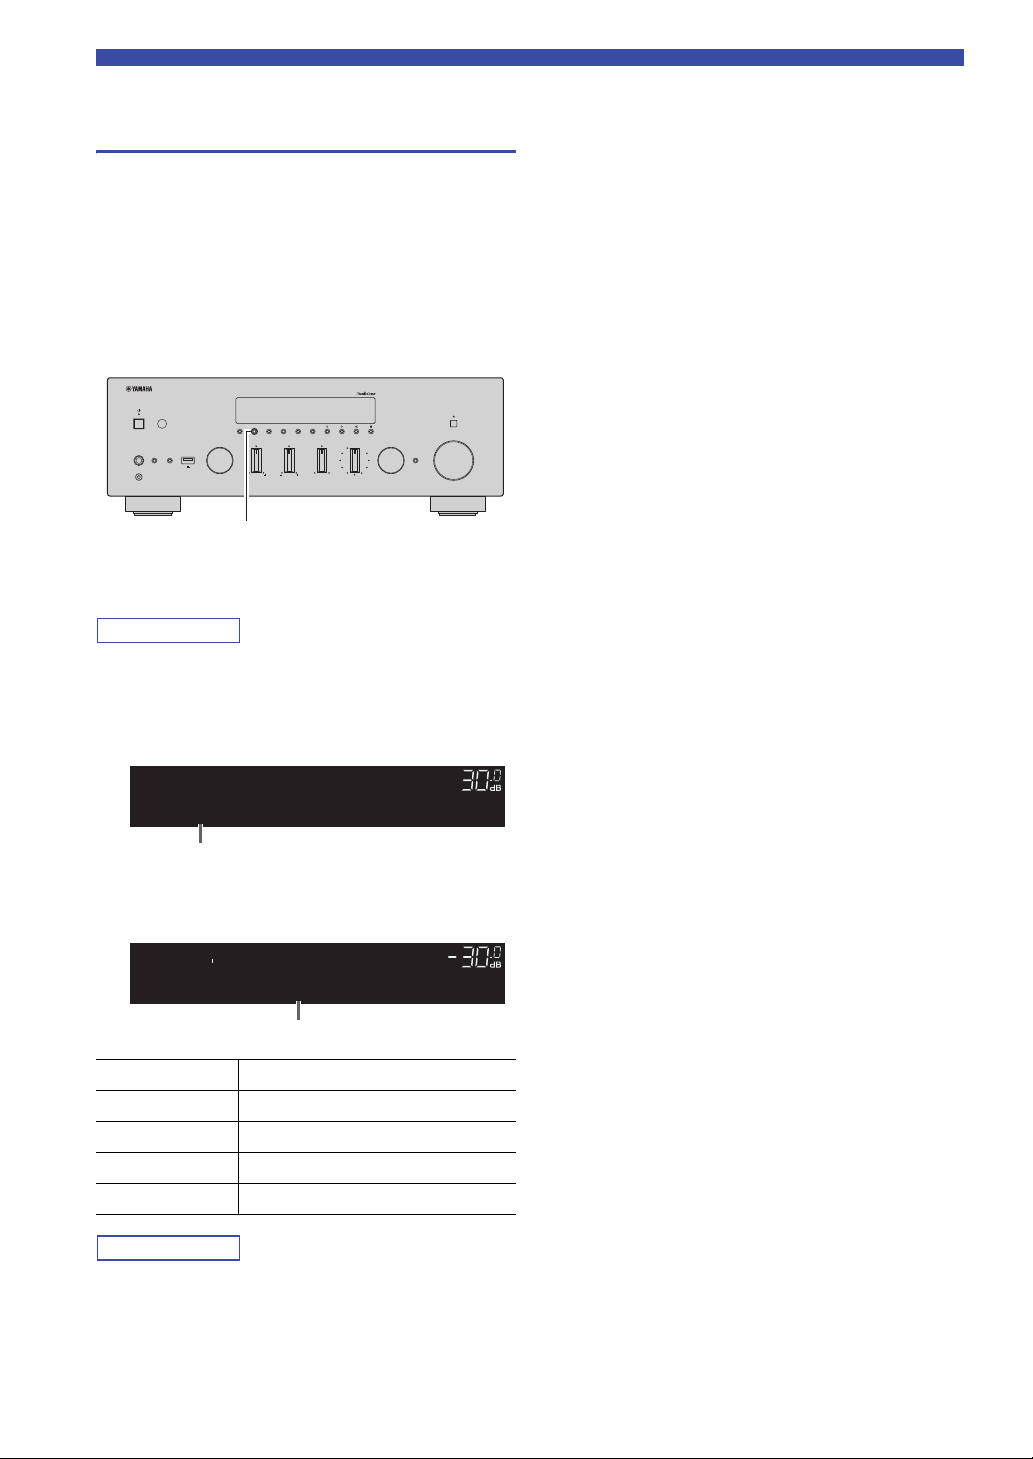
Listening to FM/AM radio
Note
Note
VOLUME
PURE DIRECT
RETURN
CONNECT
PUSH - ENTER
TUNINGPRESET
BAND
MEMORY CLEAR
BASSINPUT
5V
1A
BALANCE
LR
TREBLE
LOUDNESS
FLAT
-30dB
DIMMER MODE
DISPLAY
SELECT
PHONES
YPAO MIC
SPEAKERS USB
AB
DISPLAY
Item name
Information
Radio Data System tuning (U.K. and Europe models only)
Radio Data System is a data transmission system used by
FM stations in many countries. The unit can receive
various types of Radio Data System data, such as
“Program Service”, “Program Type,” “Radio Text” and
“Clock Time”, when it is tuned into a Radio Data System
broadcasting station.
■ Displaying the Radio Data System
information
1 Tune into the desired Radio Data System
broadcasting station.
We recommend using “Auto Preset” to tune into the Radio Data
System broadcasting stations (p. 25).
2 Press DISPLAY.
Each time you press the key, the displayed item changes.
TUNEDSTEREO
INFO
A
VOL.
Program Type
About 3 seconds later, the corresponding information
for the displayed item appears.
TUNEDSTEREO
,9850
A
VOL.
CLASSICS
Program Service Program service name
Program Type Current program type
Radio Text Information on the current program
Clock Time Current time
Frequency Frequency
“Program Service”, “Program Type”, “Radio Text”, and “Clock
Time” are not displayed if the radio station does not provide the
Radio Data System service.
28 En

Note
Note
Note
Listening to DAB radio (R-N803D)
TUNER
BAND
BBC Radio 4
VOL.
DAB
A
Listening to DAB radio (R-N803D)
DAB (Digital Audio Broadcasting) uses digital signals for
clearer sound and more stable reception compared to
analog signals. This unit can also receive DAB+ (an
upgraded version of DAB) that allows for more stations
using MPEG-4 audio codec (AAC+), which has a more
efficient transmission method.
This unit supports Band III (174 to 240 MHz) only.
Preparing the DAB tuning
Before tuning in to DAB stations, an initial scan must be
performed. When you select the DAB for the first time,
the initial scan is performed automatically.
To listen to a DAB station, connect the antenna as
described in “Connecting the DAB/FM antenna (RN803D)” (p.13).
LINE 1
LINE 2 LINE 3
TUNER
NET USB
BAND
TUNING
MEMORY
PRESET
ENTER
Selecting a DAB radio station for reception
You can select a DAB radio station from the stations
stored by the initial scan.
LINE 1
LINE 2 LINE 3
TUNER
TUNER
BAND
1 Press TUNER to select “TUNER” as the input
source.
2 Press BAND to select the DAB band.
3 Press TUNING jj / ii to select a DAB radio
station.
BAND
MEMORY
NET USB
TUNING
PRESET
ENTER
TUNING jj / ii
BASIC
OPERATION
1 Press TUNER to select “TUNER” as the input
source.
2 Press BAND to select the DAB band.
The initial scan starts. During the scan, the progress is
displayed on the front display.
When the scan is complete, the top of the list of the
scanned stations appears on the front display.
• If no DAB radio stations are found by an initial scan, “Not
Found” appears on the front display, followed by “Off Air”.
Press BAND twice to re-select the DAB band and scan again.
• You can check reception strength of each DAB channel label (p.
31).
• To perform an initial scan again after some DAB radio stations
are stored, select “Initiate Scan” (p.46) in the “OPTION” menu.
If you perform an initial scan again, the DAB radio stations
currently registered to the preset numbers will be cleared.
• “Off Air” appears when the selected DAB radio station is
currently not available.
• When the unit is receiving a secondary station, “2” appears next
to “DAB”.
English
29 En

Listening to DAB radio (R-N803D)
Note
Note
Note
Note
PRESET j / i
OPTION
RETURN
TUNER
BAND
MEMORY
ENTER
Cursor keys B /
C
“Empty” (not in use) or “Overwrite?” (in use)
PRESET:01
VOL.
A
Using preset function
You can register up to 40 DAB radio stations as presets.
Once you have registered stations, you can easily tune in
to them by recalling the presets.
You can register up to 40 favorite radio stations each for DAB
and FM bands.
TUNER
NET USB
BAND
TUNING
MEMORY
PRESET
ENTER
HOME
RETURN
SETUP
■ Registering a DAB radio station
Select a DAB radio station and register it to a preset
number.
1 Follow “Selecting a DAB radio station for
reception” (p.29) to tune into the desired
DAB radio station.
2 Press MEMORY.
VOLUME
OPTION
■ Recalling a preset station
Tune into a registered DAB radio station by selecting its
preset number.
1 Press TUNER to select “TUNER” as the input
source.
2 Press BAND to select the DAB band.
3 Press PRESET j / i to select the desired DAB
radio station.
• Preset numbers to which no stations are registered are skipped.
• If this unit does not have any preset stations, “No Presets” is
displayed.
■ Clearing preset DAB radio stations
Clear DAB radio stations registered to the preset numbers.
1 Press TUNER to select “TUNER” as the input
source.
2 Press BAND to select the DAB band.
3 Press OPTION.
4 Use the cursor keys (B / C) to select “Clear
Preset” and press ENTER.
By holding down MEMORY for more than 3 seconds, you can
skip the following steps and automatically register the selected
station to an empty preset number (i.e., the preset number
following the last preset number used).
3 Press PRESET j / i to select the preset
number to which the station will be
registered.
If you select a preset number to which no station is
registered, “Empty” is displayed.
If you select a preset number to which a station has
already been registered, “Overwrite?” is displayed.
MEMORY
02:Empty
4 Press MEMORY.
When registration is complete, the display returns to the
original state.
To cancel registration, press RETURN or do not perform any
operations for about 30 seconds.
5 Use the cursor keys (B / C) to select a preset
DAB radio station to be cleared and press
ENTER.
If the preset DAB radio station is cleared “Cleared”
appears and the next in-use preset number is
displayed.
6 Repeat step 5 until all desired preset DAB
radio stations are cleared.
7 To exit from the “OPTION” menu, press
OPTION.
A
VOL.
30 En

Listening to DAB radio (R-N803D)
Note
VOLUME
PURE DIRECT
RETURN
CONNECT
PUSH - ENTER
TUNINGPRESET
BAND
MEMORY CLEAR
BASSINPUT
5V
1A
BALANCE
LR
TREBLE
LOUDNESS
FLAT
-30dB
DIMMER MODE
DISPLAY
SELECT
PHONES
YPAO MIC
SPEAKERS USB
AB
DISPLAY
Program Type
DAB
Item name
SPORT
DAB
Information
NET USB
TUNER
PRESET
TUNING
BAND
MEMORY
SETUP
HOME
VOLUME
RETURN
ENTER
OPTION
OPTION
TUNER
BAND
ENTER
Cursor keys B /
C
12B Level: 80
TUNE AID
DAB channel label Reception strength
Displaying the DAB information
This unit can receive various types of DAB information
when it is tuned in to a DAB radio station.
1 Select “TUNER” as the input source and tune
into the desired DAB radio station.
2 Press DISPLAY on the front panel.
Each time you press the key, the displayed item
changes.
About 3 seconds later, the corresponding information
appears.
Checking reception strength of each DAB channel label
You can check reception strength of each DAB channel
label (0 [none] to 100 [best]).
1 Press TUNER to select “TUNER” as the input
source.
2 Press BAND to select the DAB band.
3 Press OPTION.
4 Use the cursor keys (B / C) to select “Tune
Aid” and press ENTER.
5 Use the cursor keys (B / C) to select the
desired DAB channel label.
BASIC
OPERATION
Item Information
Service Label Station name
DLS
(Dynamic Label Segment)
Ensemble Label Ensemble name
Program Type Station genre
Date and Time Current date and time
Audio Mode Audio mode (monaural/stereo)
CH Label/Freq Channel label and frequency
Signal Quality Signal reception quality (0 [none]
Some information may not be available depending on the selected
DAB radio station.
Information on the station
and bit rate
to 100 [best])
6 To exit from the “OPTION” menu, press
OPTION.
English
31 En

Note
Note
Note
Playing back music via Bluetooth
This unit Bluetooth device
(such as mobile device)
BLUETOOTH
Playback keys
BLUETOOTH
You can play back music files stored on a Bluetooth
device (such as mobile device) on the unit.
Please also refer to the owner’s manual of your Bluetooth
device.
• To use the Bluetooth function, set “Bluetooth” (p. 50) in the
“Setup” menu to “On” (Default).
•A Bluetooth device may not be detected by the unit or some
feature may not be compatible, depending on the model.
• You can transmit audio to Bluetooth speakers or headphones
using “MusicCast CONTROLLER” (p. 20). The audio output
can only be selected from “MusicCast CONTROLLER”.
Connecting a Bluetooth device (pairing)
When connecting a Bluetooth device to the unit for the
first time, the pairing operation is required to perform.
Pairing is an operation that registers the Bluetooth devices
with each other beforehand. Once pairing has been
completed, subsequent reconnection will be easy even
after the Bluetooth connection is disconnected.
3 On the Bluetooth device, select the unit
(network name) from the available device list.
After pairing has been completed and the unit is
connected to the Bluetooth device, “Connected”
appears on the front display, and Bluetooth indicator
will be light up.
BLUETOOTH
A
VOL.
Connected
• If the pass key is required, enter the number “0000”.
• You can change the network name of this unit in “Network
Name” (p.49) in the “Setup” menu.
Playing back Bluetooth device contents
Connect a paired Bluetooth device and start playback.
Check the following beforehand:
• Pairing has been completed.
• Bluetooth function on the Bluetooth device is turned on.
SPEAKERS
B
A
PHONO
COAX 1 COAX 2
OPT 1 OPT 2 CD
SLEEP
BLUETOOTH
SPEAKERS
B
A
PHONO
COAX 1 COAX 2
OPT 1 OPT 2 CD
SLEEP
BLUETOOTH
1 Press BLUETOOTH to select “Bluetooth” as
the input source.
If another Bluetooth device is already connected,
disconnect the Bluetooth connection before you
perform a pairing operation.
2 Turn on the Bluetooth function of the
Bluetooth device.
32 En
REPEAT
SHUFFLE
1 Press BLUETOOTH to select “Bluetooth” as
the input source.
If the unit detects the Bluetooth device previously connected, the
unit automatically connects to the Bluetooth device after Step 1.
To establish another Bluetooth connection, first disconnect the
current Bluetooth connection.

Playing back music via Bluetooth
Note
Note
2 Operate the Bluetooth device to establish a
Bluetooth connection.
Select the unit’s model name from the Bluetooth
device list on your device.
When a connection is established, Bluetooth indicator
on the front display will be light up.
If you cannot connect the Bluetooth device, please perform
pairing again.
3 Operate the Bluetooth device to play back
music.
You can use the playback keys on the remote control to control
playback.
Disconnecting a Bluetooth connection
Follow one of the procedures below to disconnect a
Bluetooth connection.
• Turn off the Bluetooth function on the Bluetooth
device.
• Hold down BLUETOOTH on the remote control for at
least 3 seconds.
• Select an input source other than “Bluetooth” on the
unit.
Bluetooth
• Bluetooth is a technology for wireless communication
between devices within an area of about 10 meters (33 ft)
employing the 2.4 GHz frequency band, a band which can
be used without a license.
Handling Bluetooth communications
• The 2.4 GHz band used by Bluetooth compatible devices is
a radio band shared by many types of equipment. While
Bluetooth compatible devices use a technology minimizing
the influence of other components using the same radio
band, such influence may reduce the speed or distance of
communications and in some cases interrupt
communications.
• The speed of signal transfer and the distance at which
communication is possible differs according to the distance
between the communicating devices, the presence of
obstacles, radio wave conditions and the type of equipment.
• Yamaha does not guarantee all wireless connections
between this unit and devices compatible with Bluetooth
function.
BASIC
OPERATION
English
33 En

Note
Playing back music stored on media servers (PCs/NAS)
PC
NAS
This unit
(Example of English version)
You can play back music files stored on your PC or
DLNA-compatible NAS on the unit.
• To use this function, the unit and your PC/NAS must be
connected to the same router (p. 14). You can check whether the
network parameters (such as the IP address) are properly
assigned to the unit in “Information” (p.48) in the “Setup”
menu.
• To play back music files, the server software installed on the
PC/NAS must support the music file formats that you want to
play back.
• The audio may be interrupted while using the wireless network
connection. In this case, use the wired network connection.
• You can connect up to 16 media servers to this unit.
• For details on supported file formats, see “Supported file
formats” (p.62).
3 Click “Turn on media streaming”.
4 Select “Allowed” from the drop-down list
next to the unit’s model name.
R-N803
Setting the media sharing of music files
To play back music files in your computer with this unit,
you need to make the media sharing setting between the
unit and computer (Windows Media Player 12 or later). In
here, setting with Windows Media Player in Windows 7 is
taken as an example.
■ When using Windows Media Player 12
1 Start Windows Media Player 12 on your PC.
2 Select “Stream”, then “Turn on media
streaming...”.
The control panel window of your PC appears.
5 As with Step 4, select “Allowed” from the
drop-down list next to devices (PCs or
mobile devices) which you want to use as the
media controllers.
6 Click “OK” to exit.
■ When using a PC or a NAS with other
DLNA server software installed
Refer to the instruction manual for the device or software
and configure the media sharing settings.
34 En

Playing back music stored on media servers (PCs/NAS)
Note
Note
Note
RETURN
OPTION
NOW PLAYING
HOME
ENTER
NET
Playback keys
Cursor keys
B / C / D / E
NAS A
SERVER
A
Song A
SERVER
A
Playback of PC music contents
Follow the procedure below to operate the PC music
contents and start playback.
“_” (underscore) will be displayed for characters not supported
by the unit.
TUNER
NET USB
BAND
TUNING
MEMORY
PRESET
ENTER
HOME
SETUP
REPEAT
1 Press NET repeatedly to select “Server” as
the input source.
2 Use the cursor keys (B / C) to select a music
server and press ENTER.
3 Use the cursor keys to select an item and
press ENTER.
If a song is selected, playback starts and the playback
information is displayed.
• If playback of a music file selected from the unit is ongoing on
your PC, the playback information is displayed.
• You can register the current playback song as a preset (p. 41).
• If you press the DISPLAY on the front panel repeatedly, you
can switch the playback information on the front display (p. 22).
VOLUME
RETURN
OPTION
MUTENOW PLAYING
SHUFFLE
Use the following remote control keys to control
playback.
Keys Function
Cursor keys
ENTER
RETURN
Playback
keys
p/ e
s
b / w
Select a music file or folder.
Starts playback if pressed while
content is selected. Moves down
one level if pressed while a folder
is selected.
Moves up one level.
Pauses/resumes playback.
Stops playback.
Skips forward/backward.
f / a
HOME
NOW PLAYING
Displays the root directory of the
music server.
Displays information about the
song that’s playing.
You can also use a DLNA-compatible Digital Media Controller
(DMC) to control playback. For details, see “DMC Control”
(p.49).
■ Repeat/shuffle settings
You can configure the repeat/shuffle settings for the
playback of PC music content.
1 When the input source is “Server,” press
REPEAT or SHUFFLE on the playback key
repeatedly to select the playback method.
Playback
keys
REPEAT
SHUFFLE
Setting Function
Off Turns off the repeat function.
One
Plays back the current song
repeatedly.
Plays back all songs in the current
All
album (folder) repeatedly.
Off Turns off the shuffle function.
Plays back songs in the current album
On
(folder) in random order.
BASIC
OPERATION
English
35 En

Playing back music stored on media servers (PCs/NAS)
■ Automatic playback setting
Use this setting to choose whether to automatically play
back music from your PC or from the NAS when turning
on the unit or when selecting “Server” as the input source.
1 When the input source is “Server”, press
OPTION.
2 Use the cursor keys (B / C) to select “Auto
Playback” and press ENTER.
3 Use the cursor keys (D / E) to select “On”
(enable) or “Off” (disable).
4 To exit from the menu, press OPTION.
36 En

Note
Note
Listening to Internet radio
RETURN
NOW PLAYING
HOME
ENTER
NET
Cursor keys
B / C / D / E
Playback keys
Radios
NET RADIO
A
Listening to Internet radio
You can listen to Internet radio stations from all over the
world.
• To use this function, the unit must be connected to the Internet
(p. 14). You can check whether the network parameters (such as
the IP address) are properly assigned to the unit in
“Information” (p.48) in the “Setup” menu.
• You may not be able to receive some Internet radio stations.
• This unit uses the airable.Radio service. airable is a service of
Tune In GmbH.
• This service may be discontinued without notice.
TUNER
NET USB
BAND
TUNING
MEMORY
PRESET
ENTER
HOME
SETUP
REPEAT
VOLUME
RETURN
OPTION
MUTENOW PLAYING
SHUFFLE
2 Use the cursor keys to select an item and
press ENTER.
If an Internet radio station is selected, playback starts
and the playback information is displayed.
NET RADIO
A
JazzST
Use the following remote control keys to control
playback.
Keys Function
Cursor keys
ENTER
RETURN
Playback keys s
HOME
NOW PLAYING
Select the Internet radio station or
category such as the genre.
Starts playback if pressed while
an Internet radio station is
selected. Moves down one level if
pressed while a category is
selected.
Moves up one level.
Stops playback.
Displays the top categories if
pressed during playback.
Displays the playback
information for the Internet radio
station.
BASIC
OPERATION
1 Press NET repeatedly to select “Net Radio”
as the input source.
The station list appears on the front display.
• You can register the current playback station as a preset (p. 41).
• If you press the DISPLAY on the front panel repeatedly, you
can switch the playback information on the front display (p. 22).
• Some information may not be available depending on the
station.
English
37 En

Note
Note
Note
CAUTION
Playing back iPhone/iTunes music via a network (AirPlay)
PC
iTunes
Router
Playback starts
iPhone
Starts playback
on iTunes
or iPhone
This unit
iTunes (example)iOS10 (example)
The AirPlay function allows you to play back iPhone/
iTunes music on the unit via network.
To use this function, the unit and your PC or iPhone must be
connected to the same router (p. 14).
AirPlay works with iPhone, iPad, and iPod touch with iOS
4.3.3 or later, Mac with OS X Mountain Lion or later, and
Mac and PC with iTunes 10.2.2 or later.
(as of June 2017)
Playback of iPhone/iTunes music contents
Follow the procedure below to play back iPhone/iTunes
music contents on the unit.
1 Turn on the unit, and start iTunes on the PC
or display the playback screen on the
iPhone.
If the iPhone/iTunes recognizes the unit, the AirPlay
icon appears.
3 Select a song and start playback.
The unit automatically selects “AirPlay” as the input
source and starts playback. The playback information is
displayed on the front display.
• If you press the DISPLAY on the front panel repeatedly, you
can switch the playback information on the front display (p. 22).
• You can turn on the unit automatically when starting playback
on iTunes or iPhone by setting “Standby (Network Standby)”
(p.49) in the “Setup” menu to “On”.
• You can edit the network name (the unit’s name on the network)
displayed on iPhone/iTunes in “Network Name” (p.49) in the
“Setup” menu.
• You can adjust the unit’s volume from the iPhone/iTunes during
playback.
Adjusting the volume on iTunes or iPhone may make the volume
unexpectedly loud, which could result in damage to your hearing
or to the device. If the playback volume is too loud, stop playback
immediately on iTunes or iPhone. We recommend using “Volume
interlock” (p. 46) in the “Option” menu to limit the changes in
volume from iTunes or iPhone.
Use the following remote control keys to control playback.
Keys Functions
Pauses/resumes playback.
Stops playback.
Skips forward/backward.
Playback
keys
p/ e
s
b / w
f / a
REPEAT Changes the Repeat settings.
SHUFFLE Changes the Shuffle settings.
If the icon does not appear, check whether the unit and PC/iPhone
are connected to the router properly.
2 On the iPhone/iTunes, click (tap) the AirPlay
38 En
icon and select the unit (network name of the
unit) as the audio output device.

Playing back music stored on a USB storage device
Note
Note
Note
Note
BASSINPUT
5V
1A
PHONES
YPAO MIC
SPEAKERS USB
AB
This unit (front)
USB storage device
Connected
USB
VOL.
A
LINE 1
NET USB
LINE 2 LINE 3
TUNER
PRESET
TUNING
BAND
MEMORY
SETUP
HOME
MUTENOW PLAYING
VOLUME
RETURN
ENTER
REPEAT
SHUFFLE
OPTION
RETURN
OPTION
USB
NOW PLAYING
HOME
ENTER
Playback keys
Cursor keys
B / C / D / E
Track #3
USB
VOL.
A
Playing back music stored on a USB storage device
You can play back music files stored on a USB storage device on the unit. Refer to the instruction manuals for the USB
storage device for more information.
• Do not connect devices other than USB mass storage class devices (such as USB chargers or USB hubs), PCs, card readers, an
external HDD, etc.
• Some features may not be compatible, depending on the model or manufacturer of the USB storage device.
• For details on supported USB storage devices and file formats, see “Supported devices and file formats” (p.62).
Connecting a USB storage device
1 Connect the USB storage device to the USB
jack.
• If the USB storage device contains many files, it may take time
to load the them. In this case, “Loading...” appears in the front
display.
• Disconnect the USB storage device from the USB jack when it
is not in use.
• Stop playback of the USB storage device before disconnect it
from the USB jack.
• You cannot connect the PC to the USB jack of the unit.
• This unit cannot charge USB storage devices while it is in
standby mode.
Playback of USB storage device contents
Follow the procedure below to operate the USB storage
device contents and start playback.
“_” (underscore) will be displayed for characters not supported
by the unit.
1
Press USB to select “USB” as the input source.
USB
A
VOL.
Blues
2 Use the cursor keys to select an item and
press ENTER.
If a song is selected, playback starts and the playback
information is displayed.
BASIC
OPERATION
English
• You can register the current playback song as a preset (p. 41).
• If you press the DISPLAY on the front panel repeatedly, you
can switch the playback information on the front display (p. 22).
39 En

Playing back music stored on a USB storage device
Use the following remote control keys to control playback.
Keys Function
Cursor keys
ENTER
RETURN
Playback
keys
HOME
NOW PLAYING
b / w
f / a
p/ e
s
Select a music file or folder.
Starts playback if pressed while a
music file is selected. Moves down
one level if pressed while a folder is
selected.
Moves up one level.
Pauses/resumes playback.
Stops playback.
Skips forward/backward.
Displays the root directory of the
USB device.
Displays information about the
song that’s playing.
■ Repeat/shuffle settings
You can configure the repeat/shuffle settings for playback
of USB storage device contents.
1 If the input source is “USB,” press REPEAT
or SHUFFLE on the playback keys repeatedly
to select the playback method.
■ Automatic playback setting
Use this setting to choose whether to automatically play
back music from your USB storage device when turning
on the unit or when selecting “USB” as the input source.
1 When the input source is “USB”, press
OPTION.
2 Use the cursor keys (B / C) to select “Auto
Playback” and press ENTER.
3 Use the cursor keys (D / E) to select “On”
(enable) or “Off” (disable).
4 To exit from the menu, press OPTION.
Playback
keys
REPEAT
SHUFFLE
Setting Function
Off Turns off the repeat function.
One
All
Off Turns off the shuffle function.
On
Plays back the current song
repeatedly.
Plays back all songs in the current
album (folder) repeatedly.
Plays back songs in the current album
(folder) in random order.
40 En
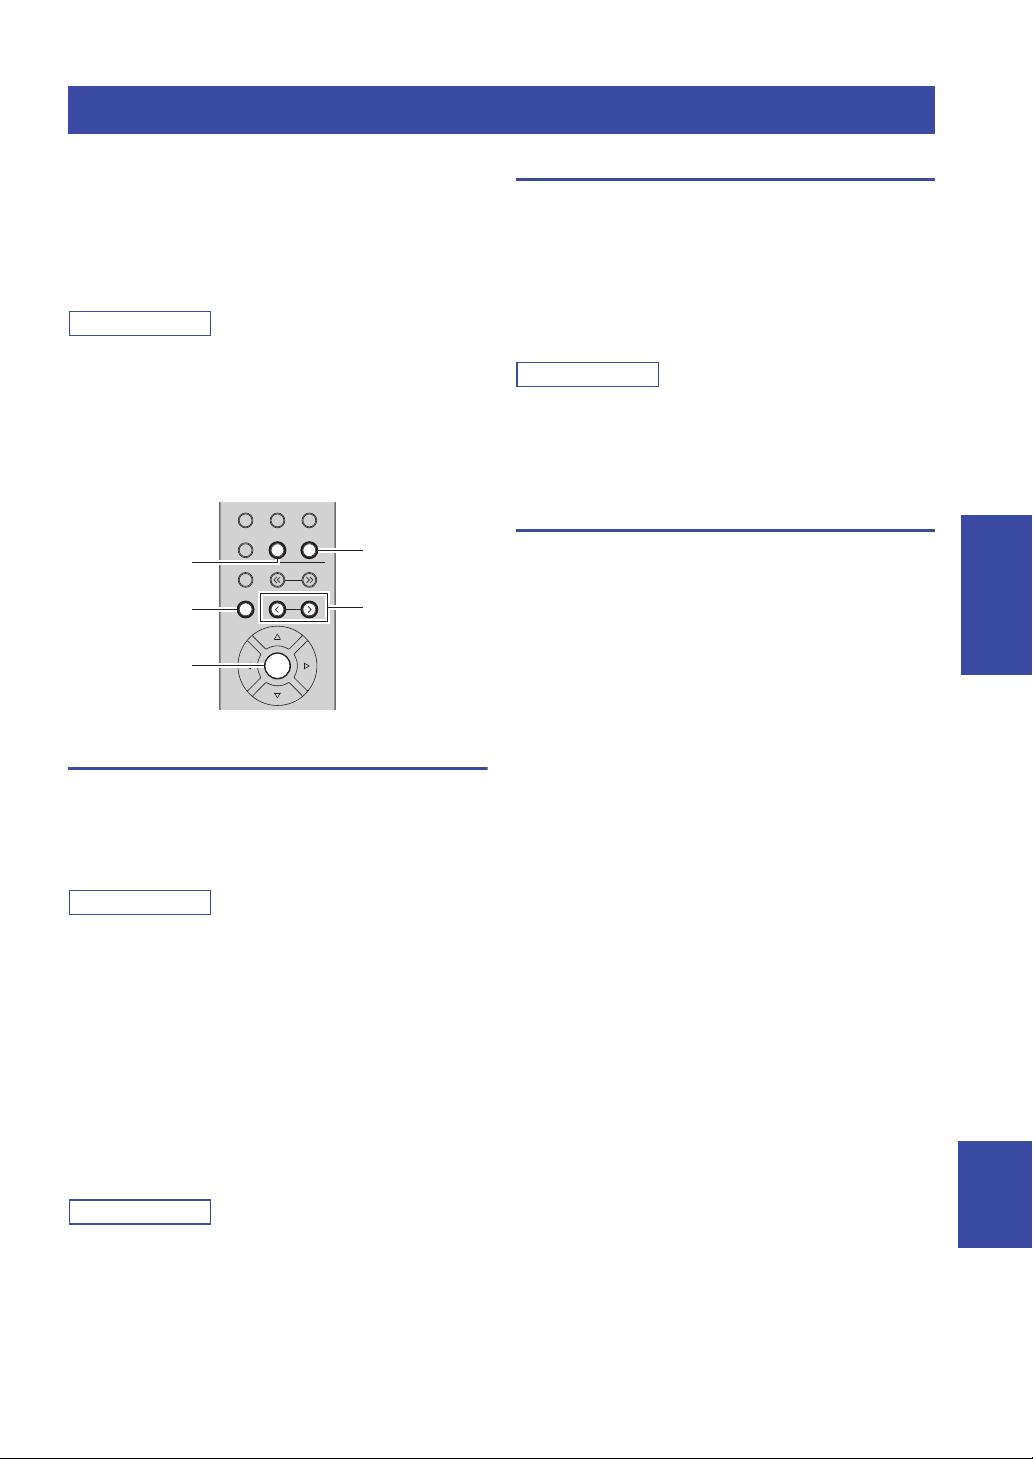
Registering the current playback song/station (Preset function)
Note
Note
Note
Note
LINE 1
NET USB
LINE 2 LINE 3
TUNER
PRESET
TUNING
BAND
MEMORY
ENTER
PRESET j / i
USB
NET
MEMORY
ENTER
Registering the current playback song/station (Preset function)
When you select network sources and USB as the input
source, you can register the current playback song or
streaming station as a preset up to 40.
You can then easily recall any preset song/station by
selecting its preset number.
The following input sources can be set as presets.
Server, Net Radio, USB and streaming services.
• You can also register songs and stations as presets using
“MusicCast CONTROLLER” (p.20).
• When you register music files stored on a USB storage device
or a PC/NAS, this unit memorizes the relative position of the
music files in the folder. If you have added or deleted any music
files to or from the folder, this unit may not recall the music file
correctly. In such cases, register the items again.
Registering to a preset
Recalling a preset
1 Press NET or USB to select the desired input
source.
2 Press PRESET j / i to select a preset
number.
3 Press ENTER to recall preset.
• It may take a while to recall a preset song or a preset station.
• To cancel recalling, press RETURN.
• You can also recall preset songs or preset stations using
“MusicCast CONTROLLER” (p.20).
Clearing a preset
1 Press NET or USB to select the desired input
source.
2 Press PRESET j / i to select a preset number
to be cleared.
3 Press CLEAR on the front panel to clear the
preset.
If the preset content is cleared, “Empty” appears.
BASIC
OPERATION
1 Playback a song or streaming station you
want to register.
2 Press MEMORY.
By holding down MEMORY for more than 3 seconds, you can
skip the following steps and automatically register the selected
song/station to an empty preset number (i.e., the preset number
following the last preset number used).
3 PRESET j / i to select the preset number to
which the song/station will be registered.
If you select a preset number to which no station is
registered, the message “Empty” is displayed.
4 Press MEMORY.
When registration is complete, the display returns to
the original state.
To cancel registration, press RETURN.
English
41 En

ADVANCED OPERATION
Note
Note
RETURN
ENTER
SPEAKERS A/B
Cursor keys
B / C / D /
E
VOLUME HIGH CUT
CROSSOVER/
MIN MAXMIN MAX
SW
BASS TREBLE BALANCE LOUDNESS
PURE DIRECTSPEAKERS A/B
Optimizing the speaker settings automatically (YPAO)
The Yamaha Parametric room Acoustic Optimizer
(YPAO) function detects speaker connections, measures
the distances from them to your listening position, and
then automatically optimizes the speaker settings, such as
volume balance and acoustic parameters, to suit your
room.
• The YPAO function of this unit adopts the YPAO-R.S.C.
(Reflected Sound Control) technology that enables to create
natural sound fields like a room specifically designed for
acoustic perfection.
• Note the following regarding YPAO measurement.
– Test tones are output at high volume and may surprise or
frighten small children.
– Test tone volume cannot be adjusted.
– Keep the room as quiet as possible.
– Stay in a corner of the room behind the listening position so
that you do not become an obstacle between speakers and the
YPAO microphone.
– Do not connect headphones.
SPEAKERS
B
A
PHONO
COAX 1 COAX 2
OPT 1 OPT 2 CD
LINE 1
TUNER
BAND
MEMORY
SLEEP
BLUETOOTH
LINE 2 LINE 3
NET USB
TUNING
PRESET
1 Press A (power) on the front panel to turn on
this unit.
2 Turn on the subwoofer and set the volume to
half.
If the crossover frequency is adjustable, set it to
maximum.
3 Configure the following settings.
• Press SPEAKERS A/B on the front panel or
remote control to select the speakers to be used.
• Set the BASS control and TREBLE control on the
front panel to 0 (center position).
• Set the BALANCE control on the front panel to the
center position.
• Set the LOUDNESS control on the front panel to
FLAT (center position).
• If Pure Direct is turned on, press PURE DIRECT
on the front panel to turn it off.
•
ENTER
HOME
SETUP
VOLUME
42 En
RETURN
OPTION
MUTENOW PLAYING
• The speaker settings are individually saved depending on the
speaker system (A, B, A+B).
• When using YPAO, select the speaker system (A+B) only for
the bi-wire connection. If you select the speaker system (A+B)
when connecting other speakers to the SPEAKERS A/B
terminals, the measurement will not be performed properly.

Optimizing the speaker settings automatically (YPAO)
Note
Note
Note
Note
Note
Note
Notice
YPAO MIC
YPAO MIC jack
YPAO microphone at
listening position
Ear
height
[ENTER]:Start
YPAO
Result Info.
YPAO( A
[ENTER]:Save
YPAO( A
[ENTER]:Cancel
YPAO( A
4 Place the YPAO microphone at your listening
position and connect it to the YPAO MIC jack
on the front panel.
Place the YPAO microphone at your listening position (same
height as your ears). We recommend the use of a tripod as a
microphone stand. You can use the tripod screws to stabilize the
microphone.
6 To check the measurement result, press the
cursor key (E).
If “No Warning” appears on the front display, the
measurement is properly completed.
YPAO( A
No Warning
If any warning message (such as W-1) appears on the front
display, see “Warning messages” (p. 45).
7 Press the cursor key (D) or RETURN.
8 To save the measurement results, use the
cursor keys (B / C) to select “Save” and
press ENTER.
To finish the measurement without saving
the result, use the cursor keys (B / C) to
select “Cancel” and press ENTER.
The following message appears on the front display.
To cancel the operation, disconnect the YPAO microphone before
starting the measurement.
5 To start the measurement, press ENTER.
The measurement will start in 10 seconds. It takes
about 1 minute to perform the measurement.
To cancel the measurement, press RETURN and then follow the
procedure in “Error messages” (p. 44).
“Result Info.” appears on the front display when the
measurement finishes.
If “Error Info” appears, press the cursor key (E) to check the
error message (p. 44).
You can change the YPAO settings (YPAO On/Off and YPAO
Volume) in the “Setup” menu (p. 50).
9 Disconnect the YPAO microphone from this
unit.
YPAO( A
Disconnect MIC
The YPAO microphone is sensitive to heat, so should not be
placed anywhere where it could be exposed to direct sunlight or
high temperatures (such as on top of AV equipment).
ADVANCED
OPERATION
English
43 En
Optimizing the speaker settings automatically (YPAO)
Note
Noisy
YPAO E-1
Error messages
If any error message is displayed during the measurement, resolve the problem and perform YPAO again.
Error message Cause Remedy
E-1 Noisy The noise is too loud.
E-2 No Signal The YPAO microphone cannot detect test tones.
E-3 No MIC The YPAO microphone has been removed.
E-4 User Cancel The measurement has been canceled. Start the measurement again as necessary.
E-5 PHONES
E-10 Internal Error An internal error has occurred.
E-20 No SPEAKERS Speakers are not detected.
E-21 Control Knob
E-22 Pure Direct Pure Direct is turned on.
The headphones are connected to the PHONES
jack of this unit.
The BASS/TREBLE/BALANCE/LOUDNESS
control positions are improper.
Keep the room quiet and start the measurement
again.
Connect the YPAO microphone to the YPAO
MIC jack firmly and start the measurement
again. If this error occurs repeatedly, contact the
nearest authorized Yamaha dealer or service
center.
Connect the YPAO microphone to the YPAO
MIC jack firmly and start the measurement
again.
Disconnect the headphones and start the
measurement again.
Exit YPAO and then turn off and on this unit. If
this error occurs repeatedly, contact the nearest
authorized Yamaha dealer or service center.
Press SPEAKERS A/B to select the speakers to
be used and start the measurement again.
If this error occurs even when the speakers are
properly selected, turn off this unit and check
the speaker connections.
Set all the controls to the center position and
start the measurement again.
Press PURE DIRECT on the front panel to turn
off Pure Direct and start the measurement again.
After checking the error message, press the cursor key (D) to return to the previous state and follow the procedure below,
– To start the measurement again:
Use the cursor keys (
– To exit YPAO:
Use the cursor keys (
44 En
B / C) to select “Retry” and press ENTER. Proceed to Step 5 in page 43.
B / C) to select “Exit” and press ENTER.

Optimizing the speaker settings automatically (YPAO)
Note
Out of Phase
YPAO W-1
Warning messages
If a warning message is displayed after the measurement, you can still save the measurement results.
However, we recommend you perform YPAO again in order to use this unit with the optimal speaker settings.
Warning message Cause Remedy
check the cable connections (+/–) of the
speakers.
If the speaker is connected incorrectly, turn off
this unit and then reconnect the speaker cable.
Depending on the type of speakers or room
environment, this message may appear even if
the speakers are connected correctly. In this
case, you can ignore the message.
Move the speaker within 24m (80 ft) of the
listening position.
Check the usage environment and cable
connections (+/–) of each speaker, and the
volume of the subwoofer. We recommend using
the same speakers or speakers with
specifications that are as similar as possible.
W-1 Out of Phase
W-2 Over Distance
W-3 Level Error
A speaker cable may be connected with the
reverse polarity (+/-).
A speaker is placed more than 24 m (80 ft) from
the listening position
There are significant volume differences
between the speakers.
• If more than one warning is detected, use the cursor keys (B / C) to check another warning message.
• To return to the previous state after checking the warning message, press the cursor key (
D)).
ADVANCED
OPERATION
English
45 En

Note
Note
Note
Note
Configuring playback settings for different playback sources
RETURN
OPTION
ENTER
Cursor keys
B / C / D / E
(Option menu)
You can configure separate playback settings for different
playback sources. This menu allows you to easily
configure settings during playback.
MEMORY
PRESET
ENTER
HOME
RETURN
SETUP
VOLUME
OPTION
MUTENOW PLAYING
1 Press OPTION.
OPTION
A
VOL.
Volume Trim
2 Use the cursor keys to select an item and
press ENTER.
To return to the previous state during menu operations, press
RETURN.
3 Use the cursor keys (D / E) to select a setting.
4 To exit from the menu, press OPTION.
Item Function Page
Vol.Interlock (Volume interlock)
Auto Playback
Enables/Disables volume controls from
iPhone/iTunes via AirPlay.
Selects whether to automatically play
back music from your PC/NAS or USB
storage device when the unit is turned
on or when the corresponding input
source is selected.
46
36, 40
■ Volume Trim
Corrects volume differences between input sources. If you
are bothered by volume differences when switching
between input sources, use this function to correct it.
This setting is applied separately to each input source.
Setting range
-10.0 dB to 0.0 dB to +10.0 dB (0.5 dB increments)
Default
0.0 dB
■ Signal Info.
Displays information about audio signal.
Choices
FORMAT Audio format of the input signal
SAMPLING
The number of samples per second of the input
digital signal
Option menu items
Available items vary depending on the selected input source.
Volume Trim
Signal Info.
Auto Preset
Clear Preset
Initiate Scan
Tune Aid
46 En
Item Function Page
Corrects volume differences between
input sources.
Displays information about the audio
signal.
Automatically registers FM radio
stations with strong signals as presets.
Clears radio stations registered to
preset numbers.
(R-N803D only)
Performs an initial scan for DAB radio
reception.
(R-N803D only)
Checks reception strength of each
DAB channel label.
46
46
25
27
29
31
To switch the information on the front display, press the cursor
keys (B / C) repeatedly.
■ Vol.Interlock (Volume interlock)
Enables/disables volume controls from iPhone/iTunes via
AirPlay.
Settings
Off Disables volume controls from iPhone/iTunes.
Ltd
(Default)
Full
Enables volume controls from iPhone/iTunes
within the limited range (-80.0 dB to -20.0 dB and
mute).
Enables volume controls from iPhone/iTunes in
the full range (-80.0 dB to +16.5 dB and mute).

Note
Configuring various functions (Setup menu)
PRESET
MEMORY
SETUP
HOME
MUTENOW PLAYING
VOLUME
RETURN
ENTER
OPTION
RETURN
SETUP
ENTER
Cursor keys
B / C / D / E
Network
SETUP
Volume
SETUP
Max Volume
VOLUME
+16.5dB
MAX VOL
You can configure the unit’s various functions.
1 Press SETUP.
2 Use the cursor keys (B / C) to select a menu
item and press ENTER.
Configuring various functions (Setup menu)
3 Use the cursor keys (D / E) to select a setting
and press ENTER.
To return to the previous state during menu operations, press
RETURN.
4 To exit from the menu, press SETUP.
47 En
ADVANCED
OPERATION
English

Configuring various functions (Setup menu)
Note
Setup menu items
Menu item Function Page
Connection Selects the network connection method. 48
Information Displays the network information on the unit. 48
IP Address Configures the network parameters (such as IP address). 49
Network
Bluetooth
YPAO
(Speaker A, Speaker B,
Speaker A+B)
Vol um e
AutoPowerStdby
(Auto Power Standby)
ECO Mode Enables/disables the eco mode (power saving mode). 51
DMC Control
Standby
(Network Standby)
Network Name
Update (Network Update) Updates the firmware via the network. 50
On/Off Enables/disables the Bluetooth functions. 50
Standby
(Bluetooth Standby)
YPAO On/Off Enables/disables the reflection of the YPAO measurement. 50
VOL
(YPAO Volume)
Max Volume Sets the maximum volume to prevent excessive loudness. 50
Initial Volume Sets the initial volume for when this receiver is turned on. 50
Selects whether to allow a DLNA-compatible Digital Media Controller
(DMC) to control playback.
Selects whether to enable/disable the function that turns on the unit from
other network devices.
Edits the network name (the unit’s name on the network) displayed on
other network devices.
Selects whether to enable/disable the function that turns on the unit from
Bluetooth devices (Bluetooth standby).
Enables/disables the YPAO volume function. 50
Sets the amount of time for the auto standby function. 51
49
49
49
50
Network
Configures the network settings.
■ Connection
Selects the network connection method.
Wired
Wireless
WirelessDirect
When this unit is in the MusicCast extended mode, “Extend” is
displayed. For details on the extended mode, refer to “MusicCast
Setup Guide” on the Yamaha website.
Select this option when you want to connect
the unit to a network with a commerciallyavailable network cable (p. 14).
Select this option when you want to connect
the unit to a network via the wireless router or
access point (p. 16).
Select this option when you want to connect a
mobile device to the unit directly. For details
on settings, see “Connecting a mobile device
to the unit directly (Wireless Direct)” (p. 19).
■ Information
Displays the network information on the unit.
NEW FW
Available
STATUS The connection status of the network.
MC NET
MAC
SSID
IP IP address
SUBNET Subnet mask
GATEWAY The IP address of the default gateway
DNS P The IP address of the primary DNS server
DNS S The IP address of the secondary DNS server
Appears if an update for this unit’s firmware is
available (p. 54).
Status of the MusicCast Network. If “Ready”
appears, you can use the MusicCast
CONTROLLER app.
Displays MAC address of the unit. MAC
address will vary depending on the connection
method (wired LAN connection or wireless
LAN / Wireless Direct connection).
(When using wireless LAN connection or
Wireless Direct) The SSID of this unit on the
wireless network.
48 En

Configuring various functions (Setup menu)
Note
Address1•••192
IP
Network Name
NETWORK
■ IP Address
Configures the network parameters (such as IP address).
DHCP
Select whether to use a DHCP server.
Off
On (Default)
Manual network settings
Does not use a DHCP server. Configure the
network parameters manually. For details, see
“Manual network settings”.
Uses a DHCP server to automatically obtain the
unit’s network parameters (such as IP address).
1 Set “DHCP” to “Off”.
2 Use the cursor keys (B / C) to select a
parameter type.
IP Specifies an IP address.
SUBNET Specifies a subnet mask.
GATEWAY Specifies the IP address of the default gateway.
DNS P
DNS S
Specifies the IP address of the primary DNS
server.
Specifies the IP address of the secondary DNS
server.
3 Use the cursor keys (D / E) to select the edit
position.
■ Standby (Network Standby)
Selects whether the unit can be turned on from other
network devices (network standby).
Off Disables the network standby function.
On
Auto
(Default)
With an advanced energy saving design, this product achieves
a low power consumption of not more than two watts when in
Network Standby mode.
Enables the network standby function. (The unit
consumes more power than when “Off” is
selected.)
Enables the network standby function. The unit is
set to the power saving mode when the unit is
disconnected from the network.
■ Network Name
Edits the network name (the unit’s name on the network)
displayed on other network devices.
1 Select “Network Name” and press ENTER.
(Example: IP address setting)
Use the cursor keys (D / E) to switch between
segments (Address1, Address2...) of the address.
4 Use the Cursor keys (B / C) to change a
value.
5 To exit from the menu, press SETUP.
■ DMC Control
Selects whether to allow DLNA-compatible Digital Media
Controller (DMC) to control playback.
Disable Does not allow DMCs to control playback.
Enable
(Default)
A Digital Media Controller (DMC) is a device that can control
other network devices through the network. When this function is
enabled, you can control playback of the unit from DMCs (such
as Windows Media Player 12) on the same network.
Allows DMCs to control playback.
2 Press ENTER twice to enter the name edit
display.
NET NAME
R-N803 XXXXXX
3 Use the cursor keys (D / E) to move the edit
position and the cursor keys (B / C) to select
a character.
NET NAME
R-N803 XXXXXX
You can insert / delete a character, by pressing
PRESET i (insert) or PRESET j (delete).
4 To confirm the new name, press ENTER.
5 To exit from the menu, press SETUP.
ADVANCED
OPERATION
English
49 En

Configuring various functions (Setup menu)
Note
Note
Note
■ Update (Network Update)
Updates the firmware via the network.
Perform
Update
Version
ID Displays the system ID number.
Starts the process to update the unit’s firmware.
For details, see “Updating the unit’s firmware via
the network” (p. 54).
Displays the version of the firmware installed on
the unit.
Bluetooth
Configures the Bluetooth settings.
■ On/Off
Enables/disables the Bluetooth function (p. 32).
Off Disables the Bluetooth function.
On (Default)
■ Standby (Bluetooth Standby)
Selects whether to enable/disable the function that turns
on the unit from Bluetooth devices (Bluetooth standby). If
this function is set to “On”, the unit automatically turns on
when a connect operation (p. 32) is performed on the
Bluetooth device.
Off Disables the Bluetooth standby function.
On (Default)
Enables the Bluetooth function. Immediately
after selecting the “On”, output of the network
source is paused.
Enables the Bluetooth standby function. (The
unit consumes more power than when “Off” is
selected.)
YPAO
Configures the setting related to YPAO.
The following settings are available for each speaker
system (Speaker A, Speaker B, Speaker A+B).
The corresponding speaker system and following settings will be
selectable after the YPAO measurement result is saved.
■ YPAO On/Off
Enables/disables the reflection of the YPAO measurement.
Off Disables the reflection of the YPAO measurement.
On (Default) Enables the reflection of the YPAO measurement.
■ VOL (YPAO Volume)
Enables/disables the YPAO volume function. When the
YPAO Volume function is enabled, the high- and lowfrequency levels are automatically adjusted according to
the volume so that you can enjoy natural sounds even at
low volume.
Off Disables the YPAO Volume function.
On (Default) Enables the YPAO Volume function.
• The YPAO Volume function is disabled when “YPAO On/Off”
is set to “Off”.
• When the YPAO volume function is enabled, the YPAO VOL.
indicator on the front display lights up.
• The LOUDNESS control (p. 24) does not function when the
YPAO Volume function is enabled.
This setting is not available when “Standby (Network Standby)”
(p. 49) is set to “Off”.
50 En
Volume
Configures the volume-related settings.
■ Max Volume
Sets the maximum volume to prevent excessive loudness.
Setting range
-30 dB to +15.0 dB / +16.5 dB (5 dB step)
Default
+16.5 dB
■ Initial Volume
Sets the initial volume when the receiver is turned on.
Setting range
Off, Mute, -80.0 dB to +16.5 dB (0.5 dB Step)
Default
Off

AutoPowerStdby
Note
Note
(Auto Power Standby)
Enables/disables the auto-standby function. If you do not
operate the unit for the specified time, the unit will
automatically go into standby mode.
Configuring various functions (Setup menu)
Off
On
Does not set the unit to standby mode
automatically.
Sets the unit to standby mode automatically.
While NET, BLUETOOTH or USB is selected as
the input source, the unit will switch to standby
mode if the selected source is not played back for
20 minutes.
For all input sources, the unit will switch to
standby mode if it is not operated for 8 hours.
Default
U.K. and Europe models: On
Other models: Off
Just before the unit enters standby mode, “AutoPowerStdby”
appears and then countdown starts in the front display.
ECO Mode
Enables/disables the eco (power saving) mode. When the
eco mode is enabled, you can reduce the unit’s power
consumption.
The new setting will take effect after the unit is restarted.
Be sure to press ENTER to restart the unit after selecting a
setting.
Off
(Default)
On Enables the eco mode.
Disables the eco mode.
ADVANCED
OPERATION
When “ECO Mode” is set to “On”, the front display may become
dark.
English
51 En

Note
Configuring the system settings (ADVANCED SETUP menu)
A (power)
SELECT/ENTER
RETURN
DISPLAY
REMOTE ID••ID1
Configure the system settings of the unit using the front
panel controls.
PHONES
SPEAKERS USB
AB
5V
1A
YPAO MIC
BASSINPUT
BALANCE
LR
LOUDNESS
SELECT
FLAT
-30dB
TREBLE
TUNINGPRESET
BAND
MEMORY CLEAR
DIMMER MODE
DISPLAY
PURE DIRECT
PUSH - ENTER
VOLUME
RETURN
CONNECT
1 Press A (power) to turn off the unit.
2
While holding down RETURN, press
A (power).
3 Rotate SELECT/ENTER to select an item.
4 Press SELECT/ENTER to select a setting.
5 Press A (power) to set the unit to turn off and
turn it on again.
The new settings take effect.
ADVANCED SETUP menu items
Item Function Page
VERSION
SP IMP.
REMOTE ID Selects the unit’s remote control ID. 52
TU
INIT Restores the default settings. 53
UPDATE Updates the firmware. 53
Checks the version of firmware
currently installed on the unit.
Changes the speaker impedance
setting.
(Asia and General models only)
Sets tuner frequency step.
52
52
53
Checking the firmware version (VERSION)
VERSION••xx.xx
Check the version of firmware currently installed on the
unit.
• You can also check the firmware version in “Update (Network
Update)” (p. 50) in the “Setup” menu.
• It may take a while until the firmware version is displayed.
Changing the speaker impedance setting (SP IMP.)
SP IMP.••8¬MIN
Change the unit’s speaker impedance settings depending
on the impedance of the speakers connected.
Settings
4 MIN
8 MIN
(Default)
Selecting the remote control ID (REMOTE ID)
Select this option when you connect speakers with
an impedance of 4 ohms to less than 8 ohms to the
unit.
Select this option when you connect speakers with
an impedance of 8 ohms or more to the unit.
52 En
Change the unit’s remote control ID so that it matches the
remote control’s ID.
Select “ID1” normally. Select “AUTO” only when you
use the remote control supplied with some Yamaha player.
Settings
ID1 (Default), AUTO

Configuring the system settings (ADVANCED SETUP menu)
Note
TU••••FM50/AM9
INIT••••CANCEL
UPDATE•NETWORK
Setting tuner frequency step (TU)
(Asia and General models only)
Selects the step size for locating tuner frequencies.
Settings
FM100/AM10, FM50/AM9 (Default)
Restoring the default settings (INIT)
Restores the default settings for the unit.
Choices
ALL Restores the default settings for the unit.
Initialize all of the network, Bluetooth and USB
NETWORK
CANCEL Does not perform an initialization.
settings. When performing the initialization, the
preset (p. 41) registered by NET/USB input will
be cleared.
Updating the firmware (UPDATE)
New firmware that provides additional features or product
improvements will be released as needed. If the unit is
connected to the Internet, you can download the firmware
via the network. For details, refer to the information
supplied with updates.
■ Firmware update procedure
Do not perform this procedure unless firmware update is
necessary. Also, make sure you read the information
supplied with updates before updating the firmware.
1 Press SELECT/ENTER repeatedly to select
“USB” or “NETWORK” and press DISPLAY to
start firmware update.
Choices
USB Update the firmware using a USB memory device.
NETWORK Update the firmware via the network.
If the unit detects newer firmware over the network, “NEW FW
Available” appears as the “Information” menu item in
“Network”. In this case, you can also update the unit’s firmware
by following the procedure in “Updating the unit’s firmware via
the network” (p. 54).
ADVANCED
OPERATION
English
53 En

Note
Note
Updating the unit’s firmware via the network
Notice
RETURN
SETUP
ENTER
Cursor keys
B / C
New firmware that provides additional features or product improvements will be released as needed. If the unit is
connected to the Internet, you can download the firmware via the network and update it.
• Do not operate the unit or disconnect the power cable or network cable during firmware update. Firmware update takes about 5
minutes or more (depending on your Internet connection speed).
• If the unit is connected to the wireless network via a wireless network adapter, network update may not be possible depending on
the condition of the wireless connection. In this case, update the firmware using the USB memory device (p. 53).
■ Notification of new firmware update
You can also update the firmware using the USB memory device
from the “ADVANCED SETUP” menu (p. 53).
MEMORY
PRESET
When new firmware is available on the network, “NEW
FW” will be displayed on the front display for a short
period of time when the unit is turned on.
NEW FW
ENTER
HOME
RETURN
SETUP
VOLUME
OPTION
MUTENOW PLAYING
1 Press SETUP.
2 Use the cursor keys (B / C) to select
“Network” and press ENTER.
3 Use the cursor keys (B / C) to select
“Information” and press ENTER.
If new firmware is available, “NEW FW Available”
appears on the front display.
NEW FW
Available
4 Press RETURN to return the previous state.
5 Use the cursor keys (B / C) to select
“Update” and press ENTER.
UPDATE
Update [ENTER]
To update the firmware, press ENTER (as described in
Step 6) while the notification is displayed. If “UPDATE
SUCCESS” appears on the front display, press A (power)
on the front panel to turn off the unit.
6 To start the firmware update, press ENTER.
To cancel the operation without updating the firmware, press
SETUP.
7 If “UPDATE SUCCESS” appears on the front
The firmware update is complete.
54 En
Perform Update
The unit to restart and the firmware update starts.
display, press A (power) on the front panel.

ADDITIONAL INFORMATION
Troubleshooting
Refer to the chart below if this unit does not function properly. If the problem you are experiencing is not listed below or
if the instructions below do not help, set this unit to standby mode, disconnect the power cable, and contact the nearest
authorized Yamaha dealer or service center.
■ General
Problem Possible cause Remedy
The power does not
turn on.
The power does not
turn off.
No sound. Incorrect input or output cable
The protection circuitry has been activated
three times consecutively. If the unit is in
this condition, the power indicator on the
front panel blinks when you try to turn on
the power.
The power cord is not connected or the
plug is not completely inserted.
The protection circuitry has been activated
because of a short circuit, etc.
The internal microcomputer has frozen,
due to an external electric shock (such as
lightning or excessive static electricity) or
to a drop in the power supply voltage.
The internal microcomputer has frozen,
due to an external electric shock (such as
lightning or excessive static electricity) or
to a drop in the power supply voltage.
connections.
No appropriate input source has been
selected.
The SPEAKERS A/B switches are not set
properly.
Speaker connections are not secure. Secure the connections.
Output has been muted. Turn off the mute.
Headphones are connected to the
PHONES jack.
The Max volume or Initial volume setting
is set too low.
The component corresponding to the
selected input source is turned off or is not
playing.
The audio output of a device connected to
a digital audio input (COAXIAL/
OPTICAL jacks) is set to other than PCM.
As a safety precaution, capability to turn on the power
is disabled. Contact your nearest Yamaha dealer or
service center to request repair.
Connect the power cord firmly.
Check that the speaker wires are not touching each
other and then turn the power of this unit back on.
Press A (power) on the front panel to turn off the unit
and turn it on again after at least 15 seconds elapse.
(If the problem persists, disconnect the power cable
from the AC wall outlet and plug it again.)
Press A (power) on the front panel to turn off the unit
and turn it on again after at least 15 seconds elapse.
(If the problem persists, disconnect the power cable
from the AC wall outlet and plug it again.)
Connect the cables properly. If the problem persists,
the cables may be defective.
Select an appropriate input source with the INPUT
selector on the front panel (or one of the input
selection key on the remote control).
Turn on the corresponding SPEAKERS A or
SPEAKERS B.
Disconnect the headphones.
Check the settings for “Max Volume” and “Initial
Volume” in the “Setup” menu.
Turn the component on and make sure it is playing.
Set the audio output of the connected device to PCM.
See
page
—
—
11
—
—
10
22
22
10
8
5
50
—
—
ADDITIONAL
INFORMATION
55 En
English

Troubleshooting
Problem Possible cause Remedy
The sound suddenly
goes off.
Only the speaker on
one side can be
heard.
There is a lack of bass
and no ambience.
A “humming” sound
can be heard.
The volume level is
low while playing a
record.
The sound is
degraded when
listening with the
headphones
connected to the CD
player or the tape
deck connected to
this unit.
The sound level is
low.
The protection circuitry has been activated
because of a short circuit, etc.
This unit has become too hot. Make sure the openings on the top panel are not
The auto power standby function has
turned this unit off.
Incorrect cable connections. Connect the cables properly. If the problem persists,
Incorrect setting for the speaker balance. Set the BALANCE control to the appropriate
The + and – wires are connected in
reverse at the amplifier or the speakers.
Incorrect cable connections. Connect the audio plugs firmly. If the problem
No connection from the turntable to the
GND terminal.
The record is being played on a turntable
with an MC cartridge.
The power of this unit is turned off, or this
unit is set to standby mode.
The loudness control function is
operating.
Set the speaker impedance to match your speakers.
Check that the speaker wires are not touching each
other and then turn the power of this unit back on.
blocked.
Change the auto power standby (“AutoPowerStdby”
in the “Setup” menu) to turn off.
the cables may be defective.
position.
Connect the speaker wires to the correct + and –
phase.
persists, the cables may be defective.
Make the GND connection between the turntable and
this unit.
The turntable should be connected to this unit through
the MC head amplifier.
Turn on the power of this unit.
Turn down the volume, set the LOUDNESS control
to the FLAT position, and then adjust the volume
again.
See
page
52
11
—
51
10
23
11
10
10
—
—
24
■ Remote control
Problem Possible cause Remedy
The remote control
does not work nor
function properly.
Wrong distance or angle. The remote control will function within a maximum
Direct sunlight or lighting (from an
inverter type of fluorescent lamp, etc.) is
striking the remote control sensor of this
unit.
The batteries are weak. Replace all batteries.
range of 6 m (20 ft) and no more than 30 degrees offaxis from the front panel.
Reposition this unit.
56 En
See
page
9
—
9

■ FM reception
Troubleshooting
Problem Possible cause Remedy
The FM radio
reception strength is
poor, and noise can
be heard.
The radio station
cannot be
automatically
selected.
The unit is receiving radio interference,
such as multipath reflections.
The unit is receiving in a region located
far away from the radio station.
The FM radio signal is weak. Use a commercially-available outdoor antenna.
Change the antenna height, direction, or place of
installation.
Press MODE on the front panel to select “MONO”
(monaural mode).
Use a commercially-available outdoor antenna.
Select the station manually.
■ AM reception (R-N803)
Problem Possible cause Remedy
The AM radio
reception strength is
poor, and noise can
be heard.
The unit is picking up noise from sources
such as a fluorescent light or a motor.
The AM radio signal is weak. Change the direction of the AM antenna.
In some environments, it may be difficult to
completely eliminate noise. However, using a
commercially-available outdoor antenna may help to
reduce noise.
Select the station manually.
Use a commercially-available outdoor antenna.
Connect the supplied AM antenna to the
ANTENNA(AM) jack.
See
page
―
25
―
―
25
See
page
―
13
25
―
AM radio stations
cannot be registered
(preset).
The stations may have been registered
automatically (Auto Preset).
Auto presets can be used with FM radio stations
only. AM radio stations must be manually registered.
■ DAB reception (R-N803D)
Problem Possible cause Remedy
Cannot tune into any
DAB stations.
The initial scan is not
successful
(“NotFound” appears
on the front display).
The initial scan has not been performed. Perform the initial scan.
The DAB radio signal is weak. Change the antenna height, direction, or place of
installation.
There is no DAB coverage in your area. Check with your dealer or WorldDMB Online at
“http://www.worlddab.org” for a listing of the DAB
coverage in your area.
The DAB radio signal is weak. Change the antenna height, direction, or place of
installation.
There is no DAB coverage in your area. Check with your dealer or WorldDMB Online at
“http://www.worlddab.org” for a listing of the DAB
coverage in your area.
26
See
page
29
13
―
13
―
ADDITIONAL
INFORMATION
English
57 En

Troubleshooting
Problem Possible cause Remedy
The DAB radio
reception strength is
poor, and noise
(such as hiss,
crackle and jitter)
can be heard.
The DAB information
cannot be displayed
or is inaccurate.
The DAB radio signal is weak. Change the antenna height, direction, or place of
The DAB station may be temporarily out
of service, or the DAB station
information is not provided by the DAB
broadcaster.
installation.
Contact the DAB broadcaster.
■ Bluetooth
Problem Possible cause Remedy
The unit cannot
connect to a
Bluetooth device.
The Bluetooth function is disabled. In the “Setup” menu, set “Bluetooth (On/Off)” to
The unit is connected to a different
Bluetooth device.
The unit is too far from the Bluetooth
device.
A device emitting electromagnetic waves
(such as a microwave oven and a
wireless device) may be located nearby.
“On”.
Disconnect the current Bluetooth connection and
connect with the desired Bluetooth device.
Move the Bluetooth device closer to this unit.
Do not use this unit near devices that emit
electromagnetic waves.
See
page
13
―
See
page
50
33
―
―
No sound can be
heard, or the sound
cuts off
intermittently.
The Bluetooth device does not support
the A2DP protocol.
The connection profile registered in the
Bluetooth device may not be functioning
correctly for some reason.
The passkey on the Bluetooth adapter or
other device may be set to a code besides
“0000”.
The volume on the Bluetooth device is
too low.
The sound output on the Blue tooth
device may not be set to this unit.
The connection to the Bluetooth device is
cut off.
The unit is too far from the Bluetooth
device.
A device emitting electromagnetic waves
(such as a microwave oven and a
wireless device) may be located nearby.
Use a Bluetooth device that supports the A2DP
protocol.
Delete the connection profile in the Bluetooth
device, and then connect the Bluetooth device to this
unit.
Use a Bluetooth device on which the passkey is set
to “0000”.
Raise the volume on the Bluetooth device.
Select this unit as the output destination on the
Bluetooth device.
Reconnect with the Bluetooth device.
Move the Bluetooth device closer to this unit.
Do not use this unit near devices that emit
electromagnetic waves.
62
32
―
―
32
32
―
―
58 En

■ USB/network
Troubleshooting
Problem Possible cause Remedy
The unit does not
detect the USB
storage device.
Folders and files in
the USB device
cannot be viewed.
The network function
cannot be used.
The unit cannot
connect to the
Internet via wireless
LAN router (access
point).
A wireless network
cannot be found.
The USB storage device is not connected
to the USB jack securely.
The file system of the USB storage
device is not FAT16 or FAT32.
The data in the USB storage device is
protected by the encryption.
The network information (IP address)
has not been properly acquired.
The wireless LAN router (access point)
is turned off.
The unit is too far from the wireless LAN
router (access point).
There is an object blocking the signal
path between this unit and the wireless
LAN router (access point).
A device emitting electromagnetic waves
(such as a microwave oven and a
wireless device) may be located nearby.
Turn off the unit, reconnect your USB device, and
turn the unit on again.
Use a USB storage device with FAT16 or FAT32
format.
Use a USB storage device without an encryption
function.
Enable the DHCP server function on your router and
set “DHCP” in the “Setup” menu to “On” on the
unit. If you want to configure the network
parameters manually, make sure that the IP address
of this unit is different from that of other devices on
the network.
Turn on the wireless LAN router (access point).
Set up this unit closer to the wireless LAN router
(access point).
Set up this unit so that there is a clear signal path
between this unit and the wireless LAN router
(access point).
When connecting wirelessly, do not use this unit
near devices that emit electromagnetic waves.
See
page
39
62
62
49
―
―
―
―
The PC (server)
cannot be detected.
The files on the PC
(server) cannot be
viewed (played
back).
Internet radio cannot
be played.
Access to the network is restricted, due to
a firewall on the wireless LAN router
(access point).
The media sharing settings on the PC
(server) is incorrect.
Access is restricted due to the security
settings on the PC (server) or router.
This unit and the PC (server) are not
connected to the same network.
The file format may not be compatible
with this unit or with the PC (server).
The selected Internet radio station is
currently not available.
The selected Internet radio station is
currently broadcasting silence.
Access to the network is restricted due to
the firewall settings on a network device,
such as a wireless LAN router (access
point).
Check the firewall settings of the wireless LAN
router (access point).
Change the media sharing settings so that this unit
can access the folder on the PC (server).
Check the security settings on the computer (server)
and wireless LAN router (access point).
Check the network and router settings, to make sure
that they are connected to the same network.
Use a file format that is compatible with this unit and
with the PC. For details on supported file formats,
see “Supported file formats”.
There may be a network problem at the radio station,
or the service may have been stopped. Try the station
later or select another station.
Some Internet radio stations broadcast silence at
certain of times of the day. Try the station later or
select another station.
Check the firewall settings of your network devices.
The Internet radio can be played only when it passes
through the port designated by each radio station.
The port number varies depending on the radio
station.
―
34
―
―
62
―
―
―
ADDITIONAL
INFORMATION
English
59 En

Troubleshooting
Problem Possible cause Remedy
This unit cannot be
detected when using
AirPlay on an
iPhone.
The unit is not
detected when using
a dedicated
application on a
mobile device.
Firmware update via
the network is failed.
The unit cannot
connect to the
wireless LAN router
(access point).
A wireless LAN router (access point)
that supports multiple SSIDs is used.
This unit and the mobile device are not
connected to the same network.
A wireless LAN router (access point)
that supports multiple SSIDs is used.
The network connection is no good. Try connecting again after a while, or a USB storage
MAC address filtering is enabled on the
wireless LAN router (access point).
The network separator function on the wireless LAN
router (access point) may be preventing this unit
from being accessed. When connecting to this unit
with an iPhone, use an SSID on which this unit can
be accessed (try connecting via the primary SSID).
Check the network and router settings, to make sure
that they are connected to the same network.
The network separator function on the wireless LAN
router (access point) may be preventing this unit
from being accessed. When connecting to this unit
with a mobile device, use an SSID on which this unit
can be accessed (try connecting via the primary
SSID).
device to update the firmware.
This unit cannot connect to the wireless LAN router
(access point) if its MAC address filtering is
enabled. Change the settings on the wireless LAN
router (access point) to allow this unit to connect.
See
page
―
―
―
53
―
60 En

Error indications on the front display
Error indications on the front display
Message Possible cause Remedy
Access denied Access to the PC is denied. Configure the sharing settings and select the unit as a device to
Access error The unit cannot access the USB device. Turn off the unit and reconnect your USB device. If the problem
The unit cannot access the iPod. Turn off the iPod and turn it on again.
The connected iPod is not supported by
the unit.
There is a problem with the signal path
from the network to the unit.
Check SP Wires The speaker cables short circuit. Twist the bare wires of the cables firmly and connect to the unit
No content There are no playable files in the selected
folder.
Please wait The unit is preparing for connecting to the
network.
Unable to play The unit cannot play back the songs stored
on the iPod for some reason.
The unit cannot play back the songs stored
on the PC for some reason.
Version error Firmware update is failed. Update the firmware again.
which music contents are shared (p. 34).
persists, try another USB device.
Use an iPod supported by the unit (p. 62).
Make sure your router and modem are turned on.
Check the connection between the unit and your router (or hub)
(p. 14).
and speakers properly.
Select a folder that contains files supported by the unit.
Wait until the message disappears. If the message stays more than
3 minutes, turn off the unit and turn it on again.
Check the song data. If it cannot be played on the iPod itself, the
song data or storage area may be defective.
Check if the format of files you are trying to play is supported by
the unit. For information about the formats supported by the unit,
see “Playing back music stored on media servers (PCs/NAS)” (p.
34). If the unit supports the file format, but still cannot play back
any files, the network may be overloaded with heavy traffic.
61 En
ADDITIONAL
INFORMATION
English

Supported devices
Note
Supported devices and file formats
■ Bluetooth device
• This unit supports Bluetooth devices that support
A2DP audio profile and AVRCP control profile.
• Bluetooth device may not be detected by the unit or
some feature may not be compatible, depending on the
model.
■ USB storage device
• This unit supports USB mass storage class devices
(e.g., flash memories or portable audio players) using
FAT16 or FAT32 format.
• USB storage devices with encryption cannot be used.
• Some features may not be compatible, depending on
the model or manufacturer of the USB storage device.
Supported file formats
■ USB/PC (NAS)
File Sampling frequency (kHz)
WAV * 32/44.1/48/88.2/96/176.4/192
MP3 32/44.1/48
WMA 32/44.1/48
MPEG-4 AAC 32/44.1/48
FLAC 32/44.1/48/88.2/96/176.4/192
ALAC 32/44.1/48/88.2/96
AIFF 32/44.1/48/88.2/96/176.4/192
DSD 2.8MHz/5.6MHz
■ AirPlay
• AirPlay works with iPhone, iPad, and iPod touch with
iOS 4.3.3 or later, Mac with OS X Mountain Lion or
later, and Mac and PC with iTunes 10.2.2 or later.
• Made for.
iPhone 7 Plus, iPhone 7, iPhone SE, iPhone 6s Plus,
iPhone 6s, iPhone 6 Plus, iPhone 6, iPhone 5s, iPhone
5c, iPhone 5, iPhone 4s
iPad Pro (9.7" and 12.9"), iPad mini 4, iPad Air 2, iPad
mini 3, iPad Air, iPad mini 2, iPad mini, iPad (3rd and
4th generation), iPad 2
iPod touch (5th and 6th generation)
(as of June 2017)
Quantization
bitrate (bit)
16/24 ― ✔
― 8 to 320 ―
― 8 to 320 ―
― 8 to 320 ―
16/24 ― ✔
16/24 ― ✔
16/24 ― ✔
1 ――
Bitrate Gapless playback
* Linear PCM format only
• To play back FLAC files stored on a PC or NAS, you need to install server software that supports sharing of FLAC files via DLNA on
your PC or use a NAS that supports FLAC files.
• Digital Rights Management (DRM) contents cannot be played back.
62 En

Trademarks
Trademarks
Supports iOS 7 or later for setup using Wireless Accessory
Configuration.
“Made for iPod,” “Made for iPhone,” and “Made for
iPad” mean that an electronic accessory has been designed
to connect specifically to iPod, iPhone, or iPad,
respectively, and has been certified by the developer to
meet Apple performance standards.
Apple is not responsible for the operation of this device or
its compliance with safety and regulatory standards.
Please note that the use of this accessory with iPod,
iPhone, or iPad may affect wireless performance.
iTunes, AirPlay, iPad, iPhone, iPod, and iPod touch are
trademarks of Apple Inc., registered in the U.S. and other
countries.
iPad Air and iPad mini are trademarks of Apple Inc.
App Store is a service mark of Apple Inc.
DLNA™ and DLNA CERTIFIED™ are trademarks or
registered trademarks of Digital Living Network Alliance.
All rights reserved.
Unauthorized use is strictly prohibited.
Windows™
Windows is a registered trademark of Microsoft
Corporation in the United States and other countries.
Internet Explorer, Windows Media Audio and Windows
Media Player are either registered trademarks or
trademarks of Microsoft Corporation in the United States
and/or other countries.
Android™
Google Play™
Android and Google Play are trademarks of Google Inc.
The Bluetooth
®
word mark and logos are registered
trademarks owned by Bluetooth SIG, Inc. and any use of
such marks by Yamaha Corporation is under license.
Bluetooth protocol stack (Blue SDK)
Copyright 1999-2014 OpenSynergy GmbH
All rights reserved. All unpublished rights reserved.
MusicCast is a trademark or registered trademark of
Yamaha Corporation.
Yamaha Eco-Label is a mark that certifies products of
high environmental performance.
(For R-N803D)
The unit supports DAB/DAB+ tuning.
Explanations regarding GPL
This product utilizes GPL/LGPL open-source software in
some sections. You have the right to obtain, duplicate,
modify, and redistribute this open-source code only. For
information on GPL/ LGPL open source software, how to
obtain it, and the GPL/LGPL license, refer to the Yamaha
Corporation website
(http://download.yamaha.com/sourcecodes/musiccast/).
ADDITIONAL
INFORMATION
The Wi-Fi CERTIFIED™ Logo is a certification mark of
®
Wi-Fi Alliance
.
The Wi-Fi Protected Setup™ Identifier Mark is a
®
certification mark of Wi-Fi Alliance
.
English
63 En

Specifications
Network
• Input jack: NETWORK x 1 (100Base-TX/10Base-T)
• PC client function
• Compatible with DLNA ver. 1.5
• AirPlay supported
• Internet radio
• Streaming service
• Wi-Fi function
Capable of direct connection with mobile device
Available security method
....................................... WEP, WPA2-PSK(AES), Mixed Mode
Radio frequency band .......................................................2.4 GHz
Radio frequency (operational frequency)
..............................................................2412 MHz to 2472 MHz
Maximum output power (E.I.R.P) ............... 17.5 dBm (56.2 mW)
Wireless network standard ................................IEEE 802.11 b/g/n
Wi-Fi settings
WPS (Wi-Fi Protected Setup) ..............................Capable of WPS
Capable of sharing with iOS devices by wireless connection.
Bluetooth related function
•Version.................. ............................................ Bluetooth 2.1 + EDR
• Frequency.............................................................................2.4 GHz
• Radio frequency (operational frequency)
....................................................................2402 MHz to 2480 MHz
• Maximum output power (E.I.R.P)....................... 4.0 dBm (2.5 mW)
• Wireless output.......................................... ............ Bluetooth Class 2
• Profiles
Source function
The unit → sink device (ex. Bluetooth headphones)
Profile: A2DP version 1.3, AVRCP version 1.6
CODEC: SBC
Sink function
The unit ← source device (ex. iPhone/Android)
Profile: A2DP version 1.3, AVRCP version 1.6
CODEC: SBC, AAC
USB
• Input jack: USB x 1 (USB 2.0)
• Capable of mass storage class USB memory
• Current supply capacity: 1.0 A
Audio
• Minimum RMS output power
(20 Hz to 20 kHz, 0.019% THD, 8Ω) .....................100 W+100 W
• Dynamic power per channel (IHF) (8/6/4/2)
........................................................................... 140/170/220/290 W
• Maximum power per channel (1 kHz, 0.7% THD, 4Ω)
[U.K. and Europe models] ...................................................160 W
• IEC power (1 kHz, 0.04% THD, 8Ω)
[U.K. and Europe models] ...................................................115 W
• Power band width (main L/R)
(0.06%THD 40.0 W, 8Ω)..................................... 10 Hz to 50 kHz
• Damping factor (SPEAKERS A)
1 kHz, 8 .................................................................... 240 or more
• Maximum effective output power (JEITA)
(1 kHz, 10% THD, 8)
[Asia and General models]...................................................145 W
• Input sensitivity/input impedance
PHONO (MM) ........................................................ 2.5 mV/47 kΩ
CD, etc. ................................................................. 200 mV/47 k
• Maximum input signal
PHONO (MM) (1 kHz, 0.03% THD) ................................. 45 mV
CD, etc. (1 kHz, 0.5% THD)..................................................2.2 V
• Output level/output impedance
CD, etc. (input 1 kHz, 200 mV)
OUT ................................................................... 200 mV/1.0 k
SUBWOOFER OUT.............................................. 4.0 V/1.2 kΩ
(Cut off frequency) ........................................................... 90 Hz
PHONES (8 load)..............................................470 mV/470
• Frequency response
CD, etc. (20 Hz to 20 kHz) ........................................... 0 ± 0.5 dB
CD, etc. (10 Hz to 100 kHz, PURE DIRECT on) ........0 ± 1.0 dB
• RIAA equalization deviation
PHONO (MM).................................................................. ± 0.5 dB
• Total harmonic distortion
PHONO (MM) to OUT
(20 Hz to 20 kHz, 2.5 V) ....................................... 0.03% or less
CD, etc. to SPEAKERS
(20 Hz to 20 kHz, 50.0 W, 8)............................ 0.019% or less
• Signal to noise ratio (IHF-A Network)
PHONO (MM) (input shorted, 5 mV)
[U.S.A., Canada, Asia, General models] .............. 82 dB or more
[U.K., Europe, Korea, Australia models] .............75 dB or more
CD, etc. (input shorted, 200 mV) ..........................100 dB or more
• Residual noise (IHF-A network) .............................................70 µV
• Channel separation
CD, etc. (5.1 k input shorted, 1 kHz/10 kHz)
.........................................................................65/50 dB or more
• Tone control characteristics
BASS
Boost/cut (20 Hz) ........................................................... ± 10 dB
Turnover frequency ......................................................... 300 Hz
TREBLE
Boost/cut (20 kHz) ........................................................ ± 10 dB
Turnover frequency ........................................................ 3.0 kHz
• Continuous loudness control
Attenuation 1 kHz................................................................ -30 dB
• Gain tracking error (+16.5 to -80 dB) ......................... 0.5 dB or less
• Digital input (OPTICAL/COAXIAL)
Support audio sample rate ..........32/44.1/48/88.2/96/176.4/192 kHz
FM
• Tuning range
[U.S.A. and Canada models] ...........................87.5 to 107.9 MHz
[Asia and General models] ....... 87.5/87.50 to 108.0/108.00 MHz
[U.K., Europe, Korea, Australia models] ....87.50 to 108.00 MHz
• 50 dB quieting sensitivity (IHF, 1 kHz, 100% MOD.)
Mono ................................................................. 3.0 µV (20.8 dBf)
• Signal to noise ratio (IHF)
Mono/stereo ...............................................................69 dB/67 dB
• Harmonic distortion (1 kHz)
Mono/stereo ................................................................. 0.5%/0.6%
• Antenna input .......................................................... 75Ω unbalanced
AM (R-N803)
• Tuning range
[U.S.A. and Canada models] .............................. 530 to 1710 kHz
[Asia and General models] ................. 530/531 to 1710/1611 kHz
[Korea model]...................................................... 531 to 1611 kHz
DAB (R-N803D)
• Tuning range...........................................174 to 240 MHz (Band III)
• Support audio format
.............................MPEG 1 Layer II/MPEG 4 HE AAC v2 (AAC+)
• Antenna input .......................................................... 75Ω unbalanced
General
• Power supply
[U.S.A. and Canada models] ............................. AC 120 V, 60 Hz
[General model] .......................AC 110-120/220-240 V, 50/60 Hz
[Korea model]..................................................... AC 220 V, 60 Hz
[Australia model] ............................................... AC 240 V, 50 Hz
[U.K. and Europe models] ................................. AC 230 V, 50 Hz
[Asia model] ......................................... AC 220-240 V, 50/60 Hz
• Power consumption ................................................................ 250 W
• Off mode.................................................................................. 0.1 W
64 En

• Standby power consumption (reference data) ......................... 0.1 W
• Network Standby on
Wired .................................................................................... 1.7 W
Wireless (Wi-Fi/Wireless Direct/Bluetooth)......................... 1.8 W
• Maximum power consumption (1 kHz, 8Ω, 10% THD)
[Asia and General models] .................................................. 450 W
• Dimensions (W H D) ................................ 435 151 392 mm
(17-1/8" 6" 15-7/16")
* Including legs and protrusions
• Reference Dimensions (W H D) (with wireless antenna upright)
......................................................................... 435 215 392 mm
(17-1/8" 8-1/2" 15-7/16")
* Including legs and protrusions
• Weight..................................................................11.0 kg (24.25 lbs)
* The contents of this manual apply to the latest specifications as of
the publishing date. To obtain the latest manual, access the Yamaha
website then download the manual file.
Specifications
65 En
ADDITIONAL
INFORMATION
English

Index
A
AC IN jack....................................................................... 7
ADVANCED SETUP menu.......................................... 52
AirPlay........................................................................... 38
AM antenna ................................................................... 13
AM radio ....................................................................... 25
ANTENNA terminals...................................................... 7
Auto Playback, option menu ......................................... 46
Auto preset, FM radio stations ...................................... 25
Auto Preset, option menu .............................................. 46
Automatic playback, PC music content......................... 36
Automatic playback, USB content ................................ 40
Automatic speaker settings............................................ 42
AutoPowerStdby (Auto Power Standby),
setup menu................................................................. 51
B
BALANCE control........................................................ 23
Banana plug, connection ............................................... 11
BASS control................................................................. 23
Batteries, remote control ................................................. 9
Bi-wire connection ........................................................ 12
Bluetooth device playback ............................................ 32
Bluetooth indicator .......................................................... 6
Bluetooth, setup menu................................................... 50
C
CD jacks .......................................................................... 7
CD player, connection................................................... 10
Clear Preset, option menu.............................................. 46
Clearing preset station ................................................... 27
COAXIAL jacks.............................................................. 7
Connection, Network, setup menu ................................ 48
Control Knob, front display message............................ 44
D
DAB antenna ................................................................. 13
DAB radio ..................................................................... 29
DIMMER......................................................................... 4
Disconnect MIC, front display message........................ 43
Disconnection, Bluetooth connection............................ 33
DLNA............................................................................ 34
DMC Control, Network, setup menu ............................ 49
DVD player, connection................................................ 10
E
ECO Mode, setup menu ................................................ 51
[ENTER]:Start, front display message .......................... 43
Error messages, YPAO.................................................. 44
F
Firmware update via network........................................ 54
Firmware update, ADVANCED SETUP menu ............ 53
Firmware version, ADVANCED SETUP menu ........... 52
FM antenna.................................................................... 13
FM radio ........................................................................ 25
Front display ................................................................... 6
Front display, switching information............................ 22
H
HOME, remote control ................................................... 8
I
Information, Network, setup menu ............................... 48
INIT, ADVANCED SETUP menu............................... 53
Initialize, ADVANCED SETUP menu......................... 53
Initiate Scan, option menu ............................................ 46
Input selection keys, remote control............................... 8
INPUT selector ............................................................... 5
Internal Error, front display message............................ 44
Internet radio................................................................. 37
iOS device setting sharing,
wireless network connection..................................... 16
IP Address, Network, setup menu ................................ 49
iPod content playback, AirPlay .................................... 38
iTunes content playback, AirPlay................................. 38
L
Level Error, front display message ............................... 45
LINE jacks ...................................................................... 7
LOUDNESS control ..................................................... 24
M
Manual preset, FM/AM radio stations.......................... 26
Manual setting, wireless network connection............... 18
Media sharing setup...................................................... 34
Message, front display .................................................. 61
MusicCast ..................................................................... 20
MUTE ............................................................................. 6
N
NAS content playback .................................................. 34
Network cable, connection ........................................... 14
Network connection...................................................... 15
NETWORK jack............................................................. 7
Network Name, Network, setup menu.......................... 49
Network, setup menu .................................................... 48
No MIC, front display message .................................... 44
No Signal, front display message ................................. 44
No SPEAKERS, front display message........................ 44
No Warning, front display message.............................. 43
Noisy, front display message ........................................ 44
NOW PLAYING, remote control................................... 8
O
OPTICAL jacks .............................................................. 7
Option menu ................................................................. 46
Out of Phase, front display message............................. 45
Over Distance, front display message........................... 45
P
Pairing, Bluetooth device.............................................. 32
PCs content playback.................................................... 34
66 En

Index
PHONES jack ................................................................. 5
PHONES, front display message.................................. 44
PHONO jacks ................................................................. 7
Playback keys ................................................................. 9
Playback, Bluetooth device contents ............................ 32
Playing back, PCs/NAS content ................................... 34
Playing back, USB content ........................................... 39
Power cord, connection ................................................ 14
Power indicator............................................................... 4
Preset function, DAB.................................................... 30
Preset, song/streaming station ...................................... 41
PURE DIRECT switch ................................................. 23
Pure Direct, front display message ............................... 44
R
Radio Data System tuning ............................................ 28
Remote control ID, ADVANCED SETUP menu......... 52
Repeat playback, AirPlay ............................................. 38
Repeat playback, PC music content.............................. 35
Repeat playback, USB content ..................................... 40
Result Info., front display message............................... 43
RETURN ........................................................................ 5
S
SELECT/ENTER............................................................ 5
Setup menu ................................................................... 47
Shuffle playback, AirPlay............................................. 38
Shuffle playback, PC music content ............................. 35
Shuffle playback, USB content..................................... 40
Signal Info., option menu ............................................. 46
Signal strength indicator ................................................. 6
SLEEP............................................................................. 6
Sleep timer .................................................................... 24
SP IMP., ADVANCED SETUP menu ......................... 52
Speaker impedance, ADVANCED SETUP menu........ 52
Speaker, connection ...................................................... 10
SPEAKERS A/B............................................................. 5
SPEAKERS terminals .................................................... 7
Standby (Network Standby), Network, setup menu ..... 49
STEREO ......................................................................... 6
SUBWOOFER OUT jack............................................... 7
Subwoofer, connection ................................................. 10
T
TREBLE control........................................................... 23
TRIGGER OUT jacks..................................................... 7
Tune Aid, option menu ................................................. 46
TUNED........................................................................... 6
Turntable, connection ................................................... 10
VOLUME control ........................................................... 5
Volume Trim, option menu........................................... 46
Volume, setup menu ..................................................... 50
W
WAC ............................................................................. 15
Warning messages, YPAO............................................ 45
Wireless antenna ........................................................... 14
Wireless Direct.............................................................. 19
WPS push button configuration,
wireless network connection ..................................... 17
Y
YPAO............................................................................ 42
YPAO VOL..................................................................... 6
YPAO, setup menu ....................................................... 50
ADDITIONAL
INFORMATION
U
Update (Network Update), Network, setup menu ........ 50
UPDATE, ADVANCED SETUP menu ....................... 53
USB content playback .................................................. 39
User Cancel, front display message.............................. 44
V
Verification, network connection ................................. 20
VERSION, ADVANCED SETUP menu ..................... 52
Vol.Interlock (Volume interlock), option menu........... 46
English
67 En

Français
ATTENTION
RISQUE D'ÉLECTROCUTION
NE PAS OUVRIR
ATTENTION : POUR RÉDUIRE LES RISQUES D'ÉLECTROCUTION,
NE PAS RETIRER LE CAPOT (OU LE DOS). NE CONTIENT
PAS DE PIÈCES NÉCESSITANT L'INTERVENTION
DE L'UTILISATEUR. POUR TOUTE INTERVENTION,
FAIRE APPEL À DES PROFESSIONNELS QUALIFIÉS.
CONSIGNES DE SÉCURITÉ À LIRE ATTENTIVEMENT
1 Lisez les instructions ci-après.
2 Conservez ces instructions.
3 Tenez compte des avertissements.
4 Suivez toutes les instructions.
5 N'utilisez pas cet instrument dans un milieu humide.
6 Employez uniquement un chiffon sec pour nettoyer
l'instrument.
7 N'obstruez pas les ouvertures prévues pour la ventilation.
Installez l'instrument conformément aux instructions
du fabricant.
8 N'installez pas l'instrument près d'une source de chaleur,
notamment un radiateur, une bouche de chaleur, un poêle ou
L’avertissement ci-dessus est situe sur l’arriere de l’unite.
Explication des symboles graphiques
L'éclair avec une flèche à l'intérieur d'un
triangle équilatéral est destiné à attirer
l'attention de l'utilisateur sur la présence d'une
« tension dangereuse » non isolée à l'intérieur
de l'appareil, pouvant être suffisamment élevée
pour constituer un risque d'électrocution.
Le point d'exclamation à l'intérieur d'un triangle
équilatéral est destiné à attirer l'attention de
l'utilisateur sur la présence d'instructions
importantes sur l'emploi ou la maintenance
(réparation) de l'appareil dans la documentation
fournie.
autres (y compris les amplificateurs).
9 Ne modifiez pas les caractéristiques de la fiche avec mise à la
terre polarisée. Une fiche polarisée est dotée de deux broches
(l'une est plus large que l'autre). Une fiche avec mise à la terre
comprend deux broches, ainsi qu'une troisième qui relie
l'instrument à la terre. La broche la plus large (ou troisième
broche) permet de sécuriser l'installation électrique. Si vous
ne pouvez pas brancher le cordon d'alimentation dans la prise
d'alimentation, demandez à un électricien de la remplacer.
10 Protégez le cordon d'alimentation. Cela permet d'éviter de
marcher dessus ou de le tordre au niveau de la fiche, de la
prise d'alimentation et des points de contact sur l'instrument.
11 N'employez que les dispositifs/accessoires indiqués par
le fabricant.
12 Utilisez uniquement le chariot, le socle, le
trépied, le support ou le plan indiqués par le
fabricant ou livrés avec l'instrument. Si
vous utilisez un chariot, soyez prudent si
vous le déplacez avec l'instrument posé
dessus pour éviter de le renverser.
13 Débranchez l'instrument en cas d'orage ou lorsque vous ne
l'utilisez pas pendant des périodes prolongées.
14 Confiez toutes les réparations à des techniciens qualifiés. Des
réparations sont nécessaires lorsque l'instrument est
endommagé, notamment dans les cas suivants : cordon
d'alimentation ou fiche défectueuse, liquides ou objets
projetés sur l'appareil, exposition aux intempéries ou
à l'humidité, fonctionnement anormal ou chute.
i Fr
AVERTISSEMENT
N'UTILISEZ PAS L'INSTRUMENT SOUS LA PLUIE OU
DANS UN ENVIRONNEMENT HUMIDE, FAUTE DE
QUOI VOUS RISQUEZ DE PROVOQUER UN INCENDIE
OU DE VOUS ÉLECTROCUTER.

Informations de la FCC (Pour les clients résidents aux États-Unis)
1 AVIS IMPORTANT: NE PAS APPORTER DE
MOFIDICATIONS À CET APPAREIL !
Ce produit est conforme aux exigences de la FCC s’il
est installé selon les instructions du mode d’emploi.
Toute modification non approuvée expressément par
Yamaha peut invalider l’autorisation, accordée par la
FCC, d’utiliser ce produit.
2 IMPORTANT:
N’utiliser que des câbles blindés de
haute qualité pour le raccordement de ce produit à des
accessoires et/ou à un autre produit. Seuls le ou les câbles
fournis avec le produit DOIVENT être utilisés. Suivre les
instructions concernant l’installation. Le non respect des
instructions peut invalider l’autorisation, accordée par la
FCC, d’utiliser ce produit aux États-Unis.
3 REMARQUE: Ce produit a été testé et déclaré
conforme aux normes relatives aux appareils
numériques de Classe « B », telles que fixées dans
l’Article 15 de la Réglementation FCC. Ces normes
sont destinées à assurer une protection suffisante contre
les interférences nuisibles avec d’autres appareils
électroniques dans une installation résidentielle.
Cet équipement génère et utilise des fréquences radio
qui, en cas d’installation et d’utilisation non conformes
aux instructions du mode d’emploi, peuvent être à
l’origine d’interférences empêchant d’autres appareils
de fonctionner.
Cependant, la conformité à la Réglementation FCC ne
garantit pas l’absence d’interférences dans une
installation particulière. Si ce produit devait produire
des interférences, ce qui peut être déterminé en
« ÉTEIGNANT » et en « RALLUMANT » le produit,
l’utilisateur est invité à essayer de corriger le problème
d’une des manières suivantes :
Réorienter ce produit ou le dispositif affecté par les
interférences.
Utiliser des prises d’alimentation branchées sur
différents circuits (avec interrupteur de circuit ou
fusible) ou installer un ou des filtres pour ligne secteur.
Dans le cas d’interférences radio ou TV, changer de
place l’antenne et la réorienter. Si l’antenne est un
conducteur plat de 300 ohms, remplacer ce câble par
un câble de type coaxial.
Si ces mesures ne donnent pas les résultats escomptés,
prière de contacter le détaillant local autorisé à
commercialiser ce type de produit. Si ce n’est pas
possible, prière de contacter Yamaha Corporation of
America A/V Division, 6600 Orangethorpe Avenue,
Buena Park, CA 90620, USA.
Les déclarations précédentes NE concernent QUE les
produits commercialisés par Yamaha Corporation of
America ou ses filiales.
PRÉCAUTION FCC
Tout changement ou toute modification non approuvé
expressément par le tiers responsable peut aboutir à
l’interdiction de faire fonctionner cet appareil.
CAN ICES-3 (B)/NMB-3(B)
(can_b_02)
DECLARATION D’INFORMATIONS DE
(DECLARATION DE PROCEDURE DE CONFORMITE)
Entité responsable: Yamaha Corporation of America A/V Division
Adresse: 6600 Orangethorpe Avenue, Buena Park, CA
Téléphone: 1-714-522-9011
Type d’équipement: Réseau Ampli-Tuner
Nom de modèle: R-N803
Le présent appareil est conforme aux la partie 15 des règles de la FCC
et CNR d’Industrie Canada applicables aux appareils radio exempts de
licence.
L’exploitation est autorisée aux deux conditions suivantes :
(1) l’appareil ne doit pas produire de brouillage, et
(2) l’utilisateur de l’appareil doit accepter tout brouillage
radioélectrique subi, même si le brouillage est susceptible d’en
compromettre le fonctionnement.
CONFORMITE
90620, USA
REMARQUE
Cet appareil a été testé et il s’est avéré être conforme aux limites déterminées pour un appareil numérique de Classe B,
conformément à la partie 15 du Règlement FCC. Ces limites sont destinées à offrir une protection raisonnable contre les
interférences nuisibles pouvant survenir en cas d’utilisation de ce produit dans un environnement domestique.
Cet appareil produit, utilise et peut émettre de l’énergie radioélectrique et, s’il n’est pas installé conformément aux
instructions, peut provoquer des interférences radio. Il n’est toutefois pas garanti qu’aucune interférence ne se produira dans le
cas d’une installation donnée. Si l’appareil provoque des interférences nuisibles à la réception de programmes radio ou de
télévision, ce qui peut être déterminé en éteignant, puis en allumant l’appareil, l’utilisateur est prié de tenter de corriger le
problème en prenant l’une ou plusieurs des mesures suivantes:
– Réorienter ou déplacer l’antenne réceptrice.
– Éloigner davantage l’appareil du récepteur.
– Raccorder l’appareil à une prise d’un circuit différent de celui du récepteur.
– Consulter le revendeur ou un technicien radio/télé expérimenté.
Cet appareil est conforme aux limites FCC/IC d’exposition aux rayonnements définies pour les appareils non commandés et
satisfait aux directives d’exposition aux fréquences radio (RF) FCC et RSS-102 d’exposition aux fréquences radio (RF) IC.
Cet appareil possède des niveaux d’énergie RF très bas, considérés conformes aux taux d’exposition maximum autorisés
(MPE) non contrôlés. Mais il est toutefois préférable d’installer et d’utiliser l’appareil en conservant une distance minimum de
20 cm entre l’émetteur et toute personne.
Ce émetteur ne peut pas être placé à proximité de ou utilisé conjointement avec tout autre émetteur ou antenne.
Français
ii Fr

AVERTISSEMENT
PRÉCAUTIONS D’USAGE
LISEZ ATTENTIVEMENT AVANT DE PROCÉDER À TOUTE UTILISATION. VEILLEZ À SUIVRE CES
INSTRUCTIONS.
Les mises en garde énumérées ci-dessous sont destinées à prévenir les risques pour l’utilisateur et les tiers, à
éviter les dommages matériels et à aider l’utilisateur à se servir de l’appareil correctement et en toute sécurité.
Assurez-vous de suivre ces instructions.
Après avoir consulté ce manuel, conservez-le dans un endroit sûr de façon
à pouvoir vous y reporter facilement.
• Veillez à faire inspecter ou réparer l’appareil par le revendeur
auprès duquel vous l’avez acheté ou par un technicien Yamaha
qualifié.
• Yamaha ne peut être tenu responsable ni des détériorations
causées par une utilisation ou des modifications impropres de
l’appareil.
• Ce produit est conçu pour un usage courant dans les résidences
standard. Ne l’utilisez pas pour des applications nécessitant une
haute fiabilité, telles que la gestion des gestes essentiels à la vie,
des soins de santé ou des biens de grande valeur.
Ce contenu indique « un risque de blessures graves ou de
mort ».
■ Alimentation/cordon d’alimentation
• Ne faites rien qui pourrait endommager le cordon d’alimentation.
- Ne le placez pas à proximité d’un radiateur.
- Évitez de le plier excessivement ou de le modifier.
- Évitez de l’érafler.
- Ne placez pas dessus d’objets lourds.
L’utilisation d'un cordon d'alimentation endommagé dont les fils
sont exposés pourrait provoquer des chocs électriques ou un
incendie.
• En cas de risque d’impact de foudre à proximité de l’appareil, évitez
de toucher la fiche d’alimentation. Le non-respect de cette consigne
peut entraîner des chocs électriques.
• Assurez-vous d’utiliser l’appareil avec la tension d’alimentation
appropriée, telle qu’imprimée sur l’unité. L’absence de
raccordement à une prise secteur appropriée pourrait provoquer un
incendie, des chocs électriques ou des dysfonctionnements.
• Veillez à utiliser le cordon d’alimentation fourni. Par conséquent,
évitez de recourir à des cordons d’alimentation fournis avec d’autres
appareils. Le non-respect des consignes précédentes risque
d’entraîner un incendie, des brûlures ou des dysfonctionnements.
• Vérifiez périodiquement l’état de la prise électrique, dépoussiérez-la
et nettoyez-la en prenant soin de retirer toutes les impuretés qui
pourraient s’y accumuler. Le non-respect de cette consigne peut
entraîner un incendie ou des chocs électriques.
• Lors de l’installation de l’appareil, assurez-vous que la prise secteur
que vous utilisez est facilement accessible. En cas de problème ou
de dysfonctionnement, désactivez immédiatement l’interrupteur
d’alimentation et retirez la fiche de la prise secteur. Même lorsque
l’interrupteur d’alimentation est en position désactivée, l’appareil
n’est pas déconnecté de la source d’électricité tant que le cordon
d’alimentation reste branché à la prise murale.
• Si vous entendez le tonnerre gronder ou suspectez l’imminence d’un
éclair, mettez immédiatement l’appareil hors tension et débranchez
la fiche d’alimentation de la prise secteur. Le non-respect de cette
consigne peut entraîner un incendie ou des dysfonctionnements.
• Si vous prévoyez de ne pas utiliser l’appareil pendant une longue
période de temps, assurez-vous de retirer la fiche d’alimentation de
la prise secteur. Le non-respect de cette consigne peut entraîner un
incendie ou des dysfonctionnements.
■ Démontage interdit
• Ne tentez pas de démonter ou de modifier l’appareil. Le non-respect
de cette procédure risque d’entraîner un incendie, des chocs
électriques, des blessures ou des dysfonctionnements. En cas
d’anomalie, veillez à faire inspecter ou réparer l’appareil par le
revendeur auprès duquel vous l’avez acheté ou par un technicien
Yamaha qualifié.
■ Avertissement relatif à la présence d’eau
• N’exposez pas l’appareil à la pluie et ne l’utilisez pas près d’une
source d’eau ou dans un milieu humide. Ne déposez pas dessus des
récipients (tels que des vases, des bouteilles ou des verres)
contenant des liquides qui risqueraient de s’infiltrer par les
ouvertures. Toute infiltration de liquide tel que de l’eau à l’intérieur
de l’appareil risque de provoquer un incendie, des chocs électriques
ou des dysfonctionnements. Si un liquide, tel que de l’eau, pénètre à
l’intérieur de l’appareil, mettez immédiatement hors tension et
débranchez le cordon d’alimentation de la prise secteur. Faites
ensuite inspecter l’appareil par le revendeur auprès duquel vous
l’avez acheté ou par un technicien Yamaha qualifié.
• N’essayez jamais de retirer ou d’insérer une fiche électrique avec les
mains mouillées. Ne manipulez pas l’appareil en ayant les mains
mouillées. Le non-respect de cette procédure risque d’entraîner des
chocs électriques ou des dysfonctionnements.
■ Prévention contre les incendies
• Ne placez pas d’objets brûlants ou de flammes nues à proximité de
l’appareil, au risque de provoquer un incendie.
■ Entretien et soins
• N’utilisez pas des aérosols ou des produits chimiques de type
pulvérisateur contenant des gaz combustibles pour le besoins de
nettoyage et de lubrification. Le cas échéant, le gaz combustible
s’accumule à l’intérieur du produit, ce qui pourrait provoquer une
explosion ou un incendie.
■ Utilisation des piles
• Ne démontez pas la pile. Tout contact du contenu des piles avec les
mains ou les yeux peut entraîner la cécité ou provoquer des brûlures
chimiques.
• Ne jetez pas les piles au feu. Cela pourrait causer l’explosion des
piles et provoquer un incendie ou des blessures.
• Évitez d’exposer les piles à une source de chaleur excessive, telle
que les rayons directs du soleil ou du feu. Les piles pourraient
exploser et provoquer un incendie ou des blessures.
• Ne tentez pas de recharger une pile non rechargeable. La charge
risque de provoquer une explosion ou une fuite de la pile, ce qui
pourrait causer la cécité, des brûlures chimiques ou des blessures.
• En cas de fuite du liquide des piles, évitez tout contact avec ce
liquide. En cas de contact avec les yeux, la bouche ou la peau,
rincez-vous immédiatement à l’eau claire et consultez un médecin.
Le liquide présent dans les piles est corrosif et peut provoquer la
cécité ou des brûlures chimiques.
■ Appareil sans fil
• N’utilisez pas cette unité à proximité d’appareils médicaux ou au
sein d’installations médicales. Les ondes radio transmises par
l’unité peuvent affecter les appareils électro-médicaux.
• N’utilisez pas cette unité lorsque vous vous trouvez à moins d’une
distance de 15 cm de personnes ayant un stimulateur cardiaque ou
un implant cardiaque défibrillateur. Les ondes radio émanant de
cette unité peuvent affecter le fonctionnement des équipements
électro-médicaux tels que les stimulateurs cardiaques ou les
défibrillateurs cardiaques.
■ En cas d’anomalie
• Si l’un des problèmes suivants se produit, coupez immédiatement
l’alimentation et retirez la fiche d’alimentation. Si l’appareil
fonctionne sur piles, retirez-en toutes les piles. Si vous constatez
l’une des anomalies décrites ci-après, désactivez immédiatement les
amplificateurs et les récepteurs.
- Le cordon/la fiche d’alimentation est endommagé(e).
- Une odeur inhabituelle ou de la fumée se dégage de l’appareil.
iii Fr

- Un corps étranger a pénétré à l’intérieur de l’appareil.
ATTENTION
- Une brusque perte de son est survenue durant l’utilisation de
l’appareil.
- L’appareil est fissuré ou endommagé.
En continuant d’utiliser l’appareil dans ces conditions, vous risquez
de provoquer des chocs électriques, un incendie ou des
dysfonctionnements. Faites immédiatement inspecter ou réparer
l’appareil par le revendeur auprès duquel vous l’avez acheté ou par
un technicien Yamaha qualifié.
• Veillez à ne pas faire tomber l’appareil. Si vous suspectez que
l’appareil a pu être endommagé à la suite d’une chute ou d’un
impact, coupez immédiatement l’alimentation et retirez la fiche de
la prise secteur. Le non-respect de cette procédure risque d’entraîner
des chocs électriques, un incendie ou des dysfonctionnements.
Faites immédiatement inspecter l’appareil par le revendeur auprès
duquel vous l’avez acheté ou par un technicien Yamaha qualifié.
Ce contenu indique « un risque de blessures ».
■ Alimentation/cordon d’alimentation
• N’utilisez pas une prise secteur dans laquelle la fiche d’alimentation
ne peut pas s’insérer fermement. Le non-respect de cette consigne
peut entraîner un incendie, des chocs électriques ou des brûlures.
• Veillez à toujours saisir la fiche elle-même, et non le câble, pour la
retirer de l’appareil ou de la prise secteur. Si vous tirez sur le
cordon, vous risquez de l’endommager et de provoquer des chocs
électriques ou un incendie.
• Introduisez complètement la fiche d’alimentation dans la prise
secteur. L’utilisation de l’appareil alors que la fiche d’alimentation
n’est pas complètement insérée dans la prise peut entraîner une
accumulation de poussière sur la fiche et provoquer un incendie ou
des brûlures.
■ Installation
• Ne placez pas l’appareil dans une position instable afin d’éviter
qu’il ne tombe ou se renverse accidentellement et ne provoque des
blessures.
• Évitez d’obstruer les orifices de ventilation (fentes de
refroidissement) de l’appareil. L’appareil possède des orifices
d’aération sur ses faces supérieure/inférieure qui sont destinées à le
protéger contre l’élévation excessive de sa température interne. Le
non-respect de cette consigne risque d’entraîner une rétention de
chaleur à l’intérieur de l’appareil, susceptible de provoquer un
incendie ou des dysfonctionnements.
• Lors de l’installation de l’appareil :
- Évitez de couvrir l’appareil avec un tissu.
- N’installez pas l’appareil sur une moquette ou un tapis.
- Assurez-vous de disposer l’appareil en orientant sa face
supérieure vers le haut ; ne le placez pas sur le côté ou à l’envers.
- N’utilisez pas l’appareil dans un lieu clos, mal aéré.
Le non-respect de ce qui précède risque d’entraîner une rétention de
chaleur à l’intérieur de l’appareil, susceptible de provoquer un
incendie ou des dysfonctionnements. Veillez àlaisser suffisamment
d’espace libre autour de l’unité : au au au moins 30 cm sur le dessus,
20 cm sur les côtés et 20 cm à l’arrière.
• Assurez-vous que la face supérieure est orientée vers le haut. Le
non-respect de cette consigne risque d’entraîner des
dysfonctionnements ou la chute de l’appareil, ce qui provoquerait
des blessures.
• Ne disposez pas l’appareil dans un emplacement où il pourrait
entrer en contact avec des gaz corrosifs ou de l’air à haute teneur en
sel. Cela pourrait provoquer des dysfonctionnements.
• Évitez d’être à proximité de l’appareil lors de la survenue d’une
catastrophe naturelle telle qu’un tremblement de terre. Compte tenu
du risque de renversement ou de chute de l’appareil pouvant
entraîner des blessures, pensez à vous éloigner rapidement de
l’appareil et à vous réfugier dans un lieu sûr.
• Avant de déplacer l’appareil, veillez à désactiver l’interrupteur
d’alimentation et à déconnecter tous les câbles de connexion. Le
non-respect de cette consigne peut entraîner l’endommagement des
câbles ou provoquer le trébuchement et la chute de l’utilisateur, s’il
s’agit de vous-même ou d’autres personnes.
• En cas de transport ou de déplacement de l’appareil, faites toujours
faire appel à au moins deux personnes. Si vous essayez de soulever
l’appareil par vous-même, vous risquerez de vous faire mal au dos
ou de vous blesser ou encore d’endommager l’appareil.
■ Perte de capacités auditives
• N’utilisez pas l’appareil/les haut-parleurs ou le casque de manière
prolongée à un niveau sonore trop élevé ou inconfortable pour
l’oreille, au risque d’endommager irrémédiablement votre ouïe. Si
vous constatez une baisse d’acuité auditive ou que vous entendez
des sifflements, consultez un médecin.
• Avant de raccorder l’appareil à d’autres dispositifs, mettez toutes les
unités concernées hors tension. Et, avant de mettre tous les appareils
sous/hors tension, vérifiez que tous les niveaux de volume sont
réglés sur la position minimale. Le non-respect de ces mesures peut
provoquer une perte d’acuité auditive, entraîner un risque
d’électrocution ou endommager l’équipement.
• Lorsque vous mettez le système audio sous tension, allumez
toujours l’appareil en DERNIER pour éviter d’endommager votre
ouïe et les haut-parleurs. Lors de la mise hors tension, vous devez
éteindre l’appareil en PREMIER pour la même raison. Le nonrespect des consignes précédentes risque d’entraîner une déficience
auditive ou d’endommager le casque.
■ Entretien
• Retirez la fiche d’alimentation de la prise secteur lors du nettoyage
de l’appareil. Le non-respect de cette consigne peut entraîner des
chocs électriques.
■ Précautions d’utilisation
• N’insérez pas de corps étranger, tel que du métal ou du papier, à
l’intérieur des trous de ventilation de l’appareil. Le non-respect de
cette procédure risque d’entraîner un incendie, des chocs électriques
ou des dysfonctionnements. En cas de pénétration de corps
étrangers à l’intérieur de l’appareil, coupez immédiatement
l’alimentation et retirez la fiche d’alimentation de la prise secteur /
puis mettez hors tension les amplificateurs et les récepteurs et faites
inspecter l’appareil par le revendeur auprès duquel vous l’avez
acheté ou par un technicien Yamaha qualifié.
• Ne vous appuyez pas sur l’appareil et ne déposez pas dessus des
objets lourds. Évitez d’appliquer une force excessive en manipulant
les touches, les sélecteurs et les connecteurs. Le non-respect des
consignes précédentes risque d’entraîner des blessures ou
d’endommager l’appareil.
• Évitez de débrancher les câbles connectés afin de ne pas causer de
blessures ou de dommages matériels qui pourraient résulter de la
chute de l’appareil.
■ Utilisation des piles
• Veillez à toujours remplacer toutes les piles en même temps. Ne
mélangez jamais piles neuves et piles usagées. L’utilisation simultanée de
piles neuves et anciennes pourrait provoquer un incendie, des brûlures ou
l’apparition de flammes dues à d’éventuelles fuites du liquide des piles.
• N’utilisez pas non plus en même temps divers types de piles,
comme par exemple, des piles alcalines et des piles au manganèse,
ou des piles de marques différentes, ou encore différents types de
piles d’un même fabricant. Cela pourrait entraîner un incendie, des
brûlures ou l’apparition de flammes provoquées par une fuite du
liquide des piles.
• Conservez les piles hors de portée des enfants. Un enfant pourrait
avaler une pile accidentellement. Le non-respect de cette consigne
risque de provoquer l’apparition de flammes provoquées par une
fuite du liquide des piles.
• Ne conservez pas les piles dans une poche ou un sac contenant des pièces
en métal et évitez de transporter ou de stocker des piles avec des éléments
métalliques. Cela pourrait court-circuiter les piles, les faire exploser ou
déverser leur liquide et provoquer un incendie ou des blessures.
• Veillez à respecter la polarité (+/-) lors de la mise en place des piles. Le nonrespect de ces instructions risque de provoquer un incendie, des brûlures ou
l’apparition de flammes en raison d’une fuite du liquide des piles.
• Lorsque les piles sont déchargées ou que vous n’utilisez pas
l’appareil pendant une longue période, retirez les piles de la
télécommande pour éviter toute fuite du liquide des piles.
• Avant de procéder au stockage ou à la mise au rebut des piles, veillez à
isoler la zone des bornes en appliquant dessus un ruban adhésif ou tout
autre type de protection. Si vous mélangez les piles à d’autres piles ou
à des objets métalliques, vous risquez de provoquer un incendie, des
brûlures ou l’apparition de flammes dues à la fuite du liquide des piles.
Attention
Ne touchez pas la surface indiquée par cette
étiquette.
La surface peut chauffer durant l’utilisation.
Français
iv Fr

Avis et informations
Avis
Indique des points qui doivent être observés pour éviter un
dysfonctionnement ou endommagement du produit et une
perte des données, ainsi que pour protéger
l’environnement.
■ Alimentation
• Si vous prévoyez de ne pas utiliser l'unité pendant une longue
période, assurez-vous de retirer le cordon d'alimentation de la prise
secteur. Même lorsque le commutateur A (Veille/Marche) a été
désactivé, une faible quantité d'électricité circule toujours dans
l'unité.
■ Installation
• N’utilisez pas l’appareil à proximité d’autres équipements
électroniques, tels qu’un téléviseur, une radio ou un téléphone
mobile. Le non-respect de cette précaution pourrait entraîner la
production de bruit sur cette unité, le téléviseur ou la radio.
• N’utilisez pas l’appareil dans un emplacement exposé à la lumière
directe du soleil (à l’intérieur d’un véhicule), à une température très
élevée (à proximité d’un appareil de chauffage) ou très basse, à un
dépôt de poussière excessif ou à de fortes vibrations. Le non-respect
de cette précaution pourrait entraîner la déformation du panneau de
l’unité, le dysfonctionnement de ses composants internes ou
l’instabilité de son fonctionnement.
• Installez l’appareil aussi loin que possible de tout autre équipement
électronique. Les signaux numériques de cette unité pourraient
causer des interférences avec d’autres appareils électroniques.
• Si vous utilisez la fonction sans fil, évitez d'installer cet appareil à
proximité de parois métalliques ou de bureaux en métal, de fours à
micro-ondes ou d'autres dispositifs sans fil.
■ Raccordements
• En cas de connexion d’unités externes, assurez-vous de lire
attentivement le mode d’emploi de l’appareil concerné et reliez-le
conformément aux instructions fournies. La non conformité aux
instructions de manipulation peut provoquer le dysfonctionnement
de l’appareil.
• Ne connectez pas l’appareil à des unités industrielles. Les normes
des interfaces audio numériques varient selon les catégories
d’usages (grand public ou industriels). Cet appareil a été conçu pour
une connexion à une interface audio numérique destinée aux
consommateurs. Toute connexion à une interface audio numérique à
usage industriel risque non seulement de provoquer le
dysfonctionnement de l’appareil mais peut aussi endommager les
haut-parleurs.
■ Manipulation
• Ne placez pas de produits en vinyle, en plastique ou en caoutchouc
sur l’appareil. Le non-respect de cette précaution pourrait décolorer
ou déformer son panneau.
• Si la température ambiante change radicalement (comme pendant le
transport de l’unité ou dans des conditions de surchauffe ou de
refroidissement rapides) et que de la condensation se forme dans
l’unité, laissez l’appareil hors tension pendant plusieurs heures
jusqu’à ce qu’il soit complètement sec avant de le réutiliser.
L’utilisation de l’appareil en cas de formation de condensation peut
entraîner son dysfonctionnement.
■ Entretien
• Utilisez un chiffon doux et sec pour le nettoyage de l’appareil.
L’utilisation de produits chimiques tels que de la benzène ou du
diluant, de produits d’entretien ou de chiffons de lavage chimique
peut causer la décoloration ou la déformation de l’appareil.
■ Piles
• Veillez à mettre au rebut les piles usagées selon la réglementation
locale en vigueur.
Informations
Indique des informations relatives à l’utilisation de ce
produit.
■ À propos du contenu de ce manuel
• Les illustrations et les captures d’écran figurant dans ce manuel
servent uniquement à expliciter les instructions.
• Les noms de société et les noms de produit mentionnés dans ce
manuel sont des marques commerciales ou des marques déposées de
leurs sociétés respectives.
• Les logiciels sont susceptibles d’être modifiés et mis à jour sans
avertissement préalable.
• Les informations repérées par l’icône « AVERTISSEMENT »
sont des précautions qui doivent impérativement être observées pour
éviter de graves blessures ou un décès.
• Les informations repérées par l’icône « ATTENTION » sont des
précautions qui doivent impérativement être observées pour éviter
des blessures.
• Les informations sous les rubriques « Avis » indiquent des points
qui doivent être observés pour éviter un dysfonctionnement ou un
endommagement du produit et la perte de données.
• Le contenu des rubriques « Note » fournit des informations
complémentaires.
• Dans ce manuel, le terme « iPhone » désigne à la fois un « iPod
touch », un « iPhone » et un « iPad ». (« iPhone » désigne un « iPod
touch », « iPhone » et « iPad », sauf indication contraire.)
• Les saisies d’écran des menus illustrées à titre d’exemple dans ce
mode d’emploi proviennent de la version anglaise.
v Fr

Table des matières
Table des matières
INTRODUCTION
Fonctions de cet appareil ........................................... 2
Sources pouvant êtres lues par cet appareil ................... 2
Accessoires fournis ..................................................... 3
Commandes et fonctions ............................................ 4
Panneau avant ................................................................ 4
Afficheur de la face avant.............................................. 6
Panneau arrière .............................................................. 7
Télécommande............................................................... 8
PRÉPARATION
Raccordements.......................................................... 10
Raccordement d’appareils audio.................................. 10
Raccordement des enceintes ........................................ 11
Raccordement des antennes FM/AM (R-N803) .......... 13
Raccordement de l’antenne DAB/FM (R-N803D)...... 13
Raccordement du câble de réseau................................ 14
Préparation d’une antenne sans fil ............................... 14
Raccordement du cordon d’alimentation ..................... 14
Mise sous tension de l’unité ........................................ 14
Raccordement à un réseau....................................... 15
Réglage de partage de l’appareil iOS .......................... 16
Configuration via bouton WPS du routeur .................. 17
Réglage manuel de connexion au réseau sans fil......... 18
Connexion directe de l’unité à un appareil mobile
(Wireless Direct) ..................................................... 19
Vérification du statut de connexion réseau.................. 20
Configuration de MusicCast ........................................ 20
OPÉRATIONS DE BASE
Lecture....................................................................... 22
Lecture d’une source.................................................... 22
Changement des informations présentées sur
l’afficheur de la face avant ...................................... 22
Opérations via le panneau avant .................................. 23
Utilisation de la minuterie de veille............................. 24
Écoute d’émissions FM/AM..................................... 25
Syntonisation FM/AM ................................................. 25
Mémorisation de vos radios favorites
(présélections) ......................................................... 25
Réception de données Radio Data System
(seulement les modèles pour le Royaume-Uni et
pour l’Europe) ......................................................... 28
Écouter la radio DAB (R-N803D) ........................... 29
Préparer la syntonisation DAB .................................... 29
Sélectionner une station radio DAB ............................ 29
Utilisation de la fonction de présélection .................... 30
Afficher les informations DAB ................................... 31
Vérifier la force du signal de chaque canal DAB........ 31
Lecture de musique via Bluetooth ........................... 32
Raccordement d’un dispositif Bluetooth (jumelage) ... 32
Lecture de contenus sur dispositifs Bluetooth ............. 32
Déconnecter une connexion Bluetooth ........................ 33
Lecture de musique stockée sur des serveurs
multimédias (PC/NAS) ......................................... 34
Configuration du partage de support des fichiers de
musique ................................................................... 34
Lecture de musique sur PC .......................................... 35
Écoute de la radio Internet ...................................... 37
Lecture de musique issue d’iTunes ou d’un
iPhone via un réseau (AirPlay) ............................38
Lecture de contenus musicaux d’iPhone ou d’un
iTunes ...................................................................... 38
Lecture de musique stockée sur un dispositif de
stockage USB .........................................................39
Raccordement d’un dispositif de stockage USB ......... 39
Lecture du contenu du dispositif de stockage USB ..... 39
Mémorisation du morceau/de la station en cours
d’écoute (fonction Preset) .....................................41
Mémorisation d’un morceau ou d’une station ............. 41
Rappel d’un morceau/d’une station mémorisé ............ 41
Supprimer une présélection ......................................... 41
OPÉRATIONS AVANCÉES
Optimisation automatique des réglages
d’enceintes (YPAO)...............................................42
Messages d’erreur........................................................ 44
Messages d’avertissement ........................................... 45
Configuration de réglages de lecture distincts
pour différentes sources de lecture
(menu Option)........................................................46
Éléments du menu Option ........................................... 46
Configuration des diverses fonctions
(menu Setup)..........................................................47
Éléments du menu Setup ............................................. 48
Network (Réseau) ........................................................ 48
Bluetooth ..................................................................... 50
YPAO .......................................................................... 50
Volume ........................................................................ 50
AutoPowerStdby (Auto Power Standby, Veille
Automatique)........................................................... 51
ECO Mode................................................................... 51
Configuration des paramètres du système
(menu ADVANCED SETUP)...............................52
Éléments du menu ADVANCED SETUP................... 52
Vérification de la version du microprogramme
(VERSION) ............................................................. 52
Modification du réglage d’impédance des enceintes
(SP IMP.)................................................................. 52
Sélection de l’ID de télécommande (REMOTE ID).... 52
Réglage du pas de fréquence de syntonisation (TU) ... 53
Restauration des réglages par défaut (INIT)................ 53
Mise à jour du microprogramme (UPDATE).............. 53
Mise à jour du microprogramme de l’unité via
le réseau..................................................................54
INFORMATIONS COMPLÉMENTAIRES
Guide de dépannage ..................................................55
Signalement d’erreurs sur l’afficheur de la face
avant .......................................................................61
Appareils et formats de fichiers compatibles..........62
Appareils compatibles ................................................. 62
Formats de fichiers pris en charge ............................... 62
Marques commerciales .............................................63
Caractéristiques techniques .....................................64
Index...........................................................................66
PRÉPARATION INTRODUCTION
BASE
OPÉRATIONS DE
AVANCÉES
OPÉRATIONS
INFORMATIONS
COMPLÉMENTAIRES
Français
1 Fr

INTRODUCTION
Note
Cette unité
1 Internet
2 Service de diffusion
Modem
Routeur*
3 PC
5 AirPlay (iTunes)
4 NAS
5 AirPlay
(iPhone/iPad/iPod touch)
6 Bluetooth
7 Dispositif
USB
8 Lecteur de CD,
etc.
Appareil
mobile
9 Radio
Fonctions de cet appareil
Ce récepteur réseau est compatible avec des sources réseau telles qu’une passerelle multimédia et des appareils mobiles.
Il permet la restitution de sources audio telles qu’un lecteur de CD ou la radio, mais aussi de dispositifs Bluetooth et de
services de diffusion en réseau.
Sources pouvant êtres lues par cet appareil
*
Il vous faut un routeur Wi-Fi (point d’accès) en vente dans le commerce pour utiliser un appareil mobile.
1 Écoute de la radio Internet (p. 37)
2 Écoute d’un service de diffusion
(voyez le supplément pour chaque service)
3 Lecture de fichiers de musique stockés sur
votre PC (p. 34)
4 Lecture de fichiers de musique stockés sur
votre NAS (p. 34)
Pour plus de détails concernant le raccordement des périphériques externes, reportez-vous à la section « Raccordements » (p. 10).
TUNINGPRESET
BAND
MEMORY CLEAR
DIMMER MODE
DISPLAY
BASSINPUT
BALANCE
LOUDNESS
TREBLE
PHONES
SPEAKERS USB
AB
5V
1A
YPAO MIC
LR
FLAT
-30dB
PURE DIRECT
VOLUME
SELECT
PUSH - ENTER
RETURN
CONNECT
5 Lecture de fichiers de musique stockés sur
votre iPod/iTunes avec AirPlay (p. 38)
6 Lecture de contenus audio stockés sur
dispositifs Bluetooth (p. 32)
7 Lecture de fichiers de musique stockés sur
votre dispositif USB (p. 39)
8 Écoute d’un dispositif externe (p. 10)
9 Écoute de la radio (p. 25, 29)
2 Fr

Accessoires fournis
Télécommande Antenne FM (R-N803)Antenne AM (R-N803) Antenne DAB/FM (R-N803D)
Microphone YPAO
Cordon d’alimentation
* Le type de cordon
d’alimentation fourni varie
selon la région où l’unité
est commercialisée.
Piles (x2)
(AA, R6, UM-3)
*
L’un des éléments ci-dessus est fourni
selon la région où a été acheté l’appareil.
Mode d’emploi du
R-N803/R-N803D
CD-ROM (modèle pour l’Europe)
Guide de démarrage
rapide du R-N803D
(modèle pour l’Europe)
G
■
■
■
■
Network Receiver
Mode d’emploi du
R-N803/R-N803D
(sauf modèle pour l’Europe)
Vérifiez que les accessoires suivants sont fournis avec le produit.
Accessoires fournis
INTRODUCTION
Network Receiver
Réseau Ampli-Tuner
Сетевой ресивер
G
Français
3 Fr

Panneau avant
Note
VOLUME
PURE DIRECT
RETURN
CONNECT
PUSH - ENTER
TUNINGPRESET
BAND
MEMORY CLEAR
BASSINPUT
5V
1A
BALANCE
LR
TREBLE
LOUDNESS
FLAT
-30dB
DIMMER MODE
DISPLAY
SELECT
PHONES
YPAO MIC
SPEAKERS USB
AB
12 3 4 5 6 7 8 9: B CA
Commandes et fonctions
1 A (alimentation)
Met l’unité sous/hors tension.
2 Témoin d’alimentation
Fortement éclairé : alimentation activée
Faiblement éclairé : mode veille
Éteint : alimentation coupée
Quand vous ne comptez pas utiliser l’unité pendant une période
prolongée, veillez à la débrancher de la prise de courant. Cette
unité consomme une quantité minimale d’électricité même en
mode veille.
3 Capteur de télécommande
Il reçoit les signaux émis par la télécommande.
4 DIMMER
Règle l’éclairage de l’afficheur de la face avant.
Choisissez parmi 5 niveaux d’éclairage en appuyant sur ce
bouton de façon répétée.
5 DISPLAY
Sélectionne les informations présentées sur l’afficheur de
la face avant (p. 22).
6 MODE
Règle le mode de réception de la bande FM sur stéréo
automatique ou mono (p. 25).
7 MEMORY
Mémorise la station radio actuelle sous forme d’une
présélection lorsque la source d’entrée TUNER est
sélectionnée (p. 25, 30).
Mémorise le morceau en cours de restitution ou la station
de diffusion actuelle sous forme d’une présélection quand
la source d’entrée NET ou USB est sélectionnée (p. 41).
8 CLEAR
Supprime une station présélectionnée quand la source
d’entrée TUNER est sélectionnée (p. 27, 30).
Supprime un morceau mémorisé ou une station de
diffusion présélectionnée quand la source d’entrée NET
ou USB est sélectionnée (p. 41).
9 BAND
Règle la bande du syntoniseur quand la source d’entrée
TUNER est sélectionnée. (p. 25, 29)
0 Afficheur de la face avant
Indique des informations sur l’état opérationnel de l’unité
(p. 6).
A PRESET j / i
Rappelle une station radio présélectionnée (p. 27, 30) ou
un morceau/une station de diffusion (p. 41).
B TUNING jj / ii
Règle la fréquence de syntonisation (p. 25) ou choisit une
station radio DAB (p. 29) quand la source d’entrée
TUNER est sélectionnée.
C PURE DIRECT et témoin
Cette fonction permet d’écouter une source avec une
pureté de son optimale (p. 23). Le témoin au-dessus du
bouton s’allume et l’afficheur de la face avant s’éteint
quand vous activez cette fonction.
4 Fr

Commandes et fonctions
Note
VOLUME
PURE DIRECT
RETURN
CONNECT
PUSH - ENTER
TUNINGPRESET
BAND
MEMORY CLEAR
BASSINPUT
5V
1A
BALANCE
LR
TREBLE
LOUDNESS
FLAT
-30dB
DIMMER MODE
DISPLAY
SELECT
PHONES
YPAO MIC
SPEAKERS USB
AB
OJIHFED K LMNG
INTRODUCTION
D Prise PHONES
Dévie le son vers votre casque en vue d’une écoute
individuelle.
E Prise YPAO MIC
Permet de connecter le microphone YPAO fourni (p. 42).
F SPEAKERS A/B
Active ou désactive le jeu d’enceintes raccordées aux
bornes SPEAKERS A et/ou SPEAKERS B situées sur le
panneau arrière à chaque pression sur le bouton
correspondant.
G Prise USB
Pour le raccordement d’un dispositif de stockage USB
(p. 39).
H Sélecteur INPUT
Sélectionne la source d’entrée que vous souhaitez écouter.
I Commande BASS
Augmente ou réduit la réponse dans les basses fréquences.
La position centrale produit une réponse plate (p. 23).
J Commande TREBLE
Augmente ou réduit la réponse dans les hautes fréquences.
La position centrale produit une réponse plate (p. 23).
K Commande BALANCE
Équilibre le son reproduit par les enceintes gauche et
droite afin de compenser le déséquilibre sonore provoqué
par l’emplacement des enceintes ou la configuration de la
pièce d’écoute (p. 23).
L Commande LOUDNESS
Permet de conserver la plage sonore intégrale à tout
volume (p. 24).
La commande LOUDNESS ne fonctionne pas quand la fonction
YPAO Volume (p. 50) est activée.
M SELECT/ENTER
Tournez la molette pour choisir une valeur numérique ou
un réglage et appuyez dessus pour confirmer votre
sélection.
N RETURN
Retourne au contenu précédent de l’afficheur de la face
avant.
CONNECT
Permet de mémoriser cette unité sur le réseau MusicCast
(p. 20).
O Commande VOLUME
Augmente ou réduit le niveau sonore.
Français
5 Fr

Commandes et fonctions
Note
VOL. MUTE
TUNED
SLEEP
YPAO VOL.
STEREO
SW
L R
AB
1 9
: A: B
2
3 6 7854
Afficheur de la face avant
• La première fois que vous mettez l’unité sous tension (ou après
son initialisation), « WAC » apparaît sur l’afficheur de la face
avant et l’unité recherche automatiquement un dispositif iOS.
Pour en savoir plus sur les dispositifs iOS et la connexion
réseau, voyez « Réglage de partage de l’appareil iOS » (p. 16).
• Vous pouvez changer la luminosité de l’affichage de la face
avant en appuyant sur DIMMER sur le panneau avant (p. 4).
1 Affichage des informations
Affiche le statut actuel (nom d’entrée, par exemple).
Vous pouvez changer les informations affichées en
appuyant sur DISPLAY en face avant (p. 22).
2 Témoin Bluetooth
S’allume lorsque l’unité est raccordée à un dispositif
Bluetooth.
3 Témoin d’intensité du signal
S’allume lorsque l’unité est raccordée à un réseau sans fil
ou fonctionne comme point d’accès. Le témoin de statut
permet de vérifier l’intensité du signal du réseau sans fil.
4 Témoin SLEEP
S’allume lorsque la minuterie de mise hors service est
activée (p. 24).
5 Témoin STEREO
S’allume lorsque l’unité reçoit un signal stéréo provenant
d’une radio FM.
7 Témoin YPAO VOL.
S’allume lorsque la fonction YPAO Volume (p. 50) est
activée.
La fonction YPAO Volume est automatiquement activée
après l’exécution de YPAO.
8 Témoins A/B
« A » s’allume lorsque la sortie enceinte SPEAKERS A est
activée, et « B » s’allume lorsque celle de SPEAKERS B
est activée.
9 Témoin de volume
Indique le volume actuel.
0 Témoins de curseur
Indiquent les touches de curseur de la télécommande
actuellement opérationnelles.
A Témoins d’enceinte
Indiquent les enceintes reproduisant les signaux durant la
mesure YPAO.
A Enceinte avant (G)
S Enceinte avant (D)
L Caisson de graves
B Témoin MUTE
Clignote lorsque le son est mis en sourdine.
6 Témoin TUNED
S’allume lorsque l’unité reçoit un signal provenant d’une
station de radio FM/AM.
6 Fr

Panneau arrière
A
B
SPEAKERS
NETWORK
COAXIALOPTICAL
FM AM
75Ω
ANTENNA
SUBWOOFER
OUT
TRIGGER
OUT
IN
2
IN
1
IN
OUT
OUT
3
12 12
CD
PHONO
LINE
GND
12V 0.1A
AC IN
381 2 4 5 6
9
7
A B C:
(R-N803)
Commandes et fonctions
INTRODUCTION
1 Prises LINE 1-3
Pour le raccordement à des composants audio analogiques
(
p. 10
).
2 Prises PHONO
Pour le raccordement à une platine (p. 10).
3 Prises OPTICAL 1/2
Pour le raccordement à des composants audio dotés d’une
sortie numérique optique (p. 10).
4 Prises COAXIAL 1/2
Pour le raccordement à des composants audio dotés d’une
sortie numérique coaxiale (p. 10).
5 Prise NETWORK
Pour le raccordement à un réseau via un câble de réseau
(p. 14).
6 Antenne sans fil
Pour le raccordement à un périphérique de réseau sans fil
(p. 14).
7 VO LTAGE SELECTOR
(Modèles généraux uniquement)
Réglez ce sélecteur sur la position correspondant à la
tension du courant dans votre région (p. 14).
8 Prise AC IN
Pour le raccordement du cordon d’alimentation fourni
(p. 14).
9 Prises CD
Pour le raccordement à un lecteur CD, etc. (p. 10).
0 Bornes ANTENNA
Pour le raccordement à des antennes radio (p. 13).
A Prises TRIGGER OUT
Pour le raccordement à un caisson de graves prenant en
charge la fonction Trigger (p. 10).
B Prise SUBWOOFER OUT
Pour le raccordement à un caisson de graves avec
amplificateur intégré (p. 10).
C Bornes SPEAKERS
Pour le raccordement à des enceintes (p. 10).
Français
7 Fr

LINE 1
OPT 1 OPT 2 CD
COAX 1 COAX 2
BLUETOOTH
NET USB
LINE 2 LINE 3
TUNER
PRESET
TUNING
BAND
MEMORY
SETUP
HOME
MUTENOW PLAYING
VOLUME
RETURN
ENTER
REPEAT
SHUFFLE
SLEEP
PHONO
B
A
SPEAKERS
OPTION
A
B
C
D
E
1
3
6
7
0
8
9
2
4
5
Commandes et fonctions
Télécommande
1 Émetteur de signal infrarouge
Envoie des signaux infrarouges.
2 SPEAKERS A/B
Active ou désactive le jeu d’enceintes raccordées aux bornes
SPEAKERS A et/ou SPEAKERS B situées sur le panneau arrière
de l’unité à chaque pression sur la touche correspondante.
3 Touches de sélection d’entrée
Sélectionnez une source d’entrée pour la lecture.
PHONO Prises PHONO
COAX 1/2 Prises COAXIAL 1/2
BLUETOOTH Connexion Bluetooth
OPT 1/2 Prises OPTICAL 1/2
CD Prises CD
LINE 1-3 Prises LINE 1–3
TUNER Syntoniseur FM/AM (R-N803)
Syntoniseur FM/DAB (R-N803D)
NET Source réseau (appuyez à plusieurs reprises
pour sélectionner la source réseau voulue)
USB Prise USB (sur le panneau avant)
4 Touches radio
Contrôlent la radio.
BAND Règle la bande du syntoniseur quand la source
d’entrée TUNER est sélectionnée. (p. 25, 29)
TUNING jj/ii Règlent la fréquence de syntonisation (p. 25)
ou choisissent une station radio DAB (p. 29)
quand la source d’entrée TUNER est
sélectionnée.
5 Touches de présélection
MEMORY Mémorise la station radio actuelle sous forme
d’une présélection lorsque la source d’entrée
TUNER est sélectionnée (p. 25, 30).
Mémorise le morceau en cours de restitution
ou la station de diffusion actuelle sous forme
d’une présélection quand la source d’entrée
NET ou USB est sélectionnée (p. 41).
PRESET j/i Rappelle une station radio présélectionnée
(p. 27, 30) ou un morceau/une station de
diffusion (p. 41).
6 Touches d’opération de menu
Touches de curseur
(B/C/D/E) paramètres, etc.
ENTER Confirme un élément sélectionné.
RETURN Retourne au statut précédent.
Permettent le choix des options de menu et des
7 HOME
Active le plus haut niveau de hiérarchie lors du choix de fichiers
musicaux, dossiers, etc.
8 SETUP
Affiche le menu « Setup » (p. 47).
9 NOW PLAYING
Affiche des informations sur le dossier, la plage, etc. choisi.
0 VOLUME +/–
Réglez le volume.
8 Fr

Commandes et fonctions
Note
Note
Note
30° 30°
Télécommande
Environ
6 m
A A (alimentation)
Met l’unité sous ou hors tension (veille).
La touche A (alimentation) de la télécommande fonctionne
uniquement quand le témoin A (alimentation) est allumé en face
avant.
B SLEEP
Règle la minuterie de veille (p. 24).
C OPTION
Affiche le menu « Option » (p. 46).
D MUTE
Met la sortie audio en sourdine.
E Touches de lecture
Contrôlent la lecture et permettent d’effectuer d’autres opérations
liées aux sources réseau, aux dispositifs Bluetooth et USB.
Selon le dispositif Bluetooth utilisé, il se pourrait que les touches
de lecture ne fonctionnent pas.
■ Installation des piles
INTRODUCTION
• Changez chacune des piles lorsque la portée de la
télécommande commence à se réduire.
• Avant de mettre la nouvelle pile en place, essuyez
soigneusement le compartiment.
■ Portée de la télécommande
Les télécommandes émettent un faisceau infrarouge
directionnel.
Veillez à diriger les télécommandes directement vers le
capteur de télécommande situé sur le panneau avant de cet
appareil.
Français
9 Fr

PRÉPARATION
ATTENTION
A
B
SPEAKERS
NETWORK
COAXIALOPTICAL
FM AM
75Ω
ANTENNA
SUBWOOFER
OUT
TRIGGER
OUT
IN
2
IN
1
IN
OUT
OUT
3
12 12
CD
PHONO
LINE
GND
12V 0.1A
O C
Entrée
audio
Sortie
audio
Enceintes B
Platine
Sortie
audio
Lecteur DVD, etc.
GND
Sortie audio
(numérique coaxiale)
Sortie audio
(numérique optique)
Lecteur CD, etc.
Sortie
audio
Lecteur CD, etc.
Caisson de
graves
Enregistreur CD, etc.
Enceintes A
Raccordement
système
Raccordements
Raccordement d’appareils audio
Assurez-vous de raccorder L (gauche) sur L, R (droite) sur R, « + » sur « + » et « – » sur « – ». Si le raccordement est
défectueux, aucun son n’est émis par les enceintes, et si la polarité de connexion des enceintes est incorrecte, les sons
manquent de naturel et de composantes graves. Reportez-vous au mode d’emploi de chaque composant.
Veillez à utiliser des câbles RCA (Cinch) et des câbles optiques ou coaxiaux pour relier les composants audio.
• Ne raccordez pas cette unité ou d’autres composants au secteur tant que toutes les connexions entre les composants ne
sont pas établies.
• Ne laissez pas les fils d’enceinte dénudés se toucher ni entrer en contact avec les pièces métalliques de cette unité. Cela
risquerait d’endommager l’unité et/ou les enceintes.
Seuls des signaux PCM peuvent être transmis aux prises numériques (OPTICAL/COAXIAL) de cette unité.
10 Fr

Note
• N’enroulez et n’acheminez jamais en faisceau les câbles audio
ATTENTION
Note
aa
b
b
d
d
c
c
10 mm
Fiche banane
et d’enceintes avec le cordon d’alimentation. Cela pourrait
générer du bruit.
• Les prises PHONO sont conçues pour la connexion d’une
platine dotée d’une cellule de type MM.
• Raccordez votre platine à la prise GND afin de réduire le bruit
dans le signal. Notez toutefois que selon la platine utilisée, il se
peut que vous obteniez moins de bruit dans le signal sans
raccorder la prise GND.
• Si vous possédez un caisson de graves Yamaha prenant en
charge la connexion système, vous pouvez mettre le caisson de
graves sous/hors tension en même temps que l’unité en
connectant le caisson de graves à la prise TRIGGER OUT avec
un câble à fiche mini-jack mono.
• Pour éviter la production d’un signal en boucle lorsqu’un
enregistreur audio est raccordé à l’unité, le signal audio n’est
pas transmis aux prises LINE 2 (OUT) quand LINE 2 est
sélectionné. De même, le signal audio n’est pas transmis aux
prises LINE 3 (OUT) quand LINE 3 est sélectionné.
Raccordements
Raccordement des enceintes
Connectez des enceintes de l’impédance indiquée ci-dessous. Si
vous connectez des enceintes d’impédance excessivement faible,
cette unité peut surchauffer. Vous pouvez changer le réglage
d’impédance des enceintes de l’unité avec le paramètre
« SP. IMP » (p. 52) du menu ADVANCED SETUP.
Raccordement des
enceintes
SPEAKERS A ou
SPEAKERS B
SPEAKERS A et
SPEAKERS B
Connexion bifilaire 4 Ω ou plus 8 Ω ou plus
■ Raccordement des câbles d’enceinte
Les câbles d’enceinte sont composés de deux fils. L’un se
connecte à la borne négative « – » de l’unité et de
l’enceinte, l’autre est destiné à la borne positive « + ». Si
les fils sont de couleurs différentes afin d’éviter toute
confusion, connectez le fil de couleur noire à la borne
négative et l’autre fil à la borne positive.
a
Dénudez sur environ 10 mm les extrémités du câble d’enceinte et
torsadez solidement les fils dénudés de ce câble.
b Desserrez la borne d’enceinte.
c Insérez les fils dénudés du câble dans l’écartement sur le côté
(supérieur droit ou inférieur gauche) de la borne.
d Serrez la borne.
Impédance des enceintes (SP IMP.)
4 MIN
4 Ω ou plus 8 Ω ou plus
8 Ω ou plus 16 Ω ou plus
8 MIN
(par défaut)
PRÉPARATION
Lorsque vous insérez les câbles d’enceinte dans les bornes des enceintes,
n’insérez que le fil d’enceinte dénudé. Si vous insérez un câble isolé, il
se peut que le raccordement soit médiocre et le son inaudible.
■
Raccordement avec fiche banane (modèles pour l’Amérique du Nord, l’Australie et modèle général uniquement)
Serrez la borne et insérez la fiche banane dans son
extrémité.
11 Fr
Français

Raccordements
Note
A
B
SPEAK
Cette unité
Enceinte
VOLUME
PURE DIRECT
RETURN
CONNECT
PUSH - ENTER
TUNINGPRESET
BAND
MEMORY CLEAR
BASSINPUT
5V
1A
BALANCE
LR
TREBLE
LOUDNESS
FLAT
-30dB
DIMMER MODE
DISPLAY
SELECT
PHONES
YPAO MIC
SPEAKERS USB
AB
SPEAKERS A/B
SPEAKERS A/B
■ Connexion bifilaire
Une connexion bifilaire a pour effet de séparer les graves
des médiums et des aigus. Une enceinte compatible avec ce
type de connexion est pourvue de quatre bornes de
connexion. Ces deux jeux de bornes permettent de diviser
l’enceinte en deux sections indépendantes. Lorsque ces
connexions sont effectuées, les circuits d’excitation des
médiums et des aigus sont reliés à un jeu de bornes et le
circuit d’excitation des graves est relié à l’autre jeu de
bornes.
Raccordez l’autre enceinte à l’autre jeu de bornes en
procédant de la même manière.
• Lorsque vous établissez des connexions bifilaires, retirez les
ponts de court-circuitage ou les câbles des enceintes. Pour plus
de détails, voyez le mode d’emploi des enceintes.
• Pour utiliser les connexions bifilaires, appuyez sur SPEAKERS A
et SPEAKERS B sur le panneau avant ou sur la télécommande
afin que les témoins « A » et « B » s’allument tous les deux sur
l’afficheur du panneau avant.
SPEAKERS
B
A
PHONO
COAX 1 COAX 2
OPT 1 OPT 2 CD
SLEEP
BLUETOOTH
12 Fr
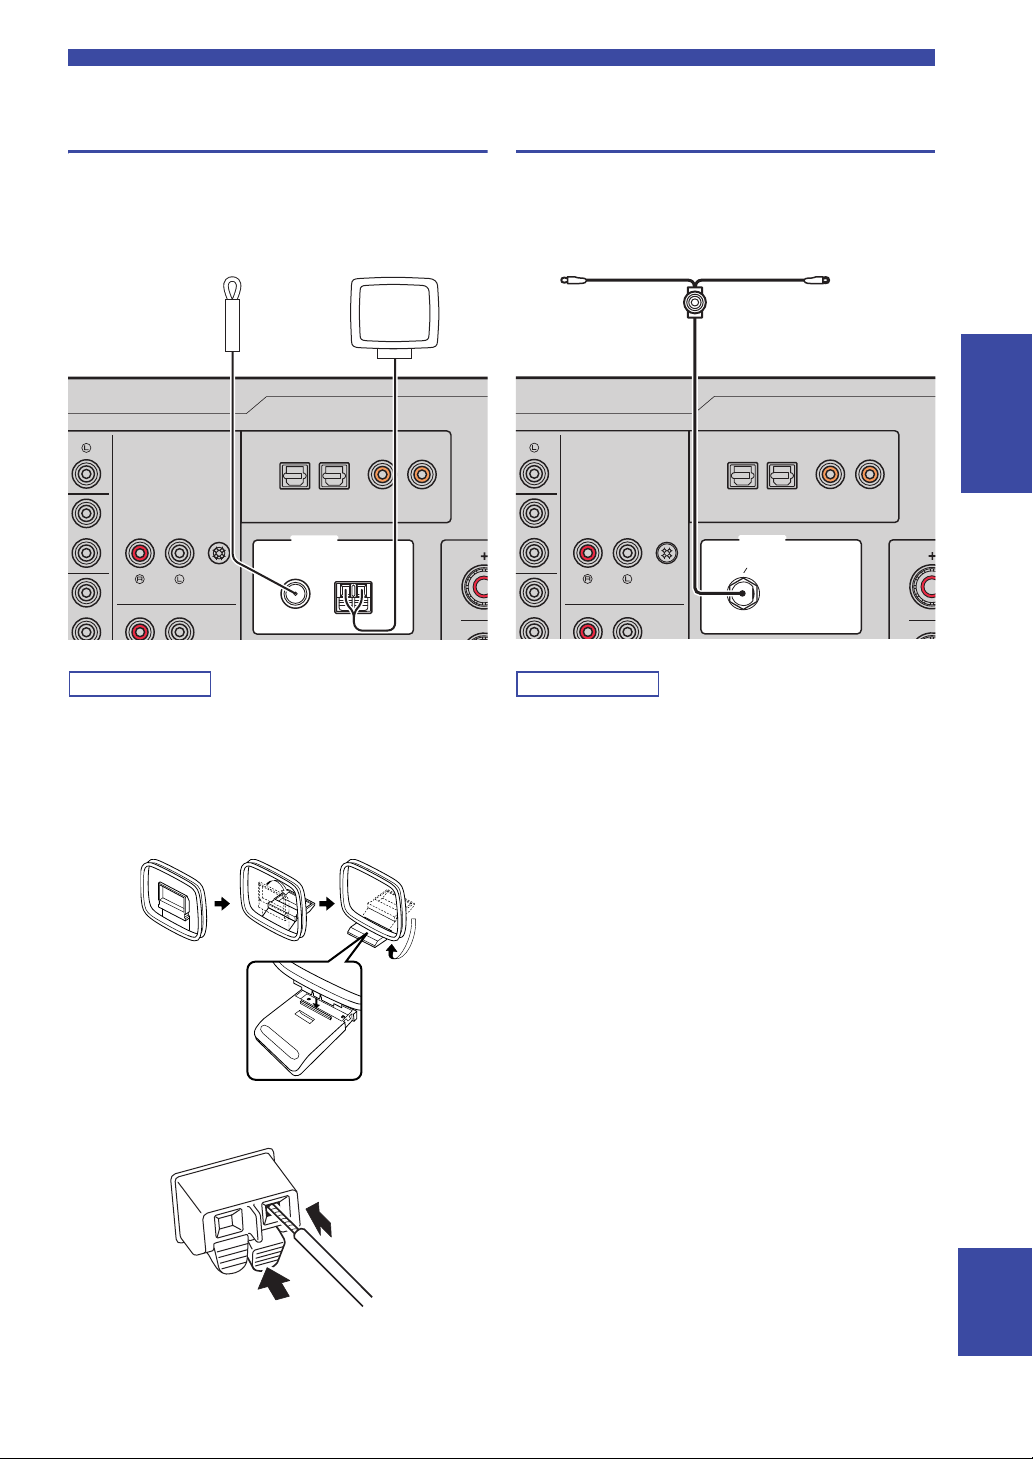
Raccordements
Note
Note
COAXIALOPTICAL
FM AM
75Ω
ANTENNA
12 12
PHONO GND
Antenne FM Antenne AM
Insérez
2
Abaissez
1
COAXIALOPTICAL
FM AM
75Ω
ANTENNA
12 12
PHONO GND
FMDAB
Antenne DAB/FM
Raccordement des antennes FM/AM (R-N803)
Connectez l’antenne FM/AM fournie à cette unité.
Fixez l’extrémité de l’antenne FM sur un mur et
positionnez l’antenne AM.
Raccordement de l’antenne DAB/FM (R-N803D)
Connectez l’antenne DAB/FM fournie à cette unité et
fixez l’antenne sur un mur.
PRÉPARATION
• Si la réception s’avère médiocre, installez une antenne
extérieure.
• Ne déroulez que la longueur de câble nécessaire à partir de
l’antenne AM.
• Les fils de l’antenne AM n’ont aucune polarité.
■ Assemblage de l’antenne AM fournie
■ Raccordement des fils de l’antenne AM
• Si la réception s’avère médiocre, installez une antenne
extérieure.
• Nous recommandons de déployer l’antenne horizontalement.
Français
13 Fr

Raccordements
Note
Avis
AVERTISSEMENT
Network Attached
Storage
(NAS)
Internet
Modem
Routeur
Câble de réseau
PC
Cette unité (arrière)
Appareil mobile
(tel qu’un iPhone)
(R-N803)
AC IN
VOLTAGE SELECTOR
110–120 V 220–240 V
Vers une prise secteur
avec le cordon
d’alimentation
A (alimentation)
Raccordement du câble de réseau
Raccordez l’unité à votre routeur au moyen d’un câble de
réseau STP (câble droit CAT-5 ou supérieur) disponible
dans le commerce.
Utilisez un câble STP (blindé à paires torsadées) pour éviter les
interférences électromagnétiques.
WAN
LAN
NETWORK
AC IN
Raccordement du cordon d’alimentation
Une fois que toutes les connexions sont effectuées,
raccordez le cordon d’alimentation fourni à cette unité et à
une prise de courant de tension appropriée.
(Modèle général uniquement)
Avant de brancher le cordon d’alimentation, assurez-vous
d’avoir réglé le sélecteur de tension VOLTAGE
SELECTOR de cette unité en fonction de votre tension
locale. Un réglage incorrect du sélecteur VOLTAGE
SELECTOR peut provoquer un incendie et endommager
l’unité.
Préparation d’une antenne sans fil
Pour utiliser une connexion réseau sans fil ou une
connexion Bluetooth, déployez l’antenne sans fil. Pour
plus de détails sur la connexion de l’unité à un réseau sans
fil, reportez-vous à la section « Raccordement à un
réseau » (p. 15). Pour plus de détails sur l’utilisation de
cette unité avec un dispositif Bluetooth, reportez-vous à la
section « Lecture de musique via Bluetooth » (p. 32).
SPEAKERS
A
NETWORK
Mise sous tension de l’unité
Appuyez sur A (alimentation) sur le panneau avant pour
mettre l’unité sous tension.
Manipulez toujours l’antenne sans fil en douceur. Une pression
trop forte sur l’antenne risque de l’endommager.
14 Fr

Raccordement à un réseau
Note
R-N803 XXXXXX
WAC
Connexion via le paramètre Wi-Fi de l’appareil
iOS (iPhone/iPad/iPod touch)
Partagez le paramètre Wi-Fi avec
l’appareil iOS (p. 16)
Connexion via la configuration une pression du
bouton WPS sur le routeur sans fil (ou point d’accès)
Utilisez la fonction de
configuration une pression du
bouton WPS (p. 17)
Connexion à un routeur sans fil (point d’accès)
sans configuration une pression du bouton WPS
Réglez manuellement la méthode
de connexion au réseau (p. 18)
Connexion via « MusicCast CONTROLLER »
Mémorisation de cette unité sur le
réseau MusicCast et connexion
directe au réseau sans fil (p. 20)
Raccordement à un réseau
Vous disposez de plusieurs méthodes pour connecter l’unité à un réseau. Sélectionnez une méthode de connexion en
fonction de votre environnement.
• Certains logiciels de sécurité installés sur votre PC ou les paramètres de pare-feu de périphériques réseau (tels qu’un routeur) peuvent
bloquer l’accès de l’unité à ces derniers ou à Internet. Dans ces cas, configurez de manière appropriée le logiciel de sécurité ou les
paramètres de pare-feu.
• Chaque serveur doit être connecté au même sous-réseau que l’unité.
• Pour utiliser ce service via Internet, nous vous recommandons d’utiliser une connexion à large bande.
• Pour lire une source audio haute résolution via le réseau, nous vous conseillons d’utiliser un routeur filaire afin d’obtenir une lecture
fluide.
WAC (Wireless Accessory Configuration)
La première fois que vous mettez l’unité sous tension (ou après son
initialisation), elle utilise automatiquement les paramètres réseau de
l’appareil iOS (iPhone/iPad/iPod touch) et tente de se connecter à un
réseau LAN sans fil (à moins qu’elle soit déjà connectée à un réseau
LAN filaire).
Si vous possédez un appareil iOS, effectuez la procédure à partir de l’étape 6 sous « Réglage de partage de l’appareil iOS » (p. 16).
Si vous comptez connecter l’unité sans fil via une autre méthode, appuyez sur RETURN pour quitter l’écran actuel, puis passez à
l’une des sections ci-dessous.
PRÉPARATION
■ Connexion via un routeur sans fil (point d’accès)
Raccordez l’unité au réseau en choisissant la méthode de connexion ci-dessous adaptée à votre système.
Français
15 Fr

Raccordement à un réseau
Note
Note
Note
Note
Note
Connexion via la fonction de serveur DHCP du
routeur
Vous pouvez connecter l’unité au
réseau en établissant simplement
une connexion LAN filaire (p. 14)
Connexion sans fil à un appareil mobile
(Wireless Direct)
Établissez une connexion sans fil
avec Wireless Direct (p. 19)
RETURN
SETUP
ENTER
Touches de
curseur B / C
Share Setting
WIRELESS
■ Connexion avec le routeur filaire
• Vous pouvez configurer les paramètres réseau (tels que l’adresse IP) avec « IP Address (Adresse IP) » (p. 49) sous le menu « Setup ».
• Si vous souhaitez utiliser une connexion LAN filaire après avoir établi une connexion sans fil, réglez le paramètre « Connection»
(p. 48) du menu « Setup » sur « Wired ».
■ Connexion sans routeur filaire ni routeur sans fil (point d’accès)
Quand l’unité est raccordée au réseau via Wireless Direct, elle ne peut être connectée à aucun autre routeur sans fil (point d’accès). Pour
lire des contenus disponibles sur l’Internet ou mettre à jour le microprogramme de cette unité via le réseau, connectez cette unité à un
réseau via un routeur filaire ou un routeur sans fil (point d’accès).
Réglage de partage de l’appareil iOS
Vous pouvez configurer facilement une connexion sans fil
en effectuant les réglages de connexion sur les appareils
iOS (iPhone/iPad/iPod touch).
Avant d’effectuer l’opération, vérifiez que votre appareil
iOS est connecté à un routeur sans fil (point d’accès).
MEMORY
PRESET
ENTER
HOME
RETURN
SETUP
• Si vous établissez une connexion sans fil avec cette méthode,
tous les paramètres réseau sont initialisés.
• Cette configuration n’est pas possible si votre routeur sans fil
(point d’accès) utilise la méthode de sécurité « WEP ». Dans ce
cas, utilisez une autre méthode de connexion.
VOLUME
OPTION
MUTENOW PLAYING
1 Appuyez sur SETUP.
2 Utilisez les touches de curseur (B / C) pour
sélectionner « Network » et appuyez sur
ENTER.
Pour revenir à l’écran précédent, appuyez sur RETURN.
3 Utilisez les touches de curseur (B / C) pour
sélectionner « Connection » et appuyez sur
ENTER.
4 Utilisez les touches de curseur (B / C) pour
sélectionner « Wireless » et appuyez sur
ENTER.
5 Utilisez les touches de curseur (B / C) pour
sélectionner « Share Setting » et appuyez
deux fois sur ENTER.
SHARE
Wireless(WAC)
16 Fr
Quand l’unité est connectée à un réseau filaire, « LAN CABLE »
et « Pls disconnect » apparaissent sur l’afficheur de la face avant.
Dans ce cas, débranchez le câble de réseau de cette unité et
appuyez sur ENTER.

Raccordement à un réseau
Note
Note
Nom de cette unité
Exemple (iOS 10)
Appuyez ici pour
démarrer la
configuration
Réseau actuellement
sélectionné
Touches de
curseur B /
C
6 Sur l’appareil iOS, sélectionnez l’unité
comme haut-parleur AirPlay dans l’écran WiFi.
7 Vérifiez le réseau actuellement sélectionné et
appuyez sur « Next ».
Une fois le partage effectué, l’unité se connecte
automatiquement au réseau sélectionné (point
d’accès).
Quand le réglage est terminé, vérifiez que l’unité est
connectée à un réseau sans fil (p. 20).
Configuration via bouton WPS du routeur
Vous pouvez établir facilement une connexion sans fil
d’une simple pression sur le bouton WPS.
Cette configuration n’est pas possible si votre routeur sans fil
(point d’accès) utilise la méthode de sécurité WEP ou WPA2TKIP. Dans ce cas, utilisez une autre méthode de connexion.
MEMORY
PRESET
HOME
SETUP
ENTER
VOLUME
RETURN
OPTION
MUTENOW PLAYING
RETURN
ENTER
SETUP
1 Appuyez sur SETUP.
2
Utilisez les touches de curseur (B / C) pour
sélectionner « Network » et appuyez sur ENTER.
Pour revenir à l’écran précédent, appuyez sur RETURN.
3 Utilisez les touches de curseur (B / C) pour
sélectionner « Connection » et appuyez sur
ENTER.
PRÉPARATION
4
Utilisez les touches de curseur (B / C) pour
sélectionner « Wireless » et appuyez sur ENTER.
WIRELESS
WPS
5 Appuyez deux fois sur ENTER.
« Connecting » apparaît sur l’affichage de la face
avant.
6 Appuyez sur le bouton WPS du routeur sans
fil (point d’accès).
Une fois la procédure de connexion terminée,
« Completed » apparaît sur l’afficheur de la face
avant. Quand le réglage est terminé, vérifiez que
l’unité est connectée à un réseau sans fil (p. 20).
Si « Not connected » s’affiche, répétez la procédure depuis
l’étape 1 ou essayez une autre méthode de connexion.
7 Pour quitter le menu, appuyez sur SETUP.
À propos de WPS
WPS (Wi-Fi Protected Setup) est une norme de la Wi-Fi
Alliance; elle permet de créer facilement un réseau
domestique sans fil.
17 Fr
Français

Raccordement à un réseau
Note
Note
RETURN
PRESET j / i
SETUP
ENTER
Touches de
curseur
B / C / D /
E
SSID
Réglage manuel de connexion au réseau sans fil
Avant d’effectuer la procédure suivante, vérifiez la
méthode de sécurité et la clé de sécurité du routeur sans fil
(point d’accès).
MEMORY
PRESET
ENTER
HOME
RETURN
SETUP
VOLUME
OPTION
MUTENOW PLAYING
1 Appuyez sur SETUP.
2 Utilisez les touches de curseur (B / C) pour
sélectionner « Network » et appuyez sur
ENTER.
Pour revenir à l’écran précédent, appuyez sur RETURN.
3 Utilisez les touches de curseur (B / C) pour
sélectionner « Connection » et appuyez sur
ENTER.
4 Utilisez les touches de curseur (B / C) pour
sélectionner « Wireless » et appuyez sur
ENTER.
5 Utilisez les touches de curseur (B / C) pour
sélectionner « Manual Setting » et appuyez
sur ENTER.
MANUAL
SSID
6 Utilisez les touches de curseur (B / C) pour
sélectionner « SSID » et appuyez sur ENTER.
7 Utilisez les touches de curseur pour saisir
l’identifiant SSID du routeur sans fil (point
d’accès), puis appuyez sur RETURN pour
retourner à l’écran précédent.
Utilisez les touches de curseur (D/E) pour
sélectionner le caractère à modifier et (B/C) pour
sélectionner un caractère.
Appuyez sur PRESET i pour insérer un caractère et
sur PRESET j pour supprimer un caractère.
18 Fr
8 Utilisez les touches de curseur (B / C) pour
sélectionner « Security » et appuyez sur
ENTER.
SECURITY
WPA2-PSK(AES)
9 Utilisez les touches de curseur (D / E) pour
sélectionner la méthode de sécurité voulue
et appuyez sur RETURN.
Réglages
None, WEP, WPA2-PSK (AES), Mixed Mode
Si vous choisissez « None », la connexion pourrait être
vulnérable en raison de l’absence de cryptage.
10 Utilisez les touches de curseur (B / C) pour
sélectionner « Security Key » et appuyez sur
ENTER.
KEY
11 Utilisez les touches de curseur pour saisir la
clé de sécurité du routeur sans fil (point
d’accès), puis appuyez sur RETURN pour
retourner à l’écran précédent.
Si vous avez choisi « WEP » à l’étape 9, saisissez une
série de 5 ou 13 caractères, ou de 10 ou 26 chiffres
hexadécimaux.
Si vous avez choisi « WPA2-PSK (AES) » ou
« Mixed Mode » à l’étape 9, saisissez une série de 8 à
63 caractères ou de 64 chiffres hexadécimaux.
Utilisez les touches de curseur (D/E) pour
sélectionner le caractère à modifier et (B /C) pour
sélectionner un caractère.
Appuyez sur PRESET i pour insérer un caractère et
sur PRESET j pour supprimer un caractère.
12 Utilisez les touches de curseur (B / C) pour
sélectionner « Connect[ENTER] » puis
appuyez sur ENTER pour enregistrer le
réglage.
Si vous n’arrivez pas à établir la connexion au réseau
sans fil, l’identifiant SSID ou la clé de sécurité est
peut-être incorrect. Reprenez la procédure depuis
l’étape 6.
Vous pouvez vérifier que l’unité est bien connectée à
un réseau sans fil (p. 20).
13 Pour quitter le menu, appuyez sur SETUP.

Raccordement à un réseau
Note
Note
Note
RETURN
PRESET j / i
SETUP
ENTER
Touches de
curseur
B / C / D /
E
SSID
W DIRECT
WPA2-PSK(AES)
SECURITY
Connexion directe de l’unité à un appareil mobile (Wireless Direct)
Via Wireless Direct, cette unité peut être utilisée comme
point d’accès de réseau sans fil et ainsi permettre la
connexion directe d’appareils mobiles.
MEMORY
PRESET
ENTER
HOME
SETUP
Quand vous établissez une connexion Wireless Direct, vous ne
pouvez pas connecter cette unité ou le dispositif mobile à
l’Internet, de sorte que les services en ligne tels que la radio
Internet ne sont pas disponibles.
1 Appuyez sur SETUP.
2 Utilisez les touches de curseur (B / C) pour
sélectionner « Network » et appuyez sur
ENTER.
Pour revenir à l’écran précédent, appuyez sur RETURN.
3 Utilisez les touches de curseur (B / C) pour
sélectionner « Connection » et appuyez sur
ENTER.
4 Utilisez les touches de curseur (B / C) pour
sélectionner « WirelesDirect » et appuyez sur
ENTER.
5 Appuyez sur ENTER pour vérifier le SSID sur
cette unité, puis appuyez sur RETURN pour
retourner à l’écran précédent.
6 Utilisez les touches de curseur (B / C) pour
sélectionner « Security » et appuyez sur
ENTER.
VOLUME
RETURN
OPTION
MUTENOW PLAYING
7 Utilisez les touches de curseur (D / E) pour
sélectionner la méthode de sécurité voulue
et appuyez sur RETURN.
Réglages
None, WPA2-PSK (AES)
• Si vous avez choisi « None », passez à l’étape 10.
• Si vous choisissez « None », la connexion pourrait être
vulnérable en raison de l’absence de cryptage.
8 Utilisez les touches de curseur (B / C) pour
sélectionner « Security Key » et appuyez sur
ENTER.
KEY
9 Utilisez les touches de curseur pour saisir la
clé de sécurité sur cette unité, puis appuyez
sur RETURN pour retourner à l’écran
précédent.
Saisissez la série de 8 à 63 caractères ou de 64
chiffres hexadécimaux.
Utilisez les touches de curseur (D / E) pour
sélectionner le caractère à modifier et (B / C) pour
sélectionner un caractère.
Appuyez sur PRESET i pour insérer un caractère et
sur PRESET j pour supprimer un caractère.
10 Utilisez les touches de curseur (B / C) pour
sélectionner « Connect[Enter] » puis
appuyez sur ENTER pour enregistrer le
réglage.
11 Configurez les paramètres sans fil d’un
appareil mobile.
Pour plus de détails sur les réglages de votre appareil
mobile, reportez-vous au manuel d’utilisation de ce
dernier.
(1) Activez la fonction sans fil de l’appareil mobile.
(2) Sélectionnez le SSID de cette unité dans la liste
des points d’accès disponibles.
(3) Quand l’écran vous demande un mot de passe,
saisissez la clé sécurité affichée à l’étape 9.
Si vous n’arrivez pas à établir la connexion Wireless
Direct, la clé de sécurité est peut-être incorrecte.
Configurez à nouveau les paramètres sans fil d’un
appareil mobile.
12 Pour quitter le menu, appuyez sur SETUP.
PRÉPARATION
Français
19 Fr

Raccordement à un réseau
Note
Note
Note
Note
PRESET
MEMORY
SETUP
HOME
MUTENOW PLAYING
VOLUME
RETURN
ENTER
OPTION
RETURN
SETUP
ENTER
Touches de
curseur B /
C
Vérification du statut de connexion réseau
La procédure suivante permet de vérifier la connexion de
l’unité à un réseau.
1 Appuyez sur SETUP.
2 Utilisez les touches de curseur (B / C) pour
sélectionner « Network » et appuyez sur
ENTER.
Pour revenir à l’écran précédent, appuyez sur RETURN.
3 Utilisez les touches de curseur (B / C) pour
sélectionner « Information » et appuyez sur
ENTER.
4 Utilisez les touches de curseur (B / C) pour
sélectionner « STATU S ».
Configuration de MusicCast
■ À propos de MusicCast
MusicCast vous permet de partager votre musique entre des
dispositifs compatibles MusicCast dans plusieurs pièces.
L’application dédiée « MusicCast CONTROLLER » vous
permet d’écouter la musique de votre smartphone, d’un serveur
multimédia (ordinateur ou NAS) ou de la radio Internet
(services de diffusion) dans toute pièce de votre domicile.
• Tous les dispositifs compatibles MusicCast peuvent
être pilotés avec l’application dédiée « MusicCast
CONTROLLER ».
• Plusieurs dispositifs compatibles MusicCast situés
dans des pièces différentes peuvent être reliés pour lire
ensemble de la musique.
• Permet la lecture de musique via la radio Internet
(services de diffusion)
• Paramètres réseau de dispositifs compatibles MusicCast
Pour plus d’informations sur MusicCast et sur les
dispositifs pris en charge, surfez sur le site suivant :
http://www.yamaha.com/musiccast/
Pour des détails sur MusicCast, téléchargez le Guide de configuration
MusicCast sur le site Internet de téléchargement de Yamaha :
http://download.yamaha.com/
■ MusicCast CONTROLLER
STATUS
Connect
Quand « Connect » s’affiche, l’unité est connectée à
un réseau. Si « Disconnect » s’affiche, initialisez la
connexion.
5 Pour quitter le menu, appuyez sur SETUP.
20 Fr
Pour utiliser les fonctions réseau avec un dispositif
compatible MusicCast, vous devez vous procurer
l’application dédiée « MusicCast CONTROLLER » pour
dispositifs mobiles.
Procurez-vous l’application « MusicCast CONTROLLER »
(gratuite) sur l’App Store ou Google Play et installez-la.
■ Enregistrement sur le réseau MusicCast
Enregistrez cette unité sur le réseau MusicCast.
Configurez simultanément les paramètres de connexion au
réseau sans fil pour cette unité.
Veillez à avoir sous la main l’identifiant SSID et la clé de
sécurité pour votre réseau sans fil.
1 Sur votre dispositif mobile, lancez
« MusicCast CONTROLLER » et appuyez sur
« Setup ».
Si vous avez déjà connecté d’autres appareils compatibles
MusicCast au réseau, appuyez sur «» (Réglages) puis
sur « Add New Device ».

2 Exécutez les instructions affichées à l’écran
Note
CONNECT
avec « MusicCast CONTROLLER », puis
maintenez enfoncé CONNECT sur la face
avant de cette unité pendant 5 secondes.
3 Configurez le réseau avec « MusicCast
CONTROLLER » en suivant les instructions
affichées à l’écran.
Ceci termine les réglages d’enregistrement sur le réseau
MusicCast et de connexion au réseau sans fil.
Lisez de la musique avec l’application « MusicCast
CONTROLLER ».
• Airplay et le son DSD ne peuvent pas être transmis. La musique
peut être lue uniquement sur cette unité.
• Quand Pure Direct (p. 23) est activé, seules les sources réseau
(comme la radio Internet), les sources de dispositifs Bluetooth
et les sources de dispositifs de stockage USB peuvent être lues
via le réseau MusicCast.
Raccordement à un réseau
PRÉPARATION
Français
21 Fr

OPÉRATIONS DE BASE
Note
Note
Note
Touches de
sélection
d’entrée
A
(alimentation)
VOLUME
SPEAKERS A/B
VOLUME
PURE DIRECT
RETURN
CONNECT
PUSH - ENTER
TUNINGPRESET
BAND
MEMORY CLEAR
BASSINPUT
5V
1A
BALANCE
LR
TREBLE
LOUDNESS
FLAT
-30dB
DIMMER MODE
DISPLAY
SELECT
PHONES
YPAO MIC
SPEAKERS USB
AB
DISPLAY
Track
INFO
A
Lecture
Lecture d’une source
SPEAKERS
B
A
LINE 2 LINE 3
NET USB
TUNING
VOLUME
SLEEP
BLUETOOTH
RETURN
OPTION
MUTENOW PLAYING
PHONO
COAX 1 COAX 2
OPT 1 OPT 2 CD
LINE 1
TUNER
BAND
HOME
SETUP
1 Appuyez sur une touche de sélection
d’entrée pour choisir la source d’entrée à
écouter.
2
Appuyez sur SPEAKERS A et/ou SPEAKERS B
pour sélectionner les enceintes A et/ou les
enceintes B.
Quand le jeu d’enceintes A est activé, « SPEAKERS
A:On » apparaît sur l’afficheur de la face avant.
Quand le jeu d’enceintes B est activé, « SPEAKERS
B:On » apparaît sur l’afficheur de la face avant.
• Lorsqu’un jeu d’enceintes est branché à l’aide de connexions
bifilaires, ou lorsque deux jeux d’enceintes sont utilisés
simultanément (A et B), appuyez sur SPEAKERS A et
SPEAKERS B sur le panneau avant ou sur la télécommande de
sorte que les témoins « A » et « B » soient tous les deux allumés
sur l’afficheur du panneau avant.
• Si vous écoutez à l’aide d’un casque, désactivez les enceintes.
3 Lisez la source.
4 Appuyez sur VOLUME +/– pour régler le
niveau sonore.
Changement des informations présentées sur l’afficheur de la face avant
Si vous avez sélectionné une source réseau ou USB
comme source d’entrée, vous pouvez changer les
informations de lecture présentes sur l’afficheur de la face
avant.
1 Appuyez sur DISPLAY.
Chaque fois que vous appuyez sur la touche,
l’élément affiché change.
Environ trois secondes plus tard, les informations
correspondant à l’élément affiché apparaissent.
SERVER
A
Track #1
Source d’entrée Élément
Bluetooth
Server (Serveur)
AirPlay
USB
Net Radio
(Radio internet)
Track (titre du morceau), Artist (nom de
l’artiste), Album (nom de l’album)
Track (titre du morceau), Artist (nom de
l’artiste), Album (nom de l’album) Time
Track (titre du morceau), Album (nom de
l’album), durée, Station (nom de la station)
Vous pouvez régler le timbre avec les commandes BASS,
TREBLE, BALANCE et LOUDNESS ou avec le commutateur
PURE DIRECT du panneau avant.
5 Quand vous avez fini d’utiliser l’unité,
22 Fr
appuyez sur A (alimentation) sur le panneau
avant pour mettre l’appareil hors tension.
Quand vous appuyez sur la touche A (alimentation)
de la télécommande, l’unité passe en veille.
Le signe « _ » (trait de soulignement) s’affiche à la place des
caractères non pris en charge par l’unité.
 Loading...