

Page 1

Network Receiver
R-N602
Réseau Ampli-Tuner
U
OWNER’S MANUAL
MODE D’EMPLOI
Page 2

English
CAUTION
RISK OF ELECTRIC
SHOCK DO NOT OPEN
CAUTION: TO REDUCE THE RISK OF
ELECTRIC SHOCK, DO NOT REMOVE
COVER (OR BACK). NO USER-SERVICEABLE
PARTS INSIDE. REFER SERVICING TO
QUALIFIED SERVICE PERSONNEL.
We Want You Listening For A Lifetime
Yamaha and the Electronic Industries Association’s Consumer Electronics Group want you to get the most out of your
equipment by playing it at a safe level. One that lets the sound come through loud and clear without annoying blaring or
distortion – and, most importantly, without affecting your sensitive hearing. Since hearing damage from loud sounds is
often undetectable until it is too late, Yamaha and the Electronic Industries Association’s Consumer Electronics Group
recommend you to avoid prolonged exposure from excessive volume levels.
IMPORTANT SAFETY INSTRUCTIONS
• Explanation of Graphical Symbols
The lightning flash with arrowhead symbol, within
an equilateral triangle, is intended to alert you to the
presence of uninsulated “dangerous voltage” within
the product’s enclosure that may be of sufficient
magnitude to constitute a risk of electric shock to
persons.
The exclamation point within an equilateral triangle
is intended to alert you to the presence of important
operating and maintenance (servicing) instructions
in the literature accompanying the appliance.
IMPORTANT
Please record the serial number of this unit in the space below.
MODEL:
Serial No.:
The serial number is located on the rear of the unit. Retain this
Owner’s Manual in a safe place for future reference.
1 Read these instructions.
2 Keep these instructions.
3 Heed all warnings.
4 Follow all instructions.
5 Do not use this apparatus near water.
6 Clean only with dry cloth.
7 Do not block any ventilation openings. Install in
accordance with the manufacturer’s instructions.
8 Do not install near any heat sources such as radiators,
heat registers, stoves, or other apparatus (including
amplifiers) that produce heat.
9 Do not defeat the safety purpose of the polarized or
grounding-type plug. A polarized plug has two blades
with one wider than the other. A grounding type plug has
two blades and a third grounding prong. The wide blade
or the third prong are provided for your safety. If the
provided plug does not fit into your outlet, consult an
electrician for replacement of the obsolete outlet.
10 Protect the power cord from being walked on or pinched
particularly at plugs, convenience receptacles, and the
point where they exit from the apparatus.
11 Only use attachments/accessories specified by the
manufacturer.
12 Use only with the cart, stand, tripod,
bracket, or table specified by the
manufacturer, or sold with the apparatus.
When a cart is used, use caution when
moving the cart/apparatus combination to
avoid injury from tip-over.
13 Unplug this apparatus during lightning storms or when
unused for long periods of time.
14 Refer all servicing to qualified service personnel.
Servicing is required when the apparatus has been
damaged in any way, such as power-supply cord or plug
is damaged, liquid has been spilled or objects have fallen
into the apparatus, the apparatus has been exposed to rain
or moisture, does not operate normally, or has been
dropped.
English
i En
Page 3

Important safety instructions
FCC INFORMATION (for US customers)
1 IMPORTANT NOTICE: DO NOT MODIFY THIS
UNIT!
This product, when installed as indicated in the
instructions contained in this manual, meets FCC
requirements. Modifications not expressly approved by
Yamaha may void your authority, granted by the FCC,
to use the product.
2 IMPORTANT:
accessories and/or another product use only high quality
shielded cables. Cable/s supplied with this product MUST
be used. Follow all installation instructions. Failure to
follow instructions could void your FCC authorization to
use this product in the USA.
When connecting this product to
3 NOTE: This product has been tested and found to
comply with the requirements listed in FCC
Regulations, Part 15 for Class “B” digital devices.
Compliance with these requirements provides a
reasonable level of assurance that your use of this
product in a residential environment will not result in
harmful interference with other electronic devices.
This equipment generates/uses radio frequencies and,
if not installed and used according to the instructions
found in the users manual, may cause interference
harmful to the operation of other electronic devices.
Compliance with FCC regulations does not guarantee
that interference will not occur in all installations. If
this product is found to be the source of interference,
which can be determined by turning the unit “OFF”
and “ON”, please try to eliminate the problem by using
one of the following measures:
Relocate either this product or the device that is being
affected by the interference.
Utilize power outlets that are on different branch
(circuit breaker or fuse) circuits or install AC line
filter/s.
In the case of radio or TV interference, relocate/
reorient the antenna. If the antenna lead-in is 300 ohm
ribbon lead, change the lead-in to coaxial type cable.
If these corrective measures do not produce
satisfactory results, please contact the local retailer
authorized to distribute this type of product. If you can
not locate the appropriate retailer, please contact
Yamaha Corporation of America A/V Division, 6600
Orangethorpe Avenue, Buena Park, CA 90620, USA.
The above statements apply ONLY to those products
distributed by Yamaha Corporation of America or its
subsidiaries.
FCC CAUTION
Change or modifications not expressly approved by the party
responsible for compliance could void the user’s authority to
operate the equipment.
FOR CANADIAN CUSTOMERS
To prevent electric shock, match wide blade of plug to wide
slot and fully insert.
CAN ICES-3(B)/NMB-3(B)
COMPLIANCE INFORMATION STATEMENT
(DECLARATION OF CONFORMITY PROCEDURE)
Responsible Party: Yamaha Corporation of America A/V Division
Address: 6600 Orangethorpe Avenue, Buena Park, CA
Telephone: 1-714-522-9011
Type of Equipment: Network Receiver
Model Name: R-N602
This device complies with Part 15 of FCC Rules and Industry Canada
licence-exempt RSS standard(s).
Operation is subject to the following two conditions:
(1) this device may not cause interference, and
(2) this device must accept any interference, including interference that
may cause undesired operation of this device.
90620, USA
NOTICE
This equipment has been tested and found to comply with the limits for a Class B digital device, pursuant to part 15 of
the FCC Rules. These limits are designed to provide reasonable protection against harmful interference in a residential
installation. This equipment generates, uses and can radiate radio frequency energy and, if not installed and used in
accordance with the instructions, may cause harmful interference to radio communications. However, there is no
guarantee that interference will not occur in a particular installation. If this equipment does cause harmful interference to
radio or television reception, which can be determined by turning the equipment off and on, the user is encouraged to try
to correct the interference by one or more of the following measures:
- Reorient or relocate the receiving antenna.
- Increase the separation between the equipment and receiver.
- Connect the equipment into an outlet on a circuit different from that to which the receiver is connected.
- Consult the dealer or an experienced radio/TV technician for help.
This equipment complies with FCC/IC radiation exposure limits set forth for an uncontrolled environment and meets the
FCC radio frequency (RF) Exposure Guidelines in Supplement C to OET65 and RSS-102 of the IC radio frequency (RF)
Exposure rules. This equipment should be installed and operated keeping the radiator at least 20cm or more away from
person’s body (excluding extremities: hands, wrists, feet and ankles).
This transmitter must not be co-located or operated in conjunction with any other antenna or transmitter.
ii En
Page 4
Caution: Read this before operating your unit.
1 To assure the finest performance, please read this manual
carefully. Keep it in a safe place for future reference.
2 Install this sound system in a well ventilated, cool, dry, clean
place – away from direct sunlight, heat sources, vibration,
dust, moisture, and/or cold. For proper ventilation, allow the
following minimum clearances.
Top: 30 cm (11-3/4 in)
Rear: 20 cm (7-7/8 in)
Sides: 20 cm (7-7/8 in)
3 Locate this unit away from other electrical appliances, motors,
or transformers to avoid humming sounds.
4 Do not expose this unit to sudden temperature changes from
cold to hot, and do not locate this unit in an environment with
high humidity (i.e. a room with a humidifier) to prevent
condensation inside this unit, which may cause an electrical
shock, fire, damage to this unit, and/or personal injury.
5 Avoid installing this unit where foreign objects may fall onto
this unit and/or this unit may be exposed to liquid dripping or
splashing. On the top of this unit, do not place:
– Other components, as they may cause damage and/or
discoloration on the surface of this unit.
– Burning objects (i.e. candles), as they may cause fire,
damage to this unit, and/or personal injury.
– Containers with liquid in them, as they may fall and liquid
may cause electrical shock to the user and/or damage to
this unit.
6 Do not cover this unit with a newspaper, tablecloth, curtain,
etc. in order not to obstruct heat radiation. If the temperature
inside this unit rises, it may cause fire, damage to this unit,
and/or personal injury.
7 Do not plug in this unit to a wall outlet until all connections
are complete.
8 Do not operate this unit upside-down. It may overheat,
possibly causing damage.
9 Do not use force on switches, knobs and/or cords.
10 When disconnecting the power cable from the wall outlet,
grasp the plug; do not pull the cable.
11 Do not clean this unit with chemical solvents; this might
damage the finish. Use a clean, dry cloth.
12 Only voltage specified on this unit must be used. Using this
unit with a higher voltage than specified is dangerous and may
cause fire, damage to this unit, and/or personal injury. Yamaha
will not be held responsible for any damage resulting from use
of this unit with a voltage other than specified.
13 To prevent damage by lightning, keep the power cord
disconnected from a wall outlet or the unit during a lightning
storm.
14 Do not attempt to modify or fix this unit. Contact qualified
Yamaha service personnel when any service is needed. The
cabinet should never be opened for any reasons.
When not planning to use this unit for long periods of time (i.e.
15
vacation), disconnect the AC power plug from the wall outlet.
16 Be sure to read the “Troubleshooting” section in the owner’s
manual on common operating errors before concluding that
this unit is faulty.
17 Before moving this unit, press A downward to turn off this
unit and then disconnect the AC power plug from the AC wall
outlet.
18 Condensation will form when the surrounding temperature
changes suddenly. Disconnect the power cable from the
outlet, then leave this unit alone.
19 When using this unit for a long time, this unit may become
warm. Turn the system off, then leave this unit alone for
cooling.
20 Install this unit near the wall outlet and where the AC power
plug can be reached easily.
21 The batteries shall not be exposed to excessive heat such as
sunshine, fire or the like. When you dispose of batteries,
follow your regional regulations.
22 Excessive sound pressure from earphones and headphones
can cause hearing loss.
This unit is not disconnected from the AC power source as long as
it is connected to the wall outlet, even if this unit itself is turned off
by A. This state is called the standby mode. In this state, this unit is
designed to consume a very small quantity of power.
WARNING
TO REDUCE THE RISK OF FIRE OR ELECTRIC SHOCK, DO
NOT EXPOSE THIS UNIT TO RAIN OR MOISTURE.
Do not use this unit within 22 cm (9 inches) of persons with a heart
pacemaker implant or defibrillator implant.
This label is required to be attached to a product of which the
temperature of the top cover may be hot during operation.
English
iii En
Page 5

Caution: Read this before operating your unit.
■ Notes on remote controls and batteries
• Do not spill water or other liquids on the remote control.
• Do not drop the remote control.
• Do not leave or store the remote control in the following
conditions:
– places of high humidity, such as near a bath
– places of high temperatures, such as near a heater or stove
– places of extremely low temperatures
– dusty places
• Insert batteries according to the polarity markings (+ and -).
• Change all batteries if you notice the operation range of the
remote control narrows.
• If the batteries run out, immediately remove them from the
remote control to prevent an explosion or acid leak.
• If you find leaking batteries, discard the batteries
immediately, taking care not to touch the leaked material. If
the leaked material comes into contact with your skin or gets
into your eyes or mouth, rinse it away immediately and
consult a doctor. Clean the battery compartment thoroughly
before installing new batteries.
• Do not use old batteries together with new ones. This may
shorten the life of the new batteries or cause old batteries to
leak.
• Do not use different types of batteries (such as alkaline and
manganese batteries) together. Read the packaging carefully
as these different types of batteries may have the same shape
and color.
• Before inserting new batteries, wipe the battery compartment
clean.
• Keep the batteries in a location out of reach of children.
Batteries can be dangerous if a child were to put in his or her
mouth.
• If the batteries grow old, the effective operation range of the
remote control decreases considerably. If this happens,
replace the batteries with new one as soon as possible.
• If you plan not to use the unit for a long period of time,
remove the batteries from the unit. Otherwise, the batteries
will wear out, possibly resulting in a leakage of battery liquid
that may damage the unit.
• Do not throw away batteries with general house waste.
Dispose of them correctly in accordance with your local
regulations.
Bluetooth
• Bluetooth is a technology for wireless communication between
devices within an area of about 10 meters (33 ft) employing the
2.4 GHz frequency band, a band which can be used without a
license.
Handling Bluetooth communications
• The 2.4 GHz band used by Bluetooth compatible devices is a
radio band shared by many types of equipment. While
Bluetooth compatible devices use a technology minimizing the
influence of other components using the same radio band, such
influence may reduce the speed or distance of communications
and in some cases interrupt communications.
• The speed of signal transfer and the distance at which
communication is possible differs according to the distance
between the communicating devices, the presence of obstacles,
radio wave conditions and the type of equipment.
• Yamaha does not guarantee all wireless connections between
this unit and devices compatible with Bluetooth function.
iv En
Page 6

Contents
INTRODUCTION
What you can do with this unit ................................. 2
Sources that can be played back on this unit ................. 2
Mastering useful apps (MusicCast CONTROLLER).... 3
Supplied accessories ................................................... 4
Controls and functions ............................................... 5
Front panel ..................................................................... 5
Front display .................................................................. 7
Rear panel ...................................................................... 8
Remote control............................................................... 9
PREPARATION
Connections ............................................................... 11
Connecting the speakers .............................................. 12
Connecting the FM and AM antennas ......................... 13
Connecting the network cable ..................................... 14
Preparing a wireless antenna ....................................... 14
Connecting power cable .............................................. 14
Connecting to network ............................................. 15
Sharing the iOS device setting..................................... 16
Using the WPS push button configuration .................. 17
Set the wireless network connection manually............ 18
Connecting a mobile device to the unit directly
(Wireless Direct) ..................................................... 19
Verify the network connection status .......................... 20
BASIC OPERATION
Playback .................................................................... 21
Playing a source........................................................... 21
Using the sleep timer ................................................... 23
Listening to FM/AM radio....................................... 24
FM/AM tuning............................................................. 24
Automatic preset tuning (FM stations only)................ 24
Manual tuning preset ................................................... 25
Recalling a preset station ............................................. 26
Clearing a preset station............................................... 26
Playing back music via Bluetooth............................ 27
Connecting a Bluetooth device (pairing) ..................... 27
Playing back Bluetooth device contents ...................... 27
Disconnecting a Bluetooth connection ........................ 28
Playing back music stored on media servers
(PCs/NAS) ............................................................. 29
Setting the media sharing of music files ...................... 29
Playback of PC music contents.................................... 30
Listening to Internet radio .......................................32
Registering favorite Internet radio stations
(bookmarks)............................................................. 33
Playing back iPod/iTunes music via a network
(AirPlay).................................................................34
Playback of iPod/iTunes music contents ..................... 34
Playing back music stored on a USB storage
device ......................................................................36
Connecting a USB storage device ............................... 36
Playback of USB storage device contents ................... 36
Playing back iPod music ...........................................38
Connecting an iPod...................................................... 38
Playback of iPod content ............................................. 38
Switching information on the front display............40
Registering the current playback song/station
(Preset function) ....................................................41
Registering to a preset ................................................. 41
Recalling a preset......................................................... 41
ADVANCED OPERATION
Configuring playback settings for different
playback sources (Option menu) .........................42
Option menu items....................................................... 42
Configuring various functions (Setup menu) .........43
Setup menu items......................................................... 43
Network ....................................................................... 44
Bluetooth ..................................................................... 45
Max Volume ................................................................ 46
Initial Volume.............................................................. 46
AutoPowerStdby (Auto Power Standby)..................... 46
ECO Mode................................................................... 46
Configuring the system settings
(ADVANCED SETUP menu)...............................47
ADVANCED SETUP menu items .............................. 47
Changing the speaker impedance setting (SP IMP.) ... 47
Selecting the remote control ID (REMOTE ID).......... 47
Restoring the default settings (INIT) ........................... 47
Updating the firmware (UPDATE) ............................. 48
Checking the firmware version (VERSION)............... 48
Updating the unit’s firmware via the network.......49
ADDITIONAL INFORMATION
Troubleshooting.........................................................50
Error indications on the front display.....................56
Trademarks ...............................................................57
Specifications .............................................................58
Index...........................................................................59
PREPARATIONINTRODUCTION
OPERATION
BASIC
OPERATION
ADVANCED
INFORMATION
ADDITIONAL
• “Note” indicates precautions for use of the unit and its feature limitations. y indicates supplementary explanations for better use.
• This manual explains operations using the supplied remote control.
• This manual describes all the “iPod” and “iPhone” as the “iPod”. “iPod” refers to “iPod” and “iPhone”, unless otherwise specified.
• In this manual, iOS and Android mobile devices are collectively referred to as “mobile devices”. The specific type of mobile
device is noted in explanations as needed.
1 En
English
Page 7

INTRODUCTION
FM/AMFM/AM
VOLUME
PURE DIRECT
RETURN
CONNECT
PUSH - ENTER
TUNINGPRESET
BAND
MEMORY CLEAR
BASSINPUT
5V
1A
BALANCE
LR
TREBLE
LOUDNESS
FLAT
-30dB
DIMMER
DISPLAY
SELECT
PHONES
SPEAKERS
AB
MODE
This unit
1 Internet
2 Streaming service
Modem
Router*
3 PC
5 AirPlay (iTunes)
4 NAS
7 iPod
0
5 AirPlay (iPod)
6 Bluetooth
8 USB
device
9 CD player etc.
Mobile
device
What you can do with this unit
This unit is a network receiver compatible with a network source such as a media server and mobile device.
It supports playback from not only analog sources such as a CD player but also Bluetooth devices and network streaming
services.
Sources that can be played back on this unit
*
You need a commercially available wireless router (access point) when you use a mobile device.
1 Play back the Internet radio (p. 32)
2 Play back the streaming service
(see the supplement for each service.)
3 Play back music files stored on your PC (p. 29)
4 Play back music files stored on your NAS
(p. 29)
5 Play back music files stored on your iPod/
iTunes with AirPlay (p. 34)
y
For details on connecting the external devices, see “Connections” (p. 11).
2 En
6 Play back audio content from Bluetooth
devices (p. 27)
7 Play back music files stored on your iPod
(p. 38)
8 Play back music files stored on your USB
device (p. 36)
9 Play back your external component (p. 11)
0 Listening to FM/AM radio (p. 24)
Page 8

Mastering useful apps (MusicCast CONTROLLER)
What you can do with this unit
You can operate and program the unit, or play streaming services via this unit, by installing the free dedicated MusicCast
CONTROLLER app on a mobile device. For details, search for “MusicCast CONTROLLER” on the App Store or
Google Play.
■ MusicCast CONTROLLER capabilities
• Basic operations of the unit (turn on/standby, adjust volume and select input)
• Play songs stored on computers (servers)
• Select an Internet radio station
• Play music stored on mobile devices
• Play music on streaming service
• Distribute and receive audio between the unit and other Yamaha MusicCast supported devices
See MusicCast Setup Guide for details.
INTRODUCTION
3 En
English
Page 9
Supplied accessories
LINE 1
OPT 1 OPT 2 CD
COAX 1 COAX 2
BLUETOOTH
NET USB
LINE 2 LINE 3
TUNER
PRESET
TUNING
BAND
MEMORY
SETUP
HOME
MUTENOW PLAYING
VOLUME
RETURN
ENTER
REPEAT
SHUFFLE
SLEEP
PHONO
B
A
SPEAKERS
OPTION
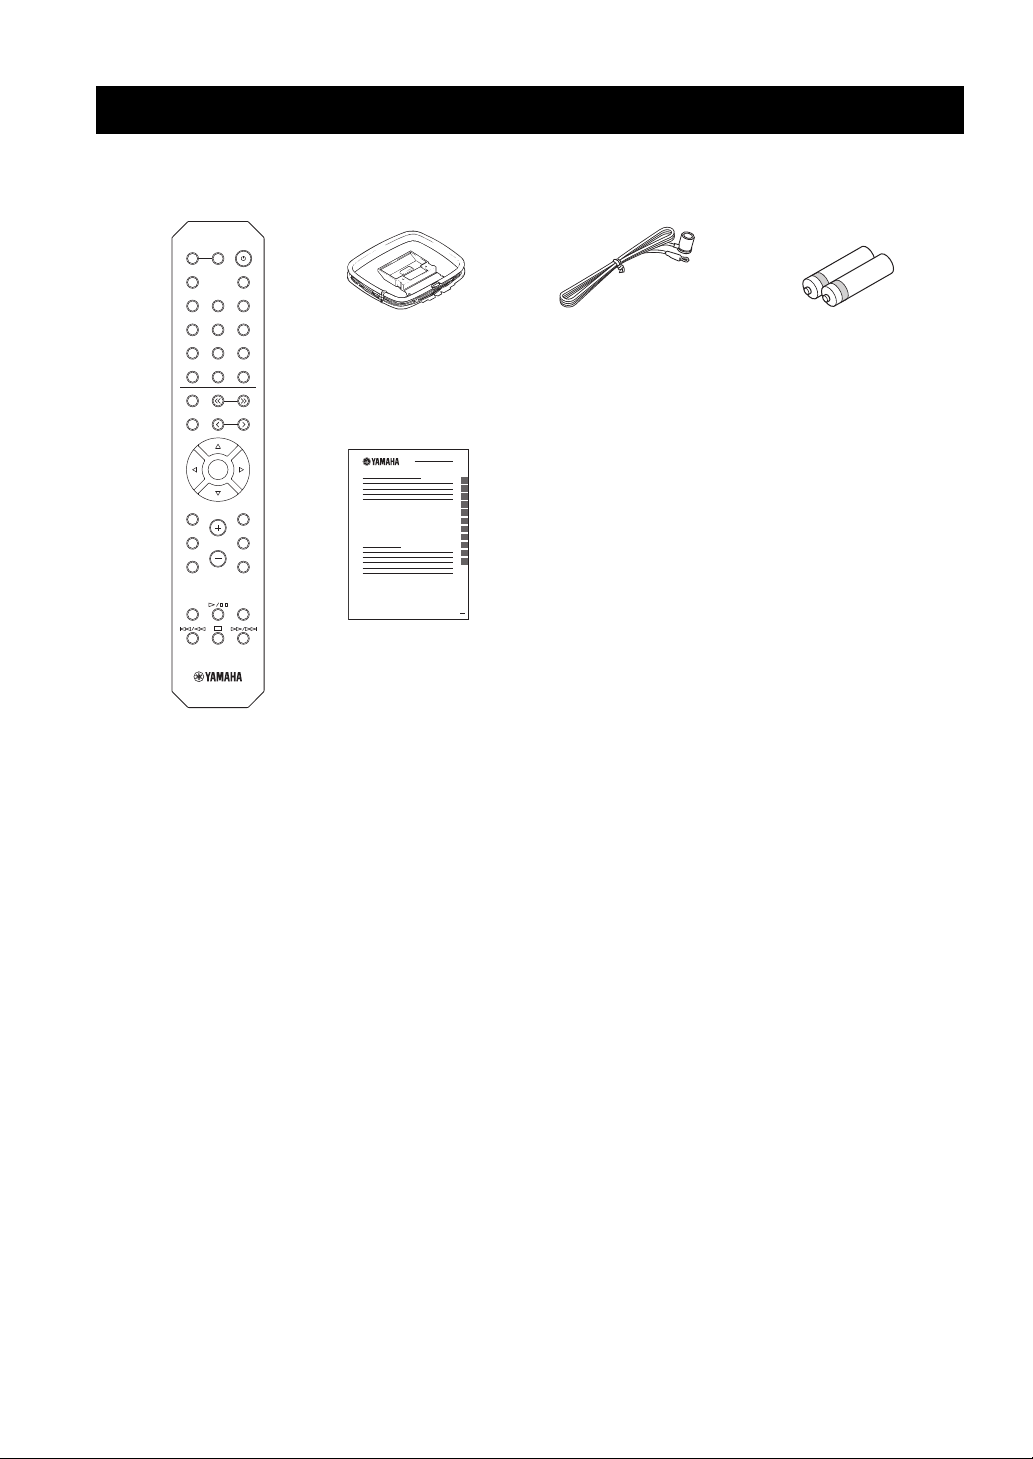
Remote control
FM antennaAM antenna
Batteries (x2)
(AA, R6, UM-3)
MusicCast Setup Guide
Check that the following accessories are supplied with the product.
4 En
Page 10
Front panel
VOLUME
PURE DIRECT
RETURN
CONNECT
PUSH - ENTER
TUNINGPRESET
BAND
MEMORY CLEAR
BASSINPUT
5V
1A
BALANCE
LR
TREBLE
LOUDNESS
FLAT
-30dB
DIMMER MODE
DISPLAY
SELECT
PHONES
SPEAKERS
AB
12 3 4 5 6 7 8 9: B CA
Controls and functions
Controls and functions
INTRODUCTION
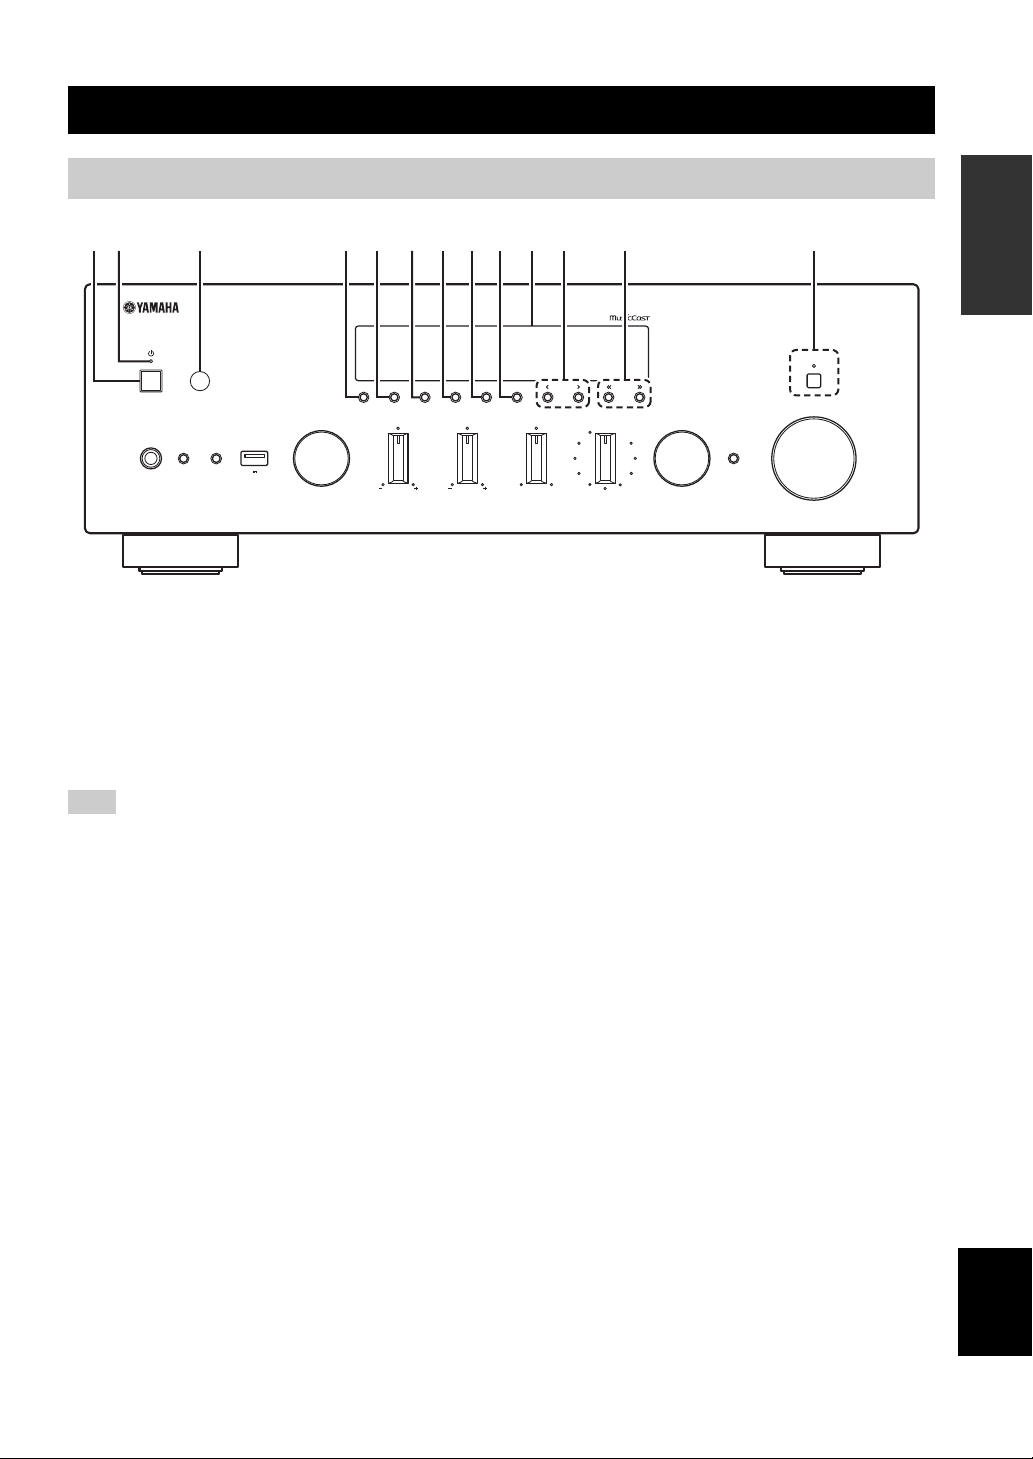
1 A (power)
Turns on/off (standby) the unit.
2 STANDBY/ON indicator
Lights up as follows:
Brightly lit: Power is on
Dimly lit: Standby mode
Note
In standby mode, this unit consumes a small amount of power to
receive infrared signals from the remote control.
3 Remote control sensor
Receives infrared signals from the remote control.
4 DIMMER
Changes the brightness level of the front display. Choose
brightness from 5 levels by pressing this button
repeatedly.
5 DISPLAY
Selects the information displayed on the front display
(p. 40).
6 MODE
Sets the FM band reception mode to automatic stereo or
monaural (p. 24).
Switches the iPod operation modes (p. 39).
7 MEMORY
Registers the current FM/AM station as a preset when
TUNER is selected as the input source (p. 25).
Registers the current playback song or streaming station
as a preset when NET, USB (except iPod) are selected as
the input source (p. 41).
8 CLEAR
Clears a FM/AM preset station when TUNER is selected
as the input source (p. 26).
9 BAND
Switches between FM and AM (p. 24).
0 Front display
Shows information about the operational status of this
unit.
A PRESET j / i
Recalls a preset FM/AM station (p. 26) or song/streaming
station (p. 41).
B TUNING jj / ii
Selects the tuning frequency when TUNER is selected as
the input source (p. 24).
C PURE DIRECT and indicator
Allows you to listen to a source in the purest possible
sound (p. 21). The indicator above it lights up and the
front display turns off when this function is turned on.
English
5 En
Page 11
Controls and functions
VOLUME
PURE DIRECT
RETURN
CONNECT
PUSH - ENTER
TUNINGPRESET
BAND
MEMORY CLEAR
BASSINPUT
5V
1A
BALANCE
LR
TREBLE
LOUDNESS
FLAT
-30dB
DIMMER MODE
DISPLAY
SELECT
PHONES
SPEAKERS
AB
NIHGED J KLMF
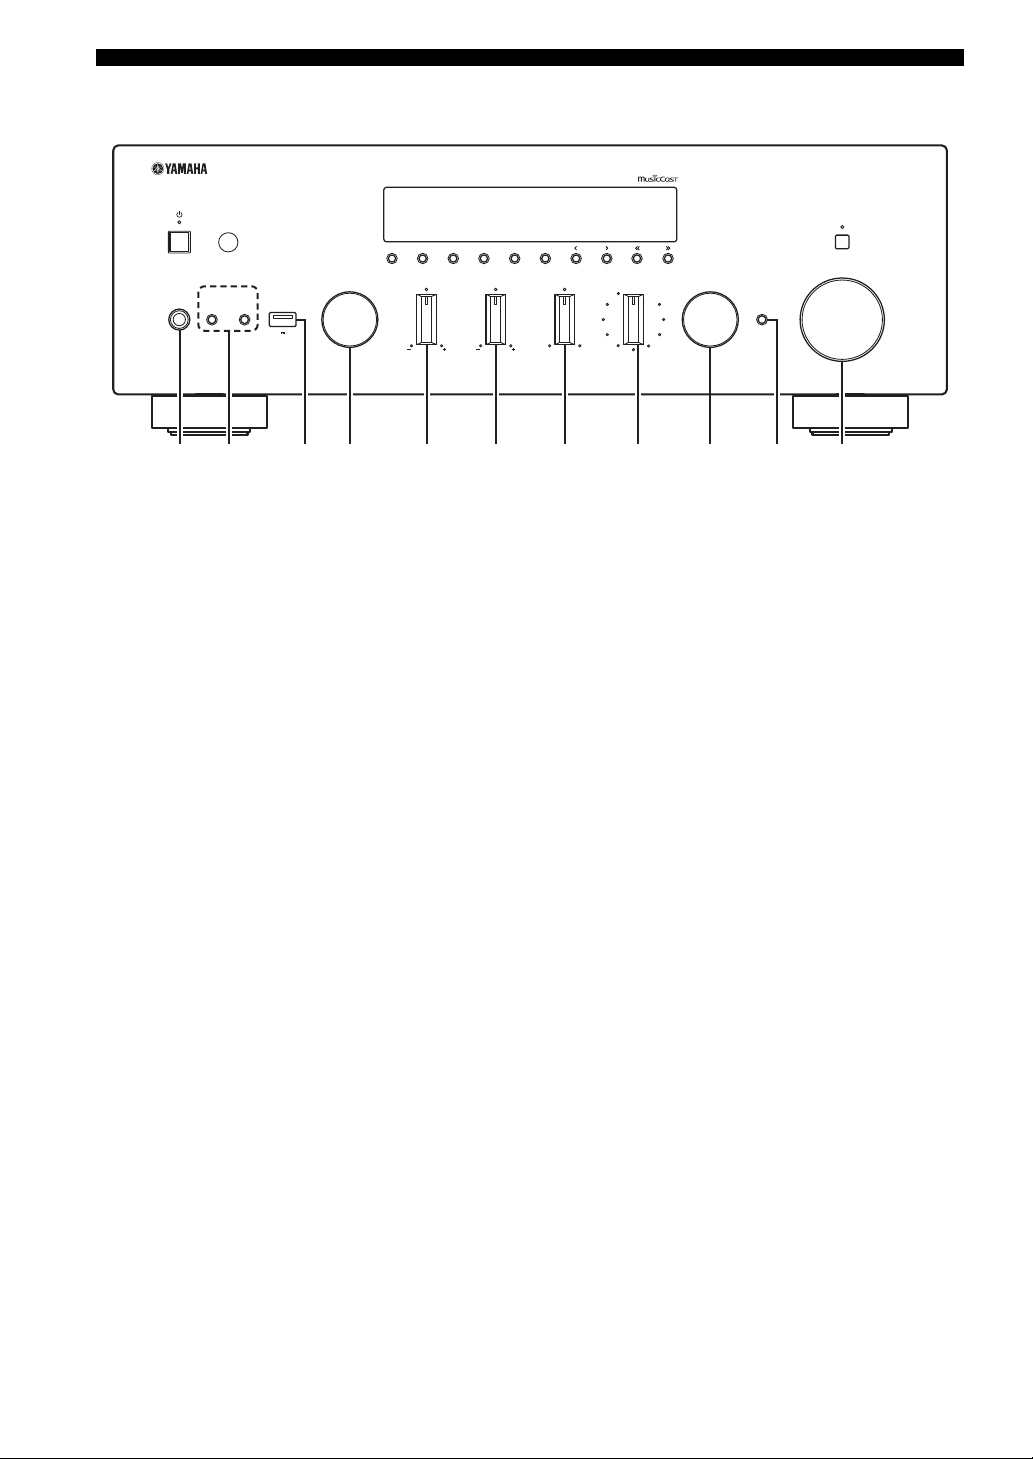
D PHONES jack
Outputs audio to your headphones for private listening.
E SPEAKERS A/B
Turns on or off the speaker set connected to the
SPEAKERS A and/or SPEAKERS B terminals on the rear
panel each time the corresponding button is pressed.
F USB jack
For connecting a USB storage device (p. 36) or an iPod
(p. 38).
G INPUT selector
Selects the input source you want to listen to.
H BASS +/– control
Increases or decreases the low frequency response. The
center position produces a flat response (p. 22).
I TREBLE +/– control
Increases or decreases the high frequency response. The
center position produces a flat response (p. 22).
J BALANCE control
Adjusts the sound output balance of the left and right
speakers to compensate for sound imbalances caused by
speaker locations or listening room conditions (p. 22).
K LOUDNESS control
Retains a full tonal range at any volume level to
compensate for the human ears’ loss of sensitivity to high
and low-frequency ranges at a low volume level (p. 22).
L SELECT/ENTER (jog dial)
Turn the dial to select a numeric value or setting, and press
the dial to confirm.
M RETURN
Returns to the previous indication of the front display.
CONNECT
Use to control the unit using the dedicated MusicCast
CONTROLLER app for mobile devices. See MusicCast
Setup Guide for details.
N VOLUME control
Increases or decreases the sound output level.
6 En
Page 12

Controls and functions
VOL.
MUTE
TUNEDSTEREO
A
SLEEP
B
1 9
6
: :
2
3 7 854
Front display
y
If the network connection is not set, turn the power ON to display “WAC” (Wireless Accessory Configuration) on the front panel and
trigger an automatic iOS device search. See “Sharing the iOS device setting” (p. 16) for details on the iOS device and network
connection.
INTRODUCTION
1 Information display
Displays the current status (such as input name).
You can switch the information that is displayed when you
press DISPLAY on the front panel (p. 40).
2 STEREO
Lights up when the unit is receiving a stereo FM radio
signal.
3 TUNED
Lights up when the unit is receiving an FM/AM radio
station signal.
4 Signal strength indicator
Lights up when the unit connects to a wireless network or
operates as an access point. The strength of the wireless
network signal can be verified by the indicator status.
5 Bluetooth indicator
Lights up when the unit is connecting to a Bluetooth
device.
6 Speaker indicators
“A” lights up when the SPEAKERS A output is enabled
and “B” lights up when the SPEAKERS B output is
enabled.
7 SLEEP
Lights up when the sleep timer is on.
8 MUTE
Blinks when audio is muted.
9 Volume indicator
Indicates the current volume.
0 Cursor indicators
Indicate the remote control cursor keys currently
operational.
y
You can change the brightness level of the front display by
pressing DIMMER on the front panel (p. 5).
English
7 En
Page 13
Controls and functions
A
B
SPEAKERS
NETWORK
COAXIAL
OPTICAL
FM AM
75Ω
ANTENNA
SUBWOOFER
PRE OUT
PHONO
IN
1
IN
OUT
2
1
2
1
2
IN
CD
LINE
OUT
3
SIGNAL
GND
3 5 68
A
1 2 4 7
9 :
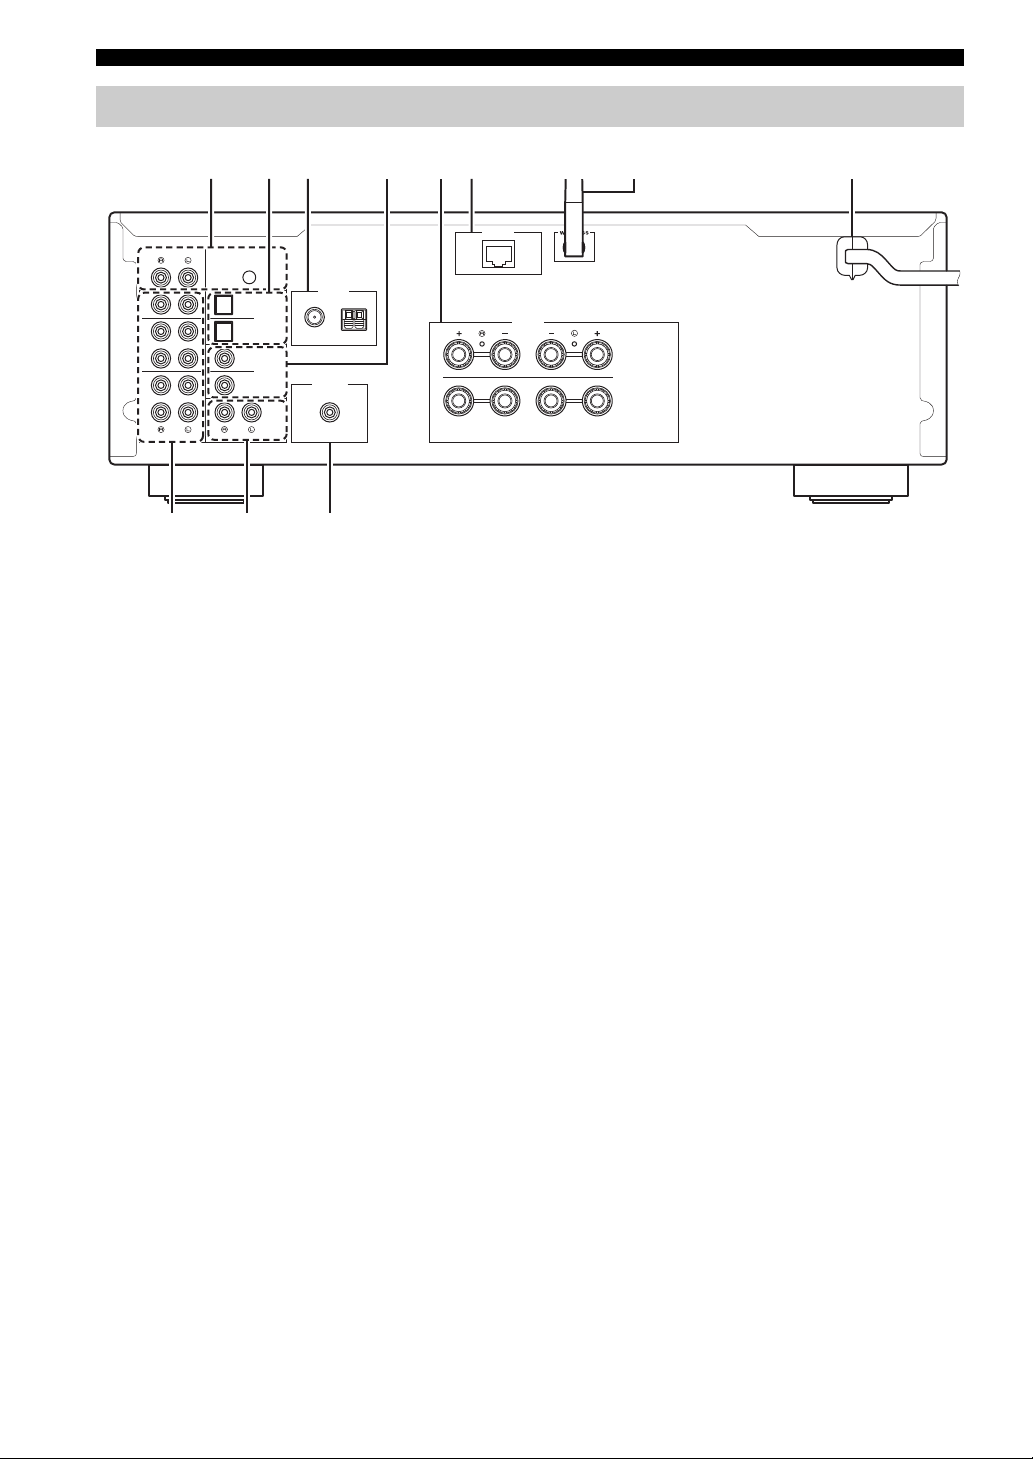
Rear panel
1 PHONO jacks
For connecting to a turntable (p. 11).
2 OPTICAL 1/2 jacks
For connecting to audio components equipped with
optical digital output (p. 11).
3 ANTENNA terminals
For connecting to FM and AM antennas (p. 13).
4 COAXIAL 1/2 jacks
For connecting to audio components equipped with a
coaxial digital output (p. 11).
5 SPEAKERS terminals
Used to connect speakers (p. 12).
6 NETWORK jack
For connecting to a network with a network cable (p. 14).
7 Wireless antenna
For connecting to a network device wirelessly (p. 14).
8 Power cable
For connecting to an AC wall outlet (p. 14).
9 LINE 1-3 jacks
For connecting to analog audio components (
p. 11
).
0 CD jacks
For connecting to a CD player (p. 11).
A SUBWOOFER PRE OUT jack
For connecting to a subwoofer with built-in amplifier
(p. 11).
8 En
Page 14
Remote control
1
3
6
7
0
8
9
2
4
5
A
Controls and functions
SPEAKERS
B
A
PHONO
COAX 1 COAX 2
OPT 1 OPT 2 CD
LINE 1
LINE 2 LINE 3
TUNER
NET USB
BAND
MEMORY
HOME
SETUP
REPEAT
TUNING
PRESET
ENTER
VOLUME
SLEEP
BLUETOOTH
RETURN
OPTION
MUTENOW PLAYING
SHUFFLE
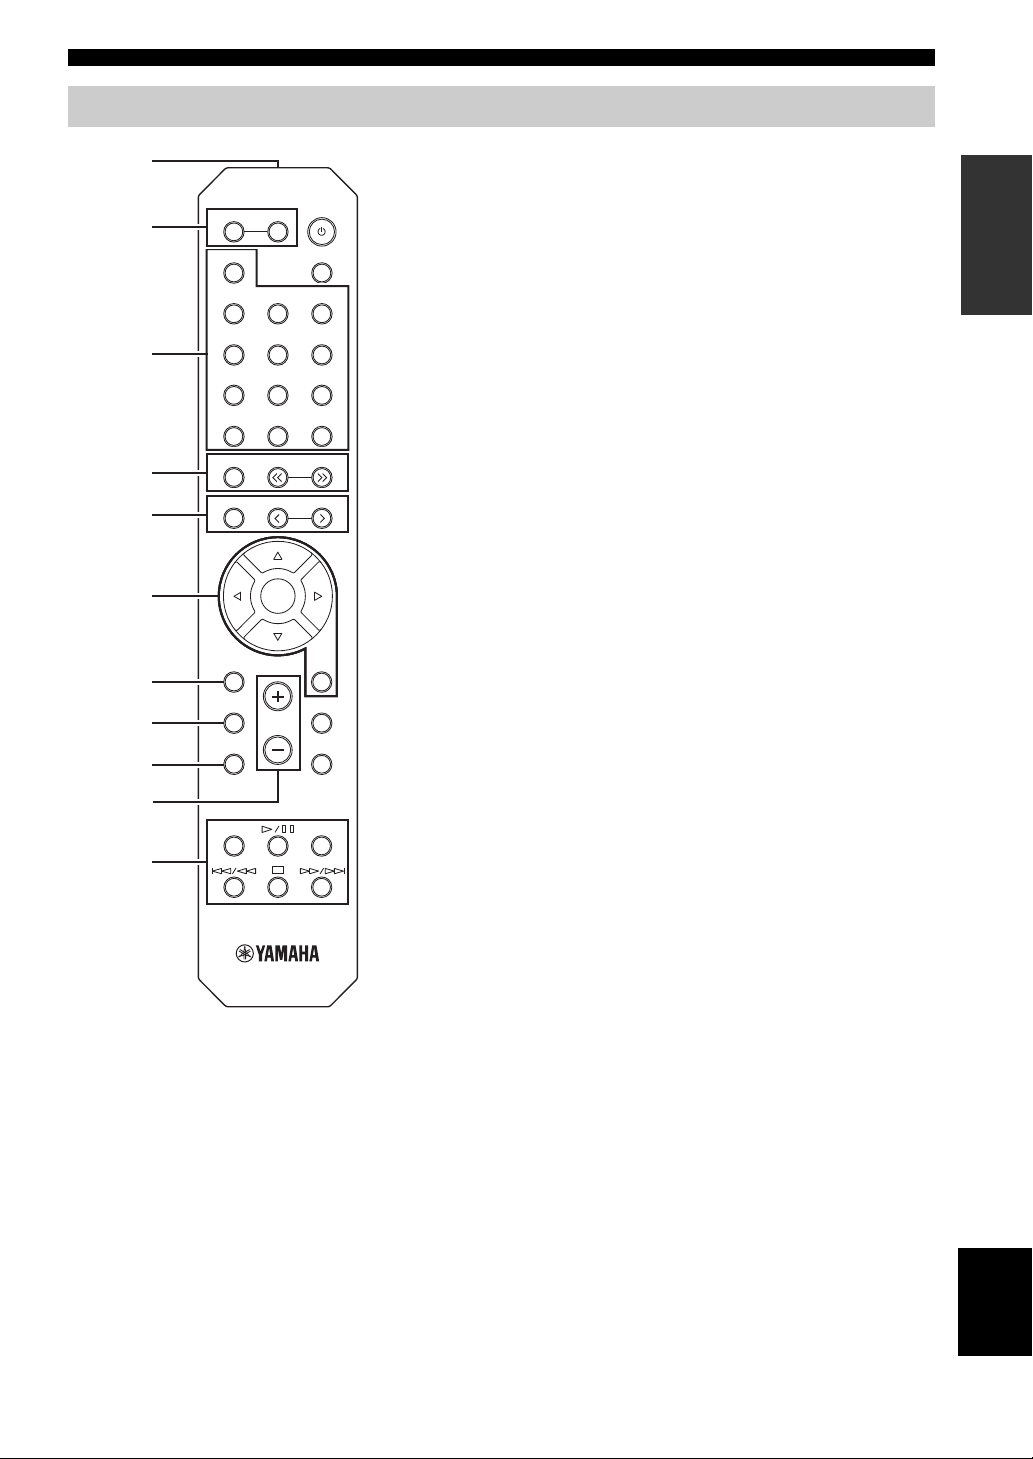
1 Infrared signal transmitter
Sends infrared signals.
2 SPEAKERS A/B
Turns on and off the set of speakers connected to the SPEAKERS
A and/or SPEAKERS B terminals on the rear panel of this unit
when the corresponding key is pressed.
3 Input selection keys
Select an input source for playback.
PHONO PHONO jacks
COAX 1/2 COAXIAL1/2 jacks
BLUETOOTH Bluetooth connection
OPT 1/2 OPTICAL 1/2 jacks
CD CD jacks
LINE 1-3 LINE 1-3 jacks
TUNER FM/AM tuner
NET Network source (press repeatedly to select a
desired network source)
USB USB jack (on the front panel)
4 Radio keys
Operate the FM/AM radio (p. 24).
BAND Switches between FM and AM.
TUNING jj/ii Selects the radio frequency.
5 Preset keys
MEMORY Registers the current FM/AM station as a
preset when TUNER is selected as the input
source (p. 25).
Registers the current playback song or
streaming station as a preset when NET, USB
(except iPod) are selected as the input source
(p. 41).
PRESET j/i Recalls a preset FM/AM station (p. 26) or
song/streaming station (p. 41).
6 Menu operation keys
Cursor keys Select a menu or a parameter.
(B/C/D/E)
ENTER Confirms a selected item.
RETURN Returns to the previous state.
7 HOME
Moves up top level when selecting music files, folders, etc.
8 SETUP
Displays the “Setup” menu (p. 43).
9 NOW PLAYING
Displays music information when selecting music files, folders,
etc.
0 VOLUME +/-
Adjust the volume.
A Playback keys
Let you play back and perform other operations for network
sources, Bluetooth devices and USB devices.
INTRODUCTION
English
9 En
Page 15

Controls and functions
30° 30°
Remote control
Approximately
6 m (20 ft)
SPEAKERS
B
A
PHONO
COAX 1 COAX 2
OPT 1 OPT 2 CD
LINE 1
LINE 2 LINE 3
SLEEP
BLUETOOTH
B
C
B A (power)
Turns on/off (standby) the unit.
C SLEEP
Sets the sleep timer (p. 23).
D OPTION
Displays the “Option” menu (p. 42).
E MUTE
Mutes the audio output.
TUNER
BAND
MEMORY
HOME
SETUP
REPEAT
NET USB
TUNING
PRESET
ENTER
VOLUME
RETURN
OPTION
MUTENOW PLAYING
SHUFFLE
D
E
■ Installing batteries
13
2
Notes
• Change all batteries if the operation range of the remote control
narrows.
• Before inserting new batteries, wipe the compartment clean.
■ Operation range
The remote controls transmit a directional infrared beam.
Be sure to aim the remote controls directly at the remote
control sensor on the front panel of this unit.
10 En
Page 16

PREPARATION
A
B
SPEAKERS
NETWORK
COAXIAL
OPTICAL
FM AM
75Ω
ANTENNA
SUBWOOFER
PRE OUT
PHONO
IN
1
IN
OUT
2
1
2
1
2
IN
CD
LINE
OUT
3
SIGNAL
GND
O C
Audio
input
Audio
output
Speakers B
Turntable
Audio
output
DVD player, etc.
GND
Audio output
(digital coaxial)
Audio output
(digital optical)
CD player, etc.
Audio
output
CD player
Subwoofer
CD recorder, etc.
Speakers A
Connections
CAUTION
• Do not connect this unit or other components to the main power until all connections between components are complete.
• All connections must be correct: L (left) to L, R (right) to R, “+” to “+” and “–” to “–”. If the connections are faulty,
no sound will be heard from the speakers, and if the polarity of the speaker connections is incorrect, the sound will be
unnatural and lack bass. Refer to the owner’s manual for each of your components.
• Do not let bare speaker wires touch each other or any metal part of this unit. This could damage this unit and/or the speakers.
• Make sure to use RCA cables, optical cables to connect audio components.
PREPARATION
Only PCM signals can be input to the digital (OPTICAL/COAXIAL) jacks of this unit.
y
• The PHONO jacks are designed for connecting a turntable with an MM cartridge.
• Connect your turntable to the GND terminal to reduce noise in the signal. However, for some turntables, you may hear less noise
without the GND connection.
Note
In order to prevent the audio signal from looping when an audio recording device is connected, the audio signal is not output from the
LINE 2 (OUT) jacks when LINE 2 is selected. Similarly, the audio signal is not output from the LINE 3 (OUT) jacks when LINE 3 is
selected.
English
11 En
Page 17
Connections
aa
b
b
d
d
c
c
10 mm
(3/8")
Banana plug
This unit
Speaker
VOLUME
PURE DIRECT
RETURN
CONNECT
PUSH - ENTER
TUNINGPRESET
BAND
MEMORY CLEAR
BASSINPUT
5V
1A
BALANCE
LR
TREBLE
LOUDNESS
FLAT
-30dB
DIMMER MODE
DISPLAY
SELECT
PHONES
SPEAKERS
AB
SPEAKERS A/B
OPT 1 OPT 2 CD
COAX 1 COAX 2
BLUETOOTH
SLEEP
PHONO
B
A
SPEAKERS
SPEAKERS A/B
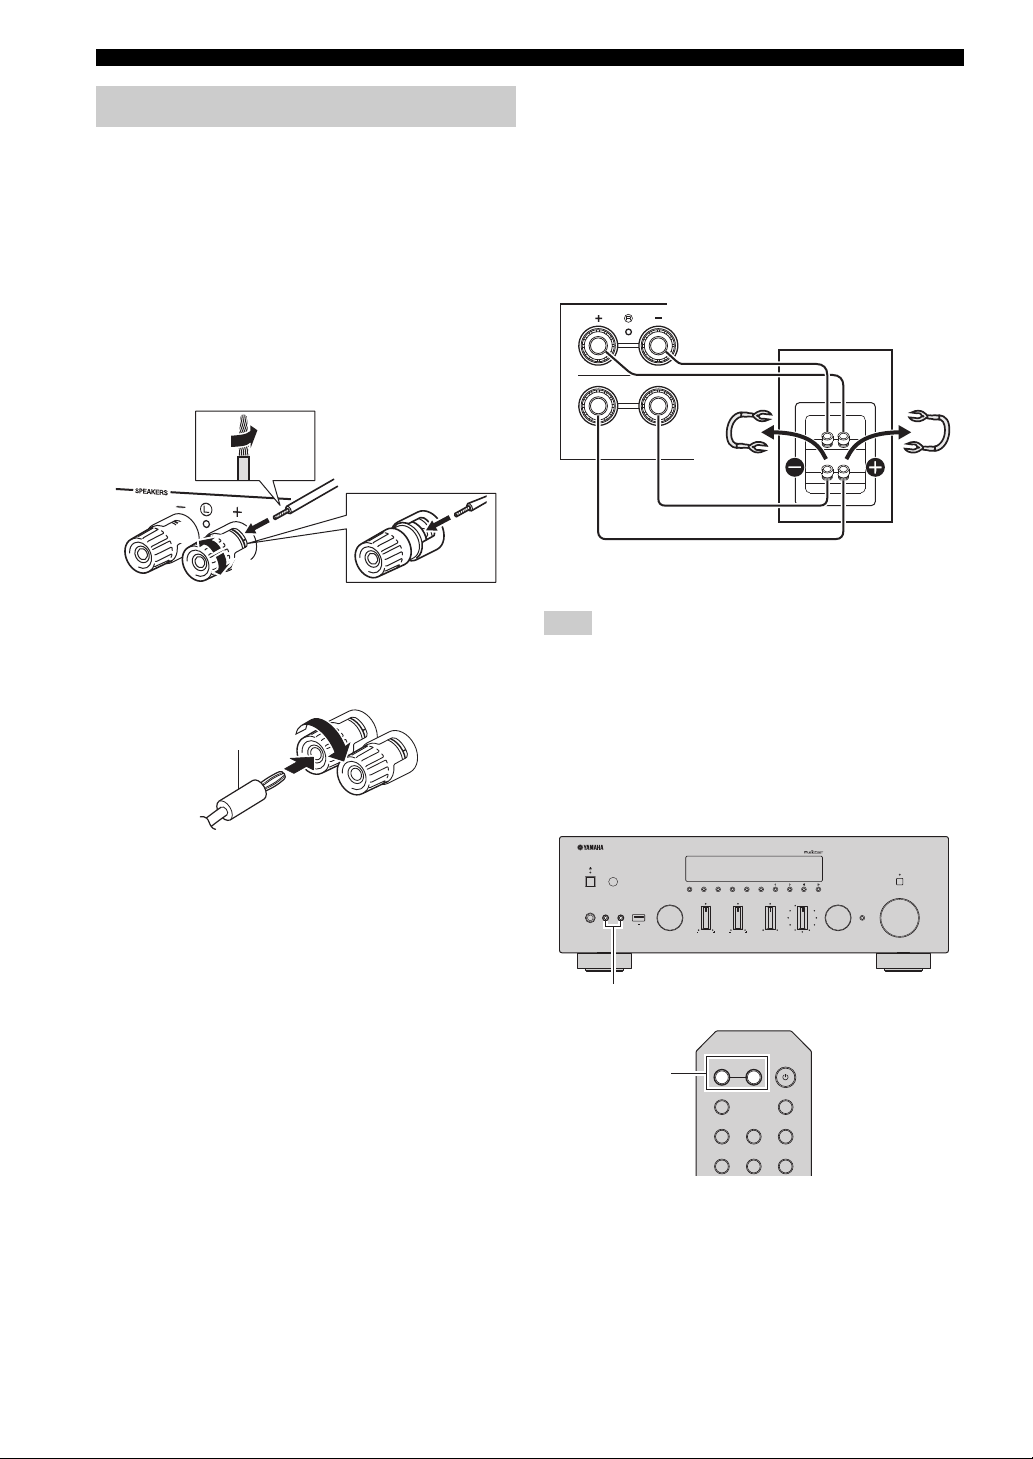
Connecting the speakers
■ Connecting speaker cables
Speaker cables have two wires. One is for connecting the
negative (–) terminal of the unit and the speaker, and the
other is for the positive (+) terminal. If the wires are
colored to prevent confusion, connect the black wire to the
negative and the other wire to the positive terminal.
a
Remove approximately 10 mm (3/8”) of insulation from the ends of
the speaker cable and twist the bare wires of the cable firmly together.
b Loosen the speaker terminal.
c Insert the bare wires of the cable into the gap on the side (upper
right or bottom left) of the terminal.
d Tighten the terminal.
■ Connecting via banana plug
Tighten the knob and then insert the banana plug into the
end of the corresponding terminal.
■ Bi-wire connection
Bi-wire connection separates the woofer from the
combined midrange and tweeter section. A bi-wire
compatible speaker has four binding post terminals. These
two sets of terminals allow the speaker to be split into two
independent sections. With these connections, the mid and
high frequency drivers are connected to one set of terminals
and the low frequency driver to another set of terminals.
SPEAK
A
B
Connect the other speaker to the other set of terminals in
the same way.
Note
When making bi-wire connections, remove the shorting bridges
or cables on the speaker. Refer to the speakers’ instruction
manuals for more information.
y
To use the bi-wire connections, press SPEAKERS A and
SPEAKERS B on the front panel or on the remote control so that
both speaker indicators (“A” and “B”) light up on the front
display.
12 En
Page 18
Connections
COAXIAL
OPTICAL
FM AM
75Ω
ANTENNA
SUBWOOFER
PRE OUT
PHONO
IN
1
IN
OUT
2
1
2
1
2
IN
CD
LINE
OUT
3
SIGNAL
GND
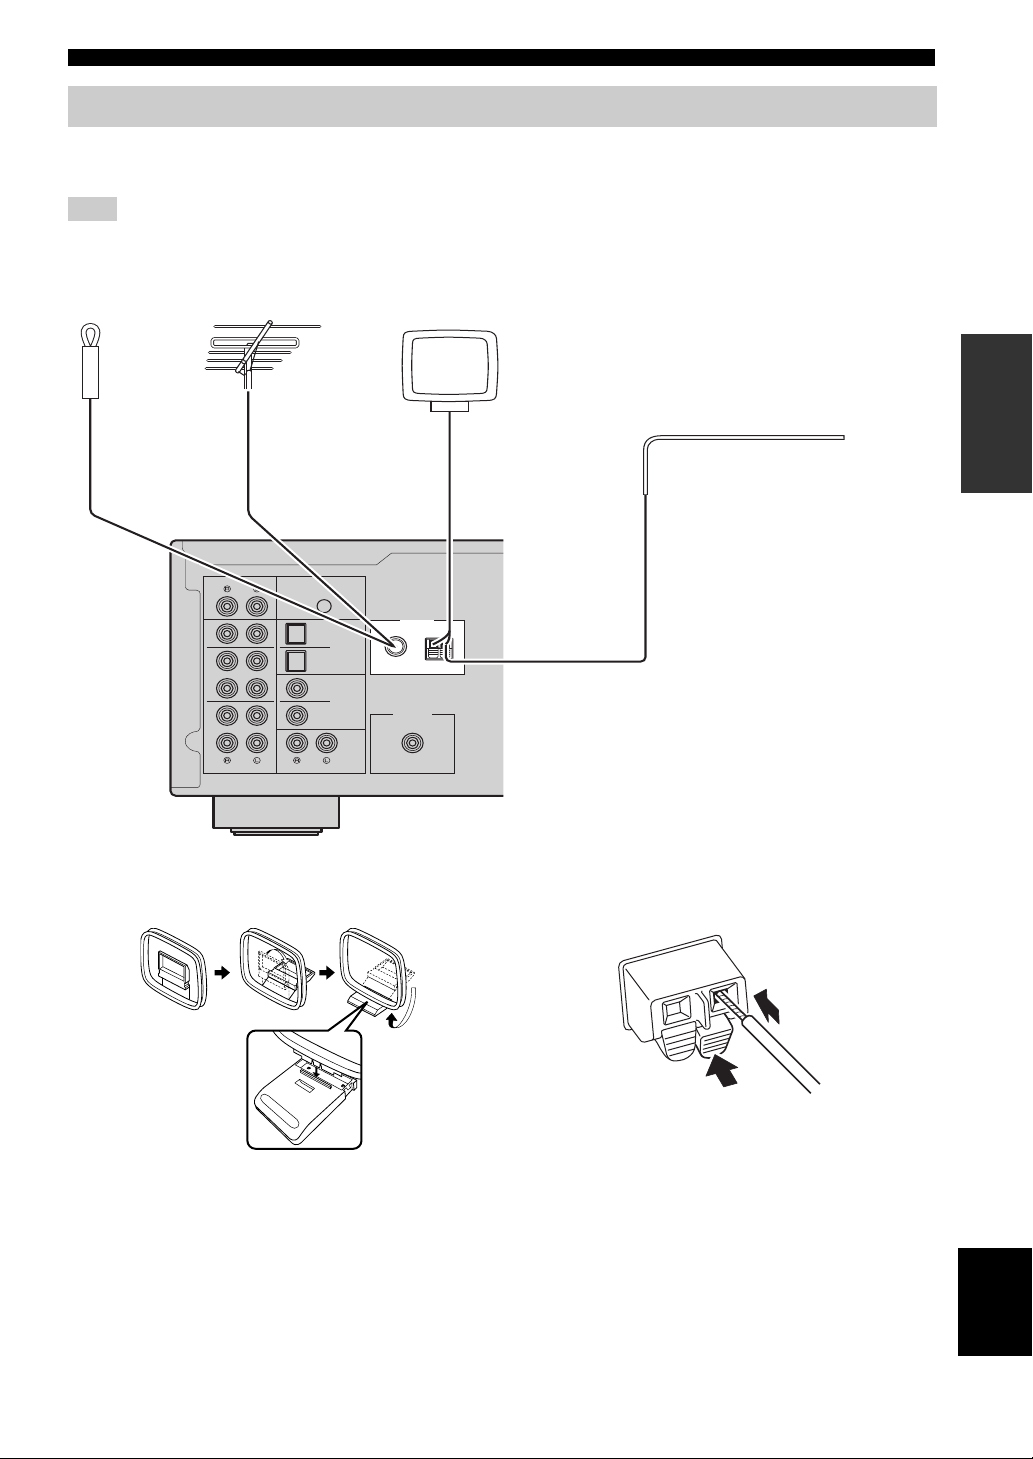
FM antenna
(included)
Outdoor AM antenna
Use 5 to 10 m of vinyl-covered wire extended
outdoors from a window.
Outdoor
FM antenna
• The AM antenna should always be connected, even if an outdoor
AM antenna is connected to this unit.
• The AM antenna should be placed away from this unit.
AM antenna (included)
or
Insert
2
Hold down
1
Connecting the FM and AM antennas
The antennas for receiving FM and AM broadcasts are included with this unit. In general, these antennas should provide
sufficient signal strength. Connect each antenna correctly to the designated terminals.
Note
If you experience poor reception quality, install an outdoor antenna. Consult the nearest authorized Yamaha dealer or service center
about outdoor antennas.
PREPARATION
■ Assembling the supplied AM antenna ■ Connecting the wires of the AM antenna
English
13 En
Page 19
Connections
Network Attached Storage
(NAS)
Internet
Modem
Router
Network cable
PC
This unit (rear)
Mobile device
(such as iPhone)
WIRELES
S
WORK
To an AC wall outlet
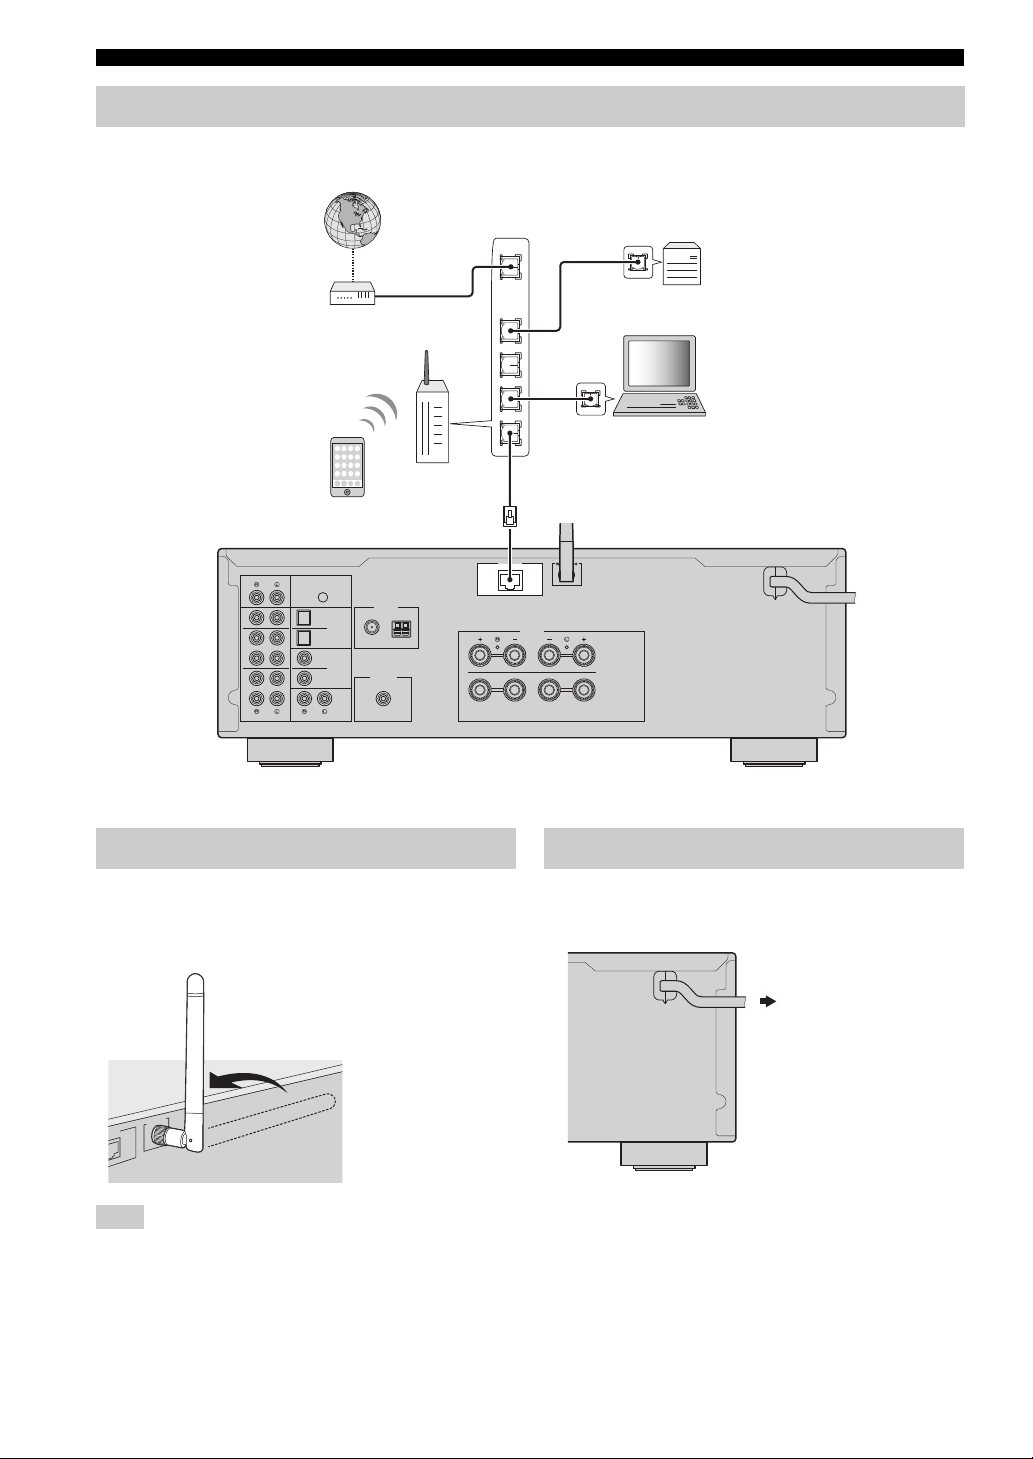
Connecting the network cable
Connect the unit to your router with a commercially-available STP network cable (CAT-5 or higher straight cable).
WAN
LAN
PHONO
IN
1
IN
2
OUT
IN
3
OUT
SIGNAL
GND
ANTENNA
FM AM
1
OPTICAL
2
75Ω
1
COAXIAL
SUBWOOFER
2
PRE OUT
LINE
CD
Preparing a wireless antenna
If you connect the unit wirelessly, erect the wireless
antenna. For information on how to connect the unit to a
wireless network, see “Connecting to network” (p. 15).
NETWORK
SPEAKERS
A
B
Connecting power cable
After all the connections are complete, plug in the power
cable.
Note
Do not apply excessive force on the wireless antenna. Doing so
may damage the antenna.
14 En
Page 20
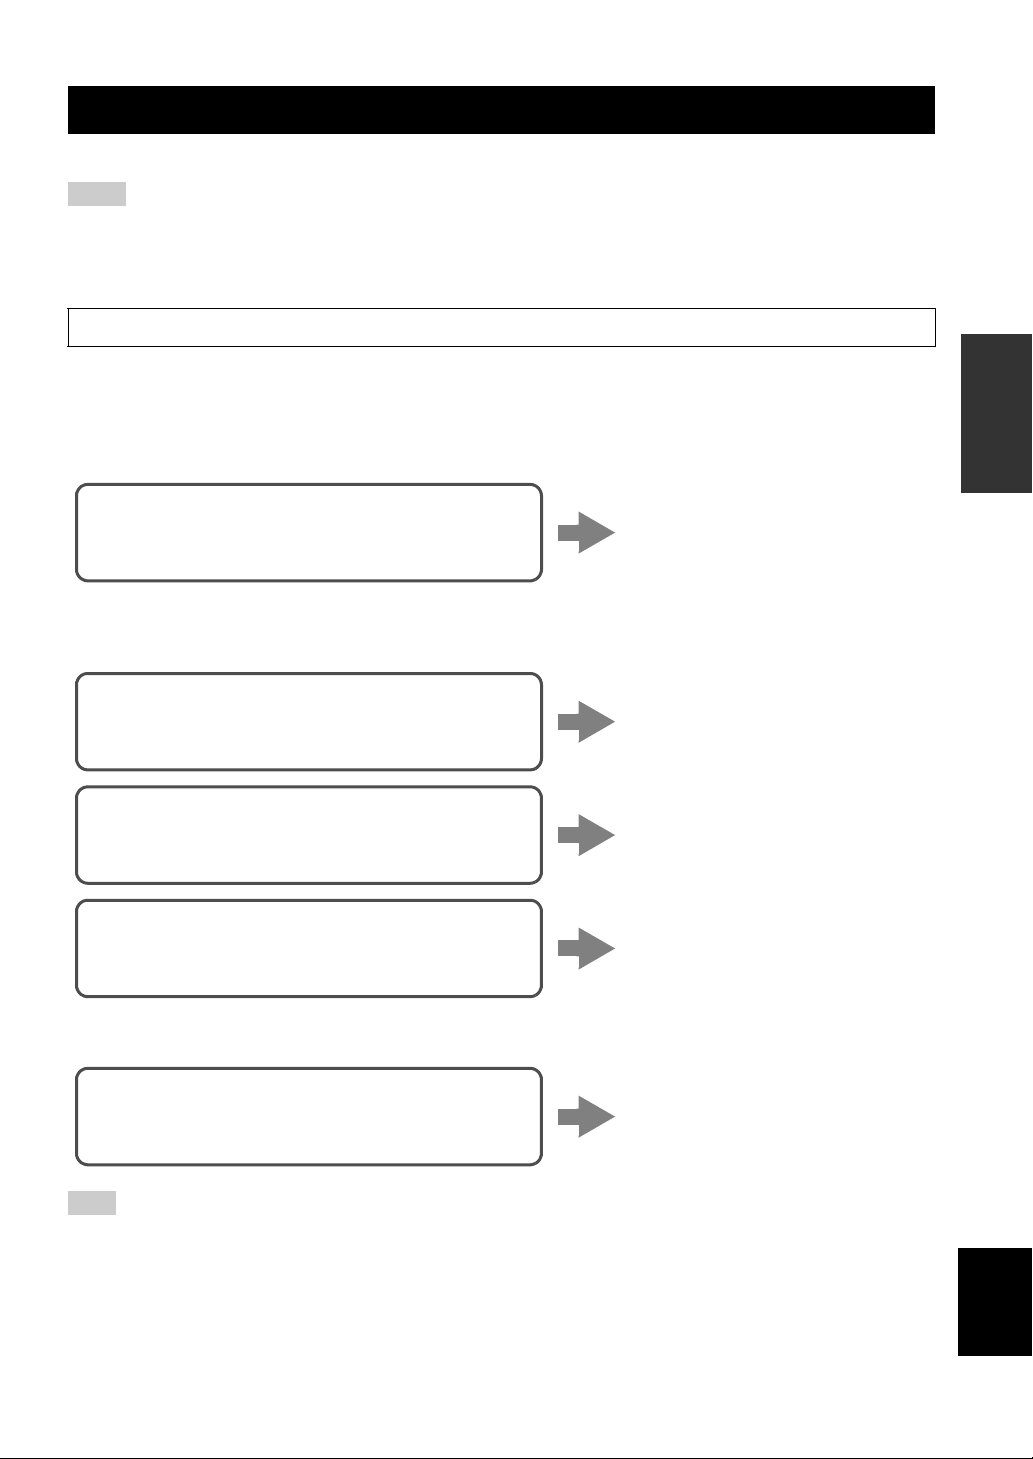
Connecting to network
Connecting using the DHCP server function of the
router
You can connect to the network by
simply making a wired connection
(p. 14)
Connecting using the Wi-Fi setting of the iOS
device (iPhone / iPod touch)
Share the Wi-Fi setting of the iOS
device (p. 16)
Connecting using WPS push button configuration
on the wireless router (or access point)
Use the WPS push button
configuration (p. 17)
Connecting with a wireless router (access point)
without WPS push button configuration
Set the network connection
manually (p. 18)
Connecting wirelessly to a mobile device
(Wireless Direct)
Connect wirelessly with Wireless
Direct (p. 19)
Connecting to network
There are several methods to connect the unit to a network. Select a connection method according to your environment.
Notes
• Some security software installed on your PC or the firewall settings of network devices (such as a router) may block the access of the
unit to the network devices or the Internet. In these cases, configure the security software or firewall settings appropriately.
• Each server must be connected to the same subnet as the unit.
• To use the service via the Internet, broadband connection is strongly recommended.
When playing a high-resolution audio source via the network, we recommend connecting with a wired router for stable playback.
■ Connecting with the MusicCast CONTROLLER app
See MusicCast Setup Guide for details.
■ Connecting with the wired router
■ Connecting with a wireless router (access point)
Connect to the network with the method listed below that corresponds to your environment.
PREPARATION
■ Connecting without a wired router or wireless router (access point)
Note
When the unit is connected to the network with Wireless Direct, it cannot connect to any other wireless router (access point). To play
back contents from the Internet, connect this unit to a network with a wired router or wireless router (access point).
English
15 En
Page 21
Connecting to network
R-N602 XXXXXX
WAC
RETURN
SETUP
ENTER
Cursor keys B /
C
The name of this unit
Tap here to start setup
The network currently
selected
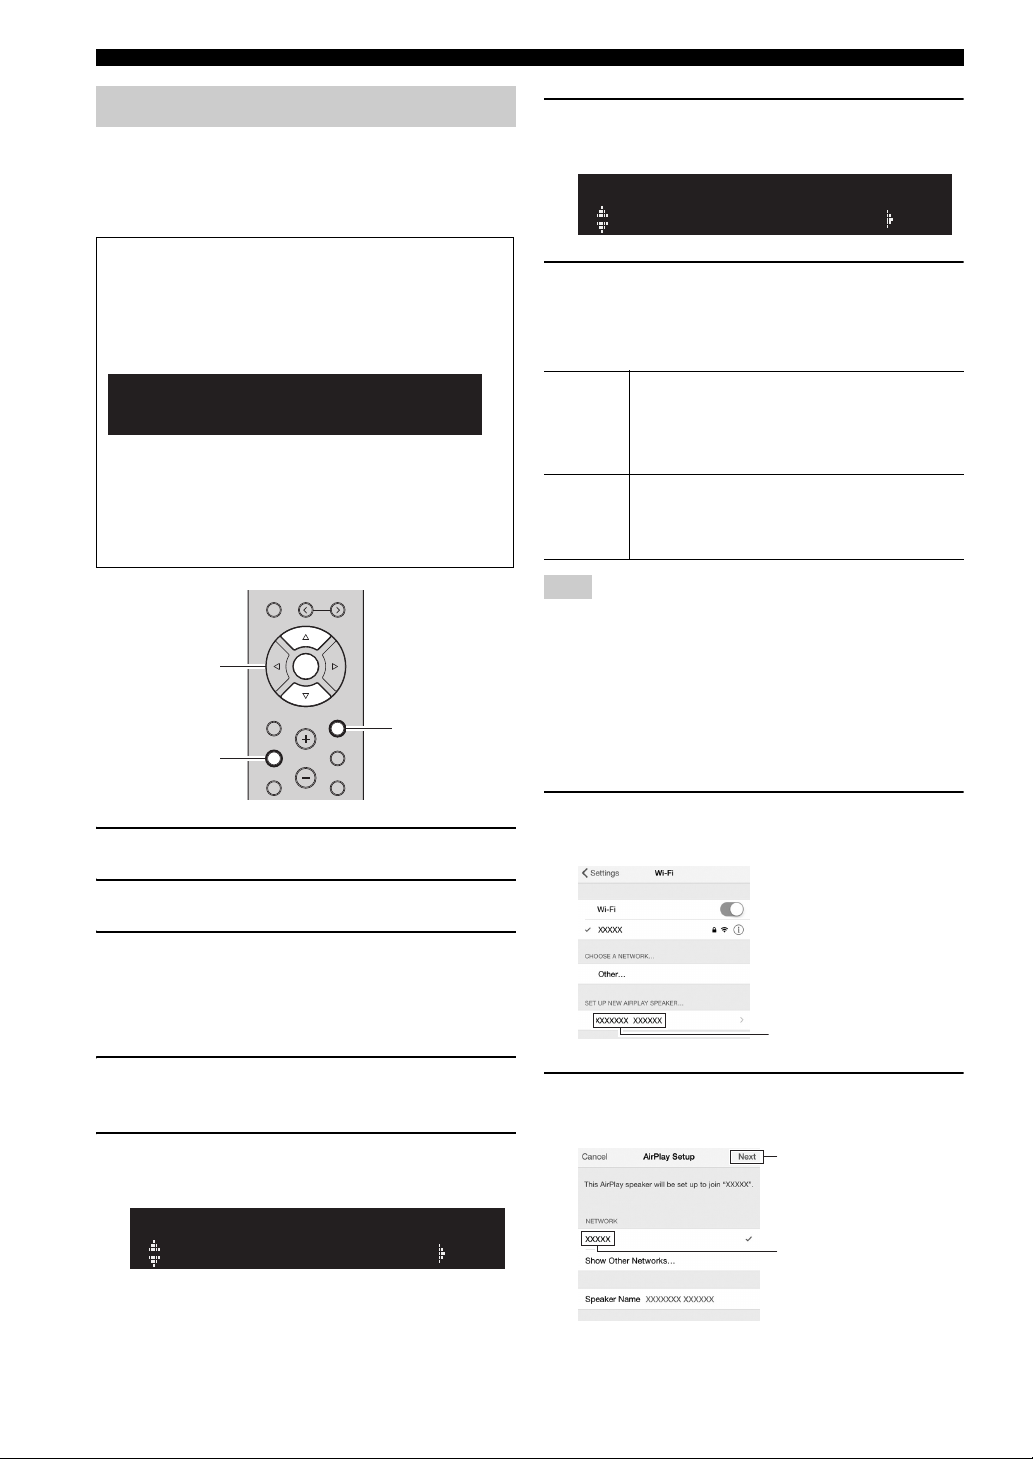
Sharing the iOS device setting
You can easily setup a wireless connection by applying the
connection settings on iOS devices (iPhone/iPod touch).
Before proceeding, confirm that your iOS device is
connected to a wireless router (access point).
If the network connection is not set, when you turn on
this unit, “WAC” (Wireless Accessory Configuration)
appears on the front display, and search automatically
iOS device. You can automatically share the network
settings.
If the unit is already wire connected and also
connected to a wireless network by another method,
settings will not be shared automatically. To manually
share the iOS device network settings, perform the
following operation.
MEMORY
PRESET
ENTER
HOME
SETUP
VOLUME
RETURN
OPTION
MUTENOW PLAYING
6 Use the cursor keys (B / C) to select “Share
Setting” and press ENTER.
SHARE
Wireless(WAC)
7 Use the cursor keys (B / C) to select the
desired connection method and press
ENTER.
The following connection methods are available.
You can apply the connection settings on the iOS
Wireless
(WAC)
USB
Cable
Note
When you select “Wireless (WAC)” as the connection method, all
network settings are initialized.
■ Sharing the iOS device setting wirelessly
If you select “Wireless (WAC)” as the connection method,
perform the network setting sharing operation on your iOS
device. (The following procedure is a setup example for
iOS 8.)
device to the unit using a wireless connection. For
details, see “Sharing the iOS device setting
wirelessly”. (You need iOS device with iOS 7 or
later.)
You can apply the connection settings on the iOS
device to the unit using a USB cable. For details, see
“Sharing the iOS device setting using a USB cable”.
(You need iOS device with iOS 5 or later.)
1 Press A to turn on this unit.
2 Press SETUP.
3 Use the cursor keys (B / C) to select
“Network” and press ENTER.
y
To return to the previous state, press RETURN.
4 Use the cursor keys (B / C) to select
“Connection” and press ENTER.
5 Use the cursor keys (B / C) to select
“Wireless” and press ENTER.
WIRELESS
WPS
16 En
1 On the iOS device, select the unit as the
AirPlay speaker in the Wi-Fi screen.
2 Check the network currently selected and tap
“Next”.
Page 22
When the sharing process finishes, the unit is
This unit (front)
RETURN
SETUP
ENTER
Cursor keys B /
C
automatically connected to the selected network
(access point).
When the setting finishes, verify whether the unit is
connected to a wireless network (p. 20).
Connecting to network
1 Press A to turn on this unit.
2 Press SETUP.
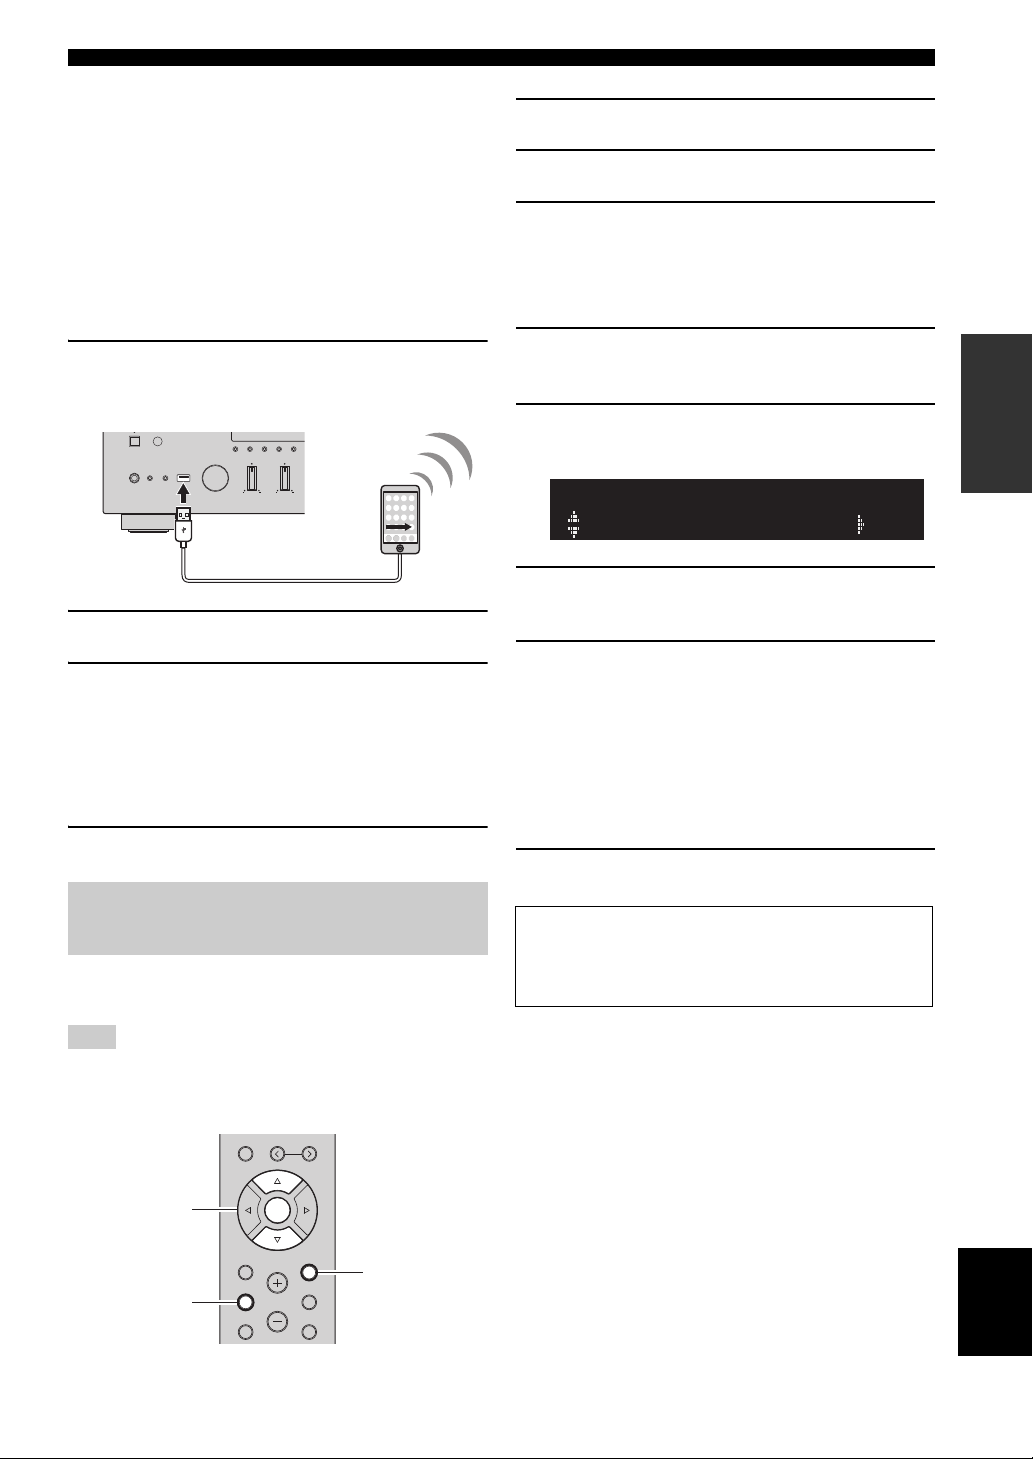
■ Sharing the iOS device setting using a
USB cable
If you select “USB Cable” as the connection method,
follow the procedure below to share the iOS device setting
with the unit.
1 Connect the iOS device to the USB jack, and
disable the screen lock on the iOS device.
MEMORY CLEAR
DIMMER MODE
DISPLAY
BASSINPUT
PHONES
SPEAKERS
AB
5V
1A
TREBLE
2 Press ENTER.
3 Tap “Allow” in the message appeared on the
iOS device.
When the connection process finishes, “Completed”
appears on the front display.
When the setting finishes, verify whether the unit is
connected to a wireless network (p. 20).
4 To exit from the menu, press SETUP.
3 Use the cursor keys (B / C) to select
“Network” and press ENTER.
y
To return to the previous state, press RETURN.
4 Use the cursor keys (B / C) to select
“Connection” and press ENTER.
5 Use the cursor keys (B / C) to select
“Wireless” and press ENTER.
WIRELESS
WPS
6 Press ENTER twice.
“Connecting” appears on the front display.
7 Push the WPS button on the wireless router
(access point).
When the connection process finishes, “Completed”
appears on the front display. When the setting
finishes, verify whether the unit is connected to a
wireless network (p. 20).
If “Not connected” appears, repeat from Step 1 or try
another connection method.
8 To exit from the menu, press SETUP.
PREPARATION
Using the WPS push button configuration
You can easily set up a wireless connection with one push
of the WPS button.
Note
This configuration does not work if the security method of your
wireless router (access point) is WEP. In this case, use other
connection method.
About WPS
WPS (Wi-Fi Protected Setup) is a standard established by the
Wi-Fi Alliance, which allows easy establishment of a
wireless home network.
MEMORY
PRESET
ENTER
HOME
RETURN
SETUP
VOLUME
OPTION
MUTENOW PLAYING
English
17 En
Page 23
Connecting to network
RETURN
SETUP
ENTER
Cursor keys
B / C / D /
E
KEY
Set the wireless network connection manually
Before performing the following procedure, check the
security method and security key on the wireless router
(access point).
MEMORY
PRESET
ENTER
HOME
SETUP
VOLUME
RETURN
OPTION
MUTENOW PLAYING
1 Press A to turn on this unit.
2 Press SETUP.
3 Use the cursor keys (B / C) to select
“Network ” and press ENTER.
y
To return to the previous state, press RETURN.
4 Use the cursor keys (B / C) to select
“Connection” and press ENTER.
5 Use the cursor keys (B / C) to select
“Wireless” and press ENTER.
6 Use the cursor keys (B / C) to select “Manual
Setting” and press ENTER.
MANUAL
SSID
7 Use the cursor keys (B / C) to select “SSID”
and press ENTER.
9 Use the cursor keys (B / C) to select
“Security” and press ENTER.
SECURITY
WPA2-PSK(AES)
10 Use the cursor keys (D / E) to select desired
security method and press RETURN.
Settings
None, WEP, WPA2-PSK (AES), Mixed Mode
Note
If you select “None”, the connection may be insecure since the
communication is not encrypted.
11 Use the cursor keys (B / C) to select
“Security Key” and press ENTER.
12 Use the cursor keys to enter the security key
on the wireless router (access point), and
press RETURN to previous state.
Use the cursor keys (D/E) to move the edit position
and the cursor keys (B/C) to select a character.
You can insert / delete a character, by pressing
PRESET i (insert) or PRESET j (delete).
13 Use the cursor keys (B / C) to select
“Connect[ENTER]” and press ENTER to save
the setting.
If “ERROR” appears, check the SSID and security
key on the wireless router (access point) and repeat
from Step 7.
If “ERROR” not appears, a connection is success.
Verify whether the unit is connected to a wireless
network (p. 20).
14 To exit from the menu, press SETUP.
SSID
8 Use the cursor keys to enter the SSID on the
wireless router (access point), and press
RETURN to previous state.
Use the cursor keys (D/E) to move the edit position
and the cursor keys (B/C) to select a character.
18 En
Page 24
Connecting to network
RETURN
SETUP
ENTER
Cursor keys
B / C / D /
E
SSID
W DIRECT
WPA2-PSK(AES)
W DIRECT
Connecting a mobile device to the unit directly (Wireless Direct)
Using Wireless Direct, this unit can operate as a wireless
network access point that mobile devices can directly
connect to.
MEMORY
PRESET
ENTER
HOME
RETURN
SETUP
Note
When the unit is connected to the network with Wireless Direct, it
cannot connect to any other wireless router (access point). To
play back contents from the Internet, connect this unit to a
network with a wired router or wireless router (access point).
1 Press A to turn on this unit.
2 Press SETUP.
3 Use the cursor keys (B / C) to select
“Network” and press ENTER.
y
To return to the previous state, press RETURN.
4 Use the cursor keys (B / C) to select
“Connection” and press ENTER.
5 Use the cursor keys (B / C) to select
“WirelesDirect” and press ENTER.
6 Press ENTER to check the SSID on this unit,
and press RETURN to previous state.
7 Use the cursor keys (B / C) to select
“Security” and press ENTER.
VOLUME
OPTION
MUTENOW PLAYING
8 Use the cursor keys (D / E) to select desired
security method and press RETURN.
Settings
None, WPA2-PSK (AES)
Note
If you select “None”, the connection may be insecure since the
communication is not encrypted.
9 Use the cursor keys (B / C) to select
“Security Key” and press ENTER.
KEY
10 Use the cursor keys to enter the security key
on this unit, and press RETURN to previous
state.
Use the cursor keys (D / E) to move the edit position
and the cursor keys (B / C) to select a character.
You can insert / delete a character, by pressing
PRESET i (insert) or PRESET j (delete).
11 Use the cursor keys (B / C) to select
“Connect[Enter]” and press ENTER to save
the setting.
The SSID and security key information is required
for setup of a mobile device.
When you select the “SSID” in step 6, you can check
the configured SSID on this unit. The SSID of this
unit can be change by using cursor keys (B / C / D /
E).
12 Configure the Wi-Fi settings of a mobile
device.
For details on settings of your mobile device, refer to
the instruction manual of the mobile device.
(1) Enable the Wi-Fi function on the mobile device.
(2) Select the SSID of this unit from the list of
available access points.
(3) When you are prompted for a password, enter the
security key displayed in Step 10.
If “ERROR” appears, check the security key on this
unit and repeat Step 12.
If “ERROR” not appears, a connection is success.
Verify whether the unit is connected to a wireless
network (p. 20).
PREPARATION
13 To exit from the menu, press SETUP.
English
19 En
Page 25
Connecting to network
RETURN
SETUP
ENTER
Cursor keys B /
C
Verify the network connection status
Perform the following procedure to verify the unit’s
connection to a network.
MEMORY
PRESET
ENTER
HOME
SETUP
VOLUME
RETURN
OPTION
MUTENOW PLAYING
1 Press SETUP.
2 Use the cursor keys (B / C) to select
“Network” and press ENTER.
y
To return to the previous state, press RETURN.
3 Use the cursor keys (B / C) to select
“Information” and press ENTER.
4 Use the cursor keys (B / C) to select
“STATUS”.
STATUS
Connect
When “Connect” appears, the unit is connected to a
network. If “Disconnect” appears, reset connection.
5 To exit from the menu, press SETUP.
20 En
Page 26
BASIC OPERATION
A (power)
SPEAKERS A/B
INPUT selector
VOLUME control
SETUP
HOME
MUTENOW PLAYING
VOLUME
RETURN
OPTION
Input selection
keys
A (power)
VOLUME
SPEAKERS A/B
PURE DIRECT switch
Playback
Playing a source
MEMORY CLEAR
DIMMER MODE
DISPLAY
PHONES
SPEAKERS
AB
5V
1A
BASSINPUT
SPEAKERS
A
PHONO
COAX 1 COAX 2
OPT 1 OPT 2 CD
LINE 1
TUNER
BAND
TREBLE
B
LINE 2 LINE 3
NET USB
BAND
BALANCE
LR
TUNING
SLEEP
BLUETOOTH
4 Play the source.
5 Rotate the VOLUME control on the front
panel (or press VOLUME +/– on the remote
TUNINGPRESET
LOUDNESS
SELECT
FLAT
-30dB
PURE DIRECT
PUSH - ENTER
VOLUME
RETURN
CONNECT
control) to adjust the sound output level.
y
You can adjust the tonal quality by using the BASS, TREBLE,
BALANCE and LOUDNESS controls or the PURE DIRECT
switch on the front panel.
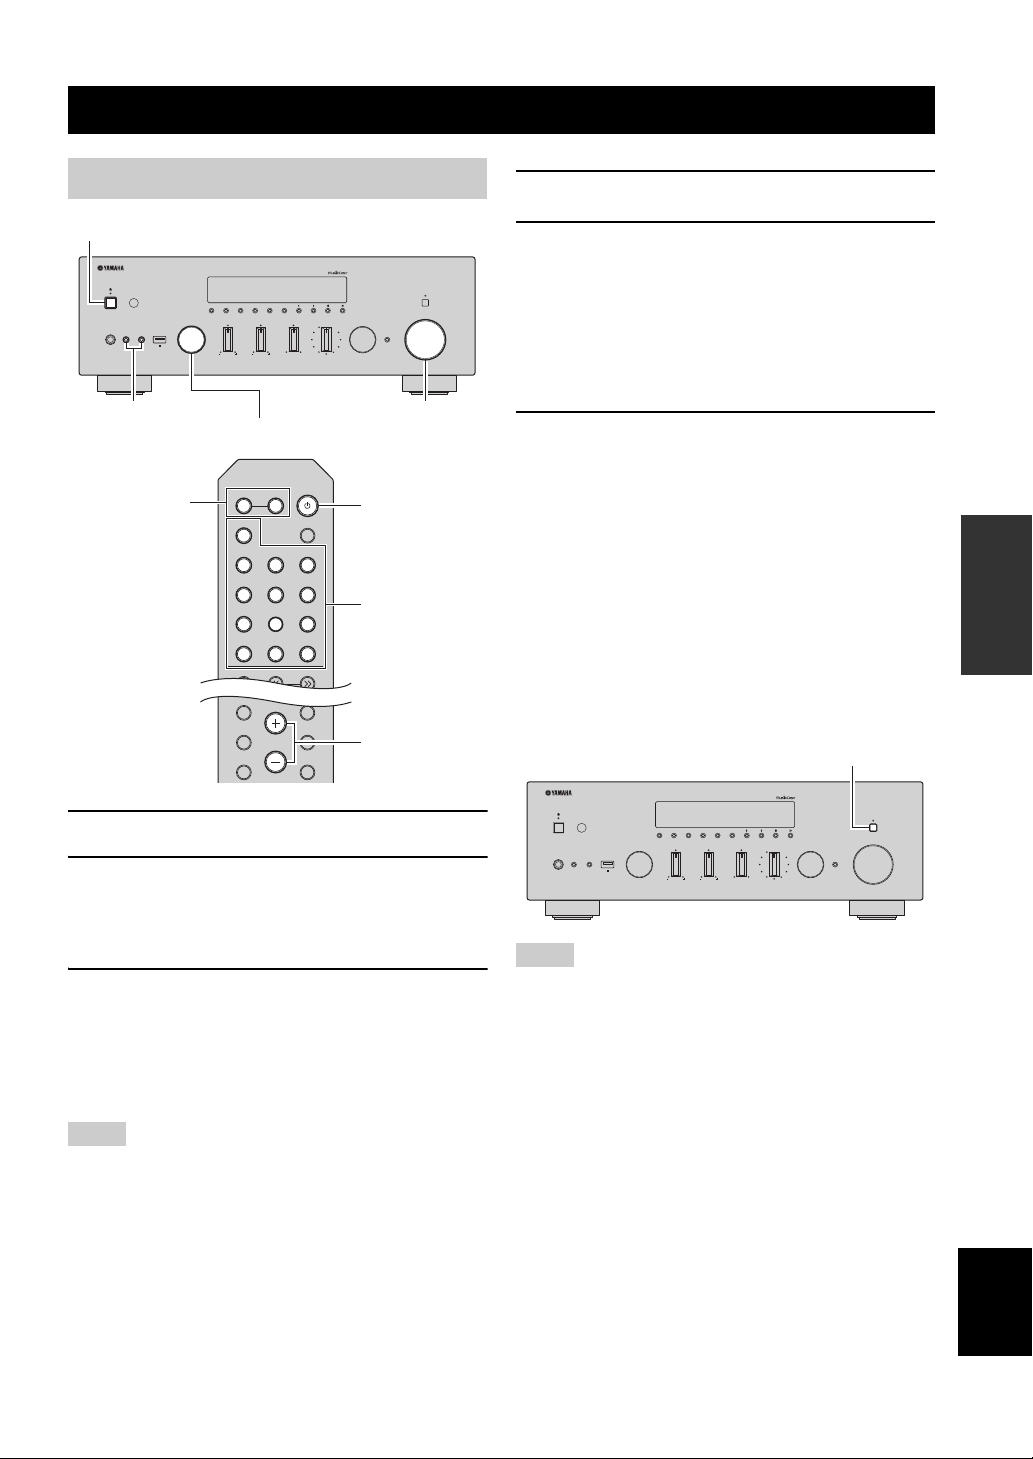
6 When you finish using, press A (Power) on
the front panel to turn off the power.
When you press A (Power) on the remote control,
this unit set to standby mode.
■ Enjoying pure high fidelity sound (Pure Direct)
When the PURE DIRECT switch is turned on, routes
input signals from your audio sources so that the input
signals bypass the BASS, TREBLE, BALANCE and
LOUDNESS controls, thus eliminating any alterations to
the audio signals and creating the purest possible sound.
The PURE DIRECT indicator lights up and the front
display turns off after a few seconds.
OPERATION
BASIC
1 Press A (power) to turn on this unit.
2 Rotate the INPUT selector on the front panel
3 Press SPEAKERS A and/or SPEAKERS B on
Notes
• When one set of speakers is connected using bi-wire connections,
or when using two sets of speakers simultaneously (A and B),
make sure “A” and “B” are displayed on the front display.
• When listening with headphones, turn off the speakers.
(or press one of the input selection keys on
the remote control) to select the input source
you want to listen to.
the front panel or on the remote control to
select speakers A and/or speakers B.
When speaker set A or speaker set B are turned on,
“A” or “B” is displayed on the front display
accordingly (p. 7).
PHONES
SPEAKERS
AB
5V
1A
BASSINPUT
BALANCE
LR
LOUDNESS
SELECT
PUSH - ENTER
FLAT
-30dB
TREBLE
TUNINGPRESET
BAND
MEMORY CLEAR
DIMMER MODE
DISPLAY
PURE DIRECT
VOLUME
RETURN
CONNECT
Notes
• When the PURE DIRECT switch is turned on, the front display
turns off.
• The BASS, TREBLE, BALANCE, and LOUDNESS controls do
not function while the PURE DIRECT switch is turned on.
21 En
English
Page 27

Playback
VOLUME
PURE DIRECT
RETURN
CONNECT
PUSH - ENTER
TUNINGPRESET
BAND
MEMORY CLEAR
BASSINPUT
5V
1A
BALANCE
LR
TREBLE
LOUDNESS
FLAT
-30dB
DIMMER MODE
DISPLAY
SELECT
PHONES
SPEAKERS
AB
BASS TREBLE
VOLUME
PURE DIRECT
RETURN
CONNECT
PUSH - ENTER
TUNINGPRESET
BAND
MEMORY CLEAR
BASSINPUT
5V
1A
BALANCE
LR
TREBLE
LOUDNESS
FLAT
-30dB
DIMMER MODE
DISPLAY
SELECT
PHONES
SPEAKERS
AB
BALANCE
VOLUME
PURE DIRECT
RETURN
CONNECT
PUSH - ENTER
TUNINGPRESET
BAND
MEMORY CLEAR
BASSINPUT
5V
1A
BALANCE
LR
TREBLE
LOUDNESS
FLAT
-30dB
DIMMER MODE
DISPLAY
SELECT
PHONES
SPEAKERS
AB
VOLUMELOUDNESS
SETUP
HOME
MUTENOW PLAYING
VOLUME
RETURN
OPTION
VOLUME +/–
■ Adjusting the BASS and TREBLE controls
The BASS and TREBLE controls adjust high and low
frequency response.
The center position produces a flat response.
BASS control
When you feel there is not enough bass (low frequency
sound), rotate clockwise to boost. When you feel there is
too much bass, rotate counterclockwise to suppress.
Control range: –10 dB to +10 dB (20 Hz)
TREBLE control
When you feel there is not enough treble (high frequency
sound), rotate clockwise to boost. When you feel there is
too much treble, rotate counterclockwise to suppress.
Control range: –10 dB to +10 dB (20 kHz)
■ Adjusting the LOUDNESS control
Retain a full tonal range at any volume level, thus
compensating for the human ears’ loss of sensitivity to
high and low-frequency ranges at low volume.
CAUTION
If the PURE DIRECT switch is turned on with the
LOUDNESS control set at a certain level, the input signals
bypass the LOUDNESS control, resulting in a sudden
increase in the sound output level. To prevent your ears or
the speakers from being damaged, be sure to press the
PURE DIRECT switch after lowering the sound output
level or after checking that the LOUDNESS control is
properly set.
1 Set the LOUDNESS control to the FLAT
■ Adjusting the BALANCE control
position.
2 Rotate the VOLUME control on the front
panel (or press VOLUME +/– on the remote
The BALANCE control adjusts the sound output balance
of the left and right speakers to compensate for sound
imbalance caused by speaker locations or listening room
control) to set the sound output level to the
loudest listening level that you would listen
to.
conditions.
3 Rotate the LOUDNESS control until the
desired volume is obtained.
y
After setting the LOUDNESS control, enjoy listening to music at
your preferred volume level. If the effect of the LOUDNESS
control setting is too strong or weak, readjust the LOUDNESS
22 En
control.
Page 28
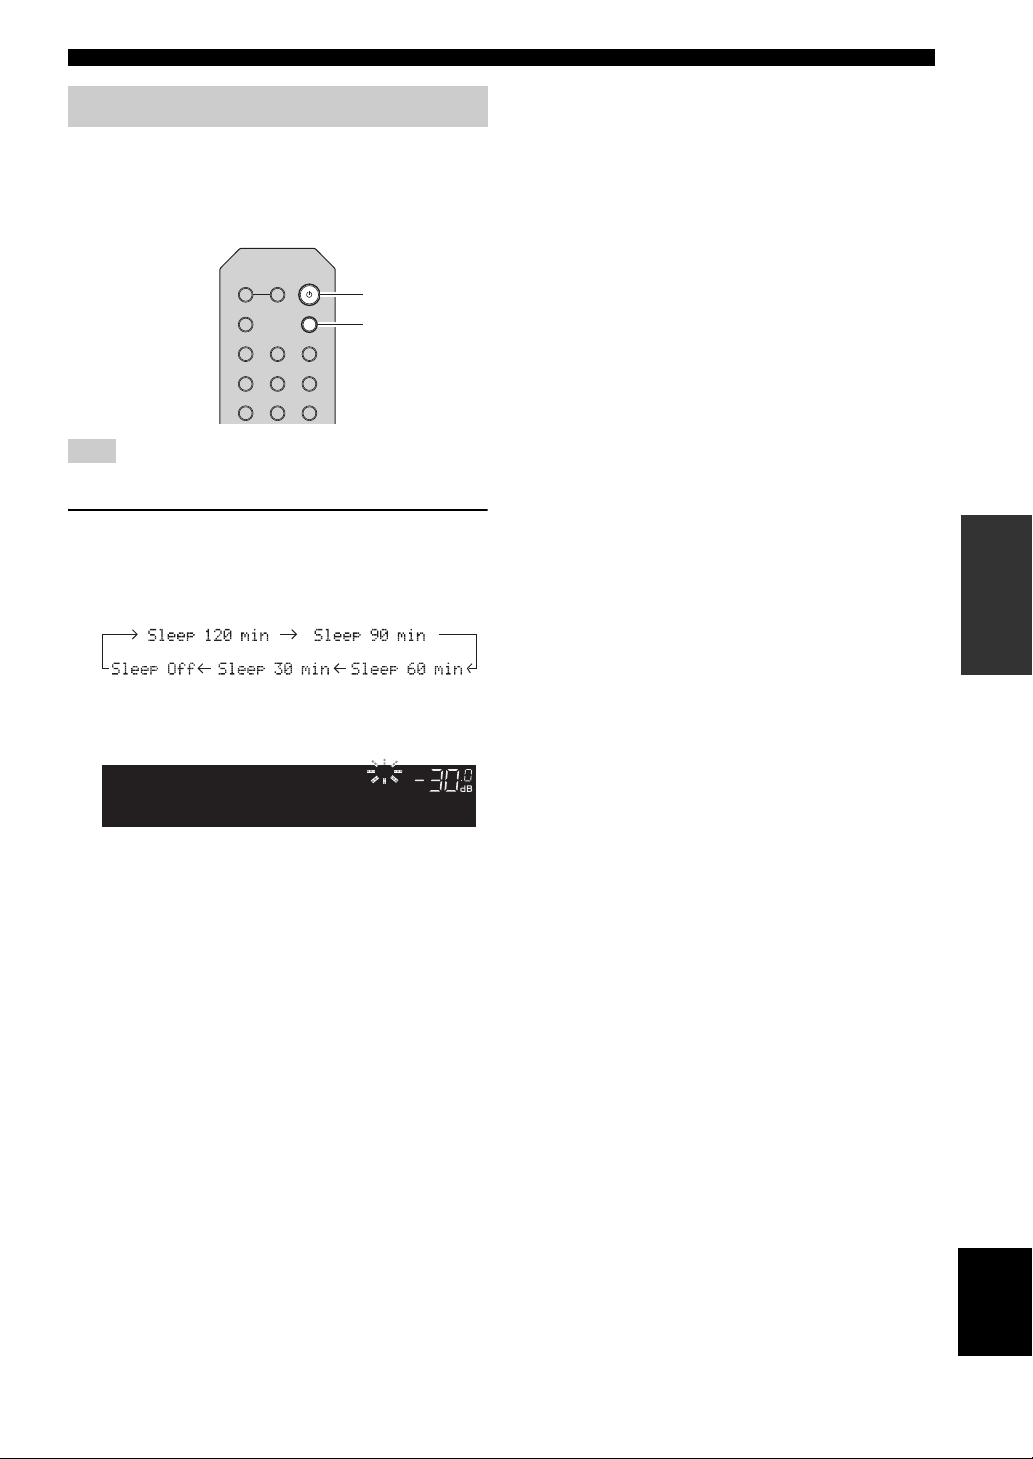
Using the sleep timer
A
SLEEP
(power)
VOL.
A
Sleep 120min.
SLEEP
Use this feature to automatically set this unit to standby
mode after a certain amount of time. The sleep timer is
useful when you are going to sleep while this unit is
playing or recording a source.
SPEAKERS
B
A
PHONO
COAX 1 COAX 2
OPT 1 OPT 2 CD
LINE 1
Note
The sleep timer can only be set with the remote control.
SLEEP
BLUETOOTH
LINE 2 LINE 3
Playback
1 Press SLEEP repeatedly to set the amount of
time before this unit is set to standby mode.
Each time you press SLEEP, the front display
changes as shown below.
The SLEEP indicator blinks while setting the amount
of time for the sleep timer.
If the sleep timer is set, the SLEEP indicator on the
front display lights up.
y
• To disable the sleep timer, select “Sleep Off”.
• The sleep timer setting can also be canceled by pressing
A (power) to set this unit to standby mode.
OPERATION
BASIC
English
23 En
Page 29
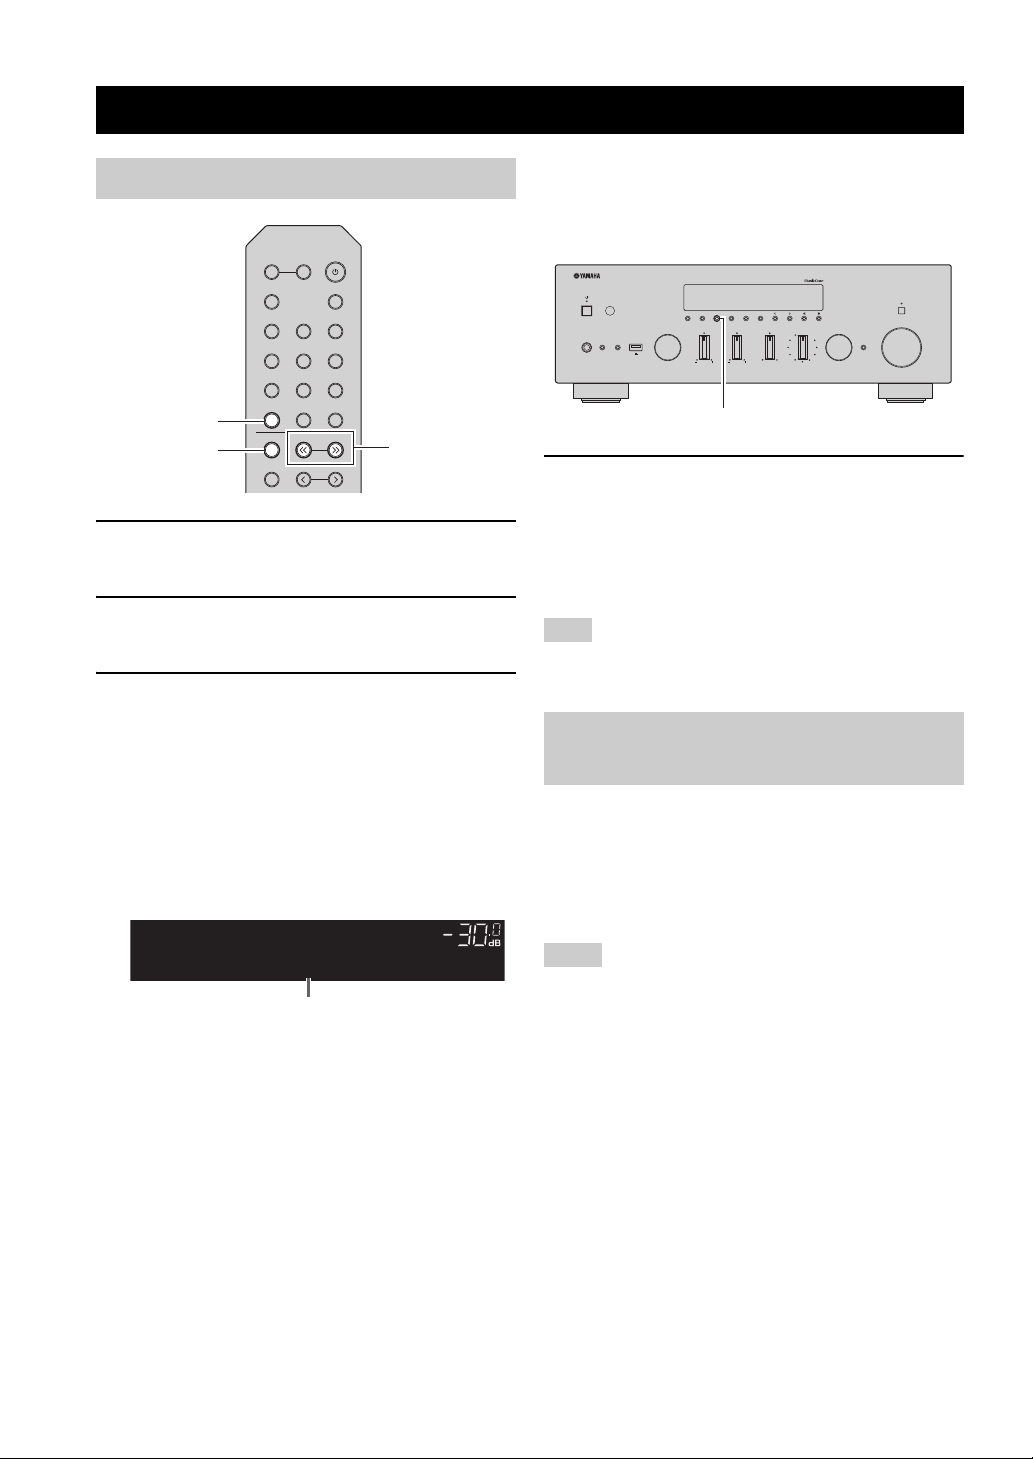
Listening to FM/AM radio
TUNING jj / ii
TUNER
BAND
VOL.
TUNEDSTEREO
A
FM 98.5 MHz
Frequency
VOLUME
PURE DIRECT
RETURN
CONNECT
PUSH - ENTER
TUNINGPRESET
BAND
MEMORY CLEAR
BASSINPUT
5V
1A
BALANCE
LR
TREBLE
LOUDNESS
FLAT
-30dB
DIMMER MODE
DISPLAY
SELECT
PHONES
SPEAKERS
AB
MODE
FM/AM tuning
SPEAKERS
B
A
PHONO
COAX 1 COAX 2
OPT 1 OPT 2 CD
LINE 1
TUNER
BAND
MEMORY
1 Press TUNER to select “TUNER” as the input
source.
2 Press BAND repeatedly to select the
reception band (FM or AM).
3 Press and hold TUNING jj / ii for more than
1 second to begin tuning.
Press ii to tune in to a higher frequency.
Press jj to tune in to a lower frequency.
The frequency of the received station is shown in the
front display.
If a broadcast is being received, “TUNED” indicator
on the front display will be lit. If a stereo broadcast is
being received, the “STEREO” indicator will also lit.
SLEEP
BLUETOOTH
LINE 2 LINE 3
NET USB
TUNING
PRESET
■ Improving FM reception (FM mode)
If the signal from the station is weak and the sound quality
is not good, set the FM band reception mode to monaural
mode to improve reception.
1 Press MODE repeatedly to select “Stereo”
(automatic stereo mode) or “Mono”
(monaural mode) when this unit is tuned in to
an FM radio station.
When Mono is selected, FM broadcasts will be heard
in monaural sound.
Note
The STEREO indicator on the front panel lights up while
listening to a station in stereo mode.
Automatic preset tuning (FM stations only)
You can use the automatic preset tuning function to
automatically register FM stations as presets. This
function enables this unit to automatically tune in to FM
stations that have a strong signal and register up to 40 of
those stations in order. You can then easily recall any
preset station by selecting its preset number.
y
• If the station signals are weak, tuning search does not stop at the
desired station.
• When the signal reception for an FM radio station is unstable,
switching to monaural may improve it.
24 En
Notes
• If a station is registered to a preset number that already has a
station registered to it, the previously registered station is
overwritten.
• If the station you want to register is weak in signal strength, try
using the manual preset tuning method.
y
FM stations registered as presets using the automatic preset
registration feature will be heard in stereo.
Page 30
LINE 1
PRESET j / i
RETURN
OPTION
TUNER
BAND
ENTER
Cursor keys B /
C
VOL.
A
Auto Preset
OPTION
VOL.
A
01:FM 87.5 MHz
READY
Preset number Frequency
Preset number
“Empty” (not in use) or the frequency currently registered
TUNER
BAND
MEMORY
HOME
SETUP
LINE 2 LINE 3
NET USB
TUNING
PRESET
ENTER
VOLUME
RETURN
OPTION
MUTENOW PLAYING
Listening to FM/AM radio
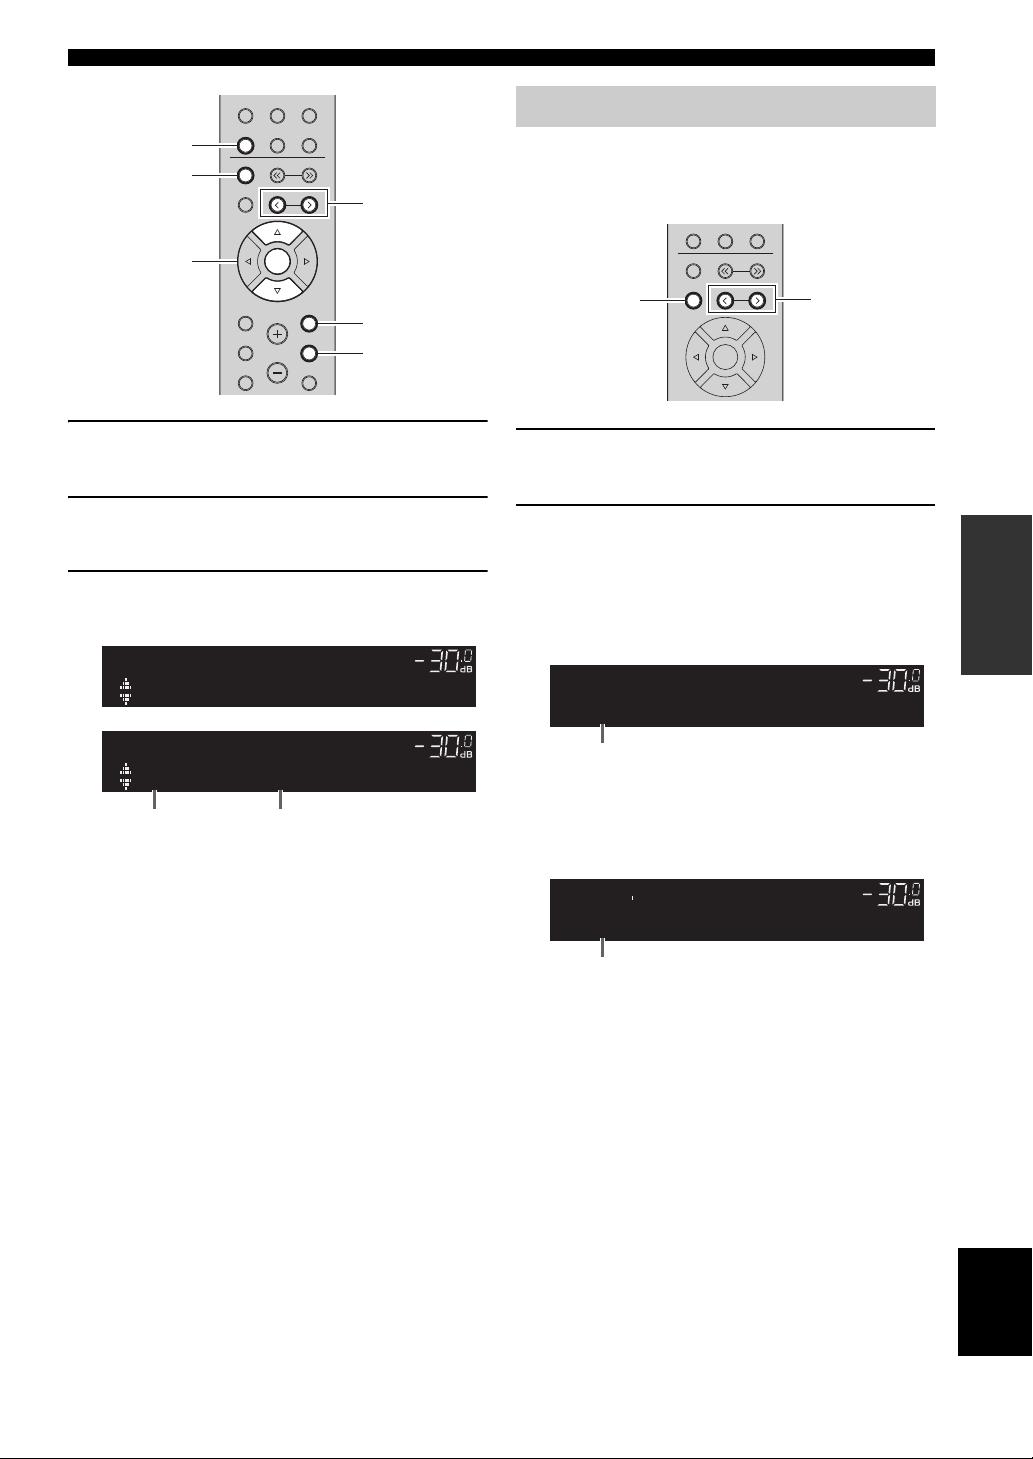
Manual tuning preset
Select a radio station manually and register it to a preset
number. You can then easily recall any preset station by
selecting its preset number.
TUNER
NET USB
BAND
TUNING
MEMORY
MEMORY
PRESET
ENTER
PRESET j / i
1 Press TUNER to select “TUNER” as the input
source.
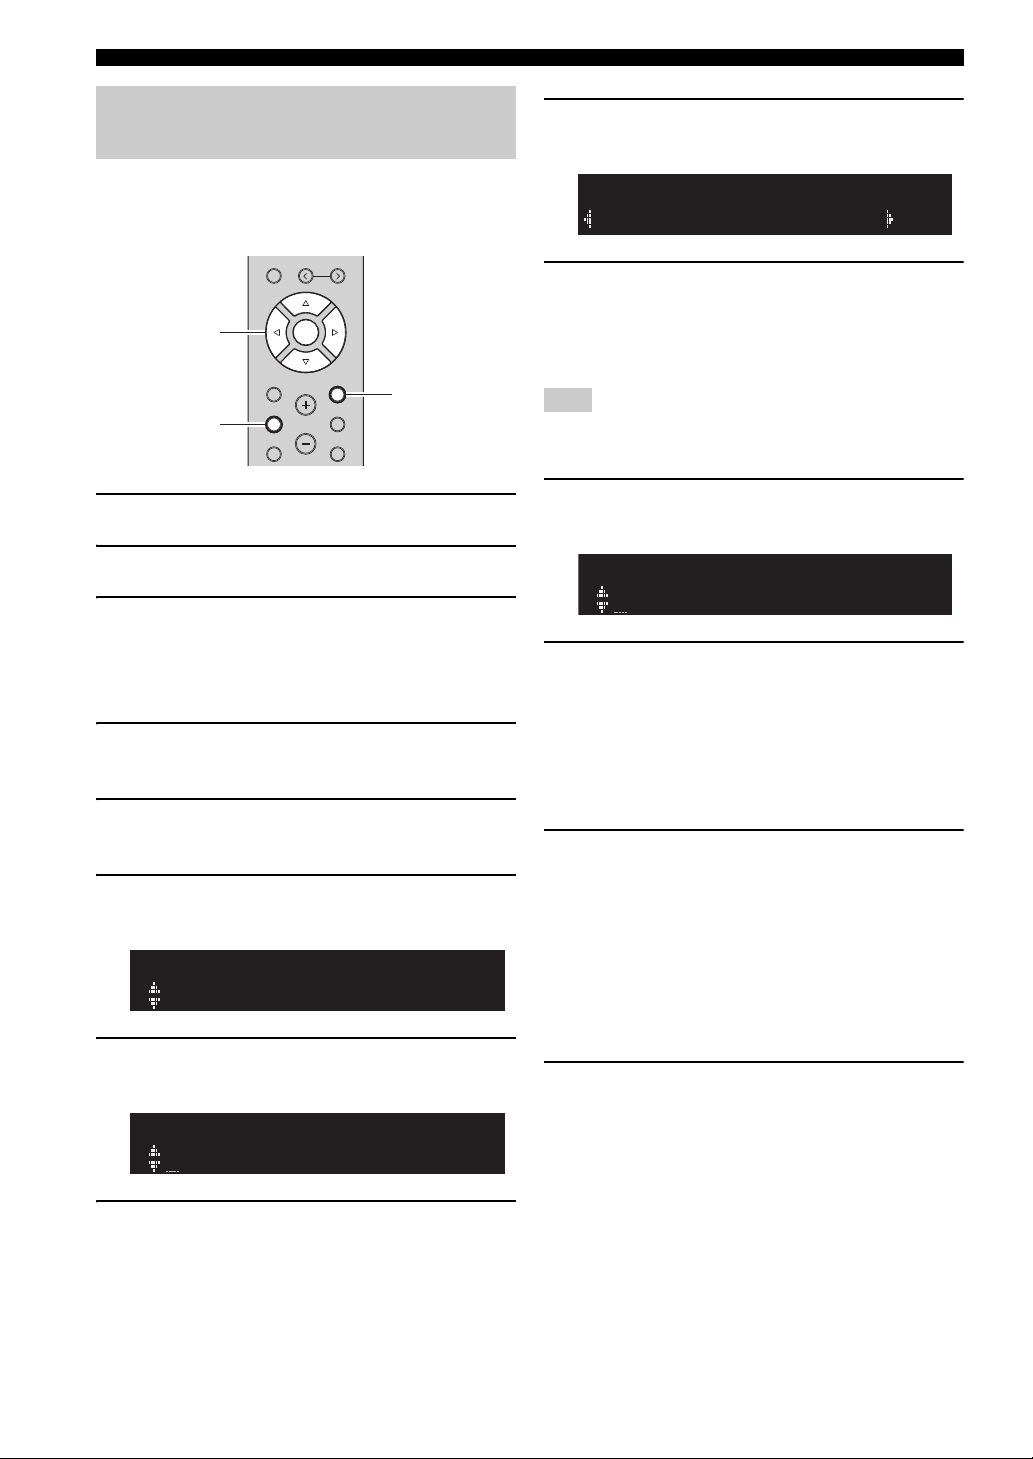
2 Press OPTION on the remote control.
The “Option” menu is displayed (p. 42).
3 Press B / C to select “Auto Preset”, and then
press ENTER.
This unit starts scanning the FM band about 5
seconds later from the lowest frequency upwards.
To begin scanning immediately, hold down ENTER.
y
• Before scanning begins, you can specify the first preset number
to be used by pressing PRESET j / i or cursor key (B/C) on the
remote control.
• To cancel scanning, press BAND or RETURN.
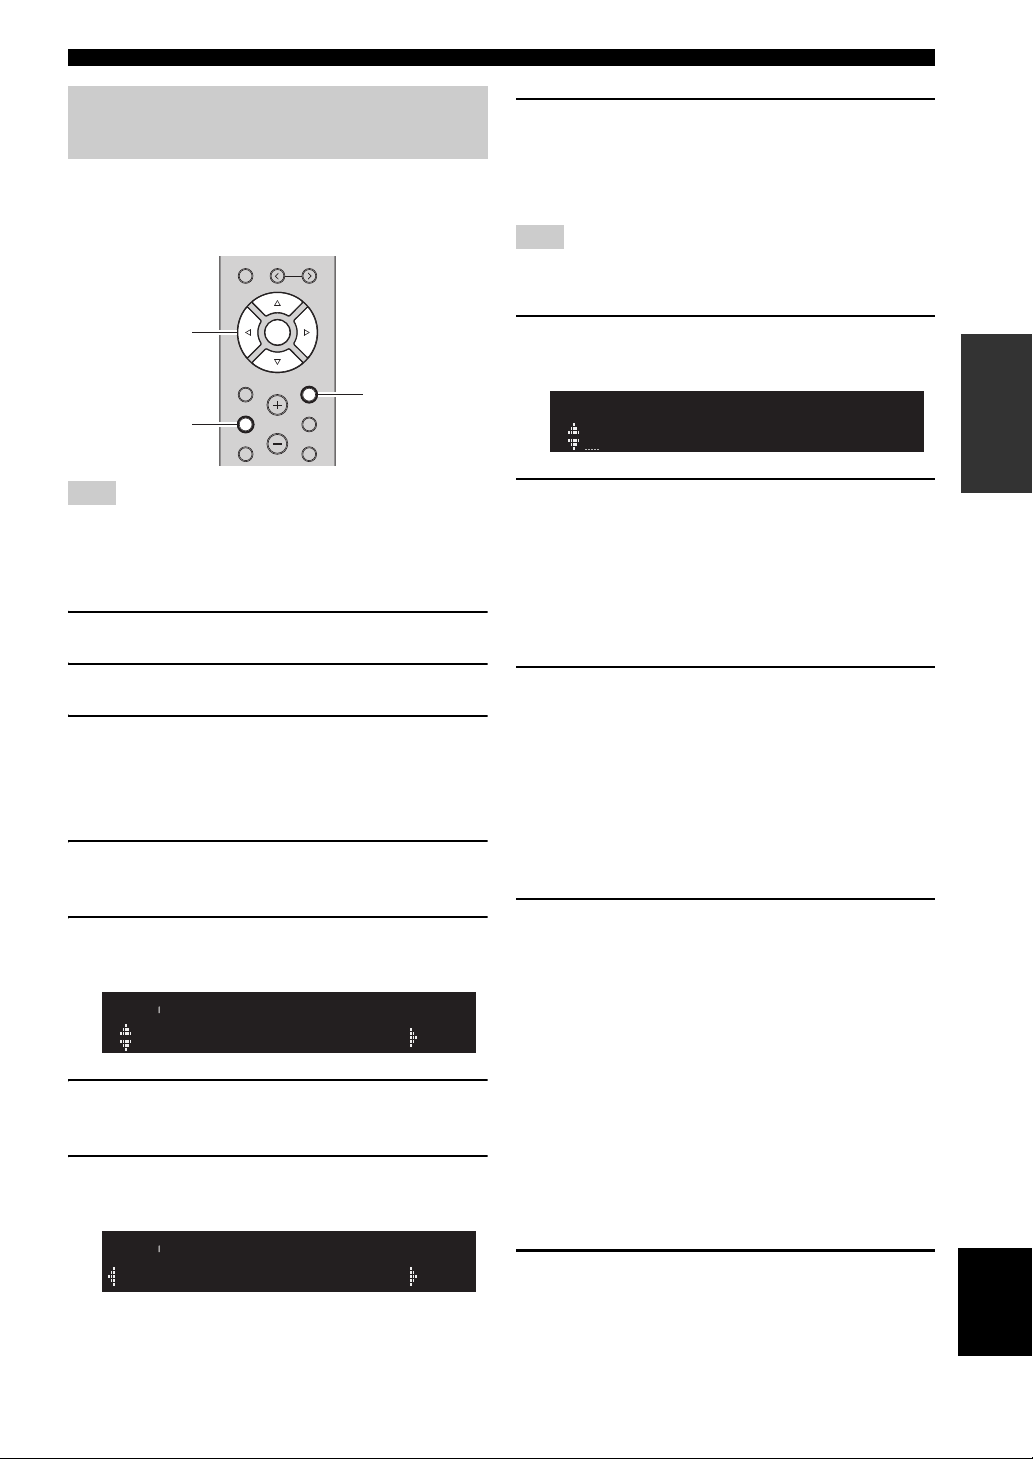
1 Follow “FM/AM tuning” (p.24) to tune into the
desired radio station.
2
Hold down MEMORY for more than 2 seconds.
The first time that you do register a station, the selected
radio station will be registered to the preset number
“01”. Thereafter, each radio station you select will be
registered to the next empty (unused) preset number
after the most recently registered number.
TUNEDSTEREO
MEMORY
A
VOL.
01:FM 98.5 MHz
y
To select a preset number for registering, press MEMORY once
after tuning into the desired radio station, press PRESET j / i to
select a preset number, and then press MEMORY again.
TUNEDSTEREO
985
A
VOL.
02:Empty
OPERATION
BASIC
When scanning is complete, “FINISH” is displayed and
then the display returns to original state.
English
25 En
Page 31

Listening to FM/AM radio
TUNER
PRESET j / i
OPTION
ENTER
TUNER
Cursor keys B /
C
Preset station to be cleared
VOL.
01:Cleard
CLEAR
A
Recalling a preset station
You can recall preset stations that were registered using
automatic station preset or manual station preset.
SPEAKERS
B
A
PHONO
COAX 1 COAX 2
OPT 1 OPT 2 CD
LINE 1
TUNER
BAND
MEMORY
SLEEP
BLUETOOTH
LINE 2 LINE 3
NET USB
TUNING
PRESET
1 Press TUNER to select “TUNER” as the input
source.
2 Press PRESET j / i to select a preset
number.
y
• Preset numbers to which no stations are registered are skipped.
• “No Presets” is displayed if no stations are registered.
Clearing a preset station
Clear radio stations registered to the preset numbers.
LINE 1
LINE 2 LINE 3
TUNER
NET USB
BAND
TUNING
MEMORY
PRESET
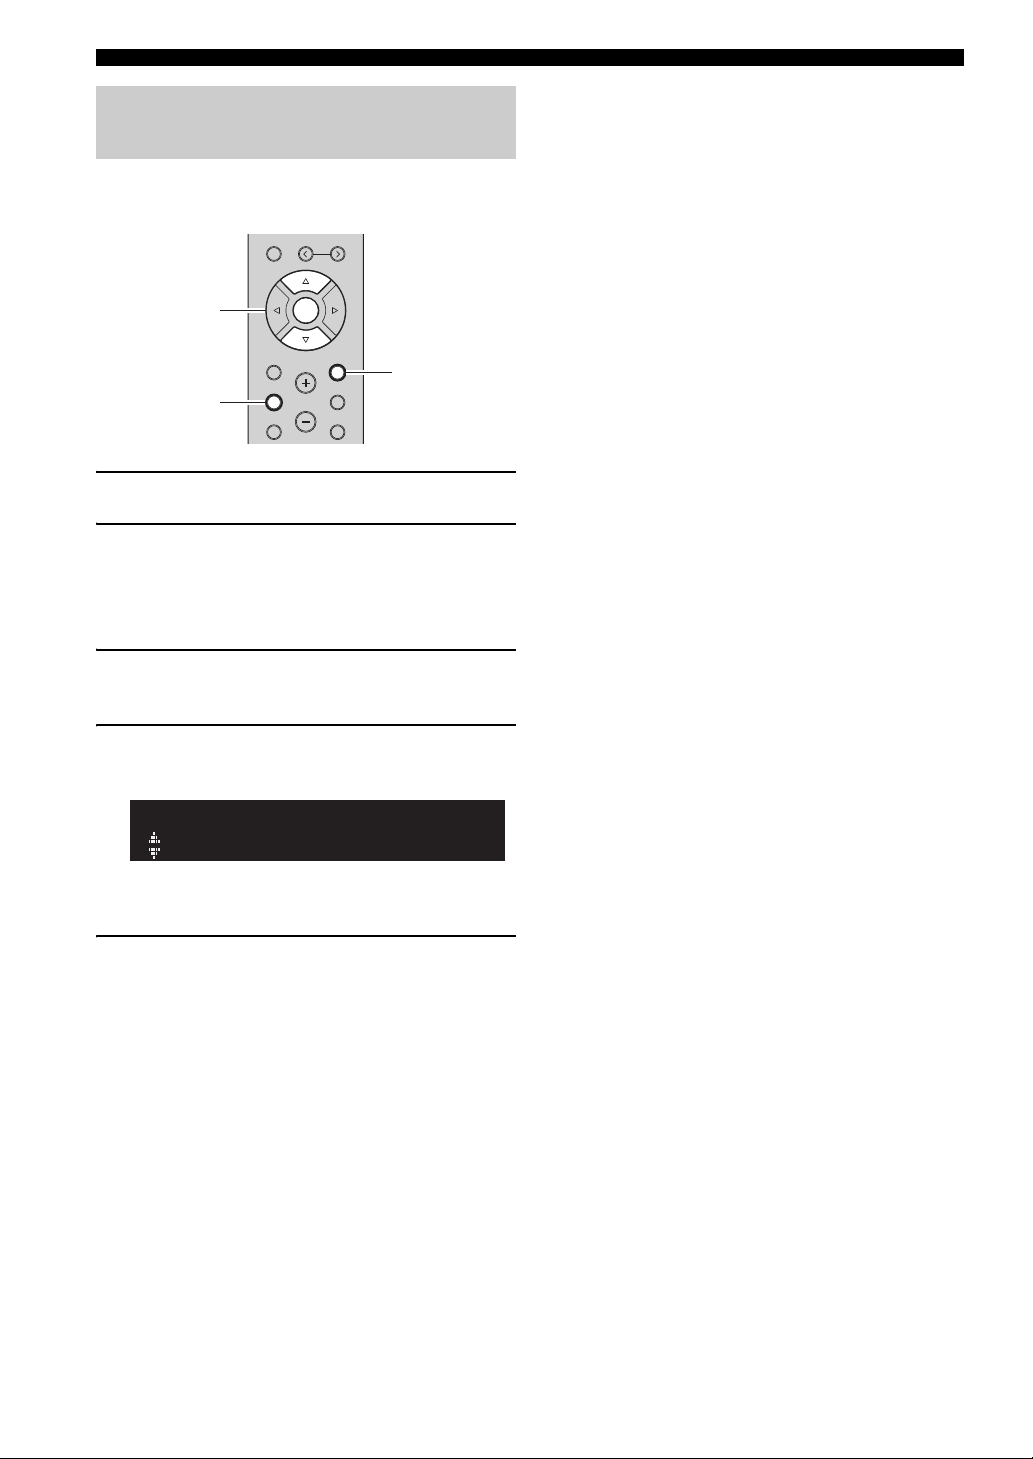
3 Use the cursor keys to select “Clear Preset”
and press ENTER.
OPTION
VOL.
Clear Preset
4 Use the cursor keys (B / C) to select a preset
station to be cleared and press ENTER.
TUNEDSTEREO
CLEAR
A
VOL.
01:FM 98.5 MHz
If the preset station is cleared, “Cleared” appears and
then the next in-use preset number is displayed.
5 Repeat step 4 until all desired preset stations
are cleared.
6 To exit from the “Option” menu, press
OPTION.
y
You can clear a preset station from the front panel.
(1) Press CLEAR on the front panel.
(2) Press PRESET D/E to select the preset station that you want
to clear.
(3) Press SELECT/ENTER or CLEAR to clear the preset station.
1 Press TUNER to select “TUNER” as the input
source.
2 Press OPTION.
26 En
ENTER
HOME
SETUP
VOLUME
RETURN
OPTION
MUTENOW PLAYING
Page 32

Playing back music via Bluetooth
This unit Bluetooth device
(such as mobile device)
BLUETOOTH
REPEAT
SHUFFLE
Playback keys
BLUETOOTH
You can play back music files stored on a Bluetooth
device (such as mobile device) on the unit.
Please also refer to the owner’s manual of your Bluetooth
device.
3 On the Bluetooth device, select the unit’s
model name from the available device list.
After pairing has been completed and the unit is
connected to the Bluetooth device, “Connected”
appears on the front display, and Bluetooth indicator
will be light up.
Notes
• To use the Bluetooth function, set “Bluetooth” (p. 45) in the
“Setup” menu to “On”.
•A Bluetooth device may not be detected by the unit or some
feature may not be compatible, depending on the model.
y
You can transmit audio to Bluetooth speakers or headphones
using the MusicCast CONTROLLER app. To transmit audio, set
“Audio Send” (p. 45) in the “Setup” menu to “On”. The audio
output can only be selected from the MusicCast CONTROLLER
app.
Connecting a Bluetooth device (pairing)
When connecting a Bluetooth device to the unit for the
first time, the pairing operation is required to perform.
Pairing is an operation that registers the Bluetooth devices
with each other beforehand. Once pairing has been
completed, subsequent reconnection will be easy even
after the Bluetooth connection is disconnected.
BLUETOOTH
A
VOL.
Connected
y
• If the pass key is required, enter the number “0000”.
• Complete a pairing procedure within 5 minutes.
• If no Bluetooth devices are found, “Not found” appears.
Playing back Bluetooth device contents
Connect a paired Bluetooth device and start playback.
Check the following beforehand:
• Pairing has been completed.
• Bluetooth function on the Bluetooth device is turned on.
SPEAKERS
B
A
PHONO
COAX 1 COAX 2
OPT 1 OPT 2 CD
SLEEP
BLUETOOTH
OPERATION
BASIC
SPEAKERS
B
A
PHONO
COAX 1 COAX 2
OPT 1 OPT 2 CD
SLEEP
BLUETOOTH
1 Press BLUETOOTH to select “Bluetooth” as
the input source.
If another Bluetooth device is already connected,
disconnect the Bluetooth connection before you
perform a pairing operation.
2 Turn on the Bluetooth function of the
Bluetooth device.
1 Press BLUETOOTH to select “Bluetooth” as
the input source.
y
If the unit detects the Bluetooth device previously connected, the
unit automatically connects to the Bluetooth device after Step 1.
To establish another Bluetooth connection, first disconnect the
current Bluetooth connection.
English
27 En
Page 33

Playing back music via Bluetooth
2 Operate the Bluetooth device to establish a
Bluetooth connection.
Select the unit’s model name from the Bluetooth
device list on your device.
When a connection is established, Bluetooth indicator
on the front display will be light up.
y
If you cannot connect the Bluetooth device, please perform
pairing again.
3 Operate the Bluetooth device to play back
music.
y
You can use the playback keys on the remote control to control
playback.
Disconnecting a Bluetooth connection
Follow one of the procedures below to disconnect a
Bluetooth connection.
• Turn off the Bluetooth function on the Bluetooth
device.
• Hold down BLUETOOTH on the remote control for at
least 3 seconds.
• Select “Disconnect” in “Audio Receive” (p. 45) in the
“Setup” menu, and then press ENTER.
• Select an input source other than “Bluetooth” on the
unit.
28 En
Page 34

Playing back music stored on media servers (PCs/NAS)
PC
NAS
This unit
(Example of English version)
You can play back music files stored on your PC or DLNA-compatible NAS on the unit.
Notes
• To use this function, the unit and your PC/NAS must be connected to the same router (p. 14). You can check whether the network
parameters (such as the IP address) are properly assigned to the unit in “Information” (p.44) in the “Setup” menu.
• The unit supports playback of WAV (PCM format only), AIFF, MP3, WMA, MPEG-4 AAC, FLAC, ALAC and DSD files.
• The unit is compatible with sampling rates of up to 192 kHz for WAV, AIFF and FLAC files, 96 kHz for ALAC files, and 48 kHz for
other files.
• The unit is compatible with 2.8 MHz/5.6 MHz (1 bit) DSD files.
• Digital Rights Management (DRM) contents cannot be played back.
• To play back music files, the server software installed on the PC/NAS must support the music file formats that you want to play back.
y
You can connect up to 16 media servers to this unit.
OPERATION
BASIC
Setting the media sharing of music files
To play back music files in your computer with this unit,
you need to make the media sharing setting between the
unit and computer (Windows Media Player 11 or later). In
here, setting with Windows Media Player in Windows 7 is
taken as an example.
■ When using Windows Media Player 12
1 Start Windows Media Player 12 on your PC.
2 Select “Stream”, then “Turn on media
streaming.”
The control panel window of your PC appears.
3 Click “Turn on media streaming.”
English
29 En
Page 35

Playing back music stored on media servers (PCs/NAS)
NET USB
TUNER
PRESET
TUNING
BAND
MEMORY
SETUP
HOME
MUTENOW PLAYING
VOLUME
RETURN
ENTER
REPEAT
SHUFFLE
OPTION
RETURN
OPTION
NOW PLAYING
HOME
ENTER
NET
Playback keys
Cursor keys
B / C / D / E
4 Select “Allowed” from the drop-down list
next to the unit’s model name.
5 Click “OK” to exit.
■ When using Windows Media Player 11
1 Start Windows Media Player 11 on your PC.
2 Select “Library” then “Media Sharing”.
Playback of PC music contents
Follow the procedure below to operate the PC music
contents and start playback.
Note
“_” (underscore) will be displayed for characters not supported
by the unit.
3 Check the “Share my media to” box, select
4 Click “OK” to exit.
■ When using a PC or a NAS with other
Refer to the instruction manual for the device or software
and configure the media sharing settings.
the unit’s icon, then click “Allow”.
DLNA server software installed
1 Press NET repeatedly to select “Server” as
the input source.
SERVER
A
NAS A
2 Use the cursor keys (B / C) to select a music
server and press ENTER.
3 Use the cursor keys to select an item and
press ENTER.
If a song is selected, playback starts and the playback
information is displayed.
SERVER
A
Song A
y
• If playback of a music file selected from the unit is ongoing on
your PC, the playback information is displayed.
• You can register the current playback song as a preset (p. 41).
• If you press the DISPLAY on the front panel repeatedly, you
can switch the playback information on the front display (p. 40).
30 En
Page 36

Use the following remote control keys to control
playback.
Keys Function
Cursor keys
ENTER
RETURN
Playback
keys
HOME
NOW PLAYING
p/ e
s
b / w
f / a
Select a music file or folder.
Starts playback if pressed while
content is selected. Moves down
one level if pressed while a folder
is selected.
Moves up one level.
Stops/resumes playback.
Stops playback.
Skips forward/backward.
(while holding down) Searches
forward/backward.
Displays the root directory of the
music server.
Displays information about the
song that’s playing.
y
You can also use a DLNA-compatible Digital Media Controller
(DMC) to control playback. For details, see “DMC Control”
(p.44).
Playing back music stored on media servers (PCs/NAS)
OPERATION
BASIC
■ Repeat/shuffle settings
You can configure the repeat/shuffle settings for the
playback of PC music content.
1 When the input source is “SERVER,” press
REPEAT or SHUFFLE on the playback key
repeatedly to select the playback method.
Playback
keys
REPEAT
SHUFFLE
Setting Function
Off Turns off the repeat function.
One
All
Off Turns off the shuffle function.
On
Plays back the current song
repeatedly.
Plays back all songs in the current
album (folder) repeatedly.
Plays back songs in the current album
(folder) in random order.
31 En
English
Page 37

Listening to Internet radio
RETURN
NOW PLAYING
HOME
ENTER
NET
Cursor keys
B / C / D / E
You can listen to Internet radio stations from all over the world.
Notes
• To use this function, the unit must be connected to the Internet
(p. 14). You can check whether the network parameters (such as
the IP address) are properly assigned to the unit in
“Information” (p.44) in the “Setup” menu.
• You may not be able to receive some Internet radio stations.
• The unit uses the vTuner Internet radio station database service.
• This service may be discontinued without notice.
LINE 1
LINE 2 LINE 3
TUNER
NET USB
BAND
TUNING
MEMORY
PRESET
ENTER
HOME
SETUP
VOLUME
RETURN
OPTION
MUTENOW PLAYING
1 Press NET repeatedly to select “Net Radio”
as the input source.
The station list appears on the front display.
NET RADIO
A
Bookmarks
2 Use the cursor keys to select an item and
press ENTER.
If an Internet radio station is selected, playback starts
and the playback information is displayed.
NET RADIO
A
JazzST
Use the following remote control keys to control
playback.
Keys Function
Cursor keys
ENTER
RETURN
Playback keys s
HOME
NOW PLAYING
y
• You can register the current playback station as a preset (p. 41).
• If you press the DISPLAY on the front panel repeatedly, you
can switch the playback information on the front display (p. 40).
• Some information may not be available depending on the
station.
Select the Internet radio station or
category such as the genre.
Starts playback if pressed while
an Internet radio station is
selected. Moves down one level if
pressed while a category is
selected.
Moves up one level.
Stops playback.
Displays the top categories if
pressed during playback.
Displays the playback
information for the Internet radio
station.
32 En
Page 38

Registering favorite Internet radio
You can switch the language.
Enter the vTuner ID in this area.
stations (bookmarks)
By registering your favorite Internet radio stations to
“Bookmarks”, you can quickly access to them from the
“Bookmarks” folder in the front display.
1 Select any of Internet radio stations on the
unit.
This operation is necessary to register the radio
station for the first time.
2 Check the vTuner ID of the unit.
You can find the vTuner ID (MAC address of the
unit) in “Information” (p. 44) in the “Setup” menu.
3 Access the vTuner website
(http://yradio.vtuner.com/) with the web
browser on your PC and enter the vTuner ID.
Listening to Internet radio
OPERATION
BASIC
y
To use this feature, you need to create your personal account.
Create your account using your e-mail address.
4 Register your favorite radio stations.
Click the “Add” icon (❤+) next to the station name.
y
To remove the station from the “Bookmarks” folder, select
“Bookmarks” in the Home screen, and then click the “Remove”
icon (❤–) next to the station name.
English
33 En
Page 39

Playing back iPod/iTunes music via a network (AirPlay)
PC
iTunes
Router
Playback starts
iPod
Starts playback
on iTunes
or iPod
This unit
iTunes (example) iPod iOS6 (example)
iPod iOS7/iOS8 (example)
iTunes (example) iPod (example)
Network name of the unit
The AirPlay function allows you to play back iPod/iTunes
music on the unit via network.
Note
To use this function, the unit and your PC or iPod must be
connected to the same router (p. 14). You can check whether the
network parameters (such as the IP address) are properly assigned
to the unit in “Information” (p.44) in the “Setup” menu.
AirPlay works with iPhone, iPad, and iPod touch with iOS
4.3.3 or later, Mac with OS X Mountain Lion or later, and
Mac and PC with iTunes 10.2.2 or later.
(as of August 2015)
Playback of iPod/iTunes music contents
2 On the iPod/iTunes, click (tap) the AirPlay
icon and select the unit (network name of the
unit) as the audio output device.
3 Select a song and start playback.
The unit automatically selects “AirPlay” as the input
source and starts playback. The playback information is
displayed on the front display.
y
• If you press the DISPLAY on the front panel repeatedly, you
can switch the playback information on the front display (p. 40).
• You can turn on the unit automatically when starting playback
on iTunes or iPod by setting “Standby (Network Standby)”
(p.44) in the “Setup” menu to “On”.
• You can edit the network name (the unit’s name on the network)
displayed on iPod/iTunes in “Network Name” (p.45) in the
“Setup” menu.
• You can adjust the unit’s volume from the iPod/iTunes during
playback.
Follow the procedure below to play back iPod/iTunes
music contents on the unit.
1 Turn on the unit, and start iTunes on the PC
or display the playback screen on the iPod.
If the iPod/iTunes recognizes the unit, the AirPlay
icon ( ) appears.
y
For iPods using iOS 7/8, AirPlay icon is displayed in Control
Center. To access Control Center, swipe up from the bottom of
the screen.
Note
If the icon does not appear, check whether the unit and PC/iPod
are connected to the router properly.
CAUTION
When you use iPod/iTunes controls to adjust volume, the
volume may be unexpectedly loud. This could result in
damage to the unit or speakers. If the volume suddenly
increases during playback, stop playback on the iPod/
iTunes immediately.
34 En
Page 40

Use the following remote control keys to control playback.
iTunes (example of English version)
Check this box
Keys Functions
Stops/resumes playback.
Stops playback.
Skips forward/backward.
Playback
keys
p/ e
s
b / w
f / a
REPEAT Changes the Repeat settings.
SHUFFLE Changes the Shuffle settings.
Note
To control iTunes playback with the remote control of the unit,
you need to configure the iTunes preferences to enable iTunes
control from remote speakers in advance.
Playing back iPod/iTunes music via a network (AirPlay)
OPERATION
BASIC
English
35 En
Page 41

Playing back music stored on a USB storage device
This unit (front)
USB storage device
Connected
USB
A
VOL.
LINE 1
NET USB
LINE 2 LINE 3
TUNER
PRESET
TUNING
BAND
MEMORY
SETUP
HOME
MUTENOW PLAYING
VOLUME
RETURN
ENTER
REPEAT
SHUFFLE
OPTION
RETURN
USB
NOW PLAYING
HOME
ENTER
Playback keys
Cursor keys
B / C / D / E
You can play back music files stored on a USB storage device on the unit. Refer to the instruction manuals for the USB
storage device for more information.
Notes
• The unit supports USB mass storage class devices (e.g., flash memories or portable audio players) using FAT16 or FAT32 format.
• The unit supports WAV (PCM format only), AIFF, MP3, WMA, MPEG-4 AAC, FLAC, ALAC and DSD files.
• The unit is compatible with sampling rate of up to 192 kHz for WAV, AIFF and FLAC files, 96 kHz for ALAC files, and 48 kHz for
other files.
• The unit is compatible with 2.8 MHz/5.6 MHz (1 bit) DSD files.
• Do not connect devices other than USB mass storage class devices (such as USB chargers or USB hubs), PCs, card readers, an
external HDD, etc.
• USB devices with encryption cannot be used.
• Digital Rights Management (DRM) contents cannot be played back.
• Some features may not be compatible, depending on the model or manufacturer of the USB storage device.
1 Connect the USB storage device to the USB
y
If the USB storage device contains many files, it may take time to
load the them. In this case, “Loading...” appears in the front
display.
Notes
• Disconnect the USB storage device from the USB jack when it
• Stop playback of the USB storage device before disconnect it
• You cannot connect the PC to the USB jack of the unit.
Connecting a USB storage device
jack.
PHONES
is not in use.
from the USB jack.
SPEAKERS
AB
5V
1A
BASSINPUT
Playback of USB storage device contents
Follow the procedure below to operate the USB storage
device contents and start playback.
Note
“_” (underscore) will be displayed for characters not supported
by the unit.
1
Press USB to select “USB” as the input source.
USB
A
VOL.
Bluse
36 En
Page 42

2 Use the cursor keys to select an item and
Track #3
USB
A
press ENTER.
If a song is selected, playback starts and the playback
information is displayed.
Playing back music stored on a USB storage device
■ Repeat/shuffle settings
You can configure the repeat/shuffle settings for playback
of USB storage device contents.
1 If the input source is “USB,” press REPEAT
or SHUFFLE on the playback keys repeatedly
to select the playback method.
y
• You can register the current playback song as a preset (p. 41).
• If you press the DISPLAY on the front panel repeatedly, you
can switch the playback information on the front display (p. 40).
Use the following remote control keys to control playback.
Keys Function
Cursor keys
ENTER
RETURN
Playback
keys
HOME
NOW PLAYING
b / w
f / a
p/ e
s
Select a music file or folder.
Starts playback if pressed while a
music file is selected. Moves down
one level if pressed while a folder is
selected.
Moves up one level.
Stops/resumes playback.
Stops playback.
Skips forward/backward.
Displays the root directory of the
USB device.
Displays information about the
song that’s playing.
Playback
keys
REPEAT
SHUFFLE
Setting Function
Off Turns off the repeat function.
One
All
Off Turns off the shuffle function.
On
Plays back the current song
repeatedly.
Plays back all songs in the current
album (folder) repeatedly.
Plays back songs in the current album
(folder) in random order.
OPERATION
BASIC
English
37 En
Page 43

Playing back iPod music
BASSINPUT
5V
1A
DIMMER MO
DISPLAY
PHONES
SPEAKERS
AB
This unit (front)
Connected
USB
A
VOL.
LINE 1
NET USB
LINE 2 LINE 3
TUNER
PRESET
TUNING
BAND
MEMORY
SETUP
HOME
MUTENOW PLAYING
VOLUME
RETURN
ENTER
REPEAT
SHUFFLE
OPTION
RETURN
USB
NOW PLAYING
HOME
ENTER
Playback keys
Cursor keys
B / C / D / E
You can play back iPod music on the unit using a USB cable supplied with the iPod.
Note
An iPod may not be detected by the unit or some features may not
be compatible, depending on the model or software version of the
iPod.
Made for
• iPod touch (2nd, 3rd, 4th and 5th generation)
• iPod nano (2nd, 3rd, 4th, 5th, 6th and 7th generation)
• iPhone 6, iPhone 6 Plus, iPhone 5s, iPhone 5c, iPhone 5,
iPhone 4S, iPhone 4, iPhone 3GS, iPhone 3G
(as of August 2015)
Connecting an iPod
Connect your iPod to the unit with the USB cable supplied
with the iPod.
1 Connect the USB cable to the iPod.
2 Connect the USB cable to the USB jack.
Playback of iPod content
Follow the procedure below to operate the iPod contents
and start playback.
Note
“_” (underscore) will be displayed for characters not supported
by the unit.
y
If “Standby (Network Standby)” (p.44) in the “Setup” menu is set
to “On” or “Auto”, the iPod will continue to charge up to 4 hours
if the unit goes into standby mode while the iPod is charging.
Note
Disconnect the iPod from the USB jack when it is not in use.
38 En
1 Press USB to select “USB” as the input
source.
USB
A
VOL.
Music
2 Use the cursor keys to select an item and
press ENTER.
If a song is selected, playback starts and the playback
information is displayed.
USB
Track #1
y
• If you press the DISPLAY on the front panel repeatedly, you
can switch the playback information on the front display (p. 40).
• To operate the iPod manually to select content or control
playback, switch to the simple play mode (p. 39).
A
VOL.
Page 44

Playing back iPod music
Use the following remote control keys to control playback.
Keys Function
Cursor keys
ENTER
RETURN
Playback
keys
HOME
NOW PLAYING
p/ e
s
b / w
f / a
Select a music file, album or genre.
Starts playback if pressed while a
music file is selected. Moves down
one level if pressed while an album
or genre is selected.
Moves up one level.
Stops/resumes playback.
Stops playback.
Skips forward/backward.
(while holding down) Searches
forward/backward.
Displays the top menu of the iPod.
Displays information about the
song that’s playing.
■ Operating the iPod itself or remote control (simple play)
1 Press MODE on the front panel to switch to
the simple play mode.
Between the simple play mode, only the input name
is displayed on the front display. If you confirm the
playback information, see the iPod screen.
y
If you want to exit the simple play mode, press MODE again.
■ Repeat/shuffle settings
You can configure the repeat/shuffle settings of your iPod.
1 If the input source is “USB,” press REPEAT
or SHUFFLE on the playback keys repeatedly
to select the playback method.
Playback
keys
REPEAT
SHUFFLE
y
The operation or display of repeat/shuffle may differ, depending
on the type or software version of iPod used.
Setting Function
Off Turns off the repeat function.
One
All Plays back all songs repeatedly.
Off Turns off the shuffle function.
Songs Plays back songs in random order.
Albums Plays back albums in random order.
Plays back the current song
repeatedly.
OPERATION
BASIC
2 Operate your iPod itself or the remote control
to start playback.
Use the following remote control keys to control
playback on the simple play mode.
Operational remote
control keys
Cursor keys
ENTER
RETURN
p/ e
Playback
keys
b / w
f / a
s
Select an item.
Confirms the selection.
Returns to the previous state.
Starts playback or stops playback
temporarily.
Stops playback.
Skips forward/backward.
(while holding down) Searches
forward/backward.
Function
English
39 En
Page 45

Switching information on the front display
VOLUME
PURE DIRECT
RETURN
CONNECT
PUSH - ENTER
TUNINGPRESET
BAND
MEMORY CLEAR
BASSINPUT
5V
1A
BALANCE
LR
TREBLE
LOUDNESS
FLAT
-30dB
DIMMER MODE
DISPLAY
SELECT
PHONES
SPEAKERS
AB
DISPLAY
Track #1
SERVER
A
When you select a network source or USB as the input source, you can switch playback information on the front display.
1 Press DISPLAY.
Each time you press the key, the displayed item
changes.
INFO
A
Track
About 3 seconds later, the corresponding information
for the displayed item appears.
Input source Item
Bluetooth
Server
AirPlay
USB (include
iPod)
Net Radio
Track (song title), Artist (artist name),
Album (album name), Time
Track (song title), Album (album name),
Time, Station (station name)
40 En
Page 46

Registering the current playback song/station (Preset function)
NET USB
TUNER
PRESET
TUNING
BAND
MEMORY
ENTER
PRESET j / i
MEMORY
ENTER
01:Empty
MEMORY
A
Preset number
When you select network sources and USB as the input source, you can register the current playback song or streaming
station as a preset up to 40.
You can then easily recall any preset song/station by selecting its preset number.
The following input sources can be set as presets.
Server, Net Radio, USB (except iPod) and streaming services.
Recalling a preset
1 Select the input source you want to recall the
preset.
2 Press PRESET j / i to select a preset
number.
Registering to a preset
1 Playback a song or streaming station you
want to register.
2 Hold down MEMORY for more than 3
seconds.
The first time that you register a song/station, the
selected song/station will be registered to the preset
number “01”. Thereafter, each song/station you select
will be registered to the next empty (unused) preset
number after the most recently registered number.
y
To select a preset number for registering, press PRESET j / i or
the cursor keys (D/E).
3 Press MEMORY again to register preset.
3 Press ENTER to recall preset.
OPERATION
BASIC
English
41 En
Page 47

ADVANCED OPERATION
RETURN
OPTION
ENTER
Cursor keys
B / C / D / E
Configuring playback settings for different playback sources
(Option menu)
You can configure separate playback settings for different playback sources. This menu allows you to easily configure
settings during playback.
MEMORY
PRESET
ENTER
HOME
SETUP
VOLUME
RETURN
OPTION
MUTENOW PLAYING
1 Press OPTION.
OPTION
A
VOL.
Volume Trim
2 Use the cursor keys to select an item and
press ENTER.
■ Volume Trim
Corrects volume differences between input sources. If you
are bothered by volume differences when switching
between input sources, use this function to correct it.
y
This setting is applied separately to each input source.
Setting range
-10.0 dB to 0.0 dB to +10.0 dB (0.5 dB increments)
Default
0.0 dB
■ Signal Info
Displays information about audio signal.
Choices
FORMAT Audio format of the input signal
SAMPL
The number of samples per second of the input
digital signal
y
To return to the previous state during menu operations, press
RETURN.
3 Use the cursor keys (D / E) to select a setting.
4 To exit from the menu, press OPTION.
Option menu items
y
Available items vary depending on the selected input source.
Item Function Page
Volume Trim
Signal Info
Auto Preset
Clear Preset
Vol.Interlock (Volume interlock)
Corrects volume differences between
input sources.
Displays information about the audio
signal.
Automatically registers FM radio
stations with strong signals as presets.
Clear radio stations registered to preset
numbers.
Enables/Disables volume controls from
iTunes/iPod via AirPlay.
42
42
24
26
42
y
To switch the information on the front display, press the cursor
keys (B / C) repeatedly.
■ Vol.Interlock (Volume interlock)
Enables/disables volume controls from iTunes/iPod via
AirPlay.
Settings
Off Disables volume controls from iTunes/iPod.
Ltd
(default)
Full
Enables volume controls from iTunes/iPod within
the limited range (-80.0 dB to -20.0 dB and mute).
Enables volume controls from iTunes/iPod in the
full range (-80.0 dB to +16.5 dB and mute).
42 En
Page 48

Configuring various functions (Setup menu)
PRESET
MEMORY
SETUP
HOME
MUTENOW PLAYING
VOLUME
RETURN
ENTER
OPTION
RETURN
SETUP
ENTER
Cursor keys
B / C / D / E
Network
SETUP
A
Max Volume
SETUP
A
+16.5dB
MAX VOL
A
You can configure the unit’s various functions.
Setup menu items
1 Press SETUP.
2 Use the cursor keys (B / C) to select a menu.
3 Press ENTER.
4 Use the cursor keys (D / E) to select a setting
and press ENTER.
y
To return to the previous state during menu operations, press
RETURN.
5 Exit from the menu, press SETUP.
Menu item Function
Connection
Information
IP Address
DMC
Control
Network
Standby
(Network
Standby)
Network
Name
Update
(Network
Update)
On/Off
Standby
(Bluetooth
Bluetooth
Max Volume
Initial Volume
AutoPowerStdby
(Auto Power Standby)
ECO Mode
Standby)
Audio
Receive
Audio Send
Selects the network
connection method.
Displays the network
information on the unit.
Configures the network
parameters (such as IP
address).
Selects whether to allow a
DLNA-compatible Digital
Media Controller (DMC) to
control playback.
Selects whether to enable/
disable the function that turns
on the unit from other
network devices.
Edits the network name (the
unit’s name on the network)
displayed on other network
devices.
Updates the firmware via the
network.
Enables/disables the
Bluetooth functions.
Selects whether to enable/
disable the function that turns
on the unit from Bluetooth
devices (Bluetooth standby).
Receives audio settings from
the Bluetooth device.
Transmit audio from the unit
to Bluetooth speakers or
headphones.
Sets the maximum volume to
prevent excessive loudness.
Sets the initial volume for
when this receiver is turned
on.
Sets the amount of time for
the auto standby function.
Enables/disables the eco
mode (power saving mode).
Page
44
44
44
44
44
45
45
45
45
45
45
46
46
46
46
OPERATION
ADVANCED
English
43 En
Page 49

Configuring various functions (Setup menu)
Network
Configures the network settings.
■ Connection
Selects the network connection method.
Wired
Wireless
WirelessDirect
Extend
■ Information
Displays the network information on the unit.
NewFwAvailable
STATUS The connection status of the network.
MC NET
MAC
SSID
IP IP address
SUBNET Subnet mask
GATEWAY The IP address of the default gateway
DNS P The IP address of the primary DNS server
DNS S The IP address of the secondary DNS server
VTUNER The ID of the Internet radio (vTuner)
■ IP Address
Configures the network parameters (such as IP address).
DHCP
Select whether to use a DHCP server.
Off
On (default)
Select this option when you want to connect
the unit to a network with a commerciallyavailable network cable (p. 15).
Select this option when you want to connect
the unit to a network via the wireless router or
access point (p. 16, 17, 18).
Select this option when you want to connect a
mobile device to the unit directly. For details
on settings, see “Connecting a mobile device
to the unit directly (Wireless Direct)” (p. 19).
Displays connection method of the MusicCast
Network.
Appears if an update for this unit’s firmware is
available (p. 49).
Status of the MusicCast Network. If “Ready”
appears, you can use the MusicCast
CONTROLLER app.
Displays MAC address of the unit. MAC
address will vary depending on the connection
method (wired LAN connection or wireless
LAN / Wireless Direct connection).
(When using wireless LAN connection or
Wireless Direct ) The SSID of this unit on the
wireless network.
Does not use a DHCP server. Configure the
network parameters manually. For details, see
“Manual network settings”.
Uses a DHCP server to automatically obtain the
unit’s network parameters (such as IP address).
2 Use the cursor keys (B / C) to select a
parameter type.
IP Specifies an IP address.
SUBNET Specifies a subnet mask.
GATEWAY Specifies the IP address of the default gateway.
DNS P
DNS S
Specifies the IP address of the primary DNS
server.
Specifies the IP address of the secondary DNS
server.
3 Use the cursor keys (D / E) to select the edit
position.
NETWORK
A
Address1•••192
(Example: IP address setting)
Use the cursor keys (D / E) to switch between
segments (Address1, Address2...) of the address.
4 Use the Cursor keys (B / C) to change a
value.
5 To exit from the menu, press SETUP.
■ DMC Control
Selects whether to allow DLNA-compatible Digital Media
Controller (DMC) to control playback.
Disable Does not allow DMCs to control playback.
Enable
(default)
y
A Digital Media Controller (DMC) is a device that can control
other network devices through the network. When this function is
enabled, you can control playback of the unit from DMCs (such
as Windows Media Player 12) on the same network.
■ Standby (Network Standby)
Selects whether the unit can be turned on from other
network devices (network standby).
Off Disables the network standby function.
On
Auto
(Default)
Allows DMCs to control playback.
Enables the network standby function. (The unit
consumes more power than when “Off” is
selected.)
Enables the network standby function.
The unit is set to the power saving mode when the
unit is disconnected from the network.
Manual network settings
1 Set “DHCP” to “Off”.
44 En
Page 50

Configuring various functions (Setup menu)
Network Name
NETWORK
A
R-N602 XXXXXX
NAME
A
R-N602 XXXXXX
NAME
A
■ Network Name
Edits the network name (the unit’s name on the network)
displayed on other network devices.
1 Select “Network Name”.
2 Press ENTER twice to enter the name edit
display.
3 Use the cursor keys (D / E) to move the edit
position and the cursor keys (B / C) to select
a character.
You can insert / delete a character, by pressing
PRESET i (insert) or PRESET j (delete).
4 To confirm the new name, press ENTER.
5 To exit from the menu, press SETUP.
■ Update (Network Update)
Updates the firmware via the network.
Perform
Update
Version
ID Displays the system ID number.
Starts the process to update the unit’s firmware.
For details, see “Updating the unit’s firmware via
the network” (p. 49).
Displays the version of the firmware installed on
the unit.
Bluetooth
Configures the Bluetooth settings.
■ On/Off
Enables/disables the Bluetooth function (p. 27).
Off Disables the Bluetooth function.
On (Default)
■ Standby (Bluetooth Standby)
Selects whether to enable/disable the function that turns
on the unit from Bluetooth devices (Bluetooth standby). If
this function is set to “On”, the unit automatically turns on
when a connect operation is performed on the Bluetooth
device.
Off Disables the Bluetooth standby function.
On (Default)
y
This setting is not available when “Standby (Network Standby)”
(p. 44) is set to “Off”.
■ Audio Receive
Receives audio settings from the Bluetooth device.
Disconnect
■ Audio Send
Transmit audio from the unit to Bluetooth speakers or
headphones.
Off (Default) Audio can not be transmitted.
On
Enables the Bluetooth function. Immediately
after selecting the “On”, output of the network
source is paused.
Enables the Bluetooth standby function. (The
unit consumes more power than when “Off” is
selected.)
Disconnects the connected Bluetooth device. To
disconnect the Bluetooth device, press ENTER
on the remote control.
Enables audio transmission. Specify the audio
transmission settings using the dedicated
MusicCast CONTROLLER app for mobile
devices.
OPERATION
ADVANCED
English
45 En
Page 51

Configuring various functions (Setup menu)
Max Volume
Sets the maximum volume to prevent excessive loudness.
Setting range
-30 dB to +15.0 dB / +16.5 dB (5 dB step)
Default
+16.5 dB
Initial Volume
Sets the initial volume when the receiver is turned on.
Setting range
Off, Mute, -80.0 dB to +16.5 dB (0.5 dB Step)
Default
Off
AutoPowerStdby (Auto Power Standby)
Enables/disables the auto-standby function. If you do not
operate the unit for the specified time, the unit will
automatically go into standby mode.
Off
(Default)
On
y
Just before the unit enters standby mode, “AutoPowerStdby”
appears and then countdown starts in the front display.
Does not set the unit to standby mode
automatically.
Sets the unit to standby mode automatically.
While NET, BLUETOOTH or USB is selected as
the input source, the unit will switch to standby
mode if the selected source is not played back for
20 minutes.
For all input sources, the unit will switch to
standby mode if it is not operated for 8 hours.
ECO Mode
Enables/disables the eco (power saving) mode. When the
eco mode is enabled, you can reduce the unit’s power
consumption.
The new setting will take effect after the unit is restarted.
Be sure to press ENTER to restart the unit after selecting a
setting.
Off (default) Disables the eco mode.
On Enables the eco mode.
Note
When “ECO Mode” is set to “On”, the front display may become
dark.
46 En
Page 52

Configuring the system settings (ADVANCED SETUP menu)
A (power)
SELECT/ENTER
RETURN
DISPLAY
SP IMP.••8¬MIN
REMOTE ID•AUTO
INIT••••CANCEL
Configure the system settings of the unit while viewing the front display.
1 Turn off the unit.
2
While holding down RETURN on the front
panel, press
PHONES
SPEAKERS
AB
5V
1A
A (power).
MEMORY CLEAR
DIMMER MODE
DISPLAY
BASSINPUT
TREBLE
BAND
BALANCE
LR
TUNINGPRESET
LOUDNESS
SELECT
PUSH - ENTER
FLAT
-30dB
PURE DIRECT
VOLUME
RETURN
CONNECT
3 Rotate SELECT/ENTER to select an item.
4 Press SELECT/ENTER to select a setting.
5 Press A (power) to set the unit to turn off and
turn it on again.
The new settings take effect.
ADVANCED SETUP menu items
Item Function Page
SP IMP.
REMOTE ID Selects the unit’s remote control ID. 47
INIT Restores the default settings. 47
UPDATE Updates the firmware. 48
VERSION
Changes the speaker impedance
setting.
Checks the version of firmware
currently installed on the unit.
47
48
Changing the speaker impedance setting (SP IMP.)
Change the unit’s speaker impedance settings depending
on the impedance of the speakers connected.
Settings
4 MIN
8 MIN
(Default)
Select this option when you connect speakers with
an impedance of 4 ohms to less than 8 ohms to the
unit.
Select this option when you connect speakers with
an impedance of 8 ohms or more to the unit.
Selecting the remote control ID (REMOTE ID)
When using multiple receivers in the same room, setting
the remote control ID of this unit to ID1 (and setting the
another receiver to other than ID1 can prevent interference
from other remote controls.
Settings
ID1, AUTO (default)
Restoring the default settings (INIT)
OPERATION
ADVANCED
Restores the default settings for the unit.
Choices
ALL Restores the default settings for the unit.
Initialize all of the network, Bluetooth and USB
NETWORK
CANCEL Does not perform an initialization.
settings. When performing the initialization, the
preset (p. 41) registered by NET/USB input will
be cleared.
English
47 En
Page 53

Configuring the system settings (ADVANCED SETUP menu)
UPDATE•NETWORK
Updating the firmware (UPDATE)
New firmware that provides additional features or product
improvements will be released as needed. If the unit is
connected to the Internet, you can download the firmware
via the network. For details, refer to the information
supplied with updates.
■ Firmware update procedure
Do not perform this procedure unless firmware update is
necessary. Also, make sure you read the information
supplied with updates before updating the firmware.
1 Press SELECT/ENTER repeatedly to select
“USB” or “NETWORK” and press DISPLAY to
start firmware update.
Choices
USB Update the firmware using a USB memory device.
NETWORK Update the firmware via the network.
y
If the unit detects newer firmware over the network,
“NewFwAvailable” appears as the “Information” menu item in
“Network”. In this case, you can also update the unit’s firmware
by following the procedure in “Updating the unit’s firmware via
the network” (p. 49).
Checking the firmware version (VERSION)
VERSION••xx.xx
Check the version of firmware currently installed on the
unit.
y
• You can also check the firmware version in “Update (Network
Update)” (p. 45) in the “Setup” menu.
• It may take a while until the firmware version is displayed.
48 En
Page 54

Updating the unit’s firmware via the network
Notes
RETURN
SETUP
ENTER
Cursor keys
B / C
Available
NEW FW
Perform Update
UPDATE
New firmware that provides additional features or product improvements will be released as needed. If the unit is
connected to the Internet, you can download the firmware via the network and update it.
• Do not operate the unit or disconnect the power cable or network cable during firmware update. Firmware update takes about 20
minutes or more (depending on your Internet connection speed).
• If the unit is connected to the wireless network via a wireless network adapter, network update may not be possible depending on
the condition of the wireless connection. In this case, update the firmware using the USB memory device (p. 48).
y
You can also update the firmware using the USB memory device
from the “ADVANCED SETUP” menu (p. 48).
MEMORY
PRESET
ENTER
7 If “UPDATE SUCCESS” appears on the front
display, press A (power) on the front panel.
The firmware update is complete.
HOME
SETUP
VOLUME
RETURN
OPTION
MUTENOW PLAYING
1 Press SETUP.
2 Use the cursor keys (B / C) to select
“Network” and press ENTER.
3 Use the cursor keys (B / C) to select
“Information” and press ENTER.
If new firmware is available, “NewFwAvailable”
appears on the front display.
4 Press RETURN to return the previous state.
5 Use the cursor keys (B / C) to select
“Update” and press ENTER.
OPERATION
ADVANCED
6 To start the firmware update, press ENTER.
The unit to restart and the firmware update starts.
y
To cancel the operation without updating the firmware, press
SETUP.
English
49 En
Page 55

ADDITIONAL INFORMATION
Troubleshooting
Refer to the chart below if this unit does not function properly. If the problem you are experiencing is not listed below or
if the instructions below do not help, set this unit to standby mode, disconnect the power cable, and contact the nearest
authorized Yamaha dealer or service center.
■ General
Problem Cause Remedy
The power does not
turn on.
The power does not
turn off.
No sound. Incorrect input or output cable
The sound suddenly
goes off.
The protection circuitry has been activated
three times consecutively. If the unit is in
this condition, the standby indicator on the
unit blinks when you try to turn on the
power.
The power cable is not connected or the
plug is not completely inserted.
The protection circuitry has been activated
because of a short circuit, etc.
The internal microcomputer has frozen,
due to an external electric shock (such as
lightning or excessive static electricity) or
to a drop in the power supply voltage.
The internal microcomputer has frozen,
due to an external electric shock (such as
lightning or excessive static electricity) or
to a drop in the power supply voltage.
connections.
No appropriate input source has been
selected.
The SPEAKERS A/B switches are not set
properly.
Speaker connections are not secure. Secure the connections.
Output has been muted. Turn off the mute.
The Max volume or Initial volume setting
is set too low.
The component corresponding to the
selected input source is turned off or is not
playing.
The audio output of a device connected to
a digital audio input (COAXIAL/
OPTICAL jacks) is set to other than PCM.
The protection circuitry has been activated
because of a short circuit, etc.
This unit has become too hot. Make sure the openings on the top panel are not
The auto power standby function has
turned this unit off.
As a safety precaution, capability to turn on the power
is disabled. Contact your nearest Yamaha dealer or
service center to request repair.
Connect the power cable firmly.
Check that the speaker wires are not touching each
other and then turn the power of this unit back on.
Turn OFF the A (Power) on the front panel and turn it
ON again after at least 15 seconds elapse. (If the
problem persists, disconnect the power cable from the
AC wall outlet and plug it again.)
Turn OFF the A (Power) on the front panel and turn it
ON again after at least 15 seconds elapse. (If the
problem persists, disconnect the power cable from the
AC wall outlet and plug it again.)
Connect the cables properly. If the problem persists,
the cables may be defective.
Select an appropriate input source with the INPUT
selector on the front panel (or one of the input
selection key on the remote control).
Turn on the corresponding SPEAKERS A or
SPEAKERS B.
Check the settings for “Max Volume” and “Initial
Volume” in the “Setup” menu.
Turn the component on and make sure it is playing.
Set the audio output of the connected device to PCM.
Set the speaker impedance to match your speakers.
Check that the speaker wires are not touching each
other and then turn the power of this unit back on.
blocked.
Change the auto power standby (“AutoPowerStdby”
in the “Setup” menu) to turn off.
See
page
—
—
12
—
—
11
21
21
11
9
46
—
—
47
12
—
46
50 En
Page 56

Troubleshooting
Problem Cause Remedy
Only the speaker on
one side can be
heard.
There is a lack of bass
and no ambience.
A “humming” sound
can be heard.
The volume level is
low while playing a
record.
The sound is
degraded when
listening with the
headphones
connected to the CD
player or the tape
deck connected to
this unit.
The sound level is
low.
Incorrect cable connections. Connect the cables properly. If the problem persists,
Incorrect setting for the speaker balance. Set the BALANCE control to the appropriate
The + and – wires are connected in
reverse at the amplifier or the speakers.
Incorrect cable connections. Connect the audio plugs firmly. If the problem
No connection from the turntable to the
GND terminal.
The record is being played on a turntable
with an MC cartridge.
The power of this unit is turned off, or this
unit is set to standby mode.
The loudness control function is
operating.
the cables may be defective.
position.
Connect the speaker wires to the correct + and –
phase.
persists, the cables may be defective.
Make the GND connection between the turntable and
this unit.
The turntable should be connected to this unit through
the MC head amplifier.
Turn on the power of this unit.
Turn down the volume, set the LOUDNESS control
to the FLAT position, and then adjust the volume
again.
See
page
11
22
12
11
11
—
—
22
51 En
INFORMATION
ADDITIONAL
English
Page 57

Troubleshooting
■ Tuner
Problem Cause Remedy
FM stereo
reception is
noisy.
There is
distortion, and
clear reception
cannot be
FM
obtained even
with a good FM
antenna.
The desired
station cannot
be tuned in
with the
automatic
tuning method.
FM/AMNO PRESETS
is displayed.
The desired
station cannot
be tuned in
with the
automatic
tuning method.
Automatic
station preset
AM
does not work.
There are
continuous
crackling and
hissing noises.
There are
buzzing and
whining noises.
The particular characteristics of the FM
stereo broadcasts being received may
cause this problem when the transmitter is
too far away or the antenna input is poor.
There is multipath interference. Adjust the antenna position to eliminate the multipath
The signal is too weak. Try using a high-quality directional FM antenna.
No preset stations are registered. Register stations you want to listen to as preset
The signal is weak or the antenna
connections are loose.
Automatic station preset is not available
for AM stations.
The noises may result from lightning,
fluorescent lamps, motors, thermostats or
other electrical equipment.
A TV set is being used nearby. Move this unit away from the TV set.
Check the antenna connections.
Try using a high-quality directional FM antenna.
Switch to monaural mode.
interference.
Try using the manual tuning method.
stations before operation.
Tighten the AM antenna connections and orient it for
the best reception.
Try using the manual tuning method.
Use manual station preset.
Try using an outdoor antenna and a ground wire.
This will help somewhat, but it is difficult to
eliminate all noise.
See
page
13
24
—
13
24
24
—
24
25
—
—
52 En
Page 58

■ Bluetooth
Troubleshooting
Problem Cause Remedy
A Bluetooth
connection cannot be
established.
No sound is
produced, or the
sound is interrupted
during playback.
The Bluetooth function of the unit is
disabled.
Another Bluetooth device is already
connected to the unit.
The unit and the Bluetooth device are too
far apart.
There is a device (such as microwave
oven and wireless LAN) that outputs
signals in the 2.4 GHz frequency band
nearby.
The Bluetooth device does not support
A2DP.
Since this unit has been paired with more
than 20 Bluetooth devices, pairing
information has been deleted.
The volume of the Bluetooth device is set
too low.
The Bluetooth device is not set to send
audio signals to the unit.
The Bluetooth connection has been
terminated.
The unit and the Bluetooth device are too
far apart.
There is a device (such as microwave
oven and wireless LAN) that outputs
signals in the 2.4 GHz frequency band
nearby.
Enable the Bluetooth function in the “Setup” menu.
Terminate the current Bluetooth connection and then
establish a new connection.
Move the Bluetooth device closer to the unit.
Move the unit away from those devices.
Use a Bluetooth device that supports A2DP.
Try pairing again.
This unit can be paired with a maximum total of 20
Bluetooth devices for reception and transmission.
When the 21st device is registered, the least
frequently used pairing information is deleted.
Turn up the volume of the Bluetooth device.
Switch the audio output of the Bluetooth device to the
unit.
Establish a Bluetooth connection between the
Bluetooth device and the unit again.
Move the Bluetooth device closer to the unit.
Move the unit away from those devices.
See
page
45
45
—
—
—
27
—
—
27
—
—
53 En
INFORMATION
ADDITIONAL
English
Page 59

Troubleshooting
■ USB and network
Problem Cause Remedy
The unit does not
detect the USB
device.
Folders and files in
the USB device
cannot be viewed.
The network feature
does not function.
The unit cannot
connect to the
Internet via a wireless
router (access point).
Wireless network is
not found.
The unit does not
detect the PC.
The files in the media
server (PCs/NAS)
cannot be viewed or
played back.
The Internet radio
cannot be played.
The iPod does not
recognize the unit
when using AirPlay.
Firmware update via
the network is failed.
The USB device is not connected to the
USB jack securely.
The file system of the USB device is not
FAT16 or FAT32 .
The data in the USB device is protected
by the encryption.
The network parameters (IP address) have
not been obtained properly.
The wireless router (access point) is
turned off.
The unit and the wireless router (access
point) are too far apart.
There is an obstacle between the unit and
the wireless router (access point).
Microwave ovens or other wireless
devices in your neighborhood might
disturb the wireless communication.
Access to the network is restricted by the
firewall settings of the wireless router
(access point).
The media sharing setting is not correct. Configure the sharing setting and select the unit as a
Some security software installed on your
PC is blocking the access of the unit to
your PC.
The unit and PC are not in the same
network.
The files are not supported by the unit or
the media server.
The selected Internet radio station is
currently not available.
The selected Internet radio station is
currently broadcasting silence.
Access to the network is restricted by the
firewall settings of your network devices
(such as the router).
The unit is connected to a multiple SSID
router.
It may not be possible depending on the
condition of the network.
Turn off the unit, reconnect your USB device, and
turn the unit on again.
Use a USB device with FAT16 or FAT32 format.
Use a USB device without an encryption function.
Enable the DHCP server function on your router and
set “DHCP” in the “Setup” menu to “On” on the unit.
If you want to configure the network parameters
manually, check that you are using an IP address
which is not used by other network devices in your
network.
Turn on the wireless router (access point).
Place the unit and the wireless router (access point)
closer to each other
Move the unit and the wireless router (access point)
in a location where there are no obstacles between
them.
Turn off these devices.
Check the firewall setting of the wireless router
(access point).
device to which music contents are shared.
Check the settings of security software installed on
your PC.
Check the network connections and your router
settings, and then connect the unit and the PC to the
same network.
Use the file format supported by both the unit and the
media server. For information about the file formats
supported by the unit, see “Playing back music stored
on media servers (PCs/NAS)”.
There may be a network problem at the radio station,
or the service may have been stopped. Try the station
later or select another station.
Some Internet radio stations broadcast silence at
certain of times of the day. Try the station later or
select another station.
Check the firewall settings of your network devices.
The Internet radio can be played only when it passes
through the port designated by each radio station. The
port number varies depending on the radio station.
Access to the unit might be restricted by the network
separation function on the router. Connect the iPod to
the SSID which can access the unit.
Update the firmware via the network again or use a
USB memory device.
See
page
—
—
—
44
—
—
—
—
—
29
—
14
29
—
—
—
—
48
54 En
Page 60

■ Remote control
Troubleshooting
Problem Cause Remedy
The remote control
does not work nor
function properly.
Wrong distance or angle. The remote control will function within a maximum
Direct sunlight or lighting (from an
inverter type of fluorescent lamp, etc.) is
striking the remote control sensor of this
unit.
The batteries are weak. Replace all batteries.
range of 6 m (20 ft) and no more than 30 degrees offaxis from the front panel.
Reposition this unit.
See
page
10
—
—
55 En
INFORMATION
ADDITIONAL
English
Page 61

Error indications on the front display
Message Cause Remedy
Access denied Access to the PC is denied. Configure the sharing settings and select the unit as a device to
Access error The unit cannot access the USB device. Turn off the unit and reconnect your USB device. If the problem
The unit cannot access the iPod. Turn off the iPod and turn it on again.
The connected iPod is not supported by
the unit.
There is a problem with the signal path
from the network to the unit.
Check SP Wires The speaker cables short circuit. Twist the bare wires of the cables firmly and connect to the unit
No content There are no playable files in the selected
folder.
Please wait The unit is preparing for connecting to the
network.
Unable to play The unit cannot play back the songs stored
on the iPod for some reason.
The unit cannot play back the songs stored
on the PC for some reason.
Version error Firmware update is failed. Update the firmware again.
which music contents are shared (p. 29).
persists, try another USB device.
Use an iPod supported by the unit (p. 38).
Make sure your router and modem are turned on.
Check the connection between the unit and your router (or hub)
(p. 14).
and speakers properly.
Select a folder that contains files supported by the unit.
Wait until the message disappears. If the message stays more than
3 minutes, turn off the unit and turn it on again.
Check the song data. If it cannot be played on the iPod itself, the
song data or storage area may be defective.
Check if the format of files you are trying to play is supported by
the unit. For information about the formats supported by the unit,
see “Playing back music stored on media servers (PCs/NAS)” (p.
29). If the unit supports the file format, but still cannot play back
any files, the network may be overloaded with heavy traffic.
56 En
Page 62

Trademarks
“Made for iPod” and “Made for iPhone” mean that an
electronic accessory has been designed to connect
specifically to iPod or iPhone, respectively, and has been
certified by the developer to meet Apple performance
standards.
Apple is not responsible for the operation of this device or
its compliance with safety and regulatory standards.
Please note that the use of this accessory with iPod or
iPhone may affect wireless performance.
AirPlay, iPhone, iPod, iPod nano, iPod touch and iTunes
are trademarks of Apple Inc., registered in the U.S. and
other countries.
DLNA™ and DLNA CERTIFIED™ are trademarks or
registered trademarks of Digital Living Network Alliance.
All rights reserved. Unauthorized use is strictly
prohibited.
Windows™
Windows is a registered trademark of Microsoft
Corporation in the United States and other countries.
Internet Explorer, Windows Media Audio and Windows
Media Player are either registered trademarks or
trademarks of Microsoft Corporation in the United States
and/or other countries.
The Wi-Fi CERTIFIED Logo is a certification mark of the
Wi-Fi Alliance.
The Wi-Fi Protected Setup Identifier Mark is a mark of the
Wi-Fi Alliance.
Wi-Fi, Wi-Fi Alliance, Wi-Fi CERTIFIED, Wi-Fi
Protected Setup, WPA and WPA2 are trademark or
registeredrademark of Wi-Fi Alliance.
®
The Bluetooth
trademarks owned by Bluetooth SIG, Inc. and any use of
such marks by Yamaha Corporation is under license.
Bluetooth protocol stack (Blue SDK)
Copyright 1999-2014 OpenSynergy GmbH
All rights reserved. All unpublished rights reserved.
Explanations regarding GPL
This product utilizes GPL/LGPL open-source software in
some sections. You have the right to obtain, duplicate,
modify, and redistribute this open-source code only. For
information on GPL/LGPL open source software, how to
obtain it, and the GPL/LGPL license, refer to the Yamaha
Corporation website
(http://download.yamaha.com/sourcecodes/musiccast/).
word mark and logos are registered
Android™
Android and Google Play are trademarks of Google, Inc.
MusicCast is a trademark or registered trademark of
Yamaha Corporation.
57 En
INFORMATION
ADDITIONAL
English
Page 63

Specifications
Network
• Input jack: NETWORK x 1 (100Base-TX/10Base-T)
• PC client function
• Compatible with DLNA ver. 1.5
• AirPlay supported
• Internet radio
• Streaming service
• Wi-Fi function
Capable of WPS
Capable of sharing with iOS devices by wireless connection and
USB connection
Capable of direct connection with mobile device
Available security method: WEP, WPA2-PSK (AES), Mixed Mode
Radio frequency band: 2.4 GHz
Wireless network standard: IEEE 802.11 b/g/n
Bluetooth
• Source function
This unit to sink device (ex. Bluetooth headphone)
Supported codec ..........................................................................SBC
• Sink function
Source device to this unit (ex. smartphone/tablet)
Supported codec ............................................................... SBC, AAC
• Capable of play/stop operation from sink device
• Bluetooth version .........................................................Ver. 2.1+EDR
• Supported profile........................................................A2DP, AVRCP
• Wireless output................................................... .... Bluetooth Class 2
• Maximum communication distance
........................................................10 m (33 ft) without interference
USB
• Input jack: USB x 1 (USB2.0)
• Capable of iPod, mass storage class USB memory
• Current supply capacity: 1.0 A
Audio
• Minimum RMS output power
(20 Hz to 20 kHz, 0.04% THD, 8 ) ....................... 80 W + 80 W
• Dynamic power per channel (IHF) (8/6/4/2 )
............................................................................ 105/125/150/178 W
• Maximum power per channel (1 kHz, 0.7% THD, 4 Ω)
[U.K. and Europe models] ................................................... 105 W
• IEC power (1 kHz, 0.04% THD, 8 Ω)
[U.K. and Europe models] ..................................................... 84 W
• Power band width (main L/R)
(0.06%THD 40.0 W, 8Ω)...................................... 10 Hz to 50 kHz
• Damping factor (SPEAKERS A)
1 kHz, 8 ..................................................................150 or more
• Maximum effective output power (JEITA)
(1 kHz, 10% THD, 8 )
[Asia and General models]....................................................115 W
• Input sensitivity/input impedance
PHONO (MM) ......................................................... 3.5 mV/47 kΩ
CD, etc. .................................................................. 200 mV/47 k
• Maximum input signal
PHONO (MM) (1 kHz, 0.003% THD) ..................60 mV or more
CD, etc. (1 kHz, 0.5% THD).....................................2.2 V or more
• Output level/output impedance
CD, etc. (input 1 kHz, 200 mV)
OUT .................................................................... 200 mV/1.1 k
SUBWOOFER PRE OUT .................................... 4.0 V / 1.2 kΩ
(Cut off frequency) .............................................................90 Hz
PHONES (8 load)............................................. 410 mV/470
• Frequency response
CD, etc. (20 Hz to 20 kHz) ........................................... 0 ± 0.5 dB
CD, etc. (10 Hz to 100 kHz, PURE DIRECT on) ......... 0 ± 1.0 dB
• RIAA equalization deviation
PHONO (MM)................................................................... ± 0.5 dB
• Total harmonic distortion
PHONO (MM) to OUT
(20 Hz to 20 kHz, 3 V) . ....................................... 0.025% or less
CD, etc. to SPEAKERS
(20 Hz to 20 kHz, 40.0 W, 8 ) ........................... 0.015% or less
• Signal to noise ratio (IHF-A Network)
PHONO (MM) (input shorted, 5 mV) ......................87 dB or more
CD, etc. (input shorted, 200 mV) ...........................100 dB or more
• Residual noise (IHF-A network) .............................................30 µV
• Channel separation
CD, etc. (5.1 k input shorted, 1/10 kHz) ......... 65/50 dB or more
• Tone control characteristics
BASS
Boost/cut (20 Hz) ...........................................................± 10 dB
Turnover frequency .......................................................... 350 Hz
TREBLE
Boost/cut (20 kHz) ......................................................... ± 10 dB
Turnover frequency ......................................................... 3.5 kHz
• Continuous loudness control
Attenuation 1 kHz................................................................. -30 dB
• Gain tracking error (+16.5 to -80 dB) ..........................0.5 dB or less
• Digital input (OPTICAL/COAXIAL)
Support audio sample rate .......... 32/44.1/48/88.2/96/176.4/192 kHz
FM
• Tuning range
[U.S.A. and Canada models] ........................... 87.5 to 107.9 MHz
[Asia and General models] ........ 87.5/87.50 to 108.0/108.00 MHz
[U.K., Europe, Korea, Australia models] .... 87.50 to 108.00 MHz
• 50 dB quieting sensitivity (IHF, 1 kHz, 100% MOD.)
Mono .................................................................. 3.0 µV (20.8 dBf)
• Signal to noise ratio (IHF)
Mono/stereo ............................................................... 65 dB/64 dB
• Harmonic distortion (1 kHz)
Mono/stereo .................................................................. 0.5%/0.6%
• Antenna input ......................................................... 75 W unbalanced
AM
• Tuning range
[U.S.A. and Canada models] ............................... 530 to 1710 kHz
[Asia and General models] ..................530/531 to 1710/1611 kHz
[U.K, Europe, Korea, Australia models] .............. 531 to 1611 kHz
General
• Power supply
[U.S.A. and Canada models] .............................. AC 120 V, 60 Hz
[General model] ....................... AC 110-120/220-240 V, 50/60 Hz
[Korea model]...................................................... AC 220 V, 60 Hz
[Australia model] ................................................ AC 240 V, 50 Hz
[U.K. and Europe models] .................................. AC 230 V, 50 Hz
[Asia model] .......................................... AC 220-240 V, 50/60 Hz
• Power consumption ................................................................. 190 W
• Off mode................................................................................... 0.1 W
• Standby power consumption (reference data) ..........................0.1 W
• Network Standby on
Wired ..................................................................................... 1.7 W
Wireless (Wi-Fi/Wireless Direct/Bluetooth).... 1.8 W/1.9 W/1.6 W
• Maximum power consumption (1 kHz, 8 Ω, 10% THD)
[U.K., Australia, Asia and General models]......................... 380 W
• Dimensions (W H D) ................................ 435 151 392 mm
(17-1/8” 6” 15-7/16”)
• Weight...................................................................... 9.8 kg (21.6 lbs)
* Specifications are subject to change without notice.
58 En
Page 64

Index
Index
A
ADVANCED SETUP menu.......................................... 47
AirPlay........................................................................... 34
AM antenna connection................................................. 13
AM radio listening......................................................... 24
ANTENNA jacks........................................................... 13
Audio device connection ............................................... 11
Audio file format (PC/NAS).......................................... 29
Audio file format (USB)................................................ 36
Audio Receive (Bluetooth, Setup menu) ....................... 45
Audio reception (Bluetooth) .......................................... 45
Audio Send (Bluetooth, Setup menu)............................ 45
Audio transmit (Bluetooth)............................................ 45
Auto Power Standby...................................................... 46
Auto preset (FM radio) .................................................. 24
Auto Preset (Option menu)............................................ 24
AutoPowerStdby (Setup menu) ..................................... 46
B
BALANCE control ........................................................ 22
Basic playback operation ............................................... 21
BASS control ................................................................. 22
Batteries ......................................................................... 10
Bi-wire connection......................................................... 12
Bluetooth........................................................................ 27
Bluetooth (Setup menu)................................................. 45
Bluetooth indicator .......................................................... 7
Bluetooth Standby ......................................................... 45
Bookmark (Internet radio) ............................................. 33
C
CD jacks..................................................................... 8, 11
Clear Preset (Option menu) ........................................... 26
COAXIAL jacks ........................................................ 8, 11
Connection (Bluetooth) ................................................. 27
Connection (iPod) .......................................................... 38
Connection (Network, Setup menu) .............................. 44
Connection (USB) ......................................................... 36
Connection method (Network) ...................................... 44
D
DHCP (Network, Setup menu) ...................................... 44
Digital Media Controller................................................ 44
DIMMER......................................................................... 5
DISPLAY ...................................................................... 40
DLNA ............................................................................ 29
DMC Control (Network, Setup menu) .......................... 44
E
ECO Mode (Setup menu) .............................................. 46
Error indication.............................................................. 56
F
Firmware update ................................................ 45, 48, 49
Firmware version ..................................................... 45, 48
FM antenna connection.................................................. 13
FM mode ........................................................................ 24
FM radio listening .......................................................... 24
Front display (Controls and functions) ............................ 7
Front panel (Controls and functions) ............................... 5
H
headphone ........................................................................ 6
I
Information (Network, Setup menu).............................. 44
Information switching (Front display) ........................... 40
INIT (ADVANCED SETUP menu) .............................. 47
Initial Volume (Setup menu).......................................... 46
Initial volume setting ..................................................... 46
Initialize ......................................................................... 47
Input selection keys........................................................ 21
INPUT selector .............................................................. 21
Internet radio (vTuner)................................................... 32
IP Address (Network, Setup menu) ............................... 44
IP address setting ........................................................... 44
iPod contents playback (AirPlay) .................................. 34
iPod contents playback (USB) ....................................... 38
iTunes contents playback (AirPlay) ............................... 34
L
LINE jacks ................................................................. 8, 11
LOUDNESS control ...................................................... 22
M
MANUAL (Wireless, Setup menu) ............................... 18
Manual network setting.................................................. 18
Max Volume (Setup menu)............................................ 46
Max volume setting........................................................ 46
Media sharing setup ....................................................... 29
MEMORY.......................................................... 25, 26, 41
Monaural (FM radio) ..................................................... 24
Mono (FM radio) ........................................................... 24
MusicCast CONTROLLER ............................................. 3
N
NAS (Network attached Storage) connection................ 14
NAS contents playback .................................................. 29
Net Radio ....................................................................... 32
Network (Setup menu) ................................................... 44
Network cable ................................................................ 14
Network connection ................................................. 15, 20
Network connection (Setup menu) ................................ 44
Network connection (Wired) ......................................... 14
Network connection (Wireless LAN) .......... 16, 17, 18, 19
Network connection status............................................. 20
Network information...................................................... 44
Network Name (Network, Setup menu) ........................ 45
Network Standby............................................................ 44
NEW FW Available ....................................................... 49
INFORMATION
ADDITIONAL
English
59 En
Page 65

Index
O
OPTICAL jacks......................................................... 8, 11
OPTION ........................................................................ 42
Option menu .................................................................. 42
P
Pairing (Bluetooth) ........................................................ 27
PC connection................................................................ 14
PC contents playback .................................................... 29
Perform Update ............................................................. 45
PHONES jack.................................................................. 6
PHONO jacks ............................................................ 8, 11
Playback (AirPlay) ........................................................ 34
Playback (Bluetooth) ..................................................... 27
Playback (FM/AM radio) .............................................. 24
Playback (Internet radio) ............................................... 32
Playback (iPod) ............................................................. 38
Playback (PC/NAS)....................................................... 29
Playback (USB)............................................................. 36
Power cable connection................................................. 14
Power saving mode........................................................ 46
Preset ............................................................................. 41
Preset (FM/AM radio) ............................................. 25, 26
Preset (Network)............................................................ 41
Preset function............................................................... 41
R
Rear panel (Controls and functions)................................ 8
Remote control (Controls and functions) ........................ 9
Remote control ID ......................................................... 47
REMOTE ID (ADVANCED SETUP menu) ................ 47
REPEAT (iPod)............................................................. 39
REPEAT (PC/NAS) ...................................................... 31
REPEAT (USB) ............................................................ 37
Repeat playback (iPod).................................................. 39
Repeat playback (PC/NAS)........................................... 31
Repeat playback (USB) ................................................. 37
S
Security (Wireless Direct, Setup menu) ........................ 19
Security (Wireless, Setup menu) ................................... 18
Security Key (Wireless Direct, Setup menu) ................ 19
Security Key (Wireless, Setup menu) ........................... 18
Server............................................................................. 29
Server connection .......................................................... 14
SETUP........................................................................... 43
Setup menu .................................................................... 43
Sharing Wi-Fi connection setting (iOS device)............. 16
SHUFFLE (iPod)........................................................... 39
SHUFFLE (PC/NAS) .................................................... 31
SHUFFLE (USB) .......................................................... 37
Shuffle playback (iPod)................................................. 39
Shuffle playback (PC/NAS) .......................................... 31
Shuffle playback (USB) ................................................ 37
Signal Info (Option menu)............................................. 42
Signal strength indicator.................................................. 7
SLEEP indicator ............................................................ 23
Sleep timer..................................................................... 23
SP IMP. (ADVANCED SETUP menu) ........................ 47
Speaker balance ............................................................. 22
Speaker cable connection............................................... 12
Speaker connection........................................................ 12
Speaker impedance ........................................................ 47
Speaker indicators............................................................ 7
Speaker selection ........................................................... 21
SPEAKERS A/B............................................................ 21
SSID (Wireless Direct, Setup menu) ............................. 19
SSID (Wireless, Setup menu) ........................................ 18
Standby (Bluetooth, Setup menu).................................. 45
Standby (Network, Setup menu).................................... 44
STATUS (Information, Setup menu)............................. 20
Stereo (FM radio)........................................................... 24
SUBWOOFER PRE OUT jacks................................ 8, 11
System ID ...................................................................... 45
T
Tone control................................................................... 22
TREBLE control ............................................................ 22
U
UPDATE (ADVANCED SETUP menu) ...................... 48
Update (Network, Setup menu) ..................................... 45
USB................................................................................ 36
USB (iPod)..................................................................... 38
USB contents playback.................................................. 36
V
VERSION (ADVANCED SETUP menu)..................... 48
Version (Network, Setup menu) .................................... 45
Vol.Interlock (Option menu) ......................................... 42
Volume control .............................................................. 21
Volume Interlock (Option menu) .................................. 42
Volume Trim (Option menu)......................................... 42
W
WAC .............................................................................. 16
Wi-Fi indicator................................................................. 7
Wired (Network, Setup menu)....................................... 44
Wired connection (Network) ......................................... 14
Wireless (Network, Setup menu)................................... 44
Wireless (WAC) (Wireless, Setup menu)...................... 16
Wireless Accessory Configuration ................................ 16
Wireless antenna .............................................................. 8
Wireless antenna (Wi-Fi)............................................... 14
Wireless connection (Bluetooth) ................................... 27
Wireless connection (Network) ................... 16, 17, 18, 19
Wireless Direct .............................................................. 19
WirelessDirect (Network, Setup menu)......................... 44
WPS (Wireless, Setup menu)......................................... 17
WPS push button configuration..................................... 17
60 En
Page 66

Français
CAUTION
RISK OF ELECTRIC
SHOCK DO NOT OPEN
ATTENTION : POUR RÉDUIRE LES RISQUES D’INCENDIE ET DE
DÉCHARGE ELECTRIQUE, NE PAS RETIRER LE COUVERCLE
(OU LE PANNEAU ARRIÈRE). AUCUNE PIÈCE INTERNE NE PEUT
ÊTRE CHANGÉE PAR L’UTILISATEUR. POUR L’ENTRETIEN,
S’ADRESSER À UN PERSONNEL QUALIFIÉ.
Nous vous souhaitons un plaisir musical durable
Yamaha et le Groupe des Entreprises Électroniques Grand Public de l’Association des Industries Électroniques vous
demandent de tirer le meilleur parti de votre équipement tout en écoutant à un niveau non dommageable pour l’ouïe, c’està-dire un niveau où vous pouvez obtenir un son fort et clair, sans hurlement ni distorsion, mais sans aucun danger pour
l’ouïe. Comme les sons trop forts causent des lésions auditives qui ne peuvent être détectées qu’à long terme, lorsqu’il est
trop tard, Yamaha et le Groupe des Entreprises Électroniques Grand Public de l’Association des Industries Électroniques
vous déconseillent l’écoute prolongée à des volumes excessifs.
PRÉCAUTIONS CONCERNANT LA SÉCURITÉ
• Explication des symboles
L’éclair avec une flèche à l’intérieur d’un triangle
équilatéral est destiné à attirer l’attention de
l’utilisateur sur la présence d’une « tension
dangereuse » non isolée à l’intérieur du produit,
pouvant être suffisamment élevée pour constituer un
risque d’électrocution.
Le point d’exclamation à l’intérieur d’un triangle
équilatéral est destiné à attirer l’attention de
l’utilisateur sur la présence d’instructions
importantes sur l’emploi ou de la maintenance
(réparation) de l’appareil dans la documentation
fournie.
IMPORTANT
Veuillez enregistrer le numéro de série de cet appareil dans
l’espace réservé à cet effet, ci-dessous.
MODÈLE:
No. de série:
Le numéro de série se trouve à l’arrière de l’appareil. Prière
de conserver le mode d’emploi en lieu sûr pour toute
référence future.
1 Lire ces instructions.
2 Conserver ces instructions.
3 Tenir compte de tous les avertissements.
4 Suivre toutes les instructions.
5 Ne pas utiliser cet appareil à proximité de l’eau.
6 Nettoyer cet appareil avec un chiffon sec seulement.
7 Ne pas recouvrir les ailettes de ventilation. Installer
l’appareil selon les instructions du fabricant.
8 Ne pas installer près d’une source de chaleur, comme un
appareil de chauffage, une résistance électrique, un poêle,
ou tout autre appareil (amplificateurs compris) produisant
de la chaleur.
9 Ne pas désamorcer le système de sécurité d’une fiche
polarisée ou d’une fiche avec mise à la terre. Une fiche
polarisée est munie de deux lames, dont l’une est plus
large que l’autre. Une fiche avec mise à la terre est munie
de deux lames et d’une broche de terre. La lame la plus
large ou la troisième broche sont reliées à la terre pour
des raisons de sécurité. Si la fiche fournie ne s’insère pas
dans la prise, s’adresser à un électricien pour faire
remplacer la prise obsolète.
10 Protéger le cordon d’alimentation de sorte qu’il ne risque
pas d’être piétiné ou coincé, surtout au niveau des fiches,
des prises et de sa sortie de l’appareil.
11 Utiliser seulement les fixations et accessoires spécifiés
par le fabricant.
12 Utiliser seulement le chariot, socle,
trépied, support ou meuble spécifié par le
fabricant ou vendu avec l’appareil. Si un
chariot est utilisé, faire attention de ne pas
se blesser ou de le renverser pendant le
transport de l’appareil.
13 Débrancher cet appareil pendant les orages électriques,
ou s’il ne doit pas être utilisé pendant un certain temps.
14 Pour toute inspection s’adresser à un personnel qualifié.
Une inspection est nécessaire en cas de dommage, quel
qu’il soit, par exemple cordon d’alimentation ou fiche
endommagé, liquide répandu ou objet tombé à l’intérieur
de l’appareil, exposition de l’appareil à la pluie ou à
l’humidité, fonctionnement anormal ou chute de
l’appareil.
Français
i Fr
Page 67

Précautions concernant la sécurité
Informations de la FCC (Pour les clients résidents aux États-Unis)
1 AVIS IMPORTANT: NE PAS APPORTER DE
MOFIDICATIONS À CET APPAREIL !
Ce produit est conforme aux exigences de la FCC s’il
est installé selon les instructions du mode d’emploi.
Toute modification non approuvée expressément par
Yamaha peut invalider l’autorisation, accordée par la
FCC, d’utiliser ce produit.
2 IMPORTANT:
N’utiliser que des câbles blindés de
haute qualité pour le raccordement de ce produit à des
accessoires et/ou à un autre produit. Seuls le ou les câbles
fournis avec le produit DOIVENT être utilisés. Suivre les
instructions concernant l’installation. Le non respect des
instructions peut invalider l’autorisation, accordée par la
FCC, d’utiliser ce produit aux États-Unis.
3 REMARQUE: Ce produit a été testé et déclaré
conforme aux normes relatives aux appareils
numériques de Classe « B », telles que fixées dans
l’Article 15 de la Réglementation FCC. Ces normes
sont destinées à assurer une protection suffisante contre
les interférences nuisibles avec d’autres appareils
électroniques dans une installation résidentielle.
Cet équipement génère et utilise des fréquences radio
qui, en cas d’installation et d’utilisation non conformes
aux instructions du mode d’emploi, peuvent être à
l’origine d’interférences empêchant d’autres appareils
de fonctionner.
Cependant, la conformité à la Réglementation FCC ne
garantit pas l’absence d’interférences dans une
installation particulière. Si ce produit devait produire
des interférences, ce qui peut être déterminé en
« ÉTEIGNANT » et en « RALLUMANT » le produit,
l’utilisateur est invité à essayer de corriger le problème
d’une des manières suivantes :
Réorienter ce produit ou le dispositif affecté par les
interférences.
Utiliser des prises d’alimentation branchées sur
différents circuits (avec interrupteur de circuit ou
fusible) ou installer un ou des filtres pour ligne secteur.
Dans le cas d’interférences radio ou TV, changer de
place l’antenne et la réorienter. Si l’antenne est un
conducteur plat de 300 ohms, remplacer ce câble par
un câble de type coaxial.
Si ces mesures ne donnent pas les résultats escomptés,
prière de contacter le détaillant local autorisé à
commercialiser ce type de produit. Si ce n’est pas
possible, prière de contacter Yamaha Corporation of
America A/V Division, 6600 Orangethorpe Avenue,
Buena Park, CA 90620, USA.
Les déclarations précédentes NE concernent QUE les
produits commercialisés par Yamaha Corporation of
America ou ses filiales.
PRÉCAUTION FCC
Tout changement ou toute modification non approuvé
expressément par le tiers responsable peut aboutir à
l’interdiction de faire fonctionner cet appareil.
POUR LES CONSOMMATEURS CANADIENS
Pour éviter les chocs électriques, introduire la lame la plus
large de la fiche dans la borne correspondante de la prise et
pousser jusqu’au fond.
CAN ICES-3(B)/NMB-3(B)
DECLARATION D’INFORMATIONS DE CONFORMITE
(DECLARATION DE PROCEDURE DE CONFORMITE)
Entité responsable: Yamaha Corporation of America A/V Division
Adresse: 6600 Orangethorpe Avenue, Buena Park, CA
Téléphone: 1-714-522-9011
Type d’équipement: Réseau Ampli-Tuner
Nom de modèle: R-N602
Le présent appareil est conforme aux la partie 15 des règles de la FCC
et CNR d’Industrie Canada applicables aux appareils radio exempts de
licence.
L’exploitation est autorisée aux deux conditions suivantes :
(1) l’appareil ne doit pas produire de brouillage, et
(2) l’utilisateur de l’appareil doit accepter tout brouillage
radioélectrique subi, même si le brouillage est susceptible d’en
compromettre le fonctionnement.
90620, USA
REMARQUE
Cet appareil a été testé et il s’est avéré être conforme aux limites déterminées pour un appareil numérique de Classe B,
conformément à la partie 15 du Règlement FCC. Ces limites sont destinées à offrir une protection raisonnable contre les
interférences nuisibles pouvant survenir en cas d’utilisation de ce produit dans un environnement domestique.
Cet appareil produit, utilise et peut émettre de l’énergie radioélectrique et, s’il n’est pas installé conformément aux
instructions, peut provoquer des interférences radio. Il n’est toutefois pas garanti qu’aucune interférence ne se produira
dans le cas d’une installation donnée. Si l’appareil provoque des interférences nuisibles à la réception de programmes
radio ou de télévision, ce qui peut être déterminé en éteignant, puis en allumant l’appareil, l’utilisateur est prié de tenter
de corriger le problème en prenant l’une ou plusieurs des mesures suivantes :
- Réorienter ou déplacer l’antenne réceptrice.
- Éloigner davantage l’appareil du récepteur.
- Raccorder l’appareil à une prise d’un circuit différent de celui du récepteur.
- Consulter le revendeur ou un technicien radio/télé expérimenté.
Cet équipement est conforme aux limites d’exposition aux rayonnements énoncées pour un environnement non contrôlé
et respecte les règles les radioélectriques (RF) de la FCC lignes directrices d'exposition dans le Supplément C à OET65
et d’exposition aux fréquences radioélectriques (RF) CNR-102 de l’IC. Cet équipement doit être installé et utilisé en
gardant une distance de 20 cm ou plus entre le dispositif rayonnant et le corps (à l’exception des extrémités : mains,
poignets, pieds et chevilles).
Ce émetteur ne peut pas être placé à proximité de ou utilisé conjointement avec tout autre émetteur ou antenne.
ii Fr
Page 68

Attention: Veuillez lire ce qui suit avant d’utiliser l’appareil.
1 Pour utiliser l’appareil au mieux de ses possibilités, lisez
attentivement ce mode d’emploi. Conservez-le soigneusement
pour référence.
2 Installez cet appareil audio dans un endroit bien aéré, frais,
sec et propre – à l’abri de la lumière directe du soleil, des
sources de chaleur ou de vibration, des poussières, de
l’humidité et du froid. Pour une aération correcte, tenez
compte des distances minimales suivantes.
Au-dessus: 30 cm
À l’arrière: 20 cm
Sur les côtés: 20 cm
3 Placez l’appareil loin des équipements, moteurs et
transformateurs électriques, pour éviter les ronflements
parasites.
4 N’exposez pas l’appareil à des variations brutales de
température, ne le placez pas dans un environnement très
humide (par exemple dans une pièce contenant un
humidificateur) car cela peut entraîner la condensation
d’humidité à l’intérieur de l’appareil qui elle-même peut être
responsable de secousse électrique, d’incendie, de dommage à
l’appareil ou de blessure corporelle.
5 Evitez d’installer l’appareil dans un endroit où des objets
peuvent tomber, ainsi que là où l’appareil pourrait être exposé
à des éclaboussures ou des gouttes d’eau. Sur le dessus de
l’appareil, ne placez pas:
– D’autres appareils qui peuvent endommager la surface de
l’appareil ou provoquer sa décoloration.
– Des objets se consumant (par exemple, une bougie) qui
peuvent être responsables d’incendie, de dommage à
l’appareil ou de blessure corporelle.
– Des récipients contenant des liquides qui peuvent être à
l’origine de secousse électrique ou de dommage à
l’appareil.
6 Ne couvrez pas l’appareil d’un journal, d’une nappe, d’un
rideau, etc. car cela empêcherait l’évacuation de la chaleur.
Toute augmentation de la température intérieure de l’appareil
peut être responsable d’incendie, de dommage à l’appareil ou
de blessure corporelle.
7 Ne branchez pas la fiche du cordon d’alimentation de
l’appareil sur une prise secteur aussi longtemps que tous les
raccordements n’ont pas été effectués.
8 Ne pas faire fonctionner l’appareil à l’envers. Il risquerait de
chauffer et d’être endommagé.
9 N’exercez aucune force excessive sur les commutateurs, les
boutons et les cordons.
10 Pour débrancher la fiche du cordon d’alimentation au niveau
de la prise secteur, saisissez la fiche et ne tirez pas sur le
cordon.
11 Ne nettoyez pas l’appareil au moyen d’un solvant chimique,
ce qui pourrait endommager la finition. Utilisez un chiffon sec
et propre.
12 N’alimentez l’appareil qu’à partir de la tension prescrite.
Alimenter l’appareil sous une tension plus élevée est
dangereux et peut être responsable d’incendie, de dommage à
l’appareil ou de blessure corporelle. Yamaha ne saurait être
tenue responsable des dommages résultant de l’alimentation
de l’appareil sous une tension autre que celle prescrite.
13 Pour éviter les dommages dus à la foudre, débranchez le
cordon d’alimentation de la prise secteur ou de l’appareil
pendant les orages électriques.
14 Ne tentez pas de modifier ni de réparer l’appareil. Consultez
le service Yamaha compétent pour toute réparation qui serait
requise. Le coffret de l’appareil ne doit jamais être ouvert,
quelle que soit la raison.
15 Si vous envisagez de ne pas vous servir de l’appareil pendant
une longue période (par exemple, pendant les vacances),
débranchez la fiche du cordon d’alimentation au niveau de la
prise secteur.
16 Lisez la section intitulée « Guide de dépannage » où figurent
une liste d’erreurs de manipulation ordinaires avant de
conclure à une anomalie une anomalie de l’appareil.
17 Avant de déplacer cet appareil, appuyez sur
s tension, puis débranchez la fiche câble d’alimentation de
hor
la prise murale.
18 La condensation se forme lorsque la température ambiante
change brusquement. En ce cas, débranchez la fiche du câble
d’alimentation et laissez l’appareil reposer.
19 La température de l’appareil peut augmenter en raison d’une
utilisation prolongée. En ce cas, coupez l’alimentation de
l’appareil et laissez-le au repos pour qu’il refroidisse.
20 Installez cet appareil à proximité de la prise secteur et à un
emplacement où la fiche du câble d’alimentation est
facilement accessible.
21 Les piles ne doivent pas être exposées à une chaleur extrême,
par exemple au soleil, à une flamme, etc. Lors de la mise au
rebut des piles, suivez vos réglementations locales.
22 Une pression excessive du son par les écouteurs et le casque
d’écoute peut entraîner la perte de l’ouïe.
Cet appareil n’est pas déconnecté du secteur tant qu’il reste branché
à la prise de courant, même si l’appareil en soi est éteint par la
touche A. Il se trouve alors « en veille ». En mode veille, l’appareil
consomme une très faible quantité de courant.
AVERTISSEMENT
POUR RÉDUIRE LES RISQUES D’INCENDIE OU DE
DÉCHARGE ÉLECTRIQUE, N’EXPOSEZ PAS CET APPAREIL
À LA PLUIE OU À L’HUMIDITÉ.
N’utilisez pas cet appareil à moins de 22 cm des personnes
disposant d’un stimulateur cardiaque ou d’un défibrillateur.
Cette étiquette doit être apposée sur un produit dont le capot
supérieur peut devenir chaud lorsqu’il fonctionne.
A pour
le mettre
Français
iii Fr
Page 69

ATTENTION: VEUILLEZ LIRE CE QUI SUIT AVANT D’UTILISER L’APPAREIL.
■ Remarques sur les télécommandes et
les piles
• Ne renversez pas d’eau ou d’autre liquide sur la
télécommande.
• Ne laissez pas tomber la télécommande.
• Ne conservez pas ou ne rangez pas la télécommande dans les
endroits suivants :
– lieux très humides, par exemple près d’une baignoire,
– lieux très chauds, par exemple près d’un appareil de
chauffage ou d’un poêle,
– lieux exposés à des températures très basses,
– lieux poussiéreux.
• Insérez les piles en respectant la polarité (+ et -).
• Remplacez toutes les piles lorsque vous remarquez que la
portée de la télécommande est plus courte.
• Retirez immédiatement les piles épuisées de la télécommande
pour éviter tout risque d’explosion ou de fuite d’acide.
• Si les piles fuient, mettez-les au rebut immédiatement, en
évitant de toucher le produit qui a fui. En cas de contact entre
le produit qui a fui et votre peau, vos yeux ou votre bouche,
rincez-les immédiatement et consultez un médecin. Avant
d’installer de nouvelles piles, nettoyez soigneusement le
logement des piles.
• Ne combinez jamais des piles neuves et des piles usagées.
Cela pourrait réduire la durée de vie des piles neuves ou faire
fuir les anciennes.
• N’utilisez pas non plus des piles de deux types différents (par
exemple, des piles alcalines et des piles au manganèse). Lisez
attentivement les informations de l’emballage car il se
pourrait que ces piles de types différents soient de forme ou de
couleur identique.
• Avant d’insérer des piles neuves, nettoyez leur logement.
• Veillez à conserver les piles hors de portée des enfants. Les
piles posent un risque pour les enfants en bas âge car ils
risquent de les mettre en bouche.
• Quand les piles commencent à s’épuiser, la portée de la
télécommande diminue fortement. Dans ce cas, remplacez les
piles par des neuves sans tarder.
• Si vous ne comptez pas utiliser l’appareil pendant une durée
prolongée, retirez les piles de sa télécommande. Sans cela, les
piles s’épuisent complètement, ce qui peut provoquer une
fuite de liquide et un endommagement de la télécommande.
• Ne mettez pas les piles au rebut avec les ordures ménagères.
Mettez-les au rebut conformément aux règlementations de
votre région.
Bluetooth
• Bluetooth est une technologie permettant d’établir des
communications sans fil entre des périphériques dans un rayon
d’environ 10 mètres dans la bande de fréquences 2,4 GHz, une
bande qui peut être utilisée sans licence.
Gestion des communications Bluetooth
• La bande 2,4 GHz utilisée par les périphériques compatibles
Bluetooth est une bande radio partagée par de nombreux types
d’équipement. Bien que les périphériques compatibles
Bluetooth fassent appel à une technologie permettant de
minimiser l’influence d’autres équipements qui utilisent la
même bande radio, une telle influence peut réduire la vitesse ou
la distance des communications voire, dans certains cas,
interrompre les communications.
• La vitesse de transfert du signal et la distance à laquelle il est
possible d’établir une communication diffèrent selon la distance
entre les périphériques qui communiquent, la présence
d’obstacles, les ondes radio et le type d’équipement.
• Yamaha ne garantit pas toutes les connexions sans fil entre cet
appareil et les périphériques compatibles Bluetooth.
iv Fr
Page 70

Table des matières
INTRODUCTION
Fonctions de cet appareil ........................................... 2
Sources pouvant êtres lues par cet appareil ................... 2
Utilisation d’applications pratiques
(MusicCast CONTROLLER).................................... 3
Accessoires fournis ..................................................... 4
Commandes et fonctions ............................................ 5
Panneau avant ................................................................ 5
Afficheur de la face avant.............................................. 7
Panneau arrière .............................................................. 8
Télécommande............................................................... 9
PRÉPARATIONS
Raccordements.......................................................... 11
Raccordements des enceintes ...................................... 12
Raccordement des antennes FM et AM....................... 13
Raccordement du câble de réseau................................ 14
Préparation d’une antenne sans fil ............................... 14
Raccordement du cordon d’alimentation ..................... 14
Raccordement au réseau .......................................... 15
Partage du réglage de l’appareil iOS ........................... 16
Utilisation de la configuration une pression du
bouton WPS............................................................. 17
Réglage manuel de connexion au réseau sans fil......... 18
Connexion directe de l’unité à un appareil mobile
(Wireless Direct) ..................................................... 19
Vérification du statut de connexion réseau.................. 20
OPÉRATIONS DE BASE
Lecture....................................................................... 21
Lecture d’une source.................................................... 21
Utilisation de la minuterie de veille............................. 23
Écoute d’émission FM/AM ...................................... 24
Syntonisation FM/AM ................................................. 24
Syntonisation automatique
(uniquement pour les stations FM).......................... 24
Syntonisation manuelle................................................ 25
Rappel d’une station présélectionnée .......................... 26
Effacement d’une station présélectionnée ................... 26
Lecture de musique via Bluetooth ........................... 27
Raccordement d’un dispositif Bluetooth (jumelage) ... 27
Lecture de contenus sur dispositifs Bluetooth ............. 27
Annulation d’une connexion Bluetooth....................... 28
Lecture de musique stockée sur des serveurs
multimédias (PC/NAS) ......................................... 29
Configuration du partage de support des fichiers de
musique ................................................................... 29
Lecture de musique sur PC .......................................... 30
Écoute de la radio Internet ...................................... 32
Mémorisation de vos radios Internet favorites avec
des signets (Bookmarks) ......................................... 33
Lecture de musique issue d’iTunes ou d’un iPod
via un réseau (AirPlay) .........................................34
Lecture de contenus musicaux issus d’un iPod ou
d’iTunes................................................................... 34
Lecture de musique stockée sur un dispositif de
stockage USB .........................................................36
Raccordement d’un dispositif de stockage USB ......... 36
Lecture du contenu du dispositif de stockage USB ..... 36
Lecture de musique sur un iPod ..............................38
Raccordement d’un iPod ............................................. 38
Lecture du contenu d’un iPod...................................... 38
Changement des informations présentées sur
l’afficheur de la face avant ...................................40
Mémorisation du morceau/de la station en cours
d’écoute (fonction Preset) .....................................41
Mémorisation d’un morceau ou d’une station ............. 41
Rappel d’un morceau/d’une station mémorisé ............ 41
OPÉRATIONS AVANCÉES
Configuration de réglages de lecture distincts pour
différentes sources de lecture (menu Option).....42
Éléments du menu Option ........................................... 42
Configuration des diverses fonctions
(menu Setup)..........................................................43
Éléments de menu Setup.............................................. 43
Network ....................................................................... 44
Bluetooth ..................................................................... 45
Max Volume ................................................................ 46
Initial Volume.............................................................. 46
AutoPowerStdby (Auto Power Standby)..................... 46
ECO Mode................................................................... 46
Configuration des paramètres du système
(menu ADVANCED SETUP)...............................47
Éléments de menu ADVANCED SETUP ................... 47
Modification du réglage de l’impédance des enceintes
(SP IMP.)................................................................. 47
Sélection de l’ID de télécommande (REMOTE ID).... 47
Restauration des réglages par défaut (INIT)................ 47
Mise à jour du microprogramme (UPDATE).............. 48
Vérification de la version du microprogramme
(VERSION) ............................................................. 48
Mise à jour du microprogramme de l’unité via le
réseau......................................................................49
INFORMATIONS COMPLÉMENTAIRES
Guide de dépannage ..................................................50
Signalement d’erreurs sur l’afficheur de la face
avant .......................................................................56
Marques commerciales .............................................57
Caractéristiques techniques .....................................58
Index...........................................................................59
PRÉPARATIONSINTRODUCTION
OPÉRATIONS DE
BASE
OPÉRATIONS
AVANCÉES
COMPLÉMENTAIRES
INFORMATIONS
• « Note » signale les précautions à prendre concernant l’utilisation de l’unité et les limites de ses fonctions. y signale des
explications supplémentaires permettant une meilleure utilisation.
• Ce manuel décrit les opérations réalisables avec la télécommande fournie.
• Dans ce manuel, le terme « iPod » désigne à la fois un « iPod » et un « iPhone », Sauf avis contraire, « iPod » peut donc
s’appliquer à un «iPod» et un «iPhone».
• Dans ce manuel, les dispositifs mobiles iOS et Android sont désignés collectivement par les termes « appareils mobiles ». Lorsque
requis, le type spécifique de l’appareil mobile est mentionné dans les explications.
1 Fr
Français
Page 71

INTRODUCTION
FM/AMFM/AM
VOLUME
PURE DIRECT
RETURN
CONNECT
PUSH - ENTER
TUNINGPRESET
BAND
MEMORY CLEAR
BASSINPUT
5V
1A
BALANCE
LR
TREBLE
LOUDNESS
FLAT
-30dB
DIMMER
DISPLAY
SELECT
PHONES
SPEAKERS
AB
MODE
Cet appareil
1 Internet
2 Service de diffusion
Modem
Routeur*
3 PC
5 AirPlay (iTunes)
4 NAS
7 iPod
0
5 AirPlay (iPod)
6 Bluetooth
8 Dispositif
USB
9 Lecteur de
CD, etc.
Appareil
mobile
Fonctions de cet appareil
Ce récepteur réseau est compatible avec des sources réseau telles qu’une passerelle multimédia et des appareils mobiles.
Il permet la restitution de sources analogiques telles qu’un lecteur de CD, mais aussi de dispositifs Bluetooth et de
services de diffusion en réseau.
Sources pouvant êtres lues par cet appareil
*
Il vous faut un routeur WiFi (point d’accès) en vente dans le commerce pour utiliser un appareil mobile.
1 Écoute de la radio Internet (p.32)
2 Écoute d’un service de diffusion
(voyez le supplément pour chaque service.)
3 Lecture de fichiers de musique stockés sur
votre PC (p.29)
4 Lecture de fichiers de musique stockés sur
votre NAS (p.29)
5 Lecture de fichiers de musique stockés sur
votre iPod/iTunes avec AirPlay (p.34)
y
Pour plus de détails concernant le raccordement des périphériques externes, reportez-vous à la section « Raccordements » (p.11).
2 Fr
6 Lecture de contenus audio stockés sur
dispositifs Bluetooth (p.27)
7 Lecture de fichiers de musique stockés sur
votre iPod (p.38)
8 Lecture de fichiers de musique stockés sur
votre dispositif USB (p.36)
9 Écoute d’un dispositif externe (p.11)
0 Écoute d’émission FM/AM (p.24)
Page 72

Fonctions de cet appareil
Utilisation d’applications pratiques (MusicCast CONTROLLER)
Vous pouvez installer l’application MusicCast CONTROLLER –gratuite et spécialement conçue pour cette unité– sur un
appareil mobile afin de piloter et programmer l’unité, ou de l’utiliser pour écouter des services de diffusion. Pour plus
d’informations, recherchez l’expression « MusicCast CONTROLLER » dans App Store ou Google Play.
■ Possibilités offertes par MusicCast CONTROLLER
• Utilisation des fonctions de base de l’unité (mise sous/hors tension, réglage du volume et choix de l’entrée)
• Lecture de morceaux stockés sur ordinateur (serveurs)
• Sélection d’une station de radio Internet
• Lecture de fichiers de musique stockés sur appareils mobiles
• Lecture de fichiers de musique d’un service de diffusion
• Transmission et réception audio entre l’unité et d’autres appareils Yamaha compatibles MusicCast
Voyez Guide d’installation MusicCast pour plus de renseignements.
INTRODUCTION
3 Fr
Français
Page 73

Accessoires fournis
LINE 1
OPT 1 OPT 2 CD
COAX 1 COAX 2
BLUETOOTH
NET USB
LINE 2 LINE 3
TUNER
PRESET
TUNING
BAND
MEMORY
SETUP
HOME
MUTENOW PLAYING
VOLUME
RETURN
ENTER
REPEAT
SHUFFLE
SLEEP
PHONO
B
A
SPEAKERS
OPTION
Télécommande
Antenne FMAntenne AM
Piles (x2)
(AA, R6, UM-3)
Guide d’installation MusicCast
Vérifiez que les accessoires suivants sont fournis avec le produit.
4 Fr
Page 74

Panneau avant
VOLUME
PURE DIRECT
RETURN
CONNECT
PUSH - ENTER
TUNINGPRESET
BAND
MEMORY CLEAR
BASSINPUT
5V
1A
BALANCE
LR
TREBLE
LOUDNESS
FLAT
-30dB
DIMMER MODE
DISPLAY
SELECT
PHONES
SPEAKERS
AB
12 3 4 5 6 7 8 9: B CA
Commandes et fonctions
Commandes et fonctions
INTRODUCTION
1 A (alimentation)
Met l’unité sous ou hors tension (veille).
2 Témoin STANDBY/ON
S’allume comme suit :
Fortement éclairé : alimentation activée
Faiblement éclairé : mode veille
Remarque
En mode veille, cet appareil consomme une faible quantité de
courant pour recevoir les signaux infrarouges de la
télécommande.
3 Capteur de la télécommande
Il reçoit les signaux émis par la télécommande.
4 DIMMER
Règle l’éclairage de l’afficheur de la face avant.
Choisissez parmi 5 niveaux d’éclairage en appuyant sur ce
bouton de façon répétée.
5 DISPLAY
Sélectionne les informations présentées sur l’afficheur de
la face avant (p.40).
6 MODE
Règle le mode de réception de la bande FM sur stéréo
automatique ou mono (p.24).
Passe en mode de fonctionnement iPod (p.39).
7 MEMORY
Mémorise la station FM/AM actuelle sous la forme d’une
présélection lorsque la source d’entrée sélectionnée est
TUNER (p.25).
Mémorise le morceau en cours de restitution ou la station
de diffusion actuelle sous la forme d’une présélection
lorsque la source d’entrée sélectionnée est NET ou USB
(sauf iPod) (p.41).
8 CLEAR
Supprime une station FM/AM présélectionnée lorsque la
source d’entrée sélectionnée est TUNER (p.26).
9 BAND
Bascule entre FM et AM (p.24).
0 Afficheur de la face avant
Indique des informations sur l’état opérationnel de
l’appareil.
A PRESET j / i
Rappelle une station FM/AM présélectionnée (p.26) ou un
morceau/une station de diffusion (p.41).
B TUNING jj / ii
Sélectionne la fréquence de syntonisation lorsque la
source d’entrée sélectionnée est TUNER (p.24).
C PURE DIRECT et témoin
Cette fonction permet d’écouter une source avec une
pureté de son optimale (p.21). Le témoin au-dessus du
bouton s’allume et l’afficheur de la face avant s’éteint
quand vous activez cette fonction.
Français
5 Fr
Page 75

Commandes et fonctions
VOLUME
PURE DIRECT
RETURN
CONNECT
PUSH - ENTER
TUNINGPRESET
BAND
MEMORY CLEAR
BASSINPUT
5V
1A
BALANCE
LR
TREBLE
LOUDNESS
FLAT
-30dB
DIMMER MODE
DISPLAY
SELECT
PHONES
SPEAKERS
AB
NIHGED J KLMF
D Prise PHONES
Dévie le son vers votre casque en vue d’une écoute
individuelle.
E SPEAKERS A/B
Active ou désactive le jeu d’enceintes raccordées aux
bornes SPEAKERS A et/ou SPEAKERS B situées sur le
panneau arrière à chaque pression sur le bouton
correspondant.
F Prise USB
Pour le raccordement d’un dispositif de stockage USB
(p.36) ou d’un iPod (p.38).
G Sélecteur INPUT
Sélectionne la source d’entrée que vous souhaitez écouter.
H Commande BASS +/–
Augmente ou réduit la réponse dans les basses fréquences.
La position centrale produit une réponse plate (p.22).
I Commande TREBLE +/–
Augmente ou réduit la réponse dans les hautes fréquences.
La position centrale produit une réponse plate (p.22).
J Commande BALANCE
Équilibre le son reproduit par les enceintes gauche et
droite afin de compenser le déséquilibre sonore provoqué
par l’emplacement des enceintes ou la configuration de la
pièce d’écoute (p.22).
K Commande LOUDNESS
Ce correcteur agit sur les fréquences afin de compenser la
plus faible sensibilité de l’oreille humaine au grave et à
l’aigu à bas volume (p.22).
L SELECT/ENTER (molette)
Tournez la molette pour choisir une valeur numérique ou
un réglage et appuyez dessus pour confirmer votre
sélection.
M RETURN
Retourne au contenu précédent de l’afficheur de la face
avant.
CONNECT
Permet de commander l’unité avec l’application
MusicCast CONTROLLER pour appareils mobiles et
conçue spécialement pour l’unité. Voyez Guide
d’installation MusicCast pour plus de renseignements.
N Commande VOLUME
Augmente ou réduit le niveau sonore.
6 Fr
Page 76

Commandes et fonctions
VOL.
MUTE
TUNEDSTEREO
A
SLEEP
B
1 9
6
: :
2
3 7 854
Afficheur de la face avant
y
Si aucune connexion réseau n’est établie, « WAC » (Wireless Accessory Configuration) apparaît sur l’afficheur de la face avant quand
vous mettez l’unité sous tension, et l’unité recherche automatiquement un dispositif iOS. Pour en savoir plus sur les dispositifs iOS et la
connexion réseau, voyez « Partage du réglage de l’appareil iOS » (p.16).
INTRODUCTION
1 Affichage des informations
Affiche le statut actuel (nom d’entrée, par exemple).
Vous pouvez changer les informations affichées en
appuyant sur DISPLAY en face avant (p.40).
2 STEREO
S’allume lorsque l’unité reçoit un signal stéréo provenant
d’une radio FM.
3 TUNED
S’allume lorsque l’unité reçoit un signal provenant d’une
station de radio FM/AM.
4 Témoin d’intensité du signal
S’allume lorsque l’unité est raccordée à un réseau sans fil
ou fonctionne comme point d’accès. Le témoin de statut
permet de vérifier l’intensité du signal du réseau sans fil.
5 Témoin Bluetooth
S’allume lorsque l’unité est raccordée à un dispositif
Bluetooth.
6 Témoins d’enceinte
« A » s’allume lorsque la sortie enceinte SPEAKERS A
est activée, et « B » s’allume lorsque celle de SPEAKERS
B est activée.
7 SLEEP
S’allume lorsque la minuterie de mise hors service est
activée.
8 MUTE
Clignote lorsque le son est mis en sourdine.
9 Témoin de volume
Indique le volume actuel.
0 Témoins de curseur
Indiquent les touches de curseur de la télécommande
actuellement opérationnelles.
y
Vous pouvez changer la luminosité de l’affichage de la face avant
en appuyant sur DIMMER sur le panneau avant (p.5).
Français
7 Fr
Page 77

Commandes et fonctions
A
B
SPEAKERS
NETWORK
COAXIAL
OPTICAL
FM AM
75Ω
ANTENNA
SUBWOOFER
PRE OUT
PHONO
IN
1
IN
OUT
2
1
2
1
2
IN
CD
LINE
OUT
3
SIGNAL
GND
3 5 68
A
1 2 4 7
9 :
Panneau arrière
1 Prises PHONO
Pour le raccordement à une platine (p.11).
2 Prises OPTICAL 1/2
Pour le raccordement à des composants audio dotés d’une
sortie numérique optique (p.11).
3 Bornes ANTENNA
Pour le raccordement à des antennes FM et AM (p.13).
4 Prises COAXIAL 1/2
Pour le raccordement à des composants audio dotés d’une
sortie numérique coaxiale (p.11).
5 Bornes SPEAKERS
Pour le raccordement à des enceintes (p.12).
6 Prise NETWORK
Pour le raccordement à un réseau via un câble de réseau
(p.14).
7 Antenne sans fil
Pour le raccordement à un périphérique de réseau sans fil
(p.14).
8 Câble d’alimentation
Pour le raccordement de l’unité à une prise secteur (p.14).
9 Prises LINE 1–3
Pour le raccordement à des composants audio analogiques
(
p.11
).
0 Prises CD
Pour le raccordement à un lecteur CD (p.11).
A Prise SUBWOOFER PRE OUT
Pour le raccordement à un caisson de graves avec
amplificateur intégré (p.11).
8 Fr
Page 78

Télécommande
1
3
6
7
0
8
9
2
4
5
A
Commandes et fonctions
SPEAKERS
B
A
PHONO
COAX 1 COAX 2
OPT 1 OPT 2 CD
LINE 1
LINE 2 LINE 3
TUNER
NET USB
BAND
MEMORY
HOME
SETUP
REPEAT
TUNING
PRESET
ENTER
VOLUME
SLEEP
BLUETOOTH
RETURN
OPTION
MUTENOW PLAYING
SHUFFLE
1 Émetteur de signal infrarouge
Envoie des signaux infrarouges.
2 SPEAKERS A/B
Active ou désactive le jeu d’enceintes raccordées aux bornes
SPEAKERS A et/ou SPEAKERS B situées sur le panneau arrière
de l’unité à chaque pression sur la touche correspondante.
3 Touches de sélection d’entrée
Sélectionnez une source d’entrée pour la lecture.
PHONO Prises PHONO
COAX 1/2 Prises COAXIAL 1/2
BLUETOOTH Connexion Bluetooth
OPT 1/2 Prises OPTICAL 1/2
CD Prises CD
LINE 1-3 Prises LINE 1–3
TUNER Syntoniseur FM/AM
NET Source réseau (appuyez à plusieurs reprises
pour sélectionner la source réseau voulue)
USB Prise USB (sur le panneau avant)
4 Touches radio
Contrôlent la radio FM/AM (p.24).
BAND Bascule entre FM et AM.
TUNING jj/ii Sélectionnent la fréquence radio.
5 Touches de présélection
MEMORY Mémorise la station FM/AM actuelle sous la
forme d’une présélection lorsque la source
d’entrée TUNER est sélectionnée (p.25).
Mémorise le morceau en cours de restitution
ou la station de diffusion actuelle sous la forme
d’une présélection lorsque la source d’entrée
sélectionnée est NET ou USB (sauf iPod)
(p.41).
PRESET j/i Rappelle une station FM/AM présélectionnée
(p.26) ou un morceau/une station de diffusion
(p.41).
6 Touches d’opération de menu
Touches de curseur
(B/C/D/E)
ENTER Confirme un élément sélectionné.
RETURN Retourne au statut précédent.
Sélectionnez un menu ou un paramètre.
7 HOME
Active le plus haut niveau de hiérarchie lors du choix de fichiers
musicaux, dossiers, etc.
8 SETUP
Affiche le menu « Setup » (p.43).
9 NOW PLAYING
Affiche des informations sur le dossier, la plage, etc. choisi.
0 VOLUME +/-
Réglez le volume.
A Touches de lecture
Contrôlent la lecture et permettent d’effectuer d’autres opérations
liées aux sources réseau, aux dispositifs Bluetooth et USB.
INTRODUCTION
Français
9 Fr
Page 79

Commandes et fonctions
30° 30°
Télécommande
Environ
6 m
PHONO
COAX 1 COAX 2
OPT 1 OPT 2 CD
LINE 1
SPEAKERS
A
B
SLEEP
BLUETOOTH
LINE 2 LINE 3
B
C
B A (alimentation)
Met l’unité sous ou hors tension (veille).
C SLEEP
Règle la minuterie de veille (p.23).
D OPTION
Affiche le menu «Option» (p.42).
E MUTE
Met la sortie audio en sourdine.
TUNER
BAND
MEMORY
HOME
SETUP
REPEAT
NET USB
TUNING
PRESET
ENTER
VOLUME
RETURN
OPTION
MUTENOW PLAYING
SHUFFLE
D
E
■ Installation des piles
13
2
Remarques
• Changez chacune des piles lorsque la portée de la
télécommande commence à se réduire.
• Avant de mettre la nouvelle pile en place, essuyez
soigneusement le compartiment.
■ Portée de la télécommande
Les télécommandes émettent un faisceau infrarouge
directionnel.
Veillez à diriger les télécommandes directement vers le
capteur de télécommande situé sur le panneau avant de cet
appareil.
10 Fr
Page 80

PRÉPARATIONS
A
B
SPEAKERS
NETWORK
COAXIAL
OPTICAL
FM AM
75Ω
ANTENNA
SUBWOOFER
PRE OUT
PHONO
IN
1
IN
OUT
2
1
2
1
2
IN
CD
LINE
OUT
3
SIGNAL
GND
O C
Entrée
audio
Sortie
audio
Enceintes B
Platine
Sortie
audio
Lecteur de DVD, etc.
GND
Sortie audio
(numérique
coaxiale)
Sortie audio
(numérique
optique)
Lecteur de CD, etc.
Sortie
audio
Lecteur CD
Subwoofer
Enregistreur de
CD, etc.
Enceintes A
Raccordements
ATT EN TI ON
• Ne raccordez pas cet appareil ou d’autres composants au secteur tant que toutes les connexions entre les composants ne
sont pas établies.
• Toutes les connexions doivent être correctes : L (gauche) à L, R (droite) à R, « + » à « + » et « – » à « – ». Si le
raccordement est défectueux, aucun son n’est émis par l’enceinte, et si la polarité de la connexion est incorrecte, le
son manque de naturel et de composantes graves. Reportez-vous au mode d’emploi de chaque composant.
• Ne laissez pas les fils d’enceinte dénudés se toucher ni entrer en contact avec les pièces métalliques de cet appareil. Cela
risquerait d’endommager l’appareil et/ou les enceintes.
• Veillez à utiliser des câbles RCA (Cinch) et des câbles optiques pour relier les composants audio.
PRÉPARATIONS
Seuls des signaux PCM peuvent être transmis aux prises numériques (OPTICAL/COAXIAL) de cette unité.
y
• Les prises PHONO sont conçues pour la connexion d’une platine dotée d’une cellule de type MM.
• Raccordez votre platine à la prise GND afin de réduire le bruit dans le signal. Notez toutefois que selon la platine utilisée, il se peut
que vous obteniez moins de bruit dans le signal sans raccorder la prise GND.
Remarque
Pour éviter la production d’un signal en boucle lorsqu’un enregistreur audio est raccordé à l’unité, le signal audio n’est pas transmis aux
prises LINE 2 (OUT) quand LINE 2 est sélectionné. De même, le signal audio n’est pas transmis aux prises LINE 3 (OUT) quand LINE
3 est sélectionné.
Français
11 Fr
Page 81

Raccordements
aa
b
b
d
d
c
c
10 mm
Fiche banane
Cet appareil
Enceinte
VOLUME
PURE DIRECT
RETURN
CONNECT
PUSH - ENTER
TUNINGPRESET
BAND
MEMORY CLEAR
BASSINPUT
5V
1A
BALANCE
LR
TREBLE
LOUDNESS
FLAT
-30dB
DIMMER MODE
DISPLAY
SELECT
PHONES
SPEAKERS
AB
SPEAKERS A/B
SPEAKERS A/B
Raccordements des enceintes
■ Raccordement des câbles d’enceinte
Les câbles d’enceinte sont composés de deux fils. L’un se
connecte à la borne négative « – » de l’unité et de
l’enceinte, l’autre est destiné à la borne positive « + ». Si
les fils sont de couleurs différentes afin d’éviter toute
confusion, connectez le fil de couleur noire à la borne
négative et l’autre fil à la borne positive.
a
Dénudez sur environ 10 mm les extrémités du câble d’enceinte et
torsadez solidement les fils dénudés de ce câble.
b Desserrez la borne d’enceinte.
c Insérez les fils dénudés du câble dans l’écartement sur le côté
(supérieur droit ou inférieur gauche) de la borne.
d Serrez la borne.
■ Raccordement via une fiche banane
Serrez le bouton et insérez la fiche banane dans
l’extrémité de la borne correspondante.
■ Connexion bifilaire
Une connexion bifilaire a pour effet de séparer les graves
des médiums et des aigus. Une enceinte compatible avec ce
type de connexion est pourvue de quatre bornes de
connexion. Ces deux jeux de bornes permettent de diviser
l’enceinte en deux sections indépendantes. Lorsque ces
connexions sont effectuées, les circuits d’attaque des
médiums et des aigus sont reliés à un jeu de bornes et le
circuit d’attaque des graves est relié à l’autre jeu de bornes.
SPEAK
A
B
Raccordez l’autre enceinte à l’autre jeu de bornes en
procédant de la même manière.
Remarque
Lorsque vous établissez des connexions bifilaires, retirez les
ponts de court-circuitage ou les câbles des enceintes. Pour plus de
détails, voyez le mode d’emploi des enceintes.
y
Pour utiliser les connexions bifilaires, appuyez sur SPEAKERS A
et SPEAKERS B sur le panneau avant ou sur la télécommande
afin que les témoins d’enceintes (« A » et « B ») s’allument tous
les deux sur l’afficheur du panneau avant.
12 Fr
SPEAKERS
B
A
PHONO
COAX 1 COAX 2
OPT 1 OPT 2 CD
SLEEP
BLUETOOTH
Page 82

Raccordements
COAXIAL
OPTICAL
FM AM
75Ω
ANTENNA
SUBWOOFER
PRE OUT
PHONO
IN
1
IN
OUT
2
1
2
1
2
IN
CD
LINE
OUT
3
SIGNAL
GND
Antenne FM
(fournie)
Antenne AM extérieure
Déployez par une fenêtre à l’extérieur un fil
isolé en vinyle de 5 à 10 m de longueur.
Antenne FM
extérieure
• L’antenne AM doit être reliée à l’appareil, y compris dans le cas où
une antenne AM extérieure est utilisée.
• L’antenne AM doit être placée à distance de cet appareil.
Antenne AM (fournie)
ou
Insérez
2
Abaissez
1
Raccordement des antennes FM et AM
Des antennes pour la réception d’émissions FM et AM sont incluses avec cet appareil. En général, ces antennes devraient
fournir un signal d’une puissance suffisante. Branchez correctement chaque antenne sur les bornes prévues à cet effet.
Remarque
Si la réception devait être mauvaise, installez une antenne extérieure. Pour de plus amples détails concernant cette question, veuillez
consulter un revendeur ou service après-vente Yamaha.
PRÉPARATIONS
■ Assemblage de l’antenne AM fournie ■ Raccordement des fils de l’antenne AM
Français
13 Fr
Page 83

Raccordements
Network Attached Storage
(NAS)
Internet
Modem
Router
Câble de réseau
PC
Cette unité (arrière)
Appareil mobile
(tel qu’un iPhone)
WIRELESS
WORK
Branchement sur une
prise secteur
Raccordement du câble de réseau
Raccordez l’unité à votre routeur au moyen d’un câble de réseau STP (câble droit CAT-5 ou supérieur) disponible dans le
commerce.
WAN
LAN
PHONO
IN
1
IN
2
OUT
IN
3
OUT
Préparation d’une antenne sans fil
SIGNAL
GND
ANTENNA
FM AM
1
OPTICAL
2
75Ω
1
COAXIAL
SUBWOOFER
2
PRE OUT
LINE
CD
NETWORK
Si vous reliez l’unité via une connexion sans fil, déployez
son antenne sans fil. Pour plus de détails sur la connexion
de l’unité à un réseau sans fil, reportez-vous à la section
(p.15).
SPEAKERS
A
B
Raccordement du cordon d’alimentation
Une fois tous les raccordements terminés, branchez le
câble d’alimentation.
Remarque
Manipulez toujours l’antenne sans fil en douceur. Une pression
trop forte sur l’antenne risque de l’endommager.
14 Fr
Page 84

Raccordement au réseau
Connexion via la fonction de serveur DHCP du
routeur
Vous pouvez connecter l’unité au
réseau en établissant simplement
une connexion filaire (p.14)
Connexion via le paramètre Wi-Fi de l’appareil
iOS (iPhone / iPod touch)
Partagez le paramètre Wi-Fi avec
l’appareil iOS (p.16)
Connexion via la configuration une pression du
bouton WPS sur le routeur sans fil (ou point
d’accès)
Utilisez la fonction de
configuration une pression du
bouton WPS (p.17)
Connexion à un routeur sans fil (point d’accès)
sans configuration une pression du bouton WPS
Réglez manuellement la méthode
de connexion au réseau (p.18)
Connexion sans fil à un appareil mobile (Wireless
Direct)
Établissez une connexion sans fil
avec Wireless Direct (p.19)
Raccordement au réseau
Vous disposez de plusieurs méthodes pour connecter l’unité à un réseau. Sélectionnez une méthode de connexion en
fonction de votre environnement.
Remarques
• Certains logiciels de sécurité installés sur votre PC ou les paramètres de pare-feu de périphériques réseau (tels qu’un routeur) peuvent
bloquer l’accès de l’unité à ces derniers ou à Internet. Dans ces cas, configurez de manière appropriée le logiciel de sécurité ou les
paramètres de pare-feu.
• Chaque serveur doit être connecté au même sous réseau que l’unité.
• Pour utiliser ce service via Internet, nous vous recommandons d’utiliser une connexion à large bande.
Pour lire une source audio haute résolution via le réseau, nous vous conseillons d’utiliser un routeur filaire afin d’obtenir une lecture
fluide.
■ Connexion avec l’application MusicCast CONTROLLER
Voyez Guide d’installation MusicCast pour plus de renseignements.
■ Connexion avec le routeur filaire
PRÉPARATIONS
■ Connexion via un routeur sans fil (point d’accès)
Raccordez l’unité au réseau en choisissant la méthode de connexion ci-dessous adaptée à votre système.
■ Connexion sans routeur filaire ni routeur sans fil (point d’accès)
Remarque
Quand l’unité est raccordée au réseau via Wireless Direct, elle ne peut être connectée à aucun autre routeur sans fil (point d’accès). Pour
lire des contenus disponibles sur l’Internet, connectez cette unité à un réseau via un routeur filaire ou un routeur sans fil (point d’accès).
Français
15 Fr
Page 85

Raccordement au réseau
PRESET
MEMORY
SETUP
HOME
MUTENOW PLAYING
VOLUME
RETURN
ENTER
OPTION
RETURN
SETUP
ENTER
Touches de
curseur B /
C
Nom de cette unité
Appuyez ici pour
démarrer la
configuration
Réseau actuellement
sélectionné
Partage du réglage de l’appareil iOS
Vous pouvez configurer facilement une connexion sans fil
en effectuant les réglages de connexion sur les appareils
iOS (iPhone/iPod touch).
Avant d’effectuer l’opération, vérifiez que votre appareil
iOS est connecté à un routeur sans fil (point d’accès).
Si aucune connexion réseau n’est établie, « WAC »
(Wireless Accessory Configuration) apparaît sur
l’afficheur de la face avant quand vous mettez l’unité
sous tension, et l’unité recherche automatiquement un
appareil iOS. Vous pouvez partager automatiquement
les réglages de réseau.
WAC
R-N602 XXXXXX
Si l’unité est déjà raccordée avec un câble et
simultanément connectée à un réseau sans fil via une
autre méthode, les réglages ne sont pas partagés
automatiquement. Pour partager manuellement les
réglages de réseau de l’appareil iOS, effectuez la
procédure suivante.
6 Utilisez les touches de curseur (B / C) pour
sélectionner « Share Setting » et appuyez sur
ENTER.
SHARE
Wireless(WAC)
7 Utilisez les touches de curseur (B / C) pour
sélectionner la méthode de connexion
voulue et appuyez sur ENTER.
Vous disposez des méthodes de connexion suivantes.
Vous pouvez appliquer les réglages de connexion de
Wireless
(WAC)
USB
Cable
Remarque
Quand vous sélectionnez « Wireless (WAC) » comme méthode
de connexion, tous les paramètres réseau sont initialisés.
l’appareil iOS à l’unité à l’aide d’une connexion sans
fil. Pour plus de détails, reportez-vous à « Partage
sans fil du réglage de l’appareil iOS ». (Veillez à ce
que votre appareil iOS dispose de la version iOS 7 ou
d’une version ultérieure.)
Vous pouvez appliquer les réglages de connexion de
l’appareil iOS à l’unité à l’aide d’un câble USB. Pour
plus de détails, reportez-vous à « Partage du réglage
de l’appareil iOS via un câble USB ». (Veillez à ce
que votre appareil iOS dispose de la version iOS 5 ou
d’une version ultérieure.)
1 Appuyez sur A pour mettre l’appareil sous
tension.
2 Appuyez sur SETUP.
3
Utilisez les touches de curseur (B / C) pour
sélectionner « Network » et appuyez sur ENTER.
y
Pour revenir à l’écran précédent, appuyez sur RETURN.
4 Utilisez les touches de curseur (B / C) pour
sélectionner « Connection » et appuyez sur
ENTER.
5 Utilisez les touches de curseur (B / C) pour
sélectionner « Wireless » et appuyez sur
16 Fr
ENTER.
WIRELESS
WPS
■ Partage sans fil du réglage de l’appareil iOS
Si vous avez sélectionné « Wireless (WAC) » comme
méthode de connexion, effectuez le partage des réglages
réseau sur votre dispositif iOS. (La procédure ci-dessous
illustre un exemple de configuration pour l’iOS 8.)
1
Sur le dispositif iOS, sélectionnez l’unité
comme haut-parleur AirPlay dans l’écran Wi-Fi.
2 Vérifiez le réseau actuellement sélectionné et
appuyez sur « Suivant ».
Page 86

Une fois le partage effectué, l’unité se connecte
Cette unité (avant)
RETURN
SETUP
ENTER
Touches de
curseur B /
C
WPS
WIRELESS
automatiquement au réseau sélectionné (point d’accès).
Quand le réglage est terminé, vérifiez que l’unité est
connectée à un réseau sans fil (p.20).
■ Partage du réglage de l’appareil iOS via un câble USB
Si vous avez sélectionné « USB Cable » comme méthode
de connexion, effectuez la procédure suivante pour
partager le réglage de l’appareil iOS avec l’unité.
Raccordement au réseau
1 Appuyez sur A pour mettre l’appareil sous
tension.
2 Appuyez sur SETUP.
3 Utilisez les touches de curseur (B / C) pour
sélectionner « Network » et appuyez sur
ENTER.
1
Connectez l’appareil iOS à la prise USB, puis
désactivez le verrou d’écran sur l’appareil iOS.
MEMORY CLEAR
DIMMER MODE
DISPLAY
BASSINPUT
PHONES
SPEAKERS
AB
5V
1A
TREBLE
2 Appuyez sur ENTER.
3 Saisissez « Allow » dans la boîte de dialogue
affichée sur l’appareil iOS.
Une fois la procédure de connexion terminée,
« Completed » apparaît sur l’afficheur de la face
avant.
Quand le réglage est terminé, vérifiez que l’unité est
connectée à un réseau sans fil (p.20).
4 Pour quitter le menu, appuyez sur SETUP.
Utilisation de la configuration une pression du bouton WPS
y
Pour revenir à l’écran précédent, appuyez sur RETURN.
4 Utilisez les touches de curseur (B / C) pour
sélectionner « Connection » et appuyez sur
ENTER.
5 Utilisez les touches de curseur (B / C) pour
sélectionner « Wireless » et appuyez sur
ENTER.
6 Appuyez deux fois sur ENTER.
« Connecting » apparaît sur l’affichage de la face avant.
7 Appuyez sur le bouton WPS du routeur sans
fil (point d’accès).
Une fois la procédure de connexion terminée,
« Completed » apparaît sur l’afficheur de la face
avant. Quand le réglage est terminé, vérifiez que
l’unité est connectée à un réseau sans fil (p.20).
Si « Not connected » s’affiche, répétez la procédure
depuis l’étape 1 ou essayez une autre méthode de
connexion.
PRÉPARATIONS
Vous pouvez établir facilement une connexion sans fil
d’une simple pression sur le bouton WPS.
Remarque
Cette configuration n’est pas possible si votre routeur sans fil
(point d’accès) est protégé par une clé de sécurité WEP. Dans ce
cas, utilisez une autre méthode de connexion.
MEMORY
PRESET
ENTER
HOME
SETUP
VOLUME
RETURN
OPTION
MUTENOW PLAYING
8 Pour quitter le menu, appuyez sur SETUP.
À propos de WPS
WPS (Wi-Fi Protected Setup) est une norme de la Wi-Fi
Alliance; elle permet de créer facilement un réseau
domestique sans fil.
Français
17 Fr
Page 87

Raccordement au réseau
RETURN
SETUP
ENTER
Touches de
curseur
B / C / D /
E
WPA2-PSK(AES)
SECURITY
Réglage manuel de connexion au réseau sans fil
Avant d’effectuer la procédure suivante, vérifiez la
méthode de sécurité et la clé de sécurité du routeur sans fil
(point d’accès).
MEMORY
PRESET
ENTER
HOME
SETUP
1 Appuyez sur A pour mettre l’appareil sous
tension.
2 Appuyez sur SETUP.
3 Utilisez les touches de curseur (B / C) pour
sélectionner « Network » et appuyez sur
ENTER.
y
Pour revenir à l’écran précédent, appuyez sur RETURN.
VOLUME
RETURN
OPTION
MUTENOW PLAYING
8 Utilisez les touches de curseur pour saisir
l’identifiant SSID du routeur sans fil (point
d’accès), puis appuyez sur RETURN pour
retourner à l’écran précédent.
Utilisez les touches de curseur (D/E) pour
sélectionner le caractère à modifier et (B/C) pour
sélectionner un caractère.
9 Utilisez les touches de curseur (B / C) pour
sélectionner « Security » et appuyez sur
ENTER.
10 Utilisez les touches de curseur (D / E) pour
sélectionner la méthode de sécurité voulue
et appuyez sur RETURN.
Réglages
None, WEP, WPA2-PSK (AES), Mixed Mode
Remarque
Si vous choisissez « None », la connexion pourrait être
vulnérable en raison de l’absence de cryptage.
11 Utilisez les touches de curseur (B / C) pour
sélectionner « Security Key » et appuyez sur
ENTER.
4 Utilisez les touches de curseur (B / C) pour
sélectionner « Connection » et appuyez sur
ENTER.
5 Utilisez les touches de curseur (B / C) pour
sélectionner « Wireless » et appuyez sur
ENTER.
6 Utilisez les touches de curseur (B / C) pour
sélectionner « Manual Setting » et appuyez
sur ENTER.
MANUAL
SSID
7 Utilisez les touches de curseur (B / C) pour
sélectionner « SSID » et appuyez sur ENTER.
SSID
18 Fr
KEY
12 Utilisez les touches de curseur pour saisir la
clé de sécurité du routeur sans fil (point
d’accès), puis appuyez sur RETURN pour
retourner à l’écran précédent.
Utilisez les touches de curseur (D/E) pour
sélectionner le caractère à modifier et (B/C) pour
sélectionner un caractère.
Pour insérer / supprimer un caractère, appuyez sur
PRESET i (insérer) ou PRESET j (supprimer).
13 Utilisez les touches de curseur (B / C) pour
sélectionner « Connect[ENTER] » puis
appuyez sur ENTER pour enregistrer le
réglage.
Si « ERROR » s’affiche, vérifiez le paramètre SSID
et la clé de sécurité du routeur sans fil (point d’accès)
et reprenez la procédure depuis l’étape 7.
Si « ERROR » ne s’affiche pas, la connexion a réussi.
Vérifiez que l’unité est connectée à un réseau sans fil
(p.20).
14 Pour quitter le menu, appuyez sur SETUP.
Page 88

Raccordement au réseau
PRESET
MEMORY
SETUP
HOME
MUTENOW PLAYING
VOLUME
RETURN
ENTER
OPTION
RETURN
SETUP
ENTER
Touches de
curseur
B / C / D /
E
SSID
W DIRECT
WPA2-PSK(AES)
W DIRECT
Connexion directe de l’unité à un appareil mobile (Wireless Direct)
Via Wireless Direct, cette unité peut être utilisée comme
point d'accès de réseau sans fil permettant la connexion
directe d'appareils mobiles.
Remarque
Quand l’unité est raccordée au réseau via Wireless Direct, elle ne
peut être connectée à aucun autre routeur sans fil (point d’accès).
Pour lire des contenus disponibles sur l’Internet, connectez cette
unité à un réseau via un routeur filaire ou un routeur sans fil
(point d’accès).
1 Appuyez sur A pour mettre l’appareil sous
tension.
2 Appuyez sur SETUP.
8 Utilisez les touches de curseur (D / E) pour
sélectionner la méthode de sécurité voulue
et appuyez sur RETURN.
Réglages
None, WPA2-PSK (AES)
Remarque
Si vous choisissez « None », la connexion pourrait être
vulnérable en raison de l’absence de cryptage.
9 Utilisez les touches de curseur (B / C) pour
sélectionner « Security Key » et appuyez sur
ENTER.
KEY
10 Utilisez les touches de curseur pour saisir la
clé de sécurité sur cette unité, puis appuyez
sur RETURN pour retourner à l’écran
précédent.
Utilisez les touches de curseur (D / E) pour
sélectionner le caractère à modifier et (B / C) pour
sélectionner un caractère.
Pour insérer / supprimer un caractère, appuyez sur
PRESET i (insérer) ou PRESET j (supprimer).
PRÉPARATIONS
3 Utilisez les touches de curseur (B / C) pour
sélectionner « Network » et appuyez sur
ENTER.
y
Pour revenir à l’écran précédent, appuyez sur RETURN.
4 Utilisez les touches de curseur (B / C) pour
sélectionner « Connection » et appuyez sur
ENTER.
5 Utilisez les touches de curseur (B / C) pour
sélectionner « WirelesDirect » et appuyez sur
ENTER.
6 Appuyez sur ENTER pour vérifier le SSID sur
cette unité, puis appuyez sur RETURN pour
retourner à l’écran précédent.
7 Utilisez les touches de curseur (B / C) pour
sélectionner « Security » et appuyez sur
ENTER.
11 Utilisez les touches de curseur (B / C) pour
sélectionner « Connect[Enter] » puis appuyez
sur ENTER pour enregistrer le réglage.
Vous devez saisir les informations SSID et de clé
sécurité pour configurer un appareil mobile.
Quand vous sélectionnez « SSID » à l’étape 6, vous
pouvez vérifier le réglage du paramètre SSID sur
cette unité. Le paramètre SSID de cette unité peut être
changé avec les touches de curseur (B / C / D / E).
12 Configurez les paramètres sans fil d’un
appareil mobile.
Pour plus de détails sur les réglages de votre appareil
mobile, reportez-vous au manuel d’utilisation de ce
dernier.
(1) Activez la fonction sans fil de l’appareil mobile.
(2) Sélectionnez le SSID de cette unité dans la liste
des points d’accès disponibles.
(3) Quand l’écran vous demande un mot de passe,
saisissez la clé sécurité affichée à l’étape 10.
Si « ERROR » s’affiche, vérifiez la clé de sécurité de
cette unité et reprenez la procédure depuis l’étape 12.
Si « ERROR » ne s’affiche pas, la connexion a réussi.
Vérifiez que l’unité est connectée à un réseau sans fil
(p.20).
13 Pour quitter le menu, appuyez sur SETUP.
19 Fr
Français
Page 89

Raccordement au réseau
RETURN
SETUP
ENTER
Touches de
curseur B /
C
Vérification du statut de connexion réseau
La procédure suivante permet de vérifier la connexion de
l’unité à un réseau.
MEMORY
PRESET
ENTER
HOME
SETUP
VOLUME
RETURN
OPTION
MUTENOW PLAYING
1 Appuyez sur SETUP.
2 Utilisez les touches de curseur (B / C) pour
sélectionner « Network » et appuyez sur
ENTER.
y
Pour revenir à l’écran précédent, appuyez sur RETURN.
3 Utilisez les touches de curseur (B / C) pour
sélectionner « Information » et appuyez sur
ENTER.
4 Utilisez les touches de curseur (B / C) pour
sélectionner « STATUS ».
STATUS
Connect
Quand « Connect » s’affiche, l’unité est connectée à
un réseau. Si « Disconnect » s’affiche, initialisez la
connexion.
5 Pour quitter le menu, appuyez sur SETUP.
20 Fr
Page 90

OPÉRATIONS DE BASE
A (alimentation)
SPEAKERS A/B
Sélecteur INPUT
Commande VOLUME
SETUP
HOME
MUTENOW PLAYING
VOLUME
RETURN
OPTION
Touches de
sélection
d’entrée
A (alimentation)
VOLUME
SPEAKERS A/B
Interrupteur PURE DIRECT
Lecture
Lecture d’une source
BAND
MEMORY CLEAR
DIMMER MODE
DISPLAY
PHONES
SPEAKERS
AB
5V
1A
BASSINPUT
BALANCE
TREBLE
LR
SPEAKERS
B
A
PHONO
COAX 1 COAX 2
OPT 1 OPT 2 CD
LINE 1
LINE 2 LINE 3
TUNER
NET USB
BAND
TUNING
BLUETOOTH
SLEEP
4 Lisez la source.
5 Tournez la commande VOLUME du panneau
avant (ou appuyez sur la touche VOLUME +/–
TUNINGPRESET
LOUDNESS
SELECT
FLAT
-30dB
PURE DIRECT
PUSH - ENTER
VOLUME
RETURN
CONNECT
de la télécommande) pour régler le niveau
sonore.
y
Vous pouvez régler le timbre avec les commandes BASS,
TREBLE, BALANCE et LOUDNESS ou avec le commutateur
PURE DIRECT du panneau avant.
6 Quand vous avez fini d’utiliser l’unité,
appuyez sur A (alimentation) sur le panneau
avant pour mettre l’appareil hors tension.
Quand vous appuyez sur la touche A (alimentation)
de la télécommande, l’unité passe en veille.
■ Bénéficier de la pureté du son haute fidélité (Pure Direct)
Quand le commutateur PURE DIRECT est actif, les
signaux d’entrée des sources audio connectées sont
acheminés directement, en contournant les circuits des
commandes BASS, TREBLE, BALANCE et
LOUDNESS. Les signaux d’entrée ne subissent donc
aucune altération et le son conserve une pureté optimale.
Le témoin PURE DIRECT s’allume et l’afficheur de la
face avant s’éteint après quelques secondes.
OPÉRATIONS DE
BASE
1 Appuyez sur A (alimentation) pour mettre
2 Tournez le sélecteur INPUT du panneau avant
3 Appuyez sur SPEAKERS A et/ou SPEAKERS
Remarques
• Lorsqu’un jeu d’enceintes est branché à l’aide de connexions
bifilaires, ou lorsque deux jeux d’enceintes sont utilisés
simultanément (A et B), vérifiez que « A » et « B » sont affichés
sur l’afficheur du panneau avant.
• Si vous écoutez à l’aide d’un casque, désactivez les enceintes.
l’appareil sous tension.
(ou appuyez sur l’une des touches du
sélecteur d’entrée de la télécommande) pour
sélectionner la source d’entrée à écouter.
B sur le panneau avant ou sur la
télécommande pour sélectionner les
enceintes A et/ou B.
Lorsque le jeu d’enceintes A ou le jeu d’enceintes B
est activé, « A » ou « B » s’affiche en conséquence
sur l’afficheur du panneau avant (p.7).
PHONES
SPEAKERS
AB
5V
1A
BASSINPUT
BALANCE
LR
LOUDNESS
SELECT
PUSH - ENTER
FLAT
-30dB
TREBLE
TUNINGPRESET
BAND
MEMORY CLEAR
DIMMER MODE
DISPLAY
PURE DIRECT
VOLUME
RETURN
CONNECT
Remarques
• Quand vous activez la fonction PURE DIRECT, l’afficheur de la
face avant s’éteint.
• Les commandes BASS, TREBLE, BALANCE et LOUDNESS
n’ont pas d’effet sur le son quand le commutateur PURE
DIRECT est actif.
21 Fr
Français
Page 91

Lecture
VOLUME
PURE DIRECT
RETURN
CONNECT
PUSH - ENTER
TUNINGPRESET
BAND
MEMORY CLEAR
BASSINPUT
5V
1A
BALANCE
LR
TREBLE
LOUDNESS
FLAT
-30dB
DIMMER MODE
DISPLAY
SELECT
PHONES
SPEAKERS
AB
BASS TREBLE
VOLUME
PURE DIRECT
RETURN
CONNECT
PUSH - ENTER
TUNINGPRESET
BAND
MEMORY CLEAR
BASSINPUT
5V
1A
BALANCE
LR
TREBLE
LOUDNESS
FLAT
-30dB
DIMMER MODE
DISPLAY
SELECT
PHONES
SPEAKERS
AB
BALANCE
VOLUME
PURE DIRECT
RETURN
CONNECT
PUSH - ENTER
TUNINGPRESET
BAND
MEMORY CLEAR
BASSINPUT
5V
1A
BALANCE
LR
TREBLE
LOUDNESS
FLAT
-30dB
DIMMER MODE
DISPLAY
SELECT
PHONES
SPEAKERS
AB
VOLUMELOUDNESS
SETUP
HOME
MUTENOW PLAYING
VOLUME
RETURN
OPTION
VOLUME +/–
■ Réglage des commandes BASS et TREBLE
Les commandes BASS et TREBLE permettent de régler la
réponse dans les hautes et les basses fréquences.
La position centrale produit une réponse plate.
Commande BASS
Si vous estimez qu’il n’y a pas assez de graves (son de
basse fréquence), tournez cette commande à droite pour
les accentuer. S’il y a trop de graves, tournez la commande
à gauche pour les atténuer.
Plage de commande : –10 dB à +10 dB (20 Hz)
Commande TREBLE
Si vous estimez qu’il n’y a pas assez d’aigus (son de haute
fréquence), tournez cette commande à droite pour les
accentuer. S’il y a trop d’aigus, tournez la commande à
gauche pour les atténuer.
Plage de commande : –10 dB à +10 dB (20 kHz)
■ Réglage de la commande LOUDNESS
Cette commande agit sur les fréquences afin de compenser
la plus faible sensibilité de l’oreille humaine au grave et à
l’aigu à bas volume, conservant ainsi la plage de
fréquence intégrale.
ATTENTION
Si le commutateur PURE DIRECT est actif et que la
commande LOUDNESS est réglée sur un certain niveau,
le signal d’entrée contourne la commande LOUDNESS,
ce qui produit une brusque hausse du volume. Pour
protéger votre ouïe et vos haut-parleurs, veillez à abaisser
le volume ou à vérifier que le réglage de la commande
LOUDNESS est approprié avant d’appuyer sur le
commutateur PURE DIRECT.
1 Placez la commande LOUDNESS en position
■ Réglage de la commande BALANCE
FLAT.
2 Tournez la commande VOLUME de la face
avant (ou utilisez les touches VOLUME +/– de
la télécommande) pour régler le volume de
La commande BALANCE équilibre le son reproduit par
les enceintes gauche et droite afin de compenser le
déséquilibre sonore provoqué par l’emplacement des
enceintes ou les conditions de la pièce d’écoute.
22 Fr
sortie au niveau maximum souhaité.
3 Tournez la commande LOUDNESS jusqu’à ce
que vous obteniez le volume souhaité.
y
Une fois que la commande LOUDNESS est correctement réglée,
vous pouvez écouter votre musique favorite au volume défini. Si
l’effet de la commande LOUDNESS est trop marqué ou trop
discret, corrigez le réglage en tournant la commande LOUDNESS.
Page 92

Utilisation de la minuterie de
A
SLEEP
(alimentation)
VOL.
A
Sleep 120min.
SLEEP
veille
Cette fonction permet de mettre automatiquement
l’appareil en mode veille après un certain laps de temps.
La minuterie de veille est utile lorsque vous allez vous
coucher alors que l’appareil lit ou enregistre une source.
SPEAKERS
B
A
PHONO
COAX 1 COAX 2
OPT 1 OPT 2 CD
LINE 1
Remarque
La minuterie de veille ne peut être réglée qu’au moyen de la
télécommande.
1 Appuyez plusieurs fois de suite sur SLEEP
pour régler le laps de temps avant la mise en
mode veille de l’appareil.
Chaque fois que vous appuyez sur SLEEP, l’afficheur
du panneau avant change comme indiqué ci-dessous.
SLEEP
BLUETOOTH
LINE 2 LINE 3
Lecture
OPÉRATIONS DE
BASE
Le témoin SLEEP clignote pendant le réglage de la
durée de la minuterie de veille.
Lorsque la minuterie de veille est activée, le témoin
SLEEP sur l’afficheur du panneau avant s’allume.
y
• Pour désactiver la minuterie de veille, sélectionnez « Sleep
Off ».
• Vous pouvez aussi annuler la minuterie de veille en appuyant
sur A (alimentation) pour mettre l’appareil en mode de veille.
Français
23 Fr
Page 93

Écoute d’émission FM/AM
TUNING jj / ii
TUNER
BAND
VOL.
TUNEDSTEREO
A
FM 98.5 MHz
Fréquence
VOLUME
PURE DIRECT
RETURN
CONNECT
PUSH - ENTER
TUNINGPRESET
BAND
MEMORY CLEAR
BASSINPUT
5V
1A
BALANCE
LR
TREBLE
LOUDNESS
FLAT
-30dB
DIMMER MODE
DISPLAY
SELECT
PHONES
SPEAKERS
AB
MODE
Syntonisation FM/AM
SPEAKERS
B
A
PHONO
COAX 1 COAX 2
OPT 1 OPT 2 CD
LINE 1
TUNER
BAND
MEMORY
1 Appuyez sur TUNER pour sélectionner
« TUNER » comme source d’entrée.
2 Appuyez plusieurs fois sur BAND pour
sélectionner la bande de réception (FM ou
AM).
3 Maintenez la touche TUNING jj / ii enfoncée
pendant plus d’une seconde pour lancer la
syntonisation.
Appuyez sur ii pour accorder une fréquence
supérieure.
Appuyez sur jj pour accorder une fréquence
inférieure.
La fréquence de la station captée est indiquée sur
l’afficheur du panneau avant.
Si l’appareil reçoit une station, son témoin « TUNED »
s’allume sur l’afficheur du panneau avant.
d’une station émettant en stéréo, le témoin « STEREO »
s’allume également.
SLEEP
BLUETOOTH
LINE 2 LINE 3
NET USB
TUNING
PRESET
S’il s’agit
■ Améliorer la réception FM (mode FM)
Si le signal de la station est faible et la qualité du son
mauvaise, réglez le mode de réception de la bande FM sur
le mode monaural afin d’améliorer la réception.
1 Appuyez à plusieurs reprises sur MODE pour
sélectionner « Stereo » (mode stéréo
automatique) ou « Mono » (mode monaural)
quand cette unité est réglée sur une station
FM.
Si vous sélectionnez Mono, vous entendrez les
émissions FM en mono.
Remarque
Le témoin STEREO sur le panneau avant s’allume lorsque vous
écoutez une émission en stéréo.
Syntonisation automatique (uniquement pour les stations FM)
Vous pouvez utiliser la fonction de mise en mémoire
automatique de stations pour présélectionner
automatiquement des stations FM. Cette fonction permet à
l’appareil de s’accorder automatiquement sur des stations
FM dont le signal est puissant et de mémoriser dans
l’ordre jusqu’à 40 de ces stations. Vous pouvez alors
facilement rappeler n’importe quelle station
présélectionnée en choisissant son numéro de
présélection.
y
• Si le signal d’une station est faible, le syntoniseur ne s’arrête
pas sur cette station.
• Lorsque la réception du signal de la station de radio FM est
instable, le passage en mono peut l’améliorer.
24 Fr
Remarques
• Si une station est mise en mémoire sous un numéro de
présélection qui a déjà été attribué à une station, la station mise
initialement en mémoire est écrasée.
• Si la puissance du signal de la station que vous voulez
mémoriser est faible, essayez la méthode de syntonisation
présélectionnée manuelle.
y
Les stations FM mises en mémoire à l’aide de la fonction de mise
en mémoire automatique sont entendues en stéréo.
Page 94

LINE 1
PRESET j / i
RETURN
OPTION
TUNER
BAND
ENTER
Touches de
curseur B /
C
VOL.
A
Auto Preset
OPTION
VOL.
A
01:FM 87.5 MHz
READY
Numéro de présélection Fréquence
Numéro de présélection
« Empty » (non utilisé) ou fréquence actuellement enregistrée
LINE 2 LINE 3
TUNER
NET USB
BAND
TUNING
MEMORY
PRESET
ENTER
HOME
SETUP
VOLUME
RETURN
OPTION
MUTENOW PLAYING
1 Appuyez sur TUNER pour sélectionner
« TUNER » comme source d’entrée.
2 Appuyez sur OPTION sur la télécommande.
Le menu « Option » s’affiche (p.42).
3 Appuyez sur B / C pour choisir « Auto
Preset », puis appuyez sur ENTER.
L’appareil commence à balayer la bande FM environ
5 secondes après, en allant de la fréquence la plus
basse vers la fréquence la plus élevée.
Pour lancer immédiatement le balayage, maintenez la
touche ENTER enfoncée.
y
• Avant le début du balayage, vous pouvez préciser le premier
numéro de présélection à utiliser en appuyant sur PRESET j / i
ou la touche de curseur (B/C) sur la télécommande.
• Pour annuler le balayage, appuyez sur BAND ou RETURN.
Une fois le balayage terminé, « FINISH » s’affiche, puis
l’afficheur revient à son état initial.
Écoute d’émission FM/AM
Syntonisation manuelle
Sélectionnez une station manuellement et enregistrez-la
sous un numéro de présélection. Vous pouvez alors
facilement rappeler n’importe quelle station
présélectionnée en choisissant son numéro de
présélection.
TUNER
NET USB
BAND
TUNING
MEMORY
MEMORY
PRESET
ENTER
PRESET j / i
1 Suivez les instructions sous « Syntonisation
FM/AM » (p.24) pour syntoniser la station
radio voulue.
2
Maintenez la touche MEMORY enfoncée
pendant plus de 2 secondes.
Lors de votre premier enregistrement, la station radio
sélectionnée est mémorisée sous le numéro de
présélection « 01 ». Ensuite, chaque station radio
sélectionnée est enregistrée sous le numéro de
présélection vide (inutilisé) suivant, à la suite du
numéro de présélection enregistré le plus récemment.
TUNEDSTEREO
MEMORY
A
VOL.
01:FM 98.5 MHz
y
Pour sélectionner un numéro de présélection de destination pour
l’enregistrement, appuyez une fois sur MEMORY après avoir
syntonisé la station de radio souhaitée, appuyez sur PRESET j / i
pour choisir un numéro de présélection, puis appuyez de nouveau
sur MEMORY.
TUNEDSTEREO
985
A
VOL.
02:Empty
OPÉRATIONS DE
BASE
Français
25 Fr
Page 95

Écoute d’émission FM/AM
LINE 1
OPT 1 OPT 2 CD
COAX 1 COAX 2
BLUETOOTH
NET USB
LINE 2 LINE 3
TUNER
PRESET
TUNING
BAND
MEMORY
SLEEP
PHONO
B
A
SPEAKERS
TUNER
PRESET j / i
OPTION
ENTER
TUNER
Touches de
curseur B / C
Station préréglée à effacer
Rappel d’une station présélectionnée
Vous pouvez rappeler des stations présélectionnées qui ont
été mises en mémoire à l’aide de la fonction de mise en
mémoire automatique de stations ou de mise en mémoire
manuelle de stations.
1 Appuyez sur TUNER pour sélectionner
« TUNER » comme source d’entrée.
2 Appuyez sur PRESET j / i pour choisir un
numéro de présélection.
y
• Les numéros de présélection sous lesquels aucune station n’a
été mise en mémoire sont ignorés.
• « No Presets » s’affiche si aucune station n’est en mémoire.
Effacement d’une station présélectionnée
Effacez les stations radio enregistrées sur les numéros de
présélection.
LINE 1
LINE 2 LINE 3
TUNER
NET USB
BAND
TUNING
MEMORY
PRESET
1 Appuyez sur TUNER pour sélectionner
« TUNER » comme source d’entrée.
2 Appuyez sur OPTION.
3 Utilisez les touches de curseur pour
sélectionner « Clear Preset » et appuyez sur
ENTER.
OPTION
VOL.
Clear Preset
4 Utilisez les touches de curseur (B / C) pour
sélectionner une présélection à effacer et
appuyez sur ENTER.
TUNEDSTEREO
CLEAR
A
VOL.
01:FM 98.5 MHz
Si la station préréglée est effacée, le message
« Cleared » apparaît et le numéro de présélection
utilisé suivant s’affiche.
CLEAR
A
VOL.
01:Cleard
5 Recommencez l’étape 4 jusqu’à ce que
toutes les stations préréglées soient
effacées.
6 Pour quitter le menu « Option », appuyez sur
OPTION.
y
Vous pouvez effacer une présélection depuis la face avant.
(1) Appuyez sur CLEAR sur la face avant.
(2) Appuyez sur PRESET D/E pour sélectionner la présélection à
effacer.
(3) Appuyez sur SELECT/ENTER ou CLEAR pour supprimer la
présélection.
26 Fr
ENTER
HOME
SETUP
VOLUME
RETURN
OPTION
MUTENOW PLAYING
Page 96

Lecture de musique via Bluetooth
Cet appareil Dispositif Bluetooth
(comme un appareil mobile)
BLUETOOTH
REPEAT
SHUFFLE
Touches de
lecture
BLUETOOTH
Sur l’unité, vous pouvez lire des fichiers de musique
stockés sur un dispositif Bluetooth (comme un appareil
mobile).
Voyez aussi le mode d’emploi de votre dispositif
Bluetooth.
3 Sur le dispositif Bluetooth, sélectionnez le
nom de modèle de l’unité dans la liste
d’appareils disponibles.
Un fois que le jumelage est effectué et que l’unité est
connectée au dispositif Bluetooth, « Connected »
apparaît sur l’afficheur de la face avant et le témoin
Bluetooth est allumé.
Remarques
• Pour utiliser la fonction Bluetooth, réglez l’option « Bluetooth »
(p.45) du menu « Setup » sur « On ».
• Selon le modèle, il se peut qu’un appareil Bluetooth ne soit pas
détecté par l’unité ou que certaines fonctions ne soient pas
prises en charge.
y
Vous pouvez transmettre le son à des haut-parleurs ou un casque
Bluetooth via l’application MusicCast CONTROLLER. Pour
transmettre le son, réglez l’option « Audio Send » (p.45) du menu
« Setup » sur « On ». La sortie audio peut uniquement être
sélectionnée avec l’application MusicCast CONTROLLER.
Raccordement d’un dispositif Bluetooth (jumelage)
Lors de la première connexion de l’unité au dispositif
Bluetooth, le jumelage doit être exécuté. Le jumelage est
une opération de mémorisation des dispositifs Bluetooth.
Une fois le jumelage terminé, les reconnexions suivantes
sont facilitées même en cas d’une déconnexion Bluetooth.
SPEAKERS
B
A
PHONO
COAX 1 COAX 2
OPT 1 OPT 2 CD
SLEEP
BLUETOOTH
BLUETOOTH
A
VOL.
Connected
y
• Si un mot de passe est requis, tapez le nombre « 0000 ».
• Veillez à effectuer le jumelage en 5 minutes maximum.
• Si aucun dispositif Bluetooth n’est détecté, « Not found »
s’affiche.
Lecture de contenus sur dispositifs Bluetooth
Raccordez un dispositif Bluetooth jumelé et lancez la
lecture. Vérifiez au préalable les points suivants :
• Le jumelage est terminé.
• La fonction Bluetooth du dispositif Bluetooth est
activée.
SPEAKERS
B
A
PHONO
COAX 1 COAX 2
OPT 1 OPT 2 CD
SLEEP
BLUETOOTH
OPÉRATIONS DE
BASE
1 Appuyez sur BLUETOOTH pour sélectionner
« Bluetooth » comme source d’entrée.
Si un autre dispositif Bluetooth est déjà raccordé,
débranchez la connexion Bluetooth avant d’effectuer
le jumelage.
2 Activez la fonction Bluetooth du dispositif
Bluetooth.
1 Appuyez sur BLUETOOTH pour sélectionner
« Bluetooth » comme source d’entrée.
y
Si l’unité détecte un appareil Bluetooth ayant déjà été connecté,
elle se connecte automatiquement à cet appareil Bluetooth après
l’étape 1. Pour établir une autre connexion Bluetooth, coupez
d’abord la connexion Bluetooth actuelle.
27 Fr
Français
Page 97

Lecture de musique via Bluetooth
2 Utilisez le dispositif Bluetooth pour établir
une connexion Bluetooth.
Sélectionnez le nom de modèle de l’unité dans la liste
d’appareils Bluetooth sur votre dispositif Bluetooth.
Quand la connexion est établie, le témoin Bluetooth
s’allume sur l’afficheur de la face avant.
y
Si le dispositif Bluetooth ne peut pas se connecter, veuillez
recommencer le jumelage.
3 Utilisez le dispositif Bluetooth pour lire de la
musique.
y
Vous pouvez utiliser les touches de lecture de la télécommande
pour commander la lecture.
Annulation d’une connexion Bluetooth
Suivez l’une des procédures ci-dessous pour annuler une
connexion Bluetooth.
• Désactivez la fonction Bluetooth du dispositif
Bluetooth.
• Maintenez BLUETOOTH enfoncé sur la
télécommande pendant au moins 3 secondes.
• Sélectionnez « Disconnect » sous « Audio Receive »
(p.45) dans le menu « Setup » puis appuyez sur
ENTER.
• Sélectionnez une source d’entrée autre que
« Bluetooth » sur l’unité.
28 Fr
Page 98

Lecture de musique stockée sur des serveurs multimédias (PC/NAS)
PC
NAS
Cet appareil
(Exemple de la version anglaise)
Sur l’unité, vous pouvez lire des fichiers de musique stockés sur votre PC ou sur un système de stockage NAS
compatible DLNA.
Remarques
• Pour utiliser cette fonction, l’unité et votre PC/NAS doivent être raccordés au même routeur (p.14). Vous pouvez vérifier que les
paramètres réseau (tels que l’adresse IP) sont correctement attribués à l’unité dans l’option « Information » (p.44) du menu « Setup ».
• L’unité prend en charge la lecture des fichiers WAV (format PCM uniquement), AIFF, MP3, WMA, MPEG-4 AAC, FLAC, ALAC et DSD.
• L’unité est compatible avec des fréquences d’échantillonnage pouvant atteindre 192 kHz pour les fichiers WAV, AIFF et FLAC, 96
kHz pour les fichiers ALAC et 48 kHz pour les autres fichiers.
• L’unité est compatible avec les fichiers DSD de 2,8 MHz/5,6 MHz (1 bit).
• Les contenus Digital Rights Management (DRM) ne peuvent pas être lus.
• Pour pouvoir lire des fichiers de musique, il faut que le logiciel de serveur installé sur l’ordinateur ou le système de stockage NAS soit
compatible avec le format des fichiers de musique en question.
y
Vous pouvez connecter jusqu’à 16 serveurs multimédia à cette unité.
OPÉRATIONS DE
BASE
Configuration du partage de support des fichiers de musique
Pour lire des fichiers de musique de votre ordinateur avec
cet appareil, vous devez configurer le paramètre de
partage de support entre l’appareil et l’ordinateur
(Windows Media Player 11 ou version plus récente). Dans
cette section, les descriptions utilisent la version pour
Windows 7 de Windows Media Player à titre d’exemple.
■ Si vous utilisez Windows Media Player 12
1
Démarrez Windows Media Player 12 sur votre PC.
2 Sélectionnez « Diffuser en continu », puis
« Activer la diffusion multimédia en continu ».
La fenêtre du panneau de configuration s’ouvre sur
votre PC.
3 Cliquez sur « Activer la diffusion multimédia
en continu ».
Français
29 Fr
Page 99

Lecture de musique stockée sur des serveurs multimédias (PC/NAS)
NET USB
TUNER
PRESET
TUNING
BAND
MEMORY
SETUP
HOME
MUTENOW PLAYING
VOLUME
RETURN
ENTER
REPEAT
SHUFFLE
OPTION
RETURN
OPTION
NOW PLAYING
HOME
ENTER
NET
Touches de
lecture
Touches de
curseur
B / C / D / E
4 Sélectionnez « Autorisé » dans la liste
5 Cliquez sur « OK » pour quitter.
■ Si vous utilisez Windows Media Player
1 Démarrez Windows Media Player 11 sur votre
2 Sélectionnez « Bibliothèque », puis « Partage
3 Cochez la case « Partager mes fichiers
4 Cliquez sur « OK » pour quitter.
■ Si vous utilisez un PC ou un système de
Reportez-vous au mode d’emploi de l’appareil ou du
logiciel et configurez les paramètres de partage de
support.
déroulante à côté du nom de modèle de
l’unité.
11
PC.
des fichiers multimédias ».
multimédias dans », sélectionnez l’icône de
l’unité et cliquez sur « Autoriser ».
stockage doté d’un autre logiciel de
serveur DLNA
Lecture de musique sur PC
Suivez la procédure ci-après pour utiliser le contenu
musical du PC et démarrer la lecture.
Remarque
Le signe « _ » (trait de soulignement) s’affiche à la place des
caractères non pris en charge par l’unité.
1
Appuyez à plusieurs reprises sur NET pour
sélectionner « Server » comme source d’entrée.
SERVER
A
NAS A
2 Utilisez les touches de curseur (B / C) pour
sélectionner un serveur de musique et
appuyez sur ENTER.
3
Utilisez les touches de curseur pour
sélectionner un élément et appuyez sur ENTER.
Si un morceau est sélectionné, la lecture commence et
les informations de lecture s’affichent.
SERVER
A
Song A
y
• Si un fichier de musique sélectionné depuis l’unité est en cours
de lecture sur votre PC, les informations de lecture s’affichent.
• Vous pouvez mémoriser le morceau en cours de lecture sous
forme de présélection (p.41).
• Vous pouvez changer les informations de lecture présentes sur
l’afficheur de la face avant en appuyant plusieurs fois sur
DISPLAY (p.40).
30 Fr
Page 100

Utilisez les touches de télécommande suivantes pour
contrôler la lecture.
Touches Fonction
Touches de curseur
ENTER
RETURN
p/ e
Touches de
lecture
HOME
NOW PLAYING
b / w
f / a
s
Permettent de choisir un fichier de
musique ou un dossier.
Une pression sur cette touche
lance la lecture quand un contenu
est sélectionné. Si un dossier est
sélectionné quand cette touche est
enfoncée, la sélection descend
d’un niveau.
Monte d’un niveau.
Arrête/redémarre la lecture.
Arrête la lecture.
Effectue un saut avant/arrière.
(maintenue enfoncée) Effectue
une recherche avant/arrière.
Affiche le répertoire racine du
serveur de musique.
Affiche des informations sur le
morceau en cours de lecture.
y
Vous pouvez également utiliser un Digital Media Controller
(DMC) compatible DLNA pour contrôler la lecture. Pour plus
d’informations, reportez-vous à la section « DMC Control »
(p.44).
Lecture de musique stockée sur des serveurs multimédias (PC/NAS)
OPÉRATIONS DE
BASE
■ Réglages pour une lecture répétée/ aléatoire
Vous pouvez configurer les réglages de lecture aléatoire/
répétée de contenus musicaux issus d’un PC.
1 Si la source d’entrée correspond à
« SERVER », appuyez sur la touche de
lecture REPEAT ou SHUFFLE pour choisir le
mode de lecture.
Touches
de lecture
REPEAT
SHUFFLE
Réglage Fonction
Désactive la fonction de lecture
Off
répétée.
Lit le morceau en cours à plusieurs
One
reprises.
Lit tous les morceaux de l’album
All
(dossier) en cours à plusieurs reprises.
Désactive la fonction de lecture
Off
aléatoire.
Lit les morceaux de l’album (dossier)
On
en cours dans un ordre aléatoire.
Français
31 Fr
 Loading...