

Page 1
Page 2

Page 3
Page 4
Page 5

Page 6

Precautions
Your QY8 will give you years of reliable service if you follow the simple
rules given below:
■ Location
Do not expose the instrument to the following conditions to avoid deformation, discoloration, or more serious damage.
• Direct sunlight (e.g. near a window).
• High temperatures (e.g. near a heat source, outside, or in a car during the daytime).
• Excessive humidity.
• Excessive dust.
• Strong vibration.
■ Power Supply
• Turn the power switch OFF when the instrument is not in use.
• If you use an AC power adaptor — the QY8 requires an optional Yamaha PA-1B or
PA-3 AC Power Adaptor — unplug the adaptor from the AC outlet if the instrument
is not to be used for an extended period of time.
• Unplug the AC power adaptor during electric storms.
• Avoid plugging an AC power adaptor used with the QY8 into the same AC outlet as
appliances with high power consumption, such as electric heaters or ovens. Also avoid
using multi-plug adaptors since these can result in reduced sound quality and possibly
damage.
Precautions
■ Turn Power OFF When Making Connections
• To avoid damage to the instrument and other devices to which it is connected (a
sound system, for example), turn the power switches of all related devices OFF prior
to connecting or disconnecting audio and MIDI cables.
■ Handling and Transport
• Never apply excessive force to the controls, connectors or other parts of the
instrument.
•
Always unplug cables by gripping the plug firmly, not by pulling on the cable.
• Disconnect all cables before moving the instrument.
• Physical shocks caused by dropping, bumping, or placing heavy objects on the
instrument can result in scratches and more serious damage.
i
Page 7

■ Cleaning
• Clean the cabinet and panel with a dry soft cloth.
• A slightly damp cloth may be used to remove stubborn grime and dirt.
• Never use cleaners such as alcohol or thinner.
• Avoid placing vinyl objects on top of the instrument (vinyl can stick to and discolor
the surface).
You may notice one or more fine diagonal lines on the panel of your QY8. These are
unavoidable in the manufacturing process and are not scratches or defects in the
product.
■ Electrical Interference
• This instrument contains digital circuitry and may cause interference if placed too
close to radio or television receivers. If this occurs, move the instrument further away
from the affected equipment.
■ Data Backup
• The QY8 contains a special long-life battery that retains the contents of its internal
RAM memory even when the power is turned OFF. The backup battery should last
for several years. To ensure reliable operation we recommend that you have the
backup battery replaced by qualified Yamaha service personnel approximately once
every 5 years. DO NOT ATTEMPT TO REPLACE THE BACKUP BATTERY
YOURSELF!
• Internal memory data can be corrupted due to incorrect operation. We recommend
that you use the QY8 Data Out function (see page 61 for details) to transfer
important data to a MIDI data recorder such as the Yamaha MDF2 MIDI Data Filer
for safe long-term storage. Yamaha cannot be held responsible for data loss caused by
battery failure or improper operation of the QY8!
Precautions
■ Service and Modification
• The QY8 contains no user serviceable parts. Opening it or tampering with it in
anyway can lead to irreparable damage and possibly electric shock. Refer all servicing
to qualified YAMAHA personnel.
YAMAHA is not responsible for damage caused by improper handling or operation.
ii
Page 8
About This Manual
About This Manual
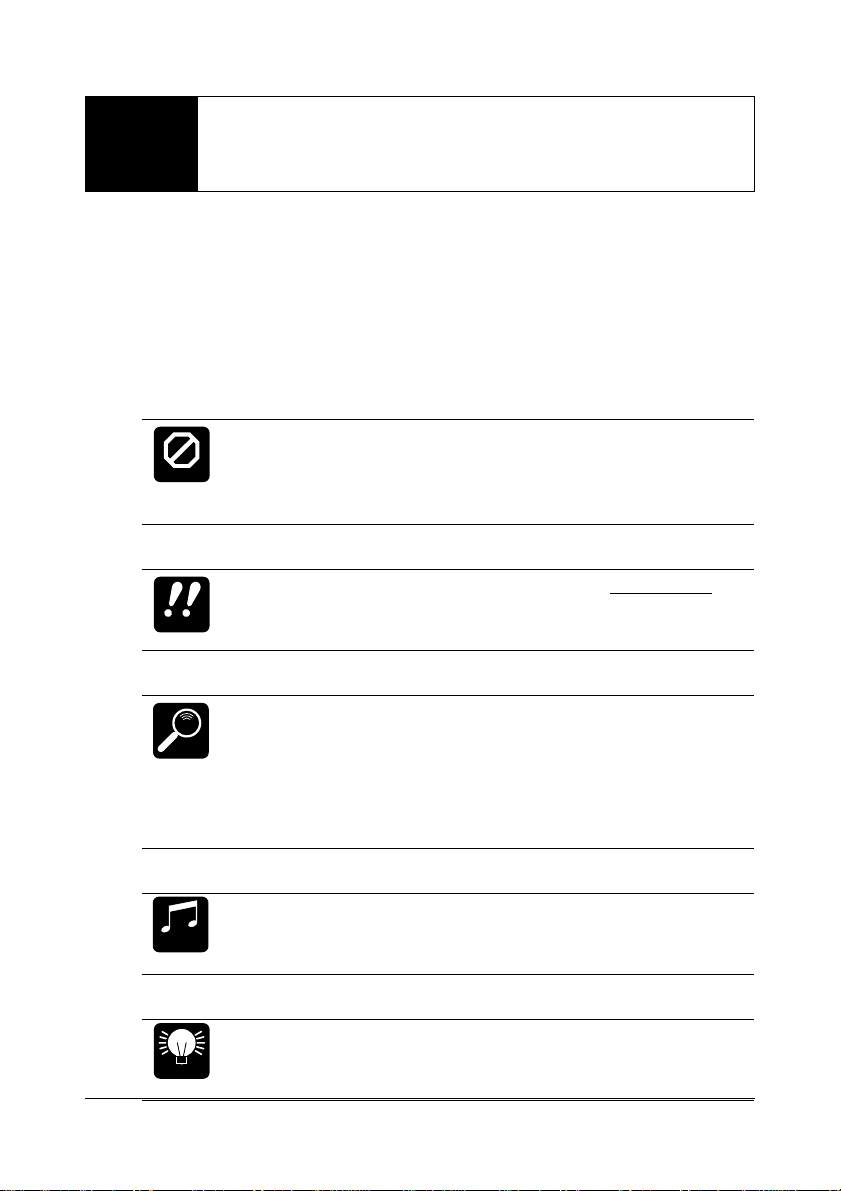
The following simple icons are used throughout this manual to draw
attention to important points and information where necessary. The
icons also make it easier to differentiate between information that you
should read immediately and information that can be skipped until
later, hopefully helping you to become familiar with the QY8 in the
quickest, most efficient manner possible.
This icon warns of possible hardware damage, soft-
CAUTION
IMPORTANT
ware malfunction, or any other serious problem
that may occur due to improper operation or set
up.
This icon marks information that you must read —
i.e. important steps or procedures that are essential
for proper, efficient, or easy operation.
iii
DETAIL
MUSICAL
NOTE
HINT
The magnifying-glass icon indicates information that
may not be essential for general operation, but is a
more detailed explanation of a feature, a description
of the principle involved, etc. You can skip this
information if full details are not required immediately.
Suggestions as to how a feature or function can be
applied musically are identified by this icon.
Hints or ideas that are not specifically musical but
may make operation easier or more interesting are
marked by the light-bulb icon.
Page 9
Contents
Contents
1 The QY8: What It Is &
What It Can Do ............................ 2
What It Is … ................................. 2
What It Can Do …........................ 4
2 Setting Up: Power &
Connections .................................. 5
Power Supply ................................. 5
Setting Up Your System ................. 8
3 Getting to Know the QY8:
How the Controls Work ............. 10
Play the Demo ............................. 14
Play the Initial Song Data ............ 16
4 The Basics: The Elements
That Make Up a Song ................. 17
Styles ............................................ 18
Chords ......................................... 22
The Sequencer Parts ..................... 25
5 Creating an
Accompaniment .......................... 26
6 Programming the
Sequencer Parts ........................... 36
Delete Measure ............................ 51
Create Measure ............................ 53
Copy Measure .............................. 54
Mix Part ....................................... 57
Transpose ..................................... 59
Clear Song ................................... 60
Data Out ..................................... 61
Program Change .......................... 63
Undo/Redo On/Off ..................... 64
8 The QY8 As a Tone
Generator/ABC Expander ........... 66
As a Tone generator Module ........ 66
As an ABC Expander ................... 67
Appendix ..................................... 70
Total Reset Procedure .................. 70
Voice List & Polyphony
Information ................................. 71
Style List ...................................... 73
Troubleshooting........................... 74
Error Messages ............................. 76
Specifications ............................... 77
MIDI Data Format ...................... 78
MIDI Implementation Chart ....... 80
Index ................................................ 82
1
2
3
4
5
6
7
8
7 The Option Functions ................ 47
Mute ............................................ 47
Key Change ................................. 49
Erase Measure .............................. 50
1
Page 10
The QY8: What It Is &
1
What It Can Do
What It Is …
The QY8 is an easy-to-use music production tool with tone generator,
sequencer, and auto-accompaniment (including drum machine)
capability all integrated with a user-friendly control interface. In short,
it provides everything you need to create great-sounding
accompaniments or complete songs. It may be convenient to think of
the QY8 as a 4-part auto-accompaniment machine plus a 4-part
sequencer that lets you record different parts of a musical composition
one at a time, and then play them back all together. The QY8 has an
internal memory that will hold up to 20 complete songs. For extra
storage capacity you can use the Data Out utility to transmit the song
data to a MIDI data recorder such as the Yamaha MDF2 (> page 61).
■ Voices
The QY8’s internal AWM tone generator provides 40 top-quality voices
plus a complete drum kit with different drum and percussion instruments assigned to different notes. You can assign any of these voices to
the QY8’s four sequencer parts (> page 37), or play them directly from
an external keyboard or other MIDI controller via the MIDI interface
(> page 43).
2
Page 11
The QY8: What It Is & What It Can Do
■ Accompaniment
With the QY8 accompaniments are produced by specifying a sequence
of “styles” and chord changes rather than by recording individual notes
(> page 26). The QY8 has 50 preset styles (each with 6 variations) that
you can simply select and use to create accompaniments in a wide
variety of musical idioms (> page 18). Accompaniments consist of four
“parts”: the chord 1 and chord 2 parts, a bass part, and a drum part.
The four parts can be independently muted so you can use the entire
accompaniment, any combination of parts, or only a single part, as
required. The accompaniment parts feature Yamaha’s advanced ABC
(Auto Bass Chord) auto-accompaniment system so you can create even
complex accompaniments with a minimum of effort.
■ The Sequencer Parts
In addition to the accompaniment parts the QY8 has 4 sequencer-like
“parts” to which you can individually assign any of the 40 internal
voices (or drum kit if desired), and record just about anything you like
either via the QY8 controls (> page 36) or an external keyboard connected to the QY8 MIDI IN connector (> page 43).
3
Page 12
The QY8: What It Is & What It Can Do
What It Can Do …
Here are a few ideas on how you can use the QY8. There’s no way we
can cover all possibilities, but the ideas presented might help to spark
some new and interesting applications.
■ A Super Practice Tool
Create accompaniments that you can practice with on your guitar, keyboard, or any other instrument (vocals too, of course). That way you have
the advantage of practicing with a bass line and chords instead of just a
metronome or drum machine (> page 26).
■ Compose & Arrange
The QY8’s outstanding voices and versatile sequencing capability make
it an excellent tool for trying out musical ideas and arrangements. It’s
also a great way to present you ideas to others (> page 36).
■ Use It As a Drum Machine
Use the drum parts of the preset accompaniment styles, or the drum kit
voice to record on the sequencer parts if you want to create original
rhythm patterns (> page 37).
■ Use It As a Tone Generator
The QY8’s AWM tone generator is in no way a compromise. You get
outstanding AWM sound quality that’s on a par with some of the finest
full-size synthesizers. You can select and play the QY8 voices remotely
from just about any MIDI keyboard, computer, or other controller (
page 66).
■ Add ABC Capability to Your MIDI Keyboard
Use the QY8 as an “ABC expander” for your MIDI keyboard. Autoaccompaniment can makes playing at home more fun, and it can be a
tremendous sound-booster at 1-performer live gigs
(> page 67).
4
>
Page 13
Setting Up:
2
Power & Connections
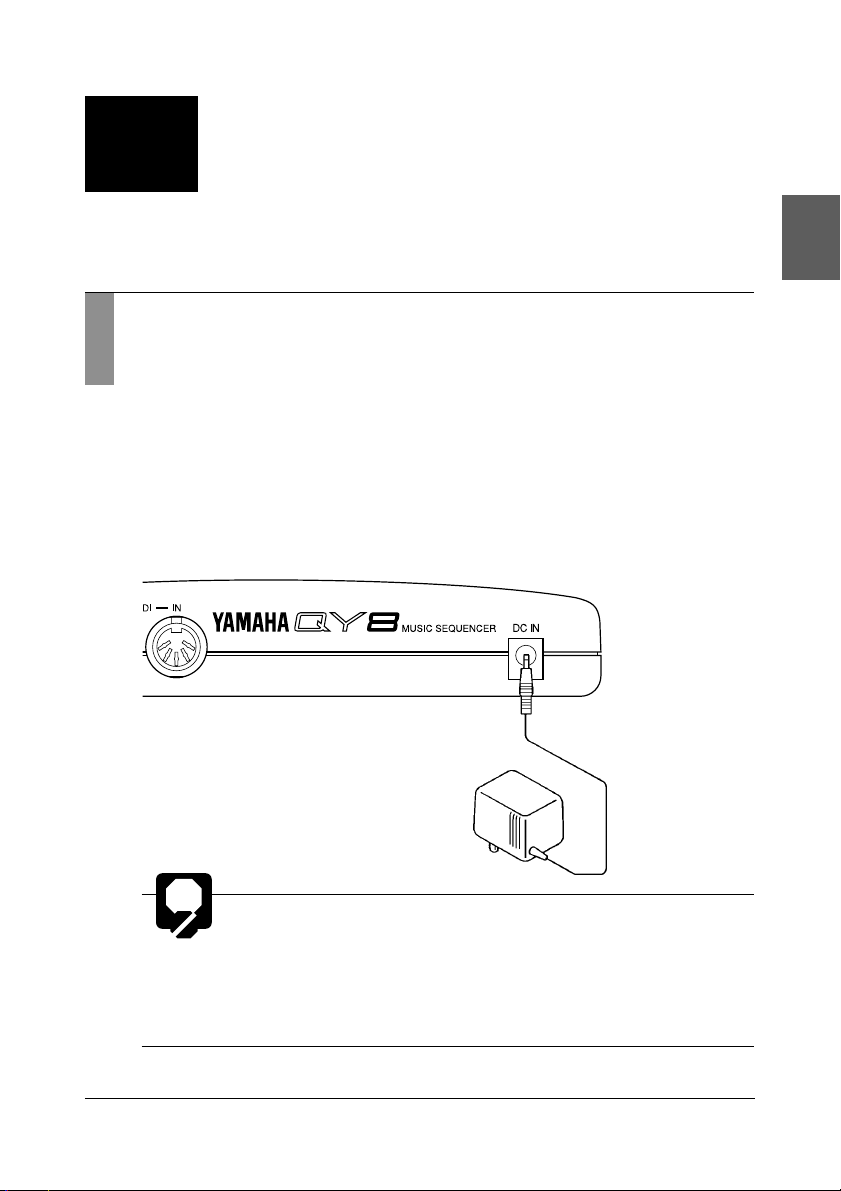
Power Supply
Your QY8 will run either from an optional AC adaptor or batteries.
Follow the instructions below according to the power source you intend
to use.
■ Using a Power Adaptor
Plug the DC output cable from a Yamaha PA-1B or PA-3 AC Adaptor
(available from your Yamaha dealer) into the DC IN jack on the rear
panel, then plug the adaptor into a convenient wall AC power outlet.
• Do not attempt to use an AC adaptor other than
CAUTION
the Yamaha PA-1B or PA-3. The use of an incompatible adaptor may cause irreparable damage to
the QY8, and might pose a serious shock hazard!
• Be sure to unplug the AC adaptor from the AC
mains socket when the QY8 is not in use.
5
Page 14
Setting Up: Power & Connections
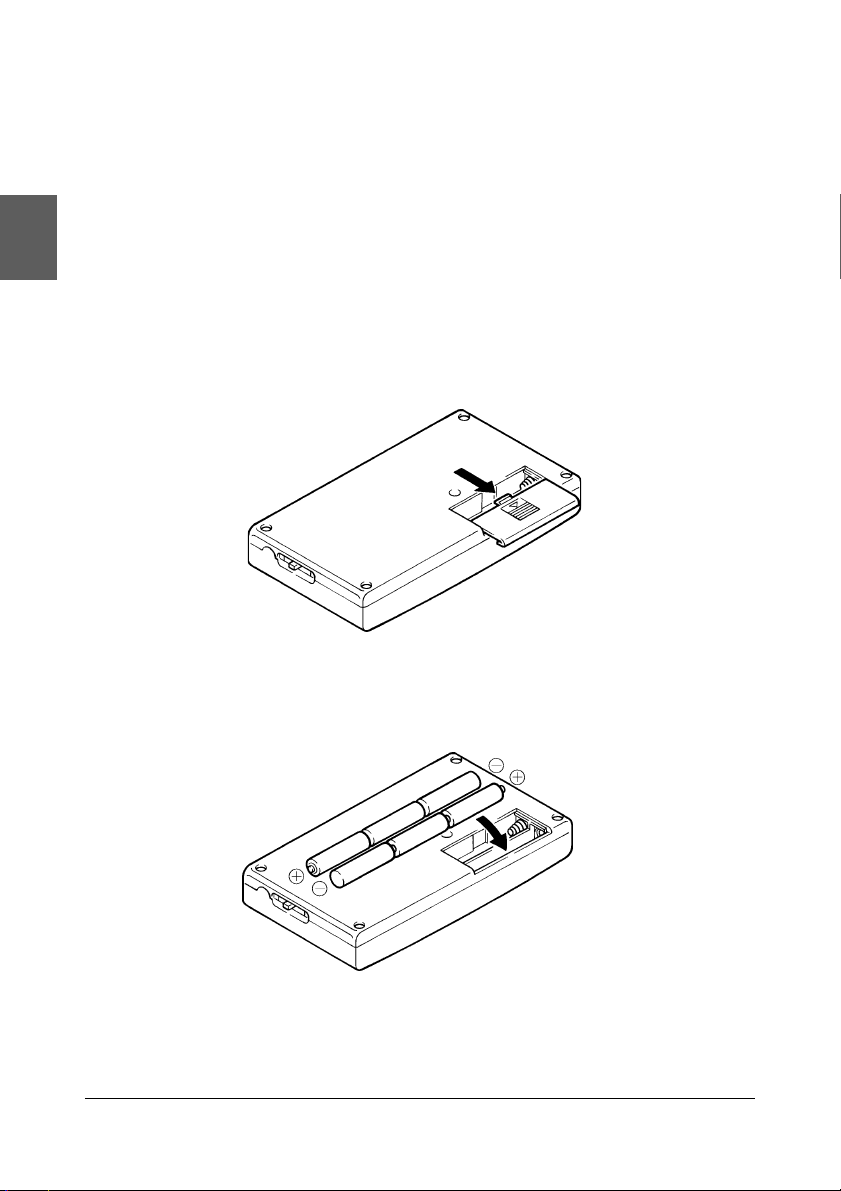
■ Using Batteries
Six 1.5V AA size (SUM-3 or R6P) or equivalent manganese or alkaline
batteries must first be installed in the battery compartment.
1. Open Battery Compartment Cover
Open the battery compartment cover — located on the instrument’s bottom panel — by pressing down on the grooved section
of the cover and sliding in the direction of the arrow, as shown in
the illustration.
2. Insert Batteries
Insert the six batteries, being careful to follow the polarity markings on the bottom case.
3. Replace Cover
Replace the compartment cover, making sure that it locks firmly
in place.
6
Page 15

Setting Up: Power & Connections
■ When to Replace the Batteries
When the batteries run down and are no longer able to operate the
QY8, the sound may become distorted and the following display will
appear:
Battery
Err
When this display appears, replace the batteries with a complete set of
six new batteries. NEVER mix old and new batteries or different types
of batteries!
To prevent possible damage due to battery leakage, remove the batteries from the instrument if it
CAUTION
is not to be used for an extended period of time.
7
Page 16

Setting Up: Power & Connections
Setting Up Your System
What you will connect the QY8 to, and what you will connect to the
QY8, will depend entirely on your individual requirements, and it
would be impossible to cover all possibilities here. A few examples are
provided below to help you get started.
■ The Connectors
1
2
1 PHONES/LINE OUT Jack
Any pair of stereo headphones with a miniature stereo phone plug can
be plugged in here for convenient monitoring. This connector also
delivers a stereo output signal from the QY8 for connection to a stereo
sound system (see “Audio Connections,” below). The output level is
adjusted via the VOLUME control on the right side panel.
2 MIDI IN & OUT Connectors
If you plan to use a MIDI keyboard or other instrument to play and
program the QY8, it should be connected to QY8 MIDI IN connector
(see “MIDI Connections,” below). The MIDI OUT connector can be
connected to an external tone generator if you want to drive external
voices from the QY8 sequencer, or a MIDI data recorder such as the
Yamaha MDF2 if you want to store your songs to floppy disk (> page
61).
8
3
Page 17

Setting Up: Power & Connections
3 DC IN Jack
This jack is only used when you are powering the QY8 from an optional
AC adaptor instead of batteries. The DC output cable from an optional
Yamaha PA-1B or PA-3 AC Power Adaptor is plugged in here.
The batteries are automatically disconnected when a plug is
inserted into the DC IN jack.
DETAIL
■ Audio Connections
The simplest way to monitor the QY8 sound is via a pair of stereo
headphones (miniature stereo phone plug type) plugged into the
PHONES/LINE OUT jack. If you want to use an external stereo sound
system, however, use the PHONES/LINE OUT jack and a “Y” cable
(miniature stereo phone plug to dual RCA pin plugs — available from
many audio and musical instrument dealers).
Make sure that both the QY8 and your sound
system are turned OFF when making connections.
CAUTION
■ MIDI Connections
Although the QY8 can be programmed without a keyboard, an external
MIDI keyboard connected to the QY8 MIDI IN connector provides
the added advantages of standard keyboard format
sensitivity (if your keyboard has a velocity-sensitive keyboard). Connect
the MIDI OUT connector of the keyboard to the MIDI IN connector
of the QY8, and make sure that your keyboard is set to transmit on the
appropriate MIDI channel. (See pages 43, 66)
and key velocity
9
Page 18

Getting to Know the QY8:
3
The QY8 has fairly simple, consistent control interface that,
once understood, makes operation fast and easy, no matter
what operation you are performing. If you read through this
section carefully you should have no problem accessing and
operating the QY8’s many advanced features.
Left Side Panel
How the Controls Work
4
3
5
2
h
j
7
6
;
t
g
1
1 POWER Switch
Slide to the “ON” position to turn the QY8 on, and to the “OFF”
position to turn it off.
2 LCD Display
This large multi-function liquid crystal display panel shows all parameters
you need to operate the QY8 with optimum ease and efficiency.
10
Page 19

Getting to Know the QY8: How the Controls Work
3 Cursor Buttons
Up
These 4 buttons move the “cursor” around the
display screen, selecting the various parameters
Left
[-1][-1]
4
[-1] and
[-1][-1]
Right
Down
[+1][+1]
[+1] Buttons
[+1][+1]
that are available for editing (the selected
parameter or symbol will flash).
These buttons are used to edit (change the value of) the parameter at
which the cursor is currently located. The [-1] button decrements
(decreases stepwise) the value of the selected parameter, while the [+1]
button increments (increases stepwise) the parameter. Press either button
briefly to decrement or increment the parameter by one, or hold the
button for continuous decrementing or incrementing in the specified
direction. When programming the QY8 sequencer parts, the [-1] and [+1]
are also used to select the musical symbols required for note programming
(note length, sharps and flats, etc.).
[ENTER][ENTER]
5
[ENTER] Button
[ENTER][ENTER]
The [ENTER] button is used to “enter” styles, chords, and repeats when
creating accompaniments, and to enter notes and rests when recording the
sequencer parts. It is also used to execute the QY8’s “option” functions.
[UNDO][UNDO]
6
[UNDO] Button
[UNDO][UNDO]
This button provides “insurance” against mistakes. As it’s name implies, it
will “undo” any operation if pressed immediately after performing that
operation. If you accidentally clear a song that you wanted to keep, for
example, the [UNDO] button will undo the clear operation and restore
your data — but
only if pressed immediately after the clear operation. If
pressed a second time, it will also “redo” the preceding operation.
The undo function requires a considerable amount of memory, so it
can be turned on if needed or off when you need to conserve memory via
the Undo/Redo On/Off function (> page 64).
11
Page 20

Getting to Know the QY8: How the Controls Work
4
3
5
2
h
j
6
;
t
g
7
7 Sequencer Buttons
The sequencer buttons control playback of the accompaniment and
sequencer parts (also real-time recording of the sequencer parts), and allow
you to locate a specific measure and beat within a song. Their layout and
functions are similar to the transport controls on a tape recorder.
h
j
Lo cate Top
Play/Stop:Play/Stop:
Play/Stop: Starts and stops playback. If playback is stopped somewhere in the
Play/Stop:Play/Stop:
1 M EA SU R E bar
;
t
g
P lay/Sto p
middle of a song, pressing this button again will cause playback to continue
from the point at which it was stopped.
Top:Top:
Top: Press this button to go directly to the “top” of the song: i.e. the first beat
Top:Top:
of the first measure.
Locate:Locate:
Locate: These buttons step backward and forward through the song, measure
Locate:Locate:
by measure or beat by beat, depending on the selected parameter, allowing
you to locate any point for programming or playback. Hold either button
for “fast forward” or “rewind” operation in the specified direction. The
current location within the song is indicated by the MEASURE number and
1 MEASURE bar on the display. The pointer above the 1 MEASURE bar
points to the current beat within the current bar (the smallest divisions on
the 1 MEASURE bar correspond to 32nd-notes).
12
Page 21

Getting to Know the QY8: How the Controls Work
Right Side Panel
8
8 VOLUME Control
The VOLUME control adjusts the volume of the sound delivered via the
PHONES/LINE OUT jack. Slide the control toward “MAX.” to increase
the volume or toward “MIN.” to decrease the volume.
Set the VOLUME control to “MIN.” when connecting the QY8 to a sound system for the first time,
CAUTION
then gradually raise the volume level until the required listening level is reached. This simple precaution can prevent unexpectedly high volume levels from damaging your speaker system (and
maybe even your ears!).
13
Page 22

Getting to Know the QY8: How the Controls Work
Play the Demo
Now that you’re set up and are basically familiar with the controls, try
playing the built-in demonstration to hear what the QY8 can do.
1. Select the SONG SELECT Mode
Use the cursor buttons to move the cursor to the SONG SELECT
pointer (▲). The song select pointer should flash.
02Dance
2. Select the Demo Song
Use the [-1] and [+1] buttons to select song number “00Demo”.
14
00DEMO0
Page 23

Getting to Know the QY8: How the Controls Work
3. Start Playback
;;
;
Press the [
repeatedly until stopped. You may need to adjust the VOLUME
control to set a comfortable listening level.
;;
/
] button to start playback — the demo will playback
tt
t
tt
00DEMO0
;
t
If you attempt to move the cursor when the demo song is
IMPORTANT
selected, the “SngDEMO Err” error message will appear on the
display. No other parameters can be accessed or changed while
the demo song is selected.
4. Stop Playback
;;
;
Press the [
;
t
DETAIL
;;
/
] button to stop playback when you’re done.
tt
t
tt
Press the [g] button after stopping playback to go back to the
beginning of the first measure.
15
Page 24

Getting to Know the QY8: How the Controls Work
5. Exit
Use the [-1] and [+1] buttons to select a song number other than
“00” to exit from the demo mode.
20*****
Play the Initial Song Data
Songs 1 through 15 initially contain a variety of accompaniments and
chord progressions in a range of musical styles. These are provided as
examples of the types of accompaniment that the QY8 can produce.
Songs 16 through 20 contain only the default style.
DETAIL
1. Select a Song
Use the [-1] and [+1] buttons to select a song number between 1
and 15.
2. Start/Stop Playback As Required
Playback can be started and stopped as described in the preceding
section.
16
Page 25

The Basics: The Elements
4
That Make Up a Song
A QY8 “SONG” consists of two main sections:
1: An accompaniment created using pre-programmed
“styles”. You specify chord changes and repeats as
required.
2: Four “parts” (similar to sequencer tracks) on which you
can record melody lines, counter lines, or just about
anything you like using the QY8 voices.
SONG 20
SONG 1
ACCOMPANIMENT
•Combine the preset styles and
select sections
Style (1~50)
Sections
Intro
Main A
Main B
Fill AB
Fill BA
Ending
Parts
(Presets; not editable)
Chord 1
Chord 2
Bass
Drum
Chord
Repeat
MELODY
•Create your own melodies
PART 4
PART 3
PART 2
PART 1
+
40 Preset Voices
1 Drum Kit
(58 Percussion Voices)
Option
Mute
Key Change
Erase Measure
Delete Measure
Create Measure
Copy Measure
Mix Parts
Transpose
Clear Song
Data Out
Program Change
Undo/Redo On/Off
The “Option Functions” shown in the diagram are described in chapter 7 (page 47).
17
Page 26

The Basics: The Elements That Make Up a Song
Styles
Styles are pre-programmed basic accompaniment patterns which include
two chord parts, a bass part, and a rhythm part. The QY8 has 50 basic
styles, each with six “sections” — an introduction, main pattern A
(usually a good choice for the “verse” of a song), main pattern B (a good
choice for the “bridge” or “chorus”), a fill-in leading from main pattern
A to B, a fill-in leading from main pattern B to A, and an ending.
■ Try Out the QY8 Styles
1. Select a Song Number
Move the cursor to the SONG SELECT pointer (▲) and use the
[-1] and [+1] buttons to select a song number between 16 and 20.
Songs 1 through 15 initially contain a variety of accompaniments
and chord progressions in a range of musical styles. If you select
DETAIL
one of these songs and try changing styles the style you enter will
automatically be changed when the next pre-programmed style
change is encountered. It is important, therefore, to select an
“empty” song (16 through 20) for this exercise. The preprogrammed data in songs 1 through 15 can be cleared by using
the “Clear Song” function described on page 60.
2. Select the Style Entry Mode
Move the cursor to the STYLE pointer (▲) to select the style
entry mode.
18
01Disco
MA0
Page 27

The Basics: The Elements That Make Up a Song
3. Select a Style
Move the cursor down to the style name and use the [-1] and [+1]
buttons to select a style (it is also possible to select a style while the
cursor is positioned at the STYLE pointer).
• Normally the currently set tempo is retained when you change
DETAIL
styles. To select a style and call its default tempo, hold the up
cursor button while selecting the style.
• A complete list of the QY8 styles is given in the Appendix on
page 73.
4. Start Playback
;;
;
Press the [
;
t
Note that the “MEASURE” number on the display advances as each
measure is played. In this mode playback will continue up to
DETAIL
measure number “299” and then stop automatically.
;;
/
] button to start playback.
tt
t
tt
5. Select a Section
While the style is playing move the cursor down to the section
abbreviation and use the [-1] and [+1] buttons to select a different
section. The selected section will begin playing from the top of the
next measure. Although the actual contents of each section are
different for each style, the basics are as follows:
Abbreviation Section
Itr Introduction. 2 … 5 measures long. Goes to main
section “A” when finished.
A Main section “A”. 2 … 4 measures long. Will
M
repeat until another section is entered.
M
B Main section “B”. 2 … 4 measures long. Will
repeat until another section is entered.
AB A fill-in leading from section “A” to “B”. One meas-
F
ure long. Will always go to main section “B” when
finished.
19
Page 28

The Basics: The Elements That Make Up a Song
Abbreviation Section
F
BA A fill-in leading from section “B” to “A”. One meas-
ure long. Will always go to main section “A” when
finished.
End Ending. 2 … 4 measures long. Playback stops when
the ending section finishes unless a different section
is entered in the measure immediately following the
ending.
03House
FAB
6. Try Out Different Styles and Sections
You can move the cursor up or down to the style name or section
abbreviation and select different styles and sections while the QY8
plays. In all cases the selected style or section will begin playback
from the top of the next measure.
05Funk0
y
20
MB0
Page 29

The Basics: The Elements That Make Up a Song
If you move the cursor to the TEMPO parameter you can use the
[-1][-1]
[-1] and
[-1][-1]
HINT
from 30 to 250 beats per minute. The 1 MEASURE pointer will
jump from beat to beat in time with the selected tempo.
[+1][+1]
[ + 1 ] buttons to set the playback tempo to anywhere
[+1][+1]
7. Stop Playback
;;
;
Press the [
;;
/
] button to stop playback when you’re done.
tt
t
tt
■ Setting the Style Volume
The volume of the styles used in the current song can be set as follows
to match the volume levels of Parts 1 through 4.
1. Select the Style Entry Mode
Move the cursor to the STYLE pointer (▲) to select the style
entry mode.
2. Select the Style Volume Parameter
Press the [ENTER] button while holding the up cursor button.
The style volume value will appear on the display.
STYLE00
100
21
Page 30

The Basics: The Elements That Make Up a Song
3. Set the Volume
Use the [-1] and [+1] buttons to set the volume as required (you
can do this while the cursor is located at the STYLE pointer or at
the VOLUME parameter). The volume range is from 0 to 127. A
setting of “0” produces no sound, while “127” produces maximum
volume. The default volume setting is “100”.
4. Exit
Move the cursor to the STYLE pointer and press [ENTER] or any
cursor button to return to the normal style entry mode.
Chords
The QY8 features a sophisticated ABC (Auto Bass Chord) system that
automatically re-harmonizes the chord and bass tracks to match chords
you specify. This makes creating complete accompaniment tracks fast
and easy … just enter the required styles and sections, then specify the
appropriate chord changes.
Chords are specified via “root”, “type” and “on-bass” parameters.
The root is the actual chord name — e.g. C, G, or Ab. Since there are
12 notes in the western musical scale, you have a choice of 12 chord
roots: C through B. The chord types include minor, major, seventh,
etc. The QY8 provides a selection of 25 chord types (listed below).
“On-bass” lets you specify a different note than the chord root to be
played by the bass — e.g. “CM7 on G” is a C major seventh chord with
G played in the bass.
22
Page 31

Chord Type (Key of C)
Name on the LCD
(M)
blank
Major
Minor
The Basics: The Elements That Make Up a Song
Seventh
Minor seventh
Major seventh
Minor major
seventh
Minor sixth
Major seventh
ninth
Seventh sharp
ninth
Seventh
suspended fourth
Augmented
Minor seventh
ninth
Seventh added
sharp eleventh
Suspended
fourth
Added ninth
Seventh
augmented
Minor seventh
added eleventh
Diminished
Minor added
ninth
Minor seventh
flatted fifth
Seventh added
thirteenth
Sixth
Seventh ninth
Seventh flatted
ninth
Seventh added
flatted thirteenth
23
Page 32

The Basics: The Elements That Make Up a Song
■ Try Out the QY8 Chords
1. Play a Style
Select a style and start playback as described in the preceding
section.
2. Select the Chord Entry Mode
Move the cursor to the CHORD pointer (▲) to select the chord
entry mode.
Chord Type
Chord Root
G000000
000
On-Bass
3. Select a Chord Root
Move the cursor down to the chord root and use the [-1] and [+1]
buttons to select different chords.
4. Select a Chord Type
Move the cursor to the chord type and use the [-1] and [+1]
buttons to try out the different chord types.
5. Change the Bass Note
Move the cursor down to the on-bass parameter and use the [-1]
and [+1] buttons to hear the effect of different on-bass settings.
24
Page 33

y
The on-bass setting is automatically cancelled whenever you
change the chord root or type.
DETAIL
6. Stop Playback
;;
;
Press the [
;;
/
] button to stop playback when you’re done.
tt
t
tt
The Basics: The Elements That Make Up a Song
A0m0000
/C0
The Sequencer Parts
The QY8’s internal AWM tone generator provides 40 top-quality voices
plus a complete drum kit with different drum and percussion
instruments assigned to different notes. You can assign any of these
voices to the QY8’s four sequencer parts to create melody lines,
harmony lines, or other musical elements to go along with the
accompaniment.
See the Appendix (> page 71) for a complete list of the QY8
voices.
DETAIL
25
Page 34

Creating an
5
Creating a complete accompaniment that can be used on
its own, or as the basis for a complete song, is a simple
process: specify the appropriate style/section changes,
chord changes, and repeats.
Accompaniment
1. Select a Song Number
1-1. Position the cursor at the SONG SELECT pointer (▲) to select
the song selection mode.
1-2. Use the [-1] and [+1] buttons to select the song number you want
to record (1 … 20).
17*****
26
Songs 01 through 15 initially contain a variety of accompaniments
and chord progressions in a range of musical styles. These are
DETAIL
provided as examples of the types of accompaniment that the
QY8 can produce.
If the song number you select contains previous data that you no
longer need — i.e. you want to record a new song from “scratch”
HINT
— use the Clear Song function described on page 60 to clear the
previous data before recording.
Page 35

Creating an Accompaniment
2. Enter the Styles
2-1. Move the cursor to the STYLE pointer (▲) to select the style
entry mode.
01Disco
MA0
2-2. Use the [
hh
h
hh
] and [
jj
j
] buttons to locate the measure at which you
jj
want to enter the first style change, as indicated by the MEASURE
number.
01Disco
h
DETAIL
j
Only one style or section change can be entered per measure, and
it will always fall on the first beat of the selected measure.
2-3. Select the desired style and section (move the cursor to the style
name or section abbreviation and use the [-1] and [+1] buttons to
select).
Itr = Introduction.
MAå = Main section “A”.
MA0
27
Page 36

Creating an Accompaniment
MBå = Main section “B”.
FAB = A fill-in leading from section “A” to “B”.
FBA = A fill-in leading from section “B” to “A”.
End = Ending.
Press [ENTER] to enter the selected style/section at the current
2-4.
location. A dot will appear on the 1 MEASURE bar to indicate
that a style change has been entered at that location.
04Dance
MB0
2-5. Repeat steps 2-2 through 2-4 until all required style and section
changes have been entered.
28
The cursor must be located at the style or section name on the
display in order to enter a style or section change.
DETAIL
Style number “51” is a blank style that lets you insert silent
“breaks” in your songs, or create completely blank accompani-
HINT
ments when you only want to use the QY8 sequencer parts.
Deleting Style & Section Changes
To delete a style or section change, move the cursor to the dot on
the 1 MEASURE bar corresponding to the change you want to
delete, then press the [ENTER] button. An alternative method is to
use the [
hh
h
hh
] and [
jj
j
] buttons to locate the measure containing the
jj
style to be deleted, select the “blank” style (indicated by a row of
flashing blocks), and press [ENTER].
Page 37

Creating an Accompaniment
In addition to deleting mistakes as described above, you can use
the [UNDO] button to undo the last operation performed — i.e. a
HINT
mistaken style entry.
3. Enter the Chord Changes
3-1. Move the cursor to the CHORD pointer (▲) to select the chord
entry mode.
C000000
3-2. Use the [
hh
h
hh
] and [
jj
j
] buttons to locate the measure and beat at
jj
which you want to enter the first chord change, as indicated by the
MEASURE number and 1 MEASURE bar on the display.
C000000
h
j
The pointer above the 1 MEASURE bar on the display
indicates the current location within the current measure.
The smallest divisions on the bar correspond to 32nd notes.
29
Page 38

Creating an Accompaniment
[[
hh
]]
[[
jj
• In the chord entry mode the
DETAIL
backward or forward in eighth-note increments when the cursor
is located at the 1 MEASURE pointer, and in quarter-note
increments when the cursor is in any other position. The
[[
jj
and
increments when the cursor is located at the CHORD pointer.
• Chords can be entered on any eighth-note division of any
measure.
]]
[
j
] buttons step backward or forward in one-measure
[[
jj
]]
[
h
[[
hh
] and
]]
]]
[
j
] buttons step
[[
jj
]]
3-3. Select the desired chord root, type, and “on bass” note if necessary
(move the cursor to the appropriate section of the display and use
the [-1] and [+1] buttons to select).
On-bass settings are automatically cancelled whenever you change
a different chord root or type.
DETAIL
3-4. Press [ENTER] to enter the selected chord at the current location.
A dot will appear on the 1 MEASURE bar to indicate that a chord
has been entered at that location.
[[
hh
]]
[
h
]
[[
hh
]]
D070000
/A0
3-5. Repeat steps 3-2 through 3-4 until all required chord changes have
been entered.
The cursor must be located at the chord root or type (or on-bass
parameter) on the display in order to enter a chord change.
DETAIL
The “blank” chord root can not be selected during playback.
DETAIL
30
Page 39

Creating an Accompaniment
Deleting Chord Changes
To delete a chord change, move the cursor to the dot on the 1
MEASURE bar corresponding to the change you want to delete,
then press the [ENTER] button. An alternative method is to use the
[
h
hh
hh
] and [
jj
j
] buttons to locate the chord to be deleted, select the
jj
“blank” chord (indicated by a row of flashing blocks), and press
[ENTER].
4. Enter an End Mark and Repeats
4-1. Move the cursor to the REPEAT pointer (▲) to select the repeat
entry mode. Five different types of repeats can be entered at appropriate points to control the flow of your song: start repeat, end/
number of repeats, first ending, second ending, and end song
(listed below).
Repeat0
4-2. Use the [
hh
h
hh
] and [
jj
j
] buttons to locate the measure at which you
jj
want to enter an end mark or repeat, as indicated by the MEASURE number on the display.
End marks and repeats will always be entered either at the
beginning or end of the selected measure (see below).
DETAIL
4-3. Select the desired end mark or repeat (move the cursor to the
repeat parameter — a row of flashing blocks will appear — and
use the [-1] and [+1] buttons to select).
31
Page 40

Creating an Accompaniment
||: Start repeat. Marks the beginning of a section of the song
which is to be repeated. Must be used in conjunction with an
end repeat (:||) mark, or first ending (¡–1) and second ending
(:||¡02) marks. Automatically entered at the beginning of the
current measure when the [ENTER] button is pressed.
:|| End repeat and number of repeats. Marks the end of a
00x02 section of the song which is to be repeated. Must be
used in conjunction with a preceding start repeat (||:)
mark. The “x02” parameter can be set to specify any
number of repeats from 2 to 99. When “X02” is selected,
for example, the section of the song between the “||:”
and “:||” marks is played twice (repeated once), then
the song continues until the next repeat section or the
end of the song. Automatically entered at the end of the
current measure when the [ENTER] button is pressed.
¡–1 First ending. Used in conjunction with the second ending
mark (:||¡–02), below, and the start repeat mark (||:), above.
The first time this mark is encountered the section following
it up to the second ending mark (:||¡–02) is played through
normally, then playback returns to the preceding start repeat
mark (’:). The second time the first ending mark (¡–1) is
encountered the section between it and the second ending
mark (:||
measure following the second ending mark.
Automatically entered at the beginning of the current
measure when the [ENTER] button is pressed.
¡–02
) is skipped and playback continues from the
32
:||¡–2 Second ending. See first ending, above.
|| End song. Marks the end of the song. Playback will stop at
this point even if other data is recorded after it. The end of
song mark does not have to be used with any other repeat
marks. Automatically entered at the top of the current
measure when the [ENTER] button is pressed (i.e. the song
actually ends after the preceding measure).
Page 41

Creating an Accompaniment
4-4. Press [ENTER] to enter the selected end mark or repeat at the
current measure. A dot will appear on the 1 MEASURE bar to
indicate that an end mark or repeat has been entered at that
location.
4-5. Repeat steps 4-2 through 4-4 until all required repeats have been
entered.
Deleting Repeats
To delete a repeat, move the cursor to the dot on the 1 MEASURE
bar corresponding to the change you want to delete, then press the
[ENTER] button. An alternative method is to use the [
jj
[
j
] buttons to locate the measure containing the repeat to be
jj
hh
h
hh
] and
deleted, select the “blank” repeat (indicated by a row of flashing
blocks), and press [ENTER].
• Improperly used repeats (e.g. :|| without a corresponding ||:
mark)will
DETAIL
be ignored.
• You cannot enter repeats within repeats (i.e. “nested” repeats).
The copy and delete functions described in chapter 7 (pages 54,
51) can make the process of creating songs faster and more
HINT
efficient.
Depending on the amount of data you have recorded, it may not
IMPORTANT
be possible to fully record all 20 available songs. If you run out of
memory during recording, the “MemFull” error message will appear
on the display. If this happens use the Clear Song function
described on page 60 to clear unwanted song data. You might also
want to use an optional Yamaha MDF2 MIDI Data Filer to save your
important song data to floppy disk for later loading and use.
5. Play Back and Check Out Your Song
5-1. Move the cursor to the SONG SELECT pointer (▲) to select the
song select mode.
33
Page 42

Creating an Accompaniment
1700000
5-2. Press [
gg
g
] to make sure you start at the first measure of the song,
gg
;;
;
then press [
or ending section, playback will stop automatically. Otherwise,
press the [
;;
/
] to start playback. If you’ve entered an end mark
tt
t
tt
;;
;
;;
/
] to stop playback at any time.
tt
t
tt
■ Entering a Song Name
When you’ve created a satisfactory accompaniment you might want to
give your song an original name:
Song names can be up to 5 characters long.
DETAIL
1. Select SONG SELECT
Move the cursor to the SONG SELECT pointer (▲) to select the
song select mode.
2. Move to the Song Name
Move the cursor down to the song number, and then to the right
to the song name. The first character of the song name will flash.
34
Page 43

Creating an Accompaniment
1700000
3. Select a Character
Use the [-1] and [+1] buttons to select the first character for the
song name. The available characters are listed below:
(Space)
!"#$%&'()*+,-.0123456789:;<=>?@
ABCDEFGHIJKLMNOPQRSTUVWXYZ[¯]^_£
abcdefghijklmnopqrstuvwxyz{|}‘“
4. Move to the Next Character & Repeat
Move the cursor to the next character position and repeat the
selection process. Continue until the entire song name has been
entered.
• When a song has been cleared (see the Song Clear function, page 60)
DETAIL
the song name appears as a series of asterisks. These will change to all
spaces as soon as any data is entered in the song.
• The style names cannot be changed.
35
Page 44

Programming the
6
Sequencer Parts
Once you’ve created an accompaniment, you might like
to add a melody line and other parts that will finish off
your composition. Melody lines and other musical
elements can be recorded using the QY8’s four “parts”,
as described below. It’s also possible to use only the four
parts, without an accompaniment.
1. Locate the Start Point
Use the [
and [
start recording.
DETAIL
gg
g
] button to go to the top of the song, or use the [
gg
jj
j
] buttons to locate the measure from which you want to
jj
[[
hh
]]
[[
jj
In the part programming mode the
backward or forward in 32nd-note increments when the cursor is
located at the 1 MEASURE pointer, and in increments
corresponding to the currently selected note length when the
cursor is located at any other part parameter. When the cursor is
located at the PART pointer the
backward or forward in 1-measure increments.
[
[[
[[
hh
[
h
[[
hh
h
] and
hh
]]
]]
] and
]]
]]
[
j
] buttons step
[[
jj
]]
[[
jj
]]
[
j
] buttons step
[[
jj
]]
hh
h
hh
]
2. Select a Part
Move the cursor to the PART 1, 2, 3, or 4 pointer (▲) to select
the part you want to program.
36
01Piano
100
Page 45

Programming the Sequencer Parts
3. Assign a Voice to the Selected Part
With the cursor either at the PART pointer or the voice name, use
the [-1] and [+1] buttons to select the voice you want to use for
the selected part.
• You can also set the volume of the selected part by moving
DETAIL
the cursor to the VOLUME parameter below the voice name
and using the
0 (no sound) and 127 (maximum volume). This is a good way
to balance the volumes of the various voices used for the four
parts.
• Complete lists of the QY8 voices and drum instruments are
provided in the “Appendix” on pages 71, 72.
• To create a drum part select voice number “41” and enter the
notes corresponding to the drum instruments you want to use.
Refer to the voice list on page 72 for drum-to-note assignments.
[-1][-1]
[-1] and
[-1][-1]
[+1][+1]
[ + 1 ] buttons to set a value between
[+1][+1]
4. Set a Key Signature
Move the cursor to the key signature on the display “score”, use
the [-1] and [+1] buttons to select the key you want to use for
your song, then press [ENTER] to actually enter the selected key
signature.
y
35SyCmp
100
y
Key Signature List
C G D A E B F
F B E A D G C
C
37
 Loading...