

Page 1
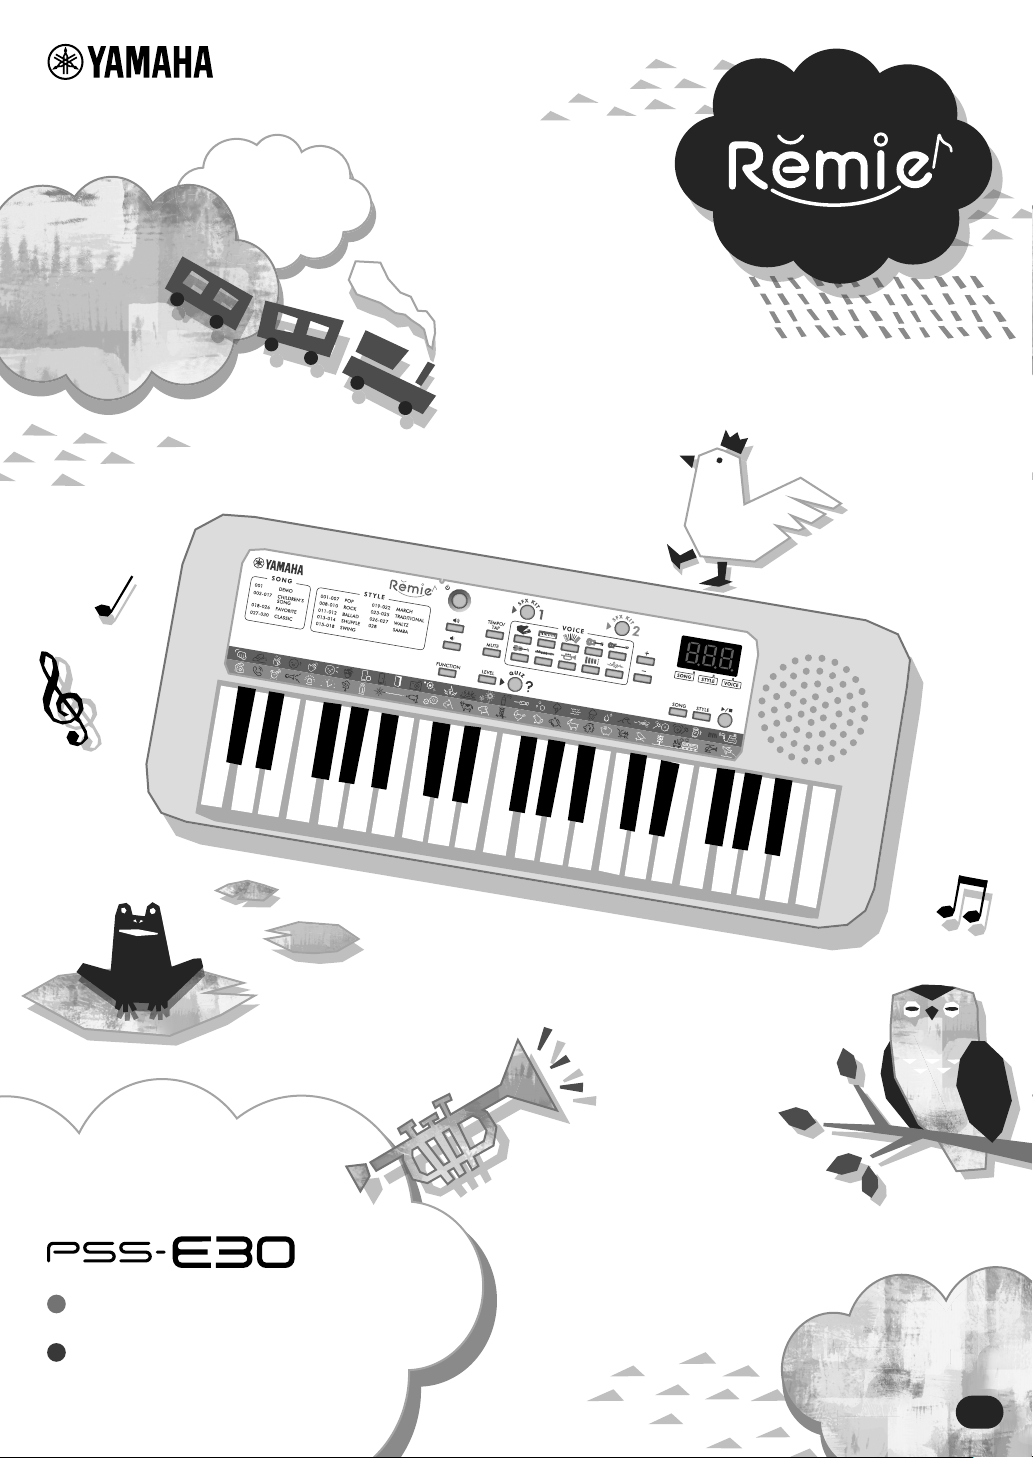
Owner’s Manual
DIGITAL KEYBOARD
Before using the instrument,
be sure to read “PRECAUTIONS”
on pages 4-5.
EN
Page 2

SPECIAL MESSAGE SECTION
This product utilizes batteries or an external power supply
(adapter). DO NOT connect this product to any power supply or
adapter other than one described in the manual, on the name
plate, or specifically recommended by Yamaha.
WARNING: Do not place this product in a position where any-
one could walk on, trip over, or roll anything over power or connecting cords of any kind. The use of an extension cord is not
recommended! If you must use an extension cord, the minimum
wire size for a 25’ cord (or less ) is 18 AWG. NOTE: The smaller the
AWG number, the larger the current handling capacity. For longer
extension cords, consult a local electrician.
This product should be used only with the components supplied
or; a cart, rack, or stand that is recommended by Yamaha. If a cart,
etc., is used, please observe all safety markings and instructions
that accompany the accessory product.
SPECIFICATIONS SUBJECT TO CHANGE:
The information contained in this manual is believed to be correct
at the time of printing. However, Yamaha reserves the right to
change or modify any of the specifications without notice or obligation to update existing units.
This product, either alone or in combination with an amplifier and
headphones or speaker/s, may be capable of producing sound
levels that could cause permanent hearing loss. DO NOT operate
for long periods of time at a high volume level or at a level that is
uncomfortable. If you experience any hearing loss or ringing in the
ears, you should consult an audiologist.
IMPORTANT: The louder the sound, the shorter the time period
before damage occurs.
Some Yamaha products may have benches and / or accessory
mounting fixtures that are either supplied with the product or as
optional accessories. Some of these items are designed to be
dealer assembled or installed. Please make sure that benches are
stable and any optional fixtures (where applicable) are well secured
BEFORE using.
Benches supplied by Yamaha are designed for seating only. No
other uses are recommended.
NOTICE:
Service charges incurred due to a lack of knowledge relating to
how a function or effect works (when the unit is operating as
designed) are not covered by the manufacturer’s warranty, and are
therefore the owners responsibility. Please study this manual carefully and consult your dealer before requesting service.
ENVIRONMENTAL ISSUES:
Yamaha strives to produce products that are both user safe and
environmentally friendly. We sincerely believe that our products
and the production methods used to produce them, meet these
goals. In keeping with both the letter and the spirit of the law, we
want you to be aware of the following:
Battery Notice:
This product MAY contain a small non-rechargeable battery which
(if applicable) is soldered in place. The average life span of this
type of battery is approximately five years. When replacement
becomes necessary, contact a qualified service representative to
perform the replacement.
This product may also use “household” type batteries. Some of
these may be rechargeable. Make sure that the battery being
charged is a rechargeable type and that the charger is intended for
the battery being charged.
When installing batteries, never mix old batteries with new ones,
and never mix different types of batteries. Batteries MUST be
installed correctly. Mismatches or incorrect installation may result
in overheating and battery case rupture.
Warning:
Do not attempt to disassemble, or incinerate any battery. Keep all
batteries away from children. Dispose of used batteries promptly
and as regulated by the laws in your area. Note: Check with any
retailer of household type batteries in your area for battery disposal information.
Disposal Notice:
Should this product become damaged beyond repair, or for some
reason its useful life is considered to be at an end, please observe
all local, state, and federal regulations that relate to the disposal of
products that contain lead, batteries, plastics, etc. If your dealer is
unable to assist you, please contact Yamaha directly.
NAME PLATE LOCATION:
The name plate is located on the bottom of the product. The
model number, serial number, power requirements, etc., are
located on this plate. You should record the model number, serial
number, and the date of purchase in the spaces provided below
and retain this manual as a permanent record of your purchase.
Model
Serial No.
Purchase Date
PLEASE KEEP THIS MANUAL
92-BP (bottom)
PSS-E30 Owner’s Manual
2
Page 3
1. IMPORTANT NOTICE: DO NOT MODIFY THIS UNIT!
This product, when installed as indicated in the instructions
contained in this manual, meets FCC requirements. Modifications not expressly approved by Yamaha may void your authority, granted by the FCC, to use the product.
2. IMPORTANT: When connecting this product to accessories
and/or another product use only high quality shielded cables.
Cable/s supplied with this product MUST be used. Follow all
installation instructions. Failure to follow instructions could void
your FCC authorization to use this product in the USA.
3. NOTE: This product has been tested and found to comply with
the requirements listed in FCC Regulations, Part 15 for Class
“B” digital devices. Compliance with these requirements provides a reasonable level of assurance that your use of this product in a residential environment will not result in harmful
interference with other electronic devices. This equipment generates/uses radio frequencies and, if not installed and used
according to the instructions found in the users manual, may
cause interference harmful to the operation of other electronic
devices. Compliance with FCC regulations does not guarantee
that interference will not occur in all installations. If this product
is found to be the source of interference, which can be determined by turning the unit “OFF” and “ON”, please try to eliminate the problem by using one of the following measures:
Relocate either this product or the device that is being affected
by the interference.
Utilize power outlets that are on different branch (circuit breaker
or fuse) circuits or install AC line filter/s.
In the case of radio or TV interference, relocate/reorient the
antenna. If the antenna lead-in is 300 ohm ribbon lead, change
the lead-in to co-axial type cable.
If these corrective measures do not produce satisfactory
results, please contact the local retailer authorized to distribute
this type of product. If you can not locate the appropriate
retailer, please contact Yamaha Corporation of America, Electronic Service Division, 6600 Orangethorpe Ave, Buena Park,
CA90620
The above statements apply ONLY to those products distributed by Yamaha Corporation of America or its subsidiaries.
* This applies only to products distributed by Yamaha Corporation of America.
FCC INFORMATION (U.S.A.)
(class B)
* This applies only to products distributed by Yamaha Corporation of America.
COMPLIANCE INFORMATION STATEMENT
(Supplier’s declaration of conformity procedure)
Responsible Party : Yamaha Corporation of America
Address : 6600 Orangethorpe Ave., Buena Park, Calif. 90620
Telephone : 714-522-9011
Type of Equipment : Digital Keyboard
Model Name : PSS-E30
This device complies with Part 15 of the FCC Rules.
Operation is subject to the following two conditions:
1) this device may not cause harmful interference, and
2) this device must accept any interference received including interference that may cause undesired operation.
(FCC SDoC)
The model number, serial number, power requirements, etc., may be found on or near the name plate, which is
at the bottom of the unit.
You should note this serial number in the space provided below and retain this manual as a permanent record
of your purchase to aid identification in the event of theft.
Model No.
Serial No.
(bottom_en_01)
PSS-E30 Owner’s Manual
3
Page 4

PRECAUTIONS
PLEASE READ CAREFULLY
BEFORE PROCEEDING
Please keep this manual in a safe and
handy place for future reference.
WARNING
Always follow the basic precautions listed below
to avoid the possibility of serious injury or even
death from electrical shock, short-circuiting,
damages, fire or other hazards. These precautions
include, but are not limited to, the following:
Power supply
• Do not place the USB cable near heat sources such as
heaters or radiators. Also, do not excessively bend or
otherwise damage the cable, or place heavy objects on it.
• Only use the voltage specified as correct for the
instrument. The required voltage is printed on the name
plate of the instrument.
• Included USB cable is designed for use with only this
instrument. Do not use for any other instrument.
• Check the plug periodically and remove any dirt or dust
which may have accumulated on it.
Do not open
• This instrument contains no user-serviceable parts. Do
not open the instrument or attempt to disassemble or
modify the internal components in any way. If it should
appear to be malfunctioning, discontinue use
immediately and have it inspected by qualified Yamaha
service personnel.
Water warning
• Do not expose the instrument to rain, use it near water or
in damp or wet conditions, or place on it any containers
(such as vases, bottles or glasses) containing liquids
which might spill into any openings. If any liquid such as
water seeps into the instrument, turn off the power
immediately and disconnect the plug from the AC outlet.
Then have the instrument inspected by qualified Yamaha
service personnel.
• Never insert or remove a plug with wet hands.
Influences on electro-medical devices
• Magnetism may affect electro-medical devices.
- Do not use this product near medical devices or inside
areas in which the use of radio waves is restricted.
- Do not use this product within 15 cm (6 in.) of persons
with a heart pacemaker or defibrillator implant.
Battery
• Follow the precautions below. Failure to do so might result
in explosion, fire, overheating or battery fluid leakage.
- Do not tamper with or disassemble batteries.
- Do not dispose of batteries in fire.
- Do not attempt to recharge batteries that are not
designed to be charged.
- Keep the batteries separate from metallic objects such
as necklaces, hairpins, coins, and keys.
- Use the specified battery type (page 13) only.
- Use new batteries, all of which are the same type, same
model, and made by the same manufacturer.
- Always make sure all batteries are inserted in
conformity with the +/- polarity markings.
- When the batteries run out, or if the instrument is not to
be used for a long time, remove the batteries from the
instrument.
- When using Ni-MH batteries, follow the instructions that
came with the batteries. Use only the specified charger
device when charging.
• Keep batteries away from small children who might
accidentally swallow them.
• If the batteries do leak, avoid contact with the leaked
fluid. If the battery fluid should come in contact with your
eyes, mouth, or skin, wash immediately with water and
consult a doctor. Battery fluid is corrosive and may
possibly cause loss of sight or chemical burns.
If you notice any abnormality
• When one of the following problems occur, immediately
turn off the power switch and disconnect the plug from
the outlet. (If you are using batteries, remove all batteries
from the instrument.) Then have the device inspected by
Yamaha service personnel.
- The USB cable or plug becomes frayed or damaged.
- It emits unusual smells or smoke.
- Some object has been dropped into the instrument.
- There is a sudden loss of sound during use of the
instrument.
- If any cracks or breakages exist on the instrument.
Fire warning
• Do not put burning items, such as candles, on the unit. A
burning item may fall over and cause a fire.
PSS-E30 Owner’s Manual
4
DMI-7 1/2
Page 5

CAUTION
Always follow the basic precautions listed below
to avoid the possibility of physical injury to you or
others, or damage to the instrument or other
property. These precautions include, but are not
limited to, the following:
Power supply
• Use the specified USB power adaptor (page 6) only.
Using the wrong adaptor can result in damage to the
instrument or overheating.
• Do not connect the instrument to an electrical outlet using
a multipleconnector. Doing so can result in lower sound
quality, or possibly cause overheating in the outlet.
• When removing the plug from the instrument or an outlet,
always hold the plug itself and not the USB cable. Pulling
by the cable can damage it.
• Remove the plug from the outlet when the instrument is
not to be used for extended periods of time, or during
electrical storms.
Location
• Do not place the instrument in an unstable position where
it might accidentally fall over.
• Before moving the instrument, remove all connected
cables, to prevent damage to the cables or injury to
anyone who might trip over them.
• When setting up the product, make sure that the AC outlet
you are using is easily accessible. If some trouble or
malfunction occurs, immediately turn off the power switch
and disconnect the plug from the outlet. Even when the
power switch is turned off, electricity is still flowing to the
product at the minimum level. When you are not using the
product for a long time, make sure to disconnect the plug
from the wall AC outlet.
Connections
• Before connecting the instrument to other electronic
components, turn off the power for all components.
Before turning the power on or off for all components, set
all volume levels to minimum.
• Be sure to set the volumes of all components at their
minimum levels and gradually raise the volume controls
while playing the instrument to set the desired listening
level.
Handling caution
• Do not insert a finger or hand in any gaps on the
instrument.
• Never insert or drop paper, metallic, or other objects into
the gaps on the panel or keyboard. This could cause
physical injury to you or others, damage to the instrument
or other property, or operational failure.
• Do not rest your weight on, or place heavy objects on the
instrument, and do not use excessive force on the
buttons, switches or connectors.
• Do not use the instrument/device or headphones for a
long period of time at a high or uncomfortable volume
level, since this can cause permanent hearing loss. If you
experience any hearing loss or ringing in the ears, consult
a physician.
Yamaha cannot be held responsible for damage caused by
improper use or modifications to the instrument, or data that is
lost or destroyed.
Always turn the power off when the instrument is not in use.
Even when the [ ] (Standby/On) switch is in standby status
(display is off), electricity is still flowing to the instrument at the
minimum level.
When you are not using the instrument for a long time, make sure
you disconnect the plug from the wall AC outlet.
Make sure to discard used batteries according to local regulations.
2/2
DMI-7
NOTICE
To avoid the possibility of malfunction/ damage to the product, damage to data, or damage to other property, follow the
notices below.
Handling
• Do not use the instrument in the vicinity of a TV, radio, stereo equipment,
mobile phone, or other electric devices. Otherwise, the instrument, TV, or
radio may generate noise.
• Do not expose the instrument to excessive dust or vibrations, or extreme
cold or heat (such as in direct sunlight, near a heater, or in a car during the
day) to prevent the possibility of panel disfiguration, damage to the
internal components or unstable operation. (Verified operating
temperature range: 5° – 40°C, or 41° – 104°F.)
• Do not place vinyl, plastic or rubber objects on the instrument, since this
might discolor the panel or keyboard.
Maintenance
• When cleaning the instrument, use a soft and dry cloth. Do not use paint
thinners, solvents, alcohol, cleaning fluids, or chemicalimpregnated
wiping cloths.
Saving data
• Some of the data of this instrument (page 7) are retained when the power
is turned off. However, the saved data may be lost due to some failure, an
operation mistake, etc.
Information
About copyrights
• Copying of the commercially available musical data including but not
limited to MIDI data and/or audio data is strictly prohibited except for your
personal use.
• This product incorporates and bundles contents in which Yamaha owns
copyrights or with respect to which Yamaha has license to use others’
copyrights. Due to copyright laws and other relevant laws, you are NOT
allowed to distribute media in which these contents are saved or recorded
and remain virtually the same or very similar to those in the product.
* The contents described above include a computer program, Accompaniment Style
data, MIDI data, WAVE data, voice recording data, a score, score data, etc.
* You are allowed to distribute medium in which your performance or music
production using these contents is recorded, and the permission of Yamaha
Corporation is not required in such cases.
About functions/data bundled with the instrument
• Some of the preset songs have been edited for length or arrangement, and
may not be exactly the same as the original.
About this manual
• The illustrations and displays as shown in this manual are for instructional
purposes only, and may appear somewhat different from those on your
instrument.
• The company names and product names in this manual are the trademarks
or registered trademarks of their respective companies.
PSS-E30 Owner’s Manual
5
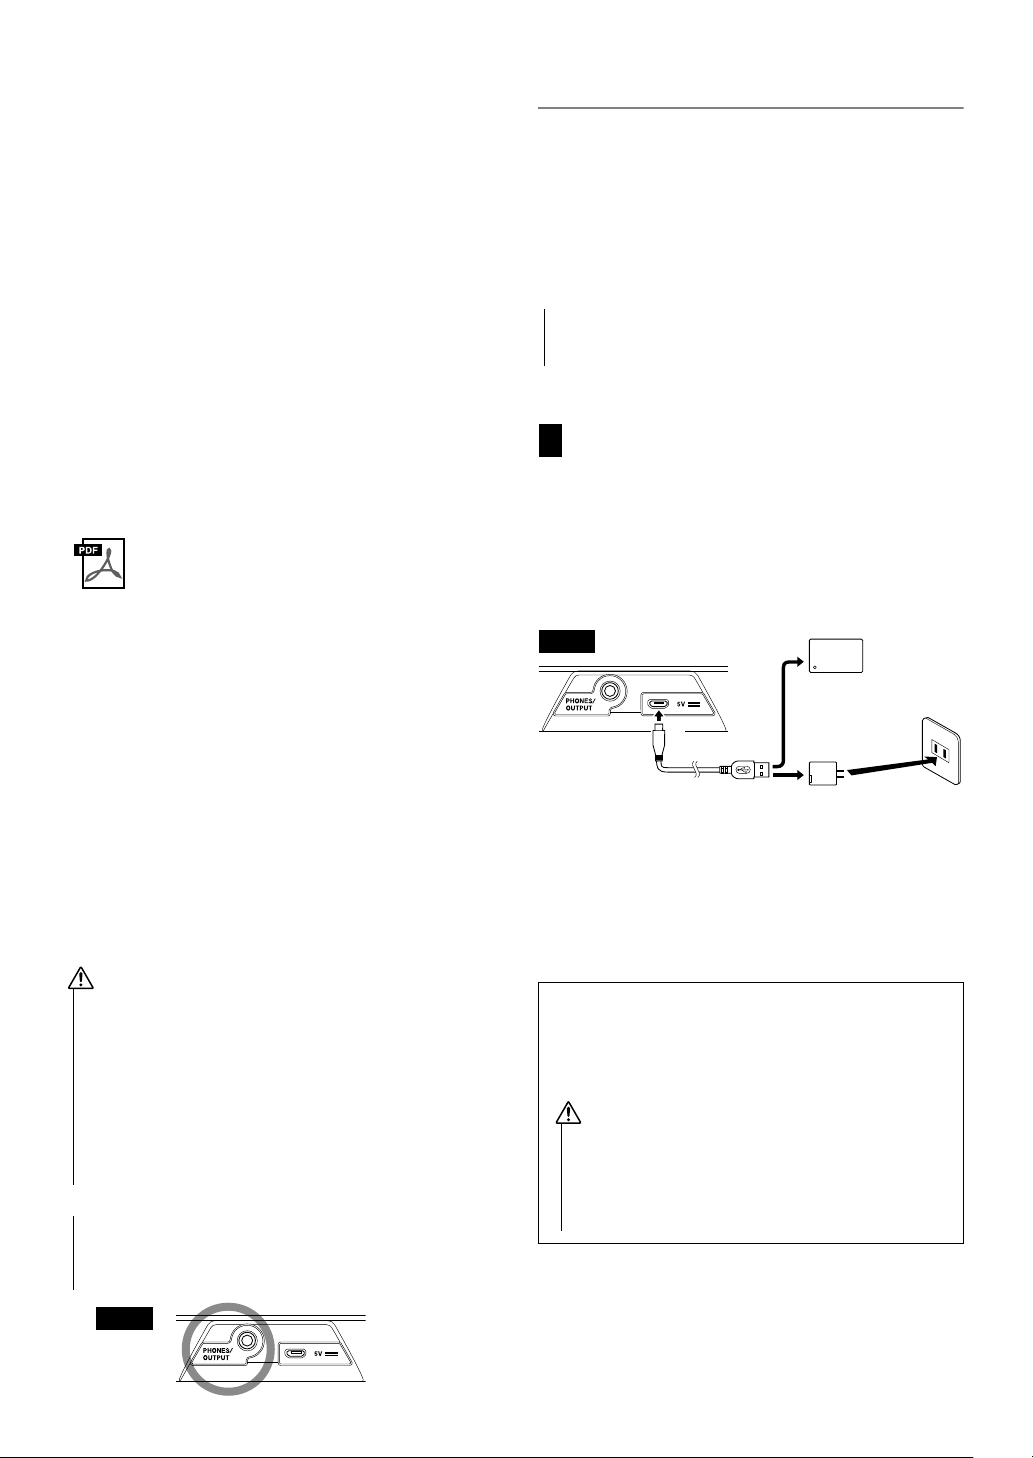
Page 6
Thank you for purchasing this Yamaha Digital
CAUTION
NOTICE
Rear
NOTICE
1 Using a USB power adaptor or
USB mobile battery, etc.
1
2
2
3
Rear
5V DC
(USB micro B)
jack
USB mobile battery
(commercially available)
USB cable
or
USB power
adaptor (commecially available)
AC Outlet
The shape of the plug and outlet
differs depending on your locale.
Make sure to use a USB power adaptor or USB mobile
battery with the specifications above. Using the wrong
USB power adator can result in damage to the instrument or overheating.
Read the safety precautions for your particular USB
power adaptor or USB mobile battery.
CAUTION
Keyboard, the PSS-E30 Remie! Remie is loaded
with various sound effects and Quiz function, so
that even small children can enjoy playing it. We
recommend that you read this manual carefully
so that you can fully take advantage of the
advanced and convenient functions of Remie.
We also recommend that you keep this manual
in a safe and handy place for future reference.
Included Accessories
• Owner’s Manual (this book) (1)
• USB cable (1)
• Online Member Product Registration (1)
Setting Up
Depending on how you are powering your
instrument, follow one of the two power supply
instructions below. This instrument does not
include power supply accessories (with the
exception of the USB cable), so make sure to
purchase them separately as required.
Use a USB cable of less than 3 meters.
If the sound is degraded, make sure to use the included USB
cable or turn down the master volume as needed.
Song Book (Online Document)
Song Book
Contains music scores for the preset Songs
(excluding Song No. 001) of this instrument.
To obtain this Song Book, access the
Yamaha website, and click on the “Download” tab beneath the model name.
Connecting Headphones or External Audio Equipment ([PHONES/OUTPUT] Jack)
For connecting a set of stereo headphones with a
stereo mini plug. This jack also functions as an external output for sending the audio signal of this instrument to external audio equipment. The speakers of
the instrument are automatically shut off when a
headphones plug, etc. is inserted into this jack.
• Before using the headphones, be sure to set the volume of
the instrument at the minimum level. Then gradually raise
the volume while playing the instrument, for your ear comfort and safety.
• Do not use the instrument or headphones for a long period
of time at a high or uncomfortable volume level, since this
can cause permanent hearing loss.
• Before connecting the instrument to other electronic components, make sure to set all volume levels to minimum,
then turn off the power off all the components. Otherwise,
damage to the components or electrical shock may occur.
To avoid possible damage to the external device, first turn on
the power to the instrument, then to the external device.
When turning off the power, do so in reverse order: first turn
off the power to the external device, then to the instrument.
Connect the included USB cable and the commercially available USB power adaptor (or USB mobile
battery) in the order shown in the illustration.
When disconnecting the USB cable or so, first turn
off the power, then follow the order shown above in
reverse.
USB Power adaptor / USB mobile battery
requirements
• Output voltage: 4.8 V to 5.2 V
• Output current: 0.5 A or greater
PSS-E30 Owner’s Manual
6
Page 7

This instrument requires four “AA” size, Alkaline
2 Using Batteries
WARNING
NOTICE
NOTICE
(LR6)/Manganese (R6) batteries, or rechargeable
nickel-metal hydride batteries (rechargeable Ni-MH
batteries). The Alkaline batteries or rechargeable NiMH batteries are recommended for this instrument,
since other types may result in poorer battery performance.
See the “Battery” section in the Precautions (page 4).
1 Make sure that the power of the instrument is off.
2 Open the battery compartment cover located on
the instrument’s bottom panel.
Troubleshooting
Problem Solution
•No Sound.
• The volume is too soft.
The sound is degraded
or choppy.
Power suddenly and
unexpectedly turns off.
When the instrument is
turned on, power is
turned off suddenly and
unexpectedly.
• Increase the volume.
• Disconnect the headphones from
[PHONES/OUTPUT] jack (page 6).
• Check whether the Volume Limit
setting (page 12) is too low or not.
• Replace all the batteries with new
ones or recharged ones.
Use the included USB cable or turn
down the master volume.
This is normal and the Auto Power Off
function may have been activated
(page 12). If you need to disable the
Auto Power Off function, select “oFF.”
The protection circuit has been activated due to overcurrent. This may
occur when your USB power adaptor
does not meet the requirements on
page 6 or is damaged.
Try to use another USB power adaptor
that meets the requirements, etc. If it
should appear to be malfunctioning,
please consult Yamaha service personnel.
3 Insert the four new batteries, being careful to fol-
low the polarity markings on the inside of the
compartment.
4 Replace the compartment cover, making sure
that it locks firmly in place.
• Make sure to set the Battery Type correctly (page 12).
Failure to set the battery type may shorten the amount of
the battery life.
• Connecting or disconnecting the USB cable with batteries
installed may turn the power off, resulting in loss of data.
Backup and Initialization
Backup Parameters
The following settings will be maintained even if
the power is turned off.
Master Volume, Volume Limit, Tuning,
Chord Fingering Type, Auto Power Off,
Battery Type
The power is turned off when the USB power adaptor is
unplugged with the power on or the alkaline / manganese
battery runs down.
Initialization
You can initialize the backup parameters via the
following method.
While holding down the highest white key, press
the [ ] (Standby/On) switch to turn the power
on. “CLr” appears on the display.
PSS-E30 Owner’s Manual
7
Page 8

Turning the Power On/Off
MEMO
The instrument Voice
changes each time you
press the musical
instrument’s button. For
details about the Voices,
refer to the “Voice List”
on page 14.
MEMO
Sound effects are
applied to the keys without illustration. For
details, please refer to
the “Drum/SFX Kit
List” on page 15.
Press to turn on the power.
“001” appears on the display.
To set the power to standby, press and hold
the switch for about a second.
MEMO
If Remie is not operated for 30 minutes (by
default) with the power on, the power is automatically turned off (Auto Power function; page 12).
Play the Keyboard and Check Out the Voices!
Select an instrument Voice and play it
1. Press the button with the musical instrument
illustration as below.
2. Play the keyboard.
Play some of the fun sound effects
1. Press or .
2. Play the keyboard with your favorite sound effect.
PSS-E30 Owner’s Manual
8
You can play the sound effect that
matches the illustration above the
keyboards.
Pressing lets you play the
upper illustration sounds, and press-
ing lets you play the lower
illustration sounds.
Page 9

0.0.1.
Adjusting the Volume
MEMO
Pressing the [LEVEL] button lets you select the
difficulty level of the Quiz.
The level changes each time you press the button.
The default setting is “Auto (AUt).”
LEVEL 1: 1 note sounds.
LEVEL 2: 3 notes sound one-by-one.
LEVEL 3: 3 notes sound simultaneously.
Auto: The level changes from LEVEL 1 to
LEVEL 3 according to the number of
correct answers.
Press to increase the volume.
Press to decrease the volume.
MEMO
•The volume level can be changed from 00 to
15. The default level is 13.
•Remie has a Volume Limit function to prevent the Master Volume from accidentally
being set to too high a level. For details,
refer to page 12.
Try the Quiz — and guess the sound!
1. Select the sound you want to guess.
Pressing or lets you to guess the fun
sounds.
2. Press .
When the fanfare plays, the Quiz starts!
3. Play the same key as the sound from
.
There are a total of 10 questions.
To quit the Quiz, press again.
RULES
• The answer time is about 10 seconds.
• If your answer is correct, a bell sounds.
• If your answer is incorrect, a buzzer sounds.
• If you do not play any key for 10 seconds, a
buzzer sounds.
• You can try the same Quiz question three
times.
• If you cannot play the correct key within
three times, a final buzzer sounds and the
next question starts.
PSS-E30 Owner’s Manual
9
Page 10

Listen to the Song, and try playing along!
First, press . The Song
number (page 16) appears on
the display.
0.0.1.
You can select or listen to
the Song while this dot is lit.
MEMO
•You cannot mute the melody part of the Demo Song (Song No.1).
•You can download the Song Book (page 6) from the Yamaha website. For details, refer to the “Song Book
(Online Document)” on page 6.
contains 30 preset Songs.
Listen to the Song!
Press to start Song playback.
To stop playback, press the button again.
Listen to various Songs referring to the “Song List” on page 16.
Pressing or lets you select the previous or next Song.
Pressing lets you select the top Song of the next category.
Try playing along with the Song!
1. Select your favorite Song.
2. Press .
The melody part of the Song is muted.
Pressing again lets you listen to the melody part.
3. Press to start Song playback.
4. Play the melody part referring to the Song Book (page 6).
Changing the Tempo
Press the [TEMPO/TAP] button to change the Tempo of the Song, Style, and Metronome (page 12). Use the [+] and [-]
buttons to change the Tempo value while “tEP” or the current Tempo value is shown on the display.
Tapping out a Tempo — Tap Start
While Song/Style playback is stopped, tap the [TEMPO/TAP] button several times to start playback at the tapped
10
tempo- four times for a 4-beat Song/Style or three times for a 3-beat Song/Style.
PSS-E30 Owner’s Manual
Page 11

Try playing with the Rhythm and Accompaniment (Styles)!
First, press . The Style
number (page 16) appears on
the display.
You can select or play
rhythm or accompaniment
while this dot is lit.
0.0.1.
Accompniment Section
(Smart Chord C2–B2)
The lowest
key
Accompaniment Section
(Multi Finger C2–F#3)
MEMO
•To play back the rhythm part only, press the [MUTE] button before or during the Style playback.
Pressing the [MUTE] button again lets you start the accompaniment again.
Playing the accompaniment
Remie includes a “Smart Chord” feature that lets you start and control Styles by simply pressing a single note of a chord in the Accompaniment Section in the illustration above. If you want to play full
chords yourself, change the “Chord Fingering Type” (page 12) from “Smart Chord (Smr)” to “Multi Finger (mLt).” For details, refer to the “Chords for Style Playback” on page 17.
includes an Auto Accompaniment feature that automatically plays appropriate
“Styles” (rhythm+bass+chord accompaniment), controlled simply by playing chords with
your left hand.
1. Press to start the rhythm.
2. Play a key in the Accompaniment Section (Smart Chord) in the illustration
below to start the accompaniment.
Select your favorite Style referring to the “Style List” on page 16.
Pressing or lets you select the previous or next Style.
Pressing lets you select the top Style of the next category.
3. Try playing the melody part using the
keys C3 and above, as shown at right.
For details on how to play with a Style, refer to
the “How to play with a Style” on page 13.
4. Press to stop the rhythm or Auto
C2 D2 E2 F2 G2A2B2C3D3E3 F3G3
Accompaniment.
Sync Start Function for Song/Style
This function lets you start the Song/Style by simply playing a key or chord.
For details, refer to page 12.
PSS-E30 Owner’s Manual
11
Page 12

The Functions
To set the various Functions, press the appropriate key (repeatedly if
necessary) while holding down .
C#2D#2F
#
2 G#2A#2C
#
3D#3F
#
3 G#3A#3C
#
4D#4
C2 D2 E2 F2 G2A2B2C3D3E3 F3G3A3B3C4D4E4
-1 +1 -1 +1 -1 -1 +1+1-0.2 +0.2
Default
Default
On/Off
Default
Default
Default
Default
On/Off
On/Off
Refer to page 17.
Refer to page 17.
Alkaline / Rechargeable
Off/5/10/15/30/60/120
w Transpose e Tuning t
Metronome
Beat
y Song/
Style/
Metronome
Vol ume
o Smart
Chord Key
!2 Volume
Limit
Smart Chord / Multi Finger
q Sustain r Metronome i Chord Fingering Type
u Sync Start !0 Battery Type
!1 Auto Power Off
Function List
Function Name Descriptions Default Value Range/Settings
q Sustain Switches the Sustain function on/off. Off (SoF)On (Son) / Off (SoF)
w Transpose Determines the pitch of the instrument in semitone increments. 00 -12–0–12
e Tuning Determines the fine tuning of the pitch of the entire instrument in approx.
r Metronome Switches the Metronome function on/off. Off (oFF)On (on) / Off (oFF)
t Metronome Beat Determines the Metronome beat. For example, when this is set to 4, the
y Song/Style/
Metronome Volume
u Sync Start Switches the Sync Start function on/off. When this function is on, the
i Chord Fingering
Ty pe
o Smart Chord Key Determines the Key Signature when the Chord Fingering Type is set to
!0 Batte
ry Type Selects the type of batteries you have installed to Remie.
!1 Auto Power Off Specifies the time that will elapse before the instrument’s power is auto-
!2 Volume Limit Determines the maximum value of the Master Volume. 15 01–15
PSS-E30 Owner’s Manual
12
0.2Hz increments. The hundreds digit of the setting value is omitted on
the display.
beat is set to 4/4 time and the first beat is accented with a bell sound.
Determines the Song/Style/Metronome volume.
Song/Style number on the display flashes and you can start the Song/
Style by simply playing a key or chord.
The preset Songs in Remie contain a silent measure at the beginning
of each Song. This is why, even if the Sync Start function is on, Song
playback does not start immediately after playing a key or a chord.
Determines how to play the chord in Accompaniment Section (page 11)
when playing with a Style.
•Smart Chord (Smr): Play only the root key of the chord.
•Multi Finger (mLt): Play all notes of the chord conventionally.
“Smart Chord.” For example, if there are 2 sharps ( # ) on your music
score (indicating the key of D; refer to the “How to play with a Style” on
page 13), press A3 or G3 key until “SP2” appears on the display. For
details, refer to the “Chords for Style Playback” on page 17.
matically turned off.
MEMO
440.0 (40.0)
The current Song
or Style Beat
12 00–15
Off
Smart Chord
(Smr)
No Key
Signature
(SP0: C Major or
A Minor)
Alkaline battery /
Manganese
battery (AL)
30 minutes
427.0 (27.0)–
440.0 (40.0)–
453.0 (53.0)
0 (no bell)–16
On (Song/Style No. on
the display flashes.) / Off
Smart Chord (Smr)/
Multi Finger (mLt)
7 Flats (FL7
7 S
harps (SP7)
AL: Alkaline battery /
Manganese battery
n|: Rechargeable bat-
tery
oFF/5/10/15/30/60/120
(minutes)
)–0 (SP0)–
Page 13

Specifications
CC CC F
CCF C
7
G
7
G C
7
G
7
G
Twinkle Twinkle Little Star
Right
Left
The # and b marks here indicate the Key Signature.
If
# (sharps) or b (flats) are written here, make sure to set the Key Signature to
match that of your music score referring to the “o Smart Chord Key” on page 12.
For details, refer to the “Chords for Style Playback” on page 17.
When setting “i Chord Fingering Type” on
page 12 to “Smart Chord (Smr)”, play only the
root note ( ). For details on how to play
chords when “Multi Finger (mLt)” is set, refer to
the “Chords for Style Playback” on page 17.
Product Name Digital Keyboard
Size/Weight Dimensions (W × D × H) 506 mm × 201 mm × 54 mm (19-15/16" × 7-15/16" × 2-1/8")
Weight 1.2 kg (2 lb, 10 oz) (not including batteries)
Control Interface Keyboard 37 HQ (High Quality) Mini Keys
Display 7-Segment LED
Panel Language English
Voice s Polyphony (max.) 32
Number of Voices 49 (46 Voices + 1 Drum Kit + 2 SFX Kits (74 sound effects))
Accompaniment
Styles
Songs Number of Preset Songs 30
Connectivity Headphones/Output (Stereo mini) jack, 5V DC (USB micro B) jack
Sound System Amplifiers 1.4 W
Power Supply Power Supply • USB power adaptor 5V/500mA
Included Accessories • Owner’s Manual
Separately Sold Accessories
(May not be available depending on your area.)
* The contents of this manual apply to the latest specifications as of the publishing date.
To obtain the latest manual, access the Yamaha website then download the manual file.
Since specifications, equipment or separately sold accessories may not be the same in every locale, please check with your Yamaha dealer.
Number of Styles 28
Fingering Smart Chord, Multi Finger
Panel Sustain Ye s
Metronome Ye s
Tempo Range 11–280, Tap Tempo (32–280)
Tr an sp os e -12–0–+12
Tuning 427.0–440.0–453.0 Hz (approx. 0.2 Hz increments)
Speakers 8 cm × 1
• Four “AA” size alkaline (LR6), manganese (R6) or Ni-MH rechargeable batteries (HR6)
Power Consumption 1.5 W
Auto Power Off Ye s
•USB cable
• Online Member Product Registration
Headphones (HPH-50/HPH-100/HPH-150)
How to play with a Style
Styles let you produce rhythm and automatic accompaniment playback simply by playing the desired
chords.
Select Style No. 11 and try playing the Song below!
PSS-E30 Owner’s Manual
13
Page 14

Voice List
Voice No. Voice Nam e
PIANO
1Grand Piano
2Piano & Strings
3Honky Tonk Piano
4Harpsichord
ELECTRIC PIANO
5 Electric Piano 1
6 Electric Piano 2
7 Electric Piano Pad
ORGAN
8 Accordion
9 Tango Accordion
10 Harmonica
11 Drawbar Organ
12 Pipe Organ
GUITAR
13 Nylon Guitar
14 Steel Guitar
15 Clean Guitar
16 Overdriven Guitar
BASS
17 Acoustic Bass
18 Finger Bass
19 Slap Bass
20 Synth Bass
STRINGS
21 Strings
22 Pizzicato Strings
23 Violin
24 Cello
25 Contrabass
26 Orchestral Harp
Voice No. Voice Name
WOODWIND
27 Flute
28 Oboe
29 Clarinet
30 Bassoon
31 Sax
BRASS
32 Brass Section
33 Trumpet
34 Trombone
35 Tuba
36 Synth Brass
PERCUSSION
37 Vibraphone
38 Marimba
39 Celesta
40 Timpani
41 Drum Kit
SYNTH
42 Square Lead
43 Sawtooth Lead
44 New Age Pad
45 Halo Pad
46 Crystal
47 Brightness
SFX KIT
48 SFX Kit 1
49 SFX Kit 2
When you select “Drum Kit (Voice No. 41)” or “SFX Kit 1 (Voice No.
48)” or “SFX Kit 2 (Voice No. 49),” various drum/percussion or SFX
sounds are assigned to individual keys. For details on assigning
instruments to keys, refer to the “Drum/SFX Kit List” on page 15.
PSS-E30 Owner’s Manual
14
Page 15

Drum/SFX Kit List
Voice No. 41
Drum Kit
C2Castanet
C# 2Brush Slap
D 2 Brush Tap Swirl
D# 2Open Rim Shot
E 2 Bass Drum
F2Snare
F# 2 Side Stick
G 2 Floor Tom
G# 2 Hi-Hat Closed
A2Low Tom
A# 2 Hi-Hat Open
B2Mid Tom
C 3 Crash Cymbal
C# 3Tambourine
D3Ride Cymbal Cup
D# 3 Ride Cymbal
E3Bongo H
F3Bongo L
F# 3 Conga H Mute
G 3 Conga H Open
G# 3 Conga L
A3Timbale H
A# 3 Timbale L
B3Cowbell
C4Vibraslap
C# 4Surdo Open
D 4 Agogo H
D# 4 Agogo L
E 4 Wood Block H
F 4 Wood Block L
F# 4Guiro Short
G 4 Guiro Long
G# 4 Cabasa
A 4 Triangle Mute
A# 4 Triangle Open
B 4 Jingle Bells
C5Bell Tree
C2
D2
E2
F2
G2
A2
B2
C3
D3
E3
F3
G3
A3
B3
C4
D4
E4
F4
G4
A4
B4
C5
C#2
D#2
F#2
G#2
A#2
C#3
D#3
F#3
G#3
A#3
C#4
D#4
F#4
G#4
A#4
Voice No. 48
SFX Kit 1
C2 Punch
C# 2 Footsteps
D 2 Finger Snap
D# 2Laugh
E2 Handclap
F2 Scream
F# 2 Applause
G 2 Knock On A Door
G# 2 Door Slam
A 2 Door Squeak
A# 2 Camera 1
B2 Camera 2
C 3 Short Circuit
C# 3Explosion
D3 Firework
D# 3Spray
E 3 Zipper
F 3 Bubble
F# 3 Thunder
G3 Stream
G# 3Rain
A3 Waterdrop
A# 3Wave
B3 Wind
C4 Gong 1
C# 4 Gong 2
D4 Kick A Can
D# 4 Barcode Scanner
E 4 Cash Register Drawer
F 4 Chime
F# 4 Question Setting
G 4 Announcement Start
G# 4Correct
A 4 Announcement End
A# 4Wrong
B 4 Metallic Sound
C5 Chau Gong
Voice No. 49
SFX Kit 2
C2 Telephone
C# 2 Dial Tone
D2 Alarm Bell
D# 2 Bicycle Horn
E2 Siren
F 2 Clock Tick
F# 2 Cuckoo Clock
G 2 Big Clock
G# 2 Laser 1
A2 Laser 2
A# 2 Laser 3
B 2 Gear
C3 Cat
C# 3Cow
D3 Dog
D# 3Owl
E 3 Rooster
F3 Frog
F# 3Horse
G3 Goat
G# 3Lion
A3 Sheep
A# 3Insect
B3 Bird
C 4 Railroad Crossing
C# 4Steam Engine Whistle
D4 Train
D# 4Helicopter
E4 Jet Plane
F 4 Car Engine Ignition
F# 4Car Blinker
G4 Car Tires Squeal
G# 4Car Horn
A 4 Car Passing
A# 4Car Crash
B4 UFO
C5 Starship
The lowest key
PSS-E30 Owner’s Manual
15
Page 16

Song List
Category Song No. Song Name Composer
DEMO 1 Demo ORIGINAL
CHILDREN’S SONG 2 Frère Jacques Traditional
3 Der Froschgesang Traditional
4 London Bridge Traditional
5 Sur le pont d’Avignon Traditional
6 Nedelka Traditional
7 Sippin’ Cider Through a Straw Traditional
8 If You’re Happy and You Know It Traditional
9 Ten Little Indians Traditional
10 The Cuckoo Traditional
11 Close Your Hands, Open Your Hands J. J. Rousseau
12 O du lieber Augustin Traditional
13 Twinkle Twinkle Little Star Traditional
14 Im Mai Traditional
15 Pop Goes The Weasel Traditional
16 Mary Had a Little Lamb Traditional
17 Row Row Row Your Boat Traditional
FAVO RITE 18 Holdilia Cook Traditional
19 Beautiful Dreamer S. C. Foster
20 La Cucaracha Traditional
21 Greensleeves Traditional
22 Wenn ich ein Vöglein wär Traditional
23 Die Lorelei F. Silcher
24 Silent Night F. Gruber
25 Deck the Halls Traditional
26 Annie Laurie Traditional
CLASSIC 27 Liebesträume Nr.3 F. Liszt
28 Humoresques A. Dvořák
29 Pizzicato Polka J. Strauss II
30 Menuett BWV Anh.114 J. S. Bach
Style No. Style Name
Pop
18Beat 1
28Beat 2
38Beat 3
4 16Beat
5EuroPop
6 Folkrock 1
7 Folkrock 2
Rock
8Rock
9 8BeatRock
10 16BeatRock
PSS-E30 Owner’s Manual
16
Style List
Style No. Style Name
Ballad
11 Ballad 1
12 Ballad 2
Shuffle
13 Shuffle 1
14 Shuffle 2
Swing
15 Swing
16 Singalong
17 Charleston
18 WinterSwing
Style No. Style Name
March
19 March 1
20 March 2
21 March 3
22 6/8March
Traditional
23 Polka 1
24 Polka 2
25 Bluegrass
Waltz
26 Waltz 1
27 Waltz 2
Samba
28 Samba
Page 17

Chords for Style Playback
C
Gm
7
The method for playing chords and the actual sound of the chords differ depending on the Chord
Fingering Type (page 12); Smart Chord or Multi Finger.
In the case of “Smart Chord”
When the Chord Fingering Type is set to “Smart Chord (Smr),” make sure to set the “Smart Chord Key”
(page 12) at first.
Smart Chord Key Setting
Make sure to set “Smart Chord Key” to match the Key Signature (# or b) on your music score before starting the
Style (Auto Accompaniment). To set the number of the Key Signature on the music score, press the G3 or A3 key
while holding down the [FUNCTION] button.
Pressing the G3 key increases the number of flats and decreases the sharps. Pressing A3 key increases the
number of sharps and decreases the flats. For the position of the G3 or A3 key, refer to the “o Smart Chord
Key” in the illustration on page 12.
Smart Chord Chart
When you set the Smart Chord Key to match the Key Signature on your music score, you can play a chord by
simply playing the root note of the chord you want to play. This chart features common chords you can play
using “Smart Chords.”
Key Signature on
the music score
2 flats ( b ) FL2 C min D 1+5 Eb Major F 7 G min A m7(b5) Bb Major
Key Signature on
the music score
1 flat ( b ) FL1 C 7 D min E m7(b5) F Major G min A 1+5 Bb Major
Key Signature on
the music score
No sharps/flats SP0 C Major D min E 1+5 F Major G 7 A min B m7(b5)
Key Signature on
the music score
1 sharp ( # ) SP1 C Major D 7 E min F# m7(b5) G Major A min B 1+5
Key Signature on
the music score
2 sharps ( # ) SP2 C# m7(b5) D Major E min F# 1+5 G Major A 7 B min
Display
Display
Display
Display
Display
C D Eb F G A Bb
C D E F G A Bb
C D E F G A B
C D E F# G A B
C# D E F# G A B
Root Note
Root Note
Root Note
Root Note
Root Note
In the case of “Multi Finger”
When the Chord Fingering Type is set to “Multi Finger (mLt),” play all keys of a chord you want to play. This
chart features common chords. For other chords, refer to commercially available chord books for further details.
Indicates the root note.
Major Minor Seventh Minor Seventh Major Seventh
Cm
C
7
Cm
7
CM
7
F Fm
G Gm
F
7
G
7
Fm
7
FM
7
GM
7
PSS-E30 Owner’s Manual
17
Page 18

LIMITED 1-YEAR WARRANTY ON PORTABLE KEYBOARDS
(NP, PSRE, PSREW, PSRF, PSRI, PSS, SHS, EZ, DGX230, DGX530, YPG AND YPT SERIES)
Thank you for selecting a Yamaha product. Yamaha products are designed and manufactured to provide a high level of defect-free
performance. Yamaha Corporation of America (“Yamaha”) is proud of the experience and craftsmanship that goes into each and every Yamaha
product. Yamaha sells its products through a network of reputable, specially authorized dealers and is pleased to offer you, the Original Owner,
the following Limited Warranty, which applies only to products that have been (1) directly purchased from Yamaha’s authorized dealers in the
fifty states of the USA and District of Columbia (the “Warranted Area”) and (2) used exclusively in the Warranted Area. Yamaha suggests that
you read the Limited Warranty thoroughly and invites you to contact your authorized Yamaha dealer or Yamaha Customer Service if you have
any questions.
Coverage: Yamaha will, at its option, repair or replace the product covered by this warranty if it becomes defective, malfunctions or
otherwise fails to conform with this warranty under normal use and service during the term of this warranty, without charge for labor or materials.
Repairs may be performed using new or refurbished parts that meet or exceed Yamaha specifications for new parts. If Yamaha elects to
replace the product, the replacement may be a reconditioned unit. You will be responsible for any installation or removal charges and for any
initial shipping charges if the product(s) must be shipped for warranty service. However, Yamaha will pay the return shipping charges to any
destination within the USA if the repairs are covered by the warranty. This warranty does not cover (a) damage, deterioration or malfunction
resulting from accident, negligence, misuse, abuse, improper installation or operation or failure to follow instructions according to the Owner’s
Manual for this product; any shipment of the product (claims must be presented to the carrier); repair or attempted repair by anyone other than
Yamaha or an authorized Yamaha Service Center; (b) any unit which has been altered or on which the serial number has been defaced, modified
or removed; (c) normal wear and any periodic maintenance; (d) deterioration due to perspiration, corrosive atmosphere or other external causes
such as extremes in temperature or humidity; (e) damages attributable to power line surge or related electrical abnormalities, lightning damage
or acts of God; or (f) RFI/EMI (Interference/noise) caused by improper grounding or the improper use of either certified or uncertified equipment,
if applicable. Any evidence of alteration, erasing or forgery of proof-of-purchase documents will cause this warranty to be void. This warranty
covers only the Original Owner and is not transferable.
In Order to Obtain Warranty Service: Warranty service will only be provided for defective products within the Warranted Area.
Contact your local authorized Yamaha dealer who will advise you of the procedures to be followed. If this is not successful, contact Yamaha at
the address, telephone number or website shown below. Yamaha may request that you send the defective product to a local authorized Yamaha
Servicer or authorize return of the defective product to Yamaha for repair. If you are uncertain as to whether a dealer has been authorized by
Yamaha, please contact Yamaha’s Service Department at the number shown below, or check Yamaha’s website at www.yamaha.com
Product(s) shipped for service should be packed securely and must be accompanied by a detailed explanation of the problem(s) requiring
service, together with the original or a machine reproduction of the bill of sale or other dated, proof-of-purchase document describing the
product, as evidence of warranty coverage. Should any product submitted for warranty service be found ineligible therefore, an estimate of
repair cost will be furnished and the repair will be accomplished only if requested by you and upon receipt of payment or acceptable
arrangement for payment.
Limitation of Implied Warranties and Exclusion of Damages: ANY IMPLIED WARRANTIES, INCLUDING WARRANTIES
OF MERCHANTABILITY AND FITNESS FOR A PARTICULAR PURPOSE SHALL BE LIMITED IN DURATION TO THE APPLICABLE PERIOD OF
TIME SET FORTH ABOVE. YAMAHA SHALL NOT BE RESPONSIBLE FOR INCIDENTAL OR CONSEQUENTIAL DAMAGES OR FOR DAMAGES
BASED UPON INCONVENIENCE, LOSS OF USE, DAMAGE TO ANY OTHER EQUIPMENT OR OTHER ITEMS AT THE SITE OF USE OR
INTERRUPTION OF PERFORMANCES OR ANY CONSEQUENCES. YAMAHA’S LIABILITY FOR ANY DEFECTIVE PRODUCT IS LIMITED TO
REPAIR OR REPLACEMENT OF THE PRODUCT, AT YAMAHA’S OPTION. SOME STATES DO NOT ALLOW LIMITATIONS ON HOW LONG AN
IMPLIED WARRANTY LASTS OR THE EXCLUSION OR LIMITATION OF INCIDENTAL OR CONSEQUENTIAL DAMAGES, SO THE ABOVE
LIMITATION OR EXCLUSION MAY NOT APPLY TO YOU. This Warranty gives you specific legal rights, and you may also have other rights
which vary from state to state. This is the only express warranty applicable to the product specified herein; Yamaha neither assumes nor
authorizes anyone to assume for it any other express warranty.
If you have any questions about service received or if you need assistance in locating an authorized Yamaha Servicer, please contact:
.
CUSTOMER SERVICE
Yamaha Corporation of America
6600 Orangethorpe Avenue, Buena Park, California 90620-1373
Telephone: 800-854-1569
www.yamaha.com
Do not return any product to the above address without a written Return Authorization issued by YAMAHA.
© 2019 Yamaha Corporation of America.
Page 19

CANADA
Yamaha Canada Music Ltd.
135 Milner Avenue, Toronto, Ontario M1S 3R1, Canada
Tel: +1-416-298-1311
U.S.A.
Yamaha Corporation of America
6600 Orangethorpe Avenue, Buena Park, CA 90620, U.S.A.
Tel: +1-714-522-9011
MEXICO
Yamaha de México, S.A. de C.V.
Av. Insurgentes Sur 1647 Piso 9, Col. San José
Insurgentes, Delegación Benito Juárez, México, D.F., C.P.
03900, México
Tel: +52-55-5804-0600
BRAZIL
Yamaha Musical do Brasil Ltda.
Rua Fidêncio Ramos, 302 – Cj 52 e 54 – Torre B – Vila
Olímpia – CEP 04551-010 – São Paulo/SP, Brazil
Tel: +55-11-3704-1377
ARGENTINA
Yamaha Music Latin America, S.A., Sucursal Argentina
Olga Cossettini 1553, Piso 4 Norte,
Madero Este-C1107CEK, Buenos Aires, Argentina
Tel: +54-11-4119-7000
PANAMA AND OTHER LATIN
AMERICAN COUNTRIES/
CARIBBEAN COUNTRIES
Yamaha Music Latin America, S.A.
Edificio Torre Davivienda, Piso: 20
Avenida Balboa, Marbella, Corregimiento de Bella Vista,
Ciudad de Panamá, Rep. de Panamá
Tel: +507-269-5311
THE UNITED KINGDOM/IRELAND
Yamaha Music Europe GmbH (UK)
Sherbourne Drive, Tilbrook, Milton Keynes,
MK7 8BL, U.K.
Tel: +44-1908-366700
GERMANY
Yamaha Music Europe GmbH
Siemensstrasse 22-34, 25462 Rellingen, Germany
Tel: +49-4101-303-0
SWITZERLAND/LIECHTENSTEIN
Yamaha Music Europe GmbH, Branch
Switzerland in Thalwil
Seestrasse 18a, 8800 Thalwil, Switzerland
Tel: +41-44-3878080
AUSTRIA/CROATIA/
CZECH REPUBLIC
/
HUNGARY/ROMANIA/SLOVAKIA/
SLOVENIA
Yamaha Music Europe GmbH, Branch Austria
Schleiergasse 20, 1100 Wien, Austria
Tel: +43-1-60203900
POLAND
Yamaha Music Europe GmbH Sp.z o.o. Oddział w Polsce
ul. Wielicka 52, 02-657 Warszawa, Poland
Tel: +48-22-880-08-88
BULGARIA
Dinacord Bulgaria LTD.
Bul.Iskarsko Schose 7 Targowski Zentar Ewropa
1528 Sofia, Bulgaria
Tel: +359-2-978-20-25
MALTA
Olimpus Music Ltd.
Valletta Road, Mosta MST9010, Malta
Tel: +356-2133-2093
NETHERLANDS/BELGIUM/LUXEMBOURG
Yamaha Music Europe, Branch Benelux
Clarissenhof 5b, 4133 AB Vianen, The Netherlands
Tel: +31-347-358040
FRANCE
Yamaha Music Europe
7 rue Ambroise Croizat, Zone d'activités de Pariest,
77183 Croissy-Beaubourg, France
Tel: +33-1-6461-4000
ITALY
Yamaha Music Europe GmbH, Branch Italy
Via Tinelli N.67/69 20855 Gerno di Lesmo (MB), Italy
Tel: +39-039-9065-1
SPAIN/PORTUGAL
Yamaha Music Europe GmbH Ibérica, Sucursal en
España
Ctra. de la Coruña km. 17,200, 28231
Las Rozas de Madrid, Spain
Tel: +34-91-639-88-88
GREECE
Philippos Nakas S.A. The Music House
19th klm. Leof. Lavriou 190 02 Peania – Attiki, Greece
Tel: +30-210-6686260
SWEDEN
Yamaha Music Europe GmbH Germany filial
Scandinavia
JA Wettergrensgata 1, 400 43 Göteborg, Sweden
Tel: +46-31-89-34-00
DENMARK
Yamaha Music Denmark,
Fillial of Yamaha Music Europe GmbH, Tyskland
Generatorvej 8C, ST. TH., 2860 Søborg, Denmark
Tel: +45-44-92-49-00
FINLAND
F-Musiikki Oy
Antaksentie 4
FI-01510 Vantaa, Finland
Tel: +358 (0)96185111
NORWAY
Yamaha Music Europe GmbH Germany Norwegian Branch
Grini Næringspark 1, 1332 Østerås, Norway
Tel: +47-6716-7800
ICELAND
Hljodfaerahusid Ehf.
Sidumula 20
IS-108 Reykjavik, Iceland
Tel: +354-525-5050
CYPRUS
Nakas Music Cyprus Ltd.
Nikis Ave 2k
1086 Nicosia
Tel: + 357-22-511080
Major Music Center
21 Ali Riza Ave. Ortakoy
P.O.Box 475 Lefkoşa, Cyprus
Tel: (392) 227 9213
RUSSIA
Yamaha Music (Russia) LLC.
Room 37, entrance 7, bld. 7, Kievskaya street, Moscow,
121059, Russia
Tel: +7-495-626-5005
OTHER EUROPEAN COUNTRIES
Yamaha Music Europe GmbH
Siemensstrasse 22-34, 25462 Rellingen, Germany
Tel: +49-4101-303-0
Yamaha Music Gulf FZE
JAFZA-16, Office 512, P.O.Box 17328,
Jebel Ali FZE, Dubai, UAE
Tel: +971-4-801-1500
TURKEY
Yamaha Music Europe GmbH
Merkezi Almanya Türkiye İstanbul Şubesi
Mor Sumbul Sokak Varyap Meridian Business 1.Blok
No:1 113-114-115
Bati Atasehir Istanbul, Turkey
Tel: +90-216-275-7960
ISRAEL
RBX International Co., Ltd.
P.O Box 10245, Petach-Tikva, 49002
Tel: (972) 3-925-6900
OTHER COUNTRIES
Yamaha Music Gulf FZE
JAFZA-16, Office 512, P.O.Box 17328,
Jebel Ali FZE, Dubai, UAE
Tel: +971-4-801-1500
THE PEOPLE’S REPUBLIC OF CHINA
Yamaha Music & Electronics (China) Co., Ltd.
2F, Yunhedasha, 1818 Xinzha-lu, Jingan-qu,
Shanghai, China
Tel: +86-400-051-7700
HONG KONG
Tom Lee Music Co., Ltd.
11/F., Silvercord Tower 1, 30 Canton Road,
Tsimshatsui, Kowloon, Hong Kong
Tel: +852-2737-7688
INDIA
Yamaha Music India Private Limited
P-401, JMD Megapolis, Sector-48, Sohna Road,
Gurugram-122018, Haryana, India
Tel: +91-124-485-3300
INDONESIA
PT. Yamaha Musik Indonesia (Distributor)
Yamaha Music Center Bldg. Jalan Jend. Gatot Subroto
Kav. 4, Jakarta 12930, Indonesia
Tel: +62-21-520-2577
KOREA
Yamaha Music Korea Ltd.
11F, Prudential Tower, 298, Gangnam-daero, Gangnamgu, Seoul, 06253, Korea
Tel: +82-2-3467-3300
MALAYSIA
Yamaha Music (Malaysia) Sdn. Bhd.
No.8, Jalan Perbandaran, Kelana Jaya, 47301
Petaling Jaya, Selangor, Malaysia
Tel: +60-3-78030900
SINGAPORE
Yamaha Music (Asia) Private Limited
Block 202 Hougang Street 21, #02-00,
Singapore 530202, Singapore
Tel: +65-6740-9200
TAI WAN
Yamaha Music & Electronics Taiwan Co., Ltd.
2F., No.1, Yuandong Rd., Banqiao Dist.,
New Taipei City 22063, Taiwan (R.O.C.)
Tel: +886-2-7741-8888
THAILAND
Siam Music Yamaha Co., Ltd.
3, 4, 15, 16th Fl., Siam Motors Building,
891/1 Rama 1 Road, Wangmai,
Pathumwan, Bangkok 10330, Thailand
Tel: +66-2215-2622
VIETNAM
Yamaha Music Vietnam Company Limited
15th Floor, Nam A Bank Tower, 201-203 Cach Mang
Thang Tam St., Ward 4, Dist.3,
Ho Chi Minh City, Vietnam
Tel: +84-28-3818-1122
OTHER ASIAN COUNTRIES
https://asia-latinamerica-mea.yamaha.com/index.html
AUSTRALIA
Yamaha Music Australia Pty. Ltd.
Level 1, 80 Market Street, South Melbourne,
VIC 3205 Australia
Tel: +61-3-9693-5111
NEW ZEALAND
Music Works LTD
P.O.BOX 6246 Wellesley, Auckland 4680,
New Zealand
Tel: +64-9-634-0099
COUNTRIES AND TRUST
TERRITORIES IN PACIFIC OCEAN
https://asia-latinamerica-mea.yamaha.com/index.html
NORTH AMERICA
CENTRAL & SOUTH AMERICA
EUROPE
AFRICA
MIDDLE EAST
ASIA
OCEANIA
For details of products, please contact your nearest Yamaha representative or the authorized distributor listed below.
DMI27
Head Office/Manufacturer: Yamaha Corporation 10-1, Nakazawa-cho, Naka-ku, Hamamatsu, 430-8650, Japan
(For European Countries) Importer: Yamaha Music Europe GmbH Siemensstrasse 22-34, 25462 Rellingen, Germany
Page 20

Manual Development Group
© 2019 Yamaha Corporation
VAV7200
Yamaha Global Site
https://www.yamaha.com/
Yamaha Downloads
https://download.yamaha.com/
Published 06/2019 POIN-A0
 Loading...