

-
-
-
-
-
-
-
-
-
THE OFFICIAL-PUBLICATION
-
OF
THE-YAMAHA USERS
~-
-
-
-
-
-
I •
GRO
-
-
UP
.....,_
-
-
---
JUNE
..
, ' ,
19~6

Editor
Tom
Darter
Operations
Sibyl Darter
Editorial Board
Bob
Frye
Bill
Hinely
Mark
Koenig
Phil
Moon
Jim
Smerdel
Production
Leslie
Bartz
Pat Gates
Paul
Haggard
Chris Ledgerwood
Cheryl Matthews
Ramirez
June
Joe
Verri
June
4
5
6
-
-
-
-
-
-
-
-
-
1986
-
-
-
-
-
-
LIGHTWAIT
A new DX7 voice created by Lowell Levinger.
SHORTHORNS
A new DX7 voice created
CX5M
Sound
An introduction
contains two musical performances featuring
computer systems; plus voice data
of
the musical selections,
'JOUT
CX5M.
--
&
Data
to
our
second Evatone Data Disk, which
so
By
Kevin Laubach &
'
-
by
Lowell Levinger.
Disk
and
that
you
can load the piece into
Tom
-
-
--
--
-
- -
Volume
!
sequence data for one
Darter.
2,
Number
CX5M
Issue
music
-
-
-
-
-
6
#9
A
product
GPI
Tom
P.O.
ridge,
AFI'ER10UCH
liahed
po11ag1e
Prairie,
points
SCIUPI10NS:
Address
respondence
10UCH,
Northridge,
2338. POSTMASTER:
Send
Box 2338, Northridge,
91323-2338.
of
Editorial
Darter,
Box
CA 91323'2338
monthly. Third
of
form
SerW:es
Director
2338,
North-
is pub-
paid
at
Loog
MN
and
additional
entry.
SUB-
Free.
subscription
to
AFI'ER-
P.O. Box 2338,
CA
91323-
3579
to
P.O.
class
cor,
CA
8
9
10
16
19
0 1986
form
lntemadonal Corporation.
CIRRUS
A new DX7 voice created by Philip Freihofner.
LYRICWOW
A new DX7 voice created
MEP4
An introduction
Event Processor, including examples
as
part
of
instructions).
MJCB
The
MJC8 MIDI Junction Controller can help you eliminate
MIDI spaghetti,
your
MIDI routings without unplugging
cables; complete with examples
By
Kevin Laubach.
Touch
Yamaha
or
lntemadooal Corporation.
by any means, electronically, mechanically, photocopying,
Response
Letters
the DX9.
1rom
No
by
Cedric D. Reverand
to
the operation
your MIDI system (complete with
By
Kevin Laubach.
and
allows
readers about Users Groups, DX7 voices,
part
of
this publlcation may
recording,
you
be
reproduced,
or
to
and
otherwise,
of
Yamaha's new MIDI
of
ways
to
step--by--step
make quick changes in
and
replugging MIDI
step--by--step
stored
in
a
retrieval
without
the
prior
syatan,
wrlttm
ll.
use the unit
instructions.
and
or
tranamit!M
permillaion
of
Yamaha
in
any
2
AFI'ER10UCH/Vol.
2 No. 6
Frotn The Editor
UR
LAST
Evatone Data Disk,
0
issue with a second Evatone
contains
data. That's why we're calling it a Sound
Disk.
computer.
between
instructions
your CX5M music system.
another
musical capabilities
Enjoy
both
The
focus
pages 6 and
Next
month,
Evatone Disk,
these
think.
For the remainder
reiterate
month.
one
giving
clarify all
you can get the information
back issue)
combined
material, chances are
requests
must go
the addresses are entered, the letters are
mally
postal
you
want,
include the indication
the envelope.
some
We
or
more
out
guidelines
of
Back
Issues:
with
for
to
our
kept
regulations.
receive any available
make back issue requests
ISSUE
musical performances
this
You
will
on
how
we
Disks,
information
still get a
of
these areas,
the
procedures
as
quickly
If
a subscription
AFTER
Mailing List input service. After
on
file,
contained
and
we continue
disk-and
time is
on
the
find
the
7,
along
to
use the data portion with
will
continue
which
will focus
of
the
FBO
and
let
us
know
of
this
column, I want
lot
of
mail
so
I want
for
each
involved,
(or
as
possible. Here goes:
a
request
it
TOUCH
in
To
"ATTN:
for
will
not
keeping
be
absolutely
back
request
our
and
CX5M
disk
with
complete
with
1
tone
module.
what
I gave
you
that
involves
to
continue
item. I want
subscription
back
issues is
or
be
fulfilled. All
subscriptions
with
various
sure
issues
that
separatel:y,
Back Issues"
first
this
this one
music
& Data
music
bound
yet
on
the
you
to
last
to
so
that
or
other
nor~
that
you
and
on
Product Uterature: All requests for
cific
product
Yamaha [Yamaha International Corp., P.O. Box
6600, Buena Park,
TOUCH
concerning
music products,
them
as we can
ever, requests for general
must
be sent
Wam.~m,
have received a number
users
complaining
AFTER
recently
warranty
issue.
It
developed
subscriptions were
sample
to
us
And
tion
the two requests separately.
as a free informational service.
sure that we can serve your needs
to
you
different envelopes. Thanks.
'
ting
sooner
mailing
receive a free subscription,
your
request
remember,
request with a request for back issues:
We
are very happy
offer these various services
to
help
Finally, watch your mailbox. You'll
the
than
literature
CA
are happy
the
use
and
in
the
to
Yamaha.
Cards&
TOUCH
purchased a product
card,
is
next
subscriptionbecause
but
true
that
from a warranty
of
the first three issues.
on
the attached postcard below.
don't
us
by
sending different
few
issues
you
think!
must
90622].
to
receive specific questions
of
Yamaha
we
will
QJ.lestions column;
product
AFI'ERTOUCH:
of
letters from Yamaha
that
they
still
haven't
our
initial
sent
to
those
combine your
to
offer AFTER
of
AFTER
go
directly
We
at
AFTER~
professional
answer as many
information
expected
and
sent
received
mailing
card
list,
but
names-just
In
you
need
to
subscri~
TOUCH
In
order
to
(and
continue
free),
we
must
requests
be
TOUCH
~
to
of
how~
We
an
they
in
a
an
was
no
a
order
send
Send
make
ask
in
get~
-TD
AFfER
TOUCH
monthly
informational
publication
from
...
is a
Yamaha.
Receive
Y
sign
AFTER
and mail
list, and you
absolutely
permanent mailing list,
of
articles you want
AFTERTOUCH
OU
CAN
by asking.
the
card
Using the attached postcard, give us your name and address.
(a
postal
TOUCH).
After
you
have filled
it
to
us.
will
no
obligation, and
the
(By
Also,
way,
don't
limit yourself
Free Every Month!
RECENE
When
receive twelve issues
if
you
to
AFTER
regulation-it
in
the
relevant information,
we receive the card, we'll
no
received
so
you
don't
to
just sending in your address. Let us know what kind
read.
The
tailor the information in AFTER
TOUCH
lets us
for an entire year, absolutely free, just
know
that
you
put a stamp
put
you
on
of
AFTER
TOUCH
other strings are attached.
this
issue
in
the
mail,
you
need
to
send in another card.)
more input we receive, the
TOUCH
to
suit your musical needs.
Then
reall1
want
to
receive
on
the
postcard
our
permanent mailing
absolutely free! There is
are
more
already
we will
be
on
able
our
to
Vol
To receive
AFfER
TOUCH
month,
...
every
abso-
lutely free, just
put
your name
and address
the enclosed
card and mail
it
to
us.
2 No.
6/
AFTER
TOUCH
on
·3
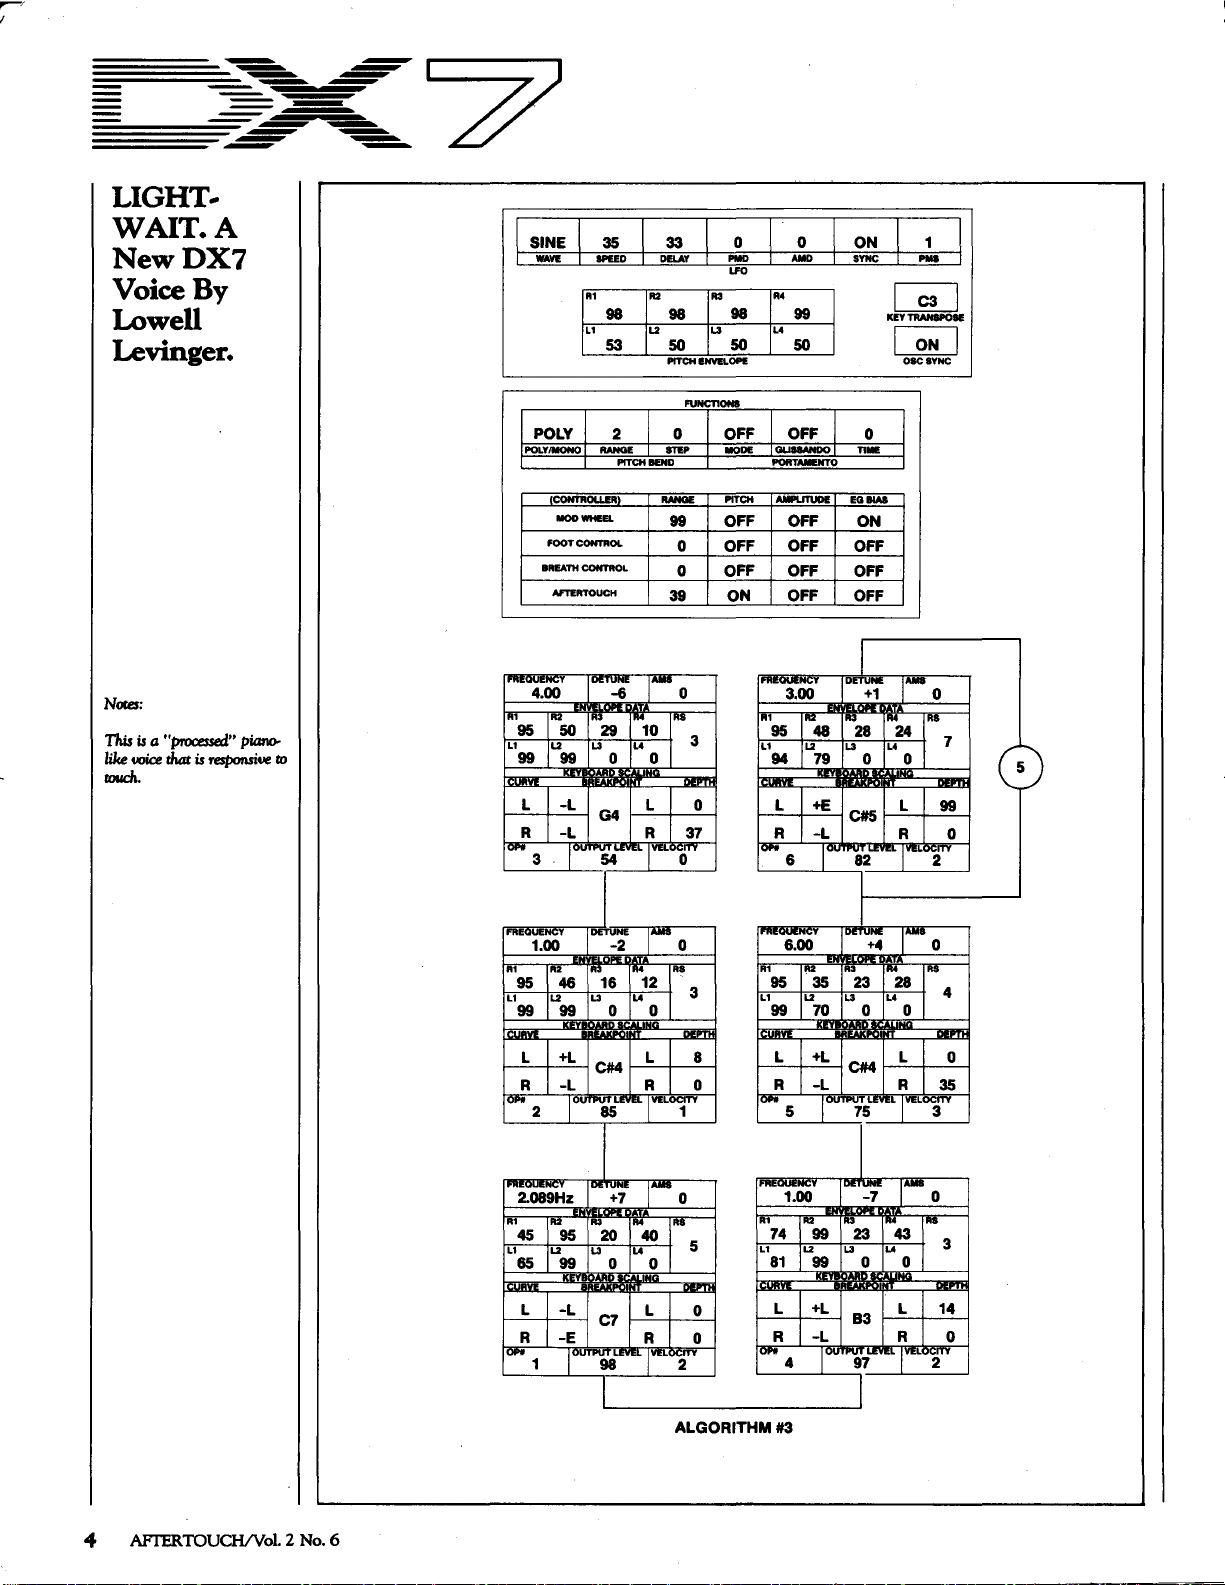
LIGHTWAIT.A
NewDX7
Voice By
Lowell
Levinger.
SINE 35
WAVE
IPEED
AI
98 98
L1
53
33
DELAY
R2
u L3
50
PITCH
INVELDPE
113
98
50
ON
SYNC PMa
R4
99
L4
50
IC3
KEY
TRANSPOSE
I ON I
OBCSYNC
Notes:
This
like
wice
touch.
is
a
"processed"
that
is
responsive
piano-
ro
CON1'ROLLIR
--
FOOT CONTROL
BREATH
CONTROL
Af'TERTOUCH
IFRE~
1 IR2
95 I 50 29
L1
99199
L I
R I
,.,...
FREOUENCT DETUNE
R1
95 I
L1
99199
IDITU.:
A3
JU
L3
-L
G4
-L
3 .
I"'
1.00
jR2 [R3 [R4
46
IL2
L3 L4
0 0
-2
16 12
0 0
r-
R4
}0
RANGE
99
39
JAS
PITCH
OFF
OFF
0
OFF
0
ON
0
3
i----=L'--+-----=-0--l
R
37
~-
I 0
AS
3
AMPUTUDI
OFF
EG
111M
ON
OFF OFF
OFF
OFF
I FRIQUENC1 DETUIIE 1-
3.00
R1
95148
L1
94 I 79
fll£
jU
OFF
OFF
R3
28
L3
+1
0
L4
0
6.00
R1
~~-
95135
L1
99170
L
R 1
I
()PO
5 I
R3
IL2
L3
I+L
-L
C#4 R 35
I
OL
rTPUT
23
0
75
LE
0
L 0
L 'VELOCITY
0
AS
7
5
3
4 AFTERTOUCH/Vol. 2
No.6
2.089Hz
A1
IR2
45
I 95 20 u40
L1
jL2
65199
I"'~;•
r-
0
R3
JR4
JAB
L3
0 0
5
ALGORITHM
FREOUENC'
1.00
JA1
74
L1
81
#3
IJR2
lu
99
99
I""
Jll3
u
23
"""
-7
JR4
L443
0 0
1-
I 0
IRS
13
TR1 I 31
WINE
I
POLY
POLYIIIONO
FOOT CONTROL
IIIII!ATH CONTROL
·"~
..
rc;o·
R1 , ...
67
L1
99
/L297
SPEED
R1
95
L1
49
2
IIANGE
PfTCHIIEND
CONTROLLER
IIOOWHEEL
AFTERTOUCH
~~·:;;~
1
l""14
3
32
u
94
I
""7o
...
DELAY
R2
L2
RANGE
,-·
o I
0
69
51
PITCH ENVELOPE
STEP
IRS
FUNCTIONS
0
99
0
0
39
0
2
PIID
I
LFO
R3
u
OFF
MOOE
PfTCH
OFF
OFF
OFF
ON
0
94
50
1
0
AMD
I
R4
99
...
50
OFF
GLISSANDO
PORTAMENTO
AMPLITUDE
OFF ON
OFF OFF
OFF OFF
OFF OFF
1.00
"'57
/""31 1""15
L1
IL2
99
96
OFF
SYNC
I
I
I I
KEY~
I I
0
TIME
EO
BIAS
I"'"~
1""50
u
...
95 0
1
....
C2
ON
OSCSYNC
,-0
RS
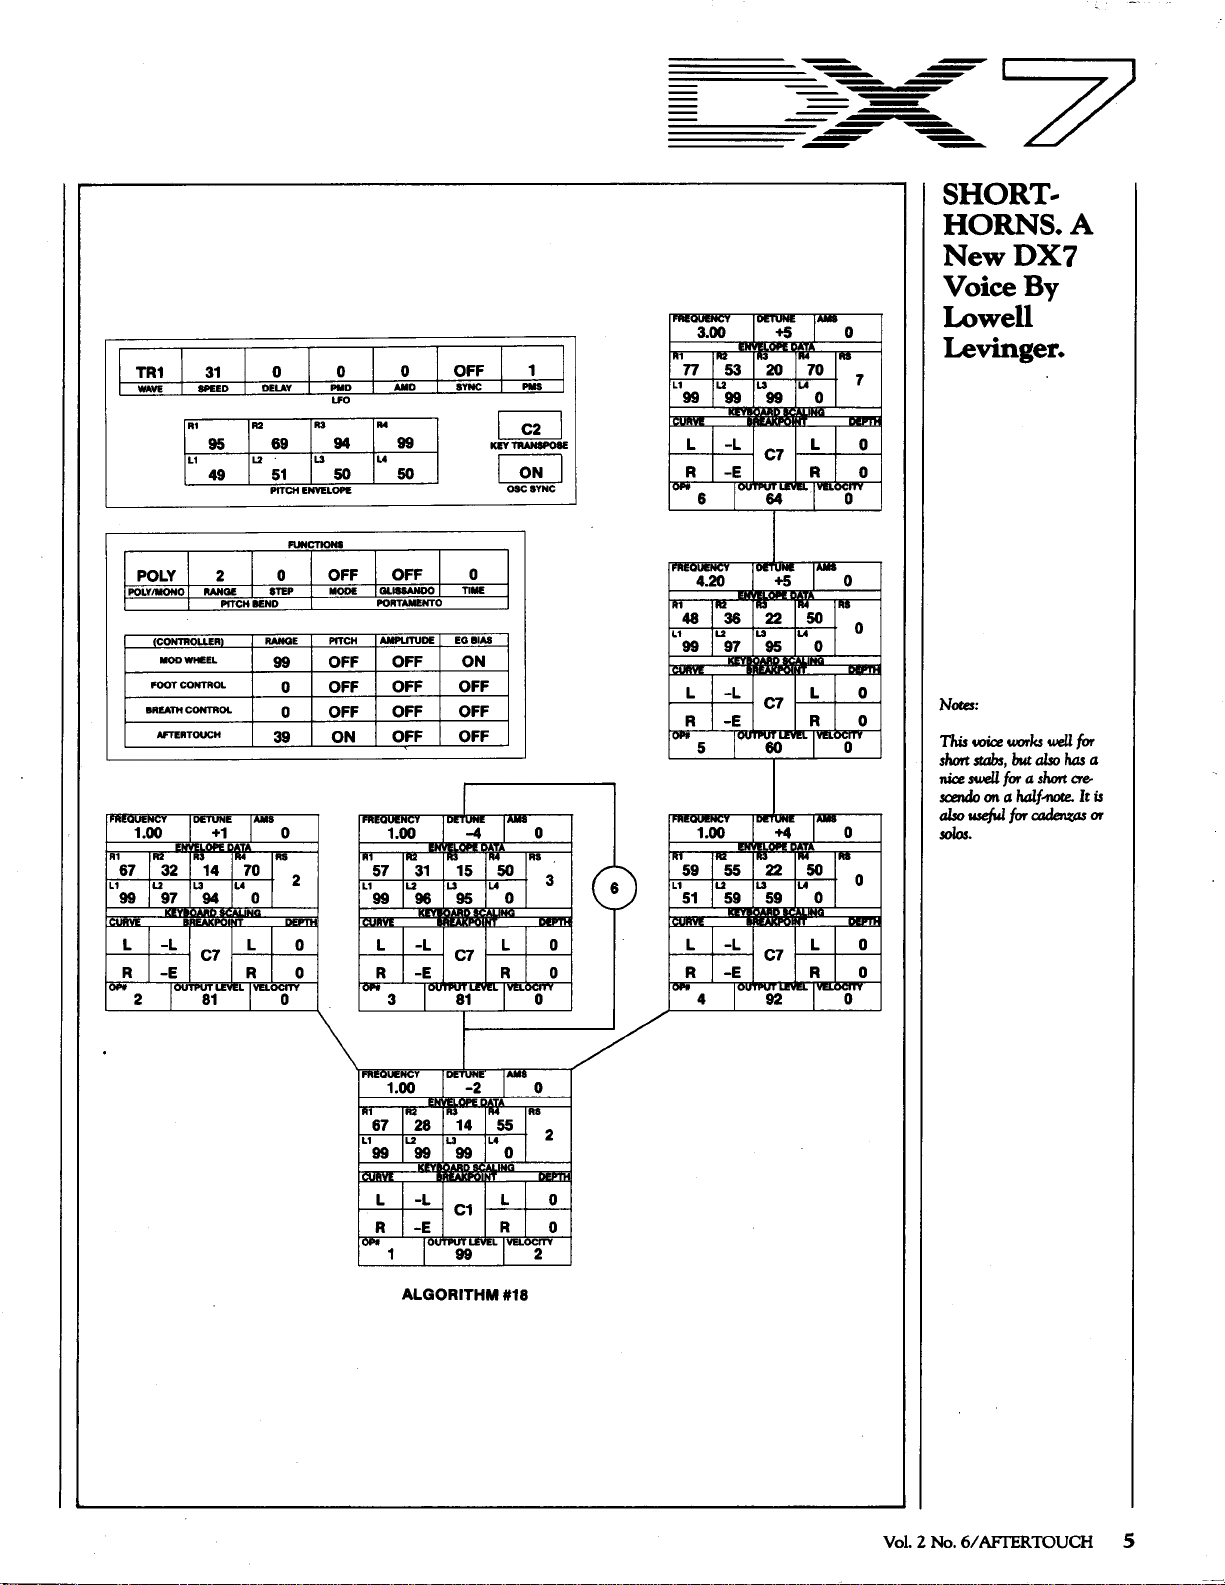
SHORT
HORNS.
..
A
NewDX7
Voice By
1-3.00
77 , ... 53
I
3
6
L1
99
L
R I
......
6
4.20
111
48 , ... 36
L1
99
L I
R
"""5
1.00
"'59 /""ss
L1
51
/L299
[-L
-E
IL2
97
-L
l-e
/u59
/'
,
~
... 20
:70
u
99 0
C7
64
l"'":s
1""22
1""50
u
...
95
C7
....
&o
...
""/-"0
1~':4
... 22
1""50
u
...
59 0
,-0
/"" 7
L
R
'/""'"ci'
,-
0
I"•
0
L 0
R 0
,
.....
_0
1
...
0
0
0
0
Lowell
Levinger.
Notes:
This
wice
works
short
stabs,
nice
swell
scendo
also
useM
solos.
on
but
far
a
a
half-note.
for
roden.tas
well
also
short
for
ha.s
cre-
It
a
is
ar
L I
R j
"""2
-L
-E
/ouar'u
C7
L I
R I
VELD
0
0
L I
-L
R I
-E
I"""
I fREQUENCY
1
"'67
L1
I"'"" 1
/guar'"'L
3
1.00
/2a
IL2
99
99 99
L I
-L
R
I-E
I
ALGORITHM #18
uu
C7
IDEUNE
-2
1
...
14
u
C1
ru
9st'
L 0
R 0
,-PC;
,-·
l'"ss
...
0
L 0
R
L I
VEL
0
RS
2
0
""'21TY
L I
R
"""4
-L
1-e
IV'
L 0
C7
R 0
92~·~,-0
Vol. 2 No.6/
AFrERTOUCH 5
Sound
An
Introduc
tion
Second
Tone
To
Our
Eva
Disk.
Kevin
Laubach_&
Tom
Darter.
...
...
By
HIS
MONTH'S
one
in
T
the
CXSM
disk,
recorded
CXSM
1 features two musical performances that show-
case the CXSM,
and
featured
To
simply place the Evatone disk
(on
top
a coin
play.
To use the music data supplied
the disk, it is necessary
data
process is as simple as making a cassette recording
of
table (as
cassette,
observe
distortion
use any noise reduction circuitry such
To
month's
describing
the Disk. In the case
ances
and
software
and
outline
the music
by-step
cassette into your CXSM music computer, and
will
recreate
data.
our
music
which
presented
musical
Sound&. Data Disk contains both. Side
sequence
on
side
play
the
of
another record), weight it down with
(on
the center
from
the
disk
any record. Place the disk
outlined
then
place
the
recording levels
on
the
give
you a proper
Sound&.
what
on
side 1, we
was
the
data
instructions for loading
describe
the
musical
FREE DISK,
AfterTouchseries, focuses
computer.
music
performances,
whUe
side 2 contains voice data
data
for
one
Unlike
data
of
the
the
second
the
instead
this
special
selections
1.
musical
tape.
you
basic setup used.
on
how
selections
on
your turntable
of
the disk, as shown) and
on
to
first copy (record) the
onto a data
above),
the
needle
For
Data
Disk, we will
will find
of
will
tell you what equipment
used
to
side 2, we
to
set
performance
cassette.
on
your turn-
set
to
record
on
the
so
as
not
best results,
introduction
on
each
the musical perform-
create
the
In
the
will
give you stepthe
your
system
on
side
side 2
on
disk
to
do
as
Dolby.
to
start
track
material,
case
data
using
on
first
of
1,
of
This
the
and
cause
not
this
by
of
of
from
up
to
this
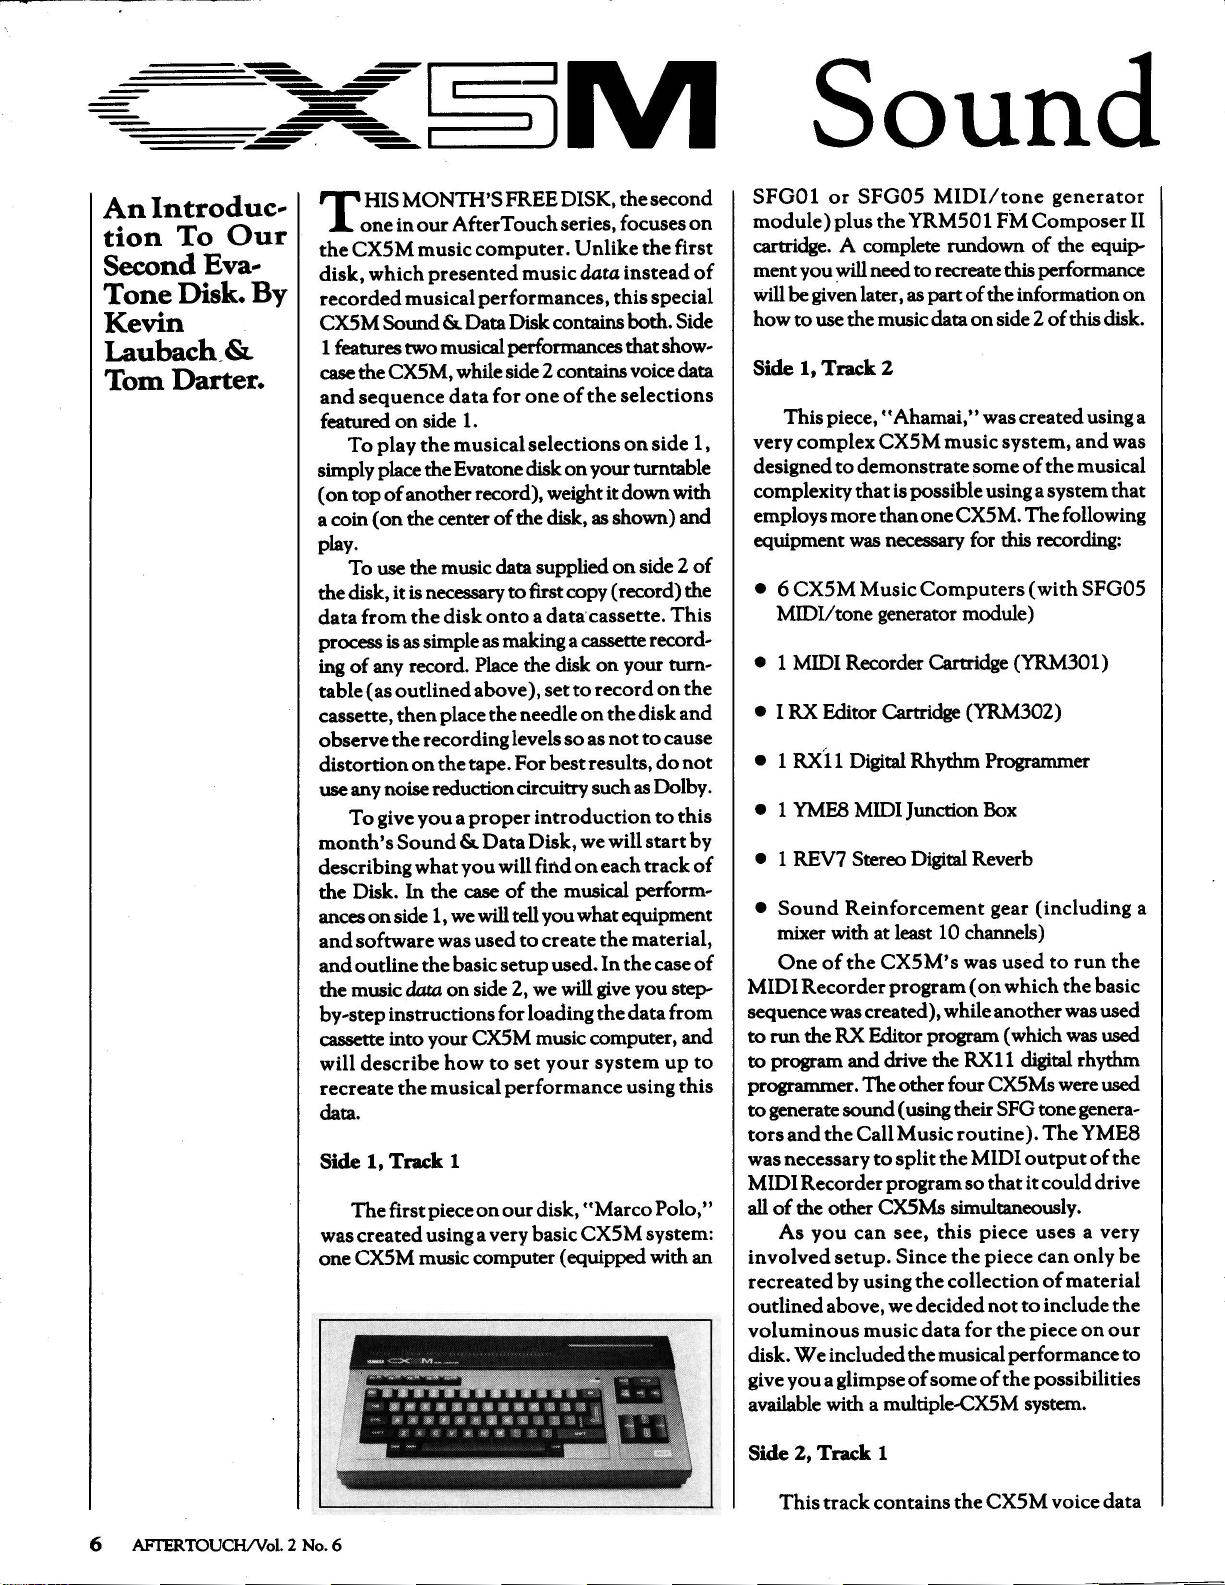
Side 1, Track 1
The
first piece
was
created
one CXSM
on
our
disk,
"Marco
using a very basic CXSM system:
music-computer (equipped with an
Polo,''
SPOOl
module)
cartridge. A complete rundown
ment you
will
how
or
SFGOS
plus
the
will
need
be
giv~n
later, as
to
use the music data
MIDI/tone
YRMSO 1
to
recreate
part
of
on
generator
FM
Composer
of
the equip-
this
performance
the information
side 2
of
this disk.
Side 1, Track 2
This
piece,
"Ahamai,"
very
complex
designed
complexity
employs
equipment
• 6
CXSM
MIDI/tone generator module)
• 1 MIDI Recorder Cartridge (YRM301)
• I RX Editor Cartridge (YRM302)
• 1
RXi
• 1
YMEB
• 1 REV? Stereo Digital Reverb
•
Sound
mixer with at least
One
MIDIRecorderprogram(on
sequence was created), while
to
run
the RX Editor program (which was
to
program and drive the
programmer. The other four CX5Ms were
to
generate sound (using their SFG tone genera-
tors
and
was necessary
MIDI Recorder
all
of
the other CX5Ms simultaneously.
As
you
involved
recreated
outlined
voluminous
disk.
We
give
you
available with a
CXSM
to
demonstrate
that
is possible using a system
more
than
one
was necessary for
Music
1 Digital Rhythm Programmer
MIDI Junction Box
Reinforcement
of
the
the
Call
can
setup.
by
above, we decided
included
a glimpse
Computers
CXSM's
Music
to
split
program
see,
Since
using
the
music
data
the
of
multiple-CXSM system.
was created using a
music
system,
some
CXSM.
this
gear
10 channels)
was
used
which
another
RXll
routine).
the
MIDI
so
that
this
piece
the
piece
collection
not
for
the
musical performance
some
of
the
and
of
the
musical
The
following
recording:
(with
SFGOS
(including
to
run
the
was used
digital rhythm
The
YME8
output
it
could
uses
a very
can
only
of
material
to
include
piece
on
possibilities
was
that
the
basic
used
used
of
the
drive
be
the
our
II
on
a
to
6 AFI"ERTOUCH/VoL 2
No.6
Side 2, Track 1
This
track
contains
the
CXSM voice
data

&Data
that
was used
on
side 1
into
your
following equipment:
•
CXSMMusicComputer(withSFG01
SFGOS
• Cassette Recorder (with appropriate Yamaha
interface cable)
• Video Monitor (with
• FM Composer II Cartridge (YRM501)
Make
OFF, and make the
the
CXS M
accompanying diagram).
Composer II Cartridge into the
slot and
boot-up automatically. Now follow these steps
to
load the voice data into your CXSM:
in
"Marco
of
our
CXSM disk). To load
CXSM
MIDVtone generator module)
sure
turn
computer,
that
and
the
the CXSM
video/
the
power
PJ:oper
cassette
ON-the
Polo"
(the
you
will
sound cable)
to
the
connections between
recorder
Then
insert
CXSM cartridge
program will
firsttrack
CXSM is
Disk
this
data
need
the
or
(see
the
the
FM
• Video Monitor (with
• FM Composer II Cartridge (YRM501)
Make sure that you have the proper
tions
between
recorder (see
that
the
FM
inserted
have
these initial steps
of.
sequence data into your CXSM:
cassette recorder and rewind
ning
2)
1)
Now
Put
On
into
just
the
of
the sequence data.
the CXSM,
the
the
Composer
the
loaded
follow
appropriate
CXSM cartridge
the
should
this
video/
sound cable)
connec-
CXS M
accompanying diagram)
data
type
and
II cartridge is
from
Side 2, track 1,
already
procedure
the following:
by
cassette
to
the
cassette
properly
slot-if
taken care
to
load
into
the
begin-
and
you
the
the
Basic
COIIMCtions
CIU.fC!U'e
data
11114Sic~.
into
for
a
CX5M
loading
1)
Put
the
appropriate
cassette recorder and rewind
ning
of
the voice data.
2)
On
the CXSM,
cload=VOICE
then press RETURN. Make sure
the SHIFT key while typing
3)
The
CXSM
Answer "yes" by pressing RETURN.
4)
Press PLAY
After
about
be
loaded into your computer.
Side
2,
Track 2
This
track
data
that
was used
~ck
on
side 1
data into your CXSM computer, you will need
the following equipment:
•
CXSM
SFGOS
Music
MIDVtone generator module)
will
on
35
seconds,
contains
in
of
our
Computer
cassette
type
the following:
"VOICE."
ask
if
you
your
cassette
the
voice
the
CXSM
"Marco
CXSM disk).
Polo"
(with
into
to
the
to
hold down
are
recorder.
data
sequence
(the
To
SFGO 1
the
begin-
sure.
will
first
load this
or
cload=
then press RETURN.
3)
The
CXSM
Answer "yes" by pressing RETURN.
4)
Press PLAY
After
about 3 minutes
sequence
computer.
After
sequence data into your CXSM (from side 2
our
cal
performance
sure
CXSM are connected
make sure that the
left, while
right. Connect any additional effects you would
like
used
Now,
the CXSM. The FM Composer II program will
respond with
you
CXSM disk), it is easy
that
the
the
to
your
a REV7 stereo digital reverb.
to
will
ask
if
you
on
your
cassette
and
40 seconds,
data
will
be
loaded
have
loaded
to
recreate the musi-
heard
on
side 1. First,
left
and
right
Audio
to
two mixer inputs; then
"Left" input is panned
"Right"
mixer-the
begin
this
input
is
recording
playback, simply press FS
display:
play=
are
recorder.
into
the
voice
Outs
panned
on
sure.
the
your
and
make
of
the
to
the
to
the
side
of
1
on
• Cassette Recorder (with appropriate Yamaha
interface cable)
Now
will
simply
begin
press
playback.
RETURN
and
the
CXSM
Vol. 2 No.
6/
AFrERTOUCH 7

CIRRUS. A
NewDX7
Voice
By
Philip
Freihofner.
These DX7
voices can also
be loaded into
all
the other
Yamaha6
..
operator FM
digital
sizers
synthe
..
and tone
generators,
including the
DXl,
DXS,
TX7, TX216,
TX816,and
TFl.
TR1
WAVE
POLY
POLY/MONO
·"·1~;·
80
L1
85 1
L I
R I
OP02
""1~ooo'Hz
45
L1
70
L I
R I
""
1
35 0
SPEED
A1
99
L1
50 50
NA I NA NA
RANGE
PITCH
CONTROLLER
MOD
WHEEL
FOOT
CONTROL
BREATH
CONTROL
AFTEATOUCH
I""'~;·
l""26
1""16
L3
..
99
81
-L
A-1
-L
IO"TPU&r'"L
I""
uo•
IR395
1""20
L3
IL2
99
99
-L
A-1
-L
l"u
gg-····
A2
L2 L3
BEND
I
1
.... 0 0
4
25
L4,
0
L
R 0
1"".,'0
lAMa
1:30
0
I
L 0
R
I'"L"oTY
DELAY
99
P1TCH
ENVELOPE
FUNCTIONS
STEP
RANGE
0
0
0
100 ON
AS
0
0
0
IRS
0
0
17
PMD
LFD
A3
99
50
MODE
PITCH
NA
NA
NA
0 ON
AMD
A4
L4
I
GLISSANDO
POATAMENTO
AMPLITUDE
OFF OFF
""""1~;·
l"'ao
L1
85
L I
R I
101'11
4
""1~2o2.iz
l"'45
L1
10 1
A A I
L I
R I
I
OPII 3
SYNC
99
50
NA I NA
NA NA
NA
NA NA
TIME
EGBIAS
NA
l""'u!'•
+7
1""26
l""16
L3
IL2
99
81
-L
A-1
-L
lo"&r'"L
oo1
u
0
A395
1""20
L3
..
99
99 0
-L
A-1
-L
[U'
"'ggLCoCL
ALGORITHM
PMS
C3 I
KEY
TRANSPOSE
I ON I
DSCSYNC
[•
1
...
25
L4
0
L 0
R 0
I""L''OIT'
o I
AMa
l"ao I"•
L4
L 0
R 0
lftL
#5
Aa
0
ucou
c
[•
1'"2s
L4
0
L
R 0
IVOL""o
1
......
"ao
L4
0
L 0
R
1""'"'0
O
I"•
0
0
·o
0
I"•
0
0
0
0
O
0
""""too'
"'8o
l""16
L1
85 1 ..
L I
R I
01'116
""1:349'Hz
45
l""2o
L1
70
r99
L I
R I
DPII
5
1""26
99
-L
-L
luu
,
IA3
-L
-L
1°""99
L3
...
L3
0
81
A-1
ar•cL
"c)"
95
99
A-1
.....
8 AFrERTOUCH/Vol. 2
No.6

TR1
WAVE
A1
L1
POLY
POLY/MONO
35
99
50
2
RANGE
PITCH
0
DELAY
A2
99
L2
50
PITCH
I
STEP
BEND
0 0
PMD
LFO
A3
L3
ENVELOPE
FUNCTIONS
0 RETAIN! OFF I
99
50
MODE
A4
L4
GLISSANDO
POATAMENTO
AMD
99
50
-
OFF 3
SYNC
0
TIME
PIIS
C3
I
KEY
TRANSPOSE
ON I
OSCSYNC
7
LYRIC
WOW.
NewDX7
Voice By
Cedric D.
Reverandll.
A
CONTROLLER
MOD
WHEEL
FOOT
CONTROL
BREATH
CONTROL
AFTEATOUCH
DflUo"
1.00
1
32
L1
45
L
R I
lVI'
FAEauENCY
4.00
A1
32
L1
45
L I +L
R I
ru""
...
97
["2s
L3
IL2
99
99 0
j
+L
A-1
-L
[uu
[A225
IL2
99
-L
I
uu
~•-u:nL
59 0
DETUNE
A3
97
L3 L4
99
C3
"64
3
2 5
A4
L4
I
0
1"4
54
'"""'"[VEL
RANGE
0
50
0
30
r-
o
AS
54
L 50
R
[VEL"'.!''
lAMS
O
AS
0
L
50
R 0
0
0
0
0
PITCH
AMPLITUDE
OFF
OFF OFF
ON OFF
OFF OFF
ON OFF
!fREQUENCY
1.00
R1
IA2
95
L1
IL2
99 97
L I
R I
""" 6
I
FREQUENCY
2.00
,
IA2
99
L1
99
IL2
L I
R I
u
...
IGBIAS
OFF
OFF
OFF
I
DnvO•
~-
0
IR499
L4
0
I""
L4
...,,
AS
99
L 0
R 0
8
1""
~
AS
0
L
R 0
L I
VELOOTY
0
0
0
6
0
A3
71
72
L3
91
-L
A-1
-L
IO~LE1'ELIVELDOITY
I
DETUNE
A3
99 99 99
L3
99
99
D I
-L
A-1
-L
I
OUTP'&s
Notes:
This
patch
in
lryical
(not rapid)
and
there's
in it.
Essentially,
erwelopes.
#4116
attack,
swi/tl,
cieca,s
at38in0p#+
The
prowles
bemuse
go to
rapid!,,
Meanwhile,
of
Ops #I-#3
for
the
brass,
comes
in a
get
off
and add
the,
oo:ce
sen.oes
the
of
bit
of
to a
as a transition
two
the
eiUielopes
#3
.!fmt,
as
aU,
tween
bemuse
is
designed
a
"wow"
it's all
stack
the
the
max.
because
the
other
is
responsible
sound
later.
Op
#2
slow
the
in. Op
sounds,
Rz
far
playing,
sound
done
with
of
0ps
initial
erwelopes
The
sound
of
stack
that
The
and
Op
and
low
hannonia
#I
aau-
be-
large!,
at
51.
we
u
!fREQUENCY
1.00
1
"'51
[A236
L1
99
IL21a
L I
+L
R I
-L
I"""
["u"gg
1
I
IDETUO 1-0
1"8
1 ... 53
l""31
L3
L4
42 0
L
C3
R
"'""L
[
YEL<>ef
I
ALGOR1Tt1M
FAEuUENCY
AI
0
50 L
25
L1
10""
99
99
1.00 0
[A248
IL2
38
I
-L
R I
-L
I
OUTPU99
4
#4
I
DETUNE
R3
20
L4
L3
0 0
A-1
LEI L I
L
I
1-o
4 AS
60
0
L 0
R
0
VELOC31TY
The
a/tertouch
The
foot
but
it
touched,
shade
control
slwwld
enough
of
tlibrato.
is
just
optional.
is
set
far
be
slight!,
to
add
,o,
a
Vol. 2 No. 6/AFTERTOUCH 9

MEP4
An
Introduc-
tion
To
Yamaha's
New
Event
MIDI
Pro-
cessor. By
Kevin
Laubach.
Front
and
bock
panels
MEP+
of
HE
NEWY
and highly flexible MIDI event processor.
T
It can be programmed
many useful
four-way keyboard splits, filtering
MIDI messages, changing one
into
another,
effects. The
cessors, which can be routed in any combination
to
its four programmable outputs.
Undentanding
The MEP4
RUN,
the three modes, simply press the appropriate
mode
the MEP4 defaults to
memories, and can
off.
or
(Pl,
andoff.
to
edited individually.
down the EDIT button and press either
P3,
to
being edited.
tions
button and press the left
CURSOR)
each processor as shown
diagram; however,
group names in the following order:
the
EDIT, and UTILITY.
button,
In the
RUN
To
select a desired memory, press the INC
DEC buttons. Pressing any processor button
P2,
P3,or
In the EDIT mode, you program the MEP4
modify incoming messages. Each processor is
or
P4. The Processor Select LED
let
you
To select which
to
edit, hold down the GROUP SELECT
1.
TheDA
one
Program Change,
AMAHA MEP4 is a powerful
to
modify MIDI
ways
that include creating up to
type
ofMIDI data
and
even
creating
MEP4 contains four internal pro-
The
MEP4
has
three operational modes:
To
When
you
turn
the
RUN
mode.
mode, you can select and store
tum
each processor
P4)willtogglethatprocessoron
·
To
sel~
a processor, hold
know which processor is currendy
of
the six groups
or
right key (P
buttons.
T A PRESETTER can
The
data
in
the accompanying
the
display will
one
flows
Pitch Bender
data
out
certain
time
delay
enter any
power
ON,
on
Pl,
will
blink
of
func-
ARAM/
through
show
send
out
in
of
and
P2,
the
position
Control Change messages
(such
position, Poly
SustainOn/Off,andsoon).
time"
any one
selected.
The
2.
accept
MIDI channels.
3.
The
out
program changes, pitch bend, aftertouch,
and
TheDATAMODIFIERallowsyouyou
4.
to
modified,
You can partially
MIDI
pletely
example, you can convert aftertouch messages into pitch-bend messages. This is the
most powerful and flexible section
MEP4. Extreme applications may require
more
desired effect.
5.
TheDELAYPROCESSORdelaysthe
output
3000
echo
function.
6. The
assign the output
oneofthefourMIDIOUTputports.
is where you can individually
(useful for detuning),
as
Volume,
function is
of
CHANNEL
one,
MESSAGE FILTER lets
specific types
the like.
choose the
and
message
different
than
one
of
the selected processor from 0 to
milliseconds. Slap
effects can be
OUTPUT
Modulation
/Mono,
the
all,
type
how
processor
ASSIGNER allows you to
Portamento Time,
performed
60
MEP4 memories is
FILTER
or
any
combination
of
MIDI
of
MIDI message to be
it
will be modified.
modify
or
convert it
MIDI
created
of
each processor
of
your choice
This
each time
can
be
you
data
an
incoming
to
message.
to
achieve the
back
and
with
set
the MIDI
and
two
Wheel
"one
set
to
of
filter
such
as
a com-
For
of
the
other
this
to
any
This
---------
D
D
D
D
D
10
AFI'ERTOUCHNol. 2
---------
POWER
ON/OFF
FOOT SW
o(i)9
YAMAHA
MEP~
IN
No.6
THAU
9
oun
OUT3
GG)Q)G
Ml
I
0
0

OUTput
channel for each processor.
The
UTILITY
These
may
GROUP
or
The functions
1.
2.
3.
4.
SELECT
right
key
MEMORYPROTECT(memorylJTotect).
This
function
protect
MEM~NAME
input).
This
programs you have created
ED~BUFFER
tion
).
This
the
Edit Buffer
scratch.
PRGRM~GERCV
receive).
respond
mode
has
seven
be
selected
(PARAM/CURSOR)
will
on
and
function
function allows
by
holding
button
and
be displayed
turns
the
MEP4
off.
INPUT
allows
INIT
(edit
so
you
create a setup from
pressing
in
(memor:Y
or
buffer
you
(program
This
function
to
incoming
sets
MIDI
the
you
to
Change messages.
5.
FOOT~SW
This
function allows
use
of a footswitch.
the
jack
can be
increment, memory decrement,
mode select.
6.
MIDIMONITOR(MIDlmonitor).
function
each processor.
7.
MIDI
function lets
tents
OUTputs 1 through
data
is sent from
The
best way
can be
tions
MIDI
specific
and outline a few
the
include a
the
described.
used
for
instruments.
MIDI
MEP4
st~by~step
MEP4
ASSIGN(footswitchassign).
you
to
When
on
the
back
panel, a footswitch
used
in
one
of
three ways:
lets
you
monitor
BULK
of
the
in
to
DUMP
you
dump
the
MEP4
memory
each
to
understand
is
to
show some specific
unit
in
conjunction
Let's
systems
each system.
perform
that
of
the
possible applications for
routine for progralnming
the
specific
(bulk dump).
4.
The
MIDI
take a look
involve
In
each case, we will
determine
plugged
the
the
entire
same
OUT.
how
application
functions.
down
the
the
left
buttons.
this
order:
memory
name
to
name
edited.
initializa-
initialize
change
MEP4
to
Program
the
into
memory
or
receive
This
output
via
with
the
of
This
con~
MIDI
bulk
the
MEP4
applica~
other
at
two
MEP4,
IN
System
keyboard controller for a TX7 (see the
on
into
sages
1
TX7 audio output.
velocity
range
to
range
DX7 is
Adding A Velocity
1
This
basic
system
page 13 ).
the
and
to
the
As many
of
rectify
of
The
MEP4; the MEP4 processes those
sends
TX7;
the
of
output
MIDI velocity.
this
situation,
MIDI velocity can be utilized when the
used
as a MIDI keyboard controller.
DX7
them
effect
you
may know,
does
uses
the
sends
through
is
heard
not
cover
The
MEP4 can be
so
that
DX7
MIDI
MIDI
the
Offset
through
DX7's MIDI
the
the
To A DX7
Keyboard
To
achieve the effect described above,
gram
the
MEP4
by
following these steps:
1.
In
the
RUN
mode, select
preset
buttons.
2.
Press
mode.
3.
Select the
holding
pressing
4. Press INC twice.
by
pressing
UTILITY
ED~
BUFFER
down
the
left
to
GROUP
or
The
an
empty MEP4
the
INC
enter
the
UTILITY
INIT
function
SELECT
right cursor keys.
display
will
* Completed! *
The
Edit
buffer
being
initialized,
settings
filter out
pitch-bend
trollers,
see
article.]
5.
SelecttheEDITmodeforprocessor 1 by
holding
6.
Hold
pressing
select
7. Press
is
now
initialized. [Note:
the
MESSAGE FILTER default
program
messages.
the
procedure
down
down
the
the
MESSAGE FILTER.
DEC
once.
change,
If
:YOU
outlined
EDIT
GROUP
left
or
right
The
and
aftertouch, and
wish
to
at
pressing
SELECT
cursor
display
use
the
will
as a
MIDI
diagram
messages
m~
OUT
port
the
full
0~
12 7
used
full
upper
pr~
or
DEC
by
while
read:
After
these
con-
end
of
this
Pl.
while
keys
to
read:
This
diagram
data
flow
MEP4'S
shows
in
each
of
prooessors.
OUT
the
the
basic
VoL 2 No.
6/
AFTER
TOUCH
11

MEP4c-a-d
Note OFF = OFF
This
stops
processor 1
messages
8.
9. You will still
10. Press DEC once. The display will read:
This
messages go through. [Note: In this application,
processor I accepts only
modifies
through.
11. Select
12. Hold down
13. Press INC twice. The display
14. Press
15.
go
through.
Hold
down
selects EDIT mode for processor 2.
TER
group. Press the right cursor once.
The display
stops
them.
Thus,
will read:
NoteON=ON
NoteON=OFF
processor 2 from
Processor
only
EDIT
holding down EDIT and pressing
GROUP
the right cursor once
MODIFIER.
O:MSG:9n.xx.yy
the
right
display will read:
PressiNCthreetimes.
read:
from
letting
EDIT
and
press P2.
be
in the MESSAGE
letting
note~on
2
lets
note-off
note-on
messages
mode
for
processor 1 by
SELECT and press
to
select the DATA
cursor
1·***·
four
The display will
note~off
This
f'll.....
note~on
messages and
messages
are
modified.]
will read:
times.
go
Pl.
The
20. Select the EDIT mode for processor 2 by
holding EDIT and pressing P2.
21. Hold down
the right cursor twice to select the
PUT ASSIGNER.
22. Press the right cursor twice. The display
will read:
23. Press DEC once. The display will read:
This
sets
processor 2 to outport
24. Select the
Play
the
hear the effect. Pressing the
toggle the effect
Storing
want
memory.
1.
2.
3. Press DEC. The display will read:
Your
If
you
to
Press UTILITY
mode.
Hold
pressing
MEMORY PROTECT function.
play will read:
GROUP
OUTPORT
OUTPORT
RUN
DX7 with different velocities
on
New
are
happy
store
the
To
do so, use the following steps:
down
GROUP
the
Protect (ON)
SELECT and press
ASSIGN=2
ASSIGN=l.
1.
mode by pressing RUN.
BYPASS
and off.
MEP4 Program
with
the
settings
to
enter the
left
cursor
button will
effect, you will
in
the
UTILITY
SELECT while
to
select
OUT~
MEP4's
the
The~
to
12
AFTERTOUCHNol. 2
1:0FS:xx,V=O
16. Press the right
cursor to
17. Press INC once
''yy.''
This
DX7 velocity.
Press the right cursor once
18.
cursor to
19. Press and hold down INC until the
play reads:
This sets processor 1 to increase the DX7
ity by a value
No.6
cursor
"xx."
sets
"0."
1:0FS:yy,V=+30
of
30.
once
to
change the display
the
MEP4
to
move the
to
offset
to
move the
to
the
d~
veloc~
Protect
4. Hold down
the right cursor once to select the
OR
Y NAME function.
read:
5.
Press
and
hold
"D,"
"D"
press
the letter
pass
reads:
(OFF)
GROUP
No.xxD
SELECT and press
The
the INC
for the first-space.
DEC
button
until
MEM~
displaY'
to
select
If
the
display
will
you

[Note:
"xx"
is
the
cuTTentl:y-selected
6. Press the right cursor
to
over one space
Repeat
7.
the
the right.
previous
space until the display reads:
memory.]
to
move the cursor
two
steps
for
each
-OX7---
System 1 MIDI
thru-
out----in--
Diagram
No.xx DX7 VEL
now
given
the
You have
it's time
8. Press
9.
Press
to
store it.
RUN
the
to
right
program a name,
enter the
cursor
RUN
(STORE).
mode.
display will read:
10. Press
the
Store xx
right
to
cursor
xx
(STORE).
display will read:
Are you sure?
to
11. Press INC
12. Press UTILITY
store the setup.
to
enter
the
UTILITY
mode.
Hold
down
13.
pressing
the
GROUP
left
SELECT
cursor
to
select
MEMORY PROTECT function. The
play will read:
Protect
(OFF)
14. Press INC. The display will read:
and
on
(ON)
and
the
again.
stored
MEMORY
You have
MEP4
now
program,
TECT function
Protect
named
is
while
your
and
The
The
the
dis-
new
PRO~
II
DX7
Control Change messages.
Since there are four processors in the MEP4,
set
of
each can send a different
set
up
the
situation
TX816
by
to
creating
modules each. This is.done by assigning
ent MIDI channel numbers
to
modules 1 and 2
MIDI channel1 (controlled
by the MEP4's processor 1 ), modules 3 and
MIDI
channel2
(controlled
processor 2 ), modules 5 and 6
3 (controlled by the MEP4's processor
modules 7 and 8
to
MIDI channel4 (controlled
by the MEP4's processor
how
to
setthe
MIDI channels in
consult your owners manual for instructions.
With
this
configuration,
information
from
the
four different Program Changes, four detuning
(via the Pitch Bender settings), and four
offsets
of
initial Control Changes
sets
of
each pair
works,
modules. To get an idea
let's
got
through
creating different program changes.
changes. You can
take
advantage
four
"groups"
to
specific modules:
by
to
4
).
If
you are
MEP4
that
settings-one
the
procedure
ofthis
of
two
differ~
4
the
MEP4's
MIDI channel
3)
and
not
sure
your
TX816,
you
can
send
will call
up
for
of
how this
for
to
Basic
MIDI amnections
System
1,
a
TX7
with
using
the
a
DX7
MEP
TX7
for
and
4·
System
board controller for a
on
into the MEP4; the MEP4 processes those
sages and sends them through MIDI
1
2
This
system uses the KX88
page 15).
TheKX88sendsMIDimessages
TX816
as
a MIDI
(see the diagram
OUT
to
the TX816; the effect is heard through the
key~
m~
port
TX816 audio outputs.
This
setup
is very
TX816 performance and function settings in
eight
tone
modules
Each
time
an
MEP4
DATA
PRES
ETTER
useful
from
one
memory
can
send
for
presetting
MEP4
is
selected
one
all
preset.
the
Program
Change, one Pitch Bender position, and any two
Sending
Four
Different
Program
Changes
ToTheTX816
To achieve the effect described above,
gram the MEP4 by following these steps:
1.
In
the
RUN
mode, select an empty MEP4
preset
by
pressing
the
INC
or
buttons.
to
enter
the
2. Press UTILITY
UTILITY
mode.
Select the
3.
holding
pressing the left
ED~
BUFFER INIT function by
down
GROUP
or
SELECT while
right keys.
4. Press INC twice. The display will read:
pr~
DEC
Vol.
2 No. 6/AFrERTOUCH
13

MEP4
The
Edit buffer is
being
settings
pitch-bend
trollers,
article.]
5.
SelecttheEDITmodeforprocessor
holding down EDIT and pressing
6.
Hold
pressing the left
DATA
7.
If
until the display reads
Press
8.
Press the right cursor
9.
over the
10.
Press
program
the
to
number
TX816.
11. Select processor 2
ing down EDIT and pressing P2.
12. Follow the steps above
Program Change
and
Using the same procedure, set the desired
13.
Program Change
(for modules 5 and 6
14. Finally, use the same procedure
desired
cessor 4 (for modules 7 and 8
TX816).
Continued
initialized,
filter
out
messages.
see
the
down
PRESE1TER.
necessary, press
INC. The display will read:
and
OAT
send
4
of
Program Change number in
* Completed! *
now
initialized. [Note: After
the
MESSAGE FILTER default
program
procedure
PRGM(OFF): 1
PRGM(ON): 1
"1."
hold
number
A PRESETTER
the
to
the TX816.
change,
If
you
outlined
GROUP
or
right keys
the
INC
is displayed.
desired
modules 1 and 2 of
EDIT
number
number
aftertouch, and
wish
to
at
SELECT
left
or
as
follows:
to
move the cursor
until
the
in
processor 1
Program
mode by
to
set the desired
for modules 3
in processor 3
of
the TX816).
use
these
the
end
of
1 by
Pl.
while
to
select the
right keys
desired
This
sets
Change
hold~
to
set
pr~
of
con~
this
the
the
the
OUTPUT
3. Press INC once. The display will read:
OUT
...CH
This sets
4.
5. Press INC twice. The display will read:
This sets processor 3
6. Hold down EDIT and press
7. Press
This sets processor 4
port
for
need
to
1. Hold down EDIT and press
2.
proCessor 2
Hold down EDIT and press P3.
OUT
...CH
INC
three
read:
OUT
...CH
OUT
will need
port
Finally, you
for each processor. Since the default setting
processor 1 to
to
change its setting.
MIDI
Presstherightcursortwice.
ASSIGN
ASSIGN=
to
output
ASSIGN=
to
output
times.
ASSIGN=
to
output
to
OUT
To
1, use these steps:
on
on
P4.
The
on
set
the MIDI
port
1,
set
the processors
2
channel 2.
3
channel 3.
display will
4
channel4.
you
P2.
The
will
display
will read:
OUTPORT
Press DEC once. The display will read:
3.
OUTPORT
This sets processor 2
4.
Hold down EDIT and press P3. The
play will read:
OUTPORT
ASSIGN=
ASSIGN=
to
outport
ASSIGN=
2
1
1.
3
OUT
not
~
14
AFrERTOUCH/Vol. 2
At
this point, you will need
output
setting for
you
processor 1.
desired MIDI channel for this application, use
these steps:
1.
2. Press
No.6
channel for each processor. The default
all processors is MIDI channel 1, so
will
not
need
to
change
To
set the other processors
Hold down EDIT and press P2.
and
hold
GROUP
press INC
five
----~-~
times. Display will read:
~~
---~
to
set the MIDI
any
settings
to
SELECT,
~~-~--~~-~-------------------
then
for
the
5. Press DEC twice. The display
OUTPORT
This sets processor 3
6. Hold down EDIT and press P4. The
play will read:
OUTPORT
ASSIGN=
to
outport
ASSIGN=
will read:
1
1.
4
~

7.
PressDECthreetimes.
read:
Thedisplaywill
System2
OUTPORT
This sets processor 4
If
you
are
happy
want
to
store
memory.
above,
To
do
in
the section called ''Storing Your New
ASSIGN = 1
to
with
the
settings
so, use
the
MEP4 program."
Message Filter Settings
After being
TER
only accepts note-on
sages.
The
initialized,
default settings are as follows:
NOTEOFF=ON
NOTEON=ON
POLY
A.TOUCH
CNTL# =
PRGRM
CH
A.TOUCH
PITCH
CH
BEND=
MODE
---
CHANGE=
=OFF
MSG
=OFF
**
OFF
=OFF
SYSTEM=OFF
To
change
any
of
these
steps:
1. Hold
sing
down
the
GROUP
left
or
right
MESSAGE FILTER.
2. Press
3.
4.
the
tion
you
Pressing
function
Pressing
left
or
right keys until
want
to
the
INC
ON.
the
DEC
change is displayed.
button
button
function OFF.
The
CNTL#
can choose
function
to
accept none, all, one,
outport
the
1.
effect,
in
the
you
MEP4's
procedure outlined
the MESSAGE
and
note-off
,**
OFF
settings,
SELECT while
is a special case. You
keys
to
will toggle
will toggle
follow
select
the
or
any
these
pres--
func~
will
F'IL-
mes--
the
the
the
two
Control
control
Change messages
changes
7
A~
7F
Messages).
To
accept all
Control
the following:
1.
Press the left
is over the
2. Press INC once.
or
right keys until
"--
The
CNTL#=ALL
To
accept
one
or
two
sages,
do
the
following:
1. Press
2. Press
the
right cursor
over the "**"
the
INC
in
the display.
or
DEC
desired Controller number{ s ).
* * * *
As
you
can
see,
the
ability
to
customize
and
gives
you a great
raw materials
does take some patience,
the
end
results are
your
deal
of
MIDI. Programming
more
(in
the
range
00~
are
covered
in
Mode
Change messages,
the
cursor
"
in
the
display.
display
Control
to
MEP4
MIDI
but
than worth
move
buttons
gives
music
of
control
you
will
read:
Change
the
cursor
to
set
you
system,
over
the
will find
the
MEP4
effort.
79;
do
mes--
the
the
the
that
Basic
System
a
T'X816
MIDI
.:z,
!ISing
with
TX816
ronnec:tions
a
KXBB
the
MEP
fur
and
4-
Vol. 2 No. 6/AFI'ERTOUCH 15

MJC8
AHAMA'S
controller
Y
MIDI signal routing. Changing
from a master
pressing a
ging
thatresultfrom
instruments (using
MIDI
and
THRU
button
rep
Reading The Front-Panel
The
key
works involves understanding
front-panel
top
half
of
the
the word
in order, as follows:
The
how
moment. Before you have
thing
"patch" directly followed by the number
current
eight"*"
under
display:
There are
to
tions).
down
left and right cursor keys.
where you
eight outputs. There are two
procedure:
1)
right cursor keys, move the cursor
that is directly under the
whose
want
2)
you
INC
number
marker under a
"output"
OUTPUT
bottom
the
machine
in,
the
MJC8
position
the
eight
50
preset
50
To
MEMORY SELECT while pressing
The
portion
Chooee a destination.
destination
to
control.
Choose a source.
want
and
of
NEW
MJC8 MIDI junction
allows complete
to
a slave can be accomplished by
instead
lugging
"daisy
jaclcs) can
to
understanding
LCD
(liquid-crystal display).
display is fixed,
half
of
display
patch;
numbers
patch()()********
patches in the MJC8 (allowing you
different MIDI routing configura-
access
the
of
set
the MIDI sources for each
to
be
the
DEC
buttons
the
desired
particular
of
MIDI
cables.
chaining" a group
the
individual
also
followed by eight numbers
1 2 3 4 5 6 7 8
the
display lets
is
configured
consists
after
markers,
in
different
the
display
OUTPUT
is
the
Select a
source
MIDI
control
an
instrument
physically unplug..
MIDI
instrument
be avoided.
Display
how
how
and
consists
at
programmed any-
of
this
you
aligned
the
top
patches,
with
main
steps
Using the left and
to
MIDI
device
MIDI
by
pressing
until
you
input.
output
means that
delays
the
MJC8
to
read
you
know
any
given
the
word
of
will
directly
half
of
hold
the
"*"
of
to
the"*"
number
you
device
see
A"*"
over
of
its
The
of
the
find
the
the
is
the
this
the
the
Eliminate
MIDI
Spaghetti
With
The
MJCSMIDI
Junction
Controller.
By
Kevin
Laubach.
no
source is selected for that output.
There
panel. They correspond
puts. The proper LED will light whenever there
is a MIDI signal present
Please note that each
tion)
the
numbered MIDI
In
other
are always fixed;
sets the routing configuration.
The MJC8 is
one reason why the
impossible
the same
MJC8
MIDI-junction box: any INPUT can be routed
to
any
routed
The best way
works
the
instruments. Let's take a look
MIDI systems that involve the MJC8, and show
some
flexibility
are
also
eight
LEOs
to
the eight MIDI out-
at
its respective output.
OUTPUT
alwa:1s
goes
to
the
same
instTUment, which is
instrument
words, the
to
OUTPUT.
is a
very
OUTPUT,
to
an:1
is
to
show some specific applications for
unit
in
of
the ways
of
connected
THRU
selecting the INPUT (source)
not
route more
of
the OUTPUTs.
to
conjunction
your MIDI routings, all without
jack
on
OUTPUTs
a MIDI merge unit. That is
OUTPUTs
than
On
the other hand, the
flexible
and a single INPUT can be
it
MIDI-routing
understand how the MJC8
with
can be used
on
the
front
( destina-
to
the
samethe back panel.
or
destinations
are
fixed-it
one INPUT
and
other
at
to
MIDI
two specific
increase the
changing a single MIDI cable.
System
~1,
diagram).
directly
of
• Playing
1
This
system
and an
to
the routing possibilities:
MJC8 front panel as follows:
involves a DX7,
RXll
All
MIDI
the MJC8, as shown. Here
the
TX7
(see the accompanying
connections
from
the
a TX7, a
are
DX7.
made
ar~
some
Set the
OUTPUT 1 2 3 4 5 6 7 8
patch
oo
2 1 * * * * * *
Make sure that the TX7 is
and
the combined mode is set.
the DX7, the TX7
allows the TX7
DX7 whenever a new
or
DX7
•
the TX7.
Recording
will also play.
to
the
set
to
MIDI channel1
When
This
send function data
voice is selected
DX7
to
the
QX21.
you play
setup also
to
the
on
the
Set the
is
to
16
AFI'ERTOUCH/Vol. 2
No.6

MJC8 front panel
as
follows:
System 1 MIDI Diapoam
OUTPUT 1 2 3 4 5 6 7 8
patch
00 3 * 1 * * * * *
Make
matches
QX21 will record the DX7, and the DX7 will
play the sequence back when the QX21 is
into
•
sure
that
the
DX7 receive
the
QX21
PLAY
mode.
Overdubbing
front panel
Make sure the TX7 receive channel matches the
QX21
viously-recorded material
QX21 using the EXCHANGE command Oob
Command
different MIDI channel
previous example
QX21 will now record what you play
DX7 while you hear the original
theTX7.
as
OUTPUT 1 2 3 4 5 6 7 8
patch
00 * 3 1 * * * * *
transmit
Bl;
transmit
on
the
Q}Ul.Set
follows:
channel. Bounce
to
then
set
the QX21
than
(Job
Command
you
channel
channel.
the MJC8
the
track 2 of
to
record
used
in
A6).
on
part
played
The
put
pre-
the
on
the
The
the
on
thru
I I I I I I I I
12345678
.J.,
.J.,
.J.. .J..
I I I I
L
___
(,
):--------.
I I I t t t 1 I
--------
--
MJC8
G8mGG
out
....... =
I I I I I I I I
12345678
I I I I I I I I
,;:..,;:..,;:..,;:..
J
=
in
thru-
-ox?---
II
DX7
--(2)1----.,
a
TX7
-(3)----.,
QX21
out:-------'
thru-
out·------
thru-
• Playing
the
follows:
Make
proper MIDI channels: one should
channel
part,
on
which you recorded your overdub. Set the
RXll
desired pattern
PLAY
parts
the
and play
• Syncing
MJC8 front panel
the
DX7, TX7,
Q;X21.
OUTPUT 1 2 3 4 5 6 7 8
patch
sure
on
and the other should
to
on
OUTPUT 1 2 3 4 5 6 7 8
patch
Set
the
00 3 3 * 3 * * * *
the
DX7
which you recorded
sync
to
a MIDI clock and select the
or
song. Now, when you press
the QX21, the DX7 and TX7
you recorded; the
in
time with your sequence.
the
Q.X21
as
00 3 3 4 * * * * *
MJ
and
TX7 are
be
RXll
to
follows:
and
RXll
C8
front
be
your
set
to the channel
will
the
RXU.
panel
set
set
also
from
as
to
the
to
the
original
will
play
begin
Set the
Basic
5,stem
a
T.X7,
RXn
MIDI
c:onneaions
I,
.mich
aua a
a Q:}U1, and
with
che
~CB.
(
4)1----,
t::::J
RX11
DESTINATIONS SOURCES
1.
2. TX7
3.
4.
5. * 5. *
6. *
7.
8. *
fur
D'X7,
an
-~·
cc
cc
DX7
in
in
QX21
in
RXll
in
*
Set the QX21
AS).
clock mode. Now, when the
the
in
out-------'
+
in
-'!!"!.AX
-~·-~
I c
c::::::::J -••
-----------
-----------
cccccccc
cccccccc
1.
DX7
out
2. TX7 out
3. QX21
4.
RXll
6. *
7.
*
8. *
to
external sync Oob Command
Be
sure that the
QX21 will begin playing the DX7 and TX7
sync with the
RXll
11
I
c
c
out
out
RXll
's tempo.
is
in
the internal
RXll
is started,
Olnanueri
VoL
2 No.
6/AFI'ERTOUCH
17

M]CB~
•
Playing
recording
front panel
the
RX11
on
as
from
the
Q){21.
follows:
the
DX7
Set the MJC8
OUTPUT 1 2 3 4 5 6 7 8
patch
00
* * 1 1 * * * *
while
System 2
1:
ol=~.u:~:.:..uls~~~:l
thru
MIDI
MJC8
Diagram
in
Make sure that the RX11 is
CH
1 and
on
the DX7. Check the RX11 owners manual
And
desired
proper notes
assigned
drums
ability
sensitivity.
INFO AVAIL.
out
which notes
drum sounds. Now, when you play the
on
the
drums
on
the RX11. Playing the RX11
from the DX7 keyboard gives you the
to
play each drum sound with velocity
You
can
"drum" performance
to
you
your sequence.
make the
drums
set
to
MIDI channel
Tum
the volume
on
the DX7 will trigger the
DX&..,
on
you will hear the
also
record
the QX21. This allows
a permanent
your
part
Syatem2
This system involves a KX88, a QX1, a
RXll
TX816, a DX7, and an
panying diagram). All MIDI connections are
made direcdy
some
of
•
Playing
the MJC8 front panel
the
the
to
the MJC8,
routing
TX816
possibilities:
(see the
as
shown. Here are
from
the
as
follows:
accom~
KX88.
OUTPUT 1 2 3 4 5 6 7 8
patch 00 * * 1 * * * * *
Be
sure that the KX88 and TX816 modules are
on
the
same
MIDI
channel.
modules
KX88 will trigger the TX816 modules that have
been
•
Recording
front panel
to
COMMON
set
to
the corresponding MIDI channel.
on
the
as
follows:
mode.
Q){
Set
1.
the
Playing
Set
the
TX816
MJC8
OUTPUT 1 2 3 4 5 6 7 8
patch
00
* 1 1 * * * * *
Prepare
When
what you play
part
18
the
QX 1 for
you start recording, the QX1 will record
on
you are recording
AFI'ER.TOUCH/Vol. 2 No. 6
recording
the KX88. You will hear the
on
the TX816.
on
track
off
to
DX7
of
Set
the
1.
( 1 )
~1-·l-l-----(2)------iin
DX7
(5)--inJ
RX11
DESI'INATIONS
1.
KX88 in
2.
QX1 in
3.
TX816in
4. DX7 in
5.
RXll
in
6.
*
7.
*
8. *
Basic
connections
2,
which
TX816,
and an
M]CB.
RX1
SGeS
a
KXBB,
a QXI, a
1
with
for
s,stem
D'X7,
the
a
•
"J
~""
,.;;L-.L.....L..J......1.....1..J...1..J....L.,.,
out
--------------------l
,....::;L...I...-----.
ijii
.=.RX11
k:~:~::::
88 88888888 8
SOURCES
1.
KX88out
2.
QX1 track 1
3. QX1 track 8
4.
TX816out
5.
DXll
6. RX11
7.
*
8. *
Overdubbing
DX7.
Set the MJC8 front panel
on
OUTPUT 1 2 3 4 5 6 7 8
patch
00
* 5 2 * * * * *
out
out
the
out
out
QX1
from
as
Continued
the
follows:
on
page
20

Touch Response
ERE
ARE
fellow
H
are
about
asking
make
There
in
the
For
information,
below,
Tom
Owens
2107
Torrance,
I
have
would
can assist
patches with me. I
about
the
old
think
address below.
Larry Melton
NJR
Ministries
P.O. Box
Branson,
AFTER
Users
for
information.
contact
Torrance/San
W.
like
how
you
and
is a Users
or
calf
213-32~2709.
230th
CA
90501
just
recently
to
correspond
me
with some patches
to
get
ARP
synthesizers
can
help,
1314
MO
65616
SOME
Groups,
TOUCH
offer
MORE
and
If
your
* * * *
Group
Pedro
contact
Place
purchased a DX7,
am
interested
some
of
please
letters
readers.
others are simply
you
are
interested,
help.
that
meets monthly
area
of
California.
me
at
the
address
with
someone
or
share some
in
finding
the
same
sounds
had
in
them.
contact
me
from
Some
and
who
out
that
If
you
at
the
I am encountering
cians
on
the
west
recently
seems
where
their problems
established. Interested parties
by
the
Bob
32
Punta Gorda, FL
Yamaha
of
myself.
and
ancient
looking
ownsaDX9.
am
States, since I
ship.
the
David
2674
Bartlett,
purchased
to
be a real
these
new
and
Please
announce
calling
me
at
813-639-7425,
address below.
Gordon
Colony Point Dr.
I am
now
the
DX9. I would like
people
or
groups
That
way, I can
greatly
of
address below.
increase
but
powerful
for
anyone
Whenlsay"immediatearea,"
course referring
doubt
If
you
are
out
Shaw
Galaxie
TN
38134
more
coast
of
CX5M
need
to
computer
pass
on
that
such a club
33950
proud
(but
to
that
are
get
the
knowledge
artifact
in
my
immediate
to
the
there are many
there,
please
have a focal
owners
in
and
more
musiFlorida
computers.
their discoveries.
lonely) owner
know
in
continental
who
can
has
can
make contact
or
by
writing
some names
the
same
touch
with
of
as
the
DX9.
area
in
my
contact
have
There
point
discuss
been
of
boat
them
such
I'm
that
United
town-
me
to
as
an
at
Letters
Readers
About
Groups,DX7
Voices,
TheDX9.
a
I
From
Users
And
''
TE
INVITE
VV
developed a novel use
it
to
us.
send
If
we
decide
Don't
ourselves, write
to
use
it
up
YOU
worry
TO
about
your
in the magazine,
CONTRIBUTE
of
one
of
the AFTER
your writing
idea
as a
full
put
TO
TOUCH
style-just
article
in
your name
AFTER
TOUCH.
products, write
get
the
information down.
AFTER
on
TOUCH,
it, and send you a check for
$100.00.
If
you've
got a hot
tip
on
applications
or
use,
send
it
along.
If
we use it,
receive full editorial credit, plus a check for $25.00.
Do
you have a great new DX7 patch, a CXSM program,
RXll?
Send them
By
the
patches,
way, we
or
manuscripts.
in-we'll
cannot
We
pay
$25.00
assume
will
only
for each one used.
liability
be
for
able
to
the
return
safe
or
a great pattern for the
return
unused
of
material
you enclose a self--addressed, stamped envelope with your material.
If
you just have a question regarding
it
send
(We
use all
along too,
regret that we
of
Finally,
your questions
if
and
you
we'll
won't
just
want
do
our
be able
to
guide us in
to
get
best
to
establish direct contact with other X users, send something in
"Touch Response."
are interested in starting
AFTER
TOUCH
We'll
do
our
bestto
up
regional users groups.
is your publication. Let us hear from you!
the
use
of
Yamaha professional products,
to
answer
it
in the pages
of
answer questions through the
our
choice
something
print
of
off
your
names
future topics.)
and
chest,
addresses
to
or
our
AFTER
mail,
if
of
If
you've
it
up
and
we'll
try
it
you
'11
unused
ideas,
to
you
if
TOUCH.
but
we
will
you'd
like
to
letters column,
all those who
Write
AFTER
To:
..
TOUCH,
P.O.
2338,
ridge,
91323
Box
North
CA
..
2338.
..
Vol 2
No.
6/AFI'ERTOUCH
19

AFTER
TOUCH
P.O. Box 2338
Northridge,
CA
91
'2")'2
")'2'2Q
Bulk
Rate
U.S.
Postage
PAID
Lang
Prairie,
Permit
No.
MN
56
Assign the same MIDI channel
OUT
port 1 (jobCommand3)and
modules. Prepare the
track 2. While you are recording, you will hear
the
existing
Your new part can be monitored from the DX7.
•
P1ayingtheTX816,DX7,andRX11
from
follows:
Send tracks
their respective MIDI channels
20
AFTERTOUCH!Vol. 2
track(
the
QX
OUTPUT 1 2 3 4 5 6 7 8
patch 00 * * 2 2 3 * * *
1--4
QX
s)
playing
1.
Set the MJC8 front panel
through
OUT
No.6
to
the QX1
theTX816
1 for recording
on
the
TX816.
port
1 and set
Oob Command
on
as
3).
Set
the
MIDI
channels
modules and DX7
ments
of
QX1 tracks
sync
on
the RX11. The QX1 will now play the
TX816 and the DX7 when it
mode. The RX11 will
play in time with the
This
configuration
number
the TX816 modules from the DX7. As you can
see, the MJC8 allows you
MIDI connections between instruments, and
makes
quickly; all without moving a single MIDI
of
it
possible
to
match the channel
1--4.
also
QX
other applications, such
to
change
of
the
TX816
assign~
Select MIDI
is
put
into
PLAY
start its pattern and
1.
is also
perfect
as
to
streamline your
MIDI
routings
voicing
cable!
clock
for
a
 Loading...