

Drum Score
Instruction
/
DTX 402 SERIES

How to Play with Songs
《
Introduction
There are many different musical genres and rhythm styles throughout the world. We have
selected ten songs for the DTX 402 Series from mainstream genres and techniques to
help hone your drumming skills. Even beginning drummers will easily be able to build their
chops by following along with the sequence charts presented below. Those able to read
music are welcome to try out each song using the drum score as well. Scores with “Lesson
(number)” written on them for songs in each genre are compatible with the “Song part
gate” practice parts in training mode. For details, see the owner’s manual for the DTX402
Series. Additionally, you can use “DTX402 Touch,” a dedicated iOS/Android application for
the DTX402 Series, to view example videos of performances by the authors.
Numbering 1 2 3 4 5 6 7 8
Count
Right hand (hi-hat)
Left hand (snare)
Right foot (bass drum)
》
1 & 2 & 3 & 4 &
● ● ● ● ● ● ●
● ●
● ●
●
An example of a sequence chart as
used in this document:
《
How to Read the Sequence Chart
Numbering
Count
The notes that form the basis of a rhythm pattern or ll are assigned to a series of
numbers that varies depending on the feel or groove.
8th Note Feel : 1-8 / 16th Note Feel : 1-16 / Triplet Feel : 1-12
The count of the beats within one bar within 4/4 time. The numbers displayed in red in
this row follow quarter note timing (starting on the downbeat). It is important to count
out the time aloud.
》
The standard method of practice is to sound out “1e&a 2e&a” like “one eee and
aah two eee and aah” and so on.
2
《
How to Practice with the Sequence Charts
1. Look at the numbering in order from the beginning, check which instrument is to be
struck, and build the pattern.
A stroke is indicated by a black dot (●). When building the pattern, there is no need to
match the tempo of the song. Start out slowly.
Ex: How to build the POP1 pattern (Rehearsal Mark A, page 10)
1: Strike with the right hand (hi-hat) and right foot (bass drum) at the same time
2: Strike with only the right hand (hi-hat)
3: Strike with the right hand (hi-hat) and left hand (snare) at the same time
4: Strike with only the right hand (hi-hat)
5-8 have the same phrasing as 1-4, so you have it down once you can play 1-4
continuously.
2. Once you are able to play the above pattern, move on to counting aloud while playing to
get the feel.
• For example, for the 8th Note Feel, count it out to feel the beat of the 8th notes.
• You can also build up to the pattern gradually by starting with just the right hand, then
adding the left hand, and then the right foot.
》
01
02
03
04
05
POP1
POP2
··········
··········
ROCK1
ROCK2
METAL
·····
·····
·····
INDEX
10
16
20
24
28
06
07
08
09
10
FUNK
··········
HIP HOP
EDM
JAZZ
LATIN
···········
···········
········
32
36
40
44
48
3

Drumming Fundamentals
1/3 1/4
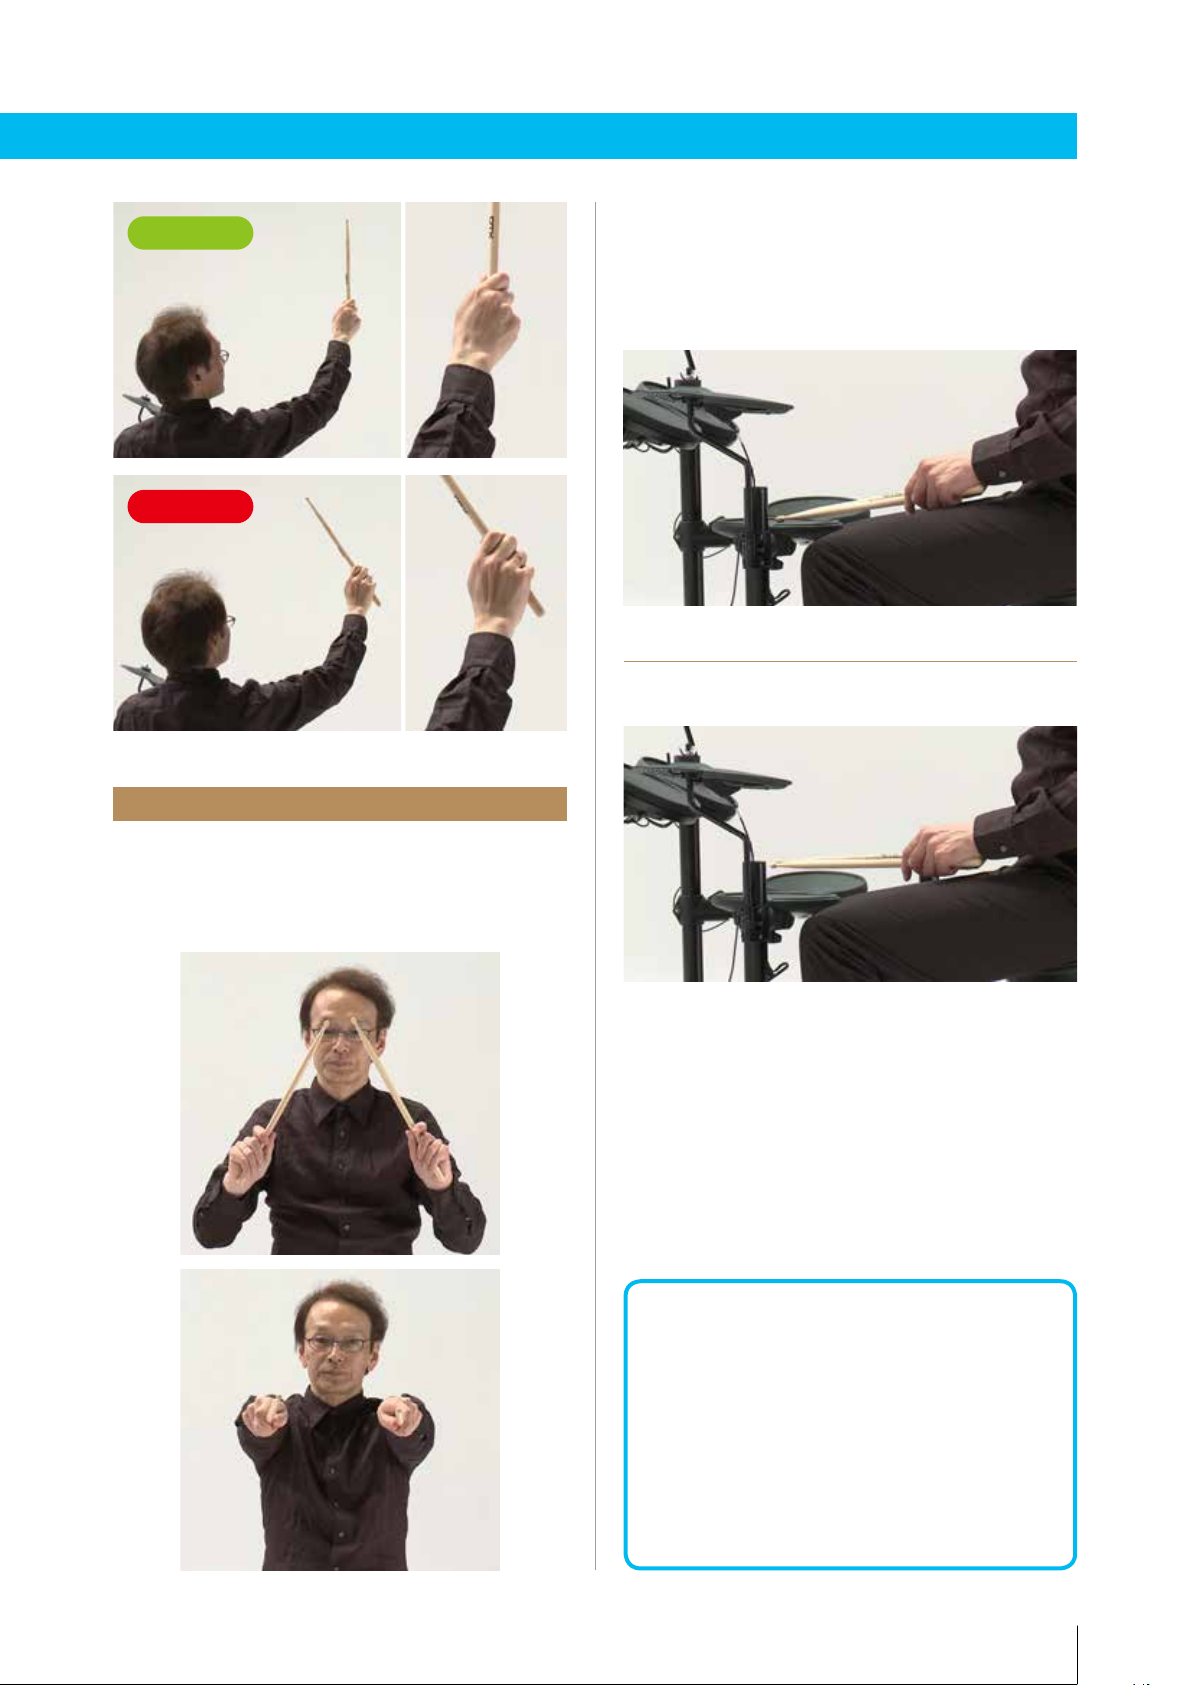
Holding the Sticks
Where to hold the sticks
《
Hold the stick about midway between 1/3
・
and 1/4 of the way from the end (page 9).
Holding at 1/3 will make the striking side too
short and make the stick feel too light, while
at 1/4 it will be too long and feel heavy.
To put it more specifically, the stick has a
・
balance point from which it can most easily
rebound off the drum. Ideally you want to
find that point, but just use the position
described above to start with.
》
Step 2
Use the remaining three fingers to lightly
support the stick. Gripping tightly with these
three fingers will cause the following problems:
Tiring out while playing
・
Stick not rebounding off the drum, ruining
・
the sound
Striking from the arm without using the wrist
・
Ideally there should be a bit of space between
the stick and the palm without trying too
hard. Make sure you are not putting any
unnecessary strength into the grip.
Right
Wrong
Holding the sticks
《
》
Step 1
Once you know where you should hold the stick,
hold that point firmly between the fleshy part of
the thumb and first joint of the index finger.
Try striking the drum by using just those two
fingers at first.
Step 3
Hold the stick so that it is in line with the
forearm. If this prevents the little finger from
touching the stick, you may hold it at a slight
angle so that the little finger touches the stick.
There is a lot of movement when playing
the drums, and it is best to position yourself
thinking of the whole arm as an extension of
the stick.
4
Right
Wrong
When doing so, make sure that the sticks and
forearms are in line. Then lower the arms so
that the tips of the sticks are above the center
of the drum head.
Ready position
《
》
Getting Ready to Play
Form
《
Hold the sticks in an upside-down V shape.
》
When the tips of the sticks are above the
・
center of the head, let the sticks hover 2-3
cm above the head. This basic position is
called the ”ready position.”
Don’t get into the habit of resting the sticks
・
on the drum head when taking this position
as it will cause unwanted noise before you
begin playing.
TIPS
The playing style described above is called
“matched grip.” There is also the traditional
grip (also known as orthodox grip). As the
degree of difficulty is somewhat higher
with the traditional grip, we will use the
matched grip in this document.
5

Sitting on the Throne
Adjust the position of the throne so that your
right foot is pointed straight at the bass drum
when seated. Keep a relaxed posture without
sitting too far back; your center of gravity should
be over the middle of the seat.
Stepping on the Pedals
There are two basic techniques for stepping on
the pedals.
Heel-down
《
》
Foot Position
Positioning your foot on the bass
《
drum pedal
For heel-up technique, place your foot so that
the tips of your toes are a little lower than the top
of the pedal.
For heel-down technique, you do not have to
place your toes down from the top of the pedal.
》
Lower your heel and play by stepping on the
・
pedal using your ankle.
It is easy to play quietly with this technique,
・
but difficult to maintain a powerful sound.
Heel-up
《
Raise your heel and play by stepping on the
・
pedal using your whole foot.
It is difficult to play quietly with this technique,
・
but easy to maintain a powerful sound.
Both heel-down and heel-up have their strengths
and limitations, so use whichever technique
matches the sound you are going for.
》
Ready position
《
Place your toes on the pedal and raise your
heel, letting the weight of your foot push the
pedal down so that the beater is touching the
drum head. This is the ready position for the
bass drum pedal.
》
6
TIPS
When using the same heel-up technique,
there is also a style of playing called
“open sound” which keeps the beater from
resting on the drum head. However, it is
hard to keep your balance playing in this
difficult style, so we will not go into it here.
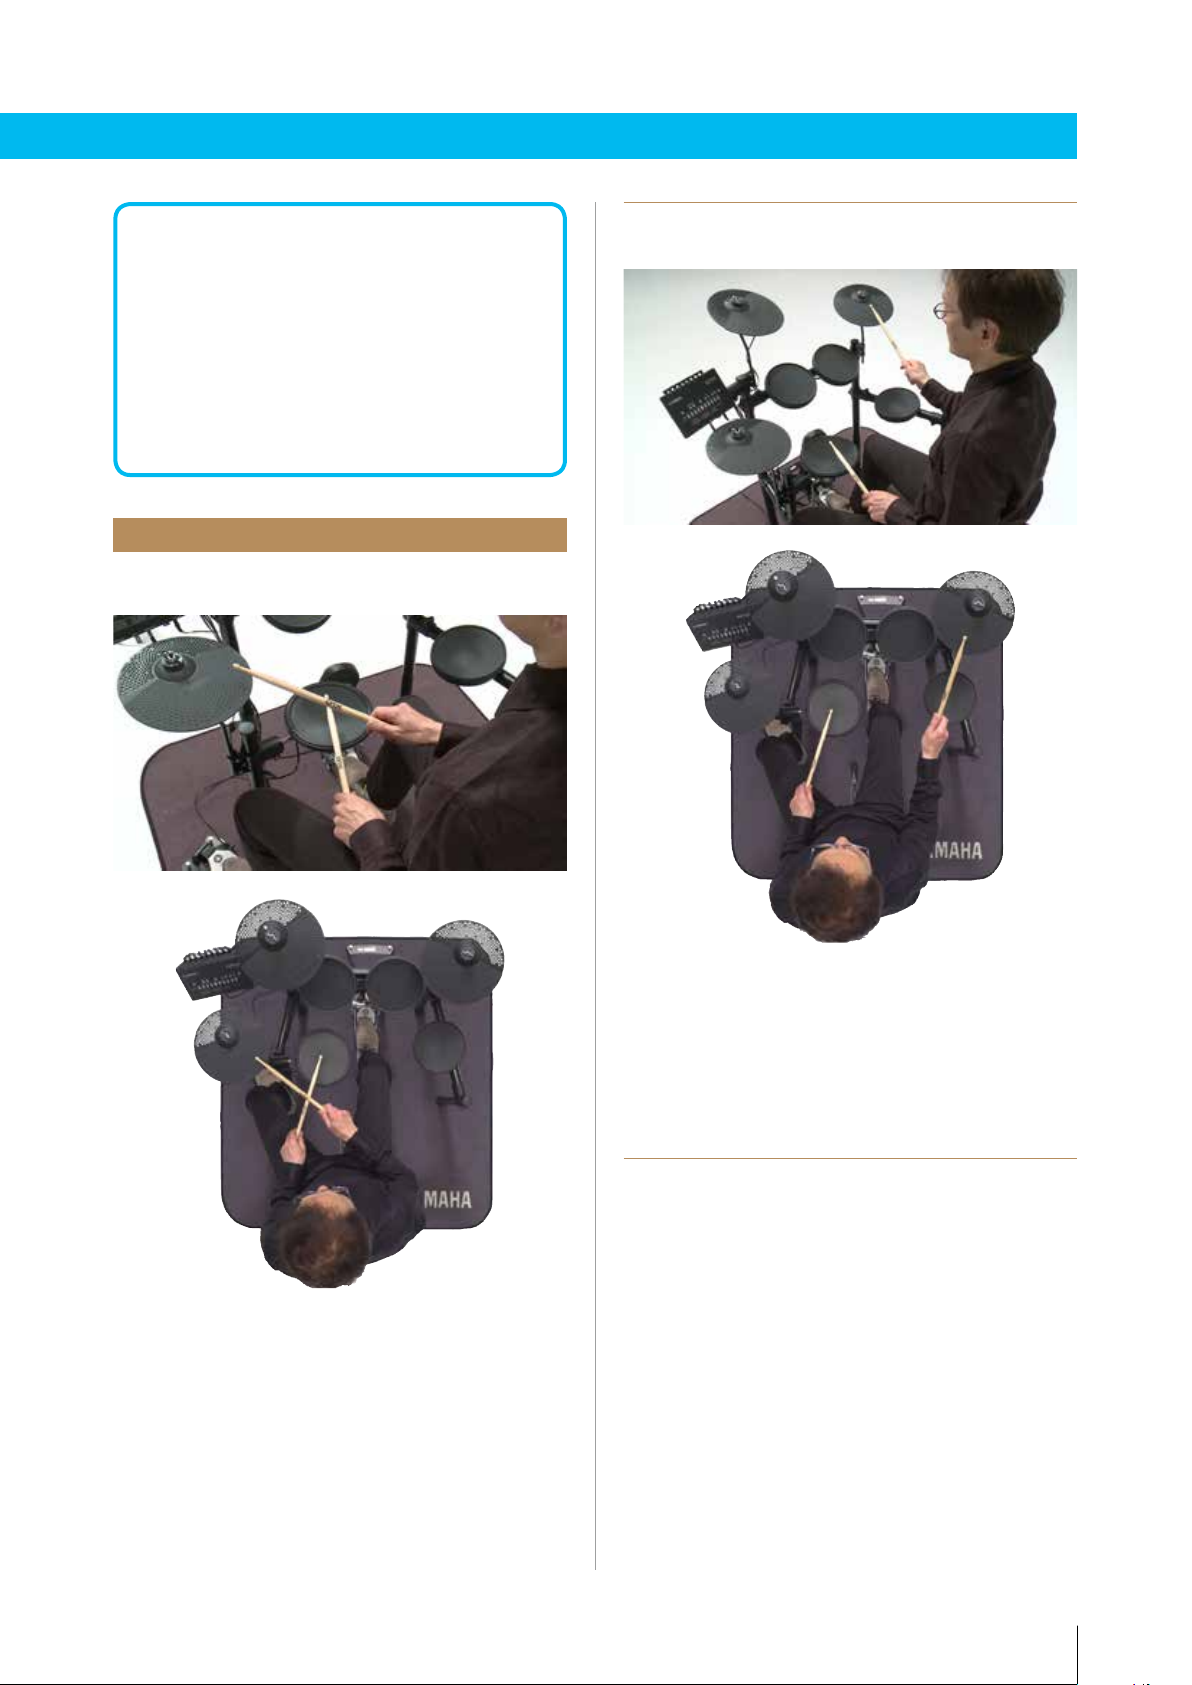
Playing the Cymbals
Hi-hat
《
》
Ride cymbal
《
》
Position yourself as pictured above with the
・
sticks crossed over each other. Your right
hand plays the hi-hat while your left hand
plays the snare below it.
Left-handed drummers may position
・
themselves without crossing the sticks so
that the left hand plays the hi-hat and the
right hand plays the snare.
Position your right hand to play the ride
・
cymbal and your left hand to play the snare.
The cymbal should be set up so that the
・
striking surface is at the same angle as the
stick when playing this way.
Crash cymbal
《
The ride cymbal is usually played using the tip
of the stick (page 9), but the crash cymbal is
hit with the shoulder of the stick. Setting up the
crash cymbal a little higher than the ride cymbal
will make for easier playing.
》
7
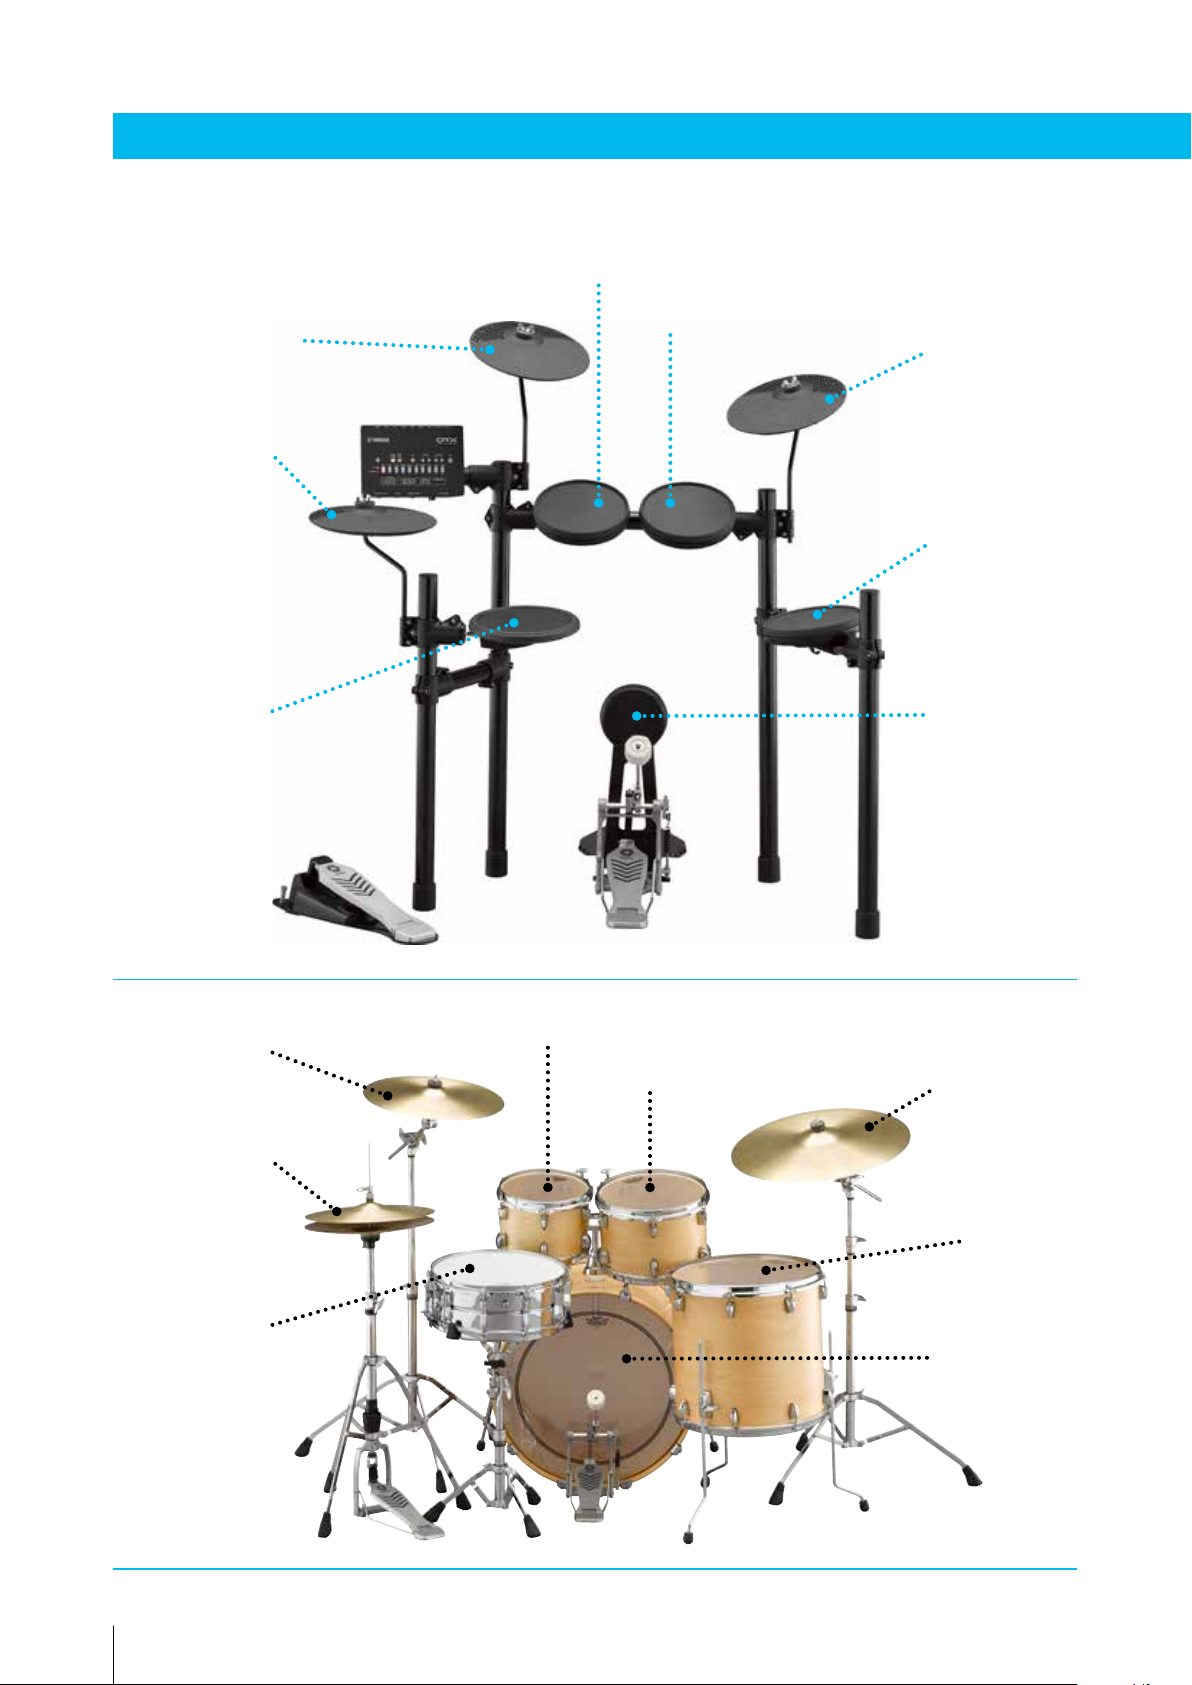
Name of each part of the drum & Notation
Name of each part of the drum
《
Crash cymbal
Hi-hat cymbal
》
High tom (Tom1)
Mid tom (Tom2)
Ride cymbal
Low tom (Tom3)
Snare drum
Crash cymbal High tom
Hi-hat cymbal
Mid tom
Bass drum
Ride cymbal
Low tom
Snare drum
8
Bass drum
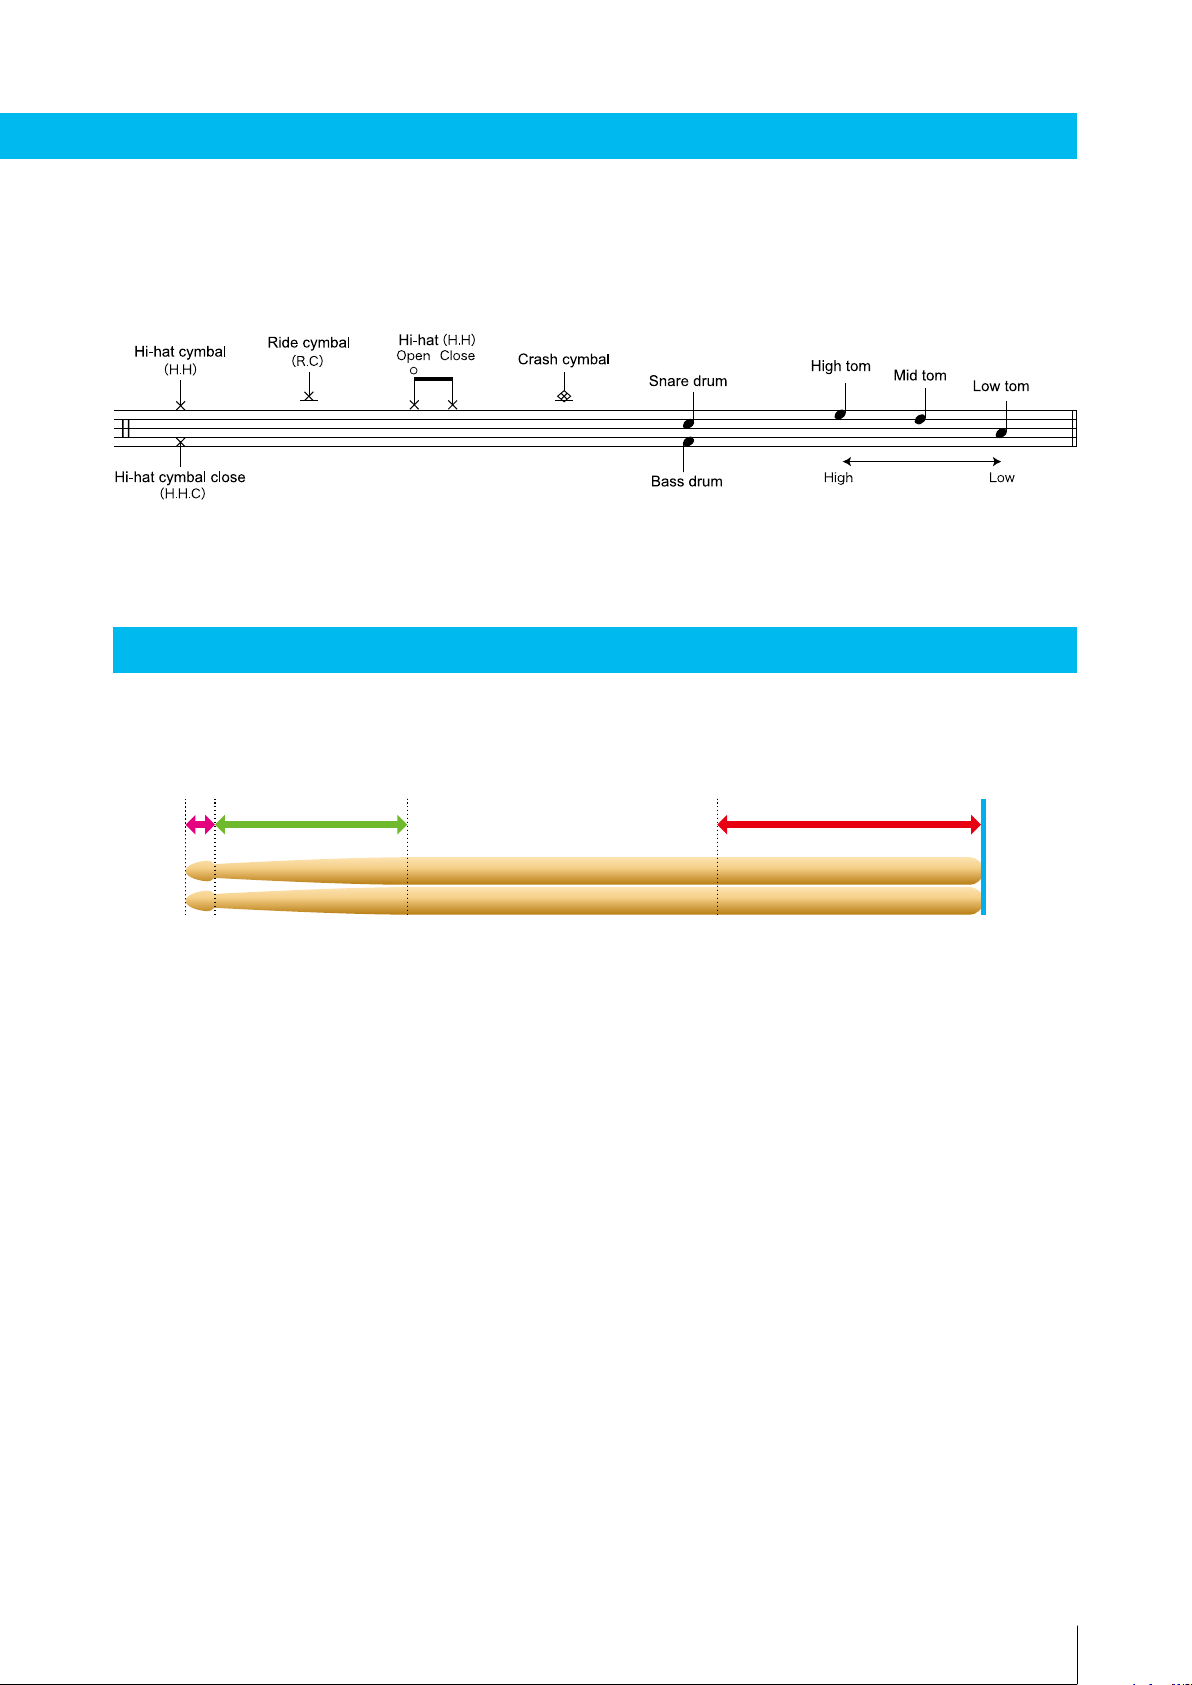
Notation
Tip
Grip
《
》
Name of each part of the stick
GripShoulder
end
9
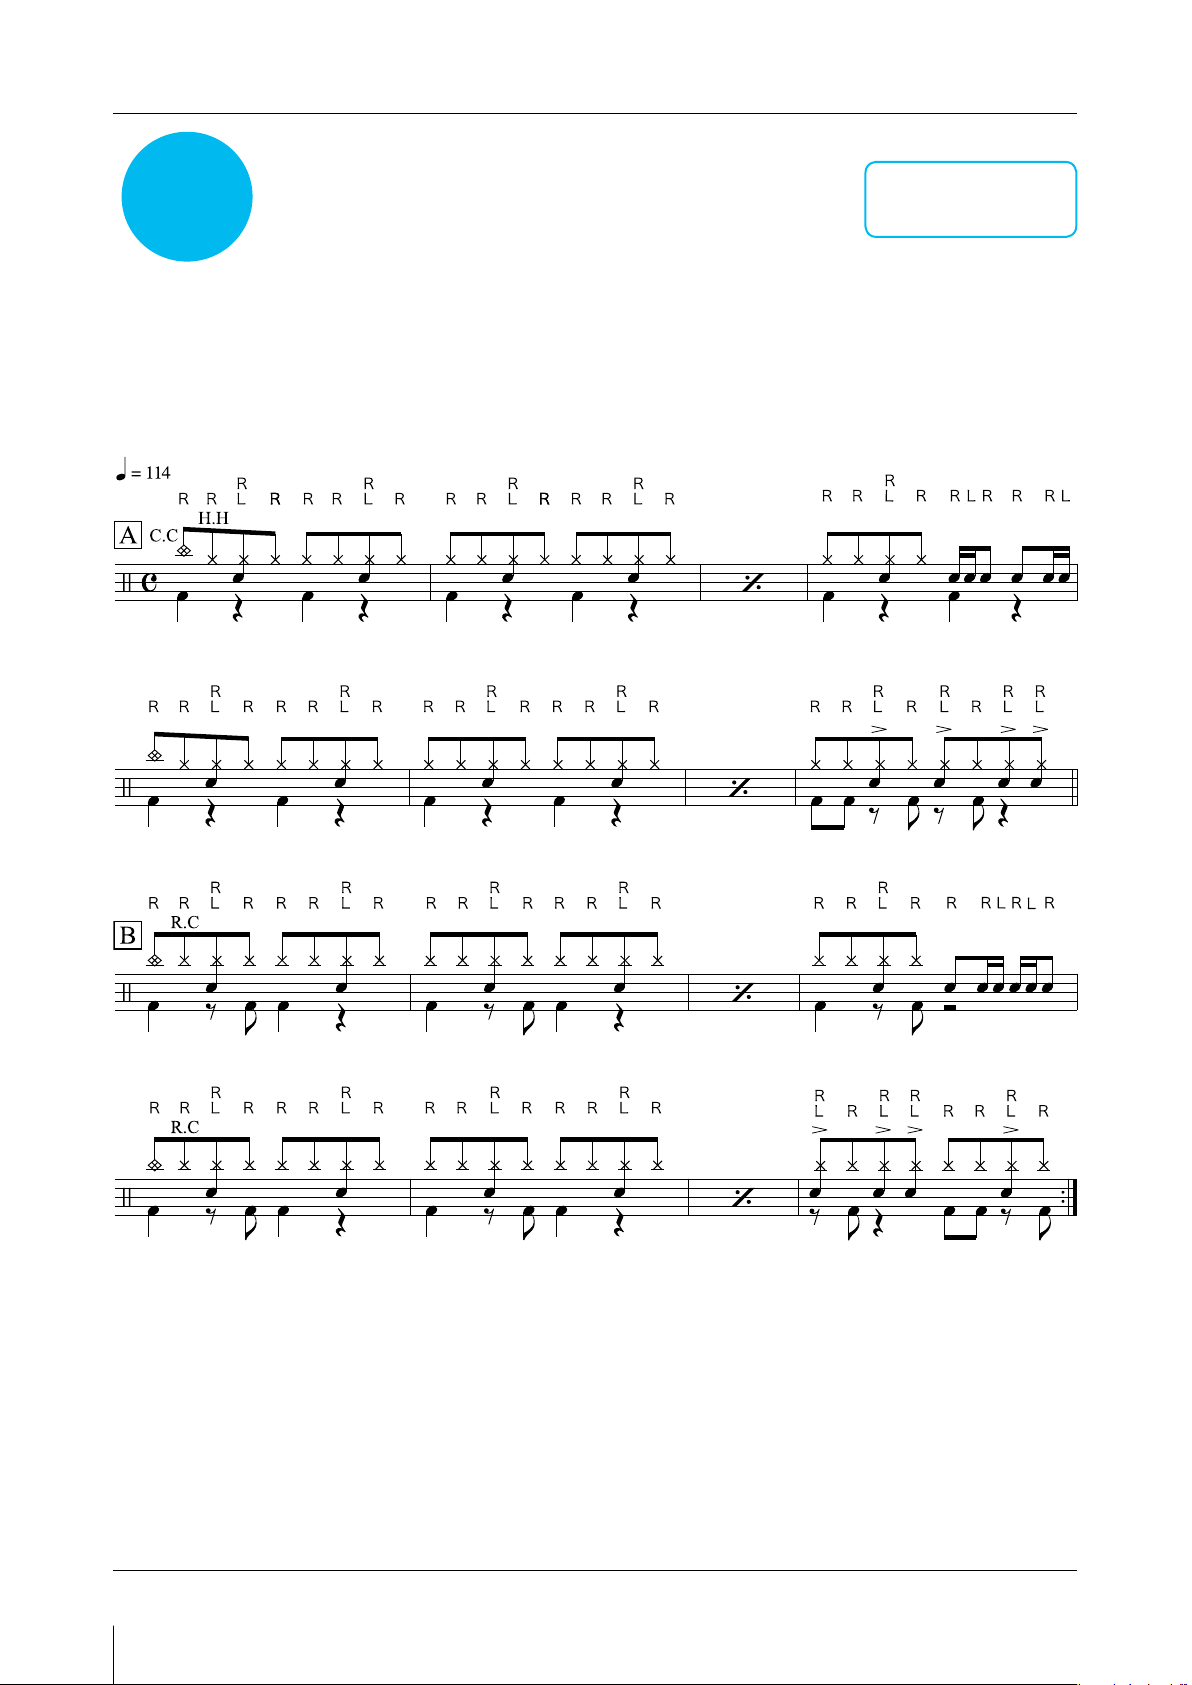
SCORE
01
Tempo :
Feel :
114
8th Note
//
POP 1
//
10
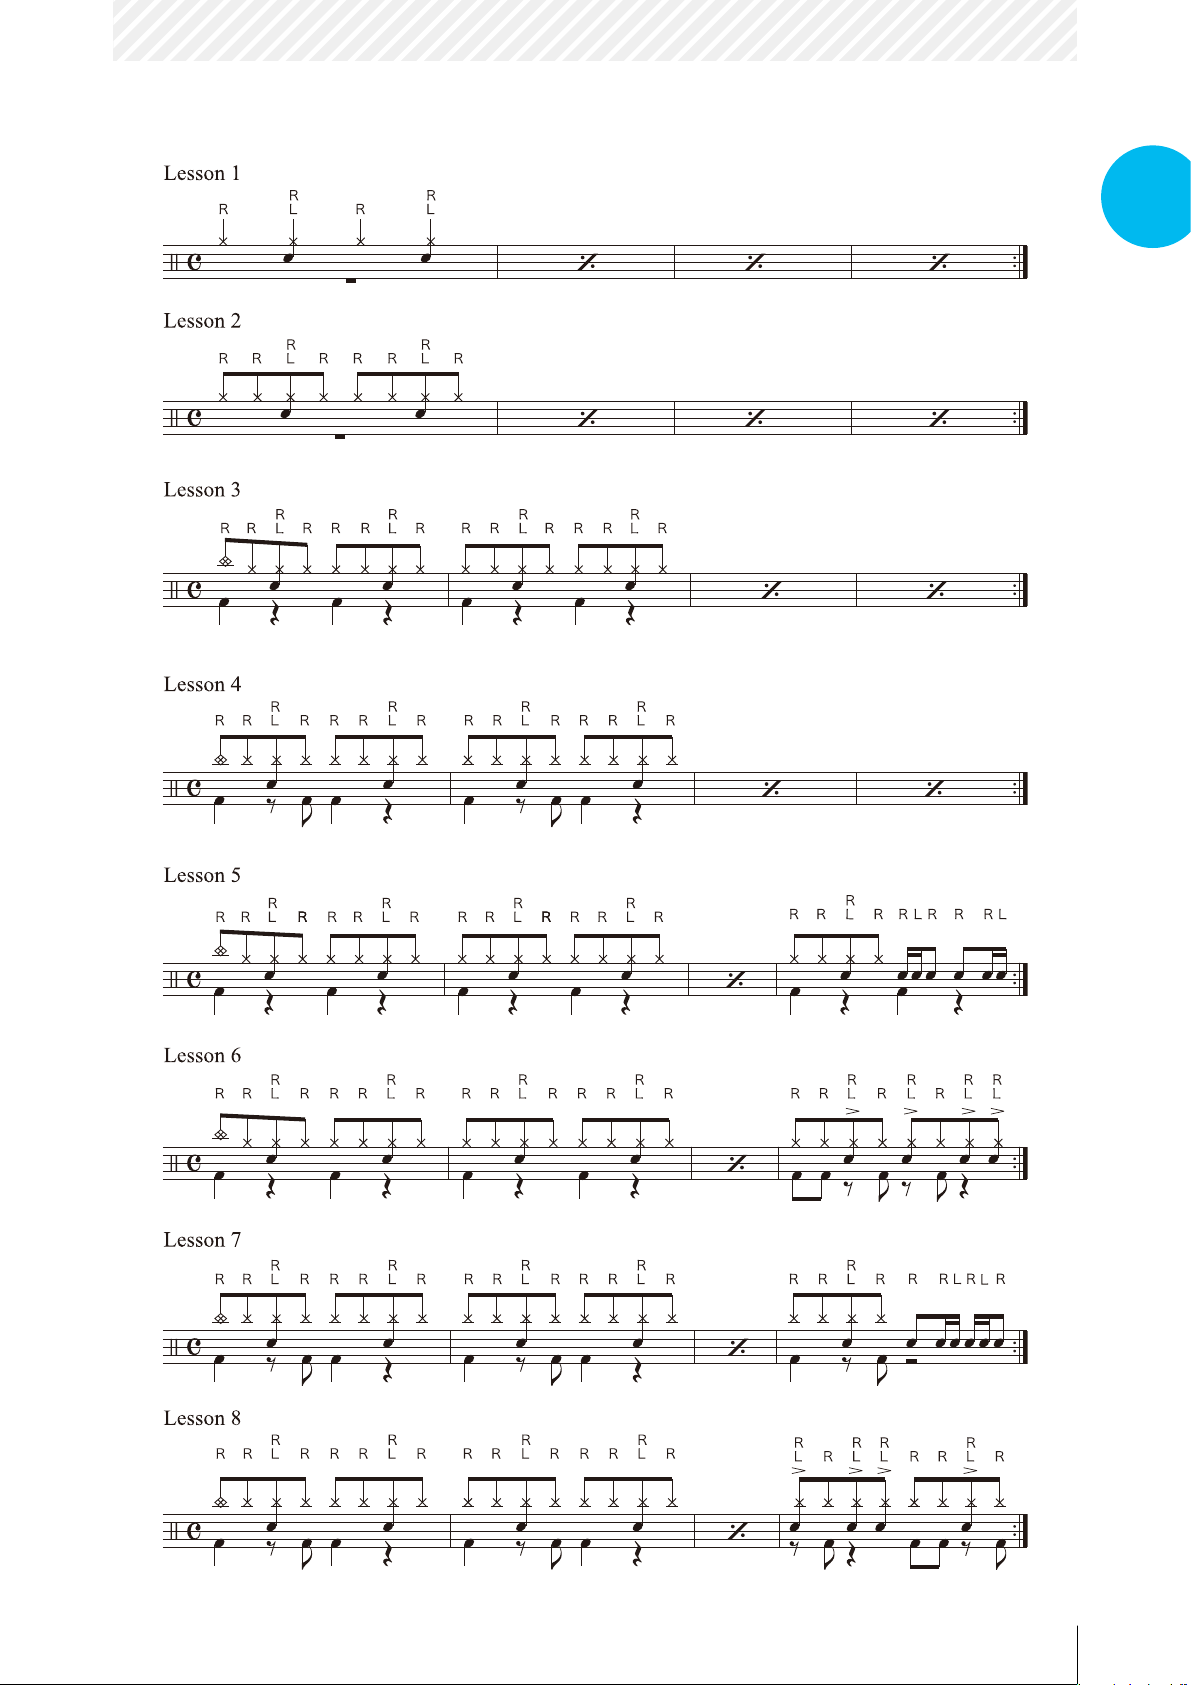
Lesson phrases
《
》
SCORE
01
11
This is the most basic rhythm pattern of the 8th Note Feel. When working on drum
SCORE
01
phrases, start by practicing the basic pattern for that song. This song uses rhythm
patterns based on 8th notes, so the numbering ranges from 1 to 8.
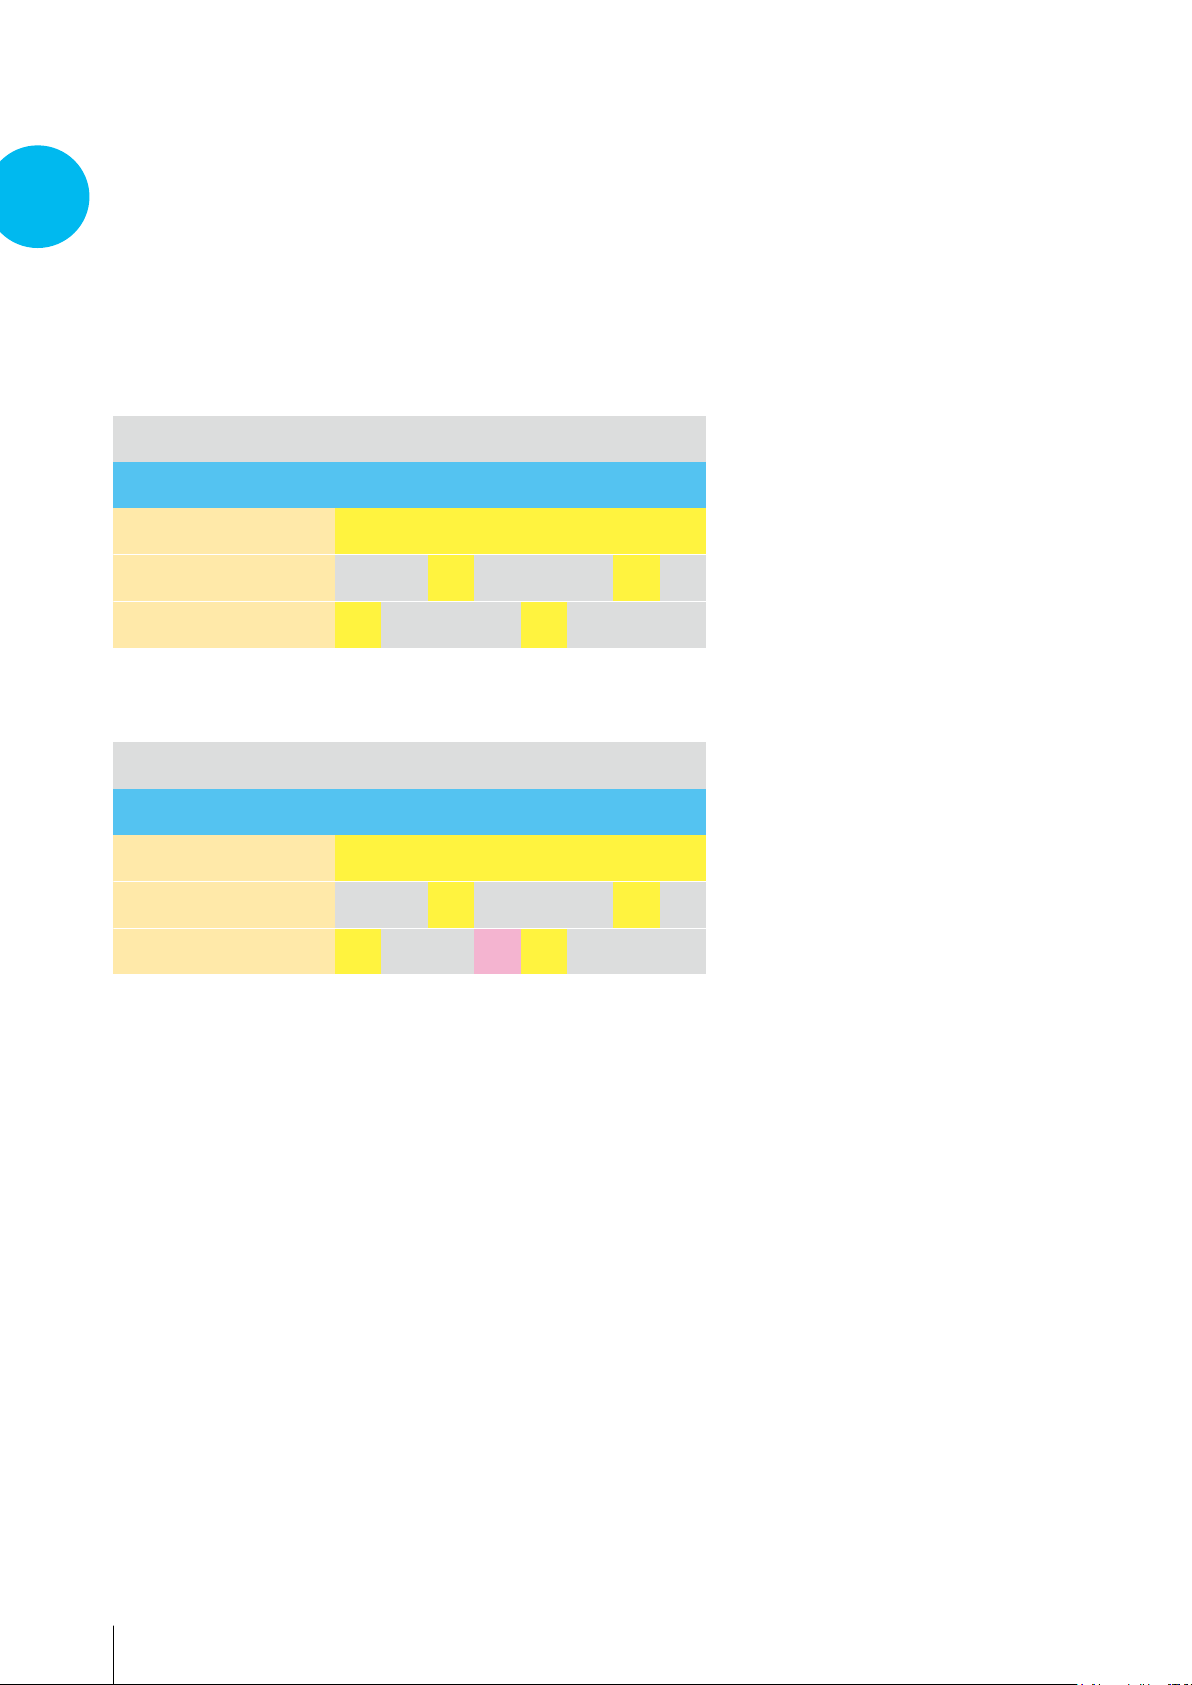
Rhythm Patterns
《
》
Rehearsal Mark A
Numbering
Count
Right hand (hi-hat)
Left hand (snare)
Right foot (bass drum)
1 2 3 4 5 6 7 8
1 & 2 & 3 & 4 &
● ● ● ● ● ● ●
● ●
● ●
●
Rehearsal Mark B
Numbering
Count
Right hand (hi-hat)
Left hand (snare)
Right foot (bass drum)
The rhythm pattern of Rehearsal Mark B adds a bass drum at the 4 position.
phrases, start by practicing the basic pattern fo
Fill #1 (Alternate sticking)
《
A ll is primarily an improvisation, usually about one or two bars in length, performed
at transitions within a tune outside the repetition of the primarily defined rhythm
pattern. It essentially relies upon the musical sense of the performer. In Japan it is
also referred to as “okazu” (side dish) because it adds a spicy avor to the tune.
1 2 3 4 5 6 7 8
1 & 2 & 3 & 4 &
● ● ● ● ● ● ●
● ●
● ●●
》
●
The ll’s main role is to raise the energy level by accenting the accompaniment and
is often used to transition to the next part of the tune.
12

①
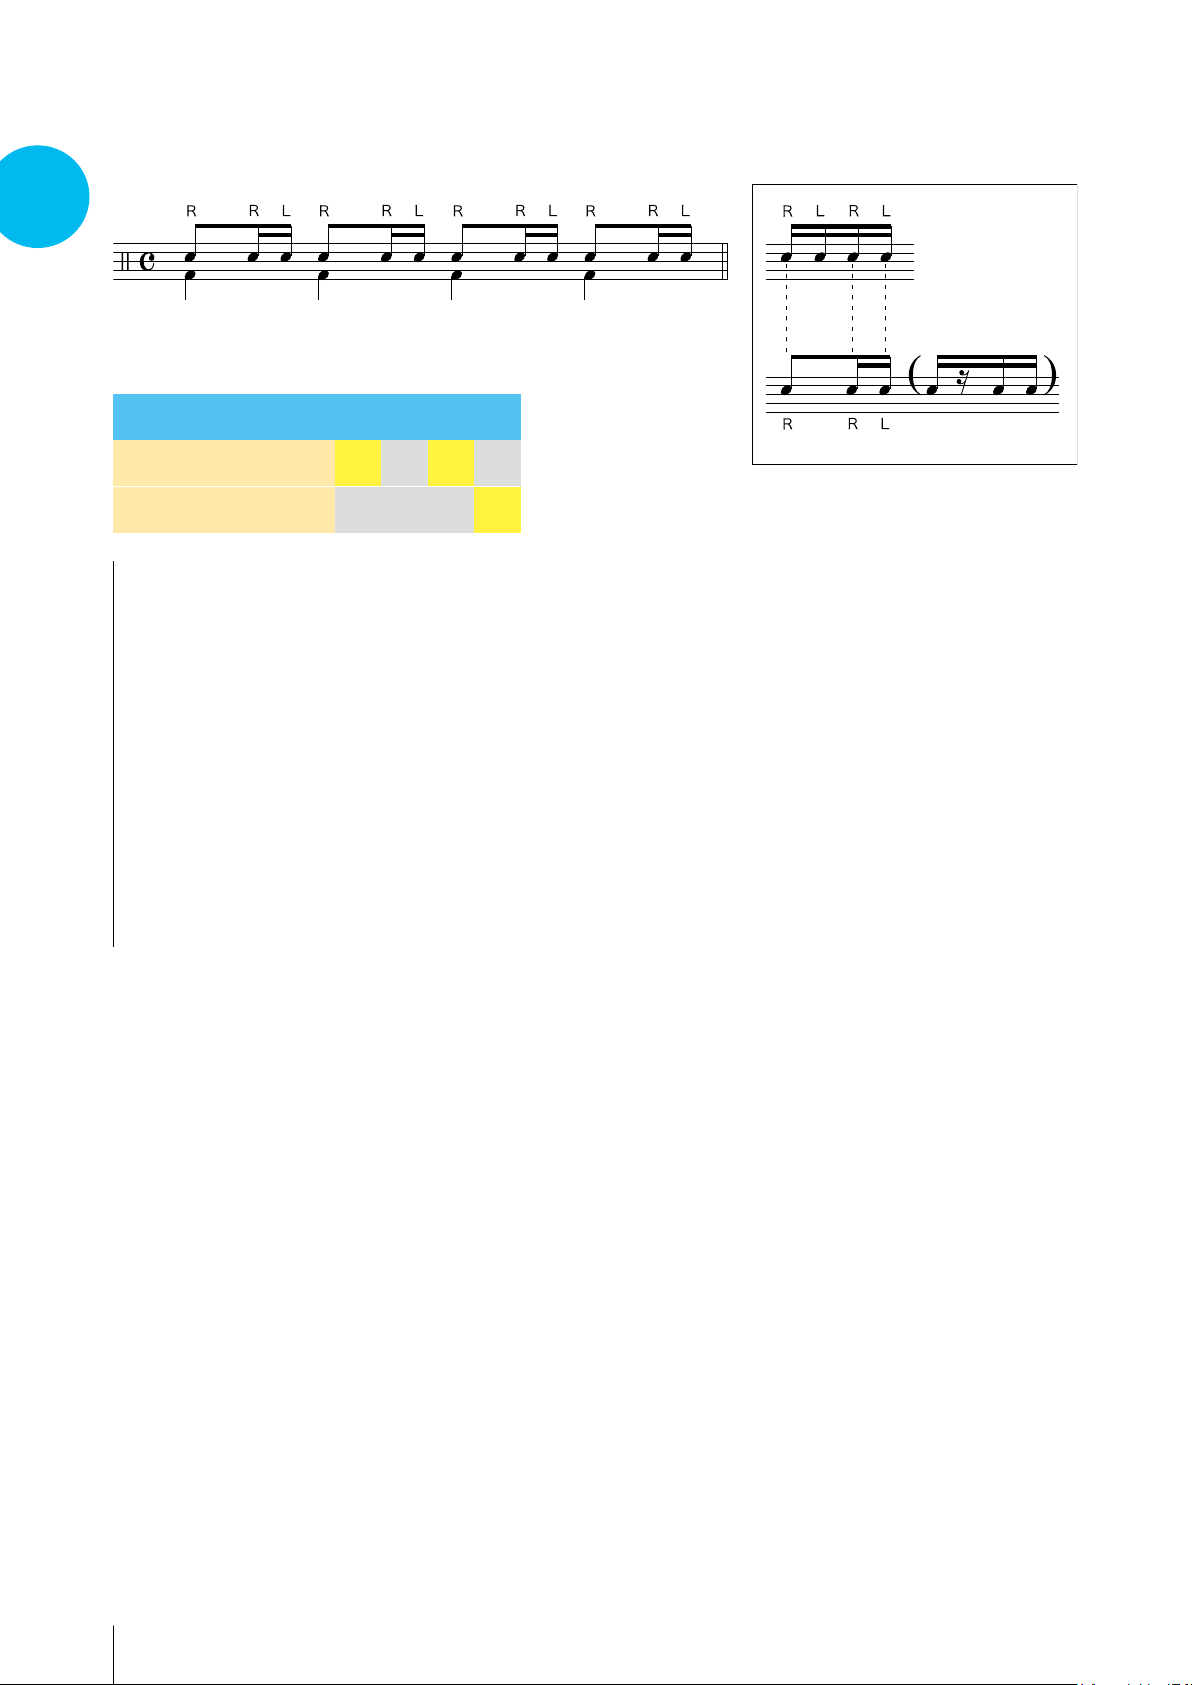
Stick Control (Basic 16th Note)
Alternating between R (right hand) and L (left hand).
SCORE
01
Count
Right hand (snare)
Left hand (snare)
1 e & a
● ●
● ●
• Make sure that your stick height (how high you raise your stick during the
stroke) is the same for both hands.
• Practice repeatedly with a metronome.
• First practice right hand/left hand, and once you get the hang of it add in the
right foot and maintain a quarter note rhythm.
From here below we will consider the RLRL alternating as in① above as the standard.
②Stick Control (16th Note variation)
Count
Right hand (snare)
Left hand (snare)
1 e & a
● ●
● ×
• This does not have the fourth beat from ①.
• Practice repeatedly with a metronome until you are able to maintain the rhythm.
13
SCORE
01
③Stick Control (16th Note variation)
Count
Right hand (snare)
Left hand (snare)
1 e & a
● ●
× ●
• This does not have the second beat from ①.
• Practice repeatedly with a metronome until you are able to maintain the rhythm.
• Repeating this phrase gives you the hi-hat rhythm from Rehearsal Mark A in
POP2 (page 16).
• Playing ② and ③ in succession gives you the ll for the 3rd and 4th beat in the
4th bar of Rehearsal Mark A.
• Playing ③ and ② in succession gives you the ll for the 3rd and 4th beat in the
4th bar of Rehearsal Mark B.
• While practicing pay attention to keeping an even stick height between both
hands and not letting just the right hand go too high.
14
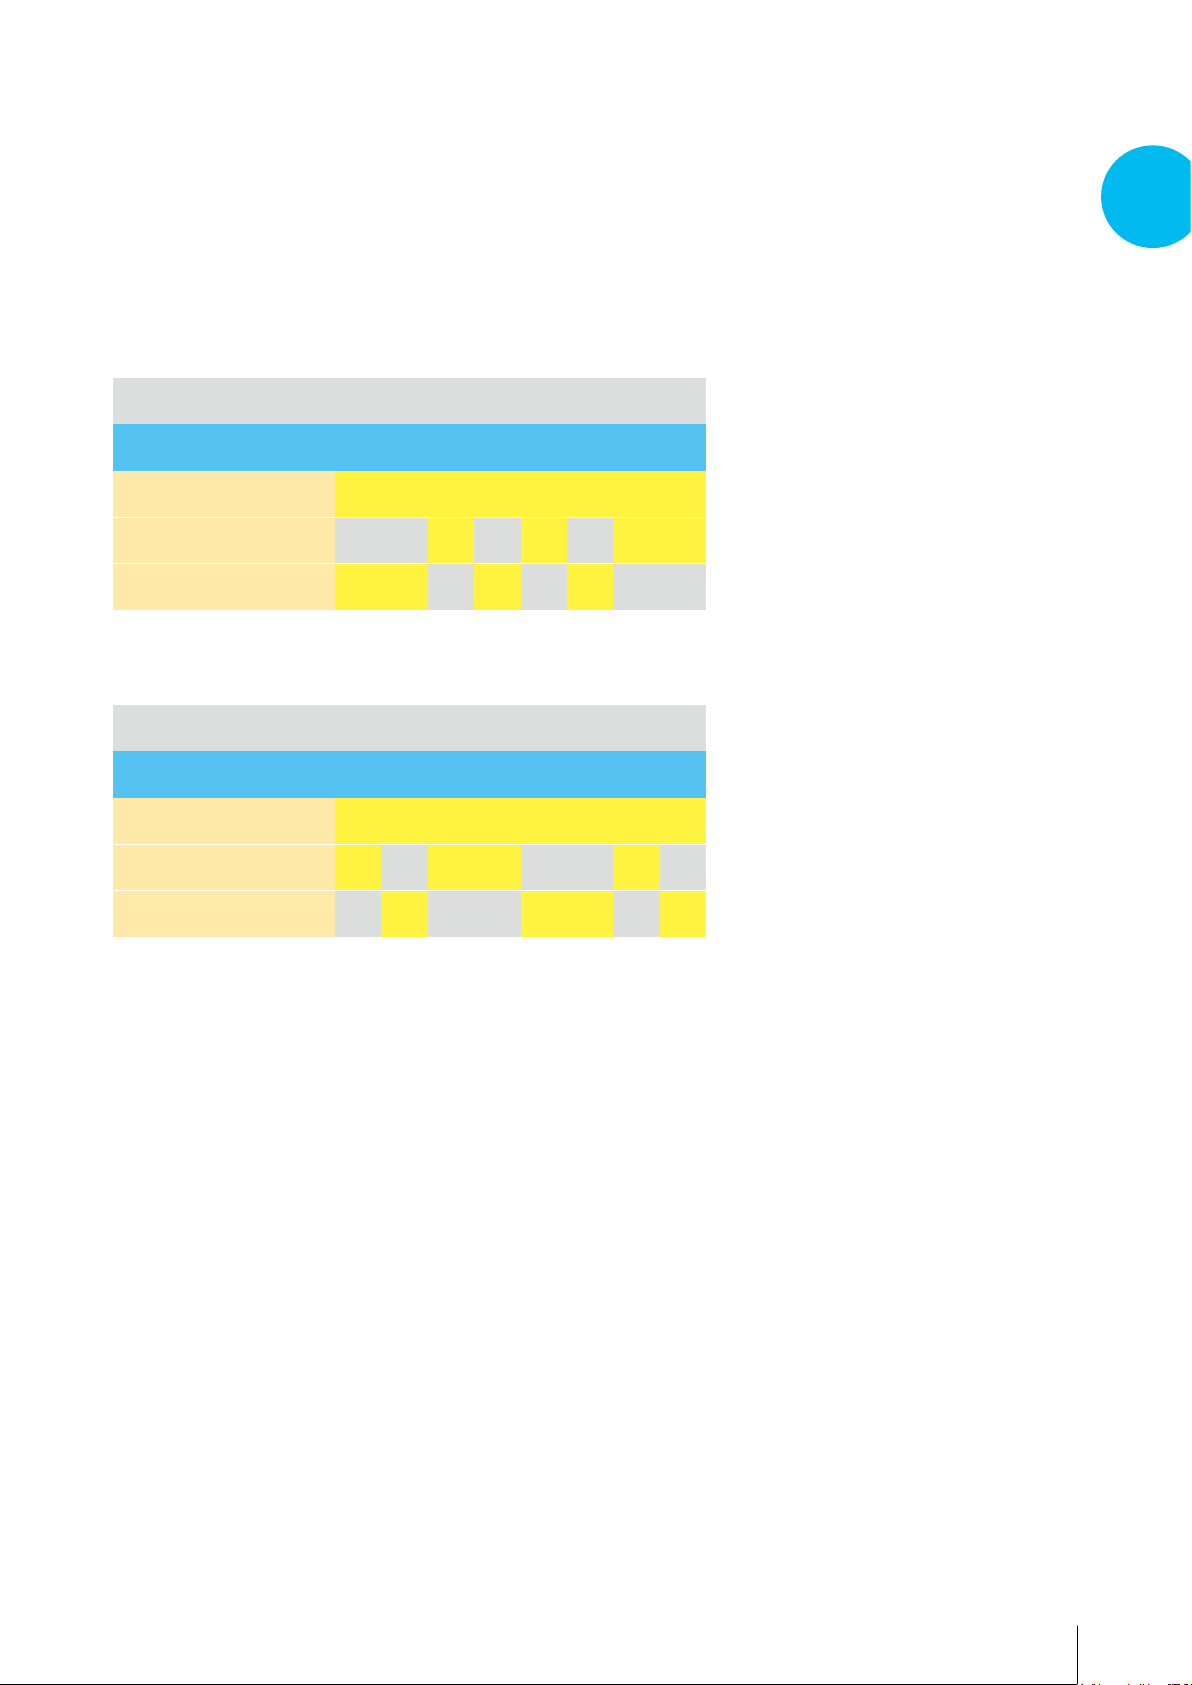
Fill #2 (Hand/foot combinations)
《
Fills can be performed with just handwork (both hands) or by adding in footwork
(both feet). A phrase that uses both hands and feet is called a hand/foot
combination.
》
Rehearsal Mark A 8th Bar
SCORE
01
Numbering
Count
Right hand (hi-hat)
Left hand (snare)
Right foot (bass drum)
1 2 3 4 5 6 7 8
1 & 2 & 3 & 4 &
● ● ● ● ● ● ●
● ● ● ●
Rehearsal Mark B 8th Bar
Numbering
Count
Right hand (hi-hat)
Left hand (snare)
Right foot (bass drum)
1 2 3 4 5 6 7 8
1 & 2 & 3 & 4 &
● ● ● ● ● ● ●
●
● ●●
●
● ● ● ●
●
● ● ●
●
15

SCORE
02
Tempo :
Feel :
112
8th Note
//
POP 2
//
16
 Loading...