

Page 1
Owner's Manual
Bedienungsanleitung
Mode d'emploi
Manual de instrucciones
Before using the Clavinova, be sure to read “PRECAUTIONS„ on pages 6 -7.
Achten Sie darauf, vor Einsatz des Clavinova die “VORSICHTSMASSNAHMEN„ auf Seite 6-7
durchzulesen.
Avant d'utiliser le Clavinova, lire attentivement la section «PRECAUTIONS D'USAGE» aux
pages 6- 7.
Antes de utilizar el Clavinova, lea las “PRECAUCIONES„ que debe tener en cuenta en las páginas
6- 7.
IMPORTANT
Check your power supply
Make sure that your local AC mains voltage matches the voltage specified on the name plate
on the bottom panel. In some areas a voltage selector may be provided on the bottom panel of
the main keyboard unit near the power cord. Make sure that the voltage selector is set for the
voltage in your area. The voltage selector is set at 240V when the unit is initially shipped. To
change the setting use a "minus" screwdriver to rotate the selector dial so that the correct voltage
appears next to the pointer on the panel.
WICHTIG
Überprüfung der Stromversorgung
Vergewissern Sie sich vor dem Anschließen an das Stromnetz, daß die örtliche Netzspannung den
Betriebsspannungswerten auf dem Typenschild an der Unterseite des Instruments entspricht. In
bestimmten Verkaufsgebieten ist das Instrument mit einem Spannungswähler an der Unterseite
neben der Netzkabeldurchführung ausgestattet. Falls vorhanden, muß der Spannungswähler auf
die örtliche Netzspannung eingestellt werden. Der Spannungswähler wurde werkseitig auf 240 V
voreingestellt. Zum Verstellen drehen Sie den Spannungsregler mit einem Schlitzschraubendreher,
bis der Zeiger auf den korrekten Spannungswert weist.
IMPORTANT
Contrôler la source d'alimentation
Vérifiez que la tension spécifiée sur le panneau inférieur correspond à la tension du secteur. Dans
certaines régions, l'instrument peut être équipé d'un sélecteur de tension situé sur le panneau
inférieur du clavier à proximité du cordon d'alimentation.
Vérifiez que ce sélecteur est bien réglé en fonction de la tension secteur de votre région. Le
sélecteur de tension est réglé sur 240 V au départ d'usine. Pour modifier ce réglage, utilisez un
tournevis à lame plate pour tourner le sélecteur afin de mettre l'indication correspondant à la
tension de votre région vis à vis du repère triangulaire situé sur le panneau.
IMPORTANTE
Verifique la alimentación de corriente
Asegúrese de que tensión de alimentación de CA de su área corresponde con la tensión
especificada en la placa de características del panel inferior. En algunas zonas puede haberse
incorporado un selector de tensión en el panel inferior de la unidad del teclado principal, cerca del
cable de alimentación. Asegúrese de que el selector de tensión esté ajustado a la tensión de su
área. El selector de tensión se ajusta a 240V cuando la unidad sale de fábrica. Para cambiar el
ajuste, emplee un destornillador de cabeza "recta" para girar el selector de modo que aparezca la
tensión correcta al lado del indicador del panel.
Page 2
Introduction
SPECIAL MESSAGE SECTION
PRODUCT SAFETY MARKINGS:
Yamaha electronic
products may have either labels similar to the graphics
shown below or molded/stamped facsimiles of these
graphics on the enclosure. The explanation of these
graphics appears on this page. Please observe all cautions
indicated on this page and those indicated in the safety
instruction section.
CAUTION
RISK OF ELECTRIC SHOCK
DO NOT OPEN
CAUTION: TO REDUCE THE RISK OF ELECTRIC SHOCK.
DO NOT REMOVE COVER (OR BACK).
NO USER-SERVICEABLE PARTS INSIDE.
REFER SERVICING TO QUALIFIED SERVICE PERSONNEL.
See bottom of Keyboard enclosure for graphic symbol markings.
The exclamation point within the
equilateral triangle is intended to alert
the user to the presence of important
operating and maintenance (servicing) instructions in the literature
accompanying the product.
The lightning flash with arrowhead
symbol, within the equilateral triangle, is intended to alert the user to the
presence of uninsulated “dangerous
voltage” within the product’s enclosure that may be of sufficient magnitude to constitute a risk of electrical
shock.
Battery Notice:
This product MAY contain a small nonrechargable battery which (if applicable) is soldered in
place. The average life span of this type of battery is
approximately five years. When replacement becomes
necessary, contact a qualified service representative to
perform the replacement.
Warning:
Do not attempt to recharge, disassemble, or
incinerate this type of battery. Keep all batteries away
from children. Dispose of used batteries promptly and as
regulated by applicable laws. Note: In some areas, the
servicer is required by law to return the defective parts.
However, you do have the option of having the servicer
dispose of these parts for you.
Disposal Notice:
Should this product become damaged
beyond repair, or for some reason its useful life is considered to be at an end, please observe all local, state, and
federal regulations that relate to the disposal of products
that contain lead, batteries, plastics, etc.
NOTICE:
Service charges incurred due to lack of knowledge relating to how a function or effect works (when the
unit is operating as designed) are not covered by the manufacturer’s warranty, and are therefore the owners responsibility. Please study this manual carefully and consult
your dealer before requesting service.
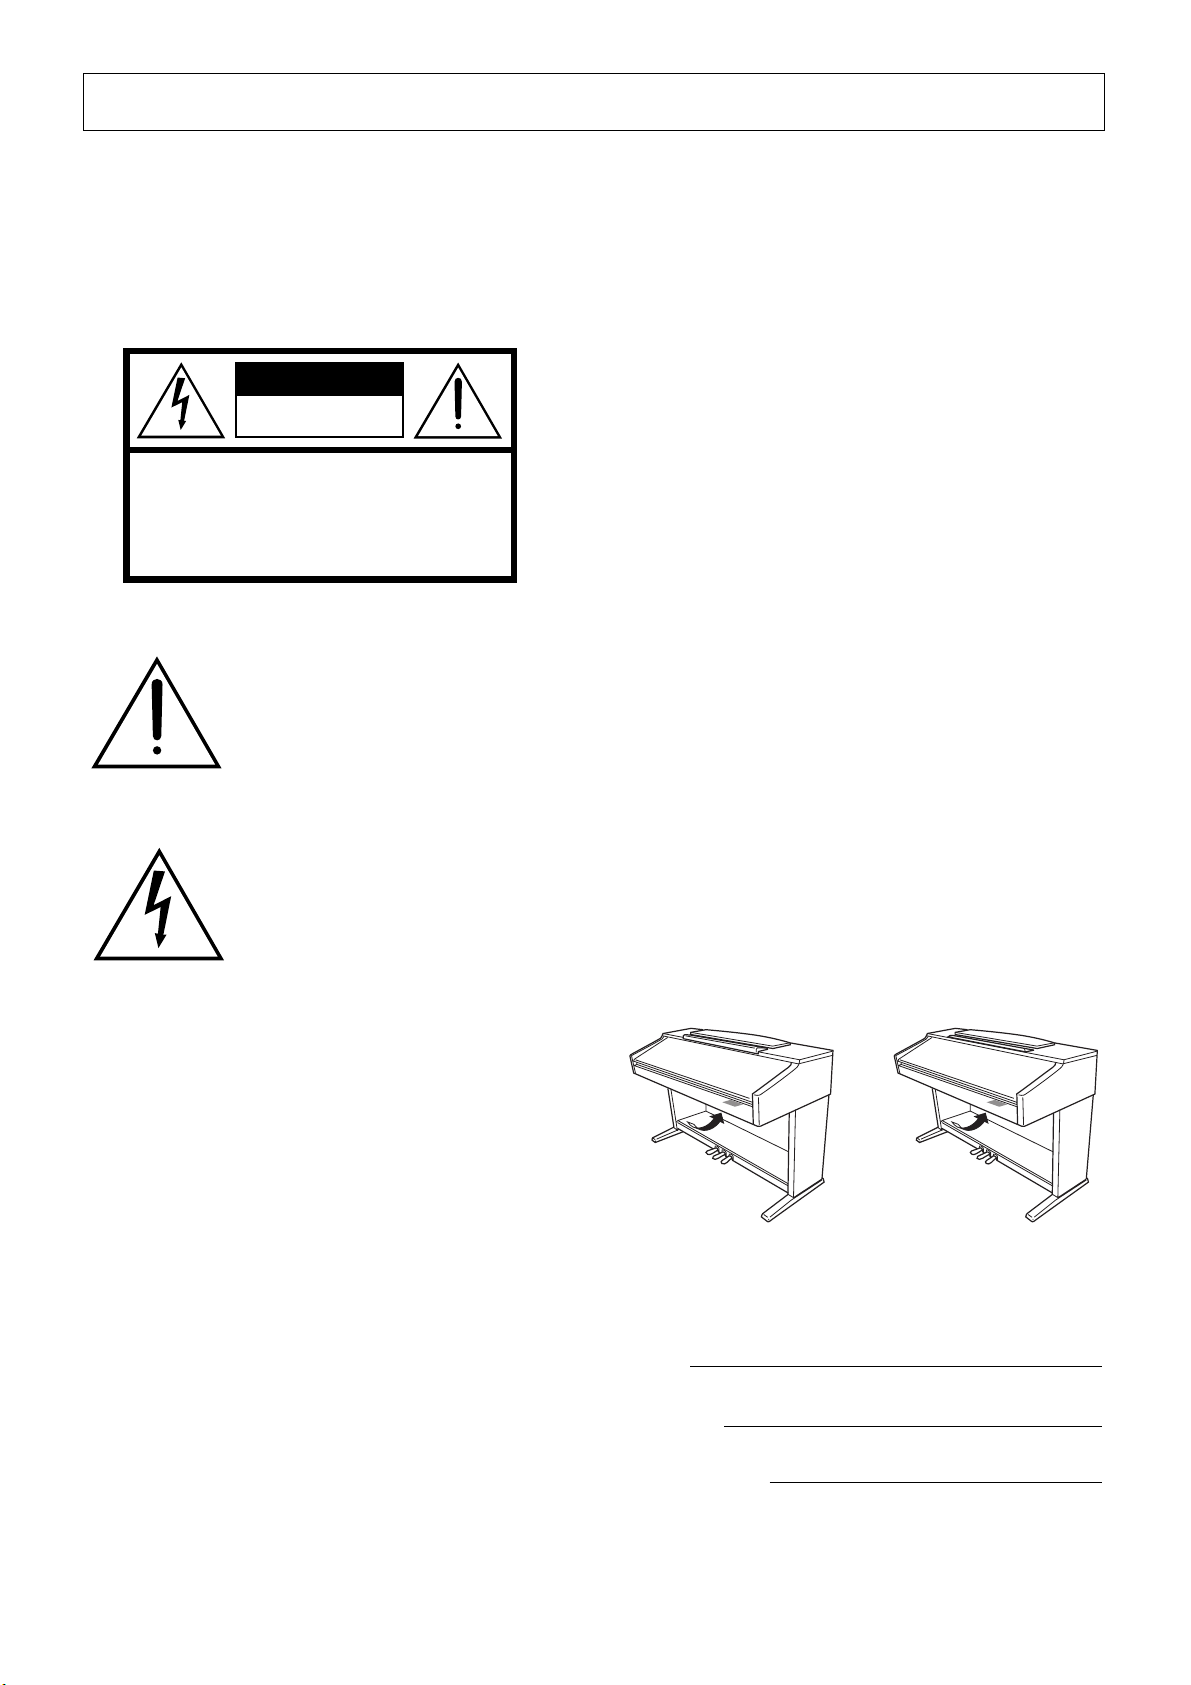
NAME PLATE LOCATION:
The graphic below indicates the location of the name plate. The model number,
serial number, power requirements, etc., are located on
this plate. You should record the model number, serial
number, and the date of purchase in the spaces provided
below and retain this manual as a permanent record of
your purchase.
IMPORTANT NOTICE:
All Yamaha electronic products
are tested and approved by an independent safety testing
laboratory in order that you may be sure that when it is
properly installed and used in its normal and customary
manner, all foreseeable risks have been eliminated. DO
NOT modify this unit or commission others to do so
unless specifically authorized by Yamaha. Product performance and/or safety standards may be diminished.
Claims filed under the expressed warranty may be denied
if the unit is/has been modified. Implied warranties may
also be affected.
SPECIFICATIONS SUBJECT TO CHANGE:
The
information contained in this manual is believed to be
correct at the time of printing. However, Yamaha reserves
the right to change or modify any of the specifications
without notice or obligation to update existing units.
ENVIRONMENTAL ISSUES:
Yamaha strives to produce products that are both user safe and environmentally
friendly. We sincerely believe that our products and the
production methods used to produce them, meet these
goals. In keeping with both the letter and the spirit of the
law, we want you to be aware of the following:
CLP-130
Model
Serial No.
Purchase Date
CLP-120
92-469 1 (bottom)
Page 3
Thank you for purchasing the Yamaha Clavinova! We recommend that you read this manual carefully so that you can
fully take advantage of the advanced and convenient functions of the Clavinova.
We also recommend that you keep this manual in a safe and handy place for future reference.
About this Owner’s Manual
This manual consists of three main sections: “Introduction,” “Reference” and “Appendix.”
Introduction (page 2):
Please read this section first.
Reference (page 13):
This section explains how to make detailed settings for the Clavinova’s various functions.
Appendix (page 69):
This section introduces reference material.
*The models CLP-130/120 will be referred to as the CLP/Clavinova in this Owner’s Manual.
*The illustrations and LED displays shown in this owner’s manual are for instructional purposes only and may appear
somewhat different from those on your instrument.
COPYRIGHT NOTICE
This product incorporates and bundles computer programs and contents in which Yamaha owns copyrights or with
respect to which it has license to use others’ copyrights. Such copyrighted materials include, without limitation, all
computer software, MIDI files, WAVE data. Any unauthorized use of such programs and contents outside of personal
use is not permitted under relevant laws. Any violation of copyright has legal consequences. DON’T MAKE, DISTRIBUTE OR USE ILLEGAL COPIES.
Trademarks:
•Apple and Macintosh are trademarks of Apple Computer, Inc.
•Windows is a registered trademark of Microsoft® Corporation.
•All other trademarks are the property of their respective holders.
“The Clavinova-Computer Connection,”
do with your Clavinova and a personal computer and how to set up a Clavinova-Computer system (the manual is not
written for any specific models). The document is available as a PDF file (in English) at the following Internet address:
Clavinova Web site (English only):
http://www.yamahaclavinova.com/
Yamaha Manual Library:
http://www2.yamaha.co.jp/manual/english/
is a supplementary guidebook that describes, for beginners, what you can
ENGLISH
CLP-130/120
About this Owner’s Manual
3
Page 4

Ta b le of Contents
SPECIAL MESSAGE SECTION ...................... 2
About this Owner’s Manual........................ 3
Application Index........................................ 5
PRECAUTIONS............................................. 6
Accessories .................................................. 8
Maintenance ............................................... 8
Features....................................................... 9
Before Using the Clavinova ...................... 10
ENGLISH
Part Names................................................ 14
Listening to the Demonstration Tunes .... 16
Listening to 50 Piano Preset Songs .......... 17
Selecting & Playing Voices........................ 21
Introduction
Key Cover ...........................................................10
Music Rest ..........................................................10
Turning the Power On.......................................11
Setting the Volume.............................................11
Using Headphones.............................................12
Using the Speaker Switch...................................12
Reference
Practicing a One-Hand Part Using 50 Preset
Songs (Part Cancel Function) .......................18
A-B Repeat for 50 Preset Songs .........................20
Selecting Voices..................................................21
Using the Pedals .................................................21
Adding Variations to the Sound –
[VARIATION] (CLP-130)/[BRILLIANCE]/
[REVERB]/[EFFECT]....................................22
Touch Sensitivity – [TOUCH] ..........................24
Transposition – [TRANSPOSE]........................25
Combining Two Voices (Dual mode)...............26
Splitting the Keyboard Range and Playing Two
Different Voices (Split mode) (CLP-130) ....27
Using the Metronome........................................29
Detailed Settings – [FUNCTION]............... 37
Basic Procedure in Function Mode .................. 38
About Each Function......................................... 40
F1. Fine Tuning of the Pitch....................... 40
F2. Selecting a Scale..................................... 41
F3. Dual Mode Functions ........................... 42
F4. (CLP-130) Split Mode Functions......... 43
F5. (CLP-130) / F4. (CLP-120)
Other Functions.................................... 44
F.6 (CLP-130) / F.5 (CLP-120)
Metronome Volume............................. 45
F7. (CLP-130) / F6. (CLP-120)
Preset Song Part Cancel Volume ......... 45
F8. (CLP-130) / F7. (CLP-120)
MIDI Functions .................................... 45
F9. (CLP-130) / F8. (CLP-120)
Backup Functions ................................. 48
About MIDI................................................ 49
Connections ..............................................50
Connectors......................................................... 50
Connecting a Personal Computer .................... 52
Troubleshooting........................................ 56
Options...................................................... 56
CLP-120: Keyboard Stand Assembly ......... 57
CLP-130: Keyboard Stand Assembly ......... 60
Preset Voice List ........................................ 63
Demo Song List .........................................66
Index.......................................................... 67
Appendix
Factory Setting List ...................................70
MIDI Data Format ..................................... 71
MIDI Implementation Chart ..................... 75
Specifications ............................................76
4
Recording Your Performance ................... 30
Recording to [TRACK1]....................................30
Re-recording TRACK1 ......................................32
Recording to [TRACK2]....................................32
Changing the Initial Settings (Data recorded at
the beginning of a song) ................................34
Playing Back Recorded Songs................... 35
Playing Back a Song ...........................................35
Useful Playback Functions.................................36
CLP-130/120
Table of Contents
Page 5

Application Index
Use this index to find reference pages that may be helpful for your particular application and situation.
Listening
Listening to demo songs with different voices....................................... “Listening to the Demonstration Tunes” on page 16
Listening to songs from “50 Greats for the Piano” ...................................... “Listening to 50 Piano Preset Songs” on page 17
Listening to my recorded performance.................................................................“Playing Back Recorded Songs” on page 35
Playing
Using the three performance control pedals.............................................................................. “Using the Pedals” on page 21
Playing an accompaniment that matches pitch................................................“Transposition – [TRANSPOSE]” on page 25
Selecting a touch sensitivity type......................................................................... “Touch Sensitivity – [TOUCH]” on page 24
Fine tuning the pitch of the entire instrument when you play the Clavinova along
with other instruments or CD music. ............................................................................ “Fine tuning of the pitch” on page 40
ENGLISH
Changing voices
Viewing the list of voices..............................................................................................................“Preset Voice List” on page 63
Simulating a concert hall ..................................................................................................................... “[REVERB]” on page 22
Combining two voices............................................................................... “Combining Two Voices (Dual mode)” on page 26
Playing different sounds with left and right hands
................................ “Splitting the Keyboard Range and Playing Two Different Voices (Split mode) (CLP-130)” on page 27
Making the sound more brilliant or mellower ...........................................................................“[BRILLIANCE]” on page 22
Adding spread or swell to the sound.................................................................................................... “[EFFECT]” on page 23
Enhancing the sound with effects............................................................................... “[VARIATION] (CLP-130)” on page 22
Practicing
Muting the right- or left-hand part
...................................................... “Practicing a One-Hand Part Using 50 Preset Songs (Part Cancel Function)” on page 18
Practicing a specified phrase repeatedly..............................................................“A-B Repeat for 50 Preset Songs” on page 20
Practicing with an accurate and steady tempo .................................................................“Using the Metronome” on page 29
Practicing using your recorded song..................................................................... “Recording Your Performance” on page 30
Recording
Recording your performance................................................................................. “Recording Your Performance” on page 30
Settings
Adjusting the Clavinova settings ...................................................................“Detailed Settings – [FUNCTION]” on page 37
Connecting the Clavinova to other devices
What is MIDI? .................................................................................................................................... “About MIDI” on page 49
Recording your performance.......................................................................................................“AUX OUT jacks” on page 50
Raising the volume....................................................................................................................... “AUX OUT jacks” on page 50
Outputting other instruments’ sound from the Clavinova............................................................ “AUX IN jacks” on page 51
Connecting a computer ..................................................................................“Connecting a Personal Computer” on page 52
Assembling
Assembling and disassembling the Clavinova ................. “CLP-130/120”: Keyboard Stand Assembly” on pages page 57–62
CLP-130/120
Application Index
5
Page 6
PRECAUTIONS
PLEASE READ CAREFULLY BEFORE PROCEEDING
* Please keep this manual in a safe place for future reference.
WARNING
Always follow the basic precautions listed below to avoid the possibility of serious injury or even
death from electrical shock, short-circuiting, damages, fire or other hazards. These precautions
include, but are not limited to, the following:
●
ENGLISH
●
●
●
●
Always follow the basic precautions listed below to avoid the possibility of physical injury to you or
others, or damage to the instrument or other property. These precautions include, but are not limited
to, the following:
Power supply/Power cord
Only use the voltage specified as correct for the instrument. The
required voltage is printed on the name plate of the instrument.
Check the electric plug periodically and remove any dirt or dust
which may have accumulated on it.
Use only the supplied power cord/plug.
Do not place the power cord near heat sources such as heaters
or radiators, and do not excessively bend or otherwise damage
the cord, place heavy objects on it, or place it in a position
where anyone could walk on, trip over, or roll anything over it.
Do not open
Do not open the instrument or attempt to disassemble the internal parts or modify them in any way. The instrument contains no
user-serviceable parts. If it should appear to be malfunctioning,
discontinue use immediately and have it inspected by qualified
Yamaha service personnel.
CAUTION
Water warning
Do not expose the instrument to rain, use it near water or in
●
damp or wet conditions, or place containers on it containing liquids which might spill into any openings.
●
Never insert or remove an electric plug with wet hands.
Fire warning
Do not put burning items, such as candles, on the unit.
●
A burning item may fall over and cause a fire.
If you notice any abnormality
●
If the power cord or plug becomes frayed or damaged, or if
there is a sudden loss of sound during use of the instrument, or
if any unusual smells or smoke should appear to be caused by
it, immediately turn off the power switch, disconnect the electric
plug from the outlet, and have the instrument inspected by qualified Yamaha service personnel.
6
Power supply/Power cord
●
When removing the electric plug from the instrument or an outlet, always hold the plug itself and not the cord. Pulling by the
cord can damage it.
Remove the electric plug from the outlet when the instrument is
●
not to be used for extended periods of time, or during electrical
storms.
Do not connect the instrument to an electrical outlet using a
●
multiple-connector.
Doing so can result in lower sound quality, or possibly cause
overheating in the outlet.
Assembly
Read carefully the attached documentation explaining the
●
assembly process.
Failure to assemble the instrument in the proper sequence
might result in damage to the instrument or even injury.
CLP-130/120
PRECAUTIONS
(1)B-7
Location
●
Do not expose the instrument to excessive dust or vibrations, or
extreme cold or heat (such as in direct sunlight, near a heater,
or in a car during the day) to prevent the possibility of panel disfiguration or damage to the internal components.
●
Do not use the instrument in the vicinity of a TV, radio, stereo
equipment, mobile phone, or other electric devices. Otherwise,
the instrument, TV, or radio may generate noise.
●
Do not place the instrument in an unstable position where it
might accidentally fall over.
Before moving the instrument, remove all connected cables.
●
Do not place the instrument against a wall (allow at least 3 cm/
●
one-inch from the wall), since this can cause inadequate air circulation, and possibly result in the instrument overheating.
1/2
Page 7
Connections
●
Before connecting the instrument to other electronic components, turn off the power for all components. Before turning the
power on or off for all components, set all volume levels to minimum. Also, be sure to set the volumes of all components at their
minimum levels and gradually raise the volume controls while
playing the instrument to set the desired listening level.
Maintenance
When cleaning the instrument, use a soft, dry or slightly damp
●
cloth. Do not use paint thinners, solvents, cleaning fluids, or
chemical-impregnated wiping cloths.
Handling caution
Take care that the key cover does not pinch your fingers, and do
●
not insert a finger or hand in any gaps on the key cover or
instrument.
Never insert or drop paper, metallic, or other objects into the
●
gaps on the key cover, panel or keyboard. If this happens, turn
off the power immediately and unplug the power cord from the
AC outlet. Then have the instrument inspected by qualified
Yamaha service personnel.
●
Do not place vinyl, plastic or rubber objects on the instrument,
since this might discolor the panel or keyboard.
Do not rest your weight on, or place heavy objects on the instru-
●
ment, and do not use excessive force on the buttons, switches
or connectors.
●
Do not operate the instrument for a long period of time at a high
or uncomfortable volume level, since this can cause permanent
hearing loss. If you experience any hearing loss or ringing in the
ears, consult a physician.
Using the bench (If included)
●
Do not place the bench in an unstable position where it might
accidentally fall over.
Do not play carelessly with or stand on the bench. Using it as a
●
tool or step-ladder or for any other purpose might result in accident or injury.
Only one person should sit on the bench at a time, in order to
●
prevent the possibility of accident or injury.
●
If the bench screws become loose due to extensive long-term
use, tighten them periodically using the included tool.
Saving data
Saving and backing up your data
●
Depending upon the Backup Settings (page 48), internal data is
retained for about 1 week after the power is turned off. If the
period is exceeded, the data will be lost. Be sure to turn the
power switch on for a few minutes at least once a week. The
data could be lost due to malfunction or incorrect operation.
Save important data to external media such as the Yamaha
MDF3 MIDI data filer.
Backing up the external media
To protect against data loss through media damage, we recom-
●
mend that you save your important data onto two external
media.
ENGLISH
Yamaha cannot be held responsible for damage caused by improper use or modifications to the instrument, or data that is lost or destroyed.
Always turn the power off when the instrument is not in use.
(1)B-7
2/2
CLP-130/120
PRECAUTIONS
7
Page 8
Accessories
• “50 Greats for the Piano” (Music Book)
• Owner’s Manual
This manual contains complete instructions for operating your Clavinova.
• Bench
A bench may be included or optional, depending on your locale.
Maintenance
ENGLISH
Clean the instrument using a dry or slightly damp soft cloth (wring well).
Do not use benzene, thinner, detergent, or chemically-treated cloth for cleaning. Do not place vinyl, plastic or rubber
products on the instrument.
Otherwise, the panel or keys may become discolored or degraded.
Before using the Clavinova, be sure to read “Precautions” on pages 6 – 7.
CAUTION
CAUTION
Tuning
Unlike an acoustic piano, the Clavinova does not need to be tuned. It always stays perfectly in tune.
Transporting
If you move to another location, you can transport the Clavinova along with your other belongings. You can move the
unit as it is (assembled) or you can disassemble the unit.
Transport the keyboard horizontally. Do not lean it up against a wall or stand it up on its side. Do not subject the
instrument to excessive vibration or shock.
8
CLP-130/120
Accessories / Maintenance
Page 9
Features
The Yamaha Clavinova CLP-130/120 digital piano offers unmatched sonic realism and natural grand-piano type playability as well as Yamaha’s original “AWM Dynamic Stereo Sampling (CLP-130)/AWM Stereo Sampling (CLP-120)” tonegeneration technology for rich, musical voices, and a special “Graded Hammer” keyboard that provides graded key
weight and response throughout the keyboard range.
The CLP-130/120 Grand Piano 1 and 2 voices feature totally new samples painstakingly recorded from a full concert
grand piano. The CLP-130 Grand Piano 1 voice features three velocity-switched samples (Dynamic Sampling), special
“Sustain Sampling” (page 88) that samples the unique resonance of an acoustic grand piano’s soundboard and strings
when the damper pedal is pressed, and “Keyoff Samples” that add the subtle sound produced when the keys are released.
The CLP-130/120 comes much closer to the sound of a true acoustic piano.
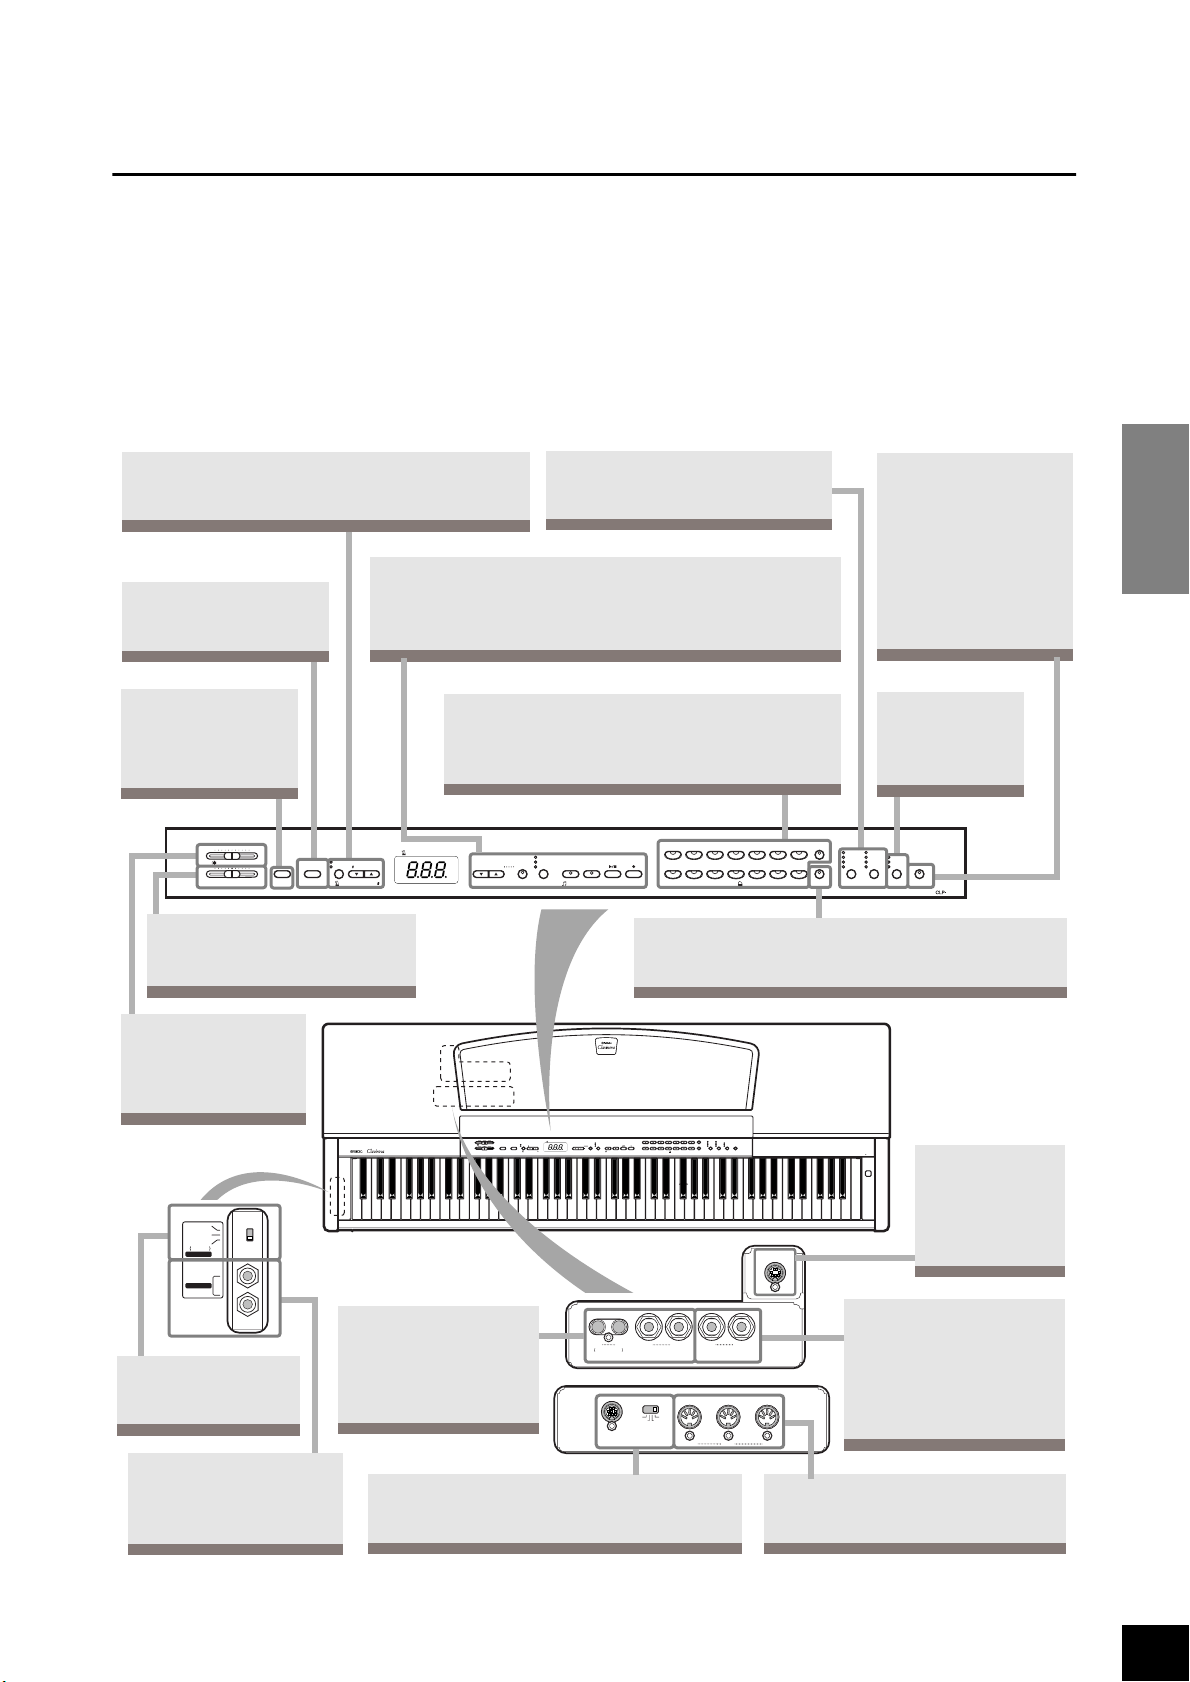
TEMPO [▼] [▲]
You can change the song tempo (speed) and select
useful functions using this buttons (pages 37–48).
The Clavinova includes 50 preset songs.
[METRONOME]
Control the metronome
functions (page 29).
[DEMO]
Demonstration playback is available for
each voice (page 16).
MIN MAX
MASTER VOLUME
MELLOW BRIGHT
BRILLIANCE
DEMO METRONOME
/
STOP
START
This section enables you to listen to these songs, practice
using a convenient practice function, and record and play
back your performance (pages 17–20, 30–36).
Voice buttons
Select voices from 14 internal sounds including
Grand Piano 1 and 2 (page 21). You can also
combine two voices at the same time (page 26).
/
OTHER VALUE
/
FUNCTION
TEMPO
–
/
NO +/YES PRESET
TEMPO
FUNCTION
TEMPO
[BRILLIANCE]
Adjust the brightness of the tone
using this slider (page 22).
[MASTER VOLUME]
Adjust the volume
level using this slider
(page 11).
[REVERB] / [EFFECT]
Add reverb (reverberation) and
effects to the sound (pages 22, 23).
GRAND
E.PIANO
E.PIANO2HARPSI-
GRAND
PIANO 1
1
USER 1
USER 2
USER 3
TRACK1TRACK2START
SONG
PIANO 2
CHURCH
JAZZ
REC
/
STOP
ORGAN
ORGAN
CHORD
STRINGS
CHOIR GUITAR E.BASS SPLIT
VOICE
[SPLIT]
You can play different voices on the left- and right-hand
sections of the keyboard (CLP-130) (page 27).
[TRANSPOSE]
You can shift the pitch
of the entire keyboard
up or down so that the
pitch will match that of
another instrument or
ENGLISH
singer, while you play
the same, unshifted
keys (page 25).
[TOUCH]
Fine-tune the
touch response
(page 24).
E.CLAVI-
VIBRA-
VARIATION
CHORD
PHONE
ROOM
CHORUS
HALL 1
PHASER
HARD
HALL 2
TREMOLO
WOOD
BASS
MEDIUM
STAGE
DELAY
SOFT
REVERB EFFECT TOUCH TRANSPOSE
ON
(CLP-130)
OFF
ON
NORMAL
HP. SW
SPEAKER
PHONES
This switch turns the
internal speakers on
or off (page 12).
A set of standard stereo
headphones can be plugged in here for private
practice (page 12).
GRAND
GRAND
PIANO 2
MIN MAX
MASTER VOLUME
MELLOW BRIGHT
BRILLIANCE
DEMO METRONOME
/
OTHER VALUE
TEMPO
TEMPO
START
/
STOP
/
NO +/YES PRESET
–
FUNCTION
/
FUNCTION
TEMPO
PIANO 1
USER 1
USER 2
REC
JAZZ
CHURCH
TRACK1TRACK2START
/
STOP
ORGAN
ORGAN
USER 3
Connect recording
equipment (such as a
cassette tape recorder)
R
LEVEL FIXED
AUX OUT
here to record your performance (page 50).
Mac
PC-1
TO HOST HOST SELECT
PC-2
This jack and selector switch allow direct connection to a personal computer for sequencing
and other music applications (pages 52–55).
E.PIANO
E.PIANO2HARPSI-
1
STRINGS
CHOIR GUITAR E.BASS SPLIT
MIDI
E.CLAVI-
VIBRA-
VARIATION
CHORD
CHORD
PHONE
CHORUS
ROOM
HARD
PHASER
HALL 1
MEDIUM
TREMOLO
HALL 2
WOOD
SOFT
DELAY
STAGE
BASS
VOICE REVERB EFFECT TOUCH TRANSPOSESONG
ON
POWER
Connect the
pedal cord here
to use the
Clavinova’s
PEDAL
pedals (page 51).
Delivers the output of the
AUX IN
L/L+RRL/L+RRL
Clavinova for connection
to an instrument amplifier,
mixing console, PA sys-
MIDI
tem, or recording equipment (page 51).
THRU
OUT IN
Connect a MIDI device here to use
various MIDI functions (pages 45–47).
(About MIDI ➝ page 49)
CLP-130/120
Features
9
Page 10
Before Using the Clavinova
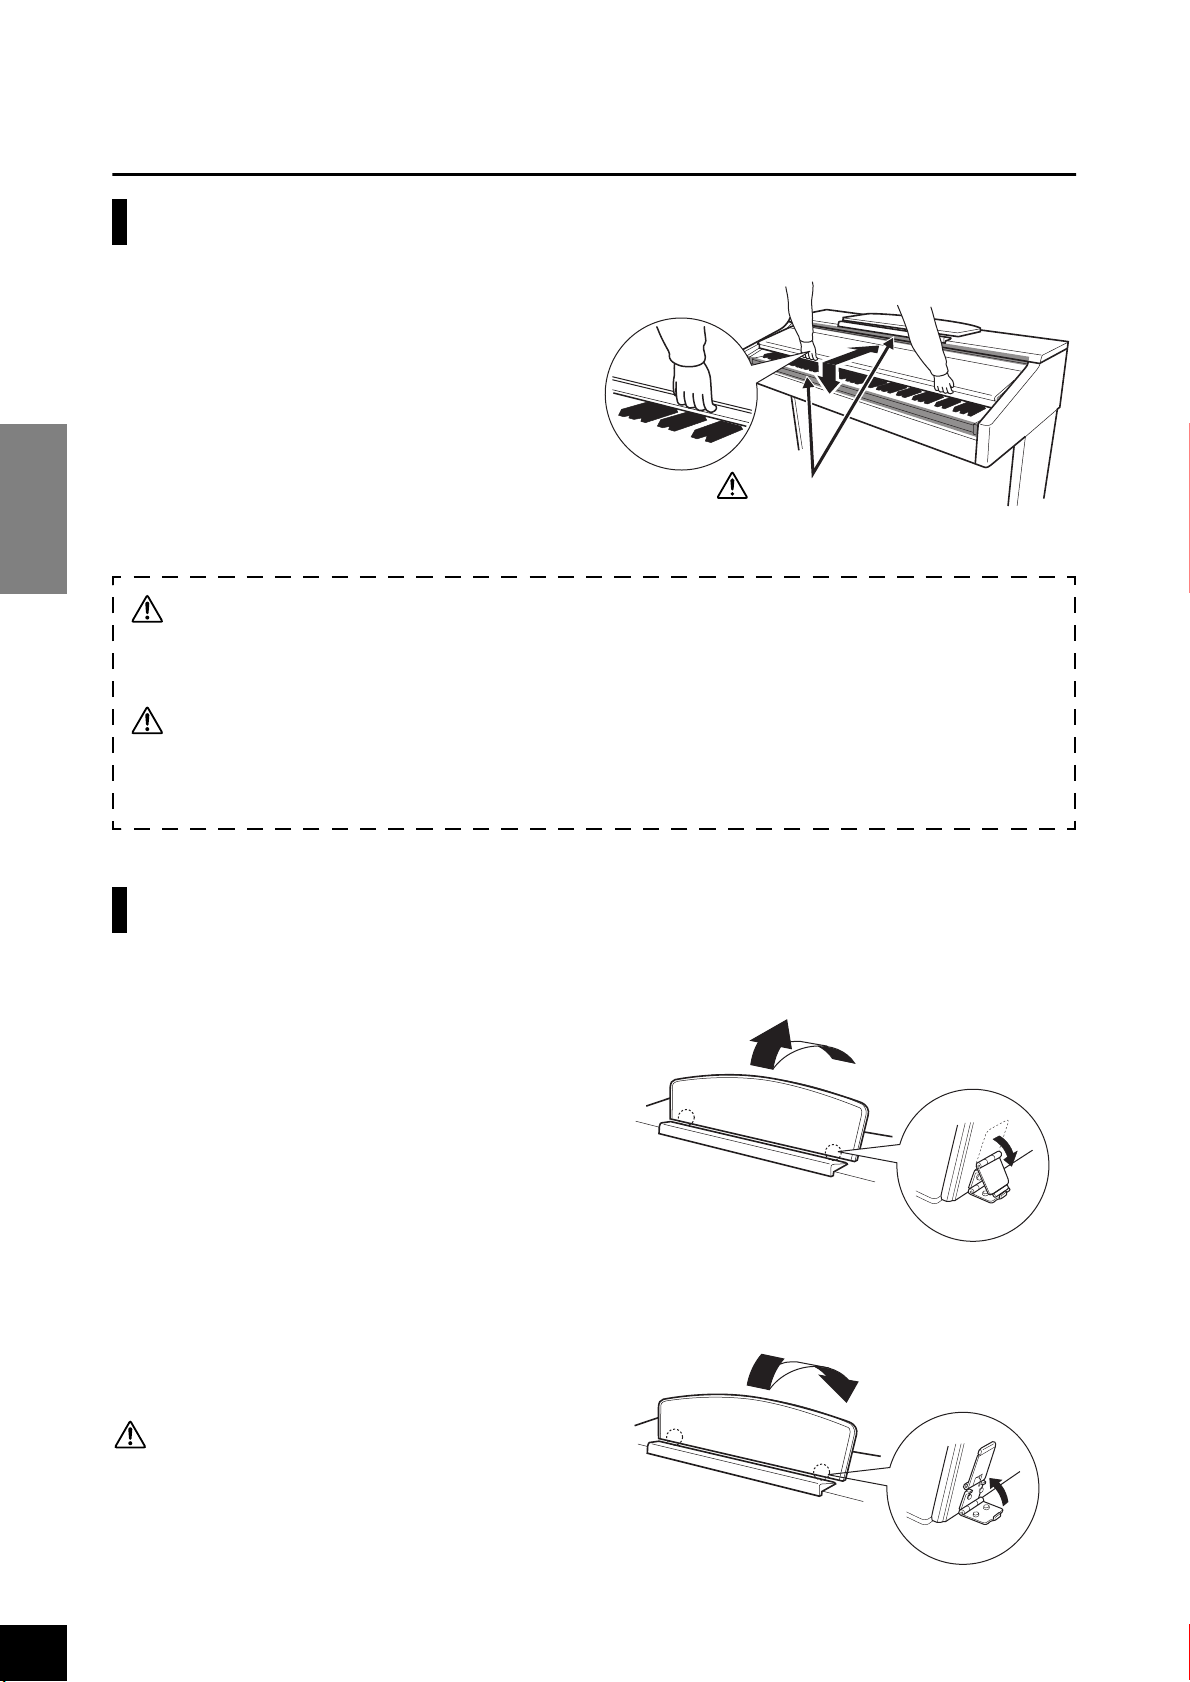
To open the key cover:
To close the key cover:
ENGLISH
Key Cover
Lift the cover slightly, then push and slide it open.
Slide the cover toward you and gently lower the cover
over the keys.
CAUTION
Be careful to avoid catching your fingers
when opening or closing the cover.
CAUTION
Hold the cover with both hands when opening or closing it. Do not release it until it is fully opened or closed. Be careful to avoid catching fingers (yours or others, especially children’s) between the cover and main unit.
CAUTION
Do not place objects such as a piece of metal or paper on top of the key cover. Small objects placed on the key cover
may fall inside the unit when the cover is opened and may be nearly impossible to remove. This could cause electric
shock, short circuit, fire or other serious damage to the instrument.
Music Rest
To raise the music rest:
1.
Pull the music rest up and toward yourself as far as it will go.
2.
Flip down the two metal supports at the left and right on
the rear of the music rest.
3.
Lower the music rest so that it rests on the metal supports.
To lower the music rest:
1.
Pull the music rest toward yourself as far as it will go.
2.
Raise the two metal supports (at the rear of the music rest).
3.
Gently lower the music rest backward until it is all the way
down.
10
CAUTION
Do not try to use the music rest in a half-raised position.
When lowering the music rest, do not release your hands
from the music rest until it is all the way down.
CLP-130/120
Before Using the Clavinova
Page 11
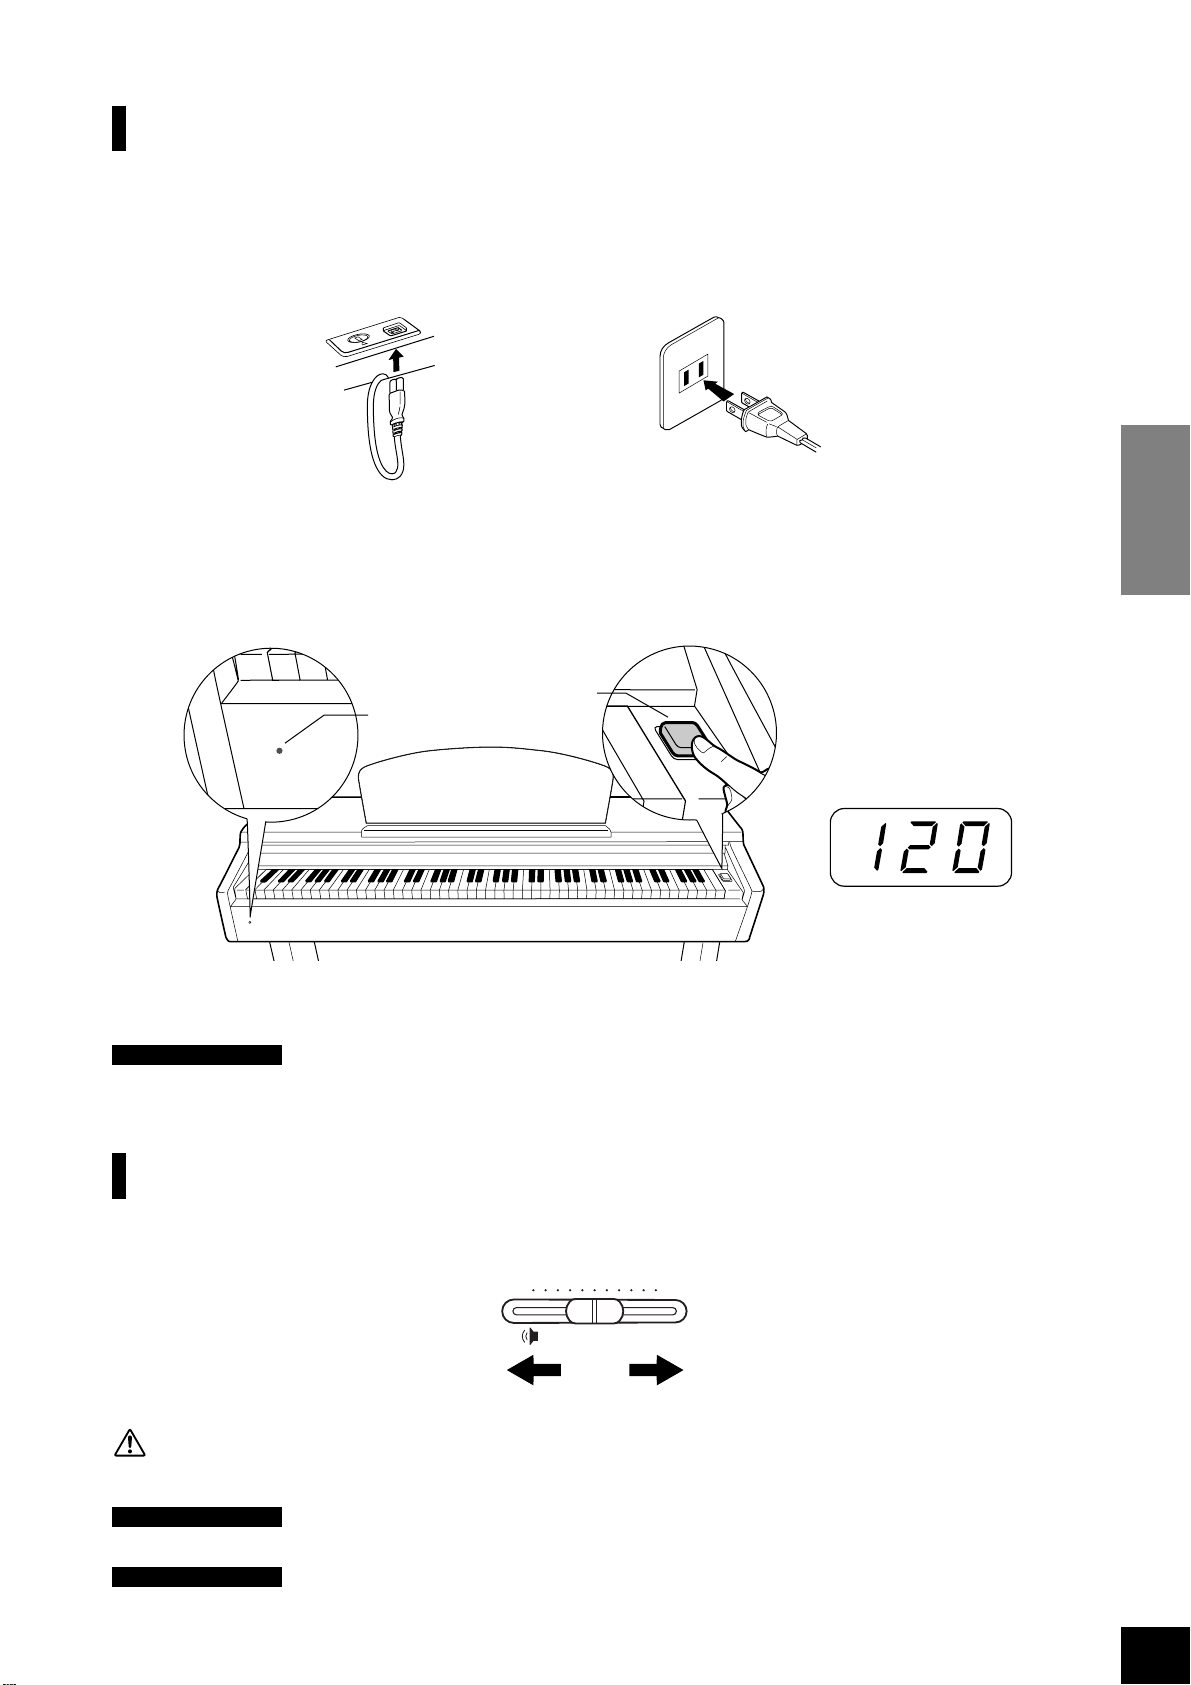
Turning the Power On
1. Connect the power cord.
Insert the plugs at the ends of the cord, one into the AC INLET on the Clavinova, and the other into a standard AC
outlet.
In some areas, a plug adaptor may be provided to match the pin configuration of the AC wall outlets in your area.
12
(bottom surface)
(The shape of plug differs depending on locale.)
2. Turn the power on.
Press the [POWER] button.
• The display located in the center of the front panel and the power indicator located below the left end of the key-
board lights up.
[POWER]
Power indicator
Display
Normally indicates tempo.
When you’re ready to turn off the power, press the [POWER] button again.
• The display and the power indicator turn off.
TIP
Power indicator
If you close the key cover without turning the power off, the power indicator remains lit, indicating that the
power is still on.
ENGLISH
Setting the Volume
Initially set the [MASTER VOLUME] control about halfway between the “MIN” and “MAX” settings. Then, when you start
playing, re-adjust the [MASTER VOLUME] control to the most comfortable listening level.
MIN MAX
MASTER VOLUME
The level decreases. The level increases.
CAUTION
Do not use the Clavinova at a high volume level for a long period of time, or your hearing may be damaged.
TERMINOLOGY
TIP
MASTER VOLUME:
The volume level of the entire keyboard sound
You can also adjust the [PHONES] output level and the AUX IN input level using the [MASTER VOLUME] slider.
CLP-130/120 Before Using the Clavinova
11
Page 12

ON
Using Headphones
Connect a pair of headphones to one of the
Tw o
You can connect two sets of standard stereo headphones. (If you are
using only one pair of headphones, you can plug them into either
jack.)
ENGLISH
Using the Headphone Hanger
A headphone hanger is included in the CLP-130/120 package so that you can
hang the headphones on the Clavinova. Install the headphone hanger using
included two screws (4 × 10mm) as shown in the figure.
[PHONES]
jacks are provided.
[PHONES]
jacks.
bottom surface
OFF
ON
NORMAL
HP. SW
SPEAKER
PHONES
standard stereo
phone plug
CAUTION
Do not hang anything other than the headphones on the hanger. Otherwise,
the Clavinova or the hanger may be damaged.
Using the Speaker Switch
This switch turns the internal speakers on or off.
NORMAL (HP. SW) ......... The speakers produce sound as long as a pair of headphones is not con-
nected.
....................................... The speakers always produce sound.
OFF ...................................... The speakers produce no sound.
NORMAL
HP. SW
SPEAKER
PHONES
OFF
ON
12
CLP-130/120
Before Using the Clavinova
Page 13

Reference
Part Names................................................................14
Listening to the Demonstration Tunes ................... 16
Listening to 50 Piano Preset Songs.......................... 17
Practicing a One-Hand Part Using 50 Preset Songs
(Part Cancel Function)............................................ 18
A-B Repeat for 50 Preset Songs .................................. 20
Selecting & Playing Voices ....................................... 21
Selecting Voices ........................................................... 21
Using the Pedals .......................................................... 21
Adding Variations to the Sound – [VARIATION]
(CLP-130)/[BRILLIANCE]/[REVERB]/
[EFFECT]................................................................. 22
Touch Sensitivity – [TOUCH].................................... 24
Transposition – [TRANSPOSE] ................................. 25
Combining Two Voices (Dual mode)......................... 26
Splitting the Keyboard Range and Playing Two
Different Voices (Split mode) (CLP-130)............... 27
Using the Metronome................................................. 29
Recording Your Performance................................... 30
Recording to [TRACK1] ............................................. 30
Re-recording TRACK1................................................ 32
Recording to [TRACK2] ............................................. 32
Changing the Initial Settings (Data recorded at the
beginning of a song)................................................ 34
Playing Back Recorded Songs.................................. 35
Playing Back a Song .................................................... 35
Useful Playback Functions.......................................... 36
Detailed Settings – [FUNCTION]........................... 37
Basic Procedure in Function Mode............................ 38
About Each Function.................................................. 40
F1. Fine Tuning of the Pitch ....................................... 40
F2. Selecting a Scale..................................................... 41
F3. Dual Mode Functions ........................................... 42
F4. (CLP-130) Split Mode Functions........................ 43
This section explains how to make detailed settings for the
Clavinova’s various functions.
F5. (CLP-130) / F4. (CLP-120) Other Functions..... 44
F.6
(CLP-130)
F7. (CLP-130) / F6. (CLP-120) Preset Song
Part Cancel Volume .............................................. 45
F8. (CLP-130) / F7. (CLP-120) MIDI Functions ..... 45
F9. (CLP-130) / F8. (CLP-120) Backup Functions.. 48
/ F.5
(CLP-120)
Metronome Volume .. 45
About MIDI.............................................................. 49
Connections ............................................................. 50
Connectors .................................................................. 50
Connecting a Personal Computer .............................. 52
Troubleshooting ....................................................... 56
Options..................................................................... 56
CLP-120: Keyboard Stand Assembly....................... 57
CLP-130: Keyboard Stand Assembly....................... 60
Preset Voice List........................................................ 63
Demo Song List........................................................ 66
Index......................................................................... 67
ENGLISH
CLP-130/120
13
Page 14

Part Names
Top panel (CLP-130)
ENGLISH
2
MIN MAX
MASTER VOLUME
MELLOW BRIGHT
3
BRILLIANCE
C0 D0 E0 F0 G0 A0 B0 C1 D1 E1 F1 G1 A1 B1 C2 D2 E2 F2 G2 A2 B2 C3 D3 E3 F3 G3 A3 B3 C4 D4 E4 F4 G4 A4 B4
B-1A-1
45 6
/
STOP
START
DEMO METRONOME
MIN MAX
MASTER VOLUME
MELLOW BRIGHT
BRILLIANCE
DEMO METRONOME
/
OTHER VALUE
TEMPO
TEMPO
—
/
NO+/YES PRESET
FUNCTION
/
STOP
START
/
FUNCTION
TEMPO
USER 1
USER 2
USER 3
TEMPO
FUNCTION
TEMPO
TRACK1TRACK2START
SONG
/
FUNCTION
GRAND
PIANO 1
CHURCH
ORGAN
E.PIANO
E.PIANO2HARPSI-
GRAND
GRAND
1
CHORD
PIANO 1
PIANO 2
CHURCH
JAZZ
/
STOP
REC
ORGAN
ORGAN
STRINGS
CHOIR GUITAR E.BASS SPLIT
VOICE
TEMPO
E.PIANO
GRAND
PIANO 2
JAZZ
ORGAN
STRINGS
E.CLAVI-
VIBRA-
VARIATION
CHORD
PHONE
ROOM
CHORUS
HALL 1
PHASER
HARD
HALL 2
TREMOLO
MEDIUM
WOOD
STAGE
DELAY
SOFT
BASS
ON
REVERB EFFECT TOUCHTRANSPOSE
C5
E5 F5 G5 A5 B5 C6 D6 E6 F6 G6 A6 B6 C7
D5
/
OTHER VALUE
/
—
9
E.PIANO2HARPSI-
1
CHOIR GUITAR E.BASS SPLIT
VOICE
CHORD
E.CLAVI-
CHORD
WOOD
BASS
NO +/YES PRESET
VIBRA-
VARIATION
PHONE
0
POWER
1
87
USER 1
USER 2
TRACK1TRACK2START
USER 3
SONG
B
CHORUS
PHASER
TREMOLO
DELAY
CD
HARD
MEDIUM
SOFT
A
ROOM
HALL 1
HALL 2
STAGE
REVERB EFFECT TOUCH TRANSPOSE
M
N
PEDAL
E
Connectors
(CLP-130)
/
STOP
REC
ON
O
OFF
NORMAL
HP. SW
SPEAKER
PHONES
ON
K
L
1 [POWER] ....................................... P11
2 [MASTER VOLUME] ....................... P11
3 [BRILLIANCE] ................................ P22
4 [DEMO] ........................................ P16
5 METRONOME [START/STOP] ........ P29
6 [TEMPO/FUNCTION #▲▼] ..... P29, 38
7 LED display ................................... P15
8 [–/NO] / [+/YES]
[PRESET]
[USER1] [USER2] [USER3] (CLP-130)
[TRACK1] [TRACK2]
SONG [START/STOP]
[REC].......................... P17–20, P30–36
R
LEVEL FIXED
AUX OUT
F
Mac
PC-2
PC-1
TO HOST HOST SELECT
H
I
MIDI
THRU
AUX IN
G
MIDI
OUT IN
J
L/L+RRL/L+RRL
9 Voice buttons................................ P21
0 [SPLIT] (CLP-130).......................... P27
A [REVERB] ....................................... P22
B [EFFECT] ....................................... P23
C [TOUCH]....................................... P24
D [TRANSPOSE]................................ P25
E [PEDAL]......................................... P51
F AUX OUT ...................................... P50
G AUX IN ......................................... P51
CLP-130/120 Part Names
14
Page 15

Top panel (CLP-120)
MIN MAX
2
MASTER VOLUME
MELLOW BRIGHT
3
BRILLIANCE
C0 D0 E0 F0 G0 A0 B0 C1 D1 E1 F1 G1 A1 B1 C2 D2 E2 F2 G2 A2 B2 C3 D3 E3 F3 G3 A3 B3 C4 D4 E4 F4 G4 A4 B4
B-1A-1
45 6
START
/
STOP
DEMO METRONOME
MIN MAX
MASTER VOLUME
MELLOW BRIGHT
BRILLIANCE
DEMO METRONOME
TEMPO
/
OTHER VALUE
TEMPO
FUNCTION
START/STOP
/
NO+/YES PRESET
—
/
FUNCTION
TEMPO
TEMPO
FUNCTION
TEMPO
TRACK1TRACK2START
SONG
/
FUNCTION
GRAND
PIANO 1
CHURCH
ORGAN1
GRAND
E.PIANO1E.PIANO2HARPSI-
GRAND
PIANO 1
CHORD 1
PIANO 2
CHURCH
CHURCH
STRINGS1STRINGS2JAZZ
/
STOP
REC
ORGAN 1
ORGAN 2
ORGAN
VOICE
/
OTHER VALUE
TEMPO
9
GRAND
E.PIANO1E.PIANO2HARPSI-
PIANO 2
JAZZ
CHURCH
ORGAN2
HARPSI-
VIBRA-
CHORD 2
PHONE
CHOIR GUITAR
REVERB EFFECT TOUCHTRANSPOSE
STRINGS1STRINGS
ORGAN
ROOM
CHORUS
HALL 1
PHASER
HARD
HALL 2
TREMOLO
MEDIUM
STAGE
DELAY
SOFT
ON
C5 D5 E5 F5 G5 A5 B5 C6 D6 E6 F6 G6 A6 B6 C7
VOICE
CHORD1
2
/
NO +/YES PRESET
—
HARPSI-
VIBRA-
CHORD2
PHONE
CHOIR GUITAR
POWER
1
87
TRACK1TRACK2START
SONG
B
A
CHORUS
ROOM
PHASER
HALL 1
TREMOLO
HALL 2
DELAY
STAGE
REVERB EFFECT TOUCH TRANSPOSE
M
N
/
STOP
CD
HARD
MEDIUM
SOFT
ON
O
REC
ENGLISH
OFF
ON
NORMAL
HP. SW
SPEAKER
PHONES
H [TO HOST] ...............................P49–55
I HOST SELECT...........................P49–55
J MIDI [IN] [OUT] [THRU] ...........P49–55
K [SPEAKER] ..................................... P12
K
L
LEVEL FIXED
R L/L+RRLR
AUX OUT AUX IN
F
L/L+R
G
MIDIMac
PC-2PC-1
TO HOST HOST SELECT
H
I
L [PHONES] ..................................... P12
M Soft (Left) Pedal ............................ P22
N Sostenute (Center) Pedal............... P22
O Damper (Right) Pedal ................... P21
Display
• Check the operation on the display in the center of the top panel as you proceed.
• The display indicates different values, as shown below, depending on the operation.
Tempo
(Normal indication)
A song number of
“50 Greats for the Piano”
Function number Parameter value
Connectors (CLP-120)
MIDI
THRU
OUT IN
J
PEDAL
E
CLP-130/120 Part Names
15
Page 16

Listening to the Demonstration Tunes
Demonstration tunes are provided that effectively demonstrate each of the CLP-130/120’s voices.
Procedure
1. Turn the power on.
ENGLISH
2. Engage Demo mode.
3. Play a Voice demo.
425
GRAND
GRAND
PIANO 1
MIN MAX
MASTER VOLUME
MELLOW BRIGHT
BRILLIANCE
START
DEMO METRONOME
TEMPO
/
STOP
FUNCTION
/
FUNCTION
TEMPO
TEMPO
/
OTHER VALUE
/
NO +/YES PRESET
—
USER 1
USER 2
USER 3
TRACK1TRACK2START
SONG
/
STOP
REC
(In case the power is not turned ON) Press the [POWER] button.
When the power is turned ON, one of the voice button LEDs will light.
Initially set the [MASTER VOLUME] control about half way between the “MIN”
and “MAX” settings. Then, when you start playing, re-adjust the [MASTER
VOLUME]
control to the most comfortable listening level.
Press the [DEMO] button to engage Demo mode. The voice button indicators
will flash in sequence.
Press one of the voice buttons to start playback of all songs starting from the
corresponding voice demo tune — featuring the voice normally selected by that
voice button. (If you press the SONG [START/STOP] button instead of a voice
button, the GRAND PIANO 1 demo tune will begin playback.)
Adjust the volume/brilliance
Use the [MASTER VOLUME] control to adjust the volume and the [BRIL-
LIANCE]
control to adjust the brilliance (page 22).
CHURCH
PIANO 2
JAZZ
ORGAN
ORGAN
3
E.PIANO
E.PIANO2HARPSI-
1
CHORD
STRINGS
CHOIR GUITAR E.BASS SPLIT
VOICE
E.CLAVI-
VIBRA-
VARIATION
CHORD
PHONE
WOOD
BASS
ROOM
CHORUS
HALL 1
PHASER
HARD
HALL 2
TREMOLO
MEDIUM
STAGE
DELAY
SOFT
ON
REVERB EFFECT TOUCH TRANSPOSE
TIP
For a list of the demo songs,
see page 66.
NOTE
MIDI reception is not possible in
Demo Song mode.
Demo song data is not transmitted via the MIDI connectors.
NOTE
Demo mode cannot be
engaged while a user song
recorder (page 30) or user song
playback (page 35) is in use.
TERMINOLOGY
Mode:
A mode is a status under which
you can execute a certain function. In Demo mode, you can
play back demonstration tunes.
4. Stop the Voice demo.
Press the SONG [START/STOP] button or the voice button of the currently-
playing demo to stop playback.
5. Exit from Demo mode.
Press the [DEMO] button to exit from Demo mode and return to normal play
mode.
The voice button indicators will stop flashing in sequence.
NOTE
You cannot adjust the tempo of
demo songs.
You cannot use the part cancel
function (page 45) or the song
A–B repeat function (page 20)
in Demo mode.
NOTE
On the CLP-130, you can demo
the piano voices with various
effects by pressing the [VARIA-
TION] button, then pressing the
desired voice button. Refer to
the “Piano Voice Demo Description” on page 66 for the complete list of demo sounds for the
piano voices with various
effects.
CLP-130/120 Listening to the Demonstration Tunes
16
Page 17

Listening to 50 Piano Preset Songs
The Clavinova provides performance data of 50 piano songs. You can simply listen to these songs
(page 17) or use them for practice (page 18). You can also refer to the included “50 Greats for the
Piano” that contains scores for 50 piano preset songs.
14
-1
MIN MAX
MASTER VOLUME
MELLOW BRIGHT
BRILLIANCE
START
DEMO METRONOME
TEMPO
/
STOP
FUNCTION
TEMPO
/
FUNCTION
TEMPO
/
OTHER VALUE
—
/
NO +/YES PRESET
USER 1
USER 2
USER 3
TRACK1TRACK2START
SONG
Procedure
1. Engage Preset Song mode.
Press the [PRESET] button to engage Preset Song mode. The [PRESET],
[TRACK1] and [TRACK2] indicators will light.
2. Play any of the 50 preset songs.
2-1 Press the [–/NO], [+/YES] buttons to select the number
of the tune you want to play (the number will appear
on the LED display).
1 – 50: Select a preset song number and play only
the song.
ALL: Play all preset songs in sequence.
rnd: Play all preset songs continuously in random order.
223
-2
GRAND
GRAND
E.PIANO
E.PIANO2HARPSI-
E.CLAVI-
VIBRA-
PIANO 2
PIANO 1
1
JAZZ
/
STOP
CHURCH
REC
ORGAN
ORGAN
CHORD
STRINGS
CHOIR GUITAR E.BASS SPLIT
VOICE
VARIATION
CHORD
PHONE
WOOD
BASS
Preset Song mode cannot be
engaged while the unit is in
Demo Song mode (page 16),
while a song is playing back
(page 35), or when the user song
recorder (page 30) is in use.
TERMINOLOGY
Song:
song number
On the CLP-130/120, performance data is called a “Song.”
This includes demonstration
tunes and piano preset tunes.
CHORUS
ROOM
PHASER
HARD
HALL 1
TREMOLO
MEDIUM
HALL 2
DELAY
SOFT
STAGE
REVERB EFFECT TOUCH TRANSPOSE
NOTE
ON
ENGLISH
2-2 Press the SONG [START/STOP] button to start playback.
Adjust the Volume
Use the [MASTER VOLUME] control to adjust the volume.
Adjust the tempo
You can use the [TEMPO/FUNCTION# ▼
▲]
buttons to adjust the playback tempo
as required. The default tempo can be
recalled by simultaneously pressing the
[▼] and [▲] buttons.
This produces a relative tempo variation, with a range from “–50”
through “---” to “50” at maximum;
the range will differ depending on
the selected song.
3. Stop playback.
Playback will stop automatically when the selected preset song has finished. To
stop the song during playback (or continuous playback), press the SONG
[START/STOP]
• To play back another song continuously, see procedure 2 above.
button.
TIP
You can play the keyboard
along with the preset song. You
can change the voice playing on
the keyboard.
TIP
You can adjust the Brilliance
control (page 22) and Reverb
type (page 22) that is applied to
the voice you play on the keyboard and for the preset song
playback. You can change the
Effect type (page 23) and
Touch sensitivity (page 24) for
the keyboard voice.
NOTE
The default tempo “---” is auto-
matically selected whenever a
new preset song is selected, or
when playback of a new preset
song begins during “ALL” or
“rnd” playback.
NOTE
When you select a different song
(or a different song is selected
during chained playback), an
appropriate reverb type will be
selected accordingly.
CLP-130/120 Listening to 50 Piano Preset Songs
17
Page 18

4. Exit from Preset Song mode.
How to use the practice functions
You can turn the left- and right-hand parts on or off as required so you can practice the
corresponding part (part cancel function) and continuously repeat a specified phrase
within a song (song A-B repeat function). For more information, see pages 18–20.
The 50 preset songs have separate left- and right-hand parts on individual tracks. You can turn the
ENGLISH
left- and right-hand parts on or off as required so you can practice the corresponding part (the part
that is turned off) on the keyboard. The right-hand part is played by [TRACK1] and the left-hand
part is played by [TRACK2].
Press the [PRESET] button to exit Preset Song mode. The indicator turns off,
and the unit returns to normal play mode.
MIDI reception is not possible in
Piano Song mode.
Piano song data is not transmitted via the MIDI connectors.
NOTE
Practicing a One-Hand Part Using 50 Preset Songs
(Part Cancel Function)
1
23
GRAND
E.PIANO
GRAND
E.PIANO2HARPSI-
E.CLAVI-
VIBRA-
MIN MAX
MASTER VOLUME
MELLOW BRIGHT
BRILLIANCE
START
DEMO METRONOME
PIANO 1
1
/
OTHER VALUE
TEMPO
/
STOP
FUNCTION
/
FUNCTION
TEMPO
TEMPO
—
/
NO +/YES PRESET
USER 1
USER 2
USER 3
TRACK1TRACK2START
SONG
/
STOP
REC
CHURCH
PIANO 2
JAZZ
ORGAN
ORGAN
CHORD
STRINGS
CHOIR GUITAR E.BASS SPLIT
VOICE
VARIATION
CHORD
PHONE
WOOD
BASS
CHORUS
ROOM
HARD
PHASER
HALL 1
MEDIUM
TREMOLO
HALL 2
SOFT
DELAY
STAGE
REVERB EFFECT TOUCH TRANSPOSE
ON
Procedure
1. Turn off the playback part you wish to practice.
After you select a song to practice, press the [TRACK1] or [TRACK2] button to
turn off the corresponding part.
When you first select a song, both [TRACK1] and [TRACK2] indicators light up,
indicating that you can play back both parts. When you press one of the buttons
to turn off playback, the corresponding button indicator turns off and the corresponding part playback is muted.
• Pressing the buttons repeatedly toggles playback between on and off.
2. Start playback and playing.
Press the SONG [START/STOP] button to start playback. Play the part you just
turned off.
NOTE
The Preset Song Part Cancel
function cannot be used during
“ALL” or “rnd” (page 17) play-
back.
TIP
The parts can be turned on or
off even during playback.
TIP
The “Preset Song Part Cancel
Volume” function described on
page 45 can be used to set the
canceled part so that it plays at
a volume from “0” (no sound) to
“20”. The normal setting is “5”.
CLP-130/120 Listening to 50 Piano Preset Songs
18
Page 19

Starting playback automatically as you start playing the keyboard
(Synchro Start)
When the Synchro Start function is engaged, play
back of the selected preset song will begin automatically as soon as you start playing on the keyboard.
To engage the Synchro Start function press the
SONG [START/STOP]
part button for the ON part. A dot will appear in the
lower right corner of the display.
(Repeat the previous operation to disengage the Synchro Start function.)
Playback will then start as soon as you begin playing on the keyboard.
Left Pedal Start/Stop
The left pedal can be assigned to start and stop preset song playback via the “Left
Pedal Mode” function described on page 44.
3.
Stop playback.
When playback is complete, it automatically stops and the Clavinova locates the
top of the song. If you wish to stop playback in the middle of a song, press the
SONG[START/STOP]
button while holding the
button.
-
song number
synchro start mark
NOTE
If you hold a track button that is
OFF while pressing the SONG
[START/STOP] button, that
track will be turned ON and the
unit will engage Synchro Start
mode.
NOTE
Both parts are automatically
turned ON whenever a new
song is selected.
ENGLISH
CLP-130/120 Listening to 50 Piano Preset Songs
19
Page 20

A-B Repeat for 50 Preset Songs
The A-B Repeat function can be used to continuously repeat a specified phrase within a preset song.
Combined with the Part Cancel function described below, this provides an excellent way to practice
difficult phrases.
Procedure
ENGLISH
1.
MIN MAX
MASTER VOLUME
MELLOW BRIGHT
BRILLIANCE
START
DEMO METRONOME
1
/
OTHER VALUE
FUNCTION
TEMPO
—
/
NO +/YES PRESET
TEMPO
/
STOP
FUNCTION
TEMPO
/
USER 1
USER 2
USER 3
TRACK1TRACK2START
SONG
2
GRAND
PIANO 1
/
STOP
CHURCH
REC
ORGAN
Specify the beginning (A) and the end (B) of the
phrase, and start practicing.
Select and play a preset song, then press the
FUNCTION#]
button at the beginning of the phrase
you want to repeat.
This sets the “A” point ( will appear on the display).
To specify the end (B) of the phrase, press the
FUNCTION#]
button a second time at the end of the
phrase.
This sets the “B” point ( will appear on the display).
At this point, repeat playback will begin between the
specified A and B points.
[TEMPO/
[TEMPO/
E.PIANO
GRAND
1
PIANO 2
JAZZ
ORGAN
STRINGS
E.PIANO2HARPSI-
E.CLAVI-
VIBRA-
CHORD
CHOIR GUITAR E.BASS SPLIT
VOICE
VARIATION
CHORD
PHONE
WOOD
BASS
ROOM
HALL 1
HALL 2
STAGE
REVERB EFFECT TOUCH TRANSPOSE
NOTE
The A-B Repeat function cannot
be used during “ALL” or “rnd”
(page 17) playback.
NOTE
• To set the “A” point at the
very beginning of the song,
press the [TEMPO/FUNC-
TION#] button before start-
ing playback.
• To set the B point at the
song’s end, press the
[TEMPO/FUNCTION#] but-
ton after song playback is
complete and before
disappears from the display.
CHORUS
PHASER
TREMOLO
DELAY
HARD
MEDIUM
SOFT
ON
Stop playback.
2.
Press the
SONG [START/STOP]
button to stop playback while retaining the
specified A and B points. A-B repeat playback will resume if you press the
[START/STOP]
To cancel the A and B points, press the
button again.
[TEMPO/FUNCTION#]
TIP
An automatic lead-in (to help
guide you into the phrase)
starts at the A point of the song.
However, when the A point is
set at the beginning of the song,
the automatic lead-in is not
played.
SONG
button once.
NOTE
The A and B points are automatically canceled when a new
song is selected.
20
CLP-130/120
Listening to 50 Piano Preset Songs
Page 21

Selecting & Playing Voices
Selecting Voices
Voice buttons
GRAND
MIN MAX
MASTER VOLUME
MELLOW BRIGHT
BRILLIANCE
DEMO METRONOME
Procedure
TEMPO
/
TEMPO
/
STOP
START
FUNCTION
TEMPO
/
FUNCTION
OTHER VALUE
/
NO +/YES PRESET
—
USER 1
USER 2
USER 3
TRACK1TRACK2START
SONG
/
STOP
PIANO 1
CHURCH
REC
ORGAN
GRAND
E.PIANO
PIANO 2
1
JAZZ
ORGAN
STRINGS
E.PIANO2HARPSI-
E.CLAVI-
VIBRA-
CHORD
CHORD
PHONE
WOOD
BASS
CHOIR GUITAR E.BASS SPLIT
VOICE
VARIATION
ROOM
HALL 1
HALL 2
STAGE
REVERB EFFECT TOUCH TRANSPOSE
CHORUS
HARD
PHASER
MEDIUM
TREMOLO
SOFT
DELAY
ON
Select the desired voice by pressing one of the
Then, when you start playing, re-adjust the
[MASTER VOLUME]
comfortable listening level.
Using the Pedals
[VOICE]
buttons.
control for the most
TIP
To learn characteristics of the
voices, listen to demo songs for
each voice (page 16). Refer to
“Preset Voice List” on page 63
for more information on the
characteristics of each preset
voice.
TERMINOLOGY
Voice:
On the Clavinova, a voice
means a “tone” or “tonal color.”
TIP
You can control the loudness of
a voice by adjusting the force
with which you strike the keys,
although different playing styles
(touch sensitivities) have little or
no effect with certain musical
instruments.
Refer to “Preset Voice List” on
page 63.
ENGLISH
The Clavinova has three foot pedals that produce a range
of expressive effects similar to those produced by the
pedals on an acoustic piano.
Damper (Right) Pedal
The damper pedal functions in the same way as a
damper pedal on an acoustic piano. When the damper
pedal is pressed, notes sustain longer. Releasing the pedal
immediately stops (damps) any sustained notes.
When you select the
GRAND PIANO 1
voice on the CLP130, pressing the damper pedal activates the instrument’s
special “Sustain Samples” to accurately recreate the
unique resonance of an acoustic grand piano’s soundboard and strings.
When you press the damper
pedal here, the notes you
play before you release the
pedal have a longer sustain.
CLP-130/120
NOTE
If the damper pedal doesn’t
work, make sure that the pedal
cord is properly plugged into the
main unit (page 61: CLP-130,
page 58: CLP-120).
TIP
The depth of the effect produced by the “Sustain Samples”
can be adjusted via the “Pedal
Functions” (page 44) in Function mode.
Selecting & Playing Voices
21
Page 22

Sostenuto (Center) Pedal
If you play a note or chord on the keyboard and press the
sostenuto pedal while the note(s) are held, those notes
will sustain as long as you hold the pedal (as if the
damper pedal had been pressed) but all subsequently
played notes will not be sustained. This makes it possible
to sustain a chord, for example, while other notes are
played “staccato.”
When you press the sostenuto pedal here while holding
the note, the note will sustain
as long as you hold the pedal.
Soft (Left) Pedal
The soft pedal reduces the volume and slightly changes the timbre of notes played while
the pedal is pressed. The soft pedal will not affect notes that are already playing when it
is pressed.
TIP
Organ, string and choir voices
will continue to sound for as
long as the sostenuto pedal is
depressed.
TIP
The left pedal can be assigned
to song start/stop operation or
variation function (CLP-130) via
the “Left Pedal Mode” described
on page 44.
ENGLISH
[VARIATION] (CLP-130)
Lets you alter another aspect of the effect, depending on the selected type.
Refer to “Preset Voice List” on page 63 for more information on the characteristics of
each variation.
Procedure
Pressing the
The indicator lights (ON) each time the
[BRILLIANCE]
This control can be used to change the tonality or “timbre” of the sound output.
The control range is from MELLOW to BRIGHT.
[REVERB]
This control enables you to select various digital reverb effects that would add extra
depth and expression to the sound to create a realistic acoustic ambience.
OFF:
ROOM: This setting adds a continuous reverb effect to the sound, similar to the
HALL 1: For a “bigger” reverb sound, use the HALL 1 setting. This effect simulates
HALL 2: For a truly spacious reverb sound, use the HALL 2 setting. This effect simu-
STAGE: Simulates the reverb of a stage environment.
Adding Variations to the Sound – [VARIATION]
(CLP-130)/[BRILLIANCE]/[REVERB]/[EFFECT]
[BRILLIANCE]
MIN MAX
MASTER VOLUME
MELLOW BRIGHT
BRILLIANCE
[VARIATION]
When no reverb effect is selected, no REVERB indicator is lit.
acoustic reverberation you would hear in a room.
the natural reverberation of a small-size concert hall.
lates the natural reverberation of a large concert hall.
START
DEMO METRONOME
TEMPO
/
STOP
FUNCTION
/
FUNCTION
TEMPO
or selected voice button toggles the variation on and off.
[—/NO] [+/YES]
TEMPO
/
OTHER VALUE
—
[VARIATION]
USER 1
USER 2
/
NO +/YES PRESET
USER 3
button is pressed.
TRACK1TRACK2START
SONG
[EFFECT][REVERB][VARIATION]
GRAND
E.PIANO
GRAND
E.PIANO2HARPSI-
E.CLAVI-
VIBRA-
PIANO 1
1
PIANO 2
CHURCH
/
STOP
REC
JAZZ
ORGAN
ORGAN
CHORD
STRINGS
CHOIR GUITAR E.BASS SPLIT
VOICE
VARIATION
CHORD
PHONE
WOOD
BASS
CHORUS
ROOM
HARD
PHASER
HALL 1
MEDIUM
TREMOLO
HALL 2
SOFT
DELAY
STAGE
REVERB EFFECT TOUCH TRANSPOSE
TIP
Normal setting = OFF
TERMINOLOGY
Normal setting:
The “Normal setting” refers to
the default setting (factory setting) obtained when you first
turn on the power to the Clavinova.
TIP
The left pedal can be assigned
to ON or OFF the variation via
the “Left Pedal Mode” function
described on page 44 (CLP-
130).
NOTE
When the BRILLIANCE is set to
BRIGHT, the overall sound will
be slightly louder. If the MASTER VOLUME is set at a high
level the sound may become
distorted. If so, lower the MASTER VOLUME level.
TIP
The default reverb type (including OFF) and depth settings are
different for each voice.
ON
22
CLP-130/120
Selecting & Playing Voices
Page 23

Procedure
Pressing the [REVERB] button repeatedly toggles the reverb on and off.
The indicators light in sequence each time the [REVERB] button is pressed. No effect is
produced when all indicators are off.
Even if the REVERB effect is OFF, a “Soundboard Reverb” effect will be applied when
the GRAND PIANO 1 voice is selected.
Adjusting Reverb Depth
Adjust the reverb depth for the selected voice by using the
[–/NO] [+/YES] buttons while holding the [REVERB] but-
ton. The depth range is from 0 through 20. The current
depth setting appears on the LED display while the
[REVERB] button is held.
[EFFECT]
The [EFFECT] button allows you to select an effect to give your
sound greater depth and animation.
OFF: When no effect is selected, no EFFECT indicator is lit.
CHORUS: A shimmering, broadening effect
PHASER: Adds a sweeping effect to the sound.
TREMOLO: Tremolo effect
DELAY: Echo effect
depth
TIP
Releasing the [REVERB] button changes the reverb type.
If you are changing the reverb
depth by holding the [REVERB]
button, pressing the [REVERB]
button will not change the
reverb type.
TIP
depth 0: no effect
depth 20: maximum reverb
depth
TIP
Default depth settings are different for each voice.
TIP
The default effect type (including OFF) and depth settings are
different for each voice.
ENGLISH
Procedure
To select an effect type press the [EFFECT] button a few times until the indicator corresponding to the desired type lights (the indicators light in sequence each time you press
the [EFFECT] button). No effect is produced when all indicators are off.
Adjusting Effect Depth
You can adjust the effect depth for the selected voice by
using the [–/NO] and [+/YES] buttons while holding the
[EFFECT] button.
The depth range is from 0 through 20. The current depth
setting appears on the LED display while the [EFFECT]
button is held.
depth
TIP
Releasing the [EFFECT] button
changes the effect type.
If you are changing the depth
settings by holding the
[EFFECT] button, pressing the
[EFFECT] button will not
change the effect type.
TIP
depth 0: no effect
depth 20: maximum effect
depth
TIP
Default depth settings are different for each voice.
CLP-130/120 Selecting & Playing Voices
23
Page 24

Touch Sensitivity – [TOUCH]
You can select four different types of keyboard touch sensitivity — HARD, MEDIUM, SOFT or FIXED
— to match different playing styles and preferences.
HARD: Requires that the keys be played quite hard to produce maximum loud-
MEDIUM: Produces a fairly “standard” keyboard response.
SOFT: Allows maximum loudness to be produced with relatively light key pres-
FIXED: All notes are produced at the same volume no matter how hard the key-
ENGLISH
MIN MAX
MASTER VOLUME
MELLOW BRIGHT
BRILLIANCE
ness.
sure.
board is played.
You can adjust the volume.
/
OTHER VALUE
START
DEMO METRONOME
TEMPO
/
STOP
FUNCTION
/
FUNCTION
TEMPO
TEMPO
[—/NO] [+/YES]
USER 1
USER 2
—
/
NO +/YES PRESET
USER 3
TRACK1TRACK2START
SONG
TIP
This setting does not change
the weight of the keyboard.
TIP
Normal setting = MEDIUM
TIP
The touch sensitivity type will
become the common setting for
all voices. However, the touch
sensitivity settings may have little or no effect with certain
voices that are not normally
responsive to keyboard dynamics. (Refer to the “Preset Voice
List” on page 63.)
[TOUCH]
GRAND
E.PIANO
E.PIANO2HARPSI-
E.CLAVI-
GRAND
PIANO 1
1
PIANO 2
CHURCH
/
STOP
REC
JAZZ
ORGAN
ORGAN
STRINGS
CHOIR GUITAR E.BASS SPLIT
VIBRA-
CHORD
VOICE
VARIATION
CHORD
PHONE
WOOD
BASS
ROOM
CHORUS
HALL 1
PHASER
HARD
HALL 2
TREMOLO
MEDIUM
STAGE
DELAY
SOFT
REVERB EFFECT TOUCH TRANSPOSE
ON
Procedure
To select a touch sensitivity type press the [TOUCH] button a few times until the indicator corresponding to the desired type lights (the indicators light in sequence each time
the
[TOUCH] button is pressed). No indicator is lit when “FIXED” is selected.
Changing the volume when FIXED is selected
When you select FIXED, you can set the volume for notes
played in FIXED mode by using the [–/NO] and [+/YES] buttons while you hold the [TOUCH] button. The current volume level appears on the display. The volume range is from 1
through 127. The default setting is 64.
volume range
TIP
1: minimum volume
127: maximum volume
TIP
The touch volume set in FIXED
mode will become the common
setting for all voices.
TIP
Releasing the [TOUCH] button
changes the touch type.
If you are changing the volume
by holding the [TOUCH] button,
pressing the [TOUCH] button
will not change the touch sensitivity type. (FIXED mode will
remain selected.)
CLP-130/120 Selecting & Playing Voices
24
Page 25

Transposition – [TRANSPOSE]
The Clavinova’s Transpose function makes it possible to shift the pitch of the entire keyboard up or
down in semitone intervals to facilitate playing in difficult key signatures, and to let you easily
match the pitch of the keyboard to the range of a singer or other instruments. For example, if you
set the transposition amount to “5,” playing key C produces pitch F. In this way, you can play a
song as though it were in C major, and the Clavinova will transpose it to the key of F.
[—/NO] [+/YES]
GRAND
E.PIANO
GRAND
PIANO 1
1
MIN MAX
MASTER VOLUME
MELLOW BRIGHT
BRILLIANCE
START
DEMO METRONOME
/
OTHER VALUE
TEMPO
/
STOP
FUNCTION
/
FUNCTION
TEMPO
TEMPO
/
NO +/YES PRESET
—
USER 1
USER 2
USER 3
TRACK1TRACK2START
SONG
/
STOP
REC
CHURCH
PIANO 2
JAZZ
ORGAN
ORGAN
STRINGS
Procedure
Use the [–/NO] and [+/YES] button while holding the
[TRANSPOSE]
The amount of transposition appears on the LED display
while the [TRANSPOSE] button is held. The default transpose
setting is “0”.
The [TRANSPOSE] button indicator remains lit when a transpose setting other than
“0” is selected. Every time the [TRANSPOSE] button is pressed after that switches the
transpose function ON or OFF.
button to transpose down or up as required.
transposition
E.PIANO2HARPSI-
E.CLAVI-
VIBRA-
CHORD
CHORD
PHONE
WOOD
BASS
CHOIR GUITAR E.BASS SPLIT
VOICE
Transpose:
Changing the key signature of a
song. On the Clavinova, transposing shifts the pitch of the
entire keyboard.
The transposition range:
–12: –12 semitones
0: normal pitch
12: 12 semitones
[TRANSPOSE]
VARIATION
ROOM
CHORUS
HARD
HALL 1
PHASER
MEDIUM
HALL 2
TREMOLO
SOFT
STAGE
DELAY
REVERB EFFECT TOUCH TRANSPOSE
TERMINOLOGY
TIP
(down one octave)
(up one octave)
ON
ENGLISH
TIP
Notes below and above the A-1
…. C7 range of the CLP-130/
120 sound one octave higher
and lower, respectively.
CLP-130/120 Selecting & Playing Voices
25
Page 26

Combining Two Voices (Dual mode)
You can play two voices simultaneously across the entire range of the keyboard. In this way, you
can simulate a melody duet or combine two similar voices to create a thicker sound.
12
GRAND
E.PIANO
E.PIANO2HARPSI-
E.CLAVI-
MIN MAX
MASTER VOLUME
MELLOW BRIGHT
BRILLIANCE
DEMO METRONOME
Procedure
GRAND
PIANO 1
1
TEMPO
/
TEMPO
START
/
STOP
FUNCTION
TEMPO
/
FUNCTION
OTHER VALUE
—
/
NO +/YES PRESET
USER 1
USER 2
USER 3
TRACK1TRACK2START
SONG
/
STOP
REC
CHURCH
PIANO 2
JAZZ
ORGAN
ORGAN
STRINGS
CHOIR GUITAR E.BASS SPLIT
VOICE
VIBRA-
CHORD
VARIATION
CHORD
PHONE
WOOD
BASS
ROOM
CHORUS
HALL 1
PHASER
HARD
HALL 2
TREMOLO
MEDIUM
STAGE
DELAY
SOFT
ON
REVERB EFFECT TOUCH TRANSPOSE
ENGLISH
1. Engage Dual mode.
2. Exit Dual mode and return to normal play mode.
Press two voice buttons at the same time (or press one voice button while holding another). The voice indicators of both selected voices will light when Dual
mode is active.
• According to the voice numbering
priority shown in the diagram on
the right, the lower value voice
number will be designated as Voice
1 (the other voice will be designated as Voice 2).
Voice numbering priority
12
GRAND
PIANO 1
CHURCH
ORGAN
8 9 10 11
34567
E.PIANO
GRAND
PIANO 2
JAZZ
ORGAN
E.PIANO2HARPSI-
1
STRINGS
CHOIR GUITAR E.BASS
E.CLAVI-
CHORD
CHORD
WOOD
BASS
VOICE
12 13 14
VIBRA-
PHONE
The CLP-130/120 Function mode provides access to a number of other Dual
mode functions, such as volume balance setting or octave setting (page 42). (If
you do not set Dual mode functions, the appropriate setting will be set in each
voice by default.)
To return to the normal single-voice play mode, press any single voice button.
NOTE (CLP-130)
Dual and Split (page 27) modes
cannot be engaged at the same
time.
TIP
[VARIATION] in Dual Mode
(CLP-130)
The [VARIATION] button’s indi-
cator will light if the variation is
engaged for either or both of the
Dual mode voices. While Dual
mode is engaged, the [VARIA-
TION] button can be used to
turn the variation for both voices
on or off.
To turn the variation on or off for
only one of the voices, hold the
voice button for the other voice
and press the button of the voice
for which you want to change
the variation.
TIP
[REVERB] in Dual Mode
The reverb type assigned to
Voice 1 will take priority over the
other. (If the reverb is set to OFF,
Voice 2 reverb type will be in
effect.) Reverb depth setting via
the panel controls (i.e., pressing
the [–/NO] or [+/YES] buttons
while holding the [REVERB] button — see page 22) will be
applied only to Voice 1.
CLP-130/120 Selecting & Playing Voices
26
TIP
[EFFECT] in Dual Mode
Depending on the conditions,
one effect type may take priority
over the other. Depth will be
decided according to the depth
default value of the voice combination. However, using function
F3 (page 42) you can adjust the
depth value for each voice to
your liking.
Effect depth setting via the panel
controls (i.e., pressing the [–/
NO] or [+/YES] buttons while
holding the [EFFECT] button —
see page 23) will be applied only
to Voice 1.
Page 27

Splitting the Keyboard Range and Playing Two Different Voices (Split mode) (CLP-130)
Split mode enables you to play two different voices on the keyboard — one with the left hand and
another with the right hand. For example, you can play a bass part using the Wood Bass or Electric
Bass voice with the left hand, and a melody with the right hand.
Voice buttons
GRAND
MIN MAX
MASTER VOLUME
MELLOW BRIGHT
BRILLIANCE
START
DEMO METRONOME
/
OTHER VALUE
TEMPO
/
STOP
FUNCTION
/
FUNCTION
TEMPO
TEMPO
/
NO +/YES PRESET
—
USER 1
USER 2
USER 3
TRACK1TRACK2START
SONG
/
STOP
PIANO 1
CHURCH
REC
ORGAN
Procedure
1. Engage Split mode.
Press the [SPLIT] button so that its indicator lights. The default setting (WOOD
BASE)
will be selected for the left-hand voice at first.
The Function mode provides access to a number of other Split mode functions
(page 43). (If you make no settings for Split mode functions, the appropriate
setting will be set in each voice by default.)
2. Specify the split point (the border between the
right-and left-hand range).
You can change the split point to any other key by pressing the key while holding the [SPLIT] button (the name of the current split-point key appears on the
LED display while the [SPLIT] button is held).
An example of split-point key display
(F 2)
(G2) (A 2)
E.PIANO
GRAND
1
PIANO 2
JAZZ
ORGAN
STRINGS
E.PIANO2HARPSI-
E.CLAVI-
VIBRA-
CHORD
CHORD
PHONE
WOOD
BASS
CHOIR GUITAR E.BASS SPLIT
VOICE
Dual (page 26) and Split
(page 26) modes cannot be
engaged simultaneously.
A specified “split point” key is
included in the left-hand range.
The split point can also be set
via Function 4 (page 43).
[SPLIT]
VARIATION
ROOM
HALL 1
HALL 2
STAGE
REVERB EFFECT TOUCH TRANSPOSE
CHORUS
PHASER
TREMOLO
DELAY
NOTE
TIP
TIP
HARD
MEDIUM
SOFT
ON
ENGLISH
followed by a high bar if sharp
followed by a low bar if flat
The split point is initially set at the F2 key by default.
If you do not need to change the split point, skip this procedure.
CLP-130/120 Selecting & Playing Voices
27
Page 28

3. Select a voice for the right hand.
4. Select a voice for the left hand.
5. Exit Split mode and return to normal play mode.
ENGLISH
Press a voice button.
Press the corresponding voice button while holding the [SPLIT] button. (The
indicator of the Left Voice button will light while the
[SPLIT] button is pressed.)
To turn the variation on or off for the split voice, hold the [SPLIT] button and
press the
[VARIATION] button or the currently-selected voice button.
Press the [SPLIT] button again so that its indicator goes out.
TIP
[VARIATION] in Split Mode
You can turn the variation on or
off for Split mode voices. Normally, the voice indicator of the
right voice lights in Split mode.
The [VARIATION] can be used
to turn the variation for the right
voice on or off as required.
While the [SPLIT] button is
held, however, the voice indicator of the left voice lights. In this
state the [VARIATION] button
turns the variation for the left
voice on or off.
TIP
[REVERB] in Split Mode
The reverb type assigned to the
right voice will take priority over
the other. (If the reverb is set to
OFF, the left voice’s reverb type
will be in effect.) Reverb depth
setting via the panel controls
(i.e. pressing the [–/NO] or [+/
YES] buttons while holding the
[REVERB] button — see
page 22) will be applied to the
right voice only.
TIP
[EFFECT] in Split Mode
Depending on the conditions,
one effect type will take priority
over the other. The depth will be
decided according to the depth
default value of the voice combination. However, using function
F4 (page 43) you can change
the depth value for each voice
as you like. Effect depth setting
via the panel controls (i.e.
pressing the [–/NO] or [+/YES]
buttons while holding the
[EFFECT] button — see
page 23) will be applied to the
right voice only.
CLP-130/120 Selecting & Playing Voices
28
Page 29

Using the Metronome
The Clavinova features a built-in metronome (a device that keeps an accurate tempo) that is convenient for practicing.
1
MELLOW BRIGHT
2
MIN MAX
MASTER VOLUME
BRILLIANCE
[TEMPO/FUNCTION# ▲▼]
TEMPO
/
START
DEMO METRONOME
TEMPO
/
STOP
FUNCTION
/
FUNCTION
TEMPO
OTHER VALUE
[—/NO] [+/YES]
USER 1
USER 2
—
/
NO +/YES PRESET
USER 3
TRACK1TRACK2START
SONG
/
STOP
REC
Procedure
1. Start the metronome.
The metronome sound is turned on by pressing
the METRONOME [START/STOP] button.
The beat indicator flashes
at the current tempo.
Adjusting the tempo
The tempo of the metronome and user song recorder playback (the recorder is
described in the next section) can be set from 32 to 280 beats per minute by
using the [TEMPO/FUNCTION# ▼, ▲] buttons (when the [TEMPO/FUNC-
TION# ▼, ▲]
Adjusting the time signature
The time signature (beat) of the metronome can be
set by using the [–/NO] and [+/YES] buttons while
holding the METRONOME [START/STOP] button.
You can set the beat to 0, 2, 3, 4, 5 or 6. The current
setting appears on the LED display while you are
holding the METRONOME [START/STOP] button.
button’s [TEMPO] indicator is lit).
PIANO 1
CHURCH
ORGAN
GRAND
E.PIANO
E.PIANO2HARPSI-
E.CLAVI-
GRAND
1
PIANO 2
JAZZ
ORGAN
STRINGS
CHOIR GUITAR E.BASS SPLIT
VOICE
VIBRA-
CHORD
VARIATION
CHORD
PHONE
WOOD
BASS
ROOM
CHORUS
HALL 1
PHASER
HARD
HALL 2
TREMOLO
MEDIUM
STAGE
DELAY
SOFT
ON
REVERB EFFECT TOUCH TRANSPOSE
ENGLISH
TIP
If the [TEMPO/FUNCTION#]
button’s [FUNCTION#] indicator
is lit, press the [TEMPO/FUNC-
TION#] button to light the
[TEMPO] indicator.
TIP
The volume of the metronome
can be adjusted via the Metronome Volume function in Func-
beat
tion mode (page 45).
2. Stop the metronome.
Turn off the metronome by pressing the METRONOME [START/STOP] button.
CLP-130/120 Selecting & Playing Voices
29
Page 30

Recording Your Performance
The ability to record and play back what you’ve played on the CLP130/120 keyboard can be an effective practice aid. You can, for example, record just the left-hand part, and then practice the right-hand
part while playing back the recorded left-hand part. Or, since you can
record up to two tracks separately, you could record the left- and righthand parts separately, or record both parts of a duet and hear how they
sound when played back. The CLP-130/120’s two-track Song Recorder
allows the recording of up to three User Songs (one User Song on the
CLP-120).
ENGLISH
TIP
You can record your performance (audio data) to a cassette tape recorder or other
recording device via the AUX
OUT connector (page 50).
TERMINOLOGY
Recording vs. Saving:
The format of performance data
recorded on a cassette tape differs from that of data recorded
on the Clavinova. A cassette
tape records audio signals. The
Clavinova “saves” information
regarding note timing, voices,
and a tempo value, but not
audio signals. When you play
back recorded songs, the Clavinova produces sound based on
the saved information. Therefore, recording on the Clavinova
may be more accurately called
“saving information.” However,
this book often uses the word
“recording” because it seems to
make more sense.
Recording to [TRACK1]
541673
GRAND
GRAND
E.PIANO
PIANO 1
PIANO 2
MIN MAX
MASTER VOLUME
MELLOW BRIGHT
BRILLIANCE
START
DEMO METRONOME
TEMPO
/
STOP
FUNCTION
TEMPO
/
FUNCTION
TEMPO
/
OTHER VALUE
—
/
NO +/YES PRESET
USER 1
USER 2
USER 3
TRACK1TRACK2START
SONG
/
STOP
REC
Procedure
CAUTION
Notes on recording
All user song recorder data will be retained in memory for about one week after the
power is turned off. If you want to keep your recorded data for longer periods of time,
turn the power on for a few minutes at least once a week.
It is also possible to store the data to an external MIDI storage device such as the
Yamaha MIDI Data Filer MDF3 by using the Bulk Data Dump function described on
page 47.
1.
Select a song for recording. (CLP-130)
Press the
The indicator of the selected song will light. (No song is selected if none of the
indicators are lit.)
2.
Make all the initial settings.
Before you begin to record, select the voice you want to record (or voices if you
will be using Dual or Split mode). Make any other desired settings (tempo,
reverb, etc.) as well. You might also want to set the volume.
You can also adjust the playback volume using
[USER 1/2/3]
button to select a song for recording.
[MASTER VOLUME]
.
CHURCH
1
JAZZ
ORGAN
ORGAN
STRINGS
2
E.PIANO2HARPSI-
E.CLAVI-
VIBRA-
CHORD
CHOIR GUITAR E.BASS SPLIT
VOICE
VARIATION
CHORD
PHONE
WOOD
BASS
ROOM
HALL 1
HALL 2
STAGE
REVERB EFFECT TOUCH TRANSPOSE
NOTE (CLP-130)
When the unit is in Demo Song
mode, the
[USER 1/2/3]
cannot be used to select a song.
NOTE
When the unit is in Demo Song
or Preset Song mode, Record
mode cannot be engaged.
NOTE
To avoid erasing data from
the track:
CLP-130
If the track contains data, the
track indicator lights up green
when you press the
3]
button. Note that recording
new data on this track will erase
the existing data.
CLP-120
Press the
[TRACK1/2]
the indicator lights up green, the
track already contains data.
Note that the existing data will
be erased if you record new
data on the track.
CHORUS
PHASER
TREMOLO
DELAY
HARD
MEDIUM
SOFT
ON
button
[USER1/2/
button. If
30
CLP-130/120
Recording Your Performance
Page 31

3. Engage Record Ready mode.
Press the [REC] button to engage Record Ready
mode. Recording does not actually start yet.
[TRACK1] or the [TRACK2] indicator flashes in
The
red.
The amount of memory available for recording will
be shown on the LED display in approximate kilobytes, and the right-most dot on the LED display
will flash at the current METRONOME tempo setting.
Record Ready mode can be disengaged before recording by pressing the
button a second time.
4. Select the record track.
When Record mode is engaged in the previous step, the last-recorded track will
automatically be selected for recording and its indicator — i.e. the [TRACK1] or
[TRACK2] button indicator — will glow red. If you want to record on a different
track, press the appropriate track button so that its indicator glows red.
flash
[REC]
NOTE
The amount of memory available for recording:
This value in KiloBytes (a unit
used of measurement for data)
indicates how much space
remains available for recording
on the Clavinova. You can
record up to a maximum of
about 9,400 notes on the CLP130/120 depending on pedal
usage and other factors.
TIP (CLP-130)
If a user song ([USER 1/2/3]) is
not selected (the lamp is not lit),
pressing the [REC] button will
result in the [USER 1] song’s
[TRACK1] being selected and
Record Ready mode engaged.
At this time, [TRACK2] playback will be turned off if the
track contains data.
ENGLISH
5. Start recording.
Recording will begin automatically as soon as you play a note on the keyboard
or press the SONG [START/STOP] button. The current measure number will
appear on the display while recording.
6. Stop recording.
Press either the [REC] or SONG [START/STOP] button to stop recording.
The indicator of the recorded track will glow green to indicate that it now contains data. (Record mode is disengaged automatically.)
7. Play back the recorded performance.
Press the SONG[START/STOP] button to play back the recorded performance.
To stop playback in the middle of a song, press the SONG[START/STOP] button.
TIP
If the metronome was on when
you started recording, you’ll be
able to keep time with the metronome while recording, but the
metronome sound will not be
recorded.
TIP
For more recording information,
see page 33.
TIP
The left pedal can be assigned
to start and stop recording via
the “Left Pedal Mode” function
described on page 44.
NOTE
The record track indicator will
begin to flash when the recorder
memory is almost full. If the
memory becomes full during
recording, “FUL” will appear on
the display and recording will
stop automatically. (All recorded
data up to that point will be
retained.)
NOTE
Pressing the SONG [START/
STOP] button to start recording,
then pressing it again to stop
recording will erase all previously-recorded data on the
selected track.
CLP-130/120 Recording Your Performance
31
Page 32

Re-recording TRACK1
This section explains how to record again in case your performance was not satisfactory.
1. Select a voice or voices (and other settings) for recording, if necessary.
2. Re-engage Record Ready mode.
Follow the procedure from Step 5 on page 31 to re-record.
ENGLISH
This section explains how to record another part on the second track.
1. Select a voice or voices (and other settings) for the recording.
2. Re-engage Record Ready mode.
Repeat Step 1 on page 30 if you wish to change the previous settings.
Press the [REC] button, again.
The selected track’s indicator flashes in red.
Recording to [TRACK2]
Select a voice (or voices) for recording. Select other settings, if necessary.
Press the [REC] button again.
The selected track’s indicator flashes in red.
TIP
If you want to change the
tempo, time signature, reverb
type, or effect type when rerecording a track or when
recording to another track, do
so after you engage Record
Ready mode (step 3).
NOTE
You cannot re-record in the middle of a song.
TIP
If you want to change the
tempo, time signature, reverb
type, or effect type when rerecording a track or when
recording to another track, do
so after entering Record Ready
mode (step 3).
3. Select a recording track.
Select a track that you have not already used for recording. The selected track’s indicator lights up red. (The indicator of a track that contains previously-recorded data
will glow green.)
You can record new sounds and notes on each pass while listening to the recorded
track.
Follow the procedure from Step 5 on page 31 to record.
NOTE
If you don’t want to hear the
previously-recorded track while
you record (for example, when
you want to record a song different from what you recorded on
the previous track), press the
playback track button before
pressing the [REC] button (step
2, above) so that its indicator is
turned off.
CLP-130/120 Recording Your Performance
32
Page 33

The user song recorder records the following data:
Data in addition to the notes and voices you play is recorded.
This data includes “Individual Tracks” and “Entire Song.” See below.
Individual Tracks
• Notes played
• Voice selection
• [VARIATION] ON/OFF (CLP-130)
• Pedal (Damper/Soft/Sostenuto)
• [REVERB] depth
• [EFFECT] depth
• Dual mode voices
• Dual balance (F3)
• Dual detune (F3)
• Dual octave shift (F3)
• Split mode voices (CLP-130)
• Split balance (F4: CLP-130)
• Split octave shift (F4:CLP-130)
Entire Song
•Tempo
• Time signature (beat)
• [REVERB] type (including OFF)
• [EFFECT] type (including OFF)
ENGLISH
CLP-130/120 Recording Your Performance
33
Page 34

The initial settings (data recorded at the beginning of a song) can be changed after the recording.
For example, after recording, you can change the voice to create a different ambience or adjust the
song tempo to your taste.
You can change the following initial settings.
Individual Tracks
• Voice selection
• [VARIATION] ON/OFF (CLP-130)
• [REVERB] depth
• [EFFECT] depth
ENGLISH
• Dual mode voices
• Split mode voices (CLP-130)
Entire Song
•Tempo
• Time signature (beat)
• [REVERB] type (including OFF)
• [EFFECT] type (including OFF)
Changing the Initial Settings (Data recorded at the
beginning of a song)
1. Engage Record mode and select a track to change the initial settings.
The indicator glows red. (Data shared by two tracks can be changed via either track.)
2. Change the settings via the panel controls.
For example, if you wish to change the recorded voice from [E. PIANO 1] to
[E. PIANO 2], press the [E. PIANO 2] button.
Be careful not to press the SONG [START/STOP] button or a key on the keyboard,
either of which will start recording and erase all previously-recorded data on the
selected track.
3. Press the [REC] button to exit Record mode.
Be careful not to press the SONG [START/STOP] button or a key on the keyboard,
either of which will start recording and erase all previously-recorded data on the
selected track.
NOTE
You can cancel changes made
to the initial settings by selecting a different track after Step 2,
then exiting Record mode during Step 3 without pressing the
[REC] button. (Changes made
to the data shared by two tracks
are also canceled.)
CLP-130/120 Recording Your Performance
34
Page 35

Playing Back Recorded Songs
You can play back songs recorded using the Record function
(pages 30–34). You can also play the keyboard along with the playback.
Playing Back a Song
213
GRAND
E.PIANO
E.PIANO2HARPSI-
GRAND
PIANO 1
1
MIN MAX
MASTER VOLUME
MELLOW BRIGHT
BRILLIANCE
START
DEMO METRONOME
/
OTHER VALUE
FUNCTION
TEMPO
/
NO +/YES PRESET
—
TEMPO
/
STOP
FUNCTION
/
TEMPO
USER 1
USER 2
USER 3
TRACK1TRACK2START
SONG
/
STOP
REC
CHURCH
ORGAN
PIANO 2
JAZZ
ORGAN
CHORD
STRINGS
CHOIR GUITAR E.BASS SPLIT
VOICE
NOTE
Song data is not transmitted via
the MIDI connectors.
E.CLAVI-
VIBRA-
VARIATION
CHORD
PHONE
WOOD
BASS
ROOM
CHORUS
HALL 1
PHASER
HARD
HALL 2
TREMOLO
MEDIUM
STAGE
DELAY
SOFT
ON
REVERB EFFECT TOUCH TRANSPOSE
Procedure
1. Select the desired song. (CLP-130)
Press the [USER 1/2/3] button to select a song for recording.
The indicator of the selected song will light. (No song is selected if none of the
indicators are lit.)
2. Start playback.
Press the SONG [START/STOP] button.
The current measure number appears on the display during playback.
• You can play the keyboard while the Clavinova is playing back a song. You
can also play the notes in a voice different from the playback voice by selecting a voice from the panel.
Adjust the volume
Use the [MASTER VOLUME] control to adjust the volume.
Adjust the tempo
You can use the [TEMPO/FUNCTION# ▼, ▲] buttons to adjust the playback
tempo as required before or during playback. The default tempo (the song’s
original tempo) is set when you press the [▼] and [▲] buttons simultaneously.
3. Stop playback.
When playback is complete, the Clavinova automatically stops and locates the
top of the song. To stop playback in the middle of a song, press the SONG
[START/STOP]
button.
NOTE (CLP-130)
When the unit is in Demo Song
mode, you cannot use the [USER
1/2/3] button to select a song.
NOTE
When the unit is in Demo Song
or Preset Song mode, you cannot play back recorded songs.
NOTE
The track indicators will not light
up green automatically when the
power is turned on to the CLP120, even if the user song
recorder contains data. Make
sure that you press the track buttons before you start playback.
NOTE
Playback cannot be started when
the recorder contains no data.
TIP
You can also enjoy playing
duets with yourself by recording one part of a duet or a song
for two pianos, then playing the
other part while the recorded
part plays back.
TIP
If the metronome is being used
during playback, the metronome will automatically stop
when playback is stopped.
TIP
If the REVERB type is changed
via the panel controls during
playback, both the playback and
keyboard reverb effects will be
changed.
ENGLISH
TIP
If the EFFECT type is changed
via the panel controls during
playback, the playback effect may
be switched off in some cases.
CLP-130/120 Playing Back Recorded Songs
35
Page 36

Useful Playback Functions
Turning track playback on and off
When you select a song on the Clavinova, the indicators for tracks that contain
data (one of [TRACK1] [TRACK2] or both) are lit in green. While the Clavinova is play-
ing or stopped, pressing these track buttons turns off the indicators, and the data on
those tracks is not played. Pressing the track buttons toggles track playback on and off.
TIP
Tracks can be turned on or off
before or during playback.
If both tracks are turned off on
the CLP-120, playback will not
start (or the playback will stop).
Starting playback automatically when you start playing the keyboard
(Synchro Start)
You can start playback as soon as you start playing the keyboard. This is called the
“Synchro Start” function.
To engage the Synchro Start function, press the SONG [START/STOP] button while
holding a track button that is ON.
The right-most dot on the display will flash at the current
ENGLISH
tempo.
(Repeat the previous operation to disengage the Synchro
Start function.)
Playback will then start as soon as you begin playing on the keyboard.
This function is useful when you wish to match the timing of the beginning of the playback sound and the start of your own performance.
Assigning the START/STOP function to the left pedal
The left pedal can also be assigned to song start/stop operation via the “Pedal Start/
Stop” (page 44).
This is convenient for starting playback of the recorded part anytime after you have
started playing.
Flash
TIP
You can adjust the volume of a
part of a song from “50 Greats
for the Piano” for which playback is turned off
(pages 18, 45).
During recorder playback, the
volume of a track that is turned
off will always be “0.”
NOTE
If you press the SONG [START/
STOP] button while holding
down a track button that is OFF,
track playback is turned on and
the Synchro Start function is
placed on stand-by.
TERMINOLOGY
Synchro:
Synchronous; occurring at the
same time
CLP-130/120 Playing Back Recorded Songs
36
Page 37

Detailed Settings – [FUNCTION]
You can set various parameters to make the best use of Clavinova functions, such as fine tuning the pitch, selecting a voice
for the metronome, repeating playback, etc.
The following parameters are available.
The CLP-130 has nine main functions, and the CLP-120 has eight main functions.
Some of these main functions consist of a set of sub-modes.
Parameter List
Function Sub-Mode CLP-130 CLP-120 Reference page
Fine tuning of the pitch
Selecting a scale
Dual mode functions
Split mode functions
Other Functions
Metronome volume
Preset Song Part Cancel
Volume
MIDI Functions
Backup Functions
— F1 F1 40
Scale F2.1 F2.1 41
Base Note F2.2 F2.2 41
Dual Balance F3.1 F3.1 42
Dual Detune F3.2 F3.2 42
Voice 1 Octave Shift F3.3 F3.3 42
Voice 2 Octave Shift F3.4 F3.4 42
Voice 1 Effect Depth F3.5 F3.5 42
Voice 2 Effect Depth F3.6 F3.6 42
Reset F3.7 F3.7 42
Split Point F4.1 — 43
Split Balance F4.2 — 43
Right Voice Octave Shift F4.3 — 43
Left Voice Octave Shift F4.4 — 43
Right Voice Effect Depth F4.5 — 43
Left Voice Effect Depth F4.6 — 43
Damper Pedal Range F4.7 — 43
Reset F4.8 — 43
Left Pedal Mode F5.1 F4.1 44
Soft Pedal Effect Depth F5.2 F4.2 44
Sustain Sample Depth F5.3 — 44
Keyoff Sample Volume F5.4 — 44
— F6 F5 45
— F7 F6 45
MIDI Transmit Channel Selection F8.1 F7.1 45
MIDI Receive Channel Selection F8.2 F7.2 46
Local Control ON/OFF F8.3 F7.3 46
Program Change ON/OFF F8.4 F7.4 46
Control Change ON/OFF F8.5 F7.5 46
MIDI Transmit Transpose F8.6 F7.6 47
Panel/Status Transmit F8.7 F7.7 47
Bulk Data Dump F8.8 F7.8 47
Voice F9.1 F8.1 48
MIDI F9.2 F8.2 48
Tuning F9.3 F8.3 48
Others F9.4 F8.4 48
ENGLISH
CLP-130/120 Detailed Settings – [FUNCTION]
37
Page 38

Basic Procedure in Function Mode
Follow the steps below to use the functions.
(If you become lost while using a function, return to this page and read the basic procedure.)
Procedure
1.
ENGLISH
2.
124 45
MIN MAX
MASTER VOLUME
MELLOW BRIGHT
BRILLIANCE
DEMO METRONOME
TEMPO
START
/
FUNCTION
STOP
TEMPO
/
FUNCTION
Engage Function mode.
Press the
lights.
the status of the unit and usage.)
[TEMPO/FUNCTION#]
will appear on the display. (The indication of “ ” varies depending on
Select a function.
Use the
from F1–F9 (CLP-130) / F1–F8 (CLP-120).
[TEMPO/FUNCTION# ▼, ▲]
TEMPO
FUNCTION
TEMPO/FUNCTION
/
OTHER VALUE
TEMPO
button so that its
3
GRAND
GRAND
PIANO 2
USER 1
USER 2
TRACK1TRACK2START
/
NO +/YES PRESET
–
USER 3
STOP
SONG
[FUNCTION#]
buttons to select the desired function
/
REC
PIANO 1
JAZZ
CHURCH
ORGAN
ORGAN
indicator
E.PIANO2HARPSI-
E.PIANO
CHORD
1
CHOIR GUITAR E.BASS SPLIT
STRINGS
VOICE
E.CLAVI-
VIBRA-
VARIATION
CHORD
PHONE
WOOD
BASS
CHORUS
ROOM
HARD
PHASER
HALL 1
MEDIUM
TREMOLO
HALL 2
SOFT
DELAY
STAGE
REVERB EFFECT TOUCH TRANSPOSE
ON
NOTE
Functions cannot be selected
during Demo/Preset Song
mode or when the user song
recorder is in operation.
NOTE
To cancel the function in Step 2,
3, or 4, press the
FUNCTION# ▼, ▲]
[TEMPO/
button any
time to exit Function mode.
Use the [–/NO] [+/YES] buttons.
3.
If the function does not include sub-modes, start setting the parameters.
If the function includes sub-modes, press the
[+/YES]
button once to enter the
respective sub-mode.
Operate the desired function using the following
4.
two buttons.
1
[TEMPO/FUNCTION# ▼, ▲]
Selects the desired function/sub-mode.
2
[–/NO]
After you select the desired function or sub-mode, set the ON/OFF, select
the type, or change the value, accordingly.
Depending on the setting, the default setting (which is used when you
first turn on the power to the Clavinova) is recalled by pressing the
NO]
and
or
[+/YES]
[+/YES]
buttons simultaneously.
[–/
TIP
After you select the function, the
current setting will be displayed
when the
[–/NO]
or
[+/YES]
but-
ton is pressed for the first time.
38
CLP-130/120
Detailed Settings – [FUNCTION]
Page 39

Operation Example 1 (F1. Fine tuning of the pitch)
TEMPO
FUNCTION
TEMPO
FUNCTION
LCD indication
TEMPO/FUNCTION
Engage Function mode.
–/NO +/YES
TEMPO/FUNCTION
Select a desired function.
LCD indication
Change the value.
Operation Example 2 (F3.1 “Dual Balance”)
TEMPO
FUNCTION
TEMPO/FUNCTION
Engage function mode.
+/YES
Engage the respective
sub-mode.
/
NO +/YES
–
TEMPO
FUNCTION
TEMPO/FUNCTION
Select a desired function.
TEMPO
FUNCTION
TEMPO/FUNCTION
Select a desired sub-mode.
LCD indication
LCD indication
ENGLISH
LCD indication
Change the value.
5. Do the following when you finish using the func-
tion.
To exit Function mode, press the [TEMPO/FUNCTION#] button so that its
[TEMPO] indicator lights.
CLP-130/120 Detailed Settings – [FUNCTION]
39
Page 40

About Each Function
F1. Fine Tuning of the Pitch
You can fine tune the pitch of the entire instrument. This function is useful when you play
the Clavinova along with other instruments or
CD music.
1. Engage Function mode and select .
2. Use the [–/NO] and [+/YES] buttons to lower
ENGLISH
or raise the pitch of the A3 key in approximately 0.2 Hz increments.
..... .....
Tenths of a hertz are indicated on the LED display by
the appearance and position of one or two dots, as in
the following example:
Display Value
440.0
440.2
440.4
440.6
Setting range:
427.0–453.0 (Hz)
Normal setting:
440.0 (Hz)
TIP
You can also tune in about 1Hz steps (in any mode other
than Function mode).
To tune down or up, respectively, in approximately 1 Hz
increments: Hold the A-1 and A-1 keys (a white and a black
key at the left end) or A-1 and B-1 keys (two white keys at the
left end) simultaneously and press the [–/NO] or [+/YES] button.
To restore standard pitch: Hold the A-1 and A-1 keys (a
white and a black key at the left end) or A-1 and B-1 keys
(two white keys at the left end) simultaneously and press the
[–/NO] [+/YES] buttons simultaneously.
(During the procedure described above, the display indi-
cates a value in Hz < … >. After the procedure, the display returns to the previous indication.)
440.8
TERMINOLOGY
Hz (Hertz):
This unit of measurement refers to the frequency of a sound
and represents the number of times a sound wave vibrates in
a second.
TIP
You can also use the keyboard to set the pitch (in any
mode other than Function mode).
To tune up (in about 0.2Hz steps): Hold the A-1 and B-1
keys (two white keys at the left end) simultaneously and
press any key between C3 and B3.
To tune down (in about 0.2Hz steps): Hold the A-1 and A-
1 keys (a white and a black key at the left end) simultaneously and press any key between C3 and B3.
To restore standard pitch: Hold the A-1, A -1 and B-1 (two
white keys and one black key at the left end) simultaneously
and press any key between C3 and B3.
• Refer to “Part Names” on page 14 for information on
the key and key name assignment.
(During the procedure described above, the display indi-
cates a value in Hz < … >. After the procedure, the display returns to the previous indication.)
CLP-130/120 Detailed Settings – [FUNCTION]
40
 Loading...