

Yamaha CLP-123, CLP-123E User Manual
CLP-123
Owner’s Manual Page 2 — 19
Bedienungsanleitung Seite 20 — 37
English
Deutsch
Mode d’emploi Pages 38 — 55
Manual de instrucciones
Páginas 56 — 73
Français
Español
1

Introduction
Thank you for choosing a Yamaha CLP-123 Clavinova. Your Clavinova is a fine musical instrument that employs advanced Yamaha music technology. With the proper care, your Clavinova
will give you many years of musical pleasure.
● Yamaha’s AWM (Advanced Wave Memory) tone generator system offers rich, realistic voices. The
CLP-123 additionally features stereo sampling of its PIANO 1 voice for unmatched realism and expressive power.
● 16 and 32-note polyphony permit use of the most sophisticated playing techniques.
● Piano-like touch response — adjustable in 3 stages — provides extensive expressive control and out-
standing playability.
● Dual play mode allows 2 voices to be played simultaneously.
● Unique Clavinova Tone voice provides a fresh sound for new musical expression.
● Damper pedal includes natural resonance effect for the piano voices, simulating the string and sound-
board resonance of acoustic pianos.
● MIDI compatibility and a range of MIDI functions make the Clavinova useful in a range of advanced
MIDI music systems.
In order to make the most of your Clavinova’s performance potential and features, we urge you
to read this Owner’s Manual thoroughly, and keep it in a safe place for later reference.
Taking Care Of Your Clavinova
Your Clavinova is a fine musical instrument, and deserves the most careful treatment.
Observe the following points and your Clavinova will sound and look great for many years.
1 Never open the case and touch or tamper with the inter-
nal circuitry.
2 Always turn the POWER switch OFF after use, and
close the key cover to protect the keyboard.
3 Clean the cabinet and keys of your Clavinova only with
a clean, slightly damp cloth. A neutral cleanser may be
used if desired. Never use abrasive cleansers, waxes,
solvents or chemical dust cloths since these can dull or
damage the finish.
4 Never place any vinyl products on your Clavinova. Con-
tact with vinyl can cause irreversible damage to the
finish.
5 Install your Clavinova in a place that is away from di-
rect sunlight, excessive humidity or heat.
6 Never apply excessive force to the controls, connectors
or other parts of your Clavinova, and avoid scratching
or bumping it with hard objects.
7 Make sure that your local AC mains voltage matches the
voltage specified on the name plate.* In some areas a
voltage selector may be provided on the rear panel of
the main unit. Make sure that the voltage selector is set
for the voltage in your area.
* Name Plate Location
The CLP-123 name plate is located on the bottom panel.
2

Contents
The Control Panel................................................................................ 4
Connections.......................................................................................... 6
Selecting & Playing Voices ............................................................... 7
■ Playing the Demonstration Tunes ....................................................... 8
The Dual Mode...................................................................................... 9
● Adjusting the Balance Between the Dual-mode Voices.................. 9
● Shifting a Dual-Mode Voice Up One Octave .................................. 9
● Slow-attack Strings ......................................................................... 9
Reverb................................................................................................... 10
● Adjusting Reverb Depth................................................................10
The Pedals ........................................................................................... 11
● Soft (Left) Pedal............................................................................11
● Sostenuto (Center) Pedal ............................................................. 11
● Damper (Right) Pedal ................................................................... 11
Touch Sensitivity ............................................................................... 12
Transposition...................................................................................... 12
Pitch Control ....................................................................................... 13
● Tuning Up ..................................................................................... 13
● Tuning Down................................................................................. 13
● To Restore Standard Pitch ........................................................... 13
MIDI Functions ................................................................................... 14
● A Brief Introduction to MIDI........................................................... 14
● MIDI “Messages” Transmitted & Received by the Clavinova ....... 14
● MIDI Transmit & Receive Channel Selection................................ 15
● MIDI Transmit Transpose ............................................................. 15
■ Other MIDI Functions ........................................................................ 16
● Local Control ON/OFF .................................................................. 16
● Program Change ON/OFF............................................................16
● Control Change ON/OFF .............................................................. 17
● The Multi-Timbre Mode................................................................. 17
● The MIDI Split & Left Local OFF Mode.........................................18
● The MIDI Split & Right Local Off Mode.........................................18
● Transmitting the Panel Settings....................................................18
Troubleshooting................................................................................. 19
Options & Expander Modules ........................................................ 19
Keyboard Stand Assembly ............................................................. 74
MIDI Data Format ............................................................................... 80
Specifications ..................................................................................... 81
MIDI Implementation Chart ............................................................. 82
3
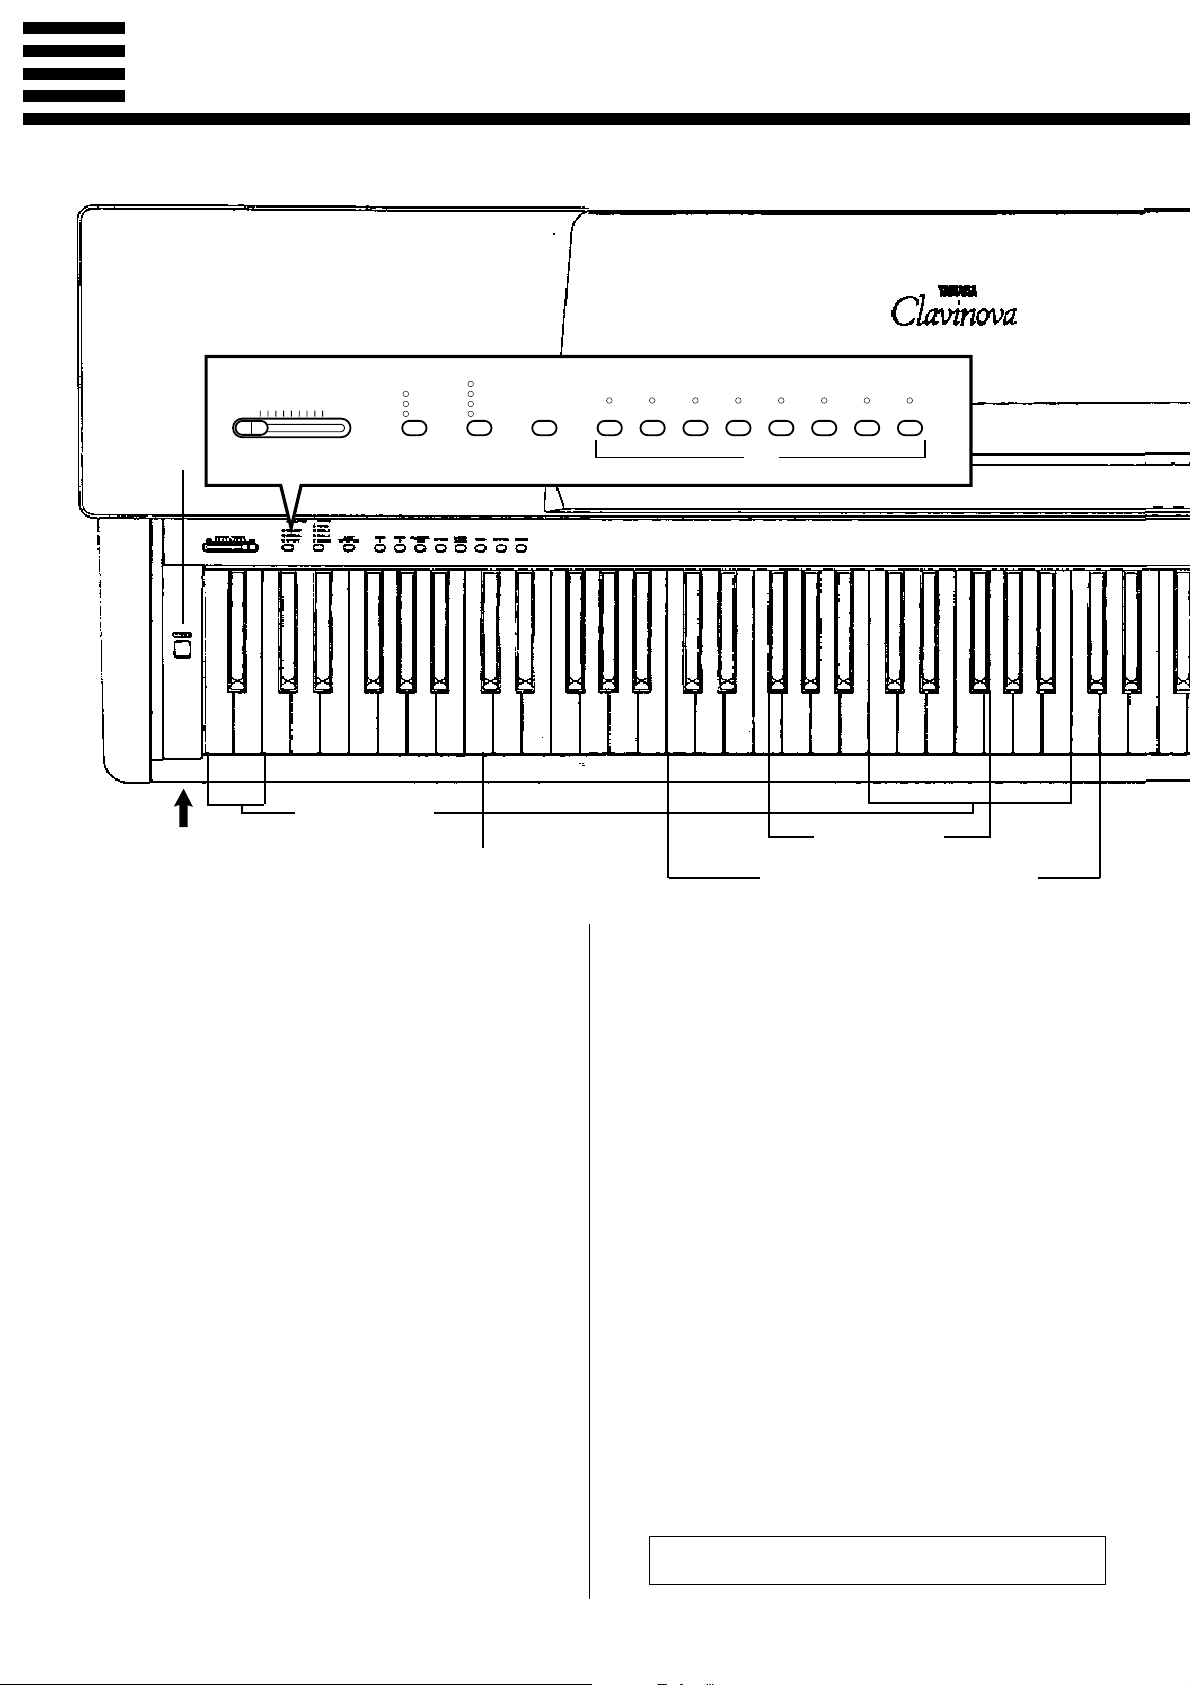
The Control Panel
BRILLIANCE
MELLOW
MASTER VOLUME
MIN MAX
NORMAL
BRIGHT
2345 61
Pitch control keys
(See page 13)
HEADPHONES Jacks
(Bottom Panel)
Left voice shift up key
(See page 9)
1 [POWER] Switch
Press the [POWER] switch once to turn the power
ON, a second time to turn the power OFF. When the
power is initially turned ON, the [PIANO 1] voice
selector LED will light.
REVERB
ROOM
HALL 1
HALL 2
COSMIC
MIDI/
TRANSPOSE
2
CLAVINOVA
TONE
HARPSI-
VIBES STRINGS ORGANE. PIANO
CHORD
Transpose keys
(See page 12)
Balance/Depth keys (See page 9, 10)
PIANO1PIANO
4 [REVERB] Button
The [REVERB] button selects a number of digital
reverb effects that you can use for extra depth and
expressive power.
➪
See page 10 for details.
2 [MASTER VOLUME] Control
The [MASTER VOLUME] control adjusts the vol-
ume (level) of sound produced by the Clavinova’s
internal stereo sound system. The [MASTER VOL-
UME] control also adjusts headphone volume when a
pair of headphones is plugged into the HEADPHONES
jack (page 6).
3 [BRILLIANCE] Button
This button can be used to change the tonality or “timbre” of the selected voice. Three settings are provided:
MELLOW, NORMAL, and BRIGHT. To select one of
these settings, press the [BRILLIANCE] button a few
times until the indicator corresponding to the desired
setting lights. The NORMAL setting produces the
“normal” tone of the selected voice. The BRIGHT
setting creates a brighter or “sharper” tone, while the
MELLOW setting produces a “rounder” more mellow
tone.
4
5 [MIDI/TRANSPOSE] Button
The [MIDI/TRANSPOSE] button allows access to the
Clavinova’s TRANSPOSE function (to shift the pitch
of the entire keyboard up or down), keyboard touch
sensitivity adjustment, and MIDI functions. For details
refer to “TRANSPOSITION” on page 12, “TOUCH
SENSITIVITY” on page 12, and “MIDI FUNCTIONS” on page 14.
6 Voice Selectors
The CLP-123 has eight voice selectors. Simply press
any of the voice selectors to select the corresponding
voice. The LED indicator above the voice selector will
light to indicate which voice is currently selected.
The CLP-123 also has a DUAL mode in which two
voices can be played simultaneously across the full
range of the keyboard — see page 9 for details.
Note: The PIANO 1 voice is automatically selected when-
ever the [POWER] switch is initially turned ON.
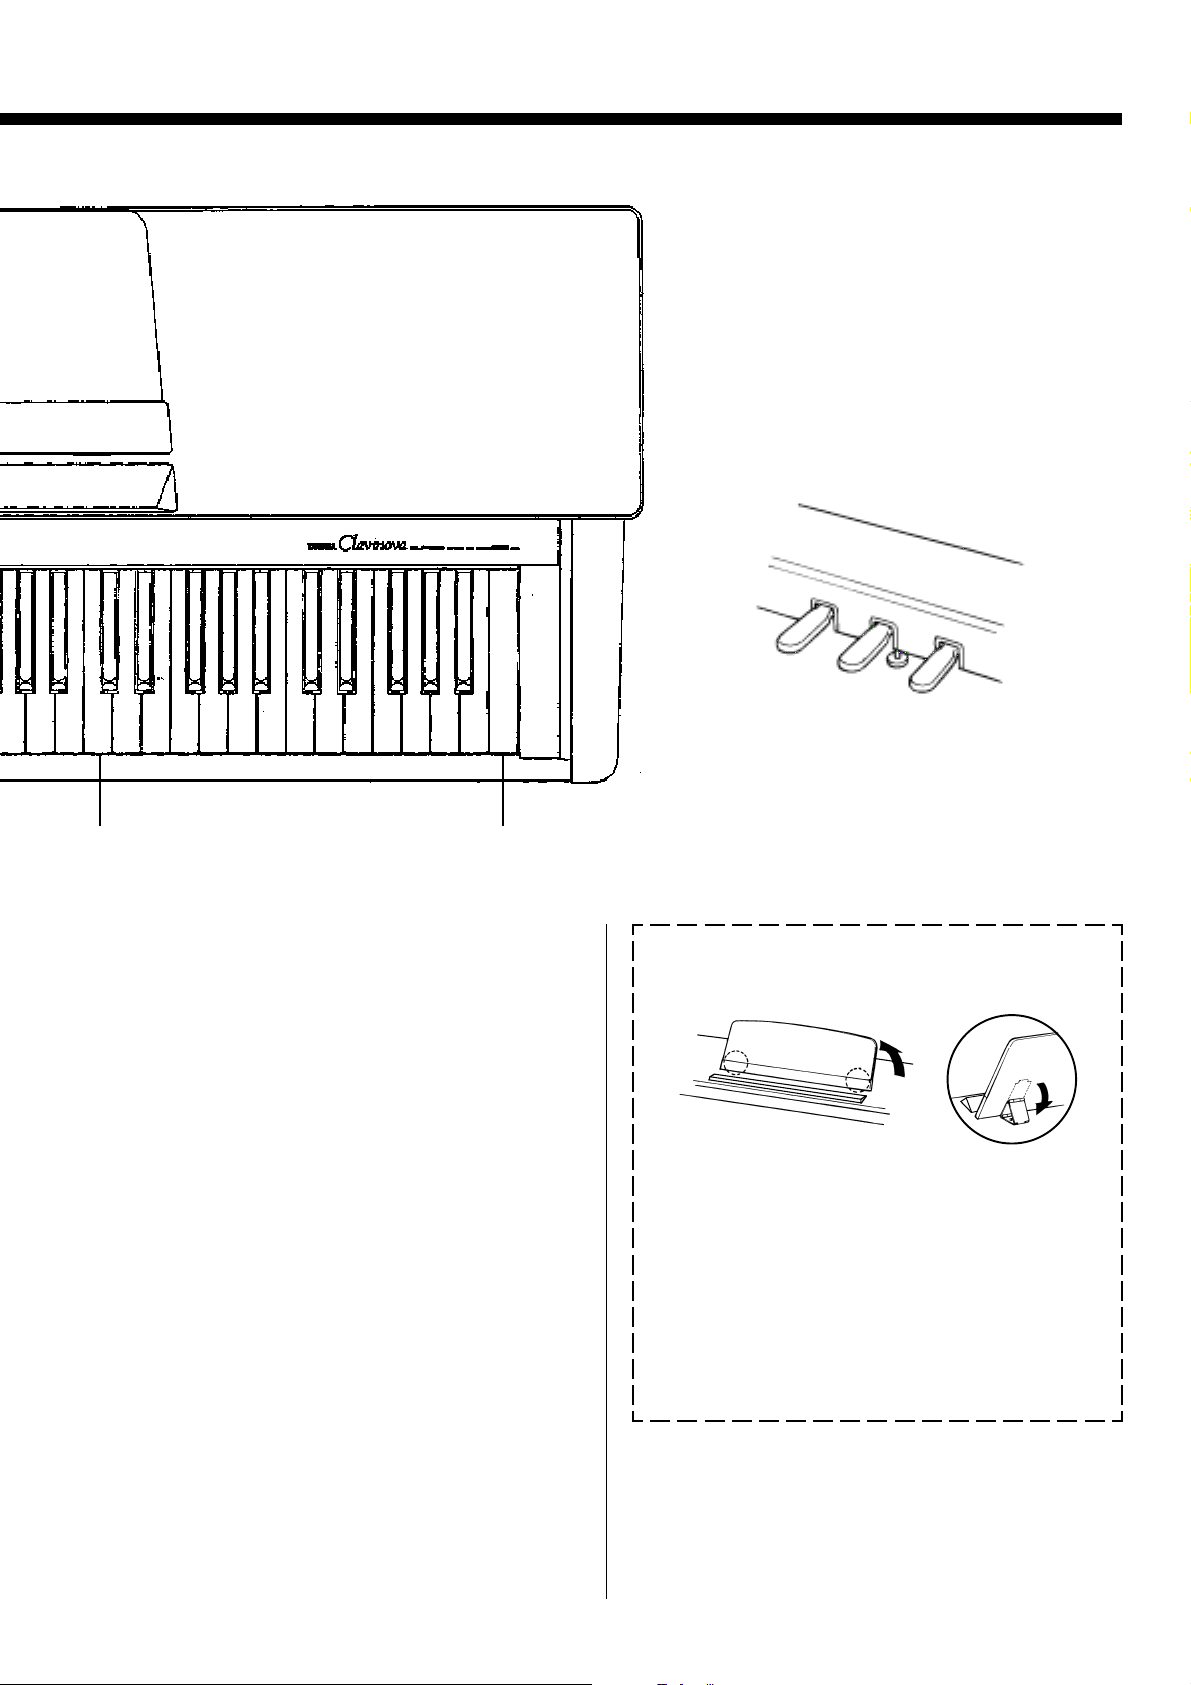
Soft
pedal
Sostenuto
pedal
7
Damper
pedal
Right voice shift up key
(See page 9)
Demonstration key
(See page 8)
7 Pedals
The CLP-123’s soft (left), sostenuto (center) and
damper (right) pedals provide a range of expressive
control capabilities similar to the pedal functions on
an acoustic piano.
➪
See page 11 for details.
● The Music Stand
If you will be using sheet music with your
Clavinova, raise the music stand built into its top
panel by lifting the rear edge of the music stand,
then flip down the music stand braces and engage
them with the corresponding recesses.
The music stand can be lowered after slightly
lifting it and folding the two brackets which support it against the back of the stand.
5
 Loading...