


JV63/JV65
Instruction Manual |
Vacuum Cleaner |
|
|
Bedienungsanleitung |
Staubsauger |
|
|
Manual de Usuarios |
Aspiradora |
|
|
Manuale di istruzioni |
Aspirapolvere |
|
|
Mode d’emploi |
Aspirateur |
|
|
Руководство по эксплуатации |
Пылесос |
|
|


|
Contents |
English |
2 |
Deutsch |
18 |
Español |
36 |
Italiano |
53 |
Français |
71 |
русский язык |
89 |
1
Before use
Unpacking
Open the package, take out the foam pad , all accessories and machine from the package, take off the plastic bag and save them for the purpose of future maintenance and repair.
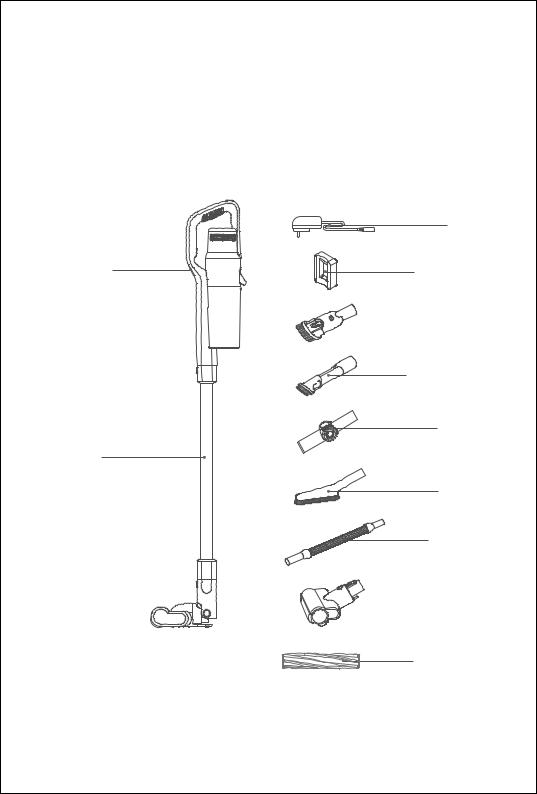
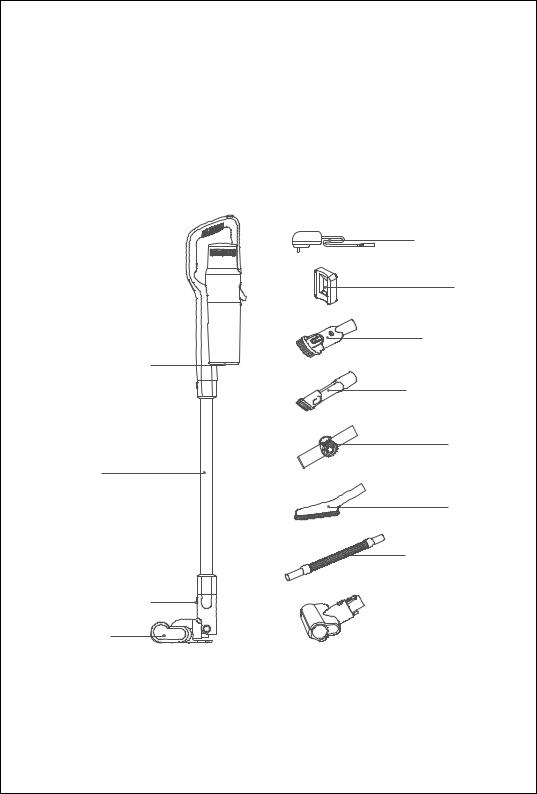
Parts Name
Adaptor
Power button
Dirt cup release button  Metal tube release button
Metal tube
Floorhead release button
Electric Floor Head
Charging holder
 2-in-1 upholstery tool
2-in-1 crevice tool
Connector
Soft brush
Stretch hose
 Electric mattress tool
Carpet brushroll
2
Packing List
Model |
JV63 |
JV65 |
|
Name |
|||
|
|
||
Handheld vacuum |
√ |
√ |
|
|
|
|
|
Floorhead |
√ |
√ |
|
|
|
|
|
Metal tube |
√ |
√ |
|
|
|
|
|
2-in-1 upholstery tool |
√ |
√ |
|
|
|
|
|
Electric mattress tool |
√ |
√ |
|
|
|
|
|
2-in-1 crevice tool |
√ |
√ |
|
|
|
|
|
Carpet brushroll |
√ |
√ |
|
|
|
|
|
Stretch hose |
|
√ |
|
|
|
|
|
Soft brush |
|
√ |
|
|
|
|
|
Connector |
|
√ |
|
|
|
|
|
Adaptor |
√ |
√ |
|
|
|
|
|
Charging holder |
√ |
√ |
|
|
|
|
|
Instruction manual |
√ |
√ |
|
|
|
|
Main-body Assembly
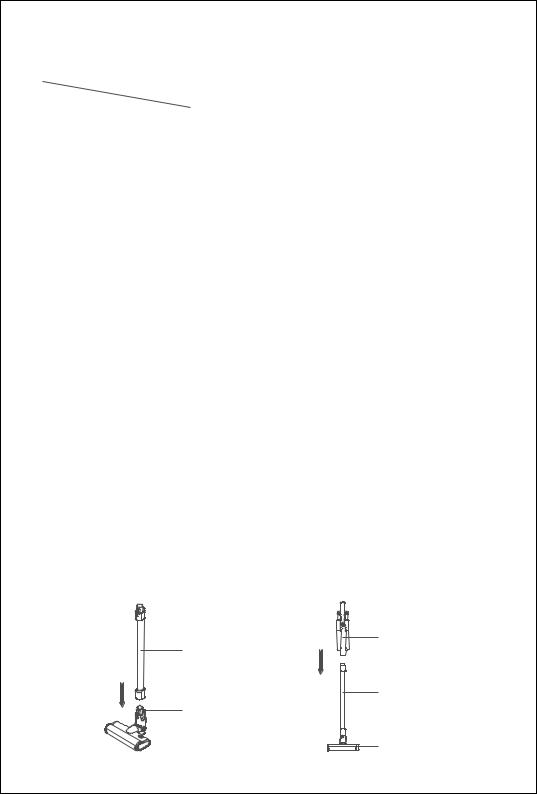
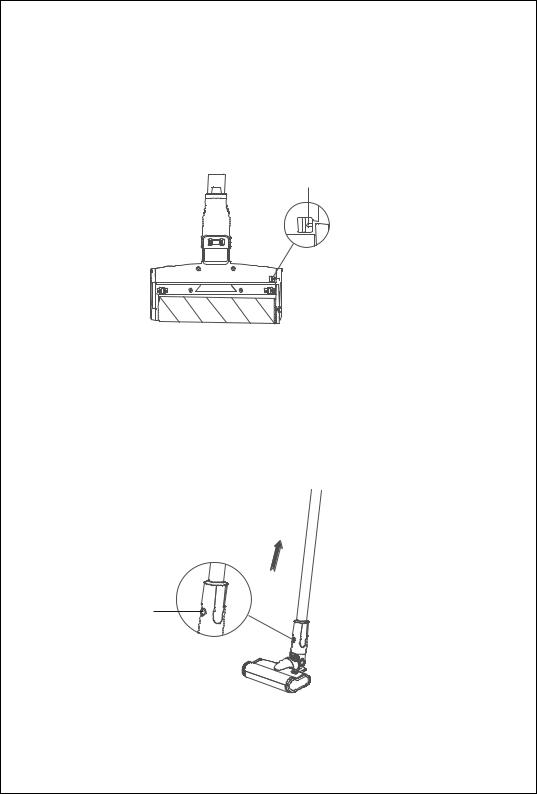
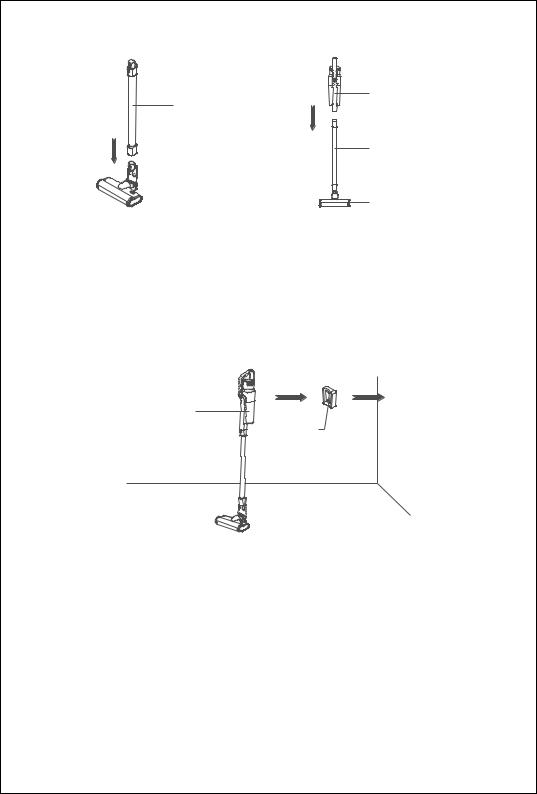
Connect the electric floor head with metal tube
Hold the floor head with left hand, use right hand to insert the metal tube vertically into floor head, align with the conductive needle, press the handle until a “click” sound is heard.
Attention: Keep the handle and floor head in the same direction, conductive needle shall align with the socket.
Assemble the electric head floor, metal tube and handheld vacuum cleaner
First, assemble the floor head and conductive metal tube based on the assembling method of electric floor head and conductive metal tube. Secondly, align the conductive needle of the conductive metal tube with the suction mouth conductivepipe, push upwards until a “click” sound is heard.
Handheld vacuum
Outer lid
Metal tube
Aligh with conductive needle
 Electric Floor Head
Electric Floor Head
3
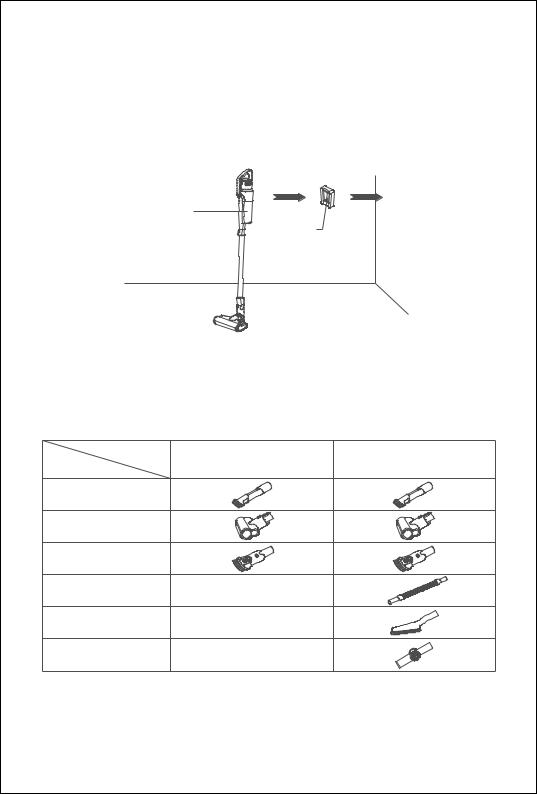
Charge holder assembly
Remove the adhesive glue cover on the back of the holder and push the holder against a smooth wall with holder height 1-1.1M away from floor. (It is recommended that the installation height of the holder be determined according to the height of the holder off the ground after the whole machine is put on holder.) Press it for 5 seconds with 50N force to make the glue adhere to the wall. It is convenient for the hand-held vacuum cleaner to store on the wall.
Handheld vacuum
Charging holder
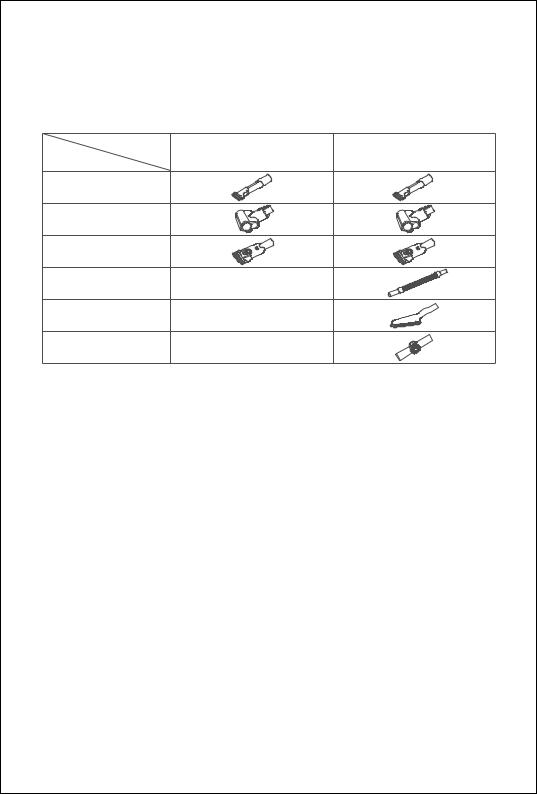
Assembly of accessories
For ease of use, this product is specially equipped with accessories for the hand-held vacuum cleaner. The handheld can connect to different tools for different cleaning purpose.
|
Model |
JV63 |
JV65 |
Name |
|
||
|
|
|
2-in-1 crevice tool
Electric mattress tool
2-in-1 upholstery tool
Stretch hose
Soft brush
Connector
4
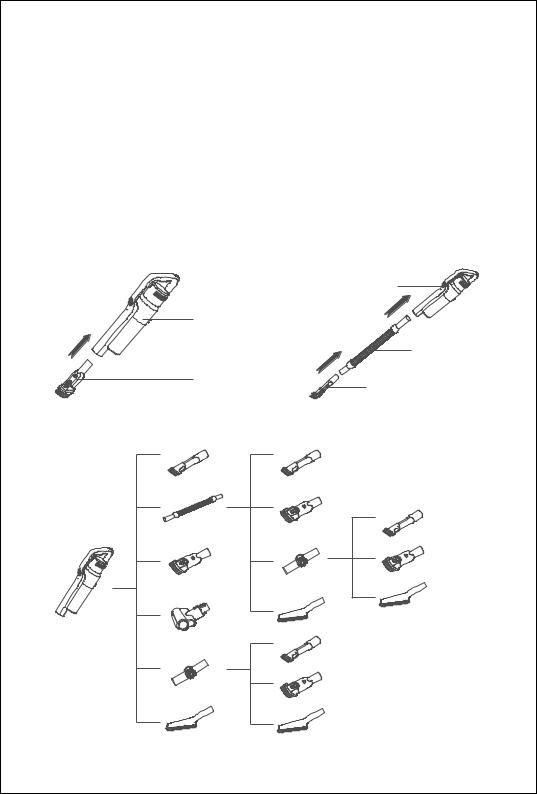
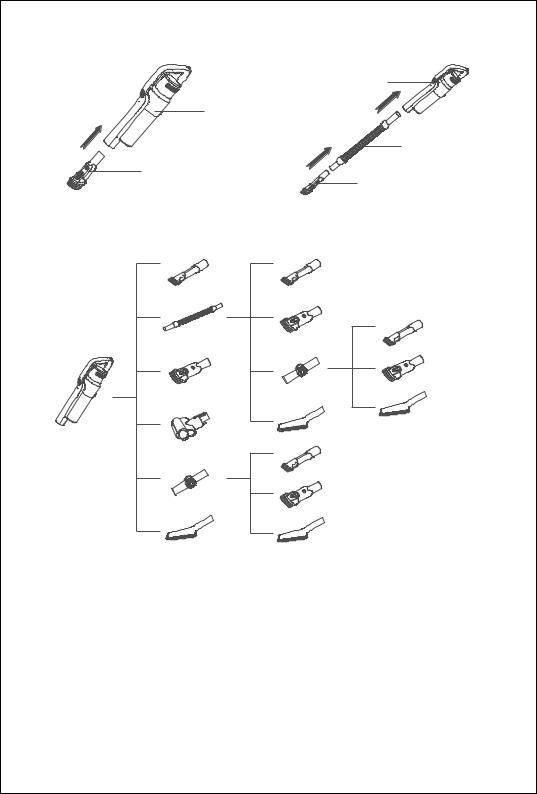
Connect handheld vacuum cleaner with 2-in-1 upholstery tool
Insert 2-in-1 upholstery tool connector into the handheld air inlet until it is tightly fitted.
Attention: The handheld vacuum can also connect other accessories:Electric mattress tool/2- in-1 crevice tool/connector/stretch hose/soft brush. The connecting method is the same as 2-in-1 upholstery tool.
Connect handheld vacuum cleaner with accessories through stretch hose
Align the vacuum cleaner with stretch hose, insert until it is fully tightened; Connect another end of stretch hose with tools.
Attention: The handheld vacuum can connect to these accessories: 2-in-1 crevice tool, 2-in-1 upholstery tool, connector, soft brush. The connecting method is the same as 2-in-1 upholstery tool.
Handheld vacuum
Handheld vacuum
stretch hose
2-in-1 upholstery tool
2-in-1 crevice tool
Accessories Connection List
5
Use of vacuum cleaner
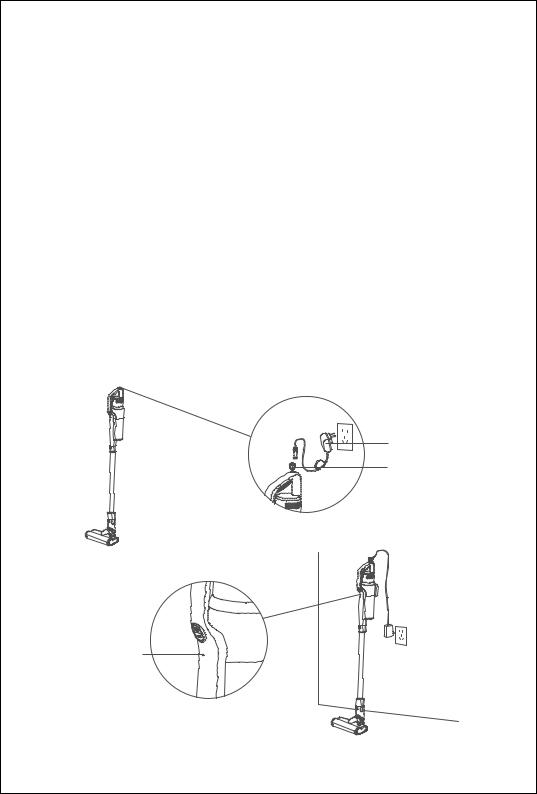
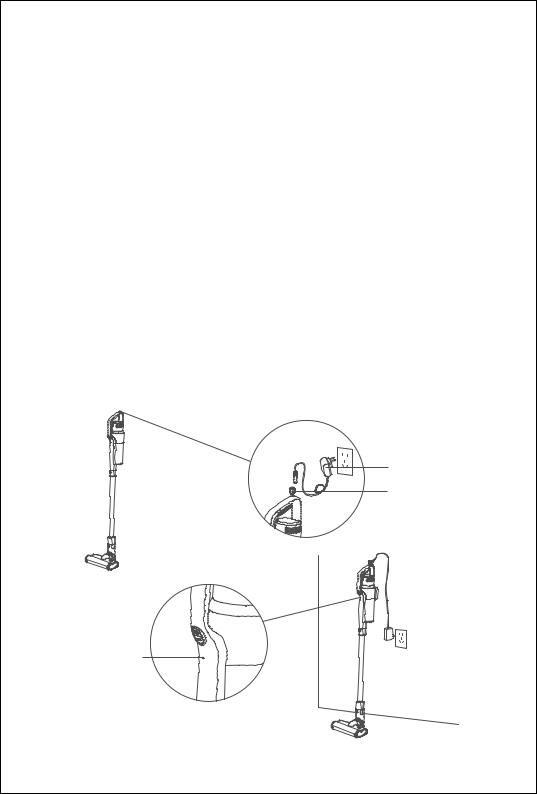
Charging
During using the vacuum cleaner, when indicator blinks in red, the machine need to be charged. When the voltage is too low, to protect the battery, the vacuum will automatically turn off. At this time, the vacuum must be charged.
Remove the rubber plug on back on handheld vacuum, insert adaptor tail into charging socket on machine. Lean the product on charging holder. Indicator turns red when it starts to charge and turns green when it finishes charging.
Charging time is about 5 hours. When the charging indicator on the hand-held vacuum turns from red to green, it means the vacuum cleaner is fully charged. We recommend continue charging for half an hour to one hour, so that the charging effect is better. After charging, unplug the charger to stop charging.
Attention:
1.When using the machine for the first time, the battery capacity is not full, need to charge the machine. The machine is able to be used after the battery is charged fully.
2.When using the vacuum cleaner for the first time, fully charge the battery and fully discharge the battery before second charge to increase the battery life.
Adaptor
Rubber plug
Charging indicator
6
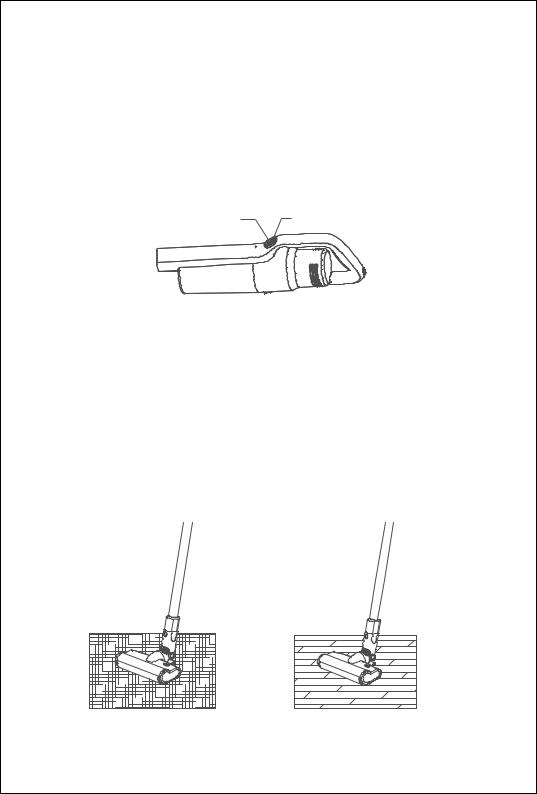
Use of Handheld Vacuum Cleaner
Take the handheld vacuum from the charging holder, press the on/off button to turn on and turn off the vacuum. Green indicator lights up, it is normal mode, press the speed control button to strong mode, the speed control button can switch between strong mode and normal mode easily.
Attention:JV63 and JV65 has normal/middle/strong three modes.
Power button |
On/off button |
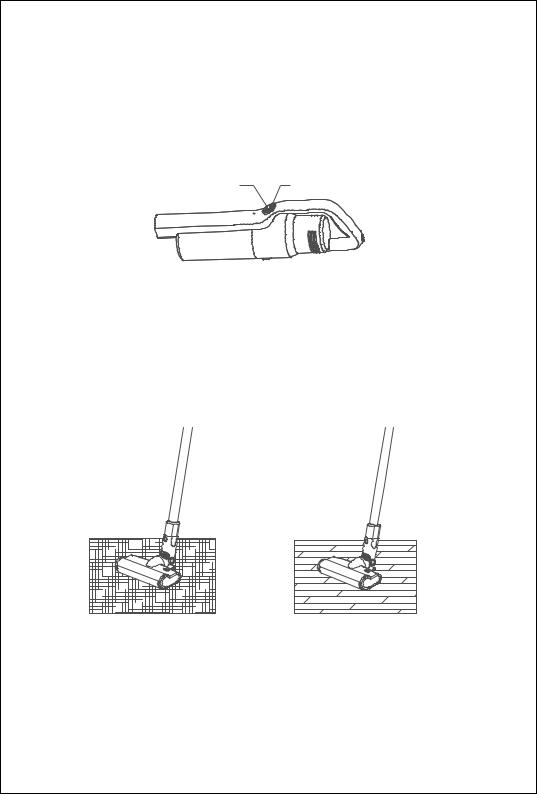
Use of Electric Floorhead
Electric floorhead can clean short hair carpet, hardfloor or tile floor.
Attention:
When the electric floorhead is running, if brushroll stopped running due to big foreign object blockage or excessive fiber entangle, or the child accidentally putting hand into brushroll, the floorhead will stop working to protect personal safety and avoid damage to floorhead motor.
7
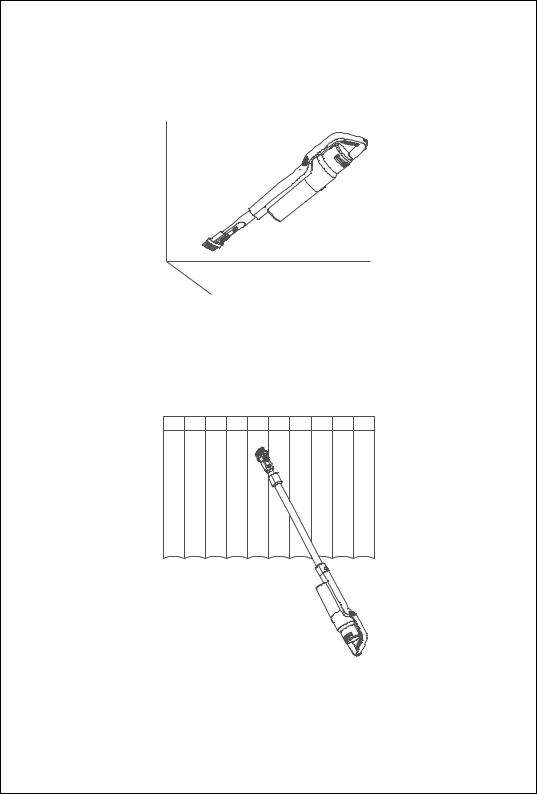
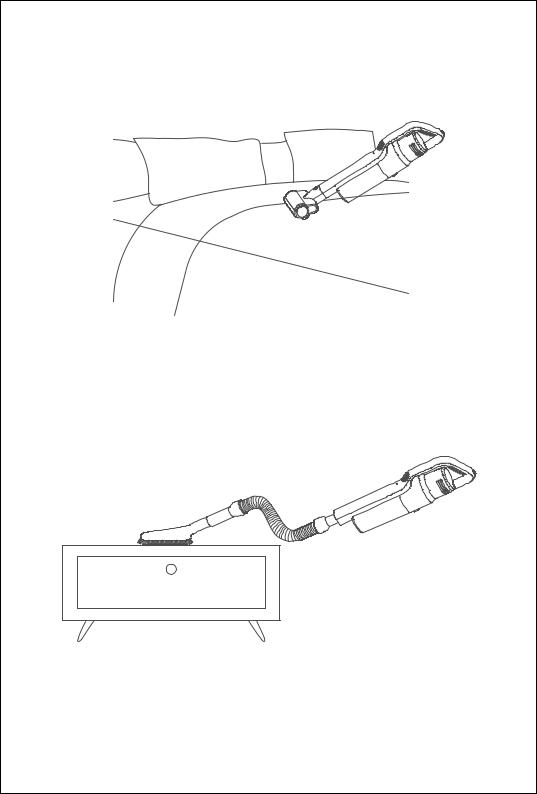
Use of Accessories
2-in-1 crevice tool: Suitable to clean crevices, corners and other narrow areas.
2-in-1 upholstery tool: Suitable to clean dust on closet, sofa,windowsill and table surface.
8
Electric Mattress Head: Beats up and cleans dust dust mite and dust mite allergen from sofa and bed.
Soft brush and stretch: Stretch hose to connect handheld vacuum cleaner and accessories to clean hard to reach areas. Soft bruh is suitable to clean easily scratched furniture,such as book shelf, artworks.
9
Cleaning and Replacing Parts
Attention:
1.HEPA filter is available for sale from local vacuum cleaner distributors.
2.It is recommended to clean the dust cup after each use; When the dust cup is full or the HEPA filter is clogged, it needs to be cleaned and replaced if necessary. Floorhead brushroll might be entangled with hair after long time use, it needs to be cleaned in time to keep the vacuum working more efficiently.
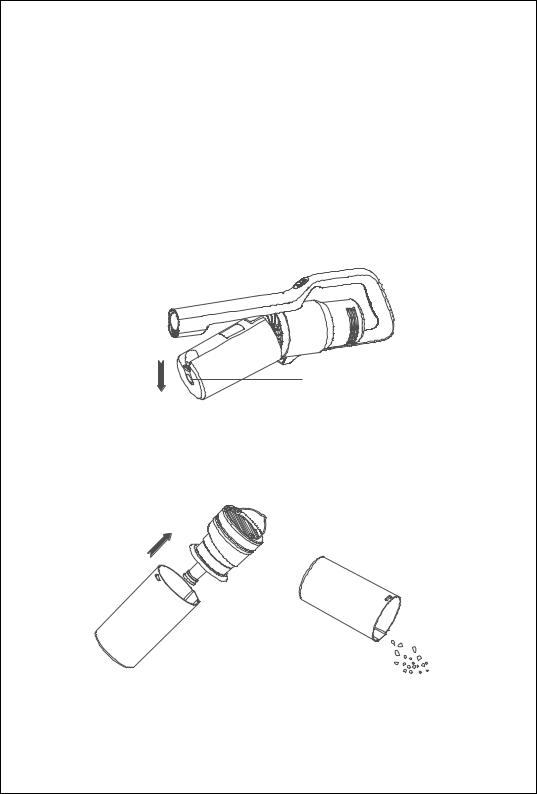
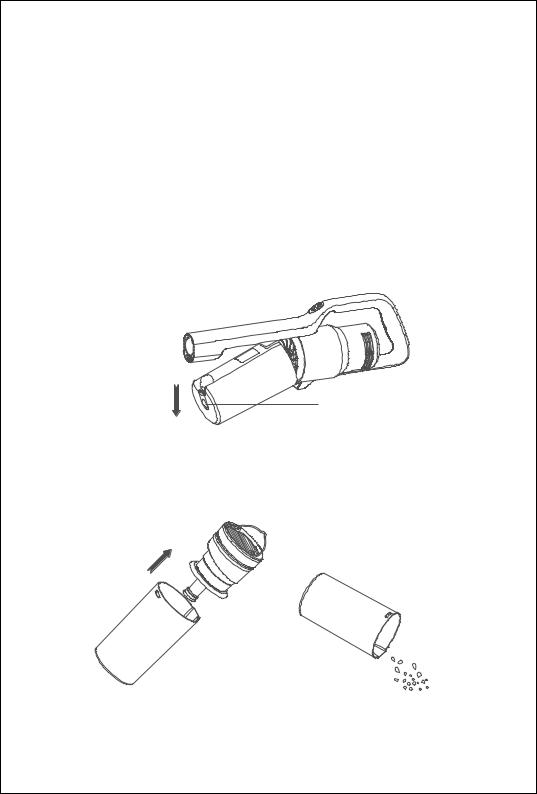
Cleaning Dust Cup
release button, rotate and remove dust cup in the arrow direction.
Take off dust cup in |
Dust cup release button |
arrow direction |
Lift out cyclone assembly and empty the dust in dust cup.
10
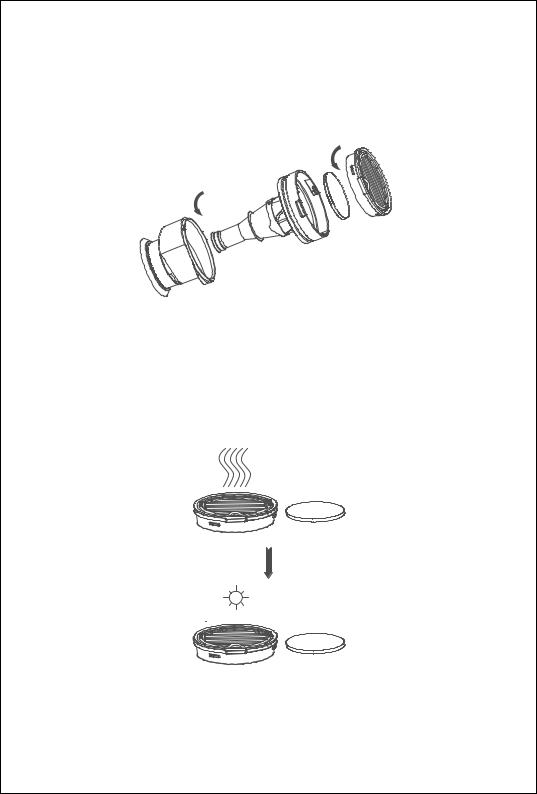
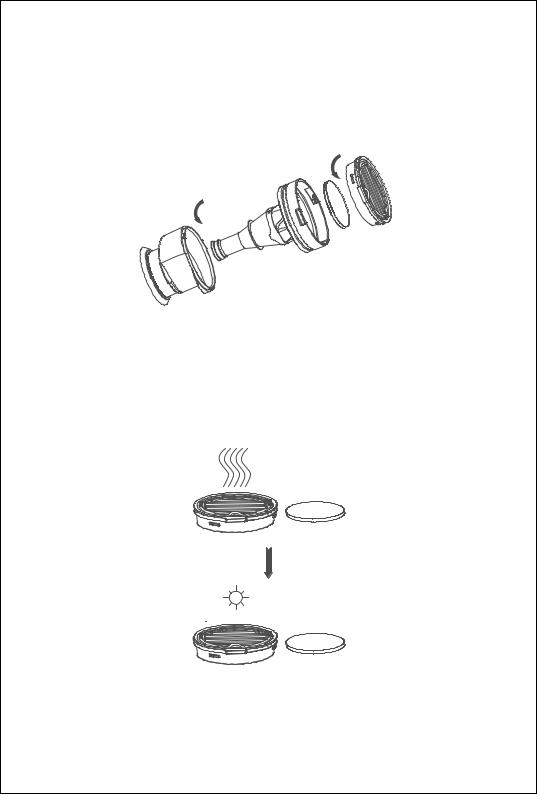
Clean filtration system
Hold the HEPA and rotate arrow direction. Take out HEPA; Rotate the cyclone in arrow direction to take out cyclone assembly. Clean or wash the HEPA, foam filter, cyclones.
If HEPA and foam filter are washed, they need to be completely dried to be used again. (Replace if necessary). After cleaning, assemble all parts in the opposite direction as disassembly.
Attention:HEPA and fom filter need to be completely dry before assembly.
11
Cleaning Electric Brushroll
Take out brushroll to clean brushroll.
1.Push brushroll release button, brushroll will automatically bump out.
2. Take out one side of the brushroll in the same direction as shown on the picture, then brushrollcan be taken out to clean.
3.After cleaning and replacing, reassemble it in opposite sequence.
Brushroll release button
1.Push brushroll release button 2.Take out brushroll
Storage of Vacuum Cleaner
Disassemble electric floor head and metal tube
When store or clean the vacuum cleaner, if you need to disassemble the electric floor head, press the electric floor head release button, pull upwards the metal tube.
Floorhead release button
12
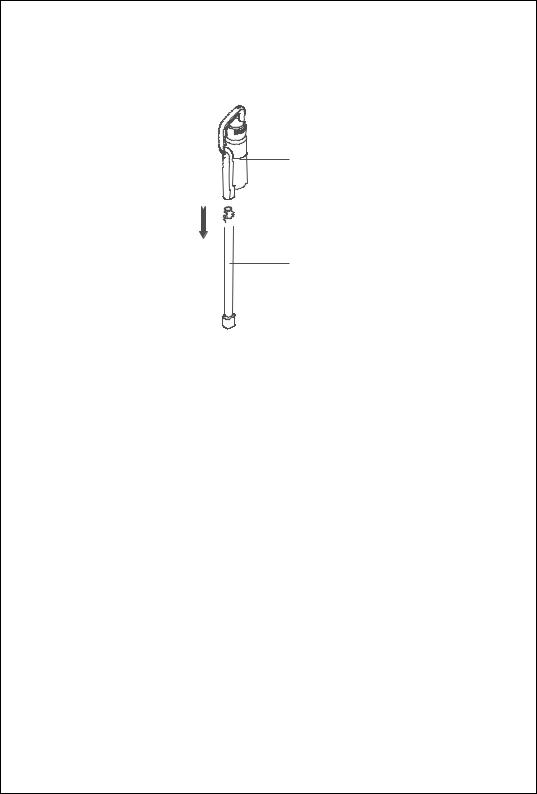
Disassemble the Handheld Vacuum Cleaner and Metal Tube
Hold the handheld, press the release button of metal tube, pull out it.
Handheld vacuum
 Metal tube release button
Metal tube
Machine Storage
If the machine is not used for a long time, properly pack it and store it in cool and dry place, avoiding direct sunlight or humid environment.
Safety Notes
This vacuum cleaner is designed for home use. Do not use it for commercial or other purposes.
Please read this instruction manual carefully before use, properly save and store it for future use.
Do not put the vacuum close to fire or other high temperature facility.
Do not use or store the machine under extreme bad conditions, for example, extreme temperature. It is recommended to use it indoors between the temperature of 5 to 40 . Store the machine in dry place and avoid direct sunlight.
Fully charge the battery before first use or after long storage.
Before using the vacuum, make sure brushroll is assembled, otherwise, it may lead to motor fan blockage, causing motor burn out.
13

Please do not use the vacuum to pick up detergent, oil, glass slag, needle, cigarette ash, wet dust, water, matches, etc.
Please do not use the vacuum to pick up tiny particles such as cement,gypsum powder, wall powder, or large objects such as paper balls, otherwise it will cause malfunctions such as blockage and motor burnout.
Avoid blockage to air inlet or brushroll, it may cause motor failure.
Do not put your hand or foot into floorhead inlet to avoid body hurt.
Do not pour or splash water or other liquids into the machine to avoid short circuit to burn out the machine.
If the brushroll is not working, please check whether the brushroll is entangled with hair or other long fiber, clean it in time.
When storing the machine for a long time, ensure that the battery is fully charged before storage and charge the machine at least every three months.
Unplug the charger to clean or repair the machine. Hold the charger when plugging or unplugging it, and do not pull the charging cord.
Use a dry cloth to clean the machine. Liquids like gasoline, alcohol, lacquer thinner will cause crack or colour fading and cannot be used.
If the machine is not working after fully charged, it must be checked and repaired in our designated office, please do not dismantle the machine on your own.
Discarded machine contains batteries. They should be recycled safely. Do not discard them randomly.
If there is damage on power cord, to avoid danger, it should be replaced or repaired by manufacturer repairing agency or professional person.
14

Trouble Shooting
Please check the following issues before sending to designated repair offices.
Symptoms |
Possible Causes |
Solutions |
|
|
|
|
|
|
Battery has no power |
Charge the vacuum cleaner |
|
|
|
|
|
Machine not working |
Metal tube, electric floor |
Check the accessories are |
|
|
had, is not assembled |
||
|
assembled correctly to the |
||
|
correctly to the vacuum |
||
|
vacuum cleaner |
||
|
cleaner |
||
|
|
||
|
|
|
|
Machine stops working |
Main motor temperature |
machine for 5 to 10 minutes |
|
|
|||
overheat and activates |
|
||
during use |
Check whether cyclone |
||
temperature protection |
|||
|
|||
|
|
systems needs cleaning |
|
|
|
|
|
|
Floorhead |
machine for 5 to 10 minutes |
|
Brushroll stops running |
overloaded(Such as |
|
|
working on carpet, too |
|
||
during use |
whether brushroll needs |
||
much hair entangled |
|||
|
cleaning |
||
|
around brushroll) |
||
|
|
||
|
|
|
|
Machine drops from |
Cyclone system is blocked |
Clean dust cup and cyclone |
|
strong to normal mode |
and activates main motor |
||
system |
|||
automatically |
over speed protection |
||
|
|||
|
|
|
|
|
Dust cup full |
Clean dust cup and cyclone |
|
|
|
|
|
Suction drops |
Filter blocked |
Clean or replace filter |
|
|
|
|
|
|
Floorhead air path blocked |
Clean floorhead air path |
|
|
|
|
|
Charging indicators red |
contact to machine or |
Replug charger to machine |
|
and green light flickers |
|||
power socket |
and power socket |
||
alternately during charging |
|||
|
|
||
|
|
|
|
|
Machine not fully charged |
Follow instruction manual to |
|
Short working time after |
fully charge the battery |
||
|
|||
charging |
Battery old aging |
Replace battery |
|
|
|||
|
|
|
Attention:If any other failures occurred, which need professional tools, in order to avoid danger, the machine must be repaired or replaced by manufacturer, other maintenance offices or professionals from similar offices.
15

Product Specification |
|
|
|
|
|
Technical Parameter |
|
|
|
|
|
Model No. |
|
JV63 |
JV65 |
||
Rated Voltage |
25.2V |
28.8V |
|||
Rated Power |
|
450W |
500W |
||
Adaptor Input Voltage |
100-240V ~ 50-60 Hz |
100-240V ~ 50-60Hz |
|||
Adaptor Output Voltage |
30V |
600mA |
34.2V |
600mA |
|
Model No of Electric Floor |
|
JV63 |
JV65 |
||
Head |
|
||||
|
|
|
|
||
Rated Power of Electric Floor |
|
30W |
|
30W |
|
Head |
|
|
|||
|
|
|
|
||
Model No of Electric Mattress |
T-CS7.0B |
T-CS7.0A |
|||
Head |
|||||
|
|
|
|
||
Rated Power of Electric |
|
20W |
|
20W |
|
Mattress Head |
|
|
|||
|
|
|
|
||
Battery pack capacity |
2500mAh |
2500mAh |
|||
Charging time |
|
5h |
|
5h |
|
Circuit diagram |
|
|
|
|
|
|
|
Adaptor |
|
|
|
Floorhead |
|
|
|
|
|
motor |
|
|
|
|
|
Indicator PCB |
|
|
|
|
|
|
|
Battery PCB |
|
Battery |
|
|
|
|
|
||
M Main motor |
|
|
|
|
|
Handheld |
|
|
|
|
|
switch PCB |
|
|
|
|
|
16 |
|
|
|
|
|

Manufacturer Information
Manufacturer |
Kingclean Electric Co., Ltd |
|
|
|
|
Address |
No.1 Xiangyang Road, Suzhou New District, |
|
Jiangsu Province 215009, China |
||
|
||
|
|
Disposal
The machine, accessories and packaging should be sorted for environmental-friendly recycling.
Do not dispose of the machine into household waste!
Only for EC countries: According to the European Guideline 2012/19/EU, machine that are no longer usable, and according to the European Guideline 2006/66/EC, defective or used battery packs/batteries, must be collected separately and disposed of in an environmentally correct manner.
Battery packs/batteries:
Integrated batteries may only be removed for disposal by qualified personnel. Opening the housing shell can damage or destroy the machine.
Do not dispose of battery packs/batteries into household waste, fire or water. Battery packs/batteries should, if possible, be discharged, collected, recycled or disposed of in an environmental-friendly manner.
Subject to change without notice.
Warranty Information
This product enjoys two year warranty from the date of purchase.
Excluded from the guarantee is normal wear, commercial use, alterations to the appliance as purchased, cleaning activities, consequences of improper use or damage by the purchaser or a third person, damage, that can be attributed to external circumstances or caused by the batteries.
17
Vor dem Gebrauch
Auspacken
die Packung öffnen, Schaum Blindholz holen, die Maschine greifen, alle Zubehörteile and Material holen , Plastiktüte herunterholen. äußere Packung halten, um den künftigen Transport zu breiten.
Teile Name
Schalter für  Geschwindigkeitskontrolle
Entriegelungsknopf für Staubbecher
Entriegelungsknopf für  Metallrohrs
leitfähiges Metallrohr
Entriegelungsknopf für
Bodenbürste
Elektrische
Bodenbürste
Zwischenstecke
Haken
Zwei-in-eins
Polstermöbel
Werkzeug
Zwei-in-eins Spalt
Werkzeug
Adapter
Weiche
Bürste
Teleskopschlauch
 Elektrische Bürste
 Bürste für Teppiche
18
Packing liste
Modell |
JV63 |
JV65 |
|
Name |
|||
|
|
||
Handstaubsauger |
√ |
√ |
|
|
|
|
|
Elektrische Bodenbürste |
√ |
√ |
|
|
|
|
|
leitfähiges Metallrohr |
√ |
√ |
|
|
|
|
|
Zwei-in-eins Polstermöbel |
√ |
√ |
|
Werkzeug |
|||
|
|
||
Elektrische Bürste |
√ |
√ |
|
|
|
|
|
Zwei-in-eins Spalt Werkzeug |
√ |
√ |
|
|
|
|
|
Bürste für Teppiche |
√ |
√ |
|
|
|
|
|
Teleskopschlauch |
|
√ |
|
|
|
|
|
Weiche Bürste |
|
√ |
|
|
|
|
|
Adapter |
|
√ |
|
|
|
|
|
Zwischenstecke |
√ |
√ |
|
|
|
|
|
Aufhänger |
√ |
√ |
|
|
|
|
|
Bedienungsanleitung |
√ |
√ |
|
|
|
|
Installation der Maschine
Elektrische Bodenbürste und leitfähiges Metallrohr installieren
Halten Sie beim Anschließen die elektrisch Bürste mit der linken Hand in die gezeigte Richtung, die rechte Hand führt das Bodenbürsten-Einbauöffnung unter dem Metallrohrteil vertikal in den Bodenbürstenanschluss ein, drücken Sie die Schubstange-Teile fest nach unten, bis Sie ein Klicken hören.
Hinweis: Der Griff ist bei der Montage in die gleiche Richtung wie die Bodenbürste ausgerichtet, richten Sie die leitenden Stifte und Abflussloch aus.
Installation von Elektrische Bodenbürste, Teile des leitfähigen Metallrohrs und Handstaubsauger
Zunächst werden gemäß dem Installationsverfahren der elektrischen Bodenbürste und des leitenden Metallrohrs die Bodenbürste und das leitende Metallrohr installiert. Zweitens richten Sie die leitende Nadel des leitenden Metallrohrs auf das leitende Kalebasse-Rohr der Düse aus, drücken Sie es kräftig nach oben und hören Sie das Geräusch der Verriegelung.
19
Handstaubsauger
leitfähiges Metallrohr
Leitendes Metallrohr
Richten Sie den leitenden


 Stift aus zu installieren
 Elektrische Bodenbürste
Elektrische Bodenbürste
Installation von Haken
Bitte decken Sie die Hakenrückschicht auf und befestigen Sie sie auf der Höhe der glatten Wand mit 1-1,1 m(Es wird empfohlen, die Hakeneinbauhöhe gemäß der Höhe des Hauptmaschinehakens vom Boden zu bestimmen, nach dem Aufstellen der gesamten Maschine ), drücken Sie mit einer Kraft von 50 N 5 Sekunden lang, um den Klebstoff an der Wand zu befestigen, sodass der Handstaubsauger bequem aufbewahrt werden kann.
Handstaubsauger
Aufhänger
20
Installation von Zubehör
Für verschiedene Gelegenheiten ist dieses Produkt speziell für Zubehör für Staubsauger ausgestattet. Das Zubehör kann mit dem Handteil verwendet oder am Metallrohr befestigt werden. Schließen Sie das Zubehör nach Bedarf an.
Modell
JV63 |
JV65 |
Name
Zwei-in-eins Spalt Werkzeug
Elektrische Bürste
Zwei-in-eins Polstermöbel
Werkzeug
Teleskopschlauch
Weiche Bürste
Adapter
Anschluss von Handstaubsauger und Zwei-in-eins Polstermöbel Werkzeug
Richten Sie die runde Adapteranschluss des 2-in-1-Sofa saugens auf die Ansaugöffnung vom Staubbecherdes Handstaubsaugers aus, Setzen Sie es dann wie gezeigt in die Stoppposition ein.
Hinweis: Handstaubsauger können auch direkt angeschlossenes Zubehör sein: elektrische Bürste, Zwei-in-eins Spalt Werkzeug, Adapter, Teleskopschlauch, weiche Bürste, Verbindungsmethode mit Zwei-in-Eins-Sofa saugen.
Handstaubsauger durch die Teleskopschlauch mit dem Zubehör verbinden
Der Adapteranschluss von Teleskopschlauch ist auf den Lufteinlass des Handstaubsaugers ausgerichtet, drücken Sie dann die Stoppposition wie gezeigt; dann das andere Ende des Teleskopschlauchs kann mit anderem Zubehör verbunden werden.
Hinweis: Teleskopschlauch kann angeschlossenes Zubehör sein:Zwei-in-eins Spalt Werkzeug , Zwei-in-Eins-Sofa saugen, Adapter und weiche Bürste.
21
Handstaubsauger |
Handstaubsauger |
Teleskopschlauch |
Zwei-in-eins Polstermöbel Werkzeug |
Zwei-in-eins Spalt Werkzeug |
Zubehör Verbingdung Liste |
22 |
Staubsauger benutzen
Maschine aufladen
Wenn Sie dieses Produkt zum ersten Mal verwenden, ist die Akkukapazität des Staubsaugers möglicherweise nicht voll. Sie müssen das Gerät aufladen und verwenden, wenn es vollständig aufgeladen ist.
Wenn Sie den Staubsauger benutzen und die Anzeigelampe rot blinkt, laden Sie den Staubsauger rechtzeitig auf; Wenn die Spannung zu niedrig ist, schaltet der Staubsauger zum Schutz der Batterie automatisch aus und aufgeladen wird.
Ziehen Sie den weichen Gummistopfen am Ende des Handgehäuses heraus, Stecken Sie das Heck des Ladeadapters in die Ladebuchse, wie, Dann lehnen Sie die ganze Einheit an den Wandhaken. Leuchtet während des Ladevorgangs rot und voller Grün.
Hinweis:
1.Laden Sie den Akku bei der ersten Verwendung vollständig auf, entladen Sie den Akku vollständig und laden Sie ihn dann auf, um die Lebensdauer des Akkus zu verlängern.
2.Die Ladezeit beträgt ca. 5 Stunden, wenn die Strom-Anzeigelampe von "rot" auf "grün" wechselt, ist der Staubsaugerbatterie voll aufgeladen. Zu diesem Zeitpunkt ist das Ladegerät noch Erhaltungsladung, Sie können den Ladevorgang 0,5 bis 1 Stunde lang fortsetzen, damit der Ladeeffekt besser ist.
Adaptor
weiches Gummistopfen
Leuchtet während des Ladevorgangs rot und voller Grün
23
Handstaubsauger benutzen
Nach dem Entfernen des Staubsaugers vom Haken, drücken Sie den Schalter am Griff, um das Starten und Stoppen des Staubsaugers zu steuern. Nach dem Start leuchtet die StromAnzeigelampe grün und ist schwach; Drücken Sie die Geschwindigkeitskontrollknopf, um die Gangposition zu wechseln und die Umstellung zwischen den einzelnen Gangpositionen zu realisieren, sodass ein Zyklus durchgeführt werden kann.
Hinweis:JV63und JV65-Modelle haben drei Positionen: "Niedrig / Mittel / Hoch"
Geschwindigkeitskontrollknopf |
Schaltknopf |
Elektrische Bodenbürste benutzen
Die elektrische Bodenbürste kann auf kurzhaarigen Teppichen oder Hartböden und Bodenfliesen gesaugt werden.
Hinweis:
Während die elektrische Bürste läuft, wenn übermäßige Fremdkörper eingeatmet werden oder übermäßige Fasern aufgewickelt werden, sogar das Kind hat beim Spielen der Maschine versehentlich seine Hand in den Bürstenraum gelegt, wodurch die Walzenbürste abnormal zum Stillstand gekommen ist, die Bodenbürste wird ausgeschaltet und angehalten, um die persönliche Sicherheit zu gewährleisten und Schäden am Bürstenmotor zu vermeiden.
24

Zubehör benutzen
Zwei-in-eins Spalt Werkzeug: Geeignet zum Reinigen von Schlitzen, toten Ecken von Türen und Fenstern und anderen engen Spalten. Wie ingezeigt.
Zwei-in-eins Polstermöbel Werkzeug: Geeignet für die Reinigung von Schränken, Fensterbänken, Sofas und Staub auf jeder Arbeitsplatte. Wie in der Abbildung gezeigt.
25
Elektrische Bürste: Speziell für Sofas, Matratzen, Bettwäsche usw. entwickelt. Durch die Schlagvibration der Walzenbürste werden Milben, Bakterien usw., die in der tiefen Schicht der Bettwäsche oder des Sofas verborgen sind, angezapft und abgesaugt. Wie gezeigt.
Teleskopschläuche und weiche Bürsten: Teleskopschläuche verbinden mit Handstaubsauger und Zubehör zum Reinigen schwer zugänglicher Stellen, weiche Bürsten eignen sich zum Reinigen leicht zerkratzter Möbeloberflächen wie Bücherschränke und Kunsthandwerk. Wie gezeigt.
26
Reinigung und Teile wechseln
Hinweis:
1.Windzufluss-HEPA sind beim Staubsauger Verkäufer erhältlich.
2.Es wird empfohlen, den Staubbecher nach jedem Gebrauch rechtzeitig zu reinigen; Wenn die Staubmenge zu groß ist, werden die HEPA blockiert, müssen gereinigt werden und können bei Bedarf ausgetauscht werden; Nachdem die elektrische Walzenbürste längere Zeit benutzt wurde, können die Walzenbürste-Borsten mit langen Flocken wie Haaren umwickelt sein und müssen rechtzeitig gereinigt werden, damit der Staubsauger effektiver arbeiten kann.
Staubbecher reinigen
Drücken Sie den Entriegelungsknopf für den Staubbecher, um den Staubbecher in Pfeilrichtung zu drehen und herunterzuholen. Wie gezeigt.
in Pfeilrichtung drehen |
Entriegelungsknopf für den Staubbecher |
und herunterholen |
Drehen Sie den Griff des Staubbechers nach oben, heben Sie die Zyklonbaugruppe in Pfeilrichtung an und schütten Sie dann den Staub aus dem Staubbecher Wie gezeigt.
27
Filtrationssystem reinigen
Halten Sie den HEPA-Griff in die gezeigte Richtung und heben Sie sie dann an, HEPABaugruppen holen; Dann kann gemäß der im Bild gezeigten Richtung die Zyklon-Haube- Baugruppe der ersten Stufe herausgenommen werden, um die HEPA-Baugruppe, die Filterwatte und den Zyklonkegel zu reinigen.
HEPA-Baugruppe und Filterwatte können mit Wasser gewaschen werden, Nach dem Waschen müssen sie getrocknet werden, bevor sie verwendet werden können.wie, Bei Bedarf ersetzen), dann in umgekehrter Reihenfolge wieder zusammenbauen, um wieder zu benutzen.
Hinweis: Windzufluss-HEPA sollte vor der Installation vollständig getrocknet sein.
28
 Loading...