

Page 1

Xerox WorkCentre 6505
Multifunction Printer
Xerox® WorkCentre® 6505
User Guide
Guide d'utilisation
Italiano Guida per l’utente
Deutsch Benutzerhandbuch
Español Guía del usuario
Português Guia do usuário
Nederlands Gebruikershandleiding
Svenska Användarhandbok
Dansk Betjeningsvejledning
Čeština Uživatelská příručka
Polski
Przewodnik użytkownika
Magyar Felhasználói útmutató
Русский Руководство пользователя
Türkçe Kullanım Kılavuzu
Ελληνικά Εγχειρίδιο χρήστη
Page 2

© 2011 Xerox Corporation. All Rights Reserved. Unpublished rights reserved under the copyright laws of the United States. Contents
of this publication may not be reproduced in any form without permission of Xerox Corporation.
Copyright protection claimed includes all forms of matters of copyrightable materials and information now allowed by statutory or
judicial law or hereinafter granted, including without limitation, material generated from the software programs which are displayed
on the screen such as styles, templates, icons, screen displays, looks, and so on.
®
XEROX
and XEROX and Design®, CentreWare®, Phaser®, PrintingScout®, Walk-Up®, WorkCentre®, ColorQube, Scan to PC
®
Desktop
, Global Print Driver®, and Mobile Express Driver are trademarks of Xerox Corporation in the United States and/or other
countries.
Adobe
Reader®, Adobe Type Manager®, ATM™, Flash®, Macromedia®, Photoshop®, and PostScript® are trademarks of
Adobe Systems Incorporated in the United States and/or other countries.
®
Apple
, AppleTalk®, Bonjour®, EtherTalk®, Macintosh®, Mac OS®, and TrueType® are trademarks of Apple Inc. registered in the U.S.
and other countries.
®
HP-GL
, HP-UX®, and PCL® are trademarks of Hewlett-Packard Corporation in the United States and/or other countries.
®
IBM
and AIX® are trademarks of International Business Machines Corporation in the United States and/or other countries.
Microsoft
®
, Windows Vista®, Windows®, and Windows Server® are trademarks of Microsoft Corporation in the United States and
other countries.
®
Novell
, NetWare®, NDPS®, NDS®, Novell Directory Services®, IPX™, and Novell Distributed Print Services™ are trademarks of
Novell, Inc. in the United States and other countries.
®
SGI
IRIX®are trademarks of Silicon Graphics International Corp. or its subsidiaries in the United States and/or other countries.
SM
Sun
, Sun Microsystems™, and Solaris™ are trademarks of Sun Microsystems, Inc. in the United States and other countries.
As an E
NERGY STAR
efficiency. The E
®
partner, Xerox Corporation has determined that this product meets the ENERGY STAR guidelines for energy
NERGY STAR name and logo are registered U.S. marks.
Document version1.0: February 2011
Page 3

Contents
1Safety
Electrical Safety . . . . . . . . . . . . . . . . . . . . . . . . . . . . . . . . . . . . . . . . . . . . . . . . . . . . . . . . . . . . . . . . . . . . . . . . . 10
General Guidelines. . . . . . . . . . . . . . . . . . . . . . . . . . . . . . . . . . . . . . . . . . . . . . . . . . . . . . . . . . . . . . . . . . . 10
Laser Safety . . . . . . . . . . . . . . . . . . . . . . . . . . . . . . . . . . . . . . . . . . . . . . . . . . . . . . . . . . . . . . . . . . . . . . . . . 10
Power Cord . . . . . . . . . . . . . . . . . . . . . . . . . . . . . . . . . . . . . . . . . . . . . . . . . . . . . . . . . . . . . . . . . . . . . . . . . . 10
Operational Safety . . . . . . . . . . . . . . . . . . . . . . . . . . . . . . . . . . . . . . . . . . . . . . . . . . . . . . . . . . . . . . . . . . . . . . 12
Operational Guidelines. . . . . . . . . . . . . . . . . . . . . . . . . . . . . . . . . . . . . . . . . . . . . . . . . . . . . . . . . . . . . . . 12
Ozone Release. . . . . . . . . . . . . . . . . . . . . . . . . . . . . . . . . . . . . . . . . . . . . . . . . . . . . . . . . . . . . . . . . . . . . . . 12
Printer Location. . . . . . . . . . . . . . . . . . . . . . . . . . . . . . . . . . . . . . . . . . . . . . . . . . . . . . . . . . . . . . . . . . . . . . 12
Printer Supplies . . . . . . . . . . . . . . . . . . . . . . . . . . . . . . . . . . . . . . . . . . . . . . . . . . . . . . . . . . . . . . . . . . . . . . 13
Maintenance Safety . . . . . . . . . . . . . . . . . . . . . . . . . . . . . . . . . . . . . . . . . . . . . . . . . . . . . . . . . . . . . . . . . . . . . 14
Printer Symbols. . . . . . . . . . . . . . . . . . . . . . . . . . . . . . . . . . . . . . . . . . . . . . . . . . . . . . . . . . . . . . . . . . . . . . . . . . 15
2Features
Parts of the Printer . . . . . . . . . . . . . . . . . . . . . . . . . . . . . . . . . . . . . . . . . . . . . . . . . . . . . . . . . . . . . . . . . . . . . . 18
Front View . . . . . . . . . . . . . . . . . . . . . . . . . . . . . . . . . . . . . . . . . . . . . . . . . . . . . . . . . . . . . . . . . . . . . . . . . . 18
Rear View . . . . . . . . . . . . . . . . . . . . . . . . . . . . . . . . . . . . . . . . . . . . . . . . . . . . . . . . . . . . . . . . . . . . . . . . . . . 19
Internal View . . . . . . . . . . . . . . . . . . . . . . . . . . . . . . . . . . . . . . . . . . . . . . . . . . . . . . . . . . . . . . . . . . . . . . . . 19
Control Panel . . . . . . . . . . . . . . . . . . . . . . . . . . . . . . . . . . . . . . . . . . . . . . . . . . . . . . . . . . . . . . . . . . . . . . . . 20
Configurations and Options . . . . . . . . . . . . . . . . . . . . . . . . . . . . . . . . . . . . . . . . . . . . . . . . . . . . . . . . . . . . . . 21
Configurations . . . . . . . . . . . . . . . . . . . . . . . . . . . . . . . . . . . . . . . . . . . . . . . . . . . . . . . . . . . . . . . . . . . . . . 21
Standard Features . . . . . . . . . . . . . . . . . . . . . . . . . . . . . . . . . . . . . . . . . . . . . . . . . . . . . . . . . . . . . . . . . . . 21
Additional Capabilities . . . . . . . . . . . . . . . . . . . . . . . . . . . . . . . . . . . . . . . . . . . . . . . . . . . . . . . . . . . . . . . 21
Optional Features. . . . . . . . . . . . . . . . . . . . . . . . . . . . . . . . . . . . . . . . . . . . . . . . . . . . . . . . . . . . . . . . . . . . 22
Energy Saver Mode . . . . . . . . . . . . . . . . . . . . . . . . . . . . . . . . . . . . . . . . . . . . . . . . . . . . . . . . . . . . . . . . . . . . . . 23
Setting the Power Saver Time . . . . . . . . . . . . . . . . . . . . . . . . . . . . . . . . . . . . . . . . . . . . . . . . . . . . . . . . 23
Exiting Energy Saver Mode . . . . . . . . . . . . . . . . . . . . . . . . . . . . . . . . . . . . . . . . . . . . . . . . . . . . . . . . . . . 23
Starting Energy Saver Mode . . . . . . . . . . . . . . . . . . . . . . . . . . . . . . . . . . . . . . . . . . . . . . . . . . . . . . . . . . 23
Information Pages . . . . . . . . . . . . . . . . . . . . . . . . . . . . . . . . . . . . . . . . . . . . . . . . . . . . . . . . . . . . . . . . . . . . . . 24
Menu Map . . . . . . . . . . . . . . . . . . . . . . . . . . . . . . . . . . . . . . . . . . . . . . . . . . . . . . . . . . . . . . . . . . . . . . . . . . 24
Configuration Page . . . . . . . . . . . . . . . . . . . . . . . . . . . . . . . . . . . . . . . . . . . . . . . . . . . . . . . . . . . . . . . . . . 24
Startup Page . . . . . . . . . . . . . . . . . . . . . . . . . . . . . . . . . . . . . . . . . . . . . . . . . . . . . . . . . . . . . . . . . . . . . . . . 24
CentreWare Internet Services . . . . . . . . . . . . . . . . . . . . . . . . . . . . . . . . . . . . . . . . . . . . . . . . . . . . . . . . . . . . 25
Accessing CentreWare Internet Services. . . . . . . . . . . . . . . . . . . . . . . . . . . . . . . . . . . . . . . . . . . . . . . 25
More Information . . . . . . . . . . . . . . . . . . . . . . . . . . . . . . . . . . . . . . . . . . . . . . . . . . . . . . . . . . . . . . . . . . . . . . . 26
3 Installation and Setup
Installation and Setup Overview. . . . . . . . . . . . . . . . . . . . . . . . . . . . . . . . . . . . . . . . . . . . . . . . . . . . . . . . . . 28
Selecting a Location for the Printer . . . . . . . . . . . . . . . . . . . . . . . . . . . . . . . . . . . . . . . . . . . . . . . . . . . . . . . 29
WorkCentre 6505 Color Laser Multifunction Printer
User Guide
3
Page 4

Contents
Connecting the Printer . . . . . . . . . . . . . . . . . . . . . . . . . . . . . . . . . . . . . . . . . . . . . . . . . . . . . . . . . . . . . . . . . . . 30
Choosing a Connection Method . . . . . . . . . . . . . . . . . . . . . . . . . . . . . . . . . . . . . . . . . . . . . . . . . . . . . . 30
Connecting to a Network . . . . . . . . . . . . . . . . . . . . . . . . . . . . . . . . . . . . . . . . . . . . . . . . . . . . . . . . . . . . . 30
Connecting Using a USB Cable . . . . . . . . . . . . . . . . . . . . . . . . . . . . . . . . . . . . . . . . . . . . . . . . . . . . . . . 31
Connecting to a Telephone Line . . . . . . . . . . . . . . . . . . . . . . . . . . . . . . . . . . . . . . . . . . . . . . . . . . . . . . 31
Configuring Network Settings . . . . . . . . . . . . . . . . . . . . . . . . . . . . . . . . . . . . . . . . . . . . . . . . . . . . . . . . . . . . 32
About TCP/IP and IP Addresses . . . . . . . . . . . . . . . . . . . . . . . . . . . . . . . . . . . . . . . . . . . . . . . . . . . . . . . 32
Assigning the IP Address of the Printer . . . . . . . . . . . . . . . . . . . . . . . . . . . . . . . . . . . . . . . . . . . . . . . . 32
Finding the IP Address of Your Printer. . . . . . . . . . . . . . . . . . . . . . . . . . . . . . . . . . . . . . . . . . . . . . . . . 35
Enabling the Printer for Faxing . . . . . . . . . . . . . . . . . . . . . . . . . . . . . . . . . . . . . . . . . . . . . . . . . . . . . . . 35
Enabling the Printer for Scanning . . . . . . . . . . . . . . . . . . . . . . . . . . . . . . . . . . . . . . . . . . . . . . . . . . . . . 36
Setting the Date and Time . . . . . . . . . . . . . . . . . . . . . . . . . . . . . . . . . . . . . . . . . . . . . . . . . . . . . . . . . . . . . . . 37
Installing the Software . . . . . . . . . . . . . . . . . . . . . . . . . . . . . . . . . . . . . . . . . . . . . . . . . . . . . . . . . . . . . . . . . . 38
Operating System Requirements. . . . . . . . . . . . . . . . . . . . . . . . . . . . . . . . . . . . . . . . . . . . . . . . . . . . . . 38
Available Print Drivers. . . . . . . . . . . . . . . . . . . . . . . . . . . . . . . . . . . . . . . . . . . . . . . . . . . . . . . . . . . . . . . . 38
Installing the Print Drivers for a Windows Network Printer . . . . . . . . . . . . . . . . . . . . . . . . . . . . . . 39
Installing the Scan Drivers for a Windows Network Printer. . . . . . . . . . . . . . . . . . . . . . . . . . . . . . 39
Installing Print and Scan Drivers for Windows USB . . . . . . . . . . . . . . . . . . . . . . . . . . . . . . . . . . . . . 40
Installing the Drivers and Utilities for Macintosh OS X Version 10.5 and Later . . . . . . . . . . . 41
Installing Other Drivers. . . . . . . . . . . . . . . . . . . . . . . . . . . . . . . . . . . . . . . . . . . . . . . . . . . . . . . . . . . . . . . 43
Installing Utilities for Windows . . . . . . . . . . . . . . . . . . . . . . . . . . . . . . . . . . . . . . . . . . . . . . . . . . . . . . . . . . . 44
Installing the Address Book Editor . . . . . . . . . . . . . . . . . . . . . . . . . . . . . . . . . . . . . . . . . . . . . . . . . . . . 44
Installing PrintingScout . . . . . . . . . . . . . . . . . . . . . . . . . . . . . . . . . . . . . . . . . . . . . . . . . . . . . . . . . . . . . . 44
Enabling Optional Features . . . . . . . . . . . . . . . . . . . . . . . . . . . . . . . . . . . . . . . . . . . . . . . . . . . . . . . . . . . . . . 46
Enabling Optional Features for the Windows PostScript Driver . . . . . . . . . . . . . . . . . . . . . . . . . . 46
Enabling Optional Features for the Windows PCL Driver . . . . . . . . . . . . . . . . . . . . . . . . . . . . . . . . 47
Enabling Optional Features for Macintosh OS X 10.5 and Later . . . . . . . . . . . . . . . . . . . . . . . . . 48
Enabling Optional Features for Linux. . . . . . . . . . . . . . . . . . . . . . . . . . . . . . . . . . . . . . . . . . . . . . . . . . 48
Setting up Scanning . . . . . . . . . . . . . . . . . . . . . . . . . . . . . . . . . . . . . . . . . . . . . . . . . . . . . . . . . . . . . . . . . . . . . 49
Scanning Setup Overview . . . . . . . . . . . . . . . . . . . . . . . . . . . . . . . . . . . . . . . . . . . . . . . . . . . . . . . . . . . . 49
Setting Up Scanning to a Shared Folder on Your Computer. . . . . . . . . . . . . . . . . . . . . . . . . . . . . 49
Setting Up Scanning to an FTP Server . . . . . . . . . . . . . . . . . . . . . . . . . . . . . . . . . . . . . . . . . . . . . . . . . 51
Setting Up Scanning to an Email Address . . . . . . . . . . . . . . . . . . . . . . . . . . . . . . . . . . . . . . . . . . . . . 52
Setting Up Scanning with USB. . . . . . . . . . . . . . . . . . . . . . . . . . . . . . . . . . . . . . . . . . . . . . . . . . . . . . . . 53
4Printing
Supported Paper and Media. . . . . . . . . . . . . . . . . . . . . . . . . . . . . . . . . . . . . . . . . . . . . . . . . . . . . . . . . . . . . . 56
Paper Usage Guidelines . . . . . . . . . . . . . . . . . . . . . . . . . . . . . . . . . . . . . . . . . . . . . . . . . . . . . . . . . . . . . . 56
Paper That Can Damage Your Printer . . . . . . . . . . . . . . . . . . . . . . . . . . . . . . . . . . . . . . . . . . . . . . . . . 57
Paper Storage Guidelines. . . . . . . . . . . . . . . . . . . . . . . . . . . . . . . . . . . . . . . . . . . . . . . . . . . . . . . . . . . . . 57
Supported Paper. . . . . . . . . . . . . . . . . . . . . . . . . . . . . . . . . . . . . . . . . . . . . . . . . . . . . . . . . . . . . . . . . . . . . 58
Loading Paper. . . . . . . . . . . . . . . . . . . . . . . . . . . . . . . . . . . . . . . . . . . . . . . . . . . . . . . . . . . . . . . . . . . . . . . . . . . 61
Loading Paper in Tray 1 . . . . . . . . . . . . . . . . . . . . . . . . . . . . . . . . . . . . . . . . . . . . . . . . . . . . . . . . . . . . . . 61
Loading Paper in the Manual Feed Slot. . . . . . . . . . . . . . . . . . . . . . . . . . . . . . . . . . . . . . . . . . . . . . . . 63
Loading Paper in the 250-Sheet Feeder (Tray 2) . . . . . . . . . . . . . . . . . . . . . . . . . . . . . . . . . . . . . . . 65
WorkCentre 6505 Color Laser Multifunction Printer
4
User Guide
Page 5

Contents
Setting Paper Types and Sizes . . . . . . . . . . . . . . . . . . . . . . . . . . . . . . . . . . . . . . . . . . . . . . . . . . . . . . . . . . . . 68
Setting the Paper Type. . . . . . . . . . . . . . . . . . . . . . . . . . . . . . . . . . . . . . . . . . . . . . . . . . . . . . . . . . . . . . . 68
Setting the Paper Size. . . . . . . . . . . . . . . . . . . . . . . . . . . . . . . . . . . . . . . . . . . . . . . . . . . . . . . . . . . . . . . . 68
Selecting Printing Options. . . . . . . . . . . . . . . . . . . . . . . . . . . . . . . . . . . . . . . . . . . . . . . . . . . . . . . . . . . . . . . . 70
Selecting Printing Defaults in Windows. . . . . . . . . . . . . . . . . . . . . . . . . . . . . . . . . . . . . . . . . . . . . . . . 70
Selecting Printing Defaults in Windows for a Shared Network Printer . . . . . . . . . . . . . . . . . . . . 71
Selecting Printing Options for an Individual Job in Windows . . . . . . . . . . . . . . . . . . . . . . . . . . . . 71
Selecting Printing Options for an Individual Job in Macintosh. . . . . . . . . . . . . . . . . . . . . . . . . . . 75
Printing on Specialty Media . . . . . . . . . . . . . . . . . . . . . . . . . . . . . . . . . . . . . . . . . . . . . . . . . . . . . . . . . . . . . . 77
Printing Envelopes . . . . . . . . . . . . . . . . . . . . . . . . . . . . . . . . . . . . . . . . . . . . . . . . . . . . . . . . . . . . . . . . . . . 77
Printing Labels. . . . . . . . . . . . . . . . . . . . . . . . . . . . . . . . . . . . . . . . . . . . . . . . . . . . . . . . . . . . . . . . . . . . . . . 80
Printing on Glossy Cardstock. . . . . . . . . . . . . . . . . . . . . . . . . . . . . . . . . . . . . . . . . . . . . . . . . . . . . . . . . . 82
Printing on Cardstock . . . . . . . . . . . . . . . . . . . . . . . . . . . . . . . . . . . . . . . . . . . . . . . . . . . . . . . . . . . . . . . . 85
Printing Custom Sizes . . . . . . . . . . . . . . . . . . . . . . . . . . . . . . . . . . . . . . . . . . . . . . . . . . . . . . . . . . . . . . . . . . . . 87
Defining Custom Paper Sizes . . . . . . . . . . . . . . . . . . . . . . . . . . . . . . . . . . . . . . . . . . . . . . . . . . . . . . . . . 87
Printing on Custom Size Paper . . . . . . . . . . . . . . . . . . . . . . . . . . . . . . . . . . . . . . . . . . . . . . . . . . . . . . . . 89
Printing on Both Sides of the Paper . . . . . . . . . . . . . . . . . . . . . . . . . . . . . . . . . . . . . . . . . . . . . . . . . . . . . . . 91
Automatic 2-Sided Printing Guidelines . . . . . . . . . . . . . . . . . . . . . . . . . . . . . . . . . . . . . . . . . . . . . . . . 91
Binding Edge Options . . . . . . . . . . . . . . . . . . . . . . . . . . . . . . . . . . . . . . . . . . . . . . . . . . . . . . . . . . . . . . . . 91
Automatic 2-Sided Printing . . . . . . . . . . . . . . . . . . . . . . . . . . . . . . . . . . . . . . . . . . . . . . . . . . . . . . . . . . . 92
Manual 2-Sided Printing. . . . . . . . . . . . . . . . . . . . . . . . . . . . . . . . . . . . . . . . . . . . . . . . . . . . . . . . . . . . . . 92
Printing Using Secure Print . . . . . . . . . . . . . . . . . . . . . . . . . . . . . . . . . . . . . . . . . . . . . . . . . . . . . . . . . . . . . . . 95
Storing a Print Job in Memory . . . . . . . . . . . . . . . . . . . . . . . . . . . . . . . . . . . . . . . . . . . . . . . . . . . . . . . . 95
Printing a Secure Print Job. . . . . . . . . . . . . . . . . . . . . . . . . . . . . . . . . . . . . . . . . . . . . . . . . . . . . . . . . . . . 96
Printing Using Proof Print . . . . . . . . . . . . . . . . . . . . . . . . . . . . . . . . . . . . . . . . . . . . . . . . . . . . . . . . . . . . . . . . 97
Setting Up a Proof Print Job . . . . . . . . . . . . . . . . . . . . . . . . . . . . . . . . . . . . . . . . . . . . . . . . . . . . . . . . . . 97
Printing a Proof Print Job . . . . . . . . . . . . . . . . . . . . . . . . . . . . . . . . . . . . . . . . . . . . . . . . . . . . . . . . . . . . . 98
5Copying
Basic Copying . . . . . . . . . . . . . . . . . . . . . . . . . . . . . . . . . . . . . . . . . . . . . . . . . . . . . . . . . . . . . . . . . . . . . . . . . . 100
Automatic Document Feeder Guidelines . . . . . . . . . . . . . . . . . . . . . . . . . . . . . . . . . . . . . . . . . . . . . 100
Adjusting Copying Options . . . . . . . . . . . . . . . . . . . . . . . . . . . . . . . . . . . . . . . . . . . . . . . . . . . . . . . . . . . . . . 102
Basic Settings . . . . . . . . . . . . . . . . . . . . . . . . . . . . . . . . . . . . . . . . . . . . . . . . . . . . . . . . . . . . . . . . . . . . . . 102
Image Adjustments. . . . . . . . . . . . . . . . . . . . . . . . . . . . . . . . . . . . . . . . . . . . . . . . . . . . . . . . . . . . . . . . . 104
Image Layout Adjustments . . . . . . . . . . . . . . . . . . . . . . . . . . . . . . . . . . . . . . . . . . . . . . . . . . . . . . . . . 105
Output Adjustments . . . . . . . . . . . . . . . . . . . . . . . . . . . . . . . . . . . . . . . . . . . . . . . . . . . . . . . . . . . . . . . . 106
Changing the Default Settings . . . . . . . . . . . . . . . . . . . . . . . . . . . . . . . . . . . . . . . . . . . . . . . . . . . . . . . . . . 107
Selecting the Default Copy Settings. . . . . . . . . . . . . . . . . . . . . . . . . . . . . . . . . . . . . . . . . . . . . . . . . . 107
Limiting Access to Copy Operations . . . . . . . . . . . . . . . . . . . . . . . . . . . . . . . . . . . . . . . . . . . . . . . . . . 109
6Scanning
Loading Documents for Scanning. . . . . . . . . . . . . . . . . . . . . . . . . . . . . . . . . . . . . . . . . . . . . . . . . . . . . . . . 112
Scanning to a Folder on a Computer with a USB Connection . . . . . . . . . . . . . . . . . . . . . . . . . . . . . . 113
Scanning to a USB Flash Drive. . . . . . . . . . . . . . . . . . . . . . . . . . . . . . . . . . . . . . . . . . . . . . . . . . . . . . . . . . . 114
WorkCentre 6505 Color Laser Multifunction Printer
User Guide
5
Page 6

Contents
Scanning to a Shared Folder on a Network Computer . . . . . . . . . . . . . . . . . . . . . . . . . . . . . . . . . . . . . 115
Setting Up Scanning to a Computer. . . . . . . . . . . . . . . . . . . . . . . . . . . . . . . . . . . . . . . . . . . . . . . . . . 115
Scanning to a Computer . . . . . . . . . . . . . . . . . . . . . . . . . . . . . . . . . . . . . . . . . . . . . . . . . . . . . . . . . . . . 115
Scanning to an Email Address . . . . . . . . . . . . . . . . . . . . . . . . . . . . . . . . . . . . . . . . . . . . . . . . . . . . . . . . . . . 116
Scanning to an FTP Server . . . . . . . . . . . . . . . . . . . . . . . . . . . . . . . . . . . . . . . . . . . . . . . . . . . . . . . . . . . . . . 117
Scanning Images into an Application . . . . . . . . . . . . . . . . . . . . . . . . . . . . . . . . . . . . . . . . . . . . . . . . . . . . 118
Scanning an Image into a Windows Application (TWAIN). . . . . . . . . . . . . . . . . . . . . . . . . . . . . 118
Using the WIA Image Manager in a Windows Application. . . . . . . . . . . . . . . . . . . . . . . . . . . . . 118
Scanning an Image into a Macintosh OS X Application. . . . . . . . . . . . . . . . . . . . . . . . . . . . . . . . 119
Adjusting Scanning Options . . . . . . . . . . . . . . . . . . . . . . . . . . . . . . . . . . . . . . . . . . . . . . . . . . . . . . . . . . . . . 120
Adjusting Scan Settings . . . . . . . . . . . . . . . . . . . . . . . . . . . . . . . . . . . . . . . . . . . . . . . . . . . . . . . . . . . . . 120
Changing the Default Scan Settings . . . . . . . . . . . . . . . . . . . . . . . . . . . . . . . . . . . . . . . . . . . . . . . . . 123
Limiting Access to Scan Operations . . . . . . . . . . . . . . . . . . . . . . . . . . . . . . . . . . . . . . . . . . . . . . . . . . 125
7Faxing
Loading Documents for Faxing . . . . . . . . . . . . . . . . . . . . . . . . . . . . . . . . . . . . . . . . . . . . . . . . . . . . . . . . . . 128
Basic Faxing . . . . . . . . . . . . . . . . . . . . . . . . . . . . . . . . . . . . . . . . . . . . . . . . . . . . . . . . . . . . . . . . . . . . . . . . . . . 129
Sending a Fax from the Printer . . . . . . . . . . . . . . . . . . . . . . . . . . . . . . . . . . . . . . . . . . . . . . . . . . . . . . 129
Sending a Fax from Your Computer . . . . . . . . . . . . . . . . . . . . . . . . . . . . . . . . . . . . . . . . . . . . . . . . . . 130
Using the Fax Address Book . . . . . . . . . . . . . . . . . . . . . . . . . . . . . . . . . . . . . . . . . . . . . . . . . . . . . . . . . . . . . 132
Faxing to an Individual . . . . . . . . . . . . . . . . . . . . . . . . . . . . . . . . . . . . . . . . . . . . . . . . . . . . . . . . . . . . . 132
Faxing to a Group . . . . . . . . . . . . . . . . . . . . . . . . . . . . . . . . . . . . . . . . . . . . . . . . . . . . . . . . . . . . . . . . . . 133
Selecting Fax Options for Single Jobs . . . . . . . . . . . . . . . . . . . . . . . . . . . . . . . . . . . . . . . . . . . . . . . . . . . . 137
Setting the Fax Resolution . . . . . . . . . . . . . . . . . . . . . . . . . . . . . . . . . . . . . . . . . . . . . . . . . . . . . . . . . . 137
Making the Image Lighter or Darker . . . . . . . . . . . . . . . . . . . . . . . . . . . . . . . . . . . . . . . . . . . . . . . . . 137
Turning On Hook On or Off . . . . . . . . . . . . . . . . . . . . . . . . . . . . . . . . . . . . . . . . . . . . . . . . . . . . . . . . . . 137
Sending a Delayed Fax. . . . . . . . . . . . . . . . . . . . . . . . . . . . . . . . . . . . . . . . . . . . . . . . . . . . . . . . . . . . . . 138
Including a Fax Cover Page. . . . . . . . . . . . . . . . . . . . . . . . . . . . . . . . . . . . . . . . . . . . . . . . . . . . . . . . . . 138
Setting Up Polling . . . . . . . . . . . . . . . . . . . . . . . . . . . . . . . . . . . . . . . . . . . . . . . . . . . . . . . . . . . . . . . . . . 138
Changing the Default Fax Job Settings . . . . . . . . . . . . . . . . . . . . . . . . . . . . . . . . . . . . . . . . . . . . . . . . . . 139
Fax Configuration . . . . . . . . . . . . . . . . . . . . . . . . . . . . . . . . . . . . . . . . . . . . . . . . . . . . . . . . . . . . . . . . . . 139
Managing Fax Functions . . . . . . . . . . . . . . . . . . . . . . . . . . . . . . . . . . . . . . . . . . . . . . . . . . . . . . . . . . . . . . . . 140
Printing Monitor Reports . . . . . . . . . . . . . . . . . . . . . . . . . . . . . . . . . . . . . . . . . . . . . . . . . . . . . . . . . . . . 140
Enabling or Disabling Secure Faxes . . . . . . . . . . . . . . . . . . . . . . . . . . . . . . . . . . . . . . . . . . . . . . . . . . 141
Limiting Access to Fax Operations . . . . . . . . . . . . . . . . . . . . . . . . . . . . . . . . . . . . . . . . . . . . . . . . . . . 141
Limiting Who Can Send Faxes to the Printer . . . . . . . . . . . . . . . . . . . . . . . . . . . . . . . . . . . . . . . . . . 142
Limiting Access to Fax Operations . . . . . . . . . . . . . . . . . . . . . . . . . . . . . . . . . . . . . . . . . . . . . . . . . . . 142
Printing Fax Reports . . . . . . . . . . . . . . . . . . . . . . . . . . . . . . . . . . . . . . . . . . . . . . . . . . . . . . . . . . . . . . . . 143
Inserting Pauses in Fax Numbers . . . . . . . . . . . . . . . . . . . . . . . . . . . . . . . . . . . . . . . . . . . . . . . . . . . . 143
8 Control Panel Menus
Navigating the Control Panel Menus. . . . . . . . . . . . . . . . . . . . . . . . . . . . . . . . . . . . . . . . . . . . . . . . . . . . . 146
WorkCentre 6505 Color Laser Multifunction Printer
6
User Guide
Page 7

System Menus . . . . . . . . . . . . . . . . . . . . . . . . . . . . . . . . . . . . . . . . . . . . . . . . . . . . . . . . . . . . . . . . . . . . . . . . . 147
System Menus. . . . . . . . . . . . . . . . . . . . . . . . . . . . . . . . . . . . . . . . . . . . . . . . . . . . . . . . . . . . . . . . . . . . . . 147
Information Pages. . . . . . . . . . . . . . . . . . . . . . . . . . . . . . . . . . . . . . . . . . . . . . . . . . . . . . . . . . . . . . . . . . 148
Billing Meters. . . . . . . . . . . . . . . . . . . . . . . . . . . . . . . . . . . . . . . . . . . . . . . . . . . . . . . . . . . . . . . . . . . . . . . 148
Admin Menu . . . . . . . . . . . . . . . . . . . . . . . . . . . . . . . . . . . . . . . . . . . . . . . . . . . . . . . . . . . . . . . . . . . . . . . 149
Default Settings . . . . . . . . . . . . . . . . . . . . . . . . . . . . . . . . . . . . . . . . . . . . . . . . . . . . . . . . . . . . . . . . . . . . 161
Tray Settings . . . . . . . . . . . . . . . . . . . . . . . . . . . . . . . . . . . . . . . . . . . . . . . . . . . . . . . . . . . . . . . . . . . . . . . 163
9 Maintenance
Cleaning the Printer . . . . . . . . . . . . . . . . . . . . . . . . . . . . . . . . . . . . . . . . . . . . . . . . . . . . . . . . . . . . . . . . . . . . 166
General Precautions . . . . . . . . . . . . . . . . . . . . . . . . . . . . . . . . . . . . . . . . . . . . . . . . . . . . . . . . . . . . . . . . 166
Cleaning the Document Glass . . . . . . . . . . . . . . . . . . . . . . . . . . . . . . . . . . . . . . . . . . . . . . . . . . . . . . . 167
Cleaning the Exterior. . . . . . . . . . . . . . . . . . . . . . . . . . . . . . . . . . . . . . . . . . . . . . . . . . . . . . . . . . . . . . . . 167
Cleaning the Interior. . . . . . . . . . . . . . . . . . . . . . . . . . . . . . . . . . . . . . . . . . . . . . . . . . . . . . . . . . . . . . . . 168
Ordering Supplies. . . . . . . . . . . . . . . . . . . . . . . . . . . . . . . . . . . . . . . . . . . . . . . . . . . . . . . . . . . . . . . . . . . . . . . 169
Consumables . . . . . . . . . . . . . . . . . . . . . . . . . . . . . . . . . . . . . . . . . . . . . . . . . . . . . . . . . . . . . . . . . . . . . . . 169
Routine Maintenance Items . . . . . . . . . . . . . . . . . . . . . . . . . . . . . . . . . . . . . . . . . . . . . . . . . . . . . . . . . 169
When to Order Supplies . . . . . . . . . . . . . . . . . . . . . . . . . . . . . . . . . . . . . . . . . . . . . . . . . . . . . . . . . . . . . 169
Recycling Supplies . . . . . . . . . . . . . . . . . . . . . . . . . . . . . . . . . . . . . . . . . . . . . . . . . . . . . . . . . . . . . . . . . . 170
Managing the Printer . . . . . . . . . . . . . . . . . . . . . . . . . . . . . . . . . . . . . . . . . . . . . . . . . . . . . . . . . . . . . . . . . . . 171
Managing the Printer with CentreWare Internet Services . . . . . . . . . . . . . . . . . . . . . . . . . . . . . . 171
Checking Printer Status with PrintingScout . . . . . . . . . . . . . . . . . . . . . . . . . . . . . . . . . . . . . . . . . . .172
Checking Printer Status using Email . . . . . . . . . . . . . . . . . . . . . . . . . . . . . . . . . . . . . . . . . . . . . . . . . . 173
Checking Page Counts . . . . . . . . . . . . . . . . . . . . . . . . . . . . . . . . . . . . . . . . . . . . . . . . . . . . . . . . . . . . . . . . . . 176
Viewing the Billing Meter. . . . . . . . . . . . . . . . . . . . . . . . . . . . . . . . . . . . . . . . . . . . . . . . . . . . . . . . . . . . 176
Printing the Print Volume Report. . . . . . . . . . . . . . . . . . . . . . . . . . . . . . . . . . . . . . . . . . . . . . . . . . . . . 176
Moving the Printer. . . . . . . . . . . . . . . . . . . . . . . . . . . . . . . . . . . . . . . . . . . . . . . . . . . . . . . . . . . . . . . . . . . . . . 178
Contents
10 Troubleshooting
Troubleshooting Overview . . . . . . . . . . . . . . . . . . . . . . . . . . . . . . . . . . . . . . . . . . . . . . . . . . . . . . . . . . . . . . 182
Error and Status Messages . . . . . . . . . . . . . . . . . . . . . . . . . . . . . . . . . . . . . . . . . . . . . . . . . . . . . . . . . . 182
PrintingScout Alerts . . . . . . . . . . . . . . . . . . . . . . . . . . . . . . . . . . . . . . . . . . . . . . . . . . . . . . . . . . . . . . . . . 182
Online Support Assistant . . . . . . . . . . . . . . . . . . . . . . . . . . . . . . . . . . . . . . . . . . . . . . . . . . . . . . . . . . . . 182
Information Pages. . . . . . . . . . . . . . . . . . . . . . . . . . . . . . . . . . . . . . . . . . . . . . . . . . . . . . . . . . . . . . . . . . 182
More Information . . . . . . . . . . . . . . . . . . . . . . . . . . . . . . . . . . . . . . . . . . . . . . . . . . . . . . . . . . . . . . . . . . 183
Control Panel Messages. . . . . . . . . . . . . . . . . . . . . . . . . . . . . . . . . . . . . . . . . . . . . . . . . . . . . . . . . . . . . . . . . 184
Supply Status Messages. . . . . . . . . . . . . . . . . . . . . . . . . . . . . . . . . . . . . . . . . . . . . . . . . . . . . . . . . . . . . 184
Error Messages . . . . . . . . . . . . . . . . . . . . . . . . . . . . . . . . . . . . . . . . . . . . . . . . . . . . . . . . . . . . . . . . . . . . . 185
Problems with the Printer . . . . . . . . . . . . . . . . . . . . . . . . . . . . . . . . . . . . . . . . . . . . . . . . . . . . . . . . . . . . . . . 188
Print-Quality Problems . . . . . . . . . . . . . . . . . . . . . . . . . . . . . . . . . . . . . . . . . . . . . . . . . . . . . . . . . . . . . . . . . . 191
Cleaning the Imaging Unit and Laser Lens . . . . . . . . . . . . . . . . . . . . . . . . . . . . . . . . . . . . . . . . . . . . . . . 196
Color Registration . . . . . . . . . . . . . . . . . . . . . . . . . . . . . . . . . . . . . . . . . . . . . . . . . . . . . . . . . . . . . . . . . . . . . . 199
Setting Automatic Color Registration . . . . . . . . . . . . . . . . . . . . . . . . . . . . . . . . . . . . . . . . . . . . . . . . 199
Performing a One-time Automatic Color Registration Adjustment. . . . . . . . . . . . . . . . . . . . . . 199
Performing a Manual Color Registration Adjustment . . . . . . . . . . . . . . . . . . . . . . . . . . . . . . . . . . 199
Color Balance . . . . . . . . . . . . . . . . . . . . . . . . . . . . . . . . . . . . . . . . . . . . . . . . . . . . . . . . . . . . . . . . . . . . . . . . . . 203
WorkCentre 6505 Color Laser Multifunction Printer
User Guide
7
Page 8

Contents
Paper Jams . . . . . . . . . . . . . . . . . . . . . . . . . . . . . . . . . . . . . . . . . . . . . . . . . . . . . . . . . . . . . . . . . . . . . . . . . . . . 204
Preventing Paper Jams . . . . . . . . . . . . . . . . . . . . . . . . . . . . . . . . . . . . . . . . . . . . . . . . . . . . . . . . . . . . . . 204
Clearing Paper Jams . . . . . . . . . . . . . . . . . . . . . . . . . . . . . . . . . . . . . . . . . . . . . . . . . . . . . . . . . . . . . . . . 205
11 Printer Specifications
Physical Specifications . . . . . . . . . . . . . . . . . . . . . . . . . . . . . . . . . . . . . . . . . . . . . . . . . . . . . . . . . . . . . . . . . . 212
Weights and Dimensions . . . . . . . . . . . . . . . . . . . . . . . . . . . . . . . . . . . . . . . . . . . . . . . . . . . . . . . . . . . . 212
Environmental Specifications. . . . . . . . . . . . . . . . . . . . . . . . . . . . . . . . . . . . . . . . . . . . . . . . . . . . . . . . . . . . 213
Temperature . . . . . . . . . . . . . . . . . . . . . . . . . . . . . . . . . . . . . . . . . . . . . . . . . . . . . . . . . . . . . . . . . . . . . . . 213
Relative Humidity. . . . . . . . . . . . . . . . . . . . . . . . . . . . . . . . . . . . . . . . . . . . . . . . . . . . . . . . . . . . . . . . . . . 213
Elevation . . . . . . . . . . . . . . . . . . . . . . . . . . . . . . . . . . . . . . . . . . . . . . . . . . . . . . . . . . . . . . . . . . . . . . . . . . . 213
Electrical Specifications . . . . . . . . . . . . . . . . . . . . . . . . . . . . . . . . . . . . . . . . . . . . . . . . . . . . . . . . . . . . . . . . . 214
Power Source . . . . . . . . . . . . . . . . . . . . . . . . . . . . . . . . . . . . . . . . . . . . . . . . . . . . . . . . . . . . . . . . . . . . . . . 214
Power Consumption . . . . . . . . . . . . . . . . . . . . . . . . . . . . . . . . . . . . . . . . . . . . . . . . . . . . . . . . . . . . . . . . 214
Performance Specifications . . . . . . . . . . . . . . . . . . . . . . . . . . . . . . . . . . . . . . . . . . . . . . . . . . . . . . . . . . . . . 215
12 Regulatory Information
Electromagnetic Interference . . . . . . . . . . . . . . . . . . . . . . . . . . . . . . . . . . . . . . . . . . . . . . . . . . . . . . . . . . . 218
United States FCC Regulations . . . . . . . . . . . . . . . . . . . . . . . . . . . . . . . . . . . . . . . . . . . . . . . . . . . . . . 218
Canada Regulations . . . . . . . . . . . . . . . . . . . . . . . . . . . . . . . . . . . . . . . . . . . . . . . . . . . . . . . . . . . . . . . . 218
European Union . . . . . . . . . . . . . . . . . . . . . . . . . . . . . . . . . . . . . . . . . . . . . . . . . . . . . . . . . . . . . . . . . . . . 219
Other Regulations . . . . . . . . . . . . . . . . . . . . . . . . . . . . . . . . . . . . . . . . . . . . . . . . . . . . . . . . . . . . . . . . . . . . . . 220
Turkey (RoHS Regulation) . . . . . . . . . . . . . . . . . . . . . . . . . . . . . . . . . . . . . . . . . . . . . . . . . . . . . . . . . . . 220
Copy Regulations. . . . . . . . . . . . . . . . . . . . . . . . . . . . . . . . . . . . . . . . . . . . . . . . . . . . . . . . . . . . . . . . . . . . . . . 221
United States. . . . . . . . . . . . . . . . . . . . . . . . . . . . . . . . . . . . . . . . . . . . . . . . . . . . . . . . . . . . . . . . . . . . . . . 221
Canada . . . . . . . . . . . . . . . . . . . . . . . . . . . . . . . . . . . . . . . . . . . . . . . . . . . . . . . . . . . . . . . . . . . . . . . . . . . . 222
Other Countries. . . . . . . . . . . . . . . . . . . . . . . . . . . . . . . . . . . . . . . . . . . . . . . . . . . . . . . . . . . . . . . . . . . . . 223
Fax Regulations . . . . . . . . . . . . . . . . . . . . . . . . . . . . . . . . . . . . . . . . . . . . . . . . . . . . . . . . . . . . . . . . . . . . . . . . 224
United States. . . . . . . . . . . . . . . . . . . . . . . . . . . . . . . . . . . . . . . . . . . . . . . . . . . . . . . . . . . . . . . . . . . . . . . 224
Canada . . . . . . . . . . . . . . . . . . . . . . . . . . . . . . . . . . . . . . . . . . . . . . . . . . . . . . . . . . . . . . . . . . . . . . . . . . . . 225
European Union . . . . . . . . . . . . . . . . . . . . . . . . . . . . . . . . . . . . . . . . . . . . . . . . . . . . . . . . . . . . . . . . . . . . 226
South African Statement . . . . . . . . . . . . . . . . . . . . . . . . . . . . . . . . . . . . . . . . . . . . . . . . . . . . . . . . . . . . 226
Material Safety Data Sheets . . . . . . . . . . . . . . . . . . . . . . . . . . . . . . . . . . . . . . . . . . . . . . . . . . . . . . . . . . . . 227
13 Recycling and Disposal
All Countries. . . . . . . . . . . . . . . . . . . . . . . . . . . . . . . . . . . . . . . . . . . . . . . . . . . . . . . . . . . . . . . . . . . . . . . . 229
North America. . . . . . . . . . . . . . . . . . . . . . . . . . . . . . . . . . . . . . . . . . . . . . . . . . . . . . . . . . . . . . . . . . . . . . 229
Other Countries. . . . . . . . . . . . . . . . . . . . . . . . . . . . . . . . . . . . . . . . . . . . . . . . . . . . . . . . . . . . . . . . . . . . . 229
European Union . . . . . . . . . . . . . . . . . . . . . . . . . . . . . . . . . . . . . . . . . . . . . . . . . . . . . . . . . . . . . . . . . . . . 229
WorkCentre 6505 Color Laser Multifunction Printer
8
User Guide
Page 9

Safety
This chapter includes:
• Electrical Safety on page 10
• Operational Safety on page 12
• Maintenance Safety on page 14
• Printer Symbols on page 15
Your printer and the recommended supplies have been designed and tested to meet strict safety
requirements. Attention to the following information ensures the continued safe operation of your
printer.
1
WorkCentre 6505 Color Laser Multifunction Printer
User Guide
9
Page 10

Safety
Electrical Safety
This section includes:
• General Guidelines on page 10
• Laser Safety on page 10
• Power Cord on page 10
General Guidelines
WARNING: Do not push objects, including paper clips or staples, into slots or openings on the
printer. Contact with a voltage point or shorting out a part could result in fire or electrical shock.
WARNING: Do not remove the covers or guards that are fastened with screws unless you are
installing optional equipment and are instructed to do so. Power must be OFF when performing
these installations. Disconnect the power cord when removing covers and guards for installing
optional equipment. Except for user-installable options, there are no parts that you can maintain
or service behind these covers.
Note: Leave the printer on for optimum performance. It does not pose a safety hazard. If,
however, you do not use the printer for an extended period, turn it off and unplug it.
The following are hazards to your safety:
• The power cord is damaged or frayed.
• Liquid is spilled into the printer.
• The printer is exposed to water.
If any of these conditions occur, do the following:
1. Turn off the printer immediately.
2. Disconnect the power cord from the electrical outlet.
3. Call an authorized service representative.
Laser Safety
This printer complies with laser printer performance standards set by governmental, national, and
international agencies and is certified as a Class 1 Laser Product. The printer does not emit hazardous
light because the beam is enclosed during all modes of customer operation and maintenance.
WARNING: Use of controls, adjustments, or performance of procedures other than the
procedures specified in this manual can result in hazardous radiation exposure.
Power Cord
• Use the power cord supplied with your printer.
WorkCentre 6505 Color Laser Multifunction Printer
10
User Guide
Page 11

Safety
• Plug the power cord directly into a grounded electrical outlet. Make sure that each end of the cord
is securely connected. If you do not know if an outlet is grounded, ask an electrician to check the
outlet.
• Do not use a ground adapter plug to connect the printer to an electrical outlet that does not have
a ground connection terminal.
• Only use an extension cord or power strip designed to handle the electrical current capacity of the
printer.
• Verify that the printer is plugged into an outlet that provides the correct voltage and power.
Review the electrical specification of the printer with an electrician if necessary.
WARNING: Avoid the potential of electrical shock by ensuring that the printer is properly
grounded. Electrical products can be hazardous if misused.
• Do not place the printer in an area where people can step on the power cord.
• Do not place objects on the power cord.
The power cord is attached to the printer as a plug-in device on the back of the printer. If it is necessary
to disconnect all electrical power from the printer, disconnect the power cord from the electrical outlet.
WorkCentre 6505 Color Laser Multifunction Printer
User Guide
11
Page 12

Safety
Operational Safety
This section includes:
• Operational Guidelines on page 12
• Ozone Release on page 12
• Printer Location on page 12
• Printer Supplies on page 13
Your printer and supplies were designed and tested to meet strict safety requirements. These include
safety agency examination, approval, and compliance with established environmental standards. Your
attention to the following safety guidelines helps to ensure the continued safe operation of your
printer.
Operational Guidelines
• Do not remove the selected paper source tray when the printer is printing.
• Do not open the doors when the printer is printing.
• Do not move the printer when it is printing.
• Keep hands, hair, neckties, and such, away from the exit and feed rollers.
Ozone Release
During print operation, a small quantity of ozone is released. This amount is not large enough to harm
anyone adversely. However, be sure the room where the printer is being used has adequate ventilation.
Ventilation is important if you are printing in high volume, or if the printer is being used continuously
over a long period.
Printer Location
• Do not block or cover the slots or openings on the printer. These openings are provided for
ventilation and to prevent overheating of the printer.
• Place the printer in a dust-free area where there is adequate space for operation and servicing. For
details, see Selecting a Location for the Printer on page 29.
• Do not store or operate the printer in extreme conditions of heat or humidity. For specifications on
optimum performance environment, see Relative Humidity on page 213.
• Place the printer on a level, solid, non-vibrating surface with adequate strength to hold the weight
of the printer. The base printer weight without any packaging materials is approximately 30 Kg
(66 lb.).
• Do not place the printer near a heat source.
• Do not place the printer in direct sunlight to avoid exposure to light-sensitive components.
• Do not place the printer where it is directly exposed to the cold air flow from an air conditioning
unit.
• Do not place the printer in locations susceptible to vibrations.
• For optimum performance, use the printer at elevations below 3,100 m (10,170 ft.).
WorkCentre 6505 Color Laser Multifunction Printer
12
User Guide
Page 13

Safety
Printer Supplies
• Use the supplies designed for your printer. The use of unsuitable materials can cause poor
performance and a possible safety hazard.
• Follow all warnings and instructions marked on, or supplied with, the printer, options, and supplies.
CAUTION: Use of non-Xerox® supplies is not recommended. The Xerox® Warranty, Service
Agreements, and Total Satisfaction Guarantee, do not cover damage, malfunction, or degradation
of performance caused by use of non-Xerox
degradation of performance caused by the use of Xerox
The Total Satisfaction Guarantee is available in the United States and Canada. Coverage can vary
outside these areas. Please contact your local representative for details.
®
supplies. They also do not cover damage or
®
supplies not specified for this printer.
WorkCentre 6505 Color Laser Multifunction Printer
User Guide
13
Page 14

Safety
Maintenance Safety
• Do not attempt any maintenance procedure that is not described in the documentation supplied
with your printer.
• Do not use aerosol cleaners. Clean with a dry, lint-free cloth only.
®
• Do not burn any consumables or routine maintenance items. For information on Xerox
recycling programs, go to www.xerox.com/gwa.
See also:
Cleaning the Printer on page 166
Moving the Printer on page 178
supplies
WorkCentre 6505 Color Laser Multifunction Printer
14
User Guide
Page 15

Printer Symbols
The following safety symbols are marked on the printer.
Symbol Description
Warning or Caution:
Ignoring this warning could cause serious injury or even death.
Ignoring this caution can damage the property or cause serious injury.
Hot surface on or in the printer. Use caution to avoid personal injury.
Do not expose the item to sunlight.
Safety
Do not expose the item to light.
Do not touch components with this symbol as personal injury could result.
Do not touch the transfer belt with your fingers or with sharp objects. It can cause
print-quality problems. The belt can be easily punctured.
Do not place or drop any object on the transfer belt. It can cause print-quality
problems or permanently damage the belt.
It can take 40 minutes for the fuser to cool down.
WorkCentre 6505 Color Laser Multifunction Printer
User Guide
15
Page 16

Safety
WorkCentre 6505 Color Laser Multifunction Printer
16
User Guide
Page 17

Features
This chapter includes:
• Parts of the Printer on page 18
• Configurations and Options on page 21
• Energy Saver Mode on page 23
• Information Pages on page 24
• CentreWare Internet Services on page 25
• More Information on page 26
2
WorkCentre 6505 Color Laser Multifunction Printer
User Guide
17
Page 18
Fea ture s
wc6505_003
5
6
4
3
2
1
7
8
9
10
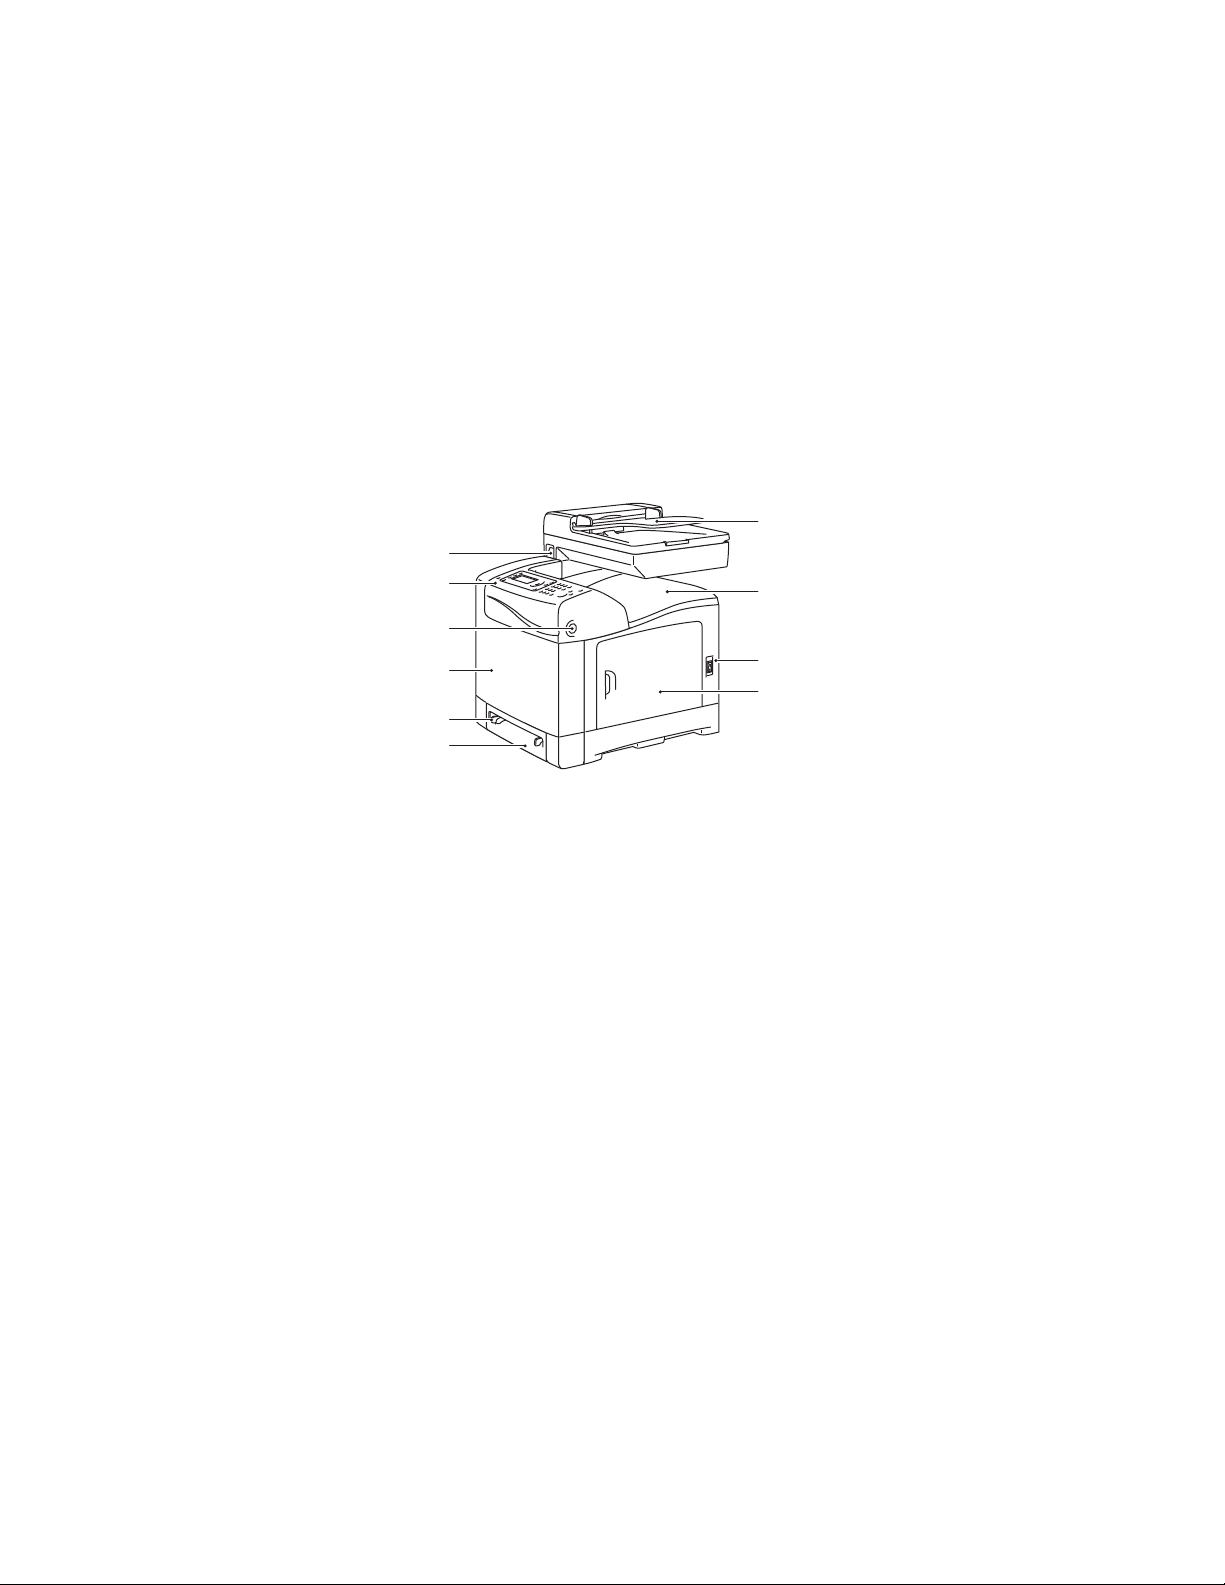
Parts of the Printer
This section includes:
• Front View on page 18
• Rear View on page 19
• Internal View on page 19
• Control Panel on page 20
Front View
1. Tray 1 (250 sheet paper tray)
2. Manual feed slot
3. Front cover
4. Front cover release button
5. Control panel
WorkCentre 6505 Color Laser Multifunction Printer
18
User Guide
6. USB memory port
7. Automatic document feeder (ADF) tray
8. Output tray
9. Power switch
10. Side door
Page 19

Rear View
wc6505_004
2
1
4
5
6
7
3
wc6505_005
1
2
3
4
5
6
Fea tures
1. Power plug
2. ADF cover
3. USB port
4. Memory slot door
Internal View
5. Network connector
6. Line out (to telephone)
7. Line in (from wall jack)
1. Button for opening the front cover
2. Transfer unit
3. Imaging unit
4. Fuser
5. ADF document glass
6. Toner cartridges
WorkCentre 6505 Color Laser Multifunction Printer
User Guide
19
Page 20

Fea ture s
wc6505_006
1
10
11
12
13
2
3 56 8 9
4 7
17 14151619 1820
Control Panel
1. One Touch keypad: Use to speed dial a
phone number.
2. Copy, Scan, Print, and Fax buttons: Press to
use the Copy, Scan, Print, and Fax menus on
the display screen.
3. Display Screen: Shows status messages,
menus, and toner levels.
4. Arrow buttons: Scroll up, down, forward, and
back through the menus.
5. Job Status button: Press to check active job
status.
6. System button: Switches the display to the
System menus.
7. Alphanumeric keypad: Use to enter letters
and numbers for names and phone numbers.
8. Redial/Pause button: Press the button to
recall the last fax number used or to insert
pauses in fax numbers.
9. Speed Dial button: Press to access directories
of group or individual fax telephone
numbers.
10. Wake Up/Power Saver button: This light is
illuminated in power saver mode. Push the
button to exit Energy Saver mode.
11. Clear All button: Clears all text, numbers or
instructions.
12. Stop button: Cancels the current print job.
13. Start button: Press to start a copy, scan, or
fax job.
14. Status indicator light: The green or red light
indicates printer status.
• Lights green when the printer is ready to
receive data.
• Blinks green when the printer is busy
receiving data.
• Lights red to indicate an error condition
or warning that requires your attention.
• Blinks red when an error occurs that
requires technical support.
• Off when the printer is in Energy Saver
mode.
15. Cancel/Clear button: Cancels the current
print or copy job. In menus, deletes a single
character each time the button is pressed.
16. Address Book button: Press to access the Fax
and Email address books.
17. OK button: Press to accept the selected
setting.
18. Back/Return button: Press to go up one level
in the menu.
19. Color Mode button: Press to switch between
Color and Black and White modes for your
copy, fax, and scan jobs.
20. Black and White/Color indicator lights:
Upper light indicates Black and White mode.
Lower light indicates Color mode.
WorkCentre 6505 Color Laser Multifunction Printer
20
User Guide
Page 21

Configurations and Options
This section includes:
• Configurations on page 21
• Standard Features on page 21
• Additional Capabilities on page 21
• Optional Features on page 22
Configurations
The WorkCentre 6505 printer is available in two configurations:
• WorkCentre 6505N: Includes all standard features.
• WorkCentre 6505DN: Includes all standard features plus a duplex unit.
Note: When these items are not standard on your printer, you can order additional memory and
trays. For automatic 2-sided printing, you can order the duplex unit.
Fea tures
Standard Features
All configurations of the WorkCentre 6505 printer include the following features:
• Tray 1 with 250-sheet capacity
• Single-sheet manual feed slot
• 256 MB Memory (RAM)
Note: All printer configurations have one memory slot supporting 512 MB or 1024 MB DDR2
DIMMs. Maximum RAM is 1280 MB (256 MB standard plus 1024 MB optional).
• 10Base-T/100/1000Base-TX Ethernet interface network connection
• USB 2.0 connection
• Energy Saver mode
• PrintingScout printer monitoring utility (Windows only)
• Printer information pages, including a Menu Map, Configuration Page, and Demo Page
• Billing meters
• Administration menu with control panel lock
Additional Capabilities
These features are built in to the printer but require additional memory to function. You can purchase
additional memory. For details, see Optional Features on page 22.
• Walk-Up Printing: Prints a stored print job directly from the printer control panel.
• RAM Disk: Allocates memory to the RAM Disk file system for Collation, Secure Print, Proof Print,
Form Overlay, and Font Download.
• Collation: Allows jobs to be stored in memory so that multiple copies can be printed in page
sequence order: 123, 123, 123, 123, instead of 1111, 2222, 3333.
WorkCentre 6505 Color Laser Multifunction Printer
User Guide
21
Page 22

Fea ture s
• Secure Print: Stores data in memory and requires you to enter a password into the control panel to
print the document.
• Proof Print: Stores multiple copies of a document in memory, then allows you to print only the first
set to check the print results. If the first copy is satisfactory, print the remainder from the control
panel.
• Form Overlay: Enables writing PCL5 forms.
• Font Download: Enables the downloading of fonts to the RAM Disk.
Optional Features
• Duplex unit for automatic 2-sided printing (optional for WorkCentre 6505N)
• 250-sheet feeder (Tray 2)
• Wireless network adapter
• Productivity Kit (512 MB)
See also:
Printer Specifications on page 211
Enabling Optional Features on page 46
WorkCentre 6505 Color Laser Multifunction Printer
22
User Guide
Page 23

Fea tures
Energy Saver Mode
This section includes:
• Setting the Power Saver Time on page 23
• Exiting Energy Saver Mode on page 23
• Starting Energy Saver Mode on page 23
The printer is equipped with Energy Saver modes to reduce power consumption when it is left idle for a
specified time. When no print data is received within the Power Saver Times, the printer enters an
Energy Saver mode.
Setting the Power Saver Time
1. On the control panel, press the System button.
2. Press the Up Arrow or Down Arrow button to select Admin Menu, then press the OK button.
3. Press the Up Arrow or Down Arrow button to select System Setup, then press OK.
4. At Power Saver Time, press OK.
5. Press the Up Arrow or Down Arrow button to select one of the following:
• Mode 1 (Printer): Reduces power consumption to 17 W or less when the printer is left idle.
Range is 5–60 minutes. The default setting is 3.
• Mode 2 (System): Disables control panel and all sensors after the printer enters Mode 1.
Reduces power consumption to 12 W or less. Range is 5–120 minutes. The default setting is 1.
6. Press OK.
7. Press the Up Arrow or Down Arrow button to select the desired time, then press OK.
8. Press the Return button to return to the Ready screen.
Exiting Energy Saver Mode
The printer automatically cancels Energy Saver mode when it receives data from a connected
computer. However, you can cancel Energy Saver mode by pressing the Power Saver button on the
control panel. For details, see Control Panel on page 20.
Starting Energy Saver Mode
You can put the printer into Energy Saver mode without having to wait for it to do so automatically
from the default settings. To enter sleep mode, press the Power Saver button on the control panel. The
printer must currently be idle and have been idle for at least one minute before you press the Power
Saver button. The printer cannot enter Energy Saver mode when any of the following conditions exist:
• The printer is receiving data.
• The printer is calibrating after having been in Energy Saver mode or after a jam is cleared.
• You pressed another button within the last minute.
WorkCentre 6505 Color Laser Multifunction Printer
User Guide
23
Page 24

Fea ture s
Information Pages
This section includes:
• Menu Map on page 24
• Configuration Page on page 24
• Startup Page on page 24
Your printer comes with a set of information pages to help you track the performance of the printer
and diagnose problems. Access the information pages from the control panel. The following topics
discuss the most commonly used information pages. For a complete list of printer information pages,
see Information Pages on page 148.
Menu Map
The Menu Map lists all main and second-level menus. Use the Menu Map to navigate the control panel
menus. The Menu Map also lists other information pages available for printing.
To print the Menu Map:
1. On the control panel, press the System button.
2. At Information Pages, press the OK button.
3. At Menu Map, press OK to print the page.
Configuration Page
The Configuration Page lists printer information such as default settings, installed options, network
settings with IP address, and font settings. Use the information on this page to help you configure
network settings for your printer, and to view page counts and system settings.
To print the Configuration Page:
1. On the control panel, press the System button.
2. At Information Pages, press the OK button.
3. Press the Up Arrow or Down Arrow button to select Configuration.
4. Press OK to print the page.
Startup Page
The Startup Page is an abbreviated version of the Configuration Page without the details of the
settings. Use the information on this page to help you configure network settings for your printer and
to view page counts.
Note: By default, the Startup Page prints automatically each time the printer is turned on. You can
turn off this feature in the System Setup Menu under the Admin Menu settings. For details, see
System Setup on page 157.
WorkCentre 6505 Color Laser Multifunction Printer
24
User Guide
Page 25

Fea tures
CentreWare Internet Services
CentreWare Internet Services is the administration and configuration software installed on the
embedded Web server in the printer. It allows you to manage, configure, monitor, and administer the
printer from a Web browser. CentreWare Internet Services gives you access to printer status,
configuration and security settings, diagnostic functions, and more.
CentreWare Internet Services requires:
• A TCP/IP connection between the printer and the network in Windows, Macintosh, or Linux
environments.
• TCP/IP and HTTP enabled on the printer.
• A network-connected computer with a Web browser that supports JavaScript.
Accessing CentreWare Internet Services
At your computer, open a Web browser, type the IP address of the printer into the address field, then
press Enter or Return.
Note: If you do not know the IP address of your printer, see Finding the IP Address of Your Printer
on page 35.
WorkCentre 6505 Color Laser Multifunction Printer
User Guide
25
Page 26

Fea ture s
More Information
The following resources provide more information about your printer and its capabilities.
Information Source
Installation Guide Packaged with the printer.
Quick Use Guide Packaged with the printer.
Video Tutorials www.xerox.com/office/WC6505docs
Recommended Media List Europe: www.xerox.com/europaper
North America: www.xerox.com/paper
Online Support Assistant www.xerox.com/office/WC6505support
Tec hn ic al Su pp o rt www.xerox.com/office/WC6505support
Information Pages Print from the control panel menu.
Supplies www.xerox.com/office/WC6505supplies
WorkCentre 6505 Color Laser Multifunction Printer
26
User Guide
Page 27

Installation and Setup
This chapter includes:
• Installation and Setup Overview on page 28
• Selecting a Location for the Printer on page 29
• Connecting the Printer on page 30
• Configuring Network Settings on page 32
• Setting the Date and Time on page 37
• Installing the Software on page 38
• Installing Other Drivers on page 43
• Installing Utilities for Windows on page 44
• Enabling Optional Features on page 46
• Setting up Scanning on page 49
See also:
Online Support Assistant at www.xerox.com/office/WC6505support
Installation Guide packaged with your printer.
3
WorkCentre 6505 Color Laser Multifunction Printer
User Guide
27
Page 28

Installation and Setup
Installation and Setup Overview
Before using the printer, you must:
1. Make sure that the printer is set up correctly in an appropriate location. For details, see Selecting a
Location for the Printer on page 29.
2. Select a connection method. For details, see Choosing a Connection Method on page 30.
3. Make sure that the printer is connected correctly. For details, see Connecting the Printer on
page 30.
4. Turn on the printer and the computer. The Startup Page prints by default. If it does not, see
Startup Page on page 24. If you are connected to a network, keep the Startup Page for referencing
network settings such as the IP address of your printer.
5. If connected to a network, configure network settings. For details, see Configuring Network
Settings on page 32.
6. Install drivers and software utilities from the Software and Documentation disc. The software
installation procedure depends on your connection type (network or USB). For details, see
Installing the Software on page 38.
7. Enable optional features and configure software.
Note: If the Software and Documentation disc is not available, you can download the latest
drivers from www.xerox.com/office/WC6505drivers.
WorkCentre 6505 Color Laser Multifunction Printer
28
User Guide
Page 29

Installation and Setup
Selecting a Location for the Printer
1. Select a dust-free area with temperatures from 10° through 32°C (50°–90°F), and relative humidity
15–85%.
Note: Sudden temperature fluctuations can affect print quality. Rapid heating of a cold room can
cause condensation inside the printer, directly interfering with image transfer.
2. Place the printer on a level, solid, non-vibrating surface with adequate strength for the weight of
the printer. The printer must be horizontal with all four feet in solid contact with the surface. The
printer weight, without the options or paper, is 25 Kg (55.1 lb.). With the 250-sheet feeder, the
duplex unit, and supplies, the weight is 34.5 Kg (76.1 lb.).
3. Ensure that your printer has the proper amount of clearance for all of its features, including any
options you purchased. See the following measurements.
The recommended minimal spacing for the printer includes the following:
Requirement Clearance
Overhead Clearance 275 mm (12.5 in.) above the printer for clearance when opening the
document feeder
Height Requirement • Printer: 549.3 mm (25.4 in.)
• Printer with 250-sheet feeder: 657.3 mm (25.9 in.)
Other Clearances • 100 mm (3.9 in.) behind the printer
• 600 mm (23.6 in.) in front of the printer
• 100 mm (3.9 in.) on the left side of the printer
• 250 mm (9.8 in.) on the right side of the printer
4. After positioning the printer, you are ready to connect it to the power source and computer or
network. Go to the next section, Connecting the Printer on page 30.
WorkCentre 6505 Color Laser Multifunction Printer
User Guide
29
Page 30

Installation and Setup
Connecting the Printer
This section includes:
• Choosing a Connection Method on page 30
• Connecting to a Network on page 30
• Connecting Using a USB Cable on page 31
• Connecting to a Telephone Line on page 31
Choosing a Connection Method
The printer can be connected to your computer using a USB cable or an Ethernet cable. The method
you choose depends on whether your computer is connected to a network. A USB connection is a direct
connection and is the easiest to set up. An Ethernet connection is used for networking. If you are going
to use a network connection, understand how your computer is connected to your network. For
example, if your computer is connected to the network by way of a router connected to a cable or DSL
modem. For more information, see About TCP/IP and IP Addresses on page 32.
Note: Hardware and cabling requirements vary for the different connection methods. Routers,
network hubs, network switches, modems, Ethernet, and USB cables are not included with your
printer and must be purchased separately.
• Network: If your computer is connected to an office network or a home network, use an Ethernet
cable to connect the printer to the network. You cannot connect the printer directly to the
computer. It must be connected through a router or hub. An Ethernet network can be used for one
or more computers and supports many printers and systems simultaneously. Ethernet connection
is typically faster than USB and allows you direct access to the settings of the printer using
CentreWare Internet Services.
• USB: If you connect the printer to one computer and do not have a network, use a USB
connection. A USB connection offers fast data speeds, but not as fast as an Ethernet connection.
In addition, a USB connection does not provide access to CentreWare Internet Services.
• Te l ep h on e: The printer must be connected to a dedicated telephone line to send and receive
fax es.
Connecting to a Network
To connect the printer to a network:
1. Make sure that the printer is turned off.
2. Attach a category 5 or better Ethernet cable from the printer to the network or router socket. Use
an Ethernet hub or router, and two or more Ethernet cables. Connect the computer to the hub or
router with one cable, then connect the printer to the hub or router with the second cable. Connect
to any port on the hub or router except the uplink port.
3. Attach the power cord, then plug in the printer and turn it on. For safety information, see Power
Cord on page 10.
4. Set or automatically discover the network IP address of the printer. For details, see Assigning the
IP Address of the Printer on page 32.
WorkCentre 6505 Color Laser Multifunction Printer
30
User Guide
Page 31

Installation and Setup
Connecting Using a USB Cable
To use USB, you must have Windows Server 2003 and later or Windows XP SP1 and later. Macintosh
users must use Mac OS X, version 10.5 and later.
To connect the printer to the computer using a USB cable:
1. Make sure that the printer is turned off.
2. Connect one end of a standard A/B USB 2.0 cable to the USB Port of the printer.
3. Attach the power cord and then plug in the printer and turn it on. For safety information, see
Power Cord on page 10.
4. Connect the other end of the USB cable to the USB Port on the computer.
5. When the Windows Found New Hardware Wizard appears, cancel it.
6. You are ready to install the print drivers. For details, see Installing the Software on page 38.
Connecting to a Telephone Line
To connect the printer to a telephone line:
1. Make sure that the printer is turned off.
2. Connect a standard RJ11 cable, NO. 26 AWG (American Wire Gauge) or larger, to the Fax port on
the back of the printer.
3. Connect the other end of the RJ11 cable to an operating telephone line.
4. Enable and configure the Fax functions. For details, see Changing the Default Fax Job Settings on
page 139.
WorkCentre 6505 Color Laser Multifunction Printer
User Guide
31
Page 32

Installation and Setup
Configuring Network Settings
This section includes:
• About TCP/IP and IP Addresses on page 32
• Assigning the IP Address of the Printer on page 32
• Finding the IP Address of Your Printer on page 35
• Enabling the Printer for Faxing on page 35
• Enabling the Printer for Scanning on page 36
Note: These instructions apply to the printer when it is connected to a network. If you have a USB
connection to the printer, you can skip this section.
About TCP/IP and IP Addresses
Computers and printers primarily use TCP/IP protocols to communicate over an Ethernet network.
Generally, Macintosh computers use either TCP/IP or the Bonjour protocol to communicate with a
network printer. For Macintosh OS X systems, TCP/IP is preferred. Unlike TCP/IP, however, Bonjour does
not require printers or computers to have IP addresses.
With TCP/IP protocols, each printer and computer must have a unique IP address. Many networks and
Cable and DSL routers have a Dynamic Host Configuration Protocol (DHCP) server. A DHCP server
automatically assigns an IP address to every computer and printer on the network that is configured to
use DHCP.
If you use a Cable or DSL router, see the documentation for your router for information on IP
addressing.
Assigning the IP Address of the Printer
This section includes:
• Allowing the IP Address to be Assigned Automatically on page 33
• Assigning the IP Address Manually on page 33
• Changing the IP Address Using CentreWare Internet Services on page 34
By default, the printer is set to acquire an IP address form the network server using DHCP. Network
addresses assigned by DHCP are temporary, however. After a specified time, the network could assign
a new IP address to the printer. You can experience connectivity issues if the print driver is set to an IP
address that changes periodically. To avoid problems, or if your network administrator requires a static
IP address for the printer, you can assign the IP address to the printer. For details, see Assigning the IP
Address Manually on page 33.
Note: You can view the IP address of your printer from the Startup Page, the Configuration Page,
or the printer control panel. For details, see Finding the IP Address of Your Printer on page 35.
WorkCentre 6505 Color Laser Multifunction Printer
32
User Guide
Page 33

Installation and Setup
Allowing the IP Address to be Assigned Automatically
To re-enable automatic assignment of the IP address of the printer:
1. On the printer control panel, press the System button.
2. Press the Up Arrow or Down Arrow button to select Admin Menu, then press the OK button.
3. At Network Setup, press OK.
4. Press the Up Arrow or Down Arrow button to select TCP/IP, then press OK.
5. Press the Up Arrow or Down Arrow button to select IPv4, then press OK.
6. At Get IP Address, press OK.
7. Press the Up Arrow or Down Arrow button to select DHCP/AutoIP, then press OK.
8. Press the Return button to return to the Ready screen.
Assigning the IP Address Manually
You can assign a static IP address to your printer from the printer control panel. Once an IP address is
assigned, you can change it using CentreWare Internet Services.
To assign a static IP address to the printer, you need the following information:
• An IP address properly configured for your network
• The Network Mask address
• The default Router/Gateway address
If you are on a network managed by a network administrator, contact your network administrator to
obtain the network information.
For a home network using routers or other devices to connect the printer to the network, refer to the
device instructions on assigning network addresses. The router or device documentation can give you a
range of acceptable address numbers you can use. It is important that the addresses be similar to the
IP addresses used by other printers and computers on the network, but not the same. Only the last digit
must be different. For example, your printer can have the IPv4 address 192.168.1.2 while your
computer has the IP address 192.168.1.3. Another device can have the IP address 192.168.1.4.
The router could assign the static IP address of the printer to another computer that obtains its IP
address dynamically. To avoid having the IP address reassigned, give the printer an address at the
higher end of the range allowed by the router or device. For example, if your computer has IP address
192.168.1.2, and your device allows IP addresses to 192.168.1.25, select an address between
192.168.1.20 and 192.168.1.25.
To assign a static IP address to the printer:
1. On the printer control panel, press the System button.
2. Press the Up Arrow or Down Arrow button to select Admin Menu, then press the OK button.
3. Press the Up Arrow or Down Arrow button to select Network Setup, then press OK.
4. Press the Up Arrow or Down Arrow button to select TCP/IP, then press OK.
5. Press the Up Arrow or Down Arrow button to select IPv4, then press OK.
6. At Get IP Address, press OK.
7. Press the Up Arrow or Down Arrow button to select Panel, then press OK to enable this option.
WorkCentre 6505 Color Laser Multifunction Printer
User Guide
33
Page 34

Installation and Setup
8. Press the Return button once to return to the IPv6 menu.
9. Press the Up Arrow or Down Arrow button to select IP Address, then press the OK button.
When undefined, the address is 000.000.000.000.
10. Set the IP address:
a. In the first field, press the Up Arrow or Down Arrow button, or use the alphanumeric keypad,
to enter the desired number.
b. Press the Forward Arrow button to move to the next field, then enter the desired number.
c. Move to the next two fields and enter the desired numbers.
Note: To scroll quickly to a number, hold down the Up Arrow or Down Arrow button. To return to a
field, press the Back Arrow button.
d. When finished, press OK to confirm the address.
11. Press the Back Arrow button once to return to IP Address.
12. Press the Down Arrow button to select Network Mask, then press OK. Repeat step 10 to set the
Network Mask address.
13. Press the Back Arrow button once to return to Network Mask.
14. Press the Down Arrow button to select Gateway Address, then press OK. Repeat step 10 to set
the Gateway Address.
15. Press the Return button to return to the Ready screen.
16. Print the Configuration Page to verify the new settings. For details, see Configuration Page on
page 24.
17. You are ready to install software. For details, see Installing the Software on page 38.
See also:
Online Support Assistant at www.xerox.com/office/WC6505support
Changing the IP Address Using CentreWare Internet Services
To change the IP address of the printer using CentreWare Internet Services:
1. At your computer, open a Web browser, type the IP address of the printer in the address field, then
press Enter or Return.
2. Click the Properties link.
3. Under Properties, scroll to the Protocols link and expand it if it is not already expanded.
4. Click TCP/IP.
The TCP/IP - Dual Stack page opens.
5. In the IPv4 section of the page, make the desired changes. For example, to change the way the
printer acquires the IP address, in the Get IP Address field, select a method from the drop-down
list.
6. After changing the address information, scroll to the bottom of the page and click Save Changes.
WorkCentre 6505 Color Laser Multifunction Printer
34
User Guide
Page 35

Installation and Setup
Finding the IP Address of Your Printer
To install the print drivers for a network-connected printer, you need the IP address of your printer. You
also need the IP address to access the settings of your printer through CentreWare Internet Services.
The IP address of your printer appears on the Configuration Page. You can also view it on the printer
control panel.
To print the Configuration Page:
1. On the control panel, press the System button.
2. At Information Pages, press the OK button.
3. Press the Up Arrow or Down Arrow button to select Configuration, then press OK to print the
page.
The IP address of the printer is listed in the Network Setup section of the page.
Note: The first time you turn on your printer, it automatically prints the Startup Page. If the IP
address listed on the page is 0.0.0.0, the printer has not had time to acquire an IP address from
the DHCP server. Wait a minute or two, then print the Startup Page again.
To view the IP address of the printer on the control panel:
1. On the control panel, press the System button.
2. Press the Up Arrow or Down Arrow button to select Admin Menu, then press the OK button.
3. Press the Up Arrow or Down Arrow button to select Network Setup, then press OK.
4. Press the Up Arrow or Down Arrow button to select TCP/IP, then press OK.
5. Press the Up Arrow or Down Arrow button to select IPv4, then press OK.
6. Press the Up Arrow or Down Arrow button to select IP Address, then press OK.
The IP address of the printer appears on the IP Address screen.
Enabling the Printer for Faxing
It is unlawful to send a message from a fax machine without the proper Fax Send Header information.
The following information must appear on the first transmitted page, or in the top or bottom margin of
each transmitted page:
• Identity of the business or individual sending the fax
• Telephone number of the sending machine
• Date and time of the transmission
To set the required Fax Send Header information at the control panel:
1. Press the System button.
2. Press the Up Arrow or Down Arrow button to select Admin Menu, then press the OK button.
3. Press the Up Arrow or Down Arrow button to select Fax Settings, then press OK.
4. Identify the business or individual sending the fax:
a. Press the Up Arrow or Down Arrow button to select Company Name, then press OK.
b. Use the alphanumeric keypad to enter the name of your company, then press OK.
5. Identify the telephone number of the sending machine:
a. Press the Up Arrow or Down Arrow button to select Fax Number, then press OK.
WorkCentre 6505 Color Laser Multifunction Printer
User Guide
35
Page 36

Installation and Setup
b. Use the alphanumeric keypad to enter the telephone number of the printer, then press OK.
6. Identify the country:
a. Press the Up Arrow or Down Arrow button to select Country, then press OK.
b. Press the Up Arrow or Down Arrow button to select your country name, then press OK.
c. At the Restart System (Are You Sure?) prompt, press the Down Arrow button to select Yes ,
then press OK.
7. Press the Return button repeatedly to return to the Ready screen.
Note: To set the date and time, see Setting the Date and Time on page 37.
You can also set the Fax Send Header information through Properties in CentreWare Internet Services.
For details, see CentreWare Internet Services on page 25.
For details about using the fax features, see Faxing on page 127.
Adding Fax Numbers and Email Addresses to the Address Book
If the printer is connected to a network, you can add fax numbers and email addresses to the printer
address book using CentreWare Internet Services.
If the printer is connected with a USB cable, you can add fax numbers and email addresses to the
printer address book using Address Book Editor.
For details, see Adding an Individual Fax Address Book Entry on page 132, Creating a Fax Group on
page 134, and Editing Address Book Fax Groups on page 135.
For more information see Faxi ng on page 127 and Scanning on page 111.
Enabling the Printer for Scanning
If the printer is connected to a network you can scan to an FTP address, an email address, or a shared
folder on your computer. You must first set up scanning in CentreWare Internet Services. For details, see
CentreWare Internet Services on page 25.
If the printer is connected with a USB cable, you can scan to a folder on your computer, or scan into an
application. You must first install the scan drivers and the Express Scan Manager utility.
Note: If you are connected using the USB cable only, you cannot scan to an email address or a
network location (a shared folder on your computer).
For more information see Scanning Setup Overview on page 49.
WorkCentre 6505 Color Laser Multifunction Printer
36
User Guide
Page 37

Installation and Setup
Setting the Date and Time
Set the date and time on the printer before using it to send fax transmissions. It is unlawful to send a
fax without the proper Fax Send Header information. For details, see Enabling the Printer for Faxing on
page 35.
To set the date and time from the control panel:
1. Press the System button.
2. Press the Up Arrow or Down Arrow button to select Admin Menu, then press the OK button.
3. Press the Up Arrow or Down Arrow button to select System Setup, then press OK.
4. Press the Up Arrow or Down Arrow button to select Clock Settings, then press OK.
5. At Set Date & Time, press OK.
6. At Time Zone, press the Up Arrow or Down Arrow button to select the UTC offset for your time
zone, then press OK.
Note: For example, the Coordinated Universal Time (UTC) zone for Pacific Standard time is -08.00.
7. At Set Date, press the Up Arrow or Down Arrow button to set the month, then press the Forward
Arrow button.
8. Press the Up Arrow or Down Arrow button to set the day, then press the Forward Arrow button.
9. Press the Up Arrow or Down Arrow button to set the year, then press OK.
10. At Set Time, press the Up Arrow or Down Arrow button to set the hour, then press the Forward
Arrow button.
11. Press the Up Arrow or Down Arrow button to set the minutes, then press OK.
12. Press the Return button repeatedly to return to the Ready screen.
Note: You can also set the date and time using CentreWare Internet Services.
WorkCentre 6505 Color Laser Multifunction Printer
User Guide
37
Page 38

Installation and Setup
Installing the Software
This section includes:
• Operating System Requirements on page 38
• Available Print Drivers on page 38
• Installing the Print Drivers for a Windows Network Printer on page 39
• Installing the Scan Drivers for a Windows Network Printer on page 39
• Installing Print and Scan Drivers for Windows USB on page 40
• Installing the Drivers and Utilities for Macintosh OS X Version 10.5 and Later on page 41
• Installing Other Drivers on page 43
Operating System Requirements
• Windows Server 2003 and later, or Windows XP SP1 and later
• Macintosh: OS X version 10.5 and later
• Linux: Your printer supports connection to Linux platforms through the network interface.
Available Print Drivers
To access special printing options, use a Xerox® print driver. Xerox® provides drivers for various page
description languages and operating systems. The following print drivers are available. To download
the latest drivers, go to www.xerox.com/office/WC6505drivers.
Print Driver Source Description
Adobe PostScript 3 Driver Software disc
and Web
PCL6 Software disc
and Web
Mac OS X version 10.5
and later Driver
Linux Software disc This driver enables printing from a Linux operating system.
Software disc
and Web
The PostScript driver is recommended to take full advantage
of the custom features and genuine Adobe PostScript of your
printer. Default print driver.
The Printer Command Language (PCL) driver can be used for
applications requiring PCL.
This driver enables printing from a Mac OS X version 10.5 and
later operating system.
WorkCentre 6505 Color Laser Multifunction Printer
38
User Guide
Page 39

Installation and Setup
Installing the Print Drivers for a Windows Network Printer
To install the print driver from the Software and Documentation disc:
1. Insert the disc into the appropriate drive on your computer. If the installer does not start
automatically, navigate to the drive, and double-click the Setup.exe installer file.
The Easy Setup Navigator starts.
2. In the lower left section of the screen, click the Software Installation button.
3. At the top of the License Agreement, select your language, then click I Agree to accept the
agreement.
®
The Xerox
4. In the Discovered Printers list, select your WorkCentre 6505 printer, then click Next.
Note: When installing drivers for a network printer, if you do not see your printer in the list, click
the IP Address or DNS Name button. In the IP Address or DNS Name field, type the IP address of
your printer, then click Search to locate your printer. If you do not know the IP address of the
printer, see Finding the IP Address of Your Printer on page 35.
5. In the Installation Options screen, select PostScript and/or PCL 6.
Note: You can install both drivers at once. Each will be displayed in your printer list after
installation.
Printer Installation screen appears.
6. Click Install to start the installation.
7. When the installation is complete, at the Installation Status screen, select the following:
• Set Printer As Default (optional)
• Print a Test Page
• Share Printer (optional)
8. Click Finish.
9. At the Product Registration screen, select your country from the list, then click Next. Complete
the registration form and submit it.
If you selected Print a Test Page, a test page prints for each driver you installed.
Note: PrintingScout is a separate option that monitors printer status. To install PrintingScout, see
Installing PrintingScout on page 44.
See also:
Online Support Assistant at www.xerox.com/office/WC6505support
Installing the Scan Drivers for a Windows Network Printer
To install the scan driver from the Software and Documentation disc:
1. Insert the disc into the appropriate drive on your computer. If the installer does not start
automatically, navigate to the drive, find the appropriate scan driver folder, and double-click the
Setup.exe installer file.
The Easy Setup Navigator starts.
2. In the lower left section of the screen, click the Software Installation button.
WorkCentre 6505 Color Laser Multifunction Printer
User Guide
39
Page 40

Installation and Setup
3. At the top of the License Agreement, select your language, then click I Agree to accept the
agreement.
®
The Xerox
Printer Installation screen appears.
4. When the installer is done, click Finish.
Note: Before using the Scanner, you must select it in the Scan Setting Tool.
To configure the computer software for using the WorkCentre 6505 scanner feature:
1. On your computer, select Start > All Programs > Xerox > WorkCentre 6505 > Scan Setting Tools.
2. In the IP Address box of the IP Address Setting window, enter the IP address of the printer.
3. If a password has been set for using the scanner feature of the printer, enter it in the field on the
Password Settings window.
4. Click OK, then close the Scan Settings Tool window.
5. Click Start > Control Panel > Scanners and Cameras. Select Xerox WorkCentre/Pro TWAIN
(Recommended) #2. Click the Test S c a n n er button to test the connection and setting of the
scanner.
6. Double-click Xerox WorkCentre 6505 (LAN) to open the Scanner and Camera Wizard.
The scanner feature is ready to use.
Installing Print and Scan Drivers for Windows USB
To install the print driver:
1. If a USB cable is not connected from the printer to your computer, connect it now.
2. Cancel the Windows Found New Hardware Wizard.
3. Wait for the wizard to appear again and cancel it again.
Note: Windows recognizes the printer as two devices, a printer and a scanner, and tries to help you
install the drivers.
4. Insert the Software and Documentation disc into the appropriate drive on your computer. The
installer starts automatically unless you have autorun disabled on your computer. If the installer
does not start, navigate to the drive and double-click the Setup.exe installer file.
Note: If the Software and Documentation disc is not available, download the latest driver from
www.xerox.com/office/WC6505drivers.
5. When the installation menu appears, click Install Print Driver and accept the License Agreement.
The Xerox Printer Installation window appears.
6. Select your printer from the list.
7. When the Installation Options window appears, click Install.
8. When the installation is complete, click Finish.
The print driver is installed.
To install the scan driver:
1. From the installation menu, click Install Scan Driver.
2. Click Next to start the installer.
3. Accept the License Agreement and click Next.
WorkCentre 6505 Color Laser Multifunction Printer
40
User Guide
Page 41

Installation and Setup
4. When the installer is done, click Finish.
5. The Windows Found New Ha rdware Wizard appears again. This time, select Yes, this time only,
then click Next.
6. Select Install the software automatically, then click Next.
7. The wizard searches for your printer and lists the associated .inf files. Select the .inf file that
corresponds to your Windows operating system:
• Vista - d:windows scan\x86vista\xrsmnim.inf
• XP, Windows Server 2003 - d:windows scan\x86\xrsmnim.inf
• Vista 64 bit - d:windows scan\x64vista\xrsmnim.inf
• XP 64 bit - d:windows scan\x64\xrsmnim.inf
8. Select Next.
9. The installer runs and completes the installation.
You can now print and scan. For information about printing see Printing on page 55. For information
about scanning see Scanning on page 111.
Installing the Drivers and Utilities for Macintosh OS X Version 10.5 and Later
To access all features of the printer, you must:
• Install the print driver
• Install the scan driver
• Add the printer
Note: Before installing drivers, verify that the printer is plugged in, turned on, and connected by
USB or to an active network. Make sure that the printer is receiving network information by
monitoring the LEDs on the back of the printer near the Ethernet cable jack (RJ45). When the
printer is connected to a functioning network and receiving traffic, the link LED is green, and its
amber traffic LED is flashing rapidly.
Installing the Print Driver
The installation process for Macintosh OS X is the same for versions 10.5 and later.
To install the print driver from the Software and Documentation disc:
1. Insert the Software and Documentation disc into the appropriate drive on your computer.
Note: If the Software and Documentation disc is not available, download the latest drivers from
www.xerox.com/office/6505MFPdrivers.
2. On your desktop, double-click the WorkCentre 6505 icon.
3. Double-click WorkCentre 6505 Installer.
4. At the Introduction installer window, click Continue.
5. Acknowledge the warning notice, then click Continue.
6. Read the license agreement, click Continue, then click Agree.
7. Click Install.
WorkCentre 6505 Color Laser Multifunction Printer
41
User Guide
Page 42

Installation and Setup
8. If prompted, enter your password, then click OK.
9. Click Continue Installation.
When the driver is finished installing, click Logout to complete the installation and restart your
computer.
Installing the Scan Driver
To install the scan driver:
1. Insert the Software and Documentation disc into the appropriate drive on your computer.
Note: If the Software and Documentation disc is not available, download the latest drivers from
www.xerox.com/office/6505MFPdrivers.
2. On your desktop, double-click the WorkCentre 6505 scan icon.
3. Click WorkCentre 6505 Scan Installer.
4. If prompted, enter your password, then click OK.
5. At the Introduction installer window, click Continue.
6. Read the license agreement, click Continue, then click Agree.
7. Click Install.
When the driver is finished installing, your browser opens to an online registration form.
8. Complete the online registration, then close the browser.
9. At the Finish Up window, click Quit.
10. Next, add the printer to your printer queue. For details, see Adding the Printer on page 42.
Adding the Printer
For networking, set up your printer using Bonjour (Rendezvous), or connect using the IP address of your
printer for an LPD/LPR connection. For a non-network printer, create a desktop USB connection.
To add the printer using Bonjour:
1. From the Applications folder or from the dock, open System Preferences.
2. Click Print & Fax.
The list of printers appears on the left of the window.
3. Click the plus (+) button under the list of printers.
4. Click the Default icon at the top of the window.
5. Select your printer from the list and click Add.
Note: If your printer was not detected, verify that the printer is on and that the Ethernet or USB
cable is connected properly.
To add the printer by specifying the IP address:
1. From the Applications folder or from the dock, open System Preferences.
2. Click Print & Fax.
The list of printers appears on the left of the window.
3. Click the plus (+) button under the list of printers.
4. Click IP.
WorkCentre 6505 Color Laser Multifunction Printer
42
User Guide
Page 43

Installation and Setup
5. From the Protocol drop-down menu, select the protocol.
6. In the Address field, enter the IP address of the printer.
7. In the Name field, enter a name for the printer.
8. From the Print Using drop-down list, select Select a driver to use.
9. Select the print driver for your printer model from the list.
10. Click Add.
You can now print and scan. For information about printing, see Printing on page 55.
See also:
Online Support Assistant at www.xerox.com/office/WC6505support
Utilities
Address Book Editor and Express Scan Manager are installed automatically when you install the scan
driver. For more information see Installing the Drivers and Utilities for Macintosh OS X Version 10.5 and
Later on page 41.
Installing Other Drivers
This section includes:
• Linux Drivers on page 43
• Other Xerox
Linux Drivers
A complete list of supported Linux distributions and the associated drivers to download are provided at
www.xerox.com/office/WC6505drivers.
Other Xerox® Drivers
The following drivers are also available to download for Windows at
www.xerox.com/office/WC6505drivers:
• Xerox Global Print Driver (PCL version): Print to any PCL printer on your network, even printers
made by other manufacturers. It configures itself for your individual printer upon installation.
• Xerox Mobile Express Driver™ (PCL version): Print to any PCL printer on your network, even
printers made by other manufacturers. The driver configures itself for the printer you select every
time you print. If you travel frequently to the same sites, you can save your favorite printers in that
location and the driver retains your settings.
®
Drivers on page 43
WorkCentre 6505 Color Laser Multifunction Printer
User Guide
43
Page 44

Installation and Setup
Installing Utilities for Windows
This section includes:
• Installing the Address Book Editor on page 44
• Installing PrintingScout on page 44
Installing the Address Book Editor
Xerox® provides software for helping to manage the address book used by the scanner and fax
functions of the printer. Use the Address Book Editor to maintain the information in the address books.
To install the utilities from the Software and Documentation disc:
1. Insert the disc into the appropriate drive on your computer. If the installer does not start
automatically, navigate to the drive, find the appropriate scan driver folder, and double-click the
Setup.exe installer file.
2. Click Install Utilities.
3. Click Next to start the installer.
4. Accept the License Agreement and click Next.
5. Click Next to accept the destination location.
6. At the prompt, click Finish.
7. On your computer, select Start > All Programs > Xerox > WorkCentre 6505 > Address Book
Editor.
8. Click Connect via Network to manage the address book over the network, then click OK.
9. Enter the IP address in the IP Address field of the IP Address Settings.
10. Click OK.
The computer synchronizes information with the printer and displays it in the Address Book Editor.
Installing PrintingScout
PrintingScout is a Windows utility that enables you to monitor the status of print jobs and printer
supplies from your computer. It automatically checks the printer status when you send a print job. If
the printer is unable to print, PrintingScout displays an alert on your computer screen to let you know
that the printer needs attention.
To install PrintingScout:
1. Insert the Software and Documentation disc into the appropriate drive on your computer. If the
installer does not start automatically, navigate to the drive, then double-click the Setup.exe
installer file.
2. At the installer screen, click Install PrintingScout.
3. In the Choose Setup Language window, select your language, then click Next.
®
4. At the Xerox
5. Read the license agreement, then click I accept the terms of the license agreement, then click
Next.
WorkCentre 6505 Color Laser Multifunction Printer
44
User Guide
PrintingScout screen, click Next.
Page 45

6. At the next screen, click Next to accept the default installation destination.
7. Click Next.
8. Click Finish.
The PrintingScout icon appears in your Windows Taskbar.
See also:
Checking Printer Status with PrintingScout on page 172
Installation and Setup
WorkCentre 6505 Color Laser Multifunction Printer
User Guide
45
Page 46

Installation and Setup
Enabling Optional Features
This section includes:
• Enabling Optional Features for the Windows PostScript Driver on page 46
• Enabling Optional Features for the Windows PCL Driver on page 47
• Enabling Optional Features for Macintosh OS X 10.5 and Later on page 48
• Enabling Optional Features for Linux on page 48
You must enable the following options in each print driver before you can use them:
•Duplex unit
• 250-sheet feeder
•RAM Disk
•Extra memory
Enabling Optional Features for the Windows PostScript Driver
This section includes:
• Enabling Optional Features for a Network-Connected Printer on page 46
• Enabling Optional Features for a USB-Connected Printer on page 46
Enabling Optional Features for a Network-Connected Printer
1. Navigate to the list of printers on your computer:
• For Windows XP SP1 and later, click Start > Settings > Printers and Faxes.
• For Windows Vista, click Start > Control Panel > Hardware and Sound > Printers.
• For Windows Server 2003 and later, click Start > Settings > Printers.
• For Windows 7, click Start > Devices and Printers.
2. In the list of printers, right-click the WorkCentre 6505 PS printer and select Properties.
3. Click the Configuration tab, then click the Get Information from Printer button.
The IP address of the printer appears in the Network Address section.
4. Click Apply.
5. To verify that the installed optional features are enabled, click the Device Settings tab and scroll
down to view the Installable Options section.
6. Click OK to close the Properties dialog box.
Enabling Optional Features for a USB-Connected Printer
1. Navigate to the list of printers on your computer:
• For Windows XP SP1 and later, click Start > Settings > Printers and Faxes.
• For Windows Vista, click Start > Control Panel > Hardware and Sound > Printers.
• For Windows Server 2003 and later, click Start > Settings > Printers.
• For Windows 7, click Start > Devices and Printers.
WorkCentre 6505 Color Laser Multifunction Printer
46
User Guide
Page 47

Installation and Setup
2. In the list of printers, right-click the WorkCentre 6505 PS printer and select Properties.
3. In the Properties dialog box, click the Device Settings tab.
4. Click the plus sign (+) to the left of Installable Options to expand and see the list of optional
features.
5. Enable the installed features:
• To specify the amount of RAM memory available, click Memory and select the amount of
memory from the drop-down list.
• To enable the 250-sheet feeder, click Paper Tray Configuration and select 2-Tray from the
list.
• If you have enough memory to use the RAM Disk feature, 768 MB or 1280 MB, click RAM
Disk and select Available from the list.
• To enable the duplex unit, click Duplex Unit and select Available from the drop-down list.
6. Click OK.
Enabling Optional Features for the Windows PCL Driver
This section includes:
• Enabling Optional Features for a Network-Connected Printer on page 46
• Enabling Optional Features for a USB-Connected Printer on page 46
Enabling Optional Features for a Network-Connected Printer
1. Navigate to the list of printers on your computer:
• For Windows XP SP1 and later, click Start > Settings > Printers and Faxes.
• For Windows Vista, click Start > Control Panel > Hardware and Sound > Printers.
• For Windows Server 2003 and later, click Start > Settings > Printers.
• For Windows 7, click Start > Devices and Printers.
2. In the list of printers, right-click the WorkCentre 6505 PCL printer and select Properties.
3. In the Properties dialog box, click the Options tab.
4. Click the Get Information from Printer button.
The IP address of the printer appears in the Network Address section. The installed optional
features appear as Available in the Items list. The amount of memory installed appears in the
Memory Capacity field.
5. Click OK.
Enabling Optional Features for a USB-Connected Printer
1. Navigate to the list of printers on your computer:
• For Windows XP SP1 or later, click Start > Settings > Printers and Faxes.
• For Windows Vista, click Start > Control Panel > Hardware and Sound > Printers.
• For Windows Server 2003 and later, click Start > Settings > Printers.
• For Windows 7, click Start > Devices and Printers.
2. In the list of printers, right-click the WorkCentre 6505 PCL printer and select Properties.
WorkCentre 6505 Color Laser Multifunction Printer
User Guide
47
Page 48

Installation and Setup
3. In the Properties dialog box, click the Options tab.
The Items box lists the printer options. To the right of each item is the status, either Available or
Not Available or, for Memory Capacity, the amount of RAM in MB.
4. To enable the items that are installed in your printer, select the item in the list, then in the
Settings for drop-down list, select Available. If you are enabling additional memory, in Memory
Capacity, select the amount of RAM in MB from the list.
5. Click OK.
Enabling Optional Features for Macintosh OS X 10.5 and Later
1. From the Applications folder or from the dock, open System Preferences.
2. Open Print & Fax. The list of printers appears on the left side of the window.
3. Select your printer in the list, then click the Options & Supplies button.
4. In the window, click the Driver tab and select the print driver from the Print Using list.
5. Enable the installed features:
• To specify the amount of RAM memory available, select the amount of memory from the
drop-down Memory Capacity list.
• To enable the optional 250-sheet feeder, click Paper Tray Configuration and select 2-Tray
from the drop-down list.
• If you have enough memory to use the RAM Disk feature, select Available from the RAM Disk
drop-down list.
Note: A minimum of 512 MB is required.
• To enable the duplex unit, select Available from the Duplex Unit drop-down list.
6. Click OK.
Enabling Optional Features for Linux
Note: These instructions are for using Common UNIX Printing System (CUPS), accessed through a
Web browser.
1. Open the Web browser on your computer. In the address field, type http://127.0.0.1:631, then
press Enter.
2. At the CUPS Home tab, click the Manage Printers button.
3. Locate your printer in the list, then click the Set Printer Options button for your printer.
4. At the Set Printer Options page, enable the optional features installed on your printer:
• In the Memory field, select the amount of Memory in MB.
• If you have the 250-sheet feeder installed, select 2-Tray in the Paper Tray Configuration field.
• To enable RAM Disk, select the Available option.
Note: A minimum of 512 MB is required.
• To enable automatic 2-sided printing, at the Duplex Unit field, select the Available option.
5. Click Set Printer Options to save the settings.
WorkCentre 6505 Color Laser Multifunction Printer
48
User Guide
Page 49

Installation and Setup
Setting up Scanning
This section includes:
• Scanning Setup Overview on page 49
• Setting Up Scanning to a Shared Folder on Your Computer on page 49
• Setting Up Scanning to an FTP Server on page 52
• Setting Up Scanning to an Email Address on page 52
• Setting Up Scanning with USB on page 53
See also:
Scanning on page 111
Scanning Setup Overview
If the printer is connected to a network, it is enabled for scanning. Before you can scan you must do the
following:
• Scanning to a shared folder on your computer: Share the folder, and add the folder as an Address
Book entry in CentreWare Internet Services. For details, see Setting Up Scanning to a Shared
Folder on Your Computer on page 49.
• Scanning to an FTP server: Add the FTP server as an Address Book entry in CentreWare Internet
Services. For details, see Setting Up Scanning to an FTP Server on page 52.
• Scanning to an email address: Configure the email server in CentreWare Internet Services. For
details, seeSetting Up Scanning to an Email Address on page 52.
If the printer is connected using a USB cable, you cannot scan to an email address or a network
location. You can scan to a folder on your computer, or scan into an application after installing the scan
drivers and the Express Scan Manager utility. For more information, see Installing the Software on
page 38.
Setting Up Scanning to a Shared Folder on Your Computer
Before you can scan to a shared folder you must:
• Share the folder.
• Add the folder as an Address Book entry using the Address Book Editor or CentreWare Internet
Services.
Note: For details, see CentreWare Internet Services on page 25.
Sharing a Folder Using Windows
To enable a folder on your Windows computer for network sharing:
1. Open Windows Explorer.
2. Browse to, then right-click the folder you want to share, then select Properties.
WorkCentre 6505 Color Laser Multifunction Printer
User Guide
49
Page 50

Installation and Setup
3. Click the Sharing tab, then click Share this folder.
4. Click the Permissions button.
5. Select the Everyone group, and verify that all permissions are enabled. If the group is not present,
type Everyone into the text block and press Enter.
6. Click OK.
Note: Record the Share name for later use.
7. Click OK again.
8. Open a DOS Command Prompt window:
a. On the Start menu, select Run.
b. In the Open field, type cmd and click OK.
9. Type ipconfig, then press Enter.
Note: Record your IP address to use when creating the address book entry.
10. Close the DOS Command Prompt window.
The folder is ready. Now add the folder as an Address Book entry. See Adding the Folder as an Address
Book Entry Using the Address Book Editor on page 51or Adding the Folder as an Address Book Entry
Using CentreWare Internet Services on page 51.
Sharing the Folder Using Macintosh
To enable a folder on your Macintosh computer for network sharing:
1. Open System Preferences.
2. Click the Sharing icon.
3. Enable Windows Sharing.
4. Click the Enable Accounts button, then enable your account.
5. Follow the onscreen prompts for entering your password.
6. Click Done.
7. Click Show All, then click the Network icon.
8. Select Built-in Ethernet from the Show drop-down list.
Note: Record your IP address to use when creating the address book entry.
9. Click Show All, then click Accounts.
Note: Record your Short Name to use when creating the address book entry.
10. Close System Preferences.
11. Create a folder in your Public folder. The scanner places scanned images in this folder.
12. In the Finder window, click the folder you created.
13. On the File menu, click Get Info, then Ownership & Permissions.
14. Click Details to expand the window.
15. Set permissions for Group to have Read and Write access, then click Apply.
WorkCentre 6505 Color Laser Multifunction Printer
50
User Guide
Page 51

Installation and Setup
The folder is ready. Now add the folder as an Address Book entry. See Adding the Folder as an Address
Book Entry Using the Address Book Editor on page 51or Adding the Folder as an Address Book Entry
Using CentreWare Internet Services on page 51.
Adding the Folder as an Address Book Entry Using the Address Book Editor
1. On your computer select Start > All Programs > Xerox > WorkCentre 6505 > Address Book
Editor.
The Address Book Editor opens.
2. Double-click the Server icon under the Printer Address Book in the left navigation pane.
3. Enter a name in the Name: field to identify this access to the shared file on your computer.
4. Select Computer (SMB) as the Server Type.
5. Click the Computer Settings Wizard button.
The Computer Folder Settings window appears.
6. Click the Browse button.
7. Browse to the shared folder that you created on your computer.
8. Click OK, then click Next.
9. Enter a Login Name for the printer to use to access the shared folder.
10. Enter, then confirm, a Login Password for the printer to use to access the shared folder.
11. Click Next, then click Finish. At the Server Address window, click OK.
The new server appears in the Server pane at the top of the window.
Adding the Folder as an Address Book Entry Using CentreWare Internet Services
1. Open your Web browser, type the IP address for your printer in the address field, then press Enter
or Return.
Note: To find the IP address for your printer, see Finding the IP Address of Your Printer on page 35.
2. Click Address Book.
3. Under Network Scan (Comp./Serv.), click Comp./Server Address Book.
4. Click Add next to any unused entry, and enter the following information:
• Name: Enter the name that you want to appear in the Address Book.
• Network Type: Select Computer (SMB).
• Host Address: Enter the IP address of your computer.
• Port Number: Enter the default port number for SMB, 139, or select a number from the range
provided.
• Name of Shared Directory: Enter a name for the directory or folder.
• Subdirectory Path: Enter the path of the subfolder on your computer. For example, if you
want the scanned files to go in a folder called colorscans inside your shared folder, type
\colorscans.
5. Click Save Changes.
A new address book entry is created.
You can now scan to a folder on your computer. For more information, see Setting Up Scanning to a
Shared Folder on Your Computer on page 49.
WorkCentre 6505 Color Laser Multifunction Printer
User Guide
51
Page 52

Installation and Setup
Setting Up Scanning to an FTP Server
1. Open your Web browser, type the IP address for your printer in the address field, then press Enter
or Return.
Note: To find the IP address for your printer, see Finding the IP Address of Your Printer on page 35.
2. Click Address Book.
3. Under Network Scan (Comp./Serv.), click Comp./Server Address Book.
4. Click Add next to any unused entry, and enter the following information:
• Name: Type the name that you want to appear in the Address Book.
• Network Type: Select Server (FTP).
• Host Address: Enter the IP address or DNS name of the FTP server.
• Port Number: Enter the default port number for FTP, 21, or select a number from the range
provided.
• Login Name: Enter a valid login name for your FTP server.
• Password: Enter a valid password for your FTP server.
• Re-enter Password: Enter the password again.
• Name of Shared Directory: Enter a name for the directory or folder. For example, if you want
the scanned files to go in a folder called scans type /scans.
• Subdirectory Path: Enter the path of the folder on the FTP server. For example, if you want
the scanned files to go in a folder called colorscans inside the scans folder, type /colorscans.
5. Click Save Changes. A new address book entry is created.
You can now scan to the FTP server. For more information, see Setting Up Scanning to an FTP Server on
page 52.
Setting Up Scanning to an Email Address
Before you can scan to an email address, you must configure the printer to communicate with your
SMTP email server.
To configure the SMTP server settings:
1. Open your Web browser, type the IP address for your printer in the address field, then press Enter
or Return.
Note: To find the IP address for your printer, see Finding the IP Address of Your Printer on page 35.
2. Click Properties.
3. Under Protocols in the left pane, click Email Settings.
4. Enter the following information:
• Return Email Address: Enter the email address to be used when sending email messages to
the printer. This is also the address that appears in the From: field of email messages sent by
the printer.
Note: A Return Email Address is not required by all SMTP servers in order to Scan to Email. The
Return Email Address can usually be any email address that is in the correct format.
• Host Address: Enter the IP address or DNS name of the SMTP server.
WorkCentre 6505 Color Laser Multifunction Printer
52
User Guide
Page 53

Installation and Setup
• SMTP Port: Enter the default port number for SMTP, 25, or select a number from the range
provided.
Note: If you use a DNS name, a DNS server must be configured in the TCP/IP settings.
5. Select an Authentication Type.
6. Enter a valid login name and password.
7. Scroll down and click Save Changes.
Note: Contact your internet service provider (ISP) or system administrator to obtain your SMTP
server name or IP address. Some ISP providers require authentication. Make sure to confirm
authentication type, login, and password.
You can now scan to an email address. For more information, see Setting Up Scanning to an Email
Address on page 52.
Setting Up Scanning with USB
When connected with a USB cable, you can scan to a folder on your computer, or scan into an
application. Before scanning, you must install the scan driver. For more information see Installing the
Software on page 38.
Setting Up Scanning to a Folder on Your Computer with USB
Before you can scan to a folder on your computer, you must install the Express Scan Manager utility.
For more information see Installing the Software on page 38.
1. Start Express Scan Manager:
• Windows: Click Start > Programs > Xerox > WorkCentre 6505 > Express Scan Manager.
• Macintosh: Navigate to Applications > Xerox > WorkCentre 6505, and double-click Express
Scan Manager.
2. Click OK to accept the default Destination Path folder, or click Browse to navigate to another
folder.
3. Click OK.
You can now scan to a folder on your computer. For more information, see Scanning to a Folder on a
Computer with a USB Connection on page 113.
WorkCentre 6505 Color Laser Multifunction Printer
User Guide
53
Page 54

Installation and Setup
WorkCentre 6505 Color Laser Multifunction Printer
54
User Guide
Page 55

Printing
This chapter includes:
• Supported Paper and Media on page 56
• Loading Paper on page 61
• Setting Paper Types and Sizes on page 68
• Selecting Printing Options on page 70
• Printing on Specialty Media on page 77
• Printing Custom Sizes on page 87
• Printing on Both Sides of the Paper on page 91
• Printing Using Secure Print on page 95
• Printing Using Proof Print on page 97
4
WorkCentre 6505 Color Laser Multifunction Printer
User Guide
55
Page 56

Printing
Supported Paper and Media
This section includes:
• Paper Usage Guidelines on page 56
• Paper That Can Damage Your Printer on page 57
• Paper Storage Guidelines on page 57
• Supported Paper on page 58
Your printer is designed to use various paper and other media types. Follow the guidelines in this
section to ensure the best print quality and to avoid jams.
®
For best results, use Xerox
excellent results with your printer.
To order paper or other specialty media, contact your local reseller or go to
www.xerox.com/office/WC6505supplies.
CAUTION: The Xerox® Warranty, Service Agreement, or Total Satisfaction Guarantee do not cover
damage caused by using unsupported paper, transparencies, and other specialty media. The Total
Satisfaction Guarantee is available in the United States and Canada. Coverage can vary outside
these areas. Please contact your local representative for details.
printing media specified for your printer. They are guaranteed to produce
See also:
Recommended Media List (Europe): www.xerox.com/europaper
Recommended Media List (North America): www.xerox.com/paper
Paper Usage Guidelines
Each printer tray accommodates certain sizes and types of paper or other specialty media. Follow these
guidelines when loading paper in the trays:
• Fan paper before loading it in the tray.
• Do not print on label stock once a label has been removed from a sheet.
• Use only paper envelopes. Do not use envelopes with windows, metal clasps, or adhesives with
release strips.
• Print all envelopes 1-sided only.
• Some wrinkling and embossing can occur when printing envelopes.
• Do not overload the paper trays. Do not load paper above the fill line on the inside of the paper
guide.
• Adjust the paper guides to fit the paper size. The paper guides click into place when they are
adjusted correctly.
• If excessive jams occur, use paper or other media from a new package.
WorkCentre 6505 Color Laser Multifunction Printer
56
User Guide
Page 57

See also:
Loading Paper on page 61
Clearing Paper Jams on page 205
Paper That Can Damage Your Printer
Your printer is designed to use various paper types. However, some paper can cause poor output
quality, increase paper jams, or damage your printer.
Unacceptable media includes:
• Rough or porous media
• Transparencies
• Paper that has been folded or wrinkled
• Paper with staples
• Envelopes with windows or metal clasps
• Padded envelopes
• Non-laser glossy or coated paper
• Perforated media
• Carbon backed media or paper
• Pressure sensitive media or paper
• Paper designed for use in inkjet printers
Printing
Paper Storage Guidelines
Providing good storage conditions for your paper contributes to optimum print quality.
• Store paper in dark, cool, relatively dry locations. Most paper items are susceptible to damage
from ultraviolet (UV) and visible light. UV radiation emitted by the sun and fluorescent bulbs is
particularly damaging to paper items. Reduce the intensity and length of exposure to visible light
on paper items as much as possible.
• Maintain constant temperatures and relative humidity.
• Avoid moisture, excessive humidity, and heat above 32°C (90°F).
• Avoid attics, kitchens, garages, and basements for storing paper. Inside walls are drier than
outside walls where moisture can collect.
• Store paper flat on pallets, cartons, shelves, or in cabinets.
• Avoid having food or drinks in the area where paper is stored or handled.
• Do not open sealed packages of paper until you are ready to load them into the printer. Leave
paper in the original packaging. For most commercial cut-size grades, the ream wrapper contains
an inner lining that protects the paper from moisture loss or gain.
WorkCentre 6505 Color Laser Multifunction Printer
User Guide
57
Page 58

Printing
Supported Paper
Using unsuitable paper can lead to paper jams, poor print quality, and damage to your printer. To use
the features of the printer effectively, use the paper recommended in the following tables.
Printing on paper that has settings different from the paper size or paper type selected in the print
driver can lead to paper jams. Loading paper into a paper tray unsuitable for the type of print job can
also lead to paper jams. To ensure that printing is done correctly, select the correct paper size, paper
type, and paper tray.
The printed image can fade due to moisture, such as water, rain or vapor. For details, contact your
reseller.
Tray 1
Paper Size • Letter (8.5 x 11 in.)
• US Folio (8.5 x 13 in.)
• Legal (8.5 x 14 in.)
• Executive (7.25 x 10.5 in.)
• A4 (210 x 297 mm, 8.2 x 11.5 in.)
• A5 (148 x 210 mm, 5.2 x 8.2 in.)
• JIS B5 (182 x 257 mm)
• #10 Envelope (4.1 x 9.5 in.)
• Monarch Envelope (3.9 x 7.5 in.)
• DL Envelope (110 x 220 mm)
• C5 Envelope (162 x 229 mm)
•Custom size range:
Width: 76.2–215.9 mm (3–8.5 in.)
Height: 127–355.6 mm (5–14 in.)
Paper Type and Weight
Loading Capacity 250 sheets (75 g/m
WorkCentre 6505 Color Laser Multifunction Printer
58
User Guide
• Plain (65–120 g/m
• Lightweight Cardstock (100–163 g/m
• Heavyweight Cardstock (163–220 g/m
•Envelope
•Labels
• Letterhead
• Lightweight Glossy Cardstock (100–163 g/m
• Heavyweight Glossy Cardstock (163–220 g/m
•Hole Punched
• Colored Paper
• Special (Lightweight Cardstock 1)
2
, 17–32 lb. Bond)
2
, 20 lb.)
2
, 37–60 lb. Cover)
2
, 60–80 lb. Cover)
2
, 37–60 lb. Cover)
2
, 60–80 lb. Cover)
Page 59

250-Sheet Feeder (Tray 2)
Paper Size • Letter (8.5 x 11 in.)
• US Folio (8.5 x 13 in.)
• Legal (8.5 x 14 in.)
• Executive (7.25 x 10.5 in.)
• A4 (210 x 297 mm)
• A5 (148 x 210 mm)
• JIS B5 (182 x 257 mm)
•Custom size range:
Width: 147.3–215.9 mm (5.8–8.5 in.)
Height: 210.8–355.6 mm (8.3–14 in.)
Paper Type and Weight Plain Paper (60–105 g/m
• Letterhead
•Hole Punched
• Colored Paper
2
, 16–28 lb. Bond)
Printing
Loading Capacity 250 sheets (20 lb.)
Manual Feed Slot
Paper Size • Letter (8.5 x 11 in.)
• Legal (8.5 x 14 in.)
• Executive (7.25 x 10.5 in.)
• US Folio (8.5 x 13 in.)
• No. 10 Envelope (4.1 x 9.5 in.)
• Monarch Envelope (3.9 x 7.5 in.)
• DL Envelope (110 x 220 mm)
• C5 Envelope (162 x 229 mm)
• A4 (210 x 297 mm)
• A5 (148 x 210 mm)
• JIS B5 (182 x 257 mm)
•Custom size range:
Width: 76.2–215.9 mm (3–8.5 in.)
Height: 127–355.6 mm (5–14 in.)
WorkCentre 6505 Color Laser Multifunction Printer
User Guide
59
Page 60

Printing
Manual Feed Slot
Paper Type and Weight
• Plain (65–120 g/m
• Letterhead (plain)
• Lightweight Cardstock (100–163 g/m
• Heavyweight Cardstock (163–220 g/m
• Lightweight Glossy Cardstock (100–163 g/m
• Heavyweight Glossy Cardstock (163–220 g/m
• Hole Punched (plain)
• Colored Paper (plain)
•Labels
• Envelope (short-edge feed only for Monarch and DL envelopes)
•Special
Loading Capacity One sheet at a time
Duplex Unit (2-Sided Printing)
Paper Size • A4 (210 x 297 mm)
• Letter (8.5 x 11 in.)
• US Folio (8.5 x 13 in.)
• Legal (8.5 x 14 in.)
•Custom size range:
Width: 76.2–215.9 mm (3–8.5 in.)
Height: 127–355.6 mm (5–14 in.)
2
, 17–32 lb. Bond)
2
, 28–60 lb. Cover)
2
, 60–80 lb. Cover)
2
, 28–60 lb. Cover)
2
, 60–80 lb. Cover)
Paper Type and Weight
• Plain (60–105 g/m
• Letterhead (plain)
• Hole Punched (plain)
• Colored Paper (plain)
Loading Capacity One sheet at a time
2
, 16–28 lb. Bond)
WorkCentre 6505 Color Laser Multifunction Printer
60
User Guide
Page 61

Loading Paper
This section includes:
• Loading Paper in Tray 1 on page 61
• Loading Paper in the Manual Feed Slot on page 63
• Loading Paper in the 250-Sheet Feeder (Tray 2) on page 65
Loading Paper in Tray 1
You can use Tray 1 for a wide variety of media, including:
• Plain Paper
• Lightweight Cardstock
• Heavyweight Cardstock
•Letterhead
•Labels
•Envelopes
• Lightweight Glossy Cardstock
• Heavyweight Glossy Cardstock
•Hole Punched
•Colored Paper
• Pre-printed Paper (paper already printed on one side)
•Custom Size Paper
Printing
For a complete list of paper types and sizes usable in Tray 1, see Supported Paper on page 58.
Follow these guidelines when loading paper into Tray 1:
• Load up to 250 sheets of plain paper, or a stack of paper (65–220 g/m
Cover) less than 15 mm high (0.60 in.).
• Tray 1 holds paper within the following dimensions:
• Width: 76.2–216 mm (3–8.5 in.)
• Length:127–355.6 mm (5–14 in.)
• For automatic 2-sided printing, you can load paper in the range of 60–105
Bond).
• Do not load different types of paper in the same tray at the same time.
• To print high quality, use high-quality paper intended for laser printers.
• Do not remove or add paper to Tray 1 during printing. Doing so could cause a paper jam. Remove
the paper, align it with the new paper and insert both into the tray together.
• Do not put any objects other than paper in Tray 1.
• Do not push or force down Tray 1.
• Always load paper for short edge feed.
For more paper usage guidelines, see Supported Paper and Media on page 56.
2
, 17–40 lb. Bond, 40–80 lb.
2
g/m
(16–28 lb.
WorkCentre 6505 Color Laser Multifunction Printer
User Guide
61
Page 62

Printing
wc6505_008
wc6505_009
wc6505_014
To load paper in Tray 1:
1. Gently pull out the paper tray.
2. Slide the paper width guides to the edge of the tray. Extend the width guides fully as shown in the
following illustration.
3. Before loading the paper flex the sheets back and forth, and then fan them. Straighten the edges
of the stack on a level surface.
WorkCentre 6505 Color Laser Multifunction Printer
62
User Guide
Page 63

4. Insert all paper face up, with the top edge at the front of the paper tray.
wc6505_010
Notes:
• Do not force the paper into the tray.
• Be careful not to bend the paper.
5. Slide the paper width guides until they rest lightly against the edge of the paper stack.
6. Insert the tray back into the printer until it stops.
CAUTION: Be careful not to use excessive force on the tray. Doing so could damage the printer.
See also:
Setting Paper Types and Sizes on page 68
Printing
Loading Paper in the Manual Feed Slot
Use the manual feed slot for a wide range of media including:
• Plain Paper
•Letterhead
• Lightweight Cardstock
• Heavyweight Cardstock
• Lightweight Glossy Cardstock (Coated 2 and Coated 3)
• Heavyweight Glossy Cardstock
•Colored Paper
•Labels
•Envelopes
•Special
For a more complete list of paper types and sizes usable in the Manual Feed Slot, see Supported Paper
on page 58.
Follow these guidelines to avoid problems during printing:
• Use several sheets of the paper only when adjusting the paper width guides.
• Holding the paper on both sides, slowly and evenly insert the paper into the printer.
• If the paper looks skewed after the printer pulls it in, gently remove the paper and reseat it. Then
press the OK button or wait for the automatic calibration to start.
WorkCentre 6505 Color Laser Multifunction Printer
User Guide
63
Page 64

Printing
wc6505_011
wc6505_012
To load paper in the manual feed slot:
1. Slide the paper guides of the manual feed slot to fit the paper you are using.
2. Place the paper into the slot with the print side face down and the top of the sheet entering the
printer first.
Note: You can insert paper during the ready mode or sleep mode of the printer. The printer
automatically detects the paper and holds it while it waits for a print job.
WorkCentre 6505 Color Laser Multifunction Printer
64
User Guide
Page 65

Printing
wc6505_049
Loading Paper in the 250-Sheet Feeder (Tray 2)
You can use the 250-sheet feeder for the following types of paper:
• Plain paper
•Letterhead
•Hole Punched
•Colored Paper
For supported paper sizes and weights, see Supported Paper on page 58.
Follow these guidelines to avoid problems during printing:
• Do not load different types of paper in the tray at the same time.
• To print high quality, use high-quality paper intended for laser printers.
• Do not remove or add paper to the 250-sheet feeder during printing. Doing so can cause a paper
jam. Remove the paper, align it with the new paper, and insert both into the tray together.
• Do not put any objects other than paper in the tray.
• Do not push or force down the tray.
• Always load paper short-edge feed first.
CAUTION: Do not remove the tray during printing because it can cause a paper jam.
To load paper in the 250-sheet feeder:
1. Gently pull the paper tray out of the printer.
WorkCentre 6505 Color Laser Multifunction Printer
User Guide
65
Page 66

Printing
wc6505_009
wc6505_010
p6500-008
2. Slide the paper width guides to the edge of the tray. Extend the width guides fully as shown in the
following illustration.
3. Squeeze the green tab on the length guide, then slide the tray until the arrow lines up with the
appropriate paper size. The guide clicks into place.
4. Before loading the paper, flex the sheets back and forth, and then fan them. Straighten the edges
of the stack on a level surface.
5. Place the paper into the tray with the print side face up.
Note: Do not exceed the maximum fill line in the tray. Overfilling the tray can cause paper jams.
WorkCentre 6505 Color Laser Multifunction Printer
66
User Guide
Page 67

6. Slide the width and length guides until they rest lightly against the edge of the paper stack.
wc6505_017
wc6505_050
Note: Be careful not to bend the paper.
7. Insert the tray back into the printer until it stops.
Printing
CAUTION: Be careful not to use excessive force on the tray. Doing so could damage the printer.
See also:
Setting Paper Types and Sizes on page 68
WorkCentre 6505 Color Laser Multifunction Printer
User Guide
67
Page 68

Printing
Setting Paper Types and Sizes
This section includes:
• Setting the Paper Type on page 68
• Setting the Paper Size on page 68
After loading paper in paper Tray 1 or the 250-sheet feeder (Tray 2), set the paper type and size on the
printer control panel.
Notes:
• If None is selected in the Paper Type menu in the print driver, the printer uses the control
panel settings. The printer prints only when the settings for the paper size and type
configured in the print driver match the control panel settings. If the settings in the print
driver and control panel do not match, follow the instructions displayed on the control
panel.
• You can select an option to display a message prompting you to set the paper size and
type on the control panel each time paper is loaded. For details, see Tray Settings on
page 163.
Setting the Paper Type
CAUTION: Paper type settings must match the type of paper loaded in the tray or print-quality
problems can occur.
Note: If None is selected in the Paper Type menu in the print driver, the printer uses the control
panel settings. The printer prints only when the settings for the paper size and type configured in
the print driver match the control panel settings. If the settings in the print driver and control
panel do not match, the print driver setting overrides the control panel setting for this job.
To set the paper type for paper in a tray:
1. On the control panel, press the System button.
2. Press the Up Arrow or Down Arrow button to select Tray Settings, then press the OK button.
3. Press the Up Arrow or Down Arrow button to select the tray you are setting, then press OK.
4. At Paper Type, press OK.
5. Press the Up Arrow or Down Arrow button to select the type of paper that is loaded in the tray,
then press OK.
6. Press the Return button to return to the Ready screen.
Setting the Paper Size
To set the paper size for paper in a tray:
1. On the control panel, press the System button.
2. Press the Up Arrow or Down Arrow button to select Tray Settings, then press the OK button.
3. Press the Up Arrow or Down Arrow button to select the tray you are setting, then press OK.
WorkCentre 6505 Color Laser Multifunction Printer
68
User Guide
Page 69

4. Press the Up Arrow or Down Arrow button to select Paper Size, then press OK.
5. Select the paper size, then press OK.
6. Press the Return button to return to the Ready screen.
Printing
WorkCentre 6505 Color Laser Multifunction Printer
User Guide
69
Page 70

Printing
Selecting Printing Options
This section includes:
• Selecting Printing Defaults in Windows on page 70
• Selecting Printing Defaults in Windows for a Shared Network Printer on page 71
• Selecting Printing Options for an Individual Job in Windows on page 71
• Selecting Printing Options for an Individual Job in Macintosh on page 75
Note: Print driver settings override control panel settings when you print using the driver software
on your computer.
Selecting Printing Defaults in Windows
Notes:
• These instructions are for setting print driver defaults for the print driver software
installed on your computer. You can set defaults settings for a network printer that apply
to that printer for anyone who accesses it over the network. For details, see Selecting
Printing Defaults in Windows for a Shared Network Printer on page 71.
• Use the following procedure to set the default settings used for all print jobs sent to the
printer from your computer using the specific driver. You can override the default settings
for an individual print job when printing from an application.
1. Navigate to the list of printers on your computer:
• For Windows XP SP1 and later, click Start > Settings > Printers and Faxes.
• For Windows Vista, click Start > Control Panel > Hardware and Sound > Printers.
• For Windows Server 2003 and later, click Start > Settings > Printers.
• For Windows 7, click Start > Devices and Printers.
2. In the Printers folder, right-click the name of your print driver (printer name plus PCL 6 or PS) and
select Printing Preferences.
3. Make selections on the driver tabs as desired, then click OK to save your selections.
4. Set defaults for the other print driver if applicable.
Note: For more information about Windows print driver options, click the Help button in the
Printing Preferences dialog box to view the online help.
WorkCentre 6505 Color Laser Multifunction Printer
70
User Guide
Page 71

Printing
Selecting Printing Defaults in Windows for a Shared Network Printer
If the printer is shared on a network, you can set printing defaults that apply to anyone who accesses it
from the network. You can override network-level defaults through the driver settings on an individual
computer.
1. Navigate to the list of printers on your computer:
• For Windows XP SP1 or later, click Start > Settings > Printers and Faxes.
• For Windows Vista, click Start > Control Panel > Hardware and Sound > Printers.
• For Windows Server 2003 and Windows Server 2008, click Start > Settings > Printers.
• For Windows 7, click Start > Devices and Printers.
2. In the Printers folder, right-click the name of your print driver (printer name plus PCL 6 or PS) and
select Properties.
3. In the printer Properties dialog box, click the Advanced tab.
4. On the Advanced tab, click the Printing Defaults button.
5. Make selections on the driver tabs as desired, then click Apply to apply your selections.
6. Click OK to save your selections.
Selecting Printing Options for an Individual Job in Windows
This section includes:
• Printing Options for Windows PostScript Driver on page 72
• Printing Options for Windows PCL Driver on page 73
To use special printing options for a particular job, change the print driver settings in the application
before sending the job to the printer.
Note: The print driver includes online help with more information on selecting printing options. In
the driver dialog boxes, click the Help button.
To select printing options:
1. With the desired document or graphic open in your application, open the Print dialog box.
2. Select your WorkCentre 6505 printer (either PostScript or PCL) and then click the Properties
button to open the print driver dialog box.
3. Make selections from the driver tabs as desired, beginning with settings in the Paper/Output tab.
For a list of options, see Printing Options for Windows PostScript Driver on page 72, and Printing
Options for Windows PCL Driver on page 73.
Note: In the PCL driver for Windows, you can save a set of printing options with a distinctive name
and apply them to other print jobs. For instructions, click the Help button in the print driver dialog
box to view the online help.
WorkCentre 6505 Color Laser Multifunction Printer
User Guide
71
Page 72

Printing
Printing Options for Windows PostScript Driver
For detailed information on using the print driver options, click the Help button in the print driver to
view the online help.
Note: For optional printer features to be available in the print driver, the optional features must be
installed and enabled. If you have not enabled your installed optional features, see Enabling
Optional Features for the Windows PostScript Driver on page 46.
Driver Tab Printing Option
Paper/Output • Job Type: Specifies the type of print job: Normal Print, Secure Print, Proof Print. Secure
Print and Proof Print available with extra RAM memory only.
• 2-Sided Print: 1-Sided Print, Flip on long edge, Flip on short edge.
• Paper Size: Specifies the size of the paper to print on, including specifying a custom
paper size.
• Paper Tray: Specifies which paper tray to print to when the Paper Tray setting in the
PostScript print driver is set to Auto Select.
• Paper Type: Specifies the type of paper in the tray.
• Image Orientation: Portrait or Landscape.
• Output Color: Color or Black and White.
• Saved Settings: Enables you to save the current settings under a specific name so that
they can be used repeatedly. Also enables you to load and edit a set of saved settings.
• Printer Status button: Opens the internal settings page of the printer in
CentreWare Internet Services, in your computer Web browser for network printers only.
• Defaults button: Returns all of the Paper/Output tab settings to their default settings.
• Default All button: Returns all settings in the Properties dialog of the printer to their
default settings.
• Help button: Opens the online help of the print driver for the Paper/Output tab.
Image Options • Image Quality: Affects the quality of the print by specifying the speed at which the
page prints.
• Brightness: Makes the printed image or page darker or lighter.
• Color Correction: Specifies how color is applied to printed images, text, and
photographs.
• Color Balance button: Enables you to specify the density of each color used for
printing.
• Defaults button: Returns all of the Image Options tab settings to their default settings.
• Help button: Opens the online help of the print driver for the Image Options tab.
Layout • Pages per Sheet (N-up): For multiple-page documents, enables you to print more than
one page per sheet of paper, including Booklet print.
• Draw Outlines: When multiple pages are printed per sheet, prints a border around each
page.
• Fit to New Paper Size: Select the output paper size to fit the page.
• Defaults button: Returns all of the Layout tab settings to their defaults.
• Help button: Opens the online help of the print driver for the Layout tab.
WorkCentre 6505 Color Laser Multifunction Printer
72
User Guide
Page 73

Printing
Driver Tab Printing Option
Advanced • Image Options: Enables you to set print resolution, image color management and
method used, TrueType font configuration, and image magnification or reduction
percentage for printed images.
• Document Options: Enables you to set the PostScript Options and the Manual Feed slot
Orientation. PostScript Options include the PostScript Output Format, TrueType Font
Download Method, PostScript Language Level, PostScript Error Message control, and
Mirror Image control.
• Help button: Opens the online help of the print driver for the Advanced tab.
• Set Features to Default button: Returns the Advanced tab settings to their defaults.
Printing Options for Windows PCL Driver
For detailed information on using the print driver options, click the Help button in the print driver to
view the online help.
Note: For optional printer features to be available in the print driver, the optional features must be
installed and enabled. If you have not enabled your installed optional features, see Enabling
Optional Features for the Windows PCL Driver on page 47.
Driver Tab Printing Option
Paper/Output • Job Type: Specifies the type of print job: Normal Print, Secure Print, Proof Print.
Secure Print and Proof Print are available with extra RAM memory only.
• 2-Sided Print: 1-Sided Print, Flip on long edge, Flip on short edge.
• Paper Size: Specifies the size of the paper to print on, including specifying a
custom paper size.
• Output Color: Color or Black and White.
• Paper Type: Specifies the type of paper in the tray.
• Saved Settings: Enables you to save the current settings under a specific name
so that they can be used repeatedly. Also enables you to load and edit a set of
saved settings.
• Paper Tray: Specifies which paper tray to print to when the Paper Tray setting in
the PCL driver is set to Auto Select.
• Manual Feed Slot Orientation: Portrait or Landscape.
• Covers/Separators button: Enables you to specify cover and separator pages for
print jobs.
• Printer Status button: Opens the internal settings page of the printer in
CentreWare Internet Services in your computer Web browser for network
printers only.
• Defaults button: Returns the Paper/Output tab settings to their defaults.
WorkCentre 6505 Color Laser Multifunction Printer
User Guide
73
Page 74

Printing
Driver Tab Printing Option
Image Options • Image Quality: Affects the print quality by specifying way the image is
processed and marked on the page.
• Output Color: Specifies Color or Black and White.
• Output Recognition: When Color is selected in the Output Color field, selecting
this check box causes some chromatic colors to be printed as black.
• Image Adjustment Mode: Recommended, ICM Adjustment (System), CMS
Adjustment (Application), Complementary Color Conversion.
• Image Types: Enables you to specify a printing mode to match the
characteristics of the printed image.
• Image Auto Correction: Determines the characteristics of a specified image
type, such as photographs on a page, and automatically performs correction for
it.
• Image Settings button: Opens the Image Settings tab of the Graphics
Properties dialog box.
• Color Balance button: Opens the Color Balance tab of the Graphics Properties
dialog box.
• Profile Settings button: Opens the Profile Settings tab of the Graphics Properties
dialog box.
• Defaults button: Returns the Image Option tab settings to their default settings.
Layout • Pages per Sheet (N-up): For multiple-page documents, enables you to print
more than one page on one sheet of paper.
• Image Order: (Available only if more than one page is being printed on a sheet.)
Determines the order in which pages are printed on the sheet.
• Draw Outlines: When multiple pages are printed per sheet, prints a border
around each page.
• Booklet/Poster/Mixed Document/Rotation button: Provides selection of Poster
printing, Booklet Creation, and Image Rotation. Poster printing enlarges one
page of data and prints it across multiple pages. Booklet Print repaginates the
original document and prints two pages per sheet so that you can fold it into a
booklet. Image rotation allows rotation of the output for files with pages that
have mixed orientation.
• Fit to New Paper Size: Select the output paper size to fit the page.
• Reduce/Enlarge: Specifies percentage to reduce or enlarge the image being
printed.
• Image Orientation: Specifies Portrait or Landscape.
• Margin Shift/Margins button: Provides access to page margin settings.
• Defaults button: Returns the Layout tab settings to their default settings.
Watermarks/Overlays Provides access to settings for creating watermarks and overlays to print on pages. A
page overlay is a group of PCL commands and/or data created from a page image
and is stored as an external file.
Advanced Provides access to advanced printer options such as skipping blank pages, printing in
draft mode, banner mode, and size mismatch settings. It provides access to certain
graphic settings and font settings.
WorkCentre 6505 Color Laser Multifunction Printer
74
User Guide
Page 75

Printing
Selecting Printing Options for an Individual Job in Macintosh
To use special printing options for a particular job, change the print driver settings in the application
before sending the job to the printer.
Note: The print driver includes help with more information on selecting printing options.
1. With the document open in your application, click File and then click Print.
2. Select the desired printing options from the menus and drop-down lists that are displayed. For a
list of options, see Printing Options for Macintosh OS X Version 10.5 and Later on page 75.
Note: In Macintosh OS X, click Save from the Presets drop-down list on the Print menu to save the
current printer settings. You can create multiple presets and save each with its own distinctive
name and printer settings. To print jobs using specific printer settings, select the applicable saved
preset in the Presets list.
3. Click Print to print the job.
Printing Options for Macintosh OS X Version 10.5 and Later
For detailed information on using the print driver options, click the question mark (?) button in the print
driver dialog boxes to view the online help.
Driver Drop-Down Title Printing Options
Copies & Pages • Copies: Specifies number of copies and whether to collate.
• Pages: All, Current, Selection, From x to x, Page range.
Layout • Pages per Sheet: Specifies the number of pages to print on each sheet of
paper.
• Layout Direction: Specifies the order in which to print the pages when
printing multiple pages on one sheet of paper.
• Border: Specifies the type and width of border to print around each page
printed on the sheet of paper.
• Two-Sided: When selected, specifies whether to flip the page on the long
edge or the short edge (duplex unit required).
Color Matching • ColorSync: This selection allows you to choose a profile from the Profile
selection menu.
•In printer
Paper Handling • Pages To Print: All Pages, Odd Only, Even Only.
• Destination paper size: (Active only when Scale to fit paper size is selected.)
Specifies the paper size to print to.
• Page Order: Automatic, Normal, Reverse.
Paper Feed • All pages from: Specifies the tray to print all pages from: Auto Select,
Manual Feed Slot, Tray 1, Tray 2 (if installed).
• First page from: Specifies the tray from which to print the first page.
• Remaining from: Specifies the tray from which to print the remaining
pages.
WorkCentre 6505 Color Laser Multifunction Printer
User Guide
75
Page 76

Printing
Driver Drop-Down Title Printing Options
Cover Page • Print Cover Page: None, Before document, After document.
When an option other than None is selected, a cover page prints.
• Cover Page Type: Classified, Confidential, Secret, Standard, Top Secret,
Unclassified.
• Billing Info: A field in which you can specify billing information to print on
the cover page.
Scheduler • Print Document: Now, At [time], On Hold.
• Priority: Urgent, High, Medium, Low.
Job Type Specifies the type of print job: Normal Print, Secure Print, Proof Print. Secure
Print and Proof Print are available with extra RAM memory only.
Job Control • Account Mode: User, Administrator.
• User Settings: Specifies account settings such as name and password.
Printer Features • Print Quality/Color: Specifies output color, image quality, brightness, color
correction method, halftone screen settings, and adjust color balance.
• Color Adjustment: Specifies RGB color adjustment settings.
•Color Balance (C, M, Y, K): Specifies amount of color to use.
• Media Handling: Specifies manual feed slot orientation, paper type, size
mismatch setting, and custom paper auto orientation.
• Printer-specific Options: Image Enhancement, Draft Mode, Skip Blank
Pages, Halftone Screen Lock, Faster B/W documents.
Supply Levels Displays bar graph showing level of toner left in each toner cartridge, and the
useful life remaining of the imaging unit.
Summary Summarizes the driver selections.
WorkCentre 6505 Color Laser Multifunction Printer
76
User Guide
Page 77

Printing on Specialty Media
This section includes:
• Printing Envelopes on page 77
• Printing Labels on page 80
• Printing on Glossy Cardstock on page 82
• Printing on Cardstock on page 85
Printing Envelopes
This section includes:
• Guidelines for Printing Envelope on page 77
• Printing Envelopes from Tray 1 on page 78
• Printing Envelopes from the Manual Feed Slot on page 79
• Printing Envelopes using the PostScript Driver on page 79
• Printing Envelopes using the PCL Driver on page 79
Printing
Guidelines for Printing Envelope
• Envelopes can be printed from Tray 1 and from the manual feed slot.
• Do not perform automatic 2-sided printing using envelopes.
• Successful envelope printing is highly dependent on the quality and construction of the envelopes.
Use envelopes made specifically for laser printers, in the supported sizes. For a listing of supported
envelope sizes for Tray 1 and the manual feed slot, see Supported Paper on page 58.
• Store unused envelopes in their packaging to avoid the effects of moisture and dryness, which can
affect print quality and cause wrinkling. Excessive moisture can cause the envelopes to seal before
or during printing. For best results, maintain constant temperatures and relative humidity.
• Do not use padded envelopes. Purchase envelopes that lie flat.
• Remove air bubbles from the envelopes before loading by setting a heavy book on top of the
envelopes.
• If wrinkling or embossing problems occur, use a different brand of envelope made specifically for
laser printers.
CAUTION: Never use envelopes with windows or metal clasps because they can damage the
printer. Damage caused by using unsupported envelopes is not covered under the Xerox
Warranty, Service Agreement, or Total Satisfaction Guarantee. The Total Satisfaction Guarantee is
available in the United States and Canada. Coverage can vary outside these areas. Please contact
your local representative for details.
®
WorkCentre 6505 Color Laser Multifunction Printer
User Guide
77
Page 78

Printing
wc6505-051
Printing Envelopes from Tray 1
To load envelopes:
1. Gently pull out the paper tray. For details, see Loading Paper in Tray 1 on page 61.
2. Slide the paper guides to the edge of the tray.
3. Insert the envelopes with the flaps closed, flaps down, and flaps to the right. You can load
envelopes up to the maximum fill line in the tray.
Note: You cannot print on the reverse side of the envelope. Envelopes can get wrinkled or the print
quality can be reduced, depending on the envelope type used.
4. Slide the paper guides so they rest lightly against the edges of the envelopes.
5. Insert the tray back into the printer until it stops.
6. On the control panel, press the System button to display the Menu screen.
7. Press the Up Arrow or Down Arrow button to select Tray Settings, then press the OK button.
8. At Tray 1, press OK.
9. Press the Up Arrow or Down Arrow button to select Paper Type, then press OK.
10. Press the Up Arrow or Down Arrow button to select Envelope, then press OK.
11. Press the Return button once to back out of the menu.
12. Press the Up Arrow or Down Arrow button to select Paper Size, then press OK.
13. Press the Up Arrow or Down Arrow button to select the desired envelope size, then press OK.
14. Do one of the following:
• If you are printing using the PostScript driver, go to Printing Envelopes using the PostScript
Driver on page 79.
• If you are printing using the PCL driver, go to Printing Envelopes using the PCL Driver on
page 79.
WorkCentre 6505 Color Laser Multifunction Printer
78
User Guide
Page 79

Printing
wc6505_013
Printing Envelopes from the Manual Feed Slot
Note: You can load only one envelope at a time in the manual feed slot.
To load an envelope:
1. Slide the paper guides of the manual feed slot to fit the envelopes you are using. For details, see
Loading Paper in the Manual Feed Slot on page 63.
2. Insert one envelope with the flaps closed, flaps up, and flaps to the right as shown in the
illustration.
3. Slide the paper guides so they rest lightly against the edge of the envelope.
4. Do one of the following:
• If you are printing using the PostScript driver, go to Printing Envelopes using the PostScript
Driver on page 79.
• If you are printing using the PCL driver, go to Printing Envelopes using the PCL Driver on
page 79.
Printing Envelopes using the PostScript Driver
1. After loading the envelopes in the appropriate tray or the manual feed slot, in the application you
are printing from, open the Print dialog box.
2. Select the WorkCentre 6505 PS printer from the list of printers, then click the Properties or
Preferences button.
3. On the Paper/Output tab, do the following:
a. From the Paper Size list, select the envelope size.
b. From the Paper Type list, select Envelope.
c. From the Paper Tray list, select the tray you are using.
4. Click OK.
5. In the Print dialog box, click OK or Print to start printing.
Printing Envelopes using the PCL Driver
1. After loading the envelopes in the appropriate tray, in the application you are printing from, open
the Print dialog box.
WorkCentre 6505 Color Laser Multifunction Printer
User Guide
79
Page 80

Printing
2. Select the WorkCentre 6505 PCL printer from the list of printers, then click the Properties or
Preferences button.
3. Click the Paper/Output tab, then do the following:
a. From the Paper Size list, select the envelope size.
b. From the Paper Type list, select Envelope.
c. From the Paper Tray list, select the tray you are using.
4. Select the Layout tab.
5. From the Fit to New Paper Size list, select the envelope size.
Note: Some applications do not allow you to rotate the image for printing on envelopes the way
they are fed into the printer. Since you cannot change the way the envelope is fed into the printer,
you can use the special rotation setting of the print driver. In the Layout tab, click the
Booklet/Poster/Mixed Document/Rotation button and select Portrait & Landscape [For
envelopes] from the Image Rotation (180 deg) list, then click OK.
6. Click OK.
7. In the Print dialog box, click OK or Print to start printing.
Printing Labels
This section includes:
• Guidelines for Printing Labels on page 80
• Printing Labels from Tray 1 on page 81
• Printing Labels from the Manual Feed Slot on page 81
®
To order paper or other specialty media, contact your local reseller or go to the Xerox
Supplies website
at www.xerox.com/office/WC6505supplies.
Guidelines for Printing Labels
Note: Labels can be printed from Tray 1 and from the manual feed slot.
• Do not use vinyl labels.
• Print only on one side of the sheet of labels. Use full sheet labels only.
CAUTION: Do not use any sheet where labels are missing; it can damage the printer.
• Do not use labels that are perforated, have backing sheets that have partially peeled away or that
have parts of the labels already removed.
• Store unused labels flat in their original packaging. Leave the sheets of labels inside the original
packaging until ready to use. Return any unused sheets of labels to the original packaging and
reseal it.
• Do not store label sheets in extreme conditions of temperature or humidity. Storing them in
extreme conditions can cause print-quality problems or cause them to jam in the printer.
• Rotate stock frequently. Long periods of storage in extreme conditions can cause labels to curl and
jam in the printer.
WorkCentre 6505 Color Laser Multifunction Printer
80
User Guide
Page 81

Printing
wc6505_015
wc6505_016
Printing Labels from Tray 1
1. Gently pull out the paper tray and slide open the paper guides. For details, see Loading Paper in
Tray 1 on page 61.
2. Fan the labels to release sheets that are stuck together.
3. Insert the labels with the label side up and with the top of the sheets at the front of the tray. Do
not load more than 25 sheets.
4. Adjust the paper guides to fit the sheets.
5. In the application you are using to print the labels, open the Print dialog box then click the
Properties or Preferences button.
6. Click the Paper/Output tab, then do the following:
a. From the Paper Tray list, select Tray 1.
b. From the Paper Size list, select the size of the sheet of labels.
c. From the Paper Type list, select Labels.
7. Click OK.
8. In the Print dialog box, click OK or Print to start printing.
Printing Labels from the Manual Feed Slot
Note: Generally it is best to print labels from Tray 1. The manual feed slot paper path has more
bends, and is more likely to cause the labels to peel off from the backing sheet.
1. Slide the paper guides of the manual feed slot to fit the label sheet. For details, see Loading Paper
in the Manual Feed Slot on page 63.
2. With the labels face down and the top of the sheet toward the printer, slowly insert the sheet into
the manual feel slot until it stops. Ensure that the sheet is entered straight, not crooked. If
necessary, reposition the paper guides to fit the sheet.
WorkCentre 6505 Color Laser Multifunction Printer
User Guide
81
Page 82

Printing
3. In the application you are using to create the labels, open the Print dialog box and select the
WorkCentre 6505 printer. You can use the PCL or the PostScript driver.
4. Click the Properties or Preferences button.
5. Click the Paper/Output tab, then do the following:
a. From the Paper Size list, select the size of the sheet of labels.
b. From the Paper Type list, select Labels.
c. From the Paper Tray list, select Manual Feed Slot.
6. Click OK.
7. In the Print dialog box, click OK or Print to start printing.
Printing on Glossy Cardstock
This section includes:
• Guidelines for Printing on Glossy Cardstock on page 82
• Printing on Glossy Cardstock from Tray 1 on page 82
• Printing on Glossy Cardstock from the Manual Feed Slot on page 84
Guidelines for Printing on Glossy Cardstock
• Use Lightweight Cardstock mode for paper weight less than 163 g/m2.
• Use Heavyweight Cardstock mode for paper weight more than 163 g/m
• You can print on glossy cardstock from Tray 1 or from the manual feed slot.
• Do not perform automatic 2-sided printing using glossy cardstock.
• Do not open sealed packages of glossy cardstock until you are ready to load them into the printer.
• Leave glossy cardstock in the original wrapper and store unopened packages in the original
shipping carton until ready to use.
• Remove all other paper from the tray before loading glossy cardstock.
• Load only the amount of glossy cardstock you plan to use, and remove the unused portion from
the tray when you are finished printing. Put the unused glossy cardstock back in the original
wrapper and seal it for later use.
• Rotate stock frequently. Long periods of storage in extreme conditions can cause glossy cardstock
to curl and jam the printer.
2
.
Printing on Glossy Cardstock from Tray 1
1. Gently pull out the paper tray and slide open the paper guides. For details, see Loading Paper in
Tray 1 on page 61.
WorkCentre 6505 Color Laser Multifunction Printer
82
User Guide
Page 83

2. Fan the sheets to release any that are stuck together.
wc6505_018
3. Insert the glossy cardstock into the tray with the print side face up.
Note: Do not load more than 25 sheets. Do not load the paper above the fill line indicated on the
tray. Overloading the tray can cause jams.
Printing
4. In the application you are printing from, open the Print dialog box and select the
WorkCentre 6505 printer. You can use the PCL or the PostScript driver.
5. Click the Properties or Preferences button.
6. Click the Paper/Output tab, then do the following:
a. From the Paper Size list, select the paper size.
b. From the Paper Type list, select Lightweight Glossy Cardstock or Heavyweight Glossy
Cardstock.
c. From the Paper Tray list, select Tray 1.
7. Select any other desired settings, such as page orientation, then click OK.
8. In the Print dialog box, click OK or Print to start printing.
WorkCentre 6505 Color Laser Multifunction Printer
User Guide
83
Page 84

Printing
wc6505_011
wc6505_052
Printing on Glossy Cardstock from the Manual Feed Slot
1. Slide the paper guides of the manual feed slot to fit the sheet. For details, see Loading Paper in the
Manual Feed Slot on page 63.
2. With the sheet face down and the top toward the printer, slowly insert one sheet into the manual
feel slot until it stops. Ensure that the sheet is entered straight, not crooked. If necessary,
reposition the paper guides to fit the sheet.
3. In the application you are printing from, open the Print dialog box and select the
WorkCentre 6505 printer. If you have both the PCL and the PostScript drivers installed, you can
use either driver.
4. Click the Properties button.
5. Click the Paper/Output tab, then do the following:
a. From the Paper Size list, select the size of the glossy cardstock.
b. From the Paper Type list, select Lightweight Glossy Cardstock or Heavyweight Glossy
Cardstock.
c. From the Paper Tray list, select Manual Feed Slot.
6. Click OK.
7. In the Print dialog box, click OK or Print to start printing.
WorkCentre 6505 Color Laser Multifunction Printer
84
User Guide
Page 85

Printing
Printing on Cardstock
This section includes:
• Guidelines for Printing on Cardstock on page 85
• Printing on Cardstock from Tray 1 on page 85
• Printing on Cardstock from the Manual Feed Slot on page 86
Guidelines for Printing on Cardstock
• You can print on lightweight cardstock and heavyweight cardstock from Tray 1 or from the manual
feed slot.
• Do not perform automatic 2-sided printing using cardstock.
2
g/m
• Lightweight cardstock acceptable weight for this printer is 100–163
• Heavyweight cardstock acceptable for this printer is 163–220
g/m
2
stock to ensure acceptable performance.
• Do not load cardstock of mixed thicknesses in the tray at the same time.
• Do not use cardstock that is coated or designed for inkjet printers.
, 37–60 lb. cover.
, 60–80 lb. cover. Test all thick
Printing on Cardstock from Tray 1
1. Gently pull out the paper tray and slide open the paper guides. For details, see Loading Paper in
Tray 1 on page 61.
2. Fan the sheets to release any that are stuck together.
3. Insert the cardstock into the tray with the print side face up.
Note: Do not load a stack of cardstock higher than 27.6 mm (1.08 in.) in the tray.
4. In the application you are printing from, open the Print dialog box and select the
WorkCentre 6505 printer. You can use the PCL or the PostScript driver.
5. Click the Properties button.
6. Click the Paper/Output tab, then do the following:
a. From the Paper Size list, select the size of the cardstock.
b. From the Paper Type list, select Lightweight Cardstock or Heavyweight Cardstock.
c. From the Paper Tray list, select Tray 1.
7. Click OK.
8. In the Print dialog box, click OK or Print to start printing.
WorkCentre 6505 Color Laser Multifunction Printer
User Guide
85
Page 86

Printing
wc6505_012
Printing on Cardstock from the Manual Feed Slot
1. Slide the paper guides of the manual feed slot to fit the sheet. For details, see Loading Paper in the
Manual Feed Slot on page 63.
2. With the sheet face down, and the top toward the printer, slowly insert one sheet into the manual
feel slot until it stops. Ensure that the sheet is entered straight, not crooked. If necessary,
reposition the paper guides to fit the sheet.
3. In the application you are printing from, open the Print dialog box and select the
WorkCentre 6505 printer. You can use the PCL or the PostScript driver.
4. Click the Properties or Preferences button.
5. Click the Paper/Output tab, then do the following:
a. From the Paper Size list, select the size of the cardstock.
b. From the Paper Type list, select Lightweight Cardstock or Heavyweight Cardstock.
c. From the Paper Tray list, select Manual Feed Slot.
6. Click OK.
7. In the Print dialog box, click OK or Print to start printing.
WorkCentre 6505 Color Laser Multifunction Printer
86
User Guide
Page 87

Printing Custom Sizes
This section includes:
• Defining Custom Paper Sizes on page 87
• Printing on Custom Size Paper on page 89
Note: Custom size paper can be loaded into all trays.
Defining Custom Paper Sizes
This section includes:
• Defining the Custom Paper Size in the Windows PostScript Driver on page 87
• Creating a Custom Paper Size Through the Windows Print Server Properties on page 88
• Creating a Custom Paper Size for the Windows PCL Driver on page 88
• Creating a Custom Paper Size for Macintosh on page 88
Notes:
• The custom size defined must be within the maximum and minimum size range for the
printer paper tray you are using. For details, see the custom size paper ranges given for
each tray in Supported Paper on page 58.
• You can create custom paper sizes for use with both the PostScript and PCL print drivers,
but the method for each is different. For optimum results, follow the instructions
carefully.
• If you get an error message when creating a custom size, you might not have permission
to save custom paper sizes on your computer. See your system administrator for help.
Printing
Defining the Custom Paper Size in the Windows PostScript Driver
Note: You can save only one custom paper size at a time as you print. Once saved, the dimensions
are retained until you change them. To create a custom paper size for the PostScript driver and
save it under a unique name for repeat use, see Creating a Custom Paper Size Through the
Windows Print Server Properties on page 88.
To define a custom paper size using the PostScript print driver:
1. Navigate to your printer directory or list, then right-click the WorkCentre 6505 PS driver and
select Properties.
2. In the Properties dialog box, click the Printing Preferences button.
3. On the Paper/Output tab, from the Paper Size list, select Custom Page Size.
4. In the PostScript Custom Size Settings dialog box, select the units of measurement to use.
5. In the Custom Size Settings section, specify the size for the short edge (width) and the long edge
(length) of the paper, then click OK.
6. In the Printing Preferences dialog box, click OK.
Note: To change the custom size, in the Paper/Output tab, click the Edit button below the Paper
Size field. Make the desired changes, and save your changes in all applicable dialog boxes.
WorkCentre 6505 Color Laser Multifunction Printer
User Guide
87
Page 88

Printing
Creating a Custom Paper Size Through the Windows Print Server Properties
Note: This method allows you to create and save a custom paper size under a unique name for use
with the Windows PostScript driver.
1. In Windows, navigate to your printer directory or list. In the Printers and Faxes folder, click the File
menu and select Server Properties.
The Print Server Properties dialog box opens.
2. Click the Forms tab, then select the Create a new form check box.
3. In the Form name field, type a name for your custom size, replacing the name that appears.
4. In the Form description section, select the units of measurement to use, then define the paper
width and height, and printer area margins.
5. Click the Save Form button, then click Close.
The custom size is available as an option in the Print dialog box of most applications when you
select the WorkCentre 6505 PS driver. The exact location varies with the application.
Creating a Custom Paper Size for the Windows PCL Driver
Notes:
• The PCL print driver is available for Windows only.
• Custom paper sizes created in the PCL driver become available in the Paper Size list on
the Paper/Output tab of the print driver. They are also available in the Print dialog box of
most applications. The exact location varies with the application.
1. Navigate to your printer directory or list, then right-click the WorkCentre 6505 PCL driver and
select Properties.
2. In the Properties dialog box, click the Configuration tab.
3. At the bottom of the Configuration tab, click the Custom Paper Size button.
The Custom Paper Size dialog box opens.
4. In the Units section, select the units of measurement to use for defining the page size.
5. In the Short Edge field, specify the width of the page.
6. In the Long Edge field, specify the length of the page.
7. To save this custom size, select the Name Paper Size check box, then type a name in the Paper
Name field.
8. Click OK.
9. In the Properties dialog box, click OK.
The custom size is available as an option in the Print dialog box of most applications when you
select the WorkCentre 6505 PCL driver. The custom size is also available in the Paper Size field, in
the Paper/Output tab of the PCL driver.
Creating a Custom Paper Size for Macintosh
1. In the application you are printing from, select File > Page Setup.
2. From the Format For drop-down list, select the WorkCentre 6505.
3. From the Paper Size drop-down list, select Manage Custom Sizes.
4. In the Custom Paper Sizes window, click the plus (+) button to add the new custom size.
WorkCentre 6505 Color Laser Multifunction Printer
88
User Guide
Page 89

5. Enter the dimensions of the custom paper size.
6. In the Non-Printable Area drop-down list, select the WorkCentre 6505.
7. Click the OK button to close the Custom Paper Sizes window.
8. Click OK to close the Page Setup window.
Note: To use the custom paper size, select File > Print, and choose the custom size you created
from the Paper Size drop-down list.
Printing on Custom Size Paper
This section includes:
• Printing on Custom Size Paper Using the Windows PostScript Driver on page 89
• Printing on Custom Size Paper Using the Windows PCL Driver on page 89
Note: When setting the paper size in the print driver and control panel, be sure to specify the same
size as the paper in the tray. Setting the wrong size for printing can cause a printer error.
Printing on Custom Size Paper Using the Windows PostScript Driver
Printing
1. Load the custom size paper in the tray you want to use. For details, see Loading Paper on page 61.
2. In the application you are printing from, open the Print dialog box and select the
WorkCentre 6505 PS driver.
3. Do one of the following:
• To print using a custom size, in the Print dialog box, select the custom paper size name from
the dialog box size menu or list. Click the Properties button and skip to step 4.
• To print using the Custom Page Size defined in the PostScript driver properties, in the Print
dialog box, click the Properties button. On the Paper/Output tab, select Custom Page Size
from the Paper Size list. In the PostScript Custom Size Settings dialog box, leave the settings
as is or change them to match the paper you are printing on. Click OK.
4. Click on the Paper/Output tab, then do the following:
a. From the Paper Type list, select the paper type.
b. From the Paper Tray list, select the tray to print from.
5. Select any other desired options, then click OK.
6. In the Print dialog box, click OK or Print to start printing.
Printing on Custom Size Paper Using the Windows PCL Driver
1. Load the custom size paper in the tray you want to use. For details, see Loading Paper on page 61.
2. In the application you are printing from, open the Print dialog box and select the
WorkCentre 6505 PCL driver.
3. Click the Properties button.
4. Click the Paper/Output tab, then do the following:
a. From the Paper Size list, select the name of a custom size you created.
b. From the Paper Type list, select the paper type.
c. From the Paper Tray list, select the tray to print from.
WorkCentre 6505 Color Laser Multifunction Printer
User Guide
89
Page 90

Printing
5. Select any other desired options, then click OK.
6. In the Print dialog box, click OK or Print to start printing.
WorkCentre 6505 Color Laser Multifunction Printer
90
User Guide
Page 91

Printing on Both Sides of the Paper
This section includes:
• Automatic 2-Sided Printing Guidelines on page 91
• Binding Edge Options on page 91
• Automatic 2-Sided Printing on page 92
• Manual 2-Sided Printing on page 92
Note: Automatic 2-sided printing is available for the WorkCentre 6505DN configuration. Manual
2-sided printing using Tray 1 is available for both WorkCentre 6505 configurations. The PCL 6 print
driver for Windows is the only driver that supports manual 2-sided printing. For details, see
Performing Manual 2-sided Printing from Tray 1 on page 93. However, you can use the manual
feed slot to print 2-sided pages one sheet at a time using the PostScript driver. For details, see
Performing Manual 2-sided Printing from the Manual Feed Slot on page 93.
Automatic 2-Sided Printing Guidelines
Printing
Before printing a 2-sided document, verify that the paper is a supported size for the tray. For a list of
supported sizes, see Supported Paper on page 58.
Do not use the following media for automatic 2-sided printing:
• Transparencies
•Envelopes
•Labels
• Any die-cut specialty media, such as business cards
•Cardstock
Binding Edge Options
When you use the print driver to select 2-sided printing, you also select the binding edge. The binding
edge determines how the pages turn. The actual outcome depends on the orientation (portrait or
landscape) of images on the page, as shown in the following illustrations.
Portrait Landscape
Flip on Long Edge Flip on Short Edge Flip on Long Edge Flip on Short Edge
WorkCentre 6505 Color Laser Multifunction Printer
User Guide
91
Page 92

Printing
Automatic 2-Sided Printing
You can perform automatic 2-sided printing from Tray 1 and, if installed, the 250-sheet feeder (Tray 2).
To perform automatic 2-sided printing:
1. Insert the paper into the desired tray. For more information, see Loading Paper on page 61.
2. In the print driver, select 2-sided printing:
• Windows: On the Paper/Output tab, from the 2-Sided Print drop-down list, select Flip on long
edge or Flip on short edge.
• Macintosh: In the Print dialog box, from the Presets menu, select Layout. Then select Long-
edged printing or Short-edged printing.
For details, see Binding Edge Options on page 91.
3. Select any other desired printing options, then click OK.
4. Click OK or Print to start printing.
Note: For optional printer features, such as 2-sided printing, to be available in the print driver
dialog boxes, the optional features must be installed and enabled. If you have not enabled your
installed optional features, see Enabling Optional Features on page 46.
See also:
Automatic 2-Sided Printing Guidelines on page 91
Manual 2-Sided Printing
This section includes:
• Performing Manual 2-sided Printing from Tray 1 on page 93
• Performing Manual 2-sided Printing from the Manual Feed Slot on page 93
If you do not have the optional duplex unit installed, you can still print on both sides of some paper.
You can also use this technique for printing on paper incompatible with the duplex unit.
CAUTION: Use only paper specified for use with this printer. Damage caused by unsupported
paper is not covered under the Xerox
Guarantee. The Total Satisfaction Guarantee is available in the United States and Canada.
Coverage can vary outside these areas. Please contact your local representative for details.
®
Warranty, Service Agreement, or Total Satisfaction
WorkCentre 6505 Color Laser Multifunction Printer
92
User Guide
Page 93

Printing
Performing Manual 2-sided Printing from Tray 1
Notes:
• This method of manual 2-sided printing is only available using the PCL print driver.
• Do not use this method with cardstock or glossy cardstock.
• This method requires the Productivity Kit to be installed in the printer for a total of
768 MB of RAM. For information on your printer configuration and available optional
features, see Configurations and Options on page 21.
• The RAM Disk feature of the printer must also be enabled for you to use this method . For
information on enabling this option, see Enabling Optional Features on page 46.
1. Load Tray 1 with paper acceptable for use in Tray 1. For details, see Supported Paper on page 58.
2. In the application you are printing from, open the Print dialog box and select the
WorkCentre 6505 PCL driver.
3. Click the Properties button.
4. Click the Advanced tab.
5. In the Other Settings section, in the Items list, select Electronic Sort.
6. In the Electronic Sort field below the Items list, select Off.
7. Click the Paper/Output tab, then do the following:
a. From the Paper Tray list, select Tray 1.
b. From the 2-Sided Print list, select Flip on long edge (Manual) or Flip on short edge
(Manual).
c. From the Paper Type field, select the paper type.
d. Select any other desired settings, then click OK.
8. In the Print dialog box, specify the pages to print, then click OK or Print to start printing.
Note: You do not need to specify printing odd or even pages. Specify all pages or a page range.
The driver sends the even pages, then pauses the printer so you can insert the printed pages back
into Tray 1.
The Setting Method for Paper Tray 1 Duplex window opens.
Note: Leave this window open until you complete the entire print job. It contains instructions for
reloading the printed pages into the paper tray.
9. When printing is complete, lift the printed pages from the paper tray without turning them over or
around, and place them in the paper tray with the blank sides of the pages facing up.
10. Close the tray.
11. On the printer control panel, press the OK button to resume printing.
Performing Manual 2-sided Printing from the Manual Feed Slot
1. Print the first side of a sheet of paper.
2. Adjust the paper guides in the manual feed slot to fit the printed sheet.
3. Insert the sheet evenly into the manual feed slot with the printed side face down.
Note: If the paper looks skewed after the printer pulls it in, gently remove the paper and insert it
again.
WorkCentre 6505 Color Laser Multifunction Printer
User Guide
93
Page 94

Printing
4. In the print file, select Print from the File menu.
5. In the Print dialog box, select the appropriate print driver, then click the Properties button.
6. Click the Paper/Output tab, then do the following:
a. From the Paper Size list, select the paper size.
b. From the Paper Type list, select the paper type.
c. From the Paper Tray list, select Manual Feed Slot.
7. Click OK.
8. In the Print dialog box, specify the page you want to print.
9. Click Print or OK to start printing.
WorkCentre 6505 Color Laser Multifunction Printer
94
User Guide
Page 95

Printing
Printing Using Secure Print
This section includes:
• Storing a Print Job in Memory on page 95
• Printing a Secure Print Job on page 96
Notes:
• Secure Print requires the Productivity Kit to be installed in the printer for a total of
768 MB of RAM. For information on your printer configuration and available optional
features, see Configurations and Options on page 21.
• The RAM Disk feature of the printer must also be enabled for you to use Secure Print. For
information on enabling this option, see Enabling Optional Features on page 46.
Secure Print allows you to store a document in the printer, then print it from the control panel. When
sending a Secure Print document to the printer, you can assign a password. When you retrieve the print
job you must enter the same password at the control panel. You can use this feature to send
confidential documents to the printer and print them when you are at the printer.
You can also store documents in the printer without assigning a password. Store frequently used
documents in the printer, then print them on demand without sending the print job from the computer
each time.
Storing a Print Job in Memory
Set up Secure Print print jobs using the PCL or PostScript print driver at your computer.
To store a print job in memory:
1. In the application you are printing from, open the Print dialog box.
2. Select your WorkCentre 6505 printer, then click the Properties button.
3. Click the Paper/Output tab, then do the following:
a. From the Job Type list, select Secure Print.
b. If you are using the PostScript driver, click the Setup button. For the PCL driver, click the
Setting button.
c. In the Secure Print dialog box, in the Username field, type your name, up to eight characters.
d. In the Password field, enter a numeric password.
Note: If you leave the password field empty, anyone can print the document without entering the
password.
e. In the Retrieve Document Name field, do one of the following:
• To use a specific document name to access the document from the printer control panel,
select Enter Document Name. In the Document Name field, type a name for the
document, up to 12 characters. This name appears on the control panel.
• To display a timestamp on the control panel, select Use Existing Name if you are using
the PostScript driver, or Auto Retrieve for the PCL driver.
f. Click OK.
WorkCentre 6505 Color Laser Multifunction Printer
User Guide
95
Page 96

Printing
4. Select any other printing options, then click OK.
5. In the Print dialog box, click OK or Print.
6. When you are ready to print, follow the instructions in Printing a Secure Print Job on page 96.
Note: Any print jobs stored in the RAM are erased when the printer is turned off or loses power.
Printing a Secure Print Job
To print a stored Secure Print job at the control panel:
1. Press the Print button.
2. At Secure Print, press the OK button.
3. Press the Up Arrow or Down Arrow button to select the username you created when you set up
the Secure Print, then press OK.
4. Use the alphanumeric keypad to enter the password that you assigned to the document, then
press OK.
5. Press the Up Arrow or Down Arrow button to select one of the following:
• All Documents
• The timestamp assigned to the document
• The document name you created
6. Press OK.
7. Press the Up Arrow or Down Arrow button to select one of the following:
• To delete the document from memory after printing, select Delete after Print, then press OK.
Use the Up Arrow and Down Arrow buttons or the alphanumeric keypad to indicate the
number of copies to print.
• To delete the document without printing it, select Delete.
8. Press OK.
Note: Any print jobs stored in the RAM are erased when the printer is switched off or loses power.
See also:
Storing a Print Job in Memory on page 95
WorkCentre 6505 Color Laser Multifunction Printer
96
User Guide
Page 97

Printing
Printing Using Proof Print
This section contains:
• Setting Up a Proof Print Job on page 97
• Printing a Proof Print Job on page 98
Notes:
• Proof Print requires that you have the Productivity Kit installed in the printer. For
information on your printer configuration and available optional features, see
Configurations and Options on page 21.
• The RAM Disk feature of the printer must also be enabled for you to use Proof Print. For
information on enabling this option, see Enabling Optional Features on page 46.
The Proof Print feature enables you to store a multiple-copy print job in the printer, then review one set
before printing the remainder. If you are satisfied with the first set, you can print the remaining copies
from the control panel.
Setting Up a Proof Print Job
You set up Proof Print print jobs in the print driver at your computer. You can use the PCL or the
PostScript drivers for Proof Print. After setup, one copy of the job prints for you to review. Then you can
print the rest of the copies or delete them from the printer control panel.
1. In the application you are printing from, open the Print dialog box.
2. Select your WorkCentre 6505 printer, then click the Properties button.
3. Click the Paper/Output tab, then do the following:
a. From the Job Type list, select Proof Print.
b. If you are using the PostScript driver, click the Setup button. For the PCL driver, click the
Setting button.
c. In the Proof Print dialog box, in the Username field, type your name, up to eight characters.
d. In the Retrieve Document Name field, do one of the following:
• To use a specific document name to access the document from the printer control panel,
select Enter Document Name. In the Document Name field, type a name for the
document, up to 12 characters. This name appears on the control panel.
• To display a timestamp on the control panel, select Use Existing Name if you are using
the PostScript driver, or Auto Retrieve for the PCL driver.
e. Click OK.
4. Select any other printing options, then click OK.
5. In the Print dialog box, click OK or Print.
Note: Do not select the number of copies. You do that at the control panel later when you print.
One set of the job prints. Review this set. If the set is satisfactory, you can print the remaining sets
from the control panel. For details, see Printing a Proof Print Job on page 98.
WorkCentre 6505 Color Laser Multifunction Printer
User Guide
97
Page 98

Printing
Printing a Proof Print Job
After reviewing the first set that printed when you sent the document, you can print the remaining sets
from the printer control panel.
1. At the control panel, press the Print button to access the Walk-Up printing feature.
2. Press the Up Arrow or Down Arrow button to select Proof Print, then press the OK button.
3. Press the Up Arrow or Down Arrow button to select the username you created when you set up
the Proof Print, then press OK.
4. Press the Up Arrow or Down Arrow button to select one of the following:
• All Documents
• The document name you created
• The timestamp assigned to the document
5. Press OK.
6. Press the Up Arrow or Down Arrow button to select one of the following:
• To delete the document from memory after printing, select Delete after Print, then press OK.
Use the Up Arrow and Down Arrow buttons or the alphanumeric keypad to indicate the
number of copies to print.
• To delete the document without printing it, select Delete.
• To keep the document in the printer memory, select Print and Save, then press OK. Use the
Up Arrow and Down Arrow buttons or the alphanumeric keypad to indicate the number of
copies to print.
7. Press OK.
Note: Any print jobs stored in the RAM are erased when the printer is turned off or loses power.
See also:
Setting Up a Proof Print Job on page 97
WorkCentre 6505 Color Laser Multifunction Printer
98
User Guide
Page 99

Copying
This chapter includes:
• Basic Copying on page 100
• Adjusting Copying Options on page 102
• Changing the Default Settings on page 107
5
WorkCentre 6505 Color Laser Multifunction Printer
User Guide
99
Page 100

Copying
wc6505_019
wc6505_020
Basic Copying
To m ak e c op i es :
1. On the control panel, press the Clear All button to clear previous copy settings.
2. Load your original documents:
• Use the document glass for single pages or paper that cannot be fed using the document
feeder. Place the first page of the document face up, in the top left corner of the document
glass.
• Use the document feeder for multiple or single pages. Remove any staples and paper clips
from the pages, then place them face up in the document feeder.
3. On the control panel, press the Copy button.
4. Using the control panel keypad, enter the desired number of copies. The number of copies
appears on the upper right corner of the display. To reset the number of copies to 1, press the
Clear All button.
5. Press the Up Arrow or Down Arrow button to select the copying option you want to change. For
details, see Adjusting Copying Options on page 102.
6. Press the Start button. One set of copies prints.
If you place originals in the document feeder, copying continues until the document feeder is
empty.
Document Glass
Lift the document feeder or the document
glass cover, then place the original face
down in the upper left corner of the
document glass.
Document Feeder
Insert originals face up with the top of the page
entering the feeder first. Adjust the paper guides
so they fit against the originals.
Automatic Document Feeder Guidelines
The Automatic Document Feeder (ADF) accommodates the following original sizes:
• Width: 148 –216 mm (4.1 in. – 8.5 in.)
• Length: 210 –355.6 mm (8.3 in. – 14 in.)
WorkCentre 6505 Color Laser Multifunction Printer
100
User Guide
 Loading...