


April 2013
702P01454
®
Xerox® WorkCentre
Network Addendum
5019/5021

©2013 Xerox Corporation. All rights reserved. XEROX®, XEROX and Design®, CentreWare® and WorkCentre® are trademarks of Xerox
Corporation in the United States and/or other countries.
Microsoft, Windows, Windows Server, Windows XP, Windows Vista, Windows 7, and Windows 8 are trademarks or registered
trademarks of Microsoft Corporation.
Microsoft product screen shot(s) reprinted with permission from Microsoft Corporation.
Document version 1.0: April 2013
BR6348

Contents
Preface . . . . . . . . . . . . . . . . . . . . . . . . . . . . . . . . . . . . . . . . . . . . . . . . . . . . . . . . . . . . . . . . . . . . . . . . . . . . . . . . . . .5
Network environment . . . . . . . . . . . . . . . . . . . . . . . . . . . . . . . . . . . . . . . . . . . . . . . . . . . . . . . . . . . . . . . . . . . . . 6
Print feature . . . . . . . . . . . . . . . . . . . . . . . . . . . . . . . . . . . . . . . . . . . . . . . . . . . . . . . . . . . . . . . . . . . . . . . . . .6
Scan feature . . . . . . . . . . . . . . . . . . . . . . . . . . . . . . . . . . . . . . . . . . . . . . . . . . . . . . . . . . . . . . . . . . . . . . . . . .6
Connecting the Ethernet cable . . . . . . . . . . . . . . . . . . . . . . . . . . . . . . . . . . . . . . . . . . . . . . . . . . . . . . . . . . . . . 7
Setting the network environment. . . . . . . . . . . . . . . . . . . . . . . . . . . . . . . . . . . . . . . . . . . . . . . . . . . . . . . . . . . 8
Setting the machine's IP address (IPv4). . . . . . . . . . . . . . . . . . . . . . . . . . . . . . . . . . . . . . . . . . . . . . . . .8
Setting the machine's IP address (IPv6). . . . . . . . . . . . . . . . . . . . . . . . . . . . . . . . . . . . . . . . . . . . . . . . .9
Using the Printer Setup Utility for Setting the IP Address . . . . . . . . . . . . . . . . . . . . . . . . . . . . . . . 10
Activating the communication port. . . . . . . . . . . . . . . . . . . . . . . . . . . . . . . . . . . . . . . . . . . . . . . . . . . . . . . 13
Using CentreWare Internet Services . . . . . . . . . . . . . . . . . . . . . . . . . . . . . . . . . . . . . . . . . . . . . . . . . . . . . . 15
CentreWare Internet Services . . . . . . . . . . . . . . . . . . . . . . . . . . . . . . . . . . . . . . . . . . . . . . . . . . . . . . . . 15
Supported environments and settings. . . . . . . . . . . . . . . . . . . . . . . . . . . . . . . . . . . . . . . . . . . . . . . . . 15
Starting CentreWare Internet Services . . . . . . . . . . . . . . . . . . . . . . . . . . . . . . . . . . . . . . . . . . . . . . . . 16
Setting items on CentreWare Internet Services . . . . . . . . . . . . . . . . . . . . . . . . . . . . . . . . . . . . . . . . 17
Properties tab . . . . . . . . . . . . . . . . . . . . . . . . . . . . . . . . . . . . . . . . . . . . . . . . . . . . . . . . . . . . . . . . . . . . . . . 17
Description . . . . . . . . . . . . . . . . . . . . . . . . . . . . . . . . . . . . . . . . . . . . . . . . . . . . . . . . . . . . . . . . . . . . . . 17
Energy Saver Settings (general setup) . . . . . . . . . . . . . . . . . . . . . . . . . . . . . . . . . . . . . . . . . . . . . 18
Internet Services Settings (general setup) . . . . . . . . . . . . . . . . . . . . . . . . . . . . . . . . . . . . . . . . . 18
Port Settings (connectivity) . . . . . . . . . . . . . . . . . . . . . . . . . . . . . . . . . . . . . . . . . . . . . . . . . . . . . . . 18
Ethernet (connectivity > physical connections) . . . . . . . . . . . . . . . . . . . . . . . . . . . . . . . . . . . . . 19
TCP/IP (connectivity > protocol) . . . . . . . . . . . . . . . . . . . . . . . . . . . . . . . . . . . . . . . . . . . . . . . . . . 19
SNMP configuration (connectivity > protocol) . . . . . . . . . . . . . . . . . . . . . . . . . . . . . . . . . . . . . 20
LPD (connectivity > protocol) . . . . . . . . . . . . . . . . . . . . . . . . . . . . . . . . . . . . . . . . . . . . . . . . . . . . . 22
Port9100 (connectivity > protocol) . . . . . . . . . . . . . . . . . . . . . . . . . . . . . . . . . . . . . . . . . . . . . . . . 22
HTTP (connectivity > protocol). . . . . . . . . . . . . . . . . . . . . . . . . . . . . . . . . . . . . . . . . . . . . . . . . . . . 23
IP Filtering (security) . . . . . . . . . . . . . . . . . . . . . . . . . . . . . . . . . . . . . . . . . . . . . . . . . . . . . . . . . . . . . 23
System administrator settings (security). . . . . . . . . . . . . . . . . . . . . . . . . . . . . . . . . . . . . . . . . . . 25
Support tab . . . . . . . . . . . . . . . . . . . . . . . . . . . . . . . . . . . . . . . . . . . . . . . . . . . . . . . . . . . . . . . . . . . . . . . . . 25
Support . . . . . . . . . . . . . . . . . . . . . . . . . . . . . . . . . . . . . . . . . . . . . . . . . . . . . . . . . . . . . . . . . . . . . . . . . 25
Setting the options configuration . . . . . . . . . . . . . . . . . . . . . . . . . . . . . . . . . . . . . . . . . . . . . . . . . . . . . . . . 26
Right side and rear machine components . . . . . . . . . . . . . . . . . . . . . . . . . . . . . . . . . . . . . . . . . . . . . 26
Using the Ethernet interface . . . . . . . . . . . . . . . . . . . . . . . . . . . . . . . . . . . . . . . . . . . . . . . . . . . . . . . . . 27
Clock and Network settings . . . . . . . . . . . . . . . . . . . . . . . . . . . . . . . . . . . . . . . . . . . . . . . . . . . . . . . . . . . . . . 30
Entering System Administration mode . . . . . . . . . . . . . . . . . . . . . . . . . . . . . . . . . . . . . . . . . . . . . . . . 30
Changing the settings . . . . . . . . . . . . . . . . . . . . . . . . . . . . . . . . . . . . . . . . . . . . . . . . . . . . . . . . . . . . . . . 31
Exiting System Administration mode . . . . . . . . . . . . . . . . . . . . . . . . . . . . . . . . . . . . . . . . . . . . . . . . . 32
Clock settings . . . . . . . . . . . . . . . . . . . . . . . . . . . . . . . . . . . . . . . . . . . . . . . . . . . . . . . . . . . . . . . . . . . . . . . 32
Network settings . . . . . . . . . . . . . . . . . . . . . . . . . . . . . . . . . . . . . . . . . . . . . . . . . . . . . . . . . . . . . . . . . . . . 33
WorkCentre 5019/5021
Network Addendum
iii

Contents
Network-related problems . . . . . . . . . . . . . . . . . . . . . . . . . . . . . . . . . . . . . . . . . . . . . . . . . . . . . . . . . . . . . . . 38
Problems using TCP/IP (LPD/Port9100) . . . . . . . . . . . . . . . . . . . . . . . . . . . . . . . . . . . . . . . . . . . . . . . 38
Problems using CentreWare Internet Services . . . . . . . . . . . . . . . . . . . . . . . . . . . . . . . . . . . . . . . . . 38
Internet/intranet connection problems. . . . . . . . . . . . . . . . . . . . . . . . . . . . . . . . . . . . . . . . . . . . . . . . 39
Unable to connect to the Internet or an intranet. . . . . . . . . . . . . . . . . . . . . . . . . . . . . . . . . . . 40
Unable to connect to the desired Web server . . . . . . . . . . . . . . . . . . . . . . . . . . . . . . . . . . . . . . 41
IPv4 or IPv6 connection problems . . . . . . . . . . . . . . . . . . . . . . . . . . . . . . . . . . . . . . . . . . . . . . . . . . . . 41
Unable to connect to an IPv4 address. . . . . . . . . . . . . . . . . . . . . . . . . . . . . . . . . . . . . . . . . . . . . 42
Unable to connect to an IPv6 address. . . . . . . . . . . . . . . . . . . . . . . . . . . . . . . . . . . . . . . . . . . . . 42
Unable to print in an IPv6 environment . . . . . . . . . . . . . . . . . . . . . . . . . . . . . . . . . . . . . . . . . . . 42
Other IPv6 problems . . . . . . . . . . . . . . . . . . . . . . . . . . . . . . . . . . . . . . . . . . . . . . . . . . . . . . . . . . . . . 42
Notes and restrictions . . . . . . . . . . . . . . . . . . . . . . . . . . . . . . . . . . . . . . . . . . . . . . . . . . . . . . . . . . . . . . . . . . . 43
Notes and restrictions when connecting to Internet or intranet . . . . . . . . . . . . . . . . . . . . . . . . . 43
Notes and restrictions when operating from computers . . . . . . . . . . . . . . . . . . . . . . . . . . . . . . . . 43
Notes and restrictions for using TCP/IP (LPD/Port9100) . . . . . . . . . . . . . . . . . . . . . . . . . . . . . . . . 43
Notes and restrictions for IPv6 connection . . . . . . . . . . . . . . . . . . . . . . . . . . . . . . . . . . . . . . . . . . . . 44
Index. . . . . . . . . . . . . . . . . . . . . . . . . . . . . . . . . . . . . . . . . . . . . . . . . . . . . . . . . . . . . . . . . . . . . . . . . . . . . . . . . . . 47
WorkCentre 5019/5021
Network Addendum
iv

Preface
Thank you for selecting the WorkCentre 5019/5021 (hereafter referred to as "the machine").
This guide describes how to configure the machine for use in a networking environment and the
precautions you should follow during operation. To get the most out of the machine and to use it
effectively, be sure to read this guide before use.
This guide assumes that you have a basic knowledge of computer and networking environments. For
information on these environments, refer to the manuals provided with the computer, operating
system, and network system.
After reading this guide, be sure to keep it handy for quick reference.
Note Also refer to the WorkCentre 5019/5021 User Guide on the original CD-ROM shipped with
the machine or visit www.xerox.com.
Xerox® WorkCentre® 5019/5021
Network Addendum
5
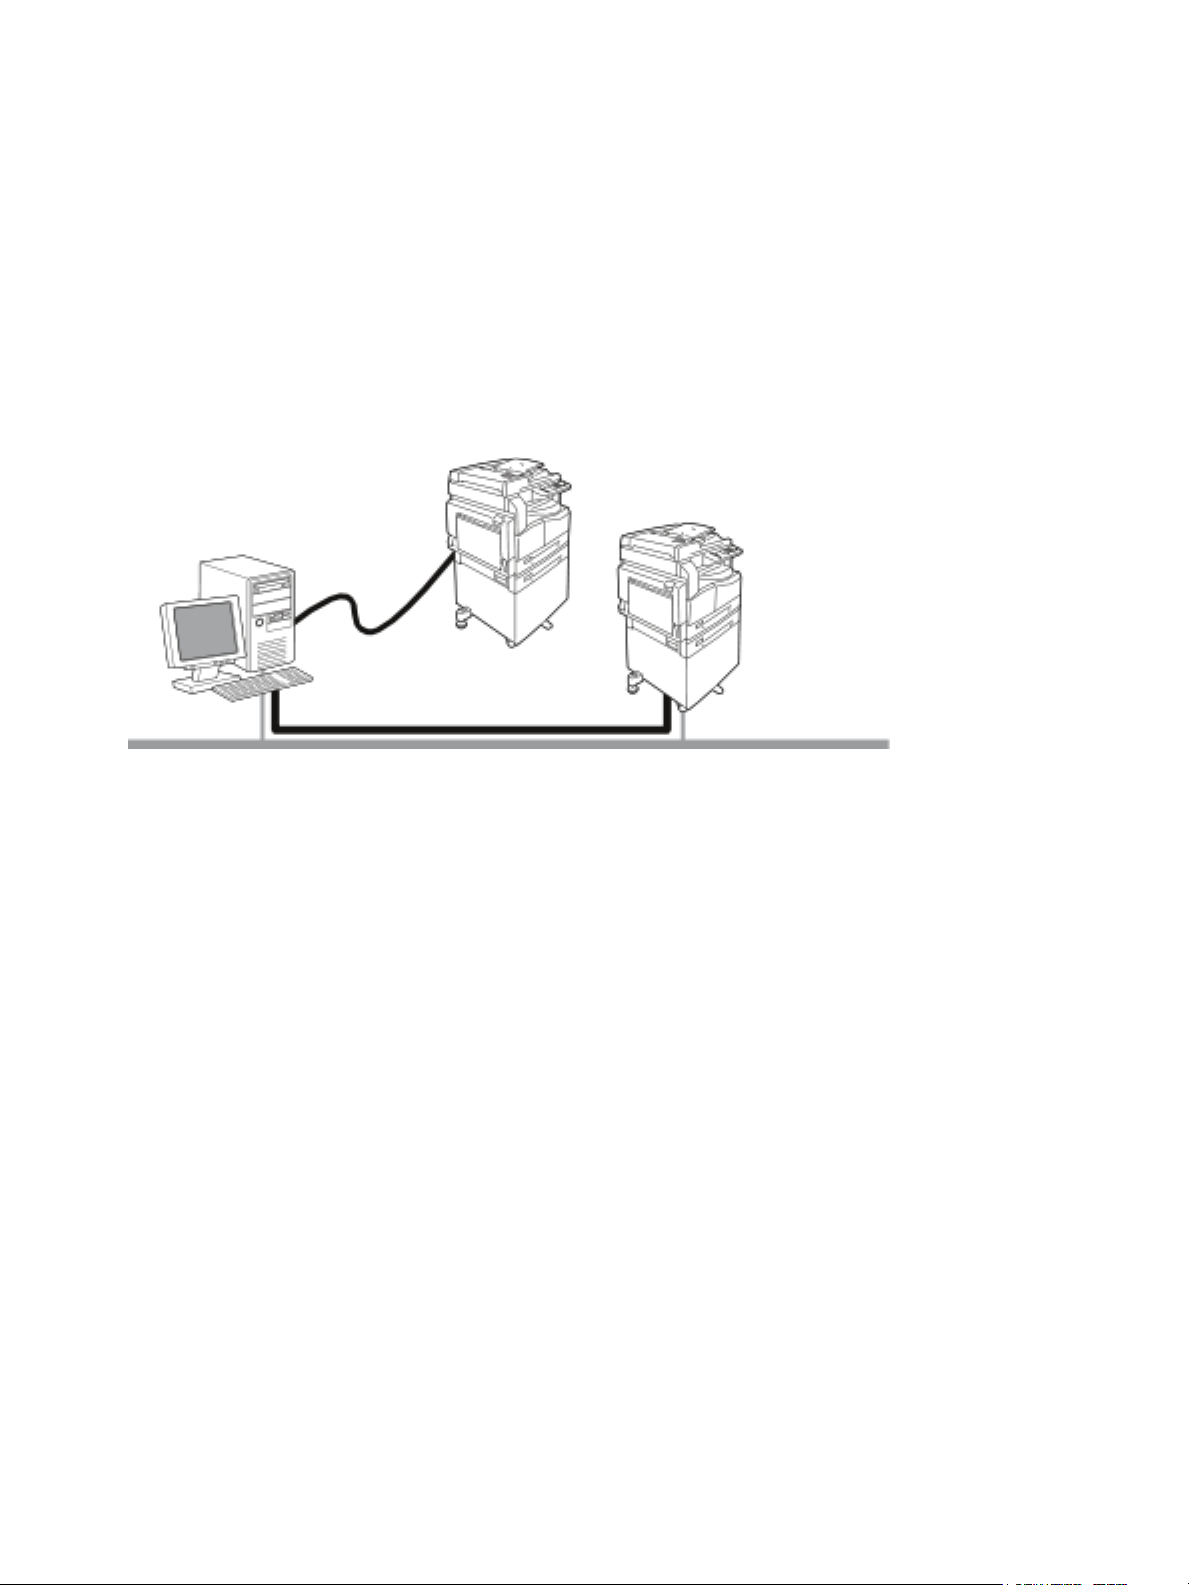
Network environment
Network Connection
LPD / Port9100
This section describes the environment settings needed to use the machine as a network printer.
Note To connect the machine directly to a computer to use as a local printer, refer to the
WorkCentre 5019/5021 User Guide.
Print feature
The machine can be connected to a network for use as a network printer.
Print from network-connected computers using the TCP/IP protocol.
To use the machine as a network printer, you need to activate the port to use for printing.
• LPD: Activate this setting when using the LPD port.
• Port9100: Activate this setting when using the Port9100 port.
Note This feature is available when the optional Network Print Kit is installed.
For information on how to set TCP/IP, refer to Setting the network environment on page 8.
For information on how to activate a communication port, refer to Activating the communication
port on page 13.
Scan feature
The machine supports the scan feature using the USB interface connection.
Important Scanning through an Ethernet network is not supported.
For more information, refer to the WorkCentre 5019/5021 User Guide.
6
Xerox® WorkCentre® 5019/5021
Network Addendum
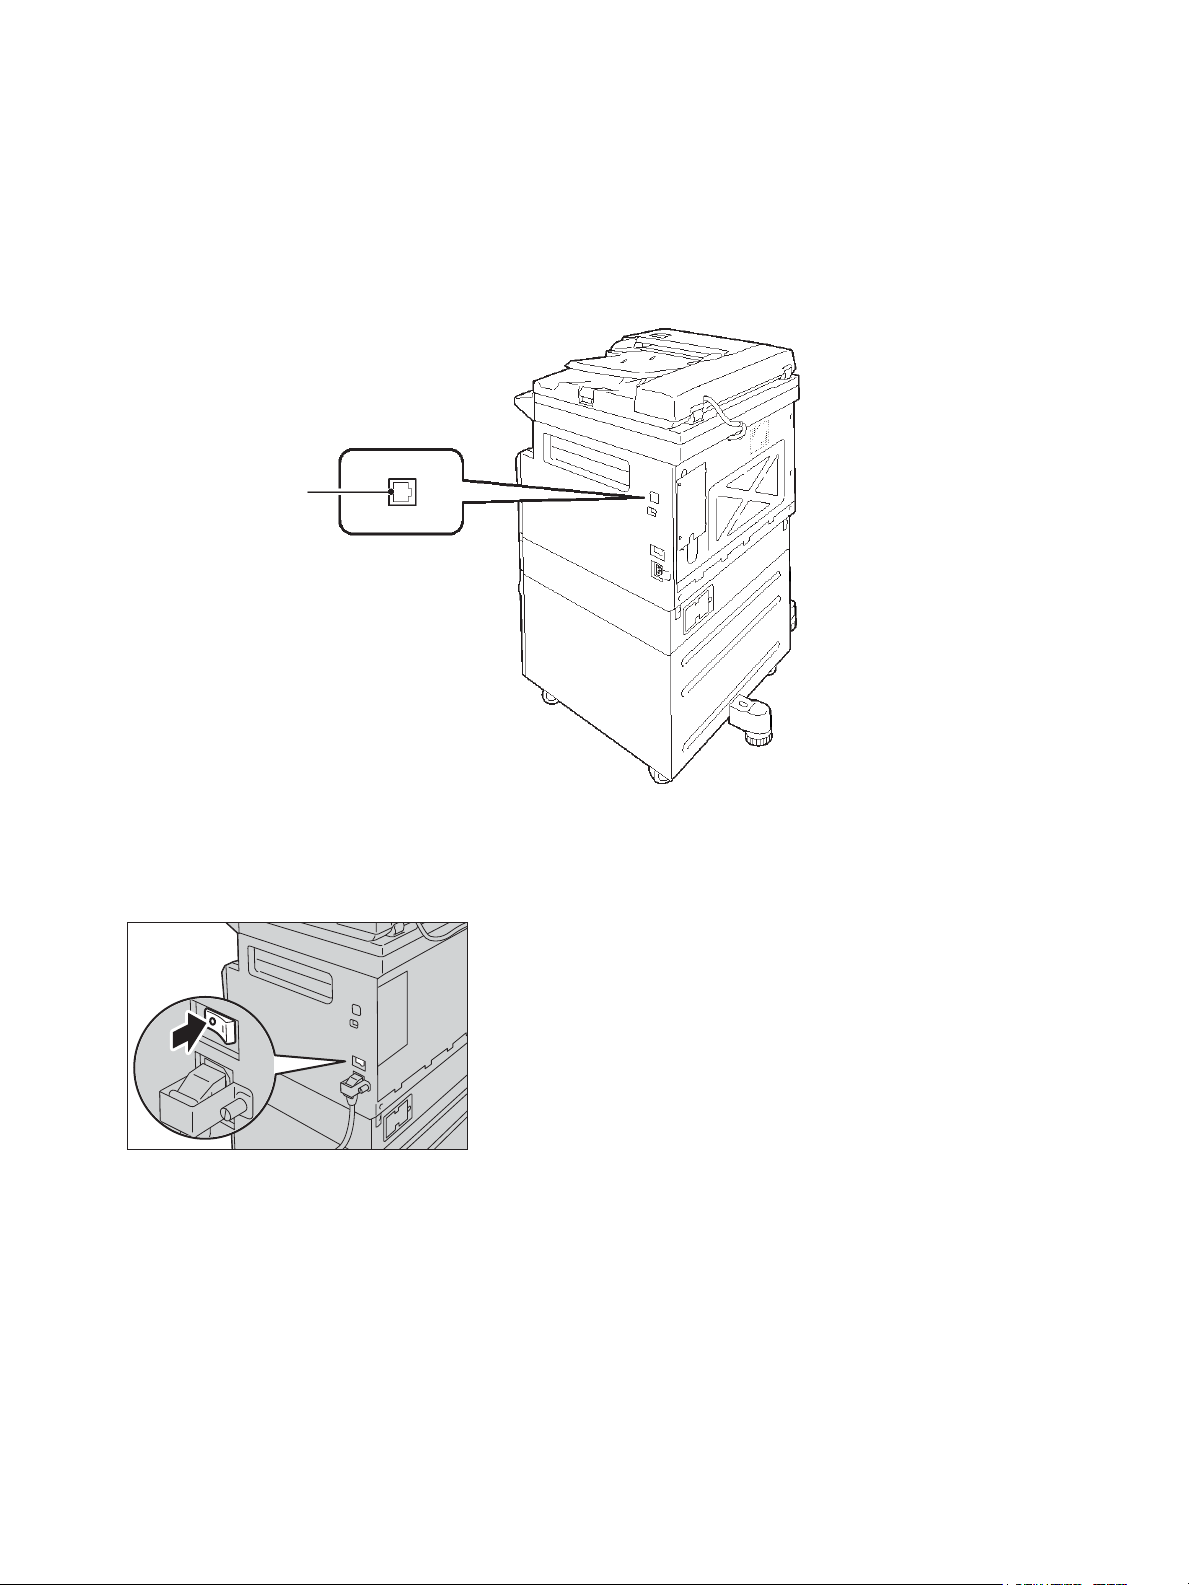
Connecting the Ethernet cable
10BASE-T/100BASE-TX
interface connector
When connecting the machine to a network, use the Ethernet interface.
The machine supports 100BASE-TX and 10BASE-T Ethernet interfaces.
To connect the Ethernet interface:
1. Press the power switch to the Off position to turn the power off.
Note The Ethernet interface is available when the Network Print Kit is installed on the machine.
Note Check that the machine status diagram display is off.
Xerox® WorkCentre® 5019/5021
Network Addendum
7
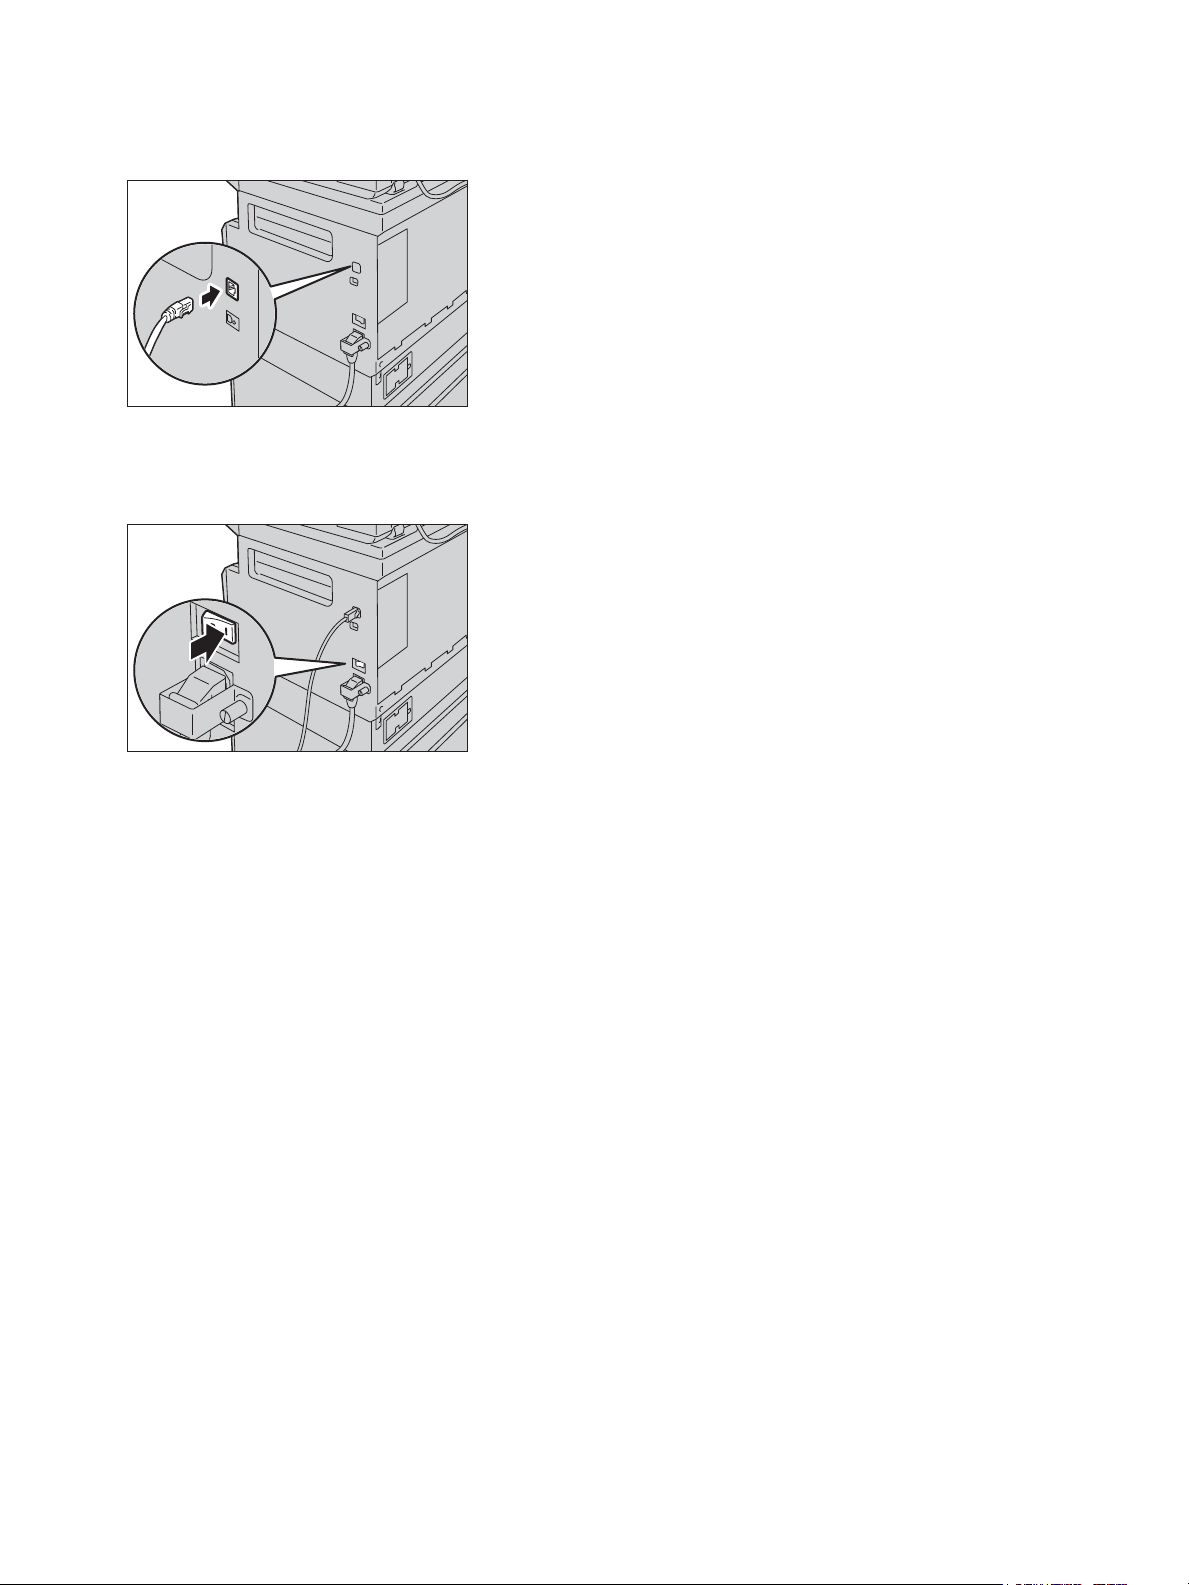
2. Connect a network cable to the Ethernet interface connector.
Note Prepare a network cable suitable for your network connection. When you replace the
network cable, contact our Customer Support Center.
3. Press the power switch to the On position to turn the power on.
Setting the network environment
This section describes how to make the settings needed to use the TCP/IP protocol.
Note The machine supports IPv6 addresses in an IPv6 network environment. For more
information, refer to Setting the machine's IP address (IPv6) on page 9.
Setting the machine's IP address (IPv4)
To use the TCP/IP protocol, you must set the machine's IP address.
By default, the machine is set to obtain its IP address automatically.
This setting automatically sets the machine's IP address when the machine is connected to a network
containing a DHCP server.
Print the System Settings Report to check whether the machine's IP address has already been set.
8
Xerox® WorkCentre® 5019/5021
Network Addendum

If the machine's IP address has not been set, you will need to set the IP address on the control panel or
using the Printer Setup Utility on the CD-ROM. Refer to Using the Printer Setup Utility for Setting the IP
Address on page 10.
Notes
• If the network has a DHCP server, the machine's IP address may change, so check the
address periodically.
• The machine can acquire address information automatically by using a BOOTP or RARP
server.
For information on how to set the IP address from the control panel, refer to Network settings on
page 33.
• After setting the program numbers from 1008 to 1020, print out the System Settings Report,
and check the applied settings.
For information on how to print the System Settings Report, refer to the WorkCentre 5019/5021
User Guide.
Setting the machine's IP address (IPv6)
The machine supports IPv6 addresses in an IPv6 network environment.
The machine's IP address type is set to IPv4 by factory default. To use the machine in an IPv6 network
environment, set the IP address type to IPv6 or both types. The IPv6 address is set automatically when
the machine is restarted.
Print the System Settings Report to check the IPv6 address.
You can set a fixed IPv6 address for the machine using either of the following methods:
• Use the Printer Setup Utility on the CD-ROM. Refer to Using the Printer Setup Utility for Setting the
IP Address on page 10.
• Use the control panel to make the setting manually.
• Use CentreWare Internet Services to make the setting manually. Print the System Settings Report
to check the address set automatically, then use that address to access CentreWare Internet
Services.
From the Properties tab, select Connectivity > Protocols > TCP/IP > IP Mode. Set the IP Mode to
IPv6 or Dual Stack. The IPv6 address can be entered manually if the Enable Manual Address
checkbox is selected under IPv6.
For information on how to print the System Settings Report, refer to the WorkCentre 5019/5021
User Guide.
For information on how to make settings from CentreWare Internet Services, refer to Setting items
on CentreWare Internet Services on page 17.
Xerox® WorkCentre® 5019/5021
Network Addendum
9
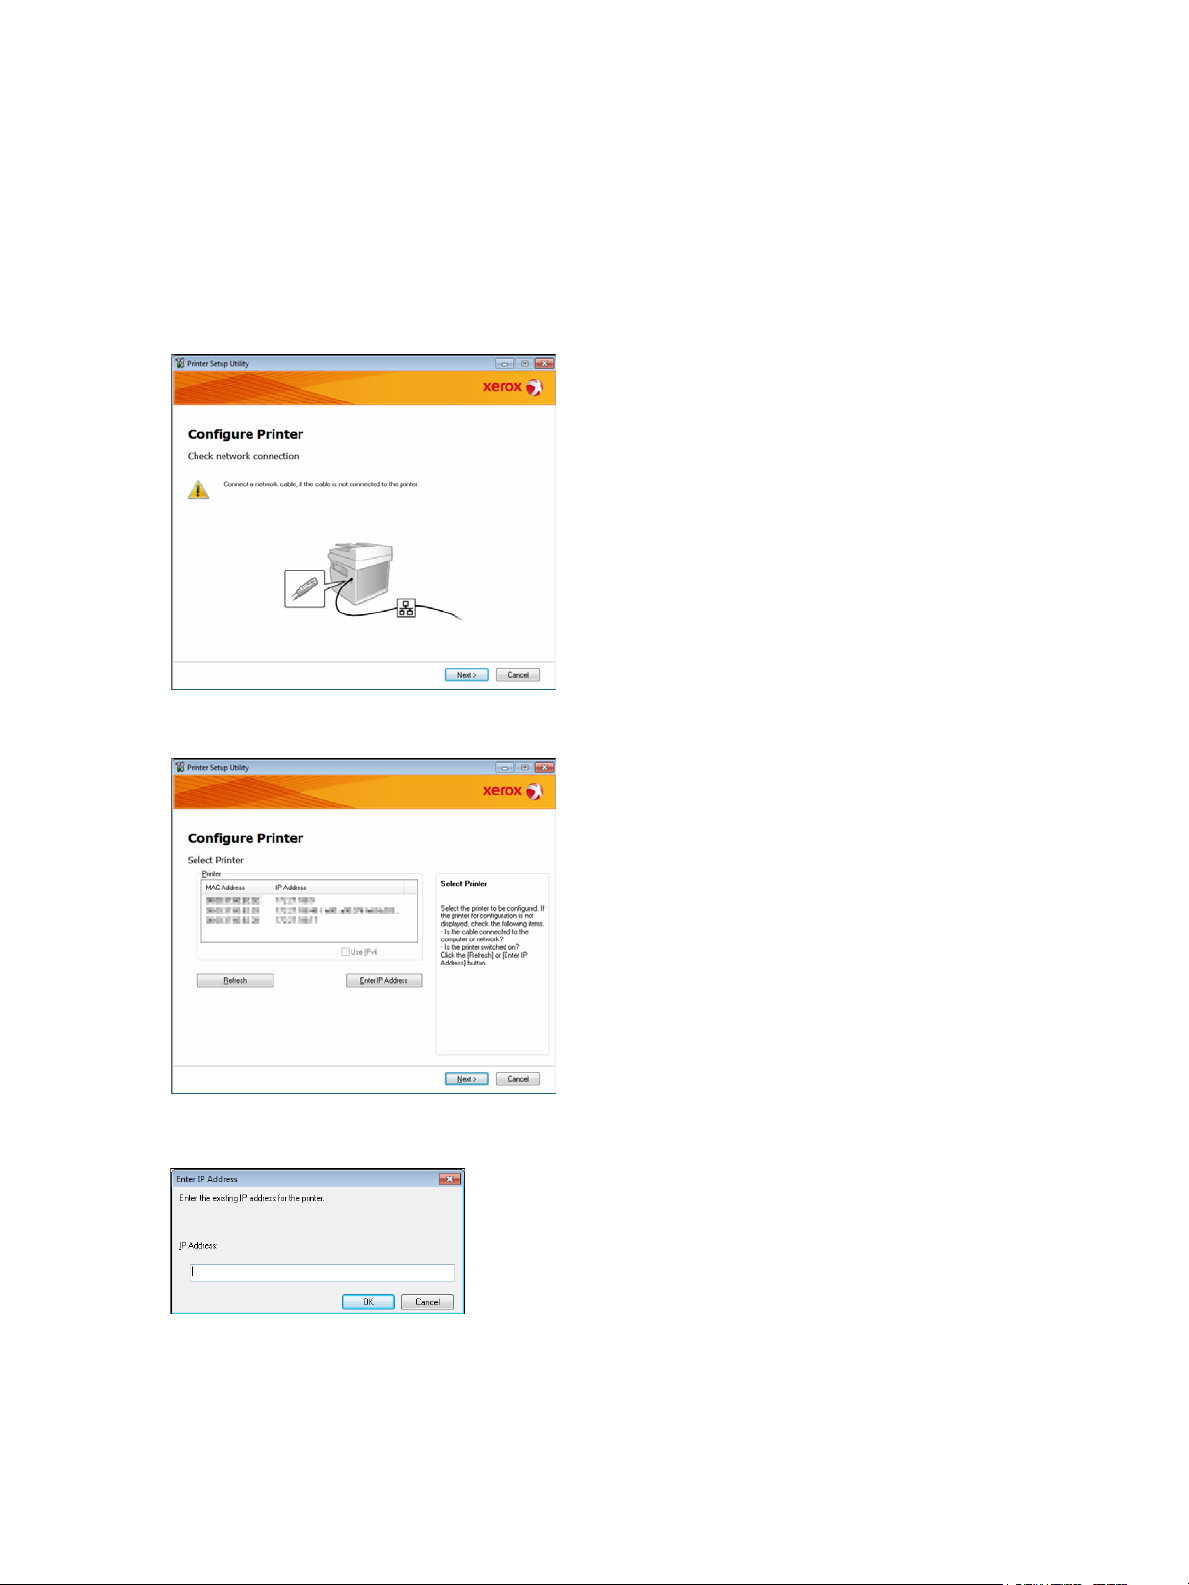
Using the Printer Setup Utility for Setting the IP Address
This section describes how to set the IP address using the Printer Setup Utility for Setting IP Address,
which is included on the Driver CD.
1. Insert the Driver CD into your computer’s CD-ROM drive.
2. Move to the IP Setup Tool folder and double-click xcpsu.exe.
3. Make sure that the network cable is connected to the machine, and then click Next..
4. Select the machine from the list of available IP addresses and MAC addresses, and then click
Next..
If you already have the IP address of the machine, click Enter IP Address and type the IP address
in the IP Address field, then click OK.
10
Xerox® WorkCentre® 5019/5021
Network Addendum
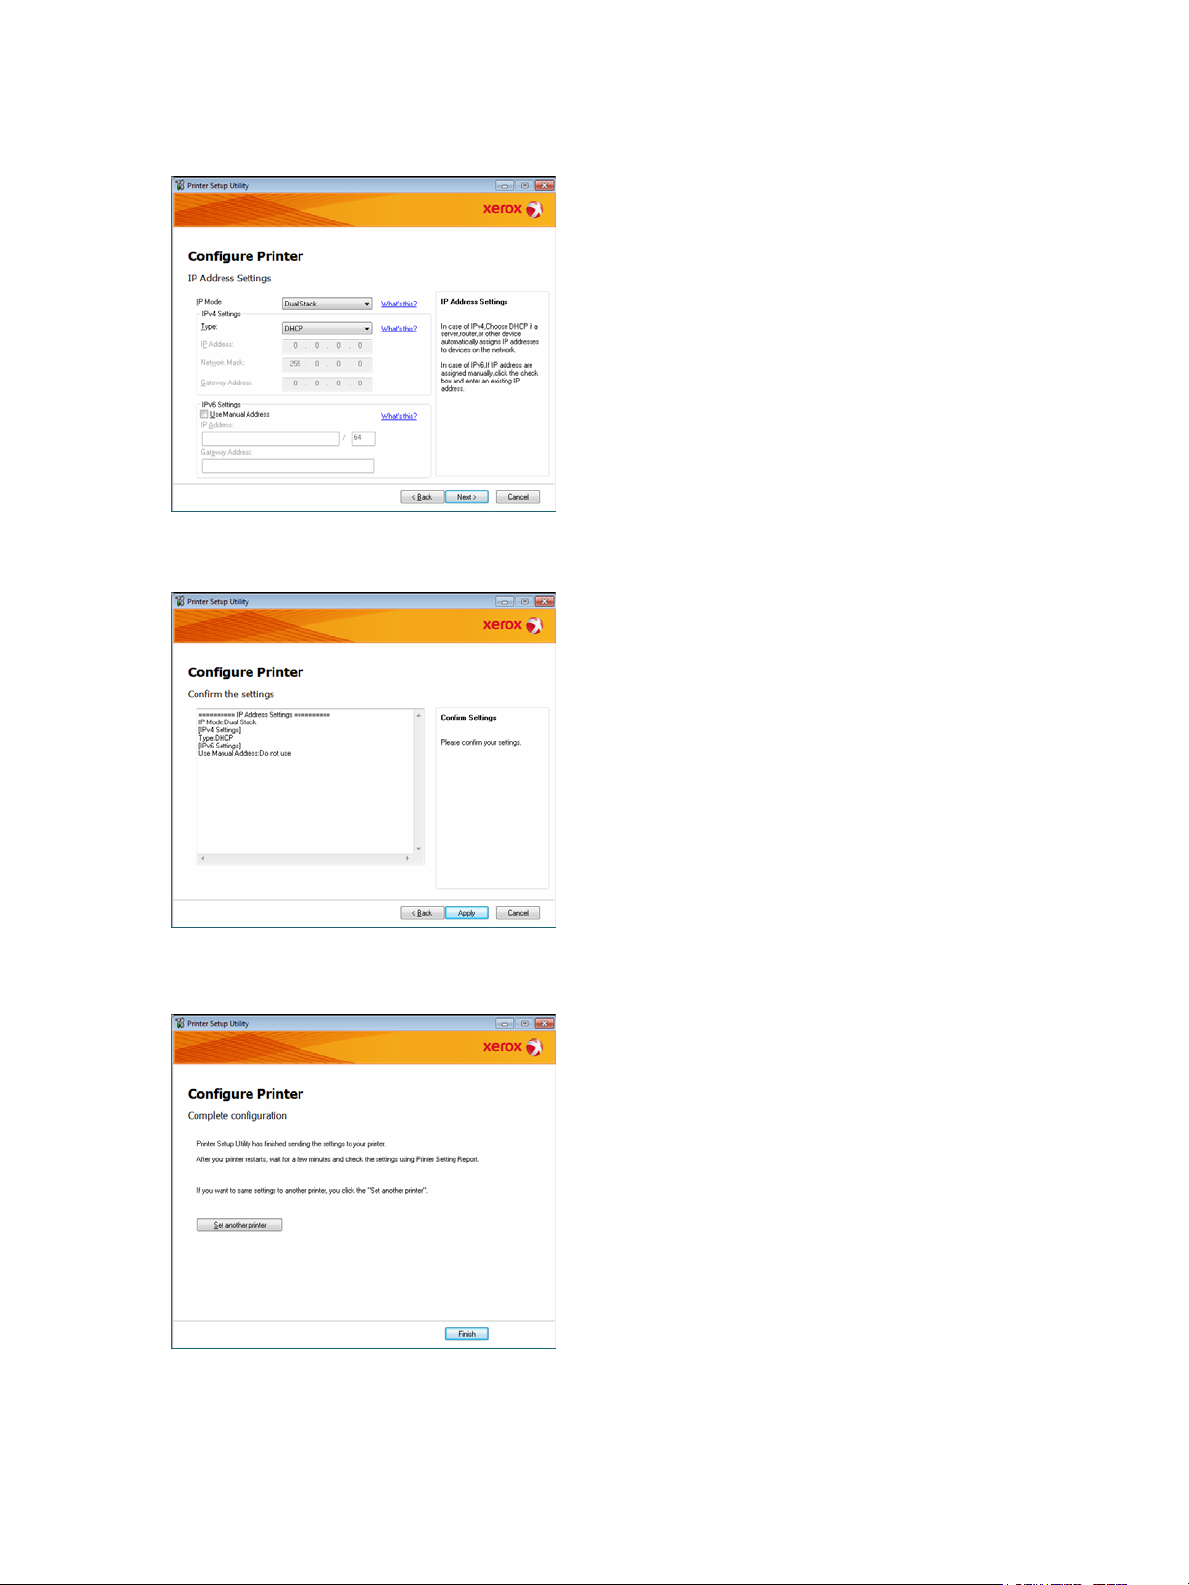
5. Make advanced settings if needed, and then click Next.
6. After confirming the information displayed, click Apply.
The specified settings are applied.
7. Click Finish to exit the Printer Setup Utility for Setting IP Address.
When the settings are properly configured the machine reboots automatically.
Xerox® WorkCentre® 5019/5021
Network Addendum
11

8. Confirm the assigned IP address after completing the setting process by one of the following
methods:
– Printing the System Settings Report (see the WorkCentre 5019/5021 User Guide)
–On the Machine Status screen (see the WorkCentre 5019/5021 User Guide)
–Using the Too ls menu items (see the WorkCentre 5019/5021 User Guide)
– Using CentreWare Internet Services (see Using CentreWare Internet Services on page 15)
12
Xerox® WorkCentre® 5019/5021
Network Addendum
Activating the communication port
Use CentreWare Internet Services to activate the communication port you want to use.
You can activate the following ports:
Port Description
SNMP Activate this port when using the SNMP protocol (used for
operations such as loading the machine's information to the print
driver).
LPD Activate this port when printing using LPD.
Port9100 Activate this port when printing using Port9100.
For information on how to make settings from CentreWare Internet Services, refer to Setting items on
CentreWare Internet Services on page 17.
To activate a communication port:
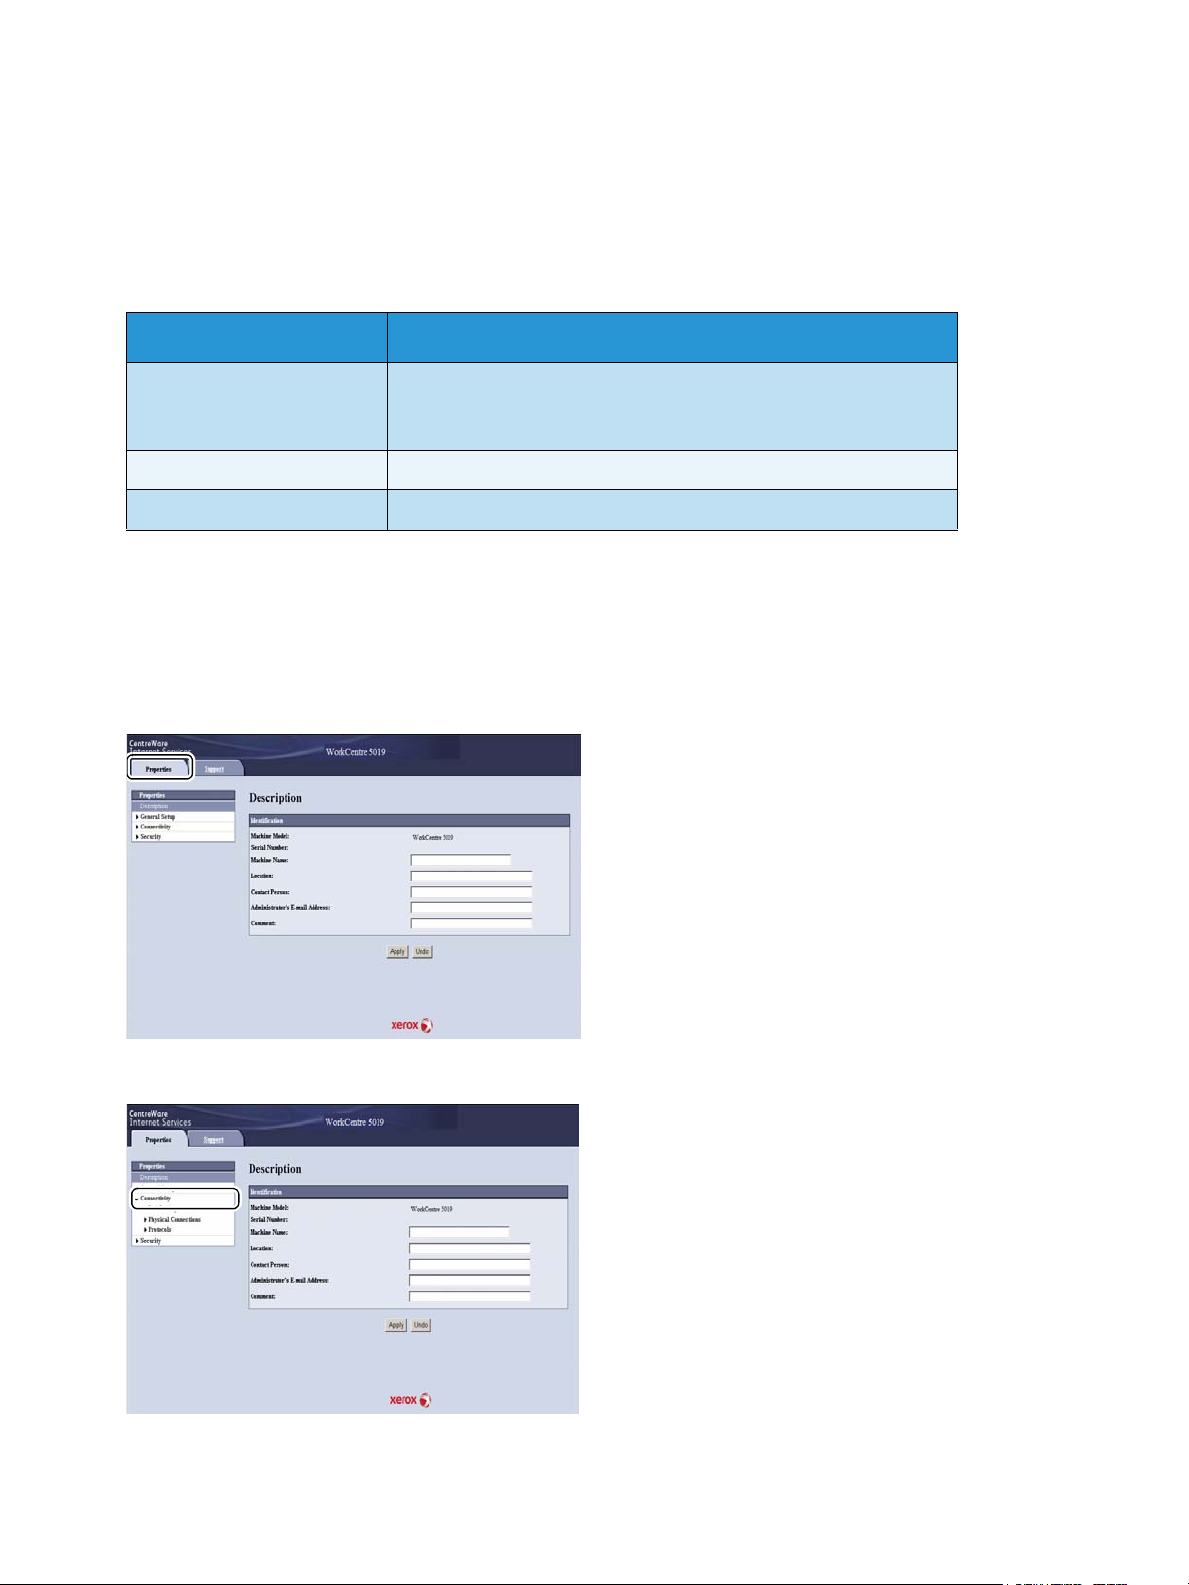
1. Start CentreWare Internet Services.
2. Click the Properties tab.
3. Select Connectivity from the menu on the left.
Xerox® WorkCentre® 5019/5021
Network Addendum
13
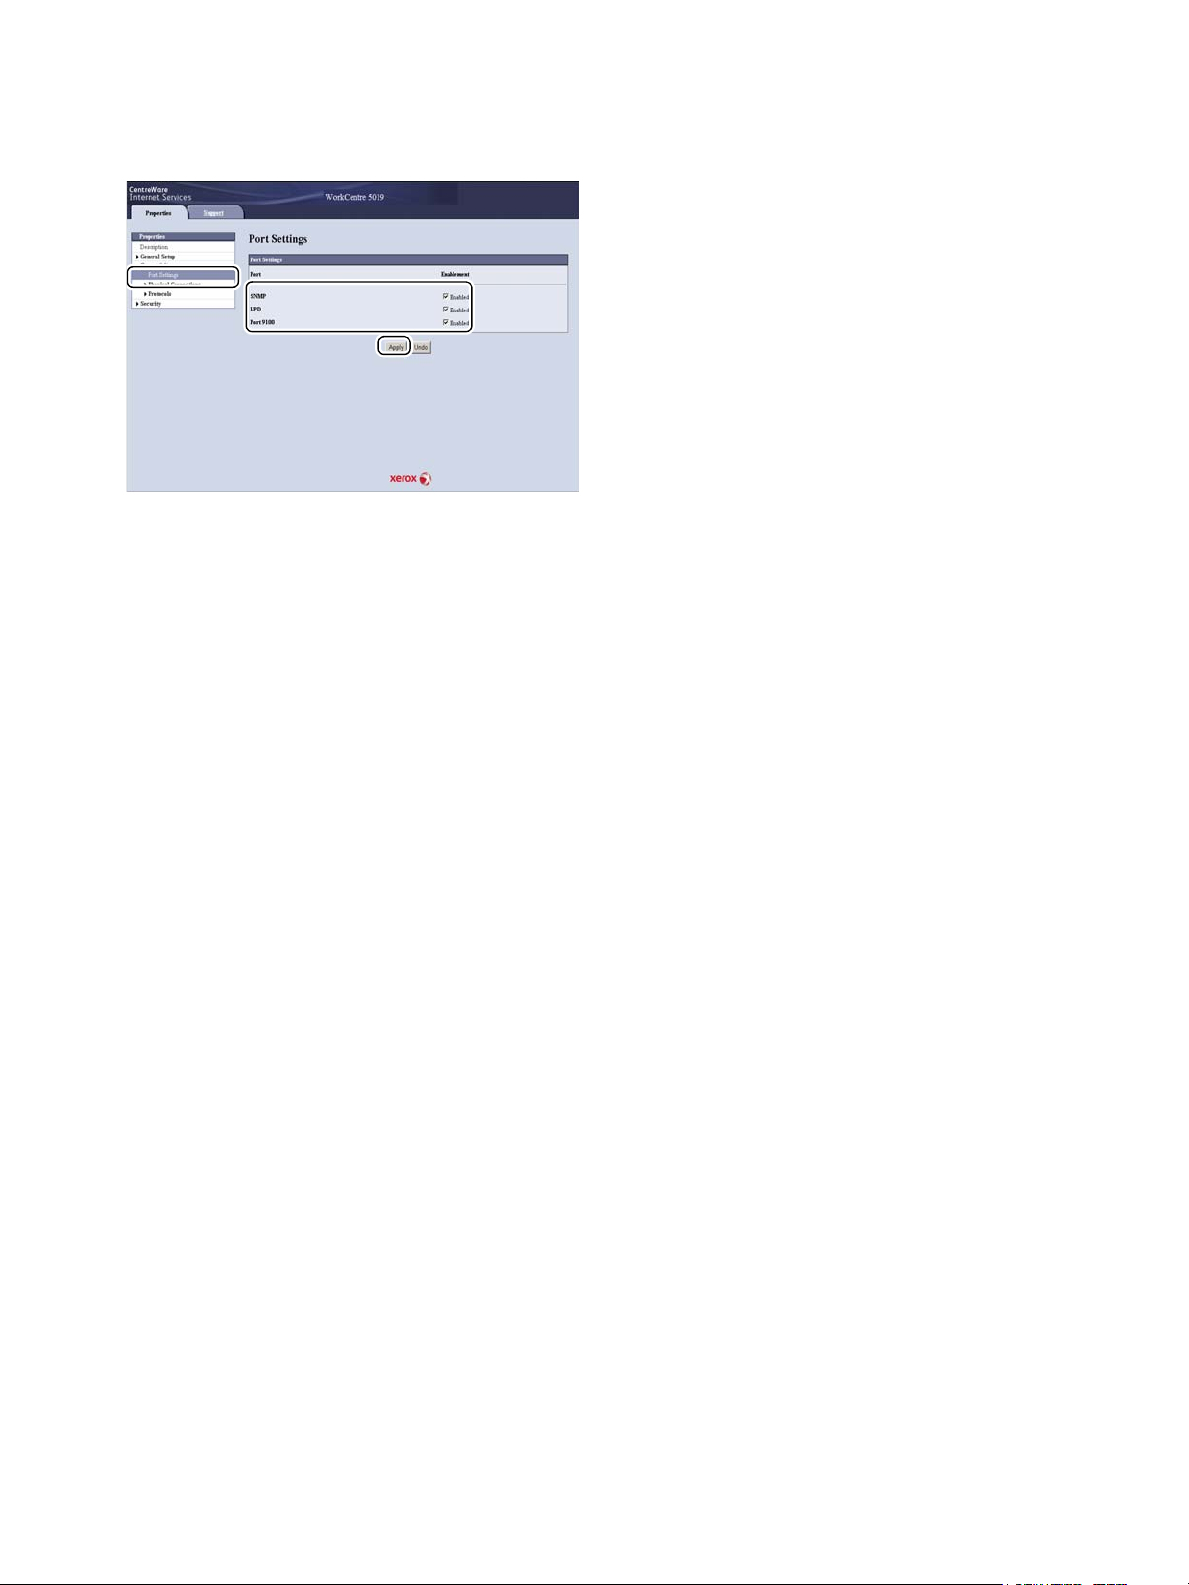
4. Click Port Settings, and select the checkbox for the desired port.
5. Click Apply.
Note Restart the machine to enable the new settings.
14
Xerox® WorkCentre® 5019/5021
Network Addendum

Using CentreWare Internet Services
CentreWare Internet Services
CentreWare Internet Services provides services such as changing settings using a Web browser on a
computer connected to a TCP/IP network environment.
Notes
• The Network Print Kit is required to use this feature. The IP address of the machine also needs
to be set. For information on how to set the IP address, refer to Setting the network
environment on page 8.
• When changing any settings using CentreWare Internet Services, the machine should be in
standby status or energy saver mode.
Supported environments and settings
Operating systems and Web browsers
The operation of CentreWare Internet Services has been verified for the following Web browsers:
Operating System Web Browsers
Windows® 8 Windows Internet Explorer® 10
Windows 7 Windows Internet Explorer 8
Windows Vista
Windows XP
®
Windows Internet Explorer 7
Windows Internet Explorer 6 SP2, Mozilla Firefox® 3.x, Netscape
7.1 Navigator
Xerox® WorkCentre® 5019/5021
Network Addendum
15

Web browser settings
Specifying the machine's address in the Web browser is recommended.
Note If you specify the machine's address using a proxy server, service response time may be
slow or screens may not appear. If these problems occur, you will need to set the machine's IP
address in the Web browser and choose not to use a proxy server. See your Web browser's manual
for how to make the setting.
You will also need to make other Web browser settings to make CentreWare Internet Services work
properly.
The following procedure is based on the Internet Explorer 6.0.
1. From the Tools menu, select Internet Options.
2. In the General tab, click Settings under Temporary Internet Files.
3. In the Settings dialog box, select Check for newer versions of stored pages:.
4. Select Every visit to the page or Every time you start Internet Explorer.
5. Click OK.
6. Click OK in the Internet Options dialog box.
Starting CentreWare Internet Services
To start CentreWare Internet Services:
1. Start your computer and Web browser.
2. In your Web browser's address bar, enter the machine's IP address or URL, then press the ENTER
key.
The top page of CentreWare Internet Services is displayed.
Example IP address (IPv4)
Example IP address (IPv6)
Example URL
Notes
• If your network uses DNS (Domain Name System) and the machine's host name is registered
on the domain name server, you can access the machine using the Internet address
16
Xerox® WorkCentre® 5019/5021
Network Addendum

combining the host name and the domain name. For example, if the host name is "myhost",
and the domain name is "example.com" then the Internet address is "myhost.example.com".
• When specifying a port number, add ":" and the port number after the IP address or the
Internet address.
• The IPv6 address cannot be entered manually in some cases depending on the Web browser
used.
• HTTPS is not supported.
Setting items on CentreWare Internet Services
The table below lists the menu items on the CentreWare Internet Services screen.
Notes
• You must have a user name and passcode to change the settings. The user ID "admin" and
passcode "1111" is set at the time of factory shipment. For information on how to change the
user ID and passcode, refer to System administrator settings (security) on page 25.
• You cannot enter System Administration mode from a computer while the machine control
panel is being used or the machine side is in System Administration mode, or there are any
current or pending jobs. Also, you cannot operate the machine control panel while entering
System Administration mode from a computer.
• Double-byte characters cannot be used in CentreWare Internet Services.
Properties tab
Description
Machine Model
The product name is displayed.
Serial Number
The product serial number is displayed.
Machine Name
You can enter the printer name (between 1 and 32 ASCII code characters excluding colons (:), equal
signs (=), at symbols (@), or asterisks (*), which are not valid).
Location
You can enter the machine's location (up to 255 ASCII code characters).
Contact Person
You can enter the contact person's information (up to 255 ASCII code characters).
Xerox® WorkCentre® 5019/5021
Network Addendum
17

Administrator's E-mail Address
You can enter the e-mail address of the system administrator (up to 128 characters).
Comment
You can enter machine comments (up to 255 ASCII code characters).
Apply button
Use to apply changes.
Energy Saver Settings (general setup)
Time to Low Power mode
You can set the time elapse from the last operation until the machine enters Low Power mode. You can
set a value between 1 and 60 minutes. (Default: 1)
Time to Sleep mode
You can set the time elapse from Low Power mode until the machine enters Sleep mode. You can set a
value between 1 and 239 minutes. (Default: 1)
Apply button
Use to apply changes.
Internet Services Settings (general setup)
Display Language
You can change the screen display language. (Default: English)
Apply button
Use to apply changes.
Port Settings (connectivity)
Port
You can activate or deactivate communication ports. You can select from SNMP, LPD, and Port9100.
Activate each port by selecting its checkbox.
Apply button
Use to apply changes.
Note Reboot the machine to enable the new settings.
18
Xerox® WorkCentre® 5019/5021
Network Addendum

Ethernet (connectivity > physical connections)
Rated Speed
You can set the Ethernet port speed. Select from Auto, 10 Mbps Half-Duplex, 10 Mbps Full-Duplex, 100
Mbps Half-Duplex or 100 Mbps Full-Duplex. (Default: Auto)
MAC Address
The machine's MAC address is displayed.
Apply button
Use to apply changes.
Note Reboot the machine to enable the new settings.
TCP/IP (connectivity > protocol)
IP Mode
You can set the IP operation mode. You can select from Dual Stack, IPv4 or IPv6. The Dual Stack setting
lets you use both IPv4 and IPv6 addresses. (Default: IPv4)
General
•Protocol
• Enabled is displayed.
•Physical Connection
• Ethernet is displayed.
•Host Name
You can set the host name. You can enter up to 1 to 32 single-byte alphanumeric characters or
hyphens.
Note Hyphens (-) cannot be used as the first or last character in the string.
IPv4
–IP Address Resolution:
You can set the method used to acquire the IP Address, Subnet Mask and Gateway Address.
You can select from STATIC, DHCP, BOOTP, RARP or DHCP/Autonet for the address
acquisition method. (Default: DHCP/Autonet)
–IP Address:
You can enter the IP address when STATIC is selected for IP Address Resolution.
•Subnet Mask:
You can enter the subnet mask when STATIC is selected for IP Address Resolution.
• Gateway Address:
You can enter the gateway address when STATIC is selected for
IP Address Resolution.
Xerox® WorkCentre® 5019/5021
Network Addendum
19

IPv6
– Enable Manual Address:
You can check this checkbox to enter the IP address and gateway address directly. (Default:
Off)
•IP Address:
You can enter the IP address when the Enable Manual Address checkbox is selected.
• Automatically Configured Address 1:
The IPv6 address set automatically is displayed.
• Link-Local Address:
The link-local address set automatically is displayed.
• Gateway Address:
You can enter the gateway address when the Enable Manual Address checkbox is
selected.
• Automatically Configured Gateway Address:
The gateway address set automatically is displayed.
SNMP configuration (connectivity > protocol)
You can set the SNMP protocol.
General
• SNMP Port Status
You ca n ch e ck Enabled to use SNMP. (Default: On)
•Edit SNMP v1/v2c Properties button
You can make advanced SNMP v1/v2c settings by pressing this button.
– Community Name (Read Only):
You can enter the community name to acquire (up to 32 ASCII code characters). (Default:
blank (public))
– Community Name (Read/Write):
You can enter the community name to acquire/write (up to 32 ASCII code characters).
(Default: blank (private))
– Trap Community Name:
You can enter the community name for trap notification (up to 32 ASCII code characters).
(Default: blank (SNMP_trap))
– System Administrator's Login ID:
You can enter information related to the person in charge of maintenance of the machine (up
to 127 ASCII code characters)(Default: blank).
Authentication failure generic traps
You c a n c h ec k Enabled to send an authentication failure trap notification when an access attempt was
made with an invalid community name not registered in the machine. (Default: On)
20
Xerox® WorkCentre® 5019/5021
Network Addendum

Advanced button
You can edit settings using the following buttons:
• Add UDP IPv4 Address button
Use to add a recipient address for UDP IPv4 trap notification.
–IP Address:
You can enter the IP address for entry.
– UDP Port Number:
You can set the UDP port No. for entry (a value between 1 and 65535).
–SNMP Version:
You can specify the SNMP version for entry as v1 or v2c. (Default: v1)
– Trap Community Name:
You can enter the trap community name for entry (between 1 and 32 ASCII code characters).
(Default: SNMP_trap)
– Trap to be Received:
You can set whether to send notifications for Print, Cold Start, and Authentication Failure
events.
• Add UDP IPv6 Address button
Use to add a recipient address for UDP IPv6 trap notification.
–IP Address:
You can enter the IP address for entry.
– UDP Port Number:
You can set the UDP port No. for entry (a value between 1 and 65535).
–SNMP Version:
You can specify the SNMP version for entry as v1 or v2c. (Default: v1)
– Trap Community Name:
You can enter the trap community name for entry (between 1 and 32 ASCII code characters).
(Default: SNMP_trap)
– Trap to be Received:
You can set whether to send notifications for Print, Cold Start, and Authentication Failure
events.
• Delete button
Use to delete the traps specified for the trap notification recipient IP address.
• Edit button
Use to display the notification information for the trap you are using. You can specify the events
for which to send notification.
Apply button
Use to apply changes.
Note Reboot the machine to enable the new settings.
Xerox® WorkCentre® 5019/5021
Network Addendum
21

LPD (connectivity > protocol)
You can set the LPD port.
General
• LPD Port Status
You ca n se l ect Enabled to use LPD. (Default: On)
•Physical Connection
Ethernet is displayed.
• Port Number
You can set the LPD port No. (a value between 1 and 65535). You must set a unique number for
each port. (Default: 515)
• Connection Time-Out
You can set the amount of time the machine waits before terminating the connection when
incoming data stops (between 2 and 3600 seconds). (Default: 60)
• Maximum Connections per Port
The maximum number of connections is displayed.
Apply button
Use to apply changes.
Note Reboot the machine to enable the new settings.
Port9100 (connectivity > protocol)
You can set Port9100.
General
• Port9100 Port Status
You ca n se l ect Enabled to use Port9100. (Default: On)
•Physical Connection
Ethernet is displayed.
Port information
•TCP Port Number
You can set the Port9100 port No. (a value between 1 and 65535).
You must set a unique number for each port. (Default: 9100)
• Maximum Connections per Port
The maximum number of connections is displayed.
22
Xerox® WorkCentre® 5019/5021
Network Addendum

• End of Job Timeout
You can set the amount of time the machine waits before terminating the connection when
incoming data stops (between 2 and 3600 seconds). (Default: 60)
• PDL Switching
Enabled is displayed.
Apply button
Use to apply changes.
Note Reboot the machine to enable the new settings.
HTTP (connectivity > protocol)
You can set the HTTP protocol.
Configuration
• Connection
Enabled is displayed.
•Physical Connection
Ethernet is displayed.
• Keep Alive Timeout
The keep-alive timeout time is displayed.
• Port Number
You can set the port No. used for HTTP communication (a value between 1 and 65535). You must
set a unique number for each port. (Default: 80)
• Connection Time-Out
Set from 1 through 255 seconds for the connection timeout time. (Default: 30)
Apply button
Use to apply changes.
Note Reboot the machine to enable the new settings.
IP Filtering (security)
You can restrict the supported IP addresses.
IPv4 Filtering
• IP Filtering
You ca n se l ect Enabled to enable IP Filtering. (Default: Off)
Xerox® WorkCentre® 5019/5021
Network Addendum
23

• Edit/Delete selection checkbox
You can select the IP Filter to edit/delete.
• IP Filter Rule List
The IPv4 address that is allowed from access is displayed.
• Add button
The Add IP Filter Rule - IPv4 screen is displayed. Use to add an IPv4 address for exclusion from
access. You can add up to 10 IPv4 addresses.
– Source IP Address:
Set the IP address to be excluded from access.
– Source IP Mask:
Set the prefix length of the IP address to be excluded from access. (Default: 0)
– Edit button
The Edit IP Filter Rule - IPv4 screen is displayed. You can edit the IPv4 address to be excluded
from access.
• Source IP Address:
Edit an IP address that is excluded from access.
• Source IP Mask:
You can set the prefix length of an IP address that is excluded from access. (Default: 0)
• Delete button
Use to remove an IPv4 address from the access exclusion list.
IPv6 filtering
• IP Filtering
You ca n se l ect Enabled to enable IP Filtering. (Default: Off)
• Delete/Edit selection checkbox
You can select the IP Filter to edit/delete.
• IP Filter Rule List
The IPv6 address that is excluded from access is displayed.
• Add button
The Add IP Filter Rule - IPv6 screen is displayed. Adds an IPv6 address for exclusion from access.
You can add up to 10 IPv6 addresses.
– Source IP Address:
You can set an IP address for exclusion from access.
– Source IP Mask:
You can set the prefix length of the IP address for exclusion from access. (Default: 0)
• Edit button
The Edit IP Filter Rule - IPv6 screen is displayed. You can edit the IPv6 address that is excluded
from access.
– Source IP Address:
You can edit the IP address that is excluded from access.
24
Xerox® WorkCentre® 5019/5021
Network Addendum

– Source IP Mask:
You can set the prefix length of the IP address that is excluded from access. (Default: 0)
• Delete button
You can delete the IPv6 address that is excluded from access by pressing this button.
Apply button
Use to apply changes.
Note Reboot the machine to enable the new settings.
System administrator settings (security)
You can set the system administrator's user ID and passcode.
System administrator settings
• Administrator's Login ID
You can enter the system administrator's user ID (between 1 and 32 ASCII code characters in
length, excludes "+", ";", "<", ">", """, "?", "[", "]", "'", "{", "}", "|", ":". (Default: admin)
• Administrator's Passcode
You can set the system administrator's passcode (between 4 and 12 ASCII code characters or
blank). (Default: 1111)
• Retype Administrator's Passcode
You need to re-enter the system administrator’s passcode that you have entered.
•Maximum Login Attempts
When login attempts using the system administrator’s user ID fail repeatedly, access is denied
when the number of failed attempts reaches the number set here.
Specify a number between 0 and 10. Specify 0 to disable this setting.
The total number of failed authentication attempts is reset when authentication is successful or
the system is restarted. (Default: 5)
Apply button
Use to apply changes.
Support tab
The links to support information is displayed. Link settings can be changed.
Support
Change Settings button
You can change a link to support information by pressing this button.
Xerox® WorkCentre® 5019/5021
Network Addendum
25

•Name
3
4
5
1
2
You can enter the link name (between 1 and 63 ASCII code characters).
•URL
You can enter the link address (between 1 and 63 alphanumeric characters including the at
symbol (@), percent sign (%), period (.), colon (:), forward slash (/), hyphen (-), tilde (~), question
mark (?), and ampersand (&), which are valid).
Apply button
Use to apply changes.
Note For information on installing print drivers and scan drivers, refer to the WorkCentre
5019/5021 User Guide.
Setting the options configuration
Right side and rear machine components
No. Component Description
1 Power switch Switches the power of the machine on and off.
For more information, refer to
2 Power cord connector Connects the power cord.
26
the WorkCentre 5019/5021 User Guide.
Xerox® WorkCentre® 5019/5021
Network Addendum

No. Component Description
3 Adjusting foot Prevents the machine from toppling over. Move the machine to its
installation site and then rotate this adjuster in clockwise direction until it
touches a floor.
4 USB 1.1/2.0 interface
connector (Type B)
5 10BASE-T/100BASE-TX
interface connector
Connect a USB 1.1/2.0 cable.
Connect a network cable.
The 10BASE-T/100BASE-TX interface connector is available when the
optional Simple Network Print Kit is installed.
When the optional Network Print Kit is installed, you can retrieve machine configuration information
from the print driver.
Note Update the machine configuration information when changing an optional component.
Using the Ethernet interface
You can send the machine's option configuration to the print driver automatically.
Notes
• This feature is not available for some models. The optional Network Print Kit is required. For
more information, contact our Customer Support Center.
• When using this feature, activate the SNMP port. (Default: Enabled)
• If you failed to retrieve the machine configuration information or are using a USB interface
connection, set the machine configuration information manually. For more information, click
Help on the screen to display the Help Information.
Follow the steps below to configure the options configuration.
1. From the PC's Start menu, select Printer and Faxes to display the properties of the printer in use.
Note Some operating systems display “Printer” or “Devices and Printers” instead of “Printers and
Faxes. ”
Xerox® WorkCentre® 5019/5021
Network Addendum
27

2. Select the Options tab.
3. Select Get Information from Printer.
28
Xerox® WorkCentre® 5019/5021
Network Addendum

If “Printer Searching Method” is displayed
The machine's information is not loaded onto the print driver. Complete the following operations.
1. Select Specify Address, and click Next.
2. Enter the printer name or IP Address in the Printer Name or IP Address field.
3. Click Finish.
4. Click OK.
Xerox® WorkCentre® 5019/5021
Network Addendum
29

Clock and Network settings
Log In/Out button
This section describes the procedures for entering/exiting System Administration mode, gives the
procedure to change settings, and describes the clock settings and network function settings you can
change.
Note For System Settings, Account Mode Settings, and Feature Settings, refer to the WorkCentre
5019/5021 User Guide.
Each machine feature is set to factory default (initial) settings, but you can customize these settings to
match your operating environment. You can change these settings in System Administration mode.
Notes
• Some settings cannot be displayed on certain models. An optional component is required. For
more information, contact our Customer Support Center.
• If there are any current or pending jobs you cannot enter System Administration mode.
• While in System Administration mode you cannot receive a print job or start a print or scan
job.
Entering System Administration mode
1. Press and hold the Log In/Out button for more than 4 seconds until the screen below displays.
30
Xerox® WorkCentre® 5019/5021
Network Addendum

2. Use the numeric keypad to enter the password, and then press the Start button.
Numeric keypad
Note The password is initially set to "11111" (five digits of "1").
• The password can be changed.
For more information, refer to the WorkCentre 5019/5021 User Guide.
• The Log In/Out button lights up when the machine enters System Administration mode.
The program number input screen appears, and shows the letter P.
Changing the settings
1. Enter a program number using the numeric keypad.
For more information, refer to the WorkCentre 5019/5021 User Guide.
2. Press the Start button to confirm the entered value.
Xerox® WorkCentre® 5019/5021
Network Addendum
31

Exiting System Administration mode
Log In/Out button
Press the Log In/Out button.
Note The Log In/Out button light goes off when the machine exits System Administration mode.
Clock settings
Notes
• Clock settings are available when the Network Print Kit is installed.
• When setting the system clock at the first time, set the Date Format and the Time Format.
Program
number
1 Year Set the year for the machine's system clock. 2010* - 2031
2 Month Set the month for the machine's system clock. 1* - 12
3 Day Set the day for the machine's system clock. 1* - 31
4 Hour Set the hour for the machine's system clock. 0* - 23
5 Minute Set the minute for the machine's system clock. 0* - 59
6 Date Format Set the date display format. 0: YYMMDD*
7 Time Format Set the time display format. 0: 12h
Menu item Description
Value
(* default setting)
1: MMDDYY
2: DDMMYY
1: 24h*
32
Xerox® WorkCentre® 5019/5021
Network Addendum

Network settings
Note These settings are available when the Network Print Kit is installed.
Program
number
1006 Ethernet Speed Set the communication speed. 17: 10BASE-T Half
1007 IP mode Set the type of TCP/IP. 4: IPv4*
1008 Get IP Address Set the retrieve method for the IP address,
1009 Manual IP
1010 Manual IP
Menu item Description
subnet mask and gateway address.
Set the 1st 8-bit of the machine's IP address
Address 1 on
IPv4
Address 2 on
IPv4
using the IPv4.
Set the 2nd 8-bit of the machine's IP
address using the IPv4.
Value
(* default setting)
18: 100BASE-TX Half
33: 10BASE-T Full
34: 100BASE-TX Full
127: Auto*
6: IPv6
10: Both IPv4 and IPv6
1: RARP
2: DHCP
4: BOOTP
8: DHCP with AutoIP*
16: Set manually
0* - 255
0* - 255
1011 Manual IP
Address 3 on
IPv4
1012 Manual IP
Address 4 on
IPv4
1013 Manual Subnet
Mask 1 on IPv4
1014 Manual Subnet
Mask 2 on IPv4
1015 Manual Subnet
Mask 3 on IPv4
1016 Manual Subnet
Mask 4 on IPv4
1017 Manual
Gateway
Address1 on
IPv4
Set the 3rd 8-bit of the machine's IP address
using the IPv4.
Set the 4th 8-bit of the machine's IP address
using the IPv4.
Set the 1st 8-bit of the machine's subnet
mask using the IPv4.
Set the 2nd 8-bit of the machine's subnet
mask using the IPv4.
Set the 3rd 8-bit of the machine's subnet
mask using the IPv4.
Set the 4th 8-bit of the machine's subnet
mask using the IPv4.
Set the 1st 8-bit of the machine's gateway
address using the IPv4.
0* - 255
0* - 255
0* - 255
0* - 255
0* - 255
0* - 255
0* - 255
Xerox® WorkCentre® 5019/5021
Network Addendum
33

Program
number
Menu item Description
Value
(* default setting)
1018 Manual
Gateway
Address2 on
IPv4
1019 Manual
Gateway
Address3 on
IPv4
1020 Manual
Gateway
Address4 on
IPv4
1021 IPv4 IP Filter Set whether to use only the IPv4 when
1022 Allowed IPv4 IP
Address (1) - 1
1023 Allowed IPv4 IP
Address (1) - 2
1024 Allowed IPv4 IP
Address (1) - 3
Set the 2nd 8-bit of the machine's gateway
address using the IPv4.
Set the 3rd 8-bit of the machine's gateway
address using the IPv4.
Set the 4th 8-bit of the machine's gateway
address using the IPv4.
connecting to the machine.
Set the 1st 8-bit of the Allowed IPv4 IP
Address (1) - 1.
Set the 2nd 8-bit of the Allowed IPv4 IP
Address (1) - 2.
Set the 3rd 8-bit of the Allowed IPv4 IP
Address (1) - 3.
0* - 255
0* - 255
0* - 255
0: No IPv4 access control*
1: Use IPv4 access control
0* - 255
0* - 255
0* - 255
1025 Allowed IPv4 IP
Address (1) - 4
1026 IPv4 Access
Control Mask
bit length (1)
1030 Allowed IPv4 IP
Address (2) - 1
1031 Allowed IPv4 IP
Address (2) - 2
1032 Allowed IPv4 IP
Address (2) - 3
1033 Allowed IPv4 IP
Address (2) - 4
1034 IPv4 Access
Control Mask
bit length (2)
1038 Allowed IPv4 IP
Address (3) - 1
1039 Allowed IPv4 IP
Address (3) - 2
Set the 4th 8-bit of the Allowed IPv4 IP
Address (1) - 4.
Set the bit length (1) of Access Control Mask
for IPv4.
Set the 4th 8 bit of the Allowed IPv4 IP
Address (2) - 1.
Set the 4th 8 bit of the Allowed IPv4 IP
Address (2) - 2.
Set the 4th 8 bit of the Allowed IPv4 IP
Address (2) - 3.
Set the 4th 8 bit of the Allowed IPv4 IP
Address (2) - 4.
Set the bit length (2) of Access Control Mask
for IPv4.
Set the 1st 8 bit of the Allowed IPv4 IP
Address (3) - 1.
Set the 2nd 8 bit of the Allowed IPv4 IP
Address (3) - 2.
0* - 255
0* - 32
0* - 255
0* - 255
0* - 255
0* - 255
0* - 32
0* - 255
0* - 255
34
Xerox® WorkCentre® 5019/5021
Network Addendum

Program
number
Menu item Description
Value
(* default setting)
1040 Allowed IPv4 IP
Address (3) - 3
1041 Allowed IPv4 IP
Address (3) - 4
1042 IPv4 Access
Control Mask
bit length (3)
1046 Allowed IPv4 IP
Address (4) - 1
1047 Allowed IPv4 IP
Address (4) - 2
1048 Allowed IPv4 IP
Address (4) - 3
1049 Allowed IPv4 IP
Address (4) - 4
1050 IPv4 Access
Control Mask
bit length (4)
1054 Allowed IPv4 IP
Address (5) - 1
Set the 3rd 8 bit of the Allowed IPv4 IP
Address (3) - 3.
Set the 4th 8 bit of the Allowed IPv4 IP
Address (3) - 4.
Set the bit length (3) of Access Control Mask
for IPv4.
Set the 1st 8 bit of the Allowed IPv4 IP
Address (4) - 1.
Set the 2nd 8 bit of the Allowed IPv4 IP
Address (4) - 2.
Set the 3rd 8 bit of the Allowed IPv4 IP
Address (4) - 3.
Set the 4th 8 bit of the Allowed IPv4 IP
Address (4) - 4.
Set the bit length (4) of Access Control Mask
for IPv4.
Set the 1st 8 bit of the Allowed IPv4 IP
Address (5) - 1.
0* - 255
0* - 255
0* - 32
0* - 255
0* - 255
0* - 255
0* - 255
0* - 32
0* - 255
1055 Allowed IPv4 IP
Address (5) - 2
1056 Allowed IPv4 IP
Address (5) - 3
1057 Allowed IPv4 IP
Address (5) - 4
1058 IPv4 Access
Control Mask
bit length (5)
1062 Allowed IPv4 IP
Address (6) - 1
1063 Allowed IPv4 IP
Address (6) - 2
1064 Allowed IPv4 IP
Address (6) - 3
1065 Allowed IPv4 IP
Address (6) - 4
Set the 1st 8 bit of the Allowed IPv4 IP
Address (5) - 2.
Set the 1st 8 bit of the Allowed IPv4 IP
Address (5) - 3.
Set the 1st 8 bit of the Allowed IPv4 IP
Address (5) - 4.
Set the bit length (5) of Access Control Mask
for IPv4.
Set the 1st 8 bit of the Allowed IPv4 IP
Address (6) - 1.
Set the 1st 8 bit of the Allowed IPv4 IP
Address (6) - 2.
Set the 1st 8 bit of the Allowed IPv4 IP
Address (6) - 3.
Set the 1st 8 bit of the Allowed IPv4 IP
Address (6) - 4.
0* - 255
0* - 255
0* - 255
0* - 32
0* - 255
0* - 255
0* - 255
0* - 255
Xerox® WorkCentre® 5019/5021
Network Addendum
35

Program
number
Menu item Description
Value
(* default setting)
1066 IPv4 Access
Control Mask
bit length (6)
1070 Allowed IPv4 IP
Address (7) - 1
1071 Allowed IPv4 IP
Address (7) - 2
1072 Allowed IPv4 IP
Address (7) - 3
1073 Allowed IPv4 IP
Address (7) - 4
1074 IPv4 Access
Control Mask
bit length (7)
1078 Allowed IPv4 IP
Address (8) - 1
1079 Allowed IPv4 IP
Address (8) - 2
1080 Allowed IPv4 IP
Address (8) - 3
Set the bit length (6) of Access Control Mask
for IPv4.
Set the 1st 8 bit of the Allowed IPv4 IP
Address (7) - 1.
Set the 1st 8 bit of the Allowed IPv4 IP
Address (7) - 2.
Set the 1st 8 bit of the Allowed IPv4 IP
Address (7) - 3.
Set the 1st 8 bit of the Allowed IPv4 IP
Address (7) - 4.
Set the bit length (7) of Access Control Mask
for IPv4.
Set the 1st 8 bit of the Allowed IPv4 IP
Address (8) - 1.
Set the 1st 8 bit of the Allowed IPv4 IP
Address (8) - 2.
Set the 1st 8 bit of the Allowed IPv4 IP
Address (8) - 3.
0* - 32
0* - 255
0* - 255
0* - 255
0* - 255
0* - 32
0* - 255
0* - 255
0* - 255
1081 Allowed IPv4 IP
Address (8) - 4
1082 IPv4 Access
Control Mask
bit length (8)
1086 Allowed IPv4 IP
Address (9) - 1
1087 Allowed IPv4 IP
Address (9) - 2
1088 Allowed IPv4 IP
Address (9) - 3
1089 Allowed IPv4 IP
Address (9) - 4
1090 IPv4 Access
Control Mask
bit length (9)
1094 Allowed IPv4 IP
Address (10) - 1
Set the 1st 8 bit of the Allowed IPv4 IP
Address (8) - 4.
Set the bit length (8) of Access Control Mask
for IPv4.
Set the 1st 8 bit of the Allowed IPv4 IP
Address (9) - 1.
Set the 1st 8 bit of the Allowed IPv4 IP
Address (9) - 2.
Set the 1st 8 bit of the Allowed IPv4 IP
Address (9) - 3.
Set the 1st 8 bit of the Allowed IPv4 IP
Address (9) - 4.
Set the bit length (9) of Access Control Mask
for IPv4.
Set the 1st 8 bit of the Allowed IPv4 IP
Address (10) - 1.
0* - 255
0* - 32
0* - 255
0* - 255
0* - 255
0* - 255
0* - 32
0* - 255
36
Xerox® WorkCentre® 5019/5021
Network Addendum

Program
number
Menu item Description
Value
(* default setting)
1095 Allowed IPv4 IP
Address (10) - 2
1096 Allowed IPv4 IP
Address (10) - 3
1097 Allowed IPv4 IP
Address (10) - 4
1098 IPv4 Access
Control Mask
bit length (10)
1103 SNMP Port
Status
1104 LPD Port Status Set the start status of LPD port. 0: Disabled
1105 Port 9100 Port
Status
1106 CentreWare
Internet
Services Start
Status
Set the 1st 8 bit of the Allowed IPv4 IP
Address (10) - 2.
Set the 1st 8 bit of the Allowed IPv4 IP
Address (10) - 3.
Set the 1st 8 bit of the Allowed IPv4 IP
Address (10) - 4.
Set the bit length (10) of Access Control
Mask for IPv4.
Set the start status of SNMP port. 0: Disabled
Set the start status of Port 9100 port. 0: Disabled
Set the start status of CentreWare Internet
Services Start Status.
0* - 255
0* - 255
0* - 255
0* - 32
1: Enabled*
1: Enabled*
1: Enabled*
0: Disabled
1: Enabled*
Xerox® WorkCentre® 5019/5021
Network Addendum
37

Network-related problems
This section provides possible solutions to network problems.
Problems using TCP/IP (LPD/Port9100)
The table below lists possible causes for problems that occur when using TCP/IP (LPD/Port9100), the
methods to check, and the required actions to take.
Unable to print
Possible cause How to check Remedy
The correct IP address has not
been set.
An unrecoverable failure
occurred while processing a
print job.
The selected protocol is not
compatible with the PC.
Have the Network
Administrator check whether
the machine's IP address is
correct.
Check whether an error is
displayed in the control
panel's display.
Check the selected protocol. Select a protocol compatible
Set the correct IP address in
the machine.
Turn the machine's power off,
wait until the display becomes
blank, then turn the power on
again.
with the PC.
Problems using CentreWare Internet Services
The table below lists possible solutions to problems you may encounter when using CentreWare
Internet Services.
Symptom Remedy
Unable to connect to
CentreWare Internet Services.
Is the machine operating normally?
Check whether the machine's power is on.
Is Internet Services running?
Print a System Settings Report and check it.
38
Has the Internet address been entered correctly?
Check the Internet address again. If you still can't connect to
CentreWare Internet Services, try connecting by entering the IP
address.
Are you using a proxy server?
The machine cannot connect to some proxy servers. Do not use
a proxy server. Set your Web browser to Not using proxy server,
or set the address you are using to Not using proxy server.
Xerox® WorkCentre® 5019/5021
Network Addendum

Symptom Remedy
The message "Please wait" is
not going away.
Nothing happens after
pressing Refresh.
The frame on the right is not
updated after selecting a
menu item from the frame on
the left.
The screen display is
fragmented.
The display is not updated. Press Refresh.
Nothing happens after
pressing Apply.
Wait for a while.
If the condition persists, press the Refresh button.
If the condition still persists, check whether the machine is
operating normally.
Are you using a supported Web browser?
See Using CentreWare Internet Services on page 15 to check
whether your Web browser is a supported type.
Change your Web browser's window size.
Are the entered values correct?
If you entered an out-of-range value, it is automatically
changed to a value within range.
Are you now using, or did you just use the machine's control
panel?
When the Auto Reset feature is set, settings made by
CentreWare Internet Services are not applied until the preset
amount of time has elapsed. Wait for a while.
Is the machine in an energy saver mode?
Cancel the energy saver mode, and then try again.
When you click Apply, a
message such as "The server
has returned ineffective or
unrecognizable response" or
"No data" is displayed on the
browser.
Is the passcode correct?
The passcode you re-entered for confirmation does not match.
Enter the passcode correctly.
Restart the machine.
Internet/intranet connection problems
The table below lists possible causes and solutions for problems that might occur when connecting to
the Internet or an intranet.
Xerox® WorkCentre® 5019/5021
Network Addendum
39

Unable to connect to the Internet or an intranet
Possible cause Remedy
The IP address has not been
set correctly.
The IP gateway address has
not been set correctly.
The subnet mask has not been
set correctly.
The DNS server address has
not been set correctly.
The DNS server selected
cannot resolve the address.
The setting of the address
that does not use a proxy
server is incorrect.
Check the IP address setting. If the IP address has not been set
correctly, specify a fixed IP address or use DHCP or Autonet to
resolve the IP address.
Enter the IP gateway address correctly when connecting to a
proxy server or Web server via an IP gateway.
Set the subnet mask correctly, to match the environment in use.
Check the DNS server address.
Select a DNS server that can resolve the address.
When connecting via the proxy server set the IP address of a
DNS server that can resolve the address of the proxy server.
When not connecting via the proxy server set the IP address of
a DNS server that can resolve the destination address.
Confirm whether only addresses that do not use a proxy server
are set. Even if addresses not through a proxy server are
specified using the FQDN, if a server is directly accessed using
its IP address, the registered server is not excluded. Set the
address not to use a proxy server.
Likewise, even if you directly specify an address that does not
use a proxy server, if a server is accessed with the FQDN, the
registered server is not excluded. Set an IP address with the
FQDN not to use a proxy server.
The connected server or proxy
server is down.
A network cable is
disconnected or broken.
Unable to communicate due
to the load on the server
application.
40
Check whether the server or proxy server to connect to is
working normally.
Check the network cable connections. The use of a spanning
tree environment is recommended to create a network
environment resistant to disconnections.
Wait a while, then access the server again.
Xerox® WorkCentre® 5019/5021
Network Addendum

Possible cause Remedy
An error has occurred but is
not displayed on the control
panel.
Unable to connect due to an
access restriction set in the
proxy server, firewall or Web
server.
Errors that occur while executing background processes are not
displayed on the control panel. Print the Job History Report to
check the execution results.
Types of access restrictions are listed below. Check the set
access restriction.
Address (port) restriction
SSL restriction
User access (or access authority level) restriction
Content block
Scheme restriction (such as restriction on use of HTTP)
Forwarded data size restriction
Method restriction (such as restriction on use of POST)
HTTP header restriction (such as access permitted only on
certain browsers)
Time restriction (such as use permitted only during certain time
slots)
Unable to connect to the desired Web server
Symptom Remedy
The machine is not set to use
a proxy server.
If the machine is not set to use a proxy server in an
environment that uses one, you cannot connect to the desired
Web server. Set the machine to use a proxy server.
The machine is set to use a
proxy server even though the
environment does not use
one.
The proxy server address has
not been set correctly.
Unable to connect because
the user name or password is
incorrect when the proxy
server requires authentication.
Do not set the machine to use a proxy server in an environment
not requiring the use of one (such as an intranet).
If the machine is set to use a proxy server, you will not be able
to connect to the desired Web server if the proxy server address
is not set correctly. Set the proxy server address correctly.
Set a user name and password in the machine that the proxy
server will permit connection for.
IPv4 or IPv6 connection problems
The table below lists possible solutions to problems that might occur when connecting to an IPv4 or
IPv6 address.
Xerox® WorkCentre® 5019/5021
Network Addendum
41

Unable to connect to an IPv4 address
Symptom Remedy
When entering an IPv4
address, the machine does not
work properly when 0 is added
to the head of values in the
address, such as
192.168.010.033
Do not add 0 to the head of address values.
Unable to connect to an IPv6 address
Symptom Remedy
Unable to access the machine
by specifying a link-local
address.
Unable to communicate with
a Windows operating system
supporting IPv6.
Searches for devices outside
the router do not work
properly.
Append a scope ID to the link-local address.
For example, when using Internet Explorer 7 in Windows Vista
to access the machine by specifying fe80::203:baff:fe48:9010,
append the Windows Vista Ethernet adapter local area
connection number (such as 8) as the scope ID (for example,
enter fe80::203:baff:fe48:9010%8).
Set fixed addresses in Windows operating systems supporting
IPv6.
When going outside the router in an SMB search, enter the
recipient address directly.
Multicasting is only supported within a local link (FF02::1).
Unable to print in an IPv6 environment
Symptom Remedy
Unable to use a shared
Windows printer from a
Windows operating system
supporting IPv6 in an IPv6
network environment without
a DNS server.
Register the machine's computer name in the "hosts" file in the
Windows operating system supporting IPv6.
Example:
Register the name in the file
C:\Windows\system32\driver\etc\hosts.
Other IPv6 problems
Symptom Remedy
IPv6 addresses are not
entered correctly in output
Job Logs.
42
Use IPv4.
Xerox® WorkCentre® 5019/5021
Network Addendum

Notes and restrictions
This section describes the notes and restrictions to observe when using the machine. For notes and
restrictions on machine use, Copy, Print, and Scan features, refer to the WorkCentre 5019/5021 User
Guide.
Note Scanning through an Ethernet network is not supported.
Notes and restrictions when connecting to Internet or intranet
Internet/intranet connections
Depending on the Web server, server application, proxy server, and firewall, you may not be able to
connect to the Internet or intranet.
To connect to the Internet or intranet using a third party server application, proxy, or firewall, the
following requirements must be met:
• The software must run on Windows XP, Windows Server 2003, Windows Server 2008, Windows
Server 2008 R2, Windows Vista, Windows 7, Windows 8, or Windows Server 2012.
• RFC2617: HTTP Authentication: Basic and Digest Access Authentication must be satisfied. (only
Basic authentication is supported, the other authentications are not supported)
• Supporting the GET/CONNECT/POST methods
CentreWare Internet Services
• Depending on the browser settings, text for language selection may not be displayed correctly.
• The tabs may not be displayed correctly when there are several browsers to access to CentreWare
Internet Services at the same time or condition of the network. In his case, refresh the display.
Notes and restrictions when operating from computers
Supported OS
The supported OS may vary depending on the functions. For more information, refer to the WorkCentre
5019/5021 User Guide.
Notes and restrictions for using TCP/IP (LPD/Port9100)
This section describes notes and restrictions to observe when using TCP/IP (LPD/Port9100).
Configuration on the machine
• IP addresses are managed for the entire system. Configure the settings only after consulting your
network administrator.
• The setting of subnet mask and gateway addresses may be required depending on the network
environment. Consult your network administrator and configure the required settings.
Xerox® WorkCentre® 5019/5021
Network Addendum
43

Configuration on the computer
• IP addresses are managed for the entire system. Configure the settings only after consulting your
network administrator.
• When setting the network such as IP addresses with a host used under the Network Information
Service (NIS), consult your NIS administrator.
While printing
When you change a computer's IP address or a computer name, queries and cancel processes
submitted from the machine are no longer executed correctly. Thus, turn the machine off and on when
there is no print data in the receiving buffer.
Note You can use the machine's control panel to cancel printing of the current print data in the
machine's receiving buffer but not printing of pending print data.
Notes and restrictions for IPv6 connection
This section describes notes and restrictions to observe when using IPv6 connection.
• You can only use the following operating system versions to print in an IPv6 environment:
–Windows XP
– Windows Vista
– Windows 7
– Windows Server 2008
– Windows Server 2008 R2
– Windows 8
– Windows Server 2012
Note IPv6 must be installed for PCs with Windows XP.
• IPv6-in-IPv4-tunneling in the machine itself is not supported.
Note If IP Mode is set to IPv6, the IPv6-inIPv4-tunneling cannot be performed.
• Communication problems may occur when multiple routers exist on the same subnet.
• The network settings of the DNS server or a server used by the machine may cause performance
problems when using services in a dual stack environment.
• Automatically set IPv6 addresses and IPv6 DNS server addresses may be unavailable addresses.
"Unavailable IPv6 addresses" mean site-local addresses (fec0::) or addresses with the IPv6
documentation prefix (2001:db8::/32).
• IPv4 DNS information can sometimes be used directly after machine startup if the IP operation
mode is Dual Stack, DNS information has been set for both IPv4 and IPv6, and the machine is
communicating with a device specified using an FQDN.
• The address displayed as the machine's IP address may change.
For example, in Dual Stack mode, either the IPv4 address or IPv6 address may not be displayed, or
a different IPv6 address may be displayed.
44
Xerox® WorkCentre® 5019/5021
Network Addendum

• In the following cases, the machine may not be able to identify whether addresses are for the
same device, so may not be able to execute status check (lpq) or cancel (lprm) commands for user
print jobs executed by LPD.
– When simultaneously operating IPv4 and IPv6 addresses with the same host
– When simultaneously operating multiple IPv6 addresses with the same host
• IPv6 addresses may not be correctly recorded on job logs. Use an IPv4 network for correct logging.
Xerox® WorkCentre® 5019/5021
Network Addendum
45

46
Xerox® WorkCentre® 5019/5021
Network Addendum

Index
H
HTTP, setting protocol, 23
Numerics
10BASE-T/100BASE-TX interface, 27
A
Adjusting foot, 27
Authentication failure generic traps, 20
C
CentreWare Internet Services, 15–26
Description, 17
Energy Saver settings, 18
Ethernet, 19
HTTP, 23
Internet Services settings, 18
LPD port, 22
menu items, 17
port settings, 18
Port9100, 22
Properties tab, 17
SNMP configuration, 20
starting, 16
supported environments, 15
supported operating systems, 15
TCP/IP, 19
Web browser settings, 16
clock, setting, 30, 32
communication port, activating, 13
connecting printer to network, 6
connection problems, 38
D
Display Language, 18
I
interface cable, 7
interface, machine, 26
Internet Services settings, 18
IP address
IPv4, 8
IPv6, 9
setting, 8, 10
IP filtering (security), 23
IP mode, 19
IPv4, 19
filtering, 23
IP address, 8
IPv6, 20
filtering, 24
IP address, 9
L
Log In/Out button, 30
Low Power mode, 18
LPD, 6, 13
LPD (connectivity), 22
M
MAC address, 19
machine interface, 26
N
network, 6
network environment, 6
network environment, setting, 8
network problems, 38
network settings, 33
E
Energy Saver settings, 18
Ethernet connections, 19
Ethernet interface, 7, 27
F
filtering
IPv4, 23
IPv6, 24
O
options configuration, setting, 26
P
port settings, 18
port, activating, 13
Port9100, 6, 13
Port information, 22
WorkCentre 5019/5021
Network Addendum
47

setting, 22
Power cord connector, 26
Power switch, 26
Printer Setup Utility for Setting the IP Address, 10
Properties tab, 17
R
rated speed, 19
restrictions, 43–45
Internet/intranet connection, 43
IPv6 connection, 44
TCP/IP, 43
S
scan feature, 6
security, IP filtering, 23
setting
clock, system, 30, 32
Energy Saver, 18
Ethernet (connectivity), 19
HTTP protocol, 23
Internet Services, 18
IP address, 10
LDP port, 22
MAC address, 19
options configuration, 26
port (connectivity), 18
Port9100, 22
rated speed, 19
SNMP configuration, 20
TCP/IP (connectivity), 19
SNMP, 13
configuration, 20
System Administration mode
entering, 30
exiting, 32
system clock, 32
network, 38
printing, 38
TCP/IP, 38
Web server, 41
U
UDP IPv4, 21
UDP IPv6, 21
USB interface, 27
T
TCP/IP, 8
connectivity settings, 19
restrictions, 43
troubleshooting, 38
Time to Sleep mode, 18
troubleshooting
CentreWare Internet Services, 38
IPv4 or IPv6, 41
48
WorkCentre 5019/5021
Network Addendum


 Loading...