


September 2012
702P00733
WorkCentre 5019/5021
User Guide

©2012 Xerox Corporation. All rights reserved. XEROX®, and XEROX and Design®, are trademarks of Xerox Corporation in the United
States and/or other countries.
Microsoft, Windows, Windows Server, Windows XP, Windows Vista, and Windows 7 are trademarks or registered trademarks of
Microsoft Corporation.
Microsoft product screen shot(s) reprinted with permission from Microsoft Corporation.
Document version 1.0: May 2012

Contents
1 Before using the machine
Preface . . . . . . . . . . . . . . . . . . . . . . . . . . . . . . . . . . . . . . . . . . . . . . . . . . . . . . . . . . . . . . . . . . . . . . . . . . . . . . . . .1-1
Available manuals. . . . . . . . . . . . . . . . . . . . . . . . . . . . . . . . . . . . . . . . . . . . . . . . . . . . . . . . . . . . . . . . . . . . . . .1-2
Using this guide. . . . . . . . . . . . . . . . . . . . . . . . . . . . . . . . . . . . . . . . . . . . . . . . . . . . . . . . . . . . . . . . . . . . . . . . . 1-3
Organization of this guide. . . . . . . . . . . . . . . . . . . . . . . . . . . . . . . . . . . . . . . . . . . . . . . . . . . . . . . . . . . . 1-3
Conventions. . . . . . . . . . . . . . . . . . . . . . . . . . . . . . . . . . . . . . . . . . . . . . . . . . . . . . . . . . . . . . . . . . . . . . . . . 1-3
Safety notes . . . . . . . . . . . . . . . . . . . . . . . . . . . . . . . . . . . . . . . . . . . . . . . . . . . . . . . . . . . . . . . . . . . . . . . . . . . .1-5
Electrical safety . . . . . . . . . . . . . . . . . . . . . . . . . . . . . . . . . . . . . . . . . . . . . . . . . . . . . . . . . . . . . . . . . . . . .1-5
Machine installation . . . . . . . . . . . . . . . . . . . . . . . . . . . . . . . . . . . . . . . . . . . . . . . . . . . . . . . . . . . . . . . . . 1-6
Operational safety. . . . . . . . . . . . . . . . . . . . . . . . . . . . . . . . . . . . . . . . . . . . . . . . . . . . . . . . . . . . . . . . . . .1-8
Consumables. . . . . . . . . . . . . . . . . . . . . . . . . . . . . . . . . . . . . . . . . . . . . . . . . . . . . . . . . . . . . . . . . . . . . . . . 1-9
Location of warning and caution labels . . . . . . . . . . . . . . . . . . . . . . . . . . . . . . . . . . . . . . . . . . . . . .1-10
Regulations . . . . . . . . . . . . . . . . . . . . . . . . . . . . . . . . . . . . . . . . . . . . . . . . . . . . . . . . . . . . . . . . . . . . . . . . . . . .1-11
Radio frequency emissions (Class A) . . . . . . . . . . . . . . . . . . . . . . . . . . . . . . . . . . . . . . . . . . . . . . . . .1-11
Product safety certification (UL, CB) . . . . . . . . . . . . . . . . . . . . . . . . . . . . . . . . . . . . . . . . . . . . . . . . .1-11
Environment . . . . . . . . . . . . . . . . . . . . . . . . . . . . . . . . . . . . . . . . . . . . . . . . . . . . . . . . . . . . . . . . . . . . . . . . . . .1-12
About licenses . . . . . . . . . . . . . . . . . . . . . . . . . . . . . . . . . . . . . . . . . . . . . . . . . . . . . . . . . . . . . . . . . . . . . . . . .1-12
Libcurl . . . . . . . . . . . . . . . . . . . . . . . . . . . . . . . . . . . . . . . . . . . . . . . . . . . . . . . . . . . . . . . . . . . . . . . . . . . . .1-12
FreeBSD . . . . . . . . . . . . . . . . . . . . . . . . . . . . . . . . . . . . . . . . . . . . . . . . . . . . . . . . . . . . . . . . . . . . . . . . . . .1-13
MD5. . . . . . . . . . . . . . . . . . . . . . . . . . . . . . . . . . . . . . . . . . . . . . . . . . . . . . . . . . . . . . . . . . . . . . . . . . . . . . .1-13
Legal notice. . . . . . . . . . . . . . . . . . . . . . . . . . . . . . . . . . . . . . . . . . . . . . . . . . . . . . . . . . . . . . . . . . . . . . . . . . . .1-15
2 Environment settings
Supported environment. . . . . . . . . . . . . . . . . . . . . . . . . . . . . . . . . . . . . . . . . . . . . . . . . . . . . . . . . . . . . . . . . .2-1
Print feature . . . . . . . . . . . . . . . . . . . . . . . . . . . . . . . . . . . . . . . . . . . . . . . . . . . . . . . . . . . . . . . . . . . . . . . .2-1
Scan feature . . . . . . . . . . . . . . . . . . . . . . . . . . . . . . . . . . . . . . . . . . . . . . . . . . . . . . . . . . . . . . . . . . . . . . . .2-1
USB interface . . . . . . . . . . . . . . . . . . . . . . . . . . . . . . . . . . . . . . . . . . . . . . . . . . . . . . . . . . . . . . . . . . . . . . . . . . .2-2
Installing the print driver/scan driver . . . . . . . . . . . . . . . . . . . . . . . . . . . . . . . . . . . . . . . . . . . . . . . . . . . . .2-3
Installing the print driver. . . . . . . . . . . . . . . . . . . . . . . . . . . . . . . . . . . . . . . . . . . . . . . . . . . . . . . . . . . . .2-3
Installing the scan driver. . . . . . . . . . . . . . . . . . . . . . . . . . . . . . . . . . . . . . . . . . . . . . . . . . . . . . . . . . . . . 2-3
Uninstalling . . . . . . . . . . . . . . . . . . . . . . . . . . . . . . . . . . . . . . . . . . . . . . . . . . . . . . . . . . . . . . . . . . . . . . . . .2-4
3 Product overview
Machine components. . . . . . . . . . . . . . . . . . . . . . . . . . . . . . . . . . . . . . . . . . . . . . . . . . . . . . . . . . . . . . . . . . . .3-1
Front, left side. . . . . . . . . . . . . . . . . . . . . . . . . . . . . . . . . . . . . . . . . . . . . . . . . . . . . . . . . . . . . . . . . . . . . . .3-2
Right side, rear . . . . . . . . . . . . . . . . . . . . . . . . . . . . . . . . . . . . . . . . . . . . . . . . . . . . . . . . . . . . . . . . . . . . . . 3-3
Inside. . . . . . . . . . . . . . . . . . . . . . . . . . . . . . . . . . . . . . . . . . . . . . . . . . . . . . . . . . . . . . . . . . . . . . . . . . . . . . . 3-4
Duplex automatic document feeder (optional) . . . . . . . . . . . . . . . . . . . . . . . . . . . . . . . . . . . . . . . . 3-5
WorkCentre 5019/5021
User Guide
iii

Contents
Power source. . . . . . . . . . . . . . . . . . . . . . . . . . . . . . . . . . . . . . . . . . . . . . . . . . . . . . . . . . . . . . . . . . . . . . . . . . . .3-6
Switching the power on . . . . . . . . . . . . . . . . . . . . . . . . . . . . . . . . . . . . . . . . . . . . . . . . . . . . . . . . . . . . . .3-6
Switching the power off. . . . . . . . . . . . . . . . . . . . . . . . . . . . . . . . . . . . . . . . . . . . . . . . . . . . . . . . . . . . . .3-7
Energy saver modes . . . . . . . . . . . . . . . . . . . . . . . . . . . . . . . . . . . . . . . . . . . . . . . . . . . . . . . . . . . . . . . . . . . . . 3-8
Entering the energy saver modes . . . . . . . . . . . . . . . . . . . . . . . . . . . . . . . . . . . . . . . . . . . . . . . . . . . . .3-8
Exiting energy saver modes . . . . . . . . . . . . . . . . . . . . . . . . . . . . . . . . . . . . . . . . . . . . . . . . . . . . . . . . . . 3-9
Control panel . . . . . . . . . . . . . . . . . . . . . . . . . . . . . . . . . . . . . . . . . . . . . . . . . . . . . . . . . . . . . . . . . . . . . . . . . .3-10
Machine status. . . . . . . . . . . . . . . . . . . . . . . . . . . . . . . . . . . . . . . . . . . . . . . . . . . . . . . . . . . . . . . . . . . . . . . . .3-13
Icons . . . . . . . . . . . . . . . . . . . . . . . . . . . . . . . . . . . . . . . . . . . . . . . . . . . . . . . . . . . . . . . . . . . . . . . . . . . . . .3-14
Account modes . . . . . . . . . . . . . . . . . . . . . . . . . . . . . . . . . . . . . . . . . . . . . . . . . . . . . . . . . . . . . . . . . . . . . . . .3-16
Types of account modes . . . . . . . . . . . . . . . . . . . . . . . . . . . . . . . . . . . . . . . . . . . . . . . . . . . . . . . . . . . .3-16
Logging in to the machine in Single Account mode . . . . . . . . . . . . . . . . . . . . . . . . . . . . . . . . . . .3-16
Logging in to the machine in Multiple Account mode . . . . . . . . . . . . . . . . . . . . . . . . . . . . . . . . .3-18
4 Loading paper
Paper types . . . . . . . . . . . . . . . . . . . . . . . . . . . . . . . . . . . . . . . . . . . . . . . . . . . . . . . . . . . . . . . . . . . . . . . . . . . . .4-1
Supported paper weights and sheet counts. . . . . . . . . . . . . . . . . . . . . . . . . . . . . . . . . . . . . . . . . . . .4-2
Supported paper type. . . . . . . . . . . . . . . . . . . . . . . . . . . . . . . . . . . . . . . . . . . . . . . . . . . . . . . . . . . . . . . . 4-2
Unusable paper . . . . . . . . . . . . . . . . . . . . . . . . . . . . . . . . . . . . . . . . . . . . . . . . . . . . . . . . . . . . . . . . . . . . .4-6
Storing and handling paper . . . . . . . . . . . . . . . . . . . . . . . . . . . . . . . . . . . . . . . . . . . . . . . . . . . . . . . . . .4-6
Loading paper . . . . . . . . . . . . . . . . . . . . . . . . . . . . . . . . . . . . . . . . . . . . . . . . . . . . . . . . . . . . . . . . . . . . . . . . . . 4-7
Loading paper in Trays 1 and 2 (optional). . . . . . . . . . . . . . . . . . . . . . . . . . . . . . . . . . . . . . . . . . . . .4-7
Loading paper in the Bypass tray . . . . . . . . . . . . . . . . . . . . . . . . . . . . . . . . . . . . . . . . . . . . . . . . . . . . . 4-9
Changing paper size. . . . . . . . . . . . . . . . . . . . . . . . . . . . . . . . . . . . . . . . . . . . . . . . . . . . . . . . . . . . . . . . . . . .4-11
Changing the paper size for Trays 1 and 2 . . . . . . . . . . . . . . . . . . . . . . . . . . . . . . . . . . . . . . . . . . .4-11
Setting the paper size . . . . . . . . . . . . . . . . . . . . . . . . . . . . . . . . . . . . . . . . . . . . . . . . . . . . . . . . . . . . . . . . . .4-13
Setting the paper type. . . . . . . . . . . . . . . . . . . . . . . . . . . . . . . . . . . . . . . . . . . . . . . . . . . . . . . . . . . . . . . . . .4-15
5Copy
Copying procedure . . . . . . . . . . . . . . . . . . . . . . . . . . . . . . . . . . . . . . . . . . . . . . . . . . . . . . . . . . . . . . . . . . . . . .5-1
Placing the document. . . . . . . . . . . . . . . . . . . . . . . . . . . . . . . . . . . . . . . . . . . . . . . . . . . . . . . . . . . . . . . . 5-1
Setting advanced settings. . . . . . . . . . . . . . . . . . . . . . . . . . . . . . . . . . . . . . . . . . . . . . . . . . . . . . . . . . . . 5-5
Entering the number of copies. . . . . . . . . . . . . . . . . . . . . . . . . . . . . . . . . . . . . . . . . . . . . . . . . . . . . . . . 5-5
Starting the copy job . . . . . . . . . . . . . . . . . . . . . . . . . . . . . . . . . . . . . . . . . . . . . . . . . . . . . . . . . . . . . . . .5-6
Stopping a copy job . . . . . . . . . . . . . . . . . . . . . . . . . . . . . . . . . . . . . . . . . . . . . . . . . . . . . . . . . . . . . . . . . . . . .5-8
iv
WorkCentre 5019/5021
User Guide

Advanced copy settings. . . . . . . . . . . . . . . . . . . . . . . . . . . . . . . . . . . . . . . . . . . . . . . . . . . . . . . . . . . . . . . . . .5-9
Paper supply . . . . . . . . . . . . . . . . . . . . . . . . . . . . . . . . . . . . . . . . . . . . . . . . . . . . . . . . . . . . . . . . . . . . . . .5-10
Collate. . . . . . . . . . . . . . . . . . . . . . . . . . . . . . . . . . . . . . . . . . . . . . . . . . . . . . . . . . . . . . . . . . . . . . . . . . . . .5-11
Reduce/enlarge. . . . . . . . . . . . . . . . . . . . . . . . . . . . . . . . . . . . . . . . . . . . . . . . . . . . . . . . . . . . . . . . . . . . .5-12
Original size . . . . . . . . . . . . . . . . . . . . . . . . . . . . . . . . . . . . . . . . . . . . . . . . . . . . . . . . . . . . . . . . . . . . . . . .5-13
Original type . . . . . . . . . . . . . . . . . . . . . . . . . . . . . . . . . . . . . . . . . . . . . . . . . . . . . . . . . . . . . . . . . . . . . . .5-14
Lighten/Darken. . . . . . . . . . . . . . . . . . . . . . . . . . . . . . . . . . . . . . . . . . . . . . . . . . . . . . . . . . . . . . . . . . . . .5-15
ID card copy . . . . . . . . . . . . . . . . . . . . . . . . . . . . . . . . . . . . . . . . . . . . . . . . . . . . . . . . . . . . . . . . . . . . . . .5-15
2-sided. . . . . . . . . . . . . . . . . . . . . . . . . . . . . . . . . . . . . . . . . . . . . . . . . . . . . . . . . . . . . . . . . . . . . . . . . . . . .5-18
Pages per side. . . . . . . . . . . . . . . . . . . . . . . . . . . . . . . . . . . . . . . . . . . . . . . . . . . . . . . . . . . . . . . . . . . . . .5-19
Sharpness. . . . . . . . . . . . . . . . . . . . . . . . . . . . . . . . . . . . . . . . . . . . . . . . . . . . . . . . . . . . . . . . . . . . . . . . . .5-20
Background suppression . . . . . . . . . . . . . . . . . . . . . . . . . . . . . . . . . . . . . . . . . . . . . . . . . . . . . . . . . . . .5-20
Erase frame . . . . . . . . . . . . . . . . . . . . . . . . . . . . . . . . . . . . . . . . . . . . . . . . . . . . . . . . . . . . . . . . . . . . . . . .5-21
Auto rotation. . . . . . . . . . . . . . . . . . . . . . . . . . . . . . . . . . . . . . . . . . . . . . . . . . . . . . . . . . . . . . . . . . . . . . .5-21
Managing the copy paper with accounting. . . . . . . . . . . . . . . . . . . . . . . . . . . . . . . . . . . . . . . . . . . . . . .5-22
Operations when using the copy feature . . . . . . . . . . . . . . . . . . . . . . . . . . . . . . . . . . . . . . . . . . . . .5-22
6Scan
Scanning procedure . . . . . . . . . . . . . . . . . . . . . . . . . . . . . . . . . . . . . . . . . . . . . . . . . . . . . . . . . . . . . . . . . . . . .6-1
Placing the document. . . . . . . . . . . . . . . . . . . . . . . . . . . . . . . . . . . . . . . . . . . . . . . . . . . . . . . . . . . . . . . . 6-1
Using the scan feature. . . . . . . . . . . . . . . . . . . . . . . . . . . . . . . . . . . . . . . . . . . . . . . . . . . . . . . . . . . . . . .6-5
Loading scan data using a PC-based application . . . . . . . . . . . . . . . . . . . . . . . . . . . . . . . . . . . . . . . . . . 6-6
Stopping the scan job . . . . . . . . . . . . . . . . . . . . . . . . . . . . . . . . . . . . . . . . . . . . . . . . . . . . . . . . . . . . . . . . . . . 6-7
Contents
7Print
Major print driver functions . . . . . . . . . . . . . . . . . . . . . . . . . . . . . . . . . . . . . . . . . . . . . . . . . . . . . . . . . . . . . .7-1
Printing. . . . . . . . . . . . . . . . . . . . . . . . . . . . . . . . . . . . . . . . . . . . . . . . . . . . . . . . . . . . . . . . . . . . . . . . . . . . . . . . .7-2
Stopping the print job . . . . . . . . . . . . . . . . . . . . . . . . . . . . . . . . . . . . . . . . . . . . . . . . . . . . . . . . . . . . . . . . . . .7-3
8Tools
System settings procedure . . . . . . . . . . . . . . . . . . . . . . . . . . . . . . . . . . . . . . . . . . . . . . . . . . . . . . . . . . . . . . .8-1
Entering System Administration mode . . . . . . . . . . . . . . . . . . . . . . . . . . . . . . . . . . . . . . . . . . . . . . . . 8-2
Changing the settings . . . . . . . . . . . . . . . . . . . . . . . . . . . . . . . . . . . . . . . . . . . . . . . . . . . . . . . . . . . . . . . 8-3
Exiting System Administration mode . . . . . . . . . . . . . . . . . . . . . . . . . . . . . . . . . . . . . . . . . . . . . . . . . 8-3
System administrator program list. . . . . . . . . . . . . . . . . . . . . . . . . . . . . . . . . . . . . . . . . . . . . . . . . . . . . . . .8-4
Clock settings . . . . . . . . . . . . . . . . . . . . . . . . . . . . . . . . . . . . . . . . . . . . . . . . . . . . . . . . . . . . . . . . . . . . . . .8-4
System settings . . . . . . . . . . . . . . . . . . . . . . . . . . . . . . . . . . . . . . . . . . . . . . . . . . . . . . . . . . . . . . . . . . . . . 8-5
Account mode settings. . . . . . . . . . . . . . . . . . . . . . . . . . . . . . . . . . . . . . . . . . . . . . . . . . . . . . . . . . . . . . .8-8
Feature settings . . . . . . . . . . . . . . . . . . . . . . . . . . . . . . . . . . . . . . . . . . . . . . . . . . . . . . . . . . . . . . . . . . . .8-11
9 Machine status
Printing reports . . . . . . . . . . . . . . . . . . . . . . . . . . . . . . . . . . . . . . . . . . . . . . . . . . . . . . . . . . . . . . . . . . . . . . . . .9-1
Checking the job counter. . . . . . . . . . . . . . . . . . . . . . . . . . . . . . . . . . . . . . . . . . . . . . . . . . . . . . . . . . . . . 9-2
Checking consumables. . . . . . . . . . . . . . . . . . . . . . . . . . . . . . . . . . . . . . . . . . . . . . . . . . . . . . . . . . . . . . . 9-3
Checking the total number of impressions copied . . . . . . . . . . . . . . . . . . . . . . . . . . . . . . . . . . . . . . . . .9-4
WorkCentre 5019/5021
User Guide
v

Contents
10 Maintenance
Replacing consumables. . . . . . . . . . . . . . . . . . . . . . . . . . . . . . . . . . . . . . . . . . . . . . . . . . . . . . . . . . . . . . . . .10-1
Replacing the toner cartridge. . . . . . . . . . . . . . . . . . . . . . . . . . . . . . . . . . . . . . . . . . . . . . . . . . . . . . . .10-3
Replacing the drum cartridge. . . . . . . . . . . . . . . . . . . . . . . . . . . . . . . . . . . . . . . . . . . . . . . . . . . . . . . .10-7
Cleaning the machine . . . . . . . . . . . . . . . . . . . . . . . . . . . . . . . . . . . . . . . . . . . . . . . . . . . . . . . . . . . . . . . . . .10-9
Cleaning the exterior . . . . . . . . . . . . . . . . . . . . . . . . . . . . . . . . . . . . . . . . . . . . . . . . . . . . . . . . . . . . . . .10-9
Cleaning the document cover and document glass . . . . . . . . . . . . . . . . . . . . . . . . . . . . . . . . . . .10-9
Cleaning the document presser and narrow glass strip . . . . . . . . . . . . . . . . . . . . . . . . . . . . . . 10-10
Cleaning the document feeder rollers . . . . . . . . . . . . . . . . . . . . . . . . . . . . . . . . . . . . . . . . . . . . . . 10-12
11 Problem solving
Troubleshooting. . . . . . . . . . . . . . . . . . . . . . . . . . . . . . . . . . . . . . . . . . . . . . . . . . . . . . . . . . . . . . . . . . . . . . . .11-1
Machine problems. . . . . . . . . . . . . . . . . . . . . . . . . . . . . . . . . . . . . . . . . . . . . . . . . . . . . . . . . . . . . . . . . . . . . .11-2
Image quality problems . . . . . . . . . . . . . . . . . . . . . . . . . . . . . . . . . . . . . . . . . . . . . . . . . . . . . . . . . . . . . . . .11-6
Copying problems . . . . . . . . . . . . . . . . . . . . . . . . . . . . . . . . . . . . . . . . . . . . . . . . . . . . . . . . . . . . . . . . . . . . 11-12
Unable to copy . . . . . . . . . . . . . . . . . . . . . . . . . . . . . . . . . . . . . . . . . . . . . . . . . . . . . . . . . . . . . . . . . . . 11-12
Copy output problems . . . . . . . . . . . . . . . . . . . . . . . . . . . . . . . . . . . . . . . . . . . . . . . . . . . . . . . . . . . . 11-13
Printer problems. . . . . . . . . . . . . . . . . . . . . . . . . . . . . . . . . . . . . . . . . . . . . . . . . . . . . . . . . . . . . . . . . . . . . . 11-16
Unable to print . . . . . . . . . . . . . . . . . . . . . . . . . . . . . . . . . . . . . . . . . . . . . . . . . . . . . . . . . . . . . . . . . . . 11-16
Print output problems. . . . . . . . . . . . . . . . . . . . . . . . . . . . . . . . . . . . . . . . . . . . . . . . . . . . . . . . . . . . . 11-16
Scan problems . . . . . . . . . . . . . . . . . . . . . . . . . . . . . . . . . . . . . . . . . . . . . . . . . . . . . . . . . . . . . . . . . . . . . . . 11-18
Unable to scan . . . . . . . . . . . . . . . . . . . . . . . . . . . . . . . . . . . . . . . . . . . . . . . . . . . . . . . . . . . . . . . . . . . 11-18
Unable to load scan data to a PC . . . . . . . . . . . . . . . . . . . . . . . . . . . . . . . . . . . . . . . . . . . . . . . . . . 11-18
Scan image quality problems. . . . . . . . . . . . . . . . . . . . . . . . . . . . . . . . . . . . . . . . . . . . . . . . . . . . . . 11-19
Error codes. . . . . . . . . . . . . . . . . . . . . . . . . . . . . . . . . . . . . . . . . . . . . . . . . . . . . . . . . . . . . . . . . . . . . . . . . . . 11-21
Paper jams. . . . . . . . . . . . . . . . . . . . . . . . . . . . . . . . . . . . . . . . . . . . . . . . . . . . . . . . . . . . . . . . . . . . . . . . . . . 11-29
E-1: Paper jam in left cover A . . . . . . . . . . . . . . . . . . . . . . . . . . . . . . . . . . . . . . . . . . . . . . . . . . . . . . 11-30
E-2: Paper jam in one tray module cover B. . . . . . . . . . . . . . . . . . . . . . . . . . . . . . . . . . . . . . . . . . 11-32
E-3: Paper jams in Tray 1. . . . . . . . . . . . . . . . . . . . . . . . . . . . . . . . . . . . . . . . . . . . . . . . . . . . . . . . . . 11-32
E-4: Paper jams in Tray 2. . . . . . . . . . . . . . . . . . . . . . . . . . . . . . . . . . . . . . . . . . . . . . . . . . . . . . . . . . 11-33
E-5: Paper jams in the Bypass Tray. . . . . . . . . . . . . . . . . . . . . . . . . . . . . . . . . . . . . . . . . . . . . . . . . 11-34
Document jams . . . . . . . . . . . . . . . . . . . . . . . . . . . . . . . . . . . . . . . . . . . . . . . . . . . . . . . . . . . . . . . . . . . . . . 11-36
12 Appendix
Specifications . . . . . . . . . . . . . . . . . . . . . . . . . . . . . . . . . . . . . . . . . . . . . . . . . . . . . . . . . . . . . . . . . . . . . . . . . .12-1
Printable area. . . . . . . . . . . . . . . . . . . . . . . . . . . . . . . . . . . . . . . . . . . . . . . . . . . . . . . . . . . . . . . . . . . . . . . . . .12-5
Optional components. . . . . . . . . . . . . . . . . . . . . . . . . . . . . . . . . . . . . . . . . . . . . . . . . . . . . . . . . . . . . . . . . . .12-6
Notes and restrictions . . . . . . . . . . . . . . . . . . . . . . . . . . . . . . . . . . . . . . . . . . . . . . . . . . . . . . . . . . . . . . . . . .12-7
Notes and restrictions on the use of the machine . . . . . . . . . . . . . . . . . . . . . . . . . . . . . . . . . . . . .12-7
Notes and restrictions on the use of the copy feature . . . . . . . . . . . . . . . . . . . . . . . . . . . . . . . . .12-8
Notes and restrictions on the use of the Print feature . . . . . . . . . . . . . . . . . . . . . . . . . . . . . . . . .12-8
Notes and restrictions on the use of the Scan feature . . . . . . . . . . . . . . . . . . . . . . . . . . . . . . . . .12-9
vi
WorkCentre 5019/5021
User Guide

Before using the
1
machine
This chapter describes how to use this guide and provides safety and legal notices you should read
before using the machine.
Preface
Thank you for selecting the WorkCentre 5019/5021 (hereafter referred to as "the machine").
This guide describes how to operate the machine and the precautions you should follow during
operation. To get the most out of the machine and to use it effectively, be sure to read this guide
before use.
This guide assumes that you have a basic knowledge of computer environments. For information on
these environments, refer to the manuals provided with the computer and operating system.
After reading this guide, be sure to keep it handy for quick reference.
WorkCentre 5019/5021
User Guide
1-1

Before using the machine
Available manuals
User Guide (this guide) (Driver CD Kit)
The guide describes how to use the copy, print, and scan features as well as how to set the paper,
perform everyday maintenance, make machine status settings, and perform troubleshooting.
Print Driver Help
The help describes print features and operations.
Guides for optional components
Optional components are available for this product. Optional components come with an installation
procedure guide that provides information on how to set up the product and other details.
1-2
WorkCentre 5019/5021
User Guide

Before using the machine
Using this guide
This guide is intended for first time users of the machine. It describes the basic operations for the copy,
print, and scan features.
Organization of this guide
This guide consists of the following chapters:
1 Before using the machine: Describes how to use this guide and provides license information.
2 Environment settings: Describes the environment required to operate the machine.
3 Product overview: Describes the names of the machine parts as well as basic operations, such as how
to turn the machine on and off and how to use the energy saver feature.
4 Loading paper: Describes the types of paper and other media that you can use on the machine and
how to load paper in a tray.
5 Copy: Describes the basic operation and features of the copy feature.
6 Scan: Describes the basic operations and features of the scan feature.
7 Print: Describes the basic printing operations.
8 Tools: Describes System Administration mode as well as how to change the default settings.
9 Machine status: Describes how to check the faults that occurred in the machine and to print various
reports.
10 Maintenance: Describes how to replace consumables and to clean the machine.
11 Problem solving: Describes troubleshooting procedures to solve the problems with the machine.
12 Appendix: Describes the specifications of the machine, optional accessories, and
cautions/restrictions.
Conventions
• The screen shots and illustrations used in this guide vary depending on the machine configuration
and optional components installed. Some of the items in the screen shots may not be displayed or
available depending on your machine configuration.
• The procedures in this guide may vary depending on the driver and utility software versions used.
• In this document, "Computer" refers to a personal computer or workstation.
• This guide uses Notes to call attention to important information and additional information on
operations or features.
WorkCentre 5019/5021
User Guide
1-3
Before using the machine
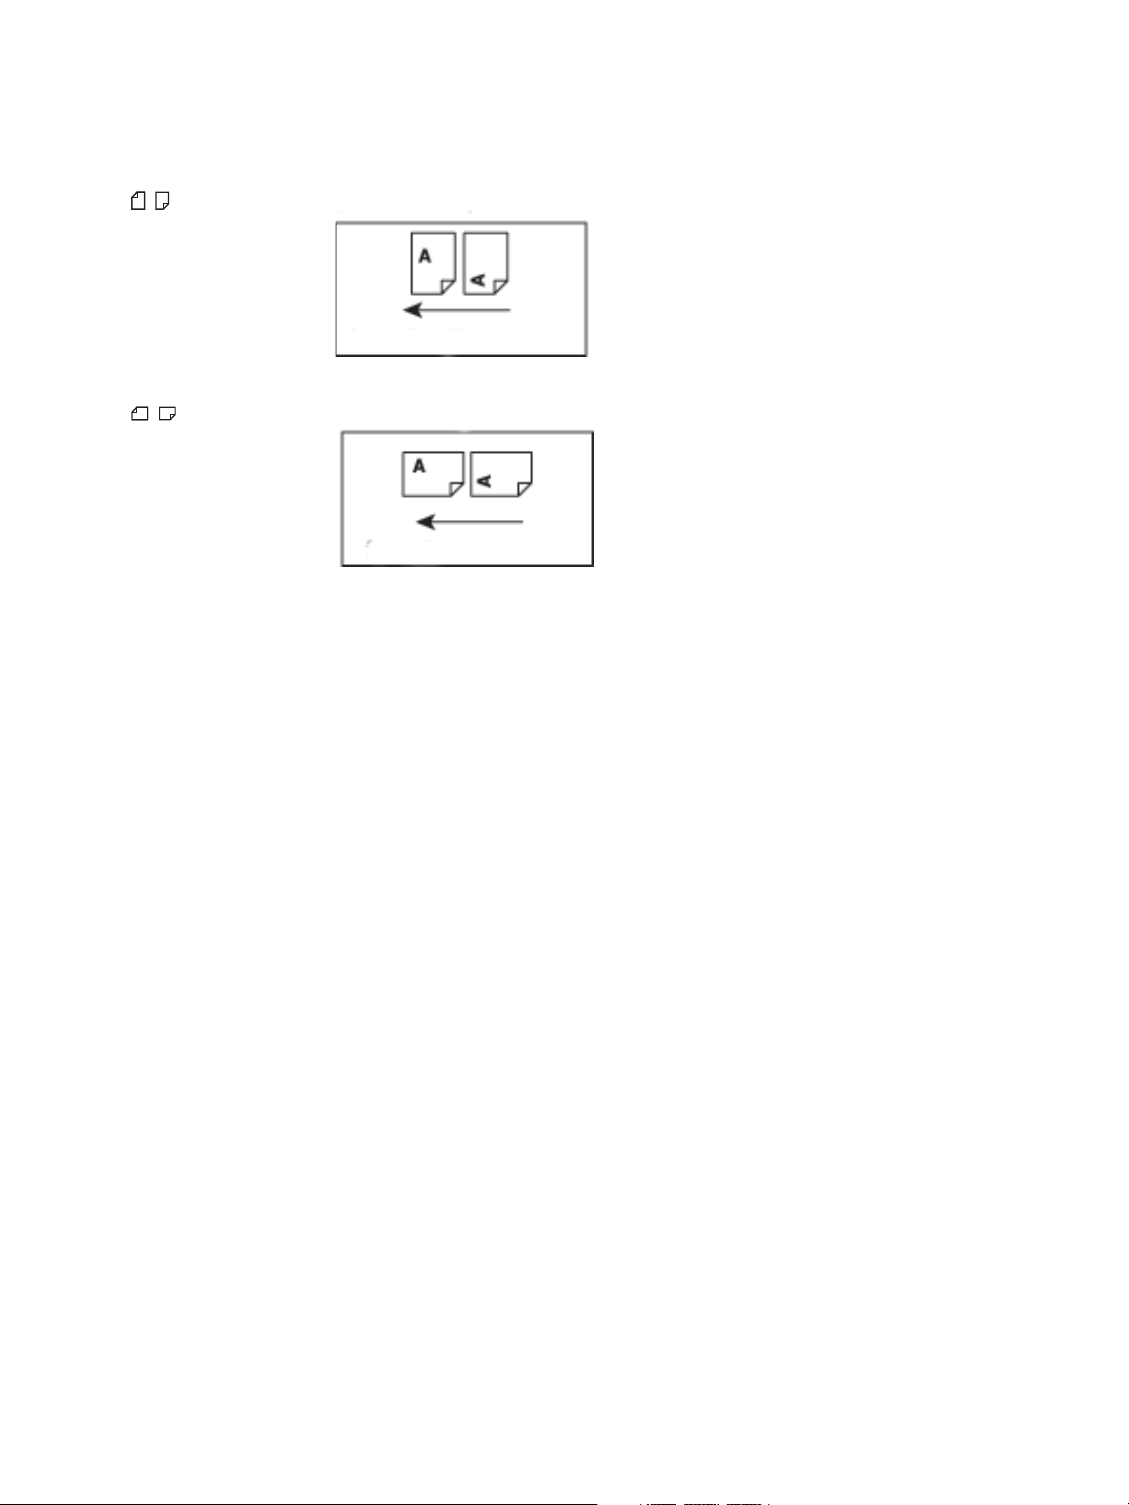
feed direction
feed direction
• Orientation of documents or paper is described in this guide as follows:
, ,
Long Edge Feed (LEF)
, ,
Short Edge Feed (SEF):
LEF orientation Loading the document or paper in portrait
orientation when viewed from the front of
the machine.
SEF orientation Loading the document or paper in
landscape orientation when viewed from
the front of the machine.
1-4
WorkCentre 5019/5021
User Guide

Before using the machine
Safety notes
Before using this product, read the safety notes carefully.
This product and recommended supplies have been tested and found to comply with strict safety
requirements including safety agency approvals and environmental standards.
Note Any unauthorized alteration including an addition of new functions or connection to
external devices may not be covered by the product warranty. Contact your local Xerox
representative for more information.
Follow all warning instructions marked on this product. The following symbols are used to indicate
danger of personal injury or machine damage:
WARNING:
CAUTION:
Risk of severe or fatal injury if not followed
strictly.
Risk of injury to user or damage to machine if
not followed strictly.
Electrical safety
This product must be operated by a power source as indicated on the machine's data plate. Consult
your local power company to check if your power source meets the requirements.
WARNINGS:
• Connect this product to a protective earth circuit.
• This product is supplied with a plug that has a protective earth pin. The plug fits only into an
earthed electrical outlet. This is a safety feature. If the plug doesn't fit to the outlet, contact an
electrician to replace the outlet to avoid risk of electric shock. Never use an earthed adapter plug
to connect the product to the electrical outlet that has no earth connection terminal.
Improper connection of a grounding conductor may cause electric shock.
• Plug the power cord directly into a grounded electrical outlet. To prevent overheat and a fire
accident, do not use an extension cord, a multi-plug adaptor or a multiple connector. Consult your
local Xerox representative to check if an outlet is grounded.
• Connect this product to a branch circuit or an outlet that has larger capacity than the rated
ampere and voltage of this product. See the data plate on the rear panel of this product for its
rated ampere and voltage.
• Never touch the power cord with wet hands. It may cause electric shock.
• Do not place any object on the power cord.
• Always keep the plug connection free of dust. A dusty or damp environment may cause a minute
electric current in a connector. It may generate heat and eventually cause a fire.
WorkCentre 5019/5021
User Guide
1-5

Before using the machine
• To avoid the risk of electric shock and fire, use only the power cord supplied with this product or a
cord designated by Xerox.
The power cord is for use with this product exclusively. Do not use it with any other product.
Do not damage or alter the power cord. Damage and alteration may generate heat and
eventually cause electric shock or fire.
If the power cord is damaged or insulated wires are exposed, contact your local Xerox representative
for a replacement. Do not use a damaged or uninsulated cord to avoid the risk of electric shock and
fire.
CAUTIONS:
• When cleaning this product, always switch off and unplug it. Access to a live machine interior may
cause electric shock.
• Do not plug in or unplug this product with the switch in the On position. Plugging and unplugging
a live connector may deform the plug and generate heat, and eventually cause a fire.
• Hold the plug, not the cord, when unplugging this product, or it may damage the cord and cause
electric shock or fire.
• Always switch off and unplug the machine when it is not used over weekends or long holidays.
Failure to do so may cause deterioration of the insulation and eventually electric shock or fire.
• Once a month, switch off this product and check the following:
• the power cord is plugged firmly into an electrical outlet
• the plug is not excessively heated, rusted or bent
• the plug and electrical outlet are free of dust
• the power cord is not cracked or worn down
If you notice any unusual condition, switch off and unplug this product first and contact your local
Xerox representative.
Machine installation
WARNING: Do not locate this product where people might step on or trip over the power cord.
Friction or excessive pressure may generate heat and eventually cause electric shock or a fire
accident.
CAUTIONS:
• Never locate this product in the following places:
• Near radiators or any other heat sources
• Near volatile flammable materials such as curtains
• In the hot, humid, dusty or poorly ventilated environment
• In the place receiving direct sunlight
• Near cookers or humidifiers
• This product weighs 79.4 lbs./36 kg (Document Feeder Model). Always use a team of two persons
to avoid mishandling or injury when lifting this product: one to hold the bottom of the folded
1-6
WorkCentre 5019/5021
User Guide
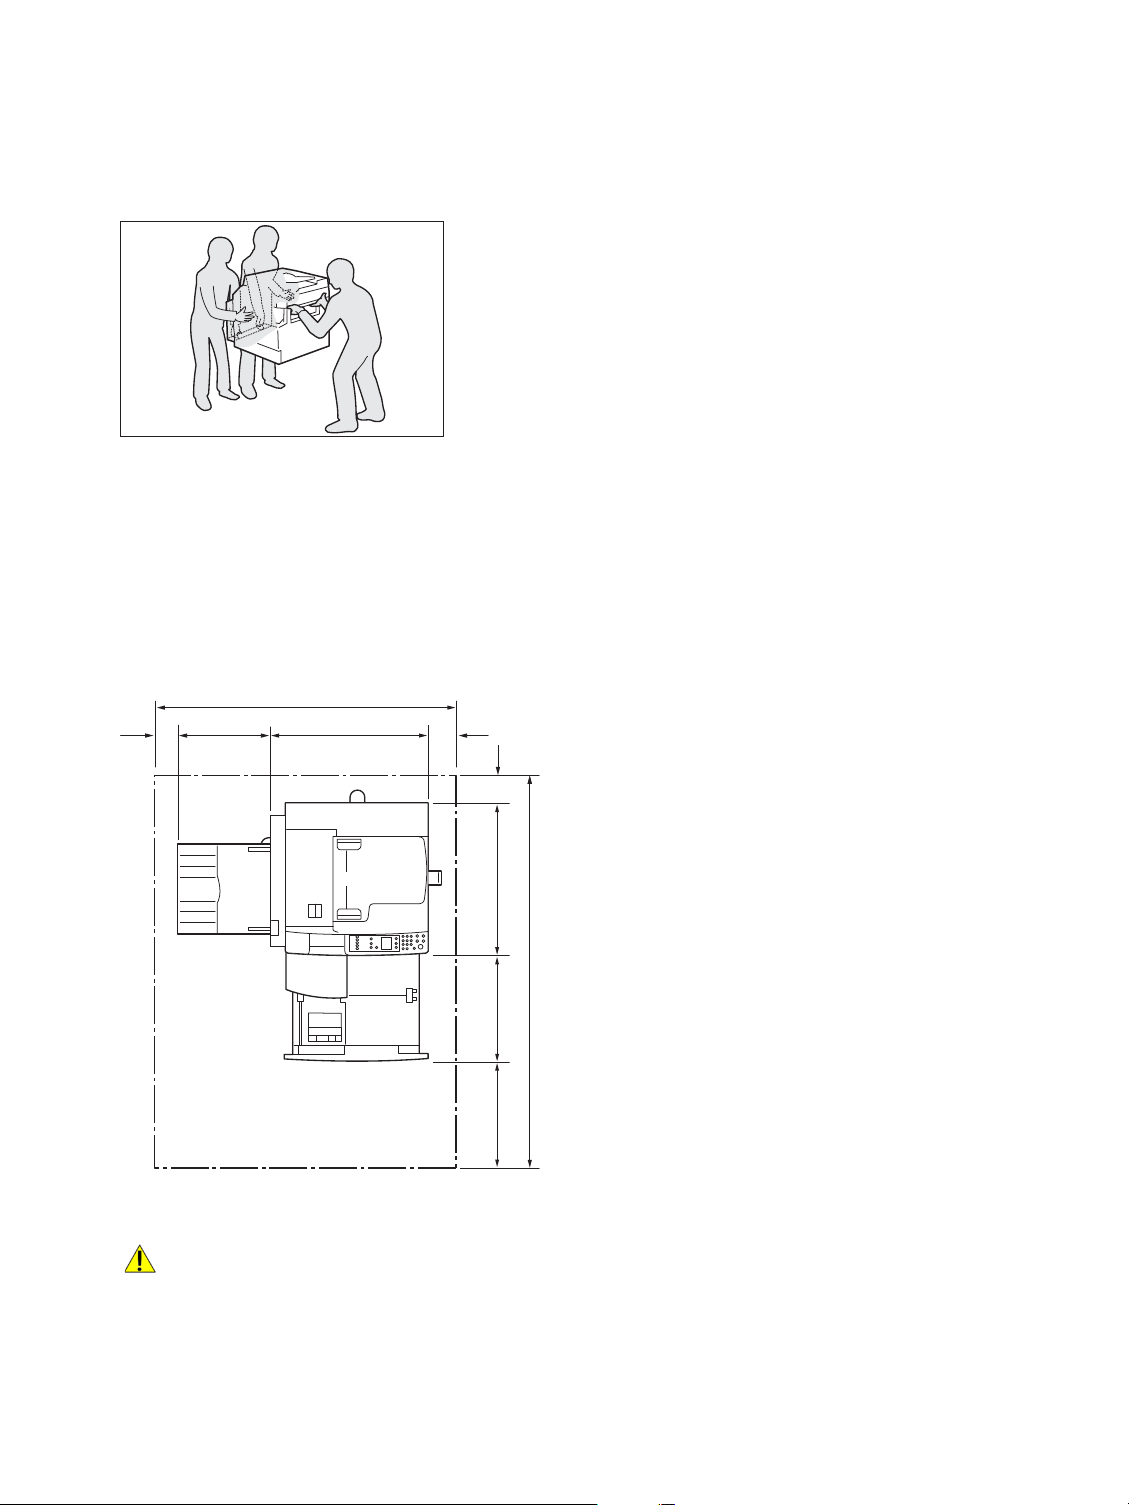
Before using the machine
Bypass tray on the left side of the product and the other one to hold the handhold provided on the
right side of the product. Never lift it by gripping any other areas. It will prevent you from dropping
the product and getting back ache or injuries.
• Locate this product on a level and sturdy surface that can withstand its weight. Otherwise, if tilted,
the product may fall over and cause injuries.
• Locate this product in a well-ventilated area. Do not obstruct the ventilation openings of the
product.
Keep the minimum clearance indicated below for ventilation and access to the power plug. Unplug the
product if an abnormal condition is noted.
With Duplex Automatic Document Feeder
1100.9
100595325.980
(Unit: mm)
100
569391
1460
400
WARNINGS:
WorkCentre 5019/5021
User Guide
1-7
Before using the machine
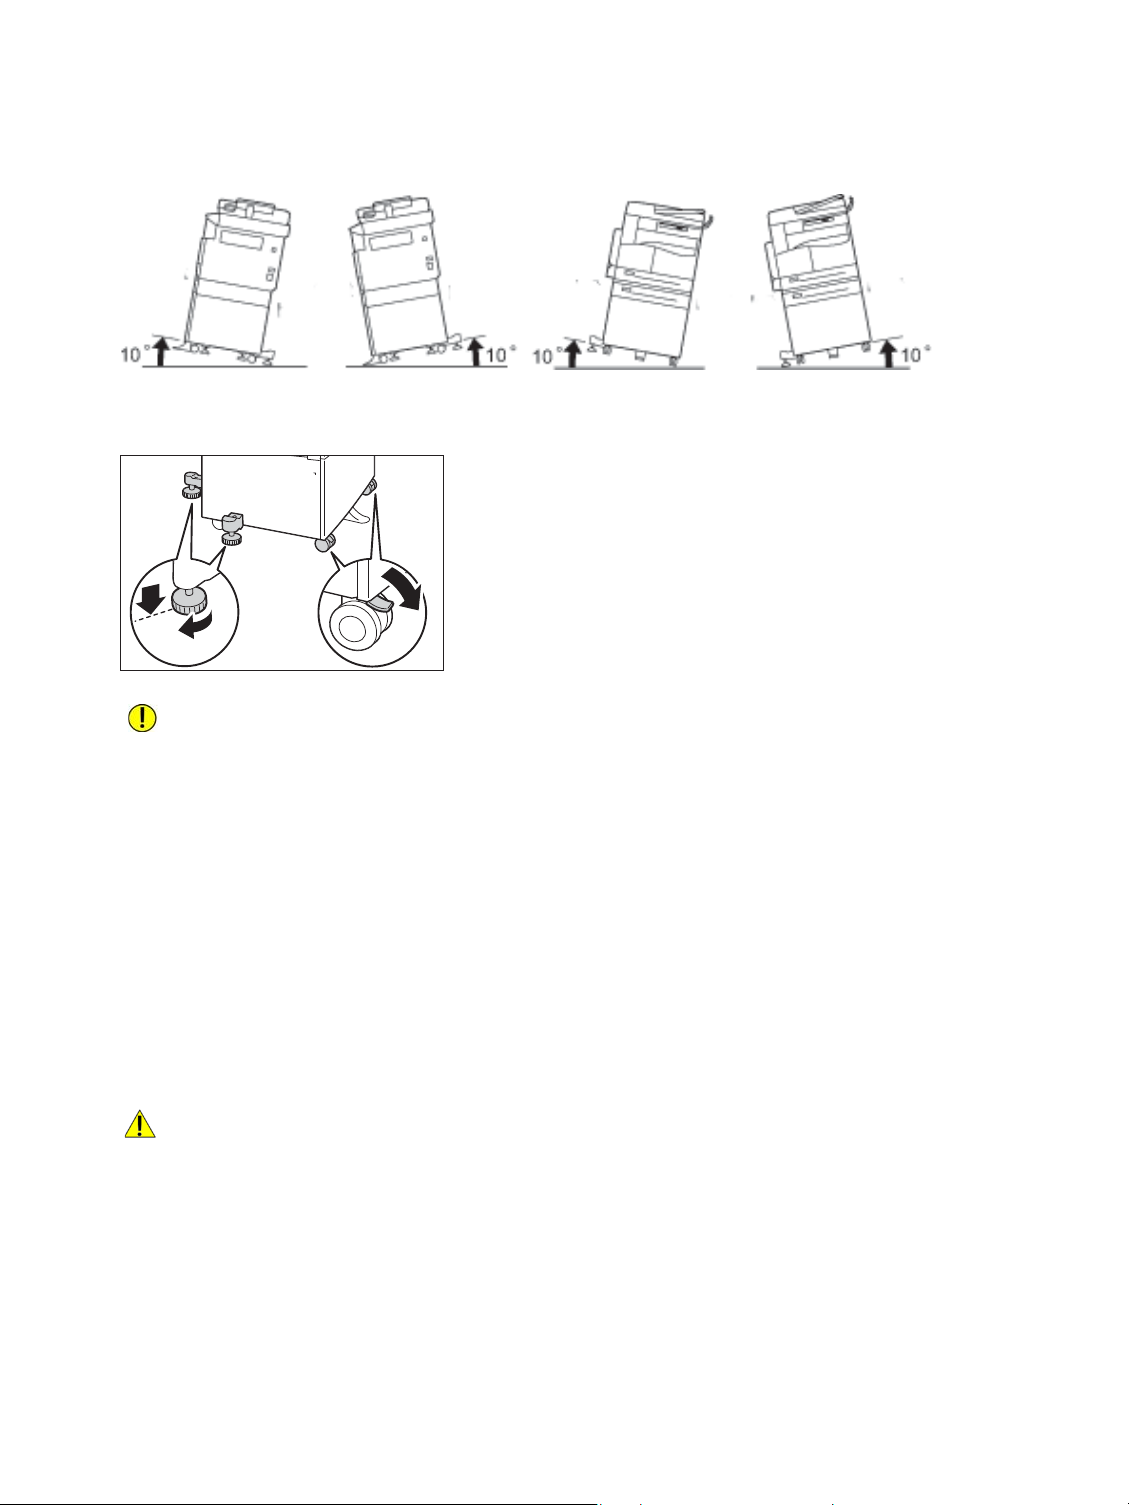
• Do not tilt the product at an angle of more than 10 degrees. Otherwise, it may fall over and cause
injury.
• Always lock the wheels of this product after installation. Otherwise, it may fall over or slide and
cause injury
CAUTION: To bundle wires and cables, always use the cable ties and spiral tubes supplied by
Xerox.
Other notices
• To keep this product in a good performance and condition, always use it in the following
environment:
Tem pe ra t u r e : 5 0
- 90° F (10 - 32° C)
Humidity: 35 - 85%
• When the product is left in a chilly room and the room is rapidly warmed up by heater, dew
condensation may form inside the product and cause a partial deletion on printing.
Operational safety
WARNINGS:
• The operator's product maintenance procedures are described in the customer documentation
supplied with this product. Do not carry out any other maintenance procedures not described in
the documentation.
• This product is equipped with a safety feature that prohibits access to hazardous areas. The areas
are isolated by covers or protectors that require a tool to remove. To prevent electric shock and
injury, never remove these covers and protectors.
1-8
WorkCentre 5019/5021
User Guide

Before using the machine
CAUTIONS:
• Keep electrical and mechanical safety interlocks active. Keep the safety interlocks away from
magnetic materials. Magnetic materials may accidentally activate the product and cause injury or
electric shock.
• Do not attempt to remove paper that is deeply jammed inside the machine, particularly if it is
wrapped around the fusing unit or the heat roller. Doing so may cause injury or burns. Switch off
the product immediately and contact your local Xerox representative.
• Do not apply excessive force to hold a thick document on the document glass. It may break the
glass and cause injury.
• Ventilate well during extended operation or mass copying. Inadequate ventilation may affect the
office air environment with an ozone odor.
Provide proper ventilation to ensure a comfortable and safe environment.
Consumables
WARNINGS:
• Store all consumables in accordance with the instructions given on its package or container.
• Use a broom or a wet cloth to wipe off spilled toner. Never use a vacuum cleaner for spills. Doing
so increases the risk of fire and explosion from electric sparks igniting inside the vacuum cleaner.
If you spill a large volume of toner, contact your local Xerox representative.
• Never throw a toner cartridge into an open flame. Remaining toner in the cartridge may catch fire
and cause burn injury or explosion.
If you have a used toner cartridge no longer needed, contact your local Xerox representative for its
disposal.
CAUTIONS:
• Keep drum cartridges and toner cartridges out of the reach of children. If a child accidentally
swallows toner, spit it out, rinse mouth with water, drink water and consult a physician
immediately.
• When replacing drum cartridges and toner cartridges, be careful not to spill the toner. In case of
any toner spills, avoid contact with clothes, skin, eyes and mouth as well as inhalation.
If you get toner particles in your eyes, wash it out with plenty of water for at least 15 minutes until
the irritation is gone. Consult a physician if necessary.
If you inhale toner particles, move to a fresh air location and rinse your mouth with water.
If you swallow toner, spit it out, rinse your mouth with water, drink plenty of water and consult a
physician immediately.
• When removing the fusing unit, always switch it off first and wait for 40 minutes until it cools.
WorkCentre 5019/5021
User Guide
1-9
Before using the machine
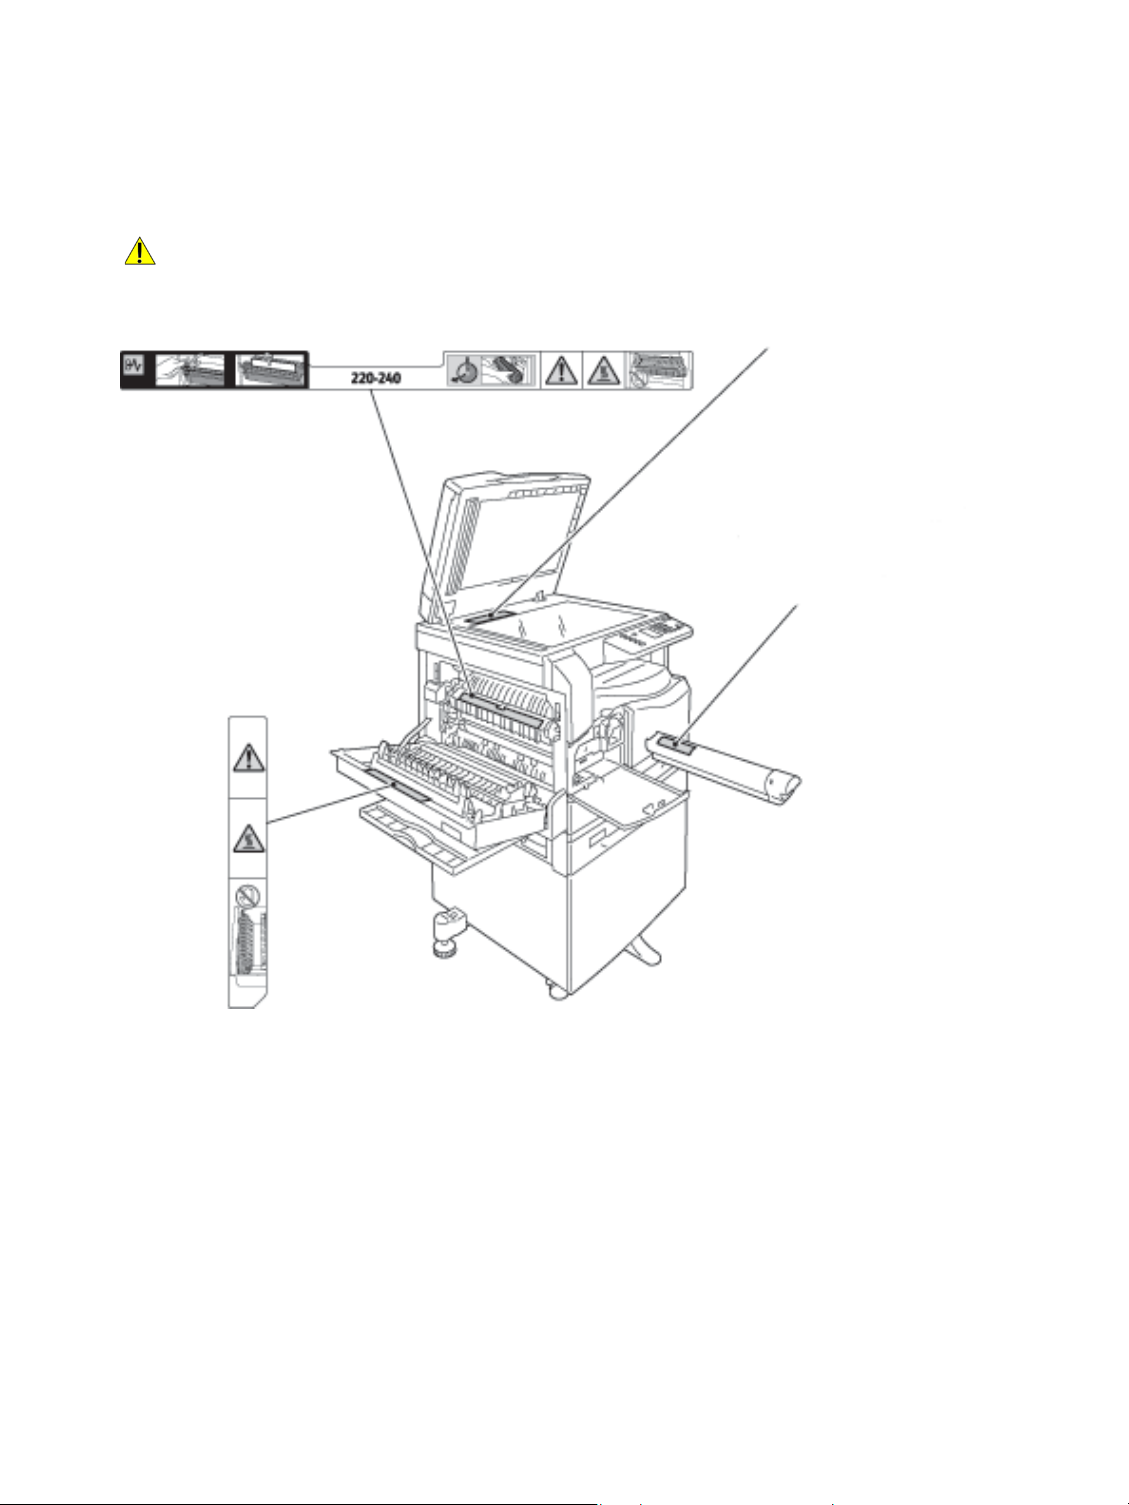
Caution label
Warning label
Location of warning and caution labels
Always follow all warning instructions marked on or supplied with this product.
WARNING: To avoid the risk of burn injury and electric shock, never touch the area with the "High
Temperature" or "High Voltage" indicators.
1-10
WorkCentre 5019/5021
User Guide

Before using the machine
Regulations
Radio frequency emissions (Class A)
This product has been tested and found to comply with the limits for a class A digital device, pursuant
to International Standard for Electromagnetic Interference (CISPR Publ. 22) and Radiocommunication
Act 1992 in Australia/New Zealand. These limits are designed to provide reasonable protection against
harmful interference when the product is operated in a commercial environment. This product
generates, uses, and can radiate radio frequency energy and, if not installed and used in accordance
with the customer documentation, may cause harmful interference to radio communications.
Operation of this product in a residential area is likely to cause harmful interference in which case the
user is required to correct the interference at their own expense.
Changes and modifications to this product not specifically approved by Xerox may void the user's
authority to operate this equipment.
Product safety certification (UL, CB)
This product is certified by the following agency using the safety standards listed.
Agency: TUV
Standard: IEC60950-1:ed. 2
WorkCentre 5019/5021
User Guide
1-11

Before using the machine
Environment
For environmental protection and efficient use of resources, Xerox recycles returned toner cartridges to
manufacture parts and materials, or for energy recovery.
Proper disposal is required for used toner cartridges and drum cartridges. Do not open toner cartridge
containers. Return them to your local Xerox representative.
About licenses
This section describes information about licenses. Be sure to read it thoroughly.
Libcurl
COPYRIGHT AND PERMISSION NOTICE
Copyright (c) 1996 - 2006, Daniel Stenberg, <daniel@haxx.se>.
All rights reserved.
Permission to use, copy, modify, and distribute this software for any purpose with or without fee is
hereby granted, provided that the above copyright notice and this permission notice appear in all
copies.
THE SOFTWARE IS PROVIDED "AS IS", WITHOUT WARRANTY OF ANY KIND, EXPRESS OR IMPLIED,
INCLUDING BUT NOT LIMITED TO THE WARRANTIES OF MERCHANTABILITY, FITNESS FOR A
PARTICULAR PURPOSE AND NONINFRINGEMENT OF THIRD PARTY RIGHTS. IN NO EVENT SHALL
THE AUTHORS OR COPYRIGHT HOLDERS BE LIABLE FOR ANY CLAIM, DAMAGES OR OTHER
LIABILITY, WHETHER IN AN ACTION OF CONTRACT, TORT OR OTHERWISE, ARISING FROM, OUT OF
OR IN CONNECTION WITH THE SOFTWARE OR THE USE OR OTHER DEALINGS IN THE SOFTWARE.
Except as contained in this notice, the name of a copyright holder shall not be used in advertising or
otherwise to promote the sale, use or other dealings in this Software without prior written
authorization of the copyright holder.
1-12
WorkCentre 5019/5021
User Guide

Before using the machine
FreeBSD
This product contains the part of FreeBSD codes.
The FreeBSD Copyright
Copyright 1994-2006 The FreeBSD Project. All rights reserved.
Redistribution and use in source and binary forms, with or without modification, are permitted
provided that the following conditions are met:
Redistributions of source code must retain the above copyright notice, this list of conditions and the
following disclaimer.
Redistributions in binary form must reproduce the above copyright notice, this list of conditions and
the following disclaimer in the documentation and/or other materials provided with the distribution.
THIS SOFTWARE IS PROVIDED BY THE FREEBSD PROJECT "AS IS" AND ANY EXPRESS OR IMPLIED
WARRANTIES, INCLUDING, BUT NOT LIMITED TO, THE IMPLIED WARRANTIES OF
MERCHANTABILITY AND FITNESS FOR A PARTICULAR PURPOSE ARE DISCLAIMED. IN NO EVENT
SHALL THE FREEBSD PROJECT OR CONTRIBUTORS BE LIABLE FOR ANY DIRECT, INDIRECT,
INCIDENTAL, SPECIAL, EXEMPLARY, OR CONSEQUENTIAL DAMAGES (INCLUDING, BUT NOT
LIMITED TO, PROCUREMENT OF SUBSTITUTE GOODS OR SERVICES; LOSS OF USE, DATA, OR
PROFITS; OR BUSINESS INTERRUPTION) HOWEVER CAUSED AND ON ANY THEORY OF LIABILITY,
WHETHER IN CONTRACT, STRICT LIABILITY, OR TORT (INCLUDING NEGLIGENCE OR OTHERWISE)
ARISING IN ANY WAY OUT OF THE USE OF THIS SOFTWARE, EVEN IF ADVISED OF THE POSSIBILITY
OF SUCH DAMAGE.
The views and conclusions contained in the software and documentation are those of the authors and
should not be interpreted as representing official policies, either expressed or implied, of the FreeBSD
Project.
MD5
Copyright (C) 1991-2, RSA Data Security, Inc. Created 1991. All rights reserved.
License to copy and use this software is granted provided that it is identified as the "RSA Data Security,
Inc. MD5 Message-Digest Algorithm" in all material mentioning or referencing this software or this
function.
WorkCentre 5019/5021
User Guide
1-13

Before using the machine
License is also granted to make and use derivative works provided that such works are identified as
"derived from the RSA Data Security, Inc. MD5 Message-Digest Algorithm" in all material mentioning
or referencing the derived work.
RSA Data Security, Inc. makes no representations concerning either the merchantability of this
software or the suitability of this software for any particular purpose.
It is provided "as is" without express or implied warranty of any kind.
These notices must be retained in any copies of any part of this documentation and/or software.
1-14
WorkCentre 5019/5021
User Guide

Before using the machine
Legal notice
Copying or printing certain documents may be illegal in your country. Fines or imprisonment may be
imposed on those found guilty. The following are examples of items that may be illegal to copy or print
in your country.
• Currency
• Banknotes and checks
• Bank and government bonds and securities
• Passports and identification cards
• Copyright material or trademarks without the consent of the owner
• Postage stamps and other negotiable instruments
This list is not inclusive and no liability is assumed for either its completeness or accuracy. In case of
doubt, contact your legal counsel.
WorkCentre 5019/5021
User Guide
1-15

Before using the machine
1-16
WorkCentre 5019/5021
User Guide
Environment settings
Local connection
USB
2
Supported environment
This section describes the environment settings needed to use the machine's print and scan features.
Print feature
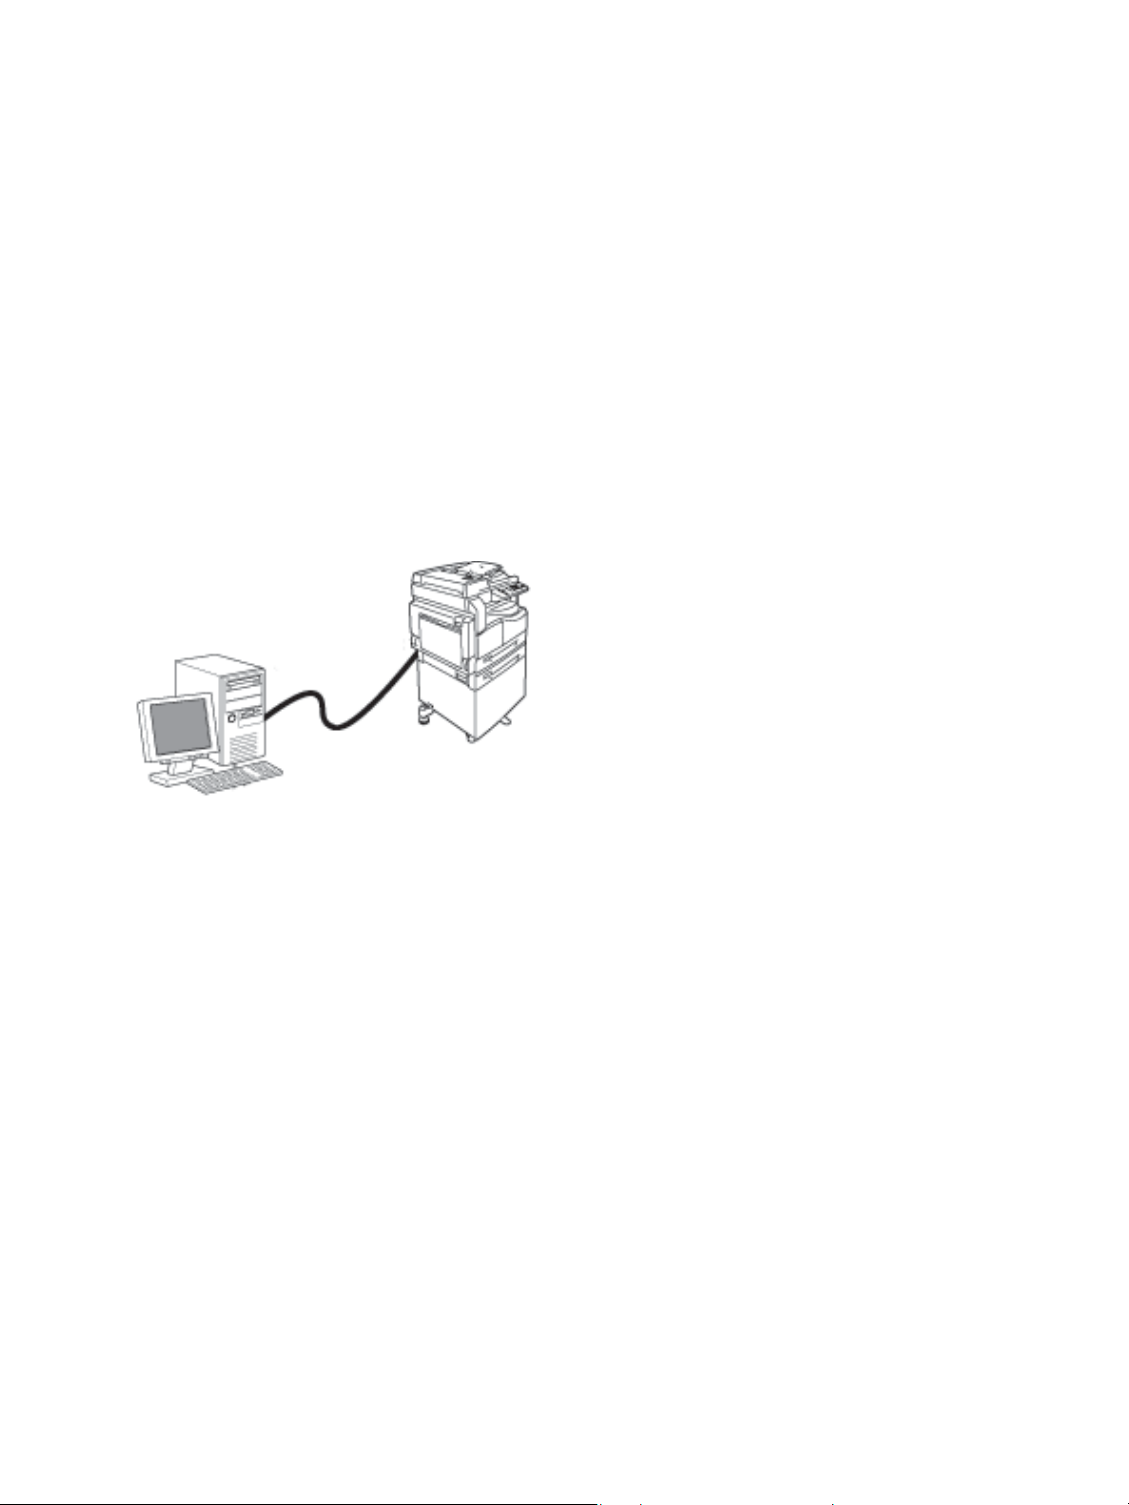
The machine can be connected directly to a computer for use as a local printer. Connect the machine
to a computer with a USB cable.
Scan feature
The machine supports the scan feature using the USB interface connection.
This feature can be used to load scan data from a TWAIN-compatible or WIA-compatible application
installed on a computer.
After specifying scanning conditions on your computer display, you can scan documents while
checking the scan results on the preview screen.
For more information, refer to Loading scan data using a PC-based application on page 6-6.
WorkCentre 5019/5021
User Guide
2-1
Environment settings
USB interface
The machine supports the USB 1.1/2.0 interface.
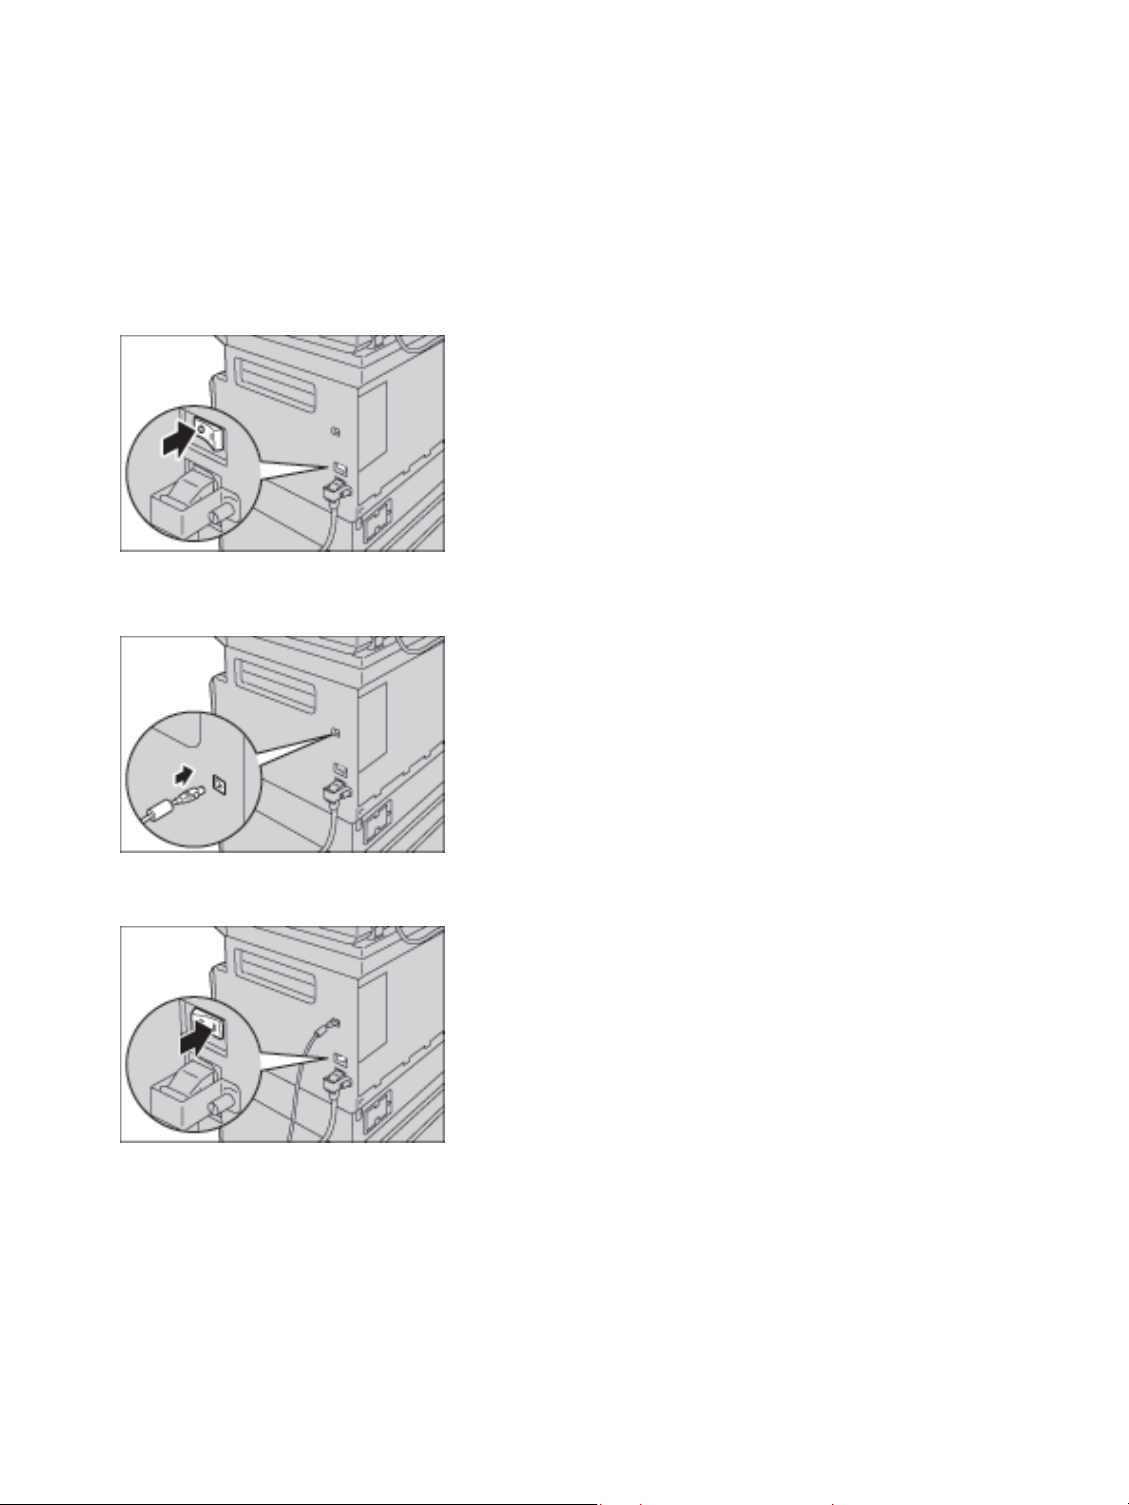
To connect the USB cable:
1. Press the power switch to the Off position to turn the power off.
Note Check that the machine status diagram display is off.
2. Connect a USB cable to the USB 1.1/2.0 interface connector.
3. Connect the other end of the USB cable to the computer.
4. Press the power switch to the On position to turn the power on.
2-2
WorkCentre 5019/5021
User Guide

Environment settings
Installing the print driver/scan driver
Installing the print driver
To enable the machine to print, you must first install a print driver from the Driver CD Kit CD-ROM.
The CD-ROM contains the following print driver.
Print Driver Name Description
Xerox WorkCentre XXXXX Click Print Driver in the Main menu of the Driver CD Kit to start
the installation.
The standard print driver. Converts the data created by the
application software to images before sending them to the
printer.
XXXXX: Displayed as either "5019" or "5021," depending on the model of your machine.
To install the print driver, follow the instructions provided in the CD-ROM Documentation (HTML)
included on the CD-ROM.
Installing the scan driver
A direct USB connection to a computer lets you load scanned data from the machine directly to the
computer.
The Driver CD Kit CD-ROM comes with the TWAIN-compatible and WIA-compatible scan driver.
Application Description
TWAIN-compatible and WIAcompatible scan driver
To install the scan driver, follow the instructions provided in the CD-ROM Documentation (HTML)
included on the CD-ROM.
Be sure to restart the computer immediately after installing the scan driver.
Click Scan Driver in the Main menu on the Driver CD Kit to
start the installation.
This feature can be used to load scan data from a TWAINcompatible or WIA-compatible application installed on a
computer.
The supported applications are 32-bit only.
For more information, refer to Loading scan data using a PC-
based application on page 6-6.
WorkCentre 5019/5021
User Guide
2-3

Environment settings
Uninstalling
Uninstalling the print driver
To uninstall the print driver, use the uninstallation tool on the Driver CD Kit CD-ROM. Follow the
instructions provided in the CD-ROM Documentation (HTML) included on the CD-ROM.
Uninstalling other software
To uninstall other software installed from the Driver CD Kit CD-ROM, see the application's Readme file.
Readme files can be displayed from the Product Information (HTML) on the CD-ROM.
2-4
WorkCentre 5019/5021
User Guide

Product overview
This chapter lists the name of each machine component, and describes basic operations such as how
to turn the power on/off and use the control panel.
3
Machine components
This section describes the machine components and their features.
WorkCentre 5019/5021
User Guide
3-1
Product overview
2
4
1
11
12
10
3
5
7
8
6
9
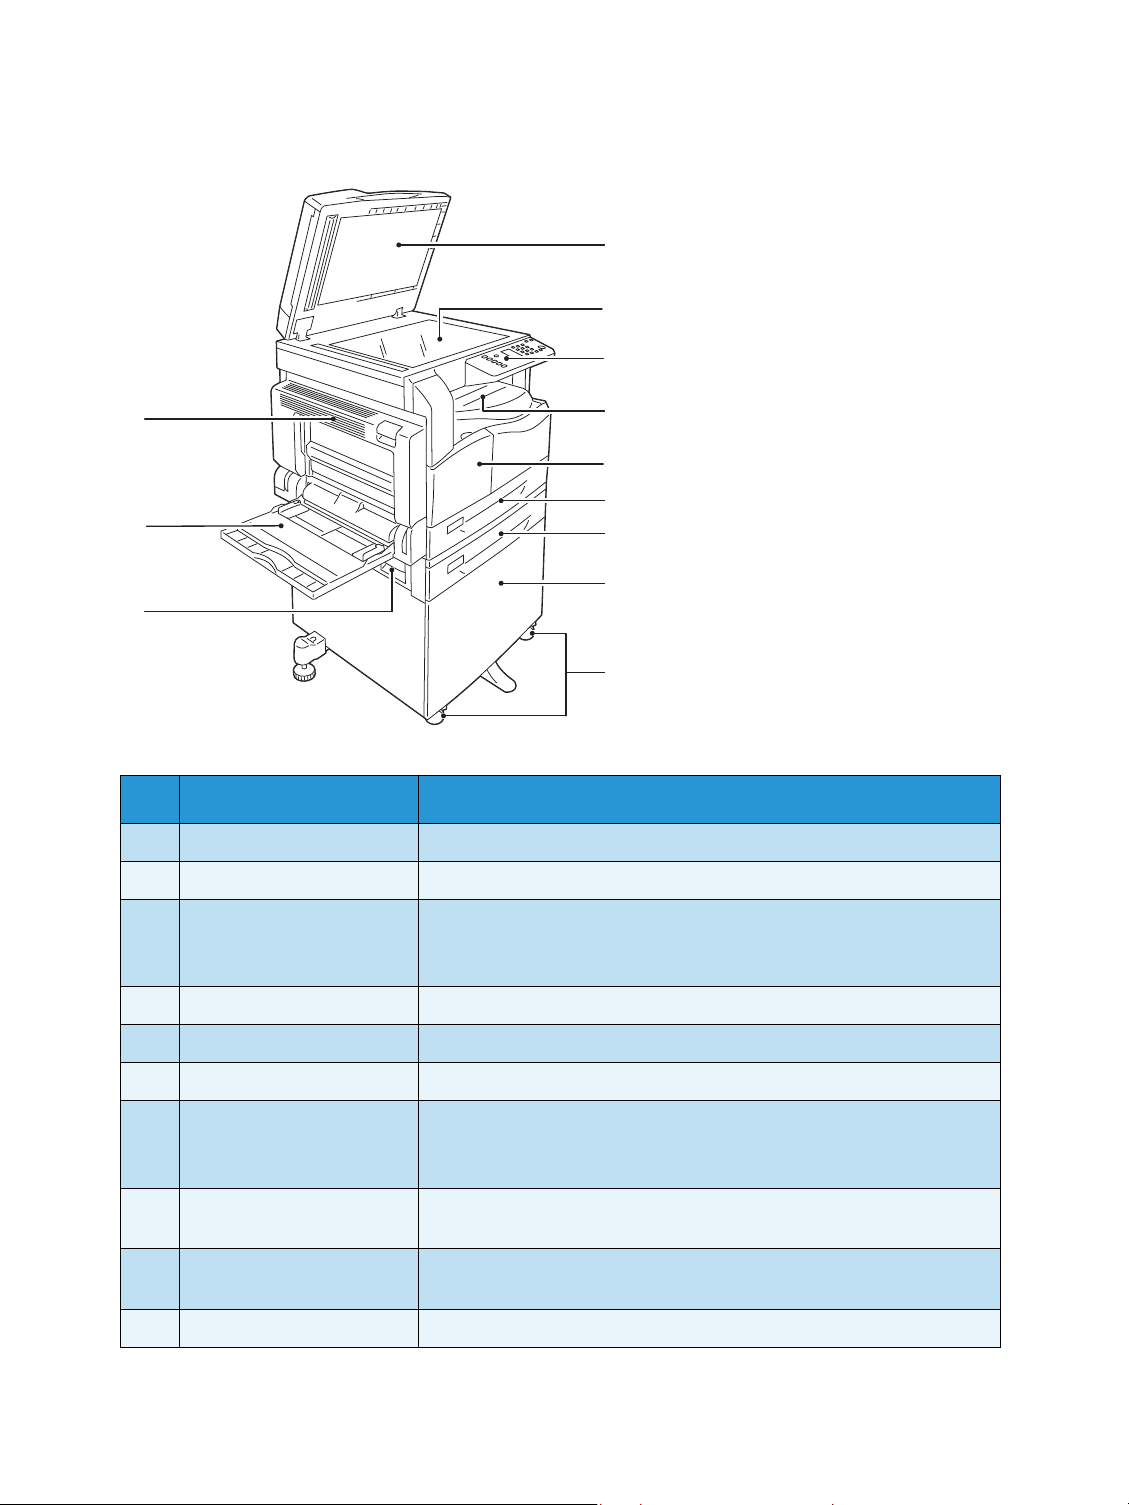
Front, left side
No. Component Description
1 Document cover Holds the document in place.
2 Document glass Place the document in the machine.
3 Control panel Contains the buttons, LED indicators, and machine status diagram
used for operations.
For more information, refer to Control panel on page 3-10.
4 Center tray Copies and prints are delivered here, facing down.
5 Front cover Open this cover to replace consumables.
6 Tray 1 (standard tray) Load paper here.
7 Tray 2
(One Tray Module)
(Optional)
8 Stand Mounts the machine on the floor. Contains storage space for paper.
9 Locking casters Locks the wheels of the machine. Lock these casters after moving the
10 One tray module cover B Open this cover to remove any jammed paper from Tray 2.
3-2
Optional tray. Load paper here.
This stand is available when the One Tray Module is installed.
machine to its installation site.
WorkCentre 5019/5021
User Guide
No. Component Description
11 Bypass tray Load paper here. The tray can be extended.
12 Left cover A Open this cover to remove any jammed paper.
When the machine works properly, this cover is locked. To open this
cover, make sure to exit Sleep mode and turn the machine's power off.
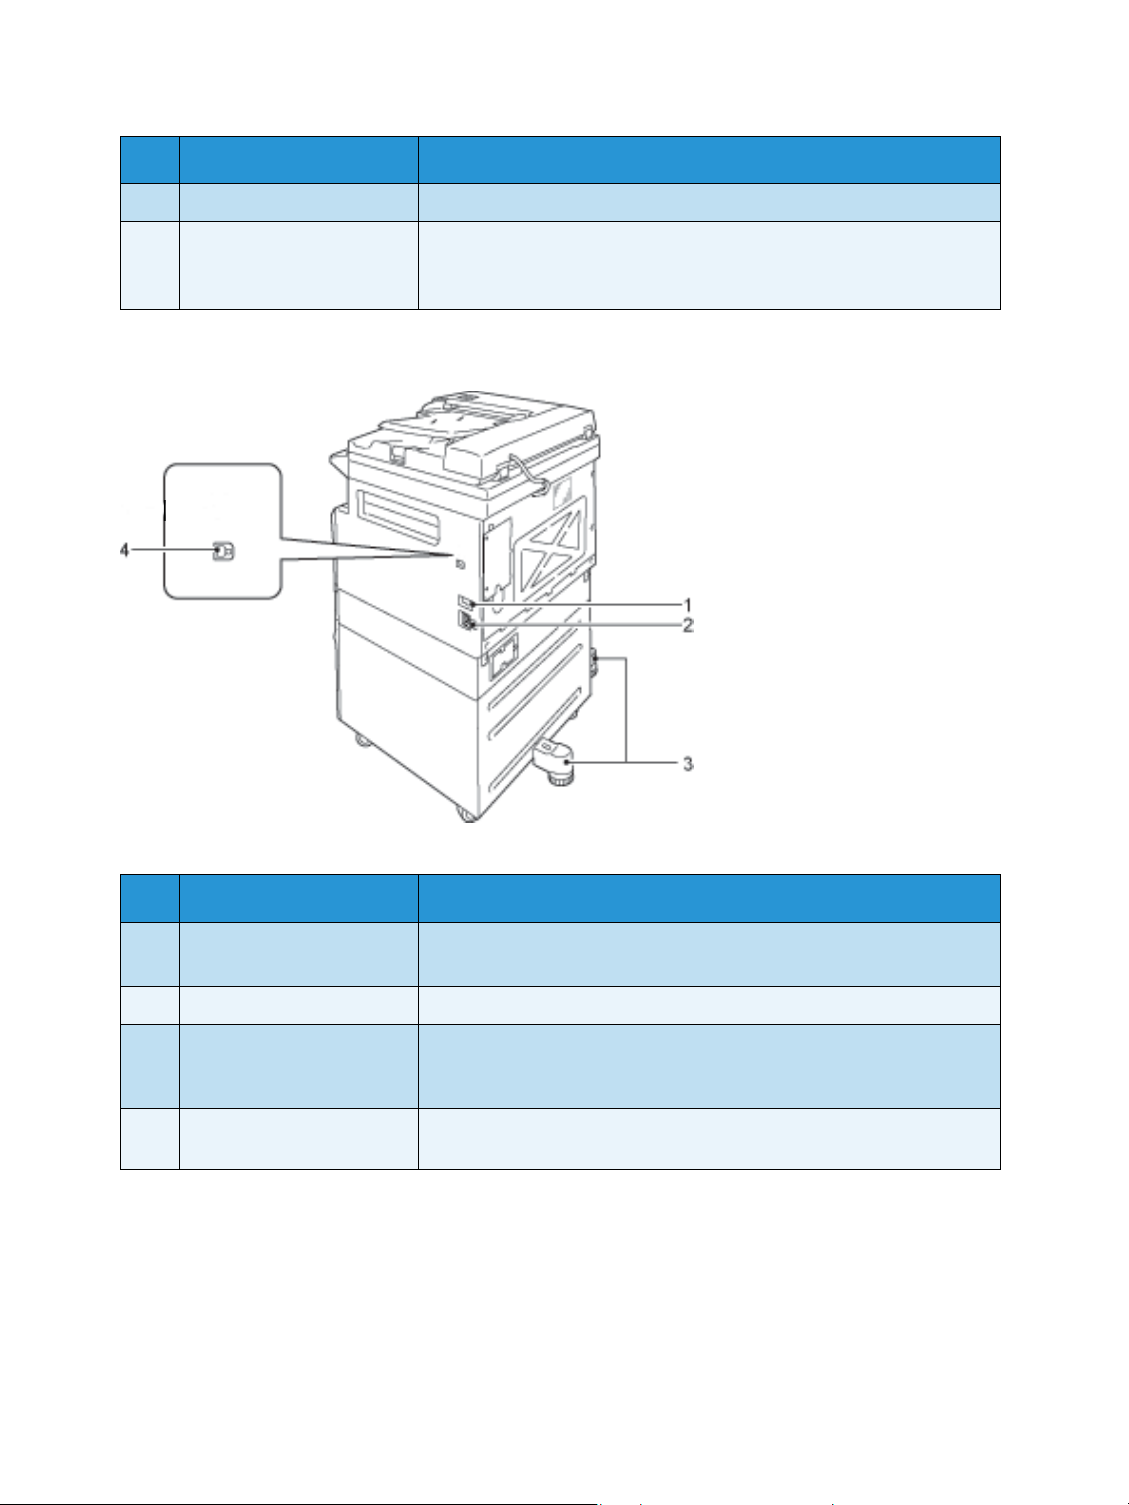
Right side, rear
Product overview
No. Component Description
1 Power switch Switches the power of the machine on and off.
For more information, refer to Power source on page 3-6.
2 Power cord connector Connects the power cord.
3 Adjusting foot Prevents the machine from toppling over. Move the machine to its
installation site and then rotate this adjuster in clockwise direction
until it touches a floor.
4 USB 1.1/2.0 interface
connector (Type B)
WorkCentre 5019/5021
User Guide
Connect a USB 1.1/2.0 cable.
3-3
Product overview
Inside
3
1
2
No. Component Description
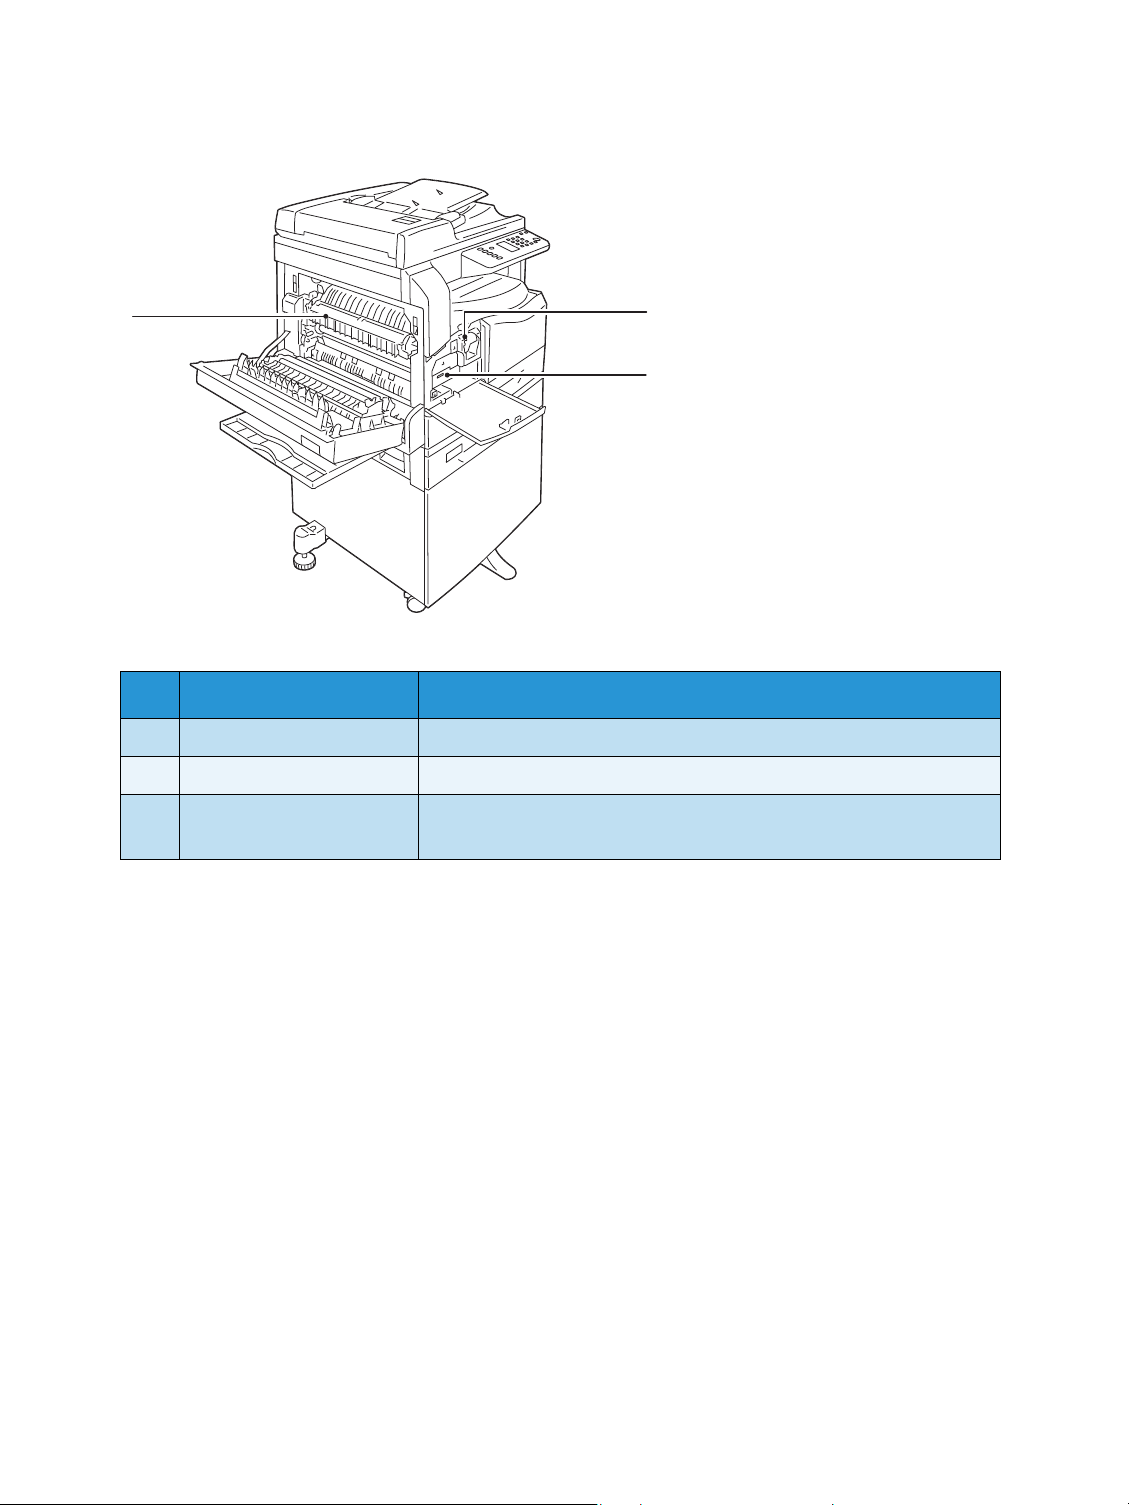
1 Toner cartridge Contains toner (the powder used to form the image).
2 Drum cartridge Contains photoconductors.
3 Fusing unit Fuses toner on paper.
Do not touch this unit as it is extremely hot.
3-4
WorkCentre 5019/5021
User Guide

Duplex automatic document feeder (optional)
5
6
7
1
3
4
2
No. Component Description
1 Document feeder cover Open this cover to remove any jammed paper.
2 Inner cover Open this cover to remove any jammed paper.
3 Document guides Aligns the edges of documents.
Product overview
4 Document feeder tray Load documents here.
5 Document stopper Prevents outputs from falling off.
6 Document output tray Outputs are delivered here.
7 Narrow glass strip Scans the loaded documents.
Note In this guide, the duplex automatic document feeder is referred to as the "document
feeder."
WorkCentre 5019/5021
User Guide
3-5
Product overview
Power source
Switching the power on
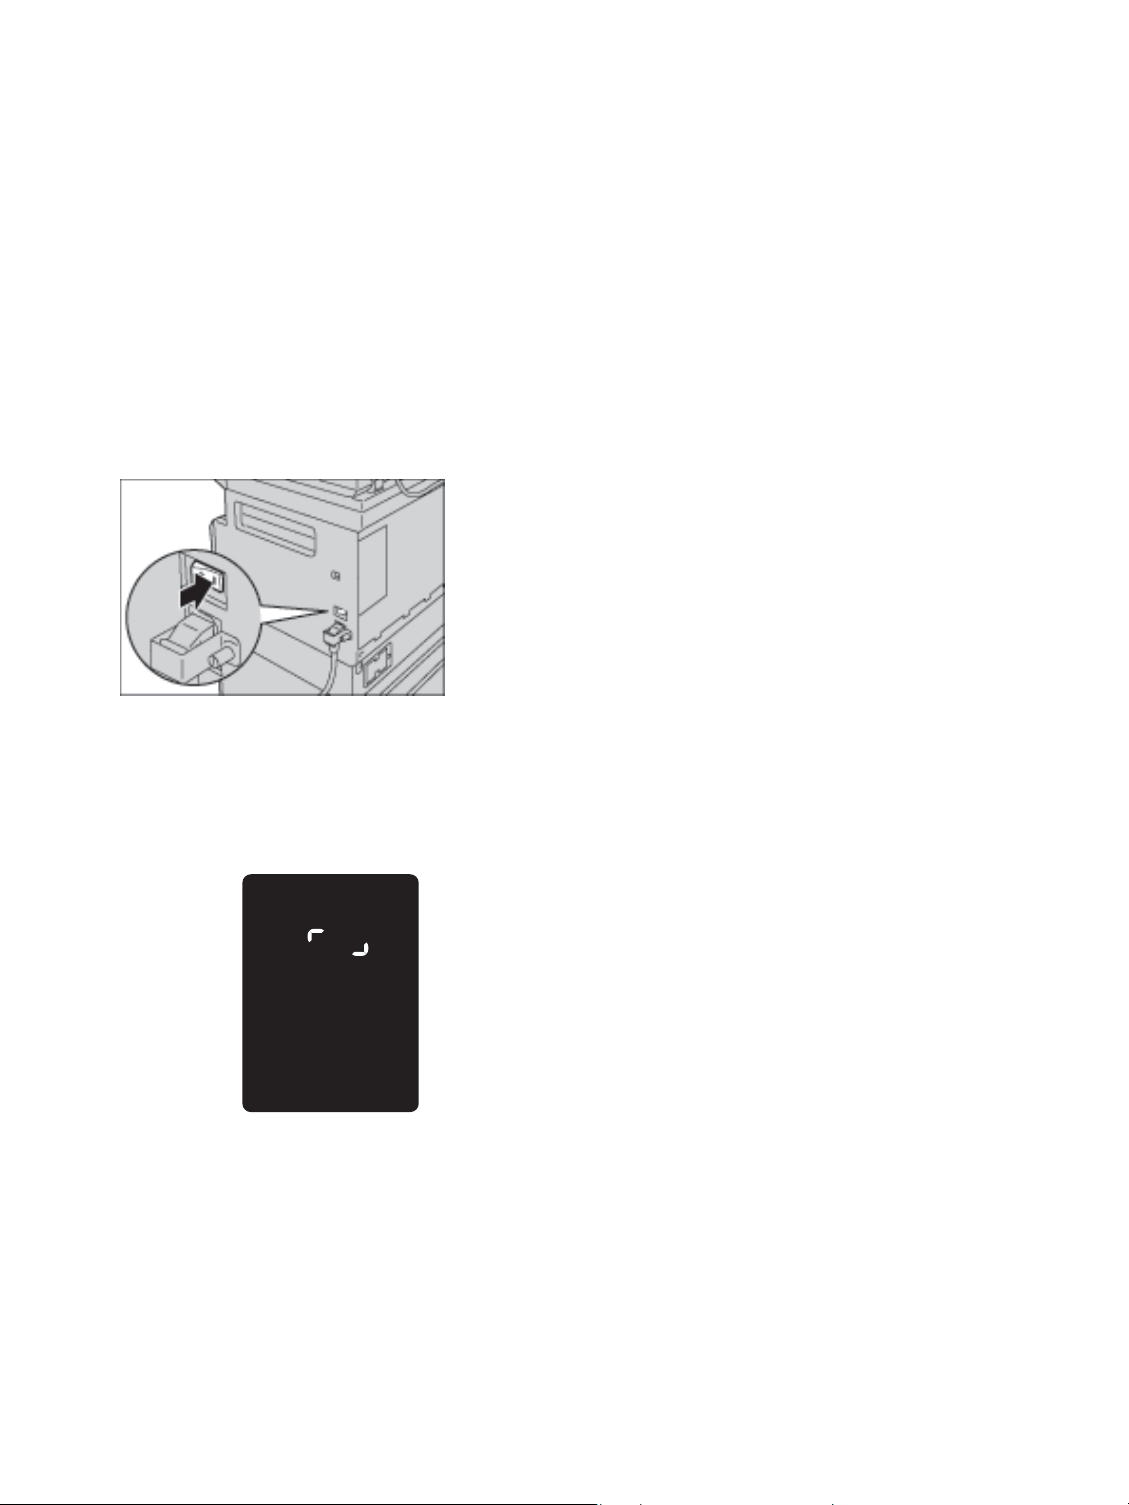
The following describes how to switch the power on.
The machine takes approximately 30 seconds to warm up and to be ready to copy or print after the
power is turned on. It may take slightly longer than normal depending on the device configuration.
Switch the power off at the end of the day or when not using the machine for an extended period of
time.
1. Press the power switch to the On position to switch the power on.
Notes
• While the machine is warming up, the machine status diagram displays as shown in the
right image. The machine is not accessible while it’s warming up
• Make sure that the power cable is connected to the machine and the wall outlet
properly..
3-6
WorkCentre 5019/5021
User Guide
Product overview
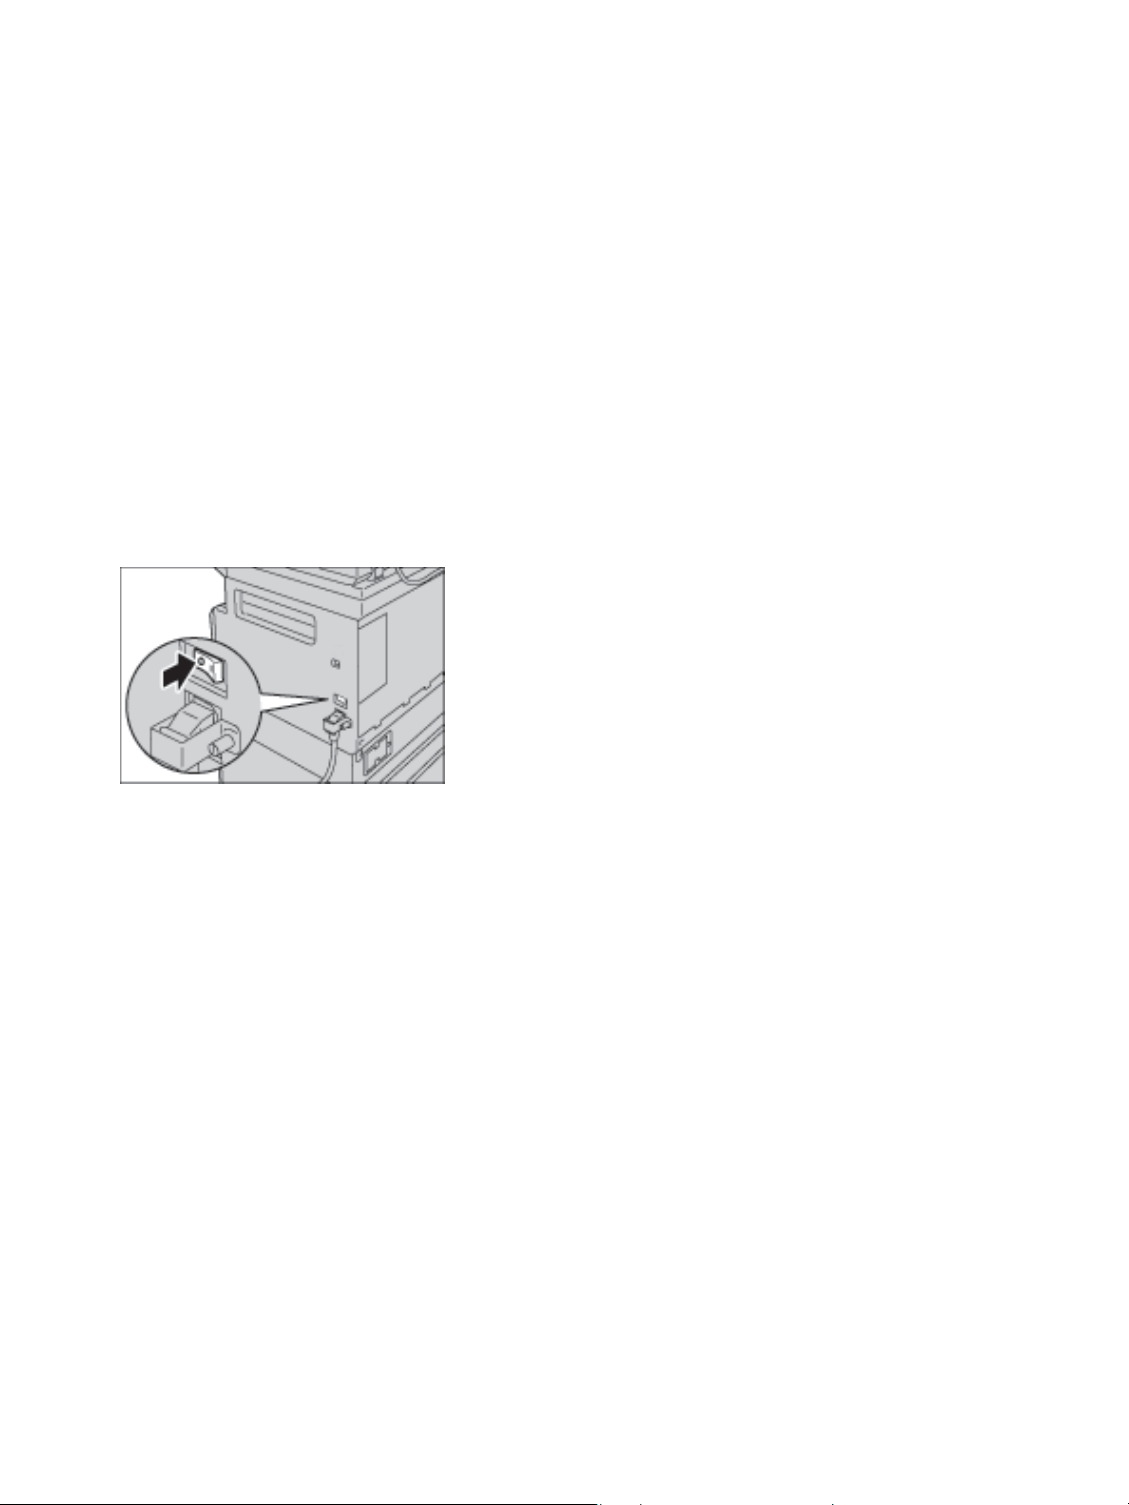
Switching the power off
Notes
• Do not switch the power off in the following situations. If the power is switched off, the
processing data may be erased.
• While data is being received
• While a job is being printed
• While a job is being copied
• While a job is being scanned
• When switching the power off, wait 5 seconds after outputs have been delivered.
• When powering the machine on after it has been switched off, wait 10 seconds after the
display goes off.
1. Before switching the power off, make sure that the machine has completed all copy or print jobs.
Then, make sure that the Data indicator does not light up.
2. Press the power switch to the Off position to switch the power off.
WorkCentre 5019/5021
User Guide
3-7
Product overview
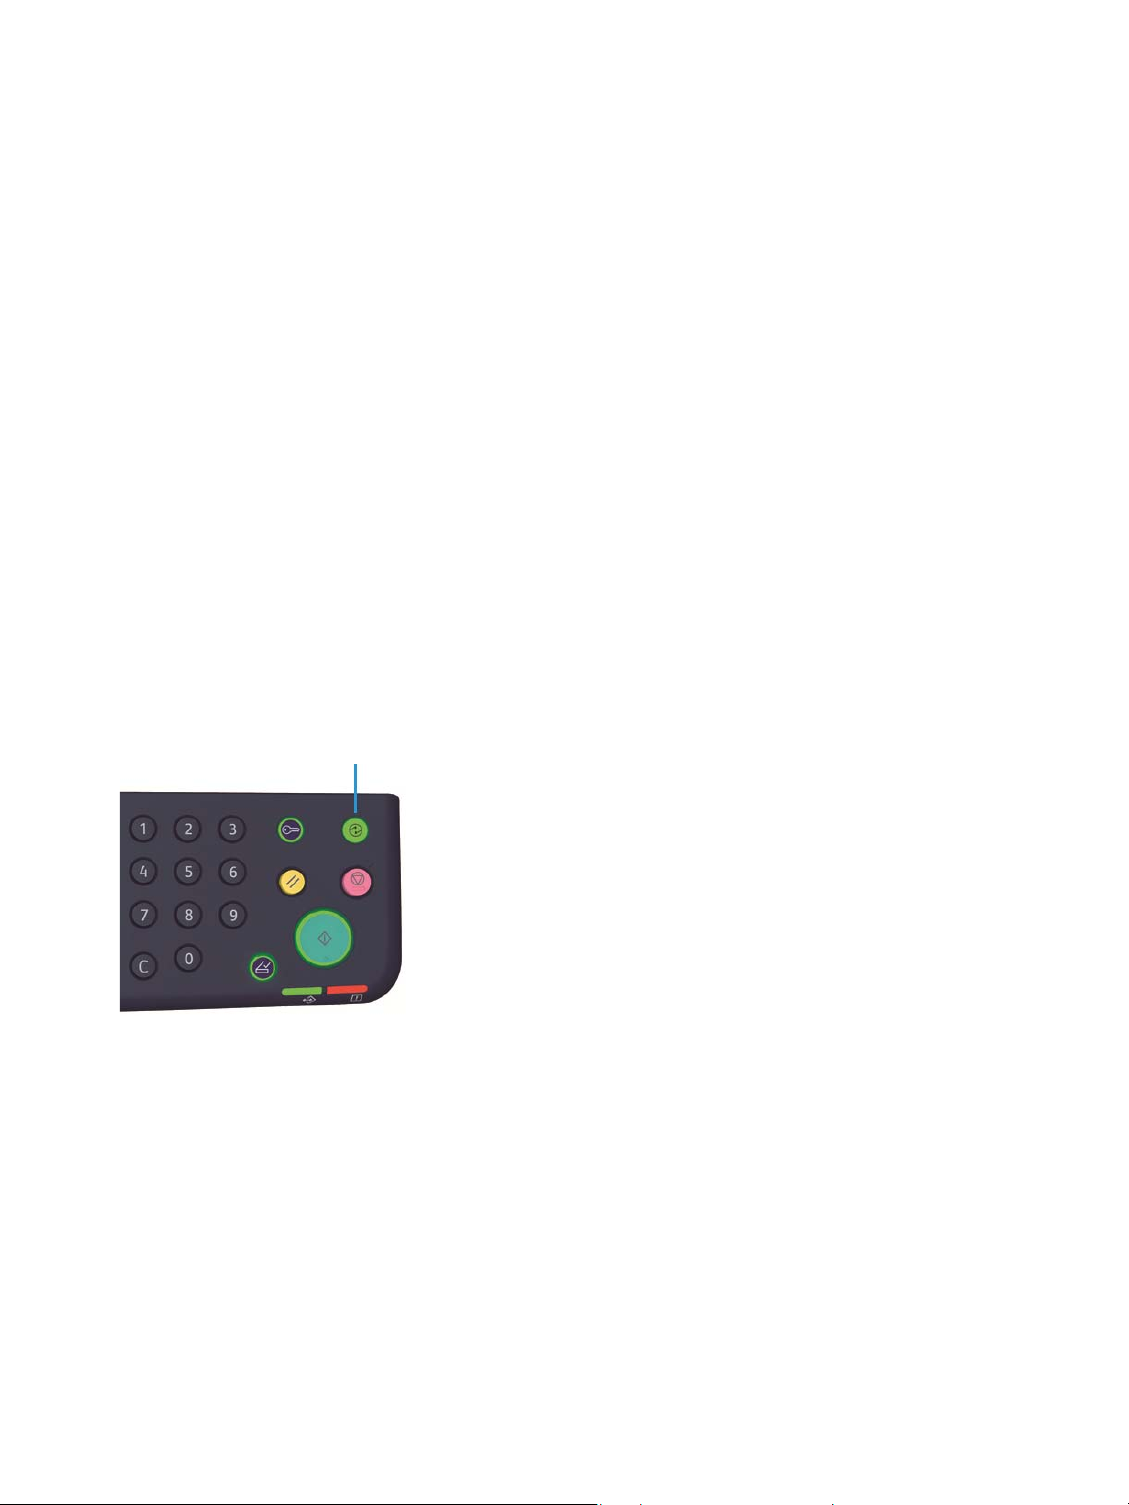
Energy Saver button
Energy saver modes
The machine is installed with the energy saver feature that will automatically cut off the electricity to
the machine if no copy or print data is received for a certain duration.
There are two energy saver modes: Low Power mode and Sleep mode.
Low Power mode
The machine's power is not turned off completely in Low Power mode. Instead, this mode creates a
balance between low power consumption and short warm-up time by controlling the temperature of
the fusing unit to a level midway between the power off temperature and the "Ready" temperature.
Sleep mode
Sleep mode minimizes power consumption by shutting off the power to all components except the
controller. Warm-up time in Sleep mode is longer than in Low Power mode.
Entering the energy saver modes
The display of the machine status diagram goes off, and the Energy Saver button on the control panel
lights up when the machine is in an energy saver mode.
You can set the length of time to wait until the machine enters Low Power/Sleep mode.
Low Power mode is set to 1 min. and Sleep mode to 1 min. at the time of factory shipment. If the
machine is left idle for 1 minute, it switches to Low Power mode and then to Sleep mode if left idle for
another minute after that.
3-8
WorkCentre 5019/5021
User Guide

Product overview
You can set the amount of time the machine waits before entering Low Power mode from 1 to 60
minutes, and the amount of time the machine waits before entering Sleep mode from 1 to 239
minutes.
Note The life of the fusing unit is largely influenced by power distribution time on the machine.
Setting the amount of time the machine waits before activating the energy saver feature to a
long value will keep the machine's power on longer, and the fusing unit may have to be replaced
more often. It may cause an early replacement of the fusing unit of the machine. For more
information, contact our Customer Support Center.
For more information on how to set the time interval for Low Power mode and/or Sleep mode,
refer to System settings on page 8-5.
Exiting energy saver modes
The following describes how to deactivate an energy saver mode.
The energy saver mode is exited and the Energy Saver button light goes off in the following instances:
Exiting Low Power mode
• Receiving a job
• Pressing the Energy Saver button
• Entering System Administration mode from a computer
Exiting Sleep mode
• Receiving a job
• Pressing the Energy Saver button
• Entering System Administration mode from a computer
• Pressing any button on the control panel
• Taking out or putting in a tray
• Opening or closing the document cover
• Opening or closing any cover of the machine
WorkCentre 5019/5021
User Guide
3-9
Product overview
Control panel
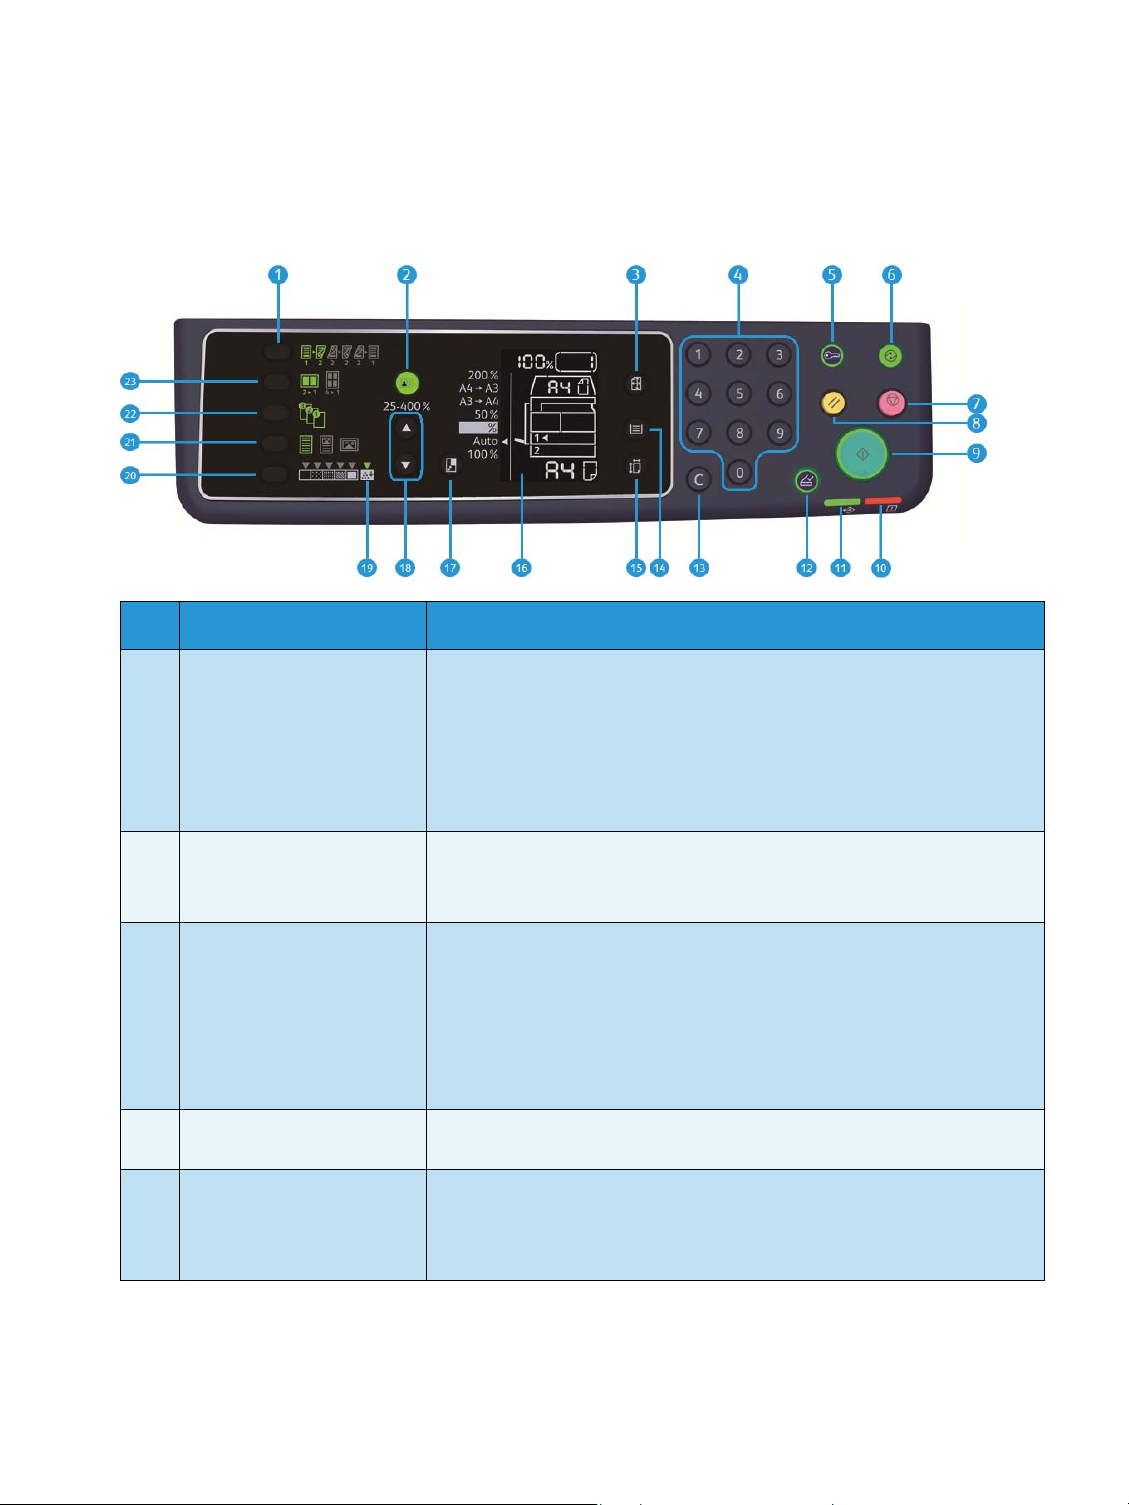
The names and functions of the control panel's components are described below.
No. Component Description
1 2 Sided button Press this button to select 1 Sided or 2 Sided copying.
Normally, the icon is off (1 Sided → 1 Sided). The selection moves to the
right from Off (1 Sided → 1 Sided) → 1 Sided → 2 Sided → 2 Sided → 2
Sided → 2 Sided → 1 Sided every time the button is pressed. As you press
the button when 2 Sided → 2 Sided is selected, the indicator light goes off
again.
For more information, refer to 2-sided on page 5-18.
2 ID Card Copy button Press this button to use the ID Card Copy feature.
While the ID Card Copy feature is selected, the button is lit.
For more information, refer to ID card copy on page 5-15.
3 Original Size button Press this button to specify the scanning size and orientation for using the
document glass.
When the document is placed on the document feeder, the scanning size is
set automatically.
The scanning size changes on the machine status diagram every time that
the button is pressed.
For more information, refer to Original size on page 5-13.
4 Numeric keypad Press these numeric buttons to enter numbers, such as the total number of
copies.
5 Log In / Out button Press this button to enter or exit System Administration mode. The Log
In/Out button is lit in System Administration mode.
For more information, refer to Entering System Administration mode on
page 8-2.
3-10
WorkCentre 5019/5021
User Guide

Product overview
No. Component Description
6 Energy Saver button Press this button to enter an energy saver mode when the machine is not in
use. The button lights up.
Press the Energy Saver button to exit an energy saver mode.
For more information, refer to Energy saver modes on page 3-8.
7 Stop button Press this button to cancel a current job or errored job.
8 Clear All button Press this button to reset the displayed settings of each feature to default
values or to clear the numbers entered. The settings return to the same
condition as when the machine is powered on.
9 Start button Press this button to start scanning documents or to confirm the value of
each setting.
10 Error indicator Blinks when a system error occurs.
Lights when an error other than a system error (such as paper jam or out of
paper) occurs in the machine.
11 Data indicator Blinks while the machine is sending or receiving data.
12 Last Original button Press this button when the last document has already been scanned.
This button blinks while the machine is scanning a document and lights up
while the machine is waiting for the next document to scan.
13 C (Clear) button Press this button to delete one numeric value that you have entered.
14 Paper Supply button Press this button to select a tray to use.
The tray indicator next to the selected tray moves to the next tray on the
machine status diagram every time the button is pressed.
For more information, refer to Paper supply on page 5-10.
15 Size (Press 2sec) button Press this button to select the size and the orientation of paper loaded in
the selected tray.
The paper size and orientation changes on the machine status diagram
every time the button is pressed.
For more information, refer to Setting the paper size on page 4-13.
16 Status Machine Diagram
(mimic)
Displays error locations, machine status, and other settings.
For more information, refer to Machine status on page 3-13.
17 Reduce/Enlarge button Press this button to select a zoom ratio.
The Reduce/Enlarge indicator next to a fixed zoom ratio moves to the next
zoom ratio and the zoom ratio changes on the machine status diagram
every time the button is pressed.
For more information, refer to Reduce/enlarge on page 5-12.
18 Variable Zoom R atio
button
Press this button to specify the zoom ratio within the range of 25 to 400%
in 1% increments.
The zoom ratio increases every time the button is pressed.
For more information, refer to Reduce/enlarge on page 5-12.
19 Ton er S ave r i c on The indicator of the Toner Saver icon is lit in toner saver mode.
For more information, refer to Lighten/Darken on page 5-15.
WorkCentre 5019/5021
User Guide
3-11

Product overview
No. Component Description
20 Lighten/Darken button Press this button to select a copy density level or toner saver mode.
The selection moves to the right on the machine status diagram every time
the button is pressed.
When the button is pressed while the rightmost icon (toner saver mode) is
lit, the selection moves back to the leftmost icon.
For more information, refer to Lighten/Darken on page 5-15.
21 Original Type button Press this button to select a document type of the document.
The selection moves to the right every time the button is pressed.
For more information, refer to Original type on page 5-14.
22 Collated button Press this button to set collate when copying multiple copies.
The selection switches between sorting and stacking every time the button
is pressed.
When documents are set in the document feeder, this feature is
automatically enabled.
For more information, refer to Collate on page 5-11.
23 Pages per Side button Press this button to use the Pages per Side feature.
Normally, the light is off (Off). The selection moves to the right from Off
(disabled) → 2-up → 4-up every time the button is pressed. When the
button is pressed while 4-up is lit, the light goes off again.
When 2-up or 4-up is selected, the scanning size and orientation that
matches the paper size are displayed on the original size display area of the
machine status diagram.
For more information, refer to Pages per side on page 5-19.
Note Some buttons are not available on some models. If you add certain options, you will be able
to use them. For more information, contact our Customer Support Center.
3-12
WorkCentre 5019/5021
User Guide
Product overview
32 4
7
1
5
6
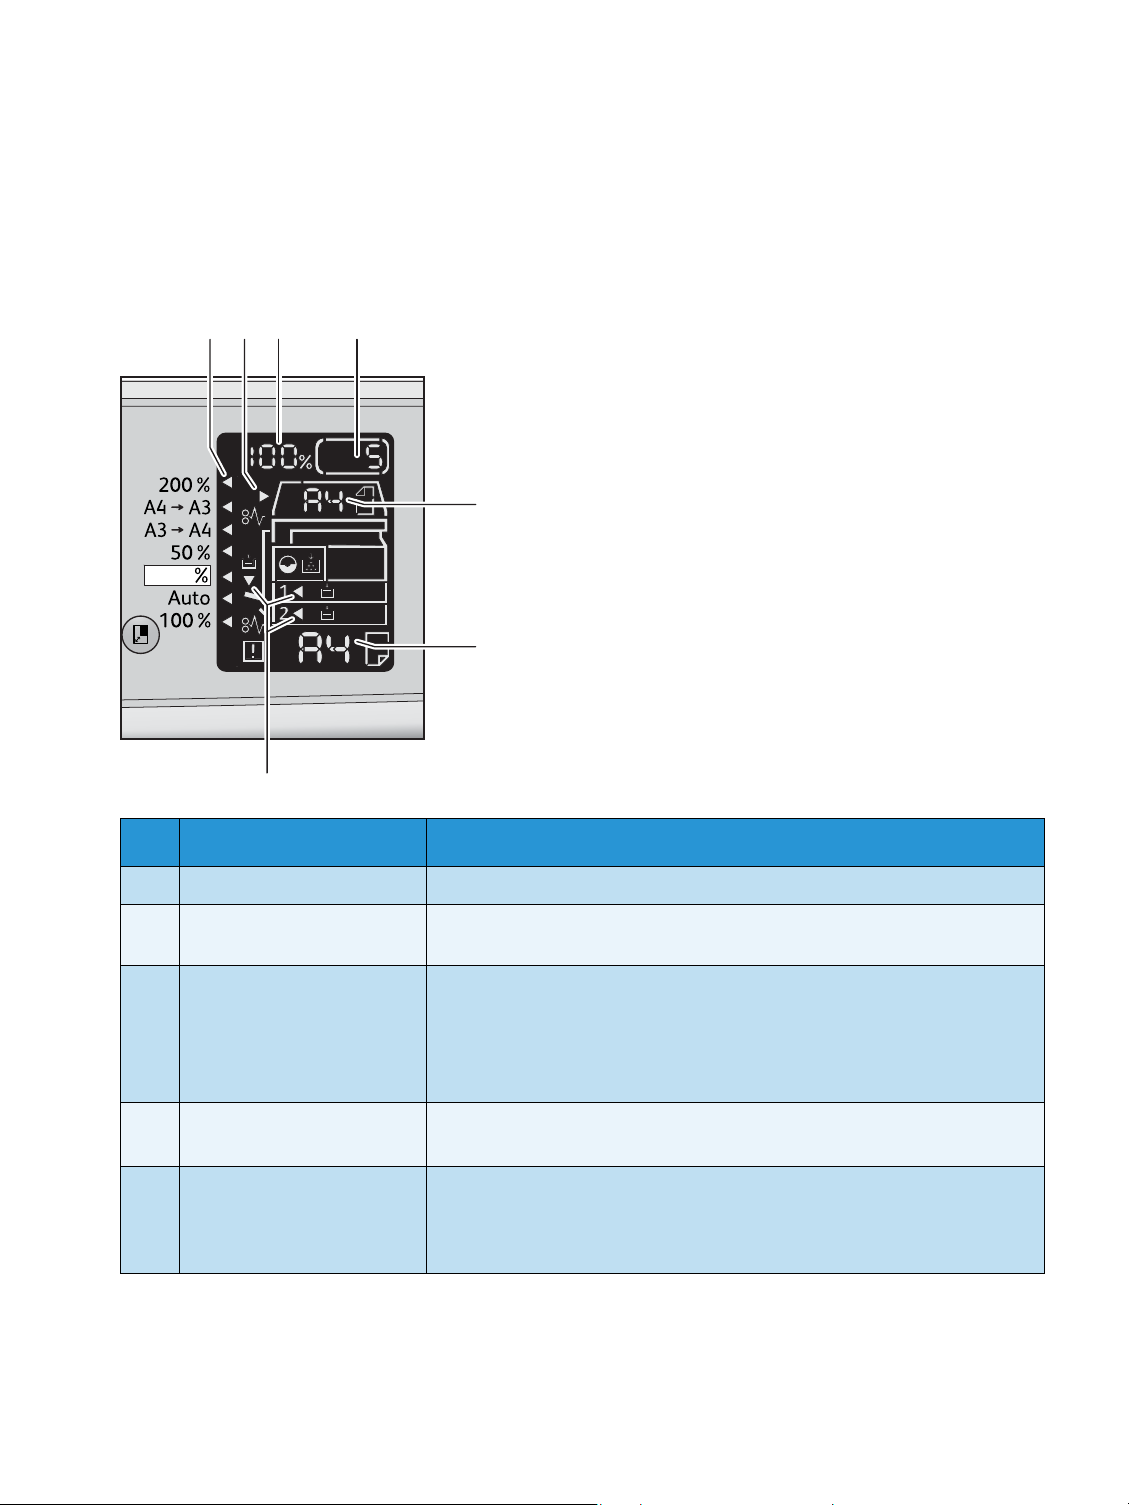
Machine status
The Status Machine Diagram (mimic) consists of the following contents to display the machine status.
This section provides detailed description of each indicator on the machine status diagram (mimic).
No. Component Description
1 Reduce/Enlarge indicator Indicates the selected zoom ratio.
2 Document indicator This indicator is lit when a document is placed in the document feeder or a
document jam occurs.
3 Reduce/Enlarge display area Displays the specified zoom ratio within a range of 25 to 400%.
When automatic detection is selected, “Aut” is displayed.
4 Tot a l C op y di sp la y ar ea Displays the total number of copies.
5 Original Size display area Displays the scanning size and orientation that are specified with the
WorkCentre 5019/5021
User Guide
Also displays the total number of copied pages, User ID/System
Administrator ID, program number, and job type (Prt for Print, Scn for Scan,
and Err for Error).
Also displays a program number or an error code.
Original Size button when the document glass is used. When the document
is placed in the document feeder, automatic detection is automatically set
and “Aut” is displayed.
3-13
Product overview
No. Component Description
6 Paper Size display area Displays the size and the orientation of the paper loaded in the selected
tray. When automatic detection is selected for the selected tray, Aut is
displayed.
7 Tray indicators Indicates the selected tray.
When automatic detection is set for the selected tray, all tray indicators are
lit.
Also indicates the tray where the paper jam occurred.
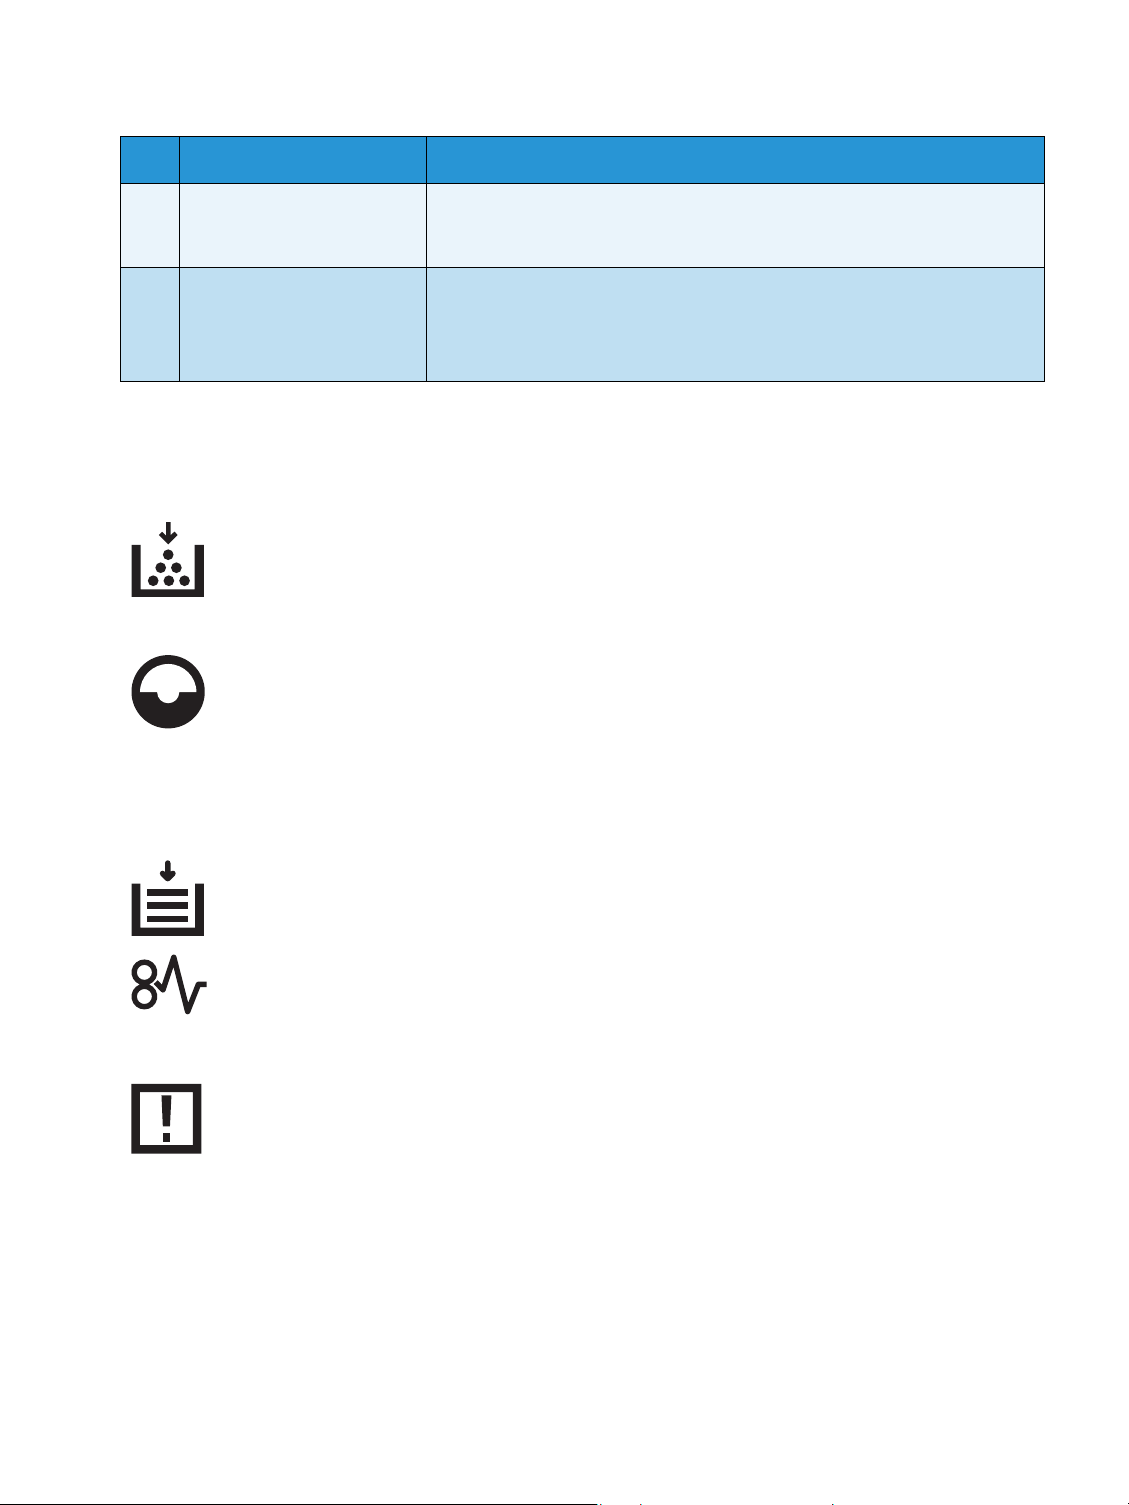
Icons
This section describes icons that may appear in the machine status diagram.
Toner Cartridge The icon blinks when the toner cartridge needs to be replaced
immediately. Replace the toner cartridge with a new one. The error
code J-1 appears in the display.
For information on how to replace the toner cartridge, refer to
Replacing the toner cartridge on page 10-3.
Drum Cartridge This icon lights when the drum cartridge needs to be replaced in
the near future. Prepare a new drum cartridge. No error code is
displayed at this point.
The icon blinks when the drum cartridge needs to be replaced
immediately. Replace the drum cartridge with a new one. An error
code, J-4, J-7, J-8, or J-9, appears on the machine status diagram.
For information on how to replace the drum cartridge, refer to
Replacing the drum cartridge on page 10-7.
Paper Tray Empty This icon lights when a tray runs out of paper.
Paper / Document
Jam
Error This icon lights when an error occurs such as a tray problem, the
This icon lights when a paper or document jams in the machine.
Check the error code that appears on the machine status diagram.
Refer to Paper jams on page 11-29 or Document jams on page 1136, and follow the appropriate procedure to remove the jammed
paper or document.
toner cartridge runs out of ink, and the drum cartridge expires.
3-14
WorkCentre 5019/5021
User Guide

Product overview
Area - blinking
When a paper/document jam occurs or any cover is open, the notification area blinks as shown below.
Front cover Left cover A One tray module
cover B
Tray 2 Bypass tray Document feeder
When any paper or document jam occurs, will also appear.
Tray 1
WorkCentre 5019/5021
User Guide
3-15

Product overview
Account modes
This section describes three different account modes that the machine offers to manage accounts
effectively for copy jobs, and how to log in to the machine.
Typ es of acco unt m odes
You can select one of the following account modes in the system settings: No Account mode, Single
Account mode, or Multiple Account mode.
For information on how to select an account mode in the system settings, refer to Account mode
settings on page 8-8.
No Account mode
No password is set on the machine in the No Account mode, allowing all users to execute any jobs.
Single Account mode
A single password is set on the machine in the Single Account mode. Only those who have the
password can execute copy jobs on the machine.
Note Password entry is not required for print jobs or scan jobs.
Multiple Account mode
Up to 10 user accounts are set on the machine in the Multiple Account mode. You can set a desired
password for each user account. Users are required to enter their account number and password to log
in to the machine. The system administrator can set the copy job limit on each user account, and also
review the total number of copies made by each account.
Note Password entry is not required for print jobs or scan jobs.
Logging in to the machine in Single Account mode
When the machine is in Single Account mode, “_ _ _ _ _ _” appears in the machine status diagram.
3-16
WorkCentre 5019/5021
User Guide

Product overview
Numeric keypad
Start button
For information on how to select an account mode in the system settings, refer to Account mode
settings on page 8-8.
1. Enter a password using the numeric keypad.
Note The password is the same as the system administrator’s password used for entering System
Administration mode from the control panel. For information, refer to Entering System
Administration mode on page 8-2.
For security reasons, as you enter each digit of the password, a hyphen appears in the display instead
of the actual number you entered.
2. Press the Start button to confirm the entered password.
WorkCentre 5019/5021
User Guide
3-17

Product overview
Log In/Out button
If the entered password is correctly, the machine enters Copy mode, and “1” appears in the display.
The Log In/Out button remains lit while you are logged in to the machine.
Notes
• You do not need to log in to the machine for a scan job or print job.
• To log out, press the Log In/Out button again.
Logging in to the machine in Multiple Account mode
When the machine is in Multiple Account mode, “Id _ _ ” appears blinking in the machine status
diagram.
3-18
WorkCentre 5019/5021
User Guide

Product overview
Numeric keyp ad
Start button
For information on how to select an account mode in the system settings, refer to Account mode
settings on page 8-8.
1. Enter an account number using the numeric keypad.
The account number you entered appears in the display.
2. Press the Start button to confirm the number.
WorkCentre 5019/5021
User Guide
3-19

Product overview
Numeric keyp ad
“_ _ _ _ _ _” appears in the machine status diagram.
3. Enter the password that corresponds to the account number that you just entered using the
numeric keypad.
For security reasons, as you enter each digit of the password, a hyphen appears in the display instead
of the actual number that you entered.
3-20
WorkCentre 5019/5021
User Guide

Product overview
Start button
Log In/Out button
4. Press the Start button to confirm the password.
If the password is correct, the machine enters Copy mode, and “1” appears in the display.
The Log In/Out button remains lit while you are logged in to the machine.
Notes
• You do not need to log in to the machine for a scan job or print job.
• To log out, press the Log In/Out button again.
WorkCentre 5019/5021
User Guide
3-21

Product overview
3-22
WorkCentre 5019/5021
User Guide

Loading paper
This chapter describes the paper that can be used with the machine, precautions when handling paper,
and how to load paper in trays.
4
Paper types
To achieve optimum machine performance, use only paper types recommended by Xerox. Use of nonrecommended paper types may result in paper jams, lower print quality, malfunctions, or damage to
the machine.
If you wish to use paper other than the paper recommended by Xerox, contact our Customer Support
Center.
Notes
• Do not use conductive paper such as origami paper, carbonic paper, or conductively-
coated paper. When a paper jam occurs, it may short-circuit the machine and eventually
cause a fire.
• Moisture generated by water, rain, or vapor may cause the printed images to fade. For
more information, contact our Customer Support Center.
WorkCentre 5019/5021
User Guide
4-1
Loading paper
Supported paper weights and sheet counts
Paper tray Basis weight/Ream weight Loadable quantity
Tray 1 (standard) 60 to 90 gsm
Ream weight: 51.6 - 77.4 kg
Tray 2
(one tray module
(optional))
Bypass tray 60 to 110 gsm
60 to 90 gsm
Ream weight: 51.6 - 77.4 kg
Ream weight: 51.6 - 94.6 kg
*1 When using 80 gsm paper
2
When using Xerox standard paper
*
Notes
• Paper jams may result if you attempt to print on a different paper type or size than the
type or size selected in the print driver, or from a tray that does not support the loaded
paper. Select the correct paper size, type, and tray to ensure successful printing.
• Basis weight is the weight of one sheet of paper of 1 m
• Ream weight is the weight of 1,000 sheets of duodecimo size (788 × 1,091 mm) paper.
Supported paper sizes:
• Maximum: A3, 11 × 17"
• Minimum: Tray 1 and 2: B5, Bypass tray: A5, 5.5 × 8.5"
2
in size.
1
1
2
250 sheets *
(Up to 27 mm)
500 sheets *
(Up to 54 mm)
100 sheets *
(Up to 10 mm)
Duplexing (2-sided printing)
The following paper types are supported for automatic duplexing:
• Lightweight (60 to 63 gsm)
• Plain (64 to 90 gsm)
• Heavyweight (91 to 110 gsm) *Bypass tray only
Supported paper type
Standard paper
When printing or copying on commonly used paper (plain paper), use paper meeting the standards
described below. To copy or print as clear as possible, we recommend the following standard paper.
Paper name
P paper 64 Plain Tough plain paper suitable for internal
4-2
Basis weight
(gsm)
Paper
type
Notes/countermeasure
documents at the office.
WorkCentre 5019/5021
User Guide

Semi-standard paper
In addition to the standard paper, the following paper also can be used.
Loading paper
Paper name
Colotech + 90 Plain Before copying or printing, fan the paper well
Laserprint 80 Plain —
Performer 70 Plain Before copying or printing, fan the paper well
Business 80 Plain Before copying or printing, fan the paper well
Express 70 Plain —
Performer + 75 Plain —
Business + 70 Plain —
DocuPaper 70 Plain —
Basis weight
(gsm)
80 Plain
80 Plain —
80 Plain —
80 Plain —
80 Plain —
Paper
type
Notes/countermeasure
and reload it in the tray.
and reload it in the tray.
and reload it in the tray.
Professional 80 Plain —
Colotech Idol 80 Plain —
Premier 80 Plain —
Xplore 70 Plain Before copying or printing, fan the paper well
and reload it in the tray.
Xcite 80 Plain Before copying or printing, fan the paper well
and reload it in the tray.
Xceed 70 Plain —
80 Plain —
ASTRO EXTRA 70 Plain —
80 Plain —
Xpress 70 Plain —
Xtra 75 Plain —
80 Plain —
WorkCentre 5019/5021
User Guide
4-3

Loading paper
Paper name
ECO Enviroguard
Paper
Explorer 70 Plain —
A-paper 75 Plain —
H-paper 80 Plain —
Vell u m Paper 80 Plain —
Diplomat 80 Plain —
PAPER ONE COPIER
PAP ER
Colour Impression 90 Plain —
PaperOne 80 Plain —
XeroxOne 80 Plain —
X'treme Platinum 80 Plain —
Basis weight
(gsm)
75 Plain —
75 Plain —
80 Plain —
70 Plain —
Paper
type
Notes/countermeasure
Attitude 70 Plain —
PerfectPrint 80 Plain —
LQ-PAPER 80 Plain —
Horizon 70 Plain —
80 Plain —
Office 70 Plain —
80 Plain —
Paper One (Package:
Blue)
80 Plain —
Usable paper
In addition to the standard/semi-standard paper, the following paper also can be used.
Paper name
DocuPaper Black 70 Plain —
Laserprint 80 Plain —
Basis weight
(gsm)
Paper
type
Notes/countermeasure
Green Wrap (Recycle) 80 Plain —
4-4
WorkCentre 5019/5021
User Guide

Loading paper
Paper name
Recycled Pure+ (Recycle) 80 Plain —
Performa Plus 70 Plain —
Colotech Idol 100 Heavy-
Recycled Supreme
(Recycle)
K-paper 75 Plain —
J Paper 82 Plain —
JD Paper 98 Plain —
PAPER ON E A ll Pu r p ose 80 Plain —
DOUBLE A 80 Plain —
XEROX ONE 80 Plain —
WARRIOR 70 Plain —
Performer 80 Plain Before copying or printing,
Basis weight
(gsm)
80 Plain —
80 Plain —
Paper
type
weight
Notes/countermeasure
—
fan the paper well and reload
it in the tray.
Professional 80 Plain —
Xerox Undertones Several Colours
Recycled Pure (Recycle) 80 Plain —
Colotech+ 90 Plain —
Van Hawk paper 70 Plain —
PaperOne 70 Plain —
RECYCLE PAPER
SHIH-TZU
Double A 80 Plain —
Roxy Paper 80 Plain —
Qinghe (Recycle) 80 Plain —
80 Plain —
100 Heavy-
weight
80 Plain —
80 Plain —
70 Plain —
—
WorkCentre 5019/5021
User Guide
4-5

Loading paper
Paper name
Star (Package: Orange) 70 Plain —
Star 80 Plain —
Basis weight
(gsm)
Paper
type
Notes/countermeasure
Unusable paper
Using paper not recommended by Xerox may cause a paper jam or machine malfunction. Use paper
recommended by Xerox.
Storing and handling paper
Please keep the following points in mind when storing paper
• Store paper inside a cabinet or other dry place. Paper that has absorbed moisture can result in
paper jams and lower image quality.
• After opening a package of paper, wrap and store any remaining paper. We recommend that you
store remaining paper in moisture prevention packets.
• Store paper on a flat surface to prevent bends or warping.
Please adhere to the following points when loading paper in a tray
• Align the stack of paper neatly before loading it in a tray.
• Do not use creased or wrinkled paper.
• Do not use warped or curled paper.
• Do not load paper of mixed sizes together into a tray.
• Take care not to touch the print side. Oils from your skin could adhere to the print media, which
could affect printing quality. If unavoidable, be sure to use a finger cot, gloves, or other means to
cover your fingers before touching the print media.
• LEF is recommended for heavyweight media feeds from the Bypass tray. If a misfeed occurs,
please apply an intentional upper curl to the leading edge of the paper.
4-6
WorkCentre 5019/5021
User Guide
Loading paper
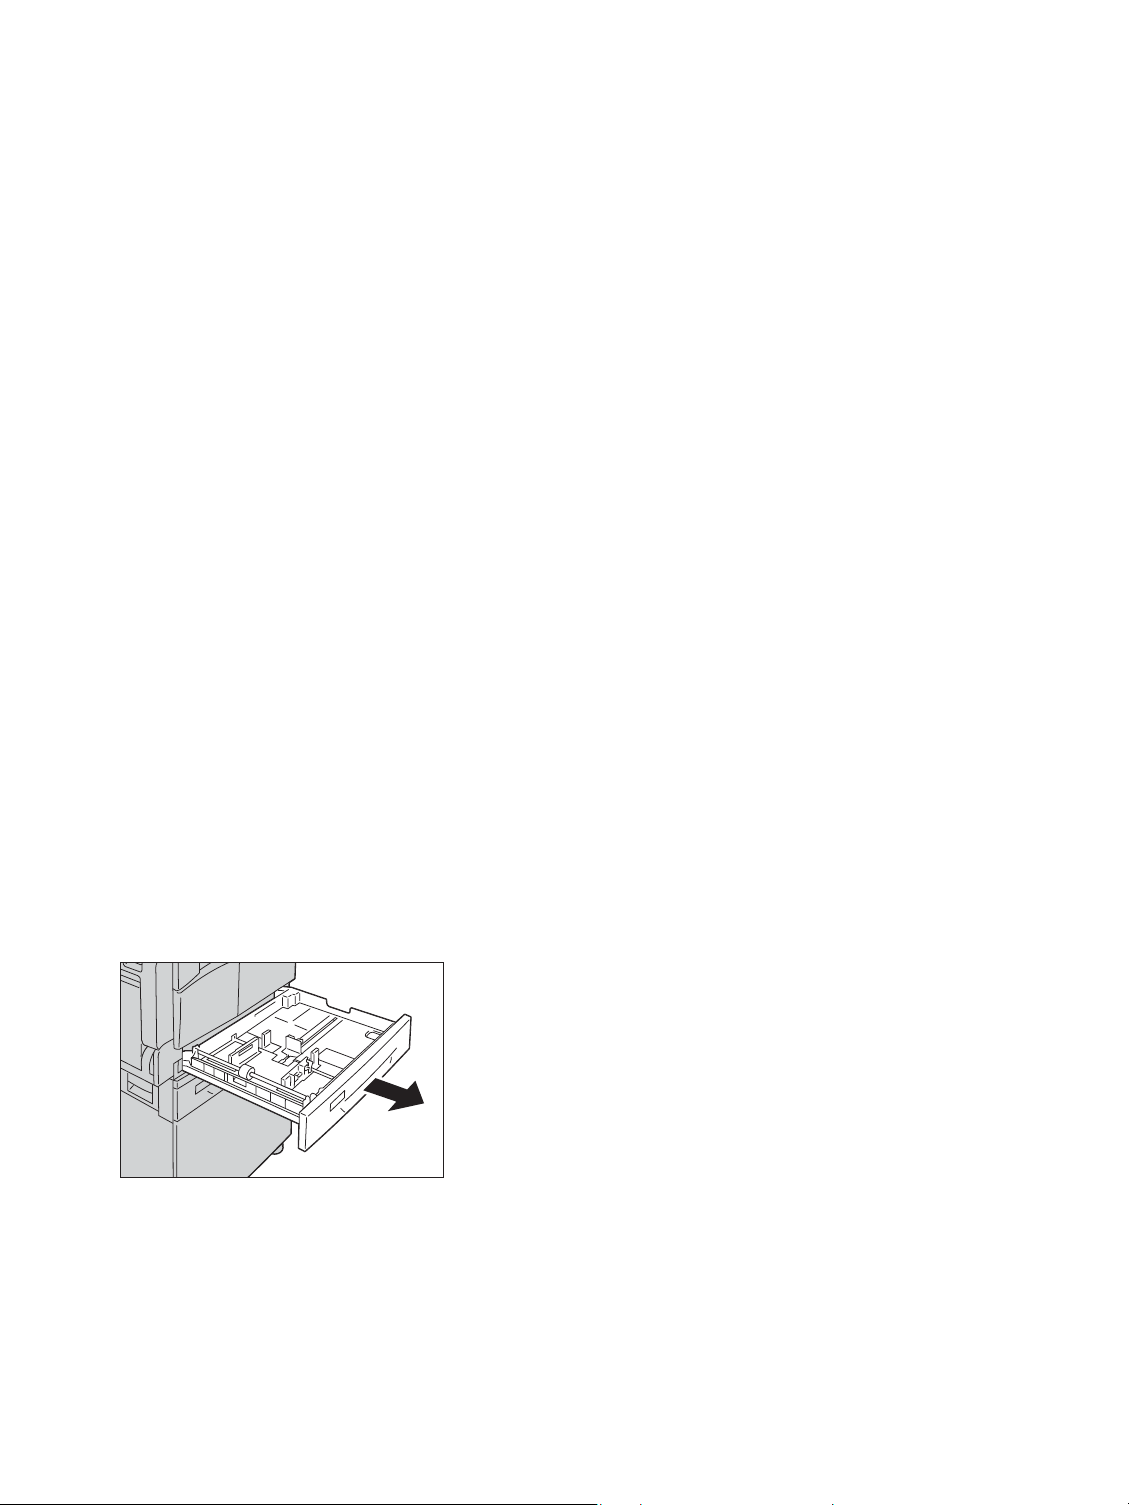
Automatic tray selection
Loading paper
When processing a print job, specify the settings in the print driver
Select under Paper Tray in the Paper/Output tab. The machine automatically selects a tray to match
the specified document size and orientation. This function is called automatic tray selection.
When processing a copy job, select Aut by pressing the Paper Supply button.
The automatic tray selection function selects the trays in order from Tray 1 > Tray 2 in cases where
more than one paper tray contains paper with the same size and orientation.
Notes
• The Bypass tray cannot be selected with automatic tray selection.
• Tray 2 is an optional component.
• When the machine runs out of paper during copying or printing, select the tray
containing the paper of the same size and orientation that was being used for copying
or printing, and continue copying or printing (auto tray switch feature).
's screen by selecting Auto Paper
Loading paper in Trays 1 and 2 (optional)
When the machine runs out of paper during copying or printing and an error code is displayed on the
machine status diagram, add paper to the tray. Copying or printing automatically resumes when paper
is added.
Note Fan the paper well before loading it in the tray. This prevents pages from sticking to each
other and reduces paper jams.
For information on how to change the paper size and orientation in a tray, refer to Changing the
paper size for Trays 1 and 2 on page 4-11.
1. Pull out the tray until it stops.
WorkCentre 5019/5021
User Guide
4-7
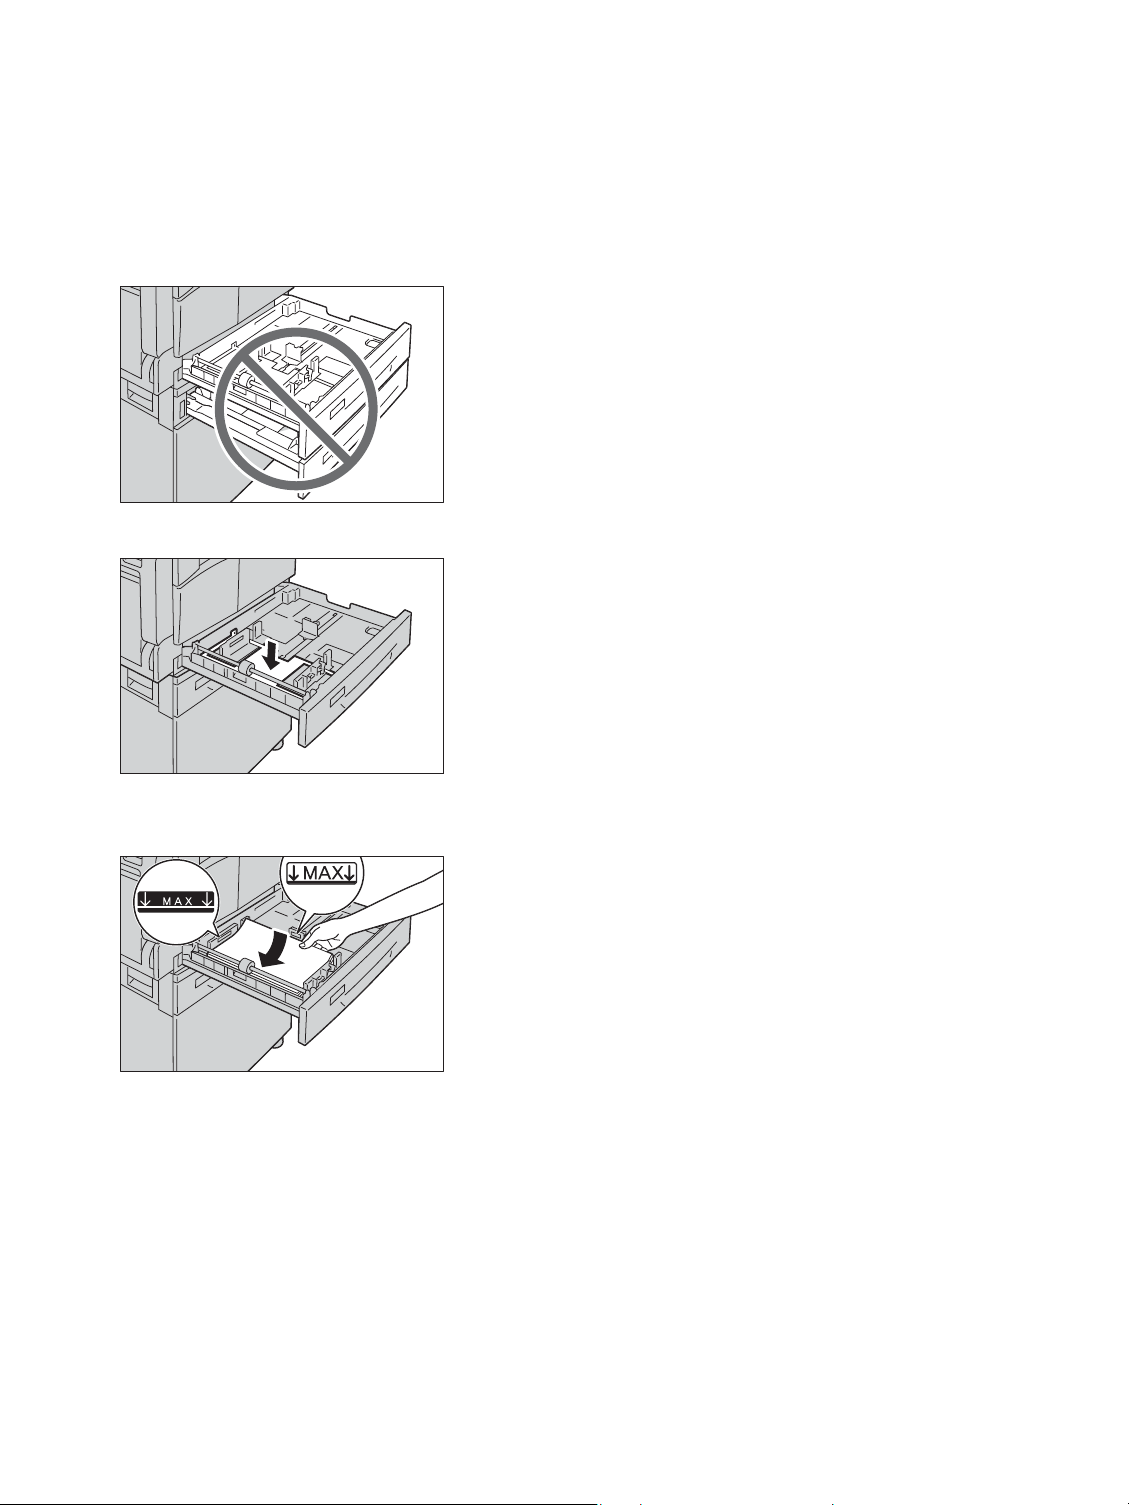
Loading paper
Notes
• While the machine is copying or printing, do not pull out the tray that the job uses.
• To prevent paper jams or loading errors, do not load different sizes or types of paper on
top of any remaining paper in a tray.
• Pulling out all the trays at once could cause the machine to tilt or fall, causing injury..
2. For Tray 1, push down the metal plate to the bottom of the tray.
3. Load the paper with the side to be copied or printed facing up. Align the leading edge of the paper
with the left side of the tray.
Notes
• Do not load paper above the maximum fill line. Doing so could cause paper jams or
machine malfunctions.
• Do not place any paper or objects in the empty space on the right side of Tray 1 or 2.
Doing so could cause paper jams or machine malfunctions.
4-8
WorkCentre 5019/5021
User Guide
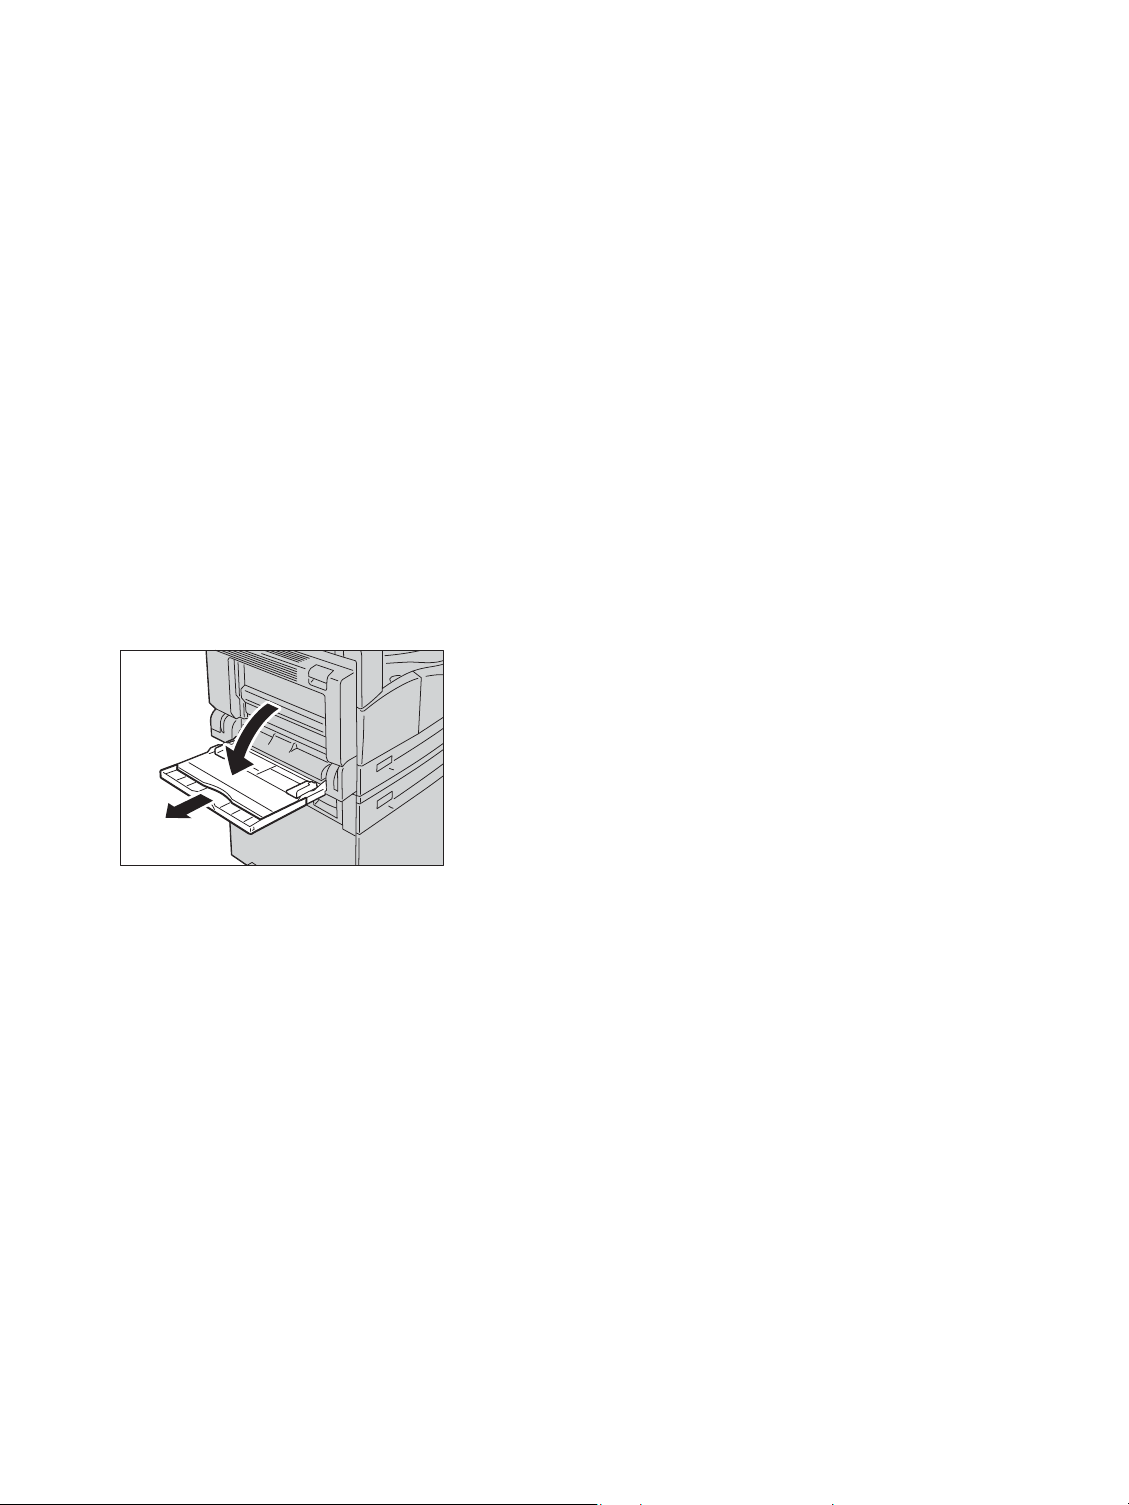
Loading paper
4. Push the tray in gently until it stops.
Notes
• When pushing the tray in, do it slowly. Pushing the tray with too much force could cause
machine malfunctions.
• Push the tray in all the way until it stops to prevent paper jams.
Loading paper in the Bypass tray
When printing or copying on the paper that cannot be set in Tray 1 or 2, use the Bypass tray.
For printing, specify the settings on the Paper/Output tab using the print driver. Also specify the type of
paper to be loaded.
Notes
• To prevent paper jams or loading errors, do not remove paper from its packaging until
needed.
• Fan the paper well before loading it in a tray. This prevents the pages from sticking to
each other and reduces paper jams.
1. Open the Bypass tray.
Note If necessary, pull out the extension tray. Pull out the extension tray gently.
WorkCentre 5019/5021
User Guide
4-9

Loading paper
2. Load paper with the side to be copied or printed on facing down, inserting the paper until its edge
lightly touches against the paper feed entrance.
Notes
• Do not load mixed paper types in a tray.
• Do not load paper above the maximum fill line. Doing so could cause paper jams or
machine malfunctions.
• The machine may not be able to feed or create the desired print quality for some types
of heavyweight paper.
3. Gently align the paper guides to the loaded paper.
4. Execute the copy or print operation.
4-10
WorkCentre 5019/5021
User Guide
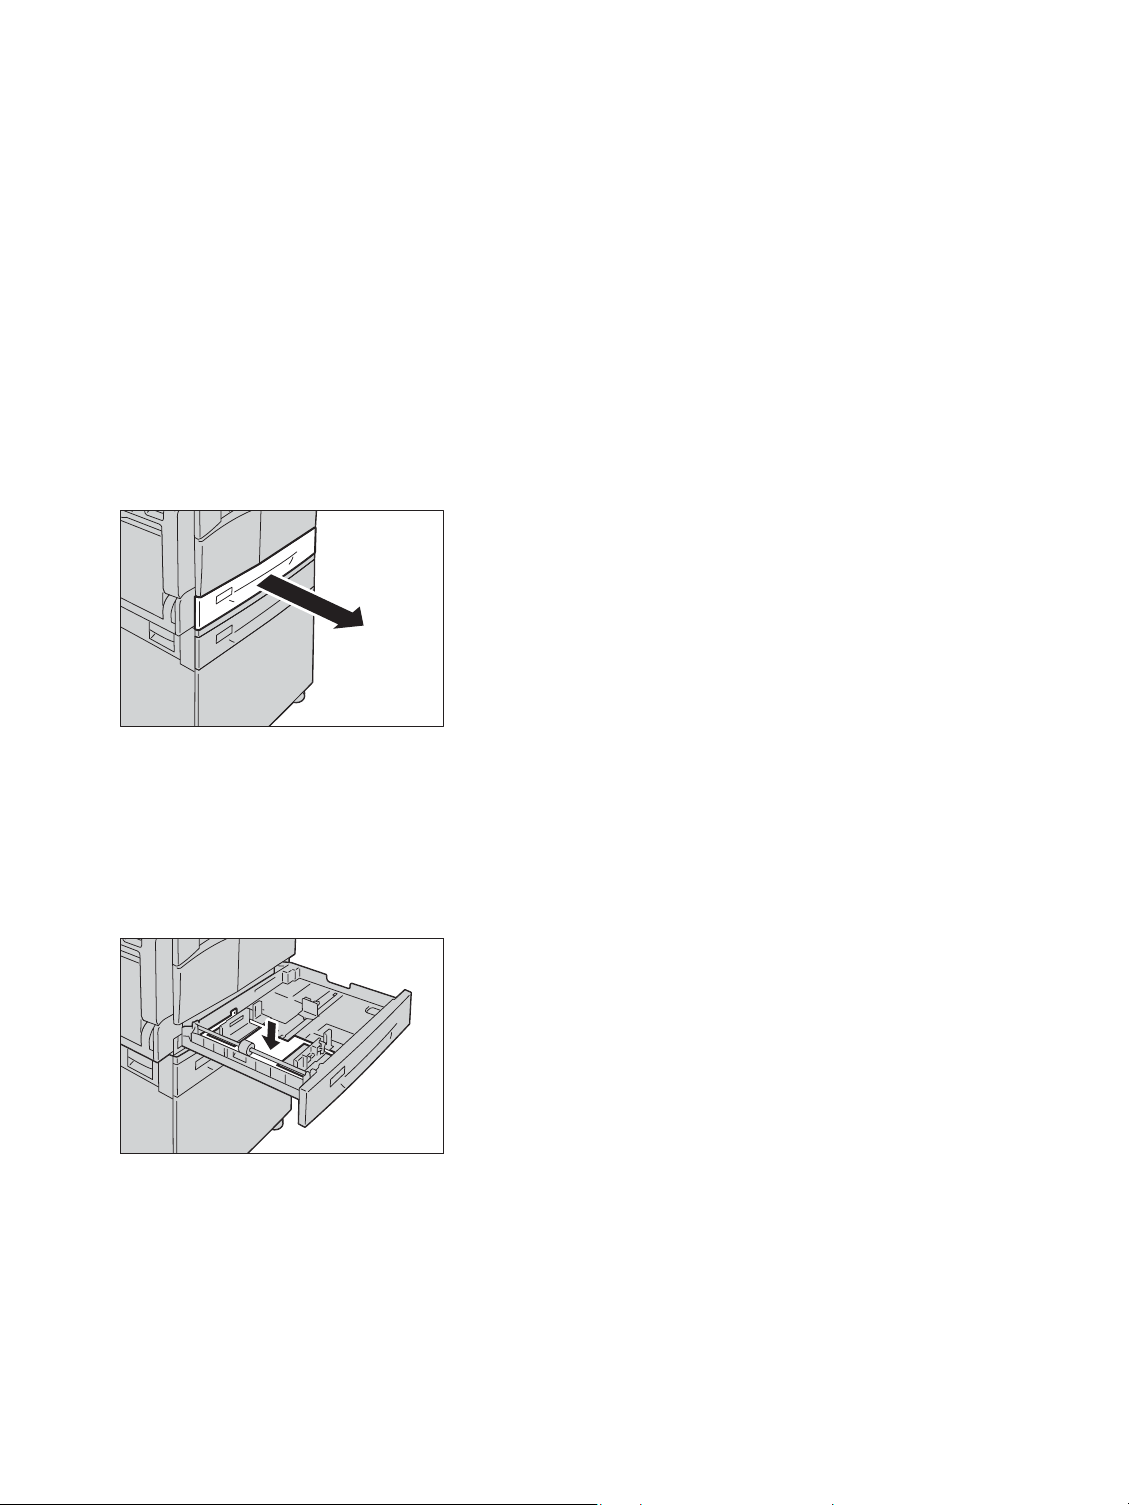
Changing paper size
This section describes how to change paper size in Trays 1 and 2.
Notes
• Do not load mixed paper sizes into a tray.
• When you change the size and orientation of paper in a tray, change the paper size
setting to match the paper size. For more information on how to change the paper size
and orientation settings, refer to Setting the paper size on page 4-13.
Changing the paper size for Trays 1 and 2
1. Pull out the tray until it stops.
Loading paper
Notes
• While the machine is copying or printing, do not pull out the tray that the job uses.
• To prevent paper jams or loading errors, do not load different sizes or types of paper on
top of any remaining paper in a tray.
2. Remove any paper loaded in the tray.
3. For Tray 1, push down the metal plate to the bottom of the tray.
WorkCentre 5019/5021
User Guide
4-11

Loading paper
4. While pinching the two paper guide levers, move them to the edges of the paper.
5. Load the paper with the side to copy or print on facing up. Align the leading edge of the paper
with the left side of the tray.
Note Do not load paper above the maximum fill line. Doing so could cause paper jams or
machine malfunctions.
6. Push the tray in gently until it stops.
Notes
• When pushing the tray in, do it slowly. Pushing the tray with too much force could cause
machine malfunctions.
• Affix the paper size label to the front of the tray.
7. Set the paper size setting.
Refer to Setting the paper size on page 4-13.
4-12
WorkCentre 5019/5021
User Guide

Loading paper
Paper Supply button
Size (Press 2sec) button
Setting the paper size
This section describes how to set the paper size and orientation for Trays 1 and 2.
After you load paper, make sure to set the size and orientation of the paper loaded into the tray.
Note You cannot change the setting while the machine is processing a job.
1. Press the Paper Supply button to select a tray where the paper you will specify the paper size and
orientation is loaded.
In the machine status diagram, the tray indicator lights up on the selected tray, and its paper size
and orientation are displayed on the paper size display.
2. Press and hold the Size (Press 2sec) button for more than 2 seconds until the paper size in the
paper size display area starts blinking.
WorkCentre 5019/5021
User Guide
4-13

Loading paper
The paper size in the paper size display area blinks and the machine enters paper size setting mode.
3. Press the Size (Press 2sec) button to select the size and orientation of the paper loaded in the
selected tray.
The selected paper size and orientation are displayed in the machine status diagram.
The Start button lights up blinking during the settings.
4. Press the Start button to confirm the settings.
To exit paper size setting mode without saving the settings, press the Clear All button or the Stop
button.
Note Be sure to press the Start button. Otherwise the settings of paper size and orientation are
canceled and remain the previous settings.
4-14
WorkCentre 5019/5021
User Guide

Loading paper
Setting the paper type
This section describes how to set the type of paper loaded in tray.
The paper type is set to standard type as default. When loading a different type of paper into a tray,
change the paper type setting according to the type of paper loaded in the tray to keep the print
quality.
Refer to Supported paper type on page 4-2.
1. Enter System Administration mode.
Refer to Entering System Administration mode on page 8-2.
2. Press the program number of the tray that you want to confirm.
Program number Item
500 Tray 1
501 Tray 2
502 Bypass tray
The current value is displayed.
3. Press the Size (Press 2sec) button to start changing the setting.
4. Enter the program number of the paper type that you want to set, and press the Start button.
Program number Item
0 Normal
2 Heavyweight
5 Lightweight
WorkCentre 5019/5021
User Guide
4-15

Loading paper
After the entered program number blinks twice, the new setting is confirmed.
5. After you confirm the setting, press the Log In/Out button and exit System Administration mode.
Note When you exit System Administration mode, the Log In/Out button light goes off.
4-16
WorkCentre 5019/5021
User Guide

Copy
Copying procedure
This section describes the basic copy procedures.
Placing the document
The following two methods are available to load documents:
Document feeder
•Single sheet
• Multiple sheets
Document glass
•Single sheet
• Bound documents, such as book
5
Note The document feeder is not available for some models. An optional component is required.
Contact your local Xerox representative.
Document feeder
Supported document sizes
You can place documents of the standard sizes in the document feeder.
When a document is placed in the document feeder, the machine detects the document size
automatically. The following standard size documents are detected automatically: A5 , A4 , A4 ,
A3 , B5 , B5 , B4 , 8.5 × 11" , 8.5 × 11" , 8.5 × 13" , 8.5 × 14" , 11 × 17" , 16K ,
16K , and 8K .
Note You can select one of the following alternative document sizes. For more information, refer
to System settings on page 8-5.
• 8.5 × 13" or 8.5 × 13.4"
• 8.5 × 13" or 8.5 × 14"
• B5 or 16K
WorkCentre 5019/5021
User Guide
5-1
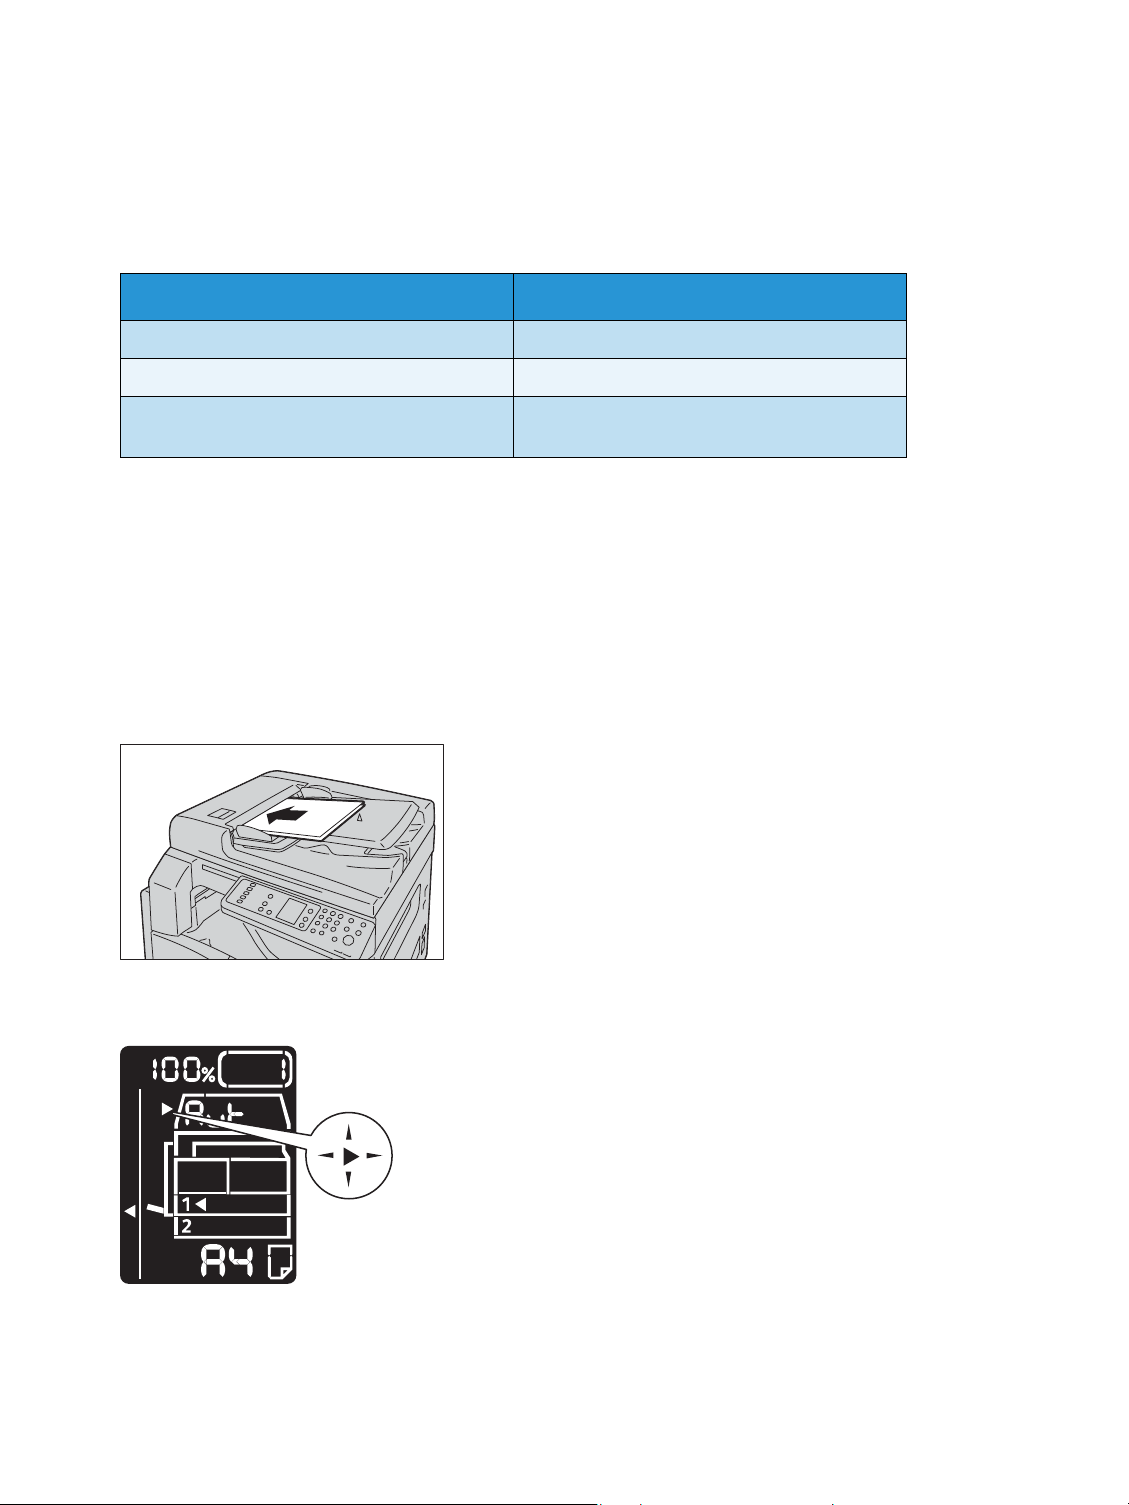
Copy
Lights up
Supported documents types (weights)
Documents with weights from 38 to 128 gsm (50 to 128 gsm for 2-sided documents) can be placed in
the document feeder and scanned.
The document feeder accepts the following number of sheets.
Document type (gsm) Number of sheets
Lightweight (38 to 49 gsm) 110 sheets
Plain (50 to 80 gsm) 110 sheets
Heavyweight (81 to 128 gsm)
(Bypass tray only)
75 sheets
Note To avoid paper jams, use the document glass for mixed size, folded, wrinkled, cut-and-pasted
documents, curled paper, or carbon-backed paper. If you can flatten the curled document, you can
use it.
Follow the steps below to place documents in the document feeder.
You can place single or multiple sheet documents.
1. Remove any paper clips or staples from the document before placing it in the document feeder.
2. Place the document in the center of the document feeder, with the side to copy (or the front
surface of a 2 Sided document) facing up.
Note The document indicator lights up when a document is placed in the document feeder. If the
indicator is not lit, place the document again.
5-2
WorkCentre 5019/5021
User Guide
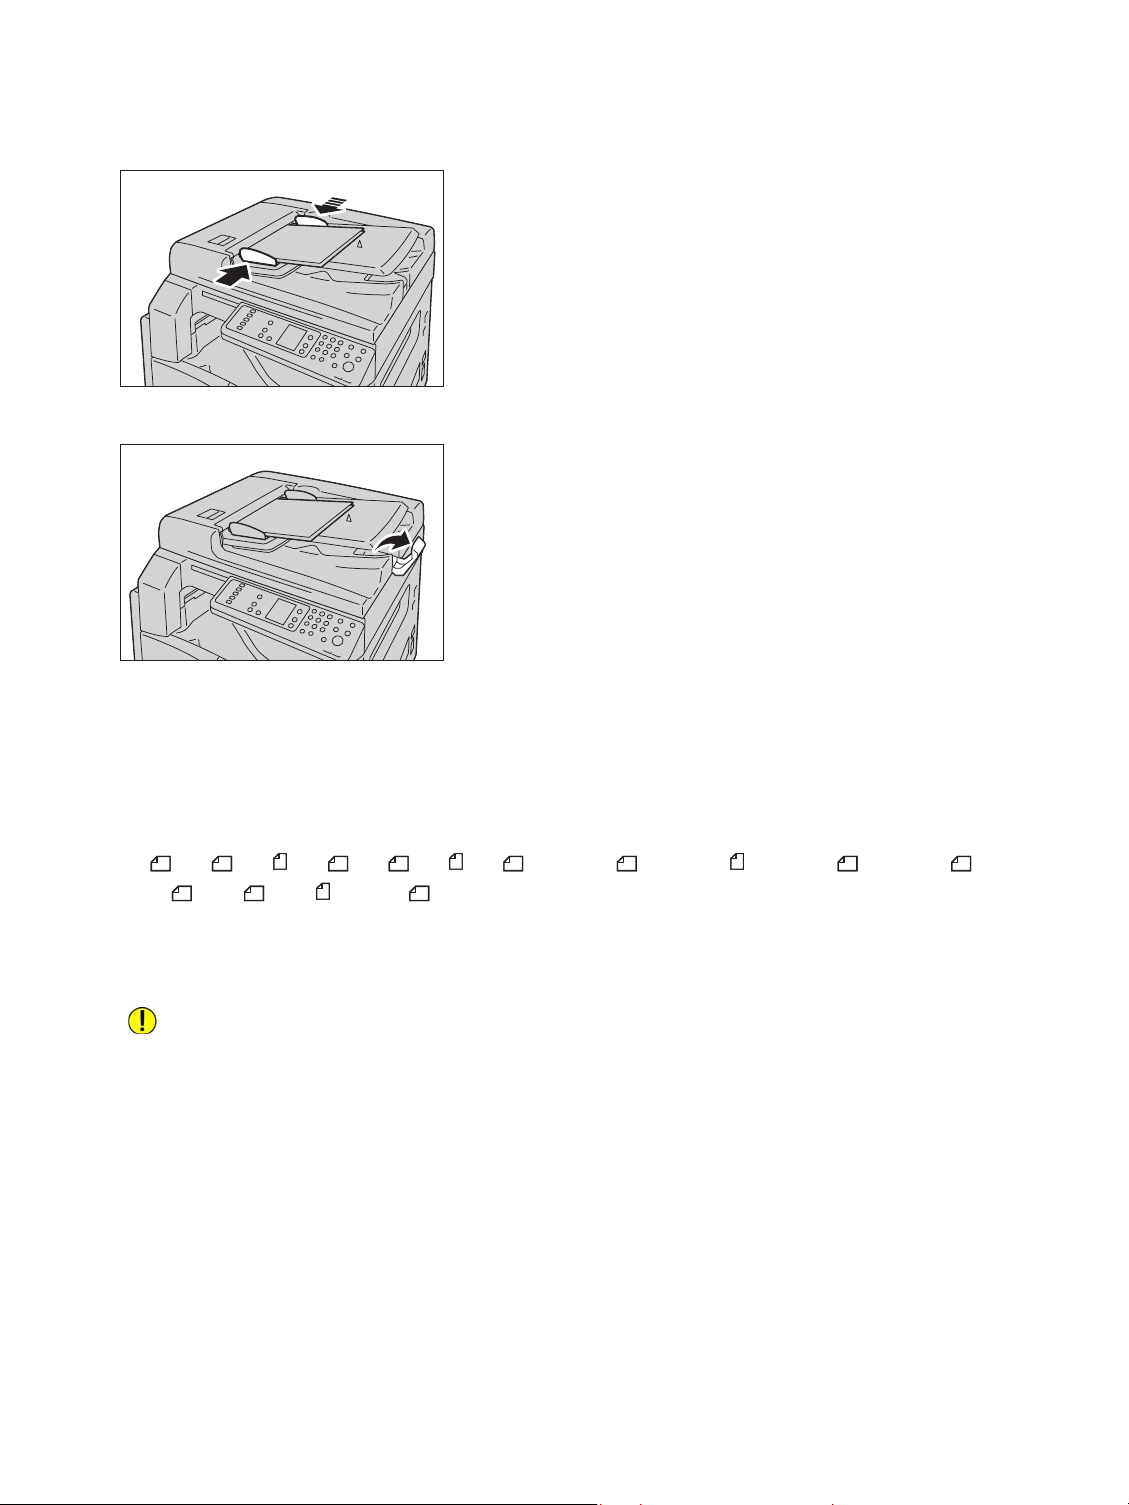
3. Align the document guides to each side of the document.
4. Open the document stopper.
Copy
Document glass
Supported document sizes
You can select one of the following document sizes for using the document glass.
A5 , A4 , A4 , A3 , B5 , B5 , B4 , 8.5 × 11" , 8.5 × 11" , 8.5 × 13" , 8.5 × 14" , 11
× 17" , 16K , 16K , and 8K .
Note The document size is not detected when using the document glass. For setting the paper
size and orientation, refer to Original size on page 5-13.
CAUTION: Do not apply excessive force to hold a thick document on the document glass.
Doing so may break the gl ass and cause injuries.
Follow the steps below to place a document on the document glass.
WorkCentre 5019/5021
User Guide
5-3
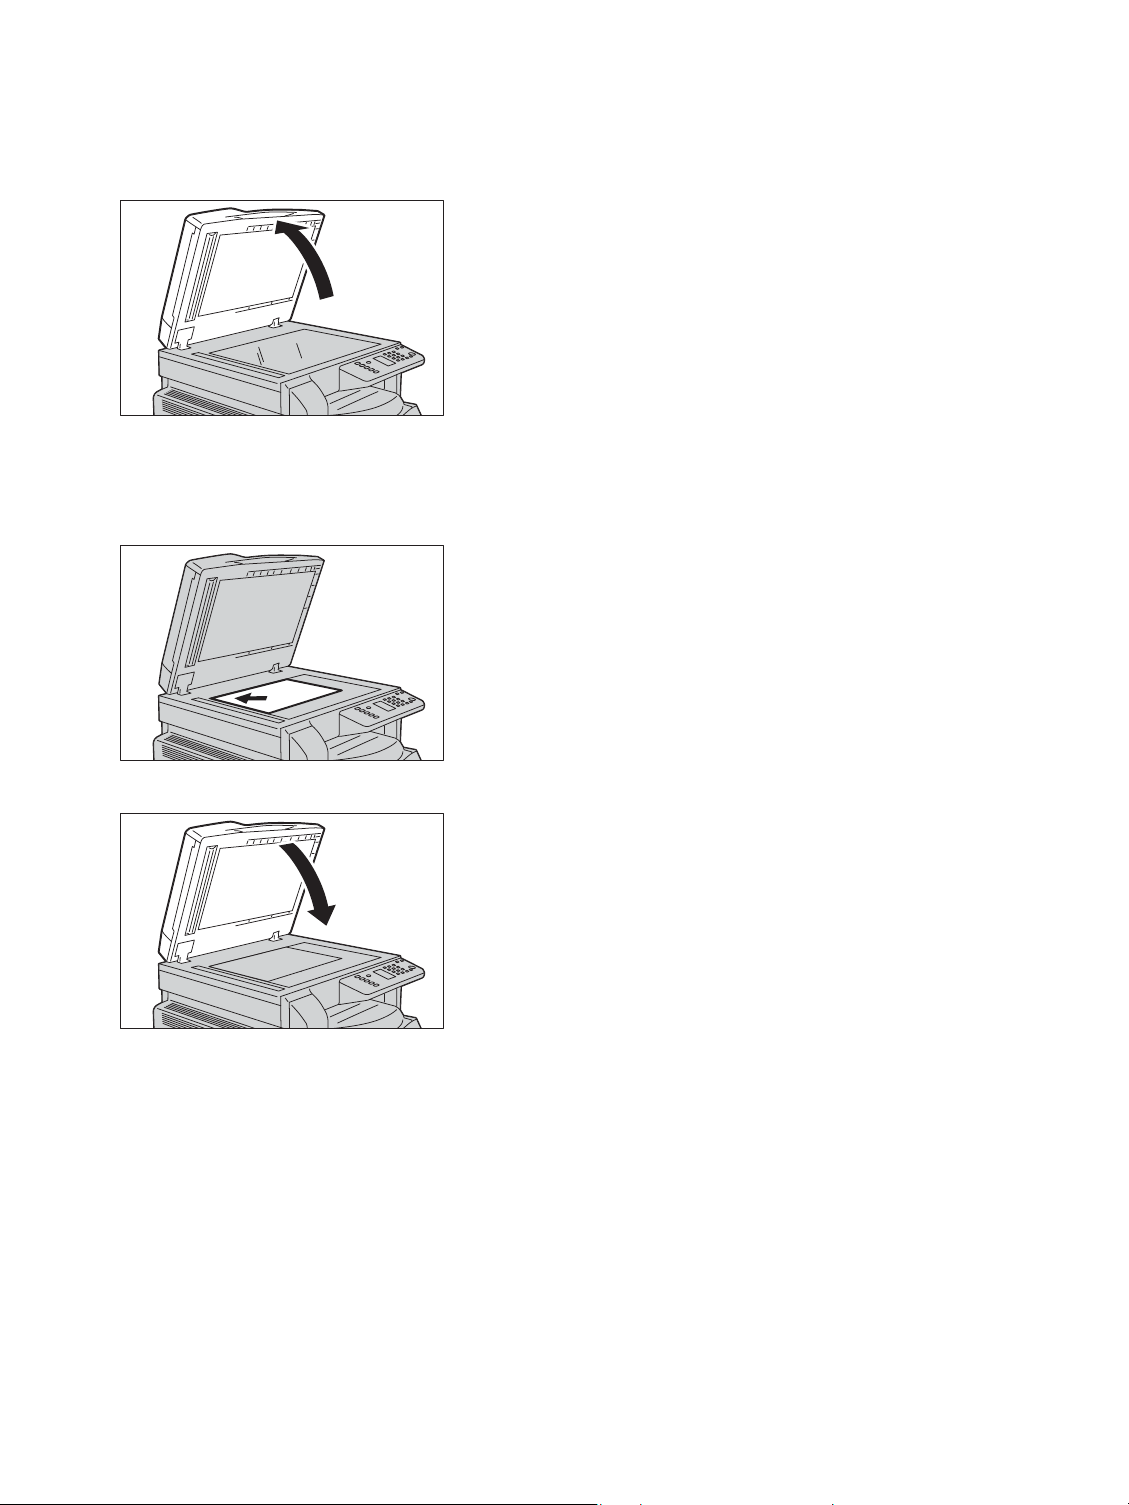
Copy
You can place a single sheet document or bound document, such as book, on the document glass.
1. Open the document cover.
Note When using the document glass, make sure to close the document cover after finishing your
copy job.
2. Place the document face down and align it against the top left corner of the document glass.
3. Close the document cover.
Note Make sure to set the size and orientation of document when using the document glass.
Refer to Original size on page 5-13.
5-4
WorkCentre 5019/5021
User Guide
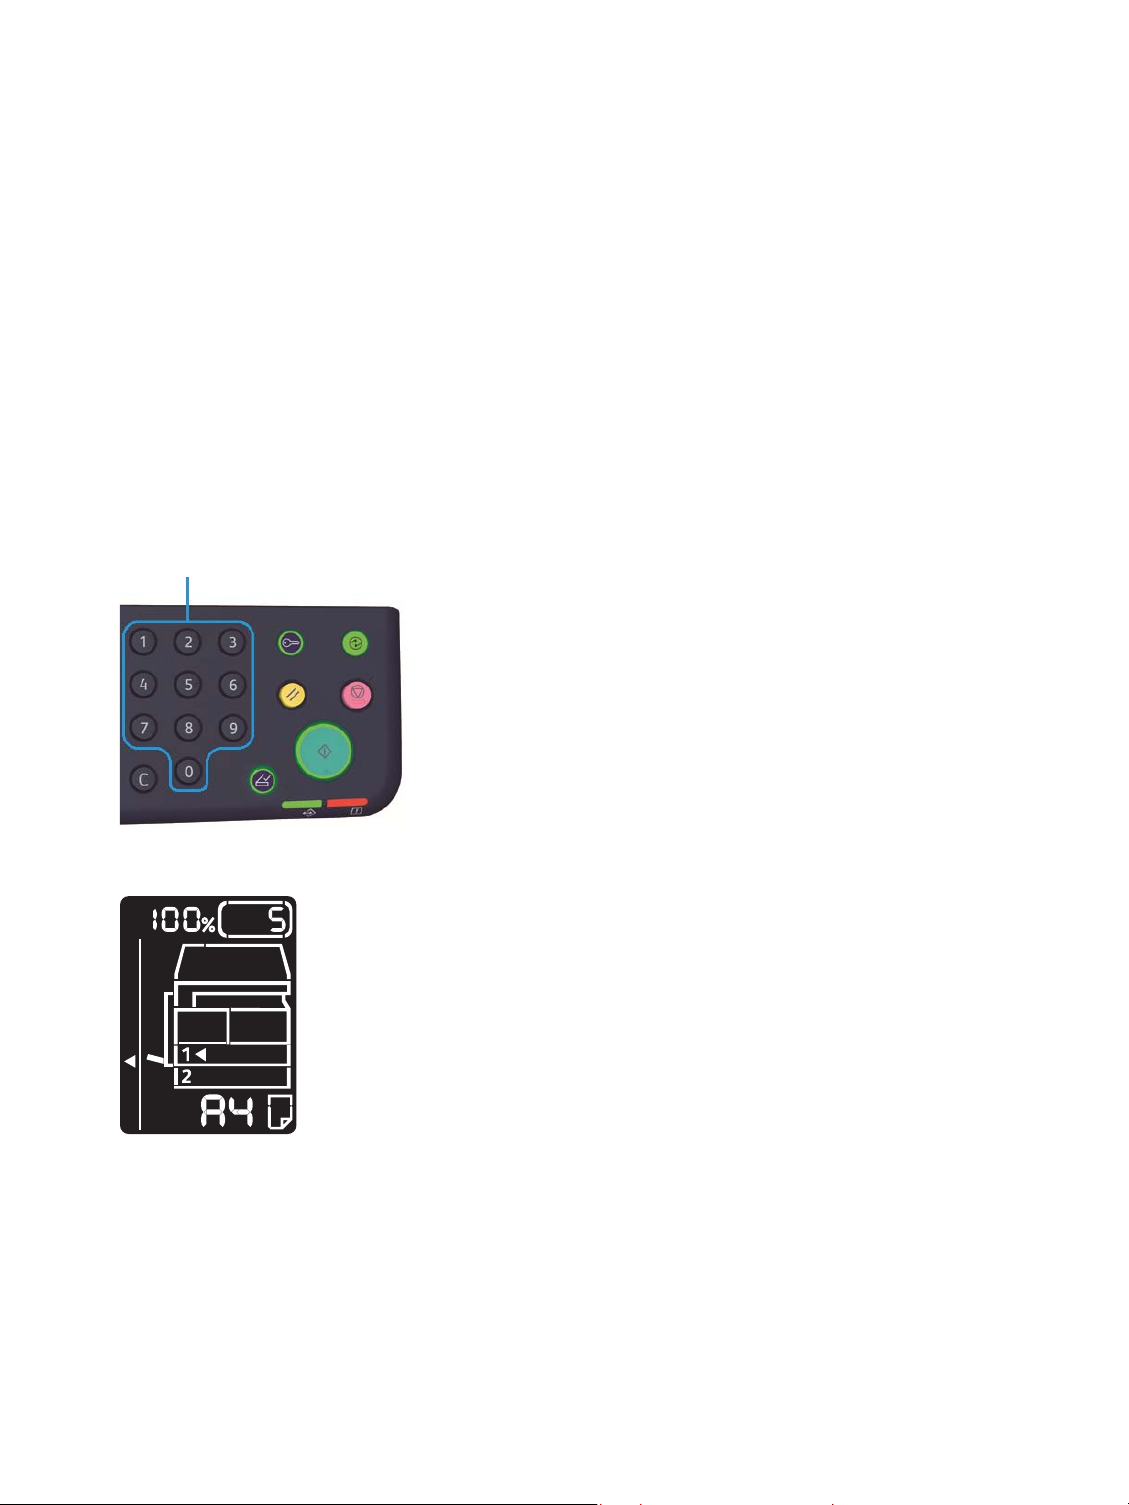
Setting advanced settings
Numeric keypad
Notes
• The settings displayed may vary according to model.
• You may need to enter a password to use the copy feature. Ask your system
administrator for the password.
For more information on advanced settings, refer to Advanced copy settings on page 5-9.
For more information on entering a password, refer to Entering System Administration mode on
page 8-2.
Entering the number of copies
You can enter a value between 1 and 999 for the number of copies.
1. Use the numeric keypad to enter the desired number of copies.
Copy
The entered value appears in the machine status diagram.
WorkCentre 5019/5021
User Guide
5-5
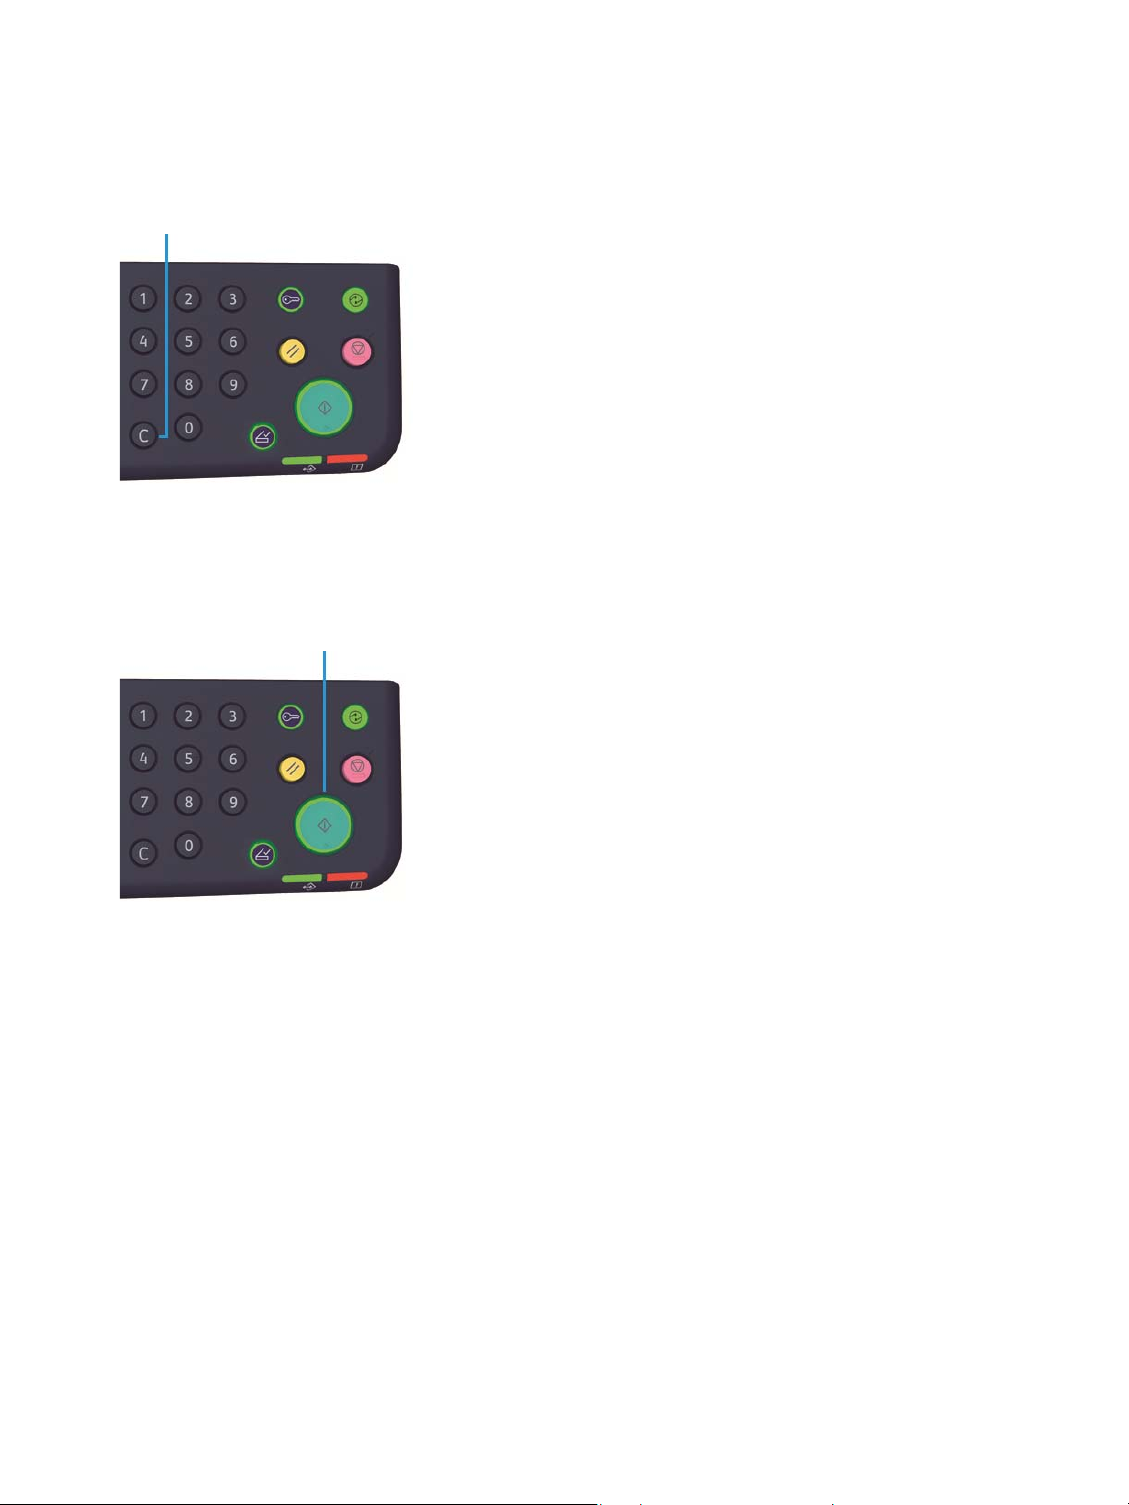
Copy
C (Clear) button
Start button
Note If you entered an incorrect value, press the C (Clear) button, and then enter the correct
value.
Starting the copy job
1. Press the Start button.
Notes
• If the document is placed in the document feeder, do not press down on the document
while it is being fed through the machine.
• If a problem occurs, an error code appears in the machine status diagram. For
information on error codes, refer to Error codes on page 11-21
.
Placing a document on the document glass
Copying multiple sets of documents
If any of the following features are set, a copy job may not be started after loading a document due to
the blinking Last Original button.
• Collate: On
•2 Sided: 1 → 2 Sided, 2 → 2 Sided
• Pages per Side: 2 Pages or 4 Pages
•ID Card Copy: On
5-6
WorkCentre 5019/5021
User Guide

After all the documents have been scanned, press the Last Original button to start copying.
Last Original button
Copy
WorkCentre 5019/5021
User Guide
5-7

Copy
Stop button
Stopping a copy job
To cancel the currently copying job press the Stop button.
5-8
WorkCentre 5019/5021
User Guide

Advanced copy settings
Copy
Feature Description
Paper Supply Sets the tray to use. P.10
Collate Sets the output method to use when making
multiple sets of copies.
Reduce/Enlarge Sets a reduction or enlargement factor. P.12
Original Size Sets the document size. P.13
Original Type Sets the document type. P.14
Lighten/Darken Adjusts the copy density. P.15
ID Card Copy Used to copy ID cards. P.15
2 Sided Used to select 1 Sided or 2 Sided copying. P.18
Pages per Side Used to copy multiple documents on a single
page.
Sharpness* Adjusts the sharpness. P.20
Background Suppression* Removes the document's background
suppression.
Erase Frame* Adjusts the level of erase frame. P.21
See
page
P.11
P.19
P.20
Auto Rotation Rotates the scanned data when copying. P.21
* You can change the settings for features marked with "*" in System Administration mode.
Note You can change the default value of some features.
For more information on changing these settings, refer to Feature settings on page 8-11.
WorkCentre 5019/5021
User Guide
5-9

Copy
Paper Supply button
Paper supply
To set the tray for copying press the Paper Supply button.
In the machine status diagram, the tray indicator lights up on the selected tray, and its paper size and
orientation are displayed on the paper size display.
Aut (automatic paper selection)
Automatically determines the tray holding the appropriate paper, based on the document size and the
specified zoom ratio.
Note When using the automatic paper selection, you cannot set the automatic zoom ratio.
Tray 1, Tray 2, and Bypass tray
Select one of the selectable trays. The indicator moves to the selected tray every time the Paper
Supply button is pressed.
Note Tray 2 is an optional component.
5-10
WorkCentre 5019/5021
User Guide
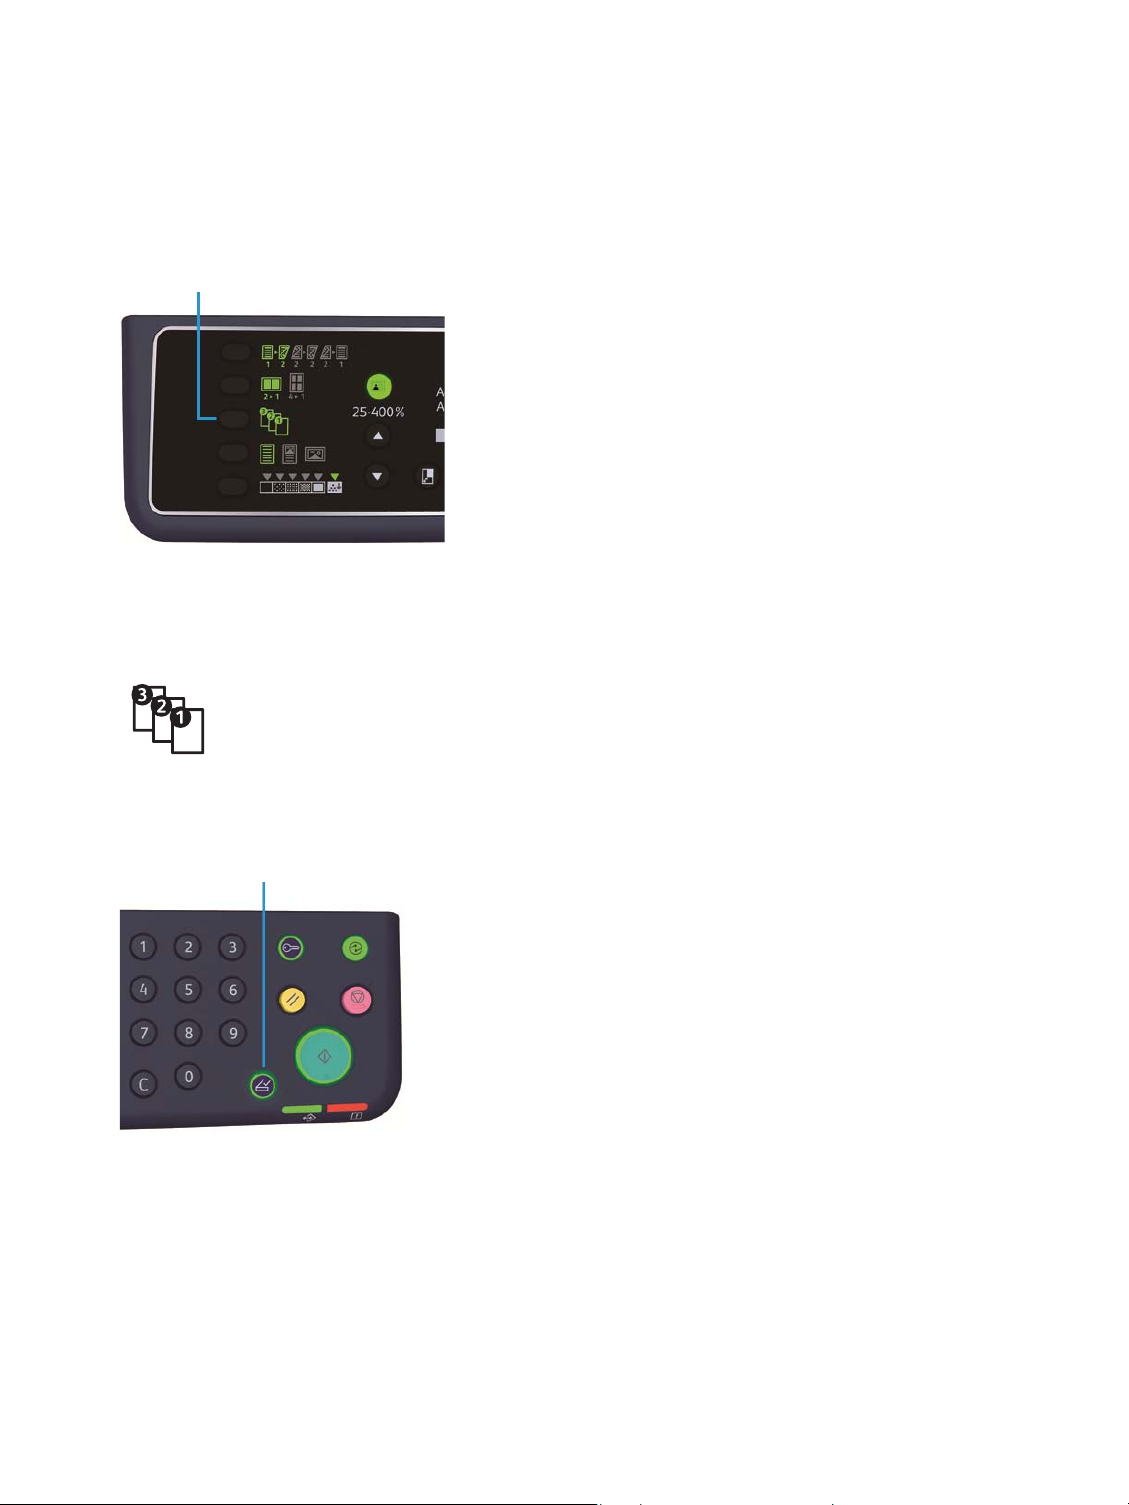
Collate
Collated butto n
Last Original button
You can set the output method for copying sets of multiple documents.
1. Press the Collated button to select the desired output method.
Off (the light is off) Uncollated. The machine outputs the specified number of copies
and sorts sheets by page.
Copy
On The machine outputs sheets sorted into sets that are arranged in
page order.
When a document is placed in the document feeder, it
automatically turns on. You can also change the setting to off.
2. When all documents are scanned, press the Last Original button.
WorkCentre 5019/5021
User Guide
5-11

Copy
Reduce/Enlarge button
Variable Zoom Ratio button
Reduce/enlarge
To set the copying zoom ratio press the Reduce/Enlarge button to select a zoom ratio.
In the machine status diagram, the selected zoom ratio is displayed on the Reduce/Enlarge display.
Display Name Description
100% The machine makes the copy the same size as the
document.
Aut (automatic zoom ratio) The machine automatically sets an appropriate zoom
Fixed zoom ratio Select from the fixed zoom ratios to set the zoom ratio.
Preset zoom ratio (custom) You can set a custom zoom ratio in System Administration
Variable zoom ratio Set the desired zoom ratio by selecting a value from 25 to
ratio by calculating the document size and the specified
paper size to enable the document to fit on the page.
mode.
400 (1% increments).
Note When using the automatic zoom ratio, you cannot select the automatic paper selection.
5-12
WorkCentre 5019/5021
User Guide

Copy
Original Size button
Magnification table
When you make enlarged or reduced copies from standard size documents on standard size paper, the
following copy ratios will apply.
Copy /
documents
A5 100% 122% 141% 174% 200%
B5 81% 100% 115% 141% 163%
A4 70% 86% 100% 122% 141%
B4 58% 70% 81% 100% 115%
A3 50% 61% 70% 86% 100%
A5 B5 A4 B4 A3
Original size
You can set the document size and orientation.
After placing the document on the document glass, make sure to set the size and orientation of the
document.
Note If the document size is larger than the original size, the image may be cut off. Make sure to
choose an appropriate document size.
Press the Original Size button to select a document size.
In the machine status diagram, the selected document size and the orientation are displayed on the
original size display.
Fixed document size (preset)
You can set the document size of the placed document by selecting from the preset document sizes.
The document size and orientation change everytime the Original Size button is pressed.
WorkCentre 5019/5021
User Guide
5-13

Copy
Original Type button
Not displayed (original size display area is blank) (Expected document size)
The machine automatically selects an appropriate scanning area from the specified paper size and the
zoom ratio.
When using the document feeder
Aut (automatic document size detection)
When a document is placed in the document feeder, the machine automatically detects a document
size from the supported standard sizes.
Original type
To set the type of document to optimize copies, press the Original Type button.
Icon Name Description
5-14
Tex t (de fa ult ) Select this option when the document contains sharp black and
white objects such as text.
Photo & Text Select this option when the document contains both text and
photos.
Photo Select this option when the document contains only photos.
WorkCentre 5019/5021
User Guide

Lighten/Darken
Lighten/Darken button
You can set the density from five levels. The farther left the position of , the darker the copy; the
farther right, the lighter.
To set the toner saver mode, press the Lighten/Darken button to select a copy density level.
Dark +2 Creates copies with the darkest density. Use this setting to scan
documents containing light objects.
Copy
Dark +1 Creates copies with a fairly dark density. Use this setting to scan
Normal Creates copies with the same density as the document.
Light +1 Creates copies with a fairly light density. Use this setting to scan
Light +2 Creates copies with the lightest density. Use this setting to scan
Ton e r s a v e r Creates copies using less amount of toner with the following
ID card copy
You can copy both sides of an ID card (name card, employee card, etc.) on one side of paper.
documents containing fairly light objects.
documents containing fairly dark objects.
documents containing dark objects.
settings.
• Lighten/Darken: Light +2
• Sharpness: Sharp +2
• Original type: Photo&Text (Should not be changed)
WorkCentre 5019/5021
User Guide
5-15
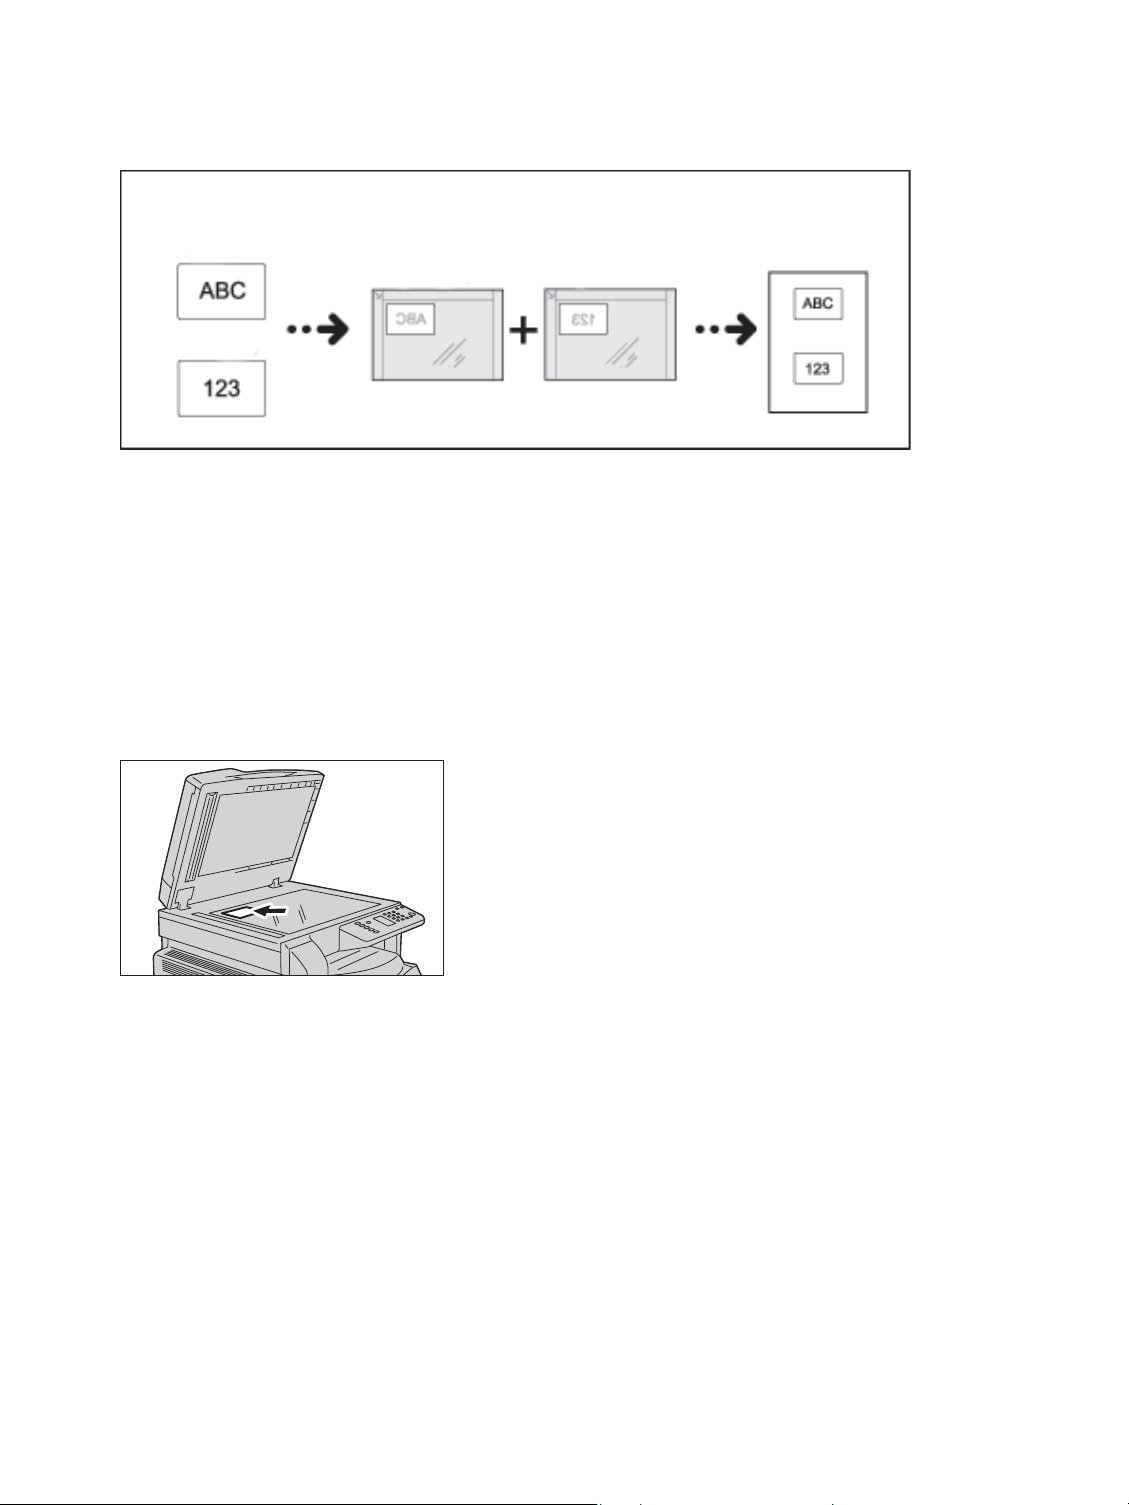
Copy
Original document Original orientation Copied output
Front side
Front side
Back side
Back side
Press the ID Card Copy button to enable this feature.
Notes
• Place an ID card in the upleft position.
• Setting ID Card Copy to On automatically sets Reduce/Enlarge to 100%. You can
change the zoom ratio manually.
Follow the steps below to use the ID Card Copy feature.
1. Place an ID card face down slightly away from the top left corner of the document glass, and then
close the document cover.
Placing the ID card too close to the corner of the document glass may not copy the edge of the ID
card properly.
5-16
WorkCentre 5019/5021
User Guide
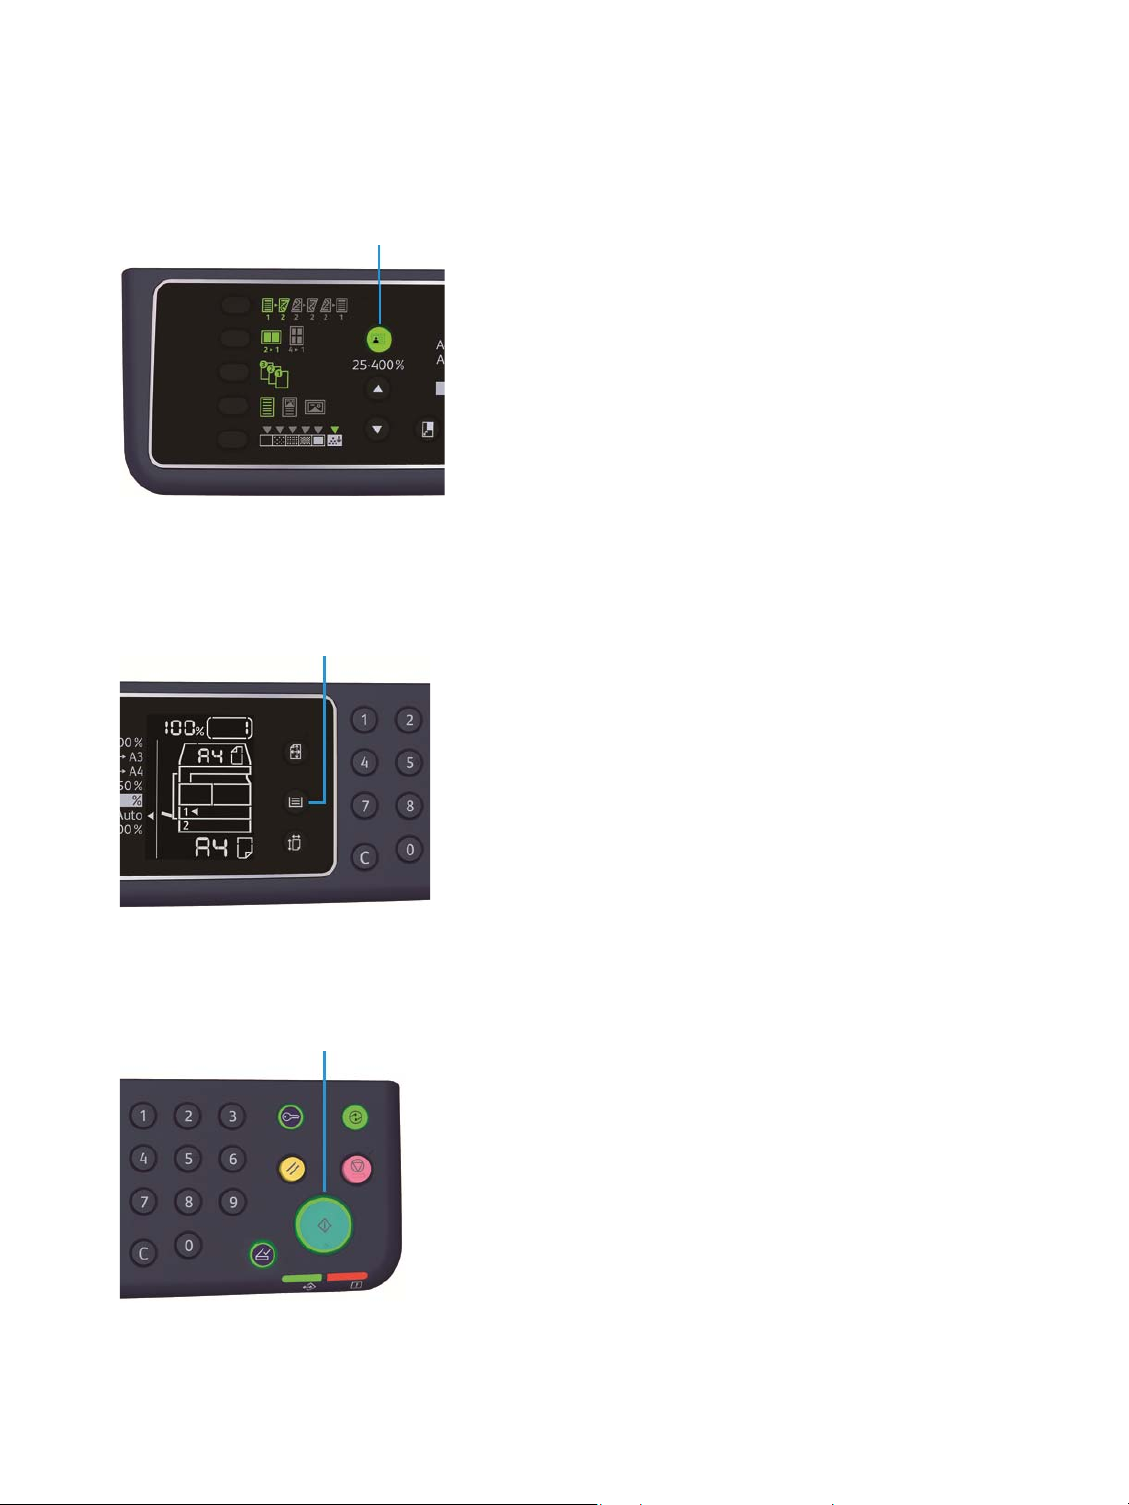
2. Press the ID Card Copy button.
ID Card Copy button
Paper Supply button
Start button
The ID Card Copy button lights up.
3. Press the Paper Supply button to select a tray.
In the machine status diagram, the tray indicator lights up on the selected tray, and its paper size
and orientation are displayed on the paper size display.
Copy
4. Press the Start button.
When one-side is finished scanning, the Start button blinks.
WorkCentre 5019/5021
User Guide
5-17
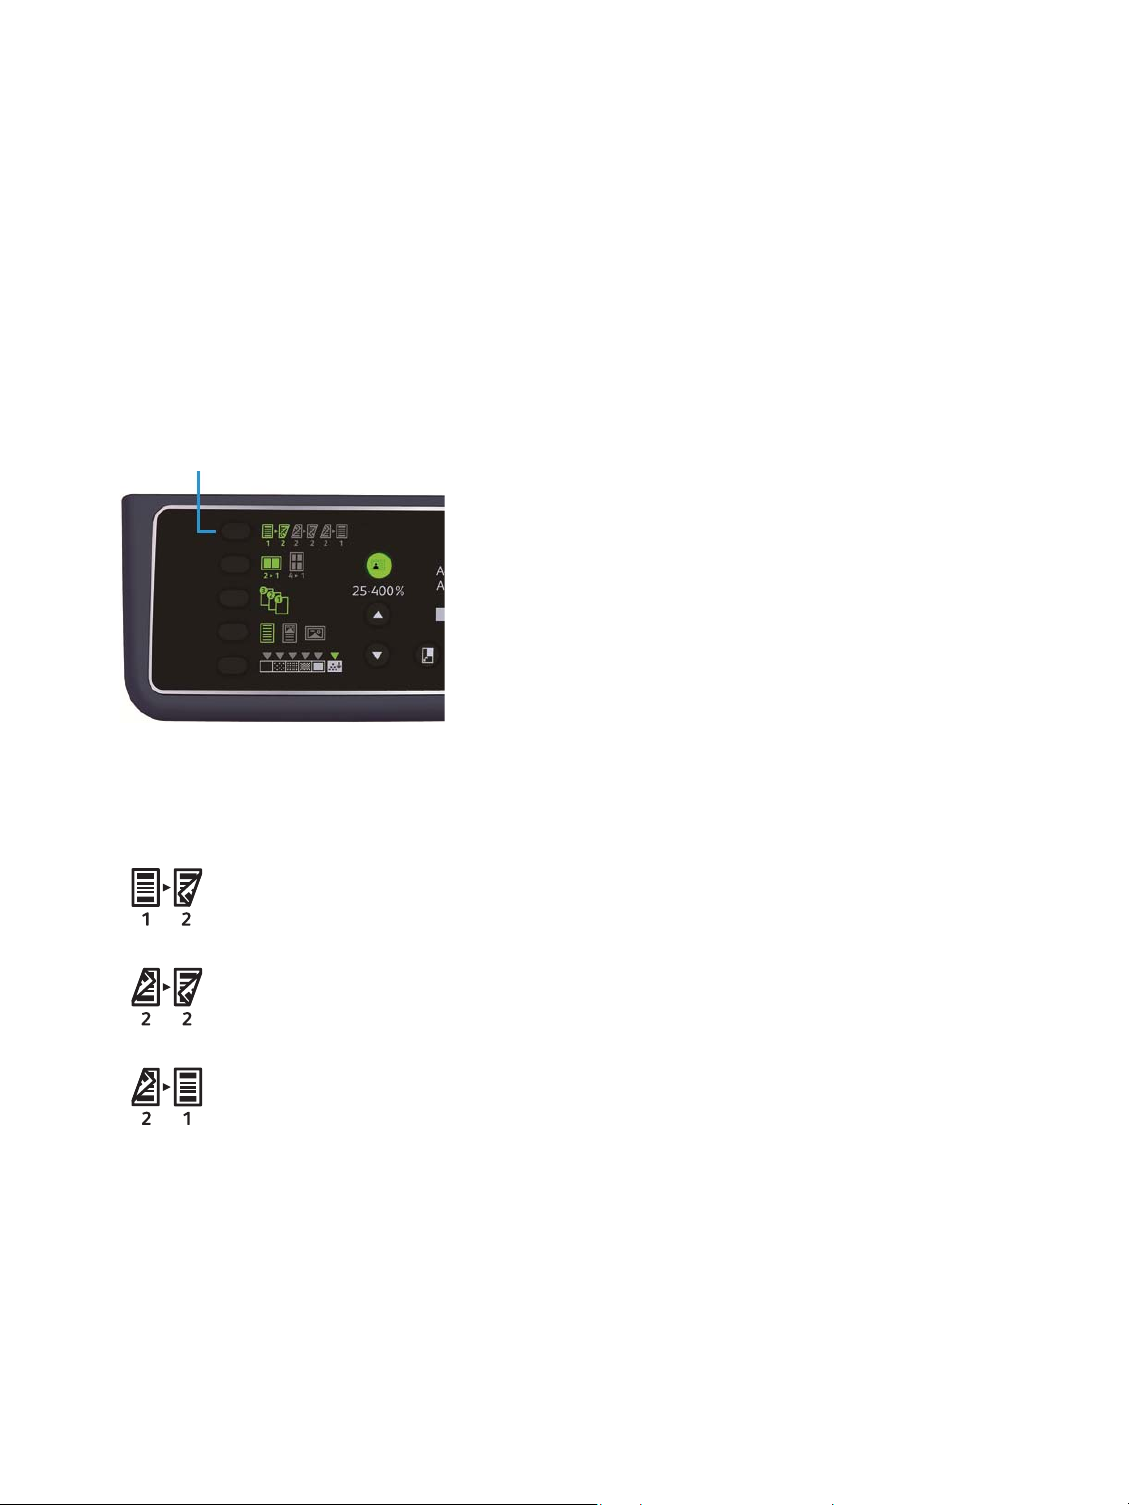
Copy
2 Sided button
5. Place the other side of the ID card face down slightly away from the top left corner of the
document glass, and close the document cover.
6. Press the Start button.
2-sided
You can set the machine to scan a 1-sided or 2-sided document, or copy to one or both sides of the
paper.
Note This feature is available when the duplex output unit is installed on the machine.
1. Press the 2 Sided button to select the desired copy method.
1→1 Sided
1→ 2 Sided Copies a 1-sided document to both sides of the paper for long
2→2 Sided Copies a 2-sided document to both sides of the paper. The copy
2→1 Sided Copies a 2-sided document to one side of the paper. The 2-sided
Copies a 1-sided document to one side of the paper. The copy
appears the same as the original.
edge binding.
appears the same as the original.
document is scanned as the document for long edge binding and
each original page is copied to only one side of each sheet of
paper.
To c op y 1 → 2 Sided or 2 → 1 Sided for short edge binding, change the binding edge setting and place
the document in landscape orientation. It is not copied properly for short edge binding when either the
document or the paper is set for portrait orientation or is using the "Pages per Side" feature.
5-18
WorkCentre 5019/5021
User Guide
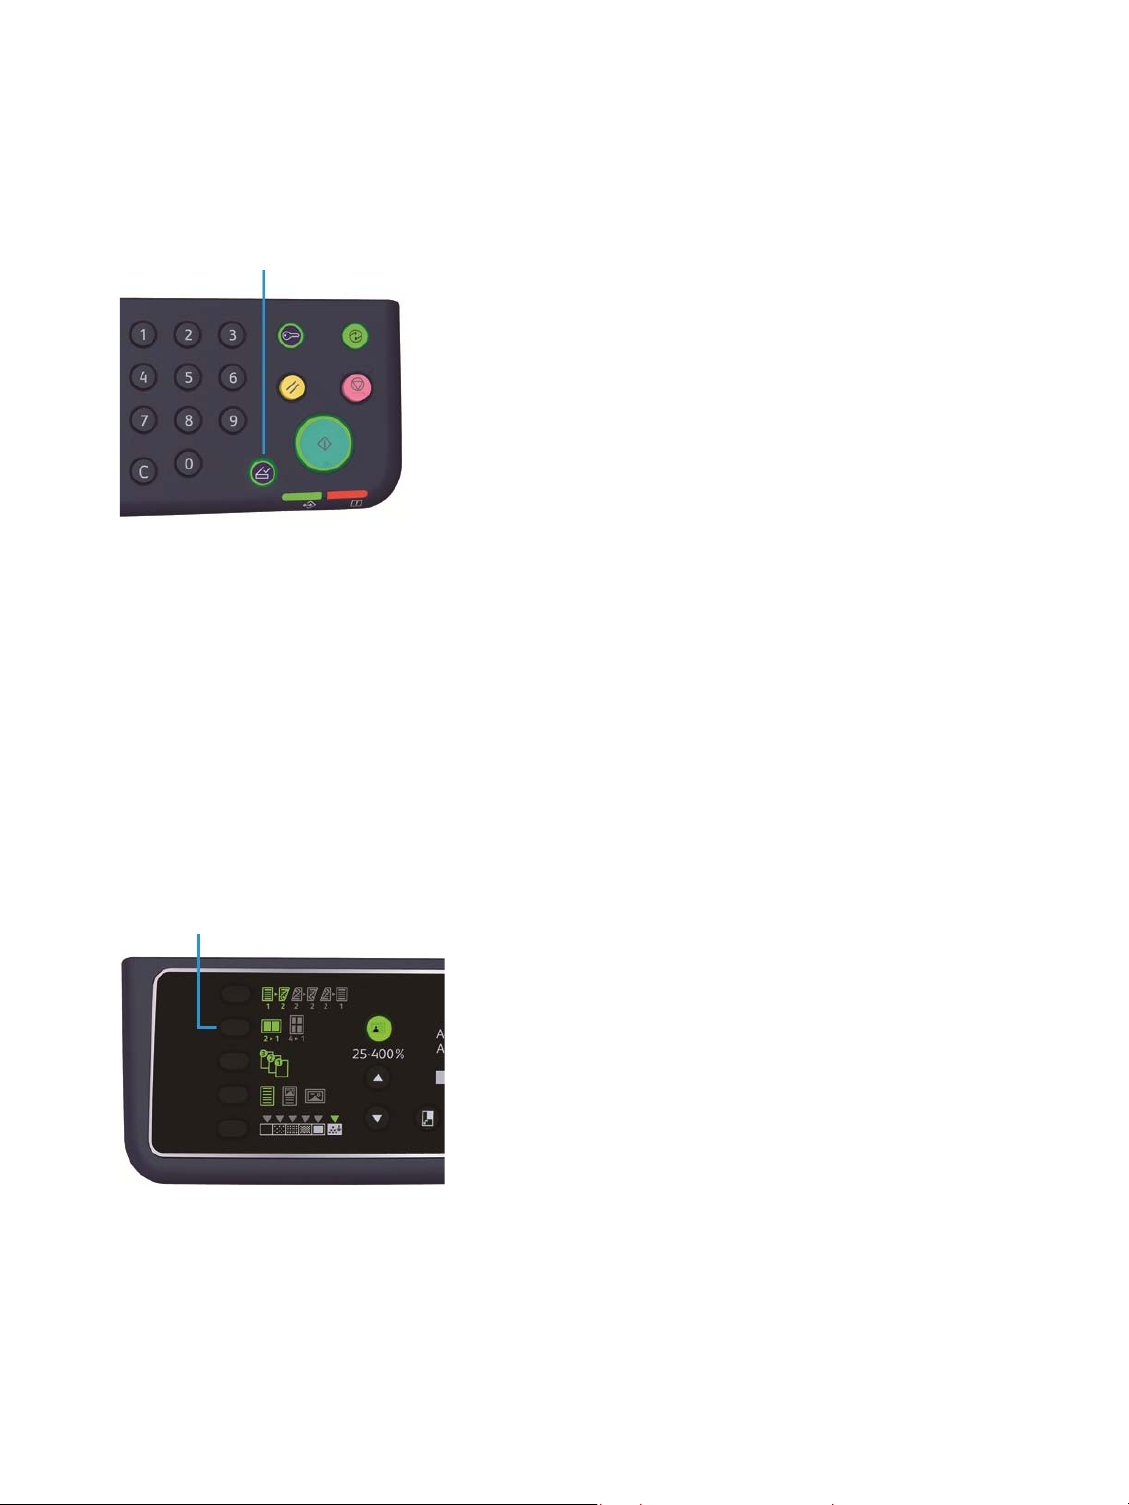
Copy
Last Original button
Pages per Side button
2. When using the document glass, 1→2 Sided or 2→2 Sided is selected, and all documents have
been scanned, press the Last Original button.
This step is necessary when the Last Original button is blinking.
Pages per side
Use this setting to copy 2 or 4 documents together on the same page.
Selecting Pages per Side automatically sets a zoom ratio that will enable the documents to fit on the
page.
Press the Pages per Side button to select the desired copy method.
Notes
• Align the top edge of the paper against the top edge of the tray.
• Setting Pages per Side automatically sets the Reduce/Enlarge setting to automatic.
• The zoom ratio is adjusted automatically within the range of 25% to 400%.
WorkCentre 5019/5021
User Guide
5-19
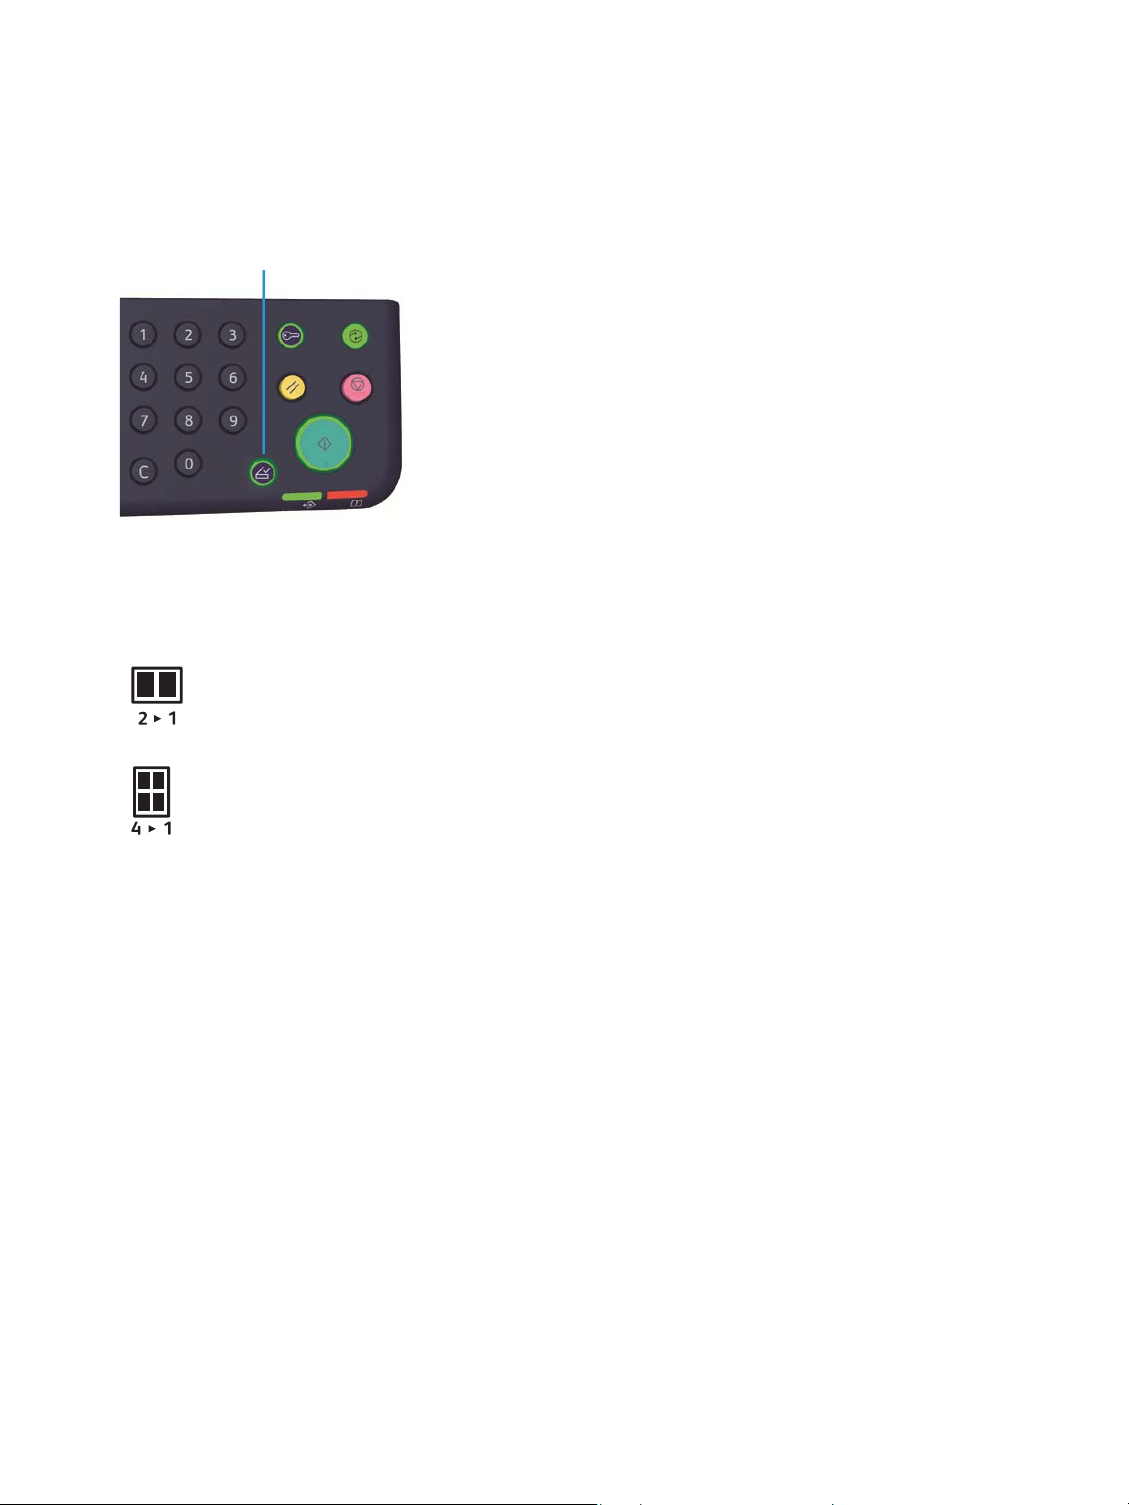
Copy
Last Original button
3. When using the document glass and all documents have been scanned, press the Last Original
button.
This step is necessary when the Last Original button is blinking.
Off Disables the Pages per Side feature.
2 Pages Copies 2 documents to a single page.
4 Pages Copies 4 documents to a single page.
Sharpness
You can adjust the image sharpness to any of 5 levels.
You can set the sharpness in System Administration mode. For more information, refer to Feature
settings on page 8-11.
Background suppression
You c an s et the bac kgr o und suppression level.
When this feature is enabled, the document's background noise is removed during copying. When this
feature is disabled, the document's background noise is not removed.
You can set the background suppression in System Administration mode. For more information, refer
to Feature settings on page 8-11.
5-20
WorkCentre 5019/5021
User Guide

Copy
Erase frame
You can set to erase the black shadows created around the edge of the paper when copying with the
document cover open or copying a bound document.
You can set a value between 0 and 50 mm (in 1 mm increments) for the erase frame feature.
Notes
• The value set for erase frame applies to all four edges of the document.
• For ID card copy, erase frame is set separately.
You can set erase frame in System Administration mode. For more information, refer to Feature settings
on page 8-11.
Auto rotation
You can set the machine to rotate the scanned data when copying the document with an orientation
that differs from the orientation of the paper loaded in tray to fit onto the paper.
You can set this feature in the following cases:
• The tray selection is set to automatic.
• The zoom ratio is set to automatic.
• The zoom ratio is set to 100% and both document and paper are the same size.
Make sure to set the size and orientation of the document when using the document glass.
WorkCentre 5019/5021
User Guide
5-21

Copy
Managing the copy paper with accounting
You can manage copy paper usage for up to 10 users.
You can set the password and maximum number of copied impressions permitted for each user.
A list of features available with accounting is given below.
• Display/set the password.
• Display the total number of copied impressions.
• Display/set the maximum number of impressions permitted for copying.
• Clear the total number of impressions.
For information on accounting modes, refer to Account mode settings on page 8-8.
Operations when using the copy feature
The operation procedure differs depending on the account mode you are using.
For more information, refer to Account modes on page 3-16.
5-22
WorkCentre 5019/5021
User Guide

Scan
6
Scanning procedure
The basic flow of scan operations, including placing the document in the machine and setting advance
settings, is detailed below.
Notes
• The machine supports the scan feature using the USB connection
• The monochrome binary scan only.
Placing the document
The following two methods are available to load documents.
Document feeder
•Single sheet
• Multiple sheets
Document glass
•Single sheet
• Bound documents, such as books
Note The document feeder is not available for some models. An optional component is required.
Contact your local Xerox representative.
Document feeder
Supported document sizes
You can place documents of the standard sizes in the document feeder.
When a document is placed in the document feeder, the machine detects the document size
automatically. The following standard size documents are detected automatically: A5 , A4 , A4 ,
WorkCentre 5019/5021
User Guide
6-1
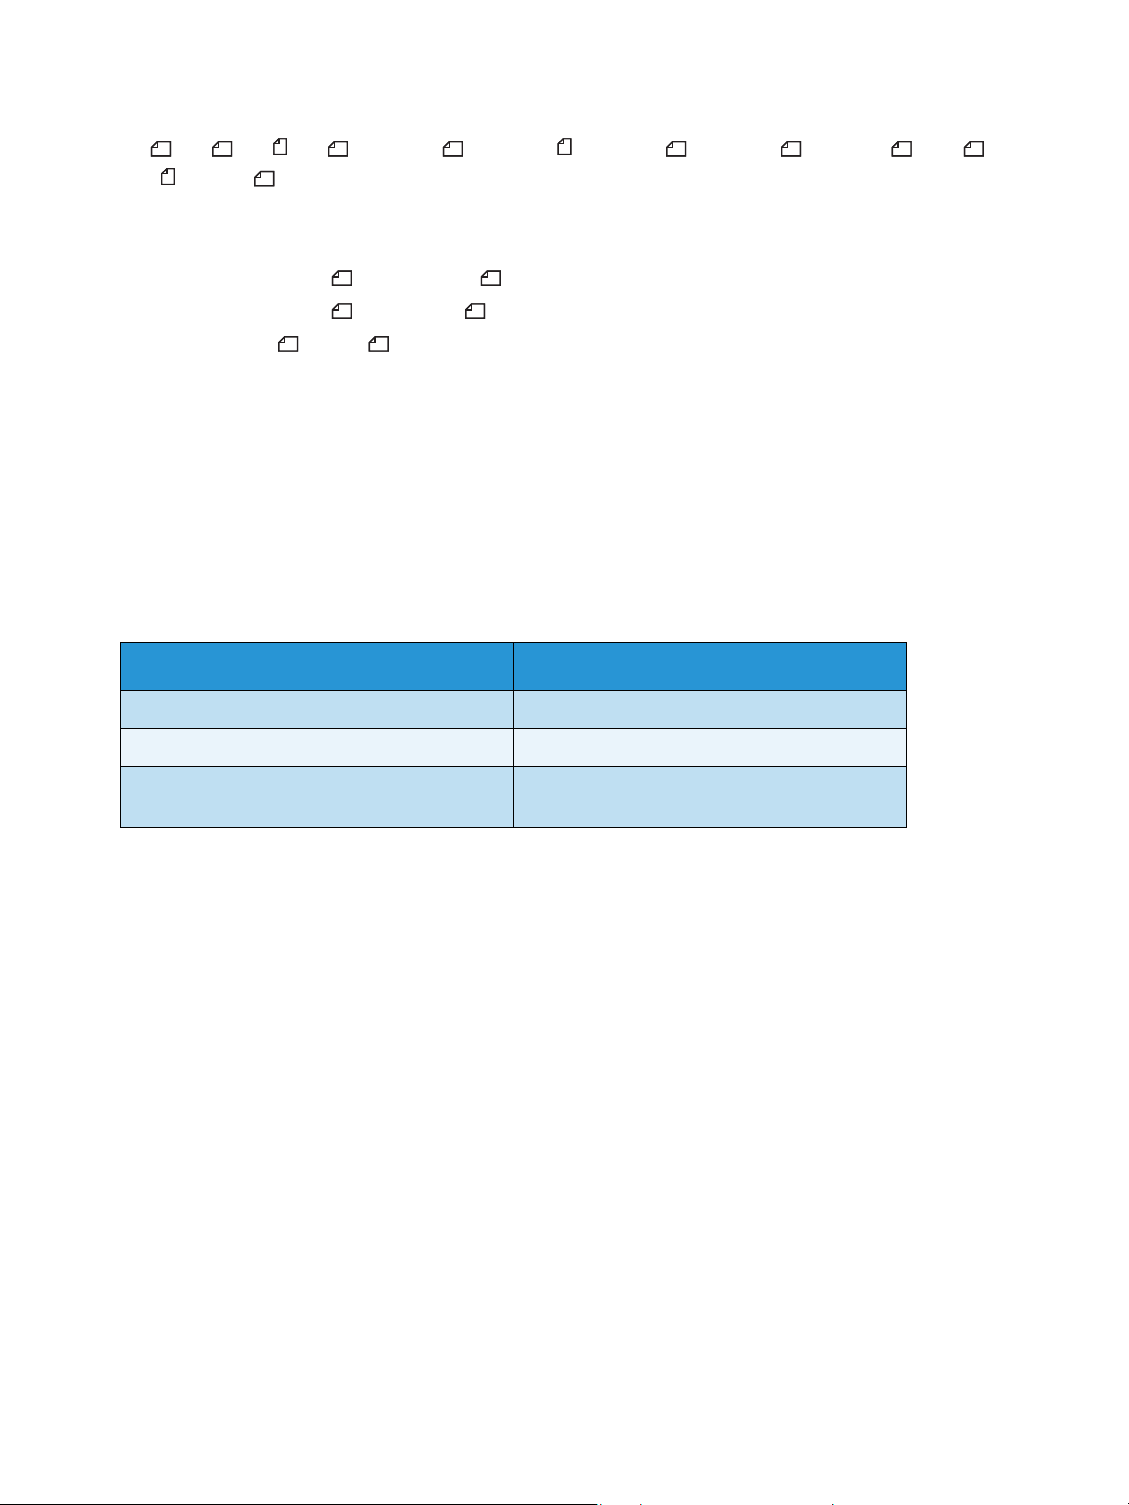
Scan
A3 , B5 , B5 , B4 , 8.5 × 11" , 8.5 × 11" , 8.5 × 13" , 8.5 × 14" , 11 × 17" , 16K ,
16K , and 8K .
Note You can select one of the following alternative document sizes. For more information, refer
to System settings on page 8-5.
• 8.5 × 13" or 8.5 × 13.4"
• 8.5 × 13" or 8.5 × 14"
• B5 or 16K
Selectable document sizes in the scan driver
A3 (297 × 420 mm), A4 (210 × 297 mm), A5 (148 × 210 mm), B4 (257 × 364 mm), B5 (182 × 257 mm),
8.5 × 11", 8.5 × 14", 11 × 17", 7.25 × 10.5", and Custom.
Supported documents types (weights)
Documents with weights from 38 to 128 gsm (50 to 128 gsm for 2 Sided documents) can be placed in
the document feeder and scanned.
The document feeder accepts the following number of sheets.
Document type (gsm) Number of sheets
Lightweight (38 to 49 gsm) 110 sheets
Plain (50 to 80 gsm) 110 sheets
Heavyweight (81 to 128 gsm)
(Bypass tray only)
75 sheets
Note To avoid paper jams, use the document glass for mixed size, folded, wrinkled, cut-and-pasted
documents, curled paper, or carbon-backed paper. If you can flatten the curled document, you can
use the document.
Follow the steps below to place the document on the document feeder.
You can place single or multiple sheet documents.
1. Remove any paper clips or staples from the document before placing it in the document feeder.
6-2
WorkCentre 5019/5021
User Guide
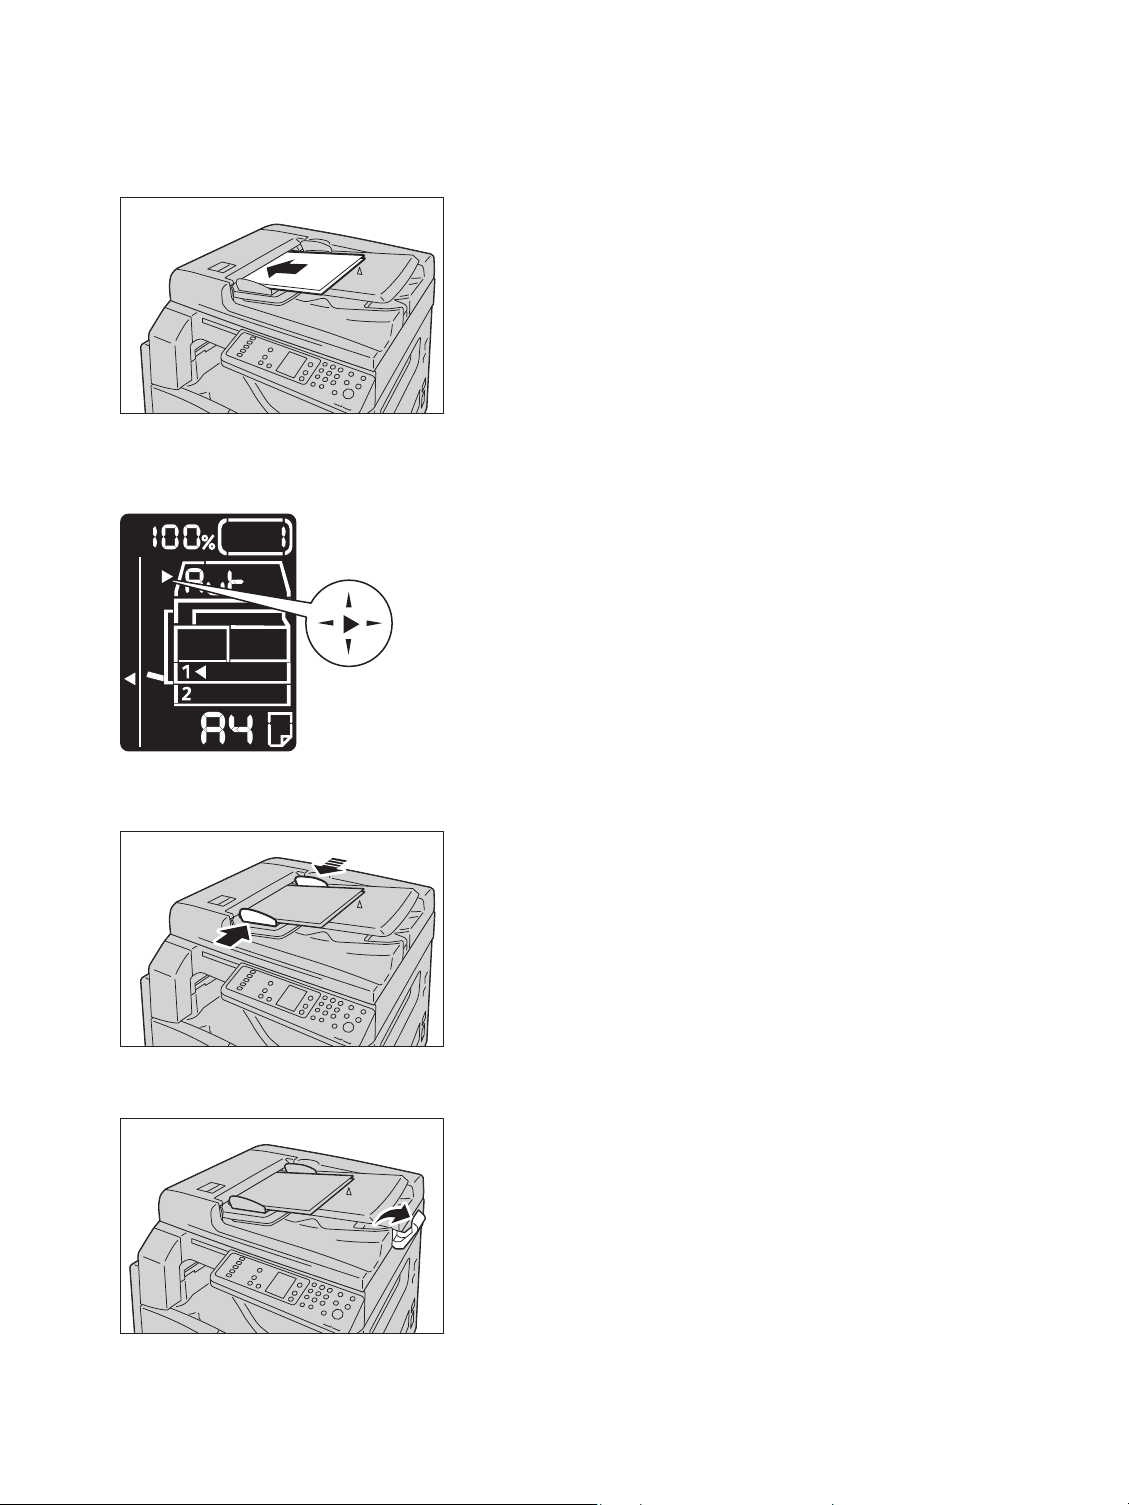
2. Place the document in the center of the document feeder, with the side to scan (or the front
Lights up
surface of a 2 Sided document) facing up.
Note The document indicator lights up when a document is placed in the document feeder. If the
indicator is not lit, place the document again.
Scan
3. Align the document guides to each side of the document.
4. Open the document stopper.
WorkCentre 5019/5021
User Guide
6-3

Scan
Document Glass
Supported document sizes
The maximum size is 297 × 432 mm.
Selectable document sizes in the scan driver
A3 (297 × 420 mm), A4 (210 × 297 mm), A5 (148 × 210 mm), B4 (257 × 364 mm), B5 (182 × 257 mm),
8.5 × 11", 8.5 × 14", 11 × 17", 7.25 × 10.5", and Custom.
CAUTION: Do not apply excessive force to hold thick document on the document glass. It may
break the glass and cause injuries.
Follow the steps below to place a single sheet document, or bound document such as book, on the
document glass.
1. Open the document cover.
Note When using the document glass, make sure to close the document cover after finishing your
scan job.
2. Place the document face down, and align it against the top left corner of the document glass.
6-4
WorkCentre 5019/5021
User Guide

Scan
3. Close the document cover.
Using the scan feature
For information on using an application to load scan data into the computer, see Loading scan data
using a PC-based application on page 6-6.
Notes
• The machine supports the scan feature using the USB connection.
• The monochrome binary scan only.
• The file name of the scanned data is displayed in the format
YYMMDDHHMMSS.extension, where, YY = Year (4 digits), MM = Month (2 digits), DD =
Day (2 digits), HH = Hour (2 digits), MM = Minutes (2 digits), and SS = Seconds (2 digits).
• The size of the scanned image may be slightly larger than the document size in some
cases. This is due to the margin of error introduced with processing.
WorkCentre 5019/5021
User Guide
6-5

Scan
Loading scan data using a PC-based application
This feature can be used to load scan data from a TWAIN-compatible or WIA-compatible application
installed on a computer. You can set the document load conditions from the PC display to enable you
to load the document while checking the scan results on the Preview screen.
Notes
• Install the scan driver to use this function. For information on how to install the scan
driver, refer to Installing the scan driver on page 2-3.
• The items you can set will vary according to the TWAIN-compatible and WIA-
compatible applications you are using.
• The supported applications are 32-bit only.
Follow the steps below to perform the operation.
1. Place the document.
Refer to Placing the document on page 6-1.
2. Start an application to load the scanned data.
3. From the File menu, select the item for the scanner (source).
4. Select Xerox WorkCentre 5019/5021.
5. Change other options if needed.
Note For information on the scan functions, click Help in the screen to display the help
information.
6. Click Scan.
6-6
WorkCentre 5019/5021
User Guide

Stopping the scan job
Stop button
To cancel the current scanning job:
On the machine
Press the Stop button.
Scan
On the computer
Press Cancel on the screen displayed while scanning.
WorkCentre 5019/5021
User Guide
6-7

Scan
6-8
WorkCentre 5019/5021
User Guide

7
Major print driver functions
This section describes the major print driver functions used for printing. The print driver must be
installed before use.
For information on how to install the print driver, refer to Installing the print driver/scan driver on
page 2-3.
Notes
• For information on the Print functions, click Help in the print driver screen to display the
help information.
• Some functions displayed in the Options tab of the Properties screen can only be used
when the mounted options information has been set into the print driver. Functions that
have been disabled do not display.
Function Description
Multiple-Up Prints a multiple-page document on a single page.
2 Sided Print Prints on both sides of each page when the duplex output unit is
installed.
Poster Enlarges one page of print data to the specified size and prints it
on multiple pages. Used to create large posters.
Booklet Combines 2-sided printing with page collation to enable the
creation of booklets with the correct page sequence.
Wat erm ark s Prints 'Confidential' or another preset character string on top of
print data.
Mixed Document Prints documents containing both vertical and horizontal pages, or
pages of different sizes.
WorkCentre 5019/5021
User Guide
7-1
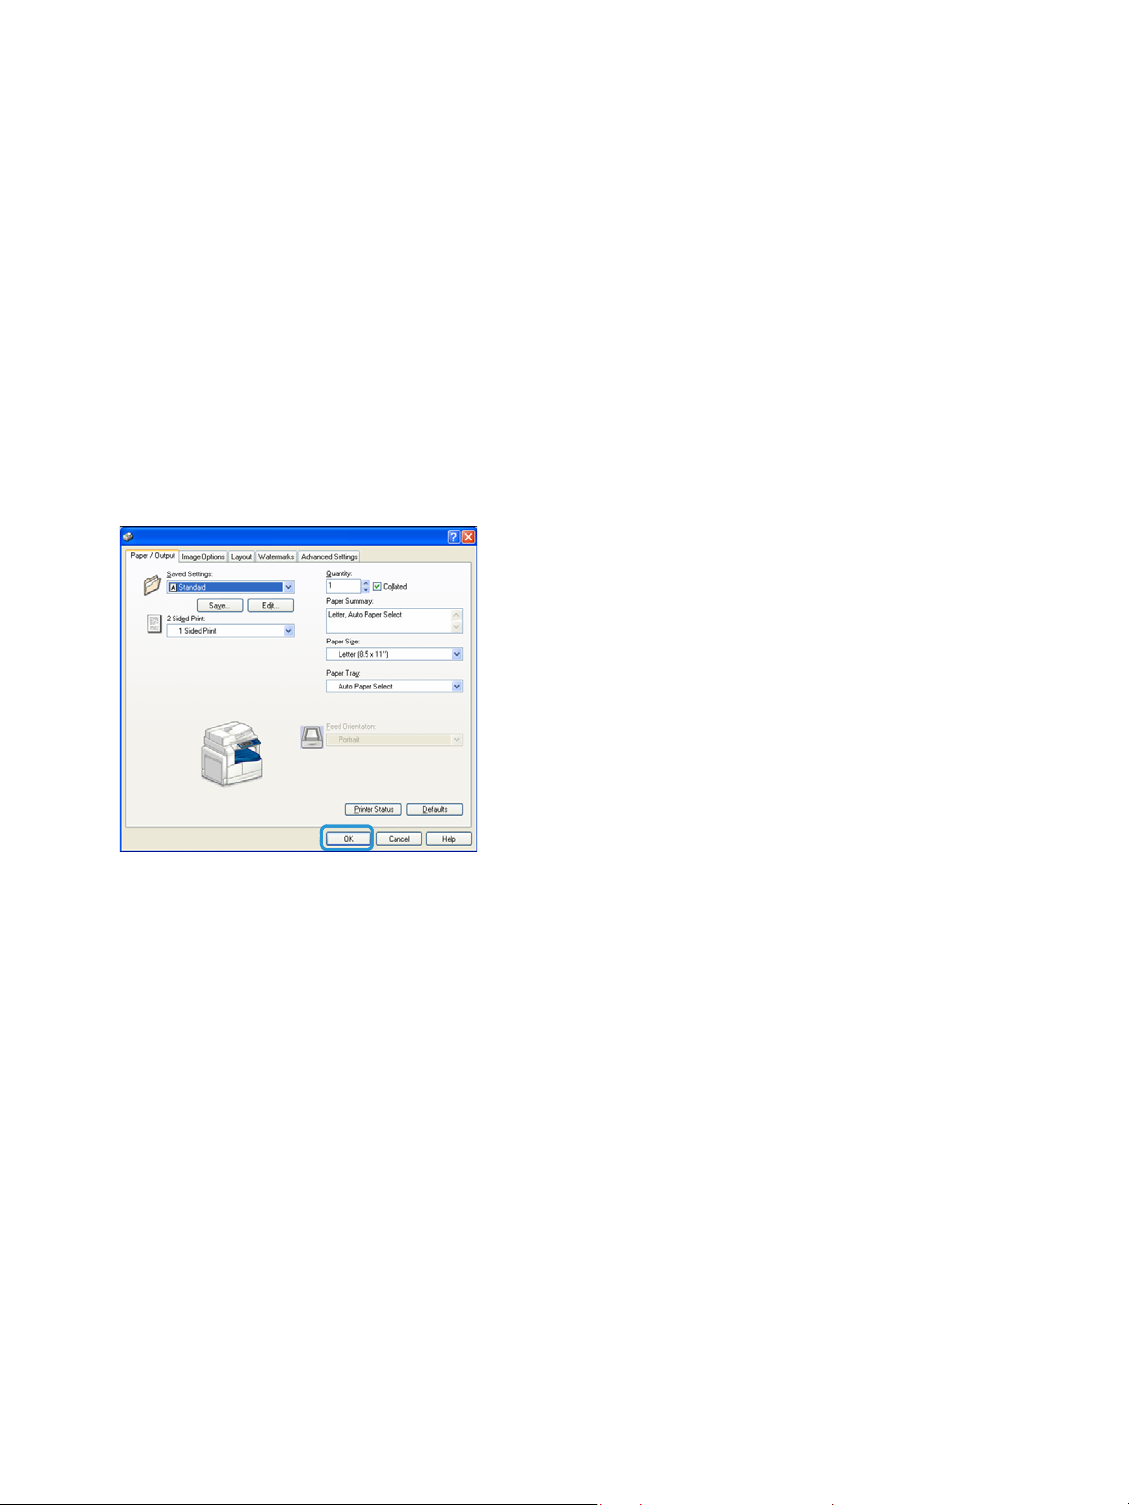
Print
Printing
The procedure used to print varies according to the application you are using. See your application's
manual for the specific procedure.
The steps below are used in the Xerox WorkCentre 5019/5021 print driver screen.
1. Select Print from the application's File menu.
2. Select Xerox WorkCentre XXXXX.
Note “XXXXX” is displayed as either "5019" or "5021" depending on the model of your machine.
3. If needed, select Properties to change other options. Select the desired settings.
Note For information on the Print functions, select Help in the print driver screen to display the
help information.
4. Click OK.
5. Click OK in the Print dialog box.
7-2
WorkCentre 5019/5021
User Guide

Stopping the print job
Stop button
To cancel the currently printing job:
On the machine
Press the Stop button.
Print
On the computer
1. Double-click the printer icon located on the task bar in the lower right corner of the screen.
2. Select the document name that you desired to cancel, and then press the Delete key.
If there is no document within the window, cancel it manually on the machine.
WorkCentre 5019/5021
User Guide
7-3

Print
7-4
WorkCentre 5019/5021
User Guide

To o l s
Each machine feature is set to factory default (initial) settings, but you can customize these settings to
match your operating environment. You can change these settings in System Administration mode.
Note Some settings cannot be displayed on certain models. An optional component is required.
For more information, contact our Customer Support Center.
This chapter describes the functions you can change settings for and provides the settings procedures.
8
System settings procedure
This section gives an overview of how to change the machine's default settings and check machine
information.
Notes
• If there are any current or pending jobs you cannot enter System Administration mode.
• While in System Administration mode you cannot receive a print job or start a print or
scan job.
WorkCentre 5019/5021
User Guide
8-1

Tools
Entering System Administration mode
1. Press and hold the Log In/Out button for more than 4 seconds until the screen below displays.
Log In/Out button
2. Use the numeric keypad to enter the password, and then press the Start button.
Notes The password is initially set to "1111".
• The password can be changed.
For more information, refer to System settings on page 8-5.
• The Log In/Out button lights up when the machine enters System Administration mode.
The program number input screen appears, and shows the letter P.
8-2
WorkCentre 5019/5021
User Guide
 Loading...