

Page 1

1
BOOK TOC
CHAPTER TOC
SEARCH
PREVIOUS PAGE NEXT PAGE
PRINT PRE VIEW
Xerox WorkCentr e 490cx
Online User Guide
To go to a section in this book, click on one of the following links. Then, click
on an entry in the section’s Table of Contents. You may also click on the
Search button on the left of the page to look for key words or phrases.
Safe ty N otes
Copyright
1: Getting Started
2: Making a Copy
3: Sending a Fax
4: Receiving a Fax
5: Printing
6: Scanning
7: Tro ublesho oti ng
8: Maintenance
A: Specifications
FC C Re gula tions
Safet y and Legal Requ ireme nts for Xerox Europe
Certification
Telephone Connectivity G uidelines
B: Glossary
Page 2
2
BOOK TOC
CHAPTER TOC
SEARCH
PREVIOUS PAGE NEXT PAGE
SAFETY NOTES
Safety Notes
Your WorkCentre 490cx and supplies are designed and tested to meet strict
safety requirements. Included are safety agency exam ination and approval
and compliance to established environmental standards. Please read the
following instructions carefully before operating the Wor kCentre 490cx, and
refer to them as needed to ensure the continued safe operation of your
WorkCentre.
Follow all warnings and instructions marked on or supplied with the product.
Symb ols Used: = Caution = Warning
Unplug the WorkCentre 490cx from the wall outlet before cleaning. Always
use materials specifically designated for this product. Use of other materials
may result in poor performance and could create a hazardous situation.
Do not use aerosol cleaners. Follow the instructions in this User Guide for
proper cleaning methods. Never spray anything onto or inside of the
WorkCentre 490cx.
Use supplies or cleaning materials only as directed. Keep all supplies and
materials out of reach of children.
Do not use the WorkCentre 490cx near water, in wet locations, or outdoor s.
Do not place the WorkCentre 490cx on an unstable cart, stand, or table.
The WorkCentre 490cx may fall, causing personal injury or serious damage
to the machine.
Page 3

3
BOOK TOC
CHAPTER TOC
SEARCH
PREVIOUS PAGE NEXT PAGE
SAFETY NOTES
This product is equipped with a grounding type plug. The plug will fit only
into a grounded power outlet. This is a safety feature. To avoid risk of
electric shock, contact your electrician to replace the receptacle if you are
unable to insert the plug into the outlet. Never use an adapter to connect the
WorkCentre to a power source receptacle that lacks a ground connection
terminal.
The WorkCentre 490cx should be operated from the type of power source
indicated on the label. If you are not sure of the type of power available,
consult your local power company.
Do not allow anythi ng to rest on the power cord. Do not locate the
WorkCentre 490cx where people will step on the c ord.
Th e pow e r su ppl y cor d is the disconnect device for this equipment. Ensure
that the WorkCentre 490cx is installed near an outlet and is easily
accessible.
Your machine is equipped with an energy saving device to conserve power
when the machine is not in use. The machine may be left on continuously.
Slots and openings in the cabinet and in the back and sides of the
WorkCentre are provided for ventilation. To ensure reliable operation of the
WorkCentre and to protect it from overheating, these openings must not be
blocked or covered. The WorkCentre 490cx should never be located near or
over a radiator or hea t register . T he W ork Centre 490c x should not be placed
in a built-in installation unless proper ventilation is provided.
Never push objects of any ki nd into the slots of the WorkCentre 490cx as
they may touch dangerous voltage points or short out parts which could
result in a fire or electric shock.
Never spill liquid of any kind on the WorkCentre 49 0cx.
Page 4

4
BOOK TOC
CHAPTER TOC
SEARCH
PREVIOUS PAGE NEXT PAGE
SAFETY NOTES
Never remove covers or guards that require a tool for removal. There ar e no
casual operator serviceable areas within the covers of the WorkCentre
490cx.
Never defeat interlock switches. This Machine is designed to restrict
operator access to unsafe areas. Covers, guards, and interlock swi tches are
provided to ensure that the machine will not operate with covers opened.
Use of an extension cord with this WorkCentre is not recommended or
author ized.
Avoid direct v iewi ng of the docum ent l ights. The lamps are bright and , while
not har mful, they may cause an annoying afterimage. Always keep the
document cover closed during operati on and storage.
If you need additional safety information concerning the WorkCentre or
Xerox supplied materials, you may call Xerox at 1-800 TEAM XRX
(1-832-6979) from within the United Sates. From outside the United States
please contact your local Xerox Helpline.
Page 5

5
BOOK TOC
CHAPTER TOC
SEARCH
PREVIOUS PAGE NEXT PAGE
COPYRIGHT
Copyright
Prepared by:
Xerox Industrial Design Human Interface
Graphic Design
Jeffe rson Ro ad
Henrietta, Ne w York
©1999 by Xerox Limited. All rights reser ved.
Copyright protection claimed includes all forms and matters of copyrightable
material and information now allowed by statutory or judicial law or
hereinafter granted, including without limitation, material generated from the
software programs which are displayed on the screen, such as icons, screen
displays, looks, etc.
Xerox ® and all Xerox products mentioned in this publication are registered
trademarks of the Xerox Corporation.
Windows TM is a trademark of Microsoft Corporation. Product nam es
andtr ademarks of other companies are also acknowledged.
Changes are periodically made to this document. Changes, technical
inacc uracies a nd typographical error s will be correcte d in subsequent
editions.
Page 6

6
BOOK TOC
CHAPTER TOC
SEARCH
PREVIOUS PAGE NEXT PAGE
Chapter 1
Getting Started
Click on one of the following topics, or click on the Search button on the left.
S e t Up Yo u r Ma c hin e
Guidel ines for Special Paper and other Med ia
Installing Software
Uninstallin g So ftware
Using the Control Panel
System Setup
Automatic Report s
Setting an Option
Page 7

7
BOOK TOC
CHAPTER TOC
SEARCH
PREVIOUS PAGE NEXT PAGE
SET UP YOUR MACHINE
Set Up Your Machine
Unpacking
*1 Two CD ROMs containing Installer, Software and Online User Guide.
*2 May vary according to country.
WC490cx
Install Guide
Tel ephone line cord
2
WorkCentre 490cx Ink Cartridges WC490cx
Quick Reference Guide
Document exit tray Document Input tray
Power cord
2
PC cable Replacement ADF
Rubber Pads
CD-ROM
1
Handset
2
Page 8

8
BOOK TOC
CHAPTER TOC
SEARCH
PREVIOUS PAGE NEXT PAGE
SET UP YOUR MACHINE
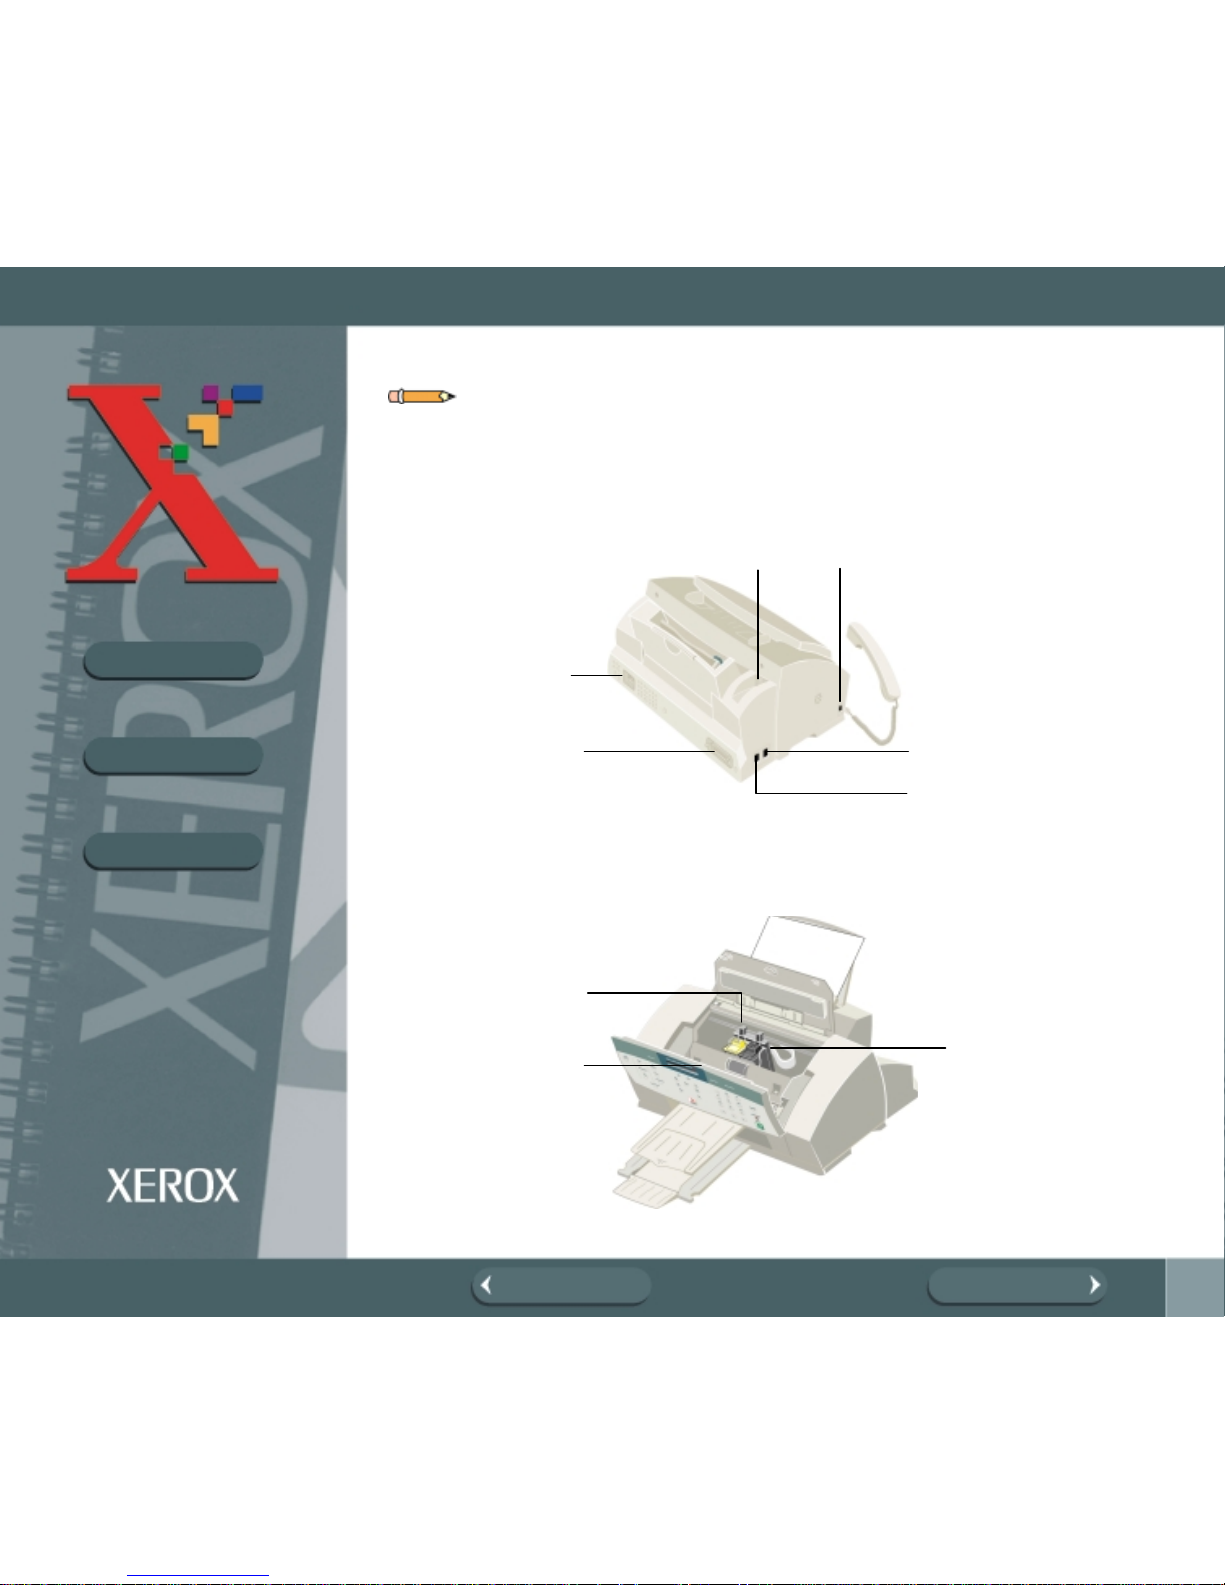
Co n trol Lo ca t ions and Functi ons
Tak e a moment t o familiarize yourself with the main components and thei r
locations.
Paper Exit Tray
Document
Guide
Control
Panel
Paper
Guide
Automatic
Paper
Feeder
Pa pe r Fe ed er
Extension Tray
Automatic
Document
Feeder
Envelope
Guide
Document
Input Tr ay
Document
Exi t Tr ay
Page 9
9
BOOK TOC
CHAPTER TOC
SEARCH
PREVIOUS PAGE NEXT PAGE
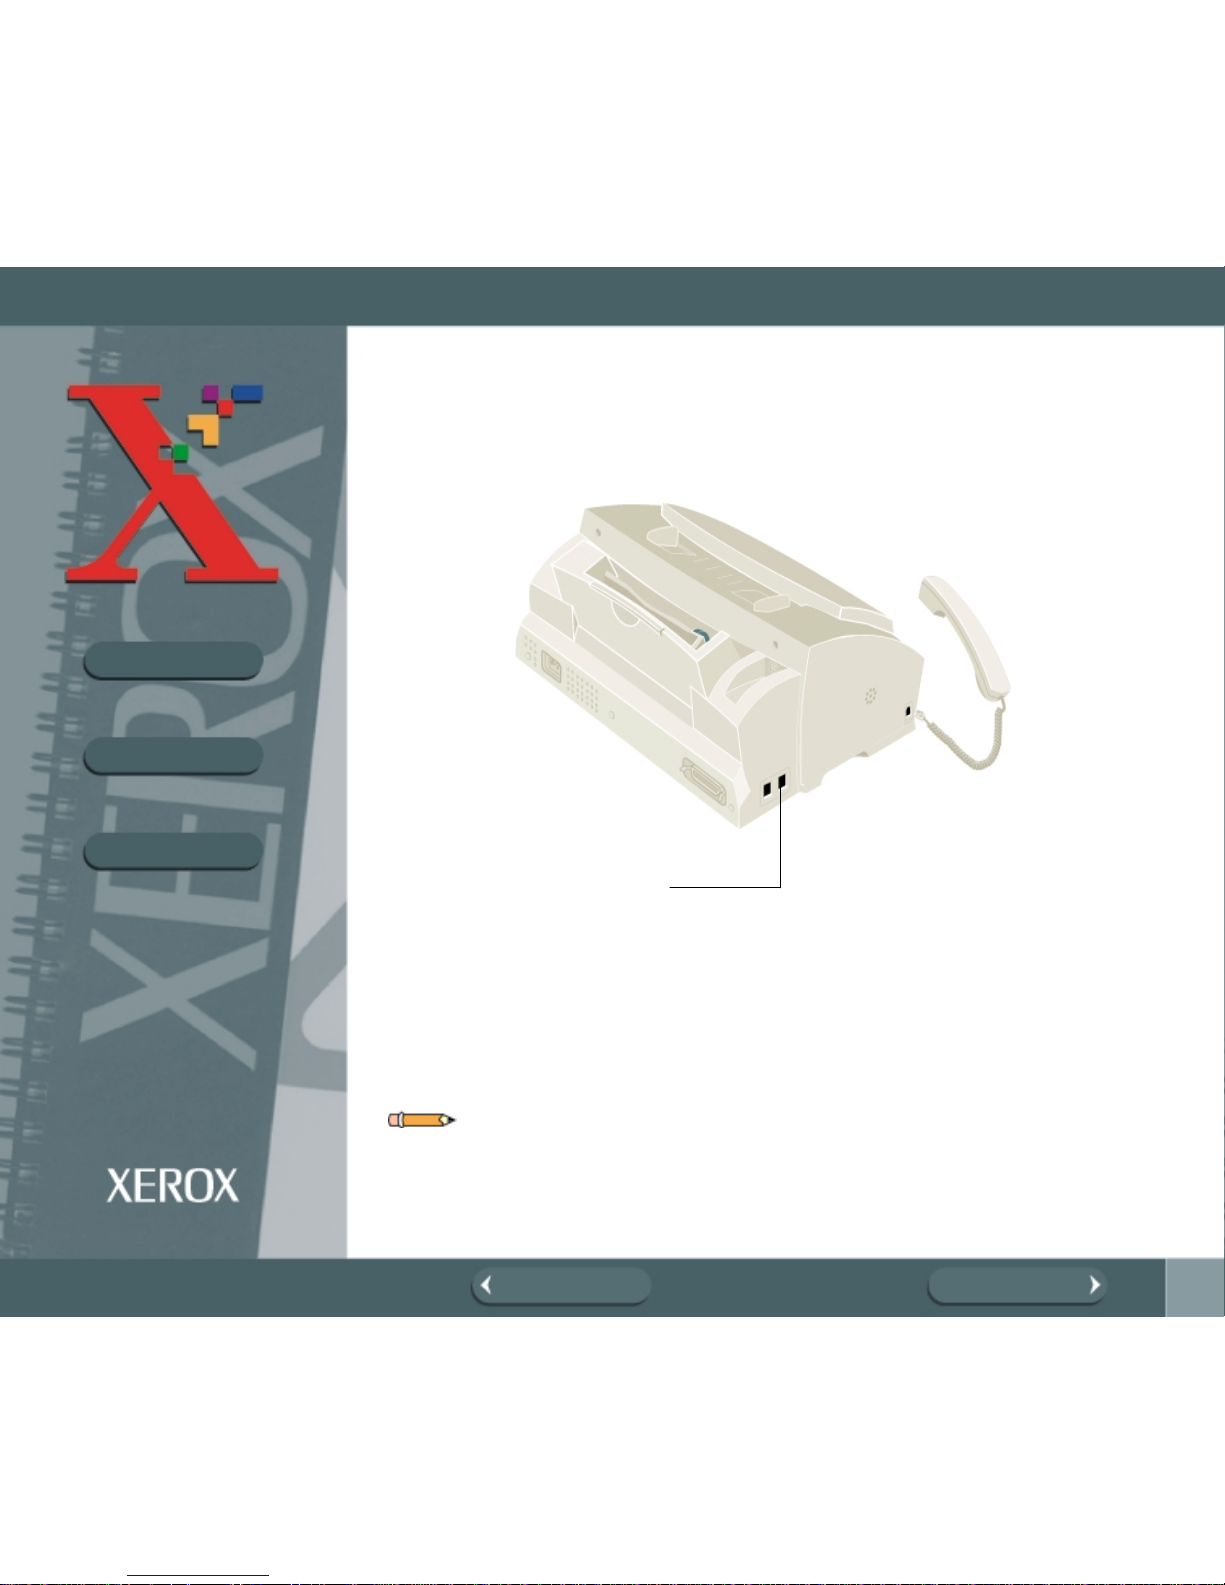
SET UP YOUR MACHINE
Note: In some countries, a handset is provided. Your machine may look
sli ghtly di ffer ent than the illus t ration with the handset m ounted on the left side
of the machine.
EXT Connection
USB C ab l e
Connector
Handset Connector (not
available in all countries)
Powe r Cord
Connector
PC Parallel
Cable
Connector
L INE Connection
Color Ink
Cartridge
Control
Panel
Cover
Black Ink
Cartridge
Page 10
10
BOOK TOC
CHAPTER TOC
SEARCH
PREVIOUS PAGE NEXT PAGE
SET UP YOUR MACHINE
Choosing a Location
To help guarantee trouble-free operation of your machine, place it on a flat,
stable surface near your workstation. Leave enough space to allow for easy
paper loading, paper unloading, and opening of the front cover.
Do not place your machine:
• In direct sunlight.
• Near heat sources or air conditioners.
• In dusty or dirty environments.
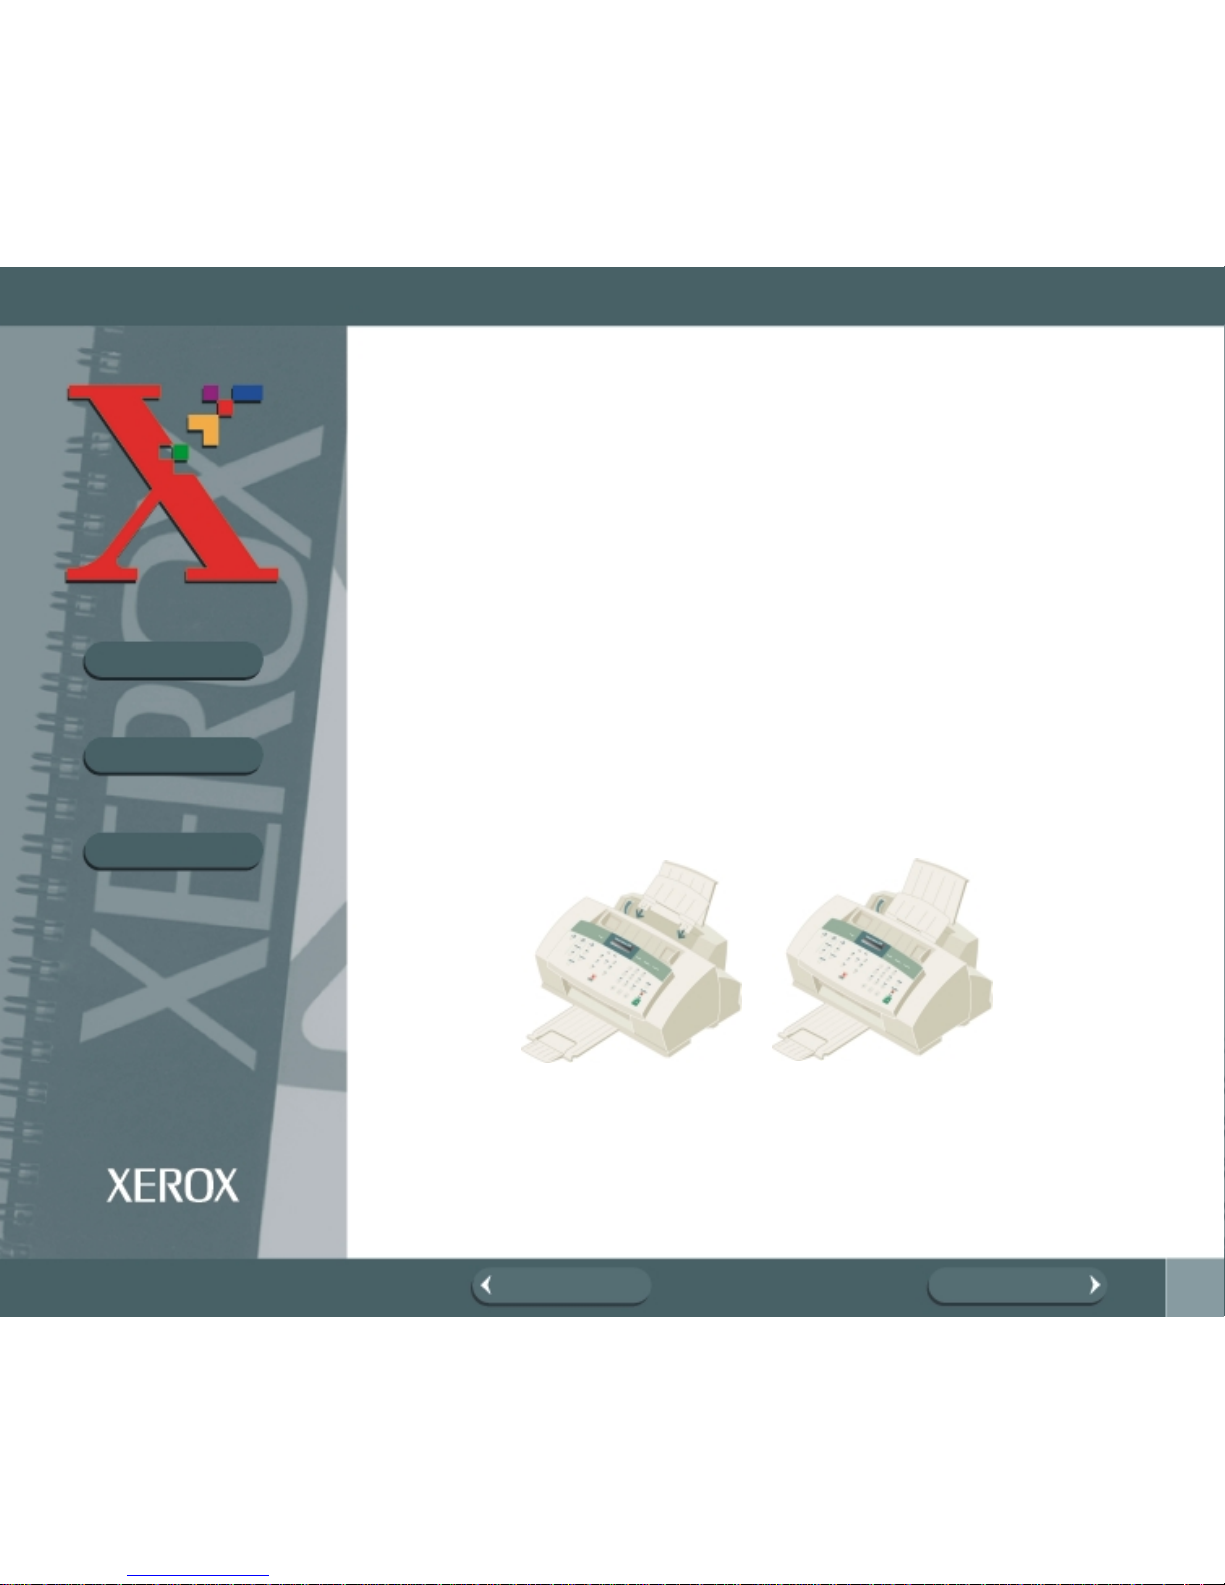
Setting Up Your Machine
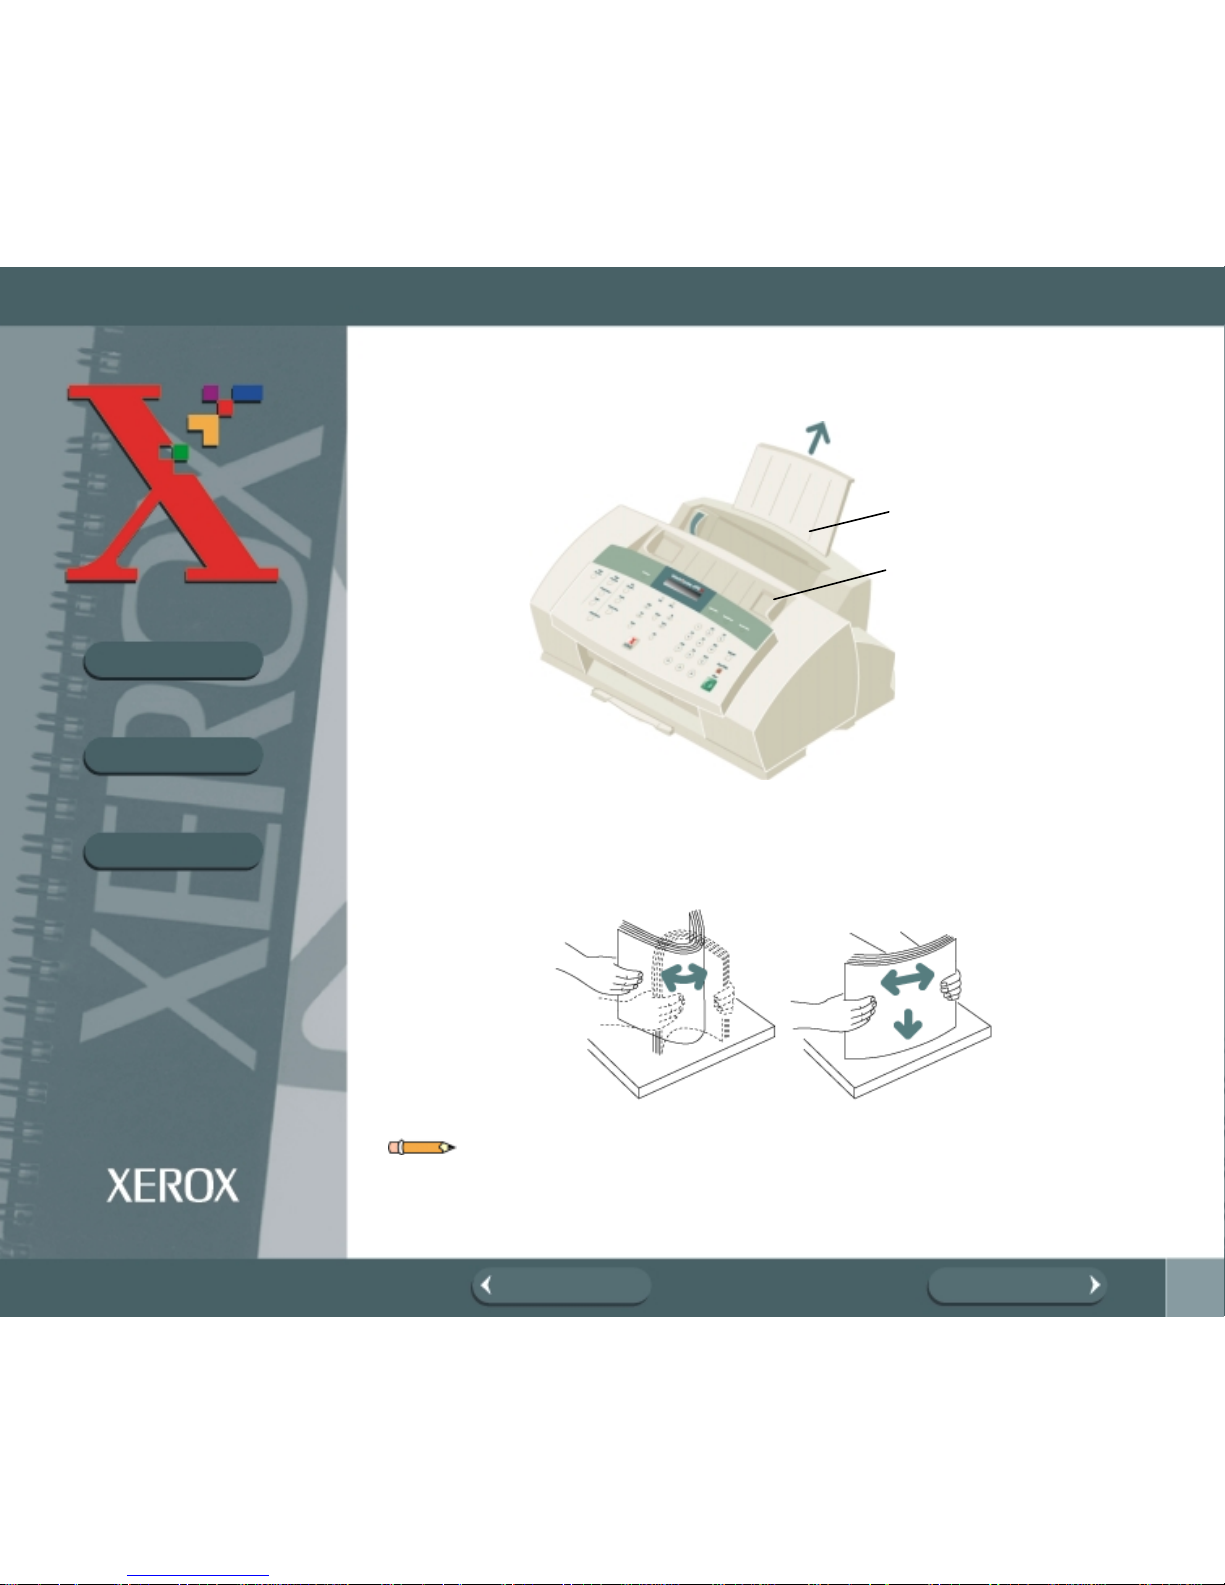
Document Input Tray
Inser t the tw o t abs on the tra y into the slo ts as show n. Fold out the ex te nsion
tray, if necessary.
Page 11
11
BOOK TOC
CHAPTER TOC
SEARCH
PREVIOUS PAGE NEXT PAGE
SET UP YOUR MACHINE
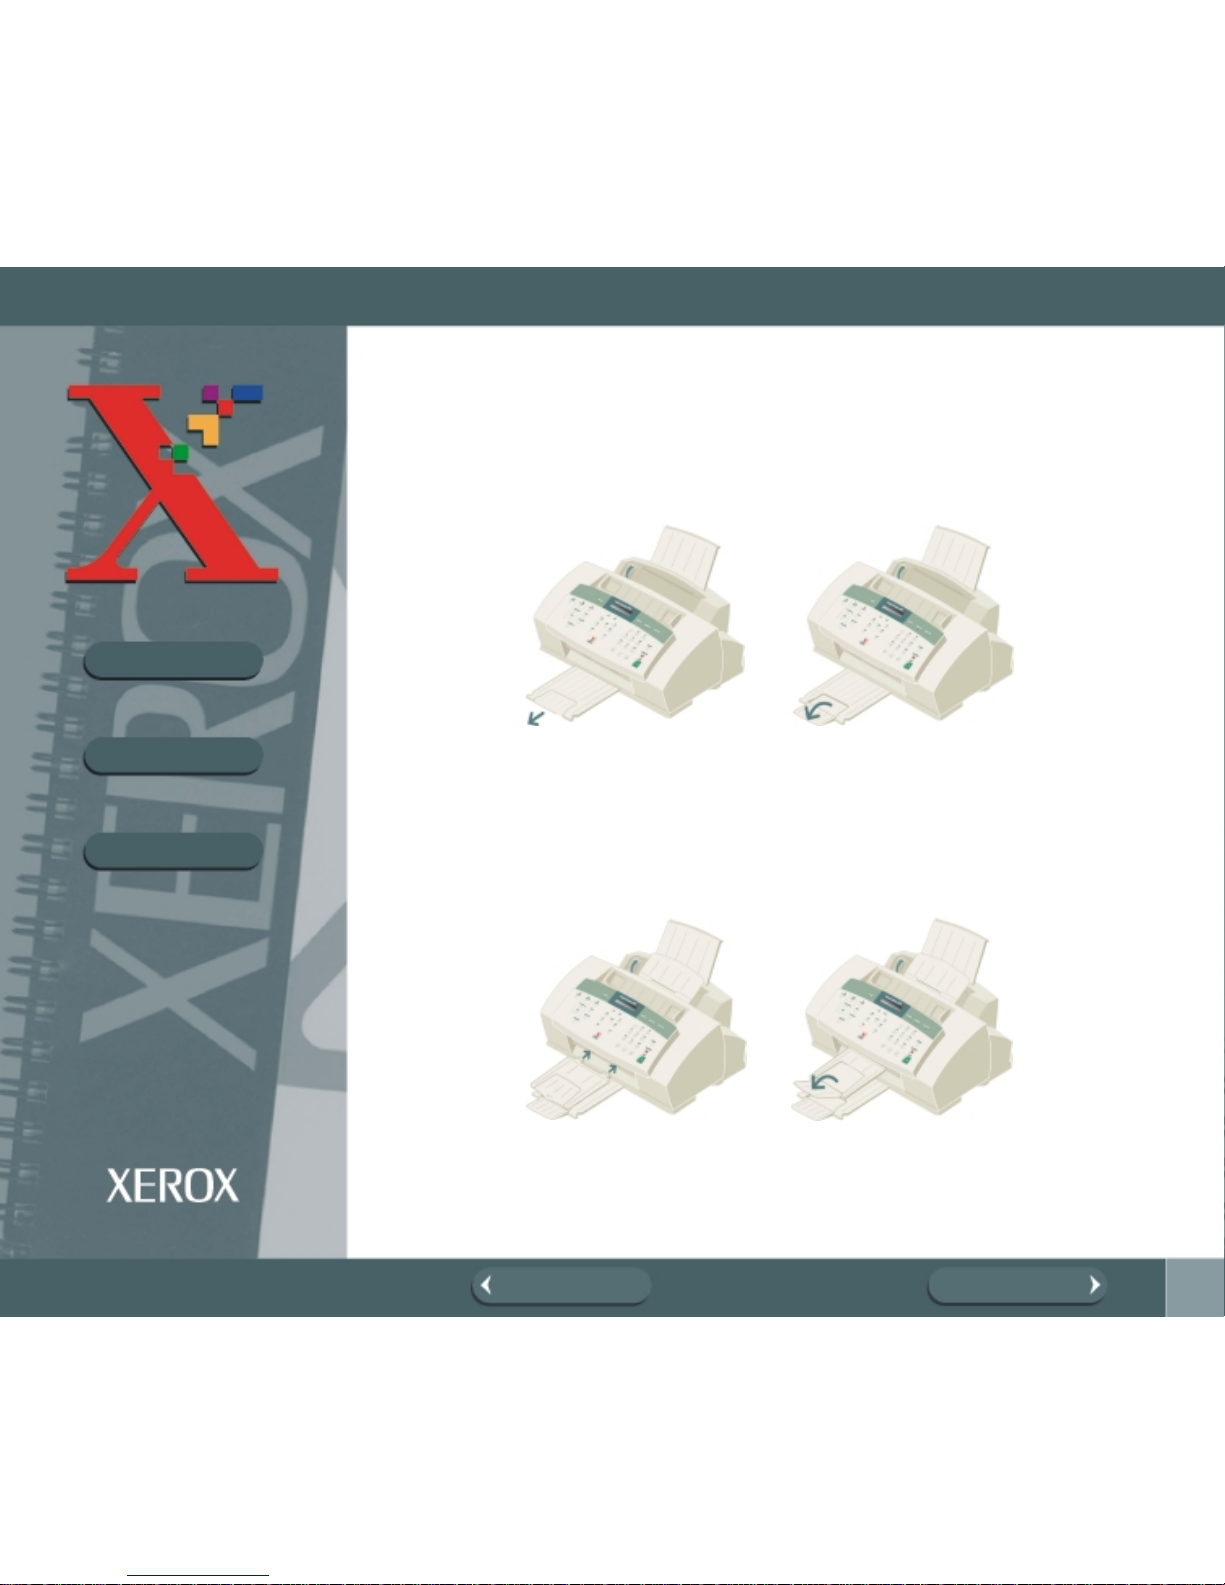
Paper Exit Tray
Slide the Paper Exit Tray out from the base of the machine. If desired, fold
out the extension tray.
Document Exit Tray
Inser t the tw o t abs on the docu ment exit tra y int o the sl ots on the fron t of yo ur
machine. Fold out the extension tray, if necessary.
Page 12

12
BOOK TOC
CHAPTER TOC
SEARCH
PREVIOUS PAGE NEXT PAGE
SET UP YOUR MACHINE
Telephone Line
Note: There are many possible ways to connect telephone accessories to
the WorkC en tre 490 cx. Refer to T eleph one C onne ctiv ity Gu ideli nes for more
details.
Plug one end of the telephone line cord into the TEL LINE jack and the other
end into a standard phone wall jack.
To a standard
telepho ne jack (will
vary according to
country)
Page 13
13
BOOK TOC
CHAPTER TOC
SEARCH
PREVIOUS PAGE NEXT PAGE
SET UP YOUR MACHINE
Extension Phone
If you want to use a standard phone or answering machine with your
WorkCentre 490cx, connect it to the jack labeled EXT on the side of the
machi ne.
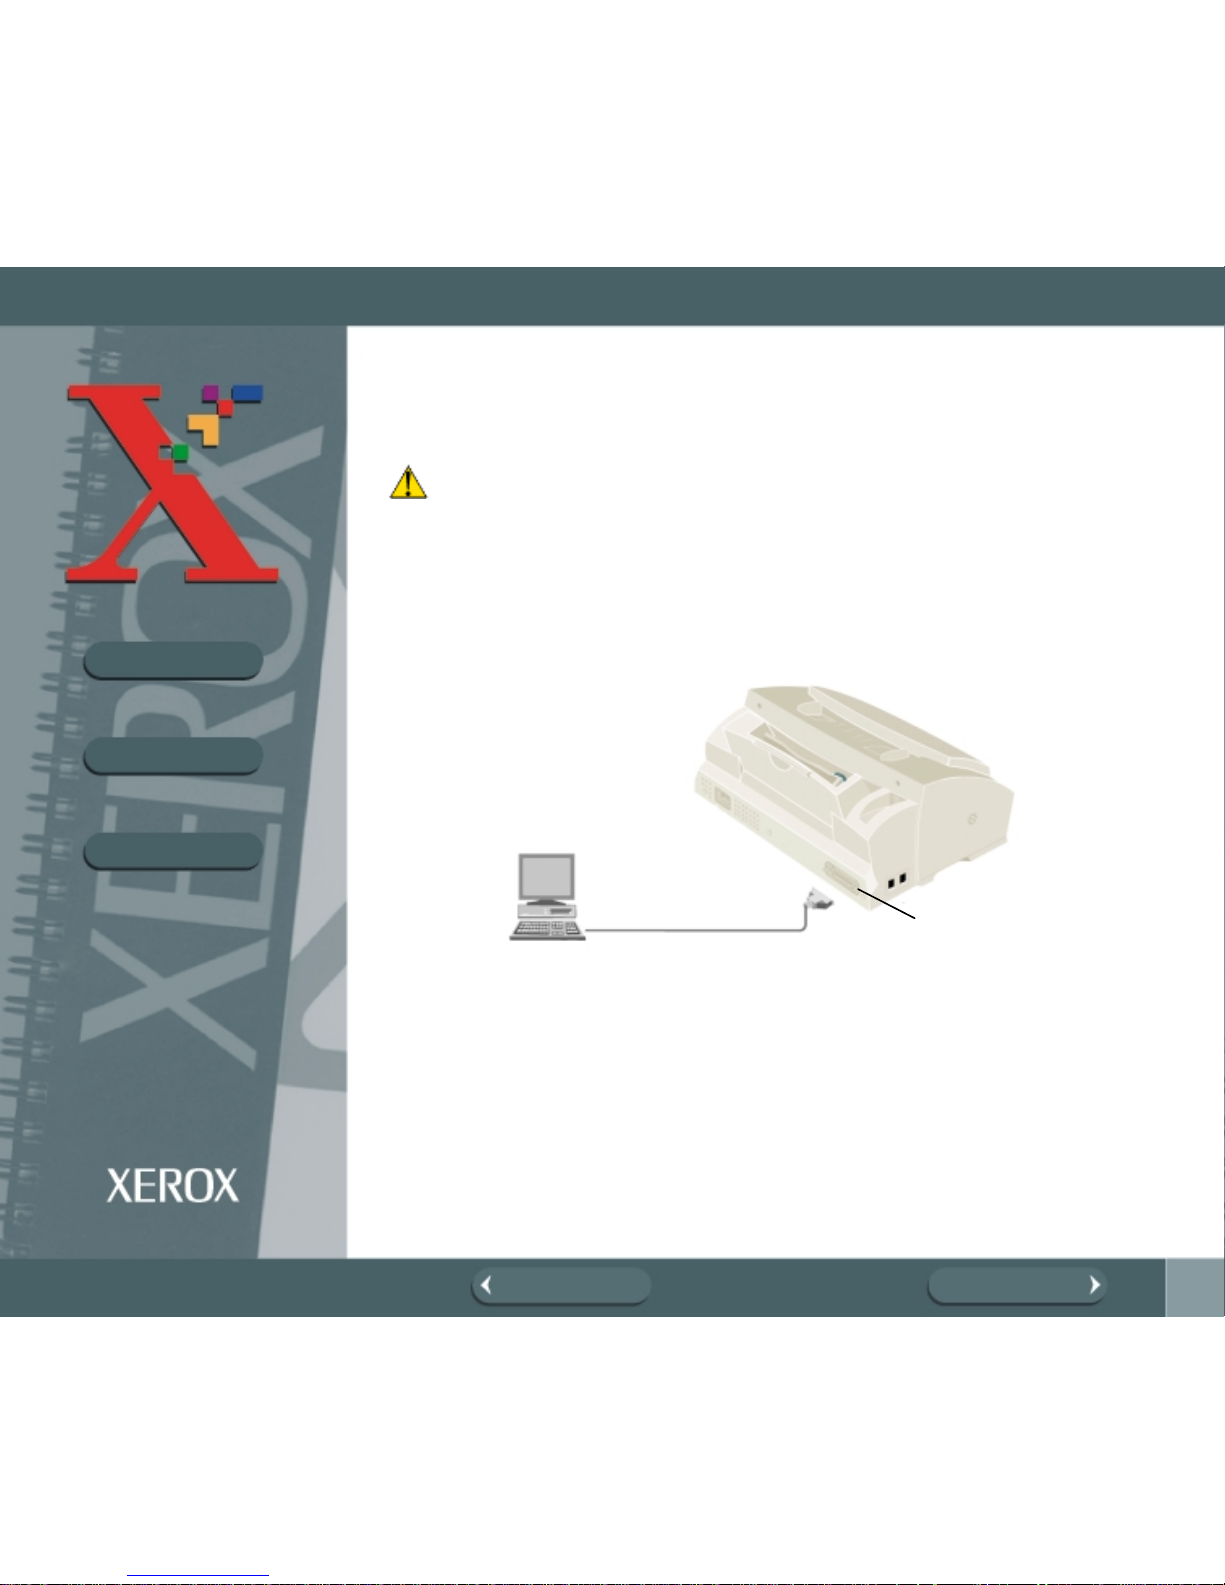
PC Cable
Your Xer ox WorkCentre 490cx is equipped with a parallel interface por t for
use wi th IBM PCs and c ompa tible c ompu ters. Us ing the suppl ied Centronics
parallel cable, connect your WorkCentre 490cx to a computer that supports
bi-dir ect iona l communi cations (IEEE stan dar d 1284 ).
Note: If using another parallel cable, ensure that it is bi-directional and
meets IEEE standard 1284 specifications and is not longer than twelve feet.
To a telephone or
answering machine
Page 14
14
BOOK TOC
CHAPTER TOC
SEARCH
PREVIOUS PAGE NEXT PAGE
SET UP YOUR MACHINE
To connect the WorkCentre 490cx to a computer using a parallel cable,
follow the steps below:
Caution: Make sure the computer is turned off, and the WorkCentre 490cx
is unplugged from the power outlet.
1. Plug the parallel cable into the connector on the back of the WorkCentre
49 0cx. Swi ng the met al cl ips of the conne ctor inw ard until they lock fi rm ly
inside the notches on the parallel cable connector.
2. Connect the other end of the cable to the parallel port on your computer.
Refer to your computer documentation for assistance with this procedure.
Close Ca ble
Connector
Lo cking Clips
Page 15
15
BOOK TOC
CHAPTER TOC
SEARCH
PREVIOUS PAGE NEXT PAGE
SET UP YOUR MACHINE
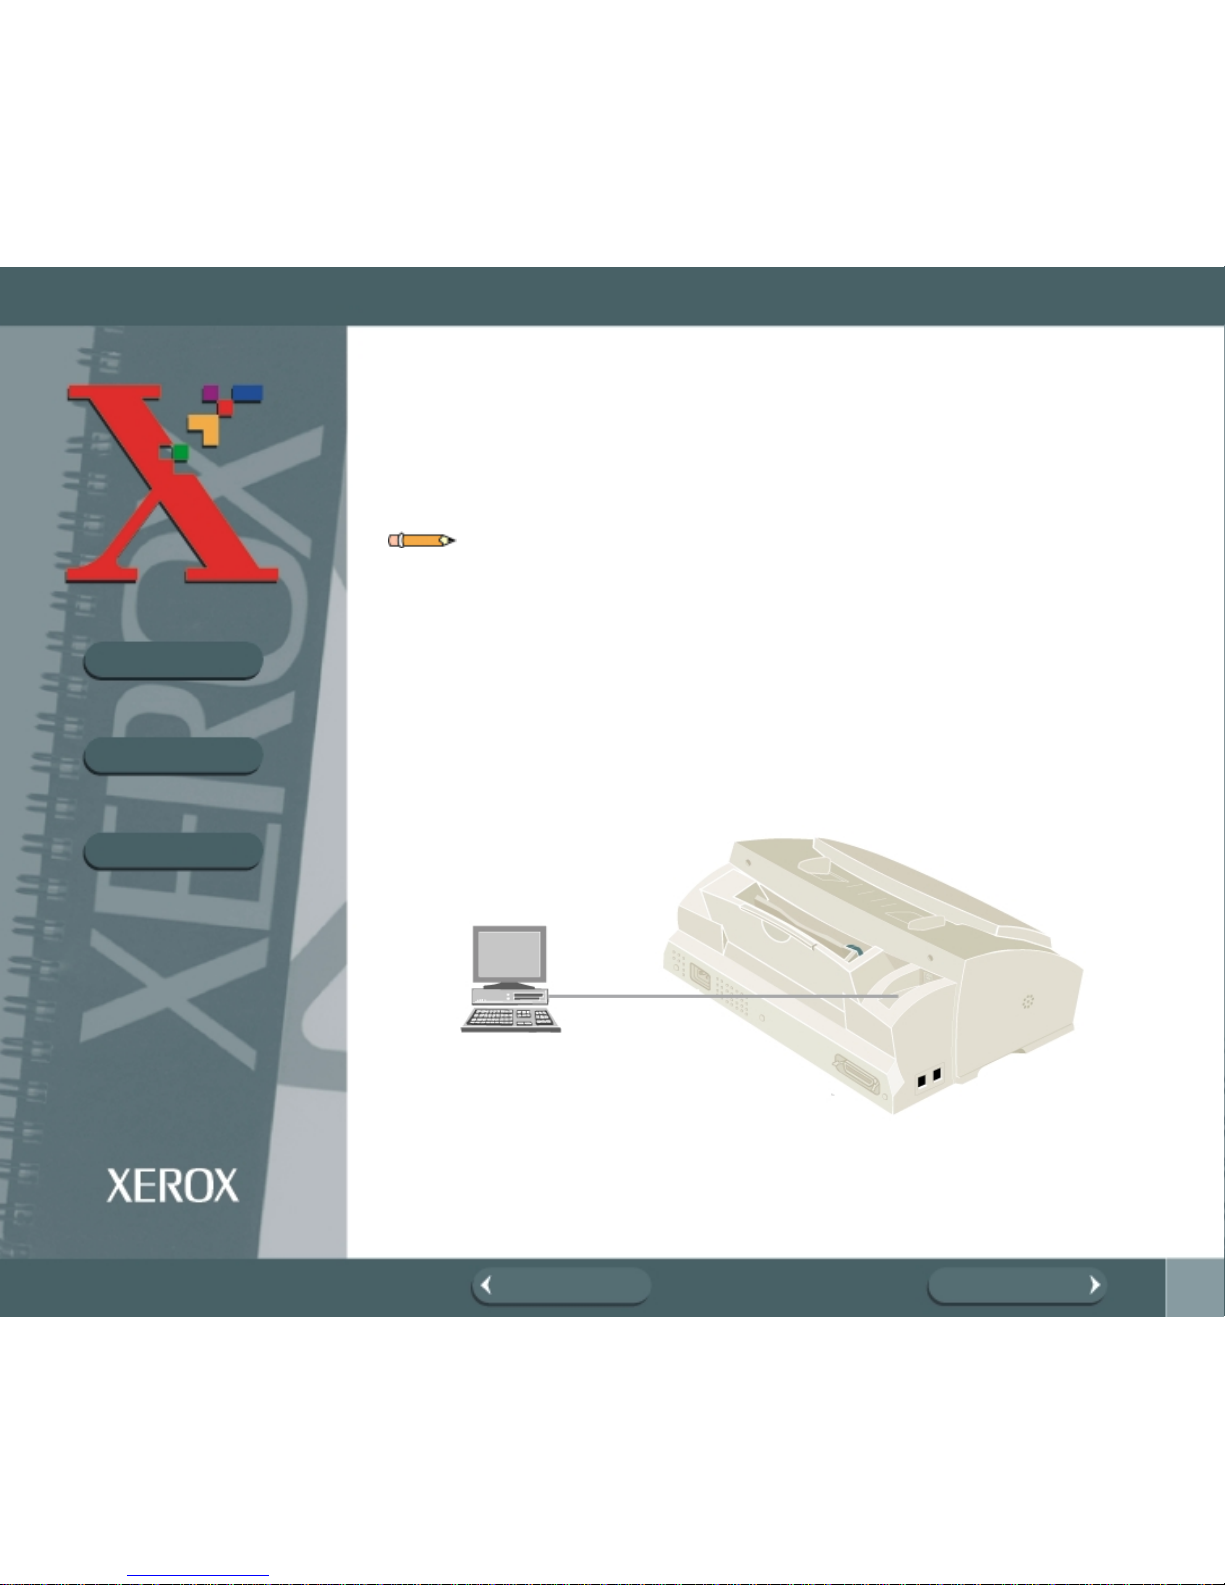
USB Cable
Your Xer ox WorkCentre is equipped with a USB interface port, that can be
used if you are running windows 98/2000 or Windows NT4.0. However, the
USB cable is not provided with the machine.
Note: If using a USB cable, the parallel cable is not used. In addition, the
computer and the 490cx must be powered on before connecting the USB
cable to the computer.
To connect the WorkCentre 490cx to a computer using the USB cable,
follow the steps below:
1. Turn on the computer and the 490cx and allow them to power up.
2. Plug the rectangle end of the USB cable into the connector on the back of
the WorkCentre 490cx.
3. Connect the other end of the USB cable to one of the USB ports on your
computer. Refer to your computer documentation for assistance with this
procedur e.
Page 16
16
BOOK TOC
CHAPTER TOC
SEARCH
PREVIOUS PAGE NEXT PAGE
SET UP YOUR MACHINE
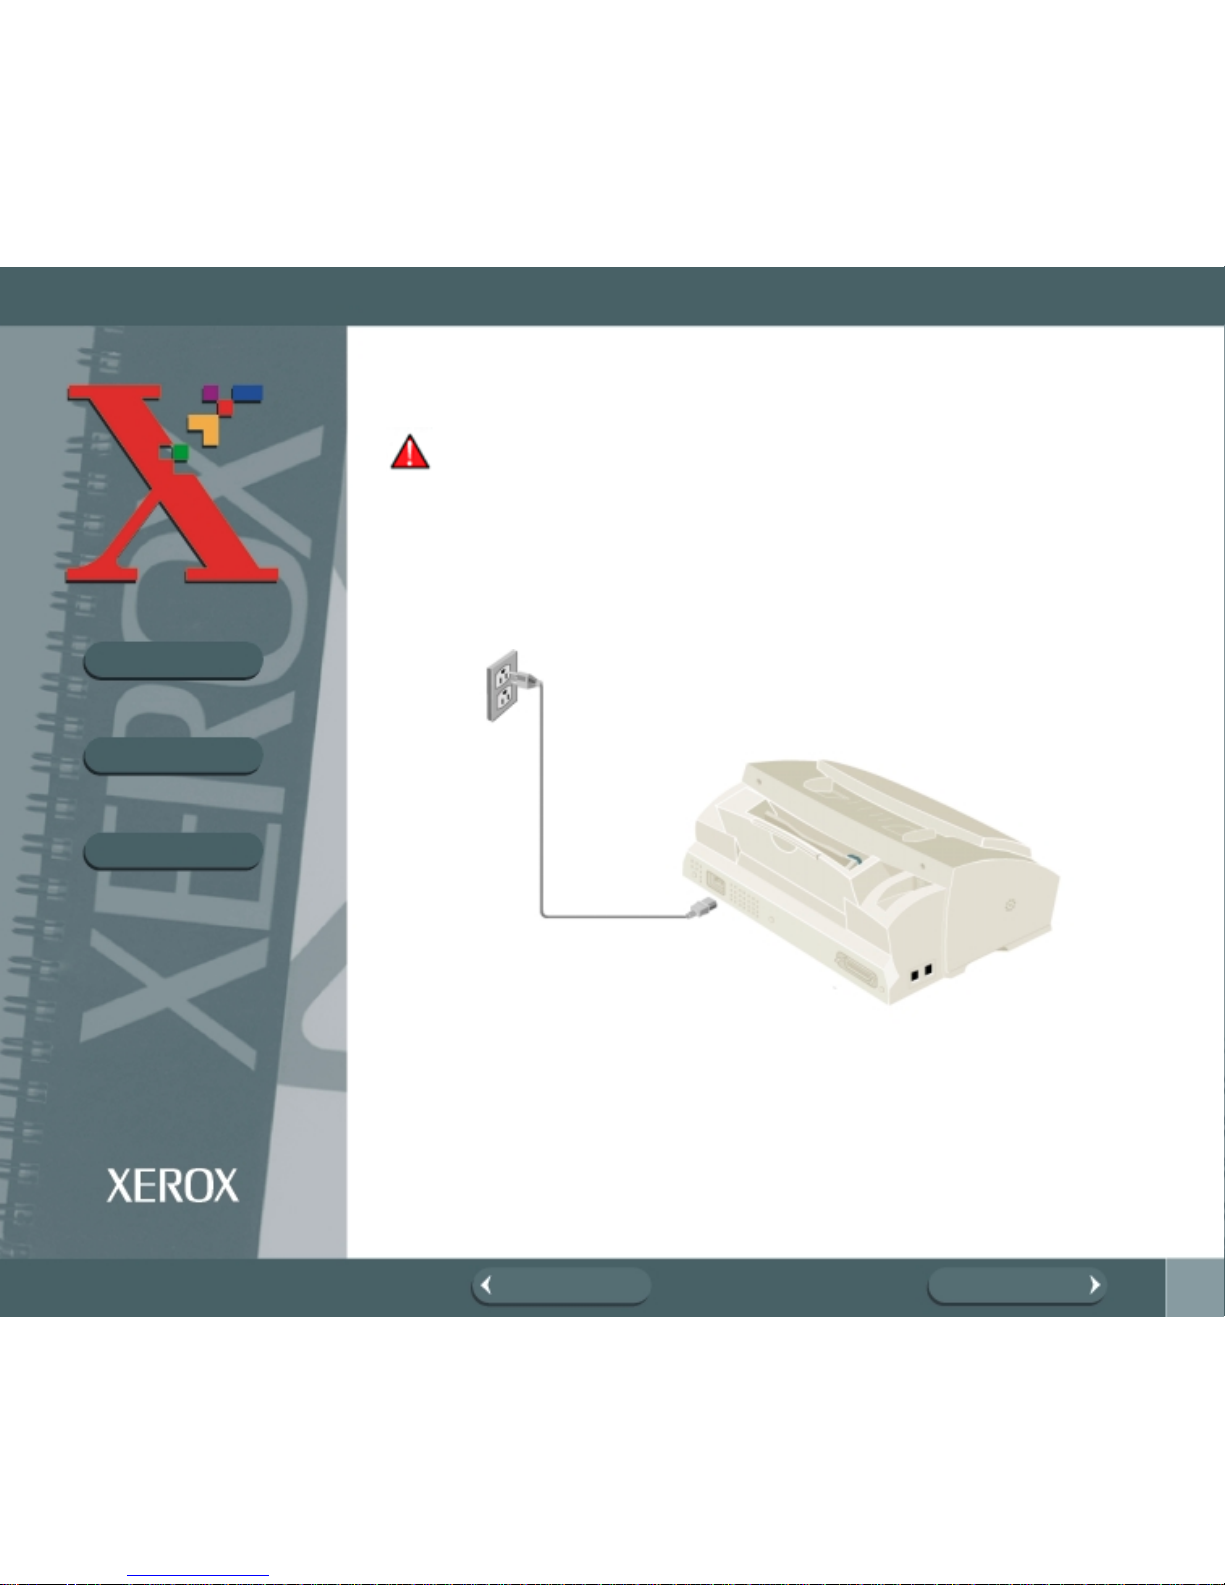
AC Power Cord
Warning: There is N O On/Off switch for the WorkCentre 490cx. When the
AC power cord is pl ugged in, the machine is fully energized.
1. Plug one end of the AC power cord into the back of the machine and the
other end into a grounded AC power outlet.
2. The machine turns on and performs a self diagnostic test.
POWER ING UP PLEASE WAIT appears on the LCD display.
To AC
outl et
Page 17

17
BOOK TOC
CHAPTER TOC
SEARCH
PREVIOUS PAGE NEXT PAGE
SET UP YOUR MACHINE
If you are setting up the machine for the first time, or if the machine has
no t been oper ated for an exten ded per io d o f time, SET DA T E AND TIM E,
and PRESS START will appear on the LCD display.
3. Press the Start button. A flashing cursor will appear on the first
character of the date in the LCD display.
4. Enter the date and time using the Number Keypad. If you need
assistance entering characters using the Number keypad, refer to
Entering Alphanumeric Characters.
5. Press the Start bu tto n to confirm your settings.
The WorkCentre 490cx returns to standby mode. If there are no ink
cartridges installed, ALL CART. EMPTY appears in the top line of the
displ ay.
Note: If you do not set the date and time, after a short period of time the
mac hine will automatically accept whatever date and time are displayed on
power up. It will then go into standby mode.
Note: To power off the machine, unplug the power cord. Power must be
applied at all times if the machine is used as an unattended fax machine.
SET DAT E AND TIM E
PRESS START
Page 18

18
BOOK TOC
CHAPTER TOC
SEARCH
PREVIOUS PAGE NEXT PAGE
SET UP YOUR MACHINE
Installing Ink Cartridges
Your machine is a dual cartr idge Inkjet printer. You must use a black and a
color ink cartr idge. Whe n viewe d from the front of the machi n e, the Black I nk
Cartridge installs in the right Cartridge Holder while the Color Ink Cartridge
installs in the left Cartridge Holde r.
When installi ng ink cartridges, you must provide specific information to the
WorkCentre 490cx about the cartridges you install. This allows the printer to
keep track of which cartridges are installed and to gauge ink cartridge
utilization. There are two methods of entering th is information . You may
enter the required information directly via the WorkCentre 490cx control
panel or you can update Ink Cartridge information using the WorkCentre
490cx P rinter Driver Software and a PC.
The procedures in this section cover Ink Car tridge Installation without using
the WorkCentre 490cx Printer Driver Program. To install Ink Cartridges using
the WorkCentre 490cx Printer Driver Program, refer to The Xerox
WorkCentre Control Program.
Page 19

19
BOOK TOC
CHAPTER TOC
SEARCH
PREVIOUS PAGE NEXT PAGE
SET UP YOUR MACHINE
Installi ng Ink Cartridges
1. Lift open the Control Panel cover by pulling up on the Control Panel.
The ink cartridge is now accessible.
2. Open the Cartridge Compartment Cover by lifting up on the recessed
handle. The Cartridge Carrier Assembly moves to the center of the
machine.
3. Unwrap and remove the Black Ink Cartridge from its packaging. Hold the
cartridge by the top only.
Note: Avoid touching the electrical contacts on the cartri dge.
Control Panel
Cartridge
Compartment
Cover
Page 20
20
BOOK TOC
CHAPTER TOC
SEARCH
PREVIOUS PAGE NEXT PAGE
SET UP YOUR MACHINE
4. Carefully remove the sealing tape by pulling straight out on the tab
located at the end of the Ink Cartridge.
Note: Ensure that there are no pieces of tape remai ning on the cartridge.
Locate the Black Ink Cartridge holder inside the pr inter. The Black Ink
Cartr idge hol d er is lo cated on the right side of the Ca rtrid ge Carr ie r Asse mbly
and can be identified by a black key tab.
5. Slide the Black Ink Cartridge down into the holder and push it in the
direction of the arr ow until it clicks into place.
Black
Cartridge
Holder
Color
Cartridge
Holder
Page 21
21
BOOK TOC
CHAPTER TOC
SEARCH
PREVIOUS PAGE NEXT PAGE
SET UP YOUR MACHINE
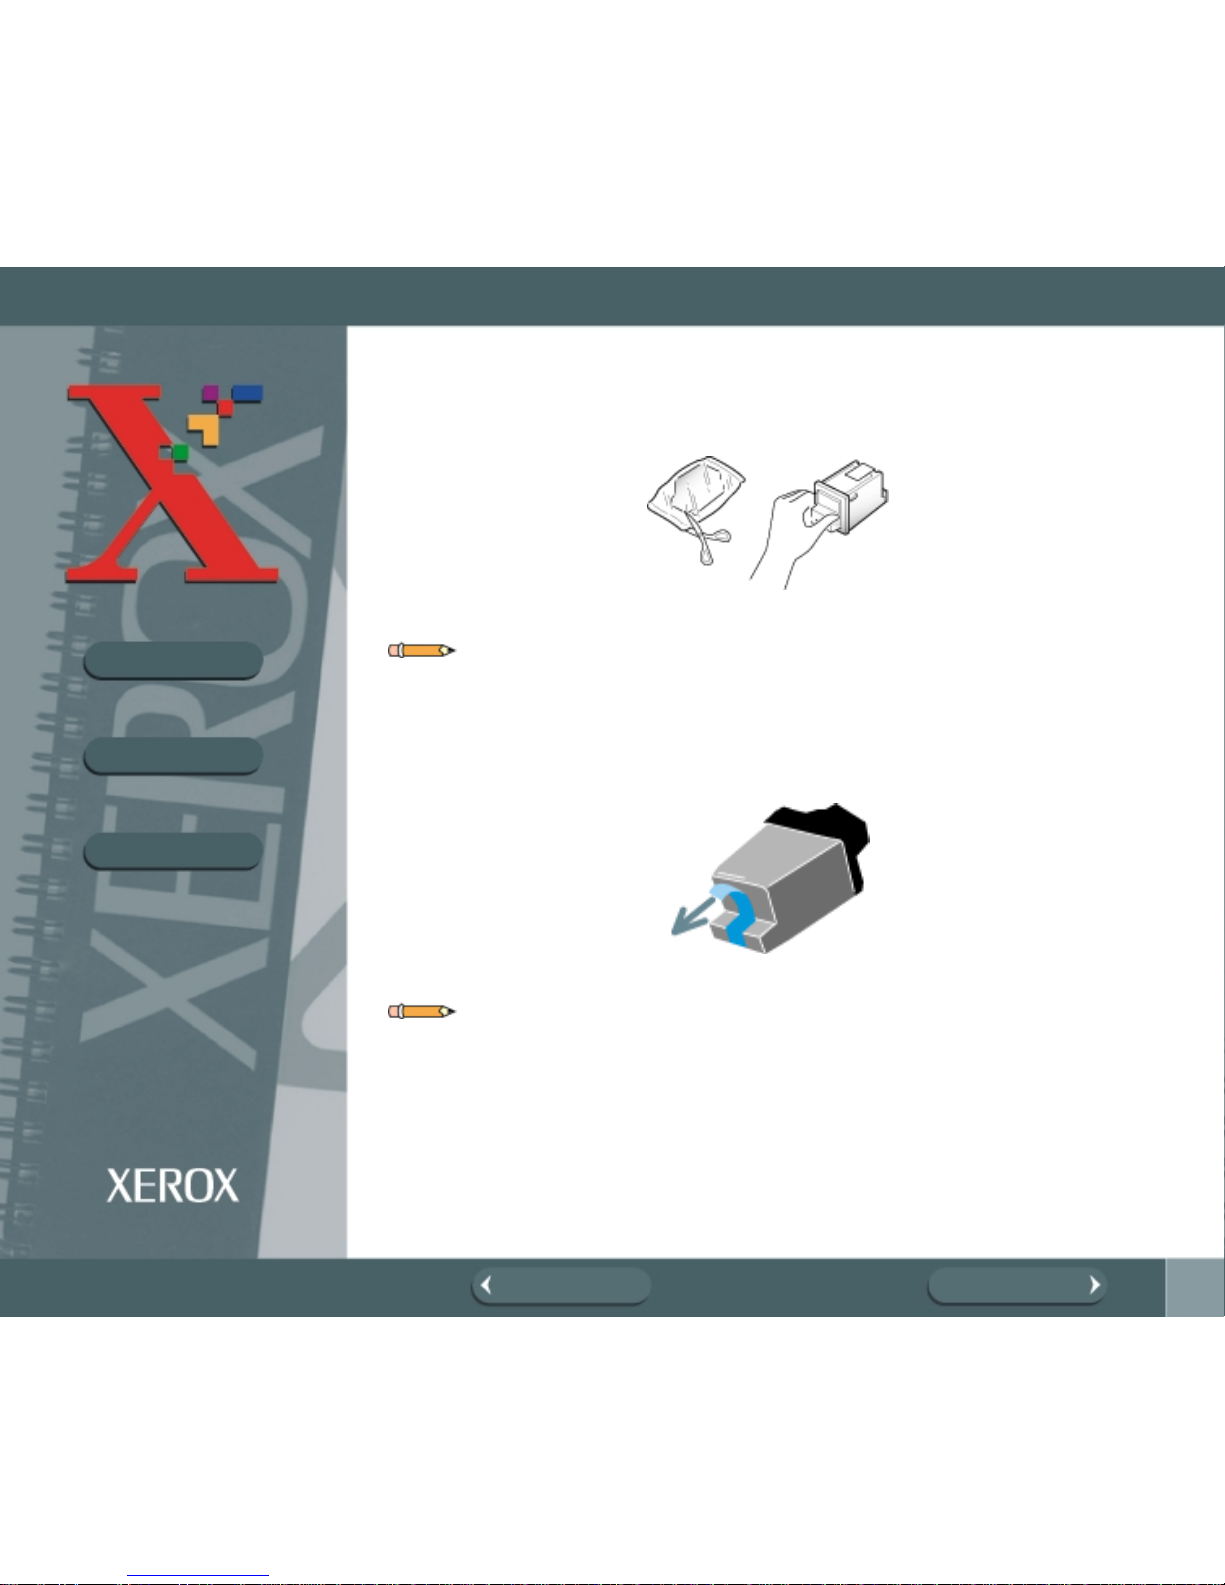
6. Unwrap and remove the Color Ink Car tridge from its packaging. Hold the
cartridge by the black areas or colored top only.
Note: Avoid touching the electrical contacts on the back of the cartridge.
7. Carefully remove the sealing tape by pulling straight out on the tab
located on the end of the Ink Cartridge.
Note: Avoid touching the electrical contacts on the cartri dge.
Page 22

22
BOOK TOC
CHAPTER TOC
SEARCH
PREVIOUS PAGE NEXT PAGE
SET UP YOUR MACHINE
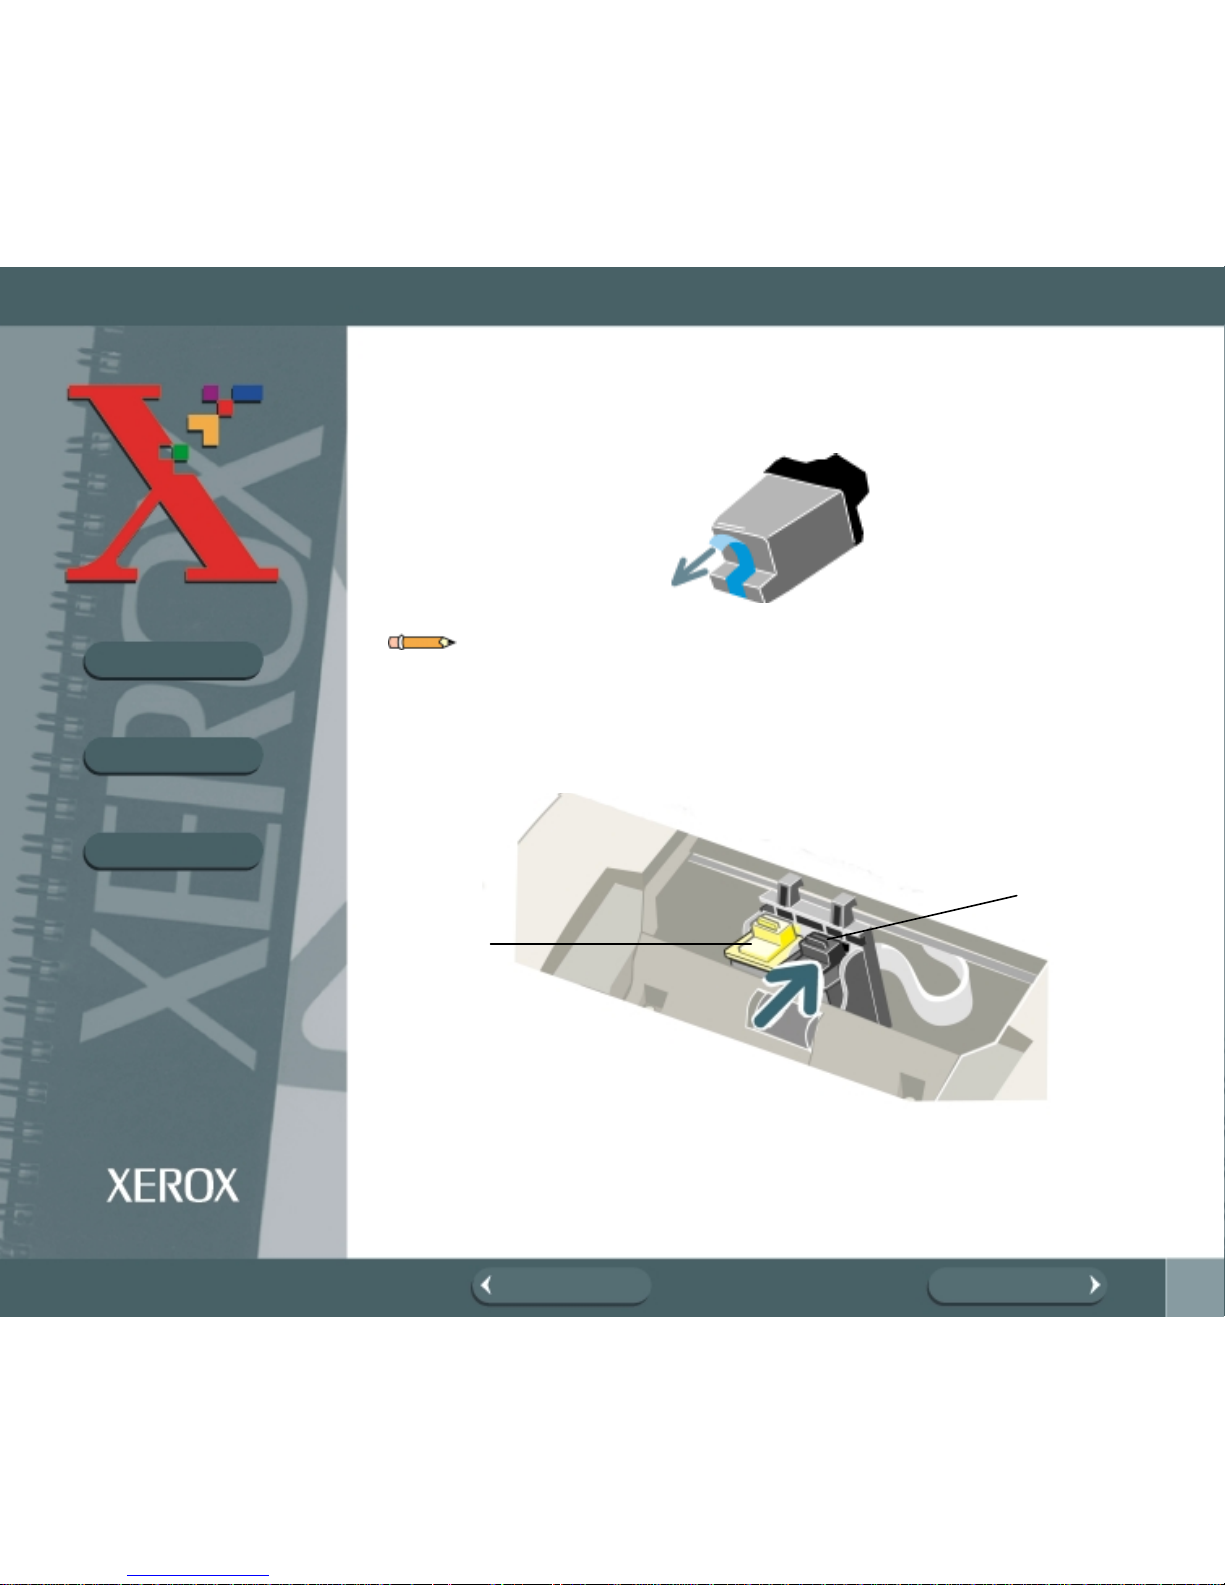
8. Locate the Color Ink Cartridge holder inside the printer. The Color Ink
Cartridge holder is located on the left side of the Cartridge Carrier
Assembly and can be identified by a light blue key tab.
9. Slide the Color Ink Cartridge down into the holder and push it in the
direction of the arr ow until it clicks into place.
10.Close the Cartridge Compartment Cover.
CARTRIDGE CHANGED? appears in the display.
11.Press the Down or Up button until BOTH appear in the display.
12.Press the Start Button.
LEFT CARTRIDGE? appears in the top line of the LCD display.
13.Press the Up or Down buttons until NEW COLOR CARTRIDGE
appears in the lower line of the display.
14.Press the Start butto n to confirm your choice.
RIGHT CARTRIDGE? appears in the top line of the LCD display.
Black
Cartridge
Holder
Color
Cartridge
Holder
Page 23

23
BOOK TOC
CHAPTER TOC
SEARCH
PREVIOUS PAGE NEXT PAGE
SET UP YOUR MACHINE
15.Press the Up or Down butto ns until NEW BL ACK CARTRIDGE
appears in the lower line of the display.
16.Press the Start butto n to confirm your choice.
The Cartridge Carrier Assembl y moves back to the docking position.
17.A Cartridge Alignment Test print is printed out. This will ensure that your
WorkCentre 490cx generates the best possible prints. Refer to Arr ange
Alignment.
Caution: Do not power off the machine until the Cartridge Carrier Assembly
has moved back into the docking position. If no menu choices are made, the
Carrier Assembly will automatically return to the docking position after about
one minute .
L oading Pape r
For best results, use high quality Xerographic copy paper or inkjet paper.
Using the Automatic Paper Feeder
Y ou can stack paper, envelo pes, card stocks, labels, or tran s parenc ies in the
Automatic Paper Feeder to feed automatically. The Automatic Paper F eeder
can hold a maxim um of 100 sheets of 20 lb plain paper, or 10 envelopes or
othe r print m edia. D epen ding upo n medi a th ickn ess, maxi m um capa ci ty may
be reduced.
Note: If you experience problems feeding paper, place the m edia into the
Manual Paper Feeder one sheet at a time.
Page 24
24
BOOK TOC
CHAPTER TOC
SEARCH
PREVIOUS PAGE NEXT PAGE
SET UP YOUR MACHINE
1. Pull the Extension Tray on the Automatic Paper Feeder all the way up.
2. Prepare the print material for loading.
For pape r and env elop es, fle x paper or fan envel opes back and f or th. Do
not fold or crease the paper. Straighten the edges on a level surface.
Note: If envelopes jam whi le printing, try reducing the number of envelopes
in the A utomatic Paper Feeder.
Extension
Tray
Automati c Paper
Feeder
Page 25

25
BOOK TOC
CHAPTER TOC
SEARCH
PREVIOUS PAGE NEXT PAGE
SET UP YOUR MACHINE
For transparencies, be sure to use transparency stock approved for use
with inkjet printer s. Refer to the packaging for the transparency stock to
de term ine the print s ide. Ho ld the transpa rencies by the edg es a nd avoid
touching the print side. Be careful not to scratch or leave fingerprints on
the print side. Fan the stack of transparencies to prevent feeding failures.
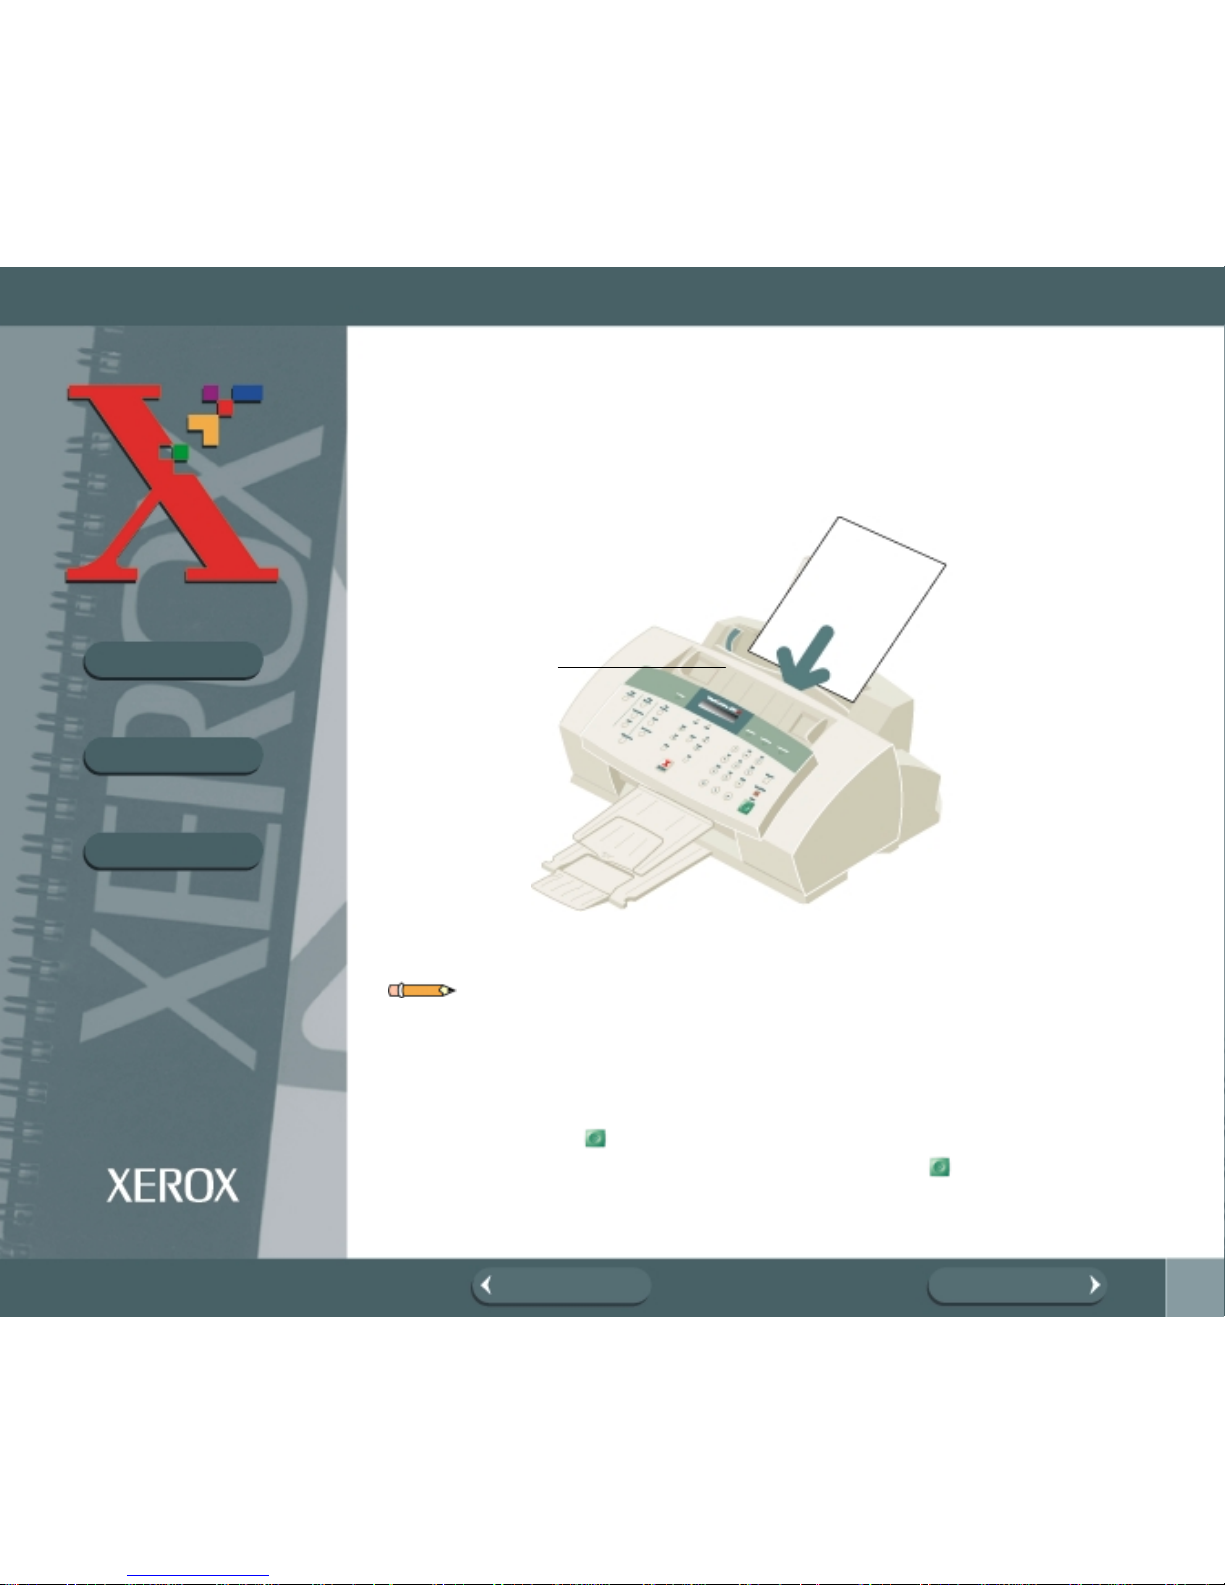
3. Load the pr int material in the Automatic Paper Feeder. Ensure that the
right edge of the media is in contact with the right side of the Automatic
Paper Feeder. Do not exceed the rated capacity. Do not mix different
types of print media. Refer to the following instructions for loading each
type of print material .
a) Load paper or transparencies with the print side facing you.
b) Load letterhead paper with the design side face-up. The top edge of
the sheet with the logo should enter the printer first.
Page 26

26
BOOK TOC
CHAPTER TOC
SEARCH
PREVIOUS PAGE NEXT PAGE
SET UP YOUR MACHINE
4. While squeezing the tab on the paper guide, move the guide to the right.
Slide the paper guide until it lightly touches the side of the stack of print
media. Do not press the paper guide too tightly to the edge of the print
media; the guide may bend the media or pr ovide too much resistance
when feeding.
Note: When you print a file from your PC using the Automatic Paper Feeder,
make sure that you select the source and the correct paper size from your
software application before starting your print job.
Page 27

27
BOOK TOC
CHAPTER TOC
SEARCH
PREVIOUS PAGE NEXT PAGE
SET UP YOUR MACHINE
Loading Envelopes
When printing envelopes, remember to use the envelope guide in the
Automatic Paper Feeder.
To load envelopes:
1. Lo ad envelop es with the address side f acing up. The end of the env elope
with the stamp area must enter the Automatic Paper Feeder first. The
right edge of the envelope must align with the raised edge of the
en velope gui de.
2. Squeeze the Left Paper Guide and move it to the right until it lightly
touches the envelope.
Note: Do not feed stamped envelopes.
Page 28

28
BOOK TOC
CHAPTER TOC
SEARCH
PREVIOUS PAGE NEXT PAGE
SET UP YOUR MACHINE
Caution: Never use envelopes with clasps, snaps, windows, coated linings,
or self-adhesive seals. These envelopes may severely damage the printer.
Using the Manual Paper Feeder
Use the Manual Paper Feeder to feed paper one sheet at a time into your
machi ne.
Note: When you print a file from your PC using the Manual Paper Feeder,
ensure that you select the source and the correct paper size from your
software application before starting your print job.
Page 29
29
BOOK TOC
CHAPTER TOC
SEARCH
PREVIOUS PAGE NEXT PAGE
SET UP YOUR MACHINE
1. Place the paper in the Manual Paper Feeder and adjust the paper guide
to the width of the print material. Slide the paper guide to the right until it
lightly touches the stack of print media. Do not tightly press the paper
guide to the edge of the print media; the guide m ay bend the media or
prevent the media from feeding.
Note: Refer to Loading Paper and Paper Guidelines for specific instructions
on loading various types of media.
2. Ens ure that the media is fed into the machin e as far as it will go.
3. Press the Start button to start manual feeding of the media. If you
have mor e than one page to print, press the Start button for each
page.
Paper Guide
Page 30

30
BOOK TOC
CHAPTER TOC
SEARCH
PREVIOUS PAGE NEXT PAGE
SET UP YOUR MACHINE
Paper Guidelines
• When sele cti ng or load ing pape r , env elope s, or other special med ia, keep
these guidelines in mind:
• Attempting to print on damp, curled, wrinkled, or torn paper can cause
paper jams and poor print quality.
• Use only high quality, copier grade paper. Avoid paper with embossed
lettering, perforations, or texture that is too smooth or too rough.
• Store paper in its ream wrapper until ready to use. Place cartons on
pallets or shelves, not on the floor. Do not place heavy objects on top of
the paper, whether it is packaged or unpackaged. Keep it away from
moisture, or other conditions that can cause it to wrinkle or curl.
• Dur ing s torag e, moistur e-p roof w rap (any plasti c contai n er or bag) sh ould
be used to prevent dust and m oisture from contaminating your paper.
• Always use paper and other media that conform with those listed under
Specifications in the Appendix.
• Use only well-constructed envelopes with sharp, well creased folds.
!
DO NOT use envelopes with clasps and snaps.
!
DO NOT use envelopes with windows, coated linings, self-adhesive
seals, or other synthetic materials.
!
DO NOT use damaged or poorly made envelopes.
Page 31

31
BOOK TOC
CHAPTER TOC
SEARCH
PREVIOUS PAGE NEXT PAGE
SET UP YOUR MACHINE
Paper Selection
One of the most important things you can do to assure the best possible
printing performance of your machine is to select the correct paper. Your
machine produces letter quality print on most plain bond papers, including
cotton bond and photocopying papers; it does not require special i nk jet
papers. However, the print quality varies with different paper types. Be sure
to test a type of paper before you purchase a large quantity.
Paper Types
Plain Paper
The machi ne supports paper sizes of letter, legal, and A4 in portrait
orientation. You can use regular copier paper, cotton bond papers, and
typical letterhead. Always use paper without curls, folds, staples, or
dam aged edges.
Inkjet Paper
This paper has been developed specifical ly for printing with inkjet printers. It
will produce high quality docu ments which will compare favorably to those
produced with a laser printer.
Coated P aper
The coated paper has been developed for high quality printing with minimal
or no smearing or running when in contact with water or dam p surfaces,
making it a good choice for damp or rainy environments.
Page 32

32
BOOK TOC
CHAPTER TOC
SEARCH
PREVIOUS PAGE NEXT PAGE
SET UP YOUR MACHINE
Glossy Photo Paper
Glossy photo paper is a high gloss, thicker paper that produces the look and
feel of a photograph. Use this paper to produce photo-realistic prints fr om
your pr inter.
Transparencies
Y our trans par encies s hould be products design ed for us e in Ink Jet produc ts,
with excellent contrast, sharpness, and color quality. T he transparancy is
placed in the m achine with the im age side up.
Iron -on Trans fe rs
Use inkjet T-shirt transfers to create and personalize T-shirts, sweatshirts,
aprons, tablecloths, napkins, tote bags, and anything else your imagination
allows! Use on any cotton or cotton/poly blend fabric. Your image is printed
in mirror image so when you iron it onto the T-shirt, the image is viewed
correctly.
Greeting Card Stock
Get the most out of card m aking software with Greeting Cards. These cards
give your unique, personalized MESSAGE the look and feel of professional
cards. You can create cards, invitations, announcements, and more.
Labels
Use Label products designed for use with Ink Jet products. Label stock can
be 8-1/2 x 11 or A4 size material.
Page 33

33
BOOK TOC
CHAPTER TOC
SEARCH
PREVIOUS PAGE NEXT PAGE
GUIDELINES FOR SPECIAL PAPER AND OTHER MEDIA
Gui delin es for Speci al Paper and ot her Media
Be sure to read any instructions that come with your special paper. These
instructions provide important information r egarding how to achieve the
highest print quality with these papers.
• It is recommended that you feed special paper types one sheet at a time.
• For transparencies and glossy photo paper, follow these guidelines:
Let the printed sheets dry completely before storing them.
When a printed sh eet has dried comp l etely, cover the pr int ed side with a
sheet of plain (not coated) paper before storing it; this is recom m ended
even if you place the sheets in a clear file or plastic holder.
Do not leave the film in the paper tray for long periods of tim e. Dust and
dirt may accumulate on the film resulting in spotty printing.
To avoid smudg i ng c aused by fi nger prints, handle transpa rency film and
coated paper carefully.
To avoid fading, do not expose the printed film to prolonged sunlight.
Store unused media flat. D o not remove papers from their protective
packaging until you are ready to use them.
Store unused media at temperatures betw een 59 and 86 degrees
Fahrenheit (15 to 30 degrees Centigrade) . The relative hum idity should
be between 10% and 70%.
• If the print density of your page is very high, light paper stock may curl
slightly due to the lar ge amount of ink. If you need to print dense
graphics, try printing on heavier stock.
• Do not use thicker paper than meets the specifications for this machine.
Printing with a paper that is thick enough to come in contact with the print
head nozzles may damage the cartridge.
Page 34

34
BOOK TOC
CHAPTER TOC
SEARCH
PREVIOUS PAGE NEXT PAGE
INSTALLI NG SOFTWARE
Install ing Software
System Requirements
Proper operation of the WorkCentre 490cx requires that your personal
computer meets or exceeds the following system requirem ents:
• IBM compatible personal computer, with a Pentium, 100MHz or faster
processor
• Windows operating environment (Windows 95, Windows 98, Windows
2000, and Windows NT 4.0)
• At least 10MB of free hard disk space*
•24MB or more RAM
* 10MB minimum hard disk space required for driver installation only. If
installing the additional software packages included on the CD ROM, an
additional 70MB free hard disk space is required (70MB Pagis Pro).
Overvi ew of WorkC entre 490cx Dr ivers
Before the WorkCentre 490cx can interface with your computer, you must
install driver files. These drivers will enable your computer to properly
communicate with the WorkCentre 490cx for pr inting and scanning
operations.
All of the necessary drivers are contained on the CD included with your
WorkCentre 490cx.
S o ftware Included Wit h the W orkC entre 490cx
For your convenience, in addition to the driver files, the scanning program
Pagis Pro 2.0 (a suite of scanning applications) is also included on the CD
ROM.
Page 35

35
BOOK TOC
CHAPTER TOC
SEARCH
PREVIOUS PAGE NEXT PAGE
INSTALLI NG SOFTWARE
S o ftware Instal lation Procedur e
In Windows 95/98, Windows 2000, or Windows N T 4.0
1. Make sure the Xerox WorkCentre 490cx is connected to your computer.
2. Power off the WorkCentre 490cx by unplugging it from the wall outlet.
3. Turn on your PC and start Windows.
4. Pow er on the Workce nt re 490c x by plugg ing it into a gr ound ed wall outle t.
5. Insert the supplied CD into your computer’s CD ROM drive.
The Xerox Wor k Centre 490cx install ation program will begin.
Page 36

36
BOOK TOC
CHAPTER TOC
SEARCH
PREVIOUS PAGE NEXT PAGE
INSTALLI NG SOFTWARE
If the program does not start:
a) From the Start menu, select Run (Windows 95/9 8, Win dows 2000, a nd
NT 4.0).
b) Ty pe D:\X INS T ALL. EX E (whe re "D" repr esent s the lett er design ati on of
the computer’s CD ROM drive), and click OK to start the installation
program.
The Xerox WorkCentre 490cx installation program wi ll begin.
Note: You must shut down and restart your computer to complete the
installation process. If your computer does not shut down and restar t
autom atically, you must shut it down manually and restart it before the
changes you have made take effect.
Note: The WorkCentre 490c x will be selected as the Defau lt printe r in
Windows after installing the printer driver.
Page 37

37
BOOK TOC
CHAPTER TOC
SEARCH
PREVIOUS PAGE NEXT PAGE
UNINSTALLI NG SOFTWARE
Uninstalling Software
Uninstallation of software is required only if you are upgrading the software,
or if you r installat ion fails.
In Window s 95/98, Windows 2000, or Windows NT
1. Start Windows.
2. From the Start menu, select Programs.
3. Locate the Start Menu Program Item for the component you wish to
uninstall.
4. Click on the Submenu uninstall icon for the component you wish to
remove.
A window will open prompting you to confirm that you wish to remove the
selected application.
5. Click on Yes.
6. Uninstall Shield launches and the com ponent is uninstalled.
Note: Each software component must be uninstalled one at a tim e.
Page 38

38
BOOK TOC
CHAPTER TOC
SEARCH
PREVIOUS PAGE NEXT PAGE
USING THE CONTROL PANEL
Using the Control Pa nel
Pri nt Functions
Form Feed
Use to e ject paper fro m the printer if the
paper is not automaticall y fed o ut from the
printe r afte r pri nting . Also, use to load
p aper i f the machine runs out of paper
during a PC print job.
FA X Functions
Resolution
Us e to c hoo s e the resol ution of
copied or transmitted docum ents.
Confirm
Use to print out con firm at ion
message of successful FAX
transmission.
Receive Mode
Us e t o deter m ine t h e m od e f o r F A X
reception.
C opy Functi ons
Copy/BW
Use to select the copy
mode.
Reduce/Enlarge
Use t o change the size.
Collate
Use to select copy
collati on if desir ed.
Menu
Use to choose special
functio ns.
Exit
Us e to ex i t an y func t io n
or mo v e up in the m enu
level.
Up an d Down Bu ttons
Use to display the next or previous
menu item. Also used to make
adjustments.
Select
Use to choose a menu selection or
move down in the menu level.
Rig ht and Lef t Button s
Use to move cursor left or right across
the displa y.
Busy LED
Indicates the
m ac hi ne is in
use.
ALAR M LED
Indicates a
malfunction.
Page 39

39
BOOK TOC
CHAPTER TOC
SEARCH
PREVIOUS PAGE NEXT PAGE
USING THE CONTROL PANEL
Job Status
Use to verify background
printing job sent from the
PC.
S pe ed Di a l
Use to dial calls and send
fax documents by
en ter ing a 2-digi t number.
Redial/Pause
Us e to redial the last
ph one number called. You
can also use it to add a
pause when storing a
number in memo ry.
On Hook Dial
Use to adjust the volume
of the internal speaker
an d for on-hoo k di aling.
LCD Dis play
The display shows the current
status of your machine, and
guides you through various tasks
using a menu system for each
operation.
Lighten/D arken
Us e to c han ge th e
contrast of the copied
or transm i tte d
documents.
Number Ke y pa d
Use to dial numbers
manually or to enter
letters and numbers for
various programming
functio ns.
Reports
Us e to print out r eports and lists of
significant machine information.
Clear/Stop
Use to stop an operation of any kind.
Start
Us e to s tar t a jo b. A lso use t o activa te the
selection shown on the LCD display.
Page 40

40
BOOK TOC
CHAPTER TOC
SEARCH
PREVIOUS PAGE NEXT PAGE
SYSTEM SETUP
System Setup
Ringer Volume
You can adjust the volume of the ringer to the desired loudness.
1. Press the Menu button, then press the 0 + 4 buttons on the keypad.
Press the Start button. The display i ndicates RINGER VOLUME ?.
2. Press the Start button, then press the Up or Down button to
choose the desired loudness of the ringer. You can choose between
OFF, LOW, MED (medium), or HIGH settings.
The selected ringer sounds and the display indicates the loudness level.
Note: The machine will work normally even if the ringer is set to off.
3. Press the Start button when the des ired volu me level is select ed. The
disp la y indi cates the ne x t setup me nu, D EF AULT SET TING ?. For detai ls
on the Defau lt Settings menu, see Default Settings.
4. To return to Standby mode, pres s t he Clear/Stop button.
RINGER VOLUME
L EVE L [MED]
Page 41

41
BOOK TOC
CHAPTER TOC
SEARCH
PREVIOUS PAGE NEXT PAGE
SYSTEM SETUP
Default Settings
The default print resolution and contrast can be set to their most frequently
used modes. Whenever a document is sent or copied, the home contr ast
and reso luti on mod e will be activated unless otherwise changed by using the
Resolu tion or Contrast button on the control panel.
1. Press the Menu button, then press the 0 + 4 buttons on the keypad.
Then pr es s the Start button. The display indicates RINGER VOLUME
?.
2. Press the Up or Down button until DEFAULT SETTING ?
appears.
3. Press the Start butt on. The displ a y promp ts yo u to choose Reso luti on
or Contrast.
4. Press 1. or press the Start button to enter the Default Resolution set
up menu. You may also use the Up and Down buttons to select.
1.R ES OLUTI ON
2.C ON TRAST
Page 42

42
BOOK TOC
CHAPTER TOC
SEARCH
PREVIOUS PAGE NEXT PAGE
SYSTEM SETUP
RESOLUTION
1. Press the Left or Right button repeatedly until you locate the
desired mode:
!
STANDARD – use with most documents.
!
FINE – use for documents with fine detail, such as small print.
!
SUPER FINE – use for documents that have extremely fine detail.
2. Press the Start button to select the desired Default Resolution. The
display again prompts you to choose Resolution or Contrast.
DEF. RESOLUTION
[ FI NE ]
1.RESOLUTION
2.CONTRAST
Page 43

43
BOOK TOC
CHAPTER TOC
SEARCH
PREVIOUS PAGE NEXT PAGE
SYSTEM SETUP
CONTRAST
1. Press the Up and Down buttons or 2 on the Number keypad to
enter the Default Contrast setup m enu.
The cur ren t Default Re solut ion is display ed.
2. Press the Left or Right button repeatedly until you find the
desired mode:
!
NORMAL–use wi th documents of average or nor m al contrast.
!
DARKEN–use with documents with low contrast or light images.
!
PHOTO–use with documents containing photos or for faxing
!
LIGHTEN–use with documents with high contrast or dark images.
3. Press the Start button to select the desired mode. The Resolution o r
Contrast setup menu selection is displayed.
4. Press the Clear/Stop button to re tu rn to Standby mode.
D EF . CONTR AST
[ NORMAL ]
Page 44

44
BOOK TOC
CHAPTER TOC
SEARCH
PREVIOUS PAGE NEXT PAGE
SYSTEM SETUP
Arrange Alignment
The Arrange Alignment menu settings provide an easy way to check and
adjust Ink Cartridge print head alignment. To run the Arrange Alignment:
1. Press the Menu button, then press the 1 + 2 buttons on the keypad.
Then press the Start button . The display indicates SELF TEST ?.
2. Press the Down button. ARRANGE ALIGNMENT ? appears in the
displ ay.
3. Press the Start button. PRINTING... appears on the LCD display.
The WorkCentre 490cx prints out a Cartridge Alignment pattern sheet
consisting of a series of six test patterns. The patterns are designated
A,B,C, D, E and F. Each pattern is made up of a series of lines which are
individually numbered. By selecting the straightest line from each
pattern, you can optimize the print head alignment.
After printing out the Cartridge Alignment sheet, the Cartridge
Maintenance set up menu appears on the LCD display.
The letter A, located on the right end of the lower line in the display,
corr esponds to alignment test pattern A. The range of numbers
bracketed in the center of the display line indicates the range of valid
pattern selection choices. The flashing number on the left side of the
display indicates the line from print pattern A that is currently selected as
optimal.
CARTRIDGE MAINT.
<15> [0-30] A
Page 45

45
BOOK TOC
CHAPTER TOC
SEARCH
PREVIOUS PAGE NEXT PAGE
SYSTEM SETUP
4. Using the Number Keypad, enter the number of the line which appears
the straightest from pattern A.
5. Press the Up and Down button to confirm your selection. The
LCD panel updates and the setup screen for the Alignment B test pattern
is displayed.
6. Repeat steps 4 and 5 for Alignment test patterns B through F.
Note: After entering the value for Alignment test pattern F, the user is
returned to normal operation.
Cl e a n Hea d
The Clean Head procedure cleans the print nozzles and removes any
deposits that may impair printing functions.
To run the Clean Head Procedure:
1. Press the Menu button, then press the 1 + 2 buttons on the keypad.
Then press the Start button . The display indicates SELF TEST ?.
2. Press the Up button twice. CLEAN HEAD ? appears in the LCD
displ ay.
3. Press the Start button. PRINTING... appears on the LCD display.
The WorkCentre 490cx prints a head cleaning test pattern. Note the series
of diagonal lines across the top and bottom of the test pattern. Breaks within
a line of the same color indicate a clogged nozzle. Try running the Clean
Head procedure again if you see breaks in the diagonal lines.
Page 46

46
BOOK TOC
CHAPTER TOC
SEARCH
PREVIOUS PAGE NEXT PAGE
SYSTEM SETUP
S elect Language
Select Language allows you to configure the default language for the LCD
pane l disp lay . Y ou may c ho ose between two diff e rent lan guage s : Eng lish and
French.
To select a defa ult language:
1. Press the Menu button, then press the 0 + 4 buttons on the keypad.
Then press the Start button . The display indicates RINGER
VOLUME?.
2. Press the Up or Down buttons until SELECT LANGUAGE ? and
ITEM 1-2 appear in the LCD display. Then press the Start button.
3. Press the Up or Down buttons to scroll through the language
options. A flashing cursor will ind ic ate the currently sele c ted language.
4. Press the Start button to confirm your language selection.
Page 47

47
BOOK TOC
CHAPTER TOC
SEARCH
PREVIOUS PAGE NEXT PAGE
SYSTEM SETUP
Adjusting Speaker Volume
1. Press the On-Hook Dial button on the front panel to adjust the
speaker volume. If you cannot hear a dial tone, check the phone line
connection.
2. Press the Up or Down button once. The display indicates the
current volume level. Press the Up or Down button repeatedly
until the desired loudness setting i s displayed.
3. After choosing the desired volume level, press the On-Hook Dial
button to return to the Standby mode.
S etting the Clock M ode
You can configure your machine to display time using either a 12 hour or 24
hour format.
1. Press the Menu button, then press the 0 + 1 buttons on the keypad.
Then press the Start button. PAPER SIZE appear s on the display.
2. Press the Up button two times.
CLOCK MODE appears on the LCD display.
The display prompts you to select either a 12 hour or 24 hour Clock
Mode.
3. Press 1 to select a 12 hour Clock Mode, or Press 2 to select a 24 hour
Clock Mode.
Page 48

48
BOOK TOC
CHAPTER TOC
SEARCH
PREVIOUS PAGE NEXT PAGE
SYSTEM SETUP
Setti n g the Date an d Time
The current date and time are shown in the display when the machine is on
and re ady for use (Sta ndby mod e). Th e date and time are pri n ted on all f axes
you send.
1. Press the Menu button, then press the 0 + 3 buttons on the keypad.
Then pr es s the Start butto n. The cur rent dat e and tim e are displayed.
A flashing cursor prompts you to enter the date.
2. Using the number keypad, enter the current date using a MMDDYYYY or
DDMMYYYY date format. If you make a mistake, use the right and left
buttons to move the cur sor to the digit you wish to change.After entering
the date the flashing cursor will move into the first d igit of the time.
Note: The Date and Time format is determined by country location.
3. Usi ng the num ber keypad , enter the c urrent tim e. Rememb er to enter the
time according to the current Clock Mode setting (12 or 24 hour format).
Refer to the previous section, CLOCK MODE for details.
10-27-1998
04: 06 (PM)
27-10-1998
04:06 (PM)
MMDDYYYY
DDMMYYYY
Page 49

49
BOOK TOC
CHAPTER TOC
SEARCH
PREVIOUS PAGE NEXT PAGE
SYSTEM SETUP
4. Press the Start button when the date and time settings displayed are
corr ect. The display indicates the date and time you have set, then
returns to Standby mode.
Note: If an invalid number is entered, the m achine beeps and does not
proceed to the next step. If this happens, enter the correct num ber.
Set ting the S ystem I D (Your N um ber and Name)
In some countri es you are requ ired by l aw to in dicate y our fa x numbe r on any
fax you send.
The System ID, containing your telephone number and name,
will be printed at the top of each page sent from your machine.
1. Press the Menu button, then press the 0 + 2 buttons on the keypad.
Then pres s the Star t button. SYSTEM NUMBER appears in the LCD
display. A flashing cursor in the display prompts you to enter the
telephone number.
Note: If there is a number previ ously registered, it appear s in the display.
2. Enter the telephone number ( up to 20 digits) to which your machine is
connected. You can enter a space by pressing the Right butto n two
times.
If an incorrect number is entered, press the Left or Right button
to m ove the cursor under the incorrect digit, then enter the correct
number.
3. Press the Start button when the corr ect number is displayed. The
display prompts you to enter your ID name.
Page 50

50
BOOK TOC
CHAPTER TOC
SEARCH
PREVIOUS PAGE NEXT PAGE
SYSTEM SETUP
4. Enter yo ur ID name . This c an be any nam e up to 40 cha ract er s in lengt h.
You can enter alphanumeric characters using the number keypad.
Special symbols such as + and - can be included by pressing 0
repeatedly.
Note: If there is an ID name previously register ed, it appears in the display.
If you want to enter the same letter or number in succession (for example,
SS, AA, 777), enter one digit, then move the cursor by pressing the R ight
button, and enter the next digit.
Use the Right button to insert a space in the name. Pressing the Right
button two times moves the cursor two positions to the right, creating a
space.
For addi tional details on how to use the number keypad to enter
alphanumeric characters, see Entering Alphanumeric Characters.
5. Press the Start button when the name in the display is correct.
Page 51

51
BOOK TOC
CHAPTER TOC
SEARCH
PREVIOUS PAGE NEXT PAGE
SYSTEM SETUP
Reports/Lists
Your fax machine can print reports or lists containing useful information like
Scheduled Jobs and System Data. The following reports are available for
selection by the user:
• TX and RX/Journal
Thes e jou rnals con sis t of a T ran smis sion R ep ort an d a Reception Repor t.
Each report contains information concerning transmission or reception
activities. They can be printed on command, or automatically if certain
conditi ons are met (see Selectable Options). These reports will be
automatically printed after every 40 transmissions or receptions.
• Schedule Information List (Schedule Job)
The Schedule Inform ation List provides information about documents
currently stor ed for Delayed Transmission, P riority Transmission, Me mory
Transmission, Continuous Polling, and TX Polling. The list shows the
starting time, type of operation, etc.
• Telephone Number List (Phone Book)
Thi s Telepho ne N umbe rs List indic ate s all of the numbe rs curr entl y stor ed
in machine memory as One-Touch Dial numbers, Speed Dial numbers,
and Group Dial numbers.
• System Data List
This System Data List indicates the status of the user-selectable options.
See User Options (System Data). After changing any setting, print this
list to confirm your changes.
• Help Li st
This quick reference guide consists of a list detailing the machine’s basic
functions and commands.
Page 52

52
BOOK TOC
CHAPTER TOC
SEARCH
PREVIOUS PAGE NEXT PAGE
SYSTEM SETUP
• M essage Conf irm ation Rep ort
The Mes sa ge Confi rm ation Report list s importa nt in form ation abo ut fax es
sent from your machine including: the remote site fax number, a sample
of the transmitted text, the number of pages faxed, the communication
mode, and the communication results.
You can set up your machine to pr int a TX Confirm report:
!
Automatically after each transmission (ON).
!
Automatically only if an er ror occurs during transmission (ERR).
The machine can be set to pr int no report at all (OFF). You can print this
report manually whenever you want by pressing the Confirm button
on the control panel.
To Print Reports/List s
1. Press the Reports button.
2. Press the Up or Down button to until the desired report or list is
displayed Press the Start button. The selected report or list will be
pr inted out.
Note: To obtain a Message Confirmation Report, press the Confirm
button.
Page 53

53
BOOK TOC
CHAPTER TOC
SEARCH
PREVIOUS PAGE NEXT PAGE
AUTOMATIC REPORTS
Automatic Reports
Some reports will print out a utomatic ally depending on m achine status. The
user is not required to select these reports.
Note: Any report or l ist w hich is configur ed to print automatically will not
print if your machine runs out of ink or paper, has a paper jam , or is printing a
file sent from a PC.
• Multi-Communication Report
This report is printed automatically after sending to or receiving from
more than one location, and provides detailed information about the
operation.
• Power Failure Report
This report is printed out automatically if the memory has not been
backed up when power is restored following a power fai lure. This report
shows any data (if any) that was erased due to the power failure.
User Options (System D ata)
Your machine has various user-selectable features. These options are
preset at the factory, but you may need to change them. To find out how the
options are currently set, print the System List. For more information on
printing the list, see To Print Reports/Lists.
Page 54

54
BOOK TOC
CHAPTER TOC
SEARCH
PREVIOUS PAGE NEXT PAGE
SETTING AN OPTION
Se tt ing an Option
1. Press the Menu button.
2. Press the 0 + 1 buttons on the keypad. Then press the Start button.
The display shows the first option menu.
3. Scroll through the options by pressing the Down or Up buttons
repeatedly.
4. When the option you want appears in the display, enter the number for
the desired setting.
Or
You can use Left or Right buttons to select the desired setting.
5. Press the Start bu tto n to store your choice in mem o ry.
You can exit from the System Data setup mode at any time by pressing
the Clear/Stop button. W hen you press the Clear/Stop butto n, t he
machine stores the options you changed and returns to the Standby
mode.
Select able Options
These instructions assume you’ve followed the steps listed in the previous
procedure, Setting an Option, and the m achine is prompting you to change
one of the options listed below.
All of these opt ions are me nu setti ng s acce ssed by t he Syste m Data (Press
the Menu button, pr ess the 0 + 1 buttons on the keypad. Then press the
Start button).
• PAPER SIZE - Selec t the paper si z e you will be print ing on.
Press 1 for letter (LTR), 2 for A4 size, or 3 to use legal (LGL) size paper.
Page 55

55
BOOK TOC
CHAPTER TOC
SEARCH
PREVIOUS PAGE NEXT PAGE
SETTING AN OPTION
• MESSAGE CONF. - A message confirmation report showing
transmission information; whether the transmission was successful, how
many pages were sent, etc.
Press 1 to print a confirmation report automatically each time you send a
fax (ON).
Press 2 to turn this feature off (OFF).
Press 3 to print only when an error occurs and the transmission was not
successful (ERR).
• AUTO JOURNAL - The journal is a report providing detailed information
about the previous 40 communication operations including times and
dates.
Press 1 to print the journal automatically after every 40 transmissions or
receptions (ON).
Press 2 to disable automatic printin g of t he Jo urnal (OFF). Yo u can s till
print Journal reports manually at any time. See To Print Reports/Lists.
• REMOTE RCV CODE - The remote receive start code al lows you to
initiate fax reception from an extension phone plugged into the EXT jack
on the side of the machine. If you pick up the extension phone and hear
fax tones, enter the Remote Code and the machine will start re c eiving.
The Remote Code is preset to *9* at the factory. You may change the
Remote Code by selecting any number from 0 to 9 on the numeric
keypad.
• DIAL MODE - Select the type of dial system your fax machine is
connected to:
Press 1 if the fax machine is connected to a tone (Touch Tone) dial line.
Press 2 if the fax machine is connected to a pulse (Rotary) dial line.
Page 56

56
BOOK TOC
CHAPTER TOC
SEARCH
PREVIOUS PAGE NEXT PAGE
SETTING AN OPTION
Note: Pulse (Rotary) dialing is not available in all countries.
• ECM MODE (Error Correction Mode) - This mode compensates for poor
line quality and ensur es accurate, error-free communication with any
other ECM-equipped facsi mile machine. If the line quality is poor,
transmission time may be increased when ECM is enabled.
Press 1 to turn the Error Correction mode on.
Press 2 to turn the Error Correction mode off.
• RX REDUCTION - When receiving a document as long as or longer than
the paper installed in your machine, the machine can reduce the data in
the document to fit the paper size in the machine. Use this feature if you
want to automatically reduce an incoming page (that would otherwise be
divided into two pages) to fit on a single page. If the fax machine cannot
reduce the data to fi t into one page with this feature enabled, the data is
divided and printed in actual size on two or more sheets.
There are two RX Reduction modes available, On and Vertical Only.
Press 1 to turn the RX reduction feature on. N ote that this feature does
not apply to the copy mode.
This will re duce incoming pages equally along each axis in order to
maintain the proportionality of the original image, as shown below.
Original
Rec eived Dat a
Page 57

57
BOOK TOC
CHAPTER TOC
SEARCH
PREVIOUS PAGE NEXT PAGE
SETTING AN OPTION
Press 2 to turn off RX Reduction.
Press 3 to enab l e ve rtical only R X Reductio n. The mac hine wi ll reduc e an
incoming page containing overflow data along the vertical axis only. The
net effect will be a vertical c omp ression o f the image as shown below:
• DISCARD SIZE - When receiving or copying a document as long as or
longer than the paper installed in your fax machine, you can set the fax
m achine to di scard any exc ess i mage at the botto m of the page, to fit into
the r ecording paper size.
If the rece i ved p age is outs ide the marg in you set , it will be printed on two
sheets of paper at the actual size.
If the data is within the margin, and the Auto Reduction feature is turned
ON, it will be reduced t o fit into the appropriate si z e paper (Discard does
not take place). If the Auto Reduction feature is turned OFF or fails, the
data within the margin will be discarded.
Using the number keypad, enter the desir ed discard size (0-30 mm), and
press the Start button to store your selection.
• REDIAL INTERVAL - Your machine can automatically redial a remote fax
machine if i t was busy or does not answer the first call.
Enter the number of minutes (from 1 to 15) using the number keypad.
• REDIALS - Enter the number of redial attempts (from 0 to 2) you wish
your machine to make.
Original
R ec eived Data
Page 58

58
BOOK TOC
CHAPTER TOC
SEARCH
PREVIOUS PAGE NEXT PAGE
SETTING AN OPTION
Note: If you enter 0, the machine wi ll not redial.
• ANSWER ON RINGS - You can select the number of times your machine
r ings befor e ans werin g an in coming call. If y ou ar e u sing your ma chi ne as
both a telephone and a fax m achine, it is recommended that you set the
ring count to at least 4 to allow you time to answer a call.
Enter the ring count by selecting a number from 1 through 7 on the
number keypad.
• SEND FROM MEMORY - With this feature enabled, all transmission
documents are automatically scanned into memory, and it will not be
necessary to wait until documents in the Automatic Document Feeder
(ADF) are sent out before you can send or store other fax jobs.
Press 1 to turn this feature on.
Press 2 to turn this feature off.
• LOCAL ID - Enabling this feature causes the m achine to automatically
print the page number, date, and time of the reception at the bottom of
each page of a received document.
Press 1 to turn this feature on.
Press 2 to turn this feature off.
• CONT. POLL REPORT (Continuous Polling Report) - You can configure
your WorkCentre 490cx to automatically poll and r etrieve faxes from
unattended fax machines. This can be set up to occur daily at regular
intervals. By enabling the Continuous Polling Report, every time
continuous polling ends a multi-communication report will be printed. The
report will contain the results for each registered station.
Press 1 to turn this feature on.
Page 59

59
BOOK TOC
CHAPTER TOC
SEARCH
PREVIOUS PAGE NEXT PAGE
SETTING AN OPTION
Press 2 to turn this feature off.
FAXPRINT QUALITY - This featur e determines the print quality for
incoming faxes. The two choices available are Letter Quality (LQ) and
Dra ft. Letter Quality Faxp rint will print out faxes at a higher resolution than
Draft Faxprint Quality. However, Letter Q uality Faxprint will print more
slowly and consume more ink.
Press 1 to choose Letter Quality printing of incoming faxes.
Press 2 to choose Dra ft Qu ality printing of incoming faxes.
• CLOCK MODE - Use this feature to determine how time is displ ayed on
your machine.
Press 1 to select a 12 hour Clock Mode.
Press 2 to select a 24 hour Clock Mode.
• DRPD (Dist inctive Ring Pattern Detection) MODE - Di s tinctive Ring is a
telephone company service which enables a user to use a single
telephone line to answer several different telephone numbers. The
particular number someone uses to call you is identified by different
ringing patterns, which consist of various combinations of long and short
ringing sounds. This feature is often used by answering services who
answer telephones for m any different clients. They need to know which
number someone is calling on to properly answer the phone.
Using the Distinctive Ring Pattern Detection feature, your fax machine
can "learn" the ring pattern you designate to be answered as a fax.
Unless you change it, this ringing pattern will continue to be recognized
and answered as a fax call. All other ringing patterns will be forwarded t o
the extension telephone or answering machine plugged into the EXT
jack.
Page 60

60
BOOK TOC
CHAPTER TOC
SEARCH
PREVIOUS PAGE NEXT PAGE
SETTING AN OPTION
Note: Before using the Distinctive Ring Pattern Detection option, Distincti ve
Ring service must be installed on your telephone line by the telephone
company. To set up Distinctive Ring Pattern Detection, you will need another
telephone line at your location, or someone available to dial your Distinctive
Ring phone number from outside.
You can suspend or change Distinctive Ring Pattern Detection at any time:
1. Press the Menu button.
2. Press the 0 + 1 buttons on the keypad. Then pr ess the St art button.
3. Press the Up but ton once. The DRPD learn mod e menu is displ ayed .
4. Press 1 to turn DRPD on, or press 2 to turn DRPD off.
If you press 1 to set up the Distinctive Ring Pattern Detection, the LCD
displays WAITING RING. Call your (DR) fax number from an o th er
telephone. It i s not necessary to place the call from a fax machine. When
your m achine begins to ring, do not answer the call. The machine
requires several rings to learn the pattern.
When the machine completes "learning," the LCD displays END DRPD
SETUP.
With the DRPD feature active, DRPD appears in the display and the
previously set reception mode is ignored. If you turn DRPD off, the
machine returns to any previously set reception mode.
Page 61

61
BOOK TOC
CHAPTER TOC
SEARCH
PREVIOUS PAGE NEXT PAGE
SETTING AN OPTION
Note: DRPD must be set up again if you re-assign your fax numb er, or
conne ct the mac hine to anot her tel ep hone line. After D RPD has been set up,
call yo ur fax num ber ag ain to v erify that t he m achine answ e rs wit h a fax tone,
then have a call plac ed to a differ ent num ber ass ign ed to that s ame line to be
sure the call is not answered by the 490cx.
Page 62

62
BOOK TOC
CHAPTER TOC
SEARCH
PREVIOUS PAGE NEXT PAGE
Chapter 2
Making a Copy
Click on one of the following topics, or use the Search button on the left.
Making a Copy
Changing Cop y Setup
Collating and Sorti ng
Changing t he Paper Type
Page 63

63
BOOK TOC
CHAPTER TOC
SEARCH
PREVIOUS PAGE NEXT PAGE
MAKING A COPY
Making a Copy
Your machine is a high quality copier which offers the following features:
• Color Copies - The WorkCentre 490cx can act as a color copier for local
copies.
• Adju stabl e Contra st - Using the LIGHTEN-DARKEN button, the contrast
setting can be changed to obtain the best copy quality for documents
containing faint markings, dark images, photographs or other halftone
images.
• Multiple copies - 1 to 99 copies of the document can be made.
• Enlarg e\Reduce - Using the ENLARGE-RED UCE menu, you can reduce
or enlarge the size of a copied image fr om 25% to 200% in increments of
1%.
• Collation - When the COPY-COLL ATE menu option is set to ON, the
machine sorts the copy job. For example, if you print two copies of a
three-page document, the machine prints one complete docum ent (page
1, page 2, page 3) before printing a second copy (page 1, page 2, and
page 3). If the Photo Mode is selected,COPY-COLLATE is set to off.
To make a single copy:
1. Adjust the document guides to match the width of the document.
2. Slide the document face down in to the A utom atic Do cumen t Feed er unt il it
is grasped and pulled into the machine. The DOCUMENT READY prompt
is displayed on the LCD display.
Page 64

64
BOOK TOC
CHAPTER TOC
SEARCH
PREVIOUS PAGE NEXT PAGE
MAKING A COPY
Note: Up to 30 pag es may be inserte d in th e Auto mati c Doc ume nt Feeder at
one time.
3. Press the Copy/BW button until the desired Copy Mode is displayed.
You may choose COLOR-DRAFT, COLOR-NORMAL,COLOR- PHOTO,
MONO-DRAFT, MONO-N ORMAL and MONO-PHOTO.
Note: If you want to change the contrast or copy si ze, refer to Changing
Copy Setup.
4. Using the keypad, enter the desired number of copies, which is 1 in this
case.
5. Press the Start button. The mac hine will make a co py.
To make 2 or more copies:
1. Adjust the document guides to match the width of the document.
2. Slide the document face down in to the A utom atic Do cumen t Feed er unt il it
is grasped and pulled into the m achine. The Document Ready prompt is
displayed on the LCD display.
Note: Up to 30 pag es may be inserte d in th e Auto mati c Doc ume nt Feeder at
one time.
3. Press the Copy/BW button until the desired Copy Mode is displayed.
You may choose COLOR-DRAFT, COLOR-NORMAL,COLOR- PHOTO,
MONO-DRAFT, MONO-N ORMAL and MONO-PHOTO.
Page 65

65
BOOK TOC
CHAPTER TOC
SEARCH
PREVIOUS PAGE NEXT PAGE
MAKING A COPY
Note: If you want to change the contrast or copy si ze, refer to Changing
Copy Setup.
4. Press the Co llate bu tto n, then press 1 on the keypad. This turns on
copy col lation.
Note: After making a copy , collat ion is turned o ff. If you want to collate agai n,
you must turn collation on again.
5. F or Normal collation, press 1. To reverse the copy from the order of the
original document, press 2. For more information on collation, refer to
Collating and Sorting.
6. Using the keypad, enter the desired number of copies.
Note: Do not enter more than tw o digits (1 - 99) or the machine will only
acce pt the last two d igits, or it will attempt to place a phone call to the digits
enter ed.
7. Press the Start but ton. The machine will make th e sele c ted num ber of
copies.
Page 66

66
BOOK TOC
CHAPTER TOC
SEARCH
PREVIOUS PAGE NEXT PAGE
CHANGING COPY SETUP
Changing Copy Setup
When maki ng copies, y ou may change the Contra st or Copy Size. This must
be don e a fter the docume nt i s inse rted into the Auto matic Docum ent Fe eder .
After making a copy, the machine will return to the original default set tings.
Therefore, you mu st repea t the C opy Set up chan ges for the nex t copy j ob. To
change copy Contrast:
1. Wi th the document inserted in the Automatic Document Feeder, press the
Lighten/Darken button. The current Contrast setting is displayed on
the LCD display.
2. To change the Contrast, continue to press the Lighten/Darken button.
The setting will change each time you press the button. You may choose
Normal, Darken, Lighten or Photo.
Note: After releasing th e but ton, the machine will switch to the mode
currently displayed. It is not necessary to press any other buttons for this
action.
3. When the desired Contrast setting has been selected, return to the
procedure that was being performed.
CONTRAST
[ NORMAL ]
Page 67

67
BOOK TOC
CHAPTER TOC
SEARCH
PREVIOUS PAGE NEXT PAGE
CHANGING COPY SETUP
To Change Copy Size:
1. Wi th the document inserted in the Automatic Document Feeder, observe
the LCD display. The current copy size setting is displayed on the LCD
display.
2. To change the Copy Size, continue to press the Reduce/Enlarge
button. The number in the right corner of the bottom line shows the current
image percenta ge. To reduce or enl ar ge the image si ze, enter the percent
value (25 to 200) using the keypad.
Note: After releasing th e but ton, the machine will switch to the mode
currently displayed. It is not necessary to press any other buttons to
complete this action.
3. Press the Down button to confirm your setting. Return to the
procedure that was being performed.
DOCUMENT RE ADY
AUG--20--2000 100%
REDUCE/ENLARGE
[25-200%] <100>
Page 68

68
BOOK TOC
CHAPTER TOC
SEARCH
PREVIOUS PAGE NEXT PAGE
COLLATING AND SORTING
Collating and Sorting
The 490cx is normally set with the Collation off. Therefore, collating copies
always requires that the collation be turned on before copying. Otherwise,
the c opies will be uncollated.To Collate and Sort copies:
1. Wi th the document inserted in the Automatic Document Feeder, press the
Collate button. The LCD display shows the Copy Collate options.
2. Selecting 1. ON will collate your co pies. There are two collation modes,
NOR (Normal) and REV (Reverse).
COPY C OL LA T E
1.ON 2.OFF
COPY PR IN T ORD ER
1. NOR 2. REV
Page 69

69
BOOK TOC
CHAPTER TOC
SEARCH
PREVIOUS PAGE NEXT PAGE
COLLATING AND SORTING
a) Selecting REV will produce copies collated in the sam e order that the
original document is in. The machine will make one copy of page 1,
page 2, and page 3, in order, then make a second copy of page 1, page
2, and page 3 until all copies have been made.
b) Selecting NOR will make copies in reverse ord er of the or iginal
document. The machine will make one copy of page 3, page 2 and
page 1 (reverse order), then make a second copy of page 3, page 2,
and page 1, until all copies have been made.
3. Selecting 2: OFF will make the requested number of copies of page 1
completely, then page 2, then page 3, etc. These copy sets will all be
stacked atop of one another in the Paper Output Tray.
1
1
2 2
3
3
Sort - REV
3
3
2 2
1
1
Sort - NOR
Group-NOR-SORT
12
1
1
2
2
Page 70

70
BOOK TOC
CHAPTER TOC
SEARCH
PREVIOUS PAGE NEXT PAGE
CHANGING THE PAPER TYPE
4. Press the Start button to begin the copy operation.
Note: The Collate function is not available in the Photo or Color Modes.
Changing the Paper Type
The copy quality can vary depending on the type of paper you are using.
Gener ally, if you use better quality paper, and tell the WorkCentre you’re
using better paper, you’ll get a higher qualit y c opy. You can conf igur e the
WorkCentre for the following paper types:
•Plain
•Premium
• Glossy
• Transparency
To change the paper type:
1. Press the Menu button.
2. Press the Up button until "Menu 13" appears in the LCD display.
3. Press the Start button to display the Paper Type menu.
4. Press Up button or Down button until until the number
corresponding to the desired paper type blinks.
5. Press the Start button. The WorkCentre 490cx returns to idle state.
Page 71

72
BOOK TOC
CHAPTER TOC
SEARCH
PREVIOUS PAGE NEXT PAGE
Chapter 3
Sending a Fax
Click on one of the following topics, or use the Search button on the left.
Options for Se nding a Fax Using the WorkCentre 490cx
Manual Faxing
Preparing Do cumen ts for Faxing or Scanni ng
Sending a Fax Manually
Sending a Fax Using a Speed Dial Number
Sending a Fax Using Group Dialing
(Multi-Address Transmissi on)
Sending a Fax Af ter Talki ng
Canceling a Transmi ssion
Confirming a Transmi ssion
Memory Transmi ssion (Broadcasting)
Delayed Trans mission
Adding Document s To a Standby Operat ion
Cancelin g a Standby Operation
Speed Dialing
Group Dialing (for Multi-Add ress Transm issi on)
Setting Document Resol ution and Contrast
Resolution
Contrast
More options on the next page ...
Page 72

73
BOOK TOC
CHAPTER TOC
SEARCH
PREVIOUS PAGE NEXT PAGE
Using the Number Keypad
Redial/Pause
Redial Memo ry
Automatic Redial
Job Status
On-Hook Dial
Searchi ng for a Number in Memory
Tone Switching
Priority Transmission
Polling
What is Polling?
Adding Documents To the Job to be Polled
Cancelin g a Job Al read y i n M em or y W hi ch is Waiting to be Polled
PC Faxing
What is LaserFAX Lite?
LaserFAX Instal l ation
Sending Faxes wi th LaserFAX Lite
Fax Conversi on Dialog Advanced Feat ur es
LaserFAX Application Features
The LaserFAX Phonebook
Trouble shooti ng Laser FAX
Page 73

74
BOOK TOC
CHAPTER TOC
SEARCH
PREVIOUS PAGE NEXT PAGE
OPTIONS FOR SENDING A FAX USING THE WORKCENTRE 490CX
Opt ions for Se nding a Fax Using the
WorkCentre 490cx
You can send faxes with the WorkCentre 490cx in one of two ways:
• By placing the document in the Automatic Document Feeder and entering
the information required for faxing at the WorkCentre 490cx Control
Panel. This is called Manual Faxing.
For information and instructions for Manual Faxing, refer to Manual
Faxing.
• By faxing the docum ent directly from your computer workstation using
Laser F AX Lite , a softwar e appl icati on inc luded wi th you r Work Ce ntre. This
is called PC Faxing.
For information and instructions for PC Faxing, r efer to PC Faxing.
Page 74

75
BOOK TOC
CHAPTER TOC
SEARCH
PREVIOUS PAGE NEXT PAGE
MANUAL FAXING
Manual Fa xing
This sect io n provides info rma tion and i nstr uct ions for fax ing a docum ent fr om
the WorkCentre 490cx using the features of the Control Panel.
Preparing Document s for Faxing or Scanning
You can fax documents that are printed on standard letter, legal or A4 size
paper. Follow these guidelines to prepare your documents.
• Do not attempt to feed the following types of documents into the machi ne:
!
carbon- paper or carbon-backed paper
!
coated paper
!
onion skin or thin paper
!
wrinkl ed or cr eased paper
!
curled or rolled paper
!
torn paper
Note: If your document falls into any of the above categories, make a copy
of the document on a platen glass copier. Use the copy for insertion into the
Automatic Document Feeder.
• Remove all staples and paper clips before feeding the document.
• Make sure any glue, ink or correction fluid on the paper is completely dry
befor e loading the document.
• Do not load documents containing different sizes or weights of paper.
Page 75

76
BOOK TOC
CHAPTER TOC
SEARCH
PREVIOUS PAGE NEXT PAGE
MANUAL FAXING
Send ing a Fax Ma nual ly
1. Adjust the document guides to match the width of the document.
2. Slide the document face down into the Automatic Document Feeder until
it is grasped and pulled into the machine.
The display alternately reads DOCUMENT READY and shows the
remaining memory capacity. Up to 30 sheets may be inserted at a time.
To insert more than one sheet, ensure that the bottom sheet enters first.
Stagger the leading edge of the sheets slightly and insert them with light
pressure to ensure smooth feeding.
To add pages while the fax is sending, insert them face down into the
Automatic Document Feeder on top of the already loaded sheets. If you
are loading pages that are unusually thick or thin, feed one sheet at a
time.
Document
Guides
Page 76

77
BOOK TOC
CHAPTER TOC
SEARCH
PREVIOUS PAGE NEXT PAGE
MANUAL FAXING
3. If necessary, adjust the document resolution and contrast. See
Resolution and Contrast.
4. Using the Number keypad, enter the number of the fax ma chine to which
you wish to send the document. If you make a mistake while entering a
number, move the cursor under the i ncorrect digit by using the Left
or Right buttons, and correct the number. You may also delete
incorrect numbers by pressing the Clear/Stop button.
Note: A phone number must be four digits or more. If it is less than four
digit s , a copy operation will start.
5. Press the Start button when the number appears corr ectly in the
displ ay. The machine dials the number and begins to transmit the fax.
If you wish to cancel the fax, pr ess the Clea r/Stop button two times.
Page 77

78
BOOK TOC
CHAPTER TOC
SEARCH
PREVIOUS PAGE NEXT PAGE
MANUAL FAXING
Sending a Fax Using a Speed Dial Number
1. Adjust the document guides to match the width of the document.
2. Slide the document face down into the Automatic Document Feeder until
it is grasped and pulled into the machine.
3. Press the Speed/Dial button, then enter a two digit s peed dial lo cation
number. For information on storing numbers in memory, see Speed
Dialing.
4. Press the Start button to dial the number.
The machine will scan the document and dial the numbe r automatically.
When the remote fax machine answers, th e docume nt will be tr ansmitte d
automatically.
Note: You can store Speed Dial numbers so you can dial your most
frequently used numbers with a two digit speed dial number. For information
on storing numbers in memory, see Speed Dialing.
Page 78

79
BOOK TOC
CHAPTER TOC
SEARCH
PREVIOUS PAGE NEXT PAGE
MANUAL FAXING
Send ing a Fax Using Group Di a ling
(Multi-Address Transmission)
Group Dialing can be used in conjunction with Memor y Transmission or
Delayed Transmission faxing operations. However, before you can access
the Group Dialing feature, Group Num bers must be configured. See Group
Dialing (for Multi-Address Transmission) for more information.
To send a fax using the Group Dialing feature:
1. Adjust the document guides to match the width of the document.
2. Slide the document face down into the Automatic Document Feeder until
it is grasped and pulled into the machine.
3. Follow the procedur e for the desired operation (see Memory
Transmission (Broadcasting) or Delayed Transmission).
4. When you come to the step where the display prompts you to enter the
remote fax num ber, enter the Group Number. Press the Men u button,
then press the 1 +1 buttons on the keypad. Then press the Start
button.
5. Select a group from the Speed Dial Directory.
Note: You can use only one Group Num ber in a single operation.
6. Continue the procedure to complete the (Memory Transmission or
Delayed Transmission) operation. Your machine wi ll automatically scan
the document into memory and subsequently dial each of the numbers
included in the group.
Page 79

80
BOOK TOC
CHAPTER TOC
SEARCH
PREVIOUS PAGE NEXT PAGE
MANUAL FAXING
Sending a Fax After Talking
If your machine is equipped with handset, or if you have a phone connected
to the EXT jack o n t he side of the ma c hine, you c an sen d a fax af ter spe aking
with a pe rson at the remote site.
1. Adjust the document guides to match the width of the document.
2. Slide the document face down into the Automatic Document Feeder until
it is grasped and pulled into the machine.
3. Pick up the handset of the telephone connected to the EXT jack.
4. Call the remote location .
DIAL FAX NUMBER THEN PRESS START appears in the LCD display.
Note: For a successful fax transmission, it is imperative that steps 5 to 7
occur in the proper order.
5. When finished talking, instruct the person at the rem ote location to start
their fax machine. They can then hang up.
The remote fax machine will send the initial fax tones.
6. Wait until you hear the fax tone from the remote fax machine.
7. Press the St ar t button on the W orkCentre 490cx. The machine begins
to transmit.
8. Replace the handset.
Page 80

81
BOOK TOC
CHAPTER TOC
SEARCH
PREVIOUS PAGE NEXT PAGE
MANUAL FAXING
Canceling a Transmissi on
To cancel a fax:
1. Press the Clear/Stop button at any time dur ing the transmission.
The machine continues to send the fax, and the display shows a
message warning you that the machine is in use.
2. Press the Clear/Stop button again to cancel the transmission.
Confirming a T r ansm iss ion
A Message Confirmation report shows whether the transmission was
successful and how many pages were sent.
When the last page of your document has been sent successfully, the
machine beeps and returns to Standby mode.
To print a Message Confirmation report:
1. Press the Confirm button in the Fax Column on the Control Panel.
2. The machine prints out a Message Confirmation report.
You can configure your machine to print out a confirmation report
autom atically each time a fax is sent.
To automaticall y print a confirmation report:
1. Press the Menu button, then press the 0 + 1 buttons on the keypad,
then press the Start b u tton.
Page 81

82
BOOK TOC
CHAPTER TOC
SEARCH
PREVIOUS PAGE NEXT PAGE
MANUAL FAXING
2. Press the Up or Down buttons repeatedly until MESSAGE
CONF. appears in the display.
a) Press 1 to print a confirmation report automatically each time you send
a fax (ON).
Or
b) Press 2 to turn th is feature off (OFF).
Or
c) Press 3 to pr int only when an error occurs and the transmission was
not successful (ERR).
If an error occurred during your fax tr ansmission, an error message appears
in the display. If you receive an er ror message, press the Clear/Stop
button to clear the message and try to send the document again.
For a listing of error messages and their meanings, see LCD Display Error
Messages.
Page 82

83
BOOK TOC
CHAPTER TOC
SEARCH
PREVIOUS PAGE NEXT PAGE
MANUAL FAXING
Memory T ransm i ssio n (Broadcast i ng)
With Memory Transmission (Memory TX), documents are stored in memory
and automatically sent to one or more remote stations. Use this feature to
send your documents to m ultiple locations.
You can store a maximum of ten fax numbers for a memory transmission. If
you need to send your fax to more than ten locations, you can increase the
number of fax locations dialed by including a Group Dial number as one of
the ten numbers.
After sending, the documents are automatically erased from memory.
1. Adjust the document guides to match the width of the document.
2. Slide the document face down into the Automatic Document Feeder until
it is grasped and pulled into the machine.
If necessary, adjust the r esolution and contrast. For details, see Resolution
and Contrast.
3. Press the Menu button, then p ress 0 + 7 buttons on the keypad. Then
press the Start button.
4. Enter the telep hone num be r of the remote machine. There are two
methods available to do this:
!
Direct entry of the telephone number using the numeric keypad.
!
Speed Number dialing using the numeric keypad (see Speed Dialing).
Note: Only a single Group Dial number from the speed dial list may be used
per Memory Transmission operation.
Page 83

84
BOOK TOC
CHAPTER TOC
SEARCH
PREVIOUS PAGE NEXT PAGE
MANUAL FAXING
5. Press the Start button.
The display prompts you to enter another fax number.
6. If you have entered the last fax number, press the Start button.
Or
If you want to send the document to more than one location, press the 1
button and enter another fax number using the numeric keypad, or two
digit Speed Dial number. The number appears in the display.
Repeat Step 6 until you have entered the last fax number. Press the 2
button after entering the last fax number.
7. The document is scanned into memory. The display shows the remaining
memory capacity and the number of pages. The machine dials the first
telephone number and begins sending the document.
ANOTHER FAX NO.?
1. YES 2. NO
Page 84

85
BOOK TOC
CHAPTER TOC
SEARCH
PREVIOUS PAGE NEXT PAGE
MANUAL FAXING
Delayed T r ansmi ssio n
You can configure your machine to send a fax at a specified time. Up to 10
delayed transmission operations can be reserved in your machine.
1. Place the document face down in the Automatic Document Feeder. If
desired, adjust the resolution and contrast. For detai ls, see Resolution
and Contrast.
2. Press the Menu button, then press the 0 + 6 buttons on the keypad.
Then press the Start button.
3. Enter the telephone number of the remote machine (up to 46 digits).
There are two m ethods available to do this:
!
Direct entry of the telephone number using the numeric keypad.
!
Group and Speed number dialing using the numeric keypad (see
Delayed Transmission).
4. Press the Start button.
The display prompts you to enter another fax number.
ANO T HER FAX NO.?
1. YES 2. NO
Page 85

86
BOOK TOC
CHAPTER TOC
SEARCH
PREVIOUS PAGE NEXT PAGE
MANUAL FAXING
5. If you have entered the last fax number setting, press the Start button.
Or
If you want to send the document to more than one location, press the 1
button and enter another fax number using the numeric keypad, or two
digit Speed Dial number.
The number appears in the display.
Repeat Step 5 until you have entered the last fax number. Press the 2
button after entering the last fax number.
Note: Only a single Group dial number from the speed dial list may be used
in a Delayed Transmission Operation.
6. The di splay pro mpts you to ente r a name for the t ransm issi on. If you w ant
to assign a name to the transmission to check the status later, enter it
using the Num ber keypad. If not, proceed to Step 7.
For details on how to enter letters using the Number keypad, see
Entering Alphanumeric Characters.
Page 86

87
BOOK TOC
CHAPTER TOC
SEARCH
PREVIOUS PAGE NEXT PAGE
MANUAL FAXING
7. Press the Start button. The display shows the curr ent time on the
up per line and promp ts yo u to enter the time t he fax wi ll be sen t.Us ing the
Number keypad, enter the time the fax will be sent. Us e the Up or
Down button to switch between AM and PM. If you set a time earlier
than the cur ren t time, th e doc ument will b e sen t at that time on the
following day.
Note: Remember to enter the time in either twelve or twenty-four hour clock
mode format, depending upon which mode you enabled. For more
information, see Selectable O ptions.
8. After entering the time, press the Start button.
9. The machine scans the document into m emory, returns to Standby mode
and displays a reminder that a Delayed Transmission is set.
Note: If you want to cancel the Delayed Transmission, see Canceling a
Standby Opera tion.
CURR ENT 12 :30P M
ST AR T 12:30PM
Page 87

88
BOOK TOC
CHAPTER TOC
SEARCH
PREVIOUS PAGE NEXT PAGE
MANUAL FAXING
Adding Docume nt s To a Standby Opera t ion
You can add documents to a Delayed Transmission previously entered into
memory.
1. Place the document face down in the Automatic Document Feeder. If
necessary, adjust the resolution and contrast. For details, see Resolution
and Contrast.
2. Press the Menu button, then p ress the 1 + 0 buttons on the ke ypad.
Then press the Start button.
3. The LCD display prompts you to select ADD or CANCEL. Note that 1.
ADD is already selected in the LCD displ ay.
4. Press the Start button to confirm. The display shows operations
currently reserved in memory.
5. Press the Up or Down buttons repeatedly until you find the
operation you want to add documents to, then press the Start button.
OPERATION
1.ADD 2.CANCEL
09:00 A M DELAY TX
FAX1
Page 88

89
BOOK TOC
CHAPTER TOC
SEARCH
PREVIOUS PAGE NEXT PAGE
MANUAL FAXING
6. The machine automatically adds the new documents to the pages
already in memory, displays the number of total pages and added pages,
then r eturns to Standby mode.
Can celi ng a St a ndby O pe r ation
1. Press the Menu button, then press the 1 + 0 buttons on the keypad,
then press the Start button. The display prompts you to select 1.ADD
or 2.CANCEL.
2. Press 2. The display shows the operations currently reserved in memor y.
3. Press the Up or Down buttons repeatedly until you find the
operation you want to cancel.
4. Press the Start button to cancel the job.
Page 89

90
BOOK TOC
CHAPTER TOC
SEARCH
PREVIOUS PAGE NEXT PAGE
MANUAL FAXING
Speed Di aling
With the Speed Dial Key and the Ten-Key Pad, you can store up to 50
numbers in two digit Speed Dial locations (01-50).
Storing a Number for Speed Dia ling
1. Press and hold the Speed/Dial button for 2 seconds.
2. Enter a two digit location number (01 through 50) to which you want to
store a number, then press the Start button .
If a number is already stored in the location, the display shows the
number in the upper line and 1:RENEW 2:OTHER in the bottom line.
Press 1 to delete the existing number or 2 to select another speed dial
number.
3. Enter the telephone number you want to store, then press the
Start button.
4. To assign a name to the numb er , enter the desir ed name . For inform ati on
on how to enter names, see Entering Alphanumeric Characters.
Or
If you don’t want to assign a name, skip this step.
5. Press the Start button when the name appears correctly or without
entering a name.
6. To store m or e telephone numbers, repeat steps 2 through 5.
Or
To return to Standby mode, pres s t he Clear/Stop button.
Page 90

91
BOOK TOC
CHAPTER TOC
SEARCH
PREVIOUS PAGE NEXT PAGE
MANUAL FAXING
Dialing a Speed-Dial Number
1. Press the Speed/Dial button, then enter the two digit number
assigned to the num ber you wi sh to call.
2. Press the Start button to dial the number.
Group Diali ng (for Multi-Ad dress Tran smissi on)
Multiple speed dial numbers can be registered as a Group. By using the
Group number, you can send a document to multipl e parties in a single
operation. Up to ten numbers may be stored as a Group. Your machine will
dial the remote numbers in a stored sequence. If the number is busy, your
mac hine will dial the next st ore d number and after dialing all of the sto red
numbers, will automatically redial any number pr eviou s ly busy. Before you
can use this feature, you must store Group numbers into speed dial
locations.
Note: Group Dial numbers are assigned to speed dial locations; up to 20
can be supported. A Group number can not include other Group numbers.
Page 91

92
BOOK TOC
CHAPTER TOC
SEARCH
PREVIOUS PAGE NEXT PAGE
MANUAL FAXING
Storing Speed Dial Numbers for Group Dialing
1. Press the Menu button, then press the 1 + 1 buttons on the keypad.
Then press the Start button.
The LCD display prompts you to select a Group Dial Number.
2. Press the location (51 through 70) you want to use for Group Dial, then
press the Start button.The LCD displ ay prompts you to confirm your
choice.
3. Press 1 to confirm your selection or 2 to cancel it and choose a different
Group Dial location.
The display prompts you to enter a Speed Dial number which you wish to
include in the group.
4. Enter the two digit Speed Dial location to w hich the fax number you
wish to include in the group is stored.
GROUP NO. :S02
1.YES 2.NO
ENTER SPEED D IAL
##
Page 92

93
BOOK TOC
CHAPTER TOC
SEARCH
PREVIOUS PAGE NEXT PAGE
MANUAL FAXING
5. Press the Start button. Repeat step 4 and this step to include more
destination number s in the group.
6. Press the Clear/Stop button w hen you have entered all the tel eph one
nu mber s you want to incl ude in the gr oup. The dis play asks you to enter a
name.
7. To assign a name to the Group, enter the desired name.
Or
If you don’t want to assign a name, skip this step.
8. Press the Start button. The display prompts you to assign another
gr oup dial numbe r . If you want to s tore ano ther gro up dial number , repeat
steps 2 through 8.
Or
To return to Standby mode, pres s t he Clear/Stop button.
Using Group Dialing
Group Dial numbers can be used for Memory Transmission, Delayed
Transmission, or Continuous Polling operations. See Memory Transmission
(Broadcasting), Delayed Tran smission, and Polling Rem ote Machines
(CONT. POLL).
Page 93

94
BOOK TOC
CHAPTER TOC
SEARCH
PREVIOUS PAGE NEXT PAGE
MANUAL FAXING
Setti ng Document Resolution and Contrast
It is recommended for good quality transmission that you fax documents that
were printed with a typewriter, felt tip pen, black ink or laser printer. The
paper should be white or very light. The document should be of normal
weight; do not use cardboard. Blue lines on a ruled pad will not fax well.
When sending typical text based documents, you should not need to adjust
the resolution and the contrast. However, if you send docum ents wi th
unusual contrast characteristics, including photographs, you can adjust the
resolution and contrast to ensure a high quality transmission.
Resolution
Press the Resolution button to increase sharpness and clarity. By
pressing the Resolution b u tton repeatedly after loading a document, you
can choose between STA NDARD, F INE
1
, or SUPER FINE modes.
Resolution cannot be changed during a job.
The document types recommended for these settings ar e described in the
table on the next page.
1. Fine is the defaul t setti ng.
Mo de Re co mm e nde d for.. .
Sta ndard Documents with no rmal sized character s .
Fine Documents c ontaining small char ac ters or t hin lines , or for sending
documents pr inted with a dot-matrix pr inter .
Super Fine Documents containing extremely fine detail. SUPER FINE mode works
onl y if t he r em ote mac hine also supports SUPE R FI NE r es olution. (See
Note.)
Page 94

95
BOOK TOC
CHAPTER TOC
SEARCH
PREVIOUS PAGE NEXT PAGE
MANUAL FAXING
Note: If the WorkCentre 490cx is set to Super Fine Resoluti on mode and the
remote fax machine does not support Super Fine R esolution, the
WorkCentre 490cx will transmit using the highest reso luti on mode s uppo rted
by the remote fax machi ne.
Contrast
Press the Lighten/Darken button to compensate for the brightness or
darkness of your faxed document. By pressing the Lighten/Darken
button repeatedly after loading a document, you can choose between
NORMAL, DARKEN, LIGHTEN, or FAX PHOTO
Note: You can set the default resolution and contrast. The default mode will
be in effect when a docu ment i s sent or copi ed unless yo u change the se tting
for an individual operat ion. The mac hine will automatically reve rt to de fault
settings af ter the ope ration is comp l eted. F or deta ils on how to set t he de fault
resolution and contrast, see Default Settings.
Mo de Re co mm e nde d for.. .
Normal F axing most documents.
Darken Docum ents cont aining light print or faint pencil m ar k ings.
Lig hten Documents c ontaining dark print.
Fax Photo Photographs or documents containing color or shades of gray. Your
machine will not trans m it color, but it will scan and send up to 256 shades
of gray.
Page 95

96
BOOK TOC
CHAPTER TOC
SEARCH
PREVIOUS PAGE NEXT PAGE
MANUAL FAXING
Using the Number Keyp ad
As you perform various tasks, you will need to enter names and numbers
using the Num ber keypad. For example, when you set up your machine, you
enter your name (or your company’s nam e) and telephone number. When
sett ing up Speed Dial n umber s , you will also need to enter telephone
numbers and names.
When prompting you to enter a nam e, the LCD display will appear as shown
below :
You can then use the procedures described below to enter up to 20 letter s
and special characters, numbers or spaces.
NA ME:
Page 96

97
BOOK TOC
CHAPTER TOC
SEARCH
PREVIOUS PAGE NEXT PAGE
MANUAL FAXING
Entering Alphanumeric C haracters
1. Locate the button labeled with the character you want. Press the button
repeatedly until the correct letter appears in the display.
For exa mple, to enter the let ter O, press the 6 key (labe led MN O). Each time
you press the 6 ke y , the disp lay sho ws a differ ent letter , f irst M, the N , and O,
and finall y 6.
You can enter special characters (space, plus sign, etc.) in the name by
using the 0 key. See Keypad Character Assignments.
Note: Only upper case letters are available.
The letter appears in the display.
NAME: O
Page 97

98
BOOK TOC
CHAPTER TOC
SEARCH
PREVIOUS PAGE NEXT PAGE
MANUAL FAXING
2. To enter another letter, locate the Number keypad button labeled with the
lett er you wa nt. Press the but ton repe atedl y unti l the let ter ap pear s in the
displ ay.
If the next letter is printed on the same Number keypad button, move the
cursor by pressing the Right button, then press the Number keypad
button labeled with the letter you want.
The blinking cursor moves right and the next letter appears in the display.
If the letter that appear s is not the one you wish to enter, press the
Number keypad button repeatedly until the letter you wish to enter
appears in the display. Select additional letters in the same way.
3. When you finish entering letters, press the Start button.
NAME: OP
Page 98

99
BOOK TOC
CHAPTER TOC
SEARCH
PREVIOUS PAGE NEXT PAGE
MANUAL FAXING
Keypad Charac ter Assignments
Editing Number s or Names
If you make a mistake while entering a number or name, move the cursor
under the wrong character by pressing the Left or Right bu tton.
Press the correct number to change or press the Clear/Stop button to
delete the character.
Key As signed numbers, lett ers or ch aracters
11
2A
→
B → C → 2
3D
→ E → F →
3
4G
→
H → I → 4
5J
→
K → L → 5
6M
→
N → O → 6
7P
→
Q → R → S → 7
8T
→
U → V → 8
9W
→
X → Y → Z → 9
0+
→
-- → ,→ . → ’ → / → * → # → &
→
0
Page 99

100
BOOK TOC
CHAPTER TOC
SEARCH
PREVIOUS PAGE NEXT PAGE
MANUAL FAXING
Inser ting a Pause
With some private telephone systems, you must dial an access code (9 for
example) and listen for a second dial tone before dialing an outside number.
In such cases, you must insert a pause in the telephone number. You can
insert a paus e in the telephone nu mber wh en you are sett ing up a S peed Dial
number, or when you dial a number without lifting the handset.
To insert a pause, press the Redial/Pause button at the appropriate place
while enter ing the telephone number. A “P” will appear in the display at the
corresponding location.
When you dial a number, the dialing process pauses for about 3 seconds at
the point where you inserted the pause. If you require a longer pause time,
press the Redial/Pause button twice.
Redial/Pause
Redial/Pause redials the last number, the last ten numbers, or adds a pause
when storing a number in Phonebook memory.
To redial the last number called, press the Redial/Pause button. If a
document is loaded in the document tray, the machine automatically begins
to send.
Re dia l Memo ry
To sear ch through Redial memory:
1. Press and hold the Redial/Pause button for 2 seconds.
The Redial memory in your machine retains the last 10 numbers called. If
you have dialed the same number multiple times, the machine does not
count the dupl icates.
Page 100

101
BOOK TOC
CHAPTER TOC
SEARCH
PREVIOUS PAGE NEXT PAGE
MANUAL FAXING
2. Press the Up or Down buttons to search through memor y until
you find the number you want.
3. When the number you want appears in the display, pr ess the
Start button to commence dialing. If a docum ent is loaded in the
Automatic Document Feeder, transmission begins when the remote
machine answers.
Au to m atic Red i al
If the number you dial to send a fax is busy or there is no answer, the
machine beeps, hangs up, and waits for the specified retry period. It then
redials the number. If, after the specified number of retry attempts (retry
count) the machine fails to connect, it retur ns to Standby mode.
1. While the machine is waiting to redial, the LCD display shows RET RY
REDIAL ?.
2. If you want to redial the number immediately, press the Start button.
To stop rediali ng, press the Clear/Stop button.
You can select the number of retries and the retry interval betw een each
redial attempt. See User Options (System Data).
Job Stat us
Job St atus dis plays an LC D message abou t p ending jobs o r jobs oper ati ng in
the background.
 Loading...