

Page 1

DocuScan C4250/C3200 A
User Guide
Page 2

Preface
Thank you for choosing the DocuScan C4250/C3200 A. This manual provides complete
information about the scanner, such as how to get ready to scan, operating instructions, and
usage restrictions and requirements. To get the most out of this product, read this manual
thoroughly before use.
After reading this manual, keep it handy for future reference.
This manual assumes that you are familiar with personal computers and network
environments.
Microsoft, Windows, and Windows NT are registered trademarks or trademarks of Microsoft
Fuji Xerox Printing Systems Co., Ltd.
Adobe and Reader are registered trademarks or trademarks of Adobe Systems
Incorporated.
Corporation in the US and other countries.
Permission have been obtained from Microsoft Corporation for use of software screen
shots.
All products/brand names are registered trademarks or trademarks of the respective
holders.
In this manual, safety instructions are preceded by the symbol . Always read and follow the instructions
before performing the required procedures.
As the scanner contains a feature designed to prevent forging of certain documents, there may be a rare
instances where copies do not achieve the desired results.
This product is certified by the following Agency using the Safety standards listed.
Agency
NEMKO IEC60950-1 Edition 1 (2001)
This product was manufactured under a registered ISO9001 system.
Important
1. This manual is copyrighted with all rights reserved. Under the copyright laws, this manual may not be copied
2. Parts of this manual are subject to change without prior notice.
3. We welcome any comments on ambiguities, errors, omissions, or missing pages.
4. Never attempt any procedure on the machine that is not specifically described in this manual. Unauthorized
XEROX, The Document Company, the digital X, Ethernet, and CentreWare are registered trademarks of
Standard
or modified in whole or part, without the written consent of the publisher.
operation can cause faults or accidents. Fuji Xerox is not liable for any problems resulting from unauthorized
operation of the equipment.
Xerox Corporation or Fuji Xerox Co., Ltd.
DocuWorks is a trademark.
2 Preface
Page 3
Related Information Sources
Manuals Included with the Scanner
Manuals
you should
read before
using the
scanner
Manuals
you should
read when
using the
scanner
Want to install the
scanner.
Want to use the
scanner.
Want to know about
the included CDROM.
Want to install
DocuScan Manager.
Want to know all about
the scanner's
features.
Want to know how to
troubleshoot error
messages.
Want to know how to
clean the scanner.
Want to register
addresses in Address
Book.
Setup and Quick
Reference Guide
(hard cover/
PDF)
Software Operation Guide
("DocuWorks SelfExtracting Documents"
format file)
User Guide (PDF)
(This manual)
DocuScan Manager
Online Help
Provides the scanner installation instructions,
document loading instructions, basic scanning/
copying procedures, and problem solving
information.
Refer to“Contents of Setup and Quick Reference
Guide (Reference)” (P. 10).
> This manual is included in the "Software Pack"
CD-ROM.
Contains information about the "Software Pack"
CD-ROM and instructions on installing
DocuScan Manager.
> This manual is included in the "Software Pack"
CD-ROM.
Provides the scanning/copying procedures,
maintenance information, problem solving
information, and notes/restrictions on use.
This manual contains all of the information
included in the "Setup and Quick Reference
Guide" except for the scanner installation
instructions.
> This manual is included in the "Software Pack"
CD-ROM.
Contains information about features and
operating procedures of DocuScan Manager.
> This manual can be viewed by selecting the
[Help] menu on DocuScan Manager.
Want to edit scanned
images.
Want to monitor the
scanner on a Web
browser.
CentreWare Internet
Services Online Help
Contains information about the features and
operating procedures of CentreWare Internet
Services.
> This manual can be viewed by selecting the
[Help] button on CentreWare Internet
Services.
Manual Included with the Optional Accessory
Scanner Stand Installation Guide Provides the scanner stand installation
instructions.
Note
• To view PDF files, you must have Adobe
from the "Software Pack" CD-ROM.
®
Reader® installed in your computer. If not installed, install it
Related Information Sources 3
Page 4
Using This Manual
Organization
This manual is organized by the following chapters. The summary of each chapter is as
follows:
1 Basic Operation Provides the names and functions of the scanner components and
2 Scan Contains information about basic scanning procedure and how to
3 Copy Contains information about basic copying procedure and how to
4 Address Book and Subject/
Comment List
5 Job Status Describes how to check the status of scan/copy jobs.
6 System Settings Provides descriptions for customizing various defaults.
7 DocuScan Manager Describes basic operating procedure of DocuScan Manager.
8 Problem Solving Contains problem solving procedures to help quickly resolve
9 Maintenance Provides maintenance information such as cleaning and relocating
A Appendix Contains information about the scanner specifications, optional
the control panel buttons, as well as basic operating procedures
such as loading documents.
configure each scan feature.
configure each copy feature.
Describes how to use Address Book and Subject/Comment List.
problems.
the scanner.
accessory, product information, and notes/restrictions on use.
Conventions
1. The illustrations and scanner interface screens are based on a DocuScan C4250
2. This manual uses the following conventions:
3. In this manual, paper feed orientations are referred to as follows:
connected with a color printer. The procedural steps and computer screen shots are
based on Microsoft
Windows XP.
[ ] : Items that appear on your computer screen or the touch panel display
on the scanner's control panel.
< > : The names of keys that appear on your computer keyboard or
hardware buttons and lamps on the scanner.
, Long Edge Feed (LEF) :Paper is fed into the scanner long-edge first.
, Short Edge Feed (SEF) :Paper is fed into the scanner short-edge first.
LEF Orientation SEF Orientation
Paper feed direction Paper feed direction
4 Using This Manual
Page 5

Contents
Preface.............................................................................................................. 2
Related Information Sources ............................................................................ 3
Using This Manual ............................................................................................ 4
Contents............................................................................................................ 5
Contents of Setup and Quick Reference Guide
(Reference) ................................................................................................. 10
Illegal Copies and Printouts ............................................................................ 12
1 Basic Operation........................................................................................ 13
1.1 Main Components ................................................................................................. 13
1.2 Entering Characters............................................................................................... 18
1.3 Switching On/Off the Power .................................................................................. 21
1.4 Setting/Exiting the Power Saver Mode .................................................................. 22
1.5 Loading Documents............................................................................................... 23
Manuals Included with the Scanner .........................................................................3
Manual Included with the Optional Accessory ......................................................... 3
Front View .............................................................................................................13
Right/Rear View ..................................................................................................... 14
Duplex Automatic Document Feeder ..................................................................... 15
Control Panel ......................................................................................................... 16
Using the Numeric Keypad ....................................................................................18
Confirming an Entry ............................................................................................... 19
Moving the Cursor .................................................................................................19
Deleting a Character ..............................................................................................19
Modifying a Character ...........................................................................................19
Character Entry Procedure ....................................................................................19
Switching On the Power ........................................................................................21
Switching Off the Power ........................................................................................21
Supported Documents ...........................................................................................23
Detectable Document Sizes ..................................................................................23
Document Loading Precautions ............................................................................24
Tips on Loading Documents .................................................................................. 25
Loading Documents ...............................................................................................27
2 Scan ......................................................................................................... 30
2.1 Scanning Procedure .............................................................................................. 30
Step 1 Get ready to scan ......................................................................................30
Step 2 Load a document and insert media ........................................................... 30
Step 3 Select the scan type .................................................................................. 31
Step 4 Set the scan features ................................................................................32
Step 5 Start the scan job ......................................................................................33
Step 6 Check the job status ..................................................................................35
Step 7 Use the scanned data ...............................................................................36
2.2 Stopping a Scan Job ............................................................................................. 37
2.3 Scan Feature Setting Items ................................................................................... 38
2.4 Using Scan to E-mail ............................................................................................. 40
Operating Tips .......................................................................................................40
Configuring Settings for Scan to E-mail ................................................................. 41
2.5 Using Scan to PC .................................................................................................. 49
Operating Tips .......................................................................................................50
Contents 5
Page 6

Configuring Settings for Scan to PC ...................................................................... 51
2.6 Using Scan to Media ............................................................................................. 58
Configuring Settings for Scan to Media .................................................................58
2.7 Setting the Basic Scan Features ........................................................................... 61
Output Color (Selecting the Output Color) ............................................................. 62
File Format (Selecting the File Format of the Scanned Data) ...............................63
2 Sided Originals (Scanning a 2-Sided Original) ................................................... 64
Original Type (Selecting the Original Type) ...........................................................66
Lighten/Darken (Adjusting the Scan Density) ........................................................68
2.8 Setting Other Scan Features ................................................................................. 69
Scan Size (Specifying the Scan Size) ...................................................................70
Reduce/Enlarge (Specifying the Scan Ratio) ........................................................71
Scan Resolution (Specifying the Scan Resolution) ...............................................73
Image Compression (Specifying the Compression Rate of the Output) ................73
Mixed Sized Originals (Scanning Mixed-size Originals Simultaneously)
(DocuScan C4250 Only) ....................................................................................... 74
Original Orientation (Specifying the Orientation of the Original) ............................ 75
Sharpness (Adjusting the Sharpness of the Output) .............................................76
Auto Exposure (Removing the Background of the Original) .................................. 77
Contrast (Adjusting the Contrast of the Output) .................................................... 78
3 Copy ......................................................................................................... 79
3.1 Copying Procedure ................................................................................................ 79
Step 1 Get ready to copy ...................................................................................... 79
Step 2 Load a document ......................................................................................79
Step 3 Select [Copy] ............................................................................................. 80
Step 4 Set the copy features ................................................................................80
Step 5 Enter the quantity ......................................................................................81
Step 6 Start the copy job ......................................................................................81
Step 7 Check the job status ..................................................................................83
3.2 Stopping a Copy Job ............................................................................................. 83
3.3 Copy Feature Setting Items................................................................................... 84
3.4 Setting the Basic Copy Features ........................................................................... 85
Paper Supply (Selecting a Paper Tray) ................................................................. 86
Reduce/Enlarge (Making a Reduced/Enlarged Copy) ........................................... 89
Output Color (Selecting the Output Color) ............................................................. 91
2 Sided Copying (Making a 1-Sided/2-Sided Copy) ..............................................92
Lighten/Darken (Adjusting the Copy Density) ........................................................ 95
3.5 Setting the Image Quality Features ....................................................................... 96
Image Quality Presets (Specifying the Image Quality) ..........................................96
Original Type (Selecting the Original Type) ...........................................................98
Auto Exposure (Removing the Background of the Original) .................................. 99
Color Balance (Adjusting the Color Balance of the Output) ................................100
Sharpness (Adjusting the Sharpness of the Output) ........................................... 102
Color Saturation (Adjusting the Color Saturation of the Output) .......................... 103
3.6 Settings Other Copy Features ............................................................................. 104
Copy Output (Collating or Uncollating the Output) ..............................................105
2 Up (Copying Two Originals on One Page) .......................................................106
Original Orientation (Specifying the Orientation of the Original) .......................... 107
Mixed Sized Originals (Scanning Mixed-size Originals Simultaneously)
(DocuScan C4250 Only) ......................................................................................109
Edge Erase (Erasing Unwanted Marks from the Center/Edges of the Original) ..110
Original Size (Specifying the Scan Size) ............................................................. 111
6 Contents
Page 7

4 Address Book and Subject/Comment List.............................................. 113
4.1 Overview.............................................................................................................. 113
What is Address Book ......................................................................................... 113
What is Subject/Comment List ............................................................................ 114
Registering Addresses/Subjects/Comments .......................................................114
Using Address Book and Subject/Comment List ................................................. 120
4.2 Using Address Book on the Scanner................................................................... 121
Displaying Address Book ..................................................................................... 121
Selecting an Address ........................................................................................... 124
Searching for an Address ....................................................................................125
Viewing the Details of an Address ....................................................................... 126
5 Job Status .............................................................................................. 127
5.1 Using the Control Panel....................................................................................... 127
5.2 Using CentreWare Internet Services ................................................................... 128
6 System Settings ..................................................................................... 129
6.1 System Setting Procedure................................................................................... 129
Step 1 Display the [System Settings] screen ...................................................... 129
Step 2 Enter the system administrator password ...............................................129
Step 3 Select a setting item ................................................................................ 130
Step 4 Exit the [System Settings] screen ...........................................................130
6.2 System Settings Setting Items............................................................................. 131
6.3 Screen Contrast................................................................................................... 133
6.4 Common Settings ................................................................................................ 133
Machine Clock/Timers ......................................................................................... 133
Audio Tones ........................................................................................................ 137
Screen Defaults ...................................................................................................140
Original Size Button ............................................................................................. 141
Service Availability ...............................................................................................143
Service Login ....................................................................................................... 145
Other Settings ...................................................................................................... 147
Maintenance/Diagnostics ....................................................................................149
6.5 Network Settings ................................................................................................. 154
Port Settings ........................................................................................................154
Protocol Settings .................................................................................................155
6.6 Copy Settings ...................................................................................................... 158
Basic Copying ...................................................................................................... 158
Copy Defaults ......................................................................................................160
Auto Exposure Level ...........................................................................................166
Print Auditron Settings ......................................................................................... 169
6.7 Scan Settings ...................................................................................................... 170
Scan Defaults ......................................................................................................170
File Name Conflict ...............................................................................................176
Scan to PC Protocol ............................................................................................176
6.8 System Administrator Settings ............................................................................ 177
Setup Password .................................................................................................. 177
7 DocuScan Manager................................................................................ 178
7.1 What is DocuScan Manager................................................................................ 178
What You Can Do ................................................................................................ 178
Image Editing Procedure .....................................................................................179
7.2 Registering an Address ....................................................................................... 180
Selecting a Scanner ............................................................................................180
Contents 7
Page 8

Registering an Address Folder ............................................................................181
Registering an Address for Scan to PC ............................................................... 182
7.3 Importing Scanned Data...................................................................................... 186
Scanning an Image on the Scanner ....................................................................186
Importing an Image into DocuScan Manager ......................................................186
7.4 Editing Images Simultaneously ........................................................................... 187
Creating an Edit Images Icon ..............................................................................187
Executing an Editing Operation ........................................................................... 188
7.5 Editing Images One by One ................................................................................ 190
Displaying an Image ............................................................................................190
Editing an Image .................................................................................................. 191
7.6 Printing an Image ................................................................................................ 193
7.7 Saving an Image.................................................................................................. 193
8 Problem Solving ..................................................................................... 194
8.1 Identifying Your Problem ..................................................................................... 194
Problem Solving Procedure ................................................................................. 194
8.2 Clearing Document Jams .................................................................................... 195
DocuScan C4250 ................................................................................................ 195
DocuScan C3200 A .............................................................................................197
8.3 Hardware Problems ............................................................................................. 199
8.4 Image Quality Problems ...................................................................................... 203
8.5 Scanner Feature Problems.................................................................................. 205
8.6 Network-related Problems ................................................................................... 206
CentreWare Internet Services Problems .............................................................206
8.7 Error Codes ......................................................................................................... 208
Other Errors .........................................................................................................215
9 Maintenance........................................................................................... 216
9.1 Monitoring/Managing the Scanner on a Web Browser ........................................ 216
Getting Ready to Use CentreWare Internet Services ..........................................216
Using CentreWare Internet Services ...................................................................217
CentreWare Internet Services Setting Items ....................................................... 219
Using the Online Help ..........................................................................................220
9.2 Cleaning the Scanner .......................................................................................... 220
Cleaning the Exterior ...........................................................................................220
Cleaning the Interior ............................................................................................220
9.3 Moving the Scanner............................................................................................. 226
A Appendix ................................................................................................ 229
A.1 Main Specifications.............................................................................................. 229
Scanner Specifications ........................................................................................ 229
Document Feeder Specifications ......................................................................... 230
Scan Feature Specifications ................................................................................ 231
DocuScan Manager System Requirements ........................................................231
Reduction/Enlargement Ratios ............................................................................ 232
A.2 Optional Accessory.............................................................................................. 233
Optional Accessory .............................................................................................. 233
A.3 About Repair Performance Parts......................................................................... 233
A.4 Obtaining the Product Information....................................................................... 233
Updating the Scanner's Firmware ....................................................................... 233
A.5 Notes and Restrictions ........................................................................................ 234
Scan Features .....................................................................................................234
Copy Features .....................................................................................................234
8 Contents
Page 9

A.6 Glossary .............................................................................................................. 236
Index ............................................................................................................. 240
Contents 9
Page 10

Contents of Setup and Quick Reference Guide (Reference)
Preface
Using This Manual
Contents
What You Can Do
Related Information Sources
Contents of the User Guide (Reference)
Safety Notes
1 Installing the Scanner............................................................................................ 14
Checking the Package Contents and Unpacking the Scanner
Main Components
Unlocking the Carriage Lock
Connecting and Switching On the Scanner
Changing the Display Language
Setting the Time Zone
Connecting the Scanner to a Network
Connecting the Scanner to a Printer
2
Network Settings .................................................................................................... 22
Network Setting Procedure
Setting an IP Address
Starting CentreWare Internet Services
Configuring the Settings for Scan to E-mail
Configuring the Settings for Scan to PC
Registering an Address in Address Book
3
Basic Operation ...................................................................................................... 31
Switching On/Off the Power
Setting/Exiting the Power Saver Mode
Loading Documents
Control Panel
Using the Screens
4
Scan ........................................................................................................................... 42
Using Scan to E-mail
Using Scan to PC
Using Scan to Media
Displaying a Preview
Stopping a Scan Job
5
Copy........................................................................................................................... 56
Copy
Stopping a Copy Job
6
Problem Solving...................................................................................................... 60
Identifying Your Problem
Clearing Document Jams
Hardware Problem
Image Quality Problems
Scanner Feature Problems
Network-related Problems
Error Codes
A
Appendix ................................................................................................................... 79
Screen Functions and Character Entry Limits
Entering Characters
Optional Accessory
About Repair Performance Parts
Obtaining the Product Information
Main Specifications
Notes and Restrictions
10 Contents of Setup and Quick Reference Guide (Reference)
Page 11

Index
Trademark
: Information included only in the Setup and Quick Reference Guide.
Contents of Setup and Quick Reference Guide (Reference) 11
Page 12

Illegal Copies and Printouts
Copying or printing certain documents may be illegal in your country. Penalties of fines or
imprisonment may be imposed on those found guilty. The following are examples of items
that may be illegal to copy or print in your country.
• Currency
• Banknotes and checks
• Bank and government bonds and securities
• Passports and identification cards
• Copyright material or trademarks without the consent of the owner
• Postage stamps and other negotiable instruments
This list is not inclusive and no liability is assumed for either its completeness or accuracy.
In case of doubt, contact your legal counsel.
12 Illegal Copies and Printouts
Page 13
1 Basic Operation
1.1 Main Components
The following provides a brief description of the components of the DocuScan C4250/
C3200 A (hereinafter referred to as "the scanner").
Note
• The components that are specific to only one of the models (DocuScan C4250/DocuScan C3200 A) are
noted with a model name.
Front View
DocuScan C3200 ADocuScan C4250
No. Name Function
1 Document feeder cover Holds documents in place.
2 Document glass Place documents here.
3 Control panel The feature buttons, indicator lamps, and touch panel display are
placed here.
Refer to
• "Control Panel (P. 16)"
4 USB Connector Connects a USB flash memory to the scanner.
Note
• The USB interface of the scanner supports USB 2.0 (HiSpeed).
• USB hubs cannot be connected.
5 Document feeder cover
sensor
6 Carriage lock
(DocuScan C4250 only)
Detects the size of documents loaded.
Locks or unlocks the carriage (read head). When in a locked
position, it locks the carriage in place to prevent it from shaking
when moving the scanner.
1.1 Main Components 13
Page 14
Right/Rear View
No. Name Function
1 Power switch Switches the scanner on/off.
DocuScan C3200 ADocuScan C4250
2 Power cord connector Connects a power cord to the scanner.
3 Ethernet interface con-
nector
4, 5 USB connector Connects a USB cable to the scanner.
6 Carriage lock
(DocuScan C3200 A only)
Connects a network cable to the scanner.
Note
• The Ethernet interface of the scanner supports 100BASE-TX/
10BASE-T.
Note
• The USB interface of the scanner supports USB 2.0 (HiSpeed).
• USB hubs cannot be connected.
Locks or unlocks the carriage (read head). When in a locked
position, it locks the carriage in place to prevent it from shaking
when moving the scanner.
14 1 Basic Operation
Page 15
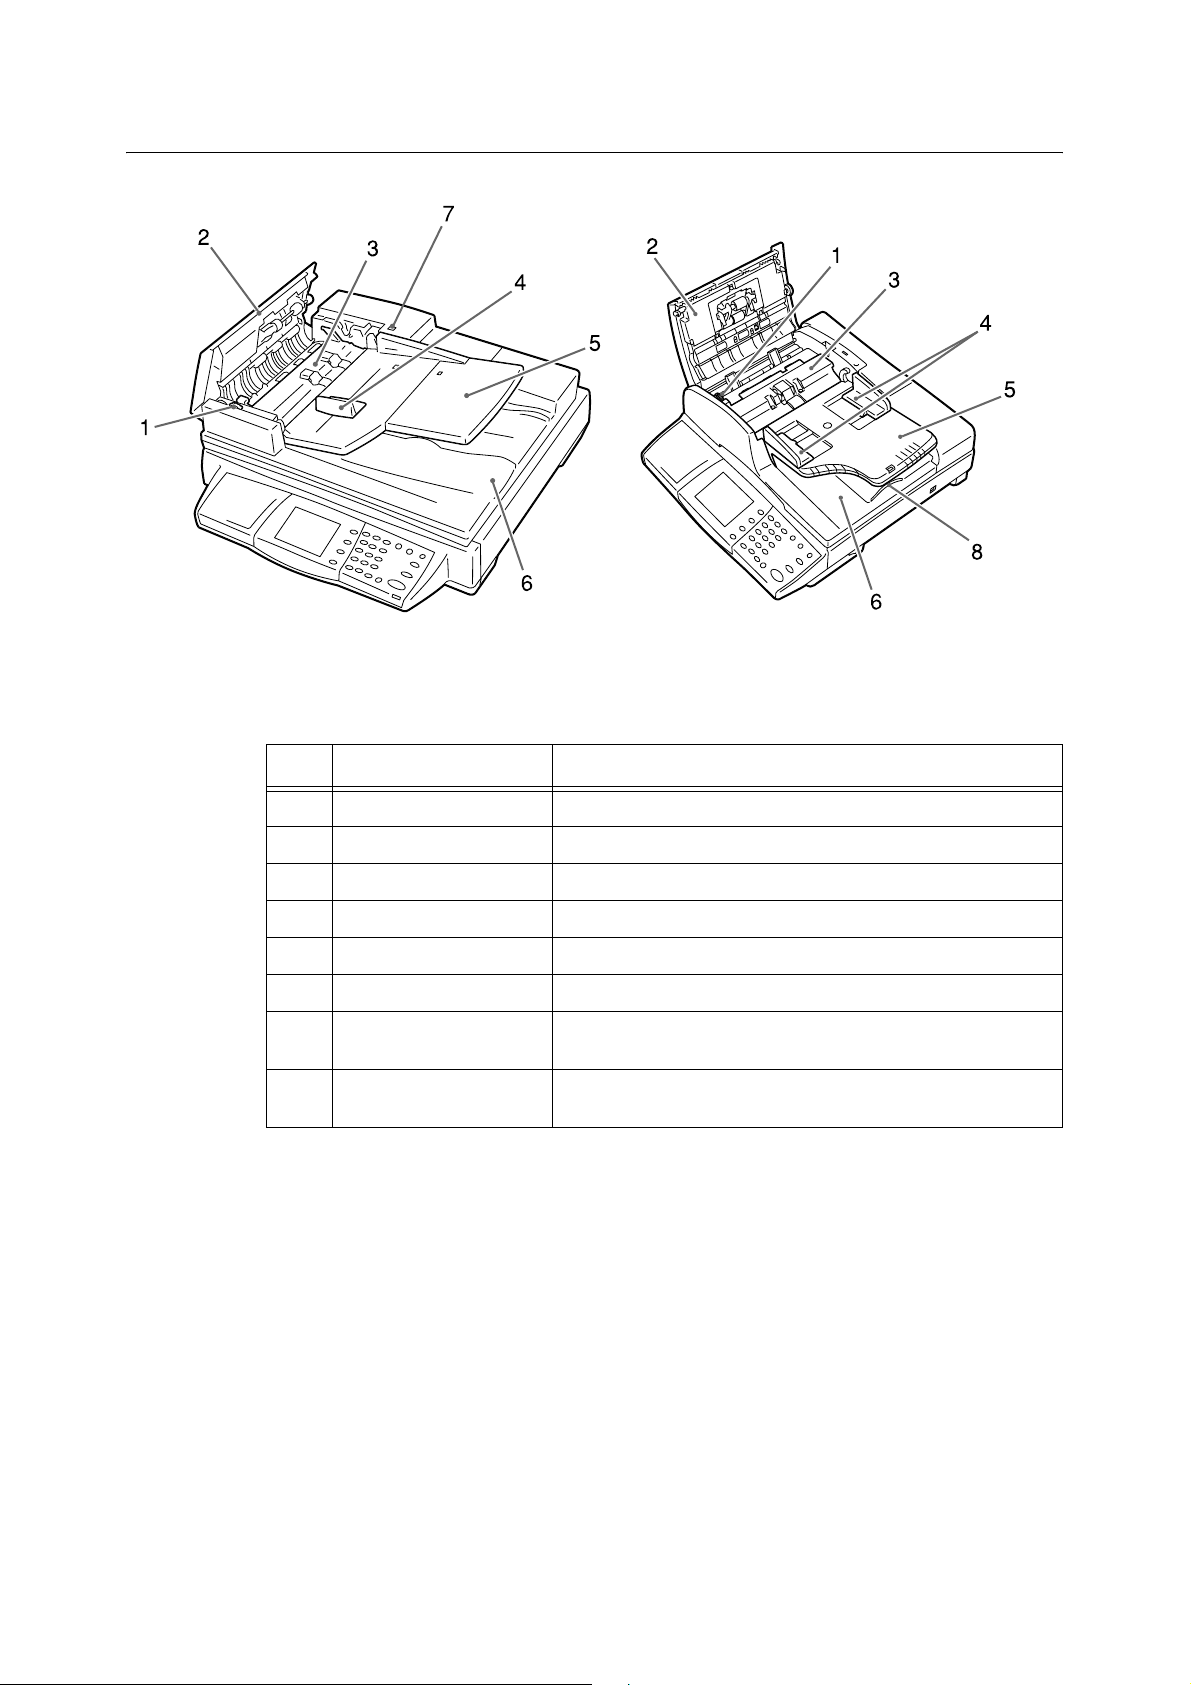
Duplex Automatic Document Feeder
DocuScan C3200 ADocuScan C4250
No. Name Function
1 Wheel Turned when clearing document jams.
2 Left cover Opened when clearing document jams.
3 Inner cover Opened when clearing document jams.
4 Document guides Adjusted to keep documents aligned.
5 Document feeder tray Load documents here.
6 Document output tray Holds scanned documents.
7 Documents indicator lamp
(DocuScan C4250 only)
8 Extension guide
(DocuScan C3200 A only)
Lights when documents are loaded correctly.
Extended when scanning long documents.
1.1 Main Components 15
Page 16
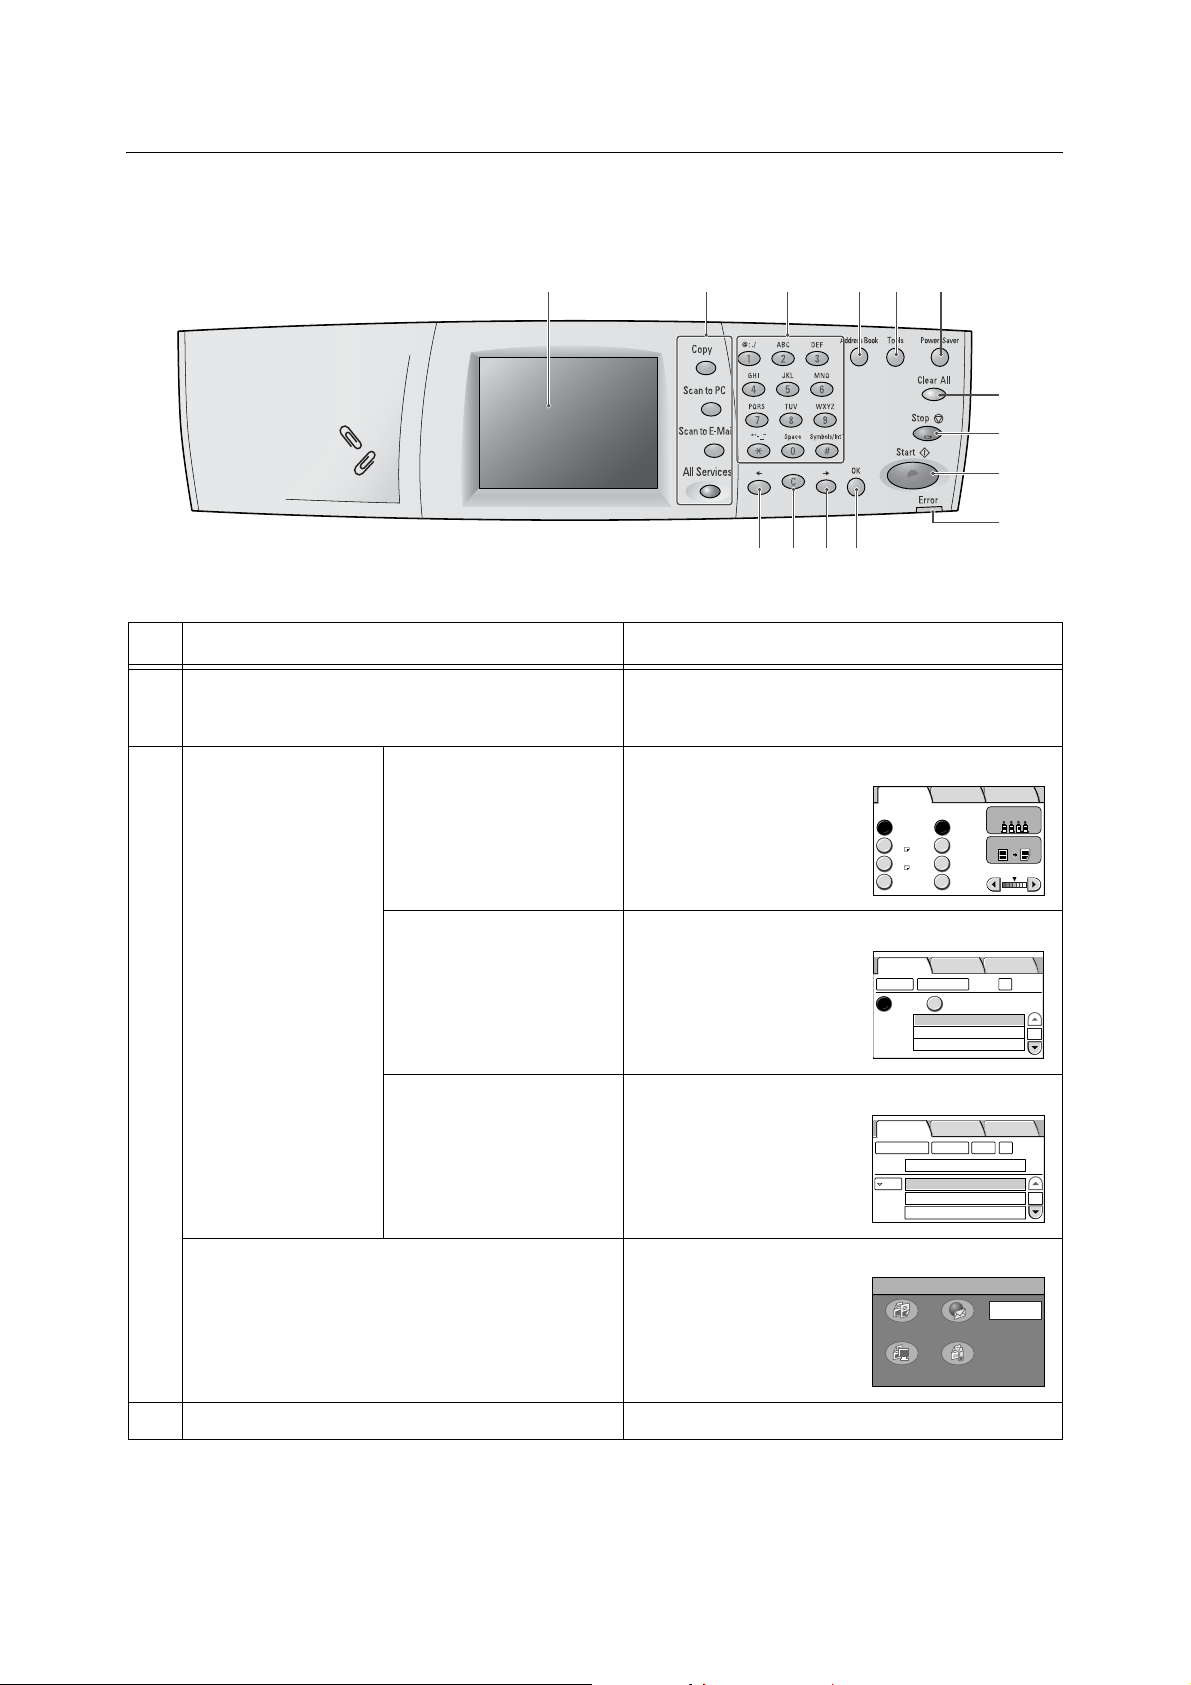
Control Panel
Note
• The control panel is common to both the DocuScan C4250 and DocuScan C3200 A.
1
36
45
7
8
9
10
11
14213
12
Name Function
1 Touch panel display Displays the messages and feature buttons required to
operate the scanner. Touch the display surface to
access and control the features.
2 Custom buttons
Note
• The features
assigned to the
custom buttons can
be changed.
<Copy> button Pressed to display the copy feature setting screen.
Reduce
/ Enlarge
Auto %
70%
A3´A4
More Copy
Features
Output Color
Lighten/Darken
Basic Copying Image Quality
Paper Supply
Auto Paper 100%
Tray 1
A4
Tray 2
A3
More... More...
2 Sided
For details, refer to
"Screen Defaults (P.
140)" in “6.4
Common Settings”.
<Scan to PC> button Pressed to display the Scan to PC setting screen.
Save In Basic Scanning
Address Book...
Change File Name...
SMB FTP
Server
Shared Name
Save In
More Scan
Features
Preview
1/2
<Scan to E-mail> button Pressed to display the Scan to E-mail setting screen.
E-mail Address Basic Scanning
Address Book... Details...
From
To
<All Services> button Pressed to display the [All Services] screen.
All Services
Copy
Scan to PC Scan to Media
3 Numeric keypad Pressed to enter numbers and characters.
16 1 Basic Operation
Scan to E-mail
Clear
More Scan
Features
Job Status
Preview
1/9
Page 17
Name Function
4 <Address Book> button Pressed to display the [Address Book] screen. Pressing
this button takes you first to the following screen. Select
the type of [Address Book] screen from [Scan to E-mail]
and [Scan to PC].
Select Service
Close
Scan to PCScan to E-mail
5 <Tools> button Pressed to display the [Tools] screen that allows you to
set the defaults.
Tools Close
Screen ContrastSystem Settings
6 <Power Saver> button Pressed to exit the Power Saver mode.
The scanner switches into the Power Saver mode to
reduce the power consumption during periods of inactivity. This button lights when the scanner is in the
Power Saver mode.
Refer to
• "1.4 Setting/Exiting the Power Saver Mode (P. 22)"
7 <Clear All> button Pressed to reset the features to the defaults.
8 <Stop> button Pressed to stop scanning or copying.
9 <Start> button Pressed to start scanning.
10 <Error> lamp Lights when an error occurs.
11 <OK> button Used when entering characters. Pressing this button
confirms your entry.
12 <J> button Used when entering characters. Pressing this button
moves the cursor or confirms your entry.
13 <C> button Cancels the copy quantity entered (Resets the quantity
to 1).
Used also when entering characters. Pressing this button deletes characters or cancels confirmed entries.
14 <I> button Used when entering characters. Pressing this button
moves the cursor or reverses the order of characters.
1.1 Main Components 17
Page 18
1.2 Entering Characters
To enter characters, use the numeric keypad on the control panel.
You can enter alphanumeric characters and symbols.
Using the Numeric Keypad
The following characters can be entered by pressing the corresponding buttons on the
numeric keypad.
Locate the button labelled with the character you want to enter, and press the button
repeatedly until the character appears on the touch panel.
Each button displays the characters in the order indicated in the chart: a number, the lowercase characters, and then the upper-case characters.
When a button is pressed continuously after the last character is displayed, it goes back to
display the first character and then the rest of the characters in the same order.
Example: When the [2] button is pressed repeatedly, the touch panel displays:
2 > a > b > c > A > B > C > 2 > a...
If you press the [I] button repeatedly when a character is displayed (before confirming its
entry), the rest of the characters will display in the reversed order.
Number Button Assigned Numbers/Characters
[1] button 1 @ : . /
[2] button 2 a b c A B C
[3] button 3 d e f D E F
[4] button 4 g h i G H I
[5] button 5 j k l J K L
[6] button 6 m n o M N O
[7] button 7 p q r s P Q R S
[8] button 8 t u v T U V
[9] button 9 w x y z W X Y Z
[0] button 0 Space
[*] button - _ ~
[#] button
! “ # $ % & ‘ ~ ^ \ |
/ = ( ) [ ] { } < >
` ; : ? @ _ , . + - *
18 1 Basic Operation
Page 19
Confirming an Entry
If you press a number button to enter a character, and press another button to enter next
character, the entry of the first character will be confirmed and the second character will
display on the touch panel.
Character entries can also be confirmed by pressing the <OK> button. When an entry is
confirmed by pressing the <OK> button, the cursor in the shape of an "I" displays right of
the character entered.
Moving the Cursor
To modify or delete a character, move the cursor to the right of the character to be modified
or deleted.
To move the cursor, press the <I> or <J> button.
Deleting a Character
To delete a character, move the cursor to the right of the character, and press the <C>
button.
Before confirming your entry, the character you entered is highlighted. While it is
highlighted, it can be deleted by pressing the <C> button.
Note
• Depending on the entry field, an entire character string can be deleted at once by pressing the <C>
button, or by selecting the [Clear] button on the touch panel.
Modifying a Character
To modify a character, move the cursor to the right of the character and press the <C>
button. Then, enter the correct character using the numeric keypad.
Character Entry Procedure
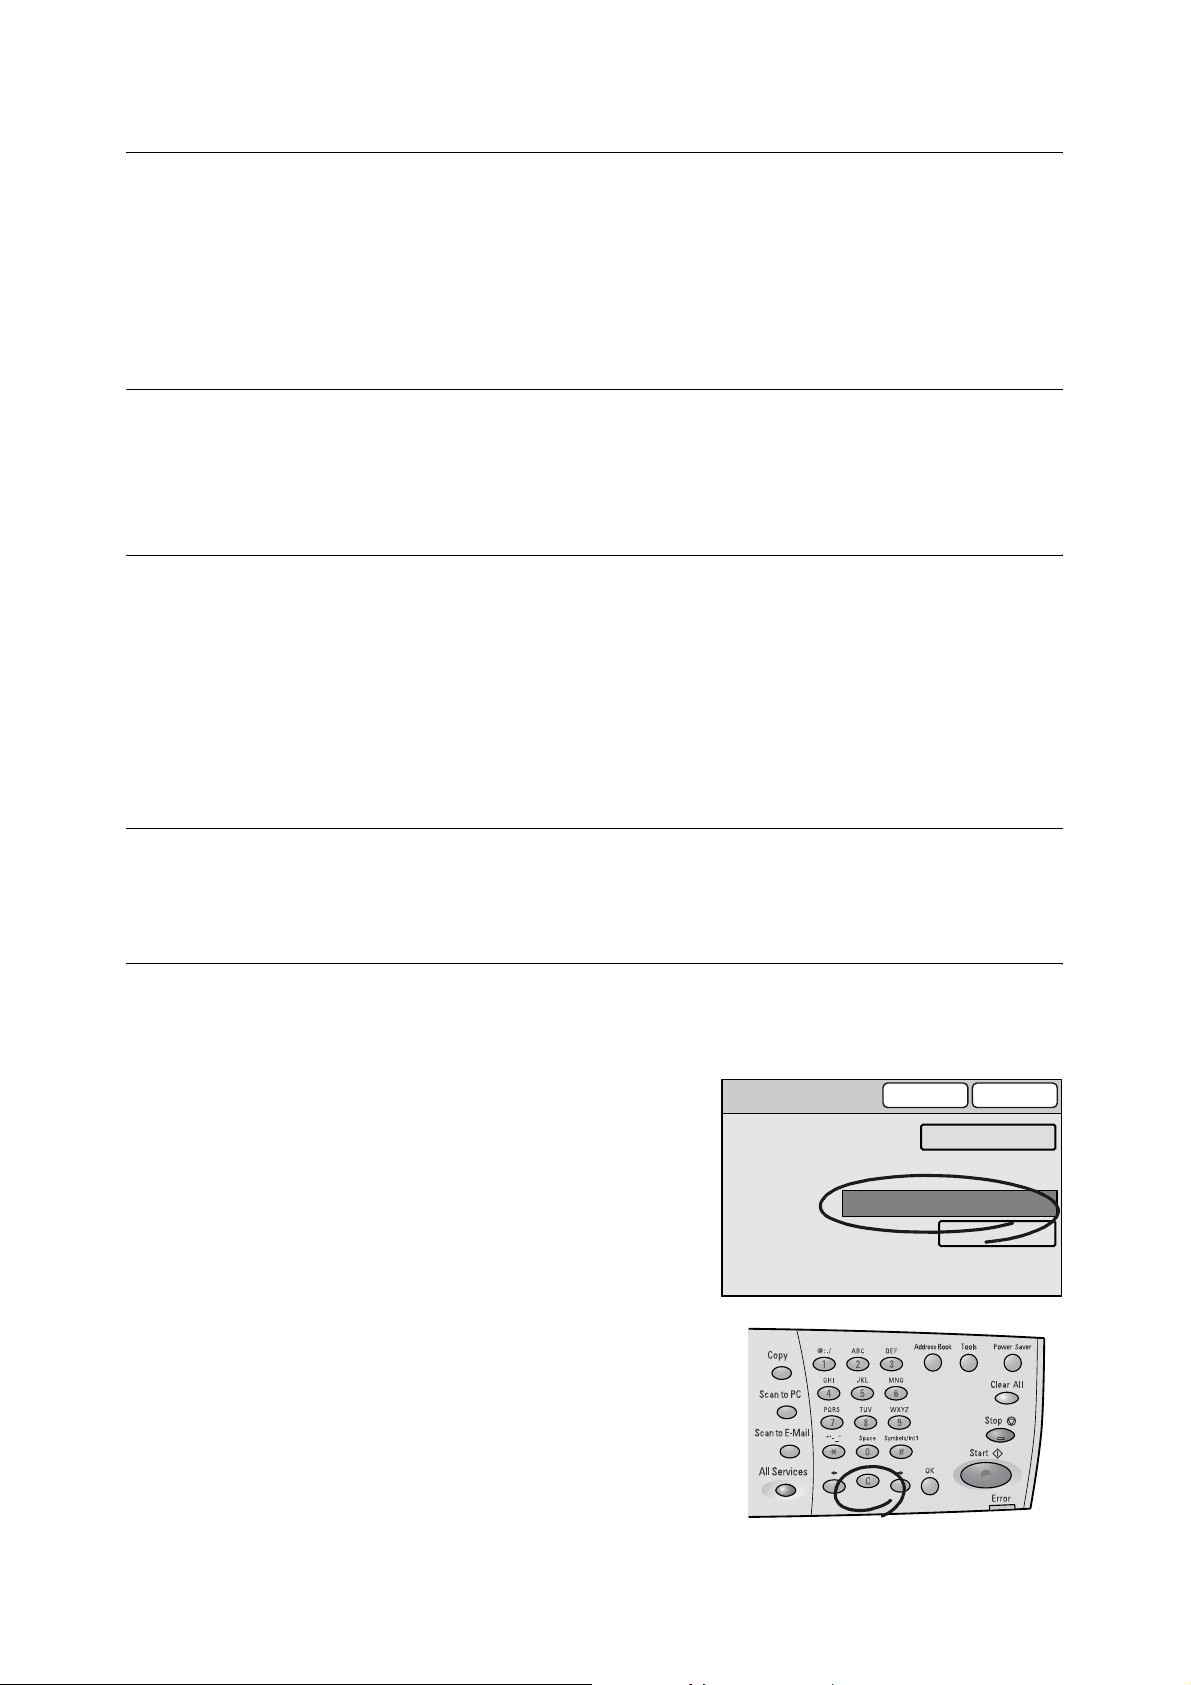
Use the following procedure to enter characters using the numeric keypad.
In this example, we will enter the word “catalog” in the [Subject] entry box.
1. On the touch panel, select the [Subject]
entry box.
2. Using the <J> button, move the cursor to
right of the default entry.
3. Press the <C> button repeatedly until the
default entry is deleted.
Enter/Change Subject
Subject
Scan Data from [Host Name]
Cancel Save
Select from List
Restore Auto
1.2 Entering Characters 19
Page 20
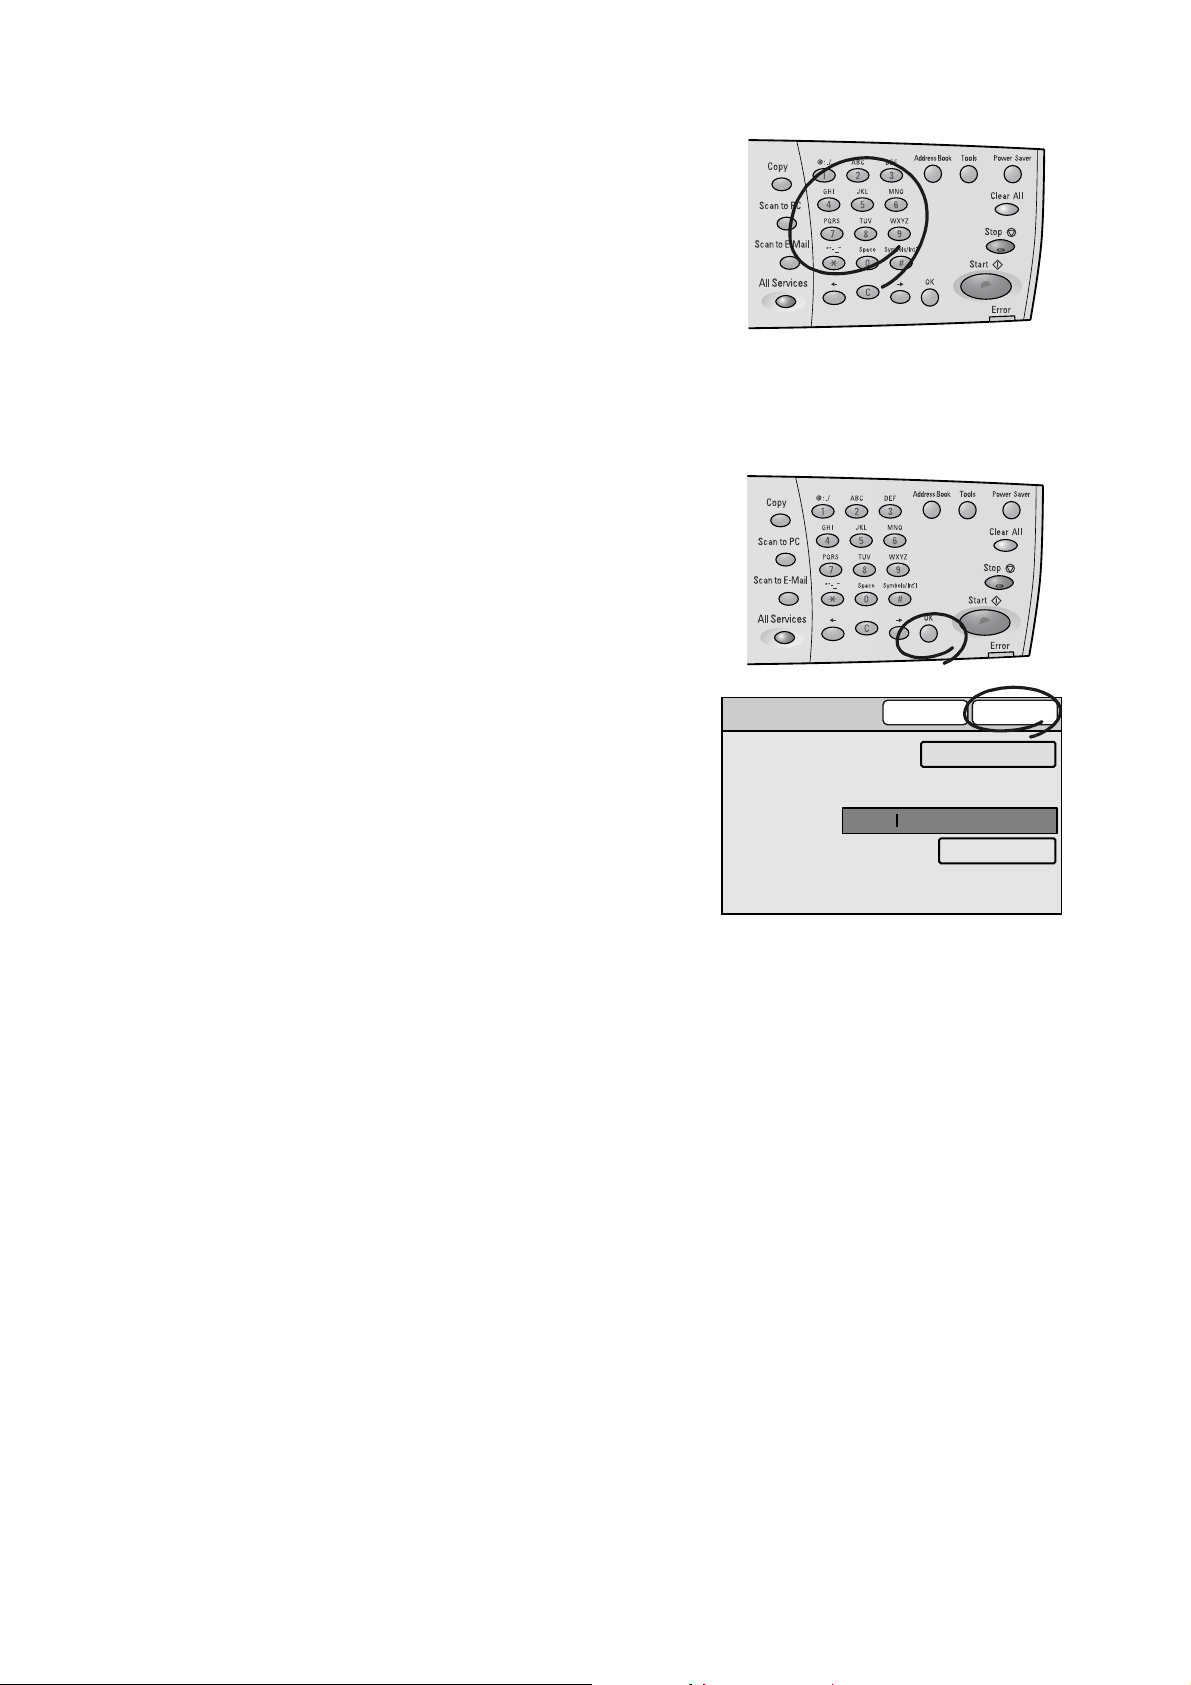
4. Press the following buttons in the order and
number of times as below:
<2> button: 4 times
<2> button: 2 times
<8> button: 2 times
<2> button: 2 times
<5> button: 4 times
<6> button: 4 times
<4> button: 2 times
The word "catalog" is entered.
5. Press the <OK> button to confirm your
entry.
6. Select [Save].
Enter/Change Subject
Subject
Catalog
Cancel Save
Select from List
Restore Auto
20 1 Basic Operation
Page 21
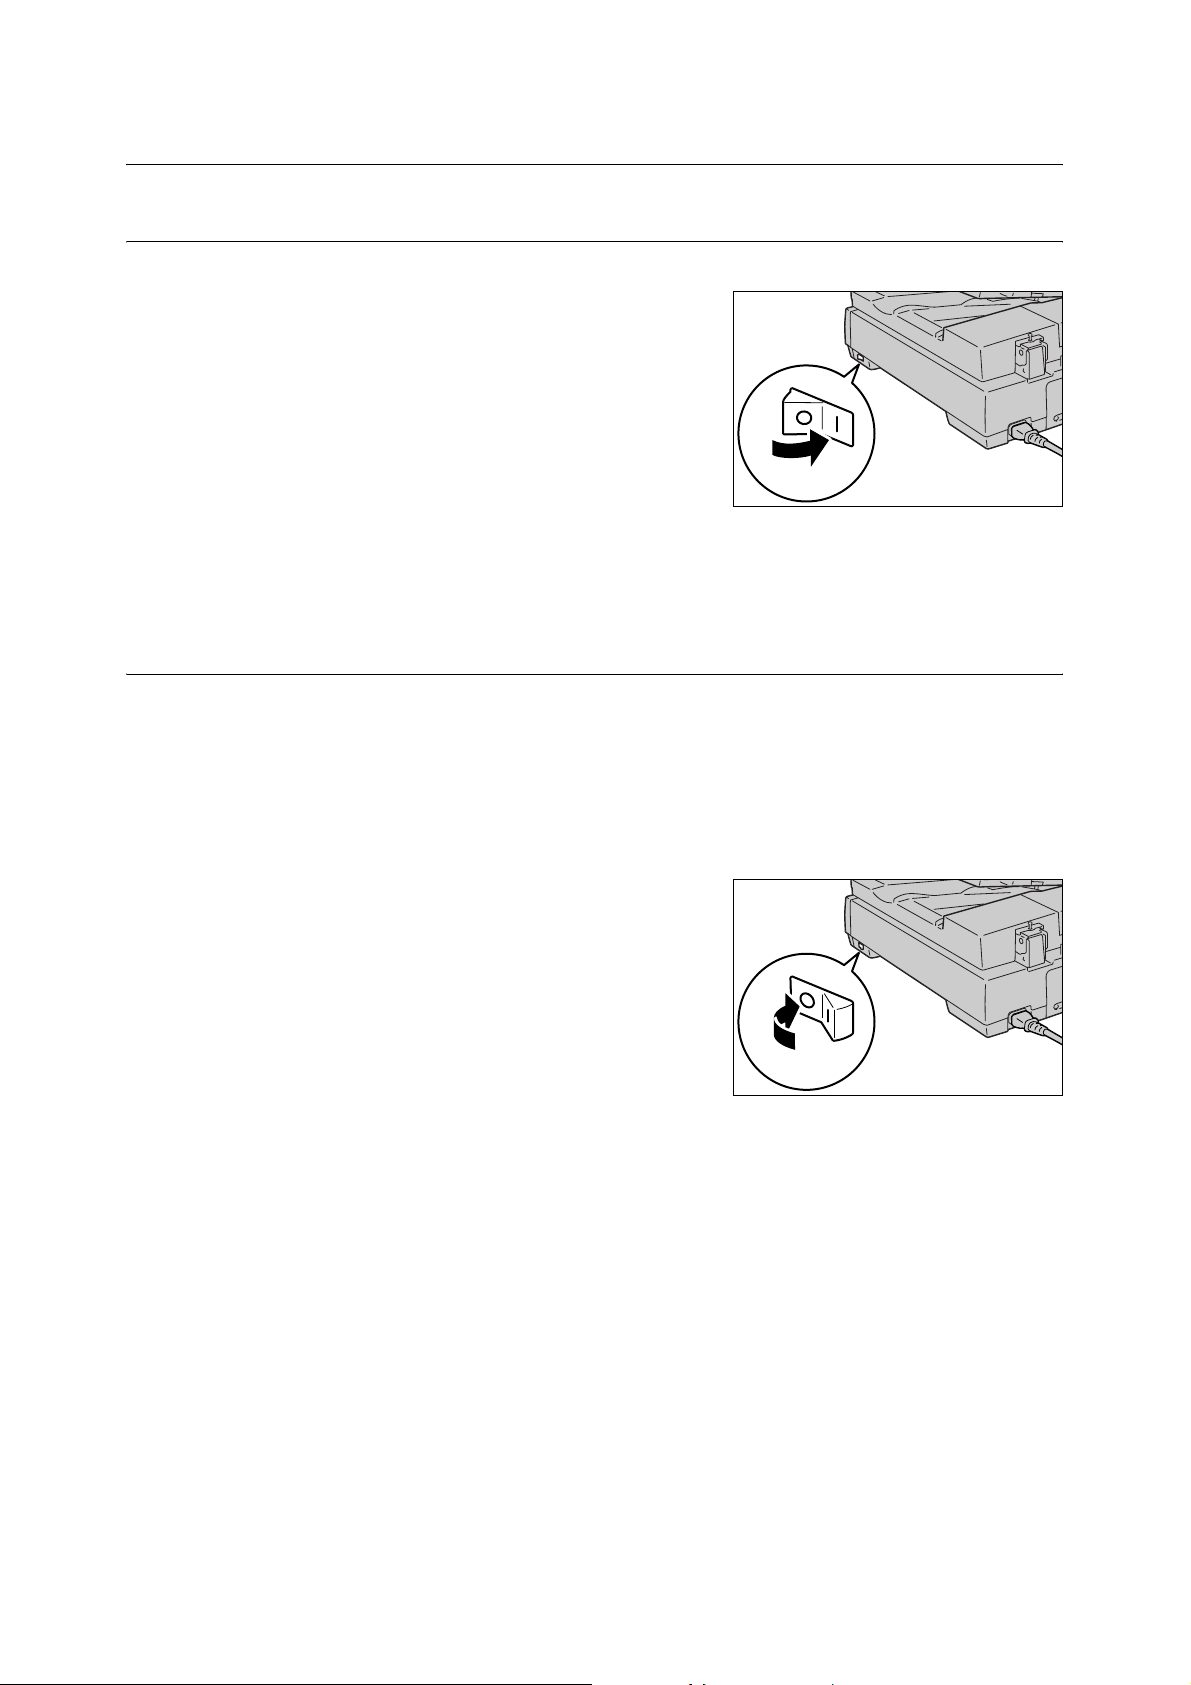
1.3 Switching On/Off the Power
Switching On the Power
1. Press the power switch to the <|> position.
2. When the scanner is switched on, the
default screen appears on the touch panel.
Important
• If an error message appears, follow the instructions
in the message to resolve the error. If an error code
is displayed, refer to "8.7 Error Codes (P. 208)" for
suggested solutions.
Note
• The scanner does not use electricity when the power is switched off even if the power cord is plugged in.
Switching Off the Power
Important
• Do not switch the power off while running a scan job. Otherwise, the scan data remained in the scanner
and the information stored in the scanner's memory will be lost.
1. Make sure that the scanner is not in operation by checking the display on the touch
panel.
2. Press the power switch to the <O> position
to switch off the scanner.
1.3 Switching On/Off the Power 21
Page 22
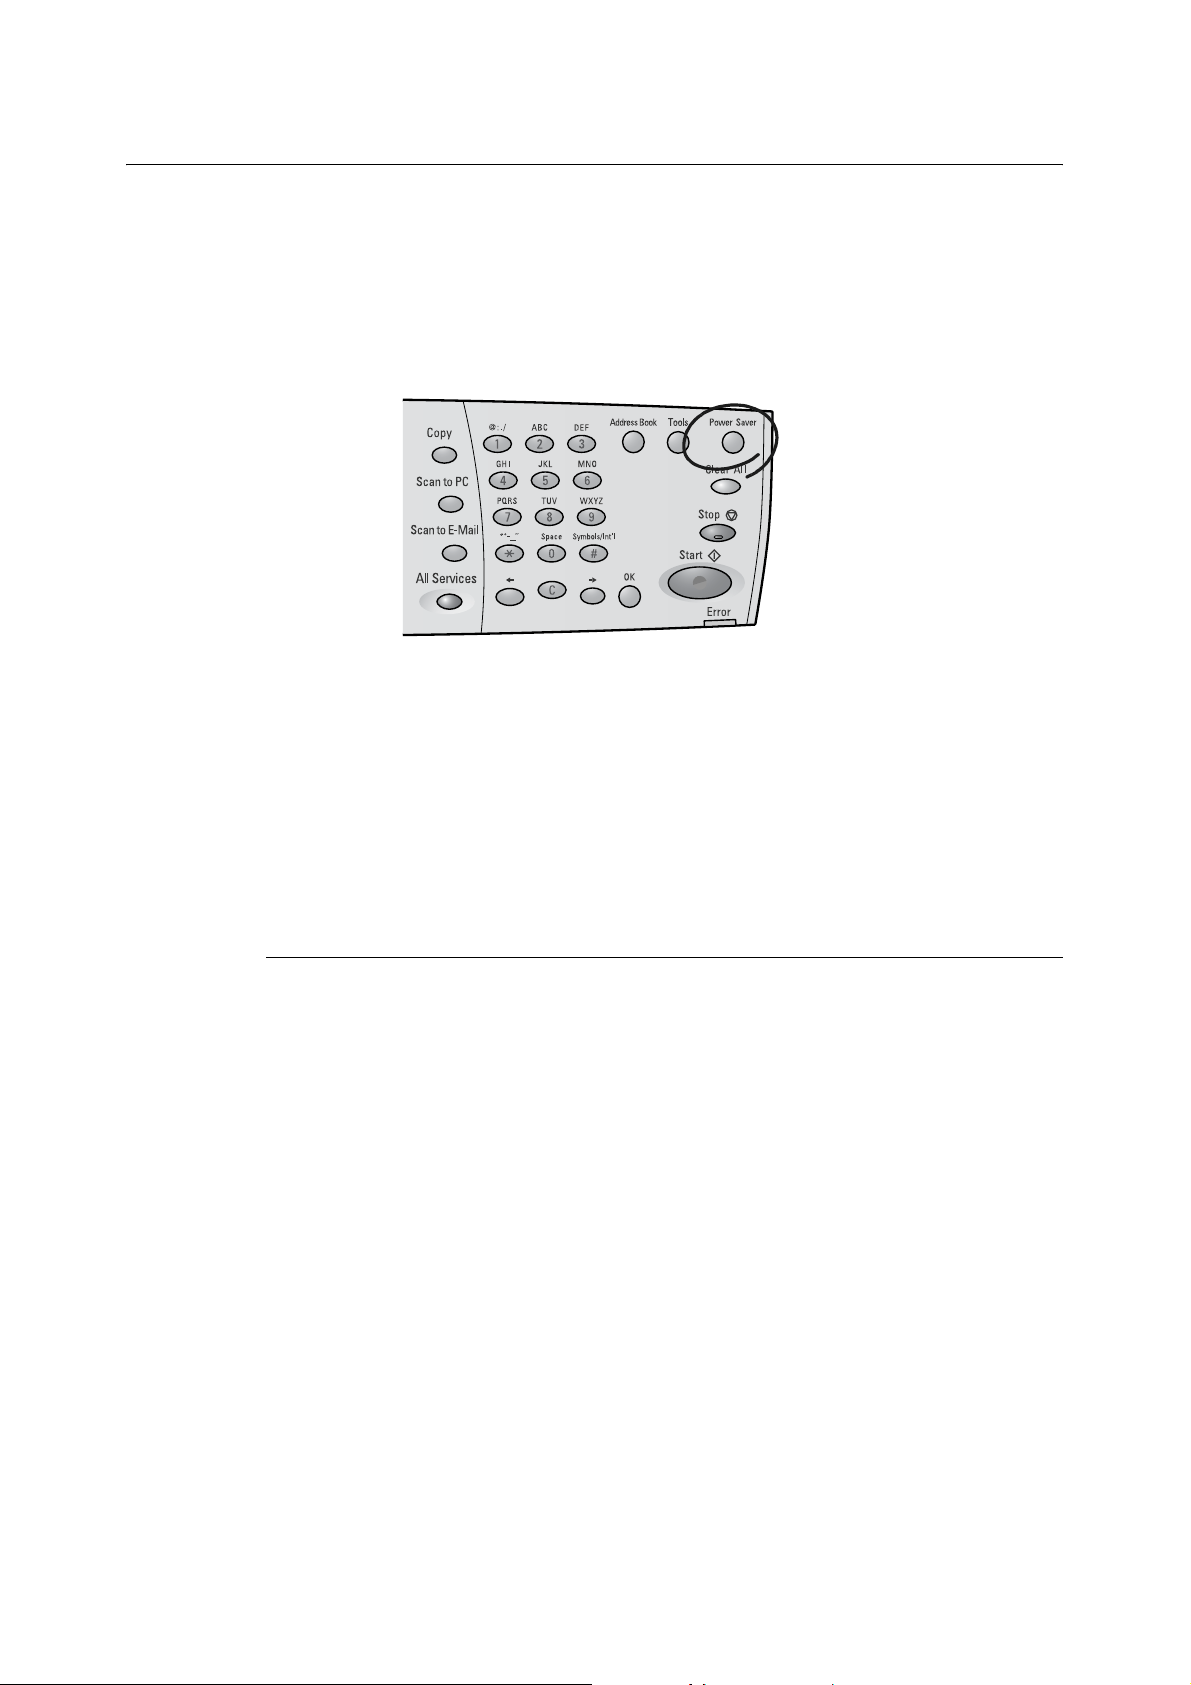
1.4 Setting/Exiting the Power Saver Mode
The scanner has the Power Saver feature which reduces the power consumption during the
periods of inactivity.
As delivered, the scanner automatically switches to the Power Saver mode 10 minutes after
the last operation.
During the Power Saver mode, all indicator lamps on the control panel except for the
<Power Saver> button go out. The touch panel also goes blank and displays nothing.
The factory default setting of 10 minutes is changeable within the range of 1 to 60 minutes.
The scanner consumes less than 9 W during the Power Saver mode, and returns to the
ready-to-scan state in about 12 seconds when re-activated.
Note
• The Power Saver mode can be disabled.
Refer to
• For more information about the Power Saver mode, refer to "Auto Power Saver (P. 137)".
Exiting the Power Saver Mode
To exit the Power Saver mode, press the <Power Saver> button on the control panel.
22 1 Basic Operation
Page 23
1.5 Loading Documents
Two choices of document input areas are available: the document glass and duplex
automatic document feeder (hereinafter referred to as the "document feeder").
Use the document feeder when scanning or copying multiple-sheet documents
simultaneously.
Note
• If loading additional documents while the first document is being scanned, load them in the same
document input area as the first document.
• You cannot change the document input area during a job. Only one document input area can be used for
a single job.
Supported Documents
Documents that meet the following criteria can be scanned from the document glass or
document feeder:
Document Glass Document Feeder
Document size C4250 [Max.] 334.5 x 452.0 mm [Min.] 100.0 x 148.0 mm
[Max.] 297.0 x 432.0 mm
C3200 A [Max.] 220.0 x 300.0 mm [Min.] 140.0 x 140.0 mm
[Max.] 215.9 x 355.6 mm
Scannable area C4250 [Min.] 15.0 x 15.0 mm
[Max.] 297.0 x 432.0 mm
C3200 A [Min.] 15.0 x 15.0 mm
[Max.] 215.9 x 297.0 mm
Document weight
(Gram per square
meter*¹)
Loading capacity 1 sheet 50 sheets
C4250 35 - 120 g/m² (1-sided documents)
C3200 A 60 - 105 g/m² (1-sided documents)
[Min.] 100.0 x 148.0 mm
[Max.] 297.0 x 432.0 mm
[Min.] 140.0 x 140.0 mm
[Max.] 215.9 x 355.6 mm
50 - 120 g/m² (2-sided documents*²)
60 - 105 g/m² (2-sided documents*²)
(plain paper: 60 - 100 g/m²)
*1 Gram per square meter (g/m²) refers to a weight in grams of one square meter of paper.
*2 The values apply when scanning or copying documents 2-sided.
Detectable Document Sizes
The scanner automatically senses the sizes of documents loaded. Documents of the
following standard sizes can be scanned or copied without specifying their sizes.
Note
• The chart shows the standard paper sizes for A/B Series (8K/16K). For the standard paper sizes for A/B
Series and Inch Series, and for information on how to set the scanner to detect other paper size series,
refer to "Paper Size Settings (P. 148)".
• When loading a document of non-standard paper size, specify the size under [More Scan Features] >
[Scan Size] if scanning, or under [More Copy Features] > [Original Size] if copying. For more
information, refer to "Scan Size (Specifying the Scan Size) (P. 70)" or "Original Size (Specifying the
Scan Size) (P. 111)".
1.5 Loading Documents 23
Page 24
Document Glass Document Feeder
C4250
C3200 A
B5 , B5 , A5 , A5 , A4 ,
A4
8.5 x 11” , B4
A3 , 11 x 17” , A6 , B6 ,
16K , 16K , 8K
B5 , A5 , A5 , A4 , A6 ,
B6 , 8.5 x 11” , 16K
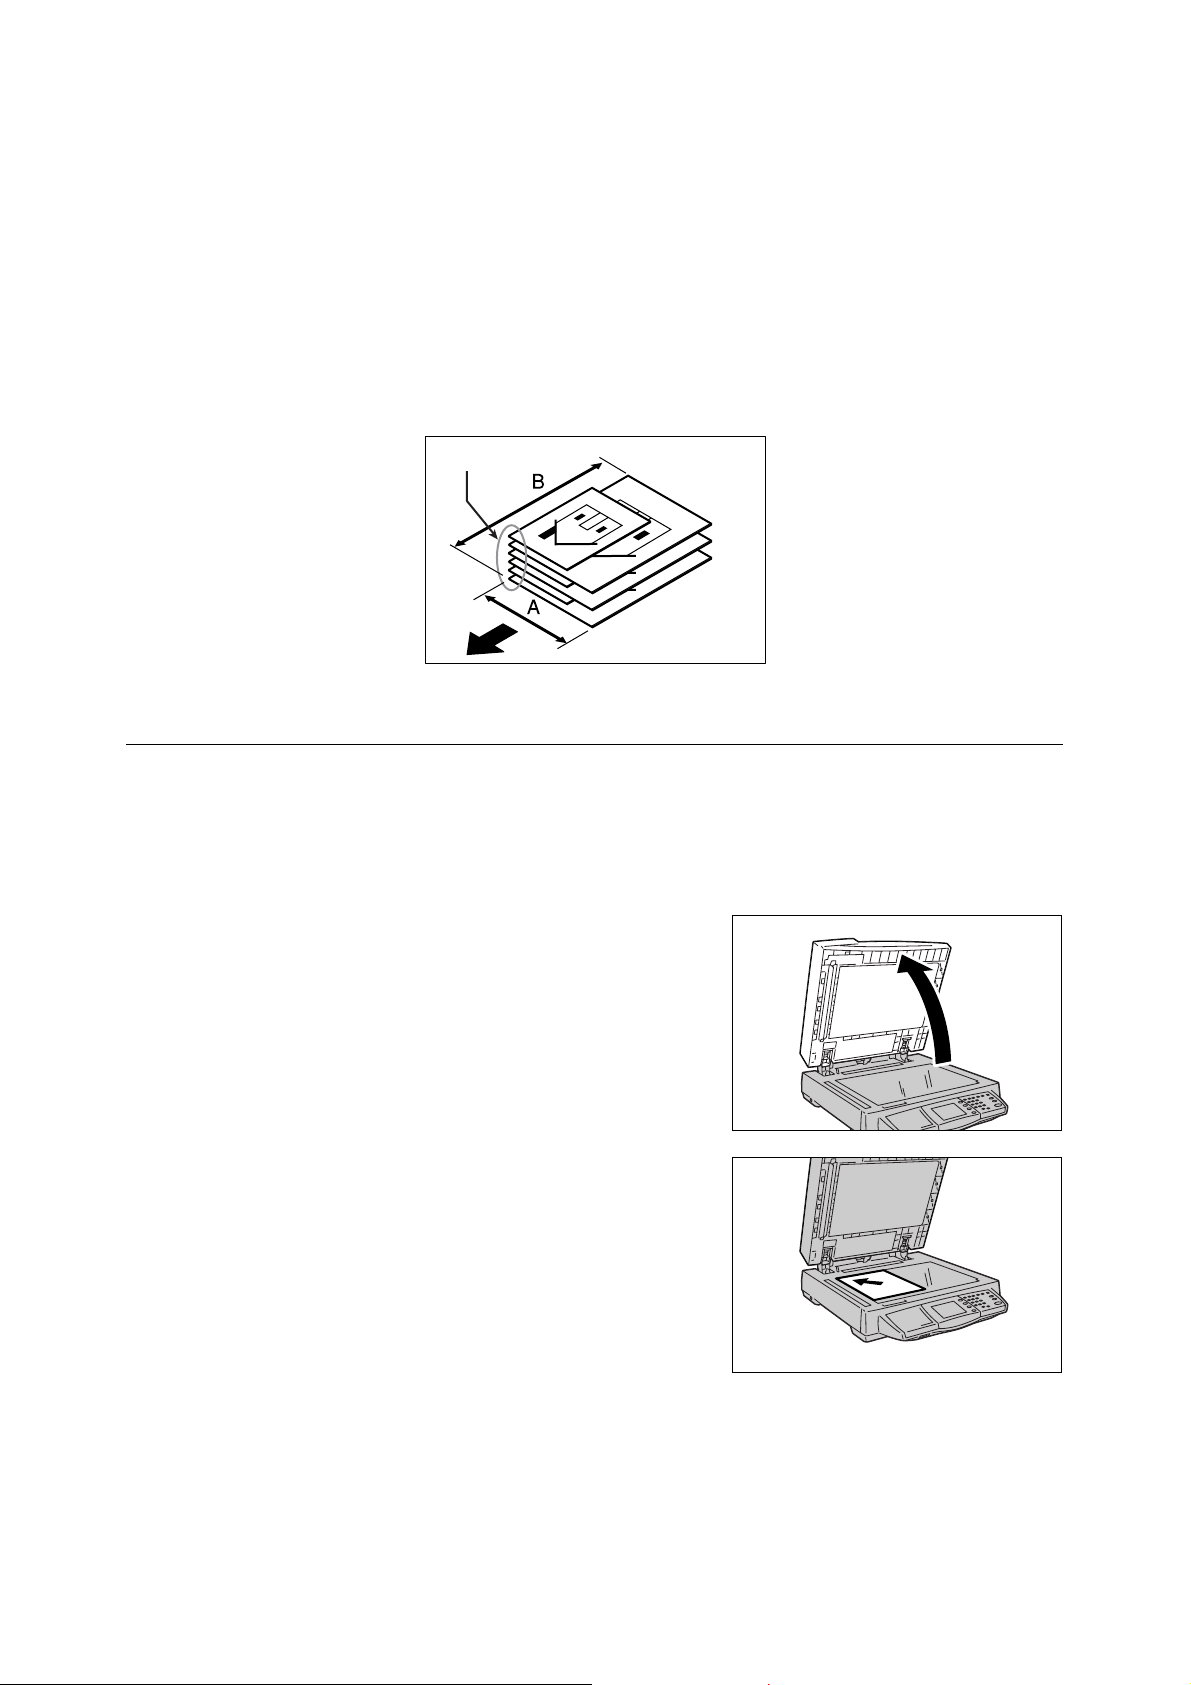
Document Loading Precautions
Observe the following precautions when placing documents on the document glass or into
the document feeder.
Documents Not Supported
Document Glass
The following types of documents can cause the auto size sensor to malfunction, resulting
in an error message or image loss.
Remedy the problem as follows:
B5 , B5 , A5 , A5 , A4 ,
A4 , B4 , A3
B5 , A5 , A5 , A4
Document Type Remedy
Non-standard size documents Specify the document size in [Scan Size] on the [More
Glossy documents
Thick documents (such as books)
Highly translucent documents (such as
transparencies)
Torn, wrinkled, hole-punched, or tightly
curled documents
Important
• Do not load documents that contain a lot of moisture. The moisture may get inside the scanner and
cause it to malfunction.
• Do not load documents that weigh more than 5 kg. Doing so may break the document glass or the
scanner itself.
Note
• Documents that use photo holders may not be properly scanned or copied depending on how lumpy the
films are.
Refer to
• For information about [Scan Size], refer to "2.8 Setting Other Scan Features (P. 69)".
• For information about [Original Size], refer to "3.6 Settings Other Copy Features (P. 104)".
Scan Features] screen if scanning, or in [Original Size] on
the [More Copy Features] screen if copying.
Place a blank paper of the same size on top of the document, or specify the document size in [Scan Size] on the
[More Scan Features] screen if scanning, or in [Original
Size] on the [More Copy Features] screen if copying.
24 1 Basic Operation
Page 25
Document Feeder
The following types of documents may get jammed or damaged if loaded into the document
feeder. Make sure to scan them from the document glass.
Folded,
creased or
torn originals
Cut and
paste
originals
The following types of documents must also be scanned from the documents glass:
• glossy documents (such as photos)
• documents that are glued or held together with clips or staples
• thick documents
• highly translucent documents (such as transparencies)
• documents using thermosensitive paper
The DocuScan C3200 A does not support scanning of mixed-size documents (documents
of different sizes) from the document feeder.
Tips on Loading Documents
Document Orientation
When scanning/copying documents, specify their orientations to identify which side is their
top.
Select [Head to Top] or [Head to Left] under [Original Orientation] either on the [More Scan
Features] or [More Copy Features] screen.
When the output file format is TIFF, Multi-page TIFF, or JPEG, load documents in "Head to
Left" orientation.
When scanning 2-sided documents, make sure that they are loaded in the orientation
specified in [2 Sided Orig.] if scanning, or in [Original Orientation] if copying.
Lightweight
originals
Curled
originals
Carbon
paper
Pre-punched
paper
Head to Top
To p
Left Right
Bottom
Original placed on document glass Scan result
To p
TIFF, Multi-page TIFF, JPEG
PDF, DocuWorks
1.5 Loading Documents 25
Page 26
To p
TIFF, Multi-page TIFF, JPEG
PDF, DocuWorks
Original loaded into document feeder Scan result
Head to Left
To p
eft Right
Bottom
Original placed on document glass Scan result
To p
Original loaded into document feeder Scan result
Refer to
• For information about [Original Orientation] (scan), refer to "2 Sided Originals (Scanning a 2-Sided
Original) (P. 64)" or "Original Orientation (Specifying the Orientation of the Original) (P. 75)".
• For information about [Original Orientation] (copy), refer to "2 Sided Copying (Making a 1-Sided/2-Sided
Copy) (P. 92)" or "Original Orientation (Specifying the Orientation of the Original) (P. 107)".
To p
Scanning Non-Standard Size Documents
When scanning non-standard size documents or documents with sticky notes attached,
specify their sizes on the [More Scan Features] or [More Copy Features] screen.
• When scanning:
[More Scan Features] screen > [Scan Size] > [Variable Size]
• When copying:
[More Copy Features] screen > [Original Size] > [Variable Size]
Refer to
• For information about [Scan Size], refer to "2.8 Setting Other Scan Features (P. 69)".
• For information about [Original Size], refer to "3.6 Settings Other Copy Features (P. 104)".
26 1 Basic Operation
Page 27
Scanning Mixed-size Documents (DocuScan C4250 only)
When scanning documents of different sizes, set [Mixed Sized Originals] to [On].
Refer to
• For information about [Mixed Sized Originals], refer to "Setting Other Scan Features (P. 69)" or "3.6
Settings Other Copy Features (P. 104)".
When loading mixed-size documents, follow the guidelines below:
• Load A5 documents in LEF orientation.
• Align the top left corner of documents to prevent them from jamming.
Align the corner
Loading Documents
The following explains how to load documents.
Using the Document Glass
Use the following procedure when scanning a document from the document glass:
1. Open the document feeder cover.
Important
• Raise the document feeder cover until the document
feeder cover sensor is detached. The auto size
sensor will not work unless the sensor is detached
from the document feeder cover.
2. Place the document face down on the
document glass, aligned with the top left
corner of the document glass.
Note
• When scanning a highly translucent document, such
as a transparency or tracing paper, place a blank
paper on top of it.
3. Close the document feeder cover.
Note
• Besure to close the document feeder cover gently. Otherwise, the document glass may break.
1.5 Loading Documents 27
Page 28
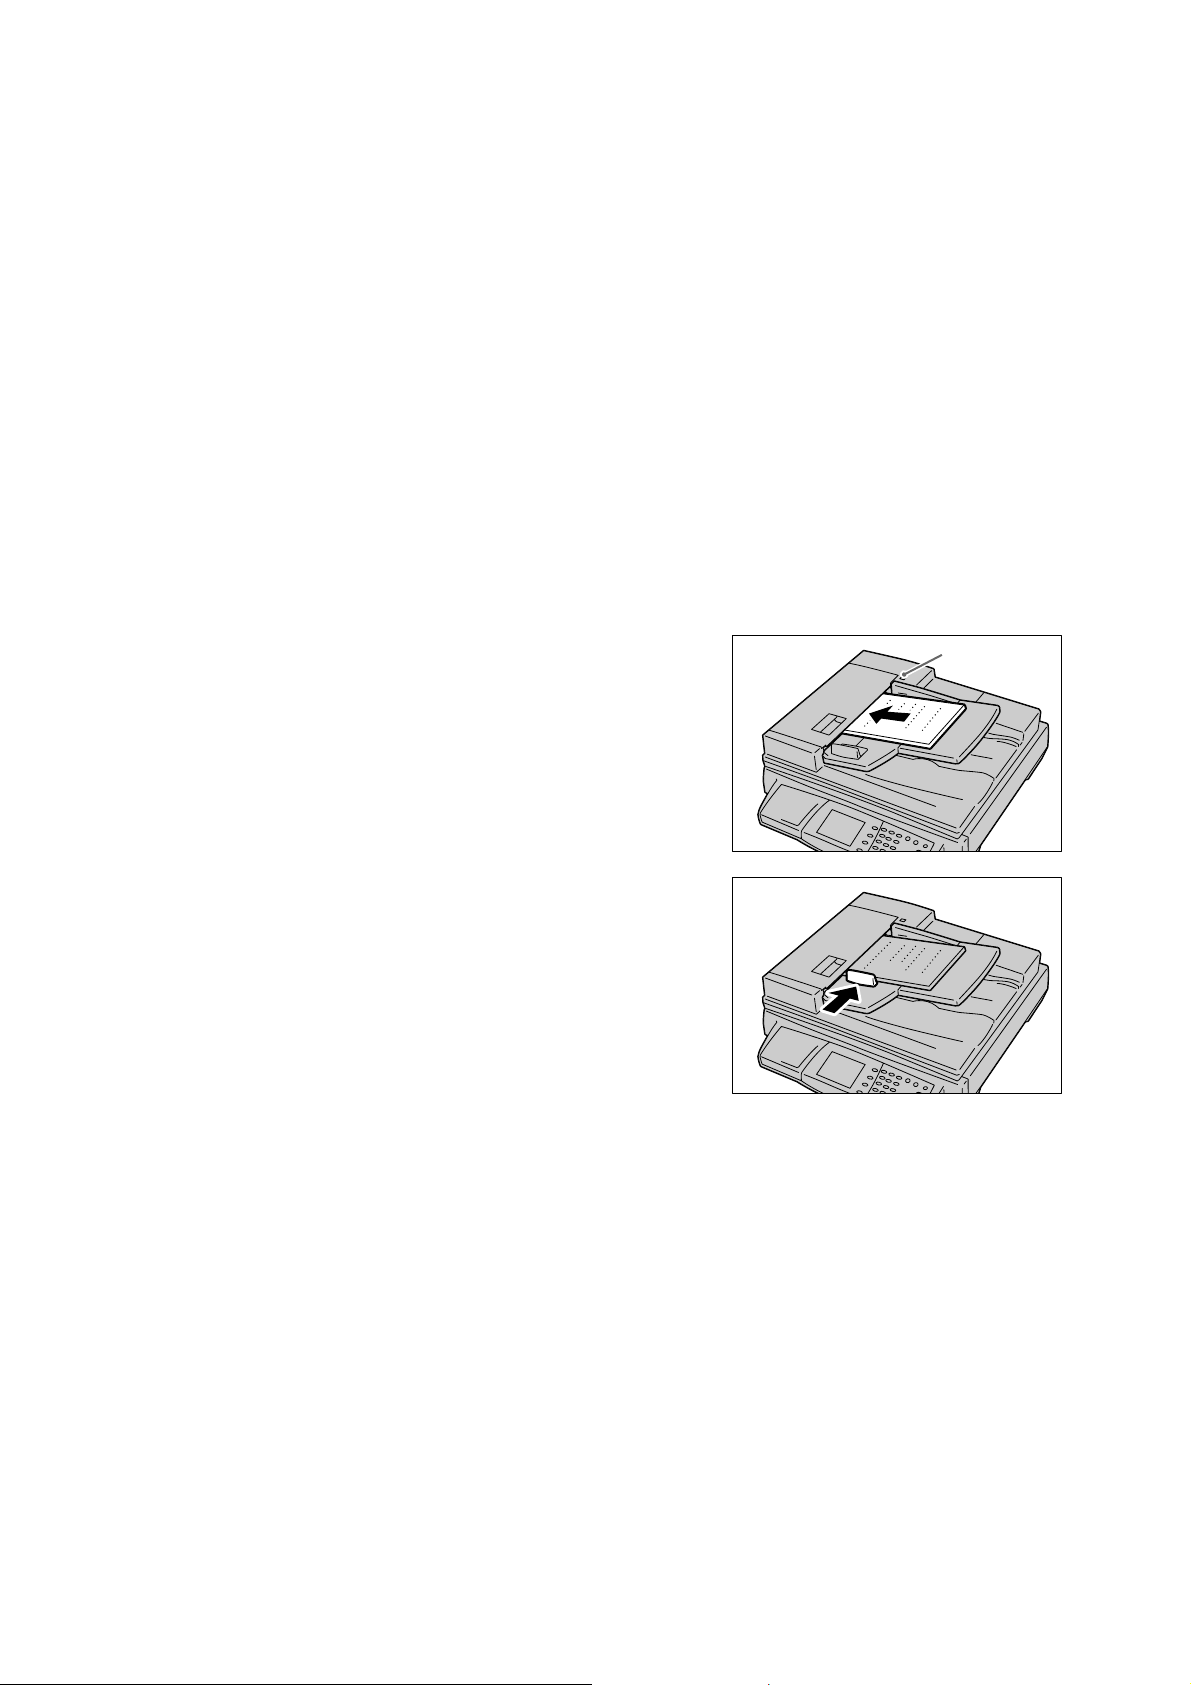
Important
• When scanning a thick document, do not press it hard against the document glass. The document
glass may break and injure you.
• When scanning with the document feeder cover open, do not stare at the scan light. The light may
cause eye irritation or fatigue.
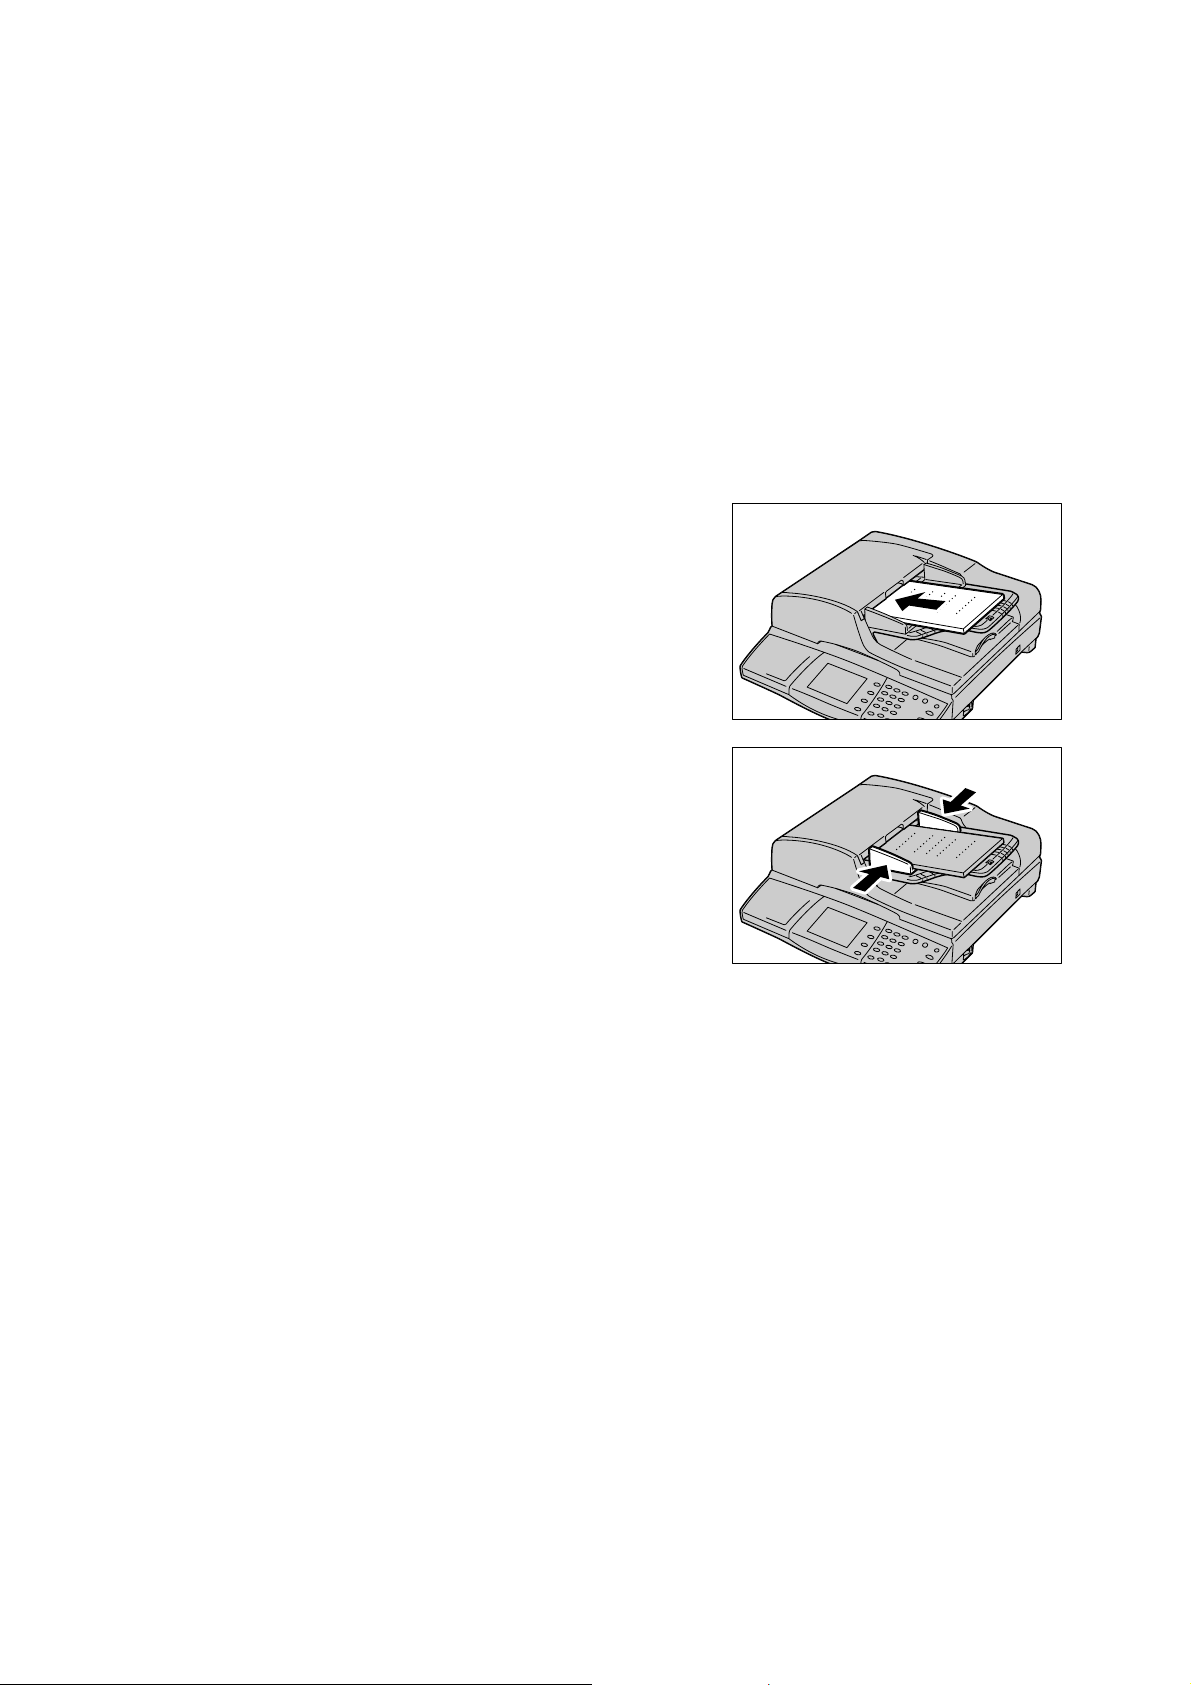
Using the Document Feeder (DocuScan C4250)
Up to 50 sheets of documents (plain paper: 60-100 g/m2) of sizes ranging from 100.0 x
148.0 mm to 297.0 x 432.0 mm can be loaded at once using the document feeder. When
scanning more than 50 sheets, load 50 sheets or less at a time.
Note
• When scanning more than 50 sheets, select [Next Original] while the first 50 sheets are being scanned,
and load the next 50 sheets or less to scan all documents as a single job. For more information, refer to
" Step 5 Start the scan job (P. 33)" or " Step 6 Start the copy job (P. 81)".
The document feeder feeds documents from the top of the stack and outputs them face
down. Use the following procedure when loading documents into the document feeder.
1. Remove all staples and paper clips from the documents and align their edges.
2. Insert the documents into the document
feeder face up, and align them with the left
and rear edges of the document feeder tray.
When the documents are loaded correctly,
the document indicator lamp lights up.
3. Position the document guide to just touch
the edge of the documents.
Important
• Keep the followings in mind to prevent the
documents from being jammed or damaged:
• Do not hold the documents while they are being
fed into the document feeder.
• Constantly remove the documents from the
document output tray after they are output (Do
not leave them on the tray until they are piled up).
• Do not put any objects on the document output tray.
28 1 Basic Operation
Page 29
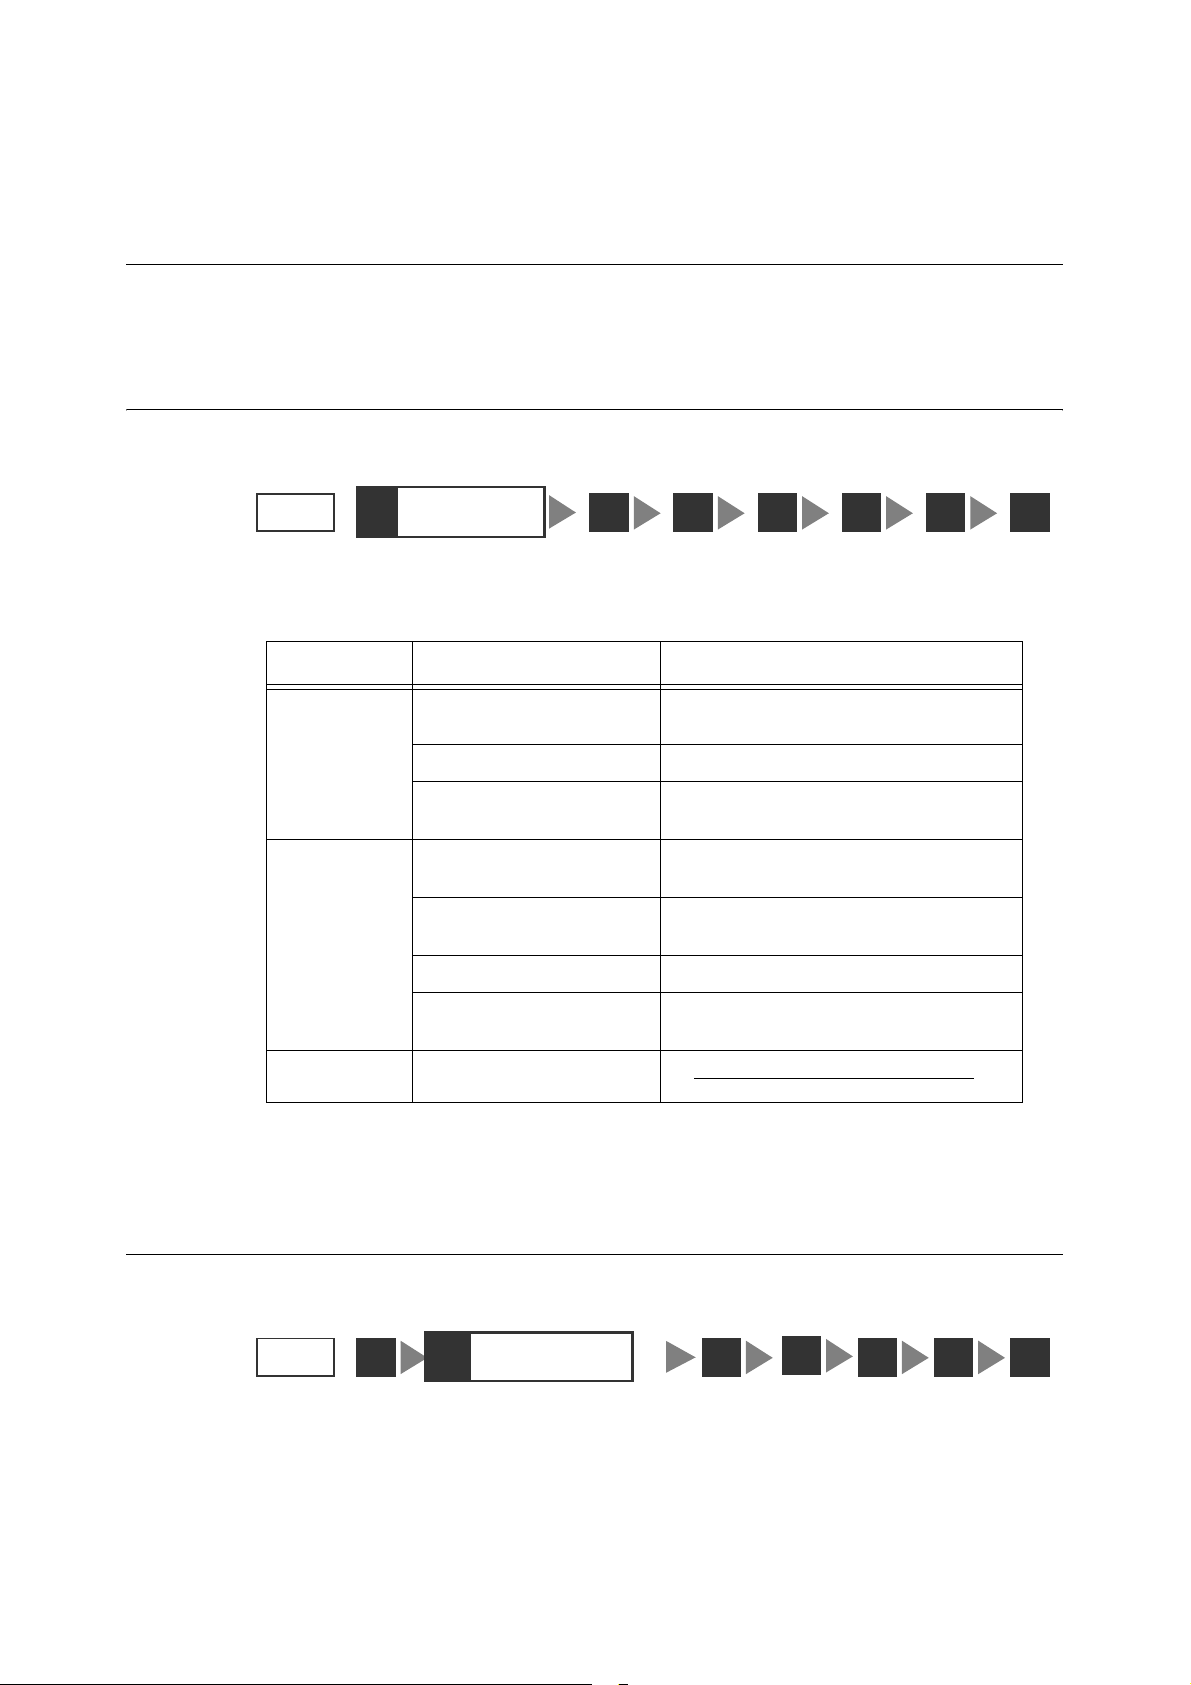
Using the Document Feeder (DocuScan C3200 A)
Up to 50 sheets of documents (plain paper: 60-100 g/m2) of sizes ranging from 140.0 x
140.0 mm to 215.9 x 355.6 mm can be loaded at once using the document feeder. When
scanning more than 50 sheets, load 50 sheets or less at a time.
Note
• When scanning more than 50 sheets, select [Next Original] while the first 50 sheets are being scanned,
and load the next 50 sheets or less to scan all documents as a single job. For more information, refer to
" Step 5 Start the scan job (P. 33)" or " Step 6 Start the copy job (P. 81)".
The document feeder feeds documents from the top of the stack and outputs them face
down. Use the following procedure to load documents into the document feeder.
1. Remove all staples and paper clips from the documents and align their edges.
2. Insert the documents into the document
feeder face up (If the documents are 2sided, their front sides should face up).
Make sure that the documents are loaded
all the way into the document feeder.
3. Position the document guides to just touch
the edge of the documents.
Important
• Keep the followings in mind to prevent the
documents from being jammed or damaged:
• Do not hold the documents while they are being
fed into the document feeder.
• Constantly remove the documents from the
document output tray after they are output (Do
not leave them on the tray until they are piled up).
• Do not put any objects on the document output tray.
1.5 Loading Documents 29
Page 30
2 Scan
2.1 Scanning Procedure
This section outlines the procedure of scanning a document and creating its electronic data.
For details, refer to the description provided for each operation.
Step 1 Get ready to scan
Get ready to
STEP
Before using the scan features, ensure that the following items are available or have been
performed:
Scan Type Items to Get Ready Resource to Use
1
scan
2
43 5 6 7
Scan to E-mail •Set an IP address
•Enable ports
•Set the e-mail parameters CentreWare Internet Services
•Register an address DocuScan Manager
Scan to PC •Set an IP address
•Enable ports
•Create a folder in which to
save scanned data
•Register a login user Computer on which to save scanned data
•Register an address DocuScan Manager
Scan to Media •USB flash memory
Refer to
• For information on how to get your scanner ready to scan, refer to "2 Network Settings" in the Setup and
Quick Reference Guide.
Control panel
(or CentreWare Internet Services)
(or CentreWare Internet Services)
Control panel
(or CentreWare Internet Services)
Computer on which to save scanned data
(or CentreWare Internet Services)
Step 2 Load a document and insert media
30 2 Scan
Load a document
STEP
Place a document onto the document glass or into the document feeder.
When using Scan to Media, plug a USB flash memory into the scanner's USB connector.
1
2
and insert media
3 5 6 7
4
Page 31

Refer to
• For instructions on how to load documents, refer to "1.5 Loading Documents (P. 23)".
• For instructions on connecting a USB flash memory to the scanner, refer to "2.6 Using Scan to Media (P.
58)".
Step 3 Select the scan type
STEP
Select the type of the scan job from the [All Services] screen depending on where you want
to save the scanned data. The following types of scan jobs are available:
Scan to E-mail
Sends the scanned data by e-mail.
Refer to
• For more information, refer to "2.4 Using Scan to E-mail (P. 40)".
Scan to PC
1
Select the scan
3
type
42 5 6 7
Transfers the scanned data to a network-connected computer using an FTP or SMB
protocol.
Refer to
• For more information, refer to "2.5 Using Scan to PC (P. 49)".
Scan to Media
Saves the scanned data on the USB flash memory.
Refer to
• For more information, refer to "2.6 Using Scan to Media (P. 58)".
1. Push the <Scan to E-mail>/<Scan to PC>
button on the control panel. Or, select
[Scan to E-mail]/[Scan to PC]/[Scan to
Media] on the [All Services] screen.
Note
• The features assigned to the custom buttons can be
changed. For more information, refer to "Custom
Buttons 1 - 3 (P. 141)".
• When a password is set for the feature selected, a
screen prompting you to enter the password appears.
When prompted, enter the password using the
numeric keypad and select [Confirm]. For information
on how to set passwords, refer to "Service Login (P.
145)".
• If the feature selected is disabled, a message
informing you of this appears. To enable or disable
each feature, refer to "Service Availability (P. 143)".
All Services
Copy
Job Status
Scan to E-mail
2. Set the required settings such as the “Save
In” location.
When [Scan to E-mail] is selected, set the
Scan to PC Scan to Media
2.1 Scanning Procedure 31
Page 32

settings on the [E-mail Address] screen.
When [Scan to PC] is selected, set the
settings on the [Save In] screen.
Note
• You do not need to set the “Save In” location when
using the Scan to Media feature. Data is always saved
right under the root directory of the USB flash memory.
• If old settings are still present, pressing the <Clear All>
button resets them to the defaults.
Step 4 Set the scan features
STEP
1
2 5 6 7
3
Set the scan
4
features
As necessary, set the scan features such as image quality and output file format. The scan
features can be set on the following two types of screens:
Basic Scanning
Used when setting features such as scan color, image quality, scan density, and file format.
Refer to
• For more information, refer to "2.7 Setting the Basic Scan Features (P. 61)".
More Scan Features
Used when setting features such as scan size and scan ratio.
Refer to
• For more information, refer to "2.8 Setting Other Scan Features (P. 69)".
1. Display one of the above screens by
selecting the [Basic Scanning] tab or [More
Scan Features] tab, and set the required
features.
Note
• If old settings are still present, pressing the <Clear All>
button resets them to the defaults.
E-mail Address Basic Scanning
Output Color
Full Color
Grayscale
Black
File Format
PDF
DocuWorks
TIFF
More...
More Scan
Features
2 Sided Orig.
Original Type
Lighten/Darken
32 2 Scan
Normal
Off
Head to Left200 dpi
More Scan
Features
E-mail Address Basic Scanning
Scan Size Image Compression
Auto Size
Detect
Reduce / Enlarge Mixed Sized Orig.
100%
Scan Resolution Original Orientation
1/2
Page 33

Step 5 Start the scan job
STEP
To start scanning, return to the screen where you set the “Save In” location in " Step 3 Select
the scan type (P. 31)".
1
Start the scan job
32 4 6 7
5
1. Display the [E-mail Address]/[Save In]
(Scan to PC)/[Save In] (Scan to Media)
screen.
2. If you want to preview the scanned image,
select the [Preview] check box.
3. Press the <Start> button on the control
panel.
Important
• When the document is loaded into the document
feeder, do not hold it while it is being fed.
Note
• If a problem occurs, the touch panel displays a
message. Follow the instructions in the message to
remedy the problem. If an error code is displayed,
refer to "8.7 Error Codes (P. 208)" for suggested
solutions.
• It may take some time for the scanner to start
scanning. The scanner starts scanning after verifying
the status of the ”Save In” location.
E-mail Address Basic Scanning
Address Book... Details...
From
Jane Smith
To
System Design Group
CC
ABC Corp.
BCC
More Scan
Features
Clear
Preview
1/9
Preview
When the [Preview] check box is selected, press the <Start> button to display the preview
of the image. You can verify the scan result on the preview screen.
Note
• The preview may not show the fine details of the image. The details, however, are scanned and saved
as they appear on the original.
1. Verify the scanned image on the preview
screen.
90-degree CW/90-degree CCW
Rotates and saves the scanned image.
This setting applies also to the rest of the pages.
Note
• Images can be rotated only when scanned in PDF or
DocuWorks format.
Last Original Next Original
2.1 Scanning Procedure 33
90-degree CW
90-degree CCW
Preview
Next Page
1
pages scanned
Stop
Page 34

Preview Next Page
Shows the preview of the next page.
Stop
Stops the scan job.
Last Original/Next Original
Sets whether you have more documents to scan.
Refer to
• For information about canceling a scan job from a
preview screen, refer to "4 Scan" in the Setup and
Quick Reference Guide.
2. Press the <Start> button on the control
panel. The scanning starts.
Note
• It may take some time for the scanner to start
scanning. The scanner starts scanning after verifying
the status of the ”Save In” location.
When you have more documents to scan
When you have more documents to scan, select [Next Original] on the touch panel while
the first document is being scanned. The scanner recognizes that there are more
documents to be scanned and scans them as a single job.
Up to 500 pages can be scanned per a single job.
Note
• When the number of scanned pages reaches 500, a message appears and the scanner will not scan the
rest of pages. When scanning documents that exceed 500 pages, scan the first 500 pages and then
scan the rest of the pages as a new job.
1. Select [Next Original] while the first
document is being scanned.
Scanning Documents...
E-mail Address: potter.beatrix@xxx.com
A4
Full Color
200dpi
Pages
Scanned
70%
Next OriginalLast Original
Pages
Transferred
710
34 2 Scan
Page 35

When the scanning of the first document
completes, the message on the touch panel
changes.
Note
• If no operation is performed for a specific amount of
time, the scanner automatically assumes that there
are not more documents to be scanned and presumes
the scan job.
Press Start to scan.
Press Last Original to complete scanning.
E-mail Address: potter.beatrix@xxx.com
A4
Full Color
200dpi
Pages
Scanned
70%
Transferred
Pages
710
2. Load the next document.
Refer to
• For instructions on how to load documents, refer to
"1.5 Loading Documents (P. 23)".
3. Press the <Start> button on the control
panel. If you have more documents to scan,
repeat the process of loading a document
and pressing the <Start> button.
4. When all documents are scanned, select
[Last Original].
Step 6 Check the job status
Next OriginalLast Original
STEP
1
2
3
4 5
Check the job
6
status
7
As necessary, check whether the job has been scanned successfully.
Selecting [Job Status] on the [All Services] screen displays the [Completed Jobs] screen.
Refer to
• For information about checking job status, refer to "5 Job Status (P. 127)".
2.1 Scanning Procedure 35
Page 36

Step 7 Use the scanned data
STEP
Scan to E-mail
Sends the scanned data to a specified e-mail address. The recipient will receive the data
as an e-mail attachment.
Scan to PC
Saves the scanned data on a specified computer.
Note
• If editing the scanned data using DocuScan Manager, it is convenient if you set the “Save In” location on
DocuScan Manager.
Refer to
• For installation instructions of DocuScan Manager, refer to the Software Operation Guide.
• For basic operating instructions of DocuScan Manager, refer to "7 DocuScan Manager (P. 178)".
• For detailed operating instructions of DocuScan Manager, refer to the DocuScan Manager Online Help.
1
32 4 5 6
Use the scanned
7
data
Scan to Media
Saves the scanned data on the USB flash memory.
You can unplug the media when the following screen is displayed.
Save In Basic Scanning
Change File Name...
The USB Flash Memory
is inserted.
Do not remove it
while saving the data.
(You can remove it
when it is not saving)
More Scan
Features
Preview
36 2 Scan
Page 37

2.2 Stopping a Scan Job
1. Press the <Stop> button on the control
panel.
A message appears confirming the
cancellation of the job.
2. Select [Yes].
A message appears informing you that the
cancellation is complete.
Cancel Job
Do you want to cancel the job?
NoYe s
3. Select [Close].
Job Cancelled
The job has been cancelled.
Close
2.2 Stopping a Scan Job 37
Page 38

2.3 Scan Feature Setting Items
The scan features offer the following setting items:
Scan to E-mail
Screen Setting Item Reference
E-mail Address Address Book "Setting the Recipient's E-mail Address
(P. 42)"
Details "Setting a Subject/Comment (P. 44)"
Clear "Setting the Sender's E-mail Address (P.
42)"
"Setting the Recipient's E-mail Address
(P. 42)"
Preview "Preview (P. 33)"
From "Setting the Sender's E-mail Address (P.
42)"
To "Setting the Recipient's E-mail Address
(P. 42)"
Details Subject "Setting a Subject/Comment (P. 44)"
Reply to
File Name
Comment
Scan to PC
Screen Setting Item Reference
Save In Address Book "Setting the “Save In” Location Using
Address Book (P. 51)"
Change File Name "Setting the File Name (P. 56)"
Preview "Preview (P. 33)"
SMB/FTP "Transfer Protocol (P. 52)"
Server "Server (P. 52)"
Shared Name "Shared Name (SMB) (P. 53)"
Save In "Save In (P. 54)"
User Name "User Name (P. 54)"
Password "Password (P. 56)"
Change File Name File Name "Setting the File Name (P. 56)"
38 2 Scan
File Name Conflict
Page 39

Scan to Media
Screen Setting Item Reference
Save In Change File Name "Setting the File Name (P. 56)"
Preview "Preview (P. 33)"
Change File Name File Name "Setting the File Name (P. 59)"
File Name Conflict
Other Scan Features
Screen Setting Item Reference
Basic Scanning Output Color "Output Color (Selecting the Output
Color) (P. 62)"
File Format "File Format (Selecting the File Format
of the Scanned Data) (P. 63)"
2 Sided Orig. "2 Sided Originals (Scanning a 2-Sided
Original) (P. 64)"
Original Type "Original Type (Selecting the Original
Type) (P. 66)"
Lighten/Darken "Lighten/Darken (Adjusting the Scan
Density) (P. 68)"
More Scan Features Scan Size "Scan Size (Specifying the Scan Size)
(P. 70)"
Reduce/Enlarge "Reduce/Enlarge (Specifying the Scan
Ratio) (P. 71)"
Scan Resolution "Scan Resolution (Specifying the Scan
Resolution) (P. 73)"
Image Compression "Image Compression (Specifying the
Compression Rate of the Output) (P.
73)"
Mixed Size Orig.* "Mixed Sized Originals (Scanning Mixed-
size Originals Simultaneously) (DocuScan C4250 Only) (P. 74)"
Original Orientation "Original Orientation (Specifying the Ori-
entation of the Original) (P. 75)"
Sharpness "Sharpness (Adjusting the Sharpness of
the Output) (P. 76)"
Auto Exposure "Auto Exposure (Removing the Back-
ground of the Original) (P. 77)"
Contrast "Contrast (Adjusting the Contrast of the
Output) (P. 78)"
*This item is not available on the DocuScan C3200 A.
2.3 Scan Feature Setting Items 39
Page 40

2.4 Using Scan to E-mail
This section explains how to convert scanned data into PDF, DocuWorks, TIFF, or JPEG
format and send it via e-mail using the Scan to E-mail feature.
This corresponds to " Step 3 Select the scan type (P. 31)" in “2.1 Scanning Procedure”.
Select the scan
STEP
Scan to E-mail allows you to send scanned data as an e-mail attachment. Fax might get
mixed up with other faxes and may not reach the intended recipient. Using this feature,
however, data is sent directly to the recipient without any worry of getting lost.
1
3
type
42 5 6 7
Scanned data
PC
Operating Tips
Getting Ready for Scan to E-mail
To use the Scan to E-mail feature, configure the following settings:
• Specify the method of obtaining an IP address and set an IP address on the control panel.
• Start CentreWare Internet Services on the control panel.
• Set the e-mail parameters on CentreWare Internet Services.
Refer to
• For details on the above settings, refer to “2. Network Settings” in the Setup and Quick Reference Guide.
E-mail server
Scanned data
PC
40 2 Scan
Page 41

Setting E-mail Addresses/Subjects/Comments
E-mail addresses, subjects, and comments (messages) can be entered by the following two
methods:
• Using the numeric keypad on the control panel.
• Storing them in Address Book or Subject/Comment List and selecting them on the
scanner.
Refer to
• For information on how to enter characters on the control panel, refer to "1.2 Entering Characters (P.
18)".
• For information about character entry restrictions, refer to "Registering Addresses/Subjects/Comments
(P. 114)".
• For information about Address Book and Subject/Comment List, refer to "4.2 Using Address Book on the
Scanner (P. 121)".
Addresses, subjects, and comments stored in Address Book or Subject/Comment List can
be altered using the numeric keypad on the control panel.
Addresses, subjects, and comments can be registered in Address Book or Subject/
Comment List using DocuScan Manager or CentreWare Internet Services.
Refer to
• For installation instructions of DocuScan Manager, refer to the Software Operation Guide.
• For basic operating instructions of DocuScan Manager, refer to "7 DocuScan Manager (P. 178)".
• For detailed operating instructions of DocuScan Manager, refer to the DocuScan Manager Online Help.
• For operating instructions of CentreWare Internet Services, refer to "9.1 Monitoring/Managing the
Scanner on a Web Browser (P. 216)".
• For instructions on setting addresses/subjects/comments on CentreWare Internet Services, refer to the
CentreWare Internet Services Online Help.
Configuring Settings for Scan to E-mail
Pressing the <Scan to E-mail> button on the control panel or selecting [Scan to E-mail] on
the [All Services] screen displays the [E-mail Address] screen.
All Services
Job Status
Copy
Scan to PC Scan to Media
Note
• When a password is set for the feature, a screen prompting you to enter the password appears. When
prompted, enter the password using the numeric keypad and select [Confirm]. For information on how to
set passwords, refer to "Service Login (P. 145)".
• When the feature is disabled, a message informing you of this appears. To enable or disable each
feature, refer to"Service Availability (P. 143)".
• If old settings are still present on the [Scan to E-mail] screen, pressing the <Clear All> button on the
control panel resets them to the defaults. The defaults can be changed under [System Settings]. For
information about [System Settings], refer to "6 System Settings (P. 129)".
Scan to E-mail
E-mail Address Basic Scanning
Address Book... Details...
From
To
More Scan
Features
Clear
Preview
1/9
2.4 Using Scan to E-mail 41
Page 42

Setting the Sender's E-mail Address
Set the e-mail address of the sender. The sender’s address can be selected from Address
Book or entered using the numeric keypad. When selected from Address Book, the name
set for [Recipient Name] will be set as the sender's name.
Note
• The scanner cannot receive e-mail. It is recommended to set an address that can receive e-mail, such
as the administrator's address, in case the e-mail server returns e-mail in the event of errors.
• The default sender's address is the address set for [Machine E-mail Address].
• [Machine E-mail Address] can be set under [Properties] > [Protocol Settings] > [E-mail] > [Machine E-
mail Address] on CentreWare Internet Services.
• This setting is optional. If you leave this blank, however, an error may occur when attempted to send e-
mail depending on the SMTP server.
• The characters that can be used for entering the sender's address are the same as for the recipient's
address.
1. On the [E-mail Address] screen, select the
[From] entry box.
2. Enter the e-mail address using the numeric
keypad.
Note
• To delete an incorrect entry, select [Clear].
E-mail Address Basic Scanning
Address Book... Details...
From
Clear
More Scan
Features
Preview
1/9
Setting the Recipient's E-mail Address
Set the e-mail address of the recipient to whom you are sending the scanned data.
The recipient address can be selected from Address Book or entered using the numeric
keypad.
This settings is mandatory.
Note
• Up to 27 recipient addresses can be entered for one e-mail message.
Using Address Book
If you select the address from Address Book, the name set for [Recipient Name] will be set
as the recipient's name.
1. Select the address entry box, and select
[Address Book...] or press the <Address
Book> button on the control panel.
E-mail Address Basic Scanning
Address Book... Details...
From
james-white@xxx.com
To
More Scan
Features
Clear
Preview
1/9
42 2 Scan
Page 43

2. On the [Address Book Folder] screen,
select the folder in which the recipient's
address is registered.
Note
• This screen does not appear if [List View] is selected
for [Address Screen] under [System Settings]. The
[Address Book...] button takes you directly to the
[Address Book] screen, which appears after a specific
folder is selected on the [Address Book Folder]
screen.
• When a password is set for the folder, a password
entry screen appears.
• Password-locked folders are indicated with a "lock"
icon.
3. On the [Address Book] screen, select the
check box of the recipient to be used.
Note
• The check boxes can be selected/deselected each
time you touch them.
Address Book Folder Close
01
Common02Jones
04
Smith
07
Potter
10
(Not in Use)11(Not in Use)12(Not in Use)
Address Book [01]
05
Jones
08
Administration
001 Jane Smith
002 System Design Group
003 xxx.xxx...
004 ABC Corp.
005 Daniel Brown
03
Accounting
06
Brown
09
Misc.
To Folder Confirm
Search... Details...
01-12
13-24
25-36
37-48
20
4. The [To] button appears on the left side of
the recipient name.
Note
• The [To] button can toggle between [To]/[CC]/[BCC]
each time you touch it.
• Select the [Search...] button if you want to search for
an address. Select the [Details...] button to display the
details of the address selected. For more information,
refer to "4 Address Book and Subject/Comment List
(P. 113)".
• The [To Folder] button cancels the selection and takes
you back to the [Address Book Folder] screen.
5. As necessary, touch the [To] button to
change it to [CC] or [BCC].
6. When sending the e-mail to other
addresses in the same folder, repeat Step 3
to 5.
7. Select [Confirm].
8. When sending the e-mail to other
addresses in different folders, repeat Step 1
to 7.
Address Book [01]
To
CC
BCC
001 Jane Smith
002 System Design Group
003 xxx.xxx...
004 ABC Corp.
005 Daniel Brown
To Folder Confirm
Search... Details...
20
Note
• To delete an address entered on the [E-mail Address]
screen, select the address and select [Clear].
2.4 Using Scan to E-mail 43
Page 44

Using the Control Panel
When entering the recipient's address on the control panel, follow the guidelines below:
• Enter it within 64 characters or symbols.
• Spaces, control characters (such as linefeeds), and the following symbols cannot be
used:
()<>[]:;\, "
• This can be a character string without an "@" symbol.
• More than one "@" symbols cannot be included.
• If an "@" symbol is included, one or more characters must come before and after the
symbol.
Use the following procedure also when altering an address that is already set.
Note
• Altering addresses on the control panel does not alter the contents of Address Book.
1. Select an address entry box.
2. Enter the recipient's e-mail address.
E-mail Address Basic Scanning
Address Book... Details...
From
james-white@xxx.com
More Scan
Features
Clear
Preview
To
1/9
Setting a Subject/Comment
Selecting [Details...] on the [E-mail Address] screen displays the [Details] screen. On this
screen, you can set the e-mail subject and comment, return e-mail address, and the file
name of the scanned data.
E-mail Address Basic Scanning
Address Book... Details...
From
Jane Smith
To
System Design Group
CC
ABC Corp.
BCC
More Scan
Features
Clear
Preview
Details
Subject
Reply to
1/9
File Name
Comment
Scan Data from [Host Name]
(Not Set)
(Auto Set)
(Auto Set)
Close
Change
44 2 Scan
Page 45

Subject
Set the subject of the e-mail you are attaching the scanned data to. The subject can be
selected from Subject/Comment List or entered using the numeric keypad.
This setting is optional. When this is left blank, the default subject will be used. The default
is "Scan Data from [xxx]" where "xxx" is a host name.
When entering the subject, follow the guidelines below:
• Enter it within 64 characters or symbols.
• Control characters (such as linefeeds) cannot be used.
Note
• The default subject can be changed under [Setup Menu] > [Subject] > [Default Subject Number] on
CentreWare Internet Services.
On CentreWare Internet Services, you can register contents of subjects such as [Default Subject
Number], [Number], and [Content]. When [Default Subject Settings] is set to [0], or when no information
is registered for the default subject, "Scan Data from [xxx]" (where “xxx” is a host name) will display as
the default.
• The "xxx" of "Scan Data from [xxx]" is the host name set under [Properties] > [Protocol Settings] > [TCP/
IP] > [Host Name] on CentreWare Internet Services.
1. On the [Details] screen, select [Subject],
and select [Change].
Details
Subject
Reply to
File Name
Comment
Scan Data from [Host Name]
(Not Set)
(Auto Set)
(Auto Set)
Close
Change
2. On the [Enter/Change Subject] screen,
select [Select from List].
If entering the subject directly, enter it in the
[Subject] entry box.
Note
• The [Restore Auto] button resets the subject to the
default.
3. On the [Select from List] screen, select the
desired subject.
4. Select [Save].
5. On the [Enter/Change Subject] screen,
select [Save].
Enter/Change Subject
Subject
Scan Data from [Host Name]
Select from List
Monthly Report
Video Conference Minutes
Weekly Meeting Agenda
Catalog Data
Bussiness Trip Schedule
Design Group Scan Data
Cancel Save
Select from List
Restore Auto
Cancel Save
1/2
2.4 Using Scan to E-mail 45
Page 46

Reply to
Set the return address of the e-mail you are attaching the scanned data to. The return
address can be selected from Address Book or entered using the numeric keypad. When
selected from Address Book, the name set for [Recipient Name] will be set as the name of
the return address.
Note
• The scanner cannot receive e-mail. It is recommended to set an address that can receive e-mail, such
as the administrator's address, in case the e-mail server returns e-mail in the event of errors.
• The characters that can be used for entering the return address are the same as for the recipient's
address.
1. On the [Details] screen, select [Reply to],
and select [Change].
2. On the [Enter/Change Reply To] screen,
select [Address Book...], and select the
return e-mail address.
When entering it on the control panel, enter
it in the [Reply to] entry box.
Details
Subject
Reply to
File Name
Comment
Enter/Change Reply To
Address Book...
Reply to
Scan Data from [Host Name]
(Not Set)
(Auto Set)
(Auto Set)
Cancel Save
Close
Change
Refer to
• For information on how to enter addresses, refer to
"Setting the Recipient's E-mail Address (P. 42)".
3. Select [Save].
File Name
Set the file name of the scanned data.
When this is left blank, the file name will be assigned automatically based on the following
rule:
• Starts with "img-" followed by a nine-digit number indicating the saved date and time.
October, November, and December, however, are indicated as "X", "Y", and "Z",
respectively.
Example: img-102030400 January 2nd, 03:04:00 (hr:min:sec)
img-X11123045 October 11th, 12:30:45 (hr:min:sec)
When entering the file name, follow the guidelines below:
• Enter it within 20 characters or symbols.
• The following symbols cannot be used:
* " / \ < > : | ? = , . ; [ ] +
46 2 Scan
Page 47

1. On the [Details] screen, select [File Name],
and select [Change].
Details
Subject
Reply to
File Name
Comment
Scan Data from [Host Name]
(Not Set)
(Auto Set)
(Auto Set)
Close
Change
2. On the [Enter/Change File Name] screen,
select the [File Name] entry box.
Enter/Change File Name
Cancel Save
3. Enter the file name using the numeric
keypad on the control panel.
Note
• The [Restore Auto] button resets the file name to the
default.
File Name (Max. 20 chars.)
(Auto Set)
Restore Auto
Example: img-102030400
(Jan.2 03:04:00)
4. Select [Save].
Comment
Set the comment (message) of the e-mail you are attaching the scanned data to. The
comment can be selected from Subject/Comment List or entered using the numeric keypad.
This setting is optional.
When entering the comment, follow the guidelines below:
• Enter it within 192 characters or symbols.
• Control characters other than linefeeds (such as tabs) cannot be used.
1. On the [Details] screen, select [Comment],
and select [Change].
Details
Subject
Reply to
File Name
Comment
Scan Data from [Host Name]
(Not Set)
(Auto Set)
(Auto Set)
2. On the [Enter/Change Comment] screen,
select [Select from List].
Enter/Change Comment
If entering the comment directly, enter it in
the [Comment] entry box.
Note
• The [Clear Field] button deletes all characters entered.
Comment
Close
Change
Cancel Save
Select from ListClear Field
2.4 Using Scan to E-mail 47
Page 48

3. On the [Select from List] screen, select the
desired comment.
Note
• Select the [Full Comment] button to display the entire
comment.
4. Select [Save].
5. On the [Enter/Change Comment] screen,
select [Save].
Select from List
FYI, attached is this month’s progress report
Please find attached the schedule for your bu
Please verify the attached data and contact u
Please circulate the attached file among your
I’m sending you the minutes from the confere
Cancel Save
Full Comment
1/2
48 2 Scan
Page 49

2.5 Using Scan to PC
This section explains how to convert scanned data into PDF, DocuWorks, TIFF, or JPEG
and transfer it to a network-connected computer using an FTP or SMP protocol.
This corresponds to " Step 3 Select the scan type (P. 31)" in “2.1 Scanning Procedure”.
Select the scan
STEP
1
If you want to share scanned data among many users, save it on an FTP server.
3
type
42 5 6 7
FTP server
Scanned
data
If you want to import scanned data into your own computer, save it on an SMB server.
Note
• A shared folder that will be used on SMB to save the scanned data can be created automatically if you
register the SMB address on DocuScan Manager.
Scanned data
PC
2.5 Using Scan to PC 49
Page 50

Operating Tips
Getting Ready for Scan to PC
To use the Scan to PC feature, configure the following settings:
• Set the parameters for an FTP server
Obtain the server name and user name from your system administrator.
• Create a shared folder (for SMB only)
Create a folder in which to save the scanned data and enable sharing of the folder.
The shared folder can be created automatically if you register the SMB address using
the Easy Setup mode on DocuScan Manager.
• Specify the method of obtaining an IP address and set up an IP address on the control
panel.
Refer to
• For details on the above settings, refer to "Network Settings" in the Setup and Quick Reference Guide.
• For information on how to create folders or to enable their sharing, refer to the Windows online help.
Setting the “Save In” Location
The following two methods can be used to enter the server name (IP address), shared name
of the location where the scanned data is to be saved, as well as the user ID and password
to be used when accessing the location:
• Using the numeric keypad on the control panel.
• Storing them in Address Book and selecting them on the scanner.
Refer to
• For information on how to enter characters on the control panel, refer to "1.2 Entering Characters (P.
18)".
• For information about character entry restrictions, refer to "Registering Addresses/Subjects/Comments
(P. 114)".
• For information about Address Book, refer to "4.2 Using Address Book on the Scanner (P. 121)".
Addresses stored in Address Book can be altered on the control panel using the numeric
keypad.
Addresses can be registered in Address Book using DocuScan Manager or CentreWare
Internet Services.
Refer to
• For installation instructions of DocuScan Manager, refer to the Software Operation Guide.
• For basic operating instructions of DocuScan Manager, refer to "7 DocuScan Manager (P. 178)".
• For detailed operating instructions of DocuScan Manager, refer to the DocuScan Manager Online Help.
• For operating instructions of CentreWare Internet Service, refer to "9.1 Monitoring/Managing the
Scanner on a Web Browser (P. 216)".
• For information about setting addresses/subjects/comments on CentreWare Internet Services, refer to
the CentreWare Internet Services Online Help.
50 2 Scan
Page 51

Configuring Settings for Scan to PC
The [Save In] screen can be displayed by pressing the <Scan to PC> button on the control
panel or by selecting [Scan to PC] on the [All Services] screen.
All Services
Copy
Scan to PC Scan to Media
Scan to E-mail
Job Status
Save In Basic Scanning
Address Book...
Server
Save In
User Name
Change File Name...
SMB FTP
More Scan
Features
Preview
1/2
Note
• If a password is set for the feature, a screen prompting you to enter the password appears. If prompted,
enter the password using the numeric keypad and press [Confirm]. For information on how to set
passwords, refer to "Service Login (P. 145)".
• If the feature is disabled, a message informing you of this appears. To enable or disable each feature,
refer to "Service Availability (P. 143)".
• If old settings are still present on the [Save In] screen, pressing the <Clear All> button resets them to the
defaults. The defaults can be changed under [System Settings]. For information about [System
Settings], refer to "6 System Settings (P. 129)".
Setting the “Save In” Location Using Address Book
1. On the [Save In] screen, select [Address
Book...].
Save In Basic Scanning
Address Book...
Change File Name...
More Scan
Features
Preview
2. On the [Address Book Folder] screen,
select a folder where the address to be
used is registered.
Note
• This screen does not appear if [List View] is selected
for [Address Screen] under [System Settings]. The
[Address Book...] button takes you directly to the
[Address Book] screen, which appears after a specific
folder is selected on the [Address Book Folder]
screen.
• If a password is set to the folder, a password entry
screen appears.
• Password-lock folders are indicated with a "lock" icon.
SMB FTP
Server
Save In
User Name
Address Book Folder Close
01
Common02Jones
04
Smith
07
Potter
05
Jones
08
Administration
03
Accounting
06
Brown
09
Misc.
10
(Not in Use)11(Not in Use)12(Not in Use)
1/2
01-12
13-24
25-36
37-48
2.5 Using Scan to PC 51
Page 52

3. On the [Address Book] screen, select the
desired “Save In” location.
Note
• Select [Search...] button to search for an address.
Select the [Details...] button to display the details of
the address selected. For more information, refer to "4
Address Book and Subject/Comment List (P. 113)".
• The [To Folder] button cancels the selection and takes
you back to the [Address Book Folder] screen.
Address Book [01]
Search... Details...
001 SMB Exterior Designs
002 FTP Design Concept
003 SMB Minutes
004 FTP Software Specifications
005 FTP Hardware Specifications
To Folder Close
4. Select [Close].
5. The [Save In] screen appears.
Note
• The address selected from Address Book can be
altered using the control panel.
Setting the “Save In” Location Using the Control Panel
Use the following procedure also when altering a “Save In” location that is already set.
Note
• Altering addresses on the control panel does not alter the contents of Address Book.
1
Transfer Protocol
Select a method to be used when transferring the scanned data from the scanner.
If saving the scanned data in a Windows shared folder, select [SMB].
If saving it on an FTP server, select [FTP].
1. Select [SMB] or [FTP].
Save In Basic Scanning
Address Book...
Server
Save In
User Name
Change File Name...
SMB FTP
More Scan
Features
Server
Set the computer on which the scanned data is to be saved.
This setting is mandatory.
When entering the server, follow the guidelines below:
• Enter it in one of the following formats:
FQDN format
Example: pcname.example.com
Computer Name (NetBIOS name)
Example: pcname
DNS Host Name
Example: pcname
IP Address
Preview
1/2
52 2 Scan
Page 53

Example: 192.168.1.100
• Enter it within 64 characters or symbols.
• Control characters (such as linefeeds) cannot be used.
Note
• For information about FTP server, ask your system administrator.
• Your computer name can be found in [My Computer] > [Properties] on Windows. If using Windows XP,
your computer name is under [Change] > [Computer Name] on the [Computer Name] tab. If using
Windows 2000, your computer name is under [Properties] > [Computer Name] on the [Network ID] tab.
• The IP address of your computer can be displayed by entering "ipconfig" in [Command Prompt] and
pressing the <Enter> key.
• If entering this in FQDN format, [Properties] > [Protocol Settings] > [TCP/IP] > [DNS] > [DNS Server
Address] must be set on CentreWare Internet Services.
• Computer name (NetBIOS name) can be entered only when [Transfer Protocol] is set to [SMB].
• When [Transfer Protocol] is [SMB] and if entering the computer name of a computer located on other
subnet, [Properties] > [Protocol Settings] > [TCP/IP] > [WINS] > [WINS Server Address] must be set on
CentreWare Internet Services.
• If entering a DNS host name, the location where the scanned data is to be saved must be in the domain
specified in [Properties] > [Protocol Settings] > [TCP/IP] > [DNS] > [DNS Server Address]/ [DNS Domain
Name] on CentreWare Internet Services.
• If setting this by entering a DNS host name when [Transfer Protocol] is [SMB], and if a computer that
uses the same name for its computer name (NetBIOS name) exists on the same subnet as the scanner,
the scanned data will be saved on that computer.
1. Select the [Server] entry box.
More Scan
Features
Preview
1/2
2. Enter the name or IP address of the server
using the numeric keypad on the control
panel.
Save In Basic Scanning
Address Book...
Server
Save In
User Name
Change File Name...
SMB FTP
DCSERVER
Shared Name (SMB)
This item appears when [SMB] is selected for the transfer protocol. Set the shared name of
the shared folder in which to save the scanned data. This setting is mandatory.
When entering the shared name, follow the guidelines below:
• Enter it within 32 characters or symbols.
• Control characters (such as linefeeds) cannot be used.
Note
• The shared name can be found in [Properties] of the shared folder you created. It is under [Share name]
on the [Sharing] tab.
1. Select the [Shared Name] entry box.
2. Enter the shared name using the numeric
keypad on the control panel.
Save In Basic Scanning
Address Book...
Server
Shared Name
Save In
Change File Name...
SMB FTP
DCSERVER
scandata
2.5 Using Scan to PC 53
More Scan
Features
Preview
1/2
Page 54

Save In
Set the name of the folder in which to save the scanned data.
When [Transfer Protocol] is [SMB], set the folder under the shared folder you created. When
[Transfer Protocol] is [FTP], set the folder under the directory to be logged in.
This setting is optional. If you leave this blank when [Transfer Protocol] is [SMB], the
scanned data will be saved right under the shared folder set in [Shared Name]. When
[Transfer Protocol] is [FTP], the scanned data will be saved in the directory that will be
logged in by the user set in [User Name].
When entering the “Save In” location, follow the guidelines below:
• Enter it within 96 characters or symbols.
• Control characters (such as linefeeds) cannot be used.
• If [Transfer Protocol] is [FTP], enter it in a format of "path1/path2". If [Transfer Protocol]
is [SMB], enter it in a format of "path1\path2".
1. Select the [Save In] entry box.
More Scan
Features
Preview
1/2
2. Enter the path of the folder in which to save
the scanned data using the numeric keypad
on the control panel.
Save In Basic Scanning
Address Book...
Server
Save In
User Name
Change File Name...
SMB FTP
DCSERVER
planning/data
User Name
Set the user who is authorized to enter the computer/folder in which to save the scanned
data.
This setting is mandatory.
When entering the user name, follow the guidelines below:
Local user name
• Enter it within 97 characters or symbols.
• Control characters (such as linefeeds) and the following symbols cannot be used:
“ * + , / : ; < = > ? [ \ ] |
54 2 Scan
• Leading and trailing spaces are not allowed.
• This cannot be a character string that only contains a period (.).
Note
• If using Windows XP, your local user name can be found under [Control Panel] > [User Account].
• If using Windows 2000, your local user name is under [My Computer] > [Properties] on the [User
Profiles] tab, and is displayed in a format of "computer name\user name". For details, check [Control
Panel] > [Users and Passwords].
NetBIOS-format domain user
Specify this in a format of "domain\user".
Example: pcname\smith
When entering the "domain” and "user” portions, follow the guidelines below:
Page 55

• Control characters (such as linefeeds) and the following symbols cannot be used:
“ * + , / : ; < = > ? [ \ ] |
• Leading and trailing spaces are not allowed.
• This cannot be a character string that only contains a period (.).
• Enter the "user portion" within 32 characters or symbols.
• Enter the "domain portion" within 64 characters or symbols.
Note
• If using Windows XP, your NetBIOS-format domain user name can be found under [Control Panel] >
[User Account].
• If using Windows 2000, your NetBIOS-format domain user name is under [My Computer] > [Properties]
on the [User Profiles] tab, and is displayed in a format of "computer name\user name".
UPN-format domain user
Set this in a format of "user portion@domain portion".
Example: guest@example.com
• The "domain portion" cannot contain control characters (such as linefeeds), spaces, and
the following symbols:
! “ # $ & ‘ ( ) * + , / : ; < = > ? @ [ \ ] ^ ` { | } ~
• Enter the "user portion" within 32 characters or symbols.
• Enter the "domain portion" within 64 characters or symbols.
Note
• For UPN-format user name, ask your network administrator.
1. Select the [User Name] entry box.
Save In Basic Scanning
2. Enter the user name using the numeric
keypad on the control panel.
Address Book...
SMB FTP
Server
Save In
User Name
Change File Name...
DCSERVER
planning/data
smith
More Scan
Features
Preview
1/2
2.5 Using Scan to PC 55
Page 56

Password
Set the password for the user set in [User Name]. This setting is mandatory.
Enter the password within 32 characters or symbols.
1. Select [T] on the right side of the [Save In]
screen to display the [Password] entry box.
2. Select the [Password] entry box.
3. Enter the password using the numeric
keypad on the control panel.
Setting the File Name
Save In Basic Scanning
Address Book...
Change File Name...
SMB FTP
Server
Save In
User Name
DCSERVER
planning/data
smith
Save In Basic Scanning
Address Book...
Change File Name...
SMB FTP
Password
*****
More Scan
Features
Preview
More Scan
Features
Preview
1/2
2/2
Selecting [Change File Name...] on the [Save In] screen displays the [Change File Name]
screen. On this screen, you can set the file name of the scanned data and specify the action
to be taken when a file name conflict occurs.
Save In Basic Scanning
Address Book...
Server
Save In
User Name
Change File Name...
SMB FTP
More Scan
Features
Preview
Change File Name
1/2
Cancel Save
File Name (Max. 20 chars.)
(Auto Set)
Restore Auto
File Name Conflict
Change Name and Save
File Name
Set the file name of the scanned data.
When this is left blank, the file name will be assigned automatically based on the following
rule:
• Starts with "img-" followed by a nine-digit number indicating the saved date and time.
October, November, and December, however, are indicated as "X", "Y", and "Z",
respectively.
Example: img-102030400 January 2nd, 03:04:00 (hr:min:sec)
img-X11123045 October 11th, 12:30:45 (hr:min:sec)
56 2 Scan
When entering the file name, follow the guidelines below:
• Enter it within 20 characters or symbols.
Page 57

• The following symbols cannot be used:
* " / \ < > : | ? = , . ; [ ] +
1. On the [Change File Name] screen, select
the [File Name] entry box.
Change File Name Cancel Save
2. Enter the file name using the numeric
keypad on the control panel.
Note
• The [Restore Auto] button rests the file name to the
default.
3. Select [Save].
File Name Conflict
Specify the action to be taken if a file name conflict occurs.
1. On the [Change File Name] screen, select
[File Name Conflict].
2. On the [File Name Conflict] screen, select
[Cancel Job], [Change Name and Save], or
[Overwrite].
In case of a file name conflict, [Change
Name and Save] will not save the file.
[Change Name and Save] will save the file,
but will add a number between 0001 and
9999 to the end of its name.
[Overwrite] will save the file by overwriting
the file of the same name.
Change File Name Cancel Save
File Name Conflict
Cancel Job
Change Name
and Save
Overwrite
File Name (Max. 20 chars.)
(Auto Set)
Restore Auto
File Name Conflict
Change Name and Save
File Name (Max. 20 chars.)
(Auto Set)
Restore Auto
File Name Conflict
Change Name and Save
Cancel Save
In the case of file name
conflict, a number
between 0001 - 9999 will
be added to the file name
to save as a new file.
3. Select [Save].
2.5 Using Scan to PC 57
Page 58

2.6 Using Scan to Media
This section explains how to convert scanned data into PDF, DocuWorks, TIFF, or JPEG
and save it on a USB flash memory (available commercially) plugged into the USB
connector.
This corresponds to " Step 2 Load a document and insert media (P. 30)" and " Step 3 Select
the scan type (P. 31)" in “2.1 Scanning Procedure”.
STEP
1
Load a document
2
and insert media
Select the scan
3
type
The Scan to Media feature allows you to import scanned data into your computer even when
the scanner is not connected to a network.
USB memory
When Scan to Media is used, data will be saved directly under the root directory of the USB
flash memory.
Important
• Scan to Media cannot be used when the security or write-protect feature of the USB flash memory is
enabled.
Configuring Settings for Scan to Media
4 5 6 7
Scanned data
PC
Selecting [Scan to Media] on the [All Services] screen or pressing the <Scan to Media>
button displays the [Save In] screen.
All Services
Job Status
Copy
Scan to PC Scan to Media
Note
• When a password is set for the feature, a screen prompting you to enter the password appears. When
prompted, enter the password using the numeric keypad and select [Confirm]. For information on how to
set passwords, refer to "Service Login (P. 145)".
• When the feature is disabled, a message informing you of this appears. To enable or disable the use of
each feature, refer to"Service Availability (P. 143)".
• If old settings are still present on the [Save In] screen, pressing the <Clear All> button on the control
panel resets them to the defaults. The defaults can be changed under [System Settings]. For information
about [System Settings], refer to "6 System Settings (P. 129)".
Scan to E-mail
Save In Basic Scanning
Change File Name...
Insert a USB Flash
Memory as shown
on the left.
More Scan
Features
Preview
58 2 Scan
Page 59

Loading the Document and Inserting the Media
1. Load the document to be scanned.
Refer to
• For instructions on how to load documents, refer to
"1.5 Loading Documents (P. 23)".
2. Insert a USB flash memory into the USB
connector.
Note
• The scanner has three USB connectors. To insert a
USB flash memory, the connector located on the front
side is the most convenient. Other USB connectors
can be used also if the connector on the front side has
malfunctioned.
Refer to
• For more information on the location of the USB
connectors, refer to "1.1 Main Components (P. 13)".
Setting the File Name
Selecting [Change File Name...] on the [Save In] screen displays the [Change File Name]
screen. On this screen, you can set the file name of the scanned data and specify the action
to be taken when a file name conflict occurs.
Save In Basic Scanning
Change File Name...
Insert a USB Flash
Memory as shown
on the left.
More Scan
Features
Preview
Change File Name
Cancel Save
File Name (Max. 20 chars.)
(Auto Set)
Restore Auto
File Name Conflict
Change Name and Save
File Name
Set the file name of the scanned data.
If you leave this blank, the file name will be assigned automatically based on the following
rule:
• Starts with "img-" followed by a nine-digit number indicating the saved date and time.
October, November, and December, however, are indicated as "X", "Y", and "Z",
respectively.
Example: img-102030400 January 2nd, 03:04:00 (hr:min:sec)
img-X11123045 October 11th, 12:30:45 (hr:min:sec)
When entering the file name, follow the guidelines below:
• Enter it within 20 characters or symbols.
• The following symbols cannot be used:
* " / \ < > : | ? = , . ; [ ] +
2.6 Using Scan to Media 59
Page 60

1. On the [Change File Name] screen, select
the [File Name] entry box.
Change File Name Cancel Save
2. Enter the file name using the numeric
keypad on the control panel.
Note
• The [Restore Auto] resets the file name to the default.
3. Select [Save].
File Name Conflict
Specify the action to be taken when a file name conflict occurs.
1. On the [Change File Name] screen, select
[File Name Conflict].
2. On the [File Name Conflict] screen, select
[Cancel Job], [Change Name and Save], or
[Overwrite].
In case of a file name conflict, [Change
Name and Save] will not save the file.
[Change Name and Save] will save the file,
but will add a number between 0001 and
9999 to the end of its name.
[Overwrite] will save the file by overwriting
the file of the same name.
Change File Name Cancel Save
File Name Conflict
Cancel Job
Change Name
and Save
Overwrite
File Name (Max. 20 chars.)
(Auto Set)
Restore Auto
File Name Conflict
Change Name and Save
File Name (Max. 20 chars.)
(Auto Set)
Restore Auto
File Name Conflict
Change Name and Save
Cancel Save
In the case of file name
conflict, a number
between 0001 - 9999 will
be added to the file name
to save as a new file.
60 2 Scan
3. Select [Save].
Page 61

2.7 Setting the Basic Scan Features
This section explains how to set the basic scan features.
This corresponds to " Step 4 Set the scan features (P. 32)" in “2.1 Scanning Procedure”.
Set the scan
STEP
1
2 5 6 73
The basic scan features can be set on the [Basic Scanning] screen.
[Basic Scanning] screen
4
features
E-mail Address Basic Scanning
Output Color
Full Color
Grayscale
Black
Note
• The above screen is the [Basic Scanning] screen when [Scan to E-mail] is selected. The content of the
screen, however, is the same even when [Scan to PC] or [Scan to Media] is selected.
• If old settings are still present on the [Basic Scanning] screen, pressing the <Clear All> button on the
control panel resets them to the defaults. The defaults can be changed under [System Settings]. For
information about [System Settings], refer to "6 System Settings (P. 129)".
File Format
PDF
DocuWorks
TIFF
More...
More Scan
Features
2 Sided Orig.
Original Type
Lighten/Darken
From the [Basic Scanning] screen, access the setting screen for each available feature.
<Example>
File Format
PDF
Cancel Save
Multi-page
TIFF
DocuWorks
TIFF
JPEG
On each setting screen, configure the required settings and select [Save] when you are
done.
When you want to delete or cancel the settings you entered, select [Cancel].
2.7 Setting the Basic Scan Features 61
Page 62

Output Color (Selecting the Output Color)
The Output Color feature allows you to select the desired output color.
Color Original
B&W Original
[Full Color]
[Full Color]
Output Color
[Grayscale]
[Grayscale]
[Black]
[Black]
Full Color
Select this when scanning color originals.
Grayscale
Select this when scanning originals with different shades of black and white. This can be
used for originals that cannot be represented in black and white only.
Black
Select this when the desired output is black and white.
1. On the [Basic Scanning] screen, select the
desired output color.
E-mail Address Basic Scanning
Output Color
Full Color
Grayscale
Black
File Format
PDF
DocuWorks
TIFF
More...
More Scan
Features
2 Sided Orig.
Original Type
Lighten/Darken
62 2 Scan
Page 63

File Format (Selecting the File Format of the Scanned Data)
The File Format feature allows you to set the file format of the scanned data.
PDF
Saves the scanned data in PDF format.
Note
• To view scanned data saved in PDF format, Acrobat Reader 4.0 or later is required. Acrobat Reader can
be installed from the "Software Pack" CD-ROM included with the scanner.
DocuWorks
Saves the scanned data in DocuWorks format.
Note
• To view or print scanned data saved in DocuWorks format, one of the following software is required:
• DocuWorks Ver. 4.0 or later
• DocuWorks Viewer Light Ver. 4.0 or later
• DocuWorks Viewer Light for Web Ver. 4.0 or later
DocuWorks 6.0 Trial Edition, DocuWorks Viewer Light 6.0, and DocuWorks Viewer Light for Web 6.0
can be installed from the "Software Pack" CD-ROM included with the scanner.
TIFF
Divides the scanned data per page and saves each page as a TIFF file.
Note
• The TIFF format can be selected from [TIFF V6] and [TTN2] under [System Settings]. For more
information, refer to "TIFF File Format (P. 172)".
More...
Displays the [File Format] screen that allows you to select other file formats.
1. On the [Basic Scanning] screen, select the
desired file format.
To select a file format that is not displayed
on the screen, select [More...] and select it
on the [File Format] screen.
E-mail Address Basic Scanning
Output Color
Full Color
Grayscale
Black
File Format
PDF
DocuWorks
TIFF
More...
More Scan
Features
2 Sided Orig.
Original Type
Lighten/Darken
[File Format] Screen
Selecting [More...] on the [Basic Scanning] screen displays the [File Format] screen.
On this screen, you can select other file formats.
Multi-page TIFF
Saves multiple-page scanned data into one TIFF file.
Note
• Multi-page TIFF files can be viewed on DocuScan Manager.
JPEG
Saves scanned data in JPEG format.
2.7 Setting the Basic Scan Features 63
Page 64

Note
• [JPEG] cannot be selected when [Output Color] is set to [Black].
1. When [More...] is selected, select the
desired file format on the [File Format]
File Format
screen.
2. Select [Save].
2 Sided Originals (Scanning a 2-Sided Original)
The 2 Sided Originals feature allows you to set whether to scan both sides or only one side
of the original.
When scanning both sides of the original, specify its printing orientation (head-to-head or
head-to-toe) and the orientation it is loaded.
Selecting [2 Sided Orig.] displays the [2 Sided Originals] screen.
Important
• If you enlarge and scan a large head-to-toe document, part of its image may get lost.
PDF
DocuWorks
TIFF
Cancel Save
Multi-page
TIFF
JPEG
[2 Sided Originals] Screen
1 Sided
Scans one side of the original.
2 Sided
Scans both sides of the original.
Selecting [2 Sided] displays the options for [Originals] and [Original Orientation] on the right
side of the screen.
[Originals]
H to H
Select this when the original is head-to-head (The top of the page remains at the top when
the page is flipped over).
H to T
Select this when the original is head-to-toe (The top of the page comes at the bottom when
the page is flipped over).
64 2 Scan
Page 65

[Original Orientation]
When scanning the original from the document feeder, specify its orientation to define which
side is the top.
Head-Top
Select this when placing the original on the document glass or into the document feeder with
its top towards the back of the scanner.
Note
• The output orientation for TIFF, Multi-page TIFF, and JPEG differs from that of PDF and DocuWorks.
To p
Left Right
Bottom
Original placed on document glass Scan result
To p
To p
TIFF, Multi-page TIFF, JPEG
PDF, DocuWorks
TIFF, Multi-page TIFF, JPEG
PDF, DocuWorks
Original loaded into document feeder Scan result
Head-Left
Select this when placing the original on the document glass or into the document feeder with
its top towards the left of the scanner. Make sure to select [Head-Left] when placing the
original in head-left orientation (texts are in sideways).
To p
Left Right
Bottom
Original placed on document glass Scan result
To p
2.7 Setting the Basic Scan Features 65
Page 66

To p
Original loaded into document feeder Scan result
Note
• The scanner will not correctly recognize the top of the original if the [Original Orientation] setting does
not match the actual orientation of the original.
1. On the [Basic Scanning] screen, select [2
Sided Orig.].
2. On the [2 Sided Originals] screen, select [1
Sided] or [2 Sided]. When [2 Sided] is
selected, select the options for [Originals]
and [Original Orientation].
3. Select [Save].
Original Type (Selecting the Original Type)
T
E-mail Address Basic Scanning
h
e
Output Color
Full Color
s
c
Grayscale
a
Black
n
n
e
.
2 Sided Originals
1 Sided
2 Sided
File Format
PDF
DocuWorks
TIFF
More...
Originals Original
H to H Head-Top
H to T Head-Left
More Scan
Features
2 Sided Orig.
Original Type
Lighten/Darken
Cancel Save
Orientation
66 2 Scan
The Original Type feature allows you to define the type of the original.
Selecting [Original Type] displays the [Original Type] screen.
[Original Type] Screen
Text
Select this to produce sharp text images.
Text & Photo
Select this for scanning originals that contain both texts and photos. It automatically
identifies text and photo area and copies both areas in the optimal print quality.
Selecting [Text & Photo] displays [Photo Type] on the right side of the screen.
Photo
Select this for scanning photos.
Selecting [Photo] displays [Photo Type] on the right side of the screen.
Page 67

[Photo Type]
Halftone
Select this for scanning printer-printed photos or printing materials such as books and
brochures.
Photograph
Select this for scanning photos printed on photographic paper.
1. On the [More Scan Features] screen, select
[Original Type].
2. On the [Original Type] screen, select the
type of the original.
3. Select [Save].
E-mail Address Basic Scanning
Output Color
Full Color
Grayscale
Black
Original Type
Text
Text & Photo
Photo
File Format
PDF
DocuWorks
TIFF
More...
Cancel Save
More Scan
Features
2 Sided Orig.
Original Type
Lighten/Darken
2.7 Setting the Basic Scan Features 67
Page 68

Lighten/Darken (Adjusting the Scan Density)
The Lighten/Darken feature allows you to adjust the overall lightness and darkness (scan
density) of the output in seven levels.
Original
Lighten / Darken
[Lighten]
1. Adjust the scan density using [ ] or [ ].
[Darken]
E-mail Address Basic Scanning
Output Color
Full Color
Grayscale
Black
File Format
PDF
DocuWorks
TIFF
More...
More Scan
Features
2 Sided Orig.
Original Type
Lighten/Darken
68 2 Scan
Page 69

2.8 Setting Other Scan Features
The following explains how to set the features available on the [More Scan Features]
screen.
This corresponds to " Step 4 Set the scan features (P. 32)" in “2.1 Scanning Procedure”.
Set the scan
STEP
1
2 5 6 73
[More Scan Features] screen
4
features
Normal
Off
Head to Left200 dpi
More Scan
Features
E-mail Address Basic Scanning
Scan Size Image Compression
Auto Size
Detect
Reduce / Enlarge Mixed Sized Orig.
100%
Scan Resolution Original Orientation
1/2
E-mail Address Basic Scanning
Sharpness Contrast
Normal
Auto Exposure
On
Normal
More Scan
Features
2/2
Note
• The above screen is the [More Scan Features] screen on the DocuScan C4250 when [Scan to E-mail] is
selected. The content of the screen, however, is the same even when [Scan to PC] or [Scan to Media] is
selected. [Mixed Sized Orig.] is not available on the DocuScan C3200 A.
• If old settings are still present on the [More Scan Features] screen, pressing the <Clear All> button on
the control panel resets them to the defaults. The defaults can be changed under [Systems Settings].
For more information about [System Settings], refer to "6 System Settings (P. 129)".
From the [More Scan Features] screen, access the setting screen for each available
feature.
<Example>
Scan Size
Auto Size
Detect
Standard Size
Variable Size
Cancel Save
A4
A4
A3
B4
B5
B5
1/2
On each setting screen, configure the required settings and select [Save] when you are
done.
When you want to delete or cancel the settings you entered, select [Cancel].
2.8 Setting Other Scan Features 69
Page 70

Scan Size (Specifying the Scan Size)
The Scan Size feature allows you to specify the scan size.
Specify the scan size when scanning a non-standard size document, or when scanning a
document in a size different from the original.
If you specify the scan size, the original will be scanned in the size you specified regardless
of its actual size.
Original
X
Question
Answer
Y
Scan Size
Question
[Variable Size]
Selecting [Scan Size] displays the [Scan Size] screen.
[Scan Size] Screen
Auto Size Detect
Automatically detects the size of the original. The following documents sizes can be
detected automatically:
Document Glass Document Feeder
C4250
B5 , B5 , A5 , A5 , A4 ,
A4 , 8.5 x 11” , B4 ,
A3 , 11 x 17” , A6 , B6 ,
16K , 16K , 8K
B5 , B5 , A5 , A5 , A4 ,
A4 , B4 , A3
70 2 Scan
C3200 A
Note
• When the size of a document cannot be detected, a screen that allows you to enter the size appears.
• The chart shows the standard paper sizes for A/B series (8K/16K). For the standard paper sizes for A/B
Series and Inch Series, and for information on how to set the scanner to detect other paper size series,
refer to "Paper Size Settings (P. 148)".
B5 , A5 , A5 , A4 , A6 ,
B6 , 8.5 x 11” , 16K
B5 , A5 , A5 , A4
Standard Size
Select this when selecting the scan size from the
preset options.
The preset options displayed on the screen can
be changed.
Note
• The DocuScan C4250 displays 12 preset options
while the DocuScan C3200 A displays 6. The screen
on the right is that of the DocuScan C4250.
Scan Size
Auto Size
Detect
Standard Size
Variable Size
Cancel Save
A4
A4
A3
B4
B5
B5
1/2
Page 71

Refer to
• For information on how to change the preset options,
refer to "Original Size Button (P. 141)".
Variable Size
Select this when the original is non-standard
size, or when scanning in a size different from its
actual size. Specify the size using [ ]/[ ]/[ ]/
[ ] in increments of 1 mm. The scale on the
document glass can help you specify the size.
Refer to
• For information about supported document sizes, refer
to "Supported Documents (P. 23)".
1. On the [More Scan Features] screen, select
[Scan Size].
Scan Size
Auto Size
Detect
Standard Size
Variable Size
Scan Size
Cancel Save
Y
X
(15 - 432)
100 mm
Cancel Save
(15 - 297)
100 mm
2. On the [Scan Size] screen, set the scan
size.
3. Select [Save].
Reduce/Enlarge (Specifying the Scan Ratio)
The Reduce/Enlarge feature allows you to specify the desired scan ratio.
Original
A
B
Reduce / Enlarge
Enlarged from A4 to A3
Auto Size
Detect
Standard Size
Variable Size
A
B
[Preset %]
[Auto %]
Reduced to fit on B5
Selecting [Reduce/Enlarge] displays the [Reduce/Enlarge] screen.
2.8 Setting Other Scan Features 71
Page 72

[Reduce/Enlarge] Screen
Preset %
Select this when selecting the scan ratio from the
preset options.
When selected, the preset options appear on the
right side of the screen.
Note
• When the scan ratio is selected from [Preset %], the
output size may not exactly match the selected preset
%. Use the paper sizes on the screen as a reference
when selecting a preset %.
Auto %
Automatically reduces/enlarges the original to fit
on the paper size selected.
When selected, the paper size options appear
on the right side of the screen.
Note
• When [Auto %] is selected, the scanner recognizes
margins as white data.
Reduce/Enlarge
Preset %
Auto %
Reduce/Enlarge
Preset %
Auto %
Cancel Save
100%
50%
A3´A5
70%
A3´A4/B4´B5
81%
B4´A4/B5´A5
86%
A3´B4/A4´B5
B4´A3/B5´A4
115 %
Cancel Save
A4
A3
B4
B5
A5
B6
1/2
1/3
1. On the [More Scan Features] screen, select
[Reduce/Enlarge].
2. On the [Reduce/Enlarge] screen, specify
the scan ratio.
3. Select [Save].
Reduce/Enlarge
Preset %
Auto %
Cancel Save
100%
50%
A3´A5
70%
A3´A4/B4´B5
81%
B4´A4/B5´A5
86%
A3´B4/A4´B5
115 %
B4´A3/B5´A4
1/2
72 2 Scan
Page 73

Scan Resolution (Specifying the Scan Resolution)
The Scan Resolution feature allows you to specify the desired scan resolution.
Higher resolution yields better image quality but increases the size of data. As data size
increases, the time required for scanning or transferring data also increases.
Selecting [Scan Resolution] displays the [Scan Resolution] screen.
[Scan Resolution] Screen
200 - 600 dpi
Select the scan resolution from the options of 200 dpi, 300 dpi, 400 dpi, and 600 dpi.
1. On the [More Scan Features] screen, select
[Scan Resolution].
Scan Resolution
Cancel Save
2. On the [Scan Resolution] screen, select the
desired scan resolution.
3. Select [Save].
200 dpi
300 dpi
400 dpi
600 dpi
Image Compression (Specifying the Compression Rate of the Output)
The Image Compression feature allows you to specify the desired data compression rate
when scanning with [Output Color] set to [Full Color] or [Grayscale].
Selecting [Image Compression] displays the [Image Compression] screen.
[Image Compression] Screen
Higher
Saves the scanned data at a high compression rate. The image quality is not high, but the
data size is small.
Normal
Saves the scanned data at a standard compression rate. Both the image quality and data
size is standard.
Lower
Saves the scanned data at a low compression rate. The image quality is high, but the data
size is large.
1. On the [More Scan Features] screen, select
[Image Compression].
2. On the [Image Compression] screen, select
the desired compression rate.
3. Select [Save].
Image Compression
Higher
Normal
Lower
2.8 Setting Other Scan Features 73
Cancel Save
Higher
File Size: Small
Lower
Resolution: High
This feature does not
work when Black is
selected as Output
Color.
Page 74

Mixed Sized Originals (Scanning Mixed-size Originals Simultaneously) (DocuScan C4250 Only)
Use the Mixed Sized Originals feature to feed documents of different sizes into the
document feeder. This feature allows you to scan documents of different sizes
simultaneously and scans them on paper appropriate for each document.
This feature also allows you to scan all documents on the same size paper.
When scanning documents on the same size paper, set [Mixed Sized Originals] to [Enable]
and configure the following settings:
• Set [Reduce/Enlarge] to [Auto %] and select the output paper size.
Refer to
• For information about scan ratios, refer to "Reduce/Enlarge (Specifying the Scan Ratio) (P. 71)".
Mixed-size Originals
A
B
Report
2
1
Important
• Always load A5 documents in LEF orientation.
Note
• If the sizes of documents cannot be detected, a screen that allows you to enter the sizes appears.
3
Scanned in Same Sizes as Originals
A
B
Report
2
1
3
Scanned on Same Size Paper
A
Report
B
2
1
Selecting [Mixed Sized Orig.] displays the [Mixed Sized Originals] screen.
[Mixed Sized Originals] Screen
Off
Select this when scanning documents of the same size.
3
74 2 Scan
On
Select this when scanning documents of different sizes. The scanner will automatically
detect the size of each document.
1. On the [More Scan Features] screen, select
[Mixed Sized Orig.].
2. On the [Mixed Sized Originals] screen,
select [On] or [Off].
3. Select [Save].
Mixed Sized Originals
Off Select On when there are
On
Cancel Save
different sizes of originals.
Page 75

Original Orientation (Specifying the Orientation of the Original)
g
The Original Orientation feature allows you to specify the orientation of the original to
identify which side is the top.
Selecting [Original Orientation] displays the [Original Orientation] screen.
[Original Orientation] Screen
Head to Top
Select this when placing the original on the document glass or into the document feeder with
its top towards the back of the scanner.
To p
To p
To p
Left Right
Bottom
Original placed on document glass
Original loaded into document feeder
Head to Left
Select this when placing the original on the document glass or into the document feeder with
its top towards the left of the scanner. Make sure to select [Head to Left] when loading the
original in head-left orientation (texts are in sideways).
To p
To p
Left Right
Bottom
To p
inal placed on document glass
Ori
Note
• The scanner will not correctly recognize the top of the original if the [Original Orientation] setting does
not match the actual orientation of the original.
• This feature does not work when [File Format] is set to [TIFF] or [JPEG].
Original loaded into document feeder
1. On the [More Scan Features] screen, select
[Original Orientation].
2. On the [Original Orientation] screen, select
Original Orientation
Head to Top
the orientation of the original.
3. Select [Save].
Head to Left
2.8 Setting Other Scan Features 75
Cancel Save
Select the orientation
your originals are
loaded.
The selected Original
Orientation becomes
invalid if TIFF or JPEG
is selected as File Format.
Page 76

Sharpness (Adjusting the Sharpness of the Output)
The Sharpness feature allows you to adjust the sharpness of the output.
Original
[Softer]
Sharpness
[Sharper]
Selecting [Sharpness] displays the [Sharpness] screen.
[Sharpness] Screen
Sharper - Softer
The sharpness can be adjusted in five levels from [Sharper] to [Softer].
The closer the level is to [Sharper], the sharper the contour of the image. The closer the
level is to [Softer], the softer the contour of the image.
1. On the [More Scan Features] screen, select
[Sharpness].
2. On the [Sharpness] screen, set the
sharpness of the image using [ ] or [ ].
3. Select [Save].
Sharpness
Cancel Save
Sharper
Normal
Softer
76 2 Scan
Page 77

Auto Exposure (Removing the Background of the Original)
The Auto Exposure feature allows you to remove unwanted marks on the original's
background when scanning with [Output Color] set to [Black]. A newspaper is one example
of this type of original.
Also when scanned with [Output Color] set to [Full Color], a white background sometimes
appears in a faint color depending on the type of paper used and how old the paper is. In
such case, this feature can make the background of the output white.
Original
Auto Exposure
Report Report
Note
• The Auto Exposure feature does not work when [Photo] is selected for [Original Type].
• When [Output Color] is [Full Color], this feature removes less of the background.
Selecting [Auto Exposure] displays the [Auto Exposure] screen.
[Auto Exposure] Screen
Off
Scans the background as it appears on the original.
On
Removes the background on the output.
1. On the [More Scan Features] screen, select
[Auto Exposure].
2. On the [Auto Exposure] screen, select [On]
or [Off].
3. Select [Save].
Auto Exposure
Off
On
Cancel Save
This feature does not work
when Photo is selected
as the Original Type.
2.8 Setting Other Scan Features 77
Page 78

Contrast (Adjusting the Contrast of the Output)
The Contrast feature allows you to adjust the contrast of the output.
Original
[Lower]
Contrast
[Higher]
Selecting [Contrast] displays the [Contrast] screen.
[Contrast] Screen
Higher - Lower
The contrast can be adjusted in five levels from [Higher] to [Lower].
The closer the level is to [Higher], the higher the degree of contrast (The bright area is made
more brighter while the dark area is made more darker.) The closer the level is to [Lower],
the lower the degree of contrast.
1. On the [More Scan Features] screen, select
[Contrast].
Contrast
Cancel Save
2. On the [Contrast] screen, set the contrast of
the image using [ ] or [ ].
3. Select [Save].
Higher
Normal
Lower
78 2 Scan
Page 79

3 Copy
3.1 Copying Procedure
By connecting the scanner to a printer using the USB cable, you can scan documents on
the scanner and output their copies from the printer.
This section outlines the basic copying procedure. For details, refer to the description
provided for each operation.
Step 1 Get ready to copy
Get ready to
STEP
Before making copies, connect the scanner with a printer using the USB cable.
Refer to
• For information on how to connect the scanner with a printer, refer to "1 Installing the Scanner" in the
Setup and Quick Reference Guide.
• For information on how to get your printer ready to copy, refer to the user guide provided for the printer.
1
copy
2
43 5 6 7
Step 2 Load a document
STEP
Place a document onto the document glass or into the document feeder.
Refer to
• For instructions on how to load documents, refer to "1.5 Loading Documents (P. 23)".
1
Load a document
2
43 5 6 7
3.1 Copying Procedure 79
Page 80

Step 3 Select [Copy]
STEP
Display the [All Services] screen, and select [Copy].
1. Press the <Copy> button on the control
panel, or select [Copy] on the [All Services]
screen.
Note
• The features assigned to the custom buttons can be
changed. For more information, refer to "Custom
Buttons 1 - 3 (P. 141)".
• When a password is set for [Copy], a screen
prompting you to enter the password appears. If
prompted, enter the password using the numeric
keypad and press [Confirm]. For information on how to
set passwords, refer to "Service Availability (P. 143)".
1
Select [Copy]
3
42 5 6 7
All Services
Copy
Scan to E-mail
Job Status
Step 4 Set the copy features
STEP
Set the required copy features such as paper type and copy ratio. The copy features can
be set on the following three types of screens.
Important
• The features and defaults displayed on the screens vary depending on the features provided by the
printer. The interface screens in this manual are of when the printer supports all copy features of the
scanner.
1
Basic Copying
Used when setting features such as paper type, copy ratio, and copy density.
Image Quality
2 5 6 7
Scan to PC Scan to Media
3
Set the copy
4
features
80 3 Copy
Used when setting features such as image sharpness and document type.
More Copy Features
Used when setting features such as scan size and document orientation.
Page 81

1. Select [Basic Copying] tab, [Image Quality]
tab, or [More Copy Features] tab, and set
the required copy features.
Note
• If old settings are still present, pressing the <Clear All>
button on the control panel resets them to the defaults.
Step 5 Enter the quantity
STEP
The scanner makes up to 999 copies.
1. Using the numeric keypad, enter the
number of copies. The number entered is
displayed in the top right corner of the touch
panel.
1
Basic Copying Image Quality
Paper Supply
Auto Paper 100%
Tray 1
A4
Tray 2
A3
More... More...
Enter the
32 4 6 7
5
quantity
Reduce
/ Enlarge
Auto %
70%
A3´A4
More Copy
Features
Output Color
2 Sided
Lighten/Darken
Note
• To cancel an incorrect entry, press the <Clear All>
button and enter the correct quantity.
Step 6 Start the copy job
STEP
1. Press the <Start> button on the control
panel. The copying starts. The document is
scanned on the scanner and its copies are
output from the printer.
Important
• When the document is loaded into the document
feeder, do not hold it while it is being fed.
1
2
3
4 5
Start the copy job
6
7
3.1 Copying Procedure 81
Page 82

Note
• If a problem occurs, the touch panel displays a
message. Follow the instructions in the message to
remedy the problem. If an error code is displayed,
refer to "8.7 Error Codes (P. 208)" for suggested
solutions.
When you have more documents to copy
When you have more documents to copy, select [Next Original] on the touch panel while
the first document is being scanned. The scanner recognizes that there are more
documents to be copied and copies them as a single job.
Up to 500 pages can be scanned per a single job.
Note
• When the number of scanned pages reaches 500, a message appears, and the scanner will not scan
the rest of the pages. If you want to scan documents that exceeds 500 pages, scan the first 500 pages,
and then scan rest of the pages as a new job.
1. While the first document is being scanned,
select [Next Original].
Scanning Documents...
Black
100%
Uncollated
Pages
Scanned
70%
Pages
Transferred
710
When the scanning of the first document
completes, the message on the touch panel
changes.
Note
• If no operation is performed for a specific amount of
time, the scanner automatically assumes that there
are no more documents to be copied and presumes
the copy job.
2. Load the next document.
Refer to
• For document loading instructions, refer to"1.5
Loading Documents (P. 23)"
3. Select the <Start> button on the control
panel. If you have more documents to copy,
repeat the process of loading a document
and pressing the <Start> button.
Next OriginalLast Original
Press Start to scan.
Press Last Original to complete scanning.
Black
100%
Uncollated
Pages
Scanned
70%
Next OriginalLast Original
Pages
Transferred
710
82 3 Copy
4. When all documents are scanned, select
[Last Original].
Page 83

Step 7 Check the job status
STEP
1
As necessary, check whether the job has been processed successfully.
Selecting [Job Status] on the [All Services] screen displays the [Completed Jobs] screen.
Refer to
• For information about checking job status, refer to"5 Job Status (P. 127)"
32 4 5 6
3.2 Stopping a Copy Job
1. Press the <Stop> button on the control
panel.
A message appears confirming the
cancellation of the job.
Check the job
7
status
2. Select [Yes].
A message appears informing you that the
cancellation is complete.
3. Select [Close].
Note
• Only pages that have not been transferred to the
printer can be cancelled.
Important
• Depending on the printer, you may need to cancel jobs
on the printer instead of on the scanner. In such event,
a message informing you of this appears on the touch
screen. When using the printer on a network, make
sure not to cancel other jobs by mistake.
• When starting a new copy job after cancelling a job,
make sure that the printer is in the ready-to-copy state.
Cancel Job
Do you want to cancel the job?
Job Cancelled
The job has been cancelled.
NoYe s
Close
3.2 Stopping a Copy Job 83
Page 84

3.3 Copy Feature Setting Items
The copy features offer the following setting items:
Screen Setting Items Reference
Basic Copying Paper Supply "Paper Supply (Selecting a Paper Tray)
(P. 86)"
Reduce/Enlarge "Reduce/Enlarge (Making a Reduced/
Enlarged Copy) (P. 89)"
Output Color*1 "Output Color (Selecting the Output
Color) (P. 91)"
2 Sided "2 Sided Copying (Making a 1-Sided/2-
Sided Copy) (P. 92)"
Lighten/Darken "Lighten/Darken (Adjusting the Copy
Density) (P. 95)"
Image Quality Presets*1 "Image Quality Presets (Specifying the
Image Quality) (P. 96)"
Original Type*2 "Original Type (Selecting the Original
Type) (P. 98)"
Auto Exposure "Auto Exposure (Removing the Back-
ground of the Original) (P. 99)"
Color Balance*1 "Color Balance (Adjusting the Color Bal-
ance of the Output) (P. 100)"
Sharpness "Sharpness (Adjusting the Sharpness of
the Output) (P. 102)"
Color Saturation*1 "Color Saturation (Adjusting the Color
Saturation of the Output) (P. 103)"
More Copy Features Copy Output*3 "Copy Output (Collating or Uncollating
the Output) (P. 105)"
2 Up "2 Up (Copying Two Originals on One
Page) (P. 106)"
Original Orientation "Original Orientation (Specifying the Ori-
entation of the Original) (P. 107)"
Mixed Sized Orig.*4 "Mixed Sized Originals (Scanning Mixed-
size Originals Simultaneously) (DocuScan C4250 Only) (P. 109)"
Edge Erase "Edge Erase (Erasing Unwanted Marks
from the Center/Edges of the Original)
(P. 110)"
Original Size "Original Size (Specifying the Scan Size)
(P. 111)"
*1 This item is not available if the scanner is connected to a monochrome printer.
*2 This item is available on the [Basic Copying] screen if the scanner is connected to a
monochrome printer.
*3 This item is available only if the printer has a collating feature and add-on hard disk.
*4 This item is not available on the DocuScan C3200 A.
84 3 Copy
Page 85

3.4 Setting the Basic Copy Features
This section describes how to set the basic copy features.
This corresponds to " Step 4 Set the copy features (P. 80)" in “3.1 Copying Procedure”.
STEP
1
2 5 6 7
3
Set the copy
4
features
The basic copy features can be set on the [Basic Copying] screen.
[Basic Copying] screen
Basic Copying Image Quality
Paper Supply
Auto Paper 100%
Tray 1
A4
Tray 2
A3
More... More...
Note
• If old settings are still present on the [Basic Copying] screen, pressing the <Clear All> button on the
control panel resets them to the defaults. The defaults can be changed under [System Settings]. For
information about [System Settings], refer to "6 System Settings (P. 129)".
• Depending on the features provided by the printer, the features and defaults displayed on the scanner
vary. The interface screens in this manual are of when the printer supports all copy features of the
scanner.
Reduce
/ Enlarge
Auto %
70%
A3´A4
More Copy
Features
Output Color
2 Sided
Lighten/Darken
3.4 Setting the Basic Copy Features 85
Page 86

Paper Supply (Selecting a Paper Tray)
The Paper Size feature allows you to select the paper tray that contains the paper you want
to copy onto.
Auto Paper
Automatically selects an appropriate paper tray based on the size of the original and the
specified copy ratio.
Note
• When [Auto Paper] is selected, select an option other than [Auto %] for [Reduce/Enlarge].
Tray 1, Tray 2
Displays the paper trays available on the printer.
Note
• The paper trays displayed on the screen are those set under [System Settings] > [Basic Copying] >
[Paper Supply-2]/[Paper Supply-3]. The following screen uses the default settings of [Tray 1] and
[Tray2]. For information on how to change the paper supply options on the [Basic Copying] screen, refer
to "Basic Copying (P. 158)".
More...
Displays the [Paper Supply] screen. On this screen, you can select paper trays that are not
displayed on the [Basic Copying] screen.
Selecting [Bypass] on the [Paper Supply] screen displays the [Bypass] screen. This screen
allows you to select the type and size of paper to be loaded on the bypass tray.
1. On the [Basic Copying] screen, select the
desired paper tray under [Paper Supply].
If the paper tray you want to use is not
displayed, select [More...]. On the [Paper
Supply] screen, select the desired paper
tray.
Basic Copying Image Quality
Paper Supply
Auto Paper 100%
Tray 1
A4
Tray 2
A3
More... More...
Reduce
/ Enlarge
Auto %
70%
A3´A4
More Copy
Features
Output Color
2 Sided
Lighten/Darken
[Paper Supply] screen
Selecting [More...] on the [Basic Copying] screen displays the [Paper Supply] screen.
This screen displays all paper trays that are available on the printer and allows you to select
paper trays that are not displayed on the [Basic Copying] screen.
Selecting the bypass tray displays the [Bypass] screen.
Important
• When the printer accommodates non-standard size paper or standard size paper that is not supported
by the scanner, the paper trays that contain such paper cannot be selected.
• The paper types available on the printer but not supported by the scanner cannot be used on the
scanner.
86 3 Copy
Page 87

1. When [More...] is selected, select the
desired paper tray on the [Paper Supply]
screen, and select [Save].
Paper Supply
Auto Paper
Tray 1 A4
Tray 2 B4
Tray 3 A3
Tray 4 A5
Bypass A5
Cancel Save
Plain
Recycled
Plain
Recycled
Recycled
1/2
[Bypass] Screen
Selecting [Bypass] on the [Paper Supply] screen displays the [Bypass] screen.
On this screen, you can select the type and size of paper to be loaded on the bypass tray.
Important
• Depending on the printer, additional settings may be required on the printer when making copies on nonstandard size paper from the bypass tray. For more information, refer to the user guide provided for the
printer.
Note
• The paper types and sizes displayed on the screen are not those of paper loaded on the printer.
Standard Size
Displays the [Standard Size] screen. On this screen, you can select the size of paper to be
loaded on the bypass tray.
Non-standard Size
Displays the [Non-standard Size] screen.
On this screen, you can specify the width (X direction) and height (Y direction) of paper in
increments of 1 mm.
Note
• The range of paper size that can be specified depends on the printer. Refer to the user guide provided
for the printer.
Paper Type
Allows you to select the desired paper type from the list.
1. When [Bypass] is selected on the [Paper
Supply] screen, select [Standard Size] or
[Non-standard Size].
Bypass
Standard Size
A4
Non-standard Size
Cancel Save
Paper TypePaper Size
Plain
Bond
Recycled
Transparency
Heavyweight 1
1/2
3.4 Setting the Basic Copy Features 87
Page 88

2. When [Standard Size] is selected, select
the desired paper size on the [Standard
Size] screen.
When [Non-standard Size] is selected,
specify the paper size using [ ]/[ ]/[ ]/
[].
3. Select [Save].
Standard Size
Non-standard Size
X is the edge
perpendicular
to the feeder.
Cancel Save
Paper Size
A4
A4
A3
B4
B5
Cancel Save
X
Y
(140 - 355)
200X:
mm
(90 - 215)
200Y:
1/1
mm
4. Select the desired paper type from [Paper
Type].
5. Select [Save] repeatedly until you return to
the [Basic Copying] screen.
Bypass
Standard Size
A4
Non-standard Size
Cancel Save
Paper TypePaper Size
Plain
Bond
Recycled
Transparency
Heavyweight 1
1/2
88 3 Copy
Page 89

Reduce/Enlarge (Making a Reduced/Enlarged Copy)
The Reduce/Enlarge feature allows you to make a reduced/enlarged copy by selecting the
desired copy ratio.
Original
A
B
Reduce / Enlarge
A
B
[100%]
[Auto %]
Reduced to fit on B5
100%
Copies in the same size as the original (size-for-size copying).
A
B
[Preset %]
Enlarged from A4 to A3
[Variable %]
Enlarged by 120%
Auto %
Automatically reduces/enlarges the original to fit on the paper size selected. The original will
be reduced/enlarged in the same proportions for X and Y directions.
Note
• When [Auto %] is selected, select an option other than [Auto] for [Paper Supply].
N %
Used when reducing/enlarging the original by this preset ratio.
More...
Displays the [Reduce/Enlarge] screen which allows you to select other copy ratios.
1. From [Reduce/Enlarge] on the [Basic
Copying] screen, select the desired copy
ratio.
When specifying a copy ratio not displayed
on the [Basic Copying] screen, select
[More...], and set the ratio on the [Reduce/
Enlarge] screen.
Basic Copying Image Quality
Paper Supply
Auto Paper 100%
Tray 1
A4
Tray 2
A3
More... More...
Reduce
/ Enlarge
Auto %
70%
A3´A4
More Copy
Features
Output Color
2 Sided
Lighten/Darken
3.4 Setting the Basic Copy Features 89
Page 90

[Reduce/Enlarge] Screen
Selecting [More...] on the [Basic Copying] screen displays the [Reduce/Enlarge] screen.
Preset %
Select this to select a copy ratio from the preset options.
Variable %
Select this to enter the desired copy ratio. The copy ratio can be specified from 50 to 200%
in increments of 1%. The original will be reduced/enlarged in the same proportions for X and
Y directions.
1. On the [Reduce/Enlarge] screen, select
[Preset %]. From the list of preset options
on the right side of the screen, select the
desired copy ratio, and select [Save].
Note
• When the copy ratio is selected from [Present %], the
output size may not exactly match the selected preset
%. Use the paper sizes displayed on the screen as a
reference when selecting a preset %.
Reduce / Enlarge
Preset %
Variable %
Cancel Save
100%
Auto %
50%
A3´A5
70%
A3´A4/B4´B5
81%
B4´A4/B5´A5
86%
A3´B4/A4´B5
1/2
2. Select [Variable %] on the [Reduce/
Enlarge] screen, and specify the copy ratio
using the numeric keypad or [ ]/[ ] in
increments of 1%.
Note
• To clear an incorrect entry, press the <C> button.
3. Select [Save].
Reduce / Enlarge
Preset %
Variable %
Cancel Save
(50 - 200)
100 %
123
456
789
0C
90 3 Copy
Page 91

Output Color (Selecting the Output Color)
The Output Color feature allows you to select the desired output color.
Color Original
[Full Color]
Output Color
[Black]
B&W Original
[Full Color]
[Black]
Selecting [Output Color] displays the [Output Color] screen.
Important
• This feature is not available if the scanner is connected to a monochrome printer.
[Output Color] Screen
Black
Select this when the desired output is a black and white copy.
Full Color
Select this when making copies of color documents.
1. On the [Basic Copying] screen, select
[Output Color].
Basic Copying Image Quality
Paper Supply
Auto Paper 100%
Tray 1
A4
Tray 2
A3
More... More...
Reduce
/ Enlarge
Auto %
70%
A3´A4
More Copy
Features
Output Color
2 Sided
Lighten/Darken
3.4 Setting the Basic Copy Features 91
Page 92

2. On the [Output Color] screen, select the
desired output color.
Output Color
3. Select [Save].
Black
Full Color
2 Sided Copying (Making a 1-Sided/2-Sided Copy)
The 2 Sided Copying feature allows you to copy 1 sided/2 sided documents onto both sides
or one side of paper.
Cancel Save
1-Sided Original
A
Report
B
Page 1 Page 2
1-Sided Original
A
Report
B
Page 1 Page 2
2-Sided Original
Report
2-Sided Original
Report
1-Sided Copy
A
Report
B
Page 1 Page 2
2-Sided Copy
Report
Selecting [2 Sided Copying] displays the [2 Sided Copying] screen.
Important
• You cannot make 2-sided copies if the printer does not have a 2-sided copying feature.
• If you make an enlarged copy of a large 2-sided head-to-toe document, part of its image may get lost.
• Depending on the printer, an additional memory is required when making 2-sided copies ([1
or [2
J2 Sided]) of A3 documents. For more information, refer to the user guide provided for the printer.
J2 Sided]
92 3 Copy
[2 Sided Copying] Screen
1J1 Sided
Makes 1-sided copies from 1-sided originals.
1J2 Sided
Makes 2-sided copies form 1-sided originals.
Important
• This feature is not available if the printer does not have a 2-sided copying feature.
2J2 Sided
Makes 2-sided copies from 2-sided originals.
Page 93

Important
• This feature is not available if the printer does not have a 2-sided copying feature.
2J1 Sided
Makes 1-sided copies from 2-sided originals.
Copies
Note
• This feature is displayed when [1
J2 Sided] is selected.
• H to H
Select this when making head-to-head copies (The top of the page remains at the top when
the page is flipped over).
• H to T
Select this when making head-to-toe copies (The top of the page comes at the bottom when
the page is flipped over).
Original/Copies
Note
• This feature is displayed when [2
J2 Sided] is selected.
• H to H
Select this when making head-to-head copies from the head-to-head original.
• H to T
Select this when making head-to-toe copies from the head-to-toe original.
Originals
Note
• This feature is displayed when [2
J1 Sided] is selected.
• H to H
Select this when the original is head-to-head.
• H to T
Select this when the original is head-to-toe.
Original Orientation
Note
• This feature is not displayed when [1
Specify the orientation of the original to identify which side is the top.
J1 Sided] is selected.
3.4 Setting the Basic Copy Features 93
Page 94

• Head-Top
g
Select this when placing the original on the document glass or into the document feeder with
its top towards the back of the scanner.
To p
To p
To p
Left Right
Bottom
Original placed on document glass
Original loaded into document feeder
• Head-Left
Select this when placing the original on the document glass or into the document feeder with
its top towards the left of the scanner. Make sure to select [Head-Left] when placing the
original in head-left orientation (texts are in sideways).
To p
To p
Left Right
Bottom
To p
inal placed on document glass
Ori
Original loaded into document feeder
Important
• The scanner will not correctly recognize the top of the original if the [Original Orientation] setting does
not match the actual orientation of the original.
1. On the [Basic Copying] tab, select [2
Sided].
Basic Copying Image Quality
Paper Supply
Auto Paper 100%
Tray 1
A4
Tray 2
A3
More... More...
Reduce
/ Enlarge
Auto %
70%
A3´A4
More Copy
Features
Output Color
2 Sided
Lighten/Darken
2. On the [2 Sided Copying] screen, select the
desired option.
2 Sided Copying
1´1 Sided
1´2 Sided
Cancel Save
94 3 Copy
2´2 Sided
2´1 Sided
Page 95

3. When an option other than [1J1 Sided] is
selected, select the desired options from
the right side of the scanner.
4. Select [Save].
Lighten/Darken (Adjusting the Copy Density)
The Lighten/Darken feature allows you to adjust the overall lightness and darkness (copy
density) of the output in seven levels. The output becomes darker as you move T to the left
and lighter as you move T to the right.
2 Sided Copying
1´1 Sided
1´2 Sided
2´2 Sided
2´1 Sided
Cancel Save
Originals Original
Orientation
H to H Head-Top
H to T Head-Left
Original
Lighten / Darken
[Lighten]
1. Adjust the copy density using [ ] and [ ].
[Darken]
Basic Copying Image Quality
Paper Supply
Auto Paper 100%
Tray 1
A4
Tray 2
A3
More... More...
Reduce
/ Enlarge
Auto %
70%
A3´A4
More Copy
Features
Output Color
2 Sided
Lighten/Darken
3.4 Setting the Basic Copy Features 95
Page 96

3.5 Setting the Image Quality Features
The following explains how to set the image quality features.
This corresponds to " Step 4 Set the copy features (P. 80)" in “3.1 Copying Procedure”.
STEP
1
2 5 6 7
3
Set the copy
4
features
The image quality features can be set on the [Image Quality] screen.
[Image Quality] screen
Basic Copying Image Quality
Presets Color Balance
Normal Y 0 0 0/M 0 0 0
Original Type Sharpness
Text & Photo
(Halftone)
Auto Exposure Color Saturation
Note
• If old settings are still present on the [Image Quality] screen, pressing the <Clear All> button resets them
to the defaults. The defaults can be changed under [System Settings]. For information about [System
Settings], refer to "6 System Settings (P. 129)".
More Copy
Features
C 0 0 0/K 0 0 0
Sharper
NormalOn
Image Quality Presets (Specifying the Image Quality)
The Image Quality Presets feature automatically adjusts the [Color Balance] settings to
produce image tones appropriate for the image.
Important
• This feature is available only when the scanner is connected to a color printer.
• This feature is available only when [Output Color] is set to [Full Color].
Note
• If you change the settings on [Color Balance] screen after configuring them on the [Image Quality
Presets] screen, the settings configured on the [Image Quality Presets] screen will become invalid.
Selecting [Presets] displays the [Image Quality Presets] screen.
[Image Quality Presets] Screen
Normal
Copies the originals with the default Color Balance settings.
Color Adjustment...
Displays the [Color Adjustment] screen which allows you to adjust the tone of red/blue/
green.
96 3 Copy
Page 97

1. On the [Image Quality] screen, select
[Presets].
2. On the [Image Quality Presets] screen,
select [Normal] or [Color Adjustment...].
Basic Copying Image Quality
Presets Color Balance
Normal Y 0 0 0/M 0 0 0
Original Type Sharpness
Text & Photo
(Halftone)
Auto Exposure Color Saturation
Image Quality Presets
C 0 0 0/K 0 0 0
Sharper
NormalOn
Cancel Save
More Copy
Features
Normal
Color
Adjustment...
Image Quality Presets
automatically adjusts
Color Balance.
The feature will be
cancelled if Color
Balance is changed.
[Color Adjustment] Screen
Selecting [Color Adjustment...] on the [Image Quality Presets] screen displays the [Color
Adjustment] screen.
On this screen, you can adjust the tone of colors.
Original Red + Original Blue +
Original Green +
Red +/Red -
Emphasizes or de-emphasizes the tone of red.
Blue +/Blue -
Emphasizes or de-emphasizes the tone of blue.
Green +/Green -
Emphasizes or de-emphasizes the tone of green.
3.5 Setting the Image Quality Features 97
Page 98

1. On the [Color Adjustment] screen, select
the desired color tone, and select [Save].
Color Adjustment
Cancel Save
2. On the [Image Quality Presets] screen,
select [Save].
Original Type (Selecting the Original Type)
The Original Type feature allows you to define the type of document you want to copy.
Selecting [Original Type] displays the [Original Type] screen.
Note
• This feature is available on the [Basic Copying] screen if the scanner is connected to a monochrome
printer.
[Original Type] Screen
Text
Select this to produce sharp text images.
Red +
Blue +
Green +
Red -
Blue -
Green -
Text & Photo
Select this for copying documents that contain both texts and photos. It automatically
identifies text and photo areas and copies both areas in the optimal image quality.
Selecting [Text & Photo] displays [Photo Type] on the right side of the screen.
Photo
Select this for copying photos.
Selecting [Photo] displays [Photo Type] on the right side of the screen.
Map
Select this for copying maps.
[Photo Type]
Halftone
Select this for copying printer-printed photos or printing materials such as books and
brochures.
Photograph
Select this for copying photos printed on photographic paper.
98 3 Copy
Page 99

1. On the [Image Quality] screen, select
[Original Type].
2. On the [Original Type] screen, select the
type of the document.
Basic Copying Image Quality
Presets Color Balance
Normal Y 0 0 0/M 0 0 0
Original Type Sharpness
Text & Photo
(Halftone)
Auto Exposure Color Saturation
Original Type
C 0 0 0/K 0 0 0
Sharper
NormalOn
Cancel Save
More Copy
Features
3. Select [Save].
Text
Text & Photo
Photo
Map
Photo Type
Auto Exposure (Removing the Background of the Original)
The Auto Exposure feature allows you to remove unwanted marks on the original's
background when copying with [Output Color] set to [Black]. A newspaper is one example
of this type of original.
Also when copied with [Output Color] set to [Full Color], a white background sometimes
appears in a faint color depending of the type of paper used and how old the paper is. In
such case, this feature can make the background of the output white.
Original
Report Report
Auto Exposure
Halftone
Photograph
Note
• The Auto Exposure feature does not work when [Original Type] in [Photo].
• When [Output] Color is [Full Color], this feature removes less of the background.
Selecting [Auto Exposure] displays the [Auto Exposure] screen.
[Auto Exposure] Screen
Off
Copies the background as it appears on the original.
On
Removes the background of the original on the output copy.
3.5 Setting the Image Quality Features 99
Page 100

1. On the [Image Quality] screen, select [Auto
Exposure].
2. On the [Auto Exposure] screen, select [On]
or [Off].
Basic Copying Image Quality
Presets Color Balance
Normal Y 0 0 0/M 0 0 0
Original Type Sharpness
Text & Photo
(Halftone)
Auto Exposure Color Saturation
Auto Exposure
C 0 0 0/K 0 0 0
Sharper
NormalOn
Cancel Save
More Copy
Features
3. Select [Save].
Off
On
This feature does not work
when Photo is selected
as the Original Type.
Color Balance (Adjusting the Color Balance of the Output)
The Color Balance feature allows you to adjust the level of four process colors (yellow,
magenta, cyan, and black). The color balance can be adjusted in seven levels for areas of
low, medium, and high density.
Original
Color Balance
100 3 Copy
Enhanced cyan Enhanced magenta Enhanced yellow Enhanced black
Important
• This feature is not available if the scanner is connected to a monochrome printer.
• When [Output Color] is set to [Black], this setting only applies to black.
Note
• If you change the settings on [Color Balance] screen after configuring them on the [Image Quality
Presets] screen, the settings configured on the [Image Quality Presets] screen will become invalid.
Selecting [Color Balance] displays the [Color Balance] screen. On this screen, you can
select a color and adjust its intensity.
 Loading...