

Page 1

The Document Company
XEROX
701P97999
1998
DocuPrint XJ6C
Ink Jet Printer
Page 2

Xerox Corporation
©1998 by Xerox Corporation. All rights reserved.
Copyright protection claimed includes all forms and matters of copyrightable material and
information now allowed by statutory or judicial law or hereinafter granted.
Xerox and all Xerox products mentioned in this publication are trademarks of Xerox
Corporation.
Xerox and all Xerox products mentioned in this publication are registered trademarks of the
Xerox Corporation and used by Xerox Canada Ltd. as a registered user.
Windows™ is a trademark of Microsoft Corporation. Products and trademarks of other
companies are also acknowledged.
Publication number: 701P97999
Page 3

Customer Support
To resolve problems with your printer, follow the
suggestions that are provided in Chapter 4,
Troubleshooting the Printer.
If you are unable to solve a XJ6C problem using this
guide or the online Help, call the Xerox Customer Support
Center. Before calling, make sur e you have the following
information:
• XJ6C serial number, which is located next to the
parallel port on the back of the printer.
• XJ6C software version, which is specified in the
printer driver About box.
• Windows operating system version (Windows 95,
Windows 3.1, or Windows 3.11).
• Amount of memory in your PC.
• Information about the problem, including the steps
taken to create the problem, any error messages, and
the expected behavior.
The Xerox Customer Support Center telephone number in
the United States and Canada is:
1-800-TEAM XRX (1-800-832-6979)
Call from a telephone near your PC and the printer. Make
sure both your PC and printer are turned on.
If you require additional information about Xerox and
Xerox products, visit the Xerox web site at:
http://WWW.XEROX.COM
Page 4

Contents
1. Introduction 1
Safety notes 2
Registration card 4
2. Understanding the printer’s features 5
Hardware features 6
Control panel 8
Printer specifications 10
Printable area 12
3. Using the printer settings 13
Accessing printer settings 14
The Main property page 15
The Page property page 17
The Advanced property page 18
The Printer property page 20
Checking the printer’s status 22
Checking the documents in the print queue 23
4. Troubleshooting the printer 25
Power LED is not on 26
The printed document does not match the
selected printer settings 26
The printed document is blank 27
i
Page 5

Contents
The document prints slowly 27
The document sent to the printer does
not print 28
Error LED is on 29
Error LED is blinking 29
The print is blurry or jagged vertical lines
appear 30
The printed image is clipped or off the edge
of the media 31
Extra characters, dashes, or lines appear on
the printed pages 31
White horizontal lines and streaks of the
wrong color appear on the printed pages 32
The print is faint or missing 33
Ink is smeared on the printed pages 34
The print quality of transparencies is poor 35
Color variations appear in large areas of color 36
The paper is not feeding properly 36
The paper does not stack neatly in the paper
output shelf 37
Low Ink Indicator LED is on 37
Low Ink Indicator LED is blinking 38
Packing the printer for return to a Service
Center 39
ii
Page 6

Xerox DocuPrint XJ6C Ink Jet Printer
5. Selecting and ordering supplies 41
Cartridges and print heads 42
Selecting plain paper 43
Selecting specialty print media 43
Selecting labels 44
Selecting transparencies 44
Selecting banner paper 44
6. Printing from DOS 45
Index 47
iii
Page 7

Chapter 1
Introduction
The DocuPrint XJ6C printer is a fast, high quality, four
color thermal ink jet printer designed for both color and
black and white applications. Featuring a compact and
lightweight design, the printer is ideally suited for use in
your office or home. The DocuPrint
connects easily to your personal computer.
Make your pages pop
• Prints up to 600x600 dpi on plain paper and up to
1200x600 dpi on photo glossy paper
• Crisp vivid graphics and photos—even on plain paper
• Automatically corrects problem areas in photos with
unique ImageFix
High-speed, high-quality prints
• Prints up to 5 black-and-white p ages per minute; up
to 2.5 pages per minute in color
• Quick return to applications with fast print spooling
TM
software
XJ6C printer
Cost-saving features
• Separate color cartridges eliminate expense of wasted
inks
• Small footprint on your desktop
1
Page 8

Chapter 1 Introduction
Safety notes
Your DocuPrint XJ6C has be en carefully designed t o give
you years of safe, reliable performance. As with all
electrical equipment, however, there are a few basic
precautions you should take to avoid hurting yourself or
damaging the unit:
1. Read and follow all warnings and instructions marked
2. Unplug the printer before you clean it. Use a damp
3. Place you printer on a firm, solid surface. If you put it
4. Do not put the printer on or near a heat source, such
5. Do not use your printer near water, or spill liquid of
6. Be certain that your power source matches the rating
7. Be sure to install the printer near a power outlet that
8. To avoid damaging the power cord, do not put
9. The use of an extension cord or power strip with this
on or supplied with the printer.
cloth only; do not use liquid or aerosol cleaners.
on an unsteady surface, it might fall and become
damaged. If you place the printer on a soft surface,
such as a rug, sofa, or bed, the vents may be blocked,
causing it to overheat.
as a radiator or heat register. If you put the printer in
any kind of enclosure, make sure it is well ventilated.
any kind into it.
listed on the back of the printer. If you are not sure,
check with your dealer or with your local power
company.
will remain easily accessible.
anything on it or place it where it will be walked on.
If the cord becomes damaged or frayed, replace it
immediately.
printer is not recommended. Check building codes
and insurance requirements before using an extension
cord or power strip. If you are using an extension
cord or power strip with the printer, make sure that
the total of the amperes required by all of the
2
Page 9

Xerox DocuPrint XJ6C Ink Jet Printer
equipment on the extension is less than the
extension’s rating. Generally, the total ratings of all
equipment plugged into any one power line should
not exceed 15 amperes. Do not exceed this unless you
know that the power line your equipment is plugged
into has a rating above 15 amperes.
10. You must only use the 3-conductor, 18 AWG, SVT
type, IEC320 style power cord provided with your
printer (e .g., a plug having a t hird grounding p in).
This plug will only fit into a grounding-type power
outlet. This is a safety feature. To avoid the risk of
electric shock, contact your electrician to replace the
receptacle if you are unable to insert the plug into the
outlet. Never use a ground ad apter plug to connect
the printer to a power source receptacle that lacks a
ground connection terminal.
11. Aside from the routine maintenance described in your
printer documentation, do not try to service the
printer yourself. Opening the cover may expose you
to shocks or other hazards. Do not make any
adjustments other than those described in the
documentation, as you might cause damage requi ring
extensive repair work.
12. If anything happens that indicates that your printer is
not working properly or has been damaged, unplug it
immediately and have your printer serviced. These
are some of the things to look for:
• The power cord or plug is frayed or damaged.
• Liquid has been spilled into the housing, or the
printer has been exposed to water.
• The printer has been dropped or its cabinet has
been damaged.
• The printer does not function normally when you
are following the operating instructions.
3
Page 10

Chapter 1 Introduction
13. The CE marking applied to this product symbolizes
Xerox’s declaration of conformity with the following
applicable directives of the European Union as of the
dates indicated.
• January 1, 1995—Council Directive 73/23/EEC
amended by Council Directive 93/68/EEC,
Approximation of the laws of the member states
related to low voltage equipment.
• January 1, 1996—Council Directive
89/336/EEC, Approximation of the laws of the
member states related to electromagnetic
compatibility.
• A full declaration defining the relevant directives
and referenced standards can be obtained from
your Xerox representative.
• WARNING: In order to allow this equipment to
operate in proximity to Industrial, Scientific and
Medical (ISM) equipment, the external radiation
from ISM equipment may have to be limited or
special mitigation measures taken.
Registration card
To ensure that your printer is registered, please spend a
moment now to complete and return the Registration
Card. Save a copy of the Registration Card and the bill of
sale as proof of purchase for future reference.
4
Page 11

Chapter 2
Understanding the
printer’s features
This chapter illustrates the parts of the DocuPrint XJ6C,
explains the control panel buttons and lights, and lists the
printer specifications.
5
Page 12
Chapter 2 Understanding the Printer’s Features
f
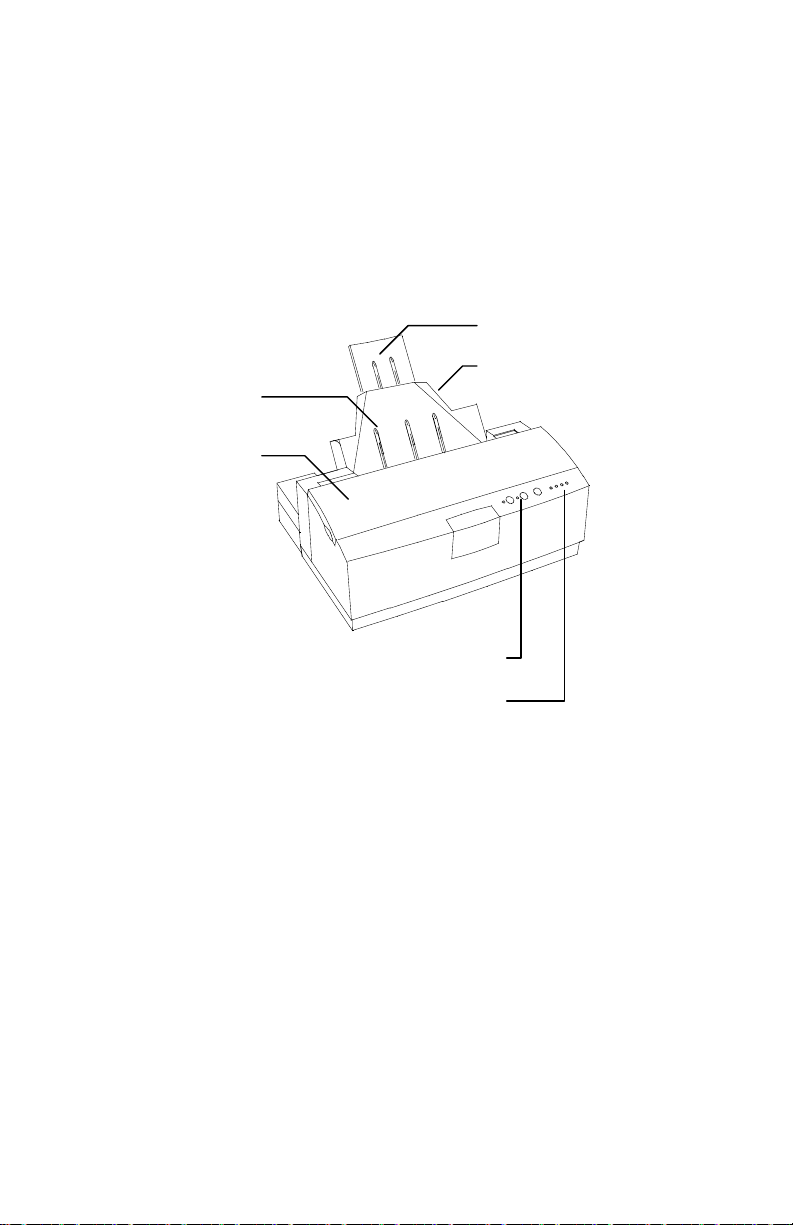
Hardware features
Review the following illustrations to familiarize yourself
with the printer’s parts.
Front view of printer
Paper output shel
Printer cover
Control panel buttons
Paper support
Paper tray
Low ink Indicators
6
Page 13
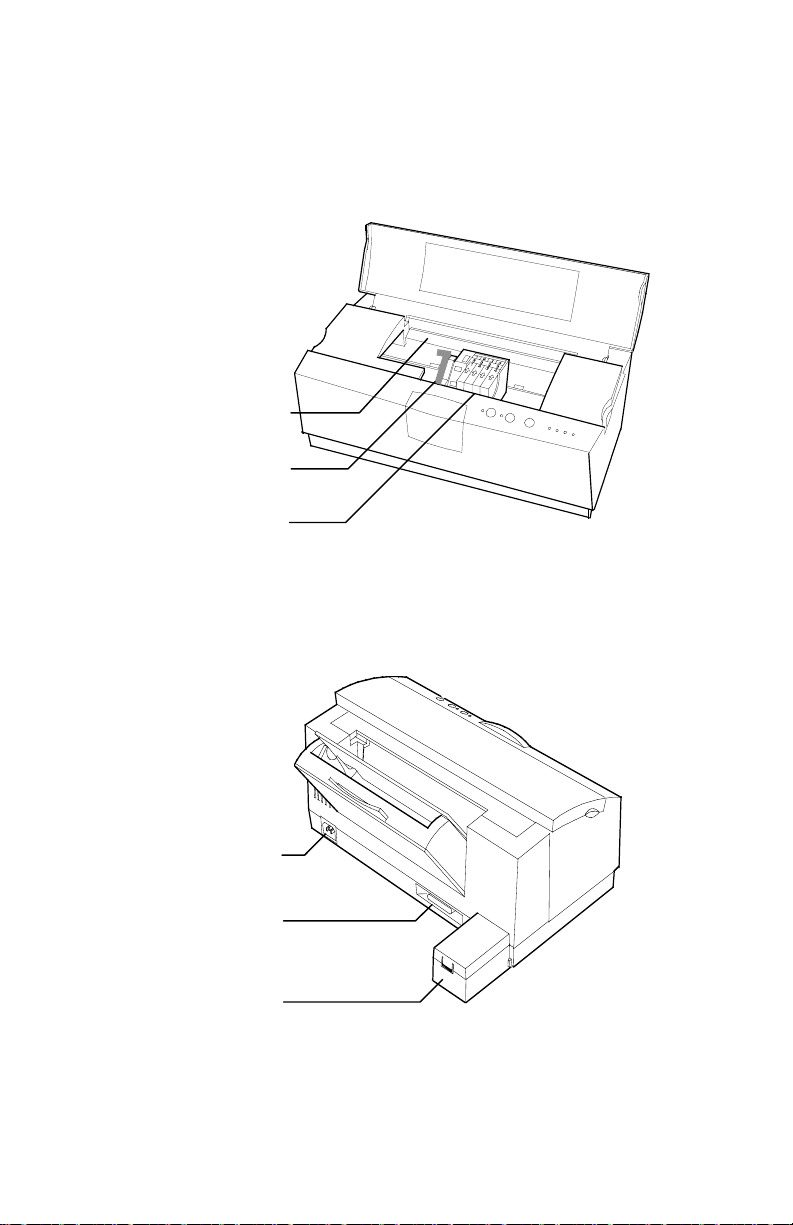
Inside view of printer
b
r
Star wheel ba
Xerox DocuPrint XJ6C Ink Jet Printer
Green cartridge lock
lever
Print head and color
ink cartridges
Back view of printer
Power connection
Parallel interface cable
connection
Print head storage
ox
7
Page 14

Chapter 2 Understanding the Printer’s Features
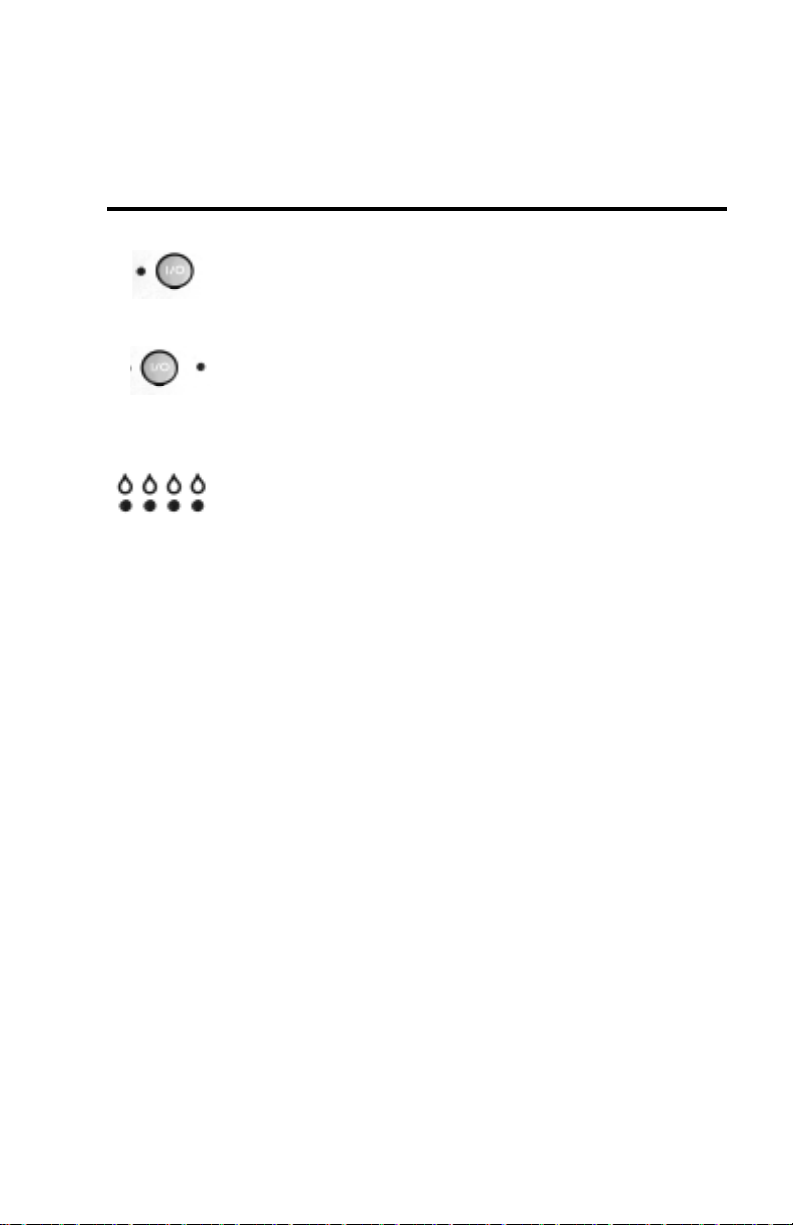
Control panel
The DocuPrint XJ6C control panel has three buttons and
six lights (LEDs). You use the three butto ns t o control
printer functions. The LEDs display the condition of the
printer.
The following tables describe the function of each button
and LED.
Button Function Action
Power/Reset
Resume/FF
Cartridge
Change/Clean
Turn on the printer.
Turn off the printer.
Reset the printer.
Resume printing.
Form feed.
Eject paper.
Clear error (when Error
LED is lit).
Print Demo page.
Print Test page.
Move print head to
center of printer so you
can replace ink
cartridge(s).
Clean the print head.
Press and release.
Press and hold for 2 to 5 seconds.
With the printer on, press and
release. Any data in the printer’s
buffer is cleared. Settings
permanently stored in the printer’s
memory are retained.
If printing has paused, press and
release.
Press and release.
Press and hold for 2 to 5 seconds.
Press and release.
With the printer idle and the paper
path clear, press and hold for 2 to 5
seconds.
With the printer off, press and hold
while turning on the printer.
With the printer on, press and
release.
With the printer on, press and hold
for 2 to 5 seconds.
8
Page 15
Xerox DocuPrint XJ6C Ink Jet Printer
LED Condition Meaning
Power
Error
Low Ink Indicator
On
Blinking
On
Blinking
Off
On
Blinking
Printer is online and ready to print.
Printer is processing data.
Recoverable error. To correct the error,
press and release the Resume/FF
button.
Non-recoverable error. Contact your
Xerox Service Representati ve.
Ink cartridge contains sufficient ink.
Ink in cartridge is low (10% - 15%
left).
Ink cartridge is empty or not installed
correctly, the wrong brand of ink
cartridge is installed, or the print head
is not installed.
9
Page 16

Chapter 2 Understanding the Printer’s Features
Printer specifications
Feature Specification
Print speed Monochrome: Up to 5 ppm (draft mode)
Color: Up to 2.5 ppm (draft mode)
Print resolution Monochrome: 600x600 dpi (plain paper)
Color: 1200x600 dpi (ink jet photo
glossy coated paper); 600x600 dpi (plain
paper)
Print yield Semi-permanent print head with expected
life of 3,000 prints
Replaceable ink cartridges (one cartridge
per color)
Black: 255 prints @ 5% area coverage
(normal mode)
Color: 320 prints @ 5% area coverage
(each color)
Emulation HP PCL3C with Xerox enhancements
Resident typefaces Courier, CG Times, Univers
DOS character sets HP PC-8, HP ROMAN-8, PC-8 Dan/Nor
(ISO 21), PC-850, ECMA-94, Latin
1(ISO 8859/1), German (ISO 21), French
(ISO 69), Italian (ISO 15), Spain (ISO
17), Swedish Names (ISO 11), Swedish
(ISO 10), Norwegian 1 & 2 (ISO 60, 61),
Portuguese (I SO 16), UK (ISO 4), ANSI
ASCII (ISO 6), HP-Legal, ISO IRV (ISO
2), HP-PC-852, Latin 2 & 5 (ISO 8859/2,
8859/9), HP-PC-8 Turkish, Cyrillic 3R,
Cyrillic
10
Page 17

Xerox DocuPrint XJ6C Ink Jet Printer
Feature Specification
Paper tray capacity 125 sheets – 75 g/m² (20 lb) paper
Paper output shelf
50 sheets – 75 g/m² (20 lb) paper
capacity
Paper size Automatic feed: Letter, Legal, A4, A5,
B5, 8 x 10, Executive
Envelopes: #10, DL, 7 3/4
Banner feed: A4 x 5, Letter x 5
Paper weight 60 – 90 g/m² plain paper: (20 – 24 lb)
Print media Plain paper, transparencies, envelopes,
paper-faced labels, high resolution paper,
photo glossy paper, fabric transfer sheets
Interface IEEE 1284 compliant
Ambient conditions Temperature: 10° – 40° C (50° - 104° F)
Humidity: 20% – 80% relative humidity
Input voltage 110V – 240V Universal Power Supply
Power consumption Standby: 0.1A 110V; 0.08A 230V
Operating: 0.5A 110V; 0.3A 230V
External dimensions Width: 41 cm (16.25 inches)
Depth: 29 cm (11.5 inches)
Height: 27 cm (10.5 inches)
Weight : 5 kg (11 lb)
11
Page 18
Chapter 2 Understanding the Printer’s Features
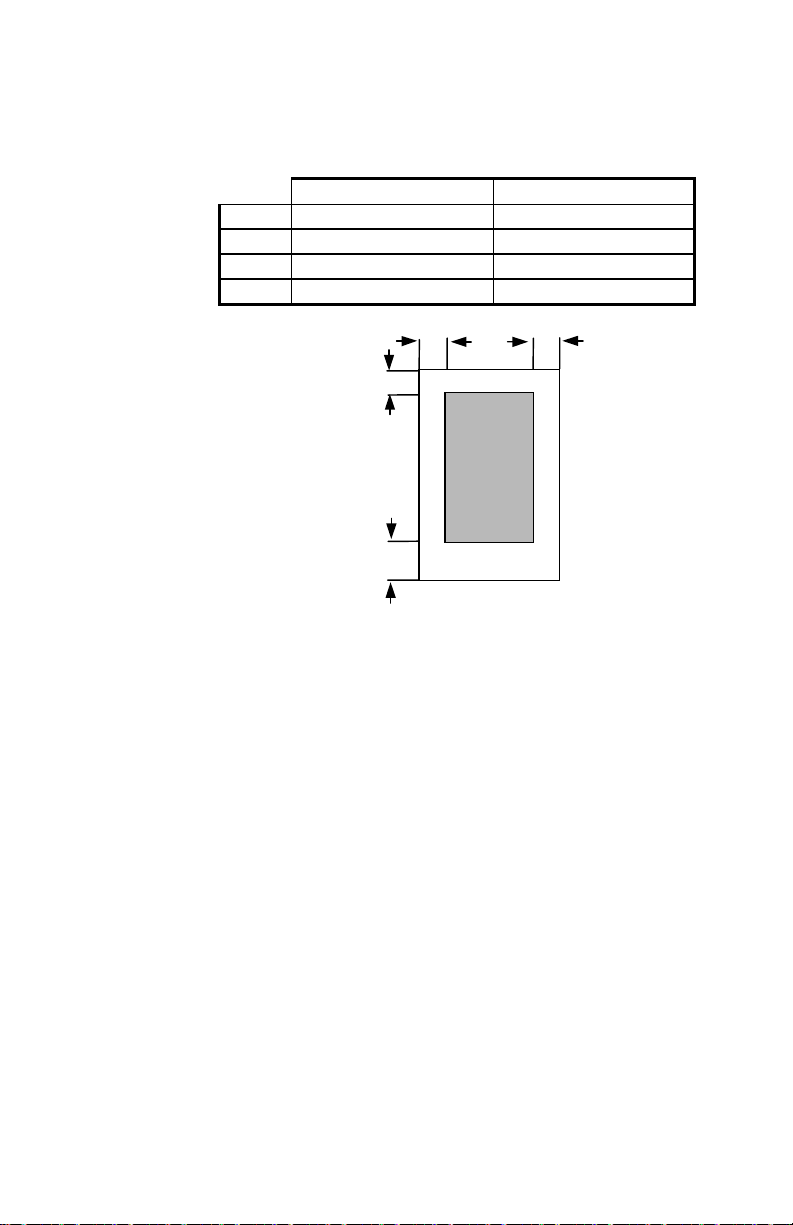
Printable area
Recommended Possible
5.0 mm (0.21”) 5.0 mm (0.21”)
A
5.0 mm (0.21”) 5.0 mm (0.21”)
B
5.0 mm (0.21”) 5.0 mm (0.21”)
C
18.0 mm (0.71”) 12.7mm (0.5”)
D
C
D
B
12
Page 19

Chapter 3
r
Using the printe
settings
Using the DocuPrint XJ6C printer driver software, you
can select from a variety of settings when printing
documents. This chapter describes the printer settings you
can select and how to check the status of the documents
sent to the printer.
13
Page 20

Chapter 3 Using the Printer Settings
Accessing printer settings
You can access the printer settings from a Windows
software application or from the Printers folder.
From a Windows software application:
Click Print from the File menu. In the Print dialog box,
click Properties (or Setup).
From the Printers folder:
In Windows 95, click the Start button, point to Settings,
and click Printers. Click the Xerox DocuPrint XJ6C icon
with the right mouse button, then click Properties.
In Windows 3.1, double-click the Control Panel, then
double-click Printers. Click the Xerox DocuPrint XJ6C
icon, then click the Setup button.
The Xerox DocuPrint XJ6C property pages are displayed.
The settings on each page are described in the following
sections.
Note: Some software applications may override any of the
settings you select on the printer property pages.
14
Page 21

The Main property page
Xerox DocuPrint XJ6C Ink Jet Printer
The Main property page provides the following settings:
Print with cartridge Specifies the print cartridge to use
to print the document or prints the document with the
currently installed cartridge. This setting lets you send
several documents to the printer and specify the type of
print cartridge to use for each document. If the appropriate
print cartridge is not installed when the print job begins,
you will receive a message to install the correct cartridge.
Print document as Sets the color quality to use based on
the contents of the document. The options vary, depending
on the type of print cartridge you're using. Intelligent
Color automatically provides the best color rendition for
photos, graphics, and text; Greyscale provides the correct
values of black and white; Natural provides the color
values used in photographs; Vivid provides the color
15
Page 22

Chapter 3 Using the Printer Settings
values required for graphics; and Text provides the color
values needed for clear, sharp text.
Media Specifies the type of media used for printing.
Print quality Sets printing at different speed and print
quality combinations. The options vary, depending on the
type of print cartridge and media you're using. Draft uses
the fastest speed appropriate for the selected media;
Normal provides letter quality printing; High Quality
provides high quality printing at a slower speed; and
Photo Quality provides high resolution printing on
specialty media.
Saved settings Specifies the printer settings file to use
for the print job. Four files are provided or you can create
your own file.
To create a saved settings file:
1. Select the settings you want on the Main, Page, and
Advanced property pages.
2. On the Main property page, click the Update button.
16
3. Type a name in the Settings box.
4. Click Save.
Page 23

The Page property page
Xerox DocuPrint XJ6C Ink Jet Printer
The Page property page provides the following settings:
Media size Sets the paper size used for printing.
Orientation Sets the paper orientation to Portrait
(vertical orientation) or Landscape (horizontal
orientation).
Mirror Reverses the image, from left to right, for special
applications such as iron-on transfer or decal media.
Copies Specifies the number of copies to print.
Collate Arranges, in sequential order, multiple copies of
the same document.
Reverse page order Prints the document from last page
to first page.
17
Page 24

Chapter 3 Using the Printer Settings
The Advanced property page
18
The Advanced property page provides the following
settings:
Halftoning Shows the halfto ne rendering used based on
the type of print cartridge you’re using and the document
contents.
Brightness Darkens or lightens all the colors in your
print.
Contrast Decreases or increases the amount of contrast
between the light and dark colors in your print.
Saturation Decreases or increases the amount of color
in your print.
Red Decreases or increases the amount of red in your
print.
Page 25

Xerox DocuPrint XJ6C Ink Jet Printer
Green Decreases or increases the amount of green in
your print.
Blue Decreases or increases the amount of blue in your
print.
Use Windows ICM Enables Windows Image Color
Management.
ImageFix Changes the image to improve sharpness,
contrast, and color. For example, ImageFix will correct
pictures and photographs that have poor color balance.
The graphic image on the right side of the property page
provides a visual preview of the selected options, except
ImageFix.
19
Page 26

Chapter 3 Using the Printer Settings
The Printer property page
20
The Printer property page provides the following settings:
Status Describes the printer’s status and, as needed,
provides help to solve a problem.
Ink levels Shows the amount of ink in the print
cartridge(s), that an invalid cartridge is installed, or that a
cartridge is not detected due to a communication problem
between the printer and your PC.
Page 27

Xerox DocuPrint XJ6C Ink Jet Printer
Print cartridge Provides maintenance tasks that you can
start or perform from your PC.
• Change Moves the print cartridge to the center
position so you can remove it.
• Clean Cleans the print cartridge. Before clicking the
Clean button, make sure the printer is idle.
• Align Prints a test pattern that you can use to verify
the correct position of the print cartridge in the
printer.
Print documents Provides documents that you can print
from your PC.
• Test Prints a diagnostic sample page that you can
use to determine printer problems.
• Demo Prints a sample page.
21
Page 28

Chapter 3 Using the Printer Settings
Checking the printer’s status
Both the Status window and the Printer property page
provide you with printer status information, including the
level of ink in the print cartridge(s). The Status window
also shows the current print job’s progress. The Status
window opens automatically while printing a document. If
the printer is idle, you can check its status by doing one of
the following:
• To display the Printer property page, display the
Xerox DocuPrint XJ6C property pages, then click the
Printer tab.
• To display the Status window, click the Start button,
point to Settings, and click Printers. Click the Xerox
DocuPrint XJ6C icon with the right mouse button,
then click Show Status window. (Windows 95 only)
Status Describes the printer’s status and, as needed,
provides help to solve a problem.
Ink levels Shows the amount of ink in the print
cartridge(s), that an invalid cartridge is installed, or that a
cartridge is not detected due to a communication problem
between the printer and your PC.
22
Document progress Shows the progress of information
sent to the printer for each page and the page number
currently being printed out of the total number of pages
sent.
Cancel button Cancels the current print job.
Restart button Pauses the current print job to let you
clear a paper jam or clean or change a print cartridge. You
can later resume printing from the current page or the start
of the job.
Page 29

Xerox DocuPrint XJ6C Ink Jet Printer
Checking the documents in the print queue
The DocuPrint XJ6C print queue shows the documents
currently being printed or waiting to be printed.
Note: The DocuPrint XJ6C print queue runs under
Windows 95. PCs running Windows 3.1/3.11 include the
Spool Manager.
1. To view the print queue, do one of the following:
• Click the Windows Start button, point to
Settings, and click Printers. Double-click the
Xerox DocuPrint XJ6C icon.
• Click the Xerox DocuPrint XJ6C button on the
taskbar.
The Xerox DocuPrint XJ6C window lists the print
jobs pending on the printer and the status of each job.
2. To pause a document that is currently being printed,
do the following:
a. Click the document name.
b. From the Document menu, click Pause printing.
3. To cancel a document that is currently being printed,
do the following:
a. Click the document name.
b. From the Document menu, click Cancel printing.
Using the spool manager
When you print a document, it is quickly processed to a
print file and placed in the Spool Manager until it's
printed. The Spool Manager window lists the print jobs
pending on the printer and the status of each job.
23
Page 30

Chapter 3 Using the Printer Settings
1. To view documents in the Spool Manager, do the
following:
• Double-click the Xerox DocuPrint XJ6C Spool
Manager icon on the desktop. The Spool
Manager window opens.
2. To change the status of print jobs in the Spool
Manager, do the following:
a. Double-click the Xerox DocuPrint XJ6C Spool
Manager icon on the desktop.
b. The Spool Manager window lists the print jobs
pending on the printer and the status of each job.
Click the name of the print job you want to
change.
c. Click the Document menu, then choose from the
following options:
Hold Does not print the document, but keeps it
in the queue, or prints the document if it was held
in the queue.
Keep after printing Keeps the document in the
queue after it's printed for printing at a later time.
Delete Removes the document from the print
queue.
Requeue Changes the document's position in
the print queue.
Info Displays information about the print job.
24
3. To Hold and release the Spool Manager queue, do the
following:
a. Double-click the Xerox DocuPrint XJ6C Spool
Manager icon on the desktop.
b. Click the Xerox DocuPrint XJ6C printer.
c. Fro m the Queue menu, click Hold to stop printing the
documents in the print queue, or to release a held print
queue.
Page 31

Chapter 4
r
Troubleshooting the
printe
This chapter describes common printer problems that may
occur and provides the recommended solutions. Follow
the suggested solutio ns to correct the problem. If the
problem continues, contact your local authorized Xerox
representative.
25
Page 32

Chapter 4 Troubleshooting the Printer
Power LED is not on
Cause Suggested Solution
The power cord is not securely
connected.
Check the power cord
connection. Make sure one end
is securely attached to the power
connection at the back of the
printer and the other end of the
cord is pl ugged into a wall
outlet.
There is no power from the
outlet.
The power cord is damaged. Check the power cord for
Plug the power cord into a
different wall outlet.
damage and replace it, if
necessary.
The printed document does not match the selected printer settings
Cause Suggested Solution
Some software applications
override the settings selected on
the DocuPrint XJ6C property
pages.
Previously selected printer
settings are used to print the
document.
Choose the printer settings from
the application.
Check the selected settings on
the DocuPrint XJ6C property
pages.
26
Page 33

Xerox DocuPrint XJ6C Ink Jet Printer
The printed document is blank
Cause Suggested Solution
There may be a problem with the
print head, printer cable, or your
PC.
Print a Demo print (press and
hold the Resume/FF button on
the printer’s control panel for 2
to 5 seconds).
If the Demo print is good, check
the printer cable or your PC.
If the Demo print is blank, do
one or more of the following:
• Remove, then reinstall the
print head.
• Press the Cartridge
Change/Clean button for 2 to
5 seconds to clean and restore
the print head. Repeat the
process, if necessary.
• Contact the Xerox Customer
Support Center.
The document prints slowly
Cause Suggested Solution
The Print Quality is set to High
quality.
On the Main property page, set
the Print quality to Draft or
Normal.
ImageFix is selected. On the Advanced property page,
click ImageFix to remove the
check mark.
27
Page 34

Chapter 4 Troubleshooting the Printer
The document sent to the printer does not print
Cause Suggested Solution
The printer cable is not
connected properly.
The printer is not mapped to the
local port.
The printer cable is incorrect. Use an IEEE 1284-compliant
The printer cable is damaged. Check the printer cable and
The type of interface is incorrect. Verify that the computer is using
Power LED is blinking. Press and release the Resume/FF
Press and hold the Power/Reset
button for 2 to 5 seconds to turn
off the printer. Make sure the
printer cable is securely
connected to the printer and your
PC.
Map the printer to LPT1. Use the
Details tab to map the port.
parallel bi-directional interface
cable to connect the printer to
your PC.
replace it if damaged.
the parallel interface. Check your
software manual to ensure that
your software communicates to
the interface port that your
printer is connected to.
button to continue printing.
28
Page 35

Xerox DocuPrint XJ6C Ink Jet Printer
Error LED is on
Cause Suggested Solution
The printer is out of paper. Add paper to the paper tray.
Then, press and release the
Resume /FF button.
The print head is not installed
correctly.
A carriage position error
occurred.
A paper feed error occurred. Clear the paper jam. Refer to the
Remove, then reinstall the print
head.
Press the Resume /FF button to
clear the error and eject the
paper.
Open the printer cover and clear
any obstructions in the scan path,
such as packaging material.
online help or Quick
Installation/Reference Guide for
more information.
Error LED is blinking
Cause Suggested Solution
An internal printer error
occurred.
Turn off, then turn on the printer.
If the printer does not turn on,
unplug the power c ord from the
printer, wait a few seconds, then
reconnect it.
If the problem continues, contact
the Xerox Customer Support
Center.
29
Page 36

Chapter 4 Troubleshooting the Printer
The print is blurry or j a gged ver tical lines appear
Cause Suggested Solution
The paper used is not
recommended for the printer.
The color print head needs to be
cleaned.
The print cartridge needs
aligning.
There is bi-directional error. Change the Print quality option
Certain papers (i.e. recycled
paper) may cause poor quality
output. Best results will be
achieved be using paper
developed for ink jet printers.
Press the Cartridge
Change/Clean button for 2 to 5
seconds to restore the ink flow.
After cleaning the ink cartridge,
run a test print. If the print is still
blurry, repeat the above process
5 more times. If the problem
continues, replace the ink
cartridge. Click the Change
button on the Printer property
page, then follow the
instructions.
Align the print cartridge. Click
the Align button on the Printer
property page, then follow the
instructions.
to High Quality.
30
Page 37

Xerox DocuPrint XJ6C Ink Jet Printer
The printed image is clipped or off the edge of the media
Cause Suggested Solution
The document margins may
exceed the printer margins.
The media type and size may not
be correct.
From the application you’re
using, adjust the document’s
margins.
Make sure you selected the
correct Media size on the Page
property page.
Extra characters, dashes, or lines appear on the printed pages
Cause Suggested Solution
The printer cable is too long. Use a printer cable that is less
than six feet long.
Port Monitoring software is
active from a device previously
connected to the printer
(parallel) port.
Remove all previously installed
printers or devices from your
PC.
31
Page 38

Chapter 4 Troubleshooting the Printer
White horizontal lines and streaks of the wrong color appear on the printed pages
Cause Suggested Solution
An ink cartridge may be empty. Replace the ink cartridge. Click
the Change button on the Printer
property page, then follow the
instructions.
An ink cartridge is clogged or
defective, or the print head needs
to be cleaned.
The printer is connected to a
power strip.
The printer is overheated. Open the printer cover. Wait
Press the Cartridge
Change/Clean button for 2 to 5
seconds to restore the ink flow.
After cleaning the ink cartridge,
run a test print. If lines and
streaks still appear, repeat the
above process 5 more times. If
the problem continues, call the
Xerox Customer Support Center.
The printer requires a small
amount of power to maintain the
print head. Either keep the
power strip turned on at all times
or connect the printer to a wall
outlet.
one hour for the printer to cool.
32
Page 39

Xerox DocuPrint XJ6C Ink Jet Printer
White horizontal lines and streaks of the
wrong color appear on the printed pages
(continued)
Cause Suggested Solution
The print cartridge remains in
the storage box for long periods
between use.
To properly maintain the stored
cartridge, remove it from the
storage box once a month, and
use the cartridge to print a few
pages before returning it to the
box.
The print is faint or missing
Cause Suggested Solution
The paper used is not
recommended for the printer.
An ink cartridge is empty. Replace the ink cartridge. Click
An ink cartridge is clogged, or
the print head needs to be
cleaned.
The Print quality option is set to
Draft.
Certain papers (i.e. recycled
paper) may cause poor quality
output. Best results will be
achieved be using paper
developed for ink jet printers.
the Change button on the Printer
property page, then follow the
instructions.
Press the Cartridge
Change/Clean button for 2 to 5
seconds to restore the ink flow.
After cleaning the ink cartridge,
run a test print. If the print is still
faint, repeat the above process 5
more times. If the problem
continues, replace the ink
cartridge.
Select a different Print quality
option.
33
Page 40

Chapter 4 Troubleshooting the Printer
Ink is smeared on the printed pages
Cause Suggested Solution
The printer is printing outside
the printable area.
The printer cover is open while
printing.
Paper is not completely exiting
the printer because the star wheel
assembly bar is disengaged.
Multiple transparencies are
stacked in the paper output shelf.
Change the document margins to
be within the recommended
printable area. Make sure the
margins are equal to or wider
than these margins:
Top, left, and right margins: 5
mm
Bottom margin: 18 mm
Close the printer cover.
Open the printer cover. Reinstall
the star wheel bar by pushing
down on each end of the bar
until it snaps into position.
Remove each transparency from
the paper output shelf after it’s
printed.
34
Page 41

Xerox DocuPrint XJ6C Ink Jet Printer
The print quality of transparencies i s poor
Cause Suggested Solution
Transparency is not selected for
the Media option on the Main
property page.
The document was printed on the
wrong side of the transparency
film.
The wrong brand of
transparencies was used.
Multiple transparencies are
stacked in the paper output shelf.
Make sure Transparency is the
selected Media option on the
Main property page. If the
problem continues, select the
Page Setup command from the
applicati on you’re using to open
the Main property page and
select the Transparency option.
Remove the transparencies from
the paper tray, turn the sheets
over, and reinstall the sheets in
the tray. The rough side of the
film should face the back of the
printer.
Use transparencies made for ink
jet printers only.
When printing multiple
transparencies, remove each
transparency from the paper
output shelf after it’s printed.
35
Page 42

Chapter 4 Troubleshooting the Printer
Color variations appear in large areas of color
Cause Suggested Solution
The print cartridge needs
aligning.
There is bi-directional error. Change the Print quality option
The Print quality option is set to
Draft.
Align the print cartridge. Click
the Align button on the Printer
property page, then follow the
instructions.
to High Quality.
Change the Print quality option
to Normal or High Quality on the
Main property sheet.
The paper is not feeding properly
Cause Suggested Solution
The paper is not correctly
positioned between the paper
guides.
The paper is not loaded properly. Remove the paper from the
Align the left edge of the paper
with the left paper guide. Slide
the right paper guide lever unt il
it rests lightly against the right
edge of the paper.
paper tray, fan the sheets, then
reload paper stack. Do not load
more than 125 sheets in the
paper tray.
If misfeeds continue, load new
paper.
More than one type of media is
loaded in the paper tray.
36
Load only one type of media in
the paper tray.
Page 43

Xerox DocuPrint XJ6C Ink Jet Printer
The paper does not stack neatly in the paper output shelf
Cause Suggested Solution
There isn’t enough clearance
above the paper output shelf.
The star wheel assembly bar is
disengaged.
The star wheels are out of
position in the star wheel
assembly.
Place a sheet of paper in the
paper output shelf. Check the
clearance above the top of the
sheet. There should be 2 inches
of clearance.
Open the printer cover. Reinstall
the star wheel bar by pushing
down on each end of the bar
until it snaps into position.
Open the printer cover. Lift the
star wheel bar by grasping each
end of the bar and rotating it
toward the back of the printer.
Make sure the small wheels in
the star wheel assembly are not
pushed all the way inside the
rectangular slo t s and are able to
rotate freely. Then reinstall the
star wheel bar and close the
printer cover.
Low Ink Indicator LED is on
Cause Suggested Solution
An ink in the cartridge is low. Buy a new color ink cartridge or
high capacity black print
cartridge, as the ink will soon
run out.
37
Page 44

Chapter 4 Troubleshooting the Printer
Low Ink Indicator LED is bli nki ng
Cause Suggested Solution
An ink cartridge is empty, or the
wrong brand of ink cartridge is
installed.
An ink cartridge is not installed
correctly.
The print head is not installed. Install the print head.
The green cartridge lock lever is
not in the locked position.
Replace the ink cartridge. Click
the Change button on the Printer
property page, then follow the
instructions.
Open the printer cover and snap
each ink cartridge into position
by pressing the cartridge down
and into the print head.
Remove the print head from the
printer. Remove and reinstall
each cartridge. Be sure to press
the cartridge down and into the
print head.
Open the printer cover and make
sure the green cartridge lock
lever is positioned toward the
back of the printer.
38
Page 45

Xerox DocuPrint XJ6C Ink Jet Printer
Packing the printer for return to a Service Center
Should you need to return the printer for servicing, follow
the packing instructions in this section.
Note: Do not ship the power cord, printer cable, printer
driver disks, user guide, print head and ink cartridges, or
storage box, unless instructed to do so.
1. Remove the print cartridge and place it in the print
head storage box.
2. Close the printer cover and remove the paper output
shelf.
3. Disconnect the power cord and the printer cable.
4. Pack the printer in its original box using the original
packing material. If you do not have the original box,
continue with step 5. Otherwise, go to step 10.
5. Completely wrap the printer in two layers of bubble
wrap (minimum thickness of 12.3 mm or 0.5”) and
tape the bubble wrap to keep it in place.
6. Select a corrugated box lar ge enough to allow at leas t
50.8 mm (2”) between the bubble-wrapped printer
and the walls of the box. Make sure the strength of
the box is at least 275 lb test.
7. Fill the bottom of the box with 75 to 100 mm (2” to
3”) of loose fill.
8. Place the bubble-wrapped printer in the center of the
box.
39
Page 46

Chapter 4 Troubleshooting the Printer
(
)
9. Add enough loose fill to complete ly surround and
cover the printer. Compress the fill to ensure minimal
movement.
10. Securely tape and seal the box.
The illustration below shows an example of how to pack
the printer.
Outside box
275 lb test
Printer
Two layers 12.3 mm
(0.5”) bubble wrap
Minimum 50.8 mm
(2”) loose fill
40
Page 47

Chapter 5
Selecting and ordering
supplies
You can purchase supplies through your local Xerox
retailer. To find the location nearest you,
call 1-800-832-6979
If your retailer is out of stock, you can order supplies
through Xerox:
In the United States, call 1-800-822-2200.
In Canada, call 1-800-668-0199 (English-speaking) or
1-800-668-0133 (French-speaking).
41
Page 48

Chapter 5 Selecting and Ordering Supplies
Cartridges and print heads
The following supplies are available for your printer.
Item Description Reorder
Color ink
cartridges
Black Black ink cartridge 8R7660
Cyan Cyan ink cartridge 8R7661
Magenta Magenta ink cartridge 8R7662
Yellow Yellow ink cartridge 8R7663
Color/Photo
print head
High capacity
ink jet cartridge
Black housing that holds the
color ink cartridges
Fast, black-only ink cartridge 8R7638
number
8R7871
42
Page 49

Xerox DocuPrint XJ6C Ink Jet Printer
Selecting plain paper
Most plain paper will work well in your Xerox printer,
quality. For best results, always use the highest grade
photocopying paper available or paper specifically
designed for ink jet printers. Fully test a paper in your
printer before purchasing large quantities.
Paper size
100 – 216 mm (3.9” – 9”) width
150 – 356 mm (3.9” – 14”) length
Paper weights
60 – 163 g/m² (16 – 43 lb)
Selecting specialty print media
Your Xerox printer will accept a wide range of specialty
print media to satisfy all your printing needs. These
include: transparencies, high-quality matte paper, glossy
paper, greeting cards, and fabric transfer sheets. It is
important to select the appropriate media on the Main
property page in the DocuPrint XJ6C window. This will
ensure the best print quality for your documents.
For best results, use specialty media designed for ink jet
printers. Avoid extremely thin or thick paper, or
chemically processed paper such as thermal fax paper, as
frequent paper misfeeds may occur.
With all specialty media, read and follow the instructions
for proper loading into the paper tray.
43
Page 50

Chapter 5 Selecting and Ordering Supplies
Selecting labels
Use only paper face label stock. Ink will not dry on vinyl,
plastic, or clear label stock. Individual labels will not feed
properly. Use full page letter or A4 label stock. For best
results, use labels designed for ink jet printers.
Do not use any label material which is partially used,
folded, curled, or wrinkled.
Selecting transparencies
Use transparencies designed for ink jet printers only. Do
not use paper-backed transparencies.
Selecting banner paper
Use any banner paper designed for ink jet printers. Do not
use track-fed paper or paper in rolls.
44
Page 51

Chapter 6
Printing from DOS
Your DocuPrint XJ6C printer includes a utility called the
DOS Control Panel. You can use the utility to print from
applications that do not have a printer driver or to print
files directly from DOS. For applications that include a
printer driver selection, the XJ6C is compatible with all
change character sets, fonts, landscape or portrait layouts,
and other setti ngs.
To install the Xerox DOS Control Panel on your
computer:
1. Insert the second disk supplied with the printer into
the A (or B) drive.
2. From an MS-DOS prompt, type A:install (or
B:install) and press the Enter key. The Installer
Directory menu displays.
Xerox DocuPrint XJ6C Printer
DOS Control Panel Installer
Install Directory C:\Xerox\InJet\
Exit Start Install
3. Check if the Install Directory is correct. Make any
necessary changes to the Install Directory. To make
changes, press the tab key until the Directory is
highlighted. Press the Enter key. Change the
selection and press the Enter key again.
45
Page 52

Chapter 6 Printing from DOS
4. With the Start Install opt i on highlighted, pr ess the
Enter key to begin installation. If it is not
highlighted, use the tab key to highlight the Start
Install option. The DOS Control Panel will be
installed in the specified directory.
Note: Check the Install Directory selection for a valid
DOS path if an ERROR message displays.
5. To start the DOS Control Panel after it’s installed, go
to the Install Directory, type XJCONPNL and press
Enter.
46
Page 53

Index
A
Advanced property page,
described, 18-19
Aligning the print cartridge, 21
B
Banner paper
type to use, 44
Blue setting, 19
Brightness setting, 18
Buttons
Cartridge Change/Clean, 8
Power/Reset, 8
Resume/FF, 8
C
Canceling a print job
current job, 22
queued job, 23
Cartridge. See Print cartridge
Cartridge Change/Clean button, 8
Cartridge lock lever, 7
Character sets, 10
Cleaning the print cartridge
from control panel, 8
from your PC, 20
Collate setting, 17
Collating documents, 17
Color ink cartridges
amount of ink remaining, 20, 22
ordering, 42
See also Print cartridge
Color print head
ordering, 42
Color printing
adjusting the amount of blue, 19
adjusting the amount of green,
19
adjusting the amount of red, 18
changing the brightne ss, 18
changing the contrast, 18
changing the saturati on, 18
using ImageFix, 19
using Windows Image Color
Management, 19
Color quality, setting, 15-16
Contrast setting, 18
Control pane l
buttons, 8
LEDs, 9
Copies setting, 17
47
Page 54

Index
D
Demo page
printing from control panel, 8
printing from your PC, 21
DOS
character sets included, 10
printing from, 45-46
DOS Control Panel
installing, 45-46
starting, 46
Draft print quality, 16
E
Error LED, 9
troublesho oting when blinking,
29
troubleshooting when on, 29
F
Fonts, built-in, 10
G
Green setting, 19
H
Halftoning setting, 18
High capacity black ink cartridge
ordering, 42
High Quality print quality, 16
I
ImageFix setting, 19
L
Labels
type to use, 44
Landscape orientation, set ting, 17
LEDs
Error, 9
Low Ink Indicator, 9
Power, 9
Low Ink Indicator LED, 9
troublesho oting when blinking,
38
troubleshooting when on, 37
M
Main property page, described,
15-16
Margins
and printable area, 12
correcting when document
margins exceed printer
margins, 31
Media
banner paper, type to use, 44
labels, type to use, 44
paper, type to use, 43
specialty print, type to use, 43
specifying size to use, 17
specifying type to use, 16
transparency film, type to use,
44
Media setting, 16
48
Page 55

Xerox DocuPrint XJ6C Ink Jet Printer
Media size setting, 17
Mirror setting, 17
N
Normal print quality, 16
O
Orientation setting, 17
P
Packing instructions, when sending
printer to a Service Center, 39
Page property page, described, 17
Paper
correcting feed problems, 36
printable area, 12
solving paper output shelf
stacking problems, 37
type to use, 43
Paper output shelf, 6
capacity, 11
Paper support, 6
Paper tray, 6
capacity, 11
Parallel interface cable connection,
7
Pausing a print job, 22, 23
Photo Quality print quality, 16
Portrait orientation, setting, 17
Power connection, 7
Power LED, 9
troubleshooting when not on, 26
Power/Reset button, 8
Print cartridge
aligning, 21
amount of ink remaining, 20
cleaning, 20
moving for removal, 20
selecting for print job, 15
status information, 20, 22
Print document as setting, 15-16
Print head and color ink cartridges,
7
Print head storage box, 7
ordering, 42
Print job
canceling current job, 22
canceling queued job, 23
checking progress, 22
pausing, 22, 23
Print quality setting, 16
Print queue
displaying, 23
Print speed. See Speed, print
Print with cartridge setting, 15
Printable area, 12
Printer
control panel, 8-9
dimensions, 11
features, 1
hardware components, 6-7
how to pack when shipping to a
Service Center, 39
registering, 4
resetting, 8
safety information, 2-4
specifications, 10-12
status, 20, 22
supplies, 41-44
turning off, 8
turning on, 8
Printer cover, 6
49
Page 56

Index
Printer driver software. See Printer
settings
Printer property page, described,
20-21
Printer settings
accessing, 14
Advanced property page, 18-19
Main property page, 15-16
Page property page, 17
Printer property page, 20-21
saving to a file, 16
troubleshooting when selected
settings don
’t match printed
document, 26
using a saved file, 16
Printer specifications, 10-12
Printing
from DOS, 45-46
Printing.
accessing printer settings, 14
choosing the media size, 17
collating multiple copies, 17
document progress, 22
from last page to first page, 17
mirror image of document, 17
paper orientation, 17
printable area, 12
selecting the media to use, 16
selecting the print cartridge to
use, 15
setting print speed and quality,
16
specifying number of copies, 17
See also Color printing
Printing problems, solving
blank document prints, 27
blurry print, 30
color variations in large color
areas, 36
document doesn
’t print, 28
extra characters, dashes, or lines
appear, 31
faint or missing print, 33
jagged vertical lines on printed
pages, 30
print quality of transparencies is
poor, 35
printed document doesn
’t match
printer settings, 26
printed image exceeds media
size, 31
smeared ink, 34
white horizontal lines and
streaks of the wrong color on
printed pages, 32
R
Red setting, 18
Registering the printer, 4
Resetting the printer, 8
Resolution, 10
Resume/FF button, 8
Reverse page order setting, 17
S
Safety information, 2-4
Saturation setting, 18
Saving printer sett i ngs, 16
Speed, print
changing, 16
specifications, 10
Star wheel bar, 7
Status window
displaying, 22
Storage box, for print cartridge, 7
ordering, 42
50
Page 57

Xerox DocuPrint XJ6C Ink Jet Printer
T
Test page
printing from control panel, 8
printing from your PC, 21
Top cover. See Printer cover
Transparency film
troubleshooting printing
problems, 35
type to use, 44
Troubleshooting
blank document prints, 27
color variations in large color
areas, 36
document sent to printer doesn
print, 28
Error LED is blinking, 29
Error LED is on, 29
extra characters, dashes, or lines
appear on printed pages, 31
ink is smearing, 34
Low Ink Indicator is on, 37
Low Ink Indicator LED is
blinking, 38
paper doesn
’t stack neatly in
paper output shelf, 37
paper isn
’t feeding properly, 36
Power LED is not on, 26
print is blurry or jagged vertical
lines appear, 30
print is faint or missing, 33
print quality of transparencies is
poor, 35
printed document doesn
’t match
printer settings, 26
printed image is clipped or off
the edge of the media, 31
white horizontal lines and
streaks of the wrong color
appear on the printed pages,
32
Turning off the printer, 8
’t
Turning on the printer, 8
Typeface. See Fonts
U
Use Windows ICM setting, 19
W
Windows Image Color
Management, using, 19
51
 Loading...