

Page 1

Xerox DocuPrint P8ex
User Guide Chapter1
Introduction ................................................................................... 1-3
Printer Unpacking and Setup ........................................................ 1-4
Printer Components ...................................................................... 1-5
Laser Print Cartridge Installation ................................................... 1-6
Paper Loading ............................................................................... 1-7
ENGLISH
Printer Connections ....................................................................... 1-9
Printer Driver Installation ............................................................. 1-10
Printer Driver Features ................................................................ 1-11
Software Utilities Installation ....................................................... 1-12
Control Panel .............................................................................. 1-13
Control Panel Indicators .............................................................. 1-14
Clearing Paper Jams ................................................................... 1-15
Installing Memory ........................................................................ 1-16
Making Installation Diskettes ....................................................... 1-17
Installing Software from Diskette ................................................. 1-18
Printer Specifications .................................................................. 1-19
Printer Certifications .................................................................... 1-20
Language Codes ......................................................................... 1-23
1-1
Page 2

DocuPrint P8ex User Guide
Xerox Corporation
800 Phillips Road
Webster, NY 14580
United States of America
ENGLISH
Xerox Europe
Channels Group
Bessemer Road
Welwyn Garden City
Herts AL7 1HE
United Kingdom
© 1999 Xerox Corporation. Xerox®, The Document Company®, the stylized X,
DocuPrint, and the identifying product names and numbers herein are trademarks of
Xerox Corporation. Xerox Canada Ltd. and Xerox Europe are licensees of all the
trademarks. Copyright protection claimed includes all forms and matters of copyrightable
materials and information now allowed by statutory or judicial law or hereinafter granted,
including without limitation material generated from the software programs which are
displayed on the screen such as icons, screen display tools, etc. Product names used in this
guide may be trademarks or registered trademarks of their respective companies and are
hereby acknowledged. All non-Xerox brands and product names are trademarks or
registered trademarks of their respective companies.
1-2
Page 3

Introduction
DocuPrint P8ex User Guide
ENGLISH
Thank you for purchasing this laser printer.
The Xerox DocuPrint P8ex is a desktop laser printer specially designed for the demanding
small office and home office environment. It uses highly innovative printing technology,
which provides all the performance and power you need for your business, small
workgroup and personal printing.
In this guide you will find information essential for setting up and operating your laser
printer. So, do keep it handy should you experience any difficulties with the printer.
1-3
Page 4
DocuPrint P8ex User Guide
Printer Unpacking and Setup
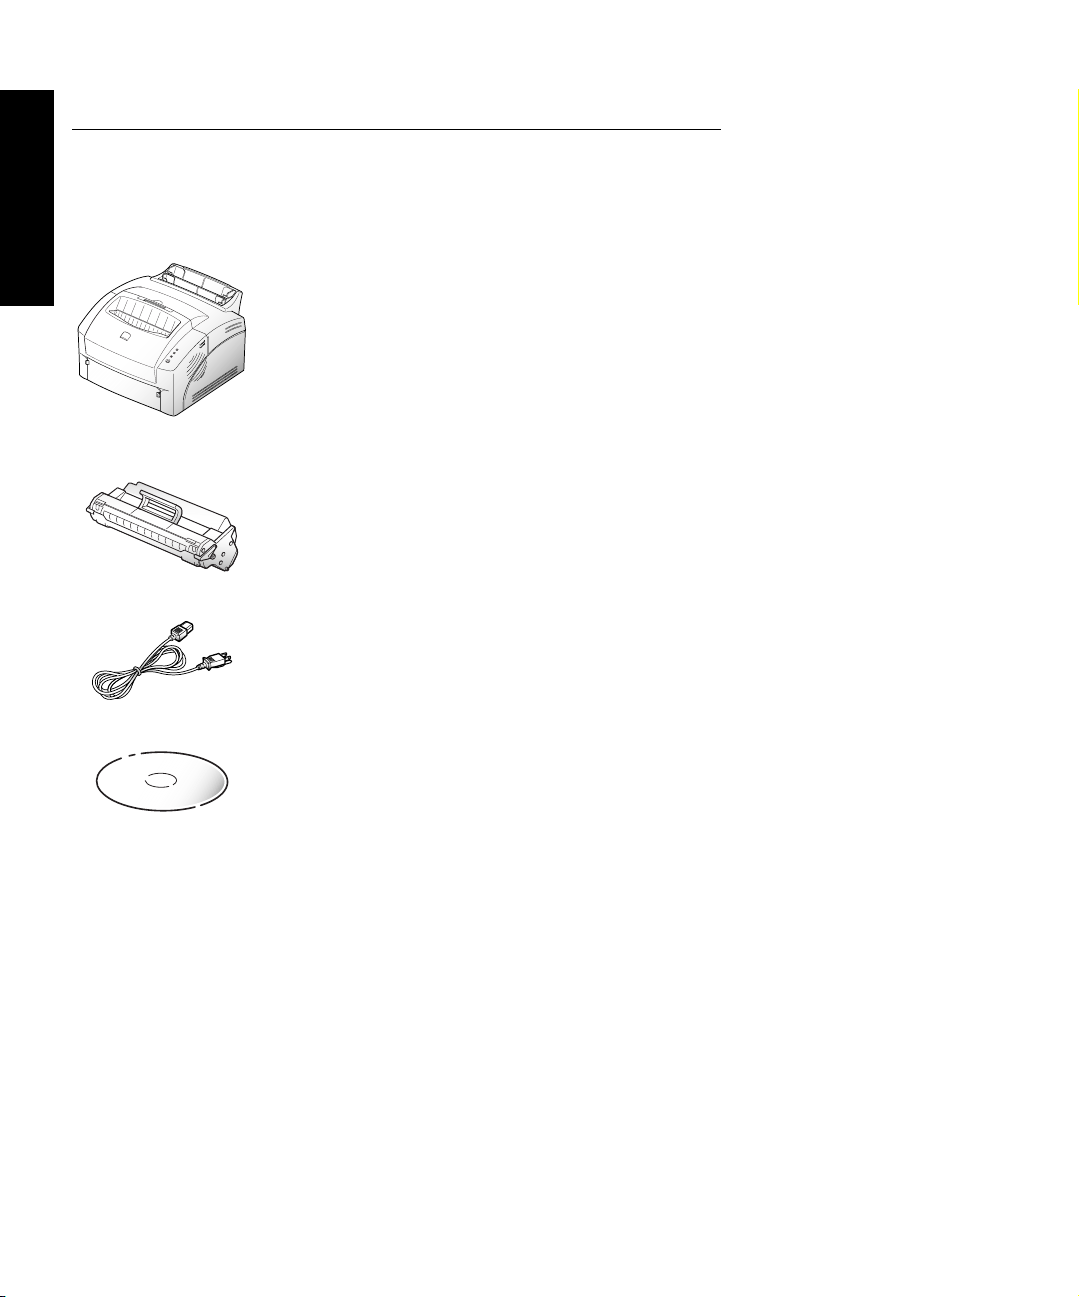
Remove the printer and all accessories from the packing carton.
1
Save the carton and packing materials in case you need to repack the printer for service or
storage.
ENGLISH
Make sure that your printer came packed with the following items:
2
• Laser print cartridge
• Power cord
• User Guide (this book)
• Warranty Information
• Xerox DocuPrint P8ex CD-ROM
This CD-ROM contains the software required to operate your printer, along with useful
printer utilities and a complete Reference Guide. Should your computer not be equipped
with a CD-ROM drive, please visit the Xerox website at www.xerox.com. If you do not
have Internet access, refer to “Making Installation Diskettes” (page 1-17) for detailed
instructions for creating installation diskettes.
Additional items contained on the CD-ROM that are not accessed through the main setup
routine:
- Adobe Acrobat Reader located in the Acrobat directory.
- Documentation located in the Docs directory:
Reference Guide: XX_P8EXR.pdf (where XX indicates the language code
User Guide: XX_P8EXU.pdf (where XX indicates the language
The printer box may also contain an IEEE 1284-compliant printer cable. Look at the drawings
labeled “Contents” on the top flap of the box. If a printer cable is not pictured there, you will
need to obtain a cable before installing the printer.
If any items are missing or damaged, notify your dealer immediately.
1
1
)
)
1-4
Carefully remove any shipping tapes from the printer.
3
Place the printer on a flat, stable surface near your workstation. Leave at least 6 inches (15 cm)
4
behind and on each side of the printer, and at least 1 foot (30 cm) in front of the printer, so that
you can operate it properly and allow adequate air circulation.
Do not place the printer:
• In direct sunlight.
• Near heat sources or air conditioners. Place the printer where the temperature is stable and
set for comfort.
• In dusty or dirty environments. Dust accumulation may prevent the printer from functioning
properly.
• Near devices that contain magnets or generate magnetic fields (such as loudspeakers or base
units of cordless telephones).
1
Refer to “Language Codes” (page 1-23) for language codes.
Page 5
Printer Components
DocuPrint P8ex User Guide
ENGLISH
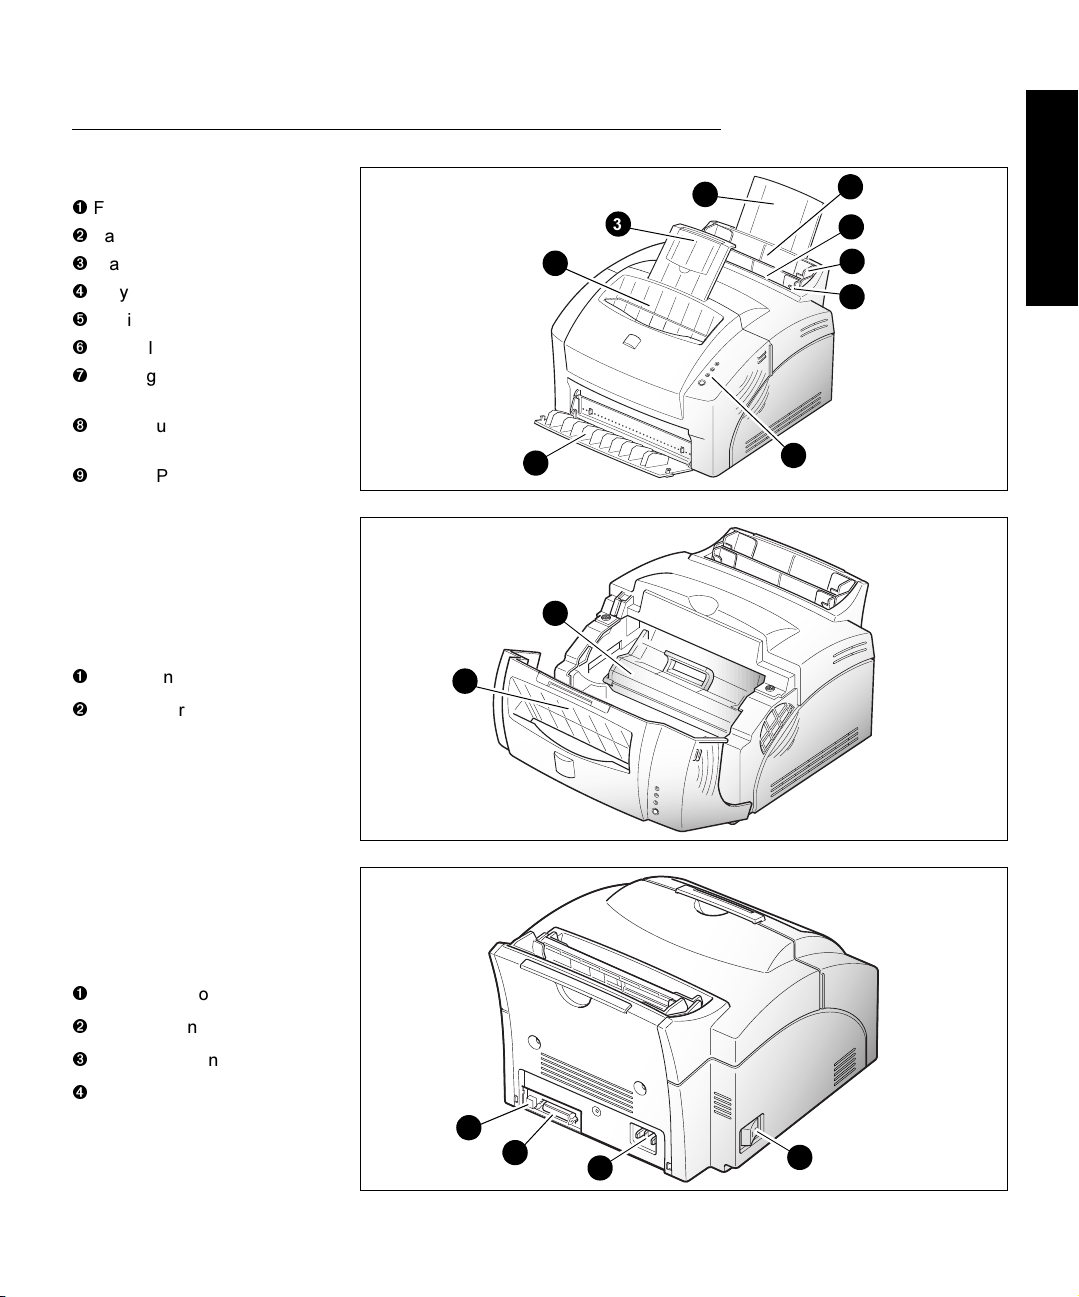
Front View
Face-up stacker
Face-down stacker
Stacker extender
Tray extender
Multipurpose paper feeder
Manual feeder
Paper guide for
multipurpose paper feeder
Paper guide for
manual feeder
Control Panel
Inside Front View
Laser print cartridge
Front cover
4
3
2
1
1
2
5
6
7
8
9
Rear View
USB connector
Parallel connector
Power cord connector
Power switch
1
2
3
4
1-5
Page 6
DocuPrint P8ex User Guide
Laser Print Cartridge Installation
1 4
ENGLISH
2
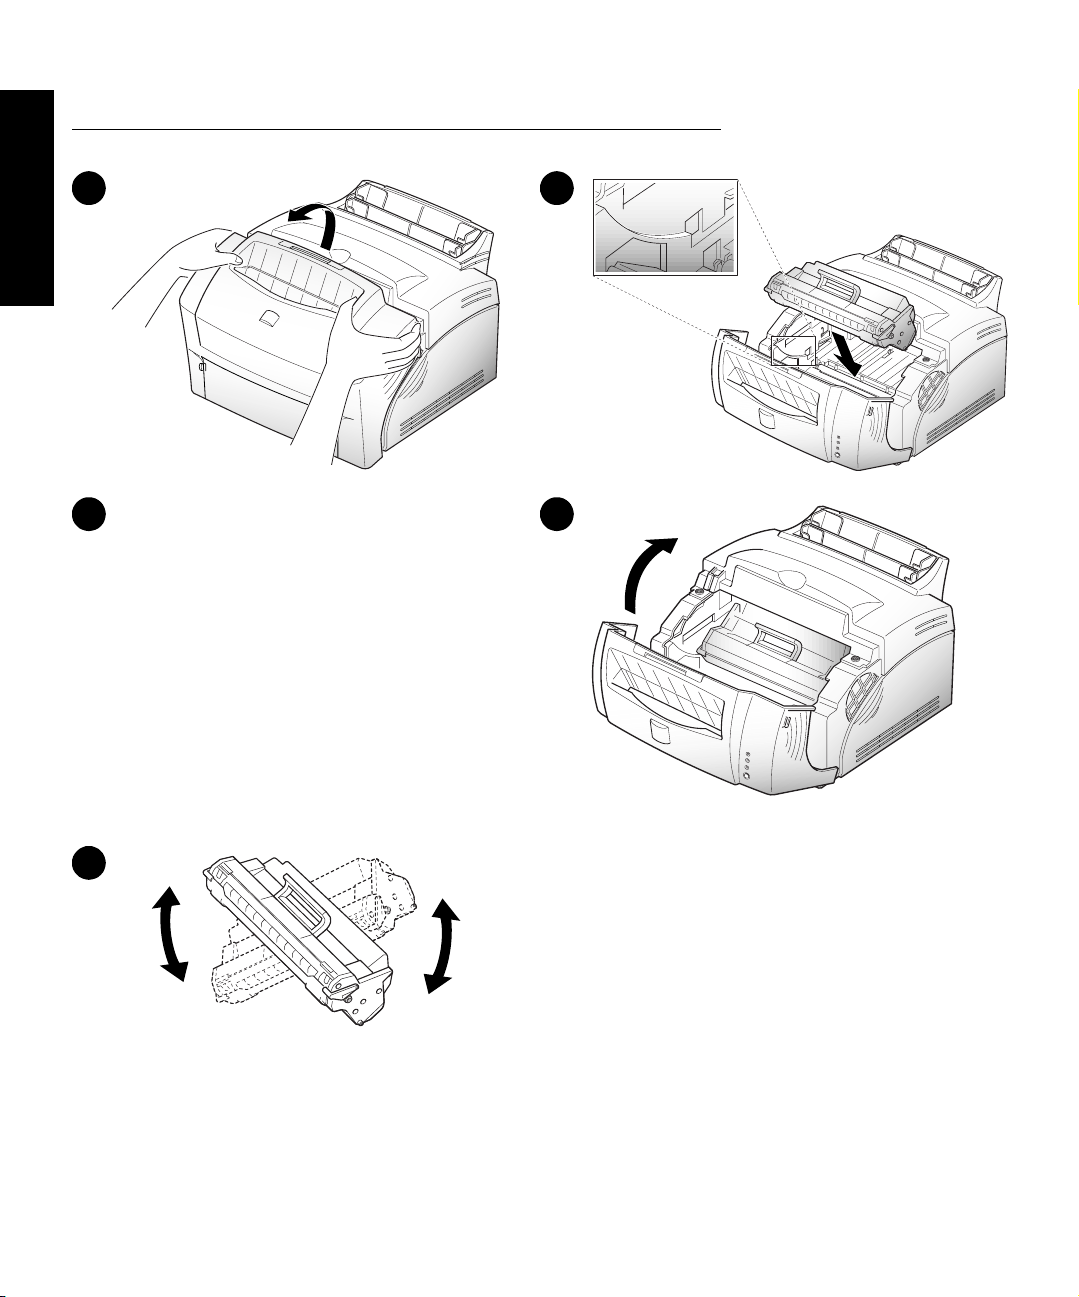
Unpack the new laser print cartridge by tearing open its
packaging at the indicated notch, then carefully remove
sealing tape from bottom of cartridge by pulling on
sealing tape tab.
Pull sealing tape completely out of cartridge.
Do not expose cartridge to direct sunlight or strong
room light.
To avoid damaging photo-sensitive drum, never
open drum shutter.
To avoid damaging cartridge, complete cartridge
installation as quickly as possible.
3
5
1-6
Page 7
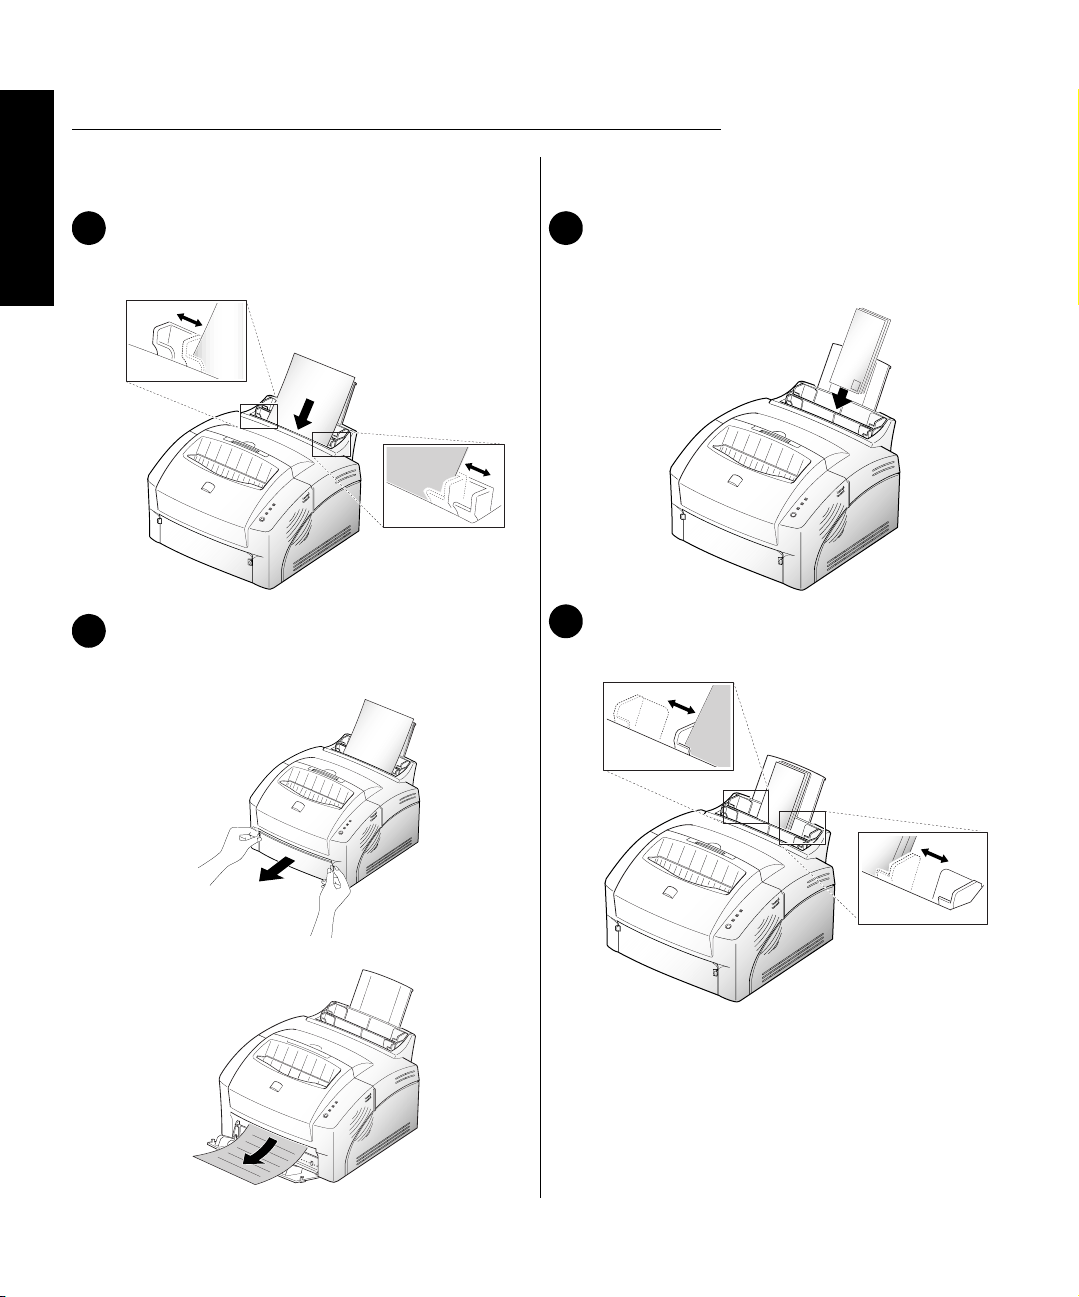
Paper Loading
DocuPrint P8ex User Guide
ENGLISH
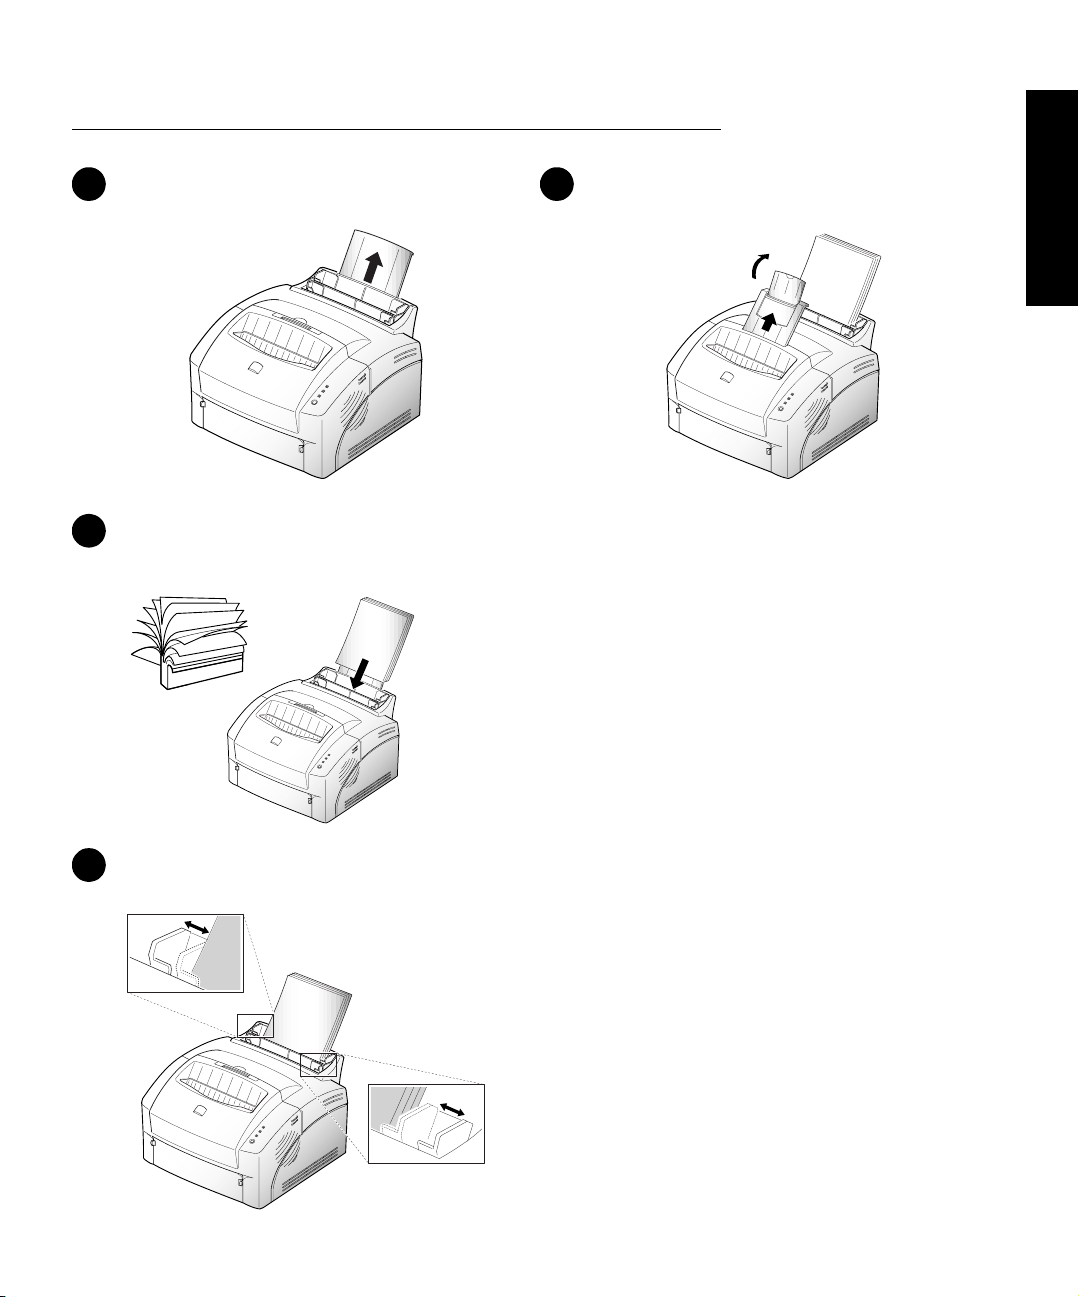
1
Pull up MPF extender until it stops.
2
Fan stack of paper to loosen, then insert in MPF.
Do not overload.
4
Pull up stacker extender until it stops.
3
Adjust paper guides to width of paper.
1-7
Page 8
DocuPrint P8ex User Guide
Paper Loading (continued)
Manual Feed Envelopes
ENGLISH
1
Place one sheet of paper in manual feeder and
adjust guides to width of paper.
2
Pull open face-up stacker so that printed media
will exit face-up.
1
Insert up to 10 envelopes into MPF (or one at
a time into manual feeder).
2
Adjust guides to width of envelopes.
1-8
Use of the face-up stacker is recommended.
Page 9

DocuPrint P8ex User Guide
Printer Connections
Parallel Interface USB Interface (Windows 98 only)
Power Cord Power On/Off
ENGLISH
1-9
Page 10

DocuPrint P8ex User Guide
Printer Driver Installation
Use the following instructions to install the PCL 6 and/or PCL 5e printer drivers on a Windows-based PC. The printer
driver enables you to control the DocuPrint P8ex’s features and capabilities (see the table on the next page). Use the
driver’s on-line help for a complete description of its functionality. If necessary, consult your Windows
documentation for instructions on accessing the driver.
ENGLISH
For other software installation procedures, including printer utilities, see the section “Software Utilities Installation”
(page 1-12). For full details on the printer software, consult the Reference Guide on the DocuPrint P8ex CD-ROM.
Before installing the software, verify the following:
• Your PC has at least 16 MB of RAM installed.
• There is at least 20 MB of free disk space on your PC.
• ALL APPLICATIONS ARE CLOSED ON YOUR PC BEFORE BEGINNING INSTALLATION. (A system
reboot may be required after the software is installed.)
Windows 95/98/NT 4.0 Windows 3.1x
Turn on the printer, then turn on the computer and start
1
Windows.
• If Windows 95/98 Plug and Play is in effect, continue
with Step 2.
• If Windows 95/98/NT 4.0 does not recognize the new
printer, skip to Step 3.
At the ‘New Hardware Found’ dialog box, click on the
2
Cancel button.
Insert the Xerox DocuPrint P8ex CD-ROM into your
3
CD-ROM drive.
• If Windows automatically runs the CD-ROM, skip to
Step 6.
Turn on the printer, then turn on the computer and start
1
Windows.
Insert the Xerox DocuPrint P8ex CD-ROM into your
2
CD-ROM drive.
Open the Program Manager and select Run from the
3
File menu.
Type d:\setup16.exe on the command line (where “d” is
4
your CD-ROM drive letter), then click OK.
Follow the on-screen instructions to complete the
5
installation.
Select Run from the Sta rt menu.
4
Typ e d:\setup.exe on the command line (where “d” is
5
your CD-ROM drive letter), then click OK.
Follow the on-screen instructions to complete the
6
installation.
1-10
Page 11

DocuPrint P8ex User Guide
Printer Driver Features
Setting Usage/Description PCL 6 PCL 5e
Number of copies Select 1-99 copies. **
Page orientation Select Portrait or Landscape. **
ENGLISH
Paper size Select from supported paper sizes
**
(see “Printer Specifications”).
Paper source Select printing from multipurpose paper feeder or manual
**
feeder.
Graphic quality Select enhancement for graphical and/or text printing. **
Graphic mode Select vector or raster mode. **
TrueType fonts Select font printing. **
Toner Saver Select draft mode printing capability. **
Overlays Include overlays in printed documents. **
1
1
1
1
Multiple images (N-Up) Select 1-9 images per physical page. *
Watermarks Create and use watermarks on documents. *
1
This setting is not available in the Windows NT 4.0 version of the PCL 5e driver.
1-11
Page 12

DocuPrint P8ex User Guide
Software Utilities Installation
For full details on the printer software, consult the Reference Guide on the DocuPrint P8ex CD-ROM.
Installing the USB Port Driver
ENGLISH
The USB port driver must be installed in order to print
to the DocuPrint P8ex via a USB connection. Currently,
USB printing is only available through Windows 98.
Insert the Xerox DocuPrint P8ex CD-ROM into your
1
CD-ROM drive. If Windows automatically runs the
CD-ROM, skip to Step 3.
Select Run from the Sta rt menu. Type d:\setup.exe on
2
the command line (where “d” is your CD-ROM drive
letter), then click OK.
Select the appropriate language, then select USB Port
3
Driver.
Installing the Xerox Font Manager
The Xerox Font Manager is a Windows-based utility
that allows you to install, load and manage fonts on the
DocuPrint P8ex.
Insert the Xerox DocuPrint P8ex CD-ROM into your
1
CD-ROM drive. If Windows automatically runs the
CD-ROM, skip to Step 3.
For Windows 95/98/NT 4.0:
2
Select Run from the Sta rt menu. Type d:\setup.exe on
the command line (where “d” is your CD-ROM drive
letter), then click OK.
For Windows 3.1x:
Open the Program Manager and select Run from the
File menu. Type d:\setup16.exe on the command line
(where “d” is your CD-ROM drive letter), then click
OK.
Select the appropriate language, then select the Font
3
Manager.
(Windows 98)
(Windows)
Installing the RCP and SM
(Windows)
The RCP (Remote Control Panel) and the SM (Status
Monitor) software are Windows-based programs that
allow the user to set default printer values as well as
monitor the status of the printer.
These two utilities can only be used when the printer is
connected via the parallel interface.
Insert the Xerox DocuPrint P8ex CD-ROM into your
1
CD-ROM drive. If Windows automatically runs the
CD-ROM, skip to Step 3.
For Windows 95/98/NT 4.0:
2
Select Run from the Star t menu. Type d:\setup.exe on
the command line (where “d” is your CD-ROM drive
letter), then click OK.
For Windows 3.1x:
Open the Program Manager and select Run from the
File menu. Type d:\setup16.exe on the command line
(where “d” is your CD-ROM drive letter), then click
OK.
Select the appropriate language.
3
For Windows 3.1x, 95 and 98, select RCP and SM. For
4
Windows NT 4.0, select RCP.
1-12
Page 13

DocuPrint P8ex User Guide
Control Panel
ERROR light
PAPER light
READY light
Control Button
Control Button Function Control Button Operation
ENGLISH
Toggle printer on-line/off-line. Briefly press button.
Release manual feed job. If PAPER light is blinking, press button. Printer will grab paper from the
manual feeder slot first, then from the MPF.
Reset printer. Turn printer off-line (all lights off). Press and hold button for about four
seconds until all lights blink briefly, then let go of button.
Self test. Turn printer on-line (READY light on). Press and hold button for about four
seconds until all lights blink briefly, then let go of button. The configuration
sheet will print.
Adjust print quality. Turn printer on-line (READY light on). Press and hold button for about
seven seconds until all lights remain lit (not blinking), then let go of button.
After cleaning printer, one cleaning sheet will print.
1-13
Page 14

DocuPrint P8ex User Guide
Control Panel Indicators
ENGLISH
Printer on-line Paper jam
Receiving data or printing
Error:
• Printer cover open
or
• Laser print cartridge not installed
1-14
Manual feed Insufficient printer memory
Printer off-line Possible printer failure
Page 15

Clearing Paper Jams
From Input Area From Inside Printer
DocuPrint P8ex User Guide
ENGLISH
1
Gently pull paper to remove.
2
Open front cover.
3
Close front cover. Printing will resume (if not, see
Troubleshooting in on-line Reference Guide).
1
Open front cover.
2
Remove laser print cartridge.
3
Gently pull paper to remove.
4
Close front cover. Printing will resume (if not, see
Troubleshooting in on-line Reference Guide).
1-15
Page 16

DocuPrint P8ex User Guide
Installing Memory
1
Turn off power and disconnect the power cable.
ENGLISH
2
Remove two screws from back of control board, and pull control board
out of printer.
3
Align SIMM with its connection points at control board’s connectors at a
o
angle.
70
Be aware that
control board is
connected to
inside of printer by
two cables. Do not
disconnect these
cables.
4
Rotate SIMM downward into connector until it snaps into place. Make
sure both metal clips on connector are fastened and two pins on
connector are pushed through the holes in the SIMM.
1-16
5
Slide control board back into printer and
fasten with screws removed in Step 2.
Reattach cable(s) and power cord and
turn on printer.
Page 17

DocuPrint P8ex User Guide
Making Installation Diskettes
Use the following procedures to copy software installation files from the Xerox DocuPrint P8ex CD-ROM onto
floppy diskettes for installation onto computers that do not have a CD-ROM drive or Internet access. To install the
software, see “Installing Software from Diskette” (page 1-18).
ENGLISH
PCL 6 Printer Driver
Label a new or freshly formatted diskette “DocuPrint
1
P8ex PCL 6 Driver” and insert it into the floppy drive.
Windows 95/98 and 3.1x:
2
Copy d:\XX\pcldrv\pcl6\win9x3x\*.* a:\
(where “d” is the CD-ROM drive letter, XX is the
language code
floppy drive letter).
Windows NT 4.0:
Copy d:\XX\pcldrv\pcl6\winNT\*.* a:\
(where “d” is the CD-ROM drive letter, XX is the
language code
floppy drive letter).
1
, i.e. EN for English, and “a” is the
1
, i.e. EN for English, and “a” is the
RCP/SM
Windows 95/98 and 3.1x:
1
Label a new or freshly formatted diskette “DocuPrint
P8ex RCP/SM” and insert it into the floppy drive.
Windows NT 4.0:
Label a new or freshly formatted diskette “DocuPrint
P8ex RCP” and insert it into the floppy drive.
Copy d:\XX\rcp_sm\*.* a:\
2
(where “d” is the CD-ROM drive letter, XX is the
language code
floppy drive letter).
1
Refer to “Language Codes” (page 1-23) for language codes.
1
, i.e. EN for English, and “a” is the
PCL 5e Printer Driver
Label a new or freshly formatted diskette “DocuPrint
1
P8ex PCL 5e Driver” and insert it into the floppy drive.
Windows 95/98 and 3.1x:
2
Copy d:\XX\pcldrv\pcl5e\win9x3x\*.* a:\
(where “d” is the CD-ROM drive letter, XX is the
language code
floppy drive letter).
Windows NT 4.0:
Copy d:\XX\pcldrv\pcl5e\winNT\*.* a:\
(where “d” is the CD-ROM drive letter, XX is the
language code
floppy drive letter).
1
, i.e. EN for English, and “a” is the
1
, i.e. EN for English, and “a” is the
Xerox Font Manager
Label a new or freshly formatted diskette “DocuPrint
1
P8ex Xerox Font Manager” and insert it into the floppy
drive.
Copy d:\XX\font\*.* a:\
2
(where “d” is the CD-ROM drive letter, XX is the
language code1, i.e. EN for English, and “a” is the
floppy drive letter).
USB Port Driver (Windows 98 only )
Label a new or freshly formatted diskette “DocuPrint
1
P8ex USB Port Driver” and insert it into the drive.
Copy d:\XX\usb\*.* a:\
2
(where “d” is the CD-ROM drive letter, XX is the
language code1, i.e. EN for English, and “a” is the
floppy drive letter).
1-17
Page 18

DocuPrint P8ex User Guide
Installing Software from Diskette
PCL Printer Drivers
The following instructions specify the PCL 6 driver. To install the
PCL 5e driver, substitute PCL 5e for PCL 6 in the instructions.
ENGLISH
Windows 95/98
1. Insert the diskette “DocuPrint P8ex PCL 6 Driver.”
2. From the Start menu, select Settings
3. Double-click Add Printer. Click Next.
4. Select Local Printer. Click Next.
5. Click Have Disk.
6. In the field Copy manufacturer’s files from:, type A:\ then
click OK.
7. Select Xerox DocuPrint P8ex PCL 6. Click Next.
8. Select the port (by default LPT1:). Click Next.
9. Xerox recommends that the PCL 6 driver be the default driver.
Click Next.
10. Click Finish.
Windows NT 4.0
1. Insert the diskette “DocuPrint P8ex PCL 6 Driver.”
2. From the Start menu, select Settings
3. Double-click Add Printer.
4. Select My Computer. Click Next.
5. Select the port (by default LPT1:). Click Next.
6. Click Have Disk.
7. In the field Copy manufacturer’s files from:, type A:\ then
click OK.
8. Select Xerox DocuPrint P8ex PCL 6. Click Next.
9. Xerox recommends that the PCL 6 driver be the default driver.
Click Next.
10. Decide whether you want to share this printer or not. Then click
Next.
11. Click Finish.
Windows 3.1x
1. Insert the diskette “DocuPrint P8ex PCL 6 Driver.”
2. Open Main
3. Click Add.
4. In List of Printers: highlight Install Unlisted or Updated
Printer and click Install.
5. In the field Insert unlisted, updated, or vendor-provided
printer driver disk in:, type A:\ then click OK.
6. Select Xerox DocuPrint P8ex PCL 6. Click OK.
7. Xerox recommends that the PCL 6 driver be the default driver.
Highlight the driver and click Set as Default Printer.
8. Click Close.
ControlPrinters.
Printers.
Printers.
RCP and SM
Windows 95/98 and NT 4.0
1. Insert the diskette “DocuPrint P8ex RCP&SM.”
Note: RCP only for Windows NT 4.0.
2. From the Start menu, select Run.
3.Type a:\setup.exe. Cl ick OK.
4. Follow on-screen instructions.
Windows 3.1x
1. Insert the diskette “DocuPrint P8ex RCP&SM.”
2. Open the Program Manager and select Run from the File menu.
3.Type a:\setup.exe. Press Enter.
Xerox Font Manager
Windows 95/98 and NT 4.0
1. Insert the diskette “DocuPrint P8ex Xerox Font Manager.”
2. From the Start menu, select Run.
3.Type a:\install.exe. Click OK.
4. Follow on-screen instructions.
Windows 3.1x
1. Insert the diskette “DocuPrint P8ex Xerox Font Manager.”
2. Open the Program Manager and select Run from the File menu.
3.Type a:\install.exe. Press Enter.
USB Port Driver (Windows 98 only)
1. Insert the diskette “DocuPrint P8ex USB Port Driver.”
2. From the Start menu, select Run.
3.Type a:\setup.exe. Cl ick OK.
4. Follow on-screen instructions.
1-18
Page 19

DocuPrint P8ex User Guide
Printer Specifications
Item Specification and Description
Speed 8 ppm
Resolution 600 x 600 dpi with 1200 dpi quality
Image cartridge Part #113R00296
Image cartridge life 5,000 @ 5% coverage (A4) (Starter cartridge: 2,500)
Media types Paper, transparencies, card stock, labels, envelopes
(Transparencies with paper backings attached to the short edge are not recommended.)
Media sizes Letter, Legal, Executive, Folio, Monarch, COM-10, DL, A4, A5, B5, C5
Minimum size: 3" x 5" (76 mm x 125 mm)
Maximum size: 8.5" x 14" (216 mm x 356 mm)
Media weight
Input capacity
Output capacity Face-down: 100 sheets
Dimensions W x D x H:
Weight 16.5 lbs. (7.5 Kg)
Duty cycle Up to 8,000 pages per month
Printer Controller KS32C6100-33MHz
Memory 4 MB standard, expandable to 36 MB
Interface Bidirectional Parallel Standard
Printer Description
Language
Fonts 45 internal scalable fonts, 1 bitmap font
Host environments Microsoft Windows 3.x, Windows 95/98, Windows NT 4.0, DOS
Host drivers and utilities PCL 6 (Windows 3.x, 95/98, NT 4.0)
Paper: 16 - 24 lb. (60 - 90 g/m2)
Other: up to 43 lb. (163 g/m2)
Paper: Up to 150 sheets (80 g/m2)
Other media (transparencies, envelopes, labels, etc.): Up to 10
Face-up: 1 sheet (thick paper)
13.5" (345 mm) x 14.3" (365 mm) x 8.8" (224 mm) tray closed
1 SIMM socket
SIMM type: EDO (Extended Data Out), 72 pin, 60 ns, 32 bit (no parity)
SIMM size: 4, 8, 16, 32 MB
- Modes supported: Compatible, Nibble, Byte, ECP
USB Interface Standard (Windows 98 only)
- USB 1.0 compliant
- 12Mbps 1 port
PCL 5e, PCL 6
PCL 5e (Windows 3.x, 95/98, NT 4.0)
RCP (Windows 3.x, 95/98, NT 4.0)
SM (Windows 3.x, 95/98)
Install program (Windows 3.x, 95/98, NT 4.0)
ENGLISH
1-19
Page 20

DocuPrint P8ex User Guide
Printer Certifications
Laser Safety
The Xerox DocuPrint P8ex complies with laser product performance standards set by governmental, national
and international agencies as a Class 1 Laser Product. It does not emit hazardous radiation, as the beam is
totally enclosed during all phases of customer operation and maintenance.
ENGLISH
The use of controls, adjustments, or procedure other than those specified in the documentation might result in
hazardous exposure to laser light.
The laser beam inside the printer is completely confined within the protective housings and external covers. The
radiation emitted cannot escape from the machine during any phase of user operation.
The Xerox DocuPrint P8ex contains laser danger labels. These labels are intended for use by Xerox Service
Representatives, and are placed on or near panels or shields that require special tools for removal. Do not
remove any of these panels. There are no operator serviceable areas inside these covers.
Laser Safety for the United States and Canada
The Xerox DocuPrint P8ex complies with safety standards, and is certified as a Class 1 Laser product under the
U.S. Department of Health and Human Services (DHHS) Radiation Performance Standard according to the
Radiation Control for Health and Safety Act of 1968. The printer does not emit hazardous laser radiation.
The use of controls, adjustments, or procedures other than those specified in the documentation might result in
hazardous exposure to laser light.
Since radiation emitted inside the printer is completely confined within the protective housings and external
covers, the laser beam cannot escape from the machine during any phase of user operation.
The Center for Devices and Radiological Health (CDRH) of the U.S. Food and Drug Administration implemented
regulations for laser products of August 1, 1976. These regulations apply to laser products marketed in the
United States. The label on the machine indicates compliance with the CDRH regulations and must be attached
to laser products marketed in the United States.
The Xerox DocuPrint P8ex contains laser danger labels. These labels are intended for use by Xerox Service
Representatives, and are placed on or near panels or shields that require special tools for removal. Do not
remove any of these panels or shields. There are no operator serviceable areas inside these covers.
Laser Safety for Finland and Sweden
Luokitus on on tehty standardin EN 60825 mukaisesti Klassningen är gjord I enlighet met standarden EN 60825.
LUOKAN 1 LASERLAITE
KLASS 1 LASER APPARAT
VAROITUS!
Laitteen käyttaminene muulla kuin tässä käyttöohjessa mainitulla tavalla saattaa alitstaa käyttäjän
turvallisuusluokan 1 ylittävälle näkymättömälle lasersäteiylle.
VARNING!
Om Apparaten används på annat sätt än I denna bruksanvisning specficeratas, kan användaren utsättas för
osynlig laserstrålning, som överskrider gränsen för laserklass 1.
Laser Statement (Laserturvallisuus)
Never operate and service the printer with the protective cover removed from laser/scanner assembly. The
reflected beam, although invisible, can damage your eyes.
Class 1 laser product
Luokan 1 laserlaite
Klass 1 laswer apparat
Allonpituus 770-795 nm
Teho 0.40mw +/-0.04 mw
1-20
Page 21

Printer Certifications (continued)
Radio Frequency Emissions
United States and Canada
Note: This equipment has been tested and found to comply with the limits for a Class B digital device, pursuant to
Part 15 of the FCC Rules. These limits are designed to provide reasonable protection against harmful
interference in a residential installation. This equipment generates, uses and can radiate radio frequency energy
and, if not installed and used in accordance with the instructions, may cause harmful interference to radio
communications. However, there is no guarantee that interference will not occur in a particular installation. If this
equipment does cause harmful interference to radio or television reception, which can be determined by turning
the equipment off and on, the user is encouraged to try to correct the interference by one or more of the following
measures:
• Reorient or relocate the receiving antenna.
• Increase the separation between the equipment and receiver.
• Connect the equipment into an outlet on a circuit different from that to which the receiver is connected.
• Consult the dealer or an experienced radio/TV technician for help.
Changes or modifications to this equipment not specifically approved by the Xerox Corporation may void the
authority granted by the FCC to operate this equipment.
Shielded cables must be used with this equipment to maintain compliance with FCC regulations.
In order to allow this equipment to operate in proximity to Industrial, Scientific and Medical (ISM) equipment, the
external radiation from ISM equipment may have to be limited or special mitigation measures taken.
Europe
The CE marking applied to this product symbolises Xerox Limited Declaration of Conformity with the following
applicable Directives of the European Union as of the dates indicated.
January 1, 1995: Council Directive 73/23/EEC amended by Council Directive 93/68/EEC, approximation of the
laws of the member states related to low voltage equipment.
January 1, 1996: Council Directive 89/336/EEC, approximation of the laws of the member state related to
electromagnetic compatibility.
This equipment has been tested and found to comply with the limits for a Class B digital device. These limits are
designed to provide reasonable protection against harmful interference in a residential installation. This
equipment generates, uses and can radiate radio frequency energy and, if not installed and used in accordance
with the instructions, may cause harmful interference to radio communications. However, there is no guarantee
that interference will not occur in a particular installation. If this equipment does cause harmful interference to
radio or television reception, which can be determined by turning the equipment off and on, the user is
encouraged to try to correct the interference by one or more of the following measures:
• Reorient or relocate the receiving antenna.
• Increase the separation between the equipment and receiver.
• Connect the equipment into an outlet on a circuit different from that to which the receiver is connected.
• Consult the dealer or an experienced radio/TV technician for help.
A full declaration, defining the relevant directives and referenced standards can be obtained from your Xerox
Limited representative or by contacting:
Xerox Limited Product Safety,
Xerox Limited Technical Centre,
PO Box 17,
Bessemer Road,
Welwyn Garden City,
Herts AL7 1HE, England
This system is certified manufactured and tested in compliance with strict safety and radio frequency interference
regulations. Any authorised alteration which includes the addition of new functions or the connection of external
devices may impact this certification. Please contact your local Xerox Limited representative for a list of approval
accessories.
In order to allow this equipment to operate in proximity to industrial, Scientific and medical (ISM) equipment, the
external radiation from the ISM equipment may have to be limited or special mitigation measures taken.
DocuPrint P8ex User Guide
ENGLISH
1-21
Page 22

DocuPrint P8ex User Guide
Printer Certifications (continued)
CE Energy Star
ENGLISH
DEMKO SEMKO
FIMKO GOST
1-22
C+UL+US NOM
Environmental Choice NEMKO
Polish B Y2K
Compliant
Page 23

Language Codes
DocuPrint P8ex User Guide
ENGLISH
Code Language
BG Bulgarian
CS Czech
DA Danish
DE German
EL Greek
EN English
ES Spanish
ET Estonian
FI Finnish
FR French
HU Hungarian
IT Italian
LT Lithuanian
LV Lat v ian
NL Dutch
NO Norwegian
PL Polish
PT Portuguese
RO Romanian
RU Russian
SH Croatian
SK Slovak
SL Slovenian
SV Swedish
TR Turkish
ZH Chinese
1-23
Page 24

ENGLISH
1-24
 Loading...