

Page 1

DocuPrint C525 A
Setup and Quick Reference Guide
IE
IE
Page 2

Adobe, the Adobe logo, Acrobat and Acrobat Reader are trademarks of Adobe Systems Incorporated.
Microsoft, Windows, Windows NT, Windows Server are either registered trademarks or trademarks of Microsoft
Corporation in the United States and/or other countries.
Permission has been obtained from Microsoft Corporation for use of software screen shots.
NetWare is a registered trademark of Novell, Inc., in the United States and other countries.
Macintosh, MacOS, AppleTalk, EtherTalk and TrueType are trademarks of Apple Computer, Inc., registered in the
U.S. and other countries.
Intel and Pentium are trademarks or registered trademarks of Intel Corporation or its subsidiaries in the United
States and other countries.
All product/brand names are trademarks or registered trademarks of the respective holders.
It may be a legal offence to print currency notes, certificates of stocks and securities, or any other
documents of similar nature, regardless of whether they will be used.
To lessen the effect on the environment, this manual is manufactured with recycling in mind. After the
product has been used, please send this manual for recycling.
Damage related to computer virus
Fuji Xerox is not responsible for any breakdown of machines due to infection of computer virus.
Important
c This manual is copyrighted with all rights reserved. Under the copyright laws, this manual may not be copied
or modified in whole or part, without the written consent of the publisher.
d Parts of this manual are subject to change without prior notice.
e We welcome any comments on ambiguities, errors, omissions, or missing pages.
f Never attempt any procedure on the machine that is not specifically described in this manual. Unauthorized
operation can cause faults or accidents. Fuji Xerox is not liable for any problems resulting from unauthorized
operation of the equipment.
Xerox, The Document Company and the stylized X are registered trademarks of Xerox Corporation.
All Xerox and Fuji Xerox product names are either registered trademarks or trademarks of Xerox Corporation and
Fuji Xerox Co., Ltd.
Page 3

Preface
Thank you for choosing this DocuPrint C525 A. This is a guide on operating this printer and the important
points to note. To understand the features fully and to use the printer correctly and effectively, please read
this guide before using it.
Keep this guide handy for a quick reference on using the printer.
This guide is written with the assumption that you are familiar with the basic knowledge, and way of
operating your computer environment and network environment.
In this manual, safety instructions are preceded by the symbol .
Always read and follow the instructions before performing the required procedures.
Remember to read also the “Safety Notes” in this manual.
This product is a “Class I Laser System” that does not emit dangerous laser beam. Operate the machine
according to the instructions in the manual. Do not carry out any operation not mentioned in the manual.
Otherwise, it may lead to unforeseen accident or machine breakdown.
IE
IE
Preface 3
Page 4
Features in Brief
4 Features in Brief
Page 5

Types of Manuals
Setup and Quick Reference Guide
Explains the way of installation, loading paper, and
troubleshooting of this printer.
User Guide (PDF)
Explains printer settings, and describes control
panel menu items and daily care in detail.
Refer to
All the contents of the Setup and Quick Reference
Guide are included except the installation of this
printer.
This PDF file is included in the CentreWare
CD-ROM.
Documentation in the CentreWare CD-ROM
(HTML)
Explains how to set the printer environment and
how to install the print driver and our company
software.
The Online Help for the CentreWare Internet
Services
Explains how to set the items and features of
CentreWare Internet Services.
The Online Help for the print driver
Explains how to set the items and features of the
print driver.
Installation Guide
Explains the installation procedure of each optional
accessory.
This manual is bundled with each optional product.
“Contents of the User Guide (Reference)”.
Conventions
1. In this guide, “computer” refers to both the
personal computer and workstation.
2. The following icons are used in this guide:
Important Indicates important information
which you should read.
Note Indicates additional information
on operations or features.
Refer to Indicates reference sources.
3. The following conventions are used in this
guide:
Refer to “xxx”: The cross-reference is
within this guide.
Refer to xxx : The cross-reference is not
within this guide.
[ ] : Indicates items displayed
on the computer and the
printer control panel. Also
indicates the title of printed
reports/lists from the
printer.
< > : Indicates items such as
hard buttons and indicators
on the keyboard and
printer.
IE
IE
Note
• Adobe
Acrobat Reader needs to be installed to
display PDF files. Install the Acrobat Reader using the
CentreWare CD-ROM first if it is not already installed.
Types of Manuals 5
Page 6

Contents
Preface ................................................. 3
Features in Brief ................................... 4
Types of Manuals ................................. 5
Conventions ......................................... 5
Contents ............................................... 6
Contents of the User Guide
(Reference) ........................................ 7
Safety Notes......................................... 8
1 Installing the Printer ..................... 12
Checking the Package Contents, Unpacking
the Printer ................................................ 12
Installing the Optional Accessories.......... 12
Installing the Additional Memory .......... 13
Installing the Network Expansion Card 13
Connecting the Power Cord to Switch On the
Printer ...................................................... 14
Installing the Toner Cartridge .................. 14
Installing the Drum Cartridge ................... 16
Connecting Interface Cable ..................... 16
Loading Paper ......................................... 17
Loading Paper in the Bypass Tray ....... 17
Loading Paper in Paper Trays
(Optional) ........................................... 18
Using the Extension Output Tray ......... 18
Printing Reports/Lists .............................. 19
2 Setting the Printer Environment... 20
Supported Environment........................... 20
Setting IP Address ................................... 21
Setting Printer Configurations via Centre-
Ware Internet Services ............................ 22
Installing the Print Driver ......................... 24
5 About Paper ................................. 28
About Paper............................................. 28
Usable Paper .......................................28
Unusable Paper ................................... 30
Loading Paper ......................................... 31
Loading Envelopes ............................... 31
Setting Paper Sizes and Types ............31
6 List of Menu Items on the Control
Panel............................................ 32
7 Troubleshooting ........................... 34
When Paper Jams ................................... 34
When Inside the Printer Gets Dirty .......... 36
Problems With the Printer ........................ 37
Problems With the Print Quality ............... 40
Error Messages Displayed at the Control
Panel........................................................ 43
A Appendix ...................................... 44
Optional Accessories and Consumables . 44
Optional Accessories ........................... 44
Consumables .......................................44
Regular Replacement Parts .................45
How to Obtain Product Information.......... 45
Latest Print Driver ............................... 45
Upgrading the Firmware Version of This
Printer ...................................................45
Index................................................... 46
3 Basic Operations ......................... 25
Switching On and Off the Power ............. 25
Switching On the Power ....................... 25
Switching Off the Power ....................... 25
Power Saver Modes ................................ 25
Canceling Printing ................................... 26
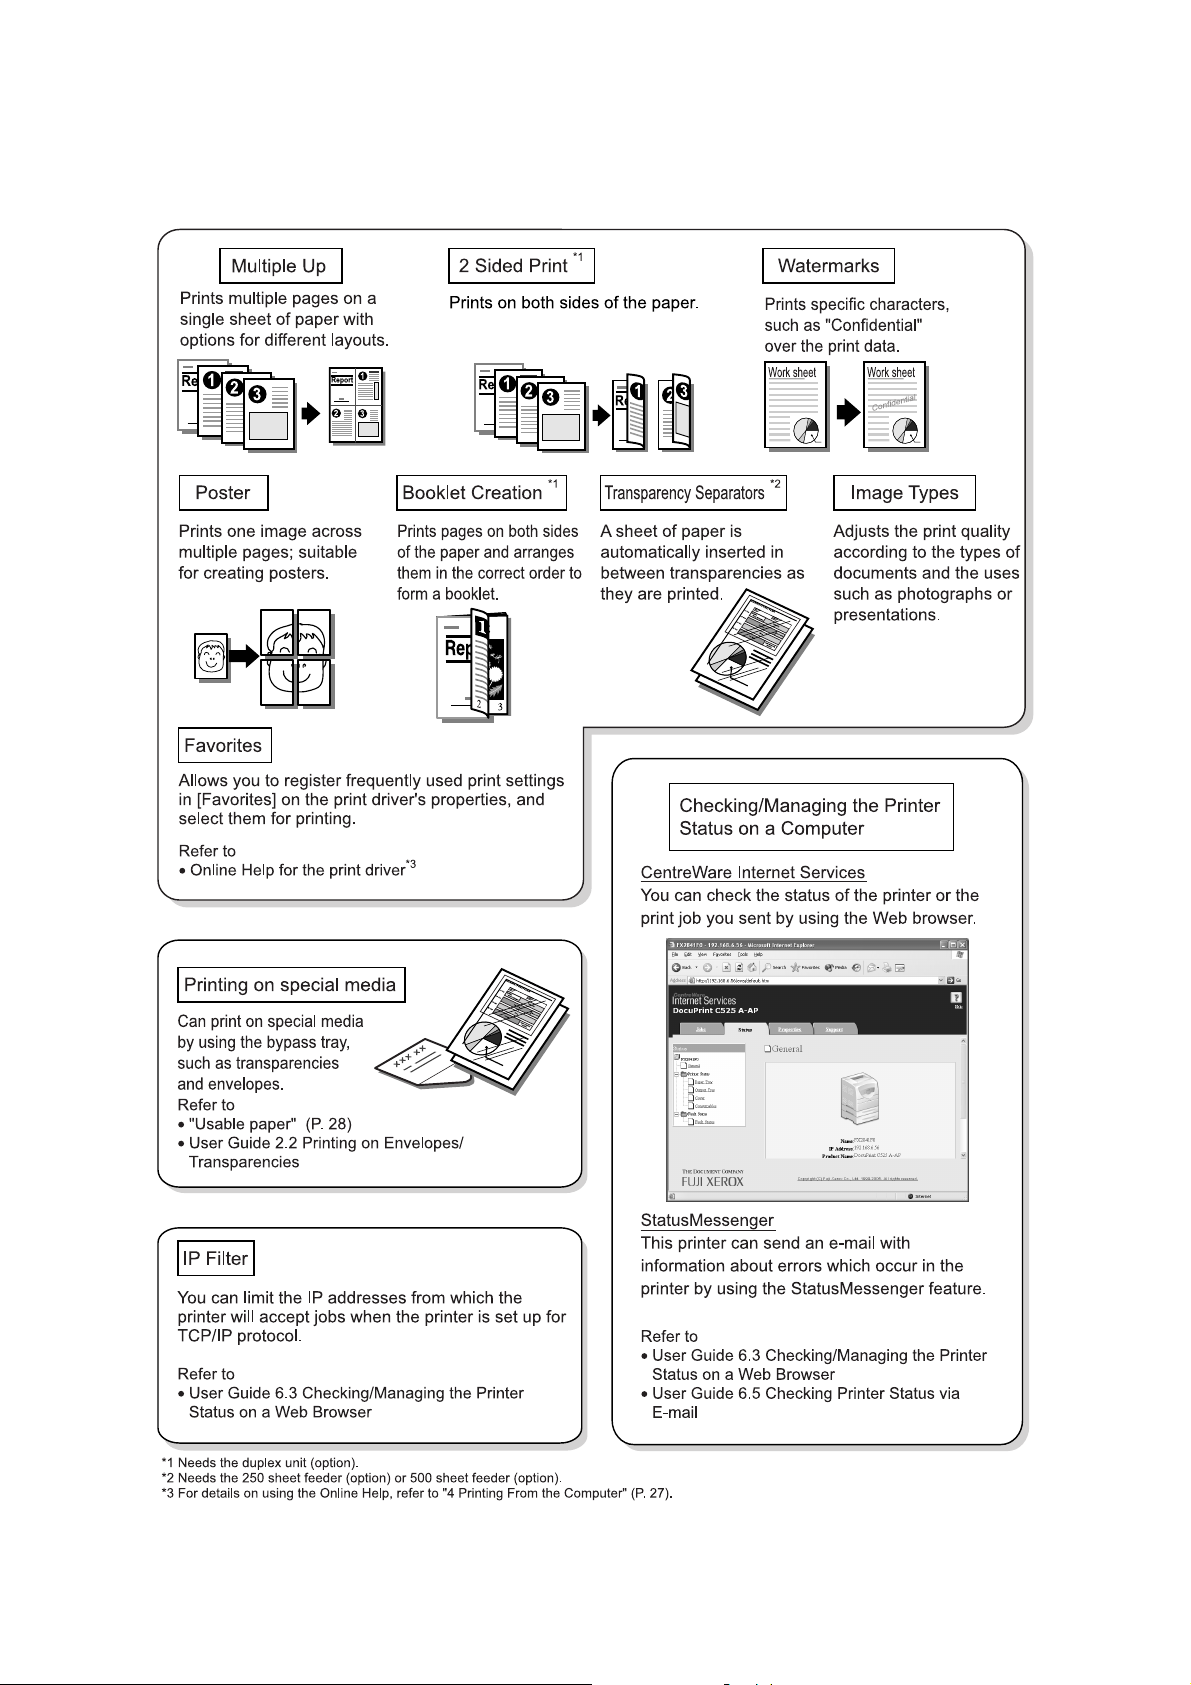
4 Printing From the Computer ........ 27
Examples of Useful Printing Functions in
the Properties Dialog Box .................... 27
6 Contents
Page 7

Contents of the User Guide (Reference)
Preface
Types of Manuals
Using This Guide
Contents
Contents of the Setup and Quick
Reference Guide (Reference)
The Objective of the International
Energy Star Program
Illegal Copies and Printouts
1 Basic Operations...................... 11
1.1 Main Components and Their
Functions
1.2 Switching On and Off the Power
1.3 Power Saver Modes
1.4 Canceling/Checking Printing
1.5 Displaying Optional Accessory
Configuration and Paper Tray
Settings
2 Printing ..................................... 20
2.1 Printing From the Computer
2.2 Printing on Envelopes/
Transparencies
2.3 Printing on Custom Size Paper
3 About Paper ............................. 27
3.1 About Paper
3.2 Loading Paper
3.3 Setting the Paper Sizes and Types
5 Troubleshooting........................ 45
5.1 When Paper Jams
5.2 When Inside the Printer Gets Dirty
5.3 Problems With the Printer
5.4 Problems With the Print Quality
5.5 Message List
5.6 Network Related Troubles
5.7 About Custom Mode
6 Daily Care................................. 61
6.1 Replacing Consumables
6.2 Printing Reports/Lists
6.3 Checking / Managing the Printer
Status on a Web Browser
6.4 Checking Printer Status via
SimpleMonitor
6.5 Checking Printer Status via E-mail
6.6 Checking Printed Pages
6.7 Cleaning the Printer
6.8 When Moving the Printer
A Appendix .................................. 81
A.1 Specifications
A.2 Optional Accessories and
Consumables
A.3 Life of Consumables and Regular
Replacement Parts
A.4 How to Obtain Product Information
A.5 Glossary
Index
4 Setting on the Control Panel .... 34
4.1 Overview of the Menu
4.2 Description of Menu Items
4.3 Menu List
: Described in the User Guide only.
Contents of the User Guide (Reference) 7
Page 8
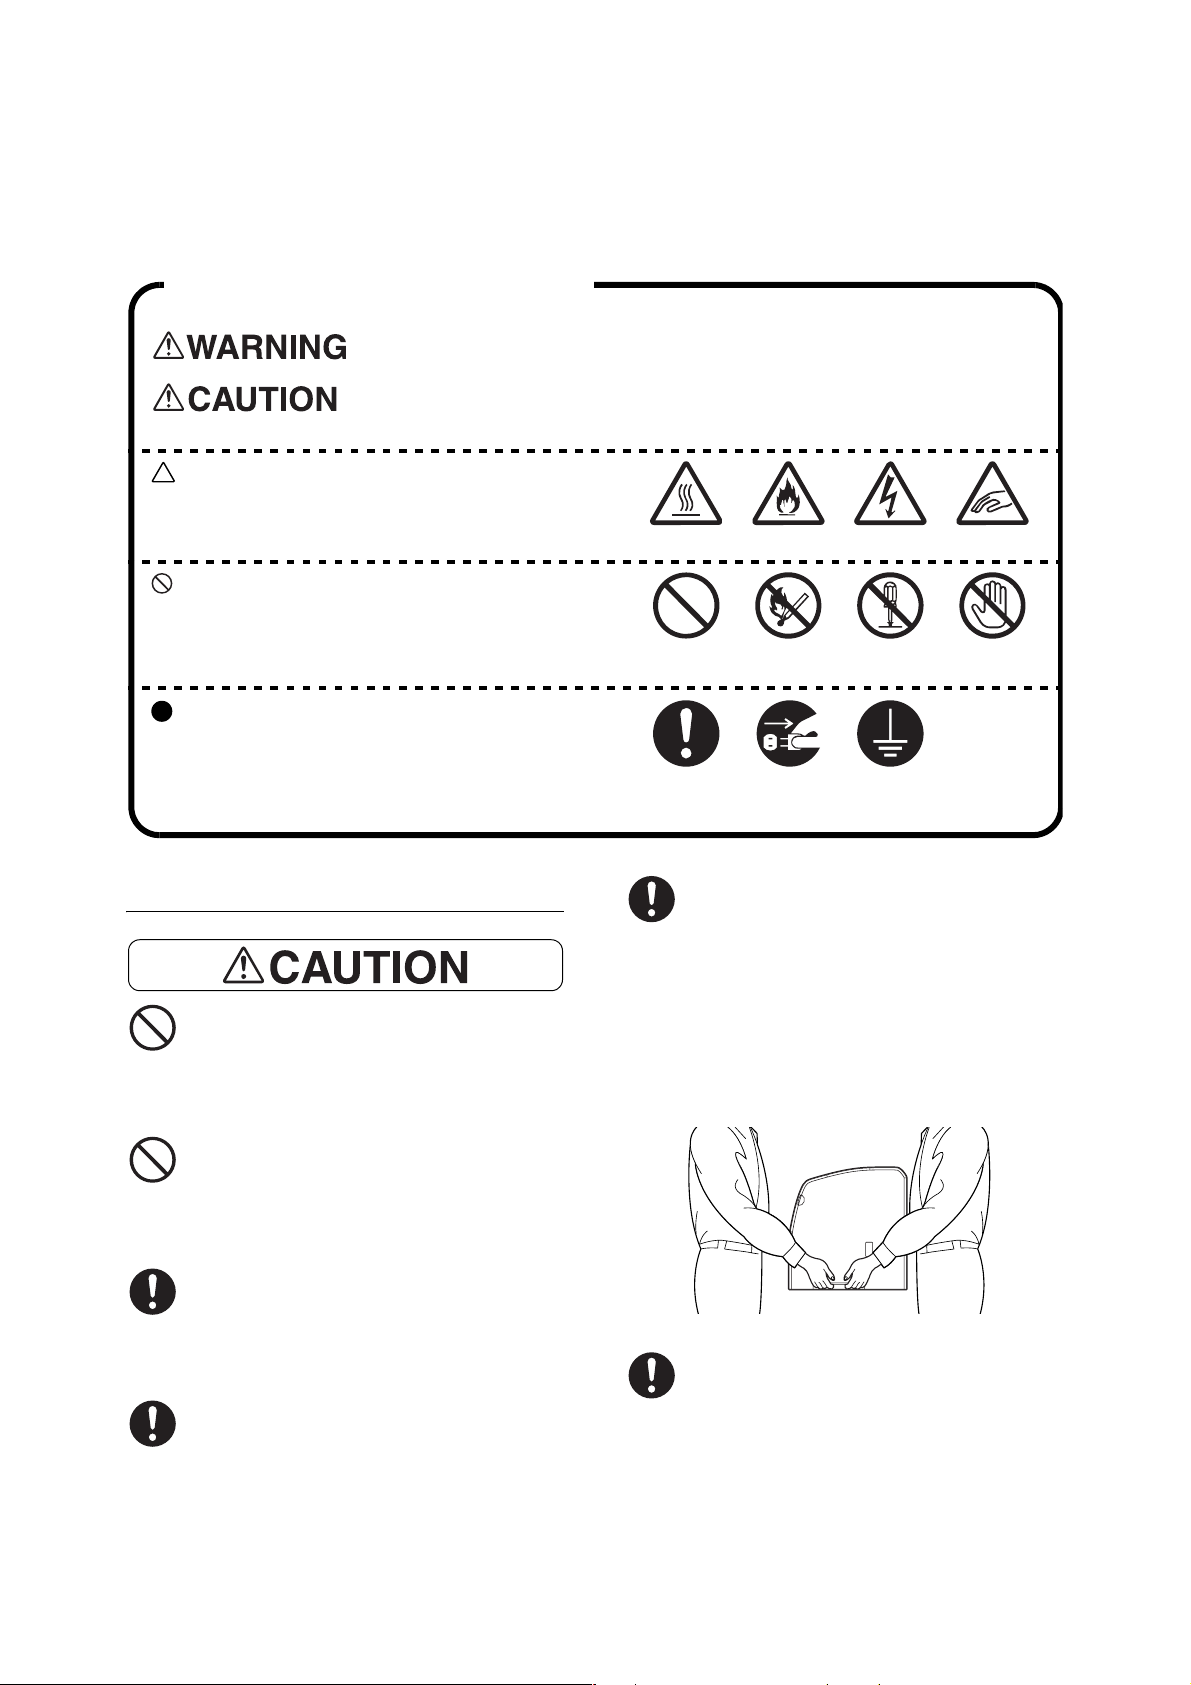
Safety Notes
For your own safety, please read this page carefully before using the machine.
Graphic symbols used throughout this guide
Used for items that if not followed strictly, can lead to severe or fatal injuries.
Used for items that if not followed strictly, can cause injuries to user or
damages to the machine.
A symbol for items to pay attention to when
handling the machine. Follow instructions
carefully to use machine safely.
Heated surface Flammable Electric shock Pinched fingers
A symbol for prohibited items. Follow instructions
carefully to avoid any dangerous acts.
A symbol for items that must be performed.
Follow instructions carefully to carry out these
essential tasks.
For Installation & Relocation
Do not place the machine in a hot, humid,
dusty, or poorly ventilated environment.
Prolonged exposure to these adverse
conditions can cause fire or electric shock.
Do not place the machine near heaters or
volatile, flammable, or combustible
materials such as curtains that may catch
fire.
Prohibited No fire Do not
tear down
Instructions Unplug Ground/Earth
When lifting the machine, one facing the
front of the machine (control panel) and the
other facing the back, should firmly grip the
recessed areas on the bottom part of both
sides of the machine. Never try to lift the
machine by gripping any other areas.
Lifting the machine by gripping any other
areas can cause the machine to fall and
result in injuries.
Do not
touch
Place the machine on a level and sturdy
surface that can withstand the machine
weight. If tilted, the machine may fall over
and cause injuries.
The machine weighs 28.0 kg for a standard
configuration (including consumables).
When moving the equipment, make sure
that there are two or more persons carrying
it.
8 Safety Notes
When lifting the machine, get a firm footing
and bend your knees to avoid possible
injuries to your back.
Page 9
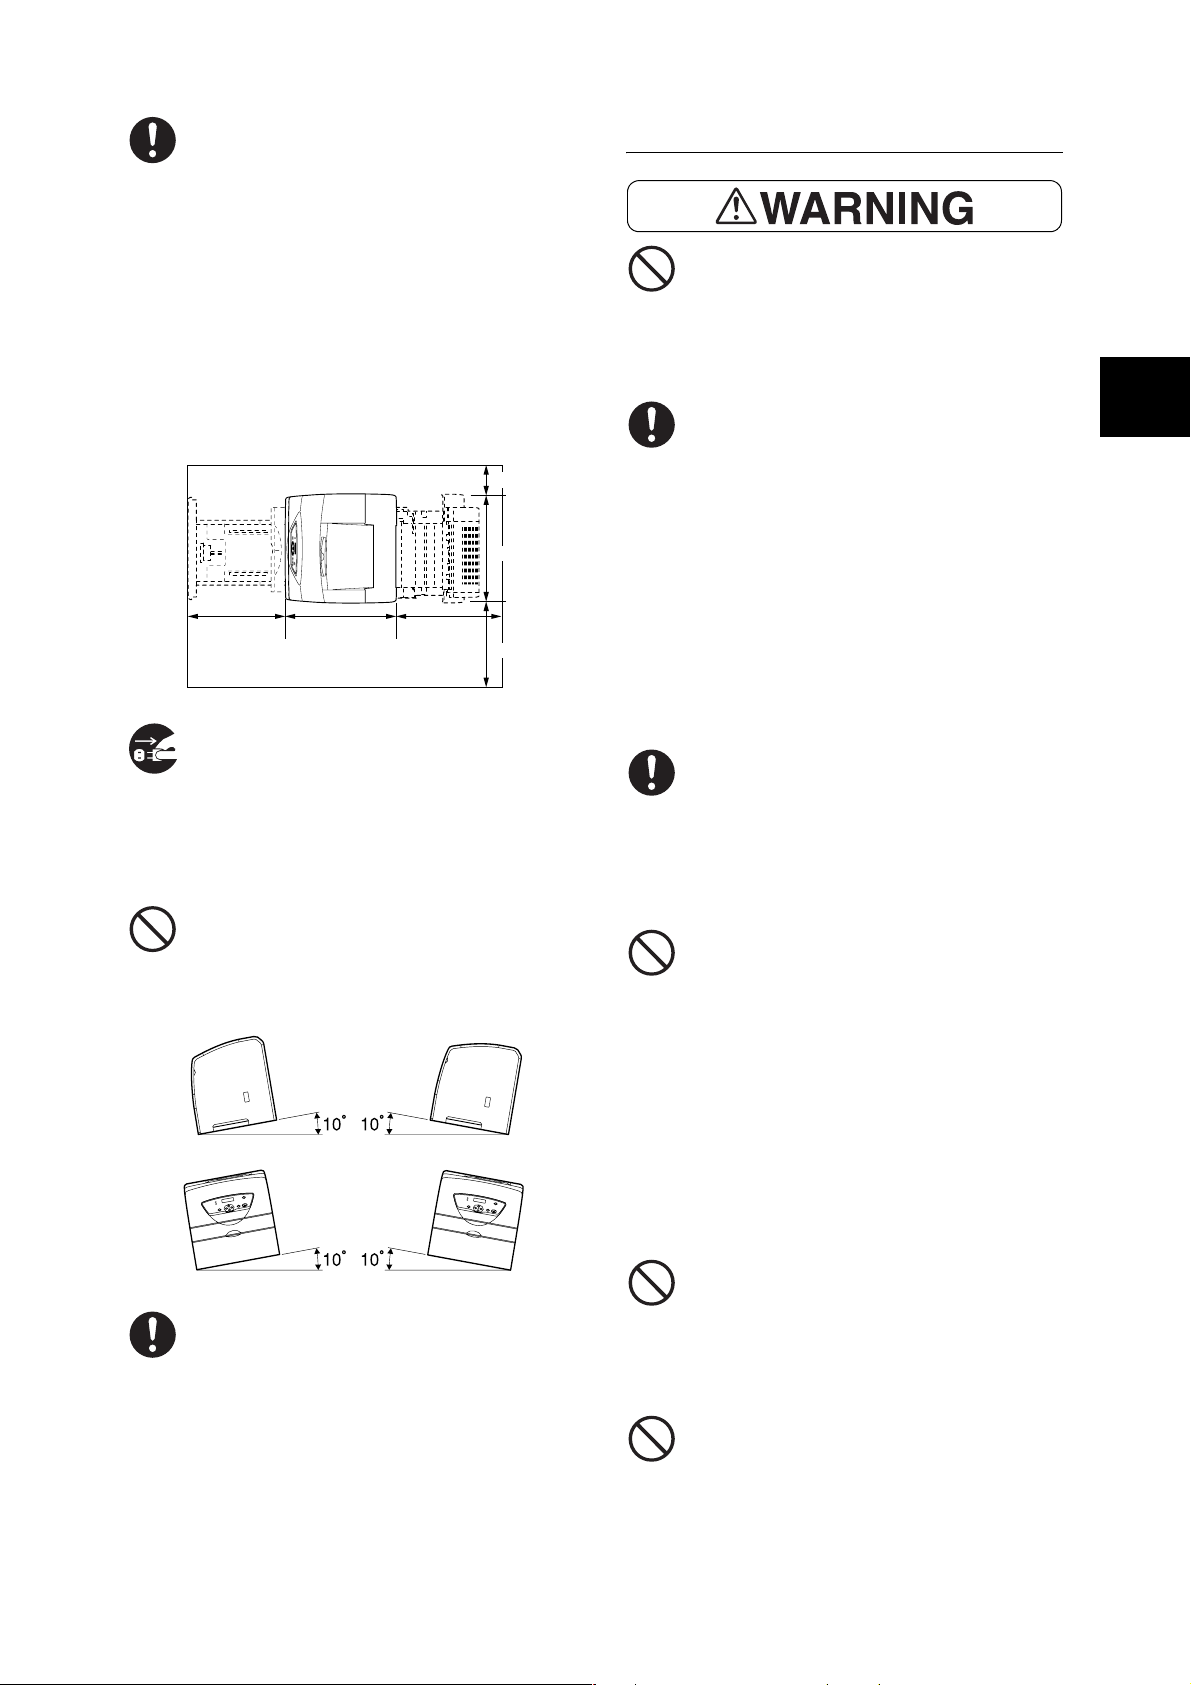
The machine has ventilation holes on the
side and rear panels. Ensure that the
machine is installed with a minimum
clearance of 400 mm from the rear vent to
the wall, 100 mm from the left vent to the
wall, and 300 mm from the right vent to the
wall. A poorly ventilated machine can
cause excessive internal heat and fire.
The accompanying diagram shows the
minimum clearances required for normal
operation, consumables replacement, and
maintenance to ensure your machine
operates at peak performance.
100 mm
425 mm
For Power & Earth Connection
Use only the power cord specified for this
printer. Using a different cord may cause
fire or electric shock. Also, do not use the
machine’s power card with other
equipment.
The power specifications are listed below.
The specifications that apply to your
machine depend on your machine
configuration. Connect the power plug only
to a properly rated power outlet.
Otherwise, it can cause fire or electric
shock. If in doubt, contact our Customer
Support Center or your dealers.
IE
422 mm
When moving the machine, be sure to
unplug the power cord from the outlet. If the
machine is moved with the power cord
connected, it can cause damage to the
cord which could result in fire or electric
shock.
When moving the machine, do not tilt it
more than 10 degrees. If tilted excessively,
the machine may fall over and cause
injuries.
400 mm370 mm
300 mm
• Rated voltage 110 - 127 V
Rated frequency 50/60 Hz
• Rated voltage 220 - 240 V
Rated frequency 50/60 Hz
Ensure that the plug connection is free of
dust. In a damp environment, a
contaminated connector can draw a nonnegligible amount of current that can
generate heat and eventually cause fire
over an extended period of time.
Always use the power cord provided with
your machine. When an extension power
cord is required, always use a properly
rated cord.
• In Japan: 125 V/15 A
• In other countries: Contact our Customer
Support Center or your dealers.
If you use a cord with an unspecified
current rating, the machine or plug may
emit smoke or become hot to the touch
externally.
IE
If the duplex unit (optional), 250 sheet or
500 sheet feeder (optional) has been
installed, uninstall it before moving the
printer. If these are not fixed securely to the
printer, they may fall to the ground and
cause injuries. For details on how to
uninstall the optional accessories, refer to
each manual that is provided with each
accessory.
Do not attempt to rework, pull, bend, chafe,
or otherwise damage the power cord. Do
not place a heavy object on the cord. A
damaged cord can cause fire or electric
shock.
Never touch a power cord with wet hands.
Danger of electric shock exists.
Safety Notes 9
Page 10
Stop operation immediately if your machine
produces smoke, excessive heat, unusual
noise, or smell, or if water is spilt onto the
machine. These conditions can cause fire.
Immediately switch off and unplug the
machine, and contact our Customer
Support Center.
To prevent fire or electric shock, connect
the printer correctly to a properly rated
electric outlet. If in doubt, contact our
Customer Support Center.
If the power cord is broken or insulated
wires are exposed, ask our Customer
Support Center or your dealers for a
replacement. Using a damaged cord can
cause fire or electric shock.
Do not unplug or replug the machine while
it is on. Unplugging a live connector can
deform the plug and cause fire.
If you notice any unusual conditions,
contact our Customer Support Center or
your dealers.
Switch off the machine before connecting
the interface cable or optional product.
Connecting the cable or optional product
with a live machine can cause electric
shock.
For Machine Operation
Do not place any liquid container such as a
vase or coffee cup on the machine. Spilt
water can cause fire or electric shock.
Do not place any metal parts such as
staples or clips on the machine. If metal
and flammable parts get into the machine,
they can short-circuit internal components,
and cause fire or electric shock.
When unplugging the machine, grasp the
plug instead of the cord. Forcibly pulling on
a cord can damage it and cause fire or
electric shock.
Be sure to switch off and unplug the
machine before accessing the interior of
the machine for cleaning, maintenance, or
fault clearance. Access to a live machine’s
interior can cause electric shock.
When the machine is not used over an
extended period of time, switch it off and
unplug it. If an unused machine is left
connected to a power source for a long
period, degraded insulation can cause
electric shock, current leakage, or fire.
Once a month, unplug the machine and
check the power cord for the following:
• The power cord is plugged firmly into a
receptacle.
• The plug is not excessively heated,
rusted, or bent.
• The plug and receptacle are free of dust.
• The cord is not cracked or frayed.
If debris (metal or liquid) gets into the
machine, switch off and unplug the
machine. Contact our Customer Support
Center or your dealers. Operating a
debris-contaminated machine can cause
fire or electric shock.
Never open or remove machine covers that
are secured with screws unless specifically
instructed in the manual. A high voltage
component can cause electric shock.
Do not try to alter the machine
configuration, or modify any parts. An
unauthorized modification can cause
smoke or fire.
This equipment is certified as a Class 1
laser product under IEC60825-1 (Class 1).
This means that the machine does not emit
hazardous laser radiation. Since radiation
emitted inside the machine is completely
confined within the protective housings and
external covers, the laser beam cannot
escape from the machine during any phase
of user operation. Do not perform any
operation apart from the instructions given
in the manual. There may be a danger of
laser beam leakage.
10 Safety Notes
Page 11

Do not play this CD-ROM using an
incompatible CD-ROM player. Playing at
high volume levels can cause hearing
damage and speaker failure.
Never touch a labeled area found on or
near the heat roller. You can get burnt. If a
sheet of paper is wrapped around the heat
roller, do not try to remove it by yourself to
avoid injuries or burns. Switch off the
machine immediately, and contact our
Customer Support Center or your dealers.
For Consumables
Never throw a drum cartridge into an open
flame. Toner remaining in the cartridge can
cause an explosion and you can get burnt.
IE
Never throw a toner cartridge into an open
flame. It can cause an explosion and you
can get burnt.
IE
When removing jammed paper, make sure
that no pieces of torn paper are left in the
machine. A piece of paper remaining in the
machine can cause fire. If a sheet of paper
is wrapped around the heat roller, or when
clearing a jammed paper that is difficult or
impossible to see, do not try to remove it by
yourself. Doing so can cause injuries or
burns. Switch off the machine immediately,
and contact our Customer Support Center
or your dealers.
Do not use a vacuum cleaner for cleaning
a toner spilled on the floor. Use a broom to
sweep it out, or a cloth soaked with soap
water to wipe it out. The vacuumed toner
may cause a fire in the cleaner due to its
electrical sparks.
Keep the drum cartridge and toner
cartridge in a location out of reach of
children.
Safety Notes 11
Page 12

1 Installing the Printer
Checking the Package Contents, Unpacking the Printer
1. Check that all items in the packaging box are
available.
Note
• Retain the packaging material and box for future use if
there is a possibility that the printer will be moved over
long distances.
This printer
Drum cartridge
Toner cartridge 4 cartridge
([K]: 4K, [Y] [M] [C]: 1.5K)
Setup and Quick Reference Guide (this
manual)
CentreWare CD-ROM
Control panel sheet
2. Remove the printer from its packaging
material, and move it to its installation
location. Ensure that the installation location
is equipped with the following conditions or
conditions stated in “For Installation &
Relocation” (P. 8).
• Temperature range 10 - 32 ° C, humidity range
15 - 85% (no condensation). Humidity should be
70% or below at 32 ° C, and temperature should
be 28 ° C or below at 85% humidity.
• Do not expose the machine to direct sunlight.
• Do not expose the printer to the direct draft of an
air-conditioner or heater.
Note
• Sudden temperature fluctuations can affect print quality.
Rapid heating of a cold room or moving the printer from
a location with low humidity/temperature to high
humidity/temperature can cause condensation inside
the printer, directly interfering with image transfer. When
condensation occurs, refer to “Problems With the
Printer” (P. 37).
• When you use the printer with the bypass tray opened,
do not locate the printer in direct sunlight. Doing so may
cause a malfunction or unnatural screen image.
3. When the printer is first taken out of the
packaging box, the cover of the printer is
taped. Remove the tape.
4. Open the front cover, and then remove the
spacer. Then, close the front cover.
5. Post the included control panel sheet on the
control panel if needed.
Installing the Optional Accessories
If you have bought optional 250 sheet/500 sheet
feeder or duplex unit, install them according to the
manual bundled with the each optional accessory.
This section describes how to install the additional
memory and network expansion card.
WARNING
• Never open or remove machine covers that are
secured with screws unless specifically
instructed in the manual. A high voltage
component can cause electric shock.
• Do not try to alter the machine configuration, or
modify any parts. An unauthorized modification
can cause smoke or fire.
CAUTION
• Switch off the machine before connecting the
interface cable or optional product.
Connecting the cable or optional product with a
live machine can cause electric shock.
12 1 Installing the Printer
Page 13
Installing the Additional Memory
There are three types of additional memory for this
printer, 128 MB, 256 MB and 512 MB. When an
additional memory is installed, the total memory
capacity becomes 192/320/576 MB respectively.
Important
• Do not touch the terminal area of the additional memory.
• Do not bend or damage the additional memory.
• Be sure to touch a metal surface to eliminate static
electricity before touching the additional memory with
your bare hands.
• To add more memory when the printer is in use, you
need to configure the memory capacity in the print
driver. For details, refer to the Online Help for the print
driver.
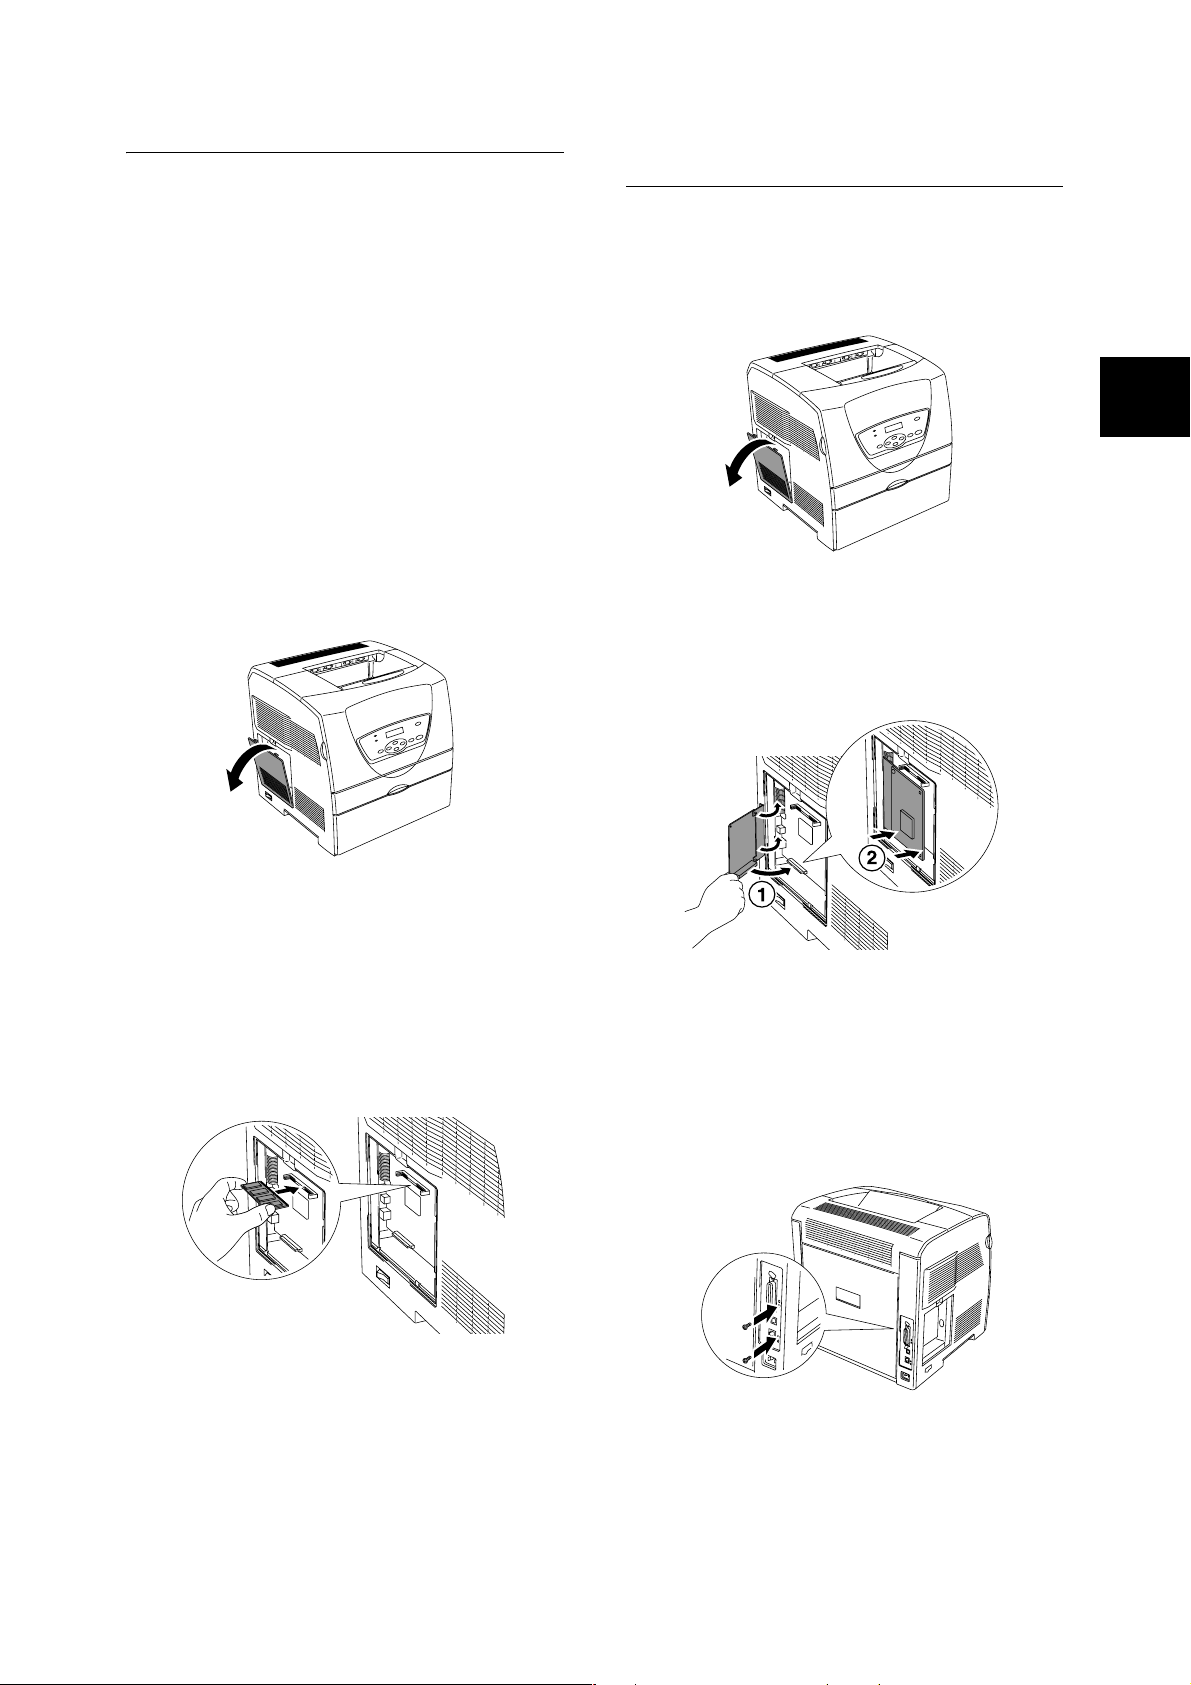
Installing the Network Expansion Card
1. Pull the cover on the left side of the printer
forward by hooking your finger on the notch
to remove the cover.
1. Pull the cover on the left side of the printer
forward by hooking your finger on the notch
to remove the cover.
2. Hold the additional memory so the notch is
aligned with the protrusion on the slot, and
insert the additional memory into the slot
firmly.
Note
• Insert the additional memory firmly by pushing it from
the top.
2. Hold the network expansion card so its
connector is toward the connector of the
printer, and insert the connector into the slot
on the left side of the printer.
Note
• Insert the network expansion card firmly by pushing it
from the top.
3. Tighten the two screws supplied with the
network expansion card on the back side of
the printer.
IE
IE
When you install a network expansion card,
skip the next step and proceed to step 2 in the
next section “Installing the Network
Expansion Card” (P. 13).
3. Reattach the cover on the left side of the
printer to the printer.
4. Reattach the cover on the left side of the
printer to the printer.
Installing the Optional Accessories 13
Page 14
Connecting the Power
Installing the Toner
Cord to Switch On the
Printer
You can load the paper or install the toner
cartridge and drum cartridge into this printer while
the printer is switched on.
When connecting the power cord, keep in mind
the warning and caution items stated in “For
Power & Earth Connection” (P. 9).
1. Connect the power cord to the power cord
connector at the back of the printer.
Cartridge
WARNING
• Never throw a toner cartridge into an open
flame. It can cause an explosion and you can
get burnt.
Important
• Although the toner is not harmful to your body, wash it
off immediately if your hands or clothes are stained with
it.
1. After confirming the “Load XXXX (the color of
the toner) Cartridge” message on the control
panel, open the front cover.
2. Connect the other end of the power cord to
the power outlet.
3. Press the power switch of the printer to the
<|> position.
The toner cartridge carrier rotates and then
stops. The “Load XXXX (the color of the
toner) Cartridge” message is displayed on
the control panel.
2. Hold the tape and gently pull it forward to
remove the protective cover.
Note
• The protective cover is attached to each toner cartridge
slot during at the factory. You only have to remove the
cover from each toner cartridge slot the first time that
you install the toner.
14 1 Installing the Printer
Page 15
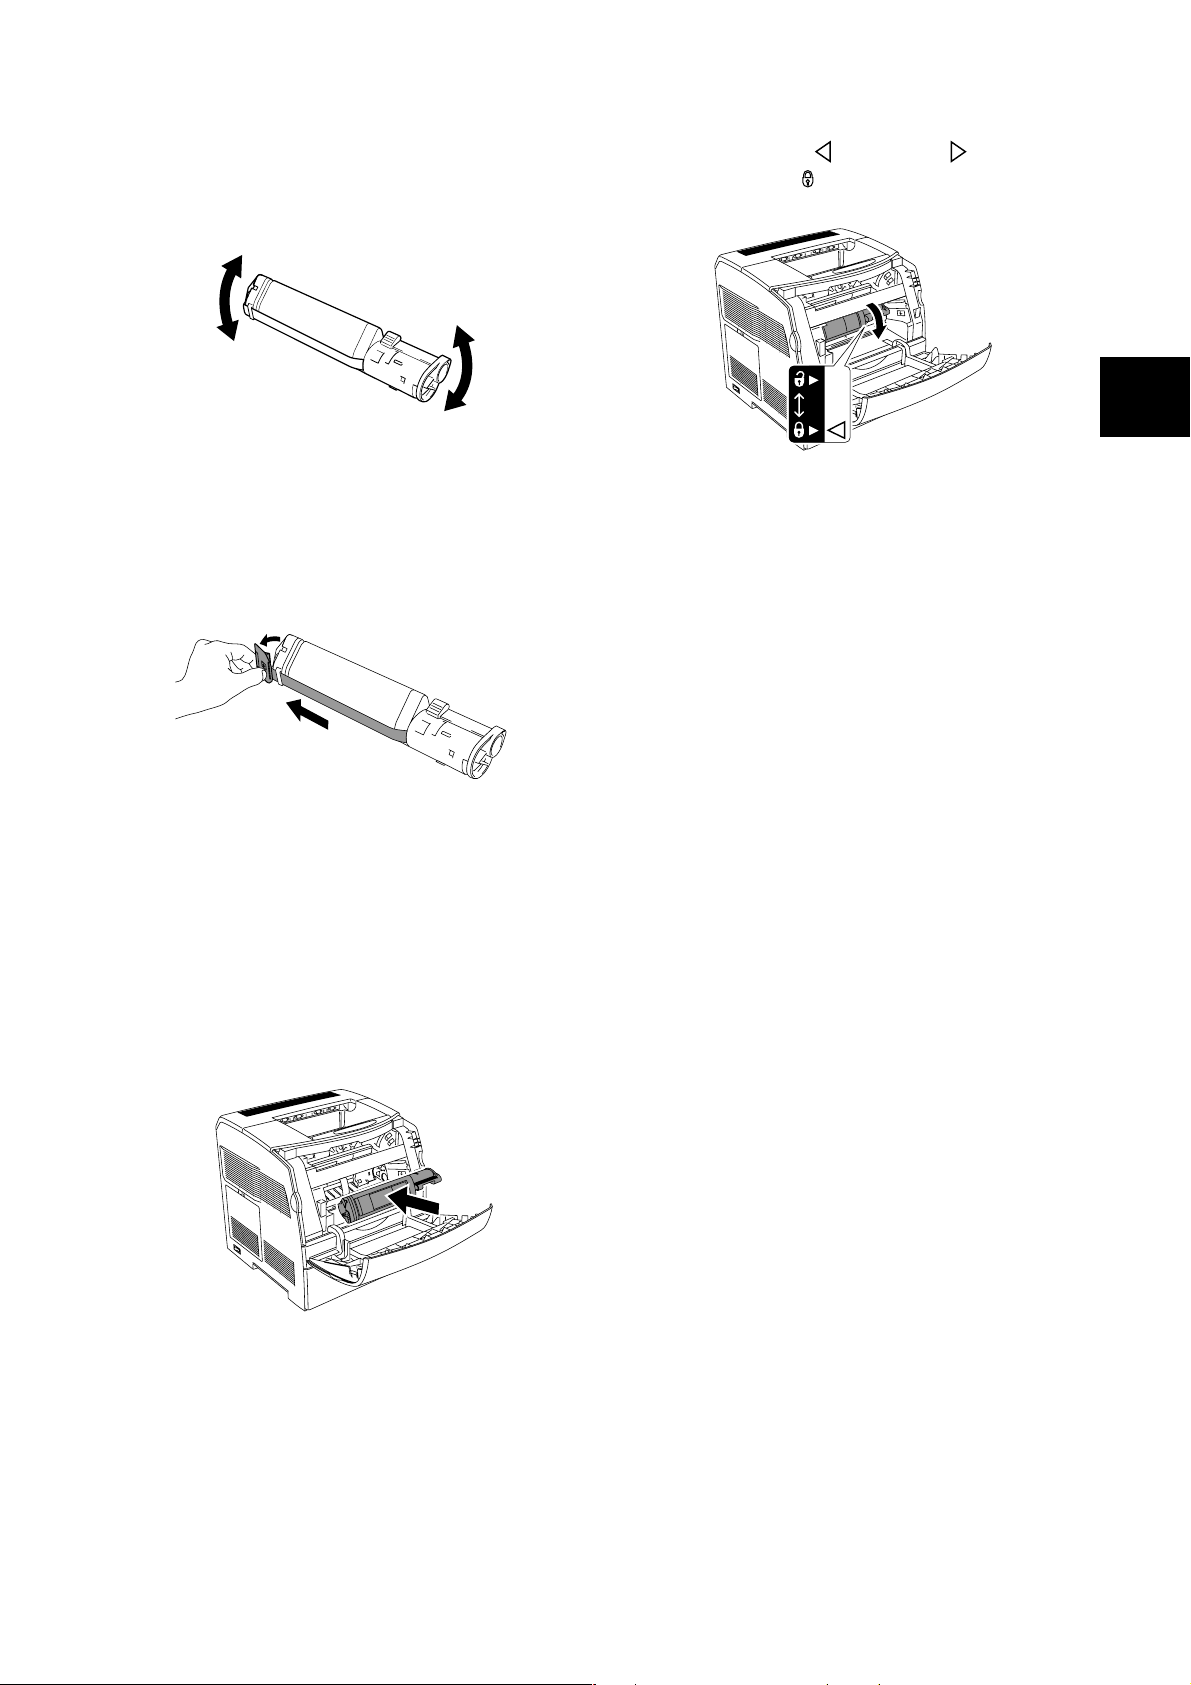
3. Take the toner cartridge out of the box, and
gently shake it several times as shown in the
diagram to distribute the toner evenly.
6. Push down the lever on the right of the toner
cartridge to turn mark to the mark on
the next to the mark.
4. Remove the top part of the seal from the
toner cartridge and pull the seal straight off,
keeping it parallel with the toner cartridge.
Important
• When pulling out the seal, pull it out horizontally. The
tape might break if it is pulled out diagonally.
• After the seal has been pulled out, do not shake or
bump the toner cartridge.
5. Insert the toner cartridge by facing the label
on the cartridge to the front and aligning it
with the arrows on the printer.
7. Close the front cover. The toner cartridge
carrier rotates to the next empty slot.
Important
• Make sure the toner cartridge is installed correctly.
Otherwise, the front cover cannot close firmly.
8. Repeat steps 1 through 7 until all cartridges
are installed.
IE
IE
Important
• Do not touch any parts inside the printer.
Installing the Toner Cartridge 15
Page 16

Installing the Drum Cartridge
WARNING
• Never throw a drum cartridge into an open
flame. It can cause an explosion and you can
get burnt.
1. When the “Load Drum Cartridge” message is
displayed on the control panel, open the front
cover, then lift and push back the top cover.
Note
• If the optional duplex unit is installed, first open the unit
D then the top cover.
3. To insert the drum cartridge, push up the
lever on the right side of the printer. With the
lever in the upright position, hold the drum
cartridge by the handle, align the arrows on
the drum cartridge with the corresponding
arrows on the printer and guide the cartridge
in until it snaps into place.
4. Pull down the lever on the right to lock the
drum cartridge in place.
Close the top cover, then close the front
cover.
2. Take the drum cartridge out of the packaging
box, and then remove the protective sheet.
Important
• Hold the drum cartridge by the handle. Do not touch the
surface of the drum (blue colored part). Also, never
allow any material to hit or rub the surface of the drum.
• Do not expose the drum cartridge to direct sunlight or
strong light.
• To ensure good print quality, always keep the drum
cartridge level when handling it.
Handle
Note
• When the unit D has been opened as in step 1, close it.
Important
• After installing the drum cartridge, the printer makes an
adjustment for about one to two minutes. Do not switch
off the printer during this time.
Connecting Interface Cable
Connect the interface cable to be used to the
printer.
Connect a USB cable only after the print driver
has been installed on the computer.
1. Connect the interface cable to the interface
connector at the back of the printer.
Parallel
USB
16 1 Installing the Printer
Network
2. Connect the other end of the interface cable
to the computer or a LAN drop or hub.
Page 17

Loading Paper
This section explains how to load A4 size plain
paper in the portrait orientation in the paper tray.
Paper feed
direction
Note
• Load the paper into this printer while the printer is
switched on.
3. Insert the paper into the bypass tray with the
side to be printed facing up and with all four
corners aligned.
Slide the right paper guide until they rest
lightly against the edge of the paper stack.
Maximum fill
line
Refer to
• Paper type and size that can be loaded: “About Paper”
(P. 28)
Loading Paper in the Bypass Tray
1. Gently pull open the bypass tray cover.
Important
• Do not apply excessive force to the bypass tray cover
when you open or close it, doing so may damage the
machine.
2. Slide the paper guide to the edge of the tray
while pinching the knob on the right paper
guide. The paper guides should be fully
extended.
Important
• Align the paper guides with the paper width correctly. Be
careful not to bend the paper.
• Do not load paper exceeding the maximum fill line or the
maximum capacity allowed.
4. Close the bypass tray cover.
Note
• When you print on paper fed from the bypass tray, set
the paper size and type in the print driver.
IE
IE
Loading Paper 17
Page 18

Loading Paper in Paper Trays (Optional)
1. Remove the paper tray from this printer.
2. Slide the width guides to the edge of the tray.
Squeeze the length guide and slide it to the
desired paper size.
4. Push the paper tray completely into the
printer.
5. Set the paper size and type according to the
message displayed on the control panel.
Note
• When you set the paper size and type on the control
panel, press the < > or < > button to select the item,
then press the <Eject/Set> button to determine the
selection. For details, refer to “6 List of Menu Items on
the Control Panel” (P. 32).
Using the Extension Output Tray
The extension output tray is designed to prevent
paper from falling from the printer after the print
job is complete.
Before printing a document, pull out the extension
output tray.
If the extension output tray is still not long enough
for the paper you are loading, pull the extension
output tray further.
3. Load the paper with the side to be printed
facing up and with all four corners aligned.
Slide the width guides until they rest lightly
against the edge of the paper stack.
Maximum fill
line
Important
• Do not load paper exceeding the maximum fill line or the
maximum capacity allowed.
• Align the width guides with the paper width correctly. If
the width guides are not in place, the paper will not be
properly fed and this may cause paper jams.
18 1 Installing the Printer
Page 19

Printing Reports/Lists
Printing Example
To check whether the printer is correctly installed,
use the control panel to print the reports/lists. Print
the [Printer Settings] to check whether optional
accessories have been correctly installed. Print
the [Panel Settings] to check paper size and type
for each tray.
Note
• If you have made a mistake when operating the control
panel, press the <Menu> button to restart. For details on
how to operate the control panel, refer to “6 List of Menu
Items on the Control Panel” (P. 32).
Important
• When you have installed 250 sheet/500 sheet feeder
(optional), load A4 size paper in tray 1 to print reports/
lists.
1. Press the <Menu> button to display the
Menu screen.
2. Press the < > or < > button until [Report/
List] is displayed, then press the < > or
<Eject/Set> button.
This section introduces an example of [Printer
Settings].
Note
• The layout of the reports/lists may be different
depending on the configuration and settings of the
printer.
Check the installed optional
accessories here.
IE
IE
3. Press the < > or < > button until [Printer
Settings] or [Panel Settings] is displayed,
then press the <Eject/Set> button.
The specified report/list will be printed.
Printing Reports/Lists 19
Page 20

2 Setting the Printer Environment
Supported Environment
This printer can be used as a local printer when connected to a computer directly by interface cable or as a
network printer via a network.
Supported OS and Environment
Important
• Supported OSs are subject to change without prior notice. Refer to our company’s web site.
Connection Local Network
Port Parallel USB LPD
Protocol - - TCP/IP IPX/SPX
Windows
OS
Windows
Windows Server 2003 {
*1: Network expansion card (optional) is required.
*2: Used when printing via Windows network.
*3: Used when printing via the internet.
*4: Connected computer must have USB port.
Important
• To use this printer as a network printer, refer to the CD-ROM Documentation (HTML) in the CentreWare CD-ROM to
configure the network environment settings.
2000
XP
{
{
*4
{
*4
{
*4
{
{ { {{{{
{ { {{{
{ { {{{
NetWare
*1
Net
BEUI
*1*2
SMB
TCP/IP TCP/IP TCP/IP
IPP
*1*3
9100
Port
20 2 Setting the Printer Environment
Page 21

Setting IP Address
Setting IP Address
When the printer is connected to the network, it
retrieves the IP address automatically from the
DHCP server once it is switched on.
If the DHCP server is not available or not in use,
use one of the following methods to retrieve and
set the IP address.
• Set the IP address from the control panel
• Use the IP Address Setting Tool in the
CentreWare CD-ROM bundled with this printer.
Important
• When using the DHCP server, the IP address may be
changed so you need to check the IP address on a
regular basis.
• When using the DHCP server in the WINS (Windows
Internet Name Service) environment, the network
expansion card is required.
• The address information can also be retrieved
automatically via the BOOTP or RARP servers. For
such cases, change the [Get IP Address] selection on
the control panel to [BOOTP] or [RARP].
• The IP address is controlled by the whole network
system. Setting an incorrect IP address may have an
adverse affect on the whole network system. Please
check with your network administrator if you have any
questions concerning your network environment.
Refer to
• Details on retrieving IP address: User Guide 4.2
Description of Menu Items
• IP Address Setting Tool: CD-ROM Documentation
(HTML) in the CentreWare CD-ROM
• CentreWare Internet Services: “Setting Printer
Configurations via CentreWare Internet Services”
(P. 22)
1. Press the <Menu> button to display the
Menu screen.
2. Press the < > or < > button until [Admin
Menu] is displayed, then press the < > or
<Eject/Set> button.
3. Check that [Network Settings] is displayed,
then press the < > or <Eject/Set> button.
4. Press the < > or < > button until [TCP/IP]
is displayed, then press the < > or <Eject/
Set> button.
5. Check that [Get IP Address] is displayed,
then press the < > or <Eject/Set> button.
6. Press the < > or < > button until [Panel] is
displayed, then press the <Eject/Set> button.
7. After “Reboot to apply settings” is displayed
for three seconds, return to the setting
screen.
After you complete setting the gateway
address, switch on the printer. Then
continue.
8. Press the < > button to return to [Get IP
Address].
9. Press the < > button to display [IP
Address], then press the < > or <Eject/Set>
button.
IE
IE
Note
• You can change the IP address using the CentreWare
Internet Services.
• You can check the current IP address, subnet mask and
gateway address settings from the [Printer Settings].
Refer to “Printing Reports/Lists” (P. 19) on how to print
the [Printer Settings].
This section explains how to set the IP address
from the control panel.
Note
• If you have made a mistake when operating the control
panel, press the <Menu> button to restart.
10. Press the < > < > < > < > buttons to
enter the IP address, then press the <Eject/
Set> button.
11. To set the subnet mask and gateway
address, press the < > button and proceed
to “Setting Subnet Mask/Gateway Address”
(P. 22).
Setting IP Address 21
Page 22

Setting Subnet Mask/Gateway
Address
1. Boot up the computer, and start the web
browser.
Note
• When “Ready to print” is displayed, follow steps 1 to 4 in
the previous section before proceeding to the next
procedure.
1. When [IP Address] is displayed, press the
< > or < > button to display [Subnet
Mask], then press the < > or <Eject/Set>
button.
2. Press the < > < > < > < > buttons to
enter the subnet mask, then press the
<Eject/Set> button.
3. Press the < > button to return to [Subnet
Mask].
4. Press the < > or < > button until [Gateway
Address] is displayed, then press the < >
button.
5. Press the < > < > < > < > buttons to
enter the gateway address, then press the
<Eject/Set> button.
2. Enter the printer’s IP address or URL in the
address input column of the web browser
and press the <Enter> key.
• Entering IP address
• Entering URL
The top page of CentreWare Internet Services
appears.
6. Switch off the printer and then switch it on
again.
Setting Printer Configurations via CentreWare Internet Services
CentreWare Internet Services are services that
allow the user to make use of a web browser in a
TCP/IP-enabled environment to display the printer
or job printing status and to change the settings.
Settings for the system and network ports can be
configured under the [Properties] tab of this
service.
Note
• CentreWare Internet Services is not available when the
printer is used as a local printer.
• Refer to the User Guide 6.3 Checking / Managing the
Printer Status on a Web Browser when the CentreWare
Internet Services screen does not appear after following
the procedures below.
22 2 Setting the Printer Environment
Page 23

Items That Can Be Set on CentreWare Internet Services
Main features that can be set in each tab of the CentreWare Internet Services are as follows.
Tab Main features
Jobs • Displays the Job list and Job History list.
Status • [General]
Displays the printer product name, IP address, and status of the printer.
• [Printer Status]
Displays the sizes of paper loaded in the paper trays and the amount remaining, output tray status,
remaining status of consumables.
• [Fault Status]
Displays the status of the control panel, location of the error and contents of the Fault Status.
Properties • [Machine Details]
Displays the [Product Name]. You can also configure the [Name]*, [Location]*, [Contact Person]* and
[Administrator E-mail Address]*.
• [Configuration]
Displays the printer’s specifications, Page Description Language (PDL), and information about the
memory.
• [Billing Meter]
Displays the total number of output pages and the number of output pages after turning on the printer
of output pages.
• [Initialization]
Initialize NVM and restart printer.
• [Internet Services Settings]*
Allows you to configure the intervals of the update by the second and whether the display of the
CentreWare Internet Services is updated automatically using the browser. Allows you to configure
the administrator’s name and password and whether the administrator mode is to be used in
CentreWare Internet Services. The default administrator’s name and password are “admin” and
“x-admin” respectively. Be sure to change the default password.
• [Port Status]
Allows you to activate or deactivate the ports.
•[Port Settings]
Allows you to configure Ethernet settings.
• [Protocol Settings]*
Allows you to configure detailed settings for each protocol.
IE
IE
Support • Displays the support information. This can links to our company’s web site.
*: These items can be configured only on CentreWare Internet Services. They cannot be set on the control panel.
Using Online Help
For details regarding the items that can be set in each tab, click the [Help] button to display the Online Help.
Note
• When you click the [Help] button, the online manual on our company’s web site is displayed.
Setting Printer Configurations via CentreWare Internet Services 23
Page 24

Installing the Print Driver
Uninstalling the Print Driver
To print from the computer, install the print driver
and other reguired software.
The print driver is software that converts print data
and instructions from the computer to data that
can be interpreted by this printer.
Depending the environment being used, the
required software and its installation procedure
may be different. Refer to the CD-ROM
Documentation (HTML) in the CentreWare
CD-ROM bundled with this printer to install each
software.
Installing the SimpleMonitor
SimpleMonitor is a tool that allows you to check
the print job you sent and printer status on a
computer, when you use this printer as a local
printer.
Allows you to check the sizes of paper loaded in
the paper trays and their remaining amount,
output tray status, remaining status of
consumables.
Refer to the CD-ROM Documentation (HTML) in
the CentreWare CD-ROM for the installation
procedure.
The print driver for Windows can be uninstalled by
using the uninstall tool of the print driver in the
CentreWare CD-ROM bundled with this printer.
For details, refer to the CD-ROM Documentation
(HTML) in the CentreWare CD-ROM for the
uninstall tool.
Note
• To uninstall Fuji Xerox’s another software, refer to the
ReadMe files for each software in the product
information (HTML) on the CentreWare CD-ROM.
Setting Configuration of Optional
Accessories and Paper
When installation of the print driver is completed,
set the configuration of the optional accessories,
and type and size of the paper loaded in the paper
trays on the [Options] tab in the print driver. For
details on the way of setting, refer to the Online
Help for the print driver or User Guide 1.5
Displaying Optional Accessory Configuration and
Paper Tray Settings.
Display the [Options] tab by the following
procedure. The procedure here explains with
Windows XP as an example.
1. From the [Start] menu, click [Printers and
Faxes].
2. Click the icon of this printer, and then select
[Properties] from the [File] menu.
3. Click the [Options] tab.
24 2 Setting the Printer Environment
Page 25

3 Basic Operations
Switching On and Off the Power
Switching On the Power
1. Press the power switch of the printer to the
<|> position.
2. When the power is on, “Diagnosing...” will be
displayed on the control panel. When the
printer is ready for printing, “Ready to print”
will be displayed.
Important
• When an error message is displayed, remedy the error
by referring to “Error Messages Displayed at the Control
Panel” (P. 43).
Switching Off the Power
Important
• Do not switch off the power of this printer when printing
is in progress. It may lead to a paper jam.
• Once the power is switched off, print data remaining in
this printer or information saved in the memory of this
printer will be deleted.
1. By checking the display on the control panel,
confirm that the printer is not processing any
data.
2. Push the power switch of this printer to the
<{> position to switch the power off.
Power Saver Modes
This printer is equipped with the power saver
mode 1 and the power saver mode 2 to reduce
power consumption when it is left idle.
When no print data is received for 3 minutes, the
printer will enter the power saver mode 1. When
no data is received for a further 5 minutes, it will
enter the power saver mode 2 by default.
When the printer enters power saver mode 1, the
screen on the control panel becomes dark and
“Ready/Standby” is displayed.
When the printer enters power saver mode 2, only
the <Power Saver> indicator lights; all the other
indicators go out. The display also goes out, and
nothing is displayed. The time ranges to specify
for the printer to go into the power saver mode 1
or the power saver mode 2 are 1 to 60 minutes or
1 to 120 minutes, respectively. Consumption of
power during the power saver mode 2 is 7 W or
less (for AC 110 - 127 V) or 9 W or less (for AC
220 - 240 V) and the time required to exit from the
power saver mode 2 to a print-ready status is
about 39 seconds.
Note
• You can specify for the printer not to go into the power
saver mode 2.
• For details on the power saver mode and the procedure
to change the settings, refer to “6 List of Menu Items on
the Control Panel” (P. 32) or User Guide 4.2 Description
of Menu Items.
IE
IE
Switching On and Off the Power 25
Page 26

Exiting the Power Saver Mode
The printer automatically cancels the power saver
mode once it receives data from the computer.
To cancel the power saver mode 1 or the power
saver mode 2 manually, press any button on the
control panel or press the <Power Saver> button,
respectively.
Note
• Opening and closing the cover automatically exits
power saver mode 1 also.
Canceling Printing
To cancel printing, you can cancel the print job
either at this printer or at the computer.
Canceling Printing of Data Being
Printed or Received at the Printer
Press the <Cancel Job> button on the control
panel. However, pages being printed at the
moment will continue to be printed.
Canceling Printing of Data Being
Processed at the Computer
Double-click the printer icon at the bottom right
of the taskbar in Windows.
From the displayed window, click the document
name that you wish to delete and press the
<Delete> key.
26 3 Basic Operations
Page 27

4 Printing From the Computer
This section explains the basic flow when printing
from application software in Windows
environment.
(The procedure may differ according to the
computer or system configuration used.)
Important
• Do not switch off the power of this printer when printing
is in progress. It may lead to paper jam.
1. From the [File] menu of the application
software, select [Print].
2. Select this printer as the printer to be used.
To use the different print features of this
printer, display the properties of the printer,
and set the necessary items. For details on
each item and how to set them, refer to the
Online Help for the print driver.
Note
• When you print on paper fed from the bypass tray,
configure the paper type correctly on the [Bypass Tray
Settings] on the [Tray/Output] tab of the print driver.
Examples of Useful Printing Functions in the Properties Dialog Box
• [Basic] tab: [2 Sided Print], [Multiple-Up],
[Poster], [Booklet Creation]
• [Tray/Output] tab: [Transp. Separators]
• [Graphics] tab: [Image Types]
• [Watermarks] tab: [Watermarks]
The overviews of above functions are described in
“Features in Brief” (P. 4).
For details about each function, refer to the Online
Help for the print driver.
Note
• You can set the print features in the properties dialog
box from the printer icon in the window displayed by
selecting [Printers and Faxes] (or [Settings] > [Printers]
depending on the OS).
IE
IE
(1)
(2)
There are two ways to display Online Help for the print
driver.
(1) Click [?], followed by the item you want to know more
about.
The explanation on the item is displayed.
(2) Click [Help].
The [Help] window is displayed.
4 Printing From the Computer 27
Page 28

5 About Paper
About Paper
Using unsuitable paper may lead to paper jams, poor print quality, breakdown and damage to your printer.
In order to use the features of this printer effectively, we suggest using the paper that is recommended here.
If you use paper that is not recommended, contact our Customer Support Center or your dealers.
Usable Paper
The types of paper that can be used on this printer are as follows:
Paper tray Size Paper type (Weight) Loading capacity
Bypass tray
Paper tray 1
(250 sheet
feeder
(optional))
Paper tray 1
or 2 (500
sheet feeder
(optional))
*1
For details on how to load envelopes, refer to “Loading Envelopes” (P. 31).
A4 , B5 , A5 ,
Legal (8.5 × 14") ,
Folio (8.5 × 13") ,
Letter (8.5 × 11") ,
Executive (7.25 × 10.5") ,
Japanese Postcard,
Envelope
Choukei 3, Monarch, COM#10, DL,
C5),
Custom (width 90 to 215.9 mm,
length 139.7 to 355.6 mm)
A4 , B5 , A5 ,
Letter (8.5 × 11") ,
Executive (7.25 × 10.5")
A4 , Letter (8.5 × 11")
*1
(Youkei 2, Youkei 3,
Plain/Plain-Side 2 (60 - 80 g/m
Bond/Bond-Side 2 (81 - 105 g/m
Transparency,
Heavyweight 1/Heavyweight 1-Side 2
(106 - 163 g/m
Heavyweight 2/Heavyweight 2-Side 2
(164 - 216 g/m
Label,
Coated 1/Coated 1-Side 2
(60 - 105 g/m
Coated 2/Coated 2-Side 2
(106 - 163 g/m
Coated 3/Coated 3-Side 2
(164 - 216 g/m
Envelope,
Postcard/Postcard-Side 2
Plain (60 - 80 g/m
Bond (81 - 105 g/m
Coated 1 (60 - 105 g/m
Plain (60 - 80 g/m
Bond (81 - 105 g/m
Coated 1 (60 - 105 g/m
2
2
),
2
),
2
),
2
),
),
2
),
2
),
2
),
2
),
2
)
2
),
2
),
2
)
200 sheets
(FX P paper) or 20 mm
or below
Important
• Load coated paper
piece by piece.
When you load
several sheets, the
paper becomes
damp and two or
more sheets will be
fed at the same time
into the printer in
folds. This may
cause a malfunction.
250 sheets
(FX P paper) or 28 mm
or below
500 sheets
(FX P paper) or 56 mm
or below
Important
• Printing on paper whose setting is different from the paper size or paper type selected on the print driver or loading paper
into unsuitable paper tray for printing may lead to paper jams. To ensure that printing is correctly done, select the correct
paper size, paper type, and paper tray.
• The printed image may fade due to moisture such as water, rain or vapor. For details, contact our Customer Support Center
or your dealers.
• Print quality may be poor or the paper can get wrinkled depending on the paper type or status.
Note
• For details on the procedure to print on transparencies, envelopes, or custom size paper, refer to the User Guide.
28 5 About Paper
Page 29

Paper Sizes and Types That are Compatible for 2 Sided Printing
When you have installed the duplex unit (optional), the following types and sizes of paper are compatible
for 2 sided printing.
Size Paper type (Weight)
B5 , A4 , Legal (8.5 × 14") ,
Folio (8.5 × 13") , Letter (8.5 × 11") ,
Executive (7.25 × 10.5")
Note
• When using plain, bond, heavyweight 1/2, coated 1/2/3, or japanese postcard, you can handle 2 sided printing manually
loading the paper that has been printed on one side using this printer into the bypass tray. At this time, select [XXX - Side 2]
([XXX S2]) as the paper type in the print driver or on the control panel.
Plain (60 - 80 g/m
Bond (81 - 105 g/m
Coated 1 (60 - 105 g/m
2
),
2
),
2
)
Supported Paper
The following table shows the supported paper for this printer.
Paper name Weight Paper type Paper characteristics and caution on usage
XC-4200DP
(standard paper for
black/white printing)
X-pression
(standard paper for
color printing)
FX P
20lb Plain Medium weight paper for internal distribution and general
office use
24lb Plain Paper that is ideal for both black/white and color printing
for general office use
2
64 g/m
Plain Medium weight paper for internal distribution and general
office use
IE
IE
FX C2
FX J
FX JD
FX WR100
FX Green 100
70 g/m
82 g/m
98 g/m
67 g/m
67 g/m
2
Plain Paper that is ideal for both black/white and color printing
for general office use
2
Bond High quality paper in widespread use such as project
books and color samples
2
Bond Two-sided paper in widespread use such as catalogs and
copy booklets
2
Plain Recycled paper with 100% pulp that has a whiteness
degree equal to bond paper
2
Plain Recycled paper with 100% pulp that has a minimum of
whiteness degree
About Paper 29
Page 30

Special Media
The following types of paper can be used for printing on this printer. Load these types of paper in the bypass
tray.
Paper name Weight Paper type Paper characteristics and caution on usage
JE001 - Transparency Transparency without any white frame
Labels (A4) V862 - Labels Full label sheets without perforations
FX JD Coated Paper
Note
• For details on special media, such as heavyweight paper, envelopes, and coated paper not listed in the table, contact our
Customer Support Center or your dealers.
105 g/m
2
Coated 1,
Coated 1-Side 2
Two-sided coated paper that is ideal for applications such
as catalogs and leaflets
Unusable Paper
Using the following types of paper might cause paper jams, malfunctions or damage to the machine. Do not
use them.
• Fuji Xerox full-color transparencies (example:
V556, V558, V302)
• Paper exclusively for ink-jet printer use
• Paper that is too thick or thin
• Paper that has been printed on before
(including color printing)
• Wrinkled, folded or torn paper
• Wet paper
• Curled paper
• Paper with static electricity
• Adhesive paper
• Postcards with pictures
• Paper using ink that will run at a temperature of
150 ° C
• Thermal paper
• Carbon paper
• Paper with staples, paper clips, ribbons or tape
• Paper with rough surfaces such as pulp paper
or fibrous paper
• If acid paper is used, the characters might
appear fuzzy. Replace it with alkaline paper.
• Envelopes that are not flat or have metal
fasteners
• Labels that do not fully cover the adhesive
backing
• Paper with special coatings
• Treated colored paper
• Adhesive paper
• Transfer paper (cold water use)
• T-shirt transfer paper (heat press use)
Important
• Postcards with pictures sometimes do not feed because the background image suppression agent adheres to the feed roll.
30 5 About Paper
Page 31

Loading Paper
Setting Paper Sizes and Types
Refer to “Loading Paper” (P. 17) for information
about loading paper in the bypass tray and paper
tray (optional). This section describes loading
envelopes into the bypass tray.
Note
• Load the paper into this printer while the printer is
switched on.
Loading Envelopes
Load envelope with the address side facing up in
the orientation shown in the diagram below.
Note
• The reverse side of the envelope cannot be printed on.
Envelope that is under
220 mm in width
Paper feed
direction
Envelope that is over
220 mm in width
Paper feed
Paper feed
direction
direction
You can set the paper size and type that is loaded
in the bypass tray on the control panel when the
[Bypass Mode] on the [Tray Settings] menu is set
to [Panel Specified] on the control panel.
In this case, the printing is done only when the
paper size and type settings on the control panel
are the same as on the print driver.
Also, using the [Display Popup], you can specify
whether or not to display the screen to set the
paper size and type every time you load paper into
each tray on the control panel. The default
settings do not display the message for the
bypass tray and do display the message for the
paper trays (optional).
IE
Note
• The [Display Popup] setting for the bypass tray is
available only when [Bypass Mode] is set to [Panel
Specified].
IE
Flap
Flap
The flap open and toward
you.
Example: Youkei 2,
Youkei 3, Monarch, DL,
Choukei 3, C5
Under
220 mm
Over
220 mm
The flap folded and on
the left.
Example: Com#10
Loading Paper 31
Page 32

6 List of Menu Items on the Control
Panel
For details on how to operate the control panel, refer to the User Guide 4 Setting on the Control Panel.
• Main operations and buttons on the control panel
Display/Close the Menu screen <Menu> button
Switch between the menu levels
Switch between menu or items in the
same level
Move the cursor (_) of the setting value to
the right or left
Confirm setting <Eject/Set> button
Reset settings to default value
Note
• indicates items that can be set when optional accessories are installed.
c: Network expansion card d: 250 sheet feeder or 500 sheet feeder
• * indicates default value.
< > button (moves one level downwards) or < > button (moves one level
upwards)
< > button (displays the previous menu or item) or < > button (displays
the next menu or item)
< > button (moves to the right) or < > button (moves to the left)
Press < > and < > button at the same time
Continued on next page
32 6 List of Menu Items on the Control Panel
Page 33

Continued from previous page
IE
IE
6 List of Menu Items on the Control Panel 33
Page 34

7 Troubleshooting
When Paper Jams
CAUTION
• When removing jammed paper, make sure that no pieces of torn paper are left in the machine. A piece
of paper remaining in the machine can cause fire. If a sheet of paper is wrapped around the heat roller,
or when clearing a jammed paper that is difficult or impossible to see, do not try to remove it by yourself.
Doing so can cause injuries or burns. Switch off the machine immediately, and contact our Customer
Support Center or your dealers.
• The fuser unit, and the surrounding area are hot. You may get burnt if you touch it directly.
Following the message on the control panel, open the cover or unit, and remove the jammed paper. If the
paper is torn, check for any remaining torn pieces of paper.
When the duplex unit is installed
Cover F
Unit D
Cover A
Refer to “Near the Center Output Tray”
(P. 35) on how to remove the paper.
Refer to “Inside the Duplex Unit”
(P. 35) on how to open cover C
and the unit D and remove the
paper.
Bypass Tray
Tray 1,
Tray 2
Cover
G (Tray 1),
Cover H (Tray 2)
Cover E
Cover F
Refer to “Near the Fuser Unit”
(P. 36) on how to remove the
paper.
Cover E
When using the bypass tray, check to
make sure there is no jammed paper in
it.
Cover C
34 7 Troubleshooting
Page 35

Inside the Duplex Unit
Near the Center Output Tray
Open the Cover C
1. Pull the cover C forward by grasping the
indentation on the backside of the printer,
and then remove any jammed paper.
2. Close the cover C.
Open the Unit D
1. Push up the lever shown in the diagram and
then open the unit D. Remove the jammed
paper.
1. Open the cover A (or the unit D when the
duplex unit is installed), and then lift up the
levers on both sides (green colored part).
Important
• The fuser unit, and the surrounding area are hot. You
may get burnt if you touch it directly.
• Never touch the outer levers located on both sides of
the fuser unit (gray colored part), which are used to
remove or install the fuser unit.
IE
IE
2. Open the fuser cover by grabbing the knob
on the left side and remove any jammed
paper.
Note
• Paper can also jam near the center output tray. In this
case, refer to “Near the Center Output Tray” (P. 35).
2. Close the unit D.
3. Push down the levers on the both sides.
Close the cover A (or the unit D when the
duplex unit is installed).
When Paper Jams 35
Page 36

Near the Fuser Unit
When Inside the Printer
1. Open the cover E (or the unit D when the
duplex unit is installed), and then open the
cover F.
Important
• The fuser unit, and the surrounding area are hot. You
may get burnt if you touch it directly.
2. Open the cover A (when the duplex unit is
installed, skip this procedure).
Gets Dirty
Clean inside the printer using the cleaning rod.
Note
• It is recommended to clean inside the printer on a
regular schedule such as after replacing the black toner
cartridge.
1. Open the front cover. Pull out the lever that is
inside the printer on the right side until it
stops. The access window cover on the right
side of the printer slides open.
3. Push up the levers on both sides (green
colored parts) and remove any jammed print
media.
Important
• Never touch the outer levers located on both sides of
the fuser unit (gray colored part), which are used to
remove or install the fuser unit.
2. Hold the cleaning rod and push it in and pull
it out several times to clean inside the printer.
3. Push the cleaning rod back to its original
position until it stops and then push the lever
that was pulled at step 1 back to its original
position. The access window cover is closed.
4. Return the levers to their original positions,
and then close all covers (including the unit
D when the duplex unit is installed).
36 7 Troubleshooting
4. Close the front cover.
Page 37

Problems With the Printer
Before treating the problem as a machine breakdown, refer to the following table and check the printer
condition again.
WARNING
• Never open or remove machine covers that are secured with screws unless specifically instructed in the
manual. A high voltage component can cause electric shock.
• Do not try to alter the machine configuration, or modify any parts. An unauthorized modification can
cause smoke or fire.
Note
• Probable causes of trouble are that the printer, computer you are using, server or other hardware is not correctly set for the
network environment you are using, or a printer restriction has been exceeded. Refer to the CD-ROM Documentation
(HTML) in the CentreWare CD-ROM.
Symptom Reason/Action
No power.
Cannot print. Is the light of the <Ready> indicator off? If so, this printer is in the menu setting mode.
Is the power to the printer switched off? Press the power switch to the <|> position to
switch on the power.
Refer to
• “Switching On and Off the Power” (P. 25)
Is the power cord disconnected or not securely connected? Switch off the power to the
printer and connect the power cord to the power outlet again. Then, switch on the
printer.
Refer to
• “Connecting the Power Cord to Switch On the Printer” (P. 14)
Is the power cord connected to a power outlet with the correct voltage? Connect the
printer exclusively to a power outlet with a suitable voltage and current rating.
Press the <Menu> button to exit the menu setting mode.
Refer to
• User Guide 1.1 Main Components and Their Functions
Is there a message displayed on the control panel? Follow the message to rectify the
problem.
Refer to
• “Error Messages Displayed at the Control Panel” (P. 43)
IE
IE
Print job sent but the light of
the <Ready> indicator is not
blinking or on.
Is the interface cable disconnected? Switch off the power and check the connection of
the interface cable.
Is the interface configured? Check the port status of the interface. Make sure the
protocol settings are correctly set up on the CentreWare Internet Services.
Refer to
• User Guide 4.2 Description of Menu Items
• Online Help for the CentreWare Internet Services
Is the computer environment correctly set up? Check the computer environment, such
as the print driver.
Problems With the Printer 37
Page 38

Symptom Reason/Action
Light of <Error> indicator is on. Is there an error message displayed on the control panel? Check the displayed
message and rectify the error.
Refer to
• “Error Messages Displayed at the Control Panel” (P. 43)
Light of <Error> indicator is
blinking.
Light of the <Ready> indicator
is on and blinking but there is
no print output.
Top section of printed
document is missing.
The text is printed in different
location from what you
intended.
Strange noise. Is the printer placed on a flat location? Place the printer on a stable surface.
An error that you cannot rectify by yourself has occurred. Record the displayed error
message or error code, switch off the power, pull out the power plug from the outlet, and
then contact our Customer Support Center or your dealers.
There are jobs remaining in the printer. Cancel printing or force the remaining data to be
printed.
To forcibly print the job, press the <Eject/Set> button. To cancel the job, press the
<Cancel Job> button.
Are the paper guides set at the correct positions?
Set the paper guides to the correct positions.
Refer to
• “Loading Paper” (P. 17)
Check that the paper size on the print driver or the control panel is correctly set.
Refer to
• Online Help for the print driver
• User Guide 4.2 Description of Menu Items
Check whether the setting for margin is correct on the print driver.
Refer to
• Online Help for the print driver
Is the paper tray set correctly? Push the paper tray completely into the printer.
Condensation has occurred
inside the printer.
Are there foreign objects inside the printer? Switch off the power and remove any
foreign objects inside the printer. If the object cannot be removed unless the printer is
disassembled, contact our Customer Support Center or your dealers.
Using the control panel, set the time the printer is in the power saver mode 1 to 60
minutes, and then leave the printer switched on. The inside of the printer warms up and
the condensation evaporates. When the condensation has evaporated you can use the
printer normally.
Refer to
• User Guide 4.2 Description of Menu Items
38 7 Troubleshooting
Page 39

Symptom Reason/Action
Paper cannot be fed.
Paper jam.
Multiple sheets of paper are
fed.
Paper is fed at an angle.
Paper is wrinkled.
Is the paper correctly loaded? Load the paper correctly. For labels, transparencies, or
envelopes, fan them well first to allow air to enter between each sheet before loading.
Refer to
• “Loading Paper” (P. 17)
Is the paper damp? Replace with paper from a new ream.
Refer to
• “Loading Paper” (P. 17)
Is the correct type of paper used? Load the correct type of paper.
Refer to
• “Usable Paper” (P. 28)
Is the paper tray set correctly? Push the paper tray completely into the printer.
Is the printer placed on a flat location? Place the printer on a stable surface.
Are the paper guides set in the correct positions? Set the paper guides to the correct
positions.
Refer to
• “Loading Paper” (P. 17)
Paper are fed at more than 1 sheet at a time. Multiple feeding of paper may occur
before the sheets of paper loaded in the tray are used up. Fan the paper to be loaded
and load again. Replenish paper only when all the sheets of the loaded paper are used
up.
IE
IE
Complex or large text is not
printed normally.
The computer being used takes a long time to process the material, so a timeout occurs
when the data is being transmitted. You can avoid this problem by doing the following.
• Increase the time out vale on the printer’s control panel.
Press the <Menu> button, after the menu is displayed, increase the timeout value by
accessing [Admin Menu] > [System Settings] > [Time-out]. For example, increase the
time from 30 seconds (default) to 60 seconds.
Do the following if he printer and computer are connected through a network.
• Increase the timeout value used in the printing protocol by accessing [Properties] >
[Protocol Settings] on the CentreWare Internet Services. For example, if you are
using Port9100, set the [Time-out] for [Port9100] to 60 seconds.
Refer to
• User Guide 4.2 Description of Menu Items
• Online Help for the CentreWare Internet Services
Problems With the Printer 39
Page 40

Problems With the Print Quality
When the print quality is poor, select the closest symptom from the following table to rectify the problem.
If the print quality does not improve after carrying out the appropriate action, contact our Customer Support
Center or your dealers.
Symptom Reason/Action
Printing is light
(faded, blurred)
Color registration is out of
alignment.
The paper is damp. Replace with paper from a new ream.
Refer to
• “Loading Paper” (P. 17)
The paper used is not suitable. Load the correct type of paper.
Refer to
• “Usable Paper” (P. 28)
The drum cartridge is defective or damaged. Replace with a new drum cartridge.
Refer to
• “Installing the Drum Cartridge” (P. 16)
There is no more toner inside the cartridge. Check the amount of the toner, and prepare
a new toner cartridge if need arises.
Refer to
• Online Help for the CentreWare Internet Services
• Online Help for the SimpleMonitor
The Draft Mode feature is on. Uncheck the [Draft Mode] checkbox on the [Detailed
Settings] tab of the print driver.
Refer to
• Online Help for the print driver
The interior of the printer may be dirty. Clean the interior of the printer.
Refer to
• “When Inside the Printer Gets Dirty” (P. 36)
Black spots or streaks are
printed.
Dirt appears at equal intervals. The feed route of the paper is stained. Print a few pages to remove the stains.
The drum cartridge is defective or damaged. Replace with a new drum cartridge.
Refer to
• “Installing the Drum Cartridge” (P. 16)
The drum cartridge is defective or damaged. Replace with a new drum cartridge.
Refer to
• “Installing the Drum Cartridge” (P. 16)
40 7 Troubleshooting
Page 41

Symptom Reason/Action
White dots appear in black
filled areas.
Printed image smudges when
rubbed with your finger.
The toner is not fixed on the
paper.
Paper is smeared with toner.
The whole piece of paper is
printed black.
The paper used is not suitable. Load the correct type of paper.
Refer to
• “Usable Paper” (P. 28)
The paper is damp. Replace with paper from a new ream.
Refer to
• “Loading Paper” (P. 17)
The drum cartridge is defective or damaged. Replace with a new drum cartridge.
Refer to
• “Installing the Drum Cartridge” (P. 16)
The paper is damp. Replace with paper from a new ream.
Refer to
• “Loading Paper” (P. 17)
The paper used is not suitable. Load the correct type of paper.
Refer to
• “Usable Paper” (P. 28)
The drum cartridge is defective or damaged. Replace with a new drum cartridge.
Refer to
• “Installing the Drum Cartridge” (P. 16)
IE
IE
This may be due to breakdown of the high voltage power part. Contact our Customer
Support Center or your dealers.
Nothing is printed. Multiple sheets of paper are fed simultaneously. Fan the paper well and reload the
paper.
Refer to
• “Loading Paper” (P. 17)
The drum cartridge is defective or damaged. Replace with a new drum cartridge.
Refer to
• “Installing the Drum Cartridge” (P. 16)
The sealing tape is still on the toner cartridge or the toner cartridge is not correctly
inserted into the printer. Insert the toner cartridge correctly.
Refer to
• “Installing the Toner Cartridge” (P. 14)
Spots of missing text This may be due to breakdown of the high voltage power part. Contact our Customer
Support Center or your dealers.
The paper is damp. Replace with paper from a new ream.
Refer to
• “Loading Paper” (P. 17)
The paper used is not suitable. Load the correct type of paper.
Refer to
• “Usable Paper” (P. 28)
Problems With the Print Quality 41
Page 42

Symptom Reason/Action
Text is blurred. The paper used is not suitable. Load the correct type of paper.
Refer to
• “Usable Paper” (P. 28)
The paper is damp. Replace with paper from a new ream.
Refer to
• “Loading Paper” (P. 17)
Condensation may have occurred inside the printer. Using the control panel, set the
time the printer is in the power saver mode 1 to 60 minutes, and then leave the printer
switched on. The inside of the printer warms up and the condensation evaporates.
When the condensation has evaporated you can use the printer normally.
Refer to
• User Guide 4.2 Description of Menu Items
Missing characters throughout
the length of the paper
Text or images are printed at
an angle.
Transparencies and envelopes
are not printed clearly.
The drum cartridge is not set correctly. Load the drum cartridge correctly.
Refer to
• “Installing the Drum Cartridge” (P. 16)
The drum cartridge is defective or damaged. Replace with a new drum cartridge.
Refer to
• “Installing the Drum Cartridge” (P. 16)
The paper guides are not set in the correct positions. Set the paper guides in the correct
positions.
Refer to
• “Loading Paper” (P. 17)
The type of transparency or envelope loaded cannot be used in this printer. Load the
correct type of paper.
Refer to
• “Usable Paper” (P. 28)
Check that the paper type on the print driver or the control panel is correctly set.
Refer to
• User Guide 4.2 Description of Menu Items
• Online Help for the print driver
The Draft Mode feature is turned on and the resolution is set at a low level on the print
driver. Change the settings on the [Detailed Settings] tab of the print driver.
42 7 Troubleshooting
Page 43

Error Messages Displayed at the Control Panel
If an error message is displayed at the control panel, follow the instruction to fix the error. Depending on the
message content, follow the instructions in the Reference column below to fix the error.
Message content Reference
Paper jam or “Clear jam”, “Clear Area” is
displayed.
Installing and replacing the drum cartridge or toner
cartridge
Loading paper “Loading Paper” (P. 17), “Loading Envelopes” (P. 31)
“When Paper Jams” (P. 34)
Procedures described on the consumables packaging box or
“Installing the Toner Cartridge” (P. 14), “Installing the Drum
Cartridge” (P. 16), “Replacing the Consumables” (P. 45)
The following describes error messages other than the above that may be difficult to understand or remedy.
For details on messages not described here, refer to the User Guide 5.5 Message List.
Message Condition/Reason/Action
xxx-xxx
Reboot printer
XXXX
Replace soon
Contact our Customer Support Center or your dealers if the same message appears
again, even though you switched the printer off and on again. Depending on the
displayed error code (xxx-xxx) confirm the following.
• 004-310: 250 sheet feeder or 500 sheet feeder (optional) is not installed into this
printer correctly. Reinstall the feeder.
• 004-311: Duplex unit (optional) is not installed into this printer correctly. Reinstall
the duplex unit.
• 010-397: Confirm that the gray outer levers on both sides of the fuser unit are
securely locked.
• 016-316: Additional memory (optional) is not inserted correctly. Make sure the
additional memory is securely inserted to the correct slot.
The drum cartridge or toner cartridge is nearly empty. Prepare a new XXXX (drum
cartridge or toner cartridge) so that you can replace it when the message to replace it
is displayed. You can still print about another 1,000 pages for toner cartridge 4K,
about 750 pages for toner cartridge 1.5K, or about 1,400 pages for the drum
cartridge even when this message is displayed*.
IE
IE
XXXX
Check paper
XXXX
Error 009-xxx
Replace xxx-xxx The printer parts need to be replaced. Contact our Customer Support Center or your
Load correct
paper in tray
Paper Tray
Config Error
Remove Drum
Cartridge
*The possible number of pages that can be printed differs according to factors such as the print contents, paper size,
paper type, environment used, and the frequency that the printer is switched on and off. For details, refer to the User
Guide A.3 Life of Consumables and Regular Replacement Parts.
Inappropriate paper is loaded in specified XXXX (the bypass tray, tray 1, or tray 2).
Load the appropriate paper.
An unsupported XXXX (toner cartridge or drum cartridge) is installed.
Replace the XXXX.
dealer and explain to them the contents of the “xxx-xxx.”
Unsupported transparencies may have been loaded. Load the appropriate
transparencies.
Configuration of the trays is incorrect. Install the 250 sheet feeder above the 500
sheet feeder when you install the two levels of the optional trays.
When you install the printer for the first time, install the toner cartridge first and then
install the drum cartridge. Remove the drum cartridge once and then install the toner
cartridge. After that install the drum cartridge.
Error Messages Displayed at the Control Panel 43
Page 44

AAppendix
Optional Accessories and Consumables
The main optional accessories and consumables
are as follows. Contact our Customer Support
Center or your dealers to order these.
Optional Accessories
Product name
128MB Memory
256MB Memory
512MB Memory
The additional memory may be necessary when
you print color documents that have a large
amount of data, such as complicated graphics.
250 Sheet Feeder EL300459
Paper tray that can be loaded up to 250 sheets of
FX P paper.
Load directly beneath the printer as tray 1.
500 Sheet Feeder EL300460
Paper tray that can be loaded up to 500 sheets of
FX P paper.
Load directly beneath the printer as tray 1 or below
the 250 sheet feeder as tray 2.
Product
code
E3300053
E3300061
EL300452
Consumables
Important
• The high print quality and the high speed printing of this
printer are designed to be most stabilized when genuine
toner cartridges are used. Using the consumables
whose specifications differ from genuine consumables
may cause degradation of printer performance. Also,
repairs that result from using consumables that are not
recommended may not be covered by warranty. When
using recommended consumables, you can receive full
support in case the printer needs repairs. It is
recommended to use genuine toner cartridges to get the
proper printer performance.
Note
• The black toner cartridge 4K is bundled with this printer
at the time of purchase. The cyan, magenta, yellow
toner cartridge 1.5K are bundled with this printer at the
time of purchase.
Types of consumables
Toner cartridge 4K
(Yellow)
Toner cartridge 4K
(Magenta)
Toner cartridge 4K
(Cyan)
Toner cartridge 4K
(Black)
Product
code
CT200652 1 unit per
CT200651 1 unit per
CT200650 1 unit per
CT200649 1 unit per
Form
box
box
box
box
Duplex Unit EL300461
Can handle 2 sided printing. The additional
memory may also be essential to enable 2 sided
printing depending on the paper size to be printed.
Network Expansion Card EL300462
You can use NetWare, SMB, or IPP network
environments as well as the standard network
environment.
*The product types and codes are effective from
January 2005.
Drum cartridge
(Including cleaning pad)
CT350390 1 unit per
box
Handling Consumables
• Do not store the consumables with the
packaging box standing.
• Before using the consumables/maintenance
products, do not open the packaging and avoid
storing them in the following locations:
• Locations with high temperature and humidity
• Locations near open flame
• Locations with direct exposure to sunlight
• Dusty locations
• Read the handling instructions on the
packaging box or container carefully before
using the consumables.
• It is recommended to keep some spares of the
consumables.
44 A Appendix
Page 45

Replacing the Consumables
How to Obtain Product
For details on the replacement procedure for the
consumables, refer to the procedure listed in the
packaging of each consumable or the User Guide
6.1 Replacing Consumables.
If the toner cartridge that must be replaced is not
in the front of the printer, follow the procedure
below.
1. Press the <Menu> button to display the
Menu screen.
2. Press the < > or < > button until [Replace
Toner] is displayed, then press the < > or
<Eject/Set> button.
3. Press < > or < > until the color of toner to
replace appears, and press the < > or
<Eject/Set> button.
The toner cartridge carrier rotates.
4. When the specified toner cartridge is moved
to the front of the printer, “Ready to replace”
message is displayed.
Regular Replacement Parts
The regular replacement parts are as follows.
Product name
Maintenance kit A EL300472 Kit A includes the
Maintenance kit B EL300473 Kit B includes the
Maintenance kit C
(220 V)
Maintenance kit C
(110 V)
Product
code
EL300475 Kit C includes the
EL300474
Reference
Deve Assy Y, M and
C.
Deve Assy K.
Fuser unit and BTR
Unit Assy.
Information
Latest Print Driver
You can download the latest print driver from our
company’s web site.
Note
• Please take note that the communication cost will be
borne by the customers.
1. Click [About] on the [Detailed Settings] tab of
the printer properties dialog box.
2. Click [Fuji Xerox Web Site]. The web
browser will be activated and the web site
displayed.
3. Following the instruction, download the
corresponding print driver.
Note
• By using the CentreWare CD-ROM bundled with this
printer you can also refer to our company’s web site.
Click [Fuji Xerox Web Site] on the screen that is
displayed when the CD-ROM is inserted.
• The address (URL) of the download service page of our
company is as follows:
http://www.fxprinters.com/
• For details on the latest print driver features, refer to the
Online Help for the print driver.
Upgrading the Firmware Version of This Printer
Our company provides the tool to upgrade the
version of the software built into this printer
(known as firmware) from the computer.
The latest firmware and upgrade utility can be
obtained from the web site address (URL) listed
below.
Download the corresponding firmware by
following the instructions on the displayed web
site.
http://www.fxprinters.com/
IE
IE
Note
• Please take note that the communication cost will be
borne by the customers.
How to Obtain Product Information 45
Page 46

Index
Symbols, Numerics
< > < > < > < > buttons . . . . . . . . . . . . . 32
128MB Memory . . . . . . . . . . . . . . . . . . . . . . . 44
2 Sided Print . . . . . . . . . . . . . . . . . . . . . . . . . . . 4
250 Sheet Feeder. . . . . . . . . . . . . . . . . . . . . . 44
256MB Memory . . . . . . . . . . . . . . . . . . . . . . . 44
500 Sheet Feeder. . . . . . . . . . . . . . . . . . . . . . 44
512MB Memory . . . . . . . . . . . . . . . . . . . . . . . 44
A
Additional memory . . . . . . . . . . . . . . . . . . 13, 44
B
Booklet Creation . . . . . . . . . . . . . . . . . . . . . . . . 4
C
<Cancel Job> button . . . . . . . . . . . . . . . . . . . 26
Canceling Printing . . . . . . . . . . . . . . . . . . . . . 26
CentreWare Internet Services . . . . . . . . . . . . 23
Items That Can Be Set . . . . . . . . . . . . . . . . 23
Setting Printer . . . . . . . . . . . . . . . . . . . . . . . 22
Using Online Help . . . . . . . . . . . . . . . . . . . . 23
Checking/Managing the Printer Status on a
Computer . . . . . . . . . . . . . . . . . . . . . . . . . . . . . 4
Cleaning inside the printer . . . . . . . . . . . . . . . 36
Connecting Interface Cable . . . . . . . . . . . . . . 16
Connecting the Power Cord . . . . . . . . . . . . . . 14
Consumables . . . . . . . . . . . . . . . . . . . . . . . . . 44
Control panel . . . . . . . . . . . . . . . . . . . . . . . . . 32
Cover A. . . . . . . . . . . . . . . . . . . . . . . . . . . . . . 34
Cover C . . . . . . . . . . . . . . . . . . . . . . . . . . . . . 34
Cover E. . . . . . . . . . . . . . . . . . . . . . . . . . . . . . 34
Cover F. . . . . . . . . . . . . . . . . . . . . . . . . . . . . . 34
Cover G (Tray 1). . . . . . . . . . . . . . . . . . . . . . . 34
Cover H (Tray 2). . . . . . . . . . . . . . . . . . . . . . . 34
D
Drum Cartridge
Installing the Drum Cartridge . . . . . . . . . . . 16
Product code. . . . . . . . . . . . . . . . . . . . . . . . 44
Duplex unit . . . . . . . . . . . . . . . . . . . . . . . . . . . 44
E
<Eject/Set> button . . . . . . . . . . . . . . . . . . . . . 32
Error messages . . . . . . . . . . . . . . . . . . . . . . . 43
Extension output tray . . . . . . . . . . . . . . . . . . . 18
F
Favorites. . . . . . . . . . . . . . . . . . . . . . . . . . . . . . 4
G
Gateway Address . . . . . . . . . . . . . . . . . . . . . . 22
I
Image Types . . . . . . . . . . . . . . . . . . . . . . . . . . . 4
Installation location . . . . . . . . . . . . . . . . . . . . . 12
Installing the Additional Memory. . . . . . . . . . . 13
Installing the Drum Cartridge . . . . . . . . . . . . . 16
Installing the Network Expansion Card. . . . . . 13
Installing the Optional Accessories. . . . . . . . . 12
Installing the Print Driver. . . . . . . . . . . . . . . . . 24
Installing the Toner Cartridge . . . . . . . . . . . . . 14
IP address. . . . . . . . . . . . . . . . . . . . . . . . . . . . 21
IP Filter . . . . . . . . . . . . . . . . . . . . . . . . . . . . . . . 4
IPP . . . . . . . . . . . . . . . . . . . . . . . . . . . . . . . . . 20
IPX/SPX . . . . . . . . . . . . . . . . . . . . . . . . . . . . . 20
L
Loading Paper . . . . . . . . . . . . . . . . . . . . . . . . 17
Envelopes . . . . . . . . . . . . . . . . . . . . . . . . . . 31
In Paper Trays (Optional) . . . . . . . . . . . . . . 18
In the Bypass Tray . . . . . . . . . . . . . . . . . . . 17
LPD. . . . . . . . . . . . . . . . . . . . . . . . . . . . . . . . . 20
M
Maintenance kit. . . . . . . . . . . . . . . . . . . . . . . . 45
Menu Items on the Control Panel . . . . . . . . . . 32
<Menu> button . . . . . . . . . . . . . . . . . . . . . . . . 32
Multiple Up . . . . . . . . . . . . . . . . . . . . . . . . . . . . 4
N
NetBEUI . . . . . . . . . . . . . . . . . . . . . . . . . . . . . 20
NetWare . . . . . . . . . . . . . . . . . . . . . . . . . . . . . 20
Network Expansion Card . . . . . . . . . . 13, 20, 44
O
Online Help (CentreWare Internet Services) . 23
Online Help (print driver). . . . . . . . . . . . . . . . . 27
Optional Accessories . . . . . . . . . . . . . . . . 12, 44
[Options] tab . . . . . . . . . . . . . . . . . . . . . . . . . . 24
P
Package contents . . . . . . . . . . . . . . . . . . . . . . 12
[Panel Settings]. . . . . . . . . . . . . . . . . . . . . . . . 19
Paper . . . . . . . . . . . . . . . . . . . . . . . . . . . . . . . 28
Compatible for 2 sided printing . . . . . . . . . . 29
Unusable paper. . . . . . . . . . . . . . . . . . . . . . 30
Usable paper. . . . . . . . . . . . . . . . . . . . . . . . 28
Paper Jams. . . . . . . . . . . . . . . . . . . . . . . . . . . 34
Parallel . . . . . . . . . . . . . . . . . . . . . . . . . . . . . . 20
Port . . . . . . . . . . . . . . . . . . . . . . . . . . . . . . . . . 20
IPP . . . . . . . . . . . . . . . . . . . . . . . . . . . . . . . 20
LPD . . . . . . . . . . . . . . . . . . . . . . . . . . . . . . . 20
NetWare . . . . . . . . . . . . . . . . . . . . . . . . . . . 20
Parallel . . . . . . . . . . . . . . . . . . . . . . . . . . . . 20
Port9100 . . . . . . . . . . . . . . . . . . . . . . . . . . . 20
SMB . . . . . . . . . . . . . . . . . . . . . . . . . . . . . . 20
46 Index
Page 47

USB. . . . . . . . . . . . . . . . . . . . . . . . . . . . . . . 20
Port9100 . . . . . . . . . . . . . . . . . . . . . . . . . . . . . 20
Poster . . . . . . . . . . . . . . . . . . . . . . . . . . . . . . . . 4
Power Saver Modes . . . . . . . . . . . . . . . . . . . . 25
<Power Saver> indicator/botton . . . . . . . . . . . 25
Print Driver
Installing . . . . . . . . . . . . . . . . . . . . . . . . . . . 24
Latest Print Driver . . . . . . . . . . . . . . . . . . . . 45
to display Online Help . . . . . . . . . . . . . . . . . 27
Uninstalling . . . . . . . . . . . . . . . . . . . . . . . . . 24
[Printer Settings] . . . . . . . . . . . . . . . . . . . . . . . 19
Printing . . . . . . . . . . . . . . . . . . . . . . . . . . . . . . 27
Printing on special media . . . . . . . . . . . . . . . . . 4
Printing Reports/Lists . . . . . . . . . . . . . . . . . . . 19
Problems With the Print Quality . . . . . . . . . . . 40
Problems With the Printer. . . . . . . . . . . . . . . . 37
To forcibly print the job . . . . . . . . . . . . . . . . 38
Product information . . . . . . . . . . . . . . . . . . . . 45
Protocol . . . . . . . . . . . . . . . . . . . . . . . . . . . . . 20
IPX/SPX . . . . . . . . . . . . . . . . . . . . . . . . . . . 20
NetBEUI . . . . . . . . . . . . . . . . . . . . . . . . . . . 20
TCP/IP . . . . . . . . . . . . . . . . . . . . . . . . . . . . 20
R
Regular Replacement Parts . . . . . . . . . . . . . . 45
Replacing the Consumables. . . . . . . . . . . . . . 45
Report/List . . . . . . . . . . . . . . . . . . . . . . . . . . . 19
U
Unit D . . . . . . . . . . . . . . . . . . . . . . . . . . . . . . . 34
Unpacking the printer . . . . . . . . . . . . . . . . . . . 12
Updating
Firmware Version . . . . . . . . . . . . . . . . . . . . 45
Print Driver . . . . . . . . . . . . . . . . . . . . . . . . . 45
USB . . . . . . . . . . . . . . . . . . . . . . . . . . . . . . . . 20
W
Watermarks . . . . . . . . . . . . . . . . . . . . . . . . . . . 4
IE
IE
S
Safety Notes . . . . . . . . . . . . . . . . . . . . . . . . . . . 8
For Consumables . . . . . . . . . . . . . . . . . . . . 11
For Installation & Relocation . . . . . . . . . . . . . 8
For Machine Operation . . . . . . . . . . . . . . . . 10
For Power & Earth Connection . . . . . . . . . . . 9
Setting Configuration of Optional Accessories and
Paper . . . . . . . . . . . . . . . . . . . . . . . . . . . . . . . 24
Setting IP Address . . . . . . . . . . . . . . . . . . . . . 21
Setting Subnet Mask/Gateway Address . . . . . 22
SimpleMonitor. . . . . . . . . . . . . . . . . . . . . . . . . 24
SMB . . . . . . . . . . . . . . . . . . . . . . . . . . . . . . . . 20
Special media . . . . . . . . . . . . . . . . . . . . . . . . . 30
StatusMessenger . . . . . . . . . . . . . . . . . . . . . . . 4
Subnet Mask. . . . . . . . . . . . . . . . . . . . . . . . . . 22
Supported OS and Environment. . . . . . . . . . . 20
Supported paper. . . . . . . . . . . . . . . . . . . . . . . 29
Switching Off the Power . . . . . . . . . . . . . . . . . 25
Switching On the Power . . . . . . . . . . . . . . . . . 25
T
TCP/IP . . . . . . . . . . . . . . . . . . . . . . . . . . . . . . 20
Toner Cartridge
Installing the Toner Cartridge . . . . . . . . . . . 14
Product code. . . . . . . . . . . . . . . . . . . . . . . . 44
Replacing the Consumables . . . . . . . . . . . . 45
Transparency Separators . . . . . . . . . . . . . . . . . 4
[Tray Settings] . . . . . . . . . . . . . . . . . . . . . . . . 31
Troubleshooting . . . . . . . . . . . . . . . . . . . . . . . 34
Types of Manuals . . . . . . . . . . . . . . . . . . . . . . . 5
Index 47
Page 48

Page 49

DocuPrint C525 A Setup and Quick Reference Guide
Human Interface Design Development
Fuji Xerox Co., Ltd.
Copyright
DE3350Z4-1 (Edition 1)
©
2005 by Fuji Xerox Co., Ltd.
 Loading...