

Page 1

DocuPrint C2535 A
User Guide
Page 2

Adobe, the Adobe logo, Acrobat, Acrobat Reader, PostScript, PostScript 3 and the PostScript logo are trademarks
of Adobe Systems Incorporated.
Microsoft, Windows, Windows NT, Windows Server are either registered trademarks or trademarks of Microsoft
Corporation in the United States and/or other countries.
Permission has been obtained from Microsoft Corporation for use of software screen shots.
Macintosh, Mac OS and TrueType are trademarks of Apple Computer, Inc., registered in the U.S. and other
countries.
All product/brand names are trademarks or registered trademarks of the respective holders.
As a member of the International Energy Star Program, Fuji Xerox confirms this product
satisfies the requirements for International Energy Star Program standards.
Fuji Xerox shares the global concern about environmental conservation and has integrated that concern
in its business activities—from research and development to disposal. We have implemented a number
of programs to lessen the burden on the environment. For example, we have totally eliminated ozonedepleting chlorofluorocarbons from our manufacturing facilities.
We are committed to leadership in the conservation of resources by reusing and recycling post-consumer
waste material such as paper, cartridges, and parts from our customer’s copiers and printers. Along with
our efforts to make environmental values a part of the Fuji Xerox culture, DocuPrint C2535 A adopts
recycled components that satisfy our strict quality standards.
This printer does not use secondary batteries.
It may be a legal offence to print currency notes, certificates of stocks and securities, or any other
documents of a similar nature, regardless of whether they will be used.
Important
c This manual may not be reproduced in any form, whole or part without the prior written consent of Fuji Xerox.
d Fuji Xerox reserves the right to change the contents of this manual at any time without notice.
e Please contact Fuji Xerox if you find any errors, irregularities, or missing pages in this manual.
f This machine may not be used in any other way than as described in this manual. Misuse of this machine
could result in damage or even cause accidents. Fuji Xerox is not liable for any problems arising from
unauthorized use of this equipment.
Xerox, The Document Company and the stylized X are registered trademarks of Xerox Corporation.
All Xerox and Fuji Xerox product names are either registered trademarks or trademarks of Xerox Corporation and
Fuji Xerox Co., Ltd.
Page 3

Preface
Thank you for choosing this printer. This is a guide on operating this printer and the
important points to note. To understand the features fully and to use the machine correctly
and effectively, please read this guide before using it.
Keep this guide handy for a quick reference on using the machine. The illustrations used in
this guide are based on DocuPrint C2535 A.
This guide is written with the assumption that you are familiar with the basic knowledge and
way of operating your computer environment and the network environment.
In this manual, safety instructions are preceded by the symbol . Always read and follow the instructions
before performing the required procedures.
This product is a “Class I Laser System” that does not emit dangerous laser radiation. Operate the
machine according to the instructions in the manual. Do not carry out any operation not mentioned in the
manual. Doing so may lead to unforeseen accidents or malfunctions.
Preface 3
Page 4
Types of Manuals
Setup Guide Explains the way of installation of this printer.
Quick Reference Guide Explains the way of setting, loading paper, and troubleshooting of this
User Guide (PDF)
(This manual)
Documentation in the
CentreWare CD-ROM (HTML)
The Online Help for the
CentreWare Internet Services
The Online Help for the print
driver
Installation Guide Explains the installation procedure of each optional accessory.
printer.
For more information, refer to “Contents of the Quick Reference Guide
(Reference)”.
Explains printer settings, and describes control panel menu items and
daily care in detail.
This PDF file is included in the CentreWare CD-ROM.
Explains how to set the printer environment and how to install the print
driver and our company software.
Explains how to set the items and features of CentreWare Internet
Services.
Explains how to set the items and features of the print driver.
This manual is provided with each optional product.
4 Types of Manuals
Page 5

Using This Guide
Organization
The following is a summary of each chapter.
1 Basic Operations This chapter explains the parts’ names and their functions and basic
2 Printing This chapter explains basic printing operations, how to cancel printing,
3 About Paper This chapter explains compatible paper and how to load paper into the
4 Setting on the Control Panel This chapter explains items that can be set on the control panel and
5 Troubleshooting This chapter explains procedures for dealing with paper jams or error
6 Daily Care This chapter explains any necessary maintenance procedures, such
A Appendix This chapter provides information about the consumables and options
operations.
and how to print on the special media or custom size paper.
printer.
the setting procedure.
messages.
Also, this chapter describes solutions to any problems that might occur
when using the printer.
as replacing consumables, cleaning, and moving the printer.
Also, this chapter explains how to check the printer status on the
computer and about the tool to set the printer settings on a computer.
used with the printer, lifespan of the consumables, and also describes
how to get the product information.
Conventions
1. In this guide, “computer” refers to both the personal computer and workstation.
2. The following icons are used in this guide:
3. The following conventions are used in this guide:
Important Indicates important information which you should read.
Note Indicates additional information on operations or features.
Refer to Indicates reference sources.
Refer to “xxx” : The cross-reference is within this guide.
Refer to xxx : The cross-reference is not within this guide.
[ ] : Indicates items displayed on the computer and the printer control
panel. Also indicates the title of printed reports/lists from the
printer.
< > : Indicates items such as hard buttons and indicators on the
keyboard and printer.
Using This Guide 5
Page 6

Contents
Preface.............................................................................................................. 3
Types of Manuals.............................................................................................. 4
Using This Guide .............................................................................................. 5
Contents............................................................................................................ 6
Contents of the Quick Reference Guide (Reference) ....................................... 9
The Objective of the International Energy Star Program ................................ 10
Illegal Copies and Printouts ............................................................................ 11
1 Basic Operations ...................................................................................... 12
1.1 Main Components and Their Functions................................................................. 12
1.2 Switching On and Off the Printer ........................................................................... 16
1.3 Power Saver Modes .............................................................................................. 17
1.4 Canceling/Checking Printing ................................................................................. 18
1.5 Displaying Optional Accessory Configuration and Paper Tray Settings ................ 20
Main Body .............................................................................................................. 12
Control Panel .........................................................................................................14
Display ...................................................................................................................15
Switching On the Power ........................................................................................ 16
Switching Off the Power ........................................................................................ 16
Canceling Printing .................................................................................................18
Checking Status of Print Data ............................................................................... 19
For Windows .......................................................................................................... 20
For Macintosh ........................................................................................................21
2 Printing ..................................................................................................... 22
2.1 Printing From the Computer .................................................................................. 22
2.2 Printing on Envelopes/Transparencies.................................................................. 24
Loading Envelopes/Transparencies ...................................................................... 24
Printing on Envelopes/Transparencies .................................................................. 25
2.3 Printing on Custom Size Paper/Long Paper.......................................................... 27
Setting Custom Paper Sizes .................................................................................. 27
Printing on Custom Size Paper ............................................................................. 28
2.4 Printing Confidential Document - Secure Print ...................................................... 30
About Secure Print ................................................................................................30
Configuring Secure Print ....................................................................................... 30
2.5 Print After Checking Printing Result - Sample Print .............................................. 33
About Sample Print ................................................................................................ 33
Configuring Sample Print ....................................................................................... 33
3 About Paper ............................................................................................. 36
3.1 About Paper........................................................................................................... 36
Usable Paper .........................................................................................................36
Unusable Paper ..................................................................................................... 38
Storing and Handling Paper .................................................................................. 39
3.2 Loading Paper ....................................................................................................... 40
Loading Paper in the Paper Tray ........................................................................... 40
Loading Paper in the Bypass Tray ........................................................................ 41
Loading Envelopes in the Bypass Tray ................................................................. 43
6 Contents
Page 7

3.3 Setting Paper Types and Sizes ............................................................................. 43
Setting Paper Trays ............................................................................................... 43
4 Setting on the Control Panel .................................................................... 45
4.1 Overview of the Menu............................................................................................ 45
Menu Configuration ............................................................................................... 45
Changing Menu Settings .......................................................................................46
4.2 Description of Menu Items..................................................................................... 48
Tray Settings ......................................................................................................... 48
Report/List ............................................................................................................. 49
Billing Meter ........................................................................................................... 49
Admin Menu .......................................................................................................... 50
4.3 Menu List ............................................................................................................... 57
5 Troubleshooting........................................................................................ 60
5.1 When Paper Jams ................................................................................................. 60
5.2 Problems With the Printer...................................................................................... 68
5.3 Problems With the Print Quality............................................................................. 70
5.4 Error Messages ..................................................................................................... 73
Messages About Consumables .............................................................................73
Messages About the Printer and Other Items (In Alphabetical Order) ..................74
5.5 Network Related Troubles ..................................................................................... 76
When Using CentreWare Internet Services ........................................................... 76
When Using the StatusMessenger Function ......................................................... 77
6 Daily Care................................................................................................. 78
6.1 Replacing Consumables........................................................................................ 78
Recycling Used Consumables ............................................................................... 78
Replacing the Toner Cartridges ............................................................................. 78
Replacing the Drum Cartridge ............................................................................... 81
Replacing the Transfer Roll Cartridge ................................................................... 84
6.2 Printing Reports/Lists ............................................................................................ 86
Types of Reports/Lists ...........................................................................................86
Printing Reports/Lists ............................................................................................ 86
6.3 Checking / Managing the Printer Status on a Web Browser ................................. 87
Settings for CentreWare Internet Services ............................................................87
Procedure .............................................................................................................. 88
IP Filter Feature via CentreWare Internet Services ............................................... 90
6.4 Checking Printer Status via SimpleMonitor ........................................................... 92
6.5 Checking Printer Status via E-mail ........................................................................ 93
Settings for StatusMessenger Feature ..................................................................93
Checking the Printer Status via E-mail .................................................................. 94
6.6 Checking Printed Pages ........................................................................................ 96
Checking Total Printed Pages on Meter ................................................................ 96
Checking Total Printed Pages for Each Paper Size ..............................................96
6.7 Cleaning the Printer............................................................................................... 97
Cleaning the Density Sensor .................................................................................97
Cleaning the Drum Cartridge ................................................................................. 99
6.8 Adjusting the Transfer Voltage ............................................................................ 101
6.9 Adjusting the Fuser Temperature ........................................................................ 102
6.10 When Moving the Printer ..................................................................................... 102
Contents 7
Page 8

A Appendix ................................................................................................ 105
A.1 Specifications ...................................................................................................... 105
Product Specifications ......................................................................................... 105
Printable Area ...................................................................................................... 107
A.2 Optional Accessories and Consumables............................................................. 108
Optional Accessories ...........................................................................................108
Consumables ....................................................................................................... 109
A.3 Life of Consumables and Regular Replacement Parts........................................ 110
A.4 How to Obtain Product Information ..................................................................... 111
Latest Print Driver ................................................................................................111
Upgrading the Firmware Version of This Printer .................................................111
A.5 Glossary .............................................................................................................. 112
Index ............................................................................................................. 116
8 Contents
Page 9

Contents of the Quick Reference Guide (Reference)
Preface
Features in Brief
Types of Manuals
Conventions
Contents
Contents of the User Guide (Reference)
Safety Notes
1 Adjusting Color Registration..................................................................... 12
Printing the Color Registration Correction Chart
Determining Values
Entering Values
2 Setting the Printer Environment ............................................................... 14
Supported Environment
Setting IP Address
Setting Printer Configurations via CentreWare Internet Services
Installing the Print Driver
3 Basic Operations ...................................................................................... 31
Switching On and Off the Power
Power Saver Modes
Printing From the Computer
Canceling Printing
4 About Paper ............................................................................................. 34
About Paper
Loading Paper
5 List of Menu Items on the Control Panel .................................................. 40
6 Troubleshooting........................................................................................ 43
When Paper Jams
Problems With the Printer
Problems With the Print Quality
Error Messages
A Appendix .................................................................................................. 59
Optional Accessories and Consumables
Life of Consumables
How to Obtain Product Information
Index
Contents of the Quick Reference Guide (Reference) 9
Page 10

The Objective of the International Energy Star Program
To protect the global environment and conserve energy sources, the International Energy
Star Program encourages the following product features. Fuji Xerox confirms DocuPrint
C2535 A satisfies the requirements for this program.
Power Saver Mode Feature
This product has a power-saving feature, which switches the machine to the power saver
mode automatically if the machine is on and not operated for a certain period of time. In this
mode the machine stops power to the fuser and saves the power consumption. The default
power saver mode 1 start time is set at 3 minutes.
You can set the power saver mode 1 start time between 1 and 60 minutes in 1 minute
intervals. For details on how to set the time, refer to “System Settings” (P. 52).
Note
• The power saver mode 2 feature in this machine saves further power consumption than the power saver
mode 1.
10 The Objective of the International Energy Star Program
Page 11

Illegal Copies and Printouts
Copying or printing certain documents may be illegal in your country. Penalties of fines
or imprisonment may be imposed on those found guilty. The following are examples of
items that may be illegal to copy or print in your country.
Currency
Banknotes and checks
Bank and government bonds and securities
Passports and identification cards
Copyright material or trademarks without the consent of the owner
Postage stamps and other negotiable instruments
This list is not inclusive and no liability is assumed for either its completeness or
accuracy. In case of doubt, contact your legal counsel.
Illegal Copies and Printouts 11
Page 12
1 Basic Operations
1
1.1 Main Components and Their Functions
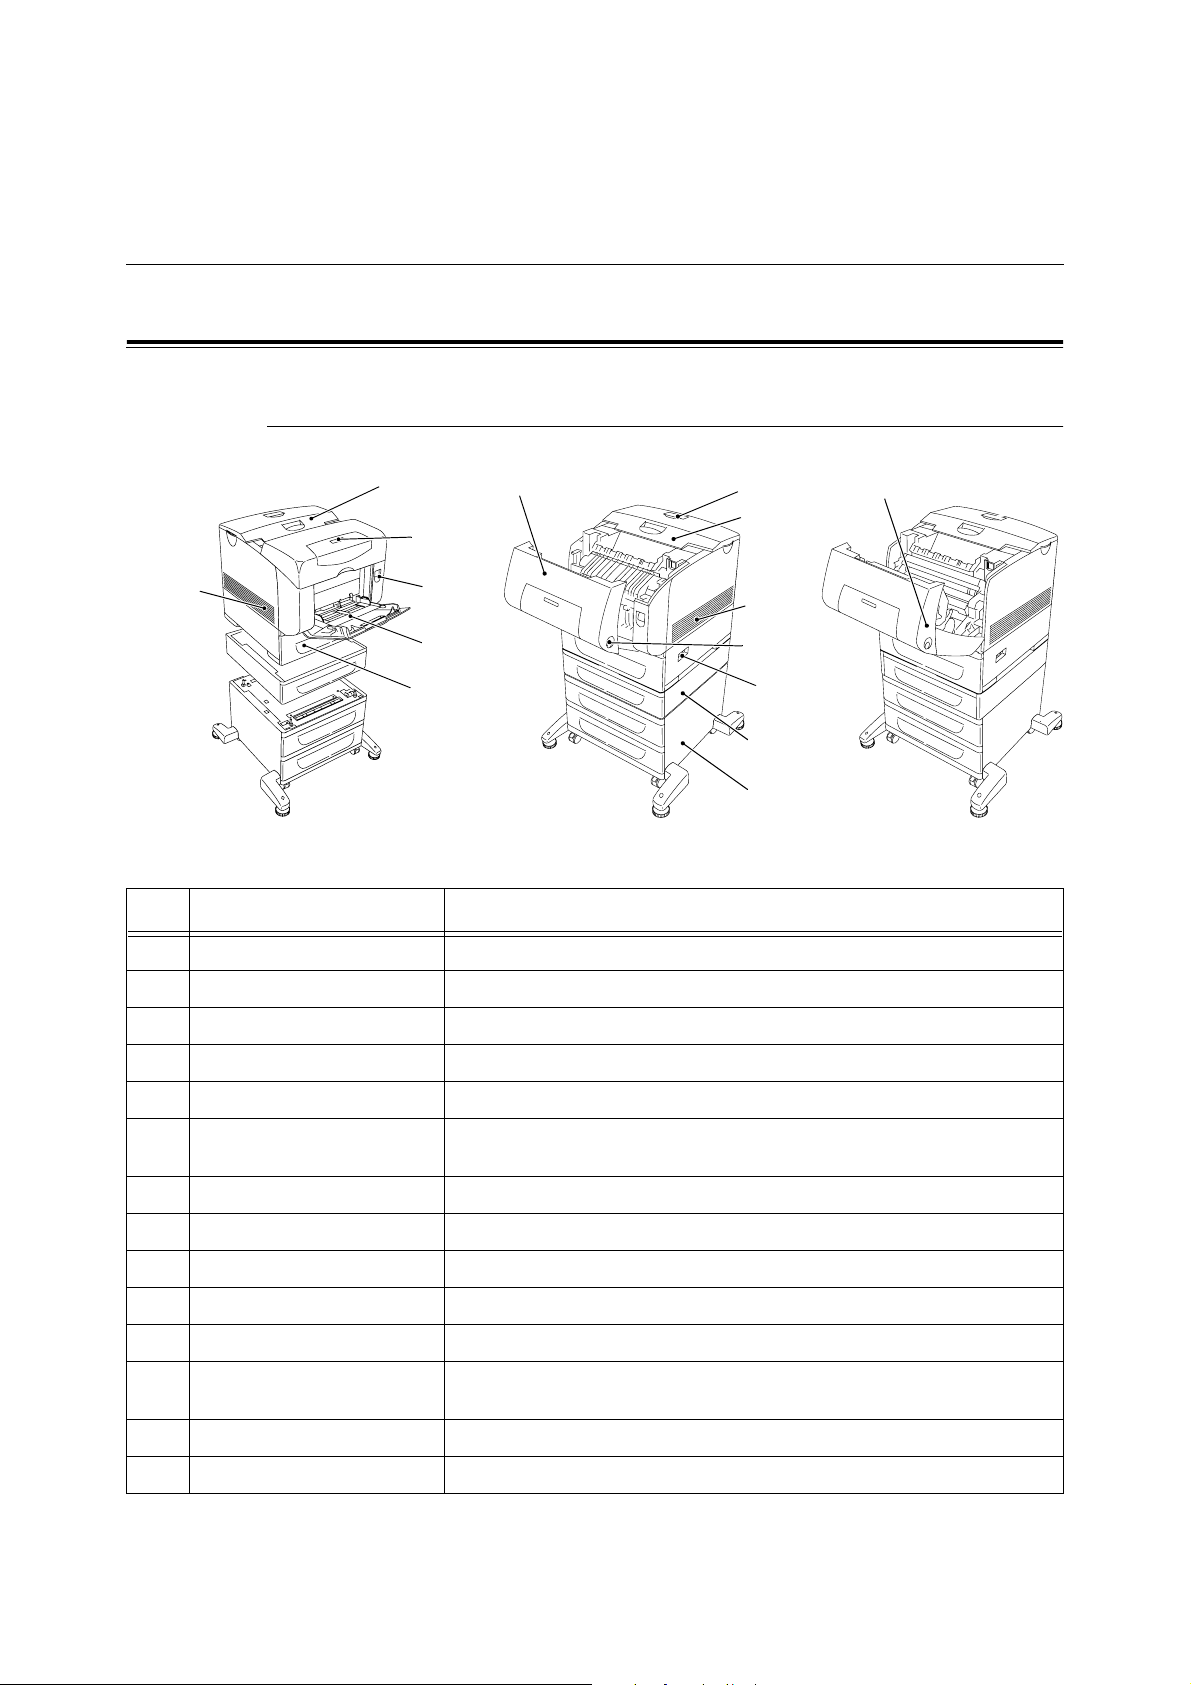
Main Body
Front View
10
7
2
3
4
5
8
9
10
11
12
13
14
No. Name Description
1 Output tray Print jobs are output with the printed side facing down.
2 Control panel Consists of operation buttons, indicators, and the display.
3 Button A Push up this button when opening the front cover A.
4 Bypass tray Load paper here.
6
5 Paper tray Load paper here.
6 Front cover A Open this when replacing the drum cartridge and removing jammed paper.
Push up the button A to open this cover.
7 Front cover B Open this when removing jammed paper. Press the button B to open this cover.
8 Paper stopper Raise this when printing on paper larger than A4 size.
9 Top cover Open this when replacing the toner cartridges.
10 Ventilation hole Releases heat to prevent the interior of the printer from heating up.
11 Button B Press this button when opening the upper part of the front cover B.
12 Power switch Switches the power of the printer on and off. Pushing the switch to the <I> side
13 Optional 550 Sheet Feeder Load paper here.
14 Optional 1100 Sheet Feeder Load paper here.
12 1 Basic Operations
switches it on and pushing it to the <{> side switches it off.
Page 13
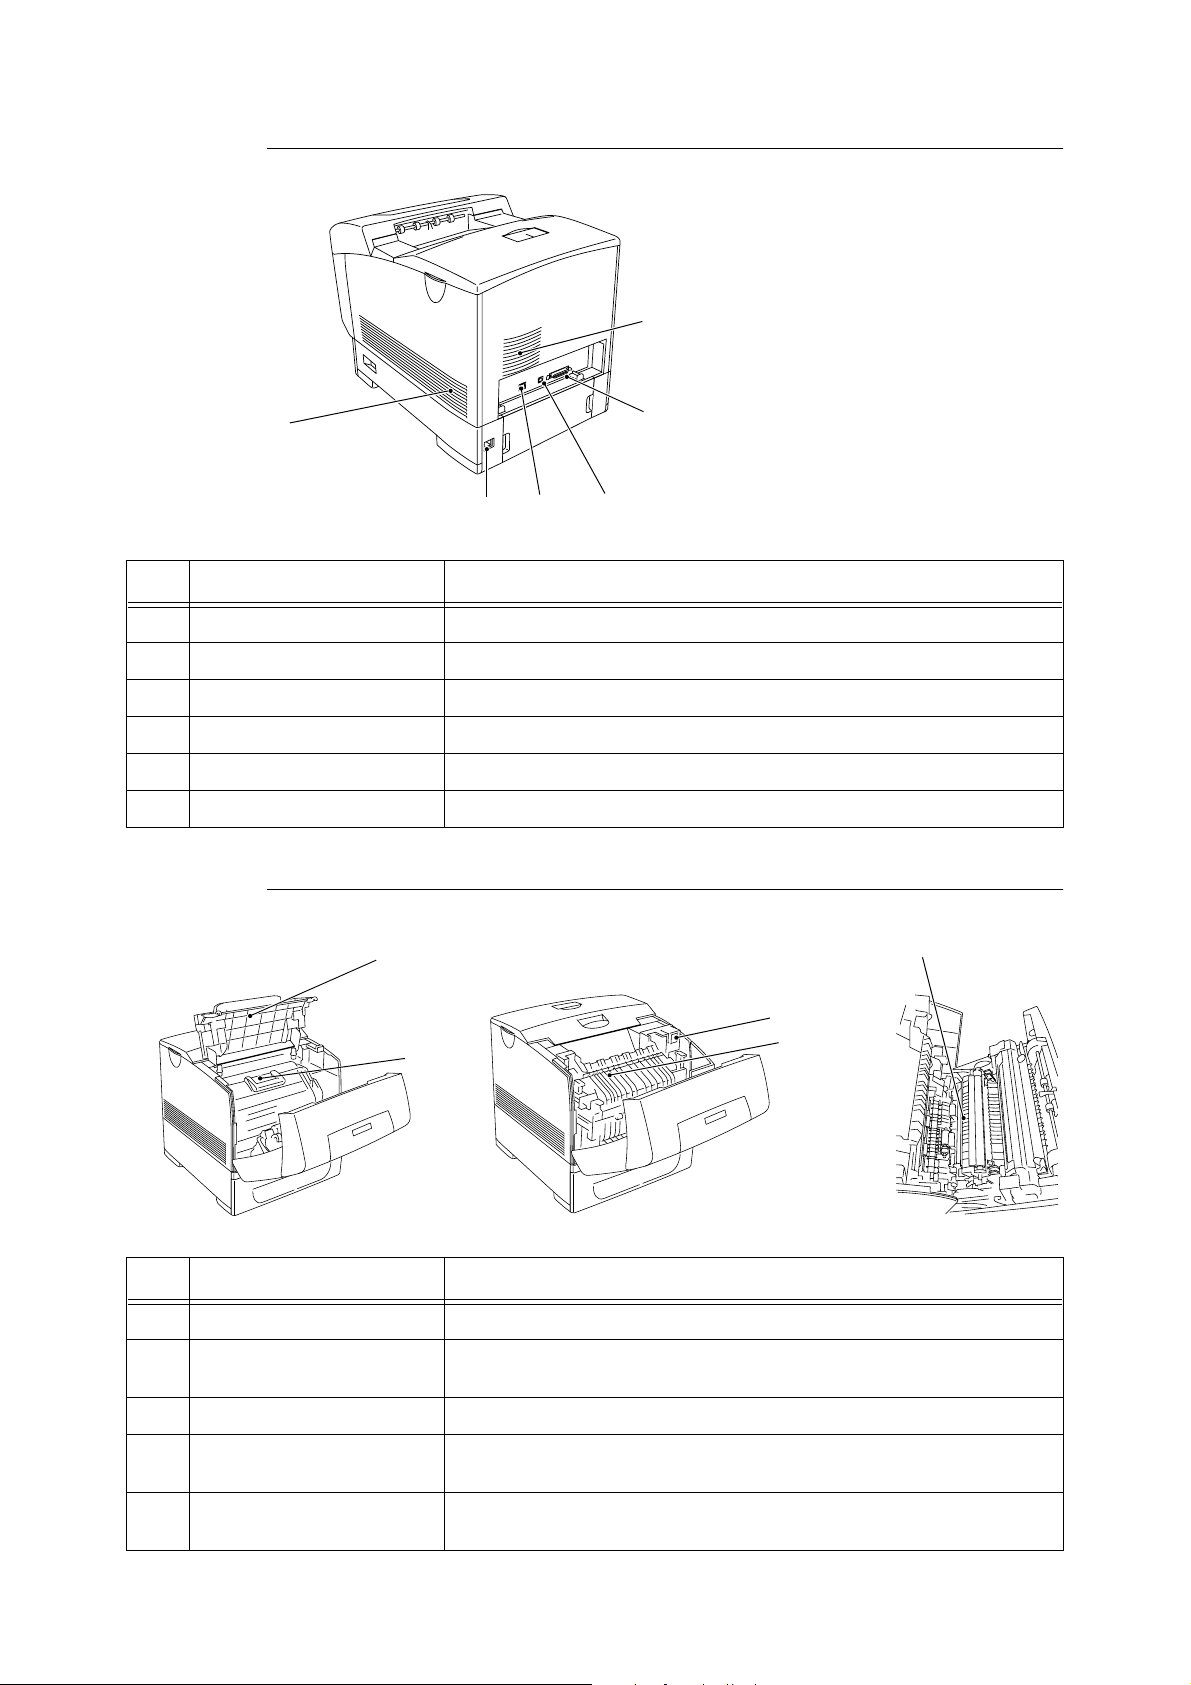
Rear View
6
1
3
2
No. Name Description
1 Ventilation hole Releases heat to prevent the interior of the printer from heating up.
2 Power cord connector Connect the power cord here.
3 Network connector Connect the network cable here when connecting this printer to a network.
4 USB port Connect the USB cable here.
5 Parallel port Connect the parallel cable here.
6 Ventilation hole Air intake to prevent the interior of the printer from heating up.
5
4
Internal View
1
5
3
4
2
No. Name Description
1 Output tray cover Open this when replacing the drum cartridge and removing jammed paper.
2 Drum cartridge Consists of the light-sensitive drum and the intermediate transfer roller. Images
are initially created as an electrical charge on the surface of this drum.
3 Button C Press this button when opening the output tray cover.
4 Fuser unit Fixes the toner on the paper. Do not touch this when using the printer as it is
hot.
5 Transfer roll cartridge Transfers the toner image on the surface of the intermediate transfer roller of
the drum cartridge to the paper.
1.1 Main Components and Their Functions 13
Page 14
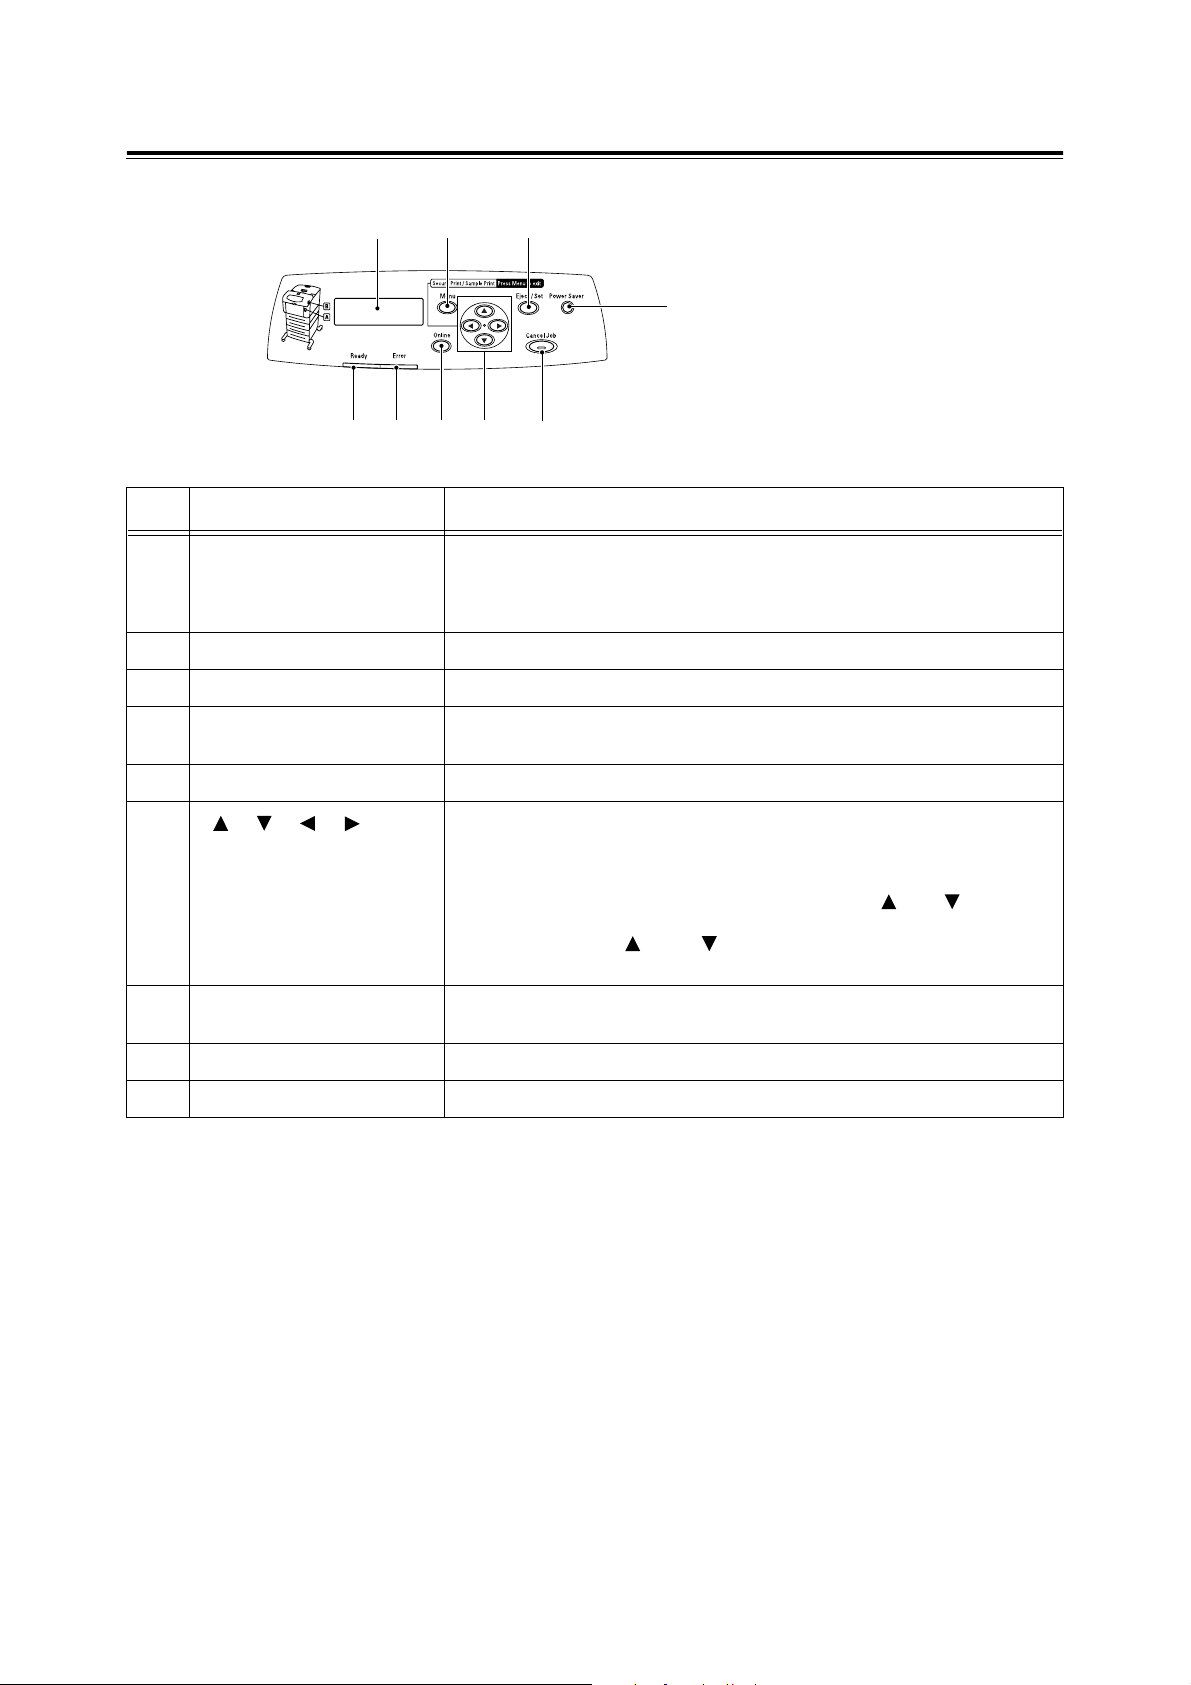
Control Panel
1
32
4
9
87
No. Name Description
1 LCD display Displays the setting items, machine status, and messages.
2 <Menu> button Press to move to the menu operation.
3 <Eject/Set> button Press to set the menu candidate values. Use this too to print report/list.
4 <Power Saver> indicator/
button
5 <Cancel Job> button Press to cancel printing.
6
5
Refer to
• “Display” (P. 15)
In the power saver mode 2, this light is on. Push this button to exit the power
saver mode 2.
6
< > < > < > < > buttons
7 <Online> button Press this button to change the printer mode between the on line mode and the
8 <Error> indicator When the light is on, there is a malfunction in the printer.
9 <Ready> indicator When the light is on, the printer is ready to receive data from the computer.
Press these to move to the required menu, item and candidate value on the
display.
Note
• When you are changing the candidate values by the < > or < > button,
you can press and hold down the buttons to change the display continuously.
Also, pressing the < > and < > buttons simultaneously will display the
default values.
off line mode.
14 1 Basic Operations
Page 15
Display
Print
There are two types of screens shown: Print screen (for displaying printer status) and Menu
screen (for configuring settings).
Note
• The message displayed differs according to the optional accessories installed and setting status.
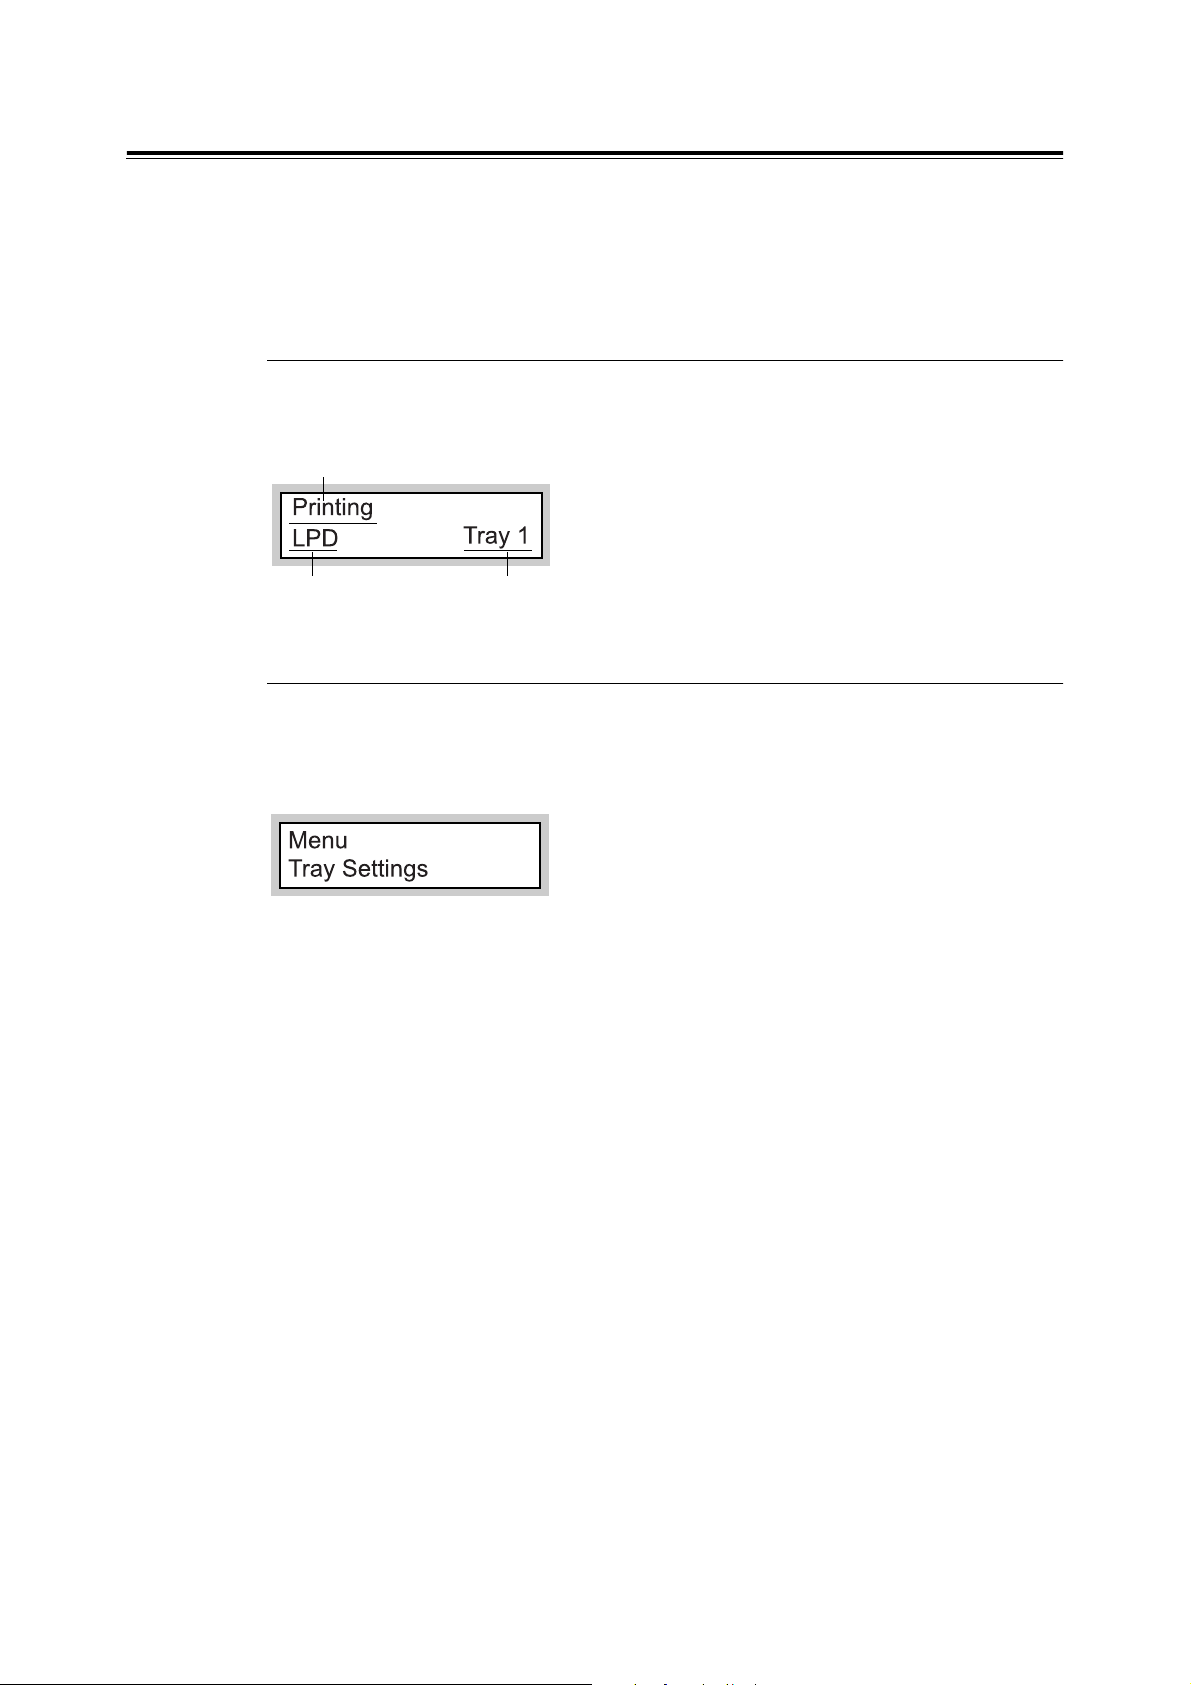
Print Screen
The Print screen appears when the printer is printing or waiting for data. The following
contents are shown on the screen.
er status
Port for receiving data
Feeding tray
Menu Screen
Screen for configuring settings related to the printer.
This screen appears when you press the <Menu> button. The initial Menu screen displayed
is as follows.
Refer to
• Items that can be set on the Menu screen: “4 Setting on the Control Panel” (P. 45)
1.1 Main Components and Their Functions 15
Page 16
1.2 Switching On and Off the Printer
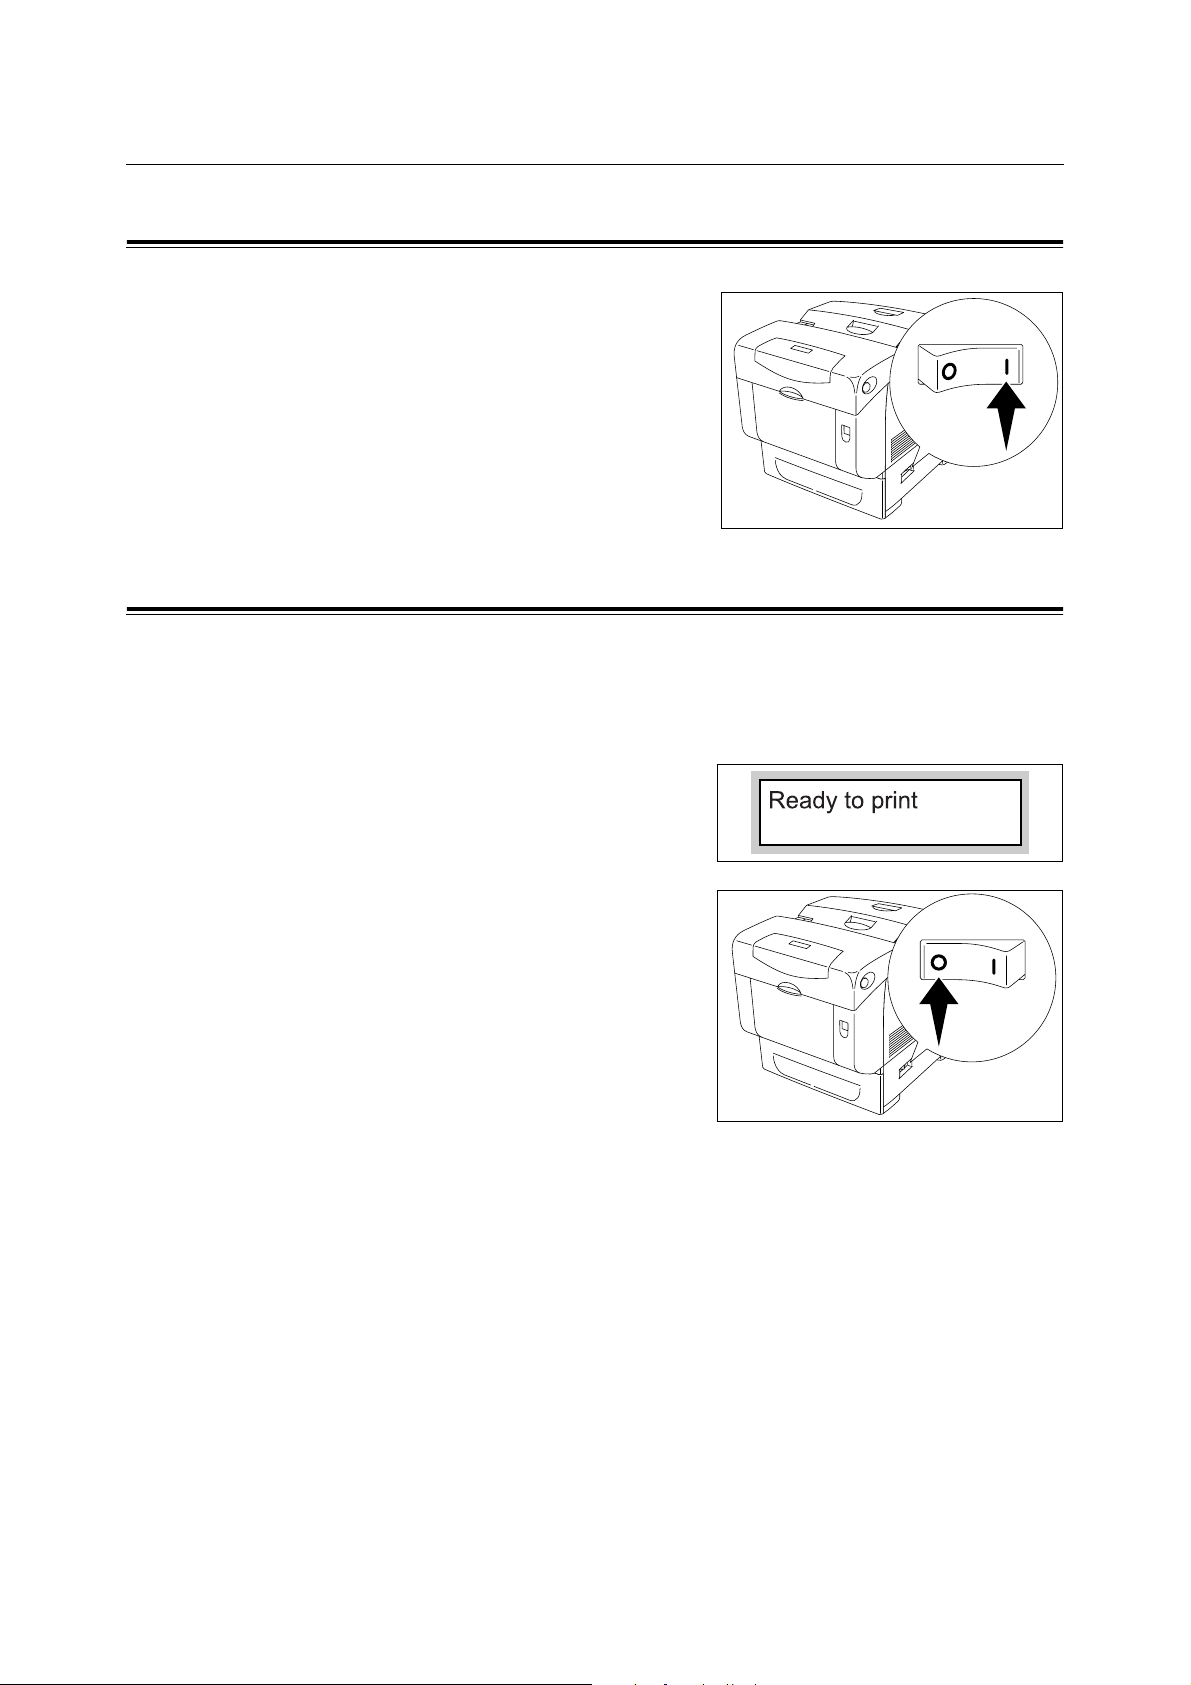
Switching On the Power
1. Press the power switch of the printer to the
<|> position.
2. When the power is on, “Diagnosing...” will
be displayed on the control panel. Check
that this display changes to “Ready to
print”.
Important
• If error message is displayed, refer to “Error
Messages” (P. 73) on how to fix it.
Switching Off the Power
Important
• Do not switch off the power of this printer when printing is in progress. It may lead to a paper jam.
• Once the power is switched off, print data remaining in this printer or information saved in the memory of
this printer will be deleted.
1. By checking the display on the control
panel, confirm that the printer is not
processing any data.
2. Press the power switch of this printer to the
<{> position to switch off the power.
16 1 Basic Operations
Page 17

1.3 Power Saver Modes
This printer is equipped with the power saver mode 1 and the power saver mode 2 to reduce
power consumption when it is left idle.
When no print data is received for 3 minutes, the printer will enter the power saver mode 1.
When no data is received for a further 5 minutes (a total of 8 minutes lapse (default) since
the last receiving data), it will enter the power saver mode 2 by default.
The data stored in the RAM disk is erased when the printer is switched off. The time ranges
to specify for the printer to go into the power saver mode 1 or the power saver mode 2 are
1 to 60 minutes or 5 to 120 minutes, respectively. Consumption of power during the power
saver mode 2 is 7 W or less and the time required to exit from the power saver mode 2 to
a print-ready status is about 42 seconds.
Note
• You can specify for the printer not to go into power saver mode 2.
• For details on the power saver mode and the procedure to change the settings, refer to “Basic
Operations (Example: Changing the Power Saver Timer)” (P. 46).
Exiting the Power Saver Mode
The printer automatically cancels the power saver mode once it receives data from the
computer.
To cancel the power saver mode 1 or the power saver mode 2 manually, press any button
on the control panel or press the <Power Saver> button, respectively.
1.3 Power Saver Modes 17
Page 18
1.4 Canceling/Checking Printing
Canceling Printing
To cancel printing, you can either cancel the print job at this printer or at the computer.
Canceling Printing of Data Being Printed or Received at the Printer
Press the <Cancel Job> button on the control panel. However, pages being printed at the
moment will continue to be printed.
Canceling Printing of Data Being Processed at the Computer
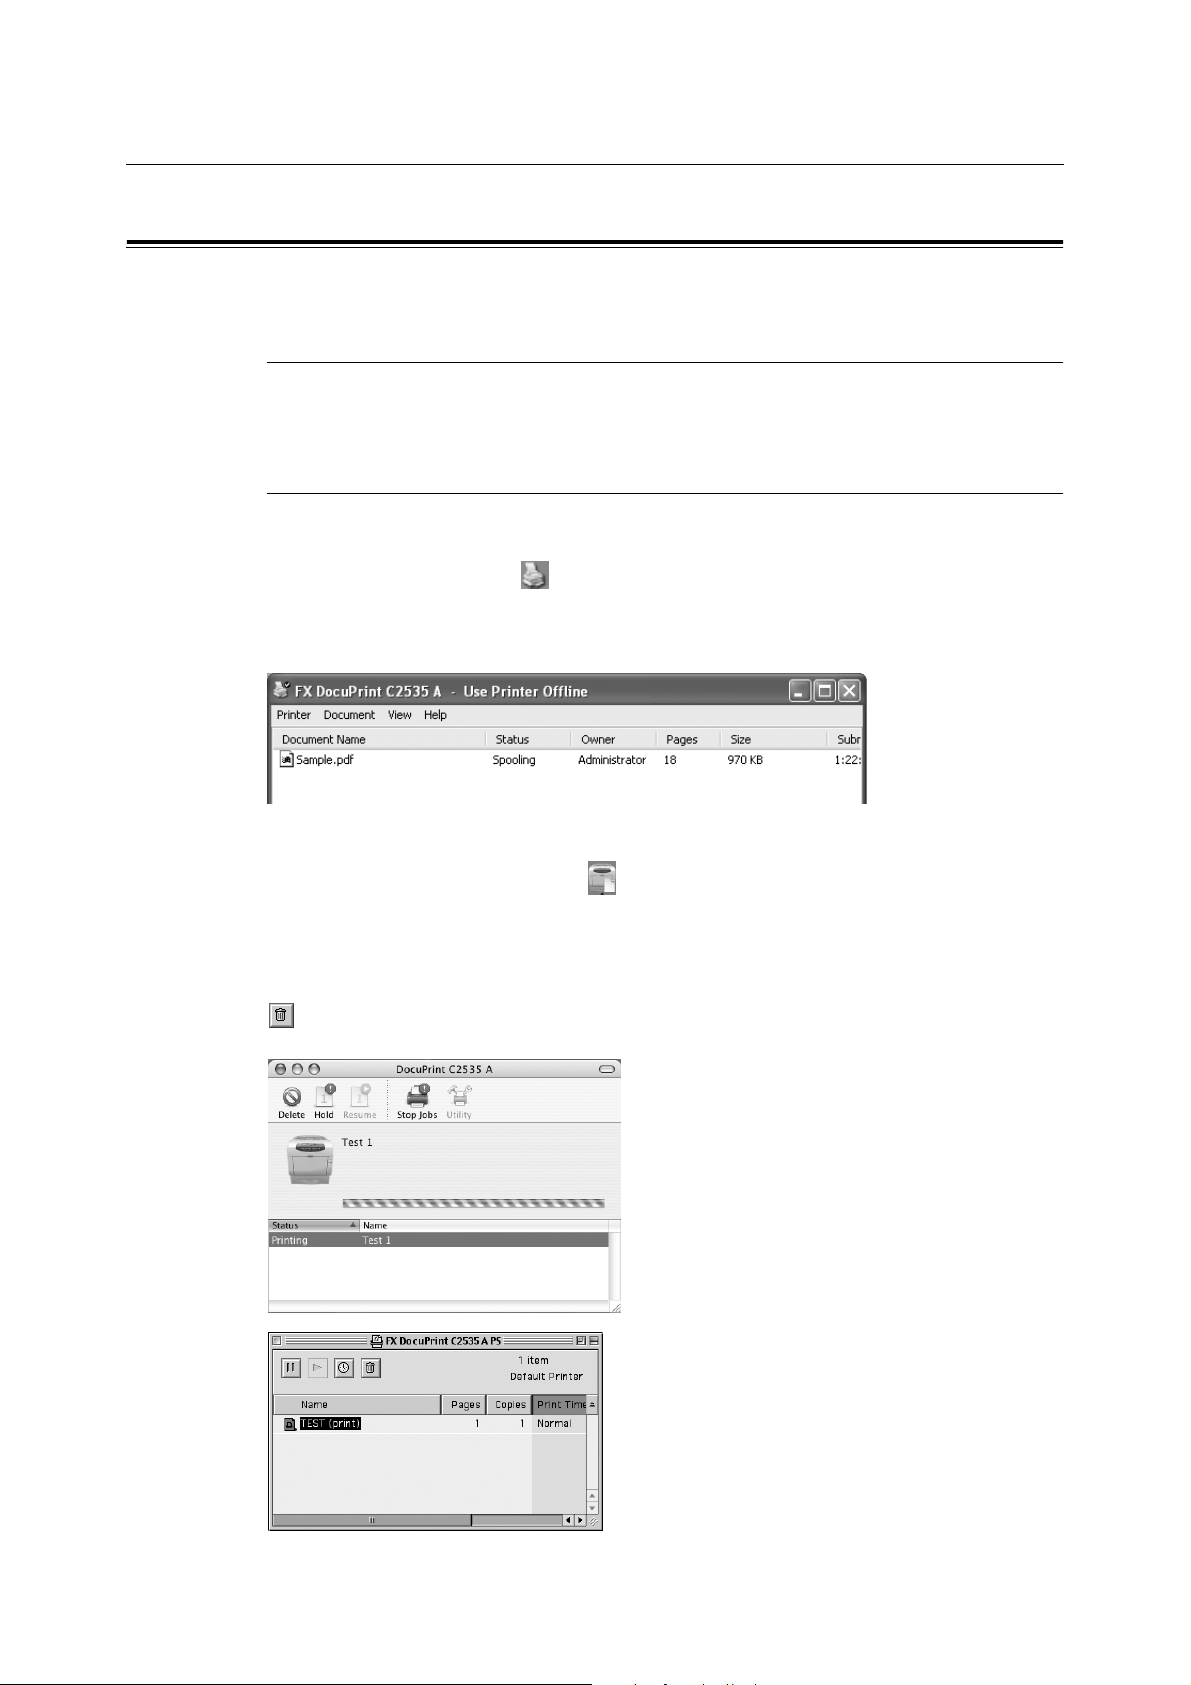
For Windows
Double-click the printer icon at the bottom right of the taskbar in Windows.
From the displayed window, click the document name that you wish to delete and press the
<Delete> key.
For Macintosh
For Mac OS X, click the printer icon at the [Dock].
From the displayed window, click the document name that you wish to delete and click
[Delete] or select [Delete Job] from the [Jobs] menu.
For Mac OS 9.x, double-click the printer icon on the desktop.
From the displayed window, click the document name that you wish to delete and click the
icon.
18 1 Basic Operations
Page 19
Checking Status of Print Data
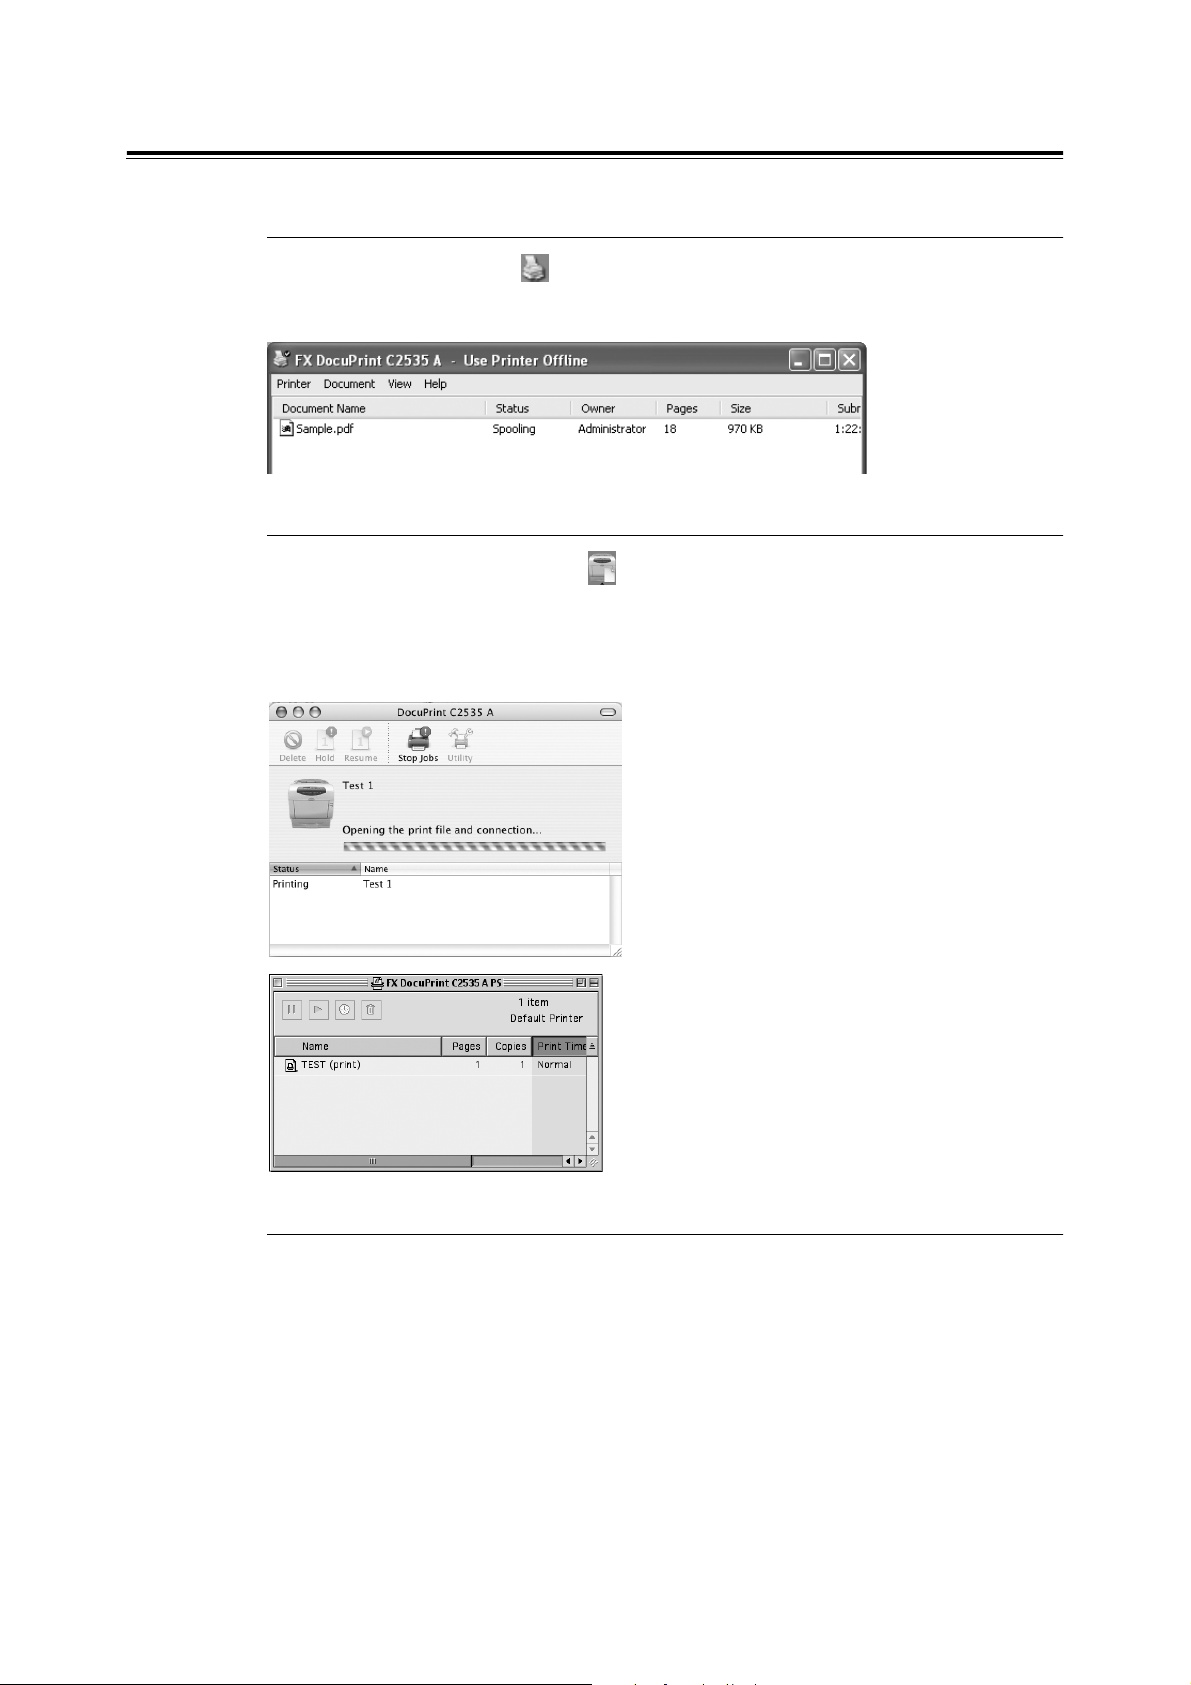
Checking in Windows
Double-click the printer icon on the task bar at the bottom right of the screen.
From the displayed window, check the column, [Status].
Checking in Macintosh
For Mac OS X, click the printer icon at the [Dock].
From the displayed window, check the column, [Status].
For Mac OS 9.x, double-click the printer icon on the desktop.
From the displayed window, check the column, [Status].
Checking in CentreWare Internet Services
You can check the status of the print job sent to the printer at the [Jobs] tab of CentreWare
Internet Services.
Refer to
• Online Help for CentreWare Internet Services
1.4 Canceling/Checking Printing 19
Page 20
1.5 Displaying Optional Accessory Configuration and Paper Tray Settings
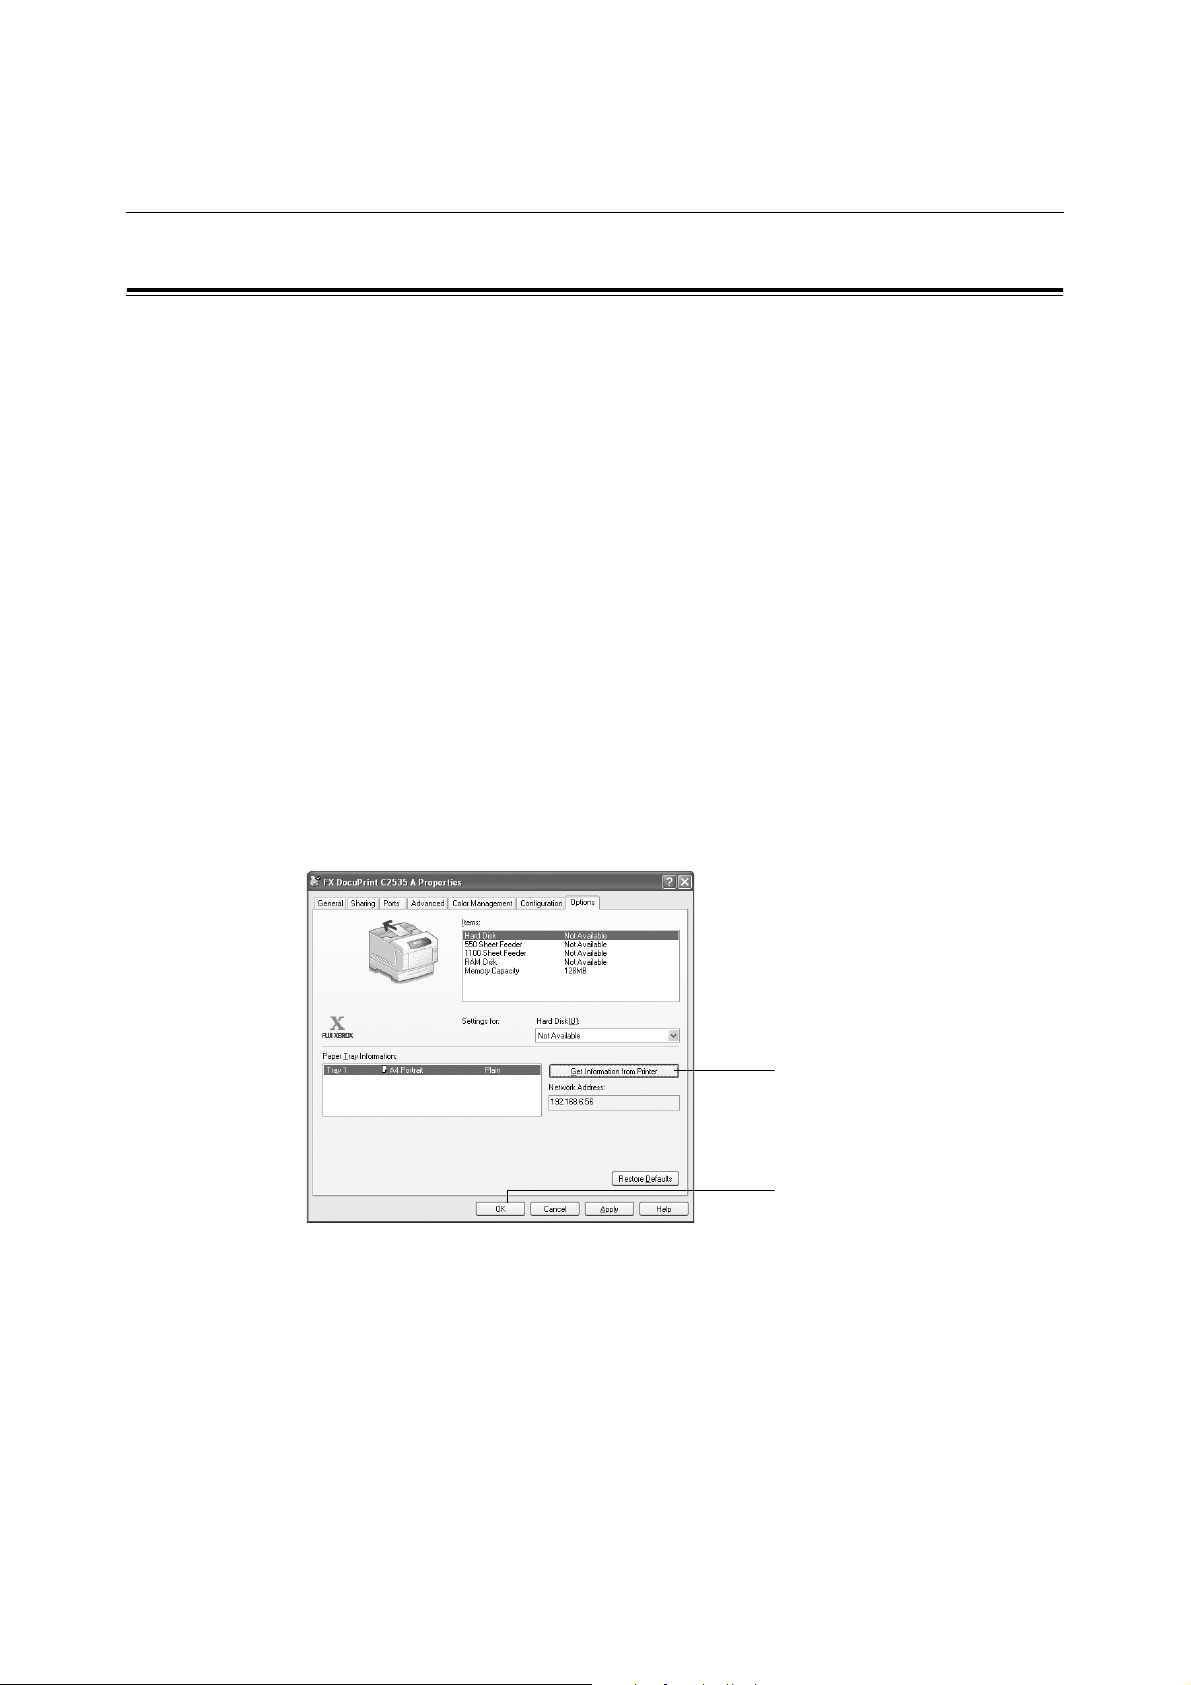
For Windows
When using this printer as a network printer and having enabled SNMP protocol, you can
display on the print driver, the optional accessory configuration or settings configured at the
control panel such as paper type or size. These settings are displayed on the [Options] tab.
This section explains the procedure using Windows XP as an example.
Important
• When using this printer as a local printer, this feature cannot be used. You have to manually set the
items on the print driver. Also, the paper type and size that are loaded in the paper tray cannot be
displayed when using the printer as a local printer.
• For paper size and paper type settings, you must configure them at the control panel beforehand.
Note
• When using this feature, you have to activate the SNMP port (default: [Enable]) on the printer using the
control panel.
• For Windows NT 4.0/Windows 2000/Windows XP, only users with administrator’s rights can change the
settings. Users without the rights can only check the contents.
1. From the [Start] menu, click [Printers and Faxes] and then display the properties of the
printer to be used.
2. Click the [Options] tab.
3. Click [Get Information from Printer].
3
4
The data of the printer can be displayed on the print driver.
4. Click [OK].
The contents of the [Options] tab will be updated based on the data obtained from the
printer.
Note
• The paper types and sizes set on the control panel will be displayed as [Paper Tray Information].
20 1 Basic Operations
Page 21
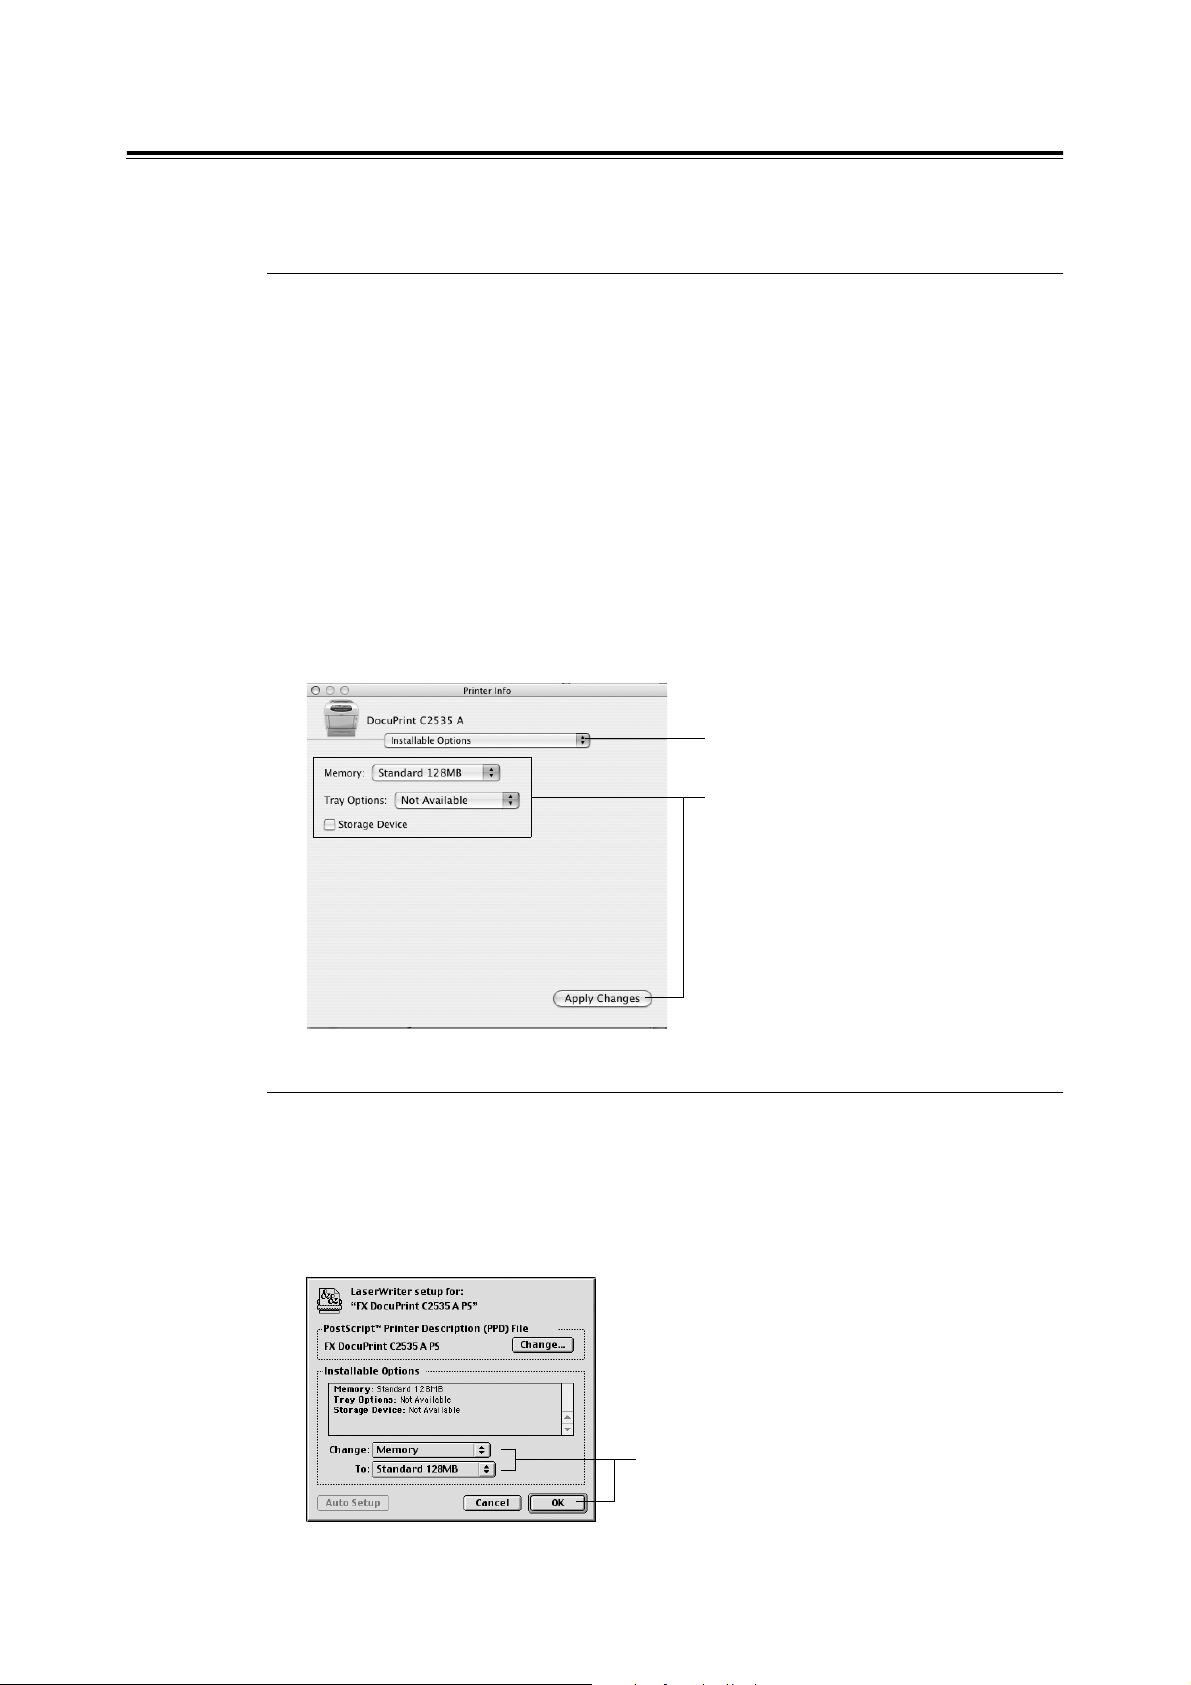
For Macintosh
You can configure the installed options settings on the print driver.
For Mac OS X
1. Start [Print Center] (or [Printer Setup Utility]).
Note
• When using Mac OS X 10.2.8, you can find [Print Center] in the [Utilities] folder in [Applications].
• When using Mac OS X 10.3.X, you can find the [Print Setup Utility] in the [Utilities] folder in
[Applications].
2. Click the printer you want to configure, then select [Show Info] from the [Printers]
3. From the drop-down list box, select [Installable Options].
4. Set the items manually, then click [Apply Changes].
The [Printer List] screen appears.
menu (or click the [Show Info] icon for Mac OS X 10.3).
The [Printer Info] dialog box is displayed.
3
4
For Mac OS 9
1. Double-click the printer icon on the desktop.
2. Select [Change Setup] from the [Printing] menu.
3. Set the items manually, then click [OK].
3
1.5 Displaying Optional Accessory Configuration and Paper Tray Settings 21
Page 22
2Printing
2.1 Printing From the Computer
This section explains the basic flow when printing from application software in Windows
environment.
(The procedure may differ according to the computer or system configuration used.)
Important
• Do not switch off the power of this printer when printing is in progress. It may lead to a paper jam.
1. From the [File] menu of the application software, select [Print].
2. Select this printer as the printer to be used to start printing.
To use the various print features of this printer, display the printer properties dialog
box to configure the settings of the necessary items. For details on each item and how
to configure its settings, refer to the Online Help for the print driver.
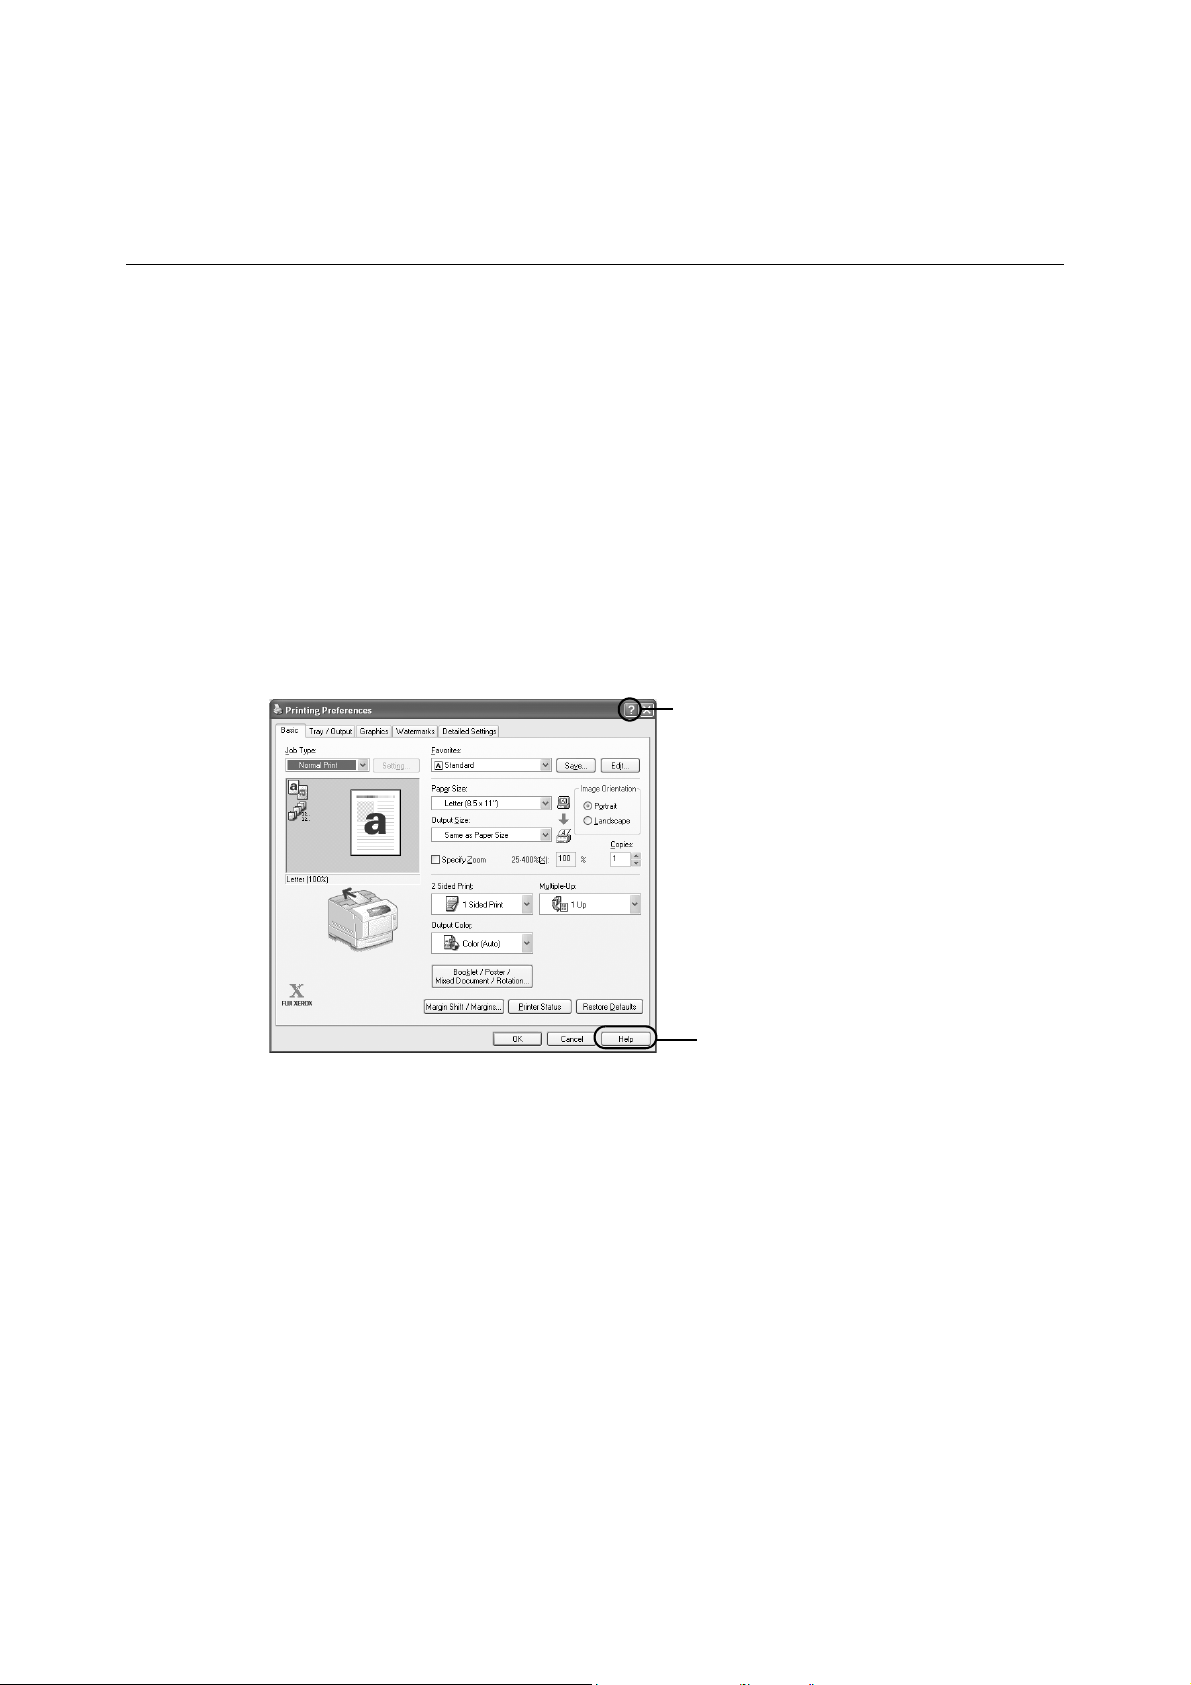
For Windows
A
There are two ways to display Online Help
for the print driver.
A Click [?]. And then, click the item you
want to know more about. The
explanation on the item will be
displayed.
B Click [Help].
The [Help] window will be displayed.
B
Note
• You can also set the print features on the [Properties] dialog box displayed by clicking the printer icon in
the [Printers and Faxes] window (or [Printers] window depending on the OS).
22 2 Printing
Page 23
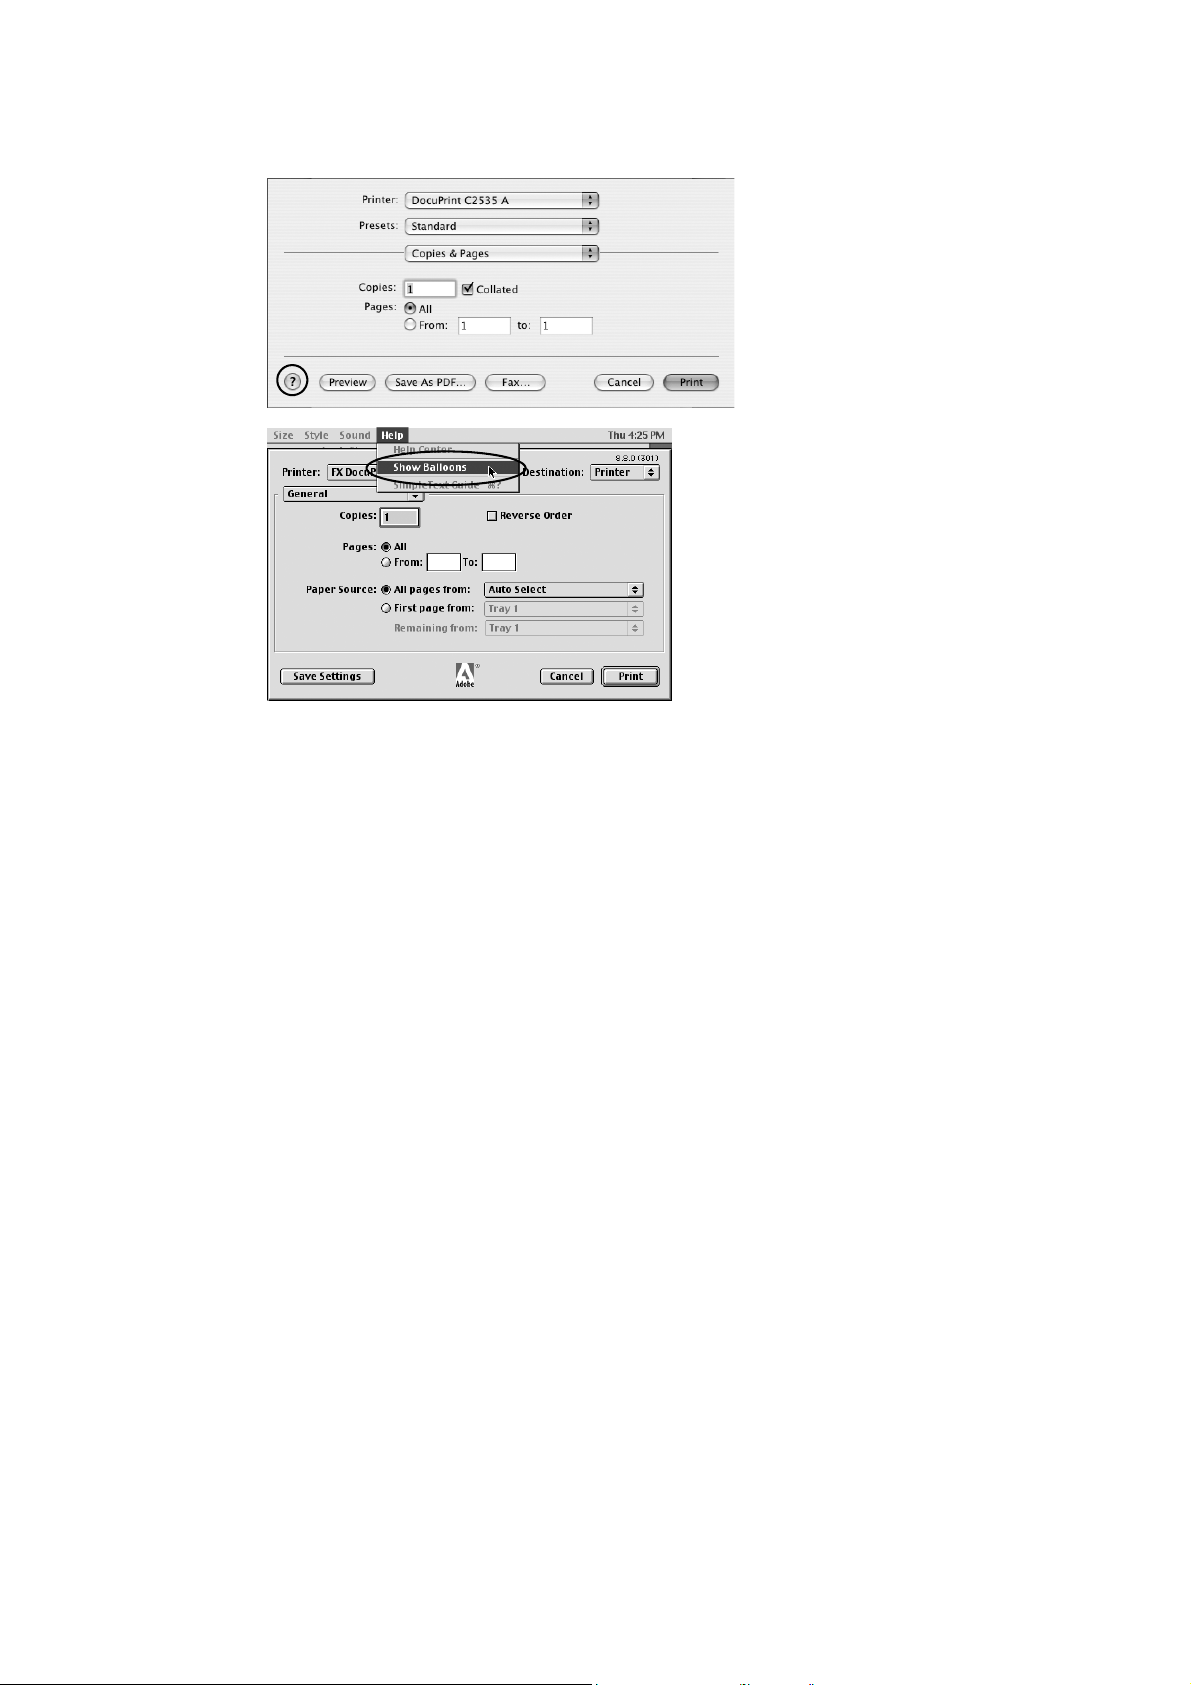
For Macintosh
For Mac OS X, click [?]. The [Mac Help]
window is displayed. For Mac OS 9.x,
select [Show Balloons] from the [Help]
menu. Then click the item you want to
know its details.
Note
• You can also set the print features in the printing dialog box.
2.1 Printing From the Computer 23
Page 24
2.2 Printing on Envelopes/Transparencies
This section explains how to print on envelopes and transparencies.
Loading Envelopes/Transparencies
Envelopes and transparencies can be loaded in the bypass tray.
Note
• For details on the procedure to load paper in bypass tray, refer to “Loading Paper in the Bypass Tray”
(P. 41).
Loading Envelopes
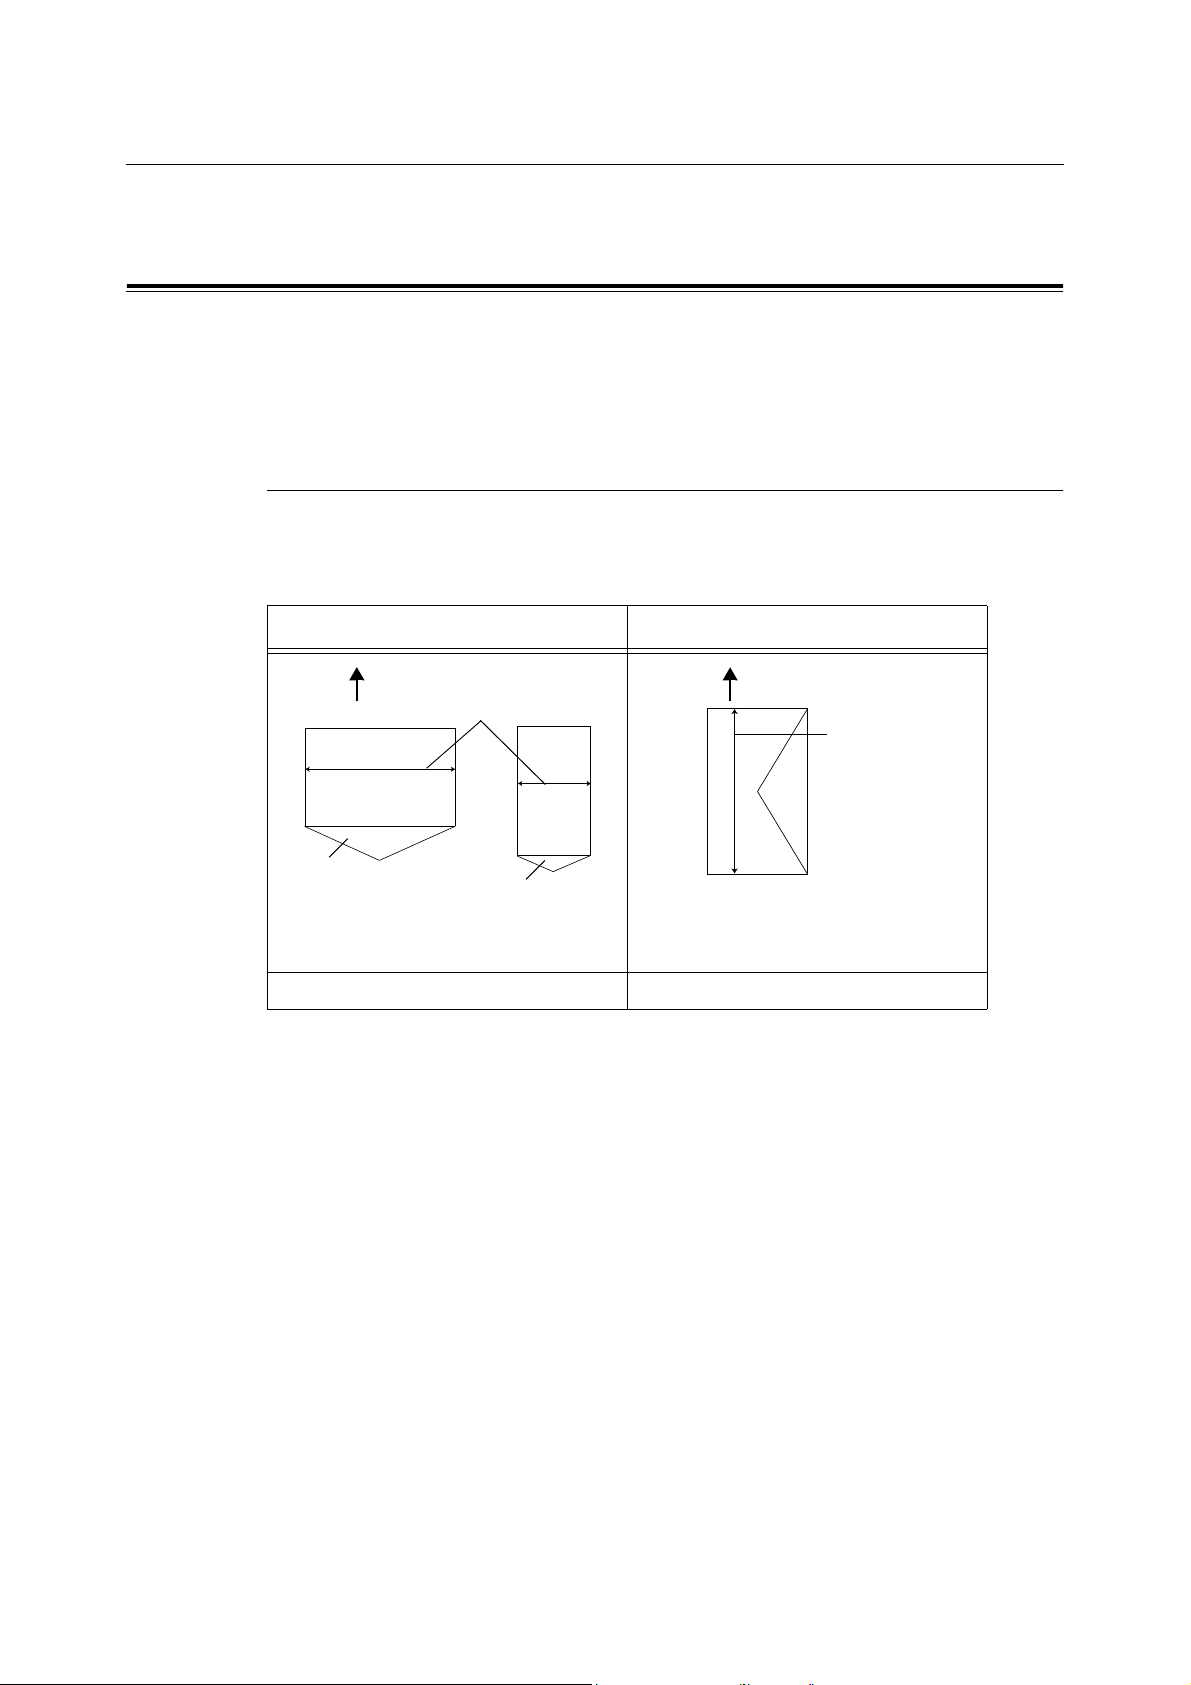
Load envelopes with the address side facing down.
The orientation and handling of envelope flaps differ depending on their size.
Less than or equal to 220 mm in width Over 220 mm in width
Paper feed direction
Less than or equal to 220 mm
Flap
Flap
Facing down with the flap open and pointing
away from the printer
Example: Monarch, DL, C5 Example: Com 10
Facing down with the flap closed and at the
right
Paper feed direction
Over
220 mm
24 2 Printing
Page 25
The following explains how to load envelopes in the bypass tray using Monarch as an
example.
Important
• The reverse side of the envelope cannot be printed on.
• Envelopes can get wrinkled or the print quality is reduced depending on the type used. For details about
the usable envelope sizes, refer to “Usable Paper” (P. 36).
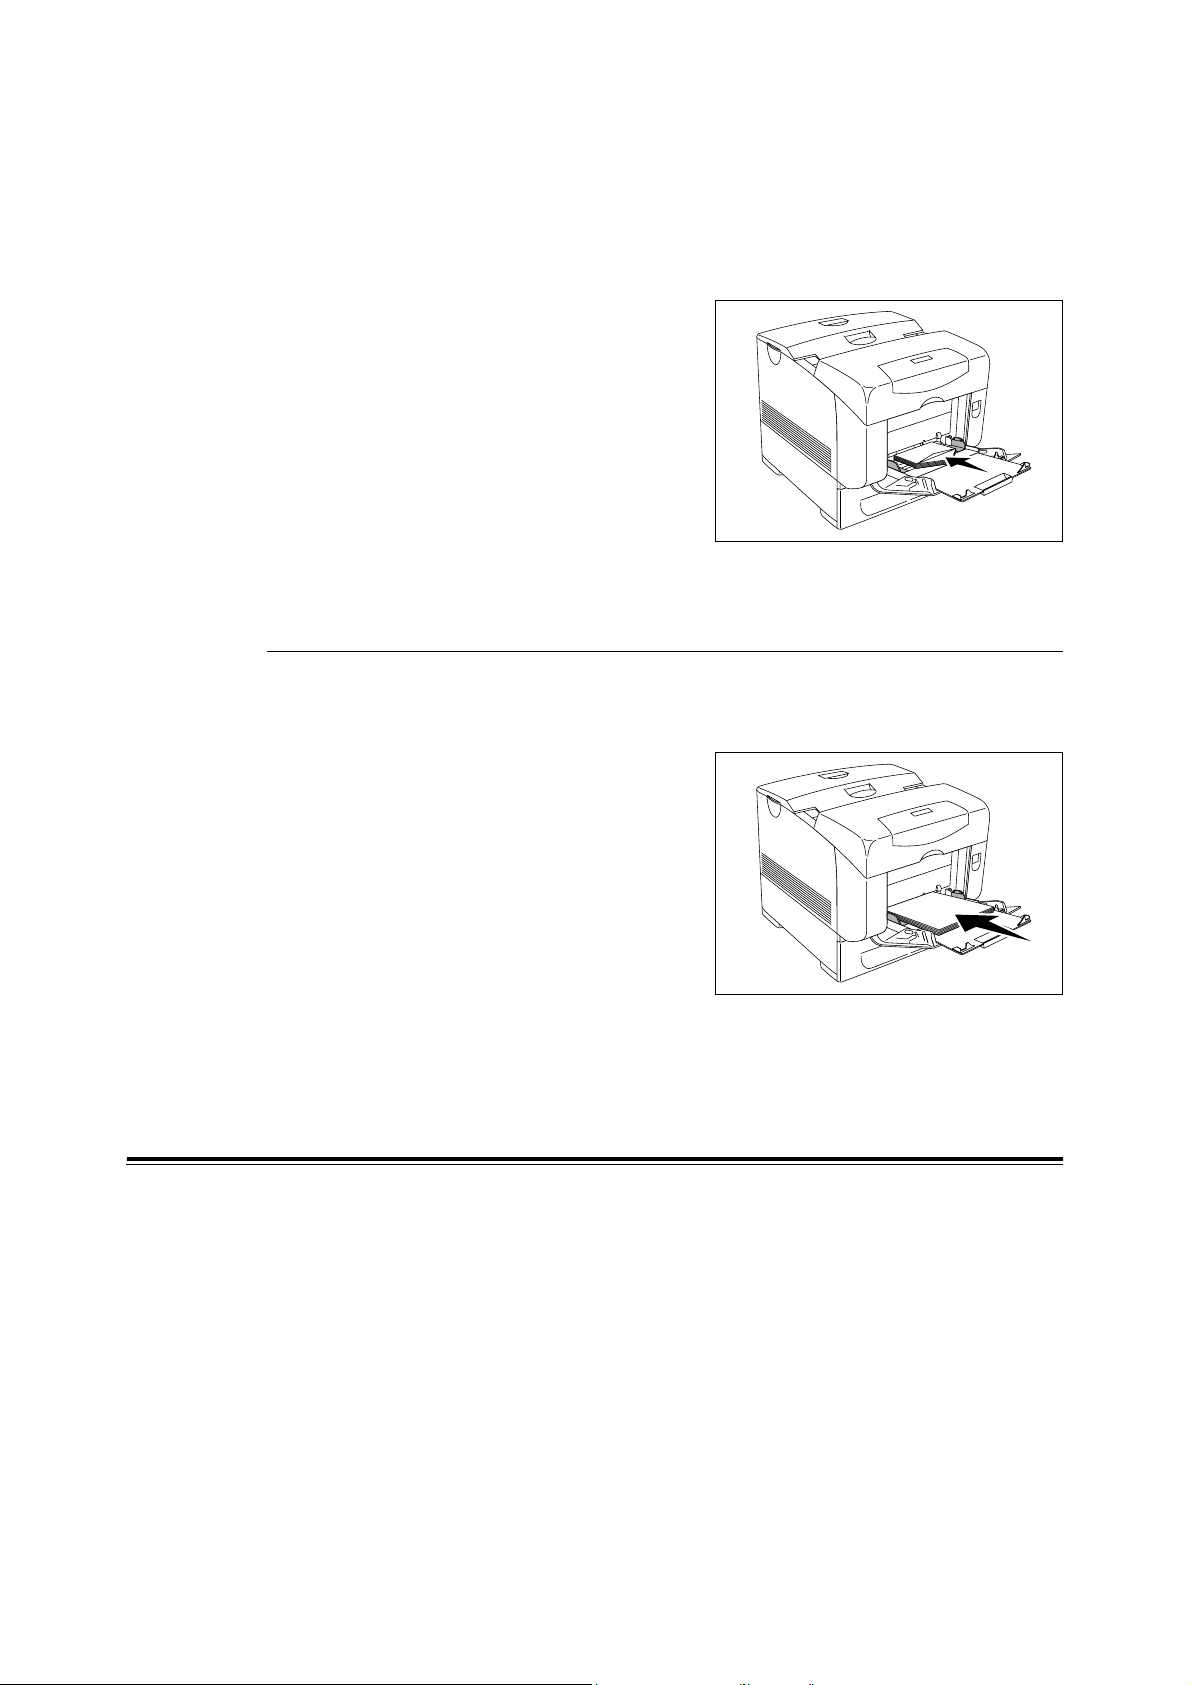
1. In the case of Monarch, insert the
envelopes with the flaps open and pointing
away from the printer.
2. Slide the paper guides to the size of the envelope.
Loading Transparencies
Important
• Transparencies with white frame and full-color transparencies cannot be used.
1. After carefully fanning a small stack of
transparencies, load them into the bypass
tray with the side to be printed facing down.
Load transparencies a few at a time.
2. Slide the paper guides to the size of the transparencies.
3. Pull out the extension tray when loading paper such as transparencies.
Printing on Envelopes/Transparencies
To print on envelopes or transparencies using the PCL print driver, display the [Tray/Output]
tab and [Basic] tab. This section explains the procedure using WordPad on Windows XP as
an example.
Note
• The way to print using the PS print driver, refer to the online help for the PS print driver.
• When [Bypass Mode] is set to [Panel Specified], you need to set the paper type and size settings for the
tray on the control panel in advance. For details, refer to “3.3 Setting Paper Types and Sizes” (P. 43).
• The way to display the printer properties dialog box differs according to the application software. Refer to
the manual of your respective application software.
• Printing transparencies continuously may lead to the output transparencies sticking to each other.
Remove the transparencies from the output tray after about 20 sheets, and then fan them to lower their
temperatures.
1. From the [File] menu, select [Print].
2.2 Printing on Envelopes/Transparencies 25
Page 26
2. Select this printer as the printer to be used and click [Preferences].
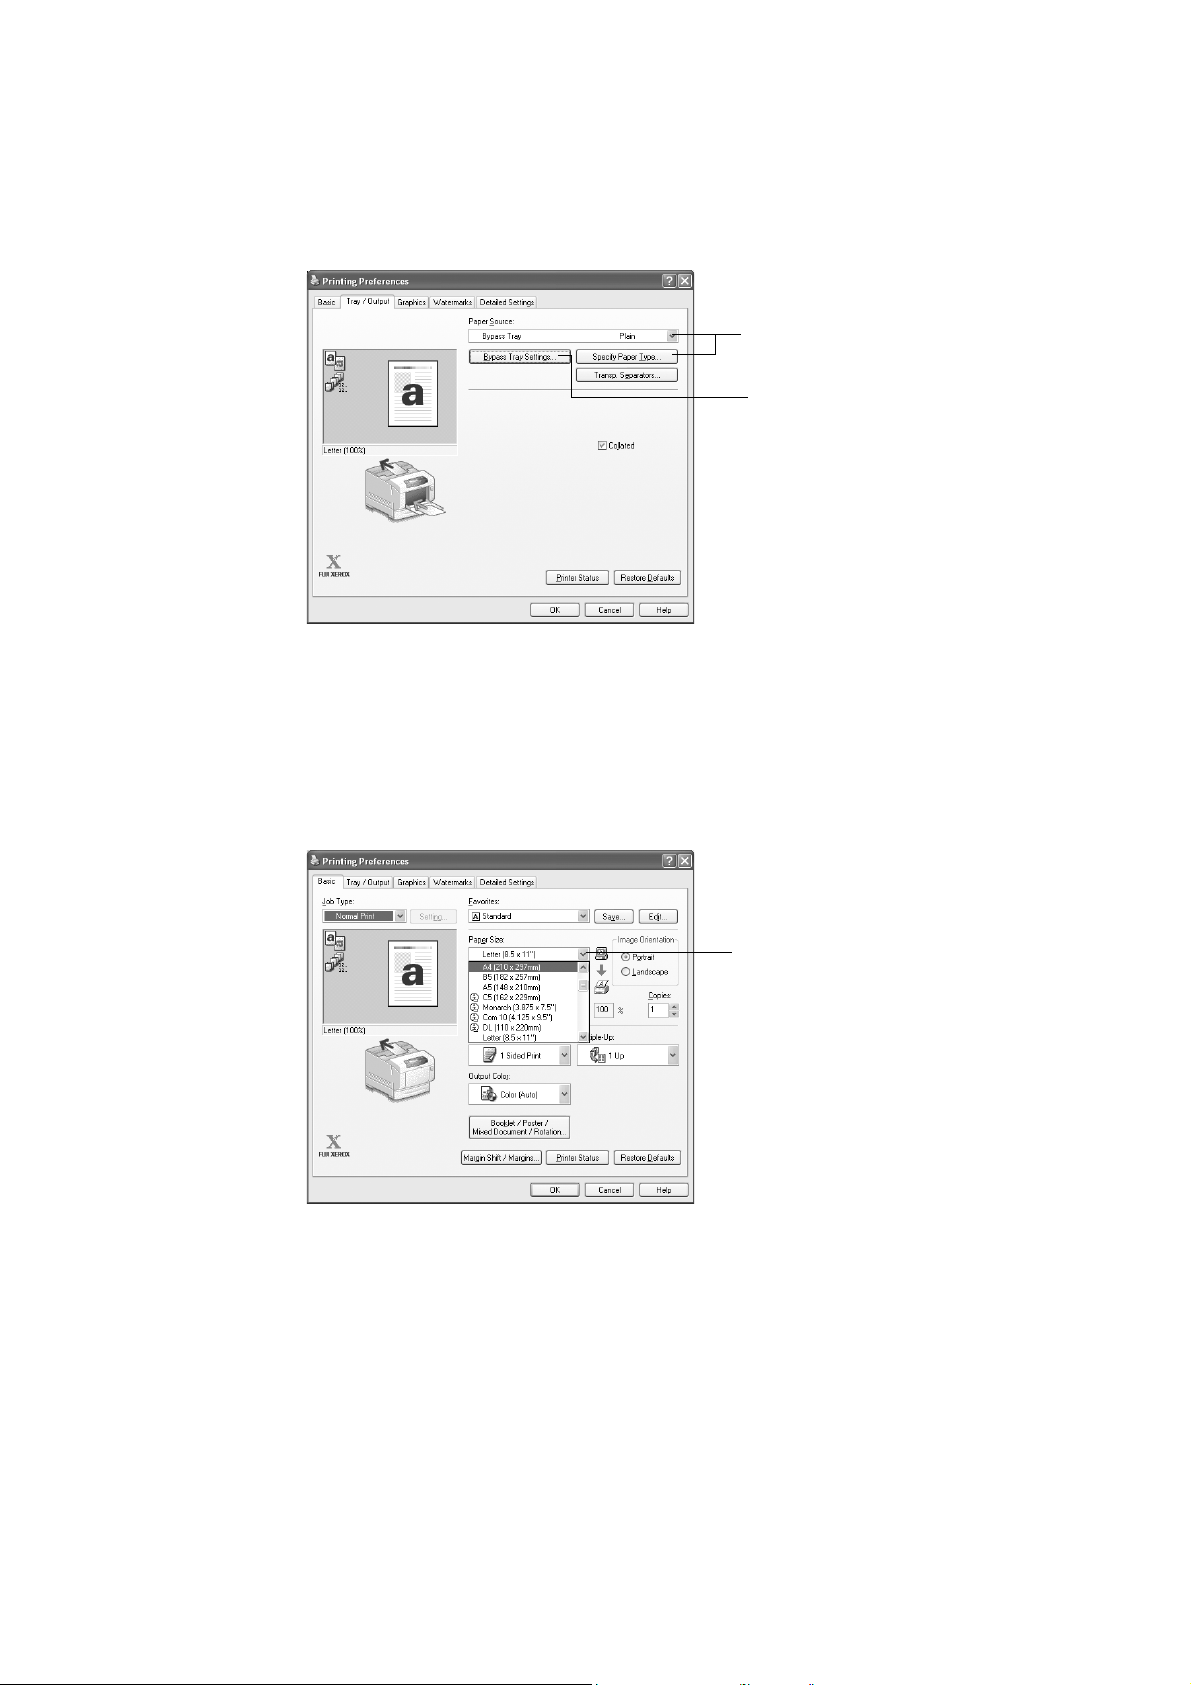
3. Click the [Tray/Output] tab.
4. From [Paper Source], select [Bypass Tray].
4
5
5. When changing the paper type setting, click [Bypass Tray Settings] to display the
[Bypass Tray Settings] dialog box. Select the appropriate paper type from [Paper
Type] and click [OK].
6. Click the [Basic] tab.
7. From [Paper Size], select the size of the original document.
7
8. From [Output Size], select the size of the transparency, and then click [OK].
9. If the envelopes are loaded in the bypass tray, click [Booklet/Poster/Mixed Document/
Rotation] to display the [Booklet/Poster/Mixed Document/Rotation] dialog box
according to what you need.
26 2 Printing
10. Set [Image Rotation (180deg)] if necessary, and then click [OK].
11. Click [OK].
12. Click [Print] in the [Print] dialog box to start printing.
Page 27
2.3 Printing on Custom Size Paper/Long Paper
This section explains how to print on custom size paper such as long paper using the PCL
print driver.
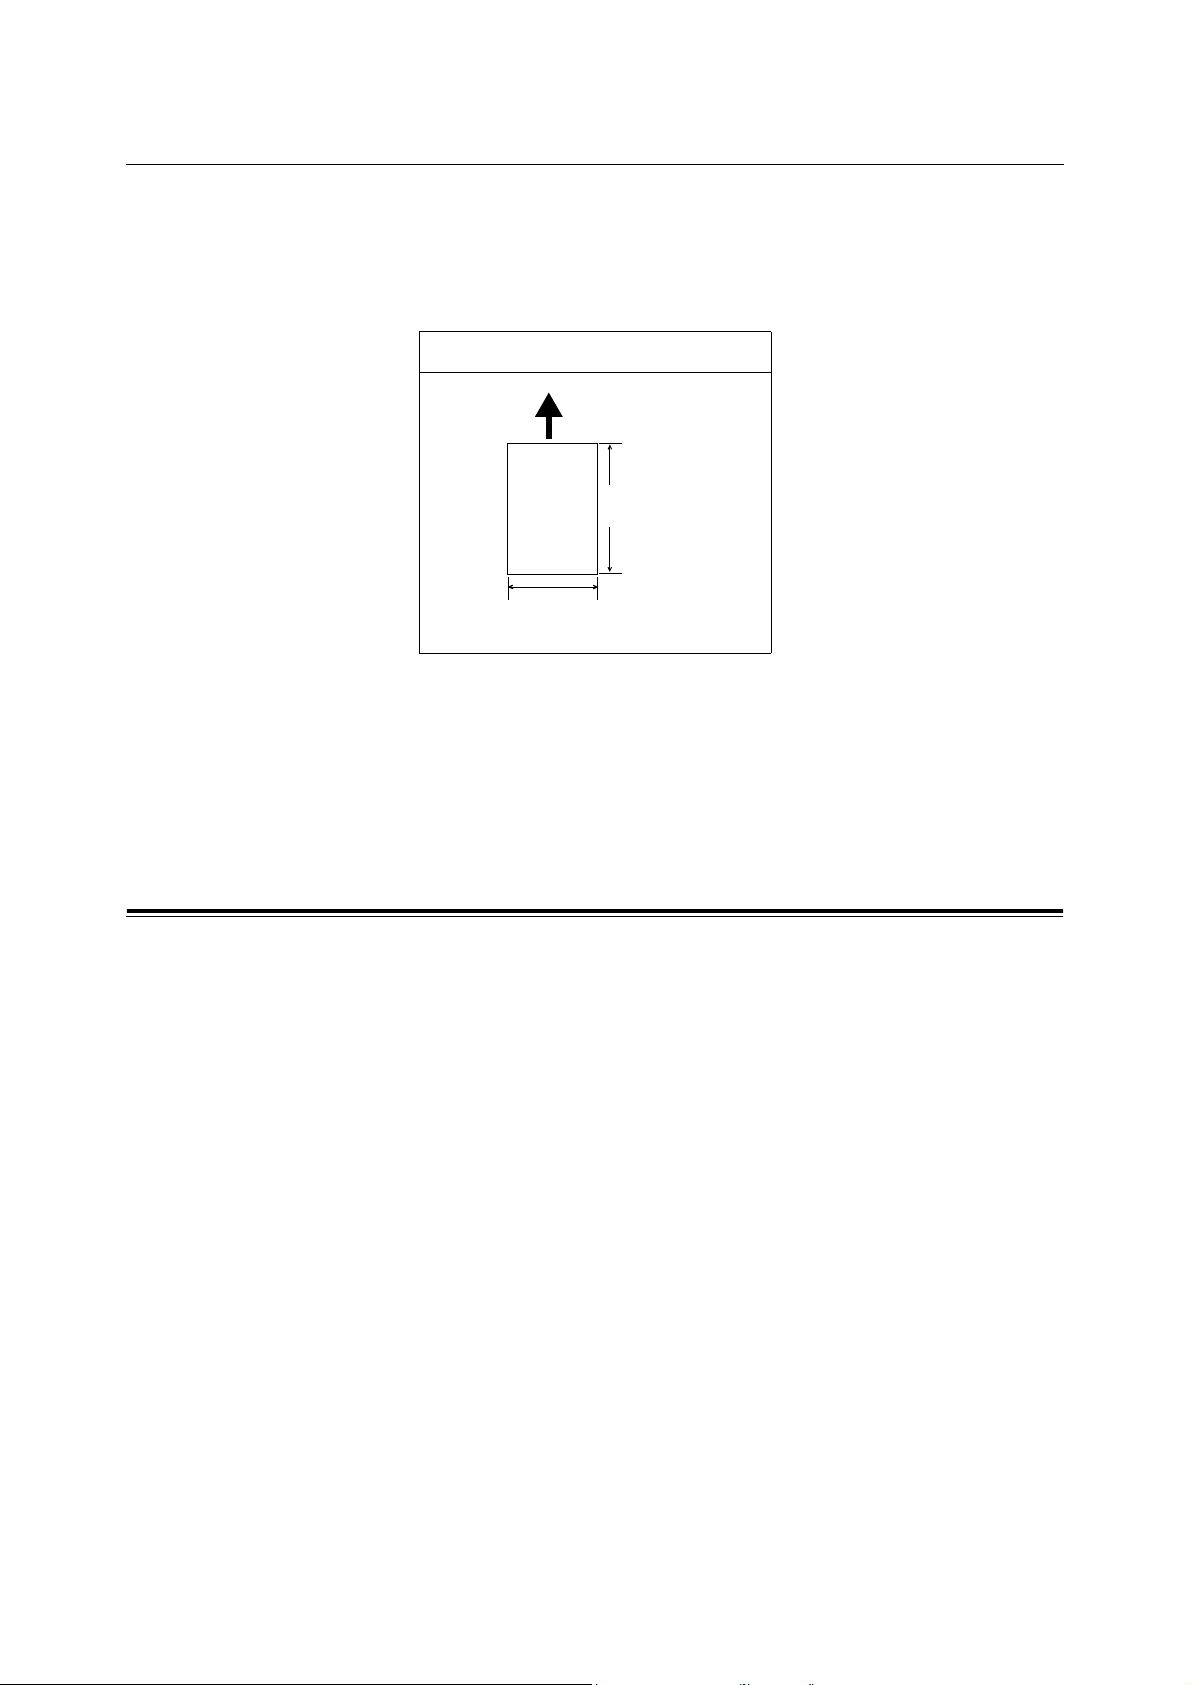
Custom size paper can be loaded in the bypass tray. The paper sizes that can be selected
on this printer are as follows:
For bypass tray
Paper feed direction
Long edge:
139.7 to 900.0 mm
Short edge:
88.9 to 215.9 mm
Note
• The way to print using the PS print driver, refer to the online help for the PS print driver.
• The way to load custom size paper in the bypass tray is the same as the one to load standard size
paper. For details, refer to “Loading Paper in the Bypass Tray” (P. 41).
• When [Bypass Mode] is set to [Panel Specified], you need to set the paper type and size settings for the
tray on the control panel in advance. For details, refer to “3.3 Setting Paper Types and Sizes” (P. 43).
• To print on paper over 356 mm in length, it has to be fed one sheet at a time and supported by hand.
Also, at least 256 MB of memory are required.
Setting Custom Paper Sizes
Before printing, set the custom size on the print driver.
Important
• When setting the paper size on the print driver and control panel, be sure to specify the same size as the
actual paper used. Setting the wrong size for printing will cause the machine failure. This is especially
true if you configure a bigger size when using a narrow width paper.
On the PCL print driver, set the custom size in the [Custom Paper Size] dialog box. This
section explains the procedure using Windows XP as an example.
Note
• For Windows NT 4.0/Windows 2000/Windows XP/Windows Server 2003, only users with administrator’s
rights can change the settings. Users without the rights of administrator can only check the contents.
• When configuring the [Custom Paper Size] dialog box in Windows NT 4.0/Windows 2000/Windows XP/
Windows Server 2003, settings of other printers on the computer will also be affected as the form data
base of the computer is used by a local printer. For a shared printer on the network, settings of other
shared printers on the same network in another computer will also be affected as the form data base on
the server with existing print queue is used. When setting on Windows 98/Windows Me, settings of other
printers on the computer will not be affected as the settings are for paper sizes defined by each printer
icon. For shared printers on the network, settings of other shared printers on the same network but in
another computer will not be affected as the settings are for paper sizes defined by each printer icon.
1. From the [Start] menu, click [Printers and Faxes], and then display the properties of
the printer to be used.
2. Click the [Configuration] tab.
2.3 Printing on Custom Size Paper/Long Paper 27
Page 28
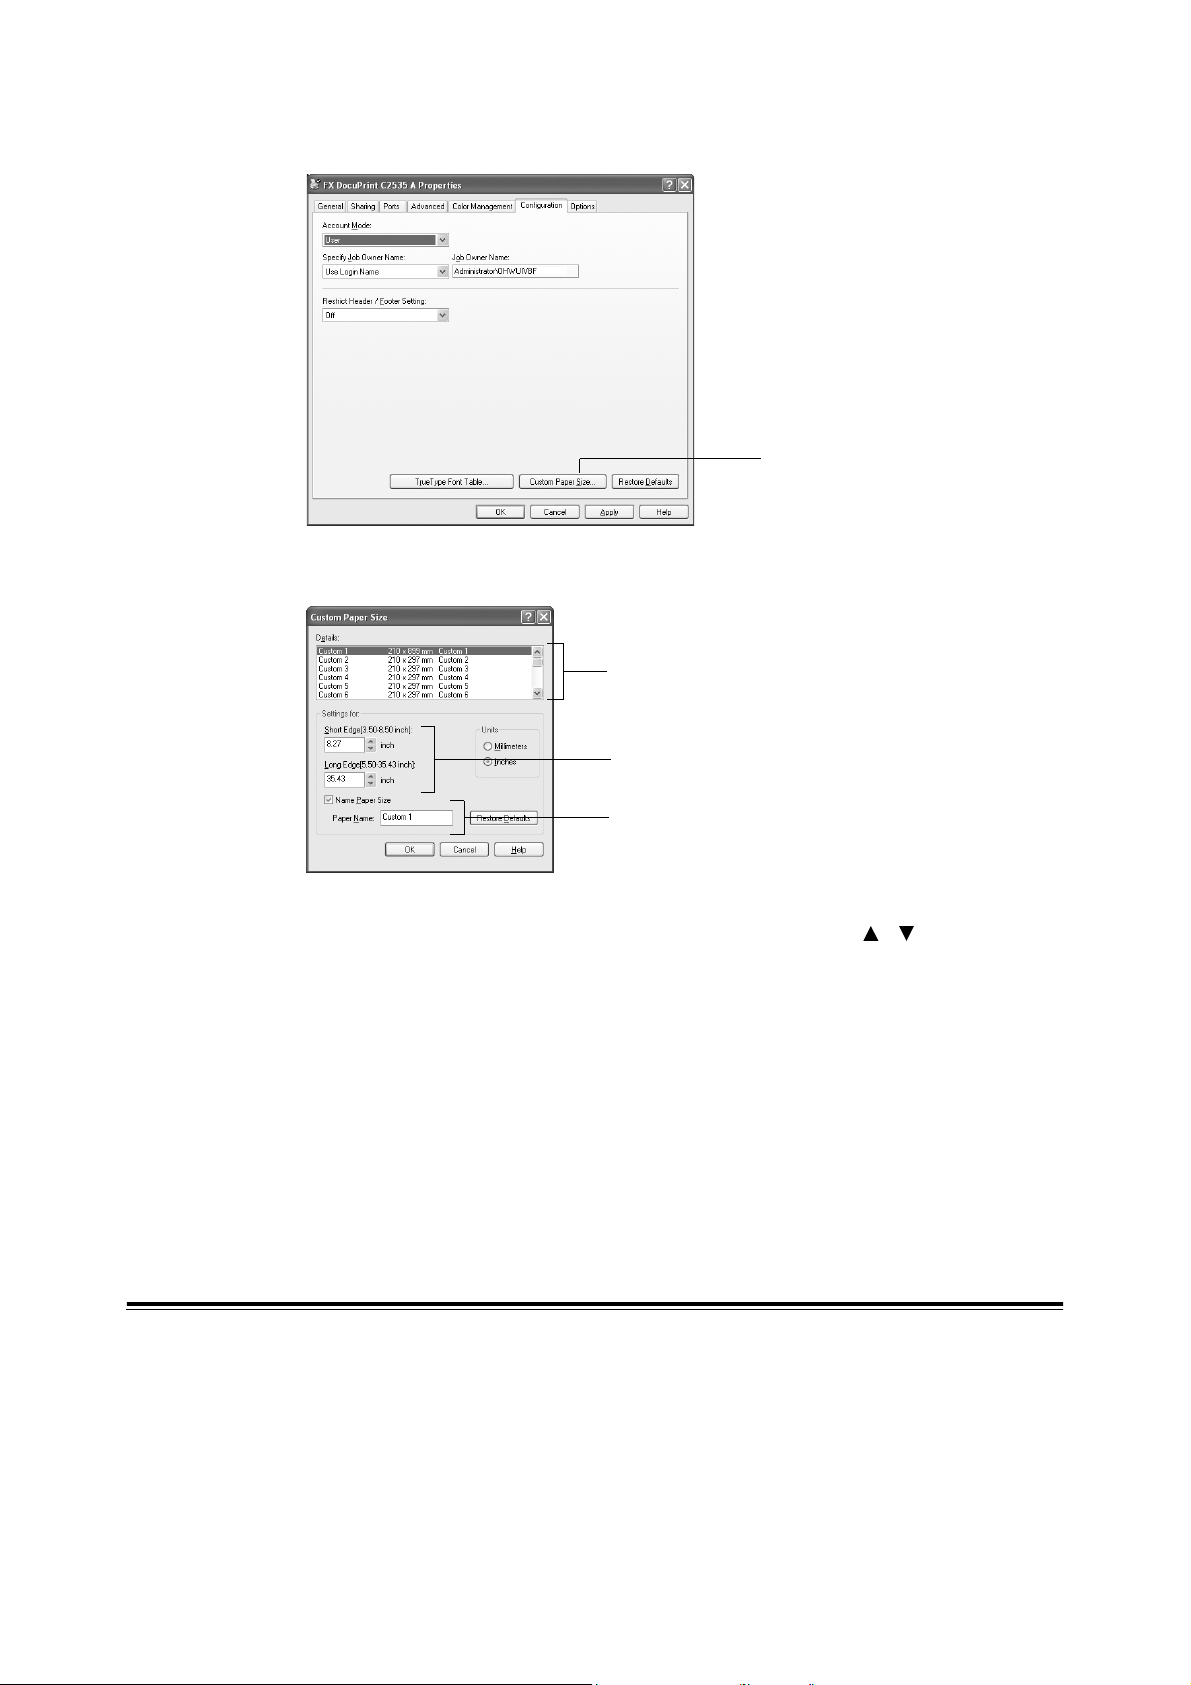
3. Click [Custom Paper Size].
3
4. Use the [Details] list box to select the custom setup you want to define.
4
5. Specify the length of the short edge and long edge under [Setting For].
You can specify the values either by entering directly or using [ ] [ ].
The length of the short edge cannot be longer than the long edge, even if it is within
the specified range. The length of the long edge cannot be shorter than the short
edge, even if it is within the specified range.
6. To assign a paper name, select the [Name Paper Size] check box, and then enter the
name in [Paper Name]. Up to 14 characters can be used for the paper name.
7. If necessary, repeat steps 4 to 6 to define another custom size.
8. Click [OK].
9. Click [OK].
Printing on Custom Size Paper
5
6
28 2 Printing
The procedure to print on custom size paper using the PCL print driver is as follows.
This section explains the procedure using WordPad on Windows XP as an example.
Note
• The way to print using the PS print driver, refer to the online help for the PS print driver.
• The way to display the printer properties dialog box differs according to the application software. Refer to
the manual of your respective application software.
Page 29
1. From the [File] menu, select [Print].
2. Select this printer as the printer to be used and click [Preferences].
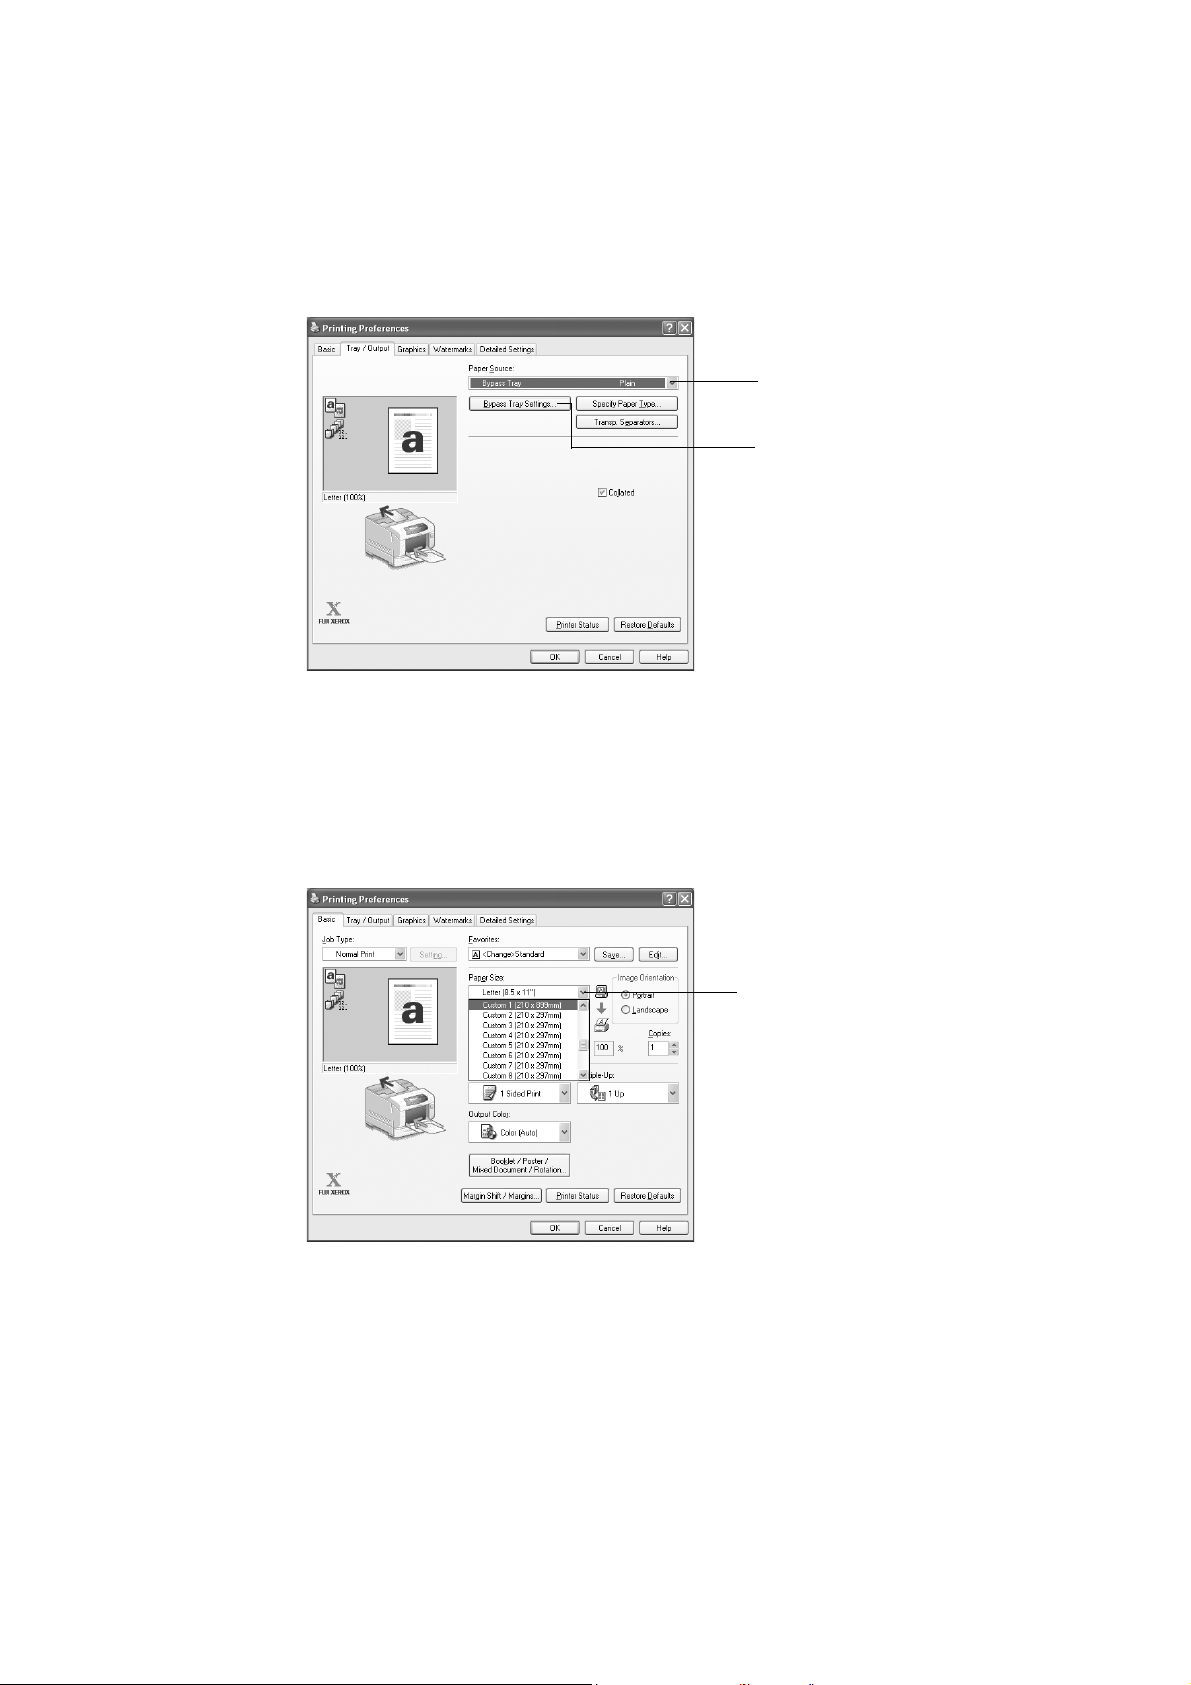
3. Click the [Tray/Output] tab.
4. From [Paper Source], select [Bypass Tray].
4
5
5. When changing the paper type setting, click [Bypass Tray Settings] to display the
[Bypass Tray Settings] dialog box. Select the appropriate paper type from [Paper
Type for Bypass Tray] and click [OK].
6. Click the [Basic] tab.
7. From [Paper Size], select the size of the original document.
7
8. From [Output Size], select the registered custom size, and then click [OK].
9. Click [Print] in the [Print] dialog box to start printing.
2.3 Printing on Custom Size Paper/Long Paper 29
Page 30
2.4 Printing Confidential Document - Secure Print
When at least 256 MB of memory are added or the internal hard disk (optional) has been
installed, you can use the secure print feature.
Note
• Set [RAM DISK] to [Enable] when the additional memory is installed. However, you do not have to set
this setting when the internal hard disk (optional) is installed.
• The data stored in the RAM disk is erased when the printer is switched off.
Important
• The hard disk may be damaged and erase important data saved in the hard disk. We recommend you
back up your data.
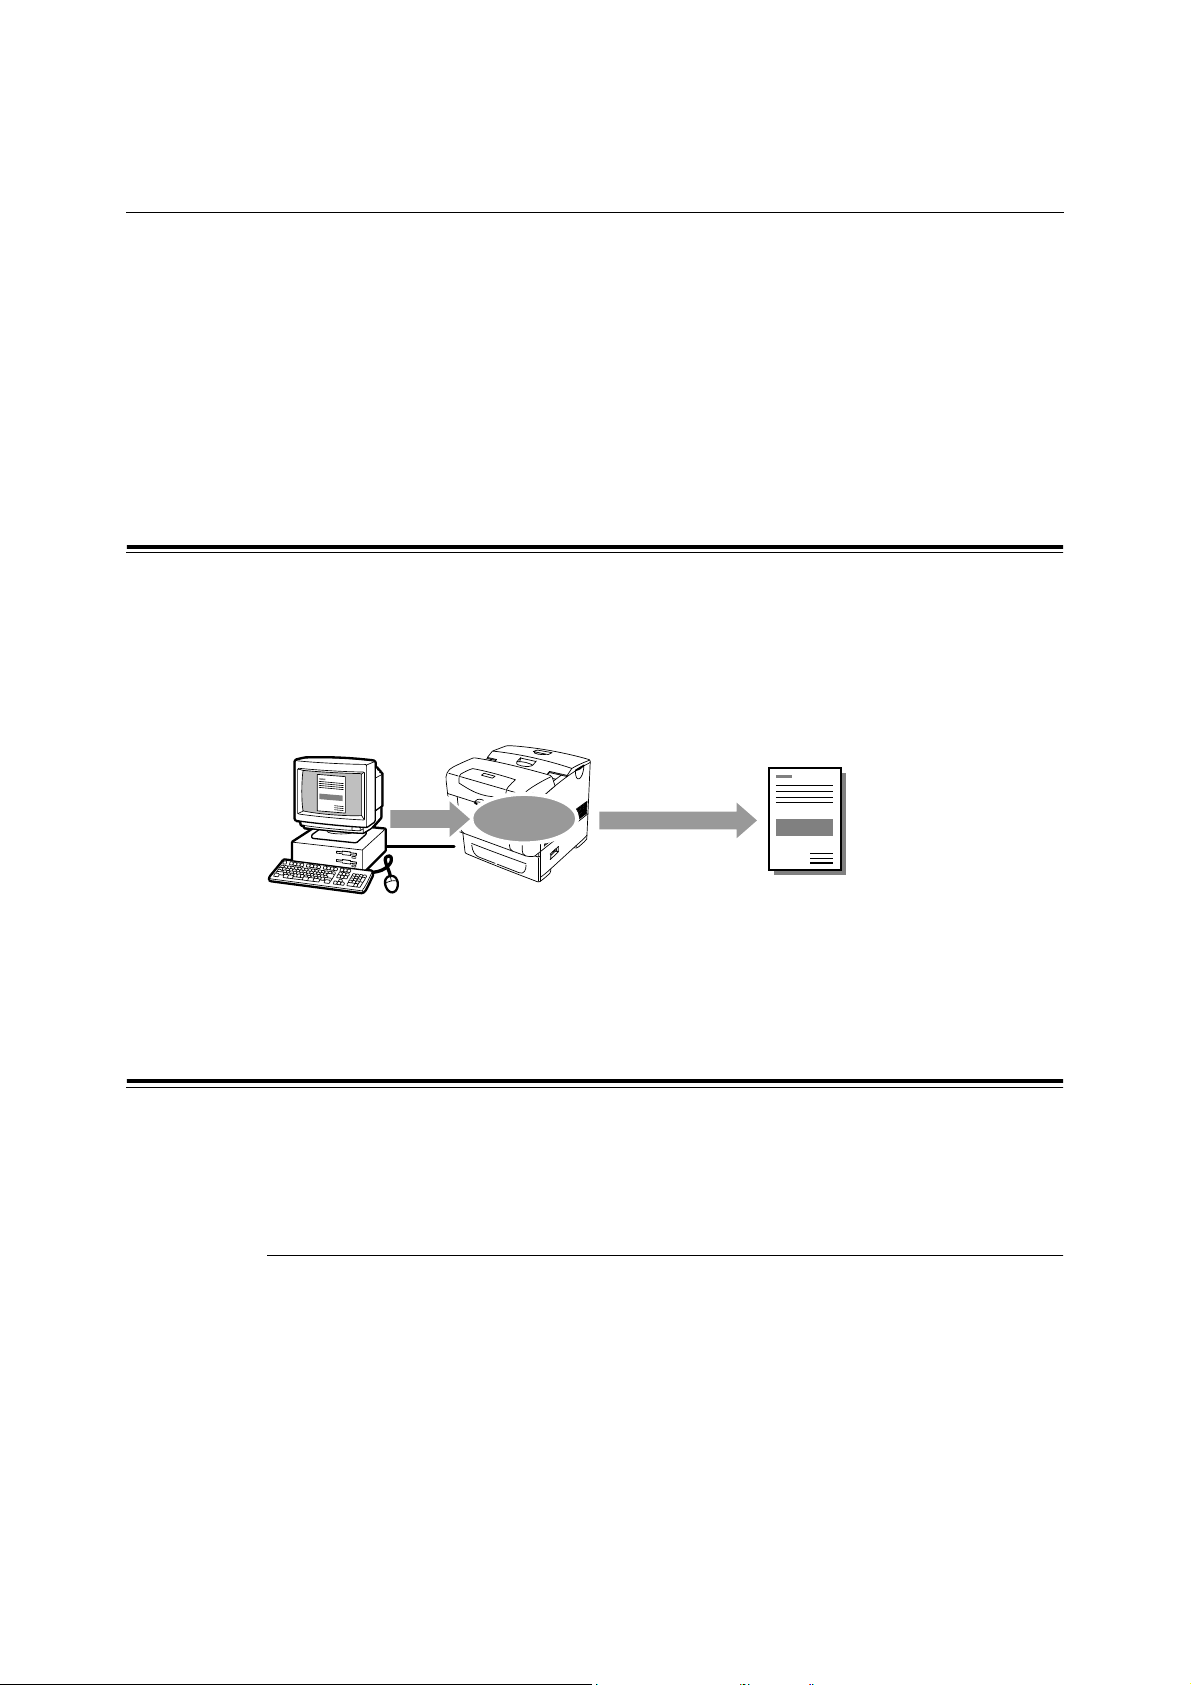
About Secure Print
Secure Print is a feature that allows you to assign a password to a print job from the
computer, send it to the printer for temporarily storing, and start printing the data from the
control panel. You can also store the print data in the printer without attaching a password.
By storing frequent-used data in the printer, you can print the data out by just operating on
this printer, and without sending them from the computer again and again.
Send
data
Note
• You can select whether to delete secure print data after printing. For details, refer to “At the Control
Panel” (P. 32).
• To delete all secure print data that has become redundant, refer to “RAM Disk” (P. 53).
Configuring Secure Print
The procedure to configure Secure Print using the PCL print driver is as follows.
First of all, carry out the secure print settings at the computer and send data to the printer
for printing. Then, carry out the output procedure at the printer to output the print data.
At the Computer
This section explains the procedure using WordPad on Windows XP as an example. The
procedure is the same for other OS.
Store in
printer
Use control panel
to output data
30 2 Printing
Note
• The way to print using the PS print driver, refer to the online help for the PS print driver.
• The way to display the printer properties dialog box differs according to the application software. Refer to
the manual of your respective application software.
1. From the [File] menu, select [Print].
2. Select this printer as the printer to be used and click [Preferences].
Page 31

3. From [Job Type] on the [Basic] tab, select [Secure Print].
3
4. Enter the user ID in [User ID].
You can enter up to 8 characters for the user ID.
4
5
6
5. To enter a password, enter it in [Password].
Enter up to 12 numeric characters.
6. From [Retrieve Document Name], select either [Enter Document Name] or [Auto
Retrieve].
If [Enter Document Name] is selected, specify a document name in [Document Name]
using up to 12 characters.
If [Auto Retrieve] is selected, the name of the document to be printed will become the
document name. However, if the printer cannot recognize a document name, it will
become the date/time (e.g. 09/03 10:30).
7. Click [OK].
8. Click [OK] on the [Basic] tab.
9. Click [Print] in the [Print] dialog box to start printing.
The document will be stored in the printer.
2.4 Printing Confidential Document - Secure Print 31
Page 32

At the Control Panel
This section explains the procedure to print data stored in the printer by Secure Print.
Note
• You can also delete, without printing, secure print data stored in the printer. For details, refer to “RAM
Disk” (P. 53).
1. Press the < > button.
2. Check that [Secure Print] is displayed and then press the < > button.
3. Press the < > or < > button until the required user is selected and then press the
< > button.
4. Move the cursor by the < > button and then enter the password (within 12 digits) by
the < > and < > buttons.
5. Press the <Eject/Set> button.
6. Press the < > or < > button until the required document is selected and then press
the < > button.
7. After printing, press the < > or < > button to delete or save the document and then
press the < > button.
8. Make sure that [Enter Qty] is displayed and press the < > or < > button to set the
print quantity.
9. Press the <Eject/Set> button. Printing will start.
Note
• The displayed user ID (up to 8 characters) is the [User ID] specified in the [Secure Print] dialog box of
the [Basic] tab of the print driver.
• For the password, enter the [Password] set in the [Secure Print] dialog box of the [Basic] tab of the print
driver. If [Password] is not configured, there will be no setting on the control panel.
The document name displayed (up to 12 characters) is the [Document Name] specified in the [Secure Print]
dialog box of the [Basic] tab of the print driver.
32 2 Printing
Page 33

2.5 Print After Checking Printing Result Sample Print
When at least 256 MB of memory are added or the internal hard disk (optional) has been
installed, you can use the sample print feature.
Note
• Set [RAM DISK] to [Enable] when the additional memory is installed. However, you do not have to set
this setting when the internal hard disk (optional) is installed.
• The data stored in the RAM disk is erased when the printer is switched off.
Important
• The internal hard disk may be damaged and erase important data saved in the internal hard disk. We
recommend you back up your data.
About Sample Print
Sample Print is a feature that allows you to store the print data of multiple copies in the
memory or the internal hard disk (optional), print out only the first set to check the print result
and if satisfactory, print the remaining copies from the control panel.
Note
• Sample print data that has become redundant can be deleted using the control panel. For details, refer
to “At the Control Panel” (P. 32).
Print only one document
Send
data
Configuring Sample Print
The procedure to configure Sample Print using the PCL print driver is as follows.
First of all, carry out the sample print settings at the computer and send data to the printer
for printing. Then, carry out the output procedure at the printer to output the print data.
At the Computer
Store in
printer
If result is
OK
If result is
not OK
Print out remaining sets
using the control panel
Stop printing using the
control panel
This section explains the procedure using WordPad on Windows XP as an example.
Note
• The way to print using the PS print driver, refer to the online help for the PS print driver.
• The way to display the printer properties dialog box differs according to the application software. Refer to
the manual of your respective application software.
1. From the [File] menu, select [Print].
2.5 Print After Checking Printing Result - Sample Print 33
Page 34

2. Select this printer as the printer to be used and click [Preferences].
3. On the [Basic] tab, specify at least 2 for [Copies].
4. Select [Sample Print] from [Job Type].
Note
• You must specify at least 2 for [Copies] before [Sample Print] can be selected.
4
5. Enter the user ID in [User ID].
You can enter up to 8 characters for the user ID.
5
6
6. From [Retrieve Document Name], select either [Enter Document Name] or [Auto
Retrieve].
If [Enter Document Name] is selected, specify a document name in [Document Name]
using up to 12 characters.
If [Auto Retrieve] is selected, the name of the document to be printed will become the
document name. However, if the printer cannot recognize a document name, it will
become the date/time (e.g. 09/03 10:30).
7. Click [OK].
34 2 Printing
8. Click [OK] on the [Basic] tab.
9. Click [Print] in the [Print] dialog box to start printing.
Page 35

At the Control Panel
This section explains the procedure to print and delete data stored in the printer by Sample
Print.
1. Press the < > button.
2. Press the < > or < > button until [Sample Print] is displayed and then press the
< > button.
3. Press the < > or < > button until the required user is selected and then press the
< > button.
4. Press the < > or < > button until the required document is selected and then press
the < > button.
5. Press the < > or < > button to print or delete the saved document and then press
the < > button.
6. Make sure that [Enter Qty] is displayed and press the < > or < > button to set the
print quantity.
7. Press the <Eject/Set> button.
The document will be printed or deleted.
Note
• The user ID displayed (up to 8 characters) is the [User ID] set in the [Sample Print] dialog box of the
[Basic] tab of the print driver.
• The document name displayed (up to 12 characters) is the [Document Name] set in the [Sample Print]
dialog box of the [Basic] tab of the print driver.
2.5 Print After Checking Printing Result - Sample Print 35
Page 36

3 About Paper
3.1 About Paper
Using unsuitable paper may lead to paper jams, poor print quality, breakdown and damage
to your printer. In order to use the features of this printer effectively, we suggest using the
paper that is recommended here.
If you use paper that is not recommended, contact our Customer Support Center or your
dealers.
Usable Paper
The types of paper that can be used on this printer are as follows:
Paper tray Size Paper type (Weight) Loading Capacity
Bypass tray
Paper tray
*1
For details on how to load envelopes, refer to “Loading Envelopes” (P. 24).
*2
When printing on paper more than 356 mm in length, the paper has to be fed one sheet at a time and supported by
hand. Also, at least 256 MB of memory are required.
*3
Refer to “Standard Paper” (P. 37).
A4 , B5 , A5 ,
Legal (8.5 × 14") ,
Folio (8.5 × 13") ,
Letter (8.5 × 11" ) ,
Executive (7.25 × 10.5") ,
Envelope
C5),
Custom (88.9 × 139.7 mm to 215.9 ×
900.0 mm)
A4 , B5 , A5 ,
Legal (8.5 × 14") ,
Folio (8.5 × 13") ,
Letter (8.5 × 11" ) ,
Executive (7.25 × 10.5")
*1
(Monarch, Com 10, DL,
*2
Plain/Plain S2 (60 - 80 g/m2),
Bond/Bond S2 (81 - 105 g/m
Heavyweight 1/Heavyweight 1 S2
(106 - 163 g/m
Heavyweight 2/Heavyweight 2 S2
(164 - 216 g/m
Transparency,
Labels,
Coated 1/Coated 1 S2
(60 - 105 g/m
Coated 2/Coated 2 S2
(106 - 163 g/m
Coated 3/Coated 3 S2
(164 - 216 g/m
Envelope
Plain (60 - 80 g/m
Bond (81 - 105 g/m
Heavyweight 1 (106 - 163 g/m
Coated 1 (60 -105 g/m
2
)
2
)
2
),
2
),
2
),
2
),
2
),
2
),
2
2
)
150 sheets
(Standard paper
15 mm or below
Important
• Load coated paper
piece by piece.
When you load
several sheets, the
paper becomes
damp and two or
more sheets will be
fed at the same time
into the printer in
folds. This may
cause a malfunction.
550 sheets
(Standard paper
61 mm or below
)
*3
*3
) or
) or
Important
• Printing on paper whose setting is different from the paper size or paper type selected on the print driver
• The printed image may fade due to moisture such as water, rain or vapor. For details, contact our
• Print quality may be poor or the paper can get wrinkled depending on the print media type or status.
Note
• For details on the procedure to print on transparencies, envelopes, or custom size paper, refer to “2
36 3 About Paper
or loading paper into unsuitable paper tray for printing may lead to paper jams. To ensure that printing is
correctly done, select the correct paper size, paper type, and paper tray.
Customer Support Center or your dealers.
Printing” (P. 22).
Page 37

Standard Paper
The following table shows the standard paper for this printer.
Paper name Weight Paper type Paper characteristics and caution on usage
XC-4200DP Letter
(standard paper for
black/white printing)
XC Premier 80gsm A4
(standard paper for
color printing)
FX P Paper A4
20 lb Plain Medium weight papers for internal distribution
and general office use
2
80 g/m
65 g/m
Plain Paper that rarely bleeds when stacked and that
is ideal for both black/white and color printing for
general office use
2
Plain High quality paper in widespread use such as
project books and color samples
Plain Paper
This printer can print on paper that is commonly sold. Select paper suitable for use by
referring to the table below. However, we recommend the use of the standard paper for
clearer printing.
Paper feed Weight
Bypass tray
Paper tray
60 - 216 g/m
60 - 163 g/m
2
2
Special Media
The following types of paper can be used for printing on this printer. Load these types of
paper in the bypass tray.
Media Weight Paper size Paper type
Transparencies - Letter Transparency
A4
Labels - Letter Label
Envelopes A4
Cover Stock
Cardboard 100 lb
Note
• For details on special media, such as heavyweight paper, envelopes, and coated paper not listed in the
table, contact our Customer Support Center or your dealers.
176 g/m
216 g/m
2
2
Letter Heavyweight 2
Letter Heavyweight 2
3.1 About Paper 37
Page 38

Duplex Printing Paper Types and Sizes
The available paper types and sizes for 2 sided printing are as follows:
Paper size Paper type
A4
B5
A5
Letter (8.5 × 11")
Folio (8.5 × 13")
Legal (8.5 × 14")
Executive
Custom*
*Duplex printing supports user-specified print media that are 149 mm to 215.9 mm wide and 210 mm to
355.6 mm long.
Unusable Paper
Avoid using the following paper types as they can cause paper jams or damage to the
printer.
• Transparency sheets other than those recommended. (Fuji Xerox Full Color
Transparencies or other)
• Paper that is too thick or too thin
Plain, Bond, Heavyweight 1 (106 - 163 g/m
Coated 2 (106 - 163 g/m
2
)
2
), Coated 1 (60 - 105 g/m2),
• Paper with one face already printed using another printer or copier, or paper already
printed with ink
• Folded, creased or torn paper
• Damp or wet paper
• Wavy or warped paper
• Sheets stuck together by static electricity
• Layered or adhesive paper
• Postcards with pictures
• Coated paper
• Colored paper with a treated surface
• Paper printed with ink that cannot withstand high temperatures.
• Heat-sensitive paper
38 3 About Paper
Page 39

• Carbon paper
• Paper with staples, paper clips, tape or ribbons attached
• Paper with a rough surface such as textured or fiber form paper
• Using acidic paper can cause the characters to fade over time. Use neutral paper to
prevent this problem.
• Envelopes with a rough surface or clips attached
• Label sheets where the backing has peeled away or are pre-cut.
Important
• If background image suppression agent sticks to the feed roll when feeding postcards with pictures, the
postcards may not feed.
Storing and Handling Paper
Even for suitable papers, poor storage conditions may lead to a change in the paper quality,
paper jams, poor print quality and printer breakdown.
• Store paper in the following locations: Temperature of 10 to 30 °C with a relative humidity
of 30 to 65%
• After opening a ream of paper, use the original cover sheets to wrap up the paper not
used and store it in a cabinet or a location with low humidity.
• Do not let the paper stand but store it in a flat location.
• Ensure that the paper is stored properly without being bent or curled.
• Store the paper in a location not exposed to direct sunlight.
3.1 About Paper 39
Page 40

3.2 Loading Paper
Loading Paper in the Paper Tray
This section describes how to load paper in the standard and optional paper trays. All trays
are loaded the same way.
Important
• Do not remove the tray during printing. It may cause a paper jam.
1. Pull the tray out of the printer until it stops.
Hold the tray with both hands, lift the front
slightly, and remove it from the printer.
2. Slide the width guides to the edge of the
tray. The width guides should be fully
extended.
Note
• When loading paper that is 8.5 inches wide such as
Letter or Legal size paper, set the tab on the side of
the tray to the [8.5] position.
3. Squeeze the length guide and slide it to the
edge of the tray.
4. Before loading the print media, flex the
sheets back and forth, and then fan them.
Straighten the edges of the stack on a level
surface.
5. Place the print media into the tray with the recommended print side face up.
40 3 About Paper
Page 41

Important
• Do not exceed the maximum fill line in the tray. Overfilling the tray may cause paper jams.
6. Slide the width guides and length guide
until they rest lightly against the edge of the
print media stack.
7. Insert the tray into the printer, and push
until it stops.
Important
• Do not use excessive force on the tray. Doing so could
damage the tray or the inside the printer.
Loading Paper in the Bypass Tray
In addition to plain paper, the bypass tray can use various other sizes and types of print
media such as envelopes and transparencies.
Make sure of the following points when loading paper in the bypass tray.
• You can load up to 150 sheets or a stack of paper (60 g/m
high.
• The bypass tray accepts print media within the following dimensions:
- Width: 88.9 mm to 215.9 mm
- Length: 139.7 mm to 900.0 mm
• You can load paper (64 g/m
mm in length has to be fed one sheet at a time and supported by hand. When a mismatch
of paper sizes occurs, follow the instructions displayed on the control panel.
Important
• Make sure of the following points to avoid any troubles during printing.
• Do not load different types of paper at the same time.
• Use high quality paper for laser printers to print at high quality. Refer to “3.1 About Paper” (P. 36) for
details.
• Do not remove or add paper to the bypass tray when printing or if there is any paper still in the bypass
tray. Doing so may cause a paper jam.
• Do not put any objects other than paper on the bypass tray. Also, do not push or force down the
bypass tray.
2
to 105 g/m2) up to 900 mm long. However, paper over 356
2
to 216 g/m2) less than 15 mm
3.2 Loading Paper 41
Page 42

1. Gently pull open the bypass tray cover, and
pull out the extension tray.
2. Slide the width guides to the edge of the
tray. The width guides should be fully
extended.
3. Insert all media face down and top edge
first into the bypass tray.
Important
• Do not force the paper.
4. Slide the width guides until they rest lightly
against the edge of the paper stack.
Important
• Be careful not to bend the paper.
Note
• When you print on paper fed from the bypass tray, configure the paper size and type in the print driver.
• When [Bypass Mode] is set to [Panel Specified], you need to set the paper type and size settings for the
tray on the control panel in advance. For details, refer to “3.3 Setting Paper Types and Sizes” (P. 43).
42 3 About Paper
Page 43

Loading Envelopes in the Bypass Tray
To load envelopes that are less than or equal to 220 mm (8.66 inches) in width in the bypass
tray, insert the envelopes with the flaps open and at the rear. To load envelopes that are
over 220 mm (8.66 inches) in width in the bypass tray, insert the envelopes with the flaps
closed and at the right side. The print side must be facing down. You can load envelopes
up to the maximum fill line in the tray at one time.
Important
• For best performance, do not use envelopes that:
• Have excessive curl or twist
• Are stuck together or damaged in any way
• Contain windows, holes, perforations, cutouts, embossing
• Use metal clasps, string ties, or metal folding bars
• Have an interlocking design
• Have postage stamps attached
• Have any exposed adhesive when the flap is in the sealed or closed position
• Have nicked edges or bent corners
• Have rough, cockle, or laid finishes
3.3 Setting Paper Types and Sizes
Setting Paper Trays
When loading paper in the 550/1100 Sheet Feeder (optional), it is necessary to set the
paper type on the control panel.
When loading paper in the bypass tray, set the paper size and type on the print driver when
printing. When [Bypass Mode] has been set [Panel Specified] ([DriverSpecified] by default)
on the control panel, you can set the paper size and type on the control panel.
This section describes how to set the paper size and type on the control panel.
Note
• When you set [Bypass Mode] to [Panel Specified], printing will be performed only when the settings for
the paper size and type configured on the print driver when printing match the settings on the control
panel. When a mismatch of paper sizes occurs, follow the instructions displayed on the control panel.
• You can also display the message to set the paper size and type on the control panel every time you
load paper into each tray. Refer to the “4.2 Description of Menu Items” (P. 48) for details.
3.3 Setting Paper Types and Sizes 43
Page 44

Setting Paper Types
Important
• Paper type settings must match those of the actual paper loaded in the trays. Otherwise, image quality
cannot be processed accurately. Toner may not fuse properly on the paper, resulting in dirty and poor
quality printouts.
Refer to
• “Usable Paper” (P. 36)
1. Press the <Menu> button to display the Menu screen.
2. Check that [Tray Settings] is displayed, then press the < > or <Eject/Set> button.
3. Press the < > or < > button until [Paper Type] is displayed, then press the < > or
<Eject/Set> button.
4. Press the < > or < > button until the required tray is displayed, then press the < >
or <Eject/Set> button.
5. Press the < > or < > button until the correct paper type is displayed for the loaded
paper, then press the <Eject/Set> button.
6. Press the <Menu> button.
Setting Paper Sizes
Refer to
• “Usable Paper” (P. 36)
1. Press the <Menu> button to display the Menu screen.
2. Check that [Tray Settings] is displayed, then press the < > or <Eject/Set> button.
3. Press the < > or < > button until [Paper Size] is displayed, then press the < > or
<Eject/Set> button.
4. Make sure that [Bypass Tray] is displayed, then press the < > or <Eject/Set> button.
5. Press the < > or < > button until the correct paper size and direction are displayed
for the loaded paper, then press <Eject/Set> button.
Note
• When you set a custom size paper, select [Driver Size].
6. Press the <Menu> button.
44 3 About Paper
Page 45

4 Setting on the Control Panel
4.1 Overview of the Menu
Menu Configuration
The menus that can be accessed from the control panel are as follows:
Menu Content
Tray Settings Use the [Tray Settings] menu to define the print media loaded in each tray.
Report/List Use the [Report/List] menu to print various types of reports and lists.
Billing Meter Use the [Billing Meter] menu to display the printed paper counts on the
control panel.
Admin Menu • [Network Settings]
Use this menu to configure the network settings for the printer.
• [ParallelSettings]
Use this menu to configure the parallel interface.
• [USB Settings]
Use this menu to configure the USB interface.
• [System Settings]
Use this menu to make the printer operation settings such as for alarm
and Power Saver mode.
• [Maintenance Mode]
Use this menu to initialize the NVM, configure the plain paper or labels
quality adjustment settings. Also, use this menu to adjust the reference
voltage for the transfer roller of each paper type.
•[PostScript]
Use this menu to configure the PostScript settings.
• [Panel Settings]
Use this menu to specify whether to limit the menu operations with a
password.
Refer to
• Details for each menu: “4.2 Description of Menu Items” (P. 48)
Each menu is configured in different levels. Set the printer settings by selecting the
objective menus or items structure level.
The following diagram shows some parts of the menu structure. The structure differs
depending on the menu.
4.1 Overview of the Menu 45
Page 46

Changing Menu Settings
Basic Operations (Example: Changing the Power Saver Timer)
Press one of the following buttons to display the menu screen or to set the printer by
browsing though each menu structure. In this example, you set the transitional time to the
power saver mode 1 to 30 mins.
Ready to print
1. To display the menu screen, press the <Menu> button at the print screen.
Menu
Tray Settings
2. To move between items in the same level, press the < > or < > button.
Menu
Admin Menu
3. To move between structure levels, press the < > (or the <Eject/Set>
button) or < > button. Press the < > button to go to the lower level or
press the < >button to return to the upper level.
Admin Menu
Network Settings
4. Press the < > or < > button until [System Settings] in the same level
is displayed.
Admin Menu
System Settings
5. Press the < > or <Eject/Set> button to go to the lower level.
System Settings
Power Saver Mode
6. Press the < > or < > button until [PowerSaver Timer] in the same
level is displayed.
System Settings
PowerSaver Timer
7. Press the < > or <Eject/Set> button to go to the lower level.
PowerSaver Timer
Mode 1
8. Press the < > or <Eject/Set> button to go to the lower level.
Mode 1
3 min
*
9. Press the < > or < > button to set the proposed value.
46 4 Setting on the Control Panel
Continued on next page
Page 47

Continued from previous page
Mode 1
30 min
10. Press the <Eject/Set> button to confirm your settings. The
settings that have been confirmed are displayed with the
affix “*”.
Mode 1
30 min
*
11. Press the < > or the <Cancel Job> button to move one
level up.
PowerSaver Timer
Mode 1
12. Press the <Menu> button to quit the menu operation and
return to the print screen.
Ready to print
Note
• If you want to change values after you have confirmed them by pressing the <Eject/Set> button (which
has the affix “*”), you need to set them from the start again.
Initializing Configured Values
Display the item you want to initialize and then press both the < > and < > buttons at the
same time.
Once the change process is completed, the factory defaults will be displayed. Press the
<Eject/Set> button to confirm the value.
4.1 Overview of the Menu 47
Page 48

4.2 Description of Menu Items
This section describes the items that can be configured on each menu.
Tray Settings
Use the Tray Settings menu to define the paper size and type loaded in each tray.
Item Description
Display Popup Specifies whether to display the message that prompts you to set the paper size and
type or not every time you load paper to the bypass tray or 550 Sheet Feeder (optional).
When you select [On], the message that prompts you to set the paper size and type is
displayed.
• [Bypass Tray] (default: [Off])
• [Paper Tray] (default: [Off])
Bypass Mode Specifies the way to set the paper type and size settings to be loaded in the bypass tray.
• [Panel Specified]
You can specify the paper type and size settings on the control panel. Printing can be
done only when the settings on the print driver matches the settings on the control
panel. When a mismatch of paper sizes occurs, follow the instructions displayed on
the control panel.
• [DriverSpecified] (default)
You cannot specify the settings on the control panel. Printing is done using the
settings on the print driver.
Paper Type Specifies the type of paper loaded in each tray.
• [Tray 1] (default: [Plain])
• [Tray 2] (default: [Plain])
• [Tray 3] (default: [Plain]
• [Tray 4] (default: [Plain])
• [Bypass Tray] (default: [Plain])
Note
• [Tray 2], [Tray 3], and [Tray 4] are displayed only when the optional sheet feeder is
installed.
• [Bypass Tray] is displayed only when the [Bypass Mode] is set to [Panel Specified].
Refer to
• “Setting Paper Types” (P. 44)
Paper Size Specify the paper size and orientation for the bypass tray. This item is displayed when
the [Bypass Mode] is set to [Panel Specified].
• [Bypass Tray] (default: [Driver Size])
Refer to
• “Setting Paper Sizes” (P. 44)
Note
• When the size or type of paper that is loaded is different from the setting, the print quality may fall or
paper may jam. Specify the correct paper type and size.
• When installing the optional sheet feeders if [Paper Source] is set to [Auto] on the print driver, the
feeding tray is automatically specified according to the setting on the control panel. Also, when installing
two optional sheet feeders and the paper size and type setting for each tray is the same, printing
continues by changing the feeding tray if the paper in the specified tray has run out.
48 4 Setting on the Control Panel
Page 49

Report/List
Prints various types of reports and lists.
Note
• The reports and lists are printed on A4 size paper. Load A4 size paper into the tray. Also, when optional
sheet feeders are installed, do not load A4 size paper into the bypass tray but into Tray 1.
• For the procedures about printing reports and lists, refer to “6.2 Printing Reports/Lists” (P. 86).
• The reports and lists are all printed in English.
Item Description
Printer Settings Prints a list of the current printer settings and the installed options.
Panel Settings Prints a detailed list of all the settings on the control panel menus.
PCL Fonts List Prints a list of PCL fonts.
PS Fonts List Prints a list of PostScript fonts.
Job History Prints a detailed list of the processed print jobs. This list contains the latest 22 print
jobs.
Error History Prints an error history. This list contains the latest 42 errors.
Demo Page You can print a sample of the document to check the printer’s performance.
Stored Documents Prints a list of documents stored in the printer when using the secure print or sample
print feature. This list can be printed when at least 256 MB of memory are added or the
internal hard disk (optional) has been installed.
Refer to
• “Printing Confidential Document - Secure Print” (P. 30)
• “Print After Checking Printing Result - Sample Print” (P. 33)
Billing Meter
Displays the number of processed print jobs on the control panel. The meter is divided
according to the color modes.
Note
• For the procedures about checking the number of printed pages, refer to “Checking Total Printed Pages
on Meter” (P. 96).
Item Description
Meter 1 Displays the total number of printed pages in black/white printing.
Meter 2 Normally not used.
Meter 3 Displays the total number of pages printed in color.
4.2 Description of Menu Items 49
Page 50

Admin Menu
This menu contains 7 sub menus, [Network Settings], [ParallelSettings], [USB Settings],
[System Settings], [Maintenance Mode], [PostScript], and [Panel Settings].
Network Settings
Specifies printer settings affecting jobs sent to the printer through a network port.
Note
• The settings in the [Network Settings] cannot be set when entering this menu during printing.
• You need to restart the printer to activate the new settings. After making the settings, turn off the printer
and then turn it on again.
Item Description
Ethernet Specifies the communication speed and the modes of Ethernet.
• [Auto] (default)
Automatically changes between 10Base half, 10Base full, 100Base half, and
100Base full.
•[10Base Half]
•[10Base Full]
• [100Base Half]
• [100Base Full]
TCP/IP Specifies the settings to use the TCP/IP protocol.
Get IP Address Specifies whether to automatically or manually retrieve the IP address.
• [DHCP/Autonet] (default)
Automatically sets the IP address.
• [BOOTP]
Uses BOOTP to set the IP address automatically.
•[RARP]
Uses RARP to set the IP address automatically.
• [DHCP]
Uses DHCP to set the IP address automatically.
• [Panel]
You can set the IP address manually by entering it on the operator panel.
IP Address,
Subnet Mask,
Gateway Address
Protocol Set [Enable] when using the protocol. When [Disable] is selected, the protocol cannot
These items are used to check the addresses that have been obtained automatically or
to specify addresses manually. Enter the address in the format of xxx.xxx.xxx.xxx. You
can specifies values in the range of 0 to 255 for xxx.
Important
• To set addresses manually, set the [Get IP Address] to [Panel].
• IP addresses are managed in the entire network. An incorrect IP address may affect
the whole network. For the addresses you need to set manually, contact your network
administrator.
be activated.
• [LPD] (default: [Enable])
• [Port9100] (default: [Enable])
• [IPP] (default: [Enable])
• [SMB TCP/IP] (default: [Enable])
• [SMB NetBEUI] (default: [Enable])
• [FTP] (default: [Enable])
• [SNMP]-[UDP] (default: [Enable])
• [StatusMessenger] (default: [Enable])
• [InternetServices] (default: [Enable])
50 4 Setting on the Control Panel
Page 51

Item Description
IP Filter Specifies blocking the reception of data from certain IP addresses.
No. n
(n: 1 to 5)
Initialize NVM Initializes network data stored in NVM. The NVM is a nonvolatile memory that stores
Adobe Protocol Specifies the communications protocol for PostScript.
You can set up to five IP addresses ([No. 1] to [No. 5]). [No. 1] has priority over the
others. To set multiple filters, set IP address in descending order from the address
network with the narrowest range.
• [Address]
Sets the IP address for No. n. You can set values between 0 and 255.
• [Mask]
Sets the mask for No. n. You can set values between 0 and 255.
• [Mode]
Specifies the mode to limits for the registered IP address from [Off] (default), [Accept],
or [Reject].
Note
• The IP filter setting can be set on the CentreWare Internet Services. For example to
set the IP filter, refer to “6.3 Checking / Managing the Printer Status on a Web
Browser” (P. 87).
the printer settings even after power off. Initializing the NVM will revert the value for
each item of the [Network Settings] menu to default.
• [Auto] (default)
Used when no special processing is required for data.
• [Standard]
Used when the communication protocol is in ASCII format.
•[BCP]
Used when the communication protocol is in binary format.
•[TBCP]
Used when the communication protocol supports both ASCII and binary data to
switch between them according to the specified control code.
•[Binary]
Used when no special processing is required for data.
ParallelSettings
Specifies the settings for the parallel interface.
Note
• You need to restart the printer to activate the new settings. After making the settings, turn off the printer
and then turn it on again.
Item Description
ECP Specifies the ECP communication mode of the parallel interface.
• [Enable] (default)
The ECP communication mode is enabled.
• [Disable]
The ECP communication mode is disabled.
Adobe Protocol Specifies the communications protocol for PostScript.
•[Auto]
Used when no special processing is required for data.
• [Standard]
Used when the communication protocol is in ASCII format.
•[BCP]
Used when the communication protocol is in binary format.
• [TBCP] (default)
Used when the communication protocol supports both ASCII and binary data to
switch between them according to the specified control code.
•[Binary]
Used when no special processing is required for data.
4.2 Description of Menu Items 51
Page 52

USB Settings
Specifies the settings for the USB interface.
Note
• You need to restart the printer to activate the new settings. After making the settings, turn off the printer
and then turn it on again.
Item Description
Adobe Protocol Specifies the communications protocol for PostScript.
• [Auto]
Used when no special processing is required for data.
• [Standard]
Used when the communication protocol is in ASCII format.
•[BCP]
Used when the communication protocol is in binary format.
• [TBCP] (default)
Used when the communication protocol allows both ASCII and binary data to switch
between them according to the specified control code.
•[Binary]
Used when no special processing is required for data.
System Settings
[System Settings] menu is used to make the printer operation settings such as for alarm and
power saver mode.
Item Description
Power Saver Mode Specifies whether to enable the transition to power saver mode 2 or not. Select
[Disable] to disable the setting.
• [Mode 2] (default: [Enable])
PowerSaver Timer Specifies the transitional time to the power saver mode.
• [Mode 1] (default: [3min])
Specify the transitional time to the power saver mode 1 between 1 and 60 minutes in
increments of 1 minute. After the specified period of time has passed from the last
print job, the printer enters the power saver mode 1.
• [Mode 2] (default: [5min])
Specify the transitional time to the power saver mode 2 between 5 and 120 minutes
in increments of 1 minute. After the specified period of time has passed from entering
the power saver mode 1, the printer enters the power saver mode 2.
Note
• When [Power Saver Mode] is set to [Disable] (default: [Enable]), the printer does not
shift to the power saver mode 2.
Refer to
• Power saver mode: “1.3 Power Saver Modes” (P. 17)
• Procedures to set the transitional time: “Basic Operations (Example: Changing the
Power Saver Timer)” (P. 46)
Alert Tone Specifies whether to turn on the alarm when an error occurs in the printer. The default is
[On]. You cannot adjust the sound volume.
Time-Out You can cancel a printing process when it goes beyond a set time period. Set the time,
until the print job is canceled, here. When this timeout expires, the print job is canceled.
• [5 sec] to [300 sec] (default: [30 sec])
Specifies the amount of time in increments of 1 second the printer waits for additional
data before it cancels the job.
•[Off]
Cannot cancel.
52 4 Setting on the Control Panel
Page 53

Item Description
Auto Log Print Specifies whether to automatically print information about the printed data that has
been processed in the printer ([Job History Report]).
• [Off] (default)
Select this if you do not want to print the [Job History Report] automatically even if the
number of print jobs exceeds 22.
•[On]
Automatically prints a report when the number of print jobs reaches 22.
Note
• You cannot set this during printing.
• You can print the [Job History Report] from the [Report/List] menu.
• You need to restart the printer to activate the new settings. After making the settings,
turn off the printer and then turn it on again.
Print ID Select this to print the user ID on a specified position.
• [Off] (default)
User ID is not printed.
• [Top Left]
Prints the user ID on the top left of the sheet of paper.
• [Top Right]
Prints the user ID on the top right of the sheet of paper.
• [Bottom Left]
Prints the user ID on the bottom left of the sheet of paper.
• [Bottom Right]
Prints the user ID on the bottom right of the sheet of paper.
Print Text Specifies whether the printer outputs PDL data, which is not supported by the printer, as
text when the printer receives it. Text data is printed on A4 or Letter size paper.
• [Off] (default)
Does not print the received data.
•[On]
Prints the received data as text data.
Banner Sheet Specifies the settings for the banner sheet.
• [Insert Position] (default: [Off])
Selects the position to output the banner sheet from [Off], [Front], [Back], and [Front
& Back]. When [Off] is selected, the banner sheet is not printed.
• [Specify Tray] (default: [Tray 1])
Specifies the tray from which the banner sheet is output from trays 1 to 4 or bypass
tray.
RAM Disk To allocate memory to the RAM Disk file system for the secure print and proof print
features.
• [Enable]
Allocates memory for using the secure print and proof print features.
• [Disable]
Does not allocate memory for using the secure print and proof print features.
Note
• This item is displayed when at least 256 MB of memory are added. However, when
the internal hard disk (optional) is installed, this item is not displayed.
4.2 Description of Menu Items 53
Page 54

Item Description
Substiture Tray Specifies whether to print on paper loaded in another tray when there is no paper left in
the tray selected by the auto tray selection feature. This item is displayed when the
optional sheet feeder is installed.
• [Off] (default)
Select this not to replace paper but display a message prompting you to load paper.
• [Larger Size]
Select this to replace the paper with a larger size paper before printing in 100%
magnification ratio.
• [Nearest Size]
Select this to replace the paper with the nearest size paper before printing in 100%
magnification ratio.
• [Bypass Feed]
Select this to print on paper loaded in the bypass tray.
Note
• If a computer issues the instruction about paper selection, it overwrites this setting.
Maintenance Mode
Use this menu to initialize the NVM, configure the plain paper or labels quality adjustment
settings. Also, use this menu to adjust the reference voltage for the transfer roller of each
paper type.
Item Description
Adjust PaperType Specifies the paper type of plain paper and labels.
• [Plain] (default: [Heavy])
Selects the density for the plain paper from [Light] and [Heavy].
• [Labels] (default: [Label 2])
Selects the density for the labels from [Label 1] and [Label 2].
Adjust BTR Specifies the value of the reference voltage for the transfer roller. You can specify the
value between -20 to 30 for each paper type.
• [Plain] (default: [0])
• [Bond] (default: [0])
• [Transparency] (default: [0])
• [Heavyweight 1] (default: [0])
• [Heavyweight 2] (default: [0])
• [Labels] (default: [0])
• [Coated 1] (default: [0])
• [Coated 2] (default: [0])
• [Coated 3] (default: [0])
• [Envelope] (default: [0])
Adjust Fuser Specifies the fuser temperature. You can specify the value between -4 to 2 for each
paper type.
• [Plain] (default: [0])
• [Bond] (default: [0])
• [Transparency] (default: [0])
• [Heavyweight 1] (default: [0])
• [Heavyweight 2] (default: [0])
• [Labels] (default: [0])
• [Coated 1] (default: [0])
• [Coated 2] (default: [0])
• [Coated 3] (default: [0])
• [Envelope] (default: [0])
Auto Regi Adjust Adjust the color registration automatically. Selecting [On] adjusts the color registration
automatically. The default is [On].
54 4 Setting on the Control Panel
Page 55

Item Description
Adjust ColorRegi Correct the color registration manually. For details, refer to the Quick Reference Guide
Adjusting Color Registration.
• [Auto Adjust]
Correct the color registration.
• [Color Regi Chart]
Prints the correction chart.
•[Enter Number]
Enter the number to correct the registration.
Clean Developer While printing is repeated, one color toner may be mixed in another color toner in the
developer. When this occurs, use this feature. Using this feature consumes some toner.
Initialize NVM Initializes the settings stored in the NVM except for the network settings. The NVM is a
nonvolatile memory that stores the printer settings even after the power is turned off.
After executing this function and restarting the printer, all the menu parameters are
reset to their default values.
Note
• You cannot execute this menu during printing.
• You need to restart the printer to activate this setting. After making the setting, turn off
the printer and then turn it on again.
Storage Disk Deletes the stored documents in the internal hard disk (optional). This menu is available
when the optional internal hard disk is installed.
Format Hard Disk Formats the internal hard disk (optional). This menu is available when the optional
internal hard disk is installed.
PostScript
Specifies the settings for the PostScript.
Item Description
PS Error Report Specifies whether the printer outputs error contents for a PostScript error. The change
becomes effective after the printer is turned off and then on again.
• [On] (default)
•[Off]
PS Job Time-Out Specifies the execution time for one PostScript job. The change becomes effective after
the printer is turned off and then on again.
• [Off] (default)
•[xx min]
A PostScript error occurs if processing is not completed after the specified time.
Init PS Disk Initializes the optional hard disk. This item is only displayed when the optional hard disk
is installed.
PaperSelect Mode Specifies the way to select the tray for PostScript mode. The change becomes effective
after the printer is turned off and then on again.
• [Auto] (default)
The tray is selected as the same setting as in the [PCL] setting.
•[Select FromTray]
The tray is selected in a method compatible with regular PostScript printers.
4.2 Description of Menu Items 55
Page 56

Panel Settings
Specifies whether to limit menu operations with a password to avoid changing the printer
settings by accident.
Item Description
Panel Lock Specifies whether to limit the menu operations with a password. Selecting [Enable]
requires the operator to enter the password. If [Enable] is set, then you must enter the
password to use the [Admin Menu]. The default is [Disable].
Change Password Sets the four-digit password. The default is [0000].
If you forget your password, turn off the printer. Then, recover the password setting to
default with following procedure.
1. Turn on the printer while holding the <Menu> button. Continue to hold the Menu
button until the display indicates “Init Password Ready to Init.”
2. Release the <Menu> button and press the <Eject/Set> button.
3. Press the < > button to select [Yes], then press the <Eject/Set> button. This will
recover the factory default password.
56 4 Setting on the Control Panel
Page 57

4.3 Menu List
For details on each feature, refer to “4.2 Description of Menu Items” (P. 48).
• Main operation and buttons on the control panel
Display/Close the Menu screen <Menu> button
Switch between the menu levels
Switch between menu or items in the
same level
Move the cursor (_) of the setting value the
right or left
Confirm setting <Eject/Set> button
Reset settings to default value
Note
• indicates items that can be configured when optional accessories are installed.
c: 550 Sheet Feeder or 1100 Sheet Feeder d: Internal hard disk
• * indicates default value.
< > button (moves one level downwards) or < > button (moves one level
upwards)
< > button (displays the previous menu or item) or < > button (displays
the next menu or item)
< > button (moves to the right) or < > button (moves to the left)
Press <
> and < > button at the same time.
Continued on next page
4.3 Menu List 57
Page 58

Continued from previous page
Continued on next page
58 4 Setting on the Control Panel
Page 59

Continued from previous page
4.3 Menu List 59
Page 60

5 Troubleshooting
5.1 When Paper Jams
If a paper jam occurs, refer to the illustration below to select the appropriate corrective
action and clear the paper jam immediately.
Note
• The illustration below shows the printer with the optional 550 Sheet Feeder and1100 Sheet Feeder are
installed.
CAUTION
• When removing jammed paper, make sure that no pieces of torn paper are left in the
machine. A piece of paper remaining in the machine can cause fire. If a sheet of paper is
wrapped around the heat roller, or when clearing a jammed paper that is difficult or
impossible to see, do not try to remove it by yourself. Doing so can cause injuries or
burns. Switch off the machine immediately, and contact our Customer Support Center or
your dealers.
• The fuser unit, and the surrounding area are hot. You may get burnt if you touch it
directly.
“Paper Jams at the Fuser
Unit” (P. 63)
“Paper Jams in the Bypass
Tray” (P. 60)
“Paper Jams in the Paper
Tray” (P. 61)
“Paper Jams in the
Optional Sheet Feeder”
(P. 66)
“Paper Jams at the Paper
Inverter” (P. 66)
“Paper Jams Between the
Drum Cartridge and Fuser
Unit” (P. 62)
Paper Jams in the Bypass Tray
Follow the procedure below to remove paper jammed in the bypass tray.
1. Pull the jammed paper out of the bypass
tray, and remove any remaining paper from
the bypass tray.
60 5 Troubleshooting
Page 61

2. Close the bypass tray once.
3. Push up the button A and open the front
cover A. Confirm that there are no scraps of
paper remaining inside the printer.
4. Close the front cover A.
Paper Jams in the Paper Tray
Follow the procedure below to remove paper jammed in the paper tray.
1. Slowly, completely remove the tray from the
printer.
2. Remove all the jammed and/or creased
paper from the tray.
3. If there is jammed paper remaining inside
the printer, pull it out carefully to avoid
tearing it.
5.1 When Paper Jams 61
Page 62

4. If jammed paper cannot be found, pull
down the green cover along the top of the
hole where the tray cartridge was in the
printer, and pull the jammed paper out
carefully.
5. Push up the button A and open the front
cover A. Confirm that there are no scraps of
paper remaining inside the printer.
6. Close the front cover A.
7. Insert the tray into the printer, and push
until it stops.
Important
• Do not use excessive force on the tray. Doing so could
damage the tray or the inside the printer.
Paper Jams Between the Drum Cartridge and Fuser Unit
1. Push up the button A and open the front
cover A.
2. Move the levers at both ends of the fuser to
their open position and remove the jammed
paper. If the paper is torn, remove any
scraps of paper remaining inside the
printer.
Important
• The fuser is hot. Do not touch, doing so may cause
burns.
62 5 Troubleshooting
Page 63

3. Completely push down the levers at both ends of the fuser unit.
4. Close the front cover A.
Paper Jams at the Fuser Unit
1. Press the button B and open the front cover
B.
2. Lift the levers at both ends of the fuser unit,
and remove the jammed paper. If the paper
is torn, remove any scraps of paper
remaining inside the printer.
Important
• The fuser is hot. Do not touch, doing so may cause
burns.
Note
• If only a small portion of the jammed paper is visible,
making it difficult to remove, see “Paper Jams
Between the Drum Cartridge and Fuser Unit” (P. 62) to
remove the jammed paper.
3. Completely push down the levers at both ends of the fuser unit.
4. Close the front cover B.
5.1 When Paper Jams 63
Page 64
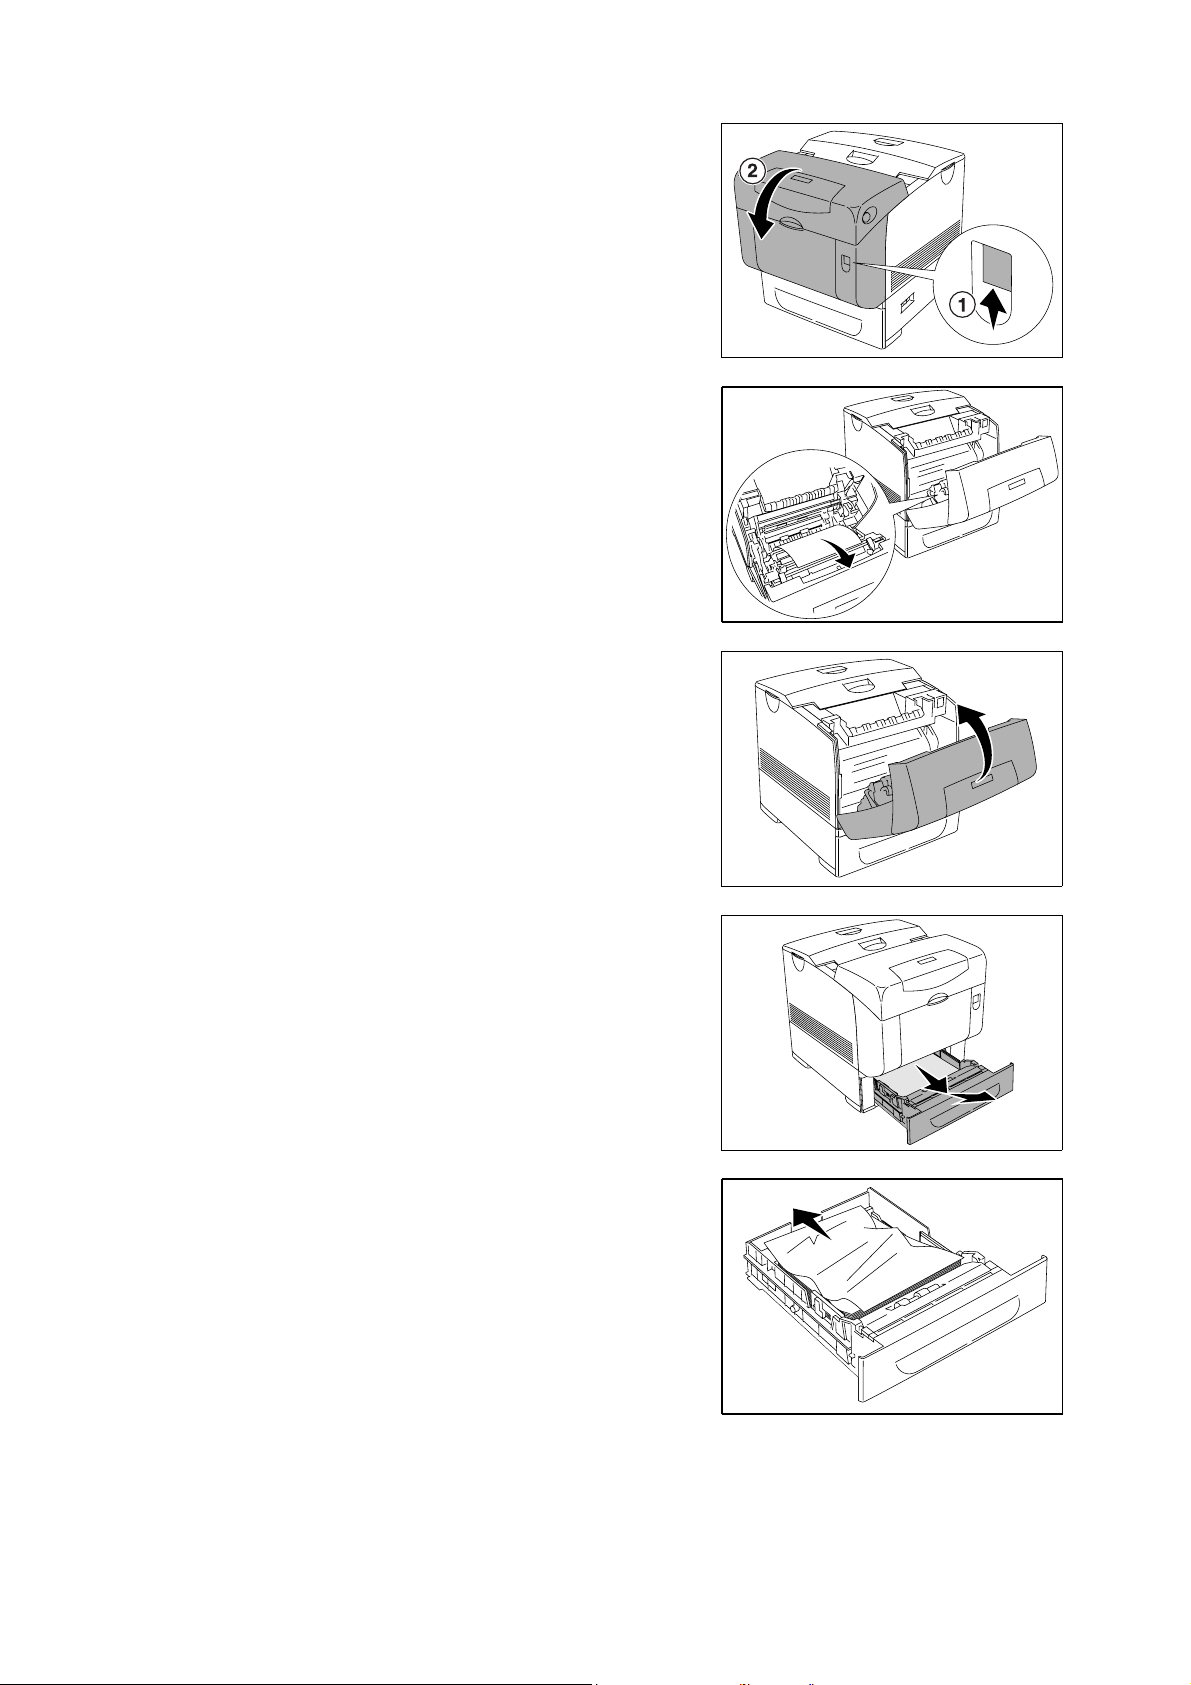
5. Push up the button A and open the front
cover A.
6. Remove the jammed paper if you see it and
proceed to the step 7. If you cannot see the
jammed paper, close the front cover A and
skip the rest of the procedure.
7. Close the front cover A.
Note
• If a paper jam occurs in the fuser area, a sheet of
paper may already have been fed from the tray. Make
sure there is no paper remaining inside the printer,
using step 8 through 14.
8. Slowly, completely remove the tray from the
printer. If the printer is equipped with an
optional sheet feeder, remove the trays
sequentially, starting with the bottom one.
Note
• You do not have to remove trays that are lower than
the feeding tray from where the jammed paper was
fed.
9. Remove all the jammed and/or creased
paper from the tray.
64 5 Troubleshooting
Page 65

10. If there is jammed paper remaining inside
the printer, pull it out carefully to avoid
tearing it.
11. If jammed paper cannot be found, pull
down the green cover along the top of the
hole where the tray cartridge was in the
printer, and pull the jammed paper out
carefully.
12. Push up the button A and open the front
cover A. Confirm that there are no scraps of
paper remaining inside the printer.
13. Close the front cover A.
14. Insert the trays into the printer. Push the
trays in until they stop.
Important
• Do not use excessive force on the tray. Doing so could damage the tray or the inside the printer.
5.1 When Paper Jams 65
Page 66

When Long Paper Jams
When long paper (longer than 356 mm) jams inside the printer, cut the paper as needed,
then remove it in the proper way depending on the place that the paper jam occurs. When
it is difficult to open the front cover, do not force it. Turn the power off immidiately and
contact our Customer Support Center or your dealers for assistance.
Paper Jams at the Paper Inverter
1. Press the button B and open the front cover
B.
2. Remove the jammed paper. If the paper is
torn, remove any scraps of paper remaining
inside the printer.
3. Close the front cover B.
Paper Jams in the Optional Sheet Feeder
1. Open the trays until you find the jammed
paper.
Note
• Paper in the sheet feeder feeds to the printer from the
front of the trays, therefore paper jammed in the lower
tray can block the upper tray of the feeder or the paper
tray in the printer, preventing you from opening them.
Look for the jammed paper sequentially, starting with
the lowest tray.
66 5 Troubleshooting
Page 67

2. Remove all jammed and/or creased paper
from the tray.
3. Pull the jammed paper out carefully to
avoid tearing it. If the paper is torn, confirm
that there are no scraps of paper remaining
inside the printer.
4. Push up the button A and open the front
cover A. Confirm that there are no scraps of
paper remaining inside the printer.
5. Close the front cover A.
6. Insert the trays into the printer. Push the
trays in until they stop.
Important
• Do not use excessive force on the tray. Doing so could
damage the tray or the inside the printer.
5.1 When Paper Jams 67
Page 68

5.2 Problems With the Printer
Before treating the problem as a machine breakdown, refer to the following table and check
the printer condition again.
WARNING
• Never open or remove machine covers that are secured with screws unless specifically
instructed in the manual. A high voltage component can cause electric shock.
• Do not try to alter the machine configuration, or modify any parts. An unauthorized
modification can cause smoke or fire.
Note
• Probable causes of trouble are that the printer, computer, server or other hardware is not correctly set for
the network environment you are using, or a printer restriction has been exceeded.
Refer to the CD-ROM Documentation (HTML) on the CentreWare CD-ROM.
Symptom Reason/Action
No power.
Cannot print. Is the light of the <Ready> indicator off? If so, this printer is offline or in the menu setting
Print job sent but the light of
the <Ready> indicator is not
blinking or on.
Is the power to the printer switched off? Press the power switch to the <|> position to
switch on the power.
Refer to
• “1.2 Switching On and Off the Printer” (P. 16)
Is the power cord disconnected or not securely connected? Switch off the power to the
printer and connect the power cord to the power outlet again. Then, switch on the
power to the printer.
Refer to
• Setup Guide Connecting the Power Cord
Is the power cord connected to a power outlet with the correct voltage? Connect the
printer exclusively to a power outlet with a suitable voltage and current rating.
mode. Fix the problem according to the following display status:
Refer to
• “1.1 Main Components and Their Functions” (P. 12)
Is there a message displayed on the control panel? Follow the message to rectify the
problem.
Refer to
• “5.4 Error Messages” (P. 73)
Is the interface cable disconnected? Switch off the power and check the connection of
the interface cable.
Is the protocol configured? Check the port status of the interface. Make sure the
protocol settings are correctly set up on the CentreWare Internet Services.
Refer to
• “Network Settings” (P. 50)
• Online Help for CentreWare Internet Services
Is the computer environment correctly set up? Check the computer environment, such
as the print driver.
Light of <Error> indicator is on. Is there an error message displayed on the control panel? Check the displayed
message and rectify the error.
Refer to
• “5.4 Error Messages” (P. 73)
68 5 Troubleshooting
Page 69

Symptom Reason/Action
Light of <Error> indicator is
blinking.
The light of the <Ready>
indicator is on and blinking but
there is no print output.
Top section of printed
document is missing.
The top and side margins are
incorrect.
Condensation has occurred
inside the printer.
Paper cannot be fed.
Paper jam.
Multiple paper are fed.
Paper is fed at an angle.
Paper is wrinkled.
An error that you cannot rectify by yourself has occurred. Record the displayed error
message or error code, switch off the power, pull out the power plug from the outlet, and
then contact our Customer Support Center or your dealers.
There are jobs remaining in the printer. Cancel printing or force the remaining data to be
printed.
To forcibly print the job, press the <Eject/Set> button. To cancel the job, press the
<Cancel Job> button.
Are the paper tray guides in the correct positions?
Set the length guide and the width guides to the correct positions.
Refer to
• “3.2 Loading Paper” (P. 40)
Check that the paper size on the print driver or the control panel is correctly set.
Refer to
• Online Help for the print driver
• “Tray Settings” (P. 48)
Check whether the setting for margin is correct on the print driver.
Refer to
• Online Help for the print driver
Turn the printer on and leave it one hour at least to get rid of any condensation. If the
problem still occurs, contact our Customer Support Center or your dealers.
Is the paper correctly loaded? Load the paper correctly. For labels, transparencies, or
envelopes, fan them well first to allow air to enter between each sheet before loading.
Refer to
• “3.2 Loading Paper” (P. 40)
Is the paper damp? Replace with paper from a new ream.
Refer to
• “3.2 Loading Paper” (P. 40)
The paper used is not suitable. Load the correct type of paper.
Refer to
• “Usable Paper” (P. 36)
Is the paper tray set correctly? Push the paper tray completely into the printer.
Is the printer placed on a flat location? Place the printer on a stable flat surface.
Are the paper tray guides set in the correct positions? Set the guides to the correct
positions.
Refer to
• “3.2 Loading Paper” (P. 40)
Papers are fed more than 1 sheet at a time. Multiple feeding of paper may occur before
the sheets of paper loaded in the tray are used up. Fan the paper to be loaded and load
again. Replenish paper only when all the sheets of the loaded paper are used up.
Unusual noises The printer is not level. Reposition the printer on a flat, stable surface.
Refer to
• Quick Reference Guide Safety Notes
The paper tray is not inserted properly. Push the paper tray completely into the printer.
There is a foreign object inside the printer. Turn off the printer and remove the foreign
object. If you need to disassemble the printer to remove the foreign object(s), contact
our Customer Support Center or your dealers for assistance.
5.2 Problems With the Printer 69
Page 70

5.3 Problems With the Print Quality
When the print quality is poor, select the closest symptom from the following table to rectify
the problem.
If the print quality does not improve after carrying out the appropriate action, contact our
Customer Support Center or your dealers.
Symptom Reason/Action
Faded printouts The paper is outside the recommended specification range. Replace the media with a
recommend size and type, and confirm that your print driver settings are correct.
Refer to
• “3.1 About Paper” (P. 36)
The paper is damp. Replace the paper.
Refer to
• “3.1 About Paper” (P. 36)
The drum cartridge or transfer roll cartridge is old or damaged. Replace the drum
cartridge or transfer roll cartridge.
Refer to
• “Replacing the Drum Cartridge” (P. 81)
• “Replacing the Transfer Roll Cartridge” (P. 84)
The high-voltage supply is defective. Contact our Customer Support Center or your
dealers for assistance.
Stray black dots or white areas
(drop outs)
Vertical black or color streaks The drum cartridge, transfer roll cartridge, or fuser unit is old or damaged. Check the
Recurring smudges Dirt in the paper path. Print several blank sheets.
The paper is outside the recommended specification range. Replace the paper with a
recommend size and type, and confirm that your print driver settings are correct.
Refer to
• “3.1 About Paper” (P. 36)
The drum cartridge or transfer roll cartridge is old or damaged. Replace the drum
cartridge or transfer roll cartridge.
Refer to
• “Replacing the Drum Cartridge” (P. 81)
• “Replacing the Transfer Roll Cartridge” (P. 84)
condition of the drum cartridge, transfer roll cartridge and fuser unit, and replace as
necessary. For information about replacing of the fuser unit, contact our Customer
Support Center or your dealers.
Refer to
• “Replacing the Drum Cartridge” (P. 81)
• “Replacing the Transfer Roll Cartridge” (P. 84)
The drum cartridge, transfer roll cartridge, or fuser unit is old or damaged. Check the
condition of the drum cartridge, transfer roll cartridge and fuser unit, and replace as
necessary. For information about replacing of the fuser unit, contact our Customer
Support Center or your dealers.
70 5 Troubleshooting
Refer to
• “Replacing the Drum Cartridge” (P. 81)
• “Replacing the Transfer Roll Cartridge” (P. 84)
Page 71

Symptom Reason/Action
Ink smears when rubbed The paper is damp. Replace the paper.
Refer to
• “3.1 About Paper” (P. 36)
The paper is outside the recommended specification range. Replace the paper with a
recommend size and type, and confirm that your print driver settings are correct.
Refer to
• “3.1 About Paper” (P. 36)
The fuser unit is old or damaged. Contact our Customer Support Center or your dealers
for assistance.
Black pages The drum cartridge is old or damaged. Replace the drum cartridge.
Refer to
• “Replacing the Drum Cartridge” (P. 81)
The high-voltage supply is defective. Contact our Customer Support Center or your
dealers for assistance.
Blank pages Two or more sheets may be feeding at once. Remove the paper stack from the tray, fan
it, and reinsert it.
The drum cartridge or transfer roll cartridge is old or damaged. Replace the drum
cartridge or transfer roll cartridge.
Hair-like marks appear in or
around black half-tone printing
Shadows appear around areas
of dense black printing
Color around the edge of
printing is incorrect
Colored dots are printed at
regular intervals
(about 30 mm)
Refer to
• “Replacing the Drum Cartridge” (P. 81)
• “Replacing the Transfer Roll Cartridge” (P. 84)
The high-voltage supply is defective. Contact our Customer Support Center or your
dealers for assistance.
The paper was left unwrapped for a long time (especially in a dry environment).
Replace the paper.
Refer to
• “3.1 About Paper” (P. 36)
The paper is outside the recommended specification range. Replace the paper with a
recommend size and type, and confirm that your print driver settings are correct.
Refer to
• “3.1 About Paper” (P. 36)
The transfer roll cartridge is old or damaged. Replace the transfer roll cartridge.
Refer to
• “Replacing the Transfer Roll Cartridge” (P. 84)
The color registration is incorrect. Adjust the color registration.
Refer to
• Quick Reference Guide Adjusting Color Registration
The drum cartridge is dirty. Clean the drum cartridge.
Refer to
• “Cleaning the Drum Cartridge” (P. 99)
5.3 Problems With the Print Quality 71
Page 72

Symptom Reason/Action
Partial blanks, creased paper
or blotted printing
Vertical blanks The drum cartridge is not installed correctly. Reinstall the drum cartridge.
The paper is damp. Replace the paper.
Refer to
• “3.1 About Paper” (P. 36)
The paper is outside the recommended specification range. Replace the paper with a
recommend size and type.
Refer to
• “3.1 About Paper” (P. 36)
The transfer roll cartridge or fuser unit is not installed correctly. Reinstall the transfer roll
cartridge and/or fuser unit. For information about replacing of the fuser unit, contact our
Customer Support Center or your dealers.
Refer to
• “Replacing the Transfer Roll Cartridge” (P. 84)
Condensation inside the printer causes partial blanks or creased paper. Turn the printer
on and leave it one hour at least to get rid of the condensation. If the problems still
occur, contact our Customer Support Center or your dealers for assistance.
Refer to
• “Replacing the Drum Cartridge” (P. 81)
The drum cartridge, transfer roll cartridge, or fuser unit is old or damaged. Check the
condition of the drum cartridge, transfer roll cartridge and fuser unit, and replace as
necessary. For information about replacing of the fuser unit, contact our Customer
Support Center or your dealers.
Refer to
• “Replacing the Drum Cartridge” (P. 81)
• “Replacing the Transfer Roll Cartridge” (P. 84)
Slanted printing The paper guides in the paper tray or bypass tray are not set correctly. Reset the paper
guides in the paper tray or bypass tray.
Refer to
• “3.2 Loading Paper” (P. 40)
White spots appear on the
printed image
Toner spilled out around the
printed image
The printed image is bluish
Printed image or texts wear off
quickly
Double printing at 80 mm
intervals
The paper is outside the recommended specification range. Replace the paper with a
recommended size and type, and confirm that your print driver settings are correct.
Refer to
• “3.1 About Paper” (P. 36)
The transfer voltage setting is not proper. Adjust the transfer voltage on the control
panel.
Refer to
• “6.8 Adjusting the Transfer Voltage” (P. 101)
The fuser temperature is not correct. Adjust the fuser temperature on the control panel.
Refer to
• “6.9 Adjusting the Fuser Temperature” (P. 102)
72 5 Troubleshooting
Page 73

5.4 Error Messages
This section describes the messages displayed on the control panel.
Messages About Consumables
Message Condition/Reason/Action
010-317
Reboot Printer
Fuser Cartridge
Error NNN-NNN
Insert Drum
Cartridge
Insert Transfer
Roll Cartridge
Insert XXX
Toner Cartridge
Please Request
Parts 009-NNN
Please Request
Parts 010-351
The fuser unit is either missing or not fully inserted into the printer. Contact our
Customer Support Center or your dealers.
An unsupported fuser unit is installed. Contact our Customer Support Center or your
dealers for assistance.
The drum cartridge is either missing or not fully inserted into the printer. Insert the
drum cartridge.
Refer to
• “Replacing the Drum Cartridge” (P. 81)
The transfer roll cartridge is either missing or not fully inserted into the printer. Insert
the transfer roll cartridge.
Refer to
• “Replacing the Transfer Roll Cartridge” (P. 84)
The specified toner cartridge is either missing or not fully inserted into the printer.
Insert the specified toner cartridge.
Refer to
• “Replacing the Toner Cartridges” (P. 78)
Switch the printer off and then on. If the error is not cleared, the developer unit needs
to be replaced. Contact our Customer Support Center or your dealers for assistance.
Switch the printer off and then on. If the error is not cleared, the fuser unit needs to
be replaced. Contact our Customer Support Center or your dealers for assistance.
Ready to Print
Replace 010-400
Ready to Print
Drum Cartridge
Replace soon
Ready to Print
Trans Roll Cart.
Replace soon
Ready to Print
XXX Cartridge
Replace soon
XXX=Yellow, Magenta, Cyan, or
Black
Remove film on
xxx Toner
The fuser unit needs to be replaced. Contact our Customer Support Center or your
dealers for assistance.
The drum cartridge needs to be replaced. Replace the drum cartridge.
Refer to
• “Replacing the Drum Cartridge” (P. 81)
The transfer roll cartridge needs to be replaced. Replace the transfer roll cartridge.
Refer to
• “Replacing the Transfer Roll Cartridge” (P. 84)
The specified toner cartridge needs to be replaced. Replace the specified toner
cartridge.
Refer to
• “Replacing the Toner Cartridges” (P. 78)
The sealing tape is still on the specified toner cartridge. Pull out the specified toner
cartridge and remove the sealing tape.
Refer to
• “Replacing the Toner Cartridges” (P. 78)
5.4 Error Messages 73
Page 74

Message Condition/Reason/Action
Replace Drum
Cartridge
Replace Transfer
Roll Cartridge
Replace xxx
Toner Cartridge
XXX
Error NNN-NNN
XXX indicates one of the following; the Yellow Toner (Y), Cyan Toner (C), Magenta Toner (M), Black Toner (K), Drum
Cartridge, or Fuser Unit.
NNN indicates a numeric value.
The drum cartridge needs to be replaced. Replace the drum cartridge.
Refer to
• “Replacing the Drum Cartridge” (P. 81)
The transfer roll cartridge needs to be replaced. Replace the transfer roll cartridge.
Refer to
• “Replacing the Transfer Roll Cartridge” (P. 84)
The specified toner cartridge needs to be replaced. Remove the specified toner
cartridge and install a new one.
Refer to
• “Replacing the Toner Cartridges” (P. 78)
An unsupported toner cartridge, fuser unit, or drum cartridge is installed. Replace the
specified toner cartridge or drum cartridge.
Messages About the Printer and Other Items (In Alphabetical Order)
Message Condition/Reason/Action
NNN-NNN
Restart Printer
016-316
Restart Printer
006-370
Restart Printer
All Trays
Out of paper
Close Front Cover Front cover A or front cover B is open. Close the front cover A or front cover B.
Disk Full
Press Set
Empty
Output Tray
Invalid Job
Press Set
Error NNN-NNN relates to printer problems. Switch the printer off and then on.
The additional memory module is not fully inserted into the slot. Remove the
additional memory card from the slot, and then reinsert it firmly.
Condensation may have occurred inside the printer. Do not use the printer for more
than one hour.
All trays are out of paper. Load paper.
RAM disk memory is full and cannot continue processing the current print job.
• Press the <Eject/Set> button to clear the message, cancel the current print job,
and conduct the next print job, if any.
• Press the <Cancel> button to cancel the print job.
• Press the <Menu> button to open the Print Menu and delete the current job.
• To avoid this error in the future, do the following:
• Reduce the number of print pages such as splitting the print data.
• Increase free memory space by deleting unnecessary data in the RAM disk.
Too much paper is loaded in the output tray. It is beyond the limits of its capacity.
Remove paper from the output tray.
When the configuration of the printer on the print driver does not conform to the
printer you are using, this message appears.
• Press the <Cancel> button to cancel the print job.
• Make sure that the configuration of the printer on the print driver conforms to the
printer you are using.
74 5 Troubleshooting
Page 75
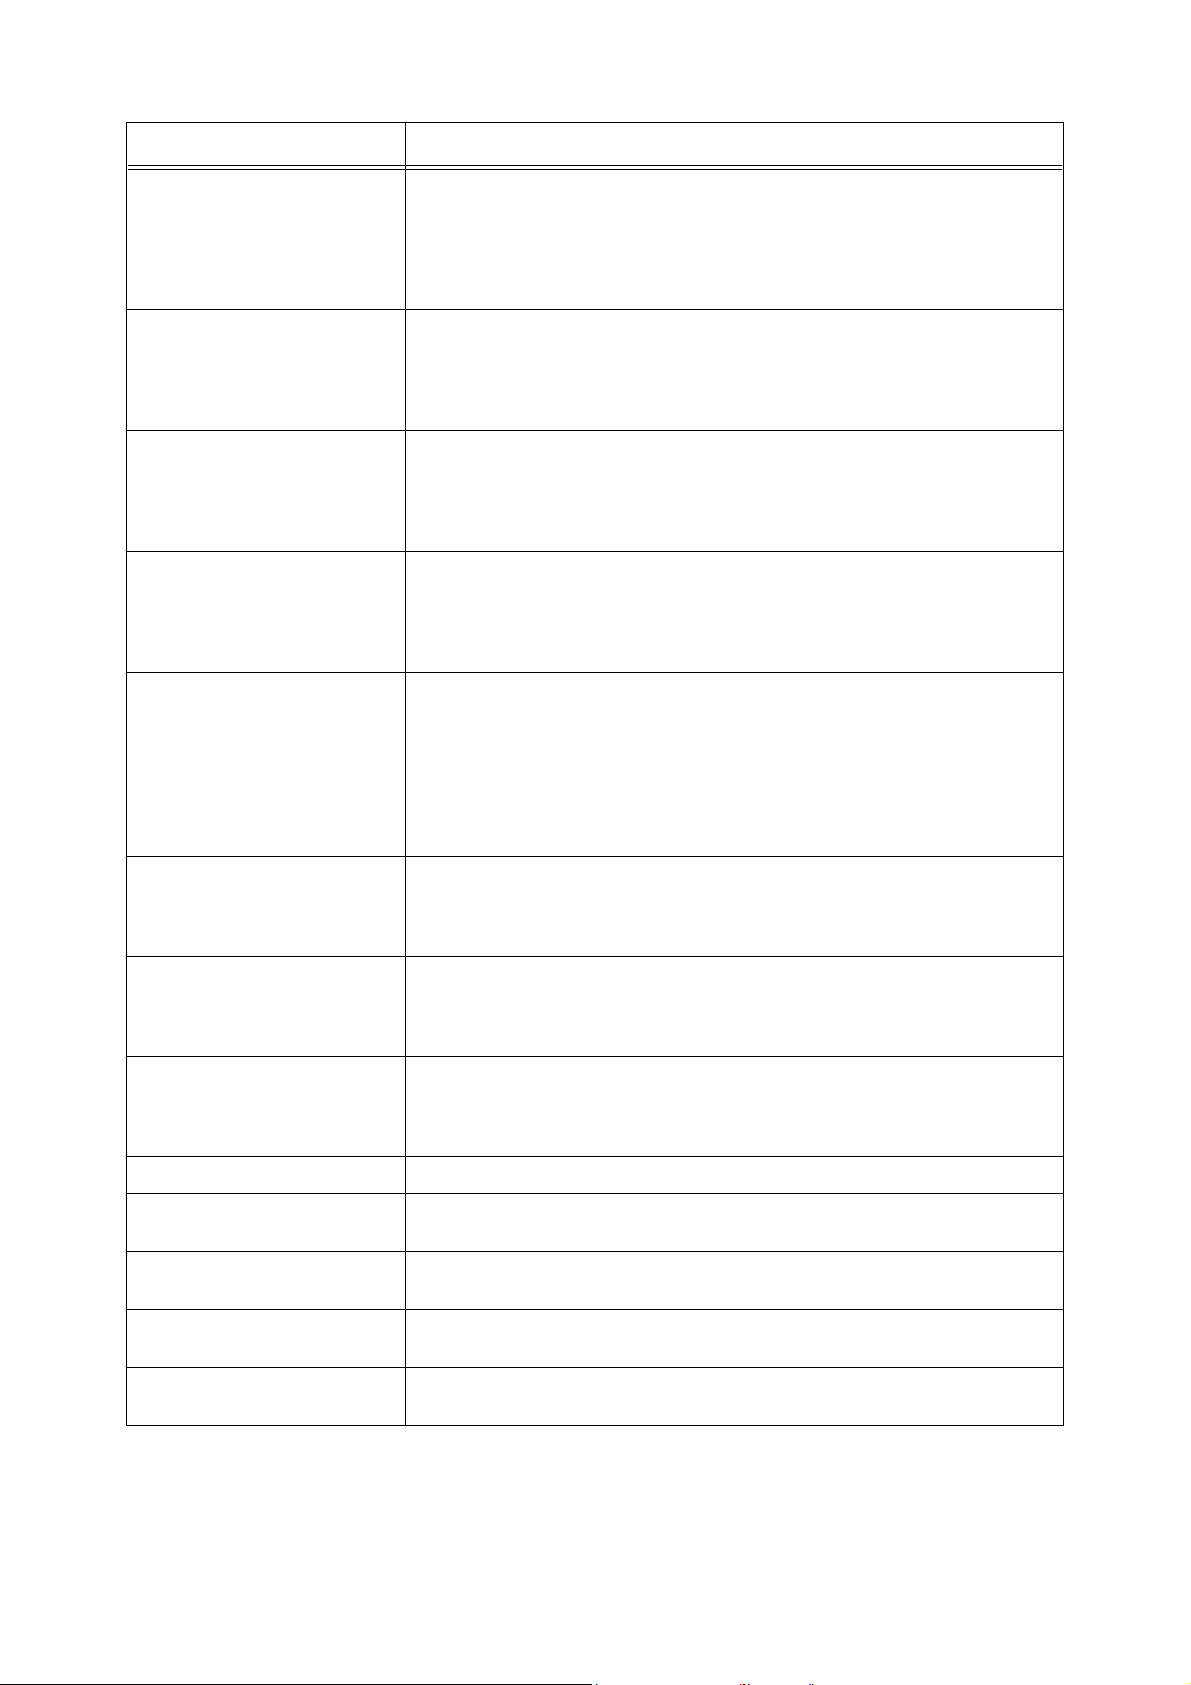
Message Condition/Reason/Action
Load xxx
yyy XXX
Open Cover A
Clear jam
Open Cover A or
B. Clear jam
Open Cover B
Clear jam
Out of Memory
Press Set
Incorrect paper size is loaded in the specified tray. xxx indicates the number of the
tray or bypass tray. yyy indicates the paper size. XXX indicates the type of paper.
Load the specified paper in the specified trays.
Refer to
• “3.2 Loading Paper” (P. 40)
Paper Jam has occurred at the registration unit. Push button A to open front cover A
and remove any paper.
Refer to
• “5.1 When Paper Jams” (P. 60)
Paper Jam has occurred at the fuser. Push up button A to open the front cover, or
push button B to open front cover B, and then remove any paper.
Refer to
• “Paper Jams at the Fuser Unit” (P. 63)
Paper Jam has occurred at the duplexer. Push button B to open front cover B and
remove any paper.
Refer to
• “Paper Jams Between the Drum Cartridge and Fuser Unit” (P. 62)
The printer memory is full and cannot continue processing the current print job.
• Press the <Eject/Set> button to clear the message, cancel the current print job,
and conduct the next print job, if any.
• Press the <Cancel> button to cancel the print job.
• Press the <Menu> button to open the Print Menu and delete the job being held.
• To avoid this error in the future, do the following:
• Delete unnecessary fonts, macros, and other data in printer memory.
• Install additional printer memory.
PCL Error
Press Set
Please Clean
Image Sensor
Pull out tray
Clear jam
Push in the tray All trays are not inserted into the printer. Insert all paper trays.
Push in xxx The specified tray is not inserted into the printer. Insert the paper tray. xxx indicates
Ready to Print
genuineToner
SysError NNN-NNN
Press Set
Tray N
Out of paper
Error relating to PCL emulation problems has occurred.
• Press the <Eject/Set> button to clear the message, cancel the current print job,
and conduct the next print job, if any.
• Press the <Cancel> button to cancel the print job.
The image sensor is dirty. Clean the image sensor.
Refer to
• “Cleaning the Density Sensor” (P. 97)
A paper jam occurs. Clear the paper path.
Refer to
• “5.1 When Paper Jams” (P. 60)
the number of the tray or bypass tray.
The printer is in the custom toner mode. Though some of the toner cartridges reach
the end of their lives, you can continue printing.
A system error has occurred. Press the <Eject/Set> button to clear the message.
The specified tray is out of paper. Load paper.
5.4 Error Messages 75
Page 76

Message Condition/Reason/Action
xxx
Check paper
NNN indicates a numeric value.
Incorrect paper size is loaded in the specified tray. xxx indicates the number of the
tray or bypass tray. Change the paper type in the specified tray.
Refer to
• “3.2 Loading Paper” (P. 40)
5.5 Network Related Troubles
Regarding troubles such as being unable to print in a network environment, refer to the
CD-ROM Documentation (HTML) on the CentreWare CD-ROM.
This section describes how to identify the cause and fix an error when a problem occurs by
using the CentreWare Internet Services and the StatusMessenger function.
When Using CentreWare Internet Services
Symptom Reason/Action
Cannot be connected to
CentreWare Internet Services.
Is the printer working correctly?
Check if the power of the printer is switched on.
The “Please wait” message is
displayed throughout the Web
browser.
The [Refresh] button is not
working.
Selecting the left frame menu
does not change the display.
Is Internet Services enabled?
Print out the [Printer Settings] to check.
Refer to
• “6.2 Printing Reports/Lists” (P. 86)
Is the URL correctly entered?
Check the URL again. If connection fails, enter the IP address to
connect.
Refer to
• “6.3 Checking / Managing the Printer Status on a Web Browser”
(P. 87)
Is the proxy server used?
Some proxy servers do not allow this feature.
Try connection without using the proxy server.
Refer to
• Online Help for web browser
Wait for a while as instructed.
If the problem persists, refresh the web browser. If nothing happens,
check if the printer is working properly.
Are you using the supported OS and a web browser?
Refer to “6.3 Checking / Managing the Printer Status on a Web
Browser” (P. 87) to check whether the OS and web browser you are
using are supported.
The screen display is distorted. Change the window size of the web browser.
The latest information is not
displayed.
76 5 Troubleshooting
Click [Refresh].
Page 77

Symptom Reason/Action
The new settings were not
reflected by clicking the [Apply
New Settings] button.
Cannot change settings if you
forget the password.
The display language is
different.
Connection to CentreWare
Internet Services has been
refused, or “Data not included
in page” is displayed.
Password not certified after
entering the password in the
username and password
window.
Is the entered value correct?
If an invalid value is entered, it will be automatically changed to a
value within the range.
If you cannot remember the password, initialize the NVM using the
[Network Settings] menu on the control panel. However, initializing
the NVM will revert the value for each item of the [Network Settings]
menu to default. It is recommended to print the [Printer Settings]
and check the current settings.
Change the display language settings on the Web browser.
Refer to
• Online Help for web browser
This symptom occurs when the Web browser display is refreshed
frequently. Do not refresh the Web browser display frequently. Also,
do not continuously display the [Status] screen or the [Jobs] screen
on several Web browsers at the same time.
If certification is refused five times, the user cannot be certified even
if the correct user name and password are input.
Switch the printer off and on once, then do the certification
procedure again.
When Using the StatusMessenger Function
This section explains how to fix the troubles when the StatusMessenger features are used.
Symptom Reason/Action
The printer status was not
notified by e-mail.
Check the following settings in [Properties] of CentreWare Internet
Services.
• Is the printer e-mail address specified?
• Is [Enable] specified for [StatusMessanger]?
• Are the SMTP server IP address and POP3 server IP address
specified correctly?
• Are the POP user name and password specified correctly?
• Are the items to be notified specified correctly?
• Are the destination e-mail addresses entered correctly?
Are the SMTP server and POP server working correctly? Check
with your network administrator.
5.5 Network Related Troubles 77
Page 78

6 Daily Care
6.1 Replacing Consumables
A message to prompt you to replace the toner cartridge or drum cartridge is displayed on
the control panel, replace the indicated cartridge.
Note
• About the possible number of pages that can be printed with a toner cartridge or drum cartridge, refer to
“Life of Consumables” (P. 110). The possible number of pages that can be printed differs according to
factors such as the print contents, paper size, paper type, number of pages being printed, environment
used, and the frequency that the printer is switched on and off.
• Before ordering a new toner cartridge or drum cartridge from your dealer, check the product code listed
in “Appendix A.2 Optional Accessories and Consumables” (P. 108).
Recycling Used Consumables
The used toner cartridges and drum cartridges are recycled for environmental conservation
and effective utilization of materials. Dispose of the used toner cartridges and drum
cartridges properly. Return them to Fuji Xerox or your dealer.
Replacing the Toner Cartridges
The printer uses four toner cartridges, cyan, magenta, yellow, and black.
Caution on Handling the Toner Cartridge
When handling the toner cartridge, take note of the following points:
WARNING
• Never throw a toner cartridge into an open flame. It can cause an explosion and you can
get burnt.
• Do not reuse toner cartridges that have been removed from the printer. Doing so may
cause degradation of print quality or the toner may spill onto print jobs.
78 6 Daily Care
• Do not shake or pat the removed toner cartridge after you remove it. The remaining toner
may spill out.
• Although the toner is not harmful to the body, wash it off immediately if your hands or
clothes are stained with it.
Page 79

Replacing the Toner Cartridge
1. Remove any paper in the output tray.
2. Remove the top cover.
3. Grip the levers at the ends of the toner
cartridge that you want to replace, and pull
them up.
4. Pull out the toner cartridge.
5. Select the new toner cartridge whose color
matches the cartridge holder and remove it
from its packaging.
6. Shake the toner cartridge several times as
illustrated to distribute the toner evenly.
6.1 Replacing Consumables 79
Page 80

7. Align the toner cartridge with the
corresponding insertion point in the printer
and insert it.
8. Grip the levers at each end of the toner
cartridge with your fingers, then push down
firmly to rotate the levers forward.
9. Pull the toner seal straight up to remove it.
Note
• Pull the toner seal straight up. Pulling the toner seal
diagonally may tear the seal.
• If there is an interval of more than 5 seconds from
inserting the toner cartridge to pulling the toner seal,
an error message may be displayed. In this case,
repeat step 8 again or switch the printer off and then
on again.
10. Replace the top cover by inserting its front
side into the printer first.
80 6 Daily Care
Page 81

About the Custom Mode
When the toner in a toner cartridge runs out, “Replace Toner Cartridge” is displayed on the
printer.
When you want to use the printer in the custom mode, follow the procedure below to set the
custom mode before replacing the new toner cartridges.
Important
• When using the printer in the custom mode, the printer’s basic functions and performance may be
degraded below the range of guaranteed quality that is possible when using our recommended
products. Using the printer continuously in the custom mode may cause malfunctions. If this is the cause
of a malfunction, repairs are not done under warranty.
Note
• When returning the setting to the normal mode, select [Off] in step 4 below.
1. Press the < > button and the <Eject/Set> button simultaneously.
2. Make sure that [Non-genuine] is displayed, then press the < > button or the <Eject/
Set> button.
3. Make sure that [Toner] is displayed, then press the < > or <Eject/Set> button.
4. Press < > button to select [On], then press the <Eject/Set> button.
5. Press the <Menu> button.
Replacing the Drum Cartridge
This section describes procedures for handling, storing and replacing the drum cartridge.
Caution on Handling the Drum Cartridge
When handling the drum cartridge, take note of the following points:
WARNING
• Never throw a drum cartridge into an open flame. It can cause an explosion and you can
get burnt.
• Do not subject it to direct sunlight or strong light.
• Do not touch the drum surface (blue part). Make sure that nothing touches or scratches
the drum surface.
• To avoid degradation of print image quality, keep the drum cartridge level.
6.1 Replacing Consumables 81
Page 82

Replacing the Drum Cartridge
Important
• Remove any print jobs from the output tray and close the bypass tray before opening the top cover or
front cover.
1. Remove any paper in the output tray.
2. Push up the button A and open the front
cover A.
3. Press the button C and open the output tray
cover.
4. Grab the drum cartridge by the handle, and
pull it up and out.
Important
• Do not touch inside the printer with your hands. Some
parts may be hot.
• Hold the handle to avoid dropping the drum cartridge.
5. Take the new drum cartridge out of the
packaging box by its handle and remove
the protective cover from the drum
cartridge.
Important
• Make sure nothing touches or scratches the surface of
the light-sensitive drum (green-colored part) or the
charge roller (black-colored part). Scratches, dirt, or oil
from your hands on the surface of the light-sensitive
drum or charge roller may reduce the print quality.
• Do not expose the drum cartridge to direct sunlight or
strong light.
82 6 Daily Care
Page 83

6. Holding the drum cartridge by the handle
and the flat part facing the back of the
printer, align the bosses that arrow marks
are attatched on both sides of the drum
cartridge with the slots that are indicated by
the arrow marks on the printer. Gently
lower the drum cartridge into the printer.
Important
• Lowering the drum cartridge into the printer without
correctly aligning the bosses on both sides of the drum
cartridge with the slots can damage the drum
cartridge.
7. Pull the protective cover on the cartridge
straight up to remove it.
Note
• Do not touch the intermediate transfer roller (black
part). Make sure that nothing touches or scratches the
roller surface. Scratches or oil from your hands on the
roller deteriorates print quality.
8. Close the output tray cover.
9. Close the front cover A.
6.1 Replacing Consumables 83
Page 84

Replacing the Transfer Roll Cartridge
This section describes procedures for replacing the transfer roll cartridge.
WARNING
• Never throw a used transfer roll cartridge into a fire. It can cause an explosion and you
can get burnt.
Important
• Do not touch the edge of the plate at the upper side of the transfer roll cartridge because it is sharp.
1. Remove any print jobs from the output tray, close the bypass tray cover before
opening the front cover.
2. Push up the button A and open the front
cover A.
3. Grip the tabs at both ends of the transfer
roll cartridge and gently lift it out of the
printer.
Important
• Do not touch inside the printer with your hands. Some
parts may be hot.
4. Unpack a new transfer roll cartridge and
grip the tabs as shown in the diagram.
5. Align the arrow marks on the transfer roll
cartridge to the marks on the printer, and
gently push the roller into the printer.
84 6 Daily Care
Page 85

6. To lock the transfer roll cartridge into the
printer push down the tabs until you hear a
click.
7. Close the front cover A.
6.1 Replacing Consumables 85
Page 86

6.2 Printing Reports/Lists
This section explains the types of reports/lists and how to print them.
Types of Reports/Lists
Other than print data from the computer, this printer has the feature to print the following
reports/lists. The reports and lists are printed in English.
Reports Description
Printer Settings Prints status of the printer such as hardware configuration and
network information. Print this report to check whether optional
accessories have been correctly installed.
Panel Settings Print a detailed list of all the settings on the operator panel menus.
PCL Fonts List Prints information of PCL fonts and sample of these fonts.
PS Fonts List Prints information of PostScript fonts and sample of these fonts.
Job History Prints information on printing result, such as whether data from the
computer has been printed correctly. The status of maximum 22 jobs
can be printed on the [Job History Report].
Use the control panel to set whether to print the [Job History Report]
automatically for every 22 jobs completed. For details, refer to “Auto
Log Print” (P. 53).
Error History Prints information of up to the latest 42 errors that occurred in this
Demo Page You can print a sample of the document to check the printer’s
Stored Documents Prints a list of documents stored in the printer when using the secure
Printing Reports/Lists
Print the report/list by operating the control panel.
Important
• When optional sheet feeders are installed, load A4 size paper into Tray 1.
1. Press the <Menu> button to display the Menu screen.
2. Press the < > or < > button until [Report/List] is displayed, then press the < > or
<Eject/Set> button.
printer.
performance.
print and sample print feature. This list can be printed when at least
256 MB of memory are added or the internal hard disk (optional) has
been installed.
Refer to
• “2.4 Printing Confidential Document - Secure Print” (P. 30)
• “2.5 Print After Checking Printing Result - Sample Print” (P. 33)
86 6 Daily Care
3. Press the < > or < > button until the desired report/list is displayed, then press the
<Eject/Set> button.
The selected report/list will be printed.
Page 87

6.3 Checking / Managing the Printer Status on a Web Browser
When the printer is installed in a TCP/IP environment, you can check printer status and
configure settings using a web browser on a network computer.
This feature is known as CentreWare Internet Services.
You can also check the remaining volume of consumables and the paper loaded in this
printer via CentreWare Internet Services.
Note
• When using the printer as a local printer, you cannot use CentreWare Internet Services. For details
about checking the status of the local printer, refer to “6.4 Checking Printer Status via SimpleMonitor”
(P. 92).
Settings for CentreWare Internet Services
This section explains the environment and settings required for using CentreWare Internet
Services.
Browsers
The following browsers can be used for CentreWare Internet Services.
• Netscape 7 or later
• Internet Explorer ver 5 or later
Click the desired
item to display its
status.
6.3 Checking / Managing the Printer Status on a Web Browser 87
Page 88

Web Browser Settings for CentreWare Internet Services
You are recommended to bypass the proxy server and specify the printer’s address directly
when using the CentreWare Internet Services.
Note
• Specifying the printer’s address via the proxy server may slow down the response or disable the display
of the screen.
• For details on the settings, refer to the Online Help for your web browser.
You can change the display language with the display language setting in the web browser.
Note
• For details, refer to your browser’s online help.
Setting the Printer
To use CentreWare Internet Services, IP address of this printer must be set and
[InternetServices] activated (default: [Enable]). When [InternetServices] is disabled, set it to
[Enable] on the control panel.
Refer to
• “Protocol” (P. 50)
Procedure
To use CentreWare Internet Services, follow the procedures below.
1. Activate the computer and web browser.
2. At the address column of the web browser, enter the IP address or URL of the printer
and then press the <Enter> key.
• Example of an IP address entry
Note
• When specifying port number, add “:” and “80” (default port number) after the address. The port number
can be changed under [Properties] > [Protocol Settings] > [HTTP] of the CentreWare Internet Services.
When connecting to CentreWare Internet Services from the web browser after changing the port
number, add the port number after “:” in the address.
• Example of an URL entry
88 6 Daily Care
Page 89

The CentreWare Internet Services screen appears.
Changing the Network Settings
You can set this printer to be used as a network printer in the [Properties] tab.
The administrator mode is set in CentreWare Internet Services as a default. To specify the
settings, you need the administrator’s name and a password.
Important
• The administrator name is “admin” and the password is “x-admin” as default settings. When you use
CentreWare Internet Services, be sure to change the default password. You can change the
administrator’s name and the password at [Properties] > [Internet Services Settings].
Using Online Help
For details regarding the items that can be set in each screen, click the [Help] button to
display the Online Help.
Note
• Clicking the [Help] button displays the online manual on our website.
6.3 Checking / Managing the Printer Status on a Web Browser 89
Page 90

IP Filter Feature via CentreWare Internet Services
When using LPD protocol or Port9100 protocol to print, this feature allows you to register
the IP addresses of computers that can be used in this printer. This will limit IP address used
for receiving print data.
Note
• IP Filter feature is available only for LPD and Port9100. The feature cannot be used for other protocols.
1. Click [Properties] in CentreWare Internet Services.
2. Click [Protocol Settings] > [LPD] or [Port9100] from the left menu.
3. Click [IP Filter].
4. Enter values between 0 and 255 for the IP address you want to filter. Then, Select the
type of filter from [Accept], [Reject], and [Disabled]. The “*” is added to the current
setting. Refer to the example of the next paragraph.
5. When you finish making the settings, click [Apply New Settings and Reboot Device] at
the bottom of the right frame to restart the printer.
Note
• Click [Restore Settings] to restore the old settings from before changes were made.
• Input the administrator’s name and password when the message that prompts you to input them, then
click [OK].
Example of the IP Filter Setting
You can register up to five IP addresses and the addresses have priority from the top. To
set multiple filters, set IP address in descending order from the address with the narrower
range.
1. To receive the print data only from a specified user (IP address: 192.168.100.10)
2. To reject the print data only from a specified user (IP address: 192.168.100.50)
90 6 Daily Care
Page 91

3. When receiving print data from specified network address (192.168), and the print
data from a part of the network address (192.168.200) are rejected, and specified
user (IP address: 192.168.200.10) in the rejected network address is permitted to
print.
6.3 Checking / Managing the Printer Status on a Web Browser 91
Page 92

6.4 Checking Printer Status via SimpleMonitor
SimpleMonitor is a tool to check the status of print jobs and the printer from your computer
when using the printer as a local printer. This tool can be installed on your computer from
the CentreWare CD-ROM.
Note
• For details about installing the SimpleMonitor, refer to the CD-ROM Documentation (HTML) on the
CentreWare CD-ROM.
You can use the following SimpleMonitor functions.
• When an error occurs on the printer while processing a print job, a dialog box opens to
and describes the problem on the computer’s monitor.
• You can check the paper size that is loaded into the trays, the status of the output tray,
and the remaining amount of consumables such as toner/drum cartridges on the following
window.
Note
• The status of the printer on the network can be checked by starting CentreWare Internet Services from
this tool.
• For details about the functions of the SimpleMonitor, refer to the SimpleMonitor’s Online Help.
92 6 Daily Care
Page 93

6.5 Checking Printer Status via E-mail
When connected in a network environment where sending and receiving of e-mails is
possible, the printer can send an e-mail with the following report to a specified e-mail
address. Only text format is available for the e-mail format.
• The network settings and the printer status
• The error status which has occurred on the printer
This feature is known as StatusMessenger feature.
Example of an e-mail sent from the printer
Settings for StatusMessenger Feature
To use the StatusMessenger feature, settings on the network and e-mail environment are
required. Check with your network administrator whether these settings are completed.
Network Environment
• Register user account
Setting the E-mail Environment (at This Printer)
Activate CentreWare Internet Services and set Port Status, Machine E-Mail Address and
mail server.
Configure the following items according to your e-mail environment under [Properties].
Note
• After configuring the settings, always click [Apply New Settings and Reboot Device] and switch off/on the
printer to reboot.
• For details about each item, refer to the Online Help for CentreWare Internet Services.
6.5 Checking Printer Status via E-mail 93
Page 94

Item
Port Status StatusMessenger Select [Enable].
Item to be
configured
Description
Protocol Settings
> E-mail
Machine E-mail
Address, SMTP
Server Address,
POP3 Server
Address, POP User
Name, POP User
Password, APOP
Settings
Transport Protocol Select appropriate settings for using TCP/IP protocol.
Permitted E-mail
Address
Password When setting the password for access to the printer
StatusMessenger Set the e-mail address to which notices about changes
Checking the Printer Status via E-mail
Select appropriate settings for sending and receiving
e-mail.
When setting the permission for e-mail for checking
information and changing the settings, input the e-mail
address that is permitted to receive the e-mail. If no
address is input here, the printer receives e-mails from
all users.
(both read only and read/write), check the [Enable
Password] check box to set the password.
in printer status or errors are sent. Also set the contents
of the notices, and time interval to send the e-mail.
This section describes cautions when sending e-mail from the computer to the printer to
check the printer status.
• Specify the printer’s e-mail address by using the e-mail program installed in the computer.
• You can specify any title for the e-mail when checking the printer status or changing the
printer settings.
• Use the commands described below to create the text of the e-mail.
Note
• The method for sending an e-mail differs depending on the e-mail program you use. For details, refer to
the manual for the e-mail program.
List of Commands That Can Be Used in E-mail Text
Command Parameter Description
#Password Password Use this command at the top of the e-mail when a
password for the read only or full access is set. You can
omit this command when the password is not set.
#NetworkInfo - Set this when you want to check information on the
network settings list.
#Status - Set this when you want to check the printer status.
#SetMsgAddr Recipient e-mail
address
Set the e-mail address to which notices about changes
in the printer status are sent by e-mail. This command
can only be used when the full access password is
specified by using the #Password command.
94 6 Daily Care
Page 95

Rules for Using Commands
Use each command according to the following rules.
• Prefix all commands with “#”, and specify the #Password command at the top of the
e-mail.
• Command lines without “#” are ignored.
• Write one command on each line and separate each command and parameter with a
space or a tab.
• When the same command is written two or more times in one e-mail, the second and
subsequent commands are ignored.
Example of Commands
1. When the read only password is “ronly”, and to check the printer status.
#Password ronly
#Status
2. When the full access password is “admin”, and to set the recipient e-mail address to
“service@fujixerox.co.jp”.
#Password admin
#SetMsgAddr service@fujixerox.co.jp
3. When the full access password is “admin”, and to set the recipient e-mail address to
“service@fujixerox.co.jp”, then confirm the setting result on the network settings list.
#Password admin
#SetMsgAddr service@fujixerox.co.jp
#NetworkInfo
Note
• Describe the “#SetMsgAddr” command before the “#NetworkInfo” command. If they are written in
reverse, the information retrieved by the “#NetworkInfo” command and the result of executing the
“#SetMsgAddr” command may differ.
6.5 Checking Printer Status via E-mail 95
Page 96

6.6 Checking Printed Pages
This section explains how to check the total number of printed pages.
Checking Total Printed Pages on Meter
The total number of printed pages for different meters can be checked on the display of the
control panel.
The meter is divided according to the color modes.
Meter 1 Black/White Printing
Meter 2 Normally not used.
Meter 3 Color printing
Note
• When printing color data, that has been converted by using ICC profile on an application, with the [Color
(Auto)] setting, the data is printed by color even if it seems to be black and white data on the monitor. In
that case, metering is done by meter 3 (color printing).
• When doing 2 sided printing, a blank page may be inserted automatically depending on the settings on
the application. In this case, the blank page is counted as one page.
The following procedure shows how to check the meter.
1. Press the <Menu> button to display the Menu screen.
2. Press the < > or < > button until [Billing Meter] is displayed and then press the < >
or <Eject/Set> button.
3. Press the < > or < > button until the desired meter is displayed.
4. After checking, press the <Menu> button.
Checking Total Printed Pages for Each Paper Size
The [Printer Settings] allows you to check the total printed pages and total number of sheets
used in this printer according to different paper sizes.
Refer to
• How to print reports and lists: “Printing Reports/Lists” (P. 86)
96 6 Daily Care
Page 97

6.7 Cleaning the Printer
This section describes how to clean the printer in order to maintain it in good condition and
print clean printouts all the time.
CAUTION
• Be sure to switch off and unplug the machine before accessing the interior of the
machine for cleaning, maintenance, or fault clearance. Access to a live machine’s
interior can cause electric shock.
Cleaning the Exterior
Clean the exterior of the printer about once a month. Wipe the parts with a wet but
wellwrung soft cloth. Then wipe with another dry soft cloth. For stubborn stains, apply a
small amount of neutral detergent, and gently wipe the stain off.
Important
• Do not spray the detergent directly on the printer. The liquid detergent may enter the printer through a
gap and cause problems. Never use cleaning agents other than water or neutral detergent.
Cleaning the Interior
After clearing paper jams or replacing the drum cartridge or toner cartridges, inspect the
inside of the printer before closing the printer covers.
CAUTION
• Never touch a labeled area found on or near the heat roller. You can get burnt. If a sheet
of paper is wrapped around the heat roller, do not try to remove it by yourself to avoid
injuries or burns. Doing so can cause injuries or burns. Switch off the machine
immediately, and contact our Customer Support Center or your dealers.
• Remove any remaining pieces of paper.
• Remove any dust or stains with a dry clean cloth.
Cleaning the Density Sensor
When the printer’s density sensor is dirty, follow the procedure below to clean it.
Important
• Do not touch the edge of the plate at the upper side of the transfer roll cartridge because it is sharp.
1. Turn off the printer.
2. Push up the button A and open the front
cover A.
6.7 Cleaning the Printer 97
Page 98

3. Grip the tabs at both ends of the transfer
roll cartridge and gently lift it out of the
printer.
Note
• Do not touch inside the printer with your hands. Some
parts may be hot. Allow time for the printer to cool
before attempting to remove parts in this area.
4. Gently wipe the density sensor window with
a clean dry cloth or swab.
Note
• Do not allow anything hard to come in contact with the
density sensor window. Do not use excessive force to
clean the window.
5. Replace the transfer roll cartridge. Grip the
tabs as shown in the diagram.
6. Align the arrow marks on the transfer roll
cartridge to the marks on the printer, and
gently push the roller into the printer.
7. To lock the transfer roll cartridge into the
printer push down the tabs until you hear a
click.
98 6 Daily Care
Page 99

8. Close the front cover A.
9. Turn on the printer.
Cleaning the Drum Cartridge
When the colored dots appears on the printed paper at regular intervals (about 30 mm),
clean the drum cartridge as following procedure.
Note
• Remove any print jobs from the output tray, close the bypass tray cover before opening the front cover.
1. Push up the button A and open the front
cover A.
2. Push the button C and open the output tray
cover.
3. Grab the drum cartridge by the handle, and
pull it up and out.
CAUTION
• Do not touch inside the printer with your
hands. Some parts may be hot. Allow time for
the printer to cool before attempting to
remove parts in this area.
6.7 Cleaning the Printer 99
Page 100
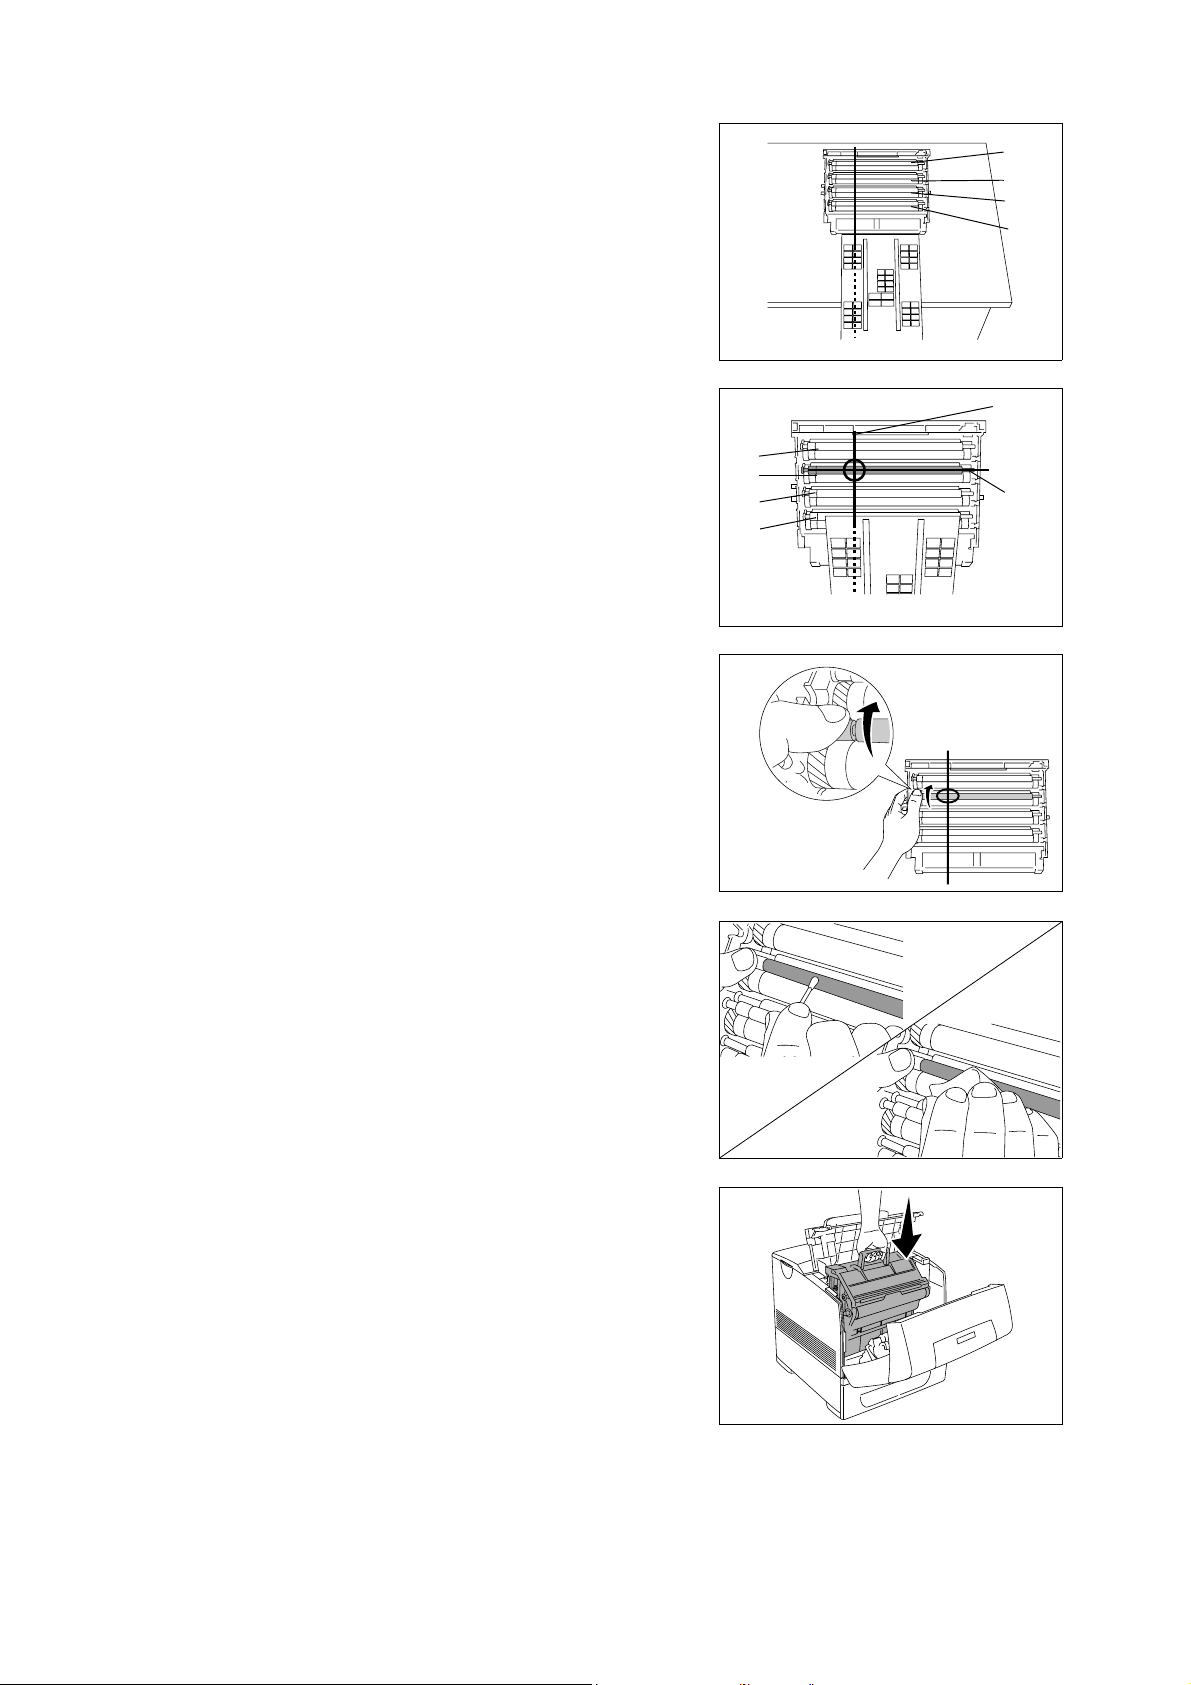
4. Place the drum cartridge next to the print
sample on which the colored dots appear to
find the part that needs to be cleaned.
Note
• You must find the part to be cleaned yourself.
• The illustration shows the parts, one to four, to be
cleaned.
• To prevent the light-sensitive drum being
overexposed, do the operation quickly.
1
2
3
4
5. Align the colored dots printed on the print
sample with the corresponding part of the
drum cartridge. 1 indicates the lateral
position of the colored dots. 2 indicates the
color of the colored dots.
Note
• The graphic shows an example with magenta colored
dots.
6. Determine the position where colored dots
were printed. Then turn the gray-colored
part on the charge roll (black-colored roller)
by rolling it with your finger on its left side to
find the dirt.
7. Clean any dirt from the roller.
Note
• Use a soft cloth, such as cotton for cleaning.
• Make sure nothing touches or scratches the surface of
the light-sensitive drum (green-colored roller) or the
charge roll (black-colored roller).
1
Y
M
C
K
2
100 6 Daily Care
8. Replace the drum cartridge. Holding the
drum cartridge by the handle with the flat
part facing the back of the printer, align the
plastic guides on both sides of the drum
cartridge with the slots in front of the arrows
on the printer.
 Loading...