

Page 1

DocuPrint C2255
User Guide
Page 2
Adobe, the Adobe logo, Acrobat, Adobe Reader, PostScript, Adobe PostScript 3, and the PostScript logo
are either registered trademarks or trademarks of Adobe Systems Incorporated in the United States and/or
other countries.
Microsoft, Windows, Windows Server, and Windows Vista are either registered trademarks or trademarks
of Microsoft Corporation in the United States and/or other countries.
Permission has been obtained from Microsoft Corporation for use of software screen shots.
NetWare is a registered trademark of Novell, Inc.
Macintosh, Mac OS, AppleTalk, EtherTalk, and TrueType are trademarks of
Apple Inc., registered in the U.S. and other countries.
RSA, BSAFE are either registered trademarks or trademarks of RSA Security Inc. in the United States and/
or other countries. RSA Security Inc. All rights reserved.
All product/brand names are trademarks or registered trademarks of the respective holders.
For license information, refer to “Licenses” (P. 19).
In this manual, safety instructions are preceded by the symbol . Always read and follow the
instructions before performing the required procedures.
It may be a legal offence to print currency notes, certificates of stocks and securities, or any other
documents of similar nature, regardless of whether they will be used.
The data saved in the hard disk of the machine may be lost if there is any problem in the hard disk. Fuji
Xerox is not responsible for any direct and indirect damages arising from or caused by such data loss.
Fuji Xerox is not responsible for any breakdown of machines due to infection of computer virus or
computer hacking.
Important
1. This manual is copyrighted with all rights reserved. Under the copyright laws, this manual may not be
copied or modified in whole or part, without the written consent of the publisher.
2. Parts of this manual are subject to change without prior notice.
3. We welcome any comments on ambiguities, errors, omissions, or missing pages.
4. Never attempt any procedure on the machine that is not specifically described in this manual.
Unauthorized operation can cause faults or accidents. Fuji Xerox is not liable for any problems resulting
from unauthorized operation of the equipment.
XEROX, The Document Company, and the stylized X are registered trademarks of Xerox Corporation.
All Xerox and Fuji Xerox product names are either registered trademarks or trademarks of
Xerox Corporation or Fuji Xerox Co., Ltd.
Page 3

Preface
Thank you for purchasing the DocuPrint C2255.
This guide explains how to operate this printer and the precautions that must be followed
during operation.
To get the most out of this printer and to use it effectively, be sure to read this guide before
use.
This guide assumes you are familiar with computers and the basics of network operation
and configuration.
After reading this guide, keep it safe and handy. Refer to this manual if any problems occur
while using the machine. The illustrations in this manual show the printer with the Duplex
unit and 3 Tray Module installed. These illustrations are current as of March 2008, however
the machine and its specifications may be changed without notice.
Fuji Xerox shares the global concern about environmental conservation and has integrated that concern
in its business activities from research and development to disposal. We have implemented a number of
programs to lessen the burden on the environment. For example, we have totally eliminated ozonedepleting chlorofluorocarbons from our manufacturing facilities.
We are committed to leadership in the conservation of resources by reusing and recycling post-consumer
waste material such as paper, cartridges, and parts from our customer's copiers and printers.
Preface 3
Page 4
DocuPrint C2255 Features
High Speed, High Image Quality
• A4 (monochrome/color): 25 ppm
(Continuous one-sided printing of a single
document)
• The oil-free fusing technology produces prints you
can easily write and place sticky-notes on.
• Prints all types of documents in the optimal print
quality.
Handles a Variety of Paper Sizes
and Types
• Supports printing on non-standard-size paper,
transparencies, and other special media in the
paper trays as well as in the bypass tray.
• Accepts more variety of media in the bypass tray.
Easy Installation and Set Up
• Installation tool (included in the supplied CD-ROM) for easy installation
• Web browser-based monitoring and remote configuration of the printer (CentreWare Internet Services)
Wide Range of Print Features
• Multiple-Up
Prints multiple pages onto one sheet
of paper.
• 2 Sided Print
Prints documents on both sides of
the paper.
• Booklet
Prints documents so they can be
folded in the center in booklet form.
*1
*1
•Poster
Used when creating posters.
• Watermarks
Adds a watermark, such as
“Confidential”, underneath an
original image.
• Saved Settings
Often-used print settings can be
registered in the print driver's
[Saved Settings] list. When
printing, a list item can be
selected for instant configuration
of the printer.
• Sample Set
Enables printing of a proof copy
and printing of all remaining copies
after verification of the proof copy.
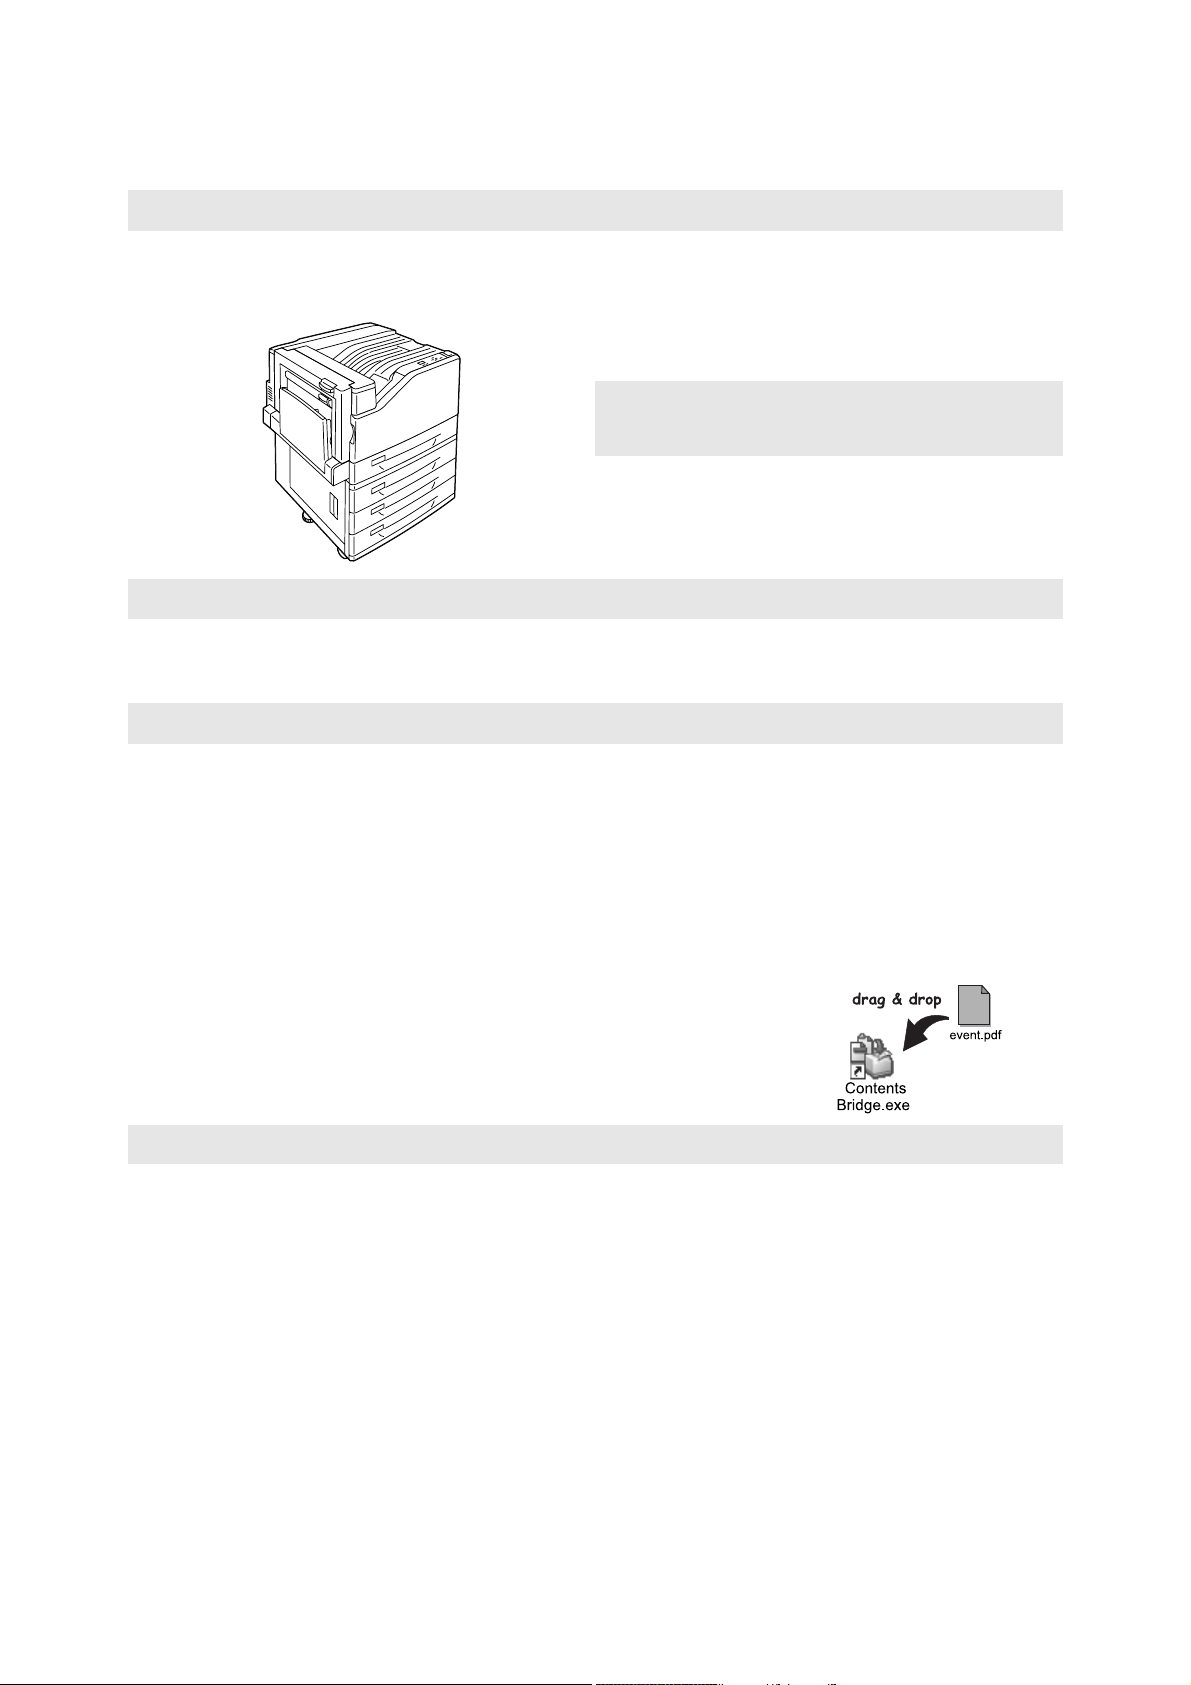
•PDF Bridge
ContentsBridge Utility enables
fast and direct printing of PDF
files simply by dragging and
dropping files onto an icon.
Security Features
• Communication Encryption
Prevents information leaks due to unauthorized
access.
• Control Panel Lock
Provides password-based access control to
control panel operations.
• Print User Control
Authentication feature controls printer access.
4 DocuPrint C2255 Features
*3
• Data Reception Control
Controls access to the printer by IP address
(when LPD or Port 9100 is used).
• Secure Print/Private Charge Print*2
Stores a password-protected document in the
printer, which is output following authentication
by password entry on the control panel or by
Smart card. This feature is ideal for printing
confidential documents.
*1: Requires the Duplex unit (option).
*2: Requires the hard disk (option).
*3: The data encryption feature is not supported on the model
available in China.
*4: Features on this printer may not be useable in some regions.
Contact your dealer for details.
*4
Page 5

Contents
Preface. . . . . . . . . . . . . . . . . . . . . . . . . . . . . . . . . . . . . . . . . . . . . . . . . . . . . . . 3
DocuPrint C2255 Features . . . . . . . . . . . . . . . . . . . . . . . . . . . . . . . . . . . . . . . 4
Contents. . . . . . . . . . . . . . . . . . . . . . . . . . . . . . . . . . . . . . . . . . . . . . . . . . . . . . 5
Types of Manuals. . . . . . . . . . . . . . . . . . . . . . . . . . . . . . . . . . . . . . . . . . . . . . . 9
Using This Guide . . . . . . . . . . . . . . . . . . . . . . . . . . . . . . . . . . . . . . . . . . . . . . 10
Safety Notes . . . . . . . . . . . . . . . . . . . . . . . . . . . . . . . . . . . . . . . . . . . . . . . . . 12
Licenses. . . . . . . . . . . . . . . . . . . . . . . . . . . . . . . . . . . . . . . . . . . . . . . . . . . . . 19
Illegal Copies and Printouts . . . . . . . . . . . . . . . . . . . . . . . . . . . . . . . . . . . . . . 24
1 Printer Environment Settings . . . . . . . . . . . . . . . . . . . . . . . . . . . . . . . . . . 25
1.1 Supported Operating Environments . . . . . . . . . . . . . . . . . . . . . . . . . . . . . . . . . . . 25
1.2 Connecting a cable . . . . . . . . . . . . . . . . . . . . . . . . . . . . . . . . . . . . . . . . . . . . . . . . 27
1.3 Switching the Control Panel Display Language . . . . . . . . . . . . . . . . . . . . . . . . . . 29
1.4 Setting the Network Environment . . . . . . . . . . . . . . . . . . . . . . . . . . . . . . . . . . . . . 30
1.5 Enabling Ports . . . . . . . . . . . . . . . . . . . . . . . . . . . . . . . . . . . . . . . . . . . . . . . . . . . 34
1.6 Configuring the Printer Using CentreWare Internet Services . . . . . . . . . . . . . . . . 35
1.7 Installing a Print Driver . . . . . . . . . . . . . . . . . . . . . . . . . . . . . . . . . . . . . . . . . . . . . 40
Setting an IP Address (IPv4) . . . . . . . . . . . . . . . . . . . . . . . . . . . . . . . . . . . . . . . 30
Setting an IP Address (IPv6) . . . . . . . . . . . . . . . . . . . . . . . . . . . . . . . . . . . . . . . . 33
Overview of CentreWare Internet Services . . . . . . . . . . . . . . . . . . . . . . . . . . . . . 35
Using CentreWare Internet Services . . . . . . . . . . . . . . . . . . . . . . . . . . . . . . . . . . 38
Using the Online Help . . . . . . . . . . . . . . . . . . . . . . . . . . . . . . . . . . . . . . . . . . . . . 39
2 Basic Operation . . . . . . . . . . . . . . . . . . . . . . . . . . . . . . . . . . . . . . . . . . . . 41
2.1 Main Components and Functions . . . . . . . . . . . . . . . . . . . . . . . . . . . . . . . . . . . . 41
Main Unit . . . . . . . . . . . . . . . . . . . . . . . . . . . . . . . . . . . . . . . . . . . . . . . . . . . . . . . 41
Control Panel . . . . . . . . . . . . . . . . . . . . . . . . . . . . . . . . . . . . . . . . . . . . . . . . . . . . 44
Control Panel Display . . . . . . . . . . . . . . . . . . . . . . . . . . . . . . . . . . . . . . . . . . . . . 45
2.2 Switching On/Off the Power . . . . . . . . . . . . . . . . . . . . . . . . . . . . . . . . . . . . . . . . . 46
Switching On the Power . . . . . . . . . . . . . . . . . . . . . . . . . . . . . . . . . . . . . . . . . . . 46
Switching Off the Power . . . . . . . . . . . . . . . . . . . . . . . . . . . . . . . . . . . . . . . . . . . 46
2.3 About the Ground Fault Interrupter . . . . . . . . . . . . . . . . . . . . . . . . . . . . . . . . . . . . 47
2.4 Setting/Exiting the Energy Saver Modes . . . . . . . . . . . . . . . . . . . . . . . . . . . . . . . 47
Entering the Energy Saver Modes . . . . . . . . . . . . . . . . . . . . . . . . . . . . . . . . . . . . 47
Exiting the Energy Saver Modes . . . . . . . . . . . . . . . . . . . . . . . . . . . . . . . . . . . . . 48
2.5 Canceling/Checking a Print Job . . . . . . . . . . . . . . . . . . . . . . . . . . . . . . . . . . . . . . 49
Canceling a Print Job . . . . . . . . . . . . . . . . . . . . . . . . . . . . . . . . . . . . . . . . . . . . . 49
Checking the Status of a Print Job . . . . . . . . . . . . . . . . . . . . . . . . . . . . . . . . . . . 50
2.6 Importing Printer Information to a Print Driver . . . . . . . . . . . . . . . . . . . . . . . . . . . 51
3 Printing. . . . . . . . . . . . . . . . . . . . . . . . . . . . . . . . . . . . . . . . . . . . . . . . . . . 52
3.1 Printing from a Computer . . . . . . . . . . . . . . . . . . . . . . . . . . . . . . . . . . . . . . . . . . . 52
3.2 Printing on Envelopes . . . . . . . . . . . . . . . . . . . . . . . . . . . . . . . . . . . . . . . . . . . . . . 55
Loading Envelopes . . . . . . . . . . . . . . . . . . . . . . . . . . . . . . . . . . . . . . . . . . . . . . . 55
Printing on Envelopes . . . . . . . . . . . . . . . . . . . . . . . . . . . . . . . . . . . . . . . . . . . . . 56
3.3 Printing on Custom Size or Long-size Paper . . . . . . . . . . . . . . . . . . . . . . . . . . . . 58
Loading Custom Size or Long Size Paper . . . . . . . . . . . . . . . . . . . . . . . . . . . . . . 58
Registering Custom Size Paper . . . . . . . . . . . . . . . . . . . . . . . . . . . . . . . . . . . . . 59
Printing on Custom Size Paper . . . . . . . . . . . . . . . . . . . . . . . . . . . . . . . . . . . . . . 61
Contents 5
Page 6

3.4 Printing after Changing the Paper Types of Trays 1 - 4 . . . . . . . . . . . . . . . . . . . . 63
3.5 Printing confidential documents - Secure Print -. . . . . . . . . . . . . . . . . . . . . . . . . . 69
Secure Print . . . . . . . . . . . . . . . . . . . . . . . . . . . . . . . . . . . . . . . . . . . . . . . . . . . . . 69
Printing with Secure Print . . . . . . . . . . . . . . . . . . . . . . . . . . . . . . . . . . . . . . . . . . 69
3.6 Printing after checking output - Sample Set - . . . . . . . . . . . . . . . . . . . . . . . . . . . . 73
Sample Set . . . . . . . . . . . . . . . . . . . . . . . . . . . . . . . . . . . . . . . . . . . . . . . . . . . . . 73
Printing Using Sample Set . . . . . . . . . . . . . . . . . . . . . . . . . . . . . . . . . . . . . . . . . . 73
3.7 Printing at a Specified Time - Delayed Print - . . . . . . . . . . . . . . . . . . . . . . . . . . . . 77
Delayed Print . . . . . . . . . . . . . . . . . . . . . . . . . . . . . . . . . . . . . . . . . . . . . . . . . . . . 77
Registering a Delayed Print Job . . . . . . . . . . . . . . . . . . . . . . . . . . . . . . . . . . . . . 77
Canceling a Delayed Print Job . . . . . . . . . . . . . . . . . . . . . . . . . . . . . . . . . . . . . . 78
3.8 Private Charge Print . . . . . . . . . . . . . . . . . . . . . . . . . . . . . . . . . . . . . . . . . . . . . . . 80
Configuring Private Charge Print Settings . . . . . . . . . . . . . . . . . . . . . . . . . . . . . . 80
Printing with Private Charge Print . . . . . . . . . . . . . . . . . . . . . . . . . . . . . . . . . . . . 80
3.9 Direct Printing of PDF Files. . . . . . . . . . . . . . . . . . . . . . . . . . . . . . . . . . . . . . . . . . 81
Supported PDF Files . . . . . . . . . . . . . . . . . . . . . . . . . . . . . . . . . . . . . . . . . . . . . . 81
Printing PDF Files Using ContentsBridge Utility . . . . . . . . . . . . . . . . . . . . . . . . . 81
Printing PDF Files without Using the ContentsBridge Utility . . . . . . . . . . . . . . . . 82
3.10 Printing Using E-mail - E-mail Print - . . . . . . . . . . . . . . . . . . . . . . . . . . . . . . . . . . 83
Configuring the E-mail Print Environment . . . . . . . . . . . . . . . . . . . . . . . . . . . . . . 83
Sending E-mails . . . . . . . . . . . . . . . . . . . . . . . . . . . . . . . . . . . . . . . . . . . . . . . . . 87
Receiving and Printing E-mail Manually . . . . . . . . . . . . . . . . . . . . . . . . . . . . . . . 88
Precautions When Using E-mail Print . . . . . . . . . . . . . . . . . . . . . . . . . . . . . . . . . 89
4 Paper . . . . . . . . . . . . . . . . . . . . . . . . . . . . . . . . . . . . . . . . . . . . . . . . . . . . 90
4.1 About Paper . . . . . . . . . . . . . . . . . . . . . . . . . . . . . . . . . . . . . . . . . . . . . . . . . . . . . 90
Supported Paper . . . . . . . . . . . . . . . . . . . . . . . . . . . . . . . . . . . . . . . . . . . . . . . . . 90
Unsupported Paper . . . . . . . . . . . . . . . . . . . . . . . . . . . . . . . . . . . . . . . . . . . . . . . 94
Storing and Handling Paper . . . . . . . . . . . . . . . . . . . . . . . . . . . . . . . . . . . . . . . . 94
4.2 Loading Paper . . . . . . . . . . . . . . . . . . . . . . . . . . . . . . . . . . . . . . . . . . . . . . . . . . . 95
Loading Paper in the Bypass Tray . . . . . . . . . . . . . . . . . . . . . . . . . . . . . . . . . . . 95
Loading paper into Trays 1 through 4 . . . . . . . . . . . . . . . . . . . . . . . . . . . . . . . . . 98
Setting the Paper Sizes of Trays 1 through 4 . . . . . . . . . . . . . . . . . . . . . . . . . . 100
Changing the Paper Type Settings of Trays 1 through 4 . . . . . . . . . . . . . . . . . 102
Configuring Image Quality Settings for Each Paper Type . . . . . . . . . . . . . . . . . 103
Auto Tray Selection Feature . . . . . . . . . . . . . . . . . . . . . . . . . . . . . . . . . . . . . . . 104
5 Control Panel Settings . . . . . . . . . . . . . . . . . . . . . . . . . . . . . . . . . . . . . . 105
5.1 Overview of the Common Menus . . . . . . . . . . . . . . . . . . . . . . . . . . . . . . . . . . . . 105
Menu Structure . . . . . . . . . . . . . . . . . . . . . . . . . . . . . . . . . . . . . . . . . . . . . . . . . 105
Changing the Settings . . . . . . . . . . . . . . . . . . . . . . . . . . . . . . . . . . . . . . . . . . . . 107
5.2 Common Menus Setting . . . . . . . . . . . . . . . . . . . . . . . . . . . . . . . . . . . . . . . . . . 109
[LanguageEmulation] . . . . . . . . . . . . . . . . . . . . . . . . . . . . . . . . . . . . . . . . . . . . . 109
[Print Reports] . . . . . . . . . . . . . . . . . . . . . . . . . . . . . . . . . . . . . . . . . . . . . . . . . . 113
[Meter Reading] . . . . . . . . . . . . . . . . . . . . . . . . . . . . . . . . . . . . . . . . . . . . . . . . . 113
[Admin Menu] . . . . . . . . . . . . . . . . . . . . . . . . . . . . . . . . . . . . . . . . . . . . . . . . . . 114
6 Troubleshooting . . . . . . . . . . . . . . . . . . . . . . . . . . . . . . . . . . . . . . . . . . . 172
6 Contents
6.1 Clearing Paper Jams . . . . . . . . . . . . . . . . . . . . . . . . . . . . . . . . . . . . . . . . . . . . . 172
Paper Jam in the Bypass Tray . . . . . . . . . . . . . . . . . . . . . . . . . . . . . . . . . . . . . 173
Paper Jam in Trays 1 - 4 . . . . . . . . . . . . . . . . . . . . . . . . . . . . . . . . . . . . . . . . . . 173
Paper Jam Inside Cover A . . . . . . . . . . . . . . . . . . . . . . . . . . . . . . . . . . . . . . . . . 174
Paper Jam Inside Cover B (Optional Duplex Unit Installed) . . . . . . . . . . . . . . . 175
Paper Jam Inside Cover C . . . . . . . . . . . . . . . . . . . . . . . . . . . . . . . . . . . . . . . . 175
Page 7

6.2 Hardware Problems (Power Failure, Abnormal Noise, etc.) . . . . . . . . . . . . . . . . 177
6.3 Printing Problems . . . . . . . . . . . . . . . . . . . . . . . . . . . . . . . . . . . . . . . . . . . . . . . . 178
6.4 Print and Image Quality Problems . . . . . . . . . . . . . . . . . . . . . . . . . . . . . . . . . . . 180
6.5 Paper Feed Problems . . . . . . . . . . . . . . . . . . . . . . . . . . . . . . . . . . . . . . . . . . . . . 184
6.6 Error Messages and Error Codes . . . . . . . . . . . . . . . . . . . . . . . . . . . . . . . . . . . . 185
Error Messages (in Alphabetical Order) . . . . . . . . . . . . . . . . . . . . . . . . . . . . . . 185
Error Codes . . . . . . . . . . . . . . . . . . . . . . . . . . . . . . . . . . . . . . . . . . . . . . . . . . . . 190
6.7 Network-related Problems . . . . . . . . . . . . . . . . . . . . . . . . . . . . . . . . . . . . . . . . . 198
CentreWare Internet Services Problems . . . . . . . . . . . . . . . . . . . . . . . . . . . . . . 198
E-mail Print/E-mail Notification Service Problems . . . . . . . . . . . . . . . . . . . . . . . 199
IPv6 Connection Problems . . . . . . . . . . . . . . . . . . . . . . . . . . . . . . . . . . . . . . . . 200
IPv6 Environment Printing Problems . . . . . . . . . . . . . . . . . . . . . . . . . . . . . . . . . 200
Other IPv6 Problems . . . . . . . . . . . . . . . . . . . . . . . . . . . . . . . . . . . . . . . . . . . . . 200
6.8 Non-Genuine Mode. . . . . . . . . . . . . . . . . . . . . . . . . . . . . . . . . . . . . . . . . . . . . . . 202
7 Maintenance . . . . . . . . . . . . . . . . . . . . . . . . . . . . . . . . . . . . . . . . . . . . . 203
7.1 Replacing Consumables . . . . . . . . . . . . . . . . . . . . . . . . . . . . . . . . . . . . . . . . . . . 203
Types of Consumables . . . . . . . . . . . . . . . . . . . . . . . . . . . . . . . . . . . . . . . . . . . 203
Recycling Used Consumables . . . . . . . . . . . . . . . . . . . . . . . . . . . . . . . . . . . . . . 204
Replacing Toner Cartridges . . . . . . . . . . . . . . . . . . . . . . . . . . . . . . . . . . . . . . . . 205
Replacing Drum Cartridges . . . . . . . . . . . . . . . . . . . . . . . . . . . . . . . . . . . . . . . . 207
Replacing the Waste Toner Bottle . . . . . . . . . . . . . . . . . . . . . . . . . . . . . . . . . . . 211
Replacing the Fuser Unit . . . . . . . . . . . . . . . . . . . . . . . . . . . . . . . . . . . . . . . . . . 214
Replacing the Transfer Belt Cleaner . . . . . . . . . . . . . . . . . . . . . . . . . . . . . . . . . 217
7.2 Printing Reports/Lists . . . . . . . . . . . . . . . . . . . . . . . . . . . . . . . . . . . . . . . . . . . . . 219
Types of Reports/Lists . . . . . . . . . . . . . . . . . . . . . . . . . . . . . . . . . . . . . . . . . . . . 219
Printing a Report/List . . . . . . . . . . . . . . . . . . . . . . . . . . . . . . . . . . . . . . . . . . . . . 222
7.3 Checking the Meter Reading . . . . . . . . . . . . . . . . . . . . . . . . . . . . . . . . . . . . . . . 223
Checking the Meter Reading by Output Color (Meter) . . . . . . . . . . . . . . . . . . . 223
Checking the Meter Reading by Computer ([Meter Report (Print Jobs)]) . . . . . 224
Checking the Meter Reading by Function ([Job Counter Report]) . . . . . . . . . . . 225
7.4 Monitoring/Managing the Printer with a Web Browser . . . . . . . . . . . . . . . . . . . . 226
7.5 Checking Printer Status via E-mail . . . . . . . . . . . . . . . . . . . . . . . . . . . . . . . . . . . 227
Information Reported by the E-mail Notification Service . . . . . . . . . . . . . . . . . . 227
Configuring the E-mail Notification Service . . . . . . . . . . . . . . . . . . . . . . . . . . . . 227
7.6 Security Features . . . . . . . . . . . . . . . . . . . . . . . . . . . . . . . . . . . . . . . . . . . . . . . . 230
Security Feature Overview . . . . . . . . . . . . . . . . . . . . . . . . . . . . . . . . . . . . . . . . 230
Controlling Data Reception by IP Address . . . . . . . . . . . . . . . . . . . . . . . . . . . . 231
Using the Watermark Feature . . . . . . . . . . . . . . . . . . . . . . . . . . . . . . . . . . . . . . 233
Using the Audit Log . . . . . . . . . . . . . . . . . . . . . . . . . . . . . . . . . . . . . . . . . . . . . . 238
7.7 Configuring Encryption Settings . . . . . . . . . . . . . . . . . . . . . . . . . . . . . . . . . . . . . 241
About Encryption . . . . . . . . . . . . . . . . . . . . . . . . . . . . . . . . . . . . . . . . . . . . . . . . 241
Configuring HTTP Communication Encryption Settings . . . . . . . . . . . . . . . . . . 242
Configuring IPSec for Encryption . . . . . . . . . . . . . . . . . . . . . . . . . . . . . . . . . . . 245
7.8 Control Access to Printer Features by Pre-registering Users . . . . . . . . . . . . . . . 249
Overview of Authentication and Auditron Administration Feature . . . . . . . . . . . 249
Configuring Authentication and Auditron Administration Settings . . . . . . . . . . . 250
7.9 Ordering Consumables With Your Web Browser . . . . . . . . . . . . . . . . . . . . . . . . 254
7.10 Adjusting Tone Density . . . . . . . . . . . . . . . . . . . . . . . . . . . . . . . . . . . . . . . . . . . . 255
Calibration Procedure . . . . . . . . . . . . . . . . . . . . . . . . . . . . . . . . . . . . . . . . . . . . 255
Performing Calibration . . . . . . . . . . . . . . . . . . . . . . . . . . . . . . . . . . . . . . . . . . . . 256
7.11 Adjusting the Image Transfer Voltage. . . . . . . . . . . . . . . . . . . . . . . . . . . . . . . . . 262
7.12 Cleaning the Printer . . . . . . . . . . . . . . . . . . . . . . . . . . . . . . . . . . . . . . . . . . . . . . 264
Cleaning the Exterior of the Printer . . . . . . . . . . . . . . . . . . . . . . . . . . . . . . . . . . 264
Cleaning the Interior of the Printer . . . . . . . . . . . . . . . . . . . . . . . . . . . . . . . . . . . 264
Contents 7
Page 8

7.13 Moving the Printer. . . . . . . . . . . . . . . . . . . . . . . . . . . . . . . . . . . . . . . . . . . . . . . . 267
A Appendix . . . . . . . . . . . . . . . . . . . . . . . . . . . . . . . . . . . . . . . . . . . . . . . . 268
A.1 Main Specifications . . . . . . . . . . . . . . . . . . . . . . . . . . . . . . . . . . . . . . . . . . . . . . . 268
DocuPrint C2255 Specifications . . . . . . . . . . . . . . . . . . . . . . . . . . . . . . . . . . . . 268
Printable Area . . . . . . . . . . . . . . . . . . . . . . . . . . . . . . . . . . . . . . . . . . . . . . . . . . 272
Built-in Fonts . . . . . . . . . . . . . . . . . . . . . . . . . . . . . . . . . . . . . . . . . . . . . . . . . . . 272
A.2 Options . . . . . . . . . . . . . . . . . . . . . . . . . . . . . . . . . . . . . . . . . . . . . . . . . . . . . . . . 274
A.3 Life of Consumables and Regular Replacement Parts . . . . . . . . . . . . . . . . . . . . 275
A.4 Obtaining Product Information . . . . . . . . . . . . . . . . . . . . . . . . . . . . . . . . . . . . . . 277
Obtaining the Latest Print Driver Version . . . . . . . . . . . . . . . . . . . . . . . . . . . . . 277
Updating the Printer's Firmware . . . . . . . . . . . . . . . . . . . . . . . . . . . . . . . . . . . . 277
A.5 Installing Additional Memory. . . . . . . . . . . . . . . . . . . . . . . . . . . . . . . . . . . . . . . . 278
Procedure for Installing Additional Memory . . . . . . . . . . . . . . . . . . . . . . . . . . . . 280
A.6 Installing the Hard Disk. . . . . . . . . . . . . . . . . . . . . . . . . . . . . . . . . . . . . . . . . . . . 283
A.7 Installing the Feature Enhance Kit . . . . . . . . . . . . . . . . . . . . . . . . . . . . . . . . . . . 286
A.8 Installing the Parallel Port . . . . . . . . . . . . . . . . . . . . . . . . . . . . . . . . . . . . . . . . . . 290
A.9 Installing the TC/SC Font ROM . . . . . . . . . . . . . . . . . . . . . . . . . . . . . . . . . . . . . 293
A.10 Installing the Korea Font ROM . . . . . . . . . . . . . . . . . . . . . . . . . . . . . . . . . . . . . . 296
A.11 Notes and Restrictions . . . . . . . . . . . . . . . . . . . . . . . . . . . . . . . . . . . . . . . . . . . . 299
Notes and Restrictions on Using the Printer . . . . . . . . . . . . . . . . . . . . . . . . . . . 299
TCP/IP (lpd) Note and Limitations . . . . . . . . . . . . . . . . . . . . . . . . . . . . . . . . . . . 300
IPv6 Connection Notes and Limitations . . . . . . . . . . . . . . . . . . . . . . . . . . . . . . . 302
Notes and Restrictions on the Cloning Feature . . . . . . . . . . . . . . . . . . . . . . . . . 303
A.12 Glossary . . . . . . . . . . . . . . . . . . . . . . . . . . . . . . . . . . . . . . . . . . . . . . . . . . . . . . . 305
Index . . . . . . . . . . . . . . . . . . . . . . . . . . . . . . . . . . . . . . . . . . . . . . . . . . . . . . 310
Control Panel Menu Tree. . . . . . . . . . . . . . . . . . . . . . . . . . . . . . . . . . . . . . . 314
8 Contents
Page 9
Types of Manuals
Setup Guide Provides step-by-step instructions on how to set up your printer.
Quick Reference Guide Provides information such as how to get ready to print, basic operating
User Guide (PDF)
(This guide)
CD-ROM Documentation
(HTML)
Emulation Setting Guide
(PDF)
PostScript User Guide
(PDF)
Installation guides for the
optional accessories
instructions, and troubleshooting tips. This guide also includes
instructions on how to install options, including additional memory, the
hard disk, the Feature Enhance Kit, the Font ROM and the Parallel
Port.
For more detailed information and information about topics not covered
by this guide, refer to the ‘User Guide’.
Describes how to get ready to print and set various print features. It
also covers control panel menus, troubleshooting tips, and
maintenance information.
• This guide is on the Driver CD Kit CD-ROM, under [Model-specific
Manual (PDF Document)].
Describes how to set up the printer's operating environment, and how
to install a print driver and various Fuji Xerox software.
• This guide is on the Driver CD Kit CD-ROM.
Explains ESC/P, PCL, HP-GL
• This guide is on the Driver CD Kit CD-ROM, under [Model-specific
Manual (PDF Document)].
Describes how to set up your printer as a PostScript
features that can be configured on your print driver.
• This guide is on the PostScript Driver Library CD-ROM.
Most optional accessories (sold separately) come with installation
guides.
®
, and HG-PL/2® emulation.
®
printer and the
Note
• To view PDF files, you must have Adobe
installed, install it from the Driver CD Kit CD-ROM.
®
Reader® installed on your computer. If you do not have it
Types of Manuals 9
Page 10
Using This Guide
Organization
This guide is organized into the following chapters. The summary of each chapter is as
follows:
1 Printer Environment Settings Describes how to set up the printer's operating environment.
2 Basic Operations Provides the names and functions of the printer's components and
3 Printing Describes various printing methods using the PCL print driver.
4 Paper Describes the supported paper types and how to load paper in the
5 Control Panel Settings Describes control panel menus and how to configure them.
6 Troubleshooting Contains procedures that help to resolve problems (such as paper
7 Maintenance Provides information on topics such as replacing consumables and
A Appendix Describes printer specifications, optional accessories, life of
basic operating procedures (such as switching the power on/off and
canceling print jobs).
printer.
jams and errors) quickly.
printing various reports/lists.
It also contains information intended for administrators, such as
CentreWare Internet Services (a tool that enables monitoring and
remote configuration of the printer), various security features, and
Authentication and Auditron Administration features.
consumables, and how to obtain product information.
10 Using This Guide
Page 11
Conventions
1. In this guide, personal computers and workstations are referred to collectively as
2. The following terms are used throughout this guide:
3. The following symbols are used throughout this guide:
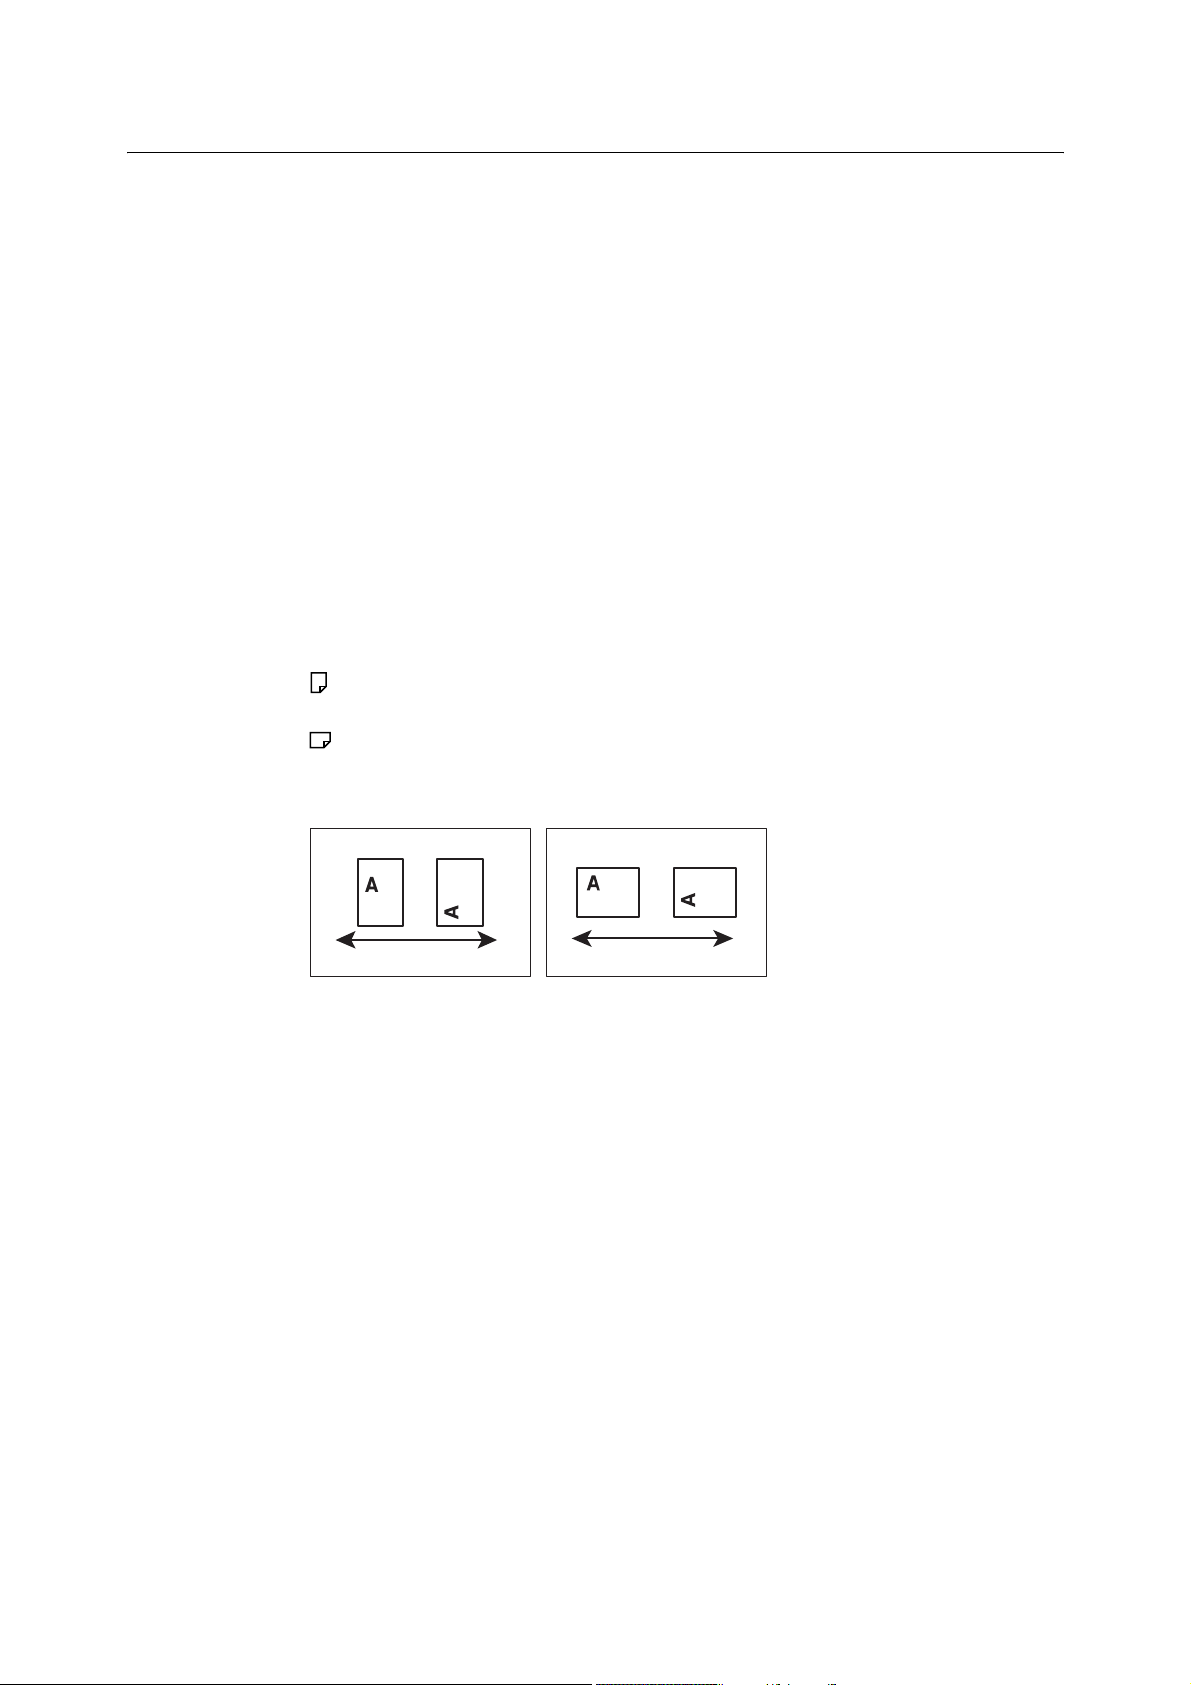
4. The symbols described below are used to indicate paper orientation within the text of
“computers”.
Important : Indicates important information. Be sure to read this information.
Note : Indicates supplementary information.
Refer to “ ” : Indicates a reference within this guide.
Refer to ‘ ’: Indicates a reference in another publication.
[ ] : Indicates a menu name, menu item, or message that appears on your
computer screen or the printer’s control panel display. These brackets
also are used for the names of reports and lists output from the printer.
< > : Indicates key cap text for keys on your computer keyboard, or
hardware buttons or lamps on the printer’s control panel.
> : Indicates the flow of menu items or commands when performing a
control panel display or CentreWare Internet Services operation.
this guide.
,Portrait : When facing the front of the printer, paper is oriented vertically when
loaded.
,Landscape: When facing the front of the printer, paper is oriented horizontally when
loaded.
Portrait Landscape
Feed direction Feed direction
Using This Guide 11
Page 12
Safety Notes
Before using this product, read “Safety Notes” carefully for safety use.
This product and recommended supplies have been tested and found to comply with strict safety
requirements including safety agency approvals and compliance with environmental standards. Follow the
following instructions for safety use.
Any unauthorized alteration including an addition of new functions or connection
to external devices may not be covered by the product warranty. Contact your
local Fuji Xerox representative for more information.
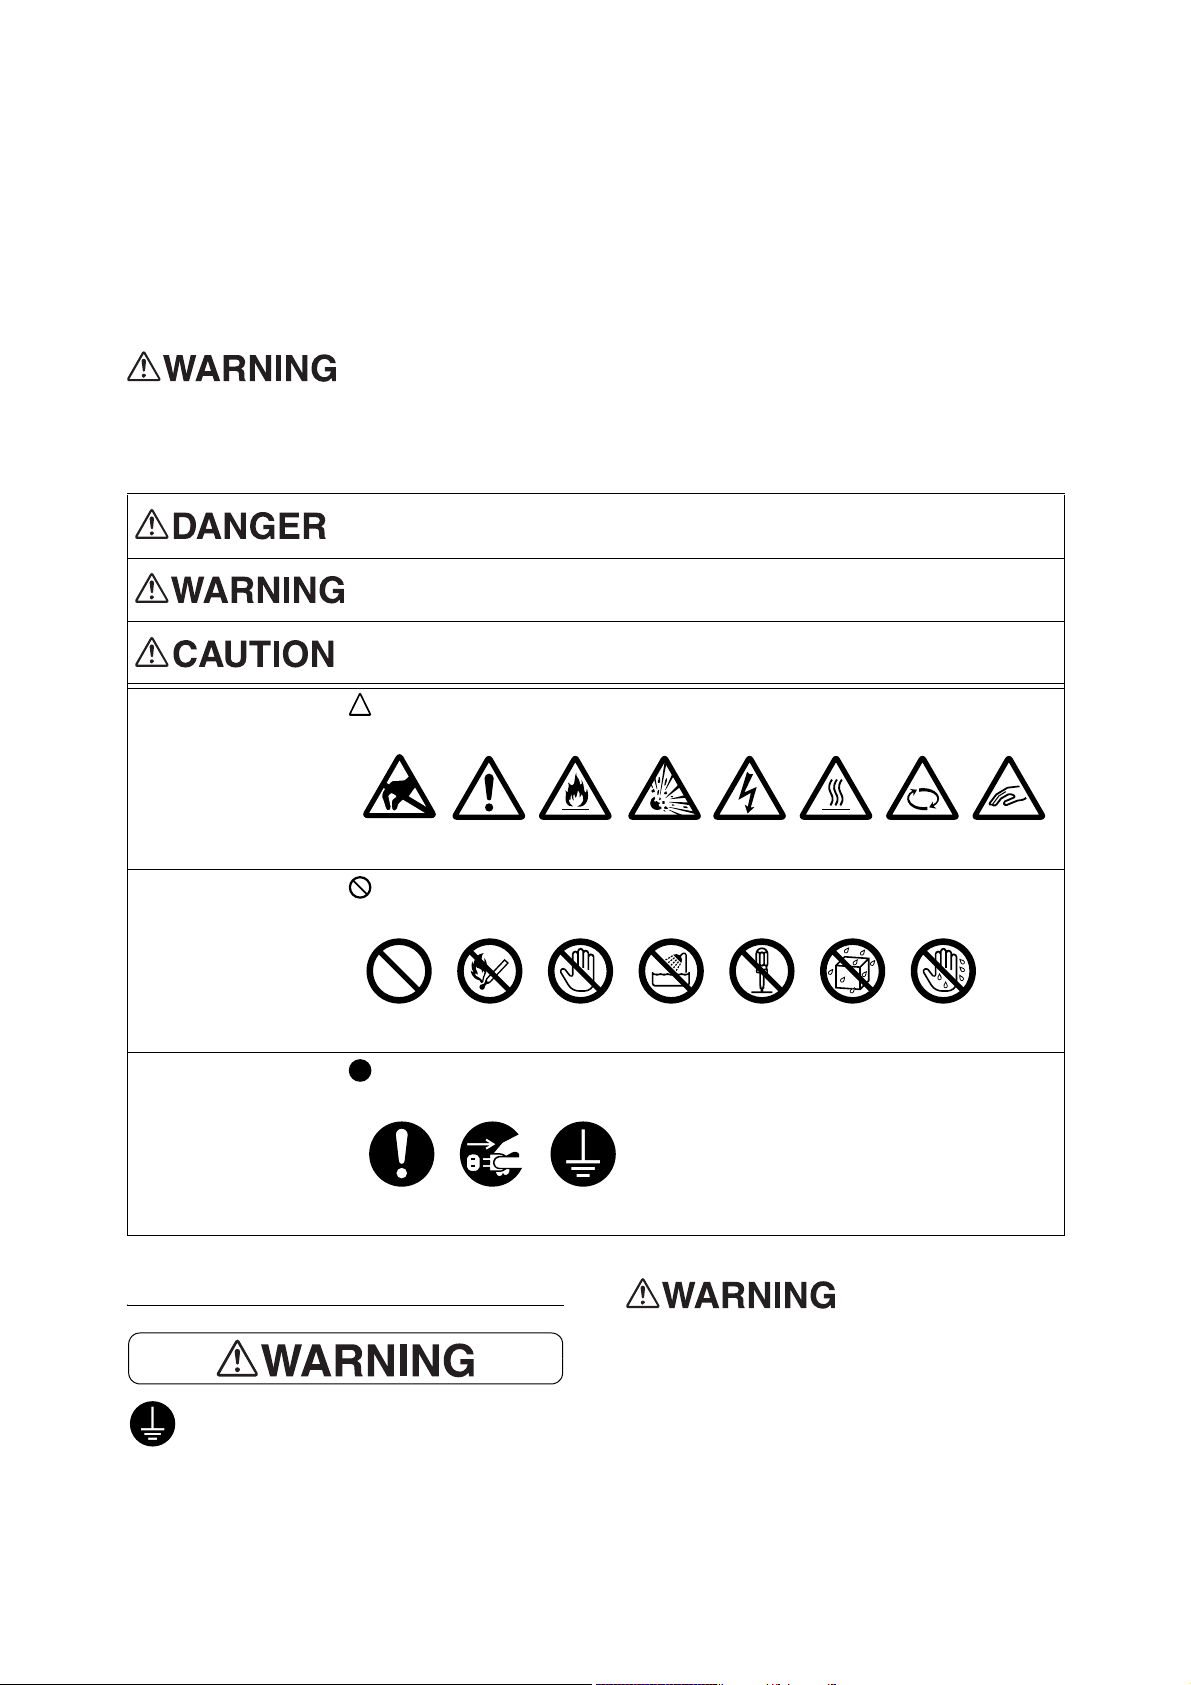
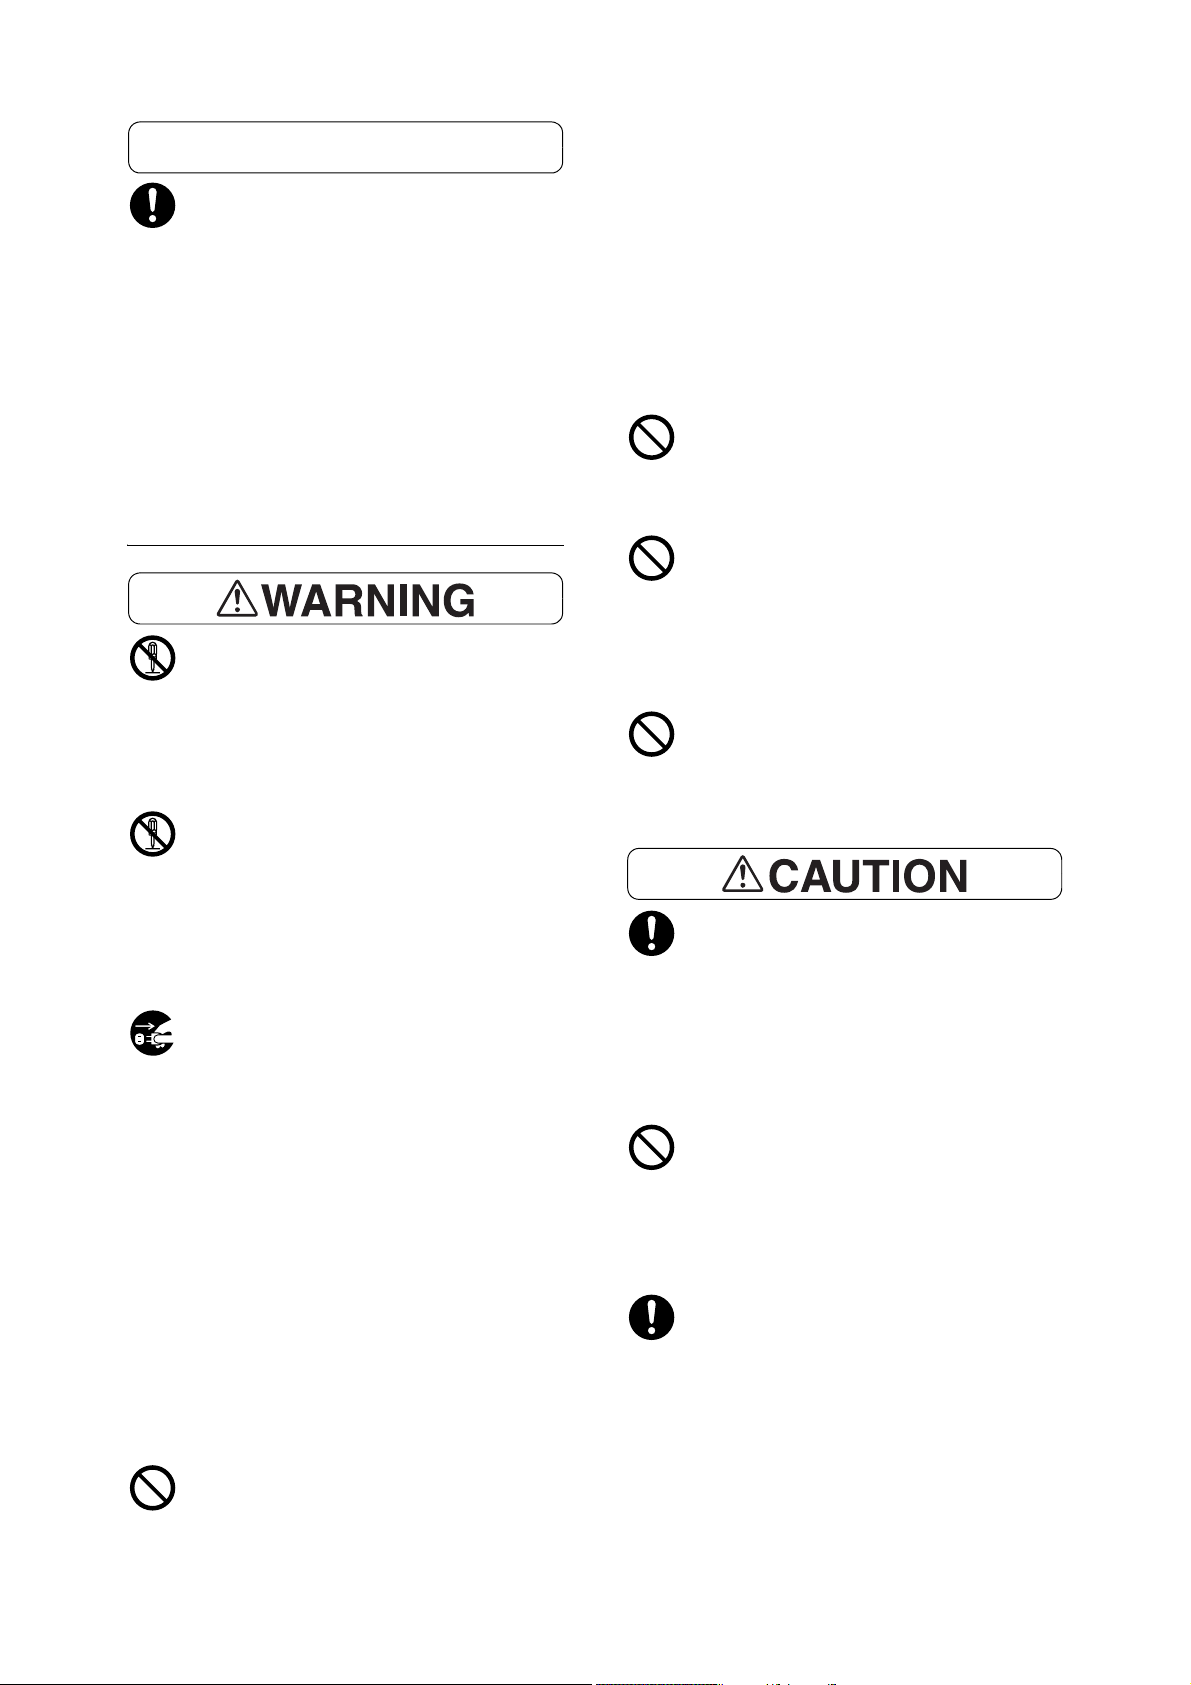
Follow all warning instructions marked on this product. The warning marks stand for the followings:
Used for item that if not followed strictly, can lead death or severe or fatal
injuries and the possibility to do it is comparatively high.
Used for items that if not followed strictly, can lead to severe or fatal
injuries.
Used for items that if not followed strictly, can cause injuries to user or
damages to machine.
: A symbol for items to pay attention to when handling machine. Follow
instructions carefully to use machine safely.
Electrical Safety
This product shall be operated by the
power source as indicated on the product's
data plate. Consult your local power
company to check if your power source
meets the requirements.
Static
Sensitive
Caution Flammable Explodable Electric
shock
Heated
surface
Moving
object
Pinched
fingers
: A symbol for prohibited items. Follow instructions carefully to avoid any
dangerous acts.
Prohibited No fire Do not
touch
Do not use
in bathroom
Do not
tear down
Keep away
from wet
Never touch
with wet hand
: A symbol for items that must be performed. Follow instructions carefully to
carry out these essential tasks.
Instructions Unplug Ground/
Earth
Connect this product to
a protective earth circuit.
This product is supplied with a plug that has
a protective earth pin. The plug fits only into
an earthed electrical outlet. This is a safety
feature. If the plug doesn't fit to the outlet,
contact an electrician to replace the outlet
to avoid risk of electric shock. Never use an
12 Safety Notes
Page 13
earthed adapter plug to connect the
product to the electrical outlet that has no
earth connection terminal.
Improper connection of a grounding
conductor may cause electric shock.
When cleaning this product, always switch
off and unplug it. Access to a live machine
interior may cause electric shock.
Plug the power cord directly into a
grounded electrical outlet. To prevent
overheat and a fire accident, do not use an
extension cord, a multi-plug adaptor or a
multiple connector. Consult your local Fuji
Xerox representative to check if an outlet is
grounded.
Connect this product to a branch circuit or
an outlet that has larger capacity than the
rated ampere and voltage of this product.
See the data plate on the rear panel of this
product for its rated ampere and voltage.
Never touch the power cord with wet
hands. It may cause electric shock.
Do not place an object on the power cord.
Always keep the plug connection free of
dust. The dusty and damp environment
may bring about minute electric current in a
connector. It may generate heat and
eventually cause a fire accident.
To avoid the risk of electric shock and a fire
accident, only use the power cord supplied
with this product or the ones designated by
Fuji Xerox.
The power cord is exclusive use for this
product. Do not use it for any other product.
Do not unplug or re-plug this product with
the switch on. Plugging and unplugging a
live connector may deform the plug and
generate heat, and eventually cause a fire
accident.
Hold the plug not the cord when unplugging
this product, or it may damage the cord and
cause electric shock or a fire accident.
Switch off and unplug the product when it is
not used over weekends or long holidays. It
may cause deterioration of insulations and
eventually electric shock or a fire accident.
Once a month, switch off this product and
check if
• the power cord is plugged firmly into an
electrical outlet;
• the plug is not excessively heated,
rusted or bent;
• the plug and electrical outlet are free of
dust; and
• the power cord is not cracked or worn
down.
Once you notice any unusual condition,
switch off and unplug this product first and
contact your local Fuji Xerox
representative.
Do not damage or alter the power cord.
Damage and alteration may generate heat
and eventually cause electric shock or a
fire accident.
If the power cord is damaged or insulated
wires are exposed, contact your local Fuji
Xerox representative for its replacement.
Do not use a damaged or uninsulated cord
to avoid the risk of electric shock and a fire
accident.
Safety Notes 13
Page 14
Machine Installation
Do not locate this product where people
might step on or trip over the power cord.
Friction or excessive pressure may
generate heat and eventually cause
electric shock or a fire accident.
Never locate this product in the following
places:
• Near radiators or any other heat sources
• Near volatile flammable materials such
as curtains
• In the hot, humid, dusty or poorly
ventilated environment
• In the place receiving direct sunlight
• Near cookers or humidifiers
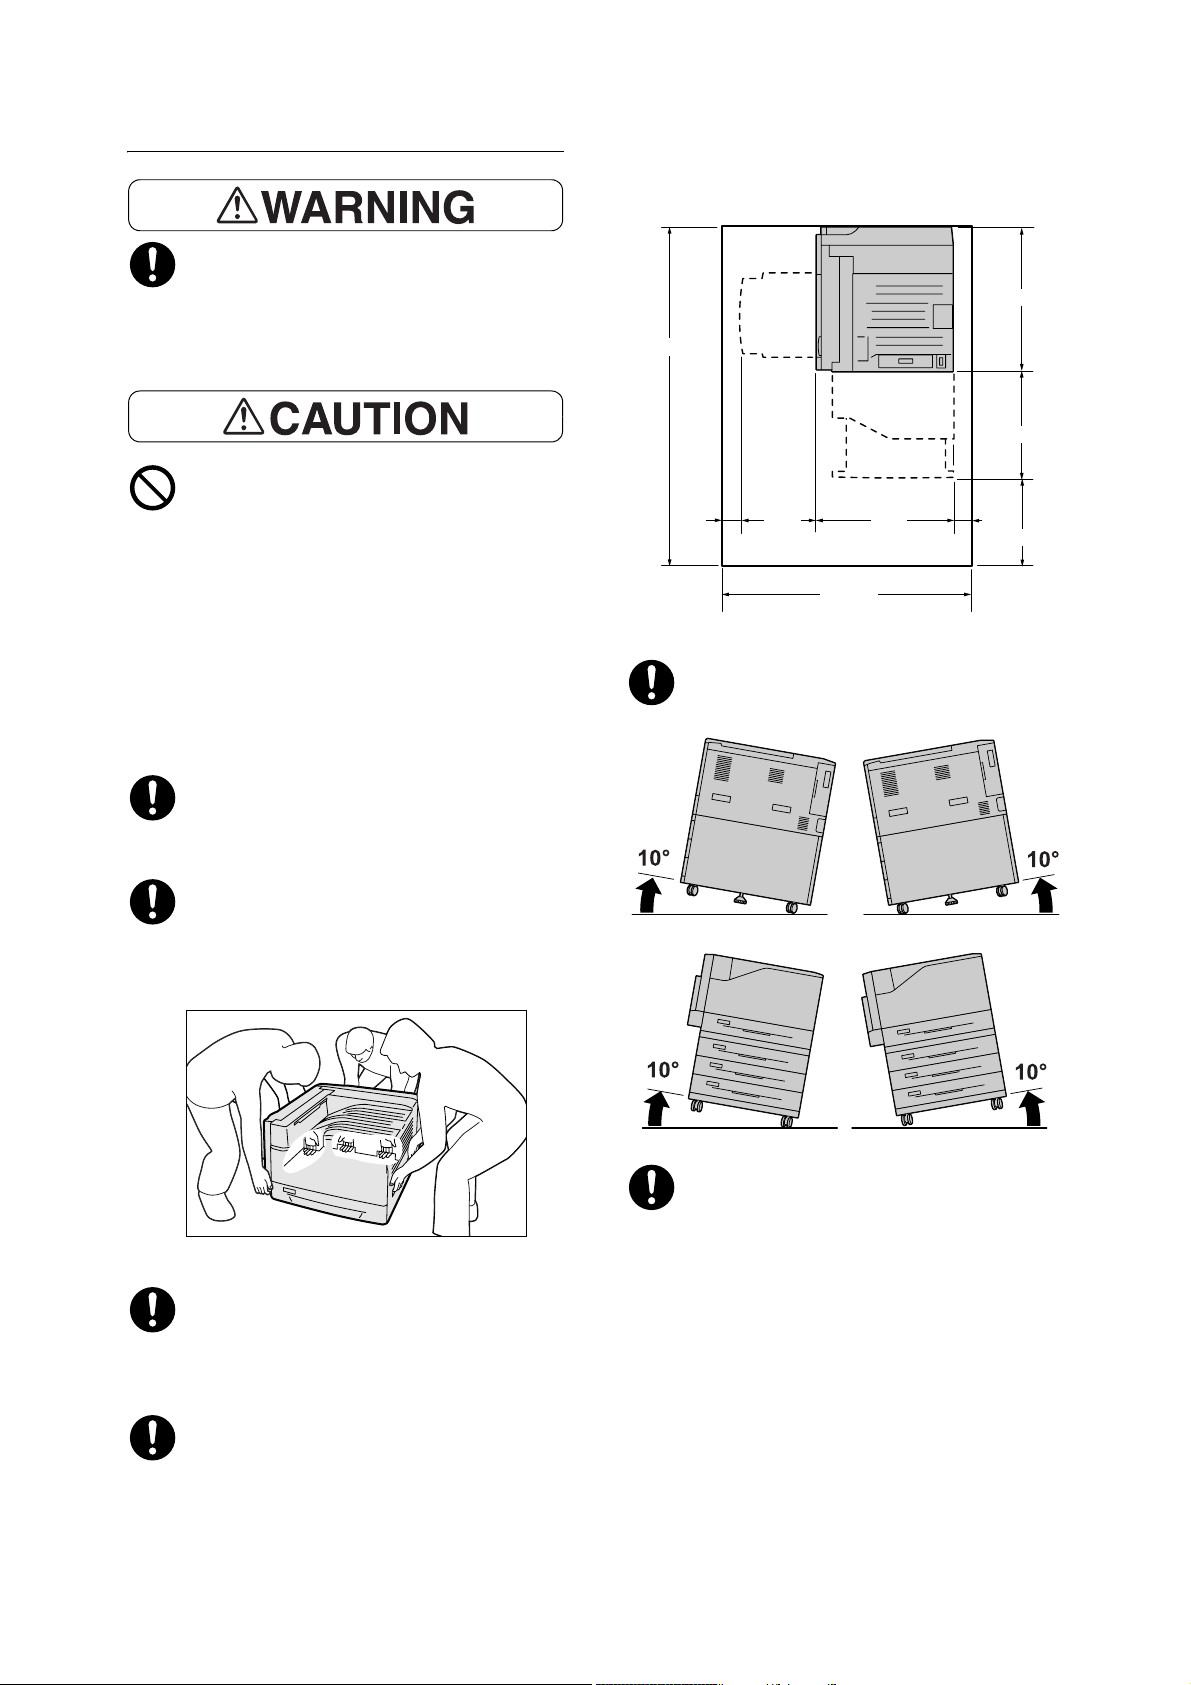
Keep the minimum clearance as follows for
ventilation and an access to the power
plug. Unplug the product if an abnormal
condition is noted.
1464
407
640 10068
1215
Do not incline the product at more than 10
degree angle. Otherwise, it may fall over
and cause injuries.
665
399
400
Unit: mm
This product weighs 63.0 kg. When moving
it, always carry it by a team of two or more
persons to avoid mishandling or injury.
When lifting this product, firmly grip the
handholds provided. Never lift it by gripping
any other areas. Doing so may prevent you
from dropping the product or injuring your
back.
Locate this product on the level and sturdy
surface that can withstand its weight.
Otherwise, if tilted, the product may fall
over and cause injuries.
Always lock the wheels of this product after
installation. Otherwise, it may fall over or
slide and cause injuries.
Locate this product in a well-ventilated
area. Do not obstruct ventilation openings
of the product.
14 Safety Notes
Page 15
Others
Do not place any of the followings on the
product:
To keep this product in a good performance
and condition, always use it in the following
environment:
• Temperature: 10 - 32°C
• Humidity: 15 - 85%
(no dew condensation)
When the product is left in a chilly room and
the room is rapidly warmed up by heater,
dew condensation may form inside the
product and cause a partial deletion on
printing.
Operational Safety
The operator's product maintenance
procedures are described in the customer
documentation supplied with this product.
Do not carry out any other maintenance
procedures not described in the
documentation.
This product features safety design not to
allow operators access to hazard areas.
The hazard areas are isolated from
operators by covers or protectors which
require a tool to remove. To prevent electric
shock and injuries, never remove those
covers and protectors.
• Liquid container such as flower vases or
coffee cups
• Metal parts such as staples or clips
• Heavy objects
If liquid is spilled over or metal parts are
slipped into the product, it may cause
electric shock or a fire accident.
Do not use conductive paper such as
carbonic paper or coated paper. When
paper jam occurs, it may cause shortcircuit and eventually a fire accident.
When cleaning this product, use the
designated cleaning materials exclusive to
it. Other cleaning materials may result in
poor performance of the product. Never
use aerosol cleaners, or it may catch fire
and cause explosion.
Never play the CD-ROM supplied with the
product on an audio player. Always use a
CD-ROM player. Otherwise, large sound
may damage audio players or your ears.
Always follow all warning instructions
marked on or supplied with this product.
To avoid the risk of electric shock and a fire
accident, switch off and unplug the product
promptly in the following conditions, then
contact your local Fuji Xerox
representative.
• The product emits smoke or its surface is
unusually hot.
• The product emits unusual noise or odor.
• The power cord is cracked or worn down.
• A circuit breaker, fuse or any other safety
device is activated.
• Any liquid is spilled into the product.
• The product is soaked in water.
• Any part of the product is damaged.
Do not insert any object into slots or
openings of this product.
To avoid the risk of burn injuries and
electric shock, never touch the area with
the “High Temperature” or “High Voltage”
marks on.
Keep electrical and mechanical safety
interlocks active. Keep the safety interlocks
away from magnetic materials. Magnetic
materials may accidentally activate the
product and cause injuries or electric
shock.
A ground fault interrupter is embedded in
this product. If current leakage occurs, the
ground fault interrupter automatically cuts
off power circuit to prevent electric shock
and a fire accident. The ground fault
interrupter is normally in the Reset position
(where the <RESET> button is in a
pressed-in state). Check once a month if
the ground fault interrupter works properly
in accordance with the following
procedures:
Safety Notes 15
Page 16
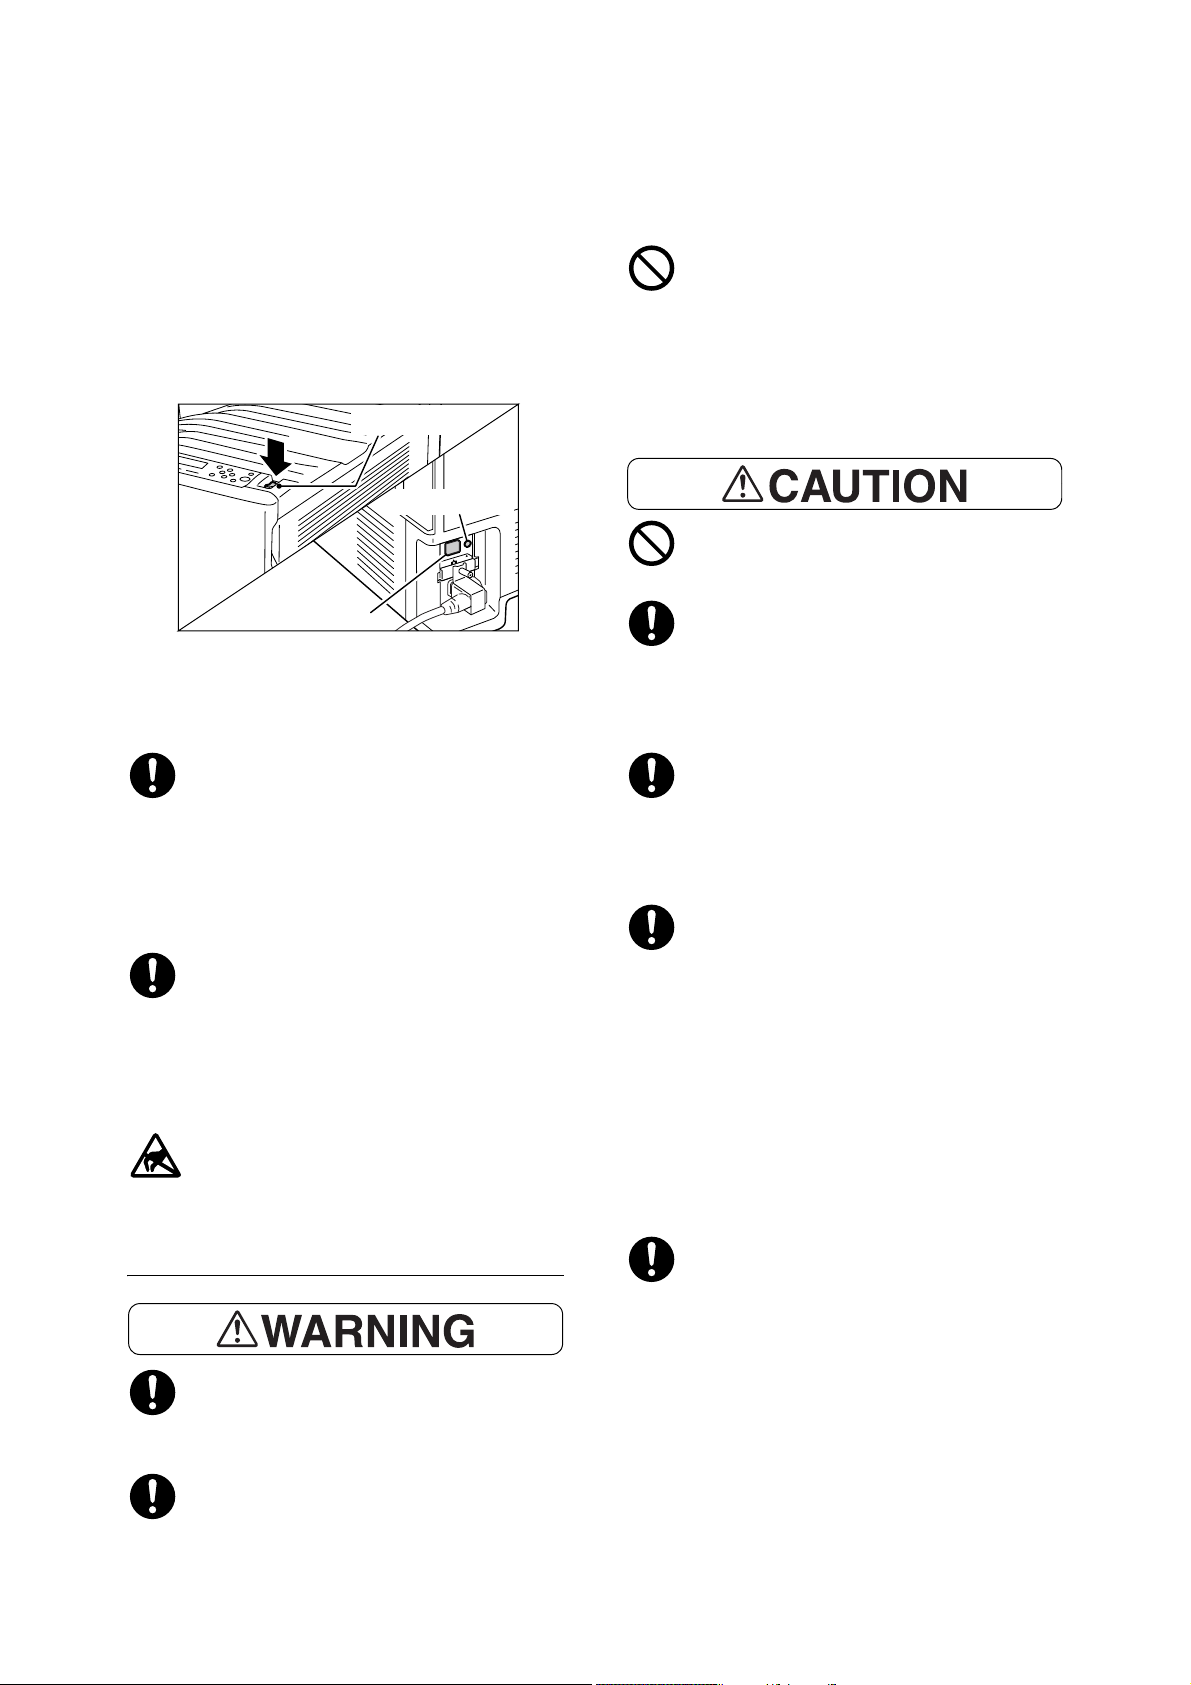
1. Switch off the product.
2. Press the <TEST> button located on
the rear left side of the product, with a
thin stick or similar object.
sparks inside the vacuum cleaner and
cause explosion. If you spill a large volume
of toner, contact your local Fuji Xerox
representative.
3. Make sure that the <RESET> button
is popped up.
4. After the confirmation, press the
<RESET> button to exit the test
mode.
POWER switch
<TEST>button
<RESET>button
If the circuit does not work properly, contact
your local Fuji Xerox representative.
Do not attempt to remove a paper jammed
deeply inside the product, particularly a
paper wrapped around a fuser or a heat
roller. Otherwise, it may cause injuries or
burns. Switch off the product promptly and
contact your local Fuji Xerox
representative.
Ventilate well during extended operation or
mass printing. It may affect the office air
environment due to odor such as ozone in
a poorly ventilated room.
Provide proper ventilation to ensure the
comfortable and safe environment.
Never touch the exposed connectors
around this label. It may cause damage to
the parts due to static discharge.
Never throw a toner cartridge into an open
flame. Remaining toner in the cartridge
may catch fire and cause burn injuries or
explosion.
If you have a used toner cartridge no longer
needed, contact your local Fuji Xerox
representative for its disposal.
Never heat the drum cartridges or scratch
their surfaces. It may cause health hazard.
Keep the drum cartridges and toner
cartridges out of the reach of children. If a
child accidentally swallows toner, spit it out,
rinse mouth with water, drink water and
consult a physician immediately.
When replacing the drum cartridges and
toner cartridges, be careful not to spill the
toner. In case of any toner spills, avoid
contact with clothes, skin, eyes, and
mouth, also avoid inhaling it.
If toner spills onto your skin or clothing,
wash it off with soap and water.
If you get toner particles in your eyes, wash
it out with plenty of water for at least 15
minutes until irritation is gone. Consult a
physician if necessary.
If you inhale toner particles, move to a fresh
air location and rinse your mouth with
water.
If you swallow toner, spit it out, rinse your
mouth with water, drink plenty of water and
consult a physician immediately.
Consumable
Store all consumables in accordance with
the instructions given on its package or
container.
Use a broom or a wet cloth to wipe off
spilled toner. Never use a vacuum cleaner
for the spills. It may catch fire by electric
16 Safety Notes
Fuser Safety
When removing the fuser unit, always
switch off first and wait for 40 minutes until
it cools off.
Page 17
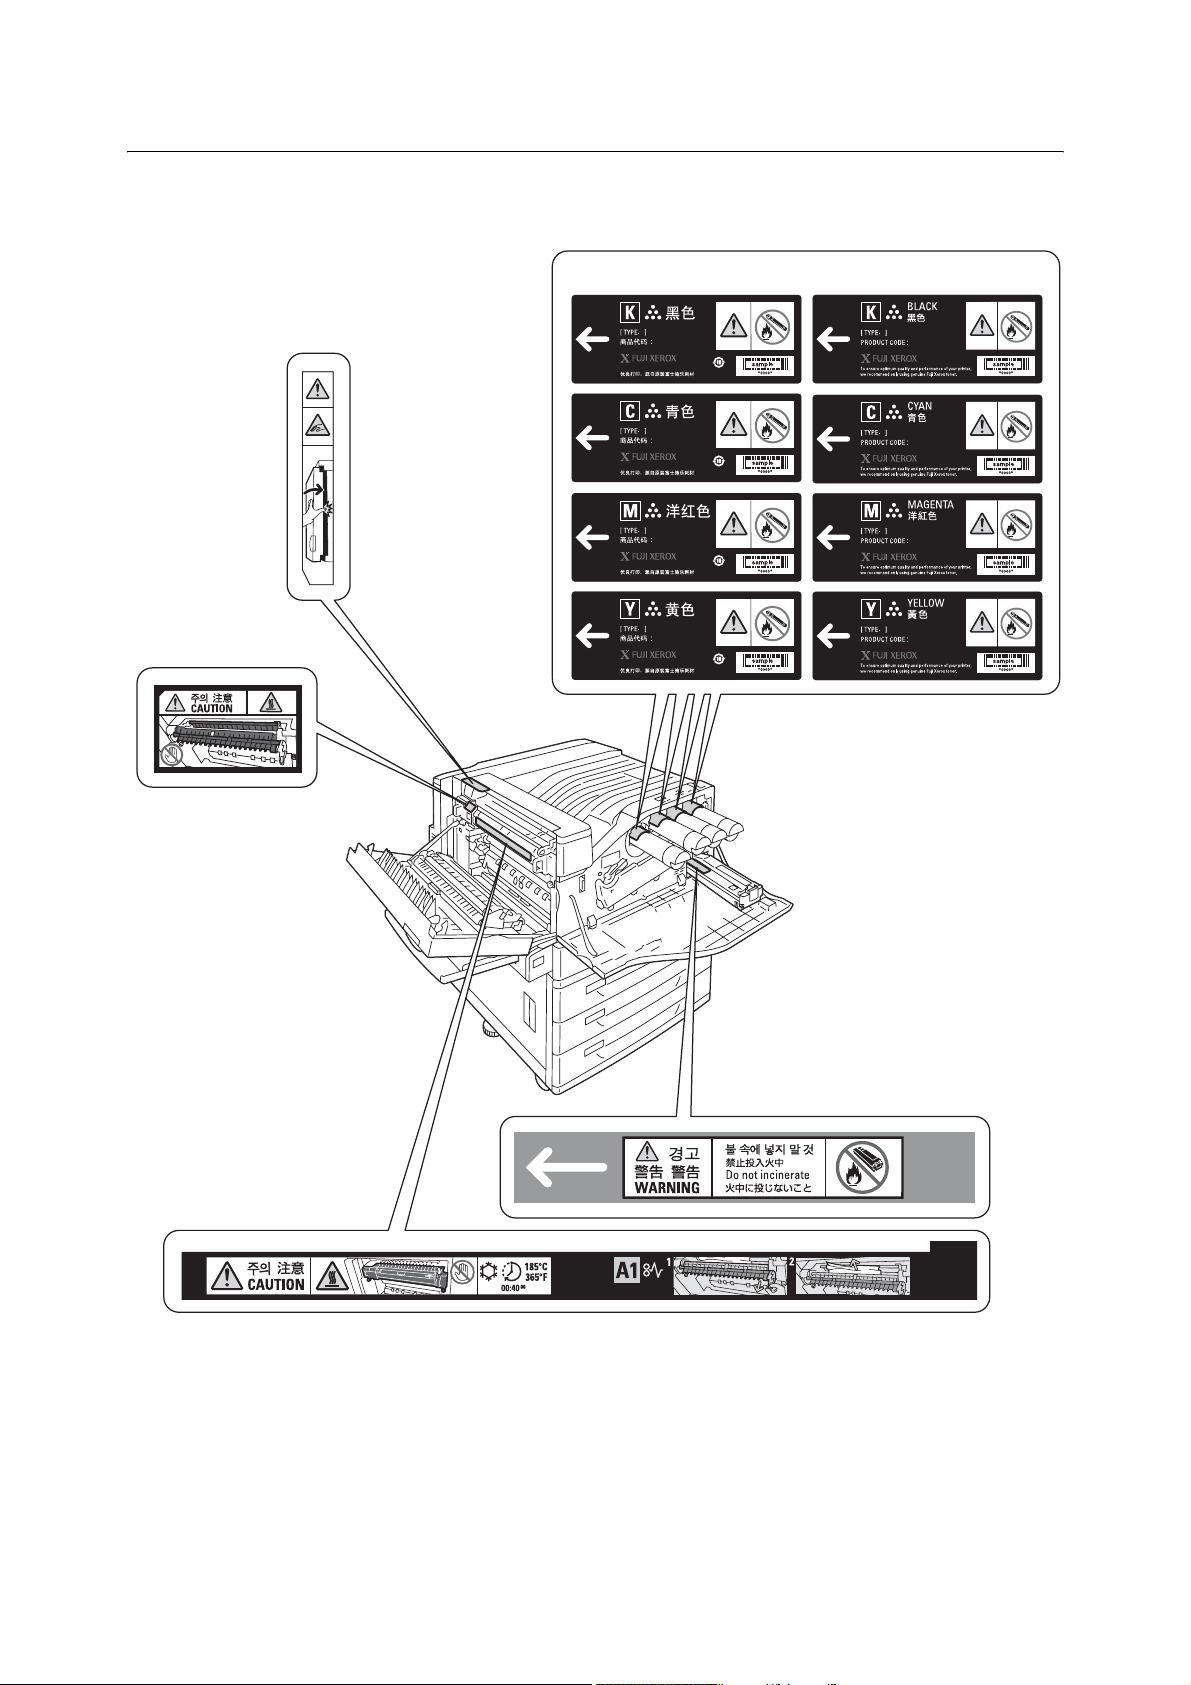
Warning and Caution Labels
Be sure to follow the warning and caution labels placed on the machine. Do not touch areas with labels
indicating high voltage or temperature. This can cause an electric shock or burn.
In China In other countries
Safety Notes 17
Page 18

Environment
• Emissions of dust, ozone and styrene from this product have been tested and found to
• For environmental protection and efficient use of resources, Fuji Xerox reuses returned
• Proper disposal is required for drum cartridges, toner cartridges and waste toner bottle
Regulation
comply with the Eco Mark criteria on chemical emission for printers. According to the test
procedures defined by Blue Angel RAL-UZ122: 2006 Appendix 2, the test was performed
under the condition of monochrome copying, using the toner type, DocuPrint C2255
Toner (Black), that is recommended for this product.
drum cartridges, toner cartridges and waste toner bottle to make recycled parts, recycled
materials or for energy recovery.
no longer needed. Do not open drum cartridges, toner cartridges and waste toner bottle.
Return them to your local Fuji Xerox representative.
Radio Frequency Emissions (Class B)
This product has been tested and found to comply with the limits for a Class B digital
device, pursuant to the International Standard for Electromagnetic Interference
(CISPR Publ. 22) and Radiocommunications Act 1992 in Australia/New Zealand.
These limits are designed to provide reasonable protection against harmful
interference in a residential installation. This product generates, uses and can
radiate radio frequency energy and, if not installed and used in accordance with the
instructions, may cause harmful interference to radio communications. However,
there is no guarantee that interference will not occur in a particular installation. If this
product does cause harmful interference to radio or television reception, which can
be determined by turning this product off and on, the user is encouraged to try to
correct the interference by one or more of the following measures:
- Reorient or relocate the receiving antenna.
- Increase the separation between this product and the receiver.
- Connect this product into an outlet on a circuit different from that to which the
receiver is connected.
- Consult the dealer or an experienced radio/TV technician for help.
Changes and modifications to this product not specifically approved by Fuji Xerox
may void the user’s authority to operate this product.
• Product Safety Certification (CB)
This product has been tested and found to comply with IEC60950-1:ed.1. and certified by
NEMKO.
NEMKO: IEC60950-1:ed. 1
18 Safety Notes
Page 19

Licenses
RSA BSAFE (For the Models Other than those Available in China)
This product includes RSA BSAFE encryption software from RSA Security Inc.
Heimdal
Copyright (c)2000 (Royal Institute of Technology,
Stockholm, Sweden). All rights reserved.
Redistribution and use in source and binary forms, with or without modification, are
permitted provided that the following conditions are met:
LZMA
1. Redistributions of source code must retain the above copyright notice, this list of
conditions and the following disclaimer.
2. Redistributions in binary form must reproduce the above copyright notice, this list of
conditions and the following disclaimer in the documentation and/or other materials
provided with the distribution.
3. Neither the name of the Institute nor the names of its contributors may be used to endorse
or promote products derived from this software without specific prior written permission.
THIS SOFTWARE IS PROVIDED BY THE INSTITUTE AND CONTRIBUTORS “AS IS”
AND ANY EXPRESS OR IMPLIED WARRANTIES, INCLUDING, BUT NOT LIMITED TO,
THE IMPLIED WARRANTIES OF MERCHANTABILITY AND FITNESS FOR A
PARTICULAR PURPOSE ARE DISCLAIMED. IN NO EVENT SHALL THE INSTITUTE OR
CONTRIBUTORS BE LIABLE FOR ANY DIRECT, INDIRECT, INCIDENTAL, SPECIAL,
EXEMPLARY, OR CONSEQUENTIAL DAMAGES (INCLUDING, BUT NOT LIMITED TO,
PROCUREMENT OF SUBSTITUTE GOODS OR SERVICES; LOSS OF USE, DATA, OR
PROFITS; OR BUSINESS INTERRUPTION) HOWEVER CAUSED AND ON ANY
THEORY OF LIABILITY, WHETHER IN CONTRACT, STRICT LIABILITY, OR TORT
(INCLUDING NEGLIGENCE OR OTHERWISE) ARISING IN ANY WAY OUT OF THE USE
OF THIS SOFTWARE, EVEN IF ADVISED OF THE POSSIBILITY OF SUCH DAMAGE.
LZMA SDK 4.21 Copyright (c) 1999-2005 Igor Pavlov (2005-06-08)
http://www.7-zip.org/
LZMA SDK 4.22 Copyright (c) 1999-2005 Igor Pavlov (2005-06-10)
http://www.7-zip.org/
Licenses 19
Page 20

JPEG Code
Libcurl
Our printer software uses some of the codes defined by the Independent JPEG Group.
COPYRIGHT AND PERMISSION NOTICE
Copyright (c) 1996 - 2006, Daniel Stenberg, <daniel@haxx.se>.
All rights reserved.
Permission to use, copy, modify, and distribute this software for any purpose with or without
fee is hereby granted, provided that the above copyright notice and this permission notice
appear in all copies.
THE SOFTWARE IS PROVIDED “AS IS”, WITHOUT WARRANTY OF ANY KIND,
EXPRESS OR IMPLIED, INCLUDING BUT NOT LIMITED TO THE WARRANTIES OF
MERCHANTABILITY, FITNESS FOR A PARTICULAR PURPOSE AND
NONINFRINGEMENT OF THIRD PARTY RIGHTS. IN NO EVENT SHALL THE AUTHORS
OR COPYRIGHT HOLDERS BE LIABLE FOR ANY CLAIM, DAMAGES OR OTHER
LIABILITY, WHETHER IN AN ACTION OF CONTRACT, TORT OR OTHERWISE,
ARISING FROM, OUT OF OR IN CONNECTION WITH THE SOFTWARE OR THE USE
OR OTHER DEALINGS IN THE SOFTWARE.
Except as contained in this notice, the name of a copyright holder shall not be used in
advertising or otherwise to promote the sale, use or other dealings in this Software without
prior written authorization of the copyright holder.
FreeBSD
This product uses some FreeBSD codes.
The FreeBSD Copyright
Copyright 1994-2006 The FreeBSD Project. All rights reserved.
Redistribution and use in source and binary forms, with or without modification, are
permitted provided that the following conditions are met:
Redistributions of source code must retain the above copyright notice, this list of conditions
and the following disclaimer.
Redistributions in binary form must reproduce the above copyright notice, this list of
conditions and the following disclaimer in the documentation and/or other materials
provided with the distribution.
THIS SOFTWARE IS PROVIDED BY THE FREEBSD PROJECT “AS IS” AND ANY
EXPRESS OR IMPLIED WARRANTIES, INCLUDING, BUT NOT LIMITED TO, THE
IMPLIED WARRANTIES OF MERCHANTABILITY AND FITNESS FOR A PARTICULAR
PURPOSE ARE DISCLAIMED. IN NO EVENT SHALL THE FREEBSD PROJECT OR
CONTRIBUTORS BE LIABLE FOR ANY DIRECT, INDIRECT, INCIDENTAL, SPECIAL,
EXEMPLARY, OR CONSEQUENTIAL DAMAGES (INCLUDING, BUT NOT LIMITED TO,
PROCUREMENT OF SUBSTITUTE GOODS OR SERVICES; LOSS OF USE, DATA, OR
20 Licenses
Page 21

OpenLDAP
PROFITS; OR BUSINESS INTERRUPTION) HOWEVER CAUSED AND ON ANY
THEORY OF LIABILITY, WHETHER IN CONTRACT, STRICT LIABILITY, OR TORT
(INCLUDING NEGLIGENCE OR OTHERWISE) ARISING IN ANY WAY OUT OF THE USE
OF THIS SOFTWARE, EVEN IF ADVISED OF THE POSSIBILITY OF SUCH DAMAGE.
The views and conclusions contained in the software and documentation are those of the
authors and should not be interpreted as representing official policies, either expressed or
implied, of the FreeBSD Project.
Copyright 1998-2006 The OpenLDAP Foundation All rights reserved.
Redistribution and use in source and binary forms, with or without modification, are
permitted only as authorized by the OpenLDAP Public License.
A copy of this license is available in the file LICENSE in the top-level directory of the
distribution or, alternatively, at <http://www.OpenLDAP.org/license.html>.
OpenLDAP is a registered trademark of the OpenLDAP Foundation.
Individual files and/or contributed packages may be copyright by other parties and/or
subject to additional restrictions.
This work is derived from the University of Michigan LDAP v3.3 distribution. Information
concerning this software is available at <http://www.umich.edu/~dirsvcs/ldap/ldap.html>.
This work also contains materials derived from public sources.
Additional information about OpenLDAP can be obtained at <http://www.openldap.org/>.
---
Portions Copyright 1998-2006 Kurt D. Zeilenga.
Portions Copyright 1998-2006 Net Boolean Incorporated.
Portions Copyright 2001-2006 IBM Corporation.
All rights reserved.
Redistribution and use in source and binary forms, with or without modification, are
permitted only as authorized by the OpenLDAP Public License.
---
Portions Copyright 1999-2005 Howard Y.H. Chu.
Portions Copyright 1999-2005 Symas Corporation.
Portions Copyright 1998-2003 Hallvard B. Furuseth.
All rights reserved.
Redistribution and use in source and binary forms, with or without modification, are
permitted provided that this notice is preserved.
The names of the copyright holders may not be used to endorse or promote products
derived from this software without their specific prior written permission. This software is
provided “as is” without express or implied warranty.
Licenses 21
Page 22

---
Portions Copyright (c) 1992-1996 Regents of the University of Michigan.
All rights reserved.
Redistribution and use in source and binary forms are permitted provided that this notice is
preserved and that due credit is given to the University of Michigan at Ann Arbor. The name
of the University may not be used to endorse or promote products derived from this software
without specific prior written permission. This software is provided “as is” without express or
implied warranty.
------------------------------------------
The OpenLDAP Public License
Version 2.8, 17 August 2003
Redistribution and use of this software and associated documentation (“Software”), with or
without modification, are permitted provided that the following conditions are met:
1. Redistributions in source form must retain copyright statements and notices,
2. Redistributions in binary form must reproduce applicable copyright statements and
notices, this list of conditions, and the following disclaimer in the documentation and/
or other materials provided with the distribution, and
3. Redistributions must contain a verbatim copy of this document.
The OpenLDAP Foundation may revise this license from time to time.
Each revision is distinguished by a version number. You may use this Software under terms
of this license revision or under the terms of any subsequent revision of the license.
THIS SOFTWARE IS PROVIDED BY THE OPENLDAP FOUNDATION AND ITS
CONTRIBUTORS “AS IS” AND ANY EXPRESSED OR IMPLIED WARRANTIES,
INCLUDING, BUT NOT LIMITED TO, THE IMPLIED WARRANTIES OF
MERCHANTABILITY AND FITNESS FOR A PARTICULAR PURPOSE ARE
DISCLAIMED. IN NO EVENT SHALL THE OPENLDAP FOUNDATION, ITS
CONTRIBUTORS, OR THE AUTHOR(S) OR OWNER(S) OF THE SOFTWARE BE
LIABLE FOR ANY DIRECT, INDIRECT, INCIDENTAL, SPECIAL, EXEMPLARY, OR
CONSEQUENTIAL DAMAGES (INCLUDING, BUT NOT LIMITED TO, PROCUREMENT
OF SUBSTITUTE GOODS OR SERVICES; LOSS OF USE, DATA, OR PROFITS; OR
BUSINESS INTERRUPTION) HOWEVER CAUSED AND ON ANY THEORY OF
LIABILITY, WHETHER IN CONTRACT, STRICT LIABILITY, OR TORT (INCLUDING
NEGLIGENCE OR OTHERWISE) ARISING IN ANY WAY OUT OF THE USE OF THIS
SOFTWARE, EVEN IF ADVISED OF THE POSSIBILITY OF SUCH DAMAGE.
The names of the authors and copyright holders must not be used in advertising or
otherwise to promote the sale, use or other dealing in this Software without specific, written
prior permission. Title to copyright in this Software shall at all times remain with copyright
holders.
22 Licenses
OpenLDAP is a registered trademark of the OpenLDAP Foundation.
Copyright 1999-2003 The OpenLDAP Foundation, Redwood City, California, USA. All
Rights Reserved. Permission to copy and distribute verbatim copies of this document is
granted.
Page 23

DES
This product includes software developed by Eric Young.
(eay@mincom.oz.au)
AES
Copyright (c) 2003, Dr Brian Gladman Worcester, UK. All rights reserved. This product uses
published AES software provided by Dr Brian Gladmanunder BSD licensing terms.
TIFF (libtiff)
LibTIFF Copyright (c) 1988-1997 Sam Leffler
Copyright (c) 1991-1997 Silicon Graphics, Inc.
ICC Profile (Little cms)
Little cms Copyright (C) 1998-2004 Marti Maria
XPS (XML Paper Specification)
This product may incorporate intellectual property owned by Microsoft Corporation. The
terms and conditions upon which Microsoft is licensing such intellectual property may be
found at http://go.microsoft.com/fwlink/?LinkId=52369.
Licenses 23
Page 24

Illegal Copies and Printouts
Copying or printing certain documents may be illegal in your country. Penalties of fines or
imprisonment may be imposed on those found guilty. The following are examples of items
that may be illegal to copy or print in your country.
• Currency
• Banknotes and checks
• Bank and government bonds and securities
• Passports and identification cards
• Copyright material or trademarks without the consent of the owner
• Postage stamps and other negotiable instruments
This list is not inclusive and no liability is assumed for either its completeness or accuracy.
In case of doubt, contact your legal counsel.
24 Illegal Copies and Printouts
Page 25
1 Printer Environment Settings
When you are finished installing your printer using the ‘Setup Guide’, go on to set up its
operating environment.
1.1 Supported Operating Environments
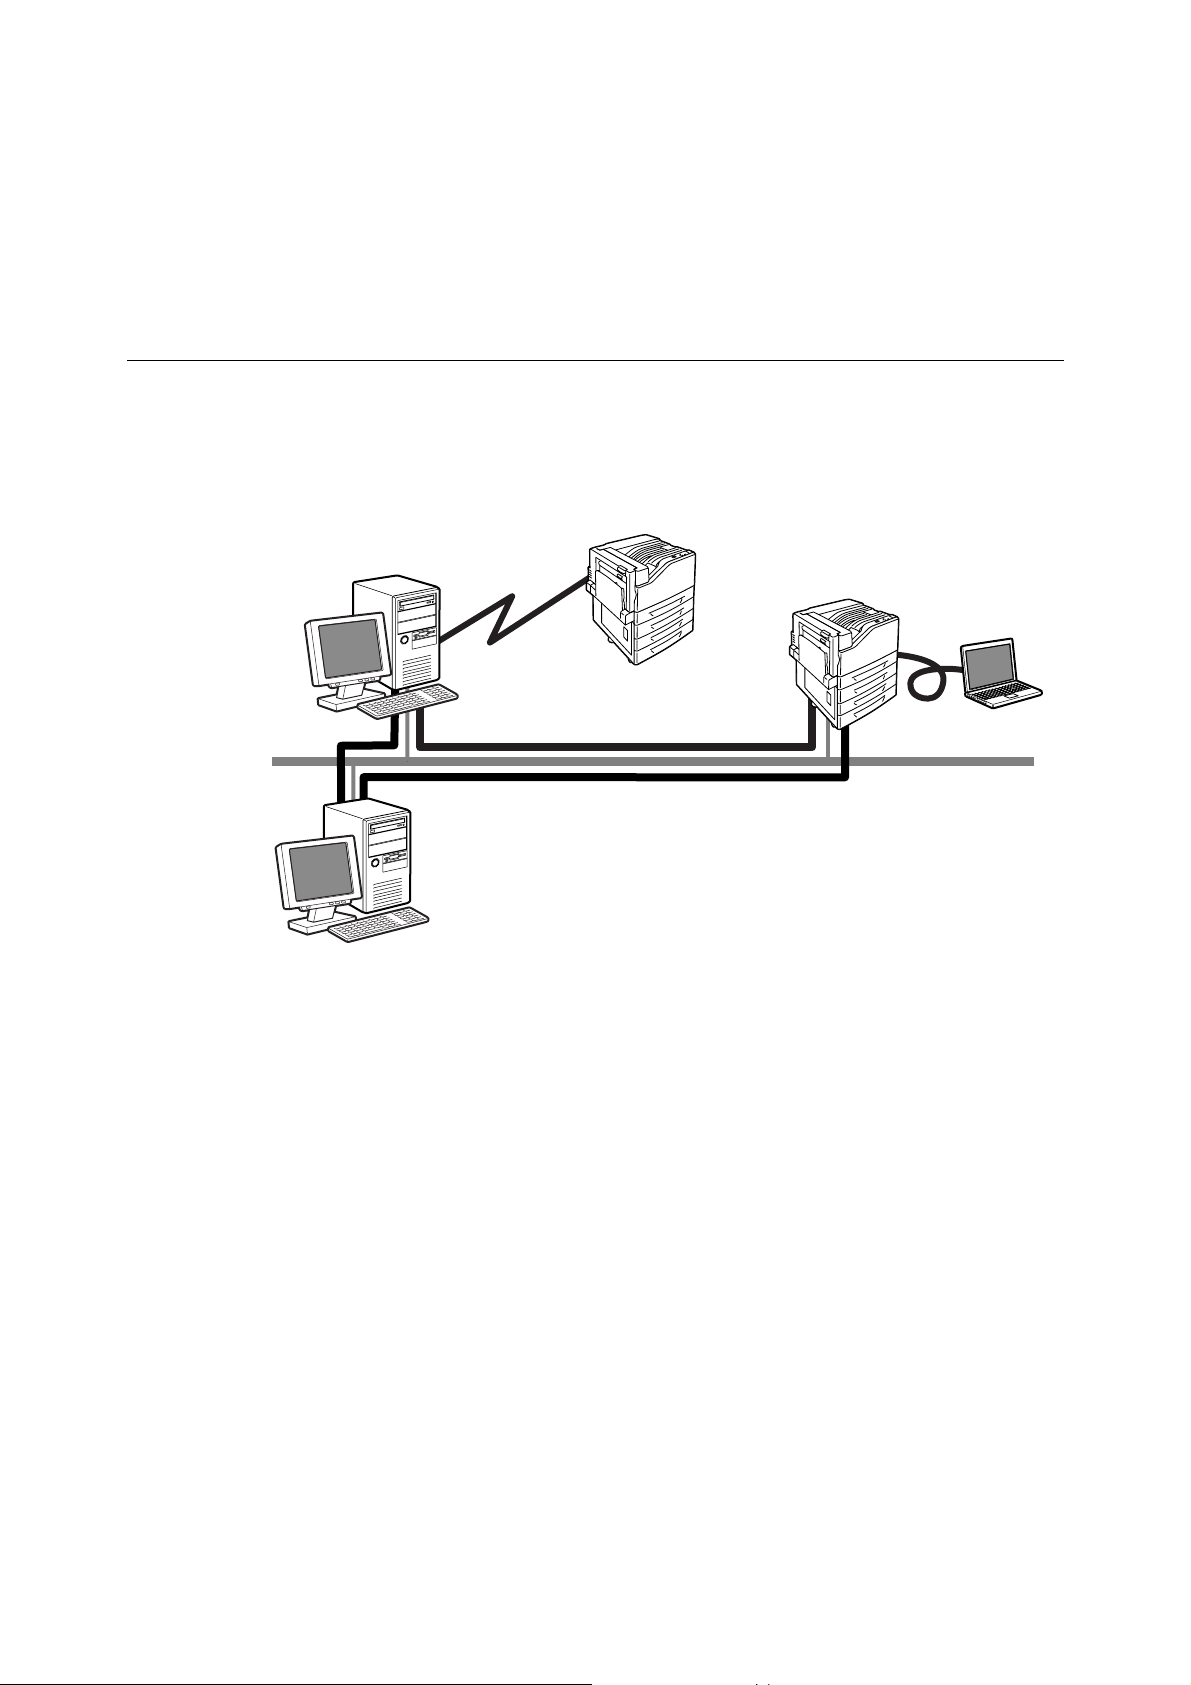
The printer can be used both as a local and a network printer. When used as a local printer,
the printer is connected directly to a computer. Connect the printer to a network for use as
a network printer.
Set all ports you want to use to [Enabled] on the control panel.
Internet
IPP
Network Connection
LPD/SMB/Port9100/EtherTalk
Local Connection
Parallel/USB
Network Connection
NetWare/Windows Shared Printer
Server
Using the Printer as a Local Printer
When using the printer as a local printer, the printer and a computer can be connected using
the following methods:
• USB connection: Connecting the printer and a computer using a USB cable.
(default: [Enabled])
• Parallel connection: Connecting the printer and a computer using a parallel cable. To use
this feature, the Parallel Port (optional) must be installed. (default:
[Disabled])
Using the Printer as a Network Printer
When using the printer as a network printer, the printer can be set up in the following
environments:
• LPD : Used when using TCP/IP protocol to enable direct communication
between the printer and a computer. (default: [Enabled])
• Port9100 : Used when using a Port9100 port.
(default: [Enabled])
•NetWare
®
: Used when sharing and managing the printer using a NetWare server.
(default: [Disabled])
1.1 Supported Operating Environments 25
Page 26

• SMB : Used when printing using a Windows® network.
(default: [Enabled])
• IPP : Used when printing via the Internet.
(default: [Disabled])
•EtherTalk
®
: Used when printing from Macintosh®. (default: [Disabled])
Supported Operating Systems and Operating Environments
Note
• The supported operating systems are subject to change without prior notice. Visit our web site for the
latest information.
Connectivity Local Network
Port Name
Protocol
Windows® 2000
Windows® XP
Windows Server® 2003
Windows Vista
Mac OS
8.6/9.2.2
Mac OS X
10.3.9/10.4.10
®
®
Note
• For information on how to print PostScript data, refer to the manual on the PostScript Driver Library CD-
USB
*1
Parallel
--
{ {{{{{{{{
{ {{{{ {{{
{ {{{{ {{{
{ {{ {{{ {
*1: To use this feature, the Parallel Port (optional) must be installed.
*2: The computer must be connected to the printer via a USB 2.0 port.
ROM.
2.0
{{
{{ { {
LPD NetWare SMB IPP
*2
TCP/IPTCP/IPIPX/
SPX
Net
BEUI
TCP/IPTCP/IPTCP/IPApple
Port
9100
Ether
Tal k
Tal k
WSD
TCP/
IP
26 1 Printer Environment Settings
Page 27
1.2 Connecting a cable
Connect the printer to your computer using an interface cable appropriate for your
connection method.
An interface cable is not included with the printer. You must purchase it separately.
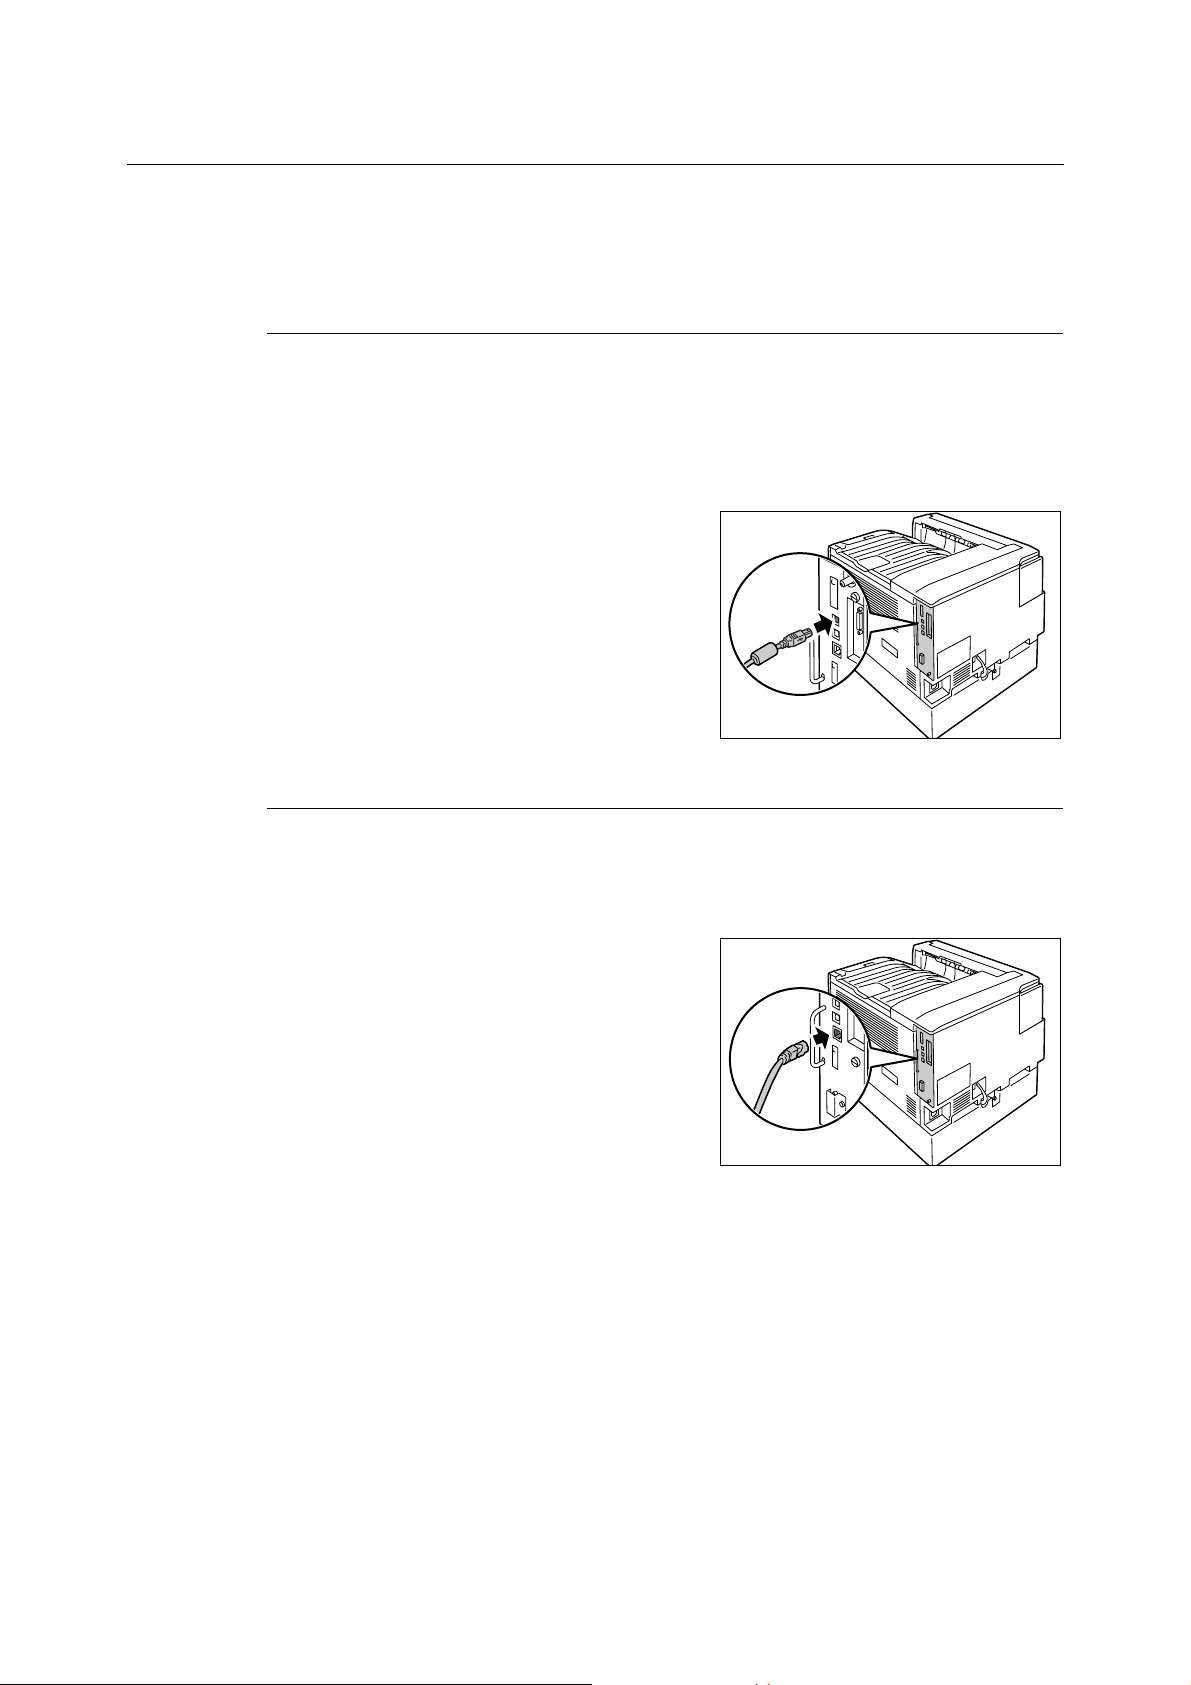
USB Connection
When using a USB connection, install the print driver on your computer before connecting
the cable. For installation instructions, refer to the “1.7 Installing a Print Driver” (P. 40) or the
‘CD-ROM Documentation (HTML)’ on the Driver CD Kit CD-ROM.
1. Switch the printer off.
2. Plug the USB cable into the interface
connector on the printer.
3. Plug the other end of the USB cable into
your computer.
4. Switch the printer on.
Network Connection
Use a straight-type network cable that supports 100BASE-TX or 10BASE-T.
1. Switch the printer off.
2. Plug the network cable into the interface
connector on the printer.
3. Plug the other end of the network cable into
a network device such as a hub.
4. Switch the printer on.
1.2 Connecting a cable 27
Page 28

Parallel Connection
When using a parallel connection, you must first install the optional Parallel Port and
connector conversion cable.
1. Switch the printer off.
2. Insert the connector conversion cable
included with the optional Parallel Port into
the interface connector on the printer.
3. Connect the other end of the connector
conversion cable to the connector on the
parallel cable. Then secure it using the
metal pieces on both sides of the
connector.
4. Plug the other end of the parallel cable into
your computer.
5. Switch the printer on.
28 1 Printer Environment Settings
Page 29
1.3 Switching the Control Panel Display Language
Set either [English], [Korean], [Simp. Chinese], or [Trad. Chinese] as the display language
for the control panel of the printer.
The following explains how to switch the control panel display language.
Note
• This guide assumes that [Language] has been set to [English]. The following operations are
unnecessary if you are using an English operating system.
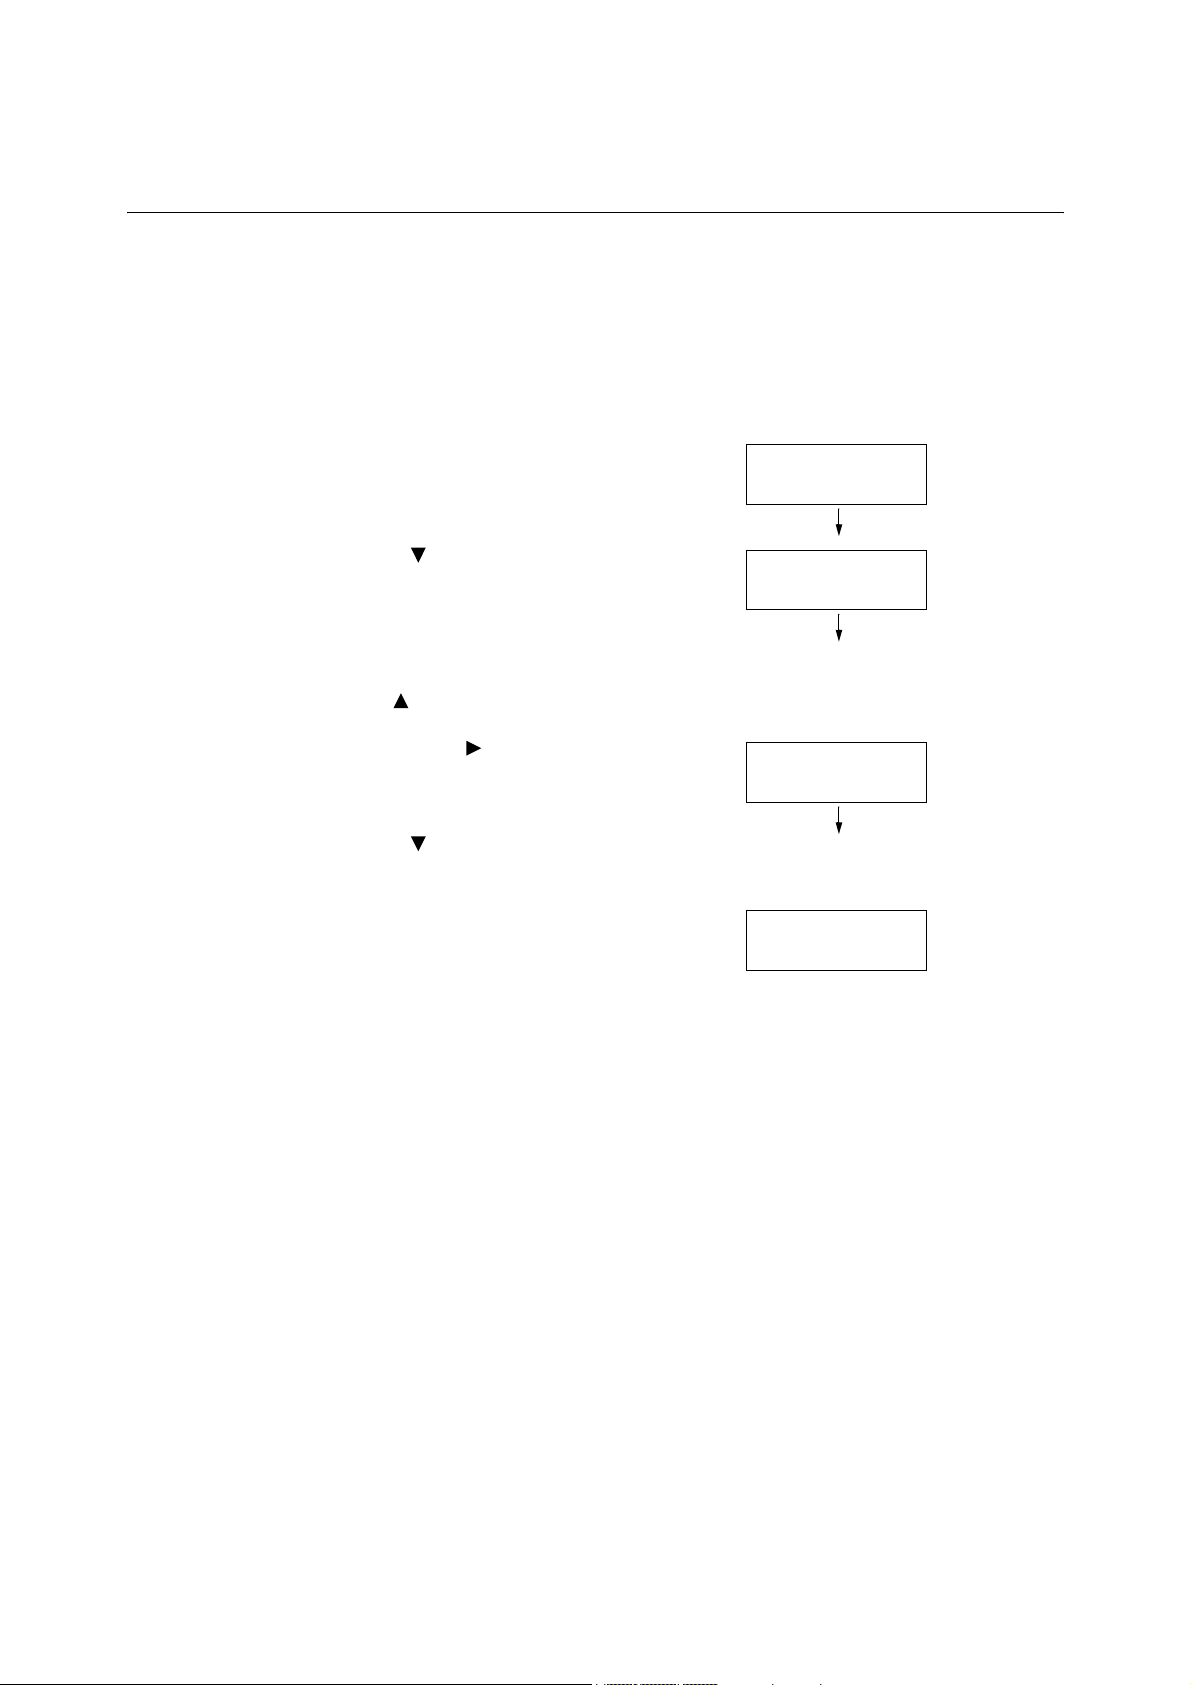
1. Press the <Menu> button to display the
menu screen.
2. Press the < > button until [Language] is
displayed.
Note
• If you went past the desired item, return to the item by
pressing the < > button.
3. Press either the < > or <OK> button to
select.
The language is displayed.
4. Press the < > button until the desired
language is displayed.
5. Press the <OK> button to confirm.
6. Press the <Menu> button to close the
menu.
The printer automatically restarts.
Menu
LanguageEmulation
Menu
Language
Language
•
English
Language
•
Korean
1.3 Switching the Control Panel Display Language 29
Page 30
1.4 Setting the Network Environment
This section explains how to install your printer in a TCP/IP environment. When installing
the printer in a different environment, refer to the ‘CD-ROM Documentation (HTML)’ on the
Driver CD Kit CD-ROM.
Note
• The printer can use an IPv6 address in an IPv6 network environment. For information on using IPv6
addresses, refer to “Setting an IP Address (IPv6)” (P. 33).
Setting an IP Address (IPv4)
To use TCP/IP protocol, you must configure an IP address for the printer.
By default, the printer is set to obtain its IP address (via the [Get IP Address] setting on the
control panel) using [DHCP/Autonet]. Thus, when the printer is connected to a network that
has a DHCP server, the printer automatically obtains its IP address from the server.
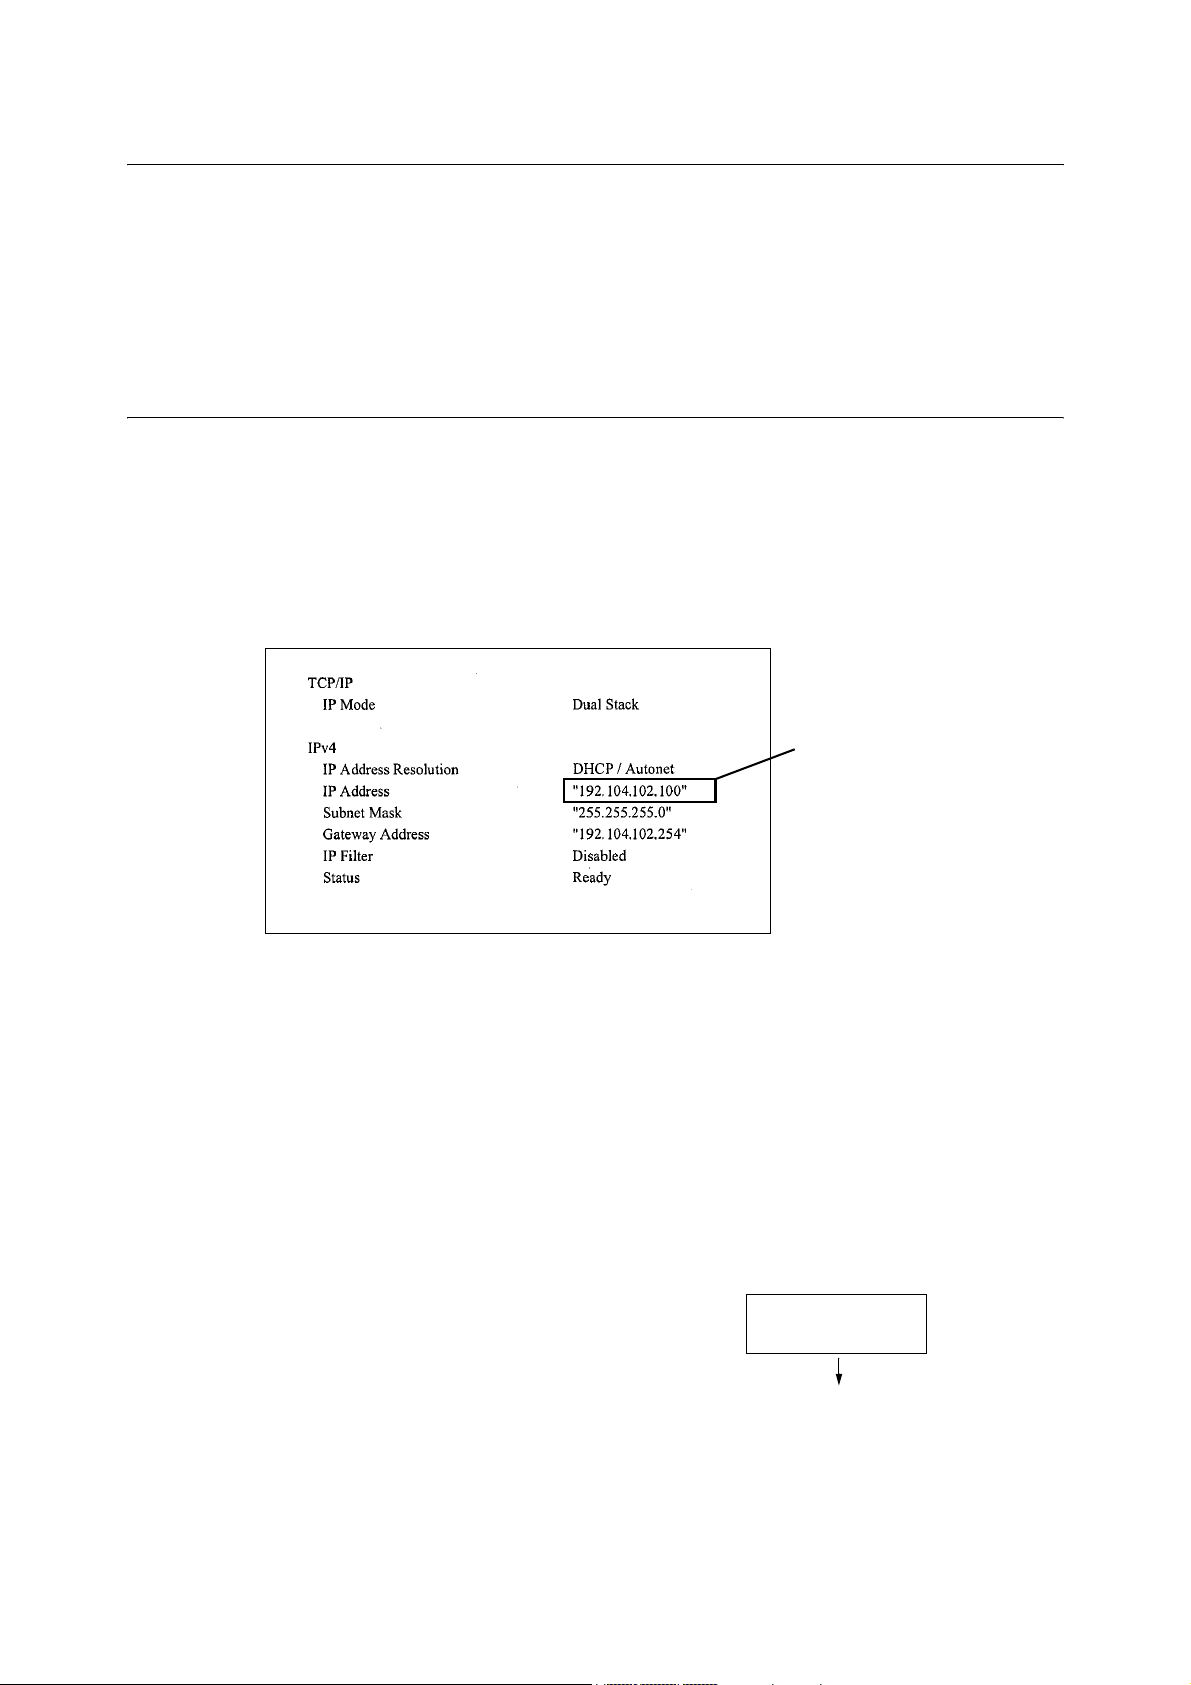
Print the [Configuration Report] to see if the printer already has an IP address.
If the printer does not have an IP address, set [Get IP Address] to [STATIC] and configure
the address.
If an IP address is listed,
skip the following procedure.
If an IP address is not listed,
or if you want to change the
current IP address, configure
the setting using the
following procedure.
Note
• For information on how to print the [Configuration Report], refer to “7.2 Printing Reports/Lists” (P. 219).
• The printer can also obtain its IP address by using a BOOTP or RARP server. If using a BOOTP or
RARP server, set [Get IP Address] to [BOOTP] or [RARP].
• If using a DHCP server, the printer’s IP address may change without notice. Make sure to check the
address periodically.
The following explains how to set up an IP address on the Control Panel. Depending on your
network environment, your printer also needs a subnet mask and gateway address. Consult
your network administrator for the settings required for your printer.
To Set the IP Address
1. On the control panel, press the <Menu>
button to display the menu screen.
Menu
LanguageEmulation
30 1 Printer Environment Settings
Page 31

2. Press the < > button until [Admin Menu] is
displayed.
Note
• If you went past the desired item, return to the item by
pressing the < > button.
Menu
Admin Menu
3. Press the < >or <OK> button to select.
[Network/Port] is displayed.
Note
• If you pressed the < > or <OK> button on the wrong
item, return to the previous screen by pressing the
< > or the <Return> button.
• To start over from the beginning, press the <Menu>
button.
4. Press the < > or <OK> button to select.
[LPD] is displayed.
Note
• [Parallel] appears only when the Parallel Port
(optional) is installed.
5. Press the < > button until [TCP/IP
Settings] is displayed.
6. Press the < > or <OK> button to select.
[IP Mode] is displayed.
Admin Menu
Network/Port
Network/Port
LPD
Network/Port
TCP/IP Settings
TCP/IP Settings
IP Mode
7. Press the < > button until [IPv4 Settings]
is displayed.
8. Press the < > or <OK> button to select.
[Get IP Address] is displayed.
9. Press the < > or <OK> button to select.
The current set value is displayed.
10. Press the < > button until [STATIC] is
displayed.
11. Press the <OK> button to confirm your
selection.
If [000.000.000.000] appears, skip to step
15.
12. Press the < > or <Return> button to return
to [Get IP Address].
TCP/IP Settings
IPv4 Settings
IPv4 Settings
Get IP Address
Get IP Address
•
DHCP/Autonet
Get IP Address
STATIC
Get IP Address
•
STATIC
IPv4 Settings
Get IP Address
1.4 Setting the Network Environment 31
Page 32

13. Press the < > button to display [IP
Address].
IPv4 Settings
IP Address
14. Press the < > or <OK> button to select.
The current IP address is displayed.
15. Enter the value in the first field using the
< > or < > button, and press the < >
button.
Note
• If you do not need to change the setting, press the
< > button to advance to the next field.
• Pressing the < > and < > buttons simultaneously
increments the value by 10.
• To return to the previous field, press the < > button.
16. Enter the rest of the fields in the same
manner. After entering the last (4th) field,
press the <OK> button to confirm your
entry.
17. If you want to set a subnet mask and
gateway address, press the <Return>
button and proceed to Step 18.
If you want to finish configuring the settings,
proceed to Step 25.
IP Address
•
000.000.000.000
IP Address
192.000.000.000
IP Address
•
192.168.001.100
To Set the Subnet Mask/Gateway Address
18. Press the < > button until [Subnet Mask]
is displayed.
19. Press the < > or <OK> button to select.
The current subnet mask is displayed.
20. Enter the subnet mask in the same way you
entered the IP address, and press the
<OK> button to confirm your entry.
21. Press the <Return> button to return to
[Subnet Mask].
22. Press the < > button to display [Gateway
Address].
23. Press the < > or <OK> button to select.
The current gateway address is displayed.
IPv4 Settings
Subnet Mask
Subnet Mask
•
000.000.000.000
Subnet Mask
•
255.255.255.000
IPv4 Settings
Subnet Mask
IPv4 Settings
Gateway Address
Gateway Address
•
000.000.000.000
32 1 Printer Environment Settings
Page 33

24. Enter the gateway address in the same way
you entered the IP address, and press the
<OK> button to confirm your entry.
25. The setup is now complete.
Press the <Menu> button to close the
menu.
The printer automatically restarts.
26. Print the [Configuration Report] to verify
your settings.
Setting an IP Address (IPv6)
The printer can use an IPv6 address in an IPv6 network environment.
By default, the printer [IP Mode] is set to [Dual Stack] to automatically detect either IPv4 or
IPv6. If you connect the printer to an IPv6 network, an IPv6 address is automatically set.
Print the [Configuration Report] to verify the IPv6 address.
Note
• When setting the fixed IPv6 address on the printer, use CentreWare Internet Services to manually
configure the settings. Then print the [Configuration Report] to verify the automatically set address. Use
this address to access CentreWare Internet Services. Set the IPv6 address [Properties] tab >
[Connectivity] > [Protocols] > [TCP/IP]. For information about each setting, refer to the online help for
CentreWare Internet Services. For information about your network environment, consult with your
network administrator.
• For more information on CentreWare Internet Services, refer to “1.6 Configuring the Printer Using
CentreWare Internet Services” (P. 35).
Gateway Address
•
192.168.001.254
Note
• For information on how to print the [Configuration Report], refer to “7.2 Printing Reports/Lists” (P. 219).
1.4 Setting the Network Environment 33
Page 34

1.5 Enabling Ports
Set all ports you want to use to [Enabled] on the control panel.
When using the standard setup, this operation is unnecessary as the default for the port is
set to [Enabled].
Use the following procedure to enable each port.
The following procedure uses IPP as an example.
1. On the control panel, press the <Menu>
button to display the menu screen.
2. Press the < > button until [Admin Menu] is
displayed.
3. Press the < > or <OK> button to select.
[Network/Port] is displayed.
4. Press the < > or <OK> button to select.
[LPD] is displayed.
Note
• [Parallel] appears only when the Parallel Port
(optional) is installed.
5. Press the < > button until the desired
protocol is displayed. (Example: IPP)
Menu
LanguageEmulation
Menu
Admin Menu
Admin Menu
Network/Port
Network/Port
LPD
Network/Port
IPP
6. Press the < > or <OK> button to select.
[Port Status] is displayed.
7. Press the < > or <OK> button to select.
The current set value is displayed.
8. Press the < > button to display [Enabled].
9. Press the <OK> button to confirm your
selection.
10. The setting is now complete.
Press the <Menu> button to close the
menu.
The printer automatically restarts.
IPP
Port Status
Port Status
•
Disabled
Port Status
Enabled
Port Status
•
Enabled
34 1 Printer Environment Settings
Page 35

1.6 Configuring the Printer Using CentreWare Internet Services
Overview of CentreWare Internet Services
CentreWare Internet Services is a service that allows you to monitor or remotely configure
the printer using a web browser when the printer is on a TCP/IP network.
Some of the control panel settings can also be set on the service’s [Properties] tab.
Note
• CentreWare Internet Services cannot be used when using the printer as a local printer.
Supported Operating Environments
Supported Web Browsers
CentreWare Internet Services has been tested to work on the following web browsers.
Windows Vista Windows Internet Explorer 7
Windows XP Microsoft Internet Explorer 6 SP2, Netscape 7.1 Navigator, Mozilla Firefox 1.5
Windows 2000 Microsoft Internet Explorer 6 SP2
Mac OS X 10.4.10 Safari 1.3
Mac OS X 10.3.9 Netscape 7.1 Navigator
Mac OS 9.2.2 Netscape 7.02 Navigator
1.6 Configuring the Printer Using CentreWare Internet Services 35
Page 36

Setting Up a Web Browser
When using CentreWare Internet Services, we recommend you specify the address of the
printer without using a proxy server.
Note
• If you access CentreWare Internet Services using a proxy server, the response from the service may be
slow or the service may not be displayed.
• For information on how to set up your web browser, refer to the online help for the web browser.
If you want to change the display language of CentreWare Internet Services, change the
display language of your web browser.
Note
• For information on how to change the display language of your web browser, refer the online help for the
web browser.
Also, if CentreWare Internet Services does not operate properly, use the following steps to
configure your web browser.
The procedure uses Internet Explorer 6.0 as an example.
1. From the [Tools] menu, select [Internet Options].
2. On the [General] tab, click [Settings] under [Temporary Internet Files].
3. Under [Check for newer versions of stored pages:] on the [Settings] dialog box, select
either [Every visit to the page] or [Every time you start Internet Explorer].
4. Click [OK].
5. Click [OK] on the [Internet Options] dialog box.
Setting Up the Printer
To use CentreWare Internet Services, you must configure the printer’s IP address and
enable [InternetServices] (default: [Enabled]). If [InternetServices] is set to [Disabled],
change it to [Enabled] on the control panel.
Refer to
• “[InternetServices]” (P. 132)
• “1.5 Enabling Ports” (P. 34)
36 1 Printer Environment Settings
Page 37

CentreWare Internet Services Settings
The following are the main features on each tab of CentreWare Internet Services.
Tab Name Menu Name Feature
Status General Displays the name, IP address, and status.
Trays Displays the status of paper in the paper tray and the status of
the output tray.
Consumables Displays the amount and status of the consumables.
Jobs Active Jobs Displays a list of jobs being processed.
Job History List Displays a list of completed jobs.
Error History Displays error information stored in the error log. Refer to “Error
Codes” (P. 190) for more information on error codes.
Print Job Submission Select files stored on the computer and print them directly to the
printer. The [Print] tab appears only when the hard disk (optional)
is installed.
Properties Configuration
Overview
Description Displays the printer’s product name and serial number. You can
General Setup The current setting is displayed. You can also set other items.
Connectivity You can check and change Network-related settings like ports
Services
Accounting
Security
*1
*1
Displays a button to move between pages showing an overview
of functions on the [Properties] tab.
also set the name
e-mail address
*1
, location*1, contact person*1, administrator’s
*1
, and machine’s e-mail address*1.
• Setting
Configuration / Job Management / Paper Tray Attributes /
Paper Settings / Power Saver/Energy Saver Settings / Stored
Document Settings / Memory Settings / Internet Services
Settings
*1
/ Cloning / Calibration / Setup E-mail Notification*1 /
Counters
and protocols.
Allows configuration of print mode, Language Emulations, e-mail
and Custom Services
*1
settings.
*1
You can configure settings related to accouting.
• Setting
Xerox Standard Accounting / Accounting Configuration /
Accounting Login Screen Settings
You can configure settings related to security*1.
• Setting
Authentication Configuration / User Details Setup / Remote
Authentication Servers / IP Filtering / Audit Log / Machine
Digital Certificate Management / IPSec / Certificate
Management / 802.1x / SSL/TLS Settings / Watermark / Job
Status Default / System Administrator Settings
*2
,
Support Displays a link to support information and a site for ordering consumables.
*1 These settings can only be set using CentreWare Internet Services. They cannot be configured on
the control panel. Some security features are not supported on the model available in China.
*2 You can set the administrative ID and password. The default system administrator ID and password
ar e “ 11111 ” and “x-a d m i n”, res p e c tively.
1.6 Configuring the Printer Using CentreWare Internet Services 37
Page 38

Using CentreWare Internet Services
Follow these steps when accessing CentreWare Internet Services.
1. Start your computer and launch a web browser.
2. In the URL field, enter the IP address or URL of the printer, and press the <Enter>
key. The top page of CentreWare Internet Services is displayed.
• Example - IP address for IPv4
• Example - URL
• Example - IP address for IPv6
Note
• When specifying a port number, enter a “:” (colon) and then “80” (the factory default port number) after
the address. Verify the printer's port number by printing [Configuration Report].
• The port number can be changed under the [Properties] tab > [Connectivity] > [Protocols] > [HTTP]. If
you change the port number, you must enter a “:” (colon) and then the port number after the address.
• Displays a screen for entering the user name and password when the Authentication function is set.
Enter the ID and password of the administrator or user registered on the printer. Contact your
administrator for information on your ID and password.
• When data encryption is enabled, enter “https” instead of “http” before the address when accessing
CentreWare Internet Services.
• For information about data encryption features, refer to “7.6 Security Features” (P. 230).
38 1 Printer Environment Settings
Page 39

Using the Online Help
For information about the settings on each screen, refer to the online help for CentreWare
Internet Services. Click [Help] to display the [Help] window.
1.6 Configuring the Printer Using CentreWare Internet Services 39
Page 40

1.7 Installing a Print Driver
To print from your computer, install the PCL print driver from the Driver CD Kit CD-ROM.
The installation procedure varies depending on how your computer is connected to the
printer.
For installation instructions, refer to the ‘CD-ROM Documentation (HTML)’ on the CD-ROM.
Note
• For information about PostScript print drivers, refer to the manual on the PostScript Driver Library CD-
ROM.
Uninstalling a Print Driver and Other Software
To Uninstall a Print Driver
Your print driver can be uninstalled using the uninstallation tool contained on the Driver CD
Kit CD-ROM. For more information, refer to the ‘CD-ROM Documentation (HTML)’ on the
CD-ROM.
To Uninstall Other Software
When uninstalling other software installed from the Driver CD Kit CD-ROM, refer to the
“Readme” file provided for each software. The “Readme” files can be viewed under the
‘Product Information (HTML)’ included on the Driver CD Kit CD-ROM.
40 1 Printer Environment Settings
Page 41

2 Basic Operation
2.1 Main Components and Functions
Main Unit
Front view
7
8
9
10
Note
• The illustrations in this guide show the printer with the Duplex unit and 3 Tray Module installed.
No. Name Description
1
2
3
4
5
6
1 Center tray Delivers printed output face down here.
2 Power switch Switches the printer on/off.
3 Control panel Consists of the control buttons, indicator lamps, and a display.
4 Front cover Opened when replacing the consumables.
5 Paper tray 1 Load paper here. This is the standard paper tray.
6 Paper trays 2, 3, & 4
(Optional 3 Tray Module)
7 Cover A Open to clear paper jams. This cover is normally locked, so the release lever
8 Cover B Open to clear a paper jam when 2-Sided Print is enabled.
9 Paper tray 5 (Bypass tray) Use this tray to print on paper that cannot be loaded in paper trays 1, 2, 3, or 4.
10 Cover C Open to clear paper jams if multiple trays are installed.
Load paper here when the optional 3 Tray Module is installed.
needs to be raised to open it.
2.1 Main Components and Functions 41
Page 42

Back
11
12
13
15
14
No. Name Description
11 Parallel connector (option) Installing a Parallel Port (option) allows connection of a Centronics interface
cable.
12 USB 2.0 connector Allows connection of a USB 2.0 cable.
13 Ethernet connector Allows connection of a 10Base-T/100Base-TX Ethernet interface cable.
14 Expansion device connector Allows connection of expansion devices supported by the printer.
15 Power cord connector Connects the power cord to the printer.
42 2 Basic Operation
Page 43

Interior
16 17
21
18
22
19
20
No. Name Description
16 Lever Unlocks the drum cartridge cover when replacing the drum cartridges.
17 Toner cartridges For loading of four toner (imaging agent) colors: black (K), cyan (C), magenta
(M), and yellow (Y).
18 Waste toner bottle For loading of a waste toner bottle to collect used toner.
19 Drum cartridge cover Open to replace the drum cartridges or to clean the interior.
20 Drum cartridges For loading of photosensitive drums. Drum cartridge names from left to right
when facing the printer are R1, R2, R3, and R4.
21 Fuser unit Fuses the toner to the paper. This is a high-temperature component, so take
care not to touch it.
22 Transfer unit Transfers toner from the transfer belt to the paper.
2.1 Main Components and Functions 43
Page 44

Control Panel
1 2 3 4 5
13 12 11 10 9 8 7 6
No. Name Description
1 Indicators In the event of an error, use this to verify the location indicated in an error
message displayed on the display.
2 <Online> button Pressing the <Online> button takes the printer offline. The <Ready> lamp is off
and printing is not done while the printer is offline. Pressing the <Online> button
again takes the printer back online (printing enabled).
3 Display Displays the status of the printer, menu options, and messages.
Refer to
• “Control Panel Display” (P. 45)
4 <Menu> button Pressed to display the menu screen.
5 <Energy Saver> button/lamp Pressed to exit Energy Saver mode.
The lamp lights while the printer is in Energy Saver mode. The lamp flashes
while the hard disk (option) is being accessed.
6 <Delete Job> button Pressed to stop printing.
7 <OK> button Pressed to confirm the menu option selected on the menu screen. This button
is used also when printing reports/lists.
8
<> <> <> <> buttons
9 <Return> button Press this button while the menu screen is displayed to return to the previous
Pressed to advance to the next menu, item, or option.
Note
• When using the < > and < > buttons to change the current setting,
holding down either button cycles through available settings at high speed.
To display a setting’s default value, press < > and < > at the same time.
item.
10 <Error> lamp Blinks or lights when an error occurs.
11 <Ready> lamp Lights when the printer is ready to print.
12 <Information> button
13 <Secure Print/Sample Set>
button
Pressing this button while the mark is on the display will display detailed
information about some current event.
Press to perform Secure Print/Sample Set operation.
Note
• To use the Secure Print/Sample Set feature, the hard disk (optional) must be
installed.
44 2 Basic Operation
Page 45

Control Panel Display
Print
Print
The display shows two types of screens: the print screen and menu screen. The print screen
displays messages that show the status of the printer, and the menu screen displays menus
that allow you to set various settings for the printer.
Note
• The messages on the display vary depending on the printer status and the options installed.
• Pressing the <Information> button while the mark is on the display shows detailed information.
Print Screen
Shows the status of the printer. The following screens are used to indicate when the printer
is in stand-by or printing.
er Status
Ton e r le v el
er Status
Data input port
Paper tray
Menu Screen
Use this screen to configure printer settings.
Press the <Menu> button to display the menu screen. The following menu item appears
when you open the menu screen.
Refer to
• For information about the menu items in the menu screen, refer to “5 Control Panel Settings” (P. 105).
2.1 Main Components and Functions 45
Page 46

2.2 Switching On/Off the Power
Switching On the Power
1. Press the <|> side of the printer’s power
switch to turn on the power.
2. This will cause [Please Wait...] to appear on
the control panel display. Wait until the
display message changes to [Ready to
print].
Note
• The [Please Wait...] message indicates the printer is
warming up. Printing cannot be done while this
message is displayed.
• If an error message is displayed, refer to “Error
Messages (in Alphabetical Order)” (P. 185) to remedy
the error.
Switching Off the Power
Important
• Do not switch the power off when the <Energy Saver> lamp is blinking. The <Energy Saver> lamp
flashes if the hard disk (option) is being accessed while the printer is in the power saver mode.
• Do not switch the power off when the display reads [Please wait...].
• Do not switch the power off during printing. Doing so can cause paper jams.
• Turning off power causes any print data or other data in the printer to be deleted.
• After you turn off the power, the printer remains on for a short while as it performs an internal power off
procedure. Do not unplug the power cord immediately after turning off the power switch.
• After turning off the power, make sure the control panel display is blank before turning the printer back
on again.
1. Make sure that the printer is not in
operation by checking the display or
indicator lamps.
2. Press the < > side of the printer’s power
switch to turn off power.
46 2 Basic Operation
Page 47

2.3 About the Ground Fault Interrupter
A ground fault interrupter is located on the back left of the printer.
It protects against ground leakage, fire, and other problems by breaking the electrical circuit
automatically whenever ground leakage from the printer occurs.
If the ground fault interrupter is triggered, check the insulation of the printer’s wiring and then
press the <RESET> button.
If the insulation of the printer’s wiring has not been fixed, the ground fault interrupter will
trigger again. If this happens, contact our Customer Support Center.
At least once a month, turn off the printer’s power switch to check operation of the ground
fault interrupter. Improper operation creates the risk of electric shock.
If you discover any abnormality with the ground fault interrupter, contact our Customer
Support Center.
Power switch
<TEST> button
<RESET> button
Refer to
• For information on how to test the ground fault interrupter, refer to “Operational Safety” (P. 15).
2.4 Setting/Exiting the Energy Saver Modes
Entering the Energy Saver Modes
The printer has Energy Saver modes that reduce electric power consumption while the
printer is in standby. There are two Energy Saver modes: a Low Power mode (70 W
average) and a Sleep mode (3 W maximum).
The sleep mode completely turns off all power except for the controller’s receiver to
minimize power consumption. Note, that the warm up time required to recover from sleep
mode is the same as when the power is turned on.
The Low Power mode does not turn off power completely, but it strikes a balance between
power consumption and warm up time by keeping the fuser’s temperature between full and
Sleep mode.
The initial factory default settings for both the Low Power mode/Sleep mode trigger times
are [1 Minutes], so the printer will go directly into Sleep mode without going into the low
power mode whenever no print data is received by the printer for one minute.
Low Power/Sleep mode triggering can be turned on or off, and the Low Power/Sleep mode
trigger time can be set within a range of 1 to 240 minutes.
Note
• The printer can be configured to use just the Low Power mode or Sleep mode.
• Both Low Power mode and Sleep mode triggering cannot be disabled at the same time.
• For information about configuring Low Power mode and Sleep mode settings, refer to “Setting Example:
Changing the Sleep Mode Timer” (P. 108).
2.3 About the Ground Fault Interrupter 47
Page 48

Exiting the Energy Saver Modes
The printer automatically exits the Energy Saver modes when it receives a print job from a
computer.
You also can exit the Energy Saver modes manually by pressing the <Energy Saver>
button on the control panel.
48 2 Basic Operation
Page 49

2.5 Canceling/Checking a Print Job
Canceling a Print Job
Print jobs can be canceled either from your computer or the control panel.
Canceling a Print Job Being Processed on a Computer
1. Double-click the printer icon on the task bar at the lower right corner of your
monitor.
2. Select the name of the document whose print job you want to cancel, and then delete
it by pressing the <Delete> key.
Note
• If you cannot find the document in the window, cancel the document on the control panel.
• You also can cancel a print job on the [Jobs] tab of CentreWare Internet Services. For information about
the procedure you should use, see CentreWare Internet Services help.
Canceling a Print Job being Printed/Received on the Printer
Press the <Delete Job> button on the control panel. Note that the page currently being
printed continues to print.
Canceling all Data Received by the Printer
You can use the following procedure to cancel printing all data, for instance after adding a
very large document to the print queue.
1. Press the <Online> button on the control
panel.
This causes [Off-line] to appear on the
display.
2. Press the <Delete Job> button.
This starts the cancellation process. [Offline] reappears after the process is
complete.
3. Press the <Online> button.
The [Ready to print] screen reappears.
Off-line
Data in memory
All data:
Deleting...
Off-line
Ready to print
K C M Y
2.5 Canceling/Checking a Print Job 49
Page 50

Checking the Status of a Print Job
There are two ways to check the status of data queued for printing: checking the data with
Windows and checking the data with CentreWare Internet Services.
Checking the Job Status on Windows
1. Double-click the printer icon on the task bar at the lower right corner of your
monitor.
2. On the displayed window, check [Status].
Checking the Job Status on CentreWare Internet Services
You can check the status of print jobs also under the [Jobs] tab on CentreWare Internet
Services.
Refer to
• CentreWare Internet Services online help
50 2 Basic Operation
Page 51

2.6 Importing Printer Information to a Print Driver
If your printer is networked, you can import printer information (such as accessory
configuration, and sizes and types of paper in the paper trays) into your print driver using
SNMP protocol. This can be done on the [Options] tab on your print driver. The following
procedure is described based on Windows XP. After installing the print driver, use this
procedure to add options and configure paper settings.
Note
• This function is not available when the printer is being used as a local printer. In this case, configure
settings of the applicable print driver items manually. Also note that during use as a local printer, the
paper types and paper sizes loaded in the trays are not displayed.
• To use this function, the control panel must be used to enable the printer’s SNMP port (Initial default:
[Enabled]).
• With Windows 2000, Windows XP, and Windows Vista, settings can be changed only by a user with
administrator privileges. Users without administrator privileges can only view the settings.
1. On the [Start] menu, select [Printers and Faxes] and display the properties of the
printer being used.
2. Click the [Options] tab.
3. Click [Get Information from Printer].
3
4
The printer information is imported to the print driver.
4. Click [OK].
The contents of the [Options] tab are updated using the information obtained from the
printer.
Note
• The paper sizes and orientations displayed in [Paper Tray Attributes] are those automatically detected
by the printer.
• The paper type and color in [Paper Tray Attributes] is based on readings of settings configured with the
control panel.
2.6 Importing Printer Information to a Print Driver 51
Page 52

3Printing
This chapter describes various printing methods using a PCL print driver.
3.1 Printing from a Computer
This section outlines the basic procedure for sending print jobs from Windows applications.
The procedure uses Windows XP WordPad as an example.
(The actual procedure may vary depending on the application being used.)
1. On the [File] menu of your application, select [Print].
2. Use the [Select Printer] box to select the printer and then display the Properties dialog
box. In Windows XP WordPad, click [Preferences] to display the dialog box.
3. Click the desired tab and configure print features as required. When you are finished
with the settings, click [OK] to close the dialog box. For details on the print features,
refer to the online help for the print driver.
(1)
To display online help:
(1) Click [?] and then the item for
which you need help.
The help for the item appears.
(2) Click [Help].
The [Help] window appears.
(2)
4. Click [Print] on the [Print] dialog box to start printing.
52 3 Printing
Page 53

Print Features in the Properties Dialog Box
The following introduces some of the print features available on each tab of the print driver.
For details on each feature, refer to the online help for the print driver.
Tab Fe ature
Paper/Output • 2-Sided Print
Prints documents on
both sides of the paper.
• Sample Set
Allows printing of a proof
copy of a multi-set job.
After the proof copy is
checked, the remainder
of the job can be printed
from the control panel.
• Transparency Separators
Automatically places separators between documents when
printing on transparencies.
Click [Paper Select] to set this item.
Image Options • Image Types
Allows you to define the type of the original and print it at optimal print quality.
• Saved Settings
Allows registration of
frequently-used print
settings. The printer can
be configured with
multiple settings simply
by selecting an item
from the list. Settings
can be edited and preregistered as required.
• Delayed Print
Allows printing at a
specified time.
•
Secure Print
Allows temporary
storage of a document in
the printer for manual
printing from the control
panel.
• Covers
Allows printing on paper
of a specific color and
thickness for covers
only.
Click [Paper Select] to
set this item.
Layout • Multiple-Up
Prints multiple pages
onto one sheet of paper.
• Booklet
Creates a booklet from a set of 2 sided documents. It correctly
positions each page to produce output, that when folded, will be
ordered to read like a booklet.
Watermarks/
Forms
•Watermarks
Adds a watermark such
as “Confidential”
underneath an original
image.
•Poster
Allows you to divide and enlarge an original document
to copy the image onto multiple sheets of paper. You
can then paste them together to make one large
poster.
•Forms
Stores frequently-used
forms in the printer. This
saves the time required to
send a form to the printer
each time it is required.
3.1 Printing from a Computer 53
Page 54

Note
• The Properties dialog box also can be displayed by clicking the printer icon on the [Printers and Faxes]
window (or the [Printers] window depending on the operating system you are using).
The settings configured here will be the defaults of the features when the dialog box is accessed from an
application.
54 3 Printing
Page 55

3.2 Printing on Envelopes
This section describes how to print on envelopes.
Loading Envelopes
Only printing on the address side of the envelope is supported. Printing on the reverse side
is not supported.
The following envelope sizes can be used with this printer.
• C5 (162 x 229 mm) • C4 (229 x 324 mm)
• No.10 (4.1 x 9.5") • Monarch (3.9 x 7.5")
• DL (110 x 220 mm)
Important
• For best print quality, do not use envelopes that:
• are curled or twisted.
• are stuck together or damaged.
• have windows, holes, perforations, cutouts, or embossments.
• use tie strings, metal clamps, or metal folding bars.
• have postage stamps attached.
• have any exposed adhesive when the flaps are closed.
• have deckle edges or creased corners.
• are wrinkled, rough or are glued.
• have adhesive flaps.
Envelopes can be printed using the bypass tray only.
Note
• For more information on how to load paper in the bypass tray, refer to “Loading Paper in the Bypass
Tray” (P. 95).
1. Position the address side of the envelope
so it is facing downwards.
With the address side face down, open the
flaps of the envelopes and position them so
they feed from the side opposite the flap
(from the bottom of the envelopes).
Note
• When loading envelopes in tray, make sure their flaps
are completely open.
Important
• In cases where you must print on envelopes with
adhesive flaps, close the flaps and load the envelopes
so they feed from the flap side. Loading envelopes
with adhesive flaps open can cause a malfunction.
2. Adjust the paper guides to the size of the
envelopes.
3.2 Printing on Envelopes 55
Page 56

Printing on Envelopes
The following procedures use Windows XP WordPad as an example.
Note
• The method for displaying the Properties dialog box varies depending on the application being used.
Refer to the documentation for the application.
1. On the [File] menu, select [Print].
2. Select the printer from the [Select Printer] list box, and then click [Preferences].
3. The [Paper/Output] tab appears.
Click [Paper Select].
3
4. For [Paper Tray], select [Tray 5 (Bypass)].
4
5
5. Click [Tray 5 (Bypass) Settings] to display the [Tray 5 (Bypass) Settings] dialog box.
56 3 Printing
Page 57

6. For [Paper Type for Tray 5 (Bypass)], select [Extra HW (X-HW) (170 - 256g/m2)].
6
7
8
7. Select the [Feed Orientation] of the envelopes.
8. Click [OK] to close the dialog box.
9. For [Paper Size], select the size of the document to be printed.
9
10
10. Click [OK] to close the dialog box.
11. Click the [Layout] tab, and then select the output paper size from [Fit to New Paper
Size].
12
11
12. Click [Booklet/ Poster/ Mixed Sized Originals] to display the [Booklet/ Poster/ Mixed
Sized Originals] dialog box.
Select the [Image Rotation 180 Degrees] setting and then click [OK].
13. Click [OK] to close the dialog box.
14. Click [Print] on the [Print] dialog box to start printing.
3.2 Printing on Envelopes 57
Page 58

3.3 Printing on Custom Size or Long-size Paper
This section explains how to print on long-size and custom size paper.
The following are the sizes of paper that can be loaded into the paper trays.
Bypass Tray Trays 1 - 4
Paper feed direction
Length:
98.4 - 1200 mm
Width:
88.9 - 320 mm
Loading Custom Size or Long Size Paper
Using the Bypass Tray
The following example explains how to load long-size paper into the bypass tray.
Note
• Finger prints can leave marks on the printing surface of long-size paper. Take care to avoid getting
marks on the long size paper when loading it.
• For information about loading other custom size paper, refer to “4.2 Loading Paper” (P. 95).
• The only paper type setting that can be specified for long size paper is [Heavyweight (HW) (106 - 169 g/m2)].
Paper feed direction
Length:
182.0 - 431.8 mm
Width:
139.7 - 297.0 mm
* Tray 2 when the Single Tray Module is being used
Length: 182.0 - 457.2 mm
Width: 139.7 - 320.0 mm
*
*
58 3 Printing
1. With the print side of the long-size paper
facing downwards, load the paper into the
bypass tray with the trailing edge curled as
shown in the illustration.
Note
• Curl the trailing edge of the long-size paper as far as
possible from the paper inlet slot. Curling it too close
to the paper inlet slot can result in the trailing edge
feeding into the printer, causing the paper to be
creased or wrinkled.
• Carefully insert the leading edge of the paper into the
inlet slot of the bypass tray. Incorrect insertion can
cause paper jams.
• Load paper one sheet at a time.
2. Adjust the paper guides to the size of the
long size paper.
Since long-size paper is long, print one
sheet at a time to ensure that the output
print does not fall to the floor.
Side for printing
Page 59

Using Trays 1 - 4
The procedure for loading custom size paper into Trays 1 - 4 is the same as for standardsize paper. Refer to “4.2 Loading Paper” (P. 95).
Registering Custom Size Paper
Custom size paper needs to be registered with the print driver before it can be used. The
following example shows how to do this with Windows XP.
When loading custom size paper in tray 1, 2, 3, or 4, use the control panel to configure the
paper size settings. For information on how to configure settings on the control panel, refer
to “Setting the Paper Sizes of Trays 1 through 4” (P. 100).
Important
• Make sure the paper size settings are configured correctly with the print driver or on the control panel.
Setting the wrong paper size can cause malfunction of the printer.
Note
• With Windows 2000, Windows XP, or Windows Server 2003/Windows Vista, only users with
administrator level access can change settings. Users without administrator privileges can only view
settings.
• Changing the settings on the [Custom Paper Size] dialog box when running Windows 2000, Windows
XP, Windows Server 2003, or Windows Vista while the printer is being used as a local printer can affect
settings for other printers on your computer. Changing settings when the printer is a network printer can
affect other network-shared printers on other computers over the network. This is because the printer
uses its own form database when it is local, while it uses the form database of a server that has a print
queue when it is networked.
1. On the [Start] menu, select [Printers and Faxes] and display the properties of the
printer being used.
Note
• In Windows Vista, right-click the icon of the printer being used, select [Run as administrator], and then
click [Properties].
2. Click the [Configuration] tab.
3.3 Printing on Custom Size or Long-size Paper 59
Page 60

3. Click [Custom Paper Size].
4. Select an item from the [Details] list.
3
4
5
6
5. Under [Settings for], specify the length for [Short Edge] and [Long Edge].
Use key input or the [ ] and [ ] keys to specify the lengths.
Even if the [Short Edge] setting is within the allowable range, you cannot specify a
value that is greater than the [Long Edge] setting. Conversely, even if the [Long Edge]
setting is within the allowable range, you cannot specify a value that is less than the
[Short Edge] setting.
6. To name the paper size setting, select the [Name Paper Size] check box and then
enter a name in [Paper Name].
A paper name can be up to 14 single-byte characters long.
7. To define other custom paper sizes, repeat Steps 4 to 6 of this procedure.
60 3 Printing
8. Click [OK] to close the dialog box.
9. Click [OK] to close the [Properties] dialog box.
Page 61

Printing on Custom Size Paper
The following procedure uses Windows XP WordPad as an example.
Important
• Make sure to set paper sizes correctly. Setting wrong paper sizes can cause printer malfunctions.
Note
• The method for displaying the Properties dialog box varies depending on the application being used.
Refer to the documentation of the application.
1. On the [File] menu, select [Print].
2. Select the printer from the [Select Printer] list box, and then click [Preferences].
3. The [Paper/Output] tab appears.
Click [Paper Select].
3
4. For [Paper Tray], select the tray where you loaded the custom size paper.
6
4
5
5. To change the paper type while [Tray 5 (Bypass)] is selected for [Paper Tray], click
[Tray 5 (Bypass) Settings] to display the [Tray 5 (Bypass) Settings] dialog box.
Configure the [Paper Type for Tray 5 (Bypass)] and [Feed Orientation] settings, and
then click [OK].
Note
• If you are using long size paper, select [Heavyweight (HW) (106 - 169 g/m2)].
6. For [Paper Size], select the size of the document to be printed.
Click [OK] to close the dialog box.
3.3 Printing on Custom Size or Long-size Paper 61
Page 62

7. Click the [Layout] tab, and from [Fit to New Paper Size], select the custom output size
you registered and then click [OK] to close the dialog box.
8. Click [Print] on the [Print] dialog box to start printing.
62 3 Printing
Page 63

3.4 Printing after Changing the Paper Types of Trays 1 - 4
The trays 1 - 4 accept plain paper and special media such as heavyweight paper, labels,
and transparencies.
This section describes how to print after changing the paper type settings of tray 1, 2, 3, or 4.
The following procedures use Windows XP WordPad as an example.
Note
• The method for displaying the Properties dialog box varies depending on the application being used.
Refer to the documentation for the application.
Printing after Changing the Paper Type Setting
There are two methods for changing the paper type settings of tray 1, 2, 3, or 4.
• Specifying the paper type on the control panel
• Specifying the paper type with the print driver
Printing after Setting the Paper Type on the Control Panel
The following example shows how to print using A4 size bond paper loaded in tray 1.
Before requesting a job, use the control panel to configure the tray’s paper type setting.
After printer settings have been changed, you can read them into the print driver and then
use the print driver to check the settings of each tray when you print.
Refer to
• For information on how to set the paper type setting on the control panel, refer to “Paper Sizes/Paper
Types for Trays 1 through 4” (P. 99), “[Paper Type]” (P. 155).
• For information about how to read paper settings into the print driver, refer to “2.6 Importing Printer
Information to a Print Driver” (P. 51).
1. On the [File] menu, select [Print].
2. Select the printer from the [Select Printer] list, and then click [Preferences].
3. The [Paper/Output] tab appears.
Click [Paper Select].
3
3.4 Printing after Changing the Paper Types of Trays 1 - 4 63
Page 64

4. For [Paper Tray], select [Tray1].
Note
• If the paper settings are being read by print driver, the dialog box will show the paper size, orientation,
type and color next to the tray name.
4
5. For [Paper Size], select the size of the document to be printed, and then click [OK] to
close the dialog box.
6. Click the [Layout] tab, and select the size of the output paper from [Fit to New Paper
Size].
6
7. Click [OK] to close the dialog box.
8. Click [Print] on the [Print] dialog box to start printing.
Printing After Using the Print Driver to Configure the Paper Type
Setting
The example below shows how to print when “Plain Paper” is specified as the paper type of
the tray 1, but the actual type of the paper loaded is “Bond Paper”.
This method allows you to print using the paper type specified by the print driver regardless
of the type of paper specified by the printer setting.
Important
• Images will not be processed properly when the paper type on the print driver does not match the actual
type of the paper loaded in the paper tray. The toner may not fuse properly onto the paper, resulting in
smearing and other print quality problems.
1. On the [File] menu, select [Print].
64 3 Printing
2. Select the printer from the [Select Printer] list, and then click [Preferences].
Page 65

3. The [Paper/Output] tab appears.
Click [Paper Select].
4. For [Paper Tray], select [Tray 1].
3
4
5
5. Click [Paper Settings for Tray] to display the [Paper Settings for Tray] dialog box.
6. For [Paper Type], select [Bond] and then click [OK].
Note
• The paper type selected here is valid for this job only. Configuring this setting does not change the paper
type setting on the control panel.
7. For [Paper Size], select the size of the document to be printed, and then click [OK] to
close the dialog box.
3.4 Printing after Changing the Paper Types of Trays 1 - 4 65
Page 66

8. Click the [Layout] tab, and select the size of the output paper from [Fit to New Paper
Size].
8
9. Click [OK] to close the dialog box.
10. Click [Print] on the [Print] dialog box to start printing.
Automatic Printing after Changing the Paper Type
When the paper types of trays 1 - 4 are configured correctly on the control panel, the printer
will select the appropriate tray from among the paper type settings, even if you do not
specify a paper tray with the print driver.
This method makes it possible to request a print job without worrying about the type of paper
loaded in each paper tray.
In order to use this feature, use the control panel to configure paper type settings for the
printer trays.
Refer to
• For information on how to set the paper type setting on the control panel, refer to “Paper Sizes/Paper
Types for Trays 1 through 4” (P. 99), “[Paper Type]” (P. 155).
1. On the [File] menu, select [Print].
2. Select the printer from the [Select Printer] list, and then click [Preferences].
66 3 Printing
Page 67

3. The [Paper/Output] tab appears.
Click [Paper Select].
4. For [Paper Tray], select [Auto Paper Select].
3
4
5
5. Click [Paper Settings for Tray] to display the [Paper Settings for Tray] dialog box.
6. For [Paper Type], select the paper type for printing and then click [OK].
7. For [Paper Size], select the size of the document to be printed, and then click [OK] to
close the dialog box.
3.4 Printing after Changing the Paper Types of Trays 1 - 4 67
Page 68

8. Click the [Layout] tab, and select the size of the output paper from [Fit to New Paper
Size].
9. Click [OK] to close the [Printing Preferences] dialog box.
10. Click [Print] on the [Print] dialog box to start printing.
68 3 Printing
Page 69

3.5 Printing confidential documents
- Secure Print -
Secure Print is available if the printer has an optional hard disk installed.
Important
• In case the hard disk fails, we recommend you to back up the hard disk data on your computer.
Secure Print
Secure Print is a feature that allows you to send a password-protected document to the
printer. Instead of printing the document immediately, the printer stores it temporarily until
you use the control panel to start printing manually. This feature also can store documents
that are not password protected. By storing frequently-used documents in the printer, you
can print them whenever you want, without having to send them each time from your
computer.
Order printing from
Send
Stored
the control panel.
Note
• Whether or not to delete a Secure Print job after printing it can be specified when you print it from the
control panel. For more information, refer to “Control Panel Operations” (P. 71).
• Secure Print output is not supported when [Disabled] is selected for [Secure Print] on the control panel.
• Password input is always required when the [Minimum Passcode Length] setting for [Items] on the
[Options] tab of the printer’s properties dialog box is [1] or greater.
Printing with Secure Print
The following explains how to print a job with Secure Print.
Configure Secure Print settings on your computer and then send the job to the printer. Next,
perform the required control panel operation to start printing manually.
Computer Operations
The following procedure uses Windows XP WordPad as an example.
Note
• The method for displaying the Properties dialog box varies depending on the application being used.
Refer to the documentation for the application.
1. On the [File] menu, select [Print].
2. Select the printer from the [Select Printer] list box, and then click [Preferences].
3.5 Printing confidential documents - Secure Print - 69
Page 70

3. The [Paper/Output] tab appears.
From [Job Type], select [Secure Print].
4. Click [Setup].
The [Secure Print] dialog box appears.
3
4
5. Enter your user ID into [User ID].
The user ID can be up to 8 single-byte alphanumeric characters.
5
6
7
6. If a password is assigned to the job, enter the password into [Secure Print Passcode].
The password can be up to 12 single-byte numeric characters.
7. For [Document Name], select [Enter Document Name] or [Use Existing Name].
If you selected [Enter Document Name], name the document by entering up to 12
single-byte characters into [New Document Name].
If you selected [Use Existing Name], the document name will be the name of the
document to be printed. If the printer cannot identify the name of the document, the
date and time that the document will be printed is used for the name.
70 3 Printing
8. Click [OK].
9. On the [Paper/ Output] tab, click [OK].
10. Click [Print] on the [Print] dialog box to start printing.
This will store the document in the printer.
Page 71

Control Panel Operations
The following explains how to print a Secure Print job stored in the printer.
Note
• To delete a Secure Print job without printing it, select [Delete] after Step 8 in the following procedure.
1. On the control panel, press the <Secure
Print/Sample Set> button.
If [Pte. Charge Print] appears on the
display, press the < > button until [Secure
Print] appears.
2. Press the < > or <OK> button to select.
A user ID appears.
3. Press the < > button until the desired user
ID appears.
Note
• The user ID is the ID set for [User ID] on the [Secure
Print] dialog box of the print driver.
4. Press the < > or <OK> button to select.
A screen that allows you to enter a
password appears.
5. Enter your password using the < > and
< > buttons. Use the < > button to move
the cursor.
Print Menu
Secure Print
Select User ID
1001.12345678
Passcode+OK key
[0 ]
Passcode+OK key
[**7 ]
Note
• Enter the password you specified for [Secure Print
Passcode] on the [Secure Print] dialog box of the print
driver. When a password is not specified, the control
panel will not prompt you for entry of a password.
6. Press the <OK> button to apply the setting.
A document name appears.
7. Press the < > button until the desired
document name appears.
Note
• The document name is the name (of up to 12 bytes)
specified for [Document Name] on the [Secure Print]
dialog box of the print driver.
• When more than one document is stored in the printer,
an [All documents] option is also available.
Select Document
1.Report
3.5 Printing confidential documents - Secure Print - 71
Page 72

8. Press the < > or <OK> button to select.
A screen appears that allows you to specify
whether to delete or save the document
after printing.
Note
• To delete the job without printing, press the < >
button to display [Delete], press the < > button, and
then press the <OK> button.
• If you want to save the document to the hard disk after
printing, press the < > button, display [Print & Save],
and proceed to Step 9 of this procedure.
1.Report
Print & Delete
9. Press the < > or <OK> button to select.
A screen to enter the number of copies
appears.
10. Enter the number of copies using the < >
button, and then press the < > or <OK>
button to print the document.
A print start confirmation screen appears.
11. Press the <OK> button to print.
Printing starts.
12. Press the <Menu> button to return to the
[Ready to print] screen.
Quantity
1 Set(s)
1.Report
Use OK to print
72 3 Printing
Page 73

3.6 Printing after checking output
- Sample Set -
Sample Set is available if the printer has an optional hard disk installed.
Important
• In case the hard disk fails, we recommend you to back up the hard disk data on your computer.
Sample Set
Sample Set lets you print a proof copy of a multi-set job and print the rest of the sets after
checking the proof copy. The job is stored on the printer’s hard disk until all of the sets are
printed using the control panel.
Send
Note
• To delete Sample Set jobs that have accumulated on the printer, without printing them, refer to “Control
Panel Operations” (P. 75).
Printing Using Sample Set
The following explains how to use Sample Set to print a job.
Configure Sample Set settings on your computer and then send the job to the printer. Next,
perform the required control panel operation to start printing manually.
1 set printed
Stored
Proof print
OK
Something wrong
with proof print.
Print the rest of the sets
using the control panel.
Cancel the job on the control panel.
Computer Operations
The following procedure uses Windows XP WordPad as an example.
Note
• The method for displaying the Properties dialog box varies depending on the application being used.
Refer to the documentation for the application.
1. On the [File] menu, select [Print].
2. Select the printer from the [Select Printer] list box, and then click [Preferences]. The
[Paper/Output] tab appears.
3.6 Printing after checking output - Sample Set - 73
Page 74

3. On the [Paper/ Output] tab, specify “2” or more for [Quantity].
4. For [Job Type], select [Sample Set].
4
5
3
5. Click [Setup].
The [Sample Set] dialog box appears.
6. Enter your user ID into [User ID].
The user ID can be up to 8 single-byte alphanumeric characters.
6
7
7. For [Document Name], select [Enter Document Name] or [Use Existing Name].
If you selected [Enter Document Name], name the document by entering up to 12
single-byte characters into [New Document Name].
If you selected [Use Existing Name], the document name will be the name of the
document to be printed. If the printer cannot identify the name of the document, the
date and time that the document will be printed is used for the name.
8. Click [OK].
9. On the [Paper/ Output] tab, click [OK].
74 3 Printing
10. Click [Print] on the [Print] dialog box to start printing.
Page 75

Control Panel Operations
The following explains how to print or delete a Sample Set job depending on the proof print
result.
1. On the control panel, press the <Secure
Print/Sample Set> button.
Note
• In some environments, [Pte. Charge Print] will appear
on the display first.
2. Press the < > button until [Sample Set]
appears.
3. Press the < > or <OK> button to select.
A user ID appears.
4. Press the < > button until the desired user
ID appears.
Note
• The user ID is the ID specified for [User ID] on the
[Sample Set] dialog box of the print driver.
5. Press the < > or <OK> button to select.
A document name appears.
Print Menu
Secure Print
Print Menu
Sample Set
Select User ID
2001.12345678
Select Document
1.Report
6. Press the < > button until the desired
document name appears.
Note
• The document name is the name (of up to 12 bytes)
specified for [Document Name] on the [Sample Set]
dialog box of the print driver.
• When more than one document is stored in the printer,
an [All documents] option is also available.
7. Press the < > or <OK> button to select.
A screen appears that allows you to specify
whether to delete or save the document
after printing.
Note
• To delete the job without printing, press the < >
button to display [Delete], press the < > button, and
then press the <OK> button.
8. When printing the document, use the < >
or <OK> button to select.
A screen to enter the number of copies
appears.
1.Report
Print
Quantity
1 Set(s)
3.6 Printing after checking output - Sample Set - 75
Page 76

9. Enter the number of copies using the < >
button, and then press the < > or <OK>
button to print the document.
A print start confirmation screen appears.
Note
• The initial number of copies is one less than the
number preset in the print driver because one copy
has already been printed.
10. Press the <OK> button to print.
Printing starts.
11. Press the <Menu> button to return to the
[Ready to print] screen.
1.Report
Use OK to print
76 3 Printing
Page 77

3.7 Printing at a Specified Time
- Delayed Print -
Delayed Print is available if the printer has an optional hard disk installed.
Important
• In case the hard disk fails, we recommend you to back up the hard disk data on your computer.
Delayed Print
Delayed Print stores print data on the hard disk and prints it automatically at a preset time.
Important
• Do not turn off the printer power while a Delayed Print job is pending. Turning off the power before the
specified time cancels the time specification and causes printing to start as soon as the power is turned
back on.
Note
• The time setting for Delayed Print must be within 24 hours after the print job is requested.
Registering a Delayed Print Job
This procedure explains how to print a job with Delayed Print.
It uses Windows XP WordPad as an example.
1. On the [File] menu, select [Print].
2. Select the printer from the [Select Printer] list, and then click [Preferences].
3. For [Job Type] on the [Paper/ Output] tab, select [Delayed Print].
3
4
4. Click [Setup].
The [Delayed Print] dialog box appears.
3.7 Printing at a Specified Time - Delayed Print - 77
Page 78

5. Specify the [Enter Hour] and [Minutes] for the printing start time.
Use 24-hour format to specify the time.
6. For [Document Name], select [Enter Document Name] or [Use Existing Name]. If you
selected [Enter Document Name], name the document by entering up to 12 singlebyte characters into [New Document Name].
If you selected [Use Existing Name], the document name will be the name of the
document to be printed. If the printer cannot identify the name of the document, the
date and time that the document will be printed is used for the name.
7. Click [OK].
8. On the [Paper/ Output] tab, click [OK].
9. Click [Print] on the [Print] dialog box to start printing.
Printing will start when the specified time is reached.
Canceling a Delayed Print Job
You can use the control panel to cancel a Delayed Print job or to print a Delayed Print job
immediately, regardless of the specified time.
1. On the control panel, press the <Secure
Print/Sample Set> button.
Note
• In some environments, [Pte. Charge Print] will appear
on the display first.
2. Press the < > button until [Delayed Print]
is displayed.
3. Press the < > or <OK> button to select.
A document name appears.
Print Menu
Secure Print
Print Menu
Delayed Print
Select Document
1.Report
78 3 Printing
4. Press the < > button until the desired
document name appears.
Note
• The document name is the name (of up to 12 bytes)
specified for [Document Name] on the [Delayed Print]
dialog box of the print driver.
Page 79

5. Press the < > or <OK> button to select.
A screen for selecting whether to print
immediately or to delete the job without
printing appears.
Note
• If you want to delete the job without printing, press the
< > button to display [Delete], press the < > button,
and then press the <OK> button.
1.Report
Print Now
6. To print the document immediately, use the
< > or <OK> button to select.
A print start confirmation screen appears.
7. Press the <OK> button to print.
Printing starts.
8. Press the <Menu> button to return to the
[Ready to print] screen.
1.Report
Use OK to print
3.7 Printing at a Specified Time - Delayed Print - 79
Page 80

3.8 Private Charge Print
Connection of a compatible Smart card system to the printer makes it possible to save print
job data from a computer temporarily in the printer and then print it when required by
performing an operation on the printer (with Smart card verification). This is the Private
Charge Print feature.
Since data can be output only by the person verified by the Smart card as the one who
requested the print job from the computer, confidential information and personal information
are protected from unauthorized viewing by other parties, and leaks due to eavesdropping
and the loss or mishandling of information are eliminated.
Note
• The hard disk (optional) must be installed to use this feature.
• The following Smart card systems are supported by the printer: IC Card Reader. Contact your dealer for
information about connecting an Smart card system to the printer.
• The IC Card Reader may not be supplied with the printer in some regions. Contact your dealer for
details.
• The Authentication feature includes login to local accounts, which uses user IDs and other login
information registered on the printer, and login to remote accounts with an affiliated external
authentication server. Contact your dealer for in formation about using the Authentication feature.
• Private Charge Print cannot be used in combination with Secure Print.
Configuring Private Charge Print Settings
To use Private Charge Print, a user ID must be specified on the print driver properties dialog
box. Printing is not possible if the user ID does not match the verification information.
For details about the content of settings and setting procedures, consult your system
administrator.
Printing with Private Charge Print
The following explains how to print a Private Charge Print job stored in the printer.
1. On the control panel, press the <Secure
Print/Sample Set> button.
2. Press the < > or <OK> button to select.
When the screen shown to the right
appears, hold the Smart card up to the
reader for authentication.
3. The screen shown to the right appears
when authentication is successful.
Press the <OK> button to start printing.
4. When you are finished printing, press the
<Menu> button to return to the [Ready to
print] screen.
Print Menu
Pte.Charge Print
Use Smart card
to login
User validated
Use OK to print
80 3 Printing
Page 81

3.9 Direct Printing of PDF Files
Some PDF files can be sent directly to the printer without using a print driver. Direct printing
of PDF files is much easier and faster compared to printing them using a print driver. There
are two methods for direct printing of PDF files, each of which is described below.
Printing with PDF Bridge
PDF Bridge is a feature that comes standard with the printer. There are two methods for
printing PDF files using PDF Bridge: Using the ContentsBridge Utility (software by Fuji
Xerox Co., Ltd.) and using commands such as lpr.
Note
• When using the ContentsBridge Utility, refer to the manual included on the Driver CD Kit CD-ROM.
When using commands such as lpr, refer to “Printing PDF Files without Using the ContentsBridge Utility”
(P. 82).
Using PostScript
You can use the PostScript function to directly send PDF files to the printer for printing.
Note
• For information about direct printing of PDF files using the PostScript feature, refer to “[PDF]” (P. 110).
For information about using the control panel to set the [PDF]
PDF Files without Using the ContentsBridge Utility” (P. 82).
> [Process Mode] to [PS], refer to “Printing
Important
• For direct printing of PDF files using the USB or parallel port, use the ContentsBridge Utility.
Note
• If the printer has an optional hard disk installed, direct printing of PDF files also can be performed from
CentreWare Internet Services. For more information, refer to the online help for CentreWare Internet
Services.
Supported PDF Files
PDF files created on Adobe Acrobat 4 to Adobe Acrobat 8 can be printed on the printer.
Note, however, that the following features are not supported.
• When using PDF Bridge: Some features added from PDF 1.5 and later
• When using PostScript: Features added from PDF 1.4 and later
Note
• Depending on how they are created, some PDF files cannot be printed directly. In that case, open the
files and print them using a print driver.
Printing PDF Files Using ContentsBridge Utility
The ContentsBridge Utility is software for sending a file from a computer directly to the
printer for printing.
The ContentsBridge Utility is on the Driver CD Kit CD-ROM. To use ContentsBridge Utility,
refer to the manual on the CD-ROM.
Note
• In addition to PDF files, ContentsBridge Utility also can be used to print TIFF and XPS files.
• XPS stands for XML Paper Specification.
Supported Operating Systems
Windows 2000, Windows XP, Windows Server 2003, Windows Vista
3.9 Direct Printing of PDF Files 81
Page 82

Printing PDF Files without Using the ContentsBridge Utility
PDF files can be sent directly to the printer using commands such as lpr instead of the
ContentsBridge Utility. When printing with commands, the following control panel [PDF]
settings become enabled.
• Process Mode • Collated
• Quantity • Output Size
• 2 Sided Printing • Layout
• Print Mode • Output Color
• Password
Refer to
• “[PDF]” (P. 110)
Note
• [2 Sided Printing] appears only when the Duplex unit (option) is installed.
• [Layout] does not appear when [PS] is selected for [Process Mode].
• When printing using the lpr command, use the lpr command to specify the number of copies. In such
cases, the [Quantity] setting on the control panel becomes invalid. If you do not specify the number of
copies using the lpr command, the printer assumes 1 set.
To print PDF files using lpr command, you must use the control panel or CentreWare
Internet Services to enable the printer’s LPD port (default: [Enabled]).
Refer to
• “[LPD]” (P. 116)
Supported Operating Systems
Windows NT 4.0/Windows 2000/Windows XP/Windows Server 2003/
Windows Vista
Printing PDF Files
The following is an example of printing a PDF file from a computer using the lpr command.
Note
• In the following examples, the bold characters are input characters.
• Spaces are indicated with U.
Example
At the command prompt, enter the command as follows.
Example: A command for printing “event.pdf” when the printer’s IP address is
192.168.1.100.
C:\>lprU-SU192.168.1.100U-PUlpUevent.pdf
<Enter> key
82 3 Printing
Page 83

3.10 Printing Using E-mail
- E-mail Print -
When the printer has a hard disk (option) installed and is connected to a network
environment that allows TCP/IP communication and e-mail receipt, e- mail can be sent from
a computer to the printer.
The printer can automatically print e-mails and TIFF, PDF, XPS, and JPEG (JFIF) files
attached to e-mails.
This feature is called E-mail Print.
Important
• In case the hard disk fails, we recommend you to back up the hard disk data on your computer.
Note
• XPS stands for XML Paper Specification.
E-mail
Printed
automatically
Configuring the E-mail Print Environment
To use E-mail Print, you must configure servers on your network (such as SMTP and POP3
servers).
Note
• Configuring the wrong e-mail settings can cause network problems. Be sure to leave configuration of e-
mail settings up to your network administrator.
Network Environment Settings
E-mail account creation
Printed
automatically
3.10 Printing Using E-mail - E-mail Print - 83
Page 84

E-mail Environment Settings (Printer)
Configure the items described below on the [Properties] tab of CentreWare Internet
Services.
Note
• After configuring the settings, be sure to click [Apply] and then turn the printer power off and then back
on again.
• For details on each menu item, refer to the online help for CentreWare Internet Services.
Item Setting Description Available
Settings
Description
Connectivity >
Port Settings
Connectivity >
Protocols >
TCP/IP
Administrator’s
E-mail
Address
Machine’s
E-mail
Address
Receive
E-mail
Host Name Specify the printer’s host
Domain Name Specify the DNS domain
Specify the e-mail address
of the Internet service
administrator.
Specify the printer’s e-mail
address. This address will
appear in the “From:” field
on e-mails sent from the
printer.
Select this check box.
name.
name.
Alphanumeric
characters plus
ampersand
(@), period (.),
hyphen (-), and
underbar (_);
up to 128 bytes
- {{
Alphanumeric
characters plus
hyphen (-); up
to 32 bytes
Alphanumeric
characters plus
period (.) and
hyphen (-); up
to 255 bytes
Receiving
Protocol
SMTP POP3
{{
{{
{ -
Obtain DNS
Server
Address
Automatically/
Obtain IPv6
DNS Server
Address
Automatically
Preferred
DNS Server/
Alternate DNS
Server 1 - 2
Dynamic DNS
Registration
(IPv4/IPv6)
Generate
Domain
Search List
Automatically
Select the [Enabled] check
box to obtain the IPv4 DNS
server address/IPv6 server
address automatically.
Specify the IPv4/IPv6 DNS
server address.
Select the [Enabled] check
box to update the IPv4/IPv6
DNS automatically, and the
[Overwrite] check box to
overwrite.
Select the [Enabled] check
box to generate the domain
search list automatically.
• Cleared:
Manual*
• Selected:
DHCP
IPv4:
xxx.xxx.xxx.xxx
IPv6: IPv6-addr
format
• Enabled
• Overwrite*
• Selected:
Auto
generation
enabled*
• Cleared:
Auto
generation
disabled
{ -
{ -
{ -
{ -
84 3 Printing
Page 85

Item Setting Description Available
Settings
Receiving
Protocol
SMTP POP3
Connectivity >
Protocols >
TCP/IP
Services >
E-mail >
Defaults >
From
Address >
Edit
Domain Name
1 - 3
Connection
Time-Out
DNS
Resolution via
IPv6 First
Receiving
Protocol
Incoming Email Print
Options
Specify domain names. Alphanumeric
characters plus
period (.) and
hyphen (-); up
to 255 bytes
Specify the time-out time for
domain searches.
Select the [Enabled] check
box to give priority to IPv6
DNS resolution in the dual
stack mode.
Specify the e-mail receiving
protocol.
Configure this setting when
printing the e-mail header
along with the document
(TIFF, PDF) attached to
received e-mail. Specify
[Attachment, Full Headers &
Message] to print the
receive routing of the e-mail,
etc.
1 - 60 seconds
1 second*
• Selected:
Priority
• Cleared:
Non-priority
•SMTP*
•POP3
•Print
Attachment
Only
•Print
Attachment
& Message if
it exists
• Attachment,
Basic
Headers &
Message
• Attachment,
Full Headers
& Message
{ -
{ -
{ -
{ -
{{
Print Delivery
Confirmation
E-mail
Specify whether or not
delivery receipt e-mail
should be printed.
•Off*
•On
• Print when
delivery fails
{{
3.10 Printing Using E-mail - E-mail Print - 85
Page 86

Item Setting Description Available
Settings
Receiving
Protocol
SMTP POP3
Connectivity >
Protocols >
POP3 Setup
IP Address /
Host Name &
Port
POP Receive
Password
Encryption
Login Name Set the login user name for the
Password Specify the password for the
Polling
Interval
Specify the IP address of the
POP3 server for receiving email, the IPv6-addr format,
or FQDN (Fully Qualified
Domain Name).
Specify the port number
used by the POP3 server.
Select the [APOP
Authentication] check box to
use APOP for POP receive
verification.
POP3 server. Only one user
can be specified.
POP user name, and re-enter
the same password into
[Retype Password].
Specify the interval for
polling the POP3 server for
mail.
Alphanumeric
characters plus
period (.) and
hyphen (-); up
to 128 bytes
1 ~ 65535
• Cleared:
Disabled*
• Selected:
Enabled
ASCII graphic
characters
(codes 33 to
126); up to 64
bytes
ASCII printable
characters
(ASCII graphic
characters plus
space; codes
32 to 126); up
to 64 bytes
1 to 120
minutes
10 minutes*
- {
- {
- {
--
- {
86 3 Printing
Page 87

Item Setting Description Available
Settings
Receiving
Protocol
SMTP POP3
Connectivity >
Protocols >
SMTP Server
SMTP Server
IP Address /
Host Name &
Port
Machine’s Email Address
Login
Credentials
for the
Machine to
access the
SMTP Server
to send
automated emails
Login Name Specify the user name for
Specify the IP address of the
POP3 server for receiving email, the IPv6-addr format, or
FQDN (Fully Qualified
Domain Name).
Also specify the port number
used by the SMTP server.
Specify the printer’s e-mail
address.
Specify the authentication
method for the SMTP
server.
authentication for an SMTP
server that requires
authentication.
Alphanumeric
characters plus
period (.) and
hyphen (-); up
to 128 bytes
1 ~ 65535
Characters
allowed for email
addresses; up
to 128 bytes
• None*
• POP before
SMTP
• SMTP AUTH
ASCII graphic
characters
(codes 33 to
126); up to 64
bytes
{ -
{ -
{ -
{ -
Sending E-mails
Supported E-mail Attachments
Files of the formats described below can be attached to e-mails.
• PDF files (Adobe Acrobat 4 to Acrobat 8. However, when using PDF Bridge, some
features added from PDF 1.5 and later are not supported. When using PostScript, some
features added from PDF 1.4 and later are not supported.)
• TIFF files
• XPS file
• JPEG (JFIF) files
Note
• XPS stands for XML Paper Specification.
Password Specify the login password
for the SMTP server.
ASCII printable
characters
(ASCII graphic
characters plus
space; codes
32 to 126); up
to 64 bytes
{ -
3.10 Printing Using E-mail - E-mail Print - 87
Page 88

Sending E-mails
This example shows how to use Outlook Express to send e-mail from a computer to the
printer.
1. Use your e-mail software to create the e-mail and attach any TIFF, PDF, or XPS files.
Important
• Configure your mail software settings to specify text format for the e-mail message. Only e-mail
messages in text format are supported.
Note
• Attaching a document with a filename extension that is something other than tif, pdf, or xps can result in
abnormal printing.
• Attachment of up to 31 documents is supported.
2. Enter the printer’s e-mail address for the address.
3. Send the e-mail.
The e-mail will be printed after it is received by the printer.
Note
• E-mail messages and attached documents are printed in accordance with the following settings on the
receiving printer.
• Mail Message: A4-size, one-sided
• TIFF File Attachment: current [TIFF/JPEG] setting for [Memory Settings] under the CentreWare
Internet Services [Language Emulations] setting
• PDF File Attachment: [PDF] when [PDF Bridge] is selected for [PDF] > [Process Mode] on the control
panel; current [PostScript] setting for [Memory Settings] under CentreWare Internet Services
[Language Emulations] when [PS] is selected for [Process Mode]
• XPS File Attachment: Settings of Print Ticket (operation depends on [XPS] settings configured with
control panel) included in the XPS
Receiving and Printing E-mail Manually
Though e-mail is printed automatically when it is received by the printer, it also can be
printed manually from the control panel.
1. On the control panel, press the <Secure
Print/Sample Set> button.
Note
• In some environments, [Pte. Charge Print] will appear
on the display first.
2. Press the < > button until [Mail Print] is
displayed.
3. Press the < > or <OK> button to select.
A receive start confirmation screen is
displayed.
4. Press the <OK> button.
This starts reception of the e-mail. The
message is printed after reception is
complete.
Print Menu
Secure Print
Print Menu
Mail Print
Mail recvd.
Use OK to process
Mail received
Job in queue
88 3 Printing
Page 89

5. The [Ready to print] screen appears
automatically after printing is complete.
Precautions When Using E-mail Print
Security Precautions
E-mail uses the Internet, a network connecting computers around the world, as its
transmission medium. Because of this, exchanging e-mails involves security risks such as
information leakage and tampering.
Use of a method that is more secure than e-mail is recommended whenever exchanging
important or confidential information. To prevent unwanted e-mails, do not give out your email address unless necessary.
Setting Permitted Domains
The printer can be programmed to receive e-mails only from particular domains.
For more information, refer to the online help for CentreWare Internet Services.
Ready to print
K C M Y
Precautions When Connecting the Printer with an Internet Provider
• If your Internet provider does not bill you at a flat rate, or if you do not have full-time
access to the Internet, you will be charged every time the printer retrieves data from the
e-mail server.
• Make sure to connect the printer in an IP masked environment. Proper operation is not
guaranteed when the printer is connected to the Internet with a global IP address
assigned.
• When enabling POP access, make sure to create a unique e-mail account for the printer.
Using a shared e-mail account can cause problems.
• It may take time to receive graphics and other large data when Internet speed is slow.
• Some providers also support SMTP reception. Use of SMTP requires detailed setup with
your provider.
• When connecting the printer to an Internet environment where MTA is running in a private
segment, configure settings according to your operating needs.
3.10 Printing Using E-mail - E-mail Print - 89
Page 90

4Paper
4.1 About Paper
Using paper that is not appropriate for the printer can cause paper jams, image quality
problems, or printer failure. Use only paper that is appropriate for the printer.
WARNING
• Do not use conductive paper such as carbonic paper or coated paper. When paper jam
occurs, it may cause short-circuit and eventually a fire accident.
Supported Paper
Supported Paper Sizes and Types
The following table lists the supported paper sizes and paper types, and the capacity of
each paper tray.
Note
• G.S.M. (gram per square meter) refers to a weight in grams of one square meter of paper.
Paper Tray Paper Size Paper Type (G.S.M.)
Bypass tray
Tray 1
(standard)
A3 , B4 , A4 , A4 ,
B5 , B5 , A5 , A5 ,
A6 , B6 , 11 x 17" ,
11 x 15" , 8.5 x 14" , 8.5 x 13" ,
8.5 x 11" , 8.5 x 11" , 9 x 11" (Cover
Letter) , 12 x 18" ,
4 x 6"(Post Card) , 5 x 7" (photo 2L-size) ,
A4 Cover (223 x 297 mm) ,
8K (Taiwan, China) ,
16K (Taiwan, China) ,
16K (Taiwan, China) ,
SRA3 (320 x 450 mm) , Envelope (C5 ,
C4 , No. 10 , Monarch , DL ),
Postcard (100 x 148 mm, 148 x 200 mm),
Envelope (120 x 235 mm),
Custom Paper (Width: 88.9 - 320 mm,
Length: 98.4 - 1200 mm)
A3 , B4 , A4 , A4 ,
B5 , B5 , A5 ,
11 x 17" , 8.5 x 14" , 8.5 x 13" ,
8.5 x 11" , 8.5 x 11" ,
8K (Taiwan, China) ,
16K (Taiwan, China) ,
Custom Paper (Width: 139.7 - 297 mm,
Length: 182.0 - 431.8 mm)
Plain (60 - 79 g/m
Recycled (60 - 79 g/m
Bond (80 - 105 g/m
Lightweight (55 - 59 g/m
Heavyweight (106 - 169 g/m
Extra Heavyweight
(170 - 256 g/m
Label,
Gloss (106 - 169 g/m
Heavyweight Gloss
(170 - 256 g/m
Transparency
Plain (60 - 79 g/m
Recycled (60 - 79 g/m
Bond (80 - 105 g/m
Heavyweight (106 - 169 g/m
Extra Heavyweight
(170 - 256 g/m
Label,
Gloss (106 - 169 g/m
Heavyweight Gloss
(170 - 256 g/m
Transparency
2
),
2
),
2
),
2
2
),
2
),
2
),
2
),
2
),
2
),
2
),
2
),
2
),
Maximum
Capacity
100 sheets (Fuji
Xerox P paper) or
10 mm max.
),
2
),
2
),
Important
• Load coated
paper one sheet
at a time. When
multiple sheets
are loaded
moisture in the
paper can cause
multi-feeds and
printer failure.
560 sheets (Fuji
Xerox P paper)
90 4 Paper
Page 91

Paper Tray Paper Size Paper Type (G.S.M.)
Tray 2 - 4
(optional)
A3 , B4 , A4 , A4 ,
B5 , B5 , A5 , 11 x 17" ,
8.5 x 14" , 8.5 x 13" ,
8.5 x 11" , 8.5 x 11" ,
12 x 18"
*1
,
8K (Taiwan, China) ,
16K (Taiwan, China) ,
*1
SRA3 (320 x 450 mm)
,
Custom Paper
Plain (60 - 79 g/m
Recycled (60 - 79 g/m
Bond (80 - 105 g/m
Heavyweight (106 - 169 g/m
Extra Heavyweight
(170 - 256 g/m
Label,
Gloss (106 - 169 g/m
Heavyweight Gloss
(170 - 256 g/m
Transparency
2
),
2
),
2
),
2
),
2
),
2
),
(Single Tray Module:
Width: 139.7 - 320.0 mm,
Length: 182.0 - 457.2 mm)
(3 Tray Module: Width: 139.7 - 297.0 mm,
Length: 182.0 - 431.8 mm)
*1
: Can be loaded when a Single Tray Module (option) is installed.
Important
• Be sure to load paper that meets the above requirements in each paper tray. Also be sure to select the
correct paper sizes, paper types, and paper trays when sending print requests from your print driver.
Loading paper that is not supported or configuring wrong settings can cause paper jams.
• Moisture, such as water, rain, and humidity can cause print images to come off from paper. For more
information, contact our Customer Support Center or your dealers.
560 sheets per tray
(Fuji Xerox P paper)
2
),
Maximum
Capacity
Paper for 2-Sided Printing
The following sizes and types of paper can be used for 2-sided printing when using the
Duplex unit (optional).
Paper Size Paper Type
2
A3 B4 , A4 , A4 ,
B5 , B5 , A5 , A5 , B6 ,
11 x 17" , 8.5 x 14" , 8.5 x 13" ,
8.5 x 11" , 8.5 x 11" , 8K (Taiwan, China) ,
Plain (60 - 79g/m
Recycled (60 - 79 g/m
Bond (80 - 105 g/m
Heavyweight (106 - 169 g/m
Gloss (106 - 169 g/m
16K (Taiwan, China) ,
16K (Taiwan, China) ,
SRA3 (320 x 450 mm) , 11 x 15" ,
A4 Cover (223 x 297 mm) ,
9 x 11" (Cover Letter) , 12 x 18"
Custom Paper (Width: 128.0 - 320.0 mm,
Length: 139.7 - 457.2 mm)
*1
: 2-Sided printing is supported by paper loaded into the bypass tray only.
Note
• If you want to print on both sides of a type of paper that is not supported for duplex printing, print the
front side and then reload the paper manually and print the reverse side (this is only possible if the front
side was printed with this machine). In this case, set the paper type in the print driver to [xxx Reload]
(xxx: paper type).
• Depending on paper quality, paper fiber orientation, and other factors, proper printing may not be
possible with some types of paper. The use of standard paper is recommended.
),
2
),
2
),
2
2)*1
),
4.1 About Paper 91
Page 92

Supported Paper Specifications
If using general paper (commercially available paper), make sure that it meets the following
specifications. To achieve the best print quality, however, we recommend you to use
standard paper instead.
Paper Tray Specifications (G.S.M.)
Bypass tray
Tray1
Tray 2 - 4 (optional)
Standard Paper and Tested Paper
The following paper and media are recommended or have been tested on the printer.
For information about other paper or media, contact our Customer Support Center or your
dealers.
Product Name G.S.M.
Colortech+90
P Paper
C2 Paper
90 g/m
64 g/m
70 g/m
55 - 256 g/m
60 - 256 g/m
60 - 256 g/m
Paper Type
Setting
2
Bond A The standard paper for this printer, for both
Image
Quality
Process
2
2
2
Paper Characteristics and Precautions
monochrome and color printing.
2
Plain B Medium-thickness paper for in-house
documents and general office use
2
Plain B Paper for general business use, suitable for
both monochrome and color printing with
minimum see-through.
C2r Paper
WR100 Paper
Green 100 Paper
Bright Recycle
DR Paper
ecolor081
Recycled Color Paper 100
J Paper
JW Paper
70 g/m
67 g/m
67 g/m
67 g/m
76 g/m
81.4 g/m
67 g/m
82 g/m
81 g/m
2
Recycled C 70% recycled pulp paper suitable for both
monochrome and color printing.
2
Recycled C 100% recycled pulp paper with the whiteness
of bond paper.
2
Recycled C 100% recycled pulp paper with minimum
whiteness.
2
Recycled C 70% recycled PPC paper with the whiteness
of bond paper and outstanding long-term
preservation characteristics.
2
Recycled C 70% recycled paper for color printing (with
eco mark)
2
Recycled D 100% recycled paper whose main material is
recycled newsprint
Environmentally conscious paper that
complies with green purchasing laws.
2
Recycled C 100% recycled paper whose main material is
recycled paper
2
Bond A Bond paper suitable for a variety of uses,
including office documents and color
samples.
2
Bond A High-whiteness color printer paper
JD Paper
92 4 Paper
98 g/m
2
Bond A Double-sided paper suitable for a variety of
uses, including brochures and booklets.
Page 93

Product Name G.S.M.
Paper Type
Setting
Image
Quality
Process
Paper Characteristics and Precautions
P (Thick) Paper
Green Paper
Ncolor081
Ncolor104
Ncolor157
Ncolor209
Color Copy
OK Prince Bond
2
78 g/m
2
75 g/m
81.4 g/m
104.7 g/m
157 g/m
209.3 g/m
90/100 g/m
120/160 g/m
200/250 g/m
104.7 g/m
127.9/157 g/m
209.3 g/m
2
2
2
2
2
2
2
2
2
2
Plain B Thick paper with little see-through, optimal
for duplex printing.
Plain B High-speed printer paper with minimal lint
generation and outstanding write ability
Bond A Color printing paper with higher whiteness
than J and JD paper.
Bond A
Environmentally friendly paper 100% sourced
from plantation-grown trees.
Heavyweight A
Extra
A
Heavyweight
Bond A Bond paper with high whiteness and high
smoothness
Heavyweight A
Extra
A
Heavyweight
Bond A Bond paper with adequate whiteness and
opacity
Heavyweight A
Extra
A
Heavyweight
JD Coated Paper
127.9/157 g/m
2
Gloss - Double-sided coated paper ideal for
brochures and leaflets. Can be loaded in the
bypass tray one sheet at a time.
Mirror Coated Platinum
104 g/m
157 g/m
2
2
Custom 5 S
Gloss - Can be loaded in the bypass tray one sheet
at a time.
256 g/m
2
Heavyweight
-
Gloss
OK Top Coated N
Transparency A4 Clear
(GAAA5224)
128 g/m
2
Gloss -
- Transparency - Transparencies without frames.
Can be loaded in the bypass tray.
Leaving printed transparencies on the output
tray can cause them to stick together.
Remove them from the center tray every 20
prints or so to fan them and cool them off.
Label (V860/V862) - Labels - This is sticker paper. There are two types: 1
sticker per sheet and 20 stickers per sheet.
Note
• Due to the characteristics of this type of
paper, it may curl. When printing
consecutively on multiple label sheets,
remove them from the center tray as soon
as they are delivered. Make sure to read
and follow the documentation supplied with
the label sheets when handling them.
Ncolor Envelope
104.7 g/m
2
Extra
Heavyweight
A Can be loaded in the bypass tray.
Refer to "Supported Paper Sizes and Types"
(P.90) for the supported envelope sizes.
4.1 About Paper 93
Page 94

Unsupported Paper
Do not use the following types of paper or media. They can cause paper jams or printer
failure.
• Transparencies other than those recommended
• Special ink jet printer paper and ink jet transparencies
• Paper that is too heavyweight or too lightweight
• Paper pre-printed by another printer or copier
• Wrinkled, creased, or ripped paper
• Damp or wet paper
• Rough or curled paper
• Static-cling paper
• Pasted-up or glued paper
• Specially coated paper
• Color paper with surface treatments
• Paper that uses ink that deteriorates with heat
• Photosensitive paper
• Carbon paper
• Paper with staples, clips, ribbons, or tape
• Paper with a rough surface, such as pulp paper or fibrous paper
• Acid paper (Texts printed on acid paper may blur. Use alkaline paper instead.)
• Envelopes that are not flat, or that have clasps
• Label paper with some labels already peeled off, or that are partially cut off
• Tack film
• Water transfer paper
• Textile transfer paper
Storing and Handling Paper
Paper stored in poor conditions may deteriorate, resulting in paper jams, image quality
problems, or printer failure. Use the following guidelines when storing paper.
Paper Storage Environment
• Temperature: 10 - 30 °C
• Relative humidity: 30 - 65%
94 4 Paper
Paper Storage Guidelines
• Re-wrap partly used packages of paper, and store them in a location away from humidity
such as in a cabinet.
• Store paper flat. Do not store it upright.
• Keep paper from becoming wrinkled, curled, or creased.
• Do not expose paper to direct sunlight.
Page 95

4.2 Loading Paper
This section explains how to load paper in the bypass tray or trays 1 - 4.
Loading Paper in the Bypass Tray
Important
• Make sure to load paper when the power is on.
• Do not load paper of different types in the same tray.
• Do not remove paper from or add paper to the paper trays during printing. Doing so can cause paper
jams.
• Do not place any objects other than paper on the bypass tray. Do not push down the tray or apply an
excessive force to the tray.
1. Lower the bypass tray.
Extend the tray as required. The extension
tray can extend two levels.
2. Load the paper with the print side facing
down.
Important
• Do not load paper of different types and sizes into the
tray. Doing so can cause paper jams.
Important
• If the paper will not feed into the machine when
printing thick paper, curl the leading edge of the paper
as shown in the illustration and then load it into the
tray. However, paper that is overly curled or creased
will cause paper jams.
Note
• A different loading method is used when loading
envelopes, and long size paper. Refer to “Bypass Tray
Feed Orientations for Envelopes” (P. 97) and “3.3
Printing on Custom Size or Long-size Paper” (P. 58).
4.2 Loading Paper 95
Page 96

3. Adjust the paper guides to the size of the
paper.
Important
• Make sure that the guides are positioned lightly
against the paper. Paper guides that are positioned
too tight or two narrow can cause paper jams.
• Do not load paper above the maximum fill-line. Doing
so can cause paper jams.
Note
• When printing from the bypass tray, use the print driver to configure paper size and type settings. For
more information, refer to the online help for the print driver.
• When printing without using the print driver (such as lpr printing of a PDF file), use the printer’s control
panel to configure the paper type setting. For more information, see "[Paper Type]" (P.155).
96 4 Paper
Page 97

Bypass Tray Feed Orientations for Envelopes
Make sure to use the proper orientation whenever loading envelopes into the bypass tray.
Envelopes
With the address side face down, open the flaps
of the envelopes and position them so they feed
from the side opposite the flap (from the bottom of
the envelopes). Make sure that the flaps are fully
open.
Important
• For best print quality, do not use envelopes that:
• are curled or twisted.
• are stuck together or damaged.
• have windows, holes, perforations, cutouts, or embossments.
• use tie strings, metal clamps, or metal folding bars.
• have postage stamps attached.
• have any exposed adhesive when the flaps are closed.
• have deckle edges or creased corners.
• are wrinkled, rough or are glued.
• have adhesive flaps.
• In cases where you must print on envelopes with adhesive flaps, close the flaps and load the envelopes
so they feed from the flap side. Loading envelopes with adhesive flaps open can cause a malfunction.
4.2 Loading Paper 97
Page 98

Loading paper into Trays 1 through 4
The following example shows how to load paper into Tray 1. Use the same procedure to
load paper into trays 2, 3, and 4.
Important
• Do not remove paper from or add paper to the paper trays during printing. Doing so can cause paper
jams.
• Make sure that the power is on when loading paper.
1. Pull out the tray until it stops.
2. Squeezing the top guide clip, slide it
towards the front of the tray.
3. Squeezing the side guide clip, slide it
towards the right side of the tray.
4. Load the paper with its print side facing up
and its leading edge aligned with the left
side of the drawer.
Important
• Do not load paper of different types into the tray. Doing
so can cause paper jams.
• Do not load paper above the maximum fill-line. Doing
so can cause paper jams.
98 4 Paper
Page 99

5. Align the top and side paper guides so they
are lightly against the paper.
Note
• When loading standard size paper, slide the guides so
they are aligned with the applicable size on the scale.
6. Gently slide the tray back in as far as it will
go.
Paper Sizes/Paper Types for Trays 1 through 4
Though the printer can detect the size and orientation of paper loaded in paper trays 1
through 4, use the control panel to configure the size setting after loading custom size
paper.
Paper type also cannot be detected and so the paper type setting also must be configured.
If the paper type setting does not match the actual type of the paper, toner may not fuse
properly to the paper, resulting in poor print quality. Make sure to configure the paper type
settings correctly. The initial factory default setting for all the trays is plain paper.
Refer to
• “Setting the Paper Sizes of Trays 1 through 4” (P. 100)
• “Changing the Paper Type Settings of Trays 1 through 4” (P. 102)
Note
• The printer performs image quality processing in accordance with the current paper type setting.
Configuration of [Image Quality] settings on the control panel also is required when using paper of poor
texture, such as some types of thick paper or business card paper. Refer to “[Image Quality]” (P. 159) for
information about image quality and “Configuring Image Quality Settings for Each Paper Type” (P. 103)
for information about configuring settings.
• The print paper type also can be changed with the print driver when printing. For the procedure, refer to
“3.4 Printing after Changing the Paper Types of Trays 1 - 4” (P. 63).
4.2 Loading Paper 99
Page 100

Setting the Paper Sizes of Trays 1 through 4
Use the following procedure when configuring custom paper size settings for trays 1
through 4.
Note
• If you changed the paper loaded in a tray from custom size paper to standard size paper, select [Auto] in
Step 9, below. Doing so allows the printer to automatically detect the type of the paper loaded in each
paper tray.
1. On the control panel, press the <Menu>
button to display the menu screen.
2. Press the < > button until [Admin Menu] is
displayed.
3. Press the < > or <OK> button to select.
[Network/Port] is displayed.
4. Press the < > button until [Printer
Settings] is displayed.
5. Press the < > or <OK> button to select.
[Substitute Tray] is displayed.
6. Press the < > button until [Paper Size] is
displayed.
Menu
LanguageEmulation
Menu
Admin Menu
Admin Menu
Network/Port
Admin Menu
Printer Settings
Printer Settings
Substitute Tray
Printer Settings
paper size
7. Press the < > or <OK> button to select.
[Tray 1] is displayed.
8. Press the < > button until the desired
paper tray is displayed, and then press the
< > or <OK> button to display its current
setting.
The current set value is displayed.
9. Press the < > button until [Custom] is
displayed.
10. Press the < > or <OK> button to select.
[Portrait (Y) Size] is displayed.
11. Press the < > or <OK> button to select.
The current set value is displayed.
Paper Size
Tray 1
Tray 1
•
Auto
Tray 1
Custom
Tray 1 Custom
Portrait (Y) Size
Portrait (Y) Size
•
140 mm
100 4 Paper
 Loading...