

Page 1
DocuPrint C2090 FS
Setup and Quick
Reference Guide
Page 2

Adobe, the Adobe logo, Acrobat Reader are trademarks of Adobe Systems Incorporated.
Microsoft, Windows, Windows NT, Windows Server are either registered trademarks or
trademarks of Microsoft Corporation in the United States and/or other countries.
Permission has been obtained from Microsoft Corporation for use of software screen shots.
NetWare is a registered trademark of Novell, Inc., in the United States and other countries.
Macintosh, MacOS, AppleTalk, EtherTalk and TrueType are trademarks of Apple
Computer, Inc., registered in the U.S. and other countries.
Intel and Pentium are trademarks or registered trademarks of Intel Corporation or
All product/brand names are trademarks or registered trademarks of the
Important:
• This manual is copyrighted with all rights reserved. Under the copyright laws, this
manual may not be copied or modified in whole or part, without the written consent
of the publisher.
• Parts of this manual are subject to change without prior notice.
• We welcome any comments on ambiguities, errors, omissions, or missing pages.
• Never attempt any procedure on the machine that is not specifically described in
this manual. Unauthorized operation can cause faults or accidents. Fuji Xerox is
not liable for any problems resulting from unauthorized operation of the equipment.
its subsidiaries in the United States and other countries
respective holders.
It may be a legal offence to print currency notes, certificates of stocks and securities, or any other documents of similar nature, regardless of whether they will be
used.
To lessen the effect on the environment, this manual is manufactured with recycling in mind. After the product has been used, please send this manual for recycling.
Fuji Xerox is not responsible for any breakdown of machines due to infection of
computer virus or computer hacking.
Xerox, The Document Company and the stylized X
are registered trademarks of Xerox Corporation and Fuji Xerox Co., Ltd.
All Xerox and Fuji Xerox product names are either registered trademarks or trademarks of
Xerox Corporation and Fuji Xerox Co., Ltd.
Page 3

Preface
About this manual
Thank you for choosing the DocuPrint C2090 FS. This is a guide on operating
this MFP (Multi Function Printer) and the important points to note. To understand
the features fully and to use the machine correctly and effectively, please read
this guide before using it. Keep this guide handy for a quick reference on using
the machine. This guide is written with the assumption that you are familiar with
the basic knowledge and way of operating your computer environment and the
network environment.
Since the machine is equipped with anti-counterfeit features, in some rare cases,
certain kinds of documents may be unable to copy.
Copyright and trademarks
Information presented in this manual has been reviewed and validated for accuracy. The instructions and descriptions are accurate at the time of this manual’s
production. However, the manufacturer reserves the right to make changes without notice and assumes no liability for damages incurred directly or indirectly from
errors, omissions, or discrepancies between this and any other future documents.
© Copyright 2006. All rights reserved. Under copyright laws, this manual cannot
be reproduced in any form without the prior written permission of the manufacturer. No patent liability is assumed with respect to the use of the information contained herein.
Microsoft, Windows, Windows NT, Windows Server are either registered trademarks or trademarks of Microsoft
countries.
Adobe Systems Incorporated in the United States and/or other countries.
Netscape is a registered trademark or trademark of Netscape company.
XEROX, The Document Company, and the digital X are trademarks of Xerox
Corporation. All Xerox and Fuji Xerox product names are either registered trademarks or trademarks of Xerox Corporation and Fuji Xerox Co., Ltd. Other product
names and company names are the registered trademarks or trademarks of their
respective holders.
Adobe and Acrobat are either registered trademarks or trademarks of
Corporation in the United States and/or other
Regulatory notices
Users of this machine must observe the following restrictions to ensure the
responsible and legal use of this machine.
Preface - i
Page 4

Responsible use of copyright materials
Scanners can be misused by improperly copying copyrighted materials. Unless
acting on the advice of a knowledgeable attorney, be responsible and respectful
by attaining the consent from the copyright holder before copying published
material.
Illegal copies and printouts
Copying or printing certain documents may be illegal in your country. Penalties of
fines or imprisonment may be imposed on those found guilty. The following are
examples of items that may be illegal to copy or print in your country.
• Currency
• Bank notes and checks
• Bank and government bonds and securities
• Passports and identification cards
• Copyright material or trademarks without the consent of the owner
• Postage stamps and other negotiable instruments
Exercise caution when copying the following items:
• Private marketable securities (stock certificates, negotiable notes,
checks, etc.)
• Driver’s license, warrants of fitness, road passes, food stamps, tickets,
etc.
This list is not inclusive and no liability is assumed for either its completeness or
accuracy. In case of doubt, contact your legal counsel.
Notice:
This machine is provided with the recognition function to prevent the copying of currency. Also, in case currency or securities are copied, the forgery tracing function can
identify a machine used for the copy.
Note that the recognition function prevents a limited range of illegal copies. Always
put your machine under careful charge to prevent illegal copies from being made.
ii - Preface
Page 5
Safety notes
For your own safety, please read this page carefully before using the DocuPrint
C2090 FS.
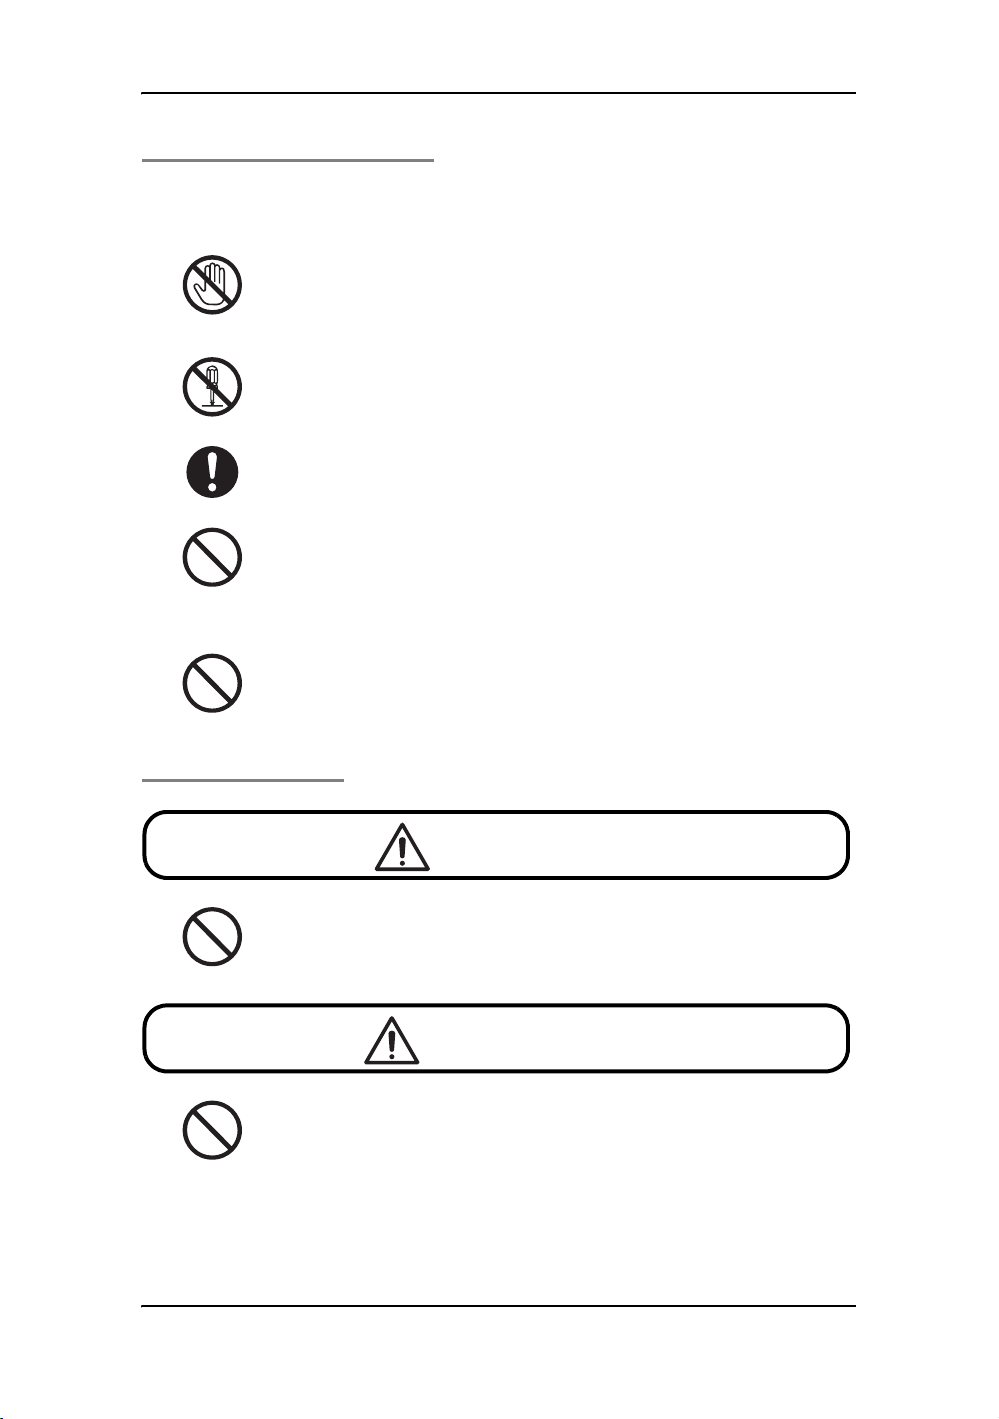
Graphic symbols used throughout this guide
WARNING
CAUTION
Used for items that if not followed directly, can lead
to severe or fatal injuries.
Used for items that if not followed directly, can cause
injuries to user or damages to the machine.
A symbol for items to pay attention
to when handling the machine.
Follow instructions carefully to use
the machine safely.
A symbol for prohibited items. Follow instructions carefully to avoid
any dangerous acts.
A symbol for items that must be
performed. Follow instructions
carefully to carry out these essential tasks.
Heated
surface
Prohibited
Instructions
Flammable
No fire Do not
Unplug Ground/
Electric
shock
tear down
Earth
Pinched
fingers
Do not
touch
For Installation and Relocation
CAUTION
Do not place the machine in a hot, humid, dusty, or poorly
ventilated environment. Prolonged exposure to these adverse
conditions can cause fire or electric shock.
Do not place the machine near heaters or volatile, flammable,
or combustible materials such as curtains that may catch fire.
Preface - iii
Page 6

Place the machine on a level and sturdy surface that can
withstand the weight of the machine. If tilted, the machine
may fall and cause injuries.
When moving the machine, be sure to unplug the power cord
from the outlet. If the machine is moved with the power cord
connected, it can cause damage to the cord which could
result in fire or electric shock.
The machine weights 33.0 kg (without consumables and with
controller). When moving the machine, make sure that there
are three or more persons handling it to avoid dropping it and
causing injuries.
When moving the machine, one person facing the front of the
machine (control panel) and the other facing the back, should
firmly grip the recessed areas on the bottom of the both sides
of the machine. Lifting the machine by gripping any other
areas can cause the machine to fall and result in injuries.
For Power and Earth Connection
WARNING
Use only the power cord specified for this machine. Using a
different power cord may cause fire or electric shock. Also, do
not use the machine’s power cord with other equipment.
The power specifications are listed as follows.
The specifications that apply to your machine depend on your
machine configuration. Connect the power plug only to an
appropriate power outlet. Otherwise, it can cause fire or electric shock. If in doubt, contact our Customer Support Center
or your dealers for more information.
iv - Preface
• Rated voltage 100/120V (+/-10%)
Rated frequency 50/60Hz (+/-3HZ)
• Rated voltage 220/240V (+/-10%)
Rated frequency 50/60Hz (+/-3HZ)
Ensure that the plug connection is free of dust. In a damp
environment, a contaminated connector can draw a significant amount of current that can generate heat and eventually
cause fire over an extended period of time.
Always use the power cord provided with your machine.
When an extension power cord is required, always use a
properly rated cord. If you use a cord with an unspecified current rating, the machine or plug may emit smoke or become
hot to the touch externally.
Page 7
Do not attempt to rework, pull, bend, chafe, or otherwise damage the power cord. Do not place a heavy object on the cord.
A damaged cord can cause fire or electric shock.
Never touch a power cord with wet hands. It may cause electric shock.
Stop operation right away if the machine produces smoke,
excessive heat, unusual noise, or smell, or if any liquid is spilt
onto the machine. These conditions can cause a fire. Switch it
off and contact the nearest Customer Support Center.
To prevent fire or electric shock, connect the machine correctly to a properly rated electric outlet. If in doubt, contact our
Customer Support Center.
If the power cord is broken or insulated wires are exposed,
contact the Customer Support Center for a replacement.
Using a damaged cord can cause fire or electric shock.
CAUTION
Do not unplug or reconnect the machine while it is on.
Unplugging a live connector can deform the plug and cause a
fire.
When unplugging the machine, grasp the plug instead of the
cord. Forcibly pulling on a cord can damage it and cause fire
or electric shock.
Be sure to switch off and unplug the machine before accessing the interior of the machine for cleaning, maintenance, or
fault clearance. Access to a live machine's interior can cause
electric shock.
When the machine is not used over an extended period of
time, switch it off and unplug it. If an unused machine is left
connected to power for a long time, degraded insulation can
cause electric shock, current leakage, or fire.
Preface - v
Page 8
For Machine Operation
Do not place any liquid container such as a vase or coffee
cup on the machine. Spilt water can cause fire or electric
shock.
Do not place any metal parts such as staples or clips on the
machine. If metal and flammable parts get into the machine,
they can short-circuit internal components, and cause fire or
electric shock.
If debris (metal or liquid) gets into the machine, switch off and
unplug the machine. Contact our Customer Support Center or
your dealers. Operating a debris-contaminated machine can
cause fire or electric shock.
Never open or remove machine covers that are secured with
screws unless specifically instructed in the manual. A high
voltage component can cause electric shock.
Do not try to alter the machine configuration, or modify any
parts. An unauthorized modification can cause smoke or fire.
WARNING
vi - Preface
CAUTION
Never touch a labeled area found on or near the heat roller. If
a sheet of paper is wrapped around the heat roller, do not
attempt to remove it by yourself. Doing so may cause injuries
or burns. Switch off the machine immediately and contact the
Customer Support Center or your nearest dealers for assistance.
When removing jammed paper, make sure that no pieces of
torn paper are left in the machine. A piece of jammed paper
remaining in the machine can cause a fire. If a sheet of paper
is wrapped around the heat roller, or it is difficult to see the
jammed paper, do not try to remove it by yourself. Switch off
the machine immediately, and contact the Customer Support
Center or your nearest dealers for assistance.
Page 9
Laser Printer Precautions
The DocuPrint C2090 FS utilizes laser technology. Follow the precautions below
to ensure safe, efficient operation.
Unless specifically instructed in the manual, be careful not to
touch the fuser, which is marked CAUTION HOT SURFACE.
If you have been using the DocuPrint C2090 FS for an
extended period of time, the fuser may be very hot.
Do not attempt to modify to disassemble the toner cartridge. It
cannot be refilled.
Do not touch the toner and avoid contact with your eyes.
Do not use a vacuum cleaner if the toner is spilled. Use a
broom and dustpan or a damp cloth with soap and water to
clean up. Because the fine particles in the toner cartridge can
cause a fire or an explosion if they come into contact with a
spark.
Do not dispose of used toner cartridges or fuser in fire. Doing
so may cause fire and injury. Dispose of them according to
local regulations.
For Consumables
Never throw a toner cartridge or drum cartridge into an open
flame. Doing so may cause fire or explosion and you can get
burnt.
Keep the drum cartridge and toner cartridge in a location out
of reach of children.
WARNING
CAUTION
Preface - vii
Page 10
Environmental notices
As an ENERGY STAR ® partner, Xerox Corporation has determined that (the
basic configuration of) this product meets the ENERGY STAR requirements.
ENERGY STAR and ENERGY STAR MARK are registered United States trademarks.
The ENERGY STAR office Equipment Program is a team effort between U.S.,
European Union and the office equipment industry to promote energy-efficient
copiers, printers, fax, multifunction machines, personal computers, and monitors.
Reducing product energy consumption helps combat smog, acid rain, and longterm changes to the climate by decreasing the emissions that result from generating electricity.
Xerox ENERGY STAR equipment is preset at the factory to enter a “low
power“state and/or shut off completely after a specified period of use. These
energy-saving features can reduce product energy consumption in half when
compared to conventional equipment.
As a member of the International Energy Star Program, Fuji Xerox confirms this
product satisfies the requirements for International Energy Star Program standards.
Notes:
• Print quality may be poor or the paper can get wrinkled depending on the paper
type or print status.
• The printed images may fade due to moisture such as water, rain, or vapor.
• For details on the paper handling, see “Paper handling” on page 62.
viii - Preface
Do not unplug or reconnect the machine while it is on.
Unplugging a live connector can deform the plug and cause a
fire.
When unplugging the machine, grasp the plug instead of the
cord. Forcibly pulling on a cord can damage it and cause fire
or electric shock.
Be sure to switch off and unplug the machine before accessing the interior of the machine for cleaning, maintenance, or
fault clearance. Access to a live machine's interior can cause
electric shock.
When the machine is not used over an extended period of
time, switch it off and unplug it. If an unused machine is left
connected to power for a long time, degraded insulation can
cause electric shock, current leakage, or fire.
Page 11

Table of Contents
Preface .......................................... i
About this manual .............................. i
Copyright and trademarks ................. i
Regulatory notices ............................ i
Safety notes....................................... iii
Environmental notices ..................... viii
Using this manual ........................ 1
Chapter summary ..............................1
Symbols and terminologies ...............2
Types of manuals ..............................2
Introducing the DocuPrint C2090
FS .................................................. 3
Features ............................................3
Printer ......................................3
Fax ...........................................3
Copier ......................................3
Scanner ....................................3
Package contents ..............................4
Unpacking the printer ...............4
Overview of the DocuPrint C2090 FS
components .......................................6
Front view ................................6
Rear view .................................6
Inside the DocuPrint C2090 FS 7
Printer components ..................8
Scanner components ...............9
Control panel ......................... 10
Getting started ........................... 12
Placing the DocuPrint C2090 FS .... 12
Connecting power ........................... 13
Power cable .......................... 13
Switching On and Off the Power .... 14
Switching on the power ......... 14
Switching off the power ......... 15
Power save mode ................. 15
Exiting the power save mode 15
Installing the toner cartridges ......... 16
Installing the drum cartridge ........... 17
Installing extra memory .................. 18
Connecting cables .......................... 19
USB cable ............................. 19
LAN cable ............................. 20
Phone cables ........................ 20
Setting IP address .......................... 21
Setting subnet mask/gateway
address ........................................... 21
Installing software ........................... 22
Setting Configuration of Paper 24
Uninstalling the Drivers and
Software ................................ 25
Network printer configuration 25
Printing ........................................27
Printing a document ........................ 27
Cancelling printing ..........................27
Cancelling printing of data
being printed or received at the
printer ....................................27
Cancelling printing data being
processed at the computer ...27
Specifying the printer settings ......... 28
Number of prints .................... 28
Resizing the prints ................. 28
Adjusting layout ..................... 28
Adding watermarks ................ 28
Advanced settings ................. 29
Scanning .....................................30
Placing the originals ........................ 30
Scanning an image ......................... 30
Scan mode (for control panel
standalone operation) ............ 30
Color scan .............................31
Original paper size and type .. 31
Image quality ......................... 31
Scanning from the DocuPrint
C2090 FS ..............................32
Scanning with DocuWorks ....32
Scanning to FTP .................... 35
Scanning to USB-Key ............ 35
Saving scanned images ........36
Previewing and adjusting the
scan area ............................... 36
Image filter ............................. 36
Operation on DocuPrint C2090
FS: .........................................36
Copying .......................................37
Placing the originals ........................ 37
Making copies .................................38
Specifying copy settings .................38
Number of copies .................. 38
Selecting the paper ...............38
Image quality ......................... 39
Enlarging/Reducing the copy
size ........................................ 40
Resetting the copy settings ... 41
Restrictions on copying ......... 41
Sending a fax ..............................42
Placing the originals ........................ 42
Sending faxes ................................. 43
Basics ....................................43
Sending a fax from the
computer ................................43
Using speed-dial .................... 43
Using one-touch dial ..............44
Using group-dial ....................44
Receiving faxes ..............................44
Table of Contents - ix
Page 12

Table of Contents
Specifying fax settings .................... 45
Input and output paper size
and type ................................. 45
Image quality ......................... 45
Adjust fax size ....................... 46
Density .................................. 47
Polling reception ................... 47
Fax settings ........................... 48
Auto-redial ............................. 49
Transmitting sender
information ............................. 49
Incoming mode ..................... 49
Assigning speed-dial numbers ....... 50
Assigning one-touch button numbers 50
Advanced functions................... 51
Using the setup menu ..................... 51
Printer settings ...................... 51
Scanner settings ................... 53
Copy settings ........................ 54
Fax settings ........................... 55
Host settings ......................... 57
System settings ..................... 58
Printing a status sheet .................... 60
Canceling an operation ................... 61
Paper handling ........................... 62
Paper sources ................................ 62
Usable paper ......................... 62
Supported paper ................... 63
Special media ....................... 63
Unusable paper .................... 64
Loading paper ................................ 64
Loading envelopes ......................... 65
Setting paper sizes and types ........ 66
Removing printouts or copies ......... 66
Troubleshooting guide .................... 67
When paper jams .................. 67
When the printer interior
gets dirty ................................ 68
Printer problems .................... 70
Print quality problem ............. 72
Scanning problems ............... 74
Scanning quality problems .... 76
Copying problems ................. 77
Fax problems ........................ 77
Paper handling problems ...... 78
Menu tree ....................................... 79
Copy Ready .......................... 79
Fax Ready ............................. 80
Scan Ready .......................... 81
Appendix..................................... 82
Specifications ................................. 82
Optional accessories and
consumables ................................... 84
Optional accessories ............. 84
Consumables ........................84
Handling consumables .......... 84
Replacing the consumables ..85
Regular replacement parts .... 85
Obtaining product information ......... 86
Latest print driver ................... 86
Upgrading the firmware version of
this printer .......................................86
PC (USB upgrade) ................86
Web server upgrade .............. 87
Status and error messages ............. 87
Printer error messages .......... 87
Scanner error messages ....... 88
Copier error messages .......... 89
Fax error messages ..............89
System error messages ........89
Troubleshooting guide ....................90
When paper jams .................. 90
Printer problems .................... 91
Print quality problem .............. 92
Scanning problems ................ 94
Scanning quality problems ....96
Copying problems ................. 97
Fax problems ......................... 97
Paper handling problems ...... 97
Replacing components ...................98
Replacing the retard pad ....... 98
x - Table of Contents
Page 13
Using this manual
Chapter summary
The DocuPrint C2090 FS user manual consists of the following chapters to help
you use the product efficiently with ease.
Chapter Title Description
Preface This chapter provides safety information, regula-
tory notices, important warning and cautions that
should be noted by the user.
Introducing the DocuPrint
C2090 FS
Paper handling This chapter provides detailed information on the
Getting started This chapter helps you to get started with the
Printing This chapter provides information on how to per-
Scanning This chapter provides information on how to per-
Copying This chapter provides information on how to per-
Sending a fax This chapter provides information on both how to
Advance functions This chapter covers information on configuration
This chapter provides an overview of the features of the DocuPrint C2090 FS, and an introduction of the components of the machine.
types paper to be used for different purposes
and how to load them properly.
MFP with information on installing cartridges and
connecting the cables appropriately.
form a printing task.
form a scanning task.
form a copying task.
send and receive a fax.
of settings for different modes and miscellaneous functions.
Appendix This chapter covers specification of the Docu-
1 - Using this manual
Print C2090 FS and troubleshooting section.
Page 14
Symbols and terminologies
The following table describes the conventions for the symbols and terms used in
this user manual.
Terms/
Symbols
Important
Note
Indicates essential information that you must read.
Indicates additional information on operation or features of
Description
the MFP.
Warning
Indicate important safety issues which you must note while
operating the MPF.
[ ] Indicates items or commands on the computer and the printer
control panel.
< > Indicates the hard buttons on the MFP.
Types of manuals
Setup and Quick Reference Guide
Explains the way of installation, loading paper, and troubleshooting of this MFP.
User Manual (PDF)
Explains MFP settings, and describes control panel items and daily care in detail.
Refer to “Chapter summary” . All the contents of the Setup and Quick Reference
Guide are included except the installation of this MFP.
This PDF file is included in the Software CD-ROM.
Documentation in the Software CD-ROM
Explains how to set the MFP environment and how to install the MFP driver and
our company software.
Installation Guide
Explains the installation procedure of each optional accessory.
This manual is bundled with each optional product.
Note
• Adobe® Acrobat® Reader needs to be installed to display PDF files. Install the
Acrobat Reader using the CentreWare CD-ROM first if it is not already installed.
Using this manual - 2
Page 15

Introducing the DocuPrint C2090 FS
This chapter explains the features,
package contents, and the components of the DocuPrint C2090 FS.
Features
Printer
• Prints multiple pages on a single sheet
• Prints watermarks or specific
stamps over printed material
• Prints single images over
multiple pages to produce
poster sized images
• Adjusts image quality depending on document type and
requirement
• 'Favorite' print settings can be
saved and reused
• Prints on special media such
as envelopes or transparencies
using the bypass tray
• IP filtering can be used to limit
users of the printer functions
• Print status and management
possible from remote computer
Fax
• Serves as both a PC fax and
MFP fax machine to send and
receive documents
• Faxes the scanned documents
or images from the computer
• Fax speed up to 33.6K with
Super G3 and color support
• Sends a fax through the phone
book from the Toolbox
• Auto-redialing
• Reports fax status
Important:
• While sending or receiving a fax,
the DocuPrint C2090 FS still performs other functions such as
printing and scanning simultaneously, but at a slower speed.
Copier
• Copy resolution up to 600 dpi
• Copy speed up to 3 cpm @
600 dpi for color print
• Copy speed up to 12 cpm @
600 dpi for B/W print
• Enlarges or reduces copy sizes
with custom copy ratios or
manually
• Adjusts the image quality
• Adjusts the copy exposure
• Adjusts color balance of the
copy
• Sorts copies in page order
Scanner
• Flatbed, CCD scanner
• High scanner resolution: 4800
dpi x 4800 dpi enhanced, 1200
dpi x 1200 dpi full color optical
• Full Color scan speed 2.5 ms/
line
• Mono color scan speed 0.284
ms/line
• Scan area up to A4/Letter on
flatbed; up to Legal via Auto
Document Feeder (ADF)
• Integrated Simplex Auto Document Feeder (ADF) max 50
sheets (@ 75 gsm paper)
Introducing the DocuPrint C2090 FS - 3
Page 16
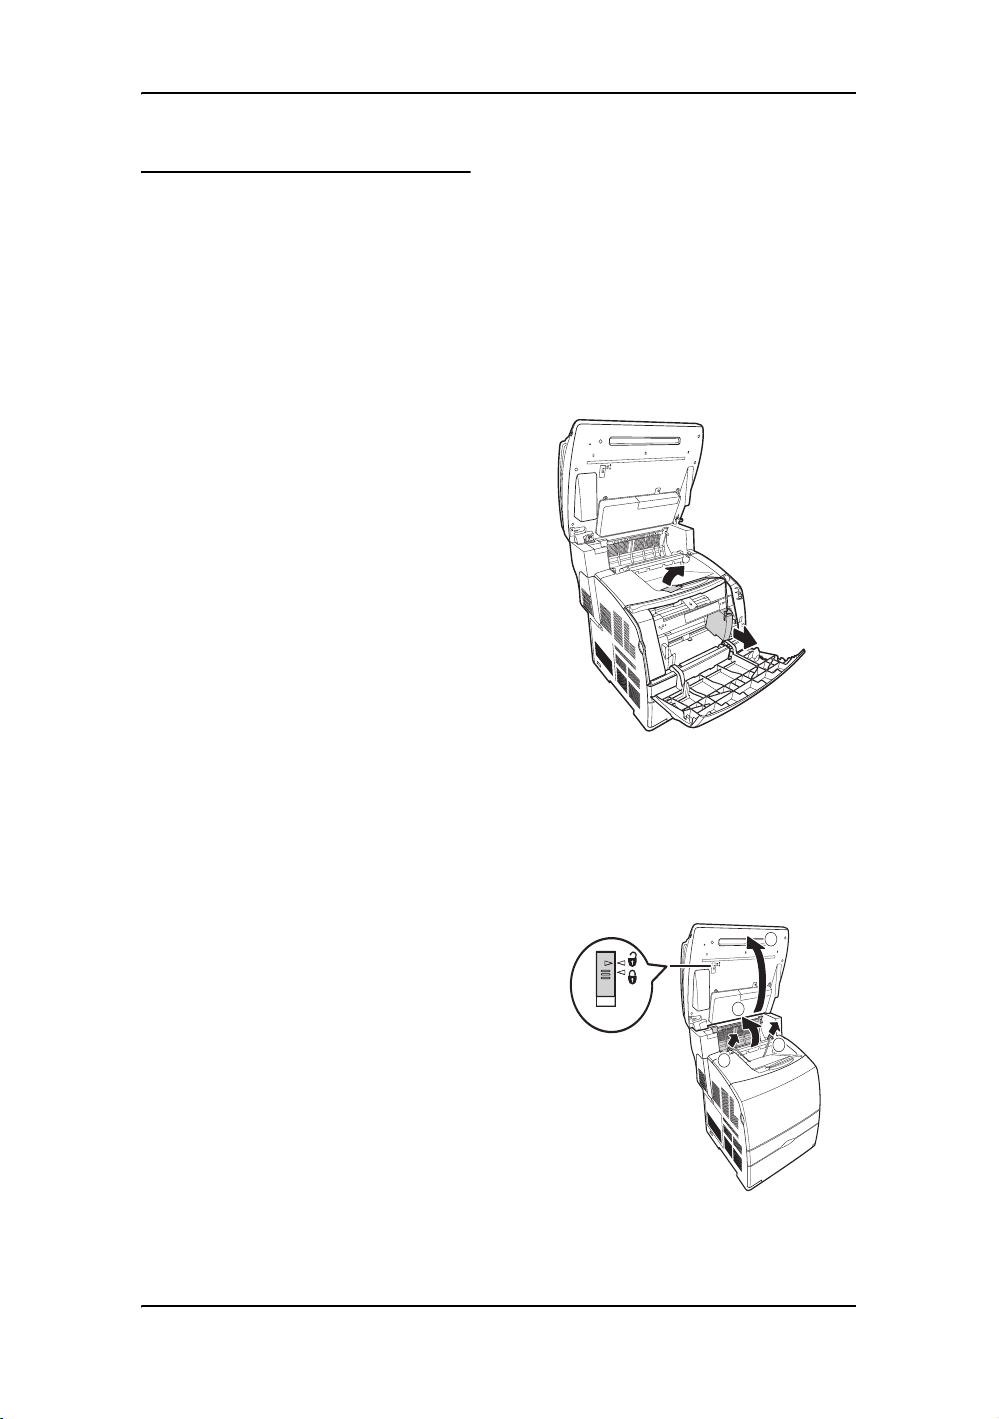
Package contents
All the following items should be
present in the package. If anything
appears to be missing or damaged,
contact your dealer immediately.
• DocuPrint C2090 FS
• Drum cartridge
• 4 Toner cartridges ([K]: 4K, [Y]
[M] [C]: 1.5K)
• Setup and Quick Reference
Guide
• Software CD-ROM
• Multi-language panel sheet x 3
(TC/SC/KR)
• AC power cable
• Phone cable
•ADF PAD
• Quick Installation Guide
• DocuWorks License
2. When the DocuPrint C2090 FS is
first taken out of the packaging
box, the cover of the machine is
taped. Remove the tape.
3. Slowly lift up B
c and Cover C
d.
4. Push up the green levers on both
sides
e and remove the spacer.
Push down the levers and close
the cover.
Note:
Language abbreviation: TC (Traditional
Chinese). SC (Simplified Chinese), KR
(Korean).
Unpacking the printer
Note:
Before using the DocuPrint C2090 FS,
make sure you have removed all the
tapes and styrofom from the machine.
Failure to do so may cause damage to
the machine or it may not function properly.
1. Remove the DocuPrint C2090 FS
from its packaging box and move
it to the desired location for installation.
4 - Introducing the DocuPrint C2090 FS
Note:
Transportation lock is located at the
back of B. Slowly flip over the scanner unit and move the transportation
lock to unlocked position before
using the DocuPrint C2090 FS.
2
3
1
3
Page 17
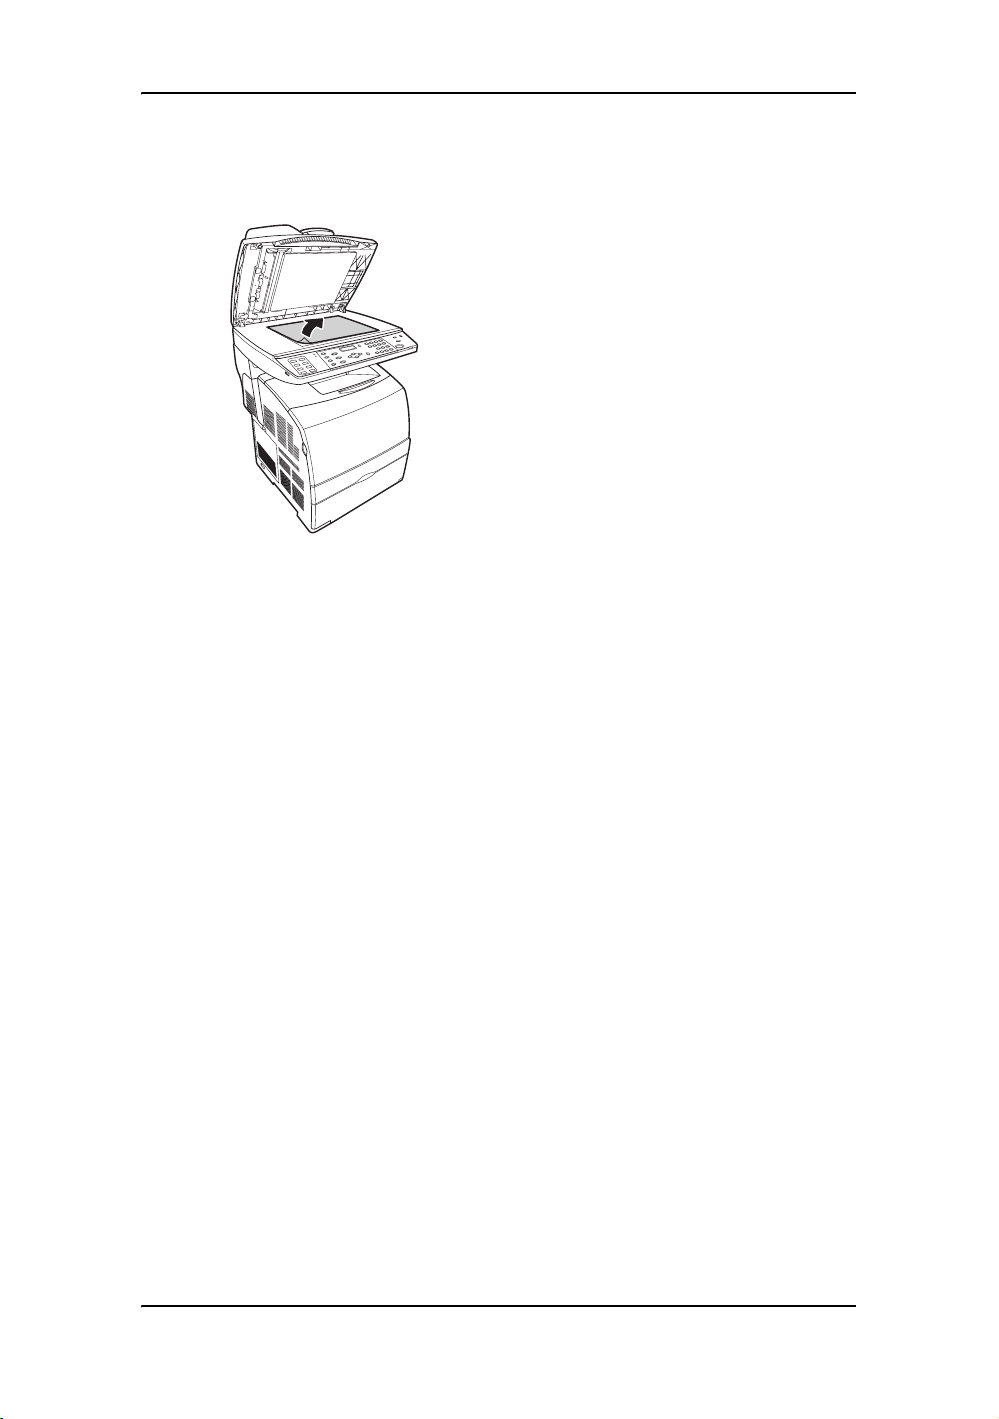
5. Open document cover and
remove the paper on the platen
glass.
Introducing the DocuPrint C2090 FS - 5
Page 18

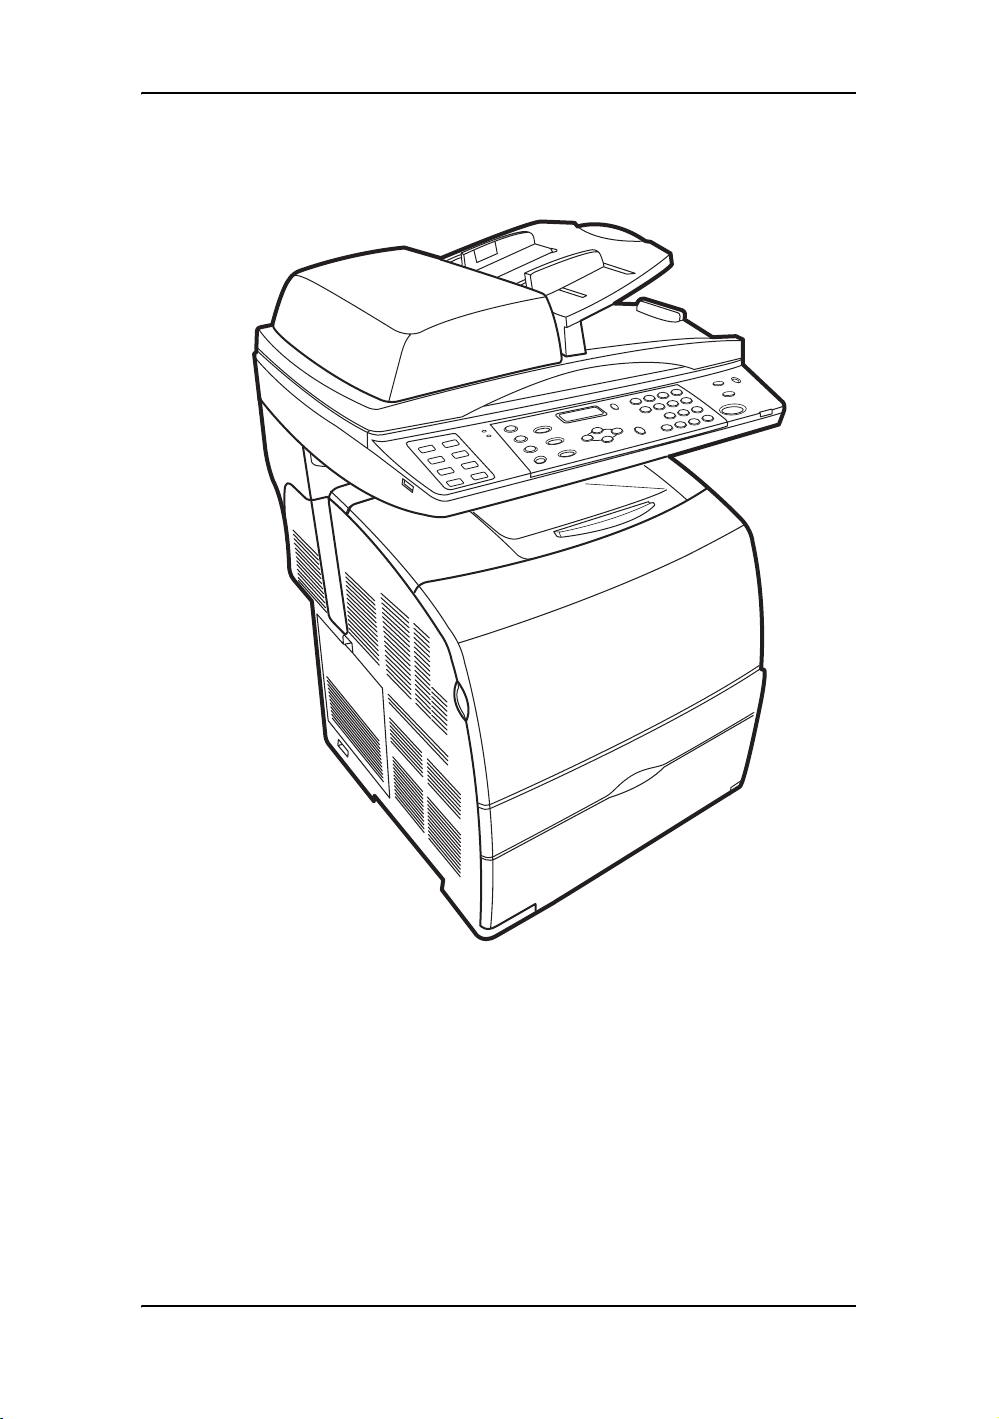
Overview of the DocuPrint C2090 FS components
This section provides a brief description of the main components of the DocuPrint
C2090 FS.
Front view
Cover A
B
USB port
Top cover
Power switch
Rear view
ADF
Cover C
Paper stopper
Control panel
Output tray
Extension output tray
Front cover
Cover D
LAN cable
connector
Cover F
6 - Introducing the DocuPrint C2090 FS
USB connector
LINE connector
PHONE connector
AC inlet
Cover E
Page 19
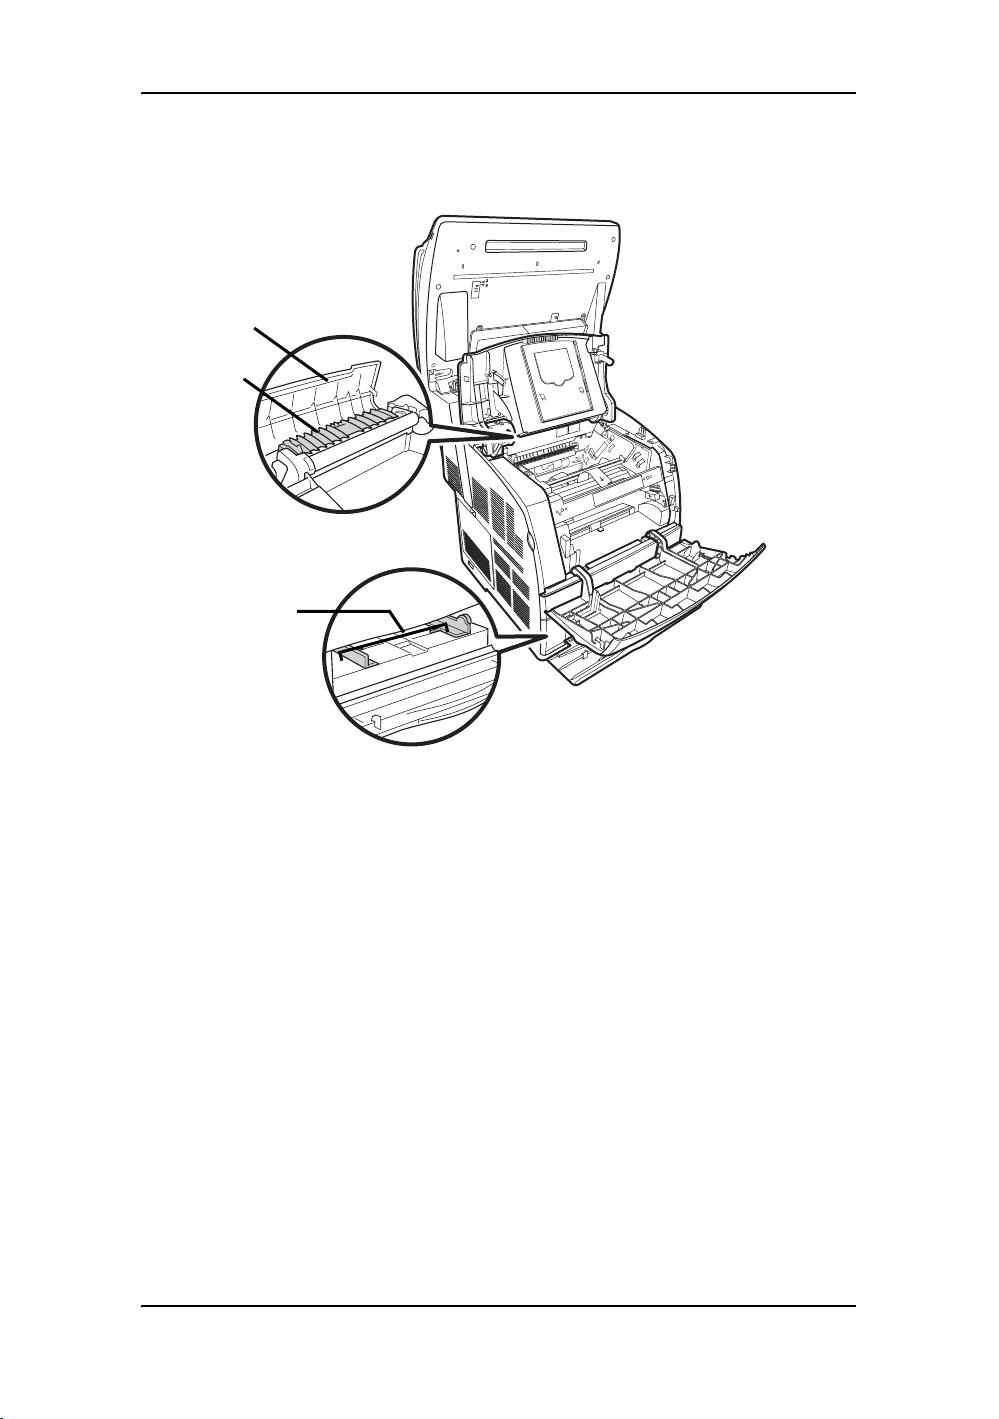
Inside the DocuPrint C2090 FS
Cover C
Fuser
Paper guides
Introducing the DocuPrint C2090 FS - 7
Page 20
Printer components
Drum cartridge slot
toner cartridge
slot
Note:
For instructions on installing cartridges, see “Installing the toner cartridges” on
page 16, and “Installing the drum cartridge” on page 17.
8 - Introducing the DocuPrint C2090 FS
Output tray
Paper tray
Page 21

Scanner components
Document cover
B
Transportation
lock
USB port
Scanner unit
Platen glass
Note:
Transportation lock is located at the back of the B. Slowly flip over the scanner unit
and move the transportation lock to unlocked position before using the DocuPrint
C2090 FS.
Introducing the DocuPrint C2090 FS - 9
Page 22
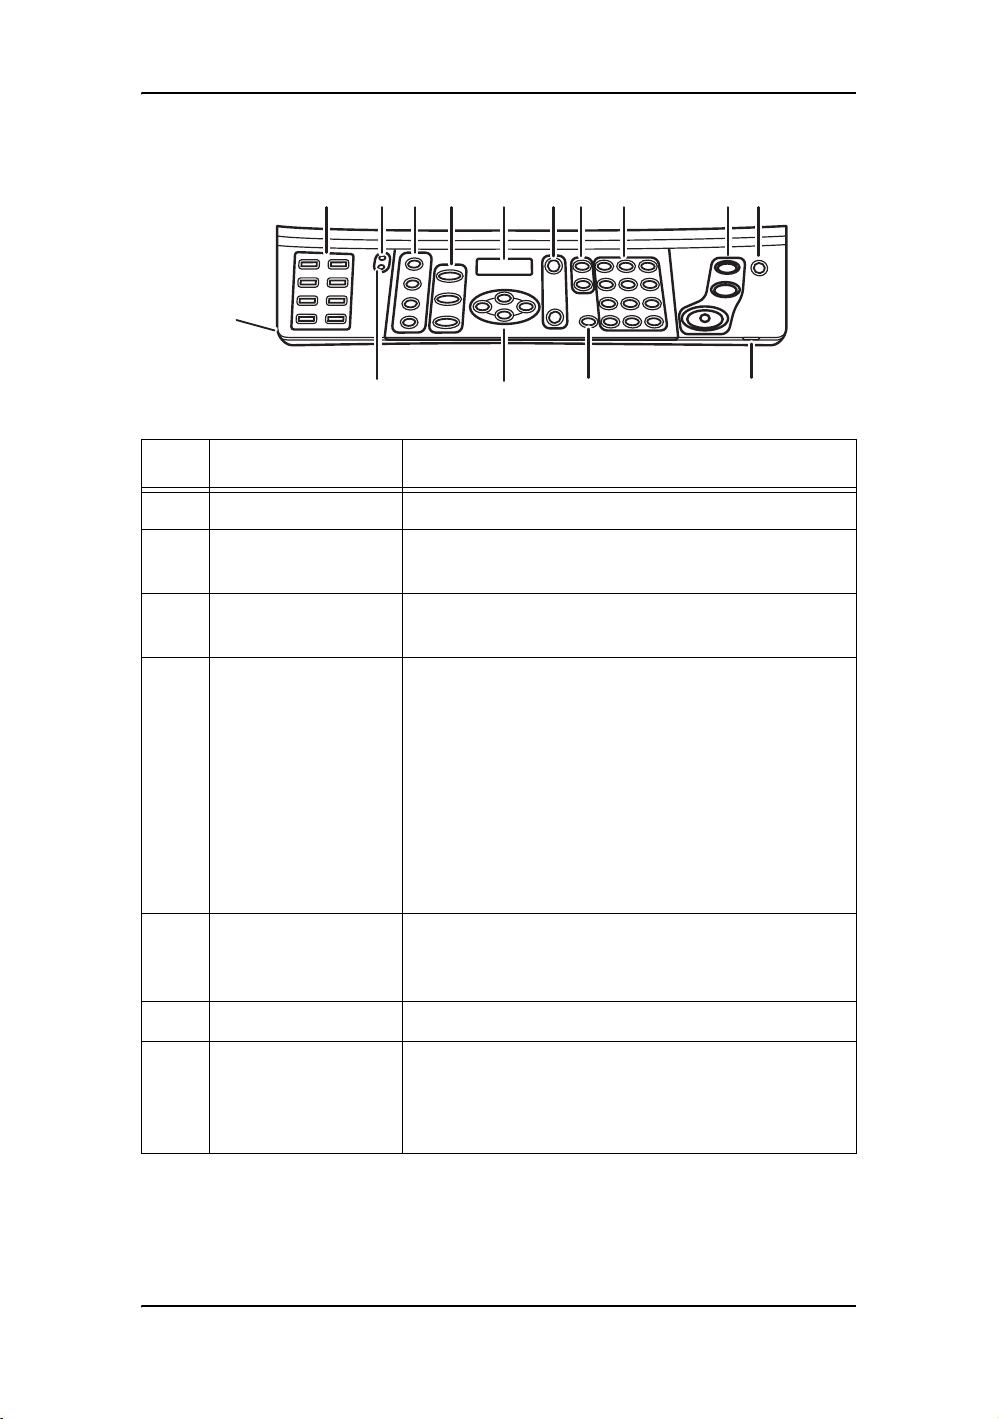
Control panel
15
234
1
56 7
910
8
1
23
456
789
0c#
*
13 1214
No. Button Name Functions
1 Fast keys Specific registered dial fast key.
2 Transmission light
(green)
3 Job in Memory
(red)
4 Copy options From top to bottom:
Indicates data transmission.
Indicates job processed in memory.
<Size/Type>: Press to choose type/size of the
original document or the paper to be used.
<Reduce/Enlarge>: Press to set the percentage
to enlarge or reduce the copy output.
<Image quality>: Press to set brightness,
sharpness, and the color balance.
<Color mode>: Press to toggle between color
and mono mode. (Green light indicates color
mode.)
11
5 Mode
buttons
From top to bottom:
<Copy/ Fax/ Scan>
Press to choose the mode for specified task.
6 LCD screen Displays current job status, menu selection.
7 Menu/
Set
From top to bottom:
<Menu>: Press to show current setting of the
machine and modify with the arrow keys.
<Set>: Press to confirm the new settings.
10 - Introducing the DocuPrint C2090 FS
Page 23
No. Button Name Functions
8 Dial buttons From top to bottom:
<Redial/Pause>: Press to call the last number
dialed.
<Speed dial>: Press the button and then the
digit set for a specified telephone number without inputting the complete number.
9 Numeric keys Press to input number of copies or fax number.
10 Clear all/ Stop/
Start
11 Power saver Press to cancel the Power Save Mode. (Green
12 Error LED Lights up when an error occurred during opera-
13 Clear Press to clear the number entered with the
14 Arrow keys Press to view and select options in the menu
15 USB port Connects USB device to scan documents to
From top to bottom:
Press <Clear all> to cancel current settings or
clear the number of copies to make.
Press <Stop> to terminate current job.
Press <Start> to perform current job.
light indicates power saver on.)
tion.
numeric keys.
tree.
USB memory.
Introducing the DocuPrint C2090 FS - 11
Page 24

Getting started
This chapter helps you get started
using the DocuPrint C2090 FS.
Placing the DocuPrint
C2090 FS
The DocuPrint C2090 FS should be
located at a well-ventilated place so
that the exhaust gases and heat generated are not directly blown onto the
user’s face. Proper ventilation is
necessary to prevent the machine
from overheating.
a
Important:
Ensure that the DocuPrint C2090
FS is installed at a location with the
following conditions:
• Temperature range 10-32° C,
humidity range 15 - 85% (no condensation). Humidity should be
70% or below at 32° C, and temperature should be 28° C or below
at 85% humidity.
• Do not expose the machine to
direct sunlight.
• Do not expose the machine to
direct draft from an air-conditioner
or heater.
Note:
When using the printer with the
bypass tray opened, do not expose
the printer to direct sunlight. Doing
so may cause a malfunction.
b
c
d
Recommend Distance
a 910 mm
b 210 mm
c 830 mm
d 180 mm
e 300 mm
e
Getting started - 12
Page 25

Connecting power
Power cable
You can load the paper or install the
toner cartridge and drum cartridge
into the printer after the printer is
switched on.
Important:
The power cable does not support
hot plug. Make sure the power
switch is in off position before connecting the power cable to the
printer.
1. Connect the power cord to the
power cord connector at the back
of the printer.
2. Connect the other end of the
power cord to the power outlet.
3. Press the power switch of the
printer to the <|> position. The
toner cartridge carrier rotates
and then stops. The [Load XXXX
(the color of the toner) Cartridge] message is displayed on
the control panel.
Note:
Before removing the power cord
from the machine, make sure the
power is switched off properly.
13 - Getting started
2
1
Page 26
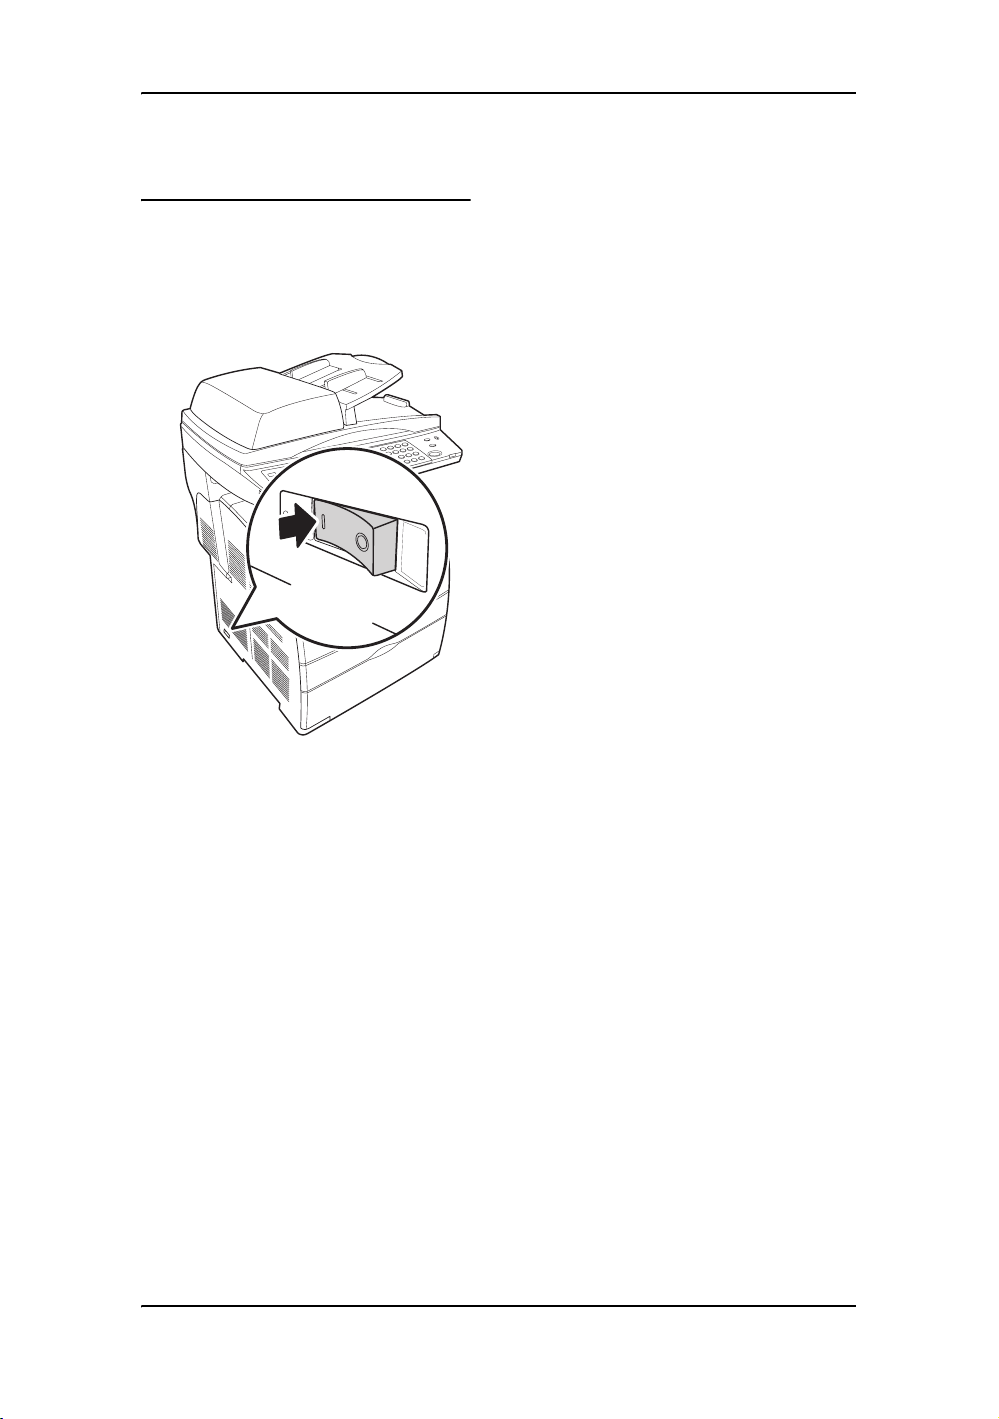
Switching On and Off
O
the Power
When turning on for the first time, follow the steps below to configure the
setting for time and date:
Switching on the power
1. Press the power switch of the
printer to the <|> position.
ON
2. When the power is turned on,
[Wait...] will be displayed on the
control panel.
Setting the time
1. In Copy mode, <Menu> button
on the control panel. Press <T>
button four times and press
<Set>.
2. In the Password screen, press
<0> four times, press <Set>.
3. In the Network screen, press
<X> button once.
4. In the System screen, press set,
press <X> button five times.
5. In the Time and Date screen,
press <Set>.
6. In the Time Setting screen, set
the time by the numeric keys key,
press <Set>.
Setting the Date
7. Follow steps 3 to 5 in the Time
setting section, and then press
<X> button once.
8. In the Date setting screen, set
the date by the numeric keys and
press <Set>.
9. In the Network screen, press the
[Copy] button or turn the power
off and on.
Getting started - 14
Page 27
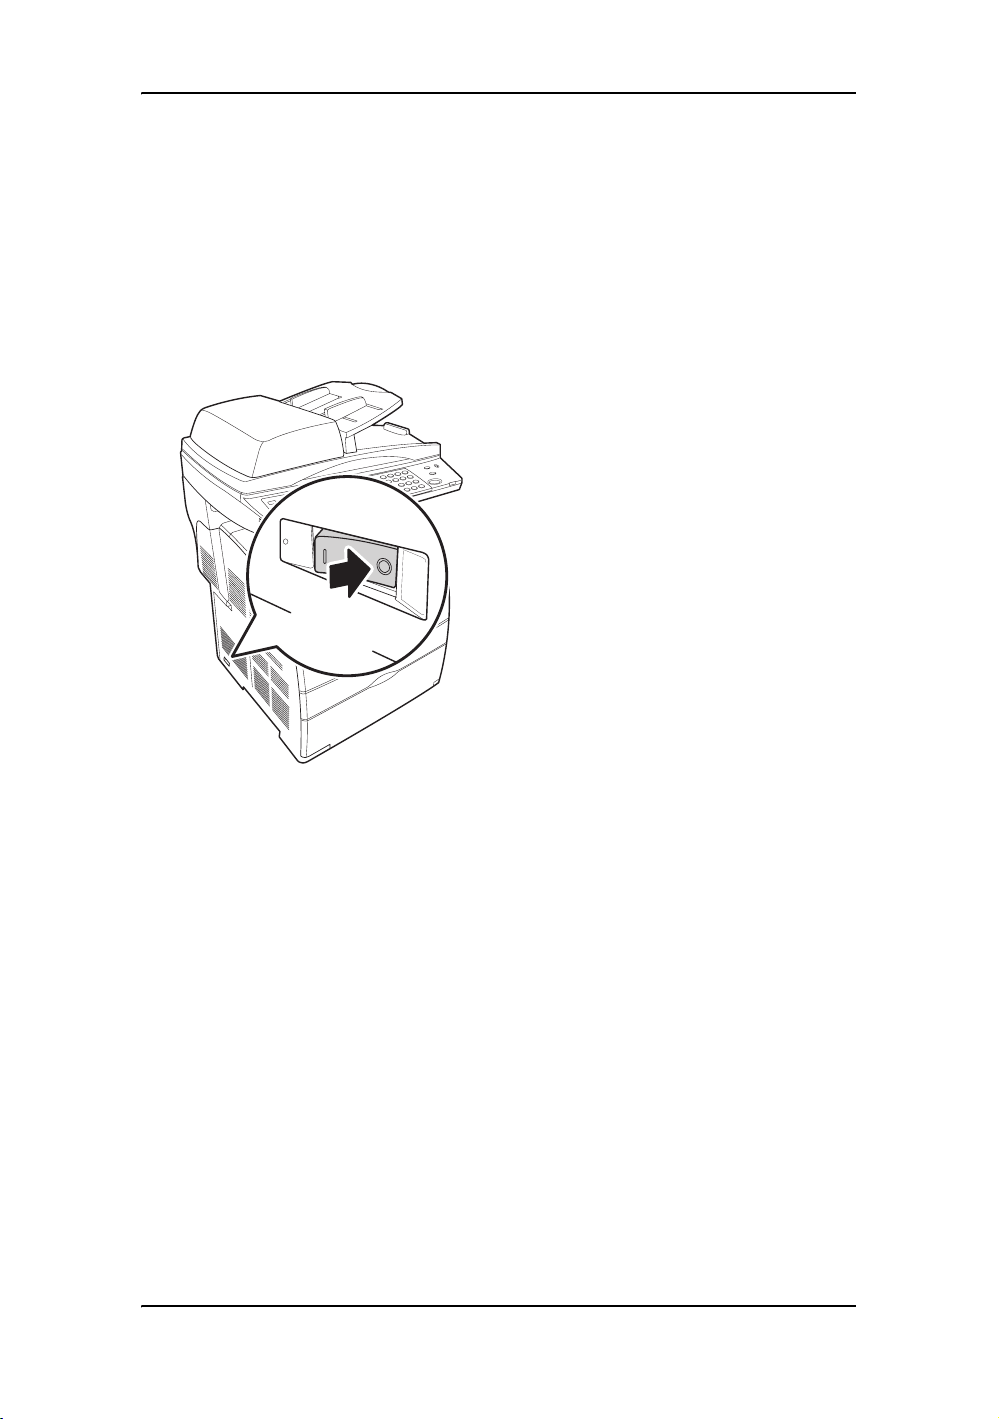
Switching off the power
1. Make sure that the printer is not
processing any data by checking
the display on the control panel.
[(mode) Ready]
2. Push the power switch of the
printer to the <O> position to
switch the power
off.
OFF
Power save mode
This printer is equipped with a power
saver mode to reduce power consumption when it is left idle.
When no print data is received for 5
minutes, the printer will enter the
power saver mode.
When the printer enter power saver
mode, only the <Power Saver> indi-
cator lights, the screen on the control
panel becomes dark and all the other
indicator goes out. The display also
goes out, and nothing is displayed.
Exiting the power save mode
The printer is automatically cancels
the power save mode once it
receives data from the computer.
To cancel power saver mode manually, press the <Power Saver> button.
Important:
• Do not switch off the power of the
printer when printing is in
progress. It may lead to a paper
jam.
• Once the power is switched off,
print data remaining in this printer
or information saved in the memory of this printer will be deleted.
• After you switch the power off,
wait for 5 seconds before switching it on again.
15 - Getting started
Page 28
Installing the toner
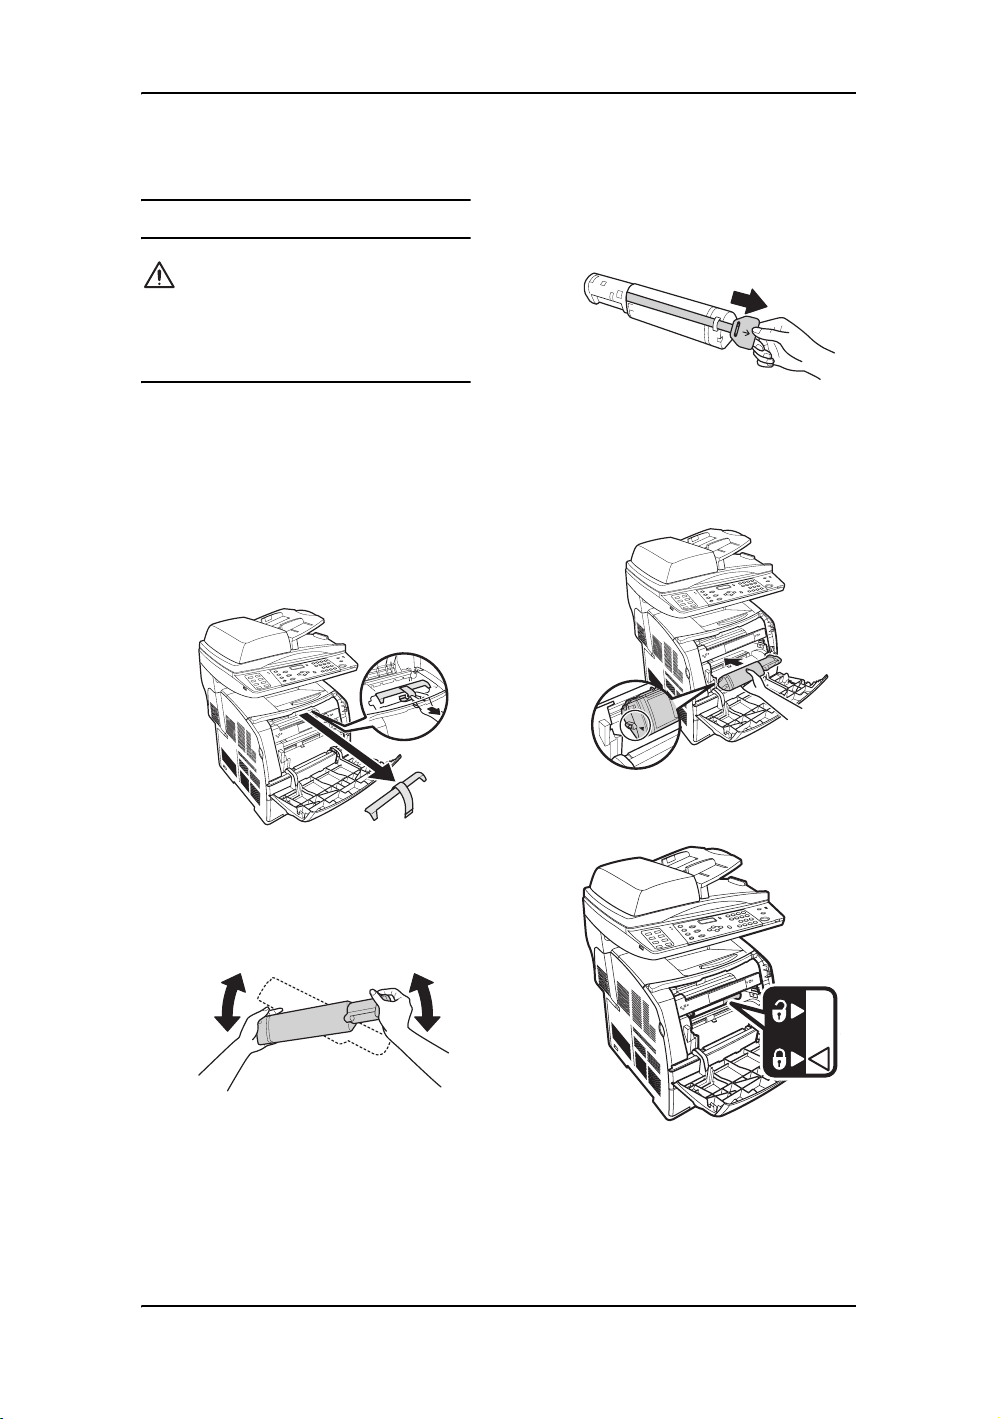
cartridges
Warning:
Never throw a toner cartridge into
an open flame. It can cause an
explosion and burn injuries.
1. After confirming the [Load XXXX
(the color of the toner) Cartridge] message on the control
panel, open the front cover.
2. Hold the tape and gently pull it
forward to remove the protective
cover from the toner cartridge.
4. Remove the top part of the seal
from the toner cartridge and pull
the seal in the direction of the
arrow, keeping it parallel with the
toner cartridge.
5. Insert the toner cartridge with the
arrow facing you. Push the
cartridge all the way into the slot.
Push both sides evenly until it is
secure.
3. Take the toner cartridge out of
the box, and gently shake it
several times as shown in the
diagram to distribute the toner
evenly.
6. Push down the right lever to lock
the toner cartridge.
7. Close the front cover. The toner
cartridge carrier rotates to the
next empty slot.
8. Repeat steps 1 through 7 until all
cartridges are installed.
Getting started - 16
Page 29
Notes:
• The toner cartridge is installed
securely when the lock lever cannot be turned further.
• Although the toner is not harmful
to your body, wash it off immediately if your hands or clothes are
stained with it.
• The protective cover is attached to
each toner cartridge slot at the
factory. You only have to remove
the cover from each toner cartridge slot the first time that you
install the toner.
• When pulling out the seal, pull it
out horizontally. The tape might
break if it is pulled out diagonally.
• After the seal has been pulled out,
do not shake or bump the toner
cartridge.
• Make sure the toner cartridge is
installed correctly. Otherwise, the
front cover cannot close firmly.
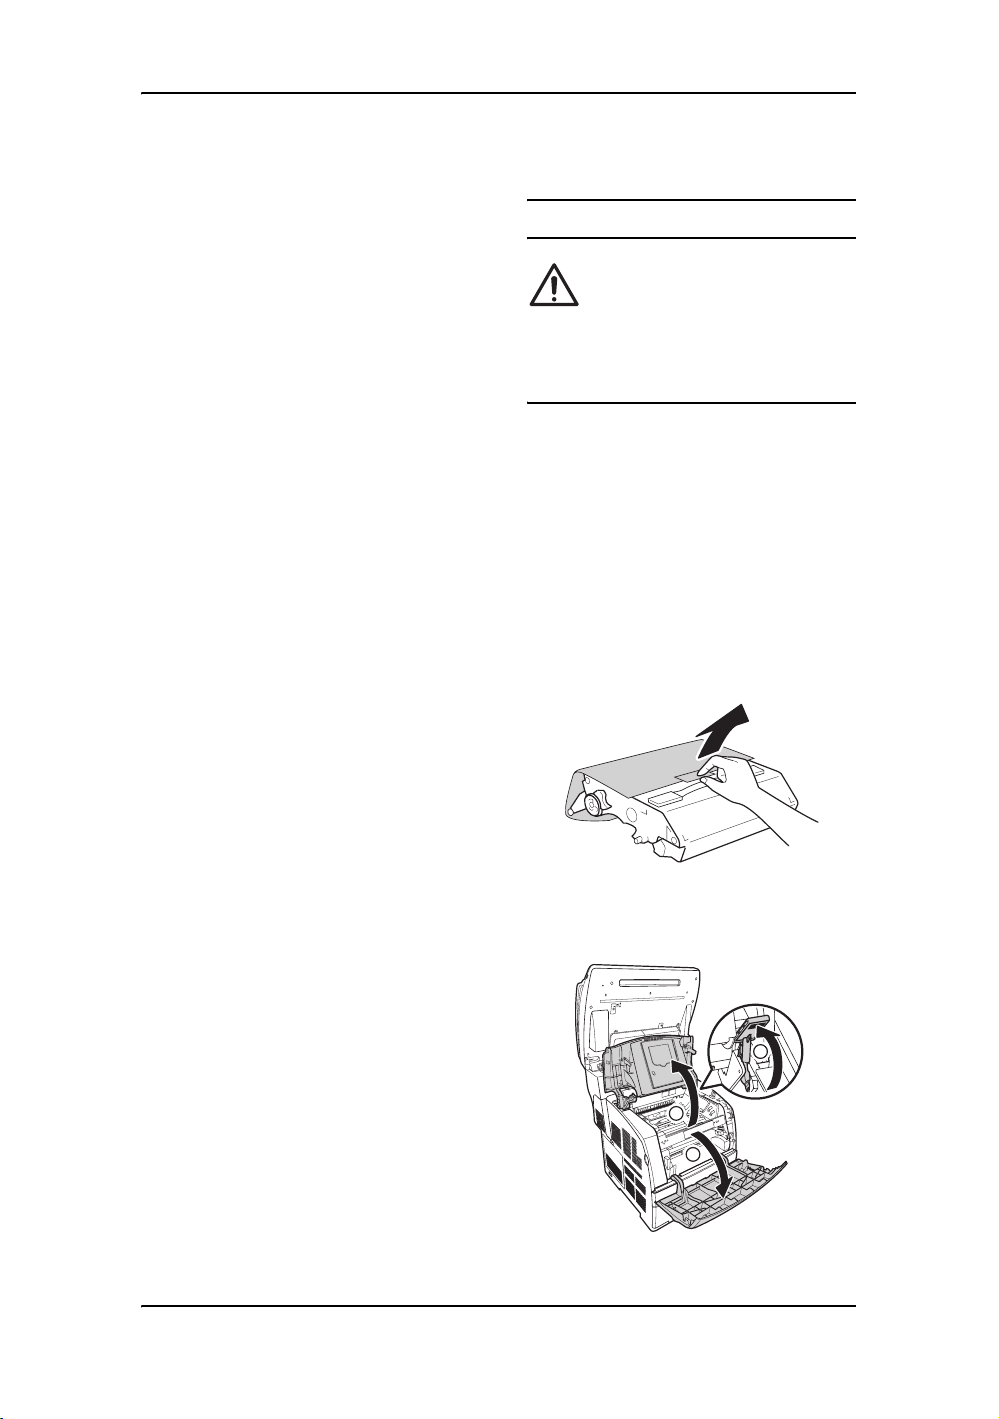
Installing the drum
cartridge
Warning:
Never throw a drum cartridge into
an open flame. It can cause an
explosion and burn injuries.
1. When the [Load Drum Car-
tridge] message is displayed on
the control panel, slowly flip back
cover B until it stops.
2. Open the front cover, and then lift
up the top cover.
3. Take the drum cartridge out of
the packaging box, and then
remove the protective
sheet.
17 - Getting started
4. To insert the drum cartridge,
push up the lever on the right
side of the printer.
3
2
1
Page 30

5. With the lever in the upright position, hold the drum cartridge by
the handle, align the arrows on
the drum cartridge with the corresponding arrows on the printer
and guide the cartridge in until it
snaps into place.
6. Pull down the lever on the right to
lock the drum cartridge in place.
Flip down the top cover, and then
close the front cover.
7. Slowly push down cover B to its
original position.
Notes:
• Hold the drum cartridge by the
handle. Do not touch the surface
of the drum (blue colored part).
Also, never allow any material to
hit or rub the surface of the drum.
• Do not expose the drum cartridge
to direct sunlight or strong light.
• To ensure good print quality,
always keep the drum cartridge
level when handling it.
• After installing the drum cartridge,
the printer makes an adjustment
for about one to two minutes. Do
not switch off the printer during
this time.
Installing extra memory
Memory expansion for 256 MB is
supported for this printer. When additional memory is installed, the total
memory capacity becomes 256 MB
respectively.
Important:
• Do not touch the connectors of
the additional memory module.
• Do not bend or damage the additional memory.
• Be sure to touch a metal surface
to eliminate static electricity
before touching the additional
memory with your bare hands.
• To add more memory when the
printer is in use, you need to configure the memory capacity in the
print driver. For details, refer to
the Online Help for the print
driver.
1. Make sure the machine is turned
off when adding or removing the
SDRAM module.
2. Slowly flip up cover B, you will
find the cover of the memory slot.
p
Getting started - 18
Page 31

3. To open the cover, release the
screws, and then pull the cover
out of the printer.
Connecting cables
This section covers the connection of
the USB cable, LAN cable, and
phone cable.
USB cable
Connect the USB cable to your PC or
notebook to be used for printing and
scanning operation.
4. Hold the additional memory so
that the notch is aligned with the
protrusion on the slot, and insert
the additional memory into the
slot firmly.
5. Reattach the cover to the printer.
6. Slowly flip down cover B to its
original position.
1. Connect the USB cable to the
USB connector at the back of the
printer.
2. Connect the other end of the
USB cable to the USB port on
your computer.
2
1
Notes:
• Both the USB port and the LAN
connector supports hot plug, you
don’t have to switch the power off
before connecting the cables.
• Connect a USB cable only after
the software driver has been
installed on the computer.
Note:
Insert the additional memory firmly
by pushing it from the top.
19 - Getting started
Page 32

LAN cable
Connects the printer to a network via
an ethernet connection.
1. Connect the LAN cable to the
LAN cable connector at the back
of the printer.
2. Connect the other end of the
LAN cable to the LAN drop on
your computer.
2
1
Note:
Please make sure the network ser-
vice is ready for using.
2. Connect a phone cable from the
telephone to the PHONE connector on the printer.
1
2
Phone cables
Connect the printer directly to a telephone wall jack for fax operation.
1. Connect one end of the phone
cable to the LINE connector on
the printer.
2. Connect the other end of the
phone cable to the telephone
wall jack.
To use the fax line as a normal telephone line, you can connect the
printer with a telephone.
1. Connect a phone cable from the
LINE connector on the printer to
the telephone wall jack.
1
2
Getting started - 20
Page 33

Setting IP address
1. Press the <Menu> button to display the Menu screen.
2. Press the <S> or <T> button
until [Admin Menu] is displayed,
then press the <X> or the <Set>
button.
3. Check that [Network Settings]
is displayed, then press the <X>
or the <Set> button.
4. Press the <S> or <T> button
until [TCP/IP] is displayed, then
press the <X> or the <Set> button.
5. Check that [Get IP Address] is
displayed, then press the <X> or
the <Set> button.
6. Press the <S> or <T> button
until [Panel] is displayed, then
press the <Set> button.
7. After [Reboot to apply settings] is
displayed for three seconds,
return to the setting screen.
After you complete setting the
gateway address, switch on the
printer. Then continue.
8. Press <W> button to return to
[Get IP Address].
9. Press <T> button to display [IP
Address], then press the <X>
the <Set> button.
10. Press the <S> <T> <X> <W>
buttons to enter the IP address,
then press the <Set> button.
11. To set the subnet mask and gateway address, press the <W> but-
ton and proceed to “Installing
software” on page 22.
or
Setting subnet mask/
gateway address
Note:
When “Ready to print“ is displayed,
follow steps 1 to 4 in the previous
section before proceeding to the
next procedure.
1. When [IP Address] is displayed,
press the <S> or <T> button to
display [Subnet Mask], then
press the <X> or the <Set> button.
2. Press the <S> <T> <X> <W>
buttons to enter the subnet
mask, then press the <Set> button.
3. Press <W> button to return to
[Subnet Mask].
4. Press the <S> or <T> button
until [Gateway Address] is displayed, then press the <X> button.
5. Press the <S> <T> <X> <W>
buttons to enter the gateway
address, then press the <Set>
button.
6. Switch off the printer and then
switch it on again.
21 - Getting started
Page 34

Installing software
To print/fax from or scan to the computer, the print driver, fax driver, and
the scan driver have to be installed
first. Depending on the environment
being used, the required software
and its installation procedure may be
different.
3. Click [Install MFP software].
The InstallShield Wizard starts
automatically.
Important:
• The Fuji Xerox DocuWorks software package contains scanner
TWAIN driver, scanner WIA driver
(support Windows XP and Server
2003 only), printer driver, fax
printer driver, and Toolbox application (MFP Scan-to-XXX utility).
• Adobe Reader is included in the
software package.
• The MFP software does not support Win98/ ME/ NT.
Follow the steps below to install the
software.
Note:
Do not connect the USB cable
before installing the driver.
1. Place the software CD into the
CD-ROM drive, it will run automatically.
2. Select a language from the
screen.
In the process of installation, there
are two ways to connect to the MFP,
one is through USB connection, and
the other is through network setup.
Follow the steps below to complete
the installation.
Getting started - 22
Page 35

Connecting via USB
1. Click the [Connected via USB],
connect the MFP with the USB
cable provided and click [NEXT]
to continue.
2. Software installation is in
progress. When the installation is
completed. Click [Finish] to
close the wizard.
Connecting via the Network
1. Select the [Connected via the
network], and click [NEXT] to
continue.
2. There are two methods of identifying the MFP. Click the recommended [Search from a list of
detected MFPs], and click on
[NEXT] to continue.
Note:
Make sure that your USB cable is
properly connected to your PC /
Notebook and the machine is powered on before you use the [Con-
nected via USB] function.
23 - Getting started
3. If your MFP is not found on the
network, please check the connections and click [Refresh] to
search again. Press [NEXT] to
proceed if your MFP detected the
network.
Page 36

Or you can use the other selection to
specify your MFP from the network.
4. Select the [Specify a MFP by
address], and click [Next] to
continue.
5. A prompt window pops up, enter
the IP address of your MFP, and
click [Finish].
Setting Configuration of Paper
When installation of the print driver is
completed, set the configuration of
paper type, and paper size under the
[Printing Preferences] tab in the
print driver interface. For details,
refer to the Online Help for the print
driver.
1. From the [Start] menu, choose
[Settings] option and click
[Printers].
2. Click the icon of this printer, and
then select [Properties] from the
[File] menu.
6. The installation is completed.
Click [Finish] to close the wizard.
3. Click the [Printing Preferences]
icon under [General] tab.
4. Configure settings for paper.
Getting started - 24
Page 37

Uninstalling the Drivers and Software
The installed software can be
removed by using the uninstallation
tool under the Fuji Xerox directory.
To uninstall the driver, go to Start \
Fuji Xerox \ Uninstall DocuPrint
C2090FS.
The uninstallation tool activates. The
Installation Wizard window pops up,
click [Remove] to uninstall the driver.
5. [Settings] and then [Printers].
6. Double-click your printer icon.
7. from the [Printer] menu, select
[Properties].
8. From the [Details] tab, select the
printer port and click [OK].
Note:
To print from the network, make
sure that the printer is set to Print
from Network Mode.
Network printer configuration
1. Insert the DocuPrint C2090 FS
software CD.
2. The software installation dialog
box appears automatically.
3. Make sure that all applications
are closed, and then click the
[Install MFP software] button.
4. Read the license agreement, and
then click the [Agree] button.
5. Select [Connected via the net-
work].
6. Install the network printer by one
of the following ways:
•Select [Search form a list of
detected MFPs (recommended)]. It will automatically
search for DocuPrint C2090 FS
on the network.
25 - Getting started
Page 38

• Select [Specify a printer by
address], and input the IP
address for the network printer.
7. When setup is complete, lick
[Finish] to exit the installation
wizard.
Getting started - 26
Page 39

Printing
This chapter explains the basic flow
when printing from application software in a Windows environment.
(The procedure may differ according
to the computer or system configuration used.)
Printing a document
To print a document from the computer:
1. From the [File] menu of the appli-
cation software, select [Print].
2. Select the DocuPrint C2090 FS
as the printer to be used. To use
the various print features of this
printer, display the properties of
the printer, and set the necessary
items. For details on each item
and how to configure the settings,
refer to the Online Help for the
print driver.
Important:
• Do not switch off the power of this
printer when printing is in
progress. It may lead to paper
jam.
• When printing with a different type
of paper, configure the paper type
correctly on the [Paper Tray Set-
tings] on the [Tray/Output] tab of
the print driver.
There are two ways to display Online
Help for the print driver:
• Click [?], followed by the item you
want to know more about. The
explanation for the item is displayed.
• Click [Help]. The [Help] window
is displayed.
To print a document from the control
panel:
1. Select <Print> function form the
control panel.
2. Press the <Set> button to start
printing.
Cancelling printing
To cancel printing, you can cancel
the job either at this MFP or at the
computer.
Cancelling printing of data being printed or received at the printer
Press the <Stop> button on the control panel. However, pages being
printer at the moment will continue to
be printed.
Cancelling printing data being processed at the computer
Double-click the printer icon at
the bottom right of the taskbar in
Windows.
From the displayed print status window, click the document name you
wish to delete. Click [Document]
and choose [Cancel] in the drop
down menu to cancel the printing job.
27- Printing
Page 40

Specifying the printer
settings
To customize your print settings,
press [Properties] in the Print dialog
box and the Print Properties dialog
box appears.
Number of prints
To specify the number of prints, enter
the number of copies in the [Copies]
field and press [OK].
Adjusting layout
To adjust the page layout, click [Margin Shift/Margins] button to config-
ure settings for margin shift, margins,
and print position for your document.
Adding watermarks
To add watermarks on your print,
click the [Watermark] tab to add a
preset water mark, create a new
water mark, or edit watermark settings.
Resizing the prints
To resize the prints, choose the original paper size and then the output
size desired. Or check the specify
zoom box and enter the percentage
for print. (25-400%)
Printing - 28
Page 41

Advanced settings
To customize the settings for graphic
prints, click the [Graphic] tab and
the following dialog box will appear.
1. Choose output color. For B/W
prints, check [enhanced Black
and White] for better print quality.
2. Choose [Image Adjustment
Mode] to specify print quality of
images.
• [Recommended] – prints a
document with text, graphics or
photos at fast speed
• [ICM Adjustment (System)] –
enhances color reproduction of
graphics in presentation
materials
• [Complimentary Color Con-
version]– uses complimentary
color conversion
Note:
[ICM Adjustment] and [Complimen-
tary Color Conversion
under
[Color Output] only.
29- Printing
] are available
Page 42

Scanning
This chapter helps you to scan
documents and save the scanned
copy on your computer using the
software CD provided in the package.
Placing the originals
Before scanning, make sure the
transportation lock on the back of the
B is set to the unlock position.
Always keep the platen glass clean
to prevent dirty or blurry images.
Note:
If you place originals on both Auto
Document Feeder (ADF) and the
platen glass, only the documents in
the ADF are scanned. And you will
hear a beep sound and a warning
message appears to remind you to
remove the document on the platen
glass.
Scanning an image
There are two ways to scan an image
using the DocuPrint C2090 FS. You
can either perform scanning task
directly through the control panel on
the DocuPrint C2090 FS, or use any
image editing software that is TWAIN
compatible, such as Fuji Xerox DocuWorks Desk software provided in the
CD Rom. Before scanning to PC,
make sure that the software is
installed on your computer.
Scan mode (for control panel standalone operation)
To choose the destination for
scanned documents or images, do
the following:
1. In Scan mode, press the <Menu>
button, and use the <W/X> buttons to choose the destination to
which an image is scanned.
2. You can scan to one of the following destinations:
• USB memory flash disk
• PC (via USB port)
• FTP1~5
3. Press <Set> to confirm your
choice.
4. Press the <S> button to return
to [READY] mode.
Scanning - 30
Page 43

Color scan
You can choose to scan an image or
a document either in B/W or color
mode.
When the green light of the <Color
Mode> button is on, the machine is
set to color mode. To change to
Mono mode, press the button again
and the light will go off.
Original paper size and type
To determine the original paper size
to scan, do the following:
1. In [Scan] mode, press the
<Menu> button on the control
panel. Use the <S/T> buttons to
select [Size/Type] function.
2. Choose [Original size] and press
the <Set> button to configure the
settings.
3. Choose the original size of the
document to scan.
Available document size:
• A4, A5, B5
• Postcard
• 8.5” x 11”, 8.5” x 5.5”
• 10.5” x 7.25”
4. Press <Set> to confirm.
5. Press the <S> button to return to
[READY] mode.
To determine the file type to scan, do
the following:
1. In [Scan] mode, press the
<Menu> button on the control
panel. Use the <S/T> buttons to
select [Size/Type] function.
2. Use the <W/X> buttons to choose
[Original type] and press <Set>.
3. Choose the original type of the
document to scan. You can scan
from [Text file], [Text & Photo
file], and [No Filter].
4. Press <Set> to confirm your
choice.
5. Press the <S> button to return to
[READY] mode.
Image quality
To configure the brightness of the
scanned images, do the following:
1. In [Scan] mode, press the
<Menu> button on the control
panel. Use the <S/T> buttons to
select [Image quality] function.
2. Press the <S/T> buttons to
choose to configure the settings
for brightness or scan resolution.
3. Choose [Brightness] and press
<Set> to confirm.
4. Use the <W/X> buttons to
increase the brightness of the
scan copy. And press the <W>
button to decrease it.
5. Press the <S> button to return to
[READY] mode.
To configure the scan resolution of
the scanned images, do the following:
1. In [Scan] mode, press the
<Menu> button on the control
panel. Use the <S/T> buttons to
select [Image quality] function.
2. Press the <W/X> buttons to
choose to configure the settings
for brightness or scan resolution.
3. Choose [Scan resolution] and
press [Set] to confirm.
4. Use the <W/X> buttons to choose
scan resolution. You can set resolution to 150 dpi, 300 dpi, 600 dpi,
or 1200 dpi.
31 - Scanning
Page 44

5. Press <Set> button to confirm
your choice.
6. Press the <S> button to return to
[READY] mode.
Scanning from the DocuPrint C2090 FS
To scan a document, do the following:
1. Open the document cover and
place the original document facedown on the platen glass. Use the
paper size marks on the left side
of the platen glass to position a
document.
Scanning with DocuWorks
Before scanning, make sure the
DocuPrint C2090 FS is connected to
your computer with a USB cable or a
network cable as described in the
installation procedure.
Scan via WIA
There are two ways to scan an image
through WIA:
Scan to an application via WIA:
1. Double click [My Computer] icon
on the desktop and select [FX
DocuPrint C2090 FS Scanner].
2. Close the document cover gently
so that your originals do not
move.
3. Use the <W/X> buttons to specify
if you want to scan to local PC or
network PC.
4. Press <Set> to confirm your
choice.
5. Press the <S> button to return to
[READY] mode.
6. Press <Start> and the scanning
task begins.
Note:
Do not place heavy objects on the
platen glass or press it with too
much force.
2. Choose a program to scan an
image and click [OK].
Scanning - 32
Page 45

3. Choose an appropriate paper
source and mode to scan the
image and click [Scan] to proceed.
Scan to a file via WIA:
1. Right-click the [FX DocuPrint
C2090 FS Scanner] icon to dis-
play the context menu.
2. Click [Get picture using Scan-
ner Wizard].
4. Specify file name, file format and
the location to save the image.
Click [Next] to proceed.
5. The scanner wizard displays the
scanning progress on the
screen.
3. Click [Next] to proceed.
6. After scanning is complete,
select [Nothing, I’m finished
working with these pictures]
and click [Next] to close to the
wizard.
33 - Scanning
Page 46

Scanning from application via TWAIN
To scan an image with the application software via TWAIN, do the following:
1. Launch the application that supports TWAIN.
2. Choose the required function to
display the TWAIN dialog for FX
DocuPrint C2090 FS Scanner.
3. Choose appropriate settings and
functions for the scan job. For
more information on using the
TWAIN dialog, refer to the Online
Help for the TWAIN driver.
Scanning - 34
Page 47

Scanning to FTP
Note:
Before scanning, make sure the
DocuPrint C2090 FS is connected to
the Internet and the settings for FTP
server has been properly configured.
To scan a document to FTP (FTP1 to
FTP5), do the following:
1. Press <Size/Type> to specify
the document size you want to
scan. [Original Size] will be displayed on the LCD screen.
2. Press <Set> to confirm your
choice.
3. Use the <W/X> buttons to specify
the document size and press
<Set>.
Scanning to USB-Key
4. Use the <W/X> buttons to specify
the document size and press
<Set>.
Note:
Before scanning, make sure the
USB-Key is properly connected and
has been formatted with FAT16.
To scan a document to USB-Key, do
the following:
1. Before scanning, make sure the
DocuPrint C2090 FS is connected to the Internet and the
settings for FTP server has been
properly configured.
2. Press <Size/Type> to specify
the document size you want to
scan. [Original Size] will be displayed on the LCD screen.
3. Press <Set> to confirm your
choice.
35 - Scanning
Page 48

Saving scanned images
After you scanned an image, you can
choose to save the image in a specific file type.
Image filter
You can scan your images at their
original size, or reduce or enlarge
them as required.
To save the scanned image, do the
following:
1. Select [Save As] from the [File]
menu.
2. Choose a folder to save the file.
3. Type a file name and select a file
format. You can save the images
as: BITMAP, EPS, JPEG, TIF,
PED, PICT, PNG, etc.
4. Click [Save].
Previewing and adjusting the scan area
Once you have configured the basic
settings for scanning, you can preview the image and select or adjust
the area of the image you want to
scan. The preview image will be displayed in a separate preview window
on your computer screen.
To preview and adjust the scan
image, do the following:
1. Click the [Preview] icon in the
Docuworks application window.
2. To select a scan area, click the
auto locate icon to place a marquee that marks the edges of your
image area. You can change the
scan area by moving the marquees.
<<images to be inserted here>>
3. When you finished adjusting the
scan area, click <Scan> to start
scanning.
Note:
If you are going to scan your image
to a particular size, such as 6 x 8
inches, select the Target Size after
previewing it, but do so before
adjusting the scan area. This sets
the scan area to the correct proportions so your image will not be
cropped.
To set the target image size, do the
following:
1. Open [DocuPrint C2090 FS]
and click [ToolBox].
2. Select [Application]. (Graphic
needed)
3. Select [Image quality], the quality is shown by ‘dpi’. Select from
75dpi to 600 dpi.
4. Press [Scan] to start.
Operation on DocuPrint C2090 FS:
1. In Scan mode, press the <Image
Quality> button on the control
panel. Use the <S/T> buttons
to select [Scan Resolution]
function.
2. Choose from 150dpi, 300dpi,
600dpi, or 1200dpi, and press
<Set>.
3. Press the <S> button when
ready.
Scanning - 36
Page 49

Copying
This chapter explains how to make
basic copies and customize settings
for special copy jobs.
Placing the originals
You can either place originals on
either the ADF or on the platen glass.
Before making a copy, make sure the
transportation lock on the back of the
B is set to the unlock position.
Always keep the platen glass clean
to prevent dirty or blurry images.
To place the original on the platen
glass, do the following:
1. Open the document cover and
place the original face-down on
the platen glass as shown. Use
the paper size marks on the left
side of the platen glass to position a document.
2. Close the document cover gently
so that your original does not
move.
To place the original on the ADF, do
the following:
1. Slide the guides all the way outward.
2. Arrange your originals in order.
The first page to copy should be
on the top of the stack.
3. Insert the originals to be copied
face up in the ADF. Slide the
edge guides inward against the
edges of the originals.
Notes:
• Do not place heavy objects on
the platen glass or press it with
too much force.
• If you intend to copy documents with multiple sheet,
using the ADF is recommended.
37 - Copying
Page 50

Making copies
To make copies of your document,
do the following:
1. Make sure the DocuPrint C2090
FS is in Copy mode.
2. Use the number keys to enter the
number of copies you want to
make.
3. Press the <Start> button to start
copying.
4. When copying job is done, get
your copies from the output tray.
Specifying copy settings
Number of copies
You can specify the number of copies by pressing the number keys on
the control panel. The default value
is set to 1.
To specify the number of copies, do
the following:
Selecting the paper
You can choose the paper size to
use for your copies.
To specify the paper size, do the following:
1. Make sure the DocuPrint C2090
FS is in Copy mode.
2. Press the <Menu> button and
use the <S/T> buttons to select
[Size/Type] option.
3. Choose [Original size] and
press <Set> to confirm. Press
the <W/X> buttons to choose the
paper size.
4. Press <Set> to confirm your
choice.
5. Press the <S> button to return
to [READY] mode.
Note:
For usable paper sizes, see “Usable
paper” on page 62.
1. Make sure the DocuPrint C2090
FS is in Copy mode. If not, press
the <Copy> button on the control
panel.
2. Make sure the [Copies] value is
highlighted in the LCD panel.
Enter the number of copies you
want to make using the number
keypad.
Copying - 38
Page 51

Image quality
You can adjust the image quality
such as the brightness, sharpness,
and color balance of your copy by
choosing from levels 1 to 5. The
higher the level, the darker the
image. The default value is set to 3.
To specify the copy brightness, do
the following:
1. Make sure the DocuPrint C2090
FS is in Copy mode. If not, press
the <Copy> button on the control
panel.
2. Press the <Menu> button and
use the <S/T> buttons to select
[Image Quality] option.
3. Press <Set> to confirm.
4. Use the <W/X> buttons to
choose [Brightness] and press
<Set>.
5. Use the <W/X> buttons to adjust
the brightness of your copy.
6. Press the <Set> button to confirm your setting.
7. Press the <S> button to return
to [READY] mode.
To specify the sharpness of your
copy, do the following:
1. Make sure the DocuPrint C2090
FS is in Copy mode. If not, press
the <Copy> button on the control
panel.
2. Press the <Menu> button and
use the <S/T> buttons to select
[Image Quality] option.
3. Press <Set> to confirm.
4. Use the <W/X> buttons to
choose [Sharpness] and press
<Set>.
5. Use the <W/X> buttons to adjust
the brightness of your copy.
6. Press the <Set> button to con-
firm your setting.
7. Press the <S> button to return
to [READY] mode.
To specify the color balance of your
copy, do the following:
1. Make sure the DocuPrint C2090
FS is in Copy mode. If not, press
the <Copy> button on the control
panel.
2. Press the <Menu> button and
use the <S/T> buttons to select
[Image Quality] option.
3. Press <Set> to confirm.
4. Use the <W/X> buttons to
choose [Color Balance R] and
press <Set>.
5. Use the <W/X> buttons to adjust
the red color balance of your
copy.
6. Press the <Set> button to con-
firm your setting.
7. Press the <S> button to return
to [READY] mode.
8. Repeat steps 1 to 8 to adjust
color balance for green and
black.
39 - Copying
Page 52

Enlarging/Reducing the copy size
You can adjust the copy size by a
specific zoom ratio or a specific percentage for enlargement or reduction
(25 to 400%). The default zoom ratio
is set to 100%.
4. Use the <W/X> buttons to adjust
the zoom ratio of your copy. You
can also use the numeric keypad
to enter a specific zoom percentage.
5. Press <Set> to confirm.
6. Press the <S> button to return
to [READY] mode.
To adjust the copy size, do the following:
1. Make sure the DocuPrint C2090
FS is in Copy mode. If not, press
the <Copy> button on the control
panel.
2. Press the <Menu> button and
use the <S/T> buttons to select
[Enlarge/Reduce] option.
3. Choose [Enlarge/Reduce] and
press <Set> to confirm.
COPY MAGNIFACATION TABLE
Document Copy
A6 B6 A5 B5 A4
A6 100% 122% 141% 173% 200%
B6 81% 100% 115% 141% 163%
A5 70% 86% 100% 122% 141%
B5 57% 70% 81% 100% 115%
A4 50% 61% 70% 86% 100%
Copying - 40
Page 53

Resetting the copy settings
There are two ways to reset the copy
settings to default values. One is by
pressing and holding the <Clear All>
button on the control panel. This will
return the LCD screen to its initial
default display. Another way is by
pressing the <Clear> button on the
control panel. The number of copies
will be set to its default value 1.
Note:
Pressing and holding the <Clear
All> button resets settings for all
modes.
Restrictions on copying
Users of this machine must observe
the following restrictions to ensure
the responsible and legal use of this
machine. See “Regulatory notices ”
on page i in Preface.
41 - Copying
Page 54

Sending a fax
This chapter explains how to send
fax copies and customize settings for
fax tasks.
Placing the originals
You can either place originals on
either the Auto Document Feeder
(ADF) or on the platen glass.
Before sending a fax, make sure the
transportation lock on the back of the
B is set to the unlock position.
Always keep the platen glass clean
to prevent dirty or blurry images.
To place the original on the platen
glass, do the following:
1. Open the document cover and
place the original face-down on
the platen glass as shown. Use
the paper size marks on the left
side of the platen glass to position a document.
2. Close the document cover gently
so that your original does not
move.
To place the original on the Auto
Document Feeder (ADF), do the following:
1. Slide the guides all the way outward.
2. Arrange your originals in order.
The first page to copy should be
on the top of the stack.
3. Insert the originals to be copied
face up in the ADF. Slide the
edge guides inward against the
edges of the originals.
Notes:
• Do not place heavy objects on the
platen glass or press it with too
much force.
• If you intend to fax documents
with multiple sheet, using the ADF
is recommended.
Sending a fax - 42
Page 55

Sending faxes
To send a fax, make sure that the
DocuPrint C2090 FS is connected to
the phone cable and the fax connection is on.
You can send a fax by one of the following ways:
Basics
1. Make sure the machine is powered on.
2. Press the <Fax> button on the
control panel.
3. Under Fax mode, the LCD will
shows [Set FAX Num Std].
4. Dial/Press the FAX number
using the numeric keypad.
5. Press <Start> when ready.
Sending a fax from the computer
1. From the [File] menu of the
application software, select
[Print].
2. Select the FX DocuPrint C2090
FS Fax Printer as the fax printer
to be used. Right-click the fax
icon to display the printer properties and configure fax settings.
window appears on the screen.
Enter the recipient information
and click [Add to list] to add it to
the recipient list.
4. Click the [OK] button to send the
fax.
Note:
For more information on configuring
fax settings, refer to the Online Help
for the fax print driver.
Using speed-dial
1. Press the <Fax> button on the
control panel.
2. In Fax mode, the LCD will show
[Set FAX Num Std].
3. Press <Speed Dial> button and
select a number from the
numeric keypad.
4. LCD will show [FAX Ready std.
Speed XX AAAAA].
• XX: the selected speed number
• AAAAA: Registered destination name. If name longer than
display area, the name is displayed by scrolling.
5. Press <Start> when ready.
3. Before the fax printer driver fax
out the document, the following
43 - Sending a fax
Page 56

Using one-touch dial
1. Press the <Fax> button on the
control panel.
2. In Fax mode, the LCD will show
[Set FAX Num Std].
3. Select 1~8 from One Touch button.
4. LCD will show [FAX ready std.
OneTouchX AAAAA].
• X: One the selected One
Touch number.
• AAAAA: Registered destination name. If name longer than
display area, the name is displayed by scrolling.
5. Press <Start> when ready.
Using group-dial
1. In FAX mode, the LCD will show
[Set FAX Num Std].
2. Use the <W/X> buttons to select
[Broadcast function] under
[FAX] menu, and press <Set>.
3. LCD will show [FAX Function Group No X].
• X: select group number
4. Select keys from numeric keypad.
5. Press <Start> when ready.
Receiving faxes
To receive a fax, make sure that the
DocuPrint C2090 FS is connected to
the phone cable and the fax connection is on.
To turn on the fax connection, do the
following:
1. In Fax mode, press the <Menu>
button on the control panel. Use
the <W/X> buttons to browse for
[Answer phone] function.
2. Choose [Answer phone] and
press <Set> to configure the settings.
3. Press the <W/X> buttons to
browse for [Connection] option.
4. Press the <W/X> buttons to turn
the connection on or off.
5. Press <Set> to confirm your
choice.
6. Press the <S> button to return
to [READY] mode.
Sending a fax - 44
Page 57

Specifying fax settings
To determine the output paper type,
do the following:
Input and output paper size and type
To determine the paper size for fax
input and output, do the following:
1. In Fax mode, press the <Menu>
button on the control panel. Use
the <W/X> buttons to browse for
[Size/Type] function.
2. Choose [Original size] and
press <Set> to configure the settings.
3. Choose the original size of the
document to scan.
4. Press <Set> to confirm your
choice.
5. Press the <S> button to return
to [READY] mode.
To determine the original file type, do
the following:
1. In Fax mode, press the <Menu>
button on the control panel. Use
the <W/X> buttons to browse for
[Size/Type] function.
2. Choose [Original type] and
press <Set> to configure the settings.
3. Choose the original type of the
document (Available choices:
Text, Text & Photo file, Photo).
4. Press <Set> to confirm your
choice.
5. Press the <Sb button to return to
[READY] mode.
1. In Fax mode, press the <Menu>
button on the control panel. Use
the <W/X> buttons to browse for
<Size/Type> function.
2. Choose [Paper type] and press
<Set> to configure the settings.
3. Choose the output paper type for
the document.
4. Press <Set> to confirm your
choice.
5. Press the <S> button to return
to
[READY] mode.
To determine the output paper size,
do the following:
1. In fax mode, press the <Menu>
button on the control panel. Use
the <W/X> buttons to browse for
[Size/Type] function.
2. Choose [Paper size] and press
<Set> to configure the settings.
3. Choose the output paper size for
the document.
4. Press <Set> to confirm your
choice.
5. Press the <S> button to return
to [READY] mode.
Image quality
To configure the settings for fax
image quality, do the following:
1. In Fax mode, press the <Menu>
button on the control panel. Use
the <W/X> buttons to browse for
[Image quality] function.
2. Choose [Image quality] and
press <Set>.
45 - Sending a fax
Page 58

3. Press the <W/X> buttons to
choose to configure the settings
for brightness.
4. Choose [Brightness] and press
<Set> to confirm.
5. Press the [W] button to increase
the brightness of the scan copy.
And press the [X] button to
decrease it.
6. Press <Set> to confirm your
choice.
7. Press the <S> button to return
to [READY] mode.
To adjust the color quality of the fax
document, do the following:
1. In Fax mode, press the <Menu>
button on the control panel. Use
the <W/X> buttons to browse for
[Image quality] function.
2. Choose [Image quality] and
press the <Set> button.
3. Press the <W/X> buttons to
choose to configure the settings
for color quality.
4. Choose [Color quality] and
press <Set> to confirm.
5. Press the [W] button to increase
the color quality of the fax document. And press the <X> button
to decrease it.
6. Press <Set> to confirm your
choice.
7. Press the <S> button to return
to [READY] mode.
To remove the background image of
the document when sending a fax,
do the following:
In Fax mode, press the <Menu> button on the control panel. Use the <W/
Xb buttons to browse for [Image
quality] function.
1. Choose [Back Remove] and
press <Set> to configure the settings.
2. Press the <W/X> buttons to turn
the back remove function on or
off.
3. Press <Set> to confirm your
choice.
4. Press the <S> button to return
to [READY] mode.
Adjust fax size
You can adjust the fax size to fit the
document size automatically by turning on the [Auto Adjust] function.
To enable the Auto Adjust function,
do the following:
1. In Fax mode, press the <Menu>
button and use the <W/X> buttons to browse for [Enlarge/
Reduce] option.
2. Choose [Enlarge/Reduce] and
press <Set> to confirm.
3. Use the <W/X> buttons to adjust
the zoom ratio of your copy. You
can also use the numeric keypad
to enter a specific zoom percentage.
4. Press <Set> to confirm your setting.
5. Press the <S> button to return
to [READY] mode.
Sending a fax - 46
Page 59

Density
To adjust the density of the fax document, do the following:
Polling reception
To adjust the pooling reception setting, do the following:
1. In Fax mode, the LCD will show
[Set FAX Num Std.
2. Use the <S/T> buttons to select
[FAX Tx mode] under [Image
Quality] menu, and press <Set>.
• Use the <W/X> buttons to
select from [Standard], [Fine],
[Super fine], or [Ultra fine].
3. Use the <W/X> buttons to select
[Brightness] under [Image
Quality] menu, and press <Set>.
• Use the <W/X> buttons to
select the level.
4. Use the <W/X> buttons to select
[Back Remove] under [Image
Function] menu, and press
<Set>.
• Use the <W/X> buttons to
select ON/OFF.
5. Use the <W/X> to select [Color
Quality] under [Image Quality]
menu, and press [Set].
• Use the <W
adjust the density level.
/X> buttons to
1. In Fax mode, the LCD shows
[Set FAX Num Std].
2. Use the <W/X> buttons to select
[Fax Function-Pooling RX] and
press <Set> to confirm.
3. The LCD shows [Pooling RX
Std - Password].
4. Use the numeric keypad to enter
the password and press <Set> to
confirm.
• Enter the password used for
the FAX polled receive session. Remote FAX machine will
check this password for sending the polled document.
5. The LCD shows [Pooling RX
Std].
6. Use <Basic/Speed dial/One
Touch dial> when ready to FAX.
• Dial number: Enter the fax
number of the remote fax
machine that makes document
ready to be polled.
47 - Sending a fax
Page 60

Fax settings
You can specify the settings for Dial
type, Ring pattern, Line monitor,
Redial attempt, Fax footer, Junk
block and Call diag under this menu.
To specify the setting for Dial type,
do the following:
1. In Fax mode, use the <S/T>
buttons to select [Configuration
FAX] function.
2. Press <Set> and the LCD shows
[FAX Config -Dial type].
3. Use the <W/X> buttons to select
[Tone] or [Pulse].
4. Press <Set> to confirm.
To specify the setting for Ring pattern, do the following:
1. In Fax mode, use the <S/T>
buttons to select [Configuration
FAX] function.
2. Press <Set> and the LCD shows
[FAX Config -Dial type].
3. Use the <S/T> buttons to select
[Fax Config - Ring Pattern].
4. Use the <W/X> buttons to select
[Normal] or [Distinctive].
5. Press <Set> to confirm.
To specify the setting for Line monitor, do the following:
1. In Fax mode, use the [S/T] but-
tons to select [Configuration
FAX ] function.
2. Press <Set> and the LCD shows
[FAX Config -Dial type].
3. Use the <S/T> buttons to select
[Fax Config - Line Monitor].
4. Use the <W/X> buttons to adjust
the value from 0 to 3
5. Press <Set> to confirm.
To specify the setting for Redial
attempt, do the following:
1. In Fax mode, use the <S/T>
buttons to select [Configuration
FAX ] function.
2. Press <Set> and the LCD shows
[FAX Config -Dial type].
3. Use the <S/T> buttons to select
[Fax Config - Redial attempt].
4. Use the <W/X> buttons to adjust
the value from 0 to 9.
5. Press <Set> to confirm.
To specify the setting for FAX Footer,
do the following:
1. In Fax mode, use the <S/T>
buttons to select [Configuration
FAX ] function.
2. Press <Set> and the LCD shows
[FAX Config -Dial type].
3. Use the <S/T> buttons to select
[Fax Config - Fax Footer].
4. Use the <W/X> buttons to turn
the Fax footer on/off.
5. Press <Set> to confirm.
Sending a fax - 48
Page 61

To specify the setting for Junk Block,
do the following:
1. In Fax mode, use the <S/T>
buttons to select [Configuration
FAX] function.
2. Press <Set> and the LCD shows
[FAX Config -Dial type].
3. Use the <S/T> buttons to select
[Fax Config - Junk Block].
4. Use the <W/X> buttons to turn
the Junk Block on/off.
5. Press <Set> to confirm.
To specify the setting for Call Diag,
do the following:
1. In Fax mode, use the <S/T>
buttons to select [Configuration
FAX] function.
2. Press <Set> and the LCD shows
[FAX Config -Dial type].
3. Use the <S/T> buttons to select
[Fax Config - Call Diag].
4. Press <Set> to confirm.
Auto-redial
To configure auto dial setting, do the
following:
1. In Fax mode, use the <S/T>
buttons to select [Configuration
FAX] function.
2. Press <Set> and the LCD shows
[FAX Config -Dial type].
3. Use the <S/T> buttons to select
Fax Config - Redial attempt.
4. Use the <W/X> buttons to adjust
the value from 0 to 9.
5. Press <Set> to confirm.
Transmitting sender information
To enable the sender information
when sending a fax, do the following:
1. In Fax mode, use the <S/T>
buttons to select [FAX Function
- Forwarding] and press <Set>.
2. Use the <S/T> buttons to select
[Fax Config - Fax Footer].
3. Use the <W/X> buttons to turn
the Fax footer on/off.
4. Press <Set> to confirm.
Incoming mode
You can specify the number of rings
before answering the phone to
receive a fax document.
To specify the number of rings, do
the following:
1. In Fax mode, press the <Menu>
button and use the <S/T> buttons to select [Answer phone]
option.
2. Choose [Number of Ring] and
press <Set> to confirm.
3. Use the <W/X> buttons to adjust
the number of rings. The value
can be set from 1 to 15.
4. Press <Set> to confirm your setting.
5. Press <S> to return to [READY]
mode.
49 - Sending a fax
Page 62

Assigning speed-dial
numbers
Assigning one-touch
button numbers
To assign speed-dials numbers to
the MFP, do the following:
1. In Fax mode, use the <W/X>
buttons to select [FAX Function
- Forwarding] and press <Set>.
2. Use the <W/X> buttons to select
[Forward Only] or [Print & Forward].
3. Press <Set>] to confirm your
choice. The LCD shows [For-
ward Number Std].
4. Press <Speed dial> button and
select your fax number from the
numeric keypad.
5. LCD shows [Set Forwarding
Std - SpeedXX - AAAAA].
Speed dial numbers are set.
To assign one-touch button numbers
to the MFP, do the following:
1. In Fax mode, use the [W/X] but-
tons to select [FAX Function -
Forwarding] and press <Set>.
2. Use the <W/X> buttons to select
[Forward Only or Print & Forward].
3. Press <Set> to confirm your
choice. The LCD shows [For-
ward Number Std].
4. Press <Speed dial> button and
select your fax number from the
numeric keypad.
5. LCD shows [Set Forwarding
Std - OneTouchX - AAAAA].
One-touch buttons are set.
Sending a fax - 50
Page 63

Advanced functions
This chapter explains how to configure settings for advance functions of
the MFP.
Using the setup menu
You can use the menu to access a
variety of submenus to customize
settings for copying, faxing, scanning
and printing.
To access the setup menu, do the
following:
1. Make sure the DocuPrint C2090
FS is turned on, and then press
the <Menu> button on the control panel.
2. The submenu is displayed on the
LCD screen. Use the <S/T>
buttons to select a submenu.
3. Press the <W/X> buttons to view
items in a submenu.
4. Press <Set> to confirm your setting.
5. Press the <S> button to return
to [READY] mode.
Printer settings
You can specify the original size,
original type and paper type for printing.
3. Choose the original size of the
document to print.
Available document size:
• A4, A5, B5
•Postcard
• 8.5” x 11”, 8.5” x 5.5”, 10.5 x
7.25, 8.5 x 13, 8.5 x 14.
4. Press <Set> to confirm your
choice.
5. Press the <S> button to return to
[READY] mode.
To determine the file type to print, do
the following:
1. In Print mode, press the <Menu>
button on the control panel. Use
the <S/T> buttons to select
[Size/Type] function.
2. Use the <W/X> buttons to
choose [Original type] and
press the <Set> button.
3. Choose the original type of the
document to print. You can print
from [Text], [Text & Photo],
[Photo], and [Draft].
4. Press the <Set> button to con-
firm your choice.
5. Press the <S> button to return
to [READY] mode.
To determine the original paper size
to scan, do the following:
1. In Print mode, press the [Menu]
button on the control panel. Use
the <S/T> buttons to select
[Size/Type] function.
2. Choose [Original size] and press
<Set> to configure the settings.
51 - Advanced functions
Page 64

To determine the paper size for printing, do the following:
To determine the paper type for printing, do the following:
1. In Print mode, press the <Menu>
button on the control panel. Use
the <S/T> buttons to select
[Size/Type] function.
2. Use the <W/X> buttons to
choose [Original type] and
press <Set>.
3. Choose the paper size for printing
Available printout sizes:
• Same as original
• A4, A5, B5
• 8.5” x 11”, 8.5 x 13, 8.5 x 14,
8.5” x 5.5”, 10.5 x 7.25
•Post card
• Env. Com-10, Env. Monarch,
Env. DL, Env. C5
4. Press <Set> to confirm your
choice.
5. Press the <S> button to return
to [READY] mode.
1. In Print mode, press the <Menu>
button on the control panel. Use
the <S/T> buttons to select
[Size/Type] function.
2. Use the <W/X> buttons to
choose [Original type] and
press <Set>.
3. Choose the paper type for printing. Available printout types:
• Plain
• Fine Quality
• Transparency
• Heightweight1
• Heightweight2
• Coated Type 1
• Coated Type 2
• Coated Type 3
• Label
•Post card
• Envelope
4. Press <Set> to confirm your
choice.
5. Press the <S> button to return
to [READY] mode.
Advanced functions - 52
Page 65

Scanner settings
You can configure the settings for
brightness and scan resolution by
doing the following:
To configure the brightness of the
scanned images:
1. In Scan mode, press the
<Menu> button on the control
panel. Use the <S/T> buttons
to select [Image quality] function.
2. Press the <S/T> buttons to
choose to configure the settings
for brightness or scan resolution.
3. Choose [Brightness] and press
<Set> to confirm. Press the <W/
X> button to increase the bright-
ness of the scan copy. And press
the <W> button to decrease it.
4. Press the <S> button to return
to [READY] mode.
To configure the scan resolution of
the scanned images:
1. In Scan mode, press the
<Menu> button on the control
panel. Use the <S/T> buttons
to select [Image quality] function.
2. Press the <W/X> buttons to
choose to configure the settings
for brightness or scan resolution.
3. Choose [Scan resolution] and
press <Set> to confirm.
4. Use the <W/X> buttons to
choose scan resolution. You can
set resolution to 150 dpi, 300 dpi,
600 dpi, or 1200 dpi.
5. Press <Set> to confirm your
choice.
6. Press the <S> button to return
to [READY] mode.
53 - Advanced functions
Page 66

Copy settings
You can adjust the copy size by a
specific zoom ratio or a specific percentage for enlargement or reduction
(25 to 400%). The default zoom ratio
is set to 100%.
To adjust the copy size, do the following:
1. Make sure the DocuPrint C2090
FS is in Copy mode. If not, press
the <Copy> button on the control
panel.
2. Press the <Menu> button and
use the <S/T> buttons to select
[Enlarge/Reduce] option.
3. Choose [Enlarge/Reduce] and
press the <Set> button to confirm.
4. Use the <W/X> buttons to adjust
the zoom ratio of your copy. You
can also use the number keypad
to enter a specific zoom percentage.
5. Press the <Set> button to confirm your setting.
6. Press the <S> button to return
to [READY] mode.
To specify special copy functions
such as 2 in1, Frame Erase, Back
Remove, or Image Shift, do the following:
1. In Copy mode, use the <S/T>
buttons to select [Copy func-
tion] to access copy function
submenu.
2. Use the <W/X> buttons to
choose the special copy function
desired:
• 2 in 1 (ADF only)
• Frame Erase removes frame
when copying the document
• Back Remove removes background when copying the document
• Image Shift (none/center/left/
right/up/down/shift value [150mm])
3. Press the <Set> button to con-
firm your setting.
4. Press the <S> button to return
to [READY] mode.
Advanced functions - 54
Page 67

Fax settings
You can specify the settings for Dial
type, Ring pattern, Line monitor,
Redial attempt, Fax footer, Junk
block, and Call diag under this menu.
To specify the setting for Dial type,
do the following:
1. In Fax mode, use the <S/T>
buttons to select [Configuration
FAX] function.
2. Press <Set> and the LCD shows
[FAX Config -Dial type].
3. Use the <W/X> buttons to select
[Tone] or [Pulse].
4. Press <Set> to confirm.
To specify the setting for Ring pattern, do the following:
1. In Fax mode, use the <S/T>
buttons to select [Configuration
FAX] function.
2. Press <Set> and the LCD shows
[FAX Config -Dial type].
3. Use the <S/T> buttons to select
[FAX Config - Ring Pattern].
4. Use the <W/X> buttons to select
[Normal] or [Distinctive].
To specify the setting for Line monitor, do the following:
1. In Fax mode, use the <S/T>
buttons to select [Configuration
FAX ] function.
2. Press <Set> and the LCD shows
[FAX Config -Dial type].
3. Use the <S/T> buttons to select
[FAX Config -
4. Use the <W/X> buttons to adjust
the value from 0 to 3
5. Press <Set> to confirm.
To specify the setting for Redial
attempt, do the following:
1. In Fax mode, use the <S/T>
buttons to select [Configuration
FAX ] function.
2. Press <Set> and the LCD shows
[FAX Config -Dial type].
3. Use the <S/T> buttons to select
[FAX Config - Redial attempt].
4. Use the <W/X> buttons to adjust
the value from 0 to 9.
5. Press <Set> to confirm.
Line Monitor].
5. Press <Set> to confirm.
55 - Advanced functions
Page 68

To specify the setting for FAX Footer,
do the following:
To specify the setting for Call Diag,
do the following:
1. In Fax mode, use the <S/T>
buttons to select [Configuration
FAX] function.
2. Press <Set> and the LCD shows
[FAX Config -Dial type].
3. Use the <S/T> buttons to select
[FAX Config - Fax Footer].
4. Use the <W/X> buttons to turn
the Fax footer on/off.
5. Press <Set> to confirm.
To specify the setting for Junk Block,
do the following:
1. In Fax mode, use the <S/T>
buttons to select [Configuration
FAX] function.
2. Press <Set> and the LCD shows
[FAX Config -Dial type].
3. Use the <S/T> buttons to select
[FAX Config - Junk Block].
4. Use the <W/X> buttons to turn
the Junk Block on/off.
5. Press <Set> to confirm.
1. In Fax mode, use the <S/T>
buttons to select [Configuration
FAX ] function.
2. Press <Set> and the LCD shows
[FAX Config -Dial type].
3. Use the <S/T
[FAX Config - Call Diag].
> buttons to select
4. Use the <W/X> buttons to turn
the Call Diag function on/off.
• On: Print T.30 signals report.
Both audio and report.
• Off: Print audio report only.
5. Press <Set> to confirm.
Advanced functions - 56
Page 69

Host settings
You can specify Host settings for
Ethernet, TCP/IP, Protocol, or IP
Filter under the host settings sub-
menu.
To specify the network setting
through ethernet connection, do the
following:
1. Press the <Menu> button on the
control panel. Use the <S/T>
buttons to select [Configuration
Need Password] and press
<Set>.
2. Use the <W/X> buttons to select
[Network Config - Network]
and press <Set>.
3. Use the <W/X> buttons to select
[Network Config - Ethernet]
and press <Set>.
4. Use the <W/X> buttons to select
[Auto select], [10Base Half],
[10Base Full], [100Base Half],
or [100Base Full].
5. Press <Set> to confirm.
To specify the TCP/IP setting, do the
following:
1. Press the <Menu> button on the
control panel. Use the <S/T>
buttons to select [Configuration
Need Password] and press
<Set>.
2. Use the <
[Network Config - Network]
and press <Set>.
3. Use the <W/X> buttons to select
[Network Config - TCP/IP] and
press <Set>.
4. Use the <W/X> buttons to select
[IP Address], [Subnet Mask], or
[Gateway address].
5. Press <Set> to confirm.
To specify the protocol setting, do
the following:
1. Press the <Menu> button on the
control panel. Use the <S/T>
buttons to select [Configuration
Need Password] and press
<Set>.
2. Use the <W/X> buttons to select
[Network Config - Network]
and press <Set>.
3. Use the <W/X> buttons to select
[Network Config - Protocol]
and press <Set>.
4. Use the <W/X> buttons to select
[LPD] or [Port 9100]
<Set>.
5. Use the <W/X> buttons to turn
the option ON/OFF.
6. Press <Set> to confirm.
W/X> buttons to select
and press
57 - Advanced functions
Page 70

To specify the IP Filter setting, do the
following:
1. Press the <Menu> button on the
control panel. Use the <S/T>
buttons to select [Configuration
Need Password] and press
<Set>.
2. Use the <W/X> buttons to select
[Network Config - IP Filter1]
and press <Set>.
3. Use the <W/X> buttons to select
[IP Filter1], [IP Filter1-Subnet
Mask], or [IP Filter1- Filter
Mode (OFF/Deny/Allow)], and
press <Set>.
4. Press <Set> to confirm.
System settings
You can specify system settings for
Power Save mode, Power Save
Timer, Warning Beep, Menu Time
Out, or Time & date under the sys-
tem settings submenu.
To enable the Power Save mode, do
the following:
1. Press the <Menu> button on the
control panel. Use the <S/T>
buttons to select [Configuration
Need Password] and press
<Set>.
2. Use the <W/X> buttons to select
[Configuration - System] and
press <Set>.
3. Use the <W/X> buttons to select
[Power Save mode] and press
<Set>.
4. Use the <W/X> buttons to turn
the Power Save mode ON/OFF.
5. Press <Set> to confirm your setting.
Advanced functions - 58
Page 71

To specify the Power Time Saver
setting, do the following:
To specify the Menu Time Out setting, do the following:
1. Press the <Menu> button on the
control panel. Use the <S/T>
buttons to select [Configuration
Need Password] and press
<Set>.
2. Use the <W/X> buttons to select
[Configuration - System] and
press [Set].
3. Use the <W/X> buttons to select
[Power Time Saver] and press
[Set].
4. Use the <W/X> buttons to select
[5 min.], [10 min.], [30 min.], or
[60 min].
5. Press <Set> to confirm.
To enable the Warning Beep function, do the following:
1. Press the <Menu> button on the
control panel. Use the <S/T>
buttons to select [Configuration
Need Password] and press
<Set>.
2. Use the <W/X> buttons to select
[Configuration - System] and
press <Set>.
3. Use the <W/X
[Warning Beep] and press
<Set>.
4. Use the <W/X> buttons to turn
the Warning Beep ON/OFF.
5. Press <Set> to confirm your setting.
> buttons to select
1. Press the <Menu> button on the
control panel. Use the <S/T>
buttons to select [Configuration
Need Password] and press
<Set>.
2. Use the <W/X> buttons to select
[Configuration - System] and
press <Set>.
3. Use the <W/X> buttons to select
[Menu Time Out] and press
<Set>.
4. Use the <W/X> buttons to select
[10 sec.], [20 sec.], [30 sec.], or
[60 sec].
5. Press <Set> to confirm.
59 - Advanced functions
Page 72

To configure the setting for time and
date, do the following:
1. Press the <Menu> button on the
control panel. Use the <S/T>
buttons to select [Configuration
Need Password] and press
<Set>.
2. Use the <W/X> buttons to select
[Configuration - System] and
press <Set>.
3. Use the <W/X> buttons to select
[Time & date] and press <Set>.
4. Use the <W/X> buttons to select
[Time HH:MM] or [Date YYYY/
MM/DD], and press [Set].
5. Use the numeric keypad on the
control panel to enter the current
time and date.
Printing a status sheet
To confirm the current status of the
DocuPrint C2090 FS and verify that
options are installed correctly, you
may want to print a status sheet.
Printing a status for Copy Mode:
1. Make sure that the DocuPrint
C2090 FS is turned on and is in
Copy mode.
2. Press the <Menu> button on the
control panel. Use the <W/X>
buttons to select Print Report
and press <Set>.
3. Use the <W/X> buttons to select
Printer settings and press
<Set> to confirm.
4. Use the <W/X> buttons to
choose printing reports for
[Function setting], [Panel setting], [Job log], or [Error log].
5. The <Transmitting> light
flashes, the status sheet starts
printing, and the LCD screen displays [Printing].
Advanced functions - 60
Page 73

Canceling an operation
Pressing the <Stop> button is the
quickest and easiest way to cancel
the current job. Press the button
once to cancel the current job. Press
and hold the button for more than
three seconds to delete all jobs from
memory, including jobs the DocuPrint
C2090 FS is currently receiving or
printing.
61 - Advanced functions
Page 74

Paper handling
This section covers the paper handling aspects of the DocuPrint C2090 FS.
Paper sources
There are several paper sources that can be used with the DocuPrint C2090 FS.
Usable paper
The types of paper that can be used on this printer are as follows:
Paper Tray Size Paper type (Wt.)
Paper tray
A4, B5, A5
Legal (8.5 x 14”)
Folio (8.5 x 13”)
Letter (8.5 x 11”)
Executive (7.25 x
10.5”)
Envelope (Monarch,
COM#10, DL,C5)
Custom (W 90 to 215.9
mm, L 139.7 to
355.6mm)
Japanese Postcard
Plain/Plain-Side (60-80 gsm)
Bond/Bond-Side (81-105
gsm)
Transparency
Heavyweight 1/Heavyweight 1-side 2 (106 -163
gsm)
Heavyweight 2/Heavyweight 2-Side 2 (164 - 216
gsm)
Label
Coated 1/ Coated 1-Side 2
(60 - 105 gsm)
Coated 2/Coated 2-Side 2
(106 - 163 gsm)
Coated 3/Coated 3-Side 2
(164 - 216 gsm)
Envelope
Postcard/Postcard-Side 2
Loading
Capacity
200 sheets (FX P
paper) or 20 mm or
below
Note:
• Load coated
paper piece by
piece. When
you load several sheets, the
paper becomes
damp and two
or more sheets
will be fed at the
same time into
the printer in
folds. This may
cause paper
jam.
Notes:
• Print quality may be poor or the paper can get wrinkled depending on the paper
type or print status.
• The printed images may fade due to moisture such as water, rain, or vapor.
Paper handling - 62
Page 75

Supported paper
The following table displays the supported paper types for this printer.
Paper name Weight
XC-4200DP
(standard paper
for B/W printing)
X-pression
(standard paper
for color printing)
FX P 64 gsm Plain Medium weight paper for international distri-
FX C2 70 gsm Plain Ideal for both B/W and color printing for gen-
FX J 82 gsm Bond High quality paper in widespread use such
FX JD 98 gsm Bond Double-sided paper in widespread use such
FX WR100 67 gsm Plain Recycled paper with 100% pulp with a white-
FX Green 100 67 gsm Plain Recycled paper with 100% pulp with a mini-
20lb Plain Medium weight paper for international distri-
24lb Plain Ideal for both B/W and color printing for gen-
Paper
type
bution and general office use
eral office use
bution and general office use
eral office use
as project books and copy booklets
as catalogues and booklets
ness degree equal to bond paper
mum whiteness degree
Paper characteristics
& caution
Special media
The following types of paper can be used for printing on this printer. Load these
types of paper in the paper tray.
Paper name Weight Paper type
JE001 - Transparency Transparency without any white frame.
Labels (A4) V862 - Labels Full label sheets without perforations.
FX JD Coated
Paper
105 g/m
2
Coated 1,
Coated 1-Side 2
Paper characteristics
& caution
Two-sided coated paper that is ideal for
application such as catalogs and leaflets
Note:
For details on special media, such as heavy weight paper, envelops, and coated
paper not listed in the table, contact our Customer SUpport Center or your dealers.
63 - Paper handling
Page 76

Unusable paper
The following types of paper might
cause paper jams, malfunctions or
damage to the device.
• Paper that is too thick or thin
• Paper that has been used for
printing
• Wrinkled, folded or torn paper
• Curled paper
• Wet paper
• Paper with static electricity
• Postcards with pictures
• Adhesive paper
• Treated color paper
• Paper with special coatings
• Thermal paper
• Carbon paper
• Paper with staples, paper clips,
ribbons or tape
• Paper with rough surfaces
such as pulp paper or fibrous
paper
• Transfer paper (cold water use)
• Paper exclusively for ink-jet
printer use.
Loading paper
This section explains how to load A4
size plain paper in the portrait orientation with the paper tray.
Paper feed
orientation
Note:
• Load the paper into this printer
while the printer is switched on.
• For the paper type and size that
can be loaded into this printer,
refer to “Usable paper” on
page 62.
To load paper in paper tray:
1. Gently pull open Cover D.
2. Slide the width guides to the
edge of the tray. Squeeze the
length guide and slide it to the
desired paper size.
1
2
3. Load the paper with the side to
be printed facing up and with all
four corners aligned.
Paper handling - 64
Page 77

4. Slide the width guides inward
until they rest lightly against the
edge of the paper
stack.
Loading envelopes
Envelopes should be loaded in the
paper tray.
Load envelopes with the address
side facing up as shown in the diagram below.
3
1
5. Close cover D.
6. Set the paper size and type
according to the message displayed on the control panel.
Notes:
• Do not apply excessive force to
the Cover D when you open or
close it; doing so may damage the
machine.
• Do not load paper past the maximum fill line or maximum allowed
capacity
• Set the paper guides to the correct paper width. If the paper
guides are not in place, the paper
will not be properly fed and this
may cause paper jams.
• When you print on paper fed from
the paper tray, set the paper size
and type in the print driver.
Envelope that is
2
under 220 mm in
width
Paper feed
direction
Flap
Flap
Under
220 mm
The flap open
and toward you.
Example:
Monarch (98.4
x190.5mm), DL
(110 x 220 mm),
Envelope that
is over 220
mm in width
Paper feed
direction
Over
220 mm
The flap
folded and
on the left
Example:
Com#10
(104.78 x
241.3mm)
C5 (162 x
229mm)
Note:
65 - Paper handling
The reverse side of the envelope
cannot be printed on.
Page 78

Setting paper sizes and
types
Removing printouts or
copies
You can set the paper size and type
that is loaded in the paper tray on the
control panel when the [Bypass
Mode] on the [Tray Settings] menu is
set to [Panel Specified] on the control
panel.
In this case, the printing is done only
when the paper size and type settings on the control panel are the
same as on the print driver.]
Also, using the [Display Popup], you
can specify whether or not to display
the screen to set the paper size and
type every time you load paper into
each tray on the control panel. The
default settings do not display the
message for the paper tray and do
display the message for the paper
trays (optional).
Note:
The [Display Popup] setting for the
paper tray is available only when
[Paper Mode] is set to [Panel Specified].
The optional output extension output
tray is designed to prevent paper
from falling from the printer after the
print job is complete.
Before printing a document, pull out
the extension output tray.
If the extension output tray is still not
long enough for the paper you are
loading, pull the extension output tray
further. Completed copies and prints
can be taken from the extension output tray.
2
1
Paper handling - 66
Page 79

Troubleshooting guide
Before treating the problem as a machine breakdown, refer to the following tips
and check the condition again.
When paper jams
CAUTION
• When removing jammed paper, make sure that no pieces of torn paper are left in
the machine. A piece of torn paper remaining in the machine can cause fire. If a
sheet of paper is wrapped around the heat roller or when clearing a jammed paper
that is difficult or impossible to see, do not try to remove it by yourself. Doing so can
cause injuries or burns. Switch off the machine immediately, and contact our Customer Support Center or your dealers for assistance.
• The fuser unit, and the surrounding area are hot. Touching it directly may cause
injuries or burns.
Bypass Tray Cover E
67 - Paper handling
When using the bypass
tray, check to make sure
there is no jammed paper
in it.
Page 80

Near the fuser unit
1. Open Cover E.
2. Gently lift up the scanner unit
and then open Cover C.
1
2
When the printer interior gets dirty
Clean the interior of the printer using
the cleaning rod.
Note:
It is recommended to clean the
inside of the printer on a regular
basis such as after replacing the
toner cartridge.
1. Open the front cover. Pull out the
lever that is inside the printer on
the right side until it stops. The
access window cover on the right
side of the printer slides open.
3. Push up the levers on both side
and remove any jammed media.
Important:
Never touch the outer levers located
on both sides of the fuser unit, which
are used to remove or install the
fuser unit.
4. Move the levers back to their
original positions, and then close
all covers.
2. Hold the cleaning rod and push it
in and pull it out several times to
clean the interior of the printer.
Paper handling - 68
Page 81

3. Push the cleaning rod back to its
original position until it stops and
then push the lever that was
pulled at step 1 back to its original position. The access window
cover is closed.
4. Close the front cover.
69 - Paper handling
Page 82

Printer problems
Problems Possible Reason/Solution
No power
Cannot print
Print job sent but
the <Ready> indicator light is not
blinking or on
<Error> light is on
<Error> light is
blinking
• Press the power switch to the <|> position to switch on
the power.
• Switch off the power to the printer and connect the
power cord to the power outlet again. Then, switch on
the printer.
• Connect the printer to a power outlet with a suitable
voltage and current rating.
• If the [Ready] indicator light is off, this printer is in menu
setting mode. Press the [Menu] button to exit.
• Switch off the power and check the interface cable connection.
• Check the interface port settings. Make sure that the
protocol settings are set up correctly on the CentreWare
Internet Services.
• Check the computer environment, such as the printer
driver.
• Check the displayed message and solve the problem.
• An error that you cannot solve on your own has
occurred.
Write down the displayed message or error code, switch
off the power, pull out the power plug from the outlet,
and then contact our Customer Support Center or the
nearest dealer for assistance.
<Ready> light is
blinking but there
is no printout
Sections of
printed document
are missing. The
test is printed in a
different location
than expected
• There are jobs being processed in the printer.
Cancel printing or force the remaining data to be
printed. To force the printing job, press the <Eject/Set>
button. To cancel the job, press <Cancel> button.
• Check and set the paper guides to the correct positions.
• Check that the paper size on the print driver or the control panel is set properly.
• Check if the margin setting is correct in the print setting.
Paper handling - 70
Page 83

Problems Possible Reason/Solution
Strange noise
Paper cannot be
fed
Paper jam
Multiple sheets of
paper are fed
Paper is wrinkled
• Place the printer on a stable surface.
• Switch off the power and remove any foreign object
inside the printer. If the object cannot be removed by
yourself, contact our Customer Support Center or your
dealers. Do not attempt to disassemble the printer by
yourself.
• Load the paper correctly. For labels, transparencies, or
enveloped, fan them well first to allow air to enter
between each sheet before loading to prevent paper
jam.
• Multiple sheets feeding may occur when the paper is
loaded exceeding the limit. Remove the paper and fan
the paper to be loaded and load again. Do not load the
paper exceeding the limit.
71 - Paper handling
Page 84

Print quality problem
Problems Possible Reason/Solution
Print is light (faded,
blurred)
Color registration is
out of alignment.
Black spots or streaks
are printed.
Dirt appears at equal
intervals.
White spots appear in
black filled areas.
Print image smudges
when rubbed with
your fingers.
The toner is not fixed
on the paper.
Paper is smeared
with toner.
• Replace with a new piece of paper.
• Do not use a used paper for printing. Replace with
the correct type of paper for printing.
• Check the drum cartridge and replace with a new
one if necessary.
• Check the amount of toner and replace a new toner
cartridge if needed.
• The interior of the printer may be dirty. Clean the
interior of the printer.
• Check the drum cartridge and replace with a new
one if necessary.
• Check if the feed route of the paper is stained. Print
a few pages to remove the stains.
• Check if the correct paper type is used for printing
and replace the paper if necessary.
• Replace with a new piece of paper.
• Check the drum cartridge and replace with a new
one if necessary.
• Check if the correct paper type is used for printing
and replace the paper if necessary.
The whole piece of
paper is printed black.
Nothing is printed.
Spots of missing text
• Check the drum cartridge and replace with a new
one if necessary.
• Fan the paper well before loading them for printing.
• Check the drum cartridge and replace with a new
one if necessary.
• Check the cartridges. Make sure they are properly
inserted.
• Check and load the correct type of paper.
Paper handling - 72
Page 85

Problems Possible Reason/Solution
Text is blurred.
Missing characters in
the printout.
Text or images are
printed at an angle.
Images, printed transparencies, and envelopes are blurred.
• Check and load the correct type of paper.
• Check the drum cartridge and make sure it is correctly loaded.
• Check the drum cartridge and replace with a new
one if necessary.
• Check the paper guides and make sure they are set
correctly.
• Check and load the correct type of paper.
• Make sure proper settings are configured for printing.
73 - Paper handling
Page 86

Scanning problems
If you have problems scanning, check your:
• Interface connections
• Computer setup and software installation
• Software instructions for scanning procedures
Problems Possible Reason/Solution
The product does
not scan.
Pressing the
[Start] button
does not start
scanning.
• Wait until the Print light stays on in green (ready for
scanning).
• Your DocuPrint C2090 FS may not work properly if you
use a USB cable other than the one supplied in the
package. Use only the USB cable supplied in the package.
• The product may not work properly when connected to
the computer through more than one USB hub. Connect
the product directly to the computer’s USB port or
through on hub only.
• Make sure DocuWorks program is installed on your
computer.
• For Windows XP users:
From the [Start] menu, select [Settings], then [Control
Panel]. Double-click [Scanners and Cameras], then
right-click [DocuPrint C2090 FS] and then select
[Properties] from the pop-up menu. Click the [Events]
tab and make sure DocuPrint C2090 FS is selected as
the application for the [Scan Button] event.
• For Windows Me, 98. 2000 users:
Click the [Events] tab in the properties window in the
[Printers] utility and make sure the [Disable device
events] check box is clear. Also, make sure DocuPrint
C2090 FS is selected in the [Scanner events] list box,
and the correct application in the [Send Scanner
events] list box, and the correct application in the
[Send to this application] list is selected.
Paper handling - 74
Page 87

Problems Possible Reason/Solution
You cannot start
DocuWorks
The scanner software does not
work properly.
• Make sure the DocuPrint C2090 FS is turned on.
• Turn off the DocuPrint C2090 FS and your computer,
and check the connection between them.
• Make sure the DocuWorks is selected in your application software.
•In the [Windows Device Manager] menu, make sure
DocuPrint C2090 FS appears under Imaging devices
hardware type without a question [ ? ] or an exclamation [ ! ] mark, or as an Unknown devices hardware
type. If so, uninstall DocuWorks, then reinstall it following the instructions in “Installing software” on page 22.
• For Windows users:
Double-click the [Scanners and Cameras] icon in the
Control Panel. Delete the DocuPrint C2090 FS icon and
reinstall the DocuWorks as described in “Installing software” on page 22.
• Make sure your computer meets the systems requirements and for the software you are using.
• Make sure your computer has enough memory for your
software. If it does not, see your software and computer
documentation for instructions on freeing up available
memory or upgrade your RAM.
75 - Paper handling
Page 88

Scanning quality problems
Problems Possible Reason/Solution
Your original is not
scanned or only a
few dots appear
as the scanned
image.
Straight lines in
your original come
out jagged in the
scanned image.
The image is distorted or blurred.
The image is too
dark.
Poor character
recognition during OCR (optical
character recognition) scanning.
The image is
larger or smaller
than the original.
• Make sure the documents is placed on the platen glass
with the side to be scanned facing down.
• Make sure the document is perfectly straight on platen
glass. Align the vertical and horizontal lines with the
scales at the top and side of the platen glass.
• Make sure the document is flat against the platen glass.
• Do not move the document while scanning.
• Change the resolution setting for your scan.
• Check the Brightness setting in the DocuWorks.
• Check the brightness and contrast settings for your
monitor.
• Make sure the document is perfectly aligned on the
platen glass. Align the vertical and horizontal lines with
the scales at the top and side of the document.
• The image size and resolution settings of your software
determine the size of the printed image. Do not use the
size of the image on your monitor to judge the printer
size.
Paper handling - 76
Page 89

Copying problems
Problems Possible Reason/Solution
The DocuPrint
C2090 FS does
not copy.
Print quality is not
good.
Copies are blank,
or images are
missing or faded.
Completely blank
pages are output.
• Make sure paper is loaded in the paper tray. See “Loading paper” on page 64.
• Make sure the original is placed face-down on the
platen glass or face-up in the ADF. See “Placing the
originals” on page 37
• You may not be using the correct type of paper for copying. See “Paper sources” on page 62 for available paper
types.
• The sealing tape may be still in the toner cartridge.
Remove the toner cartridge, pull out the sealing tape,
and reinstall the toner cartridge as described on “Installing the toner cartridges” on page 16.
• If the toner cartridge is low on toner, the copies will be
faded. Replace the toner cartridge will a new one.
• If the original has a colored background, images in the
foreground may blend too much or the background may
be in a different shade.
• You may have loaded the original upside down. In the
ADF, load the original with the short edge facing in and
the side to be scanned facing up. On the platen glass,
place the original face-down with the top left corner of
the document located in the lower right corner of the
glass.
• The paper may be too damp or rough. Load new paper
of another type in the bypass tray.
• The toner might be out.
Fax problems
Customer will provide information.
Paper handling problems
77 - Paper handling
Page 90

Problems Possible Reason/Solution
Paper does not
feed properly.
• The paper guides may not be set properly. Make sure
the paper guides in all the cassettes are set in the correct paper size positions.
• Curled paper is loaded. Straighten paper or load new
paper.
• The printer may be out of paper. Load paper into the
selected paper source.
Paper handling - 78
Page 91

Menu tree
For details on how to operate the control panel, refer to “Control panel” on
page 10.
Copy Ready
1. In Copy mode, [Copy Ready] for text documents is the default setting displayed on LCD screen.
2. Use the S T buttons to browse the menu options and press the <Set> button to view the submenus.
3. Press the <Menu> button to return to the previous menu.
Copy Ready
A4/B5
Copy Ready
R/E : 86%
Tx&Ph
Tx&Ph
Copy Ready
A4/B5
1
Copy Ready
R/E : FullImg
1
Copy Ready A4Text
Copy Ready
A4/B5
Copy Ready
8.5x13/
Copy Ready
/Post Card
Copy Ready
A4
Copy Ready
2in1
Tex t
1
Tex t
1
Photo
Tex t
Tex t
Tex t
Tex t
Copy Ready
A4/B5
Copy Ready
Back Remove
Copy Ready A4Tex t
1
Copy Ready
1
Com -10/8.5x11
Copy Ready
1
10.5x7.25/
Copy Ready
1
/Monarch
Copy Ready
1
A4/B5
Copy Ready
1
R/E:AutoFit
Text
Tex t
1
1
25
Tex t
1
Draft
1
Draft
1
Draft
1
Draft
1
Copy Ready
A4 B5
Copy Ready
Frame Erase
Copy Ready A4Text
Copy Ready
B5/10.5x7.25
Tex t
Tex t
Copy Ready
1
A4 B5
Copy Ready
1
Shift : R +10
Photo
1
1
Text
Tex t
1
1
Copy Ready
A4/B5
Copy Ready
Shift : Center
Tex t
1
Tex t
1
79 - Paper handling
Page 92

Fax Ready
1. In Fax mode, [Fax Ready] for text documents is the default setting displayed
on LCD screen.
2. Use the <W/X> buttons to browse the menu options and press the <Set>
button to view the submenus.
3. Press the <Menu> button to return to the previous
menu.
Set FAX Num Std
FAX Function
Broad Cast
FAX Function
TX Reservation
FAX Function
Polling RX
FAX Function
Polling TX
FAX Function
Fowarding
FAX Ready
XXX - XXXX - XXXX
FAX Ready
Speed XX AAAAAAAA
FAX Ready
One Touch X AAAAAA
Std
Std
Std
Broad Cast
Group No
FAX Ready
Group No X
Stdƺ
Reservation
Time : XX : XX
Std
Reservation Std
FAX Ready
XXX - XXXX - XXXX
FAX Ready
Speed XX AAAAAAAA
FAX Ready
One Touch X AAAAAA
Polling RX
Std
Password :
Polling Num
Std
FAX Ready
XXX - XXXX - XXXX
Std
FAX Ready
Speed XX AAAAAAAA
FAX Ready
Std
One Touch X AAAAAA
Std
Std
Std
Std
Std
Polling TX
Password :
FAX Ready
Polling Scan
Std
Fowarding
Off
Std
Fowarding
Foward Only
Foward Num
Set Fowading
XXX - XXXX - XXXX
Set Fowading
Speed XX AAAAAAAA
Set Fowading
One Touch X AAAAAA
Fowarding
Print & Foward
Foward Num
Set Fowading
XXX - XXXX - XXXX
Set Fowading
Speed XX AAAAAAAA
Set Fowading
One Touch X AAAAAA
Std
Std
Std
Std
Std
Std
Std
Std
Std
Std
Std
Paper handling - 80
Page 93

Scan Ready
1. In Scan mode, [Scan Destination] for text documents is the default setting
displayed on LCD screen.
2. Use the <W/X> buttons to browse the menu options and press the <Set>
button to view the submenus.
3. Press the <Menu> button to return to the previous menu.
Scan Destination
To FTP 1
Scan Ready
To FTP 1
Scan Destination
To USB-Key
300 Scan Ready
To USB-Key
Scan Destination
To PC (USB)
300
Scan Ready
To PC (USB)
Scan Destination
To FTP 3
Scan Ready
To FTP 3
300
Scan Destination
To FTP 4
Scan Ready
300
To FTP 4
Scan Destination
To FTP 2
Scan Ready
To FTP 2
300
300
Scan Destination
To FTP 5
Scan Ready
To FTP 5
300
81 - Paper handling
Page 94

Appendix
This chapter contains product specification and troubleshooting information for
user’s reference.
Specifications
DocuPrint C2090 FS Specifications
Product Type Multifunction Color Laser Printer
Functions Print/Copy/FAX/Scan
Max. Dimensions
(W x D x H)
Weight 33.0 kg (without consumables and with controller)
Humidity & Temp. Range
(Operating/ Non-operating)
Min. Operating System Win XP/2003/2000/Longhorn/64 bit OS
Interface • Ethernet (100 Base-TC/10 Base-T) for print/scan
Storage Condition
Processor ARM9+ARM9
Memory Installed • 96 MB (256MB) (Max.)
Power Consumption <30W
Voltage Required • 100/120V. 100-120V AC+/-10% (90-132V)
W: 498 mm x D: 475 mm x H: 685 mm with ADF
• Operating: 5-32
• Non-operating: -20-40 oC, 5-85% RH
• USB 2.0 for PC connection, USB 1.1 for USB memory
device
• RJ11
Normal condition: (0-35
12 months
Extreme condition: (-20-0
95% RH): guarantee for 48 hours
• 220/240V. 220-240V AC+/-10% (198-264V)
o
C, 15-85% RH
o
C, 15-80% RH): guarantee for
o
C & 35-40 oC, 5-15% & 80-
Sound Emission • In Standby Mode (Lwa): 4.0 (B)
• In Running Mode (Lwa): 6.8 (B)
• In Running Mode (Lwa) (impulse): 7.1 (B)
Life • Printer: 5 years or 200 KPV (600K images: defined by
IOT)
• ADF + Flat Bed: 120K scans
82- Appendix
Page 95

DocuPrint C2090 FS Specifications
Document Size Sensor No
Auto Document Feeder Integrated Simplex Auto Document Feeder (Max. 50
sheets @75gsm paper)
MSBF/ MPBF MSBF: 20,000 pages for scanner (ADF + Flatbed)
MPBF: 50,000 pages for printer
Max. Printer Resolution 600 dpi x 600 dpi with 2400 dpi images enhancement
(Image enhancement only available for B/W print)
Max. Print Speed 5 ppm (Full Color), 25 ppm (B/W)
Scanner Resolution Optical, 1200 dpi x 1200 dpi (by Scanner)
4800 dpi x 4800 dpi (enhanced)
Scanner Image sensor CCD
Scan Speed
(Full Color)
Scan Speed (B/W) 0.284 ms/line (600 dpi x 600 dpi)
Scan Area Up to A4/Letter (@Flatbed), up to Legal 14(@ADF)
Copy Speed • 3 cpm @600 dpi, Color-Defined TestChart
FCOT (B/W) Less than 11 sec.
FCOT (Full Color) Less than 21.5 sec.
Fax 33.6K (Super G3), 3 sec./page (slerexe page, standard
Print Languages Host Base Printing
2.5 ms/line (600 dpi x 600 dpi)
(A4/ADF& Flatbed)
• 12 cpm @600 dpi, BW-Defined TestChart
(A4/ADF& Flatbed)
• 5 cpm @300 dpi, Color-defined TestChart
(A4/ADF)
• 20 cpm @300 dpi, Color-defined TestChart
(A4/ADF& Flatbed)
(Plane paper/A4/300 dpi x300 dpi/BW/Flatbed)
(Plane paper/A4/300 dpi x300 dpi/Color/ADF)
resolution)
83 - Appendix
Page 96

Optional accessories
and consumables
The main optional accessories and
consumables are as follows. Contact
our Customer Support Center or your
dealer to order these.
Types of
consumables
Toner Cartridge 4K (Yellow)
Product
code
CT200652 1 unit/
Form
box
Optional accessories
Product name Product code
128MB Memory E3100027
Consumables
Important:
The high print quality and the high
speed printing of this printer are
designed to be most stabilized when
genuine toner cartridges are used.
Using the consumables whose
specifications differ from genuine
consumables may cause degradation of printer performance. Also,
repairs that result from using consumables that are not recommended may not be covered by
warranty. When using recommended consumables, you can
receive full support in case the
printer needs repairs. It is recommended to use genuine toner cartridges to get the proper printer
performance.
Note:
The black toner cartridge 4K is bundled with this printer at the time of
purchase. The cyan, magenta, yellow toner cartridge 1.5 K are bundled with this printer at the time of
purchase.
Toner Cartridge 4K
(Magenta)
Toner Cartridge 4K
(Cyan)
Toner Cartridge 4K
(Black)
Drum Cartridge (Including cleaning
pad)
CT200651 1 unit/
box
CT200650 1 unit/
box
CT200649 1 unit/
box
CT305390 1 unit/
box
Handling consumables
• Do not store the consumables
with the packaging box standing.
• Before using the consumables/
maintenance products, do not
open the packaging and avoid
storing them in the following
locations:
• Locations with high temperature and humidity
• Locations near open flame
• Locations with direct exposure
to sunlight
• Dusty locations
• Read the handling instructions
on he packaging box or container
carefully before using the consumables.
• It is recommended to keep some
spares of the consumables.
84- Appendix
Page 97

Replacing the consumables
For details on the replacement procedure for the consumables, refer to
procedure listed in the packaging of
each consumable.
If the toner cartridge that must be
replaced is not in the front printer, follow the procedure below.
1. Press the <Menu> button to display the Menu screen.
2. Press the <S> or <T> button
until [Replace Toner] is dis-
played, then press the <X> button or the <Set> button.
3. Press the <S> or <T> button
until the color of toner to replace
appears, and press the <X> button or the <Set> button.
The toner cartridge rotates.
4. When the specified toner cartridge is moved to the front of the
printer, [Ready to replace] mes-
sage is displayed.
5. n on the control panel. Use the
<S/T> buttons to select [Image
quality] function.
Regular replacement parts
The regular replacement parts are as
follows.
Product
name
Maintenance kit A
Maintenance kit B
Maintenance kit C
(220V)
Maintenance kit C
(110V)
Retard pad TBA TBA
Product
code
EL300472 Kit A
EL300473 Kit A
EL300475 Kit C
EL300474
Referen
ce
includes
the Deve
Assy Y,
M and C.
includes
the Deve
Assy K.
includes
the
Fuser
unit and
BTR
Unit
Assy.
85 - Appendix
Page 98

Obtaining product
information
Upgrading the firmware
version of this printer
Latest print driver
You can download the latest print
driver from our company’s web site.
1. Click [About] on the [Detailed
Settings] tab of the printer properties dialog box.
2. Click [Fuji Xerox Web Site]. The
web browser will be activated
and the web site displayed.
3. Following the instruction, download the corresponding print
driver.
Notes:
• Please note that the communication cost will be borne by the
customers.
• By using the software CD-ROM
bundled with this printer you can
also refer to our company’s web
site. Click
on the screen that is displayed
when the CD-ROM is inserted.
• The address (URL) of the download service page of our company
is as follows:
http://www.fxprinters.com/
• For details on the latest print
driver features, refer to the Online
Help for the print driver.
[Fuji Xerox Web Site]
Our company provides the tool to
upgrade the version of the software
built into this printer (known as firmware) from the computer. The latest
firmware and upgrade utility can be
obtained from the web site address
(URL) listed below. Download the
corresponding firmware by following
the instructions on the web site.
http://www.fxprinters.com/
PC (USB upgrade)
1. Make sure DocuPrint C2090 FS
is connected to your PC.
2. Download the upgrade Firmware software from the product
website or get a copy of the
upgrade software from the service person.
3. Click setup.exe to install the
upgrade software.
4. The latest version of the software
for DocuPrint C2090 FS is downloaded and upgraded automatically.
86- Appendix
Page 99

Web server upgrade
1. Make sure DocuPrint C2090 FS
is connected to your network.
2. Go to the DocuPrint C2090 FS
product web configuration website.
3. Select [Upgrade Firmware]
from the [Maintenance Tool].
4. Download the upgrade Firmware software from the service
website or get a copy of the
upgrade software from the service person to your local PC.
5. Click [Upgrade] and select
setup.exe to install the upgrade
software.
6. The latest version of the software
for DocuPrint C2090 FS is downloaded and upgraded automatically.
Note:
Please note that the communication
cost will be borne by the customers.
Status and error
messages
This section lists error messages displayed on the LCD when an error
occurred during printing, scanning, or
fax operation.
Printer error messages
See below for error messages displayed when an error occurred during printing.
Printer application error
PRT_PAR_READ_ERROR
Communication error with engine.
PRT_PAR_WRITE_ERROR
Communication error with engine.
PRT_PAR_PIPE_ERROR
TAKPRO internal error.
PRT_PAR_SYNC_ERROR
87 - Appendix
Synchronize error with engine.
PRT_DRVERR_ERROR
TAKPRO internal error.
PRT_STS_NOPAPER
No paper in the paper tray.
PRT_PFCREJT_NOPAPER
No paper in the paper tray while
printing.
PRT_USB_PLJ_PCI_TAKE
Cannot get PCI sema from system.
PRT_NET_MON_GETINFO
Page 100

Fail to get network print job information.
Printer driver error
Fuser Unit Detached
Thermistor disconnection detected.
Scanner error messages
See below for error messages displayed on the LCD when an error occurred during Flatbed scan, ADF scan, N3R, Network scan, or Scan to PDF.
Y Toner Detached
Toner cartridge not installed.
M Toner Detached
Toner cartridge not installed.
C Toner Detached
Toner cartridge not installed.
K Toner Detached
Toner cartridge not installed.
Xero CRU Detached
Xero CRU not installed.
MSI Empty
No paper is detected by No Paper
sensor for MSI tray.
Xero CRUM Communication Error
Communication with CRUM is disabled.
Xero CRUM Verify Error
Data cannot be written in CRUM.
Xero CRUM Imitation Error
Scanner application error
SCAN_PC_UNKNOWN_COMMAN
D _USB
Abnormal command or protocol.
SCAN_PC_USB_DISCONECT
USB disconnect while sending data
or status.
SCAN_NET_UNKNOWN_COMMAN
D _NET
Abnormal command or protocol.
SCAN_USBKEY_INTERCHIP_ERR
OR
Interchip communication error
SCAN_USBKEY_DMA/
PCI_ERROR
Direct DMA/PCI return fail.
SCAN_FTP_PORT_DISABLE
Error occurs in DSP.
SCAN_FTP_CONNECT_ERROR
Turn the power off and on again.
Different memory device is detected.
Xero CRUM ID Error
Different ID is detected.
Scanner driver error
SCAN_DRV_MOTOR_FAIL
• Fail to move out from home
when starting to scan.
• Fail to move back to home
when the scan job is ended.
88- Appendix
 Loading...