

Page 1
DocuPrint C2090 FS
User Guide
Page 2

Adobe, the Adobe logo, Acrobat Reader are trademarks of Adobe Systems Incorporated.
Microsoft, Windows, Windows Server are either registered trademarks or trademarks of Microsoft Corporation
in the United States and/or other countries.
Permission has been obtained from Microsoft Corporation for use of software screen shots.
Intel and Pentium are trademarks or registered trademarks of Intel Corporation or its subsidiaries in the
United States and other countries
All product/brand names are trademarks or registered trademarks of the respective holders.
Important:
• This manual is copyrighted with all rights reserved. Under the copyright laws, this manual may not be
copied or modified in whole or part, without the written consent of the publisher.
• Parts of this manual are subject to change without prior notice.
• We welcome any comments on ambiguities, errors, omissions, or missing pages.
• Never attempt any procedure on the machine that is not specifically described in this manual.
Unauthorized operation can cause faults or accidents. Fuji Xerox is not liable for any problems
resulting from unauthorized operation of the equipment.
To lessen the effect on the environment, this manual is manufactured with recycling in mind. After the product
has been used, please send this manual for recycling.
It may be a legal offence to print currency notes, certificates of stocks and securities, or any other documents
of similar nature, regardless of whether they will be used.
Fuji Xerox is not responsible for any breakdown of machines due to infection of computer virus or computer
hacking.
Xerox, The Document Company and the stylized X are
registered trademarks of Xerox Corporation and Fuji Xerox Co., Ltd.
All Xerox and Fuji Xerox product names are either registered trademarks or trademarks of Xerox Corporation
and Fuji Xerox Co., Ltd.
- 2 -
Page 3

Contents
1. Preface.......................................................................................................................... 7
1.1 About this manual......................................................................................................7
1.2 Copyright and trademarks .........................................................................................7
1.3 Regulatory notices.....................................................................................................7
1.4 Responsible use of copyright materials.....................................................................7
1.5 Illegal copies and printouts........................................................................................7
1.6 Symbols and terminologies .......................................................................................8
1.7 Types of manuals ......................................................................................................9
1.8 Safety notes...............................................................................................................9
1.9 Using this manual .................................................................................................... 11
2. Introducing the DocuPrint C2090 FS........................................................................ 12
2.1 Features...................................................................................................................12
2.2 Package contents ....................................................................................................13
2.3 Overview of the DocuPrint C2090 FS components.................................................15
2.3.1 Front view ................................................................................................................15
2.3.2 Rear view.................................................................................................................15
2.3.3 Inside the DocuPrint C2090 FS...............................................................................16
2.3.4 Printer components .................................................................................................16
2.3.5 Scanner Components..............................................................................................17
2.3.6 Control panel ...........................................................................................................18
3. Getting started ........................................................................................................... 20
3.1 Placing the DocuPrint C2090 FS.............................................................................20
3.1.1 Power cable.............................................................................................................20
3.2 Switching On and Off the Power .............................................................................21
3.2.1 Switching on the power ...........................................................................................21
3.2.2 Switching off the power ...........................................................................................22
3.2.3 Setting the time........................................................................................................22
3.3 Setting the environment...........................................................................................22
3.3.1 Setting the Date.......................................................................................................22
3.3.2 Setting IP address ...................................................................................................23
3.3.3 Setting languages mode..........................................................................................23
3.3.4 Setting country code................................................................................................24
3.3.5 Setting subnet mask/gateway address....................................................................24
3.4 Power save mode....................................................................................................24
3.5 Exiting the power save mode ..................................................................................25
3.6 Installing the toner cartridges ..................................................................................25
3.7 Installing the drum cartridge ....................................................................................27
3.8 Installing extra memory ...........................................................................................29
3.9 Connecting cables ...................................................................................................31
3.9.1 USB cable................................................................................................................31
3.9.2 LAN cable ................................................................................................................31
3.9.3 Phone cables...........................................................................................................32
3.10 Installing software....................................................................................................33
3.11 Software Installation ................................................................................................33
3.12 USB connection.......................................................................................................35
3.13 Network connection .................................................................................................36
3.14 Setting Configuration of Paper ................................................................................39
3.15 Uninstalling the Drivers and Scan Tool Box ............................................................40
3.16 Uninstalling the Software.........................................................................................41
4. Printing ....................................................................................................................... 42
4.1 Printing a document.................................................................................................42
4.2 Canceling printing....................................................................................................42
4.2.1 Canceling printing of data being printed or received at the printer..........................42
4.2.2 Canceling printing data being processed at the computer ......................................42
4.3 Specifying the printer settings .................................................................................43
4.3.1 Number of prints ......................................................................................................43
4.3.2 Resizing the prints ...................................................................................................43
4.3.3 Adjusting layout .......................................................................................................44
- 3 -
Page 4

4.3.4 Adding watermarks..................................................................................................45
4.3.5 Advanced settings ...................................................................................................46
5. Scanning..................................................................................................................... 47
5.1 Placing the originals ................................................................................................47
5.2 Scanning an image with operating panel ................................................................47
5.2.1 Setting scan mode from control panel.....................................................................47
5.2.2 Setting color scan from control panel ......................................................................48
5.2.3 Setting original paper size and file type...................................................................48
5.2.4 Image quality ...........................................................................................................48
5.2.5 Scanning an image from the DocuPrint C2090 FS .................................................49
5.2.6 Scanning to FTP......................................................................................................49
5.2.7 Scanning to USB-Key..............................................................................................50
5.3 Scanning an image with computer ..........................................................................50
5.3.1 Scan via WIA (Windows Image Acquisition)............................................................50
5.3.2 Scan to a file via WIA: .............................................................................................52
5.3.3 Scanning from application via TWAIN driver...........................................................54
5.3.4 Previewing and adjusting the scan area from TWAIN driver...................................56
5.3.5 Scan adjustment from TWAIN driver.......................................................................56
5.3.6 Image adjustment from TWAIN driver .....................................................................57
6. Copying ...................................................................................................................... 59
6.1 Placing the originals ................................................................................................59
6.2 Making copies..........................................................................................................60
6.3 Specifying copy settings ..........................................................................................60
6.3.1 Number of copies ....................................................................................................60
6.3.2 Selecting the paper..................................................................................................60
6.4 Image quality ...........................................................................................................60
6.5 Enlarging/Reducing the copy size ...........................................................................61
6.6 Resetting the copy settings .....................................................................................63
6.7 Restrictions on copying ...........................................................................................64
7. Sending a fax ............................................................................................................. 65
7.1 Placing the originals ................................................................................................65
7.2 Sending faxes..........................................................................................................66
7.2.1 Sending a fax from PC FAX & Network FAX...........................................................66
7.2.2 Sending a fax from One-touch / Speed-dial Direct FAX..........................................68
7.2.3 Sending a fax from Tx reservation FAX...................................................................68
7.2.4 Sending a fax from Forward FAX ............................................................................69
7.2.5 Setting a fax from Broadcast Fax ............................................................................69
7.3 Receiving faxes .......................................................................................................70
7.3.1 Auto-answering FAX Rx ..........................................................................................70
7.3.2 Direct Fax Rx...........................................................................................................70
7.4 Specifying fax settings.............................................................................................70
7.4.1 Input and output paper size and type ......................................................................70
7.4.2 Image quality ...........................................................................................................71
7.4.3 Adjust fax size .........................................................................................................71
7.4.4 FAX Tx mode setting (Resolution)...........................................................................72
8. Advanced functions................................................................................................... 73
8.1 Using the setup menu..............................................................................................73
8.2 Basic settings ..........................................................................................................73
8.3 Scanner settings......................................................................................................75
8.4 Copy settings...........................................................................................................75
8.5 Fax settings .............................................................................................................76
8.6 Host settings ............................................................................................................78
8.7 System settings .......................................................................................................79
8.8 Printing a status sheet.............................................................................................80
8.8.1 Printing a status for Copy Mode: .............................................................................80
8.8.2 Fax Report...............................................................................................................81
8.8.3 Scan Report.............................................................................................................82
8.9 Job canceling...........................................................................................................82
8.9.1 Jobs initiated from OP Panel ...................................................................................82
8.9.2 Jobs initiated from Application .................................................................................83
8.9.3 Jobs initiated from Scan Tool Box ...........................................................................84
8.9.4 Canceling an operation............................................................................................85
- 4 -
Page 5

8.9.5 Fax stop & Fax cancel .............................................................................................85
8.9.6 Fax Broadcast cancel ..............................................................................................85
8.10 Using Scan Tool Box ...............................................................................................86
8.10.1 Application ...............................................................................................................87
8.10.2 Copy ........................................................................................................................89
8.10.3 Fax...........................................................................................................................91
8.10.4 File ...........................................................................................................................93
8.10.5 E-mail.......................................................................................................................95
8.10.6 OCR.........................................................................................................................97
8.10.7 Setting......................................................................................................................99
9. Paper handling......................................................................................................... 101
9.1 Paper sources .......................................................................................................101
9.1.1 Usable paper .........................................................................................................101
9.1.2 Supported paper....................................................................................................102
9.1.3 Special media ........................................................................................................102
9.1.4 Unusable paper .....................................................................................................103
9.2 Loading paper........................................................................................................103
9.3. Loading envelopes ................................................................................................105
9.4. Setting paper sizes and types ...............................................................................105
9.5. Removing printouts or copies ................................................................................106
10. Troubleshooting guide .......................................................................................... 107
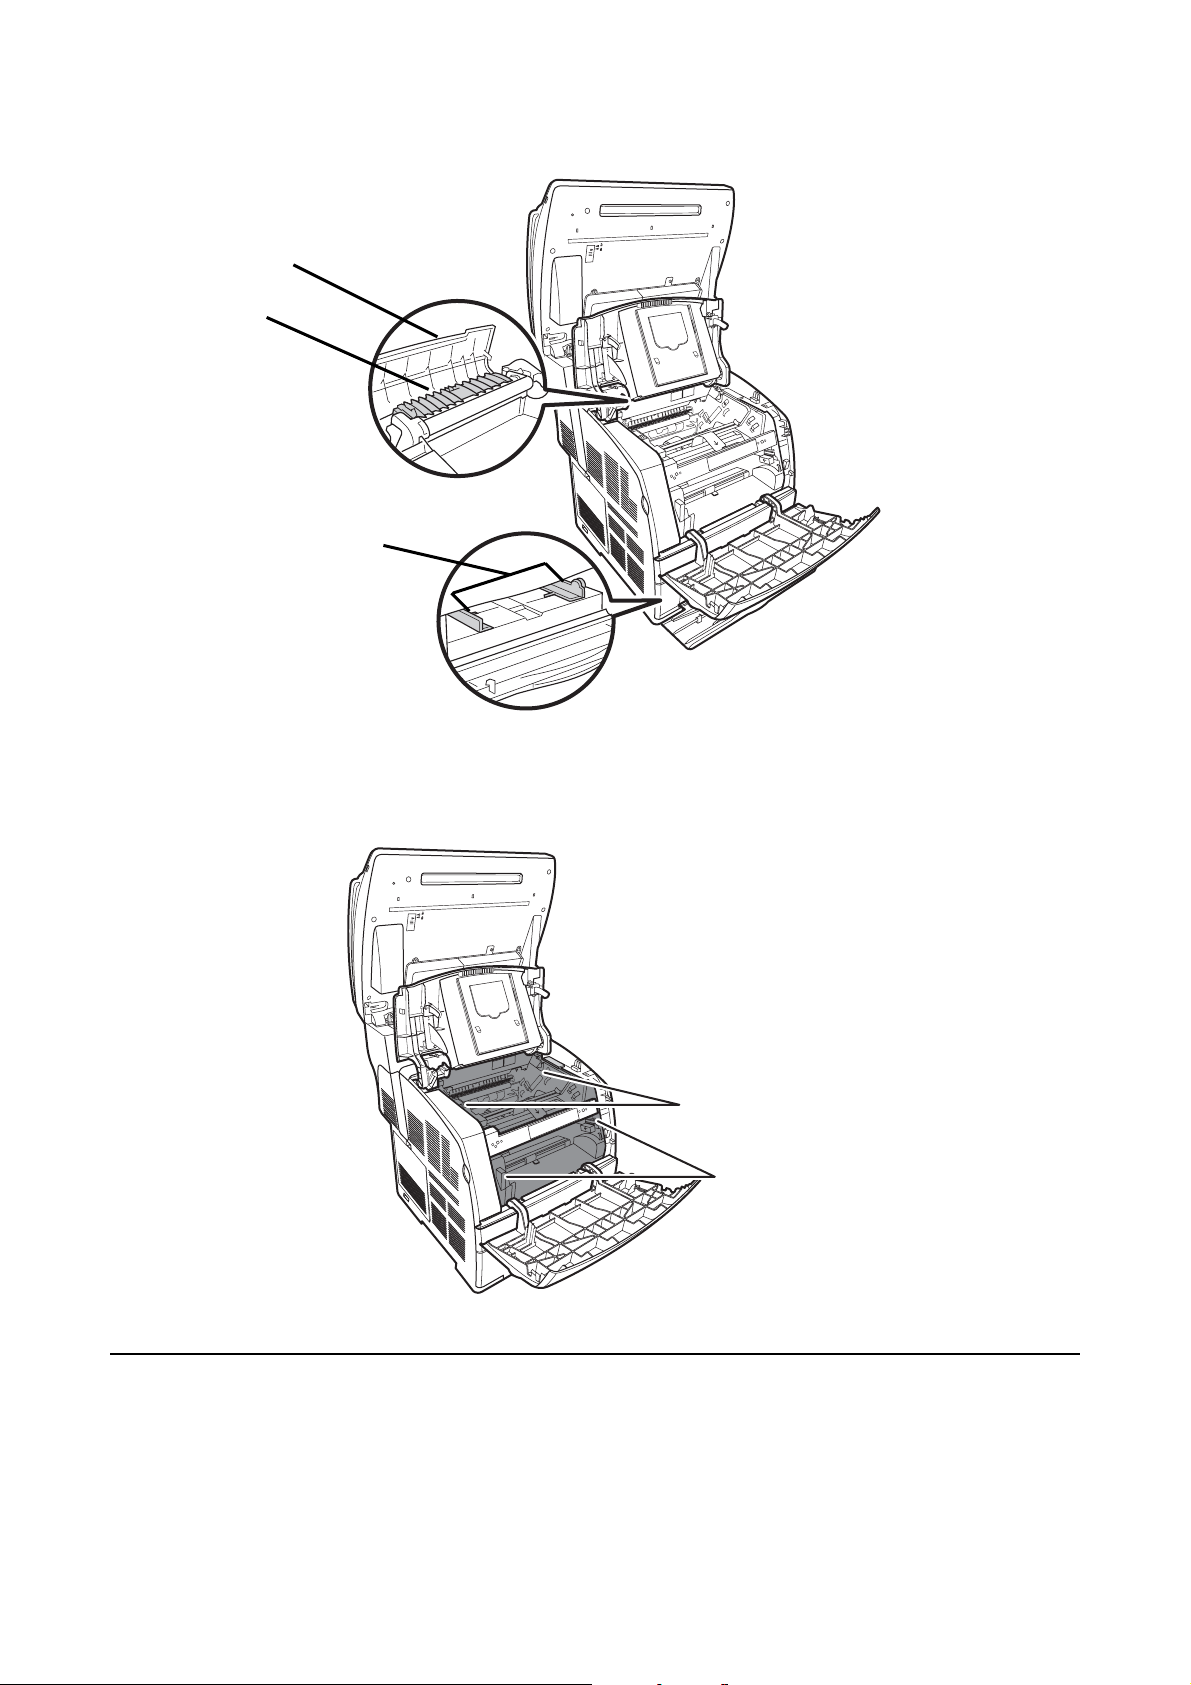
10.1 When paper jams ..................................................................................................107
10.1.1 Near the fuser unit .................................................................................................107
10.1.2 When the printer interior gets dirty ........................................................................109
10.2 Printer problems .................................................................................................... 111
10.3 Print quality problem..............................................................................................112
10.4 Scanning problems................................................................................................114
10.5 Scanning quality problems ....................................................................................115
10.6 Copying problems.................................................................................................. 116
10.7 Fax problems.........................................................................................................116
10.8 Paper handling problems.......................................................................................117
10.9 Menu tree...............................................................................................................118
10.9.1 LCD screen definition ............................................................................................118
10.9.2 DocuPrint language initialization & LCD indication ...............................................120
10.10 Major function keys and menu flow chart ..............................................................121
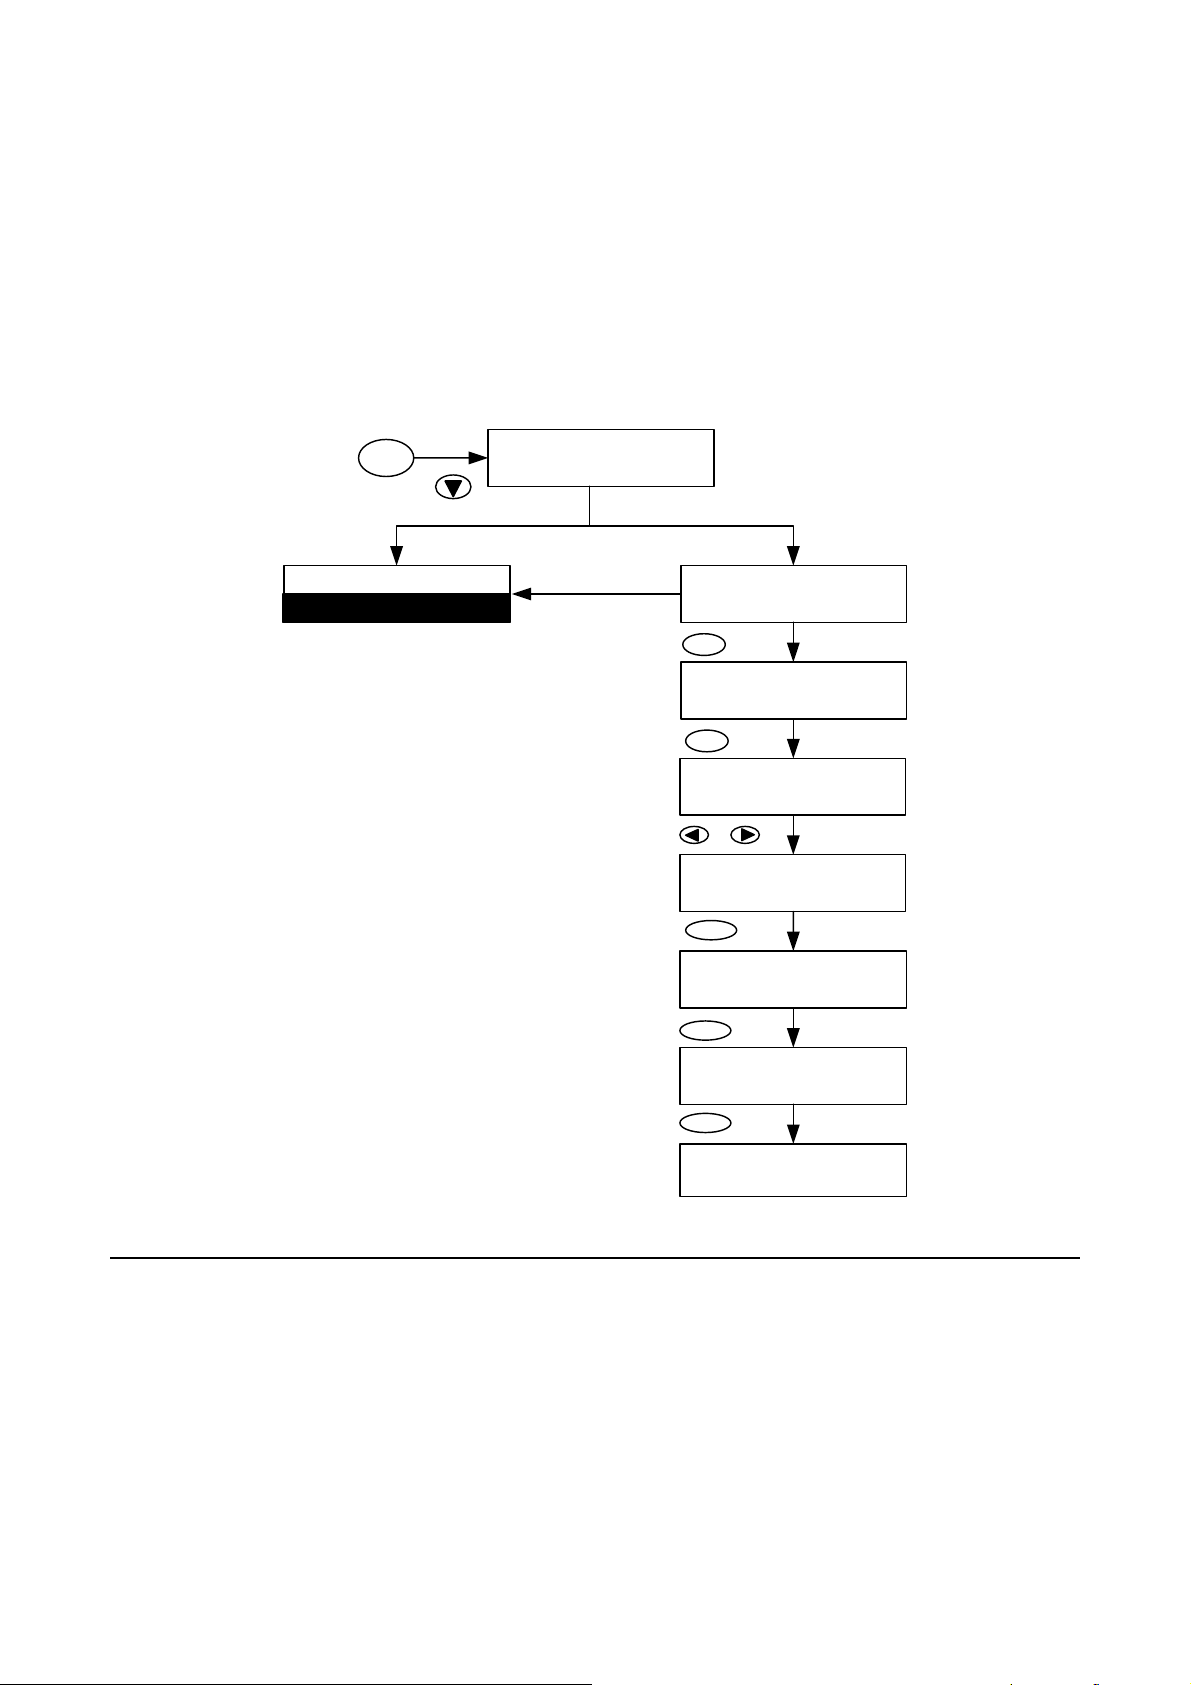
10.10.1 <Size/Type> key ....................................................................................................121
10.10.2 <Image Quality> key..............................................................................................122
10.10.3 <Reduce/Enlarge> key ..........................................................................................122
10.10.4 <Menu> key ...........................................................................................................123
10.10.5 <Scan> Key ...........................................................................................................127
10.10.6 <FAX> Key ............................................................................................................134
10.10.7 <Reduce / Enlarge > Key under Fax mode ...........................................................136
10.10.8 <Copy> Key ...........................................................................................................141
10.10.9 <Size / Type> Key under Scan mode....................................................................143
10.10.10 <MENU> key under Copy mode ...........................................................................144
11. Appendix ................................................................................................................ 149
11.1 Specifications.........................................................................................................149
11.2 Optional accessories and consumables................................................................150
11.2.1 Optional accessories .............................................................................................151
11.2.3 Handling consumables ..........................................................................................152
11.3 Replacing the consumables ..................................................................................152
11.3.1 Replacement parts.................................................................................................152
11.4 Obtaining product information ...............................................................................152
11.4.1 Laser printer driver ................................................................................................152
11.5 Upgrading the firmware version of this Multi-Functions Printer.............................153
11.5.1 PC (USB upgrade).................................................................................................153
11.5.2 Upgrade procedure................................................................................................153
11.5.3 Web server upgrade ..............................................................................................156
11.6 Status and error messages....................................................................................157
11.6.1 Printer error messages ..........................................................................................157
11.6.2 Scanner error messages .......................................................................................161
11.6.3 Scanner driver error...............................................................................................162
- 5 -
Page 6

11.6.4 Copier error messages ..........................................................................................162
11.6.5 Fax error messages...............................................................................................162
11.6.6 System error messages.........................................................................................163
11.7 Replacing components..........................................................................................164
11.7.1 Replacing the retard pad .......................................................................................164
12. CentreWare Internet Services Tool ...................................................................... 167
12.1 Access to CentreWare...........................................................................................167
12.1.1 What is CentreWare Internet Services? ................................................................167
12.1.2 Environment setting for browser............................................................................167
12.2 Web page details ...................................................................................................168
12.2.1 Status.....................................................................................................................168
12.2.2 Jobs .......................................................................................................................169
12.2.3 Setup Menu ...........................................................................................................171
12.3 Properties ..............................................................................................................173
12.3.1 Machine Details .....................................................................................................173
12.3.2 Machine Configuration...........................................................................................174
12.4 Maintenance ..........................................................................................................180
12.4.1 Error History...........................................................................................................180
12.5 Support ..................................................................................................................180
Index ............................................................................................................................. 181
- 6 -
Page 7

1. Preface
1.1 About this manual
Thank you for choosing the DocuPrint C2090 FS MFP (Multi Function Printer). With your DocuPrint C2090 FS
you can print, copy, scan and fax. This is a manual on operating this MFP and the important points to note. It
also tells you how to maintain it and troubleshoot problems.
For instructions on setting up your products and installing your software, see your Quick Installation Guide
and Setup and Quick Reference Guide
This manual is written with the assumption that you are familiar with the basic knowledge and way of
operating your computer environment and the network environment.
Since the machine is equipped with anti-counterfeit features, in some rare cases, certain kinds of documents
may be unable to copy.
1.2 Copyright and trademarks
Information presented in this manual has been reviewed and validated for accuracy. The instructions and
descriptions are accurate at the time of this manual’s production. However, the manufacturer reserves the
right to make changes without notice and assumes no liability for damages incurred directly or indirectly from
errors, omissions, or discrepancies between this and any other future documents.
© Copyright 2006. All rights reserved. Under copyright laws, this manual cannot be reproduced in any form
without the prior written permission of the manufacturer. No patent liability is assumed with respect to the use
of the information contained herein.
Microsoft, Windows, Windows Server are either registered trademarks or trademarks of Microsoft Corporation
in the United States and/or other countries. Adobe and Acrobat are either registered trademarks or
trademarks of Adobe Systems Incorporated in the United States and/or other countries.
XEROX, The Document Company, and the digital X is a trademarks of Xerox Corporation. All Xerox and Fuji
Xerox product names are either registered trademarks or trademarks of Xerox Corporation and Fuji Xerox Co.,
Ltd. Other product names and company names are the registered trademarks or trademarks of their
respective holders.
1.3 Regulatory notices
Users of this machine must observe the following restrictions to ensure the responsible and legal use of this
machine.
1.4 Responsible use of copyright materials
Scanners can be misused by improperly copying copyrighted materials. Unless acting on the advice of a
knowledgeable attorney, be responsible and respectful by attaining the consent from the copyright holder
before copying published material.
1.5 Illegal copies and printouts
Copying or printing certain documents may be illegal in your country. Penalties of fines or imprisonment may
be imposed on those found guilty. The following are examples of items that may be illegal to copy or print in
- 7 -
Page 8

your country.
• Currency
• Bank notes and checks
• Bank and government bonds and securities
• Passports and identification cards
• Copyright material or trademarks without the consent of the owner
• Postage stamps and other negotiable instruments
Exercise caution when copying the following items:
• Private marketable securities (stock certificates, negotiable notes, checks, etc.)
• Driver’s license, warrants of fitness, road passes, food stamps, tickets, etc.
This list is not inclusive and no liability is assumed for either its completeness or accuracy. In case of doubt,
contact your legal counsel.
Notice:
• This machine is provided with the recognition function to prevent the copying of currency. Also, in case
currency or securities are copied, the forgery tracing function can identify a machine used for the copy.
• Note that the recognition function prevents a limited range of illegal copies. Always put your machine
under careful charge to prevent illegal copies from being made.
1.6 Symbols and terminologies
The following table describes the conventions for the symbols and terms used in this User Guide.
Terms / Symbols Description
Important
Note
Warning
[ ]
< >
Indicates essential information that you must read.
Indicates additional information on operation or features of the
MFP.
Indicate important safety issues which you must note while
operating the MFP.
Indicates items or commands on the computer and the printer
control panel.
Indicates the hard buttons on the MFP.
- 8 -
Page 9

1.7 Types of manuals
Quick Installation Guide
Setup and Quick Reference Guide Explains the way of installation, loading paper,
User Guide (PDF) (This manual)
Documentation in the Software
CD-ROM
Note:
• Adobe® Acrobat® Reader needs to be installed to display PDF files. Install the Acrobat Reader using
the CentreWare CD-ROM first if it is not already installed.
Explains the installation procedure of each
optional accessory.
This manual is bundled with each optional
product.
and troubleshooting of this MFP
Explains MFP settings, and describes control
panel items and daily care in detail. Refer to
the contents of the Setup and Quick
Reference Guide is included except the
installation of this MFP.
This PDF file is included in the Software
CD-ROM.
Explains how to set the MFP environment and
how to install the MFP driver and our company
software
all
1.8 Safety notes
For your own safety, please read this page carefully before using the DocuPrint C2090 FS.
Graphic Symbols used throughout the guide
Used for items that if not followed directly, can lead to severe or
WARNING
CAUTION
A symbol for items to pay attention to
when handling the machine. Follow
instructions carefully to use the machine
safely
A symbol for items to pay attention to
when handling the machine. Follow
instructions carefully to use the machine
safely
A symbol for items to pay attention to
when handling the machine. Follow
instructions carefully to use the machine
safely
fatal injuries.
Used for items that if not followed directly, can cause injuries to
user or damages to the machine.
Heated
surface
Prohibited
Instructions
Flammable
No fire Do not
Unplug Ground/
Electric
shock
tear
down
Earth
Pinched
fingers
Do not
touch
- 9 -
Page 10

Laser Printer Precautions
The DocuPrint C2090 FS utilizes laser technology. Follow the precautions below to ensure safe, efficient
operation.
Unless specifically instructed in the manual, be careful not to touch the fuser, which
is marked CAUTION HOT SURFACE. If you have been using the DocuPrint C2090
FS for an extended period of time, the fuser may be very hot.
Do not attempt to modify or not to disassemble the toner cartridge. It cannot be
refilled.
Do not touch the toner and avoid contact with your eyes.
Do not use a vacuum cleaner if the toner is spilled. Use a broom and dustpan or a
damp cloth with soap and water to clean up. Because the fine particles in the toner
cartridge can cause a fire or an explosion if they come into contact with a spark.
Do not dispose of used toner cartridges or fuser in fire. Doing so may cause fire and
injury. Dispose of them according to local regulations.
Do not unplug or reconnect the machine while it is on. Unplugging a live connector
can deform the plug and cause a fire.
When unplugging the machine, grasp the plug instead of the cord. Forcibly pulling
on a cord can damage it and cause fire or electric shock.
Be sure to switch off and unplug the machine before accessing the interior of the
machine for cleaning, maintenance, or fault clearance. Access to a live machine's
interior can cause electric shock.
When the machine is not used over an extended period of time, switch it off and
unplug it. If an unused machine is left connected to power for a long time, degraded
insulation can cause electric shock, current leakage, or fire.
- 10 -
Page 11

1.9 Using this manual
Chapter summary
The DocuPrint C2090 FS User Guide consists of the following chapters to help you use the product efficiently
with ease.
Chapter Title Description
Preface This chapter provides safety information,
regulatory notices, important warning and
cautions that should be noted by the user.
Introducing the
DocuPrint C2090 FS
Getting started This chapter helps you to get started with the
Printing This chapter provides information on how to
Scanning This chapter provides information on how to
Copying This chapter provides information on how to
Sending a fax This chapter provides information on both how
Paper handling This chapter provides detailed information on
This chapter provides an overview of the
features of the DocuPrint C2090 FS, and an
introduction of the components of the machine.
MFP with information on installing cartridges and
connecting the cables appropriately.
perform a printing task.
perform a scanning task.
perform a copying task.
to send and receive a fax.
the types paper to be used for different purposes
and how to load them properly.
Trouble shooting Guide &
Menu Tree
Advance functions This chapter covers information on configuration
Appendix This chapter covers specification of the
CentreWare Internet
Services Tool
This chapter provides detailed information to
guide users to trouble shooting and introducing
LCD operating menu tree
of settings for different modes and
miscellaneous functions.
DocuPrint C2090 FS and Firmware upgrade
process
This chapter covers configure and change
default setting by using browser or control panel
- 11 -
Page 12

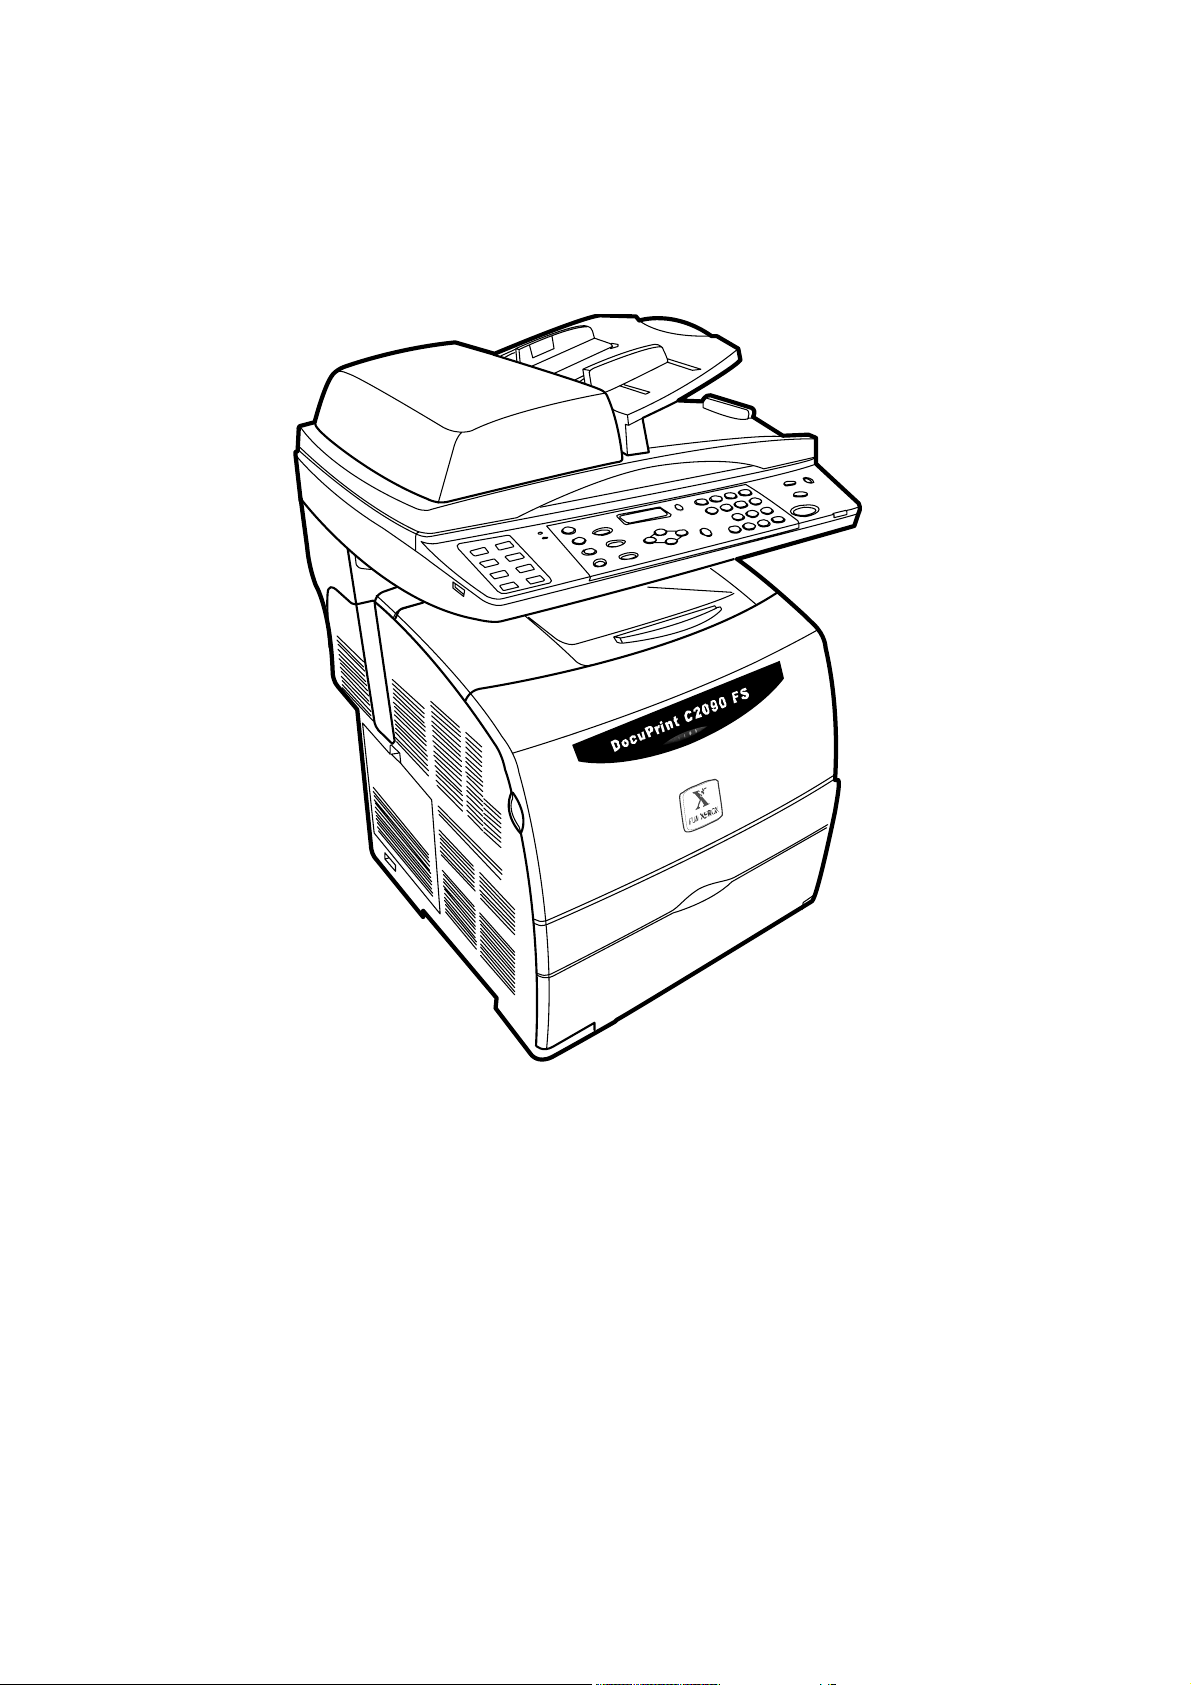
2. Introducing the DocuPrint C2090 FS
This chapter explains the features, package contents, and the components of the DocuPrint C2090 FS.
2.1 Features
Printer
• Prints multiple pages on a single sheet
• Prints watermarks or specific stamps over printed material
• Prints single images over multiple pages to produce poster sized images
• Adjusts image quality depending on document type and requirement
• 'Favorite' print settings can be saved and reused
• Prints on special media such as envelopes or transparencies using the bypass tray
• IP filtering can be used to limit users of the printer functions
• Print status and management possible from remote computer
Fax
• Serves as a PC fax machine to send documents
• Faxes the scanned documents or images from the computer
• Fax speed up to 33.6K with Super G3.
• Sends a fax through the phone book from the Tool Box by using fax driver
• Auto-redialing
• Reports fax status
Important:
• While sending or receiving a fax, the DocuPrint C2090 FS still performs other functions such as printing
and scanning simultaneously, but at a slower speed.
Copier
• Copy resolution up to 600 dpi
• Copy speed up to 3 cpm @ 600 dpi for color print
• Copy speed up to 8 cpm @ 600 dpi for B/W print
• Enlarges or reduces copy sizes with custom copy ratios or manually
• Adjusts the image quality
• Adjusts the copy exposure
• Adjusts color balance of the copy
• Sorts copies in page order
Scanner
• Flatbed, CCD scanner
• High scanner resolution: 4800 dpi x 4800 dpi enhanced, 1200 dpi x 1200 dpi full color optical
• Full Color scan speed 3 ms/line (Flatbed Scan)
• Mono scan speed 0.75 ms/line (Flatbed Scan)
• Scan area up to A4/Letter on flatbed; up to Legal via Auto Document Feeder (ADF)
• Integrated Simplex Auto Document Feeder (ADF) max 50 sheets (@ 75 gsm paper)
- 12 -
Page 13
2.2 Package contents
All the following items should be present in the package. If anything appears to be missing or damaged,
contact your dealer immediately.
• DocuPrint C2090 FS
• Drum cartridge
• 4 Toner cartridges ([K]: 4K, [Y] [M] [C]: 1.5K)
• Setup and Quick Reference Guide
• Software CD-ROM
• Multi-language panel sheet x 3 (TC/SC/KR)
• AC power cable
• Phone cable
• USB cable
• Retard pad (x 2)
• Quick Installation Guide
• DocuWorks License
Note:
• Language abbreviation: TC (Traditional Chinese). SC (Simplified Chinese), KR (Korean).
Unpacking the printer
Note:
• Before using the DocuPrint C2090 FS, make sure you have removed all the tapes and styrofoam from
the machine. Failure to do so may cause damage to the machine or it may not function properly.
Remove the DocuPrint C2090 FS from its packaging box and move it to the desired location for installation.
When the DocuPrint C2090 FS is first taken out of the packaging box, the cover of the machine is taped.
Remove the tape.
Slowly lift up part B and Cover C .
1
2
3
3
Push up the green levers on both sides and remove the spacer. Push down the levers and close the cover.
- 13 -
Page 14
Note:
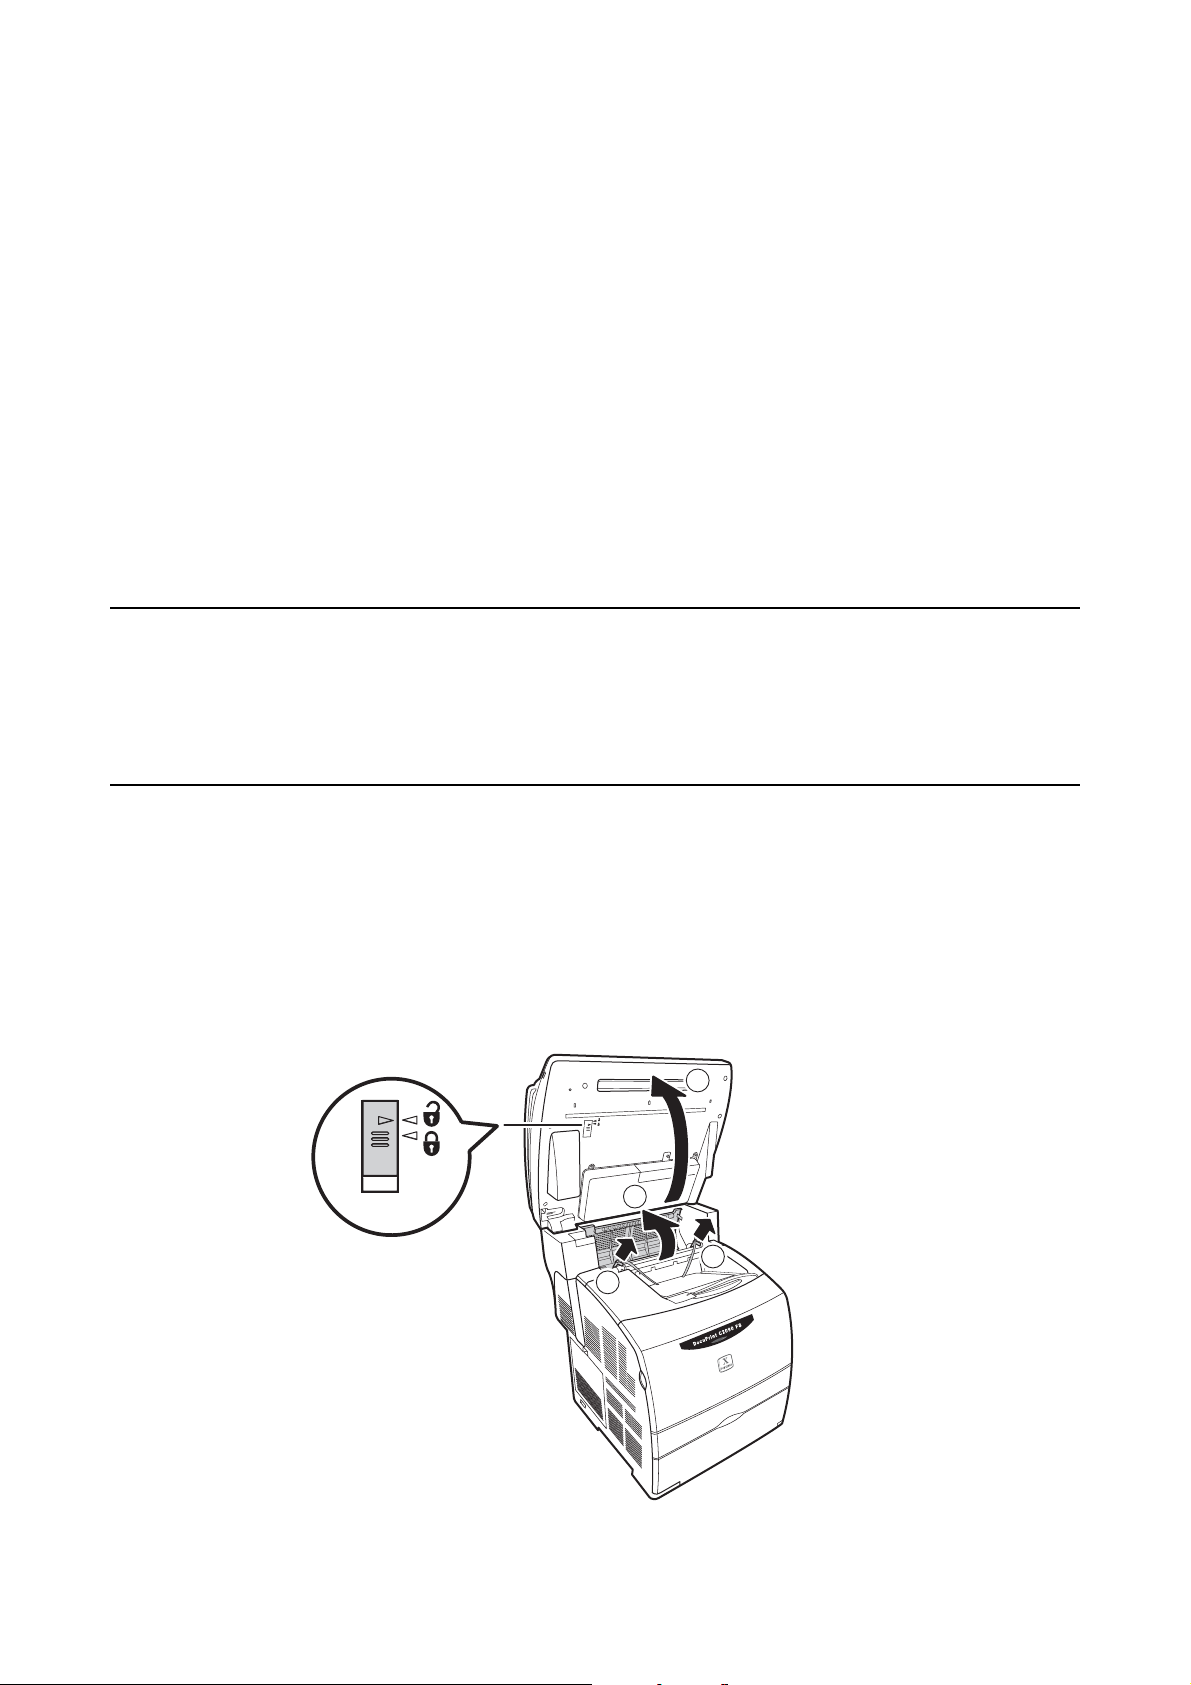
• Transportation lock is located at the back of part B. Slowly flip over the scanner unit and move the
transportation lock to unlocked position before using the DocuPrint C2090 FS.
Open document cover and remove the paper on the document glass.
- 14 -
Page 15
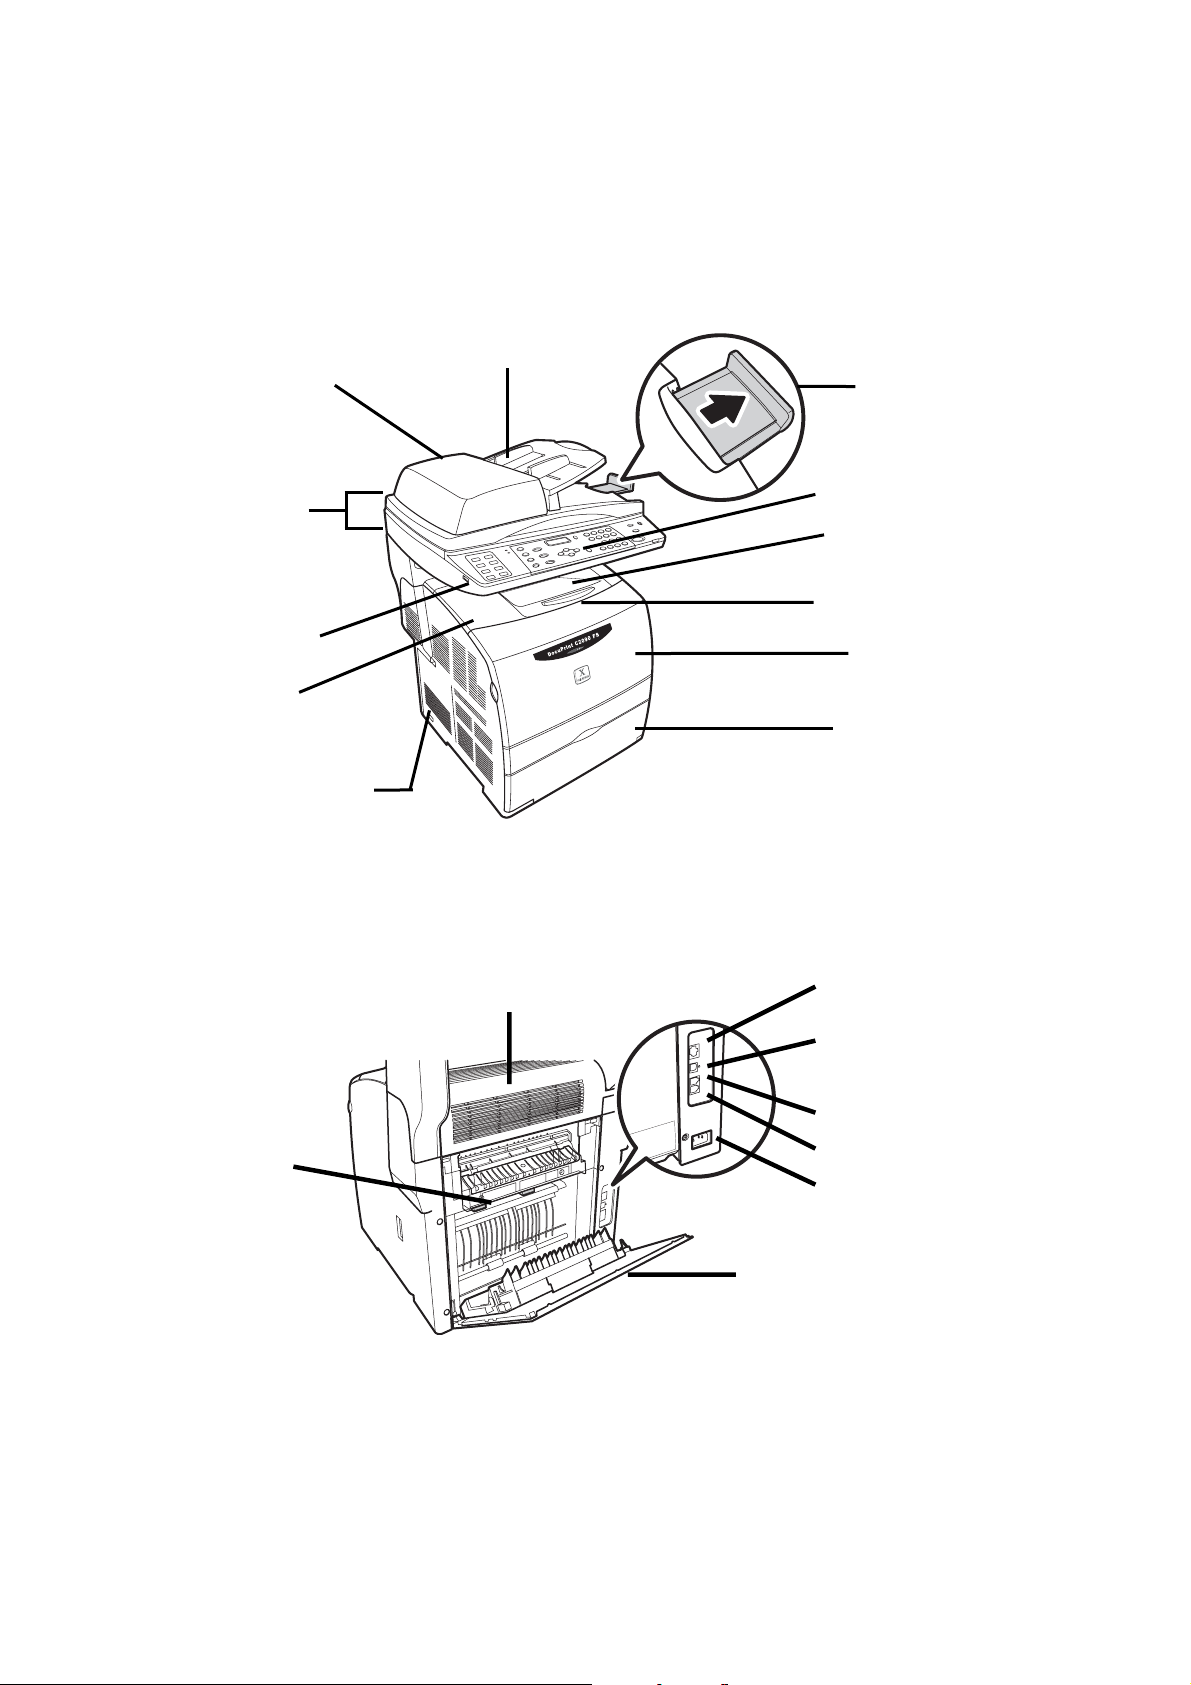
2.3 Overview of the DocuPrint C2090 FS components
This section provides a brief description of the main components of the DocuPrint C2090 FS.
2.3.1 Front view
Auto Document
feeder (ADF)
Part B
USB port
Top cover
Power switch
2.3.2 Rear view
Cover A
Paper stopper
Control panel
Output tray
Extension output tray
Front cover
Cover D
Cover C
LAN cable
Connector
Cover F
USB cable
Connector
LINE Connector
PHONE Connector
AC inlet
Cover E
- 15 -
Page 16
2.3.3 Inside the DocuPrint C2090 FS
Cover C
Fuser
Paper Guide
2.3.4 Printer components
Drum cartridge slot
Tonercartridge slot
Note:
• For instructions on installing cartridges, see “Installing the toner cartridges” & “Installing the drum
cartridge” section.
- 16 -
Page 17
per
y
Output tray
2.3.5 Scanner Components
Document Cover
Part B
Transportation lock
Pa
tra
Scanner unit
Document Glass
USB Port
,,
Note:
• Transportation lock is located at the back of the part B. Slowly flip over the scanner unit and remove the
transportation lock to unlocked position before using the DocuPrint C2090 FS
- 17 -
Page 18

2.3.6 Control panel
15
1
234
56 7
8
13 1214
910
1
23
456
789
0c#
*
11
- 18 -
Page 19

No. Button Name Functions
1 Fast keys Specific registered dial fast key.
2 Transmission light (green) Indicates data transmission.
3 Job in Memory (red) Indicates job processed in memory.
4 Copy options From top to bottom:
<Size/Type>: Press to choose type/size of the original document
or the paper to be used.
<Reduce/Enlarge>: Press to set the percentage to enlarge or
reduce the copy output.
<Image quality>: Press to set brightness, sharpness, and the
color balance.
<Color mode>: Press to toggle between color and mono mode.
(Green light indicates color mode.)
5 Mode
buttons
From top to bottom:
<Copy/ Fax/ Scan>
Press to choose the mode for specified task.
6 LCD screen Displays current job status, menu selection.
7 Menu/
Set
From top to bottom:
<Menu>: Press to show current setting of the machine and modify
with the arrow keys.
<Set>: Press to confirm the new settings.
8 Dial buttons From top to bottom:
<Redial/Pause>: Press to call the last number dialed.
<Speed dial>: Press the button and then the digit set for a
specified telephone number without inputting the complete
number.
9 Numeric keys Press to input number of copies or fax number.
10 Clear all/ Stop/
Start
From top to bottom:
Press <Clear all> to cancel current settings or clear the number of
copies to make.
Press <Stop> to terminate current job.
Press <Start> to perform current job.
11 Power saver Press to cancel the Power Save Mode. (Green light indicates
power saver on.)
12 Error LED Lights up when an error occurred during operation.
13 Clear Press to clear the number entered with the numeric keys.
14 Arrow keys Press to view and select options in the menu tree.
15 USB port Connects USB device to scan documents to USB memory.
- 19 -
Page 20
3. Getting started
This chapter helps you get started using the DocuPrint C2090 FS.
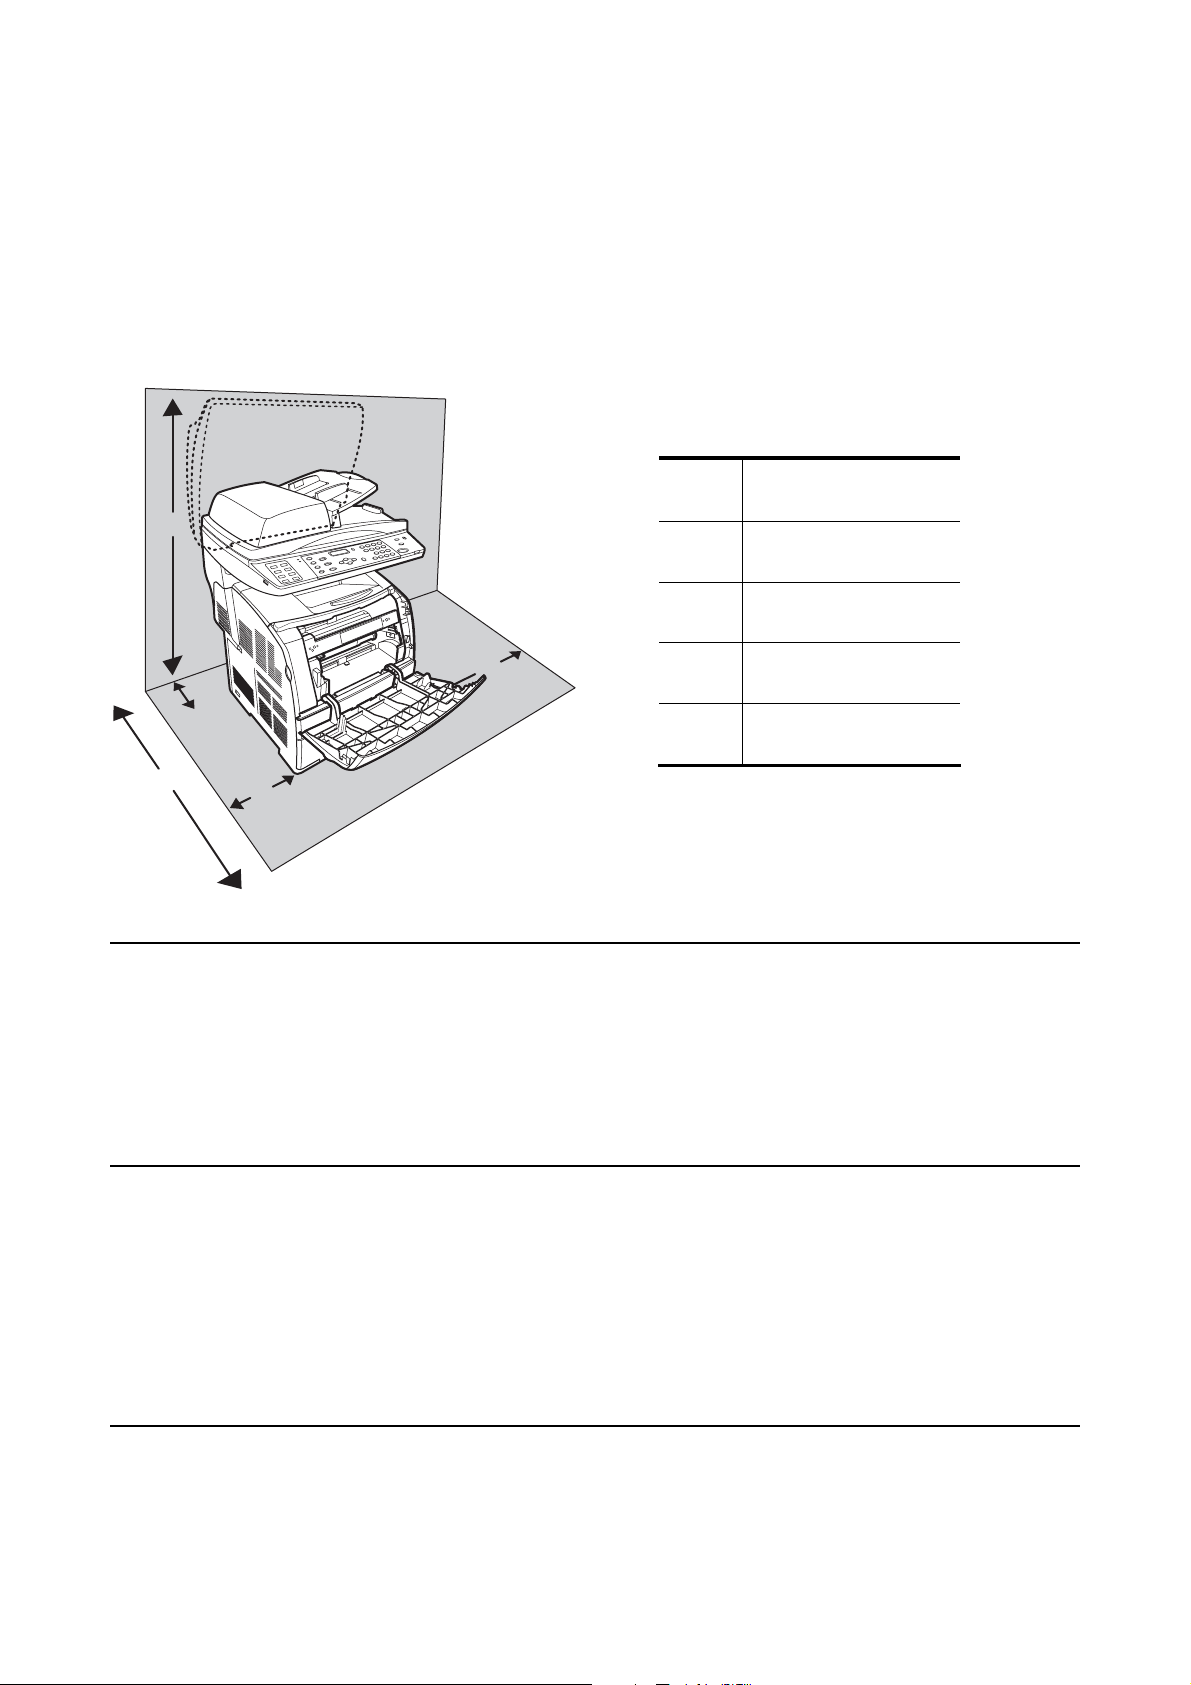
3.1 Placing the DocuPrint C2090 FS
The DocuPrint C2090 FS should be located at a well-ventilated place so that the exhaust gases and heat
generated are not directly blown onto the user’s face. Proper ventilation is necessary to prevent the machine
from overheating.
Recommend Distance
a 910 mm
a
b 210 mm
c 830 mm
e
d 180 mm
b
e 300 mm
c
Important:
Ensure that the DocuPrint C2090 FS is installed at a location with the following conditions:
• Temperature range 10-32° C, humidity range 15 - 85% (no condensation). Humidity should be 70% or
below at 32° C, and temperature should be 28° C or below at 85% humidity.
• Do not expose the machine to direct sunlight.
• Do not expose the machine to direct draft from an air-conditioner or heater.
Note:
• When using the printer with the bypass tray opened, do not expose the printer to direct sunlight. Doing
so may cause a malfunction connecting power
d
3.1.1 Power cable
You can load the paper or install the toner cartridge and drum cartridge into the printer after the printer is
switched on.
Important:
• The power cable does not support hot plug. Make sure the power switch is in off position before
connecting the power cable to the printer.
• Connect the power cord to the power cord connector at the back of the printer.
• Connect the other end of the power cord to the power outlet.
- 20 -
Page 21
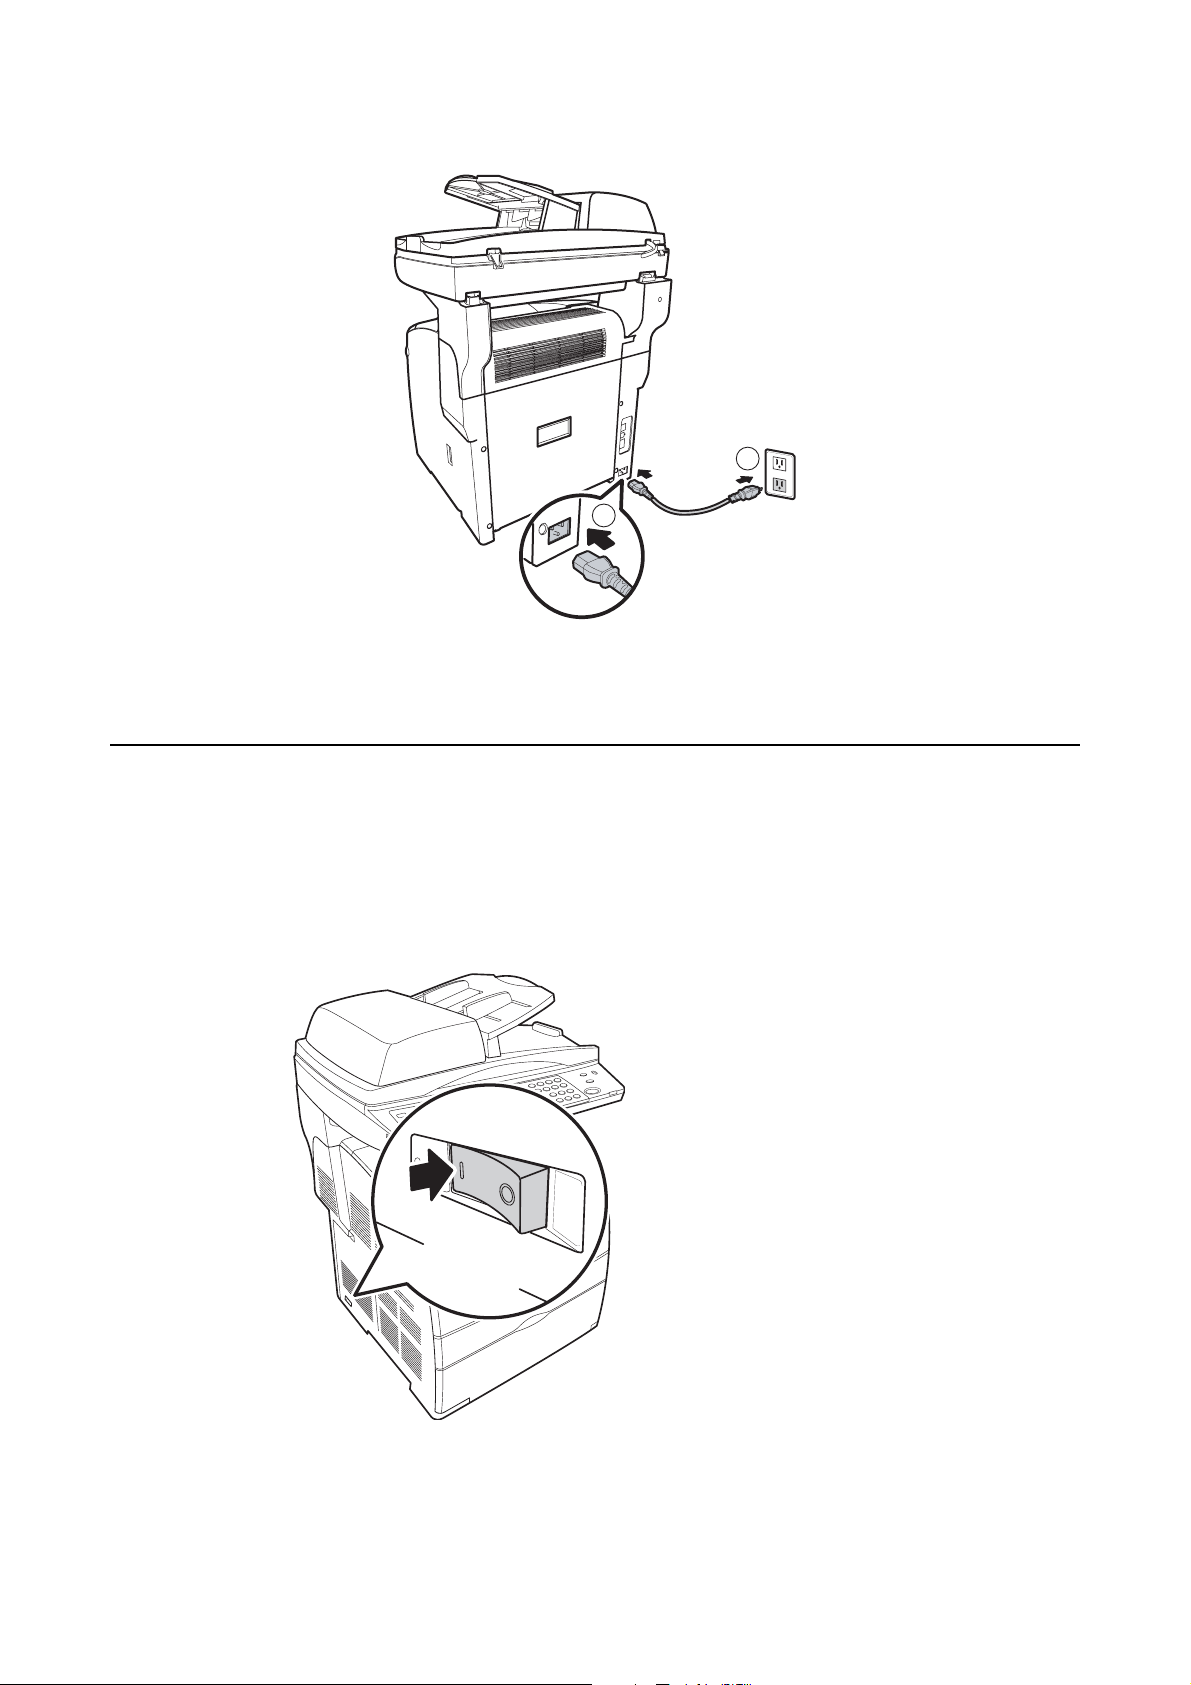
O
2
1
• Press the power switch of the printer to the <|> position. The toner cartridge carrier rotates and then
stops. The [Load XXXX (the color of the toner) Cartridge] message is displayed on the control
panel.
Note:
• Before removing the power cord from the machine, make sure the power is switched off properly.
3.2 Switching On and Off the Power
3.2.1 Switching on the power
Press the power switch of the printer to the <|> position.
ON
When the power is turned on, [Wait...] will be displayed on the control panel.
When turning on for the first time, follow the steps below to configure the setting for time and date.
- 21 -
Page 22

3.2.2 Switching off the power
1. Make sure that the printer is not processing any data by checking the display on the control panel.
[(mode) Ready]
2. Push the power switch of the printer to the <O> position to switch the power off.
OFF
Important:
• Do not switch off the power of the printer when printing is in progress. It may lead to a paper jam.
• Once the power is switched off, print data remaining in this printer or information saved in the memory
of this printer will be deleted.
• After you switch the power off, wait for 5 seconds before switching it on again.
3.2.3 Setting the time
1. In Copy mode, <Menu> button on the control panel. Press <▼> button four times and press
<Set>.
2. In the Password screen, press <0> four times, press <Set>.
3. In the Network screen, press <►> button once.
4. In the System screen, press set, press <►> button five times.
5. In the Time and Date screen, press <Set>.
6. In the Time Setting screen, set the time by the numeric keys key, press <Set>.
3.3 Setting the environment
3.3.1 Setting the Date
1. Follow steps 3 to 5 in the Time setting section, and then press <►> button once.
2. In the Date setting screen, set the date by the numeric keys and press <Set>.
3. In the Network screen, press the <Copy> button or turn the power off and on.
Remove the DocuPrint C2090 FS from its packaging box and move it to the desired location for
installation.
- 22 -
Page 23
3.3.2 Setting IP address
1. In Copy Mode, press <Menu> on the control panel. Press <▼> for four times and press <Set>.
2. On the Password screen, press <0> four times, press <Set>.
3. On the Network screen, press <Set>.
4. Select Ethernet, TCP IP, or Protocol with <◄/►> and press <Set>.
5. In the IP address screen, select the desired option <◄/►> and press <Set>.
6. Enter the IP address with the numeric keypad and press <Set>.
7. Need Power off message messages appears within a few seconds.
8. In the Network screen, press <Copy> or turn the power off and on.
MENU
Password
Invalid
Configuration ▲
Need Password
Not Match
Password ? ▲
Input : ****
SET
Match
Configuration ▲
Network ◄►
SET
Network Config ▲
Ethernet ◄►
Network Config ▲
TCP/IP ◄►
SET
TCP/IP ▲
IP Address ◄►
SET
IP Address ▲
XXX.XXX.XXX.XXX
SET
Need Power Off
To Enable
Note:
• For detail instructions on Network configuration setting, please see the chapter 10 troubleshooting
guide, “10.10.10.4 <Menu> key” section
• When you finished IP address change or modify, please switch power OFF then ON again, otherwise
changed IP address will not available.
3.3.3 Setting languages mode
Refer to the menu tree below to select the languages and insert the toner cartridges when using the device for
the first time
- 23 -
Page 24

3.3.4 Setting country code
The DocuPrint C2090FS Fax function requires telecommunication certification by countries. Before you using
DocuPrint C2090FS Fax function, you need configuring the fax setting for location of the certified countries
that offer fax as standard capability.
1. In FAX Mode, press <Menu> on the control panel. Press <▼> to find [Configuration – Need
password?] screen then press <Set>
2. On the password screen, press <0> four times, press <Set>.
3. Press <▼> find out [Configuration – Network] screen.
4. Press <◄/►> to go to [Maintenance – Country code] the press <Set>.
5. Please refer to below table for your country code selection.
6. Press <Set> to confirm your setting
Country Code
1. Hong Kong 5. Singapore 9. Malaysia
2. China 6. Australia 10. Vietnam
3. South Korea 7. New Zealand 11. Philippines
4. Taiwan 8. Indonesia 12. Thailand
3.3.5 Setting subnet mask/gateway address
1. When [IP Address] is displayed, press the <▲> or <▼> button to display [Subnet Mask], then
press the <►> or the <Set> button.
2. Press the <▲> <▼> <►> <◄> buttons to enter the subnet mask, then press the <Set> button.
3. Press <◄> button to return to [Subnet Mask].
4. Press the <▲> or <▼> button until [Gateway Address] is displayed, then press the <►> button.
5. Press the <▲> <▼> <►> <◄> buttons to enter the gateway address, then press the <Set>
button.
6. Switch off the printer and then switch it on again.
Note:
• When “Ready to print“ is displayed, follow steps 1 to 4 in the previous section before proceeding to the
next procedure.
3.4 Power save mode
This printer is equipped with a power saver mode to reduce power consumption when it is left idle.
- 24 -
Page 25
When no print data is received for 5 minutes, the printer will enter the power saver mode.
When the printer enter power saver mode, only the <Power Saver> indicator lights, the screen on the control
panel becomes dark and all the other indicator goes out. The display also goes out, and nothing is displayed.
3.5 Exiting the power save mode
The printer is automatically cancels the power save mode once it receives data from the computer.
To cancel power saver mode manually, press the <Power Saver> button.
3.6 Installing the toner cartridges
Warning
Never throw a toner cartridge into an open flame. It can cause an explosion and burn injuries.
1. After confirming the [Load XXXX (the color of the toner) Cartridge] message on the control panel,
open the front cover.
2. Hold the tape and gently pull it forward to remove the protective cover from the toner cartridge.
3. Take the toner cartridge out of the box, and gently shake it several times as shown in the diagram to
distribute the toner evenly.
- 25 -
Page 26

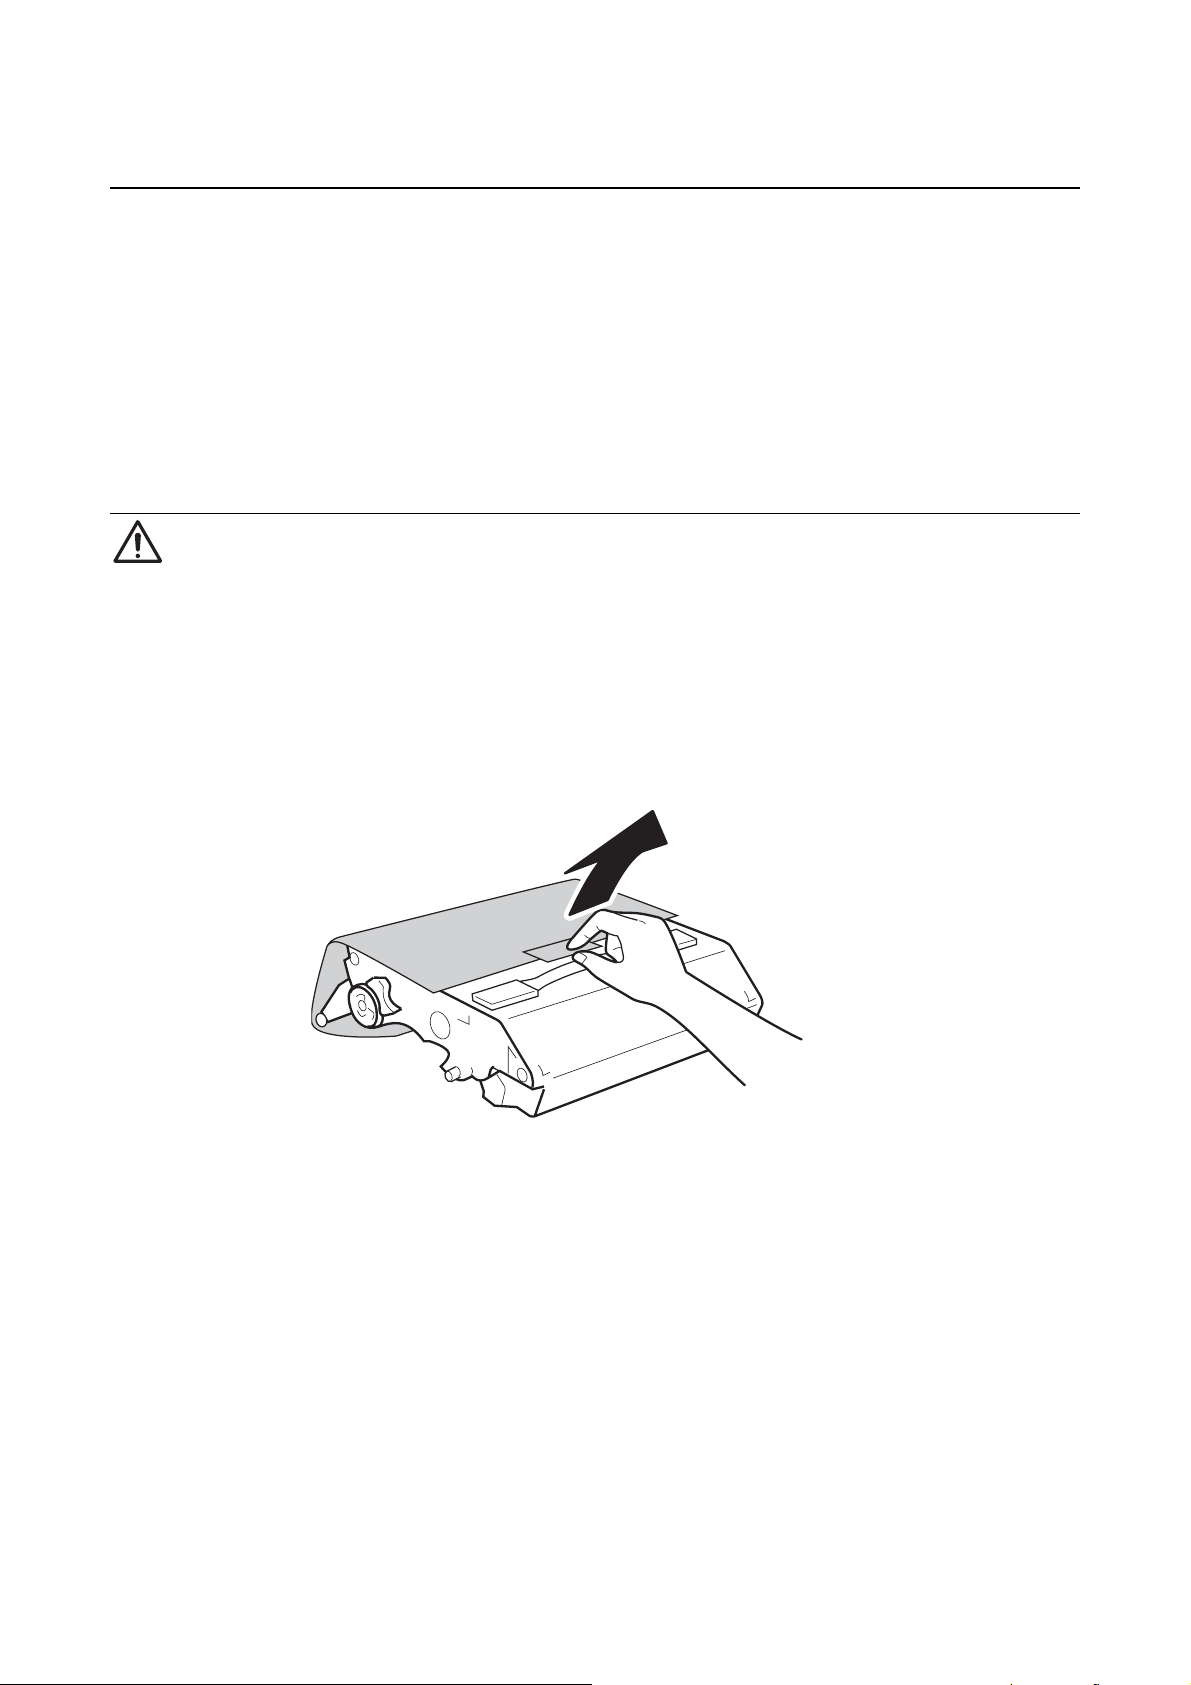
4. Remove the top part of the seal from the toner cartridge and pull the seal in the direction of the arrow,
keeping it parallel with the toner cartridge.
5. Insert the toner cartridge with the arrow facing you. Push the cartridge all the way into the slot. Push
both sides evenly until it is secure.
6. Push down the side lever to lock the toner cartridge.
- 26 -
Page 27
7. Close the front cover. The toner cartridge carrier rotates to the next empty slot.
8. Repeat steps 1 through 7 until all cartridges are installed.
Notes:
• The toner cartridge is installed securely when the lock lever cannot be turned further.
• Although the toner is not harmful to your body, wash it off immediately if your hands or clothes are
stained with it.
• The protective cover is attached to each toner cartridge slot at the factory. You only have to remove the
cover from each toner cartridge slot the first time that you install the toner.
• When pulling out the seal, pull it out horizontally. The tape might break if it is pulled out diagonally.
• After the seal has been pulled out, do not shake or bump the toner cartridge.
• Make sure the toner cartridge is installed correctly. Otherwise, the front cover cannot close firmly.
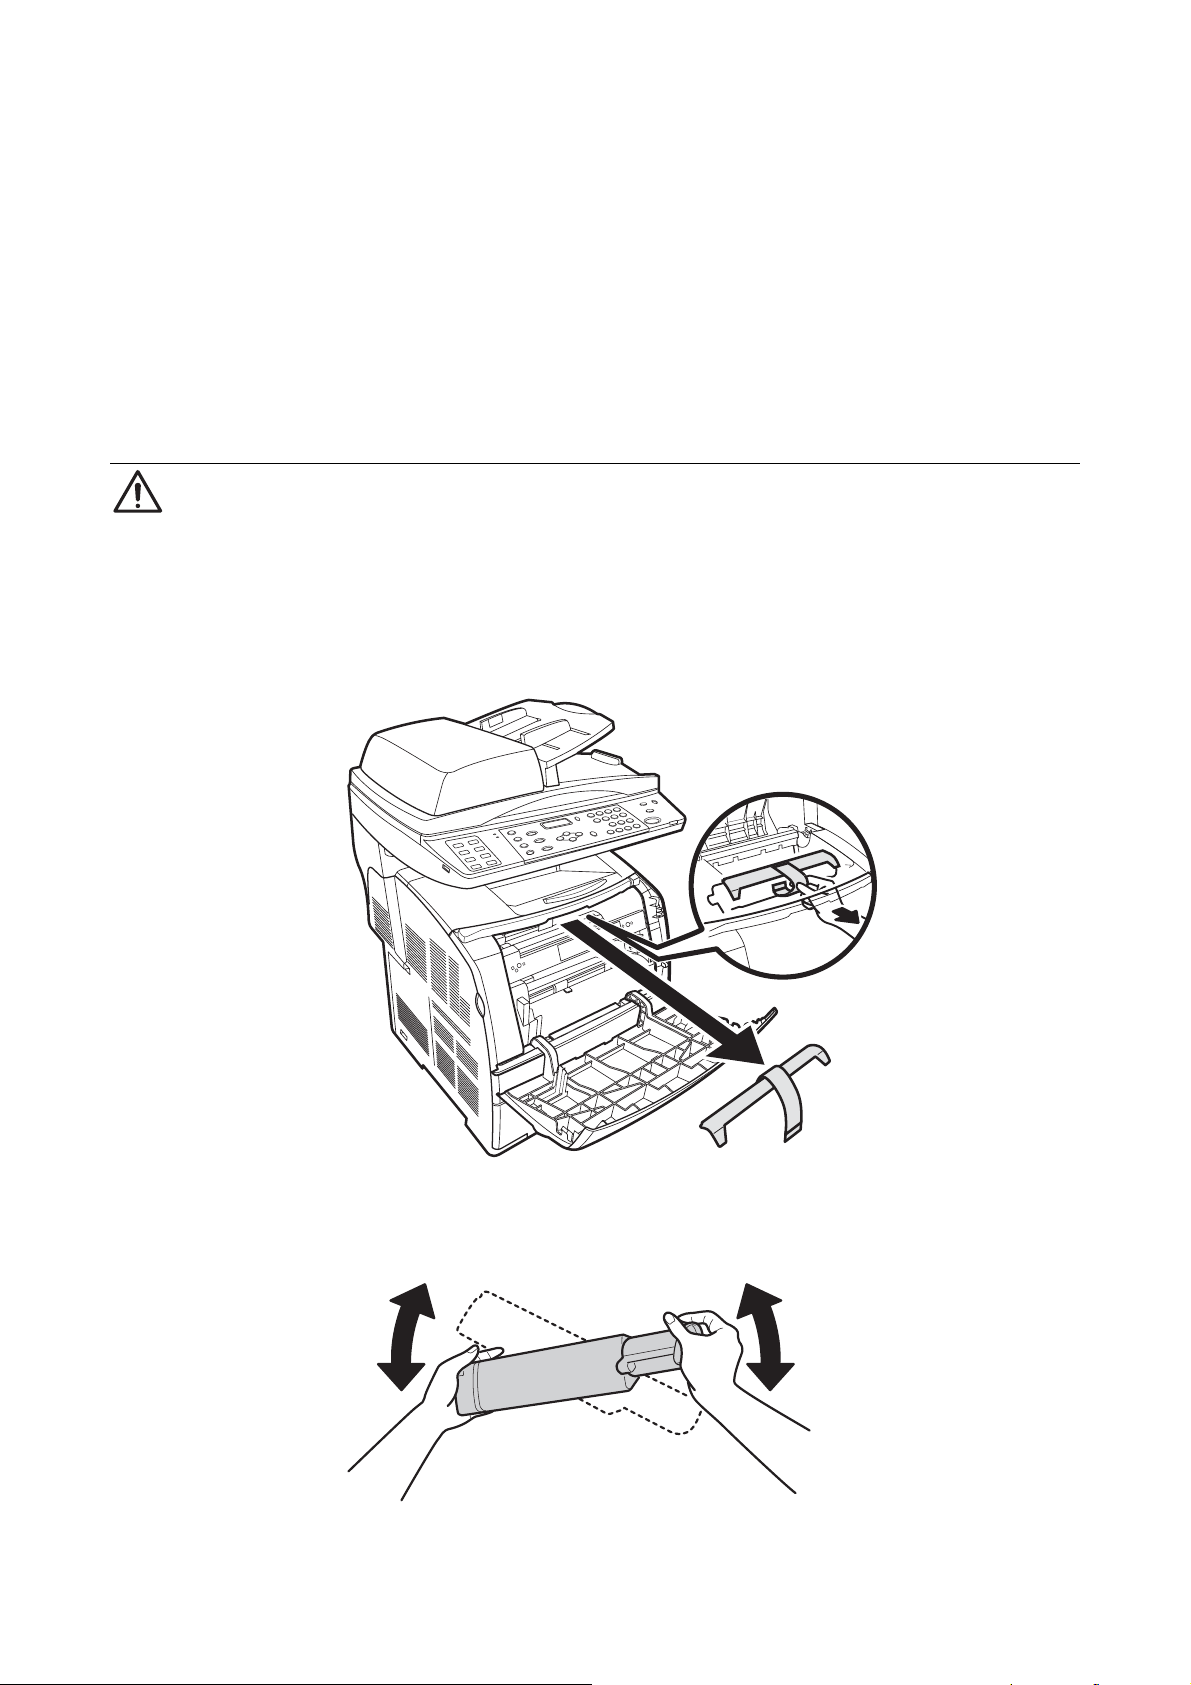
3.7 Installing the drum cartridge
Warning
• Never throw a drum cartridge into an open flame. It can cause an explosion and burn injuries.
1. When the [Load Drum Cartridge] message is displayed on the control panel, slowly flip back part B
until it stops.
2. Open the front cover, and then lift up the top cover.
3. Take the drum cartridge out of the packaging box, and then remove the protective sheet.
4. To insert the drum cartridge, push up the lever on the right side of the printer.
- 27 -
Page 28

3
2
1
5. With the lever in the upright position, hold the drum cartridge by the handle, align the arrows on the
drum cartridge with the corresponding arrows on the printer and guide the cartridge in until it snaps
into place.
6. Pull down the lever on the right to lock the drum cartridge in place. Flip down the top cover, and then
close the front cover.
7. Slowly push down part B to its original position.
Notes:
• Hold the drum cartridge by the handle. Do not touch the surface of the drum (blue colored part). Also,
never allow any material to hit or rub the surface of the drum.
• Do not expose the drum cartridge to direct sunlight or strong light.
• To ensure good print quality, always keep the drum cartridge level when handling it.
- 28 -
Page 29
• After installing the drum cartridge, the printer makes an adjustment for about one to two minutes. Do
not switch off the printer during this time.
3.8 Installing extra memory
Memory expansion to 256 MB is supported for this printer. When additional memory is installed, the total
memory capacity becomes 352 MB respectively. This total 352MB memory size is included front-end and
back-end memory.
Important:
• Do not touch the connectors of the additional memory module
• Do not bend or damage the additional memory.
• Be sure to touch a metal surface to eliminate static electricity before touching the additional memory
with your bare hands.
To add more memory when the printer is in use, you need to configure the memory capacity in the print driver.
For details, refer to the Online Help for the print driver.
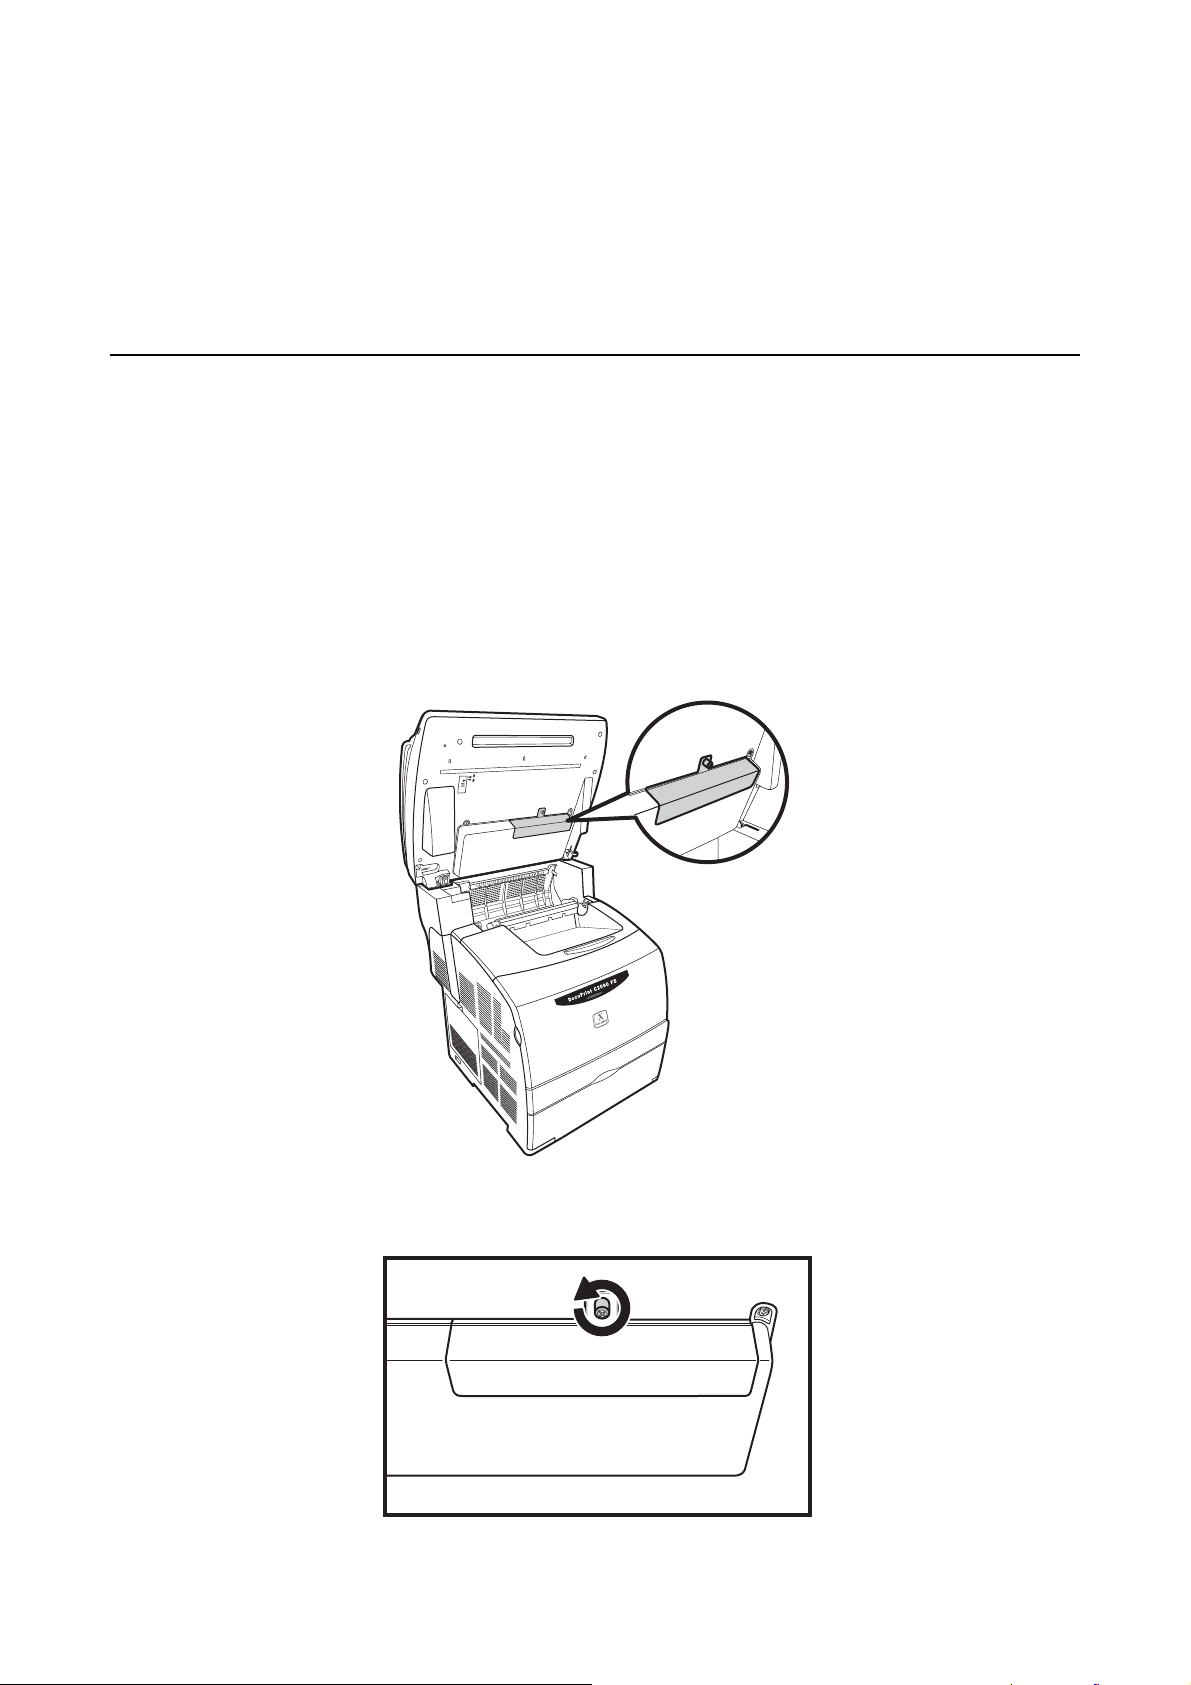
1. Make sure the machine is turned off when adding or removing the SDRAM module.
2. Slowly flip up part B, you will find the cover of the memory slot.
3. To open the cover, release the screws, and then pull the cover out of the printer.
- 29 -
Page 30

4. Before you insert additional memory to machine, please remove presented dummy DIMM card, firstly.
5. Hold the additional memory so that the notch is aligned with the protrusion on the slot, and insert the
additional memory into the slot firmly.
6. Reattach the cover to the printer.
7. Slowly flip down part B to its original position.
Notes:
• Dummy DIMM card is default set for DocuPrint C2090FS
• Insert the additional memory firmly by pushing it from the top.
• We recommend you to use our verified additional memory module, please refer the 11.2 section
indicated product code information, other third parties memory product is not be guarantee complete
compatible with Docuprint C2090FS.
- 30 -
Page 31

3.9 Connecting cables
This section covers the connection of the USB cable, LAN cable, and phone cable.
3.9.1 USB cable
Connect the USB cable to your PC or notebook to be used for printing and scanning operation.
1. Connect the USB cable to the USB connector at the back of the printer.
2. Connect the other end of the USB cable to the USB port on your computer.
2
1
Notes:
• Both the USB port and the LAN connector supports hot plug, you don’t have to switch the power off
before connecting the cables.
• Connect a USB cable only after the software driver has been installed on the computer.
3.9.2 LAN cable
Connects the printer to a network via an ethernet connection.
1. Connect the LAN cable to the LAN cable connector at the back of the printer.
2. Connect the other end of the LAN cable to the LAN drop on your computer.
- 31 -
Page 32

1
Note:
• Please make sure the network service is ready for using.
3.9.3 Phone cables
Connect the printer directly to a telephone wall jack for fax operation.
Connect one end of the phone cable to the LINE connector on the printer.
Connect the other end of the phone cable to the telephone wall jack.
2
1
2
To use the fax line as a normal telephone line, you can connect the printer with a telephone.
1. Connect a phone cable from the LINE connector on the printer to the telephone wall jack.
2. Connect a phone cable from the telephone to the PHONE connector on the printer.
- 32 -
Page 33

1
2
3.10 Installing software
To print, fax or scan from the computer, the print driver, fax driver, and the scan driver have to be installed first.
Depending on the environment being used, the required software and its installation procedure may be
different.
Important:
• The Fuji Xerox DocuWorks software package contains scanner TWAIN driver, scanner WIA driver
(support Windows XP and Server 2003 only), printer driver, fax printer driver, and Tool Box application
(MFP Scan-to-XXX utility).
• Adobe Reader is included in the software package.
• The MFP software does not support Win98/ ME/ NT.
3.11 Software Installation
Follow the steps below to install the software.
1. Place the software CD into the CD-ROM drive, it will run automatically.
2. Select a language from the screen.
- 33 -
Page 34

Click [Install MFP software]. The Install Shield Wizard starts automatically.
In the process of installation, there are two ways to connect to the MFP, one is through USB connection, and
the other is through network setup. Follow the steps below to complete the installation.
Note:
• Do not connect the USB cable before installing the driver.
- 34 -
Page 35

3.12 USB connection
1. Click the [Connected via USB], connect the MFP with the USB cable provided and click [NEXT] to
continue.
2. Software installation is in progress. When the installation is completed. Click [Finish] to close the
wizard.
Note:
• Make sure that your USB cable is properly connected to your PC / Notebook and the machine is
powered on before you use the [Connected via USB] function.
- 35 -
Page 36

3.13 Network connection
1. Select the [Connected via the network], and click [NEXT] to continue.
2. There are two methods of identifying the MFP. Click the recommended [Search from a list of
detected MFPs], and click on [NEXT] to continue.
- 36 -
Page 37

3. If your MFP is not found on the network, please check the connections and click [Refresh] to search
again. Press [NEXT] to proceed if your MFP detected the network.
Or you can use the other selection to specify your MFP from the network.
4. Select the [Specify a MFP by address], and click [Next] to continue.
5. A prompt window pops up, enter the IP address of your MFP, and click [Finish].
- 37 -
Page 38

6. The installation is completed. Click [Finish] to close the wizard.
- 38 -
Page 39

3.14 Setting Configuration of Paper
When installation of the print driver is completed, set the configuration of paper type, and paper size under the
[Printing Preferences] tab in the print driver interface. For details, refer to the Online Help for the print driver.
1. From the [Start] menu, choose [Settings] option and click [Printers].
2. Click the icon of this printer, and then select [Properties] from the [File] menu.
3. Click the [Printing Preferences] icon under [General] tab.
- 39 -
Page 40

4. Configure settings for paper.
3.15 Uninstalling the Drivers and Scan Tool Box
The installed software can be removed by using the uninstallation tool under the Fuji Xerox directory.
To uninstall the driver, go to Start \ Fuji Xerox \ Uninstall DocuPrint C2090FS.
The un-installation tool activates. The Installation Wizard window pops up, click [Remove] to uninstall the
driver.
- 40 -
Page 41

3.16 Uninstalling the Software
To remove Adobe PDF and the DocuWorks software from your computer, go to Start \ Control Panel \
Add/Remove Programs.
A list of all the programs installed on your computer is displayed. Select the program you want to remove and
click [Remove] to uninstall the software from your computer.
- 41 -
Page 42

4. Printing
This chapter explains the basic flow when printing from application software in a Windows environment. (The
procedure may differ according to the computer or system configuration used.)
4.1 Printing a document
To print a document from the computer:
1. From the [File] menu of the application software, select [Print].
2. Select the DocuPrint C2090 FS as the printer to be used. To use the various print features of this
printer, display the properties of the printer, and set the necessary items. For details on each item and
how to configure the settings, refer to the Online Help for the print driver.
Important:
• Do not switch off the power of this printer when printing is in progress. It may lead to paper jam.
• When printing with a different type of paper, configure the paper type correctly on the [Paper Tray
Settings] on the [Tray/Output] tab of the print driver.
There are two ways to display Online Help for the print driver:
1. Click [?], followed by the item you want to know more about. The explanation for the item is
displayed.
2. Click [Help]. The [Help] window is displayed.
To print a document from the control panel:
1. Select <Print> function from the control panel.
2. Press the <Set> button to start printing.
4.2 Canceling printing
To cancel printing, you can cancel the job either at this MFP or at the computer.
4.2.1 Canceling printing of data being printed or received at the printer
Press <Stop> and <Set> on the control panel. However, pages being printed at the moment will continue to
be printed.
4.2.2 Canceling printing data being processed at the computer
1. Double-click the printer icon at the bottom right of the taskbar in Windows.
2. From the displayed print status window, click the document name you wish to delete. Click [Document]
and choose [Cancel] in the drop down menu to cancel the printing job.
- 42 -
Page 43

4.3 Specifying the printer settings
To customize your print settings, press [Properties] in the Print dialog box and the Print Properties dialog box
appears.
4.3.1 Number of prints
To specify the number of prints, enter the number of copies in the [Quantity] field and press [OK].
4.3.2 Resizing the prints
To resize the prints, choose the original paper size and then the output size desired. Or check the specify
zoom box and enter the percentage for print. (25-400%)
- 43 -
Page 44

4.3.3 Adjusting layout
To adjust the page layout, click [Image Shift / Print Position…] button to configure settings for image shift,
print position and margins position for your document.
- 44 -
Page 45

4.3.4 Adding watermarks
To add watermarks on your print, click the [Watermark] tab to add a preset water mark, create a new water
mark, or edit watermark settings.
- 45 -
Page 46

4.3.5 Advanced settings
To customize the settings for graphic prints, click the [Graphic] tab and the following dialog box will appear.
• Choose output color. For B/W prints, check [enhanced Black and White] for better print quality.
• Choose [Image Adjustment Mode] to specify print quality of images.
• [Recommended] – prints a document with text, graphics or photos at fast speed
• [ICM Adjustment (System)] – enhances color reproduction of graphics in presentation materials
• [Complimentary Color Conversion]– uses complimentary color conversion
Note:
• [ICM Adjustment] and [Complimentary Color Conversion] are available under [Color Output] only.
- 46 -
Page 47

5. Scanning
This chapter helps you to scan documents and save the scanned copy on your computer using the software
CD provided in the package.
5.1 Placing the originals
Before scanning, make sure the transportation lock on the back of the part B is set to the unlock position.
Always keep the document glass clean to prevent dirty or blurry images.
Note:
• If you place originals on both Auto Document Feeder (ADF) and the document glass, only the
documents in the ADF are scanned. And you will hear a beep sound and a warning message appears
to remind you to remove the document on the document glass.
5.2 Scanning an image with operating panel
There are two ways to scan an image using the DocuPrint C2090 FS. You can either perform scanning task
directly through the control panel on the DocuPrint C2090 FS, or use any image editing software that is
TWAIN compatible, such as Fuji Xerox DocuWorks Desk software provided in the CD Rom. Before scanning
to PC, make sure that the cable is connected and software is success installed on your computer.
5.2.1 Setting scan mode from control panel
To choose the destination for scanned documents or images, do the following:
- 47 -
Page 48

1. In Scan mode, press the <Scan> button, and use the <◄/►> buttons to choose the destination to
which an image is scanned.
2. You can scan to one of the following destinations:
• USB-Key memory flash disk
• PC-USB (via USB port)
• FTP1~5
3. Press <Set> to confirm your setting.
5.2.2 Setting color scan from control panel
You can choose to scan an image or a document either in B/W or color mode.
When the green light of the <Color Mode> button is on, the machine is set to color mode. To change to Mono
mode, press the <Color Mode> button again and the light will go off.
5.2.3 Setting original paper size and file type
To determine the original paper size to scan, do the following:
1. In [Scan] mode, press the <Size/Type> button on the control panel. Use the <◄/►> buttons to
select [Size/Type- Original size] function.
2. Choose [Original size] and press the <Set> button to configure the settings.
3. Docuprint C2090FS available document size included:
• A4, A5, B5
• Postcard
• 8.5” x 11”, 5.5” x 8.5”
• 7.25” x 10.5”
To determine the file type to scan, do the following:
1. In [Scan] mode, press the <Size / Type > button on the control panel. Use the <◄/►> buttons to
select [Size/Type] function.
2. Use the <◄/►> buttons to choose [Size / Type – File Type] and press <Set>.Use the <◄/►> to
choose the original type of the document to scan. You can scan from [Text], [Text & Photo], [Photo]
and [No Filter].
3. Press <Set> to confirm your setting.
5.2.4 Image quality
To configure the brightness of the scanned images, do the following:
1. In [Scan] mode, press the <Image Quality > button on the control panel, it will shown [Image
Quality- ScanResolution] screen
2. Use the <◄/►> buttons to select image brightness. it can support -2 - +2 level
3. Press <Set> button to confirm your choice.
To configure the scan resolution of the scanned images, do the following:
1. In [Scan] mode, press the <Image Quality > button on the control panel, it will show [Image Quality-
ScanResolution] screen the press <Set> to star image resolution setting.
- 48 -
Page 49

2. Use the <◄/►> buttons to select image quality resolution, it can support 150 dpi, 300 dpi, 600 dpi, or
1200 dpi resolution in DocuPrinter C2090FS
3. Press <Set> button to confirm your choice.
5.2.5 Scanning an image from the DocuPrint C2090 FS
To scan a document, do the following:
1. Open the document cover and place the original document face-down on the document glass. Use
the paper size marks on the left side of the document glass to position a document.
2. Close the document cover gently so that your originals do not move.
3. Use the <◄/►> buttons to specify if you want to scan to local PC or network PC.
4. Press <Set> to confirm your choice.
5. Press the <▲> button to return to [READY] mode.
6. Press <Start> and the scanning task begin.
Note:
• Do not place heavy objects on the document glass or press it with too much force.
5.2.6 Scanning to FTP
Note:
• Before scanning to FTP, make sure the DocuPrint C2090 FS is connected to the Internet and the
settings for FTP server has been properly configured.
To scan a document to FTP (FTP1 to FTP5), do the following:
1. Press <Scan> then LCD screen shows [Scan Destination – To FTP 1], you can press <Set > to
confirm your setting or use <◄/►> buttons to specify other FTP.
- 49 -
Page 50

2. You can select from FTP1 to FTP5
5.2.7 Scanning to USB-Key
Note:
• Before scanning to USB-Key, make sure the USB-Key is properly connected and has been formatted
with FAT32.
To scan a document to USB-Key, do the following:
1. Press <Scan> and use <◄/►> buttons to specify LCD screen shows [Scan Destination – USB
Key], you can press <Set > to confirm your setting
5.3 Scanning an image with computer
Except to acquire an image from DocuPrint C2090FS control panel, you also can acquire an image from your
personal computer through Microsoft WIA interface or by any WIA-aware or TWAIN-compatible image editing
software.
5.3.1 Scan via WIA (Windows Image Acquisition)
There are two ways to scan an image through WIA:
Scan to an application via WIA:
1. Double click [My Computer] icon on the desktop and select [FX DocuPrint C2090 FS Scanner].
- 50 -
Page 51

2. Choose a program to scan an image and click [OK].
3. Choose an appropriate paper source and mode to scan the image and click [Scan] to proceed.
Notes:
• When you select Document feeder as paper source, the preview function will not available.
• It is possible to indicate page size what didn’t support in this machine.
• In Windows 2000, WIA is not available.
- 51 -
Page 52

• Some of applications listed in the WIA dialog like Microsoft Word or Adobe Photoshop are just
launched instead of with following scan, user has to acquire the image by importing "WIA - FX
DocuPrint C2090 FS Scanner" from the application.
• When you scan the document with unsupported size, it will be read by unexpected size.
5.3.2 Scan to a file via WIA:
1. Right-click the [FX DocuPrint C2090 FS Scanner] icon to display the context menu.
2. Click [Get picture using Scanner Wizard].
3. Click [Next] to proceed.
4. Specify file name, file format and the location to save the image. Click [Next] to proceed.
- 52 -
Page 53

5. The scanner wizard displays the scanning progress on the screen.
6. After scanning is complete, select [Nothing, I’m finished working with these pictures] and click
[Next] to close to the wizard.
- 53 -
Page 54

5.3.3 Scanning from application via TWAIN driver
To scan an image with the application software via TWAIN driver, do the following:
1. Launch the application that supports TWAIN.
2. Choose the required function to display the TWAIN dialog for FX DocuPrint C2090 FS Scanner. In
most case select [Import] or [Acquire image] etc. from the [File] menu.
3. Choose appropriate settings and functions for the scan job. For more information on using the TWAIN
dialog, refer to the Online Help for the TWAIN driver. When scanning is completed, the scanned
image will appear in the application’s display area.
4. DocuPrint C2090 FS Scanner TWAIN driver provides two scanning modes: [Simple Mode] and
[Advanced Mode].
- 54 -
Page 55

With [Simple Mode] you can choose the pre-defined scanning type according to your document type or
your scanning purpose.
Simple Mode
With [Advanced Mode] you can perform detailed settings such as resolution and Color mode.
Advanced Mode
To switch between two modes, click the corresponding tab.
- 55 -
Page 56

Note:
• When scan Legal 13” and Legal 14”, please switch to Advance Mode with Auto Document Feeder scan
source, Simple Mode does not support this function.
5.3.4 Previewing and adjusting the scan area from TWAIN driver
Once you have configured the basic settings for scanning, you can preview the image and select or adjust
the area of the image you want to scan. The preview image will be displayed in the preview window on
TWAIN window. If the preview image is satisfactory, you can then scan the document properly.
To preview and adjust the scan image, do the following:
1. Change [Scan size] as size of your document.
2. Click the [Preview] icon in the TWAIN window.
3. To select a scan area, click the [Select] icon to place a marquee in the preview window that marks
the edges of your image area. You can change the scan area by moving the marquees.
4. When you finished adjusting the scan area, click <Scan> to start scanning.
5.3.5 Scan adjustment from TWAIN driver
You can scan your images by default settings or set relative scan configurations to acquire your scans.
To set the target image size, do the following:
1. Switch to [Advance Mode] and Select [Scan Source] to involve scan from where your original
replaced.
2. Select [Color Mode] to determine your scan image color mode.
- 56 -
Page 57

3. Select [Resolution], the quality is shown by ‘dpi’. Select from 75dpi to 600dpi with Auto Document
Feeder scan source or 75dpi to 4800dpi with Document Glass scan source.
4. Select [Descreen] mode by your document type to eliminate Moiré patterns of scan image.
5. Choose [Scan size] of your document size.
6. Check [Auto Adjust] box will adjust scan image tone level automatically.
7. Check [Auto Cut] box will crop scan area of document in preview image automatically.
8. Press [Scan] to start.
Notes:
• If you select Auto Document Feeder as scan source, it will scan out all of the originals in the ADF tray.
Please use the application that supports multiple image importing features for Auto Document Feeder
scan.
• If you want to scan via other network scanner device, please click [Port] icon to search dedicated
Ethernet scanner before scan.
5.3.6 Image adjustment from TWAIN driver
Before you scanned an image, you can preview an image firstly and set image adjustment configures to see
the adjusted view in the preview window.
To save the scanned image, do the following:
1. Click [Preview] icon to preview the document.
2. Switch to [Image] for image adjustment.
3. Click [General] icon for brightness/contrast/gamma/sharpness adjustment.
4. Click [Curve] icon and drag the curve to modify image tone levels.
5. Click [Histogram] icon to determine image tone dynamic range.
6. Click [HSB] icon to change image colors by hue, saturation or brightness adjustment.
7. Click [Scan] to invoke scan with image adjustment.
- 57 -
Page 58

- 58 -
Page 59

6. Copying
This chapter explains how to make basic copies and customize settings for special copy jobs.
6.1 Placing the originals
You can either place originals on either the ADF or on the document glass.
Before making a copy, make sure the transportation lock on the back of the part B is set to the unlock
position. Always keep the document glass clean to prevent dirty or blurry images.
Notes:
• Do not place heavy objects on the document glass or press it with too much force.
• If you intend to copy documents with multiple sheets, using the ADF is recommended.
To place the original on the document glass, do the following:
1. Open the document cover and place the original face-down on the document glass as shown. Use
the paper size marks on the left side of the document glass to position a document.
2. Close the document cover gently so that your original does not move.
To place the original on the ADF, do the following:
1. Slide the guides all the way outward.
2. Arrange your originals in order. The first page to copy should be on the top of the stack.
3. Insert the originals to be copied face up in the ADF. Slide the edge guides inward against the edges
of the originals.
- 59 -
Page 60

6.2 Making copies
To make copies of your document, do the following:
1. Make sure the DocuPrint C2090 FS is in Copy mode.
2. Use the number keys to enter the number of copies you want to make.
3. Press the <Start> button to start copying.
4. When copying job is done, get your copies from the output tray.
6.3 Specifying copy settings
6.3.1 Number of copies
You can specify the number of copies by pressing the number keys on the control panel. The default value
is set to 1.
To specify the number of copies, do the following:
1. Make sure the DocuPrint C2090 FS is in Copy mode. If not, press the <Copy> button on the control
panel.
2. Make sure the [Copies] value is highlighted in the LCD panel. Enter the number of copies you want
to make using the number keypad. You also can press the <◄/►> buttons to setting copies number.
6.3.2 Selecting the paper
You can choose the paper size to use for your copies.
To specify the paper size, do the following:
1. Make sure the DocuPrint C2090 FS is in Copy mode.
2. Press the <Copy> then press <Size/Type> option.
3. LCD shown [Original size – A4 ] using the <◄/►> buttons to choose paper type.
4. Press <Set> to confirm your setting.
5. Press the <▲> button to return to [READY] mode.
Note:
• For usable paper sizes, see “Usable paper” section
6.4 Image quality
You can adjust the image quality such as the brightness, sharpness, and color balance of your copy by
choosing from levels 1 to 5. The higher level indicates the darker the image. The default value is set to 3.
To specify the copy brightness, do the following:
1. Make sure the DocuPrint C2090 FS is in Copy mode. If not, press the <Copy> button on the control
panel.
2. Press the <Image Quality> button
3. Use the <◄/►> buttons to choose [Brightness] and press <Set>.
4. Use the <◄/►> buttons to adjust the brightness of your copy.
- 60 -
Page 61

5. Press the <Set> button to confirm your setting.
6. Press the <▲> button to return to [READY] mode.
To specify the sharpness of your copy, do the following:
1. Make sure the DocuPrint C2090 FS is in Copy mode. If not, press the <Copy> button on the control
panel.
2. Press the <Image Quality>.
3. Use the <◄/►> buttons to choose [Sharpness] and press <Set>.
4. Use the <◄/►> buttons to adjust the brightness of your copy.
5. Press the <Set> button to confirm your setting.
6. Press the <▲> button to return to [READY] mode.
To specify the color balance of your copy, do the following:
1. Make sure the DocuPrint C2090 FS is in Copy mode. If not, press the <Copy> button on the control
panel.
2. Press the <Image Qulity>
3. Use the <◄/►> buttons to choose [Color Balance R] and press <Set>.
4. Use the <◄/►> buttons to adjust the red color balance of your copy.
5. Press the <Set> button to confirm your setting.
6. Press the <▲> button to return to [READY] mode.
7. Repeat steps 1 to 7 to adjust color balance for green and black.
6.5 Enlarging/Reducing the copy size
You can adjust the copy size by a specific zoom ratio or a specific percentage for enlargement or reduction
(25 to 400%). The default zoom ratio is set to 100%.
To adjust the copy size, do the following:
1. Make sure the DocuPrint C2090 FS is in Copy mode. If not, press the <Copy> button on the control
panel.
2. Press the <Reduce / Enlarge > button
3. Use the <◄/►> buttons to adjust the zoom ratio of your copy. You can also use the numeric keypad
to enter a specific zoom percentage.
4. Press <Set> to confirm your setting
5. Press the <▲> button to return to [READY] mode.
- 61 -
Page 62

COPY MAGNIFICATION TABLE
Document Copy
A5 B5 A4
A5 100% 122% 141%
B5 81% 100% 115%
A4 70% 86% 100%
Note:
• Pressing and holding the <Clear All> button resets settings for all modes.
To copy Std.size paper or Envelopes, do the followings
For standard size paper copy, do the followings,
1. Select a document size by control panel.
2. Select the paper size that you want to copy by control panel.
3. Set document on the document glass and align to arrow mark on the corner.
4. Load paper with the copy side facing up as below table and diagram shown.
For envelopes copy, do the followings,
1. Select A4 as a document size by control panel.
2. Select envelope size that you want to copy by control panel.
3. Set document or envelope on the document glass and align to arrow mark on the corner.
4. Load envelopes with the address side facing up as below table and diagram shown.
- 62 -
Page 63

p
To copy Std. Size To copy Envelopes
Document setting
direction
Paper setting
direction
width
Fla
A4 Size
A4 Size
Width
width
The flap folded and on the
left side
Document Glass
Paper feed direction
Paper Tray
The flap opened and toward
you
Envelop that is under
220mm width.
Example:
Monarch (98.4x190.5 mm)
DL (110 x 220 mm)
C5 (162 x 229 mm)
Envelop that is over
220mm width.
Example:
Com#10 (104.78 x 241.3
mm)
Note:
• The reverse side of the envelope can not be printed on.
6.6 Resetting the copy settings
There are two ways to reset the copy settings to default values. One is by pressing and holding the <Clear
All> button on the control panel. This will return the LCD screen to its initial default display. Another way is by
pressing the <Clear> button on the control panel. The number of copies will be set to its default value 1.
Note:
- 63 -
Page 64

• Pressing and holding the <Clear All> button resets settings for all modes.
6.7 Restrictions on copying
Users of this machine must observe the following restrictions to ensure the responsible and legal use of this
machine. See “Regulatory notices” on page in Preface.
- 64 -
Page 65

7. Sending a fax
This chapter explains how to send fax copies and customize settings for fax tasks.
7.1 Placing the originals
You can either place originals on either the Auto Document Feeder (ADF) or on the document glass.
Before sending a fax, make sure the transportation lock on the back of the part B is set to the unlock position.
Always keep the document glass clean to prevent dirty or blurry images.
Notes:
• Do not place heavy objects on the document glass or press it with too much force.
• If you intend to fax documents with multiple sheets, using the ADF is recommended.
• When using ADF to send Fax, please check and confirm there is not document paper place on
Document Glass firstly
To place the original on the document glass, do the following:
1. Open the document cover and place the original face-down on the document glass as shown. Use
the paper size marks on the left side of the document glass to position a document.
2. Close the document cover gently so that the original does not move.
To place the original on the Auto Document Feeder (ADF), do the following:
1. Slide the guides all the way outward.
2. Arrange your originals in order. The first page to copy should be on the top of the stack.
- 65 -
Page 66

3. Insert the originals to be copied face up in the ADF. Slide the edge guides inward against the edges
of the originals.
4. The ADF capacity support up to 50 sheets.
5. The ADF can hold the following types and sizes of paper
B5, A4, Letter (8.5” x 11”) and Legal 14 (8.5” x 14”)
Notes:
• When process ADF Scan, please make sure there is not any document place on your document glass,
firstly.
• Legal 14 paper only support and selectable when on ADF scan
7.2 Sending faxes
To send a fax, make sure that the DocuPrint C2090 FS is connected to the phone cable and the fax
connection is on.
You can send a fax by one of the following ways:
z PC FAX & Network FAX
z One-touch / Speed-dial Direct FAX
z Tx reservation FAX
z Forward FAX
z Broadcast FAX
7.2.1 Sending a fax from PC FAX & Network FAX
To sending a fax from PC FAX
1. Make sure the USB cable connected and driver is installed in system.
2. From the [File] menu of the application software, select [Print].
3. Select the FX DocuPrint C2090 FS Fax Printer as the fax printer to be used.
4. Right-click the fax icon to display the printer properties and configure fax settings.
- 66 -
Page 67

5. Select “FAX printer” then press [OK]
6. Before the fax printer driver fax out the document, the following window appears on the screen.
Enter the recipient information and click [Add to list] to add it to the recipient list.
7. Click the [OK] button to send the fax
- 67 -
Page 68

To sending a fax from Network Fax
1. Make sure the Ethernet cable connected and driver is installed in system.
2. From the [File] menu of the application software, select [Print].
3. Select the FAX Network Printer as the printer to be used the press [OK].
4. Before the fax printer driver fax out the document, the following window appears on the screen. Enter
the recipient information and click [Add to list] to add it to the recipient list.
5. Select receiver from address list or Input receiver information include title, company name and fax
number then press [OK]
6. Click the [OK] button to send the fax
7.2.2 Sending a fax from One-touch / Speed-dial Direct FAX
Use one-touch / speed-dial direct fax to assign a speed dial name to a single number or a group of
numbers. You can send a fax to that number or numbers by selecting the speed dial name.
To sending a fax from speed dial direct fax
1. Press the <Fax> button on the control panel.
2. In Fax mode, the LCD will show [Set FAX Num Std].
3. Press <Speed Dial> button and select a number from the numeric keypad.
4. LCD will show [FAX Ready std - Speed XX AAAAA].
XX: the selected speed number (1-10)
AAAAA: Registered destination name. If name longer than display area, the name is displayed
by scrolling.
5 Press <Start> to confirm your setting.
To sending a fax from one touch fax
1. Press the <Fax> button on the control panel.
2. In Fax mode, the LCD will show [Set FAX Num Std].
3. Press <One Touch > button and select a number from the numeric keypad.
4. LCD will show [FAX Ready std - OneTouchX: AAAAA].
X: the selected speed number (1-8)
AAAAA: Registered destination name. If name longer than display area, the name is displayed
by scrolling.
5. Press <Start> to confirm your setting. .
7.2.3 Sending a fax from Tx reservation FAX
To sending a fax from Tx reservation FAX
1. Press the <Fax> button on the control panel.
2. Press <►> and select [Tx Revervation].
3. Press <Set> button and LCD show [Time XX:XX] select a number (0~9) from the numeric keypad
then press <Set> to confirm your setting.
4. Then LCD shows [Reservation std - ____________], select a number (0~9) from the numeric
keypad and press <Start>
- 68 -
Page 69

Also you can process TX reservation FAX through by one touch dial or speed dial.
Using one-touch dial.
1. Press <One tough Dial> then LCD show [FAX Ready - One Touch X]
X: the selected number (1-8)
2. Select a number (1-8) from the numeric keypad and press <Start>.
Using Speed Dial.
1. Press <Speed Dial> then LCD show [FAX Ready - Speed Dial XX]
XX: the selected number (1-10)
2. Select a number (1-10) from the numeric keypad and press <Start>.
7.2.4 Sending a fax from Forward FAX
Use the forward fax setting to forward all of the faxes that the DocuPrint C2090FS receives to specified
phone number.
To set fax forwarding
1. Press the <Fax> button.
2. Press <►> to select [Fax Function - Forwarding] then press <Set>
3. Select [Forwarding Std - Forward Only] then press <Set>
4. LCD shows [Forwarding Num Std - _ _ _ _ _ _ _ _ ] then press < One Touch Dial> then LCD show
[SetForward Std - One Touch X] select a number (1~8) from the numeric keypad and press <Start>
You also can process Forward FAX through by one touch dial or speed dial
Using one-touch dial.
1. Press the <Fax> button.
2. Press <►> to select [Fax Function - Forwarding] then press <One Touch Dial>
3. LCD shows [SetForward Std - One Touch X] select a number (1~8) from the numeric keypad then
press <Set> to confirm your setting and start.
Using Speed Dial
1. Press the <Fax> button.
2. Press <►> to select [Fax Function - Forwarding] then press <Speed Dial>
3. LCD shows [SetForward Std - Speed Dial XX] select a number (1~10) from the numeric keypad
then press <Set> to confirm your setting and start.
7.2.5 Setting a fax from Broadcast Fax
1. In FAX mode, the LCD will show [Set FAX Num Std].
2. Use the <◄/►> buttons to select [Broadcast function] under [FAX] menu, and press <Set>.
3. LCD will show [FAX Function - Group No X].
X: The select group number
4. Select keys from numeric keypad.
5. Press <Start> when ready.
- 69 -
Page 70

7.3 Receiving faxes
To receive a fax, make sure that the DocuPrint C2090 FS is connected to the phone cable and the fax
connection is on. The Docuprint C2090FS support 2 kinds receive mode
7.3.1 Auto-answering FAX Rx
1. Press <FAX> to enter into Fax mode, press the <Menu> button on the control panel. Use the <▼>
buttons to browse for [T.A.M. - Connection] and press <Set>function.
2. Choose [Answer phone] and press <Set> to configure the settings.
3. LCD shows [Number of Ring XX (1-15)] Press the <◄/►> buttons to set counter number
4. Press <Set> to confirm your setting.
7.3.2 Direct Fax Rx
When receiving fax and printer not available, Docuprint C2090FS will accumulate received data and you
can print out it through by Direct Fax Rx function.
1. Press <Menu> then select [Fax Report - Accumulate Doc]
2. Using <◄/►> to select [Accumulate Doc - Print Document] to print out this fax
3. Using <◄/►> to select [Accumulate Doc - Delete Document] to delete accumulated fax.
7.4 Specifying fax settings
7.4.1 Input and output paper size and type
To determine the paper size for fax input and output, do the following:
1. Press <FAX> button then <Size/Type> button on the control panel. Use the <◄/►> buttons to
browse for function list.
2. Choose [Original size] and press <Set> to configure the settings.
3. Choose the original size of the document to scan.
4. Press <Set> to confirm your choice.
5. Press the <▲> button to return to [READY] mode.
Notes:
• Support A4, B5, 8.5” x 11” and 8.5” x 14
• 8.5” x 14 only support for ADF mode.
To determine the original file type, do the following:
1. Press <FAX> button then <Size/Type> button on the control panel. Use the <◄/►> buttons to
browse for function list.
2. Choose [Original type] and press <Set> to configure the settings.
3. Press the <▲> button to return to [READY] mode.
Note:
• Original type support Text and Photo two types.
- 70 -
Page 71

To determine the output paper type, do the following:
1. Press <FAX> button then <Size/Type> button on the control panel. Use the <◄/►> buttons to
browse for function list.
2. Choose [Paper type] and press <Set> to configure the settings.
3. Choose the output paper type for the document.
4. Press <Set> to confirm your choice.
5. Press the <▲> button to return to [READY] mode.
Note:
• This fax function support Plain and Bond paper
To determine the output paper size, do the following:
1. Press <FAX> button then <Size/Type> button on the control panel. Use the <◄/►> buttons to
browse for function list.
2. Choose [Paper size] and press <Set> to configure the settings.
3. Choose the output paper size for the document.
4. Press <Set> to confirm your choice.
5. Press the <▲> button to return to [READY] mode.
Note:
• When Auto Fit On, output paper size can support for A4, B5, 8.5x”11” and 8.5” x 14”
• When Auto Fit Off, output paper size can support for A4, B5 and 8.5x”11”
7.4.2 Image quality
To configure the settings for fax image quality, do the following:
1. Press <FAX> button then <Image Quality> button on the control panel. Use the <◄/►> buttons to
browse for function list.
2. Choose [Image quality] and press <Set>.
3. Press the <◄/►> buttons to choose to configure the settings for brightness.
4. Choose [Brightness] and press <Set> to confirm.
5. Press the <◄> button to increase the brightness of the scan copy. And press the <►> button to
decrease it.
6. Press <Set> to confirm your choice.
7. Press the <▲> button to return to [READY] mode.
7.4.3 Adjust fax size
You can adjust the fax size to fit the document size automatically by turning on the [FAX Auto fit Support]
function.
To enable the FAX Auto fit Support function, do the following:
1. Press <FAX> button then <Reduce/Enlarge> button.
- 71 -
Page 72

2. LCD shows [ AutoFit . ◄ OFF | ON ►], use the <◄/►> buttons to set this function on or off.
3. Press <Set> to confirm your setting.
Notes:
• Default setting is OFF.
• Auto Fit on/off setting only available under DocuPrint C2090FS work as fax receiver.
• Auto Fit On support paper size: A4, B5, 8.5” x 11”, 8.5” x 14”
• Auto Fit Off support paper size: A4, 8.5” x 11”, 8.5” x 14”
7.4.4 FAX Tx mode setting (Resolution)
To adjust the resolution of the fax document, do the following:
1. Press <FAX> button, the LCD will show [Set FAX Num Std] then press <Image Quality> button.
2. Use the <◄/►> buttons to select [FAX Tx mode] and press <Set>
3. Use the <◄/►> to select [Standard], [Fine], [Super fine], or [Ultra fine].
4. Press <Set> to confirm your setting.
Notes:
• Stand Mode: 200 x 100 dpi
• Fine mode : 200 x 200 dpi
• Super Fine mode : 200 x 400 dpi
• Ultra Fine mode : 400 x 400 dpi
• Photo type only support when TX mode setting to fine or ultra fine
• Default setting is Standard.
- 72 -
Page 73

8. Advanced functions
This chapter explains how to configure settings for advance functions of the MFP.
8.1 Using the setup menu
You can use the menu to access a variety of submenus to customize settings for copying, faxing, scanning
and printing.
To access the setup menu, do the following:
1. Make sure the DocuPrint C2090 FS is turned on, and then press the <Menu> button on the control
panel.
2. The submenu is displayed on the LCD screen. Use the <▲/▼> buttons to select a submenu.
3. Press the <◄/►> buttons to view items in a submenu.
4. Press <Set> to confirm your setting.
5. Press the <▲> button to return to [READY] mode.
8.2 Basic settings
You can specify the original size, original type and file type for printing.
To determine the original paper size to scan, do the following:
1. Press <Scan> button then <Size / Type> and use the <◄/►> buttons to select function.
2. Choose [Original size] and press <Set> to configure the settings.
3. Choose the original size of the document to print.
Available document size:
• A4, A5, B5
• Postcard
• 8.5” x 11”, 5.5” x 8.5”, 7.25” x 10.5”, 8.5” x 13”, 8.5” x 14”.
4. Press <Set> to confirm your choice.
5. Press the <▲> button to return to [READY] mode.
Note:
• 8.5” x 13”, 8.5” x 14” selection only available when original paper present on ADF.
To determine the paper type to print, do the following:
1. Press <Scan> button then <Size / Type>.
2. Use the <◄/►> buttons to choose [Original type] and press the <Set> button.
3. Choose the original type of the document to print. You can print from [Text], [Text & Photo], [Photo],
and [No Filter].
4. Press the <Set> button to confirm your choice.
- 73 -
Page 74

5. Press the <▲> button to return to [READY] mode.
To determine the file type to print, do the following:
1. Press <Scan> button then <Size / Type> and use the <◄/►> buttons to select function.
2. Use the <◄/►> buttons to choose [File Type] and press the <Set> button.
3. Choose the [Jpeg], [BMP] and [TIFF] file type of the document to print.
4. Press the <Set> button to confirm your choice.
5. Press the <▲> button to return to [READY] mode.
To determine the paper size for printing, do the following:
1. Press <Copy> then <Size / Type>
2. Use the <◄/►> buttons to choose [Paper Size] and press <Set>.
3. Choose the paper size for printing
Available printout sizes:
• Same as original
• A4, A5, B5
• 8.5” x 11”, 8.5” x 13”, 8.5” x 14”, 5.5” x 8.5”, 7.25” x 10.5”
• Post card
• Env. Com-10, Env. Monarch, Env. DL, Env. C5
4. Press <Set> to confirm your choice.
5. Press the <▲> button to return to [READY] mode.
To determine the paper type for printing, do the following:
1. Press <Copy> then <Size / Type>
2. Use the <◄/►> buttons to choose [Paper Type] and press <Set>.
3. Use the <◄/►> buttons to choose the paper type for printing. Available printout types:
• Plain
• Bond
• Transparency
• Heavyweight1
• Heavyweight2
• Coated 1
• Coated 2
• Coated 3
• Label
• Post card
• Envelope
4. Press <Set> to confirm your choice.
5. Press the <▲> button to return to [READY] mode.
- 74 -
Page 75

8.3 Scanner settings
You can configure the settings for brightness and scan resolution by doing the following:
To configure the brightness of the scanned images:
1. Press <Scan> then <Image Quality> button.
2. Use the <◄/►> to choose [Brightness] and press <Set> to confirm.
3. Press the <◄/►> button to increase the brightness of the scan copy. And press the <◄> button to
decrease it.
4. Press the <▲> button to return to [READY] mode.
To configure the scan resolution of the scanned images:
1. Press <Scan> then <Image Quality> button.
2. Press the <◄/►> buttons to choose [ScanResolution] and press <Set> to confirm.
3. Use the <◄/►> buttons to choose scan resolution. You can set resolution to 150 dpi, 300 dpi, 600
dpi, or 1200 dpi.
4. Press <Set> to confirm your choice.
5. Press the <▲> button to return to [READY] mode.
8.4 Copy settings
You can adjust the copy size by a specific zoom ratio or a specific percentage for enlargement or reduction
(25 to 400%). The default zoom ratio is set to 100%.
To adjust the copy size, do the following:
1. Press <Copy> button on the control panel.
2. Press the <Reduce / Enlarge> button and use the <◄/►> buttons to select copy size as
• 100%
• Preset 70%
• Auto fit
• Full Image
• Zoom 25% - 400%
Press <Set> to confirm your setting
3. When select Zoom 25%-400% you can also use the number keypad to enter a specific zoom
percentage.
4. Press the <Set> button to confirm your setting.
5. Press the <▲> button to return to [READY] mode.
- 75 -
Page 76

To specify special copy functions such as 2 in1(ADF Only>, Collate (ADF), Frame Erase, Back Remove, or
Image Shift, do the following:
1. Press <Copy> then <Menu>
2. Use the <◄/►> buttons to choose the special copy function desired:
• 2 in 1 (ADF only)
• Collate (ADF)
• Frame Erase removes frame when copying the document
• Back Remove removes background when copying the document
• Image Shift (none/center/left/right/up/down/shift value [1-50mm])
3. Press the <Set> button and <◄/►> to setting selected function status and prese <Set> to confirm
your setting.
4. Press the <▲> button to return to [READY] mode.
8.5 Fax settings
You can specify the settings for Dial type, Ring pattern, Line monitor, Redial attempt, Fax header, Junk
block and Call diag under this menu.
To specify the setting for Dial type, do the following:
1. Press <FAX> then <Menu> use the <▼> buttons to select [Configuration – Need password]
2. Preess <Set> and input password then press <Set> to enter into [Configuration - FAX]
2. Press <▼> and use the <◄/►> buttons to select [FAX Config -Dial type] and press <Set>.
3. Use the <◄/►> buttons to select [Tone] or [Pulse].
4. Press <Set> to confirm.
Note:
• Tone delay function is support for Australia only.
To specify the setting for Line monitor, do the following:
1. Press <FAX> then <Menu> button, use the <▼> buttons to select [ Configuration – Need
Password] function.
2. Press <Set> and input password press <Set> to enter into [Configuration - FAX].
3. Press <Set> to enter into [FAX Config]
4. Use the <◄/►> buttons to select [FAX Config –Line Monitor].
5. Press <Set> and the LCD shows [Line Monitor - ◄ XX ► (0-3) ]
6. Use the <◄/►> buttons to adjust the volume ( 0: mute, 3: maximum volume)
7. Press <Set> to confirm your setting. .
To specify the setting for Redial attempt, do the following:
- 76 -
Page 77

1. Press <FAX> then <Menu> button, use the <▼> buttons to select [ Configuration – Need
Password] function.Press <Set> and input the password to enter [Configuration-FAX].
2. Press <Set> and input password press <Set> to enter into [Configuration - FAX]
3. Press <Set> to enter [FAX Config]
4. Use the <◄/►> to select [FAX Config –Redial Attempt].
5. Press <Set> and the LCD shows [Redail Attempt - ◄ XX ► (0-9) ]
6. Use the <◄/►> buttons to adjust the value from 0 to 9.
7. Press <Set> to confirm.
Notes:
• If selected the volume to 0, it will not redial when sending fax fail.
• Default setting value is 7.
To specify the setting for FAX Header, do the following:
1. Press <FAX> then <Menu> button, use the <▼> buttons to select [ Configuration – Need
Password] function.Press <Set> and input the password to enter [Configuration-FAX].
2. Press <Set> and input password press <Set> to enter into [Configuration - FAX]
3. Press <Set> and the LCD shows [FAX Config –FAX Header].
4. Use the <◄/►> buttons to select [FAX Header - ◄ Off | On ► ] press <Set>.
5. Use the <◄/►> buttons to turn the Fax header on/off.
6. Press <Set> to confirm your setting
Note:
• Default setting is Off. .
To specify the setting for Junk Block, do the following:
1. Press <FAX> then <Menu> button, use the <▼> buttons to select [ Configuration – Need
Password] function.Press <Set> and input the password to enter [Configuration-FAX].
2. Press <Set> and input password press <Set> to enter into [Configuration - FAX]
3. Press <Set> and use the <◄/►> to find [FAX Config – Junk Block].
4. Press <Set> the LCD showns [Junk Block - ◄ Off | On ► ] press <Set>.
5. Use the <◄/►> buttons to turn the Junk block on/off.
6. Press <Set> to confirm your setting
Note:
• Default setting is Off.
To specify the setting for Dial Type, do the following:
1. Press <FAX> then <Menu> button, use the <▼> buttons to select [ Configuration – Need
Password] function.Press <Set> and input the password to enter [Configuration-FAX].
2. Press <Set> and input password press <Set> to enter into [Configuration - FAX]
- 77 -
Page 78

3. Press <Set> and use the <◄/►> to find [FAX Config – Dial Type].
4. Press <Set> the LCD showns [Dial Type – Tone].
5. Use the <◄/►> buttons to select Tone / Pulse.
6. Press <Set> to confirm your setting
To specify the setting for the Accumulate Doc, do the following:
1. Execute [Print List] to get detail job information.
2. Using [Print Document] or [Delete Document] to process and follow job.
Note:
• Accumulate Doc means received document caused printer or paper size incorrect and can not success
to printing immediately. You can accumulate received data first and print it at later.
To specify the setting for Print List, do the following:
1. Press <Menu> and the LCD shows [FAX Report – Accumulate Doc]
2. Press <Set> and use the <◄/►> to find LCD shows [Accumulate Doc – Print list]
3. Press <Set> to confirm you setting and get list.
o specify the setting for Print Document, do the following:
1. Press <Menu> and the LCD shows [FAX Report – Accumulate Doc]
2. Press <Set> and the LCD shows [Accumulate Doc – Print Document]
3. Press ,<Set> and LCD shows [Print Document – XX List No ] (XX: 1-99)
4. Press <Set> to confirm your setting.
Note:
• If XX code incorrect or not set by [Print List] or selected XX be deleted, DocuPrint C2090FS will not
have any action or alarm or sending error message. And LCD shows [Set FAX Num Std - _ _ _ _ _ _ _
_ _].
8.6 Host settings
You can specify Host settings for Ethernet, TCP/IP, Protocol, or IP Filter under the host settings submenu.
To specify the network setting through Ethernet connection, do the following:
1. Press the <Menu> button on the control panel. Use the <▼> buttons to select [Configuration Need
Password] and press <Set>.
2. Use the <◄/►> buttons to select [Network Config - Network] and press <Set>.
3. Use the <◄/►> buttons to select [Network Config - Ethernet] and press <Set>.
4. Use the <◄/►> buttons to select [Auto select], [10Base Half], [10Base Full], [100Base Half], or
[100Base Full].
5. Press <Set> to confirm.
To specify the TCP/IP setting, do the following:
- 78 -
Page 79

1. Press the <Menu> button on the control panel. Use the <▼> buttons to select [Configuration Need
Password] and press <Set>.
2. Use the <◄/►> buttons to select [Network Config - Network] and press <Set>.
3. Use the <◄/►> buttons to select [Network Config - TCP/IP] and press <Set>.
4. Use the <◄/►> buttons to select [IP Address], [Subnet Mask], or [Gateway address].
5. Press <Set> to confirm.
To specify the protocol setting, do the following:
1. Press the <Menu> button on the control panel. Use the <▼> buttons to select [Configuration Need
Password] and press <Set>.
2. Use the <◄/►> buttons to select [Network Config - Network] and press <Set>.
3. Use the <◄/►> buttons to select [Network Config - Protocol] and press <Set>.
4. Use the <◄/►> buttons to select [LPD] or [Port 9100] and press <Set>.
5. Use the <◄/►> buttons to turn the option ON/OFF.
6. Press <Set> to confirm.
To specify the IP Filter setting, do the following:
1. Press the <Menu> button on the control panel. Use the <▼> buttons to select [Configuration Need
Password] and press <Set>.
2. Use the <◄/►> buttons to select [Network Config - IP Filter1] and press <Set>.
3. Use the <◄/►> buttons to select [IP Filter1], [IP Filter1-Subnet Mask], or [IP Filter1- Filter Mode
(OFF/Deny/Allow)], and press <Set>.
4. Press <Set> to confirm.
8.7 System settings
You can specify system settings for Power Save mode, Power Save Timer, Warning Beep, Menu Time Out,
or Time & date under the system settings submenu.
To enable the Power Save mode, do the following:
1. Press the <Menu> button on the control panel. Use the <▼> buttons to select [Configuration Need
Password] and press <Set>.
2. Use the <◄/►> buttons to select [Configuration - System] and press <Set>.
3. Use the <◄/►> buttons to select [Power Save mode] and press <Set>.
4. Use the <◄/►> buttons to turn the Power Save mode ON/OFF.
5. Press <Set> to confirm your setting.
To specify the Power Time Saver setting, do the following:
- 79 -
Page 80

1. Press the <Menu> button on the control panel. Use the <▼> buttons to select [Configuration Need
Password] and press <Set>.
2. Use the <◄/►> buttons to select [Configuration - System] and press [Set].
3. Use the <◄/►> buttons to select [Power Time Saver] and press [Set].
4. Use the <◄/►> buttons to select [5 min.], [10 min.], [30 min.], or [60 min].
5. Press <Set> to confirm.
To enable the Warning Beep function, do the following:
1. Press the <Menu> button on the control panel. Use the <▼> buttons to select [Configuration Need
Password] and press <Set>.
2. Use the <◄/►> buttons to select [Configuration - System] and press <Set>.
3. Use the <◄/►> buttons to select [Warning Beep] and press <Set>.
4. Use the <◄/►> buttons to turn the Warning Beep ON/OFF.
5. Press <Set> to confirm your setting.
To specify the Menu Time Out setting, do the following:
1. Press the <Menu> button on the control panel. Use the <▼> buttons to select [Configuration Need
Password] and press <Set>.
2. Use the <◄/►> buttons to select [Configuration - System] and press <Set>.
3. Use the <◄/►> buttons to select [Menu Time Out] and press <Set>.
4. Use the <◄/►> buttons to select [10 sec.], [20 sec.], [30 sec.], or [60 sec].
5. Press <Set> to confirm.
To configure the setting for time and date, do the following:
1. Press the <Menu> button on the control panel. Use the <▼> buttons to select [Configuration Need
Password] and press <Set>.
2. Use the <◄/►> buttons to select [Configuration - System] and press <Set>.
3. Use the <◄/►> buttons to select [Time & date] and press <Set>.
4. Use the <◄/►> buttons to select [Time HH:MM] or [Date 20YY/MM/DD], and press <Set>.
5. Use the numeric keypad on the control panel to enter the current time and date.
8.8 Printing a status sheet
To confirm the current status of the DocuPrint C2090 FS and verify that options are installed correctly, you
may want to print a status sheet.
8.8.1 Printing a status for Copy Mode:
1. Make sure that the DocuPrint C2090 FS is turned on and is in Copy mode.
- 80 -
Page 81

2. Press the <Menu> button on the control panel. Press the <▼> button twice to select [Print Report -
Func. Setting]
3. Press the <►> button to select [Panel settings].
4. Press the <►> button to select [Job History].
5. Press the <►> button to select [Error History].
6. Press <Set> to start printing.
7. The <Transmitting> light flashes, the status sheet starts printing, and the LCD screen displays
[Printing].
Note:
• The status report out put of this machine is using 2 bit character black square.
8.8.2 Fax Report
The DocuPrint C2090FS fax report functions included bellows, these functions provides communication
history of faxes that were received, sent or deleted and any errors that occurred.
• [Accumulate Doc]
• [Panel Setting]
• [Comm. History]
• [Address Book]
• [Broadcast – Pool]
• [Tx Result]
• [On/off History]
To configure the setting for [Accumulate Doc], do the following:
1. Press the <Menu> button, and LCD shows [Fax Report – Accumulate Doc]
2. Press <Set> and use the <◄/►> buttons to select [Accumulate Doc – Print List], [Accumulate
Doc – Print Document], [Accumulate Doc – DeleteDocument]
3. Press <Set> to select [Print Document –◄ XX ► List No], [DeleteDocument - ◄ XX ► List No]
Notes:
• XX: Document number (1-25)
To configure the setting for [Panel Setting], do the following:
1. Press the <Menu> button, use the <◄/►> buttons and LCD shows [Fax Report – Panel Setting]
2. Press <Set> to confirm your setting.
To configure the setting for [Comm. History], do the following:
1. Press the <Menu> button, use the <◄/►> buttons and LCD shows [Fax Report - Comm. History]
2. Press <Set> to confirm your setting.
To configure the setting for [Address Book], do the following:
- 81 -
Page 82

1. Press the <Menu> button, use the <◄/►> buttons and LCD shows [Fax Report – Address Book]
2. Press <Set> to confirm your setting.
To configure the setting for [Broadcast ], do the following:
1. Press the <Menu> button, use the <◄/►> buttons and LCD shows [Fax Report – Broadcast]
2. Press <Set> to confirm your setting.
To configure the setting for [Tx Result], do the following:
1. Press the <Menu> button, use the <◄/►> buttons and LCD shows [Fax Report – Tx Result]
2. Press <Set> and use the <◄/►> buttons to select [Tx Result – Always], [Tx Result – No ], [Tx
Result – On Error]
3. Press <Set> to confirm your setting.
Notes:
• Select [Tx Result – Always] : Print fax log either fax process success or fail.
• Select [Tx Result – No ] : Disable log print function, either fax process success or fail
• Select [Tx Result – On Error] : Print process fail fax log only.
To configure the setting for [On/off History], do the following:
1. Press the <Menu> button, use the <◄/►> buttons and LCD shows [Fax Report – On/off History]
2. Press <Set> to confirm your setting.
8.8.3 Scan Report
Scan Report can provide scan status and verify options setting through by print a status sheet.
To configure the setting for [Scan Report-Panel Setting], do the following:
1. Press <Scan> to select scan mode from control panel.
2. Press the <Menu> and <▼> button, and LCD shows [Scan Report – Panel Setting]
3. Press <Set> to confirm your setting and start to print status report.
8.9 Job canceling
To interrupt a running job no mater what job is processing under stand along or initiated from host application.
8.9.1 Jobs initiated from OP Panel
1. Cancel a Scan job
Procedures
z Press < Stop> to enter cancel menu.
z Press<◄> or <►> to select the scan job you want to cancel while multiple jobs are
proceeding.
z The scan job you can select to cancel are included as bellows,
z Scan To PC
z Scan To USB
z Scan To FTP1
z Scan To FTP2
- 82 -
Page 83

z Scan To FTP3
z Scan To FTP4
z Scan To FTP5
z Press <Set> to cancel the job.
2. Cancel a copy job
Procedures
z Press < Stop> to enter cancel menu.
z Using <◄> or <►> to select the scan job you want to cancel while multiple jobs are
proceeding.
z Press <Set> to cancel the job.
8.9.2 Jobs initiated from Application
1. Cancel a TWAIN Scan job
Procedures
z It would popup a progress windows and preparing to scan an image after start a job.
z Press < Cancel> on progress window while scanner is scanning.
z It can be also canceled from control panel, please refer to “Cancel a Scan job” to cancel the
job.
2. Cancel a WIA Scan job
Procedures
z It would popup a progress windows and preparing to scan an image after start a job.
z Press < Cancel> on progress window while scanner is scanning.
z It can be also canceled from control panel, please refer to “Cancel a Scan job” to cancel the
job.
Note:
• Some application software doesn’t support WIA scan cancel by itself.
3. Cancel a Print job
There are two methods to cancel the print job from application as bellows,
Procedures 1:
z Open the windows printing spooler.
z Select the job that you wan to cancel.
z Click mouse right button and select [Cancel]
z Select [OK], while popup a confirm dialog screen.
Procedures 2:
z Press <Stop> on the control panel to enter into cancel menu.
z Using <◄> or <►> to select the scan job that you want to cancel while multiple jobs are
proceeding.
z Select [Print YYYYYY]
- 83 -
Page 84

YYYYYY : Job owner
z Press <Set> to confirm your setting to cancel the job.
z Select [OK] while popup a confirmation dialog.
4. Cancel a Direct Fax job
Procedures
z While this job still in spooler, you can refer to “Cancel a print job” section to process cancel
the job by control panel or spooler.
z While the job had sent to DocuPrint C2090FS, please refer “Fax stop & Fax cancel” section
to cancel this job by control panel.
8.9.3 Jobs initiated from Scan Tool Box
1. Cancel a Scan job
Procedures
z It would popup a progress window and preparing to scan an image after start a job.
z Press < Cancel> on progress window while scanner is scanning.
z It can be also canceled from control panel, please refer to “Cancel a Scan job” to cancel the
job.
2. Cancel a copy job
Procedures
z It would popup a progress window and preparing to scan an image after start a job.
z Press <Cancel> on progress window while scanner is scanning or refer to “Cancel a Scan
job” section to cancel the job.
3. Cancel a fax job
Procedures
z It would popup a progress window and preparing to scan an image after start a job.
z Press <Cancel> on progress window while scanner is scanning or refer to “Cancel a Scan
job” section to cancel the job.
z If the scanning is finished and the job still in the spooler, you can refer “Cancel a fax Job” or
“Cancel a print job” section to cancel this job by control panel or spooler.
z While the job has sent to DocuPrint C2090FS, please refer “Cancel a fax Job” section to
cancel this job by control panel.
4. Cancel a Scan to file job
Procedures
z It would popup a progress window and preparing to scan an image after start a job.
z Press <Cancel> on progress window while scanner is scanning.
z It can be also canceled from control panel.
5. Cancel a Scan to OCR job
Procedures
z It would popup a progress window and preparing to scan an image after start a job.
- 84 -
Page 85

z Press <Cancel> on progress window while scanner is scanning.
z It can be also canceled from control panel, please refer to “Cancel a Scan job” section to
cancel the job.
8.9.4 Canceling an operation
Pressing the <Stop> button and <Set> to canceling and confirm the current processing job is the easiest and
quickest way. If the <Set> button is not pressed, the current processing job will not be canceled or deleted.
8.9.5 Fax stop & Fax cancel
To stop or cancel operating fax job that start and processing through by [PC FAX], [Network FAX] or
<numeric keypad / One-touch / Speed dial / Direct Fax >, you can stop Fax Job as follows steps,
1. Press <Stop>
2. LCD screen shows [Job canceling…- FAX ZZZZZZZZZ] or [Job canceling…- FAX
WWWWWWWWW]
• ZZZZZZZZZ or WWWWWWWWW means operating fax number.
3. Press the <Set> button, then LCD screen shown [Set Fax Num Std - _ _ _ _ _ _ _ _ _] and fax
canceling process finished.
Notes:
• If press <Stop> button, and machine beeper alarmed, it means no fax job under processing. So fax
canceling operation can not be executed.
• Repeat process 1-3, you can continue to delete jobs that storage in the memory.
8.9.6 Fax Broadcast cancel
To stop or cancel fax broadcast operating, please follow bellows,
1. Press <Stop>
2. LCD screen shows [Job canceling…- FAX Broadcast]
3. Press the <Set> button, after few second the delete job finish and LCD screen shows [Set Fax Num
Std - _ _ _ _ _ _ _ _ _] then finish fax broadcast canceling.
Notes:
• If press <Set> button, and machine beeper alarmed, it means no fax broadcast job under processing.
So fax canceling operation can not be executed.
- 85 -
Page 86

8.10 Using Scan Tool Box
Scan Tool Box is a scan application tool for optimizing MFP scan functions on your computer. User may utilize
each scan functions for their own purpose by Scan Tool Box icons.
Scan Tool Box main dialog displays 7 items, which functions are:
Application
Copy
Fax
File
E-Mail
OCR
Settings
On [Settings] item, you can setup device connection configuration (via USB or Ethernet) and maintain fax
phone book. Except for the [Settings] item, the others are scanning application items.
Notes:
• Click the top-right button or press ESC key on a keyboard to close the main dialog.
• Click the top-right button
• Under Scan Tool Box if you execute job cancel when processing scan by ADF, Tool Box message also
will different by different timing.
to initiate the current on-line help document.
- 86 -
Page 87

8.10.1 Application
In the Scan images function, you can indicate an application to edit scanned image file and some scan
parameters of this function as follows:
[Scan source]
[Scan source] is allows the user to select the document source from the [Document Glass] or [Auto
Document Feeder]. Check the flatbed glass and remove any document on it before you want to scan from
the [Auto Document Feeder].
[Scan mode]
[Scan mode] allows you to select either color, black & white or black & white enhanced scans. Black and
white scans will be smaller in terms of file size.
[Image quality]
[Image quality] determines the amount of detail collected from an original. There are pre-defined
options (75, 100, 150, 200, 300, 400, 600 dpi) and Custom options. If [custom] option is selected, a dialog will
pop up for you to fill in the specified resolution between 75 and 600. Select a value based on the purpose of
your scan.
[Paper size]
Choose the document size as your scan region; each document size is supported by both scan sources,
[Document Glass] or [Auto Document Feeder]
[Multiple page scan]
For [Multiple page scan], if this option is checked, a message box appears asking for placement of the
next page to be scanned (only applicable if [Document Glass] is the selected Scan Source).
[Link scanned images to]
User may select an application target via [Set] icon that used for opening the scanned images after
scanning finished.
- 87 -
Page 88

[Set temporary files path]
User may setup temporary path to save each of scanned images via [Browse] icon. All scans will be
saved into this folder with bitmap format and only the last scan of multiple page images should be all pages
will be sent to the application software.
[Set menu name]
User may specify application name with limited length by this input box.
[Delete files]
Apply this icon can delete all temporary image files in the current folder.
[Defaults]
Click this icon to recover to original settings.
[Apply]
Save modified settings.
[Close]
Close the window without saving any settings.
[Start]
Apply settings and initiate scan task.
Notes:
• Click the top-right button or press ESC on a keyboard to close the window, the same function as
[Close] button.
• Click the top-right button
to initiate the relative on-line help document.
- 88 -
Page 89

8.10.2 Copy
Copy documents in the function, you can using this function to copy documents and set the number of copies.
It is necessary to install printer before using the function. The copy parameters in this item are as follows:
Scanner settings:
[Scan source]
[Scan source] is allows the user to select the document source from the [Document Glass] or [Auto
Document Feeder]. Check the flatbed glass and remove any document on it before you want to scan from
the [Auto Document Feeder].
[Scan mode]
[Scan mode] allows you to select either color, black & white or black & white enhanced scans. Black
and white scans will be smaller in terms of file size.
[Image quality]
[Image quality] determines the amount of detail collected from an original. There are pre-defined
options (150, 300 and 600 dpi). On 300 dpi and 600 dpi modes, the function will enhance the image quality
with sharpness features.
[Paper size]
Choose the document size as your scan region; each document size is supported by both scan sources,
[Document Glass] or [Auto Document Feeder].
[Brightness]
Adjust brightness value from -100 to 100, a value of -100 corresponds to the least brightness and a value
of 100 corresponds to the brightest.
[Scale]
Apply this function to decide the print output size. [Fit to paper] option can map the document size from
original to destination paper size. [100%] option can output the original size of scan that discards the size of
print paper.
[Multiple page scan]
- 89 -
Page 90

For [Multiple page scan], if this option is checked, a message box appears asking for placement of the
next page to be scanned on the flatbed scanner.
Notes:
• When Multiple Page Scan Check Box available, in Tool Box copy mode Job log will record the Scan
Job and Print Job of each page.
• If Job History Report is setting on automatic output, this report also will be included in output copy.
Printer settings:
[Printer]
Once the user has already setup lists the available printers.
[Print size]
Enumerate paper sizes that supported by Lists the paper sizes supported by the printer
[Print mode]
Apply printing color mode in [Color], [Black and White] or [Black and White enhance].
[Background removal]
Check this option for removal of background
[2-in-1]
[2-in-1] option merges two pages of copies into single one.
[Collate Copy]
[Collate Copy] option allows you to sort copies in page order.
[Copies]
Setup the number of copies from 1 to 99 as you want.
[Defaults]
Click this icon to recover to original settings.
[Apply]
Save modified settings.
[Close]
Close the window without saving any settings.
[Start]
Apply settings and initiate copy task.
Notes:
• Click the top-right button or press ESC on a keyboard to close the window, the same function as
[Close] button.
• Click the top-right button
to initiate the relative on-line help document.
- 90 -
Page 91

8.10.3 Fax
Save the scanned image use this function to save scanned image and send a fax by a fax printer after
configuring your fax items. It is necessary to install fax printer before using the function. Before faxing, User
can set some items, which are introduced as follows:
Scanner settings:
[Scan source]
[Scan source] is allows the user to select the document source from the [Document Glass] or [Auto
Document Feeder]. Check the flatbed glass and remove any document on it before you want to scan from
the [Auto Document Feeder].
[Scan mode]
[Scan mode] allows you to select either color, black & white or black & white enhanced scans. Black
and white scans will be smaller in terms of file size.
[Image Quality]
[Image Quality] determines the amount of detail collected from an original. There are pre-defined
options (200 and 400 dpi).
[Paper size]
Choose the document size as your scan region; each document size is supported by both scan sources,
[Document Glass] or [Auto Document Feeder]
[Multiple page scan]
For [Multiple page scan], if this option is checked, a message box appears asking for placement of the
next page to be scanned (only applicable if [Document Glass] is the selected Scan Source).
Notes:
• When Multiple Page Scan Check Box available, in Tool Box copy mode Job log will record the Scan
Job and Print Job of each page.
• If Job History Report is setting on automatic output, this report also will be included in output copy.
[Contrast]
- 91 -
Page 92

Adjust contrast value from step -100 to 100, a value of -100 corresponds to the darkest level and a value
of 100 corresponds to the lightest.
Printer settings:
[File name]
Enter the name of the file to be stored. A serial number will be added automatically in the file name for
multi-page scans (as well as the document type extension, PDF, TIF, DOC, etc).
[File type]
Select image file format as you want for all scans.
[Path]
Input directory where scanned images will be saved.
[Browse]
Setup the path to save each of scanned images via “Browse” icon. All scans will be saved into this folder
with indicated format.
[Fax Printer]
Once the user has installed the fax printer, it will appear in the list of available fax printers
[Save pictures in today’s subfolder]
Check this function for saving all scanned images in a subfolder that named with today’s date.
[Defaults]
Click this icon to recover to original settings.
[Apply]
Save modified settings.
[Close]
Close the window without saving any settings.
[Start]
Apply settings and initiate scan task.
Notes:
• Click the top-right button or press ESC on a keyboard to close the window, the same function as
[Close] button.
• Click the top-right button
to initiate the relative on-line help document.
- 92 -
Page 93

8.10.4 File
Save scanned images in with using the function. Under operations you can also perform this operation from
the keyboard of the FujiXerox Docuprint C2090FS. Please refer to section 5.2 for more information.
On the keyboard of FujiXerox DocuPrint C2090 FS, the functions [To PC (USB)] of MFP will also apply this
function for process via USB port. You can refer “5.2 Scanning an image” section for this function.
[Scan source]
[Scan source] is allows the user to select the document source from the [Document Glass] or [Auto
Document Feeder]. Check the flatbed glass and remove any document on it before you want to scan from
the [Auto Document Feeder].
[Scan mode]
[Scan mode] allows you to select either color, black & white or black & white enhanced scans. Black
and white scans will be smaller in terms of file size.
[Scan mode] determines the amount of color information collected from your origin; your choice also
influences the output image size. Color mode creates the largest image size, while black & white mode
creates the smallest ones.
[Image Quality]
[Image Quality] determines the amount of detail collected from an original. There are pre-defined
options (75, 100, 150, 200, 300, 400, 600 dpi) and Custom options. If custom option is selected, a dialog will
pop up for you to fill in the specified resolution between 75 and 600. Select a value based on the purpose of
your scan.
[Paper size]
Choose the document size as your scan region; each document size is supported by both scan sources,
[Document Glass] or [Auto Document Feeder]
[Multiple page scan]
For [Multiple page scan], if this option is checked, a message box appears asking for placement of the
next page to be scanned (only applicable if [Document Glass] is the selected Scan Source).
[File name]
- 93 -
Page 94

Enter the name of the file to be stored. A serial number will be added automatically in the file name for
multi-page scans (as well as the document type extension, PDF, TIF, DOC, etc).
[File type]
Select image file format as you want for all scans. For multiple page scan, file types will be limited to PDF,
TIF and DOC only.
[Path]
Input directory where scanned images will be saved.
[Browse]
Setup the path to save each of scanned images via “Browse” icon. All scans will be saved into this folder
with indicated format.
[Save pictures in today’s subfolder]
Check this function for saving all scanned images in a subfolder that named with today’s date.
[Defaults]
Click this icon to recover to original settings.
[Apply]
Save modified settings.
[Close]
Close the window without saving any settings.
[Start]
Apply settings and initiate scan task.
Notes:
• Click the top-right button or press ESC on a keyboard to close the window, the same function as
[Close] button.
• Click the top-right button
to initiate the relative on-line help document.
• Click
- 94 -
Page 95

8.10.5 E-mail
Attach scanned image file to e-mail in the function after configure your mail. User can set some items, which
are as follows:
[Scan source]
[Scan source] is allows the user to select the document source from the [Document Glass] or [Auto
Document Feeder]. Check the flatbed glass and remove any document on it before you want to scan from
the [Auto Document Feeder].
[Scan mode]
[Scan mode] allows you to select either color, black & white or black & white enhanced scans. Black
and white scans will be smaller in terms of file size.
[Image Quality]
[Image Quality] determines the amount of detail collected from an original. There are pre-defined
options (75, 100, 150, 200, 300, 400, 600 dpi) and Custom options.
[Paper size]
Choose the document size as your scan region; each document size is supported by both scan sources,
[Document Glass] or [Auto Document Feeder].
[Maximum file size]
By applying this item, it will limit color modes and image quality modes based on upper limitation of
attachment file size.
Notes:
• Attached scanned images to an E-mail function is set to using Microsoft Outlook Express as default
application software. You could change default setting to select other E-mail application software that
you favorite to using for default E-mail application through by below method.
- 95 -
Page 96

Click the [Start] that displayed on the windows screen then click [Control panel] and select [Internet
option] then Programs tab and select your favorite E-mail application software from list and press [OK]
to confirm you setting. This setting will available after re-start Tooling Box utility again.
• The limitation of maximum file size and image quality please refer bellows table,
Maximum
file size
Color Mode
Image quality (dpi)
Black / White & Gray (8 bits)
Image quality (dpi)
150 KB 75 dpi 75, 100 dpi
300 KB 75, 100 dpi 75, 100, 150 dpi
600 KB 75, 100, 150 dpi 75, 100, 150, 200 dpi
900 KB 75, 100, 150 dpi 75, 100, 150, 200, 300 dpi
1500 KB 75, 100, 150, 200 dpi 75, 100, 150, 200, 300, 400 dpi
3000 KB 75, 100, 150, 200, 300 dpi 75, 100, 150, 200, 300, 400, 600 dpi
Unlimited 75, 100, 150, 200, 300, 400, 600 dpi 75, 100, 150, 200, 300, 400, 600 dpi
[Multiple page scan]
For [Multiple page scan], if this option is checked, a message box appears asking for placement of the
next page to be scanned (only applicable if [Document Glass] is the selected Scan Source).
[File name]
Enter the name of the file to be stored. A serial number will be added automatically in the file name for
multi-page scans (as well as the document type extension, PDF, TIF, DOC, etc).
[File type]
Select image file format as you want for all scans.
[Path]
Input directory where scanned images will be saved.
[Browse]
Setup the path to save each of scanned images via “Browse” icon. All scans will be saved into this folder
with indicated format.
[Save pictures in today’s subfolder]
Check this function for saving all scanned images in a subfolder that named with today’s date.
[Defaults]
Click this icon to recover to original settings.
[Apply]
Save modified settings.
[Close]
Close the window without saving any settings.
[Start]
Apply settings and initiate scan task.
Notes:
• Click the top-right button or press ESC on a keyboard to close the window, the same function as
[Close] button.
• Click the top-right button
to initiate the relative on-line help document.
- 96 -
Page 97

8.10.6 OCR
Save scanned file using this function and apply DocuWorks application for character recognition (OCR). It is
necessary to install DocuWorks application before using the function. User can set some items, which are as
follows:
[Scan source]
[Scan source] is allows the user to select the document source from the [Document Glass] or [Auto
Document Feeder]. Check the flatbed glass and remove any document on it before you want to scan from
the [Auto Document Feeder].
[Scan mode]
[Scan mode] allows you to select either color, black & white or black & white enhanced scans. Black
and white scans will be smaller in terms of file size. OCR Scans only available under [Gray] mode and [Black
& white] mode.
[Image Quality]
[Image Quality] determines the amount of detail collected from an original. There are pre-defined
options (75, 100, 150, 200, 300, 400, 600 dpi) and Custom options.
[Paper size]
Choose the document size as your scan region; each document size is supported by both scan sources,
[Document Glass] or [Auto Document Feeder].
[Multiple page scan]
For [Multiple page scan], if this option is checked, a message box appears asking for placement of the
next page to be scanned (only applicable if [Document Glass] is the selected Scan Source).
[File name]
Enter the name of the file to be stored. A serial number will be added automatically in the file name for
multi-page scans (as well as the document type extension, PDF, TIF, DOC, etc).
[File type]
- 97 -
Page 98

Show image file format on OCR scans. The file format in TIF represents the original image of document
and XDW represents DocuWorks format and TXT represents the final OCR outcomes.
[Path]
Input directory where scanned images will be saved.
[Browse]
Setup the path to save each of scanned images via [Browse] icon. All scans will be saved into this folder
with indicated format.
[Save pictures in today’s subfolder]
Check this function for saving all scanned images in a subfolder that named with today’s date
[Defaults]
Click this icon to recover to original settings.
[Apply]
Save modified settings.
[Close]
Close the window without saving any settings.
[Start]
Apply settings and initiate scan task.
Notes:
• Click the top-right button or press ESC on a keyboard to close the window, the same function as
[Close] button.
• Click the top-right button
to initiate the relative on-line help document.
• OCR function does not support 64-bit operation system.
- 98 -
Page 99

8.10.7 Setting
Customize your scanner connection and maintain fax phone book here; there are 2 settings, which are as
follows:
Device settings:
This setting indicates user may select from either USB or Ethernet connection for scans.
[Local device]
Connect scanner device via USB cable.
[Broadcast]
List all available scanner devices from Ethernet network.
[Location]
Connect to scanner device on Ethernet by specified host name or IP address.
Fax address book function:
This fax address table can be sorted by [Name], [Company] or [Fax number].
- 99 -
Page 100

[Add]
Add a set of record into the phone book
[Delete]
Delete the selected record from phone book.
[Edit]
Edit the selected record from phone book by above [Add] phone book dialog.
[Defaults]
Click this icon to recover to original settings.
[Apply]
Save modified settings.
[Close]
Close the window without saving any settings.
Notes:
• Click the top-right button or press ESC on a keyboard to close the window, the same function as
[Close] button.
• Click the top-right button
to initiate the relative on-line help document.
- 100 -
 Loading...