

Page 1

DocuPrint C1618
User Guide
Page 2

TrueType font, AppleTalk, MacOS, Macintosh and EtherTalk are trademarks of Apple Computer, Inc., registered in
the U.S. and other countries.
NetWare is a registered trademark of Novell, Inc., in the United States and other countries.
Microsoft, MS-DOS, Windows, and Windows NT are either registered trademarks or trademarks of Microsoft
Corporation in the United States and/or other countries.
Permission has been obtained from Microsoft Corporation for use of software screen shots.
This software is based in part on the work of the Independent JPEG Group.
®
This product incorporates RSA
BSAFE™ Crypto-C from RSA Security Inc. RSA is a registered trademark of RSA
Security Inc. BSAFE is a registered trademark of RSA Security Inc. in the United States and/or other countries. RSA
Security Inc. All rights reserved.
All product/brand names are trademarks or registered trademarks of the respective holders.
Important
This manual is copyrighted with all rights reserved. Under the copyright laws, this manual may not
be copied or modified in whole or part, without the written consent of the publisher.
Parts of this manual are subject to change without prior notice.
We welcome any comments on ambiguities, errors, omissions, or missing pages.
Never attempt any procedure on the machine that is not specifically described in this manual.
Unauthorized operation can cause faults or accidents. Fuji Xerox is not liable for any problems
resulting from unauthorized operation of the equipment.
Xerox is a registered trademark. The Document Company and Ethernet are trademarks which may be registered in
certain jurisdictions.
CentreWare and DocuWorks are trademarks.
Page 3

Preface
Thank you for choosing the DocuPrint C1618.
This is a guide on operating the DocuPrint C1618 and the important points to note. To
understand the features fully and to use the machine correctly and effectively, please read
this guide before using it.
Keep this guide handy for use as a quick reference on using the machine.
This guide is written for users who are familiar with the personal computers, operating
systems, and software compatible with this printer. For operational procedures and
information regarding these items, refer to the documentation provided with the various
hardware and software that you are using.
It may be a legal offence to print currency notes, certificates of stocks and securities, or any other
documents of similar nature, regardless of whether they will be used.
This equipment conforms to the guidelines of the Japan Business Machine Makers Association on the
harmonic effects by copiers and other reproduction devices. These guidelines conform to the guides on
the harmonic suppressors of electronic appliances and general-purpose machines.
In this manual, safety instructions are preceded by the symbol . Always read and follow the
instructions before performing the required procedures.
This equipment is certified as a Class 1 laser product under IEC60825. This means that the machine
does not emit hazardous laser radiation. Since radiation emitted inside the machine is completely
confined within the protective housings and external covers, the laser beam cannot escape from the
machine during any phase of user operation.
As a member of the International Energy Star Program, Fuji Xerox confirms this product
satisfies the requirements for International Energy Star Program standards.
i
Page 4
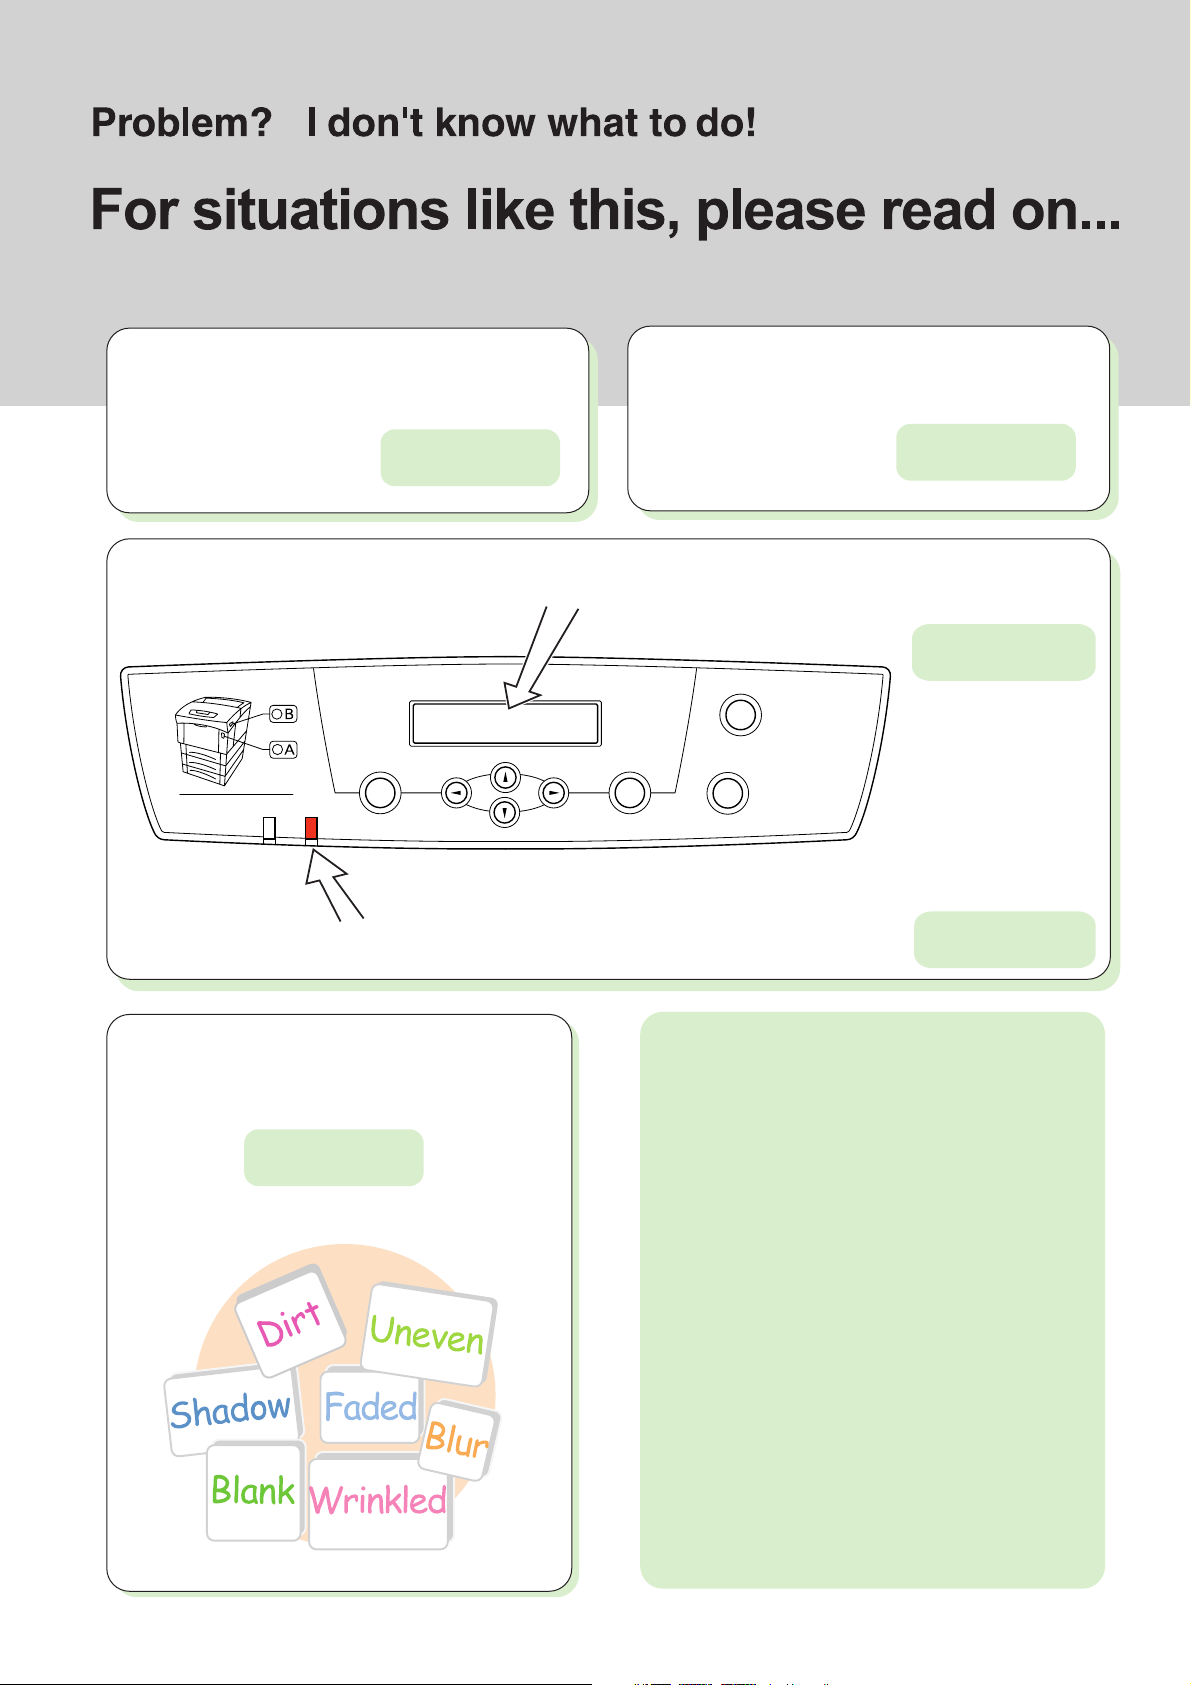
For situations like this, please read on...
Cannot switch on the
printer.
P. 134
The printer does not
print.
P. 135
An error message appears on the control panel.
P. 155
Front Door Release Button
Menu
Ready Error
Eject
Set
The Error indicator is on or blinking.
Power saver
Cancel
Back
P. 163
ii
Print quality is not good.
P. 141
Problem!
If you are unable to
rectify problems with
the recommended
remedies, contact
your
Fuji Xerox
dealers
.
or
Page 5

I want to stop printing:
P. 67
I want to know how to set paper and print:
Envelopes
Transparencies
P. 71
P. 73
Two-sided
printing
P. 80
A paper jam message
appears on the control
panel:
Feed Jam
Check Tray
P. 176
Duplex Jam
Open Cover B
P. 182
I want to replace
consumables:
Toner cartridge
Drum cartridge
Transfer roll cartridge
Custom-size paper
P. 76
Two-sided printing
on specialty paper
P. 81
P. 186
P. 190
P. 1 96
Feed Jam
Check Tray
P. 177
Regi. Jam
Open Cover A
Fuser Jam
Open Cover A & B
P. 179
Feed Jam
Check Tray
P. 183
iii
Page 6
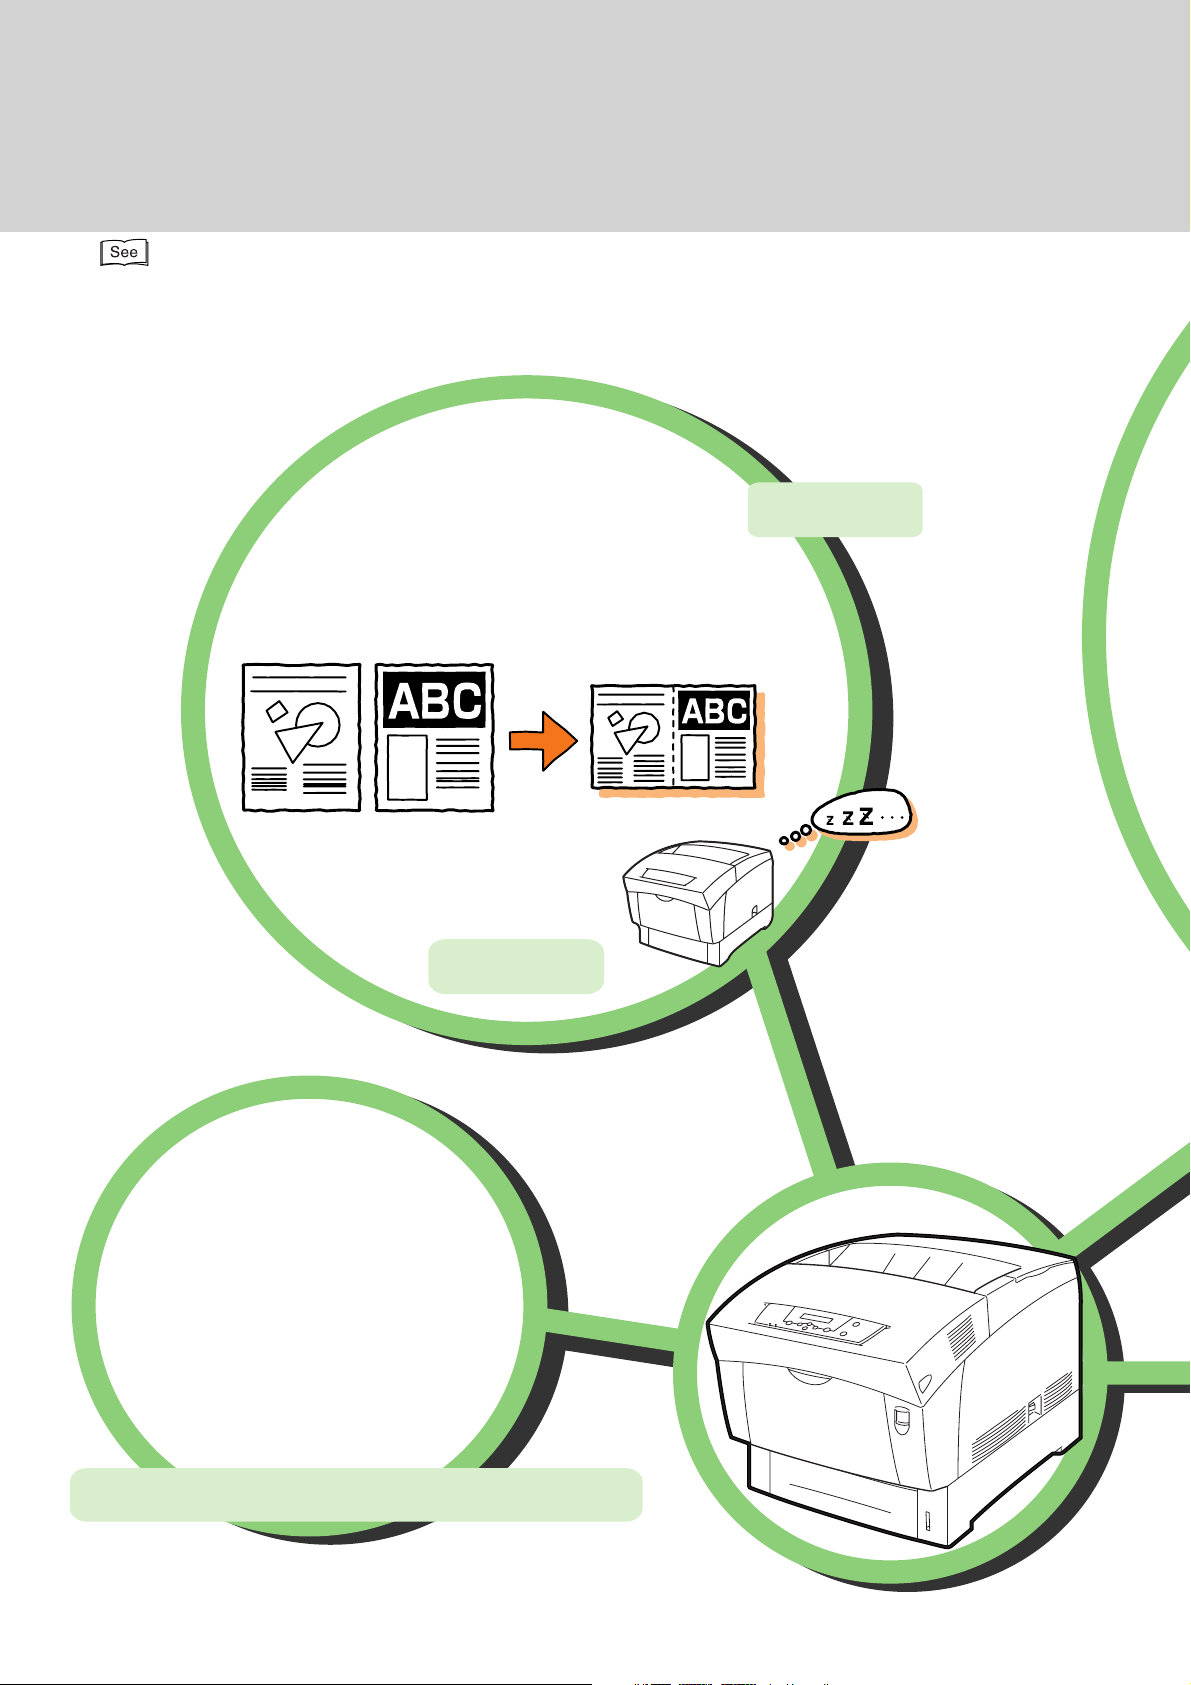
You can do the following with your
Using the printer efficiently!
You can do the following with your printer:
Help keywords are used in Windows. For information about the contents of
Help and how to use it, refer to "3.4 Using Online Help".
Economizing
Using the printer efficiently!
of the paper
You can do the following with your printer:
Print on both sides
Help keywords are used in Windows. For information about the contents of
Help and how to use it, refer to "3.4 Using Online Help".
Printing multiple pages on a
single page
Economizing
Print on both sides
of the paper
Printing multiple pages on a
single page
Setting the power
saver mode
Keyword:
2 sided Print
Keyword:
Multi-Up
Help
Setting the power
saver mode
P. 117
P. 117
Adjusting colors
Setting different image
quality levels to suit
your needs
Adjusting tones and
image quality
Adjusting colors
Printing the
PDF file directly
PDF File Easy Printing Guide
Setting different image
quality levels to suit
Keyword:
2 sided Print
Printing a stamp such as the
word ''Confidential'' as a
background to the main
Keyword:
printed text
Keyword: Printing a Watermark
Multi-Up
Printing on paper inserted
between transparency
sheets
(Transparency Separators)
Printing with banner sheets to separate print jobs
Help
Printing With Various Functions
Help
Printing a single document
several times on the same
page (Image Repeat)
Keyword:
Transparency
Ms A
Separators
Mr B
Ms C
Keyword:
Using Image Repeat to Print a Job
Keyword:
Placing Banner Sheets
Between Jobs
Managing the printer
Managing the printer
from a computer
(CentreWare Internet Services)
Printer operational settings
Managing job logs
Printing reports
P. 199
P. 204
your needs
Adjusting tones and
image quality
Printing the
PDF file directly
PDF File Easy Printing Guide
iv
Page 7

Printing With Various Functions
Printing a stamp such as the
word ''Confidential'' as a
background to the main
printed text
Keyword: Printing a Watermark
Printing on paper inserted
between transparency
sheets
(Transparency Separators)
Keyword:
Transparency
Separators
Help
Printing a single document
several times on the same
page (Image Repeat)
Keyword:
Using Image Repeat to Print a Job
Printing with banner sheets to separate print jobs
Ms A
Mr B
Ms C
Keyword:
Placing Banner Sheets
Between Jobs
Managing the printer
Managing the printer
from a computer
(CentreWare Internet Services)
Printer operational settings
Managing job logs
Printing reports
P. 204
P. 199
v
Page 8

Contents
◆ Preface
◆ For situations like this, please read on...
◆ You can do the following with your printer:
◆ Contents
◆ Type of Manuals
◆ Using This Guide
Organization
Conventions
◆ Safety Notes
◆ The Objective of the International Energy Star Program
◆ Illegal Copies
Chapter 1 Printer System Settings
1.1 Adjusting Color Registration ............................................................................................ 2
1.2 Configuring the Printer..................................................................................................... 5
1.2.1 Compatible Systems ......................................................................................... 5
1.2.2 Printer Configuration Flow............................................................................... 10
1.2.3 Setting the IP Address .................................................................................... 12
1.2.4 Setting the Protocols ....................................................................................... 16
1.2.5 Checking Settings ........................................................................................... 19
Chapter 2 Installing the Printer Driver
2.1 After Setting up the Printer ............................................................................................ 22
2.1.1 The PCL6 Printer Drivers ................................................................................ 22
2.1.2 Using the TCP/IP Direct Print Utility................................................................ 23
2.2 Installing the Printer Driver (Windows 95/Windows 98/Windows Me) ........................... 24
2.3 Configuring the TCP/IP Direct Print Utility ..................................................................... 31
2.3.1 Installing the TCP/IP Direct Print Utility........................................................... 31
2.3.2 Setting the Port ............................................................................................... 34
2.4 Installing the Printer Driver (Windows NT 4.0/Windows 2000/Windows XP)................. 38
vi
2.5 Setting Up the USB Port ................................................................................................ 47
Page 9

Chapter 3 Basic Printer Operation
3.1 Printer Part Names and Functions................................................................................. 54
3.2 Switching On/Off the Power........................................................................................... 57
3.2.1 Switching On the Power .................................................................................. 57
3.2.2 Switching Off the Power .................................................................................. 58
3.3 Printing From a Computer.............................................................................................. 59
3.4 Using Online Help .......................................................................................................... 63
3.5 Canceling Printing.......................................................................................................... 67
3.5.1 Canceling Printing From the Computer ........................................................... 67
3.5.2 Canceling Printing at the Control Panel .......................................................... 68
3.6 Changing the Configuration for Options......................................................................... 69
3.7 Printing on Envelopes, Transparencies, and Custom-size (Long) Paper....................... 71
3.7.1 Printing on Envelopes ..................................................................................... 71
3.7.2 Printing on Transparencies.............................................................................. 73
3.7.3 Printing Custom-size (Long) Paper ................................................................. 76
3.8 Two-sided Printing ......................................................................................................... 79
3.8.1 Two-sided Printing........................................................................................... 80
3.8.2 Two-sided Printing on Specialty Paper............................................................ 81
3.9 Using E-Mail Printing ..................................................................................................... 83
3.9.1 Configuring the System for E-Mail Printing ..................................................... 83
3.9.2 Transmittable File Attachments ....................................................................... 84
3.9.3 Sending Mail ................................................................................................... 84
3.9.4 Points to Note When Sending Documents via E-Mail ..................................... 87
Chapter 4 Loading Paper and Usable Paper Types
4.1 Suitable and Unsuitable Paper Types ............................................................................ 90
4.1.1 Suitable Paper................................................................................................. 90
4.1.2 Unsuitable Paper............................................................................................. 94
4.1.3 Storing Paper .................................................................................................. 95
4.2 Loading Paper................................................................................................................96
4.2.1 Loading Paper in the Paper Tray ..................................................................... 96
4.2.2 Loading A5 Paper in the Paper Tray/Changing From A5 to
Another Paper Size1 ..................................................................................... 100
4.2.3 Loading Paper in the Bypass Tray................................................................. 107
vii
Page 10

Chapter 5 Control Panel
5.1 Control Panel Part Names and Functions ................................................................... 110
5.1.1 LED Indicators............................................................................................... 110
5.1.2 Display .......................................................................................................... 111
5.1.3 Buttons .......................................................................................................... 112
5.2 Basic Menu Operation ................................................................................................. 113
5.2.1 Configuration of Basic Menu and Basic Operations...................................... 113
5.2.2 What to Do if You Make a Mistake ................................................................ 115
5.2.3 Example Operation ....................................................................................... 116
5.3 List of Menu Items ....................................................................................................... 117
5.3.1 System .......................................................................................................... 117
5.3.2 Maintenance.................................................................................................. 120
5.3.3 Parallel .......................................................................................................... 122
5.3.4 Report/List..................................................................................................... 122
5.3.5 Network ......................................................................................................... 123
5.3.6 PDF Bridge ................................................................................................... 127
Chapter 6 Troubleshooting
6.1 Type of Problems ......................................................................................................... 132
6.1.1 Problem List .................................................................................................. 132
6.2 No Power .....................................................................................................................134
6.3 The Printer Does not Print ........................................................................................... 135
6.3.1 Indicators are Illuminated, Blinking or Off ..................................................... 135
6.3.2 Cannot Print in Windows............................................................................... 138
6.4 Print Quality is Not Good ............................................................................................. 141
6.4.1 Blank or Completely Black Pages are Output ............................................... 141
6.4.2 Faded or Dirty Printouts, White Areas (Drop-outs), Creases, Blurs .............. 142
6.4.3 Unsatisfactory Printing .................................................................................. 147
6.5 Paper Does not Feed Properly .................................................................................... 148
6.6 Other Problems............................................................................................................ 150
6.6.1 Network Problems ......................................................................................... 150
6.6.2 Other Problems ............................................................................................. 153
6.7 When an Error Message Appears on the Control Panel.............................................. 155
6.8 The Error Indicator is On or Blinking............................................................................ 163
viii
6.8.1 The Error Indicator is On............................................................................... 163
6.8.2 The Error Indicator is Blinking ....................................................................... 163
6.9 Forcing the Printer to Print Remaining Data (When Printing is Halted) ....................... 164
Page 11

6.10 Cleaning the Density Sensor ....................................................................................... 166
6.11 If the Bypass Tray Comes Loose ................................................................................. 169
Chapter 7 Clearing Paper Jams
7.1 Paper Jams.................................................................................................................. 174
7.2 Paper Jams in Bypass Tray.......................................................................................... 176
7.3 Paper Jams in the Paper Tray ...................................................................................... 177
7.4 Paper Jams Between the Drum Cartridge and Fuser Cartridge .................................. 179
7.5 Paper Jams in the Paper Rotator ................................................................................. 182
7.6 Paper Jams in the 2 Tray Module................................................................................. 183
Chapter 8 Daily Care
8.1 Replacing the Toner Cartridges ................................................................................... 186
8.1.1 Toner Cartridge Handling Precautions .......................................................... 186
8.1.2 Replacing the Toner Cartridges .................................................................... 187
8.2 Replacing the Drum Cartridge ..................................................................................... 190
8.2.1 Drum Cartridge Handling Precautions .......................................................... 190
8.2.2 Replacing the Drum Cartridge ...................................................................... 191
8.3 Replacing the Transfer Roll Cartridge .......................................................................... 196
8.3.1 Transfer Roll Cartridge Handling Precautions ............................................... 196
8.3.2 Replacing the Transfer Roll Cartridge ........................................................... 197
8.4 Printing Reports and Lists ........................................................................................... 199
8.4.1 Confirming Printer Configuration and Network Settings................................ 200
8.4.2 Checking the Print Log .................................................................................. 202
8.5 Confirming Printer Status from Your Computer ........................................................... 204
8.5.1 Checking Status and Remaining Amounts of Consumables with
a Web Browser.............................................................................................. 204
8.5.2 Checking Status From the Desktop............................................................... 208
8.5.3 Checking Status by E-Mail ............................................................................ 209
8.6 Cleaning the Printer ..................................................................................................... 210
8.7 Moving the Printer........................................................................................................ 211
8.8 Storing the Printer........................................................................................................ 216
ix
Page 12

Appendix
A Introduction to Options and Consumables................................................................... 218
A.1 Options.......................................................................................................... 218
A.2 Consumables ................................................................................................ 220
B Control Panel Menu List .............................................................................................. 221
C Specifications .............................................................................................................. 225
C.1 Printer Specifications .................................................................................... 225
C.2 Network Specifications.................................................................................. 227
C.3 Printable Area ............................................................................................... 228
D Life Span of Consumables........................................................................................... 229
E Obtaining Product Information ..................................................................................... 230
F Precautions and Limitations ........................................................................................ 231
G Glossary ...................................................................................................................... 233
Index ................................................................................................................................237
x
Page 13

Type of Manuals
The following literature is provided with the printer. Use the guide to suit your purposes.
To view or print guides is supplied in PDF format, therefore, you need Adobe
Reader
ROM provided with the printer.
TM
. If necessary, you can install Adobe Acrobat Reader from the Software Pack CD-
Setup Guide
This section describes the items in the printer package, the printer and options
setup procedures (additional memory, network expansion card, hard disk)
available for the printer.
Read this section when setting up the printer.
®
Acrobat®
User Guide (this book)
This section describes the available printer functions and necessary software
installation procedures, as well as troubleshooting measures. Read this guide for
information about operation and troubleshooting.
Software Pack Operation Guide
This manual explains how to use the DocuPrint C1618 Software Pack CD-ROM
in a Windows environment, and how to install the various types of software
available in the Software Pack. Once you insert the Software Pack CD-ROM in
the CD-ROM drive of your computer, the Fuji Xerox Setup Menu will appear.
Click on the appropriate button to display this manual on the screen.
Network Print Environment User Guide
This document describes the different network setup and printing procedures for
various different network systems.
The network guide is provided in PDF format on the Software Pack CD-ROM.
The name of this file is "Net.pdf".
Other Manuals
Manuals explaining how to use other optional products are included on the
Software Pack CD-ROM as PDF files. Refer to these as appropriate for options
you have purchased.
xi
Page 14

Using This Guide
Organization
The present guide is divided into the following nine chapters. A brief outline of
each chapter is given below.
Chapter 1 Printer System Settings
Describes the color registration procedures, system requirements, and network
settings needed to use the printer.
Chapter 2 Installing the Printer Driver
Describes the procedure for installing software necessary to use the printer (the
printer driver) on your computer.
Chapter 3 Basic Printer Operation
Describes the basic functions of the printer and how to use them.
Chapter 4 Loading Paper and Usable Paper Types
Describes the loading methods of the various types of paper compatible with the
printer.
Chapter 5 Control Panel
Describes the operation of the control panel and functions that you can set from
it.
Chapter 6 Troubleshooting
Describes error messages and their meanings, as well as what to do in case an
error message appears.
Also describes common problems that occur during printing and their remedies.
Read this chapter to determine the nature of the problem and the best method of
dealing with it.
Chapter 7 Clearing Paper Jams
This chapter explains procedures to deal with paper jams.
xii
Chapter 8 Daily Care
Describes the consumables used by the printer, handling precautions, and
replacement procedures.
Also, this chapter describes the cleaning procedures required for continued
normal operation, printer storage requirements when it is not in use over a long
period, and procedures for transporting the printer.
Page 15

Appendix
The following information is presented in the appendix.
●
Introduction to Options and Consumables
●
Control Panel Menu List
●
Specifications
●
Life Span of Consumables
●
Obtaining Product Information
●
Precautions and Limitations
●
Glossary
Conventions
1. In this guide, "computer" refers to personal computer, Macintosh, workstation,
and host device.
2. The following icons are used in this guide.
Indicates important information which you should read.
Indicates additional information about operations or features.
Indicates reference sources.
" ": indicates reference to a chapter or section.
3. The following conventions are used in this guide.
Bold: Indicates selections and all kinds of buttons.
Example: Click Next.
xiii
Page 16

Safety Notes
For your own safety, please read this page carefully before using the machine.
Graphic symbols used throughout this guide
Used for items that if not followed strictly, can lead to severe or
fatal injuries.
Used for items that if not followed strictly, can cause injury to
the user or damage to the machine.
A symbol for items to pay attention to when
handling the machine. Follow instructions
carefully to use the machine safely.
A symbol for prohibited items. Follow
instructions carefully to avoid any
dangerous acts.
Heated
surface
Prohibited No fire Do not
Flammable Electric
shock
tear down
Pinched
fingers
Do not
touch
A symbol for items that must be performed.
Follow instructions carefully to carry out
these essential tasks.
For Installation & Relocation
Do not place the machine in a hot, humid, dusty, or poorly ventilated environment.
Prolonged exposure to these adverse conditions can cause fire or electric shocks.
Do not place the machine near heaters or volatile, flammable, or combustible
materials such as curtains that may catch fire.
Place the machine on a level and sturdy surface that can withstand the machine
weight. If tilted, the machine may fall over and cause injuries.
Instructions Unplug Ground/
Earth
xiv
The machine weighs 35.3 kg when the consumables and paper tray are fully
assembled. When moving the equipment, make sure that there are two or more
persons carrying it.
Page 17
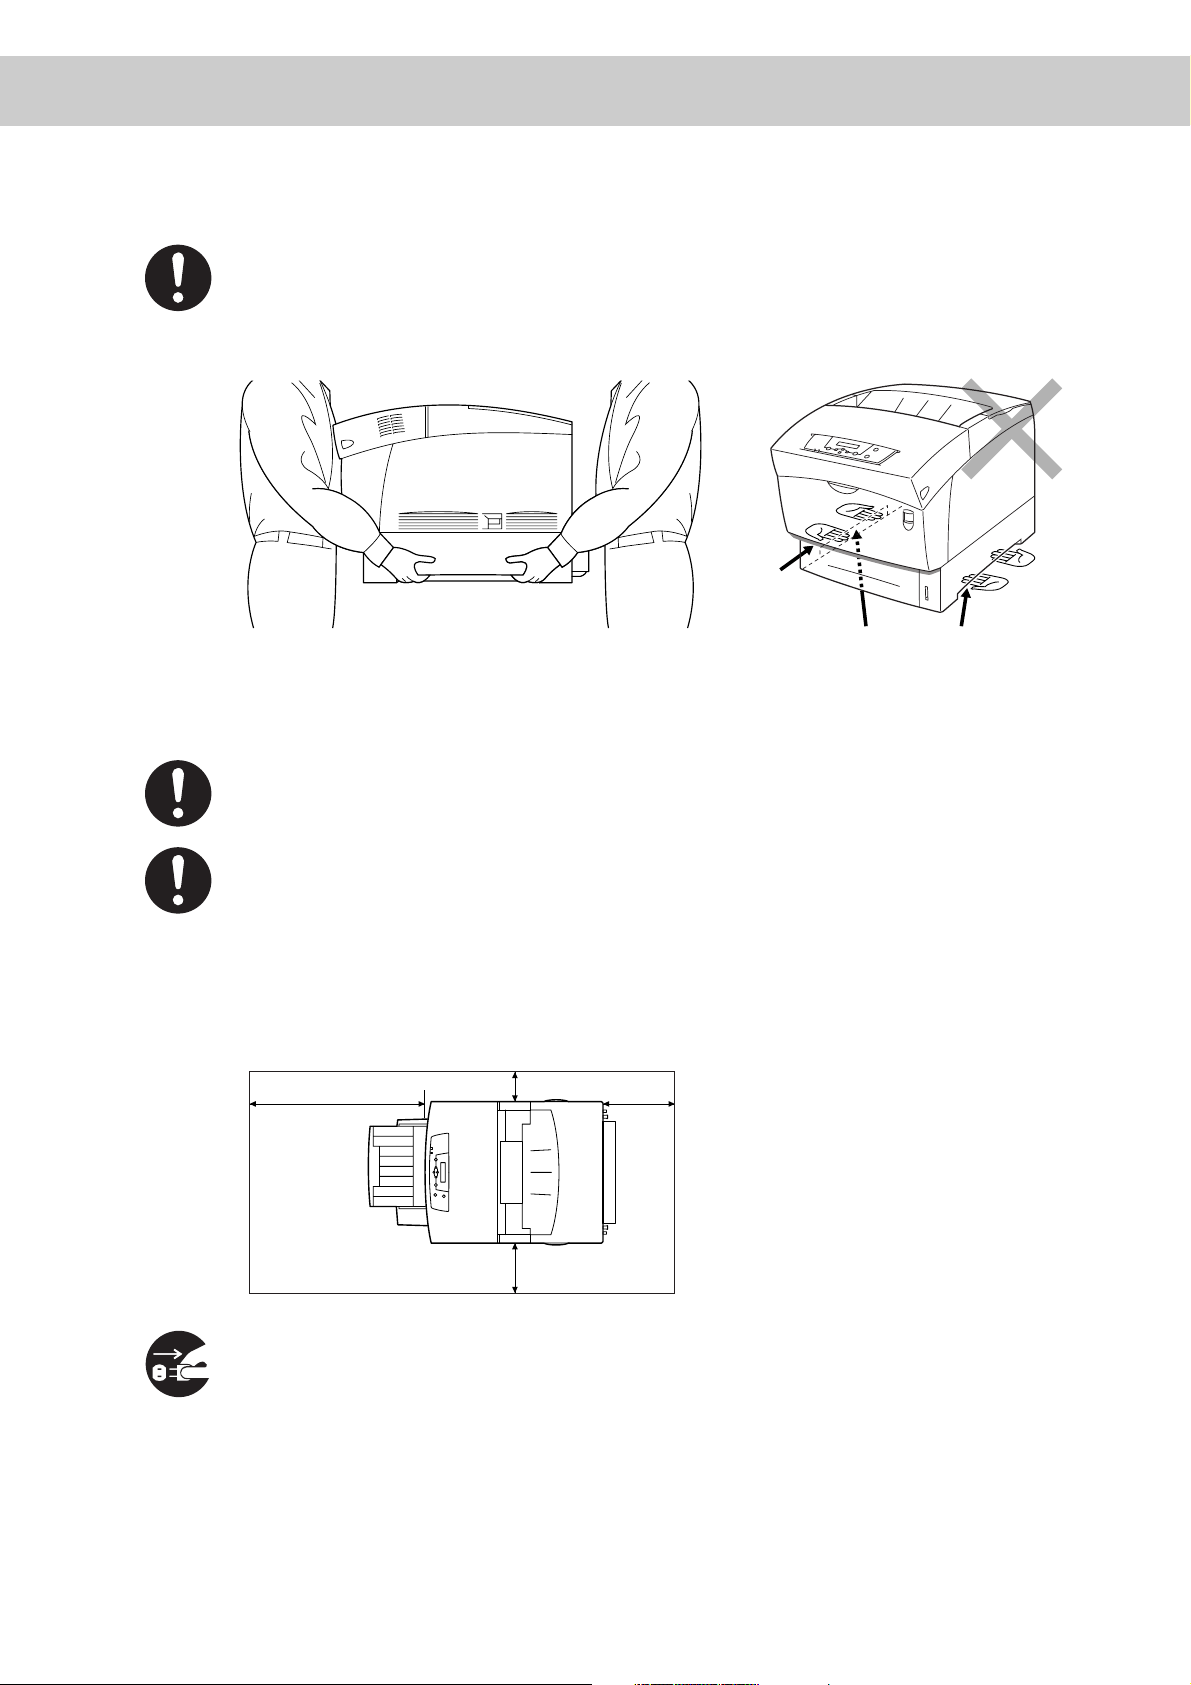
When lifting the machine, face the front panel and firmly grip the recessed areas
provided on both sides of the machine. Never try to lift the machine by gripping any
other areas. Lifting the machine by gripping any other areas can cause the machine
to fall and result in injuries.
Recess
If you hold the printer by the front
door, left or right sides, there is a
danger of the printer falling.
When lifting the machine, get a firm footing and bend your knees to avoid possible
injuries to your back.
The machine has ventilation holes on the left, right, and rear sides. Ensure that the
machine is installed with a minimum clearance of 150 mm from the right side, 100
mm from the left side, and 200 mm from the rear side. A poorly ventilated machine
can cause excessive internal heat and fire. The accompanying diagram shows the
minimum clearances required for normal operation, consumables replacement, and
maintenance to ensure your machine operates at peak performance.
600mm
*
100mm
150mm
200mm
When moving the machine, be sure to unplug the power cord from the outlet. If the
machine is moved with the power cord connected, it can cause damage to the cord
which could result in fire or electric shocks.
xv
Page 18
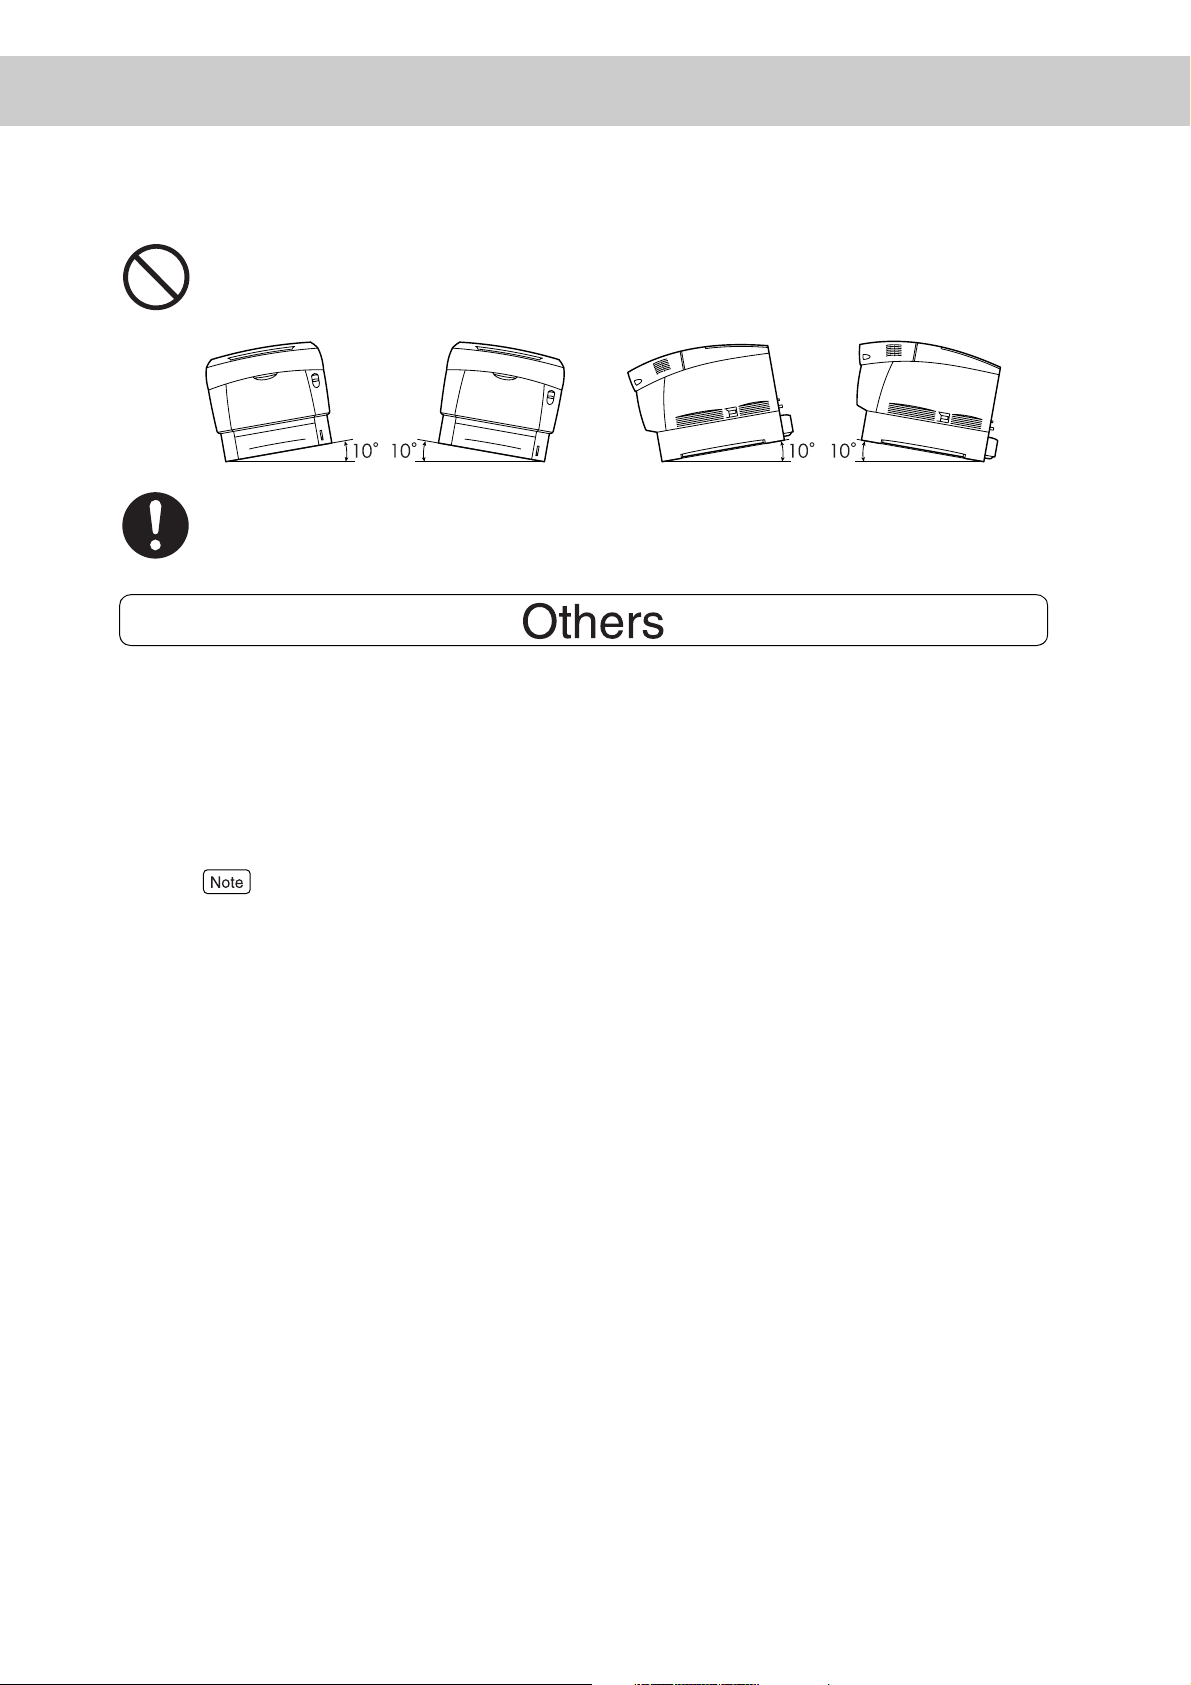
When moving the machine, do not tilt it more than an angle specified in the figure
below. If tilted excessively, the machine may fall over and cause injuries.
When the optional 2 tray module is installed, be sure to lock the caster stoppers. An
unlocked machine may fall over or slide and cause injuries.
● The machine is capable of operating normally within the following recommended
environmental limits.
Temperature range 10–32°C
Humidity range 15–85 % (no condensation)
Humidity should be 65 % or below at 32°C, and temperature should be 28°C or
below at 85 % humidity.
Sudden temperature fluctuations can affect copy quality. Rapid heating of a cold room can cause
condensation inside the machine, directly interfering with image transfer.
● Do not expose the machine to direct sunlight. Exposure to direct sunlight can
adversely affect the machine's performance.
● When moving the printer, remove the toner cartridges. Do not reuse toner
cartridges once you have removed them from the printer. Loose toner can spill
inside the printer and impair print quality.
● Do not place the printer immediately next to an air conditioner or heater. Doing so
will affect the printer's internal temperature, possibly resulting in damage.
xvi
Page 19
For Power & Earth Connection
Three power specifications are listed below. The specifications that apply to your
machine depend on your machine configuration. Connect the power plug only to a
properly rated power outlet. Otherwise, it can cause fire or electric shocks. If in
doubt, contact your Fuji Xerox or dealers.
• Rated voltage 100 V
Rated frequency 50/60 Hz
• Rated voltage 110 V
Rated frequency 60 Hz
• Rated voltage 220-240 V
Rated frequency 50/60 Hz
Never use multi-plug adaptors to plug multiple power plugs in the same outlet. Be
sure to operate the machine on a sole-use receptacle. Multiple connectors can
cause the outlet to overheat and cause fire.
Ensure that the plug connection is free of dust. In a damp environment, a
contaminated connector can draw a non-negligible amount of current that can
generate heat and eventually cause fire over an extended period of time.
Always use the power cord provided with your machine. When an extension power
cord is required, always use a properly rated cord.
• In Japan: 125 V/15 A
• In other countries: Contact your Fuji Xerox or dealers.
If you use a cord with an unspecified current rating, the machine or plug may emit
smoke or become hot to the touch externally.
Do not attempt to rework, pull, bend, chafe, or otherwise damage the power cord.
Do not place a heavy object on the cord. A damaged cord can cause fire or electric
shocks.
Never touch a power cord with wet hands. Danger of electric shock exists.
Stop operation immediately if your machine produces smoke, excessive heat,
unusual noise, or smell, or if water is spilt onto the machine. These conditions can
cause fire. Immediately switch off and unplug the machine, and contact your Fuji
Xerox or dealers.
xvii
Page 20

To prevent fire or electric shocks, follow the instruction below based on your
machine configuration. If in doubt, contact your Fuji Xerox or dealers.
• If your machine is a 220–240 V model, there is no need to attach a separate earth
line since the earth connection is incorporated in the power line. Plug it into a
properly rated outlet.
If the power cord is broken or insulated wires are exposed, ask your Fuji Xerox or
dealers for a replacement. Using a damaged cord can cause fire or electric shocks.
Do not unplug or replug the machine while it is on. Unplugging a live connector can
deform the plug and cause fire.
When unplugging the machine, grasp the plug instead of the cord. Forcibly pulling on a
cord can damage it and cause fire or electric shocks.
Be sure to switch off and unplug the machine before accessing the interior of the
machine for cleaning, maintenance, or fault clearance. Access to a live machine's
interior can cause electric shocks.
Once a month, unplug the machine and check the power cord for the following:
• The power cord is plugged firmly into a receptacle.
• The plug is not excessively heated, rusted, or bent.
• The plug and receptacle are free of dust.
• The cord is not cracked or frayed.
If you notice any unusual conditions, contact your Fuji Xerox or dealers.
When the machine is not used over an extended period of time, switch it off and
unplug it. If an unused machine is left connected to a power source for a long
period, degraded insulation can cause electric shocks, current leakages, or fire.
Switch off the machine before connecting the interface cable or any optional
product. Connecting the cable or optional product with a live machine can cause
electric shocks.
xviii
Page 21
● Reception interference
When installed at a certain location, the machine may cause interference with radio
and television reception. If you notice flickering or distorted images or noises on
your audio-visual units, your machine may be causing radio interference. Switch it
off, and if the interference disappears, the machine is the cause of radio
interference. Perform the following procedure until the interference is corrected.
• Move the machine and the TV and/or radio away from each other.
• Reposition or reorientate the machine and TV and/or radio.
• Unplug the machine, TV and/or radio, and replug them into outlets that operate
on different circuits.
• Reorientate the TV and/or radio antennas and cables until the interference stops.
For an outdoor antenna, ask your local electrician for support.
• Use coaxial cable antennas.
For Machine Operation
Do not place any liquid container such as a vase or coffee cup on the machine. Spilt
water can cause a fire or shock hazard.
Do not place any metal parts such as staples or clips on the machine. If metal and
flammable parts get into the machine, they can short-circuit internal components,
and cause fire or electric shocks.
If debris (metal or liquid) gets into the machine, switch off and unplug the machine.
Contact your Fuji Xerox or dealers. Operating a debris-contaminated machine can
cause fire or electric shocks.
Never open or remove machine covers that are secured with screws unless
specifically instructed in the Use Guide. A high voltage component can cause
electric shocks.
Do not try to alter the machine configuration, or modify any parts. An unauthorized
modification can cause smoke or fire.
xix
Page 22

This equipment is certified as a Class 1 laser product under IEC60825. This means
that the machine does not emit hazardous laser radiation. Since radiation emitted
inside the machine is completely confined within the protective housings and
external covers, the laser beam cannot escape from the machine during any phase
of user operation. Do not perform any operation apart from the instructions given in
the manual. There may be a danger of laser beam leakage.
Never touch a labelled area found on or near the heat roller. You can get burnt.If a
sheet of paper is wrapped around the heat roller, do not try to remove it by yourself
to avoid injuries or burns. Switch off the machine immediately, and contact your Fuji
Xerox or dealers.
Do not place any heavy object on the machine. An off-balance machine can fall
over or the heavy object can fall, causing injuries.
Do not use a highly flammable spray or solvent near the machine. It can cause fire.
When removing jammed paper, make sure that no pieces of torn paper are left in the
machine. A piece of paper remaining in the machine can cause fire.
If a sheet of paper is wrapped around the heat roller, or when clearing a jammed paper
that is difficult or impossible to see, do not try to remove it by yourself. Doing so can
cause injuries or burns. Switch off the machine immediately, and contact your Fuji
Xerox or dealers.
Do not place a magnet near the safety switch of the machine. A magnet can
activate the machine accidentally, resulting in injuries.
xx
Page 23

● When clearing a paper jam or other fault, follow instructions in the User Guide.
● Do not use the machine if it is tilted more than 5 degrees in either the front-to-back
or left-to-right directions. Doing so could result in damage.
For Consumables
Never throw a toner cartridge into an open flame. It can cause an explosion and you
can get burnt.
Never throw a transfer roll cartridge into an open flame. It can cause an explosion
and you can get burnt.
xxi
Page 24

Never throw a drum cartridge into an open flame. It can cause an explosion and you
can get burnt.
● Do not unpack consumables before use. Store consumables in a cool, dry, and
clean environment, away from an open flame, and out of direct exposure to sunlight.
● When using consumables, read and observe operating instructions and safeguards
given on the package and container.
● Administer emergency first aid as follows:
●
If you get toner in your eyes, rinse them abundantly in clean water and consult
your physician, if necessary.
●
If you get toner on your skin, wash it with soap and water. Rinse well.
●
If you inhale toner, leave the contaminated area immediately and gargle with
water.
●
If you swallow toner, induce vomiting and consult your physician immediately.
● When you remove the transfer roll cartridge from the printer because the transfer
roll collection box is full, do not attempt to empty the transfer roll box and reuse the
cartridge, as toner may spill inside the printer and cause damage. Loose toner can
spill inside the printer and deteriorate print quality.
● Do not tilt or shake drum cartridges or transfer roll cartridges when removing them
temporarily. Loose toner can spill inside the printer and deteriorate print quality.
xxii
Page 25

The Objective of the International Energy Star Program
To protect the global environment and conserve energy sources, the International Energy
Star Program encourages the following product features. Fuji Xerox confirms DocuPrint
C1618 satisfies the requirements for this program.
Low Power Mode Feature
This product has a power-saving feature, which switches the machine to the
lower mode ("Power Saver Mode 1") automatically if the machine is on and not
operated for a certain period of time. In this mode the machine lowers the fuser
temperature and saves the power consumption. The default low power mode
start time is set at three minutes. You can change this setting from 1 to 120
minutes. See "Chapter 5 Control Panel" of this guide for details.
In addition to "Power Saver Mode 1", this printer features "Power Saver Mode 2", a second power
mode that saves even more power.
xxiii
Page 26

Illegal Copies
Copying certain documents may be illegal in your country. Penalties of fines or
imprisonment may be imposed on those found guilty.
The following are examples of items that may be illegal to copy in your country:
❑ Currency
❑ Banknotes and cheques
❑ Bank and government bonds and securities
❑ Passports and identification cards
❑ Copyright material or trademarks without the consent of the owner
❑ Postage stamps and other negotiable instruments
This list is not inclusive and no liability is assumed for either its completeness or
accuracy. In case of doubt, contact your legal counsel.
xxiv
Page 27

Chapter
1Printer System Settings
1.1 Adjusting Color Registration........................................................ 2
1.2 Configuring the Printer ................................................................. 5
Page 28
Printer System Settings
Adjusting Color Registration
Follow the procedure below to adjust the color registration when you first install the printer or
after moving it to a new location.
Refer to "5.2 Basic Menu Operation" and "Appendix B Control Panel Menu List" for information about the
operation of the control panel.
Printing the Color Registration Correction Chart
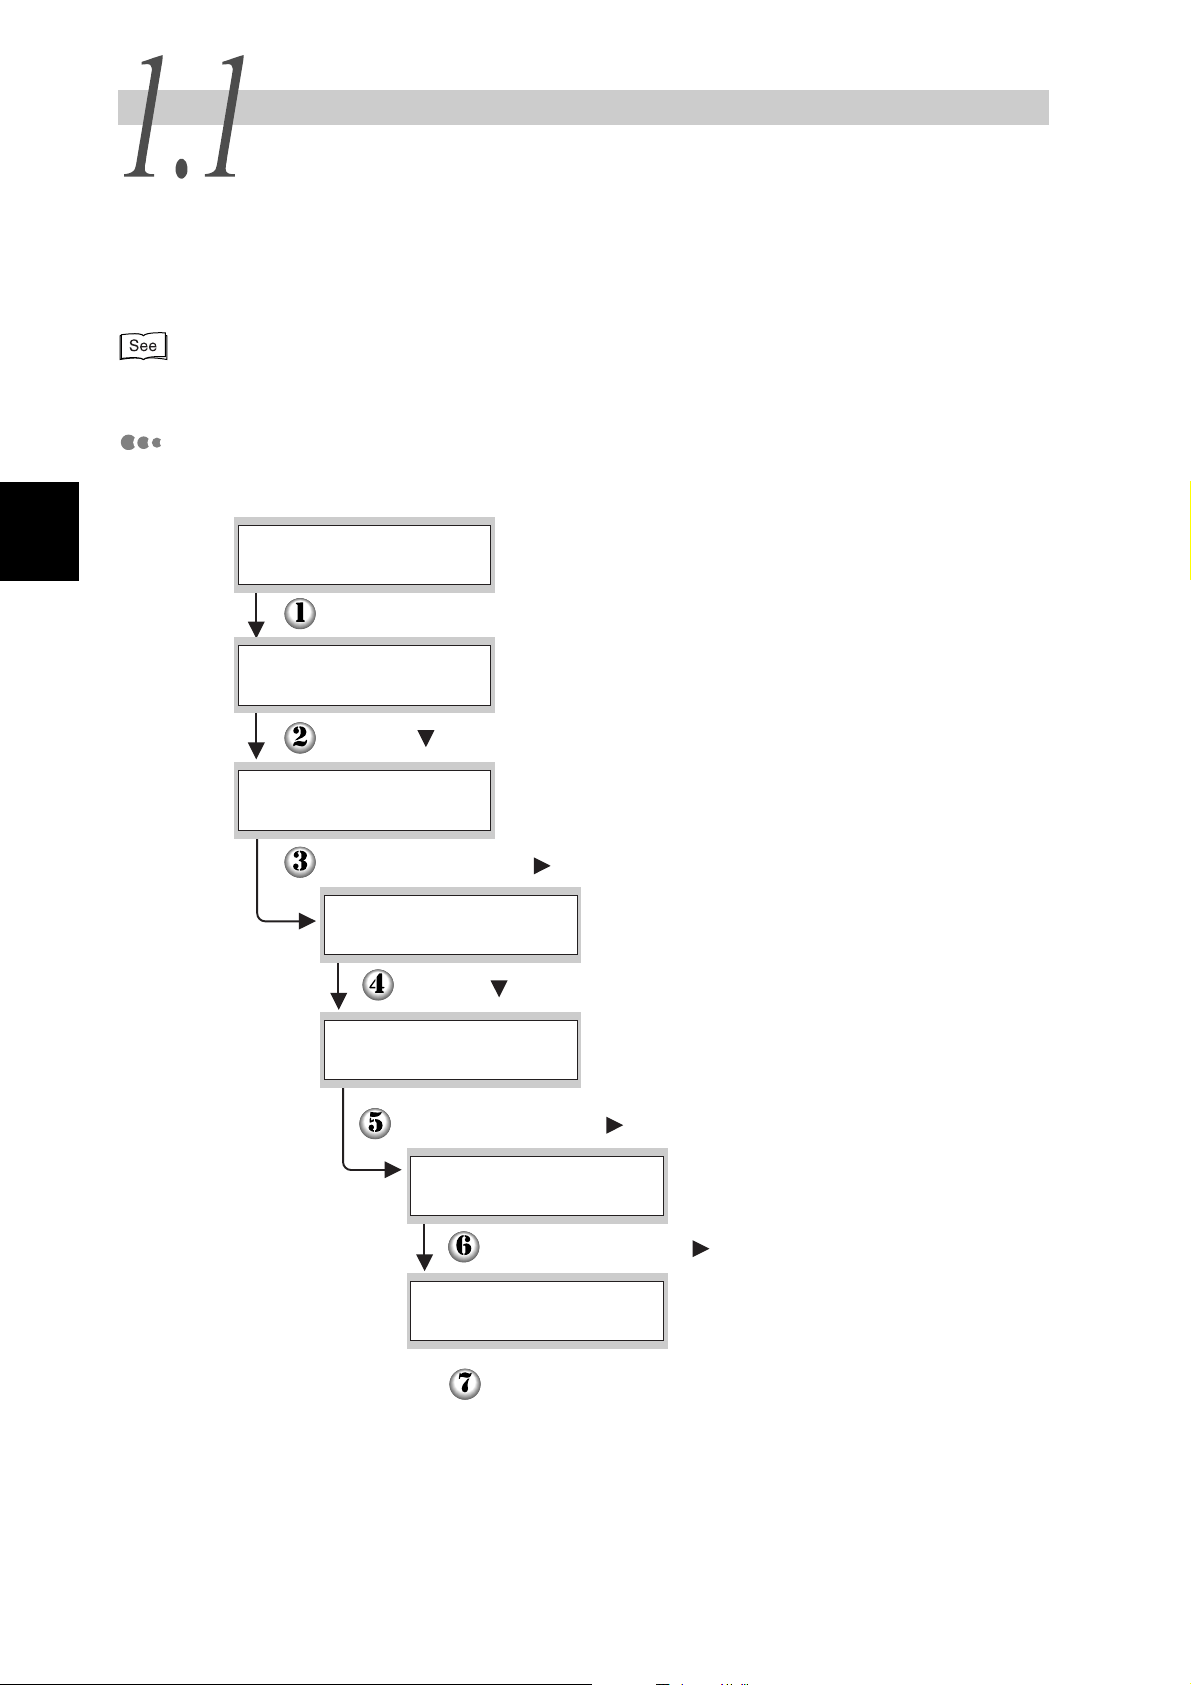
Use the control panel to print the Color Registration Correction Chart.
1
Ready to Print
Press the Menu button. The menu screen appears.
Menu
1:System
Press the button once.
Menu
2:Maintenance
Press the Set/Eject or button once.
2:Maintenance
2:Maintenance
ColorRegiCorrect
(Print screen. The printer is ready to print.)
(Menu screen)
Init NVM
Press the button three times.
2
Press the Set/Eject or button once.
ColorRegiCorrect
Correction Chart
Press the Set/Eject or button once.
Correction Chart
Ready to Print
Press the Set/Eject button once.
The Color Registration Correction Chart is printed.
When printing is finished, the print screen reappears.
Page 29
1.1 Adjusting Color Registration
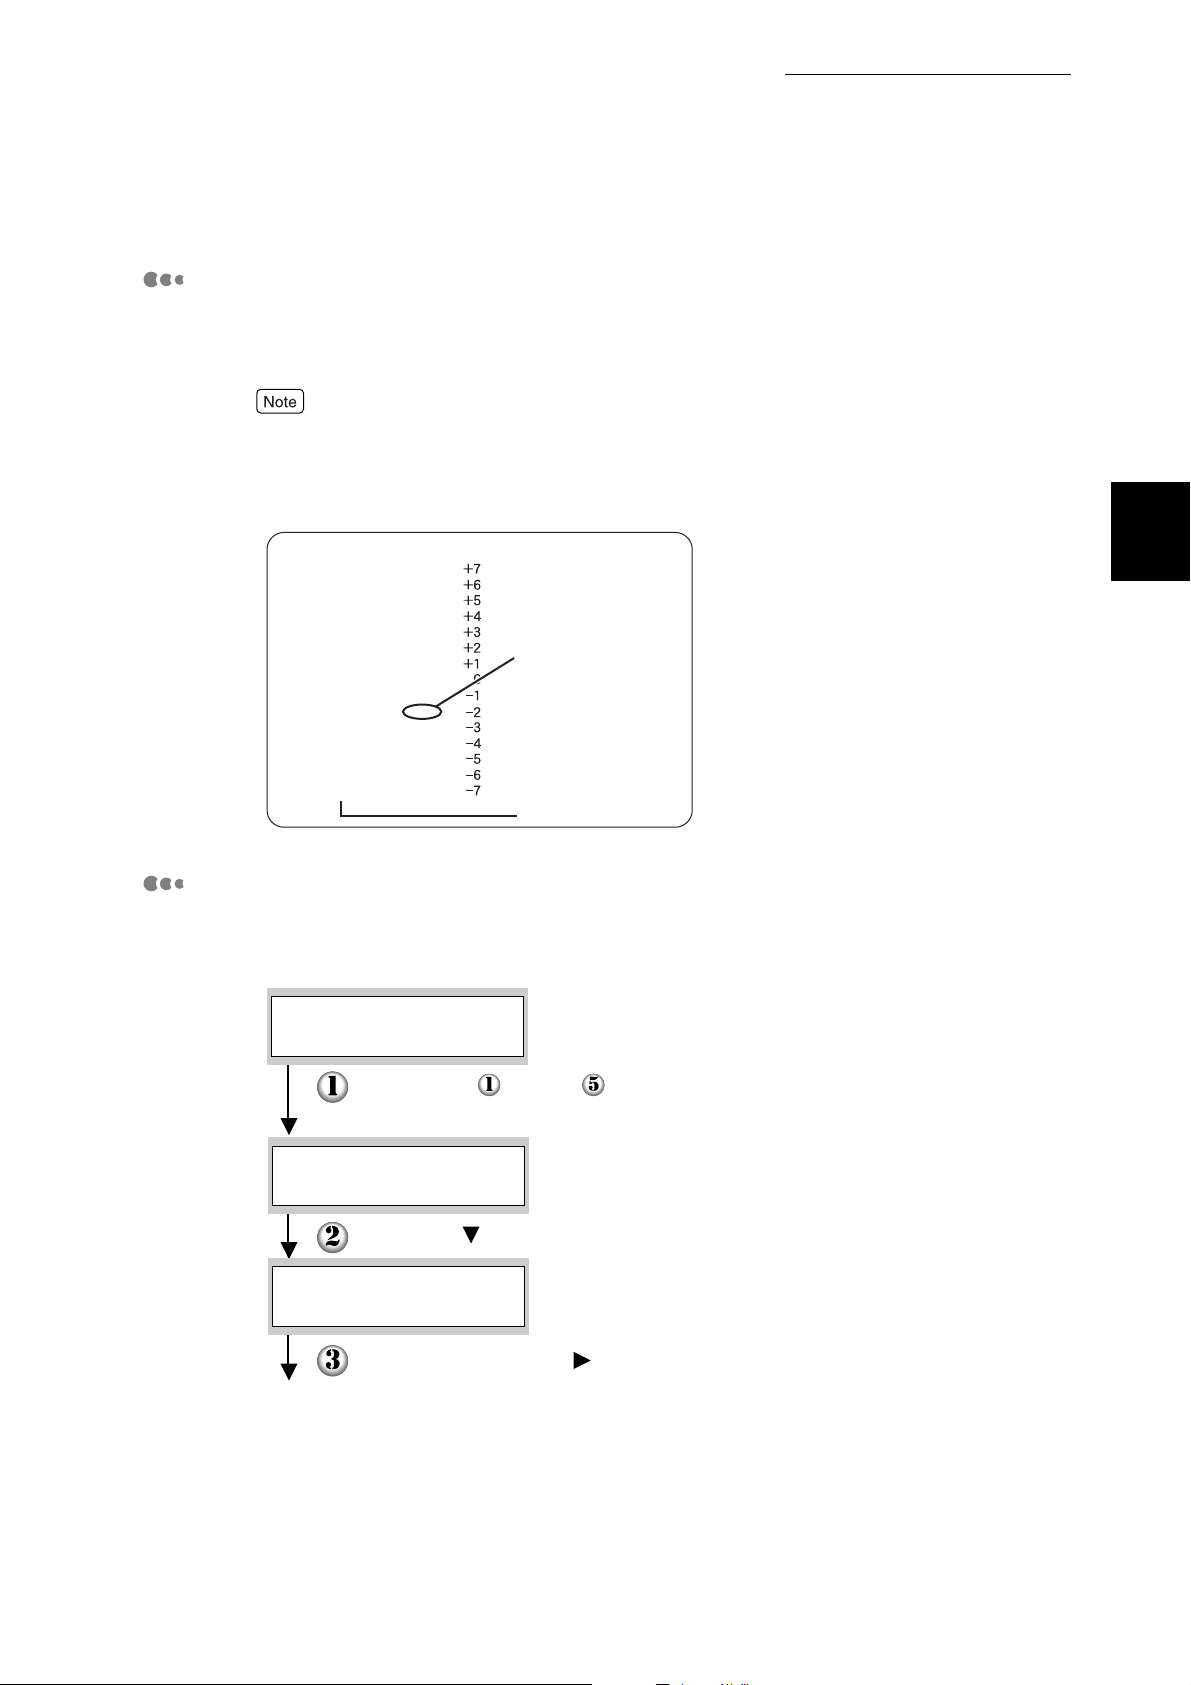
Determining Values
From the lines to the right of the Y (yellow), M (magenta), and C (cyan) pattern,
find the values of the straightest lines.
You can also use the densest colors of the grid to find the straightest lines. The colors printed at the
highest density are those next to the straightest lines.
When "0" is the value nearest the straightest line, you do not need to adjust the color registration.
When the value is not "0", follow the procedure outlined in "Entering Values".
Printer System Settings
1
Straightest line
Lattice pattern
Entering Values
Using the control panel, enter the values that you found in the Color Registration
Correction Chart to make adjustments.
Ready to Print
Follow steps through on the previous page to display
the color registration correction chart settings menu.
ColorRegiCorrect
Correction Chart
Press the button once.
ColorRegiCorrect
Enter Number
Press the Set/Eject or button once.
Continued
3
Page 30
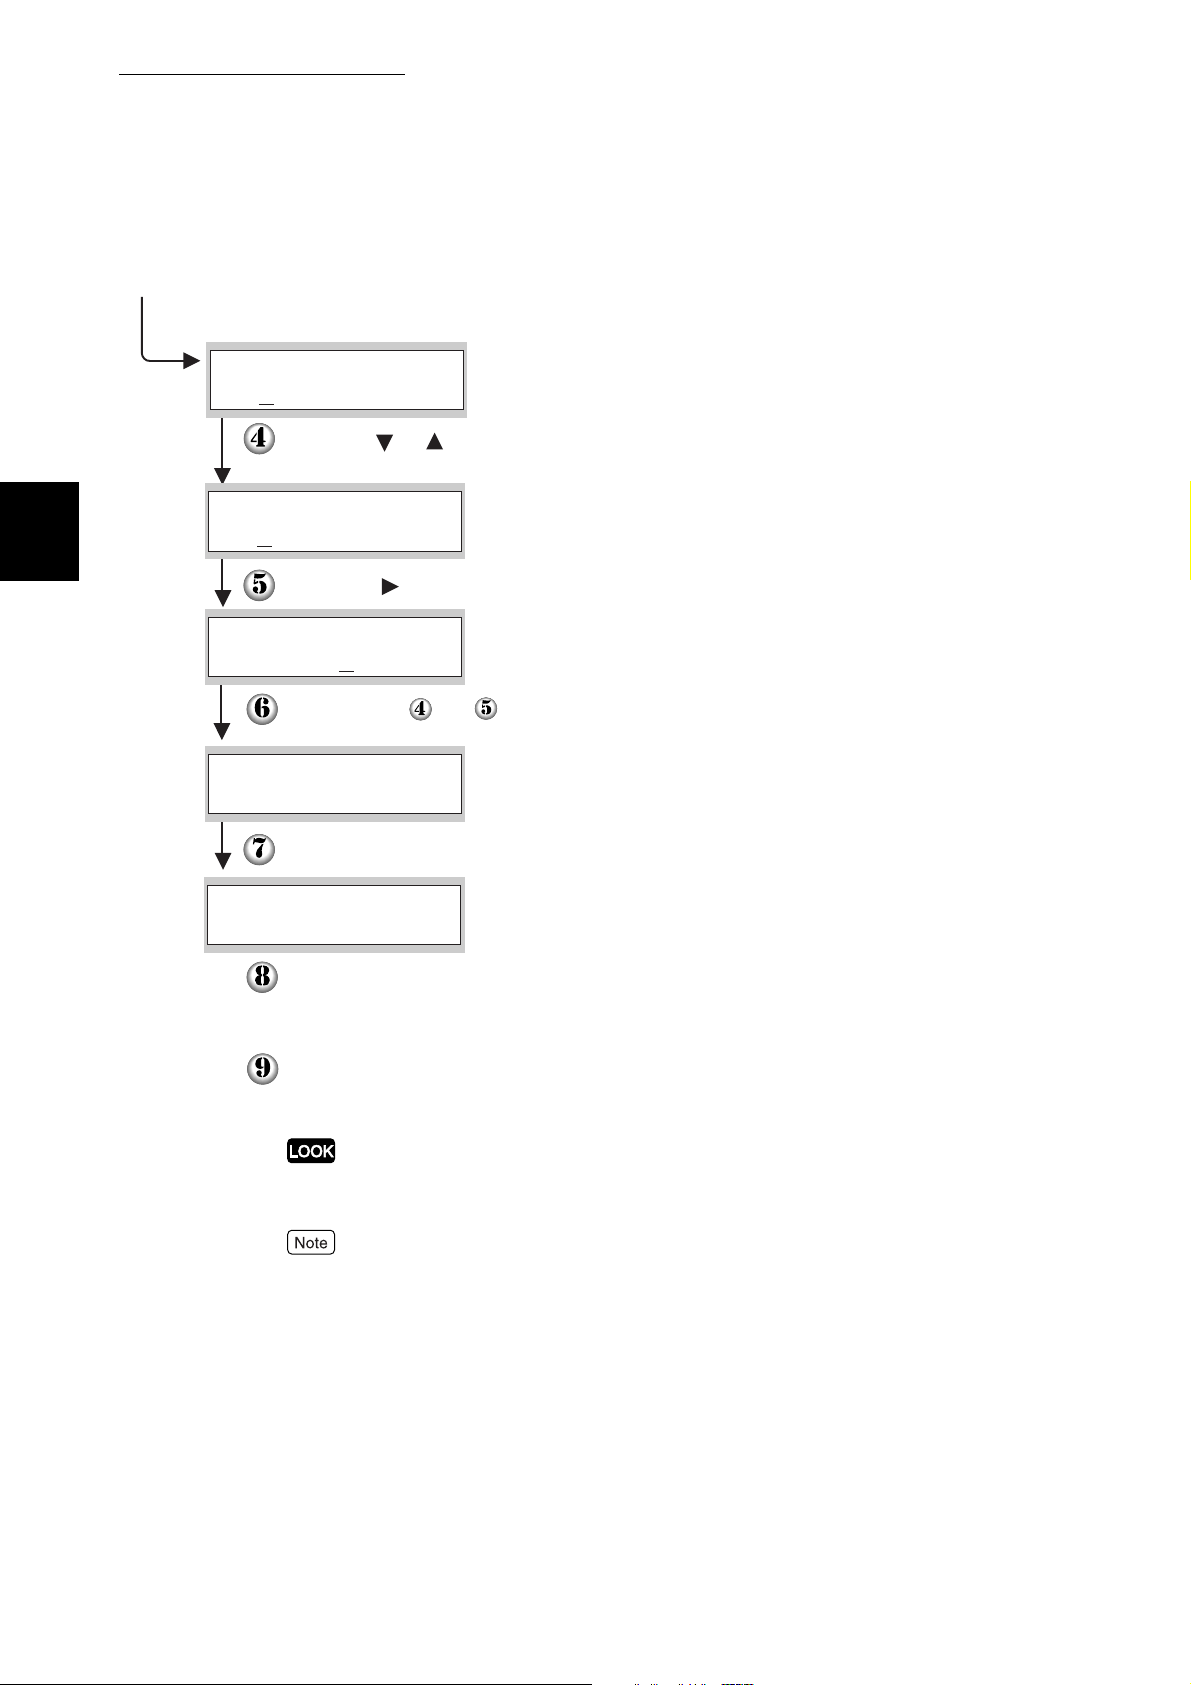
Printer System Settings
1
1.1 Adjusting Color Registration
Continued from previous page.
Enter Number
Y= 0 M= 0 C= 0
Using the or buttons, press the buttons until you
reach the value (for example, +3) displayed on the chart.
Enter Number
Y=+3 M= 0 C= 0
Press the button once and move the cursor to the next value.
Enter Number
Y=+3 M= 0 C= 0
Repeat steps and to continue adjusting the color
registration.
Enter Number
Y=+3 M=+1 C=+2
Press the Set/Eject button once.
Correction Chart
Ready to Print
Press the Set/Eject button once.
The Color Registration Correction Chart is printed with the
new values.
Color registration adjustment is complete when the
straightest Y (yellow), M (magenta), and C (cyan) lines
are next to the "0" line.
After printing the Color Registration Correction Chart, do not turn
off the printer until the printer motor has stopped running.
If "0" is not next to the straightest lines, determine the values
and adjust again.
4
Page 31

Configuring the Printer
This section describes how to confirm your system environment and how to make the
necessary printer settings.
1.2.1 Compatible Systems
You can use the printer locally when it is connected directly to your computer.
You can use the printer through a network when it is connected to a network.
Because the printer supports a variety of protocols, it is possible to share it
among a number of different networks.
Local Connection
You can connect the printer to your computer with a parallel or USB cable.
Printer System Settings
1
<Parallel cable connection>
Windows 95/Windows 98/Windows Me/
Windows NT 4.0/Windows 2000/Windows XP
Parallel cable
Printer
5
Page 32

Printer System Settings
1
1.2 Configuring the Printer
<USB cable connection>
You can use a USB cable to connect the printer if any of the conditions below are
met: However, we cannot guarantee the normal operation of all USB compatible
equipment.
●
Computers running preinstalled Windows Me, preinstalled Windows 98 Second
Edition, preinstalled Windows 2000, or preinstalled Windows XP.
Windows 98 Second Edition/Windows Me/
Windows 2000/Windows XP
Printer
USB cable
TCP/IP (Windows NT 4.0/Windows 2000/Windows XP)
The printer supports TCP/IP (LPD) protocol, allowing you to print by sending
data through an lpr port directly to the printer from computers running Windows
NT 4.0, Windows 2000, or Windows XP. To do this, you need to set the IP
address of the printer and the Windows NT 4.0, Windows 2000, or Windows XP
computer.
Windows NT 4.0/Windows 2000/Windows XP
TCP/IP(LPR/LPD)
Printer
■In Windows 2000/Windows XP the following are possible:
●
The printer supports port 9100, allowing you to print by sending data from the
designated port to the printer.
●
The printer supports IPP, allowing you to print by specifying the URL of the
printer and sending data to it through the Internet.
6
Page 33

1.2 Configuring the Printer
TCP/IP (Windows 95/Windows 98/Windows Me)
Use the TCP/IP Direct Print Utility to print from Windows 95, Windows 98, or
Windows Me.
The TCP/IP Direct Printer Utility is a program that sends print data from the
computer directly to the printer through a network, without the need to go through
a network print server.
To do this, you need to set the IP address of the printer and the Windows 95,
Windows 98, or Windows Me computer.
The TCP/IP Direct Print Utility protocol also works with LPD and port 9100.
Printer System Settings
1
TCP/IP Direct Print Utility running on
Windows 95/Windows 98/Windows Me
TCP/IP (LPR/LPD) or TCP/IP (port 9100)
Printer
■With Windows Me setup for IPP, the following types of
printing are possible:
The printer supports IPP, allowing you to print by specifying the URL of the
printer and sending data to it through the Internet.
7
Page 34

Printer System Settings
1
1.2 Configuring the Printer
SMB (Windows network)
Installing an optional network expansion card enables the printer to use the SMB
(Server Message Block) protocol. The SMB protocol allows computers running
Windows 95, Windows 98, Windows Me, Windows NT 4.0, Windows 2000, and
Windows XP to share files and printers. Using the SMB protocol means that you
do not need to use a server. Printing is carried out by sending data directly to the
printer.
The SMB transport protocol can be NetBEUI or TCP/IP. However, Windows XP
does not support NetBEUI.
Windows 95/Windows 98/Windows Me
Windows NT 4.0/Windows 2000/Windows XP
NetBEUI
(*1)
Windows XP does not support NetBEUI.
(*1)
Printer
or TCP/IP
8
Page 35

1.2 Configuring the Printer
Printer System Settings
NetWare
®
Installing an optional network expansion card enables the printer to use IPX/SPX
protocol. In a network environment using NetWare versions 3.12, 3.2, 4.1, 4.11,
4.2, or 5.0 from Novell Inc., printing is performed from NetWare client computers.
NetWare client NetWare server
NetWare(IPX/SPX)
NetWare(IPX/SPX)
Printer
Printing from a Macintosh Computer
The optional PostScript3 kit is required in order to print from a Macintosh
computer.
When the printer is connected to the Macintosh computer by USB cable, printing
is possible using the Adobe PostScript driver.
Further, with the optional network expansion card installed, the printer can be
connected to an EtherTalk network. Printing is then possible from Macintosh
computers that are connected to the network.
See the User Guide (PostScript3 Kit) for how to print from a Macintosh computer.
1
9
Page 36

Printer System Settings
1.2 Configuring the Printer
1.2.2 Printer Configuration Flow
This section describes the flow of printer configuration.
Refer to the flow chart and confirm that each requirement is met, according to
your needs.
1
Ye s
No
*1 *1
With SMB
Are you using
TCP/IP?
Start SMB
NetBEUI
(set as the
default)
Start SMB
TCP/IP
(set as the
default)
With
TCP/IP (LPD)
Set IP addresses
Start the
protocol
Start LPD
(set as the
default)
Are you using a
network?
With
port 9100
Start
port9100
(set as the
default)
"1.2.3"
"1.2.4"
(set as the
With
Internet
Start IPP
default)
With
NetWare
Start
NetWare
(set as the
default)
*2
Configure the system
with the network utility
10
*4 *3 *3
Installing the printer driver
Finish
"Chapter 2"
*1 To use these protocols you need an optional network expansion card.
*2 Refer to "Configuring in NetWare Environment" in the Network Print Environment User Guide.
*3 Refer to "Configuring in TCP/IP Environment" in the Network Print Environment User Guide.
*4 Windows NT 4.0, Windows 2000, and Windows XP allow you to share the printer. For details
about how to share the printer and printing from client computers, refer to "Configuring in TCP/IP
Environment" in the Network Print Environment User Guide.
Page 37

1.2 Configuring the Printer
Cases When You Should Refer to the Network Print Environment
User Guide
The following network functions are provided with the printer. For details about
these functions, refer to the Network Print Environment User Guide on the CDROM provided with the printer.
■In a variety of network environments, the printer gives you flexibility to:
●
In a TCP/IP system...
Have the printer's IP address managed by a DHCP server.
Register the printer on a WINS server.
The IP address will change from time to time when you use DHCP, so periodic confirmation of the
IP address is necessary. An optional network expansion card is required in order to use DHCP in a
WINS environment.
Printer System Settings
1
●
In an SMB system... Change the host name or workgroup name.
■Using CentreWare Internet Services in a TCP/IP system
This enables you to display the printer status and make various settings from a
Web page. This function is called "CentreWare Internet Services".
■The printer has an SNMP agent function for use in TCP/IP and NetWare
systems.
With the SNMP function active (active by default), you can control the printer
from an SNMP manager.
Also, with the CentreWare Simple Status Notification function, you can check
the status of the printer from your computer.
■In a TCP/IP system, the printer can send and receive e-mail.
E-mail can be used to control operation of the printer over a corporate network
or through the Internet. This function is called the "Status Messenger".
11
Page 38

Printer System Settings
1
1.2 Configuring the Printer
1.2.3 Setting the IP Address
This section describes the procedure for setting the IP address, subnet mask,
and gateway address from the control panel of the printer.
Follow the procedure below.
IP addresses are managed throughout the system as a whole. Specifying the wrong IP address can
affect the entire network. Before setting an IP address, consult your system administrator.
Refer to "5.2 Basic Menu Operation" and "Appendix B Control Panel Menu List" for information
about operation of the control panel.
Set the IP Address Acquisition Method to Panel.
Ready to Print
Press the Menu button. The menu screen appears.
Menu
1:System
Press the button four times.
Menu
5:Network
Press the Set/Eject or button once.
5:Network
Ethernet
Press the button once.
5:Network
TCP/IP
(The print screen. The printer is ready to print.)
(The menu screen)
12
Press the Set/Eject or button once.
Continued
Page 39

Continued from previous page.
TCP/IP
IP Address Setup
Press the Set/Eject or button once.
1.2 Configuring the Printer
Printer System Settings
IP Address Setup
DHCP
Press the button once.
IP Address Setup
Panel
Press the Set/Eject button once.
Reboot Printer
to Take Effect
Three seconds later, the following screen appears.
IP Address Setup
Panel
Press the Cancel/Back or button once.
The lower line of the screen returns to the
"IP Address Setup".
The value currently set has
a "*" displayed next to it.
*
When the value is set, a
"*" appears next to it.
*
1
Only restart the printer after setting the gateway
address at the last step. Continue to the next step
without restarting the printer.
13
Page 40

Printer System Settings
1.2 Configuring the Printer
Setting the IP Address
The IP address consists of four separate values (base 10) separated by decimal points. The four values
can be set anywhere between 0 and 255.
1
Continued from the previous step
TCP/IP
IP Address Setup
Press the button once.
TCP/IP
IP Address
Press the Set/Eject or button once.
IP Address
000. 000. 000. 000
Using the or button, press the buttons until the
desired value (for example, 129) appears. You can hold
down the buttons to change the value in increments of 10.
IP Address
129. 000. 000. 000
Press the button once and move the cursor to
the next value.
Example:
• IP Address "129.249.242.179"
• Subnet Mask "255.255.255.0"
• Gateway Address "129.249.242.254"
*
When you do not
understand the
menu screens
displayed or at
which level in the
menu tree the
displayed screen
is, refer to
"Appendix B
Control Panel
Menu List".
IP Address
129. 000. 000. 000
Repeat steps and to finish setting the IP address.
IP Address
129. 249. 242. 179
Press the Set/Eject button once.
Reboot Printer
to Take Effect
Three seconds later, the following screen appears.
IP Address
129. 249. 242. 179
Press the Cancel/Back or button once.
The lower line of the screen returns to "IP Address".
*
14
Page 41

Setting the Subnet Mask
Continued from the previous step
TCP/IP
IP Address
Press the button once.
1.2 Configuring the Printer
Printer System Settings
TCP/IP
Subnet Mask
Press the Set/Eject or button once.
Subnet Mask
000. 000. 000. 000
Set the subnet mask in the same way as the IP address.
To set values with the or buttons, you can hold down
the button to change the value sequentially.
Subnet Mask
255. 255. 255. 000
Press the Cancel/Back or button once.
The lower line of the screen returns to "Subnet Mask".
Setting the Gateway Address
Continued from the previous step
TCP/IP
Subnet Mask
1
*
*
Press the button once.
TCP/IP
Gateway Address
Press the Set/Eject or button once.
Gateway Address
000. 000. 000. 000
Gateway Address
129. 249. 242. 254
*
Set the gateway address in the same way as the IP address.
To set values with the or buttons, you can hold down
the button to change the value sequentially.
*
At this point, restart the printer.
15
Page 42

Printer System Settings
1.2 Configuring the Printer
1.2.4 Setting the Protocols
When the printer is shipped from the factory, all protocols except SMTP/POP3 ("Status Messenger",
"E-Mail Printing") and "FTP" are "Enabled" by default. You do not need to perform the operations
described in this section when you connect a new printer to a network for the first time.
This concludes the Printer Settings list. Move on to "1.2.5 Checking Settings".
1
When you want to use the printer as a network printer, you need to set the right
protocols on the printer.
●
For TCP/IP(LPD) → "LPD" protocol
●
For Port 9100 → "Port9100" protocol
●
For IPP → "IPP" protocol
●
For SMB (transport protocol: TCP/IP) → "SMB TCP/IP" protocol
●
For SMB (transport protocol: NetBEUI) → "SMB NetBEUI" protocol
●
For NetWare → "NetWare" protocol
Follow the procedure below.
When you want the printer to send and receive e-mail, start the "Status Messenger" and "E-Mail
Printing" protocol in the same way.
The procedure is described using screen examples with the optional network expansion card installed.
If you do not have an optional network expansion card, the following protocols do not appear:
●
SMB TCP/IP
●
SMB NetBEUI
●
NetWare
16
Refer to "5.2 Basic Menu Operation" and "Appendix B Control Panel Menu List" for information
about the operation of the control panel.
Page 43

1.2 Configuring the Printer
Printer System Settings
Ready to Print
Press the Menu button. The menu screen appears.
Menu
1:System
Press the button four times.
Menu
5:Network
Press the Set/Eject or button once.
5:Network
5:Network
(The print screen. The printer is ready to print.)
(The menu screen)
1
Ethernet
Press the button three times.
Protocol
Press the Set/Eject or button once.
Continued
17
Page 44

Printer System Settings
1
1.2 Configuring the Printer
Continued from previous page.
Protocol
Protocol
Protocol
Protocol
Protocol
LPD
Press the button once.
Port9100
Press the button once.
IPP
Press the button once.
SMB TCP/IP
Press the button once.
SMB NetBEUI
Starting protocols
1. Press the Set/Eject button
once. XXX indicates the protocol
name.
xxx
Disabled
2. Press the button once.
*
xxx
Enabled
3. Press the Set/Eject button
once. "Reboot Printer to Take
Effect" appears for three seconds,
then following screen appears.
xxx
Enabled
4. To start other protocols, press
the Cancel/Back or button
once and continue to the next
step.
*
18
Press the button once.
Protocol
NetWare
To finish the setting
procedure, go to step .
Restart the printer.
Page 45

1.2.5 Checking Settings
Print the Printer Settings list to check the content of printer settings.
The Printer Settings list also contains information that is required when
configuring computers for printing. Use the list to confirm that settings on the
printer and the computer match.
1.2 Configuring the Printer
Printer System Settings
For details about printing the list, refer to "8.4.1 Confirming Printer Configuration and Network
Settings".
Example of a Printer Settings List
Use the sample Printer Settings list on the following page as a guide when
confirming the printer’s configuration.
The sample Printer Settings list shown on the following page is from a printer with an optional
network expansion card installed.
1
19
Page 46

Printer System Settings
1
1.2 Configuring the Printer
These settings
must be made on
the computer
Check the IP
address
Check the protocol port status
20
Page 47

Chapter
2Installing the Printer
Driver
2.1 After Setting up the Printer......................................................... 22
2.2 Installing the Printer Driver
(Windows 95/Windows 98/Windows Me) ................................... 24
2.3 Configuring the TCP/IP Direct Print Utility ................................ 31
2.4
Installing the Printer Driver
(Windows NT 4.0/Windows 2000/Windows XP) ........................ 38
2.5 Setting Up the USB Port.............................................................. 47
Page 48

After Setting up the Printer
Installing the Printer Driver
2
Configure the computer after you have set up the printer.
When the printer is used as a local printer, install the printer driver to the computer
connected to the printer. If it is used as a network printer, install the printer driver to the
computer connected to the network.
To print directly to the printer from Windows 95/Windows 98/Windows Me in the TCP/IP
environment, install the printer driver and the TCP/IP Direct Print Utility to the computer.
2.1.1 The PCL6 Printer Drivers
A printer driver is a software that converts print data or instructions from the
computer to data interpreted by the printer.
The drivers for the following operating systems (OS) are available for DocuPrint
C1618:
●
Windows 95
●
Windows 98
●
Windows Millennium Edition
●
Windows NT 4.0
●
Windows 2000
●
Windows XP
The printer drivers are stored inside the Software Pack CD-ROM. Use the Fuji
Xerox Setup Menu in the same CD-ROM to install.
●
The printer driver for Windows NT 4.0 is for Intel x86 version NT 4.0.
●
You can use the printer driver for Windows 98 on Windows Me.
●
You can use the printer driver for Windows 2000 on Windows XP.
Obtaining the latest printer driver
There may be new printer drivers with future upgrades and you can download
the latest version of printer driver from the Fuji Xerox home page.
22
Page 49

2.1 After Setting up the Printer
2.1.2 Using the TCP/IP Direct Print Utility
The TCP/IP Direct Print Utility is a software for printing print data sent from a
computer directly to a printer on the network, without going through any server.
The TCP/IP Direct Print Utility is available in the Software Pack CD-ROM.
This manual assumes that the TCP/IP Direct Print Utility will be used when
printing from Windows 95, Windows 98 or Windows Me in TCP/IP environment.
Network Print Environment User Guide in the Software Pack CD-ROM for information on the TCP/IP
Direct Print Utility
Installing the Printer Driver
2
To install the TCP/IP Direct Print Utility, the computer must meet the following requirements:
●
Set the computer name in ASCII characters (single-byte alphanumeric letters in upper or lower
case/numerals/hyphen (-)/underscore (_)).
●
Installed with TCP/IP protocol
If TCP/IP is not installed, refer to the Network Print Environment User Guide or manuals on Windows
to add the protocol.
23
Page 50

Installing the Printer Driver (Windows 95/Windows 98/ Windows Me)
Installing the Printer Driver
2
The procedure for installing printer driver to Windows 95/Windows 98/Windows Me is
described in this section.
Here, we will use Windows 98 as an example. When the printer is used as a network printer, it
is assumed that the network environment client settings of the computer have been completed.
To install the printer driver on port 9100 or the IPP port, refer to the Network Print Environment User Guide.
Installing the Printer Driver
Procedure
1
2
Switch on the printer.
Start your computer and activate Windows 98.
When the printer is connected to the computer, a dialog box indicating that new hardware has been
detected is displayed when you activate Windows 98. In this case, click Cancel to close the dialog
box.
3
4
For NetWare environment, log on to the target file server.
Insert the Software Pack CD-ROM into the CD-ROM drive.
The Fuji Xerox StartUp Tool dialog box appears automatically.
If the Fuji Xerox StartUp Tool dialog box does not appear automatically, double-click the
Install_e.exe icon in the CD-ROM. Proceed to Step 6.
24
Page 51

5
2.2 (Windows 95/Windows 98/Windows Me)
Installing the Printer Driver
Click Install Language.
The Fuji Xerox Setup Menu is displayed.
6
7
Click Install Printer Driver.
2
The Driver Setup dialog box is displayed.
Confirm that FX DocuPrint C1618 PCL6 is selected in "Select a model",
then click Install printer driver.
25
Page 52

Installing the Printer Driver
2
2.2 (Windows 95/Windows 98/Windows Me)
8
Specify the following:
Printer settings
Check the optional products that you have purchased and installed.
Make this the default printer
Check the check box if DocuPrint C1618 is to be used as the default printer.
Printer name
Enter a name for the printer, if necessary.
Port (for output destination)
Select Others and click Browse if the printer is to be used as a local printer (the printer and the
computer are directly connected by a parallel or USB cable) and when using the TCP/IP Direct
Print Utility to print. When using the network printer in either the SMB or NetWare environment,
select Network and click Browse.
On the displayed dialog box, select the port that matches the required environment.
26
Page 53

2.2 (Windows 95/Windows 98/Windows Me)
■When Others is selected:
Select LPT1 from the list and click OK.
If you use the TCP/IP Direct Print Utility to print and are connected with a USB cable, set the port
later. Select LPT1: here.
■When Network is selected:
Select a printer or print queue icon from the network list by following the procedure described below.
Installing the Printer Driver
2
For SMB environment
From the network list, search and select the printer. The printer will be displayed as
"host name-p" and will be under the host name icon. The factory default for the
workgroup name and host name is "Workgroup" and "FXnnnnnn" (nnnnnn: lower six
digits of the Ethernet address of the printer) respectively.
When you do not know the workgroup name and host name of the printer, either check with the
network administrator, or print out the Printer Settings list to confirm. Refer to "8.4.1 Confirming
Printer Configuration and Network Settings".
Click OK.
For NetWare environment
From the network list, search and select the printer. The print queue is displayed under
the NetWare file server icon.
When you do not know the print queue name, check with your network administrator.
Click OK.
27
Page 54

Installing the Printer Driver
2.2 (Windows 95/Windows 98/Windows Me)
9
Confirm that the port name specified in Step 8 for the output destination
is shown in the Port text box of the Printer Driver Installation dialog box.
Then click Start to install.
The installation of printer driver begins.
2
10
11
When the installation is completed, the following dialog box will be
displayed.
Click OK.
Click Exit in the Driver Setup dialog box.
28
Page 55

12
2.2 (Windows 95/Windows 98/Windows Me)
Installing the Printer Driver
When using the TCP/IP Direct Print Utility to print, proceed to the next
section "2.3 Configuring the TCP/IP Direct Print Utility"
If connected with a USB cable, move on to "2.5 Setting Up the USB
Port".
Installation for the printer driver will be completed in other situations.
Click Exit on the Fuji Xerox Setup Menu dialog box and proceed to the
next section on "Testing Printing".
2
29
Page 56

Installing the Printer Driver
2.2 (Windows 95/Windows 98/Windows Me)
Testing Printing
To check the connection, print the test page.
The procedure is as follows:
Do not test print if you are using the TCP/IP Direct Print Utility to print as the settings have not been
completed.
Procedure
2
1
2
3
4
5
Click Start, select Settings and then Printers.
The Printers window is displayed.
The DocuPrint C1618 printer icon has been added by installation of the
printer driver. Select this added printer icon and click Properties from
the File menu.
The Properties dialog box is displayed.
Click Print Test Page in the General tab.
A dialog box is displayed to confirm whether or not the test page has been printed correctly.
Check the print results, and if the test page is printed correctly, click
Yes.
Click OK on the Properties dialog box.
30
Page 57

Configuring the TCP/IP Direct Print Utility
This section explains the settings required for using the TCP/IP Direct Print Utility to print
from Windows 95/Windows 98/Windows Me.
2.3.1 Installing the TCP/IP Direct Print Utility
The procedure for installing the TCP/IP Direct Print Utility to the computer is
described below. We will use Windows 98 in this procedure as an example.
If you are continuing with the procedure from the previous section, carry out the
procedure from Step 4 after the Fuji Xerox Setup Menu dialog box is displayed
on the computer screen.
1
2
Switch on the computer and start Windows 98.
Insert the Software Pack CD-ROM into the CD-ROM drive.
The Fuji Xerox StartUp Tool dialog box appears automatically.
If the Fuji Xerox StartUp Tool dialog box does not appear automatically, double-click the
Install_e.exe icon in the CD-ROM. Proceed to Step 4.
Installing the Printer Driver
2
3
Click Install Language.
The Fuji Xerox Setup Menu is displayed.
31
Page 58

Installing the Printer Driver
2
2.3 Configuring the TCP/IP Direct Print Utility
4
Click Install TCP/IP Direct Print Utility.
5
If you are prompted to install TCP/IP when Install TCP/IP Direct Print Utility is clicked, stop the
operation, and after you have installed TCP/IP protocol to your computer, carry out the installation
again.
Click Next.
32
Page 59

6
2.3 Configuring the TCP/IP Direct Print Utility
Installing the Printer Driver
Check the path under Destination Folder, and click Next if it is all right.
2
7
The installation of the TCP/IP Direct Print Utility begins.
When the installation is completed, the following dialog box will be
displayed. Take out the CD-ROM from the CD-ROM drive. Select Yes,
I want to restart my computer now, and then click Finish.
The settings will not take effect if you do not restart the system.
33
Page 60

Installing the Printer Driver
2.3 Configuring the TCP/IP Direct Print Utility
2.3.2 Setting the Port
After you have created the printer icon in the previous section, configure the
TCP/IP Direct Print Utility port for the printer. The procedure is as follows:
Procedure
2
1
2
3
After starting up your computer, run Windows 98. Click Start, select
Settings and then Printers.
The Printers window is displayed.
The DocuPrint C1618 printer icon has been added by installation of the
printer driver. Select this added printer icon and click Properties from
the File menu.
The Properties dialog box is displayed.
Click Add Port in the Details tab.
34
Page 61

4
2.3 Configuring the TCP/IP Direct Print Utility
Installing the Printer Driver
Select Other, and click FX TCP/IP DPU Port from "Click the type of
port you want to add".
2
5
Click OK.
The FX TCP/IP Direct Print Utility Port Setup dialog box is displayed.
35
Page 62

Installing the Printer Driver
2.3 Configuring the TCP/IP Direct Print Utility
6
Enter the appropriate value for each item, and click OK.
Example:For port name, "Trans5" and IP address, "129.249.242.179".
Item Remarks
2
Port Name
IP Address
Protocol
Enter a name of your choice to identify the printer.
When you are adding multiple TCP/IP Direct Print Utility ports, do
not use port names as in the following.
There is no difference between using upper-case and lower-case
characters. Examples of port names that cannot be used (current port
name is "printer"):
●
Adding characters at the end of the current port name.
Example: "printer1", "printer-01" and so forth.
●
Deleting some characters from the current port name.
Example: "prin", "print" and so forth.
Enter the IP address of the printer. If the Domain Name
System (DNS) has been installed, the printer host name can
be entered.
Select the protocol to be used for data transfer.
Select either of printing protocols (1) or (2) below. The default
selection is (1) LPR.
(1) "LPR": The lpr protocol is used for printing.
Enable or disable the "Validate byte count" option by
selecting or deselecting its check box.
The default selection is enabled (check box selected).
(2) "Raw": Port9100 protocol is used for printing.
You can specify a port number at the destination in "Port
Number". This setting is effective only when Raw protocol
is selected. The default setting is "9100". If the number is
deleted, "9100" appears. You can enter up to 5 digits. If
you enter a number greater than 65536 and click OK,
"9100" is registered.
36
If you do not know the IP address of the printer, check with your network administrator, or print out
the Printer Settings list. Refer to "8.4.1 Confirming Printer Configuration and Network Settings".
Page 63

7
2.3 Configuring the TCP/IP Direct Print Utility
Installing the Printer Driver
On the Details tab of the Properties dialog box, check that "(FX TCP/IP
DPU Port)" appears in "Print to the following port" together with the port
name entered in Step 6.
2
8
9
10
To check the connection, print the test page.
After you have clicked Apply to confirm the settings, click Print Test
Page on the General tab.
A dialog box is displayed to confirm whether or not the test page has been printed correctly.
Check the print results, and if the test page is printed correctly, click
Yes.
Click OK on the Properties dialog box.
37
Page 64

Installing the Printer Driver
2
Installing the Printer Driver
(Windows NT 4.0/Windows 4.0/Windows
2000/Windows XP)
The procedure for installing the printer driver to Windows NT 4.0/Windows 2000/Windows
XP is as follows. If the printer is used as a network printer, it is assumed that the network
environment client settings of the computer have been completed.
Refer to the Network Print Environment User Guide about installation of the printer driver on Port9100 or IPP port
for Windows 2000/Windows XP.
●
Before installing the printer driver on a Windows NT 4.0 system, it is necessary to set up TCP/IP Protocol and
Microsoft TCP/IP Printing. Refer to the manuals on Windows NT 4.0 for details.
●
You can select LPR Port or Standard TCP/IP Port as the output destination for the port on a Windows 2000
system. When you select LPR Port, before installing the printer driver, you are required to set up Print Services
for Unix on Windows 2000. Refer to the manuals on Windows 2000 for details.
Installing the Printer Driver
Procedure
1
2
3
4
Switch on the Printer.
Switch on the computer.
Activate Windows NT 4.0 or Windows 2000/Windows XP and log on as a user of the administrator
group or as the administrator.
When the printer is connected to the computer, a dialog box indicating that new hardware has been
detected is displayed when you activate Windows 2000. In this case, click Cancel to close the dialog
box.
For NetWare environment, log on to the target file server.
Insert the Software Pack CD-ROM into the CD-ROM drive.
The Fuji Xerox StartUp Tool dialog box appears automatically.
38
If the Fuji Xerox StartUp Tool does not appear automatically, double-click the Instal_e.exe icon in the
CD-ROM. Proceed to Step 6.
Page 65

5
2.4 (Windows NT 4.0/Windows 2000/Windows XP)
Installing the Printer Driver
Click Install Language.
The Fuji Xerox Setup Menu is displayed.
6
7
Click Install Printer Driver.
2
The Driver Setup dialog box is displayed.
Confirm that FX DocuPrint C1618 PCL6 is selected in "Select a model",
then click Install printer driver.
39
Page 66

Installing the Printer Driver
2
2.4 (Windows NT 4.0/Windows 2000/Windows XP)
8
Specify the following on the Printer Driver Installation dialog box.
Printer settings
Check the optional products that you have purchased and installed.
Make this the default printer
Check the check box if DocuPrint C1618 is to be used as the default printer.
Printer name
Enter a name for the printer, if necessary.
Displays the specified port (for output destination)
Select LPT1: for local printer and proceed to Step 9
40
If the port to be used is not displayed in the port list for network printer, click Add Port.
The Add Port dialog box is displayed.
Refer to the following sections to select a port suitable for the environment.
Page 67

2.4 (Windows NT 4.0/Windows 2000/Windows XP)
For SMB environment
Select Network and click Browse.
From the network list, search and select the printer. The printer will be displayed as
"host name-p" and will be under the host name icon. The factory defaults for the
workgroup name and the host name is "Workgroup" and "FXnnnnnn" (nnnnnn: lower six
digits of the Ethernet address of the printer) respectively.
When you do not know the workgroup name and host name of the printer, either check with the
network administrator, or print out the Printer Settings list to confirm. Refer to "8.4.1 Confirming
Printer Configuration and Network Settings".
Click OK.
Check that "\\Host name\\Host name-P" is displayed correctly in "Network Path for the
Printer" in Add Port dialog box and click OK.
Proceed to Step 9 when the Printer Driver Installation dialog box is displayed.
Installing the Printer Driver
2
For NetWare environment
Select Network and click Browse.
From the network list, search and select the print queue. The print queue is displayed
under the NetWare File Server icon.
When you do not know the print queue name, check with the network administrator.
Click OK.
Check that "\\NetWare file server name\Print queue name-P" is displayed correctly in
"Network Path for the Printer" in Add Port dialog box and click OK.
Proceed to Step 9 when Printer Driver Installation dialog box is displayed.
41
Page 68

2.4 (Windows NT 4.0/Windows 2000/Windows XP)
Installing the Printer Driver
2
For TCP/IP environment (Windows NT 4.0)
Select Others and click LPR Port from Available ports.
Click OK.
The Add LPR compatible printer dialog box is displayed.
Enter the items at each text box.
Example: For Name or address of server providing lpd, "129.249.242.179", and the
Name of printer or print queue on that server, "Trans5"
Item Remarks
Name or address of
server providing lpd
Name of printer or print
queue on that server
When you do not know the IP address of the printer, either check with the network administrator,
or print out the Printer Settings list to confirm. Refer to "8.4.1 Confirming Printer Configuration
and Network Settings".
Click OK. When the Printer Driver Installation dialog box is displayed, proceed to Step 9.
Enter the IP address of the printer. You can enter the
registered printer name when it is possible to use name
solving services like WINS.
When the IP address has numbers with less than three digits, do
not enter "0" before these numbers, e.g.
"XXX.XXX.00X.0XX". It will not work properly.
Enter any name for DocuPrint C1618.
42
Page 69

2.4 (Windows NT 4.0/Windows 2000/Windows XP)
For TCP/IP environment (Windows 2000/Windows XP)
The following example is for Windows 2000.
This section explains the procedure for selecting Standard TCP/IP Port.
Select Others and click Standard TCP/IP Port from Available ports.
Click OK.
The following screen is displayed. Click Next.
Installing the Printer Driver
2
43
Page 70

2.4 (Windows NT 4.0/Windows 2000/Windows XP)
Installing the Printer Driver
2
Enter the items at each text box.
Example: For IP address, "129.249.242.179", and the port name "IP_129.249.242.179".
Item Remarks
Printer Name or IP
Address
Enter the IP address of the printer. You can enter the
registered printer name when it is possible to use name
resolving services like WINS.
9
When the IP address has numbers with less than three digits, do
not enter "0" before these numbers, e.g.
"XXX.XXX.00X.0XX". It will not work properly.
Port Name
When you do not know the IP address of the printer, either check with the network administrator,
or print out the Printer Settings list to confirm. Refer to "8.4.1 Confirming Printer Configuration
and Network Settings".
Click Next
Check the contents on the screen and click Finish.
When the Printer Driver Installation dialog box is displayed, proceed to Step 9.
.
Enter name or IP address of the printer and the name of
port is automatically set. Enter the port name only when
you want to make changes.
Confirm that the port name specified in Step 8 for output destination is
shown in the port list box of the Printer Driver Installation dialog box.
Then click Start to install.
The installation begins.
44
Page 71

10
2.4 (Windows NT 4.0/Windows 2000/Windows XP)
Installing the Printer Driver
When the installation is completed, the following dialog box will be
displayed.
Click OK.
.
11
12
Click Exit.
2
If connected with a USB cable, move on to "2.5 Setting Up the USB
Port". Otherwise, this completes the installation of the printer driver.
Click Exit on the Fuji Xerox Setup Menu dialog box and proceed to the
next section on "Testing Printing".
45
Page 72

Installing the Printer Driver
2.4 (Windows NT 4.0/Windows 2000/Windows XP)
Testing Printing
To check the connection, print the test page.
The procedure is as follows:
Procedure
2
1
2
3
4
5
Click Start, select Settings and then Printers.
The Printers window is displayed.
The DocuPrint C1618 printer icon has been added by installation of the
printer driver. Select this added printer icon and click Properties from
the File menu.
The Properties dialog box is displayed.
Click Print Test Page on the General tab.
A dialog box is displayed to confirm whether or not the test page has been printed correctly.
Check the print results, and if the test page is printed correctly, click
Yes.
Click OK on the Properties dialog box.
46
Page 73

Setting Up the USB Port
When connecting the printer to your computer with a USB cable, do the following
procedures after installing the printer driver.
For Windows 2000 or Windows XP
The following example is for Windows 2000.
Procedure
1
2
3
4
Check that the computer is on, and then switch off the printer.
Connect the USB cable.
Switch on the printer.
The computer automatically detects the new hardware and installs necessary software. This concludes
setup of the USB port.
Check the connection.
Click Start, select Settings and then Printers.
The Printers window is displayed.
Installing the Printer Driver
2
5
6
The DocuPrint C1618 printer icon has been added by installation of the
printer driver. Select this added printer icon and click Properties from
the File menu.
The Properties dialog box is displayed.
The USB port now appears in "Print to the following port(s)" on the
Ports tab. Select the USB port and click Apply.
47
Page 74

Installing the Printer Driver
2.5 Setting Up the USB Port
7
Click Print Test Page on the General tab.
A dialog box to confirm whether or not the test page is printed correctly will be displayed.
2
8
9
Procedure
1
2
3
Check the print results, and if the test page is printed correctly, click
OK.
Click OK on the Properties dialog box.
This completes preparations for using the printer.
For Windows 98 or Windows Me
The following example is for Windows 98.
■Install the USB Print Utility
If the USB cable is connected, temporarily disconnect it.
Insert the Software Pack CD-ROM into the CD-ROM drive.
The Fuji Xerox StartUp Tool dialog box appears automatically.
Click Install Language.
48
4
5
The Fuji Xerox Setup Menu is displayed.
Click CD-ROM reference.
Open the Usb98me folder and double-click the Setup.exe icon.
Page 75

6
2.5 Setting Up the USB Port
Installing the Printer Driver
Confirm that English is selected, then click OK.
The USB Print Utility wizard starts.
7
8
Click Next.
Select
Yes, I want to restart my computer now.
, and then click
Finish
2
.
9
After starting up your computer, run Windows 98. Click Start, select
Settings and then Printers.
The Printers window is displayed.
49
Page 76

Installing the Printer Driver
2.5 Setting Up the USB Port
10
The DocuPrint C1618 printer icon has been added by installation of the
printer driver. Select this added printer icon and click Properties from
the File menu.
The Properties dialog box is displayed.
2
11
Confirm that "FXUSB: (USB Printer Port)" now appears in "Print to the
following port" on the Details tab.
50
12
Procedure
1
2
To close the dialog box, click OK.
■Connecting the USB cable
■Setting the USB port
Switch on the printer.
The computer automatically detects the new hardware and installs necessary software.
Click Start, select Settings and then Printers.
The Printers window is displayed.
To connect the USB cable, refer to the Setup Guide.
Page 77

3
2.5 Setting Up the USB Port
Installing the Printer Driver
Select the DocuPrint C1618 printer icon, then click Properties on the
File menu.
The Properties dialog box is displayed.
4
"FXUSB_x_DocuPrint C1618: (USB Printer Port)" now appears in "Print
to the following port" on the Details tab. Select this port.
In FXUSB_x_ …, a value from 0 to FF appears in the position indicated
by [x]. The value varies according to the environment.
2
5
6
7
To check the connection, print the test page.
After you have clicked Apply to confirm the settings, click Print Test
Page on the General tab.
A dialog box is displayed to confirm whether or not the test page has been printed correctly.
Check the print results, and if the test page is printed correctly, click
Yes.
Click OK on the Properties dialog box.
51
Page 78

Page 79

Chapter
3Basic Printer Operation
3.1 Printer Part Names and Functions............................................. 54
3.2 Switching On/Off the Power........................................................ 57
3.3 Printing From a Computer .......................................................... 59
3.4 Using Online Help........................................................................ 63
3.5 Canceling Printing....................................................................... 67
3.6 Changing the Configuration for Options................................... 69
3.7 Printing on Envelopes, Transparencies, and Custom-size
(Long) Paper................................................................................. 71
3.8 Two-sided Printing....................................................................... 79
3.9 Using E-Mail Printing .................................................................. 83
Page 80

Printer Part Names and Functions
The names and functions of the various parts of the printer are as follows:
Front View
Basic Printer Operation
3
5
4
3
2
1
No. Name Explanation
1 Paper tray Load paper here.
2 Bypass tray Open when manually printing. Use this tray when printing
transparencies or envelopes.
3 Front door This is the printer's front door. Color has been added in the drawing
above. Open this to remove jammed paper, or to replace the drum
cartridge or transfer roll cartridge.
4 Control panel Use the buttons and display to control the printer.
6
7
8
9
10
11
12
5 Face down tray Printed documents are output here, printed side down.
6 Paper stopper Lift to prevent paper from spilling out of the face down tray as it is
output.
7 Exhaust grille Allows internal heat to dissipate. Make sure that the exhaust grilles
are never obstructed.
8 Ventilation intake grille Allows air to enter the printer to prevent it from overheating. Make
sure that the ventilation intake grilles are never obstructed.
9 Power switch The printer's power switch. Press "|" to switch on the printer and
"O" to switch it off.
10 Button B Use button B to open the upper part of the front door.
11 Button A Use button A to open the whole front door.
12 Paper meter Use the meter as a guide to refill the paper tray.
54
Page 81

Rear View
3.1 Printer Part Names and Functions
19
18
20
17
16
15
14
13
No. Name Explanation
13 Parallel interface connector To use the printer locally, connect the parallel cable here.
14 USB interface connector
15 Ethernet interface
connector
16 Power cord connector Connect the power cord here.
17 Exhaust grille Allows internal heat to dissipate. Make sure that the exhaust
18 Toner cartridges Insert the black, yellow, magenta, and cyan toner cartridges here.
To use the printer locally, connect the USB cable here.
To use the printer through a network, connect the Ethernet cable
here.
grilles are never obstructed.
21
22
Basic Printer Operation
3
19 Top cover (Face-down
tray)
20 Option slot (for the network
expansion card)
21 Option slot (for the optional
hard disk)
22 Ventilation intake grille Allows air to enter the printer to prevent it from overheating. Make
This is the printer's top cover. Remove it to change the toner
cartridges. The top cover also acts as the printer's face down tray.
Printed documents are output here, printed side down.
Do not use the printer without the top cover.
Install the optional network expansion card here.
Install the optional hard disk here.
sure that the ventilation intake grilles are never obstructed.
55
Page 82

Basic Printer Operation
3.1 Printer Part Names and Functions
Internal View
23 24 25
26 27
3
<Front door open with button A> <Front door open with button B>
No. Name Explanation
23 Transfer roll cartridge Images formed on the drum surface are transferred to the paper.
Also, it recovers used toner.
24 Drum cartridge
25 Paper outlet cover This is the paper discharge unit. Open it to replace the drum
26 Paper rotator With two-sided printing, it turns the paper over after the front side
27 Fuser cartridge Uses heat to fuse the toner to the paper.
Consists of a light-sensitive drum, developer, and a transfer roller.
Images are initially created as an electrical charge on the surface of
this drum.
cartridge.
is printed.
The fuser unit gets very hot during printing. Do not touch.
Touching the fuser cartridge can cause burns.
56
Page 83

Switching On/Off the Power
3.2.1 Switching On the Power
Follow the procedure below.
Procedure
Basic Printer Operation
1
2
On the printer's right side, press the
side of the power switch marked "|" to
switch on the printer.
The printer starts.
The printer motors warm up for one or two minutes
when you switch on the printer.
"Diagnosing..." appears on the control
panel. When the display changes from
"Please Wait..." to "Ready to Print",
check that the Ready indicator is lit.
3
Ready
When "Please Wait..." is displayed, the printer is
preparing to print. Printing is not possible while this
message is displayed.
If an error message appears on the display, refer to "6.7
When an Error Message Appears on the Control Panel"
and rectify the error as instructed.
57
Page 84

Basic Printer Operation
3.2 Switching On/Off the Power
3.2.2 Switching Off the Power
Follow the procedure below.
Procedure
3
1
2
Confirm that "Ready to Print" is
displayed on the control panel.
Do not switch off the printer in the following situations:
●
When "Data Wait" is displayed on the control panel.
●
When the Ready indicator is blinking.
●
When the Error indicator is lit.
On the printer's right side, press the
side of the power switch marked " " to
switch off the printer.
The printer is now off.
Ready
Ready
Data Wait
58
Page 85

Printing From a Computer
This section describes the procedures for printing from computers using the PCL6 printer
driver.
When you install new printer options, you must reconfigure the printer driver to use the options. To confirm or make
settings, refer to "3.6 Changing the Configuration for Options".
Basic Printer Operation
Printing from a Program
You can output jobs to the printer from most Windows programs with their Print
command.
The following is a description of printing from Microsoft
98.
How to access dialog boxes and their contents various depending on the operating system and
programs you are using. For details, refer to the literature provided with the program you are using.
Procedure
1
On the File menu, click Print.
The Print dialog box appears.
®
Word 97 in Windows®
3
59
Page 86

3.3 Printing From a Computer
Basic Printer Operation
3
2
3
Select this printer in the Name box and click Properties.
On the various tabs, make settings for each item as required.
60
4
●
For details about the various tabs, refer to Help. For details about how to use Help, refer to "3.4
Using Online Help".
●
Use the Graphics tab to adjust the image and colors to suit your needs.
When you finish making settings, click OK in the Properties dialog box.
The Properties dialog box closes.
Page 87

3.3 Printing From a Computer
5
In the Print dialog box, select the desired interval in Page range and
click OK.
The data is sent to the printer.
Be careful when removing printed material from the face down tray, as the top cover detaches easily.
To cancel printing, refer to "3.5 Canceling Printing".
Changing Default Printing Functions
Default printing functions are preset functions in the printer driver properties
dialog box accessed from the Print dialog box. Setting default printing functions
in advance saves you time, because it reduces the number of settings you need
to make every time you print.
Follow the procedure below to change the default printing functions. The
following example is for Windows 98.
How to access dialog boxes and their contents various depending on the operating system and
programs you are using. For details, refer to the notes included with this procedure and the literature
provided with your operating system.
Basic Printer Operation
3
Procedure
1
2
Click Start, select Settings and then Printers.
The Printers window is displayed.
Select the appropriate printer and click Properties from the File menu.
The Properties dialog box is displayed.
●
●
●
In Windows 95 and Windows Me, you can open the Properties dialog box the same way as in
Windows 98.
In Windows NT 4.0, click Document Defaults on the File menu and make the settings in the dialog
box that appears.
In Windows 2000 and Windows XP, click Printing Preferences on the File menu and make the
settings in the dialog box that appears.
61
Page 88

3.3 Printing From a Computer
Basic Printer Operation
3
3
On the various tabs, make settings for each item as required.
4
For details about the various tabs, refer to Help. For details about how to use Help, refer to "3.4 Using
Online Help".
When you finish making settings, click OK in the Properties dialog box.
The default printer functions in the printer driver are now changed.
62
Page 89

Using Online Help
Keyword
How to Use Help
Printer Driver
Summary
Explanation on Ea
How to Print Job
Help for the printer is provided with the PCL6 printer driver. Refer to Help when you need to
know about printer driver items and settings, or need to check different printing methods
when problems occur.
Wine
party
Help Contains the following:
Basic Printer Operation
The Help topics are as follows.
How to Use Help Files
How to Use Help
Help Notation
How to Print
Printer Driver
How to Get the Latest Version of the Printer Driver
Trademarks and Abbreviations
Supplementary Information About the Printer Driver
How to Confirm the Printer Driver Version
Summary
DocuPrint C1618 Characteristics
Overview of Printer Driver
3
63
Page 90

Basic Printer Operation
3
3.4 Using Online Help
Explanation on Each Tab
Paper/Output Tab
Graphics Tab
Watermarks Tab
Fonts Tab
Configuration Tab
Options Tab
User Settings Tab
How to Print Job
Printing on Special Media
Printing on Envelopes
Printing on Glossy Paper
Printing on Transparencies
Inserting Paper Between Transparencies (Transparency Separators)
Duplex Print
Printing on Side 2 (Back) of Special Media
Printing on Side 2 (Back) of Plain Paper
Adjusting Graphics
Specifying the ICC Profile
Setting Color Temperature
Adjusting Color Balance When Printing Color Documents
Adjusting Brightness and Contrast When Printing B/W Documents
Saving Frequently Used Printer Driver Settings
Saving Printer Driver Settings
Using the Retrieved Printer Driver Settings to Print a Job
Printing a Specific Text Repeatedly(Watermark)
Printing a Watermark
Collating/Printing Multiple Sets
Printing Multiple Sets of a Document
Collate
Using This Feature
Using Image Repeat to Print a Job
Printing Multiple Pages of Documents on One Sheet of Paper (Multi-Up
Option)
Using Poster to Print a Job
Using Booklet Creation to Print a Job
Printing on a Output Size Different From the Paper Size
Printing on Non-standard Output Size
Shortening Print Data Transmission Time
Solution to Unacceptable Settings Dialog Box
Placing Banner Sheets Between Jobs
64
Page 91

3.4 Using Online Help
Consumables
Replacing the Toner Cartridges, Drum Cartridge and Transfer Roll Cartridge
How to Solve Printing Problems
Unable to Print
Poor Print Quality
Paper Jams
Network Related Problems
When an Error Message is Displayed
When a Problem Could Not be Solved
Nomenclature
Multi-Up
TrueType Fonts
Color Balance
Resolution
Output Color
Black/White
Restore Defaults
Banner Sheet
Printer Fonts
Non-standard Size (Custom Sizes 1-5)
Color Temperature
ICC Profile
Basic Printer Operation
3
65
Page 92

Basic Printer Operation
3.4 Using Online Help
To re fer to Help
Open the Properties dialog box and select the tab that contains the item in
question.
The example below is for the Paper/Output tab in Windows 98.
For details about how to display the Properties dialog box, refer to "3.3 Printing From a Computer" .
To display the description of an item,
( ) click the button and
( ) click the item whose description
you want to display.
3
To display Help contents,
click .
To search for an item by keyword,
( ) click the Index tab,
( ) type the keyword(s) you are
searching for, and ( ) click Display.
66
Page 93

Canceling Printing
This section explains how to cancel printing.
3.5.1 Canceling Printing From the Computer
To cancel printing in Windows, first cancel the print job on the computer, then
cancel printing on the printer's control panel.
Basic Printer Operation
Print command
Procedure
1
2
3
Click Start, select Settings and then Printers.
The Printers window is displayed.
Double-click the appropriate printer.
The printer window is displayed.
Click the document that you want to cancel and press the Delete key on
the keyboard.
1
Cancel printing
FX DocuPrint C1618 PCL6
P
r
in
te
r
(P
)
D
o
c
u
m
e
n
t
(
D
)
V
ie
w
(
V
)
H
e
lp
(
H
)
Docum
ent N
am
e
S
tatus
M
ic
ro
so
ft W
ord
-
2
Cancel printing
Cancel
Back
Cancelled
3
Continue to "3.5.2 Canceling Printing at the Control Panel".
67
Page 94

Basic Printer Operation
3.5 Canceling Printing
3.5.2 Canceling Printing at the Control Panel
Perform this operation to cancel the print data from the printer after canceling the
print command on the computer. Note that the printer finishes printing the current
page. Use the following control panel buttons to cancel printing.
Display (messages appear here)
3
Front Door Release Button
Menu
Ready
Error
For details about control panel operations, refer to "5.2 Basic Menu Operation".
Printing
Parallel
Tray 1
Press the Cancel/Back button once.
The printer begins to process the printing cancellation.
(The printer is printing)
Eject
Set Back
Cancel/Back button
Canceling
Power saver
Cancel
68
When the cancellation finishes, the print screen reappears.
Ready to Print
(The print screen. The printer is ready to print.)
Page 95

Changing the Configuration for Options
If you add any of the following options to the printer after completing initial set-up, you must
reconfigure the PCL6 printer driver.
●
Hard disk
●
Additional memory
●
2 tray module
Hard disk
Additional
memory
Basic Printer Operation
2tray module
For details about how to install options, refer to the Setup Guide or the literature provided with the options. In the
following section, it is assumed that the options are already installed.
Follow the procedure below. The following example is for Windows 98.
Procedure
1
2
Click Start, select Settings and then Printers.
The Printers window is displayed.
Select the appropriate printer and click Properties from the File menu.
The Properties dialog box is displayed.
3
3
Click the Options tab.
69
Page 96

3.6 Changing the Configuration for Options
Basic Printer Operation
3
4
Select the options added to the printer and click OK.
Example: With the 2 tray module installed.
Select this check box.
70
Page 97

Printing on Envelopes, Transparencies, and Custom-size (Long) Paper
If you are printing on special paper, you have to specify the type of paper and image quality
in the PCL6 printer driver when you send a print command from the application software.
Take care when setting envelopes, because setting them incorrectly may result in text being
printed on the wrong side or upside down.
When printing on transparencies or specialty paper, make sure that you set the type of
paper and image quality before sending the print command.
When frequently printing specialty paper in Windows, we recommend that you register the necessary settings in the
User Settings tab. Registering the settings saves you time, because you do not need to configure the driver each time
you print. For details about the User Settings tab, refer to Help.
3.7.1 Printing on Envelopes
Basic Printer Operation
Use the bypass tray to print envelopes.
The envelope sizes listed below are those suitable for use with this printer. Make
sure that the flap is closed, and set the envelopes with the flap facing to the right.
●
Com-10
●
Monarch
●
C5
●
DL
●
Do not use envelopes that have tape seals. Printing some types of
preglued envelopes may not be possible, depending on the
condition of the adhesive.
●
Do not use envelopes larger than 88.9 mm wide and 139.7 mm long.
●
Using poor-quality envelopes can cause creasing and inferior print
quality.
The following is an example of how to print the address on an envelope.
Example:
Flap
88.9 m
or more
m
139.7 mm or more
3
printed like this.
71
Page 98

3.7 Printing on Envelopes, Transparencies, and Custom-size (Long) Paper
Procedure
Basic Printer Operation
3
1
2
3
Adjust the paper guide to the mark
corresponding to the size that you are
about to use.
Make sure the flap is closed, then load
the envelope with the side to be printed
facing down and the flap to the right.
Launch printing from your program
after setting the envelope in the printer.
Now set the items in "Printer Driver
Settings (for envelopes)" as shown
below:
Printer Driver Settings (for envelopes)
■Windows settings:
Tab Item Value
Paper/Output Output Size Set Com-10, Monarch, C5, DL or
"Same as Paper Size" (If the original
size is Com-10, Monarch, C5, and
DL)
Turn Image by 180 deg Clear checkmark
(When the flap is set on the left side,
select this option.)
Paper Source Bypass
2 Sided Print 1 Sided Print
Paper Type Envelope
For details about individual printer driver items, refer to Help. For details about how to use Help, refer
to "3.4 Using Online Help".
72
Page 99

3.7 Printing on Envelopes, Transparencies, and Custom-size (Long) Paper
3.7.2 Printing on Transparencies
Use the bypass tray to print transparencies.
You can print in color on Fuji Xerox transparencies (XEROX FILM (no border))
using the DocuPrint C1618.
Use only the recommended types of transparencies. Do not use any other types, such as color
transparencies (bordered with a white frame).
Using unsuitable transparencies may damage the printer.
Basic Printer Operation
Remove each transparency from the face down tray as soon as it is output. When transparencies are
allowed to accumulate in the face down tray, static electricity can build up and cause jams.
Follow the procedure below to print transparencies.
Procedure
1
Adjust the paper guide to the mark
corresponding to the size that you are
about to use.
Do not use transparencies bordered with a white frame.
3
Full color
transparencies
73
Page 100

3.7 Printing on Envelopes, Transparencies, and Custom-size (Long) Paper
Basic Printer Operation
3
2
3
4
Fan a few transparencies at a time.
Insert the transparencies into the
bypass tray until they lightly touch the
feeding slot.
Transparency
Do not use full color transparencies. They can jam in the
printer and damage the fuser unit.
Launch printing from your program
after loading the transparencies in the
printer.
Now set the items for "Printer Driver
Settings (for transparencies)" as shown
below:
74
 Loading...