

Page 1

DocuPrint C1618
Software Pack Operation Guide
For use with the Software Pack CD-ROM
Page 2

Preface
Thank you for choosing DocuPrint C1618.
This manual describes how to use and install the DocuPrint C1618 Software Pack CD-ROM (referred to as
Software Pack CD-ROM hereafter) bundled with DocuPrint C1618, on Windows(R) 95, Windows(R) 98,
Windows(R)Me, Windows NT(R) 4.0, Windows(R) XP and Windows(R) 2000. Read this manual if you need to
confirm the operations of the Software Pack CD-ROM.
To get the most out of your printer, read the manual carefully and completely before using the machine. This
manual is written with the assumption that you are familiar with the basics of your computer to be connected, the
operating system and the application software. You may also refer to the respective manuals regarding the
operation of these products.
NetWare is a registered trademark of Novell, Inc., in the United States and other countries.
Microsoft, MS-DOS, Windows, and Windows NT are either registered trademarks or trademarks of Microsoft
Corporation in the United States and/or other countries.
Permission has been obtained from Microsoft Corporation for use of software screen shots.
This software is based in part on the work of the Independent JPEG Group.
All product/brand names are trademarks or registered trademarks of the respective holders.
Important
1. This manual is copyrighted with all rights reserved. Under the copyright laws, this manual may not be copied
or modified, in whole or part, without the written consent of the publisher.
2. Parts of this manual are subject to change without prior notice.
3. We welcome any comment on ambiguities, errors, omissions, or missing pages.
4. Never attempt any procedure on the machine that is not specifically described in this manual. Unauthorized
operation can cause faults or accidents. Fuji Xerox is not liable for any problems resulting from unauthorized
operation of the equipment.
Xerox is a registered trademark.
CentreWare is a trademark.
The Document Company and Ethernet are trademarks and may be registered in certain jurisdictions.
i
Page 3

Contents
Preface ................................................................................................................................................. i
Contents ...............................................................................................................................................ii
Types of Manuals................................................................................................................................ iii
Using This Guide.................................................................................................................................iv
Organization of This Guide........................................................................................................iv
Conventions ..............................................................................................................................iv
Chapter 1 Software Pack CD-ROM
1.1 Using the Software Pack CD-ROM.................................................................................. 2
1.1.1 Target Operating Systems................................................................................. 2
1.1.2 Using the Software Pack CD-ROM ................................................................... 2
1.1.3 File Structure of the CD-ROM ........................................................................... 3
Chapter 2 Installing from Fuji Xerox Setup Menu
2.1 Installing the Printer Driver (Install Printer Driver Button) ................................................ 8
2.2 Installing Fuji Xerox Network Utility (Install Network Utility Button) ............................... 14
2.3 Deleting the Installed Printer Icon (Delete Printer Button) ............................................. 17
2.4 Installing TCP/IP Direct Print Utility (Install TCP/IP Direct Print Utility Button) .............. 20
Chapter 3 Useful Tools and Their Usage
3.1 Installing the Printer Driver with the Same Settings to Multiple Computers................... 26
3.1.1 Creating a Setup Disk ..................................................................................... 26
3.1.2 Using the Created Setup Disk for Installation ................................................. 32
3.2 Uninstalling the Printer Driver ........................................................................................ 34
3.3 Installing CentreWare Simple Status Notification........................................................... 37
3.4 Starting up in the Command Mode ................................................................................ 40
3.4.1 Installing the Printer Driver - Command Mode ................................................ 40
3.4.2 Installing the Printer Driver by Using the Created Setup Disk
- Command Mode ........................................................................................... 41
ii
3.4.3 Deleting the Installed Printer Icon - Command Mode ..................................... 42
3.4.4 Uninstalling the Installed Printer Driver - Command Mode ............................. 43
Index ................................................................................................................................................. 44
Page 4

Types of Manuals
The following literature is provided with the printer. Use the guide to suit your purposes.
To view or print guides is supplied in PDF format, therefore, you need Adobe(R) Acrobat(R)
Reader
ROM provided with the printer.
Setup Guide
User Guide
TM
. If necessary, you can install Adobe Acrobat Reader from the Software Pack CD-
This section describes the items in the printer package, the printer and options setup
procedures (additional memory, network expansion card, hard disk) available for the
printer.
Read this section when setting up the printer.
This section describes the available printer functions and necessary software
installation procedures, as well as troubleshooting measures. Read this guide for
information about operation and troubleshooting.
Software Pack Operation Guide (this book)
This manual explains how to use the DocuPrint C1618 Software Pack CD-ROM in a
Windows environment, and how to install the various types of software available in the
Software Pack. Once you insert the Software Pack CD-ROM in the CD-ROM drive of
your computer, the Fuji Xerox Setup Menu will appear. Click on the appropriate button
to display this manual on the screen.
Network Print Environment User Guide
This document describes the different network setup and printing procedures for
various different network systems.
The network guide is provided in PDF format on the Software Pack CD-ROM. The
name of this file is "Net.pdf".
Other Manuals
Manuals explaining how to use other optional products are included on the Software
Pack CD-ROM as PDF files. Refer to these as appropriate for options you have
purchased.
iii
Page 5
Using This Guide
Organization of This Guide
This manual consists of three chapters. A brief introduction of each chapter is provided
below.
Chapter 1 Software Pack CD-ROM
This chapter provides information about the target operating systems of the CD-ROM,
the file structure and an overview of the dialog boxes that appear in the beginning.
Chapter 2 Installing from Fuji Xerox Setup Menu
This chapter describes the procedures on how to install software from the Fuji Xerox
Setup Menu dialog box.
Chapter 3 Useful Tools and Their Usage
This chapter explains how to install a printer driver with the same settings on multiple
computers, how to install CentreWare Simple Status Notification and how to start up
the computer in the command mode.
Conventions
1. In this guide, "computer" refers to personal computer, Macintosh, workstation, and
host device.
2. The following icons are used in this guide.
Indicates important information which you should read.
Indicates addtional information about operations or features.
Indicates reference sources.
" ": indicates reference to a chapter or section.
3. The following conventions are used in this guide.
iv
Bold: Indicates selections and all kinds of buttons.
Example: Click Next.
Page 6

Chapter
1Software Pack CD-ROM
1.1 Using the Software Pack CD-ROM ............................................... 2
Page 7
Using the Software Pack
Software Pack CD-ROM
1
1.1
CD-ROM
1.1.1 Target Operating Systems
The target operating systems (OS) are as follows:
●
Microsoft(R) Windows(R) 95 OS (English version)
●
Microsoft(R) Windows(R) 98 OS (English version)
●
Microsoft(R) Windows(R) Millennium Edition (English version)
●
Microsoft(R) Windows NT(R) OS Version 4.0 (English version)
●
Microsoft(R) Windows(R) 2000 OS (English version)
●
Microsoft(R) Windows(R) XP OS (English version)
1.1.2 Using the Software Pack CD-ROM
• Install the printer driver.
p.8
• Delete the
installed
printer icon.
p.17
• Refer to the
contents of the
CD-ROM.
• Read this before using
the CD-ROM.
• Install TCP/IP
Direct Print
Utility.
p.20
• Install Network
Utility.
p.14
• Start up the Software
Pack Operation Guide
(this online manual)
2
Page 8
1.1 Using the Software Pack CD-ROM
1.1.3 File Structure of the CD-ROM
The following software applications are included in the Software Pack CD-ROM:
There may be changes in the structure of the software with future upgrades.
Software for Windows
Software Pack CD-ROM
1
3
Page 9

Software Pack CD-ROM
1
1.1 Using the Software Pack CD-ROM
4
Page 10
Software for Macintosh
1.1 Using the Software Pack CD-ROM
Software Pack CD-ROM
1
5
Page 11

Page 12

Chapter
2Installing from Fuji Xerox
Setup Menu
2.1 Installing the Printer Driver (Install Printer Driver Button) ........ 8
2.2
Installing Fuji Xerox Network Utility (Install Network Utility
Button)
2.3 Deleting the Installed Printer Icon (Delete Printer Button) ...... 17
2.4 Installing TCP/IP Direct Print Utility (Install TCP/IP Direct Print
Utility Button) ............................................................................... 20
................................................................................................14
Page 13
Installing from Fuji Xerox Setup Menu
2
Installing the Printer Driver
2.1
Install the printer driver to the computer after you have set up the printer.
This printer driver is a software for converting print data or instruction on the computer to
data that can be interpreted by the printer.
Click on the Install Printer Driver button on the Fuji Xerox Setup Menu dialog box to
automatically select and install the printer driver suitable for the OS of the computer.
The section below explains the procedure to install the printer driver.
●
If you want to install the printer driver with the same settings to multiple computers, you are
recommended to create a setup disk.
●
When installing the USB driver for Windows 98 or Windows Me, open the USB98ME folder on the
Software Pack CD-ROM and launch Setup.exe. See the User Guide for details.
"3.1 Installing the Printer Driver with the Same Settings to Multiple Computers"
(Install Printer Driver Button)
Procedure
For Windows NT 4.0/Windows 2000/Windows XP, log on as a user of the administrator group
or as the administrator.
1
2
3
If a virus-scan software has been installed, either uninstall it or switch it
off.
Insert the Software Pack CD-ROM into the CD-ROM drive.
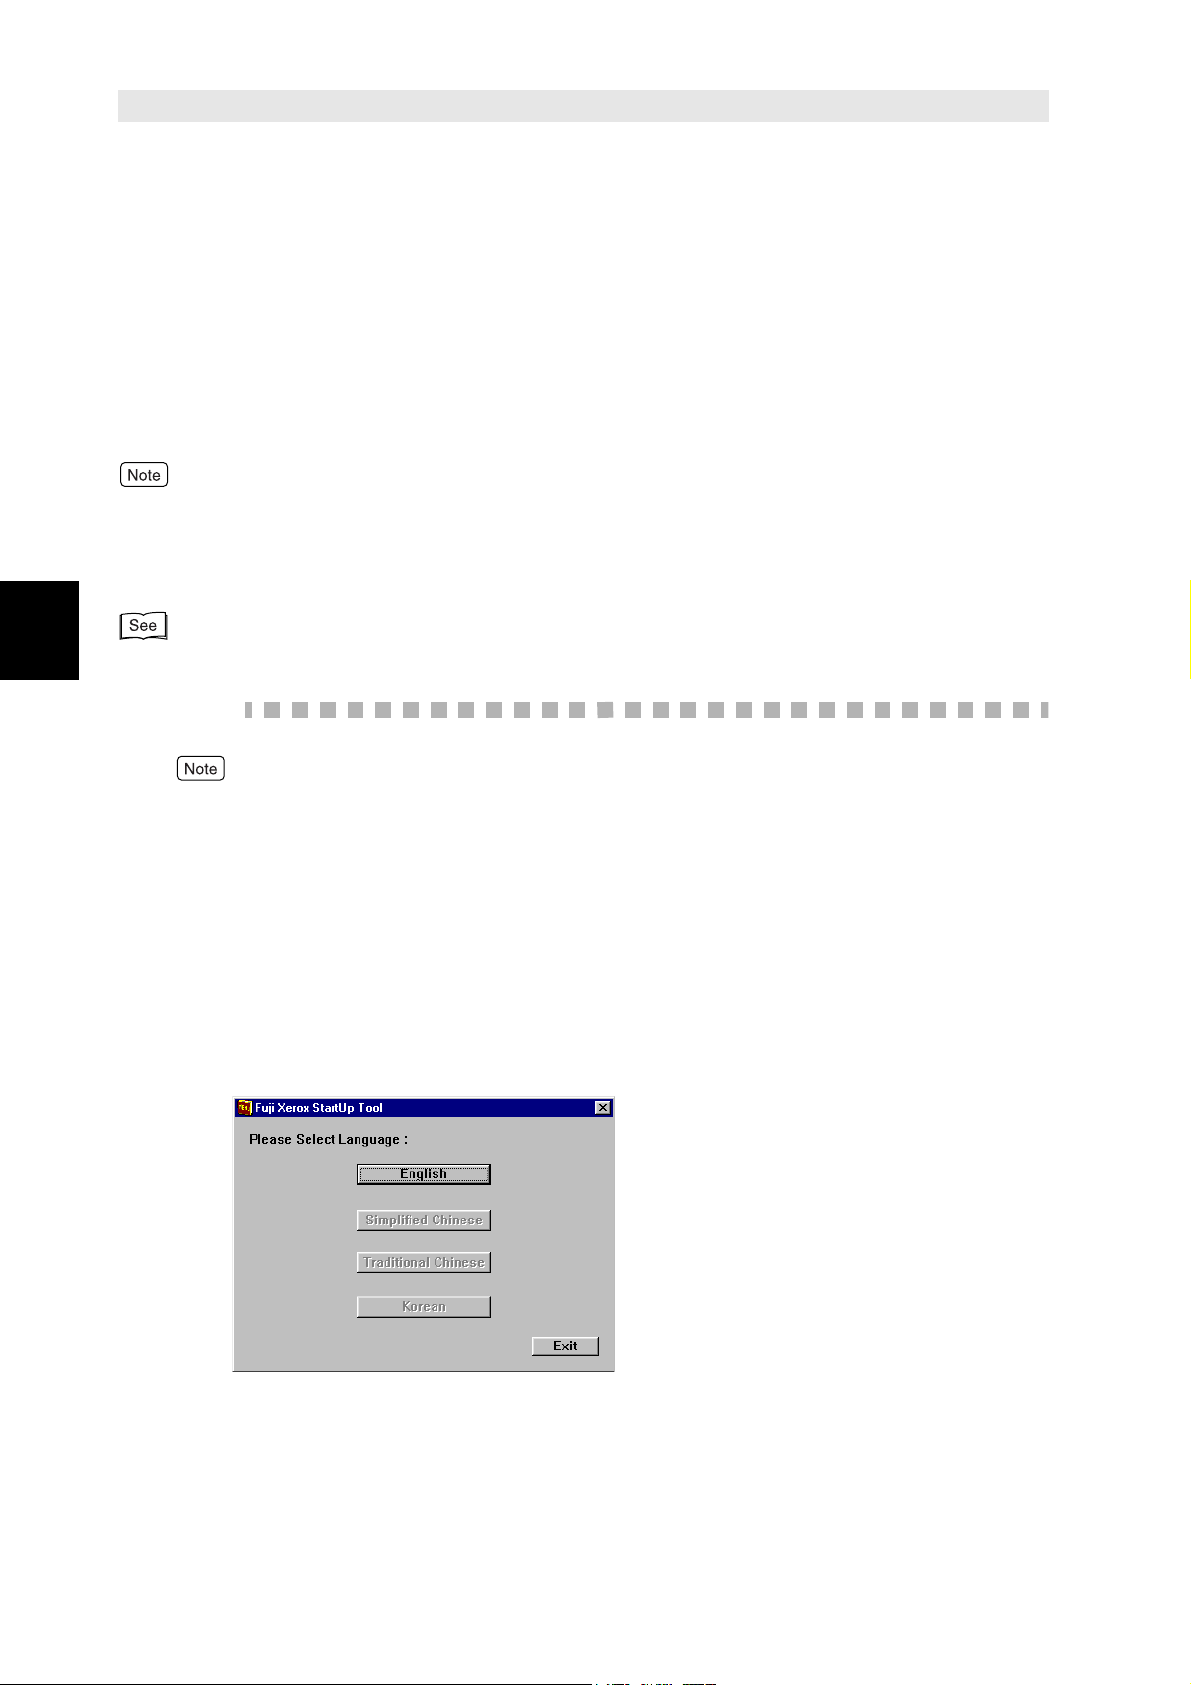
The Fuji Xerox StartUp Tool dialog box appears automatically.
Click Install Language.
8
The Fuji Xerox Setup Menu is displayed.
Page 14
2.1 Installing the Printer Driver (Install Printer Driver Button)
Installing from Fuji Xerox Setup Menu
4
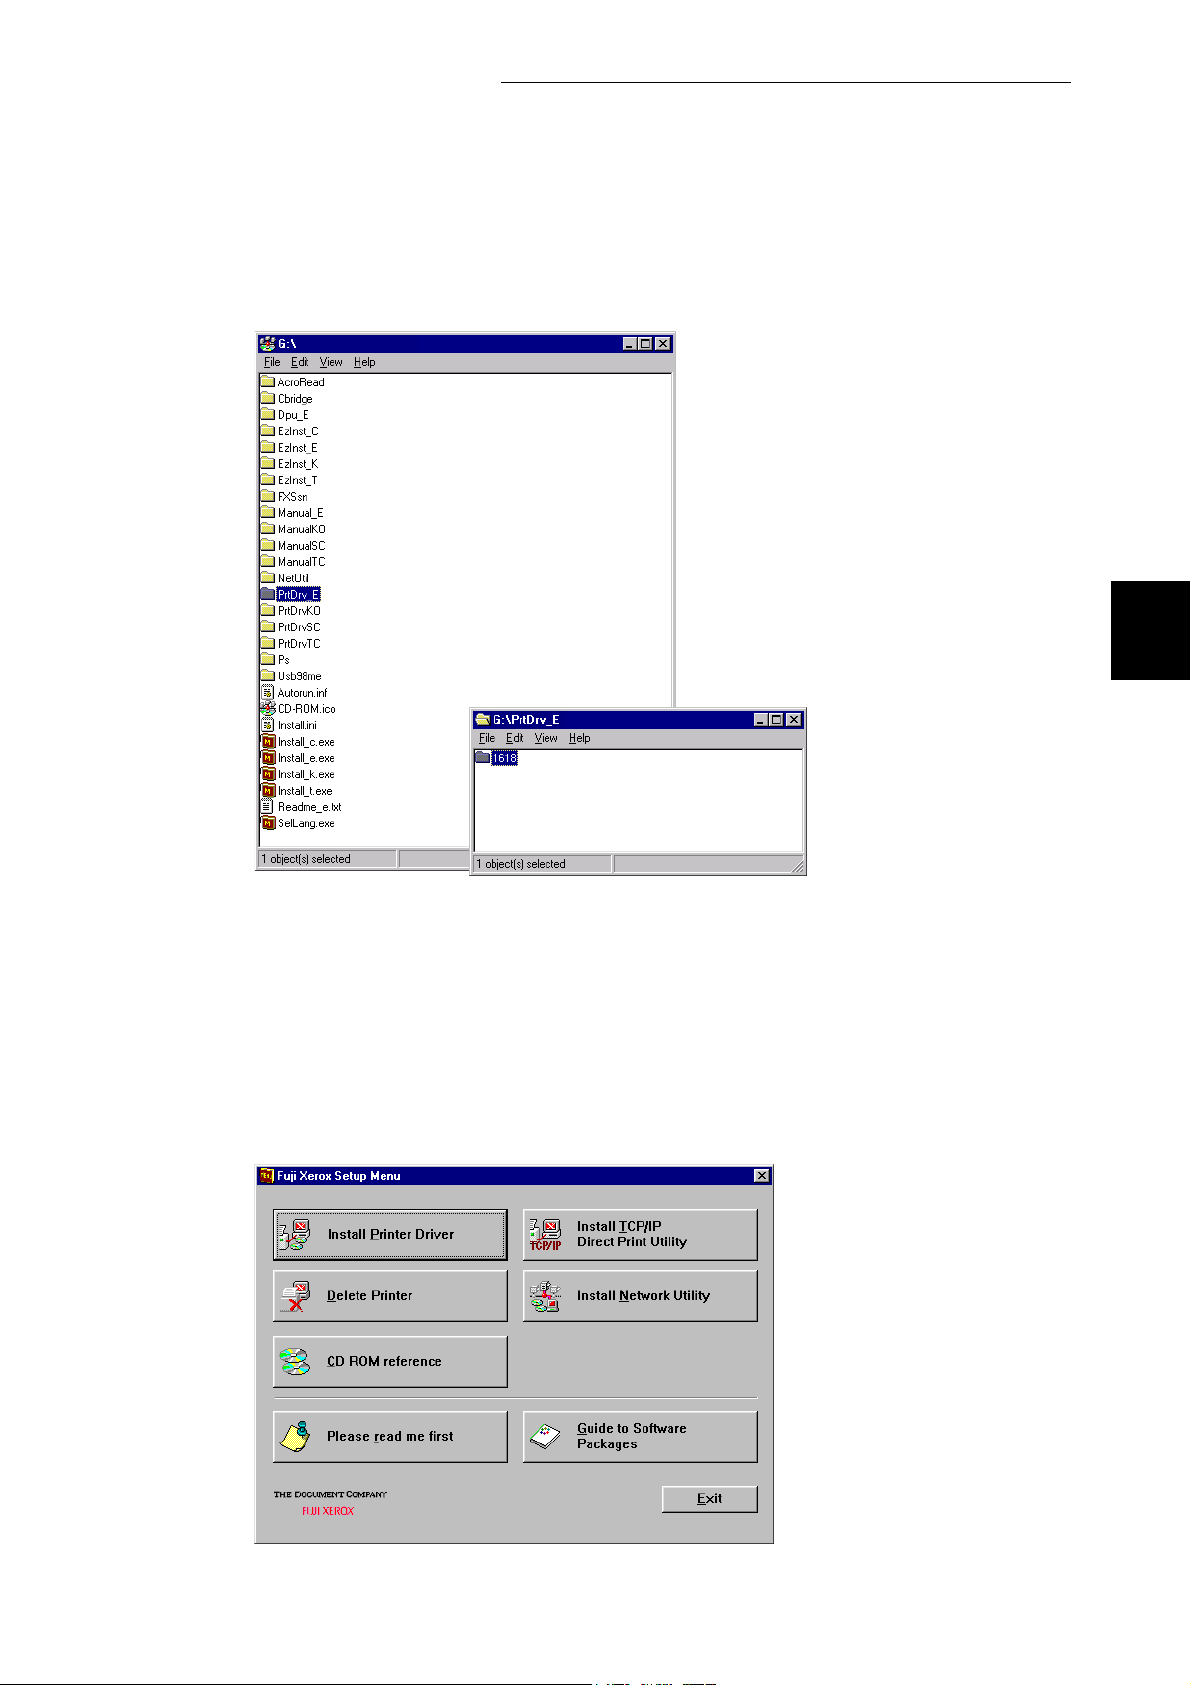
Click CD ROM reference to browse the contents. Then open the Prtdrv
folder, followed by the 1618 folder.
2
5
6
Open one of the following folders, depending on your OS, and check
the contents of the Readme.txt.
●
For Windows 95: Win95
●
For Windows 98/Windows Me: Win98
●
For Windows NT 4.0: WinNT
●
For Windows 2000/Windows XP: Win2000
Click Install Printer Driver.
The Driver Setup dialog box is displayed.
9
Page 15
2.1 Installing the Printer Driver (Install Printer Driver Button)
Installing from Fuji Xerox Setup Menu
2
7
8
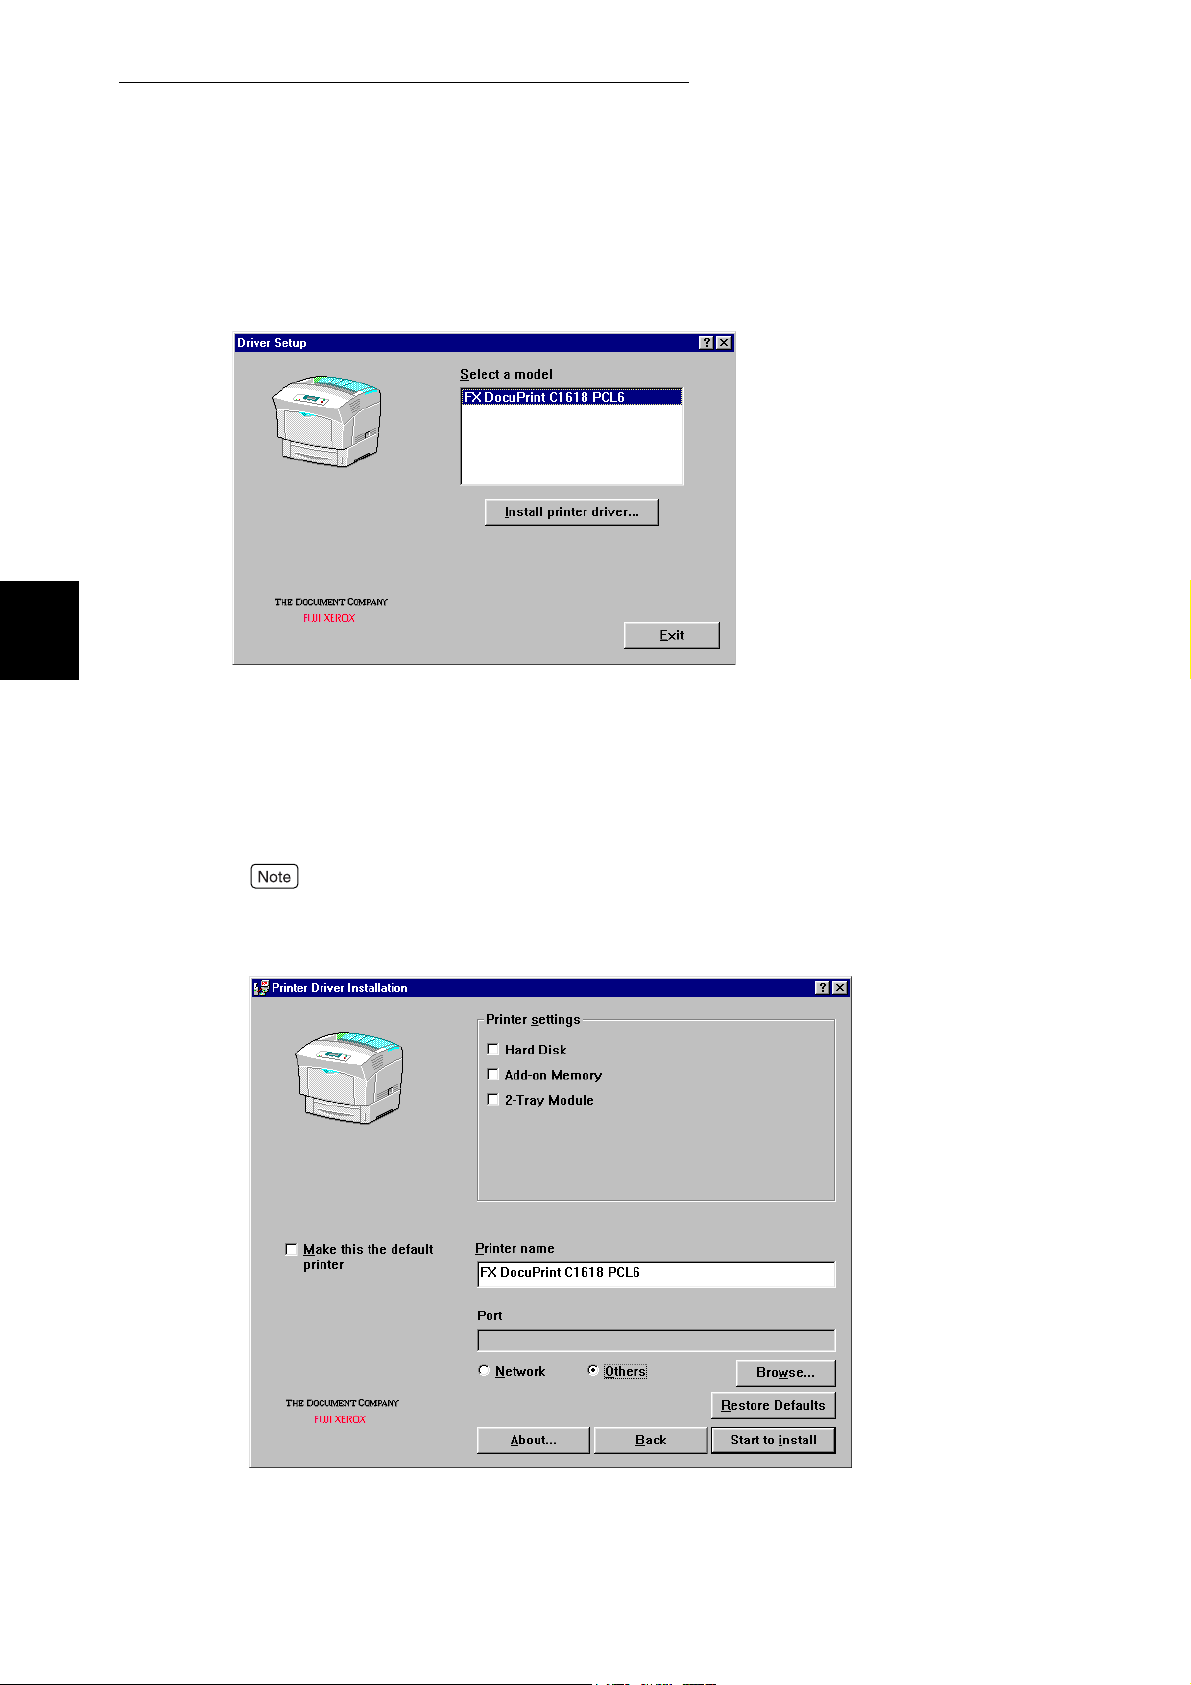
Confirm that FX DocuPrint C1618 PCL6 is selected in Select a model,
then click Install printer driver.
Specify the following:
●
Printer settings
Check the optional products that you have purchased and installed.
●
Printer name
Enter a name for the printer, if necessary.
If the printer name is not entered, it will be FX DocuPrint C1618 PCL6.
●
Make this the default printer
Check the check box if DocuPrint C1618 is to be used as the default printer.
10
Page 16

2.1 Installing the Printer Driver (Install Printer Driver Button)
Installing from Fuji Xerox Setup Menu
9
Specify the Port for output destination.
■ For Windows 95/Windows 98/Windows Me
1. Select Others if the printer is to be used as a local printer (the printer
and the computer are directly connected by a parallel cable). Then
click Browse.
Refer to the Network Print Environment User Guide (Net.pdf) if the printer is to be used
as a network printer.
2
2. Select LPT1: from the list and click OK.
11
Page 17

Installing from Fuji Xerox Setup Menu
2
2.1 Installing the Printer Driver (Install Printer Driver Button)
■ For Windows NT 4.0/Windows 2000/Windows XP
1. Click next to Displays the specified port if the printer is to be used
as a local printer (the printer and the computer are directly connected
by a parallel cable). Select LPT1: (Local Port) from the list
displayed.
Refer to the Network Print Environment User Guide (Net.pdf) if the printer is to be used
as a network printer.
12
10
11
Confirm that the port name specified in Step 9 is shown in the Displays
the specified port list box of the Printer Driver Installation dialog box.
Then click Start to install.
The installation of the printer driver begins.
When the installation is completed, the following dialog box will be
displayed. Click OK.
Page 18

2.1 Installing the Printer Driver (Install Printer Driver Button)
Installing from Fuji Xerox Setup Menu
12
13
14
Click Exit.
2
Click Exit on the Fuji Xerox Setup Menu dialog box.
Open the Printers window to confirm that the icon for DocuPrint C1618
is added.
15
Click Printers from Settings on the Start menu of Windows to display the Printers window.
Take out the CD-ROM from the CD-ROM drive.
This completes the installation of the printer driver.
13
Page 19

Installing from Fuji Xerox Setup Menu
2
Installing Fuji Xerox
2.2
Network Utility (Install
Network Utility Button)
You can install Fuji Xerox Network Utility (referred to as network utility hereafter) by clicking
Install Network Utility button on the Fuji Xerox Setup Menu dialog box.
the
The network utility is a software which has to be installed in order to connect and use the
printers in a network.
The network utility operates on the NetWare client of a network. First of all, install the
network utility onto the NetWare client computer.
Operating Requirements
To install network utility on the computer, the following conditions are required:
OS Condition
Windows 95
Windows 98
Windows Me
Novell Client for Windows 95/98 installed and NetWare client
settings completed
Windows NT 4.0
Windows 2000
Here, we assume that the computer on the network has already satisfied the abovementioned conditions.
Network Utility can be installed and run on computers that are not installed with Novell Client
for Windows. However, the search feature of NetWare, NetWare Quick Setup feature and the
NetWare print environment cannot be used.
Manuals related to Windows and NetWare for information on NetWare client settings.
Installing the Network Utility
The procedure to install network utility is as follows:
We will use Windows 98 in this procedure as an example.
Procedure
1
If a virus-check software has been installed, either uninstall it or switch
it off.
Novell Client for Windows NT/Windows 2000 installed and
NetWare client settings completed
14
2
Insert the Software Pack CD-ROM into the CD-ROM drive.
The Fuji Xerox StartUp Tool dialog box appears automatically.
Page 20

2.2 Installing Fuji Xerox Network Utility (Install Network Utility Button)
Installing from Fuji Xerox Setup Menu
3
4
Click Any Language.
The Fuji Xerox Setup Menu is displayed.
2
The Network Utility is provided only in an English edition.
Click Install Network Utility.
5
Click Next.
15
Page 21

2.2 Installing Fuji Xerox Network Utility (Install Network Utility Button)
Installing from Fuji Xerox Setup Menu
2
6
7
Check the path under Destination Folder, and click Next if it is all right.
To change the destination of the installation, click Browse and specify a directory of your choice,
and then click Next.
The installation of the network utility begins.
When the installation is completed, the following dialog box will be
displayed. Click Finish.
16
8
9
Click Exit on the Fuji Xerox Setup Menu dialog box.
Take out the CD-ROM from the CD-ROM drive.
This completes the installation.
Page 22

Deleting the Installed
2.3
Printer Icon (Delete Printer
Button)
When you click the Delete Printer button on the Fuji Xerox Setup Menu dialog box, the
printer icon of the installed DocuPrint C1618 printer driver will be deleted.
The following section explains how to delete the printer icon.
●
If there are multiple printer icons, refer to "3.2 Uninstalling the Printer Driver" to delete all these
printer icons and the printer drivers.
●
If there is only one DocuPrint C1618 printer icon and Delete Printer is executed, all the files related
to that DocuPrint C1618 printer driver will be deleted.
Procedure
Installing from Fuji Xerox Setup Menu
2
For Windows NT 4.0/Windows 2000/Windows XP, log on as a user of the administrator group
or as the administrator.
1
2
3
If a virus-check software has been installed, either uninstall it or switch
it off.
Insert the Software Pack CD-ROM into the CD-ROM drive.
The Fuji Xerox StartUp Tool dialog box appears automatically.
Click Install Language.
The Fuji Xerox Setup Menu is displayed.
17
Page 23

2.3 Deleting the Installed Printer Icon (Delete Printer Button)
Installing from Fuji Xerox Setup Menu
2
4
5
Click Delete Printer.
From the Deleting Printer dialog box, select FX DocuPrint C1618
PCL6 and click Delete.
18
6
Check the contents and click Yes.
Page 24

2.3 Deleting the Installed Printer Icon (Delete Printer Button)
Installing from Fuji Xerox Setup Menu
7
8
9
10
When the printer icon is deleted, the following dialog box will be
displayed.
Click OK.
Open the Printers window and confirm that the printer selected in Step
5 is deleted.
2
Click Printers from Settings on the Start menu of Windows to display the Printers window.
Click Exit on the Fuji Xerox Setup Menu dialog box.
Take out the CD-ROM from the CD-ROM drive.
This completes the deletion of the installed printer icon.
19
Page 25

Installing from Fuji Xerox Setup Menu
2
Installing TCP/IP Direct
2.4
Print Utility (Install TCP/IP
Direct Print Utility Button)
You can install TCP/IP Direct Print Utility by clicking the Install TCP/IP Direct Print Utility
button on the Fuji Xerox Setup Menu dialog box.
TCP/IP Direct Print Utility is a software that allows print data from the computer to be sent
directly to the network printer for printing without having to pass through the server and so forth.
Network Print Environment User Guide (Net.pdf) for information on the settings of TCP/IP Direct
Print Utility.
Operating Requirements
The following conditions must be satisfied by the computer to which TCP/IP Direct
Print Utility is to be installed.
OS Condition
Windows 95
Windows 98
Windows Me
Here, we assume that the computer on the network has already satisfied the abovementioned conditions.
Installing TCP/IP Direct Print Utility
Procedure
We will use Windows 98 in this procedure as an example.
1
2
If a virus-check software has been installed, either uninstall it or switch
it off.
Insert the Software Pack CD-ROM into the CD-ROM drive.
The Fuji Xerox StartUp Tool dialog box appears automatically.
• The network environment using TCP/IP is available.
• The computer name is set in ASCII characters.
20
Page 26

2.4 Installing TCP/IP Direct Print Utility (Install TCP/IP Direct Print Utility Button)
Installing from Fuji Xerox Setup Menu
3
4
Click Any Language.
The Fuji Xerox Setup Menu is displayed.
2
The TCP/IP Direct Print Utility is provided only in an English edition.
Click Install TCP/IP Direct Print Utility.
If you are prompted to install TCP/IP protocol when Install TCP/IP Direct Print Utility is clicked,
click OK to stop the operation, and after you have installed TCP/IP protocol to your computer,
carry out the installation again.
Network Print Environment User Guide (Net.pdf) or the manuals related to Windows on how to
install TCP/IP protocol
21
Page 27

2.4 Installing TCP/IP Direct Print Utility (Install TCP/IP Direct Print Utility Button)
Installing from Fuji Xerox Setup Menu
2
5
6
Click Next.
Check the path under Destination Folder, and click Next if it is all right.
22
The installation of TCP/IP Direct Print Utility begins.
Page 28
2.4 Installing TCP/IP Direct Print Utility (Install TCP/IP Direct Print Utility Button)
Installing from Fuji Xerox Setup Menu
7
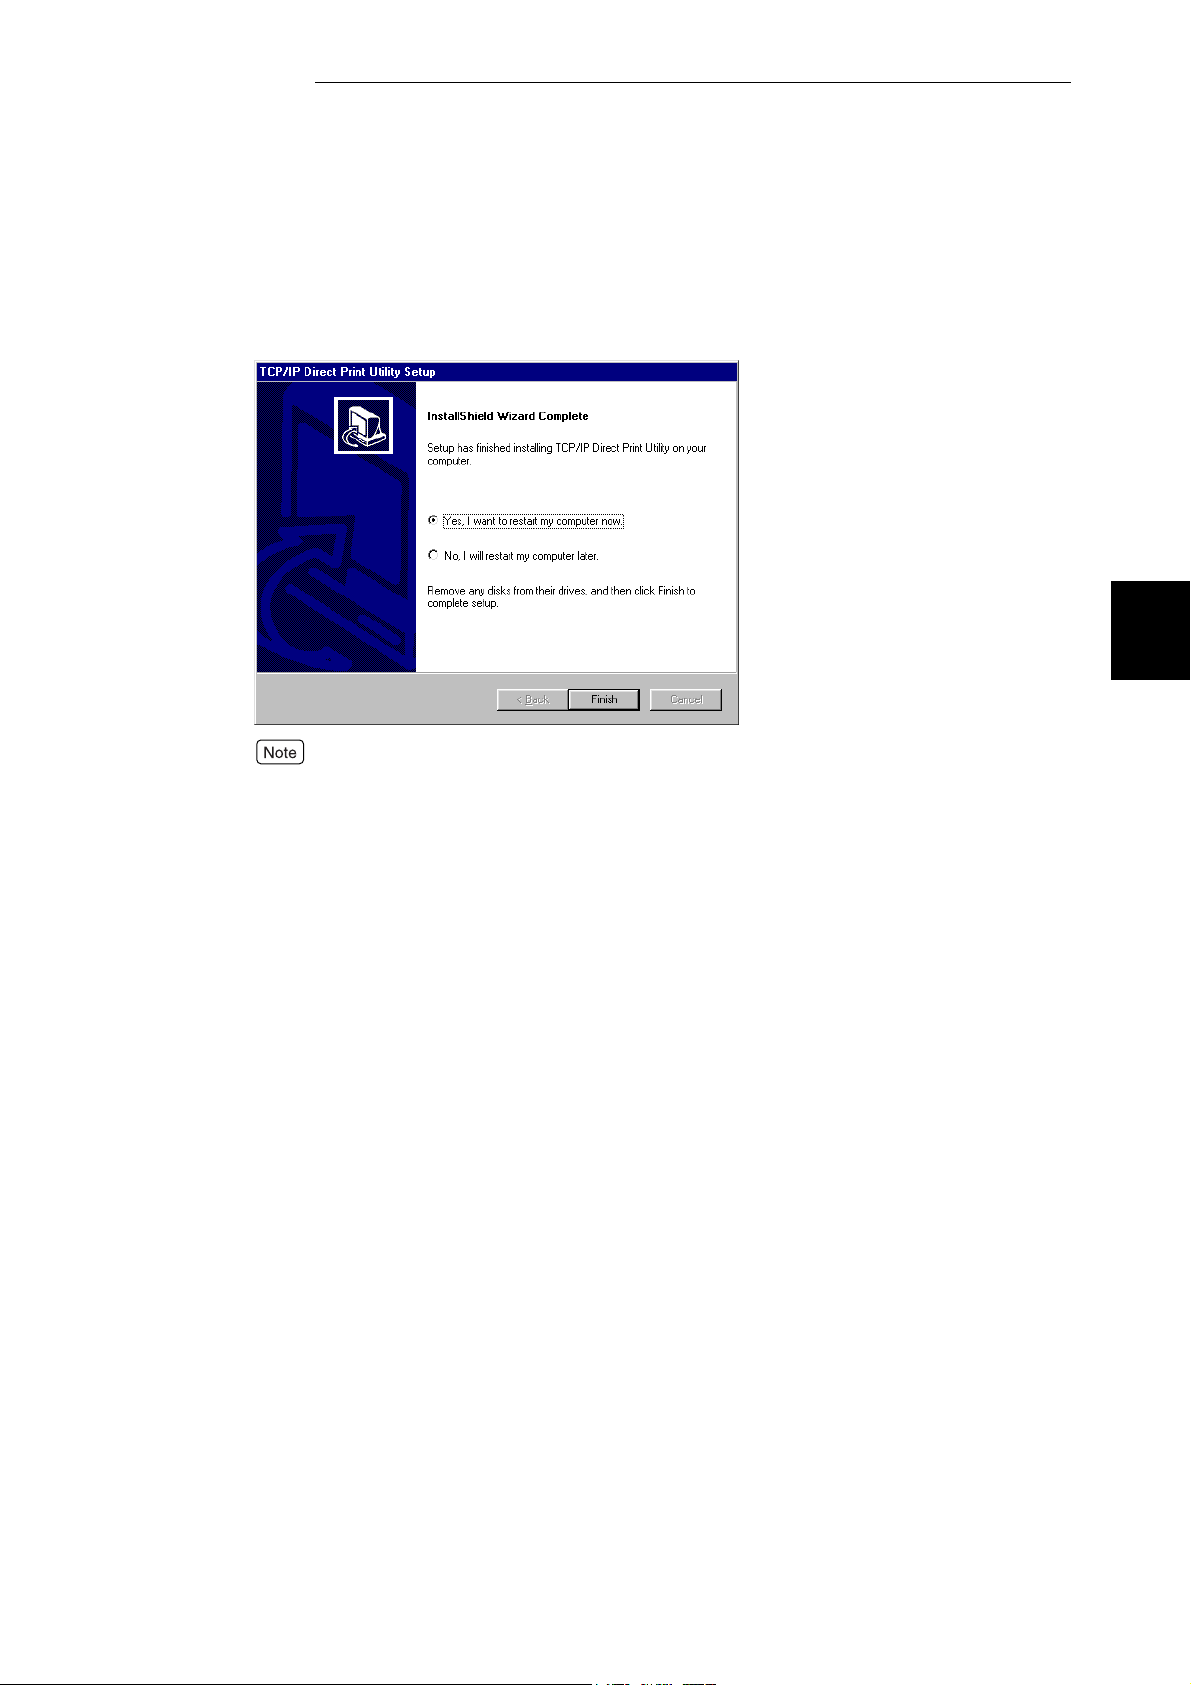
When the installation is completed, the following dialog box is
displayed. Take out the CD-ROM from the CD-ROM drive. Select Yes,
I want to restart my computer now, and then click Finish.
2
The settings will not take effect if you do not restart the system.
23
Page 29

Page 30

Chapter
3Useful Tools and Their
Usage
3.1 Installing the Printer Driver with the Same Settings to Multiple
Computers.................................................................................... 26
3.2 Uninstalling the Printer Driver.................................................... 34
3.3 Installing CentreWare Simple Status Notification .................... 37
3.4 Starting up in the Command Mode ............................................ 40
Page 31

Installing the Printer Driver
Useful Tools and Their Usage
3
3.1
with the Same Settings to
Multiple Computers
If you want to install the printer driver with the same settings to multiple computers running
the same OS, create a setup disk in a floppy disk or in a server on the network. Using the
setup disk that you have created will reduce the amount of work required when installing the
printer driver.
The section below explains the procedure to create the setup disk and how to install the
printer driver by using the disk created.
●
Install in advance the DocuPrint C1618 printer driver in the computer on which the setup disk is to
be created.
●
The setup disk can only be used on the OS on which the disk was created or computers running
the same OS. Create a separate setup disk for different types of OS.
3.1.1 Creating a Setup Disk
Procedure
For Windows NT 4.0/Windows 2000/Windows XP, log on as a user of the administrator group
or as the administrator.
1
2
3
If a virus-check software has been installed, either uninstall it or switch
it off.
Insert the Software Pack CD-ROM into the CD-ROM drive.
The Fuji Xerox StartUp Tool dialog box appears automatically.
Click Install Language.
26
4
The Fuji Xerox Setup Menu is displayed.
Click Please read me first to open the Readme.txt in the Software
Pack CD-ROM.
Page 32

3.1 Installing the Printer Driver with the Same Settings to Multiple Computers
5
6
Check the contents and close the Readme.txt.
Click CD-ROM reference to browse the contents. Then open the
EzInst folder. Double-click MakeDisk.exe.
Useful Tools and Their Usage
3
7
The Creating Setup Disk dialog box is displayed.
From Select a printer, select the printer for which to create the setup
disk. Click Create disk.
Click Open printer folder if you want to change the various settings of the printer. Select the
printer icon and go to the various tabs of the printer properties dialog box to configure the
settings.
The Setup Disk Settings dialog box is displayed.
27
Page 33

3.1 Installing the Printer Driver with the Same Settings to Multiple Computers
Useful Tools and Their Usage
3
8
Specify the following:
●
Comment
Enter comments, if any.
●
Printer name
Enter a name for the printer, if necessary.
If the printer name is not entered, it will be FX DocuPrint C1618 PCL6.
●
Make this the default printer
Check the check box if DocuPrint C1618 is to be used as the default printer.
28
Page 34

3.1 Installing the Printer Driver with the Same Settings to Multiple Computers
9
Specify the Port for output destination.
■ For Windows 95/Windows 98/Windows Me
1. Select Others if the printer is to be used as a local printer (the printer
and the computer are directly connected by a parallel cable). Then
click Browse.
Refer to the Network Print Environment User Guide (Net.pdf) if the printer is to be used
as a network printer.
Useful Tools and Their Usage
3
2. Select LPT1: from the list and click OK.
29
Page 35

3.1 Installing the Printer Driver with the Same Settings to Multiple Computers
■ For Windows NT 4.0/Windows 2000/Windows XP
Useful Tools and Their Usage
3
1. Click next to Displays the specified port if the printer is to be used
as a local printer (the printer and the computer are directly connected
by a parallel cable). Select LPT1: (Local Port) from the list
displayed.
Refer to the Network Print Environment User Guide (Net.pdf) if the printer is to be used
as a network printer.
30
10
Confirm that the port name specified in Step 9 is shown in the Displays
the specified port list box of the Setup Disk Settings dialog box.
Click Start to create setup disk.
The Setup Disk Directory Selection dialog box is displayed.
Page 36

3.1 Installing the Printer Driver with the Same Settings to Multiple Computers
11
Click Browse and select the drive or folder on which to create the setup
disk. Then click OK.
Useful Tools and Their Usage
Example: When the floppy disk drive is selected
If you select the floppy disk drive, insert a floppy disk in the disk drive, then specify.
3
12
13
14
Click OK on the Setup Disk Directory Selection dialog box.
The creation of the setup disk begins.
When the installation is completed, the following dialog box will be
displayed. Click OK.
Click Exit on the Creating Setup Disk dialog box, then click Exit on the
Fuji Xerox Setup Menu dialog box.
This completes the creation of the setup disk.
31
Page 37

3.1 Installing the Printer Driver with the Same Settings to Multiple Computers
3.1.2 Using the Created Setup Disk for
Useful Tools and Their Usage
3
Installation
Use the setup disk created in "3.1.1 Creating a Setup Disk" and install the printer
driver to a computer. Here, we will use the setup disk created on a floppy disk as an
example.
The setup disk can only be used on the OS on which the disk was created or computers
running the same OS. Use the setup disk that suits the type of OS in use.
Procedure
●
For Windows NT 4.0/Windows 2000/Windows XP, log on as a user of the administrator
group or as the administrator.
●
If the printer driver is installed to the printer setup in a NetWare environment, log on to the
corresponding NetWare server, then begin the installation.
1
If a virus-check software has been installed, either uninstall it or switch
it off.
2
3
4
5
Insert the setup disk into the floppy disk drive.
Click Run from the Start menu. The Run dialog box will be displayed.
Enter the drive, followed by a colon ":", and "\setup.exe". Click OK.
Example: A is the drive name. "A:\setup.exe"
The Driver Installation Confirmation dialog box is displayed.
When you want to set this printer as the default printer, check Make
this the default printer.
32
Page 38

3.1 Installing the Printer Driver with the Same Settings to Multiple Computers
6
Confirm the contents and click Start to install.
Useful Tools and Their Usage
3
The installation begins.
7
8
9
If the printer is used as a network printer, depending on the network environment, a dialog box
prompting the port settings will be displayed. Follow the instructions to set the port.
When the installation is completed, the following dialog box will be
displayed. Click OK.
Open the Printers window to confirm that the icon for DocuPrint C1618
is added. This completes the installation of the printer driver.
Click Printers from Settings on the Start menu of Windows to display the Printers window.
Take out the floppy disk from the floppy disk drive.
This completes the installation of the printer driver.
33
Page 39

Uninstalling the Printer
Useful Tools and Their Usage
3
3.2
You can delete the installed DocuPrint C1618 printer driver and all its related files.
If there are multiple printer icons, refer to "2.3 Deleting the Installed Printer Icon (Delete Printer
Button)" to delete only the specified printer icon.
Procedure
For Windows NT 4.0/Windows 2000/Windows XP, log on as a user of the administrator group
or as the administrator.
1
2
If a virus-check software has been installed, either uninstall it or switch
it off.
Insert the Software Pack CD-ROM into the CD-ROM drive.
The Fuji Xerox Start Up Tool dialog box appears automatically.
Driver
3
Click UnInstall Language.
The Fuji Xerox Setup Menu is displayed.
34
Page 40

3.2 Uninstalling the Printer Driver
4
Click CD ROM reference to browse the contents. Then open the EzInst
folder. Double-click UnInst.exe.
Useful Tools and Their Usage
3
5
The Deleting Driver dialog box is displayed.
Select the printer driver to be deleted from Printer(s) to be deleted, then
click Delete.
The Confirmation of Driver(s) To Be Deleted dialog box is displayed.
35
Page 41

3.2 Uninstalling the Printer Driver
Useful Tools and Their Usage
3
6
7
Check the contents and click Yes.
The deletion of the printer driver begins.
When the printer driver is deleted, the following dialog box will be
displayed.
Click OK.
8
9
Open the Printers window to confirm that the icon of DocuPrint C1618
is deleted. This completes the uninstallation of the printer driver.
Click Printers from Settings on the Start menu of Windows to display the Printers window.
Take out the CD-ROM from the CD-ROM drive.
This completes the uninstallation of the printer driver.
36
Page 42

Installing CentreWare
3.3
CentreWare Simple Status Notification (CentreWare SSN) monitors the network printer and
displays the observation result in a dialog box or as an icon on the computer.
Operating Requirements
The following is a list of OS of the computer where CentreWare SSN can be installed
and the printers that can be monitored.
Windows 95
Windows 98
Windows Me
Windows NT 4.0
Windows 2000
Windows XP
Installing CentreWare SSN
Procedure
Simple Status Notification
OS Condition
• Printer with TCP/IP environment setup, IP address defined
and SNMP UDP/IP protocol activated.
• Printer with NetWare environment setup and SNMP IPX
protocol activated.
Useful Tools and Their Usage
3
We will use Windows 98 in this procedure as an example.
1
2
3
4
Switch on the computer and start Windows 98.
Close all applications that are running, if there is any.
Insert the Software Pack CD-ROM into the CD-ROM drive.
The Fuji Xerox Start Up Tool dialog box appears automatically. Click Exit to close it.
Click Run from the Start menu. The Run dialog box will be displayed.
Enter the drive, followed by a colon ":", and "\setup.exe". Click OK.
Example: E is the drive name. "E:\FXSsn\Setup.exe"
37
Page 43

3.3 Installing CentreWare Simple Status Notification
Useful Tools and Their Usage
3
5
6
Click Next.
Check the path under Destination Folder and click Next if it is all right.
To change the destination of the installation, click Browse and specify a directory of your choice
and click Next.
38
The installation begins.
Page 44

3.3 Installing CentreWare Simple Status Notification
7
8
When the installation is completed, the following dialog box is
displayed.
Useful Tools and Their Usage
Click Finish.
3
Take out the CD-ROM from the CD-ROM drive.
This completes the installation of CentreWare Simple Status Notification.
39
Page 45

Starting up in the
Useful Tools and Their Usage
3
3.4
The following can be started up by entering the command in the Ezlnst folder of the CDROM directly (in command mode).
The command mode is a start up method and can be used in operations such as batch processing.
●
Installing the printer driver P. 40
●
Installing the printer driver by using the created setup disk P. 41
●
Deleting the installed printer icon P. 42
●
Uninstalling the installed printer driver P. 43
Command Mode
3.4.1 Installing the Printer Driver - Command
Mode
For Windows NT 4.0/Windows 2000/Windows XP, log on as a user of the administrator group
or as the administrator.
Command line
Parameter /m Specify the model ID and run setup.
Model ID Enter the ID of the model to be installed after the option (/m)
Startup example
Error Display When you have entered an incorrect parameter, a "Invalid
SETUP /m Model ID ( indicates spacing)
It can be specified in upper or lower case, single byte
characters.
Enter the model ID in upper case, single byte characters.
Model ID Model to be installed
DPC1618 DocuPrint C1618
SETUP /mDPC1618
(when installing DocuPrint C1618 printer driver)
parameter" dialog box will appear. In this case, click OK to endthe
operation.
40
Page 46

3.4 Starting up in the Command Mode
3.4.2 Installing the Printer Driver by Using the
Created Setup Disk - Command Mode
If the setup disk has not been created, see "3.1 Installing the Printer Driver with the Same
Settings to Multiple Computers" to create the setup disk.
For Windows NT 4.0/Windows 2000/Windows XP, log on as a user of the administrator group
or as the administrator.
Command line
Parameter /c Install without displaying any dialog boxes or
Error Display
This command returns the following completion codes:
Value Explanation
SETUP /c ( indicates spacing)
messages.
It can be specified in upper or lower case, single byte
characters.
When you have entered an incorrect parameter, a "Invalid
parameter" dialog box will appear. In this case, click OK to end
the operation.
Useful Tools and Their Usage
3
0 Completed without error.
1 Incorrect contents in configuration file.
2 Driver file to be installed does not exist.
3 Specified port does not exist.
4 Cannot overwrite the driver file.
5 Unable to add printer.
6 Unable to write to disk.
7 Unable to upgrade.
8 Driver of different version exists.
10 No administrator rights (Windows NT).
-1 Other errors.
41
Page 47

3.4 Starting up in the Command Mode
3.4.3 Deleting the Installed Printer Icon -
Useful Tools and Their Usage
3
Command Mode
For Windows NT 4.0/Windows 2000/Windows XP, log on as a user of the administrator group
or as the administrator.
Command line
Parameter Printer icon name
Startup example
Error Display When you have entered an incorrect parameter, a "Invalid
DELPRND (printer icon name)
( indicates spacing)
Specify the printer icon name in the Printers window.
You can specify more than one name.
DELPRN "DocuPrint C1618" DocuPrint C1618-2F (when
deleting two printer icons, DocuPrint C1618 and DocuPrint
C1618-2F)
Enter the icon name within " " (double quotes) if space is
included in the printer icon name.
parameter" dialog box will appear. In this case, click OK to end
the operation.
This command returns the following completion codes:
Value Explanation
0 Completed without error.
1 Specified printer icon does not exist.
(Also in the case when the printer icon specified is
that of an unsupported printer driver.)
10 No administrator rights (Windows NT).
-1 Other errors.
42
Page 48

3.4 Starting up in the Command Mode
3.4.4 Uninstalling the Installed Printer Driver -
Command Mode
For Windows NT 4.0/Windows 2000/Windows XP, log on as a user of the administrator group
or as the administrator.
Command line
Parameter /m Specify the installed printer (model ID) and uninstall.
Model ID Enter the ID of the model to be uninstalled after the option (/m)
Startup example
Error Display When you have entered an incorrect parameter, a "Invalid
UNINST /m Model ID ( indicates spacing)
It can be specified in upper or lower case, single byte
characters.
Enter the model ID in upper case, single byte characters.
Model ID Model to be installed
DPC1618 FX DocuPrint C1618 PCL6
UNINST /mDPC1618
(when deleting the DocuPrint C1618 printer driver)
parameter" dialog box will appear. In this case, click OK to end
the operation.
Useful Tools and Their Usage
3
The command returns the following completion codes:
Value Explanation
0 Completed without error.
1 Specified printer driver does not exist.
10 No administrator rights (Windows NT).
-1 Other errors.
43
Page 49

Index
C
CentreWare Simple Status Notification ...........37
Command Mode ...............................................40
Creating a Setup Disk .......................................26
D
Deleting the Installed Printer Icon ...................17
Deleting the Installed Printer Icon
- Command Mode ............................................42
Uninstalling the Installed Printer Driver
- Command Mode ............................................ 43
Uninstalling the Printer Driver ........................ 34
Using the Created Setup Disk for Installation
Using the Software Pack CD-ROM .................. 2
U
... 32
F
Index
File Structure of the CD-ROM ...........................3
Fuji Xerox Network Utility ..............................14
I
Installing CentreWare Simple Status
Notification ......................................................37
Installing from Fuji Xerox Setup Menu .............7
Installing Fuji Xerox Network Utility ..............14
Installing TCP/IP Direct Print Utility ..............20
Installing the Printer Driver ...............................8
Installing the Printer Driver
- Command Mode ............................................40
Installing the Printer Driver by Using the Created
Setup Disk - Command Mode ..........................41
Installing the Printer Driver with the Same
Settings to Multiple Computers .......................26
S
Setup Disk ..................................................26, 32
Starting up in the Command Mode ..................40
T
44
Target Operating Systems ..................................2
TCP/IP Direct Print Utility ...............................20
 Loading...