

Page 1
DocuMate 150
scanner
user’s guide
Page 2

DocuMate 150
scanner
user’s guide
Page 3

Copyright © 2008 Visioneer, Inc.
Reproduction, adaptation, or translation without prior written permission is prohibited, except as allowed under the
copyright laws.
XEROX ® is a trademark of Xerox Corporation in the United States and/or other countries and is used under license.
DocuMate ® is a registered trademark of Xerox Corporation used under license. All other Xerox product names and
product numbers mentioned in this publication are trademarks of Xerox Corporation.
The Visioneer brand name and logo are registered trademarks of Visioneer, Inc. The PaperPort and OmniPage Pro brand
names and logos are registered trademarks of Nuance Communications, Inc. X1® Enterprise Client is a registered
trademark of X1 Technologies, Inc. Kofax® and Virtual ReScan® are registered trademarks, and VRS™ is a trademark of
Kofax Image Products, Inc. Adobe®, Adobe® Reader®, Acrobat® Reader®, Adobe® Acrobat®, and the Adobe® PDF®
logo are registered trademarks of Adobe Systems Incorporated in the United States and/or other countries. The Adobe
PDF logo will appear in this product’s software, and full access to Adobe software features is only available if an Adobe
product is installed on your computer.
Microsoft is a U.S. registered trademark of Microsoft Corporation. Windows is a trademark and SharePoint® is a
registered trademark of Microsoft Corporation. ZyINDEX is a registered trademark of ZyLAB International, Inc. ZyINDEX
toolkit portions, Copyright © 1990-1998, ZyLAB International, Inc. All Rights Reserved. All other products mentioned
herein may be trademarks of their respective companies.
Information is subject to change without notice and does not represent a commitment on the part of Visioneer. The
software described is furnished under a licensing agreement. The software may be used or copied only in accordance with
the terms of such an agreement. It is against the law to copy the software on any medium except as specifically allowed in
the licensing agreement. No part of this document may be reproduced or transmitted in any form or by any means,
electronic or mechanical, including photocopying, recording, or information storage and retrieval systems, or translated to
another language, for any purpose other than the licensee's personal use and as specifically allowed in the licensing
agreement, without the express written permission of Visioneer.
Part Number: 05-0747-000
Restricted Rights Legend
Use, duplication, or disclosure is subject to restrictions as set forth in contract subdivision (c)(1)(ii) of the Rights in
Technical Data and Computer Software Clause 52.227-FAR14. Material scanned by this product may be protected by
governmental laws and other regulations, such as copyright laws. The customer is solely responsible for complying with all
such laws and regulations.
Page 4

Welcome
What’s in the Box . . . . . . . . . . . . . . . . . . . . . . . . . . . . . . . . . . . . . . . . . . . . . . . . . . . . . . . . . . . . . . . . . 1
The Xerox DocuMate 150 Scanner . . . . . . . . . . . . . . . . . . . . . . . . . . . . . . . . . . . . . . . . . . . . . . . . . . . 2
What You Need . . . . . . . . . . . . . . . . . . . . . . . . . . . . . . . . . . . . . . . . . . . . . . . . . . . . . . . . . . . . . . . . . . 3
Documentation . . . . . . . . . . . . . . . . . . . . . . . . . . . . . . . . . . . . . . . . . . . . . . . . . . . . . . . . . . . . . . . . . . . 3
Installation
Before You Begin . . . . . . . . . . . . . . . . . . . . . . . . . . . . . . . . . . . . . . . . . . . . . . . . . . . . . . . . . . . . . . . . . 4
Step 1: Assemble the Scanner . . . . . . . . . . . . . . . . . . . . . . . . . . . . . . . . . . . . . . . . . . . . . . . . . . . . . . . 5
Step 2: Install the Software . . . . . . . . . . . . . . . . . . . . . . . . . . . . . . . . . . . . . . . . . . . . . . . . . . . . . . . . . . 6
Step 3: Connect the Power Supply . . . . . . . . . . . . . . . . . . . . . . . . . . . . . . . . . . . . . . . . . . . . . . . . . . . 11
Step 4: Connect the USB Cable and Turn on the Power . . . . . . . . . . . . . . . . . . . . . . . . . . . . . . . . . . 12
Additional Applications Available with Your Scanner . . . . . . . . . . . . . . . . . . . . . . . . . . . . . . . . . . . . . 14
View the User Guides . . . . . . . . . . . . . . . . . . . . . . . . . . . . . . . . . . . . . . . . . . . . . . . . . . . . . . . . . . . . . 15
Register Your Scanner and Check for Updates . . . . . . . . . . . . . . . . . . . . . . . . . . . . . . . . . . . . . . . . . 16
Table of Contents
Table of Contents
Scanning
Loading Documents to Scan . . . . . . . . . . . . . . . . . . . . . . . . . . . . . . . . . . . . . . . . . . . . . . . . . . . . . . . . 18
Scanning from One Touch . . . . . . . . . . . . . . . . . . . . . . . . . . . . . . . . . . . . . . . . . . . . . . . . . . . . . . . . . 19
The Default One Touch Settings . . . . . . . . . . . . . . . . . . . . . . . . . . . . . . . . . . . . . . . . . . . . . . . . 19
Scan from the One Touch Scanner Buttons . . . . . . . . . . . . . . . . . . . . . . . . . . . . . . . . . . . . . . . 20
Scan from the One Touch Button Panel . . . . . . . . . . . . . . . . . . . . . . . . . . . . . . . . . . . . . . . . . . 21
Using the One Touch Button Panel . . . . . . . . . . . . . . . . . . . . . . . . . . . . . . . . . . . . . . . . . . . . . . 22
Configuring the One Touch Buttons . . . . . . . . . . . . . . . . . . . . . . . . . . . . . . . . . . . . . . . . . . . . . . . . . . 23
Selecting New Settings for a Button . . . . . . . . . . . . . . . . . . . . . . . . . . . . . . . . . . . . . . . . . . . . . . 24
Creating a New Scan Configuration . . . . . . . . . . . . . . . . . . . . . . . . . . . . . . . . . . . . . . . . . . . . . . 26
Editing or Deleting Scan Configurations . . . . . . . . . . . . . . . . . . . . . . . . . . . . . . . . . . . . . . . . . . 33
Selecting Document and File Format Options . . . . . . . . . . . . . . . . . . . . . . . . . . . . . . . . . . . . . . 34
Renaming a One Touch Button . . . . . . . . . . . . . . . . . . . . . . . . . . . . . . . . . . . . . . . . . . . . . . . . . 37
Selecting Options for a Button . . . . . . . . . . . . . . . . . . . . . . . . . . . . . . . . . . . . . . . . . . . . . . . . . . 38
Setting Destination Application Properties . . . . . . . . . . . . . . . . . . . . . . . . . . . . . . . . . . . . . . . . . 40
Configure Before Scan . . . . . . . . . . . . . . . . . . . . . . . . . . . . . . . . . . . . . . . . . . . . . . . . . . . . . . . . 45
Scanning with Optical Character Recognition (OCR) . . . . . . . . . . . . . . . . . . . . . . . . . . . . . . . . 48
Scanning with sPDF or nPDF and Searching for Text . . . . . . . . . . . . . . . . . . . . . . . . . . . . . . . . 49
Scan and Burn to a CD . . . . . . . . . . . . . . . . . . . . . . . . . . . . . . . . . . . . . . . . . . . . . . . . . . . . . . . 50
Scanning with Event Forwarding . . . . . . . . . . . . . . . . . . . . . . . . . . . . . . . . . . . . . . . . . . . . . . . . 51
Creating an HTML Web Page from Your Scanned Documents . . . . . . . . . . . . . . . . . . . . . . . . . 52
Transferring Scanned Documents to Storage . . . . . . . . . . . . . . . . . . . . . . . . . . . . . . . . . . . . . . 53
Checking the Hardware and Setting the Lamp Power Saving . . . . . . . . . . . . . . . . . . . . . . . . . . 57
DocuMate 150 Scanner User’s Guide i
Page 5

Table of Contents
Scanning with the TWAIN Interface
Accessing the TWAIN Interface . . . . . . . . . . . . . . . . . . . . . . . . . . . . . . . . . . . . . . . . . . . . . . . . . . . . . 59
Scanning from the TWAIN Interface . . . . . . . . . . . . . . . . . . . . . . . . . . . . . . . . . . . . . . . . . . . . . . . . . . 60
Display the Device Configuration . . . . . . . . . . . . . . . . . . . . . . . . . . . . . . . . . . . . . . . . . . . . . . . .63
Scanning with the WIA Interface
To scan using WIA from Microsoft Paint: . . . . . . . . . . . . . . . . . . . . . . . . . . . . . . . . . . . . . . . . . . . . . . 64
Fine Tuning Your Scans . . . . . . . . . . . . . . . . . . . . . . . . . . . . . . . . . . . . . . . . . . . . . . . . . . . . . . . . . . . 66
Maintenance
Clearing Paper Jams . . . . . . . . . . . . . . . . . . . . . . . . . . . . . . . . . . . . . . . . . . . . . . . . . . . . . . . . . . . . . 67
Cleaning the Automatic Document Feeder . . . . . . . . . . . . . . . . . . . . . . . . . . . . . . . . . . . . . . . . . . . . .67
Replacing the ADF Pad Assembly . . . . . . . . . . . . . . . . . . . . . . . . . . . . . . . . . . . . . . . . . . . . . . . . . . . 68
Replacing the Roller Assembly . . . . . . . . . . . . . . . . . . . . . . . . . . . . . . . . . . . . . . . . . . . . . . . . . . . . . . 68
Troubleshooting . . . . . . . . . . . . . . . . . . . . . . . . . . . . . . . . . . . . . . . . . . . . . . . . . . . . . . . . . . . . . . . . . 71
Status Light Troubleshooting Codes . . . . . . . . . . . . . . . . . . . . . . . . . . . . . . . . . . . . . . . . . . . . . 73
Uninstalling Your Scanner . . . . . . . . . . . . . . . . . . . . . . . . . . . . . . . . . . . . . . . . . . . . . . . . . . . . . . . . . 74
Uninstalling the Scanner and One Touch Software . . . . . . . . . . . . . . . . . . . . . . . . . . . . . . . . . . 74
Uninstalling the PaperPort and OmniPage Software . . . . . . . . . . . . . . . . . . . . . . . . . . . . . . . . . 74
To Install Another Driver . . . . . . . . . . . . . . . . . . . . . . . . . . . . . . . . . . . . . . . . . . . . . . . . . . . . . . 74
Xerox DocuMate 150 Scanner Specifications . . . . . . . . . . . . . . . . . . . . . . . . . . . . . . . . . . . . . . . . . . 75
Xerox DocuMate 150 Scanner Parts List . . . . . . . . . . . . . . . . . . . . . . . . . . . . . . . . . . . . . . . . . . . . . . 76
Notices . . . . . . . . . . . . . . . . . . . . . . . . . . . . . . . . . . . . . . . . . . . . . . . . . . . . . . . . . . . . . . . . . . . . . . . . . . 77
Section 1: Safety Introduction . . . . . . . . . . . . . . . . . . . . . . . . . . . . . . . . . . . . . . . . . . . . . . . . . . . . . . . 77
Section 2: EMC . . . . . . . . . . . . . . . . . . . . . . . . . . . . . . . . . . . . . . . . . . . . . . . . . . . . . . . . . . . . . . . . . . 77
Section 3: Operational Safety Information . . . . . . . . . . . . . . . . . . . . . . . . . . . . . . . . . . . . . . . . . . . . . 78
Section 4: Electrical Information . . . . . . . . . . . . . . . . . . . . . . . . . . . . . . . . . . . . . . . . . . . . . . . . . . . . . 79
Section 5: Emergency Power Off . . . . . . . . . . . . . . . . . . . . . . . . . . . . . . . . . . . . . . . . . . . . . . . . . . . . 80
Section 6: Maintenance Information . . . . . . . . . . . . . . . . . . . . . . . . . . . . . . . . . . . . . . . . . . . . . . . . . . 80
Section 7: Product Safety Certification . . . . . . . . . . . . . . . . . . . . . . . . . . . . . . . . . . . . . . . . . . . . . . . . 80
Section 8: Regulatory Information . . . . . . . . . . . . . . . . . . . . . . . . . . . . . . . . . . . . . . . . . . . . . . . . . . . 81
Section 9: Compliance Information . . . . . . . . . . . . . . . . . . . . . . . . . . . . . . . . . . . . . . . . . . . . . . . . . . . 81
Section 10: Ilegal Copies . . . . . . . . . . . . . . . . . . . . . . . . . . . . . . . . . . . . . . . . . . . . . . . . . . . . . . . . . . 83
Section 11: EH&S Contact Information . . . . . . . . . . . . . . . . . . . . . . . . . . . . . . . . . . . . . . . . . . . . . . . . 85
Index . . . . . . . . . . . . . . . . . . . . . . . . . . . . . . . . . . . . . . . . . . . . . . . . . . . . . . . . . . . . . . . . . . . . . . . . . . . . . 87
ii DocuMate 150 Scanner User’s Guide
Page 6
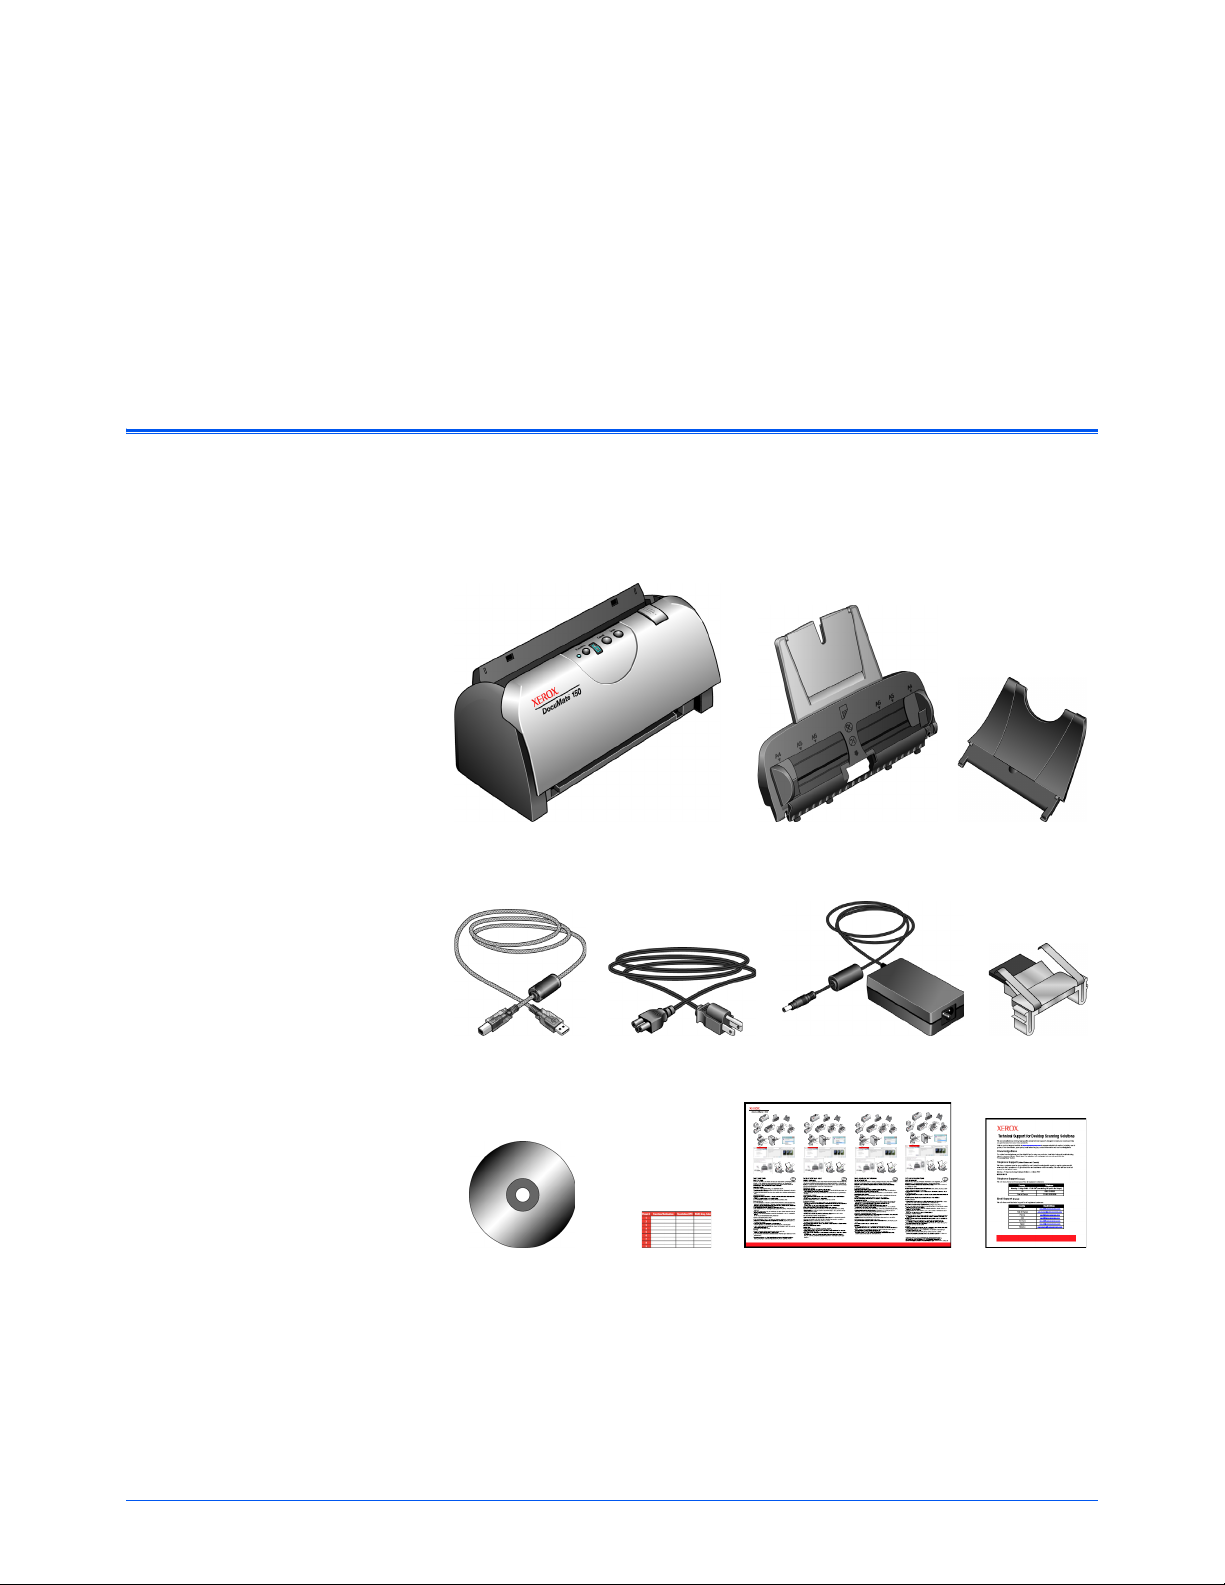
What’s in the Box
Xerox DocuMate 150 Scanner
Power Supply
Output Tray
Replacement
ADF Pad
Power CordUSB Cable
Installation Disc Quick Install Guide Technical
Support Card
Buttons
Label
Input Tray
Welcome
Your new Xerox DocuMate 150 scanner can quickly scan stacks of color,
grayscale, and black-and-white documents, up to 8.5" x 14", and place
their electronic images on your computer.
Before starting the scanner assembly and software installation, please
check the contents of the box to make sure that all parts are included. If
any items are missing or damaged, contact the dealer where you
purchased the scanner.
DocuMate 150 Scanner User’s Guide 1
Page 7
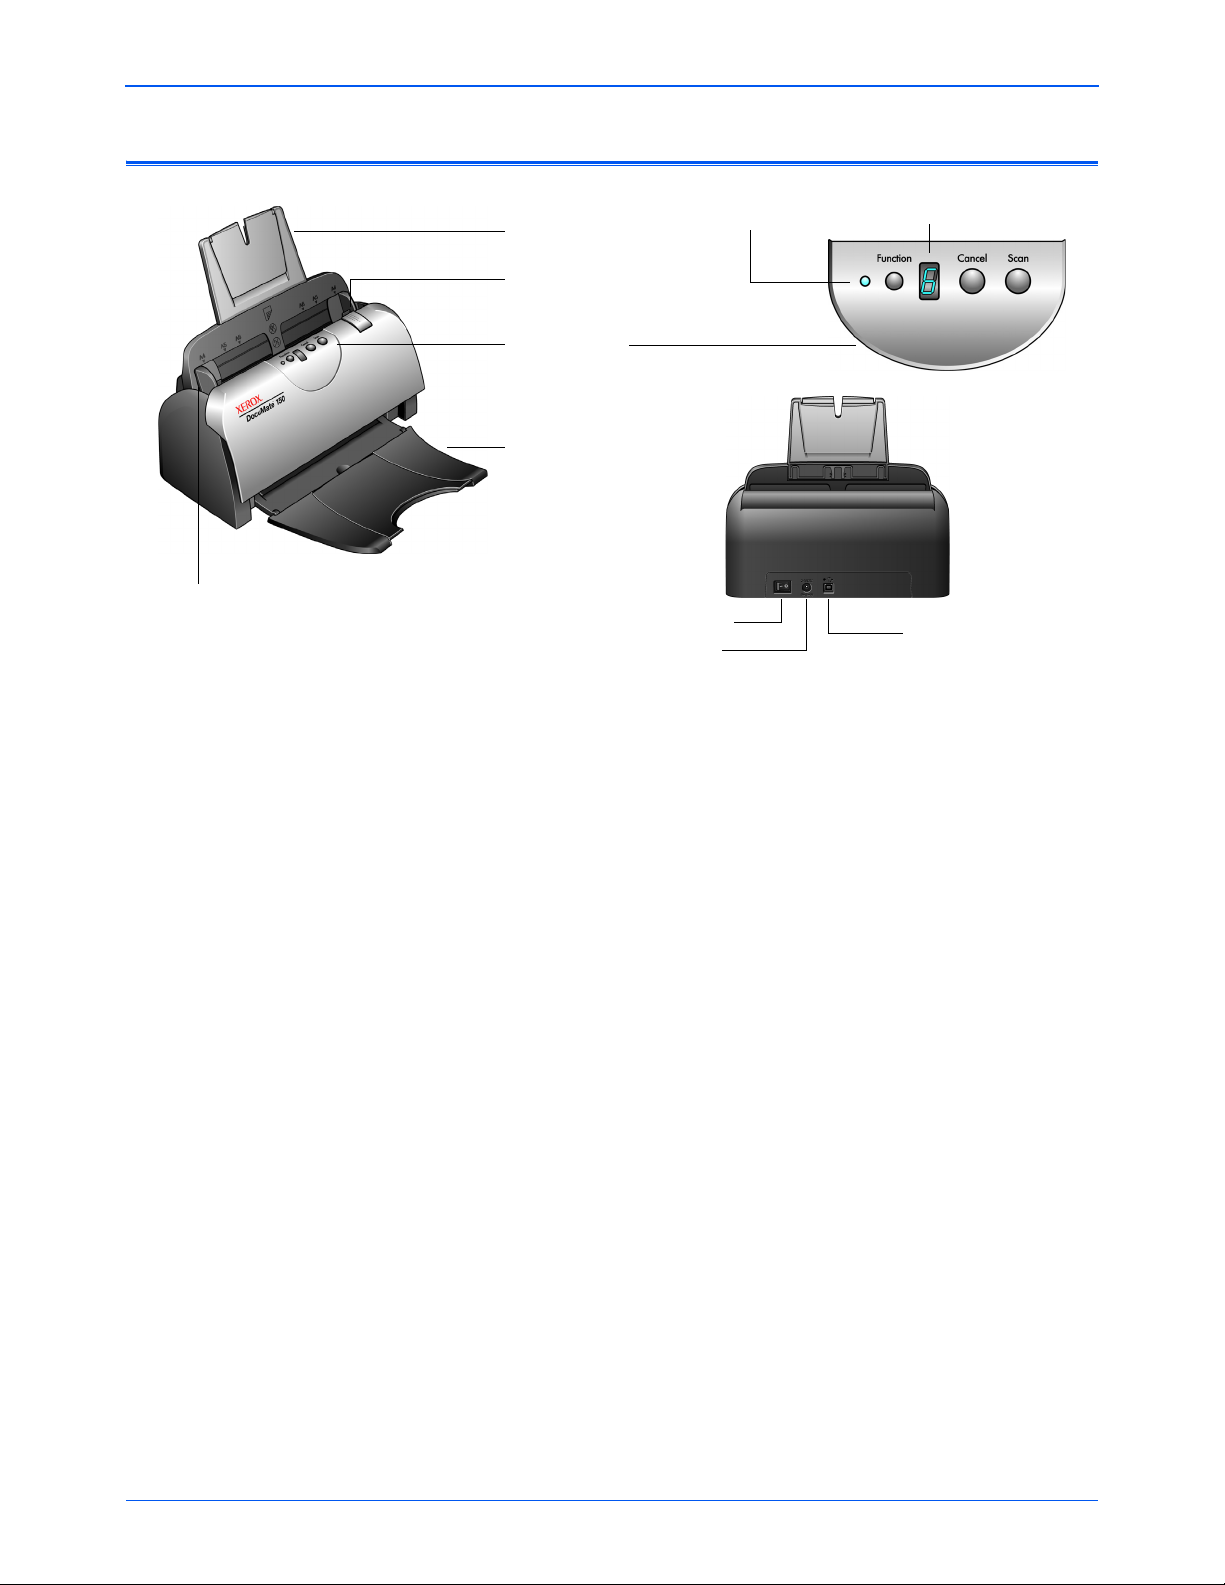
Welcome
Input Tray
Output tray
ADF cover release
Power switch
USB port
Power jack
Status light
LED Number
Control panel
Paper Guides
The Xerox DocuMate 150 Scanner
Input tray—Holds documents in the scanner.
Paper Guides—Adjust to fit the document width.
ADF cover release—Opens the scanner door.
Control panel—One Touch scanning controls.
Output tray—Holds documents after being fed through the scanner.
Status light—Shows the scanner’s status. See “Status Light
Troubleshooting Codes” on page 73 for details.
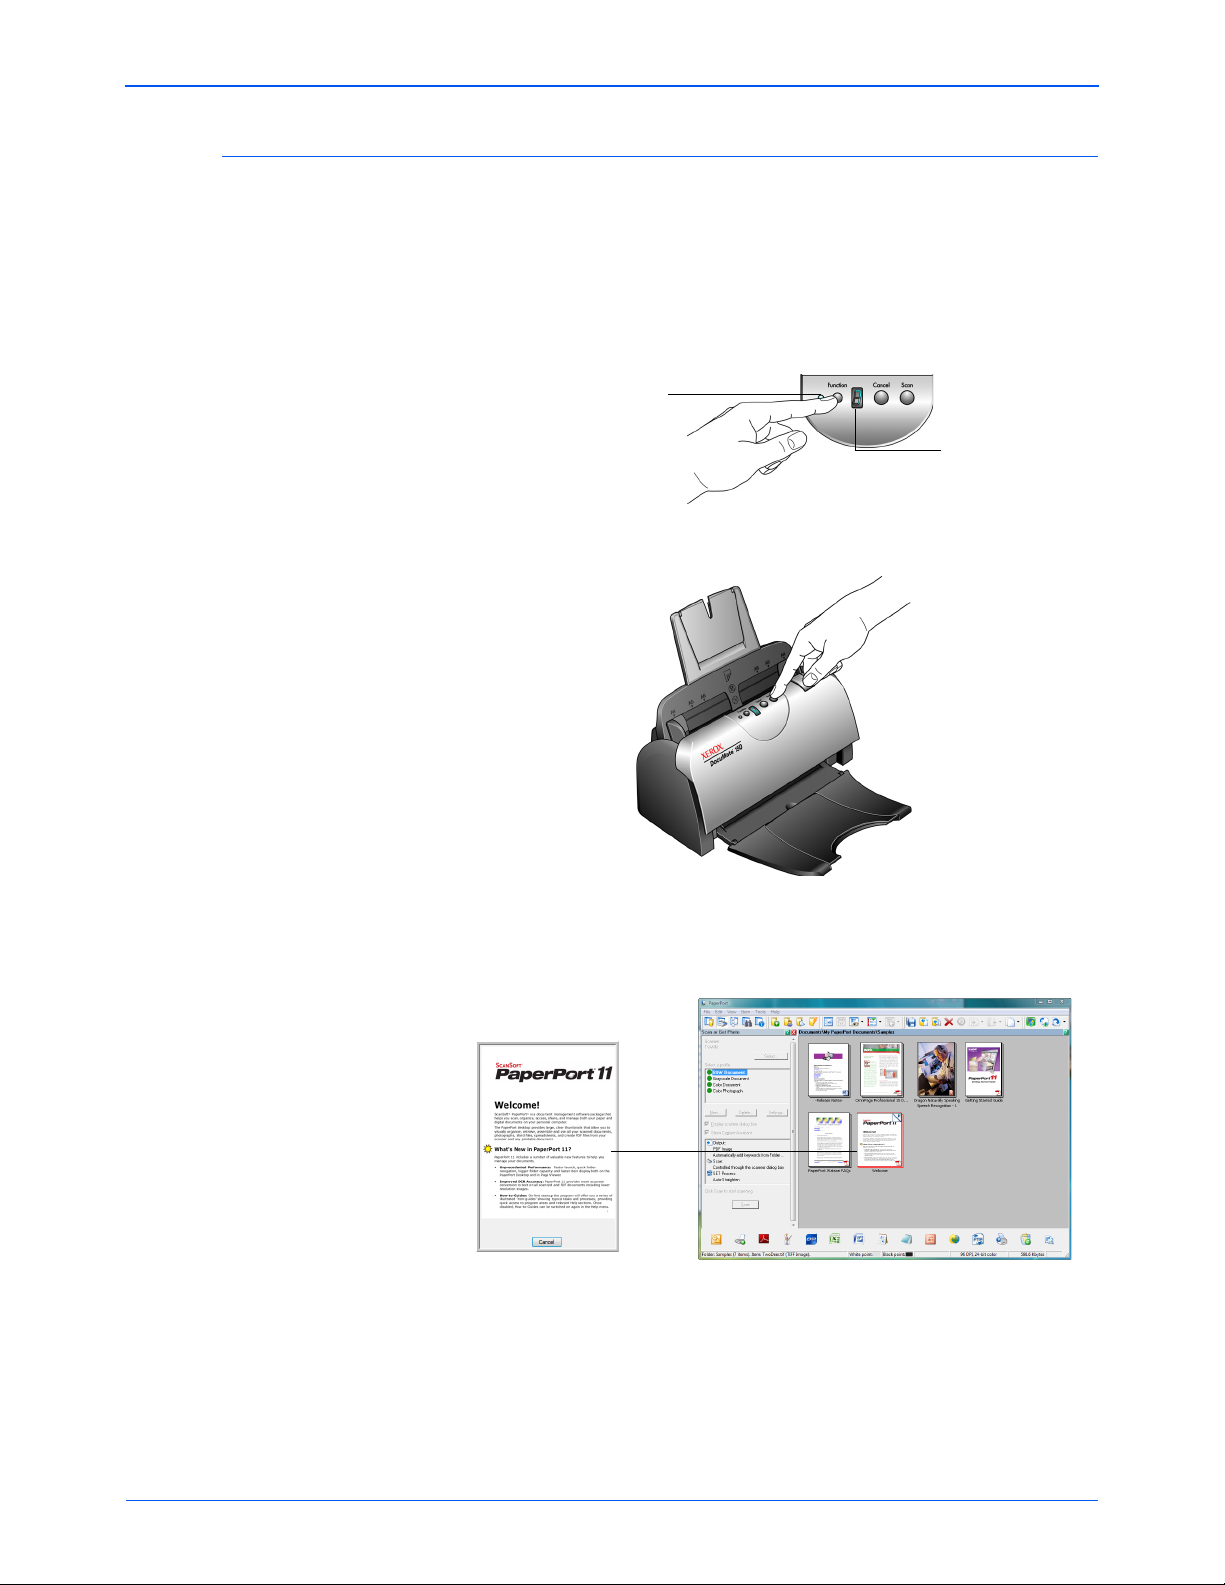
Function button—Selects the scan setting for the Scan button. Press to
cycle through the settings.
LED Number—Shows the current scan setting for the Scan button.
Scan button—Press to scan a document.
Cancel button—Press to cancel the current scan.
Power switch—On/Off power switch.
Power jack—Connects the power cord to the scanner.
Universal Serial Bus (USB) port—Connects the scanner to the
computer.
2 DocuMate 150 Scanner User’s Guide
Page 8

What You Need
Welcome
IBM-compatible Pentium PC, or AMD equivalent with:
• A DVD-ROM drive
• An available Universal Serial Bus (USB) port
•Microsoft
Pack 4), Windows XP (Service Pack 1 and 2), or Windows Vista
• Windows 2000 and XP: Minimum of 512 megabytes (MB) of internal
memory (RAM)
Windows Vista: Minimum of 1 gigabyte (GB) of internal memory
(RAM)
• 350MB minimum of free hard disk space
®
Windows® operating system: Windows 2000 (Service
A VGA or SVGA Monitor
The recommended settings for your monitor are:
Documentation
• High Color (16-bit) or True Color (24-bit or 32-bit)
• Resolution set to at least 800 x 600 pixels
To set your monitor’s colors and resolution:
• Open the Windows Control Panel
• Double-click on Display then select the Settings tab
The following documentation is provided with your scanner:
• Quick Install Guide—Abbreviated installation instructions.
• Xerox DocuMate 150 Scanner User’s Guide—On the Installation
Disc; contains detailed installation, scanning, configuration, and
maintenance information.
The Scanner Readme file has late-breaking news about your
scanner.
• PaperPort User’s Guide—On the Installation Disc; contains detailed
feature and configuration information for the PaperPort software.
• Online Help—For the scanner configuration, TWAIN and WIA
interfaces, and PaperPort software applications.
DocuMate 150 Scanner User’s Guide 3
Page 9

Installation
Before You Begin
Installation
Installation is a quick, four-step process:
1. Assemble the scanner
2. Install the software
3. Connect the power supply
4. Connect the USB cable and turn on the power
Please make sure of the following before you begin installation:
• The information in this guide may cover software not provided
with the scanner you purchased. Please disregard any
information about the software not applicable to your scanner.
Visit our web site at www.xeroxscanners.com for the latest
software updates for your Xerox DocuMate 150 scanner.
• If your computer has AntiVirus or AntiSpyware software running,
you may encounter alerts or messages during installation
asking you to allow the installation to proceed. Although the
messages will differ based on the software your computer is
running, in each case you should allow the installation to
proceed if that option is available. Alternatively, you can turn off
the AntiVirus or AntiSpyware software before installing your
scanner, but if you do, make sure to turn it back on again when
installation is finished.
• If you already have a scanner connected to your computer, it is
recommended that you remove that scanner’s driver program
prior to installing your Xerox DocuMate 150 scanner. While in
some cases you can configure your computer to have another
manufacturer’s scanner operational on your computer in
conjunction with the Xerox DocuMate 150 scanner, we do not
recommend this configuration as you may lose some of the
driver functionality on one, or both of the units. You can remove
these programs from the Windows Add/Remove programs list.
Please refer to the user manual provided with your other
scanner hardware for instructions about removing the driver
and software for that unit.
• If your computer is running Windows Vista, you may see the
Vista User Account Control screen asking you to confirm system
changes. Click the Continue button to allow the installation to
proceed.
4 DocuMate 150 Scanner User’s Guide
Page 10
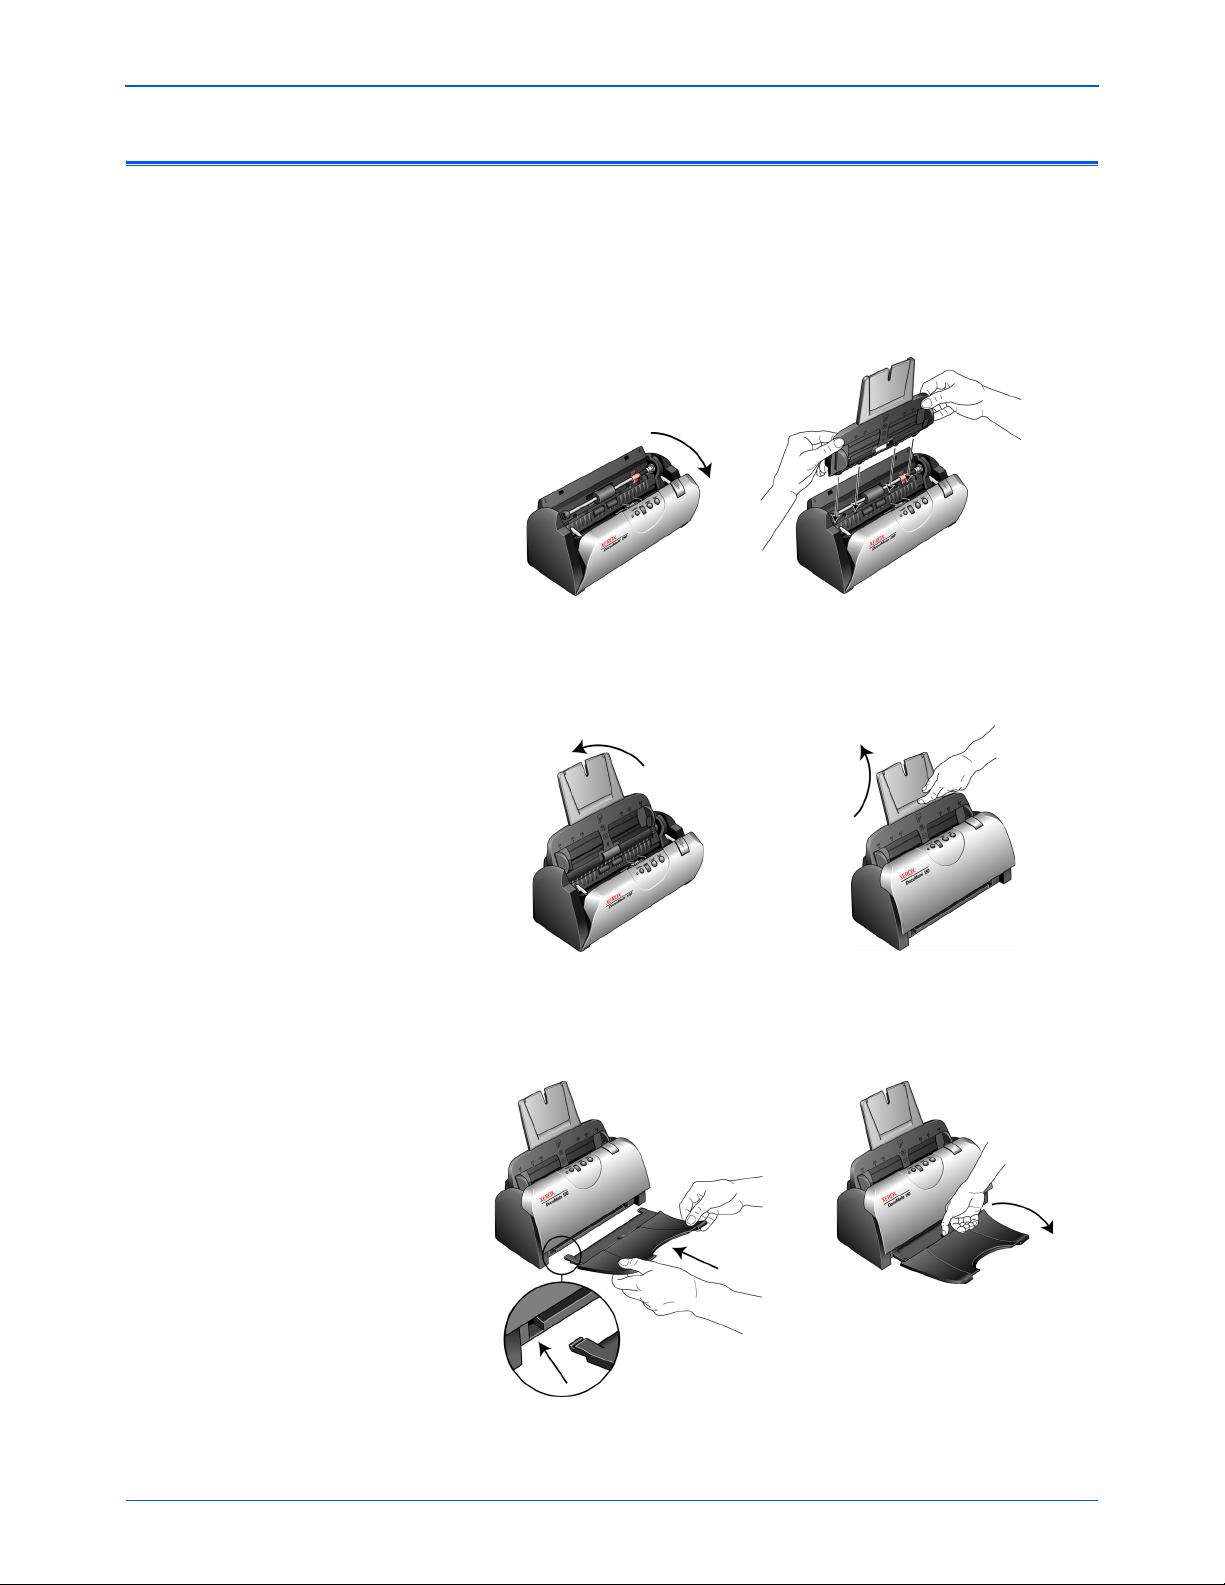
Step 1: Assemble the Scanner
1. Remove the scanner from its protective foam and plastic bag.
2. Open the ADF cover and carefully remove any foam particles that
may have gotten inside it.
3. Align the tabs on the Input tray with the slots inside the scanner and
slide the tray down into place.
4. Swing the paper guide back until it snaps into place. Close the
scanner cover. Flip the paper guide extension up so it is fully
extended.
Installation
5. Insert the pins on each side of the output tray into the holes on the
scanner. Flip open the extension on the output tray so it is fully
extended.
DocuMate 150 Scanner User’s Guide 5
Page 11
Installation
Step 2: Install the Software
All the software you need to use the scanner is on the installation disc.
1. Start Microsoft Windows and make sure no other applications are
running.
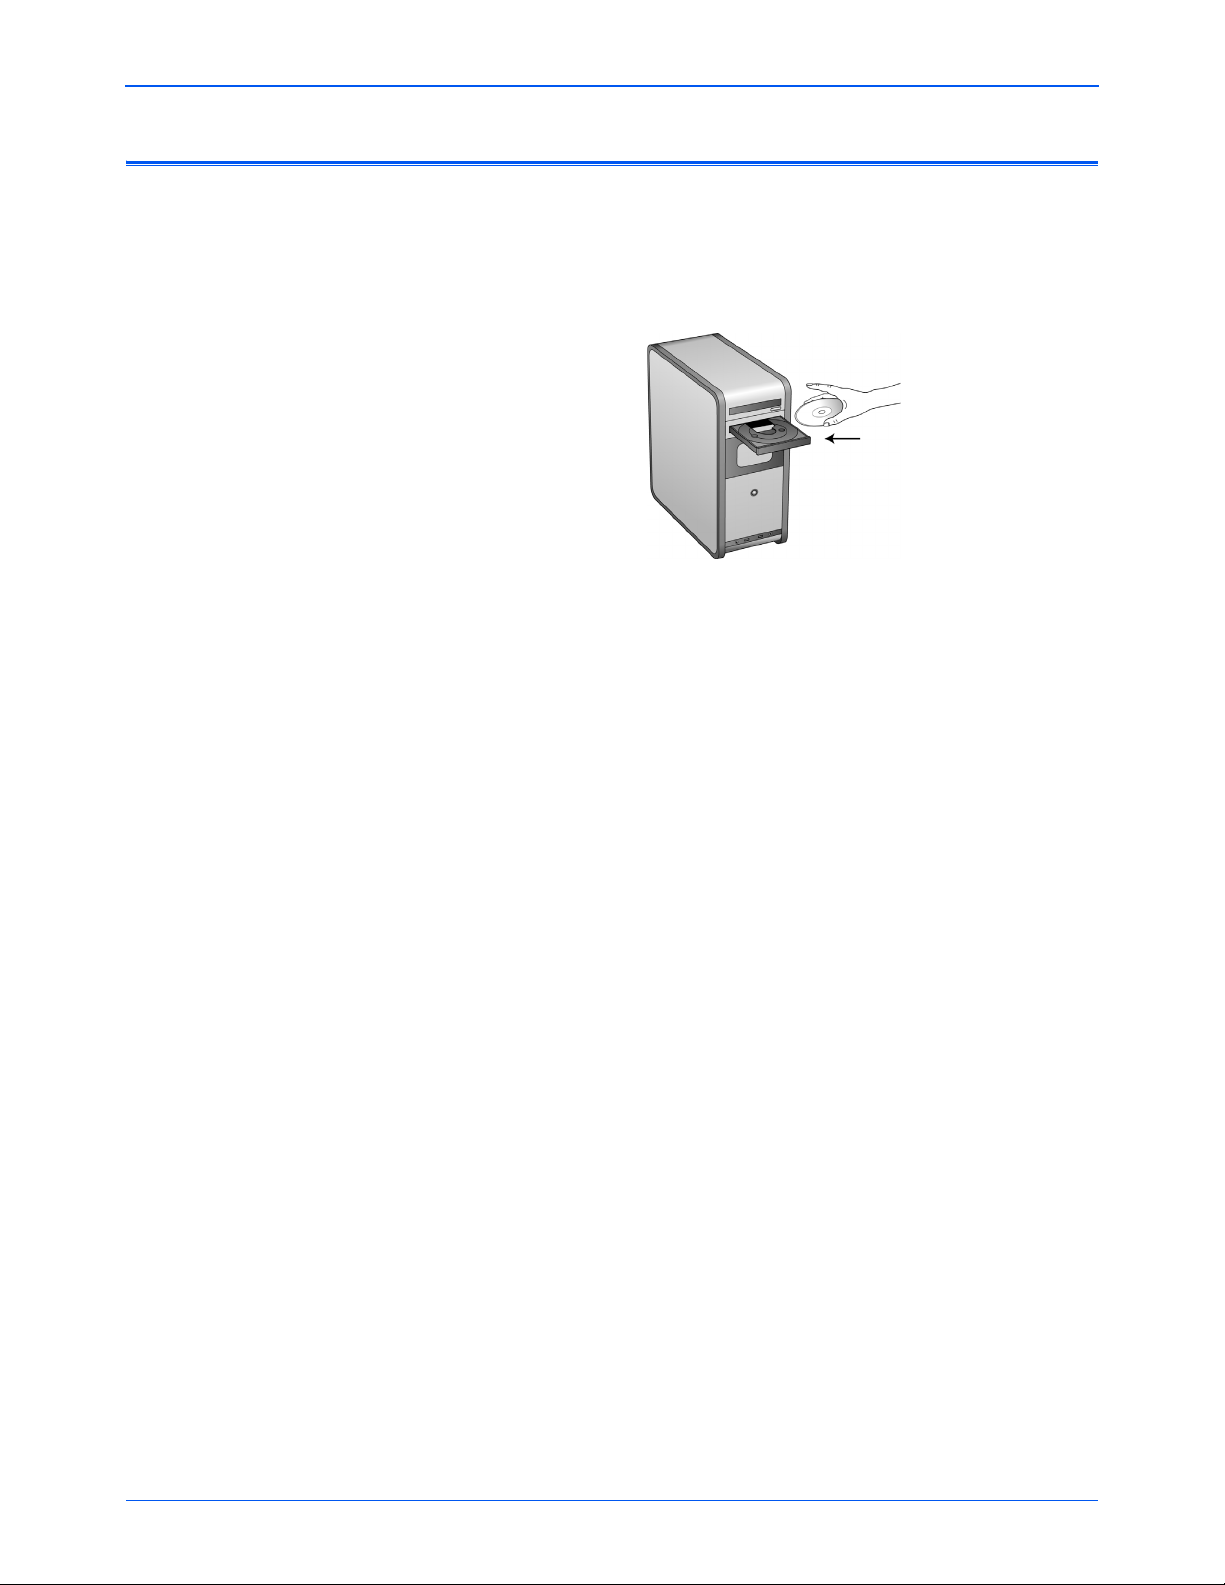
2. Insert the installation disc into your computer's DVD-ROM drive.
The disc automatically starts and the Select Language window
opens.
3. Select your language from the list of available languages.
The disc’s main menu opens in the language you selected.
NOTE: If the CD does not start, check the following:
• Make sure the CD drive’s door is completely shut.
• Make sure the CD was inserted in the drive in the proper direction
(label side up).
To launch the CD manually:
• Open the Windows option for My Computer. You can do this by
double-clicking on the My Computer icon on your desktop.
• Double-click the icon for your CD-ROM drive.
• The Installation menu for the CD should now open.
If the menu does not open:
• From the list of files on the CD, double-click the file named
START32.EXE.
NOTE: The Scanner Readme file has late-breaking news about
your scanner. The Scanner Readme file is in HTML format and will
open in any standard browser.
6 DocuMate 150 Scanner User’s Guide
Page 12
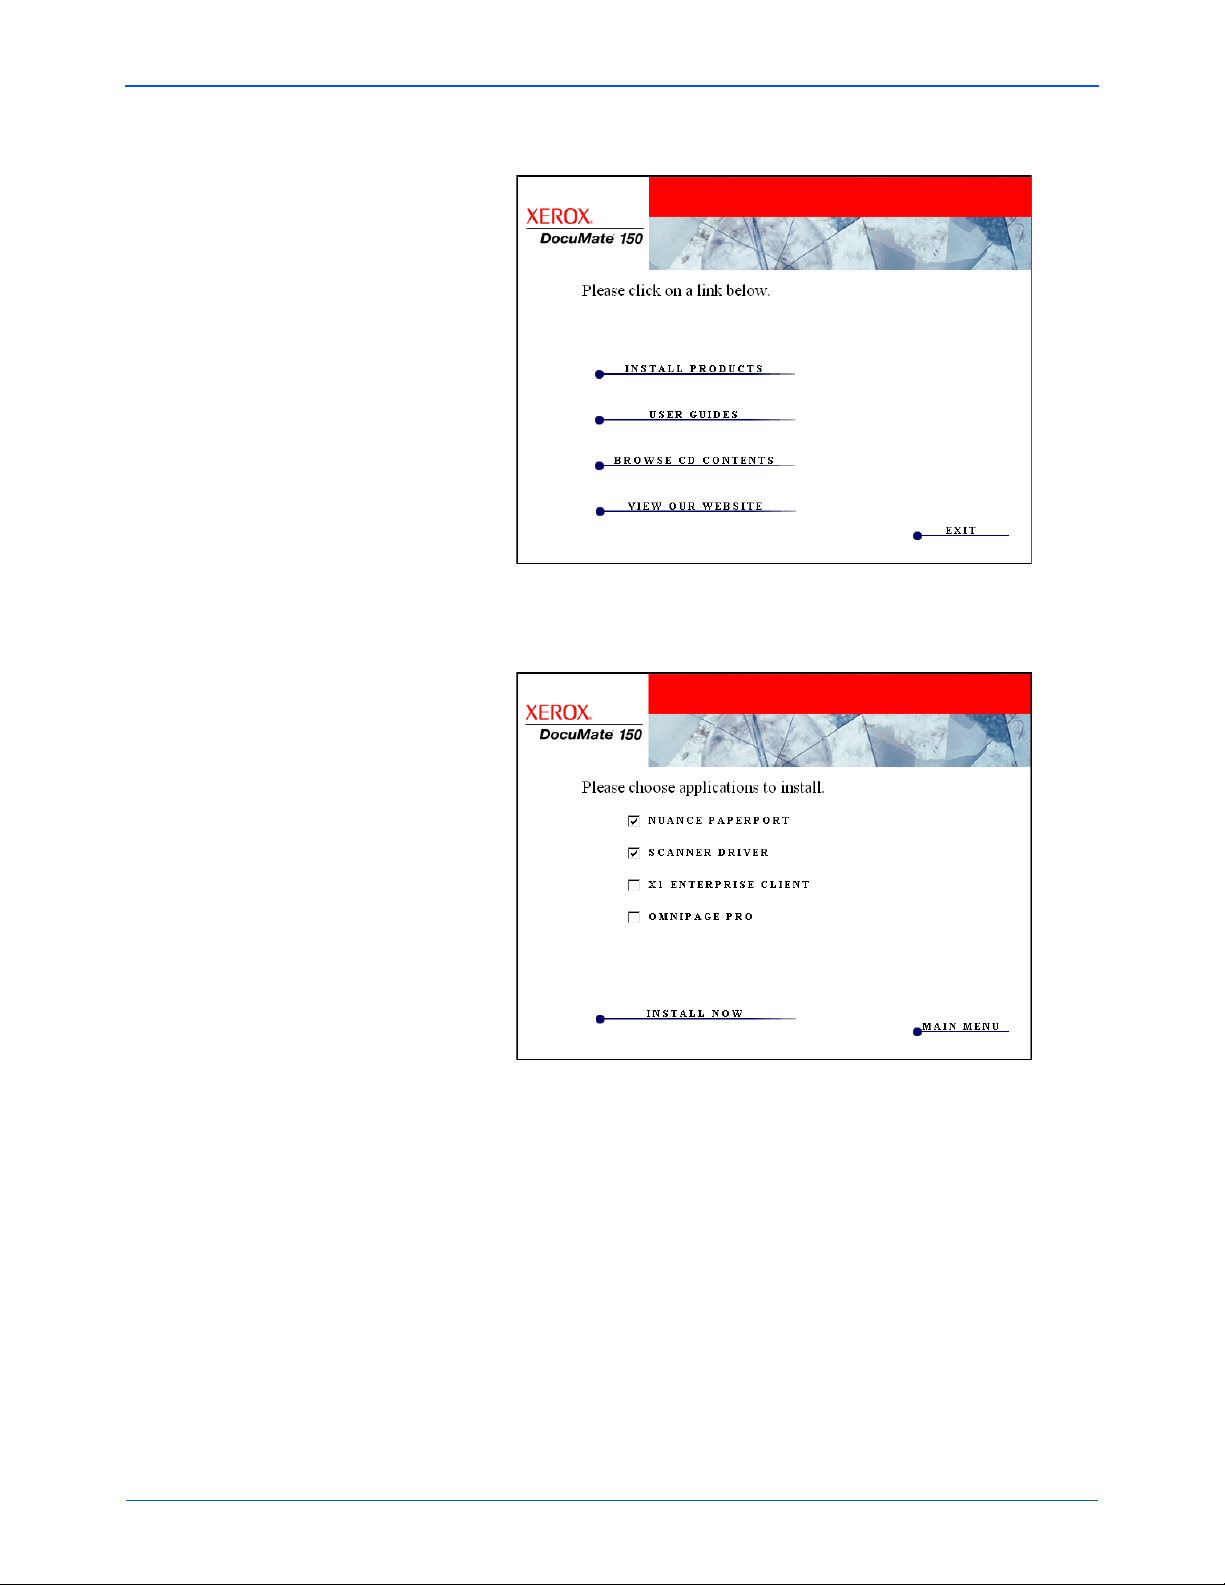
4. On the Main Menu, select Install Products.
Installation
5. Make sure the boxes for Nuance PaperPort
are checked.
6. Click Install Now.
®
and Scanner Driver
DocuMate 150 Scanner User’s Guide 7
Page 13
Installation
The PaperPort installation begins:
1. The Select Language window opens. Click the drop-down menu
arrow and select the language to use. Click OK.
2. On the PaperPort Welcome window, click Next.
Installing PaperPort will uninstall any existing version of PaperPort
and will install the newer version while retaining all of your previous
PaperPort files.
3. Read the PaperPort license agreement and select I accept the
terms in this agreement, then click on Next. If you choose not to
accept the license agreement, the installation will terminate and the
PaperPort software will not be installed.
4. Follow the instructions on screen to finish installing the PaperPort
software.
5. At the InstallShield Wizard Completed window, click Finish.
If a message window opens instructing you to restart your computer,
click Restart.
The scanner driver installation will now begin:
The scanner install will automatically launch after the PaperPort
installation finishes.
1. The Welcome to the One Touch 4.0 Setup Wizard Opens.
2. Click Next.
3. On the Xerox License Agreement window, read the license
agreement. If you accept the terms, select I Agree then click Next.
If you choose not to accept the license agreement, the installation will
terminate and the scanner driver will not be installed.
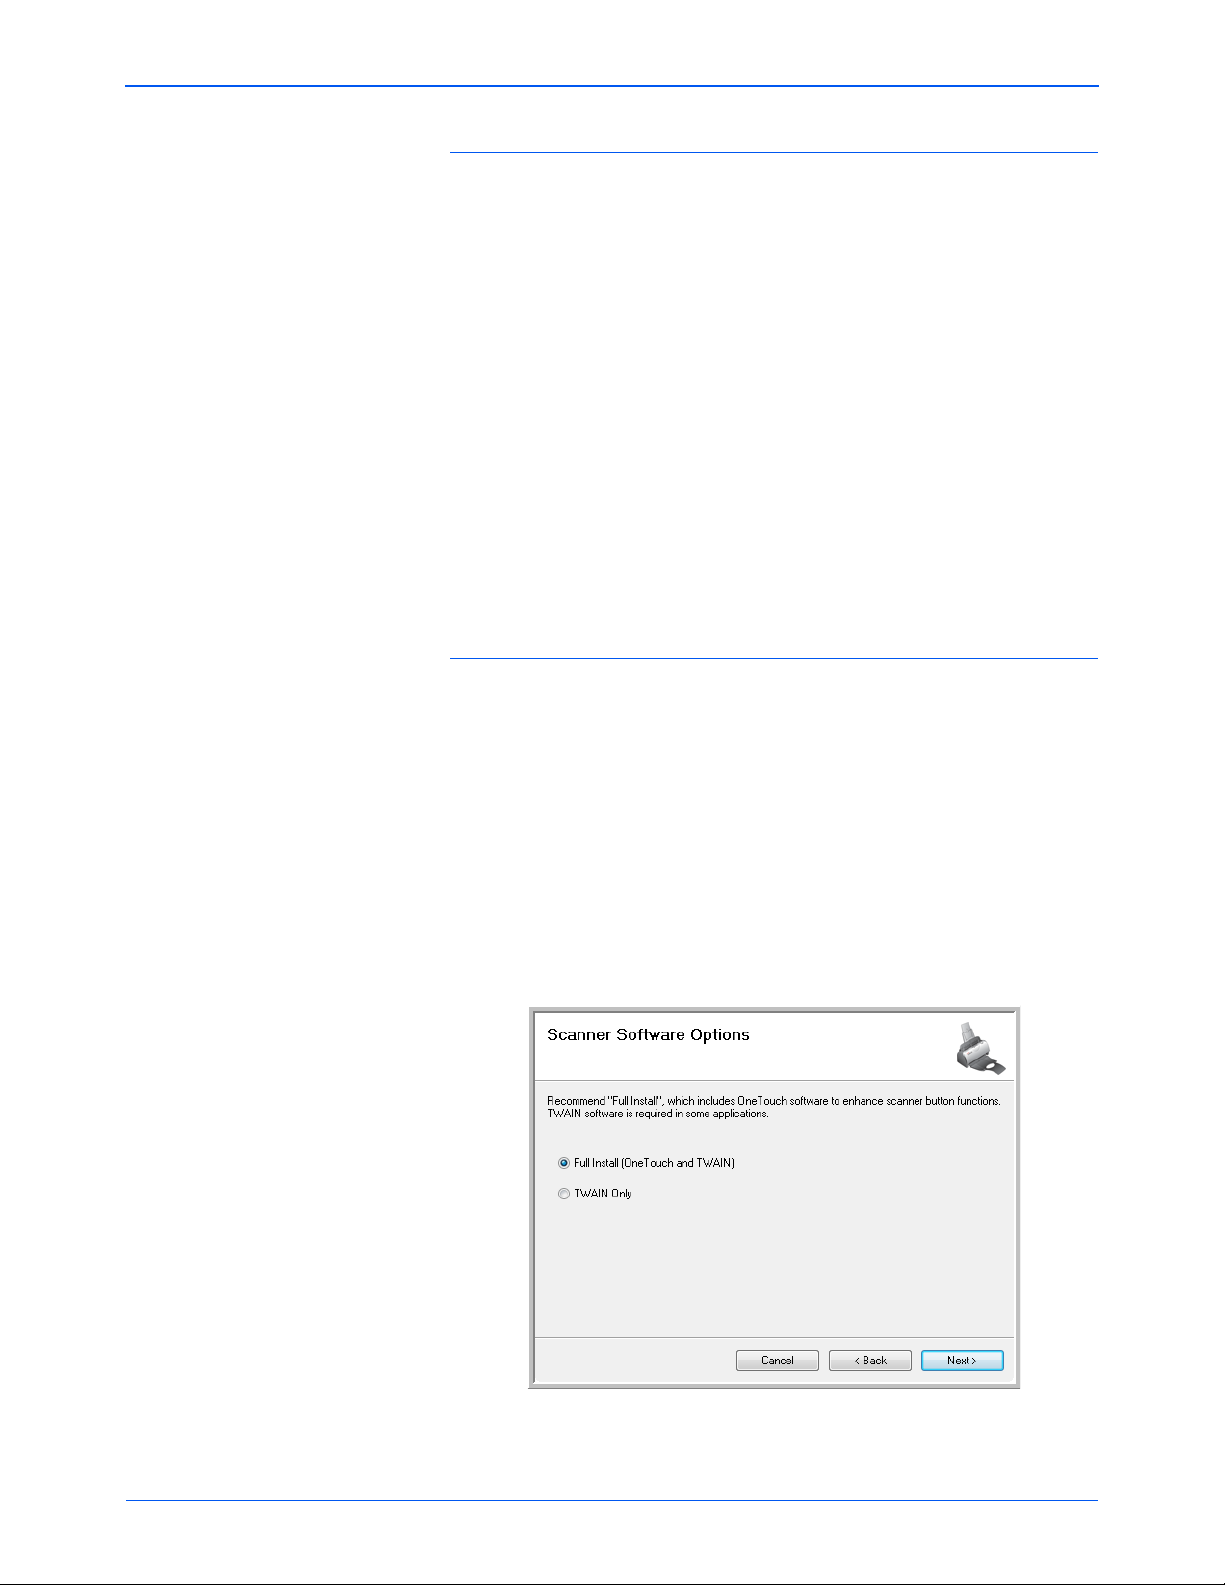
4. The next window lists the choices of the drivers that you can install for
your scanner.
8 DocuMate 150 Scanner User’s Guide
Page 14
Installation
5. Select the option you want then click Next.
• Full Install (OneTouch and TWAIN)—This is the recommended
installation. It installs the One Touch 4.0 software which provides
the necessary driver software for the scanner. It also installs the
scanning interface for the TWAIN driver. Installing this option
means that you can use several different methods to scan, as
explained in this User Guide.
• TWAIN Only—The TWAIN driver is installed. The One Touch 4.0
Monitor will not run and you cannot use the One Touch features.
You can use the TWAIN driver to scan from applications with a
TWAIN interface. You also will not be able to scan with the Scan
button on the scanner.
NOTE: If your computer is running Windows XP or Windows Vista,
Microsoft’s Windows Image Acquisition (WIA) interface for scanning is
always available, regardless of your selection on this window.
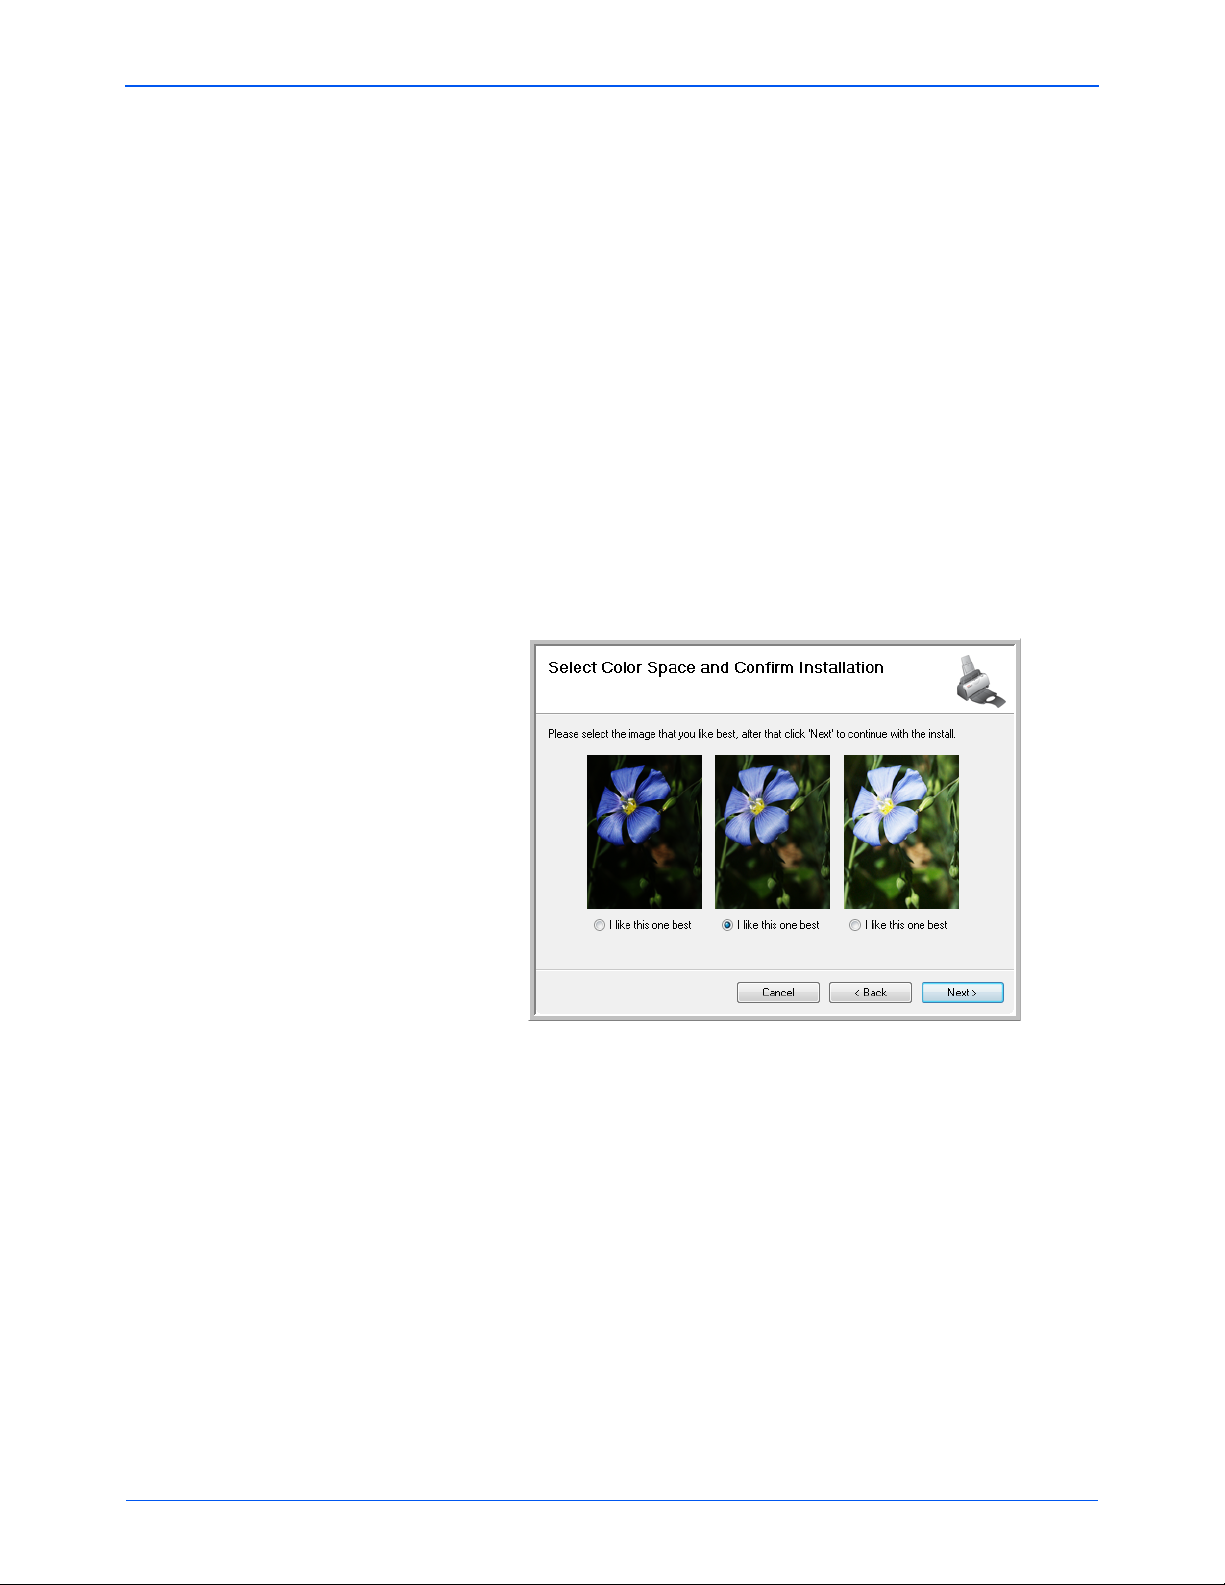
6. During installation you will see this window asking you to select one of
the images for the Color Space setting.
The Color Space setting sets the gamma value for the scanner so
scanned items look good on your monitor.
7. Select the option that looks best to you and click Next.
DocuMate 150 Scanner User’s Guide 9
Page 15

Installation
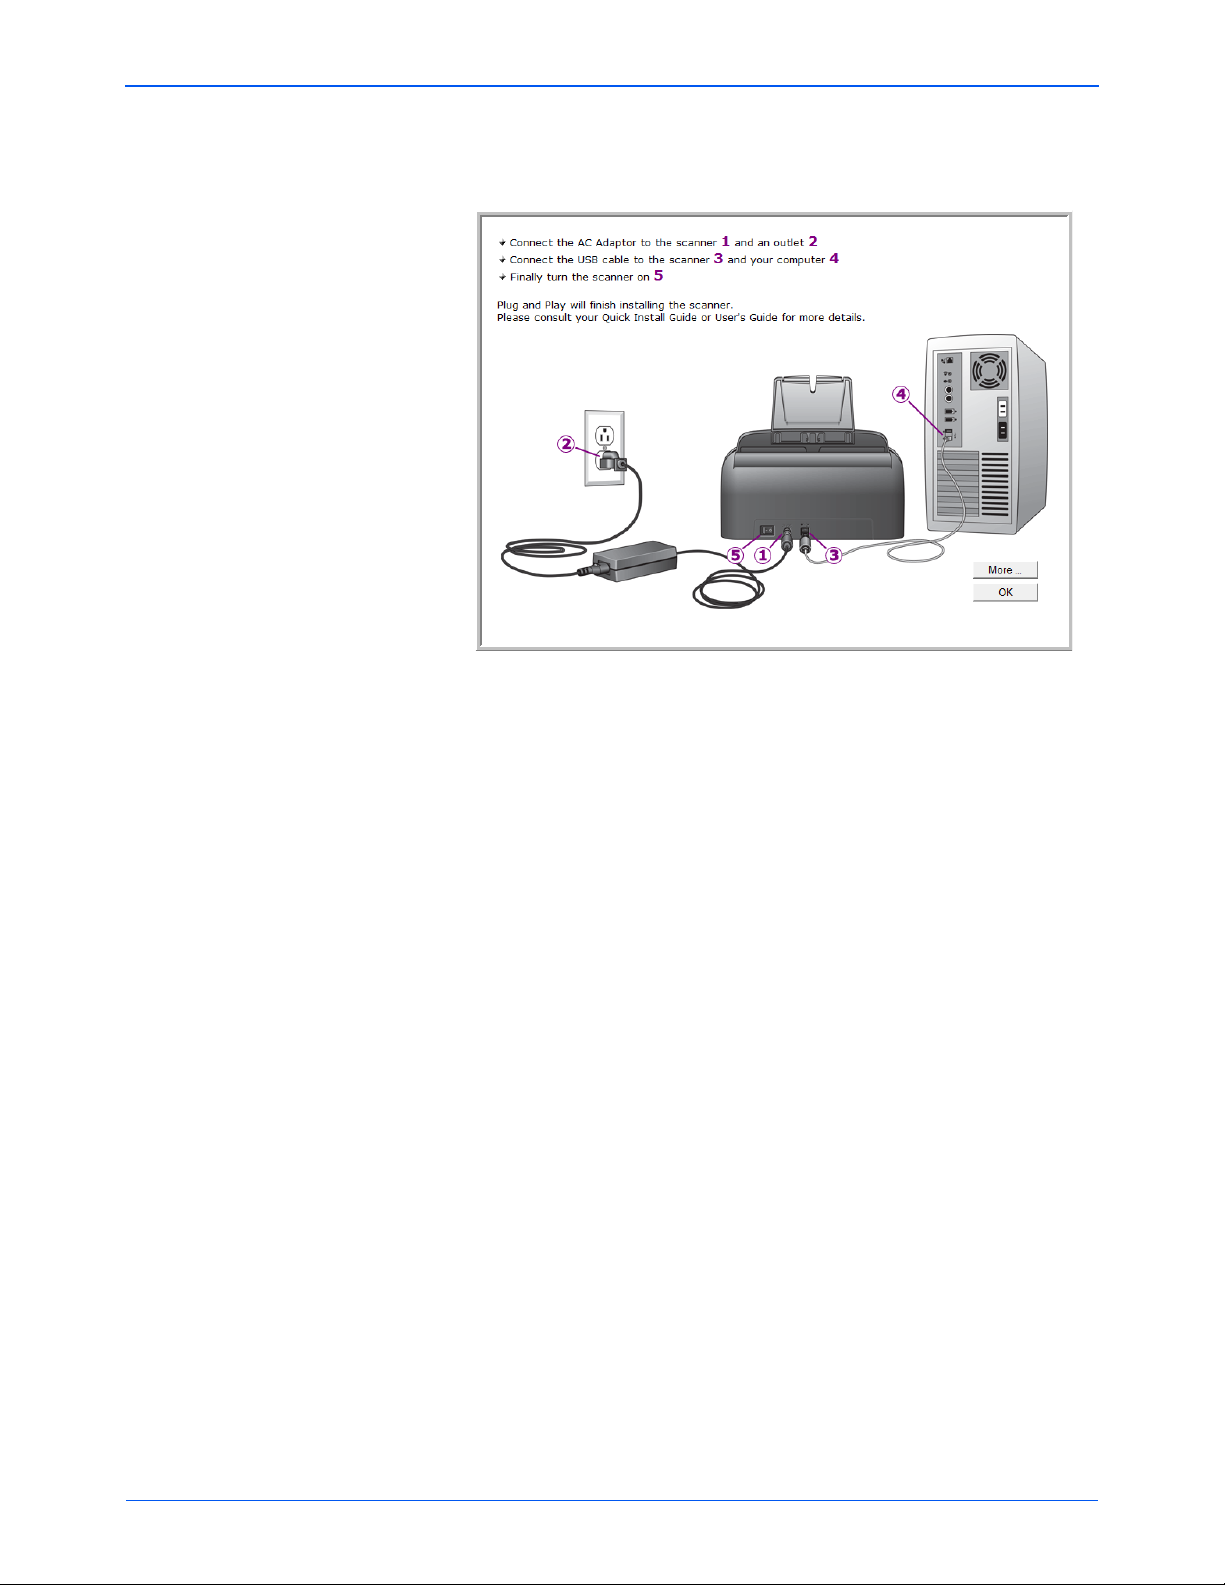
8. STOP when you see the “Complete the installation by connecting
your hardware” window. Do NOT click OK yet. Leave the window
open and proceed to the next section.
10 DocuMate 150 Scanner User’s Guide
Page 16
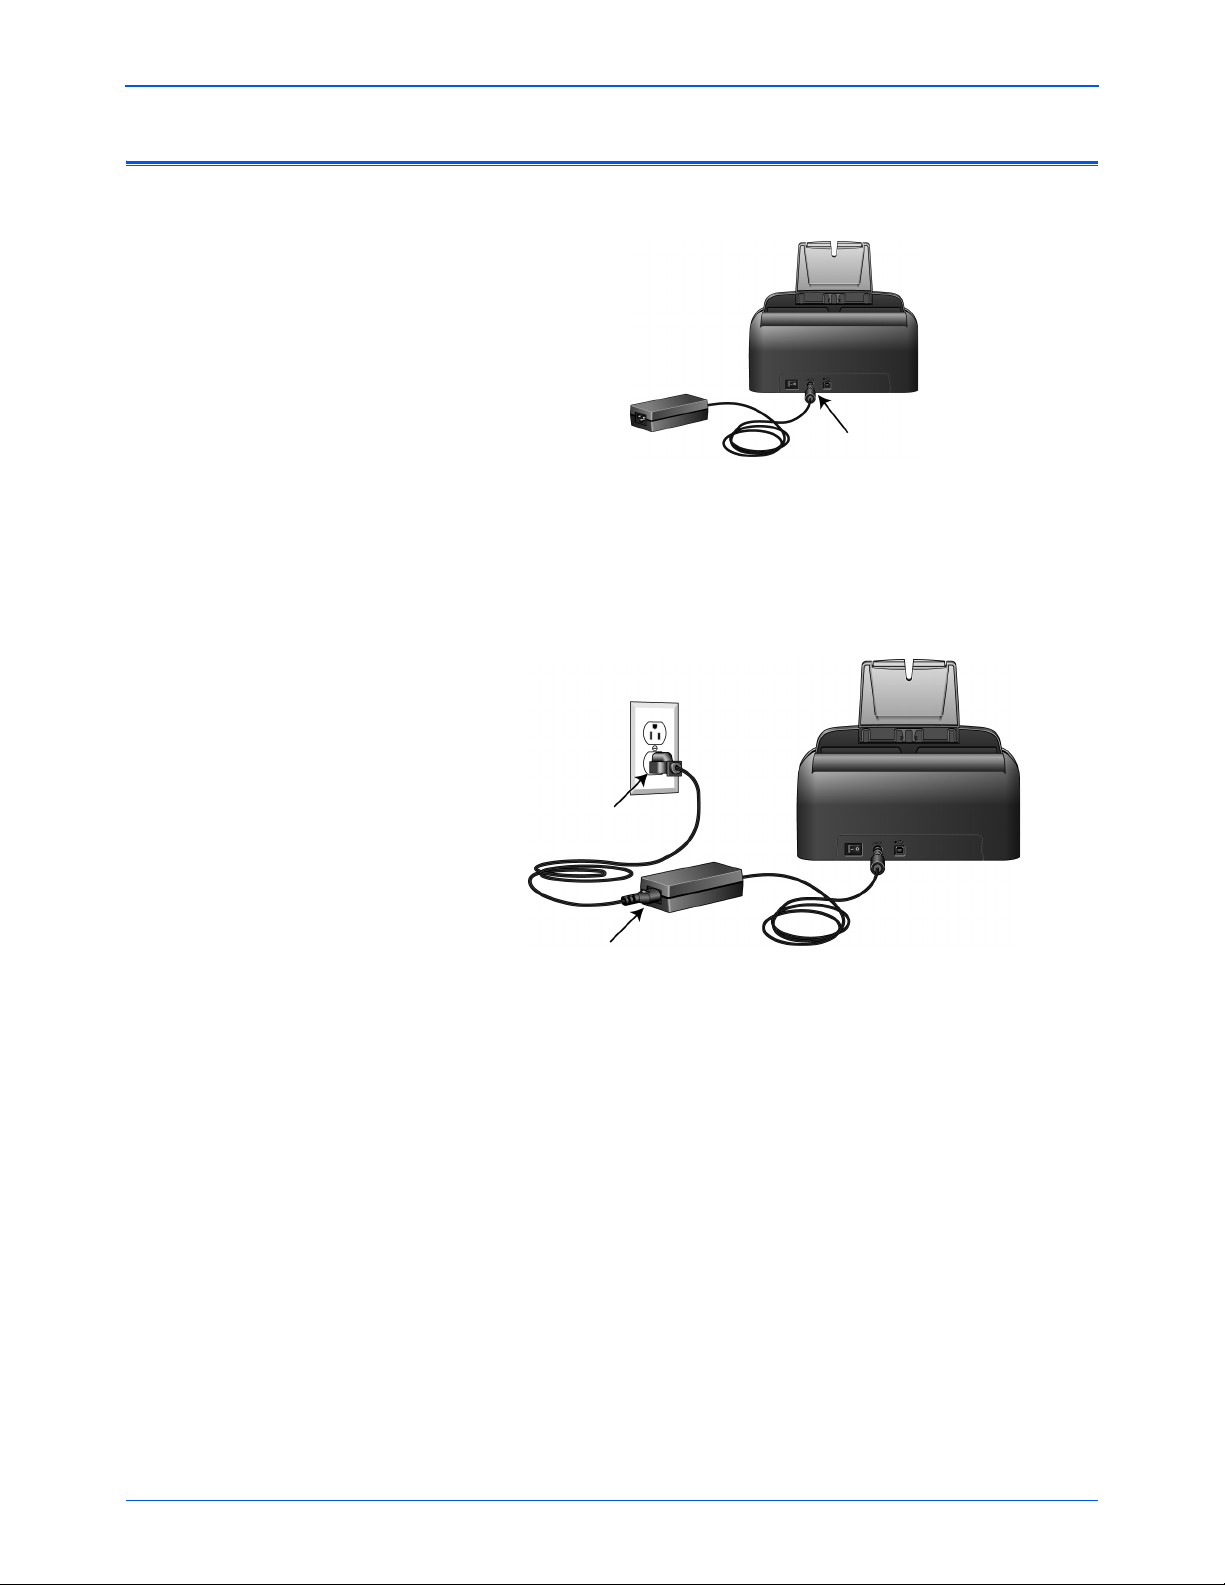
Step 3: Connect the Power Supply
1. Plug the power supply into the power port on the scanner.
NOTE: Only use the power supply included with your scanner.
Connecting any other type of power supply may damage your scanner,
and will void its warranty.
2. Plug the power cord into the power supply and into a wall outlet.
Installation
3. Now proceed to the next section.
DocuMate 150 Scanner User’s Guide 11
Page 17
Installation
USB
Step 4: Connect the USB Cable and Turn on the Power
The Xerox DocuMate 150 scanner connects to any available USB port.
Check your computer’s manual for USB port locations.
1. Remove any protective tape from the USB cable.
2. Plug the USB cable into the USB port on the scanner then into a USB
port on the computer.
If the plug does not attach easily, make sure that you are plugging it in
correctly. Do not force the plug into the connection.
3. Turn on the power switch, located on the back of the scanner to the
left of the power port.
The status light comes on and flashes indicating that the scanner is
receiving power.
If you are using Windows XP or Windows Vista, and have plugged the
USB cable into a USB 1.1 port, an information bubble may open
explaining that “A HI-SPEED USB device is plugged into a non-HISPEED USB hub”. Plug the USB cable into a USB 2.0 port (if
available) or just disregard the message. If you leave it plugged into
the USB 1.1 port, your scanner may scan a bit slower than the 25
pages per minute, and 50 images per minute available with a USB 2.0
port.
Your computer then recognizes that a scanner has been plugged into
the USB port and automatically loads the appropriate software to run
the scanner.
If your computer is running Windows XP or Windows Vista, you will
see a message similar to the following.
12 DocuMate 150 Scanner User’s Guide
Page 18
Installation
4. When you’re certain that the software has completely loaded, return
to the “Complete the installation by connecting your hardware”
window. Click OK.
You can also click More to see a quick overview about accessing and
navigating the One Touch Button Panel.
The scanner’s status light is blue when the scanner and computer are
communicating properly.
5. Click Close on the Installation Complete window to close and exit the
software installer.
You can now install the additional applications you received with your
scanner.
DocuMate 150 Scanner User’s Guide 13
Page 19

Installation
Additional Applications Available with Your Scanner
Your scanner includes free, additional applications as described in the
following table.
1. Return to the disc’s Main Menu and click Install Products.
2. Select the additional applications you want to install, then click Install
Now.
3. Follow the instructions on the screen to install each of the additional
products.
Software About the Software
®
Adobe
Acrobat
Reader
OmniPage
®
®
Pro
Adobe Acrobat Reader is a stand-alone application that you use to open, view, search,
and print PDF files. This application is located on the disc in the User Guides section.
OmniPage Pro provides precision OCR analysis, advanced layout detection, and Logical
Form Recognition™ (LFR) technology. Advanced security features quickly turn office
documents and forms into over 30 different PC applications for editing, searching and
sharing. Custom workflows handle large volumes of documents, and you can use its tools
to print to PDF.
®
Enterprise
X1
Client
X1 is a desktop search engine software. Using a single interface, the X1 Enterprise Client
software will quickly and efficiently find files and emails stored on your computer.
14 DocuMate 150 Scanner User’s Guide
Page 20
View the User Guides
Installation
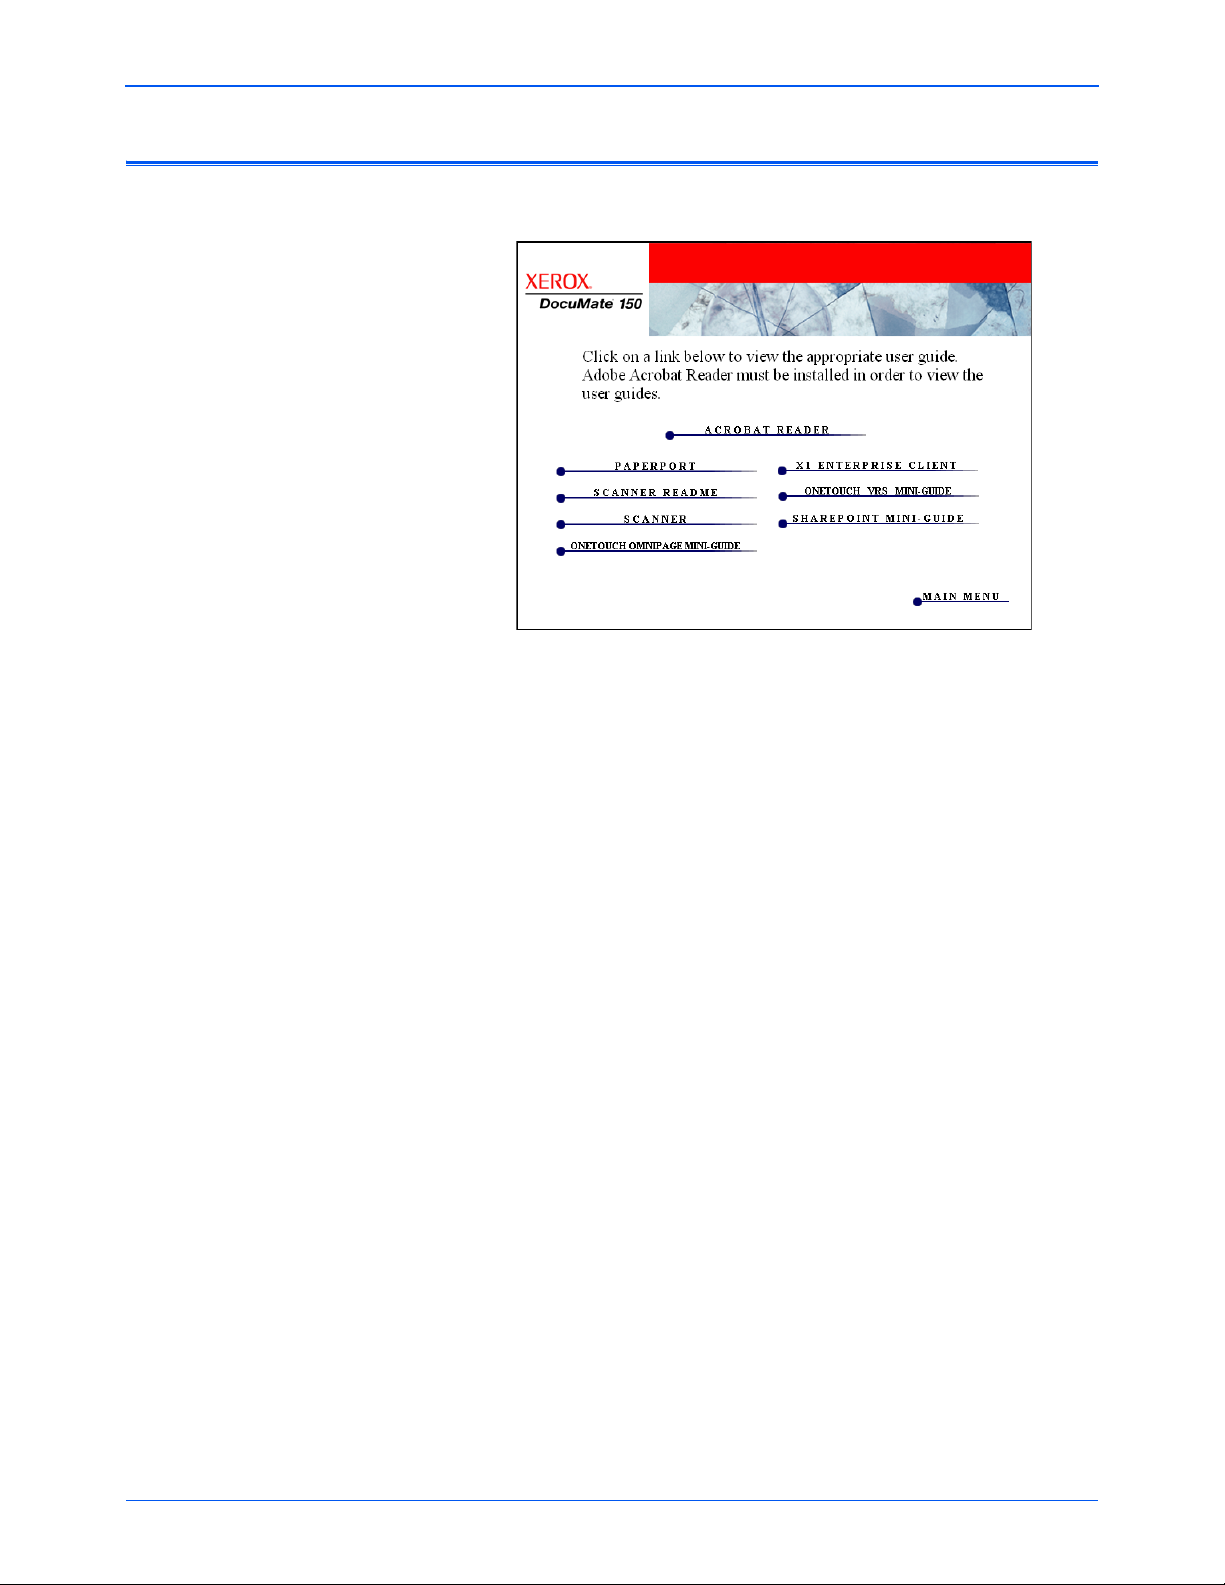
1. Return to the Main Menu window and click User Guides.
The User Guides are in Adobe® Acrobat® PDF format. If you need
to, click Acrobat Reader to install it now. Follow the instructions on
the installation windows.
If your computer already has Adobe Acrobat Reader installed, please
do not select it unless the version provided on the installation DVD is
a newer version than the one currently installed on your computer.
2. Click the name of a User Guide you want to view and it will open in
Acrobat Reader. Use the Acrobat Reader Save command to save
that User Guide on your computer.
The SharePoint Mini-Guide has information about a feature in the
One Touch 4.0 software to link to Microsoft’s SharePoint application.
This brief Mini-Guide explains how to setup the SharePoint link in
One Touch.
The One Touch VRS Mini-Guide has information about a feature in
the One Touch 4.0 software to use VRS when scanning. This brief
Mini-Guide explains what the feature is and how to use the VRS
settings when creating or modifying a scan configuration.
The One Touch OmniPage Mini-Guide has information about the
OmniPage module in the One Touch 4.0 software. This brief MiniGuide explains what the feature is and how to use the OmniPage
settings when creating or modifying scan configurations.
3. When you’re finished, click Main Menu to return to the Main Menu
window and click Exit.
4. Remove the installation disc and store it in a safe place.
That’s it! Installation is finished and your Xerox DocuMate 150 scanner is
ready to scan.
DocuMate 150 Scanner User’s Guide 15
Page 21
Installation
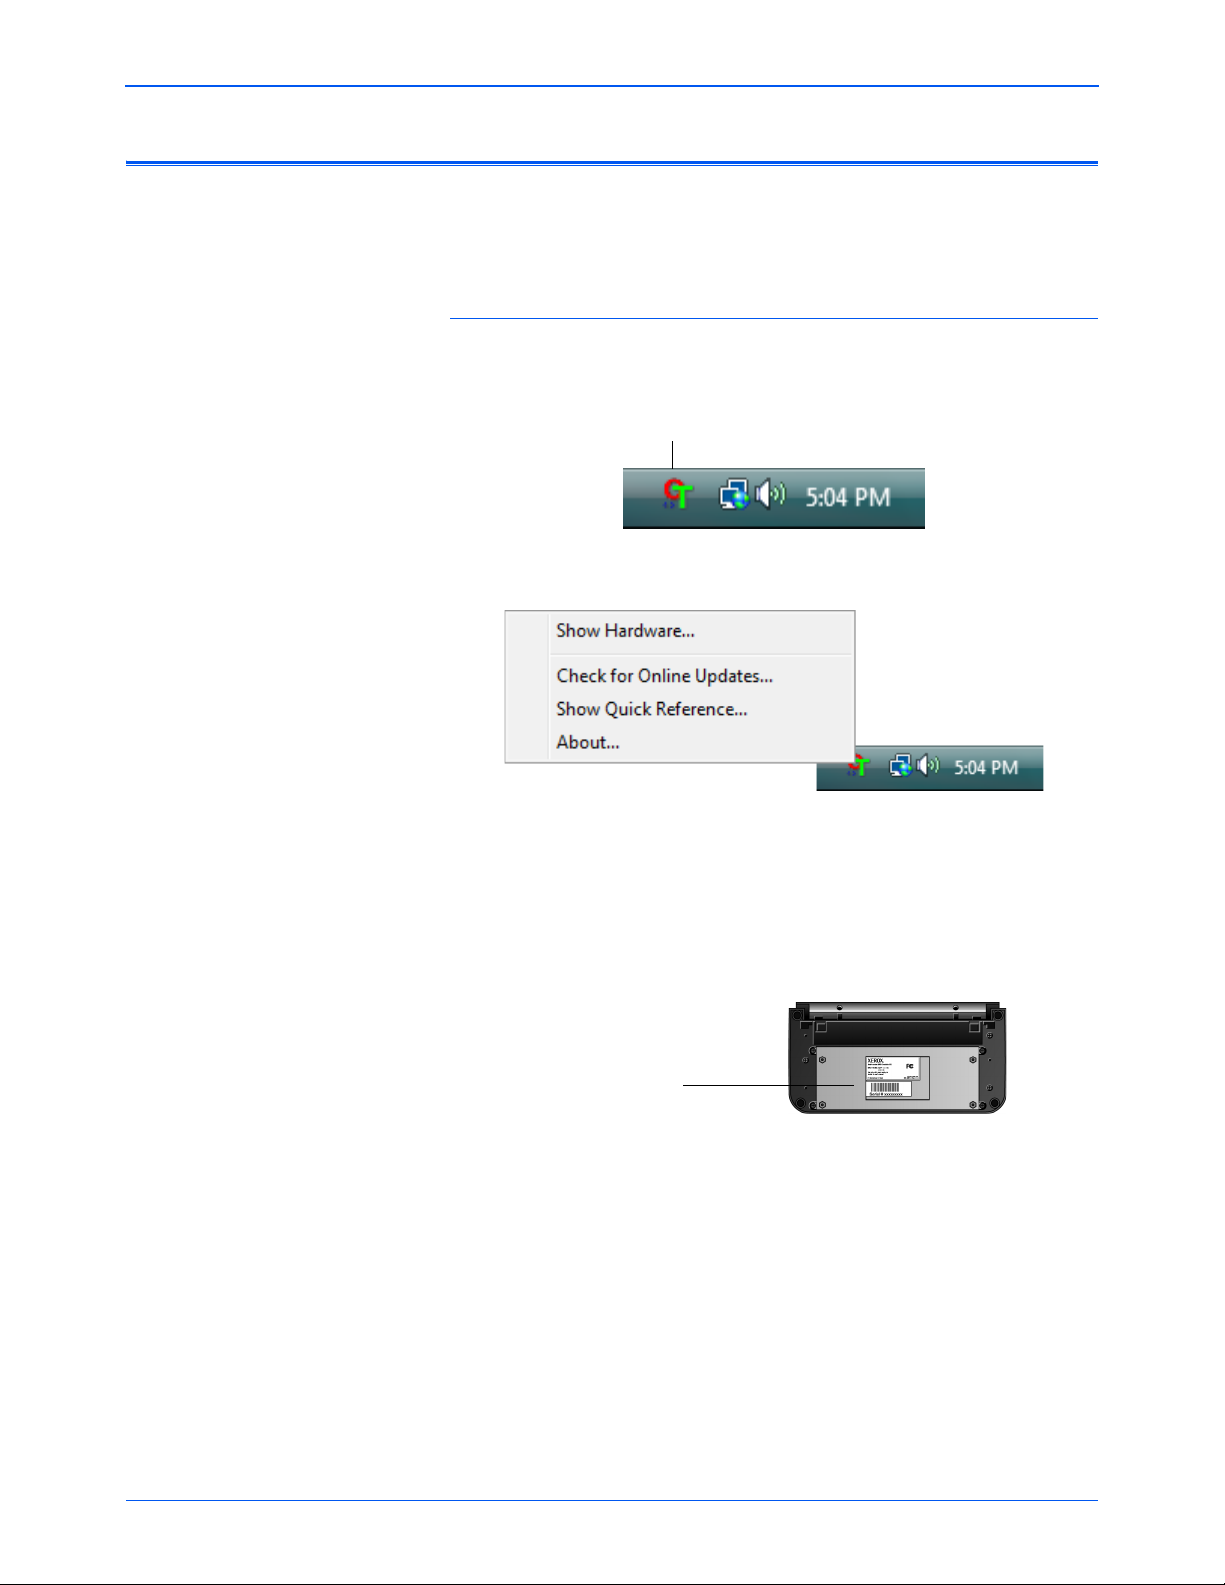
The One Touch Icon
The Serial Number
Register Your Scanner and Check for Updates
Registering your scanner is important as it provides you with access to
our free telephone support service. Registration also gives you free
access to software updates for your scanner.
To register your scanner:
1. Right-click on the One Touch icon in the Windows Notification Area
(at the bottom right corner of the screen).
2. Choose Check for Online Updates from the pop-up menu.
3. Follow the instructions on the screen and register your scanner by
entering your scanner’s serial number and your email address.
NOTE: A valid email address is required.
The serial number is located on the underside of the scanner.
After registration is complete you will receive an email message with
your RegID.
4. After receiving your RegID, write it down on a piece of paper and
keep it with your scanner so you will be able to find it easily.
16 DocuMate 150 Scanner User’s Guide
Page 22
Scanning
Scanning
If you selected the recommended Full Install option for your scanner’s
driver (see page 9), then you have several different scanning options with
your Xerox DocuMate 150 scanner. Each method scans equally well, so
use the one with appropriate options for the item you are scanning.
The scanning methods with your Xerox DocuMate 150 scanner are:
• Scan Button—When you press the Scan button, documents are
scanned using the scan settings indicated by the LED number. The
scanned images are then sent to a software application on your
computer. See “Loading Documents to Scan” on page 18. To cancel a
scan in progress, click the Cancel button.
• One Touch—Use this option to scan from the computer screen.
Scanning from on-screen One Touch Button Panel is the same as
pressing the Scan button on the scanner, except you click an icon
that represents the scanner button. See “Loading Documents to
Scan” on page 18.
• TWAIN Interface—The TWAIN interface is for scanning from various
programs on your computer. The TWAIN interface can be access
from the PaperPort software, as well as from other programs such as
Microsoft Word. See “Scanning with the TWAIN Interface” on
page 58.
• Windows Image Acquisition (WIA) Interface—If your computer is
running Windows XP or Windows Vista, you can use this option to
scan with the Microsoft WIA interface. See “Scanning with the WIA
Interface” on page 64.
DocuMate 150 Scanner User’s Guide 17
Page 23
Scanning
Loading Documents to Scan
When you press the Scan button, documents are scanned using the scan
settings indicated by the LED number. The scanned images are then sent
to a software application on your computer.
NOTE: Always remove any staples or paper clips from documents
before inserting them into the scanner’s Automatic Document Feeder.
Staples and paper clips can jam the feed mechanism and scratch the
internal components. Also remove any labels, stickers, or Post-It™
notes that may come off during the scanning process and get stuck in
the scanner. Misuse as described here will void your scanner’s
warranty.
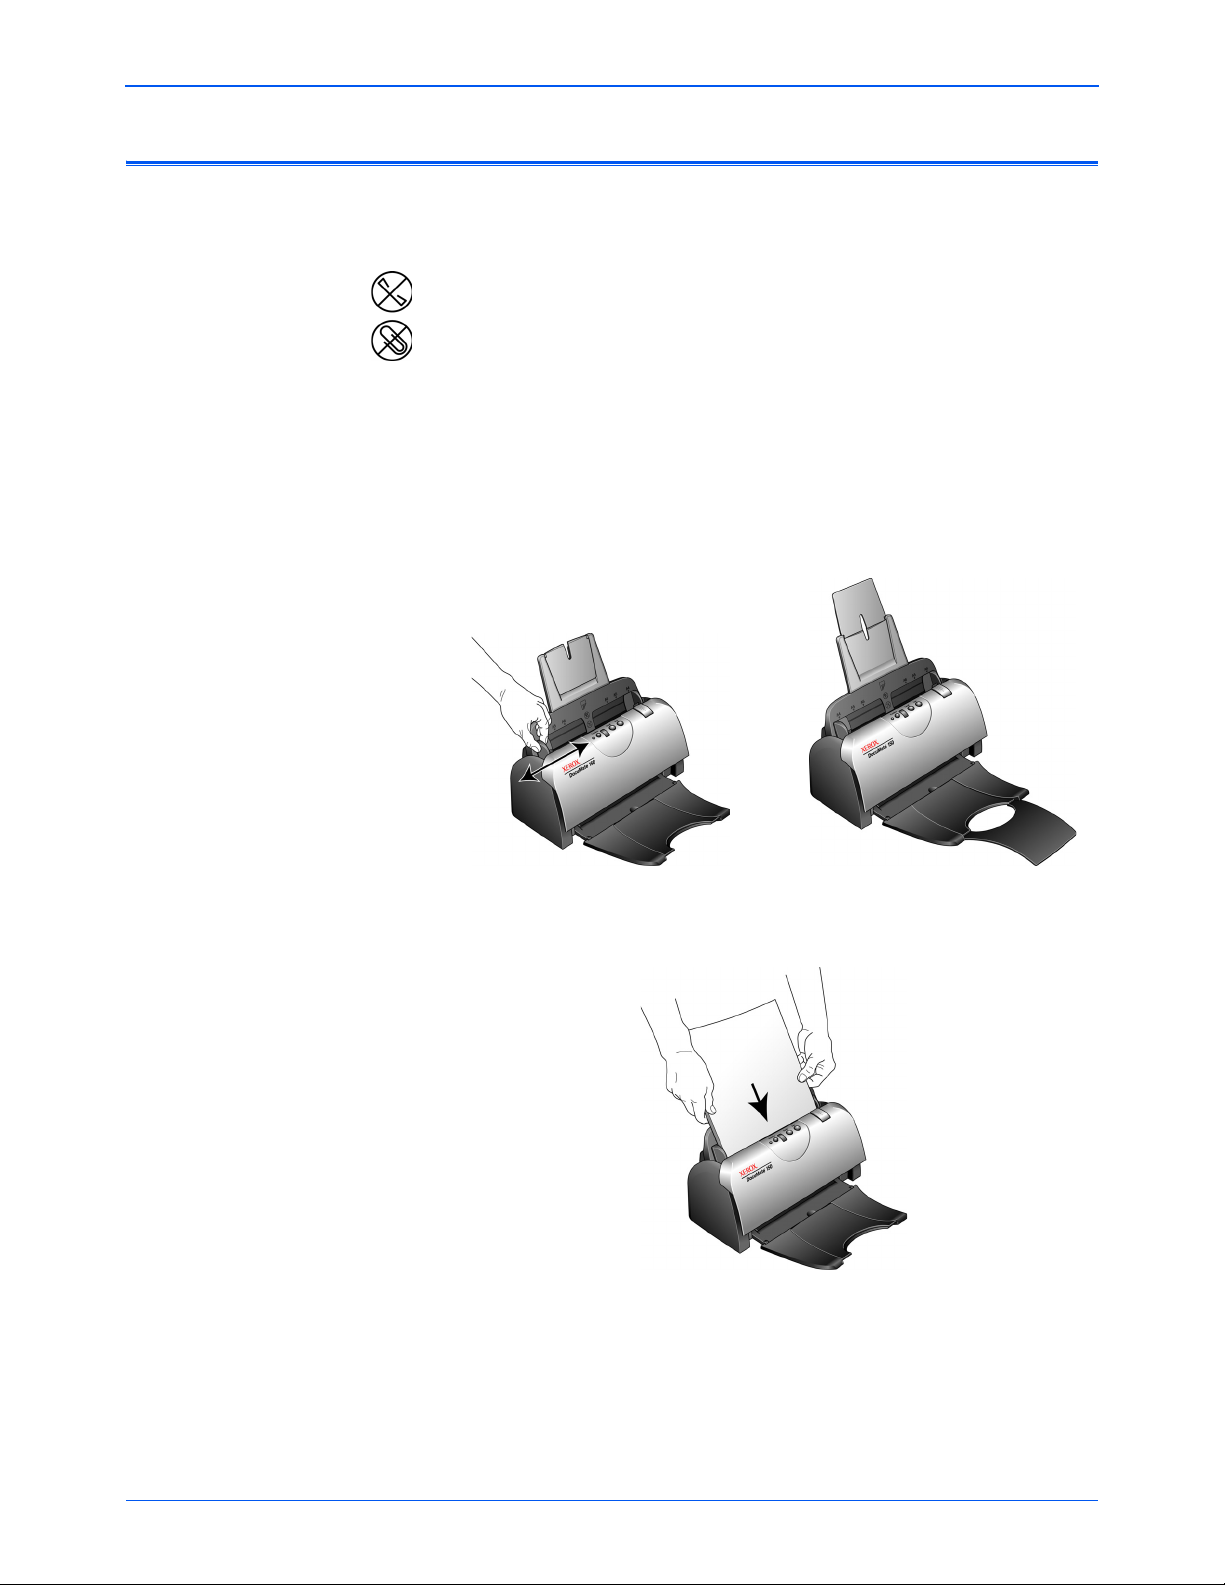
1. Adjust the paper guide for the width of paper, and make sure the input
and output trays are fully extended.
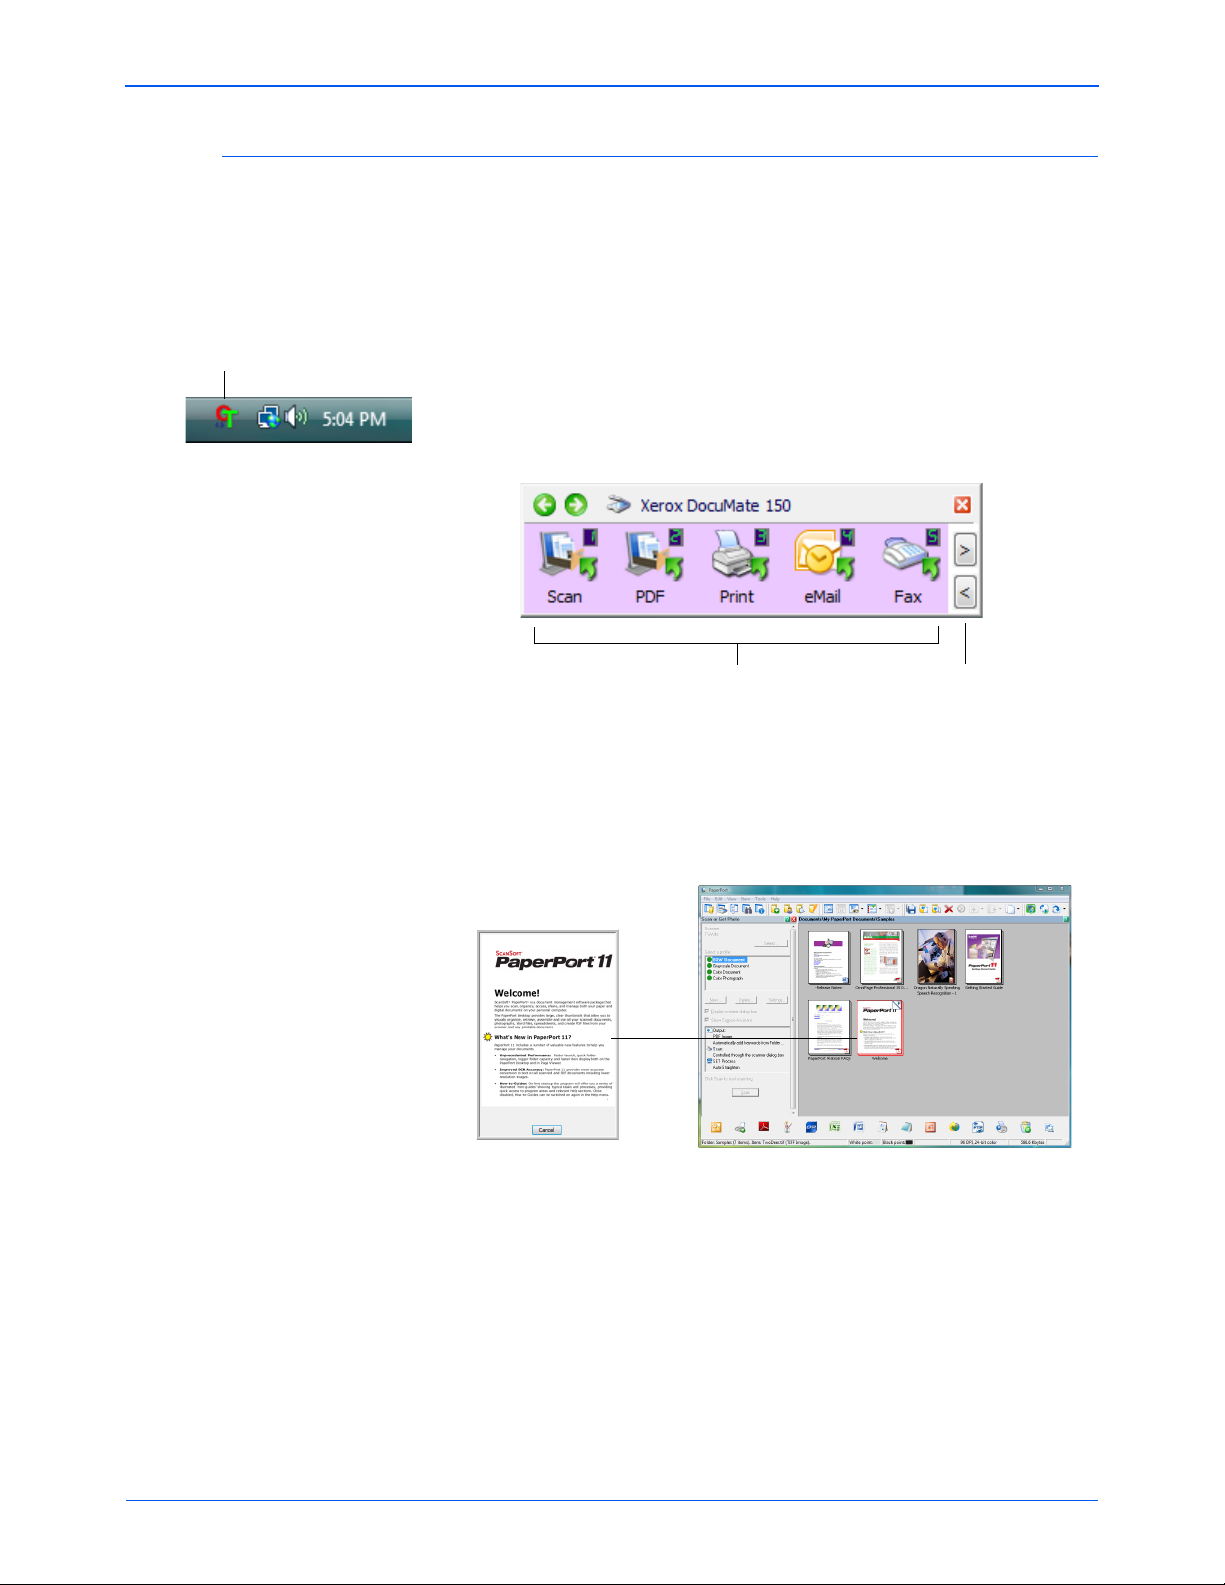
2. Load the documents face down with the top of the pages inserted into
the Automatic Document Feeder.
18 DocuMate 150 Scanner User’s Guide
Page 24
Scanning from One Touch
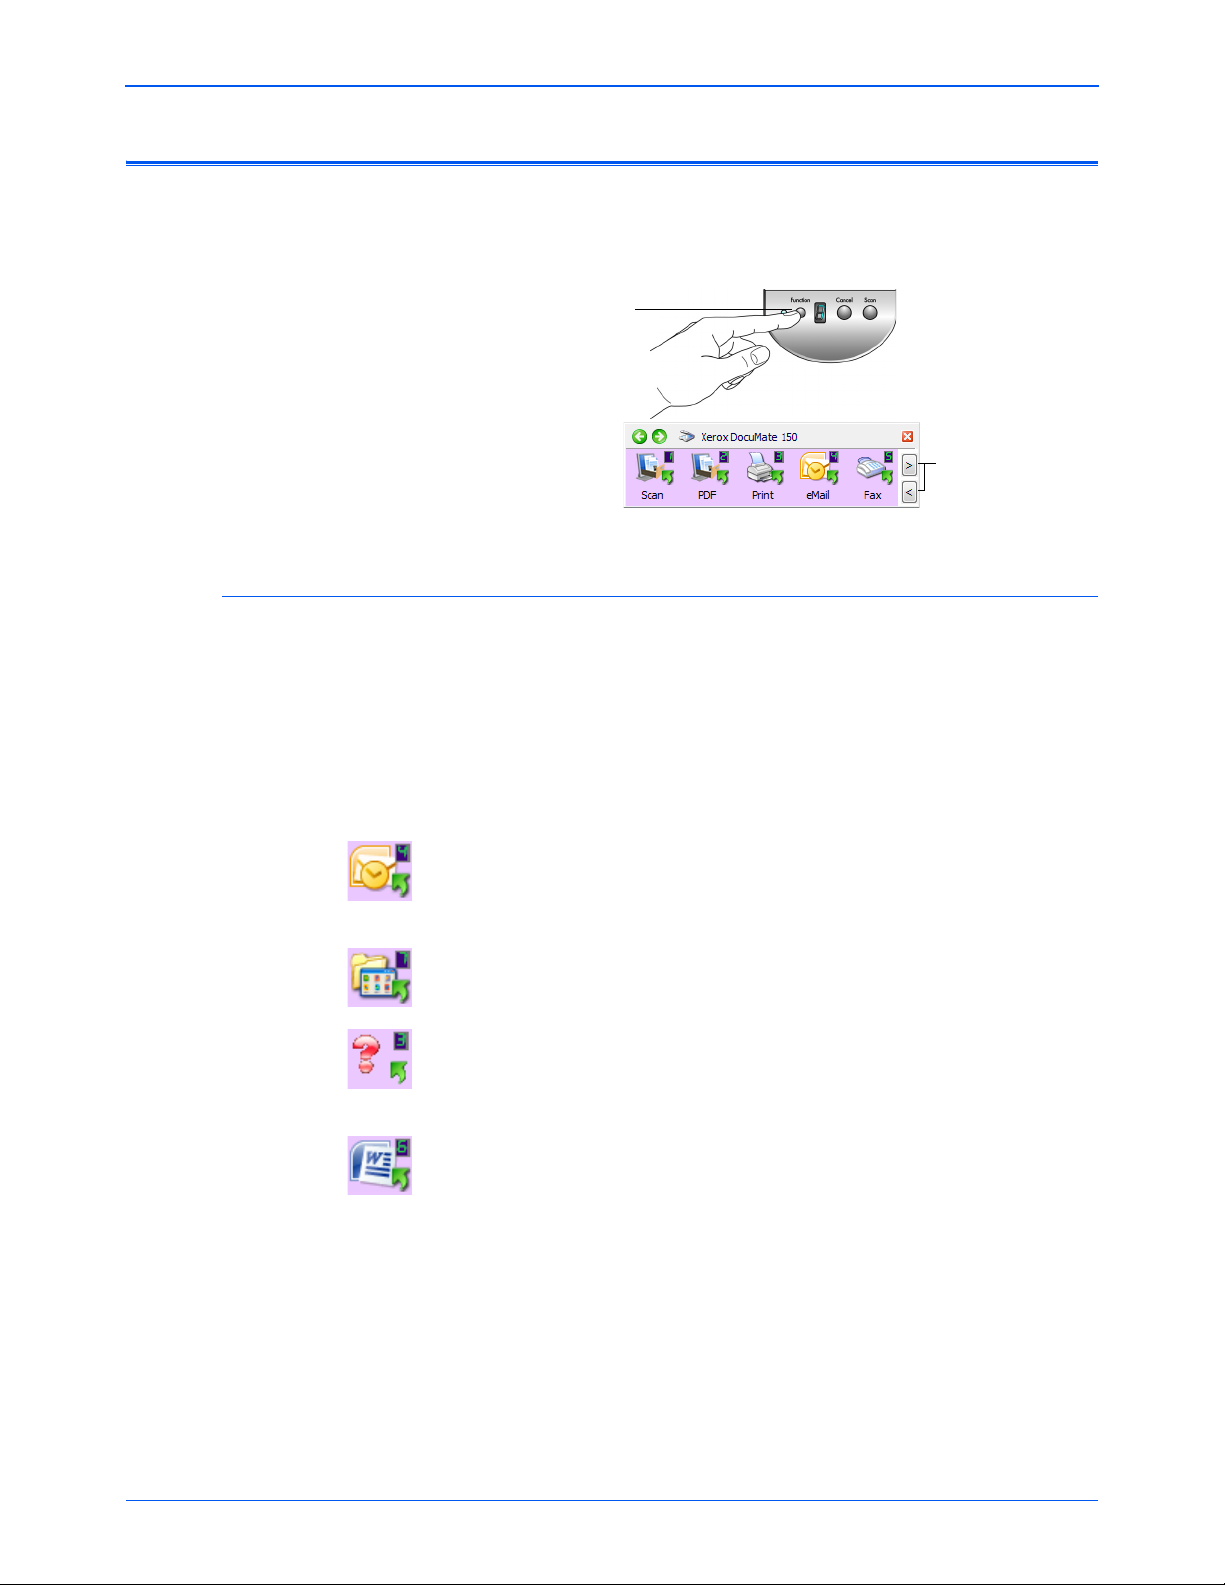
Press the Function button
to cycle through the 9
One Touch scanning
options.
Click these arrows to
cycle through the 9
One Touch scanning
options.
One Touch is your main scanning interface for using the scanner. The
One Touch functions on the scanner mirror the One Touch Button Panel
on screen.
The Default One Touch Settings
Based on the recommended installation of PaperPort and the scanner
driver, your scanner is pre-configured to scan items for various basic
tasks, such as email or fax, then send the scanned image to a Destination
Application. The button names, such as PDF, eMail or Fax, indicate the
original factory settings for the Destination Application assigned to a
button.
Scanning
You can change any of these settings. Please see “Configuring the One
Touch Buttons” on page 23 for instructions.
For example, the eMail button is set up to scan documents then
immediately attach them to a new eMail message in your default eMail
program. The email application will default to the email program specified
in the internet options of Internet Explorer.
A folder icon for a button means that the button is set up to archive the
scanned item. The scanner sends the scanned image directly to a folder
without opening the image first in a Destination Application.
A question mark for a button means your computer does not have the
appropriate software or hardware for the initial factory settings. In that
case, you would probably want to change the name and Destination
Application to something else.
If PaperPort, OmniPage or One Touch OmniPage is not installed, then the
options for sending to word processing applications such as Microsoft
Word will not be available.
NOTE: The default page size in each configuration is based on your
computer’s Windows setup of United States or Metric Units.
• If United States is the selected measurement, the default page size
in each profile will be based on the United States standard page
sizes such as 8.5” x 11”.
• If Metric is the selected measurement, the default page size in each
profile is based on the ISO 216 standard and the majority of the
profiles will default to A4.
DocuMate 150 Scanner User’s Guide 19
Page 25
Scanning
Press the Function button
to cycle through the scan
settings to select the one
you want.
The current
One Touch
scan function.
Scan from the One Touch Scanner Buttons
Pressing a scanner button scans the item and sends the image to the
Destination Application associated with the selected function LED
number.
1. Load the documents face down with the top of the pages inserted into
the Automatic Document Feeder.
2. Press the function button to select the scan setting you want.
3. Press the Scan button.
20 DocuMate 150 Scanner User’s Guide
4. A scan progress window opens and the image(s) are sent to the
selected application from the One Touch utility. In this example the
Destination Application is the PaperPort desktop.
To cancel scanning press the Cancel button on the scanner.
Page 26
Scan from the One Touch Button Panel
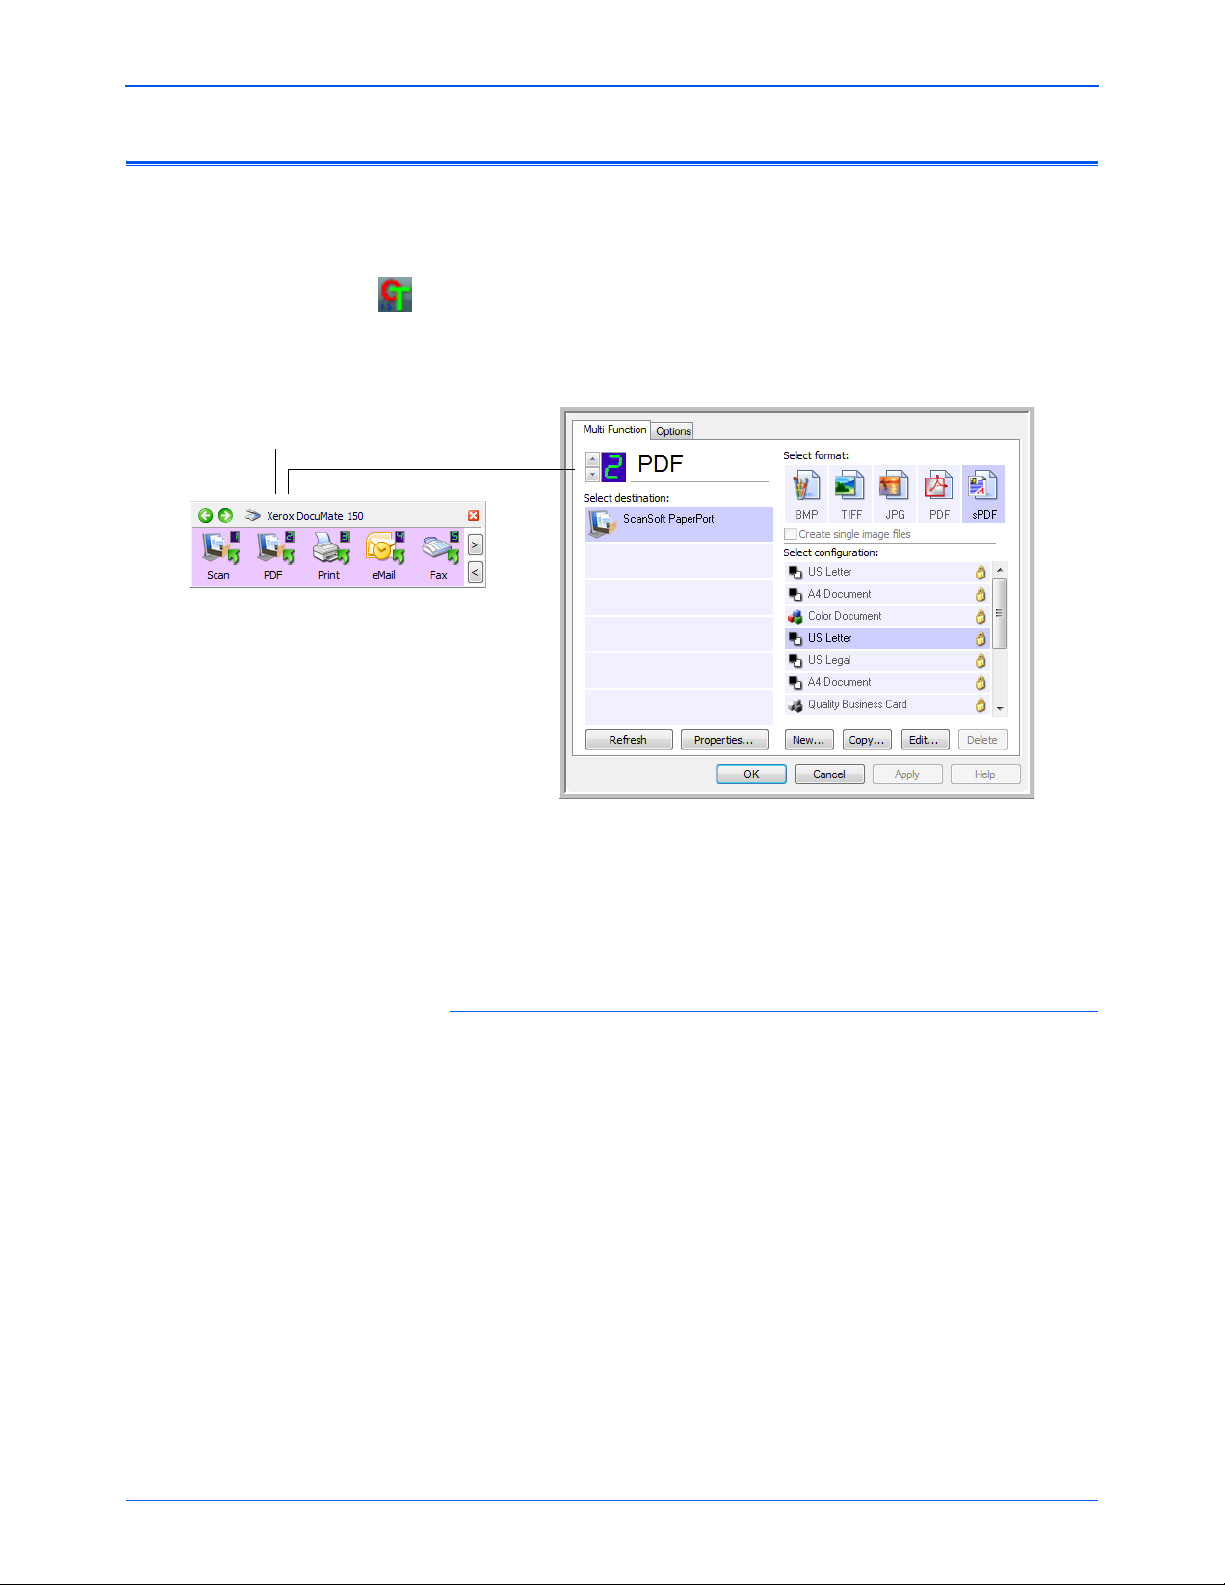
The One Touch Icon
Click these arrows
to navigate through
the nine buttons.
Click the button you
want to use to scan.
Scanning from the button panel on your computer’s screen works like
pressing a button on the scanner. The scanner scans the item, then
sends the image to the Destination Application indicated by the button’s
icon.
1. Load the documents face down with the top of the pages inserted into
the Automatic Document Feeder.
2. Click on the One Touch icon in the Windows Notification Area (at the
bottom right corner of the screen).
The One Touch Button Panel opens and shows the first five onscreen scanning buttons.
Scanning
3. Click the button you want to use to scan.
4. A scan progress window opens and the image(s) are sent to the
selected application from the One Touch utility. In this example the
Destination Application is the PaperPort desktop.
DocuMate 150 Scanner User’s Guide 21
Page 27
Scanning
The Button View
The Hardware View The Detail View
The Title Bar
Using the One Touch Button Panel
The One Touch Button Panel is your on-screen set of controls for the
scanner. Form the panel you can access the hardware settings for your
scanner and configure the One Touch buttons.
Click on the One Touch icon to open the panel.
The Title Bar
• Green arrows—click to cycle through the panel’s 3 views.
• Scanner icon—click to open the scanner’s hardware properties.
• Red “X”—click to close the One Touch panel.
The Button View
• Left-click on a Destination Application icon to start scanning.
• Right-click on a Destination Application icon to open the One Touch
Properties.
The Detail View
• Left-click on a Destination Application icon to start scanning.
• RIght-click on a Destination Application icon to open the One Touch
Properties.
• Double-Click on the detailed information to open the One Touch
Properties.
The Hardware View
• Left-click on the scanner icon to return to the Button view.
• Right-click on the scanner icon to open the scanner’s hardware
properties.
22 DocuMate 150 Scanner User’s Guide
Page 28
Configuring the One Touch Buttons
Right-click on a button (for example,
button 2) and the Properties window
opens for that button.
When you installed the scanner, the software configured each One Touch
button with appropriate settings consisting of: Destination Application, a
Scan Configuration, and a File Format.
1. Click the One Touch icon.
2. Right-click a button on the One Touch Button Panel.
3. The One Touch Properties window opens for that button.
Scanning
The One Touch Properties window also opens when you press, hold
down, and release the Scan button on the scanner.
NOTE: Grayed out options in the One Touch Properties window are
not appropriate for your scanner model.
Changing a Button Setting
1. Click on an application name in the Select Destination list.
2. Select a file format in the Select Format panel.
3. Select a scanning configuration in the Select Configuration list.
4. Click on OK to save the changes.
5. Click on the button that you made the changes for.
6. The scanner starts scanning and sends the image to the application,
with the file format and scanning configuration you specified.
The next section contains detailed information on making changes in the
One Touch Properties window.
DocuMate 150 Scanner User’s Guide 23
Page 29
Scanning
The Destination Application.
This is the application that
opens when you are finished
scanning.
The settings that
the scanner uses
when scanning
with the currently
selected button
(in this case
button 2).
The file format of
the images of
the scanned
item.
Click to select
options.
The button number and
name.
Select the application you
want One Touch to send
the scanned image to.
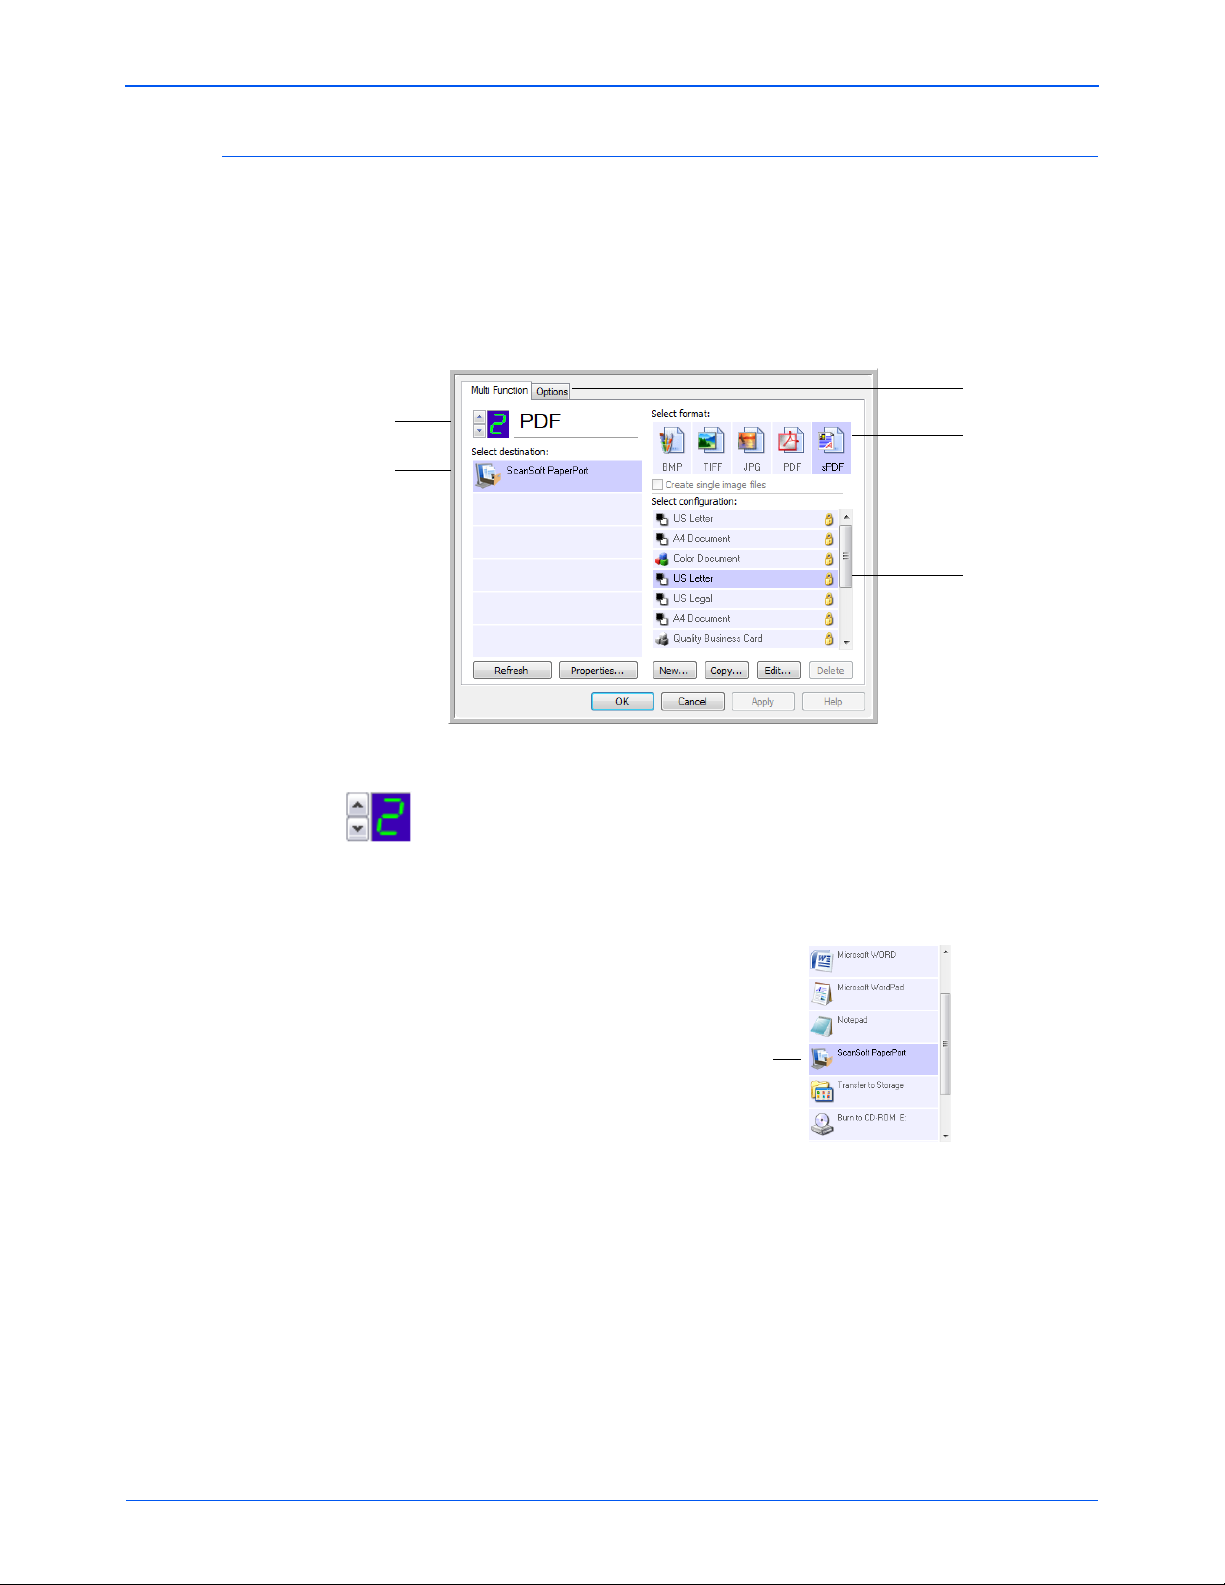
Selecting New Settings for a Button
The One Touch Properties window is where you can select new settings
for the buttons. The button number in the upper-left corner of the
One Touch Properties window corresponds to the 9 functions on the
scanner.
For each of the 9 One Touch functions, you can select a new Destination
Application, Scan Configuration, File Format, and rename the button.
The settings on the One Touch Properties window are:
LED Number—Click the up or down arrow to cycle through the 9
One Touch options.
Select Destination—The list of Destination Applications that One Touch
can send a scanned image to so that this application opens immediately
after scanning is complete.
NOTE: If you select a word processing program such as Microsoft
WordPad or Microsoft Word that can be used for OCR (such as TEXT,
RTF, or DOC), the text in scanned images is automatically converted to
word processing text.
24 DocuMate 150 Scanner User’s Guide
Page 30

Scanning
Click the icon of a
selected configuration
to view its settings.
Color GrayscaleBlack and White
Configure
Before Scan
Select Configuration—The list of available scan configurations for the
selected button. The configuration’s basic settings include: scanning
mode, resolution (dpi), page size, brightness (Br), and contrast (Cr). To
see a selected scan configuration’s settings, click its icon. Click the icon
again to close the detailed information.
These icons next to each scan configuration indicate the scanning mode:
NOTE: Use Configure Before Scan if you want to set the scanning
mode manually before scanning. See “Configure Before Scan” on
page 45.
Select Format—A set of file formats for the scanned image for the
selected button. The available formats are based on the type of
destination application you select.
The icon names indicate their file types. See “Selecting Document and
File Format Options” on page 34 for more information about the available
formats.
Options tab—Displays a window for selecting options related to the
selected Destination Application for the scanned image. See “Selecting
Options for a Button” on page 38 for instructions on configuring the list of
available destinations.
Properties button—Displays a window for selecting properties for each
type of Destination Application. See “Setting Destination Application
Properties” on page 40.
Refresh button—Updates the links between all your computer’s
Destination Applications and One Touch 4.0. If you install new software
that can be used as a Destination Application, click the Refresh button to
link the new software to One Touch 4.0.
New/Copy/Edit/Delete buttons—Click New or Copy to add new scan
configurations to the list. Click Edit or Delete to change or remove them.
See the sections “Creating a New Scan Configuration” on page 26 and
“Editing or Deleting Scan Configurations” on page 33.
DocuMate 150 Scanner User’s Guide 25
Page 31

Scanning
The Scan Configurations.
Click New to create a
new Scan Configuration.
1. OK/Cancel/Apply buttons—OK accepts any changes and closes
the window. Apply accepts any changes but leaves the window open
so you can continue making additional changes. Cancel closes the
window without accepting any changes.
Creating a New Scan Configuration
The scan configurations are where you select the scanning resolution,
mode (color, black&white, or grayscale), and a number of other settings.
To create a new configuration:
1. Open the One Touch Properties window.
2. Scroll through the applications in the Select Destination list and click
the application you want for the new scan configuration.
3. Click the New button.
If you want to start from the settings of another configuration, select
the configuration, then click the Copy button.
The Scan Configuration Properties dialog box opens.
26 DocuMate 150 Scanner User’s Guide
Page 32

The Scan Settings Tab
If the configuration
is locked, click the
lock to unlock it. The
icon becomes a key.
Type a new name for
the configuration.
Select the scan mode
and drag the slider to
set the resolution.
Drag the sliders to set
the Brightness and
Contrast.
1. On the Scan Configuration Properties dialog box, type a name.
2. Select scan settings for the new scan configuration.
Mode—Select a scanning mode:
• Black&White to scan in black and white. For example, letters
and memos are usually scanned in black and white.
Scanning
• GrayScale to scan items such as documents containing
drawings or black and white photographs.
• Color to scan color photographs and other color items. Color
scans have the largest file size.
Resolution—Drag the slider to the right or left to adjust the dots per
inch (dpi) of the resolution. The maximum resolution is 600 dpi; the
minimum is 50 dpi. Higher dpi settings take longer to scan and
produce larger files for the scanned images.
Brightness and Contrast—Drag the sliders to the right or left to
adjust the brightness and contrast of the scanned image. The
Contrast setting does not apply to the Black&White mode.
Brightness refers to the lightness or darkness of the image. Contrast
is the range between the darkest and lightest portions of the image.
The greater the contrast, the more difference between the lighter and
darker shades in the image.
3. If you want to lock the configuration, click the key icon to change it
from a Key to a Lock.
4. Click on Apply to save the changes on the Scan Settings tab.
5. If there are no other settings you want to change, click OK to save the
new configuration.
It will now be in the list of Scan Configurations on the One Touch
Properties window for the appropriate Destination Applications.
DocuMate 150 Scanner User’s Guide 27
Page 33

Scanning
Click to toggle
between inches
and millimeters.
The Page Settings Tab
1. Click the Page Settings tab to select page options.
Standard—Click the menu arrow and choose a page size from the
list.
Custom—Enter the horizontal and vertical page dimensions in the
boxes. The maximum size is 8.5" x 14". Click the name of the units,
inches or millimeters, to toggle between them.
Improvements and Settings—One the options that apply to the
selected scanning mode on the Scan Settings tab are available.
• AutoCrop to Original—Select this option to let the scanner
automatically determine the size of the item being scanned.
Always use the paper guides on the scanner so the page is not
skewed. Skewed pages may not crop properly.
• Reduce Moire Patterns—Moire patterns are wavy, rippled lines
that sometimes appear on the scanned images of photographs or
illustrations, particularly newspaper and magazine illustrations.
Selecting Reduce Moire Patterns will limit or eliminate moire
patterns in the scanned image. This option is only available for
the Grayscale or Color Mode lower resolutions.
• Straighten Image—Select this option to let the scanner
automatically determine if a page is skewed, then straighten its
image. If the page is fed through at too great an angle, the image
may not scan correctly. In that case, re-scan the page using the
paper guides to feed the paper in straight.
28 DocuMate 150 Scanner User’s Guide
Page 34

Scanning
Original Image Inverted Image
The original with a red
watermark over black text.
The scanned item with
the red filtered out.
• Invert Image—Only available for Black&White Mode, this option
reverses the black and whites of an image.
• Color Filter—Color filter is the ability of your scanner to
automatically remove a color from a scanned item. Color filter
applies to Black&White or Grayscale Mode.
2. Click on Apply to save the changes on the Page Settings tab.
3. If there are no other settings you want to change, click OK to save the
new configuration.
It will now be in the list of Scan Configurations on the One Touch
Properties window for the appropriate Destination Applications.
DocuMate 150 Scanner User’s Guide 29
Page 35

Scanning
The Advanced Settings Tab
1. Click the Advanced Settings tab.
The options of the Advanced Settings tab are for the Color or
Grayscale scanning mode.
2. Drag the sliders to the left and right to change the color settings. As
you do, the image changes to show the effects of the new settings.
Saturation—the strength or purity of a color.
Hue—the color your eyes see as reflected from the image.
Gamma—controls the brightness of the midtone colors.
3. Click on Apply to save the changes on the Advanced Settings tab.
4. If there are no other settings you want to change, click OK to save the
new configuration.
It will now be in the list of Scan Configurations on the One Touch
Properties window for the appropriate Destination Applications.
30 DocuMate 150 Scanner User’s Guide
Page 36

The Device Settings Tab
A Device Settings tab is on the Scan Configurations dialog box when your
selected Destination Application sends the scanned image to a printer,
fax application, or other device. You use the options on the Device
Settings tab to select settings for the device.
1. Click on the Device Settings tab.
Scanning
Fit to page, reduce image if necessary—If the image is too big to fit
on a single page, the image will automatically be reduced to fit the
page.
Actual size, crop image if necessary—If the image is too big to fit
on a single page, the image will automatically be cropped around its
edges to fit on the page.
Center image on page—The image will be printed in the center of
the page instead of at the top right corner.
Maintain aspect ratio—The aspect ratio is the length-to-width
relationship of the image’s dimensions. Select this option so the
image’s relative proportions remain constant.
AutoRotate image for best fit—If the image is a Landscape format
and the device is printing in the Portrait mode, or vice versa, rotate
the image to fit on the page.
Collate copies—If you are printing more than one page, collate the
copies. Enter the number of copies in the Copies box.
Advanced—Click to see additional settings for the device. The dialog
box that opens is specific to the device. For example, if the device is
your printer, the dialog box is your printer’s setup settings.
2. Click OK or Apply.
DocuMate 150 Scanner User’s Guide 31
Page 37

Scanning
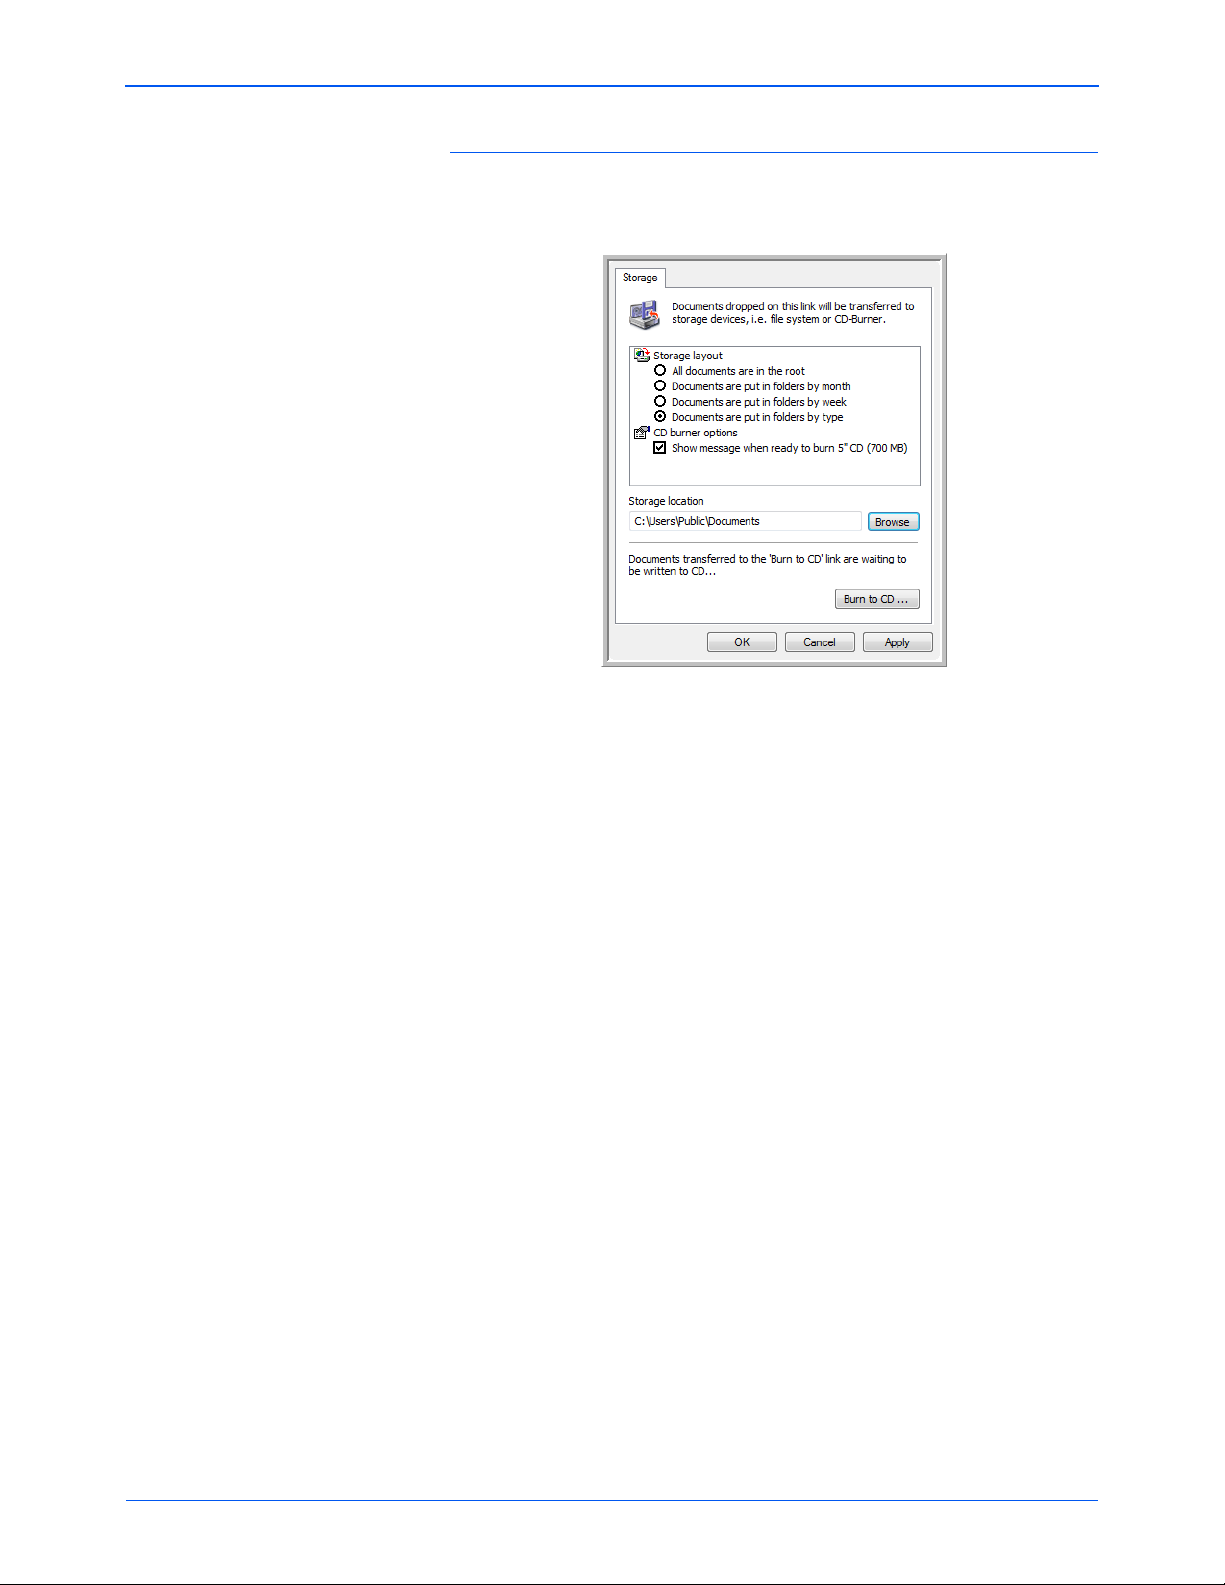
The Storage Options Tab (Archive)
A Storage Options tab is on the Scan Configurations dialog box when the
Destination Application is Transfer to Storage. You use the options on this
tab to select where to save your scanned items for storage when
scanning with that particular Scan Configuration.
1. Click on the Storage Options tab.
2. Click the Storage Layout options you want.
All documents are in the root—The scanned documents are saved
in the root of the folder specified in the Storage Location.
Documents are put into folders by month, week, or type—Folders
are created based on your selection (month, week, or type) and the
scanned documents are saved in those folders. New folders are
created for each month and week so you can keep track of when you
scanned the documents.
3. If you want to store your archive documents in some other location,
click the Browse button to specify the new location.
4. Click OK or Apply.
32 DocuMate 150 Scanner User’s Guide
Page 38

Editing or Deleting Scan Configurations
Select the scan
configuration to edit or
delete. It must be unlocked,
as indicated by not having a
lock displayed here.
Editing and deleting is normally for the configurations you create, not for
your scanner’s pre-set configurations.
NOTE: Your scanner comes with a number of configurations pre-set at
the factory. To ensure that your scanner will always have a set of
correct scan configurations, do not delete the pre-set configurations.
We also recommend that you keep those configurations locked so they
are not inadvertently deleted. That way, you will always have the
factory-settings available. If you do delete or edit them, and want to get
the factory pre-sets back again, you will need to uninstall then re-install
your scanner.
To edit or delete a scan configuration:
1. Open the One Touch Properties window.
2. Select the scan configuration you want to edit or delete.
• To delete the configuration, click the Delete button.
• To edit the configuration, click the Edit button.
Scanning
Edit the settings and click OK.
3. Click OK to close the One Touch Properties window.
DocuMate 150 Scanner User’s Guide 33
Page 39

Scanning
Image Formats Text Formats; sPDF is only one of
several text formats available.
Selecting Document and File Format Options
The Document and Fage Format options that you select determines the
file format of the scanned document. Appropriate format options and file
types are available for the type of Destination Application selected for the
button.
The available options are for images and text.
Create Single Image Files
The TIFF and PDF formats, as well as the text document formats, support
multiple page documents. Select Create single image files if you want
one file created for each image scanned. Note that this option is
automatically selected and disabled if you have selected a format that
only supports single pages, such as BMP or JPG.
Image Formats
Select an image file format for photos, artwork or other documents that
you want to save as images. BMP and TIFF are standard image file
formats generally used if you want to do additional image processing,
such as photo touch-up or color correction. Both of those file formats tend
to be larger than the JPEG format.
The JPEG format is often used for images on web pages, or if file size
might be a problem when electronically sending the files. JPEG files are
reduced in size by lowering their image quality, and you can select the
degree of quality for your scanned images from the JPEG file format icon.
The PDF format is often used to create images of text pages. The PDF
format is also used to put multi-page documents on web sites as pdfreadable files. As with the JPEG option, the PDF format can be reduced
in size or quality.
34 DocuMate 150 Scanner User’s Guide
Page 40

Scanning
The specific text format; this example is
for Microsoft Word Rich Text Format.
To select a JPEG or PDF file size:
1. Select JPG or PDF as the page format, then right-click on the icon.
2. Choose the file size/image quality option for your scanned images.
Minimize Size—Smallest file size, lowest image quality.
Normal—Medium file size, some loss of image quality.
Maximize Quality—Largest file size, no loss of image quality.
Your selection pertains only to the button currently selected on the
One Touch Properties window. Other buttons that have JPG or PDF
selected as the Format are not affected.
3. Click OK or Apply on the One Touch Properties window.
Text Formats
Selecting the text format option also selects OCR processing as an
automatic step for scanning. Therefore, when you scan a document with
the text format selected, the text portions of the document are
automatically converted to editable text. See “Scanning with Optical
Character Recognition (OCR)” on page 48.
As you select Destination Applications that are text applications, the text
format icon changes to match the file type of the application. In some
cases, the Destination Application supports several file types, and you
can right-click on the icon to choose the particular file type for that
application.
DocuMate 150 Scanner User’s Guide 35
Page 41

Scanning
Example menu of the TEXT
when the Destination
Application is Microsoft Word.
Example menu of the TEXT
format when the Destination
Application is Transfer to
Storage.
To select a file type for the text format:
1. Select the Destination Application.
2. Right-click on the text format icon.
3. Choose the file type that you want for the text format.
Your selection of a file type pertains only to the button currently
selected on the One Touch Properties window.
Simple Text—The .txt file format. Text with no formatting; used by the
standard Microsoft Notepad application.
Rich Text Format—The .rtf file format. Text that retains formatting
when converted. Available with Microsoft Wordpad and Word.
Word Document—The .doc file format used by Microsoft Word.
Comma Delimited—The .csv file format; used for database or
spreadsheet data with fields, when the document is converted into
editable text the fields are maintained.
Excel Spreadsheet—The .xls file format used by Microsoft Excel.
HTML Document—The .htm file format used to create web pages.
Searchable PDF—he .sPDF file format used by Adobe Acrobat and
OmniPage Pro. This format converts scanned text into PDF with text
search and OCR capabilities.
36 DocuMate 150 Scanner User’s Guide
Page 42

Normal PDF—The .nPDF file format used by Adobe Acrobat and
Click the arrows to get to
the button to rename, then
select the name text.
Type a new name for the
button.
OmniPage Pro. This format converts scanned text into PDF with text
search and OCR capabilities, plus you can edit the text in a PDF
editing program.
The OCR Options provide a series of selections for the OCR feature
when you scan text. This menu option is only available if you have the
One Touch OmniPage Module or OmniPage Pro software installed on
your computer. For details, refer to the One Touch OmniPage Mini-
Guide located in the User Guides section on the installation disc.
Note that the OCR Options settings apply to all buttons. If you change
them for one button, those changes apply to the other buttons as well.
4. Click OK or Apply on the One Touch Properties window.
Renaming a One Touch Button
The One Touch buttons have names that identify their pre-set functions,
such as OCR and PDF, but you can edit the names.
To change the button names:
Scanning
1. Open the One Touch Properties window.
2. Using the arrows, choose the button that you want to rename.
3. Select the name’s text and type a new name.
4. Click OK or Apply.
The button is now renamed.
DocuMate 150 Scanner User’s Guide 37
Page 43

Scanning
Options tab
Selecting Options for a Button
The One Touch Options determine the types of Destination Applications
available for a button, as well as additional options that apply to all of the
scanning buttons.
To select options:
1. Open the One Touch Properties window and click the Options tab.
2. Click the Select Button menu arrow and choose the button for new
options. The example above shows the eMail button is selected.
3. Select button options as described below.
Show All Destinations—The list of Destination Applications
available for the selected button will include all of the applications on
your computer that can receive scanned images.
Select Destinations—Individually choose the types of applications to
include in the list of Destination Applications. Check the boxes for the
type of application to include.
• Document Management includes PaperPort and other
applications for processing and keeping track of your scanned
documents.
• Image Editors include Microsoft Paint and other drawing and
graphics applications.
• Text Editors include Microsoft Word and WordPad, Microsoft
Excel, and other word processing and spreadsheet applications.
• PDF applications are for documents scanned to PDF format.
• Email includes Microsoft Outlook and other email applications.
38 DocuMate 150 Scanner User’s Guide
Page 44

Scanning
• Storage and CD-R/W is for either storing scanned documents in
a folder, or sending them to a CD burner to create a CD
containing the scanned documents.
• Fax and Print is for sending your scanned documents directly to
your printer or fax software for faxing.
• Sti event forwarding is for using another application’s interface
for scanning.
4. Click Apply then click the Multi Function tab to see the changes.
See “Setting Destination Application Properties” on page 40 for details
about the destination application options.
Global Options
• Show Progress Window—Select this option to display the scanning
progress window.
• Use enhanced folder browser—Select this option if you want to
save your scans to a network location that is not a mapped drive on
your computer.
• Create copies of scanned documents—Images sent to a printer,
fax or eMail application are temporary files that are not saved to your
computer. Use create copies of scanned documents if you want a
copy saved on your hard drive. Selecting this option enables the
Folder Copy Options field for you to choose where the files are saved.
This option is not available if either Document Management or
Storage and CD-R/W are selected because these destinations
automatically save the files in the folder location you specify.
Folder Copy Options—Click the Browse button and select a folder
to save the images. Select the grouping option for how you want the
documents to be organized.
DocuMate 150 Scanner User’s Guide 39
Page 45

Scanning
Click a Destination
Application.
Click the Properties
button
Setting Destination Application Properties
The different types of Destination Applications have various properties
that you can select.
1. On the One Touch Properties window, click a Destination Application.
2. Click the Properties button.
PaperPort Properties
These properties apply to PaperPort, and are for designating the folder to
receive your scanned items.
1. Select the PaperPort folder where you want the file of the scanned
image to be located. Click OK.
2. When PaperPort opens after you finish scanning, the thumbnails of
your scanned documents are on the Desktop in that folder.
40 DocuMate 150 Scanner User’s Guide
Page 46

Scanning
Text Documents Properties
These properties apply to Microsoft Word, Microsoft Excel®, and other
text editing applications.
1. Click in the OCR settings boxes for the options you want.
Always send a file, even when no text was found—The scanned
file is sent to the OCR reader even if the image does not appear to
contain text.
Show message if text recognition failed—A message will open on
the screen if the OCR reader does not detect text in the image.
2. To add another application to the list, click the Add Application
button.
DocuMate 150 Scanner User’s Guide 41
Page 47

Scanning
3. Click Browse to find the application you want to add to the list.
When you select the application using the Browse button, steps 1 and
2 on the dialog box are automatically filled in, and the application icon
appears in step 3.
4. Select the icon in Step 3 of the dialog box. That is the icon that will
appear in the One Touch Destination List.
5. In step 4 of the dialog box, select the file formats that the application
will accept.
Refer to the documentation you received with the application to see
which text formats the application accepts.
6. Click the Add button.
7. Click OK on the Link Properties window.
8. Click Refresh on the One Touch Properties window.
Image Documents Properties
These properties apply to Microsoft Paint and other image processing
applications.
1. Click in the Color document handling settings boxes for the options
you want.
Convert Bitmaps using Screen Resolution—Bitmap images with a
high resolution may be too big to fit on the screen. Matching the
screen resolution ensures that the image fits on the monitor screen.
Convert Bitmaps to JPEG—JPEG files can be compressed to
produce smaller file sizes and, therefore, shorter transmission times.
Use this option to provide that compression capability to image files.
2. To add another application to the list, click the Add Application
button. See the steps on page 41 to add an application to the list.
3. Click OK or Apply on the Link Properties window.
42 DocuMate 150 Scanner User’s Guide
Page 48
Scanning
Storage Properties
These properties apply to the Destination Application named Transfer to
Storage.
1. Click the Storage Layout options you want.
All documents are in the root—The scanned documents are saved
in the root of the folder specified in the Storage Location.
Documents are put into folders by month, week, or type—Folders
are created based on your selection (month, week, or type) and the
scanned documents are saved in those folders.
2. Click the Browse button to specify the location to store the scanned
documents, or type a location directly into the box.
3. If your computer has a CD burner and you are using Windows XP or
Windows Vista, select the option Show message when ready to
burn 5" CD (700MB), so you will see a message when it’s time to
click the Burn to CD button.
4. Click OK on the Link Properties window.
DocuMate 150 Scanner User’s Guide 43
Page 49

Scanning
eMail Properties
These properties apply to email applications so you can specify the folder
for documents that you will attach to an email message.
1. Click the Browse button for Folder for storing attachments and
choose a folder for your email attachments.
Microsoft Outlook
®
will accept direct attachment of documents to a
blank email message as soon as scanning is finished, you do not
need to change this folder location.
2. If you are using AOL on your computer, and the folder name for AOL
is incorrect, click the Browse button and find the correct AOL folder.
Please contact AOL for more information about the folder location in
which AOL stores attachments.
3. If you need to change your email client, or any other internet options,
click the Internet Options button.
The Windows Internet Options Control Panel opens. Click the
Programs tab and choose a new email client from the Email list.
These are the standard Windows Internet options. Please see your
Windows documentation for more information about Internet options.
If you are using AOL, please see the AOL user manual for making
changes to the Internet options applicable to AOL.
4. Select the options for color document handling.
Convert Bitmaps using Screen Resolution—Bitmap images with a
high resolution may be too big to fit on the screen. Matching the
screen resolution ensures that the image fits on the monitor screen.
Convert Bitmaps to JPEG—JPEG files can be compressed to
produce smaller file sizes and, therefore, shorter transmission times.
Use this option to provide that compression capability to image files.
5. Click OK.
44 DocuMate 150 Scanner User’s Guide
Page 50

Configure Before Scan
Click the arrows to
select the button.
Select Configure
Before Scan.
Right-click on
Configure Before
Scan to get the menu,
and choose the
interface to use for
scanning.
Choosing Configure Before Scan simply opens a scanning interface when
you press a button. You can then use that interface to change the
Resolution, Scan Mode, and other settings. When you scan, the scanned
image will still be sent as the file type and to the Destination Application
already selected in the One Touch Properties window for that button.
To Set Configure Before Scan:
1. Open the One Touch Properties window.
2. Using the arrows, choose the button that you want to set to configure
before scanning.
3. Select the scan configuration Configure Before Scan.
Scanning
DocuMate 150 Scanner User’s Guide 45
4. Right-click on Configure Before Scan and choose an interface to
use for configuring before scanning.
TWAIN—The TWAIN Interface opens for you to make changes prior
to scanning. See “Scanning with the TWAIN Interface” on page 58.
WIA—The Windows Image Acquisition Interface (WIA) opens for you
to make changes prior to scanning. See “Scanning with the WIA
Interface” on page 64.
5. Select a Destination Application and File Format.
6. Click OK or Apply on the One Touch Properties window.
Page 51

Scanning
To Scan Using Configure Before Scan
1. Load the documents face down with their tops pointing into the
scanner.
2. Click on the button you set to use the Configure Before Scan option.
In the example shown on the previous page, the scanning option 9
has been set to use Configure Before Scan.
3. The TWAIN interface will open.
4. Choose the Options applicable to your scan batch.
5. Click on the Scan button in the TWAIN interface.
6. Your documents will be scanned and sent to the Destination
Application specified in the One Touch 4.0 Properties.
In the example shown on the previous page, the Destination
Application is Microsoft Paint.
Please see “Scanning with the TWAIN Interface” on page 58 for details
about the options available in the TWAIN interface.
46 DocuMate 150 Scanner User’s Guide
Page 52

Canceling a Configure Before Scan
To cancel a scan after scanning has begun:
1. Click on the Cancel button in the scanning progress window.
2. The following window will open asking you if you want to cancel the
entire job.
Scanning
• Yes—scanning stops and all pages scanned in this batch, up to
this point, will be deleted. The TWAIN interface will close and you
can restart your scan from the beginning.
Choose Yes if the TWAIN scan settings are incorrect for your
current scanning batch.
For instance, the Scan Mode is Black & White but you want to
scan your documents in color, choose Yes to delete any scanned
pages, then select the correct Picture Type and restart the
scanning.
• No—scanning stops, but all pages scanned in this batch, up to
this point, are not deleted and the TWAIN interface remains open.
You can place a new page in the ADF, adjust the TWAIN settings
for the new page, then click on the Scan button in the TWAIN
interface to continue scanning. At the end of the scanning batch,
all pages from the first portion of the scan and second will be sent
to the Destination Application.
Choose this option if, for instance, you have been scanning a
black & white document but you want to insert a color page into
the document. Instead of having to re-scan the entire stack, you
can stop the current scan, change the Picture Type from Black &
White to Color, then restart the scanning without losing the pages
already scanned.
DocuMate 150 Scanner User’s Guide 47
Page 53

Scanning
Scanning with Optical Character Recognition (OCR)
Optical Character Recognition (OCR) converts text and numbers on a
scanned page into editable text and numbers. You can then work with the
text and numbers to edit, spell check, change font or type size, sort,
calculate, and so forth.
NOTE: Xerox recommends that all OCR processing use the original
factory settings for OCR scanning that came with your scanner. When
scanning with other settings, use at least 200 dpi for the resolution. If
the original documents are of poor quality or have a small type font,
300 dpi can be used as the maximum resolution.
The One Touch OmniPage Module or the OmniPage Pro software must
be installed on your computer in order to use the OCR options with the
One Touch 4.0 software and your DocuMate 150 scanner. The
One Touch OmniPage Module was automatically installed when you
installed your driver. The One Touch OmniPage Mini-Guide is available
on the installation disc.
To scan with OCR:
1. Open the One Touch Properties window.
2. Select a One Touch button to scan to a text editing application such
as Microsoft Word.
Button 6 is preset as an OCR button.
3. Select a text editing application in the Select Destination list, then
select a text file format in the Select Format panel.
4. Click OK to save the changes and close the One Touch Properties
window.
5. On the scanner, or on the One Touch button panel, press the button
you set for scanning with OCR.
Your scanned pages appear in the Destination Application with their
text ready for editing and other text processing.
48 DocuMate 150 Scanner User’s Guide
Page 54

Scanning with sPDF or nPDF and Searching for Text
Searchable PDF (sPDF) and Normal PDF (nPDF) are special forms of an
Adobe PDF file. sPDF creates a PDF image with a searchable text layer.
nPDF creates a PDF file that can be edited in a PDF editing program.
To scan with sPDF or nPDF:
1. Open the One Touch Properties window.
2. Select a One Touch button to scan using the sPDF or nPDF file type.
3. Select a Destination Application that uses a text format as the page
format.
Not all applications will open PDF files. You can scan as a PDF file to
the destination applications PaperPort, Transfer to Storage, Burn to
CD, eMail, Adobe® Acrobat® and Adobe® Acrobat® Reader®.
4. Right-click on the text format icon.
Scanning
5. Choose the Searchable PDF or Normal PDF option for the page
format.
6. Choose a Scan Configuration. Click OK.
7. Now scan with that button and the scanned document will be in the
sPDF or nPDF format that was selected for the button.
8. To search for the text, open Adobe® Acrobat® Reader® or Adobe®
Acrobat®.
9. From the Adobe Acrobat File menu choose Open, and open the file
you just scanned.
10. Now use the Adobe® Acrobat® features to find or edit the text you
want.
See the Adobe Acrobat user manual for more about finding text in a
PDF file, or about editing PDF text.
DocuMate 150 Scanner User’s Guide 49
Page 55

Scanning
Scan and Burn to a CD
If you have a CD burner attached to your computer, you can scan directly
from your scanner onto a CD. This feature is available only on computers
running Windows XP or Windows Vista.
1. Open the One Touch Properties window.
2. Choose a button to use for scanning and burning to a CD.
Select Burn to CD as the Destination Application.
3. Choose a Format and a Scan Configuration.
4. Click OK.
5. Now start scanning using the button you selected to use to scan and
burn to a CD.
When scanning is finished, a bubble message on the screen tells you
that files are waiting to be burned to the CD.
6. Open the One Touch window, select Burn to CD and click the
Properties button.
The One Touch 4.0 Link Properties window opens
7. Make sure a blank CD is in the CD burner.
8. Click the Burn to CD button. The CD burner begins and your
scanned documents are written to the CD.
NOTE: If other files are also waiting to be burned to the CD, they will
get written with the One Touch files on the CD.
50 DocuMate 150 Scanner User’s Guide
Page 56

Scanning with Event Forwarding
If you want to specify an application to use for scanning at the start of the
process, you can use event forwarding.
1. Open the One Touch Properties window.
2. Select Still Image Client as the Destination Application.
3. You cannot choose a page format for this option because the
Destination Application is not selected until after the scanning begins.
Scanning
4. Choose a Scan Configuration. Click OK.
5. Start scanning using the button you selected for event forwarding.
A dialog box opens for you to select the application to use for
scanning.
6. Select the application in the box and click OK.
Now the application you selected opens and you can continue
scanning using the application’s TWAIN interface.
DocuMate 150 Scanner User’s Guide 51
Page 57

Scanning
Choose HTML
Creating an HTML Web Page from Your Scanned Documents
You can convert scanned pages to HTML format for posting directly to
your website.
1. Open the One Touch Properties window.
2. Select Microsoft Explorer as the Destination Application.
3. Choose HTML as the Format.
4. Choose a Scan Configuration. Click OK.
5. Start scanning using the button you selected for scanning with the
HTML format.
When scanning is finished, the document is first converted to editable
text using the OCR process, then is converted into an HTML format.
Microsoft Internet Explorer then opens showing your converted page.
6. Choose Save As from the Internet Explorer File menu, give the page
a name, and save it in the location you use for your web page files.
7. You can now use Microsoft Internet Explorer or other application to
post the document to your web page as you would any other HTML
page.
52 DocuMate 150 Scanner User’s Guide
Page 58

Transferring Scanned Documents to Storage
Your scanned documents
will be stored at the location
you specified on the One
Touch 4.0 Link Properties
window.
Choose a text format to
have the OCR process
convert text to editable
text before the scanned
documents are stored in
their archive location.
With the Transfer to Storage scanning process, you can scan documents
and save them in a folder in one step. The process is ideal for archiving
documents without having to manually save or process them in any other
way. If you choose a text format for the file format, the documents are also
automatically converted by the OCR process into editable text and
numbers before being stored.
1. Open the One Touch Properties window.
2. Select Transfer to Storage as the Destination.
3. Click the Properties button.
In the “Storage Location” browse to the folder you want your scanned
documents saved.
Scanning
4. Choose a file format for your document.
5. Choose a Scan Configuration. Click OK.
Now scan the document using the button you set to use the Destination
Application as Transfer to Storage.
DocuMate 150 Scanner User’s Guide 53
Page 59

Scanning
Select Transfer to Storage.
Click the New button.
Scanning to Multiple Archive Folders
When scanning to the Transfer to Storage destination, you can scan them
to multiple folders. For example, one folder might be for “Business
Receipts,” a second folder might be for “Personal Receipts,” and a third
folder might be for “Annual Receipts.”
To scan to multiple folders, you create multiple configurations, each with a
different storage location for the scanned documents, then assign a
different scan configuration to each button.
NOTE: The selections you make using the Storage Options tab
override the storage location that is set in the Storage Link Properties.
Setting up multiple folders for transfer to storage:
1. Using Microsoft Windows, create the folders that you want to use for
storing scanned items.
2. Open the One Touch Properties window.
3. Select Transfer to Storage as the Destination Application.
4. Click the New button.
5. To help you remember which folder it is, give the new configuration a
name that indicates the folder name, such as “Business Receipts.”
6. Click the Scan Settings, Page Settings, and Advanced Settings
tabs, and select the settings you want.
54 DocuMate 150 Scanner User’s Guide
Page 60
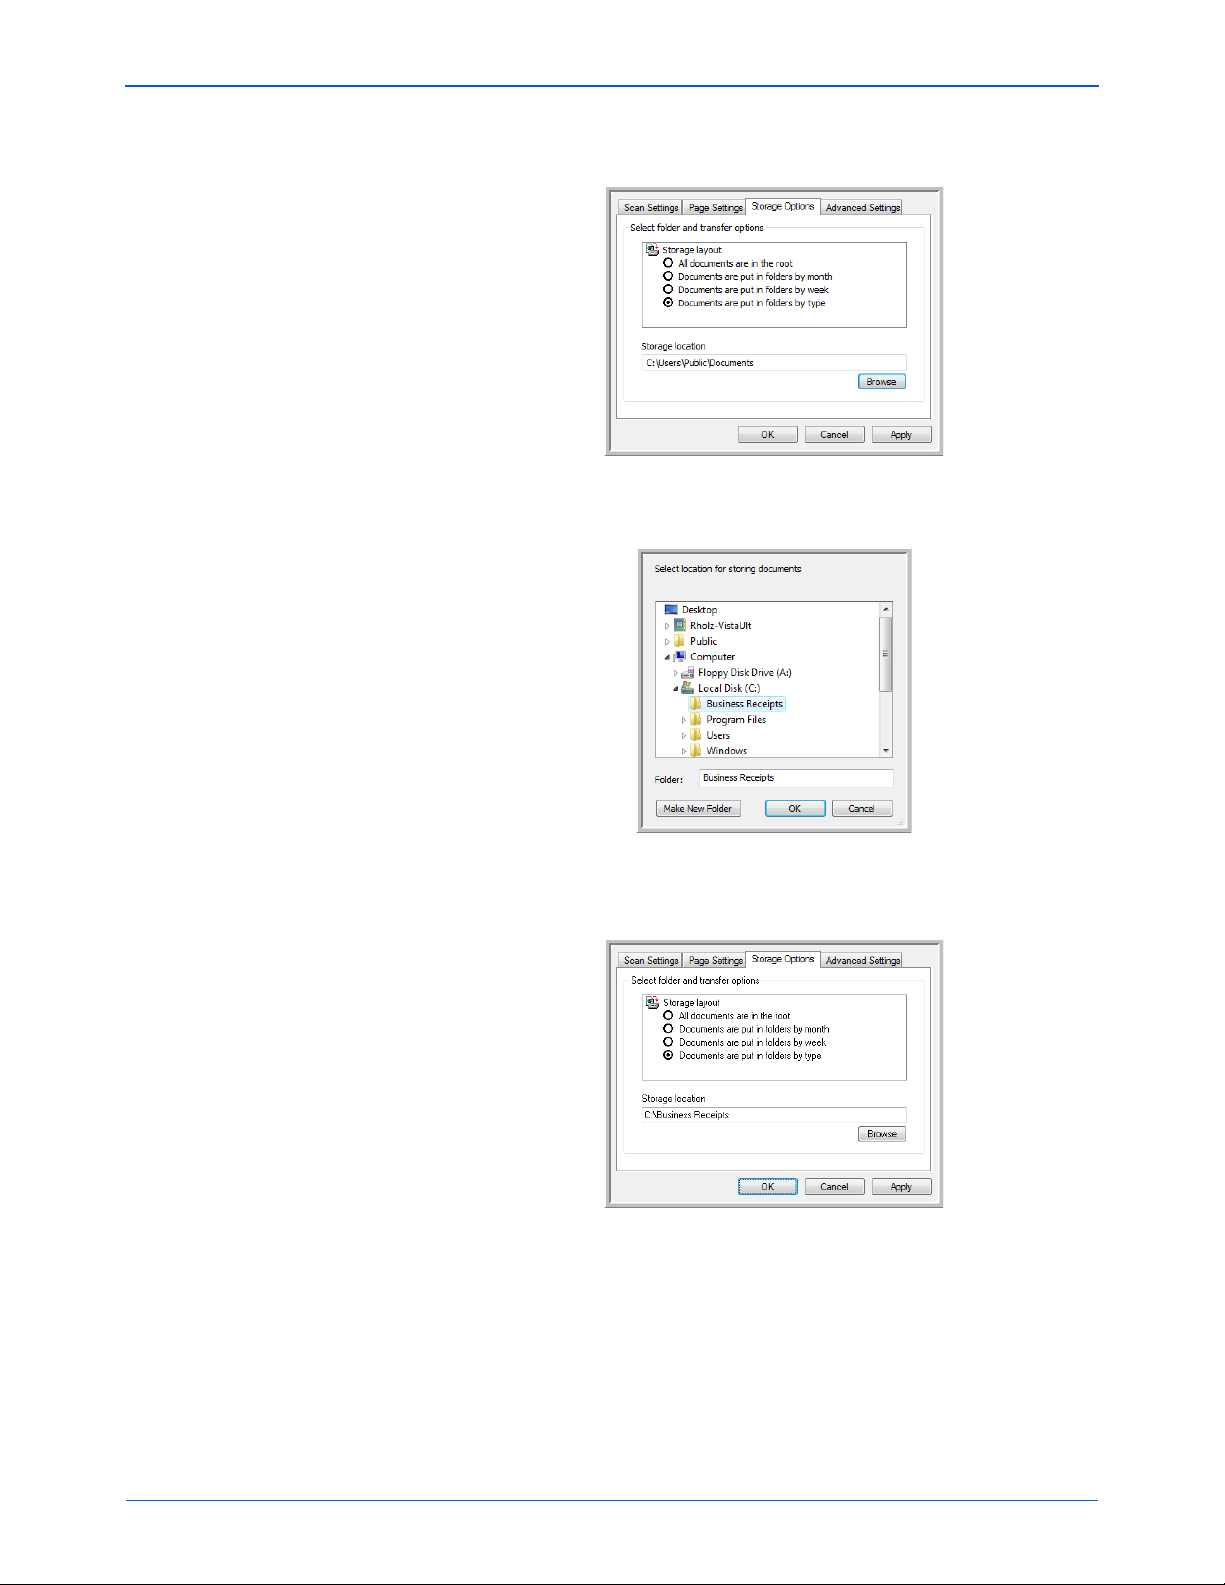
Scanning
7. Click the Storage Options tab. This is where you set the different
folder locations for the new configurations.
8. Click the Browse button and select the folder you created for storing
the scanned documents.
9. Click OK. The selected folder will now be set as the Storage Location,
such as “Business Receipts”.
10. Click OK.
11. Repeat the process to create additional new configurations, such as
“Personal Receipts.”
Make sure to designate separate folders as the Storage Locations for
the new configurations.
12. You will now have multiple configurations set up for the Transfer to
Storage destination, and each configuration scans documents to
separate folders.
DocuMate 150 Scanner User’s Guide 55
Page 61

Scanning
The new configurations
apply to the Transfer to
Storage Destination
Application.
13. Now click the arrow buttons to select a scanner button for each new
configuration. Click Apply to set that button for that configuration.
The following examples show that buttons 7 and 8 have been set to
scan to each of the new configurations.
Scan to multiple storage folders:
1. Insert the documents you want to scan to storage.
2. Press the Destination Selector buttons on the scanner to get to one
of the buttons set up for scanning to storage.
3. Press the Scan button to scan the documents.
4. When scanning is finished, insert the next set of documents and
press the Destination Selector buttons to get to the next button you
have set up for scanning.
5. Press the Scan button to scan the documents.
When scanning is finished, the documents are stored in the two separate
folders.
56 DocuMate 150 Scanner User’s Guide
Page 62
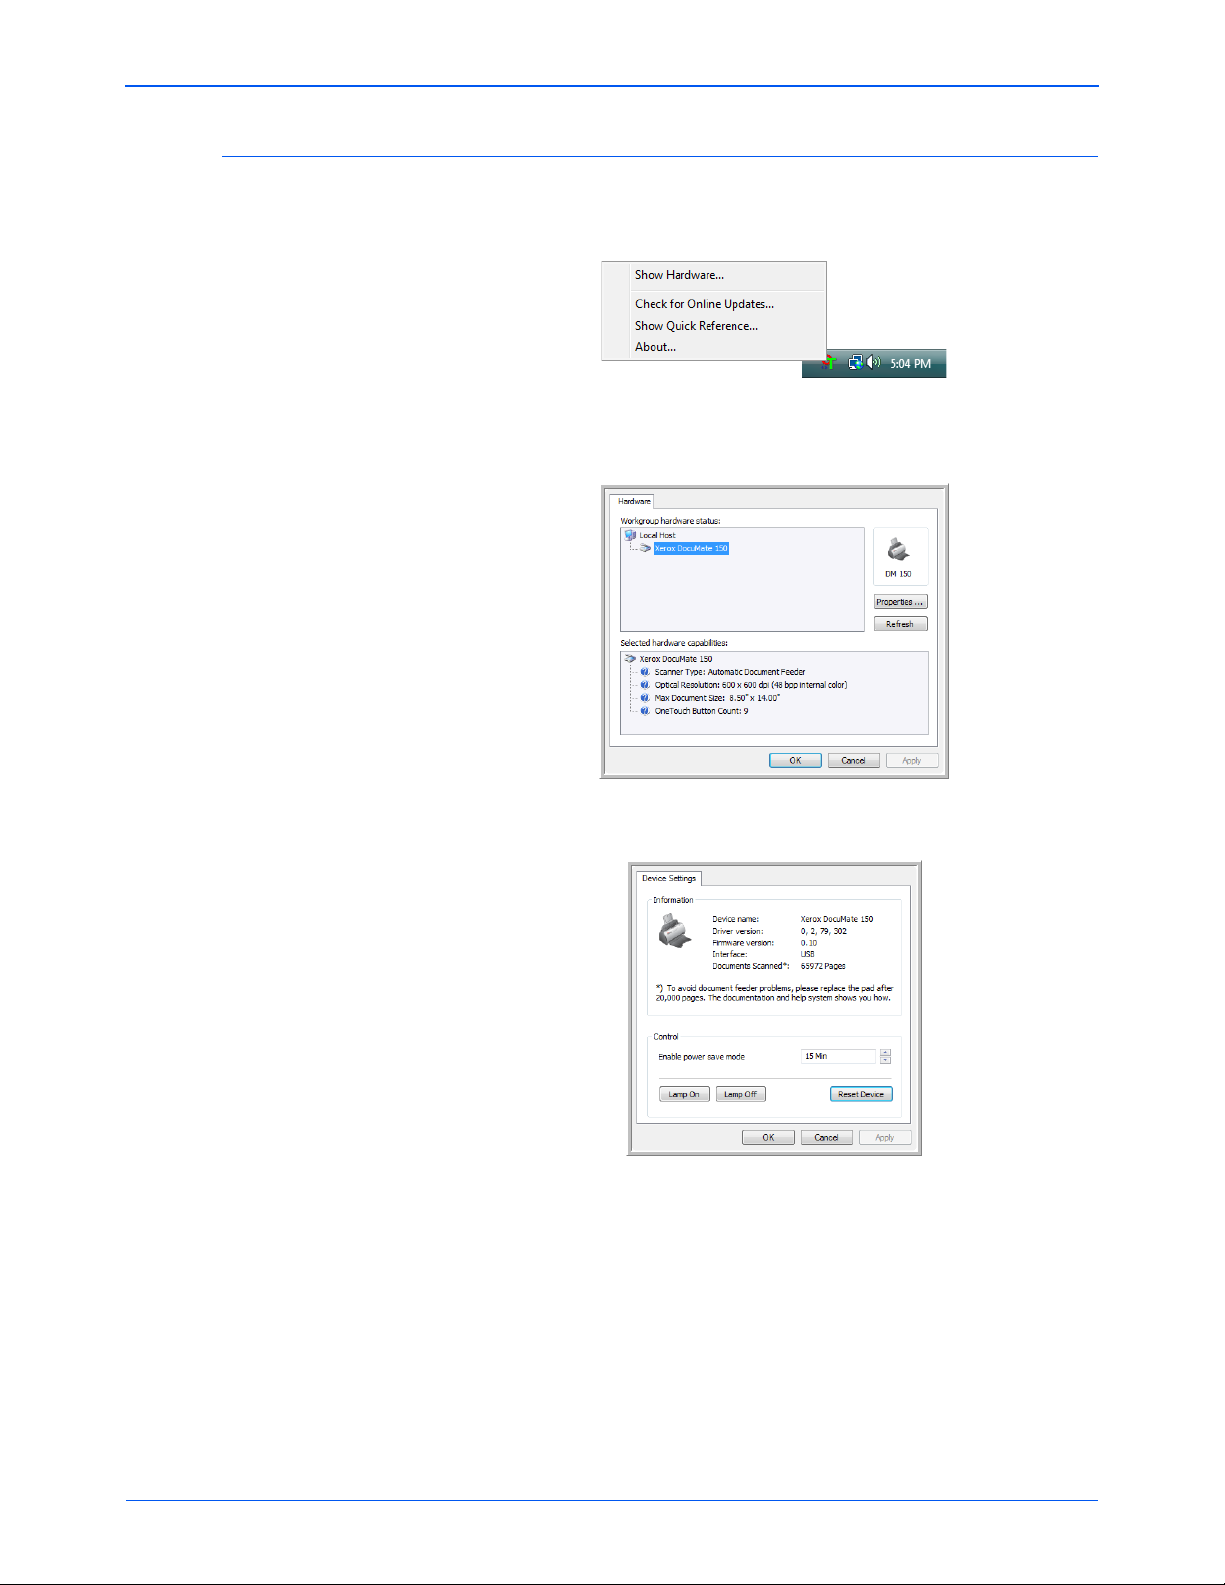
Checking the Hardware and Setting the Lamp Power Saving
1. Right-click on the One Touch icon and choose Show Hardware from
the pop-up menu.
2. The Hardware Properties dialog box opens and shows information
about your Xerox DocuMate 150 scanner.
Scanning
3. Click the Properties button.
Your scanner has a built-in power saving feature that is set to power
down after 15 minutes of idle time. You can change the time before
the scanner powers down, from 1 minute to a maximum of 4 hours.
4. Click the arrows for the Lamp time-out setting and choose a time
setting.
To turn the lamp on and off manually without turning off power to the
scanner, click the Lamp On or Lamp Off buttons.
To return the scanner to its factory settings, click Reset Device.
5. Click OK to save the changes and close the dialog box.
DocuMate 150 Scanner User’s Guide 57
Page 63

Scanning with the TWAIN Interface
Scanning with the TWAIN
Interface
You can scan from any TWAIN scanning application instead of scanning
from the One Touch buttons on your scanner or the One Touch button
pane.
A Note About Your Scanner and the TWAIN standard: TWAIN is a
widely recognized standard that software applications use to receive
images from scanners, digital cameras, and other digital devices. The
PaperPort and OmniPage applications that you received with your
scanner use the TWAIN standard. You can open the same TWAIN
interface from many other graphics and imaging applications. Because
the TWAIN interface is the same regardless of the software you use, you
can still uses the instructions in this User’s Guide for scanning with your
Xerox DocuMate 150 scanner. To access the TWAIN interface from other
software, please refer to their user’s guides.
NOTE: You can access the TWAIn interface when you’re scanning
from the One Touch software. If the One Touch configuration you’re
using is set to Configure Before Scan, and the selected option is
TWAIN, the TWAIN interface opens right away without opening
PaperPort or any other TWAIN-compliant software first. See the
section “Configure Before Scan” on page 45 for details.
Getting Help with the PaperPort Software
The PaperPort software includes a complete set of help topics that
answer questions about each feature of the software. To open the Help
Topics window, press the F1 key or choose PaperPort Help from the
Help menu.
You can also refer to the PaperPort Getting Started Guide and PaperPort
User’s Guide on the CD.
58 DocuMate 150 Scanner User’s Guide
Page 64

Accessing the TWAIN Interface
Each TWAIN-compliant software application has its own specific steps to
open the TWAIN interface, but the basic process is the same for most of
them.
Open the TWAIN Interface from One Touch:
If the One Touch configuration you’re using to scan is set to Configure
Before Scan, and the selected option is TWAIN, the TWAIN interface
opens when you press a button on your scanner without opening another
application first.
For example, the following figure shows the options you would have
selected for button 9 to open the TWAIN interface.
Scanning with the TWAIN Interface
Open the TWAIN Interface from an Application:
Each TWAIN-compliant software application has its own specific steps to
open the TWAIN interface, but the basic process is the same for most of
them.
1. Open a TWAIN-compliant scanning application.
2. Use that application’s command to open the TWAIN interface.
In PaperPort click on the toolbar Scan button then choose TWAIN:
Xerox DocuMate 150 when prompted. Select Display scanner
dialog box, then click on the Scan button in the scanning pane.
Many Microsoft Office applications can access the TWAIN interface
from the Insert menu, by choosing Picture then From Scanner or
Camera.
The TWAIN interface opens and you’re ready to start scanning.
DocuMate 150 Scanner User’s Guide 59
Page 65

Scanning with the TWAIN Interface
Scanning from the TWAIN Interface
The TWAIN interface lists the scanning options available with your Xerox
DocuMate 150 scanner.
1. Adjust the paper guides for the width of the pages you’re scanning.
2. Insert the documents face down with their tops into the scanner.
3. Adjust the settings in the TWAIN interface for the item you are
scanning.
4. Click the Scan button in the TWAIN interface.
60 DocuMate 150 Scanner User’s Guide
Page 66

Scanning with the TWAIN Interface
5. When scanning is complete, click Done to close the TWAIN interface.
The scanned images appear in the TWAIN software. This example
shows a thumbnail image of a scanned page on the PaperPort
desktop.
The options on the Xerox DocuMate 150 TWAIN interface
are:
• Mode—Select a scanning mode:
Black&White to scan in black and white. Use this setting for letters,
memos, and other black and white material.
Grayscale to scan items such as documents containing drawings or
black and white photographs. You can also scan a color document to
turn its colors into gray shades.
Color to scan magazine articles, photographs, and other color
images in full color.
• Resolution—The maximum resolution is 600 dpi; the minimum is 50
dpi. This option determines the amount of detail you can see in the
scanned image. The higher the dpi setting, the sharper and clearer
the scanned image. However, higher dpi settings take longer to scan
and produce larger files for the scanned images.
• Brightness—Sometimes an image is scanned with the brightness
and contrast set too light or too dark. For example, a note written with
a light pencil may need to be scanned darker to improve legibility.
Increasing or decreasing the brightness makes the scanned image
lighter or darker.
• Contrast—The difference between the lighter and darker portions of
the image. Increasing the contrast emphasizes the difference
between the lighter and darker portions, decreasing the contrast deemphasizes that difference.
• AutoCrop to Original—Select this option to let the scanner
automatically determine the size of the item being scanned.
When using the AutoCrop to Original option, always use the paper
guides on the scanner so the page is not skewed.
DocuMate 150 Scanner User’s Guide 61
Page 67

Scanning with the TWAIN Interface
The original with a red
watermark over black text.
The scanned item with the
red filtered out.
• Filter—The Filter is the ability of your scanner to automatically
remove a color from a scanned item. The Filter option applies to
Black&White or Grayscale Mode.
• Reduce Moire Patterns—Moire patterns are wavy, rippled lines that
sometimes appear on the scanned images of photographs or
illustrations, particularly newspaper and magazine illustrations.
Selecting Reduce Moire Patterns will limit or eliminate moire
patterns in the scanned image. This option is only available for the
Grayscale or Color Mode low resolutions.
• Define page size—Click this option to activate the Define button.
Then click the Define button to see the Define page size dialog box
for selecting a specific page size.
Standard—Click the menu arrow and choose a page size from the
list.
Custom—Enter the horizontal and vertical page dimensions in the
boxes. The maximum size is 8.5" x 14". Click the name of the units,
inches or mm (millimeters), to toggle between them.
Click OK.
The currently selected page size appears in the middle of the TWAIN
interface on the left-hand side.
• AutoScan on document insertion—AutoLaunch technology senses
when an item is inserted into the paper feed and starts scanning
immediately. If this option is not selected, the scanner waits for you to
click the Scan button.
62 DocuMate 150 Scanner User’s Guide
Page 68

Display the Device Configuration
1. Click the Xerox DocuMate 150 icon in the top right corner of the
TWAIN interface.
The Device configuration window opens and shows the information
about your scanner.
See the section “Checking the Hardware and Setting the Lamp Power
Saving” on page 57 for more information about the device settings.
Scanning with the TWAIN Interface
DocuMate 150 Scanner User’s Guide 63
Page 69

Scanning with the WIA Interface
Scanning with the WIA
Interface
Microsoft Windows XP and Windows Vista include their own scanning
interface—known as Windows Image Acquisition (WIA)—for acquiring
images from scanners, digital cameras, and other digital devices.
This section shows how to use Microsoft Paint to scan using the WIA
interface, but you can use PaperPort and other Windows applications as
well.
To scan using WIA from Microsoft Paint:
1. On the Windows taskbar, click Start, point to Programs, point to
Accessories, and then click Paint.
2. From the File menu choose From Scanner or Camera.
3. The Scan using Xerox DocuMate 150 window opens.
4. Click the button most appropriate for the item you’re scanning.
5. Select a paper size from the Page Size list.
64 DocuMate 150 Scanner User’s Guide
Page 70

Scanning with the WIA Interface
6. Click Preview to preview the image before scanning.
NOTE: If you preview when scanning a stack of documents, the first
page of the stack feeds through the ADF for the preview. After
adjusting the scanner settings, replace that page on the stack so it is
scanned with the rest of the pages.
7. Adjust settings of the previewed image as desired:
• Change the button selection for the type of image.
• Adjust the custom settings.
• Change the size of the scanned image. To do this, click and hold
the mouse pointer over one of the four sizing-boxes on the
corners of the previewed image. Then drag the box to increase or
decrease the size of the image.
8. Preview the image again. When you are satisfied with the image, click
the Scan button.
9. The scanned images will appear in Microsoft Paint (or other WIA
application you’re using).
DocuMate 150 Scanner User’s Guide 65
Page 71

Scanning with the WIA Interface
Fine Tuning Your Scans
You can select new settings before you scan an item to fine tune exactly
how you want to scan it.
1. On the scan window, click Adjust the quality of the scanned
picture.
2. Select the options for scanning.
Brightness and Contrast—Drag the sliders to the right or left to
adjust the brightness and contrast of the scanned image. The
Contrast setting does not apply to the setting Black and White
picture or text.
Resolution (DPI)—Click the menu arrow and choose the dots per
inch (dpi) of the resolution. The maximum resolution is 600 dpi; the
minimum is 50 dpi.
Picture type—Click the menu arrow and choose the most
appropriate type for the item you’re scanning.
3. Click OK.
If you want to reset the settings and start over, click Reset.
66 DocuMate 150 Scanner User’s Guide
Page 72

Clearing Paper Jams
Maintenance
Maintenance
This section contains information about maintenance, troubleshooting,
uninstalling, scanner specifications, and spare parts.
If your scanner stops scanning due to a paper jam in the Automatic
Document Feeder, a warning opens after a few moments.
1. Open the Automatic Document Feeder cover.
2. Remove the jammed paper and close the cover.
To reduce the number of paper jams, smooth and straighten the paper
before scanning, adjust the guides to the paper size, and insert the paper
evenly into the ADF
Cleaning the Automatic Document Feeder
You may need to clean the ADF feed mechanism if your documents do
not feed easily into the ADF, or several feed in at the same time.
1. Wet a soft cloth with some Isopropyl rubbing alcohol (95%).
2. Open the Automatic Document Feeder cover.
3. Wipe the feed roller from side to side. Rotate the roller to clean its
entire surface.
4. Wipe the ADF pad from top to bottom. Be careful not to snag the cloth
on the springs on either side of the pad.
5. Close the cover when you’re finished.
NOTE: Please be careful when cleaning the roller. The roller is
designed to rotate in one direction only. As you’re cleaning the roller,
make sure it rotates easily, and continue rotating it in that direction
while wiping it clean. Do NOT force the roller to rotate in the opposite
direction. Forcing the roller to rotate will damage the scanner, and may
cause the scanner to feed pages incorrectly.
DocuMate 150 Scanner User’s Guide 67
Page 73

Maintenance
Replacing the ADF Pad Assembly
The ADF pad will wear out and is designed to be a user-replaceable part.
Problems with documents feeding into the ADF is an indication that the
pad is wearing thin.
You received a replacement pad in the original scanner box, and you can
also order a new one. See the “Xerox DocuMate 150 Scanner Parts List”
on page 76 for ordering information.
To replace the ADF Pad assembly:
1. Open the Automatic Document Feeder cover.
2. The ADF pad is located behind the scanner buttons.
3. Squeeze the plastic clamps that hold the pad assembly in place and
lift it up and out. Reverse the procedure to replace the pad.
4. Close the cover when you’re finished.
Replacing the Roller Assembly
After extended use, the roller may wear out and may need to be replaced.
It is a user-replaceable part and can be ordered. See the “Xerox
DocuMate 150 Scanner Parts List” on page 76 for the part number.
Frequent paper jams are a symptom of a worn roller assembly. A worn
roller can cause documents to feed in skewed at an angle, or multiple
pages to feed at the same time. A worn roller should be replaced to avoid
damage to the scanner’s internal parts. However, before replacing the
roller you should clean it first as excessive dust on the roller will make it
appear worn and smooth to the touch. You cannot properly diagnose a
worn roller until you have cleaned it.
68 DocuMate 150 Scanner User’s Guide
Page 74

Maintenance
The roller is located in
the body of the scanner
behind the input tray.
To replace the roller assembly:
1. Open the Automatic Document Feeder cover.
2. Take out the paper input tray.
3. The roller is held in place with a lock tab that rotates to lock and
unlock it. To unlock the tab, rotate it upward until the small lock flange
is completely free.
4. Gently press the roller to the right to free its left side. Then angle the
roller to the front of the scanner until it is clear of the housing, and
bring it out and away from the scanner body.
5. Discard the worn roller. It cannot be repaired.
6. Before installing the new roller, clean any dust that may have gotten
on it during shipping.
DocuMate 150 Scanner User’s Guide 69
Page 75

Maintenance
7. Insert the right end of the roller into its housing socket. Make sure the
lock tab is facing up and the lock flange is not obstructed. If the gears
on the end of the roller do not engage easily, slightly rotate the roller
while gently pressing it into the housing until you feel them engage.
Do not force the gears to engage.
8. When you are certain that the gears are engaged, swing the roller into
it scanner and align the left side with its mount. Then gently slide the
roller to the left to fit its left end into its mount. Make sure the left end
of the roller is firmly seated into its mount.
9. Rotate the lock tab down so the locking flange catches on its latch. Do
not force the lock tab into place. If it does not rotate freely to lock into
place, make sure the flange is properly seating on its latch.
70 DocuMate 150 Scanner User’s Guide
Page 76

Troubleshooting
Maintenance
10. Insert the scanner’s input tray back into the slots in the scanner body.
Push the tray back until it is fully seated into position.
11. Close the cover when you’re finished.
In addition to the troubleshooting information contained in this section,
please see the Readme file on your installation CD. Also visit our web site
at www.xeroxscanners.com for additional technical information.
Problem: The scanner won’t scan. What’s wrong?
Check for one of these possible problems:
Check for one of these possible problems:
• Are the cables loose or not plugged in securely? Inspect the
cable connections. Make sure the cables are plugged in securely.
• Is the scanner’s status light on? Turn on the scanner’s power. If the
status light doesn’t come on, plug the power supply into another
electrical outlet.
• Did you restart the computer after installing the software? If you
didn’t restart the computer, it may not have loaded all of the software
files. Try restarting your computer.
• Did you plug the scanner into a USB hub? If you’re using a USB
hub to connect the scanner, the hub must have its own power supply.
If the hub does not have its own power supply, plug the scanner into a
USB port on the computer.
• Did you select another TWAIN source for acquiring images? If
you use multiple TWAIN devices with your computer, you may have
selected another source for images. Make sure Xerox DocuMate
150 is selected as the scanner.
Problem: With AutoCrop to Original selected, sometimes
I get blank pages, or pages with lines. What’s wrong?
The pages were probably scanned in crooked, or skewed. To use
AutoCrop to Original, the pages must be scanned in straight. Adjust the
paper guides on the scanner so pages feed in straight.
DocuMate 150 Scanner User’s Guide 71
Page 77

Maintenance
Problem: With AutoCrop to Original selected, sometimes
I get blank pages, or pages with lines.
The pages were probably scanned in crooked, or skewed. To use
AutoCrop to Original, the pages must be scanned in straight. Adjust the
paper guides on the scanner so pages feed in straight.
Problem: I got the error message: PaperPort cannot
allocate enough memory to perform internal critical
operations.
Close any other active applications so that additional memory is available.
If you click Continue, PaperPort moves the file to the PaperPort data
directory and renames the file with the prefix “bad”. This allows you to
recover the file later.
To recover the file, you can import it into PaperPort by using the Import
command in the File menu.
Problem: The installation will not complete successfully.
If installation finishes, the scanner’s One Touch 4.0
options do not seem to work properly.
A driver for another scanner may be installed on your computer and it is
interfering with the installation of your Xerox DocuMate 150scanner. You
may need to remove those other drivers and re-install your Xerox
DocuMate 150 scanner. Please see the documentation that you received
with the other scanner for the steps to remove its driver programs.
Problem: The ADF won’t feed pages properly.
A dirty or worn ADF pad assembly or dirt on the roller can cause
documents to feed in skewed at an angle, or multiple pages to feed at the
same time. Try cleaning the roller first. See “Cleaning the Automatic
Document Feeder” on page 67.
Problem: If the USB cable is disconnected during a scan,
the scanner does not reconnect when the USB cable is
plugged back in.
Unplug the power cable from the scanner, and then plug it back in.
If the scanner does not reconnect:
1. Unplug the power cable from the scanner.
2. Restart your computer.
3. After the restart is complete, plug the power cable back in.
72 DocuMate 150 Scanner User’s Guide
Page 78

Status Light Troubleshooting Codes
The LED blinks back and forth
between “E” and the error code
number (such as 5).
The red light flashes the
number of times as the error
code (5 in this example).
The status light indicates the current state of the scanner. A blue status
light indicates the normal state of the scanner. A red status light indicates
that there is a hardware issue.
Normal Operation
• Blinking blue: indicates the scanner is waking up from power saving
and preparing to scan.
• Steady blue: indicates the scanner is ready to scan.
Error Codes
If your scanner experiences hardware problems, the status light will blink
red, and the LED flashes an “E” and then the error code number.
Maintenance
In all cases you should turn off your scanner and check your scanner
setup. Open the scanner and make sure your input tray is fully seated in
the scanner casing, make sure your ADF pad is securely snapped in
place, verify the connections to the PC and wall.
Error
Code Problem Description Solution
0 The scanner is not
communicating with the
computer.
4 or 5 The scanner lamp is
either turned off or the
lamp has not warmed up
enough to initiate
scanning.
Make sure the USB cable is plugged in. If the USB cable is plugged into
a hub or keyboard, try plugging it directly into the back of the computer.
Try a different USB port on the computer or a different USB cable.
In the One Touch hardware properties turn the scanner lamp on. See
page 57 for instructions. If the lamp is already on, turn the lamp off then
on again. If the problem persists and your scanner’s power is plugged
into a surge protector or UPS battery backup, try plugging the scanner
power directly into a wall outlet.
6 The scanner is open. Make sure the scanner lid is fully closed after performing maintenance
on the scanner or removing a jammed page.
7 or 8 The paper input tray is
not fully seated into the
scanner casing.
Open the scanner and take off the input tray. Place the input tray back
into the scanner and press it back until it snaps into place. See page 5
for instructions to install the tray.
9 Paper jam Open the ADF cover and remove the jammed page.
All
Other
Codes
DocuMate 150 Scanner User’s Guide 73
An internal part in the
scanner may have
malfunctioned.
Re-boot your computer. If the problem persists, contact Xerox Technical
Support.
Page 79

Maintenance
Uninstalling Your Scanner
To uninstall your DocuMate 150 scanner, remove the One Touch 4.0
software, PaperPort, and any other software provided with your scanner.
Uninstalling the Scanner and One Touch Software
1. On the Windows taskbar, click Start, point to Settings, then click
Control Panel.
2. Windows 2000 and Windows XP: Double-click the Add or Remove
Programs icon.
Windows Vista: Double-click the Programs and Features icon.
3. From the list of programs, select One Touch 4.0. Click the Change/
Remove button.
4. Click Yes when asked to confirm that you want to remove these
software programs.
5. Follow these same steps to select and remove the Kofax
VirtualReScan 4.10 and One Touch 4.0 ScanSoft OmniPage OCR
modules from the installed programs list.
The One Touch 4.0 software and modules removed from your
computer.
6. Unplug the USB cable from the scanner.
7. Close all open windows and restart your computer.
Uninstalling the PaperPort and OmniPage Software
1. On the Windows taskbar, click Start, point to Settings, then click
Control Panel.
2. Windows 2000 and Windows XP: Double-click the Add or Remove
Programs icon.
Windows Vista: Double-click the Programs and Features icon.
3. Select PaperPort or OmniPage and click Remove.
4. A message window opens, asking if you are sure you want to remove
PaperPort from your computer. Click Yes.
5. Close all open windows and restart your computer.
To Install Another Driver
Follow the instructions in the section “Step 2: Install the Software” on
page 6.
74 DocuMate 150 Scanner User’s Guide
Page 80

Maintenance
Xerox DocuMate 150 Scanner Specifications
Optical resolution 600 x 1200 dpi
Bit depth 48-bit color (internal), 16-bit grayscale (internal)
Maximum item size 8.5" x 14"
Minimum item size 2.5" x 2"
Scan method Automatic document feeder (ADF)
ADF specifications
Scanning Speed Up to 15 pages per minute @ 200 dpi B&W
Capacity 50 sheets
Paper Thickness 16 - 28 lbs. (0.002" - 0.006")
Light source Cold cathode fluorescent lamp
Interface USB 2.0 High Speed
Scanner dimensions
Height 5.9 inches (13.8 cm)
Width 13.0 inches (30.5 cm)
Length 6.5 inches (15.2 cm)
Weight 6.4 pounds (2.9 kg)
Operating temperature 50–104° F (10°–35° C without condensation)
Relative humidity 10%–85% (@35° C without condensation)
Power adaptor DC Jack, 24Vdc/2.0A (48W), 100-240Vac, Energy Star and RoHS
compliant
Power consumption
Power cord AC, US, 3P, 10A/125V, 180 cm, 3C, 18AWG, RoHS compliant
USB cable 185 cm, 28AWG, with core, RoHS compliant
Safety and agency certifications UL, C-UL, FCC Class B, CE, TUV/GS, WEEE
≤ 48 Watts (during operation, ≤ 12 Watts (on standby)
DocuMate 150 Scanner User’s Guide 75
Page 81

Maintenance
Xerox DocuMate 150 Scanner Parts List
Please use the following part names and numbers when ordering
replacements for your scanner.
Part Name Part Number
Input Tray 57-0112-000
Output Tray 57-0108-000
ADF Pad 57-0111-000
Roller Assembly 57-0113-000
USB Cable 35-0102-000
AC Power Cord 35-0103-000
Power Supply 37-0076-000
Buttons Label 09-0631-000
76 DocuMate 150 Scanner User’s Guide
Page 82

Appendix A Notices
Section 1: Safety Introduction
Notices and Safety
Please read the following instructions carefully before operating the
machine and refer to them as needed to ensure the continued safe
operation of your machine.
Your Xerox product and supplies have been designed and tested to meet
strict safety requirements. These include safety agency evaluation and
certification, and compliance with electromagnetic regulations and
established environmental standards.
The safety and environment testing and performance of this product have
been verified using Xerox materials only.
WARNING: Unauthorized alterations, which may include the addition of
new functions or connection of external devices, may impact the product
certification. Please contact your Xerox representative for more
information.
Section 2: EMC
This equipment has been tested and found to comply with the limits for a
Class B digital device, pursuant to Part 15 of the FCC Rules. These limits
are designed to provide reasonable protection against harmful
interference when the equipment is operated in a commercial
environment. This equipment generates, uses, and can radiate radio
frequency energy and, if not installed and used in accordance with the
instruction manual, may cause harmful interference to radio
communications.
WARNING: In order to allow this equipment to operate in close
proximity to Industrial, Scientific and Medical (ISM) equipment, the
external radiation from ISM equipment may have to be limited or
special mitigation measures taken.
Changes and modifications to this equipment not specifically approved by
Xerox may void the user’s authority to operate this equipment.
DocuMate 150 Scanner User’s Guide 77
Page 83

Section 3: Operational Safety Information
Your Xerox equipment and supplies have been designed and tested to
meet strict safety requirements. These include safety agency
examination, approval, and compliance with established environmental
standards.
To ensure the continued safe operation of your Xerox equipment, follow
these safety guidelines at all times:
Do These
• Always follow all warnings and instructions that are marked on or
supplied with the equipment.
• Before cleaning this product, unplug the product from the electrical
outlet. Always use materials specifically designated for this product,
the use of other materials may result in poor performance and create
a hazardous situation. Do not use aerosol cleaners, they may be
explosive and flammable under certain conditions.
• Always exercise care when moving or relocating equipment. Please
contact your local Xerox Service Department to arrange relocation of
the copier to a location outside of your building.
• Always locate the machine on a solid support surface that has
adequate strength to support the weight of the machine.
• Always locate the machine in an area that has adequate ventilation
and room for servicing.
• Always unplug this equipment from the electrical outlet before
cleaning.
NOTE: Your Xerox machine is equipped with an energy saving device
to conserve power when the machine is not in use. The machine may be
left on continuously.
Do Not Do These
• Never use a ground adapter plug to connect the equipment to a
power outlet that lacks a ground connection terminal.
• Never attempt any maintenance function that is not specifically
described in this documentation.
• Never remove covers or guards that are fastened with screws. There
are no operator serviceable areas within these covers.
• Never locate the machine near a radiator or any other heat source.
• Never override or “cheat” any of the electrical or mechanical interlock
devices.
• Never place this equipment where people might step on or trip on the
power cord.
78 DocuMate 150 Scanner User’s Guide
Page 84

Section 4: Electrical Information
Warning - Electrical Safety Information
1. The power receptacle for the machine must meet the requirements
stated on the data plate on the rear of the machine. If you are not sure
that your electrical supply meets the requirements, please consult
your local power company or an electrician for advice.
2. The socket outlet shall be installed near the equipment and shall be
easily accessible.
3. Use the power cable that is supplied with your machine. Do not use
an extension cord or remove or modify the power cord plug.
4. Plug the power cable directly into a correctly grounded electrical
outlet. If you are not sure whether or not an outlet is correctly
grounded, consult an electrician.
5. Do not use an adapter to connect any Xerox equipment to an
electrical outlet that lacks a ground connection terminal.
6. Do not place this equipment where people might step or trip on the
power cable.
7. Do not place objects on the power cable.
8. Do not override or disable electrical or mechanical interlock devices.
9. Do not push objects into slots or openings on the machine. Electrical
shock or fire may result.
Electrical Supply
1. This product shall be operated from the type of electrical supply
indicted on the product’s data plate label. If you are not sure that your
electrical supply meets the requirements, please consult your local
power company for advice.
2. WARNING : This equipment must be connected to a protective earth
circuit. This equipment is supplied with a plug that has a protective
earth pin. This plug will only fit into an earthed electrical outlet. This is
a safety feature. If you are unable to insert the plug into the outlet,
contact your electrician to replace the outlet.
3. Always connect equipment to a correctly grounded power outlet. If in
doubt, have the outlet checked by a qualified electrician.
Disconnect Device
The power cable is the disconnect device for this equipment. It is
attached to the back of the machine as a plug-in device. To remove all
electrical power from the equipment, disconnect the power cable from the
electrical outlet.
DocuMate 150 Scanner User’s Guide 79
Page 85

Section 5: Emergency Power Off
If any of the following conditions occur, turn off the machine immediately
and disconnect the power cable(s) from the electrical outlet(s).
Contact an authorized Xerox Service Representative to correct the
problem:
• The equipment emits unusual odors or makes unusual noises.
• The power cable is damaged or frayed.
• A wall panel circuit breaker, fuse, or other safety device has been
tripped.
• Liquid is spilled into the machine.
• The machine is exposed to water.
• Any part of the machine is damaged.
Section 6: Maintenance Information
1. Any operator product maintenance procedures will be described in
the user documentation supplied with the product.
2. Do not carry out any maintenance on this product which is not
described in the customer documentation.
3. Do not use aerosol cleaners. The use of cleaners that are not
approved may cause poor performance of the equipment, and could
cause a dangerous condition.
4. Use supplies and cleaning materials only as directed in this manual.
5. Do not remove covers or guards that are fastened with screws. There
are no parts behind these covers that you can maintain or service.
6. Do not perform any maintenance procedures unless you have been
trained to do them by an authorized local dealer or unless a
procedure is specifically described in the user manuals.
Section 7: Product Safety Certification
This product is certified by the following Agency using the Safety
standards listed:
Agency Standard
Underwriters Laboratories Inc. UL60950-1 1st (2003) First Edition
TUV IEC60950-1: 2001 First Edition
(USA/Canada)
80 DocuMate 150 Scanner User’s Guide
Page 86

Section 8: Regulatory Information
Certifications in Europe
The CE mark applied to this product, symbolizes XEROX’s declaration of
conformity with the following applicable European Union Directives, as of
the dates indicated:
December 12, 2006: Council Directive 2006/95/EC as amended.
December 31, 2004: Council Directive 2004/108/EC as amended.
March 9, 1999: Council Directive 99/5/EC on radio equipment
A full declaration of conformity, defining the relevant directives and
referenced standards, can be obtained from your XEROX Limited
representative or by contacting;
Environment, Heath and Safety
The Document Company Xerox
Approximation of the laws of the member
states related to low voltage equipment.
Approximation of the laws of the member
states related to electromagnetic compatibility.
and telecommunications terminal equipment
and the mutual recognition of the conformity.
Bessemer Road
Welwyn Garden City
Herts
AL7 1HE
England, Telephone +44 (0) 1707 353434
Section 9: Compliance Information
Product Recycling & Disposal: USA & Canada
Xerox operates a worldwide equipment take back and reuse/recycle
program. Contact your Xerox sales representative (1-800-ASK-XEROX)
to determine whether this Xerox product is part of the program. For more
information about Xerox environmental programs, visit: www.xerox.com/
environment.html.
If you are managing the disposal of your Xerox product, please note that
the product contains lamp(s) with mercury, and may contain lead,
Perchlorate and other materials whose disposal may be regulated due to
environmental considerations. The presence of these materials is fully
consistent with global regulations applicable at the time that the product
was placed on the market. For recycling and disposal information, contact
your local authorities. In the United States, you may also refer to the
Electronic Industries Alliance web site: http://www.eiae.org/.
DocuMate 150 Scanner User’s Guide 81
Page 87

Perchlorate Material - This product may contain one or more Perchloratecontaining devices, such as batteries. Special handling may apply, please
see: http://www.dtsc.ca.gov/hazardouswaste/perchlorate/.
European Union
RoHS and WEEE Compliance
This product is compliant with RoHS Regulations of the European
Parliament and Council Directive on the Restrictions of the Use of Certain
Hazardous Substances in Electrical and Electronic Equipment (2002/95/
EC), and with the Waste Electrical and Electronic Equipment (WEEE)
Directive (2002/96/EC).
Some equipment may be used in both a domestic/household and a
professional/business application.
Professional/Business Environment
Application of this symbol on your equipment is confirmation that you
must dispose of this equipment in compliance with agreed national
procedures. In accordance with European legislation, end of life electrical
and electronic equipment subject to disposal must be managed within
agreed procedures.
Energy Star for the USA
Energy Program Compliance
As an ENERGY STAR® partner, Xerox Corporation has determined that
this product meets the ENERGY STAR guidelines for energy efficiency.
The ENERGY STAR and ENERGY STAR MARK are registered United
States trademarks. The ENERGY STAR Imaging Equipment Program is a
team effort between U.S., European Union and Japanese governments
and the office equipment industry to promote energy-efficient copiers,
printers, fax, multifunction machine, personal computers, and monitors.
Reducing product energy consumption helps combat smog, acid rain and
long-term changes to the climate by decreasing the emissions that result
from generating electricity.
Xerox ENERGY STAR equipment is preset at the factory. Your machine
will be delivered with the timer for switching to Power Save Mode from the
last copy/print out, set at 15 minutes. A more detailed description of this
feature can be found in the Machine Setup Section of this guide.
82 DocuMate 150 Scanner User’s Guide
Page 88

Section 10: Ilegal Copies
USA
Congress, by statute, has forbidden the reproduction of the following
subjects under certain circumstances. Penalties of fine or imprisonment
may be imposed on those guilty of making such reproductions.
1. Obligations or Securities of the United States Government, such as:
Certificates of Indebtedness National Bank Currency
Coupons from Bonds Federal Reserve Bank Notes
Silver Certificates Gold Certificates
United States Bonds Treasury Notes
Federal Reserve Notes Fractional Notes
Certificates of Deposit Paper Money
Bonds and Obligations of certain agencies of the government, such
as FHA, etc.
Bonds. (U.S. Savings Bonds may be photographed only for publicity
purposes in connection with the campaign for the sale of such
bonds.)
Internal Revenue Stamps. (If it is necessary to reproduce a legal
document on which there is a canceled revenue stamp, this may be
done provided the reproduction of the document is performed for
lawful purposes.)
Postage Stamps, canceled or uncanceled. (For philatelic purposes,
Postage Stamps may be photographed, provided the reproduction is
in black and white and is less than 75% or more than 150% of the
linear dimensions of the original.)
Postal Money Orders.
Bills, Checks, or Drafts of money drawn by or upon authorized officers
of the United States.
Stamps and other representatives of value, of whatever
denomination, which have been or may be issued under any Act of
Congress.
2. Adjusted Compensation Certificates for Veterans of the World Wars.
3. Obligations or Securities of any Foreign Government, Bank,
or Corporation.
4. Copyrighted material, unless permission of the copyright owner has
been obtained or the reproduction falls within the “fair use” or library
reproduction rights provisions of the copyright law. Further
information of these provisions may be obtained from the Copyright
Office, Library of Congress, Washington, D.C. 20559. Ask for Circular
R21.
5. Certificates of Citizenship or Naturalization. (Foreign Naturalization
Certificates may be photographed.)
6. Passports. (Foreign Passports may be photographed.)
DocuMate 150 Scanner User’s Guide 83
Page 89

Canada
7. Immigration Papers.
8. Draft Registration Cards.
9. Selective Service Induction Papers that bear any of the following
Registrant’s information:
Earnings or Income Dependency Status
Court Record Previous military service
Physical or mental condition
Exception: U. S. Army and Navy discharge certificates may be
photographed.
10. Badges, Identification Cards, Passes, or Insignia carried by military
personnel, or by members of the various Federal Departments, such
as FBI, Treasury, etc. (unless photograph is ordered by the head of
such department or bureau.)
11. Reproducing the following is also prohibited in certain states:
Automobile Licenses — Drivers’ Licenses — Automobile Certificates
of Title.
The above list is not all inclusive, and no liability is assumed for its
completeness or accuracy. In case of doubt, consult your attorney.
Parliament, by statute, has forbidden the reproduction of the following
subjects under certain circumstances. Penalties of fines or imprisonment
may be imposed on those guilty of making such copies.
1. Current bank notes or current paper money.
2. Obligations or securities of a government or bank.
3. Exchequer bill paper or revenue paper.
4. The public seal of Canada or of a province, or the seal of a public
body or authority in Canada, or of a court of law.
5. Proclamations, orders, regulations or appointments, or notices
thereof (with intent to falsely cause same to purport to have been
printed by the Queen’s Printer for Canada, or the equivalent printer
for a province).
6. Marks, brands, seals, wrappers or designs used by or on behalf of the
Government of Canada or of a province, the government of a state
other than Canada or a department, board, Commission or agency
established by the Government of Canada or of a province or of a
government of a state other than Canada.
7. Impressed or adhesive stamps used for the purpose of revenue by
the Government of Canada or of a province or by the government of a
state other than Canada.
8. Documents, registers or records kept by public officials charged with
the duty of making or issuing certified copies thereof, where the
reproduction falsely purports to be a certified copy thereof.
9. Copyrighted material or trademarks of any manner or kind without the
consent of the copyright or trademark owner.
84 DocuMate 150 Scanner User’s Guide
Page 90

The above list is provided for your convenience and assistance, but it is
not all inclusive, and no liability is assumed for its completeness or
accuracy. In case of doubt, consult your solicitor.
Other Countries
Copying certain documents may be illegal in your country. Penalties of
fine or imprisonment may be imposed on those found guilty of making
such reproductions.
Currency notes
Bank notes and cheques
Bank and government bonds and securities
Passports and identification cards
Copyright material or trademarks without the consent of the owner
Postage stamps and other negotiable instruments
Note: This list is not inclusive and no liability is assumed for either its
completeness or accuracy. In case of doubt, contact your legal counsel.
Section 11: EH&S Contact Information
Contact Information
For more information on Environment, Health, and Safety in relation to
this Xerox product and supplies, please contact the following customer
help lines:
USA: 1-800-828-6571
Canada: 1-800-828-6571
Europe: +44 1707 353 434
DocuMate 150 Scanner User’s Guide 85
Page 91

86 DocuMate 150 Scanner User’s Guide
Page 92

Index
A
ADF
cleaning 67
ADF pad assembly
replace 68
Advanced Settings Tab 30
Apply button 26
Archive button 53
aspect ratio 31
Autocrop to Original 28, 61
AutoRotate image 31
B
bit depth 75
Black&White 27, 61
BMP 34
Brightness 27, 61, 66
Burn to CD 50
Destination Application 50
button options 38
C
CD-ROM drive 3
Color 27, 61
color configuration 61
color filter 29, 62
Comma Delimited 36
components 2
computer specifications 3
Configure Before Scan 45
Contrast 27, 61, 66
csv file format 36
eMail Properties 44
error codes 73
Excel Spreadsheet 36
F
Fax and Print 39
File Format 23
file format 36
full feature install 9
G
gamma 30
grayed out options 23
GrayScale 27, 61
H
help 3, 58
htm file format 36
HTML Document 36
HTML page 52
HTML Web Page 52
hue 30
I
Image Documents Properties 42
Image Editors 38
image file format 34
improvements and settings 28
installation 4
invert image 29
D
Destination Application 20, 21, 23
OCR 24
text file format 35
Device Settings 31
Document Management 38
documentation 3
dpi 66
J
JPG 34
JPG file size 35
L
Lamp timeout setting 57
LED number 17, 18
Link Properties 40
E
eMail 38
DocuMate 150 Scanner User’s Guide 87
Page 93

Index
M
Microsoft Internet Explorer 52
Microsoft Outlook 44
Moire Patterns 28, 62
N
Normal PDF 37, 49
nPDF 37, 49
O
OCR 35
optical character recognition 48
OCR button 48
OmniPage Pro 36, 37
One Touch Button Panel 21
Button View 22
Detail View 22
Hardware View 22
initial settings 19
names 37
OCR 48
One Touch icon 21, 22, 23
One Touch Properties window 23, 40
options 26, 38
S
saturation 30
scan
from PaperPort 58
Scan Configuration 23
Scan Settings Tab 27
scan with event forwarding 51
scanner
components 2
troubleshooting 71
Searchable PDF 36, 49
Select Configuration 25
Select Destination 24, 38
Select Format and Page(s) 25
setup 4
Show All Destinations 38
Show Hardware 57
Simple Text 36
skewed page 28, 61
sPDF 36, 49
status light 12, 13, 71
troubleshooting codes 73
Sti event forwarding 39
Storage and CD-R/W 39
Storage Properties 43
Straighten Image 28
system requirements 3
P
Page Format
HTML 52
page format options 34
Page Settings Tab 28
page size 62
paper guide 5
paper jam 67, 68
PaperPort 58
Application 20, 21
help topics 58
PaperPort Properties 40
parts 1
PDF 34, 38
PDF file size 35
Picture type 66
power saving 57
Preview button 65
Properties button 25
R
Resolution 27, 61, 66
Rich Text Format 36
roller replacement 68
rtf file format 36
T
Text Documents Properties 41
Text Editors 38
text file format 35
Text Formats 35
TIFF 34
Transfer to Storage 53
troubleshooting 71
TWAIN 45, 51
TWAIN standard 58
U
uninstall 74
USB port 12
W
WIA 45, 64
Windows Image Acquisition 64
Word Document 36
X
xls file format 36
88 DocuMate 150 Scanner User’s Guide
Page 94

05-0747-000
 Loading...